Embed Size (px)
Citation preview

GRAITEC What’s new in Graitec Advance PowerPack 2016 – R2
Graitec Advance PowerPack for Revit® 2016 R2
This document describes the improvements in Graitec Advance PowerPack for Revit® 2016 R2.
GRAITEC What’s new in Graitec Advance PowerPack 2016 – R2
Table of contents
NEWS ....................................................................................................................................... 4
1: Ribbon Customization ....................................................................................................... 4 REINFORCEMENT .............................................................................................................. 5 2: Rebar Visibility .................................................................................................................. 6 3: Transversal Distribution .................................................................................................... 7 REBAR SET ....................................................................................................................... 13 4: Explode Rebar Set .......................................................................................................... 13 5: Split Rebar Set ................................................................................................................ 14 6: Isolate Rebar Set ............................................................................................................ 14 7: Unite Rebar Sets ............................................................................................................ 15 REBAR IN ELEMENT ......................................................................................................... 15 8: Copy Rebar ..................................................................................................................... 16 9: Delete Rebar ................................................................................................................... 17 TRIM / EXTEND ................................................................................................................. 17 10: Rebar to Face ............................................................................................................... 17 11: Area to Element ............................................................................................................ 18 12: Cut Openings in Rebar Set ........................................................................................... 18 13: Cut Openings in Area ................................................................................................... 19 14: Assign to Sheet ............................................................................................................. 20 15: Set Rebar Number ........................................................................................................ 21 16. Renumber Reinforcement ............................................................................................. 21 17: Browse Reinforcement ................................................................................................. 22 18: Select by Rebar Number .............................................................................................. 23 19: Delete by Rebar Number .............................................................................................. 24 20: Bending Detail .............................................................................................................. 25 SYMBOLS AND DIMENSIONS .......................................................................................... 27 21: Dimension Rebar .......................................................................................................... 27 22: Tag Rebar ..................................................................................................................... 28 23: Detail Rebar .................................................................................................................. 29 24: Show Rebar .................................................................................................................. 29 25: Automatic Symbols ....................................................................................................... 29 26: Automatic Update ......................................................................................................... 30 MODELING ......................................................................................................................... 30 27: Categoriy Visibility ........................................................................................................ 30 28: Shared Parameters for Foundations ............................................................................. 31 29: Join Openings ............................................................................................................... 31 ANNOTATIONS .................................................................................................................. 33 30: Center of Gravity ........................................................................................................... 33
GRAITEC What’s new in Graitec Advance PowerPack 2016 – R2
31: Text Case ..................................................................................................................... 36 WINDOWS .......................................................................................................................... 37 FILES .................................................................................................................................. 38 32: File Updater .................................................................................................................. 38 33: Family Exporter ............................................................................................................. 39 34: Watermark Manager ..................................................................................................... 40 BIM CONNECT ................................................................................................................... 41 35: Advance Design ............................................................................................................ 41 36: Import Load Combinations from Advance Design ........................................................ 41 37: Import FEM Results at Synchronization ....................................................................... 42 38: New Options for Models Comparison at Sync .............................................................. 42 39: New Symbols and Titleblocks ....................................................................................... 43
IMPROVEMENTS .................................................................................................................. 44
FAMILY MANAGER ............................................................................................................ 44 VIEW SHEET GENERATOR .............................................................................................. 44 GEOMETRY PARAMETERS ............................................................................................. 44 BIM CONNECT ................................................................................................................... 44
GRAITEC What’s new in Graitec Advance PowerPack 2016 – R2
News
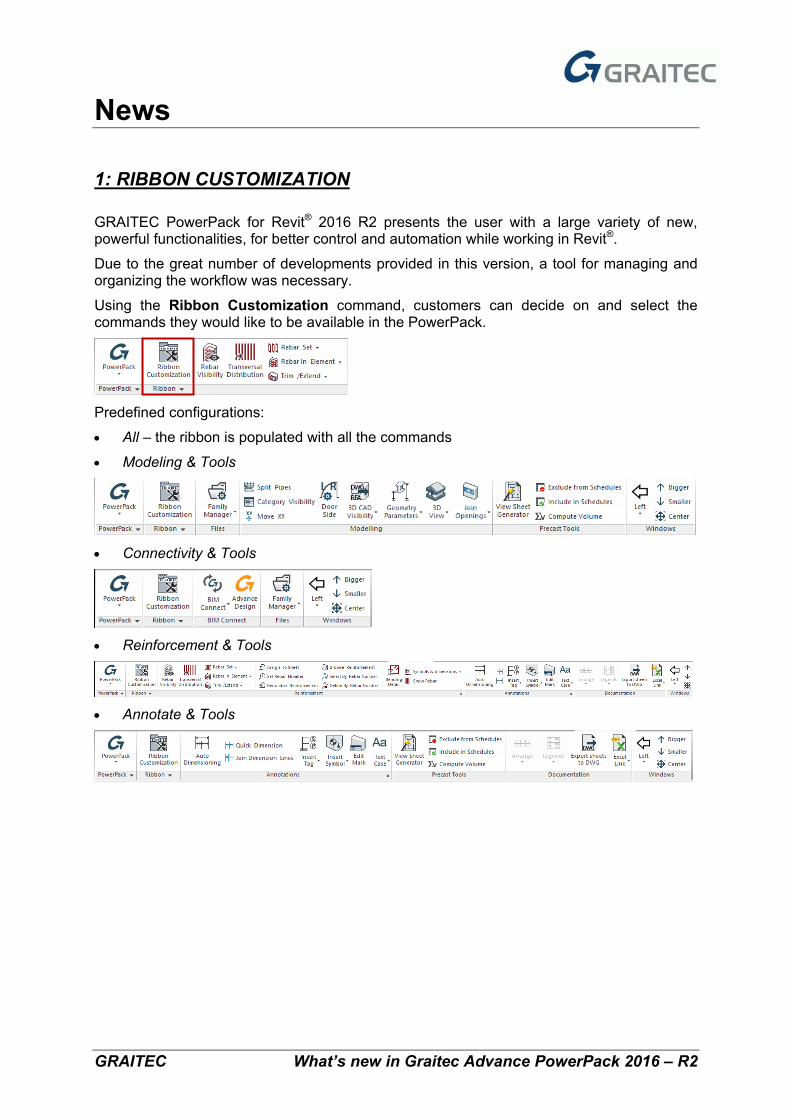
1: RIBBON CUSTOMIZATION
GRAITEC PowerPack for Revit® 2016 R2 presents the user with a large variety of new, powerful functionalities, for better control and automation while working in Revit®.
Due to the great number of developments provided in this version, a tool for managing and organizing the workflow was necessary.
Using the Ribbon Customization command, customers can decide on and select the commands they would like to be available in the PowerPack.
Predefined configurations:
• All – the ribbon is populated with all the commands
• Modeling & Tools
• Connectivity & Tools
• Reinforcement & Tools
• Annotate & Tools
GRAITEC What’s new in Graitec Advance PowerPack 2016 – R2
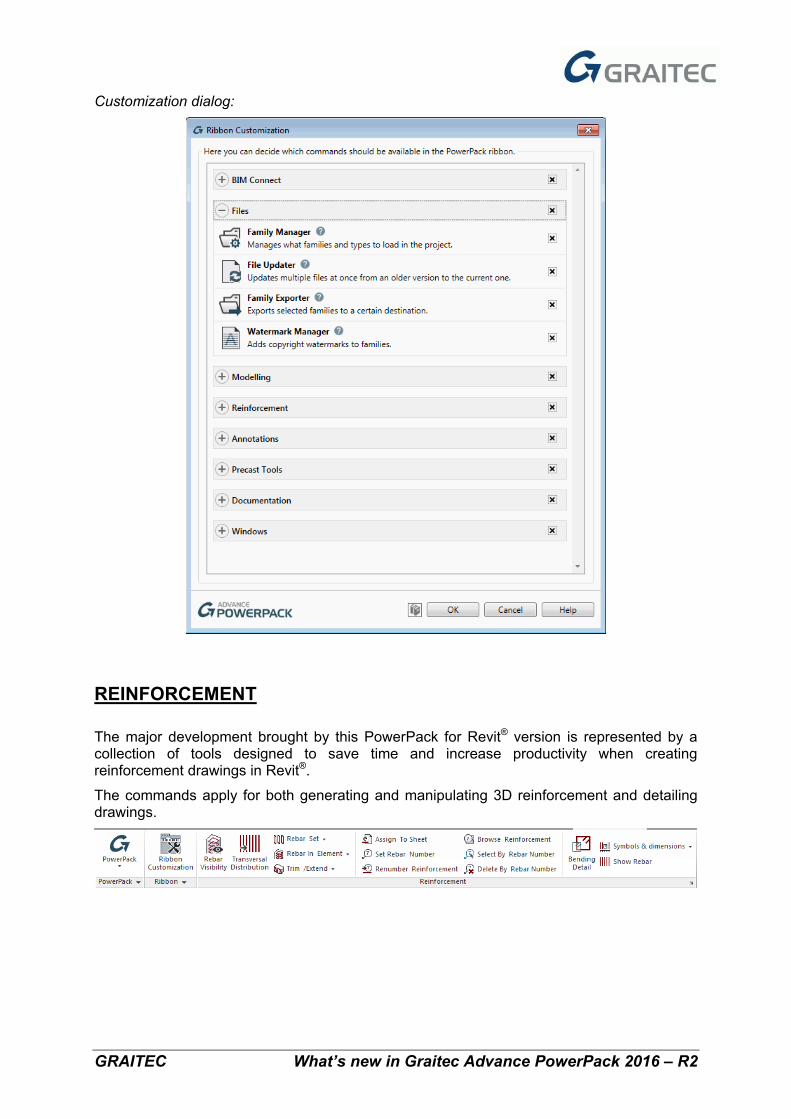
Customization dialog:
REINFORCEMENT
The major development brought by this PowerPack for Revit® version is represented by a collection of tools designed to save time and increase productivity when creating reinforcement drawings in Revit®.
The commands apply for both generating and manipulating 3D reinforcement and detailing drawings.
GRAITEC What’s new in Graitec Advance PowerPack 2016 – R2
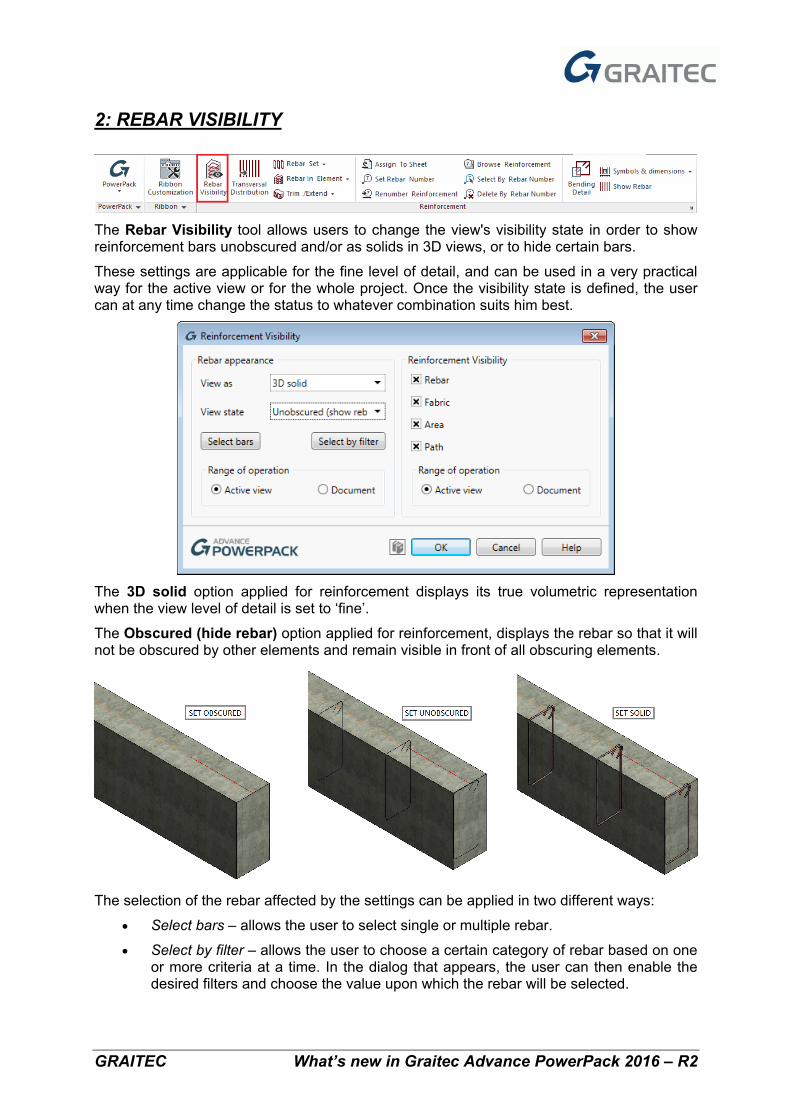
2: REBAR VISIBILITY
The Rebar Visibility tool allows users to change the view's visibility state in order to show reinforcement bars unobscured and/or as solids in 3D views, or to hide certain bars.
These settings are applicable for the fine level of detail, and can be used in a very practical way for the active view or for the whole project. Once the visibility state is defined, the user can at any time change the status to whatever combination suits him best.
The 3D solid option applied for reinforcement displays its true volumetric representation when the view level of detail is set to ‘fine’.
The Obscured (hide rebar) option applied for reinforcement, displays the rebar so that it will not be obscured by other elements and remain visible in front of all obscuring elements.
The selection of the rebar affected by the settings can be applied in two different ways:
• Select bars – allows the user to select single or multiple rebar.
• Select by filter – allows the user to choose a certain category of rebar based on one or more criteria at a time. In the dialog that appears, the user can then enable the desired filters and choose the value upon which the rebar will be selected.
GRAITEC What’s new in Graitec Advance PowerPack 2016 – R2
The Reinforcement Visibility field changes the state of the reinforcement to visible or invisible and can be applied in the following categories of reinforcement:
• Structural Rebar
• Structural Area Reinforcement
• Structural Fabric Area
• Structural Path Reinforcement
Both Rebar Appearance and Rebar Visibility sections can be set to apply either to the active view or to the whole document.
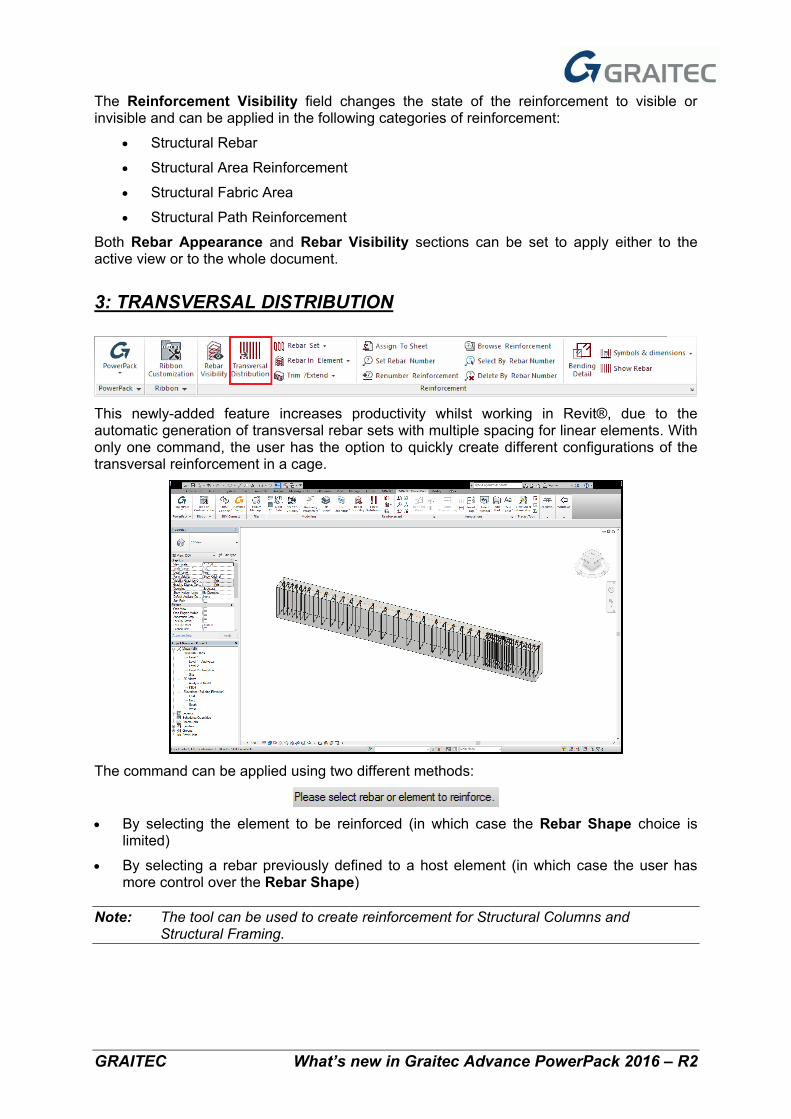
3: TRANSVERSAL DISTRIBUTION
This newly-added feature increases productivity whilst working in Revit®, due to the automatic generation of transversal rebar sets with multiple spacing for linear elements. With only one command, the user has the option to quickly create different configurations of the transversal reinforcement in a cage.
The command can be applied using two different methods:
• By selecting the element to be reinforced (in which case the Rebar Shape choice is
limited)
• By selecting a rebar previously defined to a host element (in which case the user has more control over the Rebar Shape)
Note: The tool can be used to create reinforcement for Structural Columns and Structural Framing.
GRAITEC What’s new in Graitec Advance PowerPack 2016 – R2
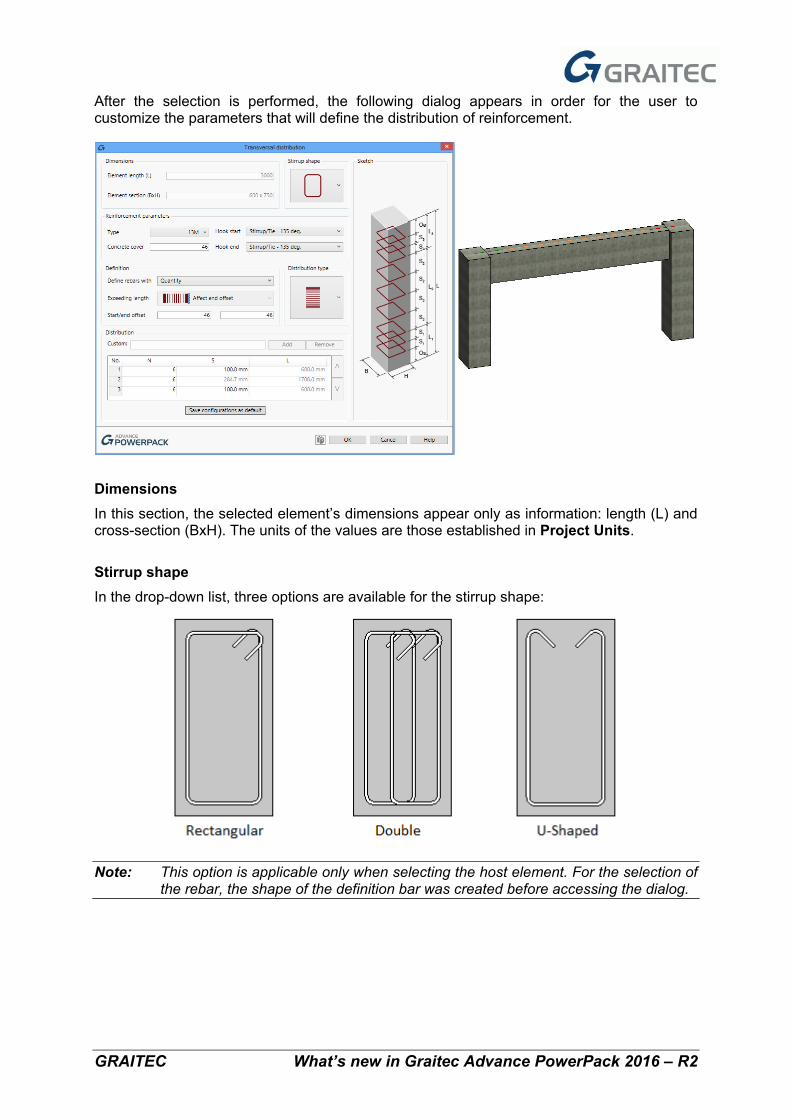
After the selection is performed, the following dialog appears in order for the user to customize the parameters that will define the distribution of reinforcement.
Dimensions In this section, the selected element’s dimensions appear only as information: length (L) and cross-section (BxH). The units of the values are those established in Project Units.
Stirrup shape In the drop-down list, three options are available for the stirrup shape:
Note: This option is applicable only when selecting the host element. For the selection of the rebar, the shape of the definition bar was created before accessing the dialog.
GRAITEC What’s new in Graitec Advance PowerPack 2016 – R2
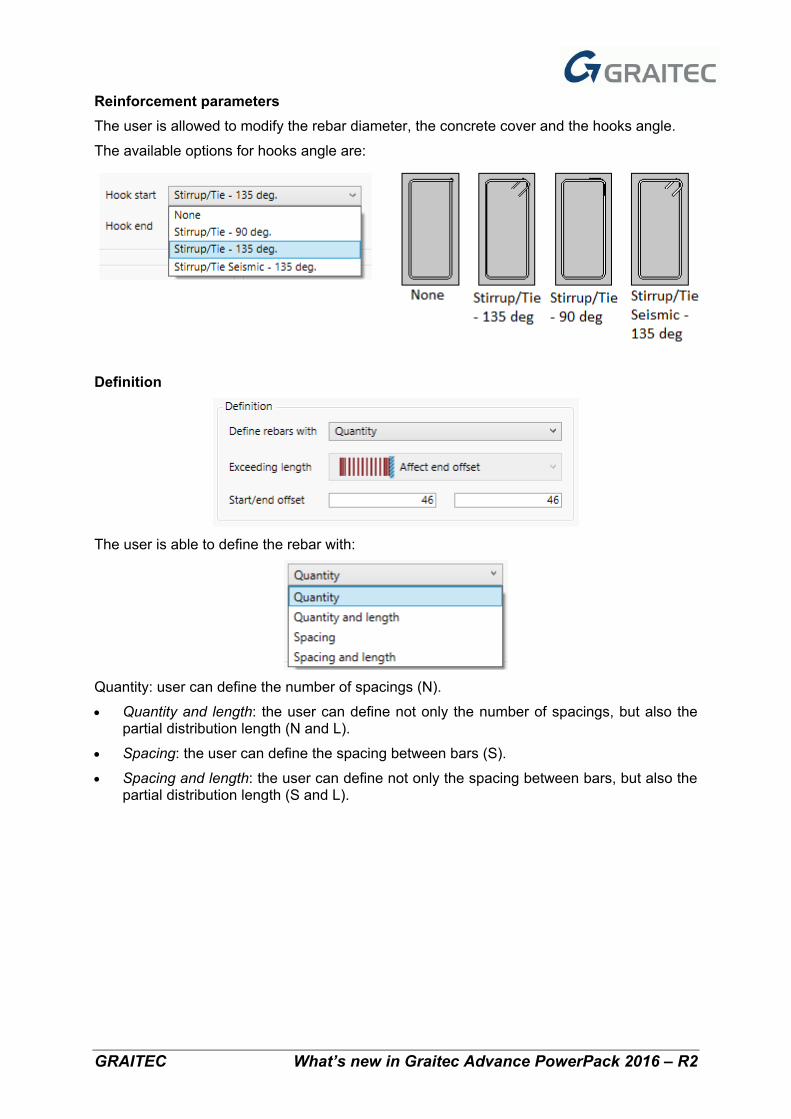
Reinforcement parameters The user is allowed to modify the rebar diameter, the concrete cover and the hooks angle.
The available options for hooks angle are:
Definition
The user is able to define the rebar with:
Quantity: user can define the number of spacings (N).
• Quantity and length: the user can define not only the number of spacings, but also the partial distribution length (N and L).
• Spacing: the user can define the spacing between bars (S).
• Spacing and length: the user can define not only the spacing between bars, but also the partial distribution length (S and L).

GRAITEC What’s new in Graitec Advance PowerPack 2016 – R2
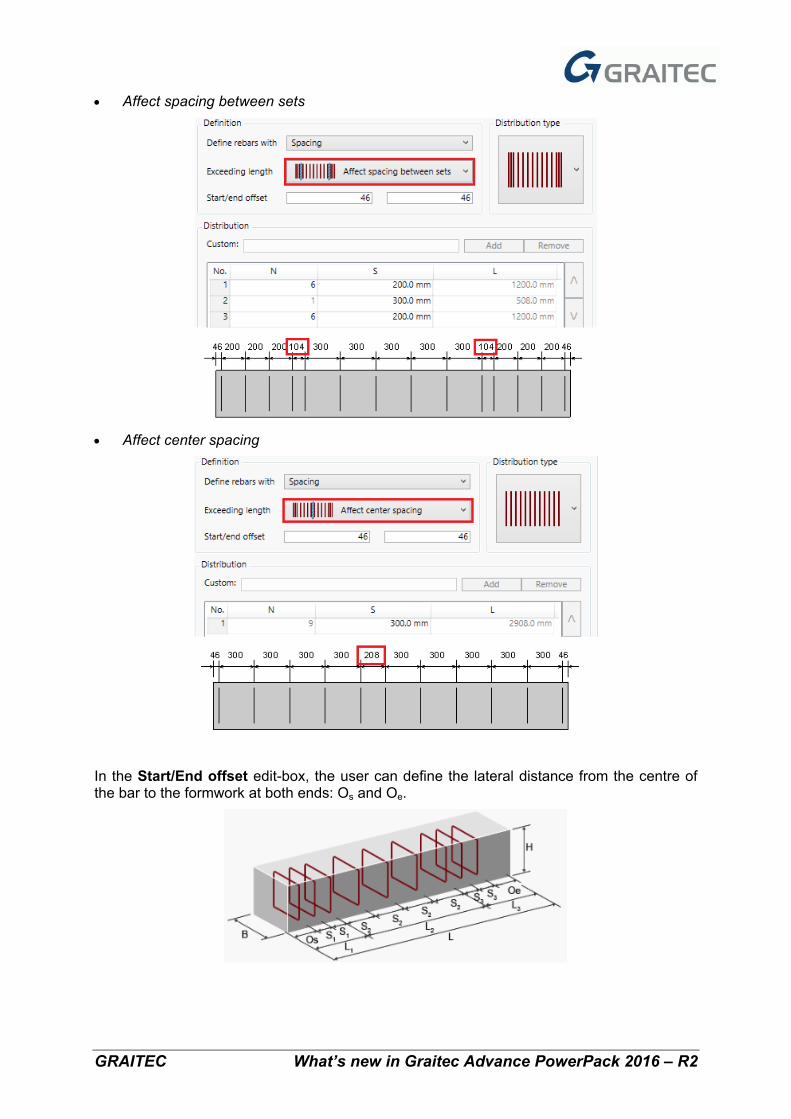
The Exceeding length option is available when defining the distribution by Spacing or Spacing and length. The user can decide where the exceeding length is added:
• Affect end offset
• Affect both offsets
GRAITEC What’s new in Graitec Advance PowerPack 2016 – R2
• Affect spacing between sets
• Affect center spacing
In the Start/End offset edit-box, the user can define the lateral distance from the centre of the bar to the formwork at both ends: Os and Oe.
GRAITEC What’s new in Graitec Advance PowerPack 2016 – R2
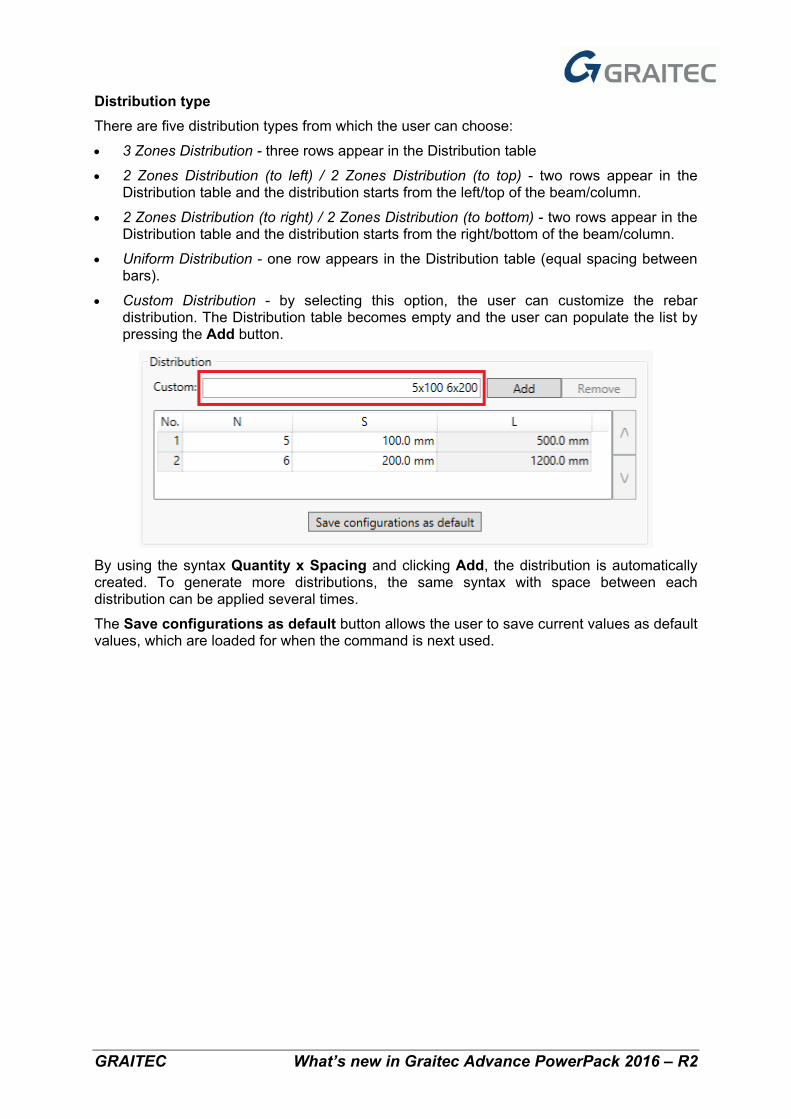
Distribution type There are five distribution types from which the user can choose:
• 3 Zones Distribution - three rows appear in the Distribution table
• 2 Zones Distribution (to left) / 2 Zones Distribution (to top) - two rows appear in the Distribution table and the distribution starts from the left/top of the beam/column.
• 2 Zones Distribution (to right) / 2 Zones Distribution (to bottom) - two rows appear in the Distribution table and the distribution starts from the right/bottom of the beam/column.
• Uniform Distribution - one row appears in the Distribution table (equal spacing between bars).
• Custom Distribution - by selecting this option, the user can customize the rebar distribution. The Distribution table becomes empty and the user can populate the list by pressing the Add button.
By using the syntax Quantity x Spacing and clicking Add, the distribution is automatically created. To generate more distributions, the same syntax with space between each distribution can be applied several times.
The Save configurations as default button allows the user to save current values as default values, which are loaded for when the command is next used.
GRAITEC What’s new in Graitec Advance PowerPack 2016 – R2
REBAR SET
GRAITEC PowerPack for Revit® 2016 R2 offers several tools for adjusting reinforcement to the desired parameters. One of the groups contains editing commands applicable to the reinforcement sets: Explode Rebar Set, Split Rebar Set, Isolate Rebar Set, and Unite Rebar Sets.
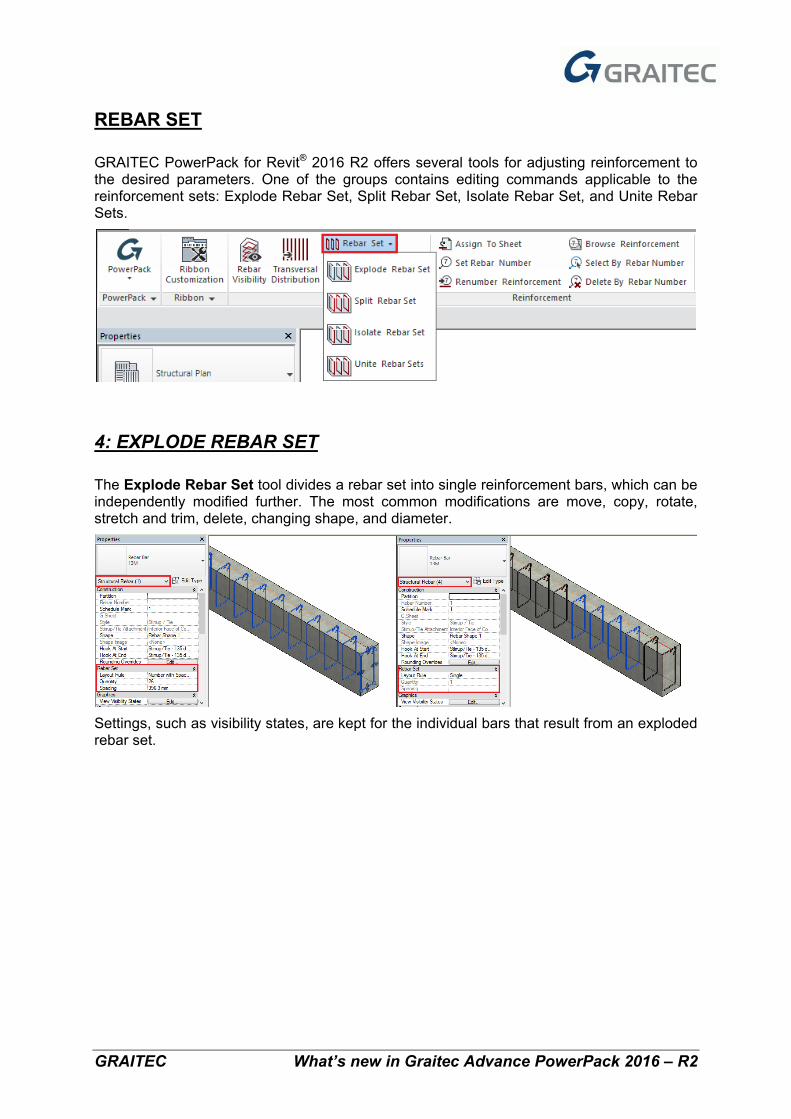
4: EXPLODE REBAR SET
The Explode Rebar Set tool divides a rebar set into single reinforcement bars, which can be independently modified further. The most common modifications are move, copy, rotate, stretch and trim, delete, changing shape, and diameter.
Settings, such as visibility states, are kept for the individual bars that result from an exploded rebar set.
GRAITEC What’s new in Graitec Advance PowerPack 2016 – R2
5: SPLIT REBAR SET
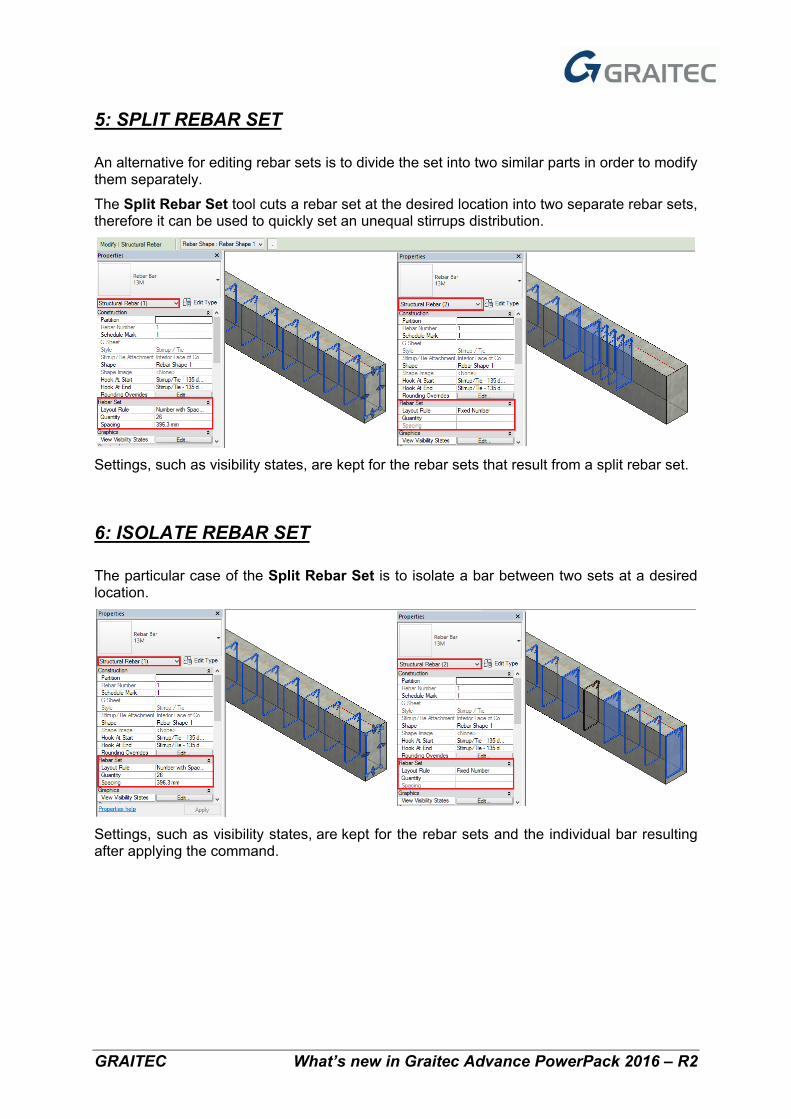
An alternative for editing rebar sets is to divide the set into two similar parts in order to modify them separately.
The Split Rebar Set tool cuts a rebar set at the desired location into two separate rebar sets, therefore it can be used to quickly set an unequal stirrups distribution.
Settings, such as visibility states, are kept for the rebar sets that result from a split rebar set.
6: ISOLATE REBAR SET
The particular case of the Split Rebar Set is to isolate a bar between two sets at a desired location.
Settings, such as visibility states, are kept for the rebar sets and the individual bar resulting after applying the command.
GRAITEC What’s new in Graitec Advance PowerPack 2016 – R2
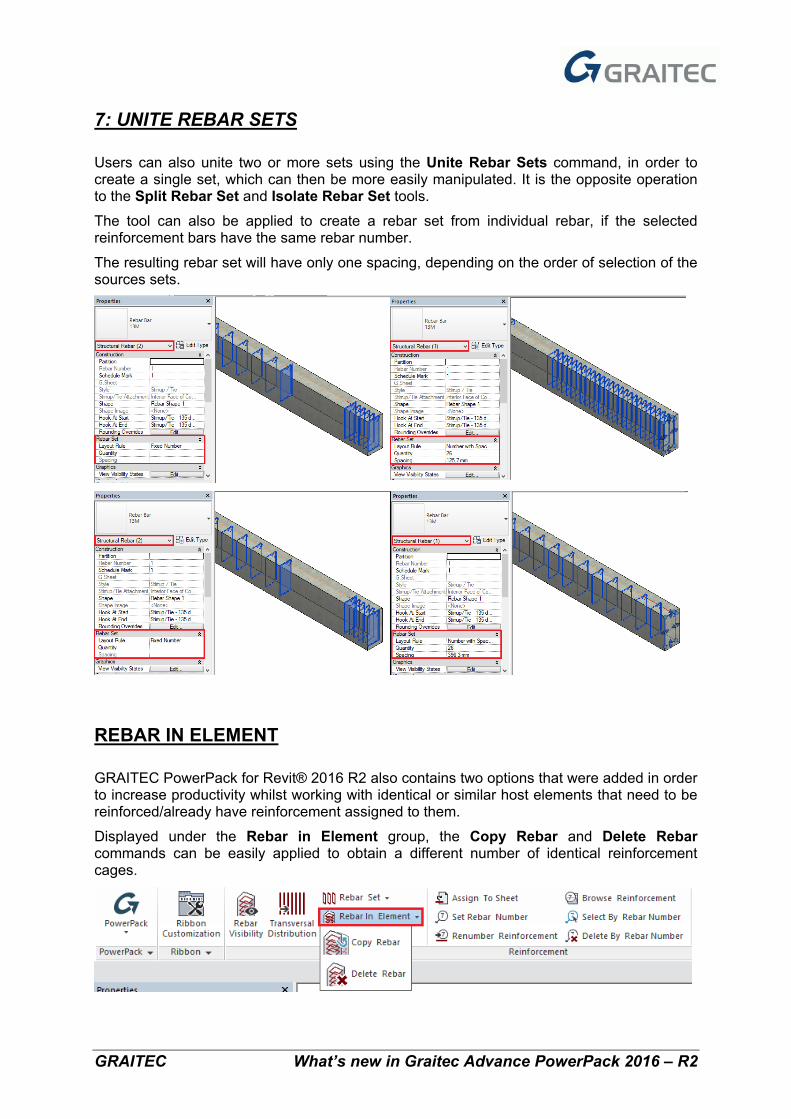
7: UNITE REBAR SETS
Users can also unite two or more sets using the Unite Rebar Sets command, in order to create a single set, which can then be more easily manipulated. It is the opposite operation to the Split Rebar Set and Isolate Rebar Set tools.
The tool can also be applied to create a rebar set from individual rebar, if the selected reinforcement bars have the same rebar number.
The resulting rebar set will have only one spacing, depending on the order of selection of the sources sets.
REBAR IN ELEMENT
GRAITEC PowerPack for Revit® 2016 R2 also contains two options that were added in order to increase productivity whilst working with identical or similar host elements that need to be reinforced/already have reinforcement assigned to them.
Displayed under the Rebar in Element group, the Copy Rebar and Delete Rebar commands can be easily applied to obtain a different number of identical reinforcement cages.
GRAITEC What’s new in Graitec Advance PowerPack 2016 – R2
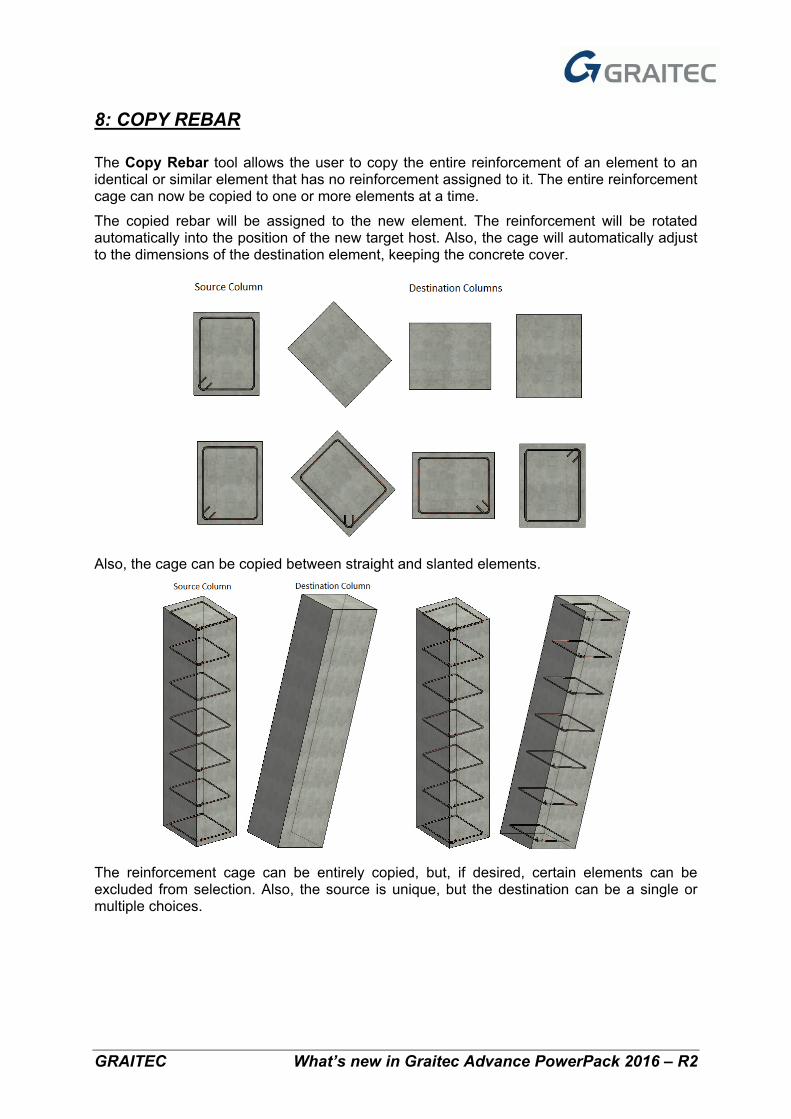
8: COPY REBAR
The Copy Rebar tool allows the user to copy the entire reinforcement of an element to an identical or similar element that has no reinforcement assigned to it. The entire reinforcement cage can now be copied to one or more elements at a time.
The copied rebar will be assigned to the new element. The reinforcement will be rotated automatically into the position of the new target host. Also, the cage will automatically adjust to the dimensions of the destination element, keeping the concrete cover.
Also, the cage can be copied between straight and slanted elements.
The reinforcement cage can be entirely copied, but, if desired, certain elements can be excluded from selection. Also, the source is unique, but the destination can be a single or multiple choices.
GRAITEC What’s new in Graitec Advance PowerPack 2016 – R2
9: DELETE REBAR
The reverse command of Copy Rebar is the Delete Rebar tool, which offers the possibility to delete the entire reinforcement of the selected host element or certain parts of it.
The command can be applied to one or more objects at a time (single or multiple selections). It is also possible to exclude one or more bars from the selection that is to be deleted.
TRIM / EXTEND
The user is now able to adjust the reinforcement created to the shape and particularities of the host element in a quick and intelligent manner, using the tools that can be found under the Trim/Extend group.
Reinforcement created in hosts with an irregular shape or with depressions and openings is adapted to the formwork using one or more of the following tools: Rebar to Face, Area to Element, Cut Openings in Rebar Set, Cut Openings in Area.
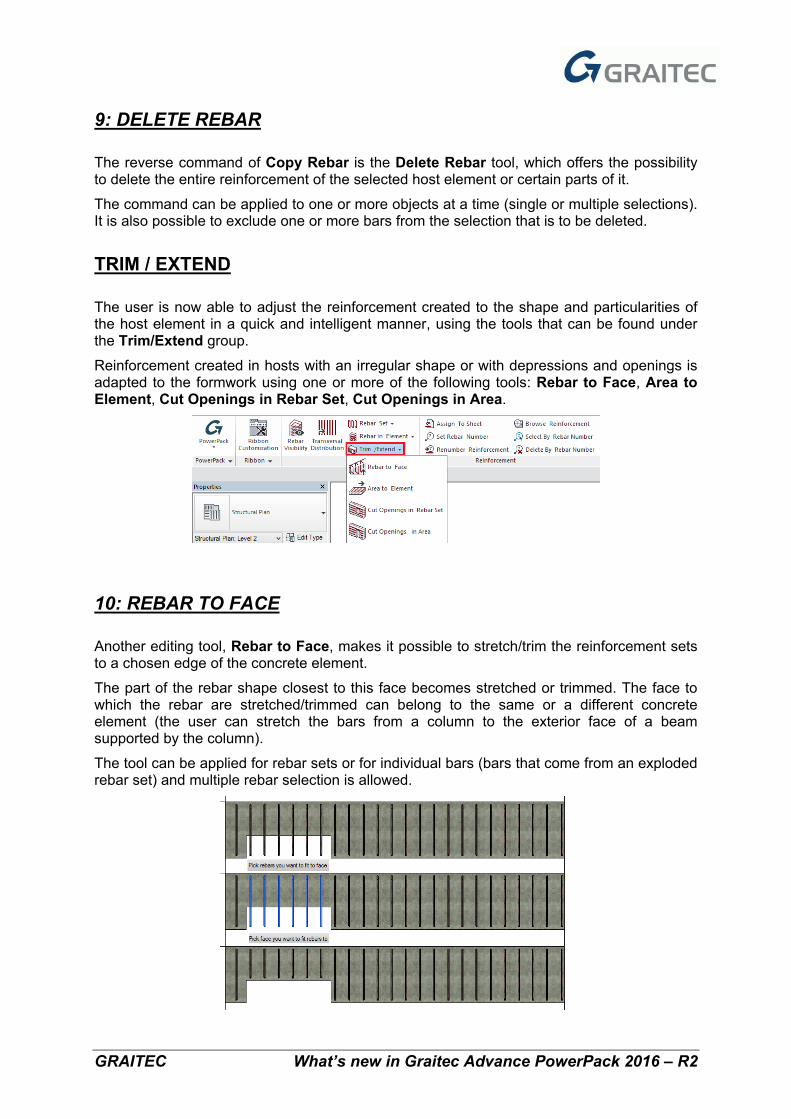
10: REBAR TO FACE
Another editing tool, Rebar to Face, makes it possible to stretch/trim the reinforcement sets to a chosen edge of the concrete element.
The part of the rebar shape closest to this face becomes stretched or trimmed. The face to which the rebar are stretched/trimmed can belong to the same or a different concrete element (the user can stretch the bars from a column to the exterior face of a beam supported by the column).
The tool can be applied for rebar sets or for individual bars (bars that come from an exploded rebar set) and multiple rebar selection is allowed.
GRAITEC What’s new in Graitec Advance PowerPack 2016 – R2
The stretch tool can also be applied if the face of the host element is slanted.
11: AREA TO ELEMENT
The Area to Element tool allows the user to stretch the reinforcement of the created area, to the dimensions of the host concrete element.
The command increases productivity whilst working with irregular shapes, circular edges, obtuse angles or large number of edges. It can be applied for Structural Area Reinforcement, or Fabric Area Reinforcement.
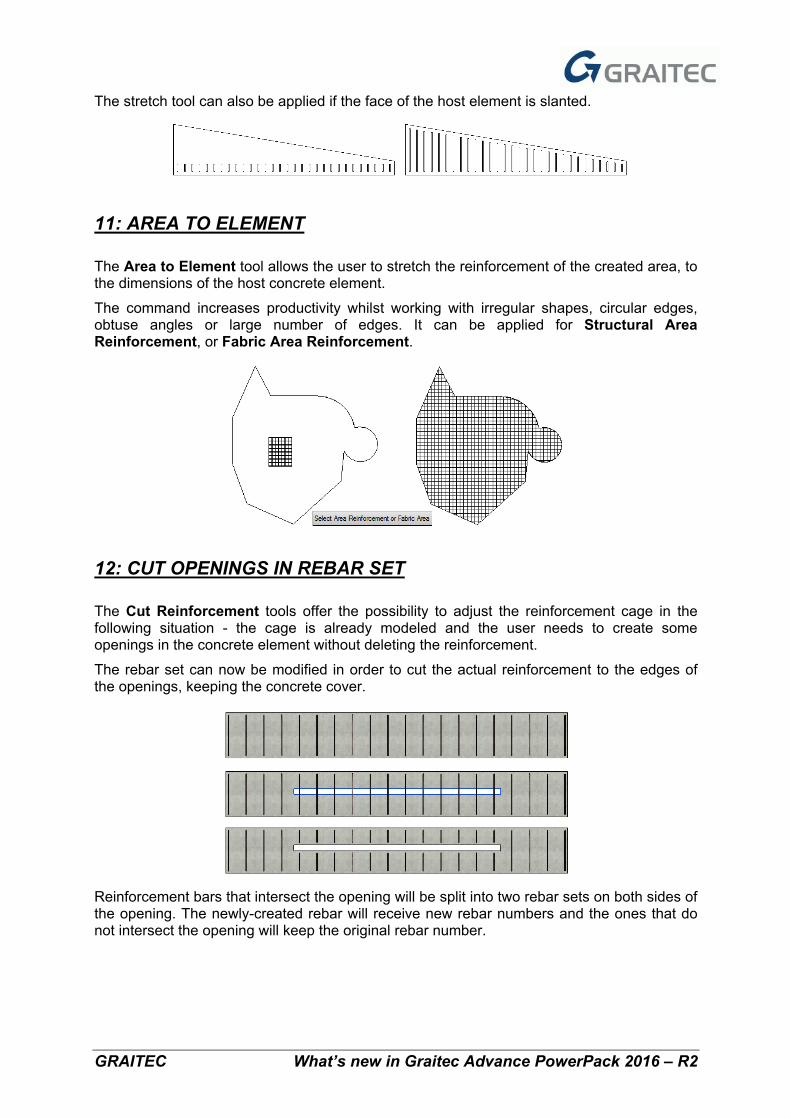
12: CUT OPENINGS IN REBAR SET
The Cut Reinforcement tools offer the possibility to adjust the reinforcement cage in the following situation - the cage is already modeled and the user needs to create some openings in the concrete element without deleting the reinforcement.
The rebar set can now be modified in order to cut the actual reinforcement to the edges of the openings, keeping the concrete cover.
Reinforcement bars that intersect the opening will be split into two rebar sets on both sides of the opening. The newly-created rebar will receive new rebar numbers and the ones that do not intersect the opening will keep the original rebar number.
GRAITEC What’s new in Graitec Advance PowerPack 2016 – R2
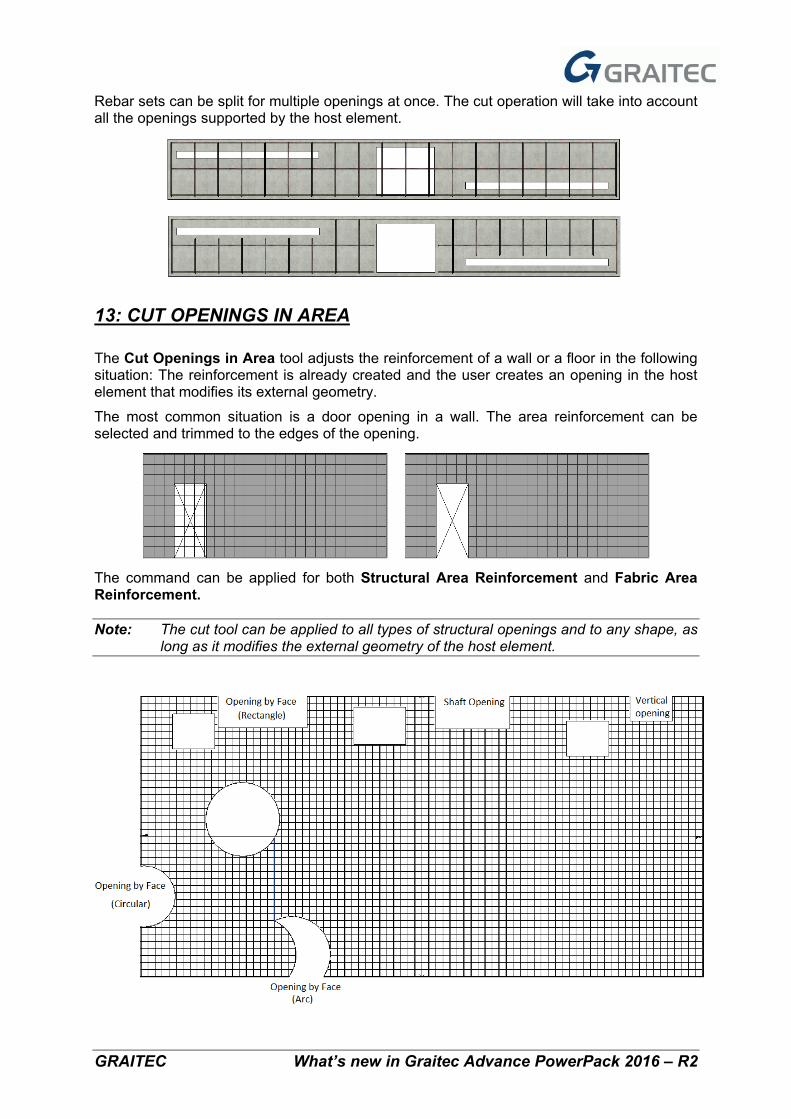
Rebar sets can be split for multiple openings at once. The cut operation will take into account all the openings supported by the host element.
13: CUT OPENINGS IN AREA
The Cut Openings in Area tool adjusts the reinforcement of a wall or a floor in the following situation: The reinforcement is already created and the user creates an opening in the host element that modifies its external geometry.
The most common situation is a door opening in a wall. The area reinforcement can be selected and trimmed to the edges of the opening.
The command can be applied for both Structural Area Reinforcement and Fabric Area Reinforcement.
Note: The cut tool can be applied to all types of structural openings and to any shape, as long as it modifies the external geometry of the host element.
GRAITEC What’s new in Graitec Advance PowerPack 2016 – R2
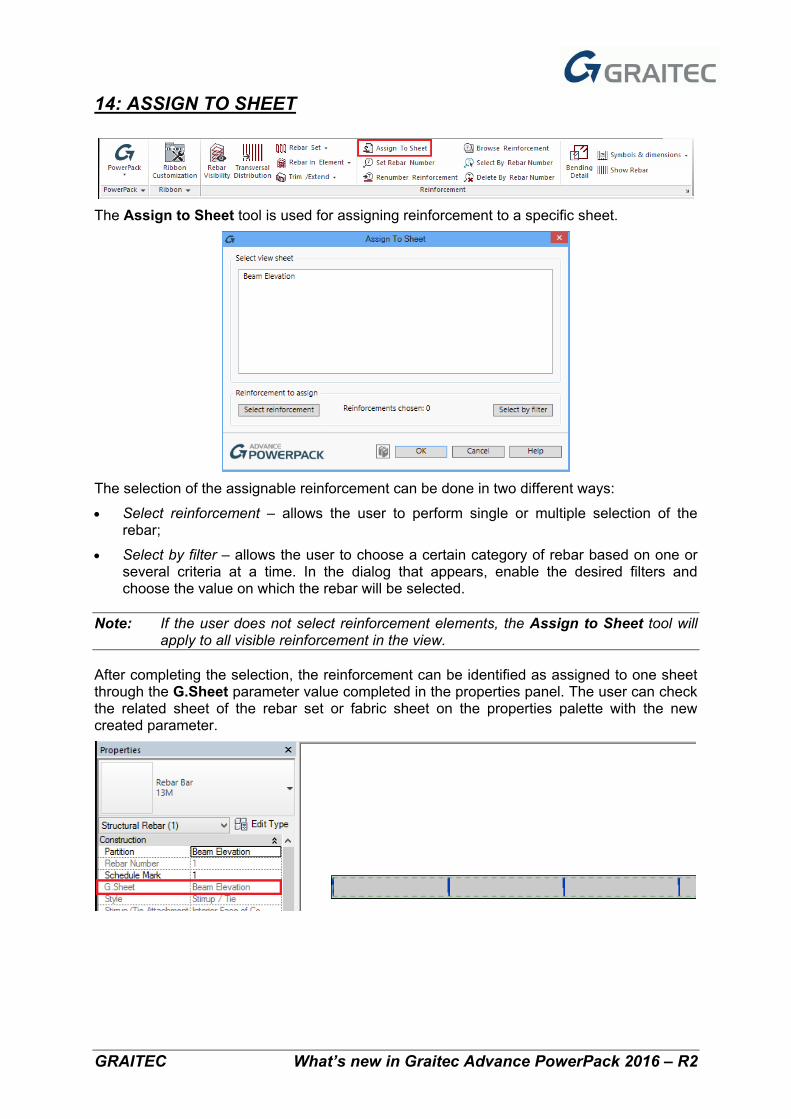
14: ASSIGN TO SHEET
The Assign to Sheet tool is used for assigning reinforcement to a specific sheet.
The selection of the assignable reinforcement can be done in two different ways:
• Select reinforcement – allows the user to perform single or multiple selection of the rebar;
• Select by filter – allows the user to choose a certain category of rebar based on one or several criteria at a time. In the dialog that appears, enable the desired filters and choose the value on which the rebar will be selected.
Note: If the user does not select reinforcement elements, the Assign to Sheet tool will apply to all visible reinforcement in the view.
After completing the selection, the reinforcement can be identified as assigned to one sheet through the G.Sheet parameter value completed in the properties panel. The user can check the related sheet of the rebar set or fabric sheet on the properties palette with the new created parameter.
GRAITEC What’s new in Graitec Advance PowerPack 2016 – R2
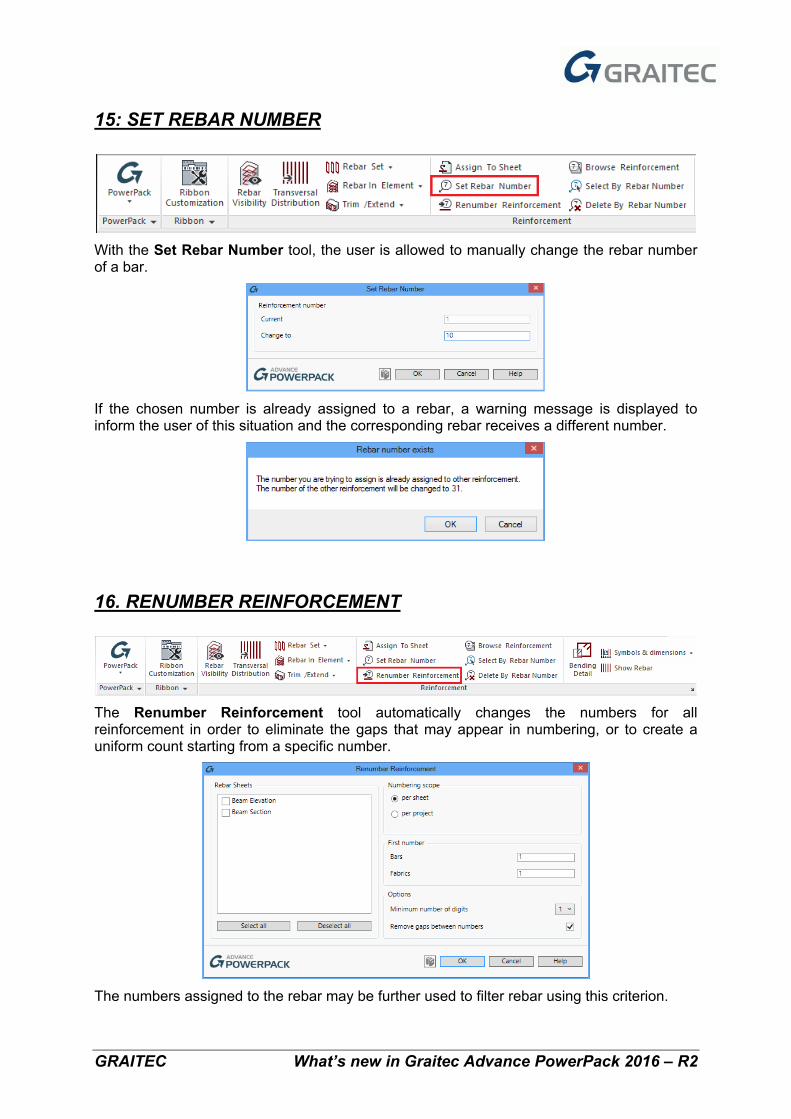
15: SET REBAR NUMBER
With the Set Rebar Number tool, the user is allowed to manually change the rebar number of a bar.
If the chosen number is already assigned to a rebar, a warning message is displayed to inform the user of this situation and the corresponding rebar receives a different number.
16. RENUMBER REINFORCEMENT
The Renumber Reinforcement tool automatically changes the numbers for all reinforcement in order to eliminate the gaps that may appear in numbering, or to create a uniform count starting from a specific number.
The numbers assigned to the rebar may be further used to filter rebar using this criterion.

GRAITEC What’s new in Graitec Advance PowerPack 2016 – R2
This operation will detect identical reinforcement regarding rebar shapes, dimensions, materials, bar diameters.
Depending on the selected mode of operation, the command behaves in two different ways:
• It affects the entire project – in which case the other option is disabled and the reinforcement assigned to sheets is reset.
• It affects selected sheets – in which case two rebar assigned to different sheets can receive the same rebar number.
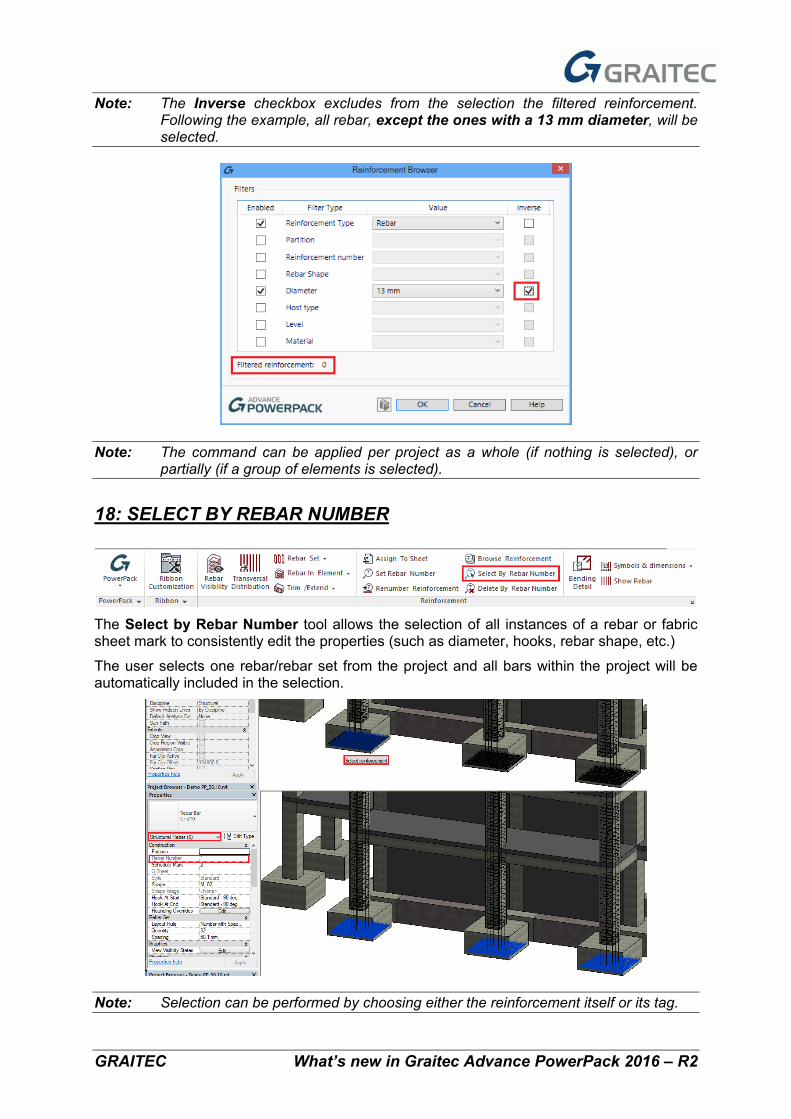
17: BROWSE REINFORCEMENT
This tool browses through rebar or fabric sheet marks and highlights all corresponding instances in the view.
The tool allows the user to choose a certain category of rebar, based on one or more criteria at a time. In the dialog that appears, the user can enable the desired filters and choose the value upon which the rebar will be selected.
In the picture below, only the rebar with a 13 mm diameter will be selected:
GRAITEC What’s new in Graitec Advance PowerPack 2016 – R2
Note: The Inverse checkbox excludes from the selection the filtered reinforcement. Following the example, all rebar, except the ones with a 13 mm diameter, will be selected.
Note: The command can be applied per project as a whole (if nothing is selected), or partially (if a group of elements is selected).
18: SELECT BY REBAR NUMBER
The Select by Rebar Number tool allows the selection of all instances of a rebar or fabric sheet mark to consistently edit the properties (such as diameter, hooks, rebar shape, etc.)
The user selects one rebar/rebar set from the project and all bars within the project will be automatically included in the selection.
Note: Selection can be performed by choosing either the reinforcement itself or its tag.
GRAITEC What’s new in Graitec Advance PowerPack 2016 – R2
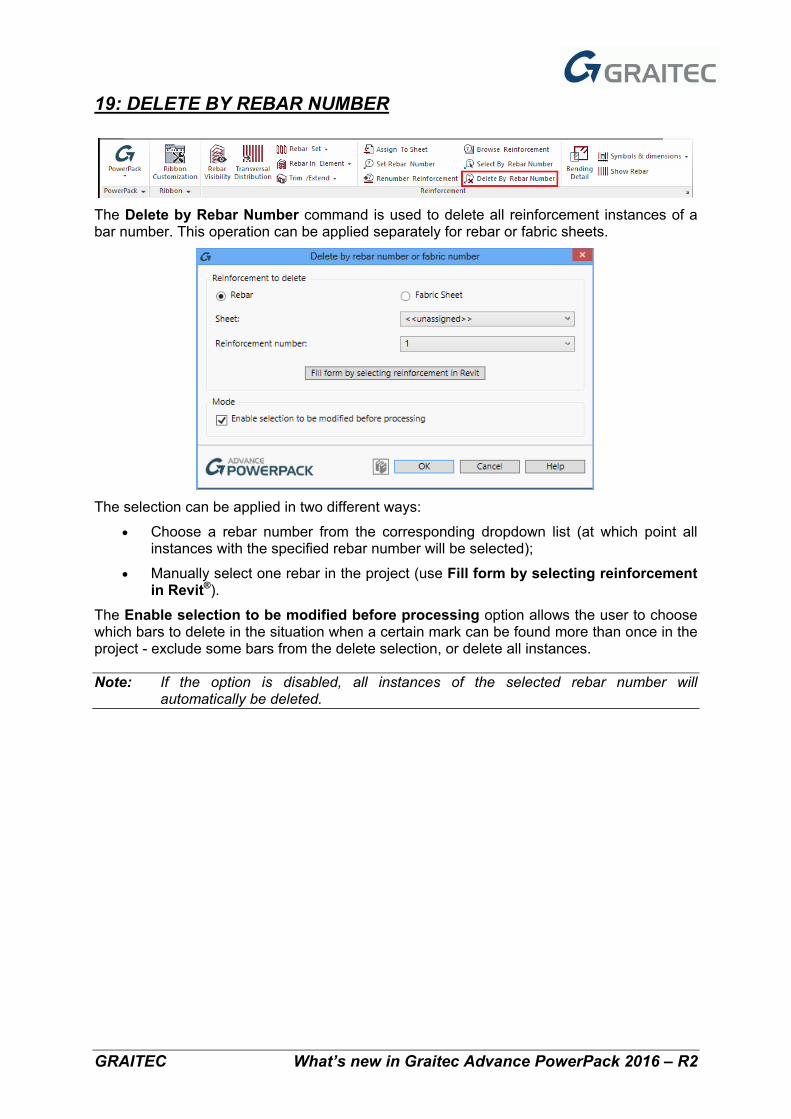
19: DELETE BY REBAR NUMBER
The Delete by Rebar Number command is used to delete all reinforcement instances of a bar number. This operation can be applied separately for rebar or fabric sheets.
The selection can be applied in two different ways:
• Choose a rebar number from the corresponding dropdown list (at which point all instances with the specified rebar number will be selected);
• Manually select one rebar in the project (use Fill form by selecting reinforcement in Revit®).
The Enable selection to be modified before processing option allows the user to choose which bars to delete in the situation when a certain mark can be found more than once in the project - exclude some bars from the delete selection, or delete all instances.
Note: If the option is disabled, all instances of the selected rebar number will automatically be deleted.
GRAITEC What’s new in Graitec Advance PowerPack 2016 – R2
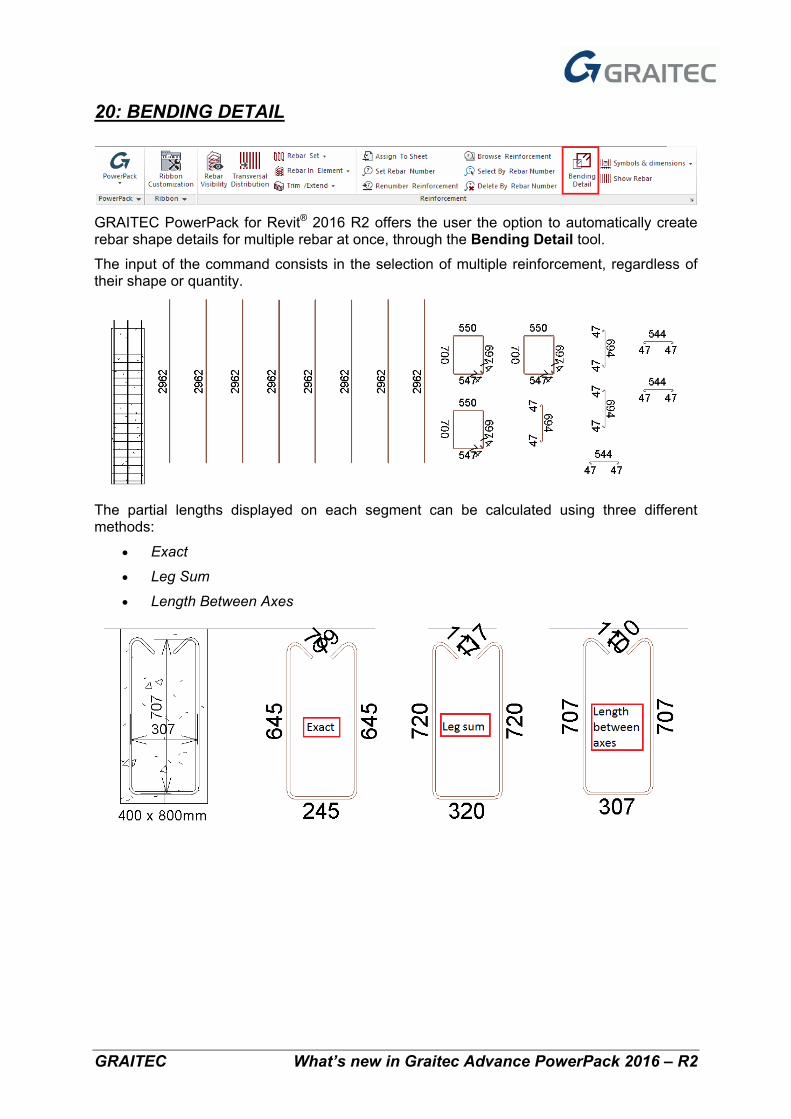
20: BENDING DETAIL
GRAITEC PowerPack for Revit® 2016 R2 offers the user the option to automatically create rebar shape details for multiple rebar at once, through the Bending Detail tool.
The input of the command consists in the selection of multiple reinforcement, regardless of their shape or quantity.
The partial lengths displayed on each segment can be calculated using three different methods:
• Exact
• Leg Sum
• Length Between Axes
GRAITEC What’s new in Graitec Advance PowerPack 2016 – R2
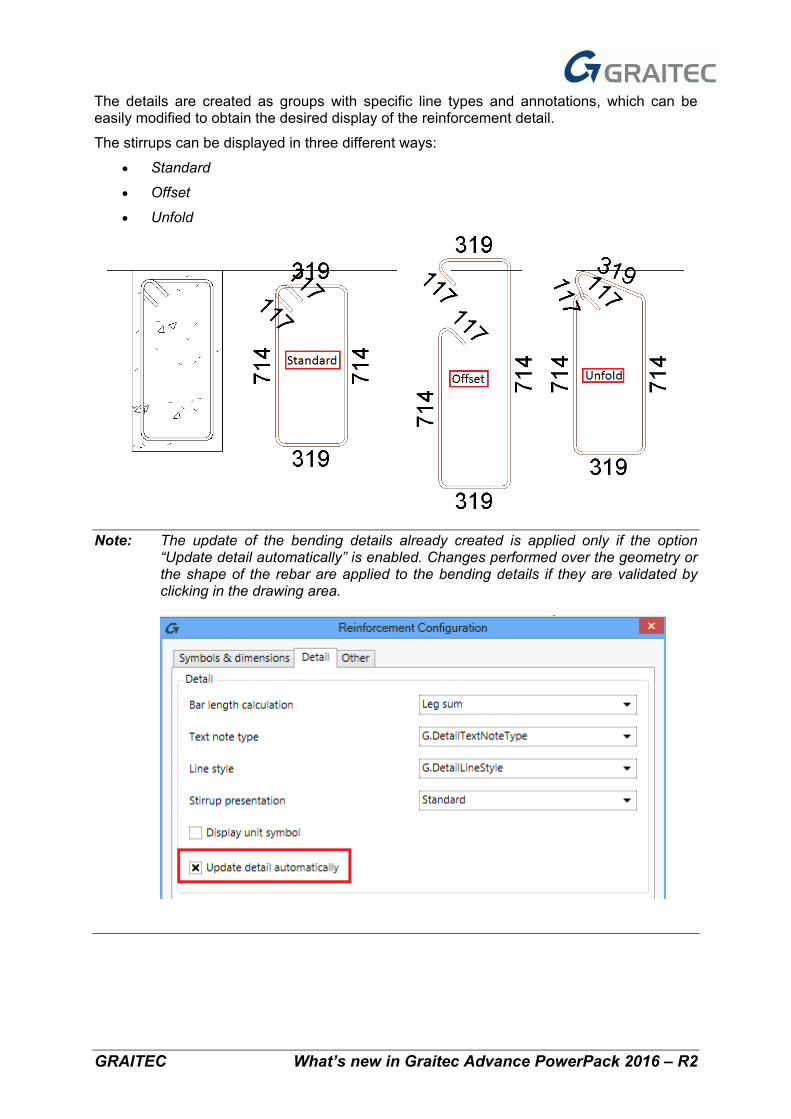
The details are created as groups with specific line types and annotations, which can be easily modified to obtain the desired display of the reinforcement detail.
The stirrups can be displayed in three different ways:
• Standard
• Offset
• Unfold
Note: The update of the bending details already created is applied only if the option “Update detail automatically” is enabled. Changes performed over the geometry or the shape of the rebar are applied to the bending details if they are validated by clicking in the drawing area.
GRAITEC What’s new in Graitec Advance PowerPack 2016 – R2
SYMBOLS AND DIMENSIONS
This set of tools offers representation styles for rebar sets in addition to the ones that are native to Revit®.
There are three separate tools offering different representations of the rebar sets: Dimension Rebar, Tag Rebar, and Detail Rebar. Each of them can be customized individually, using the Reinforcement Configuration dialog.
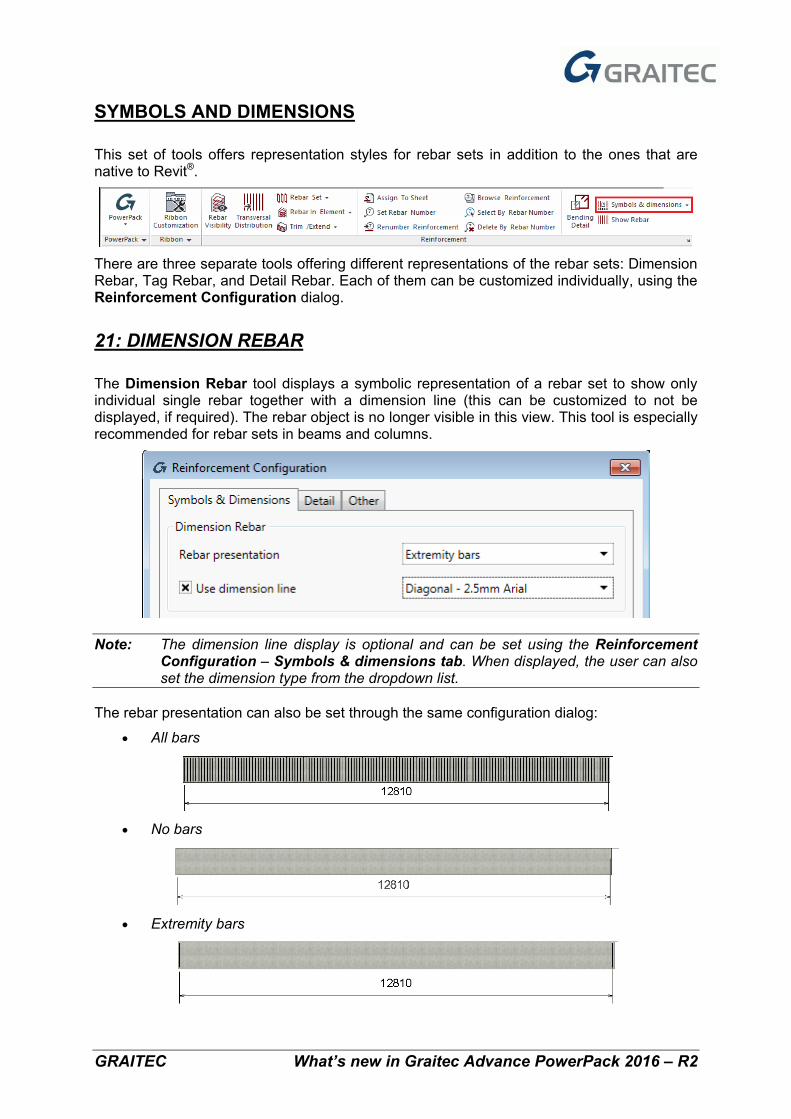
21: DIMENSION REBAR
The Dimension Rebar tool displays a symbolic representation of a rebar set to show only individual single rebar together with a dimension line (this can be customized to not be displayed, if required). The rebar object is no longer visible in this view. This tool is especially recommended for rebar sets in beams and columns.
Note: The dimension line display is optional and can be set using the Reinforcement Configuration – Symbols & dimensions tab. When displayed, the user can also set the dimension type from the dropdown list.
The rebar presentation can also be set through the same configuration dialog:
• All bars
• No bars
• Extremity bars
GRAITEC What’s new in Graitec Advance PowerPack 2016 – R2
• Two bars edge
• Three bars edge
• Central bar
• Two bars in the middle
• Three bars in the middle
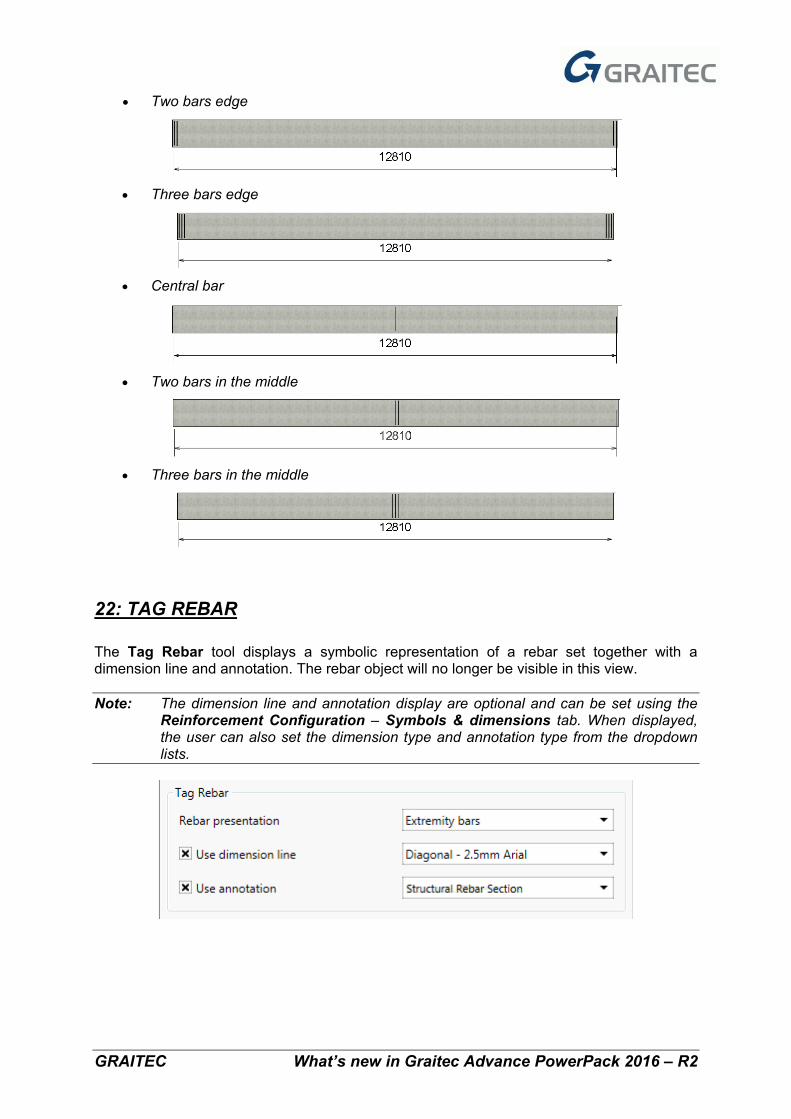
22: TAG REBAR
The Tag Rebar tool displays a symbolic representation of a rebar set together with a dimension line and annotation. The rebar object will no longer be visible in this view.
Note: The dimension line and annotation display are optional and can be set using the Reinforcement Configuration – Symbols & dimensions tab. When displayed, the user can also set the dimension type and annotation type from the dropdown lists.
GRAITEC What’s new in Graitec Advance PowerPack 2016 – R2
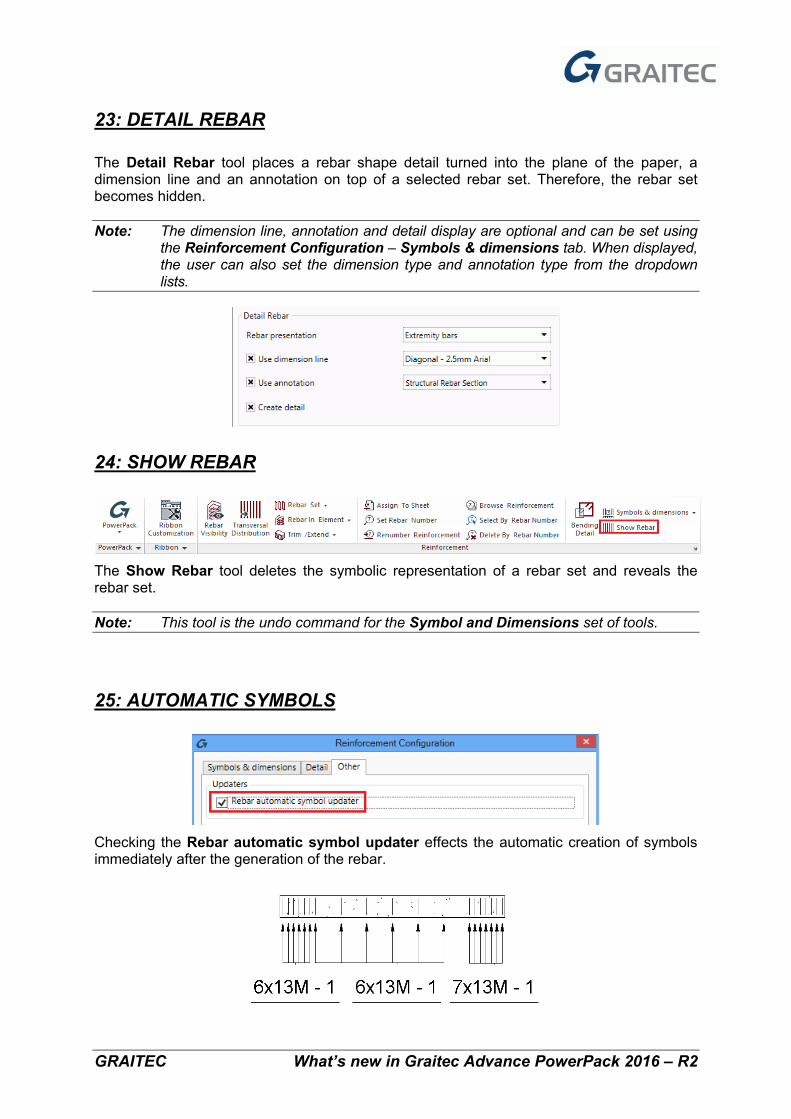
23: DETAIL REBAR
The Detail Rebar tool places a rebar shape detail turned into the plane of the paper, a dimension line and an annotation on top of a selected rebar set. Therefore, the rebar set becomes hidden.
Note: The dimension line, annotation and detail display are optional and can be set using the Reinforcement Configuration – Symbols & dimensions tab. When displayed, the user can also set the dimension type and annotation type from the dropdown lists.
24: SHOW REBAR
The Show Rebar tool deletes the symbolic representation of a rebar set and reveals the rebar set.
Note: This tool is the undo command for the Symbol and Dimensions set of tools.
25: AUTOMATIC SYMBOLS
Checking the Rebar automatic symbol updater effects the automatic creation of symbols immediately after the generation of the rebar.
GRAITEC What’s new in Graitec Advance PowerPack 2016 – R2
26: AUTOMATIC UPDATE
Checking Rebar modification updater allows the user to choose what will happen to a rebar after it has been edited: either it receives a new rebar number, or all instances of the selected bar are modified.
MODELING
GRAITEC PowerPack for Revit® 2016 R2 brings up two new modeling tools, in order to have a clearer image of the model and ease the design process within the project.
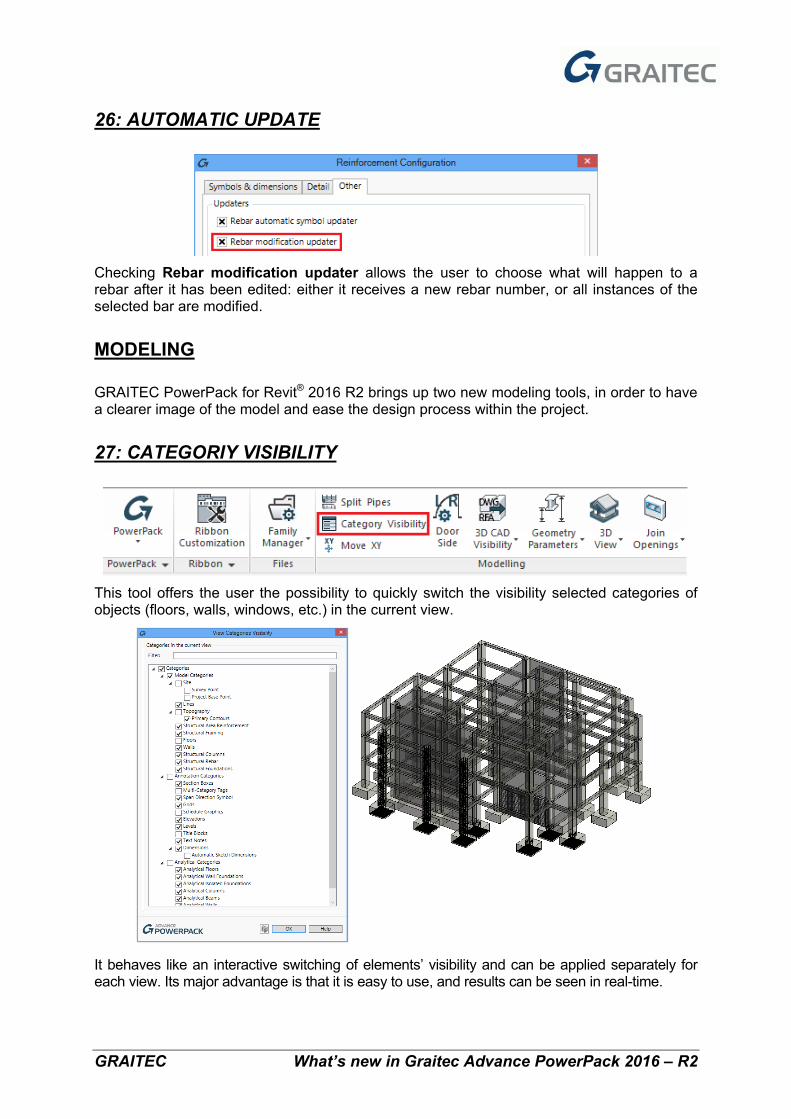
27: CATEGORIY VISIBILITY
This tool offers the user the possibility to quickly switch the visibility selected categories of objects (floors, walls, windows, etc.) in the current view.
It behaves like an interactive switching of elements’ visibility and can be applied separately for each view. Its major advantage is that it is easy to use, and results can be seen in real-time.
GRAITEC What’s new in Graitec Advance PowerPack 2016 – R2
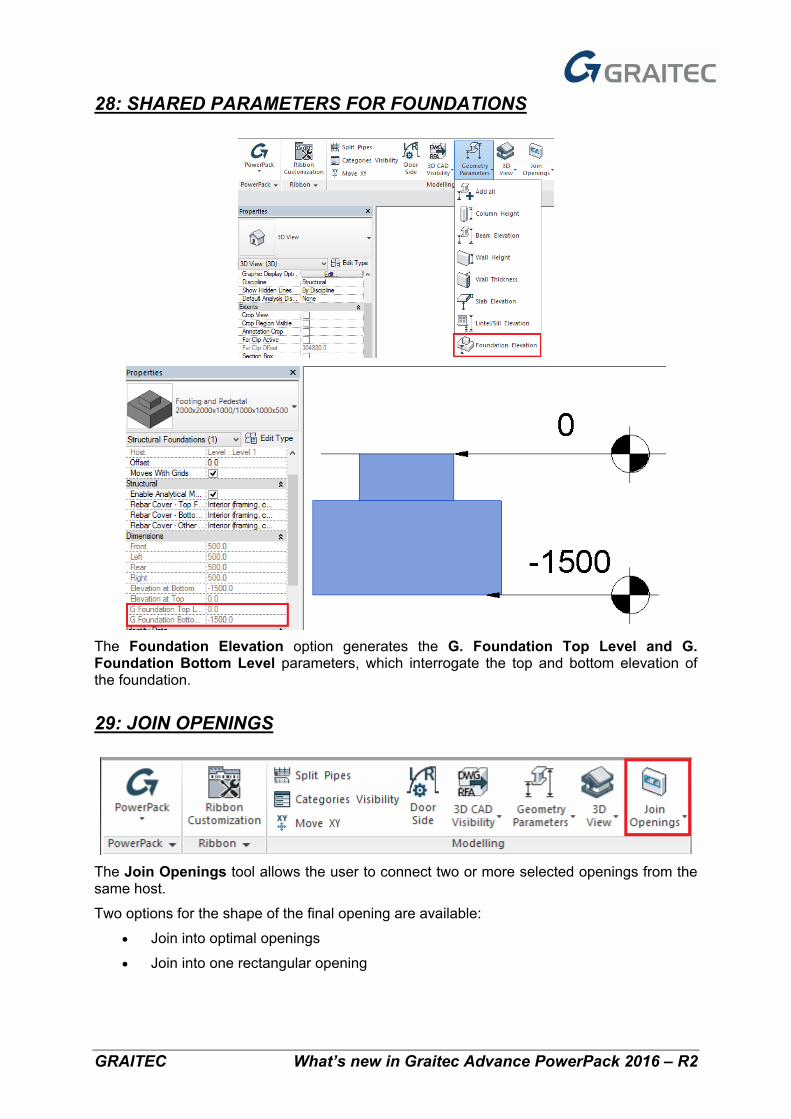
28: SHARED PARAMETERS FOR FOUNDATIONS
The Foundation Elevation option generates the G. Foundation Top Level and G. Foundation Bottom Level parameters, which interrogate the top and bottom elevation of the foundation.
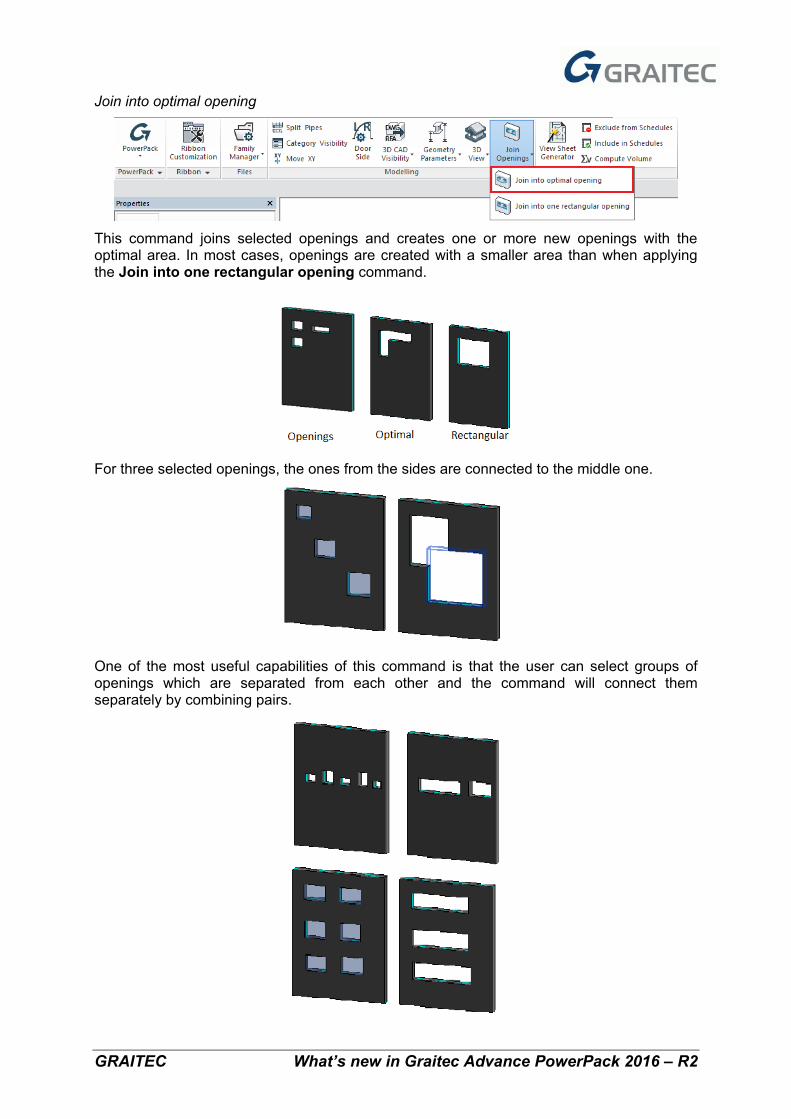
29: JOIN OPENINGS
The Join Openings tool allows the user to connect two or more selected openings from the same host.
Two options for the shape of the final opening are available:
• Join into optimal openings
• Join into one rectangular opening
GRAITEC What’s new in Graitec Advance PowerPack 2016 – R2
Join into optimal opening
This command joins selected openings and creates one or more new openings with the optimal area. In most cases, openings are created with a smaller area than when applying the Join into one rectangular opening command.
For three selected openings, the ones from the sides are connected to the middle one.
One of the most useful capabilities of this command is that the user can select groups of openings which are separated from each other and the command will connect them separately by combining pairs.
GRAITEC What’s new in Graitec Advance PowerPack 2016 – R2
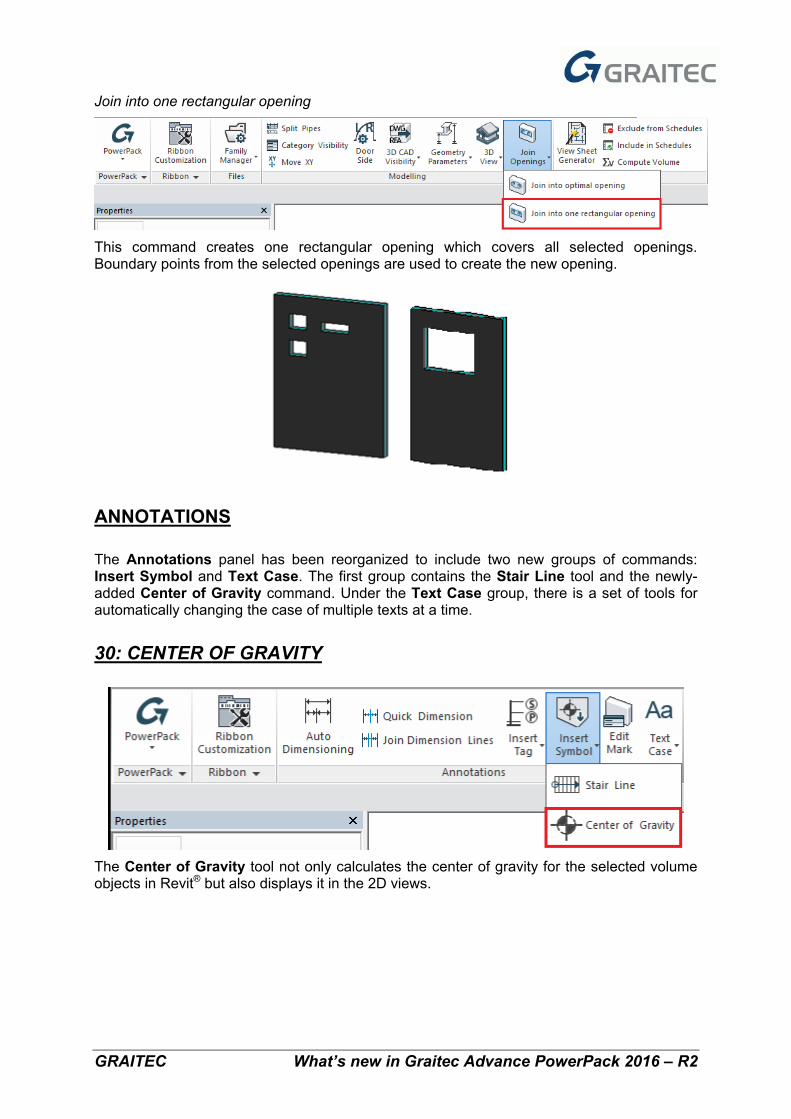
Join into one rectangular opening
This command creates one rectangular opening which covers all selected openings. Boundary points from the selected openings are used to create the new opening.
ANNOTATIONS
The Annotations panel has been reorganized to include two new groups of commands: Insert Symbol and Text Case. The first group contains the Stair Line tool and the newly-added Center of Gravity command. Under the Text Case group, there is a set of tools for automatically changing the case of multiple texts at a time.
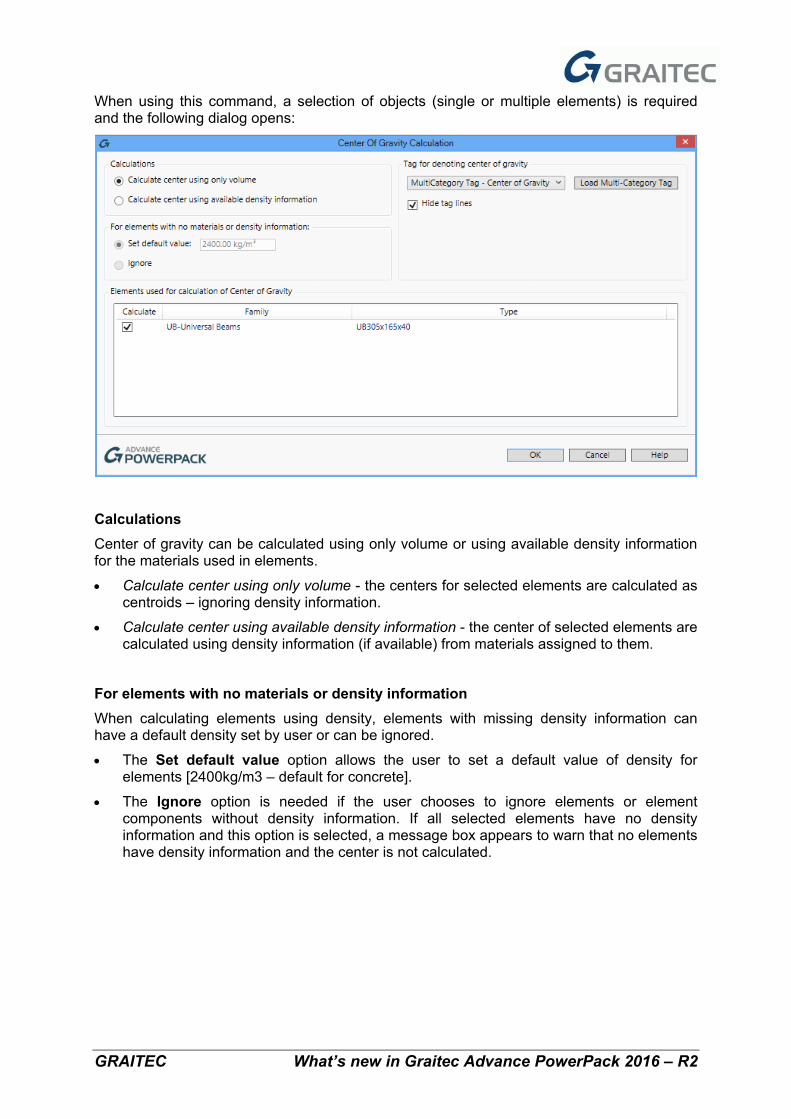
30: CENTER OF GRAVITY
The Center of Gravity tool not only calculates the center of gravity for the selected volume objects in Revit® but also displays it in the 2D views.
GRAITEC What’s new in Graitec Advance PowerPack 2016 – R2
When using this command, a selection of objects (single or multiple elements) is required and the following dialog opens:
Calculations Center of gravity can be calculated using only volume or using available density information for the materials used in elements.
• Calculate center using only volume - the centers for selected elements are calculated as centroids – ignoring density information.
• Calculate center using available density information - the center of selected elements are calculated using density information (if available) from materials assigned to them.
For elements with no materials or density information When calculating elements using density, elements with missing density information can have a default density set by user or can be ignored.
• The Set default value option allows the user to set a default value of density for elements [2400kg/m3 – default for concrete].
• The Ignore option is needed if the user chooses to ignore elements or element components without density information. If all selected elements have no density information and this option is selected, a message box appears to warn that no elements have density information and the center is not calculated.
GRAITEC What’s new in Graitec Advance PowerPack 2016 – R2
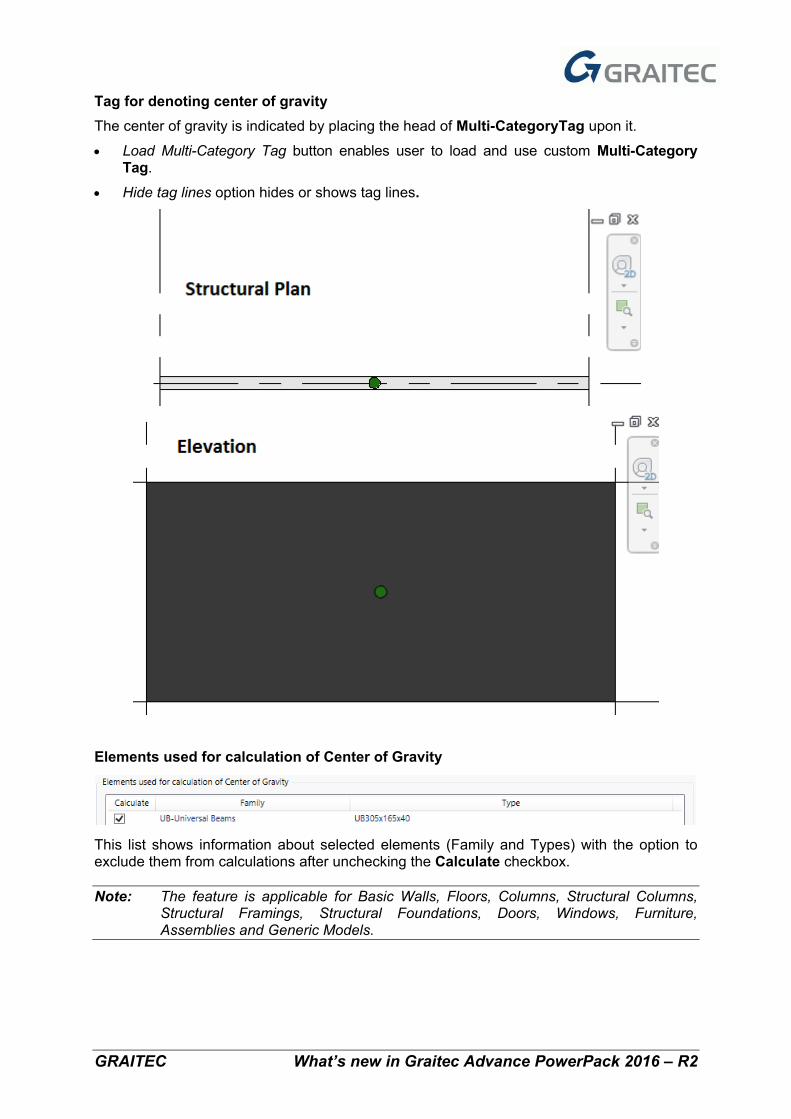
Tag for denoting center of gravity The center of gravity is indicated by placing the head of Multi-CategoryTag upon it.
• Load Multi-Category Tag button enables user to load and use custom Multi-Category Tag.
• Hide tag lines option hides or shows tag lines.
Elements used for calculation of Center of Gravity
This list shows information about selected elements (Family and Types) with the option to exclude them from calculations after unchecking the Calculate checkbox.
Note: The feature is applicable for Basic Walls, Floors, Columns, Structural Columns, Structural Framings, Structural Foundations, Doors, Windows, Furniture, Assemblies and Generic Models.
GRAITEC What’s new in Graitec Advance PowerPack 2016 – R2
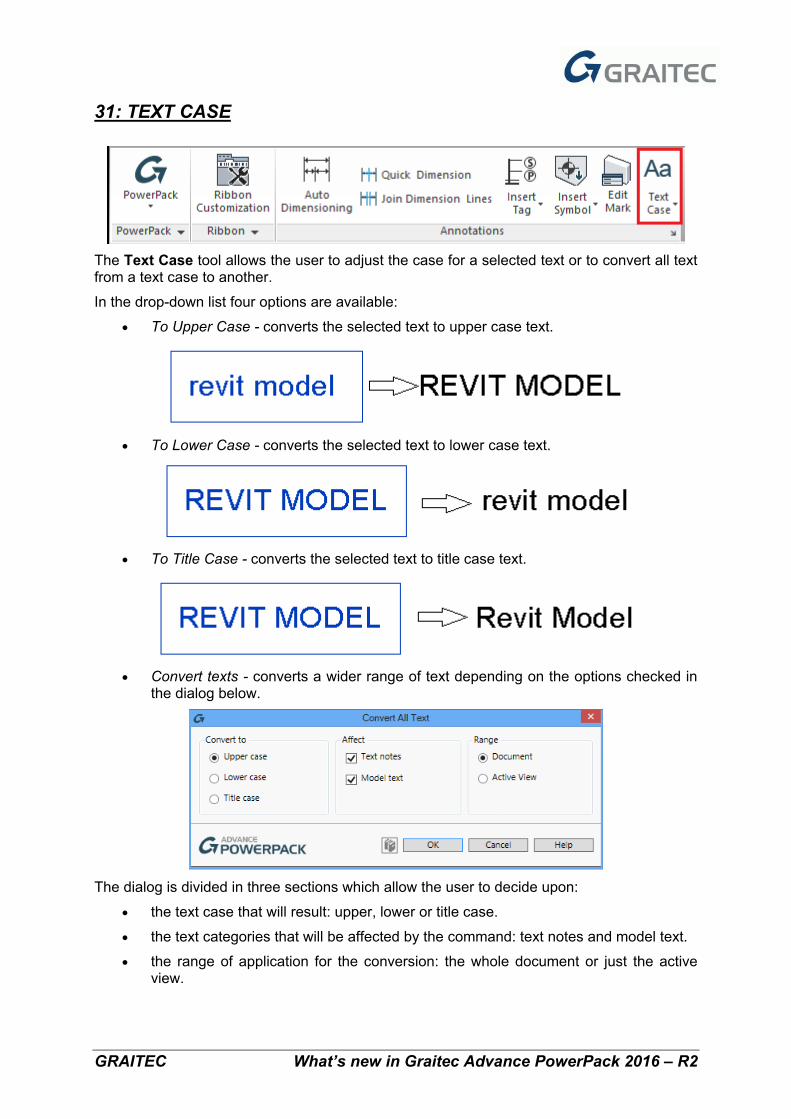
31: TEXT CASE
The Text Case tool allows the user to adjust the case for a selected text or to convert all text from a text case to another.
In the drop-down list four options are available:
• To Upper Case - converts the selected text to upper case text.
• To Lower Case - converts the selected text to lower case text.
• To Title Case - converts the selected text to title case text.
• Convert texts - converts a wider range of text depending on the options checked in
the dialog below.
The dialog is divided in three sections which allow the user to decide upon:
• the text case that will result: upper, lower or title case.
• the text categories that will be affected by the command: text notes and model text.
• the range of application for the conversion: the whole document or just the active view.
GRAITEC What’s new in Graitec Advance PowerPack 2016 – R2
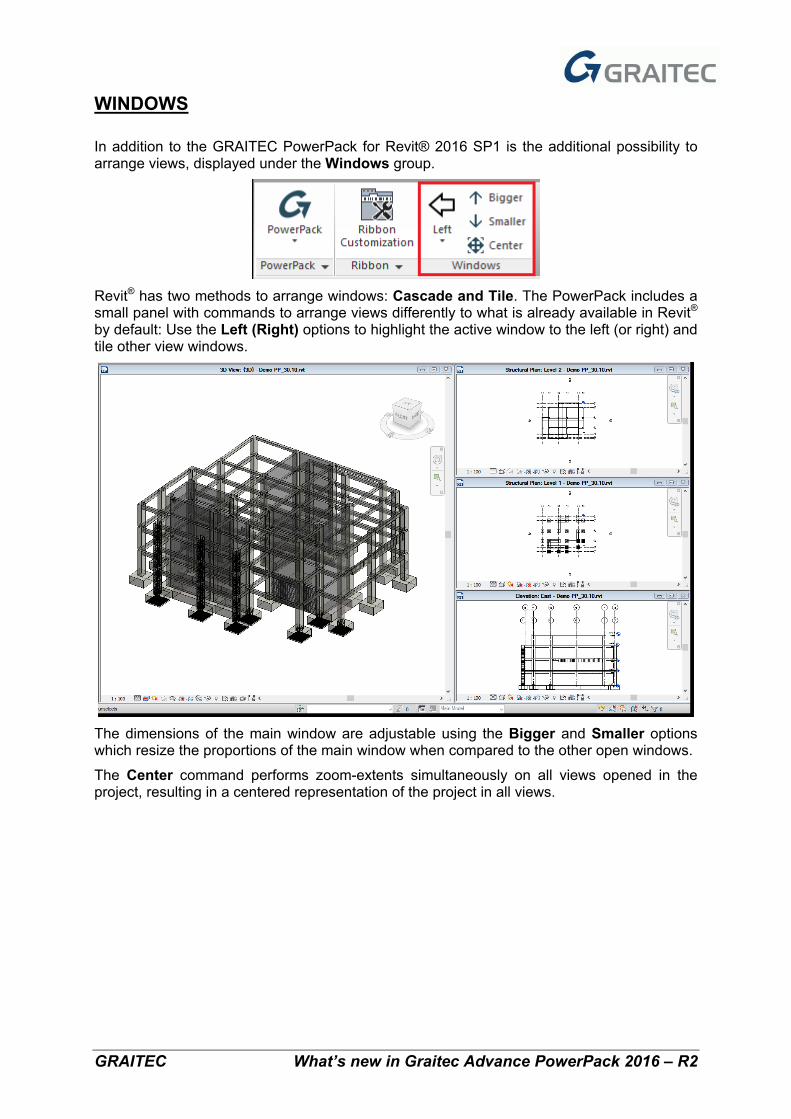
WINDOWS
In addition to the GRAITEC PowerPack for Revit® 2016 SP1 is the additional possibility to arrange views, displayed under the Windows group.
Revit® has two methods to arrange windows: Cascade and Tile. The PowerPack includes a small panel with commands to arrange views differently to what is already available in Revit® by default: Use the Left (Right) options to highlight the active window to the left (or right) and tile other view windows.
The dimensions of the main window are adjustable using the Bigger and Smaller options which resize the proportions of the main window when compared to the other open windows.
The Center command performs zoom-extents simultaneously on all views opened in the project, resulting in a centered representation of the project in all views.
GRAITEC What’s new in Graitec Advance PowerPack 2016 – R2
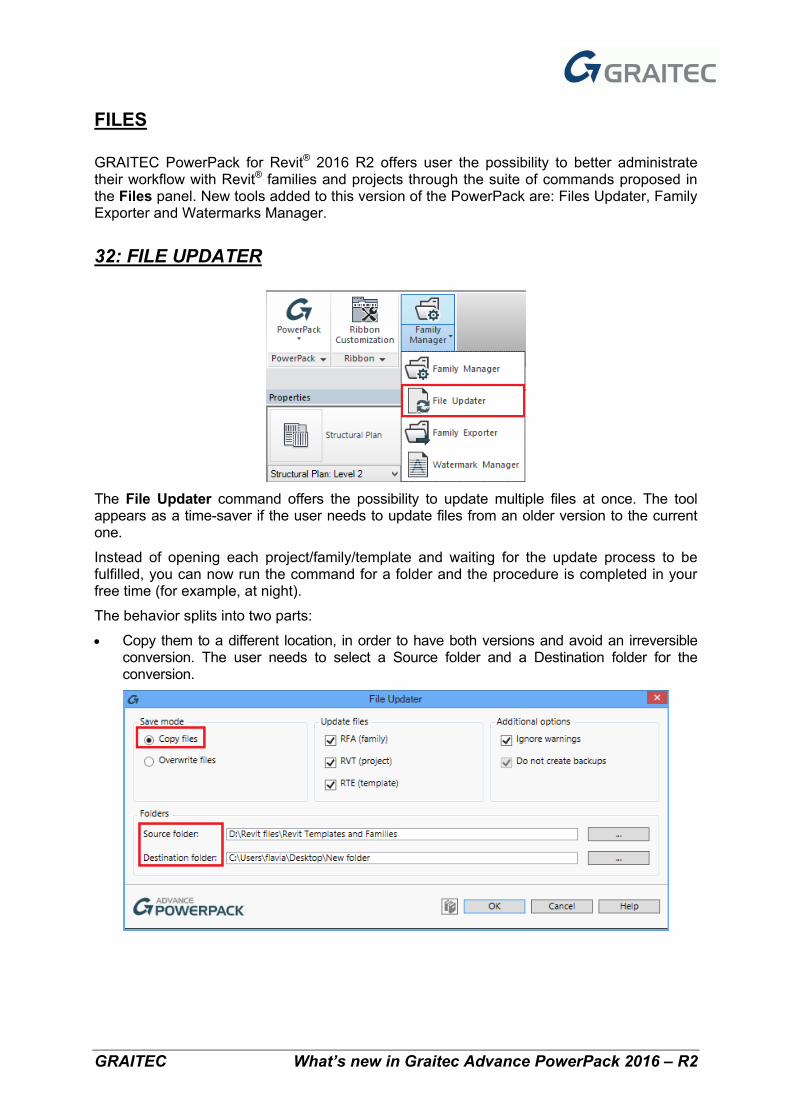
FILES
GRAITEC PowerPack for Revit® 2016 R2 offers user the possibility to better administrate their workflow with Revit® families and projects through the suite of commands proposed in the Files panel. New tools added to this version of the PowerPack are: Files Updater, Family Exporter and Watermarks Manager.
32: FILE UPDATER
The File Updater command offers the possibility to update multiple files at once. The tool appears as a time-saver if the user needs to update files from an older version to the current one.
Instead of opening each project/family/template and waiting for the update process to be fulfilled, you can now run the command for a folder and the procedure is completed in your free time (for example, at night).
The behavior splits into two parts:
• Copy them to a different location, in order to have both versions and avoid an irreversible conversion. The user needs to select a Source folder and a Destination folder for the conversion.
GRAITEC What’s new in Graitec Advance PowerPack 2016 – R2
• Overwrite the existing files at their original location, in which case the only folder selected will be the Source folder.
This tool will automatically open each file (in batch mode) and save it in the selected destination.
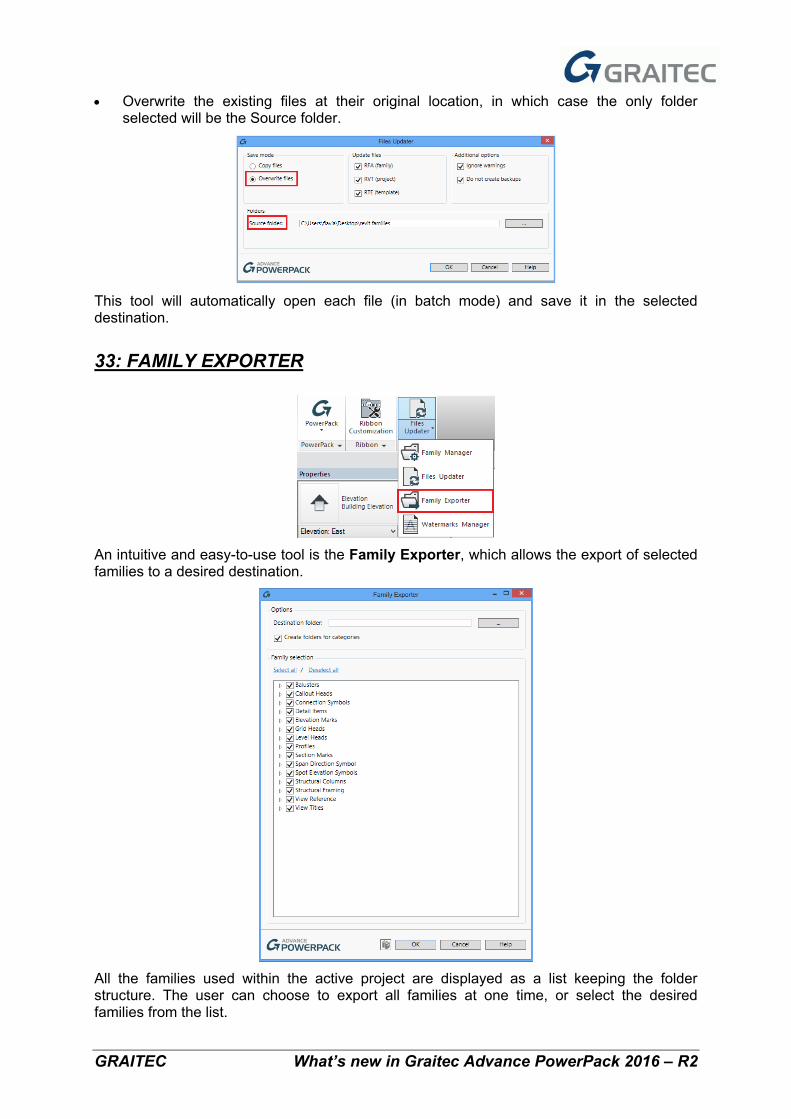
33: FAMILY EXPORTER
An intuitive and easy-to-use tool is the Family Exporter, which allows the export of selected families to a desired destination.
All the families used within the active project are displayed as a list keeping the folder structure. The user can choose to export all families at one time, or select the desired families from the list.
GRAITEC What’s new in Graitec Advance PowerPack 2016 – R2
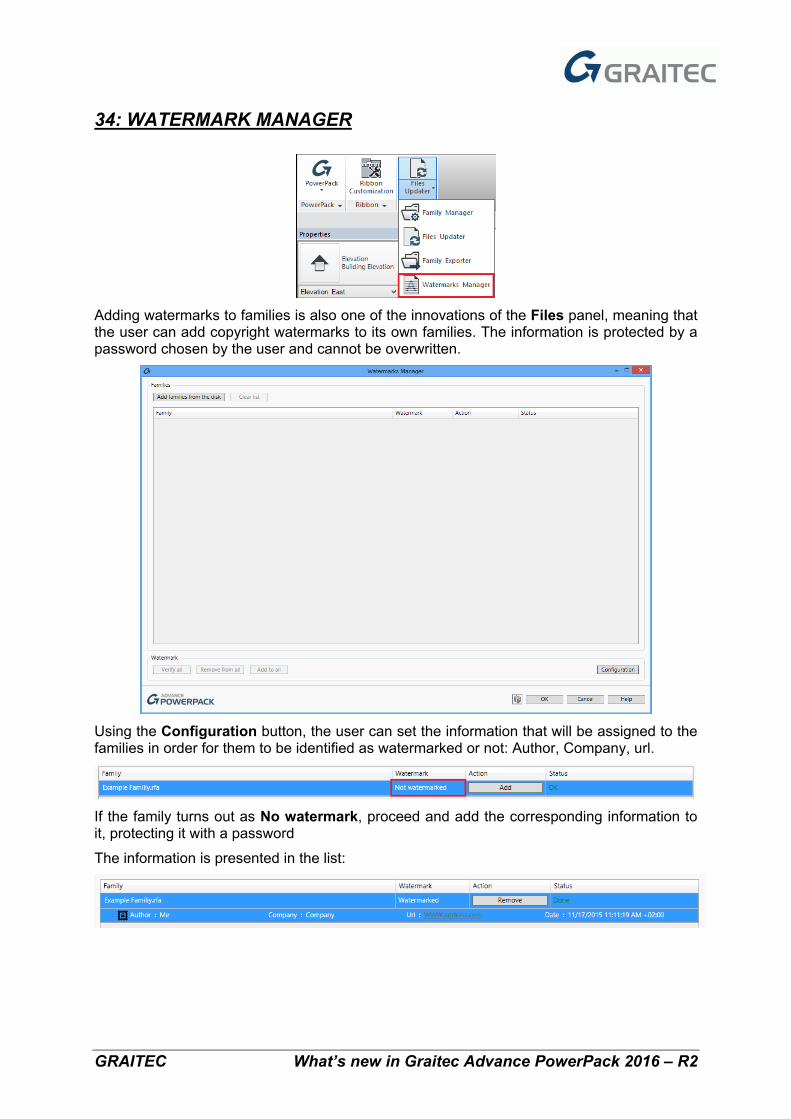
34: WATERMARK MANAGER
Adding watermarks to families is also one of the innovations of the Files panel, meaning that the user can add copyright watermarks to its own families. The information is protected by a password chosen by the user and cannot be overwritten.
Using the Configuration button, the user can set the information that will be assigned to the families in order for them to be identified as watermarked or not: Author, Company, url.
If the family turns out as No watermark, proceed and add the corresponding information to it, protecting it with a password
The information is presented in the list:
GRAITEC What’s new in Graitec Advance PowerPack 2016 – R2
BIM CONNECT
The commands in the BIM Connect category have been designed to allow the user to quickly connect their Autodesk® Revit® models to the Graitec Advance suite, and then optimize the design of their structures, producing general arrangement drawings, fabrication drawings, BOMs, and NC files, both for steel and concrete structures. The updates to the GRAITEC PowerPack for Revit® 2016 R2 when applied to this category of commands, are intended to increase productivity and offer a better response to real situations that may appear in the design process.
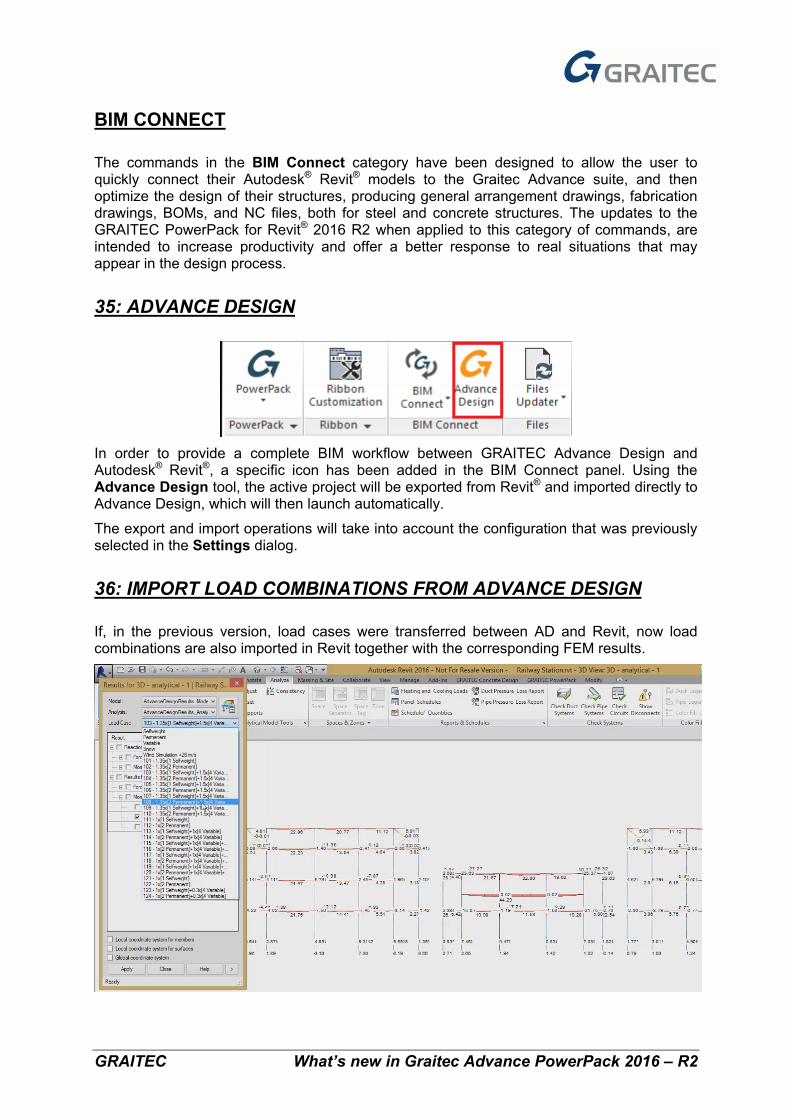
35: ADVANCE DESIGN
In order to provide a complete BIM workflow between GRAITEC Advance Design and Autodesk® Revit®, a specific icon has been added in the BIM Connect panel. Using the Advance Design tool, the active project will be exported from Revit® and imported directly to Advance Design, which will then launch automatically.
The export and import operations will take into account the configuration that was previously selected in the Settings dialog.
36: IMPORT LOAD COMBINATIONS FROM ADVANCE DESIGN
If, in the previous version, load cases were transferred between AD and Revit, now load combinations are also imported in Revit together with the corresponding FEM results.
GRAITEC What’s new in Graitec Advance PowerPack 2016 – R2
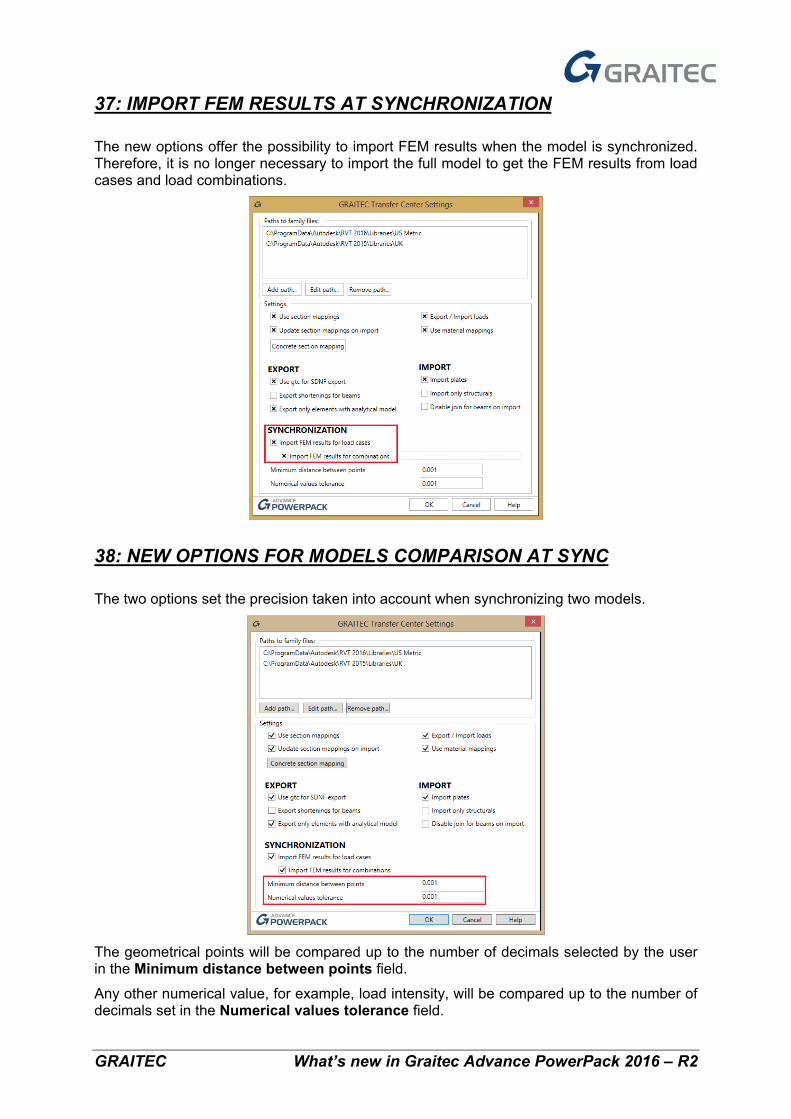
37: IMPORT FEM RESULTS AT SYNCHRONIZATION
The new options offer the possibility to import FEM results when the model is synchronized. Therefore, it is no longer necessary to import the full model to get the FEM results from load cases and load combinations.
38: NEW OPTIONS FOR MODELS COMPARISON AT SYNC
The two options set the precision taken into account when synchronizing two models.
The geometrical points will be compared up to the number of decimals selected by the user in the Minimum distance between points field.
Any other numerical value, for example, load intensity, will be compared up to the number of decimals set in the Numerical values tolerance field.
GRAITEC What’s new in Graitec Advance PowerPack 2016 – R2
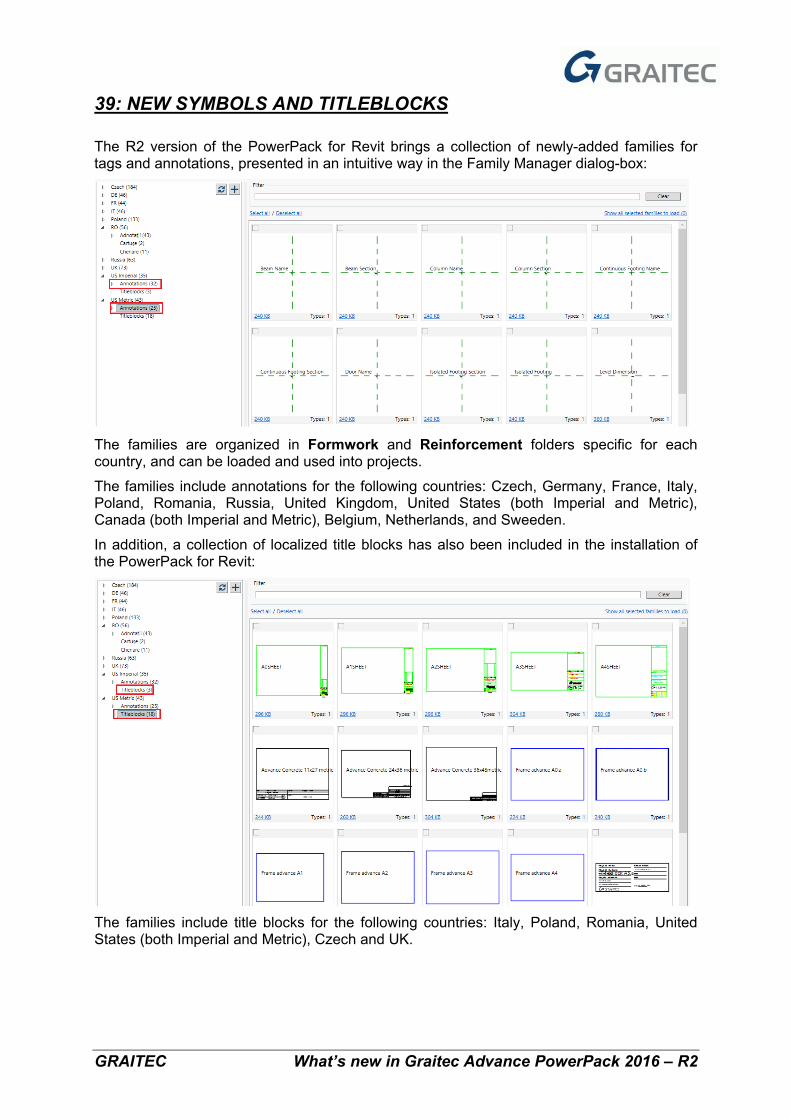
39: NEW SYMBOLS AND TITLEBLOCKS
The R2 version of the PowerPack for Revit brings a collection of newly-added families for tags and annotations, presented in an intuitive way in the Family Manager dialog-box:
The families are organized in Formwork and Reinforcement folders specific for each country, and can be loaded and used into projects.
The families include annotations for the following countries: Czech, Germany, France, Italy, Poland, Romania, Russia, United Kingdom, United States (both Imperial and Metric), Canada (both Imperial and Metric), Belgium, Netherlands, and Sweeden.
In addition, a collection of localized title blocks has also been included in the installation of the PowerPack for Revit:
The families include title blocks for the following countries: Italy, Poland, Romania, United States (both Imperial and Metric), Czech and UK.
GRAITEC What’s new in Graitec Advance PowerPack 2016 – R2
Improvements
FAMILY MANAGER
In the past, families from the Family Manager command had no distinction if they were already loaded in the project or not. In the current version, families that are loaded are marked in the dialog.
VIEW SHEET GENERATOR
• In the last version, this command could only be applied for assemblies of precast elements. Now, the user can also apply it to all types of elements in a normal project (beams, columns, walls).
• Also, the user can now decide if the views should include neighboring elements or not.
• If the option above is set to True, the user can then choose how much of the adjacent element will be displayed.
• Apart from the 2D plan views, the possibility to add one or more isometric views of the element has been added. The user can choose between the views seen from the corner of the cube.
• Another improvement is the possibility to choose the scale for each view. In the previous version the scale could only be set after creating the views.
GEOMETRY PARAMETERS
• The update of the values for the shared parameters now occurs in real-time when the geometry is changed.
• The Add all button has been included to automatically add all parameters for existing elements.
BIM CONNECT
• Files in *.gtcx format were not imported correctly when using templates other than the Structural one. This issue has now been corrected and elements are imported in the project regardless the type of template used.
• The exchange of footings between Revit® and Advance Design now works correctly both ways. The foundations from Revit® are exported to Advance Design as supports and the supports from Advance Design are imported into Revit® as foundations.
• Synchronization improvements have been made regarding the geometric modifications when exchanging information between Revit® and Advance Design.
• The transfer of the analytical model releases between Revit and Advance Design now works correctly.
• Improvements regarding load cases and load combinations transfer – the case id is saved during the model transfer between Revit® and Advance Design.