Embed Size (px)
Citation preview

1
GlobalSign Enterprise Solutions
BlueBeam® PDF Signing User Guide
PDF Signing Certificates for BlueBeam® Revu®
v.1.3

2
Table of Contents Table of Contents ................................................................................................................................ 2
Introduction ........................................................................................................................................ 3
GlobalSign Certificates ........................................................................................................................ 3
Step 1 – Establishing an EPKI Account ................................................................................................ 3
Step 2 – Registering Users for PDF Signing Certificates ...................................................................... 8
Step 3 – Installing Your Certificate .................................................................................................... 13
Your Certificate as a Digital ID in BlueBeam® Revu® .......................................................................... 13
Using Your Certificate in BlueBeam® Revu® ....................................................................................... 14
Appendix A: Purchasing Individual PDF Signing Certificates............................................................. 17
Appendix B: Applying and Customizing Digital Signatures ............................................................... 24
GlobalSign Contact Information ........................................................................................................ 24

3
Introduction Using PDF signing to certify and add approval signatures to electronic document workflows offers the same assurance of
origin and integrity as a wet ink signature. PDF Signing can be used by an individual as well as an entire Enterprise to assure
the recipient that the document is authentic, comes from a verified source, and has not been tampered with. This is seen
across multiple verticals including architecture, engineering, and construction.
To add a digital signature to a PDF document a PDF signing application is required. These applications range from simple
online solutions to desktop solutions which allow you to create, edit, collaborate on, and sign PDF documents. This solution
guide has been created to demonstrate the purchasing and configuration of GlobalSign’s PDF Signing Certificates with the
PDF signing application BlueBeam® Revu
®.
GlobalSign Certificates As a member of both Adobe’s Certified Document Services (CDS) and Approved Trust List (AATL) GlobalSign’s PDF Signing
certificates are compatible with all versions of BlueBeam® Revu
®. The type of certificate license you will require will depend
on the number of users and volume of PDF documents which will require signatures. This guide will cover both scenarios
outlined below:
Individual: ideal for an individual with the need to sign PDFs (<2,000 signatures per year). If this is the solution
you are looking for please proceed to Appendix A: Purchasing Individual PDF Signing Certificates.
Enterprise PKI (EPKI): ideal for organizations with multiple individuals with the need to sign PDFs and have the
added benefit of managing all certificates in a central location. This centralizes lifecycle management including
issuing, renewing, revoking, and reissuing. If this is the solution you are looking for please proceed to the next
step, Step 1 – Establishing an EPKI Account.
Step 1 – Establishing an EPKI Account If you do not already have a GlobalSign EPKI Account, you will need to register for an EPKI account and setup a Certificate
Profile. A Certificate Profile will serve as a pre-vetted organization template containing the organization’s identity records
(such as organization name, city, state, etc.) that end user certificate requests will be issued from. Verifying the
organization’s identity associated with a profile typically takes between 2 and 3 business days.
If you already have an EPKI Account, please proceed to Step 2- Registering Users for PDF Signing Certificates.
If you do not already have an EPKI Account, please follow the instructions below:
1. Navigate to https://www.globalsign.com/pdf-signing/ . Click How To Buy.
2. Click Select under the Desktop Enterprise Level option.

4
3. If you require a license pack for five certificates you can purchase it by clicking Select under the 5 License Pack option
and complete the purchasing process. For the purposes of this guide it is assumed you require more than five
certificates. Click on Get Quote under the Need More? Option. An account representative will be in contact with you
shortly to help you decide the best options for your EPKI account. The next step will be to register for an EPKI account.
4. Register for an EPKI account by entering your account details. Note: this is not the vetted profile information.
5. Choose a username and password. An account number (PAR####) will be appended to the username you choose. Click
Next to continue.

5
6. Confirm your account information and review the Terms of Service Agreement. Be sure to double check that all
information is entered correctly. Click Next to continue.
7. Choose the license pack size of Identity Certificates you wish to purchase. Click Next.

6
8. Choose a validity period to be applied to your license pack (1-3 years).
Optional - Add an additional technical contact (this is commonly used when you are applying on behalf of someone
else). Click Next to complete.
9. Enter the Certificate Profile Details. These details will be vetted and included as the certified identity within your issued
certificates. Click Next to continue.
Important - make sure the details entered are correct as GlobalSign will vet the details you include.

7
10. Complete the payment details.
11. Confirm your order details. Review and agree to the EPKI Service Agreement. Click Next when finished.
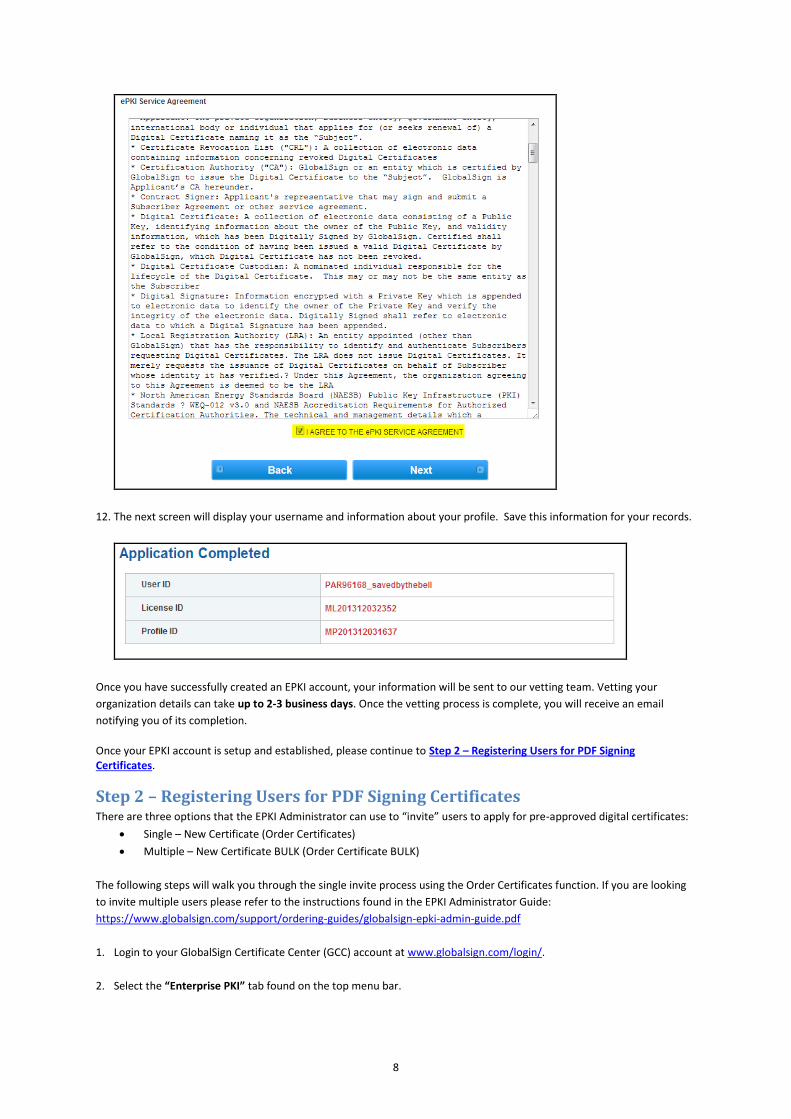
8
12. The next screen will display your username and information about your profile. Save this information for your records.
Once you have successfully created an EPKI account, your information will be sent to our vetting team. Vetting your
organization details can take up to 2-3 business days. Once the vetting process is complete, you will receive an email
notifying you of its completion.
Once your EPKI account is setup and established, please continue to Step 2 – Registering Users for PDF Signing Certificates.
Step 2 – Registering Users for PDF Signing Certificates There are three options that the EPKI Administrator can use to “invite” users to apply for pre-approved digital certificates:
Single – New Certificate (Order Certificates)
Multiple – New Certificate BULK (Order Certificate BULK)
The following steps will walk you through the single invite process using the Order Certificates function. If you are looking
to invite multiple users please refer to the instructions found in the EPKI Administrator Guide:
https://www.globalsign.com/support/ordering-guides/globalsign-epki-admin-guide.pdf
1. Login to your GlobalSign Certificate Center (GCC) account at www.globalsign.com/login/.
2. Select the “Enterprise PKI” tab found on the top menu bar.

9
Please note: if this is your first time logging in your menu options will be limited. For first time users, you will need to enroll
for an “EPKI Administrator Certificate”, which is an authentication certificate needed to access secure areas of GCC such as
the Certificate Management section. Please follow the steps below to enroll for your administrator certificate.
a. Click the Get EPKI Administrator Certificate link in the left hand menu to start the enrollment process.
b. Follow the prompted steps to enroll and install your certificate.
c. If you need further assistance and detailed instructions on how to enroll for your EPKI Administrator
Certificate, please see our administrator guide located at
https://www.globalsign.com/support/ordering-guides/globalsign-epki-admin-guide.pdf
3. In the left hand menu, select Order Certificates under My Certificates.
4. Next, select the Profile and License pack that you want to issue the certificate from. In most cases there will be only
one option for each area. Click Next.

10
5. Next, complete the Certificate Identity Details.
Provide the end-user identity details.
a. Important - Establish a one-time Pickup Password. The user will need this password to install the
certificate onto their device; you must deliver this Pickup Password in an out-of-band method.
b. Optional - enter a reason or note associated with the registration. This note will appear in the Order
History section of EPKI and may be useful for audit purposes.
Click Next to continue.

11

12
6. Review and confirm registration details. If satisfied, click Next to complete the registration.
The registration is now complete and as indicated the Enrollment Invite will be sent to the email address specified in the
Certificate Identity Details. Please continue to Step 3 – Installing Your Certificate to see how the user will complete the
certificate pick-up and installation.

13
Step 3 – Installing Your Certificate Now that you have issued a PDF Signing Certificate it will need to be installed on a USB token. GlobalSign has standardized
on offering SafeNet iKey USB tokens which will be shipped to you once the vetting process has been completed.
Once you receive the tokens you will need to take the following steps to complete the installation:
Install the GlobalSign SafeNet Utility Drivers
Initialize the USB token and set your USB token password
Install the GlobalSign certificate on the USB token
Note the certificate must be installed within thirty (30) days from the date the order was placed.
For detailed instructions on the steps outlined above please review the GlobalSign PDF Signing Certificates Installation
Support guide: https://www.globalsign.com/resources/installation-guide/pdf-signing-installation-guide.pdf
Once you have successfully installed the certificate onto your USB token please proceed to Your Certificate as a Digital ID
in BlueBeam® Revu
®.
Your Certificate as a Digital ID in BlueBeam® Revu® With locally stored digital certificates you would typically be required to create a new digital ID within BlueBeam
® Revu
®,
however with GlobalSign’s PDF Signing Certificate on a USB token, the certificate automatically displays as an available
digital ID once plugged into the computer.
1. To view your Digital IDs you will need to navigate to the Manage Digital IDs dialog by selecting Document > Signatures
> Digital IDs…

14
2. Once in the Manage Digital IDs dialog you will see your PDF Signing Certificate displayed as an available digital ID.
Using Your Certificate in BlueBeam® Revu® There are many different signature combinations and types within BlueBeam
® Revu
®. The following steps are to show a
basic signing of a PDF document so that you can understand the process of using a GlobalSign PDF Signing Certificate. For
all other signature scenarios please refer to the available BlueBeam® documentation and support page:
http://www.bluebeam.com/us/support/.
1. With a PDF document open select Document and from the Signatures drop down menu select Sign Document.
2. Use the cursor to draw the signature area on the document. Once the signature area is defined the Sign dialog will
appear.

15
3. With the Sign dialog open use the Digital ID drop down to select your GlobalSign PDF Signing certificate. Select the
Signature Type, fill in any options and adjust the Appearance as required. Click OK to continue.
For further information on how to customize the appearance of your signatures please review Appendix B: Applying
and Customizing Digital Signatures.

16
4. You will be prompted to save the PDF. Choose the desired location and click Save.

17
5. The Token Logon will appear for your USB token. Enter the Token Passphrase and click OK.
6. You have now signed the PDF document and your signature appears in the designated signature area.
Appendix A: Purchasing Individual PDF Signing Certificates The type of certificate license you will require will depend on the number of users and volume of PDF documents which
will require signatures. This section is to explain the ordering process for individuals with the need to sign PDFs (<2,000
signatures per year). If you are looking for a greater volume of certificates please review the section on GlobalSign
Certificates.
1. Navigate to https://www.globalsign.com/pdf-signing/ . Click How To Buy.
2. Click Select under the Desktop Individual Level option.

18
3. Select your region from the dropdown menu and click Select and Continue.
4. Select the product from the following options. It is recommended for most individuals to purchase the Medium Volume
license pack for up to 2,000 signatures per year. Once you have selected your product click Select and Continue.
5. Your order will then be processed and the Certificate Application will appear. Complete all required information of the
application and click Next. Note: this is not the vetted certificate information.

19
You will also need to choose a username and password. An account number (PAR####) will be appended to the
username you choose. Click Next to continue.
6. Confirm your account information and review the Terms of Service Agreement. Be sure to double check that all
information is entered correctly. Click Next to continue.

20
7. Choose a validity period to be applied to your license pack (1-3 years). Click Next.
8. Next, complete the Certificate Identity Details. These details will be vetted and included as the certified identity within
your issued certificate.
Important - make sure the details entered are correct as GlobalSign will vet the details you include.

21
Important - Establish a one-time Pickup Password. You will need this password to install the certificate onto your
device. If you forget this password you will need to resubmit your order. Please copy it somewhere safe.
Optional - Add an additional technical contact (this is commonly used when you are applying on behalf of someone
else).
Click Next to continue.
9. Complete the payment details.

22
10. Confirm the details you have entered and agree to the DocumentSign Subscriber Agreement. Click Next to continue.
11. A confirmation email will now be sent to the email address you provided earlier. To approve the application you need
to click the approval link within the approval email. Only if you approve the application will the certificate be issued.

23
12. Review the application details and APPROVE the application.
Once you have successfully ordered your PDF Signing Certificate and your application will be sent to our vetting team.
Vetting your application details can take up to 2-3 business days. Once the vetting process is complete, you will receive an
email notifying you of its completion. Once the vetting process is complete please proceed to Step 3 – Installing Your
Certificate.

24
Appendix B: Applying and Customizing Digital Signatures Further details on managing the appearance of signatures, adding the signature field and signing in fields can be found in
the following BlueBeam® Revu
® Tutorial: http://www.bluebeam.com/us/bluebeam-university/pdf-tutorials/revu-10/digital-
signatures.pdf
GlobalSign Contact Information
GlobalSign Americas
Tel: 1-877-775-4562
www.globalsign.com
GlobalSign EU
Tel: +32 16 891900
www.globalsign.eu
GlobalSign UK
Tel: +44 1622 766766
www.globalsign.co.uk
GlobalSign FR
Tel: +33 1 82 88 01 24
www.globalsign.fr
GlobalSign DE
Tel: +49 30 8878 9310
www.globalsign.de
GlobalSign NL
Tel: +31 20 8908021
www.globalsign.nl