Embed Size (px)
Citation preview
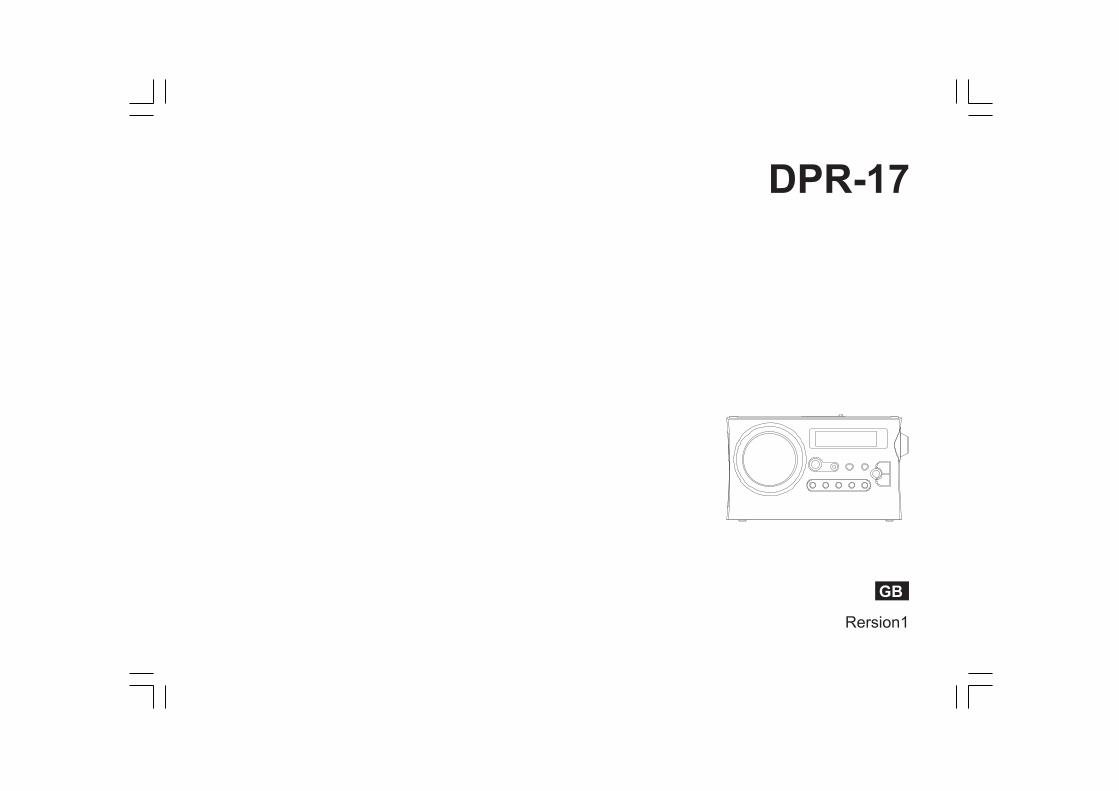
DPR-17
GB
Rersion 1
1
Table of Contents
Introduction .............................................................................. 4Controls ................................................................................... 5-7Using the Handheld receiver for the First time ..................... 8Operating Your Radio – DAB .................................................. 9Selecting a station – DAB ..................................................... 10Finding new stations – DAB .................................................. 11Manual tuning – DAB ............................................................. 12Display Modes – DAB ........................................................... 13Dynamic Range Setting (DRC) – DAB ................................ 14Station order setup – DAB ..................................................... 15Presetting Stations / Recalling a preset station(DAB and FM) .................................................................... 16-17Operating Your Radio – Search tuning FM ........................ 18Manual tuning FM .................................................................. 19Display Modes – FM .............................................................. 20Use your radio’s Rewind feature ........................................... 21Using a SD memory card with your radio ...................... 22-26FM Stereo mono / Software version ............................... 27-28System reset ............................................................................ 29Headphone socket / Specifications ............................... 29-30
2
GBImportant Safety Instructions
1. Read and understand all safety and operating instructions before the radio is operated.
2. Retain instruction: The safety and operating instructions should be retained for further reference.
3. Heed warnings. All warnings on the appliance and operating instructions should be followed.
4. Follow all operations and use instructions.
5. Water and moisture: The appliance should not be used near water. Do not use near a bathtub, washbowl, laundry tub, kitchen sink, wet basement, swimming pool, etc.
6. Unplug the radio from the AC power outlet before cleaning. Use only a damp cloth for cleaning the exterior of the radio.
7. Do not place the radio on an unstable cart, stand, bracket or table. The radio may fall, causing serious personal injury and damage to the radio.
8. Ventilation: This radio should be situated so that its location or position does not interfere with its proper ventilation. For example, the radio should not be used on a bed, sofa, rug or other soft surfaces that may block the ventilation openings. It should not be place in a built-in situation like a cabinet that may reduce air flow through the ventilation openings.
9. Power sources: The radio should be operated only from the type of power source indicated on the marking label. If you are not sure of the type of power supply to your home, consult your radio dealer or power company.
10. Mains adaptor: The mains adaptor should be positioned so it is not walked on, pinched, or items placed on top of it. Pay particular attention to wires at plugs, convenience receptacles, and the point where they exit from the unit. Unplug the mains adaptor by gripping the adaptor, not the wire. Operate the radio using only the current type of power source indicated. If you are not sure of the type of power supply to your home, consult your dealer or local power company.
11. Do not overload wall outlets or extension cords. This can result in a risk of fire or electrical shock. Never insert objects of any kind into the radio through opening. The objects may touch dangerous voltage points or short out parts. This could cause a fire or electrical shock.
12. If the radio is left unattended or unused for long periods of time, unplug it from the wall outlet. This will prevent damage caused by lightning or power line surges.
13. If the radio is left unattended or unused for long periods of time, remove the batteries. The batteries may leak and damage furniture or your radio.
3
14. Do not attempt to service the radio yourself. Removing the cover may expose you to dangerous voltage, and will void the warranty. Refer all servicing to authorized service personnel.
15. Object and Liquid Entry-Never push objects of any kind into this radio through opening as they may touch dangerous voltage points or short-out parts that could result in a fire or electric shock. Never spill liquid of any kind of product.
16. The appliance should be serviced by qualified personnel when:The mains adaptor or the plug has been damaged.Objects have fallen or liquid had been spilled into the radio.The radio has been exposed to rain or water.The radio does not appear to operate normally or exhibits amarked change in performance.The radio has been dropped, or the enclosure damaged.
A.B.C.D.
E.
4
GBIntroduction
The Sangean DPR-17 DAB+/FM Handheld Receiver with SD recordingprovides the following range of features in an attractive portable unit:
The DPR-17 receives DAB and FM (with RDS) wavebands.
10 preset stations (5 for DAB and 5 for FM).
The DPR-17 plays MP3/WMA files from an SD card and can also playits own recordings in WAV, MP2 and M4A format.
MP3 file browsing.
Large and easy to read display with backlight.
Rewind DAB+/FM via SD card.
Deep bass compensation.
A standard 3.5mm headphone socket is provided for private listening.
Rechargeable with charging LED indicator.
5
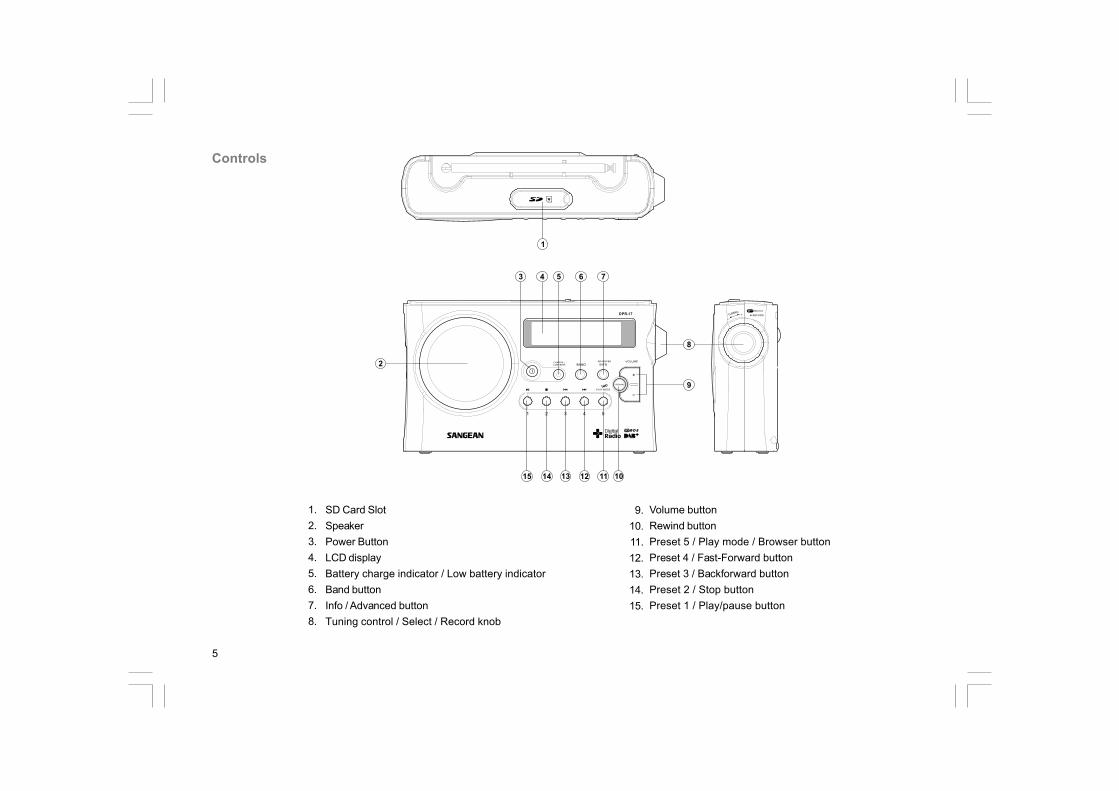
1.2.3.4.5.6.7.8.
9.10.11.12.13.14.15.
SD Card SlotSpeakerPower ButtonLCD displayBattery charge indicator / Low battery indicatorBand buttonInfo / Advanced buttonTuning control / Select / Record knob
Volume buttonRewind buttonPreset 5 / Play mode / Browser buttonPreset 4 / Fast-Forward buttonPreset 3 / Backforward buttonPreset 2 / Stop buttonPreset 1 / Play/pause button
Controls
6
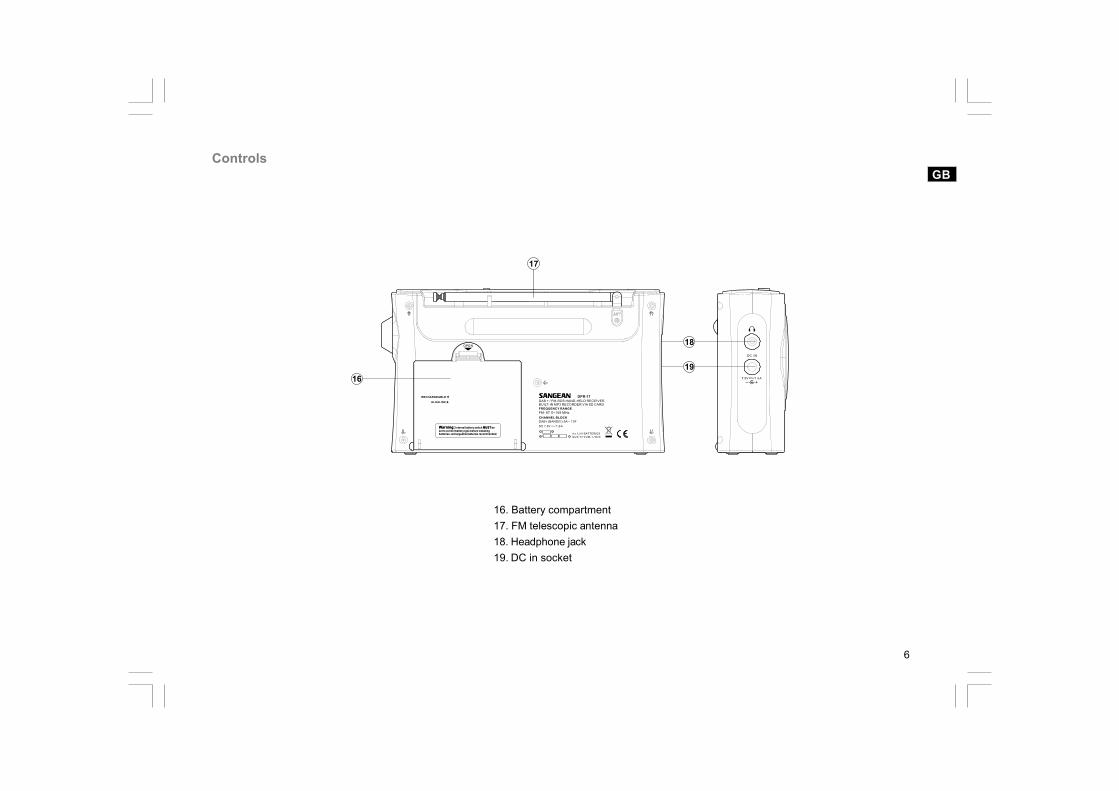
16. Battery compartment17. FM telescopic antenna18. Headphone jack19. DC in socket
GBControls

7
20. Alkaline/NiMH/NiCad rechargeable battery switch
Controls
8
GBUsing the handheld receiver for the first time
Battery operation1. Remove the battery cover on the rear of the unit by pressing the catch.Note:Before you insert the batteries, if you use non-rechargeable batteries,make sure the NiMH/Alkaline switch which located inside the batterycompartment is switched to Alkaline position. If you use rechargeablebatteries, make sure to switch NiMH/Alkaline switch to NiMH position.
2. Insert four UM-1 (D size) batteries into the spaces in the compartment.
3. Take care to ensure all batteries are inserted with correct polarity as shown on the rear cabinet. Replace the battery cover.
4. Reduced power, distortion and a “stuttering sound” are all signs that the batteries need replacing.
5. If the radio is not to be used for any extended period of time, it is recommended that the batteries are removed from the radio.
Using the AC power adaptorThe AC power adaptor required for this unit should be 7.5 volts DC at1.6 A center pin negative.Insert the adaptor plug into the DC socket on the left side of the radio.Plug the adaptor into a standard mains socket outlet.Whenever the adaptor is used, the batteries areautomatically disconnected. The AC adaptor should be disconnectedfrom the main supply when not in use.
9
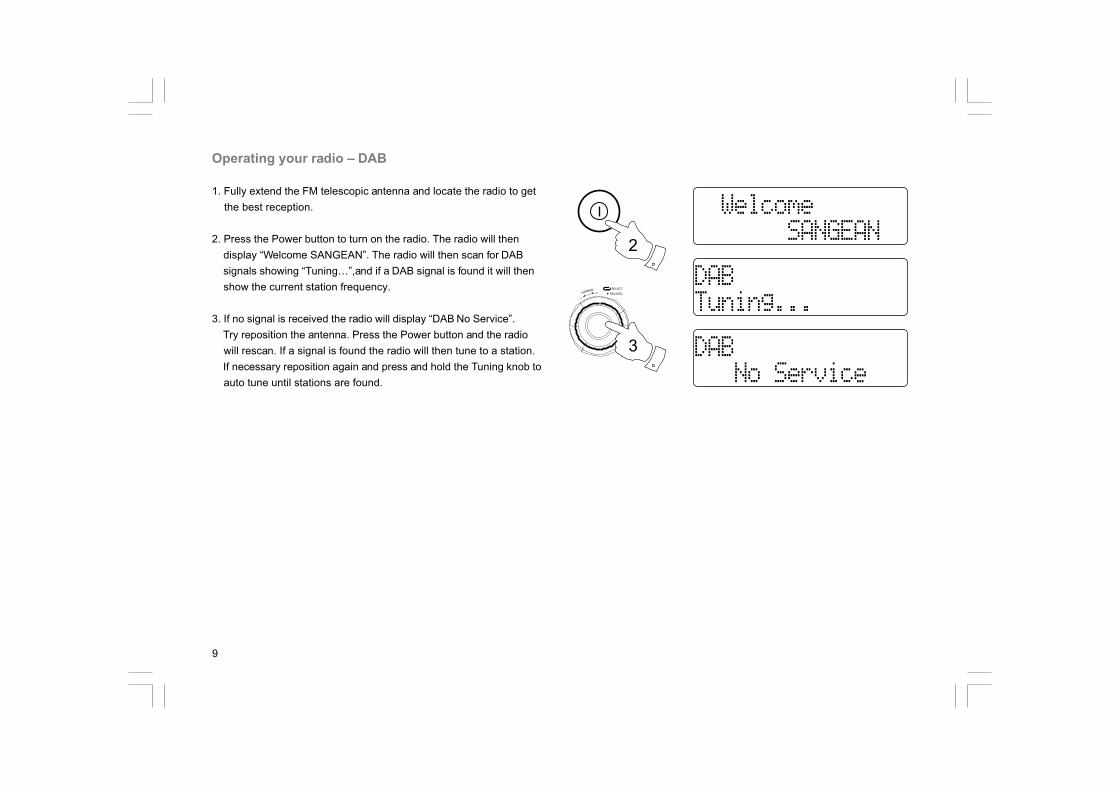
Operating your radio – DAB
1. Fully extend the FM telescopic antenna and locate the radio to get the best reception.
2. Press the Power button to turn on the radio. The radio will then display “Welcome SANGEAN”. The radio will then scan for DAB signals showing “Tuning…”,and if a DAB signal is found it will then show the current station frequency.
3. If no signal is received the radio will display “DAB No Service”. Try reposition the antenna. Press the Power button and the radio will rescan. If a signal is found the radio will then tune to a station. If necessary reposition again and press and hold the Tuning knob to auto tune until stations are found.
3
2

10
GBSelecting a station - DAB
1. Fully extend the antenna above the radio and locate the radio to get the best reception. Press the Power button to switch on the radio.
2. Press the Band button repeatedly to select the DAB band.
3. Rotate the Tuning control to scroll through the list of available stations. Stop rotating the Tuning control when you find the station that you wish to hear.
4. Press and release the Tuning control to select the station. This display may show “Tuning…” while your radio finds the new station.
5. Adjust the Volume by pressing the Volume Up / Down buttons.
3,4
2
5
11
2,3
Finding new stations – DAB
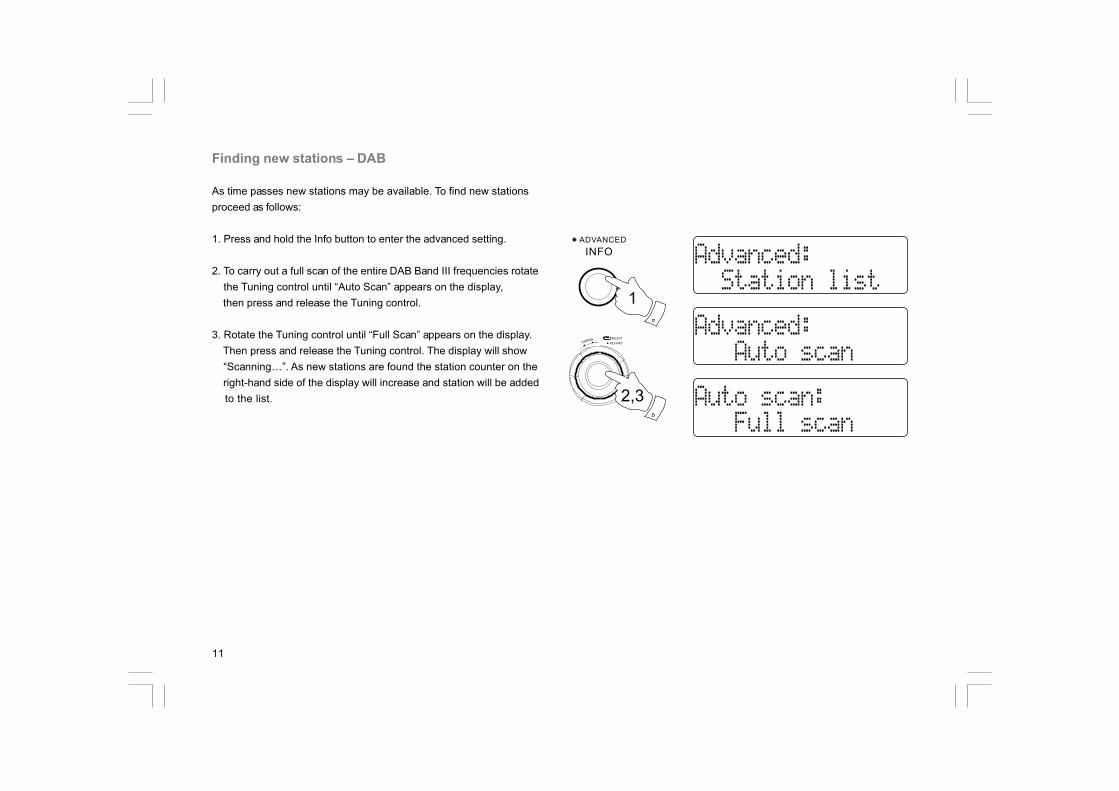
As time passes new stations may be available. To find new stationsproceed as follows:
1. Press and hold the Info button to enter the advanced setting.
2. To carry out a full scan of the entire DAB Band III frequencies rotate the Tuning control until “Auto Scan” appears on the display, then press and release the Tuning control.
3. Rotate the Tuning control until “Full Scan” appears on the display. Then press and release the Tuning control. The display will show “Scanning…”. As new stations are found the station counter on the right-hand side of the display will increase and station will be added to the list.
12
2,3
GBManual tuning – DAB
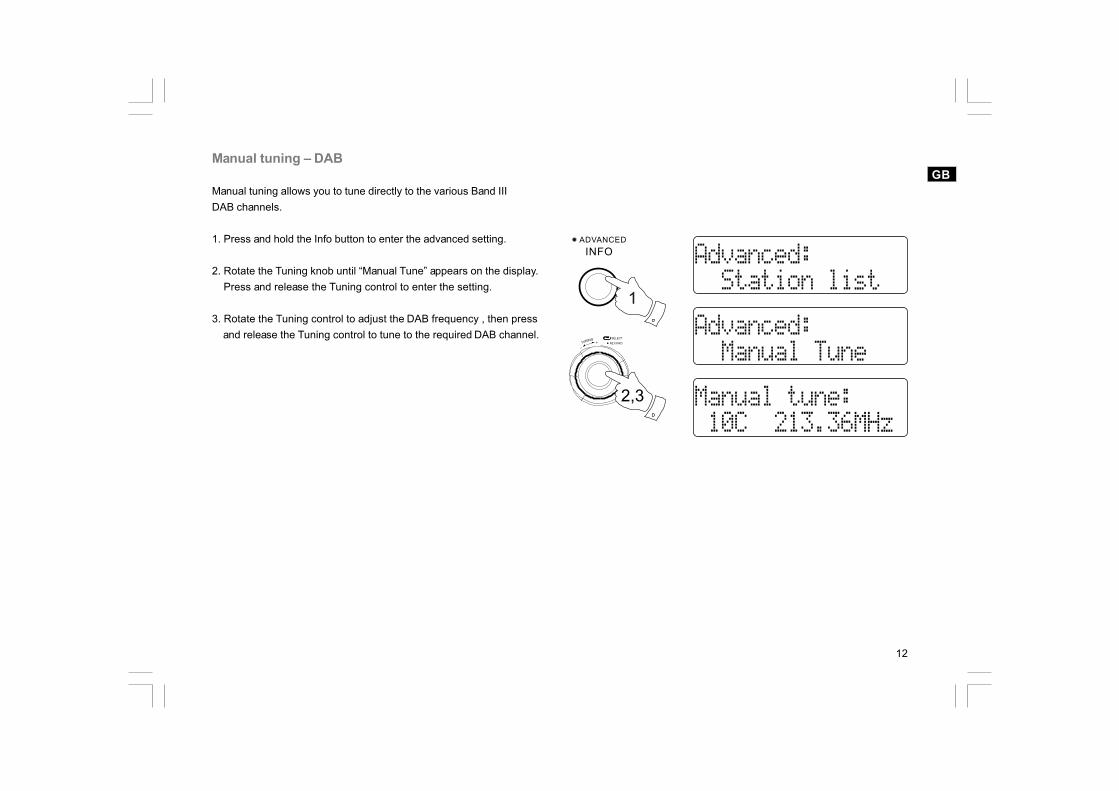
Manual tuning allows you to tune directly to the various Band IIIDAB channels.
1. Press and hold the Info button to enter the advanced setting.
2. Rotate the Tuning knob until “Manual Tune” appears on the display. Press and release the Tuning control to enter the setting.
3. Rotate the Tuning control to adjust the DAB frequency , then press and release the Tuning control to tune to the required DAB channel.
13
Display modes – DAB
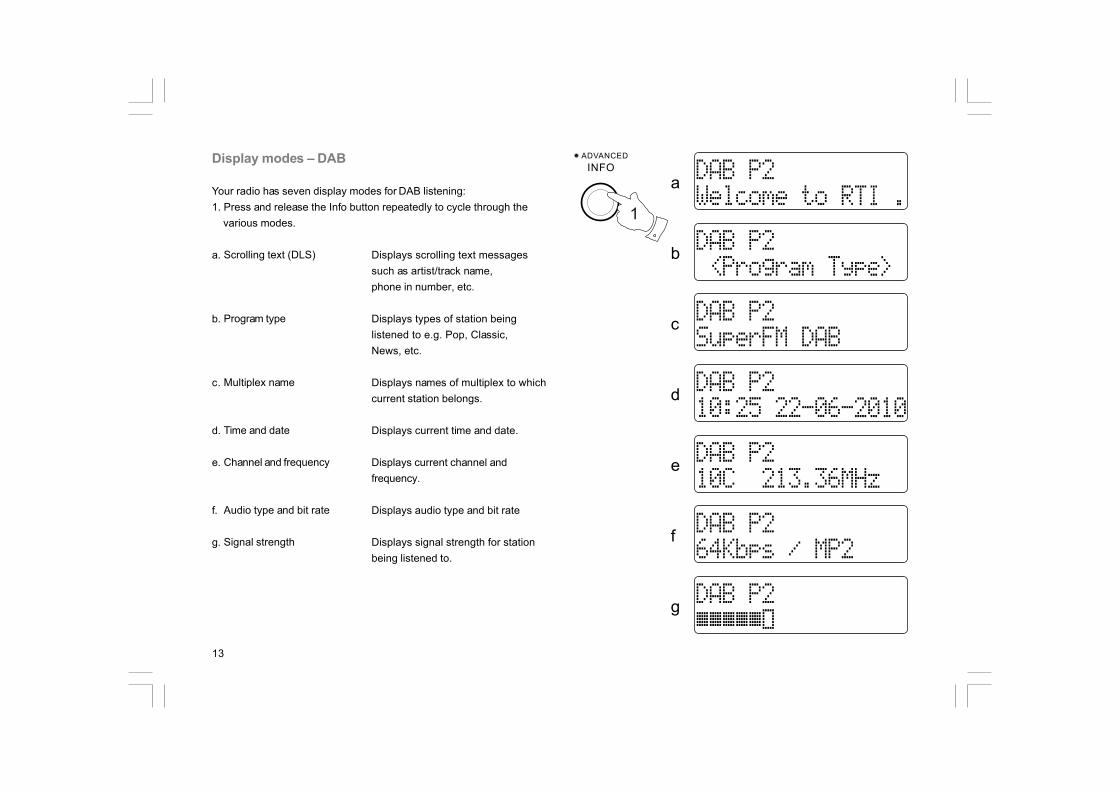
Your radio has seven display modes for DAB listening:1. Press and release the Info button repeatedly to cycle through the various modes.
a.
b.
c.
d.
e.
f.
g.
Displays scrolling text messagessuch as artist/track name,phone in number, etc.
Displays types of station beinglistened to e.g. Pop, Classic,News, etc.
Displays names of multiplex to whichcurrent station belongs.
Displays current time and date.
Displays current channel andfrequency.
Displays audio type and bit rate
Displays signal strength for stationbeing listened to.
Scrolling text (DLS)
Program type
Multiplex name
Time and date
Channel and frequency
Audio type and bit rate
Signal strength
14
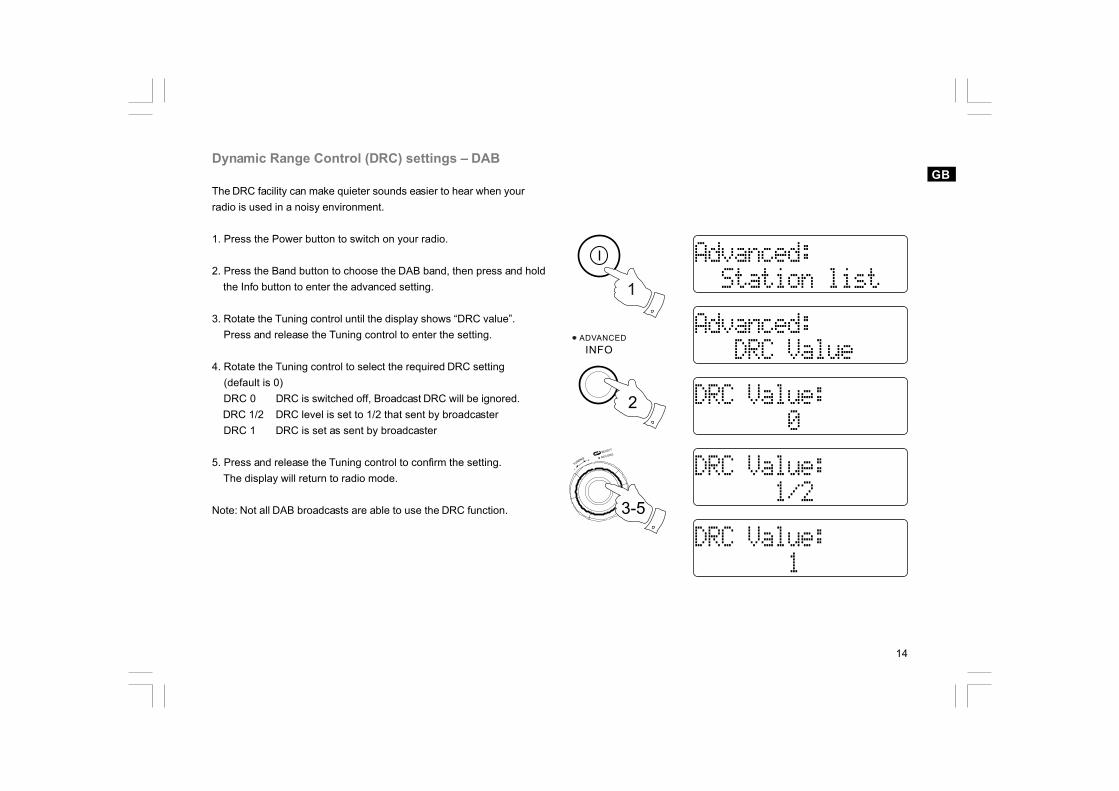
GBDynamic Range Control (DRC) settings – DAB
The DRC facility can make quieter sounds easier to hear when yourradio is used in a noisy environment.
1. Press the Power button to switch on your radio.
2. Press the Band button to choose the DAB band, then press and hold the Info button to enter the advanced setting.
3. Rotate the Tuning control until the display shows “DRC value”. Press and release the Tuning control to enter the setting.
4. Rotate the Tuning control to select the required DRC setting (default is 0) DRC 0 DRC is switched off, Broadcast DRC will be ignored. DRC 1/2 DRC level is set to 1/2 that sent by broadcaster DRC 1 DRC is set as sent by broadcaster
5. Press and release the Tuning control to confirm the setting. The display will return to radio mode.
Note: Not all DAB broadcasts are able to use the DRC function. 3-5

15
2
Station order setup – DAB
Your radio has 3 station order settings from which you can choose.The station order settings are alphanumeric, ensemble and valid station.
Note: Your radio default station order is alphanumeric.
1. Press and hold the Info button.
2. Rotate the Tuning control until “Station order” appears on the display, then press and release the Tuning control to enter the setting.
AlphanumericRotate the Tuning control until “Alphanumeric” appears on the display.Your radio will now select stations in alphanumeric order A…Z 0…9.
Ensemble stationsRotate the Tuning control until “Ensemble” appears on the display.Your radio will now organize the station list by DAB multiplex.
Valid stationsRotate the Tuning control until “Valid“ appears on the display.The display will show only those that a signal can be found.
16
3
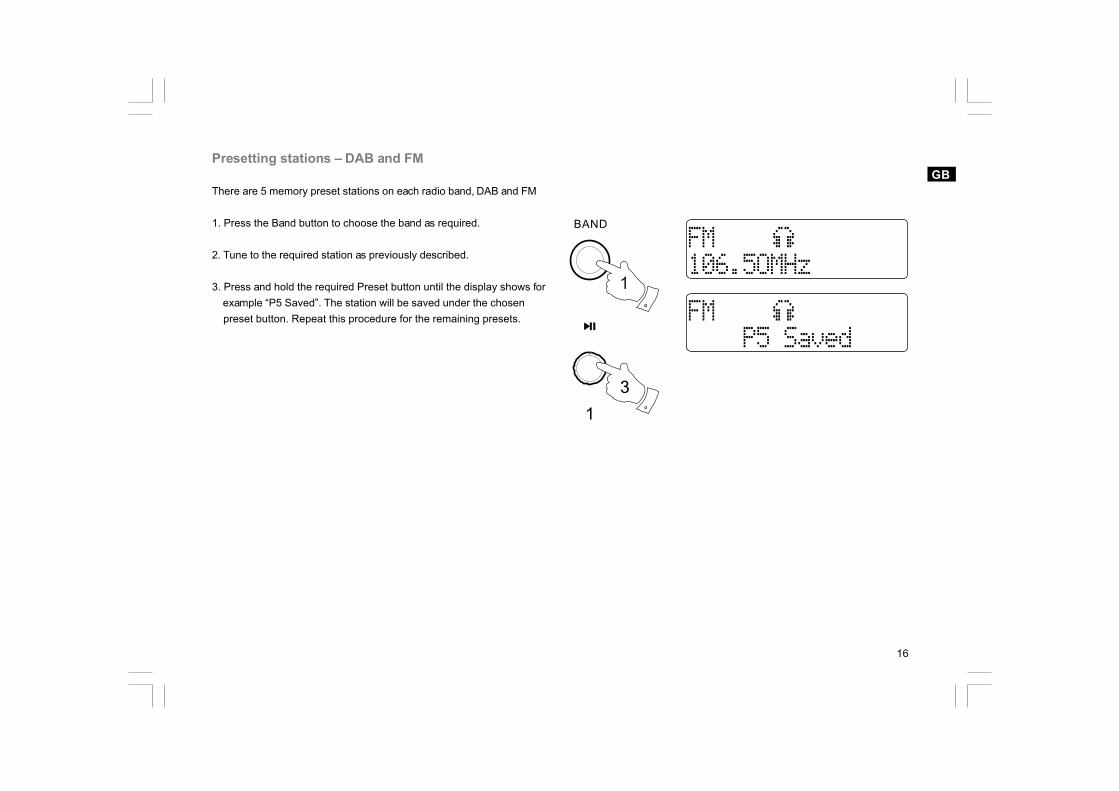
GBPresetting stations – DAB and FM
There are 5 memory preset stations on each radio band, DAB and FM
1. Press the Band button to choose the band as required.
2. Tune to the required station as previously described.
3. Press and hold the required Preset button until the display shows for example “P5 Saved”. The station will be saved under the chosen preset button. Repeat this procedure for the remaining presets.
17
2
3
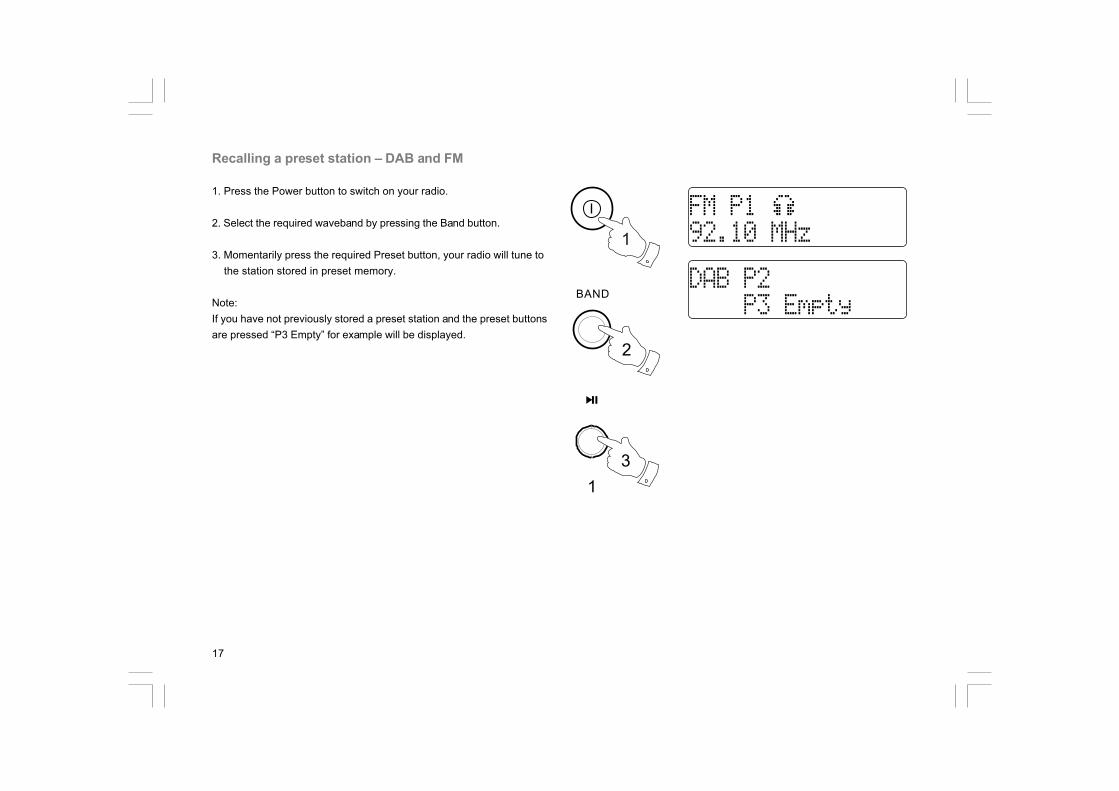
Recalling a preset station – DAB and FM
1. Press the Power button to switch on your radio.
2. Select the required waveband by pressing the Band button.
3. Momentarily press the required Preset button, your radio will tune to the station stored in preset memory.
Note:If you have not previously stored a preset station and the preset buttonsare pressed “P3 Empty” for example will be displayed.
18
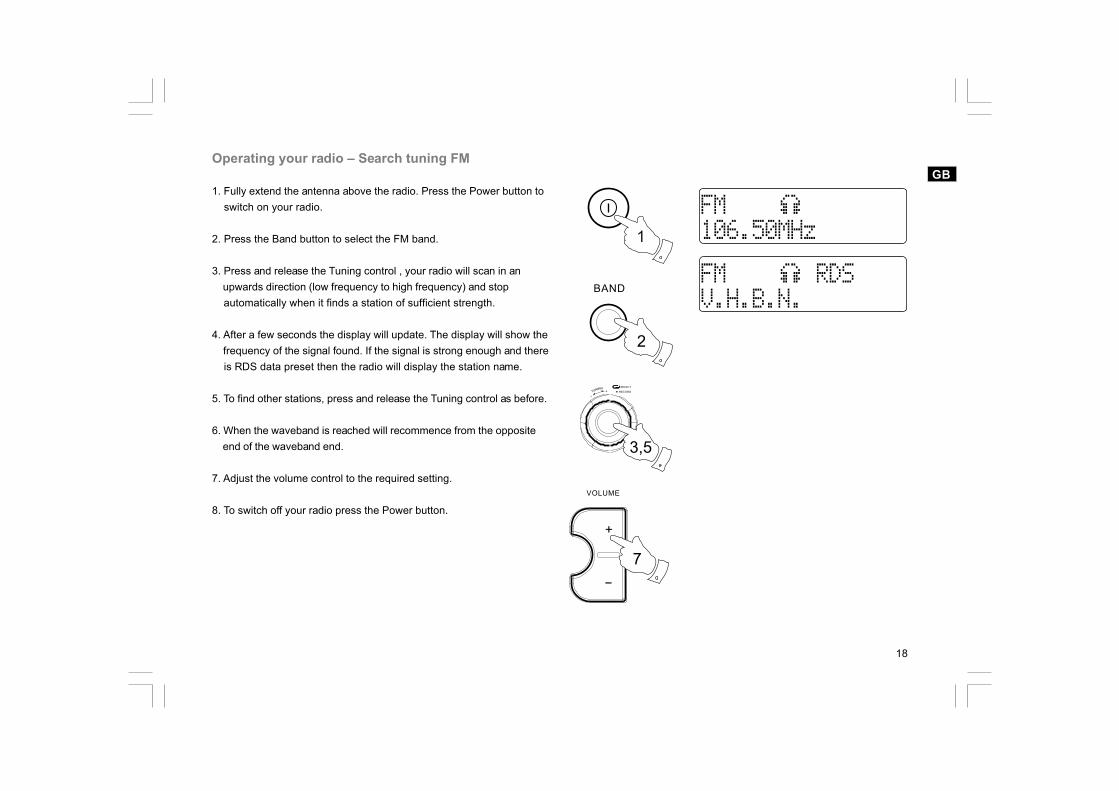
GBOperating your radio – Search tuning FM
1. Fully extend the antenna above the radio. Press the Power button to switch on your radio.
2. Press the Band button to select the FM band.
3. Press and release the Tuning control , your radio will scan in an upwards direction (low frequency to high frequency) and stop automatically when it finds a station of sufficient strength.
4. After a few seconds the display will update. The display will show the frequency of the signal found. If the signal is strong enough and there is RDS data preset then the radio will display the station name.
5. To find other stations, press and release the Tuning control as before.
6. When the waveband is reached will recommence from the opposite end of the waveband end.
7. Adjust the volume control to the required setting.
8. To switch off your radio press the Power button.
2
3,5
7
19
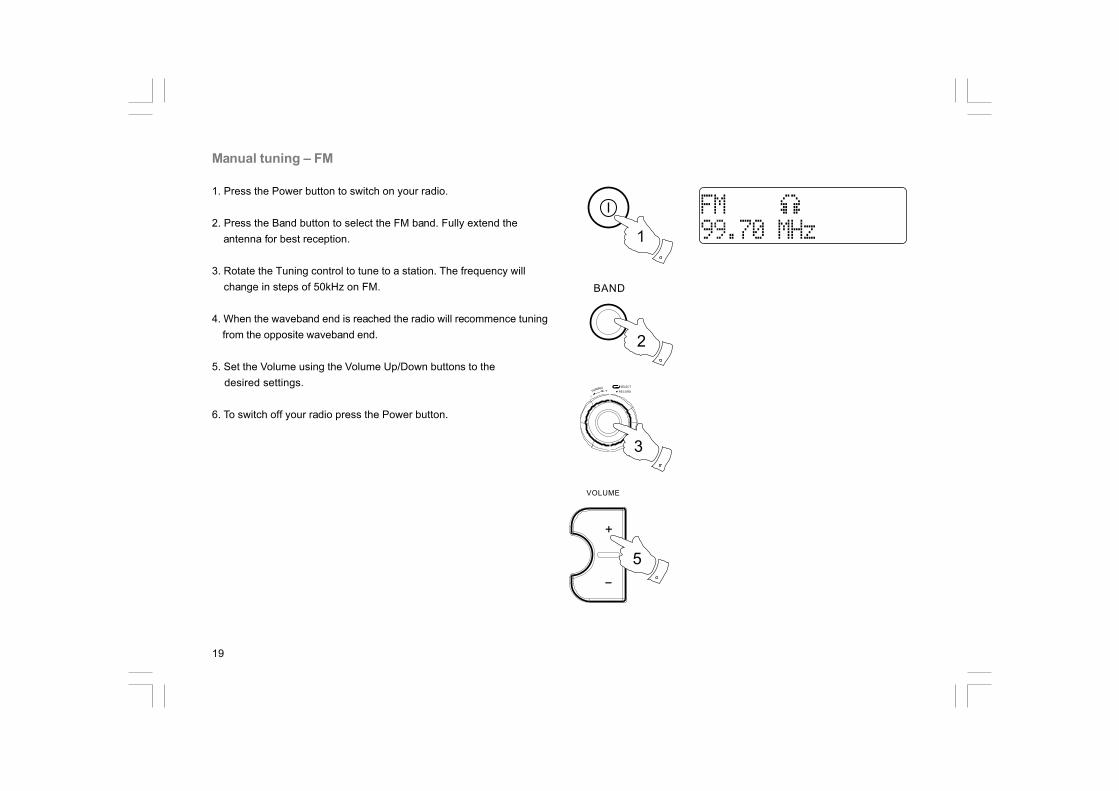
Manual tuning – FM
1. Press the Power button to switch on your radio.
2. Press the Band button to select the FM band. Fully extend the antenna for best reception.
3. Rotate the Tuning control to tune to a station. The frequency will change in steps of 50kHz on FM.
4. When the waveband end is reached the radio will recommence tuning from the opposite waveband end.
5. Set the Volume using the Volume Up/Down buttons to the desired settings.
6. To switch off your radio press the Power button.
5
3
2
20
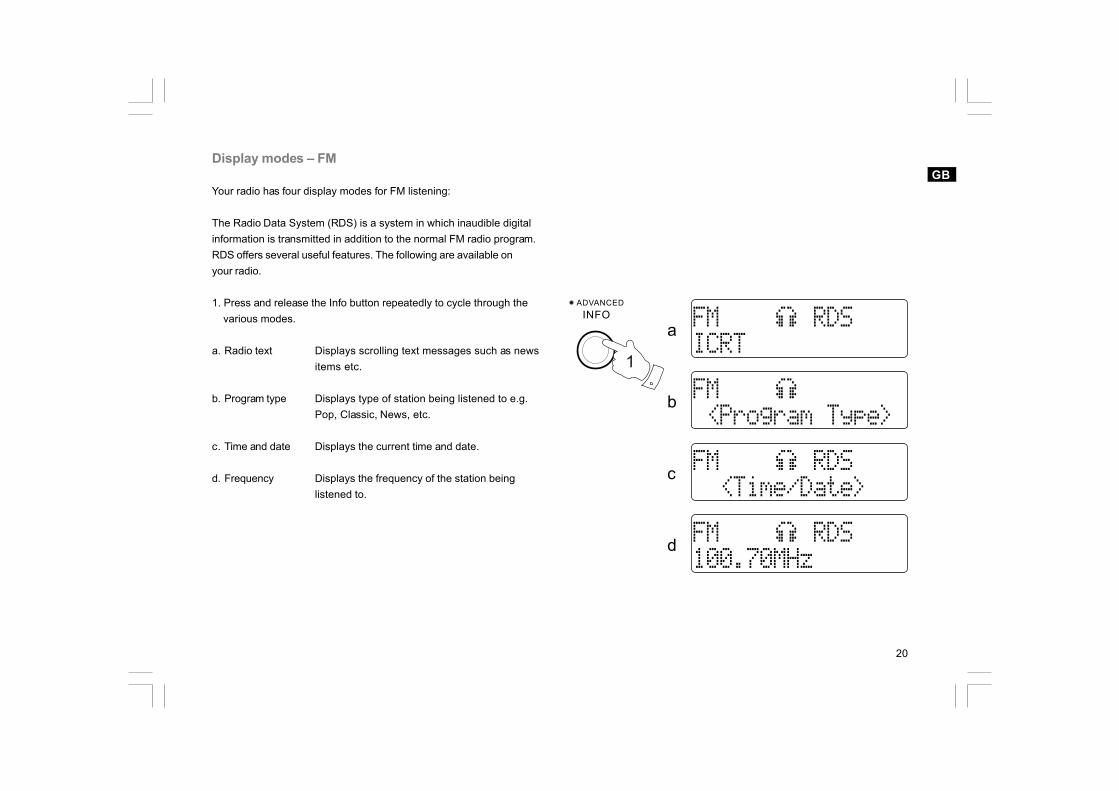
GBDisplay modes – FM
Your radio has four display modes for FM listening:
The Radio Data System (RDS) is a system in which inaudible digitalinformation is transmitted in addition to the normal FM radio program.RDS offers several useful features. The following are available onyour radio.
1. Press and release the Info button repeatedly to cycle through the various modes.
a.
b.
c.
d.
Displays scrolling text messages such as newsitems etc.
Displays type of station being listened to e.g.Pop, Classic, News, etc.
Displays the current time and date.
Displays the frequency of the station beinglistened to.
Radio text
Program type
Time and date
Frequency
21
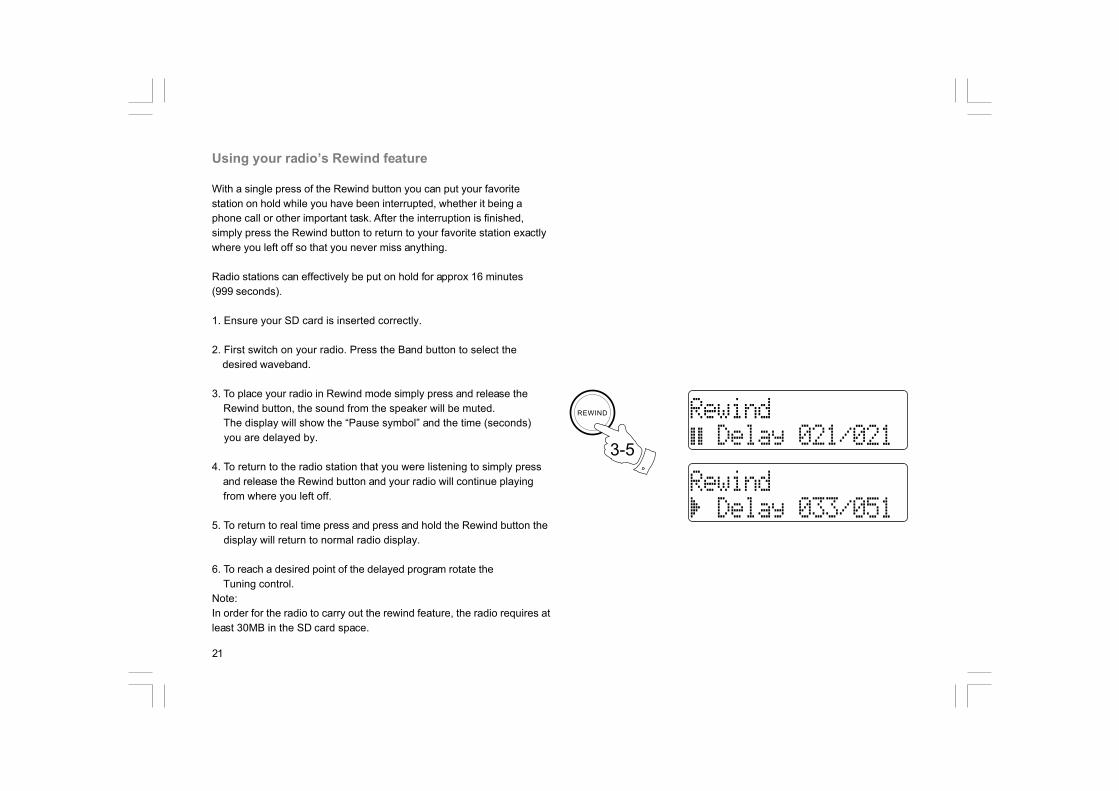
Using your radio’s Rewind feature
With a single press of the Rewind button you can put your favoritestation on hold while you have been interrupted, whether it being aphone call or other important task. After the interruption is finished,simply press the Rewind button to return to your favorite station exactlywhere you left off so that you never miss anything.
Radio stations can effectively be put on hold for approx 16 minutes(999 seconds).
1. Ensure your SD card is inserted correctly.
2. First switch on your radio. Press the Band button to select the desired waveband.
3. To place your radio in Rewind mode simply press and release the Rewind button, the sound from the speaker will be muted. The display will show the “Pause symbol” and the time (seconds) you are delayed by.
4. To return to the radio station that you were listening to simply press and release the Rewind button and your radio will continue playing from where you left off.
5. To return to real time press and press and hold the Rewind button the display will return to normal radio display.
6. To reach a desired point of the delayed program rotate the Tuning control.Note:In order for the radio to carry out the rewind feature, the radio requires atleast 30MB in the SD card space.
3-5
22
GBUsing an SD card with your radio
An SD card can be used in your radio for recording and playing backpreviously recorded radio programs, or playing back MP2 and MP3 filestransferred from a PC.
If you are using a new SD card ensure that it is formatted correctly.Please format the SD card via your computer before using your SD cardwith your radio.
Many different brands and capacities of SD card are available.Your DPR-17 has been tested with a wide range of cards up to 16GBand support cards of Secure Digital High Capacity (SDHC) standard.
Inserting and removing a cardTo insert an SD card into your radio, lift the rubber cover on top of theradio up and slid the SD card into the SD card slot. Press down therubber cover.
To remove the card push the card in slightly and it will pop outallowing removal.
Note:The SD card should not be removed during a recording as damage orcorruption of files on the card may occur.
23
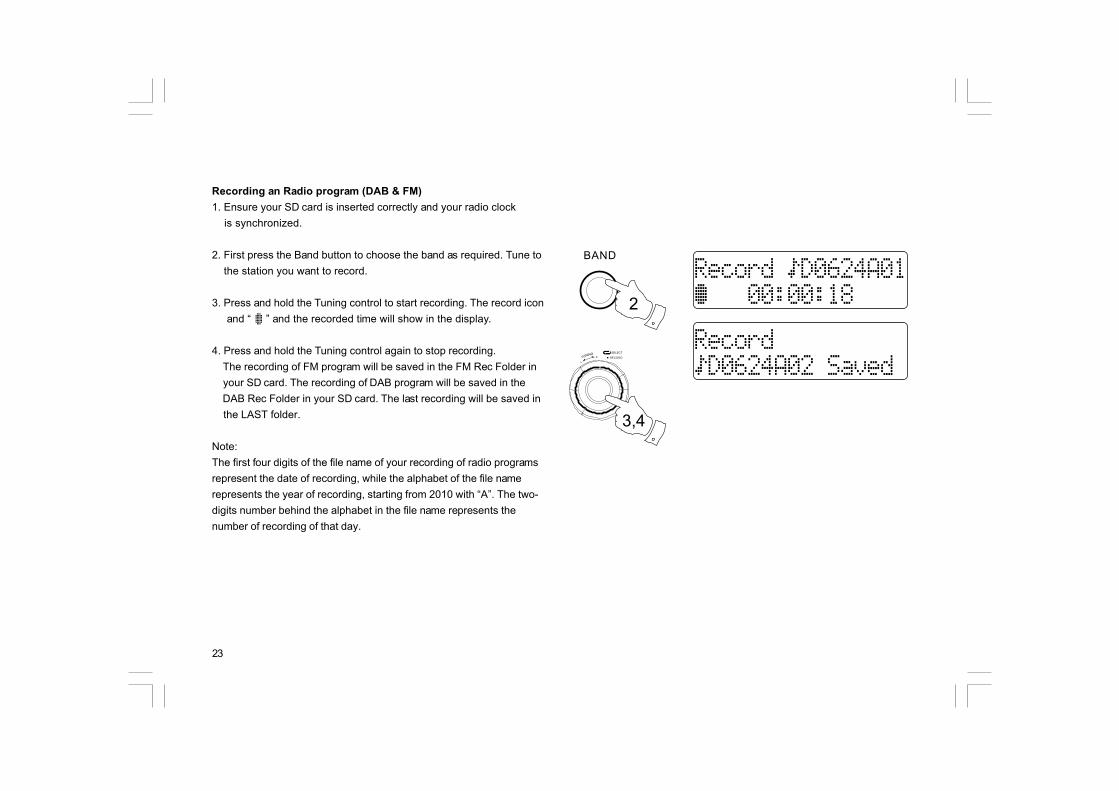
Recording an Radio program (DAB & FM)1. Ensure your SD card is inserted correctly and your radio clock is synchronized.
2. First press the Band button to choose the band as required. Tune to the station you want to record.
3. Press and hold the Tuning control to start recording. The record icon and “ ” and the recorded time will show in the display.
4. Press and hold the Tuning control again to stop recording. The recording of FM program will be saved in the FM Rec Folder in your SD card. The recording of DAB program will be saved in the DAB Rec Folder in your SD card. The last recording will be saved in the LAST folder.
Note:The first four digits of the file name of your recording of radio programsrepresent the date of recording, while the alphabet of the file namerepresents the year of recording, starting from 2010 with “A”. The two-digits number behind the alphabet in the file name represents thenumber of recording of that day.
3,4
2
24
2
GB
If your radio is not recording correctly check the following:- The card is the correct format- The card has enough recording space available- The card has not become corrupted (possibly by removing the cardduring recording). Reformat the card if necessary.
Note:When the Charge LED indicates low battery capacity, the Recording andRewind function cannot be performed.
Note:The recordings of FM programs will be saved in the SD cardin .WAV format, and the recordings of DAB programs will be savedin .MP2 format. The recording of DAB+ programs will be savedin .M4A format.
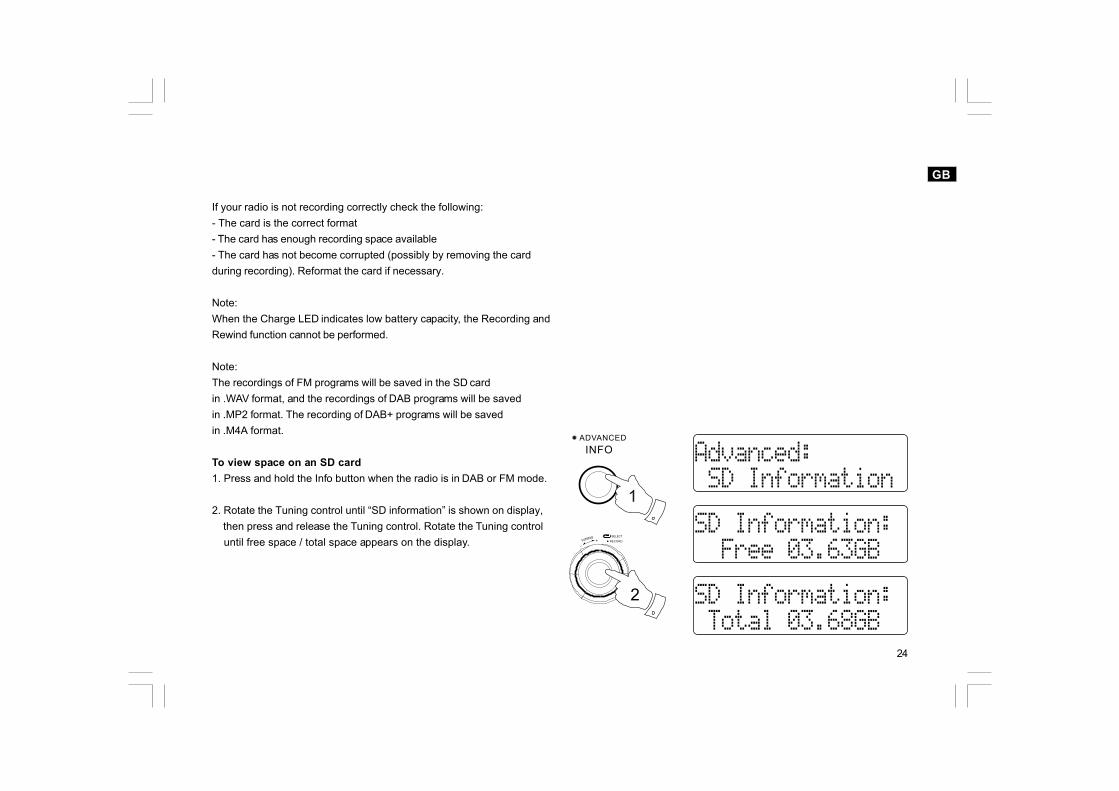
To view space on an SD card1. Press and hold the Info button when the radio is in DAB or FM mode.
2. Rotate the Tuning control until “SD information” is shown on display, then press and release the Tuning control. Rotate the Tuning control until free space / total space appears on the display.
25
3
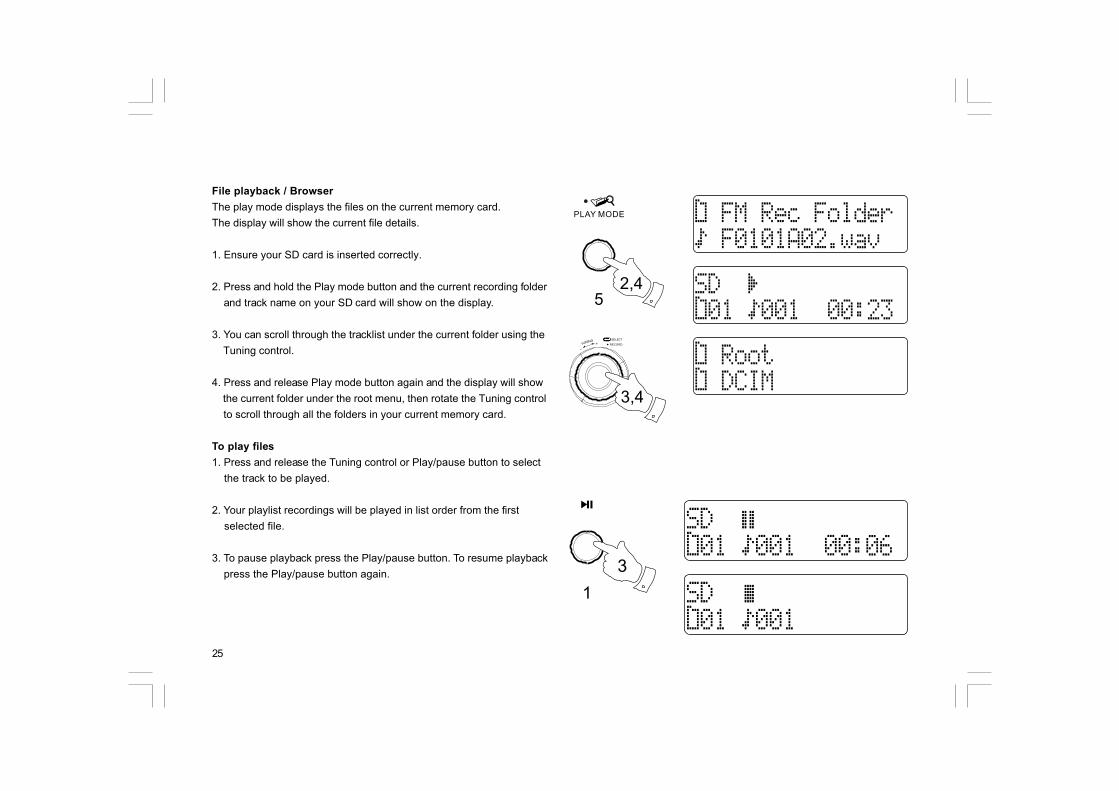
File playback / BrowserThe play mode displays the files on the current memory card.The display will show the current file details.
1. Ensure your SD card is inserted correctly.
2. Press and hold the Play mode button and the current recording folder and track name on your SD card will show on the display.
3. You can scroll through the tracklist under the current folder using the Tuning control.
4. Press and release Play mode button again and the display will show the current folder under the root menu, then rotate the Tuning control to scroll through all the folders in your current memory card.
To play files1. Press and release the Tuning control or Play/pause button to select the track to be played.
2. Your playlist recordings will be played in list order from the first selected file.
3. To pause playback press the Play/pause button. To resume playback press the Play/pause button again.
2,4
26
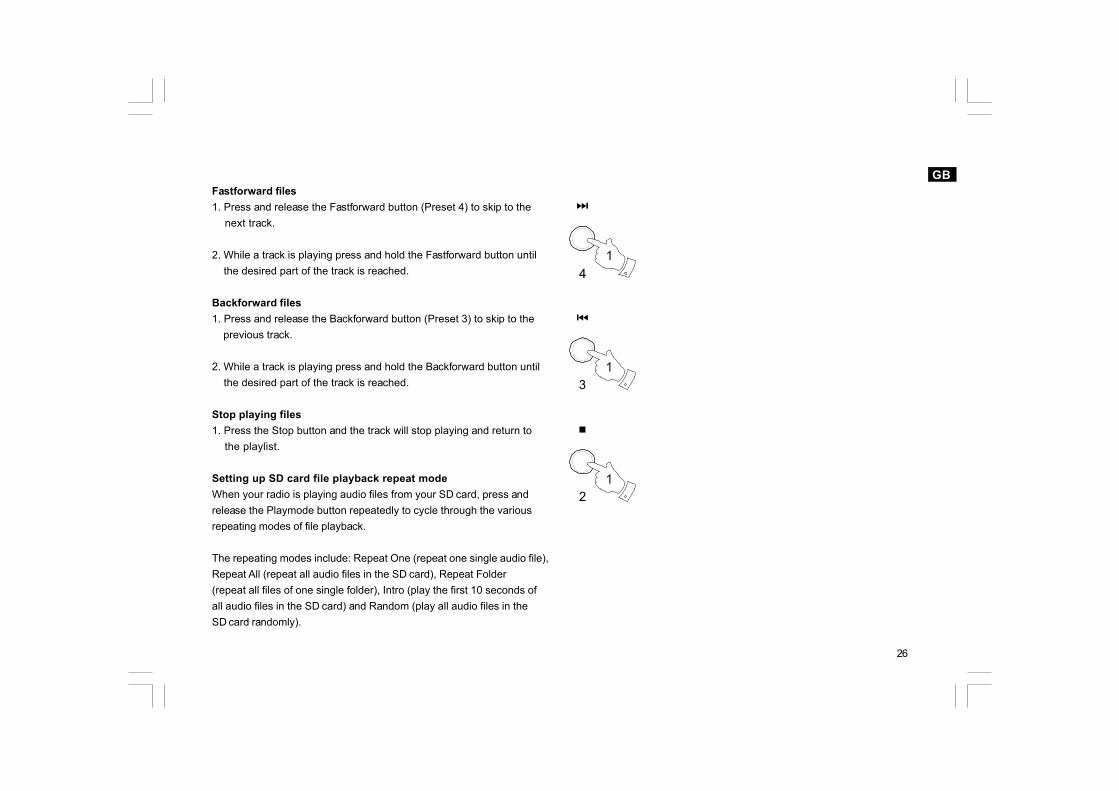
GBFastforward files1. Press and release the Fastforward button (Preset 4) to skip to the next track.
2. While a track is playing press and hold the Fastforward button until the desired part of the track is reached.
Backforward files1. Press and release the Backforward button (Preset 3) to skip to the previous track.
2. While a track is playing press and hold the Backforward button until the desired part of the track is reached.
Stop playing files1. Press the Stop button and the track will stop playing and return to the playlist.
Setting up SD card file playback repeat modeWhen your radio is playing audio files from your SD card, press andrelease the Playmode button repeatedly to cycle through the variousrepeating modes of file playback.
The repeating modes include: Repeat One (repeat one single audio file),Repeat All (repeat all audio files in the SD card), Repeat Folder(repeat all files of one single folder), Intro (play the first 10 seconds ofall audio files in the SD card) and Random (play all audio files in theSD card randomly).
27
2-4
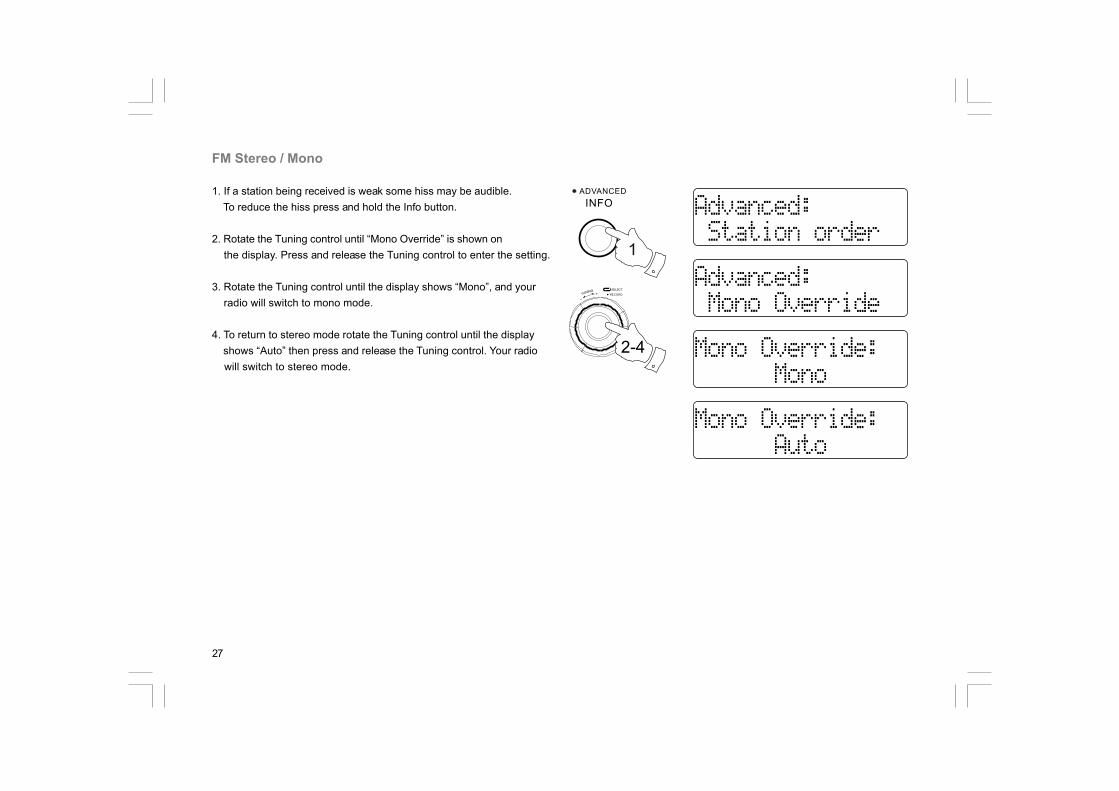
FM Stereo / Mono
1. If a station being received is weak some hiss may be audible. To reduce the hiss press and hold the Info button.
2. Rotate the Tuning control until “Mono Override” is shown on the display. Press and release the Tuning control to enter the setting.
3. Rotate the Tuning control until the display shows “Mono”, and your radio will switch to mono mode.
4. To return to stereo mode rotate the Tuning control until the display shows “Auto” then press and release the Tuning control. Your radio will switch to stereo mode.
28
2,3
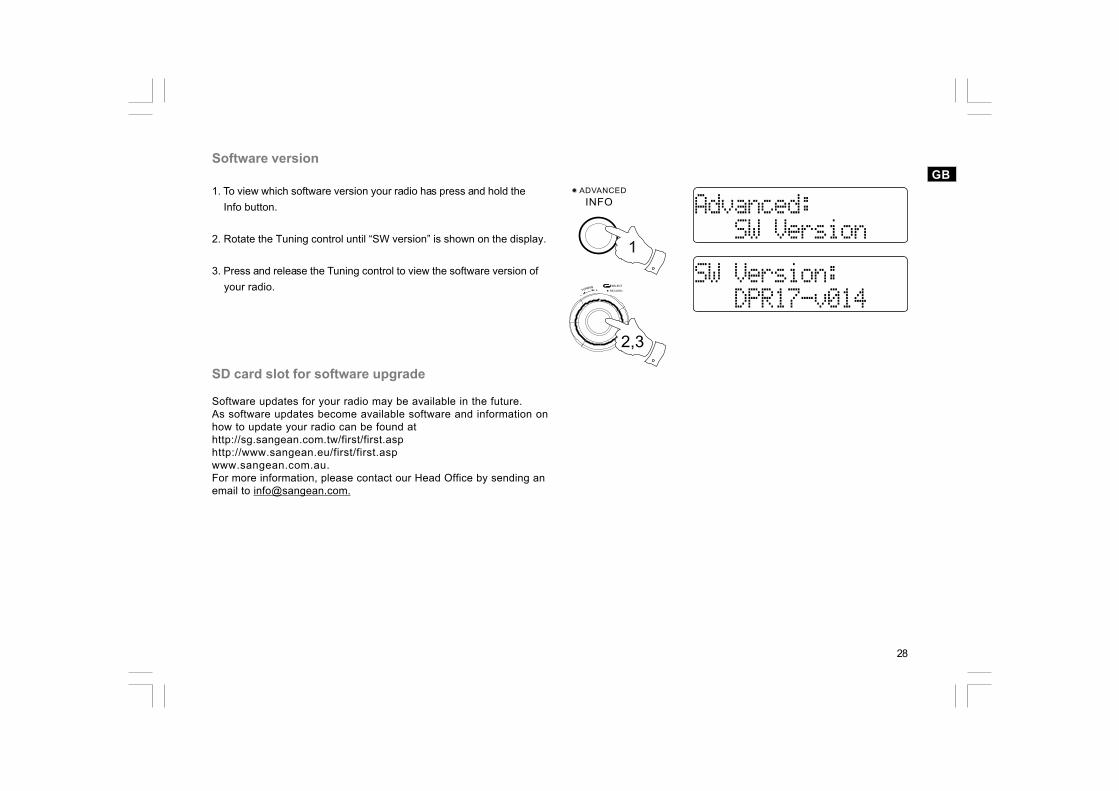
GBSoftware version
1. To view which software version your radio has press and hold the Info button.
2. Rotate the Tuning control until “SW version” is shown on the display.
3. Press and release the Tuning control to view the software version of your radio.
SD card slot for software upgrade
Software updates for your radio may be available in the future.As software updates become available software and information onhow to update your radio can be found athttp://sg.sangean.com.tw/first/first.asphttp://www.sangean.eu/first/first.aspwww.sangean.com.au.For more information, please contact our Head Office by sending anemail to [email protected].

29
2
3-5
System reset
If your radio fails to operate correctly, or some digits on the display aremissing or incomplete carry out the following procedure.
1. Switch on your radio, and press the Band button to choose your required band.
2. Press and hold the Info button.
3. Rotate the Tuning control until “Factory Reset” is shown on the display.
4. Press and release the Tuning control, the display will show NO. Rotate the Tuning control to select YES.
5. Press and release the Tuning control to confirm. The display will show “Resetting…” and a full reset will be performed and all presets and station lists will be erased. A quick scan of DAB frequencies will then be carried out.
In case of malfunction due to electronic discharge, reset theproduct (reconnection of power source may be required) to resumenormal operation.
Headphone socket
A 3.5mm Headphone socket located on the left hand side of your radiois provided for use with either headphones or an earpiece. Inserting aplug automatically mutes the internal speaker.
30
If at any time in the future you should need to dispose of this product please note that: Waste electrical products should notbe disposed of with household waste. Please recycle where facilities exist. Check with your Local Authority or retailer forrecycling advice. (Waste Electrical and Electronic Equipment Directive)
GBSpecifications
Power RequirementsAC to DC adaptor DC 7.5V = 1.6A
Frequency CoverageDAB 174.92B – 239.200MHzFM 87.50 – 108MHz
Circuit featuresSpeakerOutput PowerHeadphone socket
Aerial SystemDAB and FM
3” 4ohm 3W full range1.2 W3.5mm dia