Embed Size (px)
Citation preview
GarageBand Quick Start Guide
GarageBand is Apple’s sound recording and mixing software.
1) Create a new project 2) The parts of GarageBand 3) Recording voice or guitar 4) Add Apple loops and effects to a project 5) Saving a project or sending it to iTunes
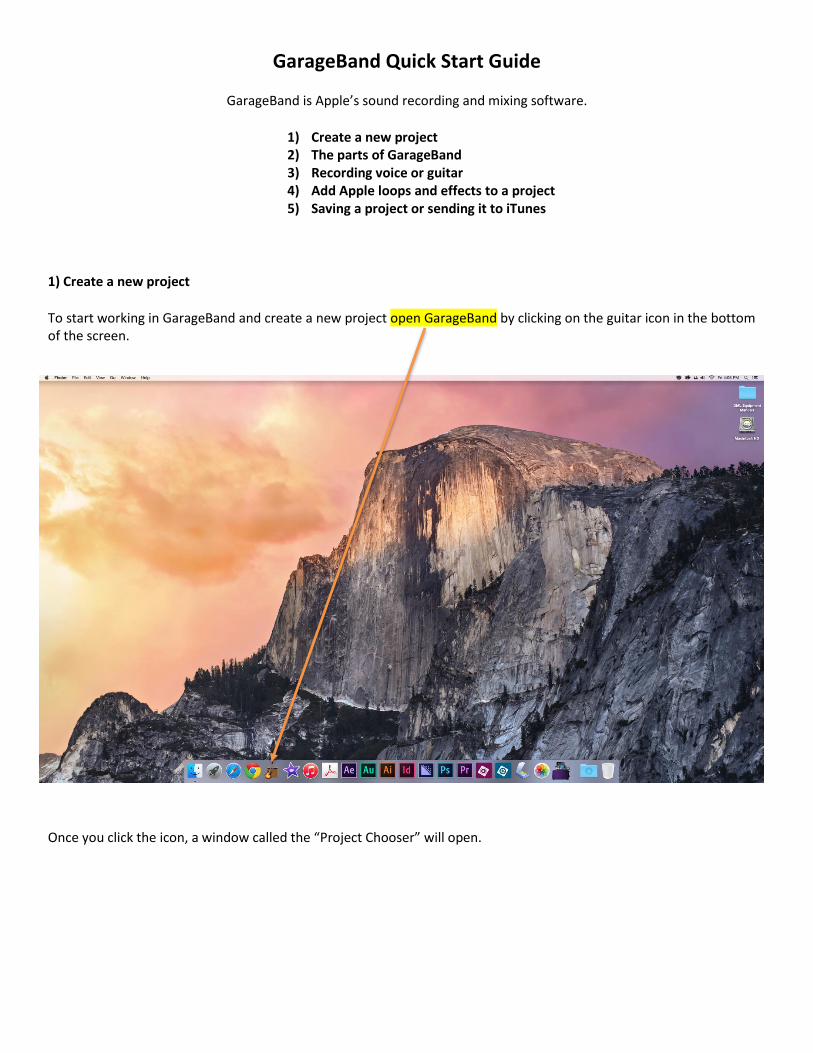
1) Create a new project
To start working in GarageBand and create a new project open GarageBand by clicking on the guitar icon in the bottom of the screen.
Once you click the icon, a window called the “Project Chooser” will open.
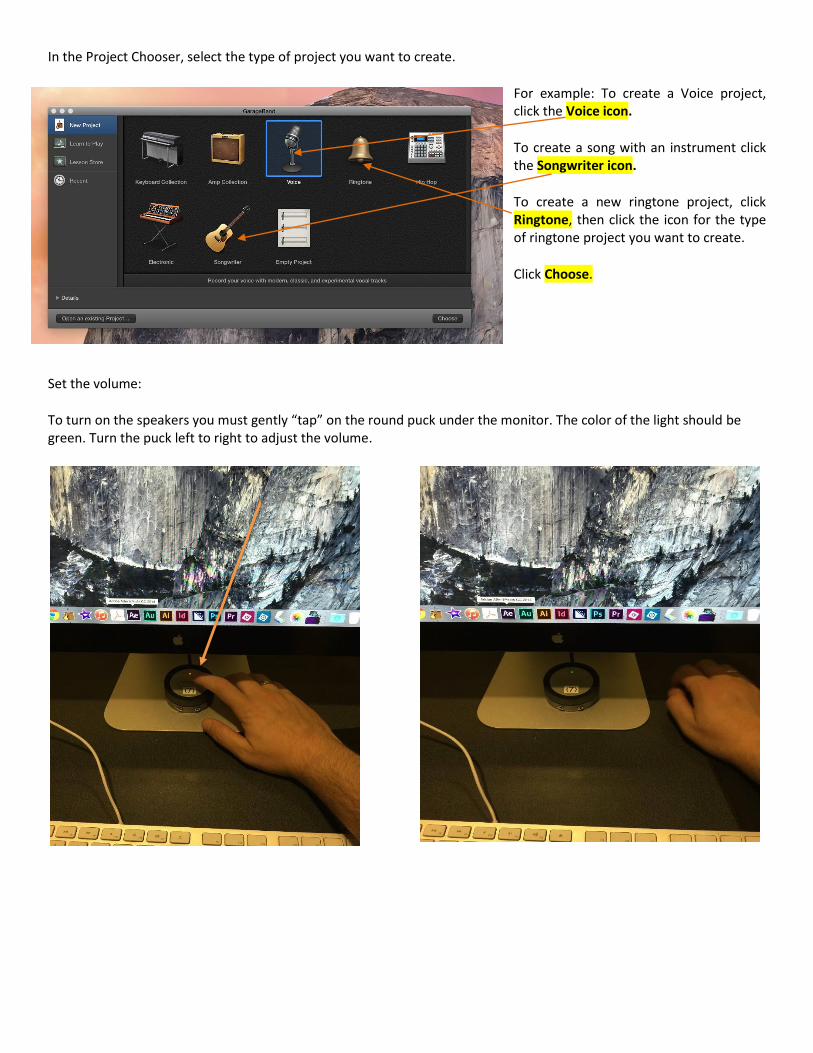
In the Project Chooser, select the type of project you want to create.
For example: To create a Voice project, click the Voice icon.
To create a song with an instrument click the Songwriter icon.
To create a new ringtone project, click Ringtone, then click the icon for the type of ringtone project you want to create.
Click Choose.
Set the volume:
To turn on the speakers you must gently “tap” on the round puck under the monitor. The color of the light should be green. Turn the puck left to right to adjust the volume.
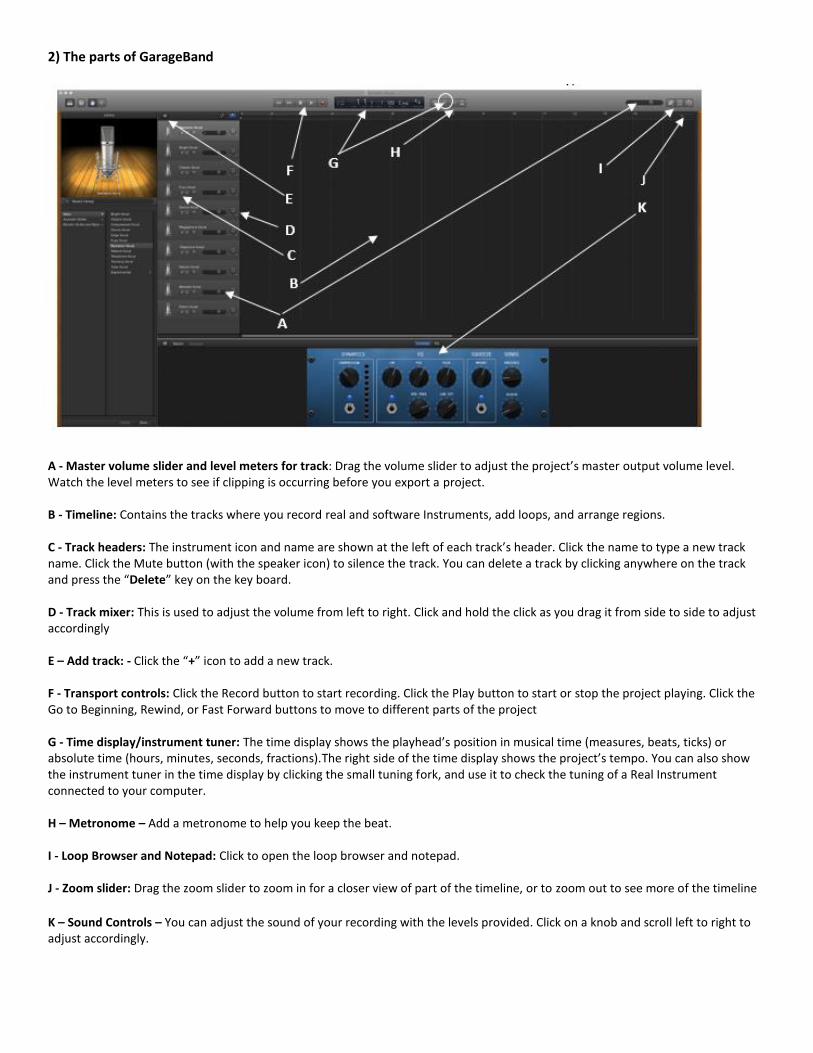
2) The parts of GarageBand
A - Master volume slider and level meters for track: Drag the volume slider to adjust the project’s master output volume level. Watch the level meters to see if clipping is occurring before you export a project. B - Timeline: Contains the tracks where you record real and software Instruments, add loops, and arrange regions. C - Track headers: The instrument icon and name are shown at the left of each track’s header. Click the name to type a new track name. Click the Mute button (with the speaker icon) to silence the track. You can delete a track by clicking anywhere on the track and press the “Delete” key on the key board. D - Track mixer: This is used to adjust the volume from left to right. Click and hold the click as you drag it from side to side to adjust accordingly E – Add track: - Click the “+” icon to add a new track. F - Transport controls: Click the Record button to start recording. Click the Play button to start or stop the project playing. Click the Go to Beginning, Rewind, or Fast Forward buttons to move to different parts of the project G - Time display/instrument tuner: The time display shows the playhead’s position in musical time (measures, beats, ticks) or absolute time (hours, minutes, seconds, fractions).The right side of the time display shows the project’s tempo. You can also show the instrument tuner in the time display by clicking the small tuning fork, and use it to check the tuning of a Real Instrument connected to your computer. H – Metronome – Add a metronome to help you keep the beat. I - Loop Browser and Notepad: Click to open the loop browser and notepad. J - Zoom slider: Drag the zoom slider to zoom in for a closer view of part of the timeline, or to zoom out to see more of the timeline K – Sound Controls – You can adjust the sound of your recording with the levels provided. Click on a knob and scroll left to right to adjust accordingly.
3) Record your voice or guitar
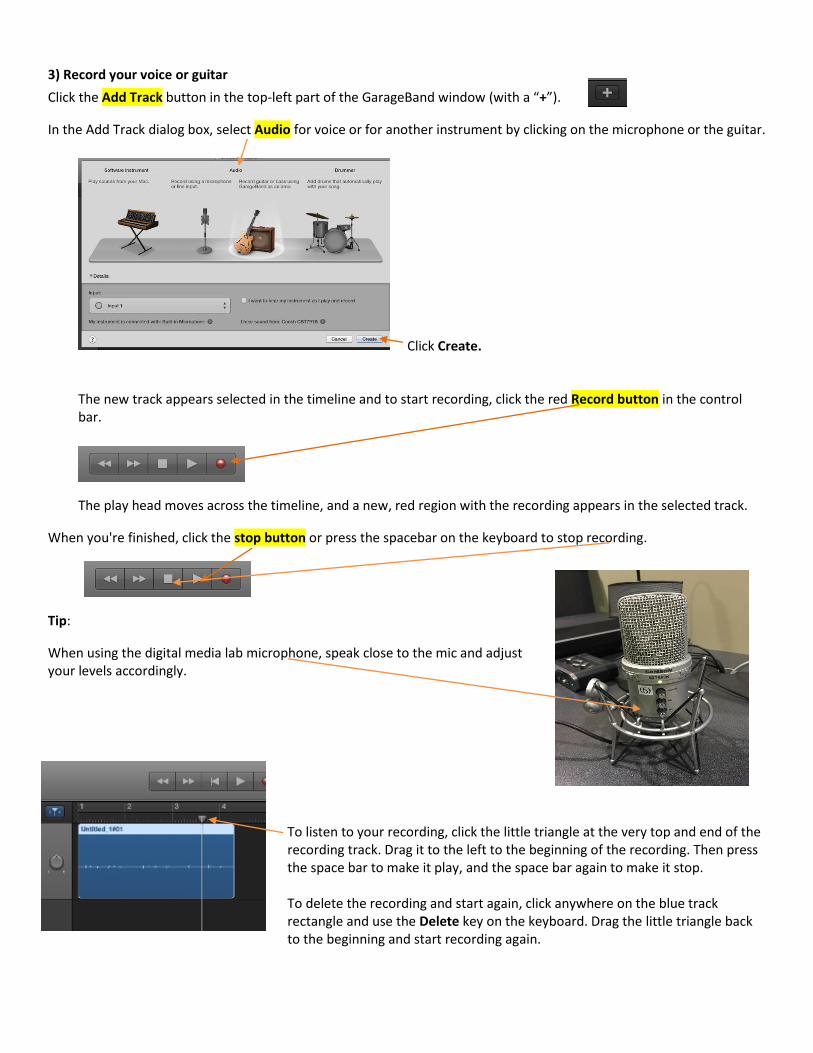
Click the Add Track button in the top-left part of the GarageBand window (with a “+”).
In the Add Track dialog box, select Audio for voice or for another instrument by clicking on the microphone or the guitar.
Click Create.
The new track appears selected in the timeline and to start recording, click the red Record button in the control bar.
The play head moves across the timeline, and a new, red region with the recording appears in the selected track.
When you're finished, click the stop button or press the spacebar on the keyboard to stop recording.
Tip:
When using the digital media lab microphone, speak close to the mic and adjust your levels accordingly.
To listen to your recording, click the little triangle at the very top and end of the recording track. Drag it to the left to the beginning of the recording. Then press the space bar to make it play, and the space bar again to make it stop. To delete the recording and start again, click anywhere on the blue track rectangle and use the Delete key on the keyboard. Drag the little triangle back to the beginning and start recording again.
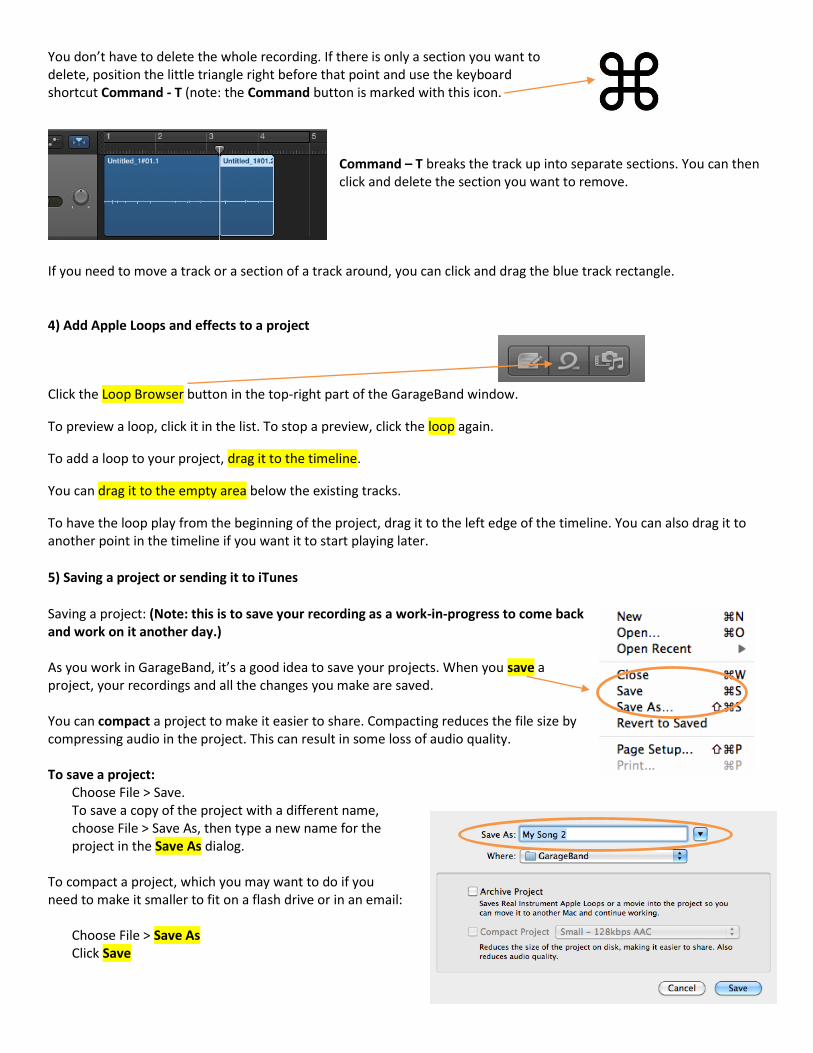
You don’t have to delete the whole recording. If there is only a section you want to delete, position the little triangle right before that point and use the keyboard shortcut Command - T (note: the Command button is marked with this icon.
Command – T breaks the track up into separate sections. You can then click and delete the section you want to remove.
If you need to move a track or a section of a track around, you can click and drag the blue track rectangle.
4) Add Apple Loops and effects to a project
Click the Loop Browser button in the top-right part of the GarageBand window.
To preview a loop, click it in the list. To stop a preview, click the loop again.
To add a loop to your project, drag it to the timeline.
You can drag it to the empty area below the existing tracks.
To have the loop play from the beginning of the project, drag it to the left edge of the timeline. You can also drag it to another point in the timeline if you want it to start playing later.
5) Saving a project or sending it to iTunes
Saving a project: (Note: this is to save your recording as a work-in-progress to come back and work on it another day.) As you work in GarageBand, it’s a good idea to save your projects. When you save a project, your recordings and all the changes you make are saved. You can compact a project to make it easier to share. Compacting reduces the file size by compressing audio in the project. This can result in some loss of audio quality. To save a project:
Choose File > Save. To save a copy of the project with a different name, choose File > Save As, then type a new name for the project in the Save As dialog.
To compact a project, which you may want to do if you need to make it smaller to fit on a flash drive or in an email:
Choose File > Save As Click Save
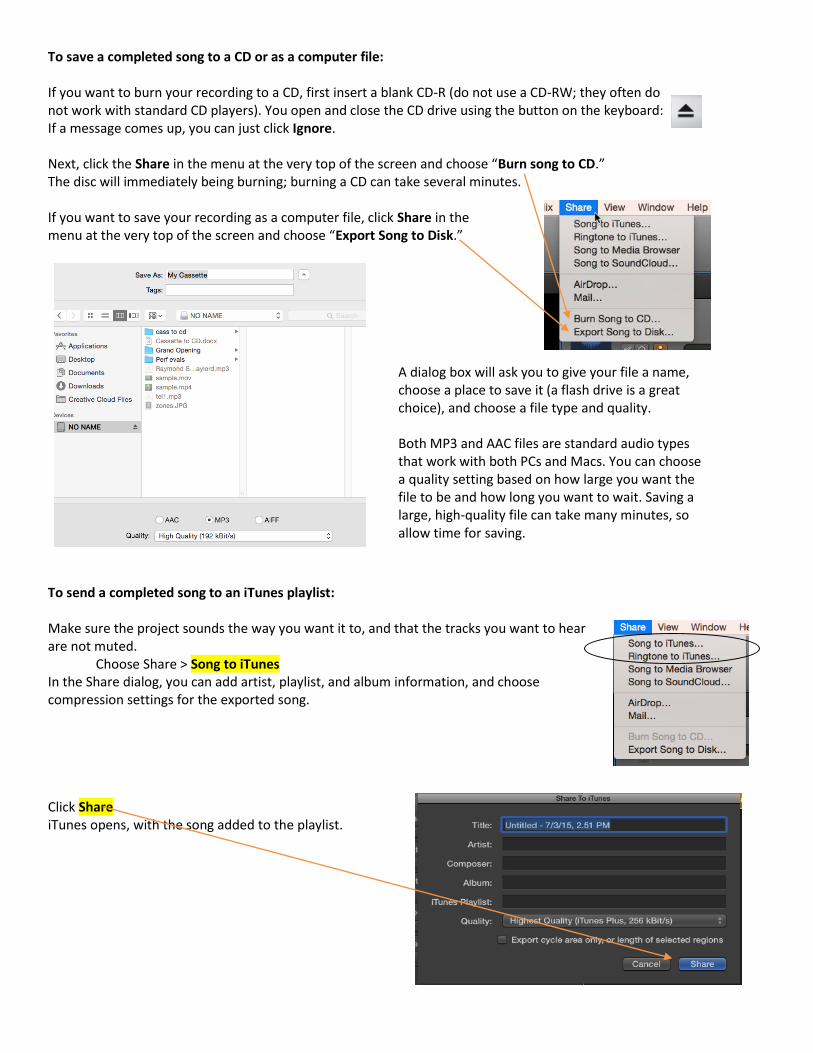
To save a completed song to a CD or as a computer file: If you want to burn your recording to a CD, first insert a blank CD-R (do not use a CD-RW; they often do not work with standard CD players). You open and close the CD drive using the button on the keyboard: If a message comes up, you can just click Ignore. Next, click the Share in the menu at the very top of the screen and choose “Burn song to CD.” The disc will immediately being burning; burning a CD can take several minutes. If you want to save your recording as a computer file, click Share in the menu at the very top of the screen and choose “Export Song to Disk.” To send a completed song to an iTunes playlist: Make sure the project sounds the way you want it to, and that the tracks you want to hear are not muted.
Choose Share > Song to iTunes In the Share dialog, you can add artist, playlist, and album information, and choose compression settings for the exported song. Click Share iTunes opens, with the song added to the playlist.
A dialog box will ask you to give your file a name, choose a place to save it (a flash drive is a great choice), and choose a file type and quality. Both MP3 and AAC files are standard audio types that work with both PCs and Macs. You can choose a quality setting based on how large you want the file to be and how long you want to wait. Saving a large, high-quality file can take many minutes, so allow time for saving.