Embed Size (px)
Citation preview

Frama Matrix F22
2
Operating manual for
Frama Matrix F22 All rights reserved. Frama Group.
Frama Matrix F22
3
Dear Customer, Thank you for choosing the innovative, forward-looking Frama Matrix F22 franking solution which meets all standards and therefore guarantees long-term protection of your investment. The information below in this operating manual is intended to assist you in installing and operating your Frama Matrix F22. It also shows how you can easily make settings yourself. We have summarized the most important points briefly here for you. The most important points at a glance: LOADING POSTAGE CREDIT 17 INSPECTION/AUTOCONNECT 18 INSERTING/CHANGING INK JET CASSETTE 26 CHANGING FRANKING DATE (PRINT DATE) 32 DISPLAY MESSAGES AND TECHNICAL DATA 47
You can get quick competent support from our Help Line 01992 451125. The right to make changes in these instructions is reserved. Frama AG also reserves the right to change and/or modify parts of these instructions and/or the product at any time without notice. The postage rates indicated and other information with time-limited validity are provided solely as examples and make no claim to currency.
Frama Matrix F22
4
Safety information and warnings Thank you for deciding to purchase the innovative Frama Matrix F22 franking system.
The information below in this operating manual is intended to assist you in installing and operating your Frama Matrix F22. It also shows how you can easily make settings yourself.
This franking system meets current safety requirements. Incorrect use can, however, lead to injury and damage. With this in mind, please read this guide before you start using your Frama Matrix F22. This will help you to avoid injury and prevent damage to your franking system. Keep this guide in a safe place and pass it on to the new user should you dispose of the machine.
Symbols used This operating manual uses the following symbols:
Danger This symbol indicates dangers and safety hazards which can cause injury when using, operating and servicing the franking system.
Information This symbol is intended to draw your attention to guidance and instructions you should be aware of which can prevent the risk of damage to the franking system, the items to be posted or the immediate surroundings when handling the franking system.
Tip Hints and tips of interest for the efficient use of the franking system.

Frama Matrix F22
5
Table of contents
SAFETY INFORMATION AND WARNINGS ............................................................................................. 4
SYMBOLS USED ........................................................................................................................................................ 4
TABLE OF CONTENTS ............................................................................................................................. 5
1. SYSTEM PRESENTATION .................................................................................................................... 7
1.1. SAFETY INSTRUCTIONS/NOTES ON USE .............................................................................................................. 7
1.2. USE AS INTENDED/NOTES ON PRINT QUALITY .................................................................................................... 8
1.3. REQUIREMENTS FOR THE NETWORK ENVIRONMENT/INFORMATION SECURITY .................................................. 8
1.4. RECYCLING AND DISPOSAL ............................................................................................................................... 9
1.5. THE FRAMA MATRIX MACHINE ........................................................................................................................10
1.6. BASIC SCREEN LAYOUT ....................................................................................................................................11
2. INSTALLATION .................................................................................................................................. 12
2.1. GENERAL NOTES AND SAFETY INFORMATION ...................................................................................................12
2.2. MAKING CONNECTIONS ...................................................................................................................................12
2.3. CONNECTING TO THE MAINS ELECTRIC SUPPLY ...............................................................................................13
2.4. FIRST USE ..........................................................................................................................................................14
2.5. FRAMAONLINE2 INSTALLATION ........................................................................................................................14
2.6. INSTALLING THE INK JET CASSETTE ...................................................................................................................16
2.7. LOADING CREDIT (POSTAGE) FROM FRAMAONLINE2 ........................................................................................16
3. FRAMAONLINE2 ............................................................................................................................... 17
3.1. GENERAL NOTES ...............................................................................................................................................17
3.2. LOADING POSTAGE CREDIT ..............................................................................................................................17
3.3. INSPECTION/AUTOCONNECT ............................................................................................................................18
4. OPERATION ....................................................................................................................................... 19
4.1. SWITCHING ON AND OFF .................................................................................................................................19
4.2. COST CENTRES .................................................................................................................................................19
4.3. DETERMINING POSTAGE VALUE ........................................................................................................................21
4.4. FRANKING ........................................................................................................................................................25
4.5. FITTING THE INK JET CASSETTE .........................................................................................................................26
5. MAIN MENU ..................................................................................................................................... 29
5.1. OVERVIEW ........................................................................................................................................................29
5.2. MESSAGE .........................................................................................................................................................29
5.3. DEVICES ...........................................................................................................................................................31
5.4. PRINT DATE ......................................................................................................................................................32
5.5. INFO PRINT .......................................................................................................................................................33
5.6. PRINTER SETTINGS ............................................................................................................................................34
6. COUNTER READINGS ........................................................................................................................ 36
7. SETUP (SETTINGS) ............................................................................................................................ 37
7.1. SETUP MENU 1 .................................................................................................................................................37
7.2. SETUP 2 MENU .................................................................................................................................................39
7.3. SETUP 3 MENU .................................................................................................................................................40
Frama Matrix F22
6
8. ADMIN MODE ................................................................................................................................... 41
8.1. LOG IN..............................................................................................................................................................41
8.2. MAIN MENU .....................................................................................................................................................42
8.3. COUNTER READINGS ........................................................................................................................................42
8.4. SETUP 1 ............................................................................................................................................................43
9. FRAMAONLINE2 ............................................................................................................................... 44
9.1. LOADING POSTAGE CREDIT ..............................................................................................................................44
9.2. INSPECTION ......................................................................................................................................................44
9.3. UNINSTALL .......................................................................................................................................................44
9.4. CONNECTION ...................................................................................................................................................45
9.5. LAST REPORT ....................................................................................................................................................46
9.6. PRINT REPORT ...................................................................................................................................................46
9.7. SMARTSHOP .....................................................................................................................................................46
10. TROUBLESHOOTING/ERROR MESSAGES ...................................................................................... 47
10.1. FRAMAONLINE2 .............................................................................................................................................47
10.2. SCALES MESSAGES (ONLY IF SCALES ARE CONNECTED) .................................................................................48
10.3. FRAMA MATRIX F22, FRANKING VALUE/CREDIT .............................................................................................49
10.4. PRINTER MESSAGES ........................................................................................................................................50
11. TECHNICAL DATA ........................................................................................................................... 51
11.1. GENERAL ........................................................................................................................................................51
11.2. ENVELOPE/ENVELOPE FLAP DIMENSIONS.........................................................................................................51
11.3. POWER SUPPLY RATING..................................................................................................................................52
11.4. DIMENSIONS AND WEIGHT .............................................................................................................................53
11.5. ACCESSORIES .................................................................................................................................................53
11.6. STORAGE AND OPERATING CONDITIONS........................................................................................................54
12. EC-DECLARATION OF CONFORMITY ............................................................................................. 55
13. INDEX .............................................................................................................................................. 56
Frama Matrix F22
7
1. System presentation
1.1. Safety instructions/Notes on use
Danger
1. Use this franking system indoors and for franking post and franking labels only. Any other use,
modification or change to the franking system is not permissible and may be dangerous. The manufacturer accepts no liability for damage caused by use contrary to the intended use or incorrect operation.
2. Check the franking system for external damage before setting it up. You may be putting your life at risk by using a damaged machine.
3. A damaged connecting lead may only be replaced by a lead of the same type. 4. A current overload protector must always be fitted in buildings in which the franking system is
plugged into the mains network. 5. Check the cable and plug before installing the system. Have any damage repaired by a specialist
electrician only. 6. Only connect the plug into a mains socket when the franking system housing is closed. 7. Always run the mains cable away from the rear of the franking system and make sure that no
risk exists of it being damaged or someone tripping over it. 8. Never pull the plug out of the socket by the mains cable. 9. Never reach into the printing unit. Your fingers could be injured if the franking machine is
switched on. Be careful if you are wearing long hair, a tie, etc. 10. Do not reach into rotating parts. There is a risk of injury. 11. Keep children away from the franking system. 12. Have your franking system repaired by a service technician from your local Frama sales and
service organization only. Never open the franking system yourself under any circumstances. Repairs carried out incorrectly can represent a significant hazard to the user.
1.1.1. Correct use
Danger!
1. Use only accessories intended for this system. The use of accessories that are not approved, or
not authorized, can be detrimental to the service life of the franking system. At the same time, a danger to the operator can be created.
2. Always keep your fingers and other parts of the body, ties, necklaces, scarves, open sleeves and similar loose items away from the feed entry area and the feed rollers. There is a risk of injury on rotating parts.
3. Do not clean the system with flammable fluids. There is a risk of explosion. 4. Disconnect the system from the mains before cleaning it. Clean the system with a damp cloth
only. Do not spray any liquids on or into the franking system. There is a risk of electric shock. Lethal hazard.
5. Do not place any liquids, glasses, franking ink, etc. on the franking system.
1.1.2. Installation notes
Information
Your Frama Matrix franking system was manufactured for use in normal conditions. Please remember: Today’s furniture is coated with a confusing variety of paints, lacquers and synthetic materials. In view of this, it is quite possible that some of these materials contain constituents which can attack or soften the plastic feet of our equipment. The feet of our equipment, if affected by foreign substances, can stain your furniture. Frama is unable to accept any liability in this respect for obvious reasons. With this in mind, use a non-slip underlay. Avoid exposing directly to sunlight.

Frama Matrix F22
8
1.2. Use as intended/Notes on print quality The following notes are intended to support you in achieving a sharp, professional print with your Frama Matrix franking system, so as not to jeopardize the delivery of your franked mail. As the user, you are responsible for the legibility of your franking.
Information
1. Your franking machine must be properly registered with the Royal Mail before you use it for the
first time. Follow the instructions given by your local Frama sales and service organisation when you do this.
2. Each franking mark may be used only once. Royal Mail regards repeated use as a serious offence and a violation of the general terms and conditions of business.
3. Test franking marks or sample franking impressions are not regarded as valid by Royal Mail and items bearing them may not, therefore, be mailed.
4. The use of fibrous and other unsuitable envelopes can result in the franking marks blurring or smearing and thus being illegible. In view of this, you are urgently advised not to use envelopes of this kind. Do not use very absorbent or fibrous envelopes for this reason. This could invalidate your franking.
5. The use of high gloss envelopes, which could offer insufficient contrast with the franking mark, is not permitted.
6. Do not frank mail items thicker than 10 mm. You risk allowing the printing head to touch the surface of the mail item and thus smearing the franked mark. You should therefore always use Frama Matrix franking labels for thick letters and packets.
7. Please make sure that no sharp objects, such as paper clips, are near the franking zone. Such objects can damage the franking system.
8. Ink jet cassettes must be checked regularly to ensure high-quality printing. After a certain time the printing head is sealed to prevent the individual nozzles from drying. Do not, therefore, switch the franking system off immediately, but wait until the print head is sealed, or use the Log off button.
9. Please run a print head test and clean the print head using the Nozzle Cleaning function (section 5.6.2. Nozzle cleaning on page 34) should you have the impression that there are lines missing from the franked mark.
1.3. Requirements for the network environment/information security
Information
1. The franking system is connected to the user's local area network by Ethernet and by the user's
internet access correspondingly provided to exchange data with the FramaOnline2 data centre. 2. Frama guarantees that no other data that are not relevant for the franking system from the
user's network will be used, transmitted or read. 3. The user must take measures to ensure the integrity and security of the network at all times
when operating the franking system on the company network. 4. The PC interface is not active. 5. Consult the IP Configuration Manual (www.frama.com � download area) for further
information on connecting the franking system.

Frama Matrix F22
9
1.4. Recycling and disposal
The WEEE Directive (Waste Electrical and Electronic Equipment; 2002/96/EC) was drawn up for the protection of human health and the environment to ensure that waste products are disposed of utilizing the best available reprocessing, recovery and technical recycling possibilities. Your product has been developed and manufactured using top-quality materials and components which can be recycled and reprocessed.
Do not dispose of this product with household waste. Please find out about local collection points for electrical and electronic waste products which are marked accordingly. You can return your old machine to your local dealer/supplier when you purchase a replacement product. The deal-er/supplier will dispose of the equipment in the correct manner under the local WEEE regulations.
Frama Matrix F22
10
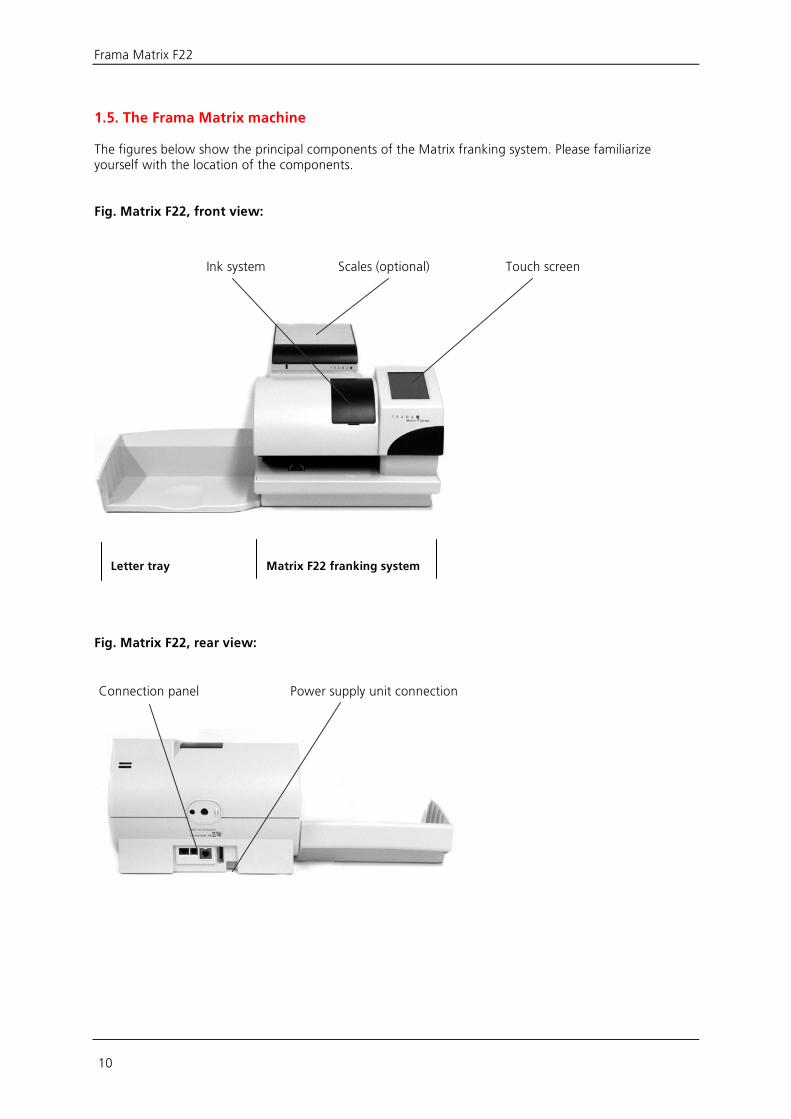
1.5. The Frama Matrix machine The figures below show the principal components of the Matrix franking system. Please familiarize yourself with the location of the components. Fig. Matrix F22, front view:
Fig. Matrix F22, rear view:
Touch screen Ink system
Letter tray Matrix F22 franking system
Power supply unit connection Connection panel
Scales (optional)
Frama Matrix F22
11
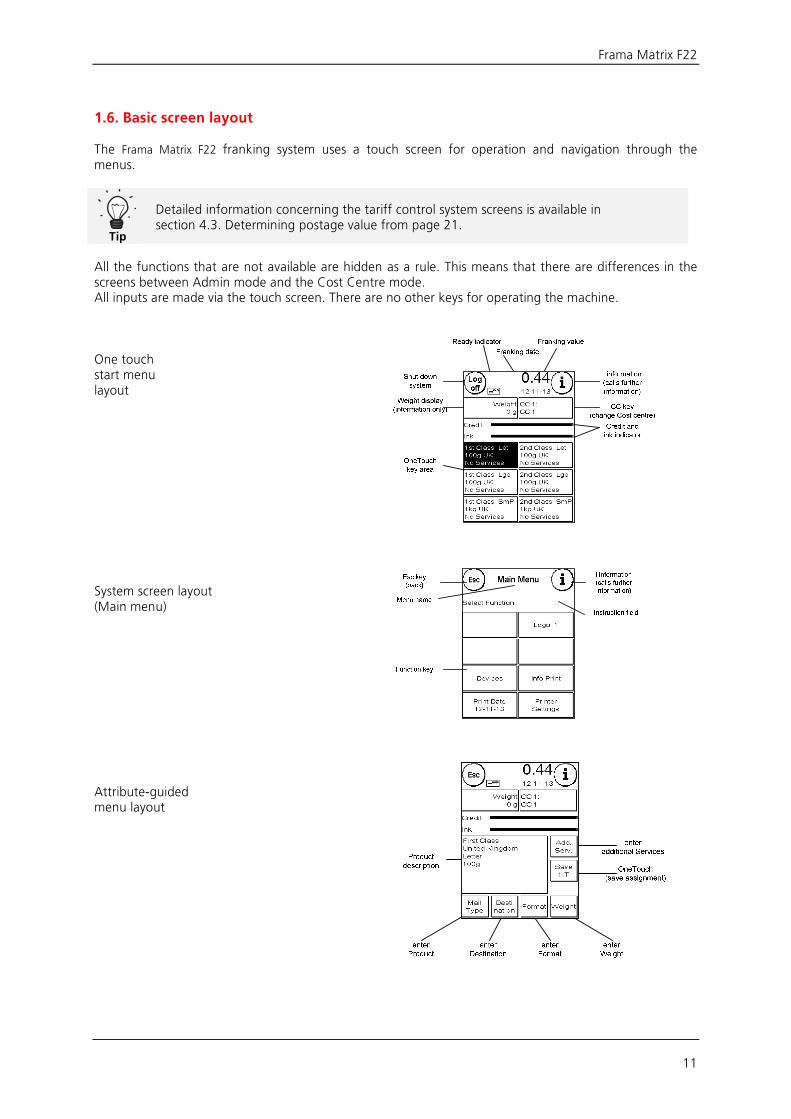
1.6. Basic screen layout The Frama Matrix F22 franking system uses a touch screen for operation and navigation through the menus.
Tip
Detailed information concerning the tariff control system screens is available in section 4.3. Determining postage value from page 21.
All the functions that are not available are hidden as a rule. This means that there are differences in the screens between Admin mode and the Cost Centre mode. All inputs are made via the touch screen. There are no other keys for operating the machine. One touch start menu layout System screen layout (Main menu) Attribute-guided menu layout
Frama Matrix F22
12
2. Installation It is easy enough to install the components yourself. Be sure to observe the safety instructions at all times. There are four steps to installation: 1. Assembly of the individual components 2. Registration with the FramaOnline2 system 3. Configuring the printer settings 4. Loading postage credit
2.1. General notes and safety information Select a position near a mains socket and an Ethernet connection for your Frama Matrix franking system. Avoid direct sunlight and severe vibration. Draughts can affect the accuracy of the scales. Your Frama Matrix franking system was manufactured for use in normal conditions. Remember: Today’s furniture is coated with a confusing variety of paints, lacquers and synthetic materials. In view of this, it is quite possible that some of these materials contain constituents which can attack or soften the plastic feet of our equipment. The feet of our equipment, if affected by foreign substances, can stain your furniture. Frama is unable to accept any liability in this respect for obvious reasons. With this in mind, use a non-slip underlay.
2.2. Making connections The figure below shows the location of the interfaces and the plug for the plug-in power supply unit on the rear of the Matrix franking system's housing (connection panel).
Serial port (RS232 – PC)
Scales port Socket for PSU
Communications module
Frama Matrix F22
13
2.2.1. Make communications connection (communications module)
The connection of the relevant cable differs depending on the communications module used. Ethernet (green): Plug the network cable (RJ45) into this socket. Plug the network cable into your network.
2.2.2. Connecting the scales (optional)
Plug the scales cable into the scales socket. Look in the operating manual for the scales if necessary.
2.3. Connecting to the mains electric supply
Danger!
1. Check the franking system for external damage before setting it up. You may be putting your
life at risk by using a damaged machine. 2. Check the cable and plug before installing the system. Have any damage repaired by a specialist
electrician only. Do not use the machine until the damage has been repaired. 3. A damaged connecting lead may only be replaced by a lead of the same type. 4. Only connect the plug into a mains socket when the franking machine housing is closed. 5. Always run the mains cable away from the rear of the franking machine and make sure that no
risk exists of it being damaged or someone tripping over it. 6. Never pull the plug out of the socket by the mains cable.
Take the power supply unit. Then connect the cable with the small right-angled round plug to the Matrix F22 (see photograph). Make sure that the plug clicks into place properly. This will be the case when the cable is flush against the housing. Make sure that you have closed the top flap on the Matrix F22. Check whether the scales are free to move.
Information
Information: The switch-on routines may take some time. During this time, the Frama Matrix franking system will not accept any input from you.
Frama Matrix F22
14
2.4. First use Switch the franking system on. You will hear various sounds during the switch-on routines. All the motors and sensors are being checked.
Information
Information: The switching-on routines may take some time. During this time, the Frama Matrix franking system will not accept any input from you.
The franking system must now be installed (registered) with the FramaOnline2 data centre.
2.5. FramaOnline2 installation Your Frama Matrix F22 is loaded with postage (credit) through the network connection. At the same time, postage rates are updated and any postage data is transmitted to Royal Mail. This process is convenient and gives you the assurance of always having postage and the latest postage rates at your disposal.
Tip
It is only possible to fetch postage and communicate with FramaOnline in Admin mode. Tip: The Admin mode is password (PIN) protected. Keep your PIN in a safe place. The PIN can only be reset in a chargeable call-out of a service technician to your premises or in the central workshop.
Check that your franking system is correctly connected to your local network. If necessary, read the Connection and start-up section again. The franking system need only be connected to the network while it is being activated and postage is being downloaded. It is only possible to download postage funds and communicate with FramaOnline in Admin mode. Caution: The Admin mode is password (PIN) protected. Use the PIN you received in a separate letter.
Information
Information: It may be necessary to configure your franking system to ensure that it connects successfully with your network. Follow the instructions on page 18 to make the necessary settings.
1. Press Admin in the Select Cost Centre display.

Frama Matrix F22
15
2. Enter your PIN. Then press the ENTER key to access the Admin mode.
3. Press the „i“ key. 4. Press the Spanner. 5. Press Next (arrow). 6. Select FramaOnline2.
Frama Matrix F22
16
7. Press Activation PIN. Enter the five-digit FramaOnline activation PIN using the
numeric keypad displayed and confirm your input by pressing Enter. There is no need to enter the FramaOnline activation PIN again. Take care to enter the PIN correctly otherwise it will be rejected by the Matrix F22 or the FramaOnline data centre.
8. Select Install. Confirm the process by pressing YES. 9. Your Frama Matrix F22 will now establish a connection to the FramaOnline2 data
centre. This process can take up to 2 minutes. Please check your network setup if the connection cannot be established. Refer to section 9.4. Connection.
10. You have now registered with the FramaOnline2 data centre. 11. The display is shown for 8 seconds. Touch the screen to quit the message. You
will then be returned to the FramaOnline2 menu. 12. Press ESC to enter Setup menu 1. Press Start up/Log off to go to Select Cost
Centre.
2.6. Installing the ink jet cassette Follow the instructions on page 26 to install the ink jet cassette correctly.
2.7. Loading credit (postage) from FramaOnline2 You must load postage credit into the franking system before you can frank mail with your Frama Matrix franking system. Follow the instructions on page 17. This concludes the installation.
Install?
Install?
Perform Install?
Frama Matrix F22
17
3. FramaOnline2
3.1. General notes FramaOnline2 will deal with preparing the postage rates, sending usage data to Royal Mail and provides a simple way of loading new postage credit onto your franking system. Your franking system must set up a connection with the data centre to allow use of FramaOnline2. Refer to section 9.4. Connection on page 45 for this.
Tip
It is only possible to download postage funds and communicate with FramaOnline2 in Admin mode. Tip: The Admin mode is password (PIN) protected. Keep your PIN in a safe place. The PIN can only be reset in a chargeable call-out of a service technician to your premises or in the central workshop.
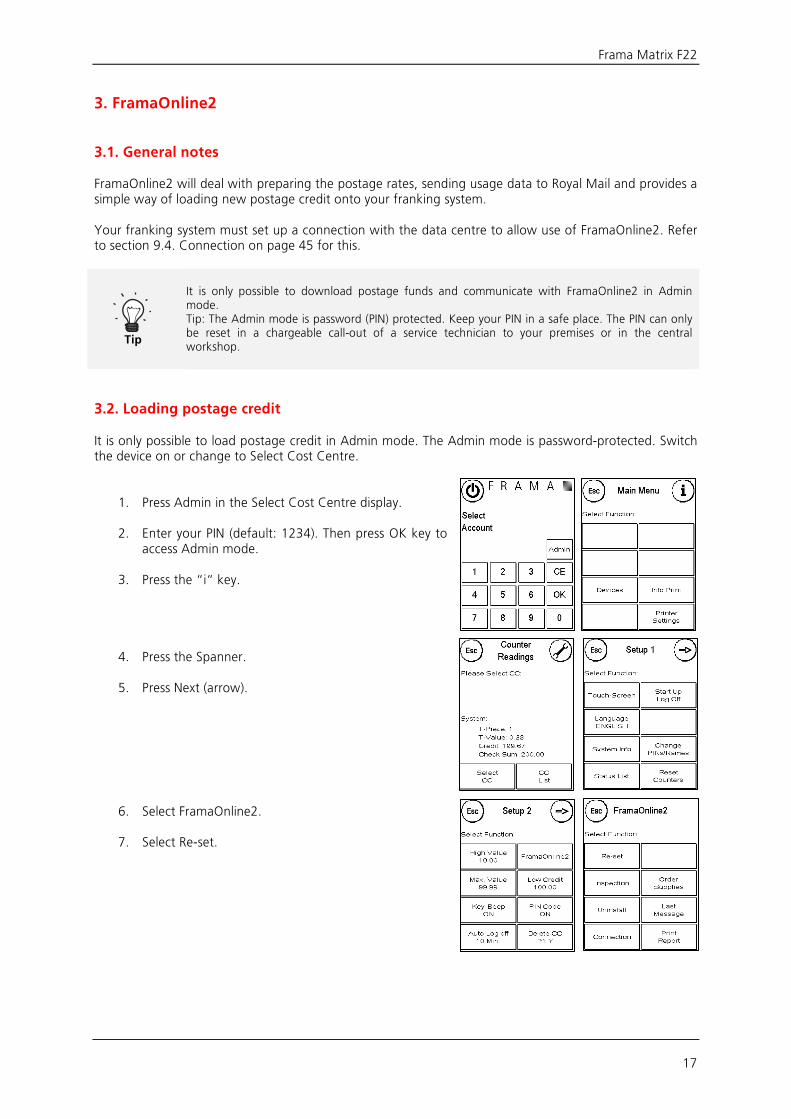
3.2. Loading postage credit It is only possible to load postage credit in Admin mode. The Admin mode is password-protected. Switch the device on or change to Select Cost Centre.
1. Press Admin in the Select Cost Centre display.
2. Enter your PIN (default: 1234). Then press OK key to access Admin mode.
3. Press the “i“ key.
4. Press the Spanner.
5. Press Next (arrow).
6. Select FramaOnline2.
7. Select Re-set.
Frama Matrix F22
18
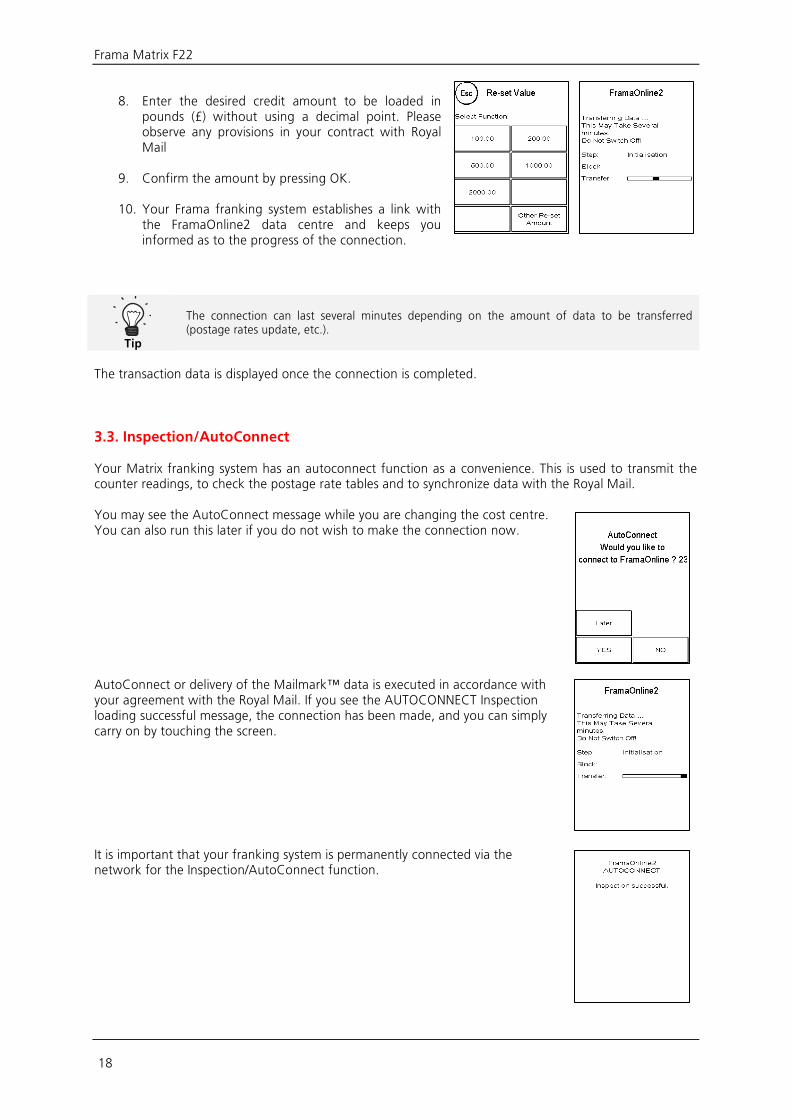
8. Enter the desired credit amount to be loaded in pounds (£) without using a decimal point. Please observe any provisions in your contract with Royal Mail
9. Confirm the amount by pressing OK.
10. Your Frama franking system establishes a link with
the FramaOnline2 data centre and keeps you informed as to the progress of the connection.
Tip
The connection can last several minutes depending on the amount of data to be transferred (postage rates update, etc.).
The transaction data is displayed once the connection is completed.
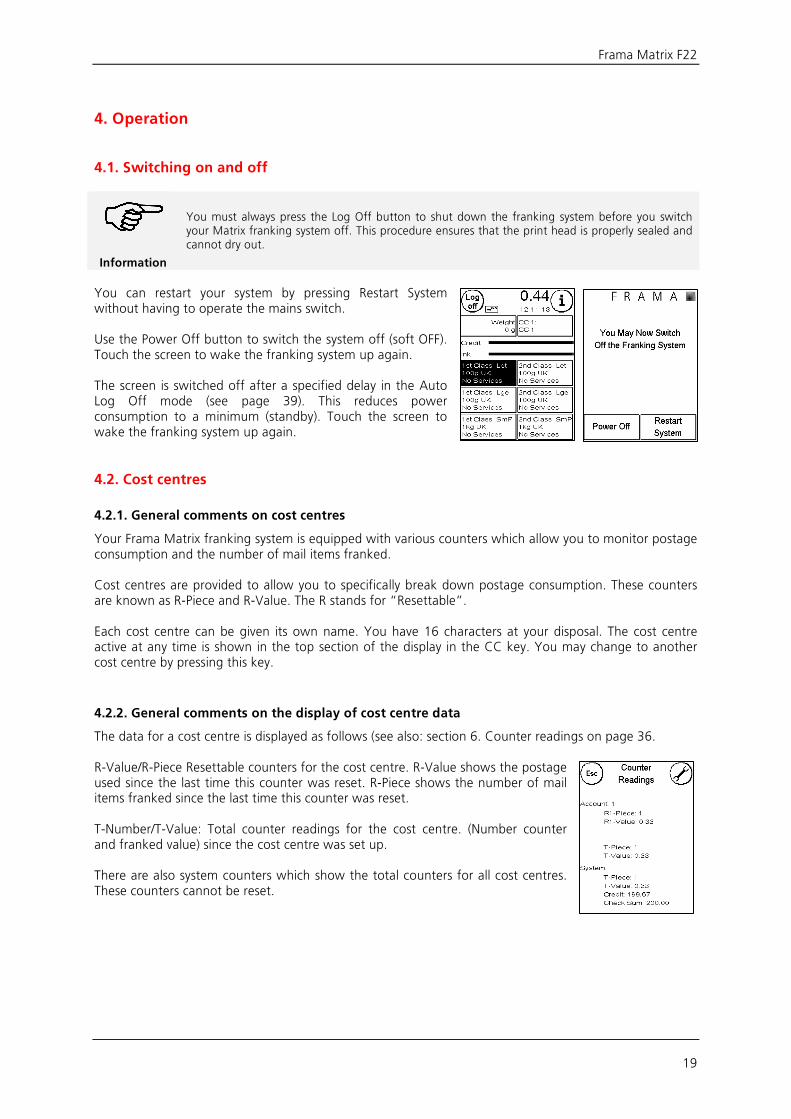
3.3. Inspection/AutoConnect Your Matrix franking system has an autoconnect function as a convenience. This is used to transmit the counter readings, to check the postage rate tables and to synchronize data with the Royal Mail. You may see the AutoConnect message while you are changing the cost centre. You can also run this later if you do not wish to make the connection now. AutoConnect or delivery of the Mailmark™ data is executed in accordance with your agreement with the Royal Mail. If you see the AUTOCONNECT Inspection loading successful message, the connection has been made, and you can simply carry on by touching the screen. It is important that your franking system is permanently connected via the network for the Inspection/AutoConnect function.
Frama Matrix F22
19
4. Operation
4.1. Switching on and off
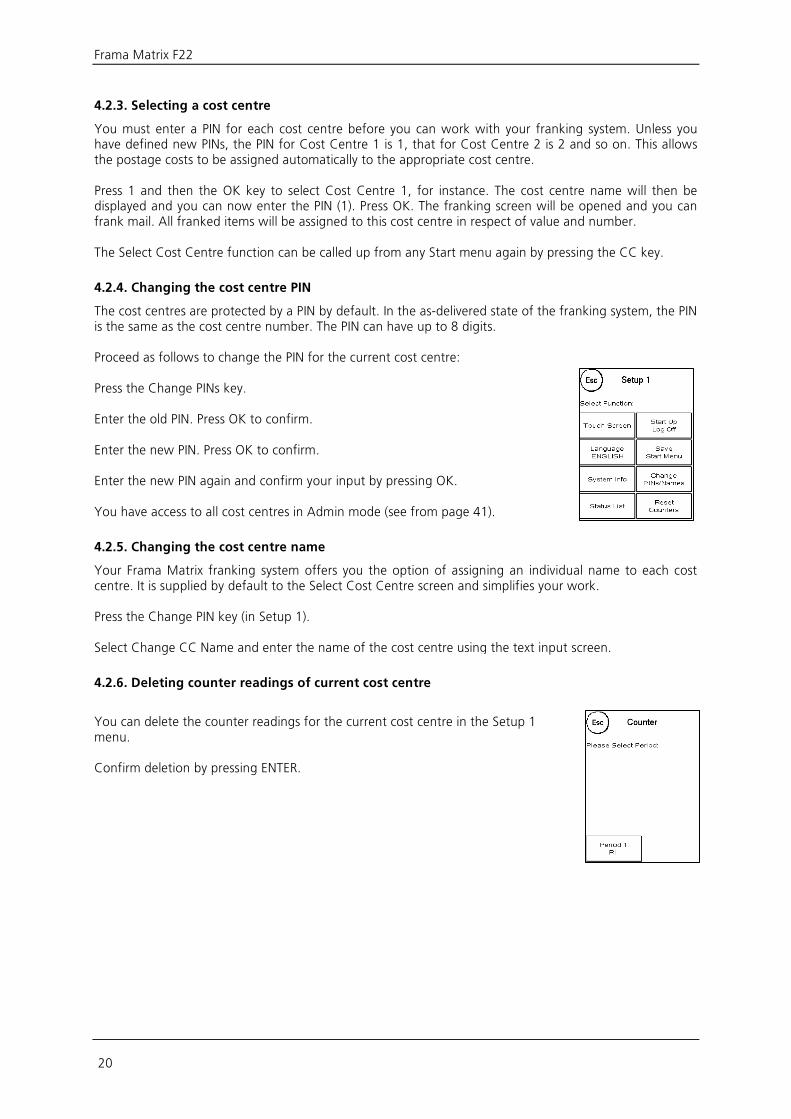
Information
You must always press the Log Off button to shut down the franking system before you switch your Matrix franking system off. This procedure ensures that the print head is properly sealed and cannot dry out.
You can restart your system by pressing Restart System without having to operate the mains switch. Use the Power Off button to switch the system off (soft OFF). Touch the screen to wake the franking system up again. The screen is switched off after a specified delay in the Auto Log Off mode (see page 39). This reduces power consumption to a minimum (standby). Touch the screen to wake the franking system up again.
4.2. Cost centres
4.2.1. General comments on cost centres
Your Frama Matrix franking system is equipped with various counters which allow you to monitor postage consumption and the number of mail items franked. Cost centres are provided to allow you to specifically break down postage consumption. These counters are known as R-Piece and R-Value. The R stands for “Resettable”. Each cost centre can be given its own name. You have 16 characters at your disposal. The cost centre active at any time is shown in the top section of the display in the CC key. You may change to another cost centre by pressing this key.
4.2.2. General comments on the display of cost centre data
The data for a cost centre is displayed as follows (see also: section 6. Counter readings on page 36. R-Value/R-Piece Resettable counters for the cost centre. R-Value shows the postage used since the last time this counter was reset. R-Piece shows the number of mail items franked since the last time this counter was reset. T-Number/T-Value: Total counter readings for the cost centre. (Number counter and franked value) since the cost centre was set up. There are also system counters which show the total counters for all cost centres. These counters cannot be reset.
Frama Matrix F22
20
4.2.3. Selecting a cost centre
You must enter a PIN for each cost centre before you can work with your franking system. Unless you have defined new PINs, the PIN for Cost Centre 1 is 1, that for Cost Centre 2 is 2 and so on. This allows the postage costs to be assigned automatically to the appropriate cost centre. Press 1 and then the OK key to select Cost Centre 1, for instance. The cost centre name will then be displayed and you can now enter the PIN (1). Press OK. The franking screen will be opened and you can frank mail. All franked items will be assigned to this cost centre in respect of value and number. The Select Cost Centre function can be called up from any Start menu again by pressing the CC key.
4.2.4. Changing the cost centre PIN
The cost centres are protected by a PIN by default. In the as-delivered state of the franking system, the PIN is the same as the cost centre number. The PIN can have up to 8 digits. Proceed as follows to change the PIN for the current cost centre: Press the Change PINs key. Enter the old PIN. Press OK to confirm. Enter the new PIN. Press OK to confirm. Enter the new PIN again and confirm your input by pressing OK. You have access to all cost centres in Admin mode (see from page 41).
4.2.5. Changing the cost centre name
Your Frama Matrix franking system offers you the option of assigning an individual name to each cost centre. It is supplied by default to the Select Cost Centre screen and simplifies your work. Press the Change PIN key (in Setup 1). Select Change CC Name and enter the name of the cost centre using the text input screen.
4.2.6. Deleting counter readings of current cost centre
You can delete the counter readings for the current cost centre in the Setup 1 menu. Confirm deletion by pressing ENTER.
Frama Matrix F22
21
4.3. Determining postage value
Tip
Your franking system protects you from unintentionally franking with high postage rates (see Settings section). By default, all franking valued over £10.00 must be approved by touching the postage value displayed (it is initially displayed inverted). This value can be configured in Setup 2 (section 7.2.1. High Value on page 39).
4.3.1. Start menu overview
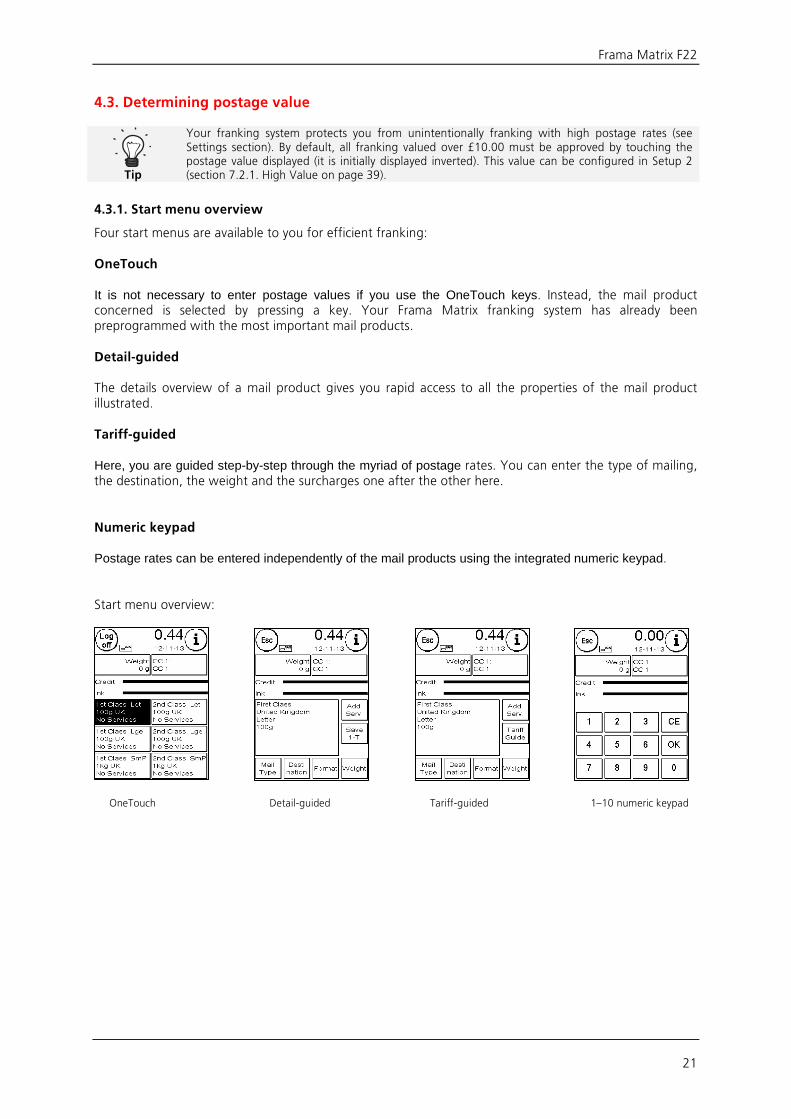
Four start menus are available to you for efficient franking: OneTouch It is not necessary to enter postage values if you use the OneTouch keys. Instead, the mail product concerned is selected by pressing a key. Your Frama Matrix franking system has already been preprogrammed with the most important mail products. Detail-guided The details overview of a mail product gives you rapid access to all the properties of the mail product illustrated. Tariff-guided Here, you are guided step-by-step through the myriad of postage rates. You can enter the type of mailing, the destination, the weight and the surcharges one after the other here. Numeric keypad Postage rates can be entered independently of the mail products using the integrated numeric keypad. Start menu overview:
OneTouch Detail-guided Tariff-guided 1–10 numeric keypad
Frama Matrix F22
22
4.3.2. OneTouch
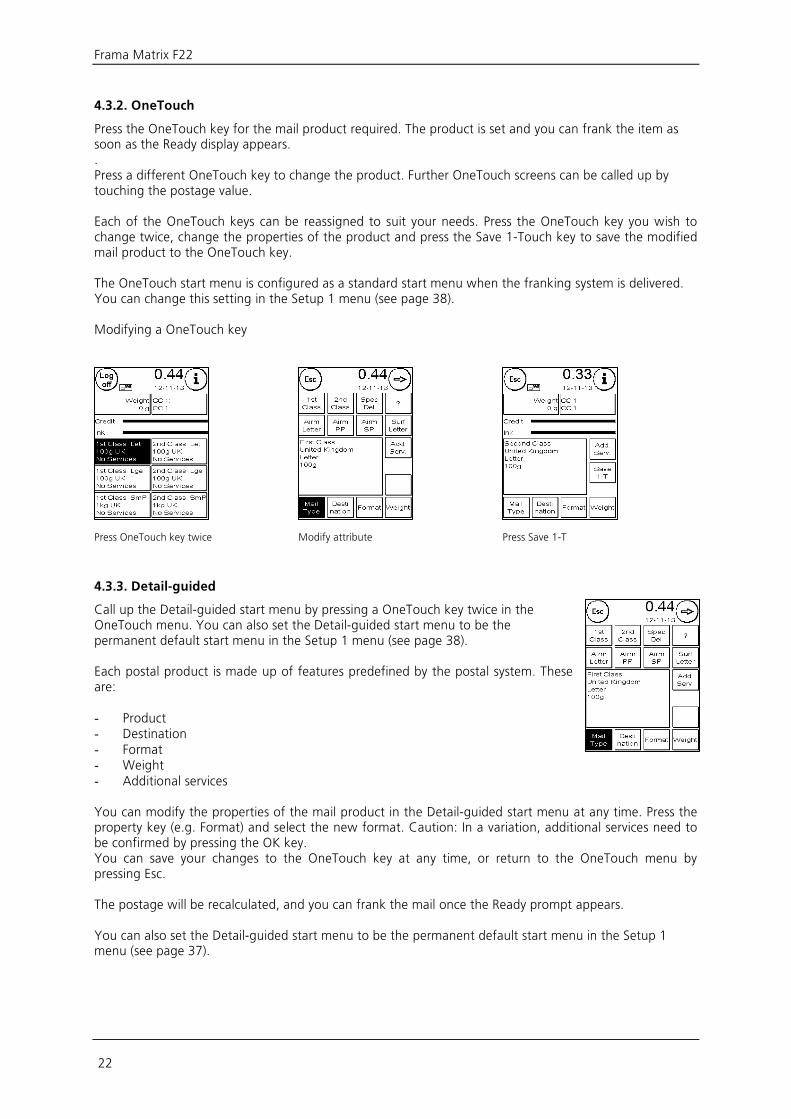
Press the OneTouch key for the mail product required. The product is set and you can frank the item as soon as the Ready display appears. . Press a different OneTouch key to change the product. Further OneTouch screens can be called up by touching the postage value. Each of the OneTouch keys can be reassigned to suit your needs. Press the OneTouch key you wish to change twice, change the properties of the product and press the Save 1-Touch key to save the modified mail product to the OneTouch key. The OneTouch start menu is configured as a standard start menu when the franking system is delivered. You can change this setting in the Setup 1 menu (see page 38). Modifying a OneTouch key
Press OneTouch key twice
Modify attribute
Press Save 1-T
4.3.3. Detail-guided
Call up the Detail-guided start menu by pressing a OneTouch key twice in the OneTouch menu. You can also set the Detail-guided start menu to be the permanent default start menu in the Setup 1 menu (see page 38). Each postal product is made up of features predefined by the postal system. These are: - Product - Destination - Format - Weight - Additional services You can modify the properties of the mail product in the Detail-guided start menu at any time. Press the property key (e.g. Format) and select the new format. Caution: In a variation, additional services need to be confirmed by pressing the OK key. You can save your changes to the OneTouch key at any time, or return to the OneTouch menu by pressing Esc. The postage will be recalculated, and you can frank the mail once the Ready prompt appears. You can also set the Detail-guided start menu to be the permanent default start menu in the Setup 1 menu (see page 37).
Frama Matrix F22
23
4.3.4. Tariff-guided
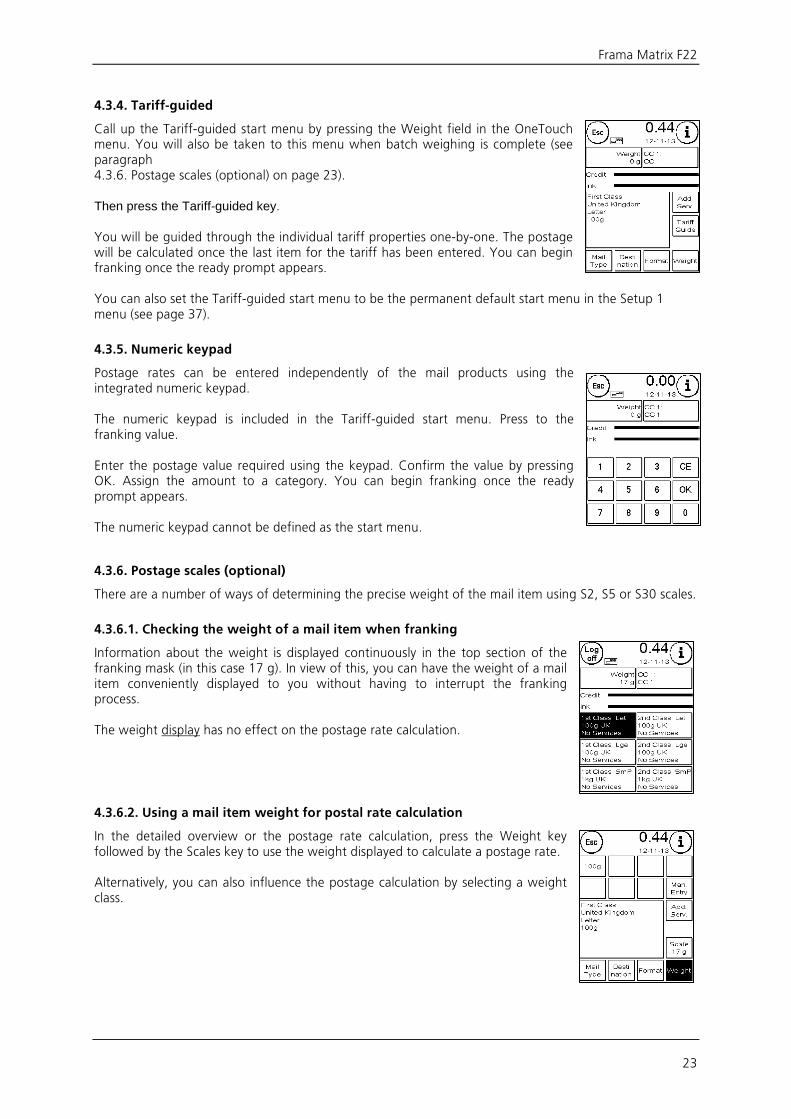
Call up the Tariff-guided start menu by pressing the Weight field in the OneTouch menu. You will also be taken to this menu when batch weighing is complete (see paragraph 4.3.6. Postage scales (optional) on page 23). Then press the Tariff-guided key. You will be guided through the individual tariff properties one-by-one. The postage will be calculated once the last item for the tariff has been entered. You can begin franking once the ready prompt appears. You can also set the Tariff-guided start menu to be the permanent default start menu in the Setup 1 menu (see page 37).
4.3.5. Numeric keypad
Postage rates can be entered independently of the mail products using the integrated numeric keypad. The numeric keypad is included in the Tariff-guided start menu. Press to the franking value. Enter the postage value required using the keypad. Confirm the value by pressing OK. Assign the amount to a category. You can begin franking once the ready prompt appears. The numeric keypad cannot be defined as the start menu.
4.3.6. Postage scales (optional)
There are a number of ways of determining the precise weight of the mail item using S2, S5 or S30 scales.
4.3.6.1. Checking the weight of a mail item when franking
Information about the weight is displayed continuously in the top section of the franking mask (in this case 17 g). In view of this, you can have the weight of a mail item conveniently displayed to you without having to interrupt the franking process. The weight display has no effect on the postage rate calculation.
4.3.6.2. Using a mail item weight for postal rate calculation
In the detailed overview or the postage rate calculation, press the Weight key followed by the Scales key to use the weight displayed to calculate a postage rate. Alternatively, you can also influence the postage calculation by selecting a weight class.
Frama Matrix F22
24
4.3.6.3. STACK/SINGLE weighing mode
Stack weighing mode, with its two variants, is a special feature. Switch the stack weighing mode between Stack and Single in the Main Menu under Devices.
STACK mode (default)
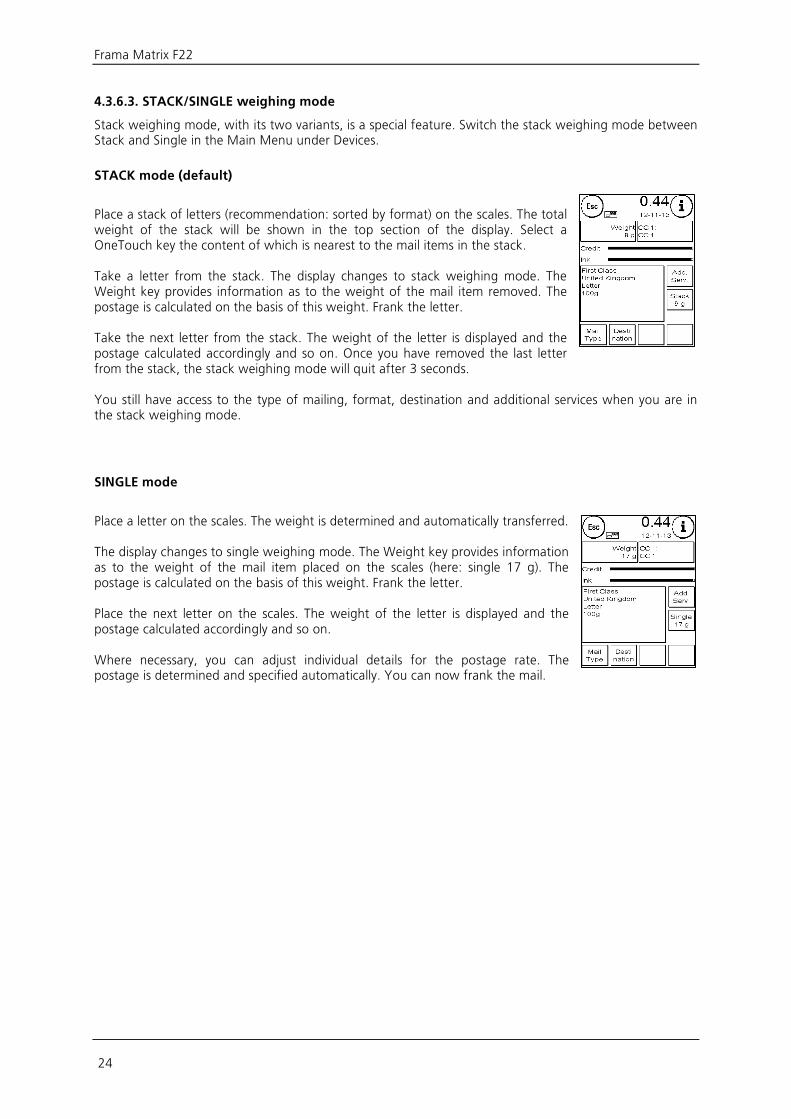
Place a stack of letters (recommendation: sorted by format) on the scales. The total weight of the stack will be shown in the top section of the display. Select a OneTouch key the content of which is nearest to the mail items in the stack. Take a letter from the stack. The display changes to stack weighing mode. The Weight key provides information as to the weight of the mail item removed. The postage is calculated on the basis of this weight. Frank the letter. Take the next letter from the stack. The weight of the letter is displayed and the postage calculated accordingly and so on. Once you have removed the last letter from the stack, the stack weighing mode will quit after 3 seconds. You still have access to the type of mailing, format, destination and additional services when you are in the stack weighing mode.
SINGLE mode
Place a letter on the scales. The weight is determined and automatically transferred. The display changes to single weighing mode. The Weight key provides information as to the weight of the mail item placed on the scales (here: single 17 g). The postage is calculated on the basis of this weight. Frank the letter. Place the next letter on the scales. The weight of the letter is displayed and the postage calculated accordingly and so on. Where necessary, you can adjust individual details for the postage rate. The postage is determined and specified automatically. You can now frank the mail.
Frama Matrix F22
25
4.4. Franking
It is only possible to frank mail items when the Ready prompt (letter icon) is showing in the display (see page 10).
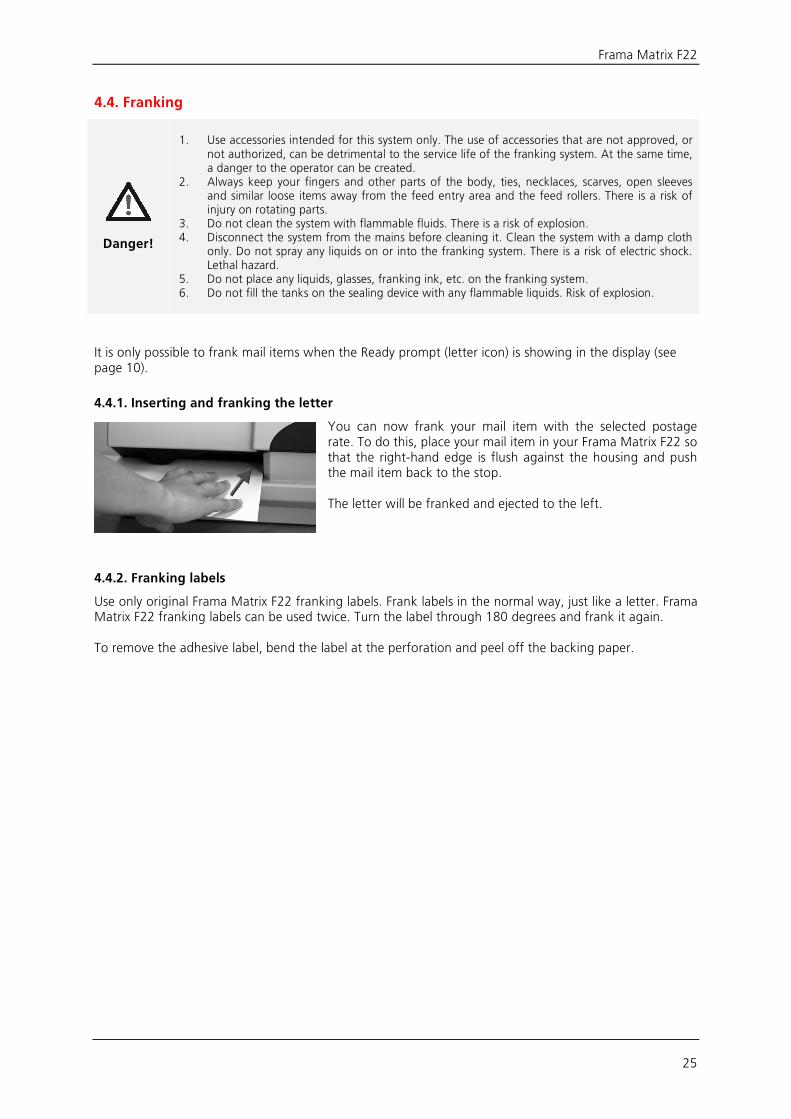
4.4.1. Inserting and franking the letter
You can now frank your mail item with the selected postage rate. To do this, place your mail item in your Frama Matrix F22 so that the right-hand edge is flush against the housing and push the mail item back to the stop. The letter will be franked and ejected to the left.
4.4.2. Franking labels
Use only original Frama Matrix F22 franking labels. Frank labels in the normal way, just like a letter. Frama Matrix F22 franking labels can be used twice. Turn the label through 180 degrees and frank it again. To remove the adhesive label, bend the label at the perforation and peel off the backing paper.
Danger!
1. Use accessories intended for this system only. The use of accessories that are not approved, or
not authorized, can be detrimental to the service life of the franking system. At the same time, a danger to the operator can be created.
2. Always keep your fingers and other parts of the body, ties, necklaces, scarves, open sleeves and similar loose items away from the feed entry area and the feed rollers. There is a risk of injury on rotating parts.
3. Do not clean the system with flammable fluids. There is a risk of explosion. 4. Disconnect the system from the mains before cleaning it. Clean the system with a damp cloth
only. Do not spray any liquids on or into the franking system. There is a risk of electric shock. Lethal hazard.
5. Do not place any liquids, glasses, franking ink, etc. on the franking system. 6. Do not fill the tanks on the sealing device with any flammable liquids. Risk of explosion.
Frama Matrix F22
26
4.5. Fitting the ink jet cassette
4.5.1. Fitting/changing the ink jet cassette
Your Frama Matrix franking system uses a double ink jet cassette to frank your mail items. The ink jet cassette also contains the printing head. You must therefore handle the ink jet cassette very carefully.
Information
1. Do not frank mail items thicker than 10 mm. You risk allowing the printing head to touch the
surface of the mail item and thus smearing the franked mark. You should therefore always use Frama Matrix franking labels for thick letters and packets.
2. Make sure that no sharp objects, such as staples, etc., can damage the sensitive surface of the printing head during franking.
3. Do not use very absorbent or fibrous envelopes which could prevent a cleanly printed mark. This could invalidate your franking.
4. The use of coloured envelopes which offer insufficient contrast with the franking mark is not permitted.
5. After a certain time the printing head is sealed to prevent the individual nozzles from drying. Do not, therefore, switch the franking system off immediately, but wait until the print head is sealed, or use the Log Off key.
6. Please run a print head test and clean the print head using the Nozzle Cleaning function should you have the impression that there are lines missing from the franked mark.
7. Do not touch the gold contact surfaces in the ink jet cassette. Grease and perspiration on your skin can leave a film which could results in “messy” print marks.
Please observe the latest installation date (see date printed on ink jet cassette) when you fit your cassette. Call up the Change Ink Jet Cassette function: 1. Press “i” in one of the start menus 2. Press the Printer Settings key 3. Press the Change Ink Jet Cassette key Open the printer cover and remove the ink jet cassette (except for first installation) by squeezing the grip surfaces together and pulling the cassette forwards out of the machine. Dispose of empty cassettes in accordance with current regulations.
Frama Matrix F22
27
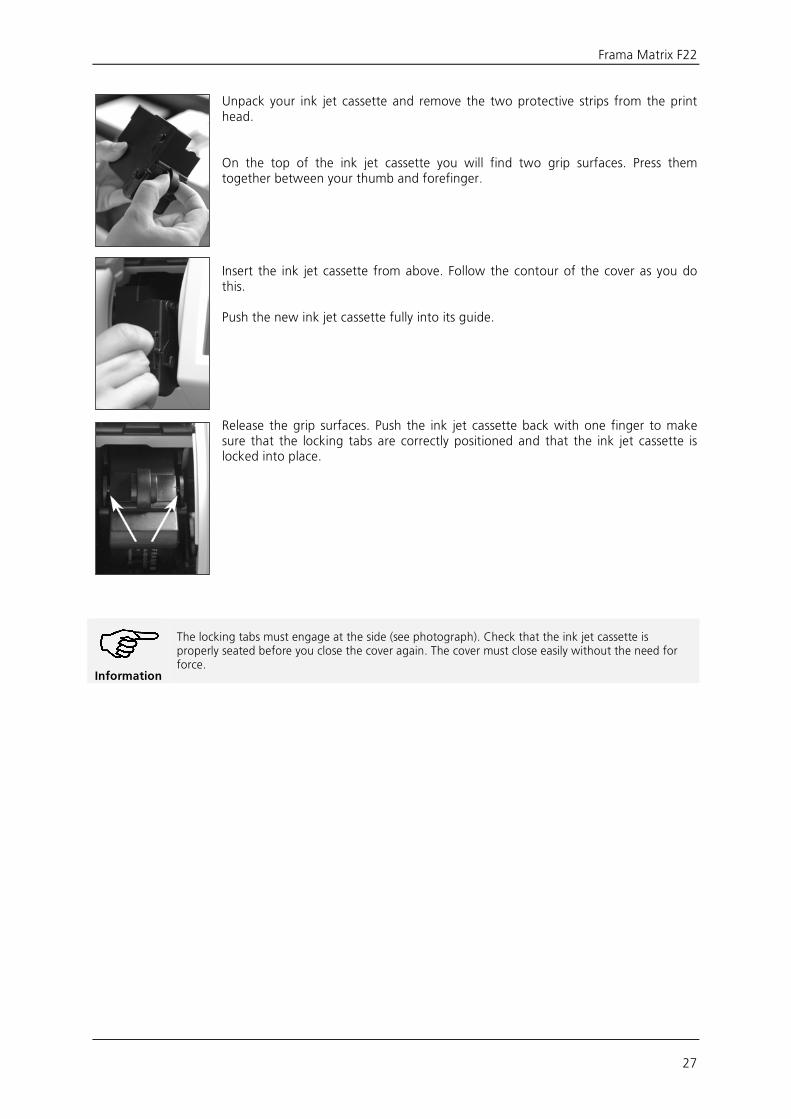
Unpack your ink jet cassette and remove the two protective strips from the print head. On the top of the ink jet cassette you will find two grip surfaces. Press them together between your thumb and forefinger. Insert the ink jet cassette from above. Follow the contour of the cover as you do this. Push the new ink jet cassette fully into its guide. Release the grip surfaces. Push the ink jet cassette back with one finger to make sure that the locking tabs are correctly positioned and that the ink jet cassette is locked into place.
Information
The locking tabs must engage at the side (see photograph). Check that the ink jet cassette is properly seated before you close the cover again. The cover must close easily without the need for force.
Frama Matrix F22
28
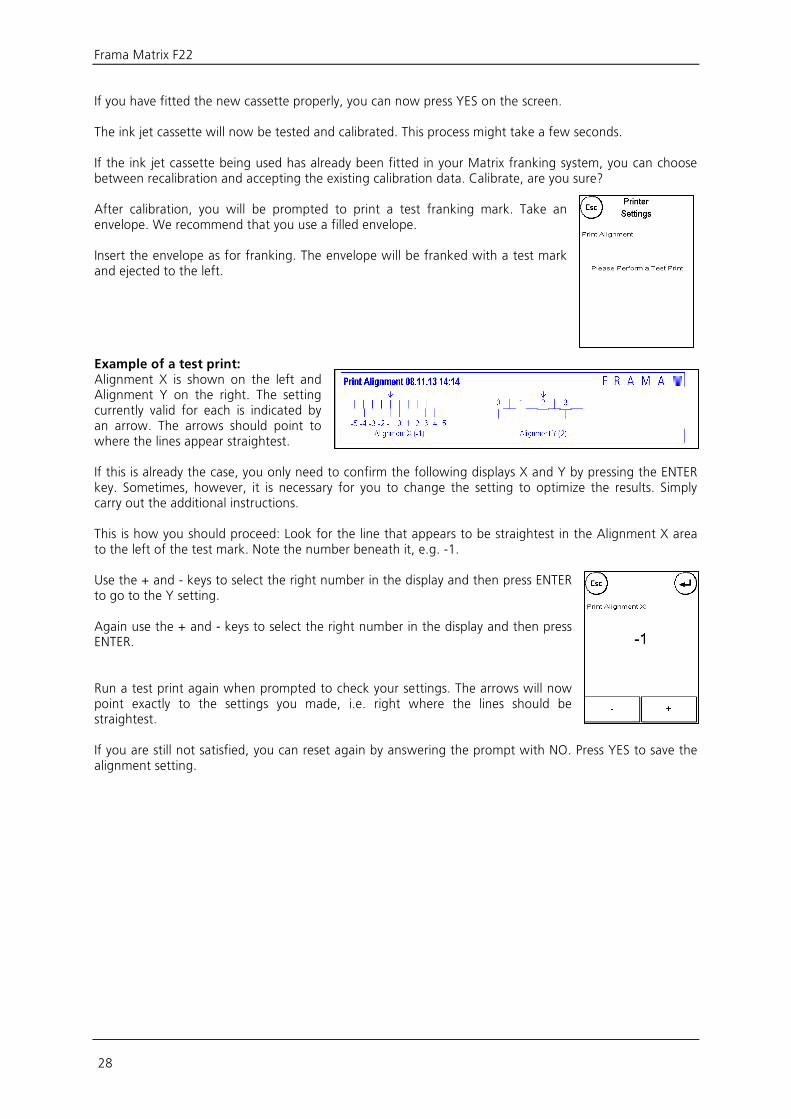
If you have fitted the new cassette properly, you can now press YES on the screen. The ink jet cassette will now be tested and calibrated. This process might take a few seconds. If the ink jet cassette being used has already been fitted in your Matrix franking system, you can choose between recalibration and accepting the existing calibration data. Calibrate, are you sure? After calibration, you will be prompted to print a test franking mark. Take an envelope. We recommend that you use a filled envelope. Insert the envelope as for franking. The envelope will be franked with a test mark and ejected to the left. Example of a test print: Alignment X is shown on the left and Alignment Y on the right. The setting currently valid for each is indicated by an arrow. The arrows should point to where the lines appear straightest. If this is already the case, you only need to confirm the following displays X and Y by pressing the ENTER key. Sometimes, however, it is necessary for you to change the setting to optimize the results. Simply carry out the additional instructions. This is how you should proceed: Look for the line that appears to be straightest in the Alignment X area to the left of the test mark. Note the number beneath it, e.g. -1. Use the + and - keys to select the right number in the display and then press ENTER to go to the Y setting. Again use the + and - keys to select the right number in the display and then press ENTER. Run a test print again when prompted to check your settings. The arrows will now point exactly to the settings you made, i.e. right where the lines should be straightest. If you are still not satisfied, you can reset again by answering the prompt with NO. Press YES to save the alignment setting.
Frama Matrix F22
29
5. Main Menu
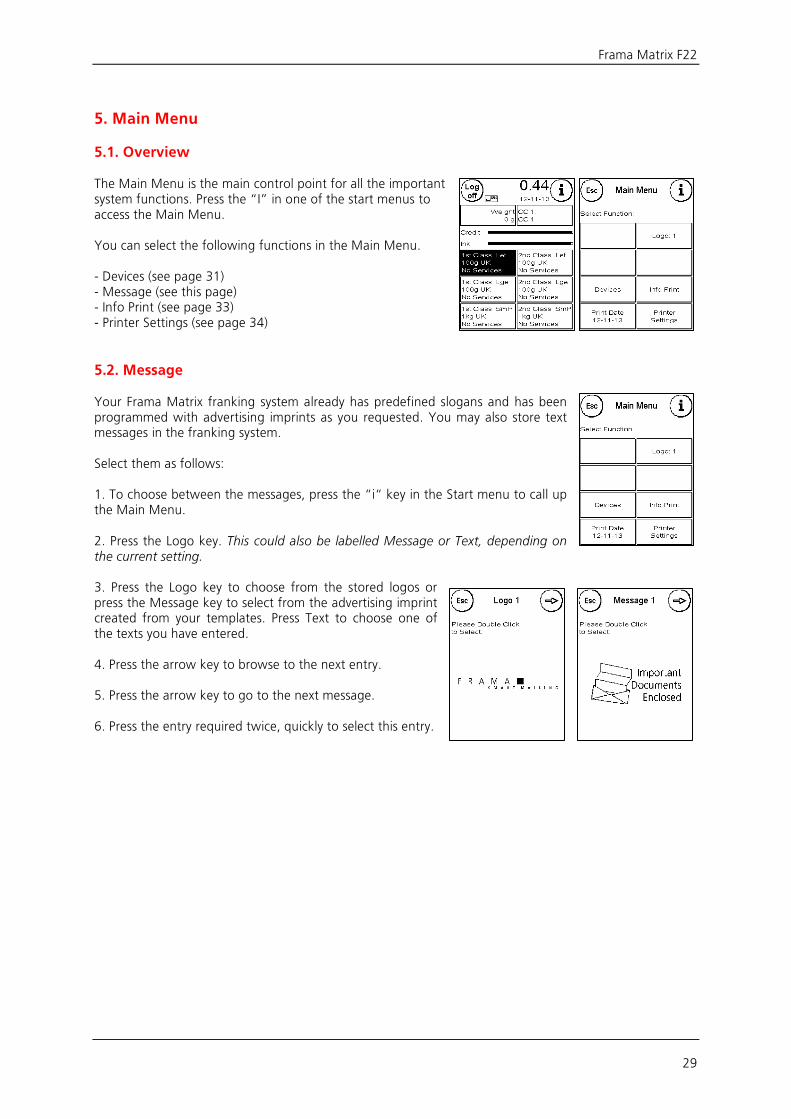
5.1. Overview The Main Menu is the main control point for all the important system functions. Press the “I” in one of the start menus to access the Main Menu. You can select the following functions in the Main Menu. - Devices (see page 31) - Message (see this page) - Info Print (see page 33) - Printer Settings (see page 34)
5.2. Message Your Frama Matrix franking system already has predefined slogans and has been programmed with advertising imprints as you requested. You may also store text messages in the franking system. Select them as follows: 1. To choose between the messages, press the “i“ key in the Start menu to call up the Main Menu. 2. Press the Logo key. qÜáë=ÅçìäÇ=~äëç=ÄÉ=ä~ÄÉääÉÇ=jÉëë~ÖÉ=çê=qÉñíI=ÇÉéÉåÇáåÖ=çå=íÜÉ=ÅìêêÉåí=ëÉííáåÖK= 3. Press the Logo key to choose from the stored logos or press the Message key to select from the advertising imprint created from your templates. Press Text to choose one of the texts you have entered. 4. Press the arrow key to browse to the next entry. 5. Press the arrow key to go to the next message. 6. Press the entry required twice, quickly to select this entry.
Frama Matrix F22
30
5.2.1. Advertising imprint text blocks
Your Matrix franking system gives you the possibility of producing your own advertising imprint text blocks and thus of drawing attention to holidays, special campaigns and events with your mail. A text block can be printed instead of a message or advertising imprint or in addition to a message or an advertising imprint.
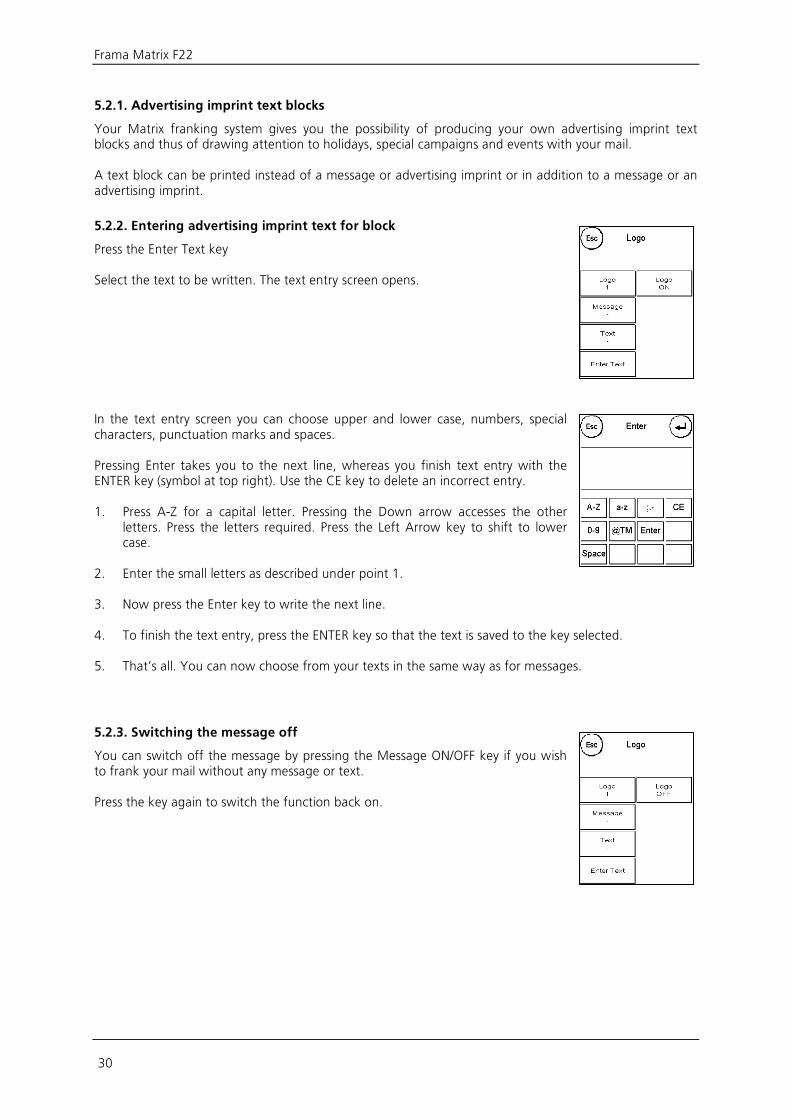
5.2.2. Entering advertising imprint text for block
Press the Enter Text key Select the text to be written. The text entry screen opens. In the text entry screen you can choose upper and lower case, numbers, special characters, punctuation marks and spaces. Pressing Enter takes you to the next line, whereas you finish text entry with the ENTER key (symbol at top right). Use the CE key to delete an incorrect entry. 1. Press A-Z for a capital letter. Pressing the Down arrow accesses the other
letters. Press the letters required. Press the Left Arrow key to shift to lower case.
2. Enter the small letters as described under point 1. 3. Now press the Enter key to write the next line. 4. To finish the text entry, press the ENTER key so that the text is saved to the key selected. 5. That’s all. You can now choose from your texts in the same way as for messages.
5.2.3. Switching the message off
You can switch off the message by pressing the Message ON/OFF key if you wish to frank your mail without any message or text. Press the key again to switch the function back on.
Frama Matrix F22
31
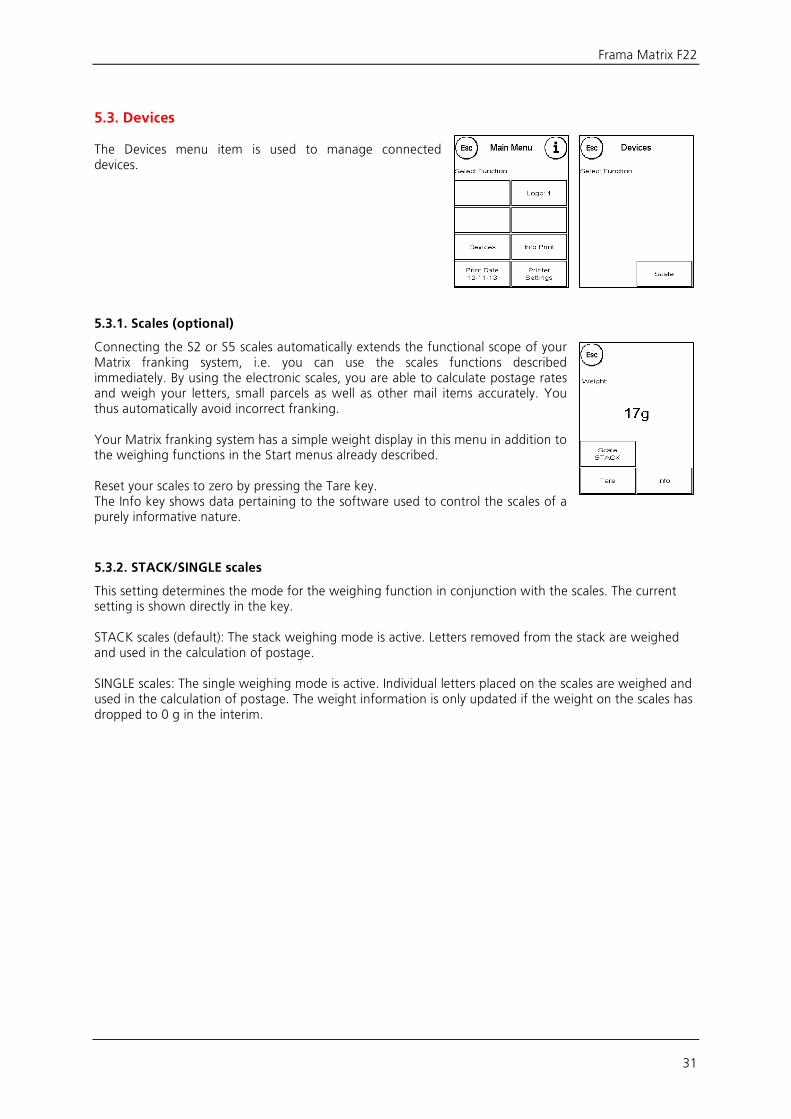
5.3. Devices The Devices menu item is used to manage connected devices.
5.3.1. Scales (optional)
Connecting the S2 or S5 scales automatically extends the functional scope of your Matrix franking system, i.e. you can use the scales functions described immediately. By using the electronic scales, you are able to calculate postage rates and weigh your letters, small parcels as well as other mail items accurately. You thus automatically avoid incorrect franking. Your Matrix franking system has a simple weight display in this menu in addition to the weighing functions in the Start menus already described. Reset your scales to zero by pressing the Tare key. The Info key shows data pertaining to the software used to control the scales of a purely informative nature.
5.3.2. STACK/SINGLE scales
This setting determines the mode for the weighing function in conjunction with the scales. The current setting is shown directly in the key. STACK scales (default): The stack weighing mode is active. Letters removed from the stack are weighed and used in the calculation of postage. SINGLE scales: The single weighing mode is active. Individual letters placed on the scales are weighed and used in the calculation of postage. The weight information is only updated if the weight on the scales has dropped to 0 g in the interim.
Frama Matrix F22
32
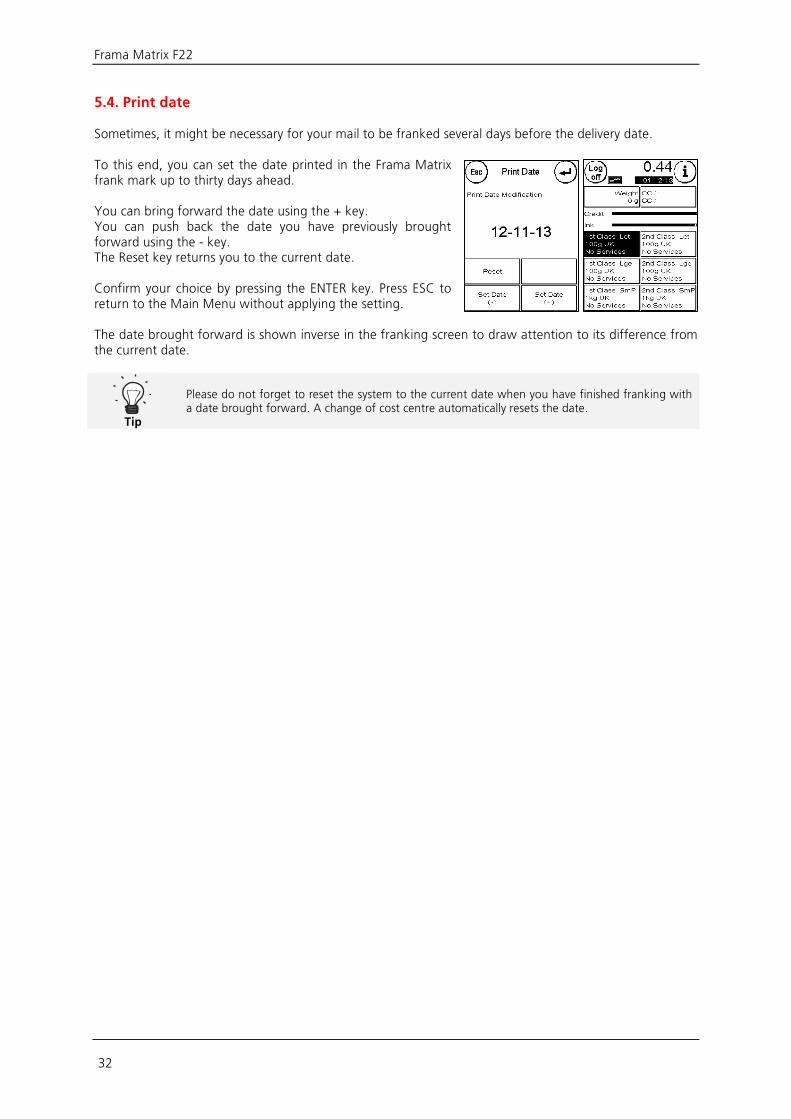
5.4. Print date Sometimes, it might be necessary for your mail to be franked several days before the delivery date. To this end, you can set the date printed in the Frama Matrix frank mark up to thirty days ahead. You can bring forward the date using the + key. You can push back the date you have previously brought forward using the - key. The Reset key returns you to the current date. Confirm your choice by pressing the ENTER key. Press ESC to return to the Main Menu without applying the setting. The date brought forward is shown inverse in the franking screen to draw attention to its difference from the current date.
Tip
Please do not forget to reset the system to the current date when you have finished franking with a date brought forward. A change of cost centre automatically resets the date.
Frama Matrix F22
33
5.5. Info Print You can set various print modes for your Matrix franking system using the Info prints. The reports are particularly important. These allow condensed information to be printed out. These reports help you by providing overviews when you are programming or, for example, they may be used as receipts after loading postage via the FramaOnline2 data centre. You can call up further Info Prints by pressing the Next key (right arrow).
5.5.1. Printing out reports
Press the key appropriate to the report you want and feed a C5/6 format envelope into your Frama Matrix franking system to print the report. You can quit the Info Print menu by pressing ESC.
5.5.2. Received stamp
You can convert your Matrix franking system into a received stamping machine. Select the Date Stamping function in the Info Print menu. This mode changes to a different franking mark. No postage is used.
5.5.3. FramaOnline2 report
The FramaOnline2 report acts as a receipt for the transaction concerned. You receive information about the sum loaded and the composition of the current credit. The check amount corresponds to the total of all amounts loaded, and it also helps you when you check your transactions. There are also other FramaOnline2 related reports available when you press the arrow key (Proforma Invoice and FO2 Statement).
5.5.4. Logo imprint
The Logo print function in the Info Print menu allows you to print the advertising imprint only. All relevant postage information is hidden. This mode does not consume postage.
5.5.5. Setup report (setup settings)
The setup report summarizes certain settings of Setup menu 2 (Admin mode) in a clear layout.
5.5.6. CC report
The cost centre report is a clearly laid out report of the data for the current cost centre or for a selected cost centre (Admin mode). You receive the cost centre data for the periods and the overall counter level (not resettable).
5.5.7. Statistics report
The statistics report is used to print out the statistics for the current period. The data collected correspond to the items you have mailed in the time between two connections with the FramaOnline2 data centre. The report extends over several pages (depending on the volume of statistics). After connecting with the FramaOnline2 data centre, the statistics are automatically deleted and then recompiled using your consumption data.
5.5.8. Specimen
Use this function to run a postage test print to allow you to assess the print quality, for instance. No post-age is used. The postage test prints may not be used for franking mail items.
Frama Matrix F22
34
5.6. Printer Settings
Information
1. Do not frank mail items thicker than 10 mm. You risk allowing the printing head to touch the
surface of the mail item and thus smearing the franked mark. You should therefore always use Frama Matrix franking labels for thick letters and packets.
2. Please make sure that no sharp objects, such as paper clips, are near the franking zone. This can damage the print head.
3. Do not use very absorbent or fibrous envelopes which could prevent a cleanly printed mark. This could invalidate your franking.
4. The use of coloured envelopes which offer insufficient contrast with the franking mark is not permitted.
5. After a certain time the printing head is sealed to prevent the individual nozzles from drying. Do not, therefore, switch the franking system off immediately, but wait until the print head is sealed, or use the Log off button.
6. Please run a print head test and clean the print head using the Nozzle Cleaning function should you have the impression that there are lines missing from the franked mark.
7. Always use the functions from the Printer Settings menu. Replacing the print head without adjusting the alignment and testing from the Printer Settings menu can lead to inadequate quality of the franking mark.
The Printer Settings menu gives you access to the options and functions required for perfect printing. The functions in the Printer Settings menu are described in sequence below.
5.6.1. Nozzle test
A franking mark test is incorporated in your Frama Matrix franking system. This test activates each individual nozzle in the printing head. This enables you to easily locate defective nozzles, and also to determine the scope of the cleaning program. Press the Nozzle Test key and insert an envelope or similar into the system. A test franking mark is made. Check whether all lines have printed. Run Nozzle Cleaning if necessary.
5.6.2. Nozzle cleaning
White lines in the print mark or lines missing from the nozzle test print mean that the print head must be cleaned to restore the print quality.
Information
Blocked nozzles are often the result of the electric supply being disconnected before the nozzles could be properly sealed. Always use the system shut-down function to switch off your franking system reliably.
Two cleaning programmes are available to you for cleaning the nozzles: Nozzle cleaning: A normal print head cleaning operation is run. The print head and the nozzles are cleaned. Nozzle cleaning +: Intensive flushing and cleaning of the nozzles and the print head. Press the appropriate key to call up the programme you need. The cleaning programme starts automatically. It is advisable to run the Nozzle Test function afterwards to check how satisfactory the cleaning operation was.

Frama Matrix F22
35
5.6.3. Changing the ink jet cassette
Information
Caution: Make sure that the ink jet cassette has been stored at room temperature for at least three hours before you fit it.
Press the Change Ink Jet Cassette key in the Main Menu and confirm by pressing YES. Open the top cover flap. Remove the ink jet cassette by squeezing together the grip surfaces on the cassette and pulling it out upwards. Follow the instructions on page 26 to install and align the new ink jet cassette and print head correctly.
5.6.4. Print alignment
Use this function to run the adjustment of the print quality for franking separately. Normally, alignment is run as part of the configuration following a change of ink jet cassette.
5.6.5. Print head new calibration
Recalibrate the print head (ink jet cassette) if the overall print quality is not satisfactory.
Frama Matrix F22
36
6. Counter readings You can access the counter readings from the Main Menu by pressing the “i“ key. The data for the current cost centre is first: oJs~äìÉLoJkìãÄÉêW Resettable counters for the cost centre. R-Value shows the postage used since the last time this counter was reset. R-Number shows the number of mail items franked since the counter was reset the last time. qJkìãÄÉêLqJs~äìÉW Total counter readings for the cost centre. (Number counter and franked value) since the cost centre was set up. The system values are listed in addition to the values for the current cost centre: qJkìãÄÉêLqJs~äìÉW Total counter readings for the franking system (number counter and franked value) since the franking system was first used. The total number counter might already show an initial figure because of the tests run before your Matrix franking system was supplied. `êÉÇáíW This is the postage still available in your franking system. `ÜÉÅâ= ëìãW This is the sum of the credit and T-Value. This amounts to the total credit drawn from FramaOnline2.
Frama Matrix F22
37
7. Setup (settings) You can adjust various settings for your Frama Matrix franking system in the Setup menu. Outside Admin mode, you only have the Setup 1 menu available. Press the “i“ key on the Main Menu. Then press the Spanner to access the Setup menu. `~ääáåÖ=ìé=íÜÉ=pÉíìé=ãÉåì=
Press “i” Press “i” Press spanner
Use the arrow key to access two further Setup menus in Admin mode. Press ESC to return.
7.1. Setup menu 1 The description below lists the various functions and settings in the Setup 1 menu from top to bottom. Press the key for the function required and follow the instructions on the screen.
7.1.1. Touch screen
Use this function to adjust the screen contrast to your requirements. Simply press this key and use + or - to adjust to the desired contrast. Apply the modified setting by pressing ENTER.
7.1.2. Language
Your Frama Matrix franking system has a number of languages built in. Switch to the language you require using this function. The current setting is shown in the key. Changing language within a cost centre only changes the operating language, it does not change the language of the tariff module. An inspection loading must be run to also change the language for the tariff module. It is only possible to change the language for the tariff module in Admin mode.
7.1.3. System Info
This key displays a system overview. This information and the information in the status list provides important input for our customer service.
7.1.4. Status List
This key displays a status list. This data and the data in the system information provide important input for our customer service.
7.1.5. Start Up/Log Off
Use this key to restart the system after you have adjusted settings. Pressing Start Up/Log Off takes you straight to cost centre selection.
Frama Matrix F22
38
7.1.6. Save Start Menu
Here you can save a Start Menu as the default. The Start menu saved will automatically be preset after every restart or after a change of cost centre.
7.1.7. Change PINs
This is used for setting up cost centres in Admin mode or for changing the PIN and name of the current cost centre. Please read page 43 for more detailed information.
7.1.8. Reset Counters
Please read page 43 for more detailed information.
Frama Matrix F22
39
7.2. Setup 2 menu Setup 2 menu can only be called up in Admin mode (see page 41).
7.2.1. High Value
This setting determines that amount from which, for security reasons, you must confirm the postage value before this amount can be franked. The default setting is £10.00. Enter the new value and confirm your input by pressing ENTER.
7.2.2. Max. Value
Define the maximum permitted franking value with this setting. Press the key, enter the value and confirm by pressing OK or ENTER (default = £100.00).
7.2.3. Key Beep
Used to switch the key beep on and off. Press the key to switch the beep ON or OFF. This setting also affects the signal in batch weighing (default = ON).
7.2.4. Auto Log off
Use this function to define the time until the current cost centre is closed and the Select Cost Centre screen is called up. Entering 0 minutes switches this function off (default = 10 minutes).
7.2.5. FramaOnline2
The FramaOnline2 functions are explained in detail from page 44.
7.2.6. Low Credit
This setting checks the amount of postage available and warns you in good time that the level is getting too low. Press the Low Credit key to change this setting. Enter the new value. Confirm your change by pressing OK (default = £100.00).
7.2.7. PIN Code
Used to switch the PIN input on or off. The PIN Code ON setting means that a PIN must be entered in the Select Cost Centre function. The PIN Code OFF setting switches off the request for PIN Code input. The Admin mode is not affected by this.
7.2.8. Delete CC
Here you can specify whether the cost centres may be deleted outside Admin mode.

Frama Matrix F22
40
7.3. Setup 3 menu Setup 3 menu can be only be called up in Admin mode.
7.3.1. Logo
Use this setting to define whether all cost centres need to work with the same logo or whether each cost centre may use an individual logo (default = Logo CC). içÖç=pvpqbjW All cost centres automatically use the logo defined in Admin mode. The Admin mode has an appropriate function in the Main Menu where you can define the logo. içÖç=``= EÇÉÑ~ìäíFW Each cost centre can use an individual logo. The logo is configured accordingly each time a cost centre is called up.
7.3.2. Reset Product on Log Off
This setting defines the response of the start menu when a cost centre is changed (default = OFF). pÉííáåÖ=lkW The current mail product is reset and must be re-entered when the cost centre is changed. pÉííáåÖ=lccW The current product is retained when the cost centre is changed.
Frama Matrix F22
41
8. Admin mode Settings made in the Admin mode always apply to all cost centres. In Admin mode you also have access to all cost centres and can thus conveniently make settings for these cost centres (counter readings, name and PIN). The additional features demanded by Admin mode are described below.
Tip
You can also make settings in each cost centre. However, when you do this not all the Admin mode functions are available to you.
8.1. Log in Admin mode is selected by pressing the Admin key from the Select Cost Centre screen. This mode is always password-protected, even if you have switched off PIN Code entry for the cost centres. Press the Admin key to access Admin mode. Enter your PIN. The default PIN is 1234. Confirm your PIN Code input by pressing OK.
Tip
Save the PIN for the Admin mode in a safe place. The PIN can only be reset by a service technician at your premises or in the central workshop. This service is chargeable.
Frama Matrix F22
42
8.2. Main Menu
You are taken to the Main Menu after logging in. Franking is not possible in Admin mode. The Admin functions in the Main Menu are described below.
8.2.1. Devices
8.2.1.1. Scales
There are no special features in Admin mode.
8.2.2. Logo
Specify the logo setting system-wide (to do this, in the Setup 3 menu, activate Logo: System. The other functions in the Logo menu do not differ from the descriptions from page 29
8.2.3. Info Print
A list of all the cost centres can be printed out using the Report CC key in Admin mode. All other reports and print options correspond to the descriptions given earlier in this operating manual (see section 5.5. Info Print from page 33).
8.2.4. Printer Settings
The Printer Settings menu item does not offer any additional functions in the Admin menu.
8.3. Counter Readings You can display the counter readings of each cost centre shown in Admin mode. You can call up one cost centre or a list of cost centres for this function. pÉäÉÅí=``W Press this key to call up the function. Select the cost centre. ``= äáëíW Here you can define a range of cost centres for the display of cost centre data. First, enter the number of the cost centre from which the data should be shown. Press OK. Then select the number of the last cost centre to be shown. Continue to the Counter Readings menu using the arrow key. Press ESC to quit the display.
Tip
Only those settings that you have defined as SYSTEM in the Setup 3 menu, such as the logo, can be adjusted.
Frama Matrix F22
43
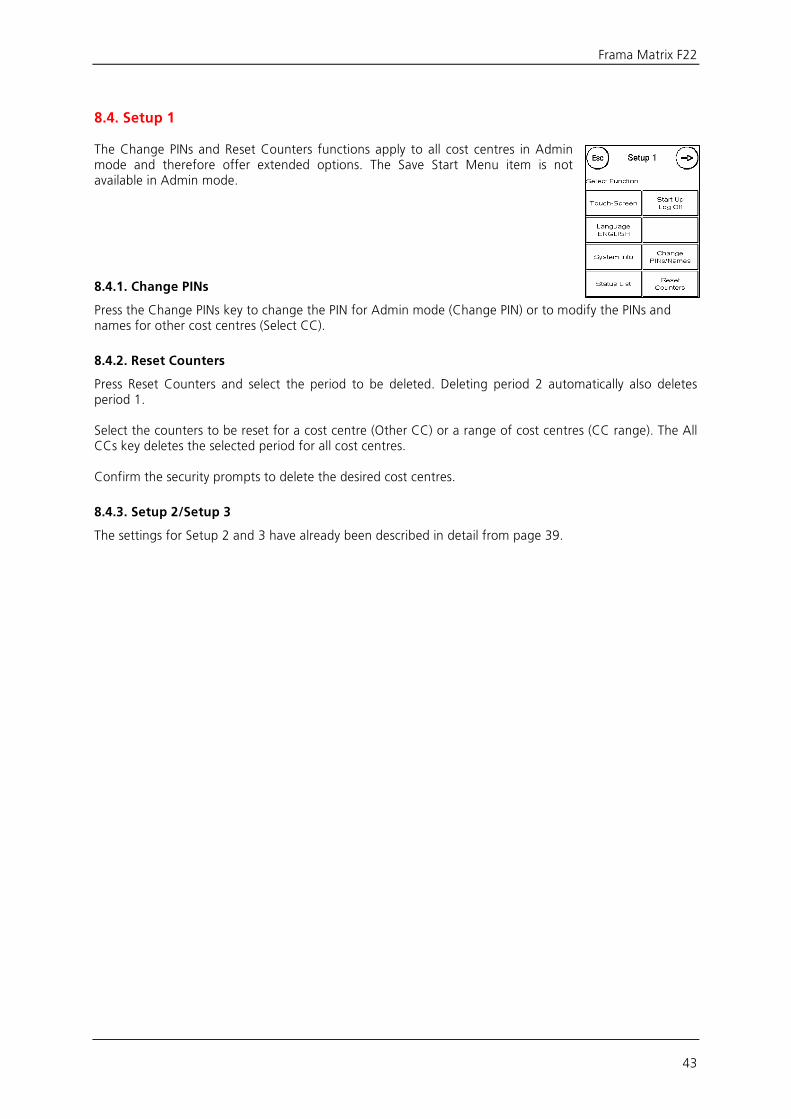
8.4. Setup 1 The Change PINs and Reset Counters functions apply to all cost centres in Admin mode and therefore offer extended options. The Save Start Menu item is not available in Admin mode.
8.4.1. Change PINs
Press the Change PINs key to change the PIN for Admin mode (Change PIN) or to modify the PINs and names for other cost centres (Select CC).
8.4.2. Reset Counters
Press Reset Counters and select the period to be deleted. Deleting period 2 automatically also deletes period 1. Select the counters to be reset for a cost centre (Other CC) or a range of cost centres (CC range). The All CCs key deletes the selected period for all cost centres. Confirm the security prompts to delete the desired cost centres.
8.4.3. Setup 2/Setup 3
The settings for Setup 2 and 3 have already been described in detail from page 39.
Frama Matrix F22
44
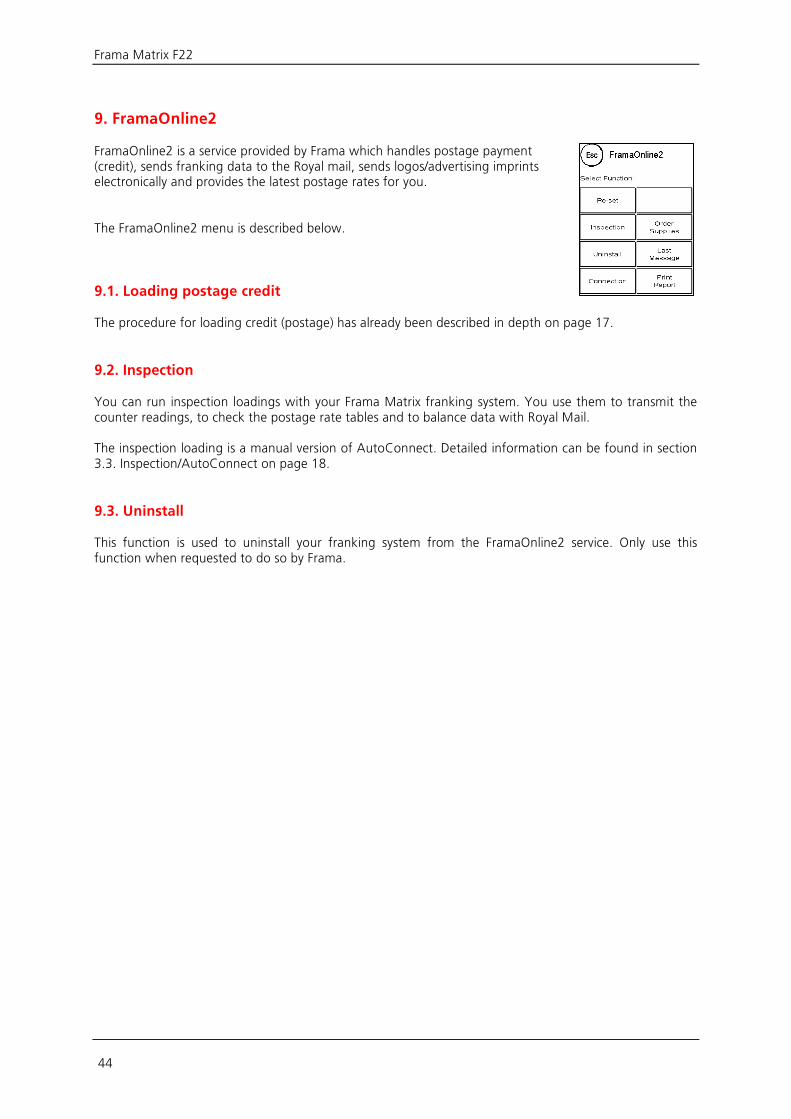
9. FramaOnline2 FramaOnline2 is a service provided by Frama which handles postage payment (credit), sends franking data to the Royal mail, sends logos/advertising imprints electronically and provides the latest postage rates for you. The FramaOnline2 menu is described below.
9.1. Loading postage credit The procedure for loading credit (postage) has already been described in depth on page 17.
9.2. Inspection You can run inspection loadings with your Frama Matrix franking system. You use them to transmit the counter readings, to check the postage rate tables and to balance data with Royal Mail. The inspection loading is a manual version of AutoConnect. Detailed information can be found in section 3.3. Inspection/AutoConnect on page 18.
9.3. Uninstall This function is used to uninstall your franking system from the FramaOnline2 service. Only use this function when requested to do so by Frama.
Frama Matrix F22
45
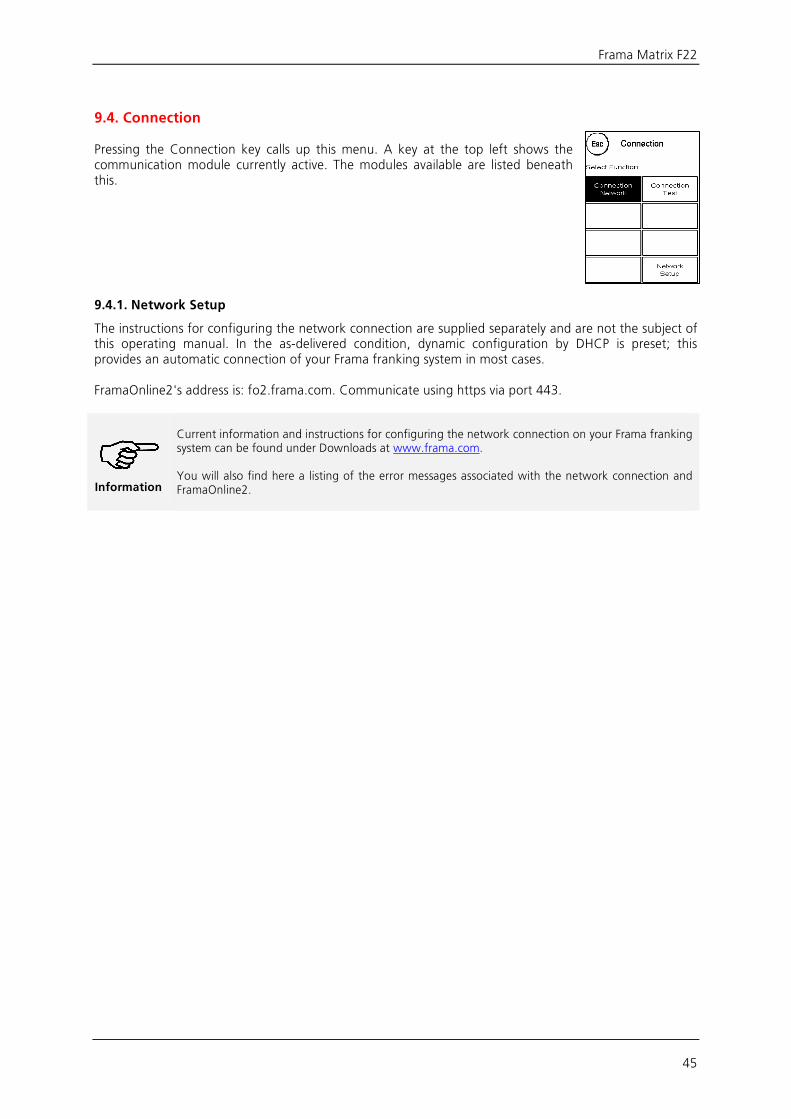
9.4. Connection Pressing the Connection key calls up this menu. A key at the top left shows the communication module currently active. The modules available are listed beneath this.
9.4.1. Network Setup
The instructions for configuring the network connection are supplied separately and are not the subject of this operating manual. In the as-delivered condition, dynamic configuration by DHCP is preset; this provides an automatic connection of your Frama franking system in most cases. FramaOnline2's address is: fo2.frama.com. Communicate using https via port 443.
Information
Current information and instructions for configuring the network connection on your Frama franking system can be found under Downloads at www.frama.com. You will also find here a listing of the error messages associated with the network connection and FramaOnline2.
Frama Matrix F22
46
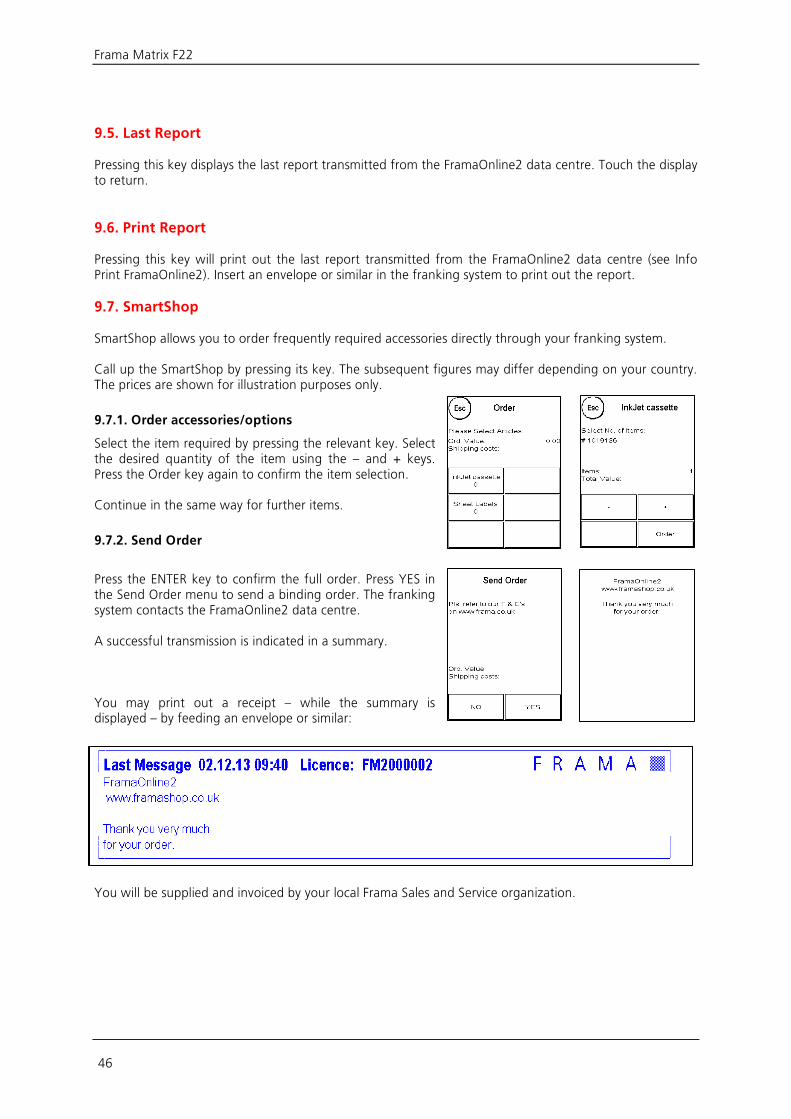
9.5. Last Report Pressing this key displays the last report transmitted from the FramaOnline2 data centre. Touch the display to return.
9.6. Print Report Pressing this key will print out the last report transmitted from the FramaOnline2 data centre (see Info Print FramaOnline2). Insert an envelope or similar in the franking system to print out the report.
9.7. SmartShop SmartShop allows you to order frequently required accessories directly through your franking system. Call up the SmartShop by pressing its key. The subsequent figures may differ depending on your country. The prices are shown for illustration purposes only.
9.7.1. Order accessories/options
Select the item required by pressing the relevant key. Select the desired quantity of the item using the – and + keys. Press the Order key again to confirm the item selection. Continue in the same way for further items.
9.7.2. Send Order
Press the ENTER key to confirm the full order. Press YES in the Send Order menu to send a binding order. The franking system contacts the FramaOnline2 data centre. A successful transmission is indicated in a summary. You may print out a receipt – while the summary is displayed – by feeding an envelope or similar:
You will be supplied and invoiced by your local Frama Sales and Service organization.
EUR
Frama Matrix F22
47
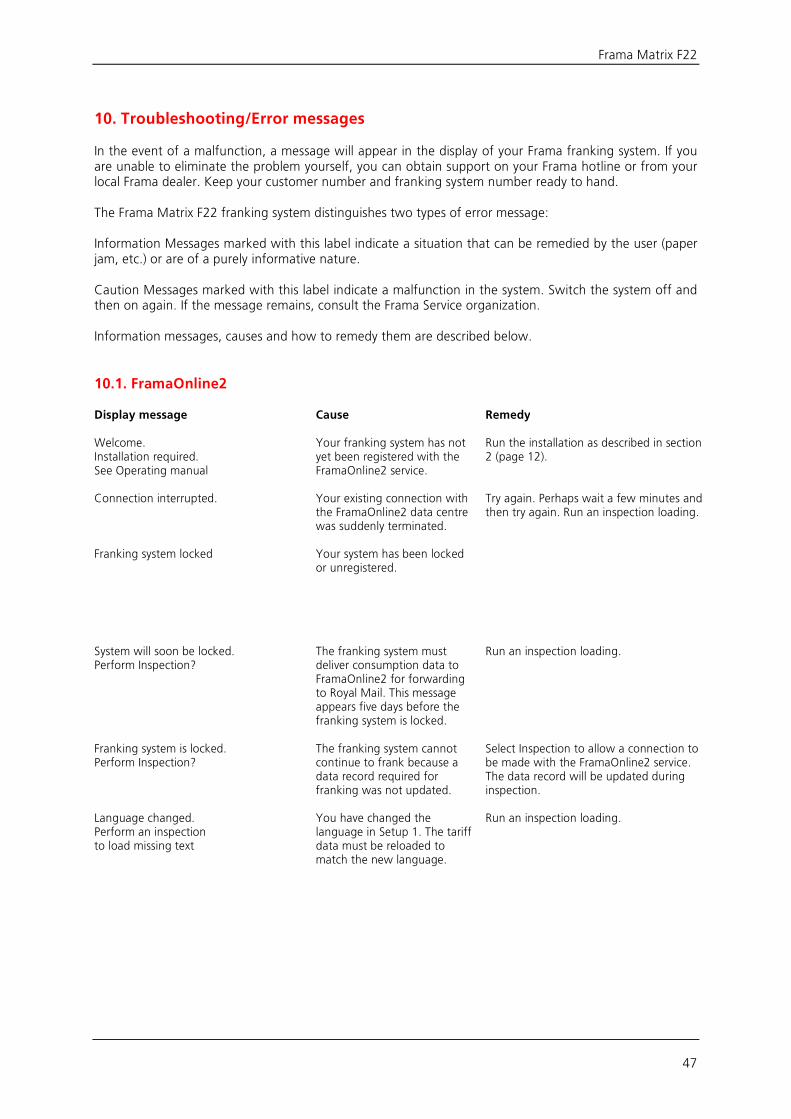
10. Troubleshooting/Error messages In the event of a malfunction, a message will appear in the display of your Frama franking system. If you are unable to eliminate the problem yourself, you can obtain support on your Frama hotline or from your local Frama dealer. Keep your customer number and franking system number ready to hand. The Frama Matrix F22 franking system distinguishes two types of error message: Information Messages marked with this label indicate a situation that can be remedied by the user (paper jam, etc.) or are of a purely informative nature. Caution Messages marked with this label indicate a malfunction in the system. Switch the system off and then on again. If the message remains, consult the Frama Service organization. Information messages, causes and how to remedy them are described below.
10.1. FramaOnline2 Display message Cause Remedy Welcome. Installation required. See Operating manual
Your franking system has not yet been registered with the FramaOnline2 service.
Run the installation as described in section 2 (page 12).
Connection interrupted. Your existing connection with
the FramaOnline2 data centre was suddenly terminated.
Try again. Perhaps wait a few minutes and then try again. Run an inspection loading.
Franking system locked Your system has been locked
or unregistered.
System will soon be locked. Perform Inspection?
The franking system must deliver consumption data to FramaOnline2 for forwarding to Royal Mail. This message appears five days before the franking system is locked.
Run an inspection loading.
Franking system is locked. Perform Inspection?
The franking system cannot continue to frank because a data record required for franking was not updated.
Select Inspection to allow a connection to be made with the FramaOnline2 service. The data record will be updated during inspection.
Language changed. Perform an inspection to load missing text
You have changed the language in Setup 1. The tariff data must be reloaded to match the new language.
Run an inspection loading.
Frama Matrix F22
48
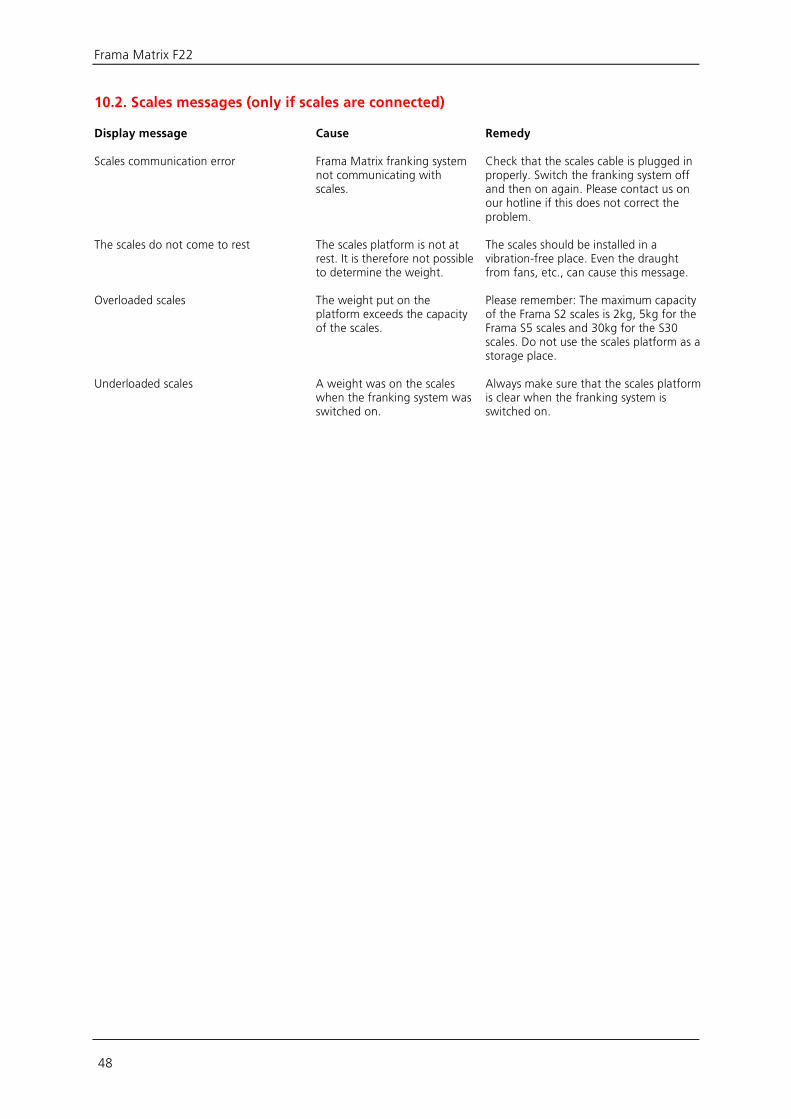
10.2. Scales messages (only if scales are connected) Display message Cause Remedy Scales communication error Frama Matrix franking system
not communicating with scales.
Check that the scales cable is plugged in properly. Switch the franking system off and then on again. Please contact us on our hotline if this does not correct the problem.
The scales do not come to rest The scales platform is not at
rest. It is therefore not possible to determine the weight.
The scales should be installed in a vibration-free place. Even the draught from fans, etc., can cause this message.
Overloaded scales The weight put on the
platform exceeds the capacity of the scales.
Please remember: The maximum capacity of the Frama S2 scales is 2kg, 5kg for the Frama S5 scales and 30kg for the S30 scales. Do not use the scales platform as a storage place.
Underloaded scales A weight was on the scales
when the franking system was switched on.
Always make sure that the scales platform is clear when the franking system is switched on.
Frama Matrix F22
49
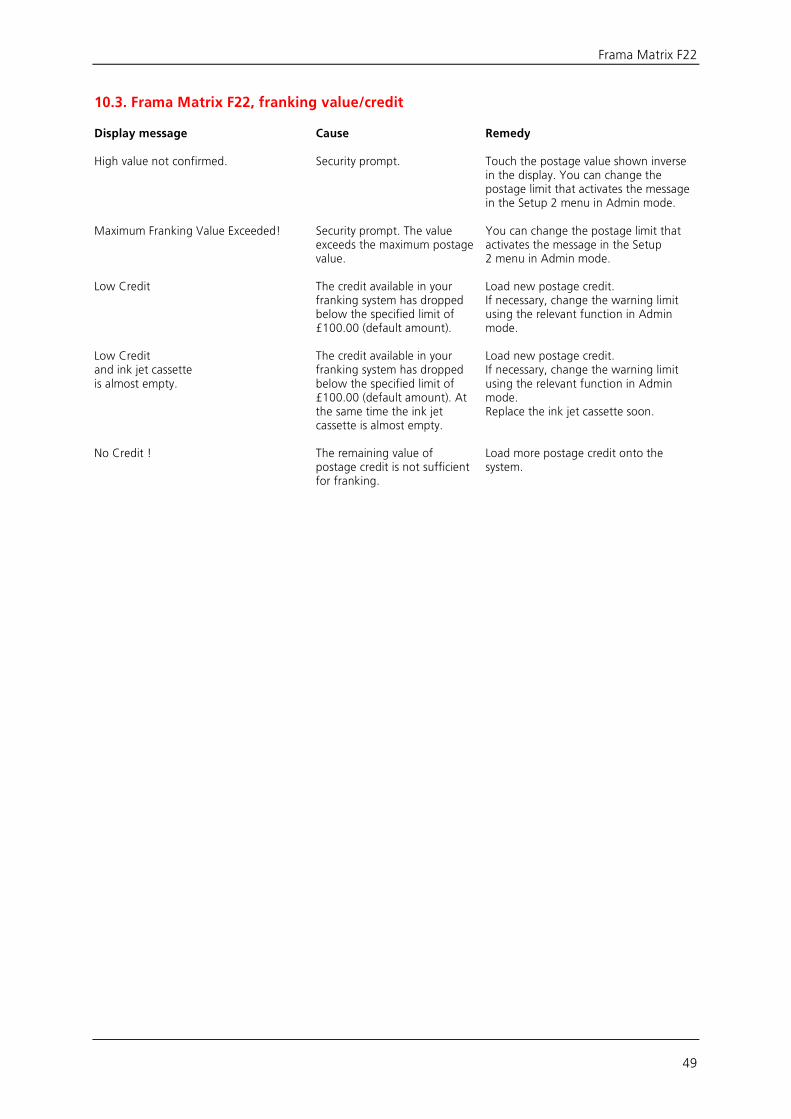
10.3. Frama Matrix F22, franking value/credit Display message Cause Remedy High value not confirmed. Security prompt. Touch the postage value shown inverse
in the display. You can change the postage limit that activates the message in the Setup 2 menu in Admin mode.
Maximum Franking Value Exceeded! Security prompt. The value
exceeds the maximum postage value.
You can change the postage limit that activates the message in the Setup 2 menu in Admin mode.
Low Credit The credit available in your
franking system has dropped below the specified limit of £100.00 (default amount).
Load new postage credit. If necessary, change the warning limit using the relevant function in Admin mode.
Low Credit and ink jet cassette is almost empty.
The credit available in your franking system has dropped below the specified limit of £100.00 (default amount). At the same time the ink jet cassette is almost empty.
Load new postage credit. If necessary, change the warning limit using the relevant function in Admin mode. Replace the ink jet cassette soon.
No Credit ! The remaining value of
postage credit is not sufficient for franking.
Load more postage credit onto the system.
Frama Matrix F22
50
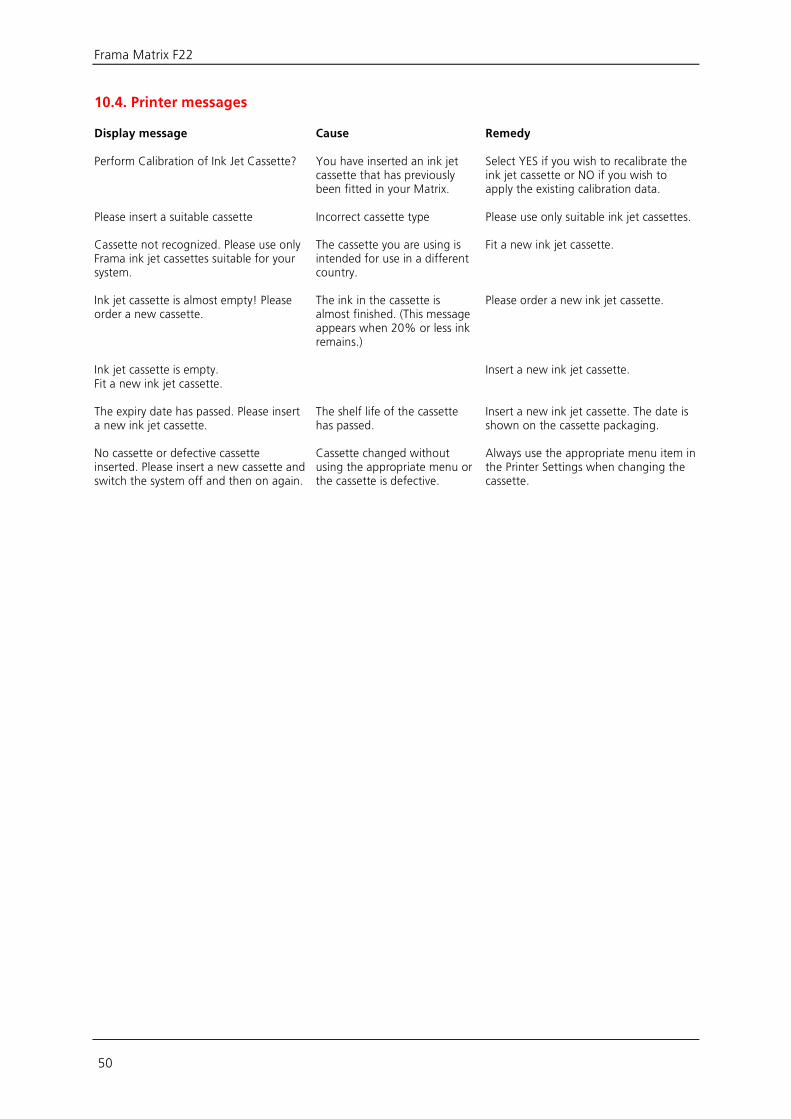
10.4. Printer messages Display message Cause Remedy Perform Calibration of Ink Jet Cassette? You have inserted an ink jet
cassette that has previously been fitted in your Matrix.
Select YES if you wish to recalibrate the ink jet cassette or NO if you wish to apply the existing calibration data.
Please insert a suitable cassette Incorrect cassette type Please use only suitable ink jet cassettes. Cassette not recognized. Please use only Frama ink jet cassettes suitable for your system.
The cassette you are using is intended for use in a different country.
Fit a new ink jet cassette.
Ink jet cassette is almost empty! Please order a new cassette.
The ink in the cassette is almost finished. (This message appears when 20% or less ink remains.)
Please order a new ink jet cassette.
Ink jet cassette is empty. Fit a new ink jet cassette.
Insert a new ink jet cassette.
The expiry date has passed. Please insert a new ink jet cassette.
The shelf life of the cassette has passed.
Insert a new ink jet cassette. The date is shown on the cassette packaging.
No cassette or defective cassette inserted. Please insert a new cassette and switch the system off and then on again.
Cassette changed without using the appropriate menu or the cassette is defective.
Always use the appropriate menu item in the Printer Settings when changing the cassette.
Frama Matrix F22
51
11. Technical data
11.1. General Matrix F22 speed: 1600 letters/hour Maximum letter thickness: 10 mm Display: graphical, touch-sensitive screen Default process: FramaOnline2 Number of fixed stored advertising messages: 3 Number of customer-specific advertising messages: up to 5 Number of freely definable texts: 2 Dimensions of advertising message: 52 x 25 mm
11.2. Envelope/envelope flap dimensions Minimum format (length x width) 137 mm x 95 mm Maximum format (length x width) 353 mm x 353 mm Minimum opacity of envelopes/cards Minimum thickness of cards 0.1 mm Minimum thickness of envelopes 0.1 mm Maximum envelope thickness: 10mm
cáÖìêÉW=cçêã~íë=~åÇ=ÇáãÉåëáçåë== =

Frama Matrix F22
52
11.3. Power supply rating Matrix F22: 24V DC, 200 mA PSU: 100 – 240 V, 50&60 Hz, 1.5 A

Frama Matrix F22
53
11.4. Dimensions and weight Dimensions (L x H x W): 305 x 205 x 210 Weight: 6.8 kg
11.5. Accessories See www.framashop.co.uk or speak to your local Frama Sales and Service partner.
Frama Matrix F22
54
11.6. Storage and operating conditions Matrix F22operating conditions Temperature range: 10°C – 40°C Relative air humidity: 10% – 80% (not condensing) Approved for indoor use only up to a maximum of 4000 metres above sea level. Overvoltage category II Pollution degree 2
Ink jet cassette operating conditions: Temperature range: 10°C – 40°C Relative air humidity: 10% – 80%
Ink jet cassette storage conditions: Temperature range: 10°C – 30°C Relative air humidity: 5% – 80%
Frama Matrix F22
55
12. EC-Declaration of Conformity in accordance with the EEC low-voltage directive 2006/95/EG in accordance with appendix III B; of December 12, 2006 Hereby we explain that those corresponds to below designated products in its conception and design as well as in circulation the execution the fundamental safety and health requirements of the Community directive low-voltage brought by us. In the case of a change of the product not co-ordinated with us this explanation loses its validity. Manufacturer: Frama AG Dorfstrasse 6 CH-3438 Lauperswil Description of the electrical equipment: Product name: Matrix F22 Type: Franking system The agreement with further valid guidelines/regulations following for the product is explained: EMC Directive (2004/108/EG) of December 15, 2004 Reference to the harmonised standards: EN 60950-1:2006/AC:2011 EN 55014-1:2006 + A1:2009 + A2:2011 EN 55014-2:1997 + A1:2001 + A2:2008 EN 55022:2010 EN 55024:2010 EN 61000-6-1:2007 EN 61000-6-3:2007 + A1:2011 EN 61000-3-2:2006 + A1:2009 + A2:2009 EN 61000-3-3:2008 Lauperswil, November 1, 2013
Thomas P. Haug CEO
Frama Matrix F22
56
13. Index
A
Accessories ..................................................... 53 Admin mode ................................................... 41 Advertising imprint ......................................... 33 Advertising imprint text blocks ........................ 30 Auto Log off ................................................... 39
B
Bring date forward .......................................... 32
C
Calibrate ......................................................... 28 CC report........................................................ 33 Change PINs ............................................. 38, 43 Changing the ink jet cassette .......................... 35 Check sum ...................................................... 36 Communications module ................................ 13 Connection ..................................................... 45 Connections ................................................... 12 Controls .......................................................... 10 Cost centre name ........................................... 20 Cost centre PIN ............................................... 20 Cost centres .................................................... 19 Counter readings ...................................... 20, 36 Counter Readings ........................................... 42 CreditW ............................................................ 36
D
Declaration of Conformity ............................... 55 Delete CC ....................................................... 39 Detail-guided ............................................ 21, 22 Determining postage value ............................. 21 Determining the weight .................................. 23 Devices ........................................................... 31 Dimensions of advertising message: ................ 51 Disposal ............................................................ 9
E
Entering advertising imprint text for block ....... 30 Envelope formats ............................................ 51 Error messages ................................................ 47
F
Fitting the ink jet cassette ............................... 26 FramaOnline2 ........................ 14, 17, 39, 44, 47 FramaOnline2 report ....................................... 33 Franking.......................................................... 25
H
High Value ...................................................... 39
I
Info Print ................................................... 33, 42 Inspection ....................................................... 44 Inspection/AutoConnect ................................. 18 Installation ...................................................... 12
Installation notes .............................................. 7 Installing the ink jet cassette ........................... 16
K
Key Beep ........................................................ 39
L
Language ....................................................... 37 Last Report ..................................................... 46 Loading postage credit ................................... 17 Loading postage credit ................................... 44 Log in ............................................................. 41 Logo......................................................... 40, 42 Low Credit ..................................................... 39
M
Main Menu .............................................. 29, 42 Mains connection ........................................... 13 Max. Value ..................................................... 39 Maximum letter thickness:.............................. 51 Messages ....................................................... 29
N
Nozzle Cleaning ............................................. 34 Nozzle Cleaning + .......................................... 34 Nozzle Test ..................................................... 34 Numeric keypad ....................................... 21, 23
O
OneTouch ...................................................... 21 Operating conditions ...................................... 54 Order accessories ........................................... 46
P
PIN Code ........................................................ 39 Postage scales ................................................ 23 Power supply .................................................. 52 Print Alignment .............................................. 35 Print date ....................................................... 32 Print Head New Calibration ............................ 35 Print Report .................................................... 46 Printer Settings ......................................... 34, 42 Printing out reports ........................................ 33
R
R1-value/R1-number ....................................... 36 Receipt stamping machine.............................. 33 Received stamp .............................................. 33 Recycling .......................................................... 9 Report system ................................................ 33 Reset Counters ............................................... 38 Reset Product on Log Off ............................... 40 Restart System ................................................ 19
S
Safety instructions ............................................ 7 Save Start Menu ............................................. 38
Frama Matrix F22
57
Scales .............................................................. 31 Scales messages .............................................. 48 Scales mode .................................................... 31 Screen layout .................................................. 11 Select cost centre ............................................ 20 Send Order ..................................................... 46 Setup .............................................................. 37 Setup 1 ........................................................... 43 Setup 2 menu ................................................. 39 Setup 3 menu ................................................. 40 Setup menu 1 ................................................. 37 SINGLE mode .................................................. 24 SmartShop ...................................................... 46 Specimen ........................................................ 33 Speed: ............................................................ 51 STACK mode (default) .................................... 24 Start menu ...................................................... 11 Start Up/Log Off ............................................. 37 Statistics report ............................................... 33 Status List ....................................................... 37
Storage and operating conditions ................... 54 Switching on and off ...................................... 19 Switching the message off ............................. 30 Symbols used ................................................... 4 System Info .................................................... 37 System screen ................................................ 11
T
Tariff-guided ............................................ 21, 23 Technical data ................................................ 51 Touch-Screen ................................................. 37 T-Piece/T-Value ............................................... 36 Troubleshooting ............................................. 47
U
Uninstall ......................................................... 44
W
Weighing a stack of mail items ....................... 24
Frama Matrix F22
58
Sales and service centre: Frama UK Limited, Hoddeston � Questions on the operation of the franking system � For problems with the connection; online system Help line: 01992 451 125 Ordering consumables: www.framashop.co.uk or your local Frama Sales and Service partner. www.frama.co.uk Frama AG Matrix F22 CH-3438 Lauperswil Document number 1019131 R01.00 - 01/14 Switzerland