Embed Size (px)
Citation preview

Anaplan Forecast 360 Getting Started Guide
Contact Support: [email protected] Book an Anaplan App Coach™ Appointment1 of 32
ContentsWELCOME TO ANAPLAN SALES FORECAST 360™ 3
BASIC SALES FORECAST 360™ SET UP 5
TIME 6
VERSIONS 6
USERS 9
LISTS & ROLL-UP’S 10
EDITING & CONTROLLING LISTS & ROLL-UP’S 10
LISTS AND ROLL-UPS ‘MODES’ 11
ACCESSING THE BLUEPRINT OF A LIST/ROLL-UP 12
LISTS/ROLL-UPS THAT NEED USER ACTION 12
HOW TO ENTER LIST/ROLL-UPS ITEMS MANUALLY 13
HOW TO ENTER HIERARCHY/LIST ITEMS VIA IMPORT 16
OVERVIEW OF HIERARCHY/LISTS POPULATED AUTOMATICALLY 17
GET READY TO IMPORT 18
CHECKING & VIEWING THE MAPPED FIELDS 20
FILTERING & OTHER CONDITIONAL SETTINGS FOR IMPORT 23
BUILDING A FILTER FORMULA 25
PERFORMING THE IMPORT 27
STEPS AFTER A SUCCESSFUL IMPORT 29
MAP ORGANIZATION & SALES REPS LISTS 29
SET SALES STAGE ASSUMPTIONS 30
ENTERING SALES REPS DETAILS 31
CONGRATULATIONS! 32
Anaplan Forecast 360 Getting Started Guide
Contact Support: [email protected] Book an Anaplan App Coach™ Appointment2 of 32
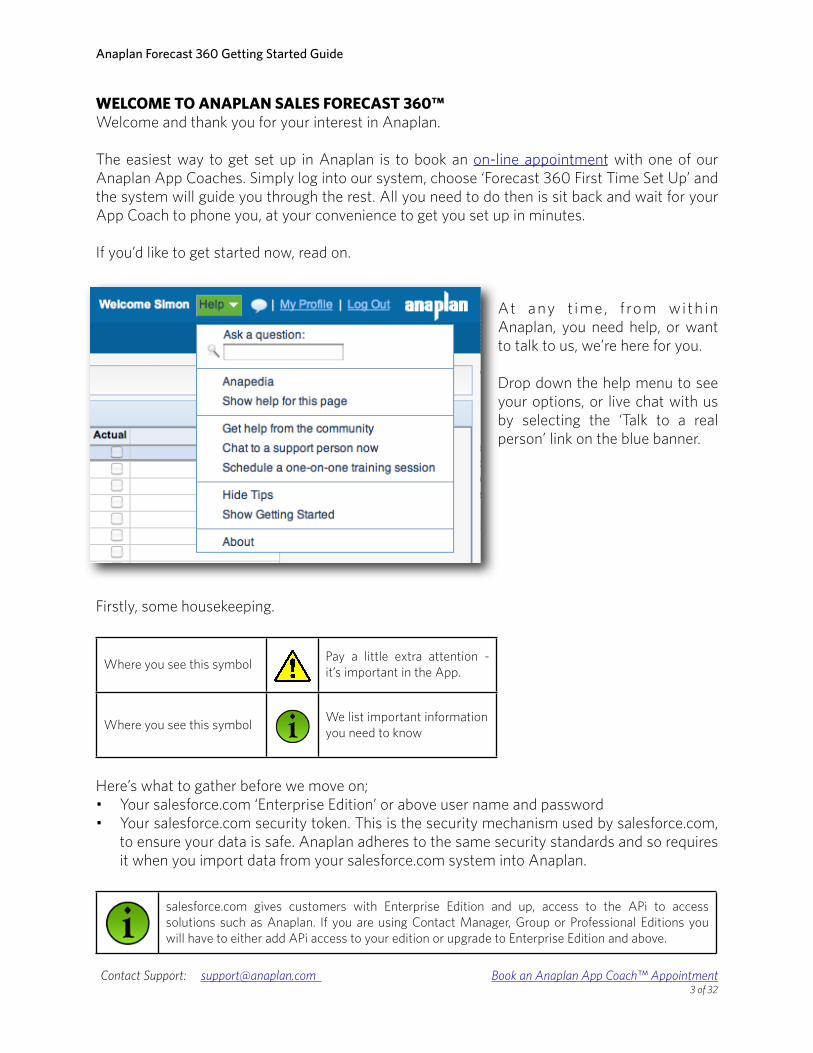
WELCOME TO ANAPLAN SALES FORECAST 360™Welcome and thank you for your interest in Anaplan.
The easiest way to get set up in Anaplan is to book an on-line appointment with one of our Anaplan App Coaches. Simply log into our system, choose ‘Forecast 360 First Time Set Up’ and the system will guide you through the rest. All you need to do then is sit back and wait for your App Coach to phone you, at your convenience to get you set up in minutes.
If you’d like to get started now, read on.
At any t ime , f rom wi th in Anaplan, you need help, or want to talk to us, we’re here for you.
Drop down the help menu to see your options, or live chat with us by selecting the ‘Talk to a real person’ link on the blue banner.
Firstly, some housekeeping.
Where you see this symbol Pay a little extra attention - it’s important in the App.
Where you see this symbol We list important information you need to know
Here’s what to gather before we move on;• Your salesforce.com ‘Enterprise Edition’ or above user name and password • Your salesforce.com security token. This is the security mechanism used by salesforce.com,
to ensure your data is safe. Anaplan adheres to the same security standards and so requires it when you import data from your salesforce.com system into Anaplan.
salesforce.com gives customers with Enterprise Edition and up, access to the APi to access solutions such as Anaplan. If you are using Contact Manager, Group or Professional Editions you will have to either add APi access to your edition or upgrade to Enterprise Edition and above.
Anaplan Forecast 360 Getting Started Guide
Contact Support: [email protected] Book an Anaplan App Coach™ Appointment3 of 32
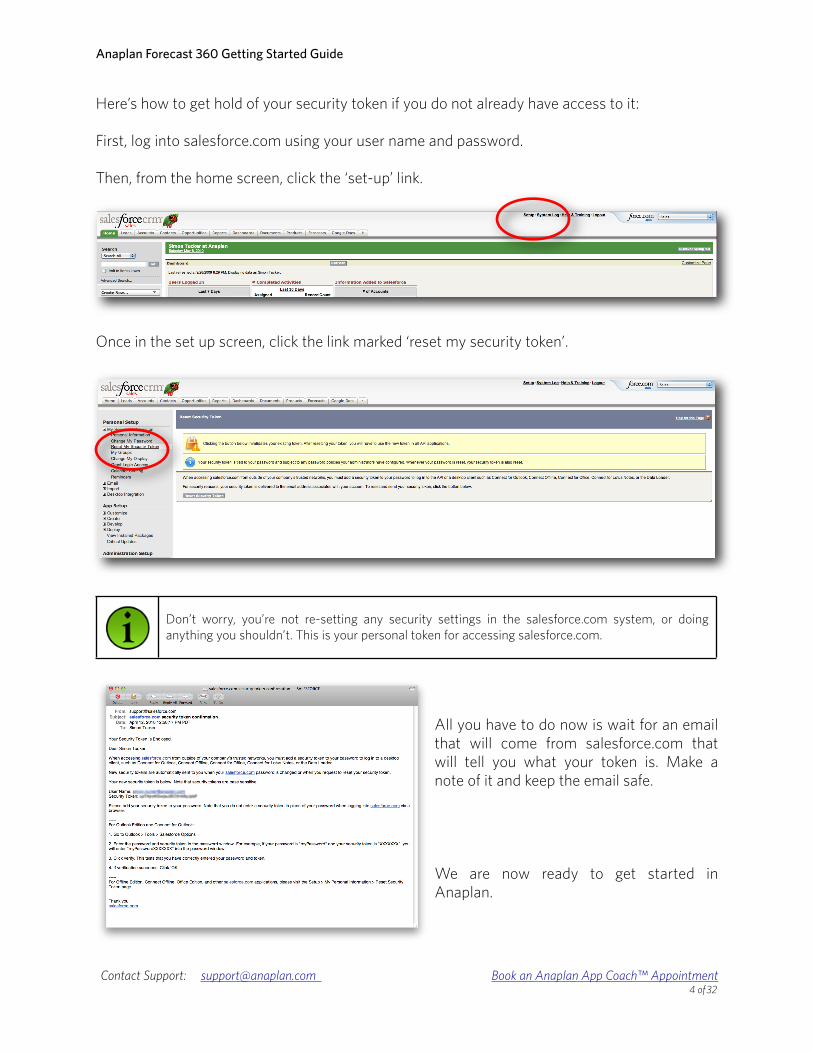
Here’s how to get hold of your security token if you do not already have access to it:
First, log into salesforce.com using your user name and password.
Then, from the home screen, click the ‘set-up’ link.
Once in the set up screen, click the link marked ‘reset my security token’.
Don’t worry, you’re not re-setting any security settings in the salesforce.com system, or doing anything you shouldn’t. This is your personal token for accessing salesforce.com.
All you have to do now is wait for an email that will come from salesforce.com that will tell you what your token is. Make a note of it and keep the email safe.
We are now ready to get started in Anaplan.
Anaplan Forecast 360 Getting Started Guide
Contact Support: [email protected] Book an Anaplan App Coach™ Appointment4 of 32
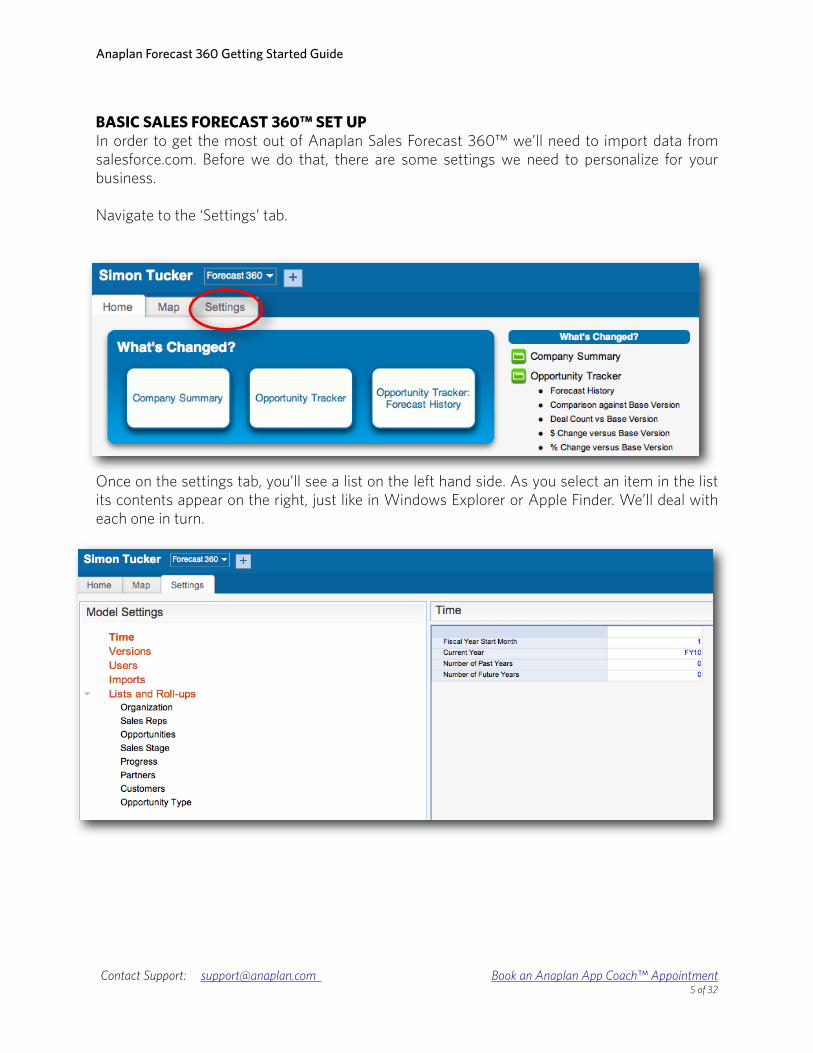
BASIC SALES FORECAST 360™ SET UPIn order to get the most out of Anaplan Sales Forecast 360™ we’ll need to import data from salesforce.com. Before we do that, there are some settings we need to personalize for your business.
Navigate to the ‘Settings’ tab.
Once on the settings tab, you’ll see a list on the left hand side. As you select an item in the list its contents appear on the right, just like in Windows Explorer or Apple Finder. We’ll deal with each one in turn.
Anaplan Forecast 360 Getting Started Guide
Contact Support: [email protected] Book an Anaplan App Coach™ Appointment5 of 32
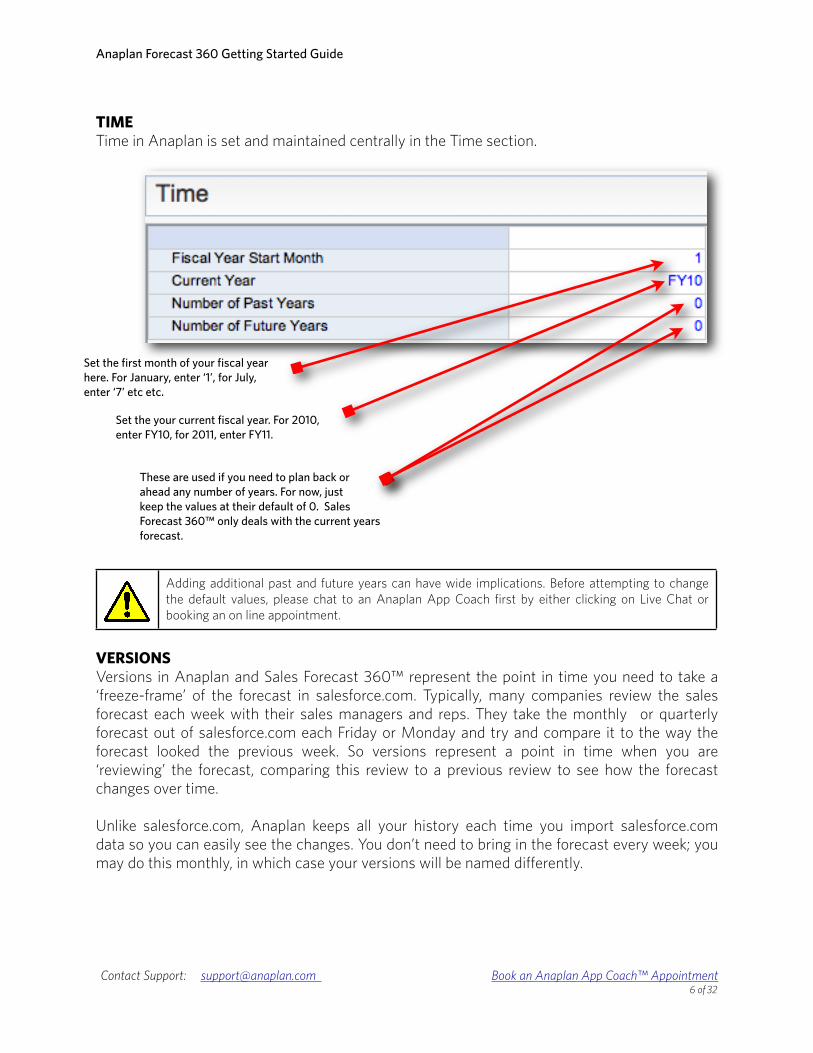
TIMETime in Anaplan is set and maintained centrally in the Time section.
Adding additional past and future years can have wide implications. Before attempting to change the default values, please chat to an Anaplan App Coach first by either clicking on Live Chat or booking an on line appointment.
VERSIONSVersions in Anaplan and Sales Forecast 360™ represent the point in time you need to take a ‘freeze-frame’ of the forecast in salesforce.com. Typically, many companies review the sales forecast each week with their sales managers and reps. They take the monthly or quarterly forecast out of salesforce.com each Friday or Monday and try and compare it to the way the forecast looked the previous week. So versions represent a point in time when you are ‘reviewing’ the forecast, comparing this review to a previous review to see how the forecast changes over time.
Unlike salesforce.com, Anaplan keeps all your history each time you import salesforce.com data so you can easily see the changes. You don’t need to bring in the forecast every week; you may do this monthly, in which case your versions will be named differently.
Anaplan Forecast 360 Getting Started Guide
Contact Support: [email protected] Book an Anaplan App Coach™ Appointment6 of 32
Set the first month of your fiscal year here. For January, enter ‘1’, for July, enter ‘7’ etc etc.
Set the your current fiscal year. For 2010, enter FY10, for 2011, enter FY11.
These are used if you need to plan back or ahead any number of years. For now, just keep the values at their default of 0. Sales Forecast 360™ only deals with the current years forecast.
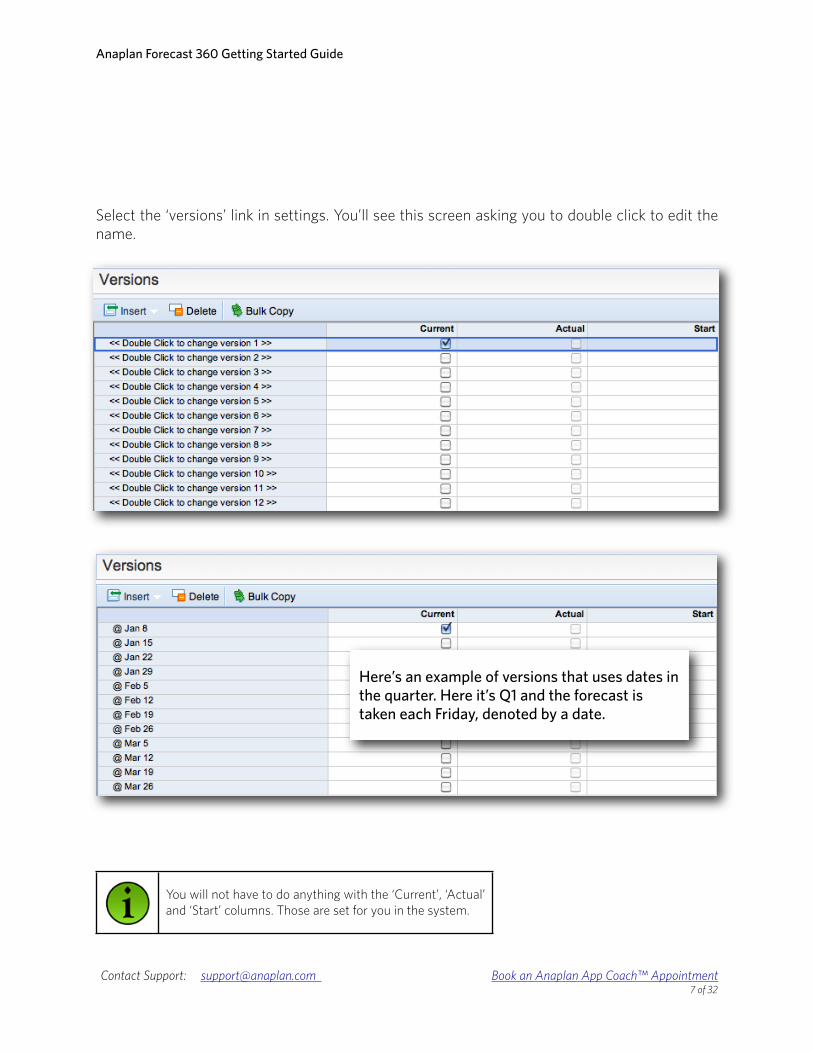
Select the ‘versions’ link in settings. You’ll see this screen asking you to double click to edit the name.
You will not have to do anything with the ‘Current’, ‘Actual’ and ‘Start’ columns. Those are set for you in the system.
Anaplan Forecast 360 Getting Started Guide
Contact Support: [email protected] Book an Anaplan App Coach™ Appointment7 of 32
Here’s an example of versions that uses dates in the quarter. Here it’s Q1 and the forecast is taken each Friday, denoted by a date.

If you have more weeks in the current quarter you can easily add another line.
Anaplan Forecast 360 Getting Started Guide
Contact Support: [email protected] Book an Anaplan App Coach™ Appointment8 of 32
Here’s an example of versions that uses week numbers in the quarter. Here it’s Q1 and the forecast is taken each week of the quarter, denoted by a week number.
Be careful what you name your versions. The module in Anaplan that displays your opportunities also displays the months they are forecasted for. Combining a versions dimension that is just called weeks, with months maybe confusing. Try to use the @ prefix if possible to avoid confusion.
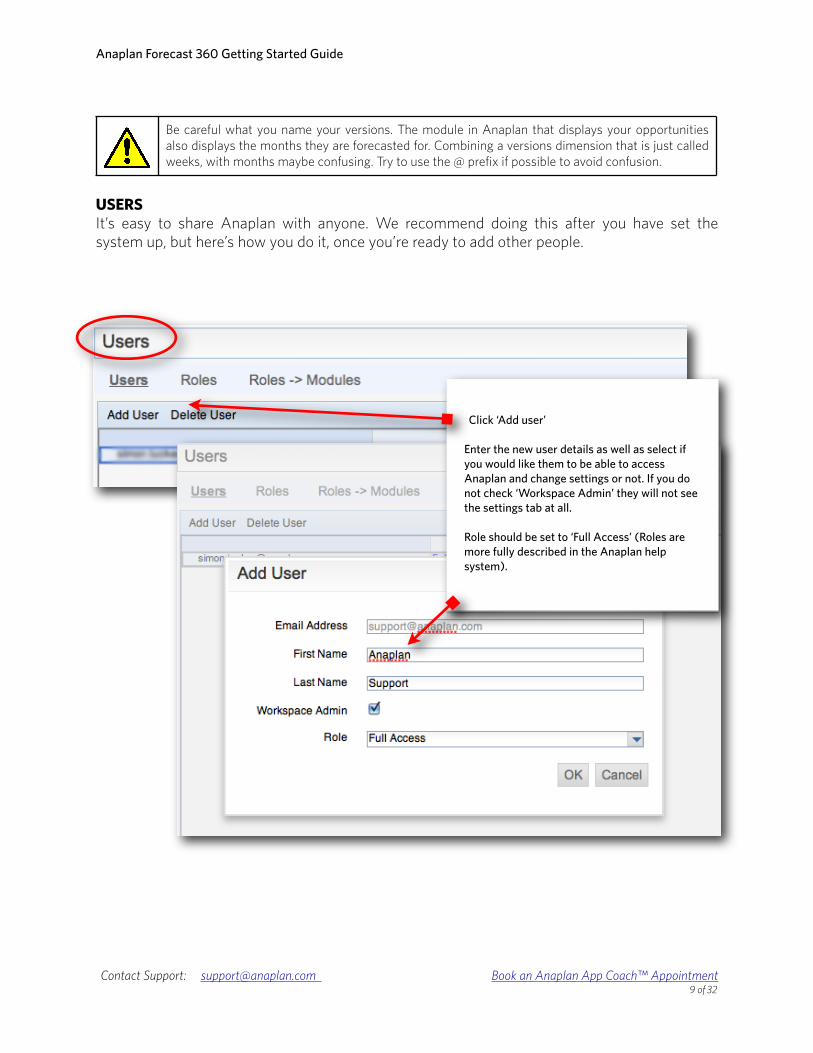
USERSIt’s easy to share Anaplan with anyone. We recommend doing this after you have set the system up, but here’s how you do it, once you’re ready to add other people.
Anaplan Forecast 360 Getting Started Guide
Contact Support: [email protected] Book an Anaplan App Coach™ Appointment9 of 32
Click ‘Add user’
Enter the new user details as well as select if you would like them to be able to access Anaplan and change settings or not. If you do not check ‘Workspace Admin’ they will not see the settings tab at all.
Role should be set to ‘Full Access’ (Roles are more fully described in the Anaplan help system).
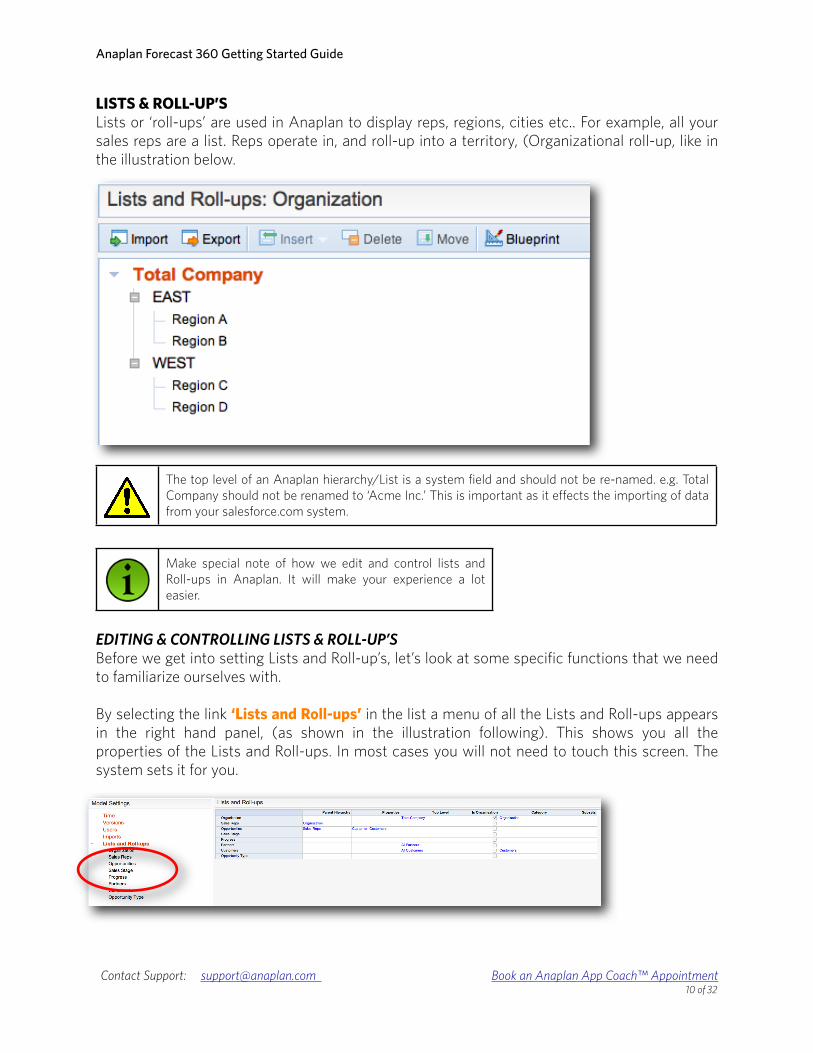
LISTS & ROLL-UP’S Lists or ‘roll-ups’ are used in Anaplan to display reps, regions, cities etc.. For example, all your sales reps are a list. Reps operate in, and roll-up into a territory, (Organizational roll-up, like in the illustration below.
The top level of an Anaplan hierarchy/List is a system field and should not be re-named. e.g. Total Company should not be renamed to ‘Acme Inc.’ This is important as it effects the importing of data from your salesforce.com system.
Make special note of how we edit and control lists and Roll-ups in Anaplan. It will make your experience a lot easier.
EDITING & CONTROLLING LISTS & ROLL-UP’SBefore we get into setting Lists and Roll-up’s, let’s look at some specific functions that we need to familiarize ourselves with.
By selecting the link ‘Lists and Roll-ups’ in the list a menu of all the Lists and Roll-ups appears in the right hand panel, (as shown in the illustration following). This shows you all the properties of the Lists and Roll-ups. In most cases you will not need to touch this screen. The system sets it for you.
Anaplan Forecast 360 Getting Started Guide
Contact Support: [email protected] Book an Anaplan App Coach™ Appointment10 of 32

When you select a list/roll-up, you’ll see a series of buttons in the toolbar, as shown in the following illustration. These are used to edit and control the Lists/Roll-ups.
LISTS AND ROLL-UPS ‘MODES’Lists/roll-ups are themselves displayed in 2 ways, as shown in the following illustrations.
In ‘Tree Mode’ you’ll see the hierarchy or list displayed with the ‘Parent’, (i.e. the division or person), to the left, with the ‘Child’, (i.e. the rep, or cost center etc etc.) that is displayed below and to the right. Here you can grab a Child item and drag and drop it onto another Parent item.
Anaplan Forecast 360 Getting Started Guide
Contact Support: [email protected] Book an Anaplan App Coach™ Appointment11 of 32
Allows you to export a hierarchy in text, (.txt) or .xls, (Microsoft Excel) formats.
Allows you to import a list or hierarchy from a text, (.txt) file.
Allows you to insert/add another hierarchy/list member.
Allows you to delete/remove a hierarchy/list member.
Allows you to move a hierarchy/list member to another line/location.
Toggle button, (click to turn on, click again to turn off), to access the ‘Blueprint’ of a hierarchy.(See BLUEPRINT section)
Hierarchy displayed as a ‘Tree’
Hierarchy displayed as a ‘grid’

You cannot add or edit lines here.
ACCESSING THE BLUEPRINT OF A LIST/ROLL-UP
To add or edit regions or territories, you need to switch to ‘BLUEPRINT’ mode by clicking on the ‘BLUEPRINT’ button on the top right.
This displays the grid view. The grid view is displaying the same List/Roll-ups but now enables you to add, delete and rename items. You can also change the ‘Parent’/’Region’ of a ‘Child’/‘Reps’ item here too. The column marked ‘Code’ is a system field and therefore does not need to be filled in by an Anaplan user.
LISTS/ROLL-UPS THAT NEED USER ACTIONMuch of the hard work has been taken out filling in and adjusting the roll-ups/lists by the Anaplan salesforce.com import feature. The only hierarchy/list we cannot build for you is
‘Organization’. Every company is different, but this could be a list of sales branches, divisions, sales regions or even sales managers that sales reps roll-up/report into. Here are some examples.
This is a list with sales centers or territories that roll up into sales regions. Here, the sales reps, (imported from salesforce) would roll into the cities or states such as New York.
This is a list with sales managers that roll up into sales regions.
Here, the sales reps, (imported from salesforce) would roll into the sales managers such as John Yardley.
Anaplan Forecast 360 Getting Started Guide
Contact Support: [email protected] Book an Anaplan App Coach™ Appointment12 of 32

There are two ways to get your list into the ‘Organization’ List/Roll-up.
1. Enter them manually in ‘BLUEPRINT’ mode and then set the Parent and Child relationships.2. Upload them from your desktop using a text (.txt) file.
HOW TO ENTER LIST/ROLL-UPS ITEMS MANUALLYWhen you first select the ‘Organization’ List/Roll-up you are presented with an empty list with just ‘Total Company’ showing.
To start entering items, choose ‘Insert’ from the toolbar and then select ‘Before’.
Once you have entered the first item, simply press ‘Enter’ or ‘Return’ on your keyboard and a new line will appear for you to enter other items. When you have completed entering the data, simply press the ESC key, (top left of your keyboard), to finish. You now have both the ‘Total Company’ and ‘Region/City’, (eg East) items but no roll-up relationships yet.
There are two ways to set the relationships, (roll-ups). You can continue to work in the ‘BLUEPRINT’ or switch to ‘Tree’ mode and drag and drop ‘Child’/‘Reps’ items onto ‘Parent’ /‘Regions’ items.
Anaplan Forecast 360 Getting Started Guide
Contact Support: [email protected] Book an Anaplan App Coach™ Appointment13 of 32

Anaplan Forecast 360 Getting Started Guide
Contact Support: [email protected] Book an Anaplan App Coach™ Appointment14 of 32
Setting Roll-ups in BLUEPRINT mode.
Setting Roll-ups in TREE mode.
To EXIT out of BLUEPRINT mode, press the BLUEPRINT BUTTON again.

HIERARCHY/LIST TOP LEVELSThe top level of an Anaplan List/Roll-up is a system field and should not be re-named. e.g. Total Company should not be renamed to ‘Acme Inc.’ This is important as it effects the importing of data from your salesforce.com system.
Anaplan Forecast 360 Getting Started Guide
Contact Support: [email protected] Book an Anaplan App Coach™ Appointment15 of 32
When prompted with this message box, press OK.
(See warning below)

HOW TO ENTER HIERARCHY/LIST ITEMS VIA IMPORTThe second way to get list items into your Organization hierarchy/List is to import them using a .txt file. Use the following convention in your text file.
Blank <<TAB>> Parent <<TAB>> Code
John Yardley <<TAB>> EAST <<TAB>> LEAVE BLANK
Sarah Sanchez <<TAB>> EAST <<TAB>> LEAVE BLANK
EAST <<TAB>> Total Company <<TAB>> LEAVE BLANK
Ricky Stevens <<TAB>> WEST <<TAB>> LEAVE BLANK
Geraldine Miller <<TAB>> WEST <<TAB>> LEAVE BLANK
WEST <<TAB>> Total Company <<TAB>> LEAVE BLANK
Total Company <<TAB>> LEAVE BLANK <<TAB>> LEAVE BLANK
Once you have your file, select ‘Import’ on the toolbar of the organization hierarchy, browse for the file and select OK. The hierarchy/list should now be populated.
Anaplan Forecast 360 Getting Started Guide
Contact Support: [email protected] Book an Anaplan App Coach™ Appointment16 of 32
When you enter the items in the list, press the TAB key on your keyboard once to space the items out.
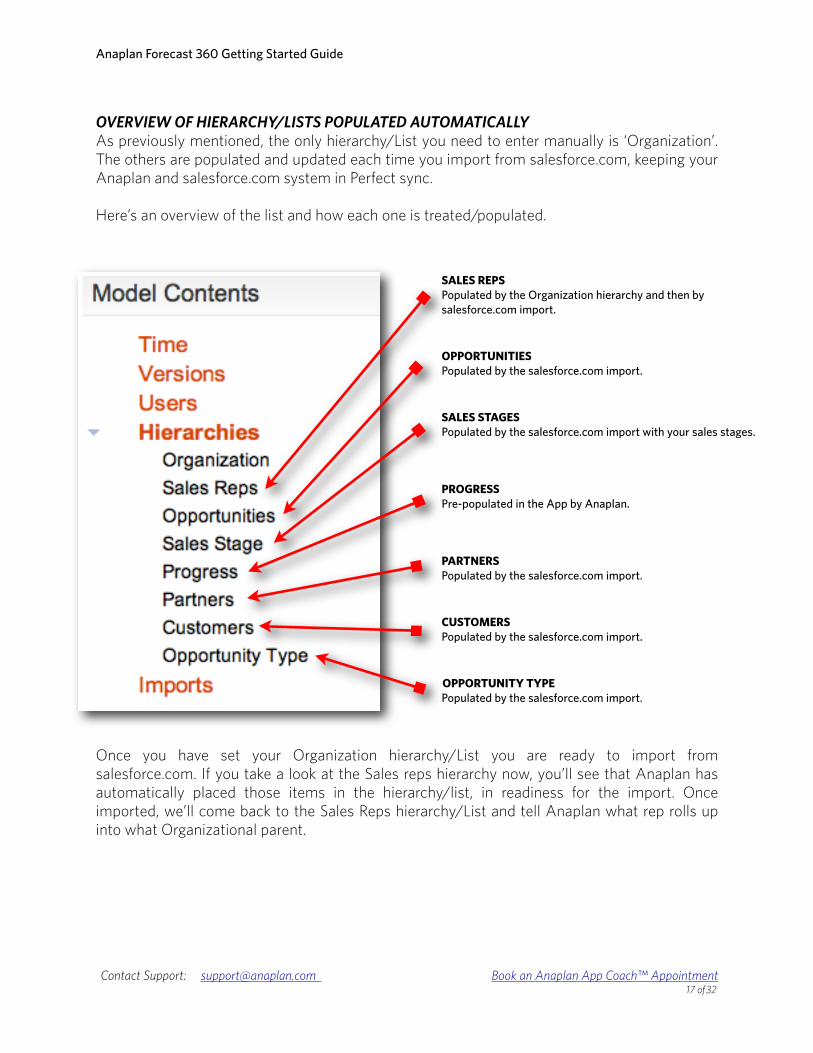
OVERVIEW OF HIERARCHY/LISTS POPULATED AUTOMATICALLYAs previously mentioned, the only hierarchy/List you need to enter manually is ‘Organization’. The others are populated and updated each time you import from salesforce.com, keeping your Anaplan and salesforce.com system in Perfect sync.
Here’s an overview of the list and how each one is treated/populated.
Once you have set your Organization hierarchy/List you are ready to import from salesforce.com. If you take a look at the Sales reps hierarchy now, you’ll see that Anaplan has automatically placed those items in the hierarchy/list, in readiness for the import. Once imported, we’ll come back to the Sales Reps hierarchy/List and tell Anaplan what rep rolls up into what Organizational parent.
Anaplan Forecast 360 Getting Started Guide
Contact Support: [email protected] Book an Anaplan App Coach™ Appointment17 of 32
SALES REPSPopulated by the Organization hierarchy and then by salesforce.com import.
OPPORTUNITIESPopulated by the salesforce.com import.
SALES STAGESPopulated by the salesforce.com import with your sales stages.
PROGRESSPre-populated in the App by Anaplan.
PARTNERSPopulated by the salesforce.com import.
CUSTOMERSPopulated by the salesforce.com import.
OPPORTUNITY TYPEPopulated by the salesforce.com import.

GET READY TO IMPORTWe are now ready to import into Anaplan from salesforce.com. Choose the ‘Imports’ link in the list from the ‘Settings’ tab. You will now see the following list in the right panel of your screen.
Next, you’ll need to determine if your salesforce.com application, (specifically around opportunities) is standard/out-of-the-box, or custom. Standard systems usually do not have any special or custom fields in the opportunities section of salesforce.com that would affect the standard forecast fields. The fields Anaplan needs to read from within a standard salesforce.com application are as follows;
• “Opportunity Owner”• “Account Name”• “Probability”• “Stage”• “Opportunity Name”• “Primary Partner”• “Amount”• “Close Date”• “Type”• “Product Name”• “Quantity”• “Total Price”
Anaplan Forecast 360 Getting Started Guide
Contact Support: [email protected] Book an Anaplan App Coach™ Appointment18 of 32
Each one of these list items is selectable, as described below, to edit the import settings.

If you have added any fields to salesforce.com that replace the ones listed above, it is likely you have a customized version and will need to re-map, (See later section)., your salesforce.com field to the Anaplan field. In addition, if you are using some sort of flag in salesforce.com to denote whether something is in or out of the forecast, you will need to use the ‘filter’ section of Anaplan, (See later section).
The actual import routine imports to a combination of Lists/Roll-ups, (previously discussed in this guide) and to a single module in Anaplan called ‘Archived Opportunities’. A ‘Module’ is a component of the Anaplan App that is a grid where you perform actions such as what-if and basic data entry. This is where all your opportunities will be kept.
Trying to determine whether your salesforce.com application is custom or not is very difficult. As such we would strongly advise that you contact an Anaplan App Coach before attempting to import data.
In normal circumstances you will NOT need to remap fields in the Anaplan salesforce.com import. We strongly recommend that if you feel you do need to adjust the mapping that you contact your Anaplan App Coach.
Anaplan Forecast 360 Getting Started Guide
Contact Support: [email protected] Book an Anaplan App Coach™ Appointment19 of 32
This is a Custom flag field that if checked, the opportunity will be included in the forecast.

CHECKING & VIEWING THE MAPPED FIELDSThe mapping facility lets you change where the data is coming from in salesforce.com. If, for example, your field in salesforce.com that describes your sales reps names were changed, or you wanted to map their names that would appear in Anaplan to be their nickname or some other identifier you had customized salesforce.com to display, you would change it here and point Anaplan to that custom field.
If you would like to check the mappings in the import you may do so by following the steps outlined below.
Anaplan Forecast 360 Getting Started Guide
Contact Support: [email protected] Book an Anaplan App Coach™ Appointment20 of 32
OVERVIEW OF THE IMPORTS SECTION & LIST ITEM ACTIONSOVERVIEW OF THE IMPORTS SECTION & LIST ITEM ACTIONS
Sales Opportunities Import Select this list item to run the import from salesforce.com
Organization from Salesforce This list item is a system field and does not need to be changed. IMPORTS TO HIERARCHY
Sales Reps from Salesforce This list item brings in Sales Reps details from the ‘Full Name’ field in salesforce.com
IMPORTS TO HIERARCHY
Opportunities from SalesforceThis list item brings in the opportunity details from salesforce.com using ‘Name’, ‘Opportunity ID’, ‘User ID’, ‘Customer Account ID’ & ‘Opportunity Type’ fields.
IMPORTS TO HIERARCHY
Customers from Salesforce This list item brings in customer details associated with opportunities using ‘Customer Account Name’ & ‘Customer Account ID’ fields.
IMPORTS TO HIERARCHY
Partners from Salesforce This list item brings in Partner details associated with opportunities using ‘Primary Partner Account Name’ & ‘Primary Partner Account ID’ fields.
IMPORTS TO HIERARCHY
Opportunity Type from Salesforce This field brings in the Opportunity ‘types’ from salesforce using the ‘Opportunity Type’ field.
IMPORTS TO HIERARCHY
Sales Stage from Salesforce This field brings in data relating to what stage each opportunity is using the ‘Stage’ field.
IMPORTS TO HIERARCHY
Archived Opportunities from SalesforceThis field brings in data relating to the opportunity details using fields ‘Opportunity ID’, ‘Close Date’, ‘Amount’, ‘Primary Partner Account ID’, ‘Opportunity Type’, ‘Stage’, ‘Customer Account ID’, & ‘Probability (%)’
IMPORTS TO MODULE
Sales Opportunities CSV Import Select this list item to run the import from an exported .csv file

First, click the ‘Manage Sources’ button to log Anaplan onto salesforce.com.
Fill in the details requested and press ‘Submit’. This will test your connection to salesforce.com.
The following screens will appear. We’ll discuss them a little later. For now, simply close them and return to the import s c r e e n . Yo u h a v e n o w successfully connected with salesforce.com.
Anaplan Forecast 360 Getting Started Guide
Contact Support: [email protected] Book an Anaplan App Coach™ Appointment21 of 32
These screens are discussed later: for now, simply close them.

Now, select the mapping you would like to check. Here, ‘Organization from Salesforce’ is selected.
Next, press the ‘Edit’ button as shown in the illustration to the left.
The following screen will appear.
Anaplan Forecast 360 Getting Started Guide
Contact Support: [email protected] Book an Anaplan App Coach™ Appointment22 of 32
The field in Anaplan ready to receive data from salesforce.com
The field in salesforce.com ready to send data to Anaplan
You can pull-down this menu to reveal all your fields in salesforce.com
Make sure that ‘Organization from Salesforce’ is selected.

You cannot change where the data is sent in Anaplan. This is fixed in the App and in the import routine. Any changes of this nature require customization. This is available through your Anaplan App Coach.
FILTERING & OTHER CONDITIONAL SETTINGS FOR IMPORTSometimes you’ll want to ‘filter out’ information from in salesforce.com that does not make sense to include in your Anaplan App. For example, you may have literally thousands of opportunities in salesforce.com that relate to years past. These are not relevant to a forward-looking forecast so it would make sense to not include them in the import.
Or, you only want to include opportunities above a certain level. This is where the filter feature of Anaplan comes in.
Click the ‘Manage Sources’ button to log Anaplan onto salesforce.com, or to bring up the ‘Manage Sources’ dialog box.
Then select ‘Salesforce’ from the menu and click the ‘Edit’ button.
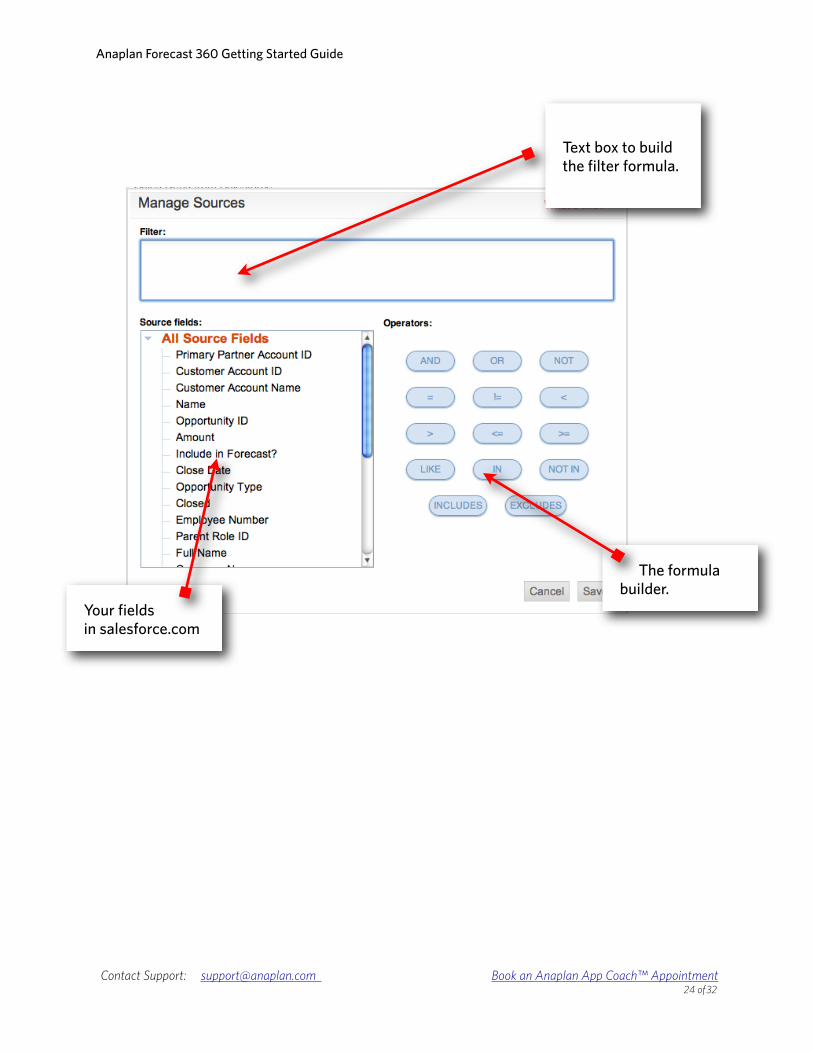
The dialog box shown here on the left should appear. This is where you’ll filter your data as it comes into Anaplan from salesforce.com.
Anaplan Forecast 360 Getting Started Guide
Contact Support: [email protected] Book an Anaplan App Coach™ Appointment23 of 32
Anaplan Forecast 360 Getting Started Guide
Contact Support: [email protected] Book an Anaplan App Coach™ Appointment24 of 32
Text box to build the filter formula.
The formula builder.
Your fields in salesforce.com

BUILDING A FILTER FORMULAIf you need to filter data out, below is an example of what to. Here, we are telling the Anaplan import to NOT bring in any opportunity that is below 100,000.
Anaplan Forecast 360 Getting Started Guide
Contact Support: [email protected] Book an Anaplan App Coach™ Appointment25 of 32
1. Choose the field that needs to be referenced in the filter.
2. Choose the criteria, (=, >,< etc etc)
3. Choose the amount or other measure which the filter will use.
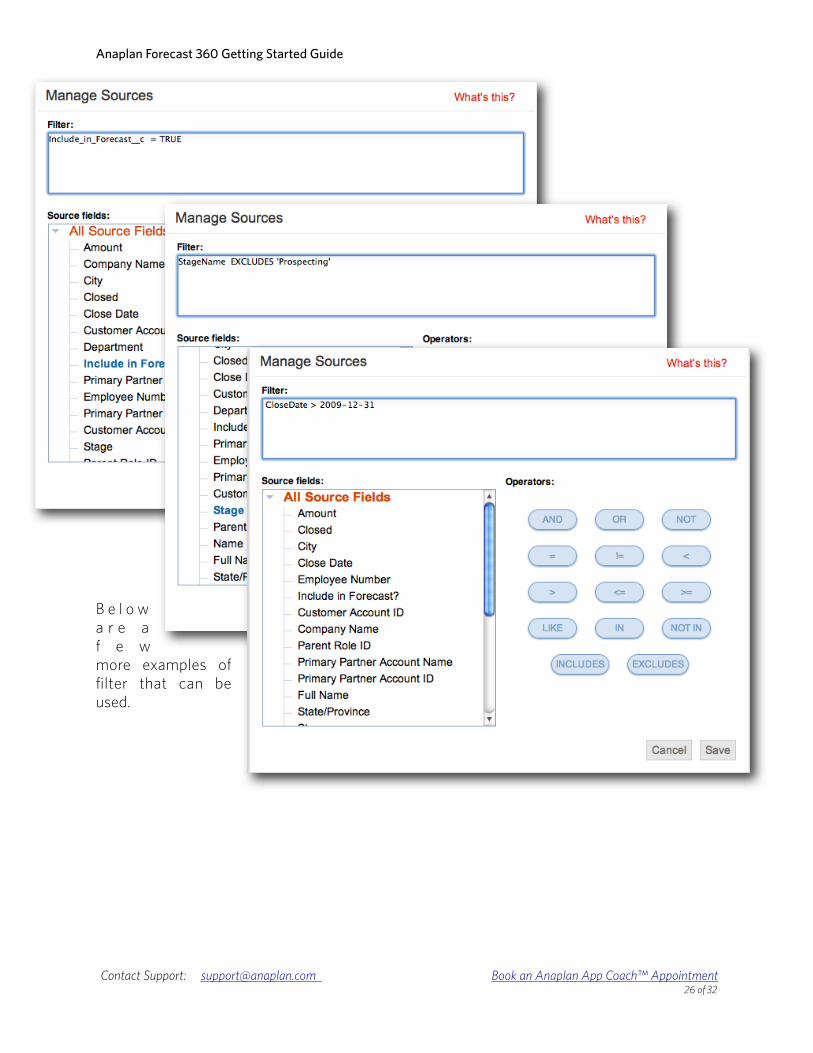
B e l o w a r e a f e w more examples of filter that can be used.
Anaplan Forecast 360 Getting Started Guide
Contact Support: [email protected] Book an Anaplan App Coach™ Appointment26 of 32

PERFORMING THE IMPORTIf you have either determined that you have
a standard salesforce.com application and that the default fields already in the system do not need to be adjusted or you have re-mapped and/or used the filter function and are now ready to import, follow the following steps.
Anaplan Forecast 360 Getting Started Guide
Contact Support: [email protected] Book an Anaplan App Coach™ Appointment27 of 32
1. Select the top list level, ‘Sales
Opportunities Import’
2. Press the ‘Run’ button
3. Select the version you would like
to import the data into. (See
versions)
4. Press the import button.
5. Check & confirm your selection

A successful import wi l l display the f o l l o w i n g summary box w i t h t h e
results of your import. It’s a good idea to check these through to make sure the number of opportunities and reps etc etc looks right.
If Anaplan returns an error message to you this could be any one of the following reasons;
Anaplan Forecast 360 Getting Started Guide
Contact Support: [email protected] Book an Anaplan App Coach™ Appointment28 of 32
Note that if you are using FireFox as your browser, it will display a yellow triangle icon, suggesting a problem. This is unique to FireFox and in most cases, (unless the dialog text reports a problem) the import will have been successful.

• The filter or mapping you have selected may be incorrect• There was an issue logging onto salesforce.com• salesforce.com is not responding
In any of the cases above, check your settings and try again, or get in contact with Anaplan App Coach.
Don’t forget that if you have used a filter on the import, this will affect the results.
STEPS AFTER A SUCCESSFUL IMPORTOnce your import has been successful, you will need to perform the following steps.
MAP ORGANIZATION & SALES REPS LISTSYou will have already set up your ‘Organization’ List/Roll-Up. Now go to the ‘Sales Reps’ List/Roll-Up in the ‘Settings’ tab.
Anaplan Forecast 360 Getting Started Guide
Contact Support: [email protected] Book an Anaplan App Coach™ Appointment29 of 32
• The Organization hierarchy has
been brought in automatically
• The sales reps have been
imported from salesforce.com
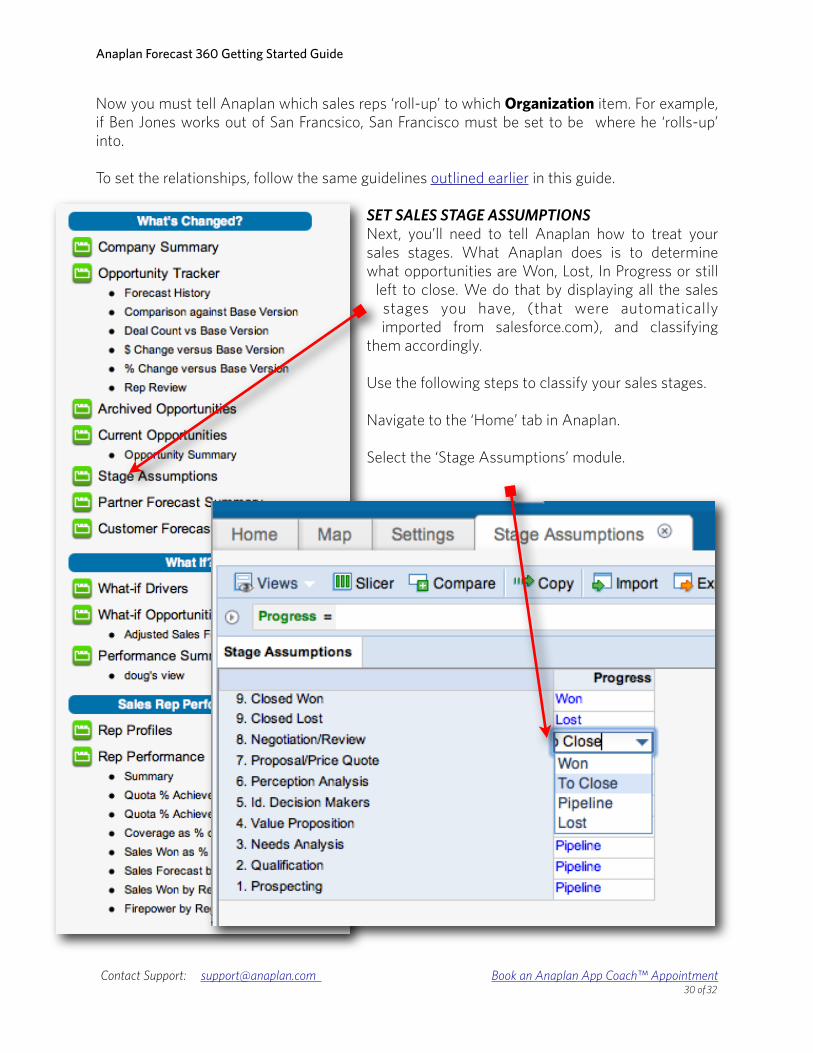
Now you must tell Anaplan which sales reps ‘roll-up’ to which Organization item. For example, if Ben Jones works out of San Francsico, San Francisco must be set to be where he ‘rolls-up’ into.
To set the relationships, follow the same guidelines outlined earlier in this guide.
SET SALES STAGE ASSUMPTIONSNext, you’ll need to tell Anaplan how to treat your sales stages. What Anaplan does is to determine what opportunities are Won, Lost, In Progress or still
left to close. We do that by displaying all the sales stages you have, (that were automatically imported from salesforce.com), and classifying
them accordingly.
Use the following steps to classify your sales stages.
Navigate to the ‘Home’ tab in Anaplan.
Select the ‘Stage Assumptions’ module.
Anaplan Forecast 360 Getting Started Guide
Contact Support: [email protected] Book an Anaplan App Coach™ Appointment30 of 32
At each of your sales stages, classify each stage. For example, your first sales stage may be, (1. Prospecting), and is considered a very early opportunity and therefore, really pipeline, rather that truly in the forecast.
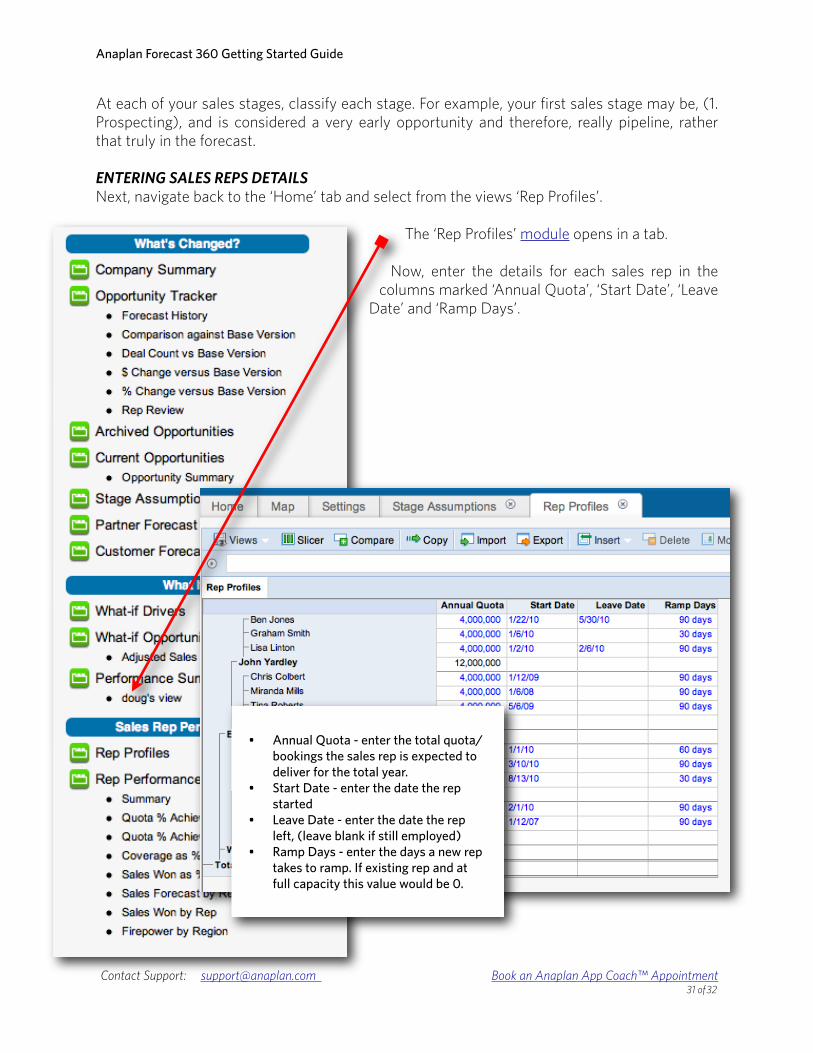
ENTERING SALES REPS DETAILSNext, navigate back to the ‘Home’ tab and select from the views ‘Rep Profiles’.
The ‘Rep Profiles’ module opens in a tab.
Now, enter the details for each sales rep in the columns marked ‘Annual Quota’, ‘Start Date’, ‘Leave
Date’ and ‘Ramp Days’.
Anaplan Forecast 360 Getting Started Guide
Contact Support: [email protected] Book an Anaplan App Coach™ Appointment31 of 32
• Annual Quota - enter the total quota/bookings the sales rep is expected to deliver for the total year.
• Start Date - enter the date the rep started
• Leave Date - enter the date the rep left, (leave blank if still employed)
• Ramp Days - enter the days a new rep takes to ramp. If existing rep and at full capacity this value would be 0.

CONGRATULATIONS!You are now ready to start using Anaplan. As you move through the quarter you can repeat the import routine described earlier in this guide. Unless your settings have changed, you do not need to access the mapping or filter areas of the import section from the ‘Settings’ tab. Anaplan will remember those settings and your log in details. All you will have to do is select the appropriate version Anaplan will populate the salesforce.com data from.
Don’t forget, we are merely a hyperlink away, so if you need any help, select the help menu from within Anaplan and choose how you’d like to speak with us, and we’ll be there to help.
Happy Forecasting!
The Anaplan [email protected]
Anaplan Forecast 360 Getting Started Guide
Contact Support: [email protected] Book an Anaplan App Coach™ Appointment32 of 32


![Anaplan SiriusDecisions Sales Survey Infographic [Russian]](https://img.dokumen.tips/doc/110x75/55d39c0ebb61ebfd268b4620/anaplan-siriusdecisions-sales-survey-infographic-russian.jpg)