Embed Size (px)
Citation preview

8/2/2019 Final Project Group7 Sankarbala Manoharan Manohars
http://slidepdf.com/reader/full/final-project-group7-sankarbala-manoharan-manohars 1/24
Survey on OpenStack Compute Page 1
B649 TERM
PROJECT
SURVEY ONOPENSTACK COMPUTE
Vignesh Ravindran
Sankarbala Manoharan

8/2/2019 Final Project Group7 Sankarbala Manoharan Manohars
http://slidepdf.com/reader/full/final-project-group7-sankarbala-manoharan-manohars 2/24
Survey on OpenStack Compute Page 2
Survey on OpenStack Compute
Contents
Introduction ............................................................................................................................................................................... 3
OpenStack Compute ............................................................................................................................................................... 4
Getting OpenStack Set Up ..................................................................................................................................................... 6
Running OpenStack Compute ........................................................................................................................................... 13
Sensor Cloud Poject .............................................................................................................................................................. 14FutureGrid testbed ................................................................................................................................................................ 16
Performance Runs ................................................................................................................................................................. 17
Future Work ............................................................................................................................................................................. 23
References ................................................................................................................................................................................ 24

8/2/2019 Final Project Group7 Sankarbala Manoharan Manohars
http://slidepdf.com/reader/full/final-project-group7-sankarbala-manoharan-manohars 3/24
Survey on OpenStack Compute Page 3
-Group 7-
INTRODUCTION
It is not always possible to have the computing resources necessary to perform the
tasks we need. The cloud computing platform has been extended to focus on these
issues and to provide solutions. One such solution is the IaaS (Infrastructure as a
Service) model where computing resources like hardware and network bandwidth
are leased out in a large scale to customers who use them on a ‘pay per-use’ basis.
This is also called as a Hardware as a service model
OpenStack is a number of projects to provide scalable cloud computing software.
Two of its main projects are OpenStack compute and OpenStack object storage.
Compute increases computing power through Virtual Machines on multiplenetworks whereas Object Storage is a software that deals with a redundant scalable
storage. We discuss OpenStack compute in this manual and as already mentioned
earlier, it is software that is used to manage a network of Virtual Machines (VM’s) to
make the entire system more scalable and redundant. It allows users to creating and
running VM instances, creating and managing users and projects. Also work with the
management of networks. This is an open source project made for supporting a
variety of configurations and hypervisors.
Two of the most recent releases of the software are Cactus and Diablo. Diablo,
released July 2011 is the most recent, however Cactus is also being used around.
OpenStack Components
The OpenStack project consists of three main components, Compute, Object storage
and Imaging service. Compute consists of a cloud controller, which is used to start
up the VM’s for the users and also to set up the network configurations that they
might need to use. It is responsible for setting up the number of networks assigned
to each project and so forth. Object storage is a system used as a large-scaleredundant storage system which supports a number of fail-safe procedures like
archiving or backup of data. It can also store secondary data and serve as a Content
Delivery Network. The imaging service is an image storage system that provides
image lookup and retrieval. It can be configured to use Object storage, S3 storage or
using S3 storage with Object storage as an intermediate to S3.

8/2/2019 Final Project Group7 Sankarbala Manoharan Manohars
http://slidepdf.com/reader/full/final-project-group7-sankarbala-manoharan-manohars 4/24
8/2/2019 Final Project Group7 Sankarbala Manoharan Manohars
http://slidepdf.com/reader/full/final-project-group7-sankarbala-manoharan-manohars 5/24
Survey on OpenStack Compute Page 5
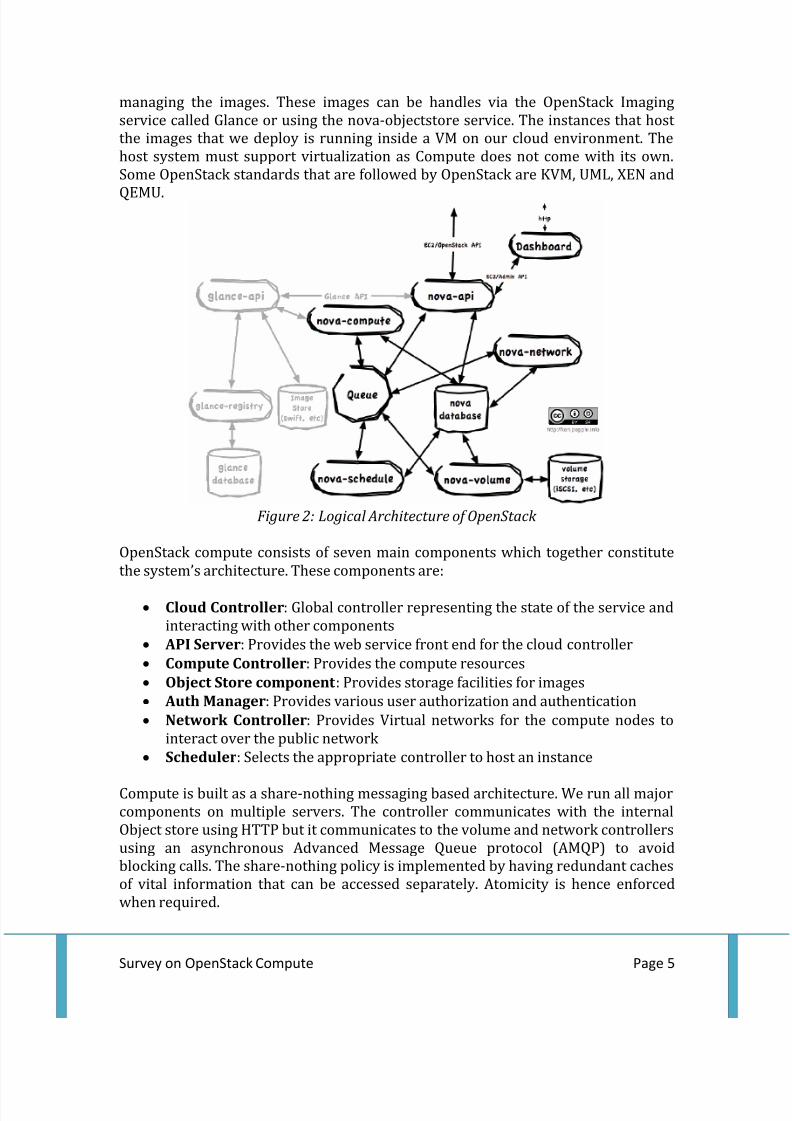
managing the images. These images can be handles via the OpenStack Imaging
service called Glance or using the nova-objectstore service. The instances that host
the images that we deploy is running inside a VM on our cloud environment. The
host system must support virtualization as Compute does not come with its own.
Some OpenStack standards that are followed by OpenStack are KVM, UML, XEN and
QEMU.
Figure 2: Logical Architecture of OpenStack
OpenStack compute consists of seven main components which together constitute
the system’s architecture. These components are:
Cloud Controller: Global controller representing the state of the service and
interacting with other components
API Server: Provides the web service front end for the cloud controller
Compute Controller: Provides the compute resources
Object Store component : Provides storage facilities for images
Auth Manager: Provides various user authorization and authentication
Network Controller: Provides Virtual networks for the compute nodes to
interact over the public network
Scheduler: Selects the appropriate controller to host an instance
Compute is built as a share-nothing messaging based architecture. We run all major
components on multiple servers. The controller communicates with the internal
Object store using HTTP but it communicates to the volume and network controllers
using an asynchronous Advanced Message Queue protocol (AMQP) to avoid
blocking calls. The share-nothing policy is implemented by having redundant caches
of vital information that can be accessed separately. Atomicity is hence enforced
when required.

8/2/2019 Final Project Group7 Sankarbala Manoharan Manohars
http://slidepdf.com/reader/full/final-project-group7-sankarbala-manoharan-manohars 6/24
Survey on OpenStack Compute Page 6
Getting OpenStack Set Up
System Specifics:
Hardware: OpenStack components are intended to run on standard hardware.
Operating System: OpenStack currently runs on Ubuntu and the large scale
deployments running OpenStack run on Ubuntu 10.04 LTS, so deployment-level
considerations tend to be Ubuntu-centric. Community members are testing
installations of OpenStack Compute for CentOS and RHEL and documenting their
efforts on the OpenStack wiki at wiki.OpenStack.org. Be aware that RHEL 6 is the
most viable option (not 5.5) due to nested dependencies.
Networking: 1000 Mbps are suggested. For OpenStack Compute, networking is
configured on multi-node installations between the physical machines on a single
subnet. For networking between virtual machine instances, three network options
are available: flat, DHCP, and VLAN.
Database: For OpenStack Compute, you need access to either a PostgreSQL or
MySQL database, or you can install it as part of the OpenStack Compute installation
process.
Permissions: You can install OpenStack Compute either as root or as a user with
sudo permissions if you configure the sudoers file to enable all the permissions.
INSTALLATION PROCESS
The installation of OpenStack can be done manually or using a script. Using a script,
the installation procedure is the simplest and the quickest. We will go through both
modes of installation here. Installation can be performed in such a manner to run
everything (controller and the compute services) on the same machine or can be
done so as to host every service on different machines.
Manual Installation
Initially we need to have super-user permissions to run the following commands. It
is essential to install the nova-services, euca2ools and all its dependencies before we
move on. Initially, we set up a nova package repository so that we can upgrade novaeasily later whenever needed.
sudo apt-get install python-software-properties
sudo add-apt-repository ppa:OpenStack-release/2011.3
We now update the system using sudo apt-get update

8/2/2019 Final Project Group7 Sankarbala Manoharan Manohars
http://slidepdf.com/reader/full/final-project-group7-sankarbala-manoharan-manohars 7/24
Survey on OpenStack Compute Page 7
Next, we install the rabbitMQ messaging server for inter-controller communication
and the python dependencies.
sudo apt-get install -y rabbitmq-server
sudo apt-get install -y python-greenlet python-mysqldb
When that is done, we now install the nova-services and its dependencies are
installed automatically
sudo apt-get install nova-volume nova-vncproxy nova-api nova-ajax-consoleproxysudo apt-get install nova-doc nova-scheduler nova-objectstoresudo apt-get install nova-network nova-computesudo apt-get install glance
We finally install euca2ools and unzip
sudo apt-get install -y euca2ools unzip
Setting up MySQL on the Controller Node
Before we actually install MySQL we need to set environments with a ’pre-seed’ to
set passwords and to bypass installation prompts.
Bash
MYSQL_PASS=novaNOVA_PASS=notnovacat <<MYSQL_PRESEED | debconf-set-selectionsmysql-server-5.1 mysql-server/root_password password $MYSQL_PASSmysql-server-5.1 mysql-server/root_password_again password $MYSQL_PASSmysql-server-5.1 mysql-server/start_on_boot boolean trueMYSQL_PRESEED
We install MySQL next using sudo apt-get install -y mysql-server
The conf files of MySQL has to be edited to change the bind address from localhost to any address.
sudo sed -i 's/127.0.0.1/0.0.0.0/g' /etc/mysql/my.cnfsudo service mysql restart
Next, we create the Nova database, grant it access privileges and set the password
for access.

8/2/2019 Final Project Group7 Sankarbala Manoharan Manohars
http://slidepdf.com/reader/full/final-project-group7-sankarbala-manoharan-manohars 8/24
Survey on OpenStack Compute Page 8
sudo mysql -uroot -p$MYSQL_PASS -e 'CREATE DATABASE nova;'sudo mysql -uroot -p$MYSQL_PASS -e "GRANT ALL PRIVILEGES ON *.* TO
'root'@'%' WITH GRANT OPTION;"sudo mysql -uroot -p$MYSQL_PASS -e "SET PASSWORD FOR 'root'@'%' =
PASSWORD('$MYSQL_PASS');"
Setting up the Compute Node
Configuring the compute nodes involves setting up the nova.conf file and using
nova-manage commands to set up the projects, project networks and the user roles.
We start up by changing the flags in the nova.conf file. This is a file that does not
read white spaces and comments. This is the main file which is looked up for any
information. The default file is already present in /etc/nova/ with a few default flags
like the following:
--daemonize=1
--dhcpbridge_flagfile=/etc/nova/nova.conf--dhcpbridge=/usr/bin/nova-dhcpbridge--logdir=/var/log/nova--state_path=/var/lib/nova
Other than these default flags, it is necessary to define certain other flags for the
system to get the information it needs. A detailed description of available flags is
found by running /bin/nova-api –help. A table of all the mandatory flags is shown
below.
Flag Description
--sql_connection IP address; Location of OpenStack Compute SQL
database
--s3_host
IP address; Location where OpenStack Compute is
hosting the objectstore service, which will contain
the virtual machine images and buckets
--rabbit_host IP address; Location of OpenStack Compute SQL
database
--cc_host IP address; Location where the nova-api service
runs
--ec2_urlHTTP URL; Location to interface nova-api. Example:
http://184.106.239.134:8773/services/Cloud

8/2/2019 Final Project Group7 Sankarbala Manoharan Manohars
http://slidepdf.com/reader/full/final-project-group7-sankarbala-manoharan-manohars 9/24
Survey on OpenStack Compute Page 9
--network_manager
Configures how your controller will communicate
with additional OpenStack Compute nodes and
virtual machines. Options:
nova.network.manager.FlatManager
Simple, non-VLAN networking
nova.network.manager.FlatDHCPManager
Flat networking with DHCP
nova.network.manager.VlanManager
VLAN networking with DHCP; This is the Default if
no network manager is defined here in nova.conf.
--fixed_range
IP address/range; Network prefix for the IP network
that all the projects for future VM guests reside on.Example: 192.168.0.0/12
--network_sizeNumber value; Number of IP addresses to use for
VM guests across all projects.
A complete usable nova.conf file excerpt is shown below. This is for a configuration
file with the compute and the controller nodes on the same system
--dhcpbridge_flagfile=/etc/nova/nova.conf
--dhcpbridge=/usr/bin/nova-dhcpbridge--logdir=/var/log/nova--state_path=/var/lib/nova--verbose--s3_host=129.79.49.115--rabbit_host=129.79.49.115--cc_host=129.79.49.115--ec2_url=http:// 129.79.49.115:8773/services/Cloud--fixed_range=10.0.0.0/12--network_size=8--FAKE_subdomain=ec2--routing_source_ip=129.79.49.115--sql_connection=mysql://root:[email protected]/nova--network_manager=nova.network.manager.FlatDHCPManager--flat_network_dhcp_start=10.0.0.2--flat_network_bridge=br100--flat_interface=eth2--flat_injected=False--public_interface=eth
Next, we create a nova group to set file permissions as this file consists of our
MySQL password.

8/2/2019 Final Project Group7 Sankarbala Manoharan Manohars
http://slidepdf.com/reader/full/final-project-group7-sankarbala-manoharan-manohars 10/24
Survey on OpenStack Compute Page 10
sudo addgroup novachown -R root:nova /etc/novachmod 640 /etc/nova/nova.conf
Once this is done, we use the nova-manage commands to set up the database
schema, users, projects and the project network as follows:
/usr/bin/nova-manage db sync/usr/bin/nova-manage user admin <user_name>/usr/bin/nova-manage project create <project_name> <user_name>/usr/bin/nova-manage network create <project-network> <number-of-networks-in-project> <IPs in project>
Certain examples of these commands are:
/usr/bin/nova-manage db sync/usr/bin/nova-manage user admin ADMIN/usr/bin/nova-manage project create SGX ADMIN/usr/bin/nova-manage network create 10.0.0.0/24 1 255
In this example, the number of IP’s are /24 as it is within the /12 range mentioned
in the nova.conf file.
We can also create and allocate specific public IP’s using commands from the nova-
manage API.
Creating certifications
Once the users have been created, it is necessary to create credentials for that
particular user and project. This is done using the nova-manage command to
generate the zipfile containing the credentials for the project. We have these
credentials in /root/creds as follows:
mkdir –p /root/creds/usr/bin/python /usr/bin/nova-manage project zipfile $NOVA_PROJECT$NOVA_PROJECT_USER /root/creds/novacreds.zip
A warning message "No vpn data for project <project_name>" can be ignored safely
depending on the networking configuration.
We then unzip the file and add the file to our environment as shown:
unzip /root/creds/novacreds.zip -d /root/creds/cat /root/creds/novarc >> ~/.bashrcsource ~/.bashrc

8/2/2019 Final Project Group7 Sankarbala Manoharan Manohars
http://slidepdf.com/reader/full/final-project-group7-sankarbala-manoharan-manohars 11/24
Survey on OpenStack Compute Page 11
NETWORK CONFIGURATION
There are three types of network configurations that can be set using the –
network_manager flag in nova.conf. These modes are
Flat Networking
FlatDHCP Networking VLAN Networking
Flat Networking
This mode is selected when we set the Network Manager to
nova.network.manager.FlatManager. In such a mode compute needs to use a bridge
interface. By default the interface is assumed to be br100 and is stored in the
database. We need to edit the network interfaces configuration to add the unused
interface eth0 to the bridge as follows
< begin /etc/network/interfaces ># The loopback network interface
auto loiface lo inet loopback
# Networking for OpenStack Computeauto br100
iface br100 inet dhcp
bridge_ports eth0
bridge_stp off bridge_maxwait 0
bridge_fd 0< end /etc/network/interfaces >
We now restart using sudo /etc/init.d/networking restart to apply the
changes. No other changes needs to be made in the nova.conf file as it already hasthe information it needs.
FlatDHCP Networking
In this networking mode, we do not use VLAN’s but we create our own bridge. We
need an interface that is free and does not have an associated IP address. We can
simply tell the network manager to bridge into the interface by specifying the –flat_interface flag in the flag file to the interface we need. The network host will
automatically add the gateway ip to this bridge. You can also add the interface to
br100 manually and not set flat_interface. If so, we edit nova.conf to have thefollowing lines:
--dhcpbridge_flagfile=/etc/nova/nova.conf--dhcpbridge=/usr/bin/nova-dhcpbridge--network_manager=nova.network.manager.FlatDHCPManager

8/2/2019 Final Project Group7 Sankarbala Manoharan Manohars
http://slidepdf.com/reader/full/final-project-group7-sankarbala-manoharan-manohars 12/24
Survey on OpenStack Compute Page 12
--flat_network_dhcp_start=10.0.0.2--flat_interface=eth2--flat_injected=False--public_interface=eth0
Once that is done, we are all set.
VLAN Networking
This is the default networking mode in compute and is taken if we do net explicitely
include the –network_manager flag in nova.conf. For use of this mode, we need to
make sure the bridge compute creates is integrated to our network and we have thenecessary hardware components to support VLAN tagging.
To allow users access instances in their projects, a special VPN instance called
cloudpipe has to be created. This image is a Linux instance with openvpn installed. It
needs a simple script to grab user data from the metadata server, b64 decode it into
a zip file, and run the autorun.sh script from inside the zip. The autorun script should configure and run openvpn to run using the data from Compute.
For certificate management, it is also useful to have a cron script that will
periodically download the metadata and copy the new Certificate Revocation List
(CRL). This will keep revoked users from connecting and disconnects any users that
are connected with revoked certificates when their connection is re-negotiated
(every hour). You set the --use_project_ca flag in nova.conf for cloudpipes to work
securely so that each project has its own Certificate Authority (CA).
Scripted Installation
Scripted installation is much simpler and quicker compared to the manual process,
we need to grab the script from https://github.com/elasticdog/OpenStack-
NOVA-Installer-Script/raw/master/nova-install and just run nova-install -t
cloud and follow the stages of installation.
The script is designed to install both the compute and controller node on a single
machine. To install the compute node on another machine, we take the same script
and run the nova-install -t compute specific to an already existing cloud
controller. We copy the nova.conf file from the cloud controller node next to the
compute node. After the installation we must still source the novarc file to accept
the generated credentials. Some details like the following needs to be provided
during the stages of the installation.
MySQL password
The default S3 IP.
The RabbitMQ host IP

8/2/2019 Final Project Group7 Sankarbala Manoharan Manohars
http://slidepdf.com/reader/full/final-project-group7-sankarbala-manoharan-manohars 13/24
Survey on OpenStack Compute Page 13
The Cloud controller IP
The MySQL IP
The installation script also runs us through the process of creating the new user,
project association and the network addresses associated to the project.
RUNNING OPENSTACK COMPUTE
Starting and Deleting Instances
Once we have the required image that we need to publish to compute, we use the
uec-publish-tarball command to get it done. We can get the working images of any
Ubuntu release from http://uec-images.ubuntu.com/. Once we have the image to
upload, we do so using the following command.
uec-publish-tarball $path_to_image [bucket-name] [hardware-arch]
We get three references, emi, eri, eki values. We use the emi value of the images while
starting instances. We now need a public key to connect to an image. You might need to
create and source credentials as a key pair using euca2ools commands as follows:
euca-add-keypair mykey > mykey.privchmod 0600 mykey.priv
We then create instances for the image using the euca-run-instances command as
follows:
euca-describe-imageseuca-run-instances $emi -k mykey -t m1.small
Once the status of the instance goes from untarring to scheduling to launching to
running OpenStack we are ready to ssh into the instance using the followingcommand
ssh ubuntu@$ipaddress
Where IPaddress is the one assigned to the instance when created.
To delete an instance we use the following command
euca-terminate-instances $instanceid

8/2/2019 Final Project Group7 Sankarbala Manoharan Manohars
http://slidepdf.com/reader/full/final-project-group7-sankarbala-manoharan-manohars 14/24
Survey on OpenStack Compute Page 14
SENSOR CLOUD PROJECT
Sensor Cloud project is a general purpose messaging system for sensor data.
Implements Narada Broker internally which is based on publish/subscribe architecture.
The project facilitates loosely-coupled, reliable and scalable communication between
distributed applications.
Figure 1 Elements of a Publisher/Subscribe System
Sensor Cloud Overview
The Sensor Cloud implements the publish/subscribe design pattern to orchestrate
communication between sensors and client applications which form an inherently
distributed system. GridBuilder creates Publisher-Subscribe Channels (Represented as a JMS Topic)
Sensors acting as publishers create TopicPublishers to send messages to a Topic
Client applications acting as subscribers create TopicSubscribers to receive
messages on a topic
NaradaBrokering is used as the underlying MOM
Figure 3 shows a high-level overview of a typical deployment scenario for the Sensor
Grid. Sensors are deployed by the Grid Builder into logical domains; the data streams
from these sensors are published as topics in the sensor grid to which client applications
may subscribe.

8/2/2019 Final Project Group7 Sankarbala Manoharan Manohars
http://slidepdf.com/reader/full/final-project-group7-sankarbala-manoharan-manohars 15/24
Survey on OpenStack Compute Page 15
Figure 3: Schematic of the Sensor Cloud
Examples of physical devices already implemented include:
Web Cameras
Wii Remotes
Lego MindStorm NXT Robots
Bluetooth GPS Devices
RFID Readers
However Sensors can be made from chat clients, Power Point presentations, web pages
virtually anything which produces data in a time-dependent stream can be implemented
as a Sensor Grid sensor.
Sensor Cloud Architecture
The main objective of the Sensor Cloud Project is to design and develop an enabling
framework to support easy development, deployment, management, real-time
visualization and presentation of collaborative sensor-centric applications. The Sensor
Grid framework is based on an event-driven model that utilizes a pub/sub communicationparadigm over a distributed message-based transport network.
The Sensor Grid is carefully designed to provide a seamless, user-friendly, scalable and
fault-tolerant environment for the development of different applications which utilize
information provided by the sensors. Application developers can obtain properties,
characteristics and data from the sensor pool through the Sensor Grid API, while the
technical difficulties of deploying sensors are abstracted away.

8/2/2019 Final Project Group7 Sankarbala Manoharan Manohars
http://slidepdf.com/reader/full/final-project-group7-sankarbala-manoharan-manohars 16/24
Survey on OpenStack Compute Page 16
At the same time, sensor developers can add new types of sensors and expose their
services to application developers through Sensor Grid’s Sensor Service Abstraction
Layer (SSAL). NaradaBrokering (NB) is the transport-level messaging layer for the
Sensor Grid. The overall architecture of the Sensor Grid is shown in Figure 4. Internally
the Sensor Grid is composed of two major components the Sensor Grid Server (SG) and
the Grid Builder (GB).
Figure 4: Sensor Cloud architecture
FUTUREGRID TESTBED
Futuregrid is an NSF funded project which provides a high performance test-bed for
many projects. The test-bed is composed of a set of distributed high-performance
computing resources connected by a high-speed network (with adjustable
performance via a network impairment device). Users can access the HPC resources
as traditional batch clusters, a computational grid, or as highly configurable cloud
resources where users can deploy their own virtual machines.
In order to run OpenStack on Futuregrid, we had to obtain user credentials bysubmitting a ticket to the futuregrid team. Once we had received the credentials,
starting up the instances and everything else was similar as the steps mentioned
earlier.

8/2/2019 Final Project Group7 Sankarbala Manoharan Manohars
http://slidepdf.com/reader/full/final-project-group7-sankarbala-manoharan-manohars 17/24
Survey on OpenStack Compute Page 17
PERFORMANCE RUNS
The performance tests of the instances on our private cloud and Futuregrid were
done using a simulated sensor which was part of the Sensorcloud Project. We
simulated the operation of a video camera sensor by writing an application that
mimics the video camera by publishing random data packets of fixed sizes andframe rates. These test are primarily run to observe the memory capacity and the
network bandwidth usage on the test environment. Primarily, there were three tests
carried out as shown below
TEST 1# TEST 2# TEST 3#
MPEG4 640*480 video
sensor (simulated) at a
FPS rate of 30 on 3 OS
instances on private cloud
manually that we set up
MPEG4 640*480 video
sensor (simulated) at an
FPS rate of 30 & 1 and
800*600 sensor
(simulated) at 30 FPS rate
on 3 FG OS instances
(large)
MPEG4 640*480, 320*240
and 800*480 video
sensors (simulated)
transmitting at FPS’ of 20,30 and 50 each on 4 FG OS
instances (large)
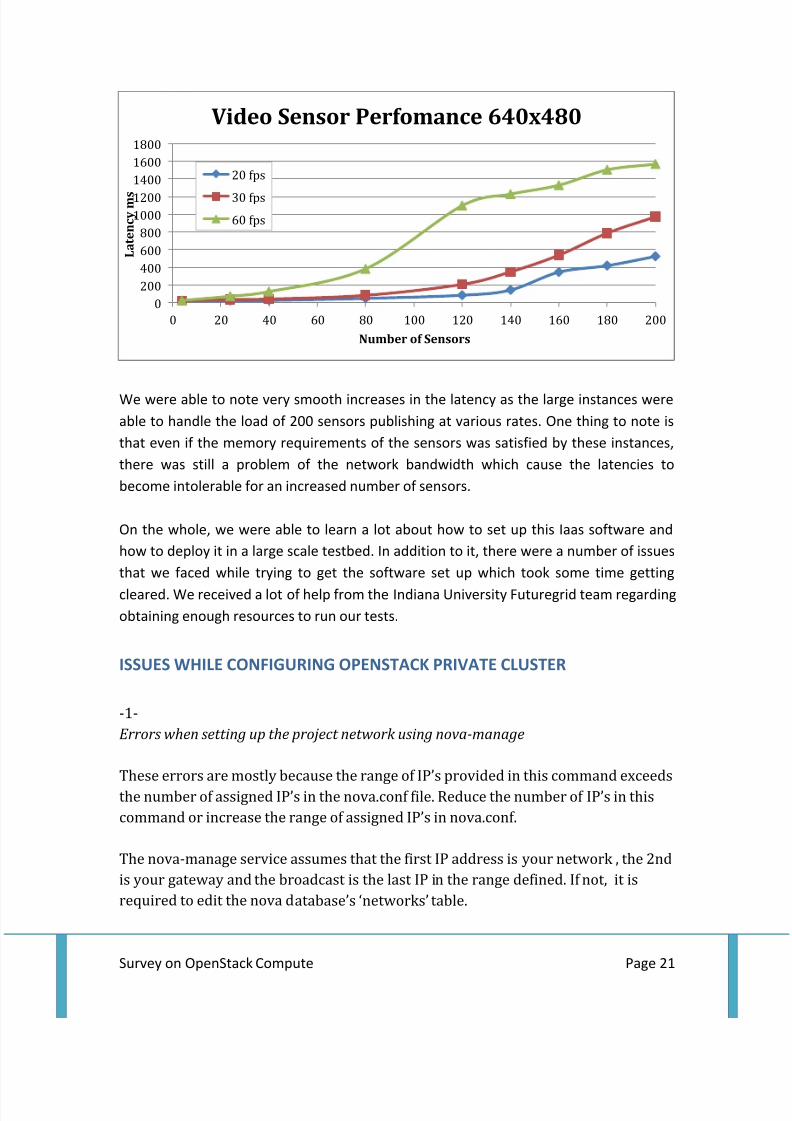
Interesting observations were made about the network and memory capacities of
the runtime environments. The results were plotted as a latency time vs number of
Sensors plot.
Latency time was measured from the time the packet was created by the sensor in
the Gridbuilder domain to the time it was processed by the client on another
machine.

8/2/2019 Final Project Group7 Sankarbala Manoharan Manohars
http://slidepdf.com/reader/full/final-project-group7-sankarbala-manoharan-manohars 18/24
Survey on OpenStack Compute Page 18
TEST 1#
One thing that we were able to note on this test which was conducted on our private
cluster that we set up was that the latencies shot up exponentially as the number of
clients increased due to the fact that each client had to subscribe to the sensors and
that increased the bandwidth requirement exponentially.
Each sensor of ours roughly transmits at 1800kbps so when the number of sensors
increased beyond 50, we were publishing at a rough rate of 88Mbps which ended up
saturating the network causing lag which is beyond tolerance for real time
conferencing and collaboration (300ms)
0
200
400
600
800
1000
1200
1400
0 10 20 30 40 50 60
Latency
in ms
Number of Simulated Video Sensors
Single Domain Sensor Cloud
Performance
1 Client
2 Clients
3 Clients

8/2/2019 Final Project Group7 Sankarbala Manoharan Manohars
http://slidepdf.com/reader/full/final-project-group7-sankarbala-manoharan-manohars 19/24
Survey on OpenStack Compute Page 19
TEST 2#
0
100
200
300
400
500
600
700
800
900
2 4 6 8 101214161820222426283032343638404244464850
640*480, 1000fps
640*480, 1000fps
0
5
10
15
20
25
30
2 6 10 14 18 22 26 30 34 38 42 46 50
640*480, 30fps
640*480, 30fps

8/2/2019 Final Project Group7 Sankarbala Manoharan Manohars
http://slidepdf.com/reader/full/final-project-group7-sankarbala-manoharan-manohars 20/24
Survey on OpenStack Compute Page 20
A few things that can be noted from this preliminary test which was run on Futuregrid
on 3 large instances is that the large instances are quite capable of handling more than
50 sensors as the latency values were not even close to being stretched when we
published data on standard frame-rates. Just to make sure on how much we can push
these instances, we tried publishing data at a rate of 1000 FPS, which is not practical in
most cases. In order to get a more clear perspective on what these large instances can
do, we moved on to test 3 which ran more number of sensors spread over more
instances.
TEST 3#
0
10
20
30
40
50
2 6 10 14 18 22 26 30 34 38 42 46 50
800*600, 30fps
800*600, 30fps
0
100
200
300
400
500
600
700
800
900
1000
0 50 100 150 200
L a t e n c y m s
Number of Sensors
Video Sensor Performance 30fps320x240
640x480
800x480
8/2/2019 Final Project Group7 Sankarbala Manoharan Manohars
http://slidepdf.com/reader/full/final-project-group7-sankarbala-manoharan-manohars 21/24

8/2/2019 Final Project Group7 Sankarbala Manoharan Manohars
http://slidepdf.com/reader/full/final-project-group7-sankarbala-manoharan-manohars 22/24
Survey on OpenStack Compute Page 22
When using some other networking scheme rather than flat mode, it is necessary to
mark one of the networks already defined as a bridge so that compute knows that a
bridge exists.
-2-
Access forbidden 403, 401 errors
These are the errors usually which show up because there is a credential problem
with the project. Occur when we try to perform any euca-XXX command. Through
current installation methods, there are basically two ways to get the novarc file. The
manual method requires getting it from within a project zipfile, and the scripted
method just generates novarc out of the project zip file and sources it for you. If you
do the manual method through a zip file, then the following novarc alone, you end
up losing the credentials that are tied to the user you created with nova-manage inthe steps before. When you run nova-api the first time, it generates the certificate
authority information, including openssl.cnf. If it gets started out of order, you may
not be able to create your zip file. Once your CA information is available, you should
be able to go back to nova-manage to create your zipfile.
-3-
Instance startup errors
There are times when instances are scheduling indefinitely, or startup and
shutdown immediately or simply stay ‘launching’ forever. These can be cause due to
a number of reasons including bad networking settings or credentials. One way of
finding out what the kind of problem we face is to check console output of an
instance using euca-get-console-output <instance ID> to check the status of the
instance or to simply check the nova-api.log in/var/logs/nova/
-4-
Unable to ping or ssh instances that are running
There are a number of reasons for this case to occur. One of the usual reasons is
because we have not yet granted access permissions to access ports for ssh or
pinging. Use the ‘euca-authorize’ command to enable access. Below, you will find the
commands to allow ‘ping’ and ‘ssh’ to your VMs:
euca-authorize -P icmp -t -1:-1 default
euca-authorize -P tcp -p 22 default

8/2/2019 Final Project Group7 Sankarbala Manoharan Manohars
http://slidepdf.com/reader/full/final-project-group7-sankarbala-manoharan-manohars 23/24
Survey on OpenStack Compute Page 23
Another common issue is you cannot ping or SSH your instances after issuing the
‘euca-authorize’ commands. Something to look at is the amount of ‘dnsmasq’
processes that are running. If you have a running instance, check to see that TWO
‘dnsmasq’ processes are running. If not, perform the following: killall dnsmasq
service nova-network restart
Some other cases might also occur. A possible case can be that the instance might be
waiting for a response from a metadata server by default that it does not receive.
Such cases can be identified from the console output of the instance. Usually
metadata forwarding is done by the gateway. In flat mode, we must do it manually
so requests should be forwarded to the api server. A simpler solution would be to
try another networking mode like flatDHCP.
It usually helps restarting all the related services once there is a problem. Specificscan be obtained from the logs in /var/logs/nova/.
-5-
Network host issues
In certain cases, faulty deployment of the instances which might not show in the
euca-get-console-output command might lead to a certain ‘Destination host
unavailable’ when we ping the instances or the ‘No route to host’ when we try to ssh
into a host which is not ready. These problems are fixed by re-bundling the image to
the server and trying again. Most likely caused by a small glitch while bundling. This
can be verified using the euca-describe-images command and looking for the
required upload bucket to confirm that the status of the image we need to deploy is
‘available’ and not ‘untarring’. These are most likely caused when the nova services
are restarted immediately after the new image is uploaded without giving the
system any time to actually register the image internally.
FUTURE WORK
It was a great learning experience for us to learn to deploy this service on our ownand to work with high performance instances on the Futuregrid testbed. In the
future we plan to work with other IaaS software like Nimbus or OpenNebula which
was recently added to part of the Futuregrid Testbed.

8/2/2019 Final Project Group7 Sankarbala Manoharan Manohars
http://slidepdf.com/reader/full/final-project-group7-sankarbala-manoharan-manohars 24/24
REFERENCES
[1] http://www.openstack.org
[2] M.A. Vouk, "Cloud computing issues, research and implementations," 30th
International Conference on Information Technology Interfaces (ITI 2008),Cavtat/Dubrovnik, Croatia: 2008, pp. 31-40.
[3] Amazon Web Services, "Amazon Elastic Compute Cloud (Amazon EC2)," [Online].
Available: http://aws.amazon.com/ec2/ [Accessed:Jan. 29, 2010]