Embed Size (px)
Citation preview
1
ATP Front Mount Intercooler Kit REVISION: AModel Year 2013+ Ford Fiesta ST 1.6L Ecoboost
Parts Checklist:
- Intercooler assembly
Installation Overview:
ATP Fiesta ST Front Mount Intercooler Kit is direct drop in replacement for stock intercooler. Compatible with stock charge pipe system, ATP high flow charge pipe, or performance stock location & replacement charge pipes. No cutting, drilling, or modification required to vehicle.
Requires removal of front bumper cover, replacement of stock intercooler with ATP Fiesta ST Front Mount Intercooler, and reinstallation of front bumper cover. Reuses OE fasteners and clamps.
Installation Tips:
Tip #1: Raise vehicle with floor jack and rest vehicle on jack stands; or use vehicle lift.
Tip #2: Remove front wheels.
Tip #3: Label, save, and/or separate fasteners and clamps.
2
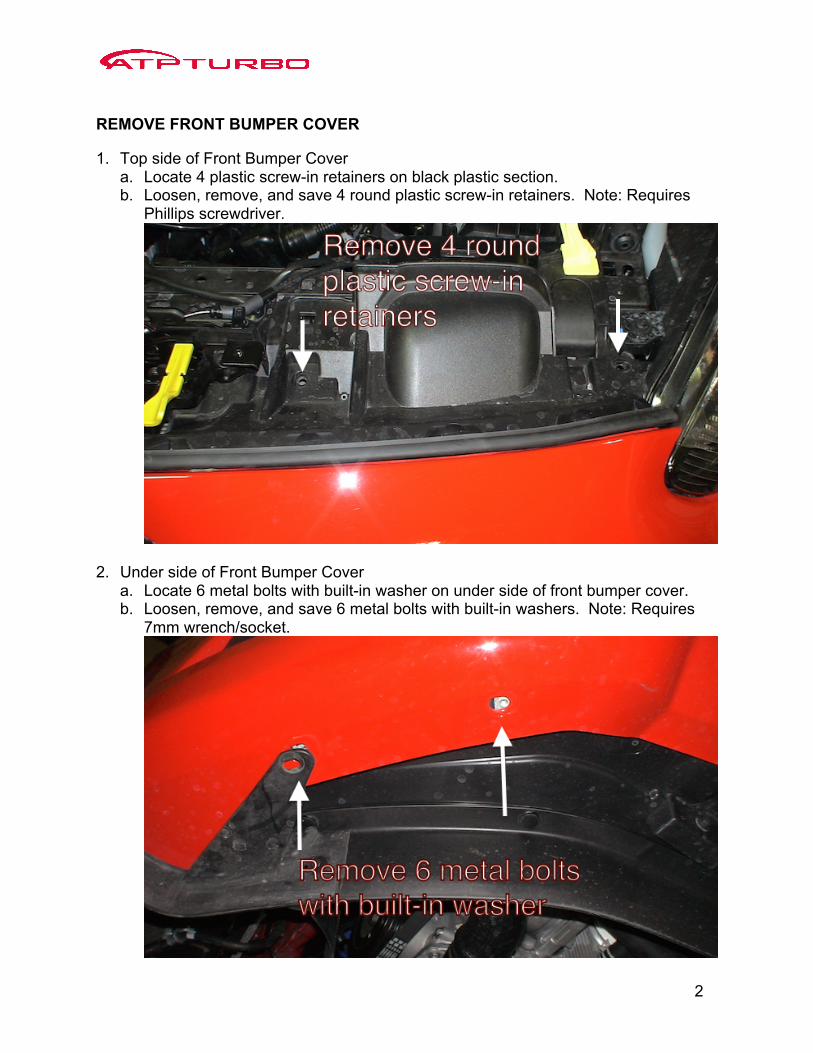
REMOVE FRONT BUMPER COVER
1. Top side of Front Bumper Cover a. Locate 4 plastic screw-in retainers on black plastic section. b. Loosen, remove, and save 4 round plastic screw-in retainers. Note: Requires
Phillips screwdriver.
2. Under side of Front Bumper Cover a. Locate 6 metal bolts with built-in washer on under side of front bumper cover. b. Loosen, remove, and save 6 metal bolts with built-in washers. Note: Requires
7mm wrench/socket.
3
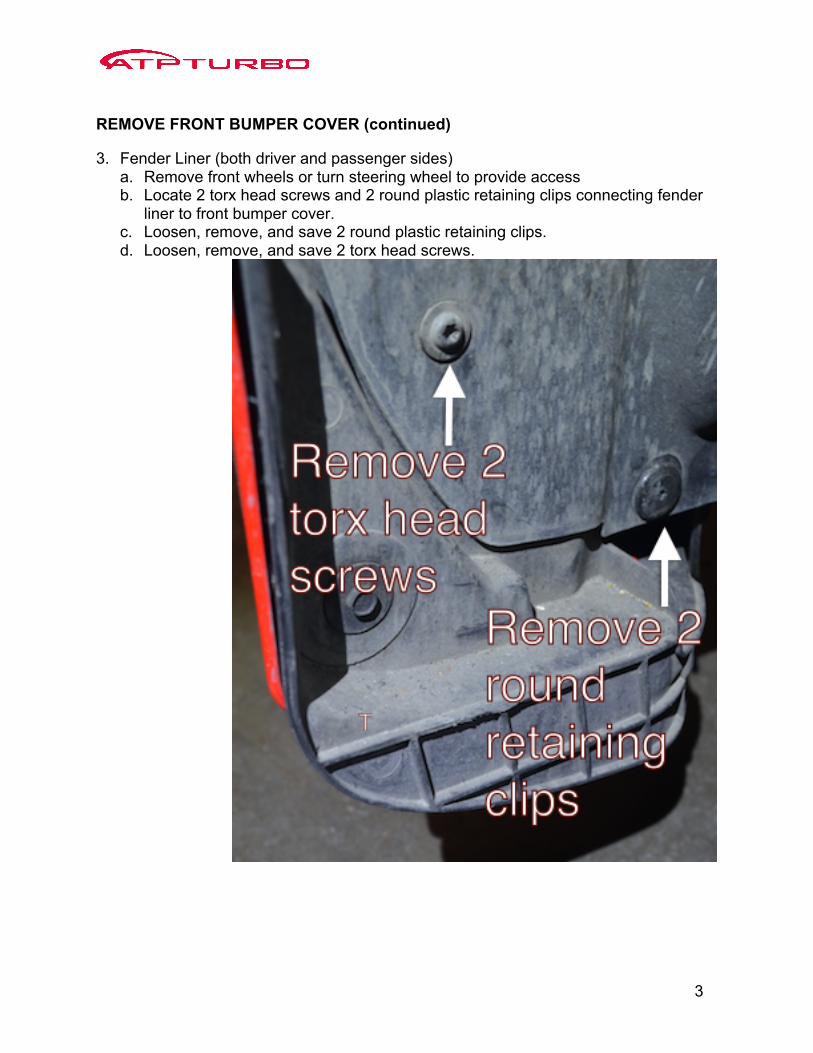
REMOVE FRONT BUMPER COVER (continued)
3. Fender Liner (both driver and passenger sides) a. Remove front wheels or turn steering wheel to provide access b. Locate 2 torx head screws and 2 round plastic retaining clips connecting fender
liner to front bumper cover. c. Loosen, remove, and save 2 round plastic retaining clips. d. Loosen, remove, and save 2 torx head screws.
4
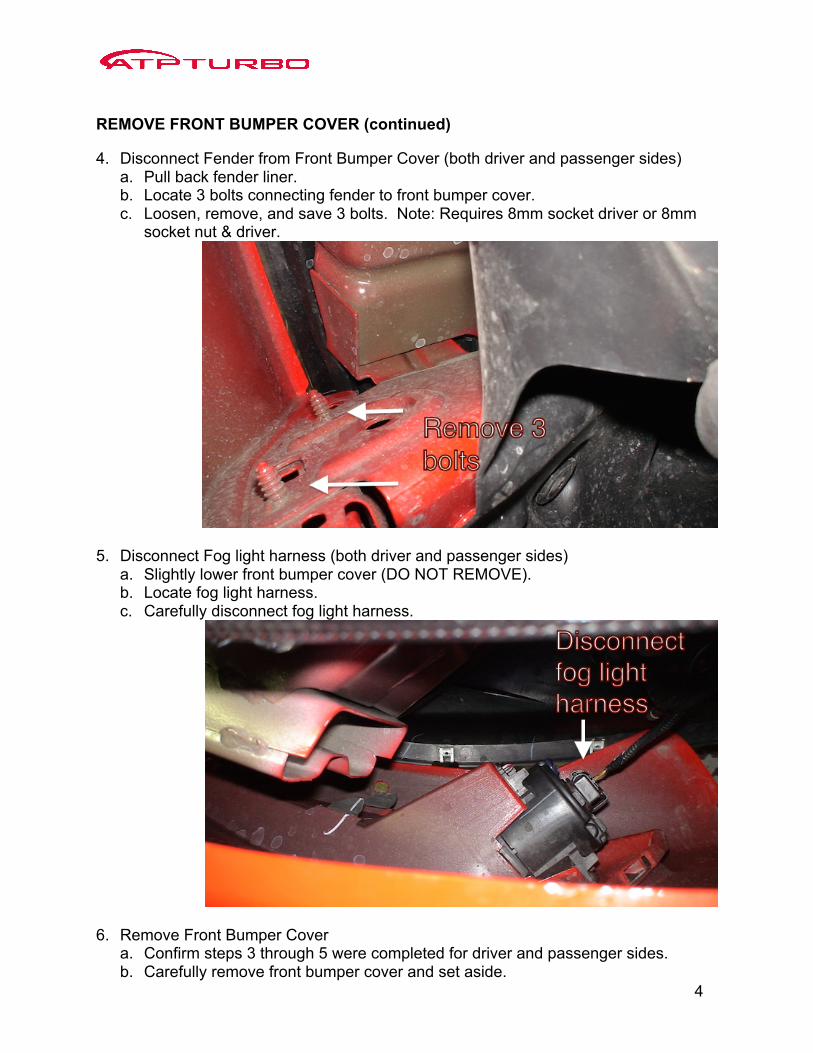
REMOVE FRONT BUMPER COVER (continued)
4. Disconnect Fender from Front Bumper Cover (both driver and passenger sides) a. Pull back fender liner. b. Locate 3 bolts connecting fender to front bumper cover. c. Loosen, remove, and save 3 bolts. Note: Requires 8mm socket driver or 8mm
socket nut & driver.
5. Disconnect Fog light harness (both driver and passenger sides) a. Slightly lower front bumper cover (DO NOT REMOVE). b. Locate fog light harness. c. Carefully disconnect fog light harness.
6. Remove Front Bumper Cover a. Confirm steps 3 through 5 were completed for driver and passenger sides. b. Carefully remove front bumper cover and set aside.

5
REMOVE STOCK INTERCOOLER
1. Stock intercooler end tank shroud bolts a. Locate 2 hex bolts in front of each intercooler end tank. Note: Requires 8mm
wrench/socket. b. Loosen, remove, and save 8mm hex bolts. Note: Requires 8mm socket/wrench.
2. Stock intercooler hose clamps
a. Locate 2 hose clamps on rubber hose ends, connected to intercooler end tanks. b. Loosen 2 hose clamps. Note: 7mm socket driver or 7mm socket nut & driver.
6
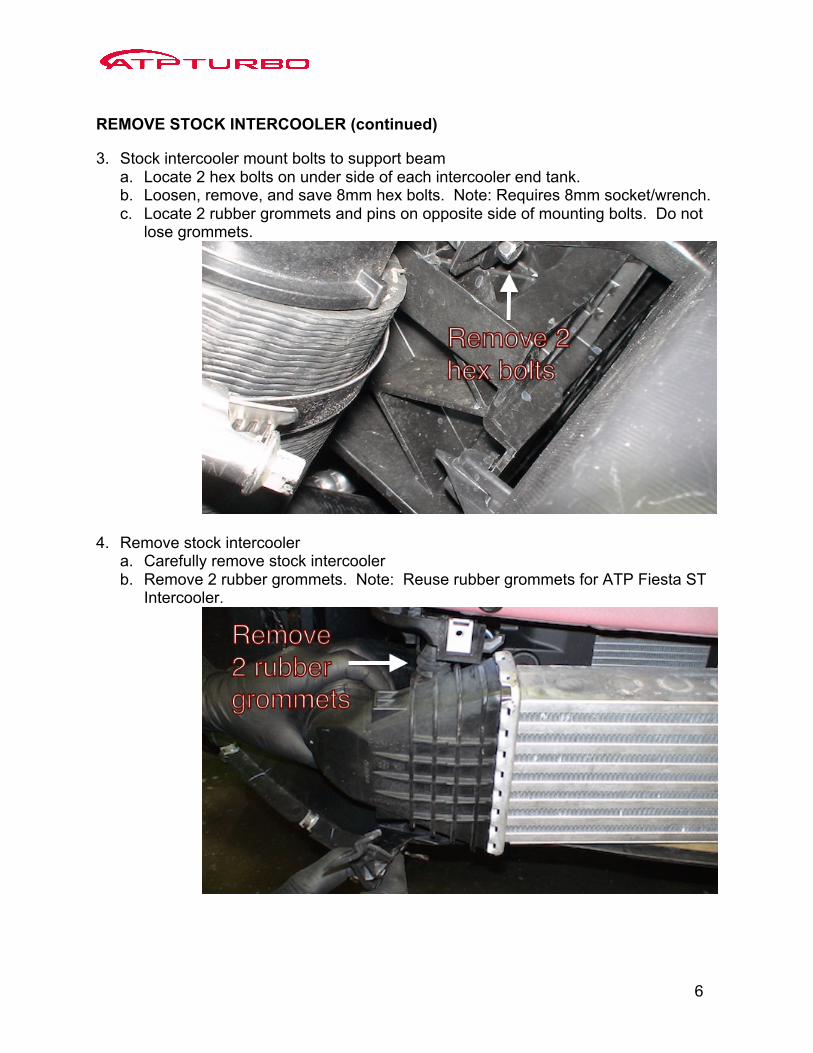
REMOVE STOCK INTERCOOLER (continued)
3. Stock intercooler mount bolts to support beam a. Locate 2 hex bolts on under side of each intercooler end tank. b. Loosen, remove, and save 8mm hex bolts. Note: Requires 8mm socket/wrench. c. Locate 2 rubber grommets and pins on opposite side of mounting bolts. Do not
lose grommets.
4. Remove stock intercooler a. Carefully remove stock intercooler b. Remove 2 rubber grommets. Note: Reuse rubber grommets for ATP Fiesta ST
Intercooler.
7
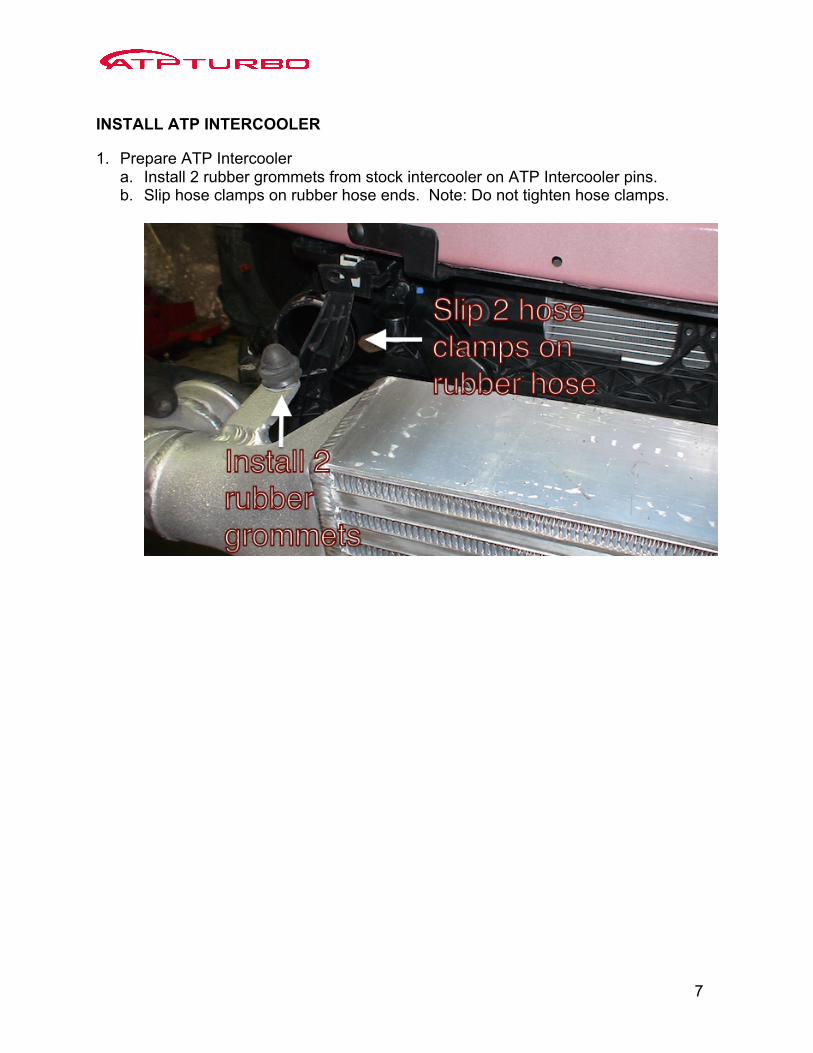
INSTALL ATP INTERCOOLER
1. Prepare ATP Intercooler a. Install 2 rubber grommets from stock intercooler on ATP Intercooler pins. b. Slip hose clamps on rubber hose ends. Note: Do not tighten hose clamps.
8
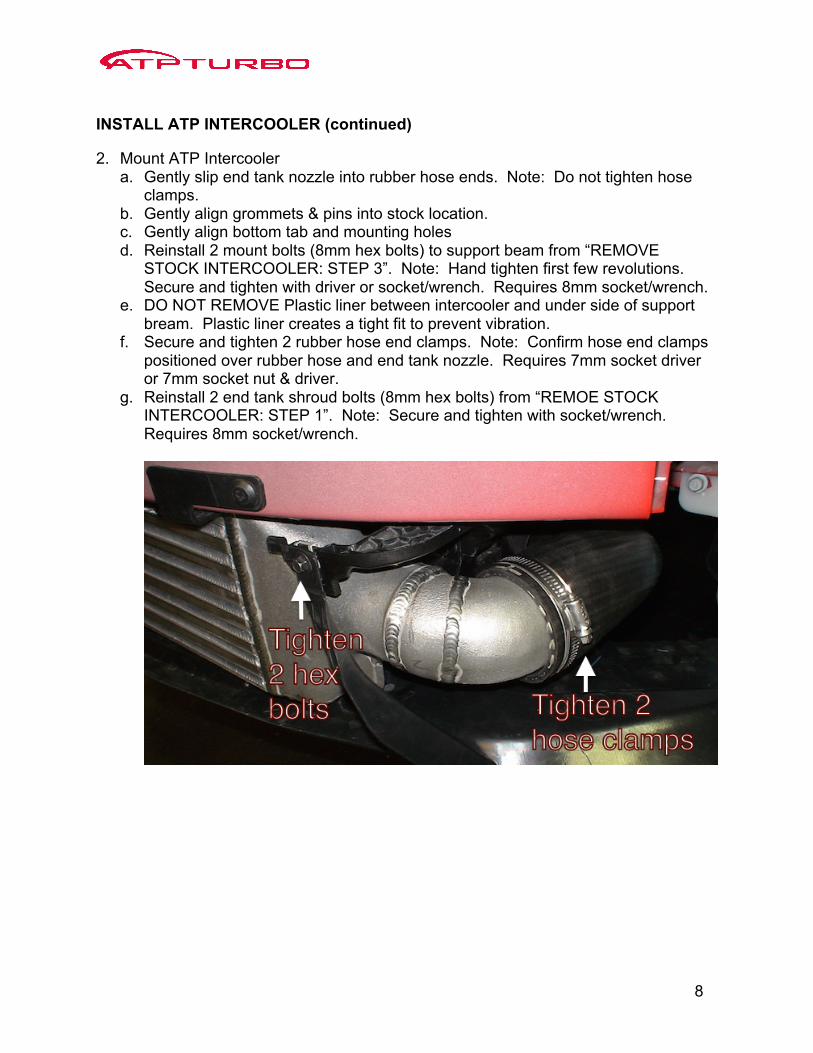
INSTALL ATP INTERCOOLER (continued)
2. Mount ATP Intercooler a. Gently slip end tank nozzle into rubber hose ends. Note: Do not tighten hose
clamps. b. Gently align grommets & pins into stock location. c. Gently align bottom tab and mounting holes d. Reinstall 2 mount bolts (8mm hex bolts) to support beam from “REMOVE
STOCK INTERCOOLER: STEP 3”. Note: Hand tighten first few revolutions. Secure and tighten with driver or socket/wrench. Requires 8mm socket/wrench.
e. DO NOT REMOVE Plastic liner between intercooler and under side of support bream. Plastic liner creates a tight fit to prevent vibration.
f. Secure and tighten 2 rubber hose end clamps. Note: Confirm hose end clamps positioned over rubber hose and end tank nozzle. Requires 7mm socket driver or 7mm socket nut & driver.
g. Reinstall 2 end tank shroud bolts (8mm hex bolts) from “REMOE STOCK INTERCOOLER: STEP 1”. Note: Secure and tighten with socket/wrench. Requires 8mm socket/wrench.
9
REINSTALL FRONT BUMPER COVER
1. Reinstall Front Bumper Cover a. Gently align front bumper cover to vehicle.
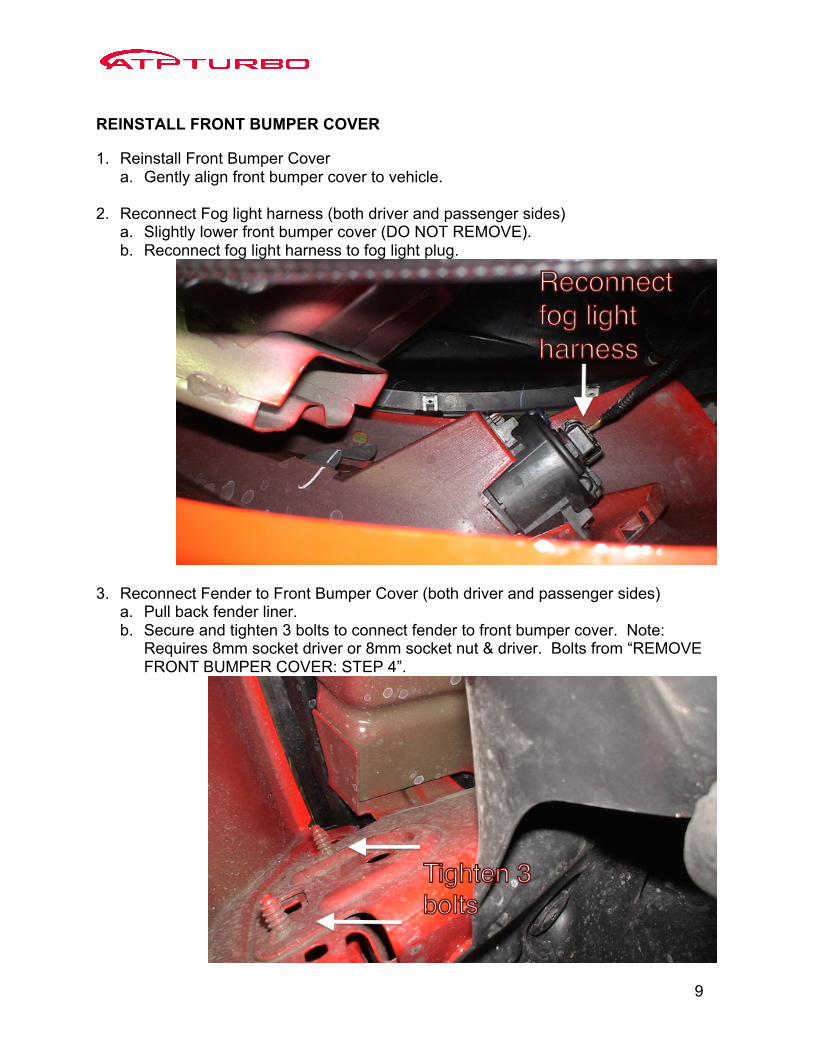
2. Reconnect Fog light harness (both driver and passenger sides)
a. Slightly lower front bumper cover (DO NOT REMOVE). b. Reconnect fog light harness to fog light plug.
3. Reconnect Fender to Front Bumper Cover (both driver and passenger sides) a. Pull back fender liner. b. Secure and tighten 3 bolts to connect fender to front bumper cover. Note:
Requires 8mm socket driver or 8mm socket nut & driver. Bolts from “REMOVE FRONT BUMPER COVER: STEP 4”.
10
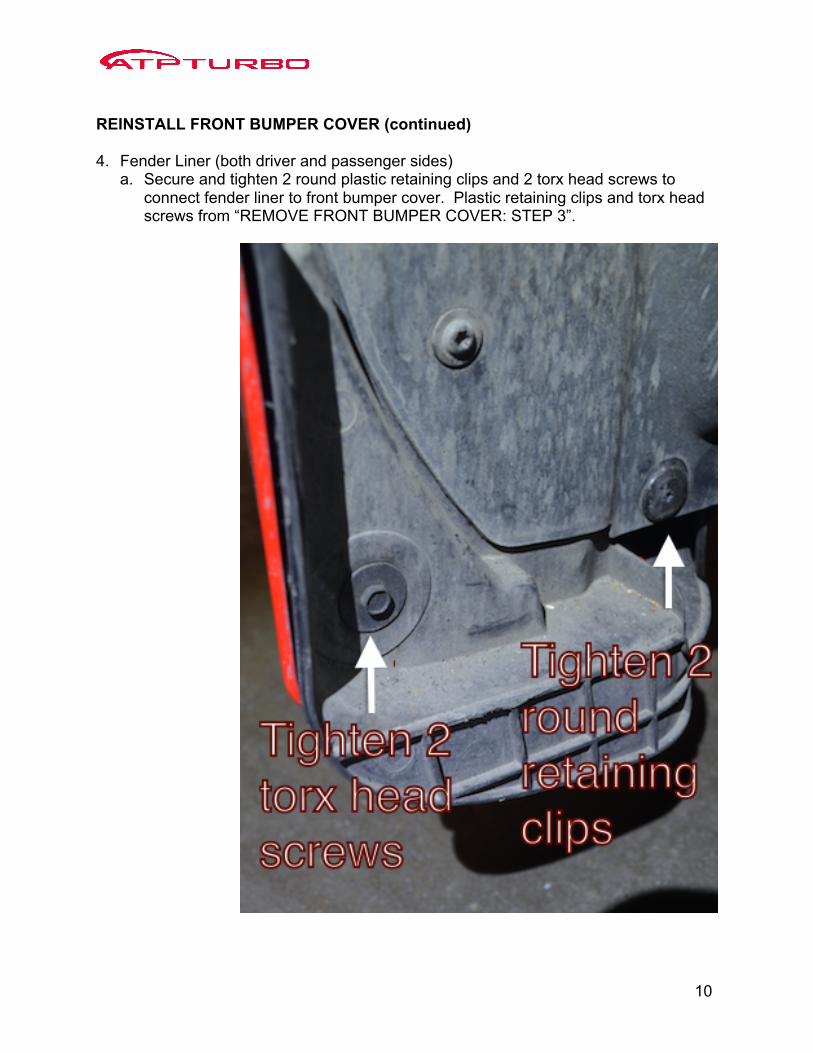
REINSTALL FRONT BUMPER COVER (continued) 4. Fender Liner (both driver and passenger sides)
a. Secure and tighten 2 round plastic retaining clips and 2 torx head screws to connect fender liner to front bumper cover. Plastic retaining clips and torx head screws from “REMOVE FRONT BUMPER COVER: STEP 3”.

11
REINSTALL FRONT BUMPER COVER (continued)
5. Under side of Front Bumper Cover a. Secure and tighten 6 metal bolts with built-in washers on under side of front
bumper cover. Note: Requires 7mm wrench/socket. Metal bolts from “REMOVE FRONT BUMPER COVER: STEP 2”.
6. Top side of Front Bumper Cover a. Secure and tighten 4 plastic screw-in retainers on black plastic section. Note:
Requires Phillips screwdriver. Screw-in retainers from “REMOVE FRONT BUMPER COVER: STEP 1”.