Embed Size (px)
Citation preview

Fidelio Suite 7
Reservations Manual
Front Office Version 7.14

Delphi is a trademark of Borland.
MSDOS, Windows 95, Windows-NT, Windows 2000, Windows XP and Microsoft Word are trademarks of Microsoft Corporation.
Oracle is a trademark of Oracle Corporation.
Crystal Report Writer is a trademark of Crystal Decisions.
R&R Report Writer is a trademark of Concentric Data Systems, Inc.
Netware is a trademark of Novell.
All other brand and product names are trademarks or registered trademarks of their respective companies.
This document has been prepared by Micros-Fidelio (Ireland) Ltd. and is available to a select group of individuals for informational purposes. This is a confidential document that contains concepts, methods and other proprietary information. Readers are to treat the information herein as confidential.
© 2006 Micros-Fidelio (Ireland) Ltd.
All rights reserved. No part of this document may be reproduced, transmitted or used in any form by any means – graphic, electronic or mechanical, including photocopying, recording, taping or information storage and retrieval systems or otherwise – without the prior consent of the copyright owners.
Micros-Fidelio (Ireland) Ltd. makes no warranty of any kind with regard to this material, including but not limited to the implied warranties of marketability and fitness for a particular purpose. Micros-Fidelio (Ireland) Ltd. shall not be liable for errors contained herein or for incidental or consequential damages in connection with the furnishing, performance, or use of this material.
Information in this document is subject to change without notice.
Author:
V7 Development Team
Printed in Germany
Micros-Fidelio (Ireland) Ltd.
Europadamm 2-6
41460 Neuss
Germany
Tel: +49 2131 137 0
Fax: +49 2131 137 464
© 2006 Micros-Fidelio (Ireland) Ltd. April 2006

Table of Contents Introduction............................................................................................1
About Suite 7 Reservations .................................................1 Reservations Speedbar........................................................2 Logging In...........................................................................3 Navigation Keys ..................................................................4
Control Keys and Shortcut Keys...........................................4 The Quick Keys....................................................................6 The Date field......................................................................7
Changing the date .............................................................8 Displaying corresponding screens and dialog boxes............9
Using the blue drill down arrow ...........................................9 Using the buttons ............................................................ 10
Printing screens and dialog boxes.....................................10 Printing using the print pop-up button ................................ 11 Saving and accessing print table files ................................. 16
Exiting Suite 7 Front Office ...............................................18 Profiles..................................................................................................21
Creating a New Profile ......................................................21 Creating a profile for an individual guest............................. 22
Future, History, and Picture ..............................................25 Viewing future reservations............................................... 25 History........................................................................... 25 Picture ........................................................................... 27
The Company/Agent/Source profile..................................29 Future reservations.......................................................... 30 Projected Revenue........................................................... 31 History........................................................................... 31
Group Master Profile .........................................................31 Editing a Profile.................................................................31
Searching for a profile...................................................... 32 Deleting a profile............................................................. 32 Copy/Paste Functionality .................................................. 33 Linking a rate code to a profile .......................................... 33 Linking a permanent virtual number to a guest profile .......... 36 Merging profiles .............................................................. 37 Guest Awards ................................................................. 37 Assigning the Award ........................................................ 39
Easy Letter ........................................................................40 Reservations .........................................................................................43
Opening the New Reservation screen without searching for a guest profile......................................................................43 Searching for a guest profile .............................................44 Making a Reservation from the New Reservation screen...44
Making a Company Reservation ......................................... 49 Making an Agent Reservation ............................................ 49 Making a Source Reservation ............................................ 50 Displaying the last reservation made.................................. 51
© 2006 Micros-Fidelio (Ireland) Ltd. April 2006 v
Version 7 Reservations Manual
Updating Reservations ......................................................51 Searching for a reservation using the standard search .......... 51 Searching for a reservation using the advanced search option 52 Checking in a guest from the Reservation List grid ............... 54 Cancelling an Expected reservation from the Reservation List grid ............................................................................... 55 Cancelling a Checked-In reservation from the Reservation List grid ............................................................................... 55 Reinstating a checked-out reservation from the Reservation List grid ............................................................................... 55 Reactivating a cancelled reservation from the Reservation List grid ............................................................................... 56
Reservations Options ............................................................................57 Opening the Reservation Options dialog box.....................57
Opening the Reservation Options from the Reservation Search dialog box ...................................................................... 57 Displaying the Reservation Options from the Reservation screen.................................................................................... 61
Routing .............................................................................62 Reinstate...........................................................................64 Fixed Charges....................................................................64 Rate Info...........................................................................66
Viewing a room rate in various currencies ........................... 66 Viewing rate details in a specific currency ........................... 66
Billing................................................................................66 Pre-Billing .........................................................................67
Posting deposit payments ................................................. 67 Deposit Adjustments........................................................ 68
Leisure ..............................................................................69 Scheduling leisure activities .............................................. 69
Authorize Direct Billing .....................................................70 Confirming authorization for direct billing when the user has no rights for authorization..................................................... 70 Authorizing direct billing ................................................... 71 Cancelling authorization for direct billing............................. 71
Q Rooms............................................................................71 Accessing the Q Rooms listing ........................................... 72 Q Room Cancellations ...................................................... 72
Package Options................................................................72 Viewing package elements for which an allowance has been created .......................................................................... 72 Routing the allowance ...................................................... 73 Displaying routings .......................................................... 74 Checking and updating changes......................................... 74 Cancelling routing of package charges ................................ 74
Virtual Numbers ................................................................75 Assigning a new virtual number......................................... 75 Deleting a virtual number ................................................. 76 Changing the assigned virtual number................................ 76
Changes ............................................................................77 Shares...............................................................................77
Creating a share reservation with a new guest..................... 77 Creating a share reservation with an existing reservation ...... 78
vi © 2006 Micros-Fidelio (Ireland) Ltd. April 2006
Table Of Contents
Creating a share reservation with a checked-in guest ........... 78 Breaking a share reservation............................................. 79
Traces ...............................................................................79 Creating a new trace........................................................ 79 Editing text on the Traces list ............................................ 80 Deleting a trace .............................................................. 80 Resolving a trace............................................................. 81 Unresolving a trace.......................................................... 81
Credit Cards ......................................................................81 Entering an Approval Code Manually .................................. 81 Altering the Current Authorization Rule............................... 82 Getting Authorization for a Higher Amount .......................... 82 Courtesy Card Handling.................................................... 83
Accompanying...................................................................83 Registering a guest as an accompanying guest .................... 83 Unlinking an accompanying guest ...................................... 83 Editing an entry on the Accompanying list........................... 84 Deleting a name from the Accompanying list ....................... 84
Messages ..........................................................................84 Viewing a guest's messages .............................................. 84 Creating a new message for a guest................................... 85 Editing a guest's message................................................. 86 Deleting a guest's message............................................... 86
History ..............................................................................86 Viewing a guest's history .................................................. 86
Registration Card ..............................................................87 Printing a registration card................................................ 87
Confirmation .....................................................................87 Viewing and/or editing a confirmation letter ........................ 87 Printing a confirmation letter............................................. 88 E-mailing a confirmation letter .......................................... 88
Delete ...............................................................................89 Deleting a reservation ...................................................... 89
Add On ..............................................................................89 Creating an Add On reservation......................................... 89
Party .................................................................................89 Making a party reservation ............................................... 90 Splitting a party reservation.............................................. 90 Breaking the connection of a reservation and the party......... 90
Room Move .......................................................................91 Moving a reservation from one room to another room........... 91
Waitlist..............................................................................91 Moving a reservation to the Waitlist ................................... 91
Regrets .............................................................................92 Moving a reservation to the Regrets list .............................. 92
Locator..............................................................................92 Entering a guest's location ................................................ 92
Guest Awards....................................................................93 Assigning the Award ........................................................ 94
Meal Plan ..........................................................................95 Setting a meal plan ......................................................... 95 Removing packages from the meal plan.............................. 95
Pro-Forma .........................................................................96
© 2006 Micros-Fidelio (Ireland) Ltd. April 2006 vii
Version 7 Reservations Manual
Waitlist..................................................................................................97 Changing the order of placement of the Waitlist reservations..........................................................................................97 Changing the date of the Waitlist dialog box.....................98 Displaying all Waitlist reservations ...................................98 Displaying the Waitlist reservations that can be moved to reservations ......................................................................98 Viewing a Waitlist reservation ..........................................99 Locating a reservation on the Waitlist...............................99 Accepting a Waitlist reservation........................................99 Cancelling a Waitlist reservation.......................................99 Regrets ........................................................................... 100
Opening the Regrets dialog box ....................................... 100 Groups ................................................................................................ 101
The Main Groups Screen.................................................. 101 Standard Groups ............................................................. 102 Group Reservations List Options ..................................... 106
Check-In/Billing ............................................................ 106 Cancel/Reactivate/Cancel CI ........................................... 107 Split All ........................................................................ 109 Search......................................................................... 110
Group Options ................................................................. 111 Rooming List................................................................. 111 Check-In Group............................................................. 115 Delete.......................................................................... 116 Room Assign................................................................. 116 Room Type Assign ......................................................... 118 New Postmaster ............................................................ 118 Statistic ....................................................................... 118 Room Status................................................................. 119 Print Keys .................................................................... 119
Sharing ........................................................................... 119 Blocks ............................................................................. 121
Block components ......................................................... 121 Accessing Block Components........................................... 122 Phases of a Block (Block Status)...................................... 122
History ............................................................................ 123 Group Block Maintenance................................................ 123 Block Header Options ...................................................... 127
Profile.......................................................................... 128 Grid............................................................................. 131 Traces ......................................................................... 135 Info............................................................................. 136 Change Status .............................................................. 136 Cutoff .......................................................................... 137
Block Options .................................................................. 137 Delete.......................................................................... 137 Move Block................................................................... 138 Refresh Grid Rates......................................................... 138 Changes....................................................................... 138 Summary Info............................................................... 138 Cancel/Reinstate ........................................................... 138
viii © 2006 Micros-Fidelio (Ireland) Ltd. April 2006
Table Of Contents
Tour Series................................................................... 139 Custom Tour Series ....................................................... 140 Booking Position History ................................................. 140
Group Detail Maintenance ............................................... 141 Rooming List................................................................. 143 Borrowing .................................................................... 147 What If There Are No Rooms Left In the Block?.................. 147
Events ................................................................................................. 149 Leisure Activities................................................................................. 151
Opening the Leisure dialog box ....................................... 151 Changing the date of the Leisure dialog box ...................... 151 Making a Leisure Activity reservation................................ 152
Changing a Leisure Booking ............................................ 155 Changing the booking time or date by cutting and pasting... 155 Changing the booking time by dragging and dropping......... 155 Changing the Booking fields ............................................ 156 Checking in a Leisure Booking ......................................... 156 Posting leisure activity charges........................................ 157 Cancelling the check-in of a Leisure Booking ..................... 157 Deleting a Leisure Booking.............................................. 158 Viewing guest information .............................................. 158
Leisure Activities Menu Options ...................................... 158 Printing the leisure schedule ........................................... 159 Changing the booking type ............................................. 160 Viewing resource information about the activity ................. 161 Entering comments about the activity............................... 161 Calculating expected revenue.......................................... 161
Index .................................................................................................. 163
© 2006 Micros-Fidelio (Ireland) Ltd. April 2006 ix

1
Introduction
About Suite 7 Reservations The Suite 7 Reservations Module allows you to perform all the hotel reservation's functions.
In this manual you will find step-by-step instructions to guide you through most of the basic Reservation functions you will require. However, as you get to know and use Suite 7, you will discover that many functions can be performed in more than one way; as well as using shortcut keys, and you will naturally choose the methods you find most convenient.
Reservations can be made for individuals and groups. You can make a new guest, company, agent, or source reservation. Every reservation must have a guest profile attached to it. If a reservation is made and there is no existing profile, then a profile must be created. In addition, a reservation can also have a company, agent, or source profile or any combination of the three profiles attached to it.
A profile is a record of information. It consists of the main information about a guest, company, travel agent, group or other source of a hotel reservation. A photograph of a guest may be attached to the profile. A summary of future reservations and past stays is also included.
After a reservation has been created, you can display, search, update or cancel a reservation. If a reservation has been cancelled, you can reactivate the reservation.
A reservation can be put on the Waitlist if the room type or rate is not available. When the room type or rate becomes available, the hotel can contact the guest and ask if they want the reservation. If the guest wants the reservation, the reservation is taken off the Waitlist and the reservation is accepted.
Various options can be attached to a reservation. For example, a confirmation letter, fixed charges, a message, or a deposit. Changes to the reservation can also be made. For example, authorizing direct billing, adding routing instructions, or splitting a party reservation. With the Events option, Suite 7 Reservations can keep track of future events, critical dates, and calendar periods.
Leisure activities can be booked for hotel outlets. There are two categories of leisure outlets, outlets without services and outlets with services. Outlets without services may include booking a tennis court or a table at a restaurant. Outlets with services may include booking a hairdresser or the spa. The Leisure option is available only if your hotel is configured for Suite 7 Leisure Management Module.
© 2006 Micros-Fidelio (Ireland) Ltd. April 2006 Page 1

Version 7 Reservations Manual
Reservations Speedbar The Suite 7 Front Office main menu screen has six Suite 7 speed icons located at the top left of the screen. Each speed icon represents one of the main user modules.
To open the Reservations toolbar:
1. From the main Suite 7 screen, click the Reservations icon.
The Reservations toolbar appears to the right of the main menu icons.
This to
plays up to seven buttons at a
olbar is the starting point for all Suite 7 Reservation functions.
Note: The Reservations toolbar distime. Depending on how your system is set up, you may have more or less than seven buttons.
2.
ttons appear on the right.
n display, click the arrow on the left side of
atio
Icon of the
To access additional buttons, click the right arrow at the right side of the toolbar.
The buttons on the left disappear, the other buttons all move left, and the additional bu
3. To toggle See the previous buttothe toolbar.
Reserv n toolbar icons
Nameicon
Description
New Reservation
Opens the New Reservation dialog box from whyou can make a new reservation.
ere
Update Reservations
Opens the Reservation Search dialog box from where you can search for reservations.
Groups update group reservations.
Opens the Groups dialog box from where you cancreate and
Waitlist e room type or rate is not
Opens the Waitlist dialog box from where you can put a reservation if thavailable.
Profiles search for and display profiles,
Opens the Profile Search screen from where you cancreate new profiles,and update profiles.
Page 2 © 2006 Micros-Fidelio (Ireland) Ltd. April 2006
Introduction
Name of the Description Icon icon
Events Opens the Events dialog box. It contains a list of all ture events, and past events which have
not been deleted. planned fu
Leisure Opens the Leisure dialo x displa
Activities g bo ying the leisure
activities that can be booked for hotel outlets.
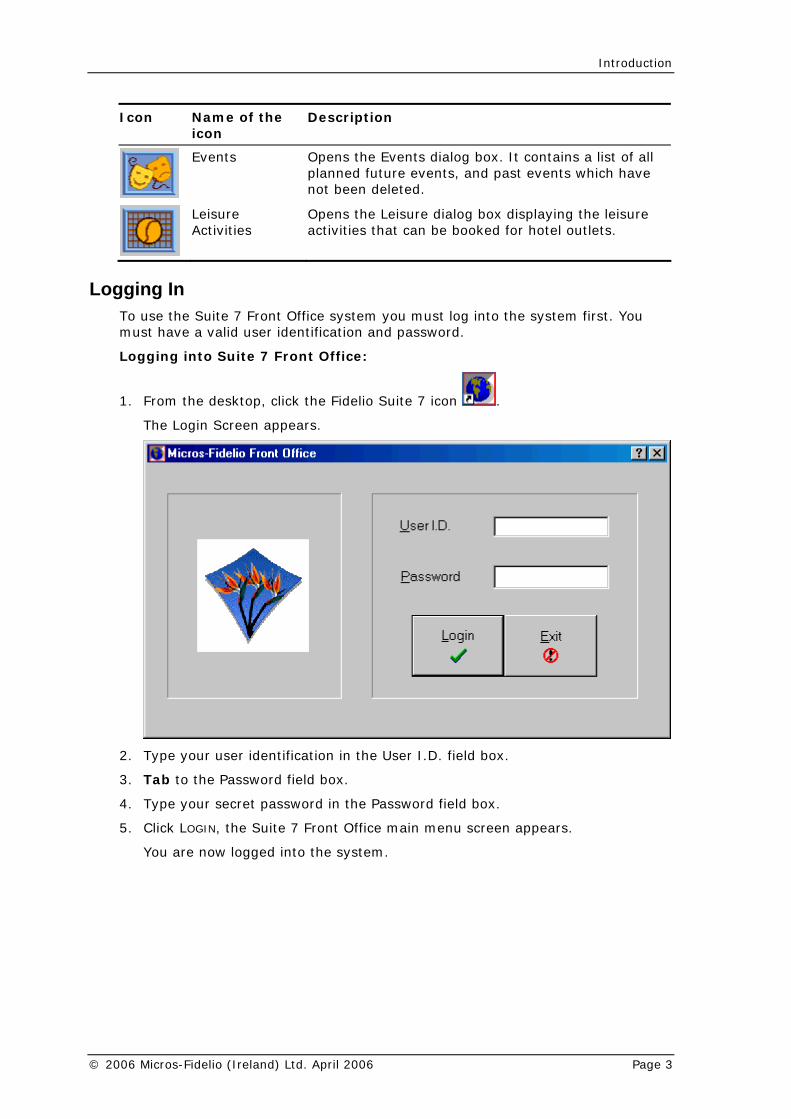
Logem you must log into the system first. You
1. From the desktop, click the Fidelio Suite 7 icon
ging In To use the Suite 7 Front Office systmust have a valid user identification and password.
Logging into Suite 7 Front Office:
.
The Login Screen appears.
2. Type your user identification in the User I.D. field box.
3. Tab to the Password field box.
4. Type your secret password in the Password field box.
5. Click LOGIN, the Suite 7 Front Office main menu screen appears.
You are now logged into the system.
© 2006 Micros-Fidelio (Ireland) Ltd. April 2006 Page 3
Version 7 Reservations Manual
Navigation Keys Accelerator keys
Suite 7 Front Office has accelerator keys that allow you fast access to a box on a screen or dialog box. When a letter is underlined you can press the Alt + letter keys and the cursor moves into the appropriate box. For example, on the New Reservations screen the letter “A” is underlined in the Arrival date field. By pressing the Alt + A keys, the cursor moves into the Arrival date field box.
To use the accelerator keys:
From the screen or dialog box, press Alt + letter
The cursor moves into the appropriate box.
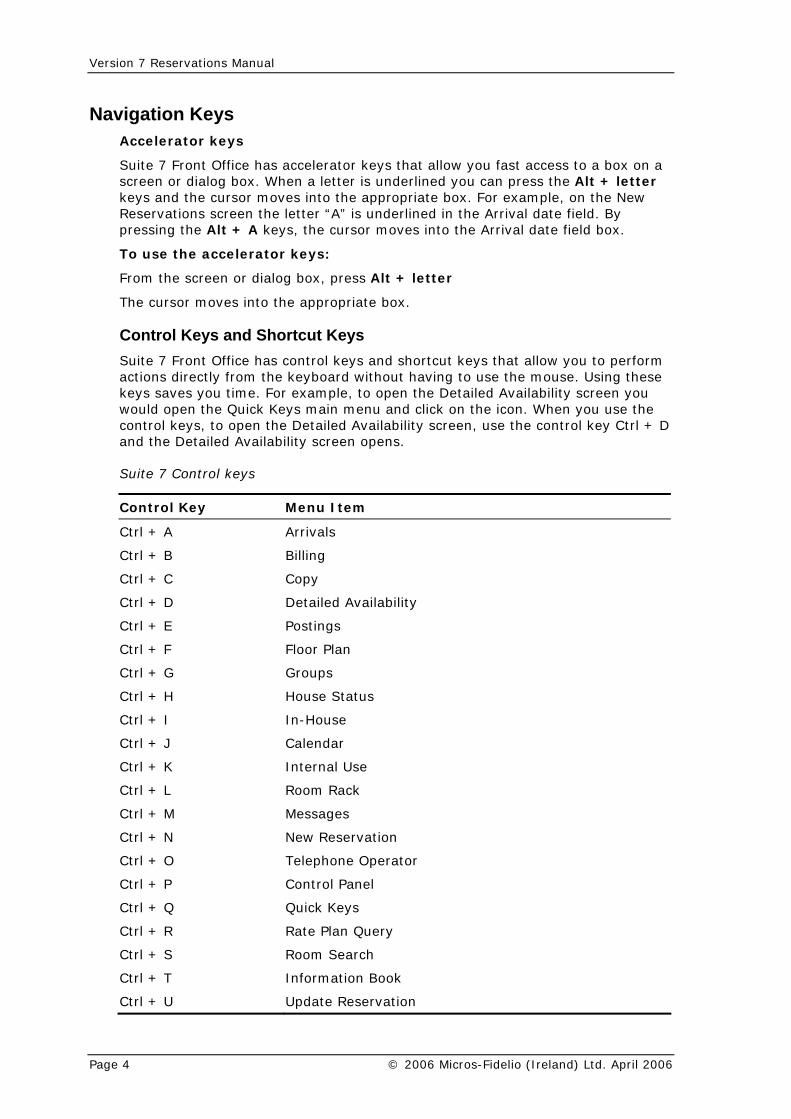
Control Keys and Shortcut Keys Suite 7 Front Office has control keys and shortcut keys that allow you to perform actions directly from the keyboard without having to use the mouse. Using these keys saves you time. For example, to open the Detailed Availability screen you would open the Quick Keys main menu and click on the icon. When you use the control keys, to open the Detailed Availability screen, use the control key Ctrl + D and the Detailed Availability screen opens.
Suite 7 Control keys
Control Key Menu Item
Ctrl + A Arrivals
Ctrl + B Billing
Ctrl + C Copy
Ctrl + D Detailed Availability
Ctrl + E Postings
Ctrl + F Floor Plan
Ctrl + G Groups
Ctrl + H House Status
Ctrl + I In-House
Ctrl + J Calendar
Ctrl + K Internal Use
Ctrl + L Room Rack
Ctrl + M Messages
Ctrl + N New Reservation
Ctrl + O Telephone Operator
Ctrl + P Control Panel
Ctrl + Q Quick Keys
Ctrl + R Rate Plan Query
Ctrl + S Room Search
Ctrl + T Information Book
Ctrl + U Update Reservation
Page 4 © 2006 Micros-Fidelio (Ireland) Ltd. April 2006
Introduction
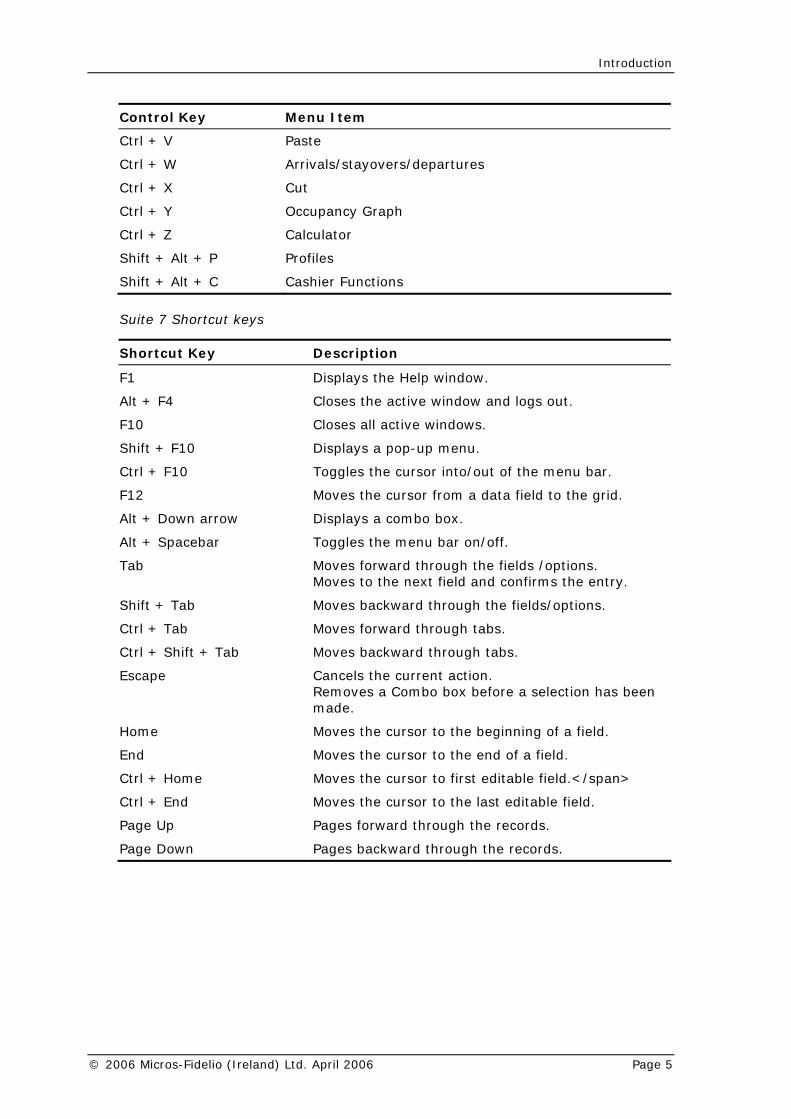
Control Key Menu Item
Ctrl + V Paste
Ctrl + W Arrivals/stayovers/departures
Ctrl + X Cut
Ctrl + Y Occupancy Graph
Ctrl + Z Calculator
Shift + Alt + P Profiles
Shift + Alt + C Cashier Functions
Suite 7 Shortcut keys
Shortcut Key Description
F1 Displays the Help window.
Alt + F4 Closes the active window and logs out.
F10 Closes all active windows.
Shift + F10 Displays a pop-up menu.
Ctrl + F10 Toggles the cursor into/out of the menu bar.
F12 Moves the cursor from a data field to the grid.
Alt + Down arrow Displays a combo box.
Alt + Spacebar Toggles the menu bar on/off.
Tab Moves forward through the fields /options. Moves to the next field and confirms the entry.
Shift + Tab Moves backward through the fields/options.
Ctrl + Tab Moves forward through tabs.
Ctrl + Shift + Tab Moves backward through tabs.
Escape Cancels the current action. Removes a Combo box before a selection has been made.
Home Moves the cursor to the beginning of a field.
End Moves the cursor to the end of a field.
Ctrl + Home Moves the cursor to first editable field.</span>
Ctrl + End Moves the cursor to the last editable field.
Page Up Pages forward through the records.
Page Down Pages backward through the records.
© 2006 Micros-Fidelio (Ireland) Ltd. April 2006 Page 5
Version 7 Reservations Manual
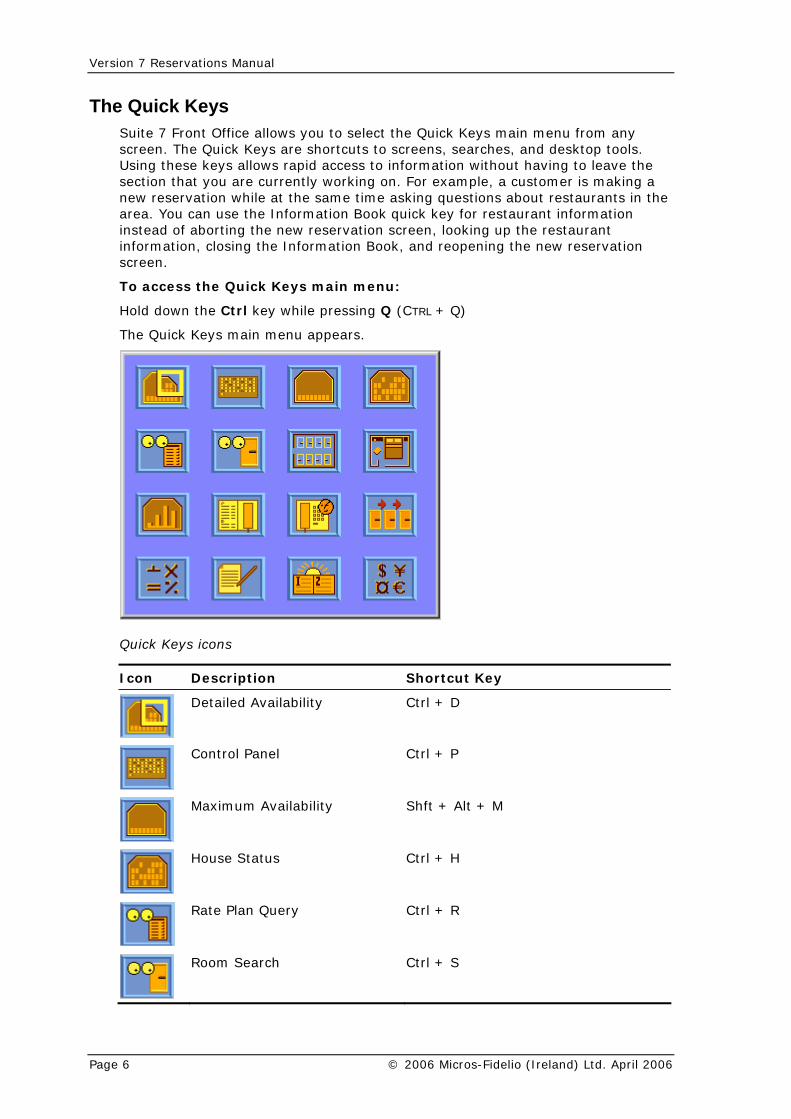
The Quick Keys Suite 7 Front Office allows you to select the Quick Keys main menu from any screen. The Quick Keys are shortcuts to screens, searches, and desktop tools. Using these keys allows rapid access to information without having to leave the section that you are currently working on. For example, a customer is making a new reservation while at the same time asking questions about restaurants in the area. You can use the Information Book quick key for restaurant information instead of aborting the new reservation screen, looking up the restaurant information, closing the Information Book, and reopening the new reservation screen.
To access the Quick Keys main menu:
Hold down the Ctrl key while pressing Q (CTRL + Q)
The Quick Keys main menu appears.
Quick Keys icons
Icon Description Shortcut Key
Detailed Availability Ctrl + D
Control Panel Ctrl + P
Maximum Availability + M Shft + Alt
House Status Ctrl + H
Rate Plan Query Ctrl + R
Room Search Ctrl + S
Page 6 © 2006 Micros-Fidelio (Ireland) Ltd. April 2006

Introduction
Icon Description Shortcut Key
Room Rack Ctrl + L
Floor Plan Ctrl + F
Occupancy Graph Ctrl + Y
Information Book Ctrl + T
Telephone Operator Ctrl + O
Arrivals/Stayovers/Departures Ctrl + W
Calculator Ctrl + Z
Log Book Shft + Alt + L
Calendar Ctrl + J
Currency Convert Calculator Shft + Alt + R
Theof the dates
and the separators between the dates may vary from one hotel to another. You can type the date with or without separators. Yo c also type the current day and month without the year and the year will default to the current year.
MM-DD-YY
DD-M
DDMM
fields in the system. For example, Start date, Arrival date, be either a specific date or an as of date.
Date field The fields are setup in the system configuration; therefore the format
u an
Typical date formats include the following:
MM/DD/YY
DD/MM/YY
M-YY
YYYY
There are many date or Date. The date can
© 2006 Micros-Fidelio (Ireland) Ltd. April 2006 Page 7
Version 7 Reservations Manual
A specific date is when you need to see what happened on that day. For example, 9/99.
t hat date. 09/09/99
thr
you need to see which guests have departed 09/0
An as of date is when you need o find out information starting from tFor example, you need to read the occupancy graph starting from
ough 12/09/99.
Note: For setting up the date format, see the Suite 7 Configuration Manual.
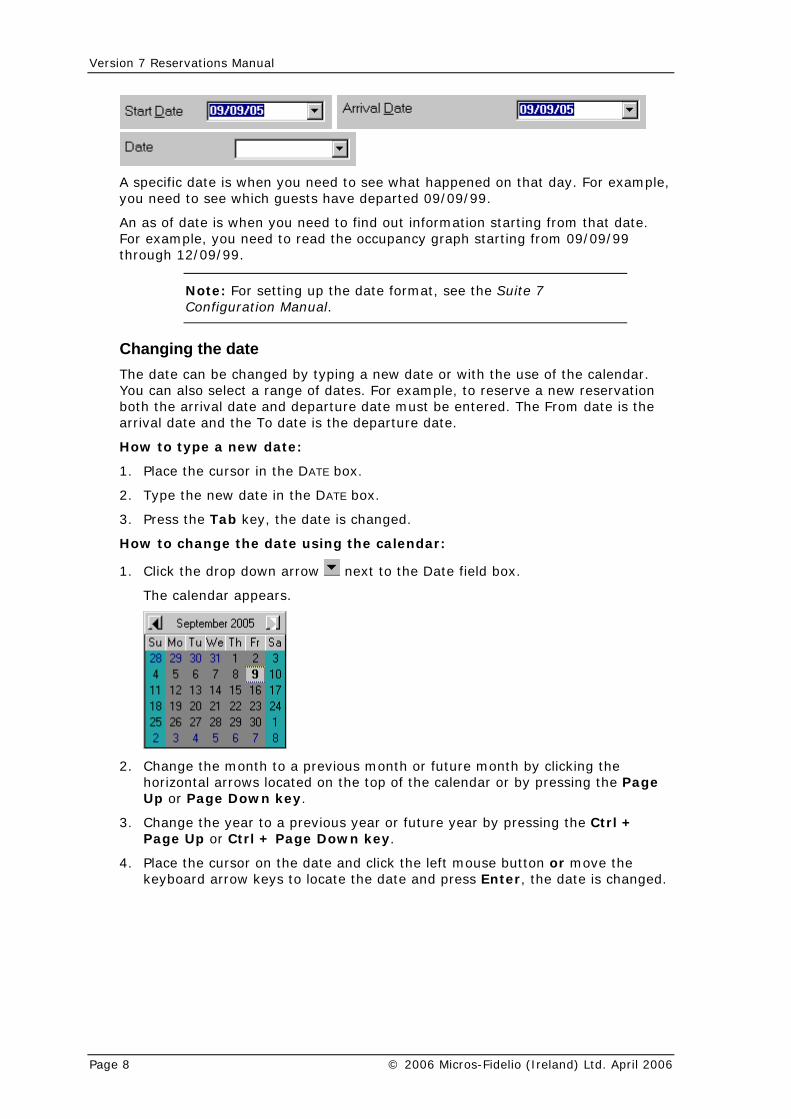
Changing the date date can be changed by typing a new The date or with the use of the calendar.
n
arrival date and the To
How to type a new date:
1. Place the cursor in the DATE box.
2. Type the new date in the DATE box.
3. Press the Tab key, the date is changed.
How to change the date using the calendar:
1. Click the drop down arrow
You can also select a range of dates. For example, to reserve a new reservatioboth the arrival date and departure date must be entered. The From date is the
date is the departure date.
next to the Date field box.
The calendar appears.
2. Change the month to a previous month or future month by clicking the horizontal arrows located on the top of the calendar or by pressing the Page Up or Page Down key.
3. Change the year to a previous year or future year by pressing the Ctrl + Page Up or Ctrl + Page Down key.
4. Place the cursor on the date and click the left mouse button or move the keyboard arrow keys to locate the date and press Enter, the date is changed.
Page 8 © 2006 Micros-Fidelio (Ireland) Ltd. April 2006

Introduction
How to select a range of dates using the calendar:
1. Click the drop down arrow next to the Date field box, the calendar appears.
2. Change the month to a previous month or future month by clicking the horizontal arrows located on the top of the calendar or by pressing the Page
future year by pressing the Ctrl +
ght horizontal arrow on the keyboard te that is the To date.
Dis dialog boxes
blue drill down arrow next to the field, this indicates that no
e a blue drill down arrow
Up or Page Down key.
3. Change the year to a previous year orPage Up or Ctrl + Page Down key.
4. Select the date which is the From Date.
5. Press the Shift key while clicking the riuntil you have highlighted the da
The date range is highlighted on the calendar.
6. Press Enter, the dates are changed.
playing corresponding screens and
Using the blue drill down arrow When there is noadditional information can be displayed for the field.
Many fields hav next to it indicating that there is played. additional information that can be dis
For example, by doubscreen appears.
le clicking in the OO Rooms field box, the Out of Order
To display corresponding screens and dialog boxes using the blue drill down arrow:
1. Place the cursor in the field box.
2. Double-click inside the field box with the left-mouse button.
The corresponding screen appears.
© 2006 Micros-Fidelio (Ireland) Ltd. April 2006 Page 9
Version 7 Reservations Manual
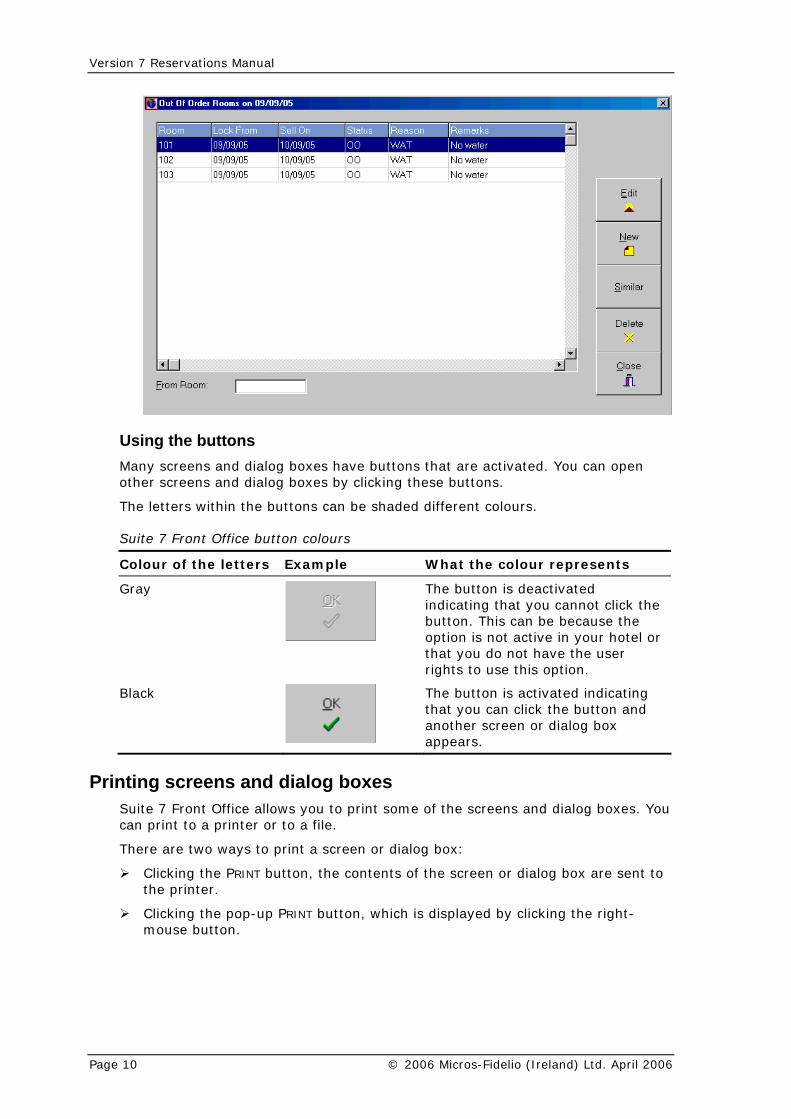
Using the buttons Many screens and dialog boxes have buttons that are activated. You can open
The l he buttons can be shaded different colours.
Suite 7 Front Office button colours
Colour of the letters Example What the colour represents
other screens and dialog boxes by clicking these buttons.
etters within t
Gray
The button is deactivated indicating that you cannot click the button. This can be because the option is not active in your hotel or that you do not have the user rights to use this option.
Black
The button is activated indicating that you can click the button and another screen or dialog box appears.
Printing screens and dialog boxes Suite 7 Front Office allows you to print some of the screens and dialog boxes. You can print to a printer or to a file.
There are two ways to print a screen or dialog box:
Clicking the PRINT button, the contents of the screen or dialog box are sent to the printer.
Clicking the pop-up PRINT button, which is displayed by clicking the right-mouse button.
Page 10 © 2006 Micros-Fidelio (Ireland) Ltd. April 2006
Introduction
To print by clicking the print button:
From the screen or dialog box, click the PRINT button.
The contents of the screen or dialog box are sent to the printer.
Printing using the print pop-up button Many screens and dialog boxes that do not have a PRINT button can be printed by using the PRINT pop-up button available on the right-mouse click. Printing via the PRINT pop-up button gives you the option of customising the report.
The printing options include:
Defining the table format.
Defining headers and footers to appear in each page of the report.
Defining a header to appear at the beginning of the report only and/or a summary to appear at the end of the report only.
Previewing the table before printing.
Saving the table format to a file and accessing previously saved formatting.
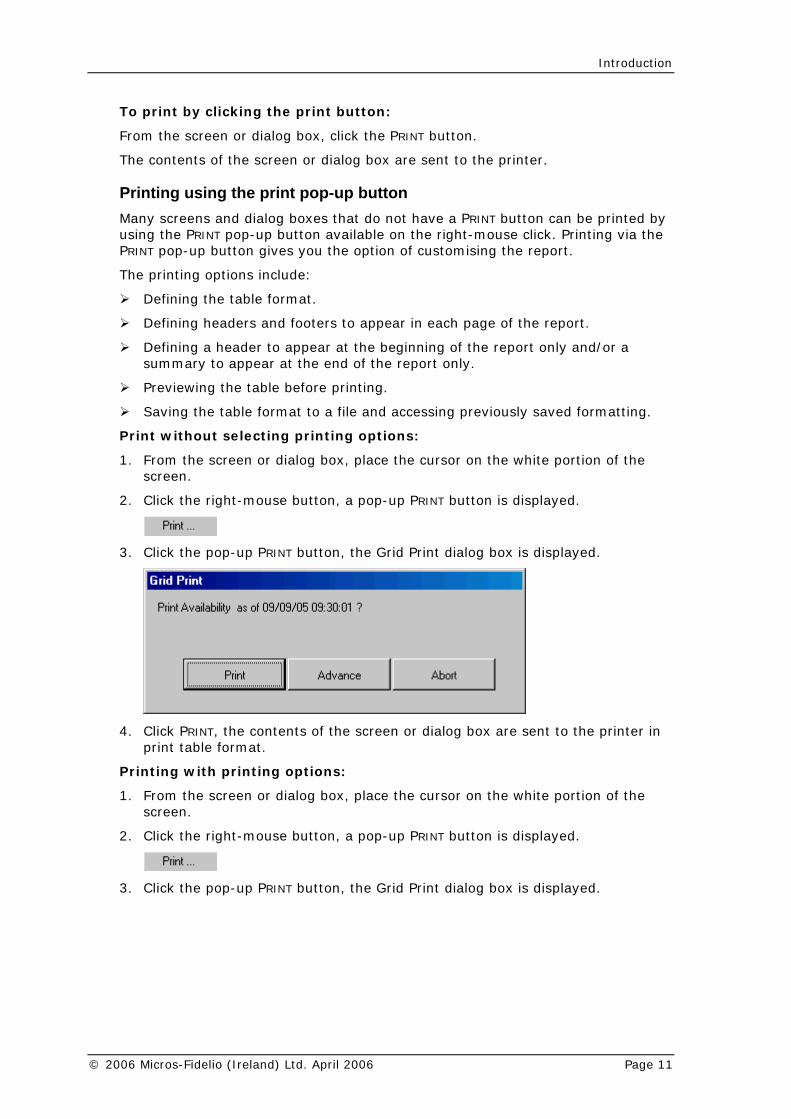
Print without selecting printing options:
1. From the screen or dialog box, place the cursor on the white portion of the screen.
2. Click the right-mouse button, a pop-up PRINT button is displayed.
3. Click the pop-up PRINT button, the Grid Print dialog box is displayed.
4. Click PRINT ntents of the screen or dialog box are sent to the printer in
Printing with printing options:
e cursor on the white portion of the
2.
, the coprint table format.
1. From the screen or dialog box, place thscreen.
Click the right-mouse button, a pop-up PRINT button is displayed.
3. INT butto rint dialog box is displayed. Click the pop-up PR n, the Grid P
© 2006 Micros-Fidelio (Ireland) Ltd. April 2006 Page 11

Version 7 Reservations Manual
4. Click ADVANCE.
The Table Print dialog box appears. It contains seven command buttons and three tabs:
Click this button To do this
Save a document.
Save a file under a new name.
Load an existing document.
Set report properties, file name, description, and job name.
Send a print table to the printer.
Preview the print table before printing.
Close the Table Print dialog box.
FORMAT - used to define the table format.
PAGE - used to define headers and footers to appear in each page of the report.
REPORT - used to define a header to appear at the beginning of the report only and/or a summary to appear at the end of the report only.
Page 12 © 2006 Micros-Fidelio (Ireland) Ltd. April 2006

Introduction
5. Select the REPORT, PAGE and FORMAT tabs and make customizations to the report as required.
6. alog box are sent to the printer in
Re
pear in the table.
izontal guide, in addition to the ng the lines of the table.
indicates that there is to be a table title and/or summary, and specifies whether it should have a grey shaded
asy to recognize. The text for the title and ummary is entered in the report tab.
format the report:
the Table Pr
Click PRINT, the contents of the screen or diprint table format.
port formatting options:
There are three formatting options available:
Style - specifies the type of grid lines to ap
Horizontal Separator - specifies a horhorizontal grid lines, to facilitate readi
Title and Summary options -
backgrounds
to make it e
How to
1. On int dialog box, click the FORMAT tab.
2. Click one of the STYLE options; the preview displays the selected grid style.
f the options next to TITLE AND SUMMARY OPTIONS.
The preview displays the selected options.
3. Select one or more o
© 2006 Micros-Fidelio (Ireland) Ltd. April 2006 Page 13
Version 7 Reservations Manual
If you selected TABLE TITLES or TABLE SUMMARY, you must enter the text into the Report tab.
3. Select one of the HORIZONTAL SEPARATOR options.
e a number
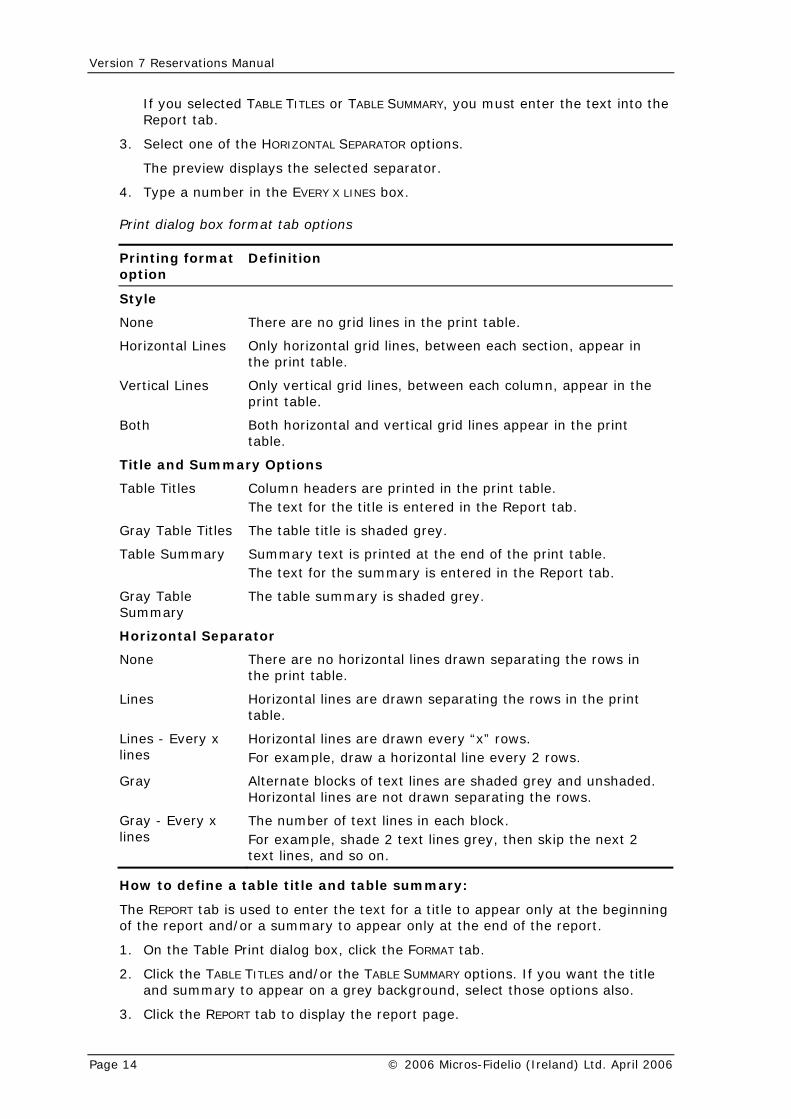
Print dialog box for ns
g format
The preview displays the selected separator.
4. Typ in the EVERY X LINES box.
mat tab optio
Printinoption
Definition
Style
None There are no grid lines in the print table.
Horizontal Lines
ach column, appear in the
int
Tab the Report tab.
d grey.
t the end of the print table. The text for the summary is entered in the Report tab.
Gray Table Sum
The table summary is shaded grey.
Horizontal Separator
None in
Lines Horizontal lines are drawn separating the rows in the print
For example, draw a horizontal line every 2 rows.
haded grey and unshaded. t drawn separating the rows.
linines in each block.
grey, then skip the next 2
Only horizontal grid lines, between each section, appear in the print table.
Vertical Lines Only vertical grid lines, between eprint table.
Both Both horizontal and vertical grid lines appear in the prtable.
Title and Summary Options
le Titles Column headers are printed in the print table. The text for the title is entered in
Gray Table Titles The table title is shade
Table Summary Summary text is printed a
mary
There are no horizontal lines drawn separating the rows the print table.
table.
Lines - Every x lines
Horizontal lines are drawn every “x” rows.
Gray Alternate blocks of text lines are sHorizontal lines are no
Gray - Every x es
The number of text lFor example, shade 2 text linestext lines, and so on.
How to define a table title and table summary:
e text for a title to appear only at the beginning of the report and/or a summary to appear only at the end of the report.
1. On the Table Print dialog box, click the FORMAT tab.
2. Click the TABLE TITLES and/or the TABLE SUMMARY options. If you want the title and summary to appear on a grey background, select those options also.
3. Click the REPORT tab to display the report page.
The REPORT tab is used to enter th
Page 14 © 2006 Micros-Fidelio (Ireland) Ltd. April 2006
Introduction
3. Type the title text in the HEADER box.
4. Type summary text in t box.
5. Select an OUTPUT OPTIO
If FILE is selected click on the filename field, enter the name of the output file and click SAVE.
Note: The text w ption has
he SUMMARY
N - PRINTER or FILE.
ill not appear unless the appropriate obeen selected on the Format tab.
How to define headers and footers for each page of the report:
The PAG s used to define headers and footers to appear in each page of the report
1. On the Table Print dialo
2. Type header text in the HEADER box.
3. Type footer text in the FOOTER box.
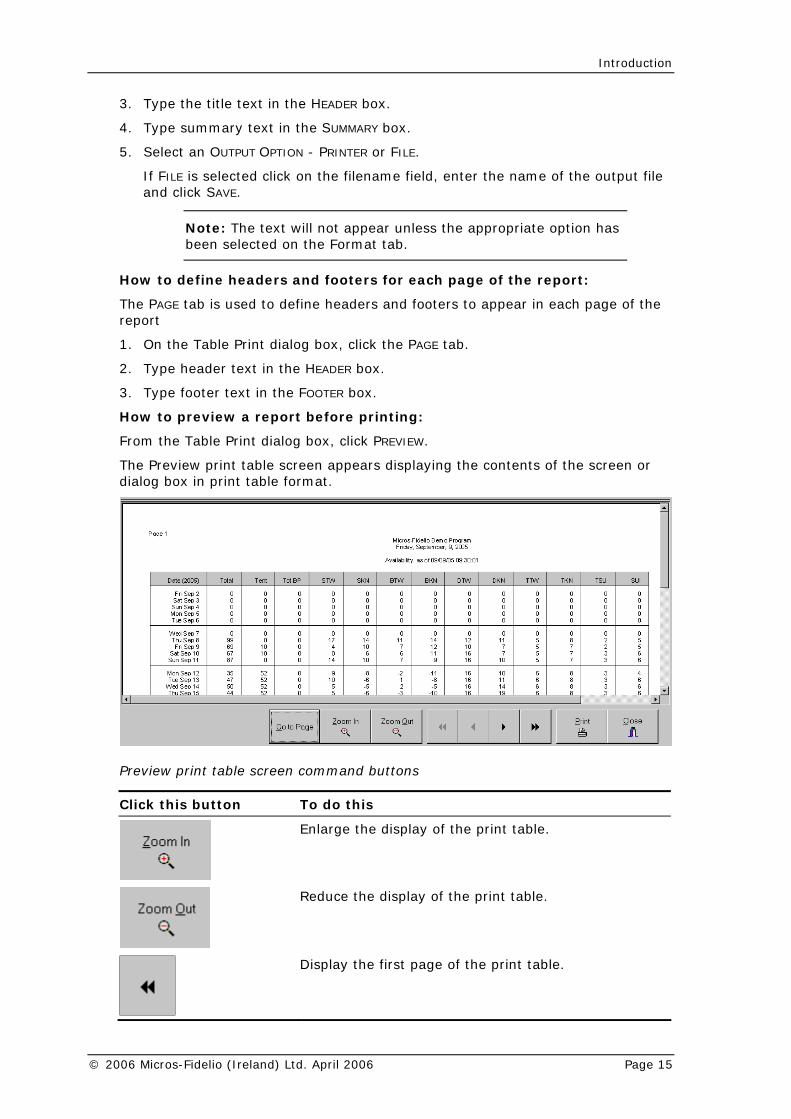
How to preview a repor
From the Table Print dialog
The Preview print table screen appears displaying the contents of the screen or dialog box in print table format.
E tab i
g box, click the PAGE tab.
t before printing:
box, click PREVIEW.
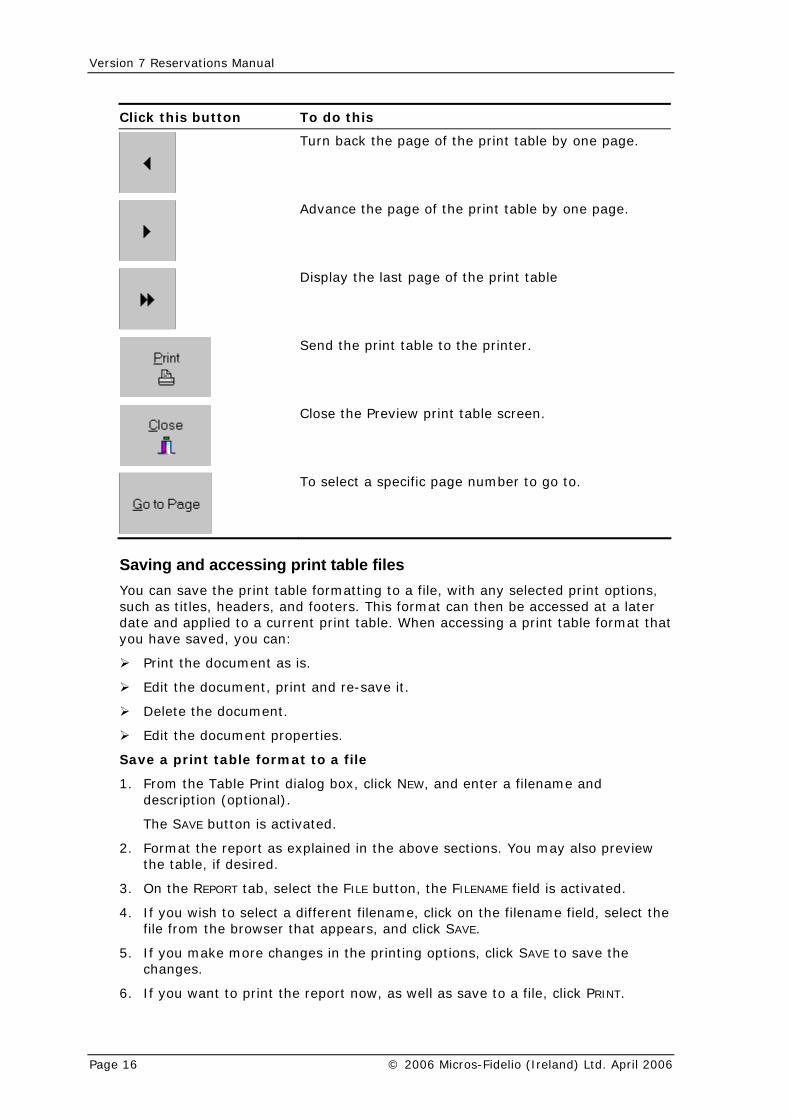
Preview print table screen command buttons
Click this button To do this
Enlarge the display of the print table.
Reduce the display of the print table.
Display the first page of the print table.
© 2006 Micros-Fidelio (Ireland) Ltd. April 2006 Page 15
Version 7 Reservations Manual
Click this button To do this
Turn back the page of the print table by one page.
Advance the page of the print table by one page.
Display the last page of the print table
Send the print table to the printer.
Close the Preview print table screen.
To select a specific page number to go to.
Sa cessing print table files atting to a file, with any selected print options, rs. This format can then be accessed at a later
int table. When accessing a print table format that
Print the document as is.
Edit the document, print and re-save it.
Save a print table format to a file
NEW, and enter a filename and
The SAVE button is activated.
2. Format the report as explained in the above sections. You may also preview the table, if desired.
3. On the REPORT tab, select the FILE button, the FILENAME field is activated.
4. If you wish to select a different filename, click on the filename field, select the file from the browser that appears, and click SAVE.
5. If you make more changes in the printing options, click SAVE to save the changes.
6. If you want to print the report now, as well as save to a file, click PRINT.
ving and acYou can save the print table formsuch as titles, headers, and footedate and applied to a current pryou have saved, you can:
Delete the document.
Edit the document properties.
1. From the Table Print dialog box, click description (optional).
Page 16 © 2006 Micros-Fidelio (Ireland) Ltd. April 2006
Introduction
7
A
. When you are finished, click ABORT to exit the Table Print dialog box.
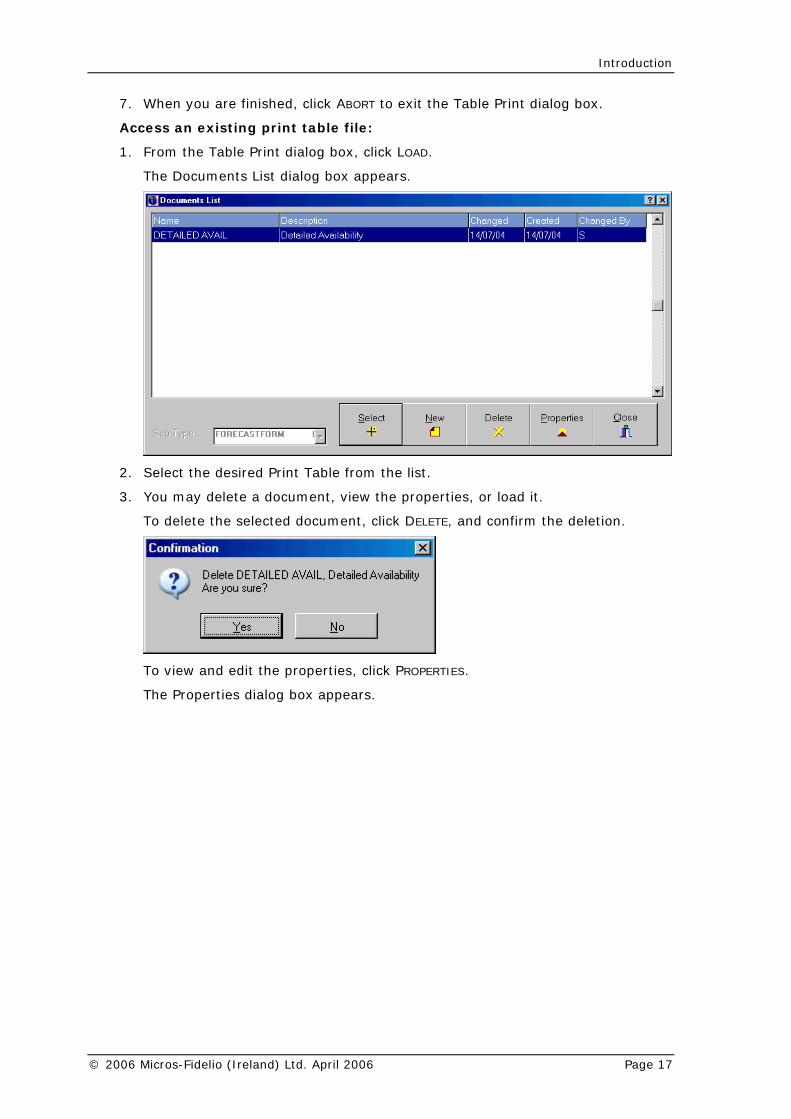
ccess an existing print table file:
1. From the Table Print dialog box, click LOAD.
uments List dialog box appears. The Doc
2. Select the desired Print Table from the list.
3. You may delete a document, view the properties, or load it.
he deletion. To delete the selected document, click DELETE, and confirm t
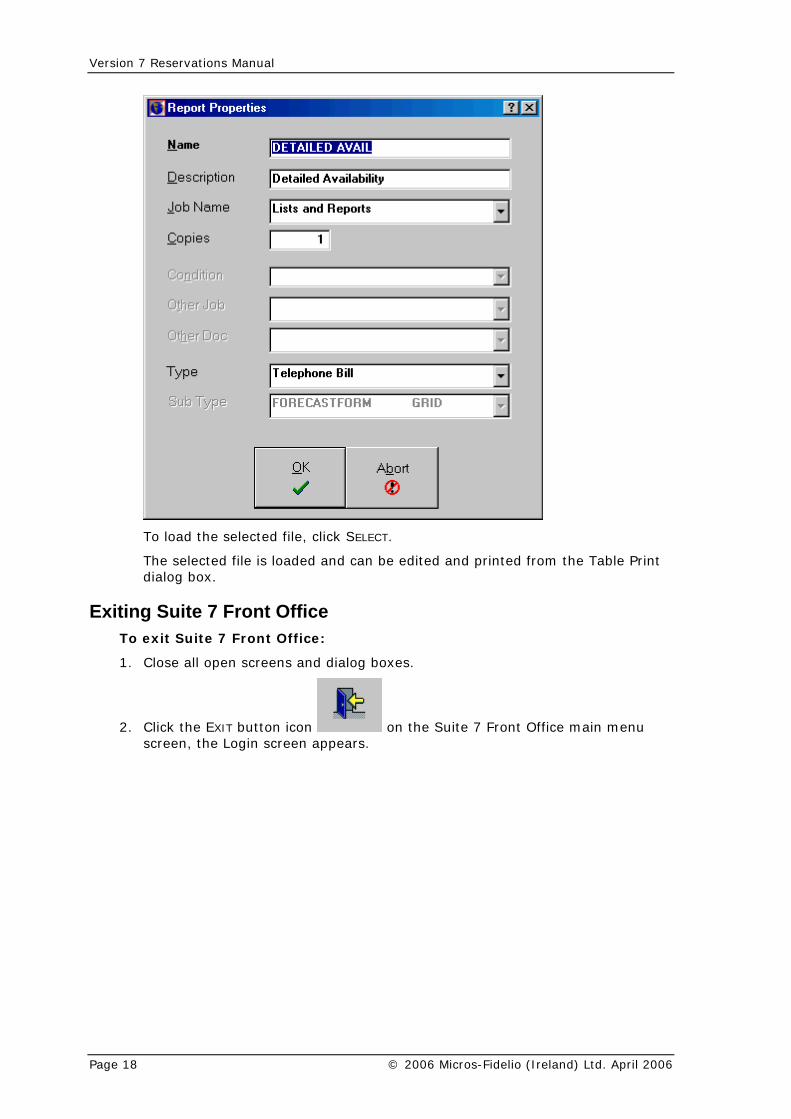
To view and edit the properties, click PRO RTIES.
The Properties dialog box appears.
PE
© 2006 Micros-Fidelio (Ireland) Ltd. April 2006 Page 17
Version 7 Reservations Manual
To load the selected file, click SELECT.
The selected file is loaded and can be editdialog box.
ed and printed from the Table Print
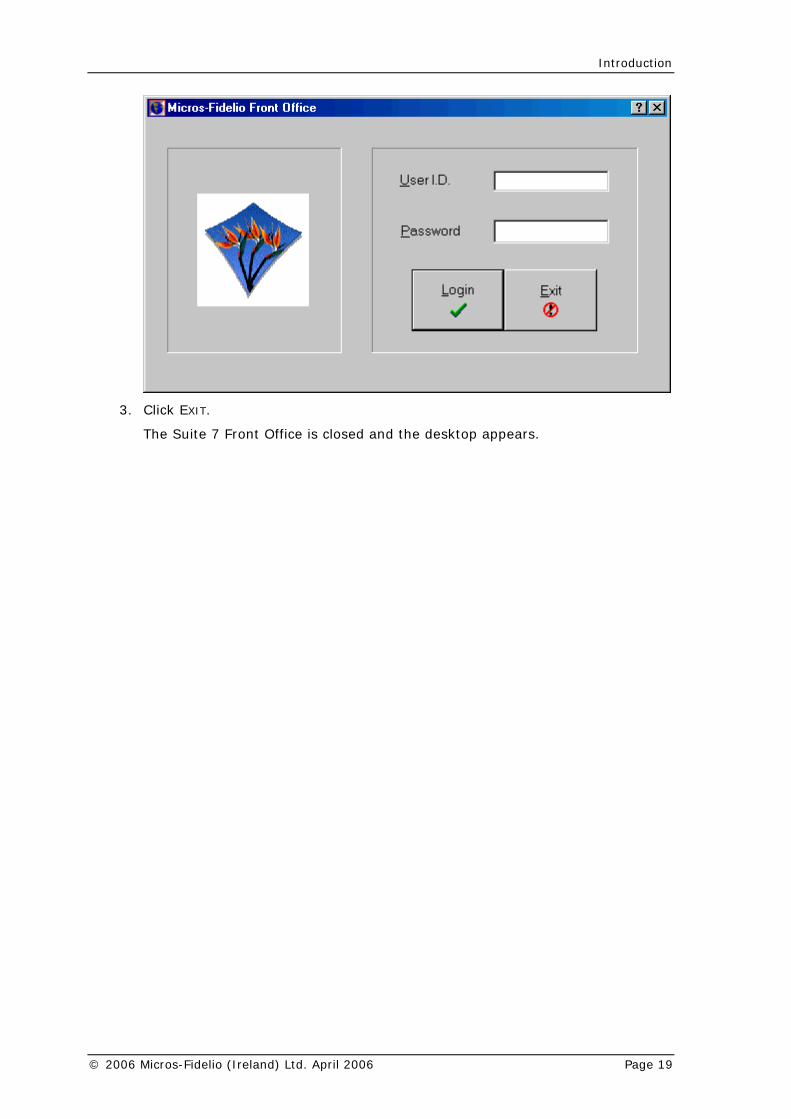
Exiting Suite 7 Front Office To
1.
2. Click t
exit Suite 7 Front Office:
Close all open screens and dialog boxes.
he EXIT button icon on the Suite 7 Front Office main, the Login screen appears.
menu screen
Page 18 © 2006 Micros-Fidelio (Ireland) Ltd. April 2006
Introduction
3. Click EX
The Suit
IT.
e 7 Front Office is closed and the desktop appears.
© 2006 Micros-Fidelio (Ireland) Ltd. April 2006 Page 19

2
Profiles A profile is a group,
ding pre mprise basic non-formati pany, or travel agent),
age, as well as statistical information about hotel stays in the and p nformation is stored by Suite 7 and is
isplarma
Whether a fie n your user rights.
oa g
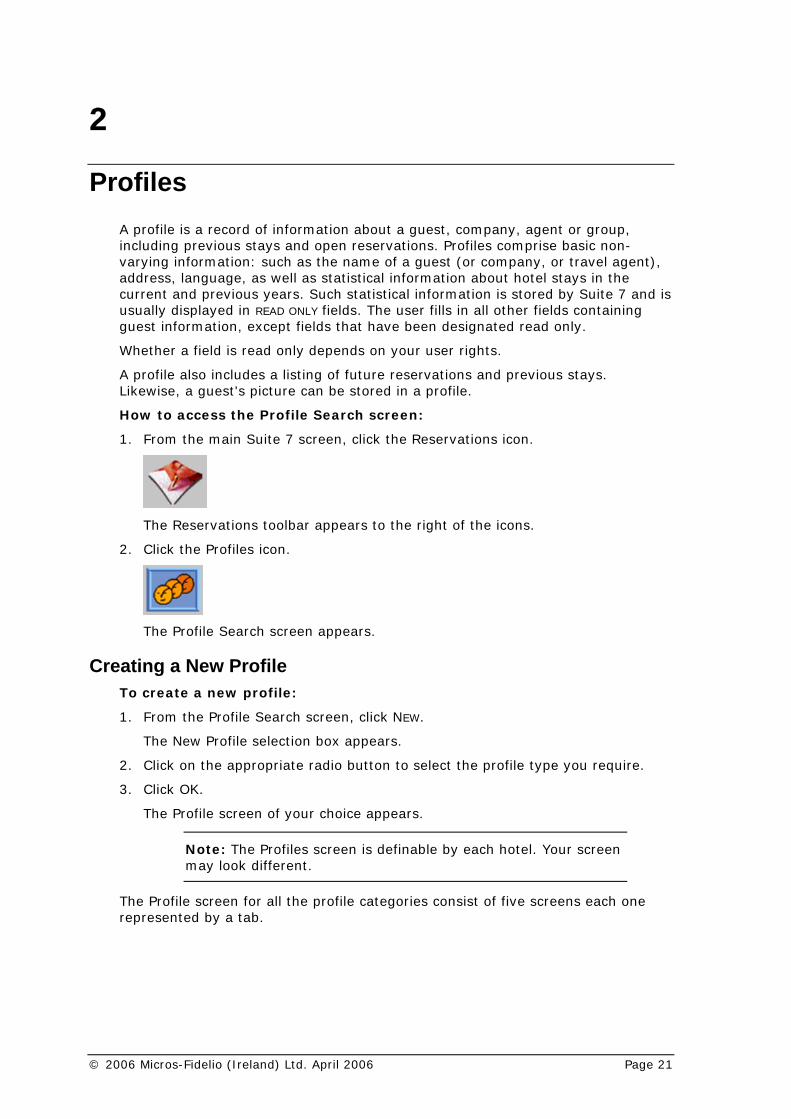
How to acce
1. From the main Suite 7 screen, click the Reservations icon.
record of information about a guest, company, agent or incluvarying inaddress, langu
vious stays and open reservations. Profiles coon: such as the name of a guest (or com
current revious years. Such statistical iusually dguest info
yed in READ ONLY fields. The user fills in all other fields containing tion, except fields that have been designated read only.
ld is read only depends o
A profile alsLikewise,
includes a listing of future reservations and previous stays. uest's picture can be stored in a profile.
ss the Profile Search screen:
The Reservations toolbar appears to the right of the icons.
2. Click the Profiles icon.
The Profile Search screen appears.
ating a New Profile Cre
1. From the Profile Search screen, click NEW.
The N
2. Click on the appropriate radio button to select the profile type you require.
3. Click OK.
ofile screen of your choice appears.
hotel. Your screen
To create a new profile:
ew Profile selection box appears.
The Pr
Note: The Profiles screen is definable by eachmay look different.
The Profile screen for all the profile categories consist of five screens each one represented by a tab.
© 2006 Micros-Fidelio (Ireland) Ltd. April 2006 Page 21
Version 7 Reservations Manual
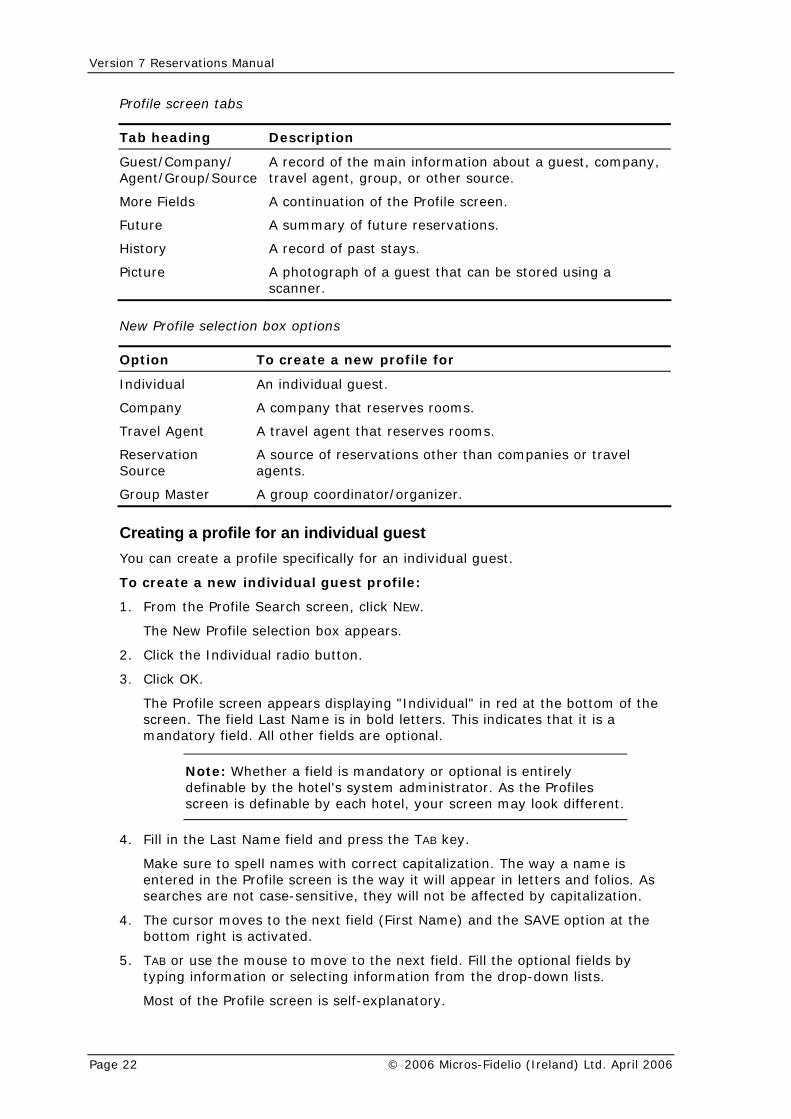
Profile screen tabs
Tab heading Description
Guest/Company/ Agent/Group/Source
A record of the main information about a guest, company, travel agent, group, or other source.
More Fields A continuation of the Profile screen.
Picture A photograph of a guest that can be stored using a
Future A summary of future reservations.
History A record of past stays.
scanner.
New Profile selection box options
e a new profile for Option To creat
Individual An individual guest.
Company A company that reserves rooms.
Travel Agent
reservations other than companies or travel
group coordinator/organizer.
A travel agent that reserves rooms.
Reservation Source
A source of agents.
Group Master A
Creating a profile for an individual guest You individual guest.
dividual guest profile:
1. .
ars.
vidual radio button.
e screen appears displaying "Individual" in red at the bottom of the tters. This indicates that it is a
field. All other fields are optional.
tory or optional is entirely
can create a profile specifically for an
To create a new in
From the Profile Search screen, click NEW
The New Profile selection box appe
2. Click the Indi
3. Click OK.
The Profilscreen. The field Last Name is in bold lemandatory
Note: Whether a field is mandadefinable by the hotel's system adminscreen is definable by each hotel, you
istrator. As the Profiles r screen may look different.
4. Fill in the Last Name field and press the TAB key.
Make sure to spell names with correct capitalization. The way a name is
-sensitive, they will not be affected by capitalization.
4. The cursor moves to the next field (First Name) and the SAVE option at the bottom right is activated.
5. TAB or use the mouse to move to the next field. Fill the optional fields by typing information or selecting information from the drop-down lists.
Most of the Profile screen is self-explanatory.
entered in the Profile screen is the way it will appear in letters and folios. As searches are not case
Page 22 © 2006 Micros-Fidelio (Ireland) Ltd. April 2006
Profiles
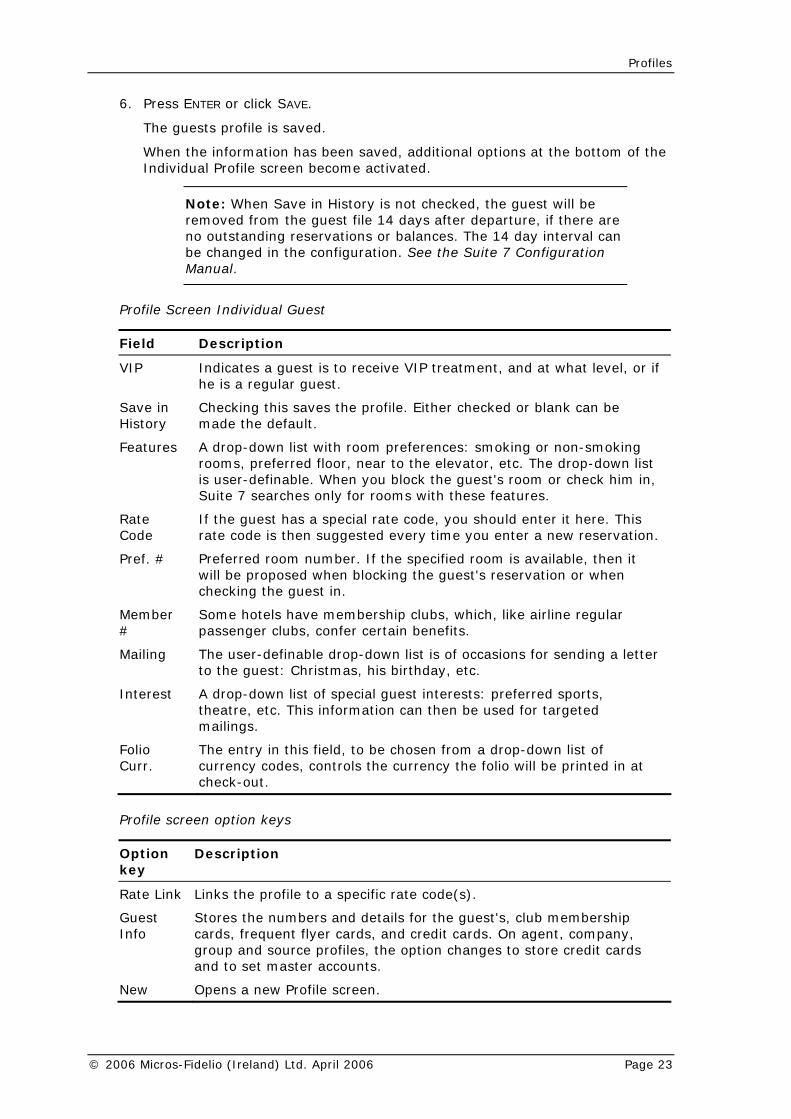
6. Press ENTER or click SAVE.
ests profile is saved.
he
Save in History is not checked, the guest will be
The gu
When the information has been saved, additional options at the bottom of tIndividual Profile screen become activated.
Note: Whenremoved from the guest file 14 days after departure, if there are
ing reservations or balances. The 14 day interval can nfiguration. See the Suite 7 Configuration
no outstandbe changed in the coManual.
Profile Screen Individual Guest
Field Description
VIP Indicates a guest is to receive VIP treatment, and at what level, or if he is a regular guest.
Save in Checking this saves the profile. Either checked or blank can be the default.
Fea : smoking or non-smoking ed floor, near to the elevator, etc. The drop-down list
When you block the guest's room or check him in, es only for rooms with these features.
Rat as a special rate code, you should enter it here. This code is then suggested every time you enter a new reservation.
Pre m is available, then it
king the guest in.
Me rship clubs, which, like airline regular ts.
able drop-down list is of occasions for sending a letter , his birthday, etc.
Int list of special guest interests: preferred sports, tre, etc. This information can then be used for targeted
History made
tures A drop-down list with room preferencesrooms, preferris user-definable.Suite 7 search
e If the guest hCode rate
f. # Preferred room number. If the specified roowill be proposed when blocking the guest's reservation or when chec
mber Some hotels have membe# passenger clubs, confer certain benefi
Mailing The user-definto the guest: Christmas
erest A drop-down theamailings.
Folio Curr.
The entry in this field, to be chosen from a drop-down list of currency codes, controls the currency the folio will be printed in at check-out.
Profile scr
Option
een option keys
Description key
Rat cific rate code(s). e Link Links the profile to a spe
Guest Info
Stores the numbcards, frequent f
ers and details for the guest's, club membership lyer cards, and credit cards. On agent, company,
ce profiles, the option changes to store credit cards ter accounts.
a new Profile screen.
group and sourand to set mas
New Opens
© 2006 Micros-Fidelio (Ireland) Ltd. April 2006 Page 23
Version 7 Reservations Manual
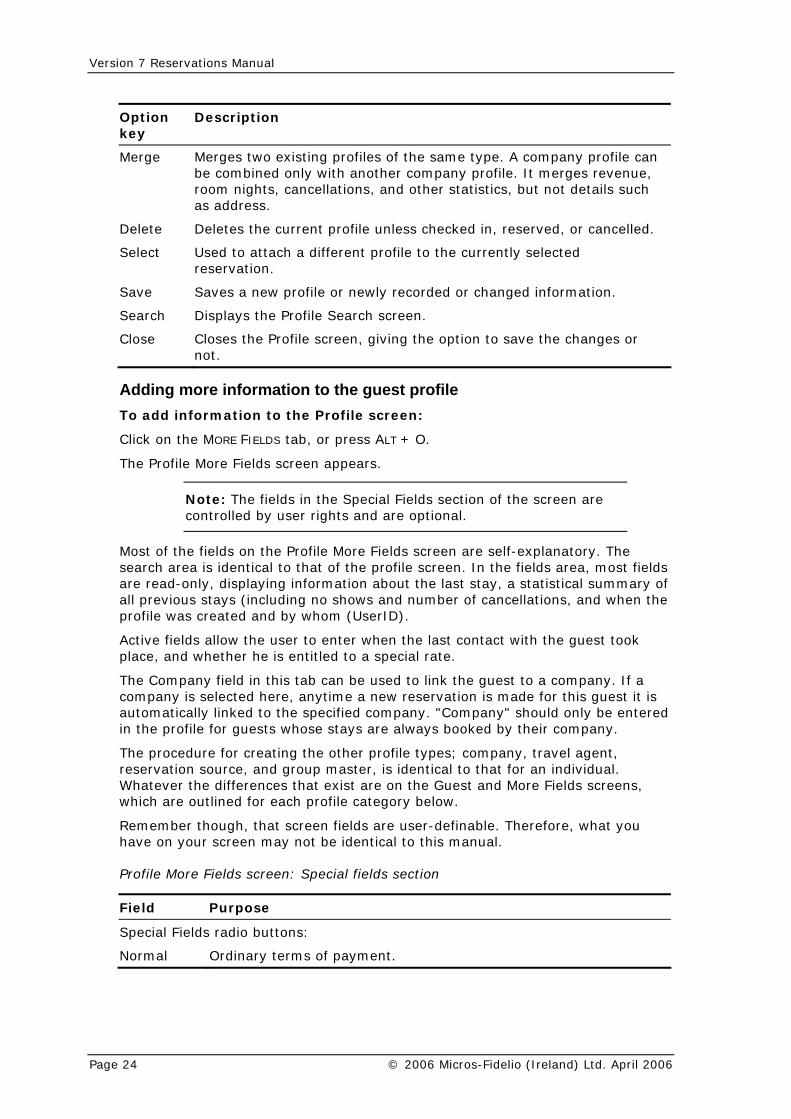
Option key
Description
Merge Merges two existing profiles of the same type. A company profile can ly with another company profile. It merges revenue,
r statistics, but not details such be combined onroom nights, cancellations, and otheas address.
Delete Deletes the current profile unless checked in, reserved, or cancelled.
Sel a different profile to the currently selected rvation.
Sav anged information.
Clo e Profile screen, giving the option to save the changes or
ect Used to attachrese
e Saves a new profile or newly recorded or ch
Search Displays the Profile Search screen.
se Closes thnot.
Ad t profile rofile screen:
b, or press ALT + O.
The
l Fields section of the screen are
ding more information to the guesTo add information to the P
Click on the MORE FIELDS ta
Profile More Fields screen appears.
Note: The fields in the Speciacontrolled by user rights and are optional.
Most of the fields on the Profile More Fields screen are self-explanatory. The search area is identical to that of the profile screen. In the fields area, most fields
isplaying information about the last stay, a statistical summary of all ns, and when the
by whom (UserID).
Active fields en the last contact with the guest took pla ecial rate.
used to link the guest to a company. If a anytime a new reservation is made for this guest it is
t ked to ied company. "Company" should only be entered tays are always booked by their company.
The le types; company, travel agent, tical to that for an individual.
Whatever the differences that exist are wh
le. Therefore, what you ntical to this manual.
Profile section
Field Purpose
are read-only, dprevious stays (including no shows and number of cancellatio
profile was created and
allow the user to enter whce, and whether he is entitled to a sp
The Company field in this tab can becompany is selected here,au omatically lin the specifin the profile for guests whose s
procedure for creating the other profireservation source, and group master, is iden
on the Guest and More Fields screens, ich are outlined for each profile category below.
Remember though, that screen fields are user-definabhave on your screen may not be ide
More Fields screen: Special fields
Special Fields radio buttons:
Normal Ordinary terms of payment.
Page 24 © 2006 Micros-Fidelio (Ireland) Ltd. April 2006
Profiles
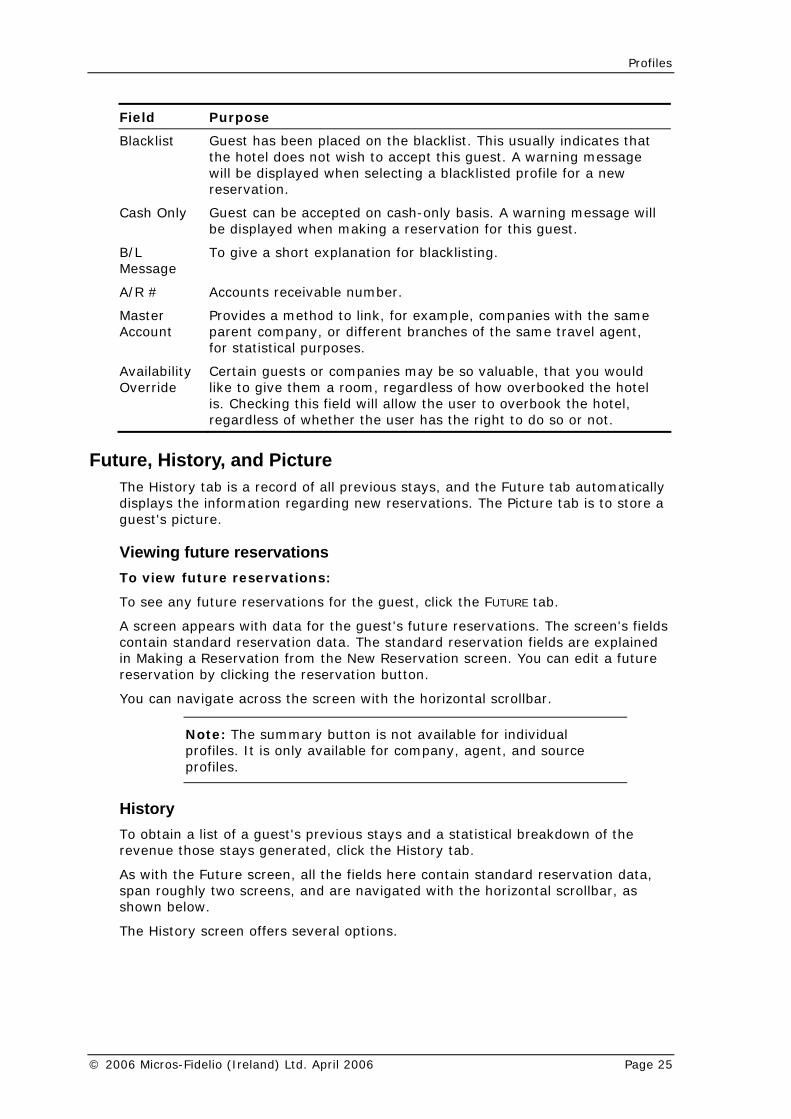
Field Purpose
Blacklist Guest has been placed on the blacklist. This usually indicates that the hotel does not wish to accept this guest. A warning message will be displayed when selecting a blacklisted profile for a new reservation.
Cash Only Guest can be accepted on cash-only basis. A warning message will be displayed when making a reservation for this guest.
B/L To give a short explanation for blackMessage
A/R # Accounts
listing.
receivable number.
ng this field will allow the user to overbook the hotel,
Master Account
Provides a method to link, for example, companies with the same parent company, or different branches of the same travel agent, for statistical purposes.
Availability Override
Certain guests or companies may be so valuable, that you would like to give them a room, regardless of how overbooked the hotel is. Checkiregardless of whether the user has the right to do so or not.
Futs a record of all previous stays, and the Future tab automatically
for the guest's future reservations. The screen's fields contain standard reservation data. The standard reservation fields are explained in Making ture reservatio
You can n
le for individual
ure, History, and Picture The History tab idisplays the information regarding new reservations. The Picture tab is to store a guest's picture.
Viewing future reservations To view future reservations:
To see any future reservations for the guest, click the FUTURE tab.
A screen appears with data
a Reservation from the New Reservation screen. You can edit a fun by clicking the reservation button.
avigate across the screen with the horizontal scrollbar.
Note: The summary button is not availabprofiles. It is only available for company, agent, and source profiles.
History a statistical breakdown of the
ose b.
t standard reservation data, tw
scr
To obtain a list of a guest's previous stays and revenue th stays generated, click the History ta
As with the Fu ure screen, all the fields here containspan roughly shown below.
o screens, and are navigated with the horizontal scrollbar, as
The History een offers several options.
© 2006 Micros-Fidelio (Ireland) Ltd. April 2006 Page 25
Version 7 Reservations Manual
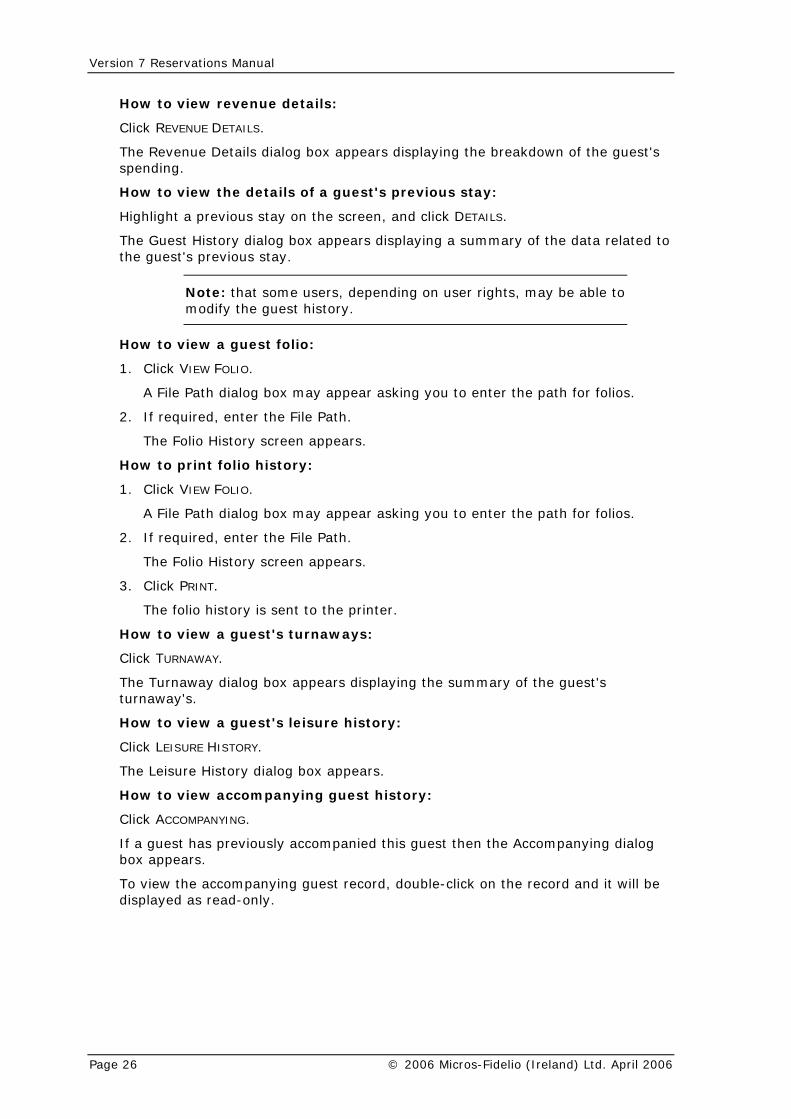
How to view revenue details:
Click R DETAILS.
nue Dspending.
How to view t ous stay:
prev
The Guest History dialog box appears displathe guest's previous stay.
Note n user rights, may be able to
EVENUE
The Reve etails dialog box appears displaying the breakdown of the guest's
he details of a guest's previ
Highlight a ious stay on the screen, and click DETAILS.
ying a summary of the data related to
: that some users, depending omodify the guest history.
How to view a
1. Click VIEW F
Path d
2. If required, File Path.
o Hi
How to print f
1. Click VIEW FOLIO.
appear asking you to enter the path for folios.
2. If required, enter the File Path.
The Folio History screen appears.
PRINT.
w to view
WA
way dialog box appears d's.
How to view a guest's leisure history:
guest folio:
OLIO.
A File ialog box may appear asking you to enter the path for folios.
enter the
The Foli story screen appears.
olio history:
A File Path dialog box may
3. Click
The folio
Ho
history is sent to the printer.
a guest's turnaways:
Click TURNA Y.
The Turnaturnaway
isplaying the summary of the guest's
Click LEISURE HISTORY.
The Leisure History dialog box appears.
How to view accompanying guest history:
Click ACCOMPANYING.
If a guest has previously accompanied this guest then the Accompanying dialog box appears.
To view the accompanying guest record, double-click on the record and it will be displayed as read-only.
Page 26 © 2006 Micros-Fidelio (Ireland) Ltd. April 2006
Profiles
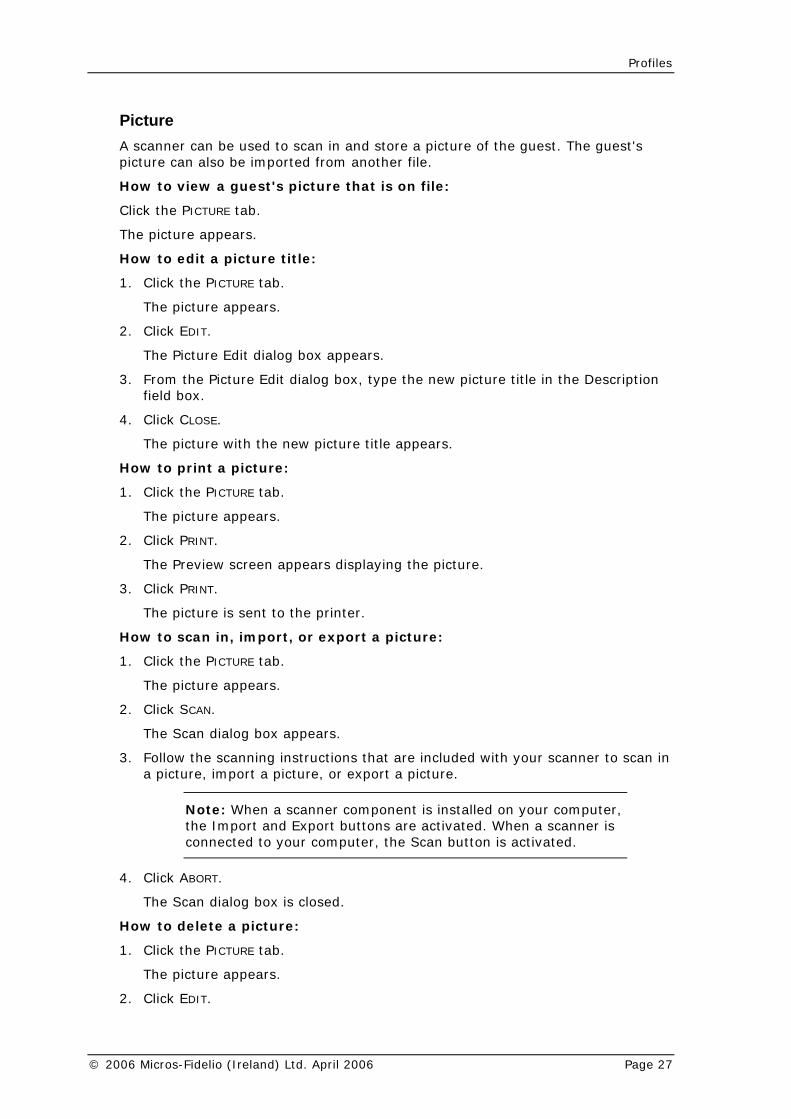
Picture A scanner can be used to scan in and store a picture of the guest. The guest's
be imported from another file.
Click the P tab.
DIT.
re Edit dialog box, type the new picture title in the Description
1.
playing the picture.
RINT.
e:
anning instructions that are included with your scanner to scan in a picture, import a picture, or export a picture.
r component is installed on your computer,
picture can also
How to view a guest's picture that is on file:
ICTURE
The picture appears.
How to edit a picture title:
1. Click the PICTURE tab.
The picture appears.
2. Click E
The Picture Edit dialog box appears.
3. From the Pictufield box.
4. Click CLOSE.
The picture with the new picture title appears.
How to print a picture:
Click the PICTURE tab.
The picture appears.
2. Click PRINT.
The Preview screen appears dis
3. Click P
The picture is sent to the printer.
How to scan in, import, or export a pictur
1. Click the PICTURE tab.
The picture appears.
2. Click SCAN.
The Scan dialog box appears.
3. Follow the sc
Note: When a scannethe Import and Export buttons are activated. When a scanner is
nnected to your computer, the Scan button is activated. co
4. Click ABORT.
ICTURE
2. Click EDIT.
The Scan dialog box is closed.
How to delete a picture:
1. Click the P tab.
The picture appears.
© 2006 Micros-Fidelio (Ireland) Ltd. April 2006 Page 27
Version 7 Reservations Manual
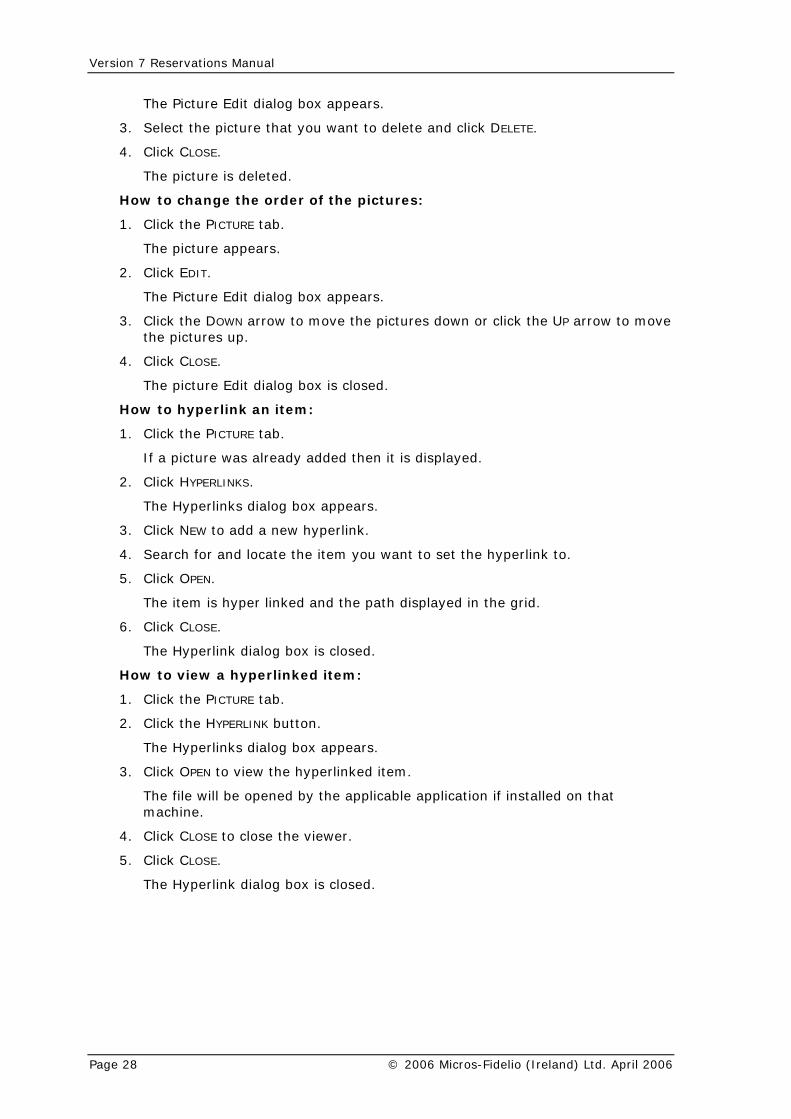
The Picture Edit dialog box appears.
3. Select the picture that you want to delete and click DELETE.
4. Click CLOSE.
the pictures:
3. move
4.
em:
ady added then it is displayed.
2.
erlinks dialog box appears.
you want to set the hyperlink to.
5.
e is hyper linked and the path displayed in the grid.
6.
e is closed.
Ho a hyperlinked item:
licable application if installed on that
4.
5.
log box is closed.
The picture is deleted.
How to change the order of
1. Click the PICTURE tab.
The picture appears.
2. Click EDIT.
The Picture Edit dialog box appears.
Click the DOWN arrow to move the pictures down or click the UP arrow to the pictures up.
Click CLOSE.
The picture Edit dialog box is closed.
How to hyperlink an it
1. Click the PICTURE tab.
If a picture was alre
Click HYPERLINKS.
The Hyp
3. Click NEW to add a new hyperlink.
4. Search for and locate the item
Click OPEN.
Th item
Click CLOSE.
Th Hyperlink dialog box
w to view
1. Click the PICTURE tab.
2. Click the HYPERLINK button.
The Hyperlinks dialog box appears.
3. Click OPEN to view the hyperlinked item.
The file will be opened by the appmachine.
Click CLOSE to close the viewer.
Click CLOSE.
The Hyperlink dia
Page 28 © 2006 Micros-Fidelio (Ireland) Ltd. April 2006
Profiles
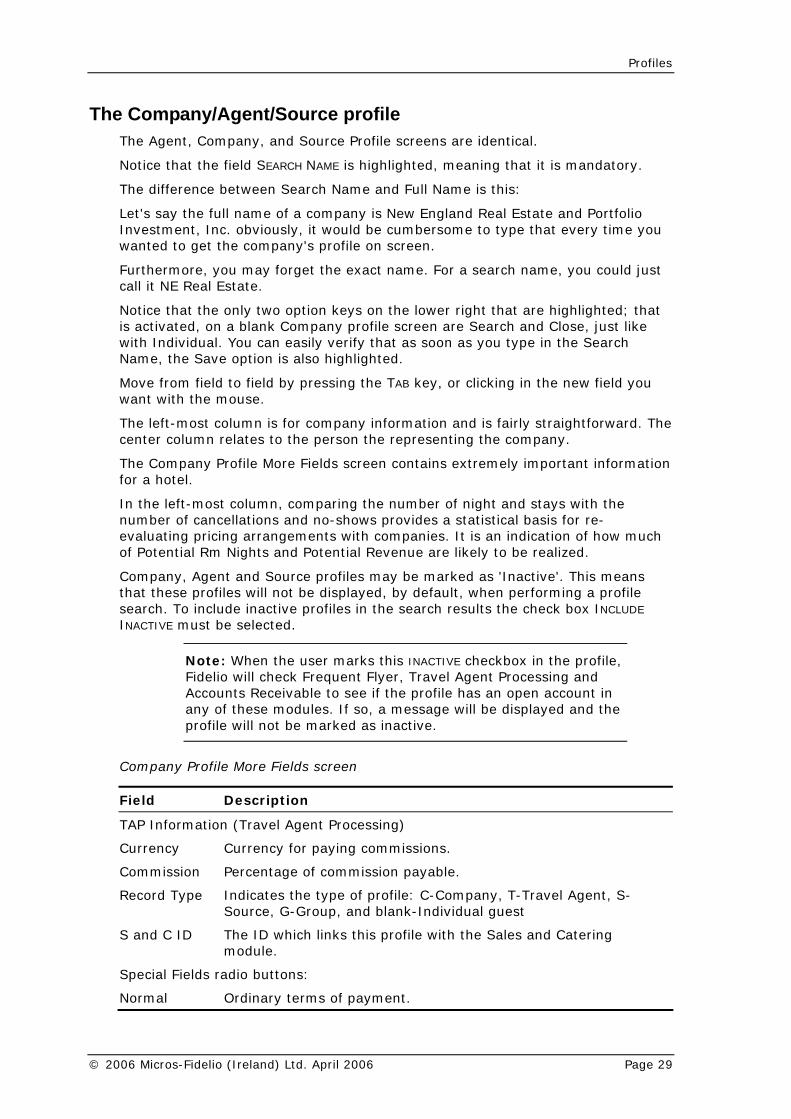
The CompaThe Agen file screens are identical.
Notice that the field SEARCH NAME is highlighted, meaning that it is mandatory.
h Name and Full Name is this:
io
een.
st
hted; that profile screen are Search and Close, just like
that as soon as you type in the Search Nam
the new field you
The y information and is fairly straightforward. The center column relates to the perso the representing the company.
lds screen contains extremely important information for
num ws provides a statistical basis for re-evalu h companies. It is an indication of how much
re likely to be realized.
Comthat these profiles will not be displayed, by default, when performing a profile
h results the check box INCLUDE
ny/Agent/Source profile t, Company, and Source Pro
The difference between Searc
Let's say the full name of a company is New England Real Estate and PortfolInvestment, Inc. obviously, it would be cumbersome to type that every time youwanted to get the company's profile on scr
Furthermore, you may forget the exact name. For a search name, you could jucall it NE Real Estate.
Notice that the only two option keys on the lower right that are highligis activated, on a blank Companywith Individual. You can easily verify
e, the Save option is also highlighted.
Move from field to field by pressing the TAB key, or clicking inwant with the mouse.
left-most column is for compann
The Company Profile More Fiea hotel.
In the left-most column, comparing the number of night and stays with the ber of cancellations and no-shoating pricing arrangements wit
of Potential Rm Nights and Potential Revenue a
pany, Agent and Source profiles may be marked as 'Inactive'. This means
search. To include inactive profiles in the searcINACTIVE must be selected.
Note: When the user marks this INACTIVE checkbox in the profile, Fidelio will check Frequent Flyer, Travel Agent Processing and Accounts Receivable to see if the profile has an open account in any of these modules. If so, a message will be displayed and the profile will not be marked as inactive.
Co pany Profile More Fields screenm
Field Description
TAP Information (Travel Agent Processing)
Cur sions.
Commission Percentage of commission payable.
Record Ty t, S-
Catering
Special Fields radio buttons:
Normal Ordinary terms of payment.
rency Currency for paying commis
pe Indicates the type of profile: C-Company, T-Travel AgenSource, G-Group, and blank-Individual guest
S and C ID The ID which links this profile with the Sales andmodule.
© 2006 Micros-Fidelio (Ireland) Ltd. April 2006 Page 29

Version 7 Reservations Manual
Fie ion ld Descript
Blacklist The company has been placed on the blacklist. This usually accept this company. A
hen selecting a blacklisted profile for a new reservation.
indicates that the hotel does not wish towarning message will be displayed w
Cash Onlylayed when making a reservation for this
A/ ccounts receivable number.
MaAccount
e same parent company, or different branches of the same travel
Com specific commission % for a specific travel
Ava be so valuable, that you would like to room, regardless of how overbooked the hotel is.
cking this field will allow the user to overbook the hotel, user has the right to do so or not.
Company can be accepted on cash-only basis. A warning message will be dispcompany.
B/L Message To give a short explanation for blacklisting.
R # A
ster Provides a method to link, for example, companies with th
agent, for statistical purposes. A lamp indicates if the profile is a master account.
m% Allows the entry of aagent.
ilability Certain companies mayOverride give them a
Cheregardless of whether the
Co pany Profile screen m fields
Field Description
Acct Accounting contact person. Contact
IATA/Corp. #
The IATA number is the number assigned to a travel agent by the . The hotel may assign a
orate number to the company for its own internal purposes.
Ctr
arks the profile as inactive, so that it will not be displayed unless option 'Include Inactive' is selected.
International Association of Travel Agentscorp
ct Rate A contracted room rate.
Inactive Mthe search
Future reservations You can view future reservations for a company, agent, and source.
How to view future reservations for a company:
To see any future reservations for the company, click the FUTURE tab.
A screen appears with data for the company's future reservations. The screen's fields contain standard reservation data. The standard reservation fields are explained in Making a Reservation from the New Reservation screen. You can edit a future reservation by clicking the reservation button.
You can navigate across the screen with the horizontal scrollbar.
Note: The summary button is not available for individual profiles. It is only available for Company, Agent, and Source profiles.
Page 30 © 2006 Micros-Fidelio (Ireland) Ltd. April 2006

Profiles
A summary of the projected number of nights and revenue can be displayed forCompany, Agent, and Source profiles.
a year per or source (not individual).
The GT prorev
ue and number of rooms:
1.
2. box.
3.
When you select another market segment, a green check appears at the end of the
5. When
The Budget dialog box closes.
HistorYou can view pas reservations for source. Summary
GroupA gthedetsummary ion is not available for group profiles as displayed on the History screen.
Editing a POnce a profile exists, you can:
other profile.
How to display the summary of future reservations:
Click SUMMARY.
The Future Reservations Summary box appears.
Projected Revenue You can enter the projected revenue and number of rooms per month for
market segment per company, agent
budget screen allows hotels to enter figures for each year. The AGENTBDcedural report then provides a comparison of the projected vs. the actual enue.
To enter the projected reven
Click BUDGET.
The Budget dialog box appears.
Select the desired market segment in the left-hand side of the dialog
Enter the Revenue and number of Rooms per month for each month.
4. Select the next market segment.
line of the market segment you just finished.
all market segments are complete, click OK.
y t a company, agent, and
information is available for all group profiles.
Master Profile roup master profile contains details of the person or company who is making group booking. The profile of a group master contains abbreviated but similar ails to the company profile, both the Profile and More Fields screens. The
informat
rofile
Edit it.
Delete it.
Link it to a rate code.
Open or edit a guest info.
Merge it with an
View the award points earned.
© 2006 Micros-Fidelio (Ireland) Ltd. April 2006 Page 31

Version 7 Reservations Manual
The we will discuss here, though, is simply searching for a pro cific profile type; Individual, Com rofiles of all types.
SeHo
idual profile (or any other type):
3. at the bottom of the screen.
4. any other type you require) and press
isplays only individual profiles.
rofile:
1. me in the Search Name field.
2. Press the TAB key.
ose names, appear
Cit
Me
Guest card number
ame Adams:
1. nd press the TAB key.
"Ad" appear.
na Adams and press ALT + E or press ENTER.
As you move up
To delet
Profile screen, select the profile you want to delete.
2.
3. ELETE.
.
first editing task file. A profile search may be limited to a spepany, etc., although a search can include p
arching for a profile w to search for a profile:
1. Click on the PROFILES button.
The Profile Search screen appears.
2. To limit the search of a profile to an indiv
Click on the View By drop-down list
The drop-down list opens, and you can see the various View By criteria.
Move the down arrow to Individual (orthe TAB key.
The Profile Search screen now d
How to find a p
Type the first few letters of the last na
All the last names that start with those letters, and only thon the screen. This is the most commonly used method for searching for a profile.
How to use additional search methods:
You can search for a profile by:
First Name.
y.
mbership number.
A/R#.
For example, say you wish to search for the n
In the Search Name field, type "Ad" a
The profiles whose last names begin with
2. Highlight Ti
The Tina Adams profile appears.
Notice that at the lower left side of the Profile screen is a list of all profiles ofthe same type as that selected, in this case Individual Guest.and down the list, the highlighted profile appears in the dialog box.
Deleting a profile e a profile:
1. In the Search
Press ENTER or click EDIT.
Click D
4. Click OK when you are asked for confirmation
Page 32 © 2006 Micros-Fidelio (Ireland) Ltd. April 2006

Profiles
Note: If the guest you chose is checked in, has an existing reservatioprofile. De
n, or a cancelled reservation, you cannot delete the lete not possible
Copy/Paste Functionality The copy/paste functionality allows you to copy profile information from an existing profile in to a new profile or into an already existing profile. This saves the user having to re-type profile details.
The amount and type of information that can be copied can be defined by the property under Configuration-> Miscellaneous->Profile Copy Options.
How to copy profile details to a new or already exiting profile:
1. Click on the PROFILES button.
ile whose information you wish to copy.
3. DIT
4.
is saved in a buffer and the PASTE button is now active.
5. en or select a profile from the profile list.
6. ion.
d in the profile.
ofile You ny, agent, or regular guest to charat cod
Note: This feature is controlled by the Rate Linkage parameter.
The Profile Search screen appears.
2. Locate the prof
Click E .
The profile screen is displayed.
Click COPY.
The information
Click NEW to open a new profile scre
The profile screen is displayed.
Click PASTE to copy the profile informat
All the information which was defined to be copied is displaye
Linking a rate code to a prr hotel may have an agreement with a comparge them a specific rate. To ensure that this company or agent receives this e every time they make a reservation, Suite 7 allows you to link a specific ratee or codes to a profile.
How to link a rate code to a profile:
1. Highlight the profile you want in Profile Search and click EDIT.
The profile you want appears.
2. Click RATE LINK.
The Rate Linkage dialog box appears.
Note: If the profile is linked to any rate codes, the name and description of the rate code will be displayed in the screen.
3. At the Rate Code field under New, click on the down arrow.
The Rate Code drop-down list opens.
4. Select the rate code(s) you want to link to the profile.
© 2006 Micros-Fidelio (Ireland) Ltd. April 2006 Page 33
Version 7 Reservations Manual
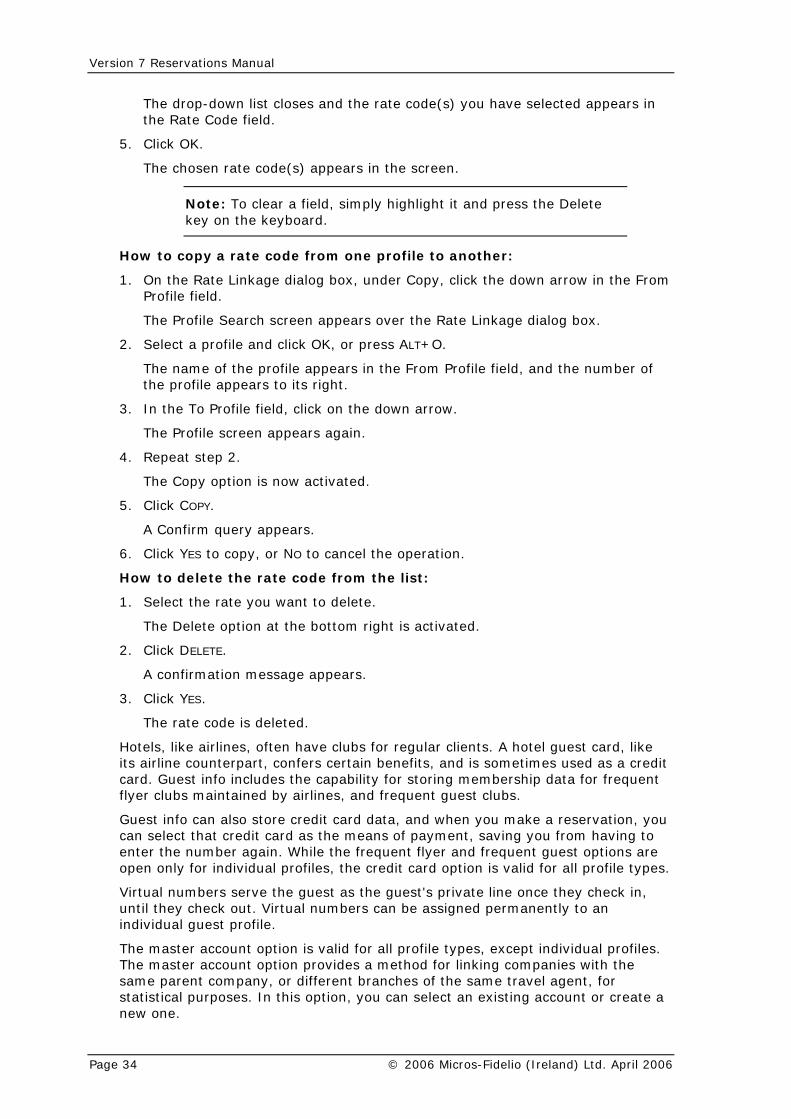
The drop-down list closes and the rate code(s) you have selected appears in
5.
screen.
hlight it and press the Delete
the Rate Code field.
Click OK.
The chosen rate code(s) appears in the
Note: To clear a field, simply higkey on the keyboard.
Ho to another:
, click the down arrow in the From
Search screen appears over the Rate Linkage dialog box.
2. r press ALT+O.
number of
3. field, click on the down arrow.
6. to cancel the operation.
Ho
s ac
2.
message appears.
3.
airlines, often have clubs for regular clients. A hotel guest card, like part, confers certain benefits, and is sometimes used as a credit
car r storing membership data for frequent tained by airlines, and frequent guest clubs.
Gue d when you make a reservation, you can ayment, saving you from having to
e the frequent flyer and frequent guest options are card option is valid for all profile types.
Virtual num guest's private line once they check in, unt mbers can be assigned permanently to an
ofile.
The rofile types, except individual profiles. d for linking companies with the of the same travel agent, for
oses. In this option, you can select an existing account or create a new one.
w to copy a rate code from one profile
1. On the Rate Linkage dialog box, under CopyProfile field.
The Profile
Select a profile and click OK, o
The name of the profile appears in the From Profile field, and the the profile appears to its right.
In the To Profile
The Profile screen appears again.
4. Repeat step 2.
The Copy option is now activated.
5. Click COPY.
A Confirm query appears.
Click YES to copy, or NO
w to delete the rate code from the list:
1. Select the rate you want to delete.
The Delete option at the bottom right i tivated.
Click DELETE.
A confirmation
Click YES.
The rate code is deleted.
Hotels, likeits airline counter
d. Guest info includes the capability foflyer clubs main
st info can also store credit card data, an select that credit card as the means of p
enter the number again. Whilopen only for individual profiles, the credit
bers serve the guest as the il they check out. Virtual nu
individual guest pr
master account option is valid for all pThe master account option provides a methosame parent company, or different branchesstatistical purp
Page 34 © 2006 Micros-Fidelio (Ireland) Ltd. April 2006
Profiles
Wh uest Card opti
The uest Info Master Account is the same, although requires somewhat different information
Theres
How to open or edit guest info:
O button at the bottom of an individual profile.
vated.
xes, the mandatory fields are highlighted.
ntering guest card information.
Ho count:
procedure for filling in the Guest Info Master Account
en an individual profile is saved, or an existing one opened, the Gon is activated. This option applies only to individual profiles.
procedure for filling in the Gthe dialog box
select button is active only when this screen is displayed from within a ervation, i.e., when selecting a guest card or credit card.
1. Click on the GUEST INF
The Guest Info dialog box appears.
If the profile already includes a guest card or credit card, the Edit option would be activated. As the above profile does not have either, only the New option is acti
2. Click NEW, or press ALT+N.
The Guest Card Edit dialog box appears.
3. Fill in the required details and click OK to save.
As in all Suite 7 dialog bo
Entering credit card information is identical to e
w to select the Master Ac
Note: The is similar, but the Master Account dialog box that opens contains only one field: the Master Account drop-down list.
1. Click on GUEST INFO at the bottom of a company, agent, or group profile.
2. R ACCOUNT radio button
eady been assigned, it will appear in the Guest Info listing when you click the radio button, and the NEW button will not be
is
The Guest Info dialog box appears.
Click on the MASTE
3. Click NEW.
The Master Account dialog box appears.
If a Master Account has alr
activated.
Note: The select button is active only when this screendisplayed from within a reservation, i.e., when selecting a guest
it card. card or cred
4. -down list.
EW.
The Edit Master Account dialog box appears.
c. Type in the Code and Description.
d. Click OK.
Select the Master Account from the drop
If the name of the master account does not appear:
a. Click NEW.
The Master Accounts listing dialog box appears.
b. Click N
© 2006 Micros-Fidelio (Ireland) Ltd. April 2006 Page 35
Version 7 Reservations Manual
e. Click ABORT.
pears in the Guest Info dialog box.
E.
card, credit card, or master account:
t profile, click GUEST INFO.
the one you want to delete.
4. Click CLOSE.
You are returned to the guest profile.
Linking a permanent virtual number to a guest profile Virtual numbers serve the guest as the guest's private line once they check in until they check out. Virtual numbers can be assigned permanently to an individual guest profile. Once a virtual number has been linked to a profile it is marked as permanent and cannot be used for another assignment. At check-in, the respective number will be displayed in the configured pool of numbers (assigned VN number dialog box), and will be available for selection.
Note: The use of Virtual numbers and the available functionality
The Edit Master Account dialog box closes.
f. In the Master Account dialog box, click CLOSE.
g. Now, select the Master Account from the drop-down list.
The name of the Master Account ap
5. In the Guest Info dialog box, click CLOS
How to delete a guest
1. From the gues
The Guest Info dialog box appears.
2. If there are credit card(s), guest card(s), or master account(s) attached, highlight
3. Click DELETE.
The card or account is deleted.
depends entirely on the capabilities and the feature set of the e used in the hotel. external system and the interfac
Ho ber to a guest profile.
1. Fr m the Profile screen, click GUEST INFO.
2. tton.
EW
The Assign Virtual Number dialog box appears.
4. From the Assign Virtual Number dialog box, click the Pool drop down arrow and select the line to which you want to assign the number.
The Pool list contains the list of the telephone lines connected to the room.
5. From the list of extension numbers, scroll to and highlight the number you wish to assign.
6. Click ASSIGN.
The Assign Virtual Number dialog box is closed. The Guest Info dialog box appears with the assigned number and Permanent displayed in the Permanent field.
7. From the Guest Info dialog box, click CLOSE.
w to link a permanent virtual num
o
The Guest Info dialog box appears.
Click the Virtual Numbers radio bu
3. Click N .
Page 36 © 2006 Micros-Fidelio (Ireland) Ltd. April 2006
Profiles
The Guest Info dialog box is closed and the Profile screen appears.
rging profiles Meu can merge profiles of the same type.
Whnigdel
Abrsecare
How to merge t
2. want to merge and click OK.
3.
file Search screen appears.
This is the profile that will be deleted.
The C
5. Click Y
The pr
To che en again. You ca le appears now, and that the information it contains matches with that of the profile in the To column of the Merge Profiles query box.
Guest Awards Guests with qualifying frequent guest or frequent flyer cards can earn award points with each stay. The points are awarded during the night audit after check-out or, alternatively, manually upon checkout. Award programs and points information can be accessed from the guest profile. You can:
Assign an award program to the reservation.
Delete an award program from the reservation.
View the points status.
Calculate award points.
Award an award when the necessary points have been earned.
In the Suite 7 Reservations module, yoThat is, you can merge two individual profiles, or two company profiles, but not an individual and a company profile.
en you choose a profile, and merge another with it, the revenue details, room hts, cancellations, and other statistics are merged, and the second profile is eted from the database.
Let's say that the database of your hotel has two profiles on the name of Jimams. You check and find that the information on one of the profiles, the ond in the list, is incomplete, and upon further inquiry, it turns out that they the same guest.
wo profiles:
1. Click PROFILES.
The Profile Search screen appears
Highlight the profile you
That profile appears with the Merge option activated. This is the profile that will be kept.
Click MERGE.
The Pro
4. Highlight the profile you want to be merged and click OK.
ompare Profile box with a Merge Profile query opens.
ES or press ALT+Y.
ofiles have merged. Close the profile.
ck if the Merge has taken place, open the Profile Search scren easily verify that only one Jim Abrams profi
© 2006 Micros-Fidelio (Ireland) Ltd. April 2006 Page 37

Version 7 Reservations Manual
How to assign an award program:
1. From the Profiles screen, click the FUTURE tab.
The Future page appears.
2. Click AWARDS.
The Guest Award dialog box appears.
3. Click NEW.
The Edit Award Card dialog box appears.
4. Select the card from the drop-down listing.
If no card is defined on the guest profile, the Guest Card Edit dialog box appears.
Fill in the fields and click OK.
The selected credit card and the member number are displayed.
5. Click in the AWARD TYPE field to display the available choices, and select the desired award.
The number of points awarded for this billing, as well as the total number of points accumulated toward this reward are displayed.
6. You may type in an award ID, as well as any text message you may wish to enter for you own purposes. These fields are not used by the system.
7. Click OK.
You are returned to the Guest Awards dialog box, which displays the award program in the listing.
When an award program has been assigned to a guest, the "Award" lamp appears on the Reservations screen.
How to delete an award program:
1. From the Profiles screen, click the FUTURE tab.
The Future page appears.
2. Click AWARDS.
The Guest Award dialog box appears.
3. Select the award program to be deleted.
4. Click DELETE.
You are asked to confirm the delete.
5. Click YES.
The selected award program is deleted.
How to view/edit awards:
1. From the Profiles screen, click the FUTURE tab.
The Future page appears.
2. Click AWARDS.
The Guest Award dialog box appears.
3. Select the award program to be edited.
4. Click EDIT.
Page 38 © 2006 Micros-Fidelio (Ireland) Ltd. April 2006

Profiles
The Edit Award Card dialog box appears for the selected award.
Edit the fields as described in step 4 through step 6 of the procedure "To assign an award program".
o the Guest Awards dialog box, which displays the edited award in the listing.
d "Awarded"
button on the Guest Award dialog box will be activated so that the award can
been
The Future page appears.
2.
3. Select the award that has enough points to earn the award.
4. Click AWARDED.
, and the required points are subtracted from the current point balance and the A button is no
Ho te award points and authorize an award:
1. From the Profiles screen, click the FUTURE tab.
The Fu
2. Click AWARDS.
award that has enough points to earn the award.
d award is credited to the guest.
want to view the status of the awards, without making any
ards ain Guest page of the Profile, only the View button will be
activated.
5. Click OK.
You are returned t
Assigning the AwarWhen a guest has earned enough points to qualify for an award, the
then be authorized. However, the awarded button is not activated until the day after check-out, since the points are automatically calculated during Night Audit processing.
If a guest has earned the required points for a reward during the current stay, it is possible to manually calculate the points so that the guest can receive the award before he leaves the hotel.
How to authorize an award when the points have already automatically calculated:
1. From the Profiles screen, click the FUTURE tab.
Click AWARDS.
The Guest Award dialog box appears.
The selected award is credited to the guestWARDED
longer activated.
w to manually calcula
ture page appears.
The Guest Award dialog box appears.
3. Select the
4. Click CALCPOINTS.
The current points are subtracted from the current point balance, and the selecte
If you only changes, you can open the Guest Awards dialog box from the main Guest page, rather than going to the Future page. When accessing the Guest Awfrom the m
© 2006 Micros-Fidelio (Ireland) Ltd. April 2006 Page 39
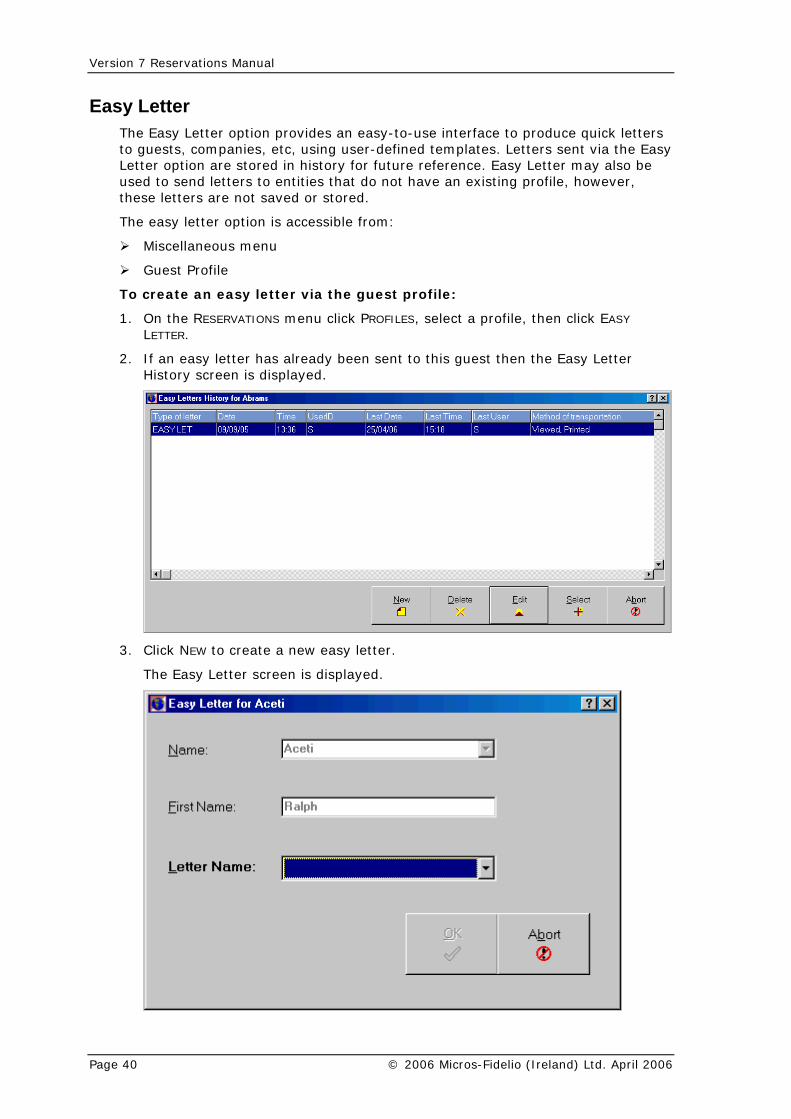
Version 7 Reservations Manual
Easy Letter The Easy Letter option provides an easy-to-use interface to produce quick lettersto guests, companies, etc, using user-defined templates. Letters sent via theLetter option are stored in history for future reference. Easy Letter may alused to send letters to entities that do not have an existing profile, however, these letters are not saved or stored.
The easy letter option is accessible from:
Easy
so be
y letter via the guest profile:
1.
2.
Miscellaneous menu
Guest Profile
To create an eas
On the RESERVATIONS menu click PROFILES, select a profile, then click EASY
LETTER.
If an easy letter has already been sent to this guest then the Easy LetterHistory screen is displayed.
3. Click NEW to
The Easy Letter screen is displayed.
create a new easy letter.
Page 40 © 2006 Micros-Fidelio (Ireland) Ltd. April 2006
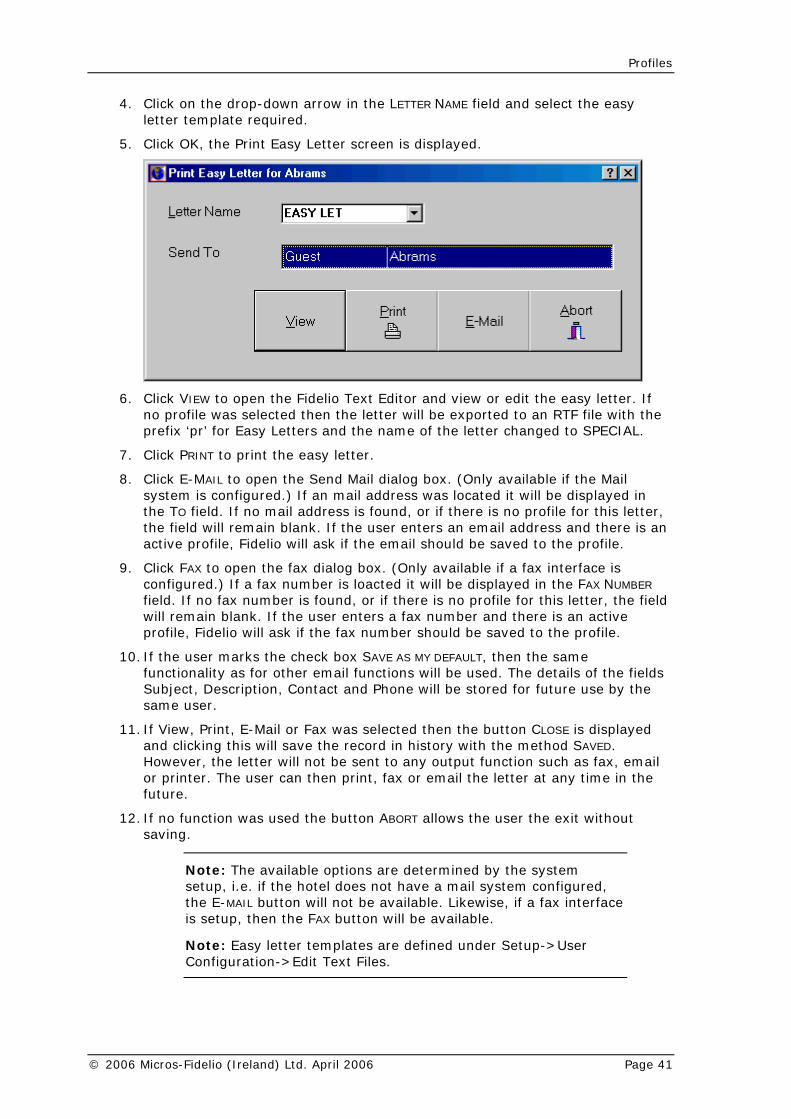
Profiles
4. ld and select the easy Click on the drop-down arrow in the LETTER NAME fieletter template required.
5. Click OK, the Print Easy Letter screen is displayed.
6. Click V letter. If no pro the prefix CIAL.
7. Click P
IL to open the Send Mail dialog box. (Only available if the Mail
ask if the email should be saved to the profile.
o open the fax dialog box. (Only available if a fax interface is will be displayed in the FAX NUMBER
s no profile for this letter, the field x number and there is an active should be saved to the profile.
er E AS MY DEFAULT, then the same ionality as for other email functions will be used. The details of the fields
e ored for future use by the .
ri ected then the button CLOSE is displayed king rd in history with the method SAVED.
h email printer. the
future.
functi s the user the exit without .
Note:
IEW to open the Fidelio Text Editor and view or edit the easy file was selected then the letter will be exported to an RTF file with
‘pr’ for Easy Letters and the name of the letter changed to SPE
RINT to print the easy letter.
8. Click E-MA
system is configured.) If an mail address was located it will be displayed in the TO field. If no mail address is found, or if there is no profile for this letter, the field will remain blank. If the user enters an email address and there is anactive profile, Fidelio will
9. Click FAX tconfigured.) If a fax number is loacted itfield. If no fax number is found, or if there iwill remain blank. If the user enters a faprofile, Fidelio will ask if the fax number
10. If the usfunct
marks the check box SAV
Subject, Dsame user
scription, Contact and Phone will be st
11. If View, P nt, E-Mail or Fax was seland clic this will save the recoHowever, tor
e letter will not be sent to any output function such as fax, The user can then print, fax or email the letter at any time in
12. If no on was used the button ABORT allowsaving
The available options are determined by the system setup d, the E ce s setup,
Note Configu
, i.e. if the hotel does not have a mail system configure-MAIL button will not be available. Likewise, if a fax interfa
i then the FAX button will be available.
: Easy letter templates are defined under Setup->Userration->Edit Text Files.
© 2006 Micros-Fidelio (Ireland) Ltd. April 2006 Page 41

3
Reservations Reservations can be made for individuals and groups. Group reservations are explained in G
You can make .
Every reservat vation is made and ther eated. In addition, a reservation c file or any combination of tached to it.
eserva dat cancel a reservation. If tivate the reservation.
pen
1. From the m k the Reservations icon.
roups.
a new guest, company, agent, or source reservation
ion must have a guest profile attached to it. If a resere is no existing profile, then a profile must be cran also have a company, agent, or source pro the three profiles at
After a r tion has been created, you can display, search, up a reservation has been cancelled, you can reac
e or
How to o the New Reservation dialog box
ain Suite 7 screen, clic
The Reservations toolbar appears to the right of the icons.
e N2. Click th ew Reservation icon or press CTRL + N.
The New R
e Forc ton is available. C ables you to enter a reservation without checking if
Note created at
eservation dialog box appears.
If th eSearchGuestHistory parameter is off, then the NEW bulicking NEW en
t
a guest profile exists.
: The LAST RES button appears only if you haveleast ng in. one new reservation after loggi
Op e N n without searching for a guest profile
To open the n est profile:
m the N e Name d.
2. Click NEW.
The New R uest name that has been
ening th ew Reservation scree
ew reservation screen without searching for a gu
1. Frofiel
ew Reservation dialog box, enter the guest's name in
eservation screen appears with the g
th
typed in.
© 2006 Micros-Fidelio (Ireland) Ltd. April 2006 Page 43
Version 7 Reservations Manual
Seaep Profiles).
ing a reservation for a repeat guest, you do not have to fill in the profile information. You select the existing guest profile and make a new
for he ot a re making the reservation. This will save you
nterin guests.
rc t profile:
N e or the first few
2. Click SEARC
rofil ed, the New Reservation screen i
If there areProfiles diaspecified.
xist
Existing Profile
Click this button
rching for a guest profile The hotel keWhen mak
s track of repeat guests through the guest profiles (See
reservation guest is n
the guest. It is recommended to always check to make sure trepeat customer befo
time in e
How to sea
g data and also help the hotel keep statistics on returning
h for a gues
1. From the ew Reservation dialog box, type the guest's namletters of the guest's name, in the Name field.
H.
If no p e matches the search criteria enterappears w th the information that has been typed in.
profiles that match the search criteria entered, the Existing log box appears with names that match the search criteria
If the E ing Profiles dialog box appears, choose an appropriate option.
s screen options
To do this
New Profile Create a profile and a reservation for a new guest.
New Resv
Profile
.
selected. If the guest has no future reservations, this button is
g box.
Create a new reservation for the guest whose name is selected.
Display the profile of the guest whose name is selected.
Future Display future reservations for the guest whose name is
greyed out.
Search Display the New Reservation dialo
Ma a Resen screen and font styles
user definable. In the above example, the Main Reservation screen consists of P
information ab
The Reservatio ecific information about the current reservation. tor e two tabs at the top indicate that this
con boxes.
ote xt, press the TAB key. To
king The screen oare
rvation from the New Reservation screen your system may look different because the
the customer ROFILE and the actual RESERVATION. The Profile area contains out the guest.
n area contains spThe manda y fields are set in bold. Thdialog box sists of Main and More Fields dialog
N : To move from one field to the nesave R key. the data currently in the dialog box, press the ENTE
How to make
ew ion in the Profile area or click to add more i
Reservation screen.
3. Click the MORE FIELDS tab.
a reservation from the New Reservation screen:
1. In the NPROFILE
Reservation screen, type the informatnformation about the guest.
2. Fill in the fields of the Reservation area of the New
Page 44 © 2006 Micros-Fidelio (Ireland) Ltd. April 2006
Reservations
The New Reservation More Fields screen appears.
4. Fill in the necessary information in the New Reservation More Fields screen.
TIO ails in the reservation.
serv
etai servations Options.
6. Click one or more options that you want to use with the current reservation.
ion appears.
red.
s you need with the current reservation.
The reservation and its related profile are saved.
5. Click OP NS to include additional det
The Re ation Options dialog box appears.
For a d led explanation of options, see Re
The dialog box of the selected opt
7. Complete the selected option's dialog box as requi
8. Repeat steps 6 and 7 for all option
9. Click OK to save the reservation.
Note: If you try to save a reservation before entering all the mandatory fields, you are prompted with a message for the mandatory field that you have skipped. For example, if you have
to save the new reservation, a Missing box appears.
missed Source and try Source message dialog
10.
11. Fill in the Source and any other missing mandatory fields before saving again.
12. ng
eservation screen is closed.
New
field
Click OK.
After the new reservation is saved, a message dialog box appears displayithe reservation number.
13. Click OK.
The New R
Reservation screen: Profile area fields
Fill in this With this information
Guest Name The guest's last name (Mandatory).
First Name The guest's first name.
Language The guest's language.
Titllanguage. For example, Dr., Professor, Monsieur, Senora.
st comes from.
xample, a frequent guest.
m number or last room occupied.
Com vation.
Source The name of the reservation source who made the reservation.
e The guest's title. The title changes according to the guest's
Phone The guest's telephone number.
Country The country the gue
VIP The VIP level of the guest. For e
Pref/Last Guest's preferred roo
Agent The name of the travel agent who made the reservation.
pany The name of the company who made the reser
Group The name of the group the reservation was made for.
For example, a central reservation system.
© 2006 Micros-Fidelio (Ireland) Ltd. April 2006 Page 45
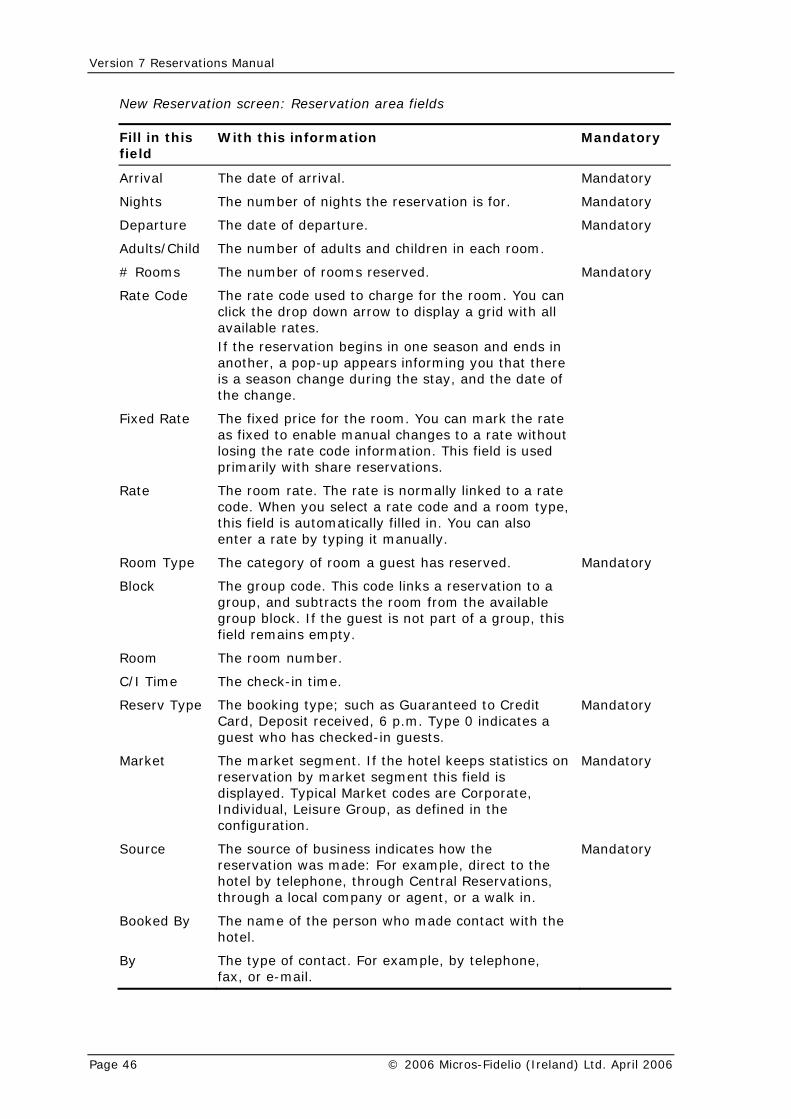
Version 7 Reservations Manual
New Reservation screen: Reservation area fields
Fillfie
in this ld
With this information Mandatory
Arrival The date of arrival. Mandatory
Nig
Departure The date of departure. Mandatory
The number of rooms reserved. Mandatory
Rat the drop down arrow to display a grid with all
season and ends in u that there
f ange.
Fix
g the rate code information. This field is used
rate is normally linked to a rate ect a rate code and a room type,
n. You can also it manually.
Bl servation to a group, and subtracts the room from the available
field remains empty.
er.
C/I
Res e booking type; such as Guaranteed to Credit Deposit received, 6 p.m. Type 0 indicates a
Mandatory
Mareservation by market segment this field is
Individual, Leisure Group, as defined in the configuration.
SouFor example, direct to the
vations, ent, or a walk in.
pe of contact. For example, by telephone,
hts The number of nights the reservation is for. Mandatory
Adults/Child The number of adults and children in each room.
# Rooms
e Code The rate code used to charge for the room. You can click
available rates. If the reservation begins in oneanother, a pop-up appears informing yois a season change during the stay, and the date othe ch
ed Rate The fixed price for the room. You can mark the rate as fixed to enable manual changes to a rate without losin
primarily with share reservations.
Rate The room rate. The code. When you selthis field is automatically filled ienter a rate by typing
Room Type The category of room a guest has reserved. Mandatory
ock The group code. This code links a re
group block. If the guest is not part of a group, this
Room The room numb
Time The check-in time.
erv Type ThCard, guest who has checked-in guests.
rket The market segment. If the hotel keeps statistics on Mandatory
displayed. Typical Market codes are Corporate,
rce The source of business indicates how the reservation was made:
Mandatory
hotel by telephone, through Central Reserthrough a local company or ag
Booked By The name of the person who made contact with the hotel.
By The tyfax, or e-mail.
Page 46 © 2006 Micros-Fidelio (Ireland) Ltd. April 2006
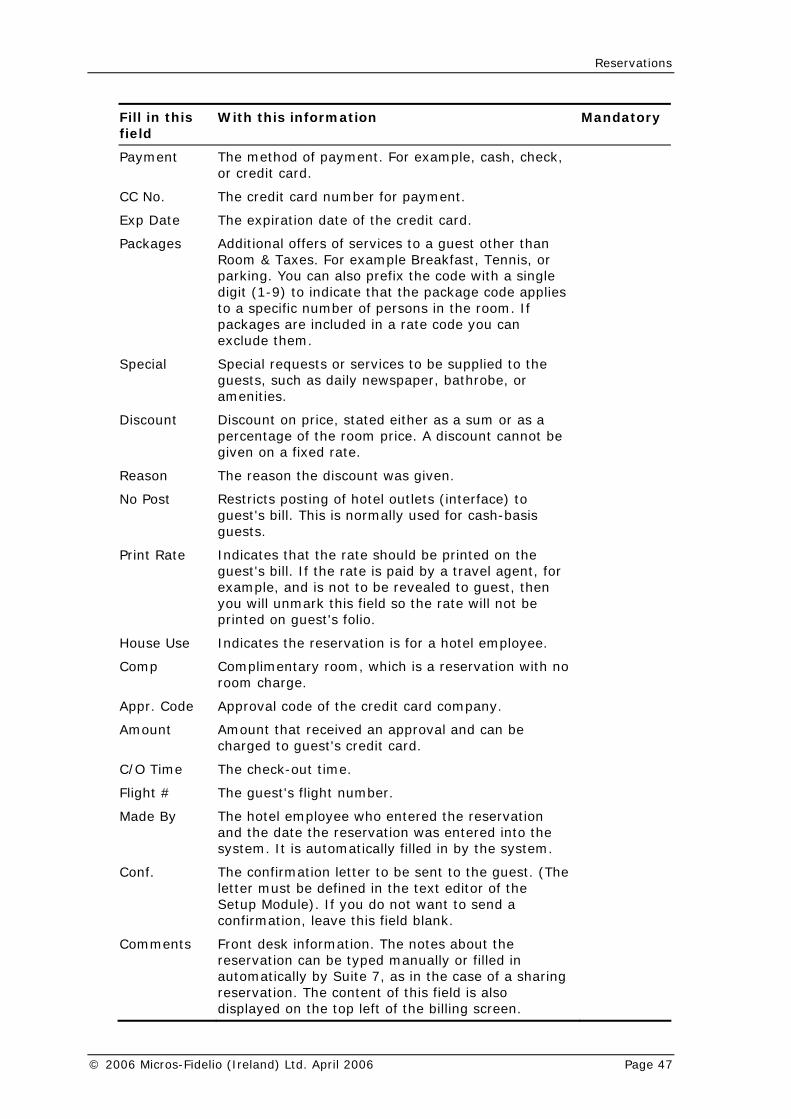
Reservations
Fill in this With this information Mandatory field
Payment The method of payment. For exampor credit card.
le, cash, check,
CC The credit card number for payment. No.
Exp card.
tional offers of services to a guest other than ast, Tennis, or
digit (1-9) to indicate that the package code applies number of persons in the room. If
n
ies.
given on a fixed rate.
Prinnt, for
example, and is not to be revealed to guest, then you will unmark this field so the rate will not be
-out time.
Flight # The guest's flight number.
and th ntered into the system. I
The co nt to the guest. (The letter m xt editor of the Setup Moduconfirm
nts Front dreservaautoma , as in the case of a sharing reserva of this field is also display
Date The expiration date of the credit
Packages AddiRoom & Taxes. For example Breakfparking. You can also prefix the code with a single
to a specific packages are included in a rate code you caexclude them.
Special Special requests or services to be supplied to the guests, such as daily newspaper, bathrobe, or amenit
Discount Discount on price, stated either as a sum or as a percentage of the room price. A discount cannot be
Reason The reason the discount was given.
No Post Restricts posting of hotel outlets (interface) to guest's bill. This is normally used for cash-basis guests.
t Rate Indicates that the rate should be printed on the guest's bill. If the rate is paid by a travel age
printed on guest's folio.
House Use Indicates the reservation is for a hotel employee.
Comp Complimentary room, which is a reservation with no room charge.
Appr. Code Approval code of the credit card company.
Amount Amount that received an approval and can be charged to guest's credit card.
C/O Time The check
Made By The hotel employee who entered the reservation e date the reservation was e
t is automatically filled in by the system.
Conf. nfirmation letter to be seust be defined in the te
le). If you do not want to send a ation, leave this field blank.
Comme esk information. The notes about the tion can be typed manually or filled in tically by Suite 7tion. The content ed on the top left of the billing screen.
© 2006 Micros-Fidelio (Ireland) Ltd. April 2006 Page 47
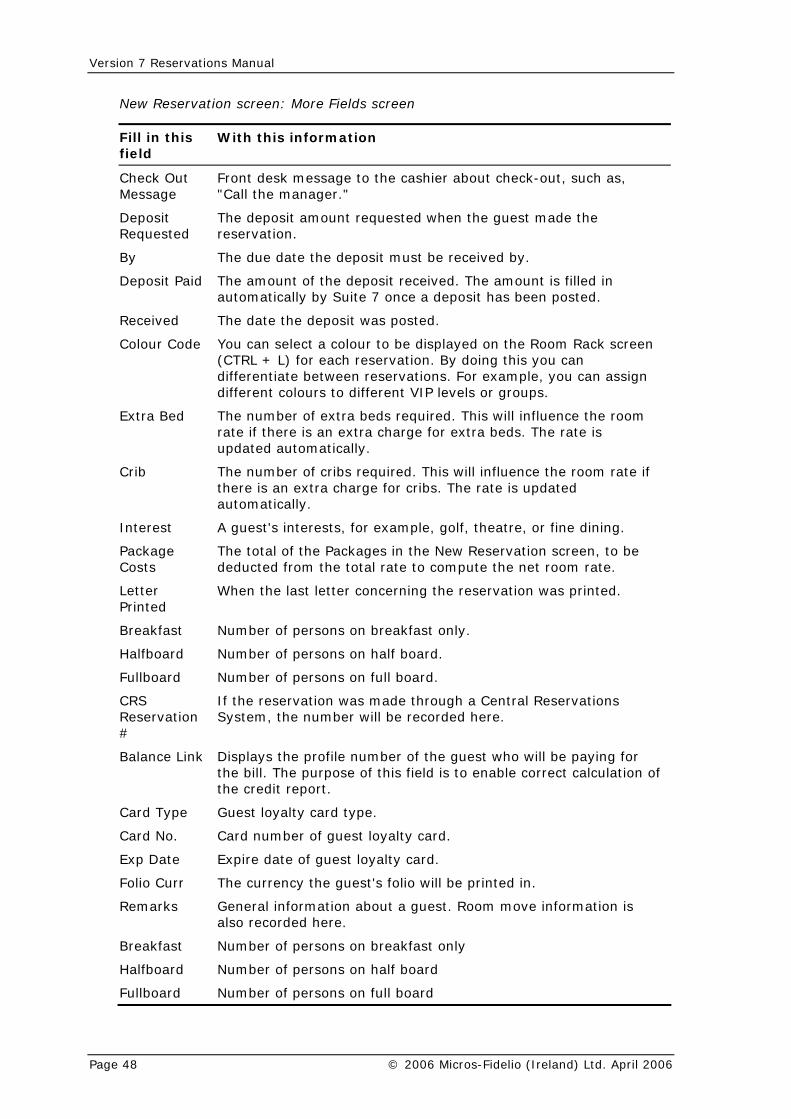
Version 7 Reservations Manual
New Reservation screen: More Fields screen
With tFill in this field
his information
Check Out Front des heck-out, such as, all thMessage "C
k message to the cashier about ce manager."
Deposit The deRequested
the guest made the reservation.
e deposit must be received by.
Th the deposit received. The amount is filled in automati uite 7 once a deposit has been posted.
ed Th
e Yo creen (CTdifdifferent col els or groups.
Thratup
Crib Th r of cribs required. This will influence the room rate if theau
A g .
The totalde
Wh was printed.
Breakfast Nu
rd Nu
Fullboard Number of persons on full board.
Reservation #
If tSy
ng for lation of
Car
Folio Curr The currency the guest's folio will be printed in.
Remarks General information about a guest. Room move information is also recorded here.
Breakfast nly
persons on half board
Ful
posit amount requested when
By The due date th
Deposit Paid e amount ofcally by S
Receiv e date the deposit was posted.
Colour Cod u can select a colour to be displayed on the Room Rack sRL + L) for each reservation. By doing this you can
ferentiate between reservations. For example, you can assign ours to different VIP lev
Extra Bed e number of extra beds required. This will influence the room e if there is an extra charge for extra beds. The rate is dated automatically.
e numbere is an extra charge for cribs. The rate is updated
tomatically.
Interest uest's interests, for example, golf, theatre, or fine dining
Package Costs
of the Packages in the New Reservation screen, to be ducted from the total rate to compute the net room rate.
Letter Printed
en the last letter concerning the reservation
mber of persons on breakfast only.
Halfboa mber of persons on half board.
CRS he reservation was made through a Central Reservations stem, the number will be recorded here.
Balance Link Displays the profile number of the guest who will be payithe bill. The purpose of this field is to enable correct calcuthe credit report.
Card Type Guest loyalty card type.
d No. Card number of guest loyalty card.
Exp Date Expire date of guest loyalty card.
Number of persons on breakfast o
Halfboard Number of
lboard Number of persons on full board
Page 48 © 2006 Micros-Fidelio (Ireland) Ltd. April 2006
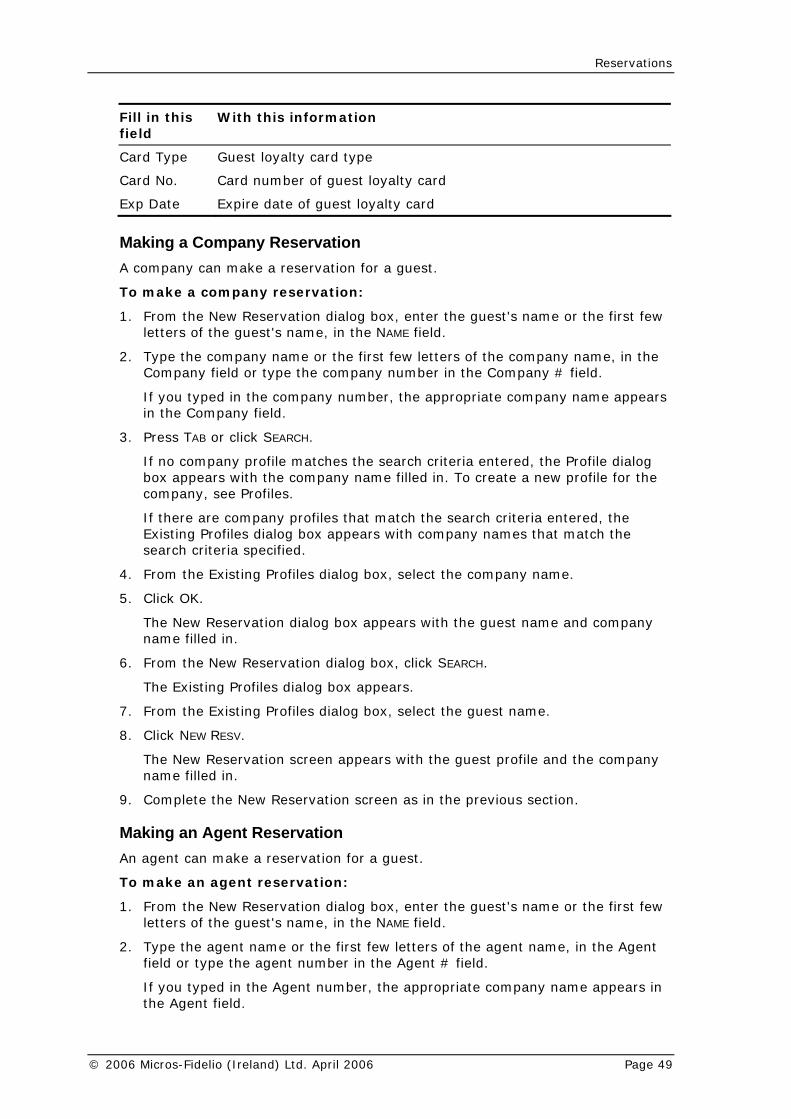
Reservations
Fill in this field
With this information
Card Type Guest loyalty card type
Card No. Card number of guest loyalty card
Exp Date Expire date of guest loyalty card
Making a Company Reservation ke a reservationA company can ma for a guest.
ompa
the New R first few letters of the gu e NAME field.
pa he Company field o ompany number in the Company # field.
yped in rs in the Company
3. Press TAB or clic
mpany p ered, the Profile dialog x appears wit w profile for the
ny, see P
re com tered, the Profiles di match the riteria s
xistin e.
ew Reserv ompany in.
e New R
isting Pro
Existin
.
Reserv and the company in.
9. Complete the N
Making an Agent Reservation nt can make
To make an agen ation:
w R rst few gu
e the agent ent field or type the
typed in the Agent field.
To make a c ny reservation:
1. From eservation dialog box, enter the guest's name or theest's name, in th
2. Type the com ny name or the first few letters of the company name, in tr type the c
If you t the company number, the appropriate company name appea field.
k SEARCH.
If no co rofile matches the search criteria entbo h the company name filled in. To create a necompa rofiles.
If there aExisting
pany profiles that match the search criteria enalog box appears with company names that
search c pecified.
4. From the E g Profiles dialog box, select the company nam
5. Click OK.
The N ation dialog box appears with the guest name and cname filled
6. From th eservation dialog box, click SEARCH.
The Ex files dialog box appears.
7. From the g Profiles dialog box, select the guest name.
8. Click NEW RESV
The New ation screen appears with the guest profile name filled
ew Reservation screen as in the previous section.
An age a reservation for a guest.
t reserv
1. From the Ne eservation dialog box, enter the guest's name or the filetters of the
2. Typ
est's name, in the NAME field.
name or the first few letters of the agent name, in the Ag agent number in the Agent # field.
If you the Agent number, the appropriate company name appears in
© 2006 Micros-Fidelio (Ireland) Ltd. April 2006 Page 49
Version 7 Reservations Manual
3. Press TAB or click SEARCH.
If no agent profile matches the search criteria entered, the Profile dialog box th ,
Profiles.
re are age isting Profiles dialog b eria specified.
5. Click OK.
The New Reservname filled in.
6. From the New R click SEARCH.
g Pro
the Existin
8. Click NEW RESV.
The New Reservname filled in.
N
Making a SourceA source can make
To make a source
1. From the New R letters of the gu
2. Type the source name or the first few letters of the agent name, in the SOURCE
x rce,
ce profiles that match the search criteria entered, the Existing x appears with source names that match the search criteria
4.
servation dialog box appears with the guest name and source in.
6.
7. name.
8. Click NEW RESV.
ce
appears withsee
e agent name filled in. To create a new profile for the agent
If the nt profiles that match the search criteria entered, the Exox appears with agent names that match the search crit
4. From the Existing Profiles dialog box, select the agent name.
ation dialog box appears with the guest name and agent
eservation dialog box,
The Existin
7. From
files dialog box appears.
g Profiles dialog box, select the guest name.
ation screen appears with the guest profile and the agent
9. Complete the ew Reservation screen as in the previous section.
Reservation a reservation for a guest.
reservation:
eservation dialog box, enter the guest's name or the first fewest's name, in the NAME field.
field.
3. Press TAB or click SEARCH.
If no source profile matches the search criteria entered, the Profile dialog boappears with the source name filled in. To create a new profile for the sousee Profiles.
If there are sourProfiles dialog bospecified.
From the Existing Profiles dialog box, select the source name.
5. Click OK.
The New Rename filled
From the New Reservation dialog box, click SEARCH.
The Existing Profiles dialog box appears.
From the Existing Profiles dialog box, select the guest
The New Reservation screen appears with the guest profile and the sourname filled in.
Page 50 © 2006 Micros-Fidelio (Ireland) Ltd. April 2006
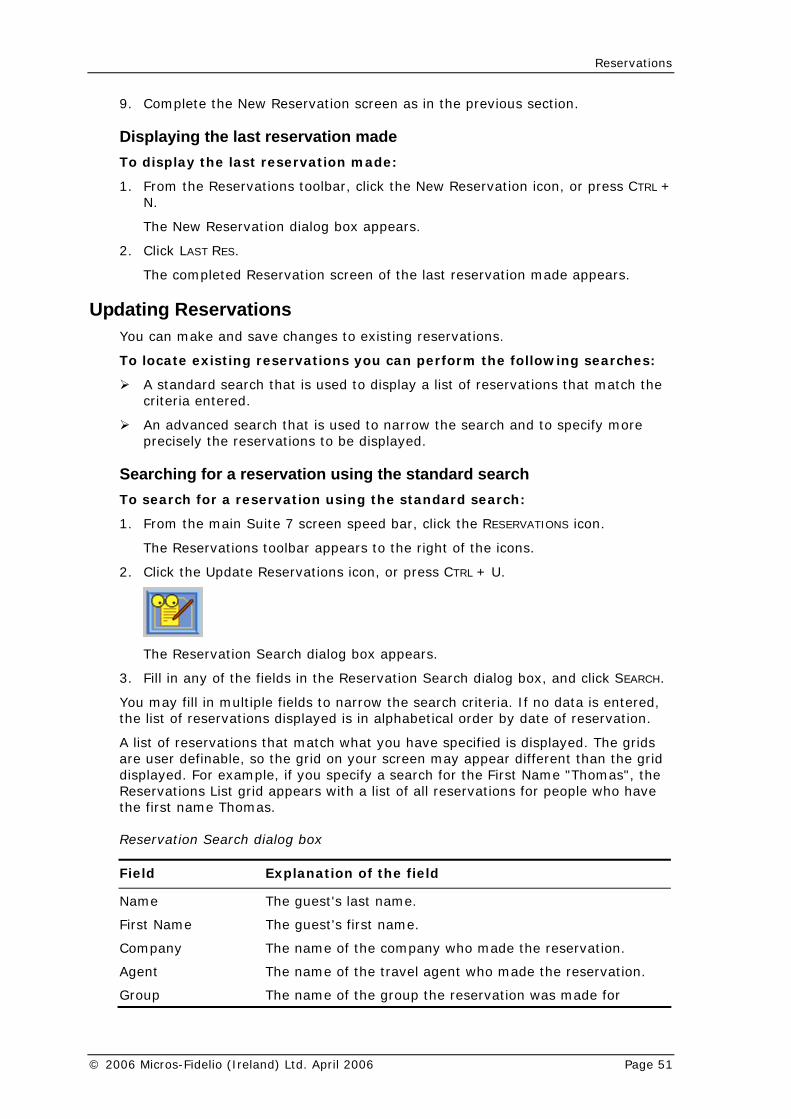
Reservations
9. Comp
DisplayinTo display the last reservation made:
L +
t reservation made appears.
Upd and save changes to existing reservations.
To hes:
the ed.
e
Searching for a reservation using the standard search To searc
1. From the main Suite 7 screen speed bar, click the RESERVATIONS icon.
tions icon, or press CTRL + U.
lete the New Reservation screen as in the previous section.
g the last reservation made
1. From the Reservations toolbar, click the New Reservation icon, or press CTR
N.
The New Reservation dialog box appears.
2. Click LAST RES.
The completed Reservation screen of the las
ating Reservations You can make
locate existing reservations you can perform the following searc
A standard search that is used to display a list of reservations that matchcriteria enter
An advanced search that is used to narrow the search and to specify morprecisely the reservations to be displayed.
h for a reservation using the standard search:
The Reservations toolbar appears to the right of the icons.
2. Click the Update Reserva
The Reservation Search dialog box appears.
3. Fill in any of the fields in the Reservation Search dialog box, and click SEARCH.
u ered,
A li ions that match what you have specified is displayed. The grids are user definable, so the grid on disResthe
Yo may fill in multiple fields to narrow the search criteria. If no data is ent the list of reservations displayed is in alphabetical order by date of reservation.
st of reservatyour screen may appear different than the grid
played. For example, if you specify a search for the First Name "Thomas", the ervations List grid appears with a list of all reservations for people who have first name Thomas.
Reservation Search dialog box
Field Explanation of the field
Name The guest's last name.
First Name The guest's first name.
Company The name of the company who made the reservation.
Agent The name of the travel agent who made the reservation.
Group The name of the group the reservation was made for
© 2006 Micros-Fidelio (Ireland) Ltd. April 2006 Page 51

Version 7 Reservations Manual
Field Explanation of the field
Block The group code.
Party The name of the party that the guest is travelling with.
The status of the reservation.
Con e confirmation number.
dates.
Dep
Rserv Type
f # Th
Arrival ---To --- A range of arrival
arture ---To --- A range of departure dates.
Reservations List grid options
Clicking this option
Does this
New Displays the New Reservation dialog box.
Check-In es to
Cancel After cancellation this button toggles to REACTIVATE. See REACTIVATE below.
CANCEL C.I. (Cancel Check-In). See CANCEL C.I.
lected reservation.
lays the Reservation Options without displaying the
Displays the Reservation screen for the selected reservation,
Sea
Rea ancelled reservation. This button toggles ion status to CANCEL CI or CANCEL.
Bill
Can ls the check-in of a guest whom checked-in today. The reservation status reverts to Expected.
Checks in a guest and changes the guest’s status from Expected to Checked-In. After Check-In, this button togglBILLING. See BILLING below.
Cancels a reservation.
In addition, on the day the guest checks in, the CANCEL button toggles to below.
Profile Displays the Profile screen for the se
Options DispReservations screen.
Edit
rch Displays the Reservation Search dialog box.
ctivate Reactivates a cdepending on the reservat
ing If you have the appropriate rights, displays the guest’s bill in Cashiering. This option is activated after the guest has check-in.
cel C.I. Cance
Searching for a reservation using the advanced search option To search for a reservation using the advanced search option:
1. From the main Suite 7 screen speed bar, click the RESERVATIONS icon.
The Reservations toolbar appears to the right of the icons.
2. Click the Update Reservations icon, or press CTRL + U.
The Reservation Search dialog box appears.
3. Click ADVANCE.
Page 52 © 2006 Micros-Fidelio (Ireland) Ltd. April 2006

Reservations
The Reservations Search dialog box expands.
. Enter one or more search criteria and click SEARCH.
The Reservation List grid appears.
tch the search criteria, Suite 7
4
Note: If no reservations manotifies you that no reservations were found.
Advanced Reservation Search dialog box fields
This field Is to search for
General All reservations' statuses: Expected, Checked-in, Cancelled, and No Show.
Cancellation Reservations that have been cancelled.
e as their
rvations that are marked as Comp in the reservation
The no-show reservations are deleted the day after the
Ci Reservations for guests from a specific city.
Country Reservations for guests from a specific country.
ied room type.
Room No. All reservations blocked with the specified room number.
Market Code rket code.
Sou
Sou Reservations with the specified source code.
llation number.
Reservations with the specified VIP code.
Me the specified member number.
Guest Card No Reservations with the specified guest card number.
Rate Code
Price--- T Reservations within the price range. If the To field is left blank, the search will be for prices above that stated.
Deposit Date Reservations that require a deposit by the date entered.
Deposit Amnt.--- To---
Reservations with deposits in the given range. If the To field is left blank, the search will be for deposits above that stated.
Conf. Letter # Reservations with the specified confirmation number.
Arrival Time--- To---
Reservations with expected arrivals in the stated time frame. If the To field is left blank, the search will be for arrival times after the stated time.
Day Use Reservations that their arrival date is samdeparture date.
Complementary Resedialog box
No Show Guests that did not arrive at the hotel on their arrival date.
original expected departure date.
Departure Guests who are due to depart today
ty
Room Type All reservations with the specif
Reservations with the specified ma
Colour Code Reservations with the specified colour code.
rce Reservations booked through the specified source.
rce Code
Cancel No Reservations with the specified cance
VIP Code
mber No. Reservations with
Reservations with the specified rate code.
o---
© 2006 Micros-Fidelio (Ireland) Ltd. April 2006 Page 53
Version 7 Reservations Manual
This field Is to search for
CRS No. Re d central reservations number. servations with the specifie
Created On--- Re specified date, by the specified hotel emplo th fields can be specified.
Respre
ncellation If be ca played and an addition button Mass ll be available on the Reservation List grw ations for the specif ter a specific reservation ty
If the check box is checked then you may enter part (some f results will include
all the reservations that contain this combination of letters e, if "ti" is typed in the Name field,
of the search will include Paretti, Martin, and
ondition Match (OR)
If the check box is checked and more than one field is entered, the results of the search may include one or more
th" is typed in the f a
d in the city of "Chicago", then
e on the list.
By--- servations made on the
yee. Either one or bo
Stay On servations that will be in-house on the stay on date ecified. This includes reservations for the future and servations which have already checked-in.
Mass Ca the check box is checked then all reservations that canncelled will be dis
Cancellation wiid. Upon selecting the Mass Cancellation button you will be arned that you are about to cancel all reserv
ied date and reminded to enpe to be cancelled.
Partial String Match o the letters) of the field and search. The
in the field. For examplthe resultsTimona.
Partial C
of the search criteria. For example, "SmiName field and "Chicago" is typed into the City field. Ireservation "Smith" is found in the city of Miami, or a reservation "Jones" is founboth of these reservations appear on the Reservation List grid. If this check box is not checked, only reservations that meet all the criteria entered will b
Checking in a guest from the Rck in a gu
e the res ard search or Sea n using the advanced search option).
om the Res
CHECK-IN
om nu ars with the defau le
4. Accept the de
5. Click OK.
notPayment Meth
6. Complete the Payment Method dialog box, and click OK.
A message that the check-in was successful appears.
eservation List grid To che est from the Reservation List grid:
1. Locat ervation (see Searching for a reservation using the standrching for a reservatio
2. Fr ervations List grid, select the guest.
3. Click .
If the ro mber has not been assigned, a Room Block prompt appelt room number. The default room number is the first availab
room number of the selected room type.
fault room number or choose one from the drop-down menu.
If you did select a method of payment in the Reservation screen, the od dialog box appears.
Page 54 © 2006 Micros-Fidelio (Ireland) Ltd. April 2006
Reservations
Cancelling an Expected reservation from the Reservation List grid cel a eservation if the guest has not made a deposit on tion.
Note: he
You can canthe reserva
n Expected r
If the guest has made a deposit, you cannot cancel treserva ancelled through the
hietion with this option. It must be c
Cas ring program (see the Suite 7 Cashiering Manual).
How to cancel rvation List grid:
te the re
2. From the Res
.
el re
e Can t m
ES.
eservati The status on the Reservation List grid is om
R .
ing a C ation List grid a es not have a balance.
an Expected reservation from the Rese
1. Loca servation.
ervations List grid, select the guest.
3. Click CANCEL
The Canc servation dialog box appears.
4. From tha reason fro
cel reservation dialog box, click the drop down arrow and selec the Reasons list.
5. Click Y
The r on is cancelled.changed fr Expected to Cancelled and the CANCEL button is toggled to
EACTIVATE
Cancell hecked-In reservation from the ReservYou can cancel Checked-In reservation if the guest do
Note: If the guest has a balance, you cannot cancel the reservation with this option.
How to cancel id:
te the re
the Res
ANCEL C
irmatio
4. Click YES.
age to
k the ch YES or to change the click YES, or to leave the room status as
ck NO.
he check-in d ed EL and
the BILLING bu
ting a ct has ch les you to check the guest the room. The t has checked out.
a checked-in reservation from the Reservation List gr
1. Loca servation.
2. From ervations List grid, select the guest.
3. Click C .I.
A conf n message appears.
A mess change the room status appears.
5. Chec eck box to change the room status to Touch Up and click room status to Dirty,
is, cli
Tfrom Check
is cancelled. The status on the Reservation List grid is change-In to Expected. The CANCEL C.I. button is toggled to CANC
tton is toggled to CHECK-IN.
Reinsta hecked-out reservation from the Reservation List grid If a guesback into
ecked out the reinstate option enab option is active only if the gues
© 2006 Micros-Fidelio (Ireland) Ltd. April 2006 Page 55
Version 7 Reservations Manual
How to reinstate a checked-out reservation from the Reservation List grid:
1. Locate the checked-out reservation.
es
3. Click REINSTA
p
4. Click ORIGINAL
The reservati The butto
Reactivating a the Reservation List grid
ote: A m r notifying you that the reservation
2. From the R ervations List grid, select the guest.
TE.
A warning a pears.
R or PX R . OOM OOM
on status is changed from Checked Out to Due Out.REACTIVATE n is toggled to CANCEL C.I.
cancelled reservation fromYou can reactivate a cancelled reservation.
N essage may appeacannot be reactivated. There are various reasons why a reservationot availa ot room left in the block. If you have
em ri ssage and reactivate the reservation.
n cannot be reactivated. For example, the rate code is ble or there is n
syst ghts, you may be able to override the me
How to reactivate vation from the Reservation List grid:
e
he Reser
3. Click REACTIVATE
A confirmation message
.
u can make es to the
Reser
ervation e n reac Cancelled to
he Check-I tton is Canc
a cancelled reser
1. Locate the res rvation.
2. From t vations List grid, select the guest.
.
appears.
4. Click YES
The Reservation screen for the reactivated reservation appears. Yochang reservation.
5. From the vation screen, click OK.
The Res screen is closed. The Reservation List grid appears with threservatio tivated. The reservation status is changed fromExpected. Ttoggled to
n button is activated and the Reactivate buel.
Page 56 © 2006 Micros-Fidelio (Ireland) Ltd. April 2006
4
Reservations Options Various options dialog box.
can tions For exa
deposit. Changes to
authorizn.
Op e ReseThe Reservation Op
Reservation scr
Opening the Resbox To open the Rese the Reservation Search dialog box:
ain
Reservation
2. Click the Update
be attached to a reservation through the Reservation Opmple, a confirmation letter, fixed charges, a message, or a
the reservation can also be made.
For example, ing direct billing, adding routing instructions, or splitting a party reservatio
ening th rvation Options dialog box tions can be opened from the following:
Reservation Search dialog box
een
ervation Options from the Reservation Search dialog
rvation Options from
1. From the m
The
Suite 7 screen speed bar, click the RESERVATIONS icon.
s toolbar appears to the right of the icons.
Reservations icon, or press CTRL + U.
The Reservation
3. Fill in any of the CH.
You may fill in mentered, the list f reservation.
4. Select the reser
5. Click OPTIONS.
Search dialog box appears.
fields in the Reservation Search dialog box, and click SEAR
ultiple fields to narrow the search criteria. If no data is of reservations displayed is in alphabetical order by date o
vation that you want to view or edit.
The Reservation Options appear.
Note: When a button is greyed out, the option is not activated for the guest selected or you do not have rights to use this option.
© 2006 Micros-Fidelio (Ireland) Ltd. April 2006 Page 57
Version 7 Reservations Manual
Reservation Search dialog box
Field Explanation of the field
Name The guest's last name.
First Name The guest's first name.
Company The name of the company who made the reservation.
Agent The name of the travel agent who made the reservation.
name of the group the reservation was made for
Par rty that the guest is travelling with.
The status of the reservation.
Con
Departure ---To --- A range of departure dates.
Group The
Block The group code.
ty The name of the pa
Rserv Type
f # The confirmation number.
Arrival ---To --- A range of arrival dates.
Reservations List grid options
Clicking this Does this option
New Displays the New Reservation dialog box.
Cheto
Can this button toggles to REACTIVATE. See REACTIVATE below. In addition, on the day the guest checks in, the CANCEL button
Prof rofile screen for the selected reservation.
Edi reservation,
Sea
Bill
Can of a guest whom checked-in today. The reservation status reverts to Expected.
ck-In Checks in a guest and changes the guest’s status from Expected to Checked-In. After Check-In, this button toggles BILLING. See BILLING below.
cel Cancels a reservation. After cancellation
toggles to CANCEL C.I. (Cancel Check-In). See CANCEL C.I. below.
ile Displays the P
Options Displays the Reservation Options without displaying the Reservations screen.
t Displays the Reservation screen for the selected
rch Displays the Reservation Search dialog box.
Reactivate Reactivates a cancelled reservation. This button toggles depending on the reservation status to CANCEL CI or CANCEL.
ing If you have the appropriate rights, displays the guest’s bill in Cashiering. This option is activated after the guest has check-in.
cel C.I. Cancels the check-in
Page 58 © 2006 Micros-Fidelio (Ireland) Ltd. April 2006
Reservations Options
Res
Clicbu
ervation Options dialog box option buttons
k this tton
To do this
Routing to post Direct charges of specific department codesautomatically to different folios.
Auth. DireBill
for their own stay, but who are having their payment made by someone
Tra track of things that have to be done for
Reg Print a registration card for the current reservation.
Roo
Rei If a guest has checked out, you can check the guest back into
PacOpt eated.
Get additional or manual approval of the guest's credit card.
Con er.
Wai
Fix
VirtNumbers
Dialling), you can assign a specific telephone or fax number to a guest
Acc
Delet Delete a reservation.
Reg
Rat
Cha s made to a reservation since the original
Me
Add urrent reservation with a different
Loc
Pre- Open the Billing screen in the Cashiering module and post a deposit payment or a pre-billing charge before the guest
button for a checked in guest.
Shares Combine two (or more) reservations to share the same room or to break an existing share reservation.
History View the details of previous stays.
Party Split a party reservation.
Meal Plan Set the meal plan schedule for a guest.
ct Authorize direct billing for guests who are not paying
else, such as, a company or organization.
ces Communicate guest's requests with other hotel staff. It allows the hotel to keepguests on a specific date.
. Card
m Move Move an in-house guest to another room.
nstate the room.
kage ions
Display a list of package elements for which an allowance has been cr
Credit Cards
firmation View, print, or e-mail a confirmation lett
tlist Move a guest reservation to the Waitlist.
ed Charges Post specific charges on a daily basis.
ual If your system is configured for DID (Direct Inward
reservation for the duration of the guest's stay.
ompanying Register each guest in the room, even if there is only one actual reservation for that room.
e
rets Move a guest reservation to the Regrets list.
e Info View a room rate in various currencies.
nges View all the changereservation was made.
ssages View, create, edit or delete guest messages.
On Make a copy of the creservation number.
ator Enter a guest locator.
Billing/Billing checks in. Changes to Billing
© 2006 Micros-Fidelio (Ireland) Ltd. April 2006 Page 59
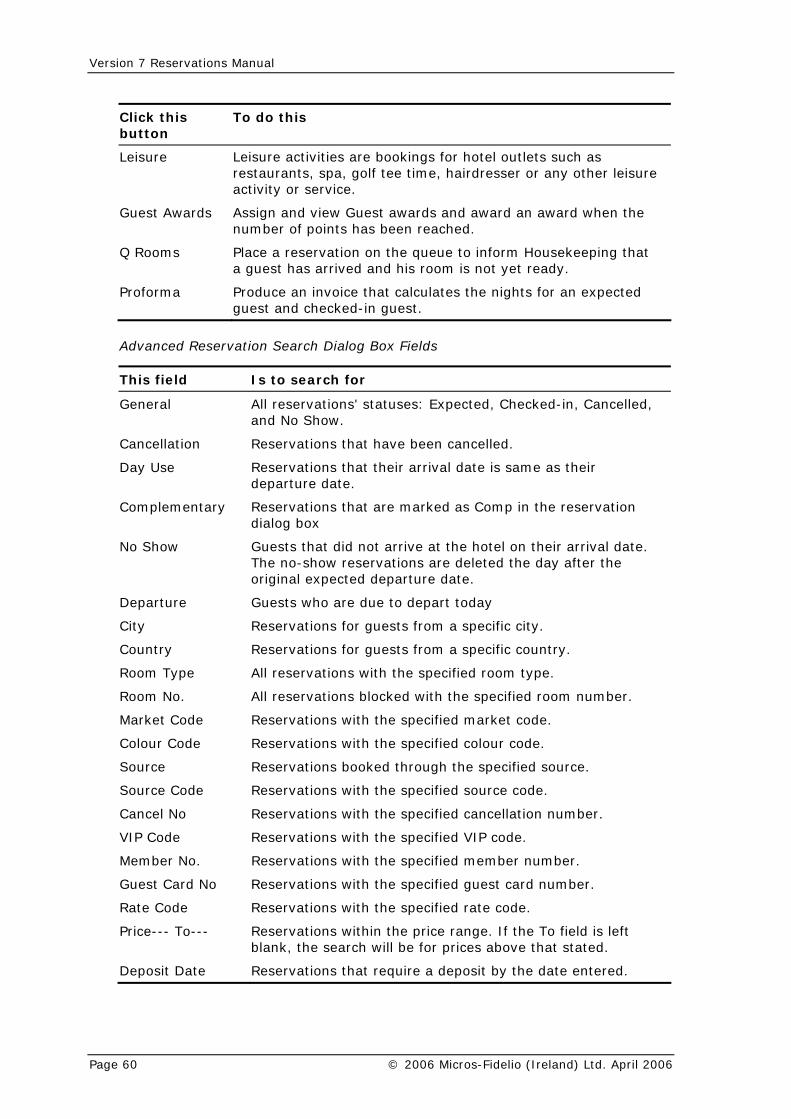
Version 7 Reservations Manual
Click this To do this button
Leisure Leisure activities are bookings for hotel outlets such as re restaurants, spa, golf tee time, hairdresser or any other leisu
activity or service.
Guest Awards and award an award when the number of points has been reached.
room is not yet ready.
Assign and view Guest awards
Q Rooms Place a reservation on the queue to inform Housekeeping that a guest has arrived and his
Proforma Produce an invoice that calculates the nights for an expected guest and checked-in guest.
Advanced Rese ields
Is to search for
rvation Search Dialog Box F
This field
General All reservations' statuses: Expected, Checked-in, Cancelledand No Show.
,
Cancellation Reservations that have been cancelled.
as their departure date.
Complementary Reservations that are marked as Comp in the reservation
No ival date. The no-show reservations are deleted the day after the original expected departure date.
Country Reservations for guests from a specific country.
Room Type All reservations with the specified room type.
Ma
Reservations with the specified colour code.
Sou the specified source.
Can ns with the specified cancellation number.
VIP Code Reservations with the specified VIP code.
Me
Guest Card No Reservations with the specified guest card number.
Rate Code
Price--- T To field is left blank, the search will be for prices above that stated.
Day Use Reservations that their arrival date is same
dialog box
Show Guests that did not arrive at the hotel on their arr
Departure Guests who are due to depart today
City Reservations for guests from a specific city.
Room No. All reservations blocked with the specified room number.
rket Code Reservations with the specified market code.
Colour Code
rce Reservations booked through
Source Code Reservations with the specified source code.
cel No Reservatio
mber No. Reservations with the specified member number.
Reservations with the specified rate code.
o--- Reservations within the price range. If the
Deposit Date Reservations that require a deposit by the date entered.
Page 60 © 2006 Micros-Fidelio (Ireland) Ltd. April 2006

Reservations Options
This field Is to search for
Dep e. If the To field osit Amnt.--- Reservations with deposits in the given rangTo--- is left blank, the search will be for deposits above that
stated.
Conf. Letter # Reservations with the specified confirmation number.
Arrival Time--- To-
Reservations with expected arrivals in the stated time is left blank, the search will be for
s after the stated time.
tions number.
CreBy---
n the specified date, by the specified one or both fields can be specified.
on the stay on date specified. This includes reservations for the future and
ady checked-in.
ked then all reservations that can be ed and an addition button
ist ill be
rvations for the ecific reservation
type to be cancelled.
MaIf the check box is checked then you may enter part (some
e Name field, the results of the search will include Paretti, Martin, and Timona.
Part and more than one field is esults of the search may include one or more
yped in the field. If a
is found in the city of Miami, or a e city of "Chicago", then
n the Reservation List grid. If this check box is not checked, only reservations that
a entered will be on the list.
-- frame. If the To fieldarrival time
CRS No. Reservations with the specified central reserva
ated On--- Reservations made ohotel employee. Either
Stay On Reservations that will be in-house
reservations which have alre
Mass Cancellation If the check box is checcancelled will be displayMass Cancellation will be available on the Reservation Lgrid. Upon selecting the Mass Cancellation button you wwarned that you are about to cancel all resespecified date and reminded to enter a sp
Partial String tch of the letters) of the field and search. The results will include
all the reservations that contain this combination of letters in the field. For example, if "ti" is typed in th
ial Condition If the check box is checked Match (OR) entered, the r
of the search criteria. For example, "Smith" is tName field and "Chicago" is typed into the Cityreservation "Smith" reservation "Jones" is found in thboth of these reservations appear o
meet all the criteri
Displaying the Reservation Options from the Reservation screen To displ ons from the Reservation screen:
working in the Reservation screen, simply click OPTIONS.
The Reservation Options
Note: When a button is greyed out, the option is not activated
ay the Reservation Opti
If you are already
dialog box appears.
for the guest selected or you do not have rights to use this option.
© 2006 Micros-Fidelio (Ireland) Ltd. April 2006 Page 61
Version 7 Reservations Manual
Routing The Routing option allows you to direct charges of specific department codes to
lios). You can route charges to so define a
addition, you ach routing instruction. When h routin structions, you will
ns
The Routing Charge screen appears.
ge, in the Window
riod.
down arrow in the Departments column.
appears.
INCLUDE to include the departments you want to route charges for, or click EXCLUDE to exclude the departments from being
the code that you want to exclude. For instance, if you include all department codes, and exclude only
field as "*,-110".
OK.
ar on the
harges , check the appropriate checkbox:
e tel ision.
this window via the television.
ROOM, NAME, OTHER
ant the charges to be mpany, Group, or Source linked
ation, or to another room or reservation, or another profile name.
n Agent, Company, Group, or Source linked to AME ROOM check box, and select the desired name
from the N drop-down listing.
route postings of an individual reservation to a
post automatically to different folios (up to 98 fothe same room, to another name, or to other guests' folio. You can alrouting period to restrict the routing of postings to certain dates. Incan also set a different method of payment for echanging the departure date on a reservation wit g inbe asked whether to update the dates on routing instructio
How to route charges:
1. From the Reservations Options dialog box, click ROUTING.
2. Click NEW.
The New Routing Charge dialog box appears.
3. Type the folio number to which you wish to route the charfield.
4. Fill in the dates for the routing pe
5. Click the drop
The Select Departments dialog box
6. From the Select Dialog box, click
routed.
If you want to include all except one or two codes, select and INCLUDE "All Department Codes". Then select and EXCLUDE
No Show (110), it will appear in the
7. Click
The Select Dialog box is closed and the abbreviations or numerical codes for the selected departments (as defined in the hotel configuration) appeRouting Charge dialog box.
8. If you want the guest to be able to view and/or check out the routed cin this window on their television
BILL VIEW: View the charges in this window on th ev
VIDEO CHECKOUT : Checkout the charges in
9. From the New Routing Charge dialog box, select SAME
ROOM, or OTHER NAME, depending on whether you wrouted to the same room, but to an Agent, Coto the reserv
a. To route the charges to athe reservation, check the S
AME
Note: To company, a travel agent, or a source, you should link the reservation first via the Agent, Company, or Source fields in the Profile.
Page 62 © 2006 Micros-Fidelio (Ireland) Ltd. April 2006

Reservations Options
b. Uncto anot
heck the SAME ROOM checkbox, select OTHER ROOM to route the charges her guest's room. If you know the room number, just type it in the
rompt you with a list of all expected and in-house h for the reservation either by room number if
field. Clicking the field will preservations. You can searcassigned to guest, or by guest's name.
Note: If you select a reservation that has no overlapping date with the current reservation, the system issues a warning.
c. Un harges to anoth t to a specif reservation.
10. Highlight the name or the room that you want to route the charges to and
ss details of the name
11. Click the Payment field to select the payment method for this window.
If non n the guest’
od is NOT a credit card routing is complete and the new appears on the Routing Charge screen with the room nformation for the guest to whom the charges are being
een. (See step 13.)
the it card. The Authorization buttons are now
rize an amount, click the appropriate authorization
enter the approved
dialog box that lets you enter an additional
ting Charge dialog box is closed. The new routing instruction
check the SAME ROOM checkbox, click OTHER NAME to route the cer name. This routes the charges to a specific profile name and noic room or
press TAB.
The Address Detail field is filled in with the addreselected.
e is selected, the payment method defaults to the type chosen is reservation.
12. Click OK.
You are returned to the Routing Charges dialog box.
If the payment methrouting instructionnumber and other irouted. Simply close the Routing Charge scr
If the payment method is a credit card, continue with the next step.
Type in the credit card number and expiration date, and the name of cardholder as it appears on the credactivated.
If you wish to authobutton:
Manual Authorization: Opens a dialog box that lets youamount and the approval code.
Additional Authorization: Opens aamount and contacts the credit card company to get the required authorization when you click OK.
The New Rouappears on the Routing Charge screen box with the room number and other information for the guest to whom the charges are being routed.
13. Click CLOSE.
The Routing Charge screen box is closed.
© 2006 Micros-Fidelio (Ireland) Ltd. April 2006 Page 63

Version 7 Reservations Manual
Rou
Click this To do this
ting Charge screen options
button
From Vie t has routing instructions from other guest or room number ve until the guest checks in.
w if the gues. Inacti
New Add
Del ion the cursor is currently on.
Cha
Card Opens the Credit Card Details dialog box for the selected billing ndow (routi
instruction i
a new routing instruction.
Delete ete the routing instruct
Edit
Credit
nge routing instructions.
details wiAct
ng instruction). ive only if the payment method for the highlighted routing
s a credit card.
Rei
oom
h
m the Rese
g app
GINAL
atio
Fixed Charges The option Fixed Charges allows you to post specific charges on a daily basis. You can also edit or delete a fixed charge. Suite 7 will post the fixed charges
night audit and when you print advance folio.
the Reservation Options dialog box, click FIXED CHARGES.
d dates of the
3. choose the department you want
lds.
be posted.
ct
nstate If a guest has checkedback into the r
out the reinstate option allows you to check the guest . This option is active only if the guest has checked out.
To reinstate a c
1. Fro
A warnin
ecked-out reservation:
rvation Options dialog box, click REINSTATE.
ears.
2. Click ORI ROOM or PX ROOM.
The reserv n status is changed from Checked Out to Due Out.
automatically during the
How to enter a new fixed charge:
1. From
The Fixed Charges screen appears with the name anreservation.
2. Click NEW.
The Edit Fixed Charges dialog box appears.
Click the Department drop down arrow and to set a fixed charge for.
4. Type the quantity and price in the appropriate fie
If the system is setup for Dual or Euro, select the currency to
Note: Some departments may include the price when you selethe item. In those instances the price will be filled in automatically once that department was selected.
5. If required, select an arrangement to include the selected department code
6. Click OK.
under specific arrangement group when you print the folio.
Page 64 © 2006 Micros-Fidelio (Ireland) Ltd. April 2006
Reservations Options
The Edit Fixed Charges dialog box is closed. The Fixed Charges screen appears antity, and price appear in the dialog box and ppears as Total fixed charge.
additional department you want fixed charges for.
The
8. Clic
The x
Ho
1. ptions dialog box, click FIXED CHARGES.
2.
3.
4.
e: Some departments may include the price when you select
displaying the department, quthe total fixed charges price a
7. Repeat steps 2-6 for every
Total fixed charges increments by each additional price.
k CLOSE.
Fi ed Charges screen is closed.
w to edit a fixed charge:
From the Reservation O
The Fixed Charges screen appears.
Select the Fixed Charge that you want to edit.
Click EDIT.
The Edit Fixed Charges dialog box appears.
Enter any changes you want to make.
Notthe item. In those instances the price will be filled in automatically once that department was selected.
5. Click OK.
The Edit Fixed Charges dialog box is closed. The Fixed Charges screen appeadisplaying
rs the department, quantity, and price appear in the dialog box and
6.
Ho
1. box, click FIXED CHARGES.
2.
4.
arge is deleted.
5.
screen is closed.
the total fixed charges price appears as Total fixed charge.
Click CLOSE.
The Fixed Charges screen is closed.
w to delete a fixed charge:
From the Reservation Options dialog
The Fixed Charges screen appears.
Select the fixed charge that you want to delete.
3. Click DELETE.
A confirmation message appears.
Click YES.
The fixed ch
Click CLOSE.
The Fixed Charges
© 2006 Micros-Fidelio (Ireland) Ltd. April 2006 Page 65
Version 7 Reservations Manual
Rat
Vierencies.
The dialog box appears.
hows currency names, where the first line shows the base currency. T
ils in a specific currency:
1.
.
5.
og box appears.
rency dialog box, click CLOSE.
The Cashier Login screen appears.
the Password field.
e Info
wing a room rate in various currencies This option enables you to view a room rate in various cur
To view a room rate in various currencies:
From the Reservation Options dialog box, click RATE INFO.
Currency
The left column she right column shows the exchange rates with the base currency.
Viewing rate details in a specific currency To view rate deta
From the Reservation Options dialog box, click RATE INFO.
The Currency dialog box appears.
2. Highlight the currency required.
3. Click DETAILS
The Rate Info dialog box appears.
4. If you want to print, click PRINT.
Click CLOSE.
The Rate Info dialog box is closed and the Currency dial
6. From the Cur
The Currency dialog box is closed.
Billing The Billing option will open the Billing screen in the Cashiering Module.
Here you can view guest's folios post charges, and use other related functions.
Remember that the billing option is only available for checked-in guests.
How to open the Billing screen:
1. From the Reservations Option dialog box, click BILLING.
2. Type your cashier number in the Cashier No field.
3. Type your password in
4. Click LOGIN.
The Billing screen appears.
Note: For instructions on Billing see the Suite 7 Cashiering Manual.
Page 66 © 2006 Micros-Fidelio (Ireland) Ltd. April 2006
Reservations Options
Pre
This option allows you to post a deposit payment before the guest checks in. Som n order to guarantee a reservation.
est who has not yet che "Billing".
If a deposit has been made on an expected reservation
-Billing
Posting deposit payments
e hotel policies require a deposit i
Remember that the pre-billing option is only available for a gucked in. When the guest checks in, this option becomes
Note:you are not able to cancel the reservation from the reservations module.
How to p
1. From the Reservation Options, click PRE-BILLING.
umber appears.
ost a deposit payment:
The Cashier Login screen with your cashier n
Note: Performing any operation related to the cashier's work requires a user password.
2. Type in your password, and click LOGIN.
amount has already been paid,
3.
The Deposit Payments dialog box appears.
Payment Department field, click on the down arrow to open the drop-
rvation Type.
10. In the nd the confir
If you ard as the payment method, the Supplementary Info field type becomes the Credit Card Number field. Type in the credit card
ded in the Reservation, it is entered
number (such as the
The Pre-Billing dialog box appears. If a deposit it will be displayed.
Click DEPOSITS.
4. In thedown list, and select the payment method.
5. Type in the Amount of the deposit.
6. To change the Reservation Type, click the down-arrow and select the new Rese
7. In the Window Number field, choose the number of the window where you want the deposit to appear once the guest checks in.
8. If you want to print a receipt for the deposit, check the Print Receipt checkbox at the bottom of the dialog box.
9. If the deposit is paid by a travel agent whose commission is pre-paid, either type in the percentage for the Pre-Paid Commission, or type the amount in directly.
Suite 7 calculates the Total Amount, which is the sum of the deposit and thecommission.
Supplementary Info field, you can enter the guest name amation number of the reservation.
have selected a credit c
number. (If the card number is recorautomatically.)
In the Reference # field you can type in a referencecheck number).
11. Click POST.
© 2006 Micros-Fidelio (Ireland) Ltd. April 2006 Page 67
Version 7 Reservations Manual
The and the payment is displayed on the Pre l
Deposit
Field na
Deposit Payments dialog box closes, -Bi ling screen.
Payment dialog box fields
me Definition
Payment Department
osit (cash, credit card, or The method of payment for the dep foreign currency, etc.).
Am
Res servation.
for the deposit. In Routing, you can open
Whether a receipt is to be printed for the deposit.
com
CreNum
ion of the transaction. (Inserted by the system.)
check
ount The deposit amount.
ervation The type of reType
Window Number The folio to creditup to 98 folios per guest.
Print Receipt
Pre-paid mission
The percentage or amount of the pre-paid commission.
Total Amount The commission amount (or percentage) plus the deposit amount.
Supplementary Info/
dit Card ber
The credit card number, if a deposit is made by credit card. If payment is by cash or check, you can type in information such as guest name and/or reservation confirmation number.
Description Descript
Reference # If a deposit is made by credit card, you can enter the credit card expiry date. If the deposit is made by check, you can enter the number.
Deposit Adjustments In some circumstances, it may be necessary to make adjustments to an initialdeposit:
ke an additional deposit payment.
eposit may be returned to a guest.
s
1. From the Reservation Options, click PRE-BILLING.
work
A guest may ma
All or part of a d
A deposit may also be retained even though the guest never checked in.
The sum of the returned and the retained portions of the deposit must be lesthan or equal to the total deposit received.
How to adjust a deposit:
The Cashier Login screen with your cashier number appears.
Note: Performing any operation related to the cashier'srequires a user password.
2. Type in your password, and click LOGIN.
The Pre-Billing dialog box appears. If a deposit amount has already been paid, it will be displayed.
Page 68 © 2006 Micros-Fidelio (Ireland) Ltd. April 2006
Reservations Options
3. Click DEPOSITS.
The Deposi pear.
Payment: A ount.
Retai
Ab ithout making any adjustment.
N eposit Payment dialog box for the ted
ETAIN box opens.
Although this dialog box contains many more fields than the Deposit Payment ed to be filled in are the same in both
dialog boxes.
aym ent field, click on the down arrow to open the drop-method.
s automatically
tain
6. Type in the
7. If the depos either in the
directly.
Suite 7 calccommission
8. In the Reference # field you can type in a reference number (such as the check number).
o field is not present in the Deposit Retain dialog box.
appear once the guest checks in.
log box closes, and the payment is displayed on the
Lei
Scookings for hotel outlets such as restaurants, spa, golf y other leisure activity or service.
t options ap
4. Select the desired option:
ccept an additional am
Return: Deposit is returned and subtracted from the balance.
n: Deposit is retained and added to balance.
ort: Closes deposit options w
If PAYME T or RETURN was selected, the Dselec guest opens.
If R was selected, the Retain Deposit dialog
dialog box, the activated fields that ne
5. In the Pdown list, and select the payment
ent Departm
If you are rselected:
etaining a payment, the Payment Department i
644: Re Deposit
Amount to be returned or added.
it is paid by a travel agent whose commission is pre-paid, type percentage for the Pre-Paid Commission, or type the amount in
ulates the Total Amount, which is the sum of the deposit and the .
The Supplementary InfIt is replaced by the remarks field.
9. In the Window Number field, choose the number of the window where you want the deposit to
10. To change the Reservation Type, click the down-arrow and select the new Reservation Type.
11. If you want to print a receipt for the deposit, check the Print Receipt checkbox at the bottom of the dialog box.
12. Click POST.
The Deposit Payments diaPre-Billing screen.
sure
heduling leisure activities The leisure activities are btee time, hairdresser or an
© 2006 Micros-Fidelio (Ireland) Ltd. April 2006 Page 69
Version 7 Reservations Manual
To
1. he Reservation Options dialog box, click LEISURE.
e dialog box appears.
2.
rom the list of Outlet services.
4. he drop down arrow and select a date from the calendar.
location or person for the activity.
pertaining to
.
9.
Booking dialog box is closed.
e Schedule dialog box reappears, with the appropriate blocks e booking in the rectangle at the lower left below
the Date field.
ptions are activated.
Authorize Direct Billing not paying their bill upon check out. This
ve the
Lat pany who is responsible for ) can authorize
direaut
g when the user has no rights
To confirm authorization for direct billing when the user has no rights for
eservation authorized for ears.
irect billing, the Reservation NOT authorized for direct bill message appears.
2. Click OK.
The message box is closed.
schedule leisure activities:
From t
The Leisur
From the Leisure dialog box, select the Outlet.
3. Select a Service f
Type in the date or click t
5. Click SELECT.
The Leisure Scheduling dialog box appears for the selected service.
6. Select the time and
7. Click BOOKING.
The Leisure Booking dialog box appears, showing the informationthe booking and the guest.
8. Edit the fields as desired
Click OK.
The Leisure
10. The Leisurmarked, and the details of th
The Leisure Schedule dialog box o
11. Click CLOSE
For more information on the leisure activities, see Leisure Activities.
Direct billing is used for guests who areallows for the authorization of a guest to check out of a hotel and habalance transferred to the City Ledger.
er the balance is billed to the person or the compaying the charges. Only users with authorization (user rights
ct billing. Other users are able to confirm authorization of direct billing, and if horization exists, to check out the guest.
Confirming authorization for direct billinfor authorization
authorization:
1. From the Reservation Options dialog box, click AUTH. DIRECT BILL.
If the guest is authorized for direct billing, the Rdirect bill message app
If the guest is not authorized for d
Page 70 © 2006 Micros-Fidelio (Ireland) Ltd. April 2006
Reservations Options
Authorizing direct billing
horization is complete.
To authorize direct billing:
1. From the Reservation Options dialog box, click AUTH. DIRECT BILL.
A confirmation message appears.
2. To authorize direct billing of the guest account, click YES.
The Authorization completed notification box appears.
3. Click OK.
The direct billing aut
Note: When a reservation has City Ledger authorization, makingan add on reservation will not copy the authorization.
Cancelling authorization for direct billing To cancel authorization for direct billing:
1. From the Reservation Options dialog box, click AUTH. DIRECT BILL.
A message appears displaying who created the authorization.
2. To cancel the authorization, click YES.
The Authorization cancelled message appears.
3. Click OK.
The au
Q Rooms This option is used in the event that a guest arrives to check-in before the room
ation about Q Rooms, see the Q Rooms nual and the Suite 7 Rooms Management
s not yet rea t of rooms on the queue appears in
ment so that the Housekeeping staff can give them top priority. As spected, Housekeeping indicates this on
the
gue in and assigned a room of the same type that is on queue. In this y choose to a
o use this option, you must activate the Q-ROOMS
thorization is cancelled.
is ready for him. For complete informchapters in the Suite 7 Front Desk MaManual.
When a guest arrives before the expected arrival time, and the room idy, the room is put into the queue. The lis
Rooms Managesoon as the room has been cleaned and in
Q rooms list, and the guest can be checked in.
It may also occur that a room is on the queue, and in the meantime a different st is checked case, you will be informed that a room of this type is on queue, and you ma
ssign this room to the waiting guest and find another room for the newer check-in.
Note: Tparameter. See the "Manager" chapter in the Suite 7Configuration Manual.
Ho
1. From the Reservation Options dialog box, click Q ROOMS.
You are asked to confirm the Q Room assignment.
2. Click YES.
w to assign a room to the queue:
© 2006 Micros-Fidelio (Ireland) Ltd. April 2006 Page 71

Version 7 Reservations Manual
The room is added to the queue:
e room has been in the queue appears at the top name is selected from the listing.
the Suite 7
ppears in the Rooms Management Q Rooms listing. (See 7 Rooms Management Manual.)
checki ld be given
Accessinlisting of the rooms that are on the queue, there are several
opti
Advanced Search dialog (Front Advanced Search) to display all reservations currently in the
l.)
tly on the queue with drill
Rooms a
ue, you will be re are three options:
iginal position
ation at the end of the queue.
If a eservation becomes a no show, the reservation is automatically the queue.
Package Options
packages fi displays a list of all package elements ance has been created. The creation of the allowance is done
autroupost owance.
Vie allowance has been created To view package elements for which an allowance has been created:
From the Reservation Options dialog box, click PACKAGE OPTIONS.
The Reservation Packages dialog box appears.
The length of time thof the Arrivals screen when the guest
The room appears in the Front Desk Q Rooms listing. (SeeFront Desk Manual.)
The room athe Suite
If you assign a room of a type that is on the queue to a different guest who is ng in, you will be notified. Perhaps the reservation on queue shoupriority for this room.
g the Q Rooms listing To display a
ons:
Front Desk: select Q Rooms in theDesk>Arrivals>queue. (See the Suite 7 Front Desk Manua
House Status: shows the number of rooms currendown possibilities.
Rooms Management: from the Rooms Management toolbar, click the Qicon to display a list of the reservations that are on the queue, as well assummary by room type. (See the Suite 7 Rooms Management Manual.)
Q Room Cancellations If you cancel a checked-in reservation that was previously in the que
asked what to do with the reservation. The
Put the reservation back in the queue in its or
Put the reserv
Remove the reservation from the queue completely
queued rremoved from
A reservation can have packages attached to it via the rate code or through the eld. The Package Options option
for which an allowomatically by Suite 7 at check-in and during the night audit. You also can te a package allowance to another guest so, if the charge for the package is ed on the other guest's folio, it will use the correct all
wing package elements for which an
Page 72 © 2006 Micros-Fidelio (Ireland) Ltd. April 2006
Reservations Options
Reservation Packages dialog box fields
Field Definition
Item. The package element code.
Description The description of the department code that the allowance was is Massage.
Dat
amount of the allowance.
Pos
Over Over or under the allowance amount.
created for. For example, department code 420
e The date for the allowance.
Allowance The
ted The amount that was posted.
Reservation Packages dialog box buttons
Click this To do this button
Display Routings
See if and where packages are routed.
Route Display Profile screen, from which you choose Pac
routing stem displays the
s you
is ry to run only if the guest has checked in already, and if
kages destination. If routing already exists, the syname of the guest the packages are routed to, and enableto cancel the routing instruction.
Refresh Check and updates changes made in packages. This optionnecessayou made changes to packages. If you attach a new package to the reservation, change or remove an attached package, or when you change the rate code to another rate with different packages.
RoThe ge option allows you to redirect package allowances from one acc to t
The Suite 7 detallowance that might be available for the other source rooms.
all package ected to the room. The system will add up all package allowances n the target room in order to produce a total for the particular
dep
ce:
1. Select the reservation that the package is being routed from.
e R ptions dialog box, click PACKAGE OPTIONS.
3. Click ROUTE
The Route Packages dialog box appears.
om the R select the reservation where the allowances are being routed to.
uting the allowance routing packaount to another account. For example, the children's charges could be directedhe parent's room.
target room is the room that the charges are being directed to. ermines whether the target room can exceed its own allowance and use the
When you route packages, you redirect the package allowance forpostings connaccumulated o
artment code allowance.
How to route the allowan
2. From th eservation O
The Reservations Packages dialog box appears.
PACKAGES.
4. Fr oute Packages dialog box,
© 2006 Micros-Fidelio (Ireland) Ltd. April 2006 Page 73

Version 7 Reservations Manual
You can search for the reservation by typing the first few letters of the name in the Name field or type the beginning of the room number in the Room No field.
lick OK.
The Route
ES o
allowa
ing routings n displa
play ro
1. Select the reservation that the package is being routed from.
S.
allowance has been
4.
Checking and updating changes made in packages. This option is necessary to
runpac or example, attach a new package to the reservation, change or
ached package, or change a rate code to another rate with different
Ho eck and update changes:
.
ation Packages dialog box appears.
2.
ying the updated package
IONS.
2.
5. C
Packages dialog box is closed. A confirmation message appears.
6. Click Y r NO.
The nce is routed.
DisplayYou ca y the reservation that the allowance has been routed to.
To dis utings:
2. From the Reservation Options dialog box, click PACKAGE OPTION
The Reservations Packages dialog box appears.
3. Click DISPLAY ROUTINGS.
A message appears displaying the guest name that therouted to.
Click OK.
The message box is closed.
You can check and update changes only if the guest has checked in already, changes were made to the kages. F
remove an attpackages.
w to ch
1. From the Reservation Options dialog box, click PACKAGE OPTIONS
The Reserv
From the Reservation Packages dialog box, click REFRESH.
The Reservation Packages dialog box appears displaitems.
Cancelling routing of package charges You can cancel the routing of package charges.
To cancel routing of package charges:
1. From the Reservation Options dialog box, click PACKAGE OPT
The Reservation Packages dialog box appears.
Click ROUTE PACKAGES.
A confirmation message appears.
3. Click YES to remove package routing.
The package routing is cancelled.
Page 74 © 2006 Micros-Fidelio (Ireland) Ltd. April 2006
Reservations Options
VirtD (Direct Inward Dialling), you can assign a a guest reservation for the duration of guest's
sta
The bers serve the guest as the guest's private line once they check in, unt
ased or room-
bas luding m moves.
Room-based virtual numbers need to coof taut The same
er can also be assigned permanently to a guest profile.
On ked as permanent and cannot be used for another assignment. At check-in, the respective number will
l of number (assigned VN number dialog box), . If a guest with a permanent virtual number has
d set to Auto Assign). However, the system r rooms that have been configured for the
respective number pool.
he available functionality
ual Numbers If your system is configured for DIspecific telephone or fax number to
y, automatically or upon request.
DID numil they check out. The Virtual Numbers option allows people outside the hotel
to dial or fax the guest directly, using the assigned numbers, without having to gothrough the hotel operator. A virtual DID number can be guest-b
ed. A guest-based virtual number will always follow the guest, incthrough roo
nsider other guests. For example, if one he share guests checks-out, the system will not unassign the number omatically, but will check first if there is a sharer in the room.
applies to room moves.
A virtual numb
ce a virtual number has been linked to a profile, it is mar
be displayed in the configured pooand will be available for selectionseveral rooms at the same time, Suite 7 will use the number for the first reservation that checks in (if configurecan only assign virtual numbers fo
Note: The use of virtual numbers and tdependexterna
s entirely upon the capabilities and the feature set of the l system and the interface used in the hotel.
Assigning a new virtual number To
om the Reservation Options dialog box, click VIRTUAL NUMBERS.
n
t of the telephone lines connected to the room.
ox.
ialog box is closed.
assign a new virtual number:
1. Fr
The Virtual Numbers dialog box appears.
2. Click NEW.
The Assign Virtual Number dialog box appears.
3. Click the Pool drop down arrow and select the line to which you want to assigthe number.
The Pool list contains the lis
4. From the list of extension numbers, scroll to and highlight the number you wish to assign.
5. Click ASSIGN.
The number appears in the Virtual Numbers dialog b
6. Click CLOSE.
The Virtual Numbers d
© 2006 Micros-Fidelio (Ireland) Ltd. April 2006 Page 75
Version 7 Reservations Manual
De
2. ELETE
leting a virtual number To delete a virtual number:
1. From the Reservation Options dialog box, click VIRTUAL NUMBERS.
The Virtual Numbers dialog box appears.
Click D .
A confirmation message appears asking if you want to delete the DID number.
Note: Some lines, such as fax and modem lines, require a DID virtual number. You cannot delete the assignment. However, you can change the assigned number.
3. ES
ed from the list.
4.
e assigned virtual number Som lines, require a DID virtual number.
hange the assigned number.
How to change the assigned virtual number:
ialog box, click VIRTUAL NUMBERS.
appears.
3.
ion message appears asking if you change the assigned the DID
d Virtual Number dialog box appears.
5. u
box is closed. The Virtual Number dialog h the new assigned virtual number.
Click Y .
The number is delet
Click CLOSE.
The Virtual Number dialog box is closed.
Changing the lines, such as fax and modem
You cannot delete the assignment. However, you can c
1. From the Reservation Options d
The Virtual Numbers dialog box
2. Select the number that you want to change.
Click DELETE.
A confirmatnumber.
4. Click YES.
The Assigne
From the list of extension numbers, scroll to and highlight the number yowish to assign.
6. Click ASSIGN.
The Assigned Virtual Number dialogbox appears wit
7. Click CLOSED.
The Virtual Number dialog box is closed.
Page 76 © 2006 Micros-Fidelio (Ireland) Ltd. April 2006

Reservations Options
Changes You can view all the changes made to a reservation since the original reservation
ion Options dialog box, click CHANGES.
2.
sed.
ShaThe he sam
Cre a new guest To create a share reservation with a new guest:
n Options dialog box, click SHARES.
nt reservation is displayed in the upper pane.
ons fields.
3.
e, Suite 7 automatically creates a re Reservation dialog box appears
es of the shared guest.
guest's name.
Profile Search dialog box, select the guest profile.
ine Share Reservations dialog box appears with the name filled in.
he Combine Share Reservations dialog box, click OK.
g box appears displaying the names of
ialog box is closed.
Click this
was made.
To view the changes made to a reservation:
1. From the Reservat
The Reservation Changes dialog box appears.
Click CLOSE.
The Reservation Changes dialog box is clo
res Shares option allows you to combine two (or more) reservations to share te room or to break an existing share reservation.
ating a share reservation with
1. From the Reservatio
The Combine Share Reservations dialog box appears.
The name of the curre
2. Fill in the (last) Name, First Name, and (number of) Pers
Click NEW RESERV.
If the guest does not have an existing profilprofile for the guest and the Creation of Shadisplaying the nam
If the guest has a profile, the Profile Search screen appears
a. From the
b. Click OK.
The Comb
c. From t
The Creation of Share Reservation dialothe shared guest.
4. You can change the price of the room for one or both guests.
5. Click OK.
The Creation of Share Reservation d
Share Reservations Options
To do this button
Zero One guest pays the full amount and the second guest does not pay anything. Which guest pays depends on where the cursor is
when the option is selected.
Split Split the charge evenly.
© 2006 Micros-Fidelio (Ireland) Ltd. April 2006 Page 77
Version 7 Reservations Manual
Click this button
To do this
Fu Each guesin
ll t pays the full amount of the given rate code. For stance, if the rack rate is $90 for single occupancy and $140 for
ull option is activated. double, each guest pays $90 if the F
Combine Add a share from an existing reservation.
Break Cancel the share. The guests will no longer share the same room
screen.
but have separate rooms.
Go To Open the reservation of selected sharing guest.
OK Save the share and close the
Abort Close the screen.
Cre reservation ting reservation:
eservation Options dialog box, click SHARES.
appears.
ars.
3. Searc l down the lis
4. Select the guest and click OK.
ne Share Reservations dialog box appears with the name of both
aying the names of the shared guest.
or both guests.
ill be asked to select
guest a share reservation with a checked-in guest. However, be sure g guest has not been assigned a room number.
To guest:
k SHARES.
2.
hare Reservations grid appears.
ating a share reservation with an existingTo create a share reservation with an exis
1. From the R
The Combine Share Reservations dialog box
2. Click COMBINE RESERV.
The Combine Share Reservations grid appe
h for the guest by typing the guest's name, room number, or scrolt.
The Combiguests.
5. Click OK.
The Share Reservation dialog box appears displ
6. You can change the price of the room for one
7. Click OK.
If the room types for the two guests are different, you wthe room type to assign to the shared reservation.
8. Click the appropriate button.
Creating a share reservation with a checked-inYou can createthat the sharin
create a share reservation with a checked-in
1. From the Reservation Options dialog box, clic
The Combine Share Reservations dialog box appears.
The name of the current reservation is displayed in the upper pane.
Click COMBINE RESERV. (If the sharing guest is a new reservation, see step 3 in Creating a share reservation with a new guest)
The Combine S
Page 78 © 2006 Micros-Fidelio (Ireland) Ltd. April 2006
Reservations Options
3. n
4.
oth
pears with the name filled in.
bine Share Reservations dialog box, click OK.
he room number.
The Creation of Share Reservation dialog box appears displaying the names of the sh s Options.)
7. You can change the price of the room for one or both guests.
1. , click SHARES.
eservations dialog box appears.
2.
The share is broken and the Share Reservation dialog box is closed.
TracesThesta on allows the hotel to keep track of things that have to be
eeds a baby crib, that
ousekeeping, through the tra n create, modify, delete or resolve a trace or mark it as com
ce called Action trace. The Action trace
entered for an action trace. An Action trace cannot be modified. an action trace.
To cre
RACES.
2. Click NEW to enter a new trace.
Search for the guest by typing the guest's name, room number, or scroll dowthe list.
Select the guest and click OK.
The Combine Share Reservations dialog box appears with the name of bguests.
The Combine Share Reservations dialog box ap
5. From the Com
A message appears asking for confirmation of t
6. Click YES.
ared guest. (See Share Reservation
8. Click OK.
The Creation of Share Reservation dialog box is closed.
Breaking a share reservation You can break the share reservation when two or more guests share a room. Theguests are moved to separate rooms.
To break a share reservation:
From the Reservation Options dialog box
The Share R
Click BREAK.
The price resets to the appropriate rate for each reservation.
3. Click OK.
Traces option allows you to communicate guest's requests with other hotel ff. The Traces opti
done for guests on a specific date. For example, if the guest nyou advise housekeeping that they need to bring a crib to that guest on date. On the specified date entered, Suite 7 notifies h
ce report, that a crib is requested. You capleted.
In addition, there is a special type of trarelates to changes in the reservation itself (such as change of rate code, price, or the number of guests), and is resolved automatically during the night audit. A reason may beOptionally a reason can be entered for
Creating a new trace ate a new trace:
1. From the Reservation Options dialog box, click T
The Traces dialog box appears.
© 2006 Micros-Fidelio (Ireland) Ltd. April 2006 Page 79
Version 7 Reservations Manual
The New Trace Entry dialog box appears.
3.
nt the trace is for.
u may select from appears under isplayed.
r own text in
ernatively, you can double-click the text or drag and drop
Enter From and Until Trace Dates.
4. Under Trace Department, select the departme
On the right-hand side, a list of texts that yoTrace Texts. A free format Text Box is also d
5. Highlight the text you want and double-click it, and/or type youthe Text box.
Tip: Altit into the Text pane.
The selected text appears in the Text box and the Save button is activated.
st is part of a group, the Save Traces dialog box appears.
ropriate radio button.
8.
Ed
rvation Options dialog box, click TRACES.
Text at the bottom right and make the necessary changes.
4.
it Trace Entry dialog box is closed and the Trace screen appears.
The Traces dialog box is closed.
1. g box, click TRACES.
ialog box appears.
2.
A confirmation message appears.
3. Click YES.
The trace is deleted and no longer appears on the Traces dialog box.
6. Click SAVE.
The Traces dialog box reappears with the text you entered.
If the gue
7. Click the app
Click OK.
The Traces dialog box appears.
9. From the Traces screen, click CLOSE.
The Traces dialog box is closed.
iting text on the Traces list To edit text on the Traces list:
1. From the Rese
The Traces dialog box appears.
2. Click EDIT.
The Edit Trace Entry dialog box appears.
3. Click into the
Click SAVE.
The Ed
5. From the Traces screen, click CLOSE.
Deleting a trace To delete a trace:
From the Reservations Options dialo
The Traces d
Click DELETE.
Page 80 © 2006 Micros-Fidelio (Ireland) Ltd. April 2006
Reservations Options
4. Click CLOSE.
The Traces dialog box is closed.
Resolving a trace Wh es that the trace has been performed.
race:
1. k TRACES.
The Traces dialog box appears.
2. Select the trace that you want resolved.
3. Click RESOLVE.
4.
If aunr
To u a trace:
k TRACES.
The Traces dialog box appears.
2.
3.
tus changes from Resolved to Not resolved.
4. Click CLOSE.
ce is closed.
Credit Cards
Entering anept a c uest when your regular credit card
s dmanually, usi L CODE radio button. This option is only
able in h
ter
The Credi
2. Click the Enter approval code radio button.
. Click OK.
The Enter Approval Code dialog box appears. If an amount and code have already been entered, they appear in the fields.
4. Type in the Approval Amount and the Approval Code.
en a trace is marked resolved, it indicat
To resolve a t
From the Reservations Options dialog box, clic
The trace's status changes from Not Resolved to Resolved, along with the date, time, and the user who changed its status.
Click CLOSE.
The Traces dialog box is closed.
Unresolving a trace trace was mistakenly marked as resolved, you can unmark the trace to esolved.
nresolve
1. From the Reservations Options dialog box, clic
Select the trace that you want unresolved.
Click UNRESOLVED.
The trace's sta
The Tra s dialog box
Approval Code Manually To acc redit card settlement from a ginterface i own, you can enter the approval amount and approval code
ng the ENTER APPROVA
avail
How to en
otels that have the Credit Card Interface installed.
approval code manually:
1. From the Reservations Options dialog box, click CREDIT CARDS.
t Card Interface dialog box appears.
3
© 2006 Micros-Fidelio (Ireland) Ltd. April 2006 Page 81
Version 7 Reservations Manual
5. Click OK.
alog box is closed and the Credit Card Interface
x is closed.
ault method, for a particular AUTHORIZATION RULE radio button.
Ho od:
1. From the Reservation Options dialog box, click CREDIT CARDS.
log box appears.
dio button.
ppears.
down list.
ethod appears in the field.
: Depending on which method you choose, an Amount field
The Enter Approval Code didialog box appears.
6. Click CLOSE.
The Credit Card Interface dialog bo
Altering the Current Authorization Rule The Authorization Rule is the method the credit card interface uses to calculate the authorization amount. You can change the defguest, using the
w to alter the authorization meth
The Credit Card Interface dia
2. Click the Authorization Rule ra
3. Click OK.
The Authorization Rule dialog box a
4. Select the new calculation method from the drop
The selected m
Notemay also appear on the dialog box.
5.
rd Interface dialog box appears.
6.
Credit Card Interface dialog box is closed.
r an additional amount:
tions dialog box, click CREDIT CARDS.
2.
ialog box appears.
4. Type in the new authorization amount.
5. Click OK.
Contact is made through the interface to the credit card company with the approval request.
If the amount is approved, a message is displayed showing the approval code and the new approval amount. (These fields are automatically updated on the guest record.)
Click OK.
The Credit Ca
Click CLOSE.
The
Getting Authorization for a Higher Amount When you want to get approval for an additional amount, above what the credit card company has already approved, use ADDITIONAL AUTHORIZATION.
How to get authorization fo
1. From the Reservations Op
The Credit Card Interface dialog box appears.
Click the Additional authorization radio button.
3. Click OK.
The Additional authorization d
Page 82 © 2006 Micros-Fidelio (Ireland) Ltd. April 2006

Reservations Options
If the amount is approval has bee
not approved, the credit card company will tell you that no n received and you must enter it manually. (Normally you
6. When finished click OK to close the Additional authorization dialog box.
alog box appears.
rd Handling
would call the credit card company for an approval and then record it manually as in Entering an Approval Code Manually).
The Credit Card Interface di
7. Click CLOSE.
The Credit Card Interface dialog box is closed.
Courtesy Ca
Note: Not supported at this time.
Accompanying The Accompanying option enables you to register each guest in the room, even ifthere is only one actual reservation for that room.
CCOMPANYING.
The A
2. Click N
possible. Note that Name and e mandatory fields.
name of the accompanying e
by the telephone operator) will show the accompanying person in a
her accompanying person, repeat steps 1-4.
6.
Unlinking an accompanying guest u eak a
To
k ACCOMPANYING.
The Accompanying dialog box appears.
2. Select the accompanying guest and click ATTACH.
The link that attaches the accompanying guest from the specific reservation is broken. The checkmark next to the name disappears.
Registering a guest as an accompanying guest To register a guest as an accompanying a guest:
1. From the Reservation Options dialog box, click A
ccompanying dialog box appears.
EW.
The Accompanying Edit dialog box appears.
3. Fill in as much of the requested information asFirst Name are highlighted, meaning they ar
4. Click OK.
The Accompanying dialog box reappears, with the person and checkmark in the Attach field. The checkmark indicates that thaccompanying guest is included in the selected reservation. A search (for example,particular room.
5. To add anot
From the Accompanying dialog box, click CLOSE.
The Accompanying dialog box is closed.
Yo can br the link th t attaches the accompanying guest from the specific reservation.
unlink an accompanying guest:
1. From the Reservation Options dialog box, clic
© 2006 Micros-Fidelio (Ireland) Ltd. April 2006 Page 83

Version 7 Reservations Manual
3. Click CLOSE.
The Accompanying dialog box is closed.
Editing an entry on the Accompanying list
1. COMPANYING.
2. DIT.
formation on the ted.
3.
Accompanying dialog box appears.
osed.
To
ompanying dialog box appears.
.
4.
Accompanying list.
panying dialog box is closed.
Messaessages for guests.
Vie a guest's messages est's messages:
1.
To edit an entry on the Accompanying list:
From the Reservations Options dialog box, click AC
The Accompanying dialog box appears.
Click E
The Accompanying Edit dialog box appears, with the inperson selec
Make the necessary changes.
4. Click OK.
The Accompanying Edit dialog box is closed and the
5. Click CLOSE.
The Accompanying dialog box is cl
Deleting a name from the Accompanying list delete a name from the Accompanying list:
1. From the Reservations Options dialog box, click ACCOMPANYING.
The Acc
2. Select the accompanying name that you want to delete
3. Click DELETE.
A confirmation message appears.
Click YES.
The name is deleted from the
5. Click CLOSE.
The Accom
ges You can view, create, edit or delete m
wing To view a gu
From the Reservation Options dialog box, click MESSAGES.
The Messages dialog box appears.
2. Click CLOSE.
The Messages dialog box is closed.
Page 84 © 2006 Micros-Fidelio (Ireland) Ltd. April 2006
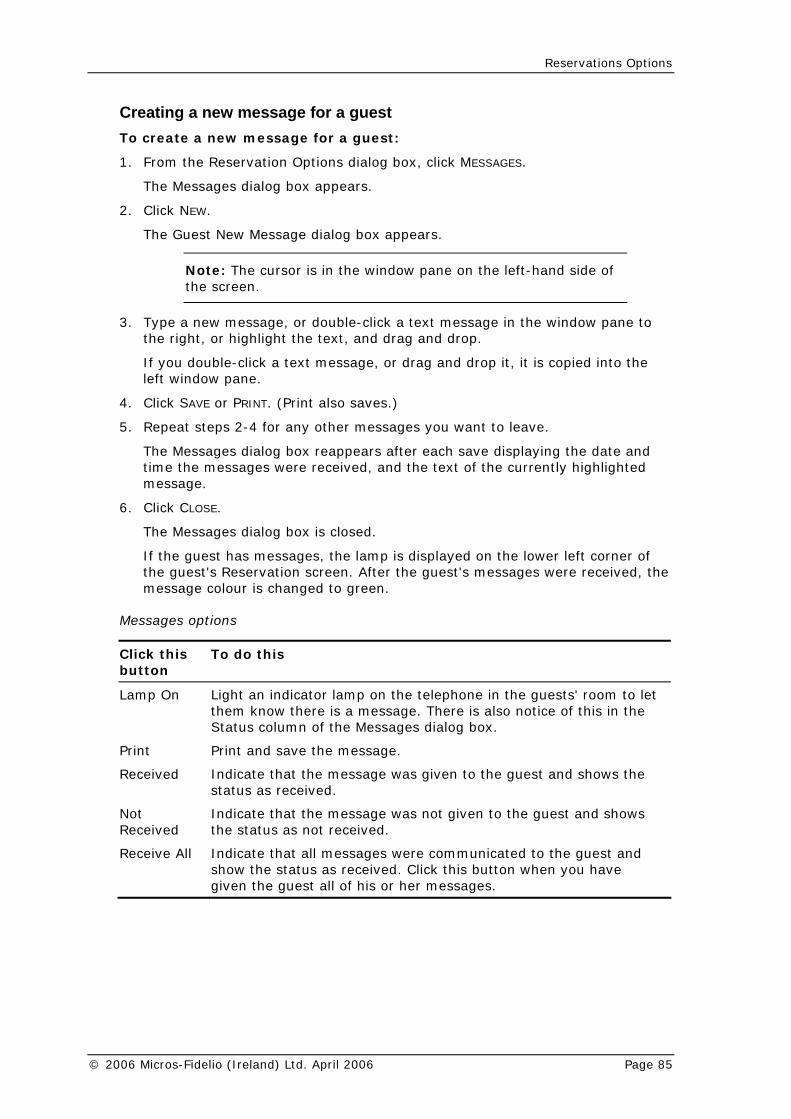
Reservations Options
Creating a new message for a guest e for a guest:
tions dialog box, click MESSAGES.
2.
New Message dialog box appears.
the window pane on the left-hand side of
To create a new messag
1. From the Reservation Op
The Messages dialog box appears.
Click NEW.
The Guest
Note: The cursor is inthe screen.
3. Type a new message, or double-click a text message in the window pane to the right, or highlight the text, and drag and drop.
If you double-click a text message, or drag and drop it, it is copied into the left window pane.
4. Click S
5. Repeat steps 2-4 for any other messages you want to leave.
ghted
6.
.
p is displayed on the lower left corner of the guest's Reservation screen. After the guest's messages were received, the
Messages options
Clic
AVE or PRINT. (Print also saves.)
The Messages dialog box reappears after each save displaying the date and time the messages were received, and the text of the currently highlimessage.
Click CLOSE.
The Messages dialog box is closed
If the guest has messages, the lam
message colour is changed to green.
k this To do this button
Lam Light an indicator lamp on the telephone in the guests' room to let n the
p On them know there is a message. There is also notice of this iStatus column of the Messages dialog box.
Print Print and save the message.
Rec hows the status as received.
Indicate that the message was not given to the guest and shows
sages.
eived Indicate that the message was given to the guest and s
Not Received the status as not received.
Receive All Indicate that all messages were communicated to the guest and show the status as received. Click this button when you have given the guest all of his or her mes
© 2006 Micros-Fidelio (Ireland) Ltd. April 2006 Page 85
Version 7 Reservations Manual
Editing a guest's message To edit a guest's message:
1. From the Reservation Options dialog box, click MESSAGES.
The Messages dialog box appears.
Highlight the 2. message that you want to edit.
3. ated in the lower pane of the dialog box.
ges dialog box is closed.
Deleting a guest's message
s dialog box, click MESSAGES.
essage that you want to delete.
3.
n message appears asking you to confirm the deletion.
4.
f the
Hisu
whether there are any recorded Turnaways for the guest. This option is also used in the guest profile. See History in the Profiles section.
Vie ry est's history:
1. ck HISTORY.
Place the cursor in the text box loc
4. Type the necessary changes to the message.
5. Click CLOSE.
The Messa
To delete a guest's message:
1. From the Reservation Option
The Messages dialog box appears.
2. Highlight the m
Click DELETE.
A confirmatio
Click YES.
The highlighted message disappears from the list in the upper pane oMessages dialog box.
5. Click CLOSE.
The Messages dialog box is closed.
tory The History option allows you to view the details of all previous stays on file. Yoalso can check
wing a guest's histoTo view a gu
From the Reservation Options dialog box, cli
The Profile screen appears displaying the guest's history.
2. Click CLOSE.
The Profile screen is closed.
Page 86 © 2006 Micros-Fidelio (Ireland) Ltd. April 2006
Reservations Options
Registration Card Thi n card for the selected reservation. This is especial s.
Printing a registration card To print
1. From
2. Select the template to be used for printing
est.
l the reservation details incorporated in a prepared form letter. You can send the confirmation to the guest by sending a hard copy of the
button changes to and a letter confirming
s option allows you to print a registratioly useful for same day reservation
a registration card:
the Reservations Options dialog box, click REG. CARD.
3. Click OK.
Suite 7 prints the registration card for the gu
ConfirmationAfter a guest has made a reservation, you can send a confirmation letter to the guest with al
confirmation by fax, mail, or using the Suite 7 E-mail.
If the reservation is cancelled or a no-show, the "Confirmation" "Confirmation Cancelled", but the button remains active, the cancellation or no-show can still be requested.
Note: Reprinting a confirmation letter is controlled by user rights.
Viewing and/or editing a confirmation letter To view and/or edit a confirmation letter:
eservation Options dialog box, click CONFIRMATION.
g box appears.
of confirmation
ght who the confirmation letter is being sent to.
k VIEW.
rs.
on to save.)
The Edit Document screen is closed and the Print Confirmation Letter dialog
1. From the R
The Print Confirmation Letter dialo
2. From the Letter Name drop-down menu, choose the type letter.
3. Highli
4. Clic
The Edit Document screen with the text of the confirmation letter appea
5. Edit the confirmation letter as required.
6. Click FILE on the menu bar.
The File menu appears.
7. Click SAVE and/or EXIT. (Exit will also give the opti
box appears.
8. Click CLOSE.
The Print Confirmation Letter dialog box is closed.
© 2006 Micros-Fidelio (Ireland) Ltd. April 2006 Page 87
Version 7 Reservations Manual
Printing a confirmation letter
rmation letter:
1. ONFIRMATION.
Print Confirmation Letter dialog box appears.
2. From the Letter Name drop-down menu, choose the type of confirmation letter.
3. Highli
4. Click P
The confirmation letter is sent to the printer.
losed.
E-m
To
onfirmation Letter dialog box appears.
2. se the type of confirmation
hlight who the confirmation letter is being sent to.
e and Attachments. The Message tab is opened.
5. Fill in
6. Save this EMAIL address to profile.
king you to confirm if the email address should be saved to the profile.
8. Click Y to save it to the profile.
A confirmation message appears asking you to confirm the sending of the e-
9.
mation Letter dialog box appears.
firmation Letter dialog box is closed.
You can print a confirmation letter.
To print a confi
From the Reservation Options dialog box, click C
The
ght who the confirmation letter is being sent to.
RINT.
5. Click CLOSE.
The Print Confirmation Letter dialog box is c
ailing a confirmation letter You can e-mail a confirmation letter.
e-mail a confirmation letter:
1. From the Reservation Options dialog box, click CONFIRMATION.
The Print C
From the Letter Name drop-down menu, chooletter.
3. Hig
4. Click E-MAIL.
The Send Mail dialog box appears. It comprises two tabs, Messag
the Message tab fields.
7. Click OK.
A confirmation message appears as
ES
mail.
Click YES.
The confirmation is then sent automatically with the e-mail message and the Print Confir
8. Click CLOSE.
The Print Con
Page 88 © 2006 Micros-Fidelio (Ireland) Ltd. April 2006

Reservations Options
Delete
Deleting a reservation To delete a reservation:
ELETE.
log box appears.
Addh a different reservation
num ion is not possible due to availability. guest who wants to add an additional room to his
a guest who plans to return to the hotel in the future.
1. From the Reservation Options dialog box, click D
The Confirm Deletion dia
2. Click YES.
The reservation is deleted.
On This option makes a copy of the current reservation, wit
ber. Suite 7 notifies you if the reservatThis option may be used for a reservation or
Note the following limitations:
r s, the 'Add On' copies the reservation for only one room.
copy routing instructions that are simply going
To
1.
2.
servation screen appears.
3.
iginal guest.
Party rve several rooms in a hotel.
ooms field in the Reservation dialog box is greater than one, the P the reservations you will have the opti vation.
When creating an 'Add On' for a reservation that has been assigned two omore room
An add on reservation will notto another window.
Creating an Add On reservation create an Add On reservation:
From the Reservation Options dialog box, click ADD ON.
A confirmation message appears.
Click YES.
The New Re
Click OK after the desired changes to the Add-on reservation have been made.
Suite 7 confirms the new reservation and notifies you of its number.
4. Click OK.
The Main Reservations dialog box appears for the or
Groups of guests travelling together may reseWhenever the # R
arty option is activated. When you spliton to change the name for each reser
© 2006 Micros-Fidelio (Ireland) Ltd. April 2006 Page 89
Version 7 Reservations Manual
Making a party reservation To
ation dialog box.
mber of rooms you would like to reserve for the party in the # .
3.
the necessary fields in the Main Reservation dialog box.
5.
is saved the Party option is activated in the Reservation Options dialog box.
IONS.
om, or SPLIT ALL to split all rooms.
e, enter the new name,
OK to select an existing profile (see also Profiles).
7. .
8.
d the party reservation and gives a
ed.
Breaking the connection of a reservation and the party After a room has been split from a party, you can break its connection to the par
How to br ation and the party:
1. Highlight the reservation that you want to split.
2. Click OPTIONS.
The Reservation Options dialog box appears.
3. Click PARTY.
The Party Reservation dialog box appears.
make a party reservation:
1. Open the reservation in the Main Reserv
2. Type the nuRooms field
A confirmation message appears.
Click YES to confirm the number of rooms for the party.
4. Complete
Click OK.
After the reservation
Splitting a party reservation To split a party reservation:
1. Highlight the reservation that you want to split.
2. Click OPT
The Reservation Options dialog box appears.
3. Click PARTY.
The Party Reservation dialog box appears.
4. Click SPLIT to split one ro
5. To change a Guest Name, highlight the existing namand press TAB.
The Profile Search screen appears.
6. Create New, or click
Change the room type and the number of adults and children if necessary
Click OK.
The system confirms that it createreservation number.
9. Click OK.
The Party Reservation dialog box is clos
ty. This is done with the Break option, which is activated after a split.
eak the connection of a reserv
Page 90 © 2006 Micros-Fidelio (Ireland) Ltd. April 2006
Reservations Options
4. Highlig
5. To bre
ht the guest who wants to break from the party, and click BREAK.
ak just the highlighted guest from the party, click YES. To break all
the party, the Break
reservations from the party, click ALL.
The Party Reservation dialog box appears.
Note: After a guest has been broken from option is changed to a Connect option. The Break is a toggle switch for severing and reconnecting the link between a guest and a party.
6. Click OK to save your changes, or ABORT to undo them.
The Party Reservation dialog box is closed.
m Move RooYou can m guest has checked i
room to another room n from one room to another room:
k ROOM MOVE.
2. oom number in the Room No.
3.
O.
Was you to move a reservation to the waitlist. A waitlisted
res
If a n be put on the waitlist. If e becomes available, the guest reservation can be removed from
the ption is displayed only if your sys
aitlist.
To move a reservation to the Waitlist:
1. From
The Waitlist dialog box appears.
2. Click the Reasons drop down arrow and select one of the reasons offered.
ove a reservation from one room to another room after the n.
Moving a reservation from oneTo move a reservatio
1. From the Reservations Options dialog box, clic
The Move Room dialog box appears.
From the Move Room dialog box, type a new rfield box or click the drop down arrow and select a room number from the Room Search Room list.
Click the drop down arrow and select a reason for the move from the Reasons list.
4. Click YES.
A confirmation message appears.
5. Complete the confirmation message and click YES or N
The room number is changed.
itlist This option allow
ervation does not affect the availability or occupancy status of a hotel.
requested room category is overbooked, a guest cathe room or rat
waitlist and the reservation confirmed. This otem is configured for waitlist.
For further explanation about waitlist's, see W
Moving a reservation to the Waitlist
the Reservation Options dialog box, click WAITLIST.
© 2006 Micros-Fidelio (Ireland) Ltd. April 2006 Page 91
Version 7 Reservations Manual
The YES button at the bottom of the dialog box is activated.
field or leave the field blank.
4.
Regre
category is overbooked, a reservation can be move to
3. Type the guest's telephone number in the Phone
Click YES.
The guest reservation is moved to the Waitlist.
ts
If a roomthe Regrets list, rather than the Waitlist. The hotel makes no
ventual vacancy. further effort to contact the guest, even if there is an e
Moving a reservation to the Regrets list To move a reservation to the Regrets list:
1. From the Reservation Options dialog box, click REGRETS.
2. lect one of the reasons offered.
of the dialog box is activated.
4.
ved to the Regrets list.
Locator If a guest expects to be out of his room, the Locator option can keep track of his location. The Locator date can be set within the guest's stay period.
Note: The Locator option is active only for guests arriving today
The Regrets dialog box appears.
Click the Reasons drop-down menu and se
The YES button at the bottom
3. Type the guest's telephone number in the Phone field or leave the field blank.
Click YES.
The reservation is mo
or in-house guests.
Entering a guest's location To enter guest location:
1. From the Reservation Options dialog box, click LOCATOR.
The Guest Locator dialog box appears.
2. In the Location pane on the left-hand side of the Locator dialog box, type where the guest is expected to be, or double-click a location from the Location List, in the right-hand pane, or drop and drag from the Location List.
The OK and CLEAR buttons at the bottom of the Guest Locator dialog box are activated.
3. In the Until field, set the expected time and date.
4. Click OK.
The Guest Location dialog box is closed.
Page 92 © 2006 Micros-Fidelio (Ireland) Ltd. April 2006
Reservations Options
GueM
st Awards any hotels and credit cards have guest award programs in place. The Guest
Awards option provides access to all guest award functions. You can:
n award program to the reservation.
n award program from the reservation.
The Edit Award Card dialog box appears.
3. Select the card from the drop-down listing.
If no card is defined on the guest profile, the Guest Card Edit dialog box
k OK.
The selected credit card and the member number are displayed.
4. he available choices, and select the
total number of
text message you may wish to e fields are not used by the system.
to the Guest Awards dialog box, which displays the award
en assigned to a guest, the "Award" lamp reen.
m:
1. From the Reservation Options, click G A .
Assign a
Delete a
View the points status.
Calculate award points.
Award an award when the necessary points have been earned.
How to assign an award program:
1. From the Reservation Options, click GUEST AWARDS.
The Guest Award dialog box appears.
2. Click NEW.
appears.
Fill in the fields and clic
Click in the AWARD TYPE field to display tdesired award.
The number of points awarded for this billing, as well as the points accumulated toward this reward are displayed.
5. You may type in an award ID, as well as any enter for you own purposes. Thes
6. Click OK.
You are returned program in the listing.
When an award program has beappears on the Reservations sc
How to delete an award progra
UEST WARDS
The Guest Award dialog box appears.
2. Select the award program to be deleted.
3. Click DELETE.
You are asked to confirm the delete.
4. Click YES.
The selected award program is deleted.
© 2006 Micros-Fidelio (Ireland) Ltd. April 2006 Page 93

Version 7 Reservations Manual
How to edit an existing award program:
1. s, click GUEST AWARDS.
2.
3 through step 5 in To assign an award program (programs).
to the Guest Awards dialog box, which displays the edited
Assigning the Award qualify for an award, the "Awarded"
cally calculated during Night Audit processing.
If a guest current stay, it is possible ints so that the guest can receive the award before he leaves the hotel.
have already been
T AWARDS.
The Guest Award dialog box appears.
DED.
rrent point balance and the AWARDED button is no longer activated.
How to m award:
1. From GUEST AWARDS.
ward that has enough points to earn the award.
selected award is credited to the guest.
From the Reservation Option
The Guest Award dialog box appears.
Select the award program to be edited.
3. Click EDIT.
The Edit Award Card dialog box appears for the selected award.
Edit the fields as described in step
5. Click OK.
You are returned award in the listing.
When a guest has earned enough points tobutton on the Guest Award dialog box will be activated so that the award can then be authorized. However, the awarded button is not activated until the day after check-out, since the points are automati
has earned the required points for a reward during the to manually calculate the po
How to authorize an award when the points automatically calculated:
1. From the Reservation Options, click GUES
2. Select the award that has enough points to earn the award.
3. Click AWAR
The selected award is credited to the guest, and the required points are subtracted from the cu
anually calculate award points and authorize an
the Reservation Options, click
The Guest Award dialog box appears.
2. Select the a
3. Click CALCPOINTS.
The current points are subtracted from the current point balance, and the
Page 94 © 2006 Micros-Fidelio (Ireland) Ltd. April 2006
Reservations Options
Meal Plan The Meal Plan option is used to set the meal plan schedule for a gyou greater flexibility, allowing you to override any pre-determine
uest. This gives d meal plans,
and also change meal plans as necessary.
The ENABLEMEALPLAN parameter must be turned on.
in which case the meal plan can be used any changes to the meal
splays automatically any packages that are included in the ratcan at any time. You will receive an error message if you
kage with posting restrictions to a day that does not meet the ing dinner to the departure date.
By default, this parameter is turned off,for forecasting purposes only, and cannot actually make plan packages.
The meal plan option die code or attached manually on the reservation. Through the meal plan you add or remove packages
try to attach a pacrestrictions; for example, attach
Note: The Meal Plan Forecast (procedure 10Day) prints the forecast report.
Setting a meal plan To add packages to the meal plan:
1. From the Reservation Options, click MEAL PLAN.
The Variable Meal Plan dialog box appears.
The "Included Meals" column displays meals that are included in the rate plan.
the "Included Meals" column is not changed by this option.
desired date.
ears.
s next to the selected package.
5. es.
ext
closed.
al plan meal plan. You cannot
eaning that ALL
The "Meals" column displays any manually added meals.
Note that
2. Click in the "Meals" column for the
3. Click PACKAGES.
The Meal Packages dialog box app
4. Highlight a relevant meal package and click INCLUDE.
A check mark appear
Repeat step 3 for all other relevant packag
6. Click OK.
The Variable Meal Plan dialog box appears. The selected packages appear nto the dates the guests will be in the hotel.
7. Click SAVE.
The Variable Meal Plan dialog box is
Removing packages from the meYou can remove only manually added packages from theremove the packages that are attached to the rate code.
Note: The meal plan as a whole is removed, mmanually attached packages are removed.
© 2006 Micros-Fidelio (Ireland) Ltd. April 2006 Page 95
Version 7 Reservations Manual
To
1.
Variable Meal Plan dialog box appears.
The "Included Meals" column displays meals that are included in the rate plan. anually added meals.
2. Click R
The m
Prothe nights of stay
for either an expected or checked in guest. The invoice may then be printed.
To generate a pro-forma invoice:
1. From the Reservation Options, click PRO-FORMA.
RINT.
3. If there is more than one billing window, you will be asked whether to display
e been displayed, you are returned to the
remove the meal plan:
From the Reservation Options, click MEAL PLAN.
The
The "Meals" column displays any m
If there are packages displayed in the "Meals" column, the Remove button isactivated.
EMOVE.
anually attached meal plan elements are all removed.
-Forma The Pro-Forma option displays a pro-forma invoice, calculating
The selected folio appears on the screen.
2. To print the folio, click P
the folio for the next window.
When all requested windows havReservations listing.
Page 96 © 2006 Micros-Fidelio (Ireland) Ltd. April 2006
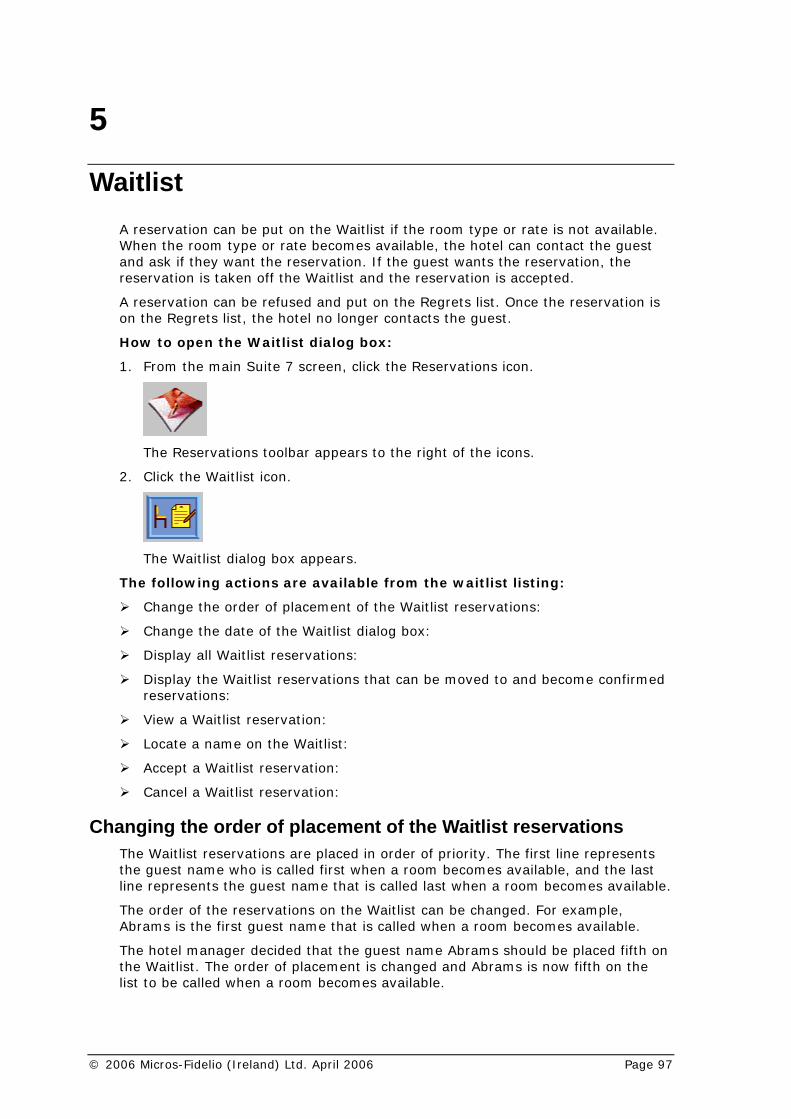
5
Waitlist A reservation can be put on the Waitlist if the room type or rate is not available. When the room type or rate becomes available, the hotel can contact the guest
d
A r sed and put on the Regrets list. Once the reservation is
Ho
an ask if they want the reservation. If the guest wants the reservation, the reservation is taken off the Waitlist and the reservation is accepted.
eservation can be refuon the Regrets list, the hotel no longer contacts the guest.
w to open the Waitlist dialog box:
1. From the main Suite 7 screen, click the Reservations icon.
The Reservations toolbar appears to the right of the icons.
2. Click the Waitlist icon.
The Waitlist dialog box appears.
able from the waitlist listing:
Display all Waitlist reservations:
can be moved to and become confirmed servatio
a Waitlist reservation:
a n
pt a W
Cancel a W
Changing the order of placement of the Waitlist reservations t reservations are placed in order of priority. The first line represents
name who is called first when a room becomes available, and the last nt le.
t angedom becomes available.
shoul fth on ms he
calle comes available.
The following actions are avail
Change the order of placement of the Waitlist reservations:
Change the date of the Waitlist dialog box:
Display the Waitlist reservations that re
View
ns:
Locate
Acce
ame on the Waitlist:
aitlist reservation:
aitlist reservation:
The Waitlisthe guestline represe
The order of Abrams is the
s the guest name that is called last when a roo
he reservations on the Waitlist can be ch first guest name that is called when a ro
m becomes availab
. For example,
The hotel manager decided thathe Waitlist. Tlist to be
t the guest name Abrams he order of placement is changed and Abrad when a room be
d be placed fiis now fifth on t
© 2006 Micros-Fidelio (Ireland) Ltd. April 2006 Page 97
Version 7 Reservations Manual
How to change the order of placement of the reservations:
1. From the Waitlist dialog box, select the reservation that yo
UP, to W , to move the atio
3. Repeat clic he desired line.
list dia nged.
Cha the a g the date i eld.
an
he Wa STAR field box.
Waitlis hanges.
Displaying all reserva rdl s of whether or not
they can be m
Note: Clicking the CAN MOVE button toggles it to DISPLAY ALL. You
u want moved.
2. Clickreserv
move the reservation up one line, or click DO
n down one line.
king UP or DOWN until the reservation is moved to t
N
The order that the reservations appear on the Wait log box is cha
ngingYou can view
date of the Waitlist dialog box different day's Waitlist by changin n the Date fi
How to ch
1. On t
Or
ge the date:
itlist dialog box, type the start date in the T DATE
2. Click the dr
The
op down arrow and select a date from the calendar.
t dialog box dates and information c
Waitlist reservations All the tions on the Waitlist can be displayed, rega
oved to reservations. es
must activate the DISPLAY ALL button to display all the ns on the Waitlist. reservatio
How to display all the Waitlist reservations:
From the Waitlist dialog box, click DISPLAY ALL.
All the Waitlist reservations are displayed.
Disreserv
Theare based on availability.
Y ALL. You
playing the Waitlist reservations that can be moved to ations reservations displayed from the Waitlist that can be moved to reservations
Note: Clicking the CAN MOVE button toggles it to DISPLA
must activate the DISPLAY ALL button to display all the reservations on the Waitlist.
How t itlist reservations that can be moved to res
From t
All the
o display the Waervations
he Waitlist dialog box, click CAN MOVE.
Waitlist reservations that can be moved to reservations are displayed.
Page 98 © 2006 Micros-Fidelio (Ireland) Ltd. April 2006

Waitlist
Vie
Note: You cannot make any changes to a Waitlist reservation.
wing a Waitlist reservation You can view a Waitlist reservation from the Waitlist dialog box.
How to view a Waitlist reservation:
1. From the Waitlist dialog box, select the reservation.
2. Click VIEW.
The Waitlist Reservation screen appears. Note that all fields are display only and cannot be changed.
3. Click CLOSE.
The Waitlist dialog box appears.
Locating a reservation on the Waitlist You can locat a reservation on the Waitlist by typing in whole name or first letter of the guest's last name in the Name field box.
How to locate a reservation on the waitlist:
he ful r first letter of the name in the Name field box.
2.
red
Acclist dialog box you can accept a Waitlist reservation.
To
1. log box, select the reservation.
RESERV.
3. ES.
Can itlist reservation A W
To rvation:
itlist dialog box, select the reservation.
2.
rop down arrow and select a reason from the Reasons list.
4.
e
1. On the Waitlist dialog box, type t l name o
Press ENTER.
The Waitlist dialog box appears displaying the names which meet the entecriteria.
epting a Waitlist reservation From the Wait
accept a Waitlist reservation:
From the Waitlist dia
2. Click ACCEPT
A transfer confirmation message appears.
Click Y
The reservation is accepted and taken off the Waitlist. The reservation no longer appears on the Waitlist dialog box.
celling a Waaitlist reservation can be cancelled and removed from the Waitlist.
cancel a Waitlist rese
1. From the Wa
Click CANCEL.
The Cancel waitlist reservation dialog box appears.
3. Click the d
Click YES.
© 2006 Micros-Fidelio (Ireland) Ltd. April 2006 Page 99
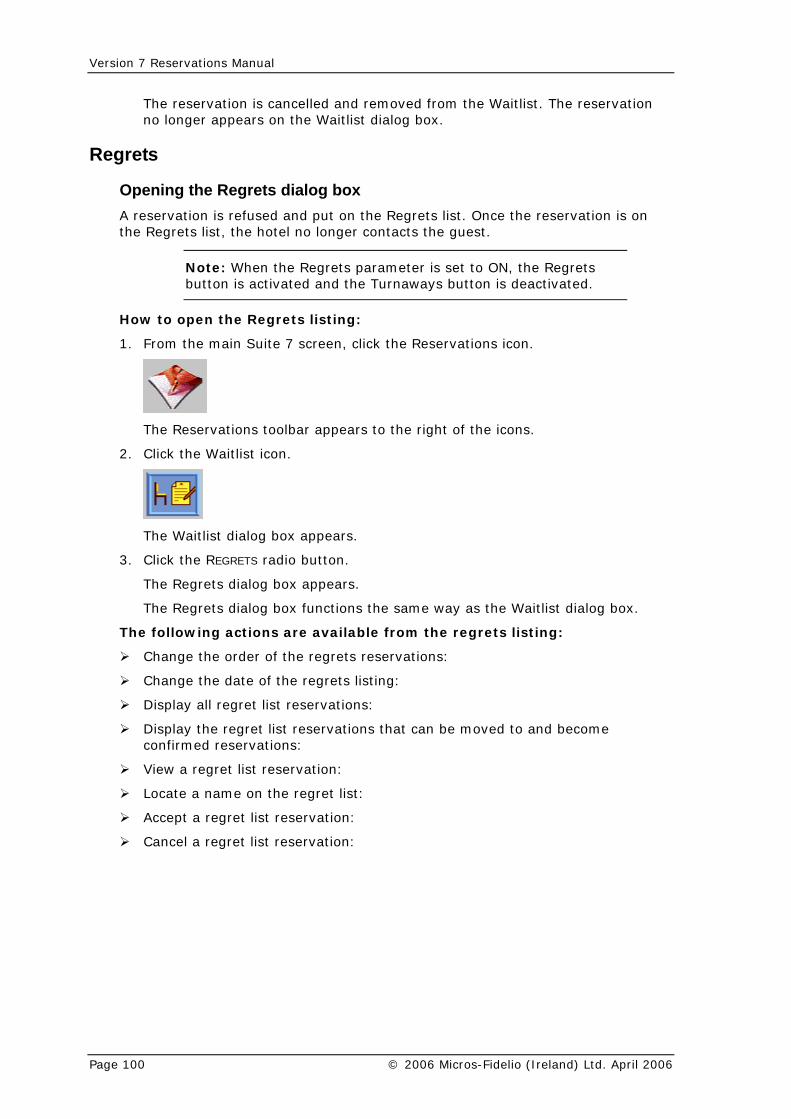
Version 7 Reservations Manual
The reservation is cancelled and removed from the Waitlist. The reservation no longer appears on the Waitlist dialog box.
Reg
OpA r ets list. Once the reservation is on the Regrets
rets
ening the Regrets dialog box eservation is refused and put on the Regr
list, the hotel no longer contacts the guest.
Note: When the Regrets parameter is set to ON, the Regrets button is activated and the Turnaways button is deactivated.
Ho
ain Suite 7 screen, click the Reservations icon.
w to open the Regrets listing:
1. From the m
The Reservations toolbar appears to the right of the icons.
2. Click the Waitlist icon.
The Waitlist dialog box appears.
REGRE
The Regrets
grets x.
wing a
e o ets reservations:
e d
e
the r moved to and become ed re
egre
Locate a nam
Accept a regret list reservation:
3. Click the TS radio button.
dialog box appears.
The Re dialog box functions the same way as the Waitlist dialog bo
The follo
Change th
ctions are available from the regrets listing:
rder of the regr
Change th ate of the regrets listing:
Display all r gret list reservations:
Displayconfirm
egret list reservations that can beservations:
View a r t list reservation:
e on the regret list:
Cancel a regret list reservation:
Page 100 © 2006 Micros-Fidelio (Ireland) Ltd. April 2006
6
Groups In this chapttwo methods f
er, o
Standard G dule is specifically designed to manage ation arrival
Blocks (Advanced Group Module): A more flexible and powerful system, and more complex groups.
If your hotel works with any of the following types of groups, we recommend Ad Module (Blocks).
vel a s that you wish to track through Suite 7.
nvent group members call and pick up their reservations idua
ree of control over the number
st
bookings with stas b
The Main Grouptanda oups screen. The
following table explains the sections of the screen, and refers you to the page in nual ibed, if applicable.
e
you will learn to create and update group reservations. There arer handling group reservations:
roup Module: This moreservdate, room
s with various similar needs, such as a group with the sametype etc.
designed for larger
using the vanced Group
Tra gent allotment
Co ion groups whereindiv lly.
Group bookings for which you need a high degof rooms blocked for group
the group, the number of rooms picked up and other atistics and reports.
Group room
ggered arrivals and departures, different numbers of ooked on each day, or rates which change during the group booking.
s Screen Both s rd groups and blocks are accessed from the main gr
this ma where each is descr
The Main Groups Screen
This section
Does this Is described her
Listing at top of
Displays a listing of all existing blocks. Standard groups are not listed. To select the
screen. block with which you wish to work, highlight it in this display.
Disunder the
the
n entered using the Info.
the labove in the listing.
Stabut Search Criteria
play area Displays the informatioInfo option.
listing on left.
Six search fields under
isting
Allows you to search for the block header(s) that meet specified search criteria. The block header(s) found will be displayed
Block Header Search Criteria
on the right.
tus radio tons
Allows you to display only blocks with the selected status.
Block Header
© 2006 Micros-Fidelio (Ireland) Ltd. April 2006 Page 101
Version 7 Reservations Manual
Thisection
Is described here s Does this
His whose departure date is tory Displays only blocks less than the system date, i.e. blocks that have already been moved to the history file.
Group Block Mai
Displays the block header for the block Group Block
Gro
Maintenance
for the block highlighted in the listing above.
Group Detail Maintenance
StaGroModule
rd Group Module. and Group Reservation List Options.
Blofrom all blocks for
log box for the Block Components
ps module and returns
ntenance highlighted in the listing above. Maintenance
up Displays the reservation listDetail
ndard up
Displays the Standard Groups dialog box and selects the Standa
Standard Groups
Cutoff All Releases available rooms cks all dates up to and including today.
New Displays the New Block diacreation of a new block.
Close Exits from the Grouyou to the main Suite 7 screen.
Standard Groups oup m
more guests who havsame company and a all
rs of an organ
Master lues for most of the fields o be used for group bil ay be attached to up to four profiles:
Group Profile: Contains name, address, phone number of group coordinator, ll as other g
pany/Trav ish to mainta e group;
n then s well as the block name.
dividual Res each guest who is p ked to an individual profile just like any regular reservation. There are two ways to make an
servation within a standard group; using the rooming list, or lit All option. These are described below.
with an existing standard group, you must first display the Group Reservation List for the group. Options such as splitting, check-in, cancellation, and all the group options are available from the Group Reservation List.
The Standard Gr odule is generally used to make reservations for five or e some features in common - e.g. they are all from the re arriving on approximately the same dates, or they are
membe ized tour, etc.
A standard group c
The Group
onsists of two primary elements:
or Pay Master (PM) Reservation: Contains default vaon the reservation screen. Also creates a PM room tling. The group master m
as we roup information. Required for all groups.
Com el Agent/Source Profile: Attach one of these profiles if youwyou ca
in statistics for the organization that generated thearch for group members using the profile name as
In ervations: An individual reservation must be made forart of the group. These are each lin
individual reusing the Sp
The first step when using the standard group module is to create the group reservation, which consists of the group profile and the group, or pay master.
To work
Page 102 © 2006 Micros-Fidelio (Ireland) Ltd. April 2006
Groups
Individual reservations may be entered using the rooming list in Group Options or ect for each group will usually be ion information for each guest. In
f guests is given to the user by the contact person reserving thegue
In grooseparat Split All). Thecon otel.
You u may hav guests, but split rest of group.
Ho
1. screen, click the Reservations icon.
by using the Split All option; the method you seldetermined by how you will receive the reservatsome cases, a list o
group. Alternatively, individual reservations may be made separately by each st.
eneral, if you have a list of guests, you will find it more convenient to use the ming list. (See Rooming List). If each guest will make his own reservation
ely, you will probably want to split the group reservation (see n the individual reservations can be made one at a time as each guest tacts the h
may also find times that you will want to combine the two methods; yoe an initial rooming list for some
w to create a group reservation using the Standard Group module:
From the main Suite 7
The Reservations toolbar appears to the right of the icons.
2. Click the Groups icon, or press CTRL + G.
The Groups dialog box appears.
3.
dialog box appears.
e you have chosen for the new group that you are creating in
5. Click OK.
ears, with the name of the new group displayed
Name
is p
8. Click S .
The new profile is saved. All group profiles have record type G, which is used ion from other profile types - guest, travel agent,
source.
9.
ox. The name of the new created is displayed in the Group field.
10.
Click STANDARD GROUP MODULE at the bottom left corner of the dialog box.
The Standard Groups
4. Type the namthe Groups field.
The Profile Search screen appin the search field.
6. Click NEW.
A Group Profile screen appears with the name of the group in the Group field.
7. Fill in the rest of the necessary information. Most of the main dialog box self-explanatory. Some of the main fields are briefly explained in the GrouProfile Fields table below. See also Profiles for more information.
AVE
to distinguish the informatcompany and
Click CLOSE.
You are returned to the Standard Groups dialog bgroup being
Click OK.
© 2006 Micros-Fidelio (Ireland) Ltd. April 2006 Page 103
Version 7 Reservations Manual
You are asked whether you want to create a new reservation.
11.
p name you have chosen n the Guest Name field in the Profile section at the top of the dialog
12.
as for an individual reservation with the eservation Fields table below. See also
tions Options.
n specified in the group reservation will automatically be copied idual reservation may be edited as
assigns a reservation number to the group reservation.
14.
dialog box is displayed. The top portion displays ection, which is now empty, will
e, or split.
ields
Fillfie
Click YES.
The New Reservation screen appears with the groudisplayed ibox.
Fill in all necessary information.
The fields are mostly the same exceptions listed in the Group RReservations and Reserva
Any informatioto every individual reservation. Each indivnecessary.
13. Click OK.
The system
Click OK.
The Group Reservation List the group master just created. The bottom sdisplay the individual reservations as they are mad
Group Profile F
in this ld
With this information
Group Name Name of the group as it will appear on the bpay master reservation.
lock header and
Language Language to be used for the folio, confirmation letters, etc.
Comments Relatively brief, (up to 70 chaspecial information you need t
racters of text), summary of any o record on the group profile.
limited amount of special information about the group.
Con of the specific contact person
Acc dence for the group; for example
Number of the contract.
Received
Ratautomatically be assigned to each individual reservation when the rooming list is entered.
Remarks Un
tact Name, title, and phone numbersInformation for this group.
t Contact Address for financial correspon"Attention Accounts Department".
Contract No
Date the contract was received.
e Code Special group rate code. If it is entered here, it will
Group Reservation Fields
Fill in this With this information field
Arriv will arrive. al Date the first group guest
Departure Date the last group guest will depart.
Number of adults per room. Adults
Page 104 © 2006 Micros-Fidelio (Ireland) Ltd. April 2006
Groups
Fill in thisfield
With this information
#Rooms Number of rooms reserved for this group.
RateCode Rate code assigned to the group. If specified, it will automatically reservations in the group.
Rat y servations in the group.
e group. After all
nt in for each guest individually.
be assigned to all
e Rate associated with this group. If specified, it will automaticallbe assigned to all re
Room Type Room type to be reserved for all members of ththe individual reservations have been made, the room type will be changed to "PM".
Payment Payment method for the group. If not specified, paymemethod will be requested at check-
Gro
ption
up Reservation List
Column Descri
Name Group Name
First (Always blank.)
Arrival Date the first group guest will arrive.
Dep
Per ber of adults per room. (Changes to "0" after all individual
Roo ot yet anges to "1" after all individual reservations are
made.)
Room type to be reserved for all members of the group. (Changes
arture Date the last group guest will depart
sons Numreservations are made.)
ms Number of rooms left for which individual reservations have nbeen made. (Ch
Room Type to "PM" after all individual reservations are made.)
Room PM room number.
Rate Rate assigned to this group.
Status Current status of the group.
How to find the Group Reservation List for an existing standard group reservation:
1. From the main Suite 7 screen, click the RESERVATIONS icon.
The Reservations toolbar appears to the right of the icons.
2. Click the GROUPS icon, or press CTRL + G.
The Groups dialog box appears.
3. Click STANDARD GROUP MODULE at the bottom left corner of the dialog box.
4. lick on display a listing of all existing groups.
5.
search criteria
The Standard Groups dialog box appears.
Type in all or part of the name of the group in the Groups field, OR cthe Groups field to
Click OK.
The Profile Search screen appears with names that match the you specified, or a listing of all existing group profiles.
© 2006 Micros-Fidelio (Ireland) Ltd. April 2006 Page 105

Version 7 Reservations Manual
6. If more than one profile is displayed, type all or part of the profile name insearch field, and press TAB or ENTE
the R.
ou specified are now
7.
displayed in the Group field.
l reservations.
11.
rned to the main Reservations module screen.
Group Reservations List Options
Gro
Clic
Only the names that match the search criteria ydisplayed.
Highlight the name of the group you want to work with.
8. Click OK.
You are returned to the Standard Groups dialog box. The name of the selected group is
9. Click OK.
The Group Reservation List dialog box is displayed. The top portion displaysthe group master of the selected group. The bottom section displays the existing individua
10. You may select a reservation to work with.
When you are finished, click CLOSE.
You are retu
up Reservations List Options
k this option To do this
Edi t Display the reservation form of the selected guest for editing.
Che
Billing to connect you to the guest's bill in Cashiering.
Display the Profile of the selected guest.
CanCan
d rvation (group or individual).
el the entire group, if the pay master ed.
If the guest is checked in, this button cancels the check in
Opt Display the Options screen. (See Reservations Options.)
Display the Group Options screen. (See Group Options.)
Spl rvation into individual reservations.
Sea rvations within a group.
Close Close the Group Reservation List.
ck In/Billing Check in the selected guest. If the guest has been checked in, this button toggles to
Profile
cel/ Reactivate/ cel CI
Toggle between cancelling and reactivating the selectereseAlso can cancreservation is select
(Cancel CI).
ions
Group Op
it All Split the entire group rese
rch Find selected individual rese
Check-In/Billing Use CHECK IN to check in an individual reservation from a group. If the guest already che
is cked in, this button toggles to BILLING to display the billing for the
guest.
Page 106 © 2006 Micros-Fidelio (Ireland) Ltd. April 2006
Groups
How to check in an individual reservation from a group:
1.
k YES or NO to continue.
y messages for the guest, they will be displayed. Click CLOSE to
to print. Click the appropriate button to continue.
o special situations, the system simply informs you that the
rned to the Group Reservation List; the status of the selected s now "Checked In".
lay a guest from a standard group:
whose bill you wish to display.
.
stem asks
in your
The billing in he selected guest is displayed. (See the Suite 7 g M
CLOSE.
u are retur
eactivte are
irely f
Cancellation, on the other hand, leaves the reservations in the system, but us to "cancelled".
E the reservation. If the guest has been checked in, the
3.
n dialog box appears.
Select the reservation you wish to check in.
2. Click CHECK IN.
If there is any question about the status of the room, etc., the system will askwhether to proceed with the check in. Click OK to continue.
If the room is shared with other guests, the system will ask whether to check in the other guests at the same time. Clic
If there are ancontinue.
If you print key cards, the system will ask how many
If there are nguest is checked in.
3. Click OK.
You are retureservation i
How to disp
1. Select the checked in guest
the bill of
2. Click BILLING
The sy for the cashier number and password.
3. Type cashier number and password.
4. Click OK.
formation for tCashierin
5. Click
anual).
Yo ned to the Group Reservation List.
Cancel/R ate/Cancel CI When you dele a group, the group master and all individual reservationsdeleted ent rom the system, leaving no record.
changes the stat
Use CANCEL to cancel an entire group, the group master, or an individual reservation from a group. If the reservation has been cancelled, this button toggles to REACTIVAT
button toggles to CANCEL CI, which cancels the check in, but not the reservation.
How to cancel an entire group:
1. Select the group master.
2. Click CANCEL.
The Cancel Group dialog box appears.
Indicate that the entire group is to be cancelled.
4. Click OK.
The Cancel Reservatio
© 2006 Micros-Fidelio (Ireland) Ltd. April 2006 Page 107
Version 7 Reservations Manual
5.
ellation are displayed.
6.
7.
1.
2.
4.
Reasons field.
plicable reason for this cancellation.
7.
eturned to the Group Reservation List; the status of the group master is now "Cancelled". However, the status of the individual reservations
al reservation from a group:
ay the Group Reservation List for the group. (See To find the Group
2. Select the res
3. Click CANCEL.
l Re
reasons f
ct the app
k YES.
u are return of the selected ation is n ations is
unchanged.
to cancel a
1. Display the Group Reservation List up eservation L
2. Select the reservation you wish to cancel the check-in.
3. Click CANCEL C
system a
YES.
The system a e room status to Touch Up or Dirty.
Click on the Reasons field
The reasons for canc
Select the applicable reason for this cancellation.
Click YES.
You are returned to the Groups dialog box. Both the group master and the individual reservations remain in the system; with a status of "Cancelled".
How to cancel a group master:
Select the group master.
Click CANCEL.
The Cancel Group dialog box appears.
3. Indicate that only the group master is to be cancelled.
Click OK.
The Cancel Reservation dialog box appears.
5. Click on the
The reasons for cancellation are displayed.
6. Select the ap
Click YES.
You are r
is unchanged.
How to cancel an individu
1. DisplReservation List for an existing standard group reservation).
ervation you wish to cancel.
The Cance servation dialog box appears.
4. Click on the Reasons field.
The or cancellation are displayed.
5. Sele licable reason for this cancellation.
6. Clic
Yoreserv
ed to the Group Reservation List; the status ow "Cancelled". The status of all other reserv
How checked in guest from a standard group:
for the group. (See To find the GroR ist for an existing standard group reservation).
I.
The sks for confirmation.
4. Click
sks whether to change th
Page 108 © 2006 Micros-Fidelio (Ireland) Ltd. April 2006
Groups
5. Indicate whether the new room status should be Touch Up.
6. Click YES to change to uch up or Dirty, NO to leave room status unchanged.
tem a to this
the appr
are return lected reservation is now "Expected".
How to reactiva n from a group:
splay the G e To find the Group
2. Select the res sh to reactivate.
ck REACTIVA
system a t.
5.
6.
servation List; the status of the selected ed". The status of all other reservations is
ate one reservation at a time; if an entire group has been master and each individual reservation must be
Split All Use S A to split the group, that is, to automatically create the required
tions are "place holders" in that they are not yet assigned to a specific guest. (Although the
The entical, using the group name as the first name, and the group the last name. Each individual "place holder"
reservation must en the actual guest name is received.
Once the group has been split, specific guest names are assigned to the individual res
Ho the Split All option:
1. tion List for the group. (See To find the Group standard group reservation).
2.
l reservations, displayed in the lower portion of the Group Reservation List.
The group master now has room type = "PM" (Post Master) and number of
If a re people, see Sharing.
To
7. The sysreservation.
sks whether to block the room, that is, to keep it assigned
8. Click opriate choice.
You ed to the Group Reservation List; the status of the se
te a cancelled reservatio
1. Di roup Reservation List for the group. (SeReservation List for an existing standard group reservation).
ervation you wi
3. Cli TE.
The sks for confirmation of the reactivate reques
4. Click YES.
The reservation form is displayed.
Make any changes necessary to the reservation.
Click OK.
You are returned to the Group Rereservation is now "Expectunchanged.
You can only reactivcancelled, the groupreactivated separately.
PLIT LL
number of individual reservations from the master. These individual reserva
y are actual reservations.)
y are all idname plus a sequence number as
be edited separately wh
ervations as information on each guest is received.
w to enter a group rooming list using
Display the Group ReservaReservation List for an existing
Click SPLIT ALL.
The group reservation is automatically split into the required number of individua
rooms = 1.
room is to be shared by two or mo
© 2006 Micros-Fidelio (Ireland) Ltd. April 2006 Page 109
Version 7 Reservations Manual
Whma ed.
Ho
1. ation List for the group. (See To find the Group reservation).
2. , that is, a reservation listing that d, rather than the name of an actual
3.
een appears, displaying the name of the selected elds. Most of the rest of the
4. ind it and link it to this reservation. If me of the guest, as well as any other
See Profiles).
5.
ation List dialog box. The individual ical order) under the name of the actual
7.
t appears.
8.
9.
s whether this change applies to this guest only or to all
11.
st displays the updated information in the individual
Use al reservations within a group. You may spe in which the reservations are to be displayed.
for selected reservations within a group:
1. for the group. (See To find the Group Reservation List for an existing standard group reservation).
en you select to display All, all the individual reservations that have been de are listed, and may be edit
w to assign names in a group rooming list:
Display the Group ReservReservation List for an existing standard group
Select the first "place holder" reservationdisplays the group name in the Name fielguest.
Click PROFILE.
The Individual Profile scrreservation in the Last Name and First Name fifields are blank.
If a profile already exists for this guest, fno profile exists, type in the nainformation in the appropriate fields. (
Click SAVE.
The profile is saved.
6. Click CLOSE.
You are returned to the Group Reservreservation now appears (in alphabetguest.
Click EDIT.
The Reservation dialog box for the selected gues
Edit any information in the reservation that needs to be changed for this guest.
Click OK.
The system askguests in this group.
10. Select the appropriate choice.
Click OK.
12. The Group Reservation Lireservation.
13. Click CLOSE.
You are returned to the Groups dialog box.
14. Click CLOSE.
You are returned to the main Suite 7 screen.
Search SEARCH to find selected individucify the search criteria and the order
How to search
Display the Group Reservation List
Page 110 © 2006 Micros-Fidelio (Ireland) Ltd. April 2006
Groups
2. Click SEARCH.
The Group Reservation Search dialog box appears.
3. Specify the search criteria for the guests you want to find; you may search for eparture on a specific date, arrival or departure within a
range of dates, or any combination of the above. Indicate also whether only s o tatus such as check-in or cancelled are to be
yed. You may also select whether the listing is to be sorted in order by
4. Click SEARCH.
5. Only the indiv e group that meet the specified search di
Group Options e GROUP O on List to display
Options
ion Does this
a name, arrival or d
reservationdispla
f a certain s
arrival date, room number or last name.
idual reservations from thcriteria are splayed in the Group Reservation List.
Click th P button at the bottom of the Group Reservatithe available group functions.
Group
This Group opt
Rooming list Makes individual group reservations, assigns shared rooms.
Check In p
Au one time.
Delete Del ystem.
Ain a group.
Au ypes to individual r ypes.
New
Automati ster - makes an additional p
Statistic Displays group.
Displays the status of
ys Automati
Groutomatically checks in all guests in a group at
etes the group from the s
Room Assign utomatically assigns room numbers to individual reservations
Room Type Assign
tomatically assigns specific room teservations that have been made using generic room t
cally copies the postmaPostmaster ostmaster
summary statistics for the
Room Status the rooms reserved for the group.
Print Ke cally prints keys for an entire group
Rooming List up and to assign
rooms.
You may find it convenient to create a more streamlined Rooming List template tailor-mad n delete and change the width and f columns, ith any group.
ter a group rooming list:
1. Display the Group Reservation List for the group. (See To find the Group for an existing standard group reservation). (To display the f
3. Click GROUP OPTIONS.
Use Rooming List to make individual reservations for a groshared
that is e to your own needs. You caorder o and then save the template for future use w
How to en
Reservation Listion listReservat or a block, see To access the Group Reservation List).
2. Select the group master.
© 2006 Micros-Fidelio (Ireland) Ltd. April 2006 Page 111
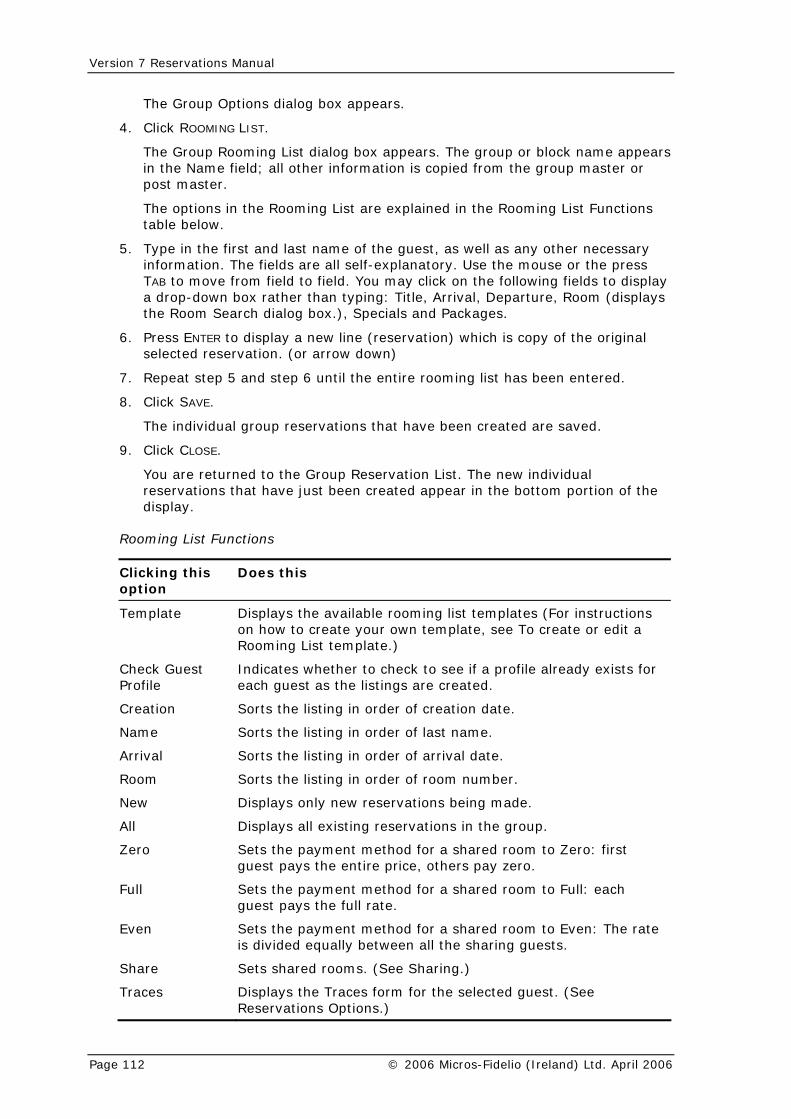
Version 7 Reservations Manual
The Group Options dialog box appears.
rs. The group or block name appears
n the Rooming List are explained in the Rooming List Functions
5. press
splay plays
6. servation) which is copy of the original
7.
8.
9.
turned to the Group Reservation List. The new individual s that have just been created appear in the bottom portion of the
ctions
this Does this
4. Click ROOMING LIST.
The Group Rooming List dialog box appeain the Name field; all other information is copied from the group master or post master.
The options itable below.
Type in the first and last name of the guest, as well as any other necessary information. The fields are all self-explanatory. Use the mouse or the TAB to move from field to field. You may click on the following fields to dia drop-down box rather than typing: Title, Arrival, Departure, Room (disthe Room Search dialog box.), Specials and Packages.
Press ENTER to display a new line (reselected reservation. (or arrow down)
Repeat step 5 and step 6 until the entire rooming list has been entered.
Click SAVE.
The individual group reservations that have been created are saved.
Click CLOSE.
You are rereservationdisplay.
Rooming List Fun
Clickingoption
Template Displays the available rooming list templates (For instructionson how to create your own
template, see To create or edit a
Rooming List template.)
Che if a profile already exists for each guest as the listings are created.
Cre
Nam Sorts the listing in order of last name.
Sorts the listing in order of arrival date.
Sorts the listing in order of room number.
p.
he payment method for a shared room to Zero: first the entire price, others pay zero.
Ful red room to Full: each te.
Sets the payment method for a shared room to Even: The rate
Sha
TraReservations Options.)
ck Guest Indicates whether to check to see Profile
ation Sorts the listing in order of creation date.
e
Arrival
Room
New Displays only new reservations being made.
All Displays all existing reservations in the grou
Zero Sets tguest pays
l Sets the payment method for a shaguest pays the full ra
Even is divided equally between all the sharing guests.
re Sets shared rooms. (See Sharing.)
ces Displays the Traces form for the selected guest. (See
Page 112 © 2006 Micros-Fidelio (Ireland) Ltd. April 2006
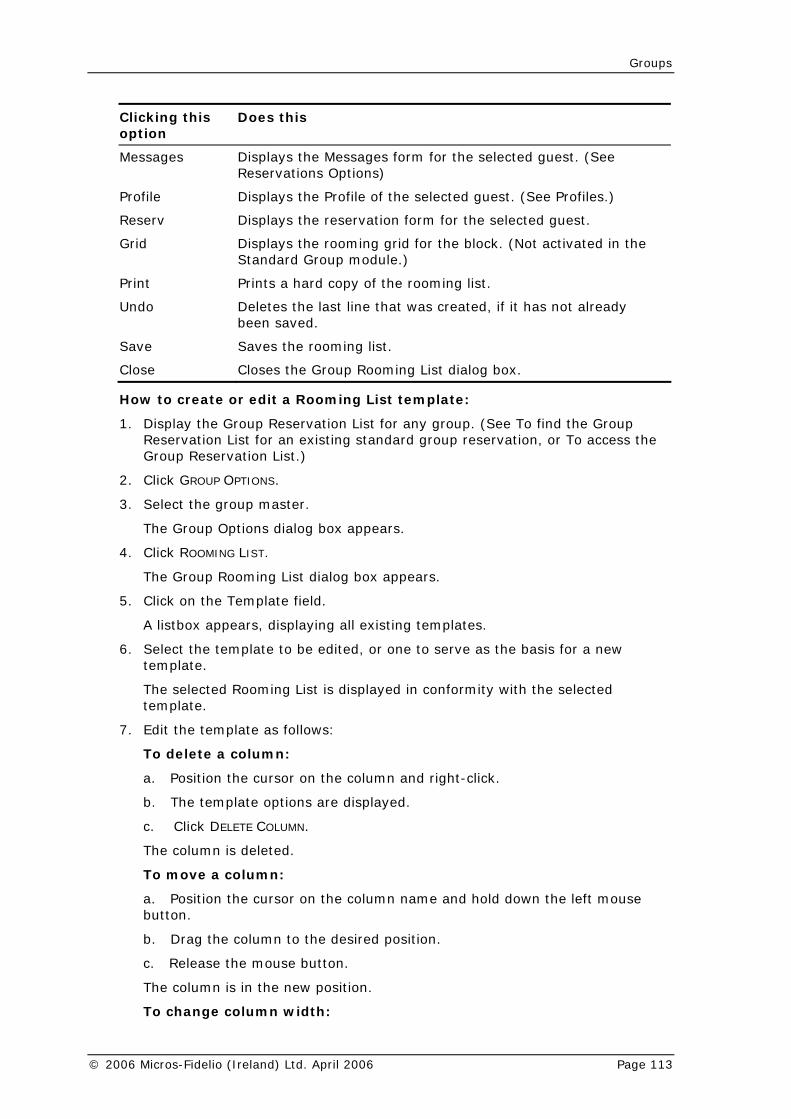
Groups
Clicking this Does this option
Messages Displays the Messages form for the selected guest. (See Reservations Options)
Profile Displays the Profile of the selected guest. (See Profiles.)
rvation form for the selected guest.
Displ rid for the block. (Not activated in the Standard Gr
Prints .
Delet if it has not already been
Save
Closes the
Reserv Displays the rese
Grid ays the rooming goup module.)
Print a hard copy of the rooming list
Undo es the last line that was created, saved.
s the rooming list. Save
Close Group Rooming List dialog box.
How to create or edit
1. Di
a Rooming List template:
splay the Group Reservation List for any group. (See To find the Group ist foation
ION
roup m
Options
4. Click ROOMING LIST.
The G
5. Click o
A listbox appears, displaying all existing templates.
is for a new
ed in conformity with the selected te.
7. s:
To delete a column:
sition the cursor on the column and right-click.
late options are displayed.
The column is deleted.
To move a column:
a. Position the cursor on the column name and hold down the left mouse button.
b. Drag the column to the desired position.
c. Release the mouse button.
The column is in the new position.
To change column width:
Reservation LGroup Reserv
r an existing standard group reservation, or To access the List.)
2. Click GROUP OPT S.
3. Select the g aster.
The Group dialog box appears.
roup Rooming List dialog box appears.
n the Template field.
6. Select the template to be edited, or one to serve as the bastemplate.
The selected Rooming List is displaytempla
Edit the template as follow
a. Po
b. The temp
c. Click DELETE COLUMN.
© 2006 Micros-Fidelio (Ireland) Ltd. April 2006 Page 113

Version 7 Reservations Manual
a. Position the cursor on the right-hand boundary of the column and hold e button.
in the Rooming List.
ate is deleted.
RESTORE COLUMN.
d. Click on the desired column name.
stored.
te dialog box is displayed.
10. nd click OK.
in a new name, a new template will be created and the original template will be unchanged. If you type in the same name, the system will
Ho
1. Group Reservation List for the group. (See To find the Group e
ation List.)
roup master
ROUP OPTIONS
.
5.
6. s you want it to be printed, right-click e Rooming List.
The template options are displayed.
7. Click PRINT.
The Grid Print dialog box appears.
down the left mous
b. Move the column boundary to create desired width.
To delete a template:
a. Right-click anywhere
b. The template options are displayed.
c. Click DELETE CURRENT TEMPLATE.
The entire templ
To restore a column:
a. Right-click anywhere in the Rooming List.
b. The template options are displayed.
c. Highlight
A listing of deleted columns appears.
The column is re
8. When the template is finished, right-click anywhere in the Rooming List.
The template options are displayed.
9. Click SAVE TABLE TEMPLATE.
The Save Table Templa
Type in the name of the template a
If you type
ask for confirmation before overwriting.
11. Click YES.
w to print the rooming list:
Display the Reservation List for an existing standard group reservation or to find thReservation List for a block, see To access the Group Reserv
2. Select the g
3. Click G
The Group Options dialog box appears.
4. Click ROOMING LIST
The Group Rooming List dialog box appears.
Select the template and sort order.
When the Rooming List is displayed aanywhere in th
Page 114 © 2006 Micros-Fidelio (Ireland) Ltd. April 2006
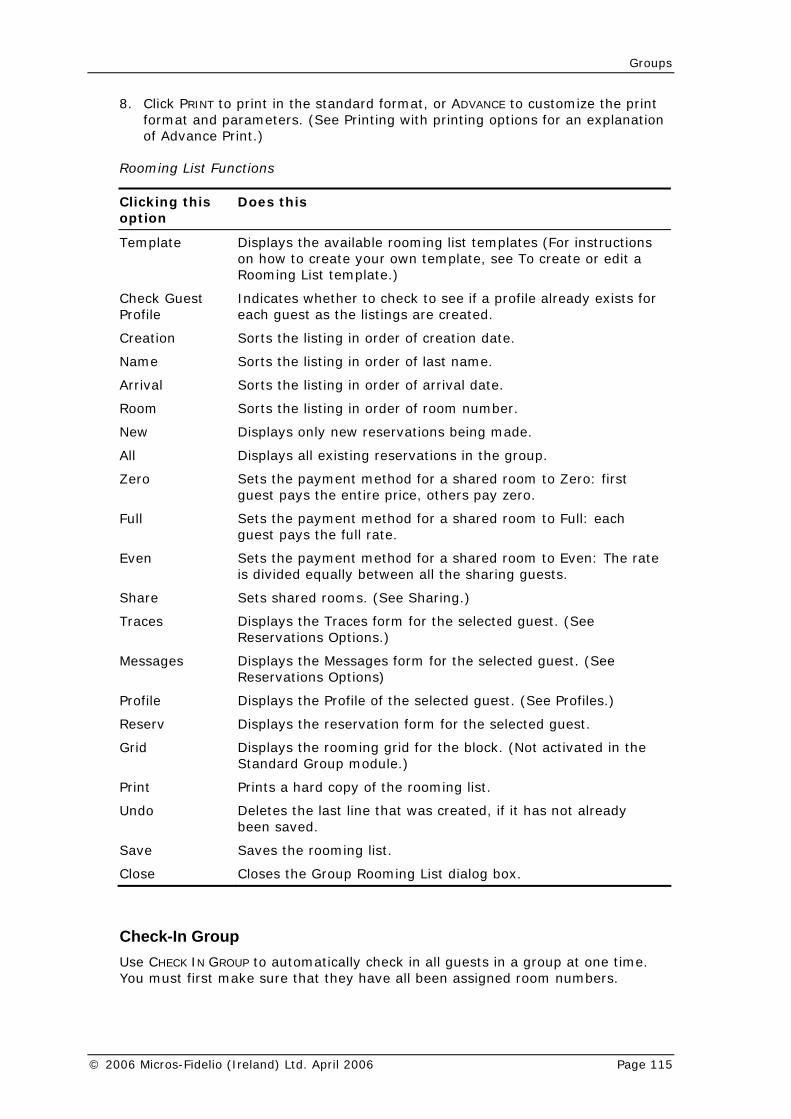
Groups
8. Click PRINT to print in the standard format, or ADVANCE to customize the print nting with printing options for an explanation
Pri
Clicopt
format and parameters. (See Priof Advance nt.)
Rooming List Functions
king this Does this ion
Temdit a
plate Displays the available rooming list templates (For instructions on how to create your own template, see To create or eRooming List template.)
Check Guest Profile
Indicates whether to check to see if a profile already exists for each guest as the listings are created.
Name Sorts the listing in order of last name.
Sorts the listing in order of arrival date.
Displays only new reservations being made.
Full Sets the payment method for a shared room to Full: each
Sets the payment method for a shared room to Even: The rate ing guests.
red rooms. (See Sharing.)
Tra orm for the selected guest. (See ations Options.)
Me essages form for the selected guest. (See Options)
Res ervation form for the selected guest.
Grid andard Group module.)
Undo
Clo
Creation Sorts the listing in order of creation date.
Arrival
Room Sorts the listing in order of room number.
New
All Displays all existing reservations in the group.
Zero Sets the payment method for a shared room to Zero: first guest pays the entire price, others pay zero.
guest pays the full rate.
Evenis divided equally between all the shar
Share Sets sha
ces Displays the Traces fReserv
ssages Displays the MReservations
Profile Displays the Profile of the selected guest. (See Profiles.)
erv Displays the res
Displays the rooming grid for the block. (Not activated in the St
Prints a hard copy of the rooming list.
Deletes the last line that was created, if it has not already been saved.
Save Saves the rooming list.
se Closes the Group Rooming List dialog box.
Check-In Group UseYou
CHECK IN GROUP to automatically check in all guests in a group at one time. must first make sure that they have all been assigned room numbers.
© 2006 Micros-Fidelio (Ireland) Ltd. April 2006 Page 115
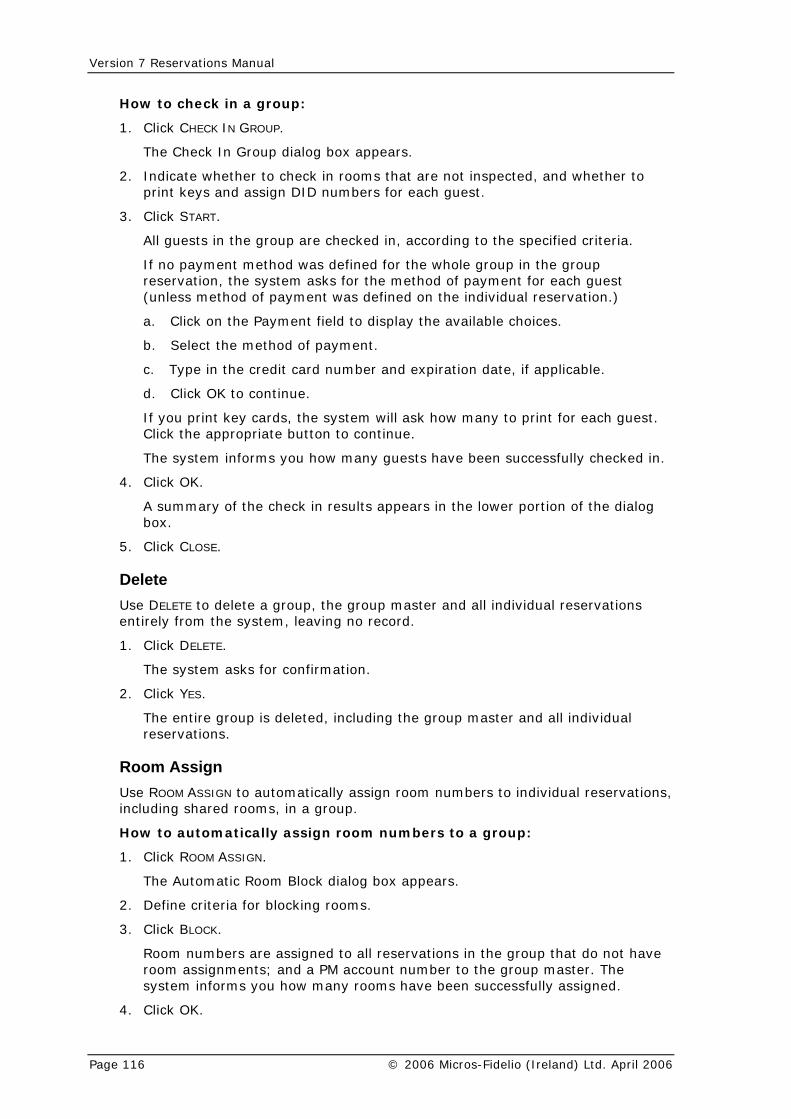
Version 7 Reservations Manual
How to check in a group:
1. IN GROUP.
er to
3.
ied criteria.
nt method was defined for the whole group in the group the system asks for the method of payment for each guest od of payment was defined on the individual reservation.)
ices.
ard number and expiration date, if applicable.
s, the system will ask how many to print for each guest. continue.
essfully checked in.
5.
Delete Use
is deleted, including the group master and all individual
RoUse , inc
1. Click R A .
dialog box appears.
3.
ot have ments; and a PM account number to the group master. The rms you how many rooms have been successfully assigned.
4. lick OK.
Click CHECK
The Check In Group dialog box appears.
2. Indicate whether to check in rooms that are not inspected, and whethprint keys and assign DID numbers for each guest.
Click START.
All guests in the group are checked in, according to the specif
If no paymereservation,(unless meth
a. Click on the Payment field to display the available cho
b. Select the method of payment.
c. Type in the credit c
d. Click OK to continue.
If you print key cardClick the appropriate button to
The system informs you how many guests have been succ
4. Click OK.
A summary of the check in results appears in the lower portion of the dialog box.
Click CLOSE.
DELETE to delete a group, the group master and all individual reservations entirely from the system, leaving no record.
1. Click DELETE.
The system asks for confirmation.
2. Click YES.
The entire group reservations.
om Assign ROOM ASSIGN to automatically assign room numbers to individual reservations
luding shared rooms, in a group.
How to automatically assign room numbers to a group:
OOM SSIGN
The Automatic Room Block
2. Define criteria for blocking rooms.
Click BLOCK.
Room numbers are assigned to all reservations in the group that do nroom assignsystem info
C
Page 116 © 2006 Micros-Fidelio (Ireland) Ltd. April 2006
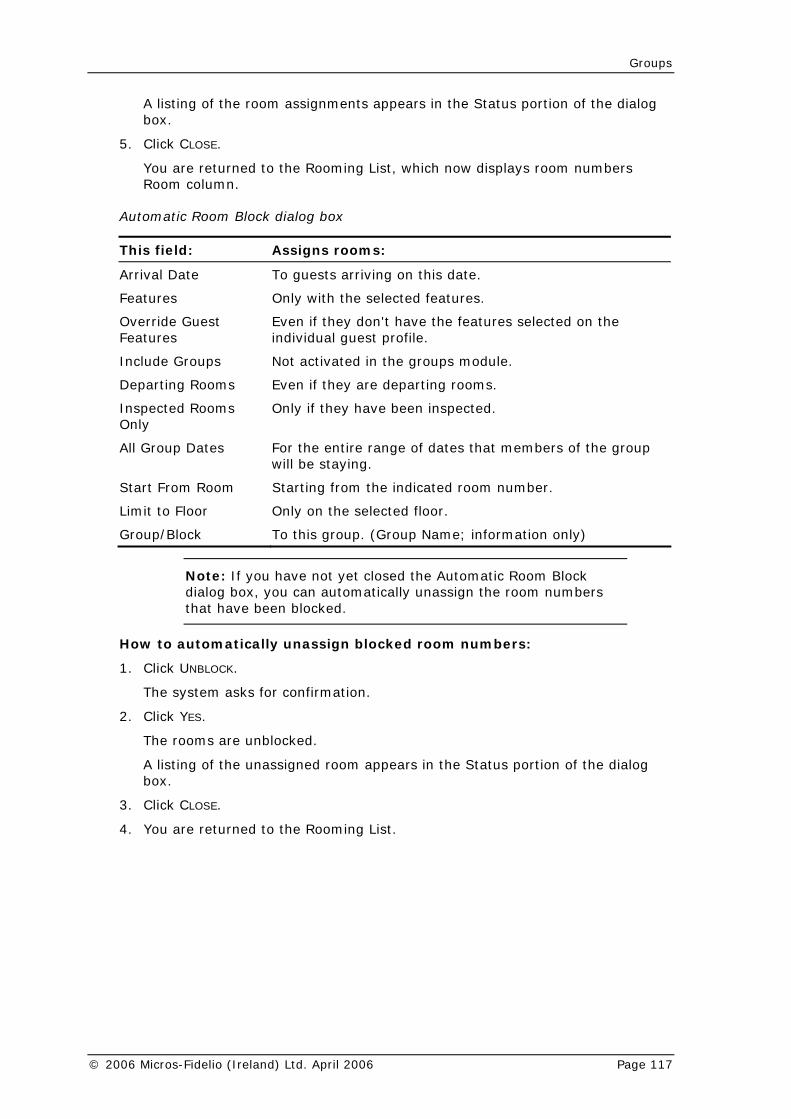
Groups
A listing of the room assignments appears in the Status portion of the dialog
ys room numbers
Aut
Assigns rooms:
box.
5. Click CLOSE.
You are returned to the Rooming List, which now displaRoom column.
omatic Room Block dialog box
This field:
Arr guests arriving on this date. ival Date To
Features Only with the selected features.
OveFea
e Groups Not activated in the groups module.
ting Rooms Even if they are departing rooms.
tes For the entire range of dates that members of the group
Start From Room Starting from the indicated room number.
Only on the selected floor.
rride Guest tures
Even if they don't have the features selected on the individual guest profile.
Includ
Depar
Inspected Rooms Only
Only if they have been inspected.
All Group Dawill be staying.
Limit to Floor
Group/Block To this group. (Group Name; information only)
Note: If you have not yet closed the Automatic Room Block dialog box, you can automatically unassign the room numbers that have been blocked.
Ho
1. Clic
2. Clic
The
3.
w to automatically unassign blocked room numbers:
k UNBLOCK.
The system asks for confirmation.
k YES.
rooms are unblocked.
A listing of the unassigned room appears in the Status portion of the dialogbox.
Click CLOSE.
4. You are returned to the Rooming List.
© 2006 Micros-Fidelio (Ireland) Ltd. April 2006 Page 117

Version 7 Reservations Manual
Room Type Assign Use matically assign specific room types to individual
2. Type in the arrival date for which the room types are to be assigned, or click from the calendar that appears.
servations in the group e, replacing the generic room type. A summary of
assignments appears in the dialog box.
SE.
to the Rooming List, which now displays a specific room type ation in the Room Type column.
the postmaster. This is useful for creating subgroups u may have a block in which various groups are
t dates; or a standard group with two room types.
5. w postmaster that are necessary
Use
1.
2.
ROOM TYPE ASSIGN to autoreservations that have been made using generic room types:
1. Click ROOM TYPE ASSIGN.
The Automatic Room Type Assignment dialog box appears.
on the field and select the date
3. Click OK.
Specific room types are assigned to all individual rearriving on the selected datthe room type
4. Click CLO
You are returned for each reserv
New Postmaster Use NEW POSTMASTER to copywithin a group. For instance, yoarriving on differen
How to use New Postmaster:
1. Click NEW POSTMASTER.
The system asks for confirmation.
2. Click OK.
The system tells you that is creating the new postmaster.
3. Click OK.
The system creates a new group master, which appears in the Reservation List.
4. Click EDIT to bring up the reservation form for the new group master.
Edit the field(s) of the ne
Statistic STATISTIC to display summary statistics for the group:
Click STATISTIC.
The Group Statistic dialog box appears.
The activity for the group is displayed as the number of rooms and personsper room type per day per day and total. This function is for information purposes only and cannot be edited.
Click CLOSE.
Page 118 © 2006 Micros-Fidelio (Ireland) Ltd. April 2006

Groups
Room Status Use ROOM STATUS to display the status of the rooms reserved for the group:
1. Click ROOM STATUS.
Group Room Status dialog box appears.
edited.
PriTo
Clic
Key the group.
SharinWh m, the room is "shared". Shared rooms are designated from the Rooming List. A shared room may be created when the reservations are entered into the rooming list, or from existing reservations.
How to create a shared room while entering reservations in the rooming list:
1. for the group or block.
layed.
sharing the be adjusted later
rice; the rate for all sharing guests
he rate for a single person in the room.
: The rate is divided evenly between the guests sharing the room.
5.
6. HARE NTER arrow to display the next line.
Share section.
7.
mber was assigned to the first reservation, it appears in the Room
e en
aring the room.
The
The status of each room assigned to an individual reservation within this group, with arrival date of today, is displayed. If no guest from the group is arriving today, a message to that effect appears. This function is for information purposes only and cannot be
2. Click CLOSE.
nt Keys automatically print keys for an entire group:
k PRINT KEYS.
cards are printed for all the guests in
g en more than one reservation is made for one roo
Display the Reservation List
2. Click GROUP OPTIONS.
The Group Options are disp
3. Click ROOMING LIST.
The Rooming list appears.
4. If this is the first share that is being created, select the method ofprice of the room to be used for the entire group. This may for specific rooms, if desired.
Zero: The first guest pays the full pis zero.
Full: Each guest pays t
Even
Enter the first of the reservations that will be sharing the room.
Click S and press E or the down
The guest name and room rate appear in the
Enter the next reservation sharing the same room.
8. Click ADD SHARE.
The name of the next guest sharing the room appears in the Share field. If aroom nucolumn of the second reservation. If no room number had been assigned, thlist displays "S/n" (where "n" is the sequ ce number of the share) in the Room column of all reservations sh
© 2006 Micros-Fidelio (Ireland) Ltd. April 2006 Page 119

Version 7 Reservations Manual
9. FUNCTION
o people will be sharing the same room, repeat step 5, tep 8.
ou want to set up a special price arrangement, click SHARE PRICE.
e R e rates, or Zero, or Eve
step
13. Click CLOSE.
How to create ing reservations:
lay the
2. Click GROUP
The Group O
3. Click ROOMIN
omin
4. Set the displ o see all the existing reservations.
5. If this is the f sharing the price of the is may be adjusted later
ific r
Zero: The fi ests is zero.
Full: Each gu .
Even: The ra tween the guests sharing the room.
6. Highlight the m.
7. Click SHARE.
The guest n
8. Select the n
9. Click ADD SH
nu mthe second r to the first reservation, umber of the share) in the .
10. If there are HE SHARING
FUNCTION.
If more than will be sharing the same room, repeat steps step 8 .
11. If you wish t ee To create a shared
12. Repeat step s are completed.
AVE.
14. Click CLOSE.
If there are no more sharing guests, click SHARE AGAIN TO EXIT THE SHARING
If more than twthrough s
10. If y
The Shar eservation dialog box appears. Type in thn, as explained in step 4.
select Full,
11. Repeat 5 through step 10 for each of the shared rooms.
12. Click SAVE.
a shared room for exist
1. Disp Reservation List for the group or block.
OPTIONS.
ptions are displayed.
G LIST.
The Ro g list appears.
ay to ALL t
first share that is being created, select the method oroom to be used for the entire group. Th
for spec ooms, if desired.
rst guest pays the full price; the rate for all sharing gu
est pays the rate for a single person in the room
te is divided evenly be
first of the reservations that will be sharing the roo
ame and room rate appear in the Share section.
ext reservation sharing the same room.
ARE.
The name of the next guesthe room
t sharing the room appears in the Share mber of the first reservation also appears in the rooeservation. If no room number had been assigned the list displays "S/n" (where "n" is the sequence n Room column of all reservation s sharing the room
field, and column of
no more sharing guests, click SHARE AGAIN TO EXIT T
two people and step 9
o set up a special price arrangement, sroom while entering reservations in the rooming list.
6 through step 11 until all shared room
13. Click S
Page 120 © 2006 Micros-Fidelio (Ireland) Ltd. April 2006

Groups
How to break a shared room:
1. Display the Rooming List for p.
one o break.
hared
SHARE P
The Share Reservation dialog box appears.
4. Click BREAK.
The share is
5. Click OK.
etu g ests in the broken shar
Blocks The Advanced G e large groups and, convention e of arrival and departure dates s travel agent allotments and tour series.
The parame urned ON.
Block componA block consists ive the block system power a
The Block H uch as the block code, reservation type. Requir
Profiles: Up
Group M er of group coordina In some cases a travel agent pr r all blocks.
Compan Profile: Attach one of these profiles if you wish to maintain statistics for the organization that generated the block; you can then search for group members using the profile name as well as the block name
The Pay Master (PM) Reservation: Contains default values for most of the fields on the reservation screen. Also creates a PM room to be used for group billing. Can only be accessed through Group Detail Maintenance.
The Room Grid: The number of rooms of each type blocked for each night are entered on the grid. Rates may also be entered. As changes are made to the grid, in addition to the actual block, you may view grids of the initial block, the available rooms, the picked up rooms, and the changes from the initial block.
Individual Reservations: An individual reservation must be made for each guest who is part of the group.
These components are generally created in the following order:
1. Block header - see To create a block header
2. Profiles - see To create the group master profile.
the grou
2. Select
The s
3. Click
f the guests in the room that you want to
rooms are displayed in the Share section.
RICE.
broken
You are r rned to the Rooming List. The Room field for all the e is now blank, and will need to be reassigned.
roup Module (Blocks) is a powerful way to handl
u
bookings with a variety of room types and a rang, as well as other allotments, such a
ter PAR_ALLOT must be t
ents of a number of components linked together to gnd flexibility.
eader: Contains basic information about the block, sname, arrival and departure dates, default rate, anded for every block.
to four profiles may be attached to each block:
aster Profile: Contains name, address, phone numbtor, as well as other group information.ofile may be used as the group profile. Required fo
y/Travel Agent/Source
© 2006 Micros-Fidelio (Ireland) Ltd. April 2006 Page 121
Version 7 Reservations Manual
3. Room Grid (including rates) - see Grid.
4. Updating block and room/rate grids as work with client to finalize grospecifications - see Grid.
5. Change status to Open for Pickup - see Change Status.
6. Create PM - see To create the pay master (Post Master).
7. Can now make individual reservations using Rooming List - see Rooming List.
Accessing Block Components The various block components are accessed through either Group Block Maintenance or Group Detail Maintenance as follows:
Group Block Maintenance:
Block header
Profiles
Block Options
Rooming and rates grids
Group Detail Maintenance:
Group Reservation List
Group Options
Individual reservations
Phases of a Block (Block Status) The block status corresponds to the phase of a block. Although four phases have been defined, not all phases must be used by all hotels, or used for every block. Each hotel must develop its own protocol for which phases to use, and when to change from one status to the next. (See Change Status.)
The four phases are:
Offer: The first phase. The offer is entered into the system, but no rooms are actually blocked.
Option: The next phase. The block is updated as negotiations continue, but no rooms are blocked yet.
Initial: May be the first phase. A contact from the group requests a certain number of rooms for a certain period of time. Generally speaking, no contract has been signed, and no deposit has been received. However, at this point the rooms are now set aside (blocked) so that other sales people in the hotel do not sell those same rooms. You may still need to make periodic changes to the number of rooms blocked, the rates offered, and the dates of the block.
Open for Pick-up: Always the final phase. In general, although the system imposes no requirements as to when to open for pick-up, hotels often wait until after all the arrangements for the group have been finalized. Only after the status is changed to Open For Pick-Up and the initial grid is closed, can you begin to make actual individual reservations.
If the parameter OFFEROPT is turned ON, all four phases are available to the user (but do not necessarily have to be used for every block.). If it is turned Off, only the Initial and Open for Pick-up phases are available.
up
Page 122 © 2006 Micros-Fidelio (Ireland) Ltd. April 2006
Groups
The status is independent of reservation type. Either a tentative or definite reservation type may be assigned to either the initial phases or the open for pick-up phase. The reservation type does not automatically change when the group changes into the open for pick-up phase.
History The Block History provides an overview of past performance of group blocks. Two days after the group departure date, the night audit transfers the block header and allotment data to a block and allotment history file respectively. All detailed data of the group block allotments is kept.
To view the block histories:
1. In the Groups screen, check the HISTORY checkbox, and enter the search fields as necessary (see To search for an existing block header).
Only the blocks in the history file are displayed.
Only the BLOCKS button (Group Block Maintenance option) are activated to provide access to the History listing.
2. Select the desired block and click BLOCKS.
The history of the block appears.
ly the foll
IONS: SUM the "Block Statistics" option lected in
ce
ader:
reen, click the Reservations icon.
The Reservations toolbar appears to the right of the icons.
GROU r press CTRL + G.
Groups
3. Click NEW.
the param asks whether the status of ew blo
ick on the
lo n the
n the bl heade k Header table
6. To complete the block profile, click PROFILE and continue as explained in To create the group master profile.
On owing display buttons are activated:
PROFILE
GRID
INFO
OPT MARY (Block Statistics appears only if is se Night Audit.)
Group Block MaintenanThe block header, profiles, and room and rates grids are all accessed and edited from Group Block Maintenance.
How to create a block he
1. From the main Suite 7 sc
2. Click the PS icon, o
The screen appears.
If eter OFFEROPT is turned ON, the systemthe n ck is Initial, Option or Offer.
4. Cl appropriate button.
A blank bupper right-hand corner
ck header form appears; the status you selected appears i.
5. Fill i block
ock header as explained in the Block Header table below. The r options are explained in the Options in the Bloc
below.
© 2006 Micros-Fidelio (Ireland) Ltd. April 2006 Page 123
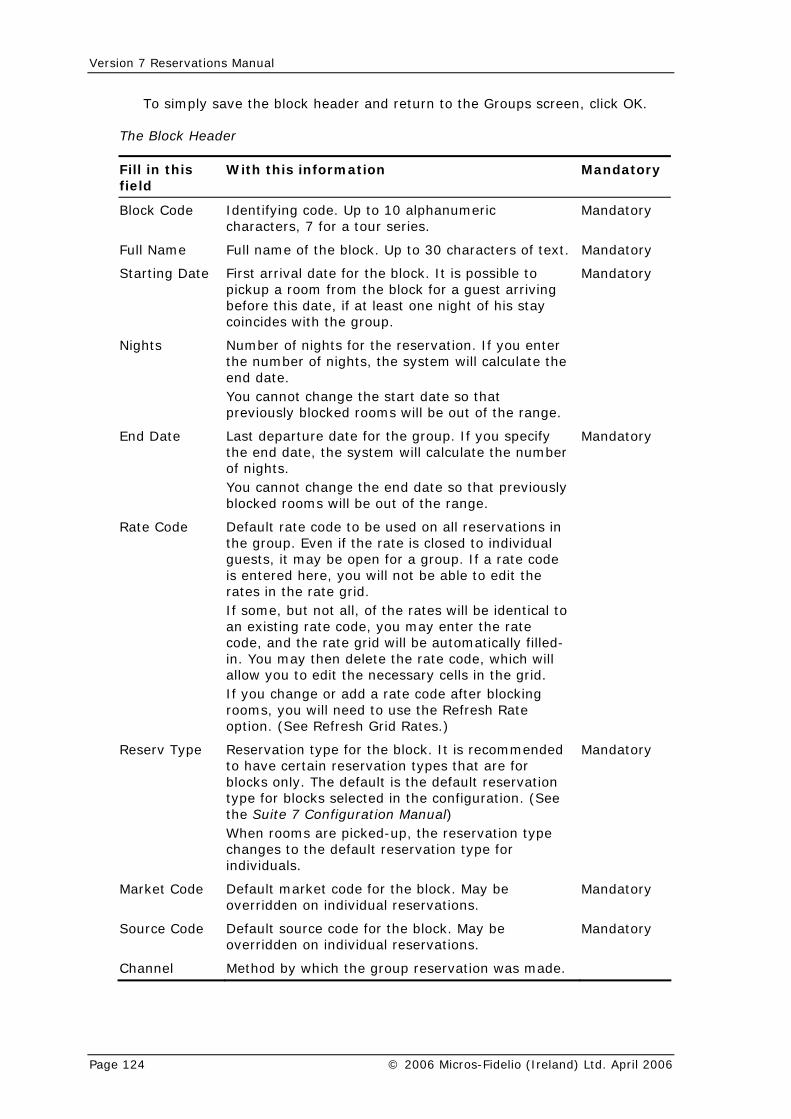
Version 7 Reservations Manual
To simply save the block header and return to the Groups screen, click OK.
The Block Header
Fill in this field
With this information Mandatory
Block Code Identifying code. Up to 10 alphanumeric characters, 7 for a tour series.
Mandatory
Full Name Full name of the block. Up to 30 characters of text. Mandatory
Starting Date First arrival date for the block. It is possible to pickup a room from the block for a guest arriving before this date, if at least one night of his stay coincides with the group.
Mandatory
Nights Number of nights for the reservation. If you enter the number of nights, the system will calculate the end date. You cannot change the start date so that previously blocked rooms will be out of the range.
End Date Last departure date for the group. If you specify the end date, the system will calculate the number of nights. You cannot change the end date so that previously blocked rooms will be out of the range.
Mandatory
Rate Code Default rate code to be used on all reservations in the group. Even if the rate is closed to individual guests, it may be open for a group. If a rate code is entered here, you will not be able to edit the rates in the rate grid. If some, but not all, of the rates will be identical to an existing rate code, you may enter the rate code, and the rate grid will be automatically filled-in. You may then delete the rate code, which will allow you to edit the necessary cells in the grid. If you change or add a rate code after blocking rooms, you will need to use the Refresh Rate option. (See Refresh Grid Rates.)
Reserv Type Reservation type for the block. It is recommended to have certain reservation types that are for blocks only. The default is the default reservation type for blocks selected in the configuration. (See the Suite 7 Configuration Manual) When rooms are picked-up, the reservation type changes to the default reservation type for individuals.
Mandatory
Market Code Default market code for the block. May be overridden on individual reservations.
Mandatory
Source Code Default source code for the block. May be overridden on individual reservations.
Mandatory
Channel Method by which the group reservation was made.
Page 124 © 2006 Micros-Fidelio (Ireland) Ltd. April 2006
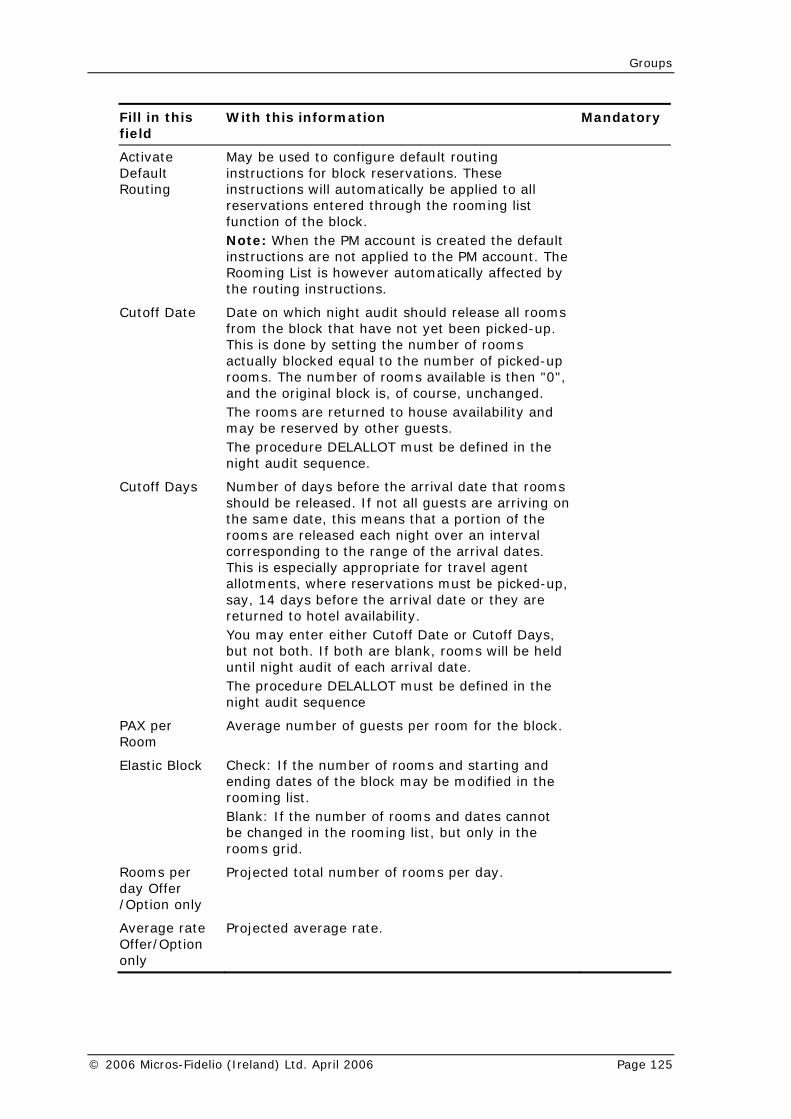
Groups
Fill in this field
With this information Mandatory
Activate Default Routing
May be used to configure default routing instructions for block reservations. These instructions will automatically be applied to all reservations entered through the rooming list function of the block. Note: When the PM account is created the default instructions are not applied to the PM account. The Rooming List is however automatically affected by the routing instructions.
Cutoff Date Date on which night audit should release all rooms from the block that have not yet been picked-up. This is done by setting the number of rooms actually blocked equal to the number of picked-up rooms. The number of rooms available is then "0", and the original block is, of course, unchanged. The rooms are returned to house availability and may be reserved by other guests. The procedure DELALLOT must be defined in the night audit sequence.
Cutoff Days Number of days before the arrival date that rooms should be released. If not all guests are arriving on the same date, this means that a portion of the rooms are released each night over an interval corresponding to the range of the arrival dates. This is especially appropriate for travel agent allotments, where reservations must be picked-up, say, 14 days before the arrival date or they are returned to hotel availability. You may enter either Cutoff Date or Cutoff Days, but not both. If both are blank, rooms will be held until night audit of each arrival date. The procedure DELALLOT must be defined in the night audit sequence
PAX per Room
Average number of guests per room for the block.
Elastic Block Check: If the number of rooms and starting and ending dates of the block may be modified in the rooming list. Blank: If the number of rooms and dates cannot be changed in the rooming list, but only in the rooms grid.
Rooms per day Offer /Option only
Projected total number of rooms per day.
Average rate Offer/Option only
Projected average rate.
© 2006 Micros-Fidelio (Ireland) Ltd. April 2006 Page 125
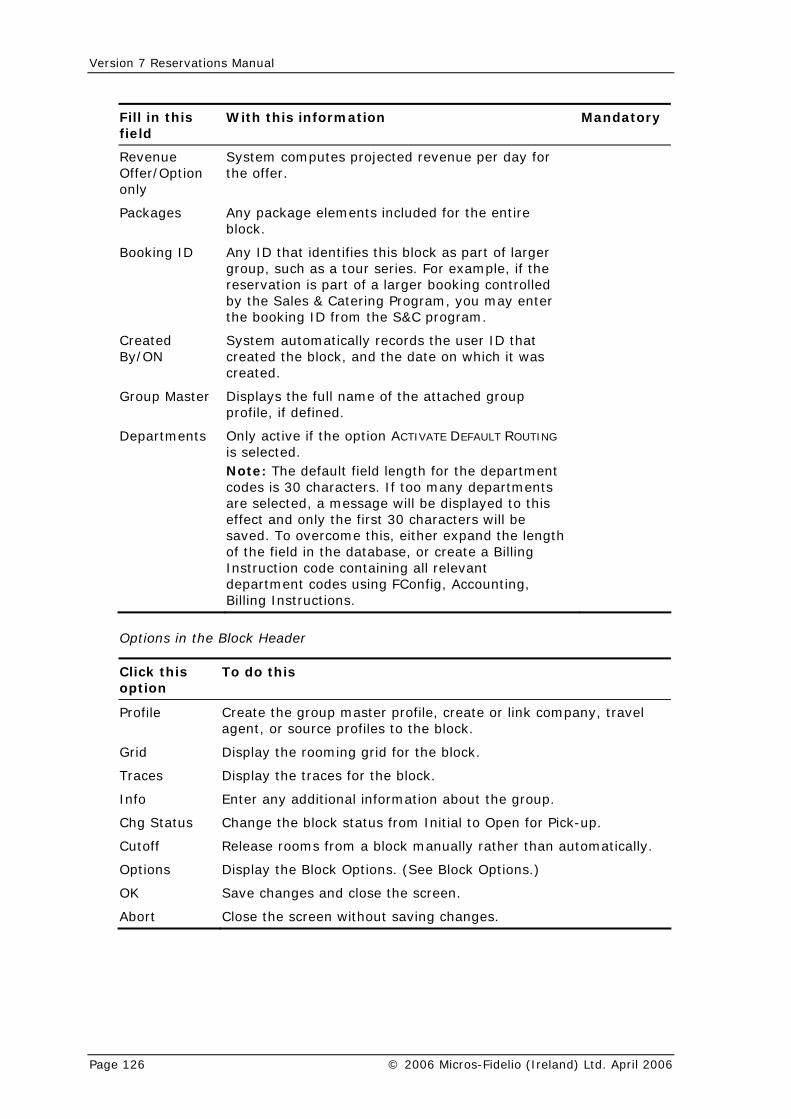
Version 7 Reservations Manual
Fill in this field
With this information Mandatory
Revenue Offer/Option only
System computes projected revenue per day for the offer.
Packages Any package elements included for the entire block.
Booking ID Any ID that identifies this block as part of larger group, such as a tour series. For example, if the reservation is part of a larger booking controlled by the Sales & Catering Program, you may enter the booking ID from the S&C program.
Created By/ON
System automatically records the user ID that created the block, and the date on which it was created.
Group Master Displays the full name of the attached group profile, if defined.
Departments Only active if the option ACTIVATE DEFAULT ROUTING is selected. Note: The default field length for the department codes is 30 characters. If too many departments are selected, a message will be displayed to this effect and only the first 30 characters will be saved. To overcome this, either expand the length of the field in the database, or create a Billing Instruction code containing all relevant department codes using FConfig, Accounting, Billing Instructions.
Options in the Block Header
Click this option
To do this
Profile Create the group master profile, create or link company, travel agent, or source profiles to the block.
Grid Display the rooming grid for the block.
Traces Display the traces for the block.
Info Enter any additional information about the group.
Chg Status Change the block status from Initial to Open for Pick-up.
Cutoff Release rooms from a block manually rather than automatically.
Options Display the Block Options. (See Block Options.)
OK Save changes and close the screen.
Abort Close the screen without saving changes.
Page 126 © 2006 Micros-Fidelio (Ireland) Ltd. April 2006

Groups
How to search for an existing block header, or all block headers meeting specified criteria:
1. Click the GROUPS icon, or press CTRL + G.
The Groups screen appears.
2. Use the fields and the status radio buttons under the listing on the right to specify the search criteria.
3. Press ENTER or TAB.
The block headers that meet the criteria are displayed.
4. You may narrow your search by filling another field.
Only the block headers that meet the further criteria are displayed.
5. You may select one of the listed block headers to work with. Click either BLOCKS or DETAILS to continue.
Block Header Search Criteria
This field Is to search for blocks that
Block Search Begin with the specified characters.
Date Include the specified date within their range of stay dates.
First arrival Have the specified first arrival date.
Trace Date Have a trace on the date specified.
User ID Were created by the specified user ID.
Agent Were booked by the specified agent.
Status Are of the selected status only.
Block Header Options The buttons at the bottom of the block header allow you to access other options related to this block, such as the profile, and to perform functions such as changing the block status.
Options in the Block Header
Click this option
To do this
Profile Create the group master profile, create or link company, travel agent, or source profiles to the block.
Grid Display the rooming grid for the block.
Traces Display the traces for the block.
Info Enter any additional information about the group.
Chg Status Change the block status from Initial to Open for Pick-up.
Cutoff Release rooms from a block manually rather than automatically.
Options Display the Block Options. (See Block Options.)
OK Save changes and close the screen.
Abort Close the screen without saving changes.
© 2006 Micros-Fidelio (Ireland) Ltd. April 2006 Page 127
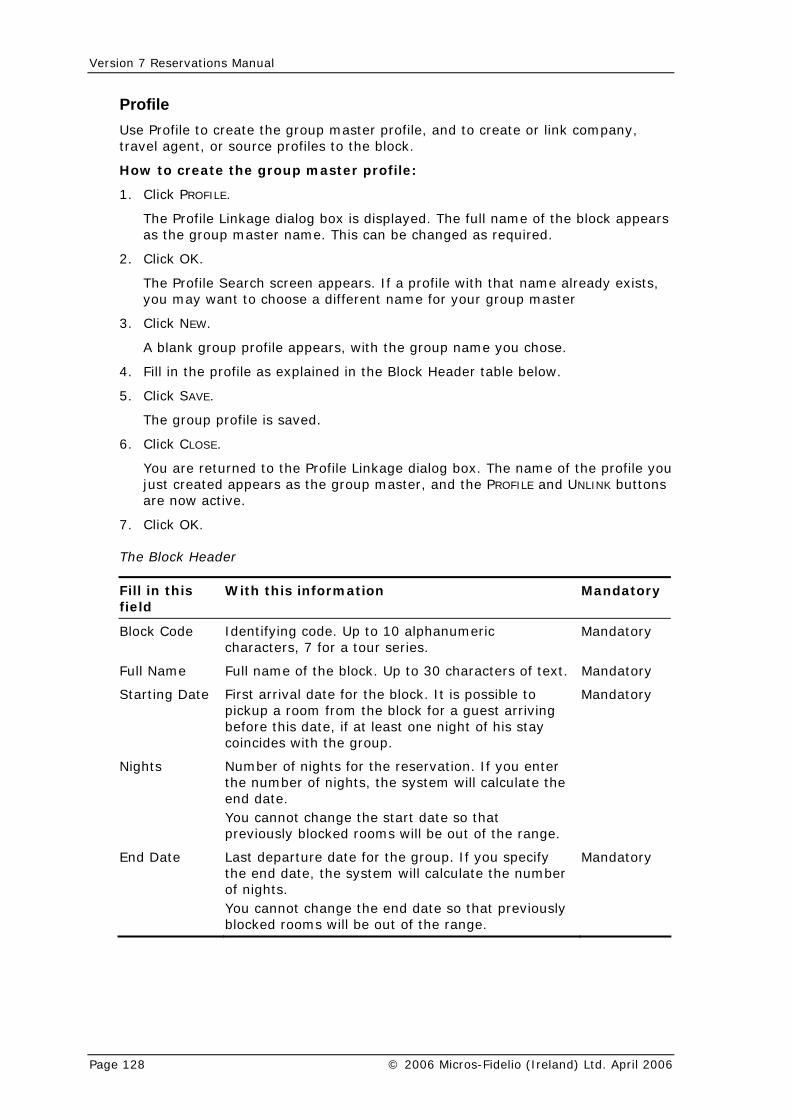
Version 7 Reservations Manual
Profile Use Profile to create the group master profile, and to create or link company, travel agent, or source profiles to the block.
How to create the group master profile:
1. Click PROFILE.
The Profile Linkage dialog box is displayed. The full name of the block appears as the group master name. This can be changed as required.
2. Click OK.
The Profile Search screen appears. If a profile with that name already exists, you may want to choose a different name for your group master
3. Click NEW.
A blank group profile appears, with the group name you chose.
4. Fill in the profile as explained in the Block Header table below.
5. Click SAVE.
The group profile is saved.
6. Click CLOSE.
You are returned to the Profile Linkage dialog box. The name of the profile you just created appears as the group master, and the PROFILE and UNLINK buttons are now active.
7. Click OK.
The Block Header
Fill in this field
With this information Mandatory
Block Code Identifying code. Up to 10 alphanumeric characters, 7 for a tour series.
Mandatory
Full Name Full name of the block. Up to 30 characters of text. Mandatory
Starting Date First arrival date for the block. It is possible to pickup a room from the block for a guest arriving before this date, if at least one night of his stay coincides with the group.
Mandatory
Nights Number of nights for the reservation. If you enter the number of nights, the system will calculate the end date. You cannot change the start date so that previously blocked rooms will be out of the range.
End Date Last departure date for the group. If you specify the end date, the system will calculate the number of nights. You cannot change the end date so that previously blocked rooms will be out of the range.
Mandatory
Page 128 © 2006 Micros-Fidelio (Ireland) Ltd. April 2006
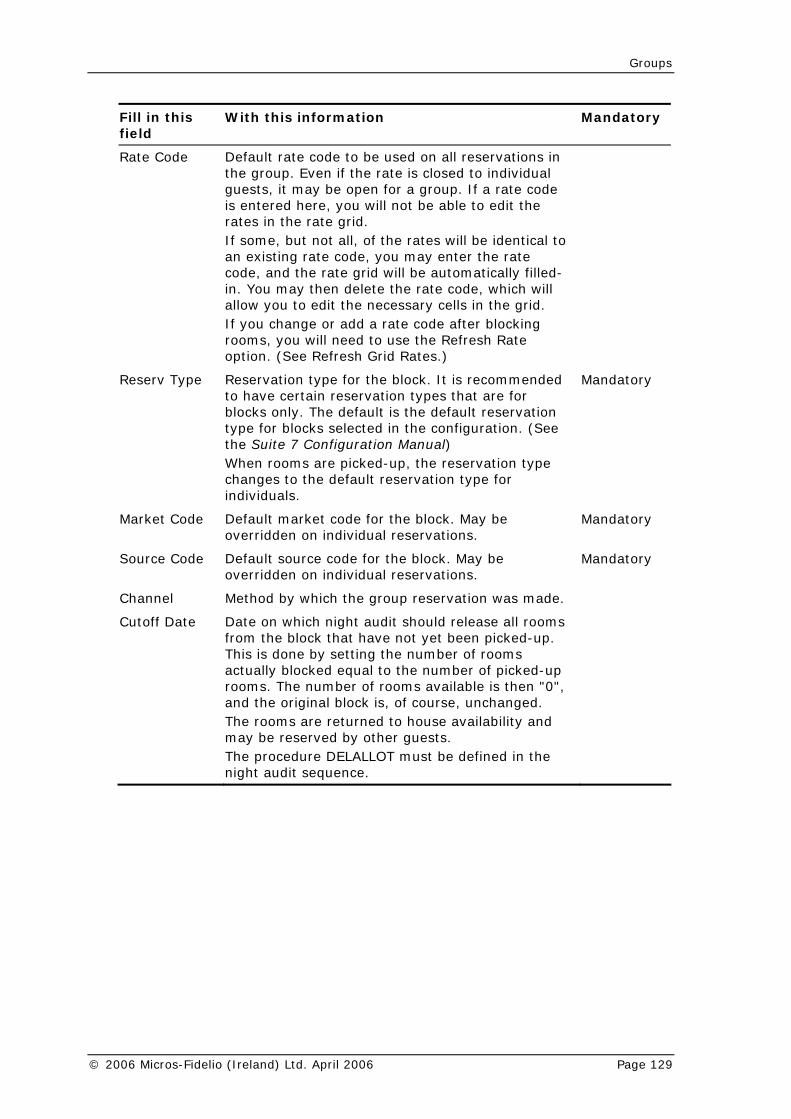
Groups
Fill in this field
With this information Mandatory
Rate Code Default rate code to be used on all reservations in the group. Even if the rate is closed to individual guests, it may be open for a group. If a rate code is entered here, you will not be able to edit the rates in the rate grid. If some, but not all, of the rates will be identical to an existing rate code, you may enter the rate code, and the rate grid will be automatically filled-in. You may then delete the rate code, which will allow you to edit the necessary cells in the grid. If you change or add a rate code after blocking rooms, you will need to use the Refresh Rate option. (See Refresh Grid Rates.)
Reserv Type Reservation type for the block. It is recommended to have certain reservation types that are for blocks only. The default is the default reservation type for blocks selected in the configuration. (See the Suite 7 Configuration Manual) When rooms are picked-up, the reservation type changes to the default reservation type for individuals.
Mandatory
Market Code Default market code for the block. May be overridden on individual reservations.
Mandatory
Source Code Default source code for the block. May be overridden on individual reservations.
Mandatory
Channel Method by which the group reservation was made.
Cutoff Date Date on which night audit should release all rooms from the block that have not yet been picked-up. This is done by setting the number of rooms actually blocked equal to the number of picked-up rooms. The number of rooms available is then "0", and the original block is, of course, unchanged. The rooms are returned to house availability and may be reserved by other guests. The procedure DELALLOT must be defined in the night audit sequence.
© 2006 Micros-Fidelio (Ireland) Ltd. April 2006 Page 129
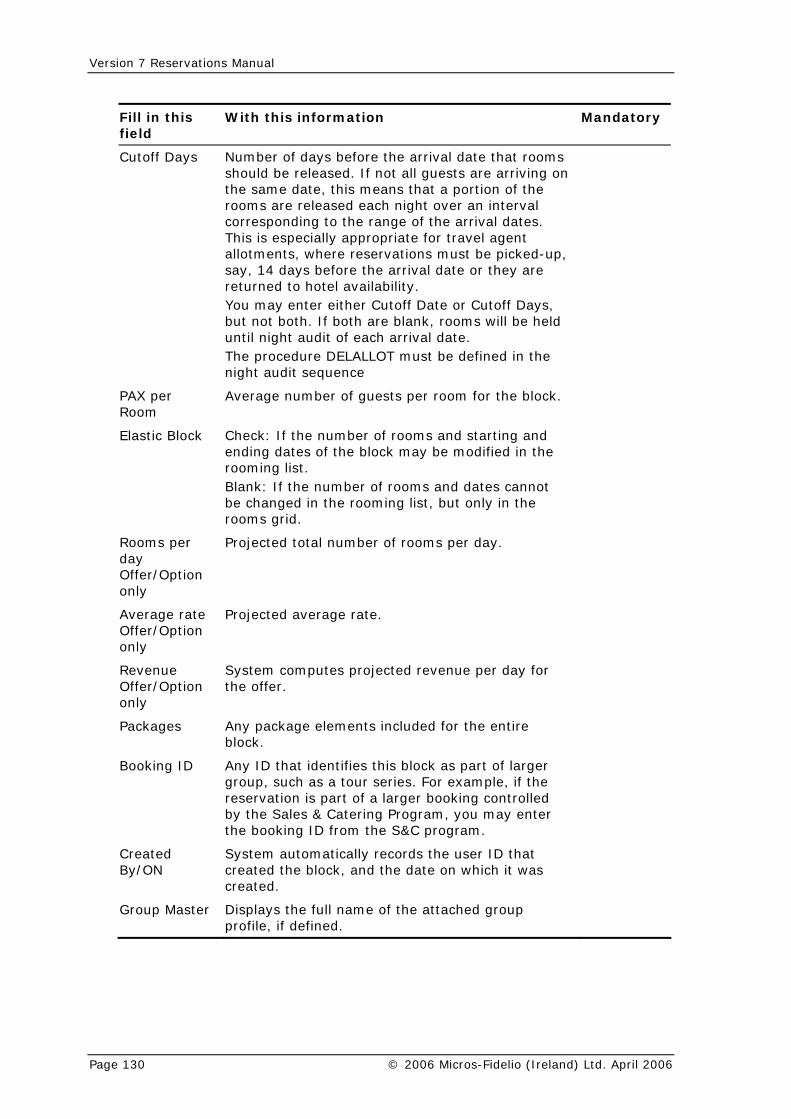
Version 7 Reservations Manual
Fill in this field
With this information Mandatory
Cutoff Days Number of days before the arrival date that rooms should be released. If not all guests are arriving on the same date, this means that a portion of the rooms are released each night over an interval corresponding to the range of the arrival dates. This is especially appropriate for travel agent allotments, where reservations must be picked-up, say, 14 days before the arrival date or they are returned to hotel availability. You may enter either Cutoff Date or Cutoff Days, but not both. If both are blank, rooms will be held until night audit of each arrival date. The procedure DELALLOT must be defined in the night audit sequence
PAX per Room
Average number of guests per room for the block.
Elastic Block Check: If the number of rooms and starting and ending dates of the block may be modified in the rooming list. Blank: If the number of rooms and dates cannot be changed in the rooming list, but only in the rooms grid.
Rooms per day Offer/Option only
Projected total number of rooms per day.
Average rate Offer/Option only
Projected average rate.
Revenue Offer/Option only
System computes projected revenue per day for the offer.
Packages Any package elements included for the entire block.
Booking ID Any ID that identifies this block as part of larger group, such as a tour series. For example, if the reservation is part of a larger booking controlled by the Sales & Catering Program, you may enter the booking ID from the S&C program.
Created By/ON
System automatically records the user ID that created the block, and the date on which it was created.
Group Master Displays the full name of the attached group profile, if defined.
Page 130 © 2006 Micros-Fidelio (Ireland) Ltd. April 2006

Groups
How to link other profiles to the block header:
1. Click PROFILE.
ofile Linkage dialog box appears, with the name of the group master
2. Click on the field of the type of profile that you want to link, either company, l agent, or source or type in all or part of the name of the organization in
OK.
Profile Search screen appears, displaying a listing of all the selected type of profiles, or a partial listing that meets the search criteria.
ect the profile that you want to link to the block. If a profile does not exist, click NEW to create one. (See Profiles)
4. Click OK.
The profile you selected is n ked to the block. You are returned to the Profile Linkage dialog e of the profile appears in the field, and the PROFILE and UNLINK
5. Click OK.
How to unlink a profile
1. Click PROFILE.
The Profile Linkage diaand other associated p
2. Click on the profile that ant to unlink.
3. Click UNLINK.
The system asks for co profile.
4. Click YES.
The profile you selecte the Profile Linkage dialoPROFILE and UNLINK buttons are not active for that field.
5. Click OK.
s the rothe number of rooms to be blocked for each room type for each date.
The rate grid allows you to enter specific rates for up to four persons per room for all the different room types. A rate in the block header will override the rate grid, but the rate grid will override a rate in the postmaster reservation.
The Room Grid appears.
If the block is open for pickup, any of the grids may be viewed, but not all may be edited. Click the radio button to display the grid you want to see.
If the block is still in the initial phase, only the initial, rates, and S&C Ceiling grids are available.
2. There are two ways to edit the grid; using the SET button, or using the mouse.
To use the set button:
The Prdisplayed.
travethe field and click
The
3. Sel
ow linbox. The nam buttons are now active for that field.
from the block header:
log box appears, with the name of the group master, rofiles displayed.
you w
nfirmation before unlinking the
d is now unlinked from the block. You are returned tog box. The field you unlinked is empty, and the
Grid Use GRID to acces om and rates grids. The room grid allows you to enter
How to use the room grid:
1. Click GRID.
© 2006 Micros-Fidelio (Ireland) Ltd. April 2006 Page 131

Version 7 Reservations Manual
a. In the Room Type field, highlight all the room types for all dates that will have the same number of rooms.
dates, if too large to
c. Type in the number of rooms to be set, and a cutoff date or days if applicable. If you are setting rates, type in the rates for up to four persons per room.
the present number, check the
The specified number appears in the grid for all selected room types and dates.
To use the mouse:
a. Highlight all the squares on the grid that will have the same number of rooms. You may use the Priorities option to group room types together on the grid.
b. Type the number.
The number appears in all the highlighted squares.
You may also use any of the available buttons at the bottom of the screen.
3. When you are finished, click CLOSE.
How to use the rates grid:
1. Click GRID.
The room grid appears.
2. Click the RATES radio button.
The rates grid appears.
3. The rate grid is edited using the SET button only:
a. In the Room Type field, highlight all the room types for all dates that will have the same rate.
b. Use the FROM and TO fields to select the range of dates, if too large to select on the grid.
c. In the Set Rate Values fields, type in the rates for up to four persons per room.
d. Click SET.
The rate for one person appears in the grid for all selected room types and dates.
The rates for more than one person for a selected room type appear in the right-hand column of the Set Rate Values fields.
4. When you are finished, click CLOSE.
b. Use the FROM and TO fields to select the range of select on the grid.
d. If you want to add or subtract from increase/decrease box.
e. Click SET.
You may also use any of the available buttons at the bottom of the screen.
Page 132 © 2006 Micros-Fidelio (Ireland) Ltd. April 2006
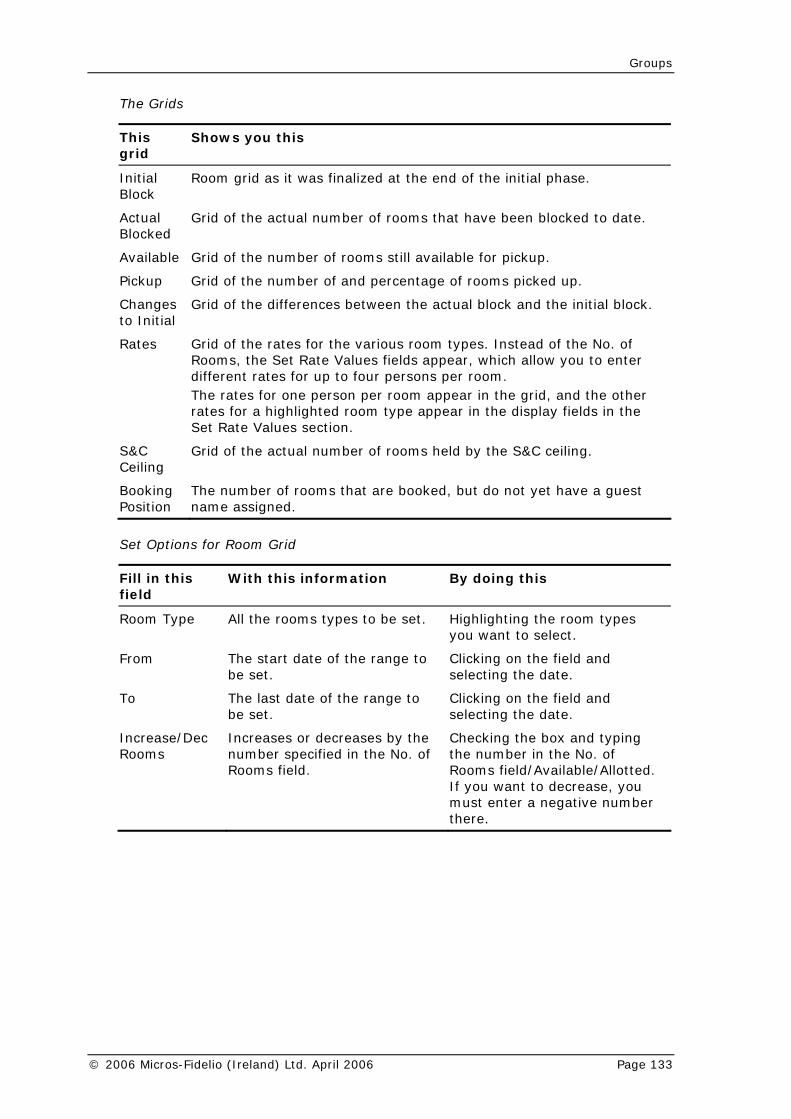
Groups
The Grids
This grid
Shows you this
Initial Block
Room grid as it was finalized at the end of the initial phase.
Actual Blocked
Grid of the actual number of rooms that have been blocked to date.
Available Grid of the number of rooms still available for pickup.
Pickup Grid of the number of and percentage of rooms picked up.
Changes to Initial
Grid of the differences between the actual block and the initial block.
Rates Grid of the rates for the various room types. Instead of the No. of Rooms, the Set Rate Values fields appear, which allow you to enter different rates for up to four persons per room. The rates for one person per room appear in the grid, and the other rates for a highlighted room type appear in the display fields in the Set Rate Values section.
S&C Ceiling
Grid of the actual number of rooms held by the S&C ceiling.
Booking Position
The number of rooms that are booked, but do not yet have a guest name assigned.
Set Options for Room G
Fill in this field
With
rid
this information By doing this
Room Type All the rooms types to be set. Highlighting the room types you want to select.
From The stbe set
The last date of the range to set
Clicking on the field and
Increase/Dec Increases or decreases by the numb
Checking the box and typing in the No. of
d/Available/Allotted. to decrease, you
there.
art date of the range to .
Clicking on the field and selecting the date.
To be . selecting the date.
Rooms er specified in the No. of the number Rooms field. Rooms fiel
If you want must enter a negative number
© 2006 Micros-Fidelio (Ireland) Ltd. April 2006 Page 133
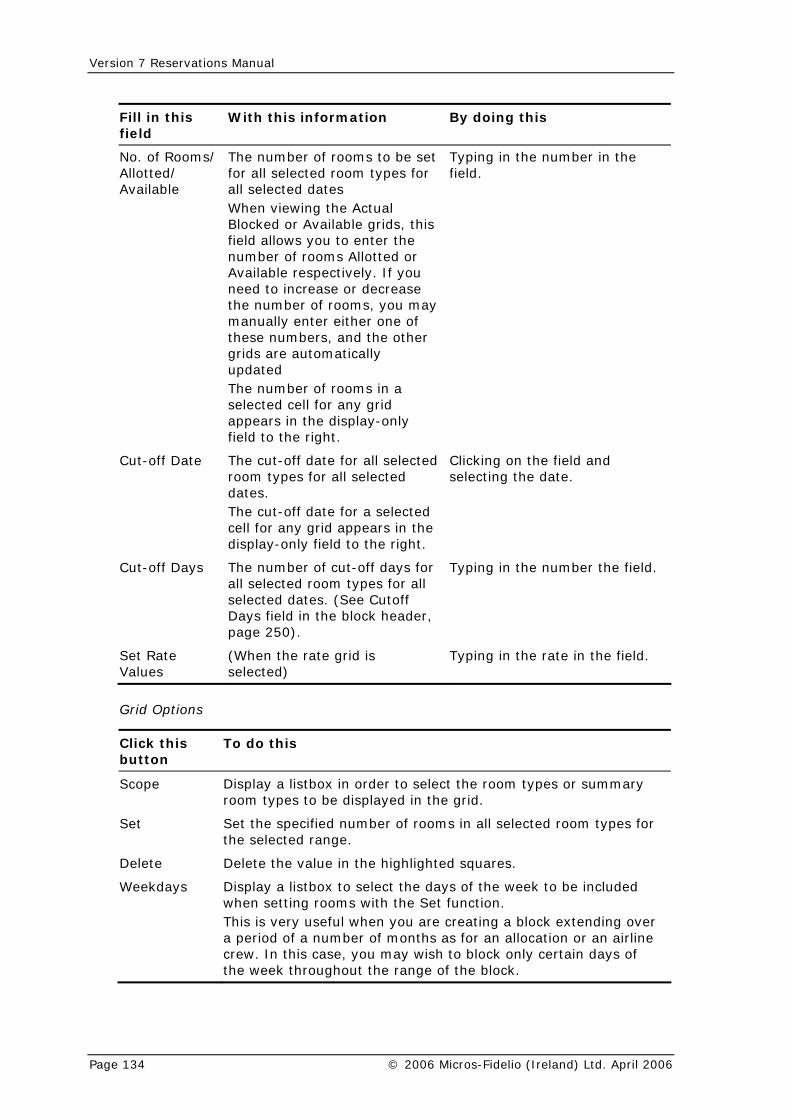
Version 7 Reservations Manual
Fill in this field
With this information By doing this
No. of Rooms/ The number of rooms to be set Typing in thAllotted/ Available
for all selected room types for all selected dates When viewing the Actual Blocked or Available grids, this field allows you to enter the number of rooms Allotted or
you ase
the number of rooms, you may manually enter either one of these numbers, and the other grids are automatically
selected cell for any grid appears in the display-only field to the right.
e number in the field.
Available respectively. Ifneed to increase or decre
updated The number of rooms in a
Cut-off Date The cut-off date for all selected room types for all selected dates. The cut-off date for a selected cell for any grid appears in the display-only field to the right.
Clicking on the field and selecting the date.
Cut-off Days The number of cut-off days for all selected room types for all selected dates. (See Cutoff Days field in the block header, page 250).
Typing in the number the field.
Set Rate Values
(When the rate grid is selected)
Typing in the rate in the field.
Grid Options
Click this To do this button
Scope Display a listbox in order to select the room types or summary room types to be displayed in the grid.
Set Set the specified number of rooms in all selected room types for the selected range.
Delete Delete the value in the highlighted squares.
Weekdays Display a listbox to select the days of the week to be included when setting rooms with the Set function.
is very useful when you are creating a block extending over iod of a number of months as for an allocation or an airline
ys of the block.
This a percrew. In this case, you may wish to block only certain dathe week throughout the range of
Page 134 © 2006 Micros-Fidelio (Ireland) Ltd. April 2006
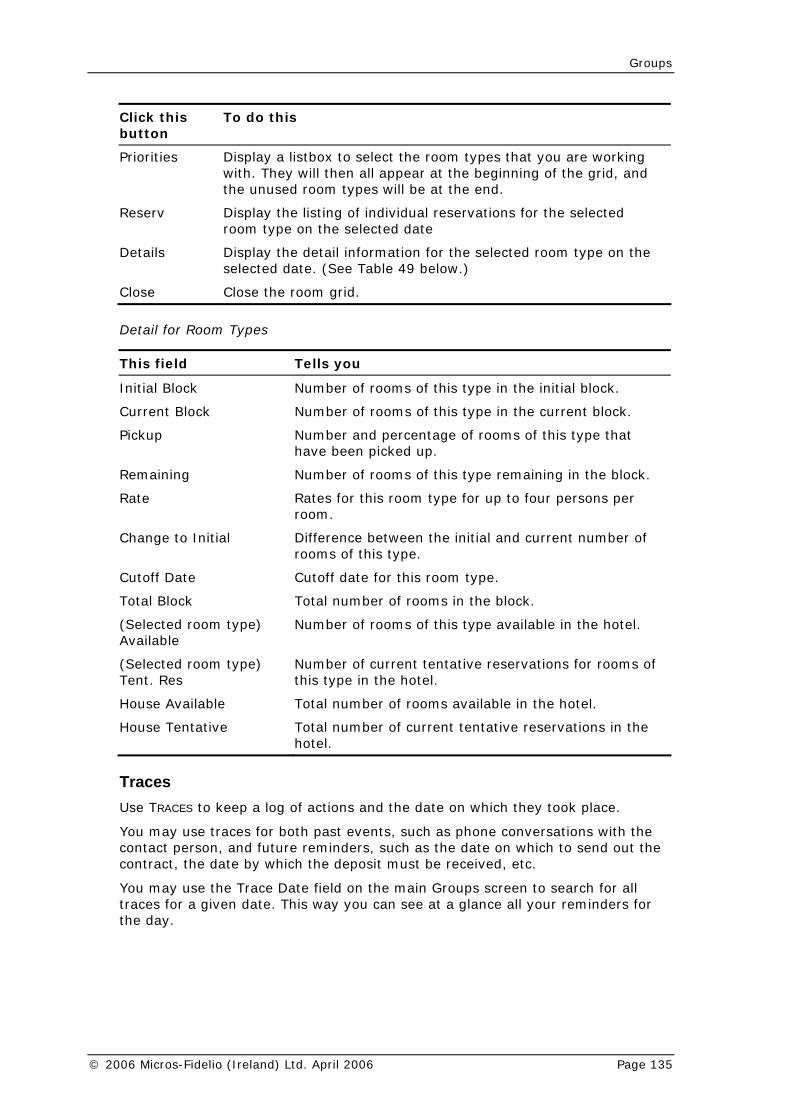
Groups
Click this button
To do this
Prio he room types that you are working l appear at the beginning of the grid, and
rities Display a listbox to select twith. They will then althe unused room types will be at the end.
Reserv Display the listing of individual reservations for the selected room type on the selected date
Details Display the detail information for the selected room type on the selected date. (See Table 49 below.)
Close Close the room grid.
Detail for Room Types
This field Tells you
Init type in the initial block. ial Block Number of rooms of this
Current Block Number of rooms of this type in the current block.
Pickup Number and percentage of rooms of this type that have been picked up.
Remaining Number of rooms of this type remaining in the block.
Rate Rates for this room type for up to four persons per room.
Cha e initial and current number of rooms of this type.
Cutoff Date Cutoff date for this room type.
Total Block Total number of rooms in the block.
(Selected room type) Available
Number of rooms of this type available in the hotel.
(Selected room type) Ten
Number of current tentative reservations for rooms of
Hou
House Tentative Total number of current tentative reservations in the hotel.
nge to Initial Difference between th
t. Res this type in the hotel.
se Available Total number of rooms available in the hotel.
Traces Use TRACES to keep a log of actions and the date on which they took place.
You may use traces for both past events, such as phone conversations with the son reminders, such as the date on which to send out the
the date by which the deposit must be received, etc.
y use thtraces for a giv ce all your reminders for
y.
contact percontract,
, and future
You ma e Trace Date field on the main Groups screen to search for all en date. This way you can see at a glan
the da
© 2006 Micros-Fidelio (Ireland) Ltd. April 2006 Page 135

Version 7 Reservations Manual
How to use Traces:
RACES
Block T
ting, h e top portion of the dialog box.
3. Click EDIT, or N to enter a new trace.
The Group Traces dialog box appears.
4. Enter the date of the trace by selecting it from the calendar that appears when you click on the Trace Date field.
5. Type in the trace information as free form text in the space provided.
6. Click OK.
Info Use INFO to type in any summary information about the group, reminders, or additional information about the block. The info is displayed both in the main
servation form when the blo
A bTex
When changing block information on a block which belongs to a tour series the user will be prompted with a message asking if the block information should be copied to all blocks linked in the tour series. Selecting yes will copy all the information text to all other the other blocks in the tour series. However; if the block info template contains variables, these variables will NOT be updated and must be updated manually by the user.
ck INFO.
up In
2. Type in any n a format that will be easy to see at a If yo
.
tatustua d ck-up HG TATUS
convenient to open for pick-up after all the ave been finalized; the contract signed and deposit
Before this, any changes to the number of rooms are not logged in a way that then allows easy comparison of initial and actual.
If the block was created with an initial status of Offer, the status must first be o Open for Pick-up.
1. Click T .
The races dialog box appears.
2. If edi ighlight the trace listing that you want to edit in th
EW
groups screen when the block is selected and on the Reck code is selected.
lock info template may be defined under Setup->User Configuration->Edit t Files.
How to use Info:
1. Cli
The Gro formation dialog box appears.
information you need iglance. u want to print out the information, click PRINT.
3. Click OK
Change S In order to acto Open for Pi
lly make reservations, the status of the block must be change. Use C S to do this. Each hotel sets its own policy on
when to change status. It is oftenarrangements for the group hreceived. At whatever point you choose to change status, the initial grid is ‘closed'and then all changes are recorded as a difference between initial and actual.
changed to Option, then to Initial, and finally t
Page 136 © 2006 Micros-Fidelio (Ireland) Ltd. April 2006

Groups
How to change Status:
1. Click CHG STATUS.
The system asks for confirmation in changing to the next phase, and warpotential problems. Once the status is changed to Open for Pick-up, it cannotbe changed See initial.
2. Click YES.
ns of
Cutoff Use CUTOFF to release a block at any time during the day. If a cutoff date or number of cutoff days has been specified, the cutoff occurs automatically during the night audit. However, there may be situations in which rooms are still available in the block and need to be released. This can either be done manually in the grid or with the cutoff option.
How to use Cutoff:
1. Click CUTOFF.
The system asks for confirmation.
2.
BloClic the bottom of the block header to display the block options.
Block Options
Click this option To do this
Click YES.
ck Options k on OPTIONS at
Delete Remove the block header from the system.
Move Block Move the entire block to a different starting date
Refresh Grid Rates Update the rate grid if you change rate codes in the block header after entering rates into the rate grid.
Changes See the record of all the changes made to the block.
Summary Info See the summary and daily statistics for the block.
Cancel/Reinstate Cancel a block header or reactivate a block which has been cancelled.
Tour series Duplicate a block at regular intervals.
Custom Tour Series Duplicate a block on selected dates.
Booking Position History
View a list of the Booking Position History for the block.
Delete Use DELETE to completely remove the block header from the system. A block cannot be deleted if reservations have already been made.
1. Click DELETE.
The system asks for confirmation.
2. Click YES.
© 2006 Micros-Fidelio (Ireland) Ltd. April 2006 Page 137
Version 7 Reservations Manual
Move Block mo block to a different starting date.
s only possible if
It is not recommende Move Block to move a block in a tour series. Since not from the tours no longer
How to use Move Bl
MOVE BLOCK.
the new s by clicking on the da
3. Click OK.
The block now beg ecified date. All other dates are adjusted accordingly, but everything else is unchanged.
Refresh Grid Rates ESH GRID RAT ter
entering rates into th block statistics and summaries will then be .
o use Refresh
1. Click REFRESH GRID RATES.
The rate grid is updated. The system informs you if a rate is not specified for t
OK.
NGES to see the record of the changes hanges number of rooms, and status.
C ES
A listing appears of the changes made to the block, in chronological order.
SE.
Info y In summary and daily statistics for the block.
SUMMAR
u venue.
ILY to
3. Click CLOSE.
Cancel/Reinstate Use this Cancel to cancel the block header. You cannot cancel a block if reservations already have been made.
Use Reinstate to reactivate a block which has been cancelled. The status of the block is changed to Initial phase.
Use MOVE BLOCK to ve the entire
This i no reservations have been entered.
d to use the block code isbeing numbered in ch
updated, confusion may resultronological order.
ock:
1. Click
The Move Block d
2. Type in
ialog box appears.
tarting date, or select it from the calendar displayedte field.
ins on the sp
Use REFR ES if you change rate codes in the block header afe rate grid. All
updated
How t Grid Rates:
every room
2. Click
ype.
Changes Use CHA
in dates, made to the block, such as c
1. Click HANG .
2. Click CLO
SummaryUse Summar fo to see the
1. Click Y INFO.
The block s mmary statistics appear, comparing actual and potential re
2. Click DA view the group daily breakdown.
Page 138 © 2006 Micros-Fidelio (Ireland) Ltd. April 2006
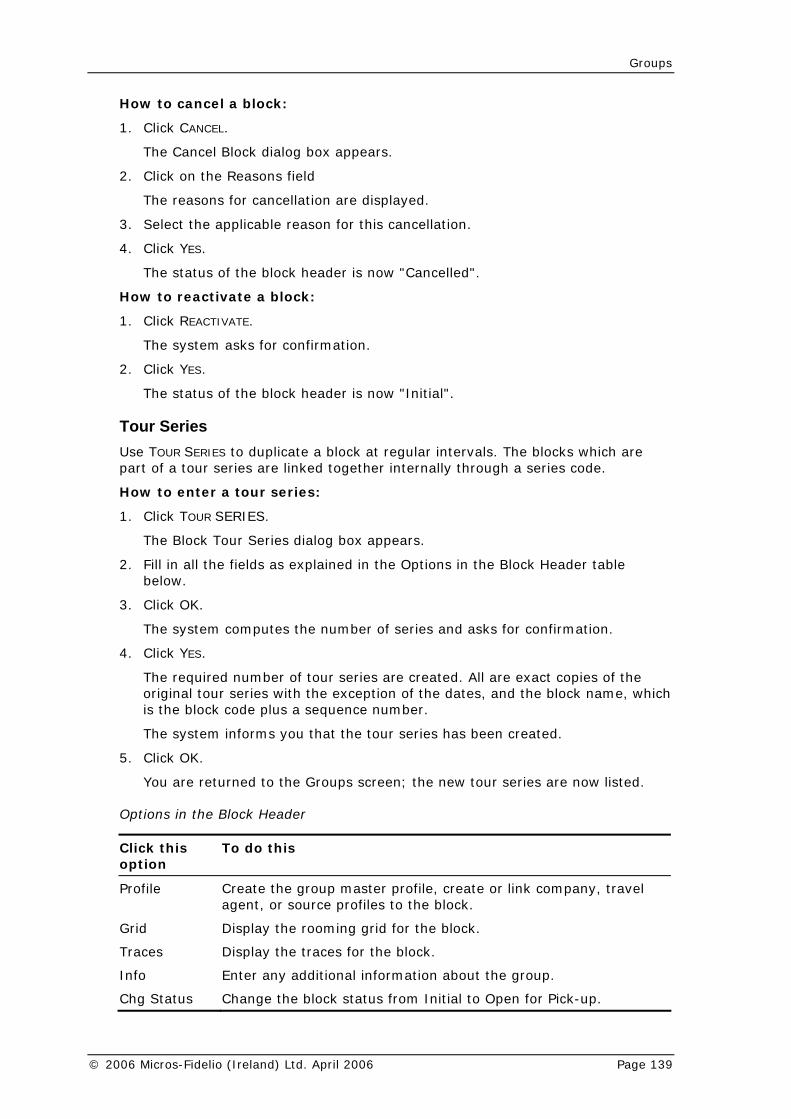
Groups
How to cancel a block:
2. Click on the Reasons field
The reasons for cancellation are displayed.
3. Select the applicable reason for this cancellation.
4. Click YES.
Ho
1. Click REACTIVATE.
The system asks for confirmation.
2. Click YES.
The status of the block header is now "Initial".
ToUse duplicate a block at regular intervals. The blocks which are part of a tour series are linked together internally through a series code.
How to enter a tour series:
1. Click TOUR SERIES.
The Block Tour Series dialog box appears.
2. Fill in all the fields as explained in the Options in the Block Header table below.
3. Click OK.
The system computes the number of series and asks for confirmation.
4. Click YES.
The required number of tour series are created. All are exact copies of the original tour series with the exception of the dates, and the block name, which is the block code plus a sequence number.
The system informs you that the tour series has been created.
5. Click OK.
You are returned to the Groups screen; the new tour series are now listed.
Options in the Block Header
To
1. Click CANCEL.
The Cancel Block dialog box appears.
The status of the block header is now "Cancelled".
w to reactivate a block:
ur Series TOUR SERIES to
Click this option
do this
Profile Crag
eate the group master profile, create or link company, travel ent, or source profiles to the block.
Grid
Traces
Di
Di
En oup.
tus Ch en for Pick-up.
splay the rooming grid for the block.
splay the traces for the block.
Info ter any additional information about the gr
Chg Sta ange the block status from Initial to Op
© 2006 Micros-Fidelio (Ireland) Ltd. April 2006 Page 139

Version 7 Reservations Manual
Click this option
To do this
Cutoff Re r than automatically. lease rooms from a block manually rathe
Options Di .)
Sa
rt Cl
splay the Block Options. (See Block Options
OK ve changes and close the screen.
Abo ose the screen without saving changes.
Custom Tour SUSTOM TOUR nd
specific start date egular intervals.
ck CUSTOM T
The Custom Tour Seri
2. Type in the name (10 characters) of the tour and select a date. Press TAB to display a new line.
3. Repeat step 2 for all the tours you want to create.
The required number of tour series are created. All are exact copies of the original tour series with the exception of the dates, and the block code which you specified.
system in
OK.
our Series
this W
eries Use C SERIES to create a tour series with user defined tour codes a
s which do not occur at r
1. Cli OUR SERIES.
es dialog box appears.
The forms you that the tour series has been created.
4. Click
You are returned to the Groups screen; the new blocks are now listed.
Block T Fields
Fill infield
ith this information
Tour Code Seven-char nce number to form the block code.
acter code to be used with a seque
Frequency Interval in weeks between tour arrival dates.
Next Tour Date of the next tour, that is the first in the series of tours to be created.
Last Tour Date of the last tour in the series.
ys before each arrival date to cut off the block. Cutoff Days Number of da
Booking Position History The id of the changes in the booking posi ife of the block.
history:
Click
Booking Position History option displays a grtion and the dates on which they were entered over the l
To display the booking position
BOOKING POSITION HISTORY.
The Booking Position History listing appears.
Page 140 © 2006 Micros-Fidelio (Ireland) Ltd. April 2006
Groups
Group ce Thi itial phase. It displays the Group Reservation List for the block. The Group Options and the Group Reservation List options are available in the Group Reservation List screen. See Group Reservations List Options and Group Options for an explanation of ava idual reservations are made using the Rooming List from the Gr
The fi s to O
Create th
1. nt to work with. (See To search for an existing
2.
it will create the post master.
3.
up master profile as rture date, rate
urce code are copied from the block header.
4. be the default values for the entire group.
If you have entered rates in the rate grid, they will override an entry in the Rate field here.
5.
servation number.
6.
The Reservation List appears, displaying the PM record.
7. Click CLOSE.
8.
ain Reservations module screen.
1. Locate the block header you want to work with as described above. (See To search for an existing block header).
2. Click DETAILS.
The Reservation List appears, displaying the PM reservation and any individual group reservations. The Available Room Grid appears at the lower left.
See Group Reservations List Options and Group Options for an explanation of available options. Remember that, with the exception of GROUP OPTIONS and SEARCH, the options apply to the record that is highlighted.
3. Click CLOSE.
You are returned to Groups screen.
4. Click CLOSE.
You are returned to the main Reservations module screen.
Detail Maintenans option is not available for a block that is still in the in
ilable options. The indivoup Options.
rst time that you enter Group Details Maintenance after changing the statupen for Pick-up, a post master will automatically be created.
e pay master (Post Master):
Locate the block header you wablock header).
Click DETAILS.
The system informs you that
Click OK.
A new reservation form appears, with the name of the grothe guest name. Certain fields, such as arrival date, depacode, market code, and so
Edit the reservation as necessary. All fields will
Click OK.
The system assigns a re
Click OK.
You are returned to Groups screen.
Click CLOSE.
You are returned to the m
Access the Group Reservation List:
© 2006 Micros-Fidelio (Ireland) Ltd. April 2006 Page 141
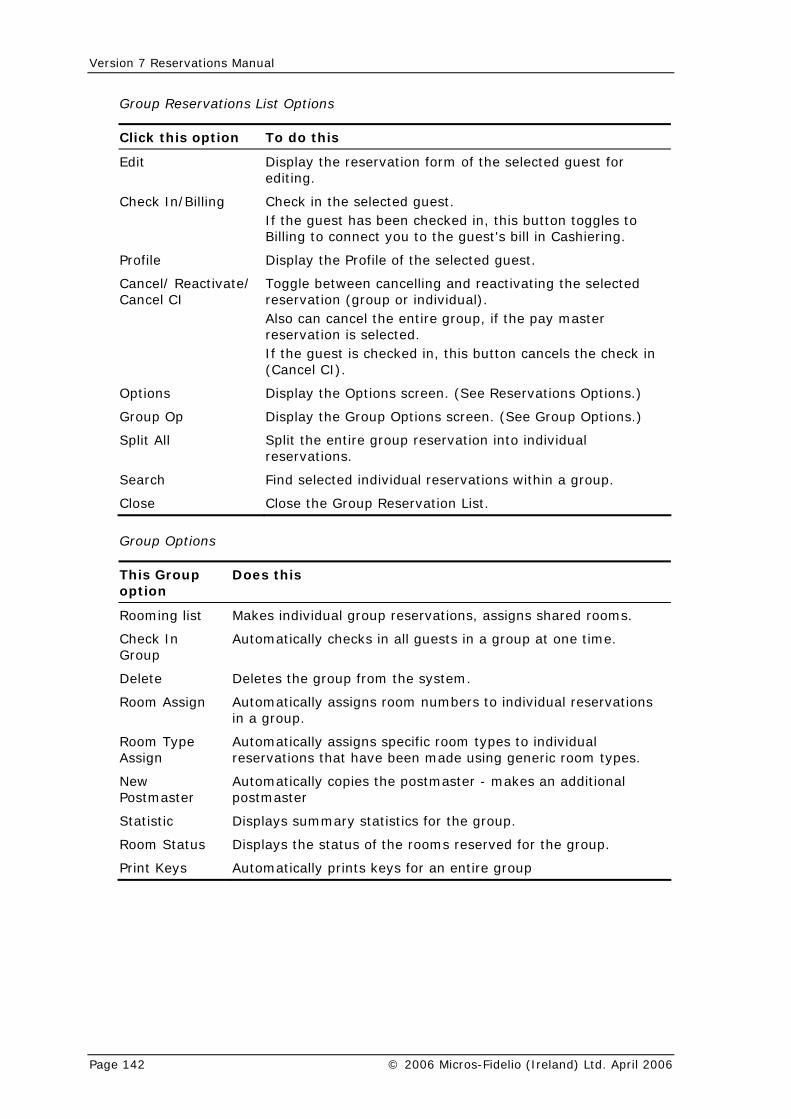
Version 7 Reservations Manual
Group Reservations List Options
Click this option To do this
Ediediting.
t Display the reservation form of the selected guest for
Check In/Billing Check in the selected guest. If the guest has been checked in, this button toggles to Billing to connect you to the guest's bill in Cashiering.
Profile Display the Profile of the selected guest.
Can nd reactivating the selected or individual).
checked in, this button cancels the check in (Cancel CI).
Options Display the Options screen. (See Reservations Options.)
Group Op Display the Group Options screen. (See Group Options.)
Split All Split the entire group reservation into individual reservations.
Search Find selected individual reservations within a group.
Close Close the Group Reservation List.
cel/ Reactivate/ Toggle between cancelling aCancel CI reservation (group
Also can cancel the entire group, if the pay master reservation is selected. If the guest is
Group Options
This Grouoption
p Does this
Rooming list M ervations, assigns shared rooms. akes individual group res
Check In Group
A
D
ssign A individual reservations i
ype A individual reservations ic room types.
tmaster Automati an additional p
tic D
Room Status Displays the status of the rooms reserved for the group.
ys A
utomatically checks in all guests in a group at one time.
Delete eletes the group from the system.
Room A utomatically assigns room numbers to n a group.
Room TAssign
utomatically assigns specific room types tothat have been made using gener
New Pos
cally copies the postmaster - makes ostmaster
Statis isplays summary statistics for the group.
Print Ke utomatically prints keys for an entire group
Page 142 © 2006 Micros-Fidelio (Ireland) Ltd. April 2006
Groups
Rooming List Use Rooming List to make individual reservations for a group and to assign shared rooms.
You may find it convenient to create a more streamlined Rooming List template that is tailor-made to your own needs. You can delete and change the width and
columns, roup.
to enter a
1. Display the G e group. (See To find the Group servation L ation). (To display the ervation li
2. Select the gro
ck GROUP O
Group Op
G LIST.
Rooming List dialog box appears. The group or block name appears
ick on the following fields to display lays
r arrow down)
8. Click SAVE.
reated are saved.
Clicking this option
Does this
order of and then save the template for future use with any g
How group rooming list:
roup Reservation List for thRe ist for an existing standard group reservRes st for a block, see To access the Group Reservation List).
up master.
3. Cli PTIONS.
The tions dialog box appears.
4. Click ROOMIN
The Groupin the Name field; all other information is copied from the group master or post master.
The options in the Rooming List are explained in the Rooming List Functions table below.
5. Type in the first and last name of the guest, as well as any other necessary information. The fields are all self-explanatory. Use the mouse or the press TAB to move from field to field. You may cla drop-down box rather than typing: Title, Arrival, Departure, Room (dispthe Room Search dialog box.), Specials and Packages.
6. Press ENTER to display a new line (reservation) which is copy of the original selected reservation. (o
7. Repeat step 5 and step 6 until the entire rooming list has been entered.
The individual group reservations that have been c
9. Click CLOSE.
You are returned to the Group Reservation List. The new individual reservations that have just been created appear in the bottom portion of the display.
Rooming List Functions
Template Displays the available rooming list templates (For instructions on how to create your own template, see To create or edit a Rooming List template.)
Check Guest Profile
Indicates whether to check to see if a profile already exists for each guest as the listings are created.
Creation Sorts the listing in order of creation date.
Name Sorts the listing in order of last name.
© 2006 Micros-Fidelio (Ireland) Ltd. April 2006 Page 143
Version 7 Reservations Manual
Clicking this option
Does this
Arrival Sorts the listing in order of arrival date.
Room Sorts the listing in order of room number.
New Displays only new reservations being made.
All Displays all existing reservations in the group.
Zero Sets the payment method for a shared room to Zero: first guest pays the entire price, others pay zero.
Full Sets the payment method for a shared room to Full: each guest pays the full rate.
Even Sets the payment method for a shared room to Even: The rate is divided equally between all the sharing guests.
Share Sets shared rooms. (See Sharing.)
Traces Displays the Traces form for the selected guest. (See Reservations Options.)
Messages Displays the Messages form for the selected guest. (See Reservations Options)
Profile Displays the Profile of the selected guest. (See Profiles.)
Reserv Displays the reservation form for the selected guest.
Grid Displays the rooming grid for the block. (Not activated in the Standard Group module.)
Print Prints a hard copy of the rooming list.
Undo Deletes the last line that was created, if it has not already been saved.
Save Saves the rooming list.
Close Closes the Group Rooming List dialog box.
How to create or edit a Rooming List template:
1. Display the Group Reservation List for any group. (See To find the Group Reservation List for an existing standard group reservation, or To access the Group Reservation List.)
2. Click GROUP OPTIONS.
3. Select the group master.
The Group Options dialog box appears.
4. Click ROOMING LIST.
The Group Rooming List dialog box appears.
5. Click on the Template field.
A listbox appears, displaying all existing templates.
6. Select the template to be edited, or one to serve as the basis for a new template.
The selected Rooming List is displayed in conformity with the selected template.
7. Edit the template as follows:
Page 144 © 2006 Micros-Fidelio (Ireland) Ltd. April 2006
Groups
To delete a column:
a. Position the cursor on the column and right-click.
b. The template options are displayed.
DELETE COLUMN.
lumn is deleted.
To move a column:
a. Position the cursor on the column name and hold down the left mouse button.
b. Drag the column to the desired position.
c. Release the mouse button.
The column is in the new position.
To change column width:
old down the left mouse button.
b. Move the column boundary to create desired width.
To delete a template:
a. Right-click anywhere in the Rooming List.
b. The template options are displayed.
c. Click DELETE CURRENT TEMPLATE.
The entire template is deleted.
To restore a column:
yed.
A listing of deleted columns appears.
d. Click on the desired column name.
The column is restored.
8. When the template is finished, right-click anywhere in the Rooming List.
The template options are displayed.
9. Click SAVE TABLE TEMPLATE.
The Save Table Template dialog box is displayed.
10. Type in the name of the template and click OK.
If you type in a new name, a new template will be created and the original template will be unchanged. If you type in the same name, the system will ask for confirmation before overwriting.
11. Click YES.
c. Click
The co
a. Position the cursor on the right-hand boundary of the column and h
a. Right-click anywhere in the Rooming List.
b. The template options are displa
c. Highlight RESTORE COLUMN.
© 2006 Micros-Fidelio (Ireland) Ltd. April 2006 Page 145
Version 7 Reservations Manual
How to print the rooming list:
(See To find the Group
.)
2. Select the group master
3. Click GROUP OPTIONS
The Group Options dialog box appears.
4. Click ROOMING LIST.
The Group Rooming List dialog box appears.
5. Select the template and sort order.
6. When the Rooming List is displayed as you want it to be printed, right-click anywhere in the Rooming List.
The template options are displayed.
7.
The Grid Print dialog box appears.
8. Click PRINT to print in the standard format, or ADVANCE to customize the print format and parameters. (See Printing with printing options for an explanation of Advance Print.)
Rooming List Functions
Clicking this option
Does this
1. Display the Group Reservation List for the group. Reservation List for an existing standard group reservation or to find the Reservation List for a block, see To access the Group Reservation List
Click PRINT.
Template Displays the available rooming list templates (For instructions on how to create your own template, see To create or edit a Rooming List template.)
Check Guest Profile
Indicates whether to check to see if a profile already exists for each guest as the listings are created.
Creation Sorts the listing in order of creation date.
Name Sorts the listing in order of last name.
Arrival Sorts the listing in order of arrival date.
Room Sorts the listing in order of room number.
New Displays only new reservations being made.
All Displays all existing reservations in the group.
Zero Sets the payment method for a shared room to Zero: first guest pays the entire price, others pay zero.
Full Sets the payment method for a shared room to Full: each guest pays the full rate.
Even Sets the payment method for a shared room to Even: The rate is divided equally between all the sharing guests.
Share Sets shared rooms. (See Sharing.)
Traces Displays the Traces form for the selected guest. (See Reservations Options.)
Page 146 © 2006 Micros-Fidelio (Ireland) Ltd. April 2006
Groups
Co
licking this ption
Does this
Messages Displays the Messages form for the selected guest. (See s Options) Reservation
Profile Displays the Profile of the selected guest. (See Profiles.)
been saved.
Save
Close Closes the Group Rooming List dialog box.
Reserv Displays the reservation form for the selected guest.
Grid Displays the rooming grid for the block. (Not activated in the Standard Group module.)
Print Prints a hard copy of the rooming list.
Undo Deletes the last line that was created, if it has not already
Saves the rooming list.
Borrowing Occasionally, when you are entering the rooming list, you may want to reserve a room type which is not available in the block; either because they have all been picked-up, or because it was not one of the room types included in the block.
Wh system will "borrow ill available. The
lected room type is still "0", because the borrowed room was immediately picked-up.
The number of available rooms for the room type that was borrowed from is decreased by one. The number of actual blocked rooms for the selected room type stays the same, whereas the number for the room type that was borrowed from increases by one.
Borrowing from a room type does not increase the total size of the block. It only readjusts the allocation among the different room types.
What If There Are No Rooms Left In the Block? If ttherooms of the selected type increased, but the size of the block itself is also
the reservation ver, be made as an individual
ms even for a block that is not elastic.)
en you select a room type that has no available rooms, the " a room from the room type that has the most rooms st
number of available rooms for the se
here are no available rooms left in the block, and the block is an elastic block, room can be added. In this case, not only is the number of actual blocked
increased. If the block is not elastic, the system informs you that cannot be made as part of the block. (It may, howereservation, or the change may be made in the room grid, where it is possible to increase the number of allocated roo
© 2006 Micros-Fidelio (Ireland) Ltd. April 2006 Page 147


7
Events With the Events option, Suite 7 Reservations can keep track of future events, and of critical dates istmas.
How to open t
1. From the main Suite 7 screen, click the Reservations icon.
and calendar periods, such as Chr
he Events dialog box:
The Reserva in menu icons. tions toolbar appears to the right of the ma
is the startinThis toolbar g point for all Suite 7 Reservation functions.
Ev2. Click the ents icon.
The Events dialog box appears. It contains a list of all planned future events, and past events which have not been deleted.
How to see the events forecast for a future period:
ents dialog box, click the Start Show n menu.
dow
he m nd day you want the Events lis
ven ed.
How to create
1. From the Eve ield, ty date of the cho nda
fiel vent.
3. In the EVENT field, type the name of the event.
The OK button is highlighted.
4. In the NOTE field, type any notes relevant to the event (optional).
5. Click OK.
The new event appears on the Events list.
6. Click CLOSE.
Update runs and the Event Dialog box closes.
1. From the Ev From drop-dow
The drop-
2. Click on t
The first e
n calendar appears.
onth a t to begin at.
t on the chosen date is highlight
a new event:
nts dialog box, in the FROM f
pe the startingevent, or
2. In the TO
ose it from the drop-down cale
d, enter the ending date of the e
r.
© 2006 Micros-Fidelio (Ireland) Ltd. April 2006 Page 149
Version 7 Reservations Manual
How to edit an event:
1. In the Events uble click the event.
of the event appear in the lower frame of the dialog box.
2. Change the fields you want to edit.
3. Click OK.
o delete an event:
1. Highlight the event you want to delete.
2. Click DELETE.
You are prompted to confirm the deletion.
3. Click YES.
h
CLOSE.
Note: You ents.
dialog box, do
The details
How t
You return to t e Events dialog box.
4. Click
Update runs and the Event Dialog box closes.
can select and delete multiple ev
Page 150 © 2006 Micros-Fidelio (Ireland) Ltd. April 2006
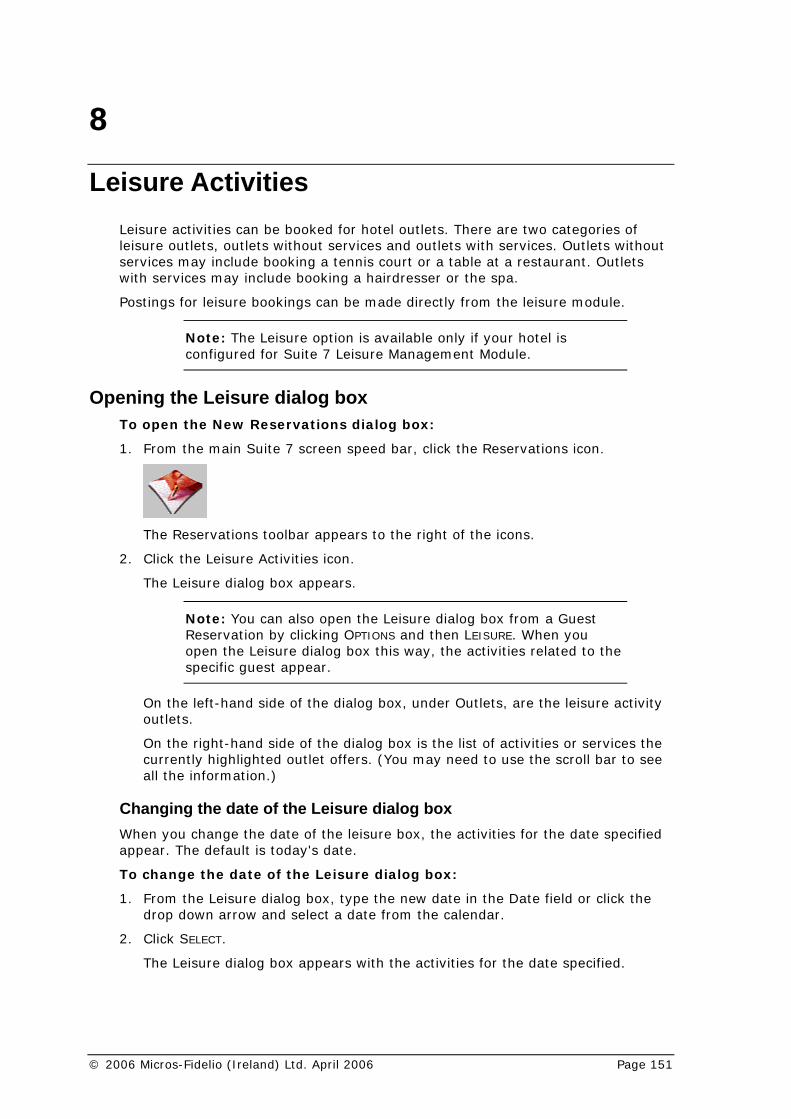
8
Leisure Activities Leisure activities can be booked for hotel outlets. There are two caleisure outlets, outlets without services and outlets with services. O
tegories of utlets without nt. Outlets
w h services may include booking a hairdresser or the spa.
Postings for leisure bookings can be made directly from the leisure module.
Note: The Leisure option is available only if your hotel is
services may include booking a tennis court or a table at a restaurait
configured for Suite 7 Leisure Management Module.
Openi
1. From the main Suite 7 screen speed bar, click the Reservations icon.
ng the Leisure dialog box To open the New Reservations dialog box:
The Reservations toolbar appears to the right of the icons.
2. Click the Leisure Activities icon.
The Leisure dialog box appears.
Note: You can also open the Leisure dialog box from a Guest Reservation by clicking OPTIONS and then LEISURE. When you open the Leisure dialog box this way, the activities related to the specific guest appear.
On the left-hand side of the dialog box, under Outlets, are the leisure activity
list of activities or services the currently highlighted outlet offers. (You may need to use the scroll bar to see all the information.)
Changing the date of the Leisure dialog box Wh specified
1. in the Date field or click the drop down arrow and select a date from the calendar.
2. Click SELECT.
ivities for the date specified.
outlets.
On the right-hand side of the dialog box is the
en you change the date of the leisure box, the activities for the date appear. The default is today's date.
To change the date of the Leisure dialog box:
From the Leisure dialog box, type the new date
The Leisure dialog box appears with the act
© 2006 Micros-Fidelio (Ireland) Ltd. April 2006 Page 151

Version 7 Reservations Manual
Making a Leisure Activity reservation
log box, select the OUTLET you require.
the SERVICE.
t a date te.
4. Click SELECT.
The Leisure Scheduling dialog box appears for the selected service.
5. Select the time and location or name of the employee by whom the service is to be given, by placing the cursor on the available activity grid box that you want to book and click. If more than one time slot is required, drag and drop the cursor down to the next time slot.
e: You may need to scroll down to see all of the times slots
To make a Leisure Activity reservation:
1. From the Leisure Activities dia
2. On the right-hand side, select
3. Type the date in the DATE field or click the drop down arrow and selecfrom the calendar. The default is today's da
Notand activities.
6. Click BOOKING.
The Select Leisure Reservation Type dialog box appears.
7. Click the appropriate radio button.
9. Click OK.
ppears, with the information pertaining to the
Note: At the top right of the Leisure Booking dialog box, the
8. In the NAME field type the guest's name.
The Leisure Booking dialog box abooking.
booking type is indicated, that is whether the booking is for a hotel guest, a club member, an outside guest, or hotel staff.
10. Click the SERVICE drop down arrow and select a service from the list of services.
11. artment from
ed for either the activity or service is used. (The department code cannot be changed when
e details of the booking in the text box at the lower left
Type the Duration, Price, and Discount %, and select the Depthe drop-down list.
If a Department code is not selected, the department code defin
posting.).
12. Click OK.
The Leisure Schedule dialog box reappears, with the appropriate blocks marked off, and thcorner below the Date field. If you click a cell that has a leisure activity booked, the guest name, employee name, and time are detailed in the text box.
TIP: Double Click on an empty time slot to create a new leisure booking. In order to view or change an existing booking, double click on a reserved time slot. You cannot make a new reservation on a time slot which is either removed from availability or not open for bookings.
Page 152 © 2006 Micros-Fidelio (Ireland) Ltd. April 2006

Leisure Activities
Leisure S
Click thisbutton
chedule dialog box options
To do this
Scroll the calendar back one week.
Scroll the calendar back one day.
Scroll the calendar forward one day.
Scroll the calendar forward one week.
Booking Make a leisure activity reservation.
Delete Delete the currently highlighted booking.
Com ted leisure booking to the name in the
"check-in".
Gue ation about the guest. For example, or an outside guest, a dialog box
appears with the name and phone number. If the guest is a member, the guest profile appears.
Close Close the Leisure Scheduling dialog box.
mence Change the status of the currently highligh"Checked In." An asterisk appears next toblocking. By pressing Commerce again you can cancel the
st Info Display the available informif the leisure reservation is f
Select Leisure Activities radio buttons
Click this radio button
For this case Then do this
Select from Reservation file
A guest with a reservation in the hotel. Note: If the reservation is cancelled, and no charges have been posted, Suite 7 will also cancel the leisure booking.
1. Click the Name field to display the reservation list.
2. Select a name from the reservation list.
3. Click OK.
© 2006 Micros-Fidelio (Ireland) Ltd. April 2006 Page 153
Version 7 Reservations Manual
Click this radio button
For this case Then do this
Select from Me
A person with a guest profile aying in the hotel.
1. Type in the member Name or the Member number or click the Name field to display the Profile Search screen.
2. Select a name from the Profile Search screen or create a new profile.
3. Click OK. Depending on the configuration setup, the membership number may be either mandatory or optional.
mber file who is not st
Outside guest A guest with neither a member servation.
Type in the name and click OK. The telephone number is optional.
Type in the name of the staff member and click OK. The telephone number is optional.
profile nor a hotel re
Staff Staff members.
Leisure Booking fields
With this iFill in this field nformation
Name T he guest or staff member's name
Member Number T automatically filled in
T uest.
es The reservation dates – arrival and departure.
T H t bty
T
Start Time T leisure activity. You cannot change th
Duration T the activity. Default is the standard duration fo
me T eld cannot be changed di
T
Booking Type TH r Staff. This field cannot be changed.
he number of the member. This field is from the member's profile.
Room
Resv Dat
he room number if the guest is a hotel g
Type he type of guest for whom you have made the booking:otel Guest, Member, Outside Guest or Staff. A differenooking type can be selected only if the original booking pe is for an Outside Guest or Staff Member.
Date he date of the booking.
he starting time for the e start time from this dialog box.
he duration of(Minutes).
End Ti
r this activity as configured in the setup program.
he end time for the booking. This firectly but is affected by the Duration field.
he leisure activity selected.
he type of guest for whom you have made the booking:
Service
otel Guest, Member, Outside Guest o
Page 154 © 2006 Micros-Fidelio (Ireland) Ltd. April 2006

Leisure Activities
Fill in this field With this information
Persons (in non
screen only)
Number of people participating in the activity. The Persons fico
service activity eld defaults to the standard number of participants as nfigured in the setup program.
Dept. The department code that will be used when charging for the activity. From this screen another department code can be selected.
Price The price of the activity in the currency defined as deffor the hotel. The price is calculated automatically based on
ault
ivity, date, time, duration, persons, and discount.
Discount % Percentage of price discount. Default is 0 (no discount).
User The name of the user who entered the leisure booking.
Created Creation date of the leisure booking.
Not
the actYou can accept the price or modify it.
es Free text for special notes pertaining to this leisure booking.
Changing a Leisure Booki
Changing the booking time or date by cutting and pasting To change the booking time or date by cutting and pasting:
1. From the Leisure Activities dialog box, select the Outlet you require.
2. On the right-hand side, select the Service.
3. Type the date in the Date field or click the drop down arrow and select a date
ighting the booking and click the right mouse button.
menu appears.
7. If you want to move the activity reservation to a new date, enter a new date in the Date field. Select a new time slot and click the right mouse button.
appears.
8. Click PASTE.
The date and/or time are changed.
9. Click OK.
The Leisure Schedule dialog box is closed.
Changing the booking time by dragging and dropping To change the booking time by dragging and dropping:
1. From the Leisure Activities dialog box, select the Outlet you require.
2. On the right-hand side, select the Service.
3. Type the date in the Date field or click the drop down arrow and select a date from the calendar. The default is today's date.
ng
from the calendar. The default is today's date.
4. Click SELECT.
The Leisure Scheduling dialog box appears for the selected service.
5. Highl
The Leisure Activity
6. Click CUT.
The Leisure Activity menu
© 2006 Micros-Fidelio (Ireland) Ltd. April 2006 Page 155
Version 7 Reservations Manual
4. Click SELECT.
The Leisure Scheduling dialog box appears for the selected service.
5. Place the cursor on the booking and click.
the new time and location or name of the
The time of the booking is changed.
7. Click OK.
The Leisure Schedule dialog box is closed.
Changing the Booking fields You can change the booking fields such as, duration, persons, price, department, not
1. From the Leisure Activities dialog box, select the Outlet you require.
2. On the right-hand side, select the Service.
3. Type the date in the Date field or click the drop down arrow and select a date from the calendar. The default is today's date.
4. Click SELECT.
The Leisure Scheduling dialog box appears for the selected service.
g and double click or click G.
Booking dialog box appears, with the information pertaining to the
f the fields.
lick OK.
8. The Leisure B the L log box appears.
re S
Checking in a Leisure Booking When the guest(s) arrives for the Leisure activity you can check them in to indicate that they have arrived at the activity.
To check in a guest for the leisure activity:
1. From the Leisure dialog box, select the activity and click SELECT.
The dialog box for the selected activity appears.
2. Select the booking you want to check-in and clic
The system indicates that the booking has been
tion on the leisure activity will be added to the guest's folio.
An asterisk appears next to the name of the checked-in guest.
6. Drag and drop the booking toemployee by whom the service is to be given.
es, name, or phone number.
To change the Booking fields:
5. Place the cursor on the
The Leisure
bookin BOOKIN
booking.
6. Edit any o
7. C
ooking dialog box is closed and eisure Schedule dia
9. Click OK.
10. The Leisu chedule dialog box is closed.
k COMMENCE.
checked in.
The informa
Page 156 © 2006 Micros-Fidelio (Ireland) Ltd. April 2006
Leisure Activities
Posting leisure activity charges You can manually post leisure charges directly from the Leisure screen once the
g has commenced. Under certain circumstances, the posting may also be automatically:
If a guest is an early departure, any commenced ay will be posted automatically during check-out.
For in-house guests it is possible to have the system make the posting eisure booking must be
Note: No changes may be made to the Manual Posting screen.
bookinmade
leisure booking for this d
automatically during the night audit. However the lmarked as commenced.
Make sure that a department code is assigned in the Booking dialog box, and that the proper price is specified.
To post a leisure activity charge:
1. select the booking in the Leisure
The Leisure Booking dialog box appears.
LOGIN.
The Manual Posting dialog box appears.
Remember that all fields are automatically filled, and cannot be edited.
return to the Leisure Booking dialog box and make sure that a Department Code has been assigned.
4. Click POST.
e Billing button does not appear.
.
Cancelling the check-in of a Leisure Booking You cannot cancel a checked-in leisure activity if a charge was already posted for the activity. The CANCEL CHECK-IN button will be disabled.
To cancel the check-in of a guest for the leisure activity:
1. From the Leisure dialog box, select the activity and click SELECT.
The dialog box for the selected activity appears. Next to checked-in guests, an
2. Select the booking you want to remove from check-in and click COMMENCE.
The system asks if you want to remove the check-in for that booking.
3. Click YES.
When a leisure booking has commenced, Schedule and click BILLING.
2. Click BILLING.
The Cashier Login dialog box appears.
3. Enter your cashier number and password, and click
If the POST button is not activated,
The posting is listed in the top section of the screen.
5. Click CLOSE.
You are returned to the Leisure Schedule dialog box.
If you open the Leisure Booking screen for the same booking, you will see that:
Th
The Amount Posted" lamp appears
asterisk appears.
© 2006 Micros-Fidelio (Ireland) Ltd. April 2006 Page 157
Version 7 Reservations Manual
The asterisk is removed from the booking.
Deleting a Leisure Booking You cannot delete a leisure activity if a charge was already posted for the activity. The DELETE button will be disabled.
To delete a leisure booking:
1. From the Leisure dialog box, select the activity and click SELECT.
The dialog box for the selected activity appears.
2. Select the booking you want to delete and click DELETE.
The system asks if you want to delete that booking.
3. Click YES.
The booking is removed.
Viewing guest information To view guest information:
1. From the Leisure dialog box, select the activity and click SELECT.
The dialog box for the selected activity appears.
2. Select the booking for the guest you want to view and click GUEST INFO.
Depending on the type of booking, either the guest reservation, guest profile, or guest name is displayed. The guest profile appears. You may make changes to the guest reservation or profile if you have the rights.
3. Click CLOSE.
The Leisure dialog box appears.
Leisure Activities Menu Options To open the Leisure Activity menu:
Select a booking and click the right mouse button.
A menu of commands appears.
Leisure Activities menu options
Select this menu item
To perform this action
New Reservation To enter a new leisure booking.
Reservation Information
View the details of a leisure booking.
Delete Leisure Booking
To delete the selected leisure booking.
Remove/Restore Availability
Block a particular activity at certain time for a specific reason. For example, Lunch Break or Cleaning Duty.
Print Prints out the schedule for that day, showing all bookings for all guests.
Cut To select the highlighted booking in order to change resource, time or day.
Page 158 © 2006 Micros-Fidelio (Ireland) Ltd. April 2006
Leisure Activities
Select titem
his menu To perform this action
Paste To place the highlighted booking in the new resource, time slot or day.
Change Booking Type
Change the booking type. (Type of guest: Existing Guest, Member, Outside Guest or Staff.)
Resource Information
Retrieve information about the location, item or person supplying the activity. This usually contains specific information, for example, if a tennis court is clay or grass.
Diary Enter comments about the activity.
Expected Revenue Calculate expected daily revenue for the service outlet or the activity on the selected day.
You can remove a block of time from the schedule for a specific reason; for example, Lunch Break or Cleaning Duty. The blocked time then is not available for booking.
You may also restore a block of time that was removed from availability.
To remove availability:
1. Select a booking or an empty activity grid box and click the right mouse button.
The Leisure Activities menu appears.
2. Highlight REMOVE AVAILABILITY.
The available reasons that are defined in the configuration program appear.
3. Click on the applicable reason.
The time becomes blocked; the colour of the activity grid box is changed, and the selected reason is displayed.
To restore availability:
1. Select a block of removed time and click the right mouse button.
The Leisure Activities menu appears.
2. Click on RESTORE AVAILABILITY.
The block of time is now unmarked, and available for booking.
Printing the leisure schedule You can print out the schedule for the selected day, showing all bookings for all guests.
To print a schedule:
1. Right-click anywhere in the Leisure Schedule screen.
The Leisure Activities menu appears.
2. Click PRINT.
The schedule is printed.
© 2006 Micros-Fidelio (Ireland) Ltd. April 2006 Page 159
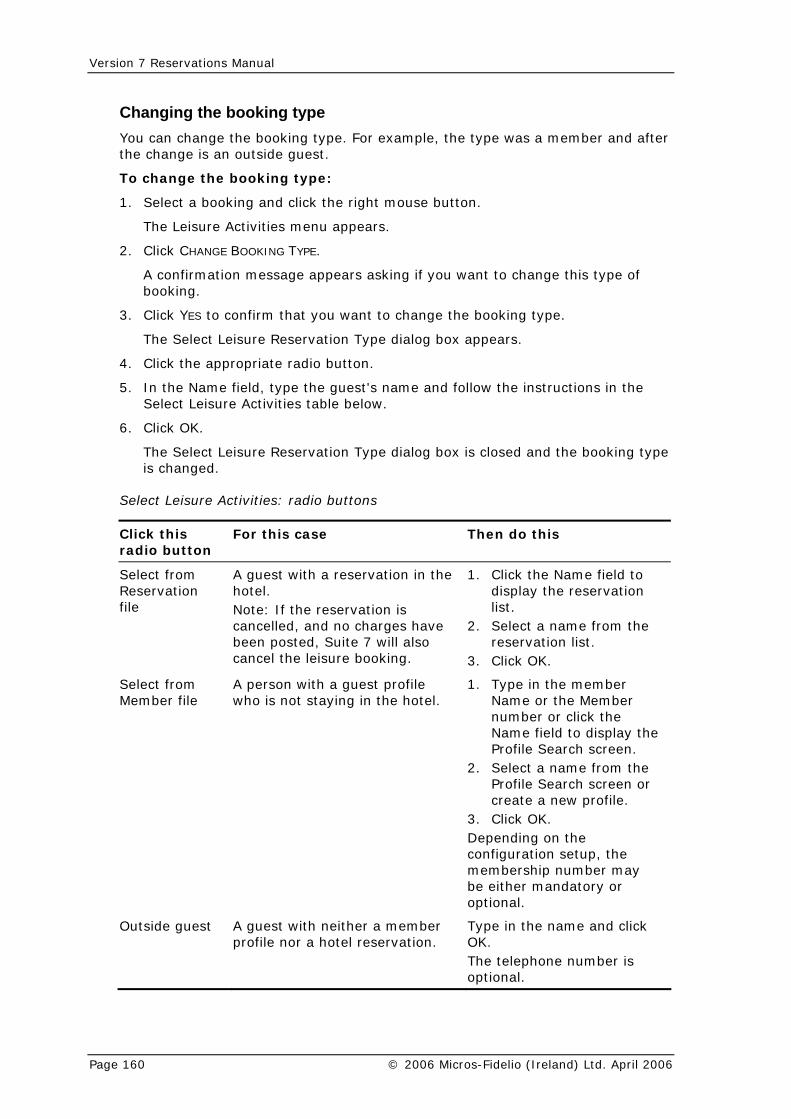
Version 7 Reservations Manual
Changing the booking type examp ter
s
s.
king i
o cha
e dialo
name aSelect Leisure Activities table below.
e dialo e
You can change the booking type. For le, the type was a member and afthe change is an outside guest.
To change the booking type:
1. Select a booking and click the right mou e button.
The Leisure Activities menu appear
2. Click CHANGE BOOKING TYPE.
A confirmation message appears as f you want to change this type of booking.
3. Click YES to confirm that you want t nge the booking type.
The Select Leisure Reservation Typ g box appears.
4. Click the appropriate radio button.
5. In the Name field, type the guest's nd follow the instructions in the
6. Click OK.
The Select Leisure Reservation Typis changed.
g box is closed and the booking typ
Select Leisure Activities: radio buttons
Click this radio button
For this case Then do this
Select from Reservation
A guest with a reservationhotel.
file Note: If the reservatiocancelled, and no cha
i
n is rges h
been posted, Suite 7 will alsking.
n n the 1. Click the Name field to
ave o
2. Select a name from the reservation list.
cancel the leisure boo
display the reservatiolist.
3. Click OK.
Select from A person with a guest pMember file who is not staying in t
rofile he ho
2. Select a name from the r
memervati
tel. Name or the Member 1. Type in the member
number or click the Name field to display the Profile Search screen.
Profile Search screen o create a new profile.
3. Click OK. Depending on the configuration setup, the membership number may be either mandatory or optional.
Outside guest A guest with neither a ber on.
Type in the name and click OK. profile nor a hotel resThe telephone number is optional.
Page 160 © 2006 Micros-Fidelio (Ireland) Ltd. April 2006
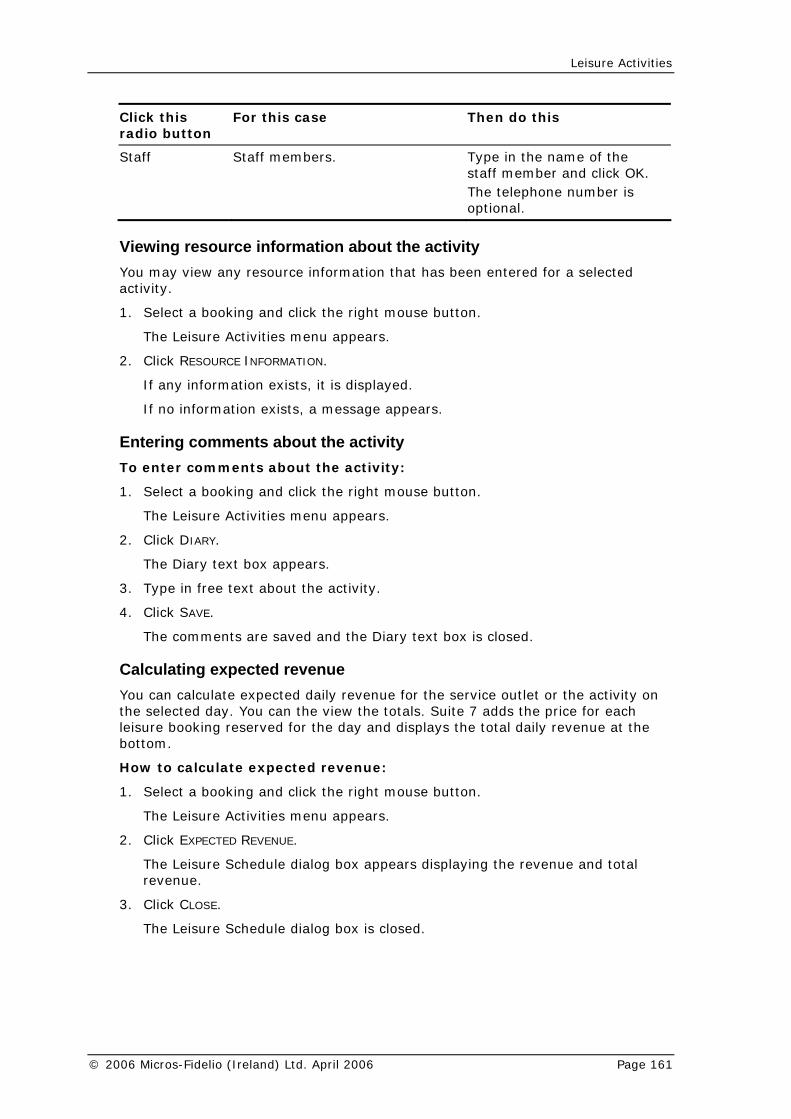
Leisure Activities
Click this radio button
For this case Then do this
Staff Staff members. Type in the name of the staff member and click OK. The telephone number is optional.
Viewing resource information about the that
s
s.
2. Click RESOURCE INFORMATION.
ayed.
appe
ity enter comments about the activity:
se
s.
The Diary text box appears.
iary t
ue fortotalsd dis
:
s utton.
The Leisure Activities menu appears.
pears
The Leisure Schedule dialog box is closed
activity You may view any resource information has been entered for a selected activity.
1. Select a booking and click the right mou e button.
The Leisure Activities menu appear
If any information exists, it is displ
If no information exists, a message ars.
Entering comments about the activTo
1. Select a booking and click the right mou button.
The Leisure Activities menu appear
2. Click DIARY.
3. Type in free text about the activity.
4. Click SAVE.
The comments are saved and the D ext box is closed.
Calculating expected revenue You can calculate expected daily reven the service outlet or the activity on the selected day. You can the view the leisure booking reserved for the day an
. Suite 7 adds the price for each plays the total daily revenue at the
bottom.
How to calculate expected revenue
1. Select a booking and click the right mou e b
2. Click E R . XPECTED EVENUE
The Leisure Schedule dialog box ap displaying the revenue and total revenue.
3. Click CLOSE.
.
© 2006 Micros-Fidelio (Ireland) Ltd. April 2006 Page 161


© 2006 Micros-Fidelio (Ireland) Ltd. April 2006 Page 163
Index
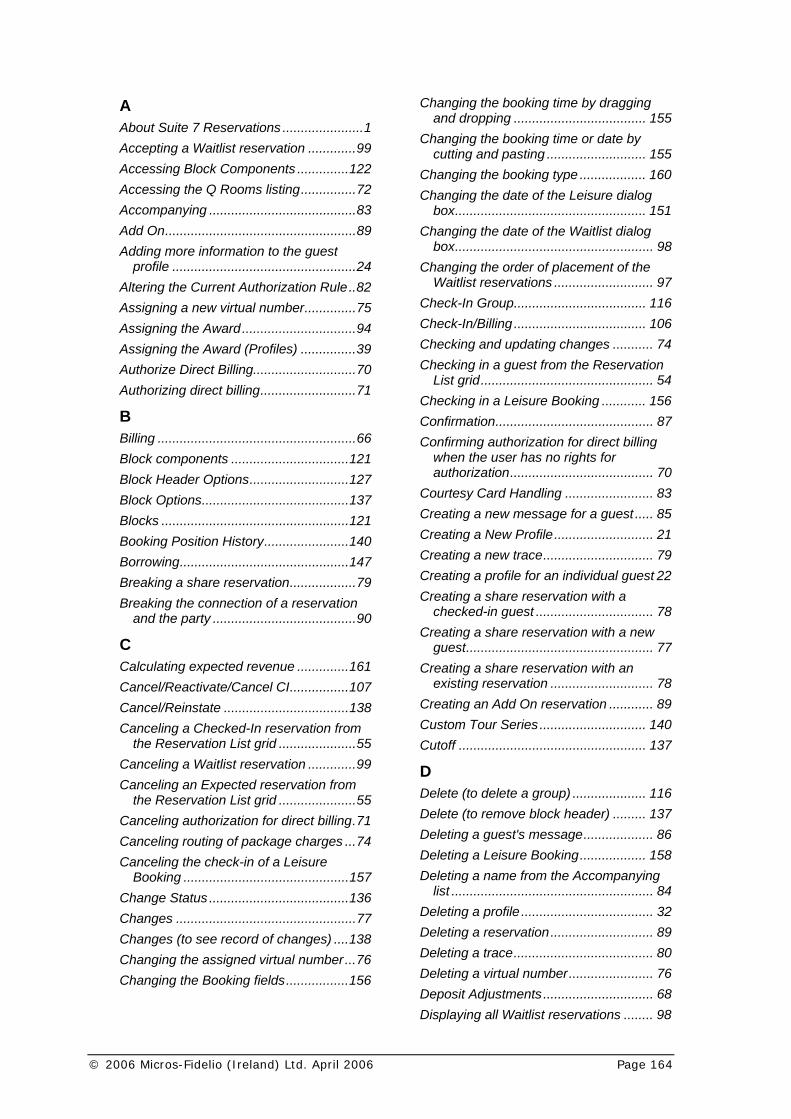
© 2006 Micros-Fidelio (Ireland) Ltd. April 2006 Page 164
A About Suite 7 Reservations ......................1 Accepting a Waitlist reservation .............99 Accessing Block Components ..............122 Accessing the Q Rooms listing...............72 Accompanying ........................................83 Add On....................................................89 Adding more information to the guest
profile ..................................................24 Altering the Current Authorization Rule..82 Assigning a new virtual number..............75 Assigning the Award...............................94 Assigning the Award (Profiles) ...............39 Authorize Direct Billing............................70 Authorizing direct billing..........................71
B Billing ......................................................66 Block components ................................121 Block Header Options...........................127 Block Options........................................137 Blocks ...................................................121 Booking Position History.......................140 Borrowing..............................................147 Breaking a share reservation..................79 Breaking the connection of a reservation
and the party .......................................90
C Calculating expected revenue ..............161 Cancel/Reactivate/Cancel CI................107 Cancel/Reinstate ..................................138 Canceling a Checked-In reservation from
the Reservation List grid .....................55 Canceling a Waitlist reservation .............99 Canceling an Expected reservation from
the Reservation List grid .....................55 Canceling authorization for direct billing.71 Canceling routing of package charges ...74 Canceling the check-in of a Leisure
Booking .............................................157 Change Status ......................................136 Changes .................................................77 Changes (to see record of changes) ....138 Changing the assigned virtual number...76 Changing the Booking fields.................156
Changing the booking time by dragging and dropping .................................... 155
Changing the booking time or date by cutting and pasting ........................... 155
Changing the booking type .................. 160 Changing the date of the Leisure dialog
box.................................................... 151 Changing the date of the Waitlist dialog
box...................................................... 98 Changing the order of placement of the
Waitlist reservations ........................... 97 Check-In Group.................................... 116 Check-In/Billing .................................... 106 Checking and updating changes ........... 74 Checking in a guest from the Reservation
List grid............................................... 54 Checking in a Leisure Booking ............ 156 Confirmation........................................... 87 Confirming authorization for direct billing
when the user has no rights for authorization....................................... 70
Courtesy Card Handling ........................ 83 Creating a new message for a guest ..... 85 Creating a New Profile........................... 21 Creating a new trace.............................. 79 Creating a profile for an individual guest 22 Creating a share reservation with a
checked-in guest ................................ 78 Creating a share reservation with a new
guest................................................... 77 Creating a share reservation with an
existing reservation ............................ 78 Creating an Add On reservation ............ 89 Custom Tour Series ............................. 140 Cutoff ................................................... 137
D Delete (to delete a group) .................... 116 Delete (to remove block header) ......... 137 Deleting a guest's message................... 86 Deleting a Leisure Booking.................. 158 Deleting a name from the Accompanying
list ....................................................... 84 Deleting a profile .................................... 32 Deleting a reservation............................ 89 Deleting a trace...................................... 80 Deleting a virtual number....................... 76 Deposit Adjustments.............................. 68 Displaying all Waitlist reservations ........ 98
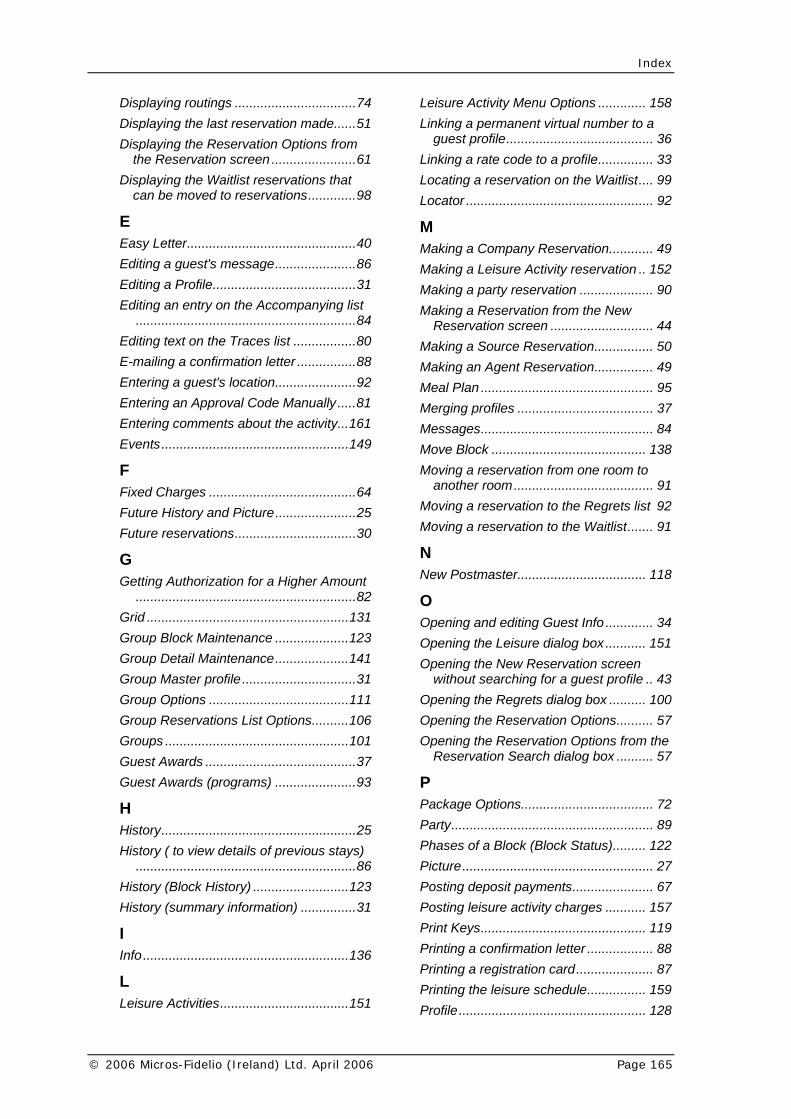
Index
© 2006 Micros-Fidelio (Ireland) Ltd. April 2006 Page 165
Displaying routings .................................74 Displaying the last reservation made......51 Displaying the Reservation Options from
the Reservation screen .......................61 Displaying the Waitlist reservations that
can be moved to reservations.............98
E Easy Letter..............................................40 Editing a guest's message......................86 Editing a Profile.......................................31 Editing an entry on the Accompanying list
............................................................84 Editing text on the Traces list .................80 E-mailing a confirmation letter ................88 Entering a guest's location......................92 Entering an Approval Code Manually .....81 Entering comments about the activity...161 Events...................................................149
F Fixed Charges ........................................64 Future History and Picture......................25 Future reservations.................................30
G Getting Authorization for a Higher Amount
............................................................82 Grid .......................................................131 Group Block Maintenance ....................123 Group Detail Maintenance....................141 Group Master profile ...............................31 Group Options ......................................111 Group Reservations List Options..........106 Groups ..................................................101 Guest Awards .........................................37 Guest Awards (programs) ......................93
H History.....................................................25 History ( to view details of previous stays)
............................................................86 History (Block History) ..........................123 History (summary information) ...............31
I Info........................................................136
L Leisure Activities...................................151
Leisure Activity Menu Options ............. 158 Linking a permanent virtual number to a
guest profile........................................ 36 Linking a rate code to a profile............... 33 Locating a reservation on the Waitlist.... 99 Locator ................................................... 92
M Making a Company Reservation............ 49 Making a Leisure Activity reservation .. 152 Making a party reservation .................... 90 Making a Reservation from the New
Reservation screen ............................ 44 Making a Source Reservation................ 50 Making an Agent Reservation................ 49 Meal Plan ............................................... 95 Merging profiles ..................................... 37 Messages............................................... 84 Move Block .......................................... 138 Moving a reservation from one room to
another room...................................... 91 Moving a reservation to the Regrets list 92 Moving a reservation to the Waitlist....... 91
N New Postmaster................................... 118
O Opening and editing Guest Info ............. 34 Opening the Leisure dialog box ........... 151 Opening the New Reservation screen
without searching for a guest profile .. 43 Opening the Regrets dialog box .......... 100 Opening the Reservation Options.......... 57 Opening the Reservation Options from the
Reservation Search dialog box .......... 57
P Package Options.................................... 72 Party....................................................... 89 Phases of a Block (Block Status)......... 122 Picture.................................................... 27 Posting deposit payments...................... 67 Posting leisure activity charges ........... 157 Print Keys............................................. 119 Printing a confirmation letter .................. 88 Printing a registration card..................... 87 Printing the leisure schedule................ 159 Profile................................................... 128

Version 7 Reservations Manual
Page 166 © 2006 Micros-Fidelio (Ireland) Ltd. April 2006
Profiles....................................................21 Pro-Forma...............................................96 Projected Revenue .................................31
Q Q Room Cancellations............................72 Q Rooms.................................................71
R Reactivating a cancelled reservation from
the Reservation List grid .....................56 Refresh Grid Rates ...............................138 Registering a guest as an accompanying
guest ...................................................83 Registration Card....................................87 Regrets ...................................................92 Reinstating a checked-out reservation ...64 Reinstating a checked-out reservation
from the Reservation List grid .............55 Removing packages from the meal plan 95 Removing/Restoring Availability ...........159 Reservations...........................................43 Reservations Options .............................57 Reservations Speedbar ............................2 Resolving a trace....................................81 Room Assign ........................................116 Room Move ............................................91 Room Status .........................................119 Room Type Assign ...............................118 Rooming List.................................111, 143 Routing charges......................................62 Routing the allowance ............................73
S Scheduling leisure activities ...................69 Search ..................................................110 Searching for a guest profile...................44 Searching for a profile.............................32 Searching for a reservation using the
advanced search option......................52 Searching for a reservation using the
standard search ..................................51 Setting a meal plan.................................95
Shares.................................................... 77 Sharing................................................. 119 Split All ................................................. 109 Splitting a party reservation ................... 90 Standard Groups.................................. 102 Statistic ................................................ 118 Summary Info....................................... 138
T The Company/Agent/Source profile....... 29 The Main Groups Screen..................... 101 Tour Series .......................................... 139 Traces .................................................... 79 Traces (to keep a log of actions) ......... 135
U Unlinking an accompanying guest ......... 83 Unresolving a trace................................ 81 Updating Reservations .......................... 51
V Viewing a guest's history ....................... 86 Viewing a guest's messages.................. 84 Viewing a room rate in various currencies
........................................................... 66 Viewing a Waitlist reservation................ 99 Viewing and/or editing a confirmation letter
........................................................... 87 Viewing future reservations ................... 25 Viewing guest information.................... 158 Viewing package elements for which an
allowance has been created .............. 72 Viewing rate details in a specific currency
........................................................... 66 Viewing resource information about the
activity .............................................. 161 Virtual Numbers ..................................... 75
W Waitlist ................................................... 97 Waitlist (to move reservation to waitlist) 91 What If There Are No Rooms Left In the
Block?............................................... 147


![Micros Folder 10-2010 - nsc-ksa.comnsc-ksa.com/catalogue/NSC CATALOGUES/Microscopes/Micros/MC300serie.pdfhijgYn XdchigjXi^dc VcY ZVhn ]VcYa^c\ ^i ... micros micros micros micros micros](https://img.dokumen.tips/doc/110x75/5b1c97d97f8b9a2d258ff7ed/micros-folder-10-2010-nsc-ksacomnsc-ksacomcataloguensc-cataloguesmicroscopesmicros.jpg)