Embed Size (px)
Citation preview

Make a beautiful paper flower or a whole bouquet from material have at home.
Supplies Needed
• brown paper grocery bag• Q-Tip• scissors• tempera or acrylic paint and a small to medium brush• hot glue gun
How to do it!
1. Cut out 3 rectangles from the side of the paper bag so you get a double layer of paper for each rectangle (connected by the folded edge of the bag). The sizes should be roughly 3”x3”, 2”x2”, and 2”x1”.
2. Cut out flower shapes from the 2 squares. You will be cutting through two layers of paper at a time so you will end up with 4 flowers (2 big and 2 small). Cut a leaf shape out of the 2”x1” rectangle to get 2 leaves.
3. Paint the larger flowers and smaller flowers in two colors that look nice together. Paint the leaves green. Add details in another color to the flowers and leaves. For the flowers, you can paint a small circle in the center with lines going out on each petal. For the leaves, you can paint a line down the middle and veins coming off of the sides of that line.
Albuquerque Museum 2000 Mountain Road NW Albuquerque, NM 87104 505-243-7255 • cabq.gov/museum
Family Art from Home
Mini Paper Flower Projectby Ophelia Cornet
Cut squares and rectangle
Cut flower and leaf shapes, and then paint
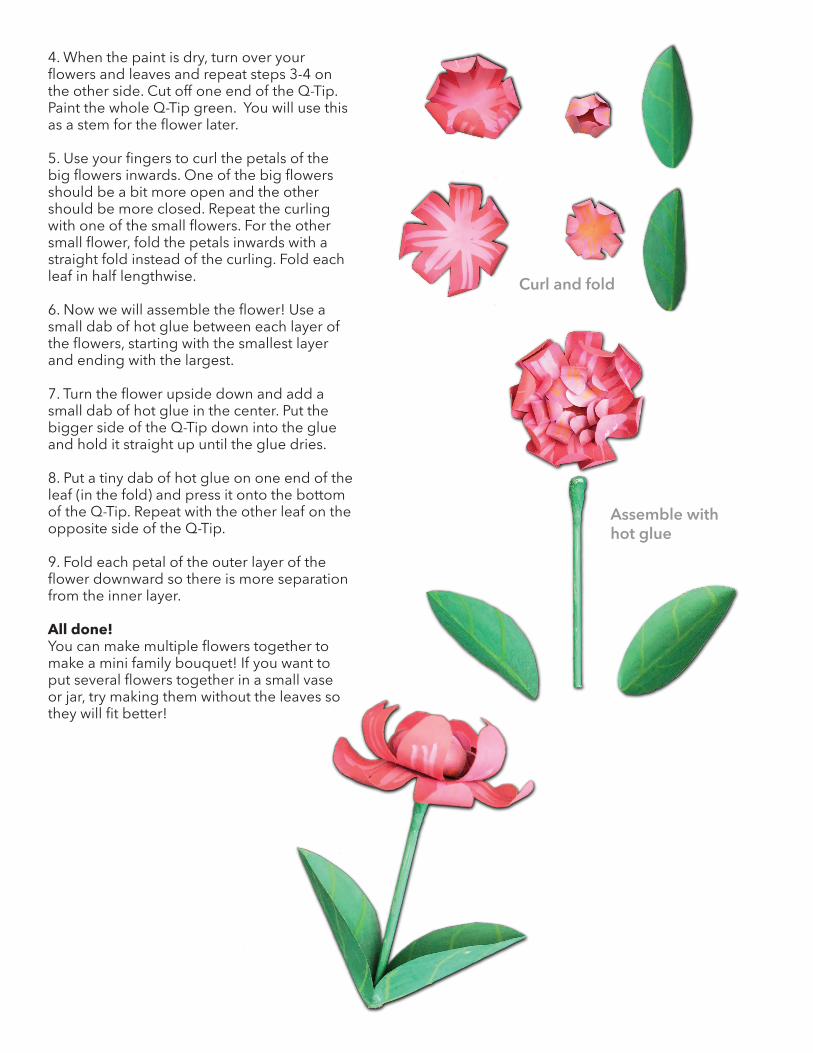
Curl and fold
Assemble with hot glue
4. When the paint is dry, turn over your flowers and leaves and repeat steps 3-4 on the other side. Cut off one end of the Q-Tip. Paint the whole Q-Tip green. You will use this as a stem for the flower later.
5. Use your fingers to curl the petals of the big flowers inwards. One of the big flowers should be a bit more open and the other should be more closed. Repeat the curling with one of the small flowers. For the other small flower, fold the petals inwards with a straight fold instead of the curling. Fold each leaf in half lengthwise.
6. Now we will assemble the flower! Use a small dab of hot glue between each layer of the flowers, starting with the smallest layer and ending with the largest.
7. Turn the flower upside down and add a small dab of hot glue in the center. Put the bigger side of the Q-Tip down into the glue and hold it straight up until the glue dries.
8. Put a tiny dab of hot glue on one end of the leaf (in the fold) and press it onto the bottom of the Q-Tip. Repeat with the other leaf on the opposite side of the Q-Tip.
9. Fold each petal of the outer layer of the flower downward so there is more separation from the inner layer.
All done!You can make multiple flowers together to make a mini family bouquet! If you want to put several flowers together in a small vase or jar, try making them without the leaves so they will fit better!