Embed Size (px)
Citation preview

Logging on After connecting to the internet, the rail booking system is accessed via:
www.business-travel.netSelect the Rail online tab at the top of your screen
On accessing the website, you will be presented with the home page, where you can login.
Forgotten password
If you have forgotten your password, you can click the link, which allows you to reset your password.
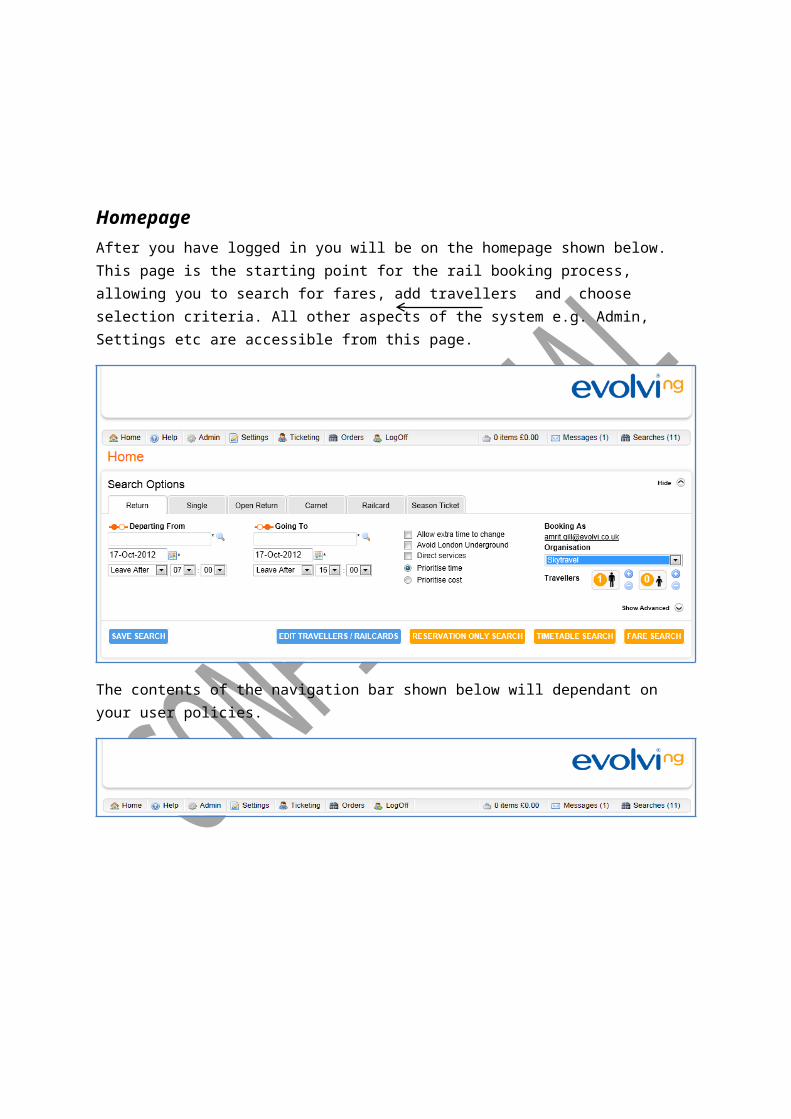
Opens the Message centre which displays Evolvi and TMC messages.
HomepageAfter you have logged in you will be on the homepage shown below. This page is the starting point for the rail booking process, allowing you to search for fares, add travellers and choose selection criteria. All other aspects of the system e.g. Admin, Settings etc are accessible from this page.
The contents of the navigation bar shown below will dependant on your user policies.
Opens Setting module, which allows you to personalise Evolvi
Opens the Basket which displays the details of order items in your order order.
Searches : Allows you to view and reuse previous searches for fares.
Link takes you back to the homepage from anywhere in the website.
Opens Help guide
Opens Admin module
Opens the Ticketing module, which allows you to print tickets
Opens the Orders module, allowing you to view and search order history
Making a standard rail bookingA rail booking is made up of the following steps.
The process allows for a flexible approach to make rail bookings, an example of this, you can make bookings on the behalf of other users/organisations. This flexibility is driven by policies which enables these features for you.
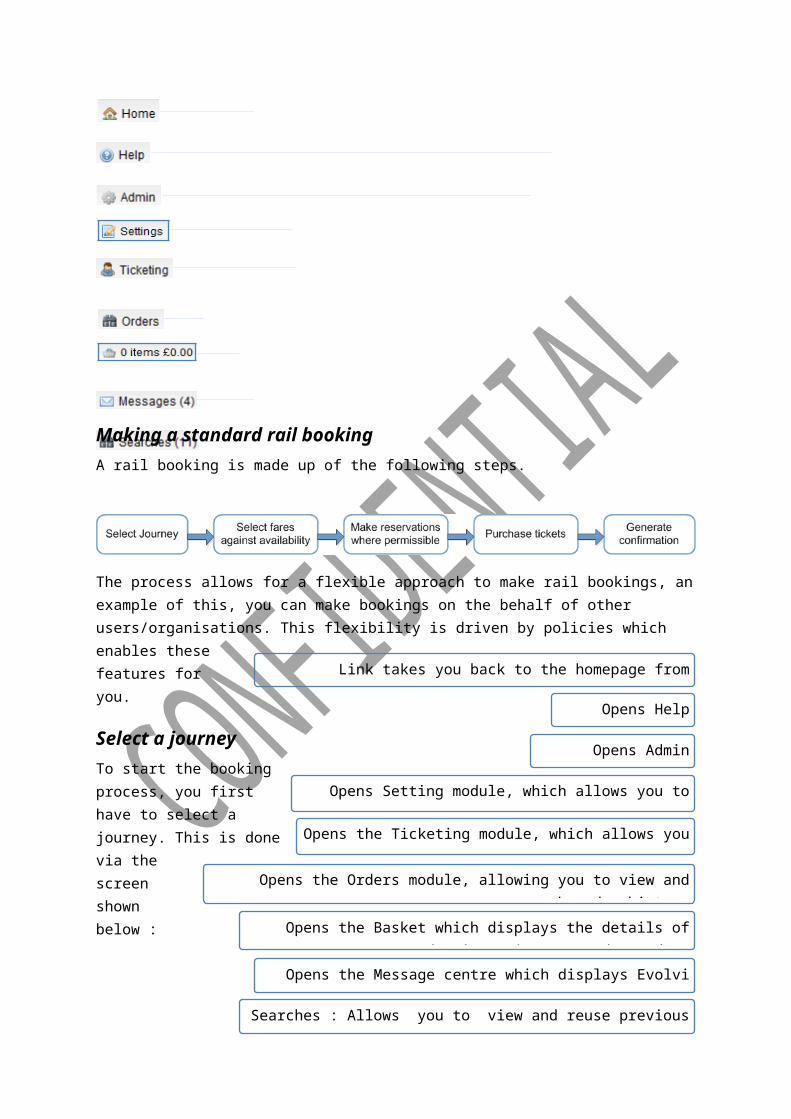
Select a journeyTo start the booking process, you first have to select a journey. This is done via the screen shown below :
The tabs shown in Search Options show the various journey and ticket types available, these are discussed in further detail below :
Return – Allows you to enter details for a standard return journey. Single - Allows you to enter details for a standard single journey. Open return - Allows you to enter details for an open return journey. Carnet – Allows you to enter details for a carnet ( multiple ticket ) purchase. Railcard – Allows you to enter details for a railcard purchase. Season ticket – Allows you to enter details to obtain a quote for the cost of a season ticket.
These filters will restrict your search according to the option selected.
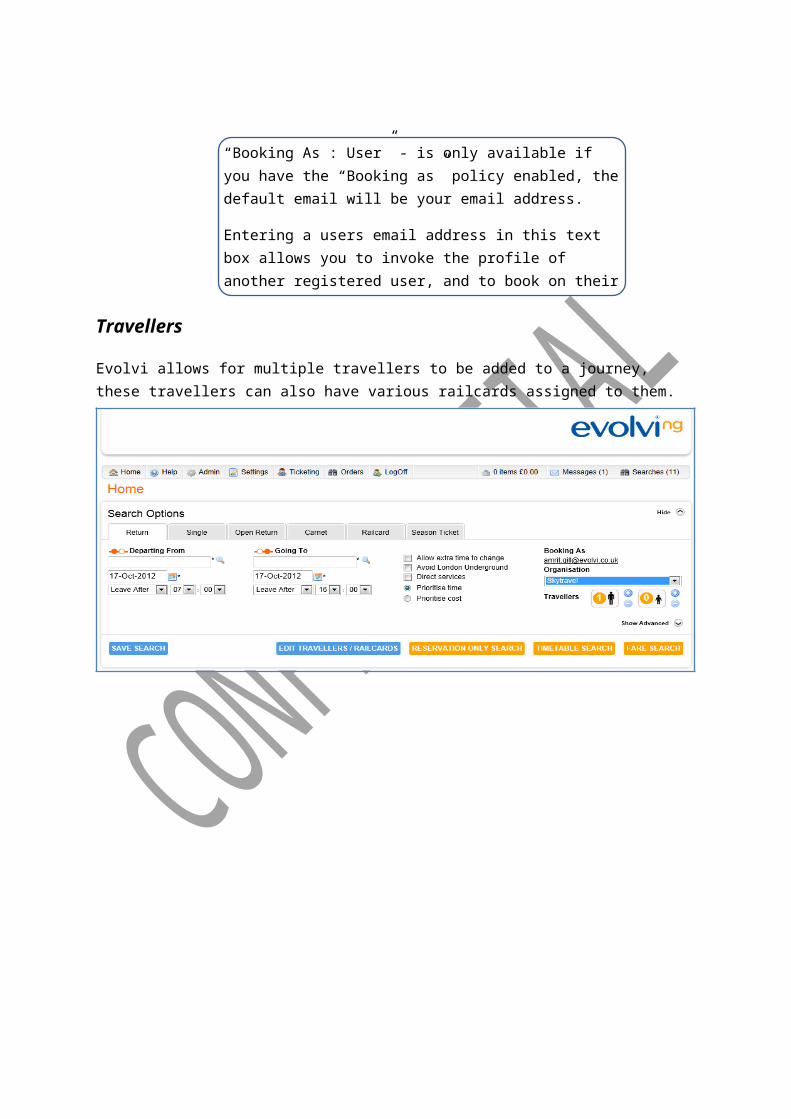
“Booking As : User” - is only available if you have the “Booking as” policy enabled, the default email will be your email address.
Entering a users email address in this text box allows you to invoke the profile of another registered user, and to book on their behalf.
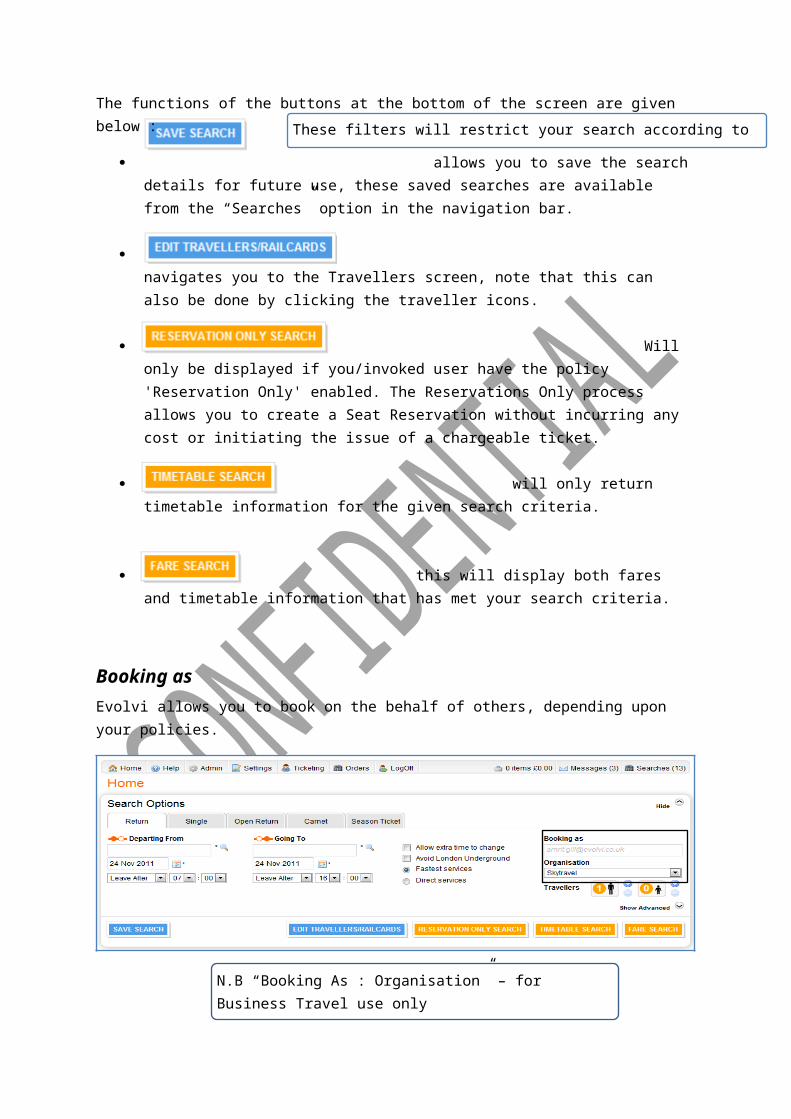
The functions of the buttons at the bottom of the screen are given below :
allows you to save the search details for future use, these saved searches are available from the “Searches” option in the navigation bar.
navigates you to the Travellers screen, note that this can also be done by clicking the traveller icons.
Will only be displayed if you/invoked user have the policy 'Reservation Only' enabled. The Reservations Only process allows you to create a Seat Reservation without incurring any cost or initiating the issue of a chargeable ticket.
will only return timetable information for the given search criteria.
this will display both fares and timetable information that has met your search criteria.
Booking asEvolvi allows you to book on the behalf of others, depending upon your policies.
N.B “Booking As : Organisation” – for Business Travel use only
Travellers
Evolvi allows for multiple travellers to be added to a journey, these travellers can also have various railcards assigned to them.
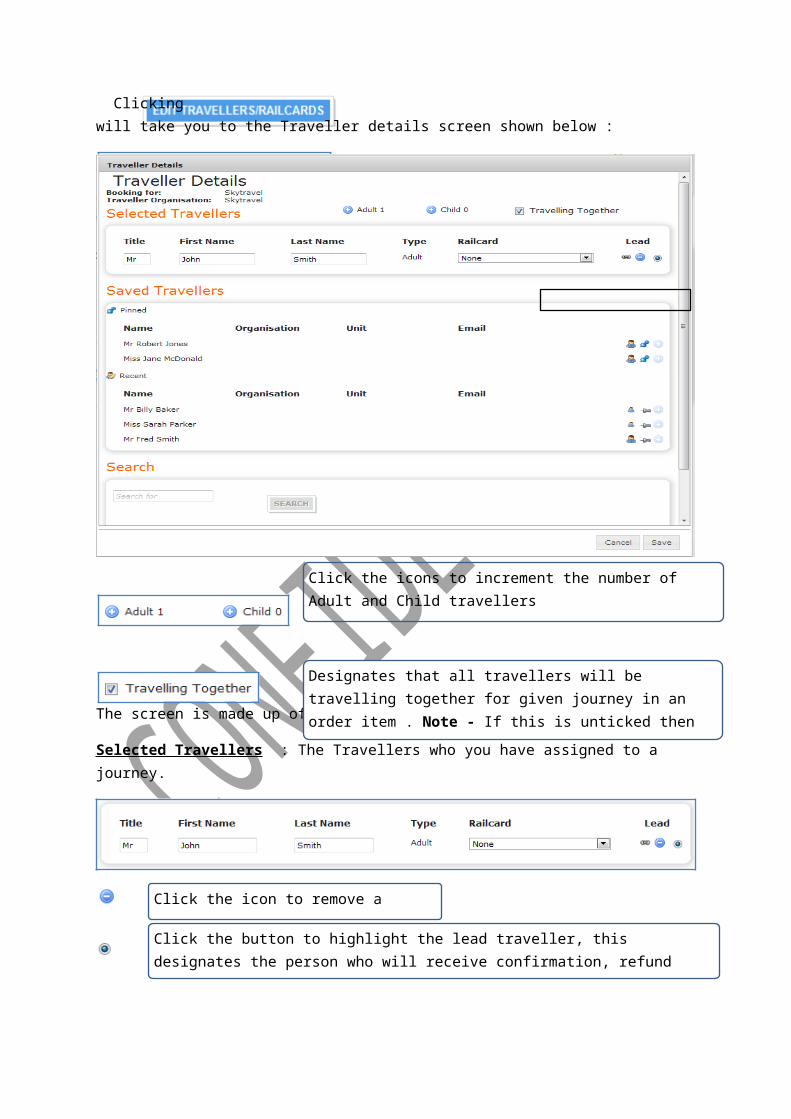
Clicking will take you to the Traveller details screen shown below :
Click the icons to increment the number of Adult and Child travellers
Designates that all travellers will be travelling together for given journey in an order item . Note - If this is unticked then any group discounts will not be applied.
The screen is made up of 3 distinct areas :
Selected Travellers : The Travellers who you have assigned to a journey.
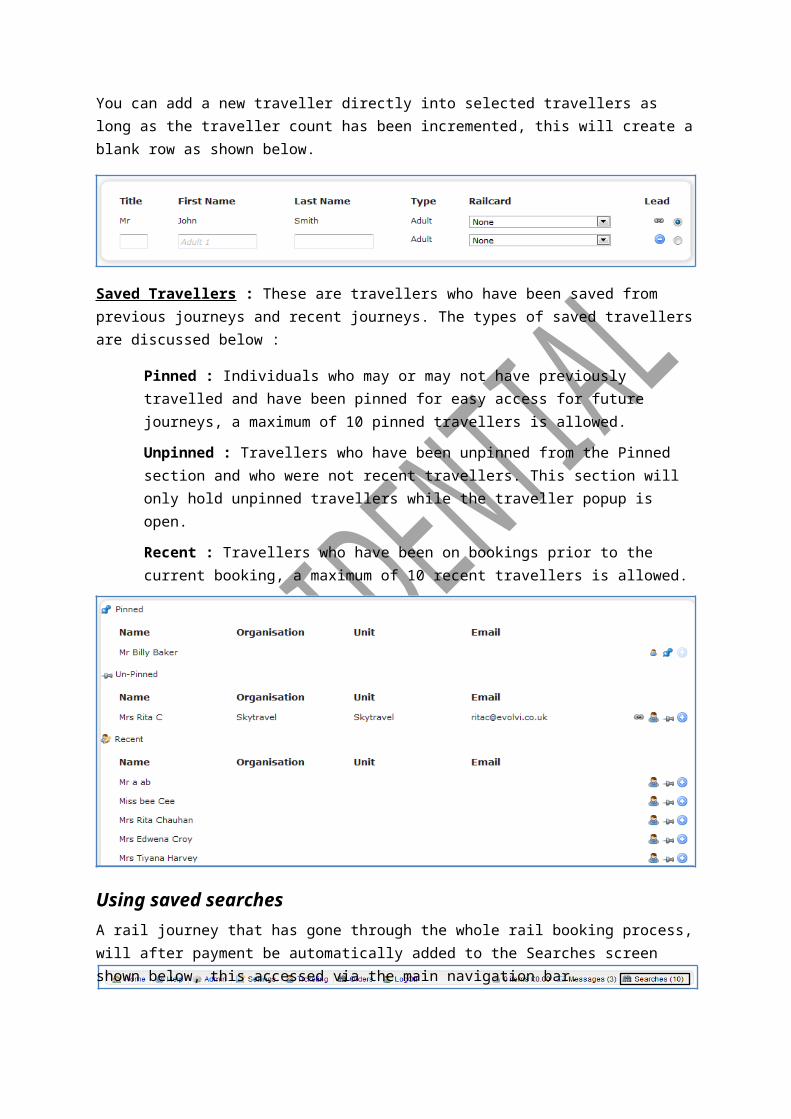
You can add a new traveller directly into selected travellers as long as the traveller count has been incremented, this will create a blank row as shown below.
Saved Travellers : These are travellers who have been saved from previous journeys and recent journeys. The types of saved travellers are discussed below :
Pinned : Individuals who may or may not have previously travelled and have been pinned for easy access for future journeys, a maximum of 10 pinned travellers is allowed.
Unpinned : Travellers who have been unpinned from the Pinned section and who were not recent travellers. This section will only hold unpinned travellers while the traveller popup is open.
Recent : Travellers who have been on bookings prior to the current booking, a maximum of 10 recent travellers is allowed.
Click the icon to remove a Traveller
Click the button to highlight the lead traveller, this designates the person who will receive confirmation, refund emails etc.
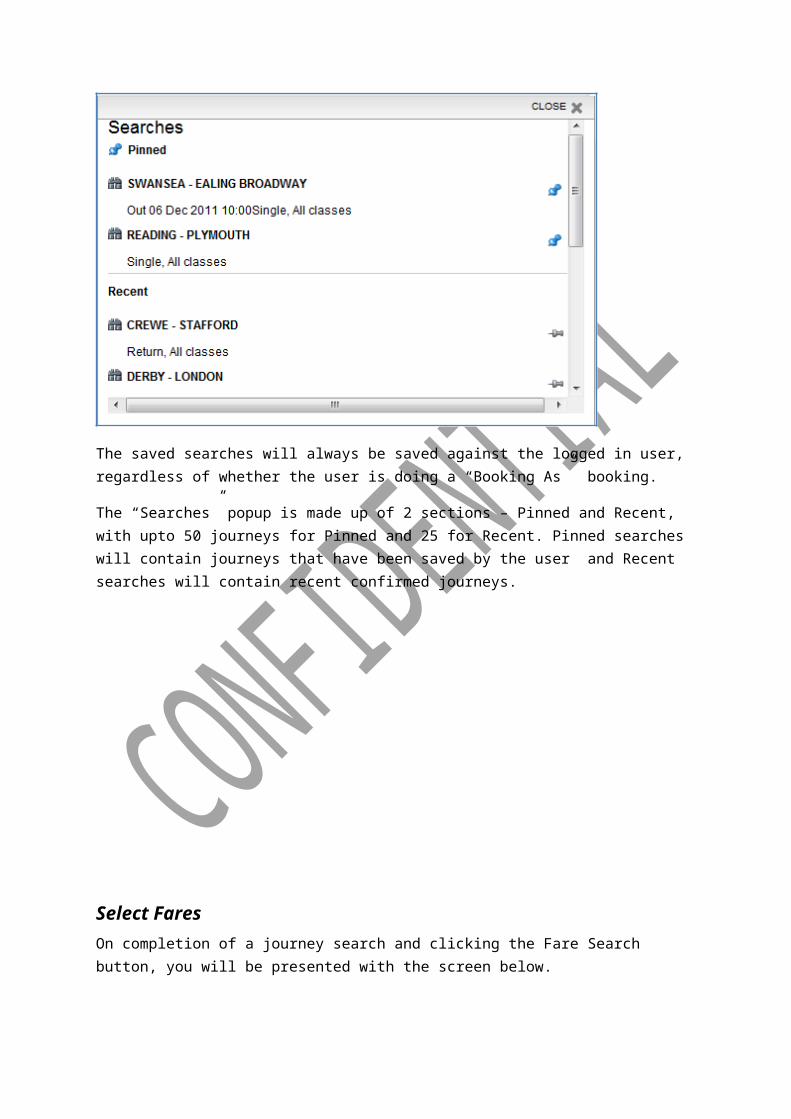
Using saved searchesA rail journey that has gone through the whole rail booking process, will after payment be automatically added to the Searches screen shown below, this accessed via the main navigation bar.
The saved searches will always be saved against the logged in user, regardless of whether the user is doing a “Booking As” booking.
The “Searches” popup is made up of 2 sections – Pinned and Recent, with upto 50 journeys for Pinned and 25 for Recent. Pinned searches will contain journeys that have been saved by the user and Recent searches will contain recent confirmed journeys.
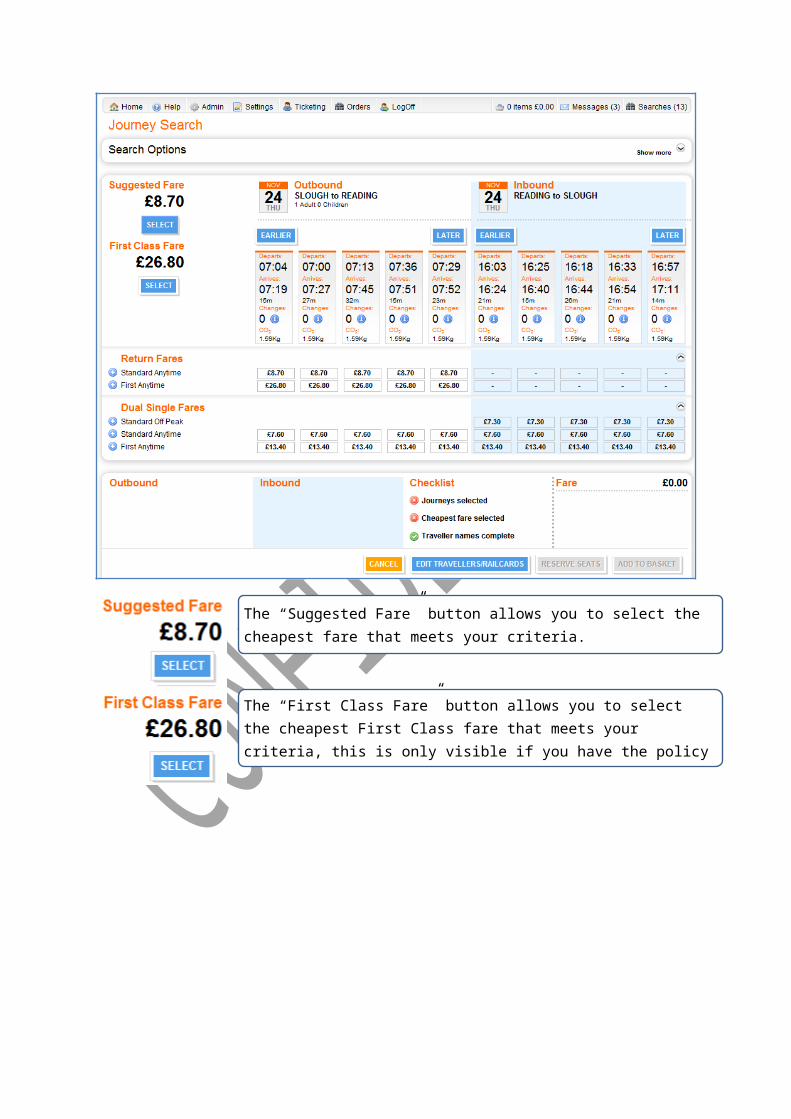
Select FaresOn completion of a journey search and clicking the Fare Search button, you will be presented with the screen below.
The “Suggested Fare” button allows you to select the cheapest fare that meets your criteria.
The “First Class Fare” button allows you to select the cheapest First Class fare that meets your criteria, this is only visible if you have the policy to book first class fares.
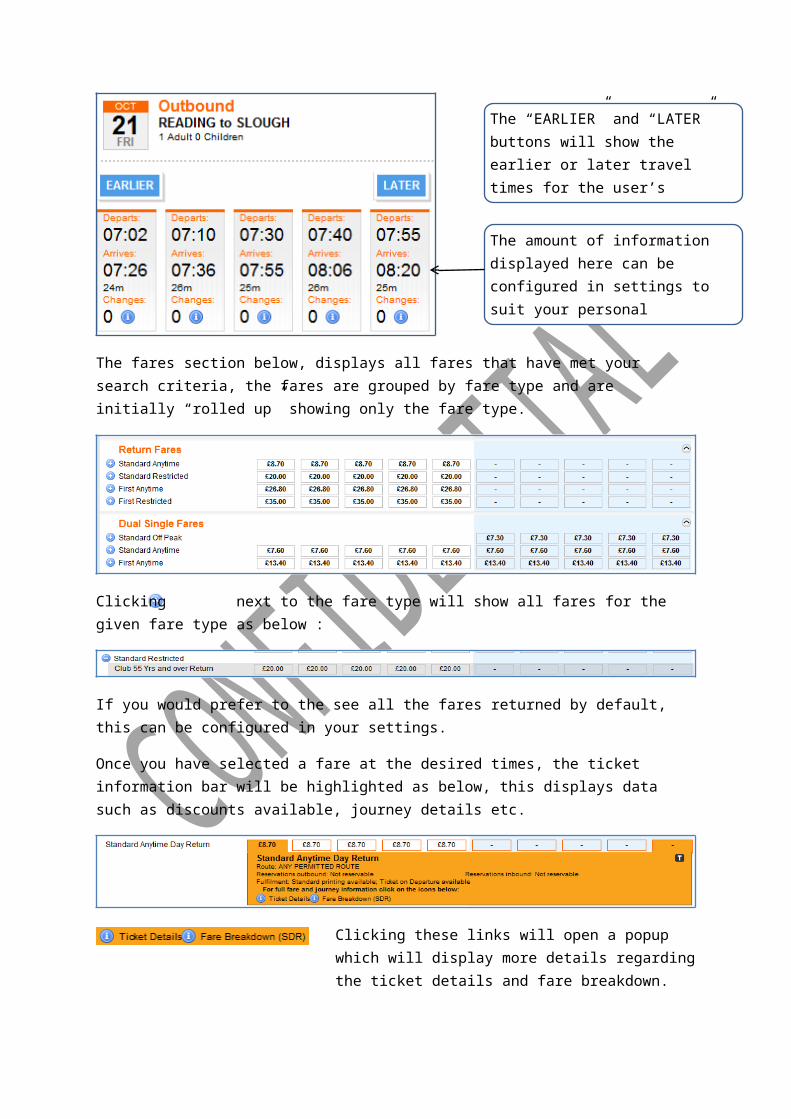
The fares section below, displays all fares that have met your search criteria, the fares are grouped by fare type and are initially “rolled up” showing only the fare type.
Clicking next to the fare type will show all fares for the given fare type as below :
If you would prefer to the see all the fares returned by default, this can be configured in your settings.
Once you have selected a fare at the desired times, the ticket information bar will be highlighted as below, this displays data such as discounts available, journey details etc.
Clicking these links will open a popup which will display more details regarding the ticket details and fare breakdown.
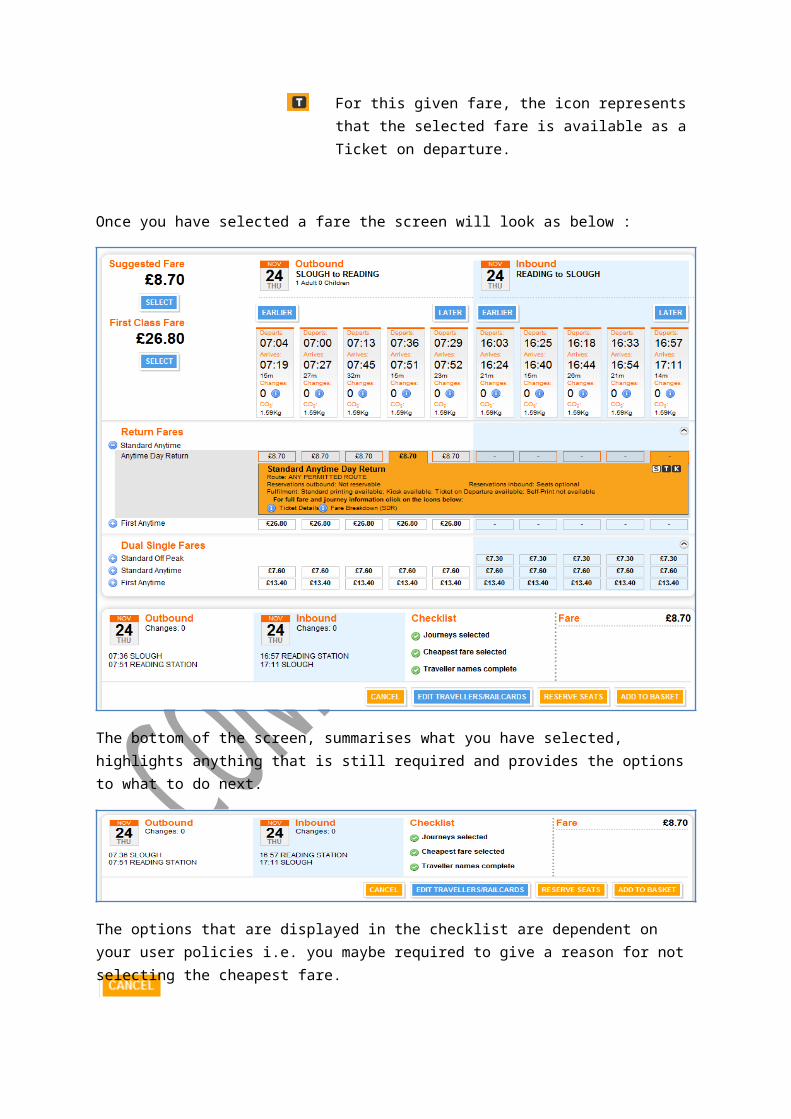
For this given fare, the icon represents that the selected fare is available as a Ticket on departure.
Once you have selected a fare the screen will look as below :
The “EARLIER” and “LATER” buttons will show the earlier or later travel times for the user’s selected journey.
The amount of information displayed here can be configured in settings to suit your personal preferences.
The bottom of the screen, summarises what you have selected, highlights anything that is still required and provides the options to what to do next.
The options that are displayed in the checklist are dependent on your user policies i.e. you maybe required to give a reason for not selecting the cheapest fare.
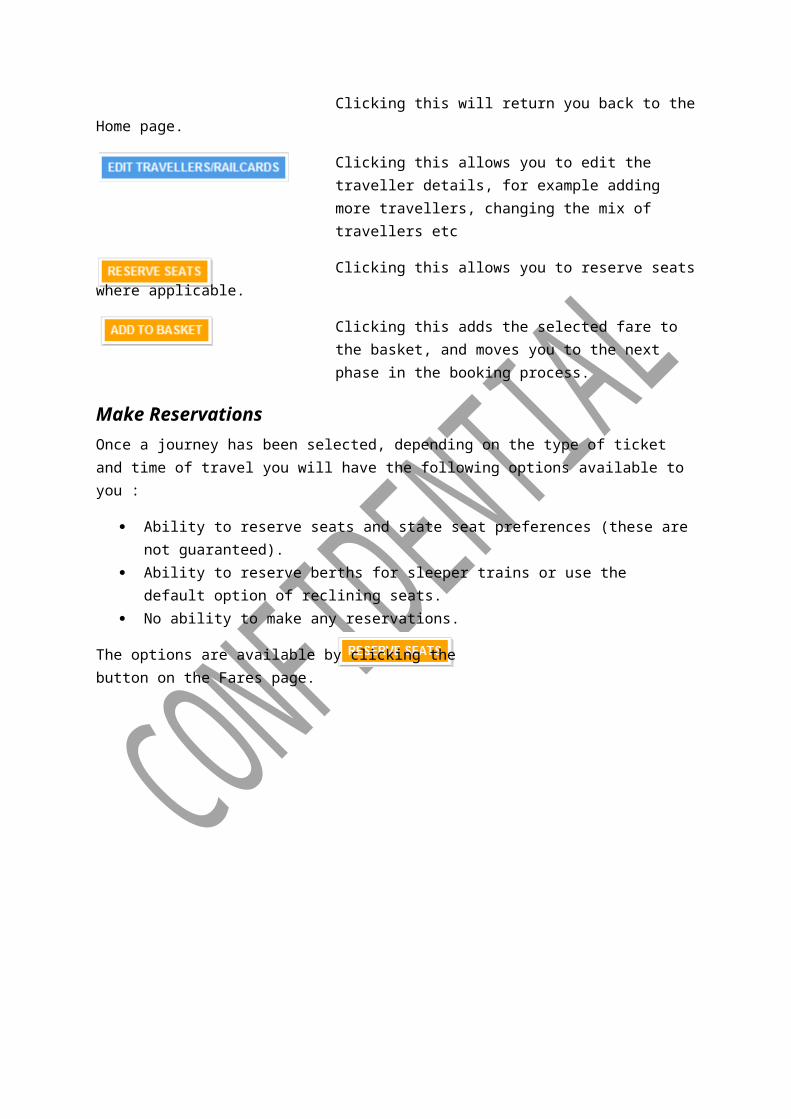
Clicking this will return you back to the Home page.
Clicking this allows you to edit the traveller details, for example adding more travellers, changing the mix of travellers etc
Clicking this allows you to reserve seats where applicable.
Clicking this adds the selected fare to the basket, and moves you to the next phase in the booking process.
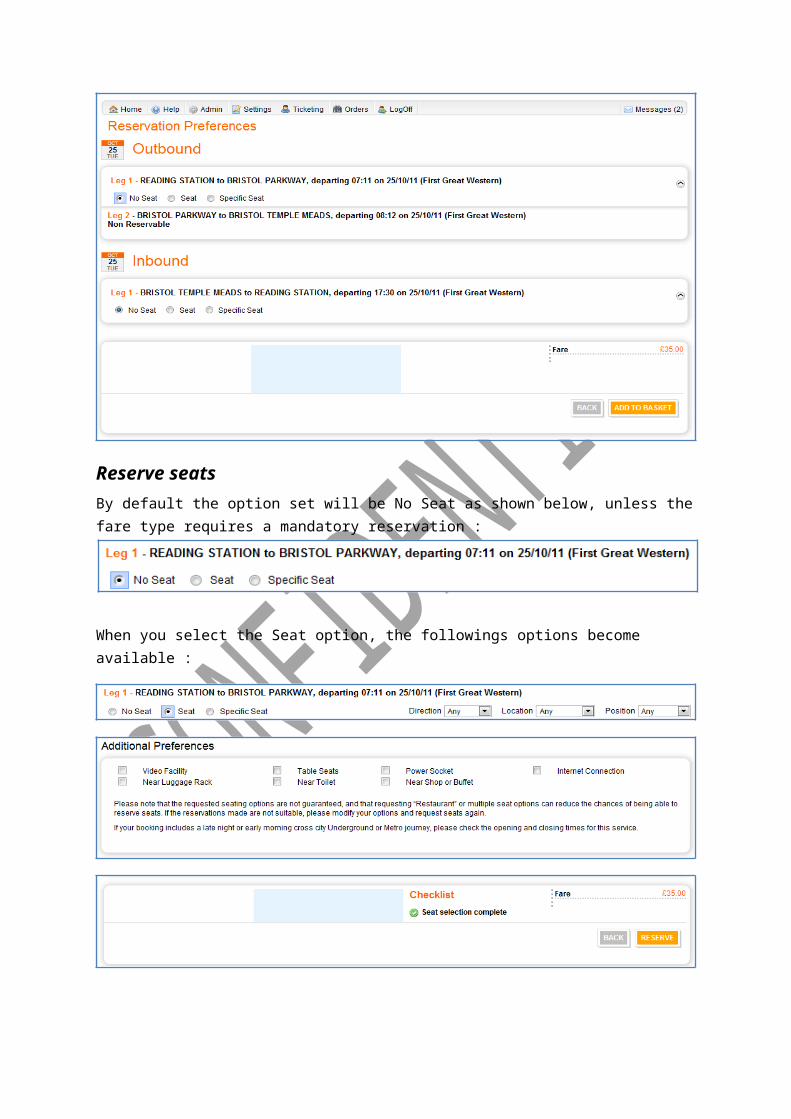
Make ReservationsOnce a journey has been selected, depending on the type of ticket and time of travel you will have the following options available to you :
Ability to reserve seats and state seat preferences (these are not guaranteed). Ability to reserve berths for sleeper trains or use the default option of reclining seats. No ability to make any reservations.
The options are available by clicking the button on the Fares page.
Reserve seatsBy default the option set will be No Seat as shown below, unless the fare type requires a mandatory reservation :
When you select the Seat option, the followings options become available :
When you select Specific Seat the following options are available. Note – this is only available for single travellers.
Additional Preferences will also be available as for Seat revervations.
Once you have selected your seats, click the button. Depending upon availability you may not get the seats requested and you will be presented with the screen below :
Clicking the button will take you back to the Reservation Preferences screen.
If you proceed with the booking you will be taken to the check out screen where order numbers etc are added to the booking – now known as Custom Fields, these will be set up by Business Travel to your companies requirements.
Custom fieldsThis is an example of the Custom Field Screen.
One this screen has been completed to you will be asked to select your delivery option, depending on the options available to your Company.
You booking is then complete.
Orders – Order Manager – Previously Bookings ManagerIf you have the policy for Bookings Manager enabled you will be able to search on orders with a variety of parameters, this replaces the Bookings Manager that was previously found in the Admin area. Orders can now be accessed via the navigation bar as shown below :
Once you have clicked Settings the following screen will be displayed :
The Reference tab allows you to search for an order by the given references, by default the search is done on Order reference. Once a search has been performed the results will be returned as below :
Note that if you have logged in and done a “Booking As” booking that details for both you and the “Booking As” booker will be displayed against Booker.
Clicking the icon will expand the order item details as below :
If the user has the policy 'Add to Outlook Calendar' enabled, you will have the option of adding the journey information of the order item to your Outlook calendar.
HelpThe Help section is accessed via the navigation bar by clicking the icon as shown below :
This section will open a new window containing links to the following items :
Maps - access to maps of the London Underground and National Rail network ToD Stations -link to search on ToD station facilities Station Facilities – link to search on station facilities Group Save Calendar - GroupSave offers discounts when travelling with selected
Train Operating Companies to groups of three or four people travelling together. However, there are certain days when GroupSave cannot be used on some services.
FAQs – this will access to answers to FAQs