Embed Size (px)
Citation preview
White paper ETERNUS DX/AF Authentication Using Active Directory
www.fujitsu.com/us Page 1 of 34
ETERNUS DX/AF Authentication Using Active DirectoryAbility to manage administrative user IDs for various IT equipment like Storage Arrays have gained increased importance in the recent years. Having the user IDs managed by central directory systems such as Microsoft® Active Directory offers advantages for both the administrative users and the security management organization. An administrative user does not have to contend with having to remember multiple IDs and passwords for IT equipment and gain the convenience of the Single Sign On ability. It offers advantages to the management side because the granting and revocation as well as monitoring of user accounts can be managed at a central location and discourages the all too common practice of assigning shared trivial passwords to various IT equipment. Even though IT equipment is typically located inside the firewall, we hear too often about the firewall being penetrated by sophisticated malware. ETERNUS® DX/AF offers seamless integration with Active Directory through its RADIUS interface which is built-in as part of the Windows® Operating System as the Network Protocol Services role. Fine grained control of roles and privileges through the ETERNUS RBAC (Role Based Access Control) feature is fully supported through the Active Directory. This paper documents the detailed procedure on how to implement Active Directory Integration for ETERNUS DX/AF management authentication.

www.fujitsu.com/us
White paper ETERNUS DX/AF Authentication Using Active Directory
Page 2 of 34
Table of Contents
Overview of RADIUS/Active Directory Integration ........................................................................................................................................................ 4 The procedure for setting up the RADIUS service on Windows Server 2012R2 and 2008R2 ......................................................................................... 6
(Windows 2012R2) Install the Network Policy Services (NPS) Role. ............................................................................................................... 6 (Windows 2008R2) Install the Network Policy and Access Services (NPS) Role ............................................................................................. 11
Setup ETERNUS DX/AF unit as a RADIUS Client ........................................................................................................................................................... 12 Open the Network Policy Server (NPS) to define new RADIUS Client ............................................................................................................ 12 Fill in information regarding the ETERNUS DX/AF ........................................................................................................................................ 12 Set up the RADIUS client in the ETERNUS DX/AF GUI .................................................................................................................................... 13
Prepare Active Directory User accounts and Security Group Definitions. ................................................................................................................... 14 Select Users being authorized for ETERNUS DX/AF Access. ........................................................................................................................... 14 Enable Reversible Password Encryption for the selected users. ................................................................................................................... 15 Ask the affected users to login and reset their passwords. .......................................................................................................................... 15 Configure the User Groups .......................................................................................................................................................................... 15
Define Network Policy for each Role/Group Access .................................................................................................................................................... 18 Create new Network Policy .......................................................................................................................................................................... 18 Start the Network Policy wizard .................................................................................................................................................................. 18 Continue the Network Policy Wizard: Specify Conditions ............................................................................................................................. 18 Continue the Network Policy Wizard: Specify Access Permission .................................................................................................................. 20 Continue the Network Policy Wizard: Configure Authentication Methods .................................................................................................... 21 Continue the Network Policy Wizard: Configure Authentication Constraints ................................................................................................ 22 Continue the Network Policy Wizard: Configure Settings ............................................................................................................................. 23 Add Vendor Specific Attribute ..................................................................................................................................................................... 24 Complete the Network Policy Wizard........................................................................................................................................................... 26 Define the Network Policy for the rest of the Roles/Groups. ......................................................................................................................... 27
Testing the new Active Directory based User Authentication. ................................................................................................................................... 28 Testing user Benjamin Braddock ................................................................................................................................................................. 29 Testing user Thuy Nguyen ........................................................................................................................................................................... 29 Testing user Samuel L. Jackson ................................................................................................................................................................... 30
Troubleshooting ......................................................................................................................................................................................................... 31 Case #1 – Forgetting to update the password with Reversible Encryption: .................................................................................................. 31 Case #2 - The authentication or accounting record could not be written failure .......................................................................................... 32
List of Figures Figure 1: Overview of ETERNUS DX/AF Active Directory Integration ............................................................................................................................. 4 Figure 2: Add Roles and Features Wizard .................................................................................................................................................................... 6 Figure 3: Add Roles and Features Wizard .................................................................................................................................................................... 7 Figure 4: Add Roles and Features Wizard .................................................................................................................................................................... 7 Figure 5: Add Roles and Features Wizard: Select features ........................................................................................................................................... 8 Figure 6: Add Network Policy and Access services ....................................................................................................................................................... 9 Figure 7: Select role services ..................................................................................................................................................................................... 10 Figure 8: Confirm installation selections ................................................................................................................................................................... 10 Figure 9: Add NPS Role ............................................................................................................................................................................................. 11 Figure 10: Select Role Services.................................................................................................................................................................................. 11 Figure 11: Setup new RADIUS Client ......................................................................................................................................................................... 12 Figure 12: New RADIUS Client setup. ........................................................................................................................................................................ 13 Figure 13: Modify RADIUS screen .............................................................................................................................................................................. 14 Figure 14: Select Users Identified for ETERNUS DX/AF Access .................................................................................................................................... 14 Figure 15: Enable Reversible Password Encryption ................................................................................................................................................... 15 Figure 16: Adding new ETERNUS DX/AF Role............................................................................................................................................................. 16 Figure 17: Define New Security Group object ............................................................................................................................................................ 16 Figure 18: List of ETERNUS DX/AF Users and Security Groups..................................................................................................................................... 17

www.fujitsu.com/us
White paper ETERNUS DX/AF Authentication Using Active Directory
Page 3 of 34
Figure 19: Assigning a User to a Security Group ........................................................................................................................................................ 17 Figure 20: Creating new Network Policy ................................................................................................................................................................... 18 Figure 21: Network Policy Wizard (First Panel) ......................................................................................................................................................... 18 Figure 22: Network Policy Wizard - Assign User Group under Specify Conditions. ...................................................................................................... 19 Figure 23: Network Policy Wizard - Summary of Conditions ...................................................................................................................................... 20 Figure 24: Network Policy Wizard - Access Granted ................................................................................................................................................... 21 Figure 25: Network Policy Wizard - Configure Authentication Methods ..................................................................................................................... 22 Figure 26: Network Policy Wizard - Configure Constraints ......................................................................................................................................... 23 Figure 27: Network Policy Wizard - Configure Settings .............................................................................................................................................. 24 Figure 28: Network Policy Wizard - Add Vendor Specific Attribute ............................................................................................................................. 25 Figure 29: Network Policy Wizard - Specifying Vendor-Specific Attribute Information ............................................................................................... 25 Figure 30: Network Policy Wizard - Configure VSA ..................................................................................................................................................... 26 Figure 31: Network Policy Wizard – Summary page and completion. ........................................................................................................................ 27 Figure 32: Network Policy Summary Screen after defining all four policies ............................................................................................................... 28 Figure 33: Logging in bbraddock with Domain ID ..................................................................................................................................................... 29 Figure 34: Verifying login with engcloud\bbraddock ................................................................................................................................................. 29 Figure 35: Logging in tnguyen without domain id .................................................................................................................................................... 30 Figure 36: Verifying login with tnguyen .................................................................................................................................................................... 30 Figure 37: NPS Role Summary Page .......................................................................................................................................................................... 31
List of Tables Table 1: Vendor Specific Attributes (VSA) .................................................................................................................................................................... 4 Table 2: ETERNUS DX/AF Built in Roles ...................................................................................................................................................................... 15 Table 3 : Table of new Nework Policies created......................................................................................................................................................... 27 Table 4: Table of ETERNUS DX/AF Authorized Users and Roles................................................................................................................................... 28
www.fujitsu.com/us
White paper ETERNUS DX/AF Authentication Using Active Directory
Page 4 of 34
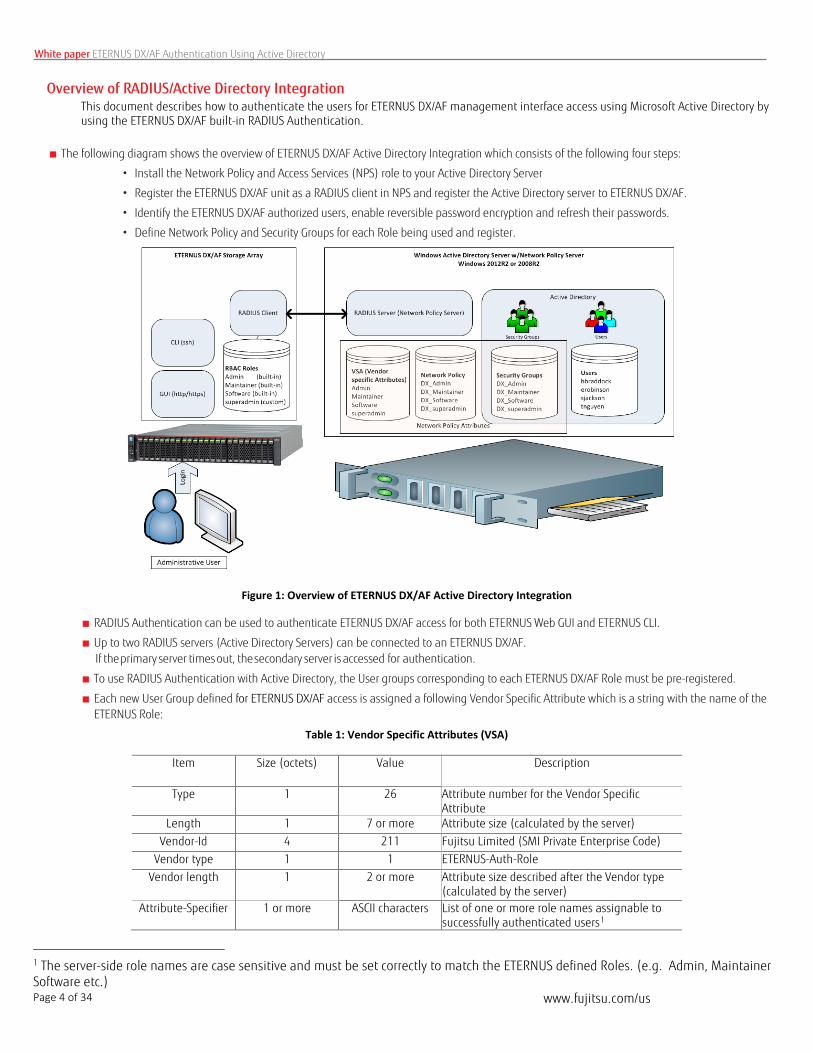
Overview of RADIUS/Active Directory Integration This document describes how to authenticate the users for ETERNUS DX/AF management interface access using Microsoft Active Directory by using the ETERNUS DX/AF built-in RADIUS Authentication.
■ The following diagram shows the overview of ETERNUS DX/AF Active Directory Integration which consists of the following four steps:
• Install the Network Policy and Access Services (NPS) role to your Active Directory Server
• Register the ETERNUS DX/AF unit as a RADIUS client in NPS and register the Active Directory server to ETERNUS DX/AF.
• Identify the ETERNUS DX/AF authorized users, enable reversible password encryption and refresh their passwords.
• Define Network Policy and Security Groups for each Role being used and register.
Figure 1: Overview of ETERNUS DX/AF Active Directory Integration
■ RADIUS Authentication can be used to authenticate ETERNUS DX/AF access for both ETERNUS Web GUI and ETERNUS CLI.
■ Up to two RADIUS servers (Active Directory Servers) can be connected to an ETERNUS DX/AF. If the primary server times out, the secondary server is accessed for authentication.
■ To use RADIUS Authentication with Active Directory, the User groups corresponding to each ETERNUS DX/AF Role must be pre-registered.
■ Each new User Group defined for ETERNUS DX/AF access is assigned a following Vendor Specific Attribute which is a string with the name of the ETERNUS Role:
Table 1: Vendor Specific Attributes (VSA)
Item Size (octets) Value Description
Type 1 26 Attribute number for the Vendor Specific Attribute
Length 1 7 or more Attribute size (calculated by the server) Vendor-Id 4 211 Fujitsu Limited (SMI Private Enterprise Code)
Vendor type 1 1 ETERNUS-Auth-Role Vendor length 1 2 or more Attribute size described after the Vendor type
(calculated by the server) Attribute-Specifier 1 or more ASCII characters List of one or more role names assignable to
successfully authenticated users1
1 The server-side role names are case sensitive and must be set correctly to match the ETERNUS defined Roles. (e.g. Admin, Maintainer Software etc.)

www.fujitsu.com/us
White paper ETERNUS DX/AF Authentication Using Active Directory
Page 5 of 34
■ There are two types of authentication method supported by ETERNUS DX/AF RADIUS Client: CHAP and PAP.
CHAP is the preferred method due to more robust security. This example assumes that CHAP is being used.
■ The use of CHAP authentication necessitates that the User’s password stored using “Reversible Password Encryption”. First, the “Reversible Password Encryption” must be enabled for the authorized users and then the user password must be updated in order for the password with Reversible Encryption to be stored.2
■ If RADIUS Authentication fails and "Do not use Internal Authentication" has been selected for "Authentication Error Recovery", it will not be possible to login to ETERNUS Web GUI or ETERNUS CLI.
■ When "Use Internal Authentication (Network Error Case)" has been selected for "Authentication Error Recovery", Internal Authentication is only performed if RADIUS Authentication fails on both primary and secondary RADIUS servers, and at least one of these failures is due to network error.
■ So long as there is no RADIUS Authentication response the ETERNUS DX/AF will keep retrying to authenticate the user for the entire "Timeout" period set on the "Set RADIUS Authentication (Initial)" menu. Authentication not succeeding before the timeout occurs is considered a RADIUS Authentication failure.
■ When using RADIUS Authentication, if the role that is received from the server is unknown (not set) for the storage system, RADIUS Authentication fails.
2 There is a security implication of enabling Reversible Password Encryption. A stored encrypted password can be decrypted by knowledgeable users. Please read the following Microsoft TechNet Article https://technet.microsoft.com/en-us/library/hh994559 to understand the security implication. We recommend that the use of Reversible Password Encryption limited to the user accounts which need to access ETERNUS DX/AF using this method.

www.fujitsu.com/us
White paper ETERNUS DX/AF Authentication Using Active Directory
Page 6 of 34
The procedure for setting up the RADIUS service on Windows Server® 2012R2 and 2008R2 The procedure for setting up the RADIUS service using Active Directory Instance on Windows Server 2008 R2 and Windows Server 2012R2 is outlined here3. The GUI interface for the Windows 2012R2 and 2008R2 for Adding Roles is different but the subsequent steps are identical.
(Windows 2012R2) Install the Network Policy Services (NPS) Role. Steps (1) and (2) describe adding the NPS role. Step (1) describes the sequence on Windows2012R2 and Step (2) describes the same sequence on Windows2008R2: Open Add Roles and Features Wizard on Windows2012R2 as shown below:
Figure 2: Add Roles and Features Wizard
Clicking on the NPS Role checkbox will pop up a confirmation dialog to add the required Features. Click “Add Features” to confirm
3 It must be noted that this setup procedure is not necessarily guaranteed to work for all network and Active Directory environments. Make sure to obtain your system administrator's help in setting up the system.
www.fujitsu.com/us
White paper ETERNUS DX/AF Authentication Using Active Directory
Page 7 of 34
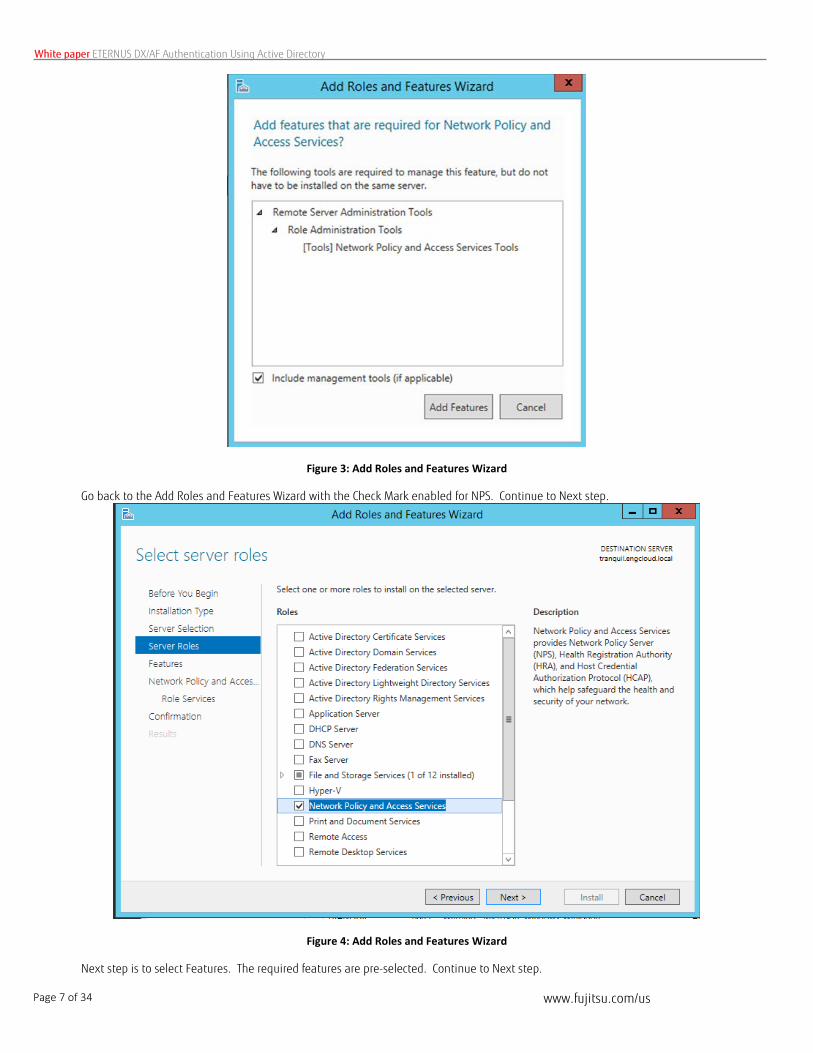
Figure 3: Add Roles and Features Wizard
Go back to the Add Roles and Features Wizard with the Check Mark enabled for NPS. Continue to Next step.
Figure 4: Add Roles and Features Wizard
Next step is to select Features. The required features are pre-selected. Continue to Next step.

www.fujitsu.com/us
White paper ETERNUS DX/AF Authentication Using Active Directory
Page 8 of 34
Figure 5: Add Roles and Features Wizard: Select features
Next step shows some notes. The only option we are interested in is for NPS to act as the RADIUS server and proxy.

www.fujitsu.com/us
White paper ETERNUS DX/AF Authentication Using Active Directory
Page 9 of 34
Figure 6: Add Network Policy and Access services
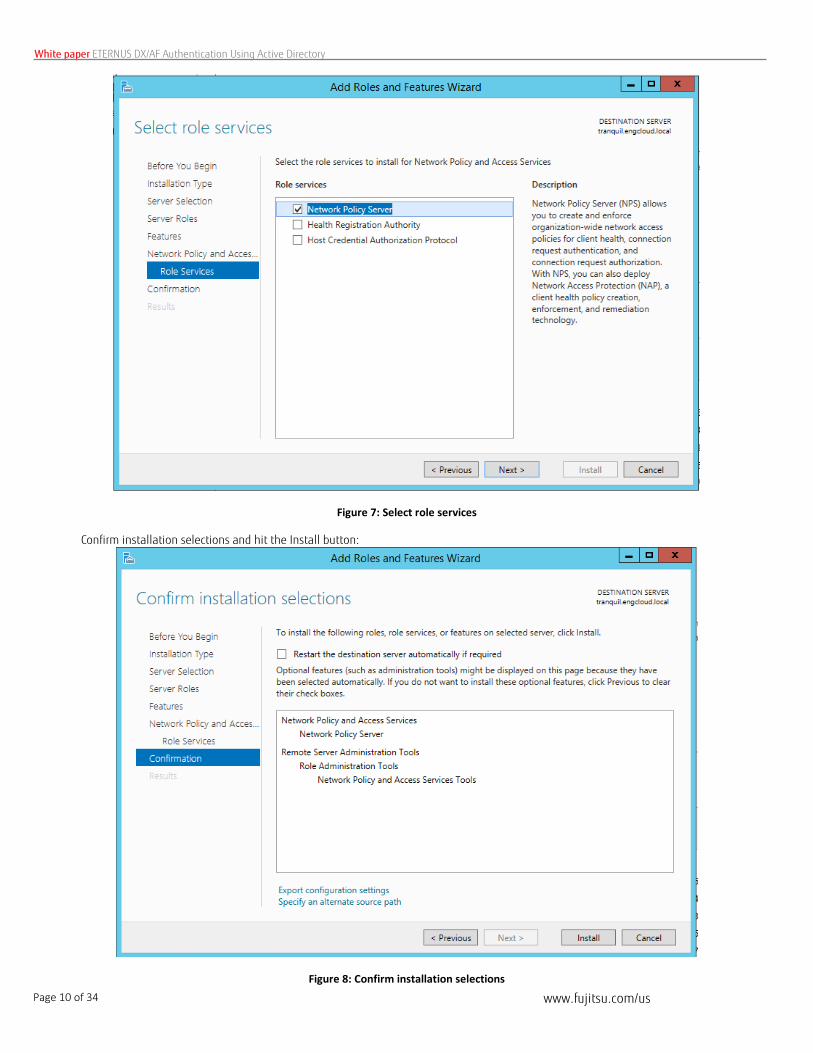
Select the role services screen, just keep the Network Policy Server (Default) and hit Next.
www.fujitsu.com/us
White paper ETERNUS DX/AF Authentication Using Active Directory
Page 10 of 34
Figure 7: Select role services
Confirm installation selections and hit the Install button:
Figure 8: Confirm installation selections

www.fujitsu.com/us
White paper ETERNUS DX/AF Authentication Using Active Directory
Page 11 of 34
This completes the addition of NPS role on Windows2012R2, please proceed to Step 3.
(Windows 2008R2) Install the Network Policy and Access Services (NPS) Role Use the “Add Roles Wizard” and select “Network Policy and Access Services” to the Active Directory Server as shown in Error! Reference source not found.
Figure 9: Add NPS Role
Continue the Wizard selecting only the base Network Policy Server with no additions (default) as shown below:
Figure 10: Select Role Services
www.fujitsu.com/us
White paper ETERNUS DX/AF Authentication Using Active Directory
Page 12 of 34
Setup ETERNUS DX/AF unit as a RADIUS Client
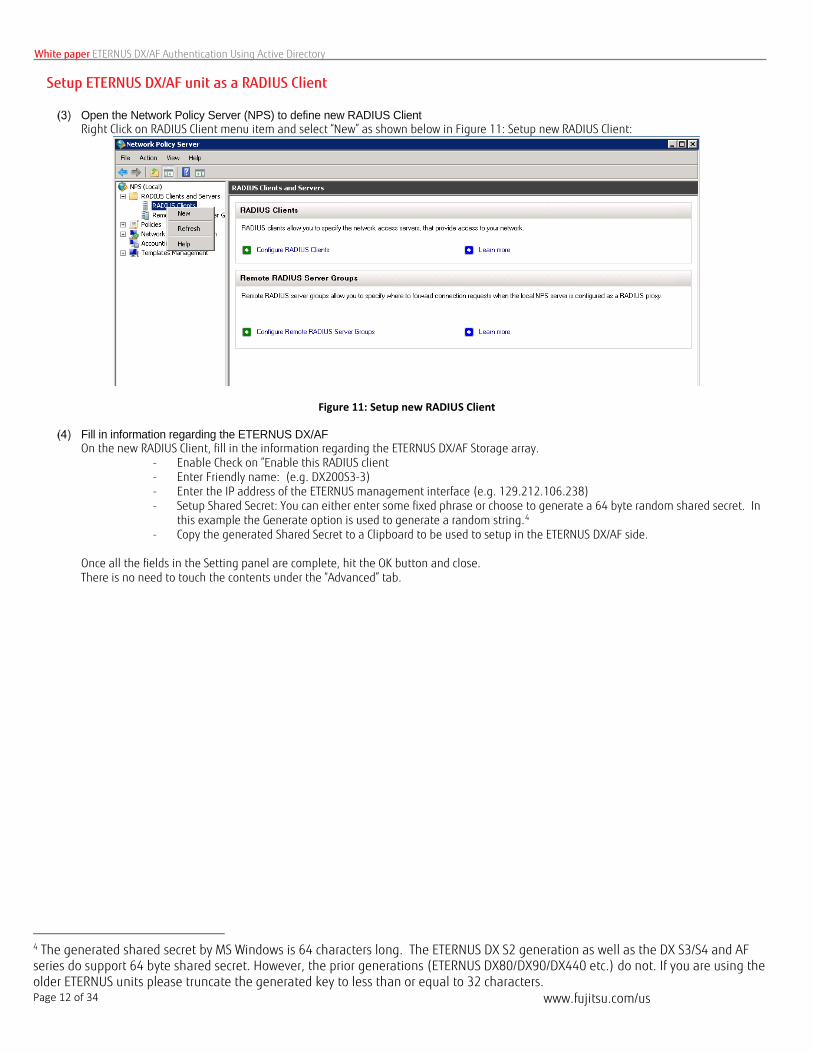
Open the Network Policy Server (NPS) to define new RADIUS Client Right Click on RADIUS Client menu item and select “New” as shown below in Figure 11: Setup new RADIUS Client:
Figure 11: Setup new RADIUS Client
Fill in information regarding the ETERNUS DX/AF On the new RADIUS Client, fill in the information regarding the ETERNUS DX/AF Storage array.
- Enable Check on “Enable this RADIUS client - Enter Friendly name: (e.g. DX200S3-3) - Enter the IP address of the ETERNUS management interface (e.g. 129.212.106.238) - Setup Shared Secret: You can either enter some fixed phrase or choose to generate a 64 byte random shared secret. In
this example the Generate option is used to generate a random string.4 - Copy the generated Shared Secret to a Clipboard to be used to setup in the ETERNUS DX/AF side.
Once all the fields in the Setting panel are complete, hit the OK button and close. There is no need to touch the contents under the “Advanced” tab.
4 The generated shared secret by MS Windows is 64 characters long. The ETERNUS DX S2 generation as well as the DX S3/S4 and AF series do support 64 byte shared secret. However, the prior generations (ETERNUS DX80/DX90/DX440 etc.) do not. If you are using the older ETERNUS units please truncate the generated key to less than or equal to 32 characters.

www.fujitsu.com/us
White paper ETERNUS DX/AF Authentication Using Active Directory
Page 13 of 34
- Figure 12: New RADIUS Client setup.
Set up the RADIUS client in the ETERNUS DX/AF GUI Login to the ETERNUS GUI and go to System -> User Settings -> Modify RADIUS Settings to configure the ETERNUS DX/AF RADIUS client. Fill in the following information in the panel.
- RADIUS Authentication – Enable - Recovery Mode – Yes (Communication Error/Authentication Error)
Note: In this mode the accounts defined locally in the ETERNUS DX/AF unit such as “root” are still usable. Use this mode for now, once the authentication using Active Directory has been well established you can switch to a stricter mode to prevent back door access.
- Primary Server o Domain Name/IP Address: The IP address of the Active Directory and NPS Server (e.g. 129.212.106.254) o Port No: 1812 (Leave it at default) o LAN Port:- MNT (Leave it at default) o Authentication mode – CHAP o Shared Secret: Paste the generated Secret key from the Active Directory Server o Retry Out Time: 30 sec (Leave it at default)
- The Secondary Server is not being configured in this example. Once all the fields are filled in hit the “Modify” button to complete this step.

www.fujitsu.com/us
White paper ETERNUS DX/AF Authentication Using Active Directory
Page 14 of 34
Figure 13: Modify RADIUS screen
Prepare Active Directory User accounts and Security Group Definitions. It is necessary for the accounts using the CHAP authentication to use the “Reversible Password Encryption” This can be done by identifying the users, which require access to ETERNUS DX/AF and then enable “Reversible Password Encryption” to all of these users. It is necessary for the users to reset the password afterwards so that the password with reversible encryption is stored.
Select Users being authorized for ETERNUS DX/AF Access. For example, assume you have identified four users in your organization to have access to the ETERNUS DX/AF with various roles. Select all the candidate users as shown below in Figure 14: Select Users Identified for ETERNUS DX/AF Access:
Figure 14: Select Users Identified for ETERNUS DX/AF Access

www.fujitsu.com/us
White paper ETERNUS DX/AF Authentication Using Active Directory
Page 15 of 34
Enable Reversible Password Encryption for the selected users. With the Users selected open Properties: Enable check marks on “User must change password at next logon” and “Store Password using Reversible Encryption” as shown below in Figure 15: Enable Reversible Password Encryption
Figure 15: Enable Reversible Password Encryption
Ask the affected users to login and reset their passwords. This step is important; the Login to ETERNUS DX/AF will fail unless the password is updated with Reversible Encryption so it is important that the users refresh the password after the reversible encryption is enabled.
Configure the User Groups An Active Directory User Group must be created for each ETERNUS DX/AF role that you intend to use: The role may be one of the seven built-in roles shown in Table 2, or it can be custom built:
Table 2: ETERNUS DX/AF Built in Roles
Role Name Description Monitor Allow monitoring only, no configuration changes. Admin All Administrator functions including User accounts. StorageAdmin All Storage Provisioning functions AccountAdmin User account management SecurityAdmin Security auditing functions Maintainer Hardware and Firmware Maintenance Functions Software CLI Only Used only for Software API interface (e.g. ESF, PMCC etc.)
In this example, we will use three built-in roles:
• Admin • Maintainer • Software
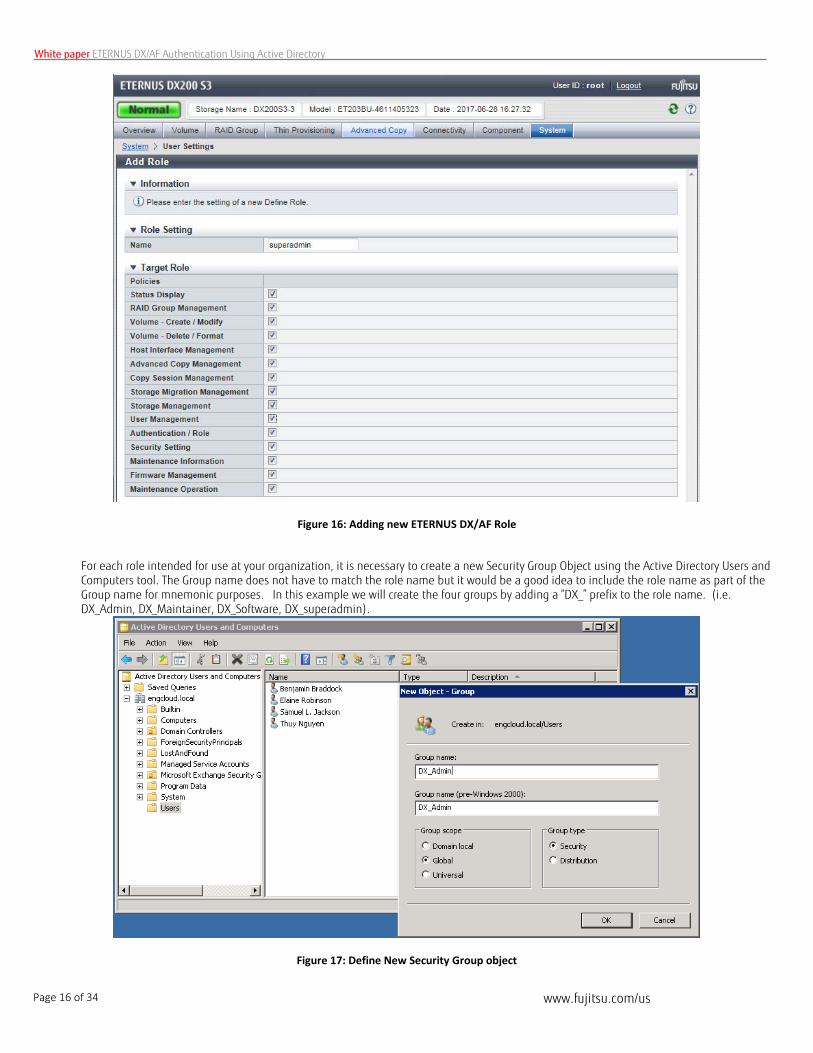
Additionally we will create one Custom role. Custom role is created using the ETERNUS GUI: Login to ETERNUS DX/AF using the root (or admin role) account and then go to: System -> User Settings -> Add Role In this example, we will create a new role called “superadmin” with Policies defined as shown below:
www.fujitsu.com/us
White paper ETERNUS DX/AF Authentication Using Active Directory
Page 16 of 34
Figure 16: Adding new ETERNUS DX/AF Role
For each role intended for use at your organization, it is necessary to create a new Security Group Object using the Active Directory Users and Computers tool. The Group name does not have to match the role name but it would be a good idea to include the role name as part of the Group name for mnemonic purposes. In this example we will create the four groups by adding a “DX_” prefix to the role name. (i.e. DX_Admin, DX_Maintainer, DX_Software, DX_superadmin).
Figure 17: Define New Security Group object

www.fujitsu.com/us
White paper ETERNUS DX/AF Authentication Using Active Directory
Page 17 of 34
Once all the groups are created the list of Users and Groups looks like the below example:
Figure 18: List of ETERNUS DX/AF Users and Security Groups
Now we should assign each user to one of the Security groups. In this example, we will use the following assignment:
• Benjamin Braddock -> DX_Admin • Elaine Robinson -> DX_Maintainer • Samuel L. Jackson -> DX_Software • Thuy Nguyen -> DX_superadmin
The Figure below shows an example of adding Elaine Robinson to the DX_Maintainer Group:
Figure 19: Assigning a User to a Security Group

www.fujitsu.com/us
White paper ETERNUS DX/AF Authentication Using Active Directory
Page 18 of 34
Define Network Policy for each Role/Group Access For each new Security Group created in the previous step we need to define a new Network Policy. Network Policy ties the Security Group, Role Name and Authentication Methods to define how the Login by ETERNUS RADIUS Client is authenticated.
Create new Network Policy Open the NPS tool and select NPS(local)->Policies->Network Policies and Right Click and select “New” as shown below:
Figure 20: Creating new Network Policy
Start the Network Policy wizard The network policy wizard starts with the Policy name. In this example we will use the same Policy name to match the Security Group name previously defined. (i.e. Policy name -> Security Group Name, DX_admin -> DX_admin, DX_maintainer -> DX_maintainer)
Figure 21: Network Policy Wizard (First Panel)
Continue the Network Policy Wizard: Specify Conditions Next step in the Network Policy Wizard asks you to Specify Conditions, here we tie the Network Policy to the Security Group Name by assigning

www.fujitsu.com/us
White paper ETERNUS DX/AF Authentication Using Active Directory
Page 19 of 34
the condition as “User Groups” and then select the corresponding Security Group name. In this case we are doing DX_Admin policy so we select the DX_Admin user group:
Figure 22: Network Policy Wizard - Assign User Group under Specify Conditions.
The following screen shows how the conditions are defined after specifying the User Group.

www.fujitsu.com/us
White paper ETERNUS DX/AF Authentication Using Active Directory
Page 20 of 34
Figure 23: Network Policy Wizard - Summary of Conditions
Continue the Network Policy Wizard: Specify Access Permission Continuing the Network Policy Wizard, it asks to specify “Access granted” or “Access denied”. Since we want to grant access to a user in group DX_admin we specify “Access granted” (Default):

www.fujitsu.com/us
White paper ETERNUS DX/AF Authentication Using Active Directory
Page 21 of 34
Figure 24: Network Policy Wizard - Access Granted
Continue the Network Policy Wizard: Configure Authentication Methods Next screen in the Wizard asks for the Authentication Methods: IMPORTANT: Checkbox for “Encrypted Authentication Method (CHAP)” must be enabled here. It is not enabled by default.

www.fujitsu.com/us
White paper ETERNUS DX/AF Authentication Using Active Directory
Page 22 of 34
Figure 25: Network Policy Wizard - Configure Authentication Methods
Continue the Network Policy Wizard: Configure Authentication Constraints No change required in this panel – continue to the next panel.

www.fujitsu.com/us
White paper ETERNUS DX/AF Authentication Using Active Directory
Page 23 of 34
Figure 26: Network Policy Wizard - Configure Constraints
Continue the Network Policy Wizard: Configure Settings We add the VSA (Vendor Specific Attributes) in this panel. Select “Vendor Specific” under RADIUS Attributes in the Settings menu and then hit the “Add” button to define new VSA:

www.fujitsu.com/us
White paper ETERNUS DX/AF Authentication Using Active Directory
Page 24 of 34
Figure 27: Network Policy Wizard - Configure Settings
Add Vendor Specific Attribute A new dialog will appear after pressing the “Add” button. Scroll all the way down on the Attributes box and select “Vendor-Specific” and hit the “Add” button:
www.fujitsu.com/us
White paper ETERNUS DX/AF Authentication Using Active Directory
Page 25 of 34
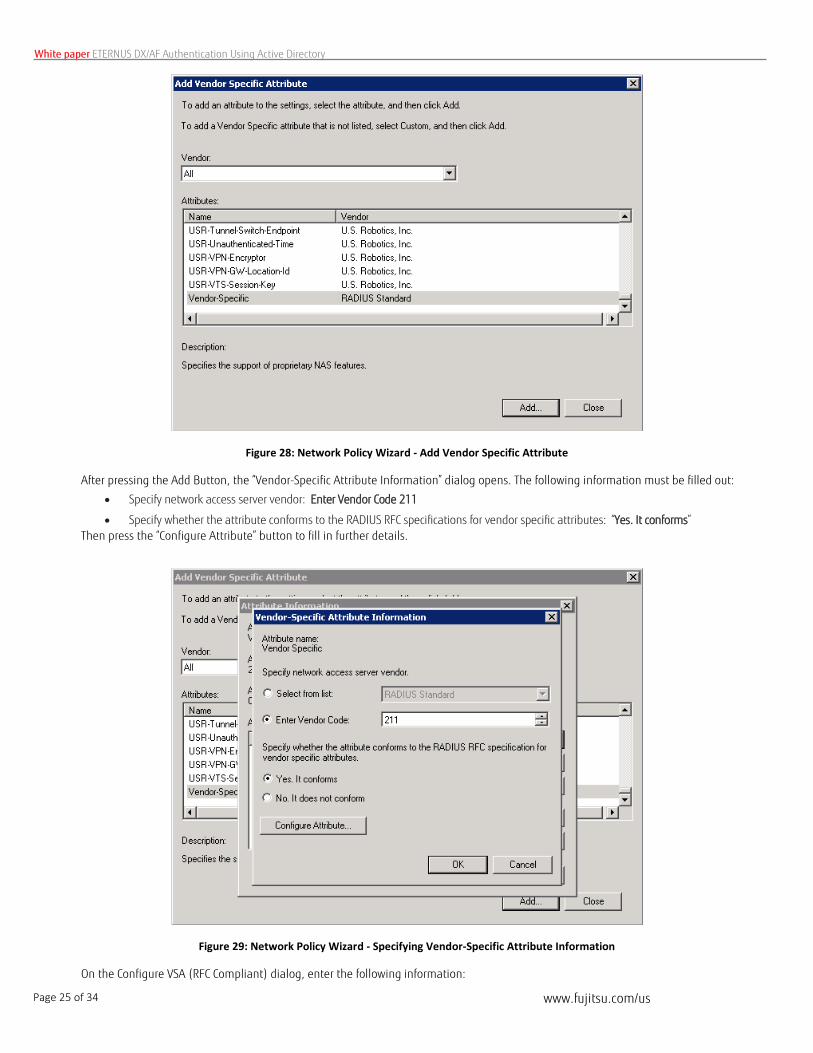
Figure 28: Network Policy Wizard - Add Vendor Specific Attribute
After pressing the Add Button, the “Vendor-Specific Attribute Information” dialog opens. The following information must be filled out:
• Specify network access server vendor: Enter Vendor Code 211
• Specify whether the attribute conforms to the RADIUS RFC specifications for vendor specific attributes: “Yes. It conforms” Then press the “Configure Attribute” button to fill in further details.
Figure 29: Network Policy Wizard - Specifying Vendor-Specific Attribute Information
On the Configure VSA (RFC Compliant) dialog, enter the following information:

www.fujitsu.com/us
White paper ETERNUS DX/AF Authentication Using Active Directory
Page 26 of 34
o Vendor-assigned attribute number: 1 o Attribute format: String o Attribute Value: This is the name of the Role defined in ETERNUS DX/AF. This string is Case Sensitive. In this example it
should be “Admin”.
Figure 30: Network Policy Wizard - Configure VSA
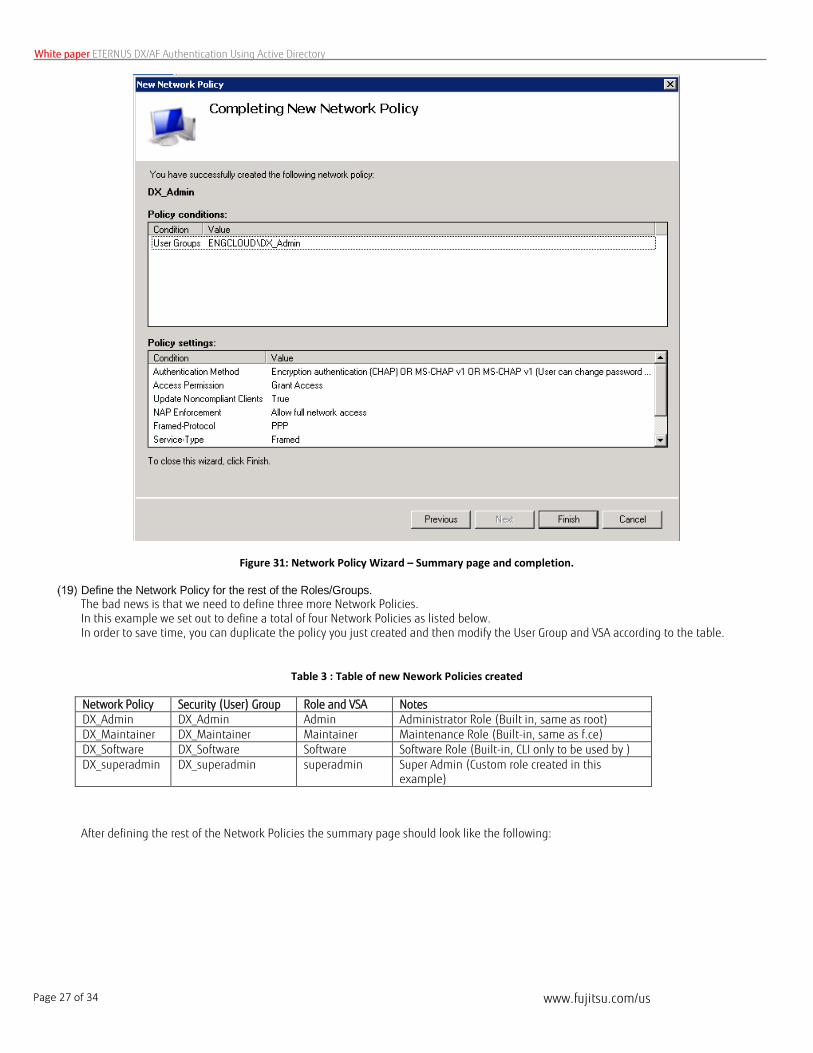
Complete the Network Policy Wizard After completing the VSA the network Policy Wizard is finally complete. Review the summary screen to ensure that the information is filled out correctly and then press the “Finish” button. The summary information should be as follows:
o Policy Conditions: There should be one condition with “User Groups” and the User Group Name that corresponds to the Network Policy Name (i.e. DX_admin)
o Policy Settings - Verify the following settings Authentication Method: Encryption Authentication (CHAP)... Access Permission: Grant Access Vendor-Specific: Admin (ETERNUS DX/AF defined Role name)
www.fujitsu.com/us
White paper ETERNUS DX/AF Authentication Using Active Directory
Page 27 of 34
Figure 31: Network Policy Wizard – Summary page and completion.
Define the Network Policy for the rest of the Roles/Groups. The bad news is that we need to define three more Network Policies. In this example we set out to define a total of four Network Policies as listed below. In order to save time, you can duplicate the policy you just created and then modify the User Group and VSA according to the table.
Table 3 : Table of new Nework Policies created
Network Policy Security (User) Group Role and VSA Notes DX_Admin DX_Admin Admin Administrator Role (Built in, same as root) DX_Maintainer DX_Maintainer Maintainer Maintenance Role (Built-in, same as f.ce) DX_Software DX_Software Software Software Role (Built-in, CLI only to be used by ) DX_superadmin DX_superadmin superadmin Super Admin (Custom role created in this
example)
After defining the rest of the Network Policies the summary page should look like the following:
www.fujitsu.com/us
White paper ETERNUS DX/AF Authentication Using Active Directory
Page 28 of 34
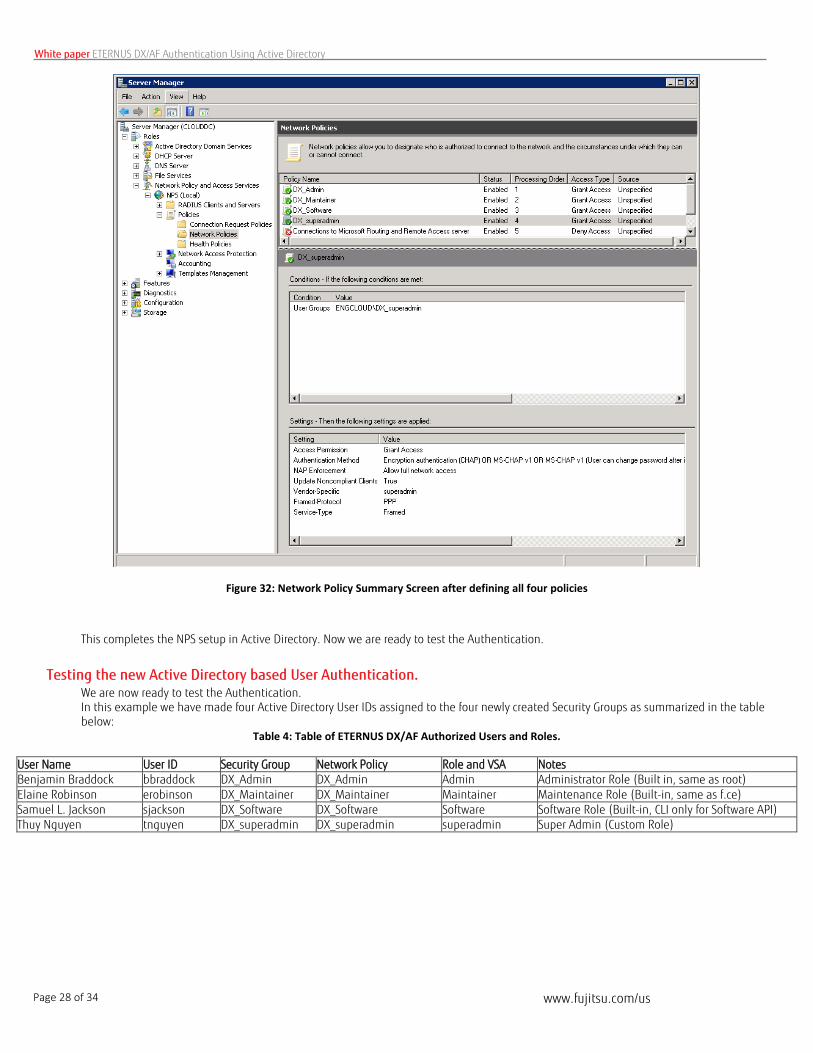
Figure 32: Network Policy Summary Screen after defining all four policies
This completes the NPS setup in Active Directory. Now we are ready to test the Authentication.
Testing the new Active Directory based User Authentication. We are now ready to test the Authentication. In this example we have made four Active Directory User IDs assigned to the four newly created Security Groups as summarized in the table below:
Table 4: Table of ETERNUS DX/AF Authorized Users and Roles.
User Name User ID Security Group Network Policy Role and VSA Notes Benjamin Braddock bbraddock DX_Admin DX_Admin Admin Administrator Role (Built in, same as root) Elaine Robinson erobinson DX_Maintainer DX_Maintainer Maintainer Maintenance Role (Built-in, same as f.ce) Samuel L. Jackson sjackson DX_Software DX_Software Software Software Role (Built-in, CLI only for Software API) Thuy Nguyen tnguyen DX_superadmin DX_superadmin superadmin Super Admin (Custom Role)

www.fujitsu.com/us
White paper ETERNUS DX/AF Authentication Using Active Directory
Page 29 of 34
Testing user Benjamin Braddock Test access for the user Benjamin Braddock whose Id is “bbraddock”. In this test we will specify the Domain name which is “engcloud”.
Figure 33: Logging in bbraddock with Domain ID
Verify successful login: After login go to “System” tab to verify the login ID (engcloud\bbraddock) and Role (Admin).
o
Figure 34: Verifying login with engcloud\bbraddock
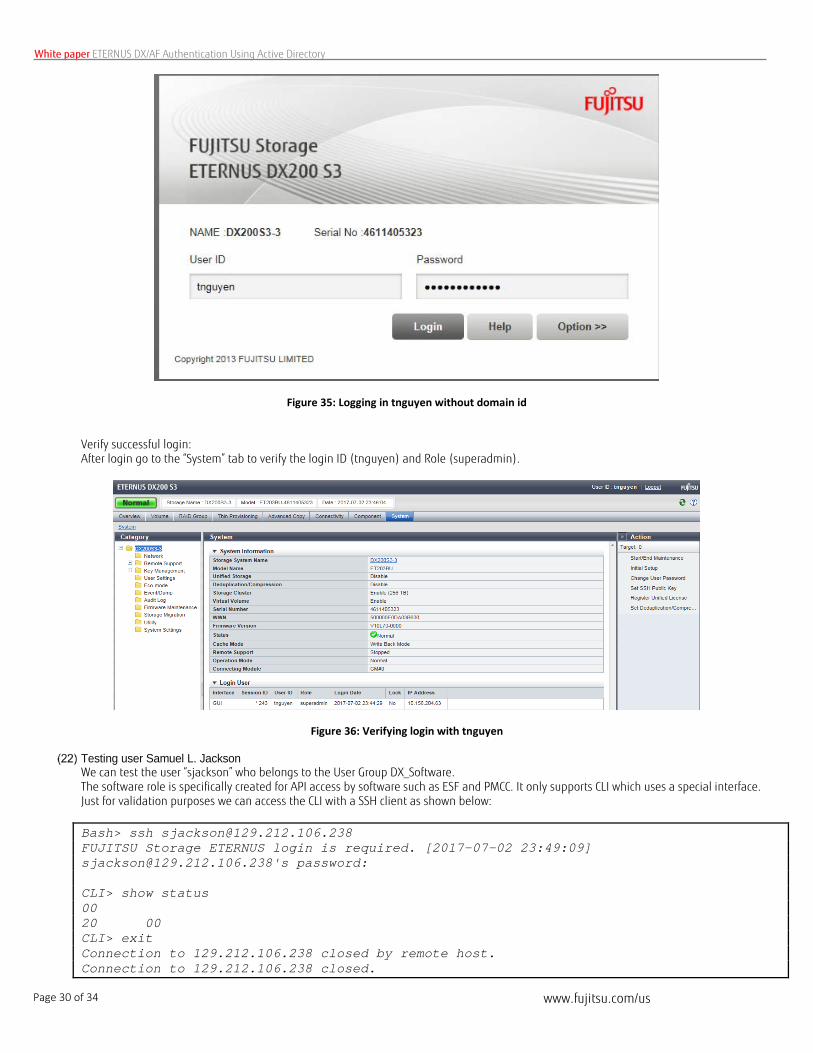
Testing user Thuy Nguyen This time we test the user “tnguyen” who belongs to the User Group with Custom Role “superadmin”. In this case we will not specify the Domain name5.
5 In this environment where the RADIUS server is connected to the Active Directory Server with single domain there is no need to specify the Domain Name in Login. This may differ depending on how the domain controller is configured.
www.fujitsu.com/us
White paper ETERNUS DX/AF Authentication Using Active Directory
Page 30 of 34
Figure 35: Logging in tnguyen without domain id
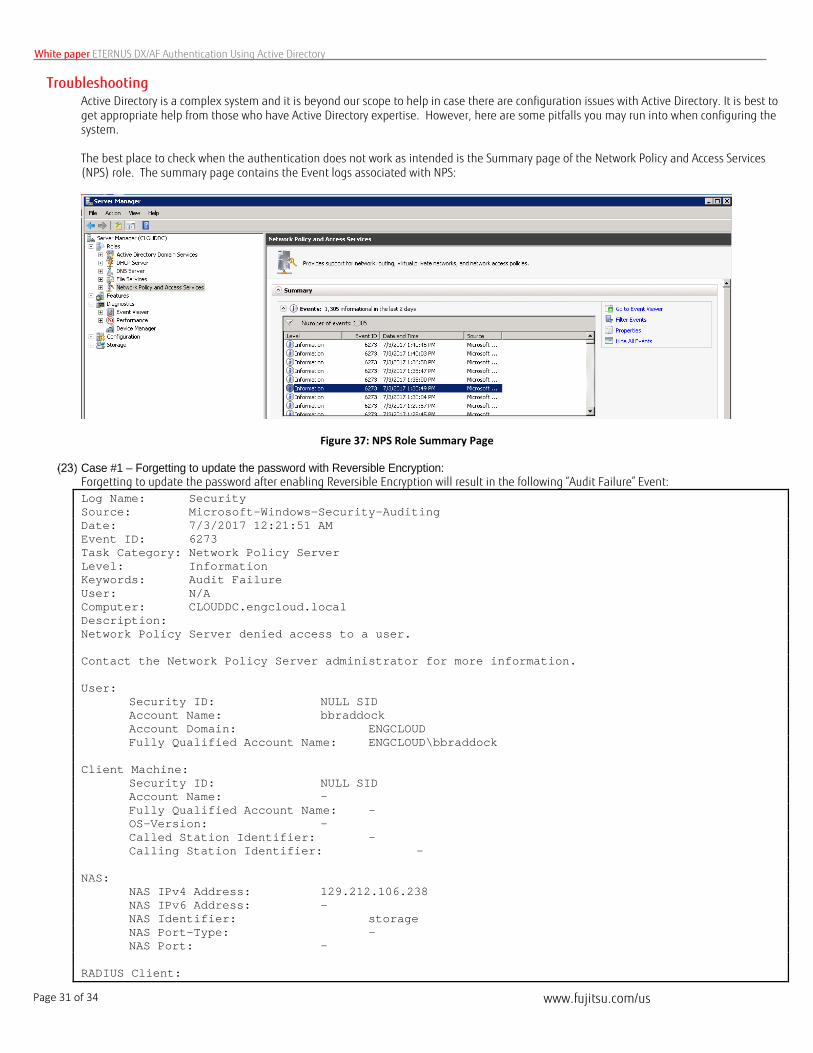
Verify successful login: After login go to the “System” tab to verify the login ID (tnguyen) and Role (superadmin).
Figure 36: Verifying login with tnguyen
Testing user Samuel L. Jackson We can test the user “sjackson” who belongs to the User Group DX_Software. The software role is specifically created for API access by software such as ESF and PMCC. It only supports CLI which uses a special interface. Just for validation purposes we can access the CLI with a SSH client as shown below:
Bash> ssh [email protected] FUJITSU Storage ETERNUS login is required. [2017-07-02 23:49:09] [email protected]'s password: CLI> show status 00 20 00 CLI> exit Connection to 129.212.106.238 closed by remote host. Connection to 129.212.106.238 closed.
www.fujitsu.com/us
White paper ETERNUS DX/AF Authentication Using Active Directory
Page 31 of 34
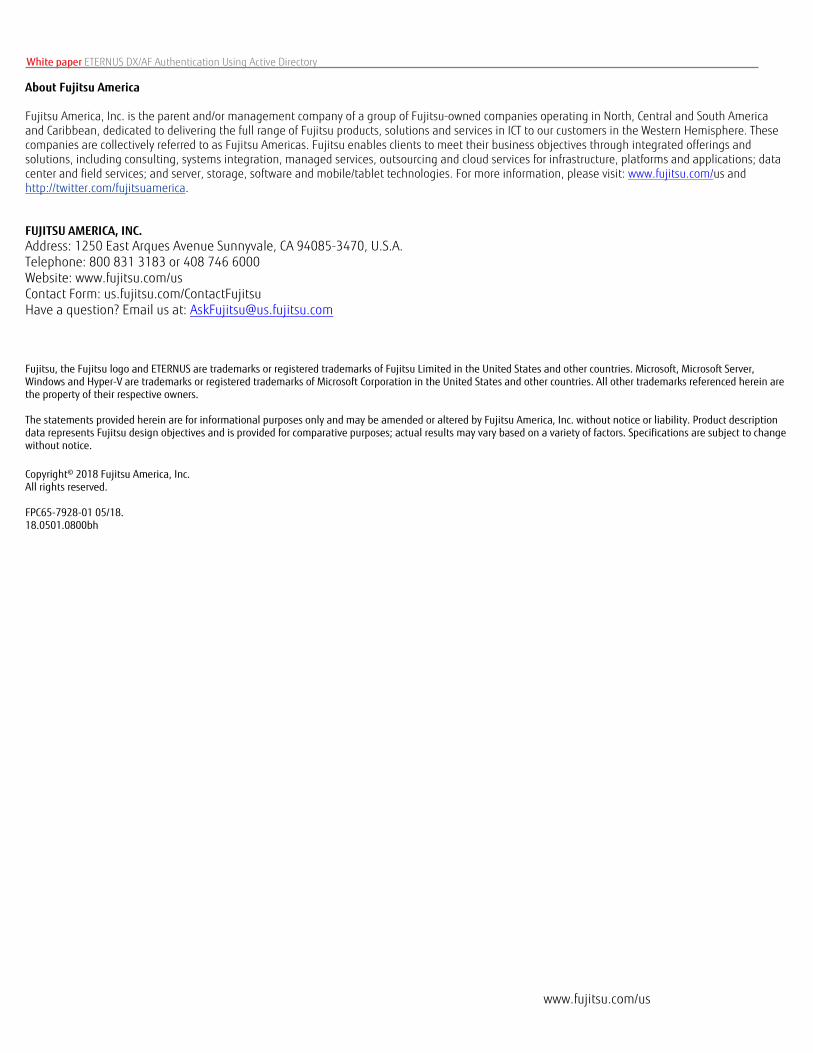
Troubleshooting Active Directory is a complex system and it is beyond our scope to help in case there are configuration issues with Active Directory. It is best to get appropriate help from those who have Active Directory expertise. However, here are some pitfalls you may run into when configuring the system. The best place to check when the authentication does not work as intended is the Summary page of the Network Policy and Access Services (NPS) role. The summary page contains the Event logs associated with NPS:
Figure 37: NPS Role Summary Page
Case #1 – Forgetting to update the password with Reversible Encryption: Forgetting to update the password after enabling Reversible Encryption will result in the following “Audit Failure” Event: Log Name: Security Source: Microsoft-Windows-Security-Auditing Date: 7/3/2017 12:21:51 AM Event ID: 6273 Task Category: Network Policy Server Level: Information Keywords: Audit Failure User: N/A Computer: CLOUDDC.engcloud.local Description: Network Policy Server denied access to a user. Contact the Network Policy Server administrator for more information. User: Security ID: NULL SID Account Name: bbraddock Account Domain: ENGCLOUD Fully Qualified Account Name: ENGCLOUD\bbraddock Client Machine: Security ID: NULL SID Account Name: - Fully Qualified Account Name: - OS-Version: - Called Station Identifier: - Calling Station Identifier: - NAS: NAS IPv4 Address: 129.212.106.238 NAS IPv6 Address: - NAS Identifier: storage NAS Port-Type: - NAS Port: - RADIUS Client:

www.fujitsu.com/us
White paper ETERNUS DX/AF Authentication Using Active Directory
Page 32 of 34
Client Friendly Name: DX200S3-3 Client IP Address: 129.212.106.238 Authentication Details: Connection Request Policy Name: Use Windows authentication for all users Network Policy Name: - Authentication Provider: Windows Authentication Server: CLOUDDC.engcloud.local Authentication Type: MD5-CHAP EAP Type: - Account Session Identifier: - Logging Results: Accounting information was written to the local log file. Reason Code: 19 Reason: The user could not be authenticated using Challenge Handshake Authentication Protocol (CHAP). A reversibly encrypted password does not exist for this user account. To ensure that reversibly encrypted passwords are enabled, check either the domain password policy or the password settings on the user account.
Case #2 - The authentication or accounting record could not be written failure The following failure occurred in our case because the storage in the Active Directory server was exhausted. This error may also occur if the Network Access Protection - > Accounting information for where the logs are saved are incorrectly specified. Log Name: Security Source: Microsoft-Windows-Security-Auditing Date: 6/28/2017 5:38:28 PM Event ID: 6274 Task Category: Network Policy Server Level: Information Keywords: Audit Failure User: N/A Computer: CLOUDDC.engcloud.local Description: Network Policy Server discarded the request for a user. Contact the Network Policy Server administrator for more information. User: Security ID: ENGCLOUD\kkatsumata Account Name: Engcloud\kkatsumata Account Domain: ENGCLOUD Fully Qualified Account Name: engcloud.local/Users/Kun Katsumata Client Machine: Security ID: NULL SID Account Name: - Fully Qualified Account Name: - OS-Version: - Called Station Identifier: - Calling Station Identifier: - NAS: NAS IPv4 Address: 129.212.106.238 NAS IPv6 Address: - NAS Identifier: storage NAS Port-Type: - NAS Port: - RADIUS Client: Client Friendly Name: test Client IP Address: 129.212.106.238 Authentication Details: Connection Request Policy Name: Use Windows authentication for all users Network Policy Name: test-policy Authentication Provider: Windows Authentication Server: CLOUDDC.engcloud.local Authentication Type: MD5-CHAP

www.fujitsu.com/us
White paper ETERNUS DX/AF Authentication Using Active Directory
Page 33 of 34
EAP Type: - Account Session Identifier: - Reason Code: 80 Reason: The authentication or accounting record could not be written to the configured accounting datastore. Ensure that the log file location is accessible, has available space, can be written to and that the directory or SQL server is available.
www.fujitsu.com/us
White paper ETERNUS DX/AF Authentication Using Active Directory
About Fujitsu America Fujitsu America, Inc. is the parent and/or management company of a group of Fujitsu-owned companies operating in North, Central and South America and Caribbean, dedicated to delivering the full range of Fujitsu products, solutions and services in ICT to our customers in the Western Hemisphere. These companies are collectively referred to as Fujitsu Americas. Fujitsu enables clients to meet their business objectives through integrated offerings and solutions, including consulting, systems integration, managed services, outsourcing and cloud services for infrastructure, platforms and applications; data center and field services; and server, storage, software and mobile/tablet technologies. For more information, please visit: www.fujitsu.com/us and http://twitter.com/fujitsuamerica. FUJITSU AMERICA, INC. Address: 1250 East Arques Avenue Sunnyvale, CA 94085-3470, U.S.A. Telephone: 800 831 3183 or 408 746 6000 Website: www.fujitsu.com/us Contact Form: us.fujitsu.com/ContactFujitsu Have a question? Email us at: [email protected]
Fujitsu, the Fujitsu logo and ETERNUS are trademarks or registered trademarks of Fujitsu Limited in the United States and other countries. Microsoft, Microsoft Server, Windows and Hyper-V are trademarks or registered trademarks of Microsoft Corporation in the United States and other countries. All other trademarks referenced herein are the property of their respective owners. The statements provided herein are for informational purposes only and may be amended or altered by Fujitsu America, Inc. without notice or liability. Product description data represents Fujitsu design objectives and is provided for comparative purposes; actual results may vary based on a variety of factors. Specifications are subject to change without notice. Copyright© 2018 Fujitsu America, Inc. All rights reserved. FPC65-7928-01 05/18. 18.0501.0800bh