Embed Size (px)
Citation preview
ESI Cloud PBX
Quick-start Guide
0455-1154 Rev. A
For on-line help, visit www.esi-estech.com/support. About ESI ESI (Estech Systems, Inc.) designs and manufactures high-performance phone systems for businesses and organizations. ESI uses advanced technology to design IP and digital communications systems that integrate built-in capabilities, advanced features, and highly differentiated applications into flexible products that are easy to use and keep employees productive. ESI has sold over 250,000 business communications systems through hundreds of factory-trained Certified Resellers. Founded in 1987, ESI is a privately held corporation with headquarters in Plano, Texas. Copyright © 2014 ESI (Estech Systems, Inc.).
Contents
Getting started .............................................................................................................................................................................. 1Gathering info ............................................................................................................................................................................... 4Managing the domain .................................................................................................................................................................. 5Creating time frames .................................................................................................................................................................... 6Creating user accounts ............................................................................................................................................................... 9
Creating the initial user profile ............................................................................................................................................... 9Configuring conferences ........................................................................................................................................................... 18
Premier conference bridges ................................................................................................................................................. 18Configuring call queues ............................................................................................................................................................ 21
Call-park queues .................................................................................................................................................................. 21Ring-all queues .................................................................................................................................................................... 23Standard queues .................................................................................................................................................................. 26
Configuring auto attendants ..................................................................................................................................................... 29Configuring music on hold ........................................................................................................................................................ 34Assigning DID and toll-free numbers ....................................................................................................................................... 36Conclusion .................................................................................................................................................................................. 38
Index
ESI Cloud PBX Quick-start Guide
1
Getting started This Quick-start Guide is intended to offer you a quick walkthrough of the ESI Cloud PBX solution, from setup to programming, reporting, and overall maintenance. Troubleshooting will be added to a later revision.
By now, you have received the phones which have been pre-provisioned for the ESI service. You have also received your Reseller login information that you’ll need to use to log into your Reseller dashboard. Note that this guide can be used with either your demo domain account or with a customer domain. Now, you just need to configure the system and assist in training the new end users.
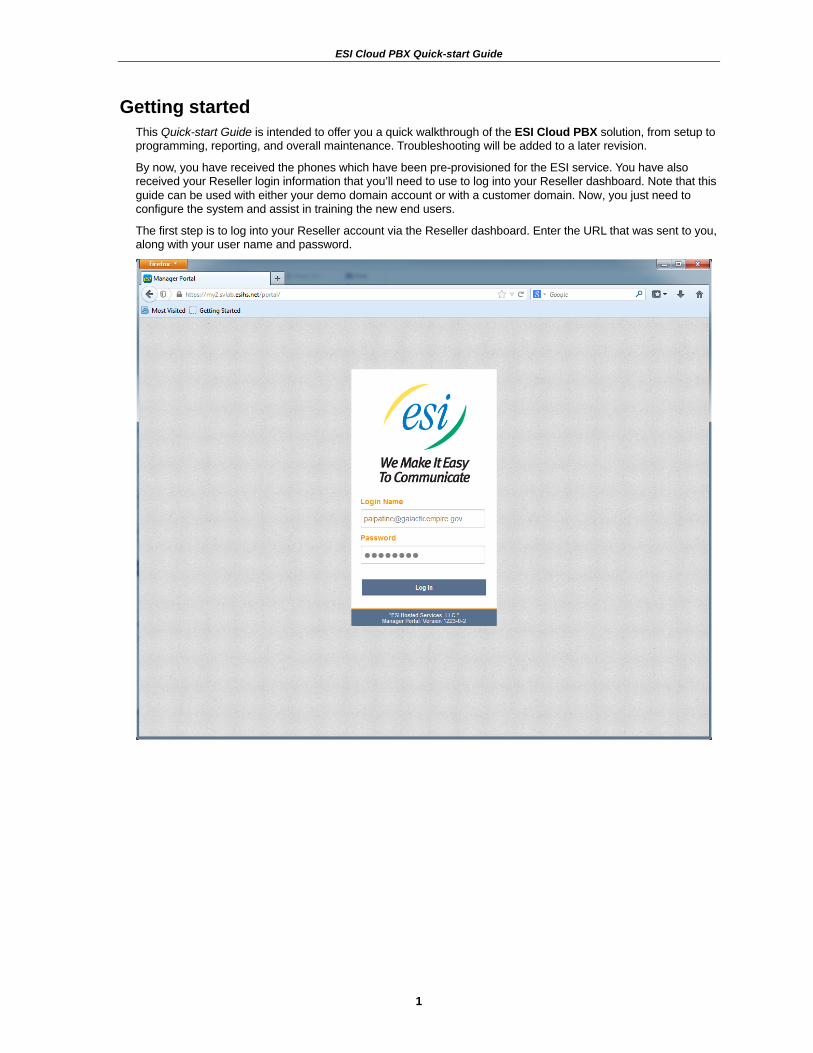
The first step is to log into your Reseller account via the Reseller dashboard. Enter the URL that was sent to you, along with your user name and password.
ESI Cloud PBX Quick-start Guide
2
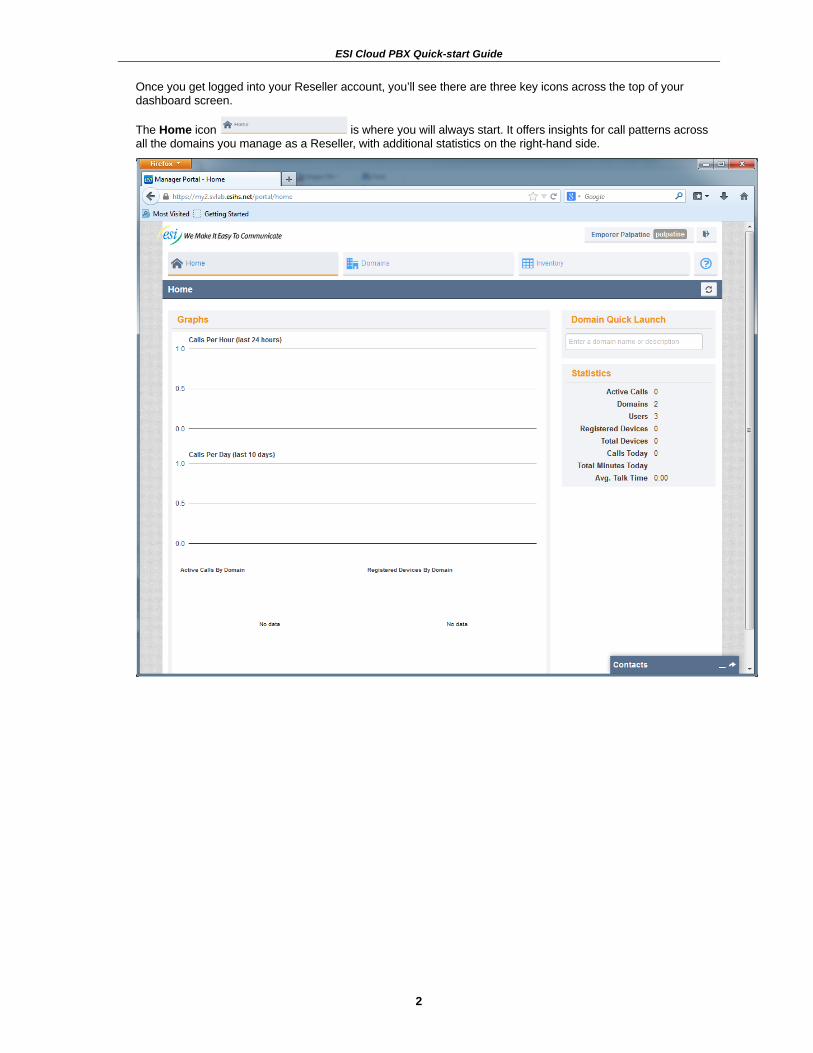
Once you get logged into your Reseller account, you’ll see there are three key icons across the top of your dashboard screen.
The Home icon is where you will always start. It offers insights for call patterns across all the domains you manage as a Reseller, with additional statistics on the right-hand side.
ESI Cloud PBX Quick-start Guide
3
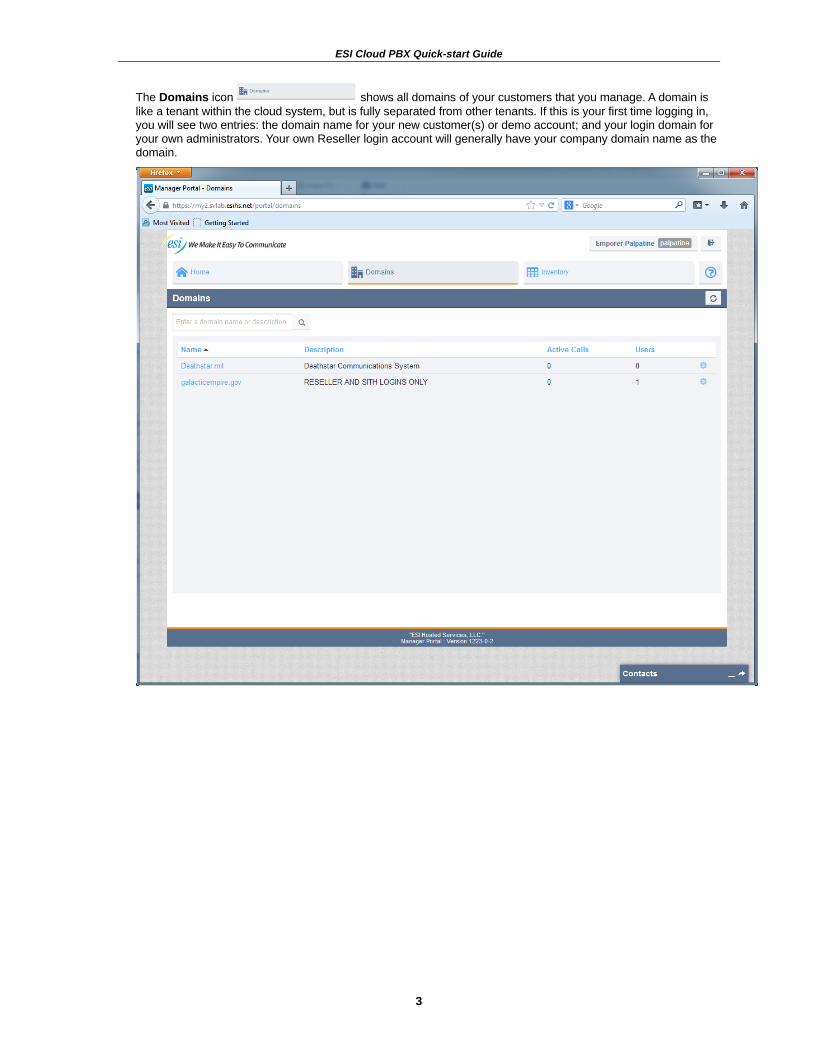
The Domains icon shows all domains of your customers that you manage. A domain is like a tenant within the cloud system, but is fully separated from other tenants. If this is your first time logging in, you will see two entries: the domain name for your new customer(s) or demo account; and your login domain for your own administrators. Your own Reseller login account will generally have your company domain name as the domain.
ESI Cloud PBX Quick-start Guide
4
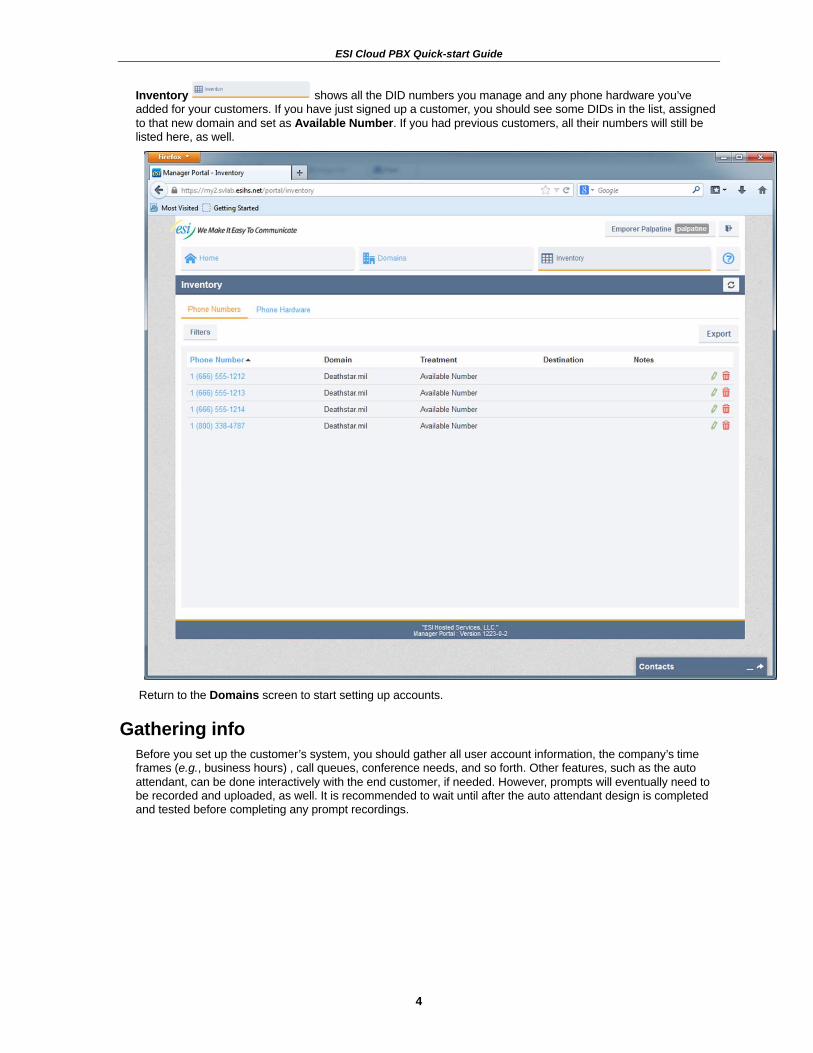
Inventory shows all the DID numbers you manage and any phone hardware you’ve added for your customers. If you have just signed up a customer, you should see some DIDs in the list, assigned to that new domain and set as Available Number. If you had previous customers, all their numbers will still be listed here, as well.
Return to the Domains screen to start setting up accounts.
Gathering info Before you set up the customer’s system, you should gather all user account information, the company’s time frames (e.g., business hours) , call queues, conference needs, and so forth. Other features, such as the auto attendant, can be done interactively with the end customer, if needed. However, prompts will eventually need to be recorded and uploaded, as well. It is recommended to wait until after the auto attendant design is completed and tested before completing any prompt recordings.
ESI Cloud PBX Quick-start Guide
5
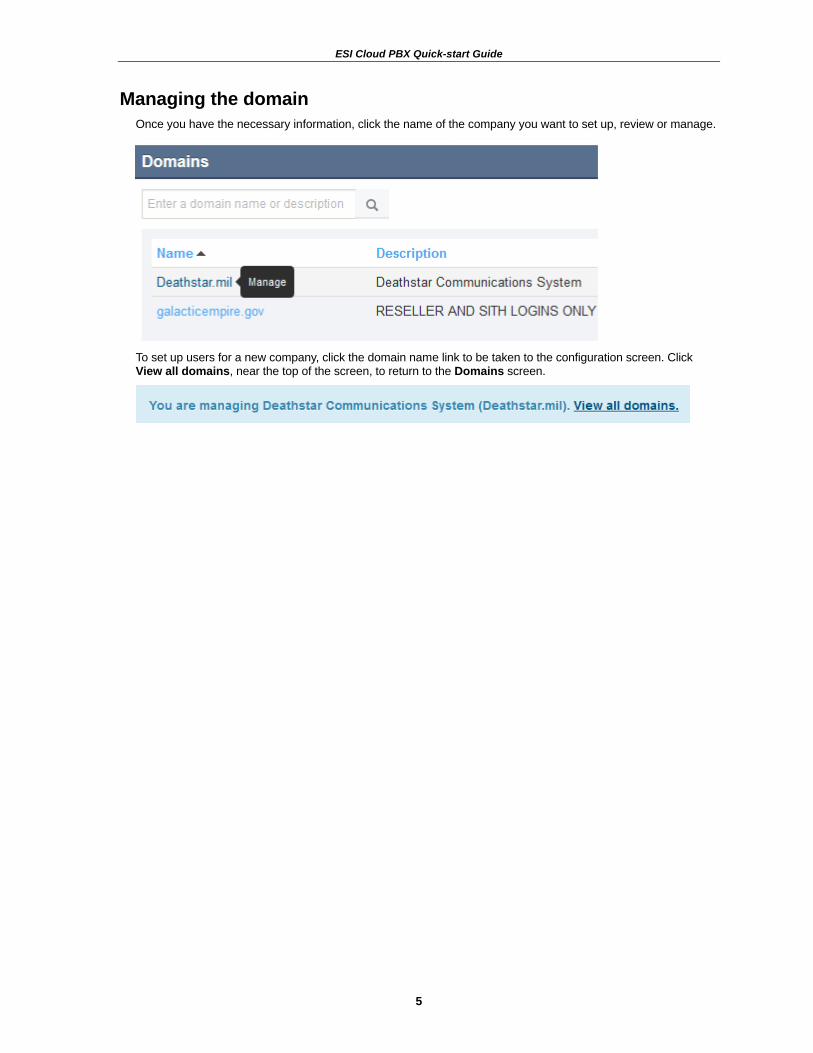
Managing the domain Once you have the necessary information, click the name of the company you want to set up, review or manage.
To set up users for a new company, click the domain name link to be taken to the configuration screen. Click View all domains, near the top of the screen, to return to the Domains screen.
ESI Cloud PBX Quick-start Guide
6
Creating time frames Time frames define when answering rules apply for users and auto attendants apply. You can create a time frame that’s always on, as in the case of a do-not-disturb rule, or one that specifies specific days and times to define business hours or after-hours periods. In this section, we’ll define some time frames and then later apply some answering rules to those. The answering rules are actually set per user account, since each user may want to have different phone behavior during those time frames.
1. Make sure you are in the domain you want to manage.
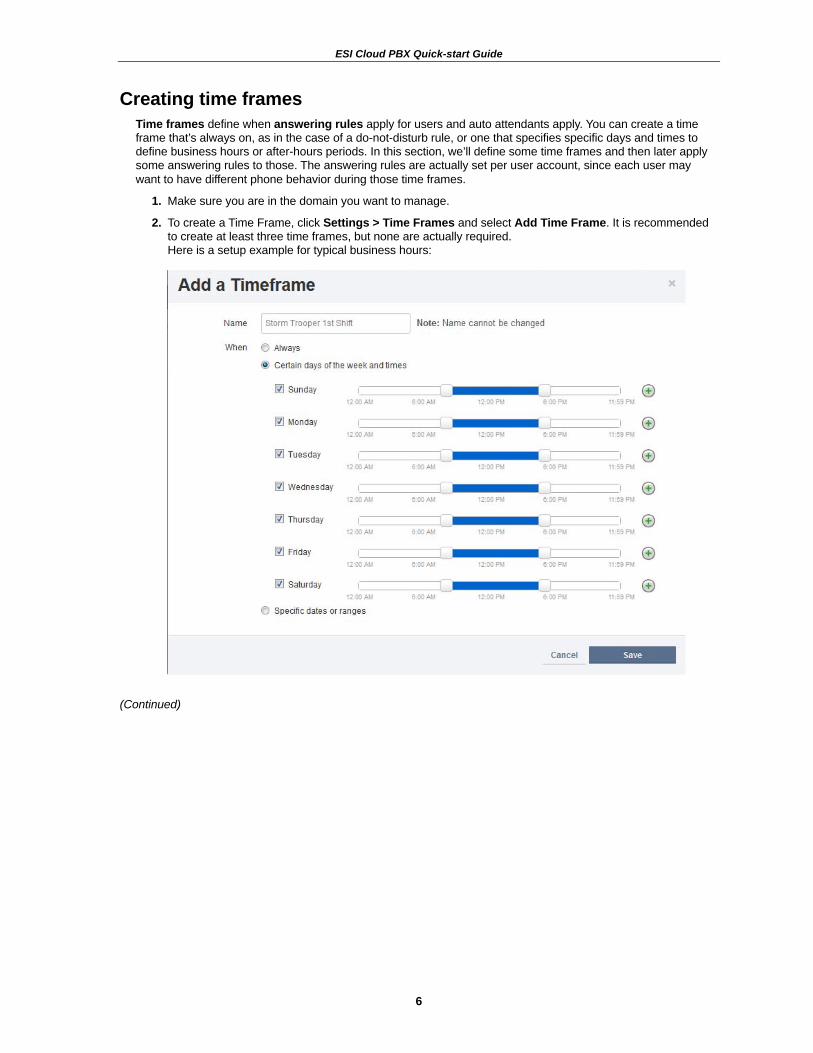
2. To create a Time Frame, click Settings > Time Frames and select Add Time Frame. It is recommended to create at least three time frames, but none are actually required. Here is a setup example for typical business hours:
(Continued)
ESI Cloud PBX Quick-start Guide
7
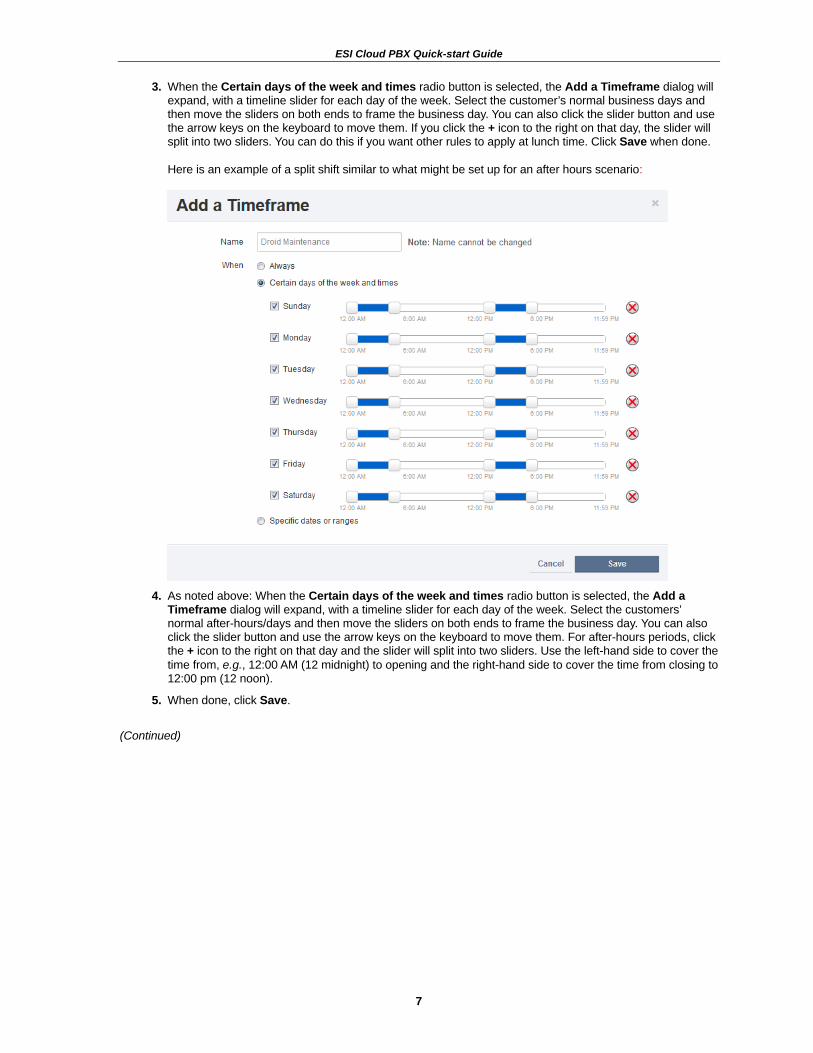
3. When the Certain days of the week and times radio button is selected, the Add a Timeframe dialog will expand, with a timeline slider for each day of the week. Select the customer’s normal business days and then move the sliders on both ends to frame the business day. You can also click the slider button and use the arrow keys on the keyboard to move them. If you click the + icon to the right on that day, the slider will split into two sliders. You can do this if you want other rules to apply at lunch time. Click Save when done. Here is an example of a split shift similar to what might be set up for an after hours scenario:
4. As noted above: When the Certain days of the week and times radio button is selected, the Add a
Timeframe dialog will expand, with a timeline slider for each day of the week. Select the customers’ normal after-hours/days and then move the sliders on both ends to frame the business day. You can also click the slider button and use the arrow keys on the keyboard to move them. For after-hours periods, click the + icon to the right on that day and the slider will split into two sliders. Use the left-hand side to cover the time from, e.g., 12:00 AM (12 midnight) to opening and the right-hand side to cover the time from closing to 12:00 pm (12 noon).
5. When done, click Save.
(Continued)
ESI Cloud PBX Quick-start Guide
8
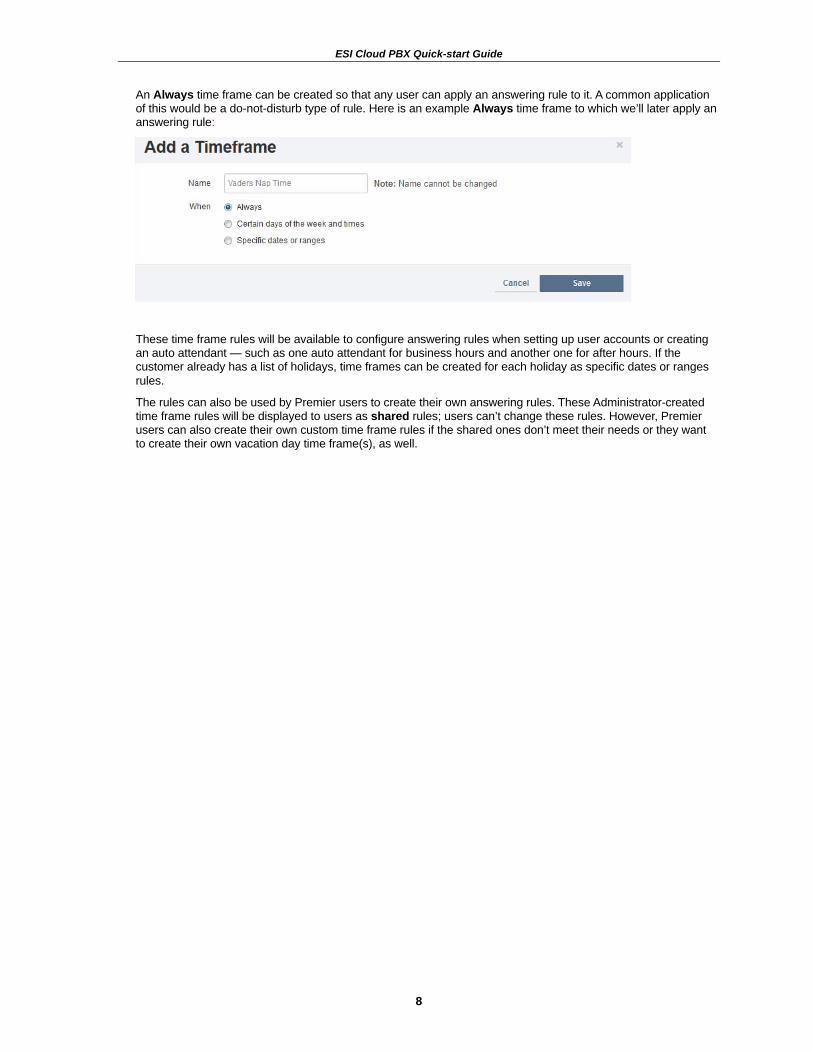
An Always time frame can be created so that any user can apply an answering rule to it. A common application of this would be a do-not-disturb type of rule. Here is an example Always time frame to which we’ll later apply an answering rule:
These time frame rules will be available to configure answering rules when setting up user accounts or creating an auto attendant — such as one auto attendant for business hours and another one for after hours. If the customer already has a list of holidays, time frames can be created for each holiday as specific dates or ranges rules.
The rules can also be used by Premier users to create their own answering rules. These Administrator-created time frame rules will be displayed to users as shared rules; users can’t change these rules. However, Premier users can also create their own custom time frame rules if the shared ones don’t meet their needs or they want to create their own vacation day time frame(s), as well.
ESI Cloud PBX Quick-start Guide
9
Creating user accounts Next, add user accounts using the information gathered from the customer. In this section, we’ll create a user account and review the options.
Creating the initial user profile 1. Click Users at the top of the screen when you are editing a domain.
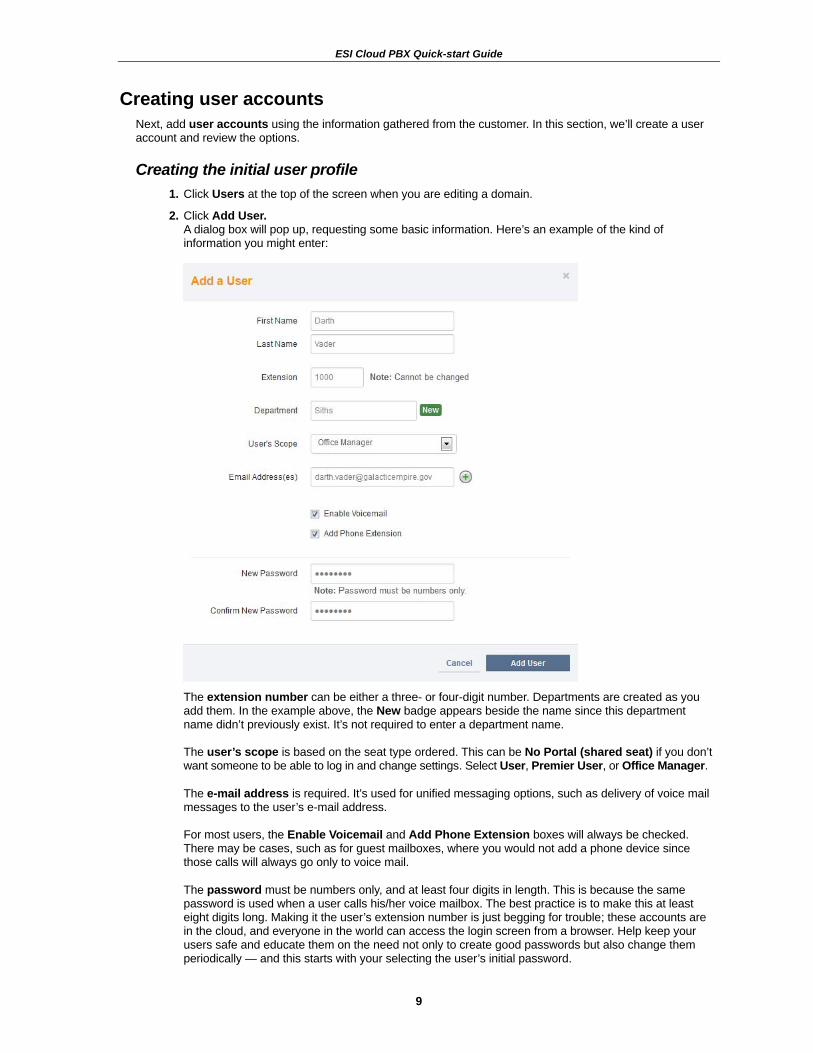
2. Click Add User. A dialog box will pop up, requesting some basic information. Here’s an example of the kind of information you might enter:
The extension number can be either a three- or four-digit number. Departments are created as you
add them. In the example above, the New badge appears beside the name since this department name didn’t previously exist. It’s not required to enter a department name. The user’s scope is based on the seat type ordered. This can be No Portal (shared seat) if you don’t want someone to be able to log in and change settings. Select User, Premier User, or Office Manager. The e-mail address is required. It’s used for unified messaging options, such as delivery of voice mail messages to the user’s e-mail address. For most users, the Enable Voicemail and Add Phone Extension boxes will always be checked. There may be cases, such as for guest mailboxes, where you would not add a phone device since those calls will always go only to voice mail. The password must be numbers only, and at least four digits in length. This is because the same password is used when a user calls his/her voice mailbox. The best practice is to make this at least eight digits long. Making it the user’s extension number is just begging for trouble; these accounts are in the cloud, and everyone in the world can access the login screen from a browser. Help keep your users safe and educate them on the need not only to create good passwords but also change them periodically — and this starts with your selecting the user’s initial password.
ESI Cloud PBX Quick-start Guide
10
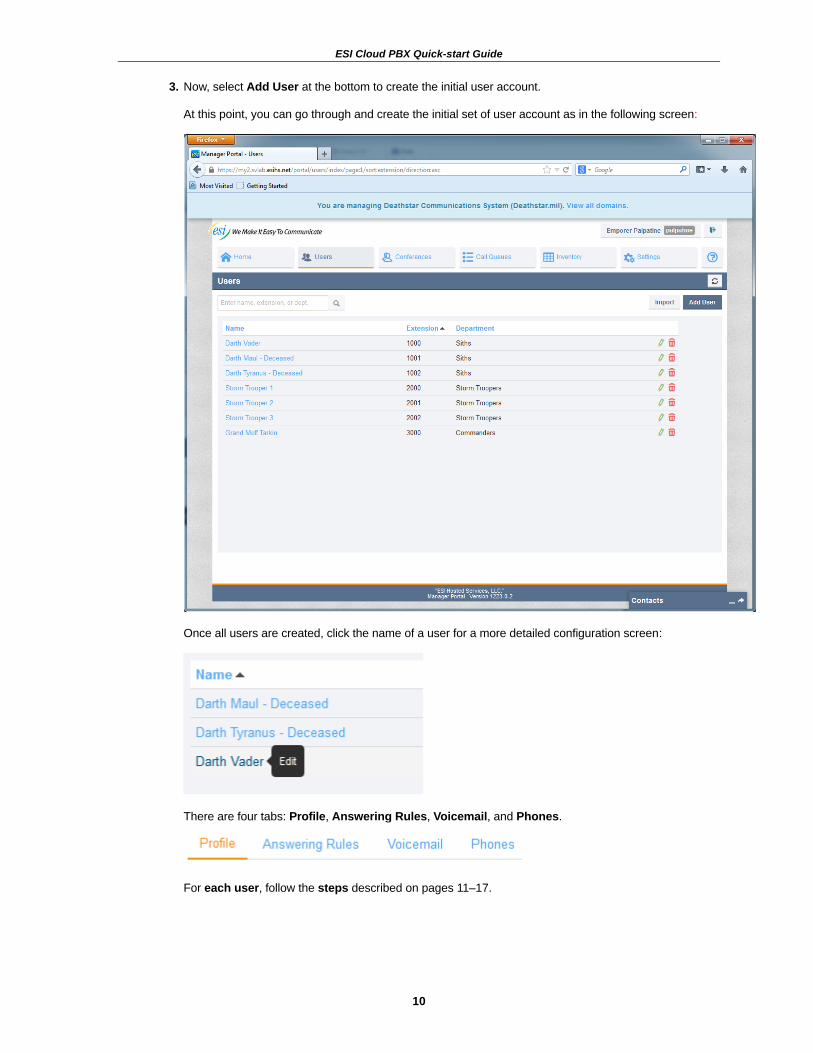
3. Now, select Add User at the bottom to create the initial user account. At this point, you can go through and create the initial set of user account as in the following screen:
Once all users are created, click the name of a user for a more detailed configuration screen:
There are four tabs: Profile, Answering Rules, Voicemail, and Phones.
For each user, follow the steps described on pages 11–17.
ESI Cloud PBX Quick-start Guide
11
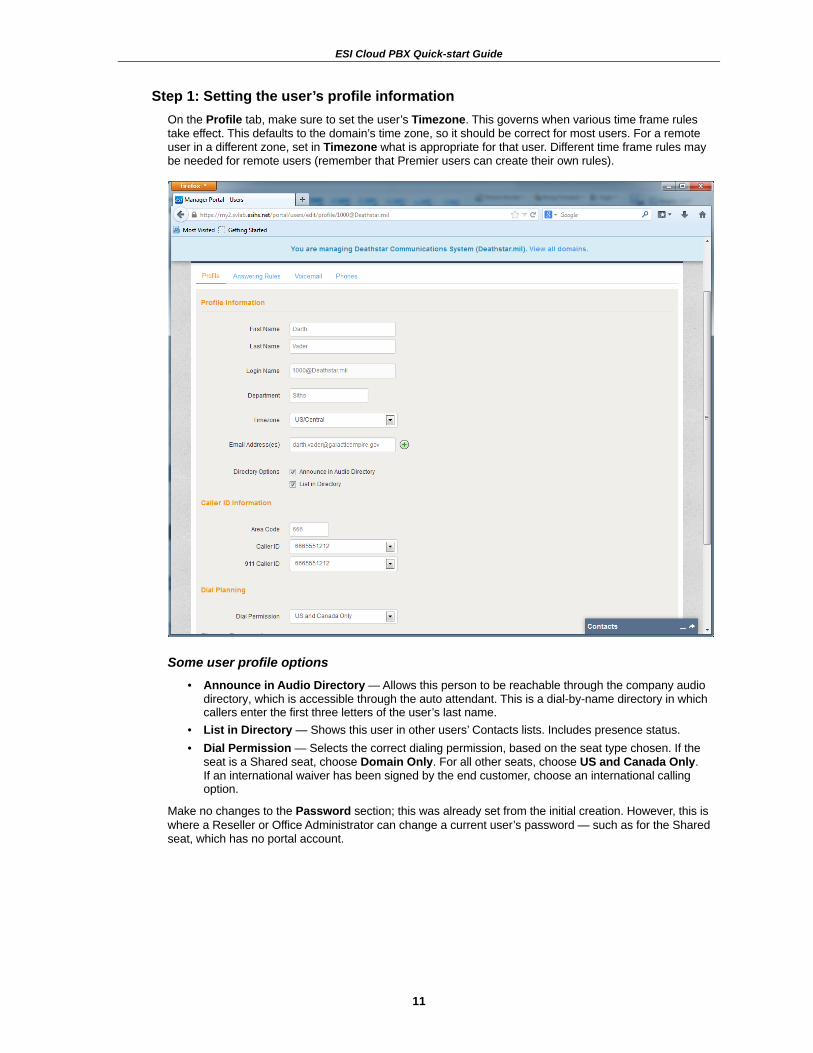
Step 1: Setting the user’s profile information On the Profile tab, make sure to set the user’s Timezone. This governs when various time frame rules take effect. This defaults to the domain’s time zone, so it should be correct for most users. For a remote user in a different zone, set in Timezone what is appropriate for that user. Different time frame rules may be needed for remote users (remember that Premier users can create their own rules).
Some user profile options • Announce in Audio Directory — Allows this person to be reachable through the company audio
directory, which is accessible through the auto attendant. This is a dial-by-name directory in which callers enter the first three letters of the user’s last name.
• List in Directory — Shows this user in other users’ Contacts lists. Includes presence status. • Dial Permission — Selects the correct dialing permission, based on the seat type chosen. If the
seat is a Shared seat, choose Domain Only. For all other seats, choose US and Canada Only. If an international waiver has been signed by the end customer, choose an international calling option.
Make no changes to the Password section; this was already set from the initial creation. However, this is where a Reseller or Office Administrator can change a current user’s password — such as for the Shared seat, which has no portal account.

ESI Cloud PBX Quick-start Guide
12
Step 2: Setting answering rules Answering rules are used to define now calls are delivered to a user’s phone, as well as define what routing to take in exception cases, such as if the user is busy. Select the Answering Rules tab. There is always a default rule with a rule of Ring x[the user’s extension].
To add a new rule, select Add Rule, which will bring up a dialog with your choices:
(Continued)
ESI Cloud PBX Quick-start Guide
13
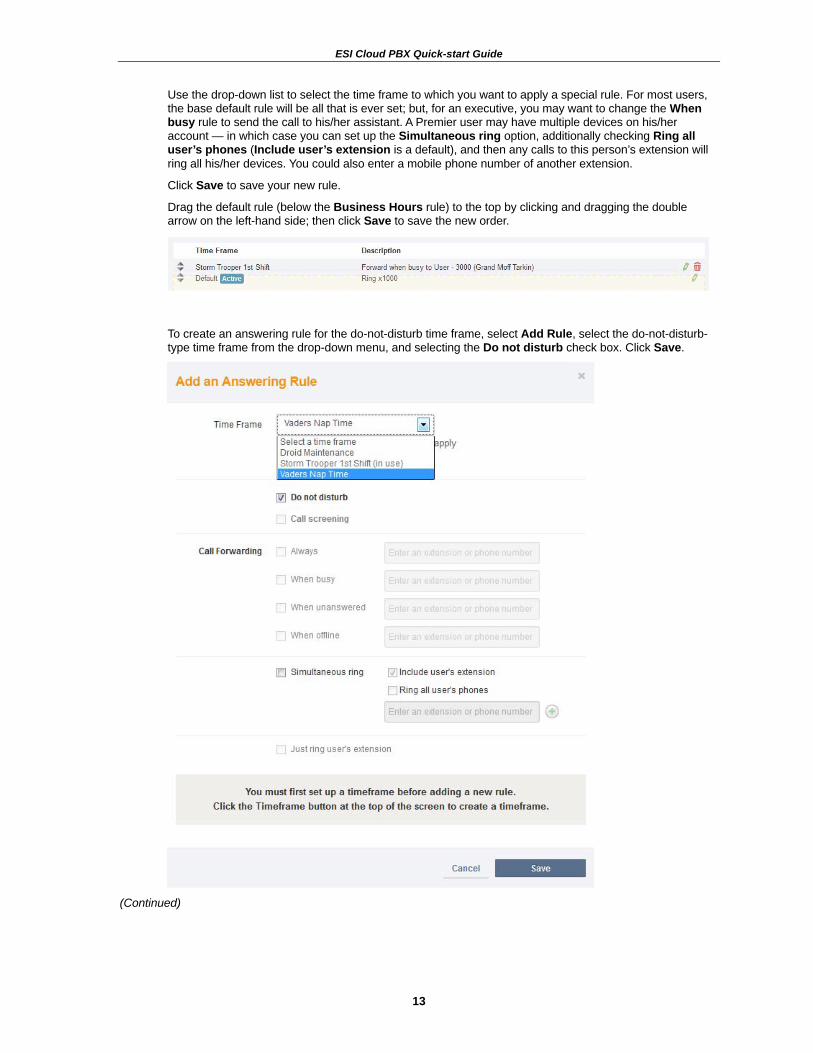
Use the drop-down list to select the time frame to which you want to apply a special rule. For most users, the base default rule will be all that is ever set; but, for an executive, you may want to change the When busy rule to send the call to his/her assistant. A Premier user may have multiple devices on his/her account — in which case you can set up the Simultaneous ring option, additionally checking Ring all user’s phones (Include user’s extension is a default), and then any calls to this person’s extension will ring all his/her devices. You could also enter a mobile phone number of another extension.
Click Save to save your new rule.
Drag the default rule (below the Business Hours rule) to the top by clicking and dragging the double arrow on the left-hand side; then click Save to save the new order.
To create an answering rule for the do-not-disturb time frame, select Add Rule, select the do-not-disturb-type time frame from the drop-down menu, and selecting the Do not disturb check box. Click Save.
(Continued)
ESI Cloud PBX Quick-start Guide
14
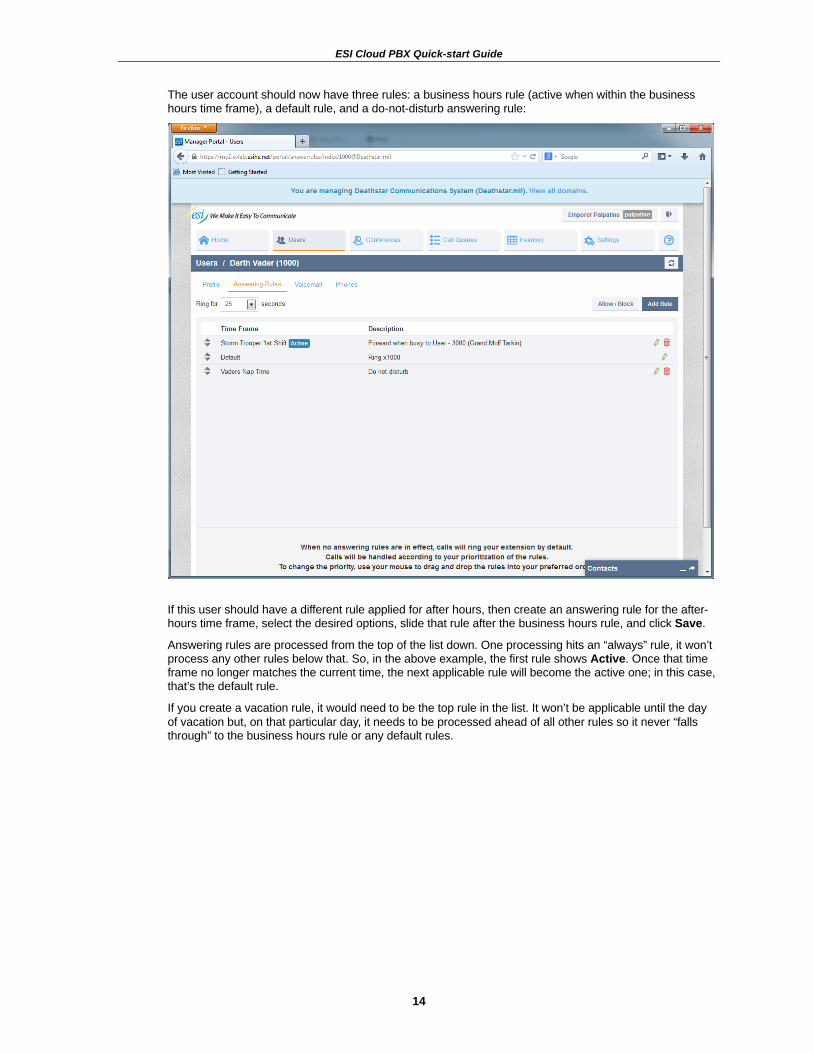
The user account should now have three rules: a business hours rule (active when within the business hours time frame), a default rule, and a do-not-disturb answering rule:
If this user should have a different rule applied for after hours, then create an answering rule for the after-hours time frame, select the desired options, slide that rule after the business hours rule, and click Save.
Answering rules are processed from the top of the list down. One processing hits an “always” rule, it won’t process any other rules below that. So, in the above example, the first rule shows Active. Once that time frame no longer matches the current time, the next applicable rule will become the active one; in this case, that’s the default rule.
If you create a vacation rule, it would need to be the top rule in the list. It won’t be applicable until the day of vacation but, on that particular day, it needs to be processed ahead of all other rules so it never “falls through” to the business hours rule or any default rules.
ESI Cloud PBX Quick-start Guide
15
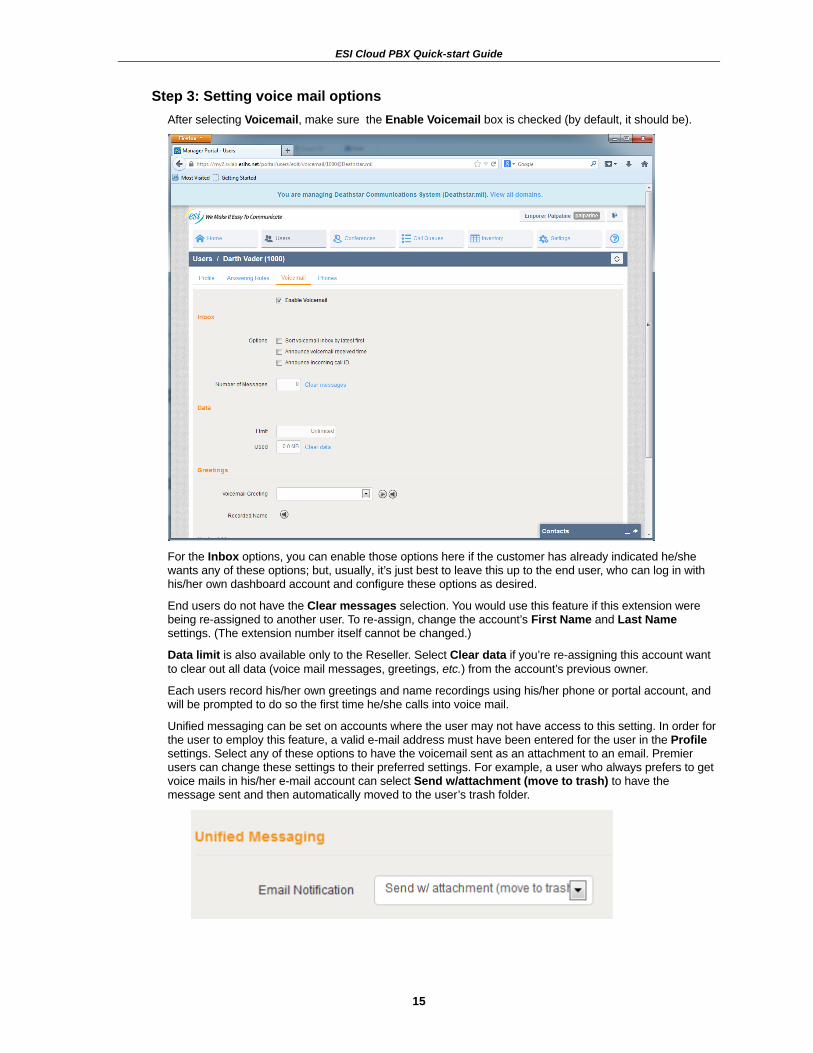
Step 3: Setting voice mail options After selecting Voicemail, make sure the Enable Voicemail box is checked (by default, it should be).
For the Inbox options, you can enable those options here if the customer has already indicated he/she wants any of these options; but, usually, it’s just best to leave this up to the end user, who can log in with his/her own dashboard account and configure these options as desired.
End users do not have the Clear messages selection. You would use this feature if this extension were being re-assigned to another user. To re-assign, change the account’s First Name and Last Name settings. (The extension number itself cannot be changed.)
Data limit is also available only to the Reseller. Select Clear data if you’re re-assigning this account want to clear out all data (voice mail messages, greetings, etc.) from the account’s previous owner.
Each users record his/her own greetings and name recordings using his/her phone or portal account, and will be prompted to do so the first time he/she calls into voice mail.
Unified messaging can be set on accounts where the user may not have access to this setting. In order for the user to employ this feature, a valid e-mail address must have been entered for the user in the Profile settings. Select any of these options to have the voicemail sent as an attachment to an email. Premier users can change these settings to their preferred settings. For example, a user who always prefers to get voice mails in his/her e-mail account can select Send w/attachment (move to trash) to have the message sent and then automatically moved to the user’s trash folder.
ESI Cloud PBX Quick-start Guide
16
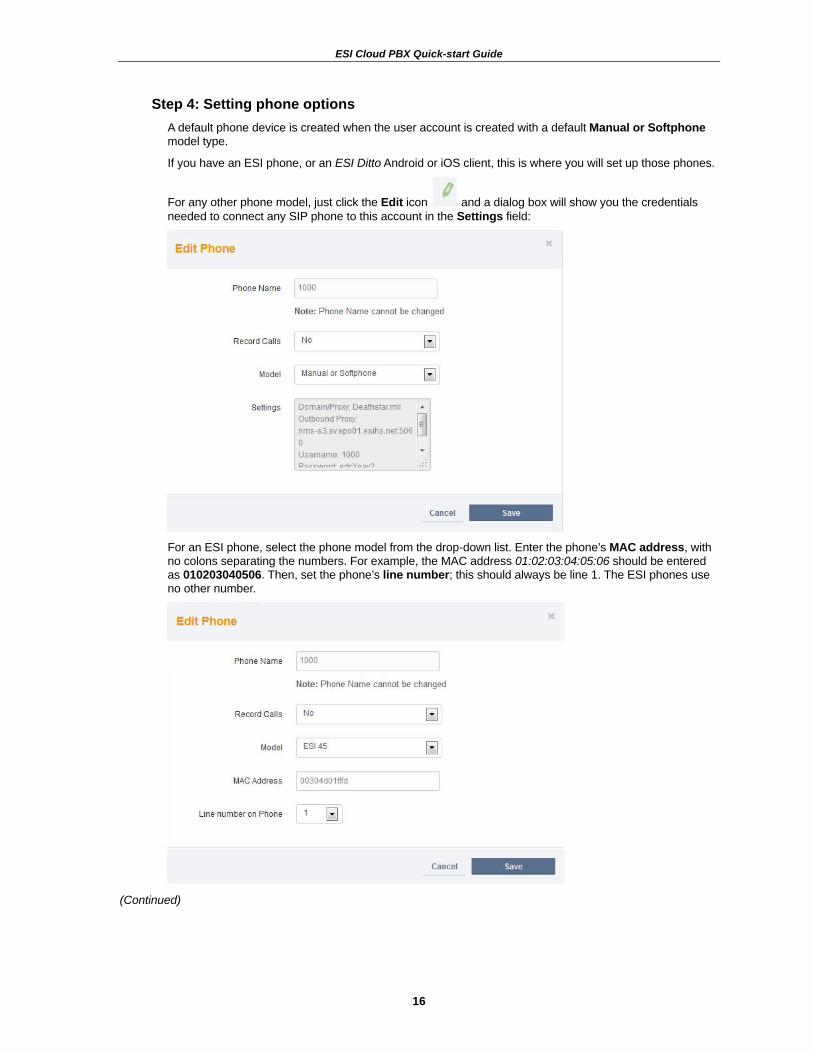
Step 4: Setting phone options A default phone device is created when the user account is created with a default Manual or Softphone model type.
If you have an ESI phone, or an ESI Ditto Android or iOS client, this is where you will set up those phones.
For any other phone model, just click the Edit icon and a dialog box will show you the credentials needed to connect any SIP phone to this account in the Settings field:
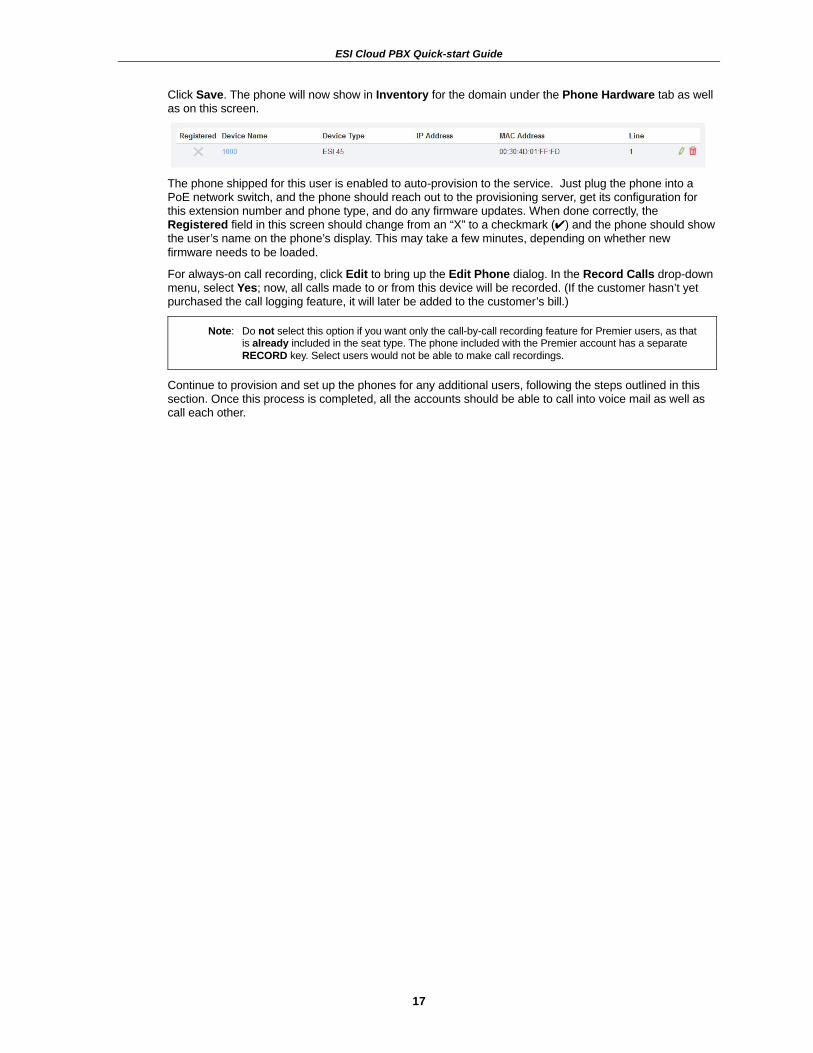
For an ESI phone, select the phone model from the drop-down list. Enter the phone’s MAC address, with no colons separating the numbers. For example, the MAC address 01:02:03:04:05:06 should be entered as 010203040506. Then, set the phone’s line number; this should always be line 1. The ESI phones use no other number.
(Continued)
ESI Cloud PBX Quick-start Guide
17
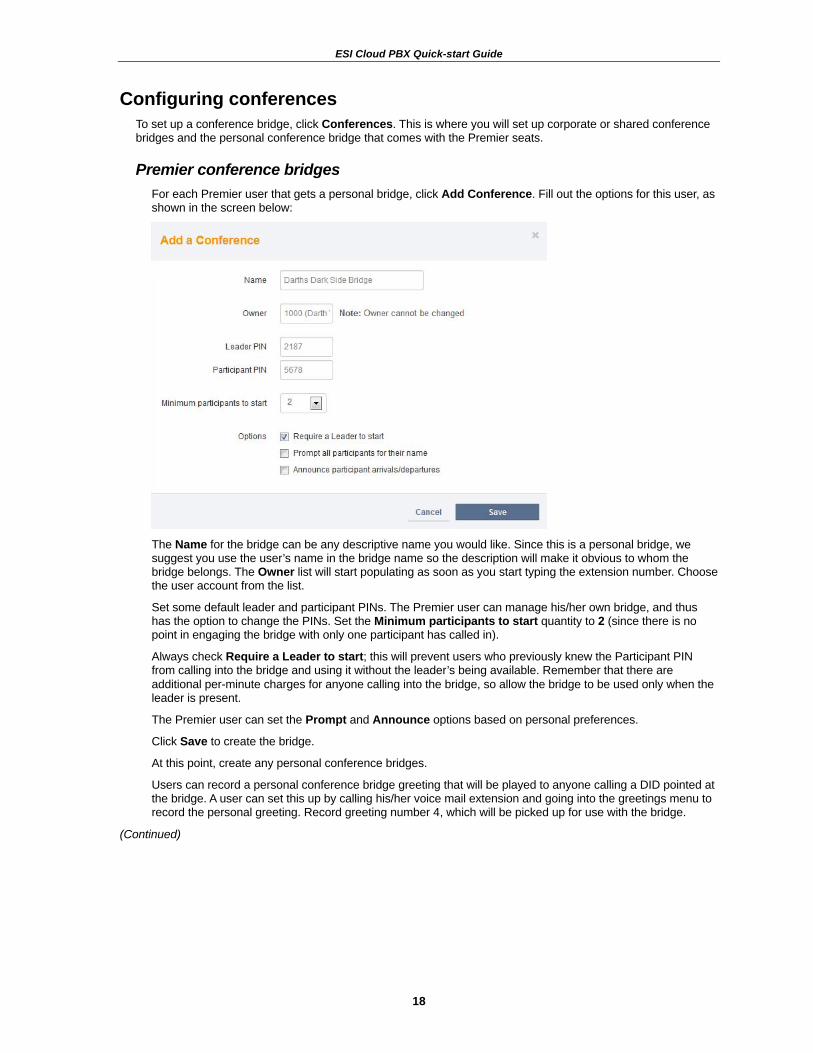
Click Save. The phone will now show in Inventory for the domain under the Phone Hardware tab as well as on this screen.
The phone shipped for this user is enabled to auto-provision to the service. Just plug the phone into a PoE network switch, and the phone should reach out to the provisioning server, get its configuration for this extension number and phone type, and do any firmware updates. When done correctly, the Registered field in this screen should change from an “X” to a checkmark (✔) and the phone should show the user’s name on the phone’s display. This may take a few minutes, depending on whether new firmware needs to be loaded.
For always-on call recording, click Edit to bring up the Edit Phone dialog. In the Record Calls drop-down menu, select Yes; now, all calls made to or from this device will be recorded. (If the customer hasn’t yet purchased the call logging feature, it will later be added to the customer’s bill.)
Note: Do not select this option if you want only the call-by-call recording feature for Premier users, as that is already included in the seat type. The phone included with the Premier account has a separate RECORD key. Select users would not be able to make call recordings.
Continue to provision and set up the phones for any additional users, following the steps outlined in this section. Once this process is completed, all the accounts should be able to call into voice mail as well as call each other.
ESI Cloud PBX Quick-start Guide
18
Configuring conferences To set up a conference bridge, click Conferences. This is where you will set up corporate or shared conference bridges and the personal conference bridge that comes with the Premier seats.
Premier conference bridges For each Premier user that gets a personal bridge, click Add Conference. Fill out the options for this user, as shown in the screen below:
The Name for the bridge can be any descriptive name you would like. Since this is a personal bridge, we suggest you use the user’s name in the bridge name so the description will make it obvious to whom the bridge belongs. The Owner list will start populating as soon as you start typing the extension number. Choose the user account from the list.
Set some default leader and participant PINs. The Premier user can manage his/her own bridge, and thus has the option to change the PINs. Set the Minimum participants to start quantity to 2 (since there is no point in engaging the bridge with only one participant has called in).
Always check Require a Leader to start; this will prevent users who previously knew the Participant PIN from calling into the bridge and using it without the leader’s being available. Remember that there are additional per-minute charges for anyone calling into the bridge, so allow the bridge to be used only when the leader is present.
The Premier user can set the Prompt and Announce options based on personal preferences.
Click Save to create the bridge.
At this point, create any personal conference bridges.
Users can record a personal conference bridge greeting that will be played to anyone calling a DID pointed at the bridge. A user can set this up by calling his/her voice mail extension and going into the greetings menu to record the personal greeting. Record greeting number 4, which will be picked up for use with the bridge.
(Continued)
ESI Cloud PBX Quick-start Guide
19
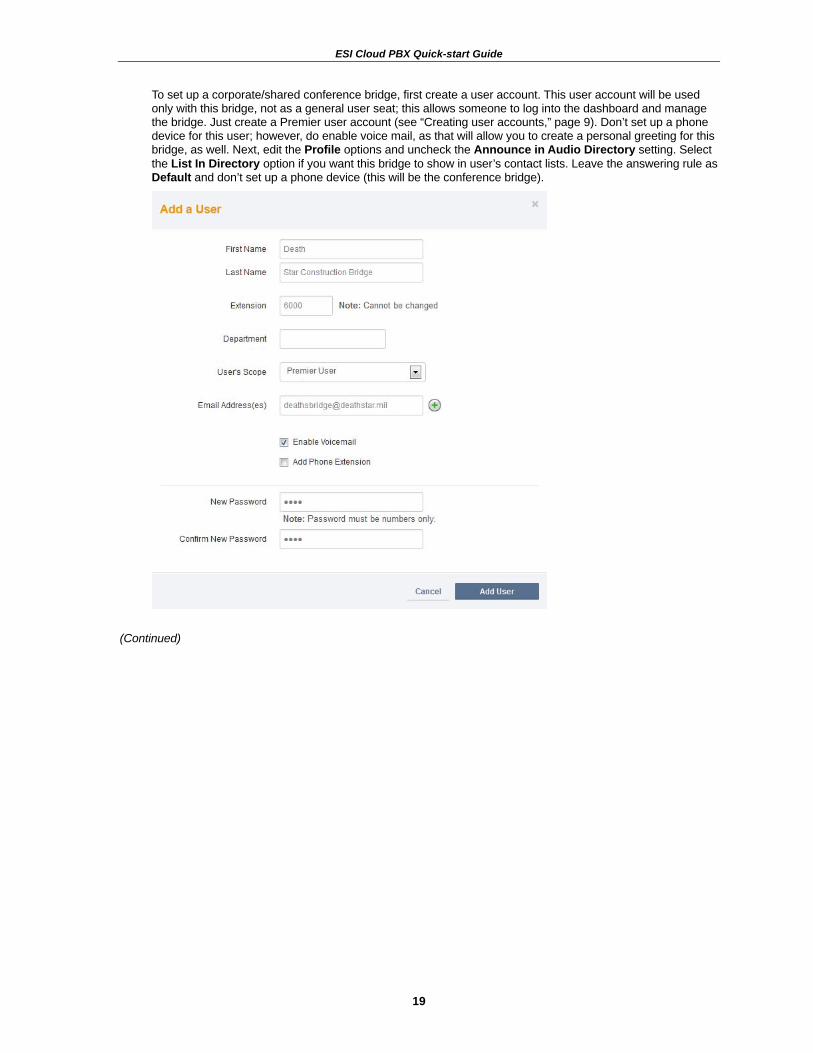
To set up a corporate/shared conference bridge, first create a user account. This user account will be used only with this bridge, not as a general user seat; this allows someone to log into the dashboard and manage the bridge. Just create a Premier user account (see “Creating user accounts,” page 9). Don’t set up a phone device for this user; however, do enable voice mail, as that will allow you to create a personal greeting for this bridge, as well. Next, edit the Profile options and uncheck the Announce in Audio Directory setting. Select the List In Directory option if you want this bridge to show in user’s contact lists. Leave the answering rule as Default and don’t set up a phone device (this will be the conference bridge).
(Continued)

ESI Cloud PBX Quick-start Guide
20
Next, click Conferences and select Add Conference. Create the new bridge, as in the following example:
Click Save to create the bridge. Again, these options are the same as you would set for the Premier conference bridges.
To call into a bridge, you can dial 0026000 (in this example) to reach the bridge directly. The same is true for the Premier conference bridges since, if you call the Premier user’s extension, you will just reach that user’s extension. The 002 prepended to the number allows you to reach the user’s bridge internally without calling through a DID. Later, you can point a DID at the bridge so users outside the company can reach it.
ESI Cloud PBX Quick-start Guide
21
Configuring call queues Call queues can be used for a variety of features in the ESI Cloud PBX platform. This section will walk you through setting up these queues.
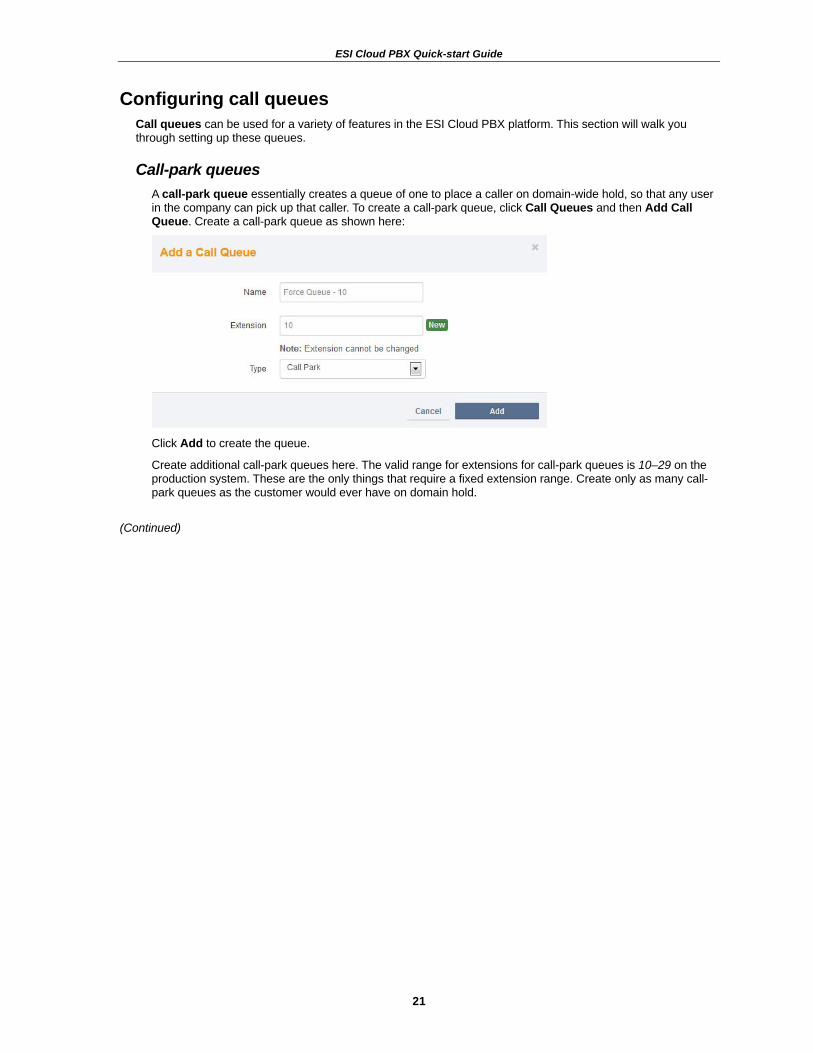
Call-park queues A call-park queue essentially creates a queue of one to place a caller on domain-wide hold, so that any user in the company can pick up that caller. To create a call-park queue, click Call Queues and then Add Call Queue. Create a call-park queue as shown here:
Click Add to create the queue.
Create additional call-park queues here. The valid range for extensions for call-park queues is 10–29 on the production system. These are the only things that require a fixed extension range. Create only as many call-park queues as the customer would ever have on domain hold.
(Continued)
ESI Cloud PBX Quick-start Guide
22
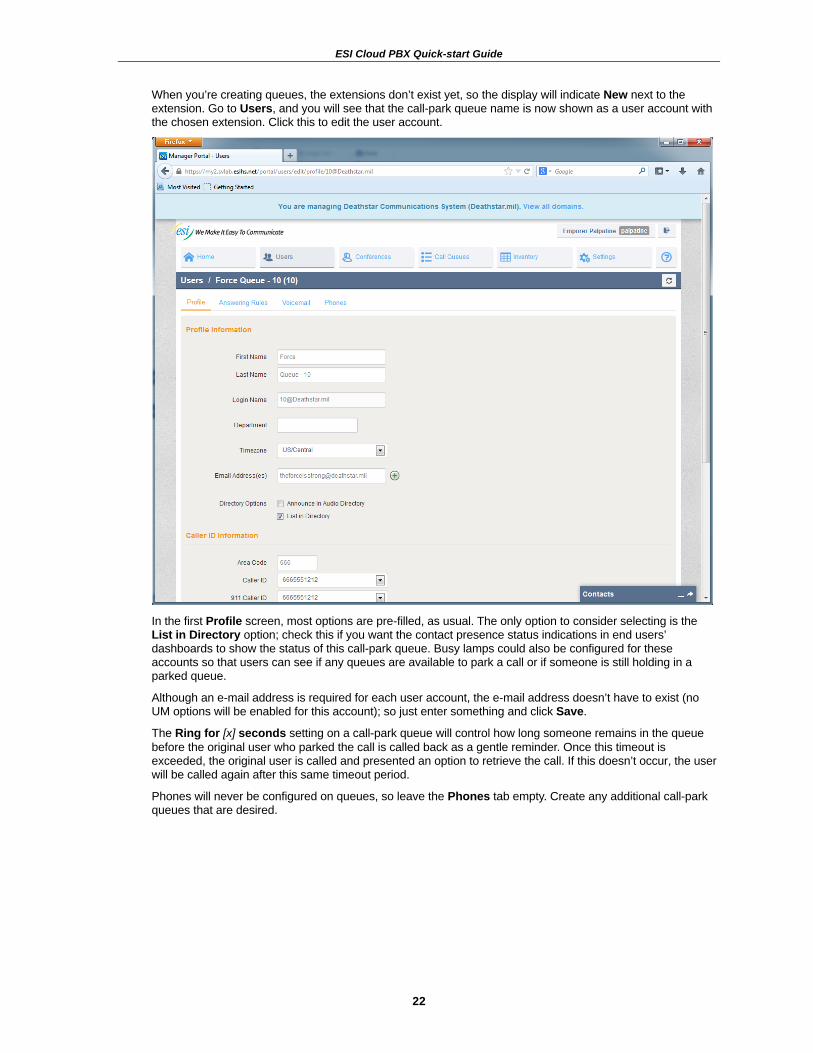
When you’re creating queues, the extensions don’t exist yet, so the display will indicate New next to the extension. Go to Users, and you will see that the call-park queue name is now shown as a user account with the chosen extension. Click this to edit the user account.
In the first Profile screen, most options are pre-filled, as usual. The only option to consider selecting is the List in Directory option; check this if you want the contact presence status indications in end users’ dashboards to show the status of this call-park queue. Busy lamps could also be configured for these accounts so that users can see if any queues are available to park a call or if someone is still holding in a parked queue.
Although an e-mail address is required for each user account, the e-mail address doesn’t have to exist (no UM options will be enabled for this account); so just enter something and click Save.
The Ring for [x] seconds setting on a call-park queue will control how long someone remains in the queue before the original user who parked the call is called back as a gentle reminder. Once this timeout is exceeded, the original user is called and presented an option to retrieve the call. If this doesn’t occur, the user will be called again after this same timeout period.
Phones will never be configured on queues, so leave the Phones tab empty. Create any additional call-park queues that are desired.
ESI Cloud PBX Quick-start Guide
23
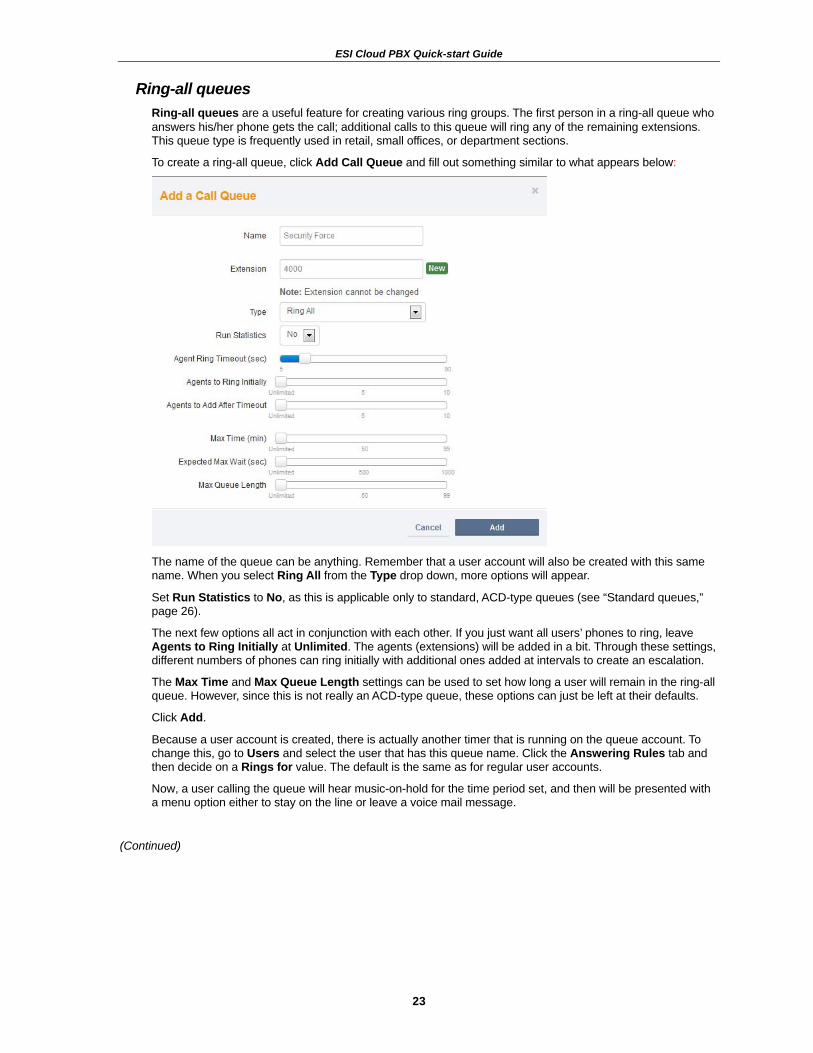
Ring-all queues Ring-all queues are a useful feature for creating various ring groups. The first person in a ring-all queue who answers his/her phone gets the call; additional calls to this queue will ring any of the remaining extensions. This queue type is frequently used in retail, small offices, or department sections.
To create a ring-all queue, click Add Call Queue and fill out something similar to what appears below:
The name of the queue can be anything. Remember that a user account will also be created with this same name. When you select Ring All from the Type drop down, more options will appear.
Set Run Statistics to No, as this is applicable only to standard, ACD-type queues (see “Standard queues,” page 26).
The next few options all act in conjunction with each other. If you just want all users’ phones to ring, leave Agents to Ring Initially at Unlimited. The agents (extensions) will be added in a bit. Through these settings, different numbers of phones can ring initially with additional ones added at intervals to create an escalation.
The Max Time and Max Queue Length settings can be used to set how long a user will remain in the ring-all queue. However, since this is not really an ACD-type queue, these options can just be left at their defaults.
Click Add.
Because a user account is created, there is actually another timer that is running on the queue account. To change this, go to Users and select the user that has this queue name. Click the Answering Rules tab and then decide on a Rings for value. The default is the same as for regular user accounts.
Now, a user calling the queue will hear music-on-hold for the time period set, and then will be presented with a menu option either to stay on the line or leave a voice mail message.
(Continued)
ESI Cloud PBX Quick-start Guide
24
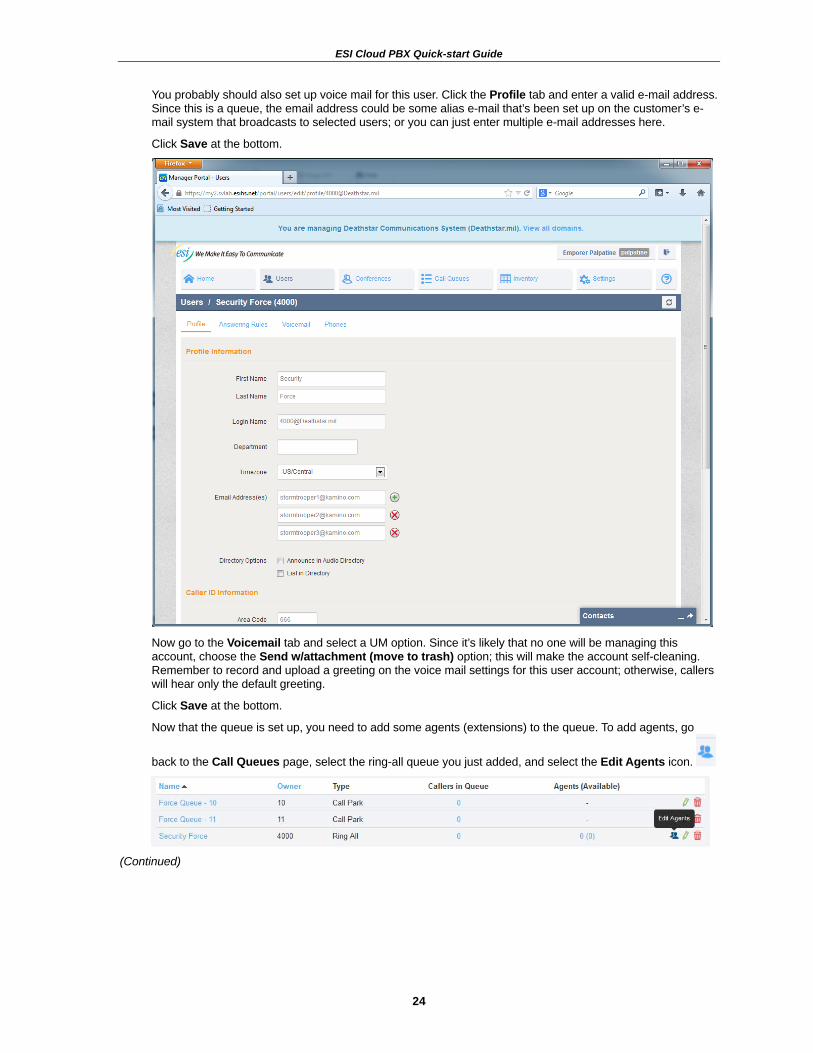
You probably should also set up voice mail for this user. Click the Profile tab and enter a valid e-mail address. Since this is a queue, the email address could be some alias e-mail that’s been set up on the customer’s e-mail system that broadcasts to selected users; or you can just enter multiple e-mail addresses here.
Click Save at the bottom.
Now go to the Voicemail tab and select a UM option. Since it’s likely that no one will be managing this account, choose the Send w/attachment (move to trash) option; this will make the account self-cleaning. Remember to record and upload a greeting on the voice mail settings for this user account; otherwise, callers will hear only the default greeting.
Click Save at the bottom.
Now that the queue is set up, you need to add some agents (extensions) to the queue. To add agents, go
back to the Call Queues page, select the ring-all queue you just added, and select the Edit Agents icon.
(Continued)
ESI Cloud PBX Quick-start Guide
25
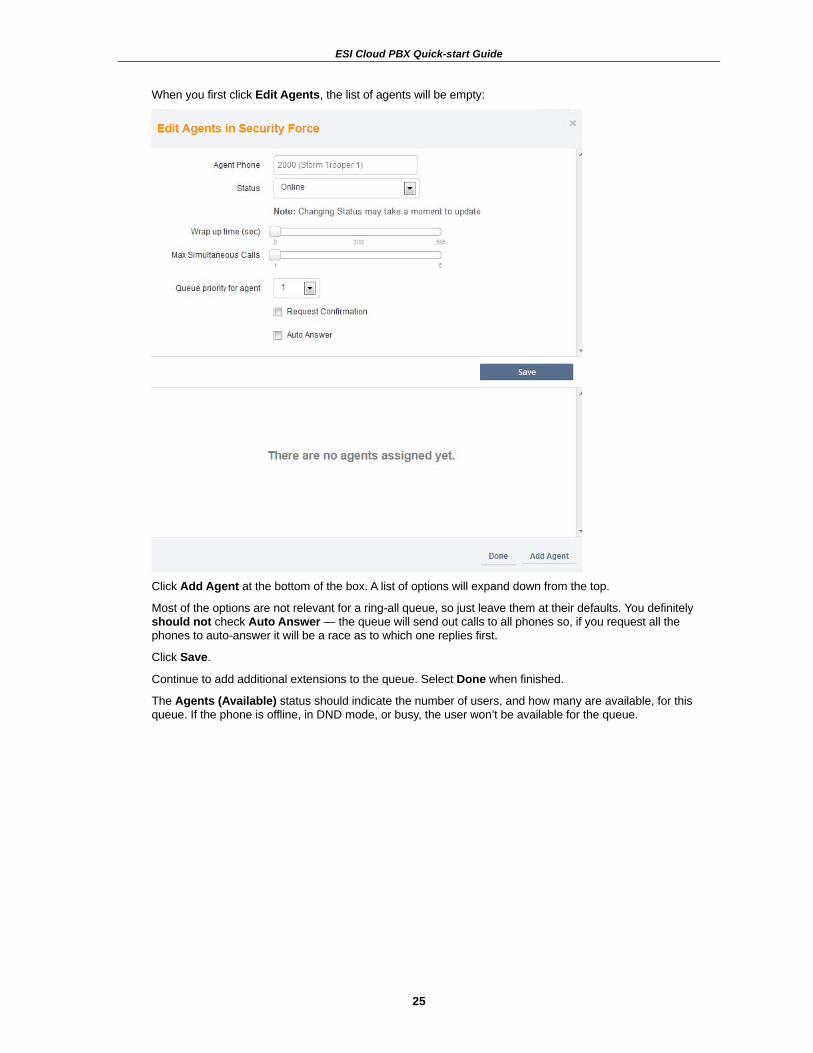
When you first click Edit Agents, the list of agents will be empty:
Click Add Agent at the bottom of the box. A list of options will expand down from the top.
Most of the options are not relevant for a ring-all queue, so just leave them at their defaults. You definitely should not check Auto Answer — the queue will send out calls to all phones so, if you request all the phones to auto-answer it will be a race as to which one replies first.
Click Save.
Continue to add additional extensions to the queue. Select Done when finished.
The Agents (Available) status should indicate the number of users, and how many are available, for this queue. If the phone is offline, in DND mode, or busy, the user won’t be available for the queue.
ESI Cloud PBX Quick-start Guide
26
Standard queues Standard queues (ACD-type queues) can be configured as either round-robin or linear:
• A round-robin queue starts by calling the first agent in the queue. If that agent doesn’t answer within the timeout period, the next agent in the queue gets the call, and so on until an agent answers.
• With a linear queue, an available agent with the lowest priority number gets the call first. If multiple agents are at that same level, that group of agents will hunt between them until they are all busy. Then, the next higher order agent group will ring. This allows the customer to keep his/her best agents in one group and keep them busy.
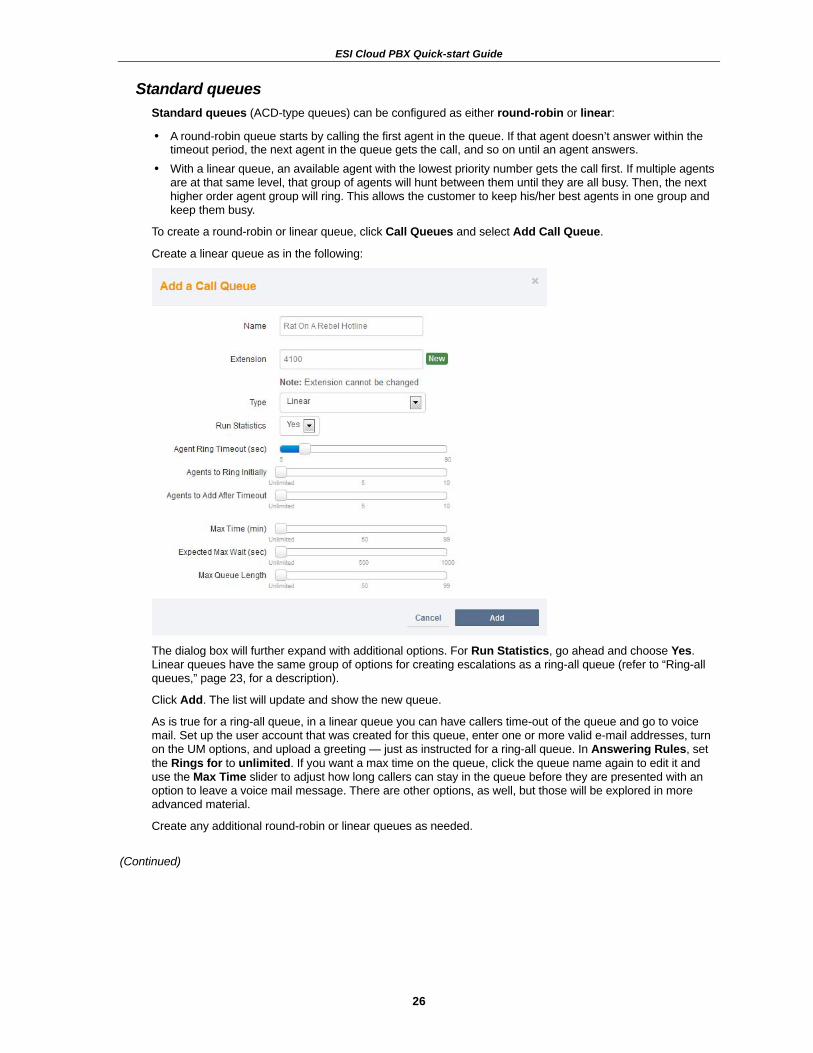
To create a round-robin or linear queue, click Call Queues and select Add Call Queue.
Create a linear queue as in the following:
The dialog box will further expand with additional options. For Run Statistics, go ahead and choose Yes. Linear queues have the same group of options for creating escalations as a ring-all queue (refer to “Ring-all queues,” page 23, for a description).
Click Add. The list will update and show the new queue.
As is true for a ring-all queue, in a linear queue you can have callers time-out of the queue and go to voice mail. Set up the user account that was created for this queue, enter one or more valid e-mail addresses, turn on the UM options, and upload a greeting — just as instructed for a ring-all queue. In Answering Rules, set the Rings for to unlimited. If you want a max time on the queue, click the queue name again to edit it and use the Max Time slider to adjust how long callers can stay in the queue before they are presented with an option to leave a voice mail message. There are other options, as well, but those will be explored in more advanced material.
Create any additional round-robin or linear queues as needed.
(Continued)
ESI Cloud PBX Quick-start Guide
27
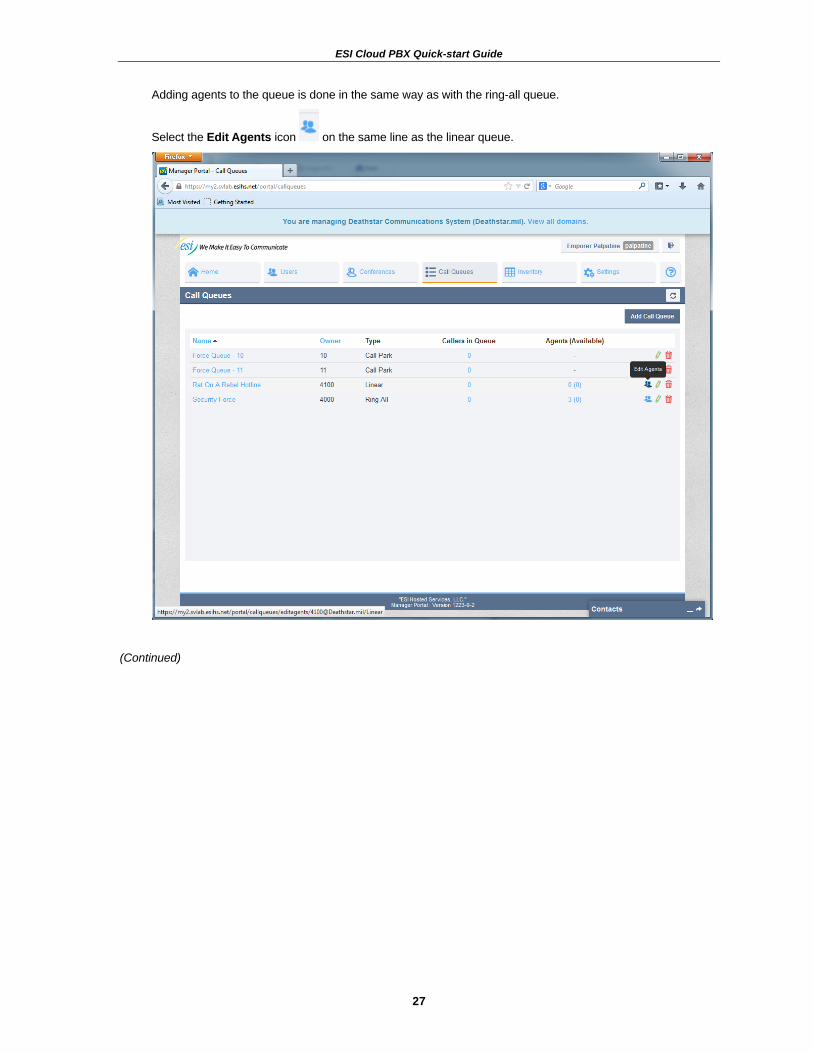
Adding agents to the queue is done in the same way as with the ring-all queue.
Select the Edit Agents icon on the same line as the linear queue.
(Continued)
ESI Cloud PBX Quick-start Guide
28
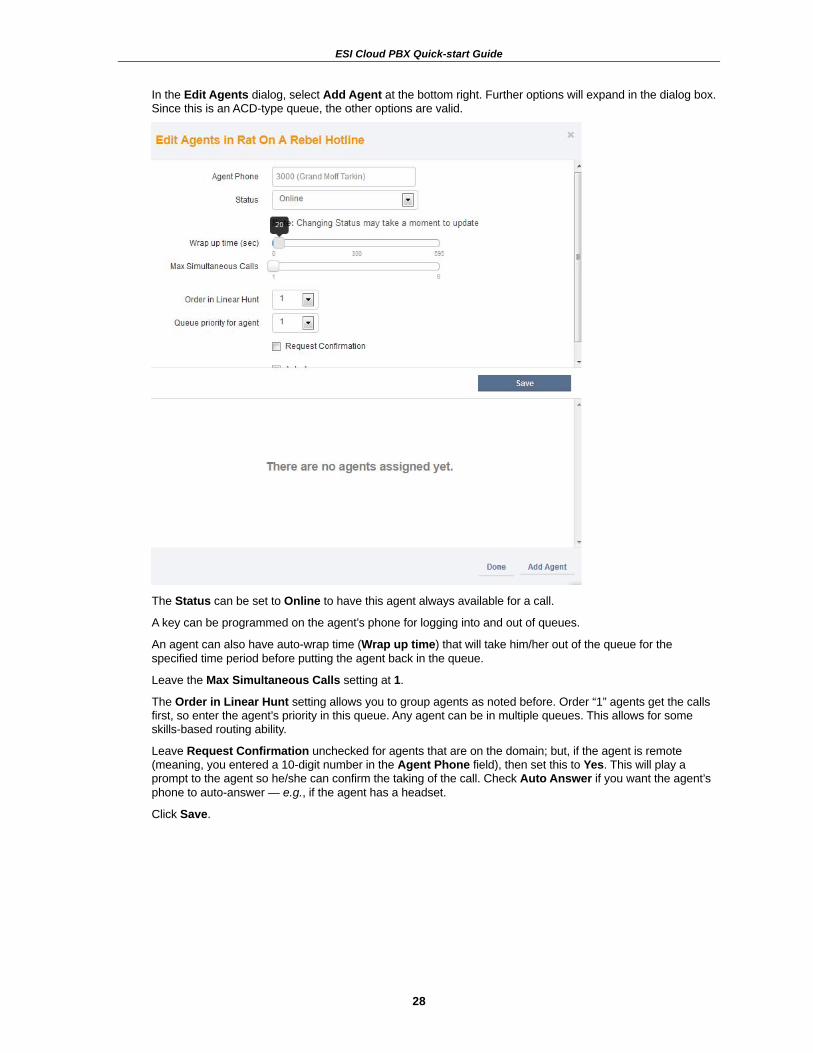
In the Edit Agents dialog, select Add Agent at the bottom right. Further options will expand in the dialog box. Since this is an ACD-type queue, the other options are valid.
The Status can be set to Online to have this agent always available for a call.
A key can be programmed on the agent’s phone for logging into and out of queues.
An agent can also have auto-wrap time (Wrap up time) that will take him/her out of the queue for the specified time period before putting the agent back in the queue.
Leave the Max Simultaneous Calls setting at 1.
The Order in Linear Hunt setting allows you to group agents as noted before. Order “1” agents get the calls first, so enter the agent’s priority in this queue. Any agent can be in multiple queues. This allows for some skills-based routing ability.
Leave Request Confirmation unchecked for agents that are on the domain; but, if the agent is remote (meaning, you entered a 10-digit number in the Agent Phone field), then set this to Yes. This will play a prompt to the agent so he/she can confirm the taking of the call. Check Auto Answer if you want the agent’s phone to auto-answer — e.g., if the agent has a headset.
Click Save.
ESI Cloud PBX Quick-start Guide
29
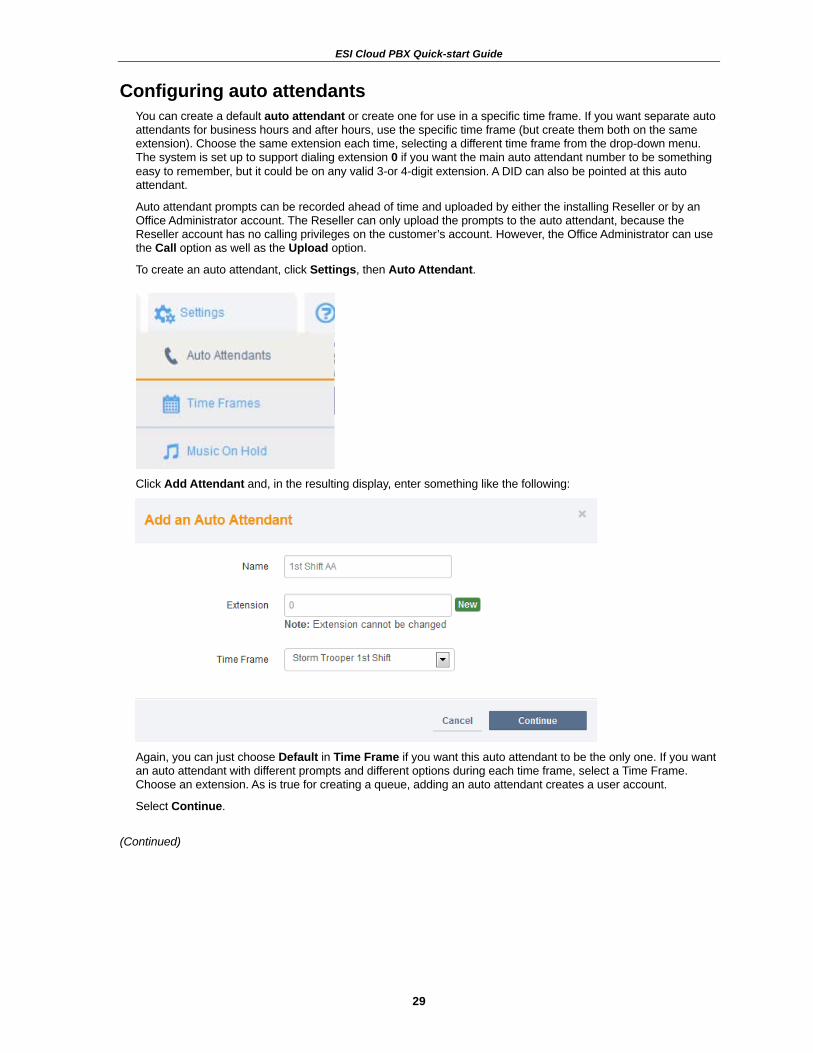
Configuring auto attendants You can create a default auto attendant or create one for use in a specific time frame. If you want separate auto attendants for business hours and after hours, use the specific time frame (but create them both on the same extension). Choose the same extension each time, selecting a different time frame from the drop-down menu. The system is set up to support dialing extension 0 if you want the main auto attendant number to be something easy to remember, but it could be on any valid 3-or 4-digit extension. A DID can also be pointed at this auto attendant.
Auto attendant prompts can be recorded ahead of time and uploaded by either the installing Reseller or by an Office Administrator account. The Reseller can only upload the prompts to the auto attendant, because the Reseller account has no calling privileges on the customer’s account. However, the Office Administrator can use the Call option as well as the Upload option.
To create an auto attendant, click Settings, then Auto Attendant.
Click Add Attendant and, in the resulting display, enter something like the following:
Again, you can just choose Default in Time Frame if you want this auto attendant to be the only one. If you want an auto attendant with different prompts and different options during each time frame, select a Time Frame. Choose an extension. As is true for creating a queue, adding an auto attendant creates a user account.
Select Continue.
(Continued)
ESI Cloud PBX Quick-start Guide
30
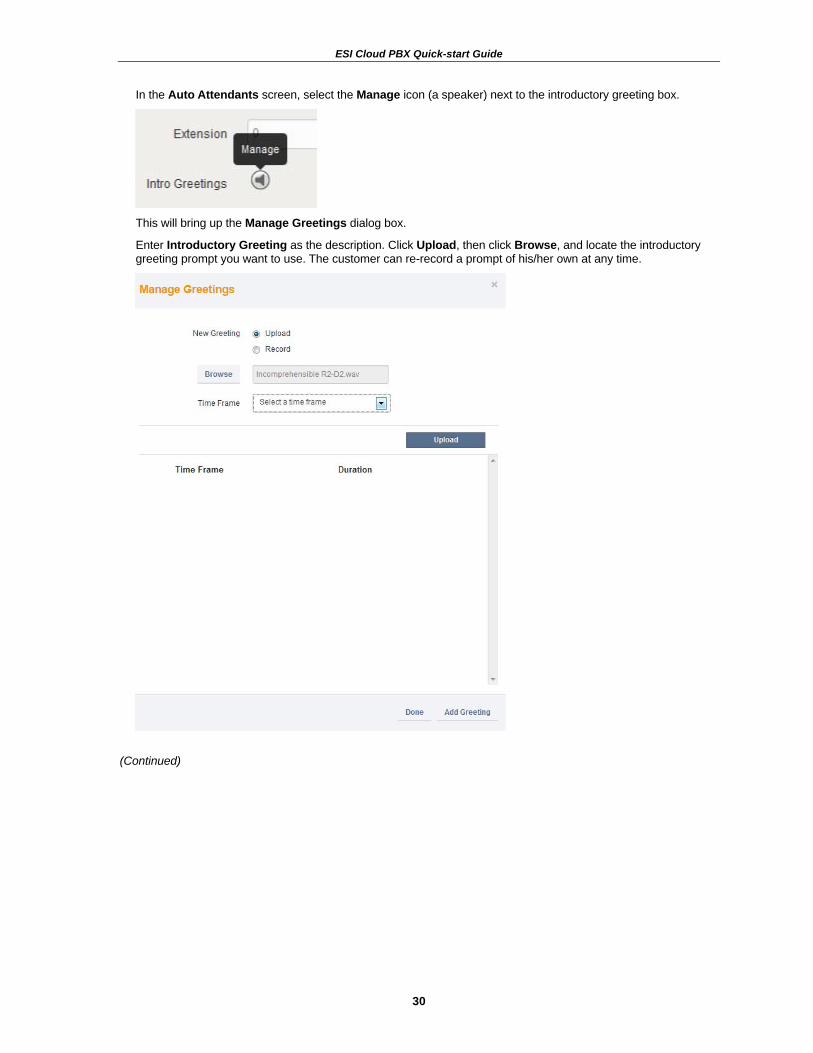
In the Auto Attendants screen, select the Manage icon (a speaker) next to the introductory greeting box.
This will bring up the Manage Greetings dialog box.
Enter Introductory Greeting as the description. Click Upload, then click Browse, and locate the introductory greeting prompt you want to use. The customer can re-record a prompt of his/her own at any time.
(Continued)
ESI Cloud PBX Quick-start Guide
31
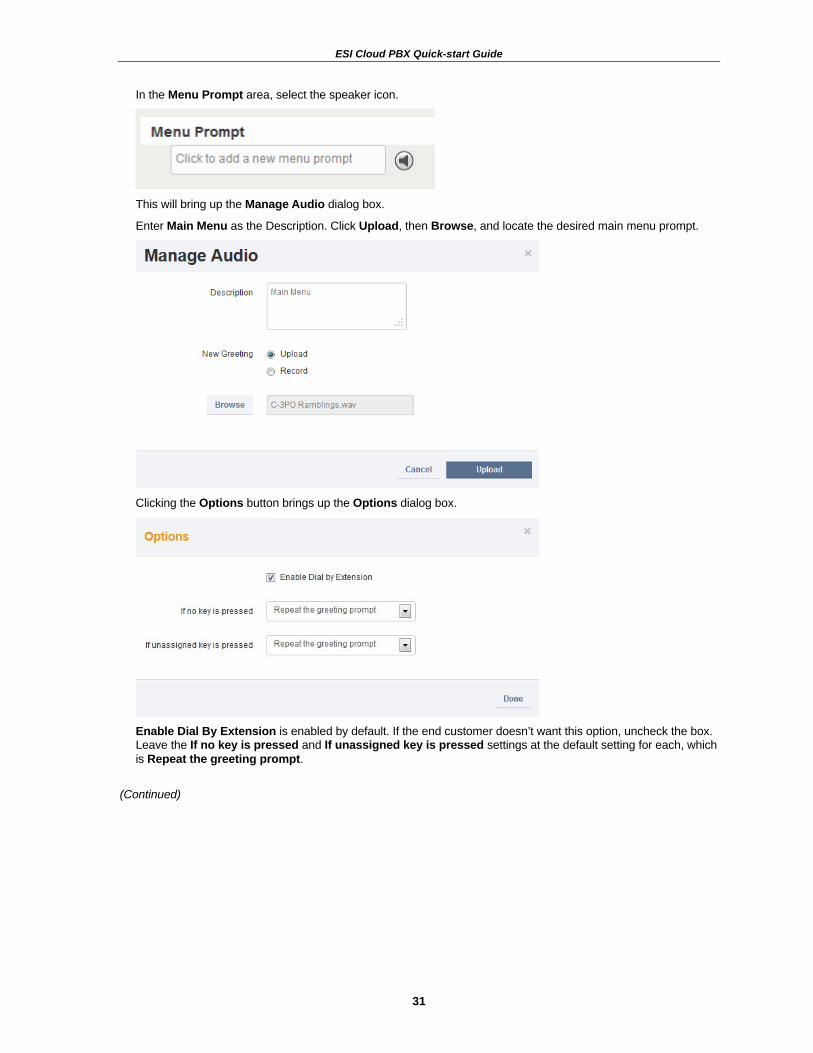
In the Menu Prompt area, select the speaker icon.
This will bring up the Manage Audio dialog box.
Enter Main Menu as the Description. Click Upload, then Browse, and locate the desired main menu prompt.
Clicking the Options button brings up the Options dialog box.
Enable Dial By Extension is enabled by default. If the end customer doesn’t want this option, uncheck the box. Leave the If no key is pressed and If unassigned key is pressed settings at the default setting for each, which is Repeat the greeting prompt.
(Continued)
ESI Cloud PBX Quick-start Guide
32
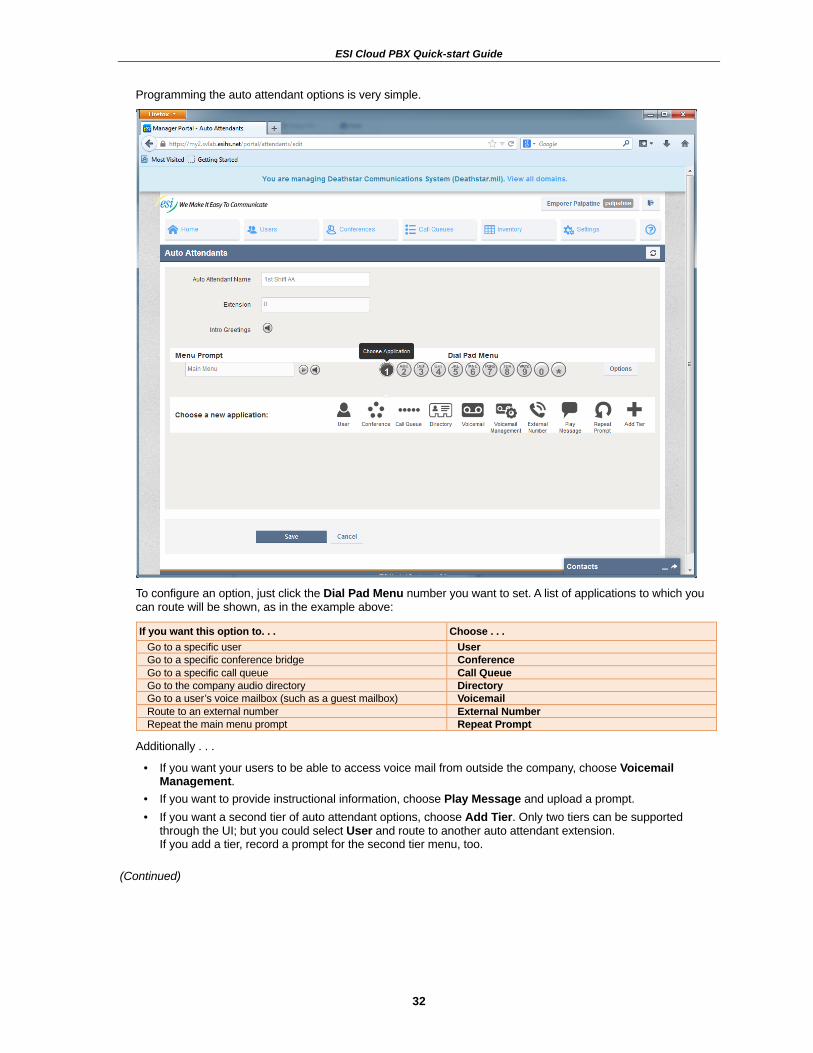
Programming the auto attendant options is very simple.
To configure an option, just click the Dial Pad Menu number you want to set. A list of applications to which you can route will be shown, as in the example above:
If you want this option to. . . Choose . . . Go to a specific user User Go to a specific conference bridge Conference Go to a specific call queue Call Queue Go to the company audio directory Directory Go to a user’s voice mailbox (such as a guest mailbox) Voicemail Route to an external number External Number Repeat the main menu prompt Repeat Prompt
Additionally . . .
• If you want your users to be able to access voice mail from outside the company, choose Voicemail Management.
• If you want to provide instructional information, choose Play Message and upload a prompt. • If you want a second tier of auto attendant options, choose Add Tier. Only two tiers can be supported
through the UI; but you could select User and route to another auto attendant extension. If you add a tier, record a prompt for the second tier menu, too.
(Continued)

ESI Cloud PBX Quick-start Guide
33
When done, click Save.
At this point, you can create additional auto attendants.
ESI Cloud PBX Quick-start Guide
34
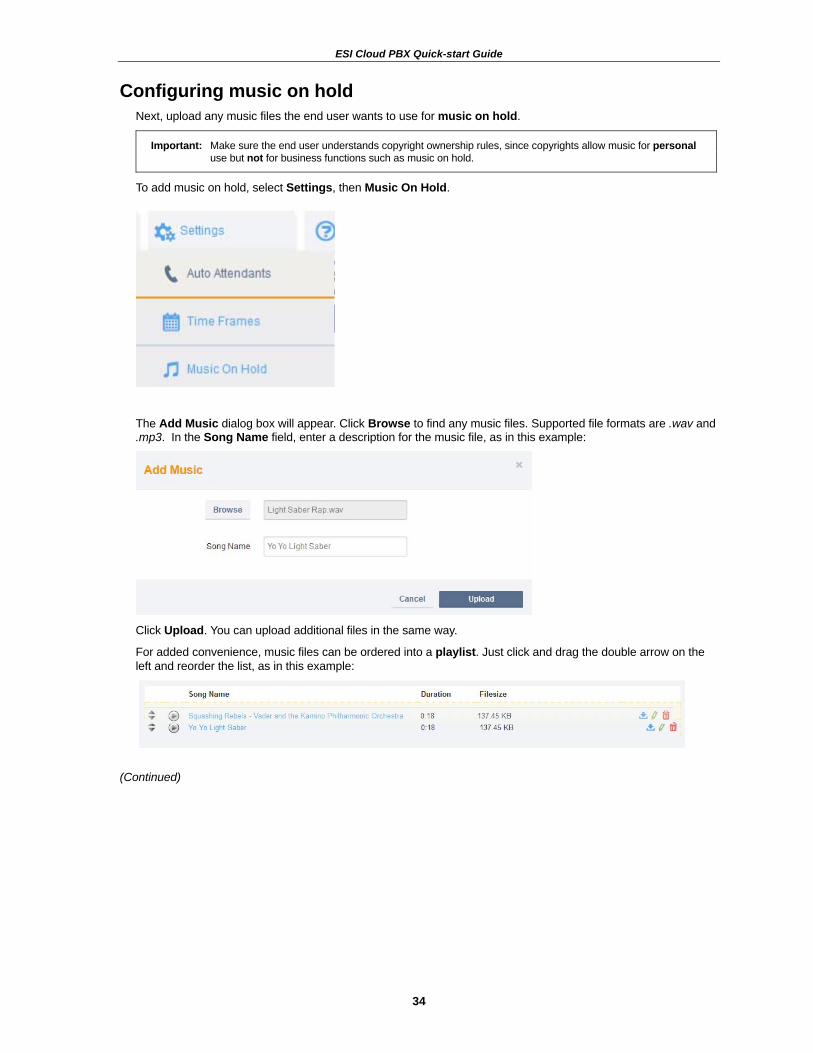
Configuring music on hold Next, upload any music files the end user wants to use for music on hold.
Important: Make sure the end user understands copyright ownership rules, since copyrights allow music for personal use but not for business functions such as music on hold.
To add music on hold, select Settings, then Music On Hold.
The Add Music dialog box will appear. Click Browse to find any music files. Supported file formats are .wav and .mp3. In the Song Name field, enter a description for the music file, as in this example:
Click Upload. You can upload additional files in the same way.
For added convenience, music files can be ordered into a playlist. Just click and drag the double arrow on the left and reorder the list, as in this example:
(Continued)
ESI Cloud PBX Quick-start Guide
35
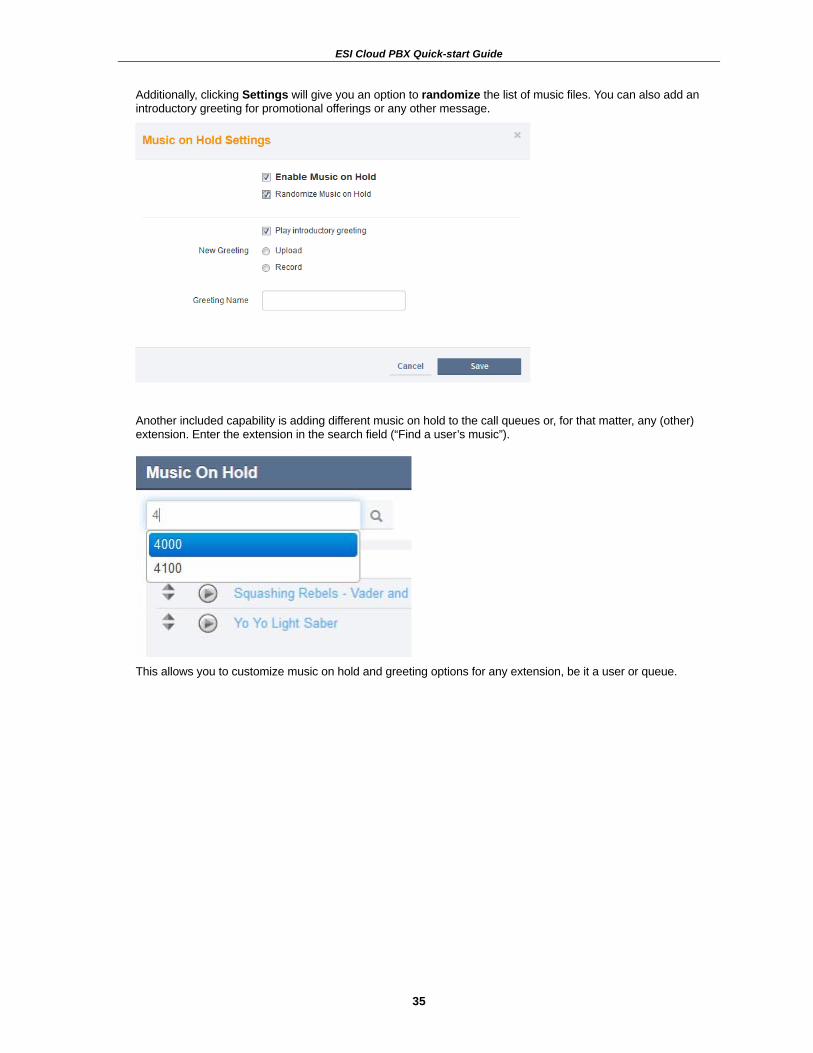
Additionally, clicking Settings will give you an option to randomize the list of music files. You can also add an introductory greeting for promotional offerings or any other message.
Another included capability is adding different music on hold to the call queues or, for that matter, any (other) extension. Enter the extension in the search field (“Find a user’s music”).
This allows you to customize music on hold and greeting options for any extension, be it a user or queue.
ESI Cloud PBX Quick-start Guide
36
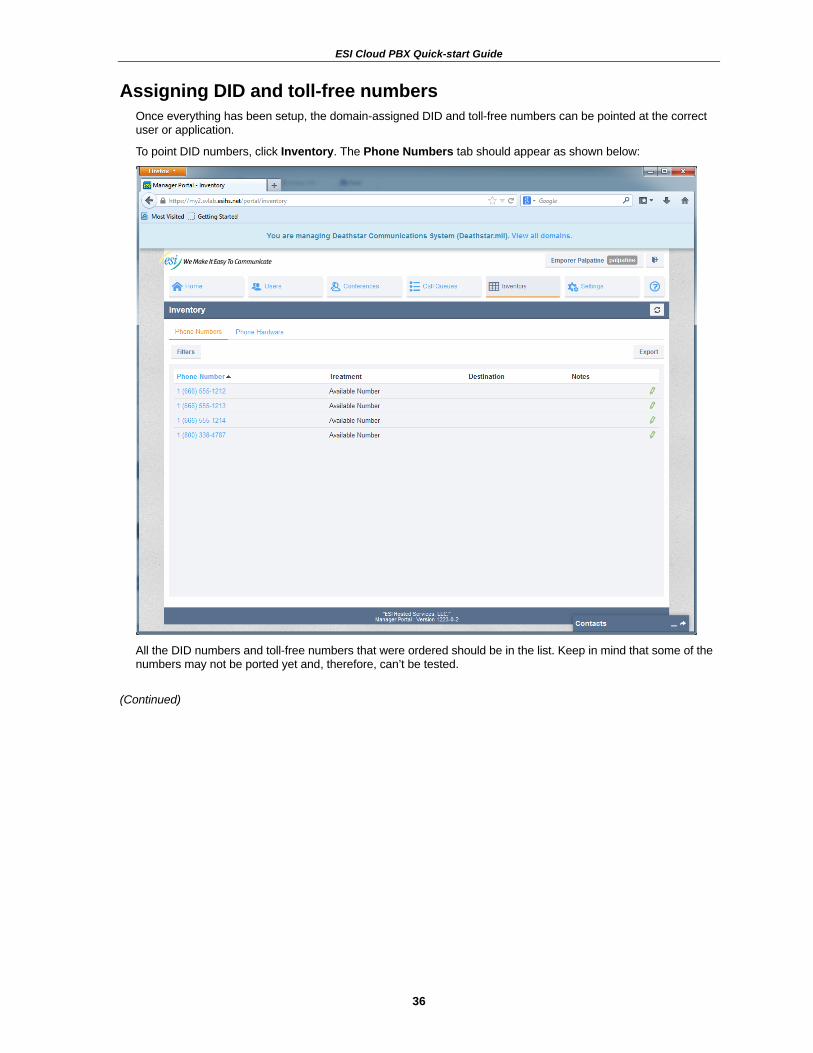
Assigning DID and toll-free numbers Once everything has been setup, the domain-assigned DID and toll-free numbers can be pointed at the correct user or application.
To point DID numbers, click Inventory. The Phone Numbers tab should appear as shown below:
All the DID numbers and toll-free numbers that were ordered should be in the list. Keep in mind that some of the numbers may not be ported yet and, therefore, can’t be tested.
(Continued)
ESI Cloud PBX Quick-start Guide
37
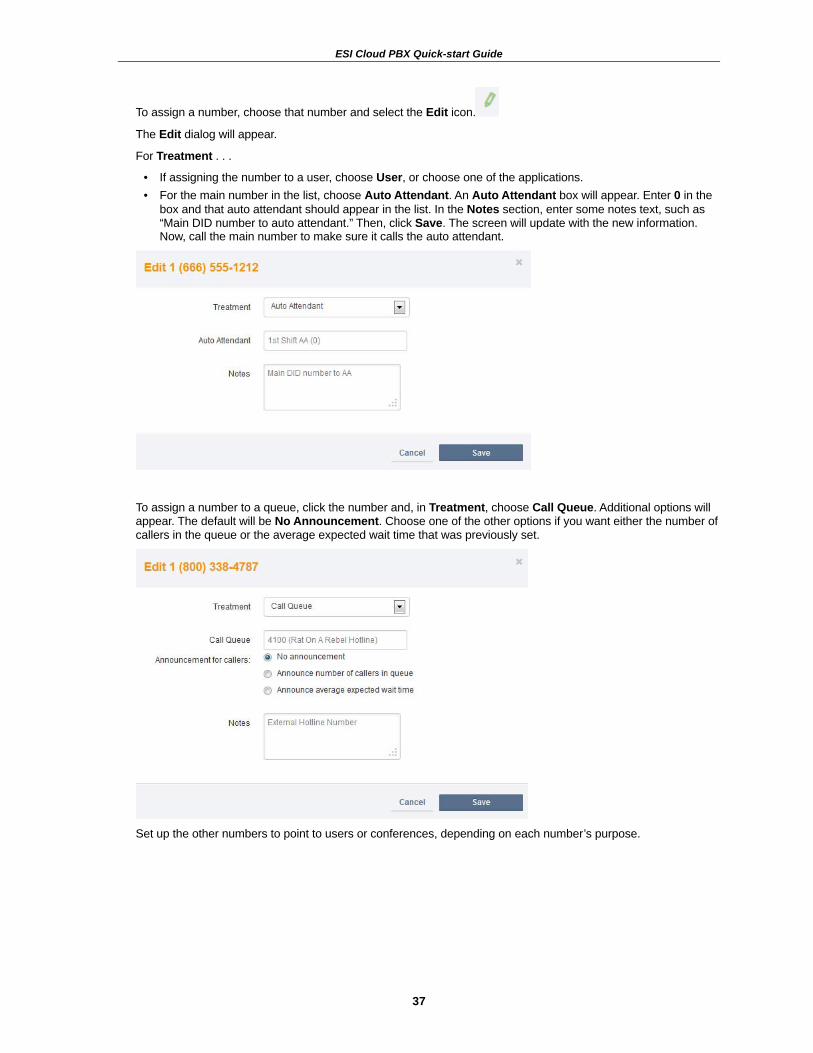
To assign a number, choose that number and select the Edit icon.
The Edit dialog will appear.
For Treatment . . .
• If assigning the number to a user, choose User, or choose one of the applications. • For the main number in the list, choose Auto Attendant. An Auto Attendant box will appear. Enter 0 in the
box and that auto attendant should appear in the list. In the Notes section, enter some notes text, such as “Main DID number to auto attendant.” Then, click Save. The screen will update with the new information. Now, call the main number to make sure it calls the auto attendant.
To assign a number to a queue, click the number and, in Treatment, choose Call Queue. Additional options will appear. The default will be No Announcement. Choose one of the other options if you want either the number of callers in the queue or the average expected wait time that was previously set.
Set up the other numbers to point to users or conferences, depending on each number’s purpose.
ESI Cloud PBX Quick-start Guide
38
Conclusion Congratulations on getting your company built out! There are still many options that we will explore in a more advanced guide which is still under development at this time.
For example, with the main features working for the end user, additional customizations can be done. There is a lot of flexibility in the Answer Rules options to create some unique call-routing options. Also, if a queue times-out, you could have the caller forwarded to a different queue or forwarded to voice mail.
With the many DSS key options on ESI SIP phones, a user can have a key for the Call Park feature (including busy lamps on call-park queues), a private call key for sending out calls as “Anonymous,” and just about anything else that requires a user account.
May the force be with you.
Index Android, 16 Answering rules, 6, 8, 12 Auto attendants, 4, 8
Configuring, 29–33 Call logging, 17 Conference bridges, 18–20 Domains
Managing, 5 Icons
Domains, 3 Home, 2 Inventory, 4
International calling, 11 iOS, 16 MAC address, 16 Music on hold
Configuring, 34–35 Copyright ownership rules, 34 File formats, 34
Passwords, 9 Prompts, 4 Provisioning, 17 Queues
Call-park, 21–22, 38 Ring-all, 23–25 Standard (ACD-type), 26–28
Reseller Logging in, 1
Softphone, 16 Time frames, 4, 6, 11 Time zone, 11 Troubleshooting, 1 UM. See Unified messaging Unified messaging, 15 Voice mail, 15


![Highlights of ESI[truck] North America ESI[truck] North](https://img.dokumen.tips/doc/110x75/628b4a9ff91dad22754155f1/highlights-of-esitruck-north-america-esitruck-north-.jpg)