Embed Size (px)
Citation preview

ImageNow and CaptureNow are registered trademarks of Perceptive Software, Inc. All other products produced by Perceptive Software, Inc., including WebNow, are Perceptive Software trademarks. All other brands and product names mentioned in this document are trademarks or registered trademarks of their respective owners.
Copyright© 2013 Perceptive Software, Inc. All rights reserved.
ImageNow Server and Client Installation and Setup Guide Environment: Windows DBMS: Microsoft SQL Server
Version: 6.6.x Written by: Product Documentation, R&D Date:
February 2013
Perceptive Software ImageNow Installation and Setup Guide
Page 2 of 119
Table of Contents Installing ImageNow ................................................................................................................................... 4
Installation Process ................................................................................................................................... 4 Prepare for the installation ..................................................................................................................... 4 Verify the installation checklist ............................................................................................................... 4
Verify TCP/IP Connectivity for ImageNow Server ................................................................................. 5
Open firewall and network ports for communication .............................................................................. 5
About handling external messages ........................................................................................................... 6 Database access through INEMUSER .................................................................................................. 6
Order processing of external messages ................................................................................................ 6
Installing ImageNow Server on Windows using Microsoft SQL Server .................................................... 6 ImageNow Server installation process .................................................................................................. 7
Download the ImageNow Server files .................................................................................................... 7
Create the INOW6 database using SQL Server 2005 ........................................................................... 7
Create INOW6 database using SQL Server 2008 ................................................................................. 8 Verify the INOW6 database user authentication ................................................................................... 8
Install ImageNow Server ........................................................................................................................... 9 Install ImageNow Server attended ......................................................................................................... 9
Install ImageNow Server unattended ................................................................................................... 10
Remove the DEP setting ..................................................................................................................... 12
Installing ImageNow Client ...................................................................................................................... 12 Download the ImageNow Client file ..................................................................................................... 12
Install the ImageNow Client attended .................................................................................................. 13
Install ImageNow Client unattended .................................................................................................... 14
ADDLOCAL value definitions ............................................................................................................... 19
Installing an ImageNow Server license ................................................................................................... 19 Obtain the license files ......................................................................................................................... 19 Install ImageNow product licenses ...................................................................................................... 20
Start all ImageNow services .................................................................................................................... 20 Configure isa.exe to run as administrator ............................................................................................ 20
Appendix A: Server configuration tables ............................................................................................... 21
inow.ini ..................................................................................................................................................... 21 Additional settings ................................................................................................................................ 21
inserver.ini ............................................................................................................................................... 43
inserverAlarm.ini ...................................................................................................................................... 51
inserverBatch.ini ...................................................................................................................................... 53
Perceptive Software ImageNow Installation and Setup Guide
Page 3 of 119
inserverEM.ini .......................................................................................................................................... 56
inserverFS.ini ........................................................................................................................................... 58
inserverImp.ini ......................................................................................................................................... 60 Import Agent Document Key Mapping Options ................................................................................... 71
inserverJob.ini ......................................................................................................................................... 73
inserverMonitor.ini ................................................................................................................................... 75
inserverMQ.ini ......................................................................................................................................... 85
inserverNotification.ini ............................................................................................................................. 88
inserverOSM.ini ....................................................................................................................................... 90 inserverRetention.ini ................................................................................................................................ 92
inserverTask.ini ....................................................................................................................................... 94
inserverWorkflow.ini ................................................................................................................................ 98 Client configuration tables ..................................................................................................................... 100
ImageNow.ini ......................................................................................................................................... 100 Additional settings .............................................................................................................................. 100
Index ......................................................................................................................................................... 119
Perceptive Software ImageNow Installation and Setup Guide
Page 4 of 119
Installing ImageNow Running ImageNow on your network requires that you install the ImageNow Server on a server computer and install at least one ImageNow Client on a computer that can access the server computer. You install the client on all computers on which a user performs ImageNow tasks, such as scanning and linking. ImageNow can be set to use encrypted communication through TCP/IP to pass data between the server and clients. Each user accesses ImageNow from the client using a login ID and password.
An initial installation of ImageNow Client and Server requires that you complete several tasks in order. The following installation information assumes that you are performing an initial installation of ImageNow instead of upgrading from an earlier version of ImageNow. If you are updating ImageNow components, make sure you first refer to the Update ReadMe document available on the Product Documentation tab of the Customer Portal on www.perceptivesoftware.com. Sections of the update readme may reference procedures in this installation guide.
ImageNow components are not backwards-compatible. For example, you must install version 6.6 of the ImageNow Client to work with version 6.6 of the ImageNow Server. For product technical specifications and system requirements, ask your Perceptive Software representative for a copy of the Product Technical Specifications document.
Installation Process The following steps outline the high-level procedures that you need to perform to install and configure ImageNow and information you need to verify before the installation.
Prepare for the installation Before you install ImageNow, verify the following information:
• Obtain the TCP/IP host name or TCP/IP address and the authorization port of the computer to install the ImageNow Server on. You need these to log in the first time.
• On Windows, verify that Microsoft TCP/IP is installed and configured. On Windows, make sure that you have an NTFS-formatted volume for all ImageNow Server executables and directory structures.
• Make sure that you have sufficient disk space for executables and object storage.
Verify the installation checklist This checklist describes the high-level procedures performed during this installation. Each of these procedures is described in detail later in this guide.
1. Verify TCP/IP connectivity for ImageNow Server.
2. Create users and groups on the operating system network domain or directory, if needed. User names and passwords in ImageNow Management Console must match the network user names and passwords.
3. Make sure that you have a user name and password for the Customer Portal at http://www.perceptivesoftware.com/support so you can download product files for installation.
4. Download and install the appropriate ImageNow Server for your operating system and database. You need the base installation of Microsoft SQL Server using mixed mode authentication.
5. Download and install ImageNow Client.
6. Install ImageNow licenses unless you are installing an evaluation copy.
7. Start all ImageNow services.
8. Create and test a login profile.
9. Log in to ImageNow to create and test groups and users.
Perceptive Software ImageNow Installation and Setup Guide
Page 5 of 119
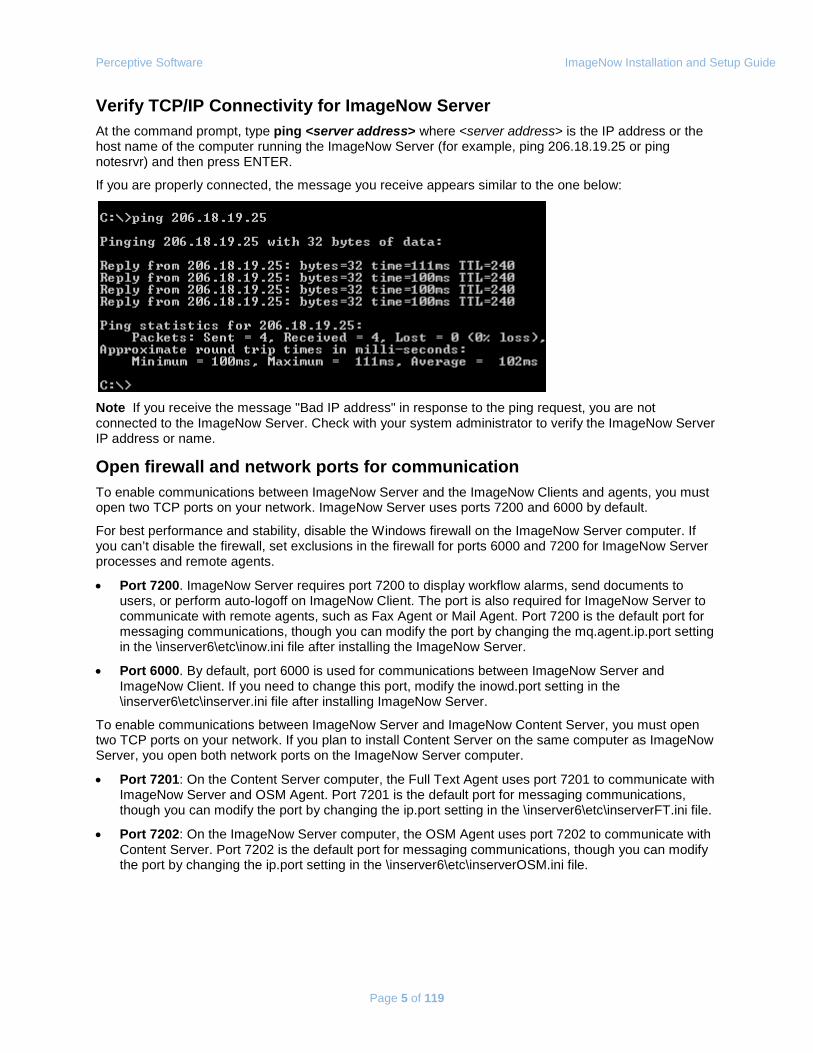
Verify TCP/IP Connectivity for ImageNow Server At the command prompt, type ping <server address> where <server address> is the IP address or the host name of the computer running the ImageNow Server (for example, ping 206.18.19.25 or ping notesrvr) and then press ENTER.
If you are properly connected, the message you receive appears similar to the one below:
Note If you receive the message "Bad IP address" in response to the ping request, you are not connected to the ImageNow Server. Check with your system administrator to verify the ImageNow Server IP address or name.
Open firewall and network ports for communication To enable communications between ImageNow Server and the ImageNow Clients and agents, you must open two TCP ports on your network. ImageNow Server uses ports 7200 and 6000 by default.
For best performance and stability, disable the Windows firewall on the ImageNow Server computer. If you can’t disable the firewall, set exclusions in the firewall for ports 6000 and 7200 for ImageNow Server processes and remote agents.
• Port 7200. ImageNow Server requires port 7200 to display workflow alarms, send documents to users, or perform auto-logoff on ImageNow Client. The port is also required for ImageNow Server to communicate with remote agents, such as Fax Agent or Mail Agent. Port 7200 is the default port for messaging communications, though you can modify the port by changing the mq.agent.ip.port setting in the \inserver6\etc\inow.ini file after installing the ImageNow Server.
• Port 6000. By default, port 6000 is used for communications between ImageNow Server and ImageNow Client. If you need to change this port, modify the inowd.port setting in the \inserver6\etc\inserver.ini file after installing ImageNow Server.
To enable communications between ImageNow Server and ImageNow Content Server, you must open two TCP ports on your network. If you plan to install Content Server on the same computer as ImageNow Server, you open both network ports on the ImageNow Server computer.
• Port 7201: On the Content Server computer, the Full Text Agent uses port 7201 to communicate with ImageNow Server and OSM Agent. Port 7201 is the default port for messaging communications, though you can modify the port by changing the ip.port setting in the \inserver6\etc\inserverFT.ini file.
• Port 7202: On the ImageNow Server computer, the OSM Agent uses port 7202 to communicate with Content Server. Port 7202 is the default port for messaging communications, though you can modify the port by changing the ip.port setting in the \inserver6\etc\inserverOSM.ini file.
Perceptive Software ImageNow Installation and Setup Guide
Page 6 of 119
About handling external messages If your system includes applications that need to communicate with ImageNow Server, you can use the following database tables to processes external messages.
• IN_EXTERN_MSG
• IN_EXTERN_MSG_PROP
• IN_EXTERN_MSG_GROUP
• IN_EXTERN_MSG_SEQ
To create a new message, insert a record into the IN_EXTERN_MSG table with a unique value for the EXTERN_MSG_ID column.
Database access through INEMUSER The database setup script creates the INUSER and INEMUSER users. INEMUSER allows you to connect your external applications to the ImageNow database. INEMUSER user can add, remove, and update records in the database tables without the risk of corrupting information stored in the ImageNow database. External applications can access the ImageNow database only through INEMUSER.
Order processing of external messages Messages with the same group process in first-in-first-out (FIFO) order.
If you want to group messages, insert the EXTERN_MSG_ID and an EXTERN_MSG_GROUP_ID into the IN_EXTERN_MSG_GROUP table. You must also insert the EXTERN_MSG_ID into the IN_EXTERN_MSG_SEQ table. The EXTERN_MSG_ID is the same ID used in the IN_EXTERN_MSG table.
Note You can add more than one group to a message by inserting additional records into the IN_EXTERN_MSG_GROUP table.
Note The EXTERN_MSG_ID and EXTERN_MSG_GROUP_ID columns have a limit of 64 characters.
Installing ImageNow Server on Windows using Microsoft SQL Server
Important This document assumes you are installing ImageNow Server for the first time or that you have no earlier versions running on your computer. To update or upgrade from a previous version, make sure you first refer to the Update ReadMe document available on the Customer Portal of the Perceptive Software website at http://www.perceptivesoftware.com. Sections of the update readme may reference procedures in this installation guide.
Before you install, verify the following:
• On the ImageNow Server computer, check the Windows Event Viewer to make sure that the computer has no DNS, hardware, or critical Windows errors.
• Verify that your system meets the requirements in the Product Technical Specifications. Then, verify your product compatibility outside of ImageNow, such as the compatibility between the service pack level of the operating system and your version of Microsoft SQL Server.
In addition, we recommend that you have the Microsoft SQL Server database running on a different computer than the ImageNow Server computer.
Perceptive Software ImageNow Installation and Setup Guide
Page 7 of 119
ImageNow Server installation process During this installation, you perform the following procedures:
• Create the INOW6 database
• Increase the tempdb space and the transaction log size
• Verify the INOW6 database user authentication
• Install ImageNow Server
• Change the DEP settings
Important When installed on a Windows Server operating system, all agents that read to or write from the OSMs must be set to run under a domain service account if you are using a remote storage device.
Download the ImageNow Server files 1. Go to the Perceptive Software website at www.perceptivesoftware.com, click Customer Portal, enter
your user name and password, and then click Downloads.
2. In the Product Downloads page, download the following files to a temporary directory on your computer:
• The ImageNow Server installer.
Note The latest build is either called a Set-Up Kit (which is a full release) or a Patch (which is a complete build released after the Set-Up Kit).
• The DB Creation and Update scripts for your DBMS.
• The ImageNow Readme and Patch Readme, if available.
3. Review the ImageNow Readme.
4. Unzip the installer, if applicable.
5. Unzip the DB Creation and Update scripts file you downloaded.
6. Verify the location of the Data directory for your SQL Server. For example, for SQL Server 2005, this location is C:\Program Files\Microsoft SQL Server\MSSQL.1\MSSQL\Data.
Note If you are not using this default location, you must modify the SunflowerSS.sql file for your system before creating the SQL Server INOW6 database. To do this, edit the SunflowerSS.sql file and change the path for each FILENAME parameter to match the actual SQL server location on your computer.
Create the INOW6 database using SQL Server 2005 Important This procedure varies depending on your version of SQL Server. Verify the data directory for Microsoft SQL. This is the directory where the database files appear when the following .sql file runs. If you are using more than one drive, you must open the SunflowerSS.sql file and update the drive in the three path locations at the top of the script.
1. Log in to the SQL Server computer with a user ID that has local administrator rights, click the Start button, point to Programs, point to Microsoft SQL Server 2005, and then click SQL Server Management Studio.
2. In the Connect to Server dialog box, enter the information in the Server Type, Server Name, and Authentication fields. Click Connect.
Perceptive Software ImageNow Installation and Setup Guide
Page 8 of 119
3. On the File menu, select Open and then select File. In the Open File dialog box, navigate to the location that contains the SunflowerSS.sql file, (extracted from the DB Creation and Update Scripts you downloaded), select the SQL file, and then click Open. If you are prompted to connect to the database, select Connect to make the connection.
4. To execute the query batch file, on the Query menu, select Execute. The execution is finished when the completion message appears at the bottom of the Query window.
Create INOW6 database using SQL Server 2008 Important This procedure varies depending on your version of SQL Server. Verify the data directory for Microsoft SQL. This is the directory where the database files appear when the following .sql file runs. If you are using more than one drive, you must open the SunflowerSS.sql file and update the drive in the three path locations at the top of the script.
1. Log in to the SQL Server computer with a user ID that has local administrator rights, click the Start button, point to Programs, point to Microsoft SQL Server 2008, and then click SQL Server Management Studio.
2. In the Connect to Server dialog box, enter the information in the Server Type, Server Name, and Authentication fields. Click Connect.
3. In the Object Explorer, verify that the master database is selected.
Tip This is typically under the System Databases folder.
4. On the File menu, select Open and then select File. In the Open File dialog box, navigate to the location that contains the SunflowerSS.sql file, (extracted from the DB Creation and Update Scripts you downloaded), select the SQL file, and then click Open. If you are prompted to connect to the database, select Connect to make the connection.
5. Modify the path in the three places on the Create Database and the Alter Database lines to navigate to the correct location.
6. To execute the query batch file, on the Query menu, select Execute. The execution is finished when the completion message appears at the bottom of the Query window.
Verify the INOW6 database user authentication 1. In SQL Server Management Studio, in the Object Explorer pane, right-click your server, which is
typically the first item in the tree, and then select Properties.
2. In the Server Properties dialog box, under Select a Page, click Security. Under Server Authentication, do one of the following actions:
• If SQL Server and Windows Authentication mode is selected, click OK.
• If Windows Authentication Mode is selected, change it to SQL Server and Windows, click OK, and then click Yes to restart the server. If you are not prompted to restart the server after changing the user authentication method, in the Object Explorer pane, right-click the server and click Restart.
3. Click OK and then exit SQL Server Management Studio.
Perceptive Software ImageNow Installation and Setup Guide
Page 9 of 119
Install ImageNow Server You can choose to install ImageNow Server using the installation wizard using the following procedure or install ImageNow Server unattended (withou the installation wizard) using the instructions in the next section.
Install ImageNow Server attended You can choose to install ImageNow Server using the installation wizard using the following procedure or install ImageNow Server unattended (withou the installation wizard) using the instructions in the next section.
Note Before proceeding, make sure that the INOW6 database is installed and online.
1. In Windows Explorer, right-click the executable you downloaded and select Run as Administrator.
2. In the Welcome to the Installation Wizard for ImageNow Server 6 page, click Next.
3. In the License Agreement page, review the information, scroll to the bottom of the agreement, click in the agreement field, click I accept the terms in the license agreement, and then click Next.
4. In the Select ImageNow Database page, click Microsoft SQL Server and then click Next.
5. In the Destination Folder page, select the location for ImageNow and then click Next.
6. In the Select Storage Type page, select the storage type.
7. In the ImageNow Setup page, set the following options:
• Port number – Specify the port number you want ImageNow to use to connect to the ImageNow Server, which is typically 6000.
• ImageNow Owner – Accept the administrator as the owner or supply a different owner.
• Optional. Language – Select the language you want to use with ImageNow.
8. Click Next. When prompted, click Yes to confirm the owner.
9. In the Ready to Install the Program page, click Install.
1. In the ODBC SQL Server Wire Protocol Driver Setup dialog box, on the General tab, in Database server, supply the database server name or IP address for the database server.
2. In Database name, supply the database name (INOW6 is the default database name) and then click OK.
10. In the Installation Wizard Completed page, complete the following actions:
1. Select the Show the readme file check box.
2. If the Show the Windows Installers log check box appears, you can select the check box to view the log file.
3. Click Finish.
11. If you receive a message to turn off DEP protection, click OK and then refer to the following “Remove the DEP setting” section.
12. If you are prompted to restart, click Yes.
13. Optional. If you need to change privileges for INUSER to meet your company's security requirements, have your DBA do so at this time. If you change privileges, make sure your DBA provides the following minimum privileges for ImageNow: CONNECT, SELECT, INSERT, UPDATE, DELETE, and EXECUTE privileges to all INOW6 database objects. EXECUTE privileges include those used for stored procedures, packages, and functions.
Perceptive Software ImageNow Installation and Setup Guide
Page 10 of 119
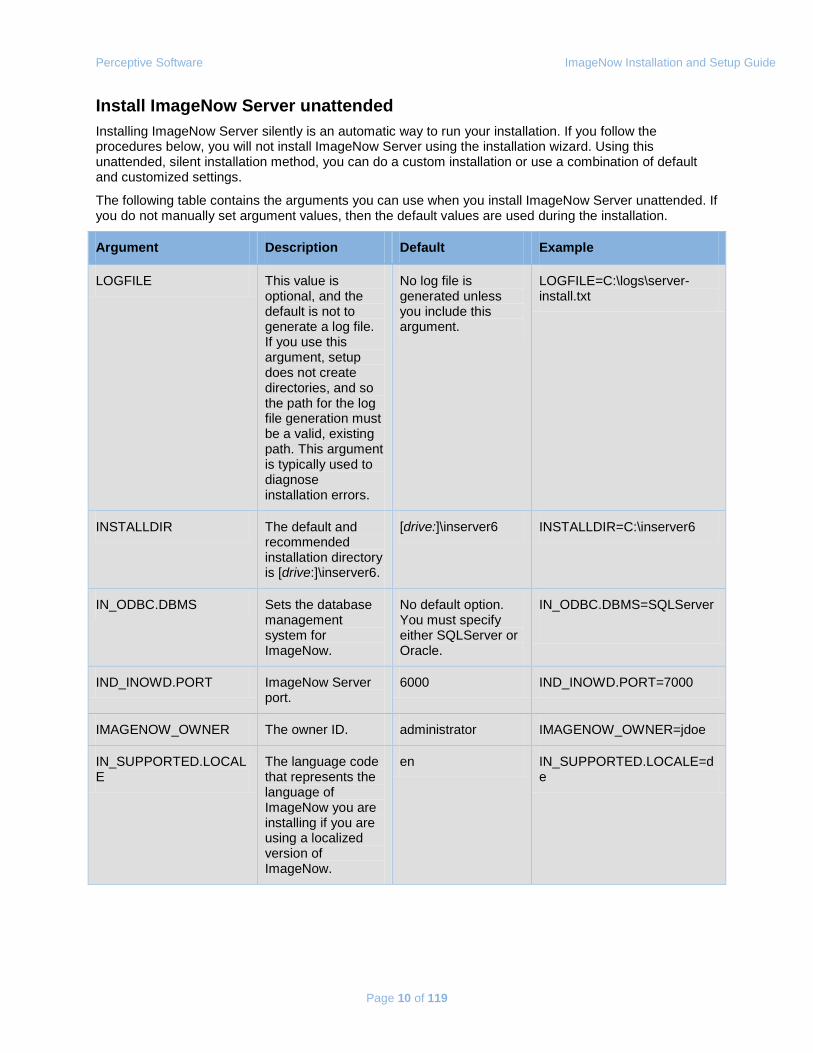
Install ImageNow Server unattended Installing ImageNow Server silently is an automatic way to run your installation. If you follow the procedures below, you will not install ImageNow Server using the installation wizard. Using this unattended, silent installation method, you can do a custom installation or use a combination of default and customized settings.
The following table contains the arguments you can use when you install ImageNow Server unattended. If you do not manually set argument values, then the default values are used during the installation.
Argument Description Default Example
LOGFILE This value is optional, and the default is not to generate a log file. If you use this argument, setup does not create directories, and so the path for the log file generation must be a valid, existing path. This argument is typically used to diagnose installation errors.
No log file is generated unless you include this argument.
LOGFILE=C:\logs\server-install.txt
INSTALLDIR The default and recommended installation directory is [drive:]\inserver6.
[drive:]\inserver6 INSTALLDIR=C:\inserver6
IN_ODBC.DBMS Sets the database management system for ImageNow.
No default option. You must specify either SQLServer or Oracle.
IN_ODBC.DBMS=SQLServer
IND_INOWD.PORT ImageNow Server port.
6000 IND_INOWD.PORT=7000
IMAGENOW_OWNER The owner ID. administrator IMAGENOW_OWNER=jdoe
IN_SUPPORTED.LOCALE
The language code that represents the language of ImageNow you are installing if you are using a localized version of ImageNow.
en IN_SUPPORTED.LOCALE=de
Perceptive Software ImageNow Installation and Setup Guide
Page 11 of 119
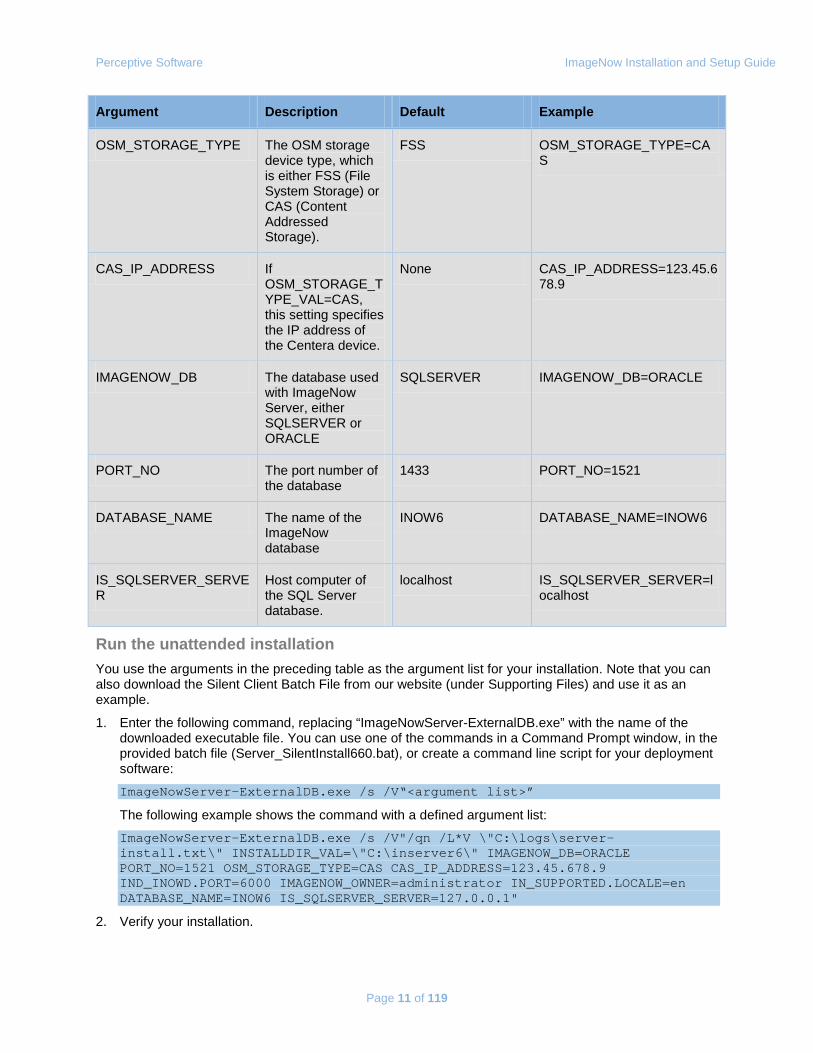
Argument Description Default Example
OSM_STORAGE_TYPE The OSM storage device type, which is either FSS (File System Storage) or CAS (Content Addressed Storage).
FSS OSM_STORAGE_TYPE=CAS
CAS_IP_ADDRESS If OSM_STORAGE_TYPE_VAL=CAS, this setting specifies the IP address of the Centera device.
None CAS_IP_ADDRESS=123.45.678.9
IMAGENOW_DB The database used with ImageNow Server, either SQLSERVER or ORACLE
SQLSERVER IMAGENOW_DB=ORACLE
PORT_NO The port number of the database
1433 PORT_NO=1521
DATABASE_NAME The name of the ImageNow database
INOW6 DATABASE_NAME=INOW6
IS_SQLSERVER_SERVER
Host computer of the SQL Server database.
localhost IS_SQLSERVER_SERVER=localhost
Run the unattended installation You use the arguments in the preceding table as the argument list for your installation. Note that you can also download the Silent Client Batch File from our website (under Supporting Files) and use it as an example.
1. Enter the following command, replacing “ImageNowServer-ExternalDB.exe” with the name of the downloaded executable file. You can use one of the commands in a Command Prompt window, in the provided batch file (Server_SilentInstall660.bat), or create a command line script for your deployment software:
ImageNowServer-ExternalDB.exe /s /V“<argument list>”
The following example shows the command with a defined argument list:
ImageNowServer-ExternalDB.exe /s /V"/qn /L*V \"C:\logs\server-install.txt\" INSTALLDIR_VAL=\"C:\inserver6\" IMAGENOW_DB=ORACLE PORT_NO=1521 OSM_STORAGE_TYPE=CAS CAS_IP_ADDRESS=123.45.678.9 IND_INOWD.PORT=6000 IMAGENOW_OWNER=administrator IN_SUPPORTED.LOCALE=en DATABASE_NAME=INOW6 IS_SQLSERVER_SERVER=127.0.0.1"
2. Verify your installation.
Perceptive Software ImageNow Installation and Setup Guide
Page 12 of 119
Remove the DEP setting You must remove the Data Execution Prevention (DEP) setting from the ImageNow executable files in [drive:]\inserver6\bin if you operate in a Windows Server 2003 or Windows Server 2008 32-bit environment.
Note If you installed ImageNow Server on a 64-bit Windows server, do not complete the following steps.
1. On the desktop, right-click My Computer (Windows Server 2003) or Computer (Windows Server 2008), and then select Properties.
2. In Windows 2008, under Tasks choose Advanced system settings. Windows 2003 does not require this selection.
3. In the System Properties dialog box, on the Advanced tab, under Performance, click Settings.
4. In the Performance Options dialog box, on the Data Execution Prevention tab, select Turn on DEP for all programs and services except those I select.
5. Click Add.
6. In the Open dialog box, navigate to the \inserver6\bin directory, select an EXE file in that directory, and then click Open. Repeat this step for each .exe file in the directory.
7. Click OK twice.
8. Restart your computer to save the DEP setting.
Installing ImageNow Client This topic assumes that you are installing ImageNow for the first time or that you have no earlier versions of ImageNow running on your computer. These instructions enable you to install the ImageNow Client directly on the local computer, shown below as attended. You can also install the ImageNow Client silently on unattended installations by following the instructions in the “Install ImageNow Client unattended” section of this document.
Important To install or update the ImageNow Client on Microsoft Vista or Microsoft Windows 7, make sure that you are logged in as a member of the "Administrators" group on the local Vista computer.
Before you install, perform the following readiness actions:
• On the ImageNow Client computer, check the Windows Event Viewer to make sure that the computer has no DNS, hardware, or critical Windows errors.
• Verify that your system meets the requirements in the Product Technical Specifications. Then, verify your product compatibility outside of ImageNow, such as the compatibility between the service pack level of the operating system and your version of Microsoft SQL Server.
Download the ImageNow Client file 1. Go to the Perceptive Software website at www.perceptivesoftware.com and log in to the Customer
Portal.
2. In the Product Downloads page, search for all downloadable items for the specific product and version you want to use. These files may include a product installer, product documentation, or set of supporting files.
3. Download the relevant files to a temporary directory on your computer.

Perceptive Software ImageNow Installation and Setup Guide
Page 13 of 119
Install the ImageNow Client attended 1. To start the ImageNow Client installation, do one of the following:
• For Windows XP, double-click the downloaded executable.
• For Windows Vista or Windows 7, right-click the downloaded executable and select Run as Administrator.
2. Optional. If the Choose Setup Language dialog box appears, from the list, select the language you want to use during installation and then click OK.
3. In the Welcome to the ImageNow Installation Wizard for ImageNow Desktop Client page, click Next.
4. In the License Agreement page, read the License Agreement, scroll to the bottom of the agreement, select I accept the terms in the license agreement, and then click Next.
5. In the Custom Setup page, select the components you want to install by selecting the corresponding icons:
• ImageNow Client Files – Installs all files necessary to run ImageNow Client software.
• Demo Images – Installs demonstration software.
• User Help – Installs end-user help files.
• Administrator Help – Installs the ImageNow integration and administration help files.
• Support for viewing non-graphic data – Installs filters for viewing non-raster based objects (such as TXT, RTF, PDF, XLS, or DOC).
• ImageNow Printer – Installs all files necessary to run the ImageNow Printer.
• Business Insight Integration – Installs all files necessary to view Business Insight reports in ImageNow.
6. In the Default Connection Profile page, do the following actions and then click Next:
1. In the Profile Name box, enter a name for the default profile.
2. In the Server Name box, enter the name or IP address of the ImageNow Server.
3. In the Port box, enter the port number ImageNow Server uses.
7. In the ImageNow Shortcuts page, select the shortcuts you want to appear and then click Next.
8. In the Ready to Install the Program page, click Install.
9. In the Installation Wizard Completed page, perform the following actions:
1. Select the Show the readme file check box.
2. If the Show the Windows Installers log check box appears, you can select the check box to view the log file.
3. Click Finish.
Perceptive Software ImageNow Installation and Setup Guide
Page 14 of 119
Remove the DEP setting You must remove the Data Execution Prevention (DEP) setting from the ImageNow executable if you operate in a Windows Server 2003 or Windows Server 2008 environment.
1. On the desktop, right-click My Computer (Windows Server 2003) or Computer (Windows Server 2008) and then select Properties.
2. In Windows 2008, under Tasks choose Advanced system settings. Windows 2003 does not require this selection.
3. In the System Properties dialog box, on the Advanced tab, under Performance, click Settings.
4. In the Performance Options dialog box, on the Data Execution Prevention tab, select Turn on DEP for all programs and services except those I select.
5. Click Add.
6. In the Open dialog box, navigate to the \Program Files\ImageNow6\bin directory, select the imagenow.exe file in that directory and then click Open.
7. Click OK twice. Restart your computer to save the DEP setting.
Install ImageNow Client unattended Installing the ImageNow Client silently is an automatic way to run unattended installations. If you follow the procedures below, you will not install ImageNow Client using a standard InstallShield interface. Additionally, you can use your own automation tools or login scripts to install ImageNow on multiple workstations. Using this silent install method, you can do a custom install or use a combination of default and customized settings.
This section applies to new installs, updates, and upgrades as follows:
• If you are installing ImageNow for the first time or upgrading from ImageNow, version 5.x, you can use the instructions in this section.
• If you are upgrading from ImageNow, version 6.x, Perceptive Software recommends that you use the automatic updater. For more information about automatic updates, refer to the automatic update readme. Otherwise, you can use the instructions in this section.
• If you are updating ImageNow from an earlier version of 6.6.x, Perceptive Software recommends that you use the automatic updater. For more information about automatic updates, refer to the automatic update readme. Otherwise, you can use the instructions in this section for installing ImageNow using the downloaded executable file. While it is possible to install ImageNow using the ClientSetup.msi, it is strongly discouraged. However, if you elect to do so, you must include the following parameters with your argument parameters:
REINSTALL=ALL REINSTALLMODE=vomus
The default features include the ImageNow Client, Demo Images, and the Help files. You also get three shortcuts to open ImageNow Client; they are located on the Windows Start menu, the Quick Launch menu, and the desktop. The default features do not include the ImageNow Printer or Business Insight Integration.
The following instructions refer to the "common application data folder," which is typically hidden. Its physical location varies, depending on your version of Windows. For example, in Windows XP, the path to this folder is C:\Documents and Settings\<username>\Local Settings\Application Data\ Downloaded Installations\[Unique ID] and in Windows 7, the path to this folder is C:\ProgramData\Downloaded Installations\[Unique ID]. Refer to your Windows documentation for the specific location of your common application data folder.

Perceptive Software ImageNow Installation and Setup Guide
Page 15 of 119
Prepare the ImageNow Client files 1. Optional. If you use deployment software to push out your installations and if it requires you to use an
MSI file, extract ClientSetup.msi from the downloaded executable.
2. If you have not already installed this version of the ImageNow Client on your ImageNow Server computer, double-click the downloaded ClientSetup.exe file, which extracts the ClientSetup.msi.
3. By default, ClientSetup.msi is extracted to the common application data folder. The Unique ID varies with each build, and so you must sort the Downloaded Installations folder by Date Modified and copy the most recent entry containing this file to the folder that is required by your deployment software.
4. In the Welcome to the ImageNow Installation Wizard for ImageNow Client page, click Cancel.
Note Do not delete the Downloaded Installations\[Unique ID] folder or remove the MSI file. You must have both for certain maintenance functionality.
Perceptive Software ImageNow Installation and Setup Guide
Page 16 of 119
The following table contains the arguments you can use when you install ImageNow Client unattended. If you do not manually set argument values, then the default values are used during the installation.
Argument Description Default Example
INSTALLDIR The default and recommended installation directory is [drive:]\Program Files\ImageNow6.
[drive:]\Program Files\ImageNow6
INSTALLDIR=\”C:\Program Files\IN6\”
ADDLOCAL Select which features are installed. Optional features are DemoImages, UserHelp, AdminHelp, KeyView, ImageNowPrinter, and BIIntegration.
Important You must install ImageNowClient, Pixtran, Accusoft, SystemFiles, LeadTools, and OneDirectory for the application to work properly.
There are no spaces allowed between the words and the commas when using this argument. The core features are required, but some features are optional.
Note For definitions of values for the ADDLOCAL argument, refer to the ADDLOCAL definitions section.
ImageNowClient, Pixtran, Accusoft, SystemFiles, LeadTools, OneDirectory, DemoImages, UserHelp, AdminHelp, KeyView
ADDLOCAL= ImageNowClient, Pixtran,Accusoft,SystemFiles, LeadTools,OneDirectory
IN_PROFILENAME The default connection profile name.
DefaultProfile IN_PROFILENAME=default
IN_SERVER_NAME The ImageNow Server host name or host address.
Localhost IN_SERVER_NAME=MyServer
IN_PORT_NO The ImageNow Server port.
6000 IN_PORT_NO=7000
Perceptive Software ImageNow Installation and Setup Guide
Page 17 of 119
Argument Description Default Example
STARTMENUICON The default value is Yes, which means a shortcut for the ImageNow Client is created on the Start menu. Allowed values are either Yes or No.
Yes STARTMENUICON=Yes
DESKTOPICON The default value is Yes, which means a shortcut to ImageNow Client is created on the desktop. Allowed values are either Yes or No.
Yes DESKTOPICON=No
QUICKLAUNCHICON The default value is Yes, which means a shortcut to ImageNow Client is created on the Quick Launch area of the Taskbar. Allowed values are either Yes or No.
Yes QUICKLAUNCHICON=Yes
REMOVEOLDVERSIONS This value only applies when the client setup detects a version of ImageNow earlier than 6.0. The default is No, and allowed values are either Yes or No.
No REMOVEOLDVERSIONS= Yes
LOGFILE This value is optional, and the default is no log file generated. If you use this argument, setup does not create directories and so the path for the log file generation must be a valid, existing path. This argument is typically used to diagnose installation errors.
No log file is generated unless you include this argument.
LOGFILE=C:\logs\client-install.txt
Perceptive Software ImageNow Installation and Setup Guide
Page 18 of 119
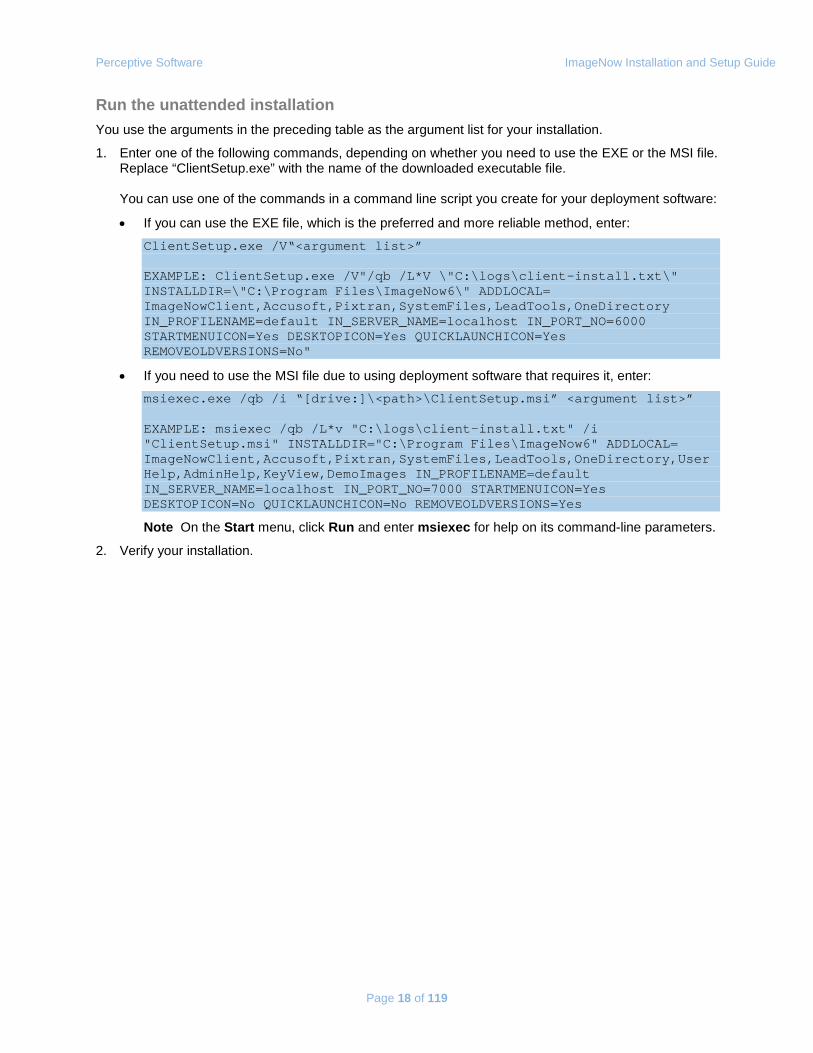
Run the unattended installation You use the arguments in the preceding table as the argument list for your installation.
1. Enter one of the following commands, depending on whether you need to use the EXE or the MSI file. Replace “ClientSetup.exe” with the name of the downloaded executable file. You can use one of the commands in a command line script you create for your deployment software:
• If you can use the EXE file, which is the preferred and more reliable method, enter:
ClientSetup.exe /V“<argument list>” EXAMPLE: ClientSetup.exe /V"/qb /L*V \"C:\logs\client-install.txt\" INSTALLDIR=\"C:\Program Files\ImageNow6\" ADDLOCAL= ImageNowClient,Accusoft,Pixtran,SystemFiles,LeadTools,OneDirectory IN_PROFILENAME=default IN_SERVER_NAME=localhost IN_PORT_NO=6000 STARTMENUICON=Yes DESKTOPICON=Yes QUICKLAUNCHICON=Yes REMOVEOLDVERSIONS=No"
• If you need to use the MSI file due to using deployment software that requires it, enter:
msiexec.exe /qb /i “[drive:]\<path>\ClientSetup.msi” <argument list>” EXAMPLE: msiexec /qb /L*v "C:\logs\client-install.txt" /i "ClientSetup.msi" INSTALLDIR="C:\Program Files\ImageNow6" ADDLOCAL= ImageNowClient,Accusoft,Pixtran,SystemFiles,LeadTools,OneDirectory,UserHelp,AdminHelp,KeyView,DemoImages IN_PROFILENAME=default IN_SERVER_NAME=localhost IN_PORT_NO=7000 STARTMENUICON=Yes DESKTOPICON=No QUICKLAUNCHICON=No REMOVEOLDVERSIONS=Yes
Note On the Start menu, click Run and enter msiexec for help on its command-line parameters.
2. Verify your installation.
Perceptive Software ImageNow Installation and Setup Guide
Page 19 of 119
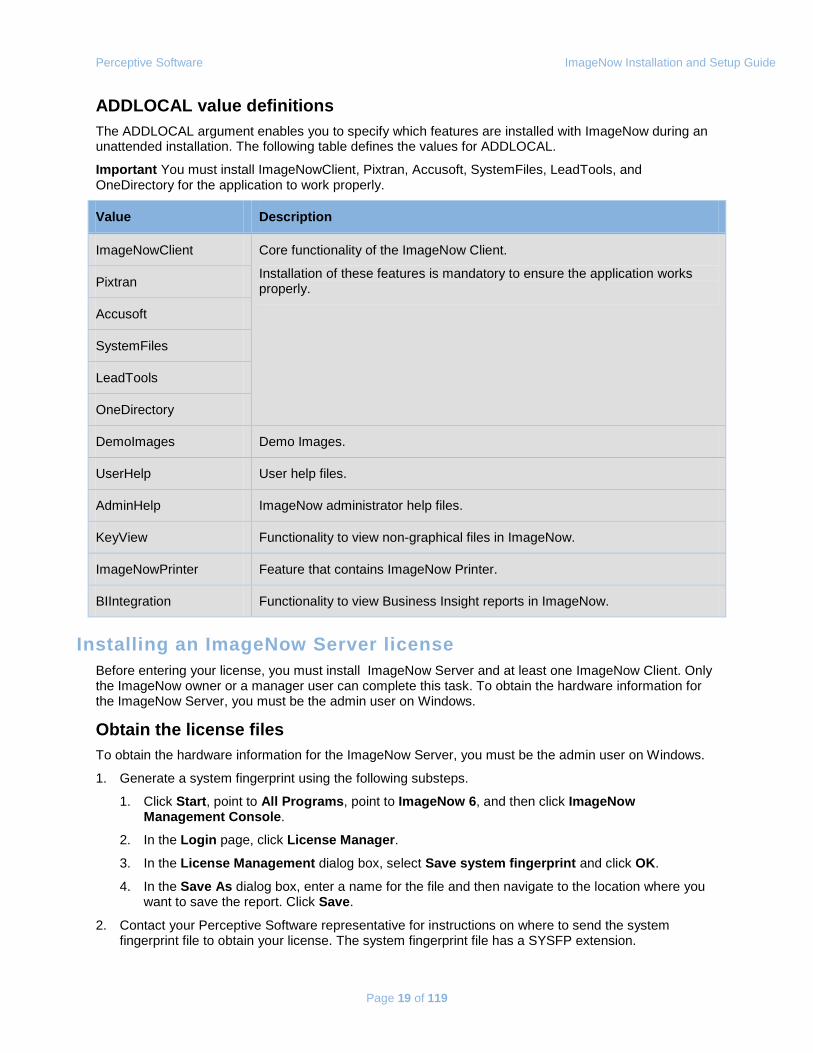
ADDLOCAL value definitions The ADDLOCAL argument enables you to specify which features are installed with ImageNow during an unattended installation. The following table defines the values for ADDLOCAL.
Important You must install ImageNowClient, Pixtran, Accusoft, SystemFiles, LeadTools, and OneDirectory for the application to work properly.
Value Description
ImageNowClient Core functionality of the ImageNow Client.
Installation of these features is mandatory to ensure the application works properly. Pixtran
Accusoft
SystemFiles
LeadTools
OneDirectory
DemoImages Demo Images.
UserHelp User help files.
AdminHelp ImageNow administrator help files.
KeyView Functionality to view non-graphical files in ImageNow.
ImageNowPrinter Feature that contains ImageNow Printer.
BIIntegration Functionality to view Business Insight reports in ImageNow.
Installing an ImageNow Server license Before entering your license, you must install ImageNow Server and at least one ImageNow Client. Only the ImageNow owner or a manager user can complete this task. To obtain the hardware information for the ImageNow Server, you must be the admin user on Windows.
Obtain the license files To obtain the hardware information for the ImageNow Server, you must be the admin user on Windows. 1. Generate a system fingerprint using the following substeps.
1. Click Start, point to All Programs, point to ImageNow 6, and then click ImageNow Management Console.
2. In the Login page, click License Manager.
3. In the License Management dialog box, select Save system fingerprint and click OK.
4. In the Save As dialog box, enter a name for the file and then navigate to the location where you want to save the report. Click Save.
2. Contact your Perceptive Software representative for instructions on where to send the system fingerprint file to obtain your license. The system fingerprint file has a SYSFP extension.

Perceptive Software ImageNow Installation and Setup Guide
Page 20 of 119
3. When you receive the license files, store the license files in a temporary directory on the ImageNow Server computer.
Install ImageNow product licenses Before entering your licenses, you must have installed the ImageNow Server and at least one ImageNow Client. You must have Service Administrator privileges to install ImageNow licenses. The ImageNow Client must be available on a Windows machine in order to install the ImageNow product licenses.
1. When you receive the license files from your Perceptive Software representative, copy them to a temporary folder where you can access them with an ImageNow Client.
4. Upload licenses, as explained in the following substeps:
1. Click Start, point to All Programs, and then select ImageNow 6.
2. In the login page, click License Manager.
3. In the License Management dialog box, select Upload Licenses and click OK.
4. Navigate to the folder where the ImageNow license files are stored, select the LIC files to upload, and click Open.
5. Enter the User Name, Password, and Server Location and click OK.
6. Optional. The License Upload dialog box lets you view the type name, actual license code, and current status of each license upload. To display detailed information for a specific license, select the appropriate row.
5. Click OK.
Start all ImageNow services Complete the steps in this section to start the ImageNow services.
Configure isa.exe to run as administrator Complete the following steps before starting the ImageNow services.
1. For 32-bit installations, navigate to the [drive:]\inserver6\bin folder. For 64-bit installations, navigate to the [drive:]\inserver6\bin64 folder.
2. Right-click isa.exe and select Properties.
3. On the Compatibility tab, select Run this program as an administrator.
After all components are licensed, you can start all the ImageNow Services using ImageNow Server Administrator (ISA).
1. On the Start menu, point to All Programs, point to ImageNow Server 6, and then click ImageNow Server Admin.
2. In the ImageNow Server Administration dialog box, type the password for your ImageNow owner, provided when you installed the ImageNow Server, and then click OK.
3. When the message box appears, asking if you want to start all services, click Yes.
4. When all services successfully start, the ImageNow Server Administration window shows "0 ImageNow Services stopped." You can click View Details to look at service status.
Perceptive Software ImageNow Installation and Setup Guide
Page 21 of 119
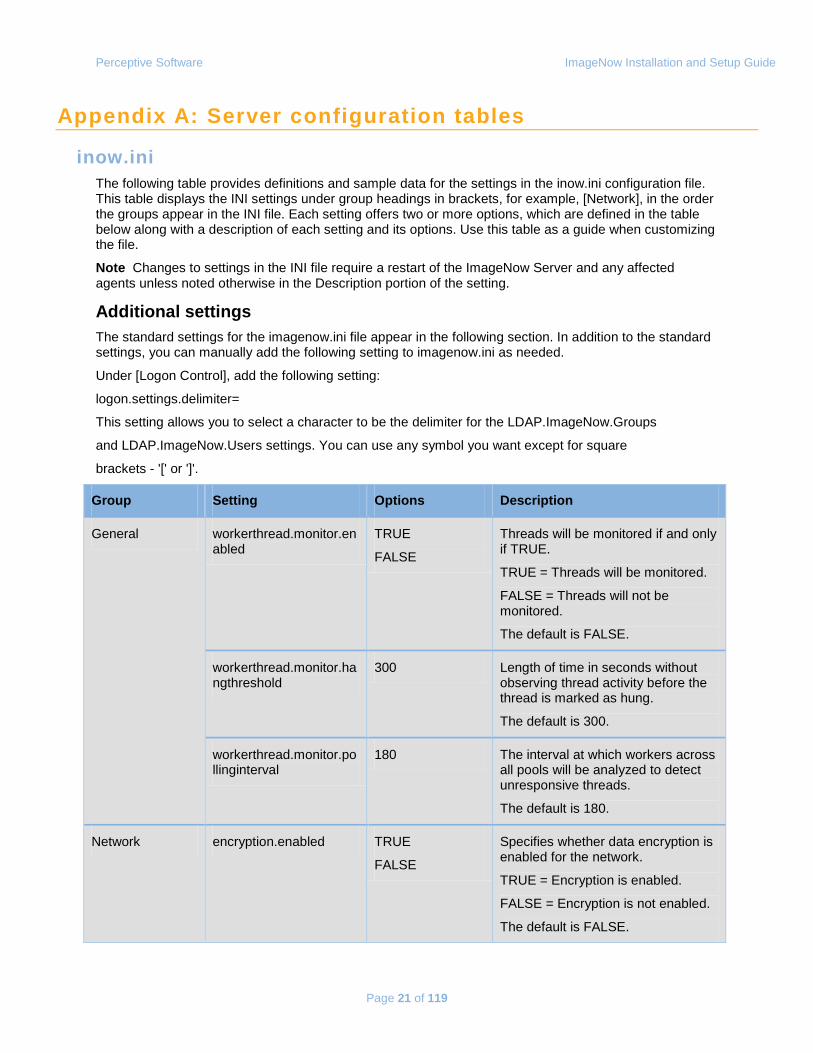
Appendix A: Server configuration tables
inow.ini The following table provides definitions and sample data for the settings in the inow.ini configuration file. This table displays the INI settings under group headings in brackets, for example, [Network], in the order the groups appear in the INI file. Each setting offers two or more options, which are defined in the table below along with a description of each setting and its options. Use this table as a guide when customizing the file.
Note Changes to settings in the INI file require a restart of the ImageNow Server and any affected agents unless noted otherwise in the Description portion of the setting.
Additional settings The standard settings for the imagenow.ini file appear in the following section. In addition to the standard settings, you can manually add the following setting to imagenow.ini as needed.
Under [Logon Control], add the following setting:
logon.settings.delimiter=
This setting allows you to select a character to be the delimiter for the LDAP.ImageNow.Groups
and LDAP.ImageNow.Users settings. You can use any symbol you want except for square
brackets - '[' or ']'.
Group Setting Options Description
General workerthread.monitor.enabled
TRUE
FALSE
Threads will be monitored if and only if TRUE.
TRUE = Threads will be monitored.
FALSE = Threads will not be monitored.
The default is FALSE.
workerthread.monitor.hangthreshold
300 Length of time in seconds without observing thread activity before the thread is marked as hung.
The default is 300.
workerthread.monitor.pollinginterval
180 The interval at which workers across all pools will be analyzed to detect unresponsive threads.
The default is 180.
Network encryption.enabled TRUE
FALSE
Specifies whether data encryption is enabled for the network.
TRUE = Encryption is enabled.
FALSE = Encryption is not enabled.
The default is FALSE.
Perceptive Software ImageNow Installation and Setup Guide
Page 22 of 119
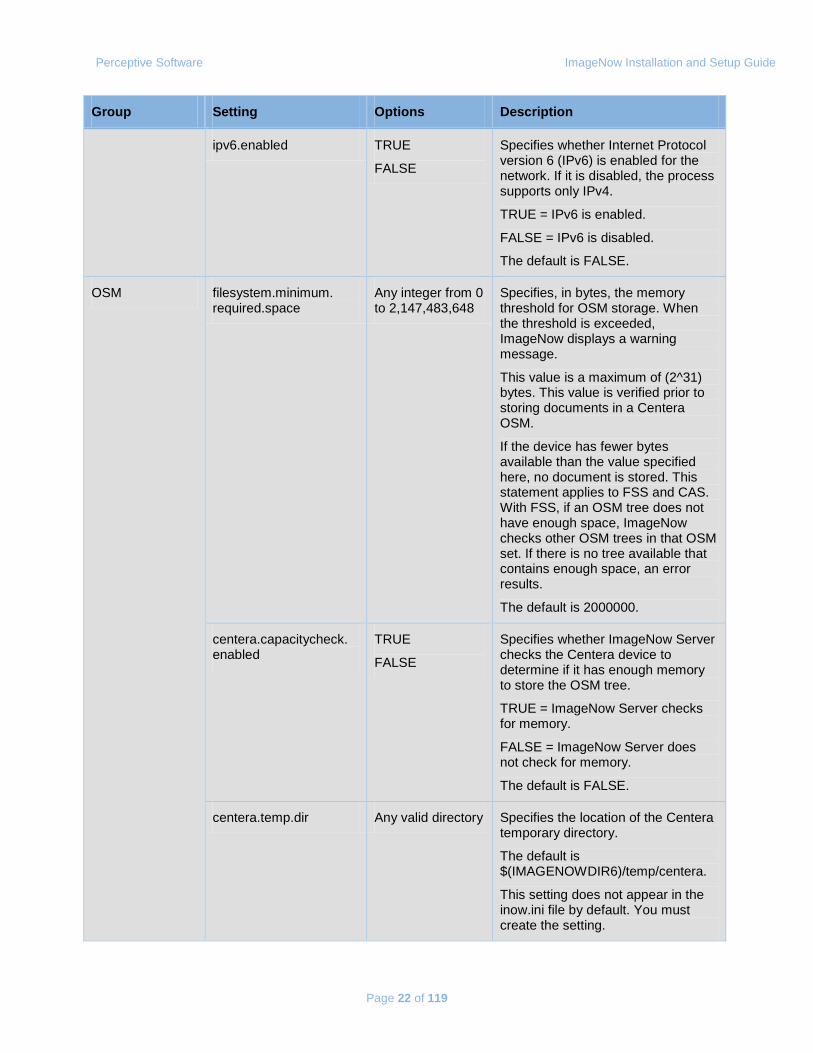
Group Setting Options Description
ipv6.enabled TRUE
FALSE
Specifies whether Internet Protocol version 6 (IPv6) is enabled for the network. If it is disabled, the process supports only IPv4.
TRUE = IPv6 is enabled.
FALSE = IPv6 is disabled.
The default is FALSE.
OSM filesystem.minimum. required.space
Any integer from 0 to 2,147,483,648
Specifies, in bytes, the memory threshold for OSM storage. When the threshold is exceeded, ImageNow displays a warning message.
This value is a maximum of (2^31) bytes. This value is verified prior to storing documents in a Centera OSM.
If the device has fewer bytes available than the value specified here, no document is stored. This statement applies to FSS and CAS. With FSS, if an OSM tree does not have enough space, ImageNow checks other OSM trees in that OSM set. If there is no tree available that contains enough space, an error results.
The default is 2000000.
centera.capacitycheck. enabled
TRUE
FALSE
Specifies whether ImageNow Server checks the Centera device to determine if it has enough memory to store the OSM tree.
TRUE = ImageNow Server checks for memory.
FALSE = ImageNow Server does not check for memory.
The default is FALSE.
centera.temp.dir Any valid directory Specifies the location of the Centera temporary directory.
The default is $(IMAGENOWDIR6)/temp/centera.
This setting does not appear in the inow.ini file by default. You must create the setting.
Perceptive Software ImageNow Installation and Setup Guide
Page 23 of 119
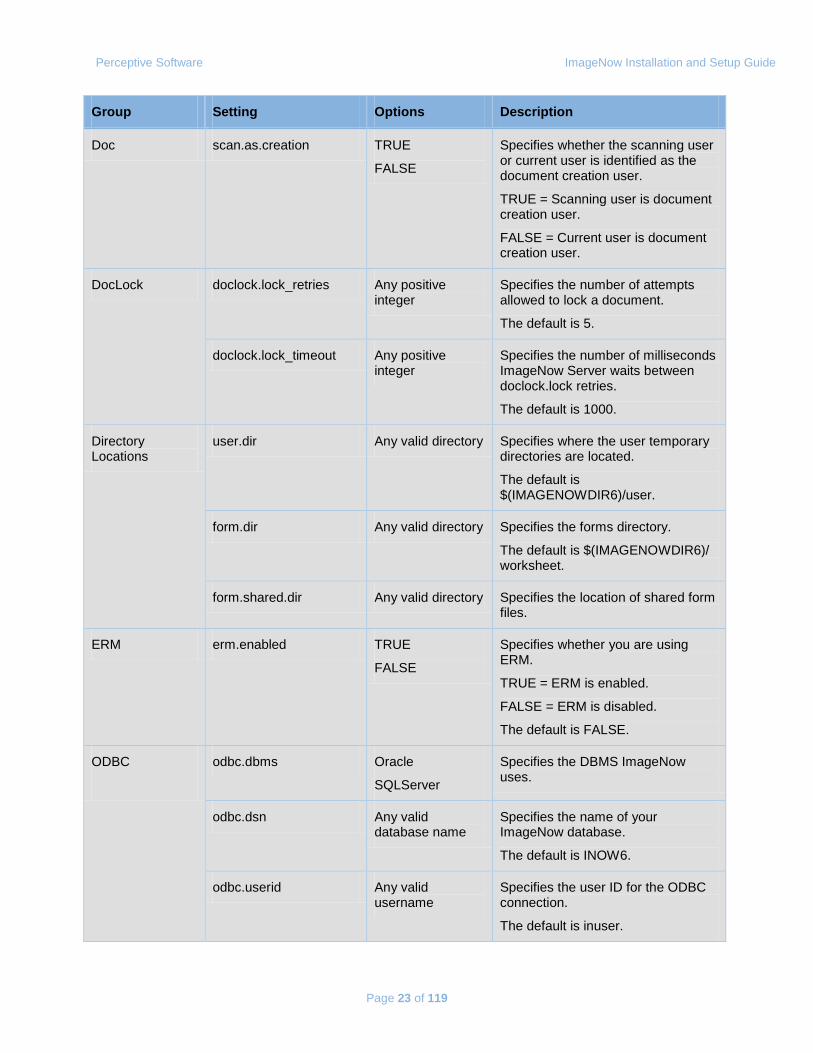
Group Setting Options Description
Doc scan.as.creation TRUE
FALSE
Specifies whether the scanning user or current user is identified as the document creation user.
TRUE = Scanning user is document creation user.
FALSE = Current user is document creation user.
DocLock doclock.lock_retries Any positive integer
Specifies the number of attempts allowed to lock a document.
The default is 5.
doclock.lock_timeout Any positive integer
Specifies the number of milliseconds ImageNow Server waits between doclock.lock retries.
The default is 1000.
Directory Locations
user.dir Any valid directory Specifies where the user temporary directories are located.
The default is $(IMAGENOWDIR6)/user.
form.dir Any valid directory Specifies the forms directory.
The default is $(IMAGENOWDIR6)/ worksheet.
form.shared.dir Any valid directory Specifies the location of shared form files.
ERM erm.enabled TRUE
FALSE
Specifies whether you are using ERM.
TRUE = ERM is enabled.
FALSE = ERM is disabled.
The default is FALSE.
ODBC
odbc.dbms Oracle
SQLServer
Specifies the DBMS ImageNow uses.
odbc.dsn Any valid database name
Specifies the name of your ImageNow database.
The default is INOW6.
odbc.userid Any valid username
Specifies the user ID for the ODBC connection.
The default is inuser.
Perceptive Software ImageNow Installation and Setup Guide
Page 24 of 119
Group Setting Options Description
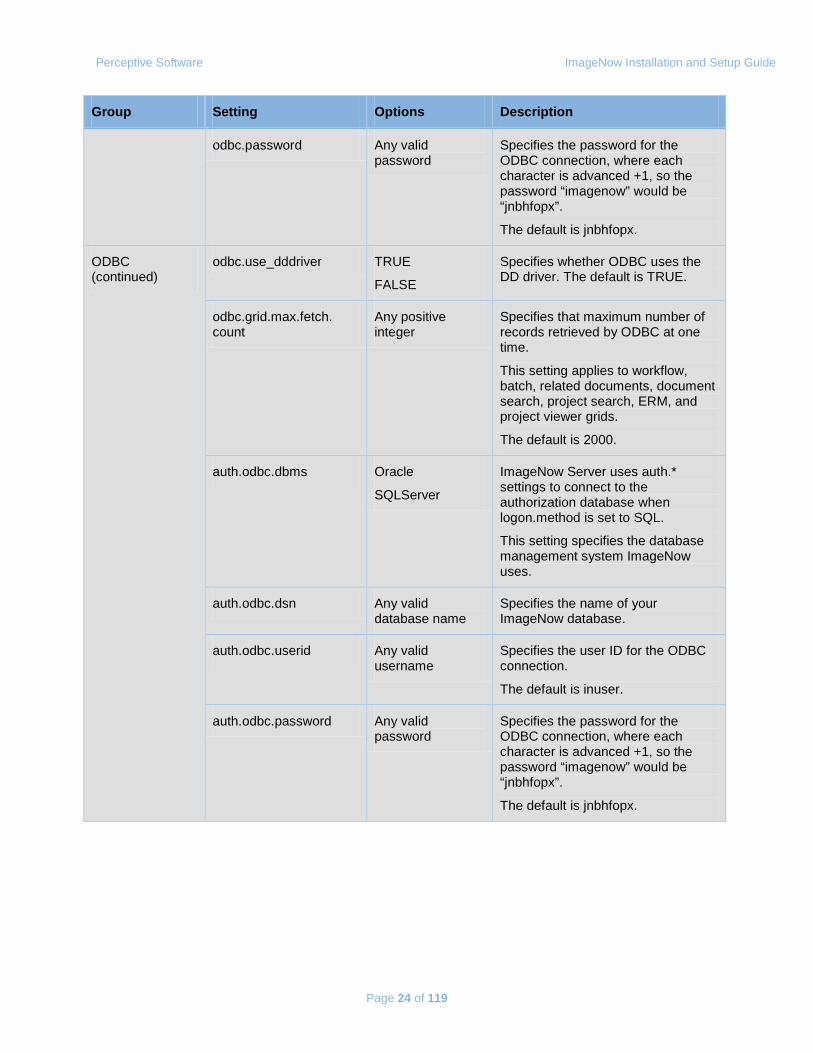
odbc.password Any valid password
Specifies the password for the ODBC connection, where each character is advanced +1, so the password “imagenow” would be “jnbhfopx”.
The default is jnbhfopx.
ODBC (continued)
odbc.use_dddriver TRUE
FALSE
Specifies whether ODBC uses the DD driver. The default is TRUE.
odbc.grid.max.fetch. count
Any positive integer
Specifies that maximum number of records retrieved by ODBC at one time.
This setting applies to workflow, batch, related documents, document search, project search, ERM, and project viewer grids.
The default is 2000.
auth.odbc.dbms Oracle
SQLServer
ImageNow Server uses auth.* settings to connect to the authorization database when logon.method is set to SQL.
This setting specifies the database management system ImageNow uses.
auth.odbc.dsn Any valid database name
Specifies the name of your ImageNow database.
auth.odbc.userid Any valid username
Specifies the user ID for the ODBC connection.
The default is inuser.
auth.odbc.password Any valid password
Specifies the password for the ODBC connection, where each character is advanced +1, so the password “imagenow” would be “jnbhfopx”.
The default is jnbhfopx.
Perceptive Software ImageNow Installation and Setup Guide
Page 25 of 119
Group Setting Options Description
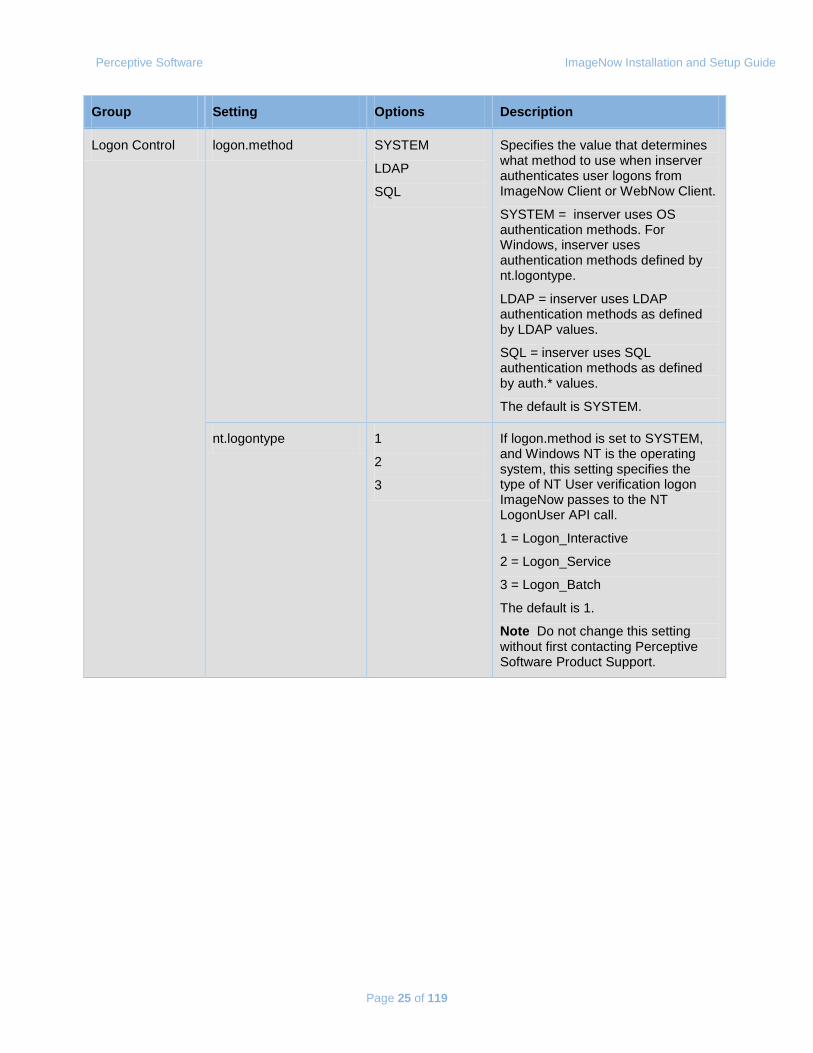
Logon Control logon.method SYSTEM
LDAP
SQL
Specifies the value that determines what method to use when inserver authenticates user logons from ImageNow Client or WebNow Client.
SYSTEM = inserver uses OS authentication methods. For Windows, inserver uses authentication methods defined by nt.logontype.
LDAP = inserver uses LDAP authentication methods as defined by LDAP values.
SQL = inserver uses SQL authentication methods as defined by auth.* values.
The default is SYSTEM.
nt.logontype 1
2
3
If logon.method is set to SYSTEM, and Windows NT is the operating system, this setting specifies the type of NT User verification logon ImageNow passes to the NT LogonUser API call.
1 = Logon_Interactive
2 = Logon_Service
3 = Logon_Batch
The default is 1.
Note Do not change this setting without first contacting Perceptive Software Product Support.
Perceptive Software ImageNow Installation and Setup Guide
Page 26 of 119
Group Setting Options Description
Logon Control (continued)
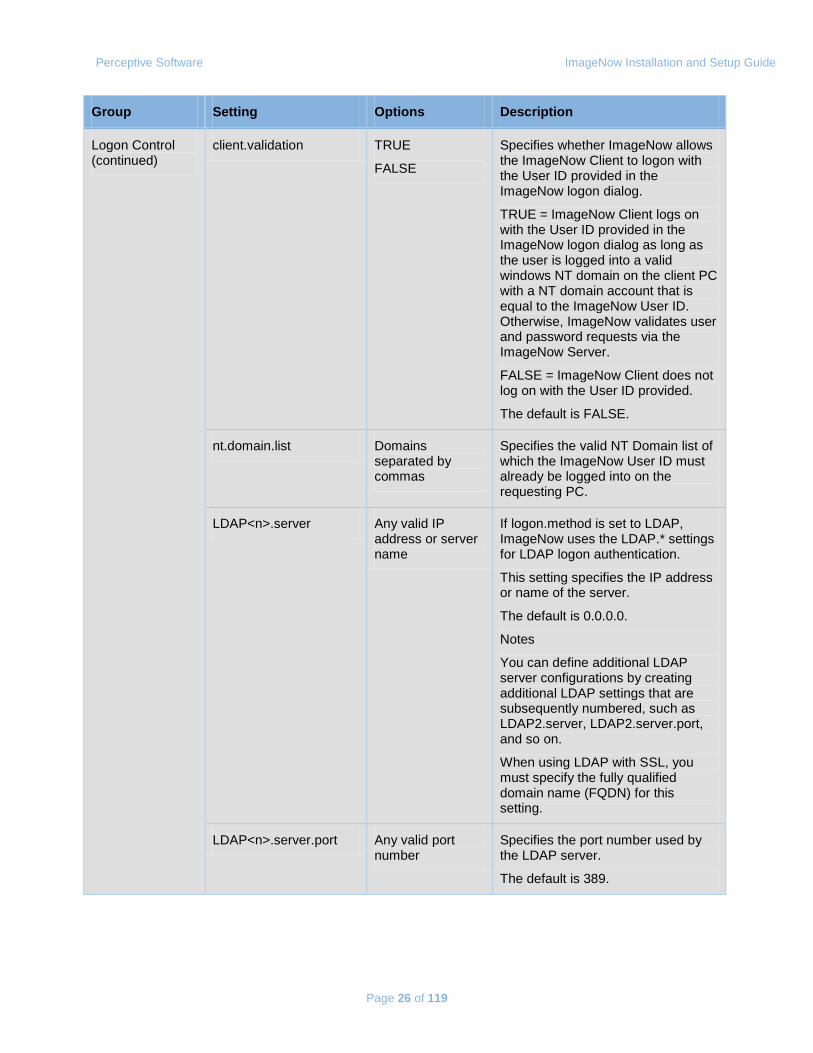
client.validation TRUE
FALSE
Specifies whether ImageNow allows the ImageNow Client to logon with the User ID provided in the ImageNow logon dialog.
TRUE = ImageNow Client logs on with the User ID provided in the ImageNow logon dialog as long as the user is logged into a valid windows NT domain on the client PC with a NT domain account that is equal to the ImageNow User ID. Otherwise, ImageNow validates user and password requests via the ImageNow Server.
FALSE = ImageNow Client does not log on with the User ID provided.
The default is FALSE.
nt.domain.list Domains separated by commas
Specifies the valid NT Domain list of which the ImageNow User ID must already be logged into on the requesting PC.
LDAP<n>.server Any valid IP address or server name
If logon.method is set to LDAP, ImageNow uses the LDAP.* settings for LDAP logon authentication.
This setting specifies the IP address or name of the server.
The default is 0.0.0.0.
Notes
You can define additional LDAP server configurations by creating additional LDAP settings that are subsequently numbered, such as LDAP2.server, LDAP2.server.port, and so on.
When using LDAP with SSL, you must specify the fully qualified domain name (FQDN) for this setting.
LDAP<n>.server.port Any valid port number
Specifies the port number used by the LDAP server.
The default is 389.
Perceptive Software ImageNow Installation and Setup Guide
Page 27 of 119
Group Setting Options Description
Logon Control (continued)
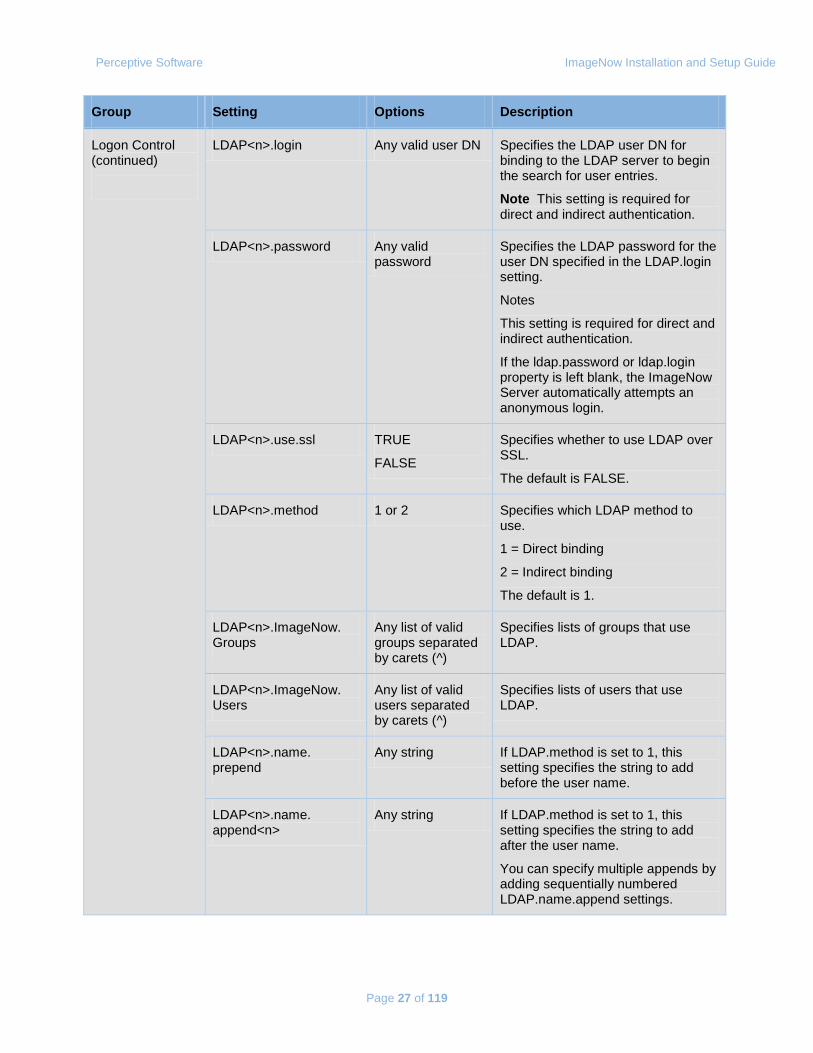
LDAP<n>.login Any valid user DN Specifies the LDAP user DN for binding to the LDAP server to begin the search for user entries.
Note This setting is required for direct and indirect authentication.
LDAP<n>.password Any valid password
Specifies the LDAP password for the user DN specified in the LDAP.login setting.
Notes
This setting is required for direct and indirect authentication.
If the ldap.password or ldap.login property is left blank, the ImageNow Server automatically attempts an anonymous login.
LDAP<n>.use.ssl TRUE
FALSE
Specifies whether to use LDAP over SSL.
The default is FALSE.
LDAP<n>.method 1 or 2 Specifies which LDAP method to use.
1 = Direct binding
2 = Indirect binding
The default is 1.
LDAP<n>.ImageNow. Groups
Any list of valid groups separated by carets (^)
Specifies lists of groups that use LDAP.
LDAP<n>.ImageNow. Users
Any list of valid users separated by carets (^)
Specifies lists of users that use LDAP.
LDAP<n>.name. prepend
Any string If LDAP.method is set to 1, this setting specifies the string to add before the user name.
LDAP<n>.name. append<n>
Any string If LDAP.method is set to 1, this setting specifies the string to add after the user name.
You can specify multiple appends by adding sequentially numbered LDAP.name.append settings.

Perceptive Software ImageNow Installation and Setup Guide
Page 28 of 119
Group Setting Options Description
Logon Control (continued)
LDAP<n>.base.dn Any valid DN Specifies the base or root DN of the LDAP server where you want the search to begin and search all its containers. For example, LDAP.base.dn="OU=Research and Development, DC=acme, DC=com".
LDAP<n>.login.attr Any valid attribute Specifies the LDAP user attribute you want to search for in the LDAP server. The search looks for this attribute whose value is the value entered in the ImageNow login. For example, LDAP.login.attr=sAMAccountName.
LDAP.ssl.cert.path Any valid directory Specifies the location of the LDAP SSL certificate.
The default is $(IMAGENOWDIR6)/etc.
auth.sql.query Any valid string If logon.method is set to SQL, this setting defines the SQL query string for authentication.
For example, "SELECT * FROM SQLAUTH WHERE LOGINNAME='[USERID]' AND PASSWORD='[PASSWORD]' AND USERSTATUS=1"[USERID] and [PASSWORD] will be replaced with the strings specified in auth.odbc.userid and auth.odbc.password.
Warning Do not use a "SELECT COUNT (*)...". This query must return one row if valid and no rows if invalid.
Perceptive Software ImageNow Installation and Setup Guide
Page 29 of 119
Group Setting Options Description
Logon Control (continued)
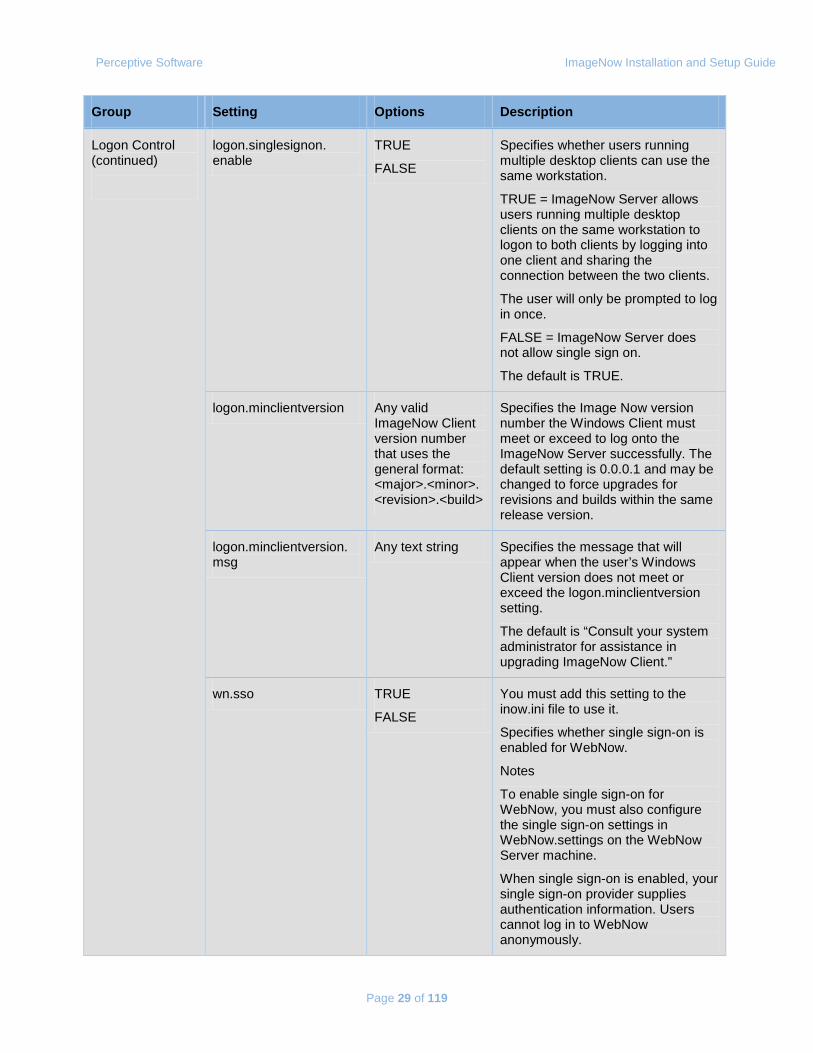
logon.singlesignon. enable
TRUE
FALSE
Specifies whether users running multiple desktop clients can use the same workstation.
TRUE = ImageNow Server allows users running multiple desktop clients on the same workstation to logon to both clients by logging into one client and sharing the connection between the two clients.
The user will only be prompted to log in once.
FALSE = ImageNow Server does not allow single sign on.
The default is TRUE.
logon.minclientversion Any valid ImageNow Client version number that uses the general format: <major>.<minor>.<revision>.<build>
Specifies the Image Now version number the Windows Client must meet or exceed to log onto the ImageNow Server successfully. The default setting is 0.0.0.1 and may be changed to force upgrades for revisions and builds within the same release version.
logon.minclientversion. msg
Any text string Specifies the message that will appear when the user’s Windows Client version does not meet or exceed the logon.minclientversion setting.
The default is “Consult your system administrator for assistance in upgrading ImageNow Client.”
wn.sso TRUE
FALSE
You must add this setting to the inow.ini file to use it.
Specifies whether single sign-on is enabled for WebNow.
Notes
To enable single sign-on for WebNow, you must also configure the single sign-on settings in WebNow.settings on the WebNow Server machine.
When single sign-on is enabled, your single sign-on provider supplies authentication information. Users cannot log in to WebNow anonymously.

Perceptive Software ImageNow Installation and Setup Guide
Page 30 of 119
Group Setting Options Description
Logon Control (continued)
wn.sso.key Any valid string You must add this setting to the inow.ini file to use it.
Specifies the token used when single sign-on is enabled for WebNow.
Message Queuing
mq.agent.ip.address Any valid IP address or DEFAULT
Specifies which network interface that Message Queuing Agent listens to for incoming connections. If you change this value to something other than DEFAULT, Message Queuing Agent monitors only the specified IP address.
The default is DEFAULT. This setting only takes effect if you do not use the message queuing override settings.
mq.agent.ip.port Any valid port Specifies the port ImageNow uses for messaging communications.
The default is 7200.
mq.reconnect.interval Any positive integer
Specifies how long, in seconds, ImageNow waits before reattempting to connect to Message Queuing Agent after a failed attempt.
The default is 60.
mq.agent.ip.general. override
Any valid IP address or DEFAULT
Specifies which IP address clients and agents use to connect to the Message Queuing Agent. If DEFAULT is specified then the value for mq.agent.ip.port is used. The default is DEFAULT.
Forms form.integration TRUE
FALSE
Specifies whether forms are enabled.
The default is TRUE.
OCR ocr.integration TRUE
FALSE
Specifies whether OCR is enabled.
The default is FALSE.
Data Capture data.capture. integration
TRUE
FALSE
Specifies whether DataCapture is enabled.
The default is FALSE.
Perceptive Software ImageNow Installation and Setup Guide
Page 31 of 119
Group Setting Options Description
Full Text
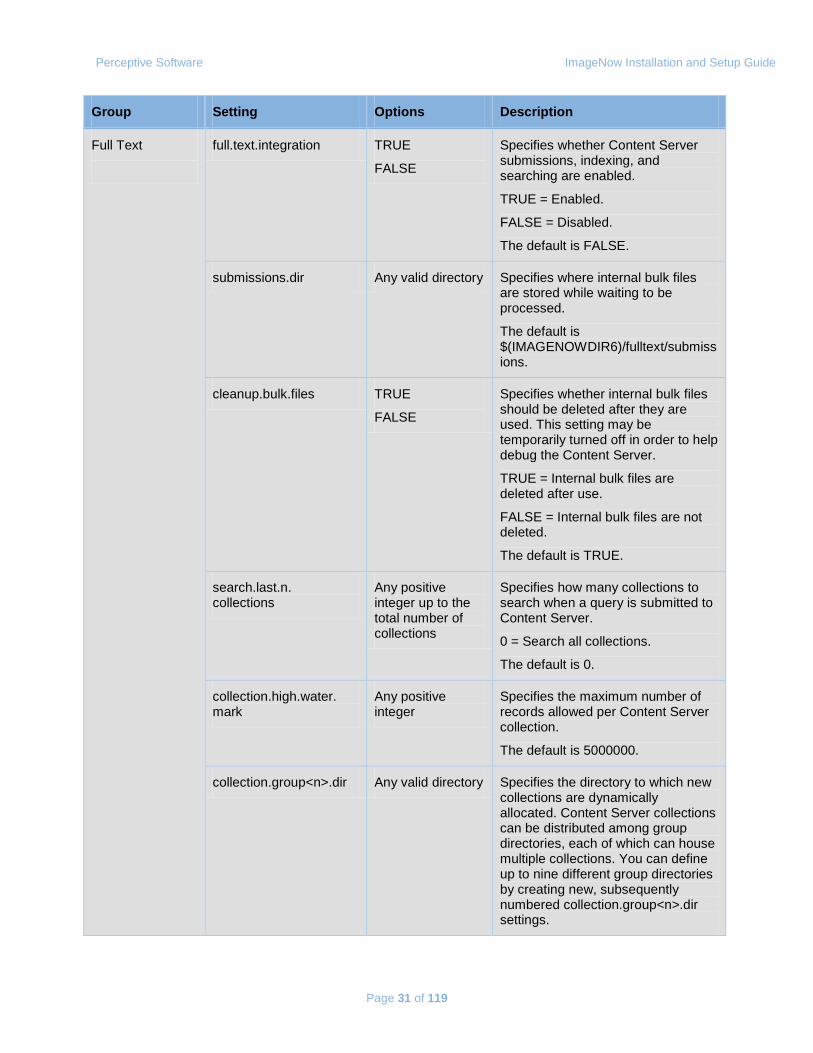
full.text.integration TRUE
FALSE
Specifies whether Content Server submissions, indexing, and searching are enabled.
TRUE = Enabled.
FALSE = Disabled.
The default is FALSE.
submissions.dir Any valid directory Specifies where internal bulk files are stored while waiting to be processed.
The default is $(IMAGENOWDIR6)/fulltext/submissions.
cleanup.bulk.files TRUE
FALSE
Specifies whether internal bulk files should be deleted after they are used. This setting may be temporarily turned off in order to help debug the Content Server.
TRUE = Internal bulk files are deleted after use.
FALSE = Internal bulk files are not deleted.
The default is TRUE.
search.last.n. collections
Any positive integer up to the total number of collections
Specifies how many collections to search when a query is submitted to Content Server.
0 = Search all collections.
The default is 0.
collection.high.water. mark
Any positive integer
Specifies the maximum number of records allowed per Content Server collection.
The default is 5000000.
collection.group<n>.dir Any valid directory Specifies the directory to which new collections are dynamically allocated. Content Server collections can be distributed among group directories, each of which can house multiple collections. You can define up to nine different group directories by creating new, subsequently numbered collection.group<n>.dir settings.
Perceptive Software ImageNow Installation and Setup Guide
Page 32 of 119
Group Setting Options Description
Full Text (continued)
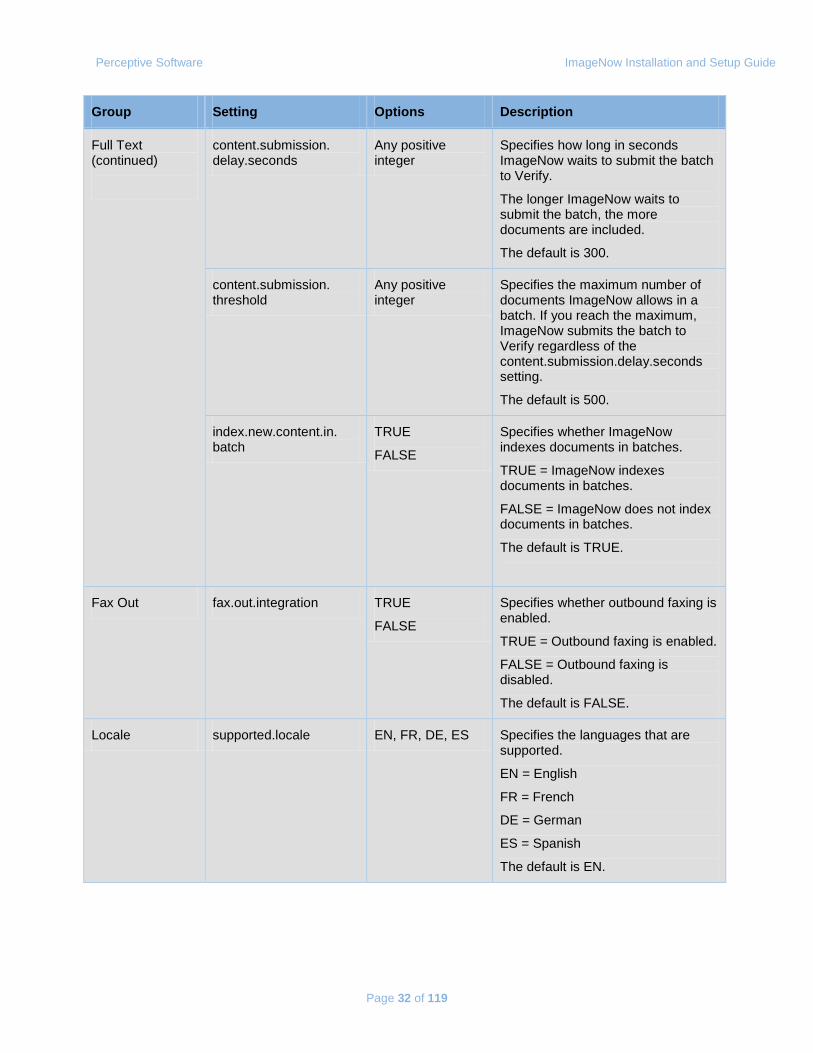
content.submission. delay.seconds
Any positive integer
Specifies how long in seconds ImageNow waits to submit the batch to Verify.
The longer ImageNow waits to submit the batch, the more documents are included.
The default is 300.
content.submission. threshold
Any positive integer
Specifies the maximum number of documents ImageNow allows in a batch. If you reach the maximum, ImageNow submits the batch to Verify regardless of the content.submission.delay.seconds setting.
The default is 500.
index.new.content.in. batch
TRUE
FALSE
Specifies whether ImageNow indexes documents in batches.
TRUE = ImageNow indexes documents in batches.
FALSE = ImageNow does not index documents in batches.
The default is TRUE.
Fax Out fax.out.integration TRUE
FALSE
Specifies whether outbound faxing is enabled.
TRUE = Outbound faxing is enabled.
FALSE = Outbound faxing is disabled.
The default is FALSE.
Locale supported.locale EN, FR, DE, ES Specifies the languages that are supported.
EN = English
FR = French
DE = German
ES = Spanish
The default is EN.
Perceptive Software ImageNow Installation and Setup Guide
Page 33 of 119
Group Setting Options Description
Audit
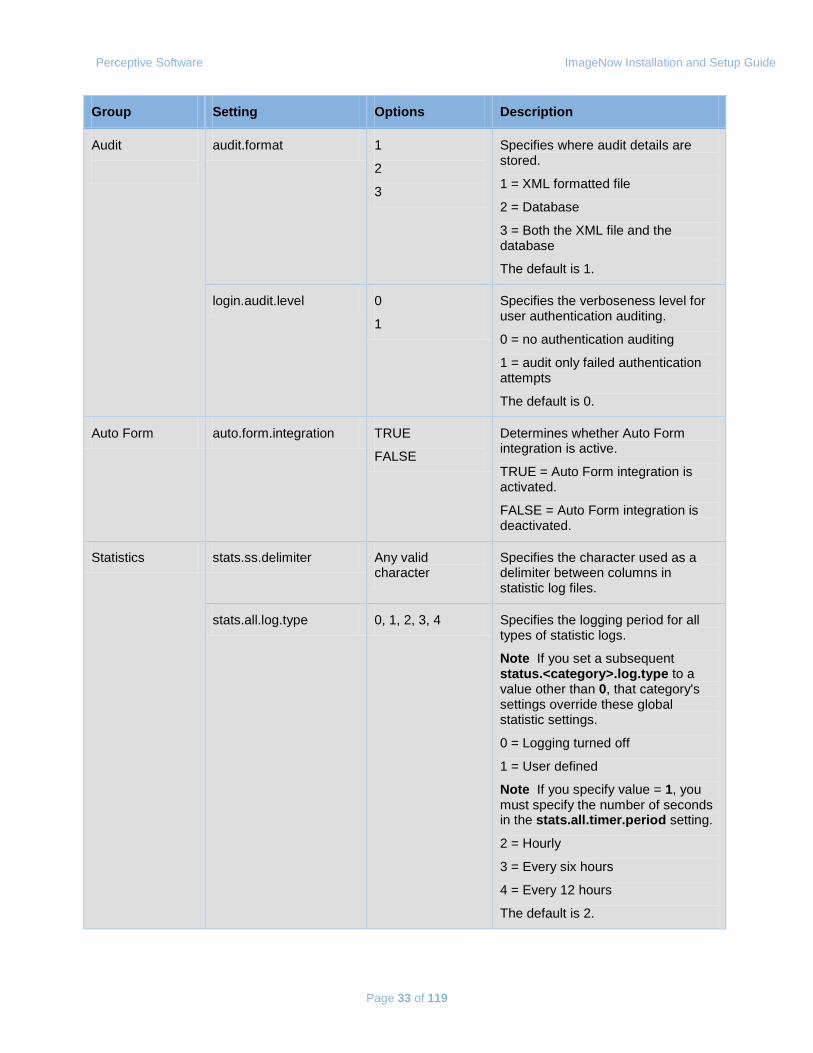
audit.format 1
2
3
Specifies where audit details are stored.
1 = XML formatted file
2 = Database
3 = Both the XML file and the database
The default is 1.
login.audit.level 0
1
Specifies the verboseness level for user authentication auditing.
0 = no authentication auditing
1 = audit only failed authentication attempts
The default is 0.
Auto Form auto.form.integration TRUE
FALSE
Determines whether Auto Form integration is active.
TRUE = Auto Form integration is activated.
FALSE = Auto Form integration is deactivated.
Statistics stats.ss.delimiter Any valid character
Specifies the character used as a delimiter between columns in statistic log files.
stats.all.log.type 0, 1, 2, 3, 4 Specifies the logging period for all types of statistic logs.
Note If you set a subsequent status.<category>.log.type to a value other than 0, that category's settings override these global statistic settings.
0 = Logging turned off
1 = User defined
Note If you specify value = 1, you must specify the number of seconds in the stats.all.timer.period setting.
2 = Hourly
3 = Every six hours
4 = Every 12 hours
The default is 2.
Perceptive Software ImageNow Installation and Setup Guide
Page 34 of 119
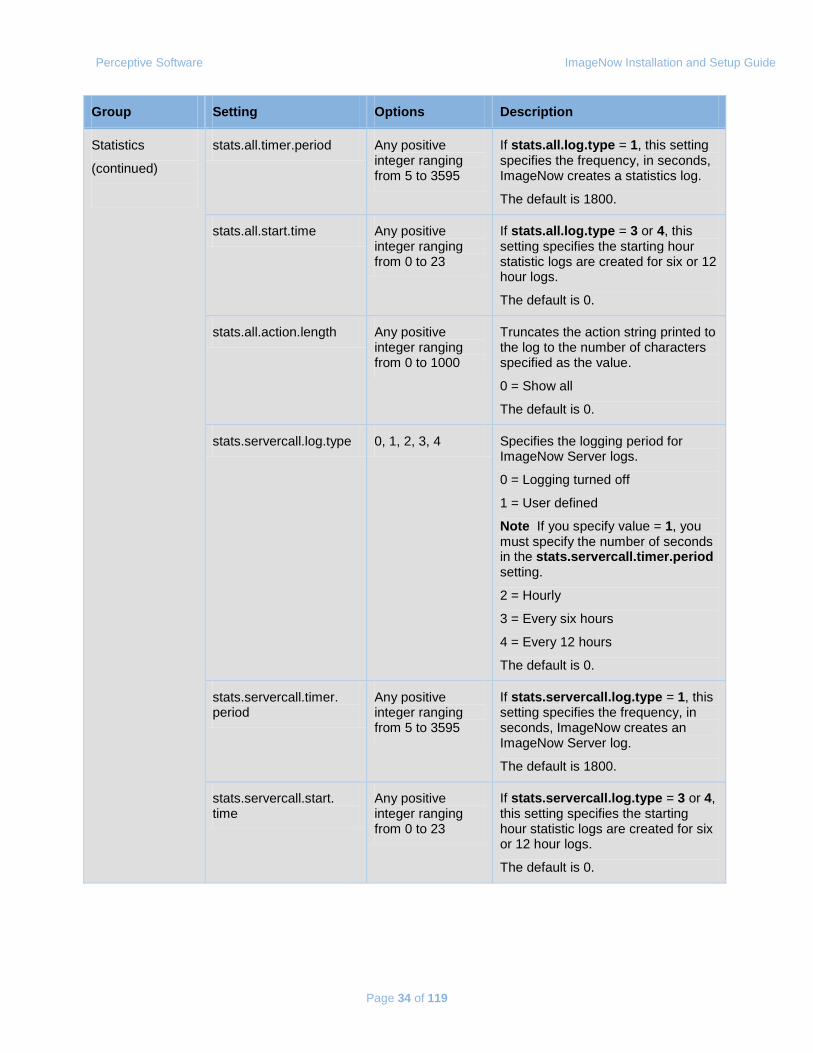
Group Setting Options Description
Statistics
(continued)
stats.all.timer.period Any positive integer ranging from 5 to 3595
If stats.all.log.type = 1, this setting specifies the frequency, in seconds, ImageNow creates a statistics log.
The default is 1800.
stats.all.start.time Any positive integer ranging from 0 to 23
If stats.all.log.type = 3 or 4, this setting specifies the starting hour statistic logs are created for six or 12 hour logs.
The default is 0.
stats.all.action.length Any positive integer ranging from 0 to 1000
Truncates the action string printed to the log to the number of characters specified as the value.
0 = Show all
The default is 0.
stats.servercall.log.type 0, 1, 2, 3, 4 Specifies the logging period for ImageNow Server logs.
0 = Logging turned off
1 = User defined
Note If you specify value = 1, you must specify the number of seconds in the stats.servercall.timer.period setting.
2 = Hourly
3 = Every six hours
4 = Every 12 hours
The default is 0.
stats.servercall.timer. period
Any positive integer ranging from 5 to 3595
If stats.servercall.log.type = 1, this setting specifies the frequency, in seconds, ImageNow creates an ImageNow Server log.
The default is 1800.
stats.servercall.start. time
Any positive integer ranging from 0 to 23
If stats.servercall.log.type = 3 or 4, this setting specifies the starting hour statistic logs are created for six or 12 hour logs.
The default is 0.
Perceptive Software ImageNow Installation and Setup Guide
Page 35 of 119
Group Setting Options Description
Statistics
(continued)
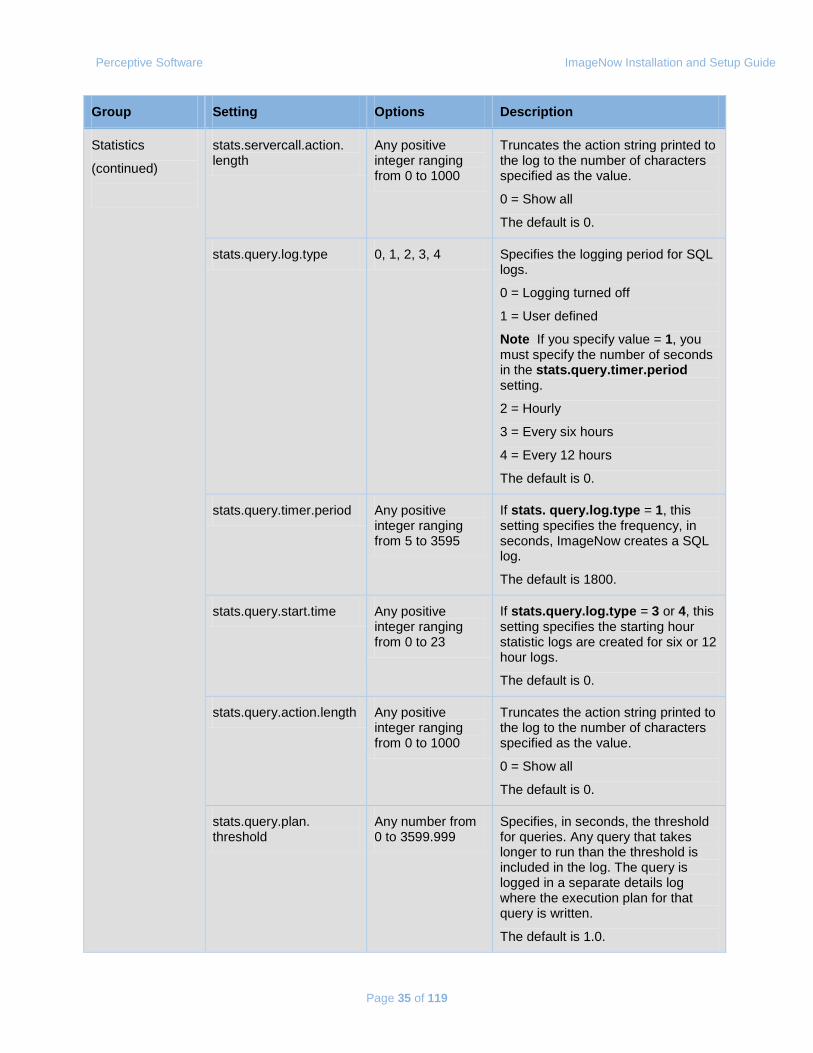
stats.servercall.action. length
Any positive integer ranging from 0 to 1000
Truncates the action string printed to the log to the number of characters specified as the value.
0 = Show all
The default is 0.
stats.query.log.type 0, 1, 2, 3, 4 Specifies the logging period for SQL logs.
0 = Logging turned off
1 = User defined
Note If you specify value = 1, you must specify the number of seconds in the stats.query.timer.period setting.
2 = Hourly
3 = Every six hours
4 = Every 12 hours
The default is 0.
stats.query.timer.period Any positive integer ranging from 5 to 3595
If stats. query.log.type = 1, this setting specifies the frequency, in seconds, ImageNow creates a SQL log.
The default is 1800.
stats.query.start.time Any positive integer ranging from 0 to 23
If stats.query.log.type = 3 or 4, this setting specifies the starting hour statistic logs are created for six or 12 hour logs.
The default is 0.
stats.query.action.length Any positive integer ranging from 0 to 1000
Truncates the action string printed to the log to the number of characters specified as the value.
0 = Show all
The default is 0.
stats.query.plan. threshold
Any number from 0 to 3599.999
Specifies, in seconds, the threshold for queries. Any query that takes longer to run than the threshold is included in the log. The query is logged in a separate details log where the execution plan for that query is written.
The default is 1.0.
Perceptive Software ImageNow Installation and Setup Guide
Page 36 of 119
Group Setting Options Description
Statistics
(continued)
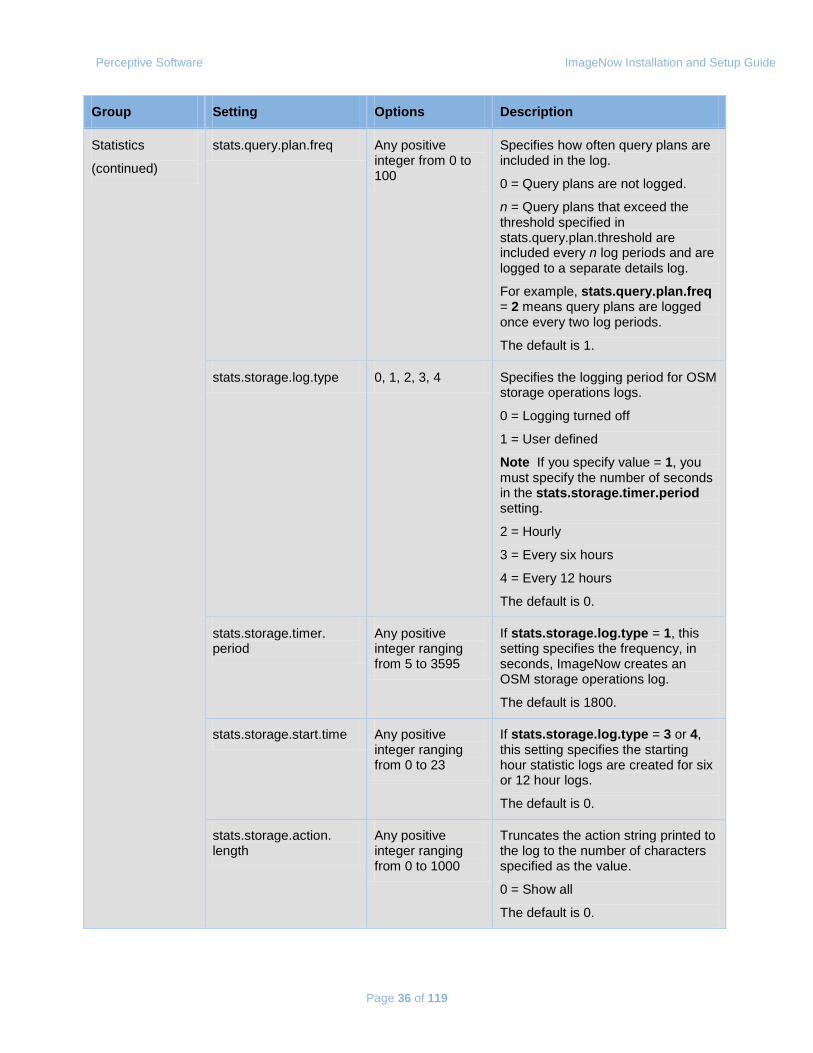
stats.query.plan.freq Any positive integer from 0 to 100
Specifies how often query plans are included in the log.
0 = Query plans are not logged.
n = Query plans that exceed the threshold specified in stats.query.plan.threshold are included every n log periods and are logged to a separate details log.
For example, stats.query.plan.freq = 2 means query plans are logged once every two log periods.
The default is 1.
stats.storage.log.type 0, 1, 2, 3, 4 Specifies the logging period for OSM storage operations logs.
0 = Logging turned off
1 = User defined
Note If you specify value = 1, you must specify the number of seconds in the stats.storage.timer.period setting.
2 = Hourly
3 = Every six hours
4 = Every 12 hours
The default is 0.
stats.storage.timer. period
Any positive integer ranging from 5 to 3595
If stats.storage.log.type = 1, this setting specifies the frequency, in seconds, ImageNow creates an OSM storage operations log.
The default is 1800.
stats.storage.start.time Any positive integer ranging from 0 to 23
If stats.storage.log.type = 3 or 4, this setting specifies the starting hour statistic logs are created for six or 12 hour logs.
The default is 0.
stats.storage.action. length
Any positive integer ranging from 0 to 1000
Truncates the action string printed to the log to the number of characters specified as the value.
0 = Show all
The default is 0.
Perceptive Software ImageNow Installation and Setup Guide
Page 37 of 119
Group Setting Options Description
Statistics
(continued)
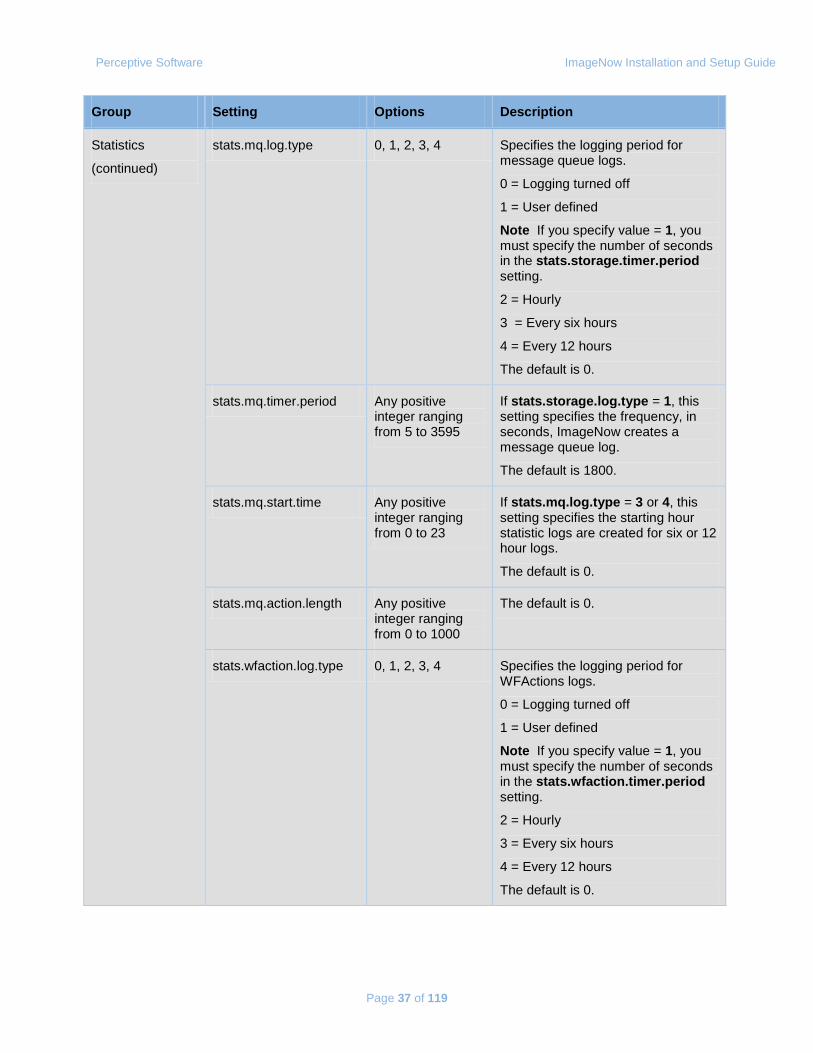
stats.mq.log.type 0, 1, 2, 3, 4 Specifies the logging period for message queue logs.
0 = Logging turned off
1 = User defined
Note If you specify value = 1, you must specify the number of seconds in the stats.storage.timer.period setting.
2 = Hourly
3 = Every six hours
4 = Every 12 hours
The default is 0.
stats.mq.timer.period Any positive integer ranging from 5 to 3595
If stats.storage.log.type = 1, this setting specifies the frequency, in seconds, ImageNow creates a message queue log.
The default is 1800.
stats.mq.start.time Any positive integer ranging from 0 to 23
If stats.mq.log.type = 3 or 4, this setting specifies the starting hour statistic logs are created for six or 12 hour logs.
The default is 0.
stats.mq.action.length Any positive integer ranging from 0 to 1000
The default is 0.
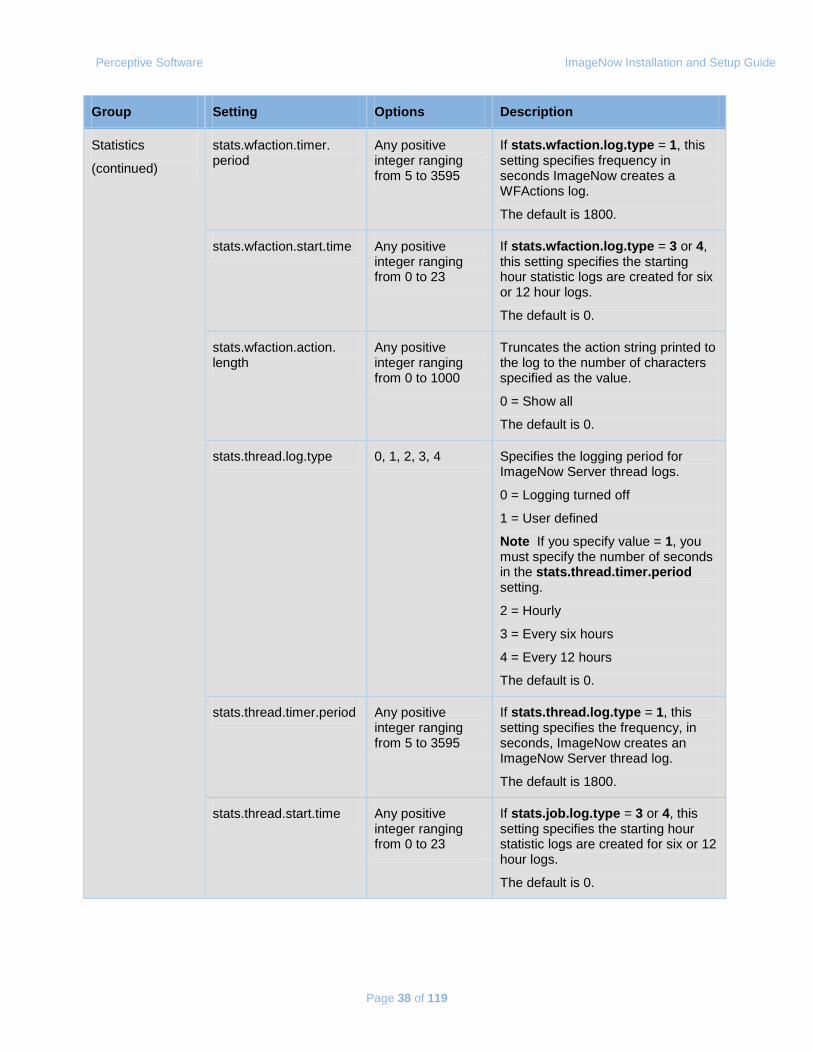
stats.wfaction.log.type 0, 1, 2, 3, 4 Specifies the logging period for WFActions logs.
0 = Logging turned off
1 = User defined
Note If you specify value = 1, you must specify the number of seconds in the stats.wfaction.timer.period setting.
2 = Hourly
3 = Every six hours
4 = Every 12 hours
The default is 0.
Perceptive Software ImageNow Installation and Setup Guide
Page 38 of 119
Group Setting Options Description
Statistics
(continued)
stats.wfaction.timer. period
Any positive integer ranging from 5 to 3595
If stats.wfaction.log.type = 1, this setting specifies frequency in seconds ImageNow creates a WFActions log.
The default is 1800.
stats.wfaction.start.time Any positive integer ranging from 0 to 23
If stats.wfaction.log.type = 3 or 4, this setting specifies the starting hour statistic logs are created for six or 12 hour logs.
The default is 0.
stats.wfaction.action. length
Any positive integer ranging from 0 to 1000
Truncates the action string printed to the log to the number of characters specified as the value.
0 = Show all
The default is 0.
stats.thread.log.type 0, 1, 2, 3, 4 Specifies the logging period for ImageNow Server thread logs.
0 = Logging turned off
1 = User defined
Note If you specify value = 1, you must specify the number of seconds in the stats.thread.timer.period setting.
2 = Hourly
3 = Every six hours
4 = Every 12 hours
The default is 0.
stats.thread.timer.period Any positive integer ranging from 5 to 3595
If stats.thread.log.type = 1, this setting specifies the frequency, in seconds, ImageNow creates an ImageNow Server thread log.
The default is 1800.
stats.thread.start.time Any positive integer ranging from 0 to 23
If stats.job.log.type = 3 or 4, this setting specifies the starting hour statistic logs are created for six or 12 hour logs.
The default is 0.
Perceptive Software ImageNow Installation and Setup Guide
Page 39 of 119
Group Setting Options Description
Statistics
(continued)
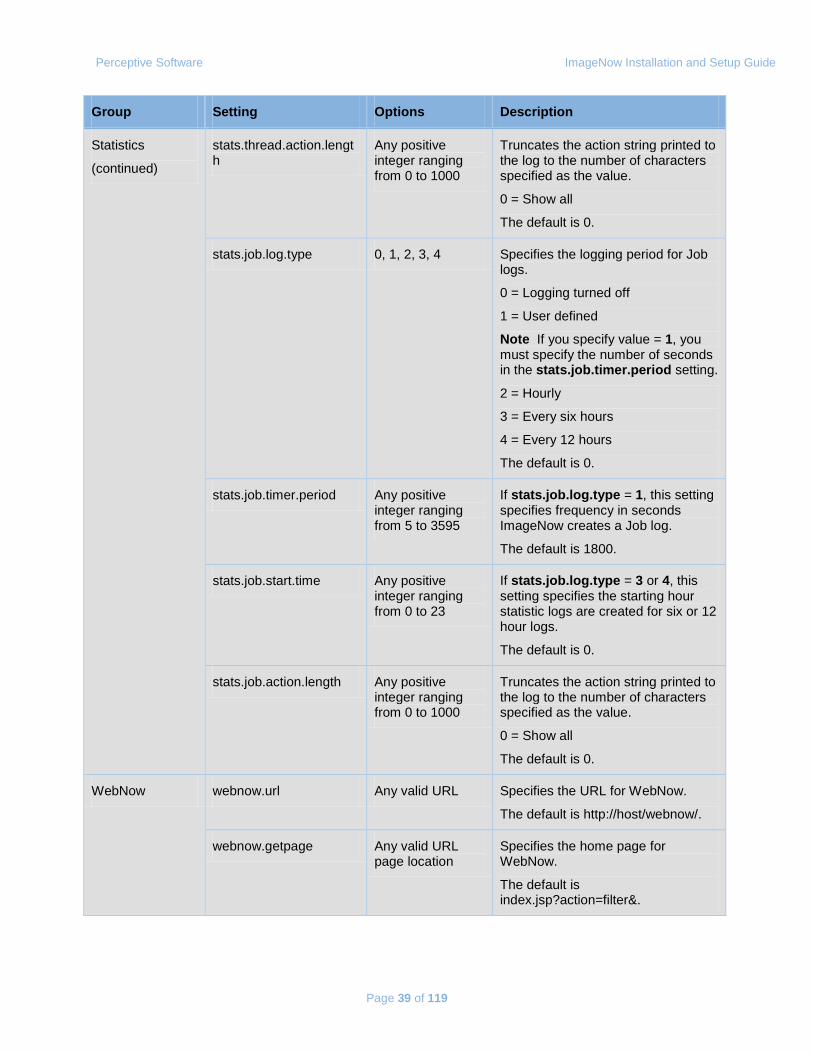
stats.thread.action.length
Any positive integer ranging from 0 to 1000
Truncates the action string printed to the log to the number of characters specified as the value.
0 = Show all
The default is 0.
stats.job.log.type 0, 1, 2, 3, 4 Specifies the logging period for Job logs.
0 = Logging turned off
1 = User defined
Note If you specify value = 1, you must specify the number of seconds in the stats.job.timer.period setting.
2 = Hourly
3 = Every six hours
4 = Every 12 hours
The default is 0.
stats.job.timer.period Any positive integer ranging from 5 to 3595
If stats.job.log.type = 1, this setting specifies frequency in seconds ImageNow creates a Job log.
The default is 1800.
stats.job.start.time Any positive integer ranging from 0 to 23
If stats.job.log.type = 3 or 4, this setting specifies the starting hour statistic logs are created for six or 12 hour logs.
The default is 0.
stats.job.action.length Any positive integer ranging from 0 to 1000
Truncates the action string printed to the log to the number of characters specified as the value.
0 = Show all
The default is 0.
WebNow webnow.url Any valid URL Specifies the URL for WebNow.
The default is http://host/webnow/.
webnow.getpage Any valid URL page location
Specifies the home page for WebNow.
The default is index.jsp?action=filter&.
Perceptive Software ImageNow Installation and Setup Guide
Page 40 of 119
Group Setting Options Description
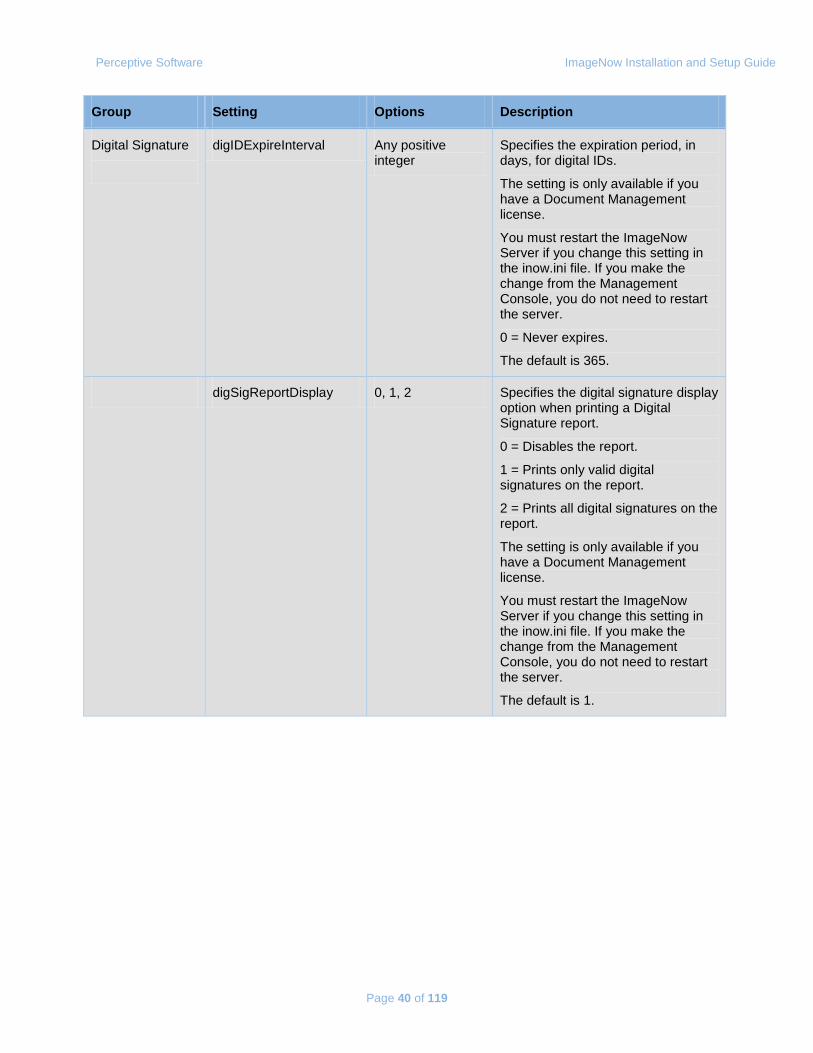
Digital Signature
digIDExpireInterval Any positive integer
Specifies the expiration period, in days, for digital IDs.
The setting is only available if you have a Document Management license.
You must restart the ImageNow Server if you change this setting in the inow.ini file. If you make the change from the Management Console, you do not need to restart the server.
0 = Never expires.
The default is 365.
digSigReportDisplay 0, 1, 2 Specifies the digital signature display option when printing a Digital Signature report.
0 = Disables the report.
1 = Prints only valid digital signatures on the report.
2 = Prints all digital signatures on the report.
The setting is only available if you have a Document Management license.
You must restart the ImageNow Server if you change this setting in the inow.ini file. If you make the change from the Management Console, you do not need to restart the server.
The default is 1.
Perceptive Software ImageNow Installation and Setup Guide
Page 41 of 119
Group Setting Options Description
Digital Signature (continued)
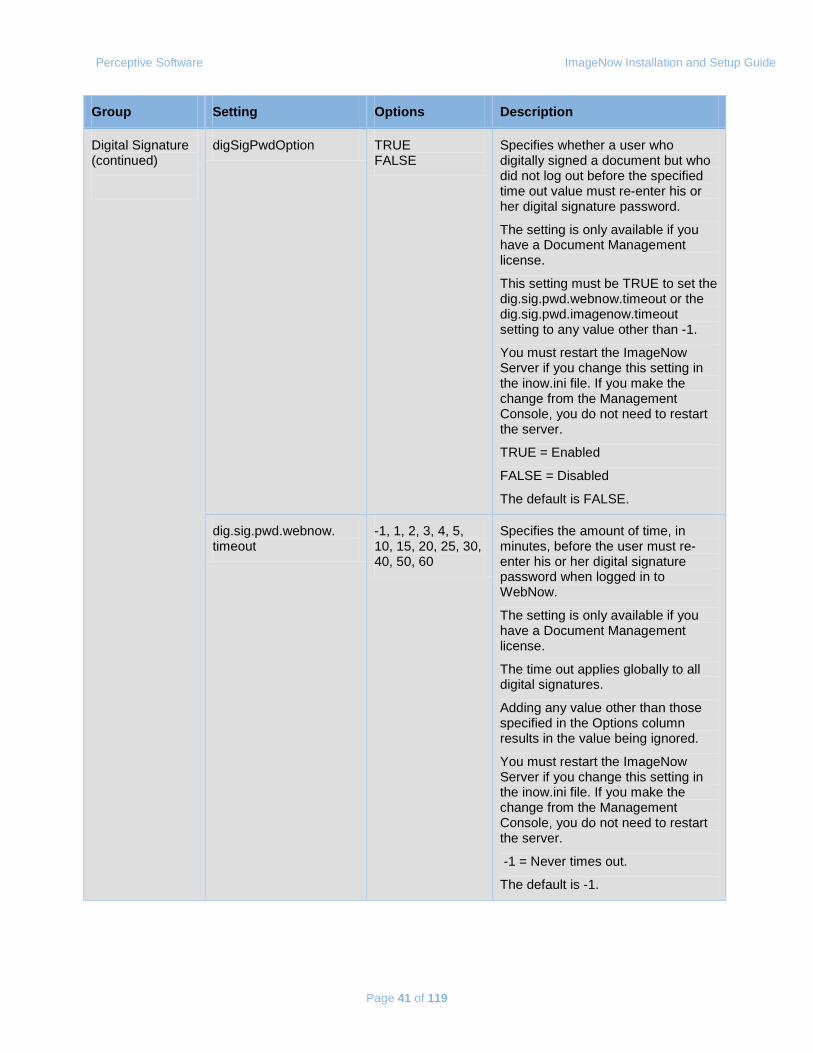
digSigPwdOption TRUE FALSE
Specifies whether a user who digitally signed a document but who did not log out before the specified time out value must re-enter his or her digital signature password.
The setting is only available if you have a Document Management license.
This setting must be TRUE to set the dig.sig.pwd.webnow.timeout or the dig.sig.pwd.imagenow.timeout setting to any value other than -1.
You must restart the ImageNow Server if you change this setting in the inow.ini file. If you make the change from the Management Console, you do not need to restart the server.
TRUE = Enabled
FALSE = Disabled
The default is FALSE.
dig.sig.pwd.webnow. timeout
-1, 1, 2, 3, 4, 5, 10, 15, 20, 25, 30, 40, 50, 60
Specifies the amount of time, in minutes, before the user must re-enter his or her digital signature password when logged in to WebNow.
The setting is only available if you have a Document Management license.
The time out applies globally to all digital signatures.
Adding any value other than those specified in the Options column results in the value being ignored.
You must restart the ImageNow Server if you change this setting in the inow.ini file. If you make the change from the Management Console, you do not need to restart the server.
-1 = Never times out.
The default is -1.
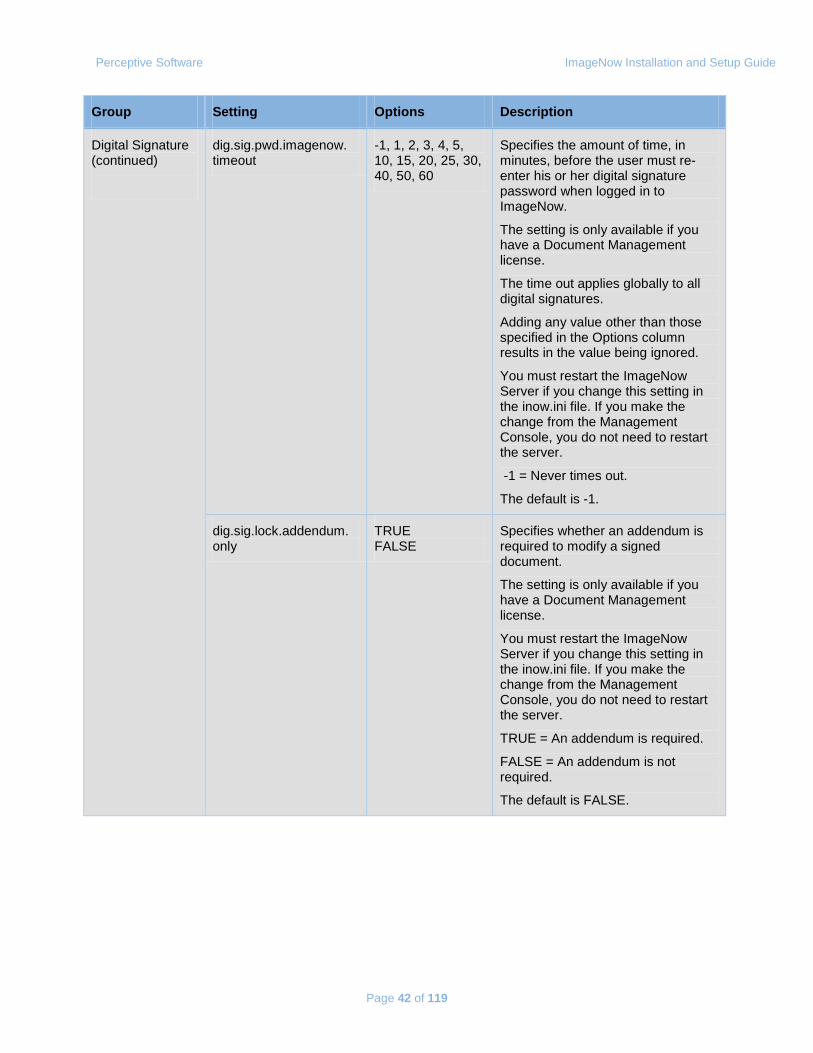
Perceptive Software ImageNow Installation and Setup Guide
Page 42 of 119
Group Setting Options Description
Digital Signature (continued)
dig.sig.pwd.imagenow. timeout
-1, 1, 2, 3, 4, 5, 10, 15, 20, 25, 30, 40, 50, 60
Specifies the amount of time, in minutes, before the user must re-enter his or her digital signature password when logged in to ImageNow.
The setting is only available if you have a Document Management license.
The time out applies globally to all digital signatures.
Adding any value other than those specified in the Options column results in the value being ignored.
You must restart the ImageNow Server if you change this setting in the inow.ini file. If you make the change from the Management Console, you do not need to restart the server.
-1 = Never times out.
The default is -1.
dig.sig.lock.addendum. only
TRUE FALSE
Specifies whether an addendum is required to modify a signed document.
The setting is only available if you have a Document Management license.
You must restart the ImageNow Server if you change this setting in the inow.ini file. If you make the change from the Management Console, you do not need to restart the server.
TRUE = An addendum is required.
FALSE = An addendum is not required.
The default is FALSE.
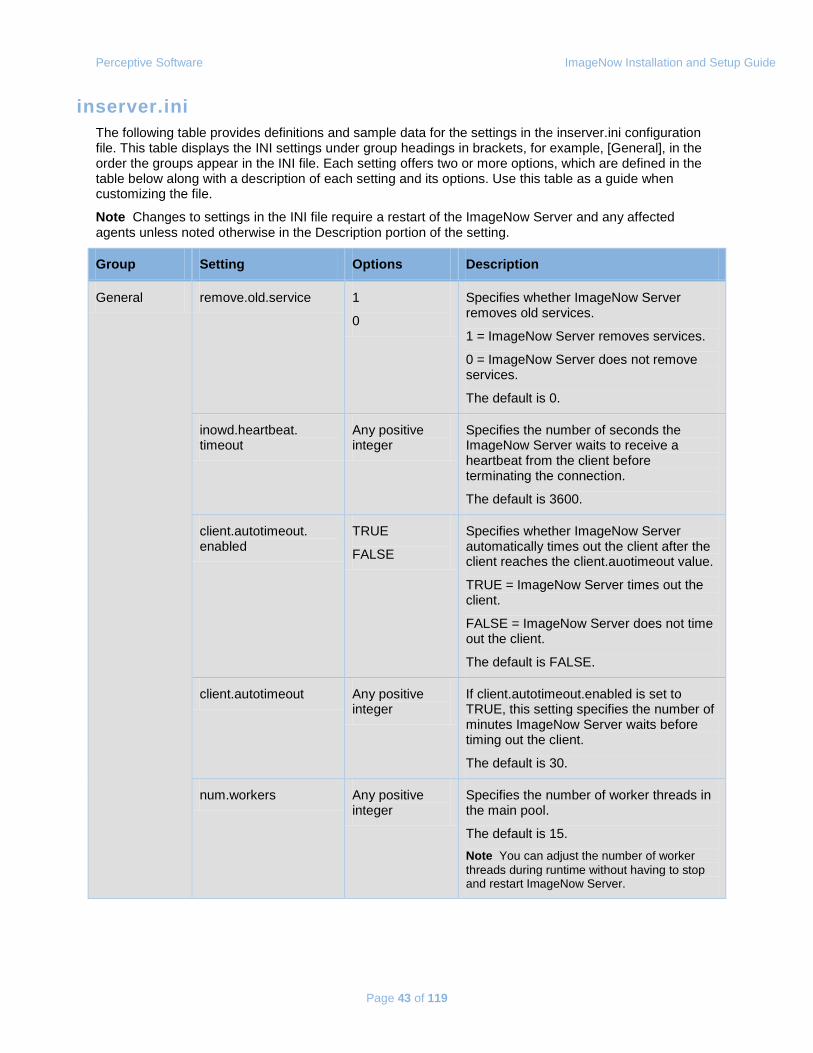
Perceptive Software ImageNow Installation and Setup Guide
Page 43 of 119
inserver.ini The following table provides definitions and sample data for the settings in the inserver.ini configuration file. This table displays the INI settings under group headings in brackets, for example, [General], in the order the groups appear in the INI file. Each setting offers two or more options, which are defined in the table below along with a description of each setting and its options. Use this table as a guide when customizing the file.
Note Changes to settings in the INI file require a restart of the ImageNow Server and any affected agents unless noted otherwise in the Description portion of the setting.
Group Setting Options Description
General remove.old.service 1
0
Specifies whether ImageNow Server removes old services.
1 = ImageNow Server removes services.
0 = ImageNow Server does not remove services.
The default is 0.
inowd.heartbeat. timeout
Any positive integer
Specifies the number of seconds the ImageNow Server waits to receive a heartbeat from the client before terminating the connection.
The default is 3600.
client.autotimeout. enabled
TRUE
FALSE
Specifies whether ImageNow Server automatically times out the client after the client reaches the client.auotimeout value.
TRUE = ImageNow Server times out the client.
FALSE = ImageNow Server does not time out the client.
The default is FALSE.
client.autotimeout Any positive integer
If client.autotimeout.enabled is set to TRUE, this setting specifies the number of minutes ImageNow Server waits before timing out the client.
The default is 30.
num.workers Any positive integer
Specifies the number of worker threads in the main pool.
The default is 15. Note You can adjust the number of worker threads during runtime without having to stop and restart ImageNow Server.
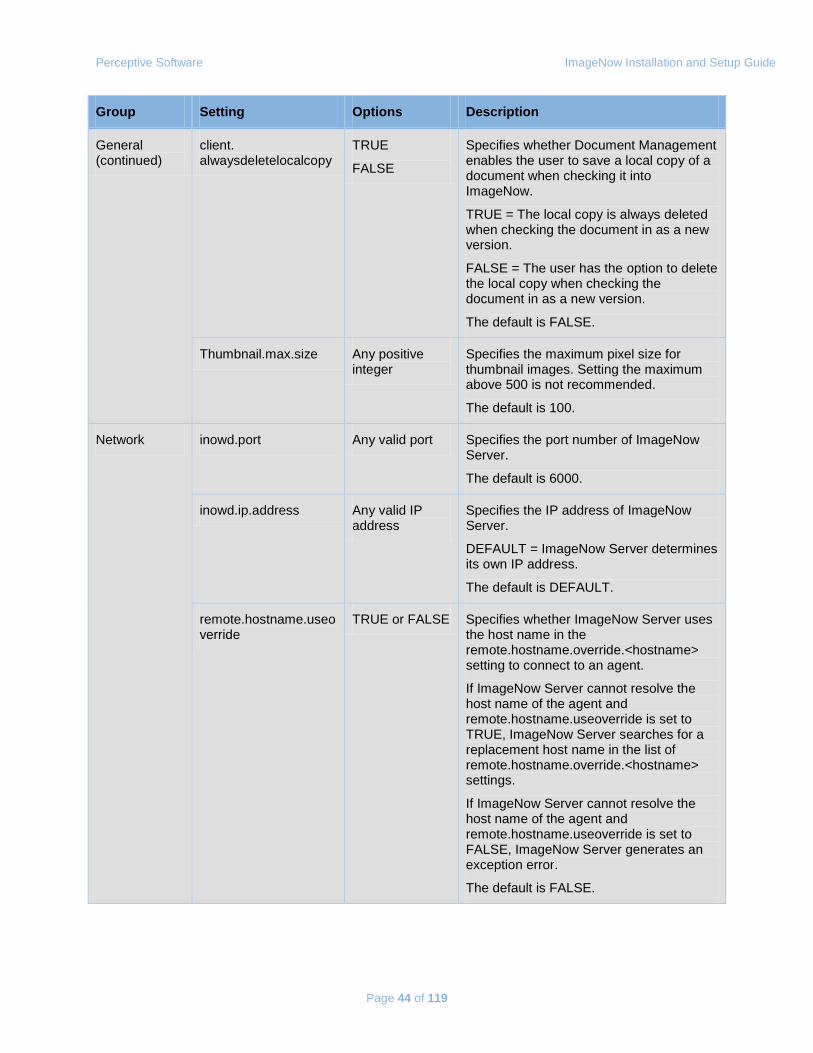
Perceptive Software ImageNow Installation and Setup Guide
Page 44 of 119
Group Setting Options Description
General (continued)
client. alwaysdeletelocalcopy
TRUE
FALSE
Specifies whether Document Management enables the user to save a local copy of a document when checking it into ImageNow.
TRUE = The local copy is always deleted when checking the document in as a new version.
FALSE = The user has the option to delete the local copy when checking the document in as a new version.
The default is FALSE.
Thumbnail.max.size Any positive integer
Specifies the maximum pixel size for thumbnail images. Setting the maximum above 500 is not recommended.
The default is 100.
Network inowd.port Any valid port Specifies the port number of ImageNow Server.
The default is 6000.
inowd.ip.address Any valid IP address
Specifies the IP address of ImageNow Server.
DEFAULT = ImageNow Server determines its own IP address.
The default is DEFAULT.
remote.hostname.useoverride
TRUE or FALSE Specifies whether ImageNow Server uses the host name in the remote.hostname.override.<hostname> setting to connect to an agent.
If ImageNow Server cannot resolve the host name of the agent and remote.hostname.useoverride is set to TRUE, ImageNow Server searches for a replacement host name in the list of remote.hostname.override.<hostname> settings.
If ImageNow Server cannot resolve the host name of the agent and remote.hostname.useoverride is set to FALSE, ImageNow Server generates an exception error.
The default is FALSE.
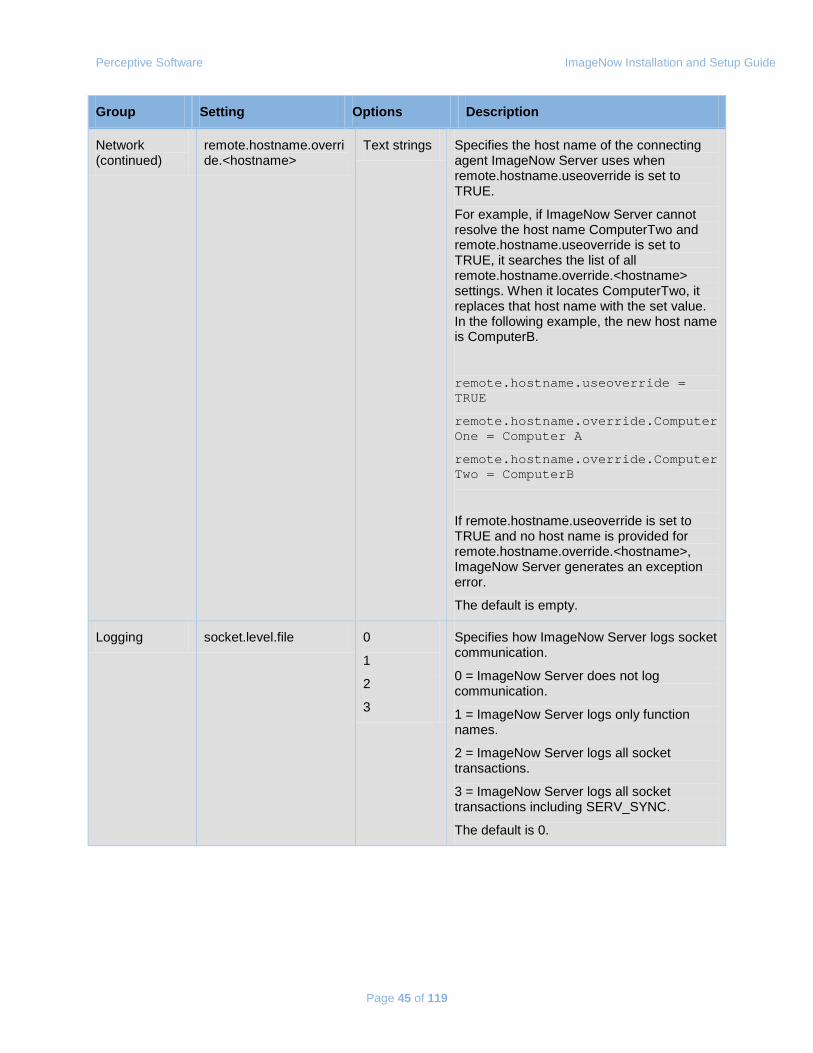
Perceptive Software ImageNow Installation and Setup Guide
Page 45 of 119
Group Setting Options Description
Network (continued)
remote.hostname.override.<hostname>
Text strings Specifies the host name of the connecting agent ImageNow Server uses when remote.hostname.useoverride is set to TRUE.
For example, if ImageNow Server cannot resolve the host name ComputerTwo and remote.hostname.useoverride is set to TRUE, it searches the list of all remote.hostname.override.<hostname> settings. When it locates ComputerTwo, it replaces that host name with the set value. In the following example, the new host name is ComputerB.
remote.hostname.useoverride = TRUE
remote.hostname.override.ComputerOne = Computer A
remote.hostname.override.ComputerTwo = ComputerB
If remote.hostname.useoverride is set to TRUE and no host name is provided for remote.hostname.override.<hostname>, ImageNow Server generates an exception error.
The default is empty.
Logging socket.level.file 0
1
2
3
Specifies how ImageNow Server logs socket communication.
0 = ImageNow Server does not log communication.
1 = ImageNow Server logs only function names.
2 = ImageNow Server logs all socket transactions.
3 = ImageNow Server logs all socket transactions including SERV_SYNC.
The default is 0.
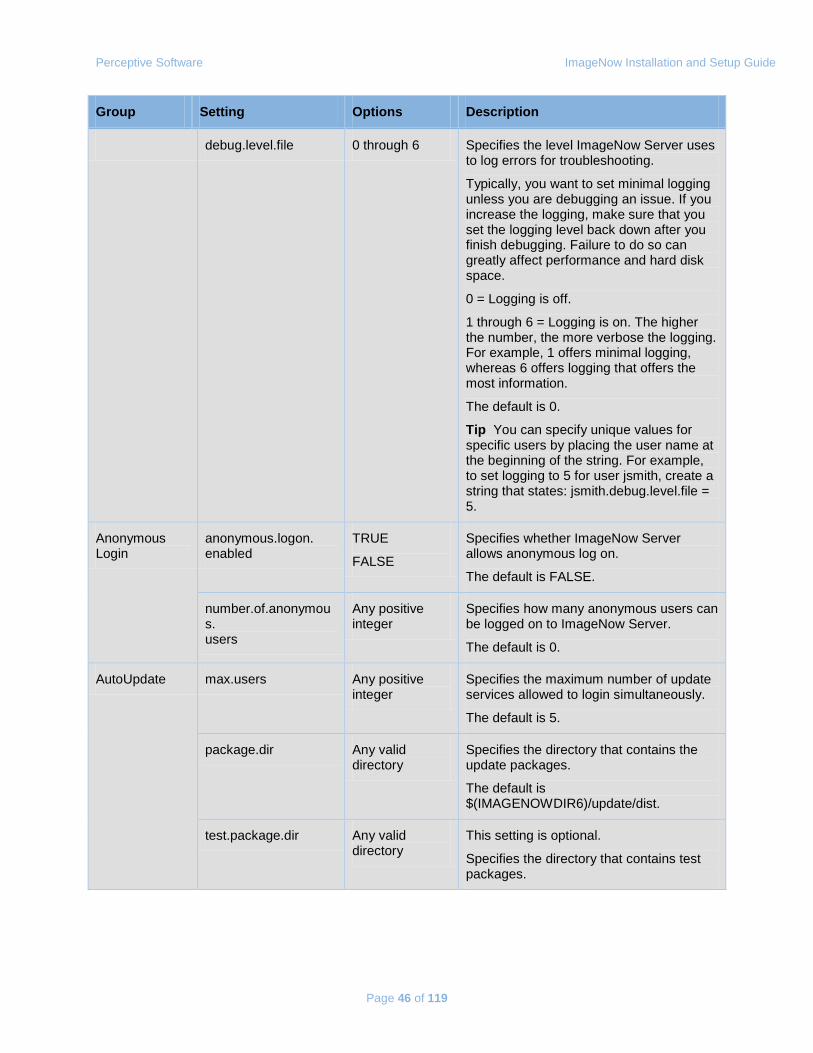
Perceptive Software ImageNow Installation and Setup Guide
Page 46 of 119
Group Setting Options Description
debug.level.file 0 through 6 Specifies the level ImageNow Server uses to log errors for troubleshooting.
Typically, you want to set minimal logging unless you are debugging an issue. If you increase the logging, make sure that you set the logging level back down after you finish debugging. Failure to do so can greatly affect performance and hard disk space.
0 = Logging is off.
1 through 6 = Logging is on. The higher the number, the more verbose the logging. For example, 1 offers minimal logging, whereas 6 offers logging that offers the most information.
The default is 0.
Tip You can specify unique values for specific users by placing the user name at the beginning of the string. For example, to set logging to 5 for user jsmith, create a string that states: jsmith.debug.level.file = 5.
Anonymous Login
anonymous.logon. enabled
TRUE
FALSE
Specifies whether ImageNow Server allows anonymous log on.
The default is FALSE.
number.of.anonymous. users
Any positive integer
Specifies how many anonymous users can be logged on to ImageNow Server.
The default is 0.
AutoUpdate max.users Any positive integer
Specifies the maximum number of update services allowed to login simultaneously.
The default is 5.
package.dir Any valid directory
Specifies the directory that contains the update packages.
The default is $(IMAGENOWDIR6)/update/dist.
test.package.dir Any valid directory
This setting is optional.
Specifies the directory that contains test packages.
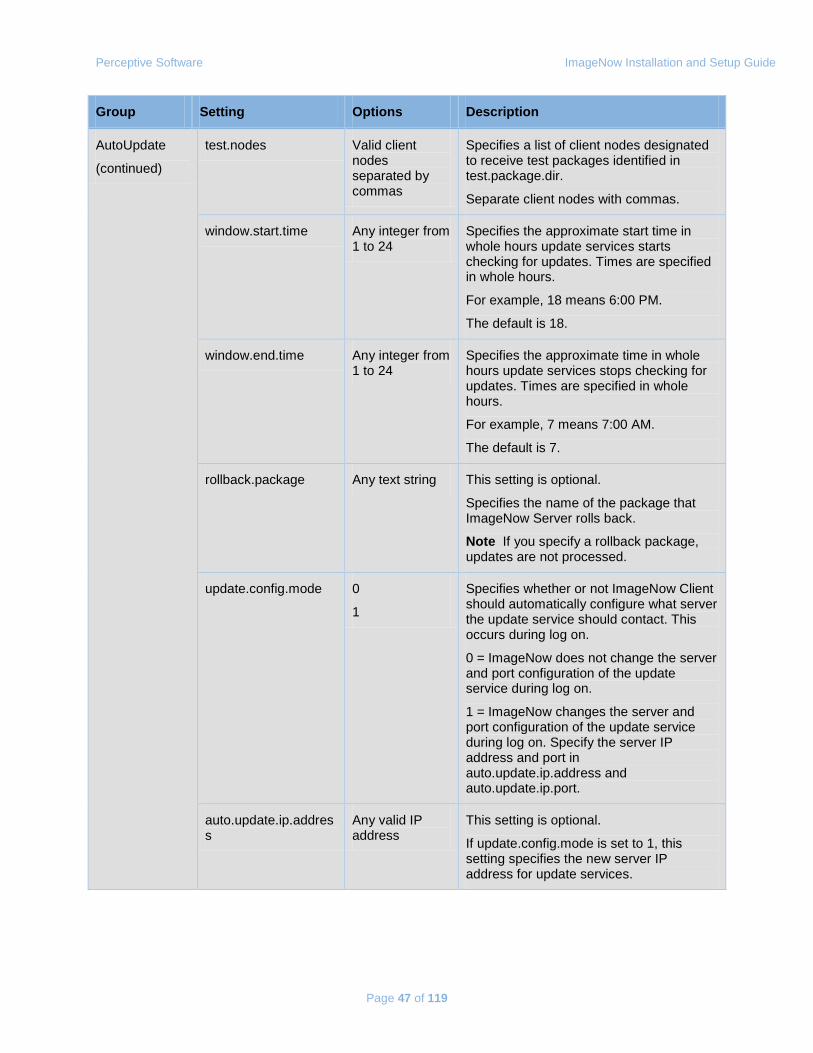
Perceptive Software ImageNow Installation and Setup Guide
Page 47 of 119
Group Setting Options Description
AutoUpdate
(continued)
test.nodes Valid client nodes separated by commas
Specifies a list of client nodes designated to receive test packages identified in test.package.dir.
Separate client nodes with commas.
window.start.time Any integer from 1 to 24
Specifies the approximate start time in whole hours update services starts checking for updates. Times are specified in whole hours.
For example, 18 means 6:00 PM.
The default is 18.
window.end.time Any integer from 1 to 24
Specifies the approximate time in whole hours update services stops checking for updates. Times are specified in whole hours.
For example, 7 means 7:00 AM.
The default is 7.
rollback.package Any text string This setting is optional.
Specifies the name of the package that ImageNow Server rolls back.
Note If you specify a rollback package, updates are not processed.
update.config.mode 0
1
Specifies whether or not ImageNow Client should automatically configure what server the update service should contact. This occurs during log on.
0 = ImageNow does not change the server and port configuration of the update service during log on.
1 = ImageNow changes the server and port configuration of the update service during log on. Specify the server IP address and port in auto.update.ip.address and auto.update.ip.port.
auto.update.ip.address
Any valid IP address
This setting is optional.
If update.config.mode is set to 1, this setting specifies the new server IP address for update services.
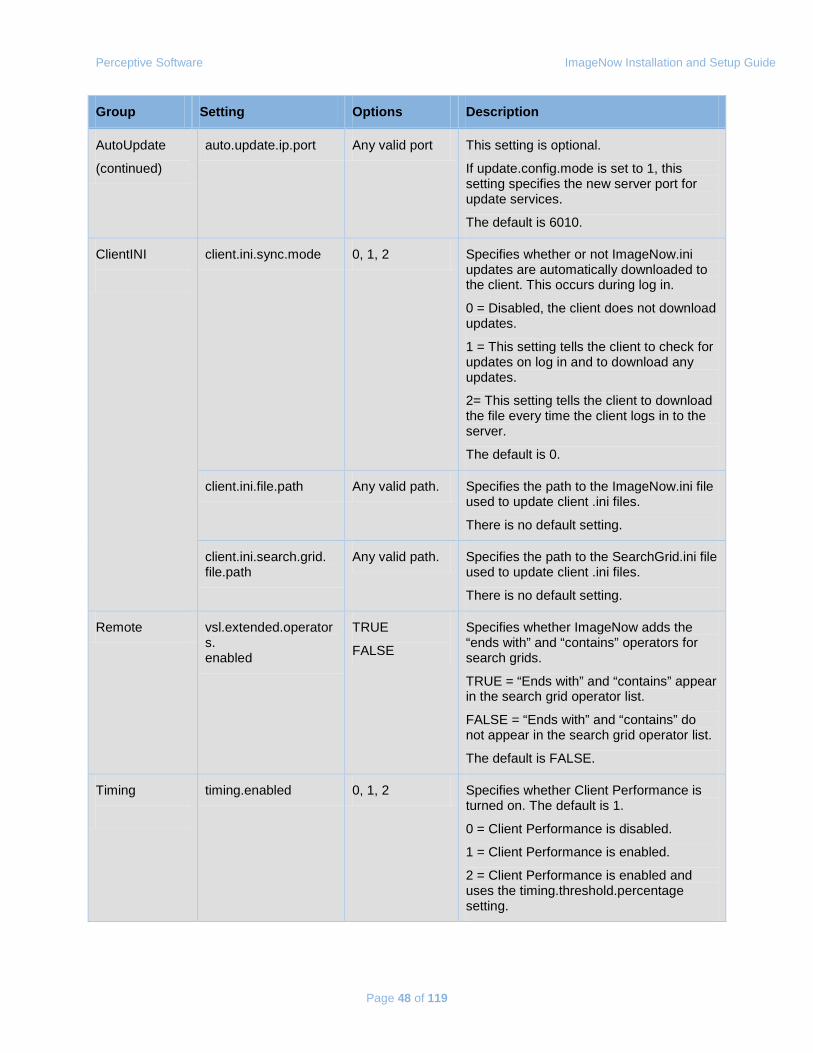
Perceptive Software ImageNow Installation and Setup Guide
Page 48 of 119
Group Setting Options Description
AutoUpdate
(continued)
auto.update.ip.port Any valid port This setting is optional.
If update.config.mode is set to 1, this setting specifies the new server port for update services.
The default is 6010.
ClientINI
client.ini.sync.mode 0, 1, 2 Specifies whether or not ImageNow.ini updates are automatically downloaded to the client. This occurs during log in.
0 = Disabled, the client does not download updates.
1 = This setting tells the client to check for updates on log in and to download any updates.
2= This setting tells the client to download the file every time the client logs in to the server.
The default is 0.
client.ini.file.path Any valid path. Specifies the path to the ImageNow.ini file used to update client .ini files.
There is no default setting.
client.ini.search.grid. file.path
Any valid path. Specifies the path to the SearchGrid.ini file used to update client .ini files.
There is no default setting.
Remote vsl.extended.operators. enabled
TRUE
FALSE
Specifies whether ImageNow adds the “ends with” and “contains” operators for search grids.
TRUE = “Ends with” and “contains” appear in the search grid operator list.
FALSE = “Ends with” and “contains” do not appear in the search grid operator list.
The default is FALSE.
Timing
timing.enabled 0, 1, 2 Specifies whether Client Performance is turned on. The default is 1.
0 = Client Performance is disabled.
1 = Client Performance is enabled.
2 = Client Performance is enabled and uses the timing.threshold.percentage setting.
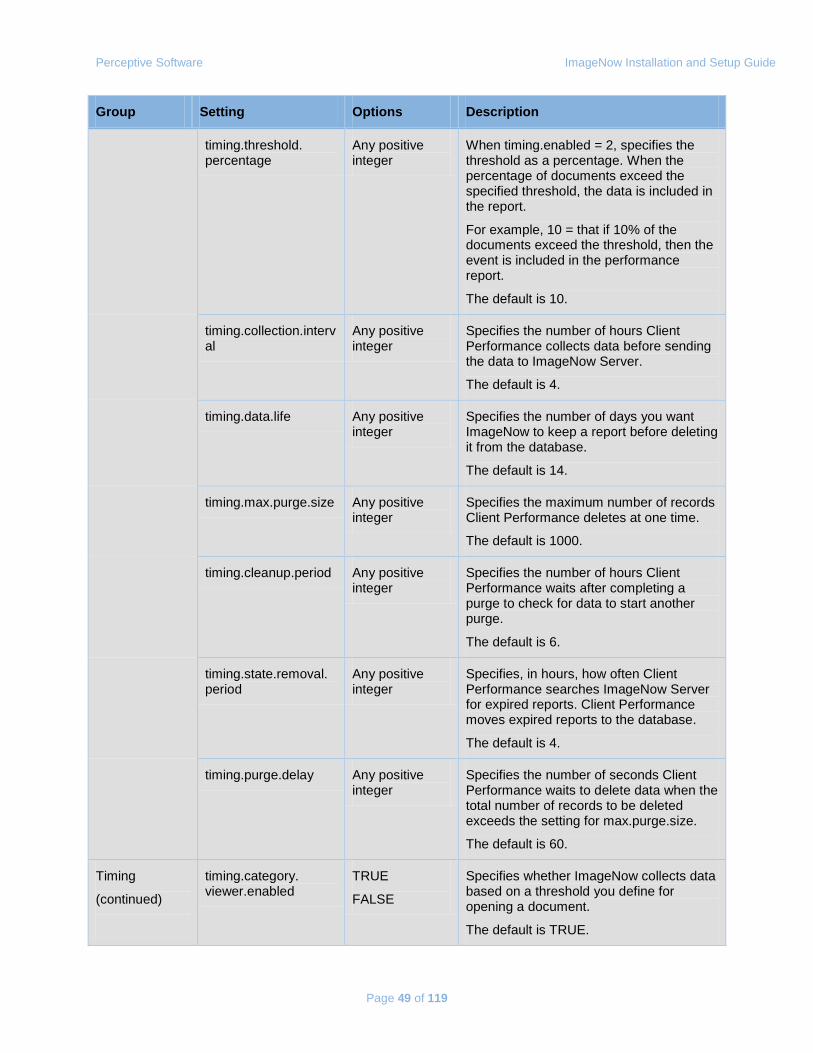
Perceptive Software ImageNow Installation and Setup Guide
Page 49 of 119
Group Setting Options Description
timing.threshold. percentage
Any positive integer
When timing.enabled = 2, specifies the threshold as a percentage. When the percentage of documents exceed the specified threshold, the data is included in the report.
For example, 10 = that if 10% of the documents exceed the threshold, then the event is included in the performance report.
The default is 10.
timing.collection.interval
Any positive integer
Specifies the number of hours Client Performance collects data before sending the data to ImageNow Server.
The default is 4.
timing.data.life Any positive integer
Specifies the number of days you want ImageNow to keep a report before deleting it from the database.
The default is 14.
timing.max.purge.size Any positive integer
Specifies the maximum number of records Client Performance deletes at one time.
The default is 1000.
timing.cleanup.period Any positive integer
Specifies the number of hours Client Performance waits after completing a purge to check for data to start another purge.
The default is 6.
timing.state.removal. period
Any positive integer
Specifies, in hours, how often Client Performance searches ImageNow Server for expired reports. Client Performance moves expired reports to the database.
The default is 4.
timing.purge.delay Any positive integer
Specifies the number of seconds Client Performance waits to delete data when the total number of records to be deleted exceeds the setting for max.purge.size.
The default is 60.
Timing
(continued)
timing.category. viewer.enabled
TRUE
FALSE
Specifies whether ImageNow collects data based on a threshold you define for opening a document.
The default is TRUE.
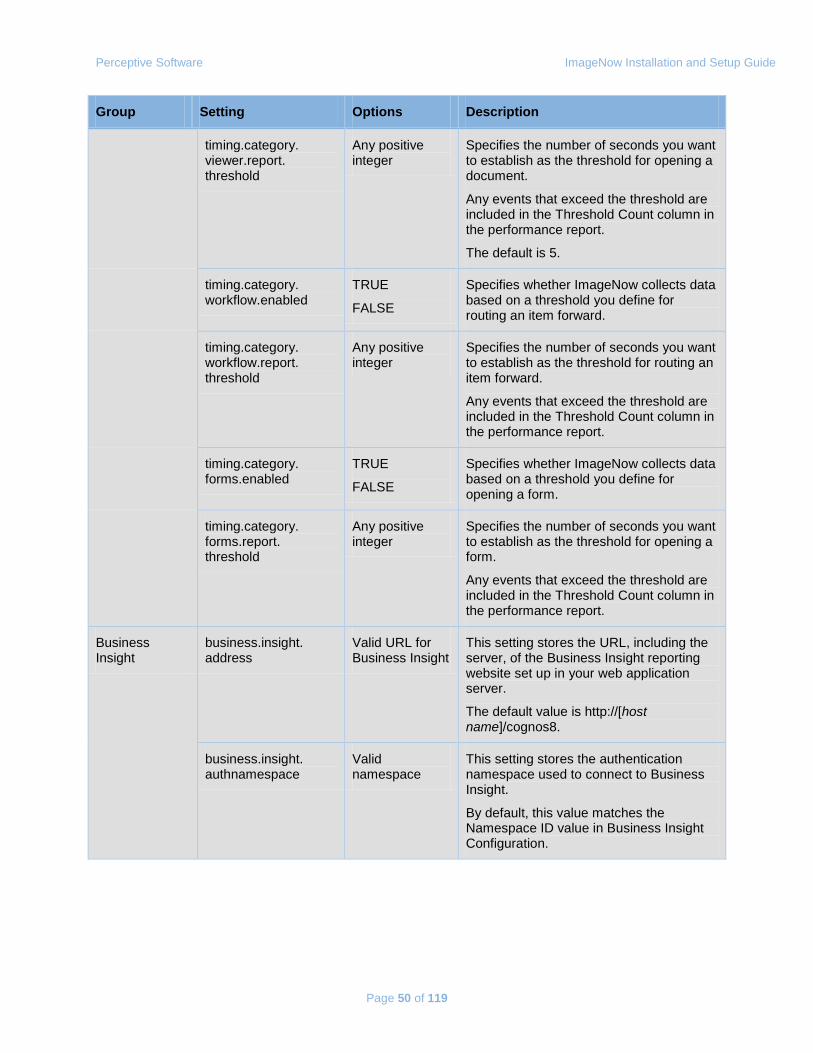
Perceptive Software ImageNow Installation and Setup Guide
Page 50 of 119
Group Setting Options Description
timing.category. viewer.report. threshold
Any positive integer
Specifies the number of seconds you want to establish as the threshold for opening a document.
Any events that exceed the threshold are included in the Threshold Count column in the performance report.
The default is 5.
timing.category. workflow.enabled
TRUE
FALSE
Specifies whether ImageNow collects data based on a threshold you define for routing an item forward.
timing.category. workflow.report. threshold
Any positive integer
Specifies the number of seconds you want to establish as the threshold for routing an item forward.
Any events that exceed the threshold are included in the Threshold Count column in the performance report.
timing.category. forms.enabled
TRUE
FALSE
Specifies whether ImageNow collects data based on a threshold you define for opening a form.
timing.category. forms.report. threshold
Any positive integer
Specifies the number of seconds you want to establish as the threshold for opening a form.
Any events that exceed the threshold are included in the Threshold Count column in the performance report.
Business Insight
business.insight. address
Valid URL for Business Insight
This setting stores the URL, including the server, of the Business Insight reporting website set up in your web application server.
The default value is http://[host name]/cognos8.
business.insight. authnamespace
Valid namespace
This setting stores the authentication namespace used to connect to Business Insight.
By default, this value matches the Namespace ID value in Business Insight Configuration.

Perceptive Software ImageNow Installation and Setup Guide
Page 51 of 119
inserverAlarm.ini The following table provides definitions and sample data for the settings in the inserverAlarm.ini configuration file. This table displays the INI settings under group headings in brackets, for example, [General], in the order the groups appear in the INI file. Each setting offers two or more options, which are defined in the table below along with a description of each setting and its options. Use this table as a guide when customizing the file.
Note Changes to settings in the INI file require a restart of the ImageNow Server and any affected agents unless noted otherwise in the Description portion of the setting.
Group Setting Options Description
General remove.old.service 1
0
Specifies whether Alarm Agent removes old services.
1 = Alarm Agent removes services.
0 = Alarm Agent does not remove services.
The default is 0.
polling.interval Any positive integer
Specifies how often, in seconds, Alarm Agent searches for new alarms.
Note Do not change this value without first consulting Perceptive Software Product Support.
The default is 15.
Modem comm.port Any valid port Specifies the port Alarm Agents uses to connect to the modem.
The default is COM1.
baud.rate Any positive integer
Specifies the baud rate of the modem.
The default is 9600.
Email smtp.server Any valid IP address or server name of an SMTP server
Specifies the SMTP server Alarm Agent uses for e-mail alarms.
The default is localhost.
port Any valid port Specifies the e-mail server port.
The default is 25.
queue.email.link 0, 1, 2 Specifies the link type to send in queue alarm emails.
0 = Include an ImageNow link.
1 = Include a WebNow URL link.
2 = Include ImageNow and WebNow link types
The default is 0.
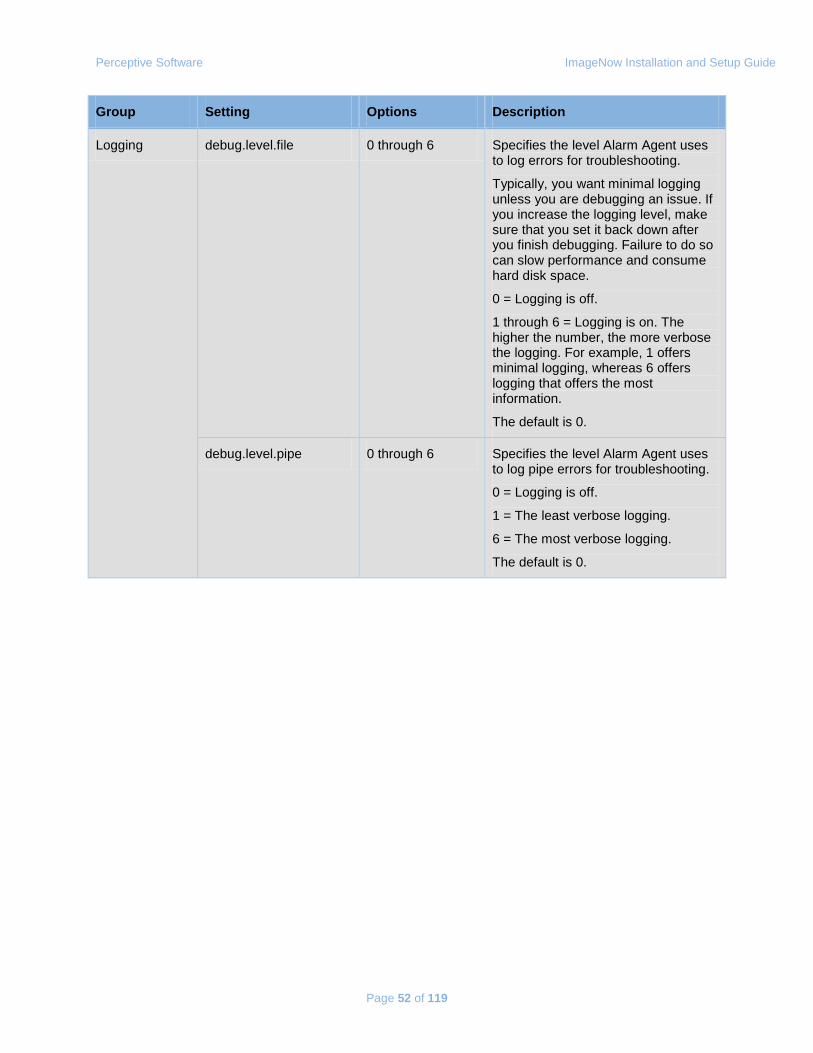
Perceptive Software ImageNow Installation and Setup Guide
Page 52 of 119
Group Setting Options Description
Logging debug.level.file 0 through 6 Specifies the level Alarm Agent uses to log errors for troubleshooting.
Typically, you want minimal logging unless you are debugging an issue. If you increase the logging level, make sure that you set it back down after you finish debugging. Failure to do so can slow performance and consume hard disk space.
0 = Logging is off.
1 through 6 = Logging is on. The higher the number, the more verbose the logging. For example, 1 offers minimal logging, whereas 6 offers logging that offers the most information.
The default is 0.
debug.level.pipe 0 through 6 Specifies the level Alarm Agent uses to log pipe errors for troubleshooting.
0 = Logging is off.
1 = The least verbose logging.
6 = The most verbose logging.
The default is 0.
Perceptive Software ImageNow Installation and Setup Guide
Page 53 of 119
inserverBatch.ini The following table provides definitions and sample data for the settings in the inserverBatch.ini configuration file. This table displays the INI settings under group headings in brackets, for example, [General], in the order the groups appear in the INI file. Each setting offers two or more options, which are defined in the table below along with a description of each setting and its options. Use this table as a guide when customizing the file.
Note Changes to settings in the INI file require a restart of the ImageNow Server and any affected agents unless noted otherwise in the Description portion of the setting.
Group Setting Options Description
General poll.interval Any positive integer
Specifies how often, in seconds, the Batch Agent searches for new batches.
Note Do not change this value without first consulting Perceptive Software Product Support.
The default is 1.
number.of.server.agents Any positive integer
Specifies the number of Batch Agents.
The default is 1.
pause.between. transactions
Any positive integer
Specifies, in milliseconds, how long Batch Agent pauses between pages when processing a batch.
The default is 100.
barcode.fail.to.queue. enabled
TRUE
FALSE
Specifies whether Batch Agent can fail a batch with an unverified barcode.
TRUE = Batch Agent can fail a batch with unverified barcodes.
FALSE = Batch Agent does not fail unverified barcodes.
The default is FALSE.
submit.to.content.server TRUE
FALSE
Specifies whether full-text searching is enabled for batches.
TRUE = Full-text searching is enabled.
FALSE = Full-text searching is disabled.
The default is FALSE.
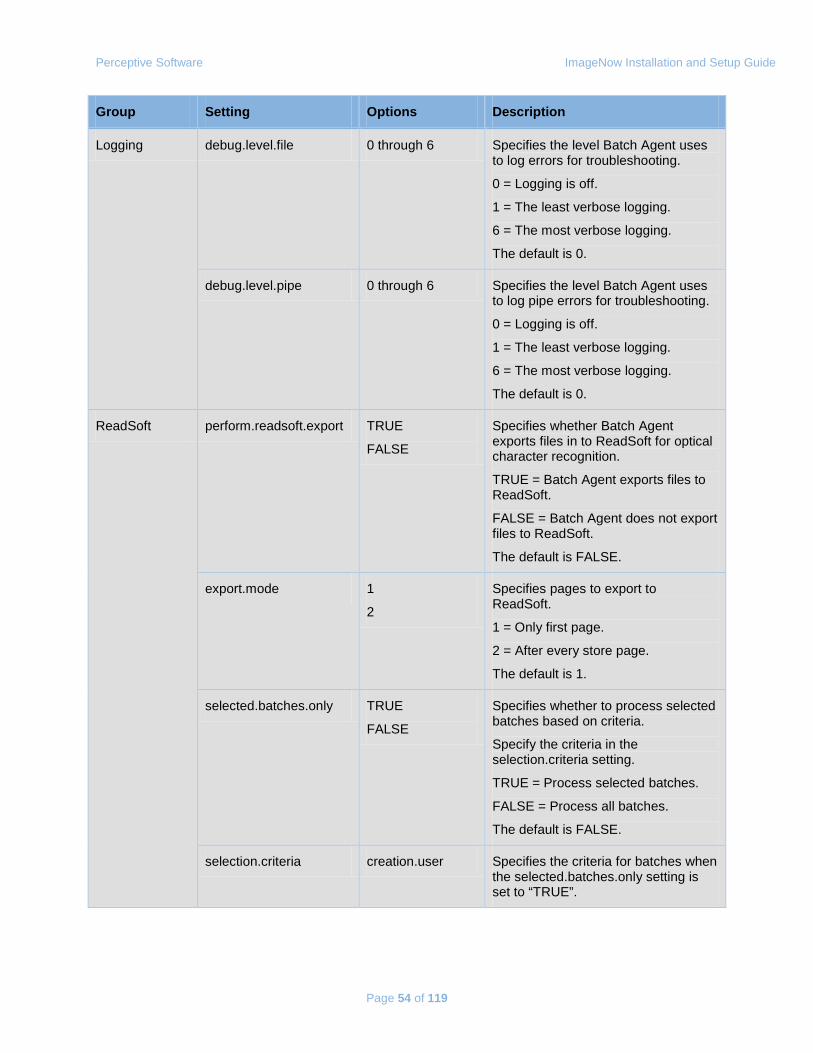
Perceptive Software ImageNow Installation and Setup Guide
Page 54 of 119
Group Setting Options Description
Logging debug.level.file 0 through 6 Specifies the level Batch Agent uses to log errors for troubleshooting.
0 = Logging is off.
1 = The least verbose logging.
6 = The most verbose logging.
The default is 0.
debug.level.pipe 0 through 6 Specifies the level Batch Agent uses to log pipe errors for troubleshooting.
0 = Logging is off.
1 = The least verbose logging.
6 = The most verbose logging.
The default is 0.
ReadSoft perform.readsoft.export TRUE
FALSE
Specifies whether Batch Agent exports files in to ReadSoft for optical character recognition.
TRUE = Batch Agent exports files to ReadSoft.
FALSE = Batch Agent does not export files to ReadSoft.
The default is FALSE.
export.mode 1
2
Specifies pages to export to ReadSoft.
1 = Only first page.
2 = After every store page.
The default is 1.
selected.batches.only TRUE
FALSE
Specifies whether to process selected batches based on criteria.
Specify the criteria in the selection.criteria setting.
TRUE = Process selected batches.
FALSE = Process all batches.
The default is FALSE.
selection.criteria creation.user Specifies the criteria for batches when the selected.batches.only setting is set to “TRUE”.
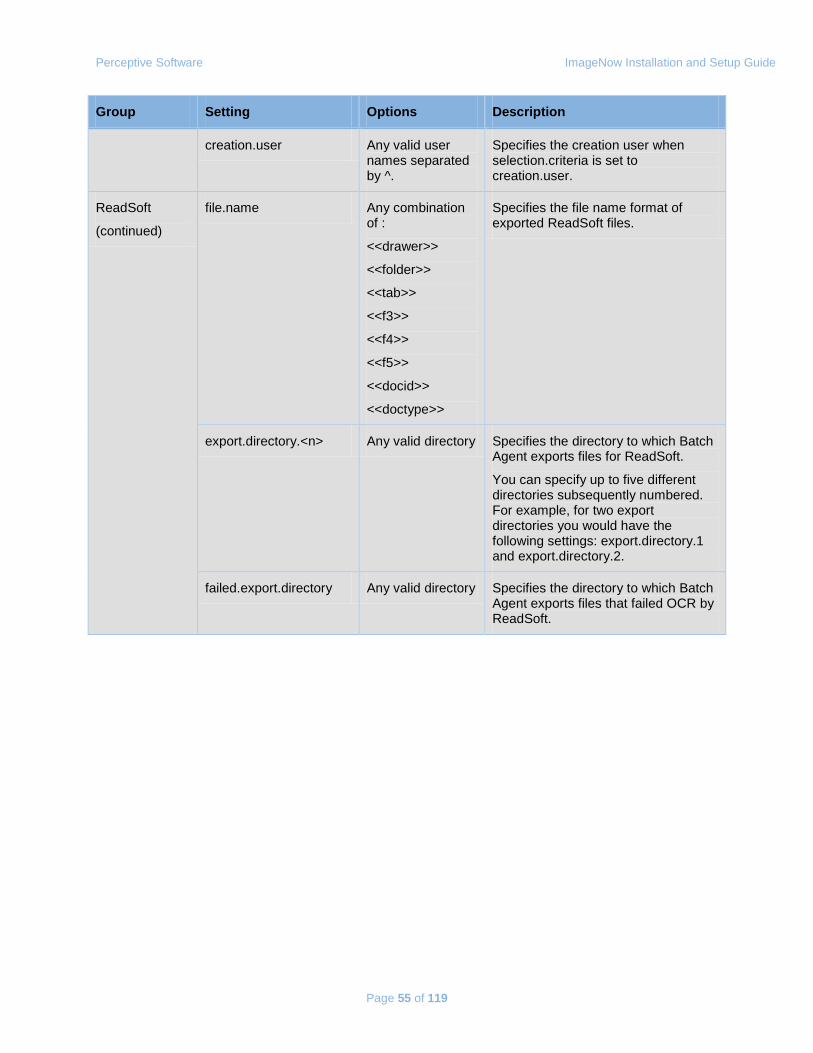
Perceptive Software ImageNow Installation and Setup Guide
Page 55 of 119
Group Setting Options Description
creation.user Any valid user names separated by ^.
Specifies the creation user when selection.criteria is set to creation.user.
ReadSoft
(continued)
file.name Any combination of :
<<drawer>>
<<folder>>
<<tab>>
<<f3>>
<<f4>>
<<f5>>
<<docid>>
<<doctype>>
Specifies the file name format of exported ReadSoft files.
export.directory.<n> Any valid directory Specifies the directory to which Batch Agent exports files for ReadSoft.
You can specify up to five different directories subsequently numbered. For example, for two export directories you would have the following settings: export.directory.1 and export.directory.2.
failed.export.directory Any valid directory Specifies the directory to which Batch Agent exports files that failed OCR by ReadSoft.
Perceptive Software ImageNow Installation and Setup Guide
Page 56 of 119
inserverEM.ini The following table provides definitions and sample data for the settings in the inserverEM.ini configuration file. This table displays the INI settings under group headings in brackets, for example, [General], in the order the groups appear in the INI file. Each setting offers two or more options, which are defined in the table below along with a description of each setting and its options. Use this table as a guide when customizing the file.
Note Changes to settings in the INI file require a restart of the ImageNow Server and any affected agents unless noted otherwise in the Description portion of the setting.
Group Setting Options Description
General num.workers Any positive integer
Specifies the number of worker threads used when the External Message Agent starts.
The default is 3.
message.pulling.interval Any positive integer
Specifies how often, in seconds, the agent checks and downloads messages from the external message database.
The default is 60.
max.messages.per.type Any positive integer
Specifies the maximum number of processed messages to pull each time from the database for each message type.
The default is 100.
Purge Note A record’s END_TIME value determines the amount of time External Message Agent waits before purging messages. However, outbound messages are processed by other entities that may not set the END_TIME value or may set the value in local time instead of GMT time causing processed messages to be purged earlier than desired. Inbound Messages processed by inserverEM are not affected.
purge.completed. messages
TRUE
FALSE
Specifies whether External Message Agent removes messages after successful completion.
TRUE = Messages with a MSG_STATUS of 3 and an END_TIME of x hours are purged after x hours have passed.
The default is TRUE.
hours.to.keep.completed.messages
Any positive integer
If purge.completed.messages = TRUE, specifies the number of hours before External Message Agent purges completed messages.
The default is 48.
Perceptive Software ImageNow Installation and Setup Guide
Page 57 of 119
Group Setting Options Description
Purge
(continued)
purge.errored.messages TRUE
FALSE
Specifies whether External Message Agent removes messages that have been completed with an error. When set to TRUE, messages with an MSG_STATUS of 4 and an END_TIME of X hours ago are purged. The hours.to.keep.errored setting specifies the value of X
hours.to.keep.errored. messages
Any positive integer
If purge.completed.messages = TRUE, specifies the number of hours before External Message Agent purges messages that have completed with an error.
The default is 1200.
Logging debug.level.file 0 through 6 Specifies the level External Messaging Agent uses to log errors for troubleshooting.
Typically, you want minimal logging unless you are debugging an issue. If you increase the logging level, make sure that you set it back down after you finish debugging. Failure to do so can slow performance and consume hard disk space.
0 = Logging is off.
1 through 6 = Logging is on. The higher the number, the more verbose the logging. For example, 1 offers minimal logging, whereas 6 offers logging that offers the most information.
The default is 0.
Perceptive Software ImageNow Installation and Setup Guide
Page 58 of 119
inserverFS.ini The following table provides definitions and sample data for the settings in the inserverFS.ini configuration file. This table displays the INI settings under group headings in brackets, for example, [General], in the order the groups appear in the INI file. Each setting offers two or more options, which are defined in the table below along with a description of each setting and its options. Use this table as a guide when customizing the file.
Note Changes to settings in the INI file require a restart of the ImageNow Server and any affected agents unless noted otherwise in the Description portion of the setting.
Group Setting Options Description
General batch.delete.size Any positive integer
Specifies the number of deleted documents and projects in a batch ImageNow deletes permanently at one time. You may need to decrease this value if the CPU is taking too long to remove a large batch of items.
The default is 500.
destruction.wait.time Any positive integer
Specifies the number of days a deleted document or project remains in the system before it is deleted permanently. If you specify a value of 0, the document or project is destroyed as soon as it is deleted.
The default is 0.
num.transfer.workers Any positive integer
Specifies the number of worker threads for transfer job processing.
The default is 1.
num.osm.replication. workers
Any positive integer
Specifies the number of worker threads to process OSM cache replication jobs (asynchronous cache writes).
The default is 2.
max.osm.replication. retries
Any positive integer
Specifies the total number of allowed attempts to replicate a cached item to the primary device.
The default is 3
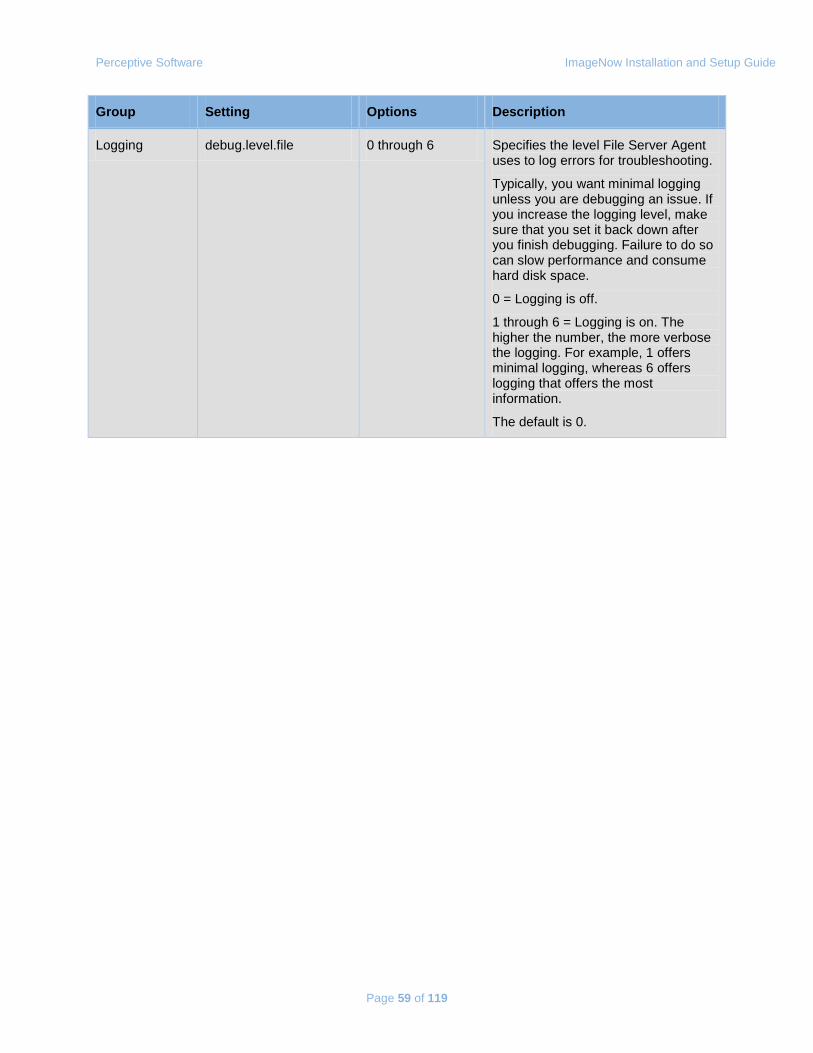
Perceptive Software ImageNow Installation and Setup Guide
Page 59 of 119
Group Setting Options Description
Logging debug.level.file 0 through 6 Specifies the level File Server Agent uses to log errors for troubleshooting.
Typically, you want minimal logging unless you are debugging an issue. If you increase the logging level, make sure that you set it back down after you finish debugging. Failure to do so can slow performance and consume hard disk space.
0 = Logging is off.
1 through 6 = Logging is on. The higher the number, the more verbose the logging. For example, 1 offers minimal logging, whereas 6 offers logging that offers the most information.
The default is 0.
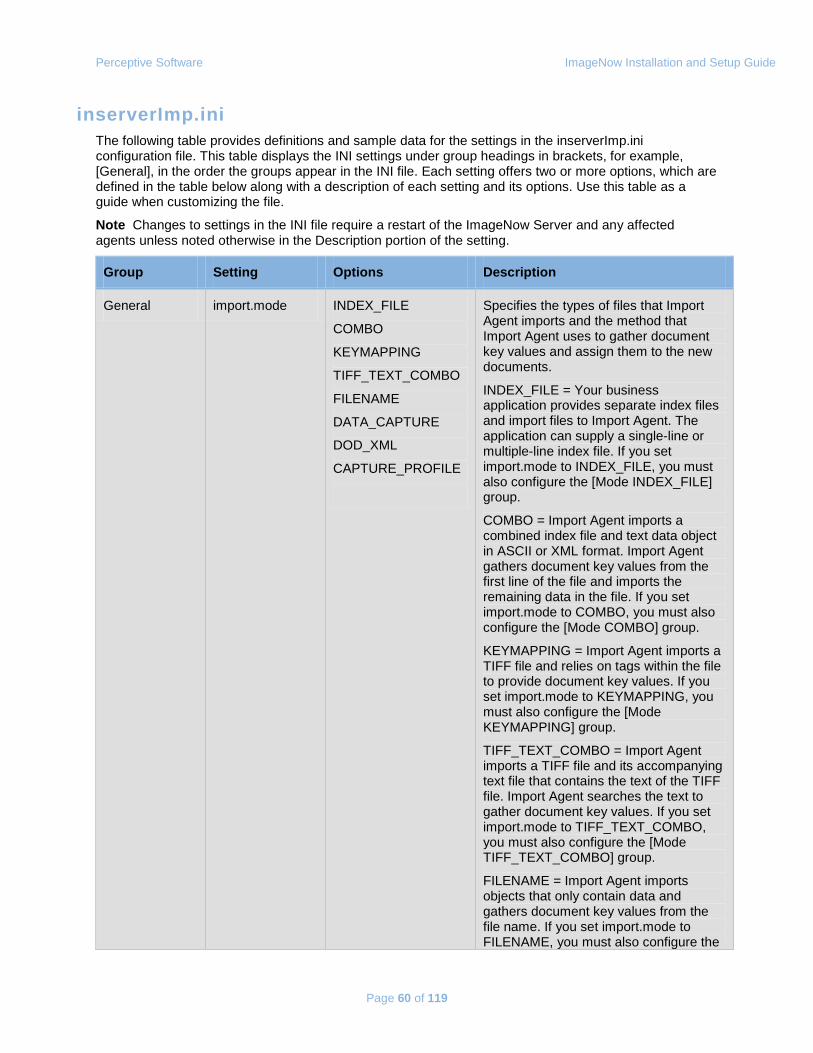
Perceptive Software ImageNow Installation and Setup Guide
Page 60 of 119
inserverImp.ini The following table provides definitions and sample data for the settings in the inserverImp.ini configuration file. This table displays the INI settings under group headings in brackets, for example, [General], in the order the groups appear in the INI file. Each setting offers two or more options, which are defined in the table below along with a description of each setting and its options. Use this table as a guide when customizing the file.
Note Changes to settings in the INI file require a restart of the ImageNow Server and any affected agents unless noted otherwise in the Description portion of the setting.
Group Setting Options Description
General import.mode INDEX_FILE
COMBO
KEYMAPPING
TIFF_TEXT_COMBO
FILENAME
DATA_CAPTURE
DOD_XML
CAPTURE_PROFILE
Specifies the types of files that Import Agent imports and the method that Import Agent uses to gather document key values and assign them to the new documents.
INDEX_FILE = Your business application provides separate index files and import files to Import Agent. The application can supply a single-line or multiple-line index file. If you set import.mode to INDEX_FILE, you must also configure the [Mode INDEX_FILE] group.
COMBO = Import Agent imports a combined index file and text data object in ASCII or XML format. Import Agent gathers document key values from the first line of the file and imports the remaining data in the file. If you set import.mode to COMBO, you must also configure the [Mode COMBO] group.
KEYMAPPING = Import Agent imports a TIFF file and relies on tags within the file to provide document key values. If you set import.mode to KEYMAPPING, you must also configure the [Mode KEYMAPPING] group.
TIFF_TEXT_COMBO = Import Agent imports a TIFF file and its accompanying text file that contains the text of the TIFF file. Import Agent searches the text to gather document key values. If you set import.mode to TIFF_TEXT_COMBO, you must also configure the [Mode TIFF_TEXT_COMBO] group.
FILENAME = Import Agent imports objects that only contain data and gathers document key values from the file name. If you set import.mode to FILENAME, you must also configure the
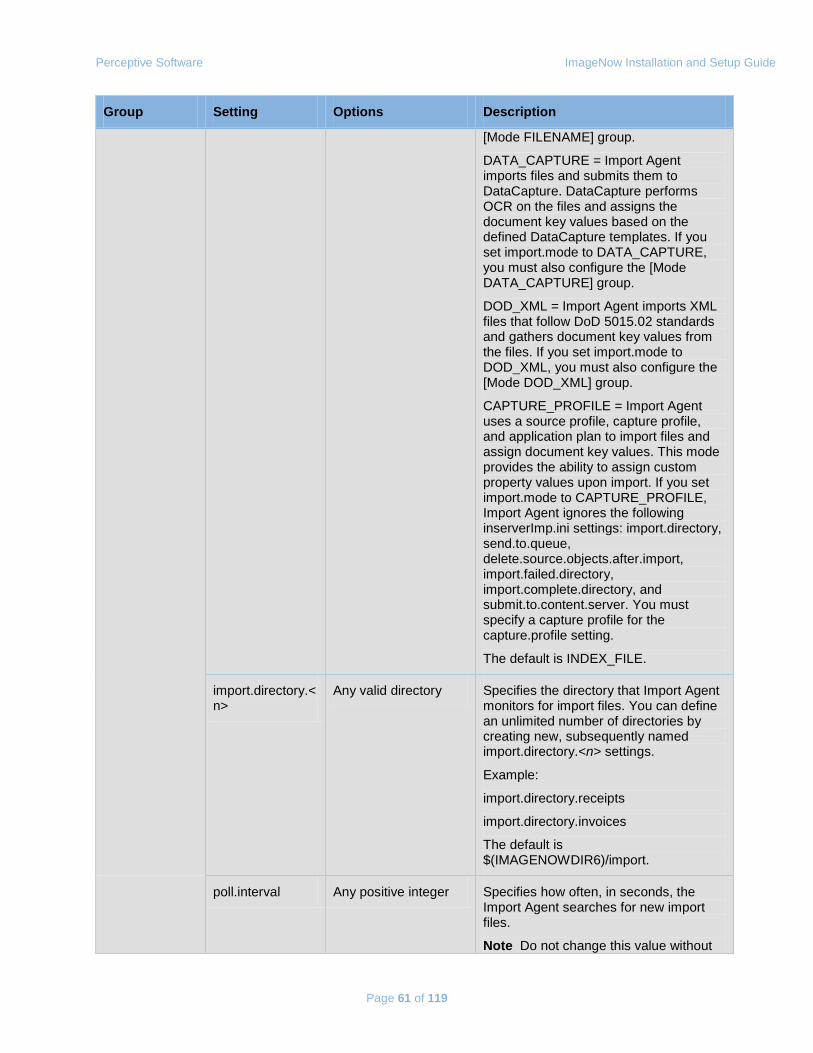
Perceptive Software ImageNow Installation and Setup Guide
Page 61 of 119
Group Setting Options Description
[Mode FILENAME] group.
DATA_CAPTURE = Import Agent imports files and submits them to DataCapture. DataCapture performs OCR on the files and assigns the document key values based on the defined DataCapture templates. If you set import.mode to DATA_CAPTURE, you must also configure the [Mode DATA_CAPTURE] group.
DOD_XML = Import Agent imports XML files that follow DoD 5015.02 standards and gathers document key values from the files. If you set import.mode to DOD_XML, you must also configure the [Mode DOD_XML] group.
CAPTURE_PROFILE = Import Agent uses a source profile, capture profile, and application plan to import files and assign document key values. This mode provides the ability to assign custom property values upon import. If you set import.mode to CAPTURE_PROFILE, Import Agent ignores the following inserverImp.ini settings: import.directory, send.to.queue, delete.source.objects.after.import, import.failed.directory, import.complete.directory, and submit.to.content.server. You must specify a capture profile for the capture.profile setting.
The default is INDEX_FILE.
import.directory.<n>
Any valid directory Specifies the directory that Import Agent monitors for import files. You can define an unlimited number of directories by creating new, subsequently named import.directory.<n> settings.
Example:
import.directory.receipts
import.directory.invoices
The default is $(IMAGENOWDIR6)/import.
poll.interval Any positive integer Specifies how often, in seconds, the Import Agent searches for new import files.
Note Do not change this value without
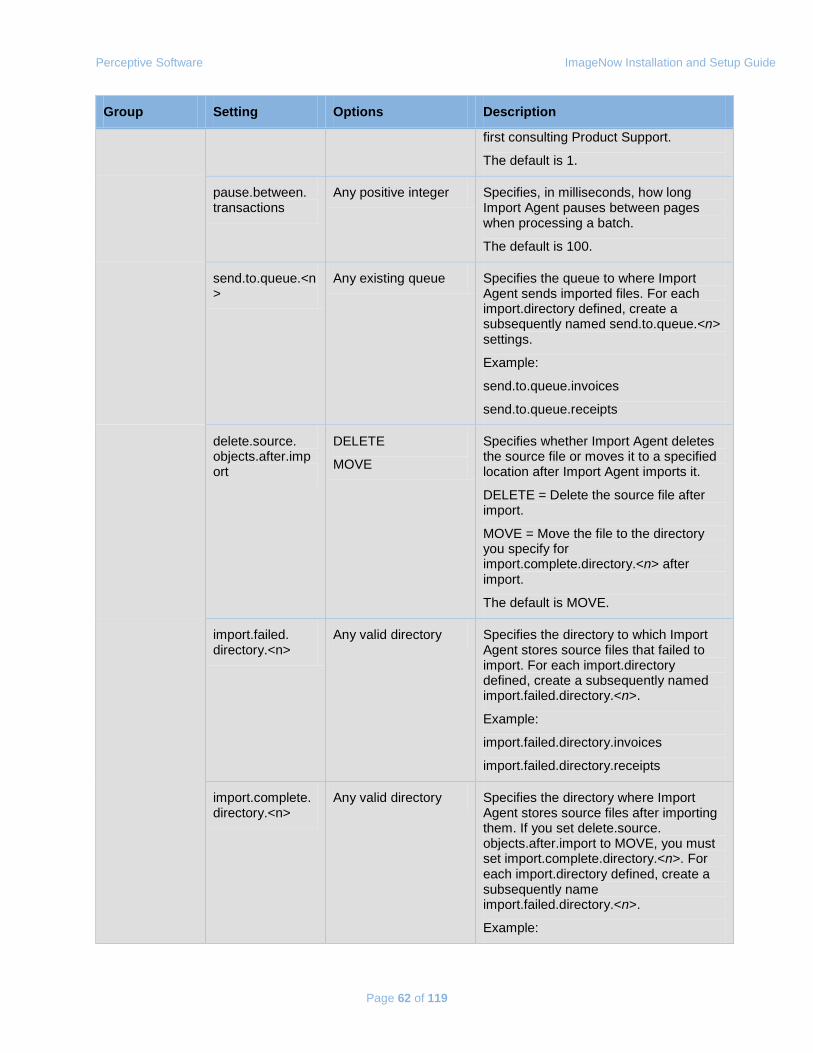
Perceptive Software ImageNow Installation and Setup Guide
Page 62 of 119
Group Setting Options Description
first consulting Product Support.
The default is 1.
pause.between. transactions
Any positive integer Specifies, in milliseconds, how long Import Agent pauses between pages when processing a batch.
The default is 100.
send.to.queue.<n>
Any existing queue Specifies the queue to where Import Agent sends imported files. For each import.directory defined, create a subsequently named send.to.queue.<n> settings.
Example:
send.to.queue.invoices
send.to.queue.receipts
delete.source. objects.after.import
DELETE
MOVE
Specifies whether Import Agent deletes the source file or moves it to a specified location after Import Agent imports it.
DELETE = Delete the source file after import.
MOVE = Move the file to the directory you specify for import.complete.directory.<n> after import.
The default is MOVE.
import.failed. directory.<n>
Any valid directory Specifies the directory to which Import Agent stores source files that failed to import. For each import.directory defined, create a subsequently named import.failed.directory.<n>.
Example:
import.failed.directory.invoices
import.failed.directory.receipts
import.complete. directory.<n>
Any valid directory Specifies the directory where Import Agent stores source files after importing them. If you set delete.source. objects.after.import to MOVE, you must set import.complete.directory.<n>. For each import.directory defined, create a subsequently name import.failed.directory.<n>.
Example:
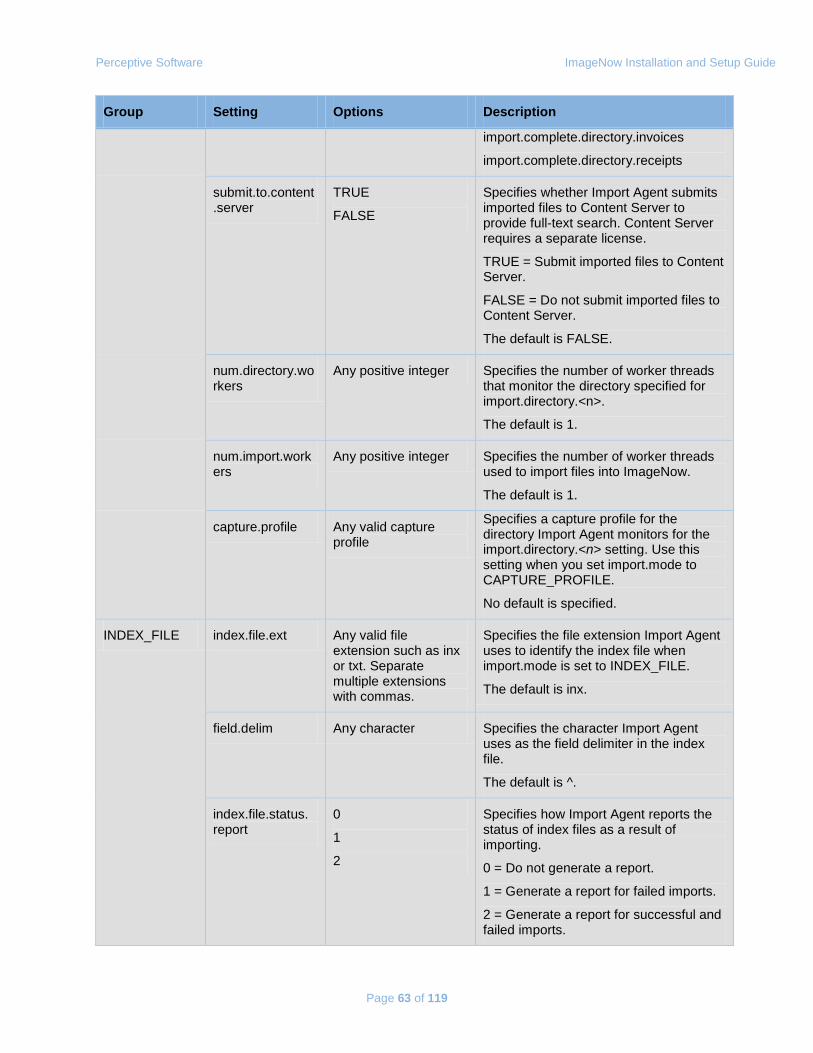
Perceptive Software ImageNow Installation and Setup Guide
Page 63 of 119
Group Setting Options Description
import.complete.directory.invoices
import.complete.directory.receipts
submit.to.content.server
TRUE
FALSE
Specifies whether Import Agent submits imported files to Content Server to provide full-text search. Content Server requires a separate license.
TRUE = Submit imported files to Content Server.
FALSE = Do not submit imported files to Content Server.
The default is FALSE.
num.directory.workers
Any positive integer Specifies the number of worker threads that monitor the directory specified for import.directory.<n>.
The default is 1.
num.import.workers
Any positive integer Specifies the number of worker threads used to import files into ImageNow.
The default is 1.
capture.profile Any valid capture profile
Specifies a capture profile for the directory Import Agent monitors for the import.directory.<n> setting. Use this setting when you set import.mode to CAPTURE_PROFILE.
No default is specified.
INDEX_FILE index.file.ext Any valid file extension such as inx or txt. Separate multiple extensions with commas.
Specifies the file extension Import Agent uses to identify the index file when import.mode is set to INDEX_FILE.
The default is inx.
field.delim Any character Specifies the character Import Agent uses as the field delimiter in the index file.
The default is ^.
index.file.status. report
0
1
2
Specifies how Import Agent reports the status of index files as a result of importing.
0 = Do not generate a report.
1 = Generate a report for failed imports.
2 = Generate a report for successful and failed imports.
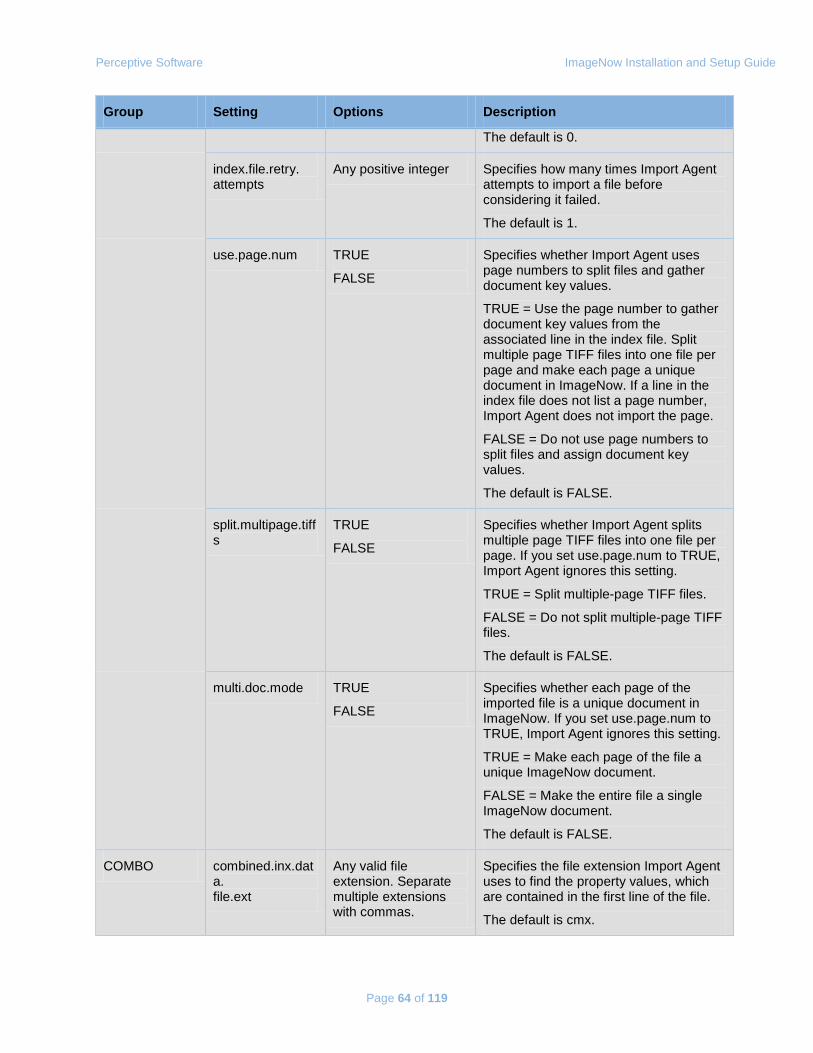
Perceptive Software ImageNow Installation and Setup Guide
Page 64 of 119
Group Setting Options Description
The default is 0.
index.file.retry. attempts
Any positive integer Specifies how many times Import Agent attempts to import a file before considering it failed.
The default is 1.
use.page.num TRUE
FALSE
Specifies whether Import Agent uses page numbers to split files and gather document key values.
TRUE = Use the page number to gather document key values from the associated line in the index file. Split multiple page TIFF files into one file per page and make each page a unique document in ImageNow. If a line in the index file does not list a page number, Import Agent does not import the page.
FALSE = Do not use page numbers to split files and assign document key values.
The default is FALSE.
split.multipage.tiffs
TRUE
FALSE
Specifies whether Import Agent splits multiple page TIFF files into one file per page. If you set use.page.num to TRUE, Import Agent ignores this setting.
TRUE = Split multiple-page TIFF files.
FALSE = Do not split multiple-page TIFF files.
The default is FALSE.
multi.doc.mode TRUE
FALSE
Specifies whether each page of the imported file is a unique document in ImageNow. If you set use.page.num to TRUE, Import Agent ignores this setting.
TRUE = Make each page of the file a unique ImageNow document.
FALSE = Make the entire file a single ImageNow document.
The default is FALSE.
COMBO combined.inx.data. file.ext
Any valid file extension. Separate multiple extensions with commas.
Specifies the file extension Import Agent uses to find the property values, which are contained in the first line of the file.
The default is cmx.
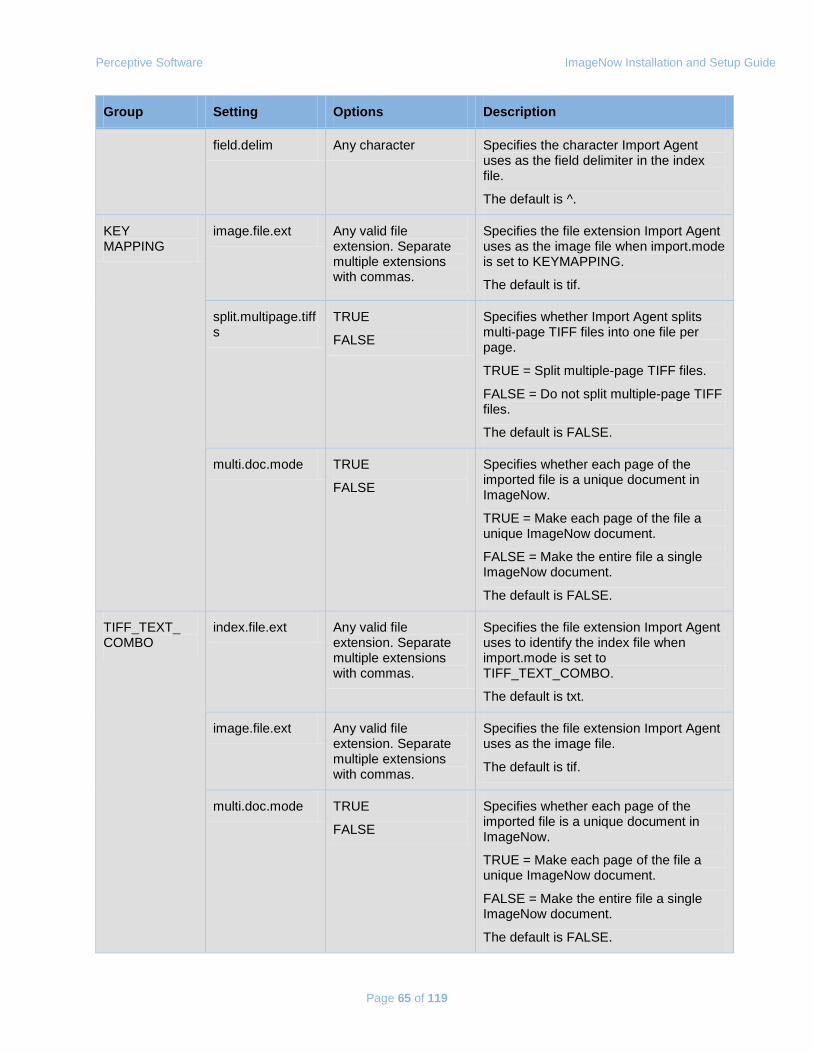
Perceptive Software ImageNow Installation and Setup Guide
Page 65 of 119
Group Setting Options Description
field.delim Any character Specifies the character Import Agent uses as the field delimiter in the index file.
The default is ^.
KEY MAPPING
image.file.ext Any valid file extension. Separate multiple extensions with commas.
Specifies the file extension Import Agent uses as the image file when import.mode is set to KEYMAPPING.
The default is tif.
split.multipage.tiffs
TRUE
FALSE
Specifies whether Import Agent splits multi-page TIFF files into one file per page.
TRUE = Split multiple-page TIFF files.
FALSE = Do not split multiple-page TIFF files.
The default is FALSE.
multi.doc.mode TRUE
FALSE
Specifies whether each page of the imported file is a unique document in ImageNow.
TRUE = Make each page of the file a unique ImageNow document.
FALSE = Make the entire file a single ImageNow document.
The default is FALSE.
TIFF_TEXT_ COMBO
index.file.ext Any valid file extension. Separate multiple extensions with commas.
Specifies the file extension Import Agent uses to identify the index file when import.mode is set to TIFF_TEXT_COMBO.
The default is txt.
image.file.ext Any valid file extension. Separate multiple extensions with commas.
Specifies the file extension Import Agent uses as the image file.
The default is tif.
multi.doc.mode TRUE
FALSE
Specifies whether each page of the imported file is a unique document in ImageNow.
TRUE = Make each page of the file a unique ImageNow document.
FALSE = Make the entire file a single ImageNow document.
The default is FALSE.
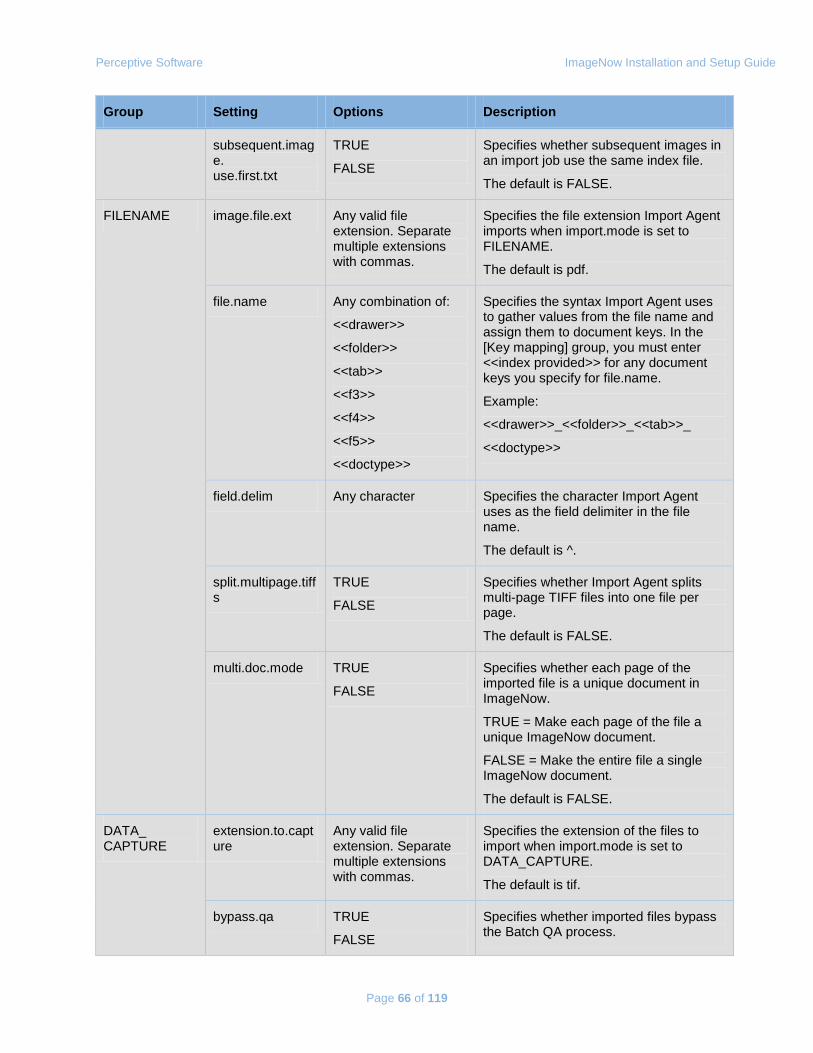
Perceptive Software ImageNow Installation and Setup Guide
Page 66 of 119
Group Setting Options Description
subsequent.image. use.first.txt
TRUE
FALSE
Specifies whether subsequent images in an import job use the same index file.
The default is FALSE.
FILENAME image.file.ext Any valid file extension. Separate multiple extensions with commas.
Specifies the file extension Import Agent imports when import.mode is set to FILENAME.
The default is pdf.
file.name Any combination of:
<<drawer>>
<<folder>>
<<tab>>
<<f3>>
<<f4>>
<<f5>>
<<doctype>>
Specifies the syntax Import Agent uses to gather values from the file name and assign them to document keys. In the [Key mapping] group, you must enter <<index provided>> for any document keys you specify for file.name.
Example:
<<drawer>>_<<folder>>_<<tab>>_
<<doctype>>
field.delim Any character Specifies the character Import Agent uses as the field delimiter in the file name.
The default is ^.
split.multipage.tiffs
TRUE
FALSE
Specifies whether Import Agent splits multi-page TIFF files into one file per page.
The default is FALSE.
multi.doc.mode TRUE
FALSE
Specifies whether each page of the imported file is a unique document in ImageNow.
TRUE = Make each page of the file a unique ImageNow document.
FALSE = Make the entire file a single ImageNow document.
The default is FALSE.
DATA_ CAPTURE
extension.to.capture
Any valid file extension. Separate multiple extensions with commas.
Specifies the extension of the files to import when import.mode is set to DATA_CAPTURE.
The default is tif.
bypass.qa TRUE
FALSE
Specifies whether imported files bypass the Batch QA process.
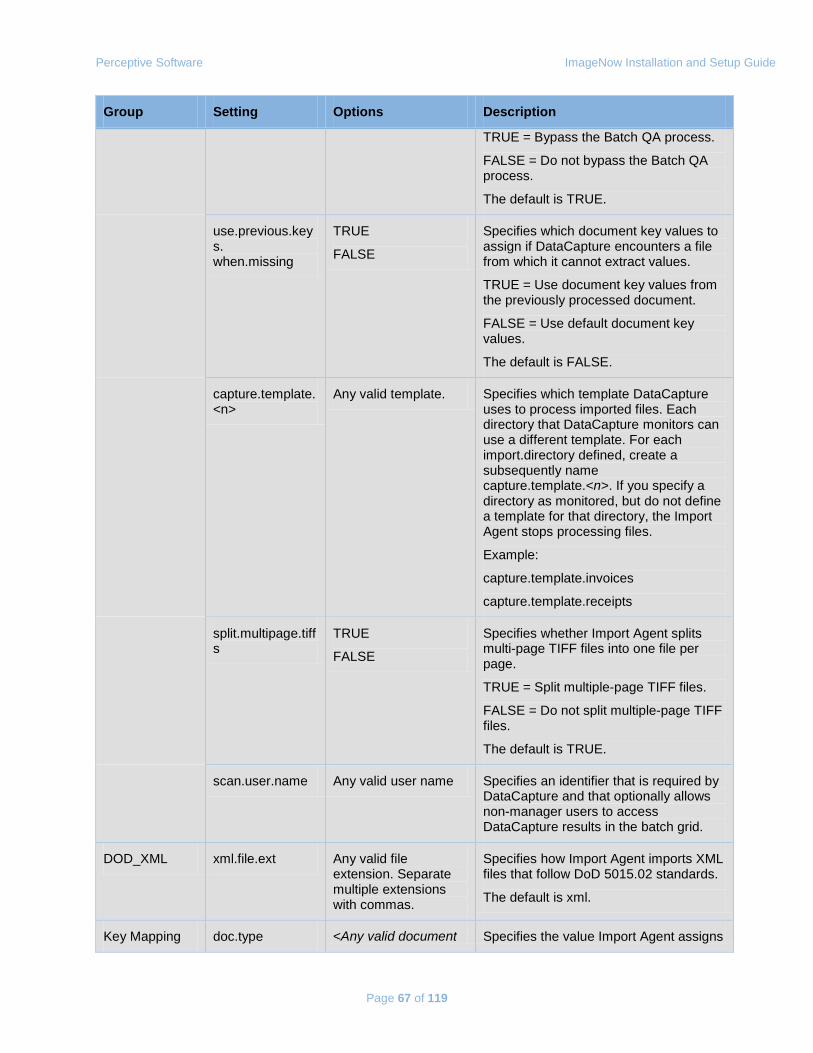
Perceptive Software ImageNow Installation and Setup Guide
Page 67 of 119
Group Setting Options Description
TRUE = Bypass the Batch QA process.
FALSE = Do not bypass the Batch QA process.
The default is TRUE.
use.previous.keys. when.missing
TRUE
FALSE
Specifies which document key values to assign if DataCapture encounters a file from which it cannot extract values.
TRUE = Use document key values from the previously processed document.
FALSE = Use default document key values.
The default is FALSE.
capture.template.<n>
Any valid template. Specifies which template DataCapture uses to process imported files. Each directory that DataCapture monitors can use a different template. For each import.directory defined, create a subsequently name capture.template.<n>. If you specify a directory as monitored, but do not define a template for that directory, the Import Agent stops processing files.
Example:
capture.template.invoices
capture.template.receipts
split.multipage.tiffs
TRUE
FALSE
Specifies whether Import Agent splits multi-page TIFF files into one file per page.
TRUE = Split multiple-page TIFF files.
FALSE = Do not split multiple-page TIFF files.
The default is TRUE.
scan.user.name Any valid user name Specifies an identifier that is required by DataCapture and that optionally allows non-manager users to access DataCapture results in the batch grid.
DOD_XML xml.file.ext Any valid file extension. Separate multiple extensions with commas.
Specifies how Import Agent imports XML files that follow DoD 5015.02 standards.
The default is xml.
Key Mapping doc.type <Any valid document Specifies the value Import Agent assigns
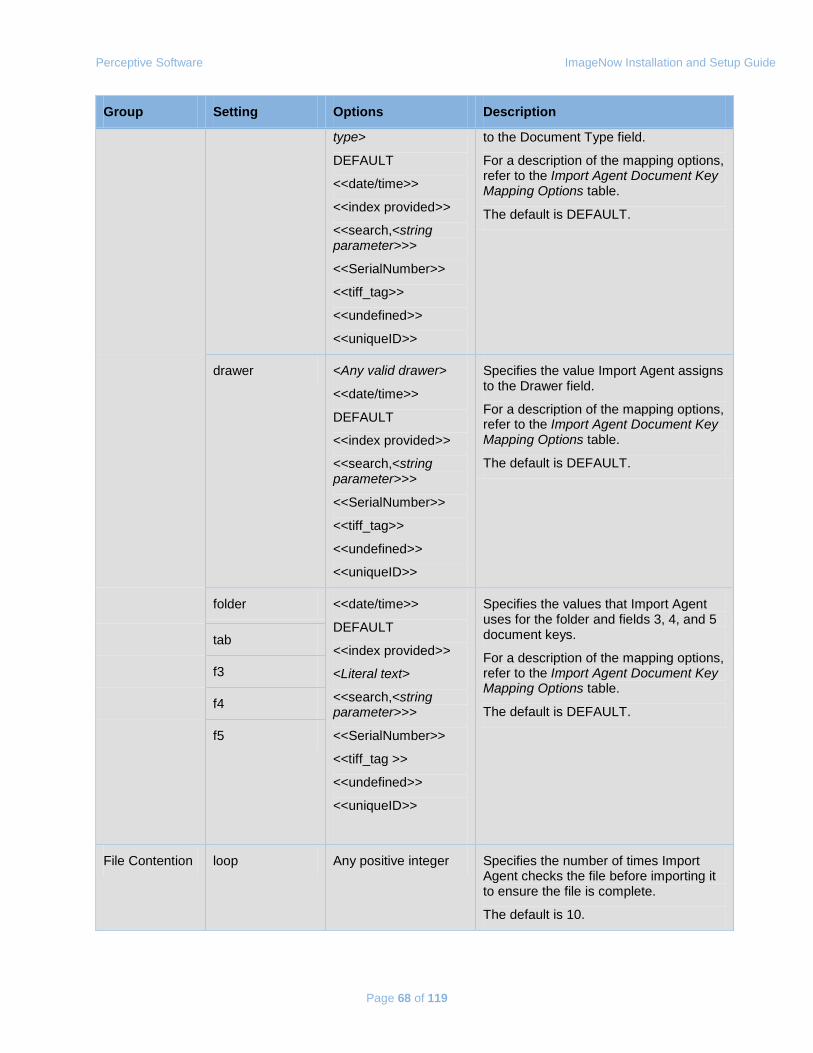
Perceptive Software ImageNow Installation and Setup Guide
Page 68 of 119
Group Setting Options Description
type>
DEFAULT
<<date/time>>
<<index provided>>
<<search,<string parameter>>>
<<SerialNumber>>
<<tiff_tag>>
<<undefined>>
<<uniqueID>>
to the Document Type field.
For a description of the mapping options, refer to the Import Agent Document Key Mapping Options table.
The default is DEFAULT.
drawer <Any valid drawer>
<<date/time>>
DEFAULT
<<index provided>>
<<search,<string parameter>>>
<<SerialNumber>>
<<tiff_tag>>
<<undefined>>
<<uniqueID>>
Specifies the value Import Agent assigns to the Drawer field.
For a description of the mapping options, refer to the Import Agent Document Key Mapping Options table.
The default is DEFAULT.
folder <<date/time>>
DEFAULT
<<index provided>>
<Literal text>
<<search,<string parameter>>>
<<SerialNumber>>
<<tiff_tag >>
<<undefined>>
<<uniqueID>>
Specifies the values that Import Agent uses for the folder and fields 3, 4, and 5 document keys.
For a description of the mapping options, refer to the Import Agent Document Key Mapping Options table.
The default is DEFAULT.
tab
f3
f4
f5
File Contention loop Any positive integer Specifies the number of times Import Agent checks the file before importing it to ensure the file is complete.
The default is 10.
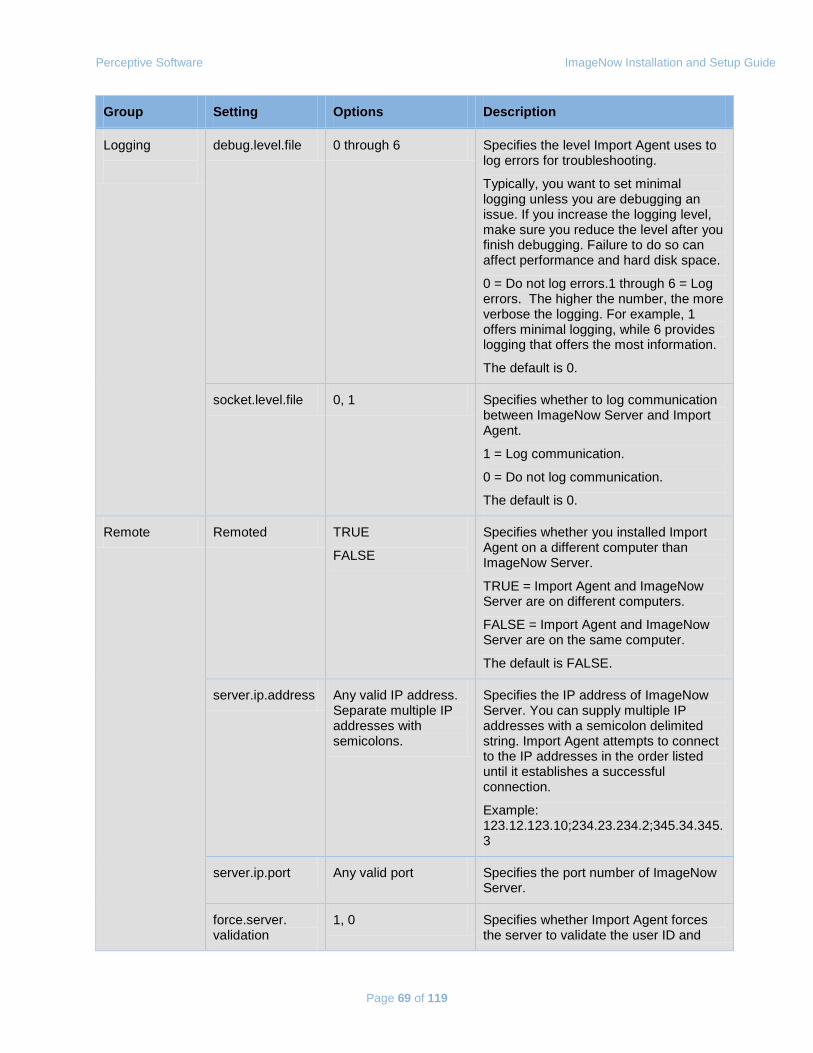
Perceptive Software ImageNow Installation and Setup Guide
Page 69 of 119
Group Setting Options Description
Logging
debug.level.file 0 through 6 Specifies the level Import Agent uses to log errors for troubleshooting.
Typically, you want to set minimal logging unless you are debugging an issue. If you increase the logging level, make sure you reduce the level after you finish debugging. Failure to do so can affect performance and hard disk space.
0 = Do not log errors.1 through 6 = Log errors. The higher the number, the more verbose the logging. For example, 1 offers minimal logging, while 6 provides logging that offers the most information.
The default is 0.
socket.level.file 0, 1 Specifies whether to log communication between ImageNow Server and Import Agent.
1 = Log communication.
0 = Do not log communication.
The default is 0.
Remote Remoted TRUE
FALSE
Specifies whether you installed Import Agent on a different computer than ImageNow Server.
TRUE = Import Agent and ImageNow Server are on different computers.
FALSE = Import Agent and ImageNow Server are on the same computer.
The default is FALSE.
server.ip.address Any valid IP address. Separate multiple IP addresses with semicolons.
Specifies the IP address of ImageNow Server. You can supply multiple IP addresses with a semicolon delimited string. Import Agent attempts to connect to the IP addresses in the order listed until it establishes a successful connection.
Example: 123.12.123.10;234.23.234.2;345.34.345.3
server.ip.port Any valid port Specifies the port number of ImageNow Server.
force.server. validation
1, 0 Specifies whether Import Agent forces the server to validate the user ID and
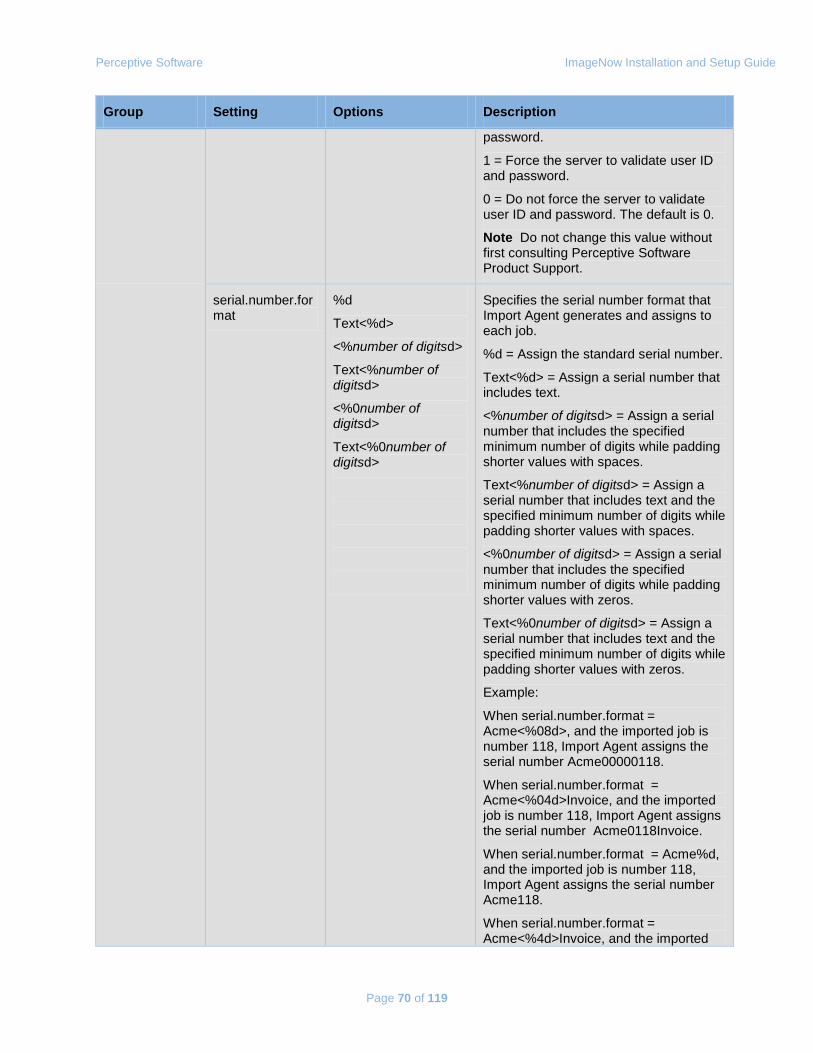
Perceptive Software ImageNow Installation and Setup Guide
Page 70 of 119
Group Setting Options Description
password.
1 = Force the server to validate user ID and password.
0 = Do not force the server to validate user ID and password. The default is 0.
Note Do not change this value without first consulting Perceptive Software Product Support.
serial.number.format
%d
Text<%d>
<%number of digitsd>
Text<%number of digitsd>
<%0number of digitsd>
Text<%0number of digitsd>
Specifies the serial number format that Import Agent generates and assigns to each job.
%d = Assign the standard serial number.
Text<%d> = Assign a serial number that includes text.
<%number of digitsd> = Assign a serial number that includes the specified minimum number of digits while padding shorter values with spaces.
Text<%number of digitsd> = Assign a serial number that includes text and the specified minimum number of digits while padding shorter values with spaces.
<%0number of digitsd> = Assign a serial number that includes the specified minimum number of digits while padding shorter values with zeros.
Text<%0number of digitsd> = Assign a serial number that includes text and the specified minimum number of digits while padding shorter values with zeros.
Example:
When serial.number.format = Acme<%08d>, and the imported job is number 118, Import Agent assigns the serial number Acme00000118.
When serial.number.format = Acme<%04d>Invoice, and the imported job is number 118, Import Agent assigns the serial number Acme0118Invoice.
When serial.number.format = Acme%d, and the imported job is number 118, Import Agent assigns the serial number Acme118.
When serial.number.format = Acme<%4d>Invoice, and the imported
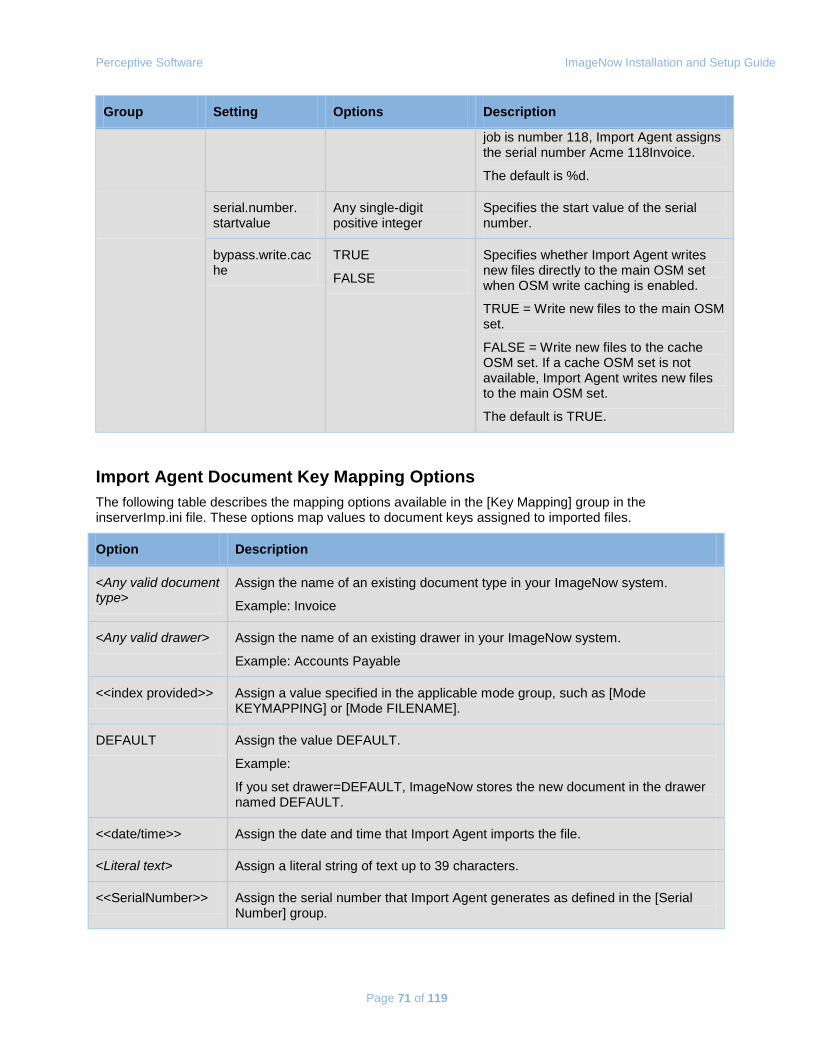
Perceptive Software ImageNow Installation and Setup Guide
Page 71 of 119
Group Setting Options Description
job is number 118, Import Agent assigns the serial number Acme 118Invoice.
The default is %d.
serial.number. startvalue
Any single-digit positive integer
Specifies the start value of the serial number.
bypass.write.cache
TRUE
FALSE
Specifies whether Import Agent writes new files directly to the main OSM set when OSM write caching is enabled.
TRUE = Write new files to the main OSM set.
FALSE = Write new files to the cache OSM set. If a cache OSM set is not available, Import Agent writes new files to the main OSM set.
The default is TRUE.
Import Agent Document Key Mapping Options The following table describes the mapping options available in the [Key Mapping] group in the inserverImp.ini file. These options map values to document keys assigned to imported files.
Option Description
<Any valid document type>
Assign the name of an existing document type in your ImageNow system.
Example: Invoice
<Any valid drawer> Assign the name of an existing drawer in your ImageNow system.
Example: Accounts Payable
<<index provided>> Assign a value specified in the applicable mode group, such as [Mode KEYMAPPING] or [Mode FILENAME].
DEFAULT Assign the value DEFAULT.
Example:
If you set drawer=DEFAULT, ImageNow stores the new document in the drawer named DEFAULT.
<<date/time>> Assign the date and time that Import Agent imports the file.
<Literal text> Assign a literal string of text up to 39 characters.
<<SerialNumber>> Assign the serial number that Import Agent generates as defined in the [Serial Number] group.
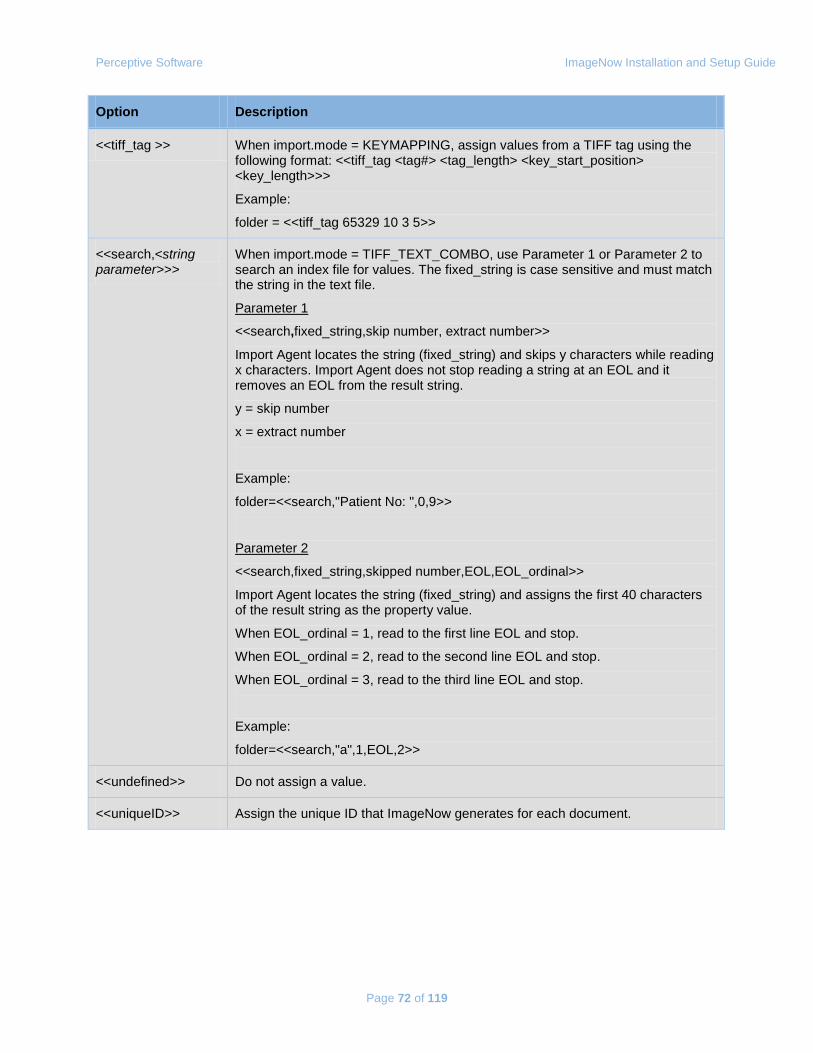
Perceptive Software ImageNow Installation and Setup Guide
Page 72 of 119
Option Description
<<tiff_tag >> When import.mode = KEYMAPPING, assign values from a TIFF tag using the following format: <<tiff_tag <tag#> <tag_length> <key_start_position> <key_length>>>
Example:
folder = <<tiff_tag 65329 10 3 5>>
<<search,<string parameter>>>
When import.mode = TIFF_TEXT_COMBO, use Parameter 1 or Parameter 2 to search an index file for values. The fixed_string is case sensitive and must match the string in the text file.
Parameter 1
<<search,fixed_string,skip number, extract number>>
Import Agent locates the string (fixed_string) and skips y characters while reading x characters. Import Agent does not stop reading a string at an EOL and it removes an EOL from the result string.
y = skip number
x = extract number
Example:
folder=<<search,"Patient No: ",0,9>>
Parameter 2
<<search,fixed_string,skipped number,EOL,EOL_ordinal>>
Import Agent locates the string (fixed_string) and assigns the first 40 characters of the result string as the property value.
When EOL_ordinal = 1, read to the first line EOL and stop.
When EOL_ordinal = 2, read to the second line EOL and stop.
When EOL_ordinal = 3, read to the third line EOL and stop.
Example:
folder=<<search,"a",1,EOL,2>>
<<undefined>> Do not assign a value.
<<uniqueID>> Assign the unique ID that ImageNow generates for each document.

Perceptive Software ImageNow Installation and Setup Guide
Page 73 of 119
inserverJob.ini The following table provides definitions and sample data for the settings in the inserverJob.ini configuration file. This table displays the INI settings under group headings in brackets, for example, [Timers], in the order the groups appear in the INI file. Each setting offers two or more options, which are defined in the table below along with a description of each setting and its options. Use this table as a guide when customizing the file.
Note Changes to settings in the INI file require a restart of the ImageNow Server and any affected agents unless noted otherwise in the Description portion of the setting.
Group Setting Options Description
Timers auto.suspend.timeout Any positive integer
Specifies the number of seconds Job Agent allows a job to process before suspending it.
The default is 1200.
auto.destroy.timeout Any positive integer
Specifies the number of hours Job Agent retains a completed job before deleting it.
The default is 1.
auto.suspend.interval Any positive integer
Specifies the number of seconds Job Agent waits to start an automatic suspension upon completion of the previous automatic suspension.
The default is 1800.
auto.resume.interval Any positive integer
Specifies the number of seconds Job Agent waits to resume processing jobs after a suspension.
The default is 600.
auto.destroy.interval Any positive integer
Specifies the number of seconds Job Agent waits to start an automatic destroy upon completion of the previous automatic destroy.
The default is 1800.
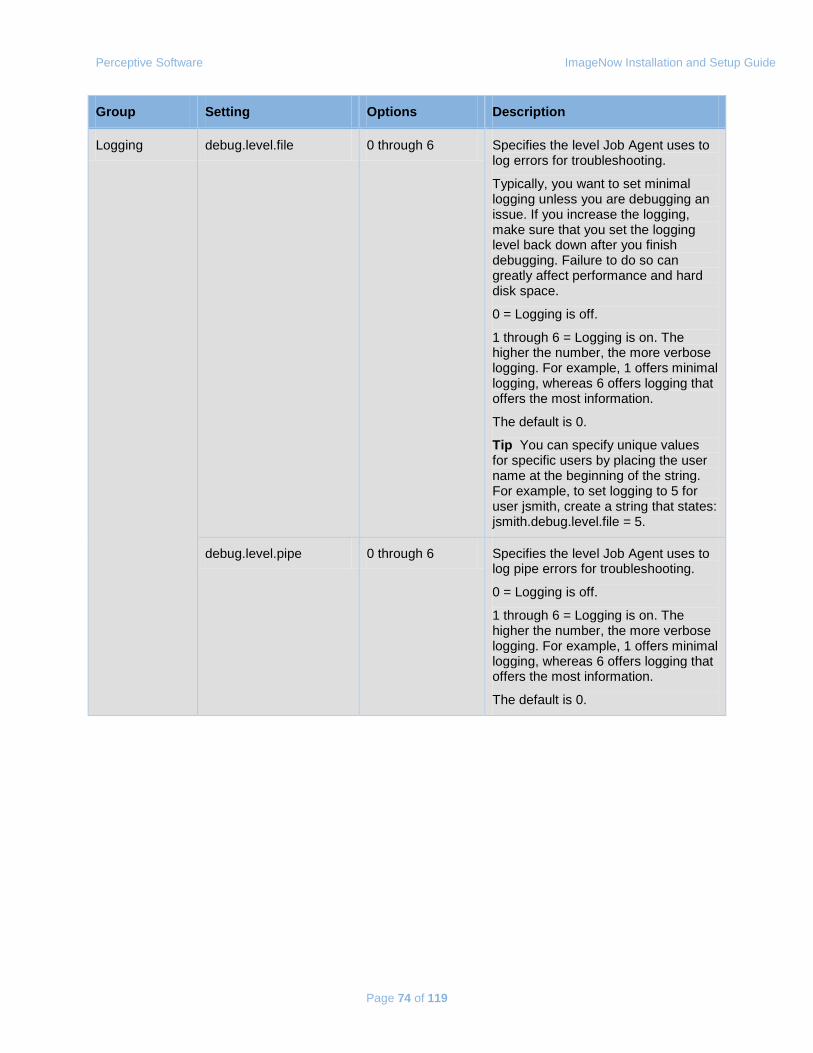
Perceptive Software ImageNow Installation and Setup Guide
Page 74 of 119
Group Setting Options Description
Logging debug.level.file 0 through 6 Specifies the level Job Agent uses to log errors for troubleshooting.
Typically, you want to set minimal logging unless you are debugging an issue. If you increase the logging, make sure that you set the logging level back down after you finish debugging. Failure to do so can greatly affect performance and hard disk space.
0 = Logging is off.
1 through 6 = Logging is on. The higher the number, the more verbose logging. For example, 1 offers minimal logging, whereas 6 offers logging that offers the most information.
The default is 0.
Tip You can specify unique values for specific users by placing the user name at the beginning of the string. For example, to set logging to 5 for user jsmith, create a string that states: jsmith.debug.level.file = 5.
debug.level.pipe 0 through 6 Specifies the level Job Agent uses to log pipe errors for troubleshooting.
0 = Logging is off.
1 through 6 = Logging is on. The higher the number, the more verbose logging. For example, 1 offers minimal logging, whereas 6 offers logging that offers the most information.
The default is 0.
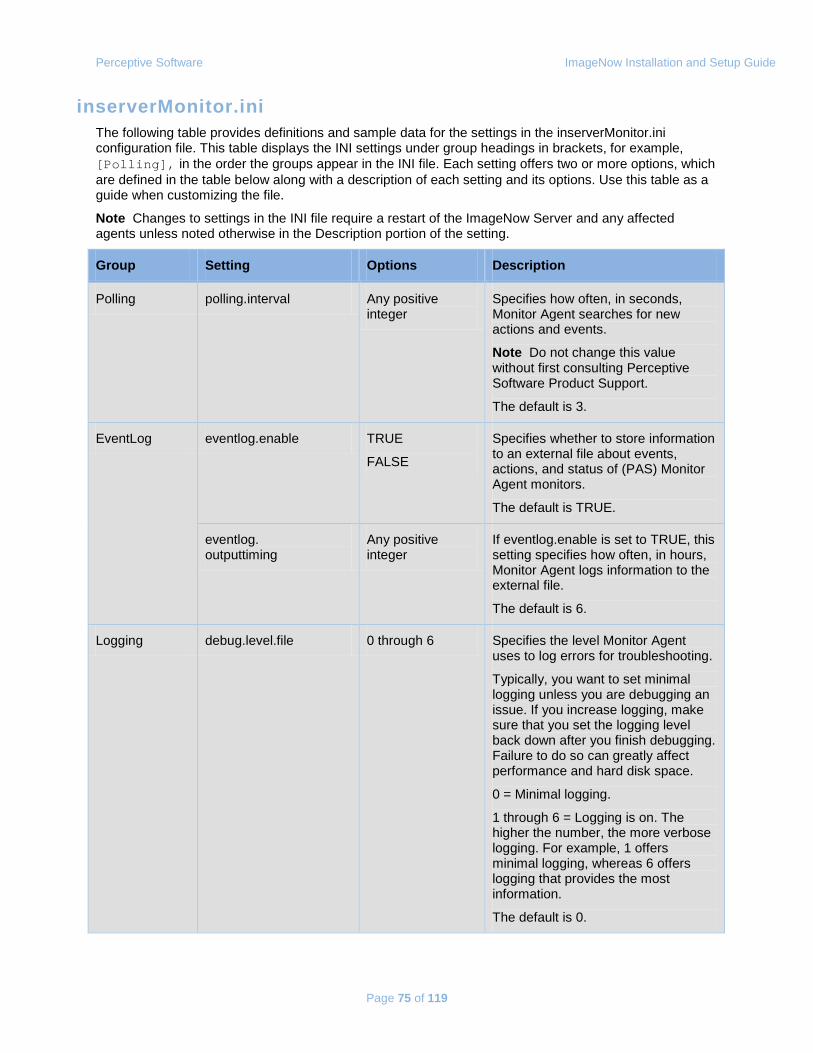
Perceptive Software ImageNow Installation and Setup Guide
Page 75 of 119
inserverMonitor.ini The following table provides definitions and sample data for the settings in the inserverMonitor.ini configuration file. This table displays the INI settings under group headings in brackets, for example, [Polling], in the order the groups appear in the INI file. Each setting offers two or more options, which are defined in the table below along with a description of each setting and its options. Use this table as a guide when customizing the file.
Note Changes to settings in the INI file require a restart of the ImageNow Server and any affected agents unless noted otherwise in the Description portion of the setting.
Group Setting Options Description
Polling polling.interval Any positive integer
Specifies how often, in seconds, Monitor Agent searches for new actions and events.
Note Do not change this value without first consulting Perceptive Software Product Support.
The default is 3.
EventLog eventlog.enable TRUE
FALSE
Specifies whether to store information to an external file about events, actions, and status of (PAS) Monitor Agent monitors.
The default is TRUE.
eventlog. outputtiming
Any positive integer
If eventlog.enable is set to TRUE, this setting specifies how often, in hours, Monitor Agent logs information to the external file.
The default is 6.
Logging debug.level.file 0 through 6 Specifies the level Monitor Agent uses to log errors for troubleshooting.
Typically, you want to set minimal logging unless you are debugging an issue. If you increase logging, make sure that you set the logging level back down after you finish debugging. Failure to do so can greatly affect performance and hard disk space.
0 = Minimal logging.
1 through 6 = Logging is on. The higher the number, the more verbose logging. For example, 1 offers minimal logging, whereas 6 offers logging that provides the most information.
The default is 0.
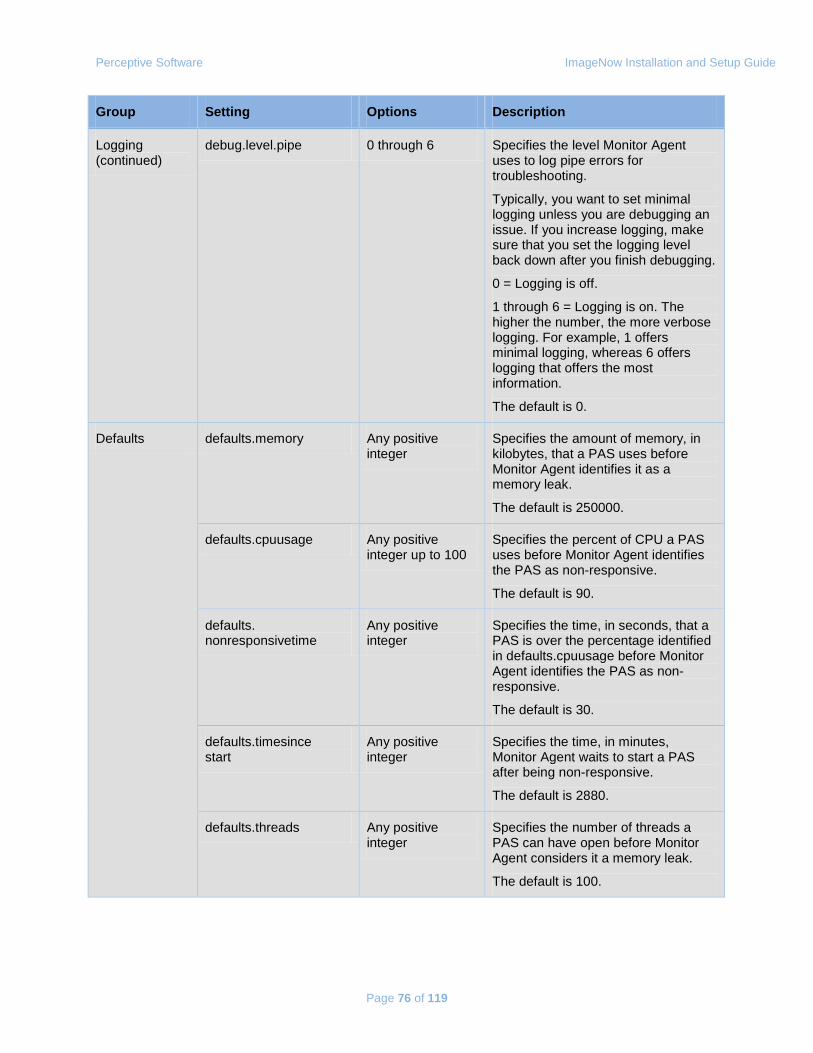
Perceptive Software ImageNow Installation and Setup Guide
Page 76 of 119
Group Setting Options Description
Logging (continued)
debug.level.pipe 0 through 6 Specifies the level Monitor Agent uses to log pipe errors for troubleshooting.
Typically, you want to set minimal logging unless you are debugging an issue. If you increase logging, make sure that you set the logging level back down after you finish debugging.
0 = Logging is off.
1 through 6 = Logging is on. The higher the number, the more verbose logging. For example, 1 offers minimal logging, whereas 6 offers logging that offers the most information.
The default is 0.
Defaults defaults.memory Any positive integer
Specifies the amount of memory, in kilobytes, that a PAS uses before Monitor Agent identifies it as a memory leak.
The default is 250000.
defaults.cpuusage Any positive integer up to 100
Specifies the percent of CPU a PAS uses before Monitor Agent identifies the PAS as non-responsive.
The default is 90.
defaults. nonresponsivetime
Any positive integer
Specifies the time, in seconds, that a PAS is over the percentage identified in defaults.cpuusage before Monitor Agent identifies the PAS as non-responsive.
The default is 30.
defaults.timesince start
Any positive integer
Specifies the time, in minutes, Monitor Agent waits to start a PAS after being non-responsive.
The default is 2880.
defaults.threads Any positive integer
Specifies the number of threads a PAS can have open before Monitor Agent considers it a memory leak.
The default is 100.
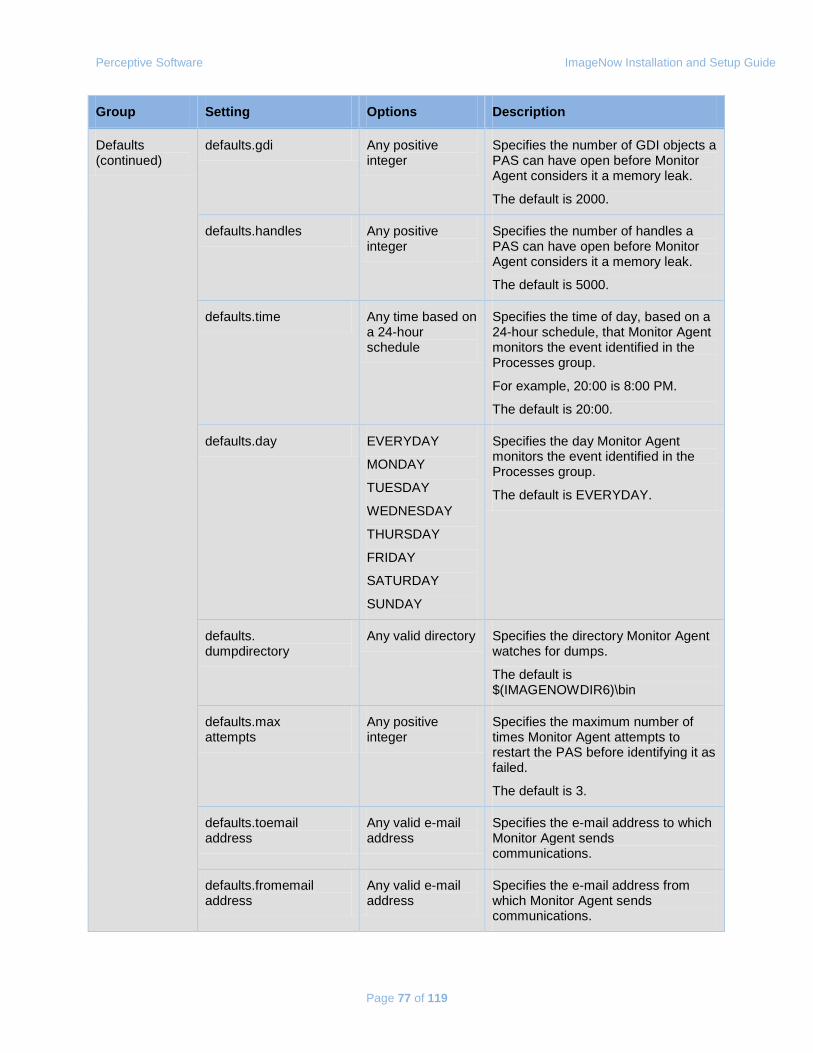
Perceptive Software ImageNow Installation and Setup Guide
Page 77 of 119
Group Setting Options Description
Defaults (continued)
defaults.gdi Any positive integer
Specifies the number of GDI objects a PAS can have open before Monitor Agent considers it a memory leak.
The default is 2000.
defaults.handles Any positive integer
Specifies the number of handles a PAS can have open before Monitor Agent considers it a memory leak.
The default is 5000.
defaults.time Any time based on a 24-hour schedule
Specifies the time of day, based on a 24-hour schedule, that Monitor Agent monitors the event identified in the Processes group.
For example, 20:00 is 8:00 PM.
The default is 20:00.
defaults.day EVERYDAY
MONDAY
TUESDAY
WEDNESDAY
THURSDAY
FRIDAY
SATURDAY
SUNDAY
Specifies the day Monitor Agent monitors the event identified in the Processes group.
The default is EVERYDAY.
defaults. dumpdirectory
Any valid directory Specifies the directory Monitor Agent watches for dumps.
The default is $(IMAGENOWDIR6)\bin
defaults.max attempts
Any positive integer
Specifies the maximum number of times Monitor Agent attempts to restart the PAS before identifying it as failed.
The default is 3.
defaults.toemail address
Any valid e-mail address
Specifies the e-mail address to which Monitor Agent sends communications.
defaults.fromemail address
Any valid e-mail address
Specifies the e-mail address from which Monitor Agent sends communications.
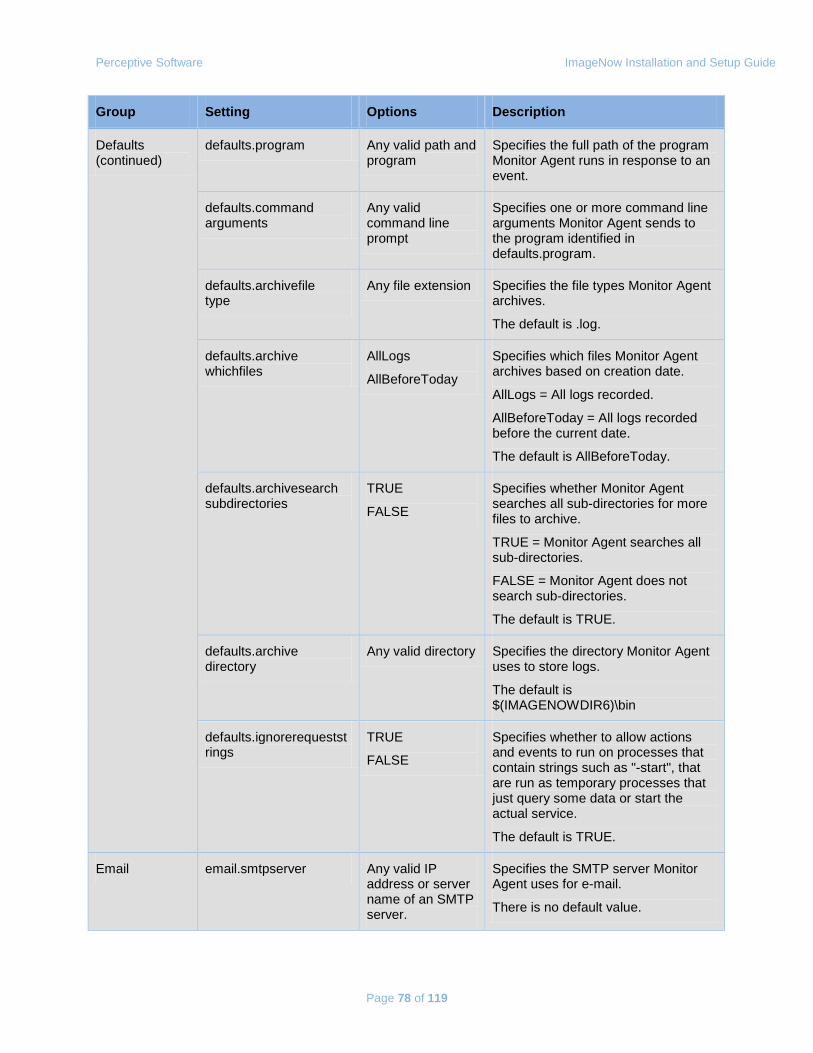
Perceptive Software ImageNow Installation and Setup Guide
Page 78 of 119
Group Setting Options Description
Defaults (continued)
defaults.program Any valid path and program
Specifies the full path of the program Monitor Agent runs in response to an event.
defaults.command arguments
Any valid command line prompt
Specifies one or more command line arguments Monitor Agent sends to the program identified in defaults.program.
defaults.archivefile type
Any file extension Specifies the file types Monitor Agent archives.
The default is .log.
defaults.archive whichfiles
AllLogs
AllBeforeToday
Specifies which files Monitor Agent archives based on creation date.
AllLogs = All logs recorded.
AllBeforeToday = All logs recorded before the current date.
The default is AllBeforeToday.
defaults.archivesearch subdirectories
TRUE
FALSE
Specifies whether Monitor Agent searches all sub-directories for more files to archive.
TRUE = Monitor Agent searches all sub-directories.
FALSE = Monitor Agent does not search sub-directories.
The default is TRUE.
defaults.archive directory
Any valid directory Specifies the directory Monitor Agent uses to store logs.
The default is $(IMAGENOWDIR6)\bin
defaults.ignorerequeststrings
TRUE
FALSE
Specifies whether to allow actions and events to run on processes that contain strings such as "-start", that are run as temporary processes that just query some data or start the actual service.
The default is TRUE.
Email email.smtpserver Any valid IP address or server name of an SMTP server.
Specifies the SMTP server Monitor Agent uses for e-mail.
There is no default value.
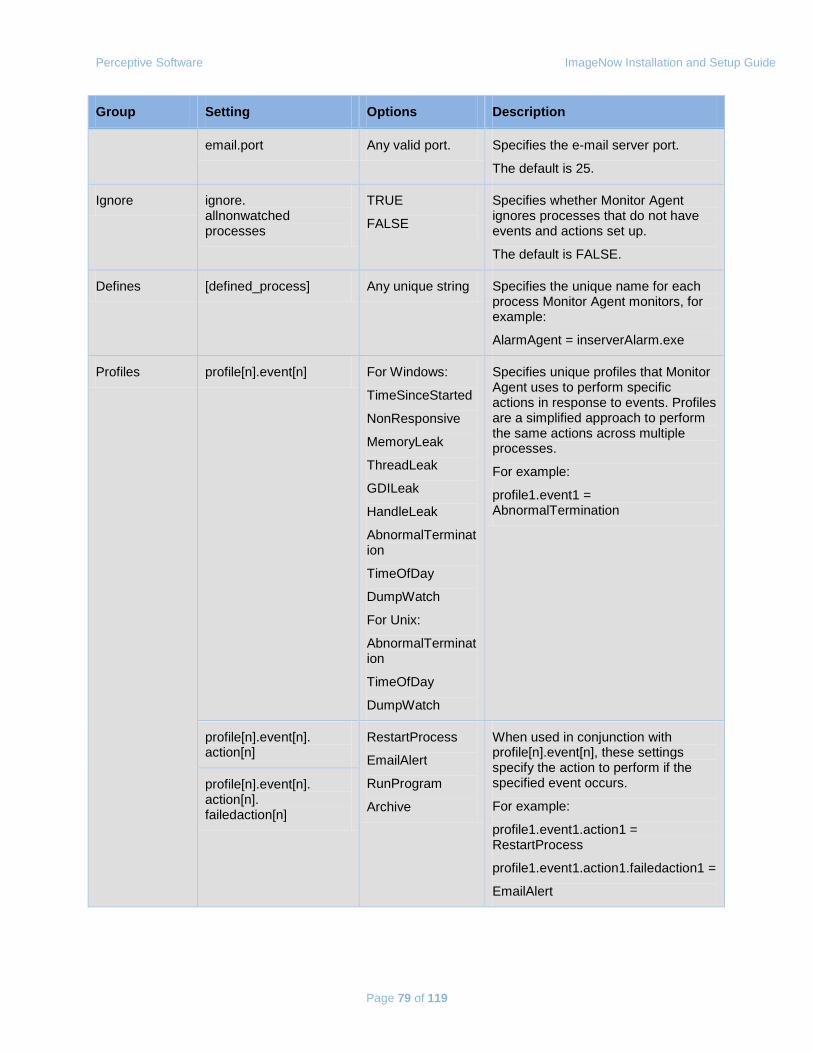
Perceptive Software ImageNow Installation and Setup Guide
Page 79 of 119
Group Setting Options Description
email.port Any valid port. Specifies the e-mail server port.
The default is 25.
Ignore ignore. allnonwatched processes
TRUE
FALSE
Specifies whether Monitor Agent ignores processes that do not have events and actions set up.
The default is FALSE.
Defines [defined_process] Any unique string Specifies the unique name for each process Monitor Agent monitors, for example:
AlarmAgent = inserverAlarm.exe
Profiles profile[n].event[n] For Windows:
TimeSinceStarted
NonResponsive
MemoryLeak
ThreadLeak
GDILeak
HandleLeak
AbnormalTermination
TimeOfDay
DumpWatch
For Unix:
AbnormalTermination
TimeOfDay
DumpWatch
Specifies unique profiles that Monitor Agent uses to perform specific actions in response to events. Profiles are a simplified approach to perform the same actions across multiple processes.
For example:
profile1.event1 = AbnormalTermination
profile[n].event[n]. action[n]
RestartProcess
EmailAlert
RunProgram
Archive
When used in conjunction with profile[n].event[n], these settings specify the action to perform if the specified event occurs.
For example:
profile1.event1.action1 = RestartProcess
profile1.event1.action1.failedaction1 =
EmailAlert
profile[n].event[n]. action[n]. failedaction[n]
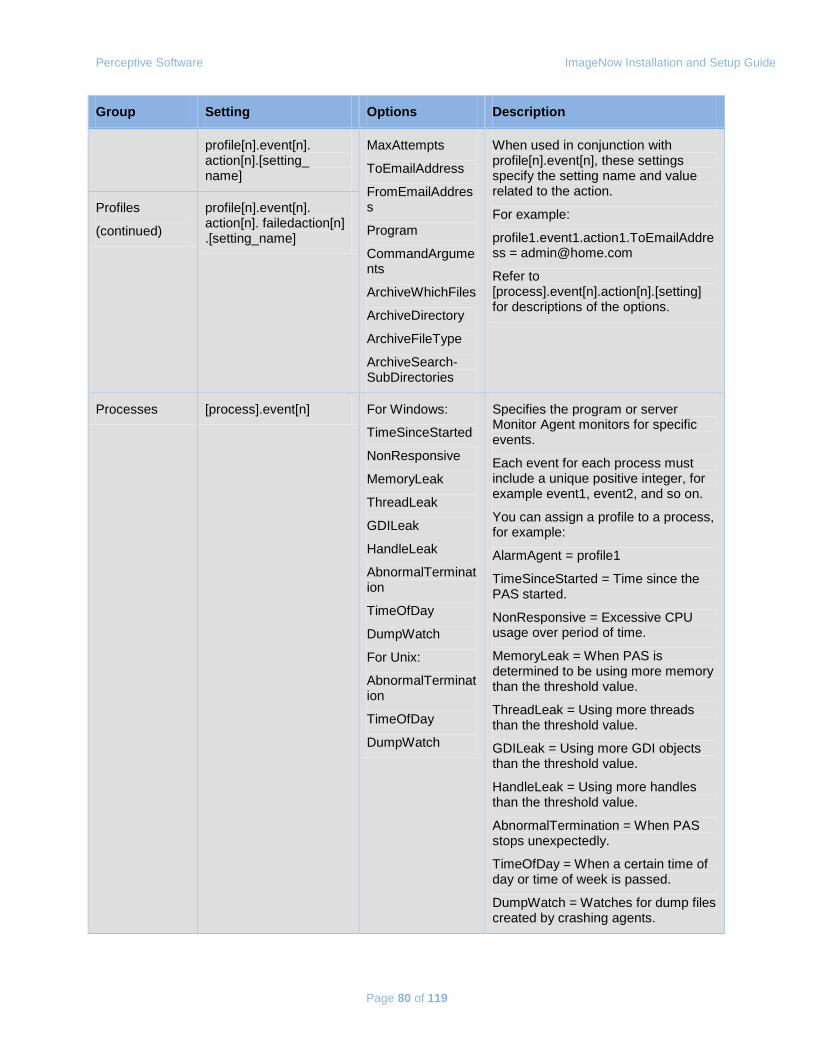
Perceptive Software ImageNow Installation and Setup Guide
Page 80 of 119
Group Setting Options Description
profile[n].event[n]. action[n].[setting_ name]
MaxAttempts
ToEmailAddress
FromEmailAddress
Program
CommandArguments
ArchiveWhichFiles
ArchiveDirectory
ArchiveFileType
ArchiveSearch-SubDirectories
When used in conjunction with profile[n].event[n], these settings specify the setting name and value related to the action.
For example:
profile1.event1.action1.ToEmailAddress = [email protected]
Refer to [process].event[n].action[n].[setting] for descriptions of the options.
Profiles
(continued)
profile[n].event[n]. action[n]. failedaction[n] .[setting_name]
Processes [process].event[n] For Windows:
TimeSinceStarted
NonResponsive
MemoryLeak
ThreadLeak
GDILeak
HandleLeak
AbnormalTermination
TimeOfDay
DumpWatch
For Unix:
AbnormalTermination
TimeOfDay
DumpWatch
Specifies the program or server Monitor Agent monitors for specific events.
Each event for each process must include a unique positive integer, for example event1, event2, and so on.
You can assign a profile to a process, for example:
AlarmAgent = profile1
TimeSinceStarted = Time since the PAS started.
NonResponsive = Excessive CPU usage over period of time.
MemoryLeak = When PAS is determined to be using more memory than the threshold value.
ThreadLeak = Using more threads than the threshold value.
GDILeak = Using more GDI objects than the threshold value.
HandleLeak = Using more handles than the threshold value.
AbnormalTermination = When PAS stops unexpectedly.
TimeOfDay = When a certain time of day or time of week is passed.
DumpWatch = Watches for dump files created by crashing agents.
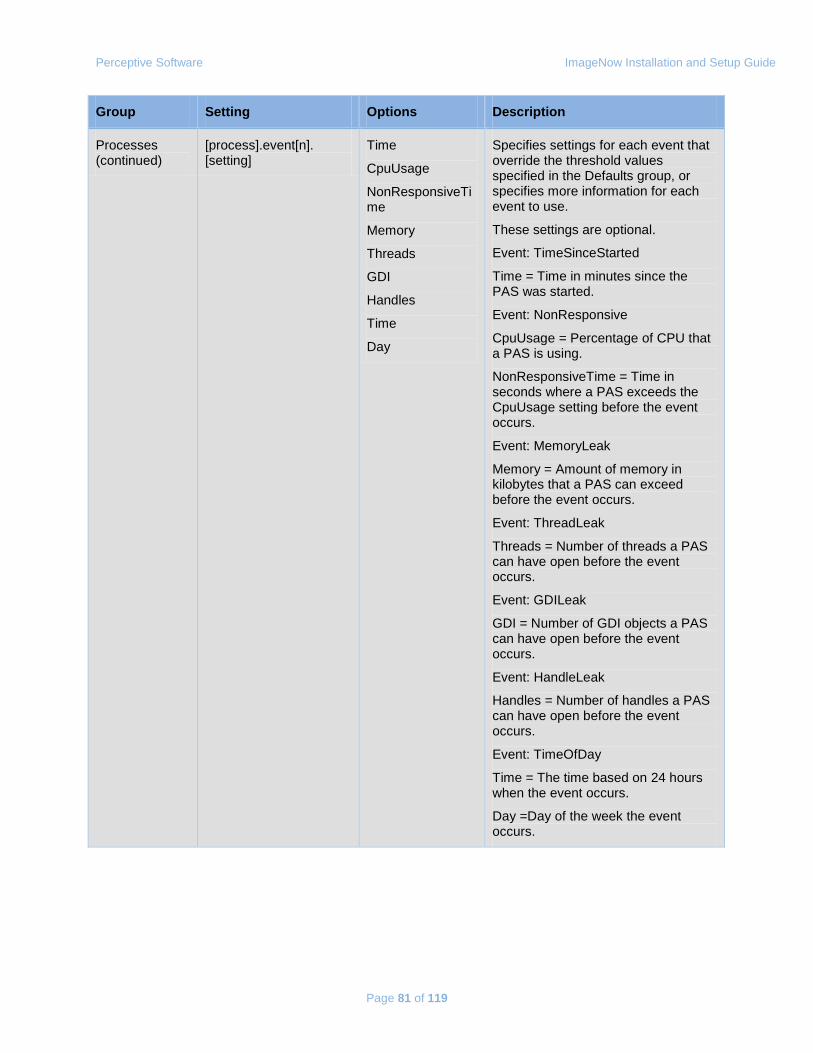
Perceptive Software ImageNow Installation and Setup Guide
Page 81 of 119
Group Setting Options Description
Processes (continued)
[process].event[n]. [setting]
Time
CpuUsage
NonResponsiveTime
Memory
Threads
GDI
Handles
Time
Day
Specifies settings for each event that override the threshold values specified in the Defaults group, or specifies more information for each event to use.
These settings are optional.
Event: TimeSinceStarted
Time = Time in minutes since the PAS was started.
Event: NonResponsive
CpuUsage = Percentage of CPU that a PAS is using.
NonResponsiveTime = Time in seconds where a PAS exceeds the CpuUsage setting before the event occurs.
Event: MemoryLeak
Memory = Amount of memory in kilobytes that a PAS can exceed before the event occurs.
Event: ThreadLeak
Threads = Number of threads a PAS can have open before the event occurs.
Event: GDILeak
GDI = Number of GDI objects a PAS can have open before the event occurs.
Event: HandleLeak
Handles = Number of handles a PAS can have open before the event occurs.
Event: TimeOfDay
Time = The time based on 24 hours when the event occurs.
Day =Day of the week the event occurs.
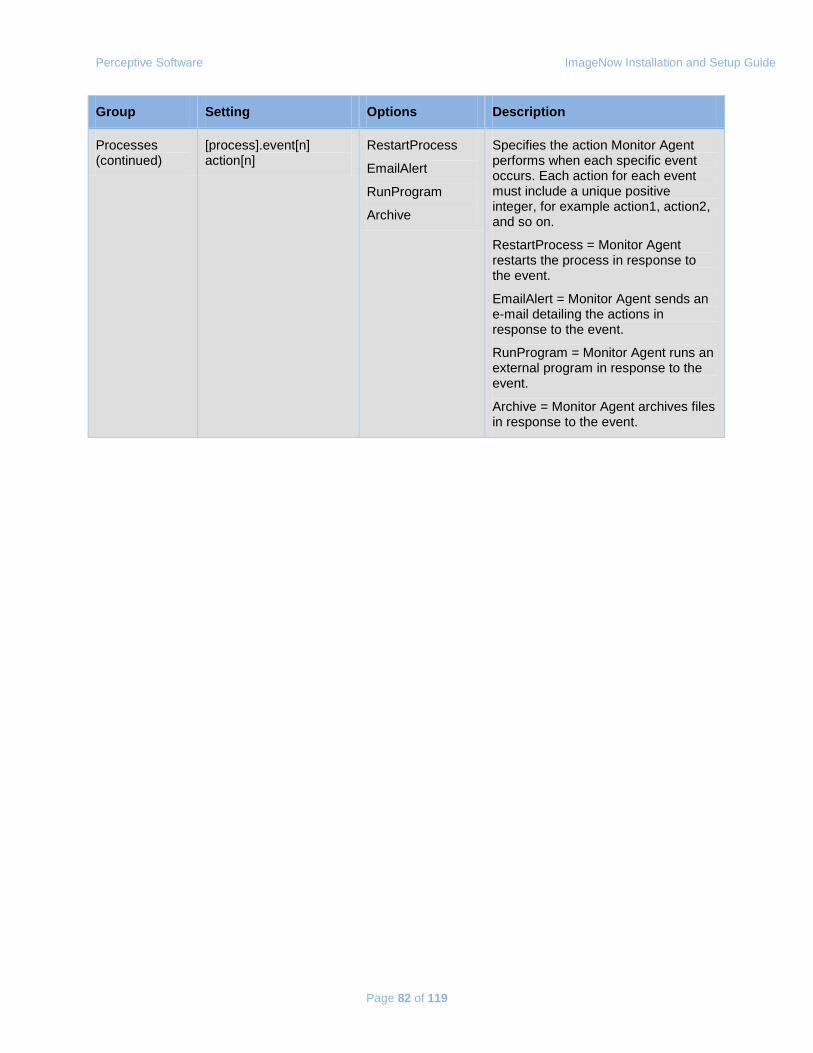
Perceptive Software ImageNow Installation and Setup Guide
Page 82 of 119
Group Setting Options Description
Processes (continued)
[process].event[n] action[n]
RestartProcess
EmailAlert
RunProgram
Archive
Specifies the action Monitor Agent performs when each specific event occurs. Each action for each event must include a unique positive integer, for example action1, action2, and so on.
RestartProcess = Monitor Agent restarts the process in response to the event.
EmailAlert = Monitor Agent sends an e-mail detailing the actions in response to the event.
RunProgram = Monitor Agent runs an external program in response to the event.
Archive = Monitor Agent archives files in response to the event.
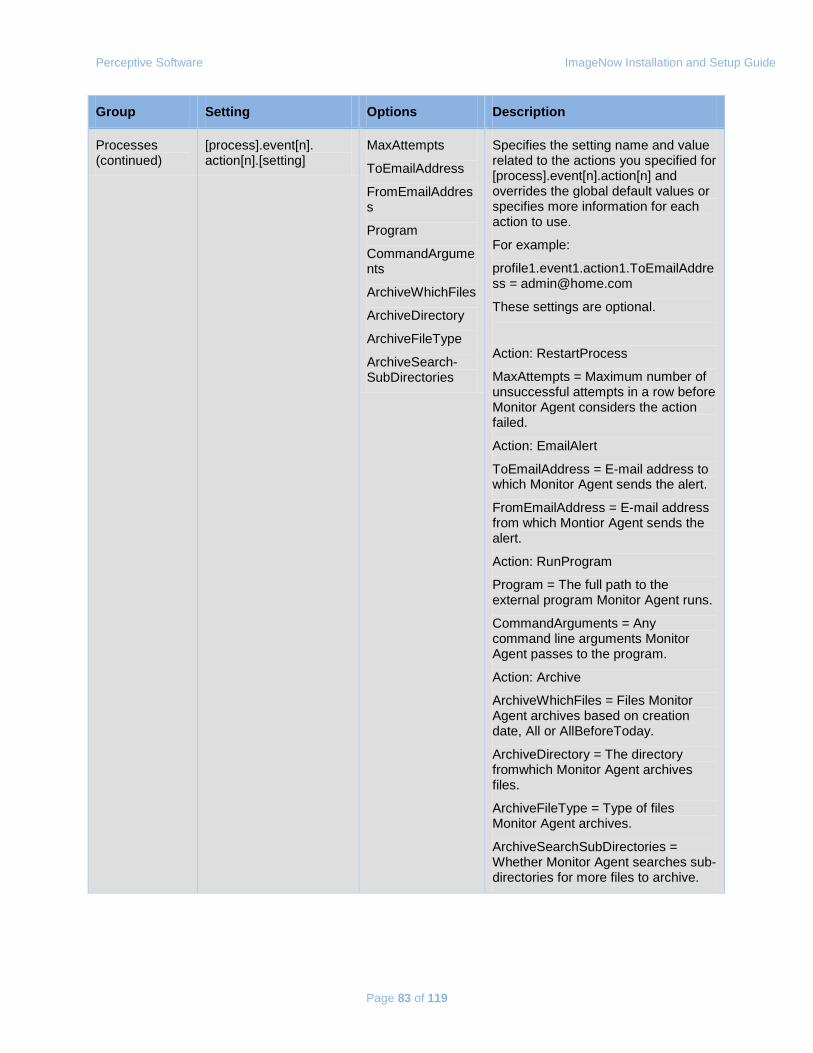
Perceptive Software ImageNow Installation and Setup Guide
Page 83 of 119
Group Setting Options Description
Processes (continued)
[process].event[n]. action[n].[setting]
MaxAttempts
ToEmailAddress
FromEmailAddress
Program
CommandArguments
ArchiveWhichFiles
ArchiveDirectory
ArchiveFileType
ArchiveSearch-SubDirectories
Specifies the setting name and value related to the actions you specified for [process].event[n].action[n] and overrides the global default values or specifies more information for each action to use.
For example:
profile1.event1.action1.ToEmailAddress = [email protected]
These settings are optional.
Action: RestartProcess
MaxAttempts = Maximum number of unsuccessful attempts in a row before Monitor Agent considers the action failed.
Action: EmailAlert
ToEmailAddress = E-mail address to which Monitor Agent sends the alert.
FromEmailAddress = E-mail address from which Montior Agent sends the alert.
Action: RunProgram
Program = The full path to the external program Monitor Agent runs.
CommandArguments = Any command line arguments Monitor Agent passes to the program.
Action: Archive
ArchiveWhichFiles = Files Monitor Agent archives based on creation date, All or AllBeforeToday.
ArchiveDirectory = The directory fromwhich Monitor Agent archives files.
ArchiveFileType = Type of files Monitor Agent archives.
ArchiveSearchSubDirectories = Whether Monitor Agent searches sub-directories for more files to archive.
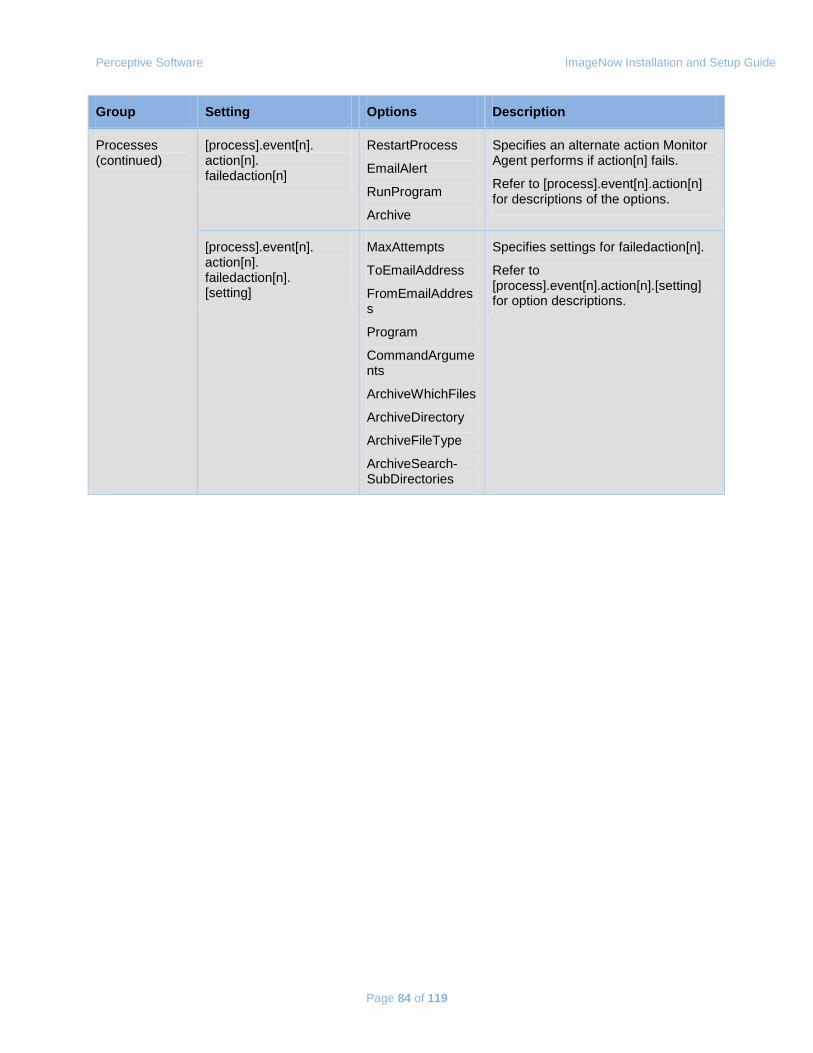
Perceptive Software ImageNow Installation and Setup Guide
Page 84 of 119
Group Setting Options Description
Processes (continued)
[process].event[n]. action[n]. failedaction[n]
RestartProcess
EmailAlert
RunProgram
Archive
Specifies an alternate action Monitor Agent performs if action[n] fails.
Refer to [process].event[n].action[n] for descriptions of the options.
[process].event[n]. action[n]. failedaction[n]. [setting]
MaxAttempts
ToEmailAddress
FromEmailAddress
Program
CommandArguments
ArchiveWhichFiles
ArchiveDirectory
ArchiveFileType
ArchiveSearch-SubDirectories
Specifies settings for failedaction[n].
Refer to [process].event[n].action[n].[setting] for option descriptions.
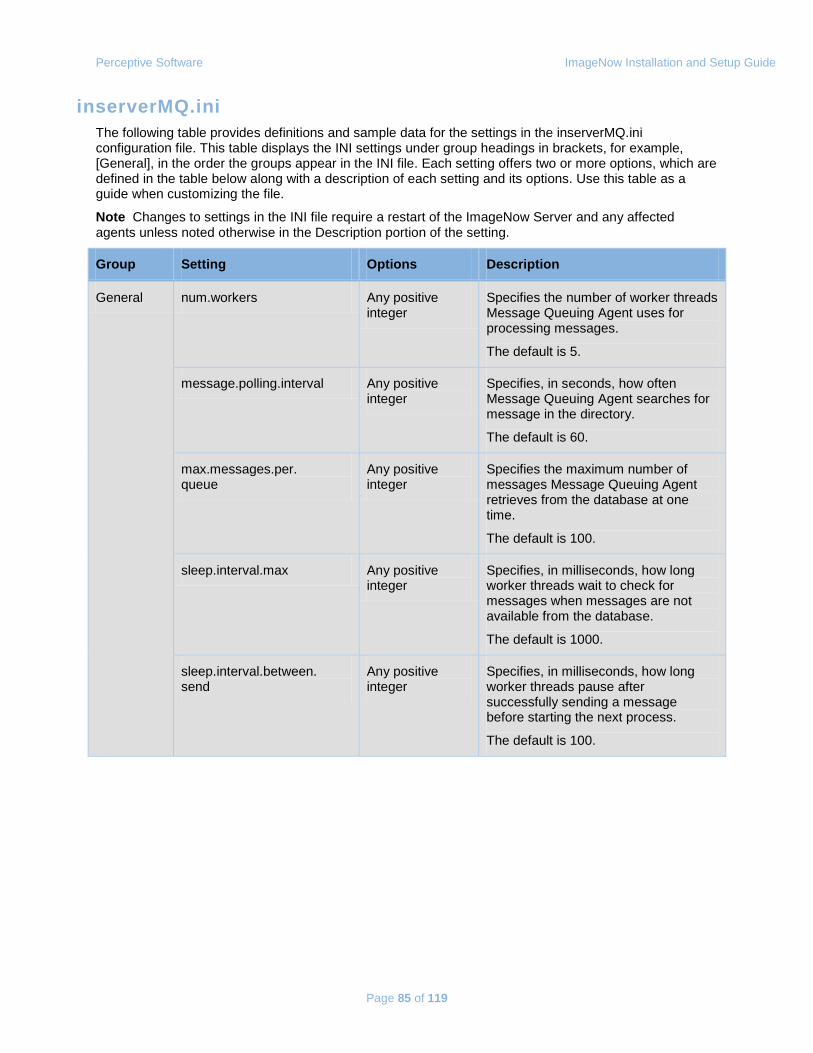
Perceptive Software ImageNow Installation and Setup Guide
Page 85 of 119
inserverMQ.ini The following table provides definitions and sample data for the settings in the inserverMQ.ini configuration file. This table displays the INI settings under group headings in brackets, for example, [General], in the order the groups appear in the INI file. Each setting offers two or more options, which are defined in the table below along with a description of each setting and its options. Use this table as a guide when customizing the file.
Note Changes to settings in the INI file require a restart of the ImageNow Server and any affected agents unless noted otherwise in the Description portion of the setting.
Group Setting Options Description
General num.workers Any positive integer
Specifies the number of worker threads Message Queuing Agent uses for processing messages.
The default is 5.
message.polling.interval Any positive integer
Specifies, in seconds, how often Message Queuing Agent searches for message in the directory.
The default is 60.
max.messages.per. queue
Any positive integer
Specifies the maximum number of messages Message Queuing Agent retrieves from the database at one time.
The default is 100.
sleep.interval.max Any positive integer
Specifies, in milliseconds, how long worker threads wait to check for messages when messages are not available from the database.
The default is 1000.
sleep.interval.between. send
Any positive integer
Specifies, in milliseconds, how long worker threads pause after successfully sending a message before starting the next process.
The default is 100.
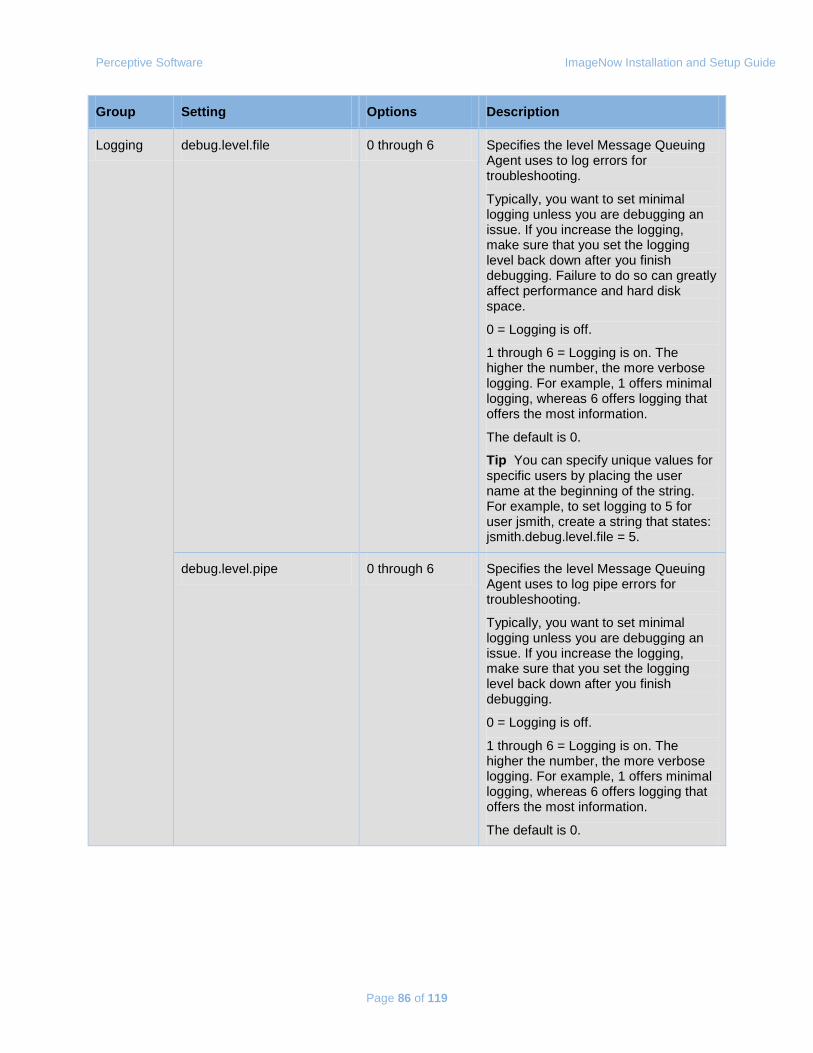
Perceptive Software ImageNow Installation and Setup Guide
Page 86 of 119
Group Setting Options Description
Logging debug.level.file 0 through 6 Specifies the level Message Queuing Agent uses to log errors for troubleshooting.
Typically, you want to set minimal logging unless you are debugging an issue. If you increase the logging, make sure that you set the logging level back down after you finish debugging. Failure to do so can greatly affect performance and hard disk space.
0 = Logging is off.
1 through 6 = Logging is on. The higher the number, the more verbose logging. For example, 1 offers minimal logging, whereas 6 offers logging that offers the most information.
The default is 0.
Tip You can specify unique values for specific users by placing the user name at the beginning of the string. For example, to set logging to 5 for user jsmith, create a string that states: jsmith.debug.level.file = 5.
debug.level.pipe 0 through 6 Specifies the level Message Queuing Agent uses to log pipe errors for troubleshooting.
Typically, you want to set minimal logging unless you are debugging an issue. If you increase the logging, make sure that you set the logging level back down after you finish debugging.
0 = Logging is off.
1 through 6 = Logging is on. The higher the number, the more verbose logging. For example, 1 offers minimal logging, whereas 6 offers logging that offers the most information.
The default is 0.
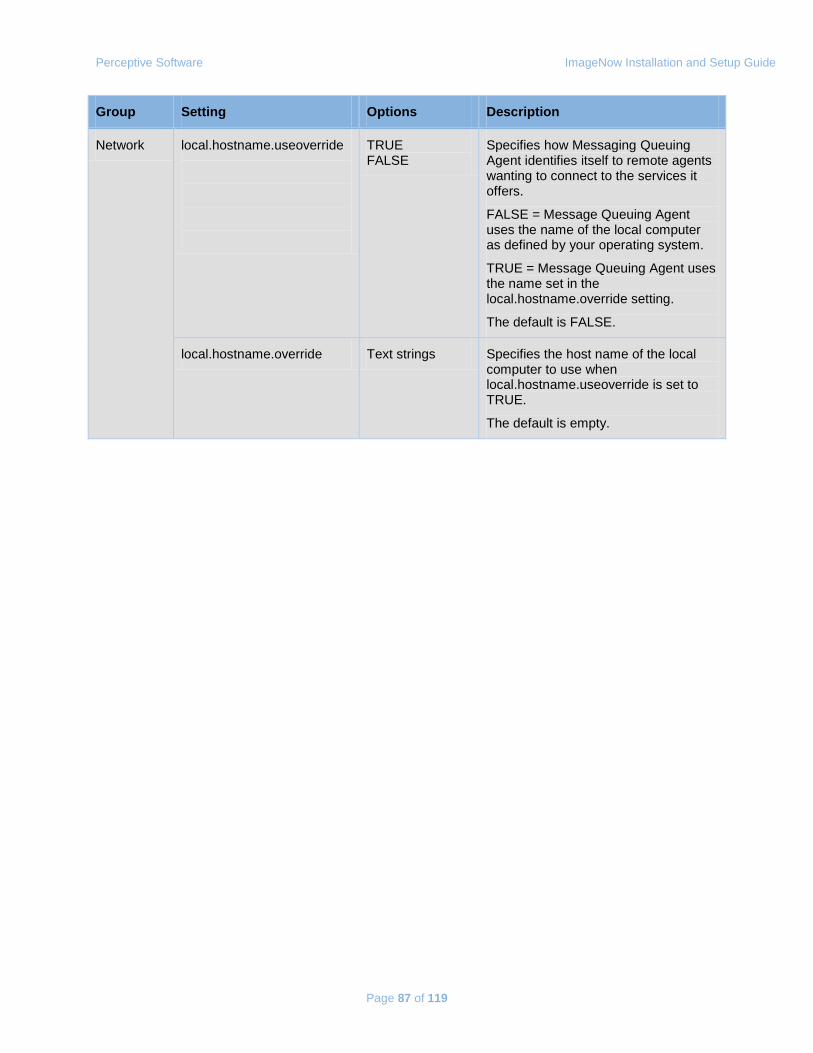
Perceptive Software ImageNow Installation and Setup Guide
Page 87 of 119
Group Setting Options Description
Network local.hostname.useoverride
TRUE FALSE
Specifies how Messaging Queuing Agent identifies itself to remote agents wanting to connect to the services it offers.
FALSE = Message Queuing Agent uses the name of the local computer as defined by your operating system.
TRUE = Message Queuing Agent uses the name set in the local.hostname.override setting.
The default is FALSE.
local.hostname.override Text strings Specifies the host name of the local computer to use when local.hostname.useoverride is set to TRUE.
The default is empty.
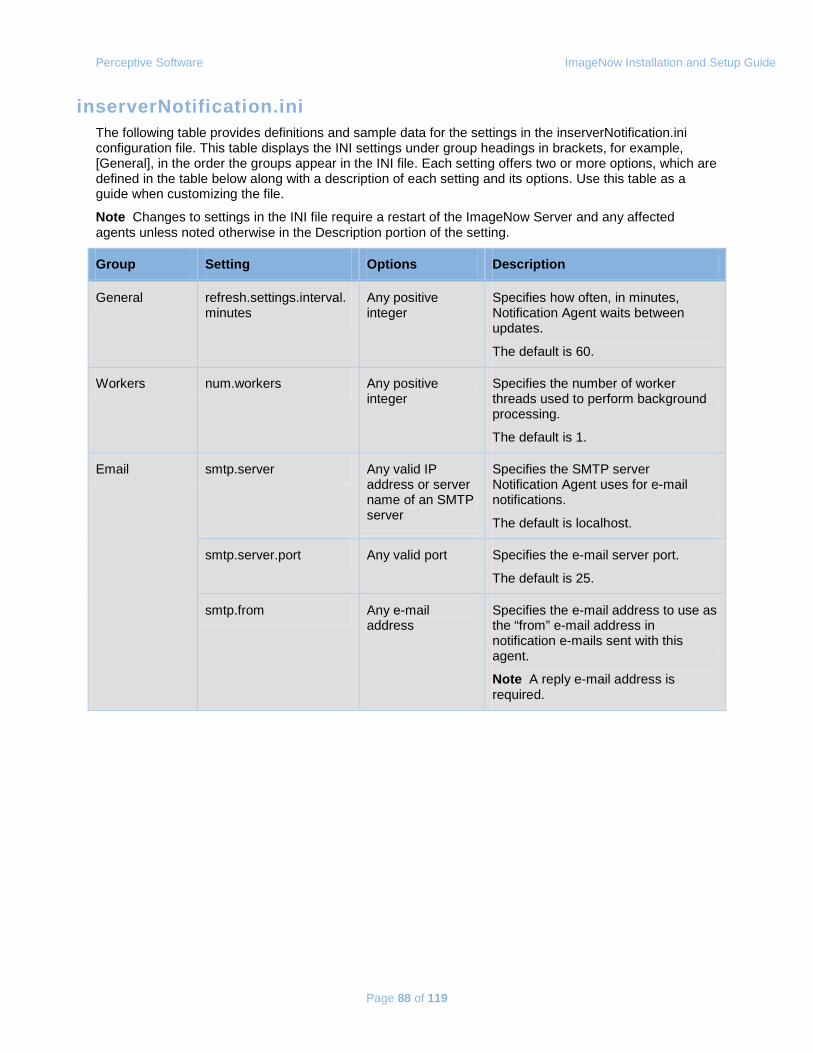
Perceptive Software ImageNow Installation and Setup Guide
Page 88 of 119
inserverNotification.ini The following table provides definitions and sample data for the settings in the inserverNotification.ini configuration file. This table displays the INI settings under group headings in brackets, for example, [General], in the order the groups appear in the INI file. Each setting offers two or more options, which are defined in the table below along with a description of each setting and its options. Use this table as a guide when customizing the file.
Note Changes to settings in the INI file require a restart of the ImageNow Server and any affected agents unless noted otherwise in the Description portion of the setting.
Group Setting Options Description
General refresh.settings.interval. minutes
Any positive integer
Specifies how often, in minutes, Notification Agent waits between updates.
The default is 60.
Workers num.workers Any positive integer
Specifies the number of worker threads used to perform background processing.
The default is 1.
Email smtp.server Any valid IP address or server name of an SMTP server
Specifies the SMTP server Notification Agent uses for e-mail notifications.
The default is localhost.
smtp.server.port Any valid port Specifies the e-mail server port.
The default is 25.
smtp.from Any e-mail address
Specifies the e-mail address to use as the “from” e-mail address in notification e-mails sent with this agent.
Note A reply e-mail address is required.
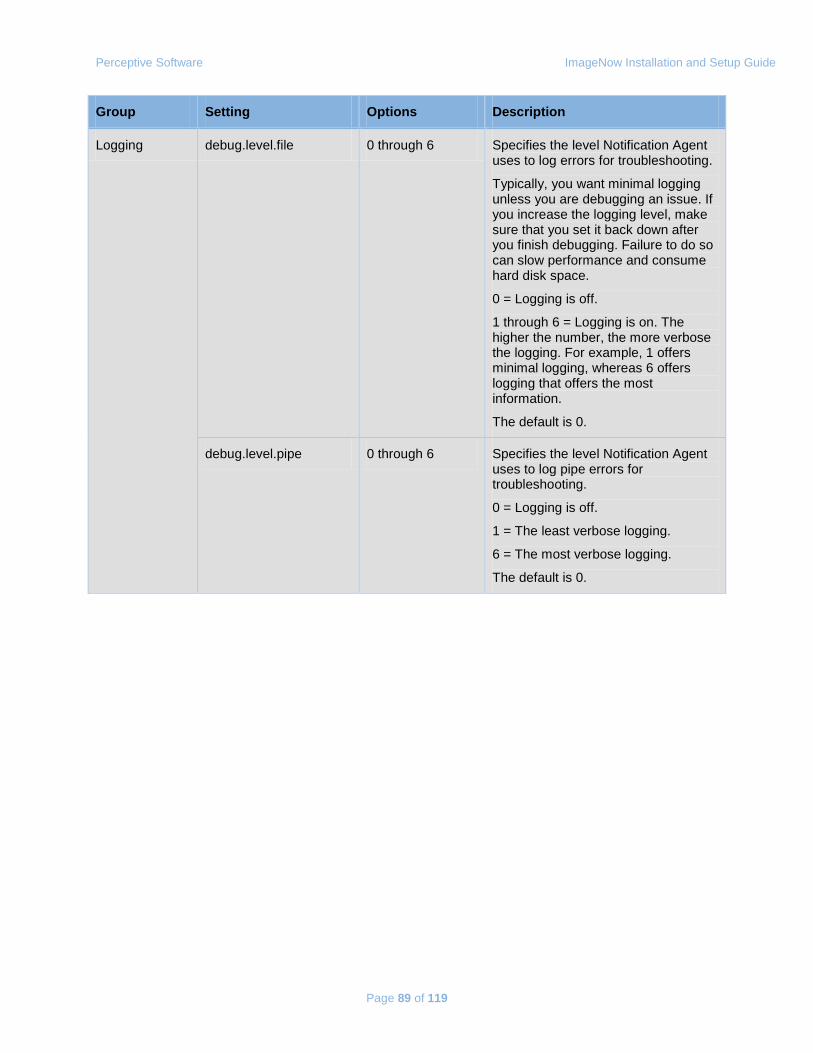
Perceptive Software ImageNow Installation and Setup Guide
Page 89 of 119
Group Setting Options Description
Logging debug.level.file 0 through 6 Specifies the level Notification Agent uses to log errors for troubleshooting.
Typically, you want minimal logging unless you are debugging an issue. If you increase the logging level, make sure that you set it back down after you finish debugging. Failure to do so can slow performance and consume hard disk space.
0 = Logging is off.
1 through 6 = Logging is on. The higher the number, the more verbose the logging. For example, 1 offers minimal logging, whereas 6 offers logging that offers the most information.
The default is 0.
debug.level.pipe 0 through 6 Specifies the level Notification Agent uses to log pipe errors for troubleshooting.
0 = Logging is off.
1 = The least verbose logging.
6 = The most verbose logging.
The default is 0.
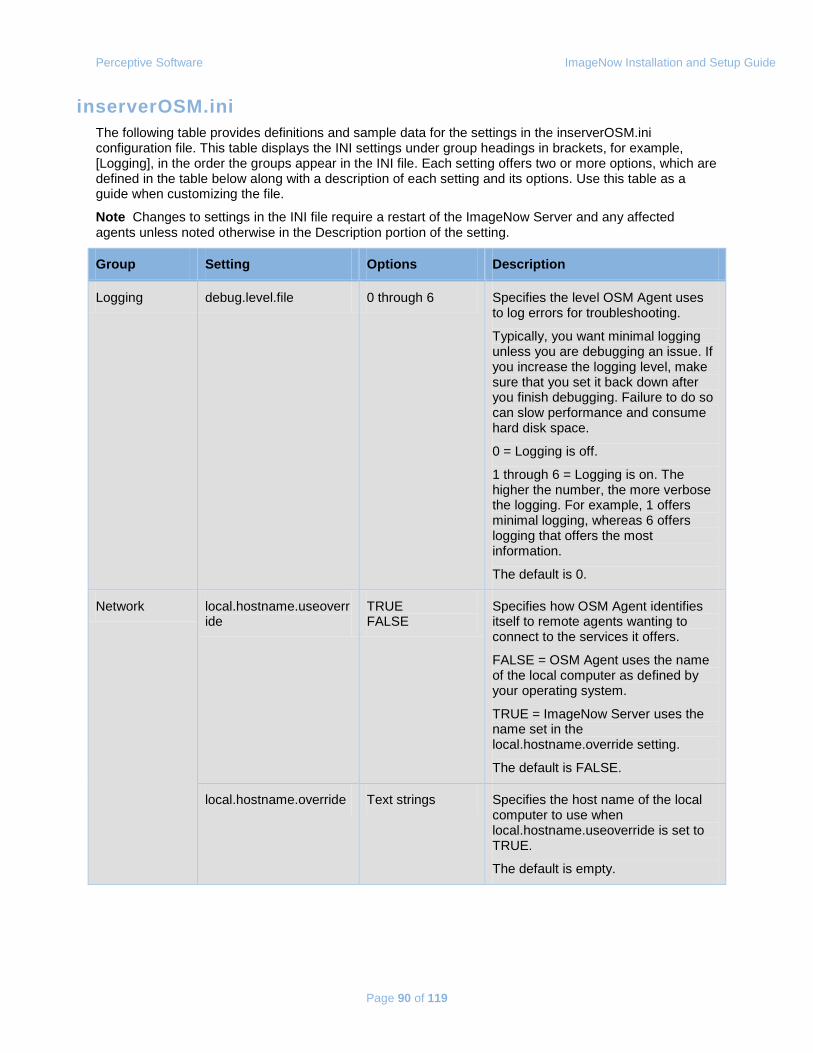
Perceptive Software ImageNow Installation and Setup Guide
Page 90 of 119
inserverOSM.ini The following table provides definitions and sample data for the settings in the inserverOSM.ini configuration file. This table displays the INI settings under group headings in brackets, for example, [Logging], in the order the groups appear in the INI file. Each setting offers two or more options, which are defined in the table below along with a description of each setting and its options. Use this table as a guide when customizing the file.
Note Changes to settings in the INI file require a restart of the ImageNow Server and any affected agents unless noted otherwise in the Description portion of the setting.
Group Setting Options Description
Logging debug.level.file 0 through 6 Specifies the level OSM Agent uses to log errors for troubleshooting.
Typically, you want minimal logging unless you are debugging an issue. If you increase the logging level, make sure that you set it back down after you finish debugging. Failure to do so can slow performance and consume hard disk space.
0 = Logging is off.
1 through 6 = Logging is on. The higher the number, the more verbose the logging. For example, 1 offers minimal logging, whereas 6 offers logging that offers the most information.
The default is 0.
Network local.hostname.useoverride
TRUE FALSE
Specifies how OSM Agent identifies itself to remote agents wanting to connect to the services it offers.
FALSE = OSM Agent uses the name of the local computer as defined by your operating system.
TRUE = ImageNow Server uses the name set in the local.hostname.override setting.
The default is FALSE.
local.hostname.override Text strings Specifies the host name of the local computer to use when local.hostname.useoverride is set to TRUE.
The default is empty.
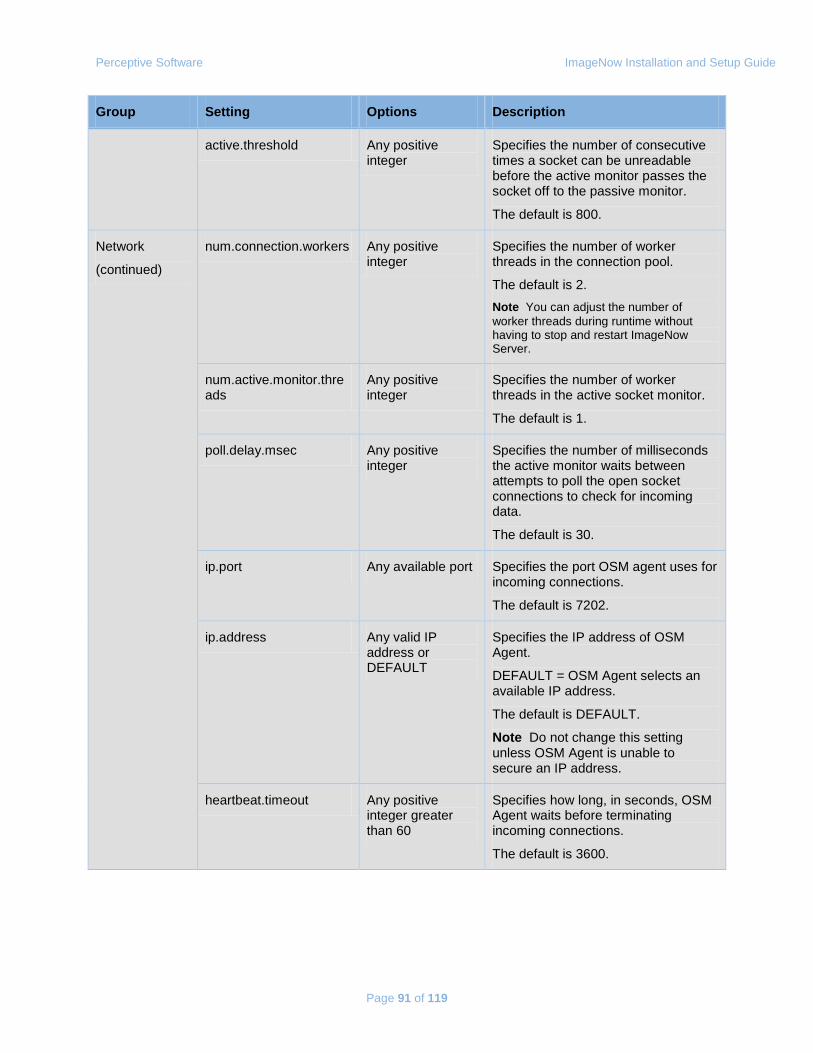
Perceptive Software ImageNow Installation and Setup Guide
Page 91 of 119
Group Setting Options Description
active.threshold Any positive integer
Specifies the number of consecutive times a socket can be unreadable before the active monitor passes the socket off to the passive monitor.
The default is 800.
Network
(continued)
num.connection.workers Any positive integer
Specifies the number of worker threads in the connection pool.
The default is 2. Note You can adjust the number of worker threads during runtime without having to stop and restart ImageNow Server.
num.active.monitor.threads
Any positive integer
Specifies the number of worker threads in the active socket monitor.
The default is 1.
poll.delay.msec Any positive integer
Specifies the number of milliseconds the active monitor waits between attempts to poll the open socket connections to check for incoming data.
The default is 30.
ip.port Any available port Specifies the port OSM agent uses for incoming connections.
The default is 7202.
ip.address Any valid IP address or DEFAULT
Specifies the IP address of OSM Agent.
DEFAULT = OSM Agent selects an available IP address.
The default is DEFAULT.
Note Do not change this setting unless OSM Agent is unable to secure an IP address.
heartbeat.timeout Any positive integer greater than 60
Specifies how long, in seconds, OSM Agent waits before terminating incoming connections.
The default is 3600.
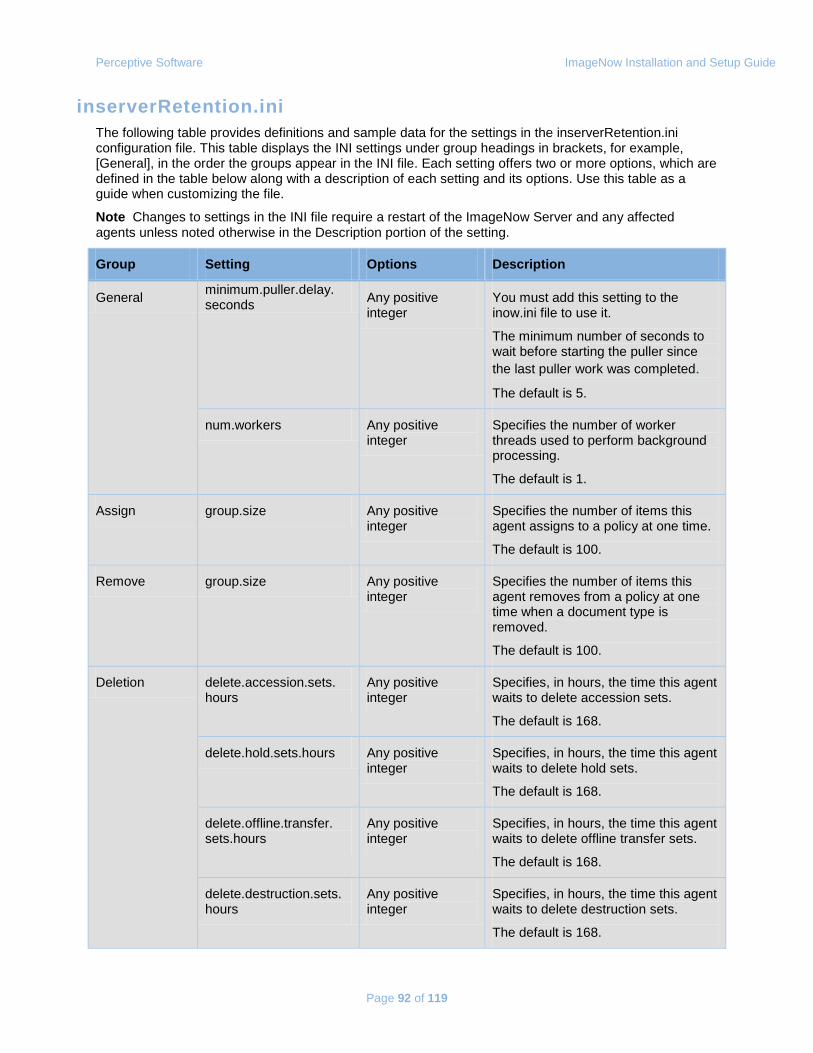
Perceptive Software ImageNow Installation and Setup Guide
Page 92 of 119
inserverRetention.ini The following table provides definitions and sample data for the settings in the inserverRetention.ini configuration file. This table displays the INI settings under group headings in brackets, for example, [General], in the order the groups appear in the INI file. Each setting offers two or more options, which are defined in the table below along with a description of each setting and its options. Use this table as a guide when customizing the file.
Note Changes to settings in the INI file require a restart of the ImageNow Server and any affected agents unless noted otherwise in the Description portion of the setting.
Group Setting Options Description
General minimum.puller.delay. seconds Any positive
integer You must add this setting to the inow.ini file to use it.
The minimum number of seconds to wait before starting the puller since the last puller work was completed. The default is 5.
num.workers Any positive integer
Specifies the number of worker threads used to perform background processing.
The default is 1.
Assign group.size Any positive integer
Specifies the number of items this agent assigns to a policy at one time.
The default is 100.
Remove group.size Any positive integer
Specifies the number of items this agent removes from a policy at one time when a document type is removed.
The default is 100.
Deletion delete.accession.sets. hours
Any positive integer
Specifies, in hours, the time this agent waits to delete accession sets.
The default is 168.
delete.hold.sets.hours Any positive integer
Specifies, in hours, the time this agent waits to delete hold sets.
The default is 168.
delete.offline.transfer. sets.hours
Any positive integer
Specifies, in hours, the time this agent waits to delete offline transfer sets.
The default is 168.
delete.destruction.sets. hours
Any positive integer
Specifies, in hours, the time this agent waits to delete destruction sets.
The default is 168.
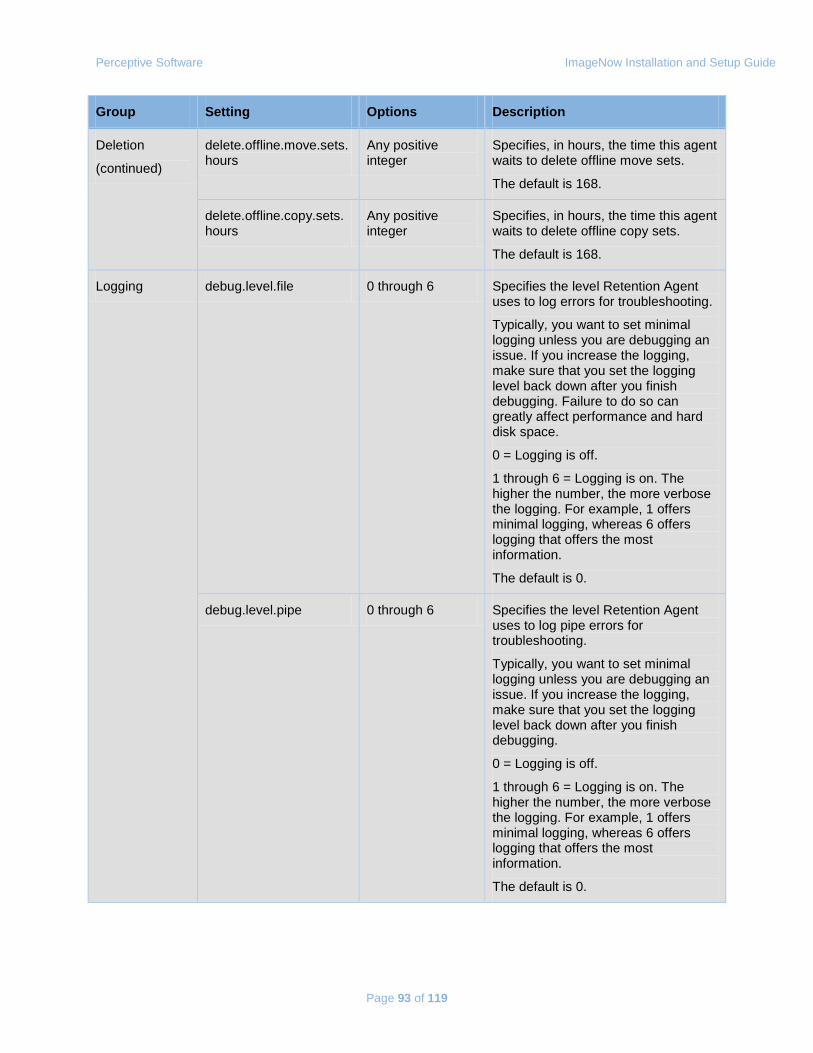
Perceptive Software ImageNow Installation and Setup Guide
Page 93 of 119
Group Setting Options Description
Deletion
(continued)
delete.offline.move.sets. hours
Any positive integer
Specifies, in hours, the time this agent waits to delete offline move sets.
The default is 168.
delete.offline.copy.sets. hours
Any positive integer
Specifies, in hours, the time this agent waits to delete offline copy sets.
The default is 168.
Logging debug.level.file 0 through 6 Specifies the level Retention Agent uses to log errors for troubleshooting.
Typically, you want to set minimal logging unless you are debugging an issue. If you increase the logging, make sure that you set the logging level back down after you finish debugging. Failure to do so can greatly affect performance and hard disk space.
0 = Logging is off.
1 through 6 = Logging is on. The higher the number, the more verbose the logging. For example, 1 offers minimal logging, whereas 6 offers logging that offers the most information.
The default is 0.
debug.level.pipe 0 through 6 Specifies the level Retention Agent uses to log pipe errors for troubleshooting.
Typically, you want to set minimal logging unless you are debugging an issue. If you increase the logging, make sure that you set the logging level back down after you finish debugging.
0 = Logging is off.
1 through 6 = Logging is on. The higher the number, the more verbose the logging. For example, 1 offers minimal logging, whereas 6 offers logging that offers the most information.
The default is 0.
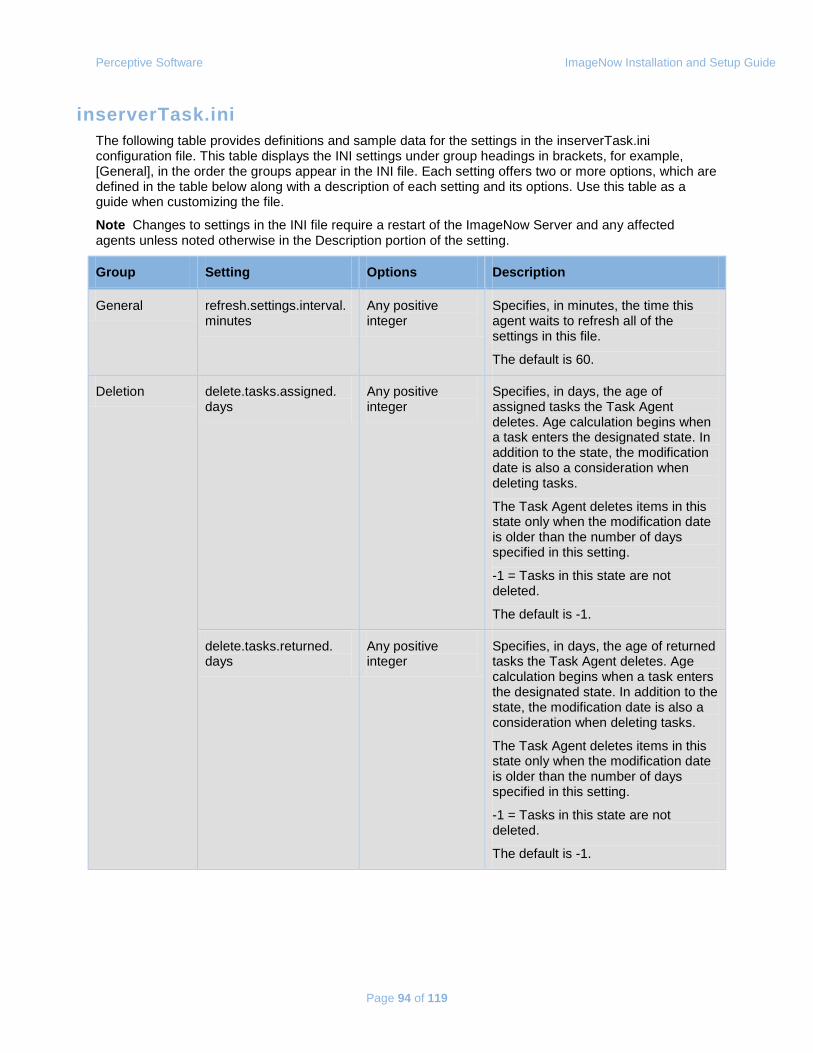
Perceptive Software ImageNow Installation and Setup Guide
Page 94 of 119
inserverTask.ini The following table provides definitions and sample data for the settings in the inserverTask.ini configuration file. This table displays the INI settings under group headings in brackets, for example, [General], in the order the groups appear in the INI file. Each setting offers two or more options, which are defined in the table below along with a description of each setting and its options. Use this table as a guide when customizing the file.
Note Changes to settings in the INI file require a restart of the ImageNow Server and any affected agents unless noted otherwise in the Description portion of the setting.
Group Setting Options Description
General refresh.settings.interval. minutes
Any positive integer
Specifies, in minutes, the time this agent waits to refresh all of the settings in this file.
The default is 60.
Deletion delete.tasks.assigned. days
Any positive integer
Specifies, in days, the age of assigned tasks the Task Agent deletes. Age calculation begins when a task enters the designated state. In addition to the state, the modification date is also a consideration when deleting tasks.
The Task Agent deletes items in this state only when the modification date is older than the number of days specified in this setting.
-1 = Tasks in this state are not deleted.
The default is -1.
delete.tasks.returned. days
Any positive integer
Specifies, in days, the age of returned tasks the Task Agent deletes. Age calculation begins when a task enters the designated state. In addition to the state, the modification date is also a consideration when deleting tasks.
The Task Agent deletes items in this state only when the modification date is older than the number of days specified in this setting.
-1 = Tasks in this state are not deleted.
The default is -1.
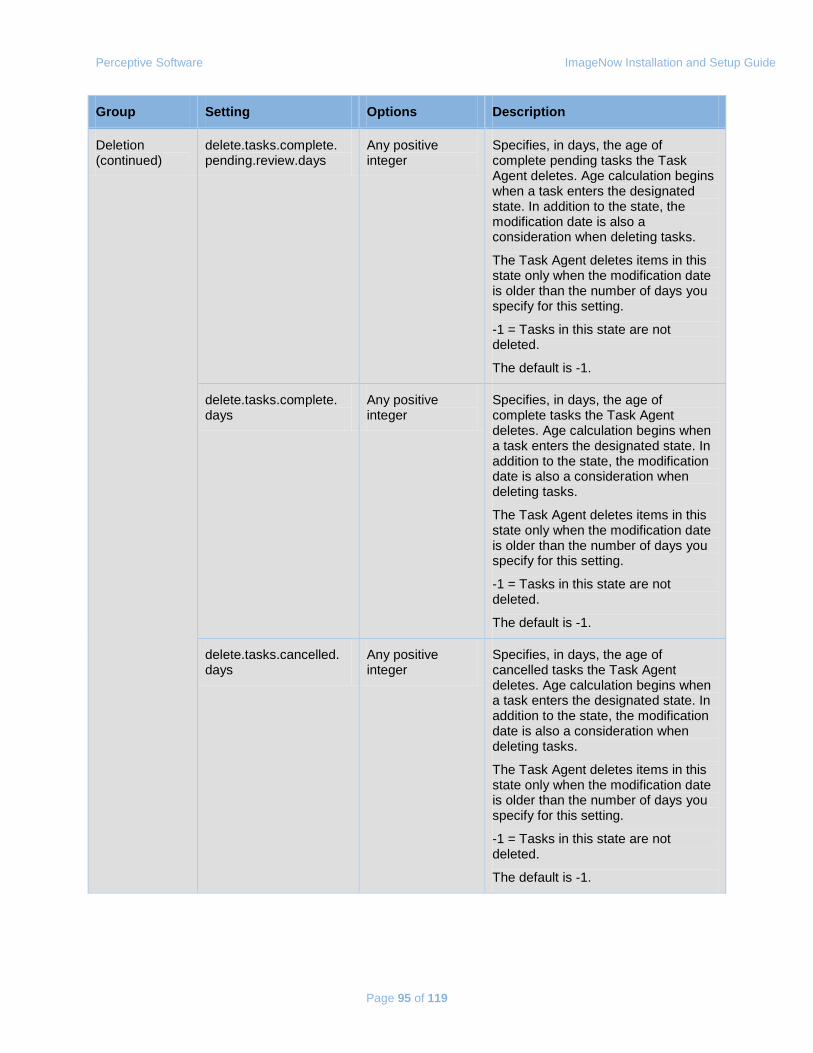
Perceptive Software ImageNow Installation and Setup Guide
Page 95 of 119
Group Setting Options Description
Deletion (continued)
delete.tasks.complete. pending.review.days
Any positive integer
Specifies, in days, the age of complete pending tasks the Task Agent deletes. Age calculation begins when a task enters the designated state. In addition to the state, the modification date is also a consideration when deleting tasks.
The Task Agent deletes items in this state only when the modification date is older than the number of days you specify for this setting.
-1 = Tasks in this state are not deleted.
The default is -1.
delete.tasks.complete. days
Any positive integer
Specifies, in days, the age of complete tasks the Task Agent deletes. Age calculation begins when a task enters the designated state. In addition to the state, the modification date is also a consideration when deleting tasks.
The Task Agent deletes items in this state only when the modification date is older than the number of days you specify for this setting.
-1 = Tasks in this state are not deleted.
The default is -1.
delete.tasks.cancelled. days
Any positive integer
Specifies, in days, the age of cancelled tasks the Task Agent deletes. Age calculation begins when a task enters the designated state. In addition to the state, the modification date is also a consideration when deleting tasks.
The Task Agent deletes items in this state only when the modification date is older than the number of days you specify for this setting.
-1 = Tasks in this state are not deleted.
The default is -1.
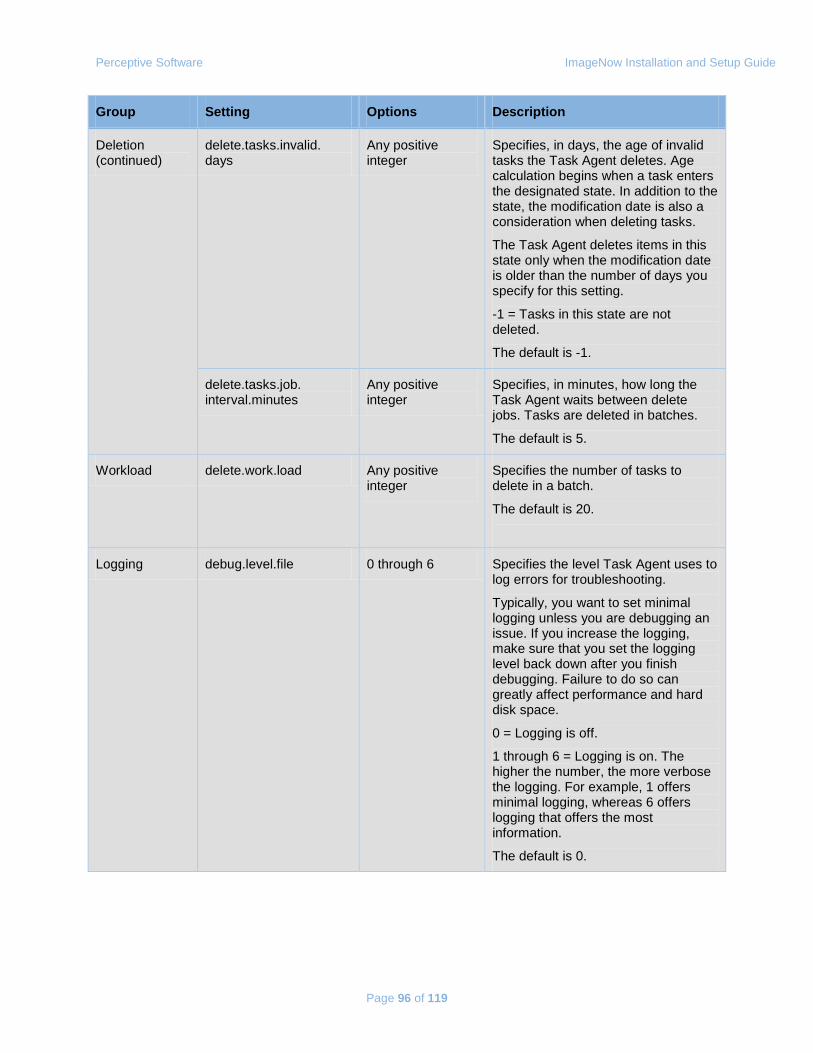
Perceptive Software ImageNow Installation and Setup Guide
Page 96 of 119
Group Setting Options Description
Deletion (continued)
delete.tasks.invalid. days
Any positive integer
Specifies, in days, the age of invalid tasks the Task Agent deletes. Age calculation begins when a task enters the designated state. In addition to the state, the modification date is also a consideration when deleting tasks.
The Task Agent deletes items in this state only when the modification date is older than the number of days you specify for this setting.
-1 = Tasks in this state are not deleted.
The default is -1.
delete.tasks.job. interval.minutes
Any positive integer
Specifies, in minutes, how long the Task Agent waits between delete jobs. Tasks are deleted in batches.
The default is 5.
Workload delete.work.load Any positive integer
Specifies the number of tasks to delete in a batch.
The default is 20.
Logging debug.level.file 0 through 6 Specifies the level Task Agent uses to log errors for troubleshooting.
Typically, you want to set minimal logging unless you are debugging an issue. If you increase the logging, make sure that you set the logging level back down after you finish debugging. Failure to do so can greatly affect performance and hard disk space.
0 = Logging is off.
1 through 6 = Logging is on. The higher the number, the more verbose the logging. For example, 1 offers minimal logging, whereas 6 offers logging that offers the most information.
The default is 0.
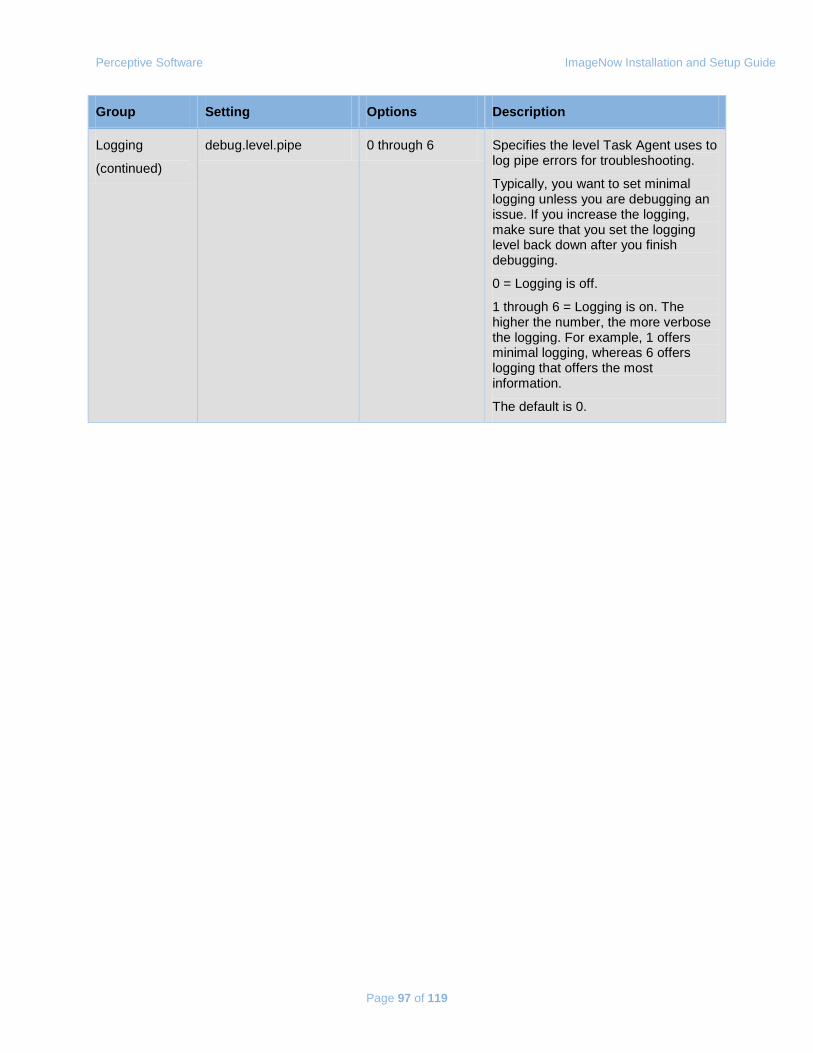
Perceptive Software ImageNow Installation and Setup Guide
Page 97 of 119
Group Setting Options Description
Logging
(continued)
debug.level.pipe 0 through 6 Specifies the level Task Agent uses to log pipe errors for troubleshooting.
Typically, you want to set minimal logging unless you are debugging an issue. If you increase the logging, make sure that you set the logging level back down after you finish debugging.
0 = Logging is off.
1 through 6 = Logging is on. The higher the number, the more verbose the logging. For example, 1 offers minimal logging, whereas 6 offers logging that offers the most information.
The default is 0.
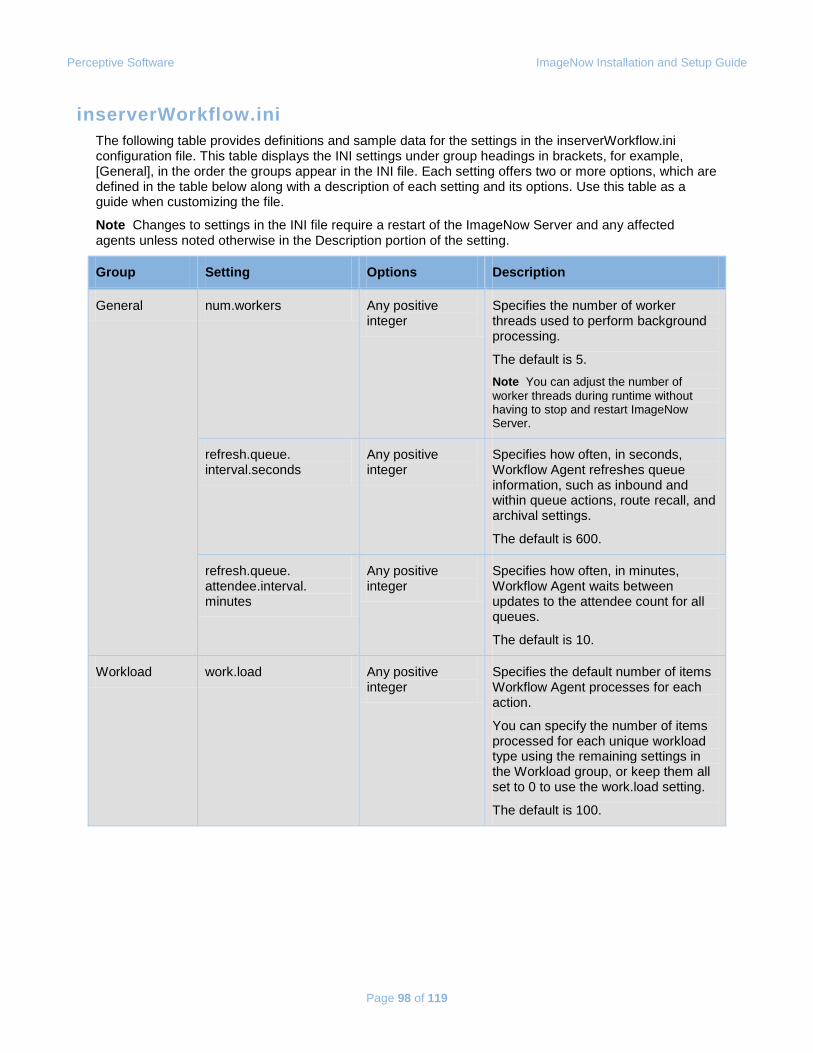
Perceptive Software ImageNow Installation and Setup Guide
Page 98 of 119
inserverWorkflow.ini The following table provides definitions and sample data for the settings in the inserverWorkflow.ini configuration file. This table displays the INI settings under group headings in brackets, for example, [General], in the order the groups appear in the INI file. Each setting offers two or more options, which are defined in the table below along with a description of each setting and its options. Use this table as a guide when customizing the file.
Note Changes to settings in the INI file require a restart of the ImageNow Server and any affected agents unless noted otherwise in the Description portion of the setting.
Group Setting Options Description
General num.workers Any positive integer
Specifies the number of worker threads used to perform background processing.
The default is 5. Note You can adjust the number of worker threads during runtime without having to stop and restart ImageNow Server.
refresh.queue. interval.seconds
Any positive integer
Specifies how often, in seconds, Workflow Agent refreshes queue information, such as inbound and within queue actions, route recall, and archival settings.
The default is 600.
refresh.queue. attendee.interval. minutes
Any positive integer
Specifies how often, in minutes, Workflow Agent waits between updates to the attendee count for all queues.
The default is 10.
Workload work.load Any positive integer
Specifies the default number of items Workflow Agent processes for each action.
You can specify the number of items processed for each unique workload type using the remaining settings in the Workload group, or keep them all set to 0 to use the work.load setting.
The default is 100.
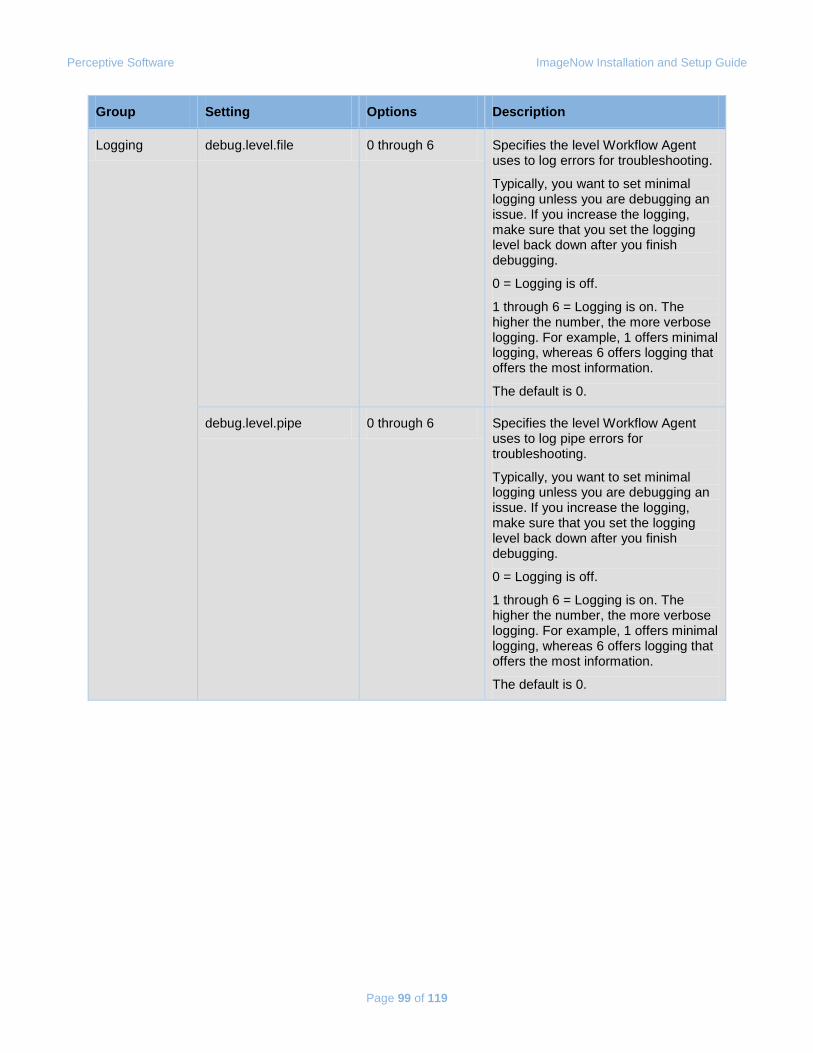
Perceptive Software ImageNow Installation and Setup Guide
Page 99 of 119
Group Setting Options Description
Logging debug.level.file 0 through 6 Specifies the level Workflow Agent uses to log errors for troubleshooting.
Typically, you want to set minimal logging unless you are debugging an issue. If you increase the logging, make sure that you set the logging level back down after you finish debugging.
0 = Logging is off.
1 through 6 = Logging is on. The higher the number, the more verbose logging. For example, 1 offers minimal logging, whereas 6 offers logging that offers the most information.
The default is 0.
debug.level.pipe 0 through 6 Specifies the level Workflow Agent uses to log pipe errors for troubleshooting.
Typically, you want to set minimal logging unless you are debugging an issue. If you increase the logging, make sure that you set the logging level back down after you finish debugging.
0 = Logging is off.
1 through 6 = Logging is on. The higher the number, the more verbose logging. For example, 1 offers minimal logging, whereas 6 offers logging that offers the most information.
The default is 0.
Perceptive Software ImageNow Installation and Setup Guide
Page 100 of 119
Client configuration tables
ImageNow.ini The following table provides definitions and sample data for the most commonly used settings in the ImageNow.ini configuration file. This table displays the INI settings under group headings in brackets, for example, [User Preferences], in the order the groups appear in the INI file. Each setting offers two or more options, which are defined in the table below along with a description of each setting and its options. Use this table as a guide when customizing the file.
Additional settings The standard settings for the imagenow.ini file appear in the following section. In addition to the standard settings, you can manually add the following settings to imagenow.ini as needed. We recommend that you add these settings to both the default imagenow.ini file and any imagenow.ini files that have been created in the user profiles. The default imagenow.ini file resides in [drive:]\Program Files\ImageNow6\imagenow.ini. Each user who has logged in at least once has an imagenow.ini file in their user profile, which is typically [drive:]\Documents and Settings\<username>\Application Data\ImageNow\imagenow.ini.
Network Address Translation override: If you add these settings, you enable IP address override for Network Address Translation (NAT) purposes. Use these settings to override the standard IP address settings in the inow.ini file. To enable this function, under the [Message Queuing] section in the imagenow.ini file, add the following two settings:
Set the enable setting to TRUE to specify that ImageNow Client uses the IP address in the mq.agent.ip.address.override setting of this same configuration file. Set the enable setting to FALSE to disable the setting. The default is FALSE.
Set the address setting to a valid and explicit IP address to specify the IP address to use when mq.agent.ip.enable.override is set to TRUE. Leave the address setting empty if the enable setting is set to FALSE. If mq.agent.ip.enable.override is set to TRUE and no override address is provided for this setting, ImageNow Server generates an exception error. The default is empty.
Note If you are upgrading to ImageNow version 6.3 from a previous version, the former client-side settings are replaced with these new settings, so you need to use the new settings instead. The mq.agent.ip.enable.override setting replaces the mq.agent.client.ip.override setting. The mq.agent.ip.address.override setting replaces the mq.agent.client.ip.address setting. The mq.agent.client.ip.override and the mq.agent.client.ip.address settings were used in previous versions of ImageNow in the imagenow.ini configuration files.
The following is an example of using the settings.
mq.agent.ip.enable.override=TRUE mq.agent.ip.address.override=127.0.0.1
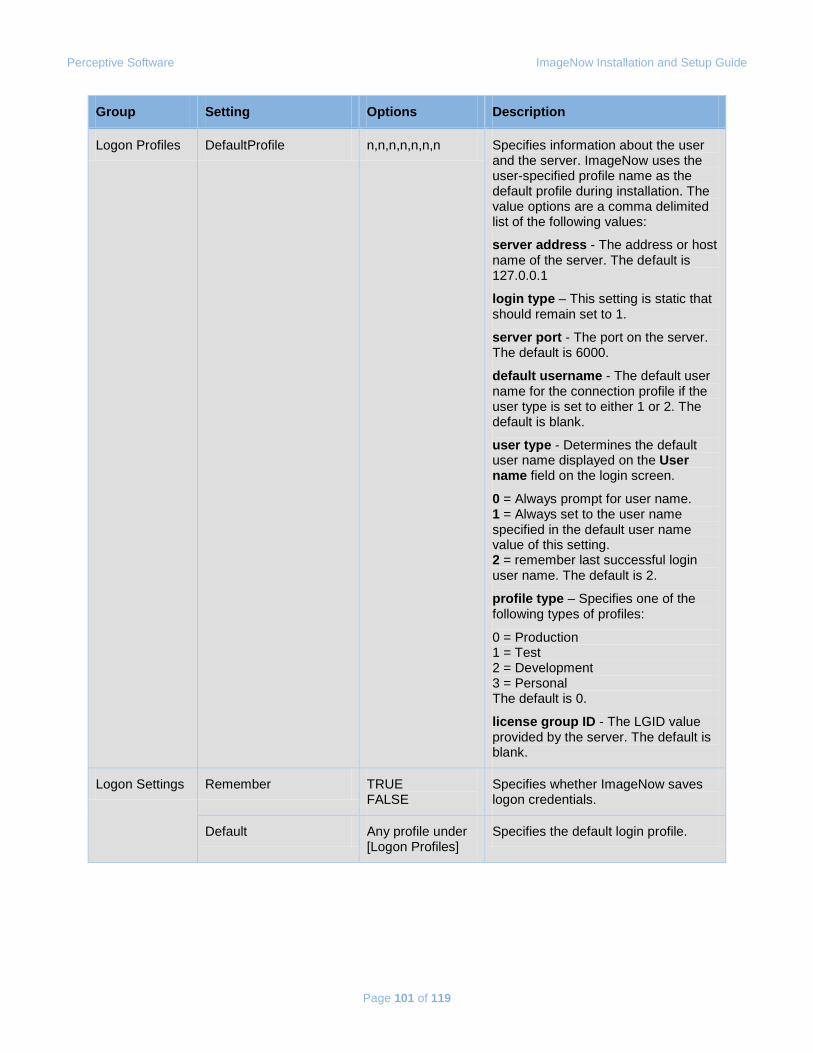
Perceptive Software ImageNow Installation and Setup Guide
Page 101 of 119
Group Setting Options Description
Logon Profiles DefaultProfile n,n,n,n,n,n,n Specifies information about the user and the server. ImageNow uses the user-specified profile name as the default profile during installation. The value options are a comma delimited list of the following values:
server address - The address or host name of the server. The default is 127.0.0.1
login type – This setting is static that should remain set to 1.
server port - The port on the server. The default is 6000.
default username - The default user name for the connection profile if the user type is set to either 1 or 2. The default is blank.
user type - Determines the default user name displayed on the User name field on the login screen.
0 = Always prompt for user name. 1 = Always set to the user name specified in the default user name value of this setting. 2 = remember last successful login user name. The default is 2.
profile type – Specifies one of the following types of profiles:
0 = Production 1 = Test 2 = Development 3 = Personal The default is 0.
license group ID - The LGID value provided by the server. The default is blank.
Logon Settings Remember TRUE FALSE
Specifies whether ImageNow saves logon credentials.
Default Any profile under [Logon Profiles]
Specifies the default login profile.
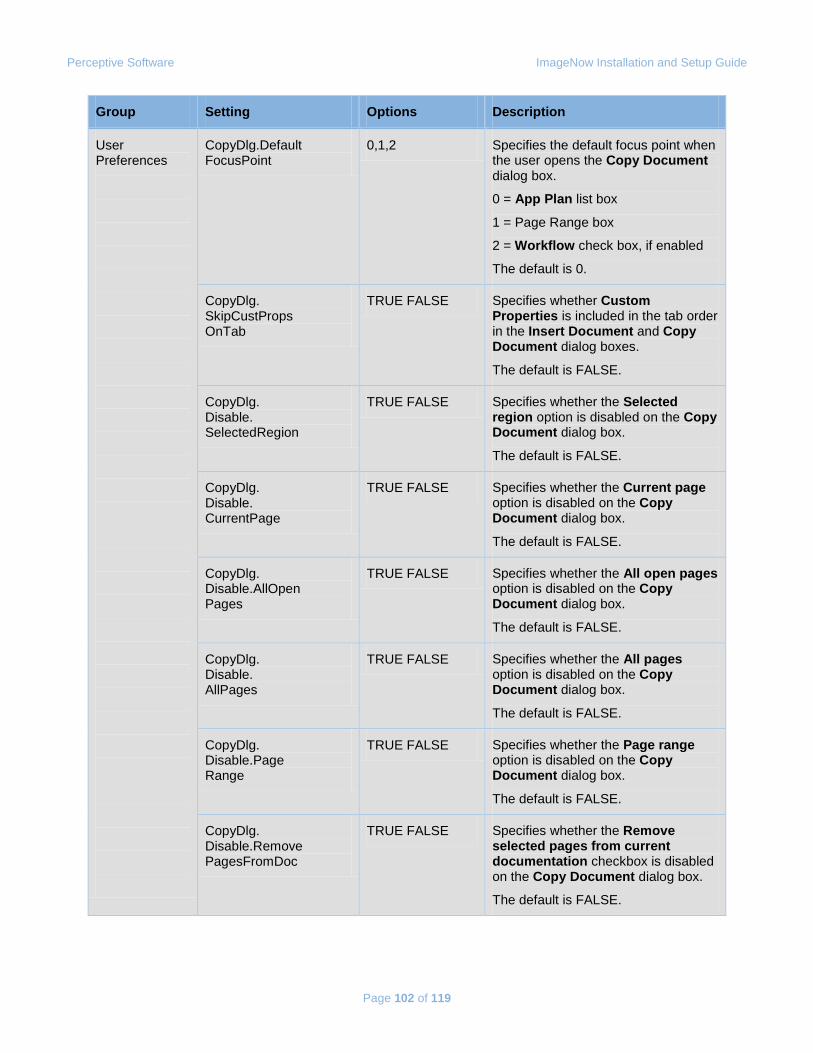
Perceptive Software ImageNow Installation and Setup Guide
Page 102 of 119
Group Setting Options Description
User Preferences
CopyDlg.Default FocusPoint
0,1,2 Specifies the default focus point when the user opens the Copy Document dialog box.
0 = App Plan list box
1 = Page Range box
2 = Workflow check box, if enabled
The default is 0.
CopyDlg. SkipCustProps OnTab
TRUE FALSE Specifies whether Custom Properties is included in the tab order in the Insert Document and Copy Document dialog boxes.
The default is FALSE.
CopyDlg. Disable. SelectedRegion
TRUE FALSE Specifies whether the Selected region option is disabled on the Copy Document dialog box.
The default is FALSE.
CopyDlg. Disable. CurrentPage
TRUE FALSE Specifies whether the Current page option is disabled on the Copy Document dialog box.
The default is FALSE.
CopyDlg. Disable.AllOpen Pages
TRUE FALSE Specifies whether the All open pages option is disabled on the Copy Document dialog box.
The default is FALSE.
CopyDlg. Disable. AllPages
TRUE FALSE Specifies whether the All pages option is disabled on the Copy Document dialog box.
The default is FALSE.
CopyDlg. Disable.Page Range
TRUE FALSE Specifies whether the Page range option is disabled on the Copy Document dialog box.
The default is FALSE.
CopyDlg. Disable.Remove PagesFromDoc
TRUE FALSE Specifies whether the Remove selected pages from current documentation checkbox is disabled on the Copy Document dialog box.
The default is FALSE.
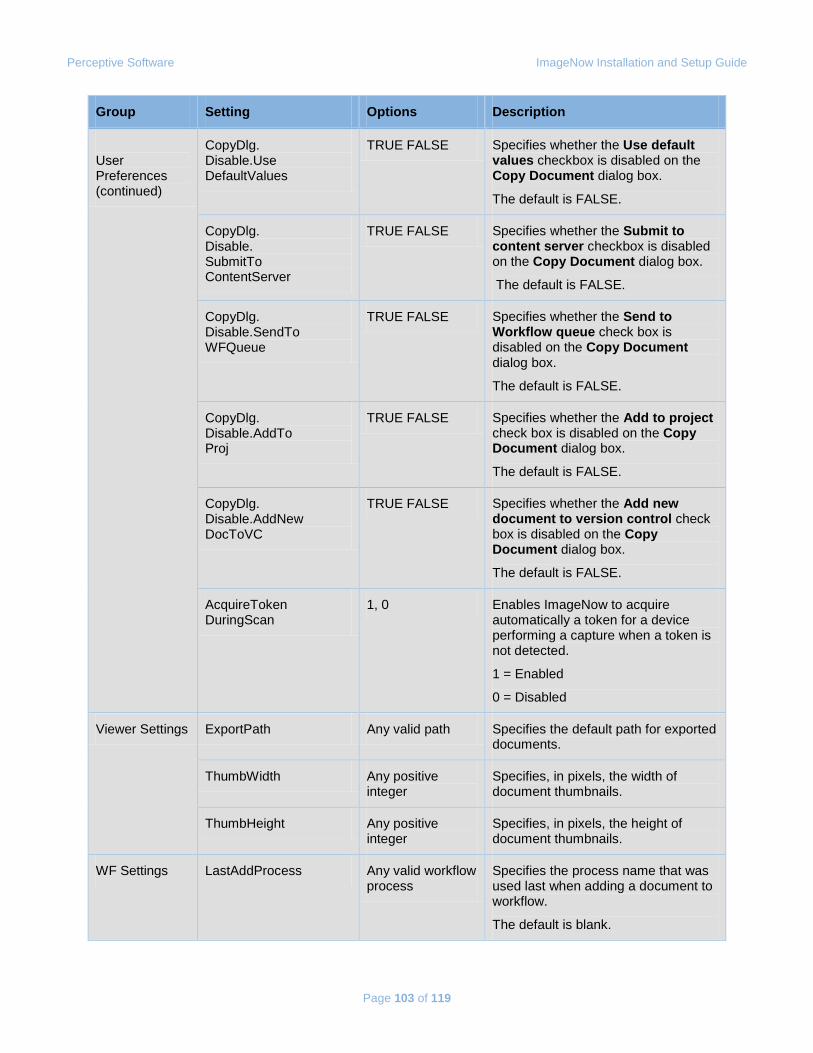
Perceptive Software ImageNow Installation and Setup Guide
Page 103 of 119
Group Setting Options Description
User Preferences (continued)
CopyDlg. Disable.Use DefaultValues
TRUE FALSE Specifies whether the Use default values checkbox is disabled on the Copy Document dialog box.
The default is FALSE.
CopyDlg. Disable. SubmitTo ContentServer
TRUE FALSE Specifies whether the Submit to content server checkbox is disabled on the Copy Document dialog box.
The default is FALSE.
CopyDlg. Disable.SendTo WFQueue
TRUE FALSE Specifies whether the Send to Workflow queue check box is disabled on the Copy Document dialog box.
The default is FALSE.
CopyDlg. Disable.AddTo Proj
TRUE FALSE Specifies whether the Add to project check box is disabled on the Copy Document dialog box.
The default is FALSE.
CopyDlg. Disable.AddNew DocToVC
TRUE FALSE Specifies whether the Add new document to version control check box is disabled on the Copy Document dialog box.
The default is FALSE.
AcquireToken DuringScan
1, 0 Enables ImageNow to acquire automatically a token for a device performing a capture when a token is not detected.
1 = Enabled
0 = Disabled
Viewer Settings ExportPath Any valid path Specifies the default path for exported documents.
ThumbWidth Any positive integer
Specifies, in pixels, the width of document thumbnails.
ThumbHeight Any positive integer
Specifies, in pixels, the height of document thumbnails.
WF Settings LastAddProcess Any valid workflow process
Specifies the process name that was used last when adding a document to workflow.
The default is blank.
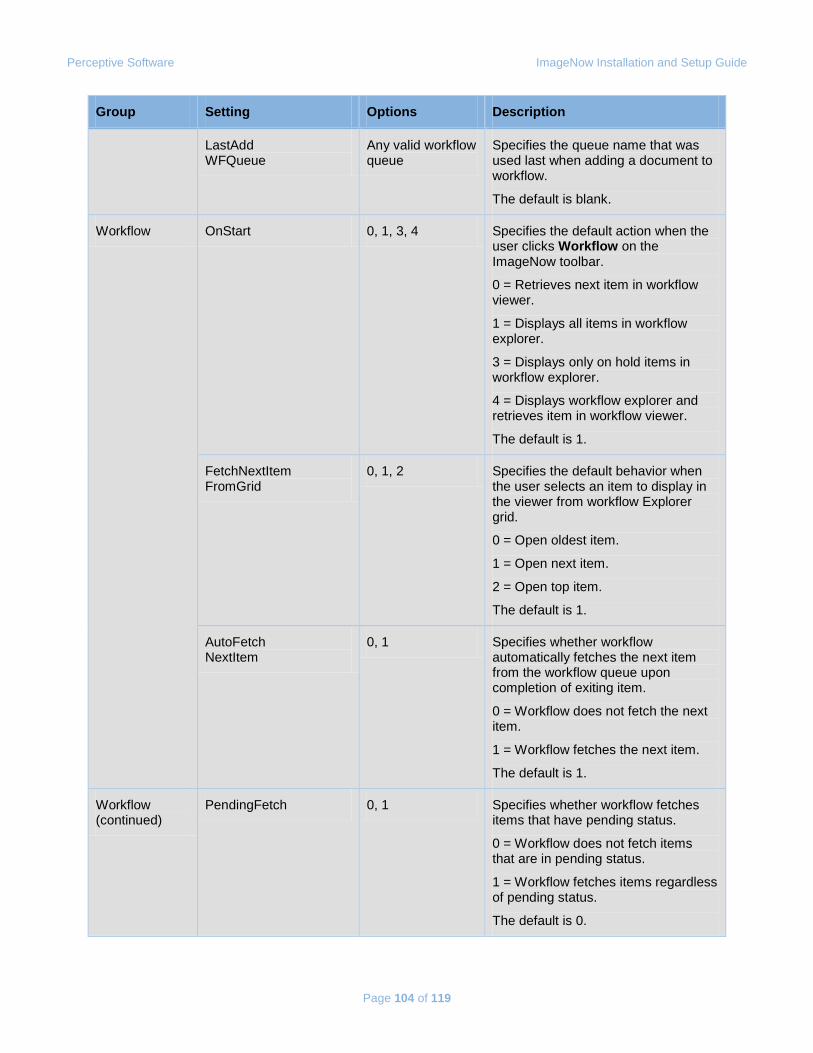
Perceptive Software ImageNow Installation and Setup Guide
Page 104 of 119
Group Setting Options Description
LastAdd WFQueue
Any valid workflow queue
Specifies the queue name that was used last when adding a document to workflow.
The default is blank.
Workflow OnStart 0, 1, 3, 4 Specifies the default action when the user clicks Workflow on the ImageNow toolbar.
0 = Retrieves next item in workflow viewer.
1 = Displays all items in workflow explorer.
3 = Displays only on hold items in workflow explorer.
4 = Displays workflow explorer and retrieves item in workflow viewer.
The default is 1.
FetchNextItem FromGrid
0, 1, 2 Specifies the default behavior when the user selects an item to display in the viewer from workflow Explorer grid.
0 = Open oldest item.
1 = Open next item.
2 = Open top item.
The default is 1.
AutoFetch NextItem
0, 1 Specifies whether workflow automatically fetches the next item from the workflow queue upon completion of exiting item.
0 = Workflow does not fetch the next item.
1 = Workflow fetches the next item.
The default is 1.
Workflow (continued)
PendingFetch 0, 1 Specifies whether workflow fetches items that have pending status.
0 = Workflow does not fetch items that are in pending status.
1 = Workflow fetches items regardless of pending status.
The default is 0.
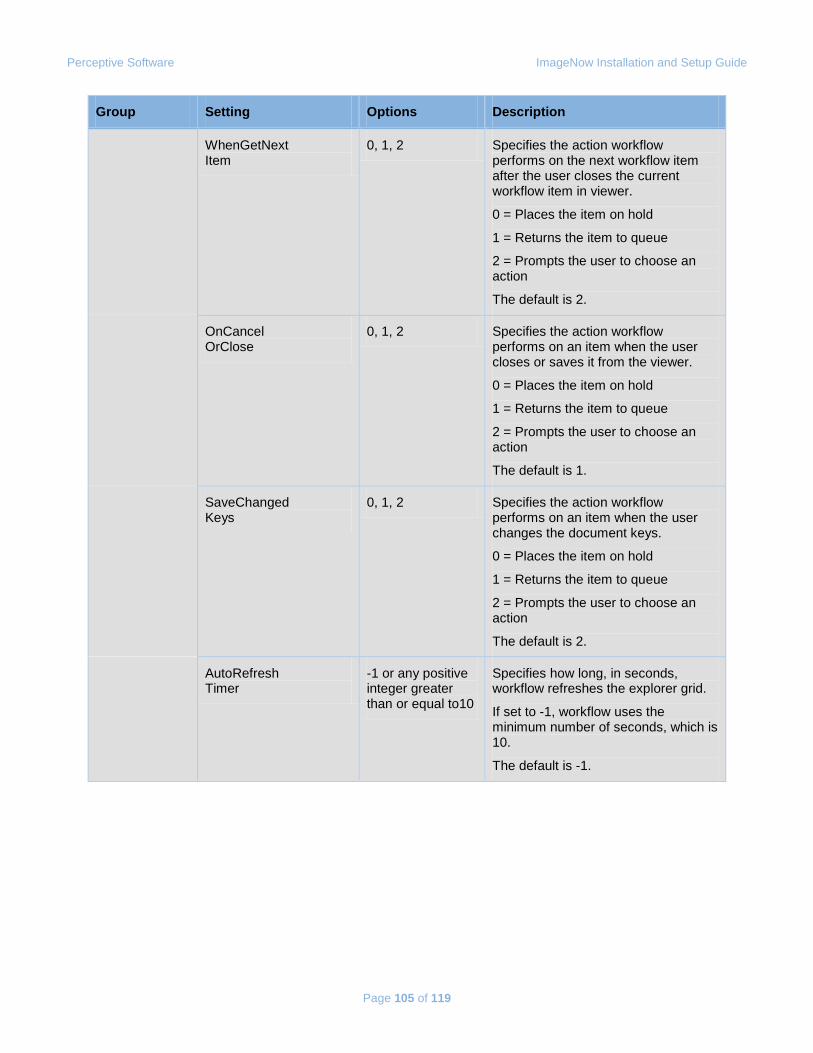
Perceptive Software ImageNow Installation and Setup Guide
Page 105 of 119
Group Setting Options Description
WhenGetNext Item
0, 1, 2 Specifies the action workflow performs on the next workflow item after the user closes the current workflow item in viewer.
0 = Places the item on hold
1 = Returns the item to queue
2 = Prompts the user to choose an action
The default is 2.
OnCancel OrClose
0, 1, 2 Specifies the action workflow performs on an item when the user closes or saves it from the viewer.
0 = Places the item on hold
1 = Returns the item to queue
2 = Prompts the user to choose an action
The default is 1.
SaveChanged Keys
0, 1, 2 Specifies the action workflow performs on an item when the user changes the document keys.
0 = Places the item on hold
1 = Returns the item to queue
2 = Prompts the user to choose an action
The default is 2.
AutoRefresh Timer
-1 or any positive integer greater than or equal to10
Specifies how long, in seconds, workflow refreshes the explorer grid.
If set to -1, workflow uses the minimum number of seconds, which is 10.
The default is -1.
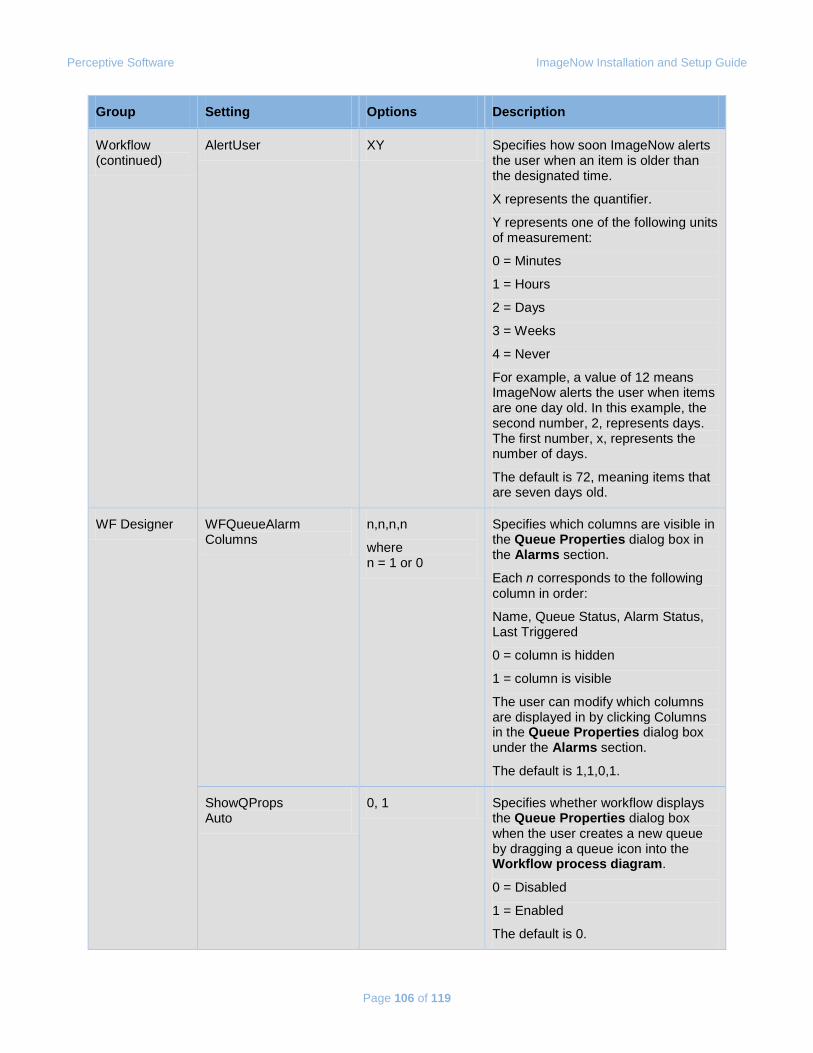
Perceptive Software ImageNow Installation and Setup Guide
Page 106 of 119
Group Setting Options Description
Workflow (continued)
AlertUser XY Specifies how soon ImageNow alerts the user when an item is older than the designated time.
X represents the quantifier.
Y represents one of the following units of measurement:
0 = Minutes
1 = Hours
2 = Days
3 = Weeks
4 = Never
For example, a value of 12 means ImageNow alerts the user when items are one day old. In this example, the second number, 2, represents days. The first number, x, represents the number of days.
The default is 72, meaning items that are seven days old.
WF Designer WFQueueAlarm Columns
n,n,n,n
where n = 1 or 0
Specifies which columns are visible in the Queue Properties dialog box in the Alarms section.
Each n corresponds to the following column in order:
Name, Queue Status, Alarm Status, Last Triggered
0 = column is hidden
1 = column is visible
The user can modify which columns are displayed in by clicking Columns in the Queue Properties dialog box under the Alarms section.
The default is 1,1,0,1.
ShowQProps Auto
0, 1 Specifies whether workflow displays the Queue Properties dialog box when the user creates a new queue by dragging a queue icon into the Workflow process diagram.
0 = Disabled
1 = Enabled
The default is 0.
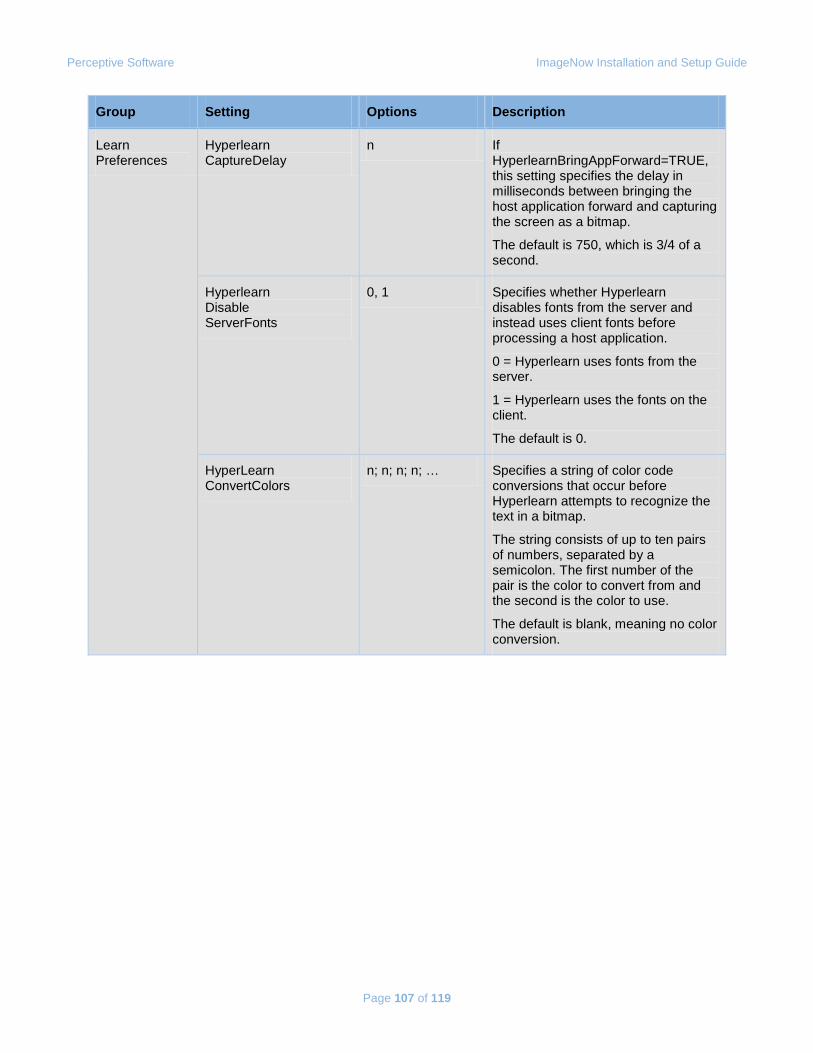
Perceptive Software ImageNow Installation and Setup Guide
Page 107 of 119
Group Setting Options Description
Learn Preferences
Hyperlearn CaptureDelay
n If HyperlearnBringAppForward=TRUE, this setting specifies the delay in milliseconds between bringing the host application forward and capturing the screen as a bitmap.
The default is 750, which is 3/4 of a second.
Hyperlearn Disable ServerFonts
0, 1 Specifies whether Hyperlearn disables fonts from the server and instead uses client fonts before processing a host application.
0 = Hyperlearn uses fonts from the server.
1 = Hyperlearn uses the fonts on the client.
The default is 0.
HyperLearn ConvertColors
n; n; n; n; … Specifies a string of color code conversions that occur before Hyperlearn attempts to recognize the text in a bitmap.
The string consists of up to ten pairs of numbers, separated by a semicolon. The first number of the pair is the color to convert from and the second is the color to use.
The default is blank, meaning no color conversion.
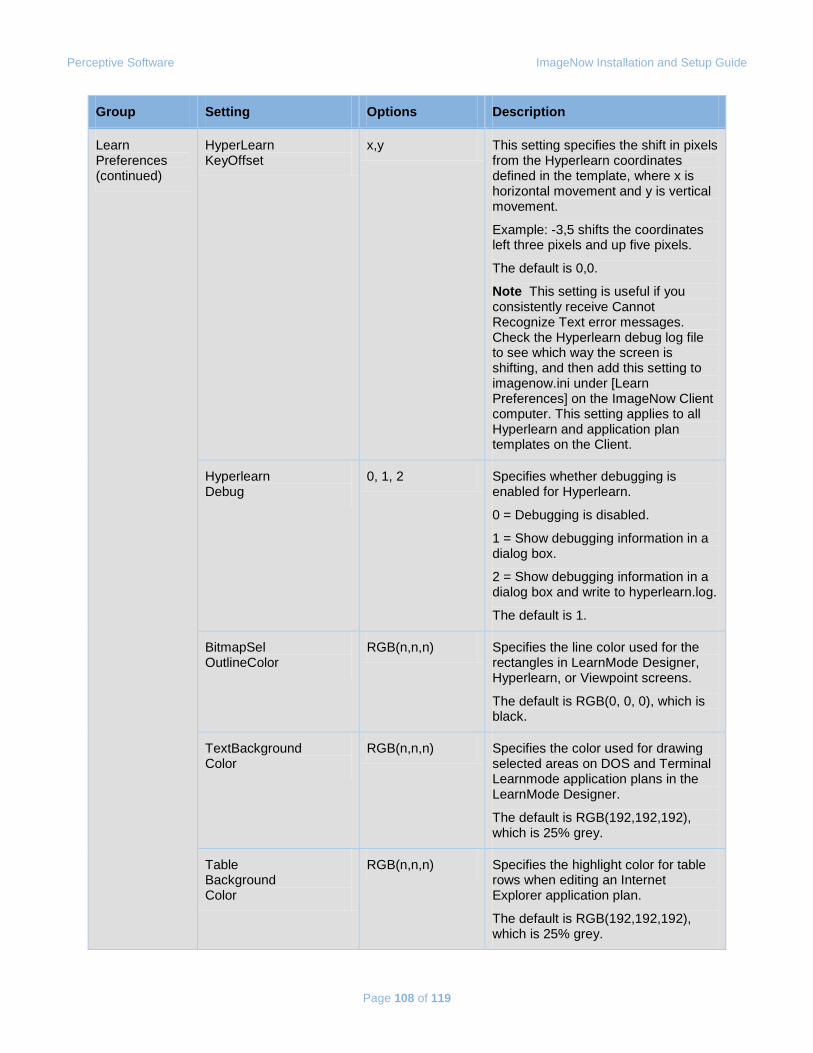
Perceptive Software ImageNow Installation and Setup Guide
Page 108 of 119
Group Setting Options Description
Learn Preferences (continued)
HyperLearn KeyOffset
x,y This setting specifies the shift in pixels from the Hyperlearn coordinates defined in the template, where x is horizontal movement and y is vertical movement.
Example: -3,5 shifts the coordinates left three pixels and up five pixels.
The default is 0,0.
Note This setting is useful if you consistently receive Cannot Recognize Text error messages. Check the Hyperlearn debug log file to see which way the screen is shifting, and then add this setting to imagenow.ini under [Learn Preferences] on the ImageNow Client computer. This setting applies to all Hyperlearn and application plan templates on the Client.
Hyperlearn Debug
0, 1, 2 Specifies whether debugging is enabled for Hyperlearn.
0 = Debugging is disabled.
1 = Show debugging information in a dialog box.
2 = Show debugging information in a dialog box and write to hyperlearn.log.
The default is 1.
BitmapSel OutlineColor
RGB(n,n,n) Specifies the line color used for the rectangles in LearnMode Designer, Hyperlearn, or Viewpoint screens.
The default is RGB(0, 0, 0), which is black.
TextBackground Color
RGB(n,n,n) Specifies the color used for drawing selected areas on DOS and Terminal Learnmode application plans in the LearnMode Designer.
The default is RGB(192,192,192), which is 25% grey.
Table Background Color
RGB(n,n,n) Specifies the highlight color for table rows when editing an Internet Explorer application plan.
The default is RGB(192,192,192), which is 25% grey.
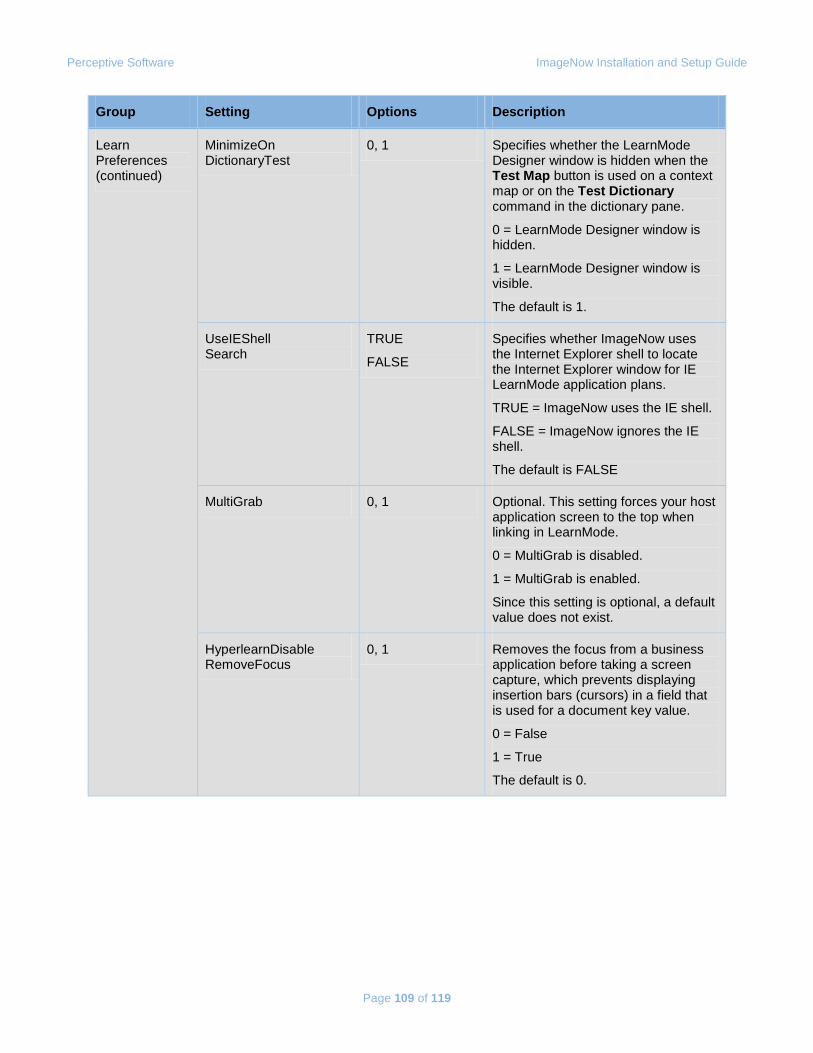
Perceptive Software ImageNow Installation and Setup Guide
Page 109 of 119
Group Setting Options Description
Learn Preferences (continued)
MinimizeOn DictionaryTest
0, 1 Specifies whether the LearnMode Designer window is hidden when the Test Map button is used on a context map or on the Test Dictionary command in the dictionary pane.
0 = LearnMode Designer window is hidden.
1 = LearnMode Designer window is visible.
The default is 1.
UseIEShell Search
TRUE
FALSE
Specifies whether ImageNow uses the Internet Explorer shell to locate the Internet Explorer window for IE LearnMode application plans.
TRUE = ImageNow uses the IE shell.
FALSE = ImageNow ignores the IE shell.
The default is FALSE
MultiGrab 0, 1 Optional. This setting forces your host application screen to the top when linking in LearnMode.
0 = MultiGrab is disabled.
1 = MultiGrab is enabled.
Since this setting is optional, a default value does not exist.
HyperlearnDisable RemoveFocus
0, 1 Removes the focus from a business application before taking a screen capture, which prevents displaying insertion bars (cursors) in a field that is used for a document key value.
0 = False
1 = True
The default is 0.

Perceptive Software ImageNow Installation and Setup Guide
Page 110 of 119
Group Setting Options Description
Learn Preferences (continued)
HyperlearnBringApp Forward
0, 1 Note This setting is necessary for business applications that do not support WM_PRINT Windows API.
Prior to ImageNow 6.3, to capture a bitmap of the business application, the business application had to be in focus. In ImageNow 6.3, the business application no longer needed to be in focus before capturing a bitmap. Use this setting to revert to the previous method for capturing a bitmap.
0 = False
1 = True
The default is 0.
DisableFontSmoothing 0, 1 Before capturing a bitmap of the business application, the system disables ClearType font rendering and then enables it again once the bitmap is captured. Use this setting to stop the system from disabling ClearType font rendering.
0 = False
1 = True
The default is 0.
BatchOnlyRemember Keys
0, 1 Use this setting if you want the system to copy document key values, such as drawer and folder, from the previously linked document into the corresponding boxes of the next document you link, in batch mode only.
0 = False
1 = True
The default is 0.
Button Actions Applet Valid application plan
When DefaultApplet is set to 0, this setting specifies the default application plan that opens when the user clicks Applications on the ImageNow toolbar.
The default is blank.
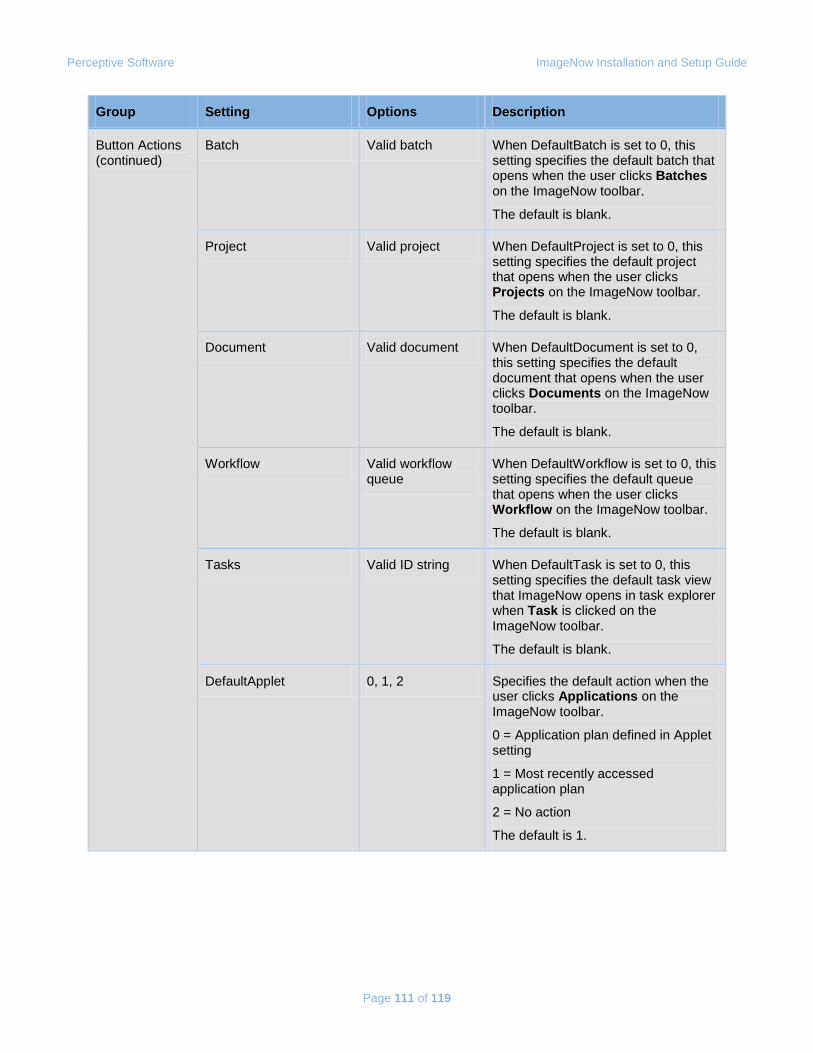
Perceptive Software ImageNow Installation and Setup Guide
Page 111 of 119
Group Setting Options Description
Button Actions (continued)
Batch Valid batch When DefaultBatch is set to 0, this setting specifies the default batch that opens when the user clicks Batches on the ImageNow toolbar.
The default is blank.
Project Valid project When DefaultProject is set to 0, this setting specifies the default project that opens when the user clicks Projects on the ImageNow toolbar.
The default is blank.
Document Valid document When DefaultDocument is set to 0, this setting specifies the default document that opens when the user clicks Documents on the ImageNow toolbar.
The default is blank.
Workflow Valid workflow queue
When DefaultWorkflow is set to 0, this setting specifies the default queue that opens when the user clicks Workflow on the ImageNow toolbar.
The default is blank.
Tasks Valid ID string When DefaultTask is set to 0, this setting specifies the default task view that ImageNow opens in task explorer when Task is clicked on the ImageNow toolbar.
The default is blank.
DefaultApplet 0, 1, 2 Specifies the default action when the user clicks Applications on the ImageNow toolbar.
0 = Application plan defined in Applet setting
1 = Most recently accessed application plan
2 = No action
The default is 1.
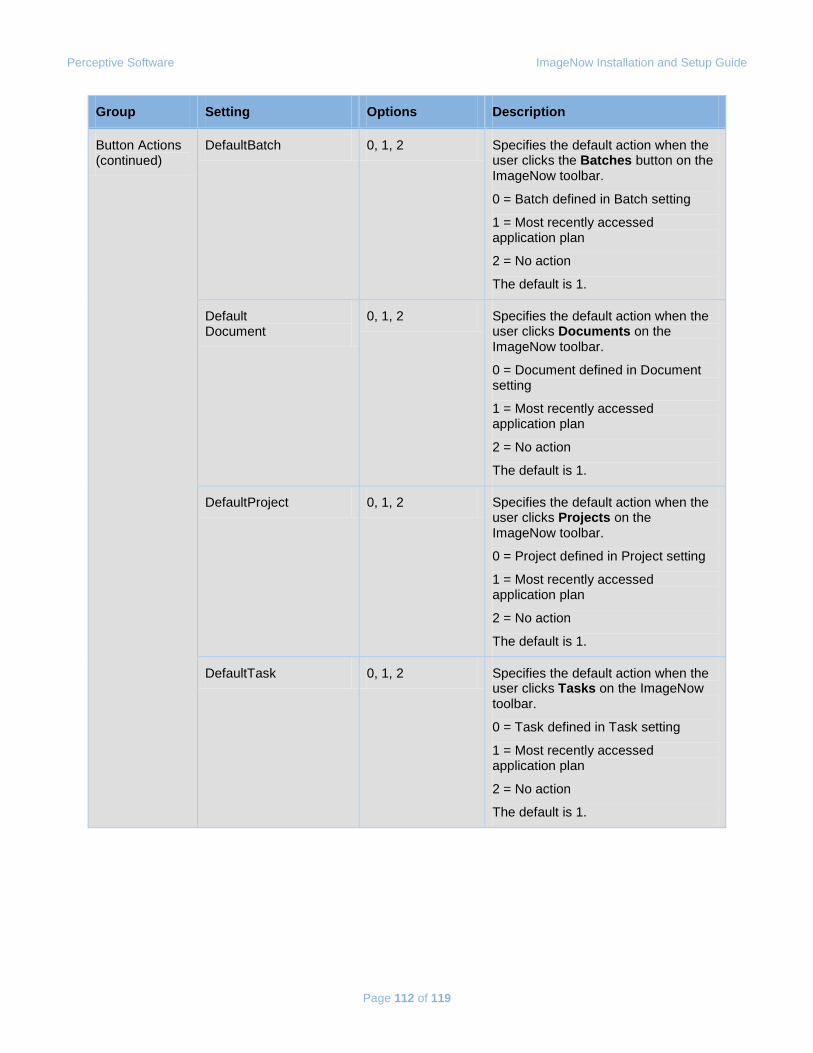
Perceptive Software ImageNow Installation and Setup Guide
Page 112 of 119
Group Setting Options Description
Button Actions (continued)
DefaultBatch 0, 1, 2 Specifies the default action when the user clicks the Batches button on the ImageNow toolbar.
0 = Batch defined in Batch setting
1 = Most recently accessed application plan
2 = No action
The default is 1.
Default Document
0, 1, 2 Specifies the default action when the user clicks Documents on the ImageNow toolbar.
0 = Document defined in Document setting
1 = Most recently accessed application plan
2 = No action
The default is 1.
DefaultProject 0, 1, 2 Specifies the default action when the user clicks Projects on the ImageNow toolbar.
0 = Project defined in Project setting
1 = Most recently accessed application plan
2 = No action
The default is 1.
DefaultTask 0, 1, 2 Specifies the default action when the user clicks Tasks on the ImageNow toolbar.
0 = Task defined in Task setting
1 = Most recently accessed application plan
2 = No action
The default is 1.
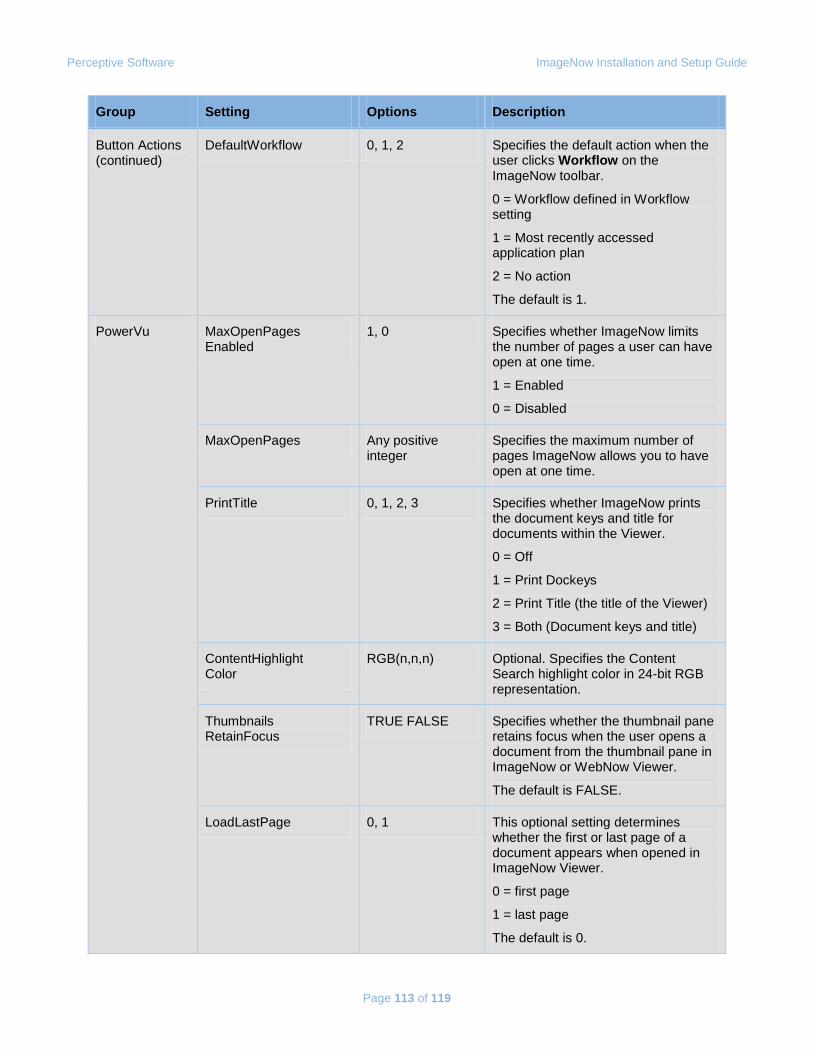
Perceptive Software ImageNow Installation and Setup Guide
Page 113 of 119
Group Setting Options Description
Button Actions (continued)
DefaultWorkflow 0, 1, 2 Specifies the default action when the user clicks Workflow on the ImageNow toolbar.
0 = Workflow defined in Workflow setting
1 = Most recently accessed application plan
2 = No action
The default is 1.
PowerVu MaxOpenPages Enabled
1, 0 Specifies whether ImageNow limits the number of pages a user can have open at one time.
1 = Enabled
0 = Disabled
MaxOpenPages Any positive integer
Specifies the maximum number of pages ImageNow allows you to have open at one time.
PrintTitle 0, 1, 2, 3 Specifies whether ImageNow prints the document keys and title for documents within the Viewer.
0 = Off
1 = Print Dockeys
2 = Print Title (the title of the Viewer)
3 = Both (Document keys and title)
ContentHighlight Color
RGB(n,n,n) Optional. Specifies the Content Search highlight color in 24-bit RGB representation.
Thumbnails RetainFocus
TRUE FALSE Specifies whether the thumbnail pane retains focus when the user opens a document from the thumbnail pane in ImageNow or WebNow Viewer.
The default is FALSE.
LoadLastPage 0, 1 This optional setting determines whether the first or last page of a document appears when opened in ImageNow Viewer.
0 = first page
1 = last page
The default is 0.
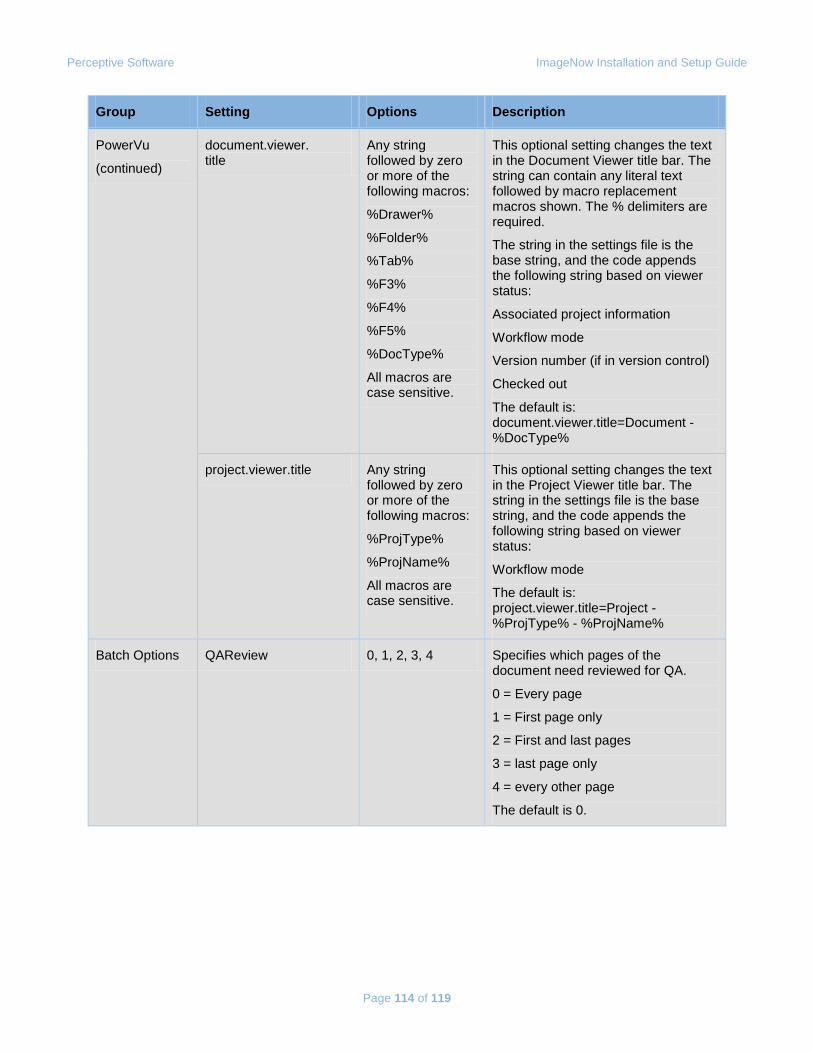
Perceptive Software ImageNow Installation and Setup Guide
Page 114 of 119
Group Setting Options Description
PowerVu
(continued)
document.viewer. title
Any string followed by zero or more of the following macros:
%Drawer%
%Folder%
%Tab%
%F3%
%F4%
%F5%
%DocType%
All macros are case sensitive.
This optional setting changes the text in the Document Viewer title bar. The string can contain any literal text followed by macro replacement macros shown. The % delimiters are required.
The string in the settings file is the base string, and the code appends the following string based on viewer status:
Associated project information
Workflow mode
Version number (if in version control)
Checked out
The default is: document.viewer.title=Document - %DocType%
project.viewer.title Any string followed by zero or more of the following macros:
%ProjType%
%ProjName%
All macros are case sensitive.
This optional setting changes the text in the Project Viewer title bar. The string in the settings file is the base string, and the code appends the following string based on viewer status:
Workflow mode
The default is: project.viewer.title=Project - %ProjType% - %ProjName%
Batch Options QAReview 0, 1, 2, 3, 4 Specifies which pages of the document need reviewed for QA.
0 = Every page
1 = First page only
2 = First and last pages
3 = last page only
4 = every other page
The default is 0.
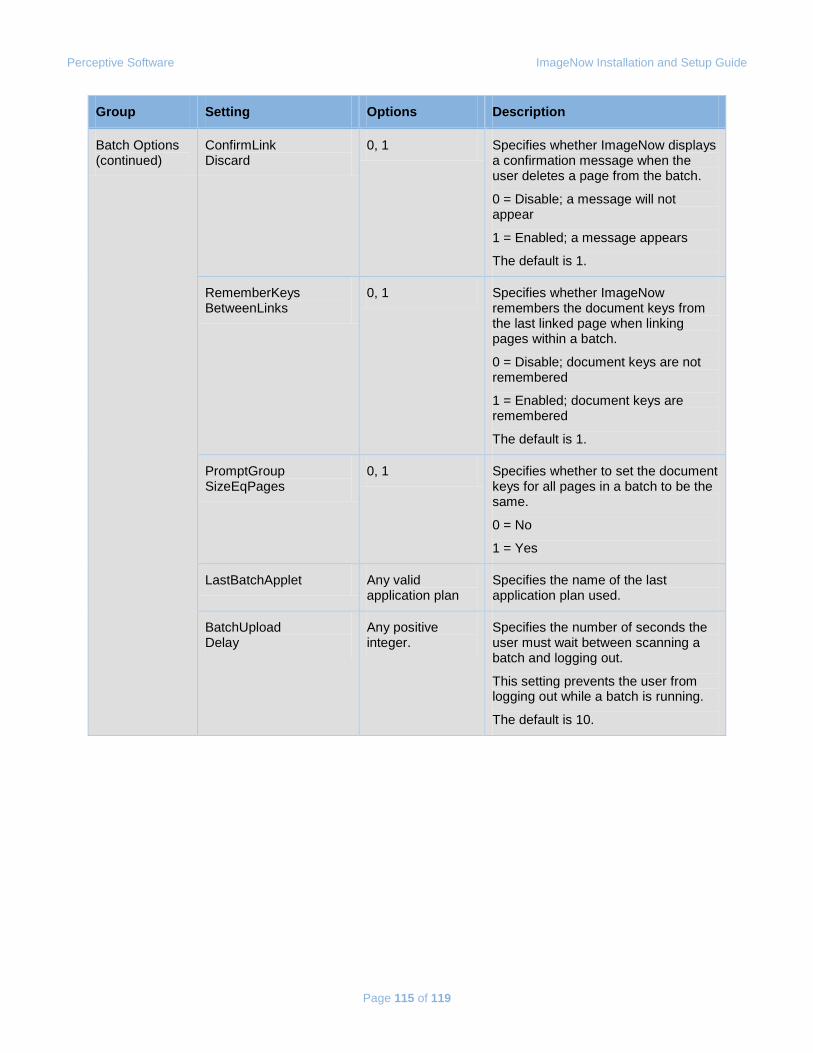
Perceptive Software ImageNow Installation and Setup Guide
Page 115 of 119
Group Setting Options Description
Batch Options (continued)
ConfirmLink Discard
0, 1 Specifies whether ImageNow displays a confirmation message when the user deletes a page from the batch.
0 = Disable; a message will not appear
1 = Enabled; a message appears
The default is 1.
RememberKeys BetweenLinks
0, 1 Specifies whether ImageNow remembers the document keys from the last linked page when linking pages within a batch.
0 = Disable; document keys are not remembered
1 = Enabled; document keys are remembered
The default is 1.
PromptGroup SizeEqPages
0, 1 Specifies whether to set the document keys for all pages in a batch to be the same.
0 = No
1 = Yes
LastBatchApplet Any valid application plan
Specifies the name of the last application plan used.
BatchUpload Delay
Any positive integer.
Specifies the number of seconds the user must wait between scanning a batch and logging out.
This setting prevents the user from logging out while a batch is running.
The default is 10.
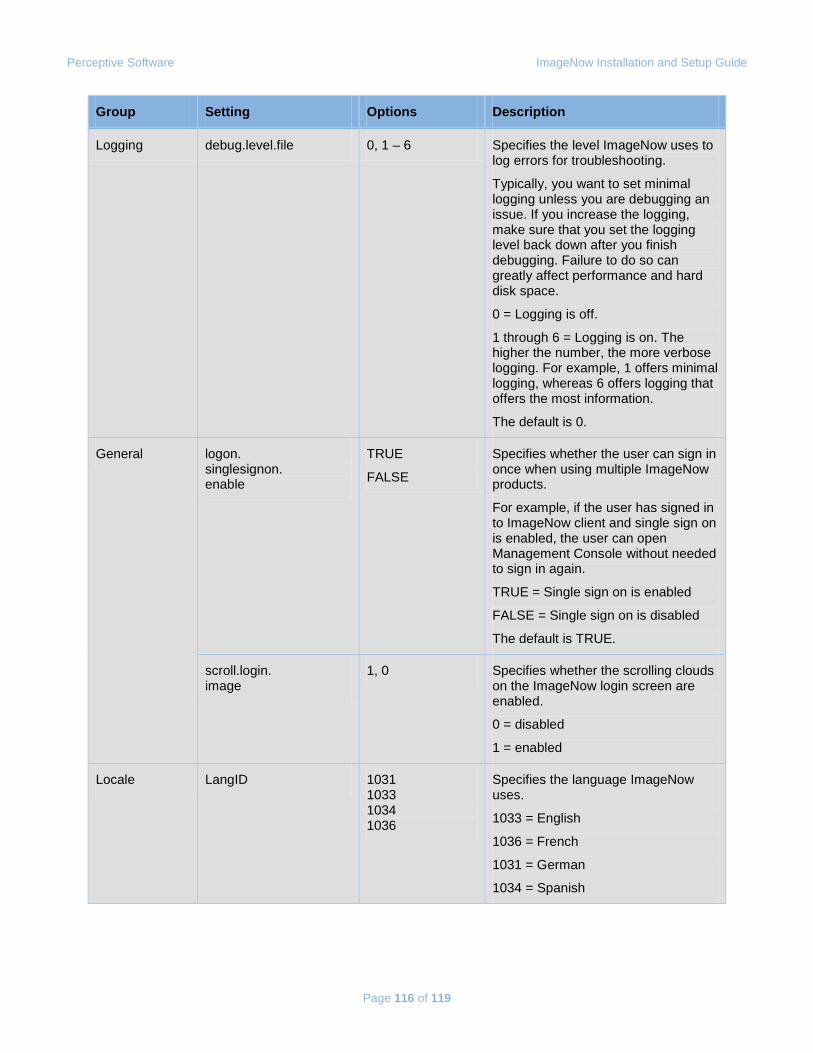
Perceptive Software ImageNow Installation and Setup Guide
Page 116 of 119
Group Setting Options Description
Logging debug.level.file 0, 1 – 6 Specifies the level ImageNow uses to log errors for troubleshooting.
Typically, you want to set minimal logging unless you are debugging an issue. If you increase the logging, make sure that you set the logging level back down after you finish debugging. Failure to do so can greatly affect performance and hard disk space.
0 = Logging is off.
1 through 6 = Logging is on. The higher the number, the more verbose logging. For example, 1 offers minimal logging, whereas 6 offers logging that offers the most information.
The default is 0.
General logon. singlesignon. enable
TRUE
FALSE
Specifies whether the user can sign in once when using multiple ImageNow products.
For example, if the user has signed in to ImageNow client and single sign on is enabled, the user can open Management Console without needed to sign in again.
TRUE = Single sign on is enabled
FALSE = Single sign on is disabled
The default is TRUE.
scroll.login. image
1, 0 Specifies whether the scrolling clouds on the ImageNow login screen are enabled.
0 = disabled
1 = enabled
Locale LangID 1031 1033 1034 1036
Specifies the language ImageNow uses.
1033 = English
1036 = French
1031 = German
1034 = Spanish
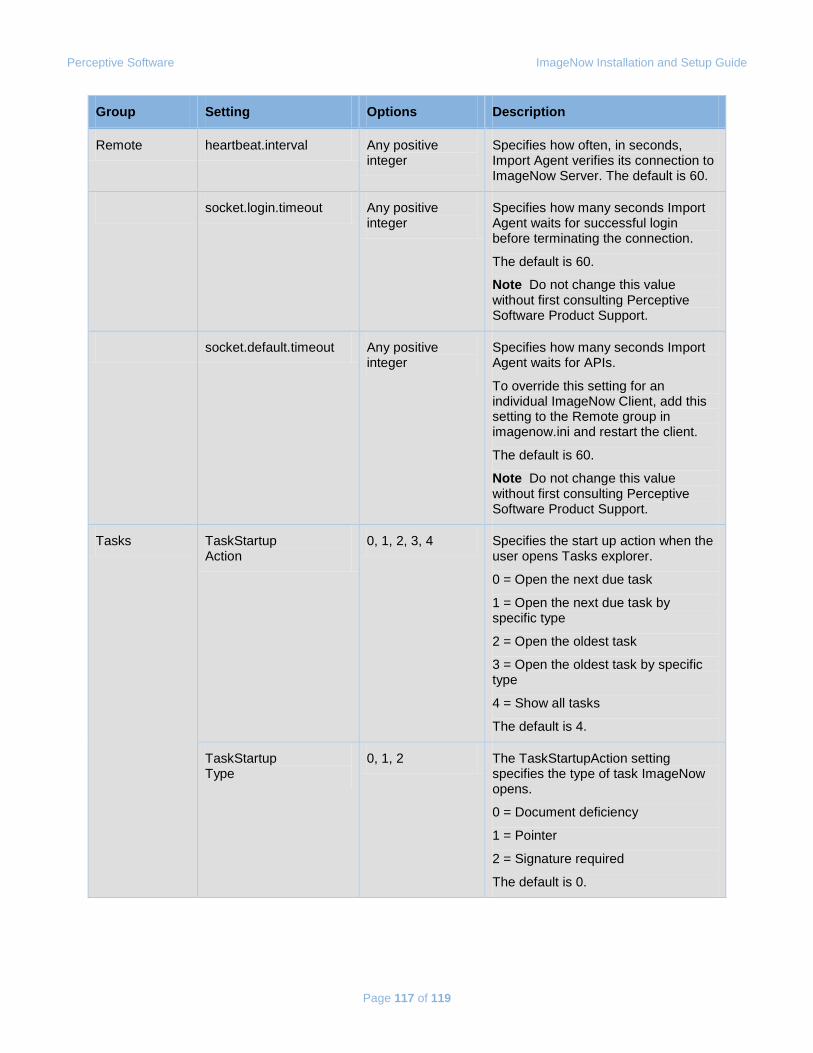
Perceptive Software ImageNow Installation and Setup Guide
Page 117 of 119
Group Setting Options Description
Remote heartbeat.interval Any positive integer
Specifies how often, in seconds, Import Agent verifies its connection to ImageNow Server. The default is 60.
socket.login.timeout Any positive integer
Specifies how many seconds Import Agent waits for successful login before terminating the connection.
The default is 60.
Note Do not change this value without first consulting Perceptive Software Product Support.
socket.default.timeout Any positive integer
Specifies how many seconds Import Agent waits for APIs.
To override this setting for an individual ImageNow Client, add this setting to the Remote group in imagenow.ini and restart the client.
The default is 60.
Note Do not change this value without first consulting Perceptive Software Product Support.
Tasks TaskStartup Action
0, 1, 2, 3, 4 Specifies the start up action when the user opens Tasks explorer.
0 = Open the next due task
1 = Open the next due task by specific type
2 = Open the oldest task
3 = Open the oldest task by specific type
4 = Show all tasks
The default is 4.
TaskStartup Type
0, 1, 2 The TaskStartupAction setting specifies the type of task ImageNow opens.
0 = Document deficiency
1 = Pointer
2 = Signature required
The default is 0.
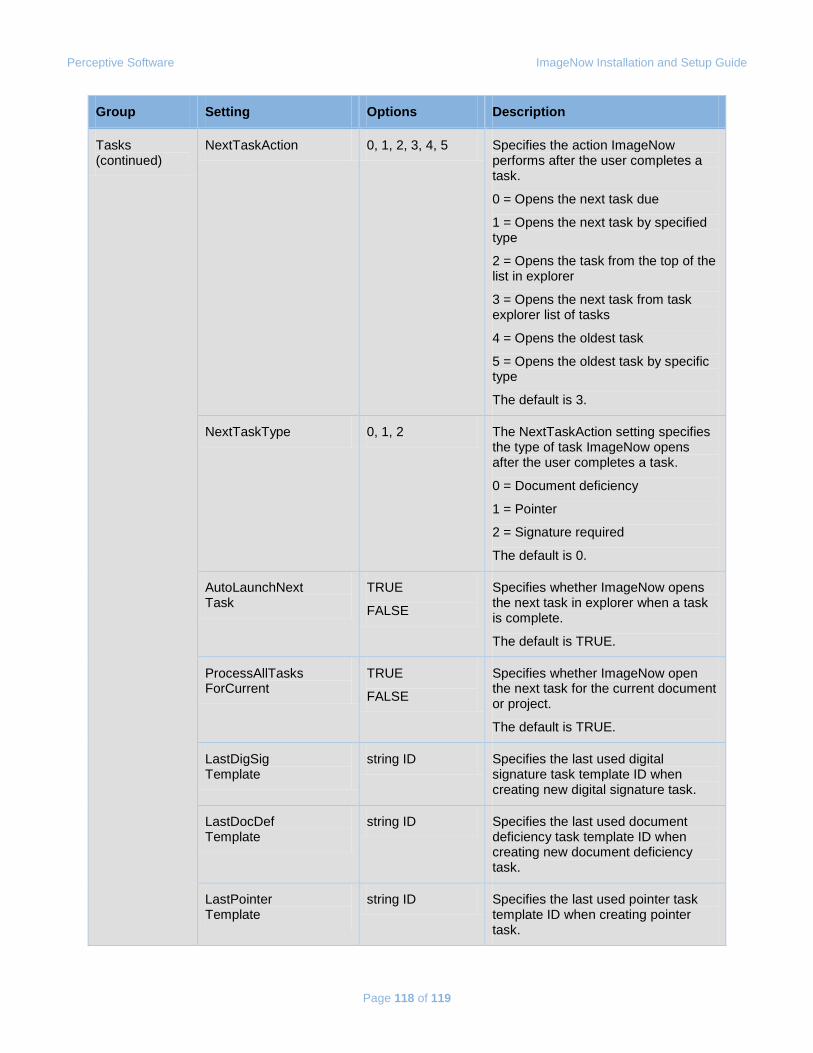
Perceptive Software ImageNow Installation and Setup Guide
Page 118 of 119
Group Setting Options Description
Tasks (continued)
NextTaskAction 0, 1, 2, 3, 4, 5 Specifies the action ImageNow performs after the user completes a task.
0 = Opens the next task due
1 = Opens the next task by specified type
2 = Opens the task from the top of the list in explorer
3 = Opens the next task from task explorer list of tasks
4 = Opens the oldest task
5 = Opens the oldest task by specific type
The default is 3.
NextTaskType 0, 1, 2 The NextTaskAction setting specifies the type of task ImageNow opens after the user completes a task.
0 = Document deficiency
1 = Pointer
2 = Signature required
The default is 0.
AutoLaunchNext Task
TRUE
FALSE
Specifies whether ImageNow opens the next task in explorer when a task is complete.
The default is TRUE.
ProcessAllTasks ForCurrent
TRUE
FALSE
Specifies whether ImageNow open the next task for the current document or project.
The default is TRUE.
LastDigSig Template
string ID Specifies the last used digital signature task template ID when creating new digital signature task.
LastDocDef Template
string ID Specifies the last used document deficiency task template ID when creating new document deficiency task.
LastPointer Template
string ID Specifies the last used pointer task template ID when creating pointer task.

Perceptive Software ImageNow Installation and Setup Guide
Page 119 of 119
Index Create the INOW6 database .............................. 7
Customer Portal ................................................. 4
DEP .................................................... 7, 9, 12, 14
remove the setting ........................................ 12
ImageNow.ini ................................................. 100
inow.ini ............................................................. 21
inserver.ini ........................................................ 43
inserverAlarm.ini .............................................. 51
inserverBatch.ini ............................................... 53
inserverEM.ini .................................................. 56
inserverFS.ini ................................................... 58
inserverImp.ini .................................................. 60
inserverJob.ini .................................................. 73
inserverMonitor.ini ............................................ 75
inserverMQ.ini .................................................. 85
inserverNotification.ini ...................................... 88
inserverOSM.ini ............................................... 90
inserverRetention.ini ........................................ 92
inserverTask.ini ................................................ 94
inserverWorkflow.ini ......................................... 98
Installing an ImageNow Server license............ 19
Installing ImageNow........................................... 4
checklist .......................................................... 4 ImageNow Client .......................................... 12 ImageNow Client unattended ....................... 14 ImageNow Server on Windows using
Microsoft SQL Server ................................. 6 process ........................................................... 4
Microsoft Vista ................................................. 12
services ............................................................ 20
SQL Server Management Studio ................... 7, 8
SunflowerSS.sql ............................................. 7, 8
TCP/IP Connectivity ........................................... 5