Embed Size (px)
Citation preview

Enterprise WiFi SystemModels:UAPUAP-LR (Long Range)

1
Introduction
Introduction
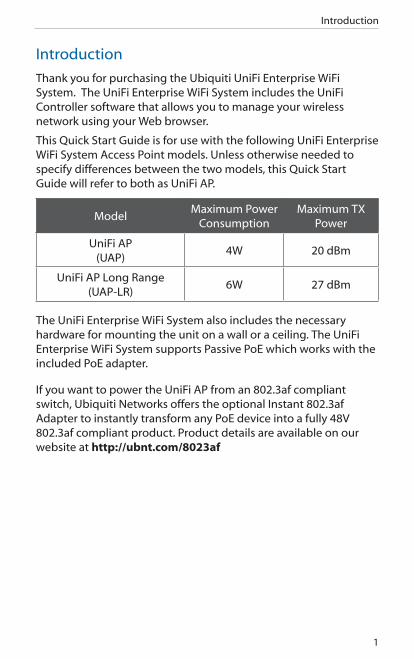
Thank you for purchasing the Ubiquiti UniFi Enterprise WiFi System. The UniFi Enterprise WiFi System includes the UniFi Controller software that allows you to manage your wireless network using your Web browser.
This Quick Start Guide is for use with the following UniFi Enterprise WiFi System Access Point models. Unless otherwise needed to specify differences between the two models, this Quick Start Guide will refer to both as UniFi AP.
ModelMaximum Power
ConsumptionMaximum TX
Power
UniFi AP (UAP)
4W 20 dBm
UniFi AP Long Range (UAP-LR)
6W 27 dBm
The UniFi Enterprise WiFi System also includes the necessary hardware for mounting the unit on a wall or a ceiling. The UniFi Enterprise WiFi System supports Passive PoE which works with the included PoE adapter.
If you want to power the UniFi AP from an 802.3af compliant switch, Ubiquiti Networks offers the optional Instant 802.3af Adapter to instantly transform any PoE device into a fully 48V 802.3af compliant product. Product details are available on our website at http://ubnt.com/8023af
2
UniFi AP/UniFi AP-LR
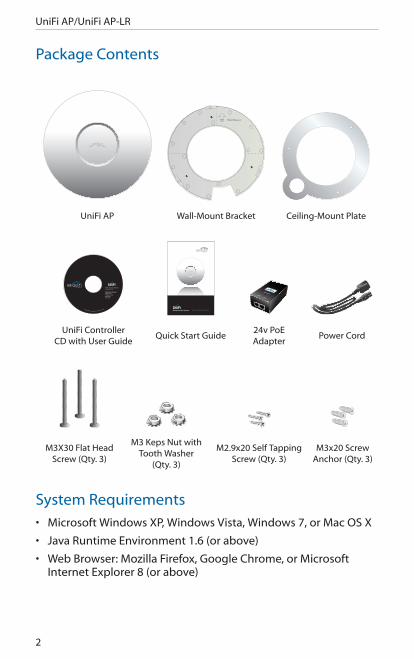
Package Contents
Wall Mount
UniFi AP Wall-Mount Bracket Ceiling-Mount Plate
Enterprise WiFi System
UniFi Controller CD with User Guide
Quick Start Guide24v PoE Adapter
Power Cord
M3X30 Flat Head Screw (Qty. 3)
M3 Keps Nut with Tooth Washer
(Qty. 3)
M2.9x20 Self Tapping Screw (Qty. 3)
M3x20 Screw Anchor (Qty. 3)
System Requirements• Microsoft Windows XP, Windows Vista, Windows 7, or Mac OS X
• Java Runtime Environment 1.6 (or above)
• Web Browser: Mozilla Firefox, Google Chrome, or Microsoft Internet Explorer 8 (or above)
3
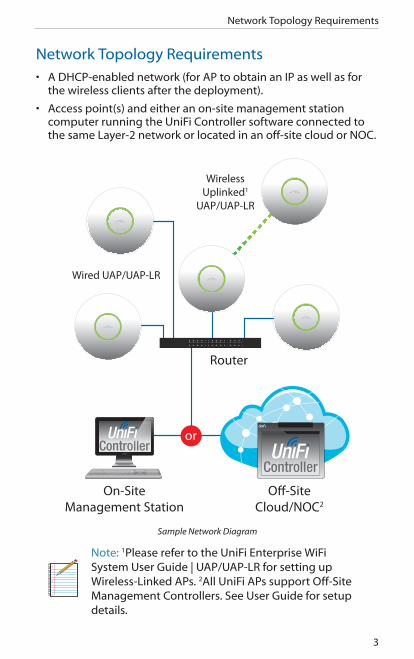
Network Topology Requirements
Network Topology Requirements• A DHCP-enabled network (for AP to obtain an IP as well as for
the wireless clients after the deployment).
• Access point(s) and either an on-site management station computer running the UniFi Controller software connected to the same Layer-2 network or located in an off-site cloud or NOC.
or
Router
O�-SiteCloud/NOC2
On-SiteManagement Station
Wired UAP/UAP-LR
WirelessUplinked1
UAP/UAP-LR
Sample Network Diagram
Note: 1Please refer to the UniFi Enterprise WiFi System User Guide | UAP/UAP-LR for setting up Wireless-Linked APs. 2All UniFi APs support Off-Site Management Controllers. See User Guide for setup details.
4
UniFi AP/UniFi AP-LR
Hardware Installation
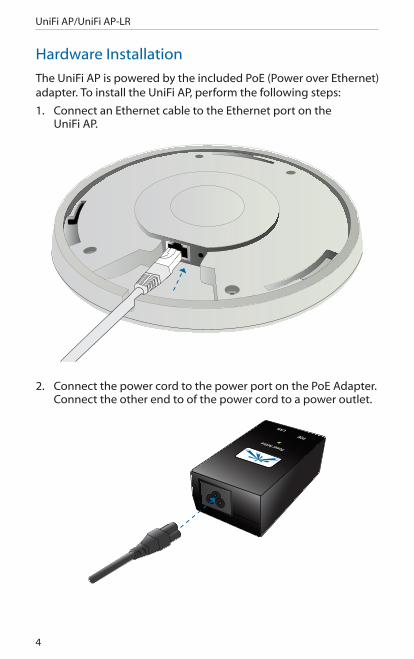
The UniFi AP is powered by the included PoE (Power over Ethernet) adapter. To install the UniFi AP, perform the following steps:
1. Connect an Ethernet cable to the Ethernet port on the UniFi AP.
2. Connect the power cord to the power port on the PoE Adapter. Connect the other end to of the power cord to a power outlet.
5
Hardware Installation
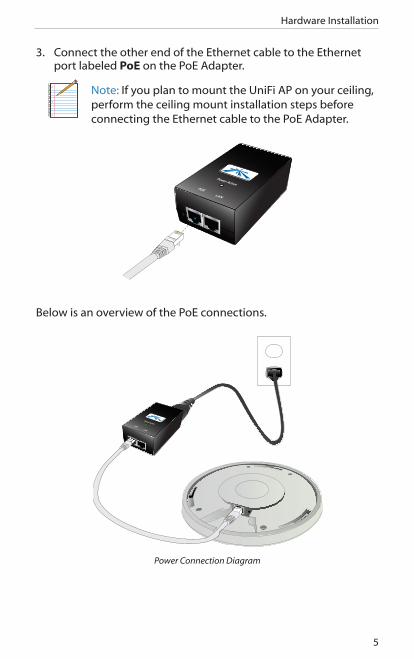
3. Connect the other end of the Ethernet cable to the Ethernet port labeled PoE on the PoE Adapter.
Note: If you plan to mount the UniFi AP on your ceiling, perform the ceiling mount installation steps before connecting the Ethernet cable to the PoE Adapter.
Below is an overview of the PoE connections.
Power Connection Diagram
6
UniFi AP/UniFi AP-LR
Mounting the Access Point
The UniFi AP can be wall-mounted or mounted on a ceiling. Perform the following steps for the appropriate installation:
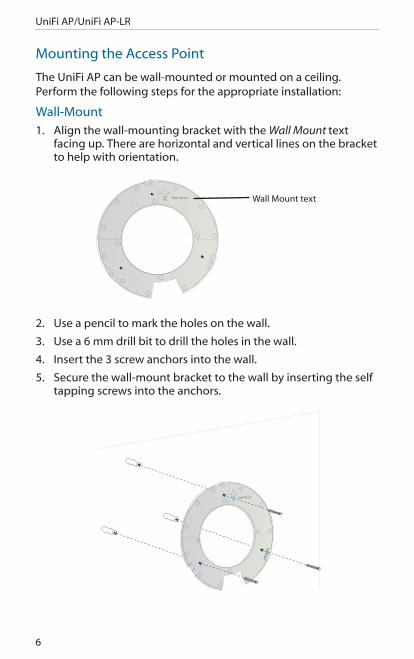
Wall-Mount1. Align the wall-mounting bracket with the Wall Mount text
facing up. There are horizontal and vertical lines on the bracket to help with orientation.
Wall Mount Wall Mount text
2. Use a pencil to mark the holes on the wall.
3. Use a 6 mm drill bit to drill the holes in the wall.
4. Insert the 3 screw anchors into the wall.
5. Secure the wall-mount bracket to the wall by inserting the self tapping screws into the anchors.
Wall Mount
7
Hardware Installation
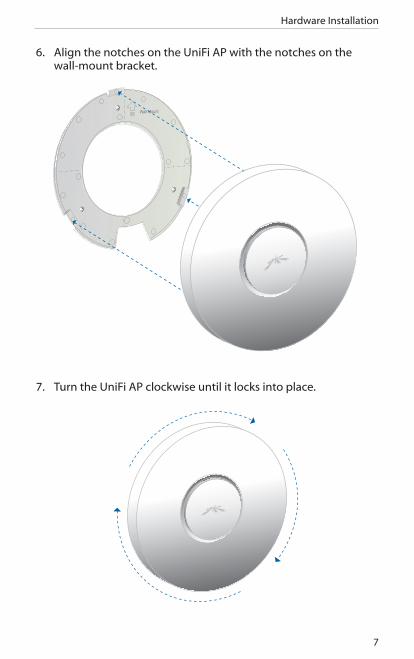
6. Align the notches on the UniFi AP with the notches on the wall-mount bracket.
Wall Mount
7. Turn the UniFi AP clockwise until it locks into place.
Wall Mount
8
UniFi AP/UniFi AP-LR
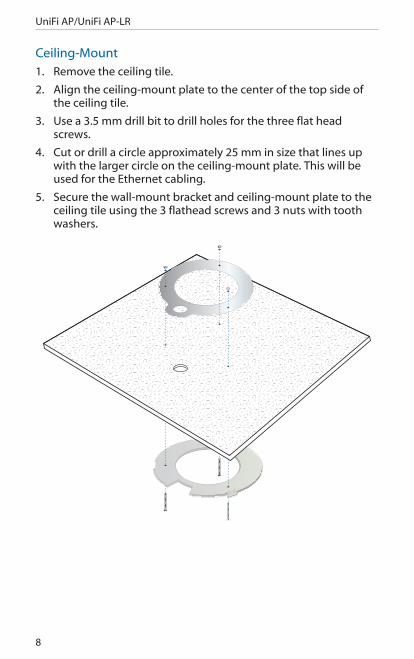
Ceiling-Mount1. Remove the ceiling tile.
2. Align the ceiling-mount plate to the center of the top side of the ceiling tile.
3. Use a 3.5 mm drill bit to drill holes for the three flat head screws.
4. Cut or drill a circle approximately 25 mm in size that lines up with the larger circle on the ceiling-mount plate. This will be used for the Ethernet cabling.
5. Secure the wall-mount bracket and ceiling-mount plate to the ceiling tile using the 3 flathead screws and 3 nuts with tooth washers.
9
Hardware Installation
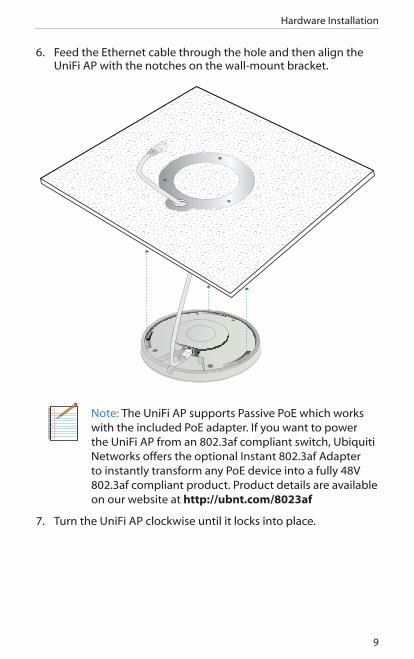
6. Feed the Ethernet cable through the hole and then align the UniFi AP with the notches on the wall-mount bracket.
Note: The UniFi AP supports Passive PoE which works with the included PoE adapter. If you want to power the UniFi AP from an 802.3af compliant switch, Ubiquiti Networks offers the optional Instant 802.3af Adapter to instantly transform any PoE device into a fully 48V 802.3af compliant product. Product details are available on our website at http://ubnt.com/8023af
7. Turn the UniFi AP clockwise until it locks into place.
10
UniFi AP/UniFi AP-LR
Software Installation
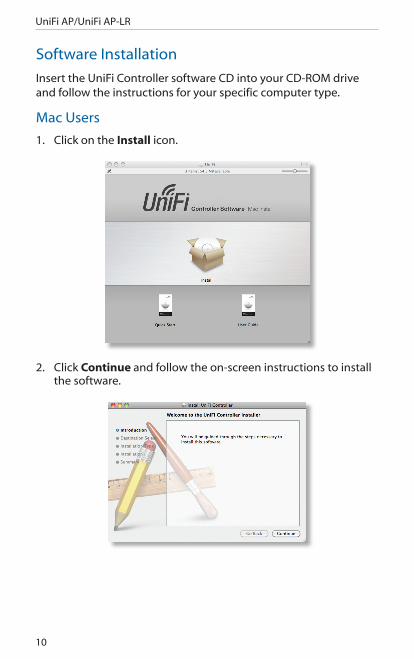
Insert the UniFi Controller software CD into your CD-ROM drive and follow the instructions for your specific computer type.
Mac Users
1. Click on the Install icon.
2. Click Continue and follow the on-screen instructions to install the software.
11
Software Installation
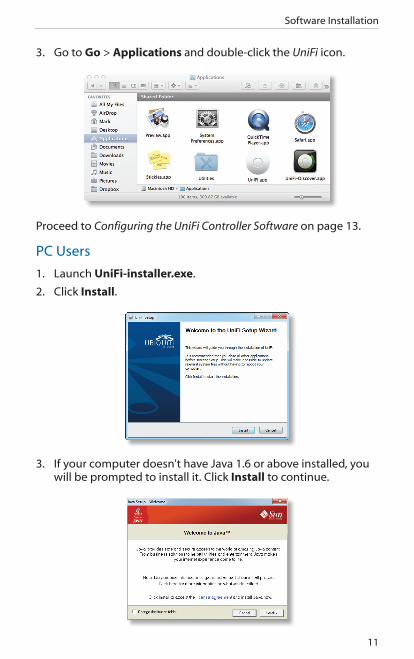
3. Go to Go > Applications and double-click the UniFi icon.
Proceed to Configuring the UniFi Controller Software on page 13.
PC Users
1. Launch UniFi-installer.exe.
2. Click Install.
3. If your computer doesn't have Java 1.6 or above installed, you will be prompted to install it. Click Install to continue.
12
UniFi AP/UniFi AP-LR
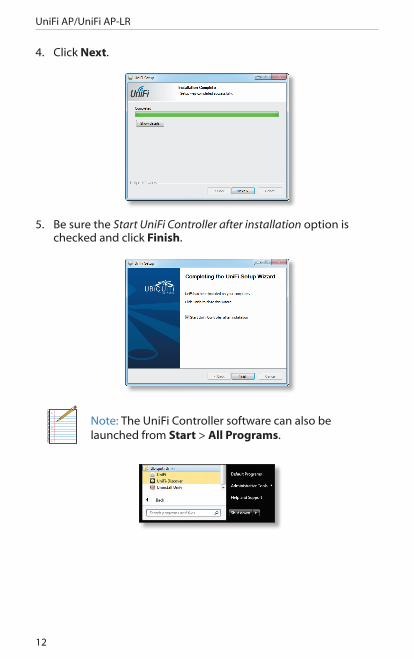
4. Click Next.
5. Be sure the Start UniFi Controller after installation option is checked and click Finish.
Note: The UniFi Controller software can also be launched from Start > All Programs.
13
Software Installation
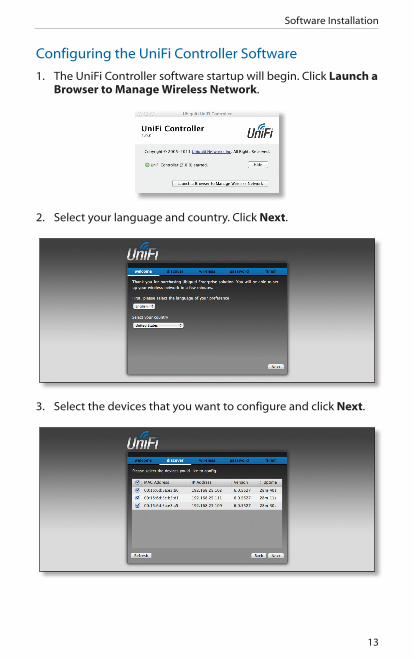
Configuring the UniFi Controller Software
1. The UniFi Controller software startup will begin. Click Launch a Browser to Manage Wireless Network.
2. Select your language and country. Click Next.
3. Select the devices that you want to configure and click Next.
14
UniFi AP/UniFi AP-LR
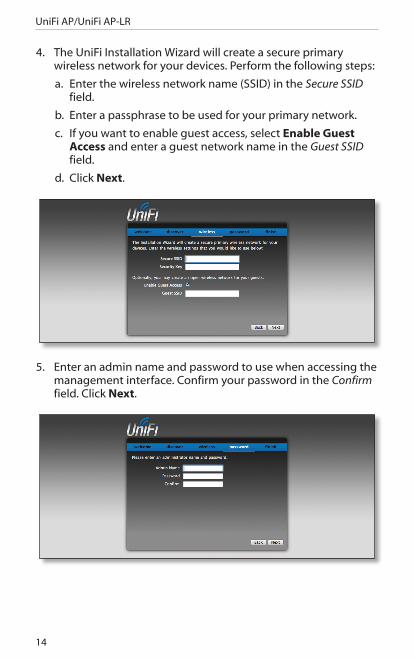
4. The UniFi Installation Wizard will create a secure primary wireless network for your devices. Perform the following steps:
a. Enter the wireless network name (SSID) in the Secure SSID field.
b. Enter a passphrase to be used for your primary network.
c. If you want to enable guest access, select Enable Guest Access and enter a guest network name in the Guest SSID field.
d. Click Next.
5. Enter an admin name and password to use when accessing the management interface. Confirm your password in the Confirm field. Click Next.
15
Software Installation
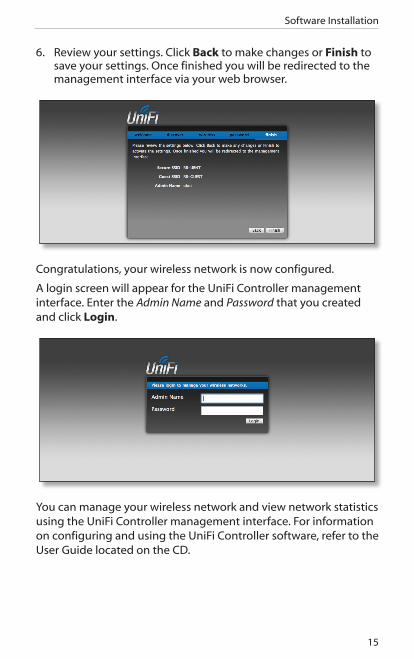
6. Review your settings. Click Back to make changes or Finish to save your settings. Once finished you will be redirected to the management interface via your web browser.
Congratulations, your wireless network is now configured.
A login screen will appear for the UniFi Controller management interface. Enter the Admin Name and Password that you created and click Login.
You can manage your wireless network and view network statistics using the UniFi Controller management interface. For information on configuring and using the UniFi Controller software, refer to the User Guide located on the CD.
English
We recommend that you protect your networks from the most brutal environments and devastating ESD attacks with industrial-grade shielded Ethernet cable from Ubiquiti Networks. For more details, visit www.ubnt.com/toughcable
Deutsch
Schützen Sie Ihre Netzwerke vor extremen Umwelteinflüssen und verheerender elektrostatischer Entladung (ESD), indem Sie abgeschirmte Ethernetkabel in Unternehmensqualität von Ubiquiti Networks verwenden. Weitere Informationen erhalten Sie unter www.ubnt.com/toughcable
Español
Le recomendamos que proteja sus redes de los entornos más hostiles y los devastadores efectos de las descargas electrostáticas utilizando cable Ethernet blindado con calidad-industrial de Ubiquiti Networks. Para obtener más información, visite www.ubnt.com/toughcable
Français
Nous vous recommandons de protéger vos réseaux contre les environnements les plus brutaux et les décharges électrostatiques les plus dévastatrices avec un câble Ethernet Ubiquiti Networks avec blindage renforcé. Pour en savoir plus, rendez-vous sur www.ubnt.com/toughcable
Italiano
Si consiglia di proteggere le reti dagli ambienti e dagli attacchi ESD più invasivi con il cavo Ethernet schermato-di tipo industriale di Ubiquiti Networks. Per ulteriori informazioni, visitare il sito Web www.ubnt.com/toughcable
MA090111

Ubiquiti Networks Support
Email: [email protected]
Phone (9 a.m. - 5 p.m. PST): 408-942-1153
Online Resources
Wiki Page: www.ubnt.com/wiki
Support Forum: www.ubnt.com/forum
Downloads: www.ubnt.com/support/downloads
w w w . u b n t . c o m
© 2011 Ubiquiti Networks, Inc. All rights reserved.