Embed Size (px)
Citation preview

EMT-Special Skill Curriculum
Intravenous Therapy
Revised December 2011 DOH 530-136 December 2011

This page intentionally left blank

TABLE OF CONTENTS
iii
PREFACE ....................................................................................................................... iv
Required Instruction for Intravenous Therapy Training ......................................... v
EMT-IV Special Skill Curriculum – Instructor Guidelines ................................................. 1
Washington State Training Course Forms ............................................................ 1
Course Length ...................................................................................................... 2
Washington State Clinical/Field Internship Rotation Requirements ...................... 2 EMT IV Special Skill Practical Skill Evaluation Process ....................................... 3
Intravenous Therapy Training Endorsement ........................................................ 3
Training Program Personnel ................................................................................. 4 Program Director/Course Coordinator ....................................................... 4
Program Faculty/Instructors ....................................................................... 4
Course Medical Director ............................................................................ 5 Facilities ............................................................................................................... 5
Equipment and Supplies ....................................................................................... 5
How to Use the Curriculum ................................................................................... 6 Objectives .................................................................................................. 6
Declarative ................................................................................................. 6
EMT-Intravenous Therapy Special Skill Curriculum ........................................................ 1 Lesson 1: Overview of Human Systems ............................................................... 2
Lesson 2: Patient Assessment & Clinical Decision Making ................................ 11
Lesson 3: Assessment and Management of Shock ............................................ 17 Lesson 4: Intravenous & Intraosseous Line Placement and Infusion ................. 27
APPENDICES ............................................................................................................... 43
Appendix A - EMT-Intravenous Therapy Special Skill Estimated Course Hours .. 1
Appendix B - Possible Abandonment Situations - Student Handout ..................... 1 Appendix C – IV Technician Skill Maintenance Requirements ............................. 1
IV Related Skills Maintenance Requirements for the CME Method ........... 3
IV Related Skills Maintenance Requirements for the OTEP Method ......... 4 Appendix D – Approved EMT-IV Practical Evaluation Guidelines & Skill Sheets . 1
Flow Chart - EMT-IV Provider Course Practical Skill Evaluation Process.. 3
Narrative - EMT-IV Provider Course Practical Skill Evaluation Process .... 3 Patient Assessment - Medical .................................................................... 7
Patient Assessment - Trauma .................................................................... 9
Bleeding Control/Shock Management ..................................................... 11 Intravenous Therapy ................................................................................ 13
Intravenous Bolus Administration ............................................................ 13
Intraosseous Infusion .............................................................................. 15
Required Scores for Successful Completion ............................................ 19
EMT-IV Therapy Special Training: Washington State DOH 530-136 December 2011
iv
PREFACE The purpose of EMT-IV Therapy special training is to provide specific, limited life-saving skills to rural areas that are unable to develop or maintain full paramedic service. This EMT-IV Therapy Special Skill Curriculum represents the minimum required information to be presented within a course leading to endorsement for EMT-IV Therapy. EMTs who take this course must have a minimum of one (1) year of field experience as an EMT to complete this training. This level is not a substitute for paramedics in existing services. Approval of this course and endorsement of personnel shall be based on the Regional EMS/TC Plan, and shall result in an improved level of care. People who successfully complete the training are allowed to use the skills only upon approval of the County Medical Program Director (MPD). Caution should be used when considering the number of EMT-IV providers trained in an area because of the skill maintenance requirements. There is additional education that will be required of EMT-IV providers who operate in the field, i.e. ambulance driving, heavy and light rescue, basic extrication, special needs, and so on. This information may differ among communities. Each training program or system should identify and provide special instruction for these training requirements. This curriculum is intended to prepare a medically competent EMT-IV Therapy provider to operate in the field. Enrichment programs and continuing education will help meet other specific needs for the EMT-IV Therapy provider’s education. The training must also meet skill maintenance requirements for continued MPD approval to use the skill. Skill maintenance requirements for the CME and OTEP methods are provided in Appendix C. For any patient requiring care beyond the BLS level, it is also intended that when paramedic service is available, EMT-IV personnel shall contact medical control for advice about rendezvous with paramedics as soon as possible.

EMT-IV Therapy Special Training: Washington State DOH 530-136 December 2011
v
Required Instruction for Intravenous Therapy Training Required Lessons
Lesson 1: Overview of Human Systems
Lesson 2: Patient Assessment & Clinical Decision Making
Lesson 3: Assessment and Management of Shock
Lesson 4: Intravenous & Intraosseous Line Placement and Infusion
Clinical Internship Requirements NOTE: It is recommended that some IV insertions be accomplished during the field internship. Competency for all skills is determined by the County Medical Program Director.
10 IV insertions on Humans. . At the option of the MPD, 5 may be performed on training aids. Lab skill proficiency required in:
IO line placement
Field internship
Competency Determined By the County Medical Program Director
Evaluations/Examinations
Practical Skill Evaluations as identified in Appendix D Written course completion examination approved by the MPD.
EMT-IV Therapy Special Training: Washington State DOH 530-136 December 2011
vi
This page intentionally left blank

EMT-IV Therapy Special Training: Washington State DOH 530-136 December 2011
EMT-IV Special Skill Curriculum – Instructor Guidelines Washington State Training Course Forms Course Application Forms: - You may complete these forms on the Internet at http://www.doh.wa.gov/hsqa/emstrauma/education.htm
Training Course Application: The EMS Training Course Application, DOH Publication 530-014 must be completed and received by the EMS and Trauma Section at least three weeks prior to the start of the course.
Course Schedule: The EMT-IV Therapy Special Skill Course Schedule, DOH Publication 530-134, must be completed and submitted with the Training Course Application. Clinical and Field internship agreements: Copies of the required clinical and field internship agreements must be submitted with your course application and course schedule.
Course Completion Forms:
EMS Course Completion Verification Form: DOH Publication 530-008 must be completed by indicating all students enrolled in the class (whether they successfully completed or not).
Certificate or Letter of Course Completion: The Lead Instructor must document successful course completion. Prior to issuing a certificate of course completion, the Lead Instructor must verify the student’s:
• Comprehensive cognitive, affective and psychomotor abilities. • Successful completion of the clinical/field rotations.
The Certificate or Letter of Course Completion:
• Is provided by the Lead Instructor to students who successfully complete the EMT-IV provider Course.
• Must include the course approval number, course location, Student’s name, Lead Instructor’s name and signature, and course completion date.

EMT-IV Therapy Special Training: Washington State DOH 530-136 December 2011
2
Course Length EMT with IV training should be based on the competency of the individual and not the length of the training. The time involved in educating an EMT-IV provider to an acceptable level of competence depends on many factors. It is expected that the average program, with average students, will achieve average results in approximately 42 hours.
Didactic
Lab/Eval
Course Knowledge & Skill Evaluations
Total
Clinical/Field Internships
IV Tech Spec. Skill
36
8
5
42
Varies
The length of this course will vary according to a number of factors, including, but not limited to:
• student’s basic academic skills competence • faculty to student ratio • student motivation • the student’s prior emergency/health care experience • prior academic achievements • clinical and academic resources available • quality of the overall educational program
Washington State Clinical/Field Internship Rotation Requirements In addition to the hours of instruction and practical skill evaluations, this course requires that the student successfully complete patient interactions in a clinical/prehospital setting. Any combination of the resources listed below may be used to meet the requirements. The lead instructor or Medical Program Director (MPD) must establish appropriate relationships with various clinical sites to assure students receive:
• Adequate supervision • Adequate contact with patients • Student performance reports.
Resources: Any combination of the resources listed below may be used to meet the clinical/field requirements for the course:
• Clinical Experience Resources o Intensive care unit o Coronary care unit o Emergency department o IV Therapy Department o OB-GYN o Recovery room o Nursing home o Clinics o Doctor’s Office o Other departments or clinical facilities approved by the MPD
• Field Experience Resources o Ambulance or Aid vehicle runs involving the care of sick or injured patients. o Be approved by the Program Director, Training Physician, SEI, and MPD.
EMT-IV Therapy Special Training: Washington State DOH 530-136 December 2011
3
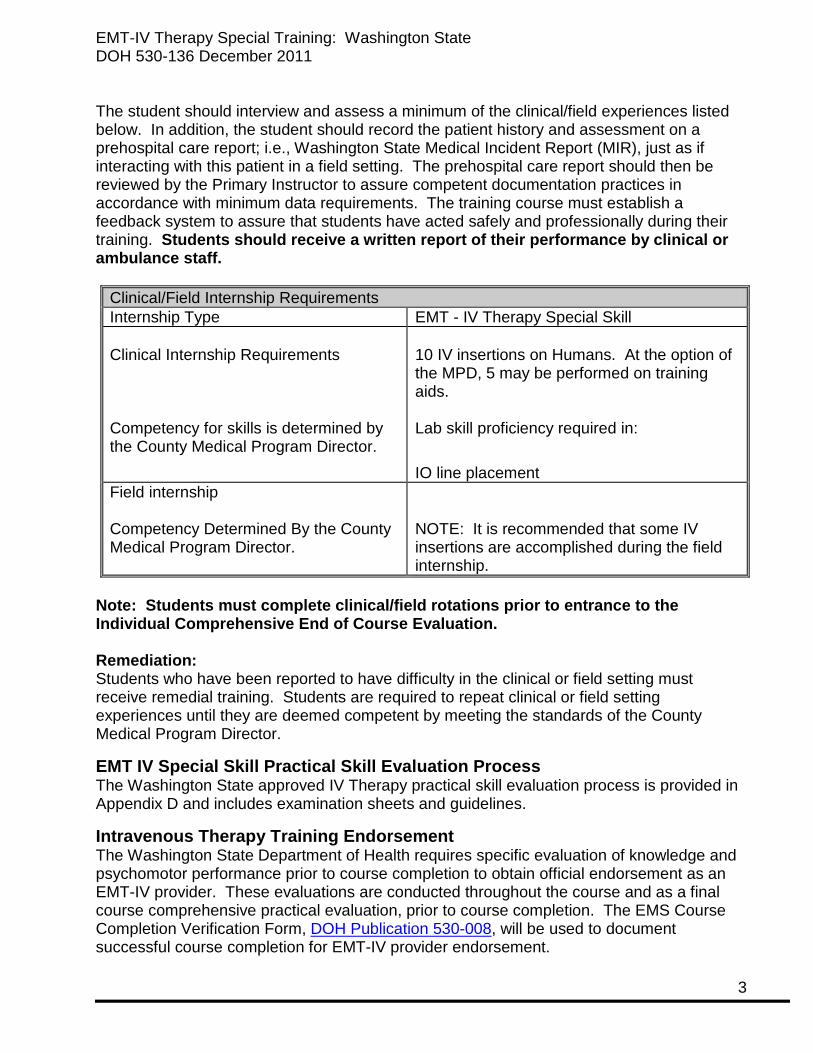
The student should interview and assess a minimum of the clinical/field experiences listed below. In addition, the student should record the patient history and assessment on a prehospital care report; i.e., Washington State Medical Incident Report (MIR), just as if interacting with this patient in a field setting. The prehospital care report should then be reviewed by the Primary Instructor to assure competent documentation practices in accordance with minimum data requirements. The training course must establish a feedback system to assure that students have acted safely and professionally during their training. Students should receive a written report of their performance by clinical or ambulance staff.
Clinical/Field Internship Requirements Internship Type EMT - IV Therapy Special Skill Clinical Internship Requirements Competency for skills is determined by the County Medical Program Director.
10 IV insertions on Humans. At the option of the MPD, 5 may be performed on training aids. Lab skill proficiency required in:
IO line placement Field internship Competency Determined By the County Medical Program Director.
NOTE: It is recommended that some IV insertions are accomplished during the field internship.
Note: Students must complete clinical/field rotations prior to entrance to the Individual Comprehensive End of Course Evaluation. Remediation: Students who have been reported to have difficulty in the clinical or field setting must receive remedial training. Students are required to repeat clinical or field setting experiences until they are deemed competent by meeting the standards of the County Medical Program Director.
EMT IV Special Skill Practical Skill Evaluation Process The Washington State approved IV Therapy practical skill evaluation process is provided in Appendix D and includes examination sheets and guidelines.
Intravenous Therapy Training Endorsement The Washington State Department of Health requires specific evaluation of knowledge and psychomotor performance prior to course completion to obtain official endorsement as an EMT-IV provider. These evaluations are conducted throughout the course and as a final course comprehensive practical evaluation, prior to course completion. The EMS Course Completion Verification Form, DOH Publication 530-008, will be used to document successful course completion for EMT-IV provider endorsement.
EMT-IV Therapy Special Training: Washington State DOH 530-136 December 2011
4
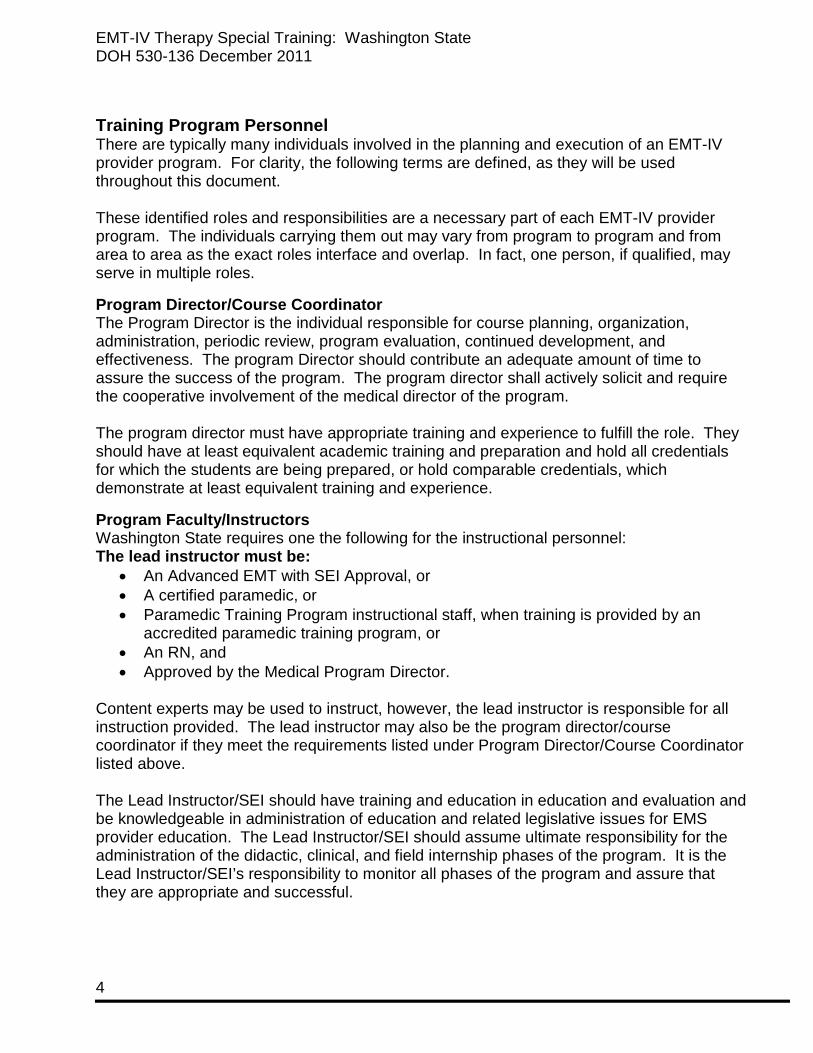
Training Program Personnel There are typically many individuals involved in the planning and execution of an EMT-IV provider program. For clarity, the following terms are defined, as they will be used throughout this document. These identified roles and responsibilities are a necessary part of each EMT-IV provider program. The individuals carrying them out may vary from program to program and from area to area as the exact roles interface and overlap. In fact, one person, if qualified, may serve in multiple roles.
Program Director/Course Coordinator The Program Director is the individual responsible for course planning, organization, administration, periodic review, program evaluation, continued development, and effectiveness. The program Director should contribute an adequate amount of time to assure the success of the program. The program director shall actively solicit and require the cooperative involvement of the medical director of the program. The program director must have appropriate training and experience to fulfill the role. They should have at least equivalent academic training and preparation and hold all credentials for which the students are being prepared, or hold comparable credentials, which demonstrate at least equivalent training and experience.
Program Faculty/Instructors Washington State requires one the following for the instructional personnel: The lead instructor must be:
• An Advanced EMT with SEI Approval, or • A certified paramedic, or • Paramedic Training Program instructional staff, when training is provided by an
accredited paramedic training program, or • An RN, and • Approved by the Medical Program Director.
Content experts may be used to instruct, however, the lead instructor is responsible for all instruction provided. The lead instructor may also be the program director/course coordinator if they meet the requirements listed under Program Director/Course Coordinator listed above. The Lead Instructor/SEI should have training and education in education and evaluation and be knowledgeable in administration of education and related legislative issues for EMS provider education. The Lead Instructor/SEI should assume ultimate responsibility for the administration of the didactic, clinical, and field internship phases of the program. It is the Lead Instructor/SEI’s responsibility to monitor all phases of the program and assure that they are appropriate and successful.
EMT-IV Therapy Special Training: Washington State DOH 530-136 December 2011
5
Course Medical Director Medical direction is an essential component of out-of-hospital training and physician involvement should be in place for all aspects of EMS education. The Course Medical Director should be the County Medical Program Director (MPD) or an MPD delegated training physician who will act as the medical authority regarding course content, procedures, and protocols. All of the program faculty should work closely together in the preparation and presentation of the program. The Course Medical Director can assist in settling questions of medical protocol and acting as a liaison between the course and the medical community. During the program the Medical Director will be responsible for reviewing the quality of care rendered by the EMS provider student in the clinical and field setting. The Course Medical Director should review all course content material and examinations. The medical director should periodically observe lectures and practical laboratories, field and clinical internships. The medical director should participate in clinical instruction, student counseling, psychomotor and oral testing, and summative evaluation. Most importantly, the Course Medical Director is responsible to verify student competence in the cognitive, affective and psychomotor domains. Students should not be awarded course completion certificates unless the medical director and program director can assure through documentation of completion of terminal competencies that each student has completed the full complement of education. Documentation of completion of course competencies should be affixed to the student file with signatures of the medical director and program director at the completion of the course.
Facilities The physical environment for the provision of the EMT-IV provider program is a critical component for the success of the overall program. The facility should sufficient space for seating all students. Abundant space should be made available for demonstration during the presentation of the course material. Additional rooms or adequate space should be available to serve as a practice area. The facility should be well lit for adequate viewing of various types of visual aids and demonstrations. Heating and ventilation should assure student and instructor comfort and the seats should be comfortable with availability of desk tops or tables for taking notes. There should be an adequate number of tables for display of equipment, medical supplies, and training aids. A chalkboard (flip chart, grease board) should be in the main hall. A projection screen and appropriate audiovisual equipment should be located in the presentation facility. Practice areas should be carpeted and large enough to accommodate six students, one instructor, and the necessary equipment and medical supplies. Tables should be available for practice areas, with appropriate and sufficient equipment and medical supplies.
Equipment and Supplies Sufficient supplies and equipment to be used in the provision of instruction shall be available and consistent with the needs of the curriculum and adequate for the students enrolled. The equipment must be in proper working order and sufficient to demonstrate skills of patients in various age groups. It is recommended that all the required equipment for the program be stored at the facility to assure availability for its use
EMT-IV Therapy Special Training: Washington State DOH 530-136 December 2011
6
How to Use the Curriculum There are four lessons of instruction in the EMT-IV Special Skill Training content. The unit terminal objective represents the desired outcome of completion of the block of instruction. In most cases it is a very high level objective, which can make it difficult to evaluate. This global objective represents the desired competency following completion of the section. Although this objective may be viewed as the aggregate of lower level objectives, in many cases, the whole is greater than the sum of the parts.
Objectives These are the individual objectives of the curriculum. Mastery of each of these objectives provides the foundation for the higher order learning that is expected of the entry level provider. The instructor and student should strive to understand the complex interrelationships between the objectives. These objectives are not discrete, disconnected bits of knowledge, but rather fit together in a mosaic that is inherently interdependent. The objectives are divided into three categories: Cognitive, Affective, and Psychomotor. Cognitive Affective Psychomotor mental process emotional process physical process perception feelings muscular activity reasoning intuition To assist with the design and development of a specific unit, each objective has a numerical value, e.g., 2.1. The first number is the Lesson of instruction, followed by a hyphen and the number of the specific unit. For example, 2-2 is:
Lesson 2: Patient Assessment and Critical Decision Making Objective 2 Explain and demonstrate decision making skills(C-1, C-3)
At the end of each objective is a letter for the type of objective: C = Cognitive; A = Affective; and P = Psychomotor. (The example above is cognitive). The number following the type of objective represents the level of objective: 1 = Knowledge; 2 = Application; and 3 = Problem Solving. (The example above is knowledge).
Declarative This material is designed to provide program directors and faculty with clarification on the depth and breadth of material expected of the entry level EMT-IV provider. The declarative material is not all-inclusive. The declarative sections of the curriculum lack much of the specific information that must be added by the instructor. The declarative information represents the bare minimum that should be covered, but the instructor must elaborate on the material listed. Every attempt has been made in development of the declarative material to avoid specific treatment protocols, drug dosages or other material that changes over time and has regional variations. It is the responsibility of the instructors to provide this information. Specifically, the declarative material is used to help instructors develop lesson plans and instructional strategies. It is also designed to assist examination and publishers in developing appropriate evaluation materials and instructional support materials. It is of utmost importance to note that the declarative material is not designed to be used as a lesson plan, but rather it should be used by instructors to help develop their own lesson plans.

EMT-Intravenous Therapy Special Skill Curriculum

Lesson 1: Overview of Human Systems
Lesson 1 Page 2
Lesson 1: Overview of Human Systems

EMT-IV Therapy Special Training: Washington State DOH 530-136 December 2011
Lesson 1: Page 3
LESSON TERMINAL INSTRUCTIONAL OBJECTIVE At the end of this lesson the EMT-IV student will be able to explain how the anatomy and physiology of each body system relates and provides the foundation for the clinical practice of out of hospital emergency medicine. OBJECTIVES LEGEND
C=Cognitive P=Psychomotor A=Application 1=Knowledge 2=Application 3=Problem Solving Level
COGNITIVE OBJECTIVES At the completion of this lesson, the EMT-IV student will be able to use the principles of anatomy and physiology as a foundation for the clinical practice of out of hospital emergency medicine. Organization and General Plan of the Body 1. Define homeostasis, and use an example to explain. (C-1) The Integumentary System 2. Name the two major layers of the skin and the tissue of which each is made. (C-1) 3. Describe how the arterioles in the dermis respond to heat, cold, and stress. (C-1) 4. Name the tissues that make up the subcutaneous tissue, and describe their functions.
(C-1) The Nervous System 5. Explain how the sympathetic division of the autonomic nervous system enables the
body to adapt to a stress situation. (C-1) 6. Explain how the parasympathetic division of the autonomic nervous system promotes
normal body functioning in relaxed situations. (C-1) The Senses 7. Explain referred pain and its importance. (C-1) 8. Explain the importance of baroreceptor. (C-1) Blood 9. Describe the composition and explain the functions of blood plasma. (C-1) 10. State the function of red blood cells, including the protein and the mineral involved. (C-1) 11. State what platelets are, and explain how they are involved in hemostasis. (C-1)

Lesson 1: Overview of Human Systems
Lesson 1 Page 4
The Heart 12. Describe the cardiac cycle. (C-1) 13. Explain stroke volume, cardiac output. (C-3) The Vascular System 14. Describe the structure of arteries and veins, and relate their structure to function. (C-1) 15. Describe the structure of capillaries, and explain the exchange processes that take
place in capillaries. (C-1) 16. Describe the pathway and purpose of pulmonary circulation. (C-1) 17. Name the major systemic veins, and the parts of the body they drain of blood. (C-1) 18. Define blood pressure. (C-1) 19. Explain how the heart and kidneys are involved in the regulation of blood pressure. (C-3) The Respiratory System 20. State the general function of the respiratory system. (C-1) 21. Describe the structure of the alveoli and pulmonary capillaries, and explain the
importance of surfactant. (C-1) 22. Name and describe the important air pressures involved in breathing. (C-1) 23. Describe normal inhalation and exhalation and forced exhalation. (C-1) 24. Explain the diffusion of gases in external respiration and internal respiration. (C-1) Fluid-Electrolyte and Acid-Base Balance 25. Describe the water compartments and the name for the water in each. (C-1) 26. Explain how water moves between compartments. (C-1) 27. Explain the regulation of the intake and output of water. (C-1) 28. Describe the effects of acidosis and alkalosis. (C-1) AFFECTIVE OBJECTIVES None defined PSYCHOMOTOR OBJECTIVES None defined
EMT-IV Therapy Special Training: Washington State DOH 530-136 December 2011
Lesson 1: Page 5
Presentation DECLARATIVE – Anatomy and Physiology Focused on IV therapy I. Tissues
A. Epithelial tissue and glands B. Connective tissue
1. Blood a) Plasma b) Blood cells
(1) Red blood cells (2) White blood cells (3) Platelet
2. Cardiac muscles a) Involuntary muscle
II. Integumentary system A. The epidermis B. The dermis
1. Receptors 2. Glands 3. Blood vessels
C. Subcutaneous tissue D. Nervous system
1. Afferent impulses 2. Efferent impulses 3. Divisions of the spinal cord
a) Cervical b) Thoracic c) Lumbar
4. Level of injury or disease of spinal cord a) More serious the closer to the brain stem they occur b) Dynamics of neurogenic shock
5. Nerve root control a) Cervical (shoulder girdle C5) b) Thoracic
(1) Sensation at nipple level (T4) (2) Sensation at the umbilicus level (T10)
c) Lumbar d) Sacral
E. The peripheral nervous system 1. Peripheral Nerves
a) Categories (1) Somatic sensory
(a) Pain

Lesson 1: Overview of Human Systems
Lesson 1 Page 6
(b) Temperature (c) Touch (d) Pressure (e) Position or muscle sense
(2) Somatic motor (3) Visceral sensory - from glands and structures composed of somatic or
cardiac muscle (4) Visceral motor
b) Brachial plexus (1) collection of nerves at the posterior triangle of the neck (2) May be injured at birth, or in injuries causing permanent disability (3) Major nerves
F. The autonomic nervous system 1. Function - beyond conscious control 2. Division and effects of each
a) Sympathetic division (1) More widespread effects (2) Stimulation causes increased heart rate, increased BP, rise in blood
sugar, bronchodilation (3) “Fight or flight”
b) Parasympathetic division (1) Effects more apparent in quiet state (2) Body conservation processes, i.e., digestion and storage of materials
for well-being (3) Complementary effects
III. Blood A. Characteristics of blood
1. Amount 2. Color
B. Plasma C. Blood cells
1. Red blood cells a) Function b) Production and maturation c) Blood types
2. White blood cells a) Functions
3. Platelet a) Function
4. Blood clotting IV. The heart
A. Chambers, vessels, and valves 1. Right atrium

EMT-IV Therapy Special Training: Washington State DOH 530-136 December 2011
Lesson 1: Page 7
a) Vena cava (1) Superior vena cava (2) Inferior vena cava
b) Tricuspid valve 2. Left atrium
a) Pulmonary veins b) Mitral valves/bicuspid
3. Right ventricle a) Pulmonary artery b) Pulmonary semilunar valve
4. Left ventricle a) Aorta b) Aortic semilunar valve
5. Coronary vessels B. The cardiac cycle
1. Systole 2. Diastole
C. Cardiac output 1. Heart rate
a) Baroreceptor - sensory nerve endings that adjust blood pressure as a result of vasodilation or vasoconstriction
2. Stroke volume a) The amount of blood pumped into the cardiovascular system as a result of
one contraction V. The vascular system
A. Layers of blood vessels 1. Tunica intima/endothelium 2. Tunica media 3. Tunica externa
B. Arteries C. Veins
1. Valves D. Capillaries E. Exchange in the capillaries
1. Gas exchange 2. Fluid exchange
F. Blood pressure VI. Respiratory system
A. The mechanics of breathing 1. Inhalation 2. Exhalation
B. Exchange of gases

Lesson 1: Overview of Human Systems
Lesson 1 Page 8
1. Diffusion of gasses C. Transportation of gases in the blood D. Pulmonary volumes
1. Tidal volume 2. Minute respiratory volume 3. Inspiratory reserve 4. Expiratory reserve 5. Vital capacity 6. Residual air
E. Regulation of respiration 1. Nervous control 2. Chemical control
VII. Acid-base balance
A. Buffer systems 1. Bicarbonate buffer system 2. Phosphate buffer system 3. Protein buffer system
B. Respiratory compensation 1. Respiratory acidosis 2. Respiratory alkalosis 3. Respiratory compensation for metabolic changes
C. Renal compensation D. Effects of pH changes
1. Acidosis 2. Alkalosis
E. Acid - base balances 1. Hydrogen ion and pH 2. Buffer systems
a) Carbonic acid-bicarbonate buffering b) Protein buffering c) Renal buffering d) Other buffers
3. Acid-base imbalances a) Metabolic acidosis
(1) Pathophysiology (2) Clinical presentation (3) Evaluation and treatment
b) Metabolic alkalosis (rare) (1) Pathophysiology (2) Clinical presentation (3) Evaluation and treatment
c) Respiratory acidosis (1) Pathophysiology (2) Clinical presentation

EMT-IV Therapy Special Training: Washington State DOH 530-136 December 2011
Lesson 1: Page 9
(3) Evaluation and treatment d) Respiratory alkalosis
(1) Pathophysiology (2) Clinical presentation (3) Evaluation and treatment

Lesson 1: Overview of Human Systems
Lesson 1 Page 10
NOTES:
Lesson 2: Patient Assessment & Clinical Decision Making

Lesson 2: Clinical Decision Making
Page 12
OBJECTIVES LEGEND C=Cognitive P=Psychomotor A=Application
1=Knowledge 2=Application 3=Problem Solving Level
COGNITIVE OBJECTIVES At the completion of this topic, the EMT-IV student will be able to: 1. Explain and demonstrate critical thinking skills(C-1, C-3) 2. Explain and demonstrate decision making skills(C-1, C-3) 3. Explain and demonstrate assessment Based Patient Care(C-1, C-3) Presentation DECLARATIVE I. Introduction and key concepts
A. The cornerstones of effective EMT-IV practice 1. Gathering, evaluating, and synthesizing information 2. Developing and implementing appropriate patient management plans 3. Apply judgment and exercise independent decision making 4. Thinking and working effectively under pressure
B. The prehospital environment 1. Unlike other environments where medical care is traditionally rendered 2. Unique - heavily influenced by factors that don’t exist in other medical settings.
C. The spectrum of patient care in prehospital care 1. Obvious, critical life threats
a) Major, multi-system trauma b) Devastating single system trauma c) End stage disease presentations d) Acute presentations of chronic conditions
2. Potential life threats a) Serious, multi-system trauma b) Multiple disease etiologies
3. Non-life threatening presentations D. Providing guidance and authority for EMT-IV action and treatments
1. Protocols, standing orders, and patient care algorithms a) Can clearly define and outline performance parameters b) Promote a standardized approach
2. Limitations of protocols, standing orders & patient care algorithms a) Only addresses “classic” patient presentations
(1) Non-specific patient complaints don’t follow model (2) Limited clarity of presenting patient problems
b) Don’t speak to multiple disease etiologies c) Don’t speak to multiple treatment modalities
EMT-IV Therapy Special Training: Washington State DOH 530-136 December 2011
Section 2: Page 13
d) Promotes linear thinking, “cookbook medicine” providers II. Components, stages, and sequence of Critical Thinking process for EMT-IVs
A. Concept Formation 1. Mechanism of injury (MOI)/scene assessment 2. Primary assessment 3. Chief complaint 4. Patient history and secondary assessment 5. Patient affect 6. Diagnostic tests
B. Data interpretation 1. Data gathered 2. EMT-IV knowledge of Anatomy, Physiology, and pathophysiology 3. EMT-IV attitude 4. Previous experience base of EMT-IV
C. Application of principle 1. Field impression/working diagnosis 2. Protocols/standing orders 3. Treatment/intervention
D. Evaluation 1. Reassessment of patient 2. Reflection in action 3. Revision of impression 4. Protocol/standing orders 5. Revision of treatment/intervention
E. Reflection on action 1. Run critique 2. Addition to/ modification of experience base of EMT-IV
III. Fundamental elements of critical thinking for EMT-IVs A. Adequate fund of knowledge B. Ability to pay attention C. Ability to gather and organize data and form concepts D. Ability to identify and deal with medical ambiguity E. Ability to differentiate between relevant and irrelevant data F. Ability to analyze and compare similar situations G. Ability to recall contrary situations H. Ability to articulate decision making reasoning and construct arguments
IV. Considerations with field application of Assessment Based patient management A. The Patient Acuity Spectrum
1. EMS is activated for countless reasons 2. Few prehospital calls constitute true life threatening emergencies
a) Minor medical and traumatic events require little critical thinking and have relatively easy decision making

Lesson 2: Clinical Decision Making
Page 14
b) Patient’s with obvious life threats pose limited critical thinking challenges c) Patient’s who fall on the acuity spectrum between minor and life threatening
pose the greatest critical thinking challenge B. Thinking under pressure
1. Hormonal influence i.e. “fight or flight” response impacts EMT-IV decision making both positively and negatively a) Enhanced visual and auditory acuity b) Improved reflexes and muscle strength c) Impaired critical thinking skills d) Diminished concentration and assessment ability
2. Mental conditioning is the key to effective performance under pressure a) Skills learned at a pseudo-instinctive performance level b) Automatic response for technical treatment requirements
C. Mental checklist for thinking under pressure 1. Stop and think 2. Scan the situation 3. Decide and act 4. Maintain clear, concise control 5. Regularly and continually reevaluate the patient
D. Facilitating behaviors 1. Stay calm, don’t panic 2. Assume and plan for the worst; err on the side of the patient 3. Maintain a systematic assessment pattern 4. Balance analysis, data processing and decision making styles
a) Situation analysis styles: reflective vs. Impulsive b) Data processing styles: divergent vs. Convergent c) Decision making styles: anticipatory vs. Reactive
E. Situation awareness 1. Reading the scene 2. Reading the patient
F. Putting it all together - “The Six R’s” 1. Read the patient
a) Observe the patient (1) Level of responsiveness/consciousness (2) Skin color (3) Position and location of patient - obvious deformity or asymmetry
b) Talk to the patient (1) Determine the chief complaint (2) New problem or worsening of preexisting condition?

EMT-IV Therapy Special Training: Washington State DOH 530-136 December 2011
Section 2: Page 15
c) Touch the patient (1) Skin temperature and moisture (2) Pulse rate, strength, and regularity
d) Auscultate the patient (1) Identify problems with the lower airway
e) Status of ABC’s-identifying life threats f) Complete and accurate set of vital signs
(1) Use as triage tool to estimate severity (2) Can assist in identifying the majority of life threatening conditions (3) Influenced by patient age, underlying physical and medical conditions,
and current medications 2. Read the scene
a) General environmental conditions b) Evaluate immediate surroundings c) Mechanism of injury
3. React a) Address life threats in the order they are found b) Determine the most common and statistically probable that fits the patient’s
initial presentation c) Consider the most serious condition that fits the patient’s initial presentation d) If a clear medical problem is elusive, treat based on presenting signs and
symptoms 4. Reevaluate
a) Focused and detailed assessment b) Response to initial management/interventions c) Discovery of less obvious problems
5. Revise management plan 6. Review performance at run critique

Lesson 2: Clinical Decision Making
Page 16
NOTES:
Lesson 3: Assessment and Management of Shock

Lesson 3: Assessment and Management of Shock
Page 18
OBJECTIVES LEGEND C=Cognitive P=Psychomotor A=Application
1=Knowledge 2=Application 3=Problem Solving Level
LESSON TERMINAL INSTRUCTIONAL OBJECTIVE At the end of this lesson, the EMT-IV student will be able to utilize the assessment findings to formulate a field impression and implement the treatment plan for the bleeding patient or the patient in shock. COGNITIVE OBJECTIVES At the conclusion of this lesson, the EMT-IV student will be able to: GENERAL 1. Describe the epidemiology, including the morbidity/mortality and prevention strategies,
for shock and hemorrhage. (C-1) 2. Discuss the anatomy and physiology of the cardiovascular system. (C-1) 3. Predict shock and hemorrhage based on mechanism of injury. (C-3) 4. Discuss the various types and degrees of shock and hemorrhage. (C-1) 5. Emphasize that placing an IV should not delay transport of the patient. PATHOPHYSIOLOGY, ASSESSMENT AND MANAGEMENT - Cardiovascular System 6. Discuss the pathophysiology of hemorrhage and shock. (C-1) 7. Discuss the assessment findings associated with hemorrhage and shock. (C-1) 8. Identify the need for intervention and transport of the patient with hemorrhage or shock.
(C-1) 9. Discuss the treatment plan and management of hemorrhage and shock. (C-1) SPECIFIC PATHOPHYSIOLOGY, ASSESSMENT AND MANAGEMENT - Hemorrhage 10. Describe the incidence, morbidity, and mortality of hemorrhage.(C-1) 11. Discuss the management of external hemorrhage.(C-1) 12. Differentiate between the administration rate and amount of IV fluid in a patient with
controlled versus uncontrolled hemorrhage.(C-3) 13. Relate internal hemorrhage to the pathophysiology of compensated and
uncompensated hemorrhagic shock.(C-3) 14. Relate internal hemorrhage to the assessment findings of compensated and
uncompensated hemorrhagic shock.(C-3) 15. Discuss the management of internal hemorrhage.(C-1)
EMT-IV Therapy Special Training: Washington State DOH 530-136 December 2011
Section 2: Page 19
SPECIFIC PATHOPHYSIOLOGY, ASSESSMENT AND MANAGEMENT - Shock 16. Describe the incidence, morbidity, and mortality of shock.(C-1) 17. Describe the body's physiologic response to changes in perfusion.(C-1) 18. Discuss the assessment findings of hemorrhagic shock.(C-1) 19. Relate pulse pressure changes to perfusion status.(C-3) 20. Relate orthostatic vital sign changes to perfusion status.(C-3) 21. Define compensated and uncompensated hemorrhagic shock.(C-1) 22. Discuss the pathophysiological changes associated with compensated shock.(C-1) 23. Discuss the assessment findings associated with compensated shock.(C-1) 24. Identify the need for intervention and transport of the patient with compensated shock. 25. Discuss the treatment plan and management of compensated shock.(C-1) 26. Discuss the pathophysiological changes associated with uncompensated shock.(C-1) 27. Discuss the assessment findings associated with uncompensated shock.(C-1) 28. Identify the need for intervention and transport of the patient with uncompensated shock. 29. Discuss the treatment plan and management of uncompensated shock.(C-1) 30. Differentiate between compensated and uncompensated shock.(C-3) 31. Relate external hemorrhage to the pathophysiology of compensated and
uncompensated hemorrhagic shock.(C-3) 32. Relate external hemorrhage to the assessment findings of compensated and
uncompensated hemorrhagic shock.(C-3) 33. Differentiate between the administration of fluid in the normotensive, hypotensive, and
profoundly hypotensive patient.(C-3) 34. Discuss the physiologic changes associated with the pneumatic anti-shock garment
(PASG).(C-1) 35. Discuss the indications and contraindications for the application and inflation of the
PASG.(C-1) INTEGRATION 36. Apply epidemiology to develop prevention strategies for hemorrhage and shock. (C-1) 37. Integrate the pathophysiological principles to the assessment of a patient with
hemorrhage or shock. (C-1) 38. Synthesize assessment findings and patient history information to form a field
impression for the patient with hemorrhage or shock. (C-2) 39. Develop, execute and evaluate a treatment plan based on the field impression for the
hemorrhage or shock patient. (C-1)
Lesson 3: Assessment and Management of Shock
Page 20
PSYCHOMOTOR OBJECTIVES 40. Demonstrate the assessment of a patient with signs and symptoms of hemorrhagic
shock. (P-2) 41. Demonstrate the management of a patient with signs and symptoms of hemorrhagic
shock. (P-2) 42. Demonstrate the assessment of a patient with signs and symptoms of compensated
hemorrhagic shock.(P-2) 43. Demonstrate the management of a patient with signs and symptoms of compensated
hemorrhagic shock. (P-2) 44. Demonstrate the assessment of a patient with signs and symptoms of uncompensated
hemorrhagic shock.(P-2) 45. Demonstrate the management of a patient with signs and symptoms of uncompensated
hemorrhagic shock. (P-2) 46. Demonstrate the assessment of a patient with signs and symptoms of external
hemorrhage.(P-2) 47. Demonstrate the management of a patient with signs and symptoms of external
hemorrhage. (P-2) 48. Demonstrate the assessment of a patient with signs and symptoms of internal
hemorrhage.(P-2) 49. Demonstrate the management of a patient with signs and symptoms of internal
hemorrhage. (P-2)

EMT-IV Therapy Special Training: Washington State DOH 530-136 December 2011
Section 2: Page 21
Presentation DECLARATIVE I. Pathophysiology, assessment, and management of hemorrhage
A. Hemorrhage 1. Epidemiology
a) Incidence b) Mortality/morbidity c) Prevention strategies
2. Pathophysiology a) Location
(1) External (2) Internal
(a) Trauma (b) Non-trauma
(i) Common sites (ii) Uncommon sites
b) Anatomical type (1) Arterial (2) Venous (3) Capillary
c) Timing (1) Acute (2) Chronic
d) Severity (1) Amounts of blood loss adults, children and infants can tolerate
e) Physiological response to hemorrhage (1) Clotting (2) Localized vasoconstriction
f) Stages of hemorrhage (1) Stage 1
(a) Up to 15% intravascular loss (b) Compensated by constriction of vascular bed (c) Blood pressure maintained (d) Normal pulse pressure, respiratory rate, and renal output (e) Pallor of the skin (f) Central venous pressure low to normal
(2) Stage 2 (a) 15-25% intravascular loss (b) Cardiac output can not be maintained by arteriolar constriction (c) Reflex tachycardia (d) Increased respiratory rate (e) Blood pressure maintained

Lesson 3: Assessment and Management of Shock
Page 22
(f) Catecholamines increase peripheral resistance (g) Increased diastolic pressure (h) Narrow pulse pressure (i) Diaphoresis from sympathetic stimulation (j) Renal output almost normal
(3) Stage 3 (a) 25-35% intravascular loss (b) Classic signs of hypovolemic shock
(i) Marked tachycardia (ii) Marked tachypnea (iii) Decreased systolic pressure (iv) 5-15 ml per hour urine output (v) Alteration in mental status (vi) Diaphoresis with cool, pale skin
(4) Stage 4 (a) Loss greater than 35% (b) Extreme tachycardia (c) Pronounced tachypnea (d) Significantly decreased systolic blood pressure (e) Confusion and lethargy (f) Skin is diaphoretic, cool, and extremely pale
3. Assessment a) Bright red blood from wound, mouth, rectum or other orifice b) Coffee ground appearance of vomitus c) Melena and hematochezia d) Dizziness or syncope on sitting or standing e) Orthostatic hypotension f) Signs and symptoms of hypovolemic shock
4. Management a) Airway and ventilatory support b) Circulatory support
(1) Bleeding from nose or ears after head trauma (a) Refrain from applying pressure (b) Apply loose sterile dressing to protect from infection
(2) Bleeding from other areas (a) Control bleeding
(i) Direct pressure (ii) Tourniquet (iii) Splinting (iv) Packing of large gaping wounds with sterile dressings (v) PASG
(b) Apply sterile dressing and pressure bandage

EMT-IV Therapy Special Training: Washington State DOH 530-136 December 2011
Section 2: Page 23
(3) Transport considerations (4) Psychological support/Communication strategies
II. Shock A. Epidemiology
1. Mortality/morbidity 2. Prevention strategies 3. Pathophysiology
a) Stages of shock (1) Compensated or nonprogressive
(a) Characterized by signs and symptoms of early shock (b) Arterial blood pressure is normal or high (c) Treatment at this stage will typically result in recovery
(2) Decompensated or progressive (a) Characterized by signs and symptoms of late shock (b) Arterial blood pressure is abnormally low (c) Treatment at this stage will sometimes result in recovery
(3) Irreversible (a) Characterized by signs and symptoms of late shock (b) Arterial blood pressure is abnormally low (c) Even aggressive treatment at this stage does not result in recovery
b) Etiologic classifications (1) Hypovolemic
(a) Hemorrhage (b) Plasma loss (c) Fluid and electrolyte loss (d) Endocrine
(2) Distributive (vasogenic) (a) Increased venous capacitance (b) Low resistance, vasodilatation
(3) Cardiogenic (a) Myocardial insufficiency (b) Filling or outflow obstruction (obstructive)
4. Assessment - Hypovolemic shock due to hemorrhage a) Early or compensated
(1) Tachycardia (2) Pale, cool skin (3) Diaphoresis (4) Level of consciousness
(a) Normal (b) Anxious or apprehensive
(5) Blood pressure maintained (6) Narrow pulse pressure
Lesson 3: Assessment and Management of Shock
Page 24
(a) Pulse pressure is the difference between the systolic and diastolic pressures, i.e., Pulse pressure = systolic - diastolic
(b) Pulse pressure reflects the tone of the arterial system and is more sensitive to changes in perfusion than the systolic or diastolic alone
(7) Orthostatic hypotension (8) Dry mucosa (9) Complaints of thirst (10) Weakness (11) Possible delay of capillary refill
b) Late or progressive (1) Extreme tachycardia (2) Extreme pale, cool skin (3) Diaphoresis (4) Significant decrease in level of consciousness (5) Hypotension (6) Dry mucosa (7) Nausea (8) Cyanosis with white waxy looking skin
5. Differential shock assessment findings a) Shock is assumed to be hypovolemic until proven otherwise b) Cardiogenic shock is differentiated from hypovolemic shock by one or more
of following (1) Chief complaint, e.g., Chest pain, dyspnea, tachycardia (2) Heart rate, i.e., Bradycardia or excessive tachycardia (3) Signs of congestive heart failure, i.e., Jugular vein distention (JVD), rales (4) Dysrhythmias
c) Obstructive shock (filling or outflow obstruction) is differentiated from hypovolemic shock by presence of signs and symptoms suggestive of (1) Cardiac tamponade (2) Tension pneumothorax
d) Distributive shock (Vasogenic) is differentiated from hypovolemic shock by presence of one or more of following (1) Mechanism that suggests vasodilatation, e.g., Spinal cord injury, drug
overdose, sepsis, anaphylaxis (2) Warm, flushed skin, especially in dependent areas (3) Lack of tachycardia response (not reliable, though, since significant
number of hypovolemic patients never become tachycardic) B. Management/Treatment Plan
1. Airway and ventilatory support a) Ventilate and suction as necessary b) Administer high concentration oxygen
2. Circulatory support a) Hemorrhage control

EMT-IV Therapy Special Training: Washington State DOH 530-136 December 2011
Section 2: Page 25
b) Intravenous volume expanders (1) Types
(a) Isotonic solutions (2) Rate of administration
(a) External hemorrhage that can be controlled (b) External hemorrhage that can not be controlled (c) Internal hemorrhage
(i) Blunt trauma (ii) Penetrating trauma
c) Pneumatic anti-shock garment (1) Effects
(a) Increased arterial blood pressure above garment (b) Increased systemic vascular resistance (c) Immobilization of pelvis and possibly lower extremities (d) Increased intraabdominal pressure
(2) Mechanism (a) Increases systemic vascular resistance through direct compression
of tissues and blood vessels inferior to costal margin (b) Negligible autotransfusion effect
(3) Indications (a) Hypoperfusion with unstable pelvis (b) Conditions of decreased Systemic Vascular Resistance (SVR) not
corrected by other means (c) As approved locally, other conditions characterized by
hypoperfusion with hypotension (4) Research studies (5) Contraindications
(a) Advanced pregnancy (no inflation of abdominal compartment) (b) Object impaled in abdomen or evisceration (no inflation of
abdominal compartment) (c) Ruptured diaphragm (d) Cardiogenic shock (e) Pulmonary edema
3. Fluid Replacement. a) Hypovolemic shock
(1) Volume expanders b) Cardiogenic shock
(1) Volume expanders c) Distributive (vasogenic) shock
(1) Volume expanders (2) PASG/MAST trousers(per MPD protocols)
d) Obstructive shock (filling or outflow obstruction) (1) Volume expanders
Lesson 3: Assessment and Management of Shock
Page 26
4. Psychological support/Communication strategies 5. Transport considerations
a) Indications for rapid transport b) Indications for transport to a Trauma Center
III. Medical/legal considerations IV. Integration
NOTES:

Appendix D: Approved EMT-IV Practical Evaluation Guidelines & Skill Sheets
Lesson 4: Intravenous & Intraosseous Line Placement and Infusion
Lesson 4: Intravenous & Intraosseous Line Placement and Infusion
Page 28
OBJECTIVES LEGEND C=Cognitive P=Psychomotor A=Application
1=Knowledge 2=Application 3=Problem Solving Level
COGNITIVE OBJECTIVES: At the end of this lesson, the student will be able to: 1. Define the term intravenous cannulation. (C-1) 2. Describe universal precautions and body substance isolation (BSI) procedures when
performing an intravenous cannulation. (C-1) 3. Discuss medical asepsis. (C-1) 4. Differentiate among the different solutions and intravenous cannulation devices used
when administering intravenous cannulations for the management of trauma and medical emergencies. (C-3)
5. Identify anatomic landmarks utilized in administering intravenous cannulations. (C-1) 6. Correctly locate three appropriate sites for intraosseous needle insertion. (C-1) 7. Describe the equipment needed, indications, contraindications, complications, and
procedures for the preparation and administration of intravenous cannulations, including saline locks. (C-1)
8. Identify the equipment needed and procedures used for discontinuing an intravenous cannulation. (C-1)
9. Describe the procedures, the preparation and administration of a fluid challenge.(C-1) 10. Describe on-line and off-line medical direction/control for intravenous cannulation. (C-1) 11. State the indications and contraindications for insertion of an intraosseous line. (C-1) 12. List the necessary equipment for an intraosseous insertion. (C-1) 13. Describe the steps required for intraosseous needle insertion and confirmation of correct
placement. (C-1) 14. Describe the process of securing the intraosseous needle. (C-1) 15. Compare the rate of fluid infusion through a peripheral line versus an intraosseous line,
and describe methods of increasing the rate of infusion through an intraosseous line. (C-1)
16. Describe the concept of fluid limitation in patients under 100 pounds. (C-1) 17. State the potential complications of intraosseous needle insertion and infusion. (C-1) 18. Differentiate among the different techniques for obtaining a blood sample. (C-3) 19. Identify locations utilized in obtaining a blood sample. (C-1) 20. Describe the equipment needed, techniques utilized, complications, and general
principles for obtaining a blood sample. (C-1) 21. Describe and understand the use and testing of blood glucose monitoring devices. (C-1) 22. Describe disposal of contaminated items and sharps. (C-1)

EMT-IV Therapy Special Training: Washington State DOH 530-136 December 2011
Page 29
AFFECTIVE OBJECTIVES 23. Comply with universal precautions and body substance isolation (BSI). (A-1) 24. Serve as a model for disposing contaminated items and sharps. (A-3) PSYCHOMOTOR OBJECTIVES 25. Perform universal precautions and body substance isolation (BSI) procedures. (P-1, P-
2) 26. Perfect clean technique during intravenous cannulation, blood draws and glucose
monitoring. (P-3) 27. Demonstrate preparation and techniques for performing an intravenous cannulation. (P-
1, P-2) 28. Demonstrate the procedures, the preparation and administration of a fluid challenge.(P-
1, P-2) 29. Demonstrate preparation and techniques for performing an intraosseous needle
insertion and confirmation of correct placement. (P-1, P-2) 30. Locate sites utilized in obtaining a blood sample. (P-1, P-2) 31. Demonstrate preparation and techniques for obtaining a blood sample. (P-1, P-2) 32. Demonstrate preparation and techniques for using blood glucose monitoring devices.
(P-1, P-2) 33. Perfect disposal of contaminated items and sharps. (P-3)

Lesson 4: Intravenous & Intraosseous Line Placement and Infusion
Page 30
Presentation Declarative: I. Intravenous Cannulation
A. Definition: 1. The placement of a catheter into a vein. It is used to administer fluids, or
medications directly into the circulatory system. It can also be used to obtain venous blood specimens for laboratory determinations.
2. Because IV fluids are drugs, on-line medical direction/control or standing orders are required for the EMT-IV to administer IV fluids.
B. Indications 1. Replacement of circulatory volume 2. To establish a medication administration route
C. Contraindications - Cannulation of a particular site is contraindicated in: 1. Sclerotic veins 2. Burned extremities
D. Universal Precautions and Body Substance Isolation (BSI) in Medication Administration
E. Equipment 1. Intravenous (IV) solutions
a) Types of solutions (1) Crystalloids (2) Colloids - Informational only - not for field use
b) Types of containers c) Variety of volumes
2. Intravenous (IV) administration sets a) Components
(1) Piercing spike (2) Drip Chamber
(a) Macrodrip chamber-type (b) Microdrip chamber-type
b) Flow clamp c) Drug administration port d) Connector end e) Variety of extensions and other pieces of equipment f) Some IV administration sets are manufacturer specific
3. Needles/Catheters a) Types
(1) Over the needle (2) Through the needle
b) IV catheter size

EMT-IV Therapy Special Training: Washington State DOH 530-136 December 2011
Page 31
4. Supplies and materials a) Personal protective equipment to maintain BSI b) Tourniquet c) Alcohol/povidone iodine d) Sterile dressings e) Tape f) Armboards g) Vacutainer holder and assorted blood collection tubes for blood samples
F. Sites for peripheral venous cannulation 1. Structure of veins 2. Difference between arteries and veins 3. The skin
a) Epidermis b) Dermis
4. Sites used in non-critical, routine situations: a) Distal veins on the dorsum of the hand and arms b) If available, the EMT-IV should use a vein that is:
(1) Fairly straight (2) Easily accessible (3) Well-fixed, not rolling (4) Feels springy when palpated
c) Avoid (1) Sclerotic veins (2) Veins near joints (3) Areas where an arterial pulse is palpable close to the vein (4) Injured or swollen extremities
5. Sites used in cardiac arrest - antecubital fossa (the area anterior to and below the elbow)
6. Other sites include peripheral leg veins G. Procedure for performing IV cannulation - The EMT-IV must do the following:
1. Explain the need for IV cannulation and describe the procedure to the patient. 2. Ask if the patient has any allergies (especially to iodine if using iodine pads to
cleanse the skin). 3. Select IV solution to be used and check to make sure it is:
a) The proper solution b) Clean, without particulate matter c) Not outdated d) Not leaking e) Warmed or cooled as indicated
4. Select an appropriate size catheter: a) 14 to 16 gauge for trauma, volume replacement, or cardiac arrest b) 18 to 20 gauge for medical conditions

Lesson 4: Intravenous & Intraosseous Line Placement and Infusion
Page 32
5. Select the proper administration set: a) Macro for trauma b) Micro for medical conditions and drug administration
6. Prepare the IV bag and administration set using an aseptic technique to prevent contamination. a) Remove IV bag from its protective envelope and gently squeeze to detect
any punctures or leakage. b) Steady the port of the IV bag with one hand, and remove the protective cap
by pulling smoothly to the right. c) Remove the administration set from its protective wrapping or box d) Slide the flow control valve close to the drip chamber. e) Close off the flow control valve. f) Remove the protective cap from the spiked piercing end of the
administration set. g) Invert the IV bag. h) Using sterile technique, insert the spiked end of the administration set into
the tubing insertion port of the IV bag. Use one quick, smooth motion. i) Turn the IV bag right side up, and squeeze the drip chamber two or three
times to fill it half-way. j) Open the control valve to flush IV solution through the entire tubing, which
should force out all the air. 7. Cut or tear several pieces of tape of different lengths. 8. Employ BSI precaution 9. Talk to the patient, let them know what you are doing and what to expect. 10. Make sure you are using the correct IV solution, correct gauge needle, and the
correct location. 11. If possible, place the patient into a suitable position with the selected extremity
lower than the heart. This positioning helps distend the distal veins. 12. Apply a tourniquet.
a) Many elderly patients and patients on prednisone have very delicate skin. Use caution when applying and removing the tourniquet.
13. Select a suitable vein by palpation and sight. a) Avoid areas of the veins where a valve is situated. b) Avoid using Fistulas, shunts or graphs. Keep in mind, that these may be
used at last resort... c) Standard practice is to look at distal (hand) veins first and work your way up
the arm. If you are using a hand vein, place the tourniquet near the hand. d) If the vein rolls, or feels hard or rope-like, select another vein. e) Veins can be distended for easier cannulation by:
(1) Having the patient open and close their fist tightly five or six times. (2) Flicking the skin over the vein with one or two sharp snaps of the
fingers. (3) Rubbing or stroking the skin upward toward the tourniquet.
f) If a suitable vein cannot be found, or if the vein still feels small and uniform, release the tourniquet and apply it closer to the IV site.

EMT-IV Therapy Special Training: Washington State DOH 530-136 December 2011
Page 33
g) IF you are not seeing a vein that you are confident you can cannulate, don’t hesitate to look at the other arm.
14. Stabilize the vein by anchoring it with the thumb and stretching the skin downward.
15. Perform the venipuncture without contaminating the equipment or site. a) Tell the patient there will be a small poke or pinch as the needle enters the
skin. b) Hold the end of the venipuncture device between thumb and the
index/middle fingers: (1) Maintain visualization of the flashback chamber. (2) Avoid touching any portion of the catheter, because a contaminated
device is not usable. c) Depending on the type of venipuncture device and manufacturer
recommendations, hold the needle at a 15, 30 or 45 degree angle to the skin.
d) Penetrate the skin with the bevel of the needle pointed up. (1) If significant resistance is felt, do not force the catheter. (2) Instead, withdraw the needle and catheter together as a unit.
e) If possible, penetrate the vein at its junction or bifurcation with another vein, because it is more stable at this location.
f) Enter the vein with the needle from either the top or side. (1) Normally, a slight “pop” or “give” is felt as the needle passes through
the wall of the vein. (2) Be careful not to enter too fast or too deeply, because the needle can
go through the back wall of the vein. g) Note when blood fills the flashback chamber. h) Lower the venipuncture device and advance it another 1 to 2 cm until the tip
of the catheter is well within the vein. i) Advance the catheter into the vein following the manufacturer’s
recommendations. j) Once the catheter is within the vein, apply pressure to the vein beyond the
catheter tip with the little finger to prevent blood from leaking out of the catheter hub once the needle is completely withdrawn.
k) It may be necessary to use the drawback technique to determine patency. 16. Draw a blood sample. The tourniquet should be left in place while drawing
blood samples. a) Stabilize the catheter with one hand, and attach a Vacutainer holder with a
multi-sample IV Luer-lock adapter or a syringe to the hub. (1) Be careful not to disrupt the catheter placement while connecting the
Vacutainer or syringe. (2) Once the device is connected, release the finger pressure at the distal
tip of the catheter b) If using a Vacutainer device, insert the blood collection tube fully into the
holder and allow its internal vacuum to draw blood out of the vein. c) If using a syringe, slowly withdraw the plunger to fill the syringe with blood.

Lesson 4: Intravenous & Intraosseous Line Placement and Infusion
Page 34
(1) If blood flow into the syringe stops, it usually means that the sucking pressure of the syringe is collapsing the vein.
(2) To correct this problem, slow the rate at which the plunger is being withdrawn.
17. Once enough blood collection tubes have been filled or the syringe is completely full, release the tourniquet from the patient’s arm. a) Next reapply pressure to the vein beyond the catheter tip with the little
finger to prevent blood from leaking out of the catheter hub once the blood drawing device is disconnected.
b) Disconnect the syringe or Vacutainer device from the hub of the catheter by holding the hub between the first finger and thumb and pulling the device free with the other hand.
18. Connect the IV tubing to the catheter hub. Be careful not to contaminate either the hub or connector prior to insertion.
19. Open the IV flow control valve and run the IV for a brief period of time to ensure the line is patent. To ensure proper IV flow rates, the IV container must hang at least 30 to 36 inches above the insertion site.
20. Cover the IV site with povidone-iodine ointment and a sterile dressing or a bandage.
21. Secure the catheter, administration set tubing, and sterile dressing in place with tape. a) Tubing should be looped and secured with tape above the IV cannulation
site. b) This gives the tubing more play, making the catheter less likely to be
dislodged by accidental pulls on the tubing. c) Do not make the loop so small that it kinks the tubing and restricts fluid flow.
22. Adjust the appropriate flow rate for the patient’s condition. 23. Dispose of the needle(s) in a proper biomedical waste container. 24. If a syringe was used to draw the blood:
a) The necessary blood collection tubes must be filled by attaching needle to the syringe and inserting it into each blood tube.
b) The tubes should then be labeled and stored in a safe location. H. Using an armboard. Armboards may be:
1. Avoided simply by choosing a venipuncture site well away from any flexion areas.
2. Necessary when a venipuncture device is inserted near a joint or in the dorsum of the hand
3. Used along with restraints in confused or disoriented patients. I. Regulating fluid flow rates
1. Flow rates should be adjusted as ordered by medical control/direction. 2. The EMT-IV must know the volume to be infused, the period of time over which
the fluid is to be infused, and the number of drops per milliliter the infusion set delivers. a) The following formula can be used to calculate IV solution drip rates per
minute

EMT-IV Therapy Special Training: Washington State DOH 530-136 December 2011
Page 35
b) Drops per min. = volume to be infused x drops/ml of administration set ÷ total time of infusion in minutes.
3. After determining the rate, open the clamp slowly to start fluid dripping into the drip chamber. a) Determine drops per minute and adjust the flow clamp as needed to obtain
the correct drip rate. b) Check the flow rate periodically.
4. Various types of infusion pumps J. Documenting IV cannulation
1. Depending on local protocol, when an IV is started, the following must be documented on the run report: a) Date and time of the venipuncture b) Type and amount of solution c) Type of venipuncture device used, including the length and gauge d) Venipuncture site e) Number of insertion attempts (if more than one) f) IV flow rate g) Any adverse reactions and the actions taken to correct them h) Name or identification number of the EMT-IV initiating the infusion
2. In addition to documenting correct IV placement, unsuccessful attempts also should be documented
3. Some local protocols call for the EMT-IV to document the following information directly on the tape that is used to secure the venipuncture device and administration set tubing in place: a) Date and time of insertion b) Type and gauge of needle or catheter c) Initial of the EMT-IV who placed the device
4. To do this procedure: a) A piece of tape should be cut and placed on a flat surface b) Information should be written on the tape then applied over the dressing
5. Never label the tape after it has been applied over the dressing. Doing so will irritate the venipuncture site
K. When the IV does not flow 1. Was the venous tourniquet removed? 2. Is there swelling at the cannulation site? 3. Is the flow regulator in an open position? 4. Is the tip of the catheter positioned against a valve or wall of the vein? 5. Is the IV bag high enough? 6. Is the drip chamber completely filled with IV solution?
L. Complications 1. Pain 2. Catheter shear 3. Cannulation of an artery
Lesson 4: Intravenous & Intraosseous Line Placement and Infusion
Page 36
4. Hematoma or infiltration 5. Phlebitis or infection 6. Extravasation 7. Air in tubing/air embolism 8. Circulatory overload and pulmonary edema 9. Allergic reaction 10. Pulmonary embolism 11. Failure to infuse properly
M. Steps in changing to the next container of IV solution N. Steps to discontinue an intravenous infusion
1. Equipment a) Gloves b) Sterile gauze pad c) adhesive bandage
2. Technique a) Close the flow control valve completely b) Taking care not to disturb the catheter, carefully untape and remove the
dressing c) Hold the sterile gauze pad just above the site to stabilize the tissue and
withdraw the catheter by pulling straight back until the catheter is completely out of the vein
d) Immediately cover the site with the sterile gauze pad and hold it against the puncture site until the bleeding has stopped
e) Tape the dressing in place or cover with an adhesive bandage II. Drawing Blood
A. Purpose - to obtain blood samples from a patient for analysis B. Equipment needed for obtaining a blood sample:
1. Variety of sizes and types of blood tubes are available to collect and store blood samples. a) The rubber caps on the tubes come in several colors and patterns denoting
the specific tests that are conducted with the blood that is stored in them b) Most commonly used in the field are the red, purple, green, or “jungle” blue,
and gray tops (1) Blood collection tubes may vary by manufacturer. (2) Check with your local medical facility.
c) Some tubes have small amounts of liquids or agents inside the tube to prevent blood coagulation or to aid in preserving the blood in a way necessary for a particular type of test
d) During manufacture of blood tubes, a vacuum is created in the tube that acts to “suck blood” into the tube
C. Locations from which to obtain a blood sample 1. Anatomical sites 2. From the established intravenous catheter 3. Other locations

EMT-IV Therapy Special Training: Washington State DOH 530-136 December 2011
Page 37
D. Steps to preparing equipment for obtaining a blood sample E. Techniques for obtaining a blood sample
1. When drawing blood, each tube should be filled completely 2. Blood tubes can be filled by drawing blood from the vein with a syringe and then
using at least a 19-gauge needle to introduce it into the blood tube or using a Vacutainer holder that has a multi-sample IV Luer-lock adapter
3. Once the blood is obtained, the outside of the tube should be labeled with the patient’s name, date, time drawn and by whom a) In addition, any information that may be useful, such as, “drawn before the
administration of 50% dextrose” b) During the transportation of the patient to the hospital, the filled blood
collection tubes can be stored in a plastic “zip-lock” bag to prevent contamination of the EMT-IV should one or more of the tubes be accidentally broken
F. Complications G. Refer to the local Medical Program Director protocols regarding the blood draw
process and procedures for law enforcement blood draw requests. III. Saline Intravenous Access Locks
A. Saline lock devices maintain intravenous access while avoiding the risk of inadvertent rapid-fluid administration and the inconvenience of manipulating IV tubing and fluid bags while moving and handling patients
B. Equipment 1. Infusion adapter device 2. Vial of normal saline for injection 3. Syringe with needle 4. Alcohol wipe
C. Candidates for saline locks: 1. Patients who would have an IV placed to establish venous access
prophylactically 2. Patients who would have an IV placed to administer medication
D. Candidates for conventional IV therapy with appropriate solutions and administrations sets: 1. Patients requiring volume resuscitation 2. Patients requiring continuous drip infusion of medication. Patients with
medications other than IV fluids are beyond the scope of EMT-IV Therapy providers.
3. Patients requiring cardiac or other resuscitation with frequent medications in sequence
E. If, at any time, the patient’s condition deteriorates and it is felt a conventional IV is necessary, it may be established by piggybacking into the injection port using a needle no larger than 18 Ga. due to possible injection port coring with larger sizes
F. Procedure IV. Fluid Challenge for Cardiogenic Shock

Lesson 4: Intravenous & Intraosseous Line Placement and Infusion
Page 38
A. Following intravenous cannulation of normal saline at a KVO rate give a 250 to 500 cc fluid challenge if called for by medical direction/control or local protocols
V. Intraosseous Line Placement and Infusion. A. The chief indications for intraosseous line insertion are:
1. Compensated and Uncompensated Shock a) Shock is usually the result of:
(1) Hypovolemia (2) Sepsis (3) Cardiac problems
b) Children respond to shock by: (1) an increase in heart rate (2) an increase in respiratory rate (3) peripheral vasoconstriction
c) Signs of compensated (early) shock are: (1) Tachycardia (2) Tachypnea (3) cool clammy extremities
d) Note 1: The child’s blood pressure does not decrease until later, when the child is no longer able to compensate by an increase in heart rate and vasoconstriction.
e) Note 2: Major symptoms to indicate a need for intervention with IV/IO fluids would include: (1) “Quiet” tachycardia (rate over 170) (2) Altered level of consciousness (3) Decreased perfusion
f) Signs of uncompensated shock are: (1) Decreased level of consciousness (2) Weak or absent pulses (3) Hypotension
2. Cardiac Arrest: a) A protocol for obtaining vascular access is helpful in making a decision
about the use of an intraosseous line when venous access cannot be obtained rapidly. An intraosseous line is usually attempted after other means of vascular access are unsuccessful or unavailable. (1) Peripheral intravenous access often requires more time to insert than
an intraosseous line. A median time of 10 minutes is required to achieve peripheral vascular access during cardiac arrests; only 18% of these attempts are successful within 90 seconds.
(2) If peripheral access is not achieved within 90 seconds, attempts to insert an intraosseous line should be initiated.
(3) The intraosseous route delivers fluids and medications into the bone marrow cavity, which acts as a non-collapsible vein and permits access to the central circulation. Patients with medications other than IV fluids are beyond the scope of EMT-IV Therapy providers.

EMT-IV Therapy Special Training: Washington State DOH 530-136 December 2011
Page 39
(4) All fluids and medications that are administered through a peripheral IV can be administered through an intraosseous line. It is generally recommended that hypertonic and alkaline solutions be diluted prior to infusion.
B. Contraindications for insertion of an intraosseous line 1. An intraosseous line should not be inserted when there is a known fracture of
the bone chosen for line placement. 2. An intraosseous line should not be inserted when there is infection present in
the leg chosen for line placement. 3. Insertion of an intraosseous needle should not be attempted on the same leg
two times, as the hole made by the attempted insertion does not close rapidly and fluid will extravasate.
C. Sites for Intraosseous Needle Insertion 1. There are three potential sites for intraosseous needle insertion:
a) Proximal Tibia (1) The proximal tibia is the preferred location for intraosseous insertion in
a child six years and under because: (a) The site is easily identified. (b) A large marrow cavity exists with no adjacent structures that are
likely to be damaged. (2) The site of insertion is on the flat medial surface of the anterior tibia,
one to two finger breadths below and medial to the tibial tuberosity. b) Distal Femur
(1) The site of insertion is midline, approximately three centimeters above the lateral condyle.
c) Distal Tibia (1) The site of insertion is just above the medial malleolus.
D. Equipment for Intraosseous Infusion 1. Needles:
a) Either an intraosseous or bone marrow aspiration needle may be used. They are preferable because of the following: (1) They may contain a trocar or stylet, which minimizes the risk of
occlusion from bone marrow. (2) They are shorter, sturdier and less flexible. (3) They are less likely to be dislodged in transport because they are
threaded and shorter. (4) Some of these needles have side infusion ports within the threads so a
stylet or trocar is not necessary. (5) Some needle lengths can be adjusted.
b) A spinal needle can be substituted when an intraosseous or bone marrow needle is not available; however it is less stable because of the needle’s length and flexibility.
2. Other Equipment: a) Iodine solution - for cleaning insertion site

Lesson 4: Intravenous & Intraosseous Line Placement and Infusion
Page 40
b) Sterile towels and gloves - to maintain sterility during insertion c) 4x4 gauze pads - for cleaning and for use in applying pressure if needle is
withdrawn d) Two 5 or 10 cc syringes - to aspirate bone marrow and to infuse saline e) IV solution (normal saline or lactated Ringer’s solution) and tubing f) Towel or sandbag or small IV bag - for stabilizing leg during and after
insertion of the intraosseous needle g) Blood tubes - for bone marrow aspirate h) Pressure infusion bag i) Volume limiting device
E. Four steps for intraosseous needle insertion 1. Step one - Stabilize the leg
a) Position the leg with the knee slightly bent. b) Place a sandbag, or a roll of towels under the knee for support, and to
prevent movement. c) Tape in place if necessary.
2. Step two - Prepare the insertion site a) Clean the skin with iodine solution and 4x4 gauze pads. b) Wipe in a circular motion starting at the planned insertion site and moving
outward. c) Wipe the area dry with a sterile 4x4 gauze pad.
3. Step three - Insert the needle a) Check the needle packaging for additional instructions. Some needles
require back and forth or a clockwise motion. (1) Use aseptic technique. (2) The needle should be directed away from the knee in order to decrease
the risk of insertion into the growth plate. (3) Apply pressure to the top of the needle in order to push through the
cortex of bone. (4) A slight give will be felt as the tip enters the marrow cavity. (5) If the needle is properly inserted, it will stand without support.
b) Caution: If too much pressure is applied, the needle may exit through the bone on the other side. (1) If this occurs:
(a) Fluid will infiltrate into the tissue and Compartment syndrome may develop.
(b) Remove the needle (c) A site on the other leg must be chosen for the next insertion
attempt. 4. Step four - Confirm needle placement
a) Remove the stylet from the needle. b) Connect a syringe to the hub of the needle. c) Aspirate approximately I cc of bone marrow. Marrow may not always be
aspirated.
EMT-IV Therapy Special Training: Washington State DOH 530-136 December 2011
Page 41
d) Bone marrow aspirate can be used for various lab studies such as hemoglobin, electrolytes, bilirubin, gluclose, creatinine and bicarbonate.
e) 5 - 10 cc of normal saline may used to initially flush the syringe and intraosseous needle while observing for extravasation. This fluid should flush easily. If no extravasation occurs, placement is confirmed.
f) If the needle placement cannot be confirmed, remove the needle. g) Do not attempt to re-insert the needle on the same site, as this will cause
leakage of fluids from the insertion site into the surrounding tissue. h) If the needle is removed, apply pressure for 5 minutes and cover the
insertion site with a sterile dressing. F. Securing the intraosseous needle
1. Connect the IV tubing to the hub of the correctly placed needle. a) IV fluid should flow without obstruction when the needle is correctly
positioned. b) IF the IV fluid is not flowing and correct insertion cannot be verified, remove
the intraosseous needle and attempt insertion at another location. 2. When correct insertion is confirmed, tape the tubing onto the child’s leg to assist
in preventing dislodgment. 3. Carefully monitor the insertion site for signs of infiltration.
a) Remove the needle if infiltration is observed. b) The needle should not be left in place for over 12 hours.
G. Increasing the Rate of Infusion 1. The flow rate through the intraosseous needle may be a little slower than
through a peripheral line. If fluids need to be administered rapidly, two methods may be used to increase the flow rate: a) Pressure bag
(1) To increase the rate of fluid infusion, a pressure bag may be applied to the IV solution and inflated to 300 torr.
b) A syringe with a three-way stopcock directly attached to the IV line flowing to the intraosseous needle will allow administration of fluid boluses. (1) Attach an empty 30 or 60 cc Luer-Lok™ syringe (with the plunger
depressed) to the three-way stopcock. (2) Close the stopcock valve allowing IV flow to the patient, and open the
valve from the IV bag to the syringe. (3) Withdraw the plunger to fill the syringe with the desired amount of IV
fluid from the IV bag. (4) Close off the flow to the IV bag and open the valve allowing fluid to flow
from the syringe to the patient. (5) Depress the plunger of the syringe to administer the desired amount of
IV fluid to the patient. (6) Repeat steps (2)-(5) above as necessary until the full amount of fluid
bolus has been administered. (7) Reopen the valve to the patient so that the IV continues to flow; check
flow rate.
Lesson 4: Intravenous & Intraosseous Line Placement and Infusion
Page 42
(8) Reassess the patient to determine need for additional fluid, repeating steps (2)-(6) above, if appropriate.
2. Carefully monitor the amount of fluid administered to the pediatric patient to prevent fluid overload. The use of small volume IV bags (i.e., 250-500 cc bags) may be helpful in this monitoring process.
3. A child in shock may require several 20 cc/kg boluses of fluid. Frequent reassessments are necessary.
H. Potential Complications 1. Potential complications from intraosseous insertion and infusion include:
a) Extravasation of fluid: (1) This is generally the result of improper needle placement or multiple
insertion attempts. (2) Collection of fluid in the tissue can lead to compartment syndrome.
b) Skin infection: (1) The infection rate for intraosseous is lower than that found with
intravenous cannulation. (2) Osteomelitis (very rare).
2. Overall, complications from intraosseous insertion and infusion are rare. VI. Blood Glucose Monitoring
A. To properly perform a finger-stick blood sugar determination: 1. Use either the patient’s index or middle finger 2. Clean the fingertip with an alcohol swab 3. Gently squeeze the finger at the joint below the fingertip 4. At the same time, use either a small needle or special finger-stick lancet to
pierce the skin of the fingertip a) The tip should not go in more than 1 to 2 mm b) Do this in a rapid “in and out” fashion c) Do not leave the lancet or needle in place or twist it around
5. Immediately remove the lancet or needle 6. Using a gloved hand, gently squeeze the fingertip to express a drop of blood
from the wound 7. Place the drop of blood on the chemical reagent strip; begin timing 8. When the proper period of time has passed (this depends on the type of
reagent strip), use a cotton ball and wipe the remaining blood from the strip 9. Use either a measuring device (glucometer) or the color scale on the reagent
container to determine the patient’s blood sugar VII. Disposal of Contaminated Items and Sharps - Follow local protocol for disposition of
contaminated items and sharps VIII. Medical/legal considerations

Appendix D: Approved EMT-IV Practical Evaluation Guidelines & Skill Sheets
APPENDICES

Page 44
This page was intentionally left blank.
Appendix D: Approved EMT-IV Practical Evaluation Guidelines & Skill Sheets
Appendix A - EMT-Intravenous Therapy Special Skill Estimated Course Hours

Appendix A: EMT-Intravenous Therapy Special Skill Estimated Course Hours
Appendix A: Page 2
This page was intentionally left blank.

Appendix A: Page 3
WASHINGTON STATE EMT-INTRAVENOUS THERAPY SPECIAL SKILL COURSE CURRICULUM
Revised – December 2011
ESTIMATED COURSE HOURS This Program is Competency Based. Hours may vary.
Lesson Topic
Didactic
Practical Lab/ Evaluation
Section 1 – Essentials
Lesson 1: Human Systems 8 1
Lesson 2: Patient Assessment and Clinical Decision Making 9 3
Lesson 3: Assessment and Management of Shock 4 1
Lesson 4: Intravenous & Intraosseous Line Placement and Infusion 7 3
Estimated Didactic, Practical Lab and Evaluation Hours – 36 28 8
End of Course Evaluations/Examinations
Practical Skill Evaluations during the course AND Individual Comprehensive End of Course Practical Skill Evaluations as identified in the Appendices
Approx 3
End of Course knowledge examination approved by the County Medical Program Director following course completion
Approx 2
Clinical/Field Internships Clinical Field
Clinical Internship requirements NOTE: It is recommended that some IV insertions are accomplished during the field internship. Hours may vary. Competency for all skills is determined by the County Medical Program Director.
Varies
Varies
Field internship requirements
Note: Hours may vary, competence determined by the County Medical Program Director
Varies
Varies
Total Estimated Didactic, Practical Lab and Evaluation Hours - 42
Didactic Only
28
Prac Lab/Evals
14

Appendix A: EMT-Intravenous Therapy Special Skill Estimated Course Hours
Appendix A: Page 2
This page was intentionally left blank.

Appendix D: Approved EMT-IV Practical Evaluation Guidelines & Skill Sheets
Appendix B - Possible Abandonment Situations - Student Handout

Appendix B - Possible Abandonment Situations - Student Handout
Appendix B: Page 2
This page intentionally left blank

EMT-IV Special Skill Training: Washington State DOH 530-136 December 2011
Appendix B: Page 3
Student Handout Highest Level of Skill Performance Indicated By Current or Anticipated Clinical Circumstances
Revised December 2011 Highest Level of Skill Performance Indicated By Current or Anticipated Clinical Procedures:
Abandonment can exist when
Paramedic Care is released to AEMT personnel after drugs have been administered that are not within the ILS Technician’s scope of training or after an ET has been placed in the patient and is required to maintain the continuum of care.
Advanced EMT ------------------------------------- Care is released to an EMT with IV or supraglottic airway (SGA) endorsement when drug administration, or when an IV or supraglottic airway has been initiated the EMT does not have the appropriate endorsement and is required to maintain the continuum of care.
EMT with an IV or SGA endorsement ------- Care is released to an EMT without the appropriate endorsement or a First Responder when an IV or SGA has been initiated and is required to maintain the continuum of care.
EMT --------------------------------------------------- Care is released to a First Responder who then occupies the patient compartment. State law requires a minimum of an EMT during patient transport.

Appendix B - Possible Abandonment Situations - Student Handout
Appendix B: Page 4
This page intentionally left blank
Appendix D: Approved EMT-IV Practical Evaluation Guidelines & Skill Sheets
Appendix C – IV Technician Skill Maintenance Requirements
The most current statutes and rules are located on our web site at:
http://www.doh.wa.gov/hsqa/emstrauma/statutes.htm

Appendix C: IV Technician Skill Maintenance Requirements
Appendix C: Page 2
This page intentionally left blank

EMT-IV Special Skill Training: Washington State DOH 530-136 December 2011
Appendix C: Page 3
IV Related Skills Maintenance Requirements for the CME Method
EMR EMT AEMT Paramedic First Certification Period or Three Years
First Year
IV starts EMT w/IV therapy skill
36 36
36
Intraosseous infusion placement
EMT w/IV therapy skill
X X
X
Second and Third Years
IV starts over the two-year period
EMT w/IV therapy skill
72 72
72
Intraosseous infusion placement
EMT w/IV therapy skill
X
Later Certification Periods
Annual Requirements
IV starts EMT w/IV therapy skill
X X
X
Intraosseous infusion placement
EMT w/IV therapy skill
X X
X "X" Indicates an individual must demonstrate proficiency of the skill to the satisfaction of the MPD.
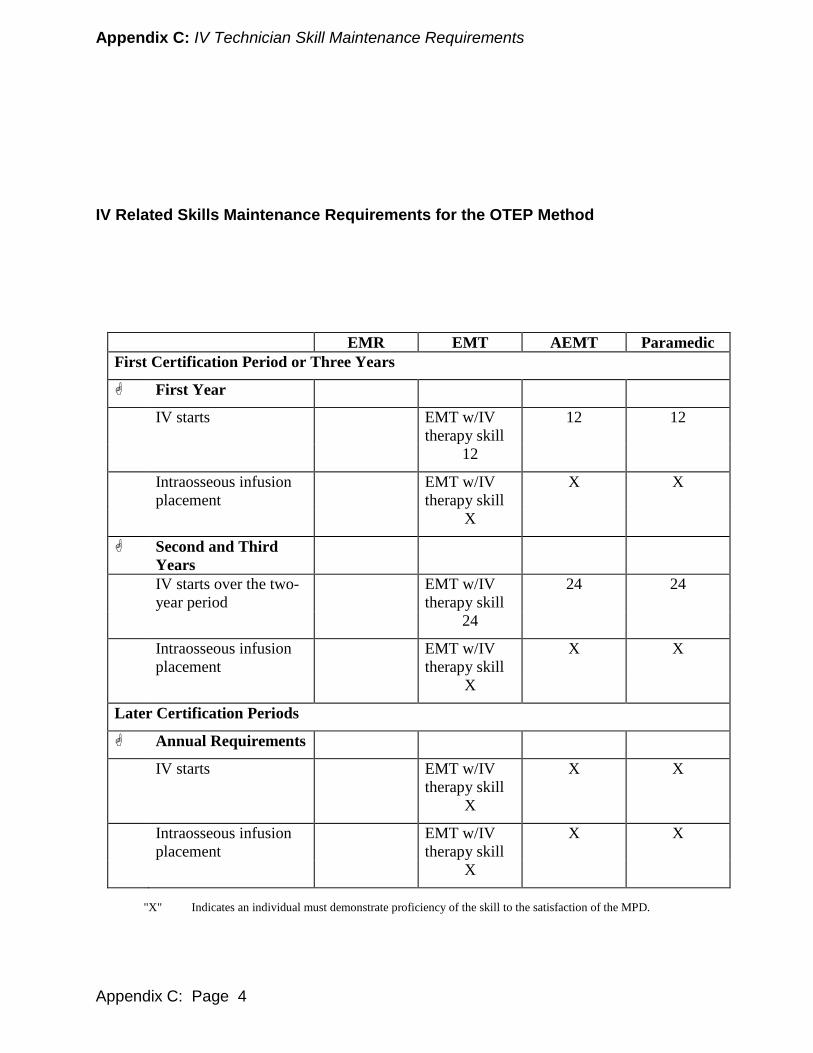
Appendix C: IV Technician Skill Maintenance Requirements
Appendix C: Page 4
IV Related Skills Maintenance Requirements for the OTEP Method
EMR EMT AEMT Paramedic First Certification Period or Three Years
First Year
IV starts EMT w/IV therapy skill
12 12
12
Intraosseous infusion placement
EMT w/IV therapy skill
X X
X
Second and Third Years
IV starts over the two-year period
EMT w/IV therapy skill
24 24
24
Intraosseous infusion placement
EMT w/IV therapy skill
X X
X
Later Certification Periods
Annual Requirements
IV starts EMT w/IV therapy skill
X X
X
Intraosseous infusion placement
EMT w/IV therapy skill
X X
X "X" Indicates an individual must demonstrate proficiency of the skill to the satisfaction of the MPD.

EMT-IV Special Skill Training: Washington State DOH 530-136 December 2011
Appendix D: Page 1
Appendix D – Approved EMT-IV Practical Evaluation Guidelines & Skill Sheets

Appendix D: Approved EMT-IV Practical Evaluation Guidelines & Skill Sheets
Appendix D: Page 2
This page intentionally left blank

EMT-IV Special Skill Training: Washington State DOH 530-136 December 2011
Appendix D: Page 3
Flow Chart - EMT-IV Provider Course Practical Skill Evaluation Process
Step # 1 EMT-IV Students must demonstrate proficiency on practical skills identified for each lesson using practical evaluation skill sheets identified on page D-5. Instructors may use skill sheets multiple times throughout the course. (Evaluation lessons may be combined with practical skill labs to meet this requirement.) Students must achieve the required score for each skill listed on page D-19, and receive NO check marks in the Critical Criteria section. MPD-approved Evaluators must complete all evaluations. Step # 2 EMT-IV Students must complete clinical/field rotations prior to entrance to the final practical skill course evaluation (if not completed during labs). Information regarding clinical and field rotations is located on pages D-4. Step # 3 EMT-IV Students: Instructors must issue successful students a Certificate or Letter of Course Completion attesting to student competency with the required information identified on page 5. Prior to issuing the certificate, Instructors must verify the student’s:
• Comprehensive cognitive, affective and psychomotor abilities. • Successful completion of the clinical/field rotation following the procedures
identified on pages D-4.
Narrative - EMT-IV Provider Course Practical Skill Evaluation Process Step # 1 - PRACTICAL SKILL EVALUATIONS The practical skill evaluation sheets provided in this appendix are to be used in conjunction with the core curriculum and are organized in the order of the corresponding lessons. They should be copied and provided to each student at the beginning of the training course and are to be used to document the performance of required skills evaluations throughout the training course. Required Practical skill Evaluations: Students must demonstrate proficiency on practical skills identified for each “evaluation lesson” using the required practical skill evaluation sheets specified for that lesson on page D-5. Some skill sheets are used multiple times throughout the course. (Evaluation lessons may be combined with practical skill labs to meet this requirement.) MPD-approved Evaluators must complete all evaluations. Individual Practical Skill Evaluation Sheets: The individual practical skill evaluation sheets located on pages D-7 through D-16 are to be used to document the performance of students during course practical skill evaluations. MPD-approved Evaluators must complete all evaluations. Evaluator names and signatures
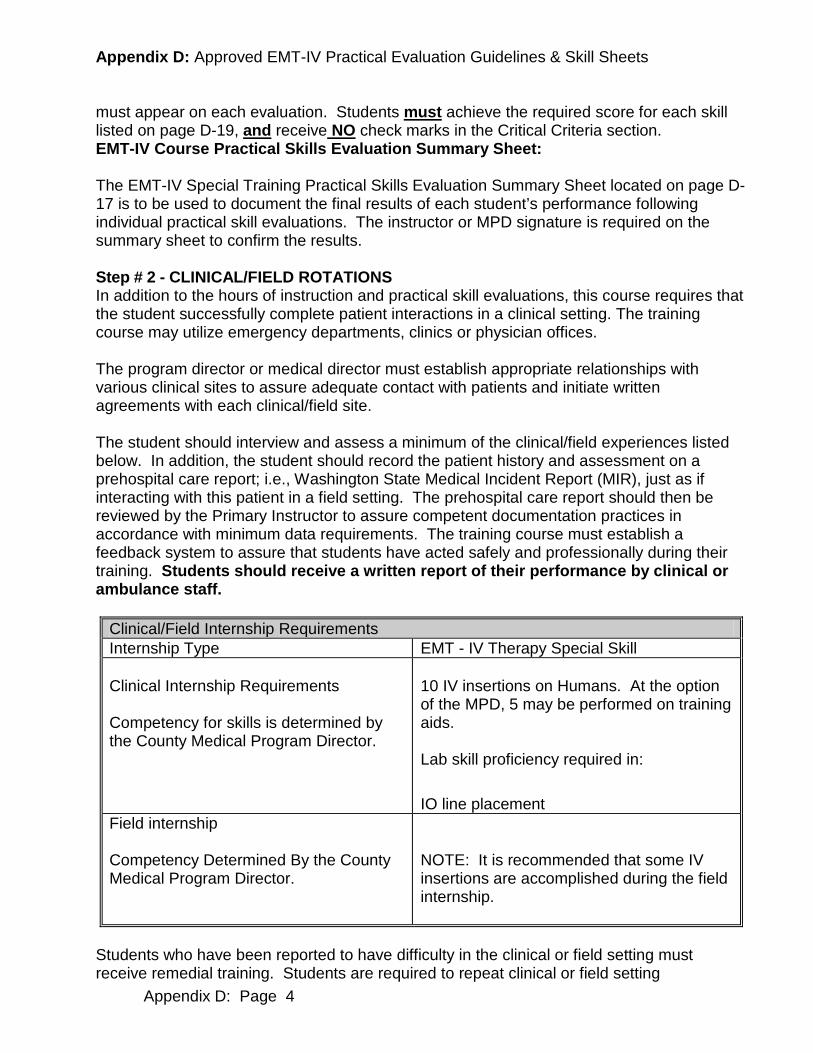
Appendix D: Approved EMT-IV Practical Evaluation Guidelines & Skill Sheets
Appendix D: Page 4
must appear on each evaluation. Students must achieve the required score for each skill listed on page D-19, and receive NO check marks in the Critical Criteria section. EMT-IV Course Practical Skills Evaluation Summary Sheet: The EMT-IV Special Training Practical Skills Evaluation Summary Sheet located on page D-17 is to be used to document the final results of each student’s performance following individual practical skill evaluations. The instructor or MPD signature is required on the summary sheet to confirm the results. Step # 2 - CLINICAL/FIELD ROTATIONS In addition to the hours of instruction and practical skill evaluations, this course requires that the student successfully complete patient interactions in a clinical setting. The training course may utilize emergency departments, clinics or physician offices. The program director or medical director must establish appropriate relationships with various clinical sites to assure adequate contact with patients and initiate written agreements with each clinical/field site. The student should interview and assess a minimum of the clinical/field experiences listed below. In addition, the student should record the patient history and assessment on a prehospital care report; i.e., Washington State Medical Incident Report (MIR), just as if interacting with this patient in a field setting. The prehospital care report should then be reviewed by the Primary Instructor to assure competent documentation practices in accordance with minimum data requirements. The training course must establish a feedback system to assure that students have acted safely and professionally during their training. Students should receive a written report of their performance by clinical or ambulance staff.
Clinical/Field Internship Requirements Internship Type EMT - IV Therapy Special Skill Clinical Internship Requirements Competency for skills is determined by the County Medical Program Director.
10 IV insertions on Humans. At the option of the MPD, 5 may be performed on training aids. Lab skill proficiency required in:
IO line placement Field internship Competency Determined By the County Medical Program Director.
NOTE: It is recommended that some IV insertions are accomplished during the field internship.
Students who have been reported to have difficulty in the clinical or field setting must receive remedial training. Students are required to repeat clinical or field setting

EMT-IV Special Skill Training: Washington State DOH 530-136 December 2011
Appendix D: Page 5
experiences until they are deemed competent by meeting the standards of the County Medical Program Director. Step # 3 - CERTIFICATE OF COURSE COMPLETION Instructors must issue a CERTIFICATE OF COURSE COMPLETION attesting to student competency for the student to be eligible to take the Washington State written certification examination. Prior to issuing the certificate, Instructors must verify the student’s:
• Comprehensive cognitive, affective and psychomotor abilities: • Successful completion on the clinical/field rotation following the procedures identified
on pages D-4 and D-5. The CERTIFICATE OF COURSE COMPLETION MUST include: Course approval number (Issued by DOH – Emergency Medical and Trauma Prevention) Course location Student’s name Instructor’s name and signature Course completion date
REQUIRED PRACTICAL SKILLS EVALUATIONS FOR INTRAVENOUS THERAPY SPECIAL SKILL COURSE
Lesson Number
LESSON TITLE REQUIRED EVALUATION SHEET
2 Patient Assessment & Clinical Decision Making D-7, D-9
3 Assessment and Management of Shock D-9,D-11
4 Intravenous D-7,D-13, D-15
4 Intraosseous Line Placement & Infusion D-15

Appendix D: Approved EMT-IV Practical Evaluation Guidelines & Skill Sheets
Appendix D: Page 6
This page intentionally left blank

Appendix D: Page 7
Patient Assessment - Medical
Candidate: Examiner: Date: Signature: Scenario #:
Possible Points Actual Time Started: Points Awarded Takes or verbalizes body substance isolation precautions 1 SCENE SIZE-UP Determines the scene/situation is safe 1 Determines the mechanism of injury/nature of illness 1 Determines the number of patients 1 Requests additional help if necessary 1 Considers stabilization of spine 1 PRIMARY SURVEY Verbalizes general impression of the patient 1 Determines responsiveness/level of consciousness 1 Determines chief complaint/apparent life-threats 1 Assesses airway and breathing
-Assessment (1 point) -Assures adequate ventilation (1 point) -Initiates appropriate oxygen therapy (1 point)
3
Assesses circulation -Assesses/controls major bleeding (1 point) -Assesses skin [either skin color, temperature, or condition] (1 point) -Assesses pulse (1 point)
3
Identifies priority patients/makes transport decision 1 HISTORY TAKING AND SECONDARY ASSESSMENT History of present illness
-Onset (1 point) -Severity (1 point) -Provocation (1 point) -Time (1 point) -Quality (1 point) -Clarifying questions of associated signs and symptoms as related to OPQRST (2 points) -Radiation (1 point)
8
Past medical history -Allergies (1 point) -Past pertinent history (1 point) -Events leading to present illness (1 point) -Medications (1 point) -Last oral intake (1 point)
5
Performs secondary assessment [assess affected body part/system or, if indicated, completes rapid assessment] -Cardiovascular -Neurological -Integumentary -Reproductive -Pulmonary -Musculoskeletal -GI/GU -Psychological/Social
5
Vital signs -Pulse (1 point) -Respiratory rate and quality (1 point each) -Blood pressure (1 point) -AVPU (1 point)
5
Diagnostics [must include application of ECG monitor for dyspnea and chest pain] 2 States field impression of patient 1 Verbalizes treatment plan for patient and calls for appropriate intervention(s) 1 Transport decision re-evaluated 1 REASSESSMENT Repeats primary survey 1 Repeats vital signs 1 Evaluates response to treatments 1 Repeats secondary assessment regarding patient complaint or injuries 1
Actual Time Ended: TOTAL 48
CRITICAL CRITERIA Failure to initiate or call for transport of the patient within 15 minute time limit Failure to take or verbalize body substance isolation precautions Failure to determine scene safety before approaching patient Failure to voice and ultimately provide appropriate oxygen therapy Failure to assess/provide adequate ventilation Failure to find or appropriately manage problems associated with airway, breathing, hemorrhage or shock [hypoperfusion] Failure to differentiate patient’s need for immediate transportation versus continued assessment and treatment at the scene Does other detailed history or physical examination before assessing and treating threats to airway, breathing, and circulation Failure to determine the patient’s primary problem Orders a dangerous or inappropriate intervention Failure to provide for spinal protection when indicated
You must factually document your rationale for checking any of the above critical items on the reverse side of this form.

Appendix D: Approved EMT-IV Practical Evaluation Guidelines & Skill Sheets
Appendix D: Page 8
Evaluation Notes:
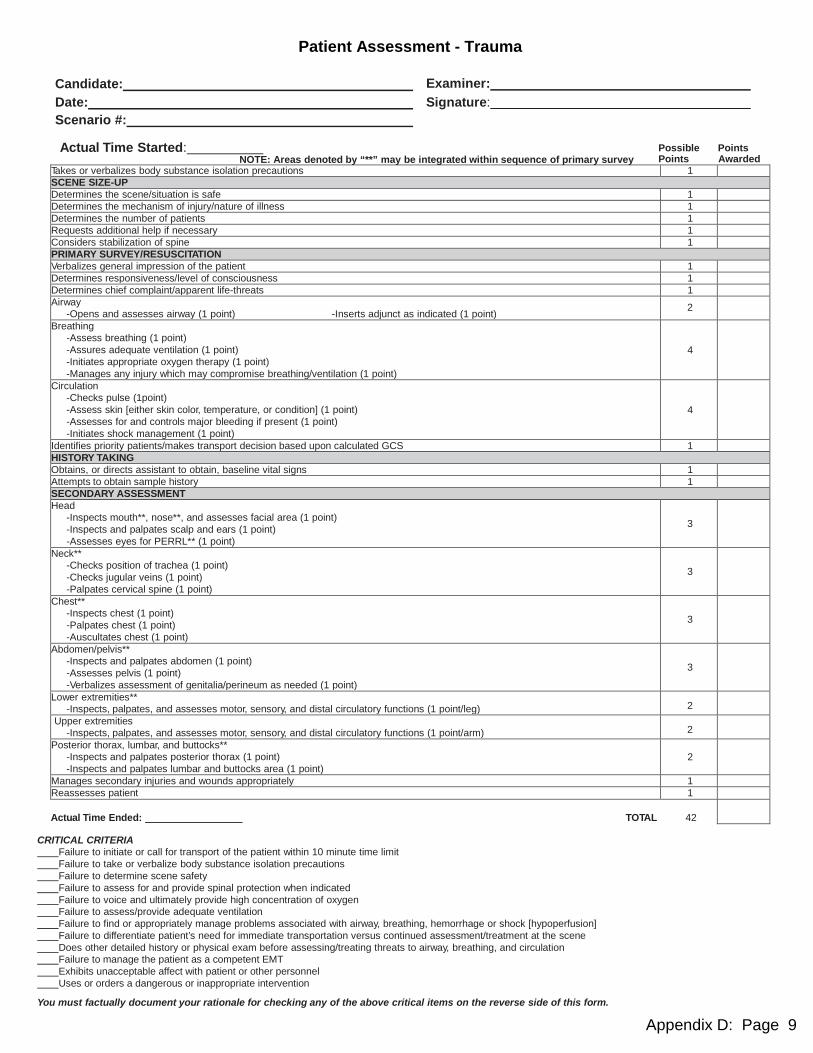
Appendix D: Page 9
Patient Assessment - Trauma
Candidate: Examiner: Date: Signature: Scenario #:
Actual Time Started: Possible Points
NOTE: Areas denoted by “**” may be integrated within sequence of primary survey Points Awarded Takes or verbalizes body substance isolation precautions 1 SCENE SIZE-UP Determines the scene/situation is safe 1 Determines the mechanism of injury/nature of illness 1 Determines the number of patients 1 Requests additional help if necessary 1 Considers stabilization of spine 1 PRIMARY SURVEY/RESUSCITATION Verbalizes general impression of the patient 1 Determines responsiveness/level of consciousness 1 Determines chief complaint/apparent life-threats 1 Airway
-Opens and assesses airway (1 point) -Inserts adjunct as indicated (1 point) 2 Breathing
-Assess breathing (1 point) -Assures adequate ventilation (1 point) -Initiates appropriate oxygen therapy (1 point) -Manages any injury which may compromise breathing/ventilation (1 point)
4
Circulation -Checks pulse (1point) -Assess skin [either skin color, temperature, or condition] (1 point) -Assesses for and controls major bleeding if present (1 point) -Initiates shock management (1 point)
4
Identifies priority patients/makes transport decision based upon calculated GCS 1 HISTORY TAKING Obtains, or directs assistant to obtain, baseline vital signs 1 Attempts to obtain sample history 1 SECONDARY ASSESSMENT Head
-Inspects mouth**, nose**, and assesses facial area (1 point) -Inspects and palpates scalp and ears (1 point) -Assesses eyes for PERRL** (1 point)
3
Neck** -Checks position of trachea (1 point) -Checks jugular veins (1 point) -Palpates cervical spine (1 point)
3
Chest** -Inspects chest (1 point) -Palpates chest (1 point) -Auscultates chest (1 point)
3
Abdomen/pelvis** -Inspects and palpates abdomen (1 point) -Assesses pelvis (1 point) -Verbalizes assessment of genitalia/perineum as needed (1 point)
3
Lower extremities** -Inspects, palpates, and assesses motor, sensory, and distal circulatory functions (1 point/leg) 2
Upper extremities -Inspects, palpates, and assesses motor, sensory, and distal circulatory functions (1 point/arm) 2
Posterior thorax, lumbar, and buttocks** -Inspects and palpates posterior thorax (1 point) -Inspects and palpates lumbar and buttocks area (1 point)
2
Manages secondary injuries and wounds appropriately 1 Reassesses patient 1 Actual Time Ended: TOTAL 42
CRITICAL CRITERIA Failure to initiate or call for transport of the patient within 10 minute time limit Failure to take or verbalize body substance isolation precautions Failure to determine scene safety Failure to assess for and provide spinal protection when indicated Failure to voice and ultimately provide high concentration of oxygen Failure to assess/provide adequate ventilation Failure to find or appropriately manage problems associated with airway, breathing, hemorrhage or shock [hypoperfusion] Failure to differentiate patient’s need for immediate transportation versus continued assessment/treatment at the scene Does other detailed history or physical exam before assessing/treating threats to airway, breathing, and circulation Failure to manage the patient as a competent EMT Exhibits unacceptable affect with patient or other personnel Uses or orders a dangerous or inappropriate intervention
You must factually document your rationale for checking any of the above critical items on the reverse side of this form.
Appendix D: Approved EMT-IV Practical Evaluation Guidelines & Skill Sheets
Appendix D: Page 10
Evaluation Notes:

Appendix D: Page 11
Bleeding Control/Shock Management Candidate: Examiner:
Date: Signature:
Actual Time Started: Possible Points Points Awarded
Takes or verbalizes body substance isolation precautions 1 Applies direct pressure to the wound 1 NOTE: The examiner must now inform the candidate that the wound continues to bleed. Applies tourniquet 1 NOTE: The examiner must now inform the candidate that the patient is exhibiting signs and
symptoms of hypoperfusion. Properly positions the patient 1 Administers high concentration oxygen 1 Initiates steps to prevent heat loss from the patient 1 Indicates the need for immediate transportation 1
Actual Time Ended: TOTAL 7
CRITICAL CRITERIA Did not take or verbalize body substance isolation precautions Did not apply high concentration of oxygen Did not control hemorrhage using correct procedures in a timely manner Did not indicate the need for immediate transportation
You must factually document your rationale for checking any of the above critical items on the reverse side of this form.

Appendix D: Approved EMT-IV Practical Evaluation Guidelines & Skill Sheets
Appendix D: Page 12
Evaluation Notes:

Appendix D: Page 13
Intravenous Therapy
Candidate: Examiner: Date: Signature:
Possible Points Actual Time Started: Points Awarded
Checks selected IV fluid for: -Proper fluid (1 point) -Clarity (1 point) -Expiration date (1 point)
3
Selects appropriate catheter 1 Selects proper administration set 1 Connects IV tubing to the IV bag 1 Prepares administration set [fills drip chamber and flushes tubing] 1 Cuts or tears tape [at any time before venipuncture] 1 Takes or verbalizes body substance isolation precautions [prior to venipuncture] 1 Applies tourniquet 1 Palpates suitable vein 1 Cleanses site appropriately 1 Performs venipuncture
-Inserts stylette (1 point) -Notes or verbalizes flashback (1 point) -Occludes vein proximal to catheter (1 point) -Removes stylette (1 point) -Connects IV tubing to catheter (1 point)
5
Disposes/verbalizes proper disposal of needle in proper container 1 Releases tourniquet 1 Runs IV for a brief period to assure patent line 1 Secures catheter [tapes securely or verbalizes] 1 Adjusts flow rate as appropriate 1
Actual Time Ended Total 22
NOTE: Check here ❑ if candidate did not establish a patent IV within 3 attempts in 6 minutes. Do not evaluate the candidate in IV Bolus. Critical Criteria Failure to establish a patent and properly adjusted IV within 6 minute time limit Failure to take or verbalize appropriate body substance isolation precautions prior to performing venipuncture Contaminates equipment or site without appropriately correcting the situation Performs any improper technique resulting in the potential for uncontrolled hemorrhage, catheter shear, or air embolism Failure to successfully establish IV within 3 attempts during 6 minute time limit Failure to dispose/verbalize disposal of blood-contaminated sharps immediately in proper container at the point of use Failure to manage the patient as a competent EMT-IV provider Exhibits unacceptable affect with patient or other personnel Uses or orders a dangerous or inappropriate intervention You must factually document your rationale for checking any of the above critical items on the reverse side of this form.
Intravenous Bolus Administration Possible Points Actual Time Started: Points Awarded
Asks patient for known allergies 1 Assures correct fluid 1 Assembles syringe correctly and dispels air 1 Continues to take or verbalize body substance isolation precautions 1 Identifies and cleanses injection site closest to the patient [Y-port or hub] 1 Reaffirms bolus amount 1 Stops IV flow 1 Administers correct dose at proper push rate 1 Disposes/verbalizes proper disposal of syringe and needle in proper container 1 Turns IV on and adjusts drip rate to TKO/KVO 1 Verbalizes need to observe patient for desired effect and adverse side effects 1
Actual Time Ended Total 11
Critical Criteria Failure to continue to take or verbalize appropriate body substance isolation precautions Failure to begin administration of bolus within 3 minute time limit Contaminates equipment or site without appropriately correcting the situation Failure to adequately dispel air resulting in potential for air embolism Injects improper fluid or dosage [wrong fluid, incorrect amount, or pushes at inappropriate rate] Failure to turn-on IV after injecting fluid bolus Recaps needle or failure to dispose/verbalize disposal of syringe and other material in proper container Failure to manage the patient as a competent EMT-IV provider Exhibits unacceptable affect with patient or other personnel Uses or orders a dangerous or inappropriate intervention
You must factually document your rationale for checking any of the above critical items on the reverse side of this form.

Appendix D: Approved EMT-IV Practical Evaluation Guidelines & Skill Sheets
Appendix D: Page 14
Evaluation Notes:

Appendix D: Page 15
Intraosseous Infusion
Candidate: Examiner:
Date: Signature: Possible Points Actual Time Started: Points Awarded
Checks selected IV fluid for: -Proper fluid (1 point) -Clarity (1 point) -Expiration date (1 point)
3
Selects appropriate equipment to include: -IO needle (1 point) -Syringe (1 point) -Saline (1 point) -Extension set or 3-way stopcock (1 point)
4
Selects proper administration set 1 Connects administration set to bag 1 Prepares administration set [fills drip chamber and flushes tubing] 1 Prepares syringe and extension tubing or 3-way stopcock 1 Cuts or tears tape [at any time before IO puncture] 1 Takes or verbalizes appropriate body substance isolation precautions [prior to IO puncture] 1 Identifies proper anatomical site for IO puncture 1 Cleanses site appropriately 1 Performs IO puncture:
-Stabilizes tibia without placing hand under puncture site and “cupping” leg (1 point) -Inserts needle at proper angle (1 point) -Advances needle with twisting motion until “pop” is felt or notices sudden lack of resistance (1 point)
-Removes stylette (1 point)
4
Disposes/verbalizes proper disposal of needle in proper container 1 Attaches syringe and extension set to IO needle and aspirates; or attaches 3-way stopcock between administration set and IO needle and aspirates; or attaches extension set to IO needle [aspiration is not required for any of these as many IO sticks are “dry” sticks]
1
Slowly injects saline to assure proper placement of needle 1 Adjusts flow rate/bolus as appropriate 1 Secures needle and supports with bulky dressing [tapes securely or verbalizes] 1
Actual Time Ended Total 22 Critical Criteria ___ Failure to establish a patent and properly adjusted IO line within 6 minute time limit ___ Failure to take or verbalize appropriate body substance isolation precautions prior to performing IO puncture ___ Contaminates equipment or site without appropriately correcting the situation ___ Performs any improper technique resulting in the potential for air embolism ___ Failure to assure correct needle placement [must aspirate or watch closely for early signs of infiltration] ___ Failure to successfully establish IO infusion within 2 attempts during 6 minute time limit ___ Performs IO puncture in an unacceptable manner [improper site, incorrect needle angle, holds leg in palm
and performs IO puncture directly above hand, etc.] ___ Failure to properly dispose/verbalize disposal of blood-contaminated sharps immediately in proper container at
the point of use ___ Failure to manage the patient as a competent EMT ___ Exhibits unacceptable affect with patient or other personnel ___ Uses or orders a dangerous or inappropriate intervention You must factually document your rationale for checking any of the above critical items on the reverse side of this form

Appendix D: Approved EMT-IV Practical Evaluation Guidelines & Skill Sheets
Appendix D: Page 16
EVALUATION NOTES

Appendix D: Page 17
EMT-IV Special Training PRACTICAL SKILL EVALUATION SUMMARY SHEET
Candidate Name:
Lesson Number
Page Number
Practical Skill S U Instructor or MPD Signature and Date
2 D-7 Patient Assessment - Medical
2 D-9 Patient Assessment - Trauma
3 D-11 Bleeding Control/Shock Management
4 D-13 Intravenous Therapy
4 D-13 Intravenous Bolus Admin
4 D-15 Intraosseous line Placement

Appendix D: Approved EMT-IV Practical Evaluation Guidelines & Skill Sheets
Appendix D: Page 18
EVALUATION NOTES

Appendix D: Page 19
EMT-IV COURSE PRACTICAL SKILL EVALUATION SHEETS
Required Scores for Successful Completion
7
Lesson Number
Practical Skill Sheet Page
Number
Practical Skill
Points
Possible
Points Required to Successfully Complete
Practical Skill
2 D-7 Patient Assessment - Medical 48 39
2 D-9 Patient Assessment - Trauma 42 34
3 D-11 Bleeding Control/Shock Management 7 6
4 D-13 Intravenous Therapy 22 18
4 D-13 Intravenous Bolus Admin 11 9
4 D-15 Intraosseous line Placement 22 18
NOTE: A check mark in the Critical Criteria section of any of the above skills is a failure of the station regardless of the points attained.

Appendix D: Approved EMT-IV Practical Evaluation Guidelines & Skill Sheets
Appendix D: Page 20
EVALUATION NOTES