Embed Size (px)
Citation preview

EMC ViPR ControllerVersion 2.4.0.0
ViPR Controller Integration withRecoverPoint and VPLEX User andAdministration Guide302-002-421
01

Copyright © 2013-2015 EMC Corporation. All rights reserved. Published in USA.
Published November, 2015
EMC believes the information in this publication is accurate as of its publication date. The information is subject to changewithout notice.
The information in this publication is provided as is. EMC Corporation makes no representations or warranties of any kind withrespect to the information in this publication, and specifically disclaims implied warranties of merchantability or fitness for aparticular purpose. Use, copying, and distribution of any EMC software described in this publication requires an applicablesoftware license.
EMC², EMC, and the EMC logo are registered trademarks or trademarks of EMC Corporation in the United States and othercountries. All other trademarks used herein are the property of their respective owners.
For the most up-to-date regulatory document for your product line, go to EMC Online Support (https://support.emc.com).
EMC CorporationHopkinton, Massachusetts 01748-91031-508-435-1000 In North America 1-866-464-7381www.EMC.com
2 EMC ViPR Controller 2.4.0.0 ViPR Controller Integration with RecoverPoint and VPLEX User and Administration Guide

ViPR Controller support for RecoverPoint 7
Overview of RecoverPoint support................................................................... 8ViPR Controller services for RecoverPoint ...........................................8
Overview of RecoverPoint consistency groups creation.................................... 9ViPR Controller supported RecoverPoint configurations................................... 9
Support for local Continuous Data Protection (CDP)............................9Support for Remote Continuous Data Protection (CRR)......................10Support for two RecoverPoint systems with three physical sites andRecoverPoint CRR............................................................................. 11Required Discoveries....................................................................... 12
Procedure summary - Creating a block volume with CDP protection............... 12Create a ViPR Controller Project........................................................ 13Create a consistency group.............................................................. 14Create a Virtual Array........................................................................14Optionally create virtual arrays for RecoverPoint journal volumes..... 14Add Ports......................................................................................... 15Add Networks to the Virtual Array..................................................... 17Rediscover the RecoverPoint Protection System............................... 18Optionally create virtual pools for RecoverPoint journal volumes......18Create Two Virtual Pools...................................................................19Create a Block Volume with RecoverPoint CDP Protection................. 20
Procedure Summary - Create Block Volume with CRR Protection.................... 21Build Two Virtual Arrays................................................................... 22Create Two Virtual Pools...................................................................22Create a Block Volume with RecoverPoint CRR Protection................. 23
Procedure Summary - Create Block Volume in two RecoverPoint systems inthree sites with CRR Protection...................................................................... 23Create a Volume Snapshot using a RecoverPoint Bookmark.......................... 25Block Protection Services > Restore Block Snapshot...................................... 25Run Block Protection Service > Failover Block Volume.................................... 25Run Block Protection Service > Swap Continuous Copies................................28
EMC ViPR Controller with VPLEX : Benefits and Examples 31
What is VPLEX .............................................................................................. 32Supported VPLEX Versions............................................................................ 32Installation and integration: supported deployment models..........................32Discovering VPLEX ........................................................................................33Create a VPLEX -based virtual array............................................................... 34Local fabric virtual arrays ..............................................................................35Stretched fabric virtual arrays........................................................................36Adding VPLEX high availability to virtual pools.............................................. 38Creating VPLEX virtual volumes..................................................................... 41ViPR Controller naming conventions on VPLEX .............................................. 42Adding VPLEX to an existing VMAX/VNX/ViPR Controller environment........... 43ViPR Controller in pre-provisioned data centers............................................. 43Provisioning to VPLEX -enabled stretched clusters.........................................43Expansion of VPLEX virtual volumes.............................................................. 44Creating back-end clones of VPLEX virtual volumes....................................... 44VPLEX data mobility: change virtual array and change virtual pool.................44
Chapter 1
Chapter 2
CONTENTS
EMC ViPR Controller 2.4.0.0 ViPR Controller Integration with RecoverPoint and VPLEX User and Administration Guide 3

Data Mobility: Change the ViPR Controller Virtual Array in a VPLEXEnvironment 47
About the Change Virtual Array service.......................................................... 48Change Virtual Array: Notes on consistency groups.......................... 48Setting the type of transfer speed for VPLEX data migration..............48
Use ViPR Controller to change the virtual array used in a VPLEX configuration..................................................................................................................... 49Understand how changing the ViPR Controller virtual array changes the VPLEXenvironment .................................................................................................49
Changing the virtual array for volumes in VPLEX consistency groups........................................................................................................ 51
Supported VPLEX Versions............................................................................ 53
Data Mobility: Change the ViPR Controller Virtual Pool in a VPLEXEnvironment 55
About the Change Virtual Pool service........................................................... 56How to change the ViPR Controller virtual pool used in a VPLEX environment..................................................................................................................... 56Setting the type of transfer speed for VPLEX data migration...........................56Use cases for changing the ViPR Controller virtual pool in a VPLEX environment..................................................................................................................... 57
Change the back end storage for a VPLEX virtual volume in aconsistency group............................................................................62
Export a VPLEX Local Virtual Volume to a Host or Cluster 63
Export a VPLEX local volume to a host or cluster............................................ 64Datacenter requirements...............................................................................64Discoveries................................................................................................... 65Run Block Storage Services > Create Block Volume........................................ 65
Create a Virtual Array........................................................................66Add Networks to the Virtual Array..................................................... 66Create a Virtual pool for your virtual array.........................................67Create a VPLEX Local Block Volume.................................................. 68
Block Protection Services > Export VPLEX Volume.......................................... 68Block Storage Services > Create Block Volume for a Host............................... 69
Create Block Volume for a Host........................................................ 69Block Storage Services > Remove Block Volume.............................................70Worldwide Names on VPLEX Volumes Provisioned through ViPR Controller....70Supported VPLEX Versions............................................................................ 71
Support for VPLEX volume snapshots 73
ViPR Controller support for VPLEX volume snapshots.....................................74Consistency Groups......................................................................... 74
Create a VPLEX Local Volume Snapshot using RecoverPoint Bookmarks........ 74Data center requirements for VPLEX local virtual volume snapshotswith RecoverPoint bookmarks.......................................................... 74Discoveries...................................................................................... 75Create Block Volume Snapshot using RecoverPoint Bookmarks........76
Create a VPLEX local array snapshot.............................................................. 82Data center requirements for local array snapshots of VPLEX localvirtual volumes................................................................................ 83Required Discoveries for Local Array Snapshot Creation................... 83
Chapter 3
Chapter 4
Chapter 5
Chapter 6
CONTENTS
4 EMC ViPR Controller 2.4.0.0 ViPR Controller Integration with RecoverPoint and VPLEX User and Administration Guide

Create Block Volume Local Array Snapshot.......................................84Block Protection Services > Remove Block Snapshot......................................85Create and delete snapshots for volumes in consistency groups................... 86
Supporting VPLEX Full Copies 89
ViPR Controller support for VPLEX full copies................................................. 90Create Full Copy............................................................................... 90Remove Full Copy.............................................................................90
Block Protection Services > Create Full Copy.................................................. 91Block Protection Services > Remove Full Copy................................................ 91
ViPR Controller support for VPLEX Local volume mirrors 93
ViPR Controller support for VPLEX Local volume mirrors.................................94Datacenter requirements...............................................................................95Discoveries................................................................................................... 96Supported virtual pool configurations........................................................... 96Configuration #1: No continuous copies virtual pool..................................... 96Configuration #2: Using a continuous copy virtual pool within a single virtualarray............................................................................................................. 97Configuration #3 - Using separate virtual arrays for the virtual volume andmirror............................................................................................................98
Step 2 - Create two virtual arrays...................................................... 99Step 3 - Add networks to the physical storage virtual array............... 99Step 4 - Create a virtual pool for your mirror virtual array................ 102Step 5 - Create a virtual pool for the physical storage virtual array.. 103Step 6 - Create a VPLEX Local Block Volume................................... 103Step 7 - Create Continuous Copies................................................. 104
Remove Continuous Copies.........................................................................104Detaching a mirror from its VPLEX virtual volume.........................................105
A second way to stop continuous copies........................................ 105
Supporting VPLEX high availability volumes with RecoverPointprotection 107
ViPR Controller support for VPLEX high availability volumes with RecoverPointprotection................................................................................................... 108
Supported data center configurations............................................ 108Summary of required discoveries................................................................ 110Overview of consistency groups creation.....................................................110
VPLEX-specific considerations for consistency groups....................111Block Storage Services > Create Block Volume............................................. 111Virtual pool settings.................................................................................... 113Run Block Protection Service > Failover Block Volume.................................. 115Add RecoverPoint Protection to a VPLEX Virtual Volume...............................115
Block Storage Services > Change Volume Virtual Pool..................... 116Add RecoverPoint protection service orchestration.........................117
Upgrading an existing RecoverPoint +VPLEX CRR setup to MetroPoint CRR... 118Data Protection panel fields........................................................................ 119
ViPR Controller Support for MetroPoint 121
ViPR Controller support for RecoverPoint MetroPoint Overview.................... 122
Chapter 7
Chapter 8
Chapter 9
Chapter 10
CONTENTS
EMC ViPR Controller 2.4.0.0 ViPR Controller Integration with RecoverPoint and VPLEX User and Administration Guide 5

ViPR Controller and MetroPoint 3-Site Topology: Physical DatacenterRequirements..............................................................................................122ViPR Controller and MetroPoint 2-Site Topology: Physical DatacenterRequirements..............................................................................................124Required Discoveries...................................................................................125ViPR Controller and MetroPoint: Virtual data center configuration................125Create a block volume in a MetroPoint environment.................................... 126
Create the virtual arrays................................................................. 127Enable connectivity between elements in your virtual arrays.......... 128Rediscover the RecoverPoint Appliance..........................................130Create a RecoverPoint Target Virtual Pool....................................... 131Create a MetroPoint High Availability Virtual Pool...........................132Create a MetroPoint Source Virtual Pool......................................... 133Create a VPLEX distributed block volume in your MetroPointconfiguration................................................................................. 135
Exporting a VPLEX Metro Virtual Volume to a Host or Cluster 137
Export a VPLEX Metro Virtual Volume to a Host or Cluster.............................138ViPR Controller Integration with VPLEX Metro: Data Center Requirements.... 138Required Discoveries...................................................................................139Block Storage Services > Create Block Volume............................................. 139
Create a VPLEX Distributed Block Volume.......................................141Block Storage Services > Export VPLEX Volume............................................ 142Block Storage Services > Create Block Volume for a Host............................. 143
Run Create Block Volume for a Host............................................... 144Block Storage Services > Remove Block Volume...........................................145Worldwide Names on VPLEX Volumes Provisioned through ViPR Controller..145Supported VPLEX Versions.......................................................................... 146
ViPR Controller Support for VPLEX Distributed Volume Mirrors 147
Datacenter requirements.............................................................................148Discoveries................................................................................................. 149Virtual array and virtual pool configuration..................................................149Block Storage Services > Create Block Volume............................................. 149
Create Two Virtual Arrays................................................................150Enable connectivity by adding ports...............................................151Create two continuous copies virtual pools.................................... 154Create the VPLEX High Availability virtual pool................................155Create the VPLEX Source virtual pool..............................................157Create a VPLEX Distributed Block Volume.......................................158Create Continuous Copies.............................................................. 159
Remove Continuous Copies.........................................................................159Detaching a mirror from its VPLEX virtual volume.........................................159
A second way to stop continuous copies........................................ 160
Common UI procedures 161
Create a virtual array................................................................................... 162Adding networks to a virtual array............................................................... 162Adding ports to a virtual array..................................................................... 163
Chapter 11
Chapter 12
Appendix A
CONTENTS
6 EMC ViPR Controller 2.4.0.0 ViPR Controller Integration with RecoverPoint and VPLEX User and Administration Guide

CHAPTER 1
ViPR Controller support for RecoverPoint
This chapter contains the following topics:
l Overview of RecoverPoint support........................................................................... 8l Overview of RecoverPoint consistency groups creation............................................ 9l ViPR Controller supported RecoverPoint configurations........................................... 9l Procedure summary - Creating a block volume with CDP protection....................... 12l Procedure Summary - Create Block Volume with CRR Protection............................ 21l Procedure Summary - Create Block Volume in two RecoverPoint systems in three
sites with CRR Protection.......................................................................................23l Create a Volume Snapshot using a RecoverPoint Bookmark.................................. 25l Block Protection Services > Restore Block Snapshot.............................................. 25l Run Block Protection Service > Failover Block Volume............................................ 25l Run Block Protection Service > Swap Continuous Copies........................................28
ViPR Controller support for RecoverPoint 7

Overview of RecoverPoint supportViPR Controller supports RecoverPoint data protection. RecoverPoint is an EMC softwarepackage that protects your data by replicating it dynamically on other physical storage.
The RecoverPoint appliance (RPA) is RecoverPoint's intelligent data protection appliance.RPAs manage all aspects of reliable data replication and they can be physical hardwareor virtual machines. RPAs are used to attain availability. If an RPA fails, another RPA willpick up the workload.
Note
ViPR Controller supports only physical RecoverPoint appliances. Virtual RecoverPointappliances are not supported by ViPR Controller.
The RecoverPoint splitter is proprietary software that is installed on storage subsystems,and is built-into the VNX/CLARiiON, VMAX, and VPLEX storage systems. The RecoverPointsplitter is used to “split” the application writes so that they are sent first to theRecoverPoint appliance and then, to their normally designated storage volumes.
A RecoverPoint system consists of RecoverPoint splitters and two to eight clusteredRecoverPoint appliances (RPAs) that are used to replicate and protect data.
ViPR Controller services for RecoverPointViPR Controller provides several services in its service catalog that are integrated withRecoverPoint .
These are some of the ViPR Controller services that are integrated with RecoverPoint .
Block Storage Services > Create Block VolumeCreates a block volume. By following the instructions in this chapter, you will be ableto create a block volume with RecoverPoint protection. The RecoverPoint protectionis added through the virtual pool configuration.
Block Protection Services > Create Block SnapshotCreates a RecoverPoint snapshot. See Create a Volume Snapshot using aRecoverPoint Bookmark on page 25.
Block Protection Services > Restore Block SnapshotRestores a RecoverPoint snapshot. See Block Protection Services > Restore BlockSnapshot on page 25.
Block Storage Services > Change Volume Virtual PoolMoves a volume from one virtual pool to another. The target virtual pool can be usedto add RecoverPoint protection to a volume or change the protection of all volumesin a consistency group from RecoverPoint + VPLEX CRR to MetroPoint CRR. See BlockStorage Services > Change Volume Virtual Pool on page 116 and Upgrading anexisting RecoverPoint + VPLEX CRR setup to MetroPoint CRR on page 118.
Block Protection Services > Failover Block VolumeThis enables image access on the latest image at the remote site. See Run BlockProtection Service > Failover Block Volume on page 25.
Block Protection Services > Swap Continuous CopiesPerforms a RecoverPoint failover which reverses the source and target personalities.The source becomes the target and the target becomes the source. See Run BlockProtection Service > Swap Continuous Copies on page 28.
ViPR Controller support for RecoverPoint
8 EMC ViPR Controller 2.4.0.0 ViPR Controller Integration with RecoverPoint and VPLEX User and Administration Guide

Block Protection Services > Export Snapshot to a HostExports a snapshot of a volume to a host. You can specify the volume's Host LUNNumber (HLU) or have ViPR Controller automatically assign this number.
Overview of RecoverPoint consistency groups creationAll RecoverPoint protected volumes must be part of a ViPR Controller consistency group.RecoverPoint allows a maximum of 128 consistency groups to be provisioned, across allRPA clusters, per RecoverPoint system.
When a new consistency group is created as part of a volume provisioning request, ViPRController balances the load across the RPAs. ViPR Controller determines the primary RPAto service the consistency group by looking at the throughput for all of the RPAs in thecluster. The RPA with the lowest amount of throughput is selected.
When you have a storage system connected to multiple RecoverPoint systems,RecoverPoint allows a maximum number of consistency groups equal to 128 x number ofRecoverPoint systems. In this scenario, ViPR Controller first balances across theRecoverPoint systems. Once the RecoverPoint system is selected, then ViPR Controllerbalances across the RPAs within that RecoverPoint system.
When you add a volume to an existing consistency group, there is no balancing acrossthe RPAs. The volume is added to the RPA that is servicing the existing consistency group.
ViPR Controller supported RecoverPoint configurationsViPR Controller supports both CDP and CRR RecoverPoint configurations. The diagrams inthis section show details of the configurations supported by ViPR Controller.
ViPR Controller supports CLR RecoverPoint configurations as well. These configurationsinvolve both local and remote replication of your data.
In a ViPR Controller environment, the difference between CDP, CRR or CLR is determinedby which virtual arrays are used in the virtual pool and the visibility those virtual arrayshave to different RecoverPoint appliances (RPAs). You do not specifically select CDP, CRR,or CLR from the ViPR Controller UI.
If all the virtual arrays can only see RPA cluster 1 then ViPR Controller sees yourRecoverPoint setup as CDP.
Note
You can also use the ViPR Controller UI CLI to isolate virtual arrays to RPA clusters.
If the source virtual array sees RPA cluster 1 and the target virtual array sees RPA cluster2, ViPR Controller sees your setup as CRR.
If the source virtual array sees RPA cluster 1, one target virtual array sees RPA cluster 1and the second target virtual array sees RPA cluster 2, ViPR Controller sees your setup asCLR.
Support for local Continuous Data Protection (CDP)ViPR Controller supports RecoverPoint protection for volumes, such as VMAX, VNX andVPLEX . For the complete list of supported volume types, see the ViPR Controller SupportMatrix which can be found on the ViPR Controller Product Documentation Index .
The data center configuration below includes a RecoverPoint appliance protecting sourcedata on one array. The RecoverPoint target volume is on a second array. This redundancy
ViPR Controller support for RecoverPoint
Overview of RecoverPoint consistency groups creation 9

on separate physical storage arrays means that your data is protected in case of an arrayfailure.
Support for Remote Continuous Data Protection (CRR)ViPR Controller supports data center configurations that include remote RecoverPointprotection.
The following figure shows a sample ViPR Controller-supported data center configuration.This configuration shows a RecoverPoint Remote (CRR) setup.
ViPR Controller support for RecoverPoint
10 EMC ViPR Controller 2.4.0.0 ViPR Controller Integration with RecoverPoint and VPLEX User and Administration Guide

It includes:
l Two physical data centers.
l A single RecoverPoint system comprised of two RecoverPoint Clusters, one in eachdata center..
l Two VMAX arrays - one in each data center. In this example, VMAX1 is the sourcevolume. VMAX4 is the array on which the RecoverPoint target volume is saved.
Note
For the complete list of supported volume types, see the ViPR Controller Support Matrixwhich can be found on the ViPR Controller Product Documentation Index .
Support for two RecoverPoint systems with three physical sites and RecoverPointCRR
ViPR Controller supports the configuration where there are two RecoverPoint systems withthree physical sites andRecoverPoint CRR . The shared site between the two systems canbe a source or a target for protection.
The following figure shows an example of the ViPR Controller supported data centerconfiguration.
ViPR Controller support for RecoverPoint
Support for two RecoverPoint systems with three physical sites and RecoverPoint CRR 11

Figure 1 Example configuration of 3 sites with 2 RecoverPoint systems
You can set up the site shared by the two RecoverPoint systems as either the target or thesource.
Required DiscoveriesFrom ViPR Controller, you must discover the following hardware in order to manage aRecoverPoint local connection.
l The hosts (or cluster) to which you want to provision storage.
l The block storage arrays where the RecoverPoint source volumes are stored.
l The block storage arrays where the RecoverPoint target volumes are stored.
l Any Brocade or Cisco switches required to connect the hosts, the arrays and theRecoverPoint appliance.
l Any VPLEX s fronting other storage systems.
l The RecoverPoint appliance.
Procedure summary - Creating a block volume with CDPprotection
This service creates a block volume with RecoverPoint protection. Create Block Volumedoes not export the volume to the host.
Before you begin
To run this service, your environment must meet all of the following requirements.
l You must log in to ViPR Controller as a tenant administrator, or as a user with accessto the project that contains the volume you want to export.
l This procedure shows how to set up and run the Create Block Volume service for adata center that has implemented Continuous Data Protection (CDP). Your physicaldatacenter must meet all of the requirements described in Support for localContinuous Data Protection (CDP) on page 9.
l You must discover the physical infrastructure listed in Required Discoveries on page12.
ViPR Controller support for RecoverPoint
12 EMC ViPR Controller 2.4.0.0 ViPR Controller Integration with RecoverPoint and VPLEX User and Administration Guide

l All masking and zoning for the RecoverPoint system must be complete, and theRecoverPoint splitters must be correctly installed before you discover the protectionsystem in ViPR Controller.
Once your RecoverPoint Appliance is under ViPR Controller management, you shouldrediscover the Protection System whenever you make a change to the RecoverPointconfiguration, specifically when you add or remove any virtual arrays.
Procedure
1. Create a ViPR Controller project.
See Create a ViPR Project on page 13
2. Build a ViPR Controller consistency group.
See Create a consistency group on page 14.
3. Build a virtual array.
See Create a Virtual Array on page 14.
4. Optionally, create a virtual array for RecoverPoint copy journal volumes.
5. Add networks to the virtual arrays to enable physical connectivity between all thehardware elements in the virtual array. Alternatively, you can add specific ports to thevirtual array by using the Storage Ports dialog. You can also add networks by addingentire storage systems, including VPLEX to the virtual array by using Add StorageSystem dialog.
See Add Networks to the Virtual Array on page 17 or Add Ports on page 15.
6. Rediscover the RecoverPoint Protection System.
In order for RecoverPoint to see the virtual array you built, you must rediscover theprotection system. See Rediscover the RecoverPoint Protection System on page 18.
7. Optionally, create a virtual pool for RecoverPoint copy journal volumes.
8. Create the RecoverPoint target virtual pool.
See Create Two Virtual Pools on page 19.
9. Create the RecoverPoint source virtual pool.
See Create Two Virtual Pools on page 19.
10.Run Block Storage Services > Create Block Volume from the service catalog to createthe block volume with RecoverPoint protection.
See Create a Block Volume with RecoverPoint CDP Protection on page 20.
Create a ViPR Controller ProjectYou can create a project, to which a new volume can be assigned, from the TenantSettings > Projects page at the ViPR Controller UI.
l You must be either a Tenant Administrator or a Project Administrator to be allowed tocreate projects.
Procedure
1. Log in as a user with Tenant Admin rights.
2. Select Tenant Settings > Projects.
3. Click Add.
4. Enter a project name in the Name field.
ViPR Controller support for RecoverPoint
Create a ViPR Controller Project 13
5. Click Add ACL.
6. Set the Type to Group or User and specify the name of the Group or User who will beassigned access to the project.
7. Specify the Access as ALL.
8. Click Save.
Create a consistency groupAll RecoverPoint protected volumes must be part of a ViPR Controller consistency group.
Before you begin
You must create a project before you can create a consistency group.
Procedure
1. Log in as a user with Tenant Admin rights.
2. Choose Tenant Settings > Consistency Groups.
3. Choose a project from the project list.
4. Click Add.
5. Enter the name for the new consistency group.
6. Click Save.
Create a Virtual ArrayFrom the user interface, create a virtual array as follows:
Procedure
1. Complete the discoveries described in Discoveries on page 12.
2. From the Administrator Mode, select Virtual Assets -> Virtual Array.
3. Click Add.
4. Give the virtual array a name.
5. Select either Automatic or Manual SAN Zoning. This example uses automatic SANzoning.
6. Click Save. The new virtual array is added to the list of virtual arrays.
Optionally create virtual arrays for RecoverPoint journal volumesYou can create a separate virtual array for RecoverPoint journal volumes for both thesource and the target copy volumes. If you do not create a separate virtual array, then thevirtual array of the corresponding RecoverPoint copy is used for the journal volumes.
Before you begin
Using a different virtual array for the journal volumes makes it possible to use a differentstorage type for the journal volumes. For example, your source and target volumes maybe VPLEX virtual volumes and your journal volumes may be on VMAX or VNX, non-virtualized.Follow
Procedure
1. Complete the discoveries described in Discoveries on page 12.
ViPR Controller support for RecoverPoint
14 EMC ViPR Controller 2.4.0.0 ViPR Controller Integration with RecoverPoint and VPLEX User and Administration Guide

2. From the Administrator Mode, select Virtual Assets -> Virtual Array.
3. Click Add.
4. Give the virtual array a name.
5. Click Save.
The Edit Virtual Array screen is displayed.
6. Select either Automatic or Manual SAN Zoning. This example uses automatic SANzoning.
7. Click Save.
The new virtual array is added to the list of virtual arrays. And the Virtual Arrays screenis displayed.
8. Repeat steps 3 - 7 if you are creating additional virtual arrays for the RecoverPointjournal volumes.
Add PortsThere are two ways to establish connectivity in a virtual array - adding networks andadding ports.
Before you begin
Before adding ports to your virtual arrays, complete the discoveries listed in RequiredDiscoveries on page 12.
Adding specific ports to your virtual arrays gives you a level of granular control over whichports you use to communicate between specific resources in your data center. In thisexample, connectivity needs to be established between the physical arrays and theswitches in the SAN.
Procedure
1. Edit the source virtual arrays that you created in Create a Virtual Array on page 14. TheEdit Virtual Array configuration screen opens.
2. Click Storage Ports. The Storage Ports page opens.
ViPR Controller support for RecoverPoint
Add Ports 15

3. Type a string that filters the ports list in the Search field. For example, if you enter fa-8in the Search field, the Storage Ports list displays only the ports on arrays whosenames match that string.
4. Select the check boxes next to each port that you want to add to the virtual array.
5. Click Add.
ViPR Controller adds the storage ports you selected to the virtual array.
6. To add ports to any virtual arrays that you created for the RecoverPoint journalvolumes, edit the virtual arrays. The Edit Virtual Array configuration screen opens.Repeat steps 2 -6, editing the journal virtual arrays that you created in Optionallycreate virtual arrays for RecoverPoint journal volumes on page 14.
ViPR Controller support for RecoverPoint
16 EMC ViPR Controller 2.4.0.0 ViPR Controller Integration with RecoverPoint and VPLEX User and Administration Guide

Add Networks to the Virtual ArrayFrom the user interface, add networks to your virtual arrays as follows:
Procedure
1. Choose Virtual Assets > Virtual Arrays to display the list of virtual arrays.
2. Click the name of the virtual array you created in Create a Virtual Array on page 14.The Edit Virtual Array configuration screen appears.
3. Click Networks. The Networks screen appears.
4. Click Add Existing. The Add Network dialog appears with a list of fabrics.
5. Click the check boxes next to the fabrics you want to add to your virtual array. Thenetworks you add must give you access to the VPLEX and the physical storage arrays.In the following figure, the four fabrics added to the virtual array provide connectivityto the VPLEX and two physical block storage arrays - a VMAX and a VNX.
6. Click Add.
7. Click the virtual array name in the breadcrumb at the top of the screen to navigateback to the Edit Virtual Array screen. The VPLEX and the physical storage systemsshould display in the Associated Storage Systems list.
8. If you are adding networks to any virtual arrays that you created for the RecoverPointjournal volumes in Optionally create virtual arrays for RecoverPoint journal volumes onpage 14:
a. Click Virtual Arrays in the breadcrumb at the top of the screen to display theVirtual Arrays screen.
b. Click the name of the source virtual array you created for the RecoverPoint journalvolumes.
ViPR Controller support for RecoverPoint
Add Networks to the Virtual Array 17

The Edit Virtual Array configuration screen appears.
9. Repeat steps 3 -7.
Rediscover the RecoverPoint Protection SystemAfter building your virtual array, you must rediscover the RecoverPoint protection systemin order for RecoverPoint to see the virtual array.
Before you begin
Your virtual arrays must be built before you perform this procedure.
Procedure
1. Log in as a system administrator.
2. Choose Physical Assets > Data Protection Systems.
The Data Protection Systems list displays.
3. Select a Data Protection system, and click Rediscover.
Optionally create virtual pools for RecoverPoint journal volumesYou can create a separate virtual pool for RecoverPoint journal volumes for both thesource and the target copy volumes. If you do not create a separate virtual pool, then thevirtual pool of the corresponding RecoverPoint copy is used for the journal volumes.
Before you begin
You must create a virtual array before you can create the virtual pools. The virtual arraymust provide storage on the same site as the corresponding RecoverPoint copy volume.This is the virtual array that you created in Optionally create virtual arrays forRecoverPoint journal volumes on page 14.
Procedure
1. Choose Virtual Assets > Block Virtual Pools.
2. Click Add.
The Edit Block Virtual Pool screen appears.
3. Enter the name of the block virtual pool in the Name field.
4. Enter a string description of the virtual pool in the Description field.
5. Choose the virtual array you created for journal volume creation.
6. For VMAX journal volumes, in the Hardware panel change Provisioning Type to Thick,as ViPR Controller does not pre-allocate the volumes.
7. Verify that the number of storage pools that match the virtual pool definition is 1 orgreater.
8. Click Save.
9. Repeat steps 1 - 8 for each journal volume virtual pool that you are creating.
ViPR Controller support for RecoverPoint
18 EMC ViPR Controller 2.4.0.0 ViPR Controller Integration with RecoverPoint and VPLEX User and Administration Guide

Create Two Virtual PoolsCreating a block volume with RecoverPoint protection requires two virtual pools - one forthe RecoverPoint copies, and one for the RecoverPoint source.
Before you begin
You must create a virtual array before you can create the virtual pools. See Create avirtual array on page 14.
Create the RecoverPoint Target virtual pool first - see steps 1 through 6 below. Then,create the RecoverPoint source virtual pool.
Note
You cannot set Host IO limits on a virtual pool that includes RecoverPoint protection.Leave the Host Front End Bandwidth and Host Front End I/O Limit fields at the default (0).
Procedure
1. Choose Virtual Assets > Block Virtual Pools. .
2. Click Add.
The Create Block Virtual Pool screen appears.
3. Enter the name of the block virtual pool in the Name field.
4. Enter a string description of the virtual pool in the Description field.
5. Choose the virtual array you created.
Be sure that the number of storage pools that match the virtual pool definition is 1 orgreater.
6. Click Save.
7. Repeat Steps 1 through 5 to create a RecoverPoint source virtual pool and add it to thevirtual array.
8. In the Hardware panel, enable Multi-Volume Consistency.
9. In the Data Protection panel, set Protection System to EMC RecoverPoint.
10.Under RecoverPoint Copies, click Add Copy.
11.In the RecoverPoint Copies dialog, set the Virtual Array field to the virtual array youbuilt.
12.Set the Virtual Pool to the RecoverPoint Copies virtual pool.
13.Optionally, select a separate virtual array for the journal volume of this RecoverPointcopy in Journal Virtual Array. The default is the same virtual array as the RecoverPointcopy.
14.Optionally, select a separate virtual pool for the journal volume of this RecoverPointcopy in Journal Virtual Pool. The default is the same virtual pool as the RecoverPointcopy.
ViPR Controller support for RecoverPoint
Create Two Virtual Pools 19
Note
For VMAX journal volumes, ensure that the virtual pool has the Provisioning Type setto Thick, as ViPR Controller does not pre-allocate the volumes.
15.Click Done.
Be sure that the number of storage pools that match the virtual pool definition is 1 orgreater.
16.Click Save.
Create a Block Volume with RecoverPoint CDP ProtectionFrom User Mode, create a block volume with local RecoverPoint protection as follows:
Procedure
1. Choose User Mode.
2. Run Block Storage Services > Create Block Volume from the service catalog.
3. Choose the virtual array you built. See Create a Virtual Array on page 14.
4. Choose the RecoverPoint source virtual pool.
5. Choose the project you built.
6. Enter a string description for the block volume.
7. Specify the ViPR Controller consistency group you built. This is required for building ablock volume with RecoverPoint protection.
8. Set the number of volumes to 1 or more.
9. Set the volume size in gigabytes.
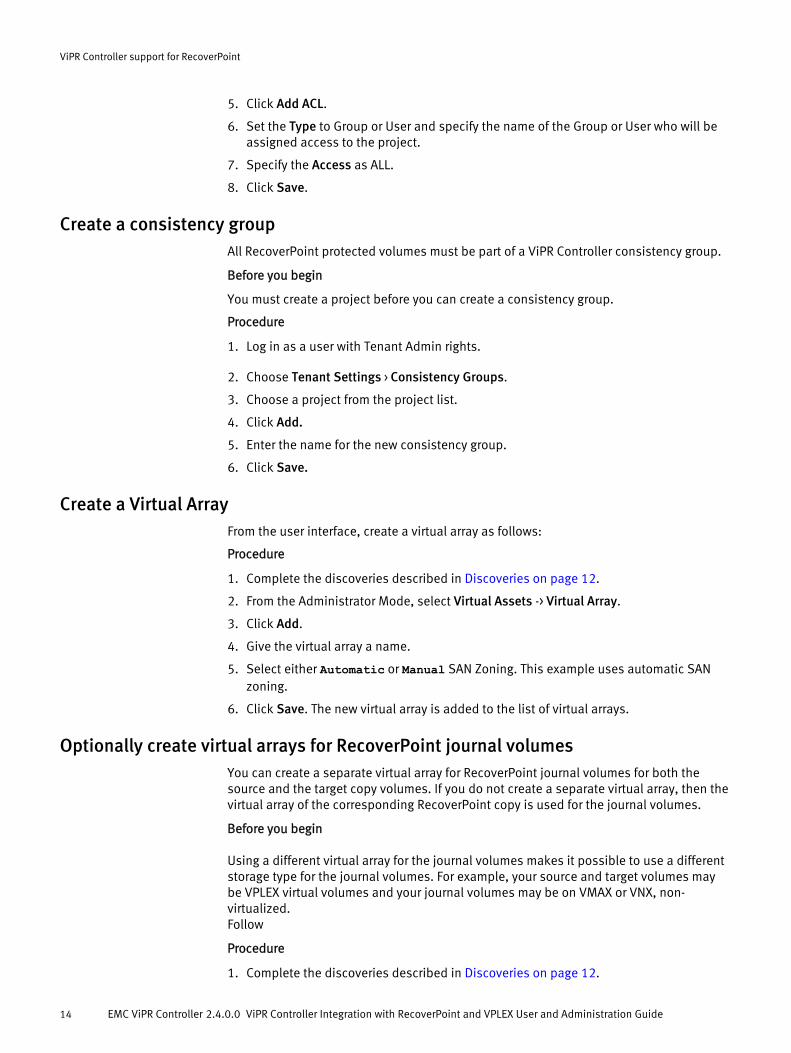
10.Click Order.
This service creates both the block volume and the RecoverPoint Target volume. Thefollowing figure shows an example.
ViPR Controller support for RecoverPoint
20 EMC ViPR Controller 2.4.0.0 ViPR Controller Integration with RecoverPoint and VPLEX User and Administration Guide

Procedure Summary - Create Block Volume with CRR ProtectionThis service creates a block volume with remote RecoverPoint protection. Create BlockVolume does not export the volume to the host.
Before you begin
To run this service, your environment must meet all of the following requirements.
l You must log in to ViPR Controller as a tenant administrator, or as a user with accessto the project that contains the volume you want to export.
l This procedure shows how to set up and run the Create Block Volume service for adata center that has implemented Continuous Remote. Replication (CRR). Yourphysical datacenter must meet all of the requirements described in Support forContinuous Remote Replication (CRR) on page 10.
l You must discover the physical infrastructure listed in Required Discoveries on page12.
Procedure
1. Create a ViPR Controller project.
See Create a ViPR Controller Project on page 13
2. Build a ViPR Controller consistency group.
See Create a consistency group on page 14.
3. Build two virtual arrays, one for each data center.
See Build Two Virtual Arrays on page 22
4. Optionally, build virtual arrays for the RecoverPoint journal volumes. See Optionallycreate virtual arrays for RecoverPoint journal volumes on page 14.
5. Add networks to the virtual arrays to enable physical connectivity between all thehardware elements in the virtual array. Alternatively, you can add specific ports to thevirtual array by using the Storage Ports dialog.
See Add Networks to the Virtual Array on page 17 or Add Ports on page 15.
6. Rediscover the RecoverPoint Protection System.
In order for RecoverPoint to see the virtual arrays you built, you must rediscover theprotection system. See Rediscover the RecoverPoint Protection System on page 18.
7. Optionally, create virtual pools for the RecoverPoint journal volumes. See Optionallycreate virtual pools for RecoverPoint journal volumes on page 18.
8. Create the RecoverPoint target virtual pool.
See Create Two Virtual Pools on page 19.
9. Create the RecoverPoint source virtual pool.
See Create Two Virtual Pools on page 19.
10.Run Block Storage Services > Create Block Volume from the service catalog to createthe block volume with RecoverPoint protection.
See Create a Block Volume with RecoverPoint CRR Protection on page 23
ViPR Controller support for RecoverPoint
Procedure Summary - Create Block Volume with CRR Protection 21
Build Two Virtual ArraysBuilding a Volume with CRR protection requires two virtual arrays - one for theRecoverPoint source and one for the RecoverPoint target.
Before you begin
l Log in to ViPR Controller as a system administrator.
l Complete the discoveries described in Required Discoveries on page 12.
Procedure
1. From Administrator Mode, select Virtual Assets > Virtual Array.
2. Click Add.
3. Type the name of the virtual array.
4. Select Automatic SAN Zoning.
5. Click Save to add the new virtual array to the list of virtual arrays.
6. Click Add a second time. Follow steps 3 through 5 to create a second virtual array.
Create Two Virtual PoolsCreating a block volume with RecoverPoint CRR protection requires two virtual pools - onefor the RecoverPoint copies, and one for the RecoverPoint source.
Before you begin
You must create both virtual arrays before you create the virtual pools.
Procedure
1. Choose Virtual Assets > Block Virtual Pools. .
2. Click Add.
The Create Block Virtual Pool screen appears.
3. Enter the name of the block virtual pool in the Name field.
4. Enter a string description of the virtual pool in the Description field.
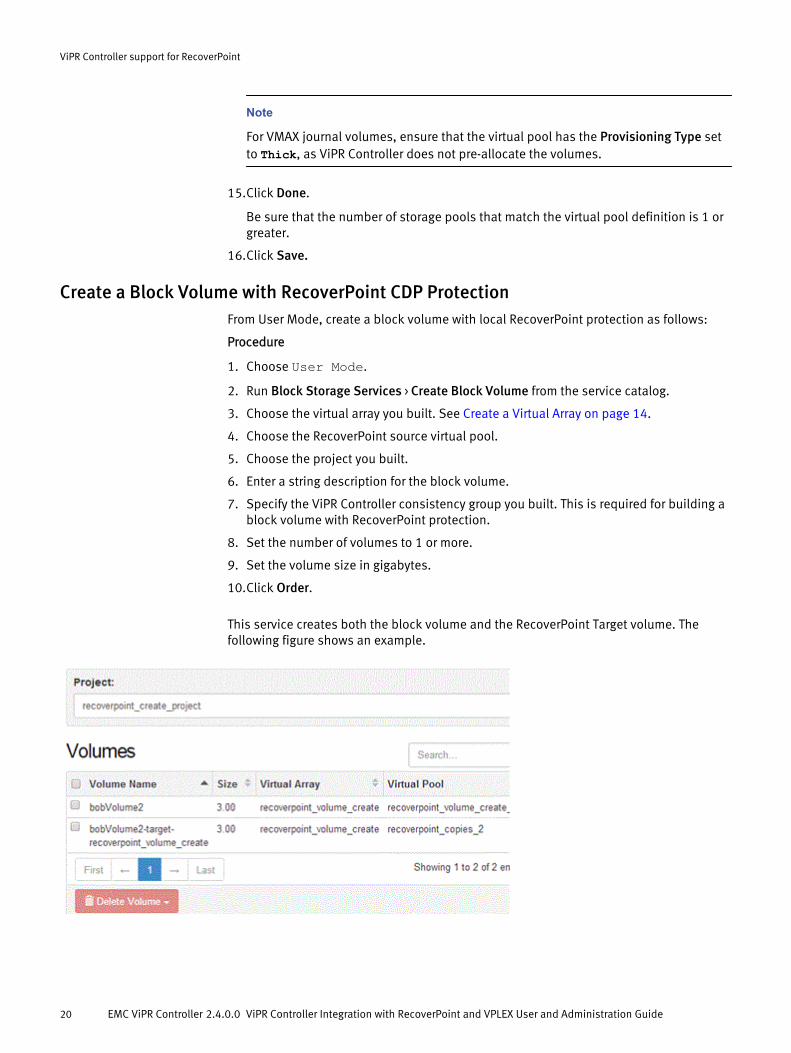
5. Choose the RecoverPoint target virtual array you created.
Verify that the number of storage pools that match the virtual pool definition is 1 orgreater.
6. In the High Availability panel, select the VPLEX Local option.
7. Click Save.
8. Repeat Steps 1 through 5 to create a RecoverPoint source virtual pool and add it to thevirtual array.
9. In the Hardware panel, enable Multi-Volume Consistency.
10.In the Data Protection panel, set Protection System to EMC RecoverPoint.
11.Under RecoverPoint Copies, click Add Copy.
12.In the RecoverPoint Copies dialog, set the Virtual Array field to the RecoverPoint targetvirtual array you built.
ViPR Controller support for RecoverPoint
22 EMC ViPR Controller 2.4.0.0 ViPR Controller Integration with RecoverPoint and VPLEX User and Administration Guide

13.Set the Virtual Pool to the RecoverPoint target virtual pool.
14.Optionally, select a separate virtual array for the journal volume of this RecoverPointcopy in Journal Virtual Array. The default is the same virtual array as the RecoverPointcopy.
15.Optionally, select a separate virtual pool for the journal volume of this RecoverPointcopy in Journal Virtual Pool. The default is the same virtual pool as the RecoverPointcopy.
16.Click Done.
Be sure that the number of storage pools that match the virtual pool definition is 1 orgreater.
17.Click Save.
Create a Block Volume with RecoverPoint CRR ProtectionFrom User Mode, create a block volume with remove RecoverPoint protection as follows:
Procedure
1. Choose User Mode.
2. Run Block Storage Services > Create Block Volume from the service catalog.
3. Choose the source virtual array you built. See Create a Virtual Array on page 14.
4. Choose the RecoverPoint source virtual pool.
5. Choose the project you built.
6. Enter a string description for the block volume.
7. Specify the ViPR Controller consistency group you built. This is required for building ablock volume with RecoverPoint protection.
8. Set the number of volumes to 1 or more.
9. Set the volume size in gigabytes.
10.Click Order.
This service creates both the block volume and the RecoverPoint target volume.
Procedure Summary - Create Block Volume in two RecoverPointsystems in three sites with CRR Protection
This service creates a block volume with remote RecoverPoint protection when there aretwo RecoverPoint systems with three sites, with one of the sites shared between the twoRecoverPoint systems.
Before you begin
To run this service, your environment must meet all of the following requirements.
l You must log in to ViPR Controller as a tenant administrator, or as a user with accessto the project that contains the volume that you want to export.
l This procedure shows how to set up and run the Create Block Volume service for thesupported configuration of two RecoverPoint systems with three sites and ContinuousRemote Replication (CRR). Your physical datacenter must meet all of the requirements
ViPR Controller support for RecoverPoint
Create a Block Volume with RecoverPoint CRR Protection 23
described in Support for two RecoverPoint systems with three physical sites andRecoverPoint CRR on page 11.
l You must discover the physical infrastructure listed in Required Discoveries on page12
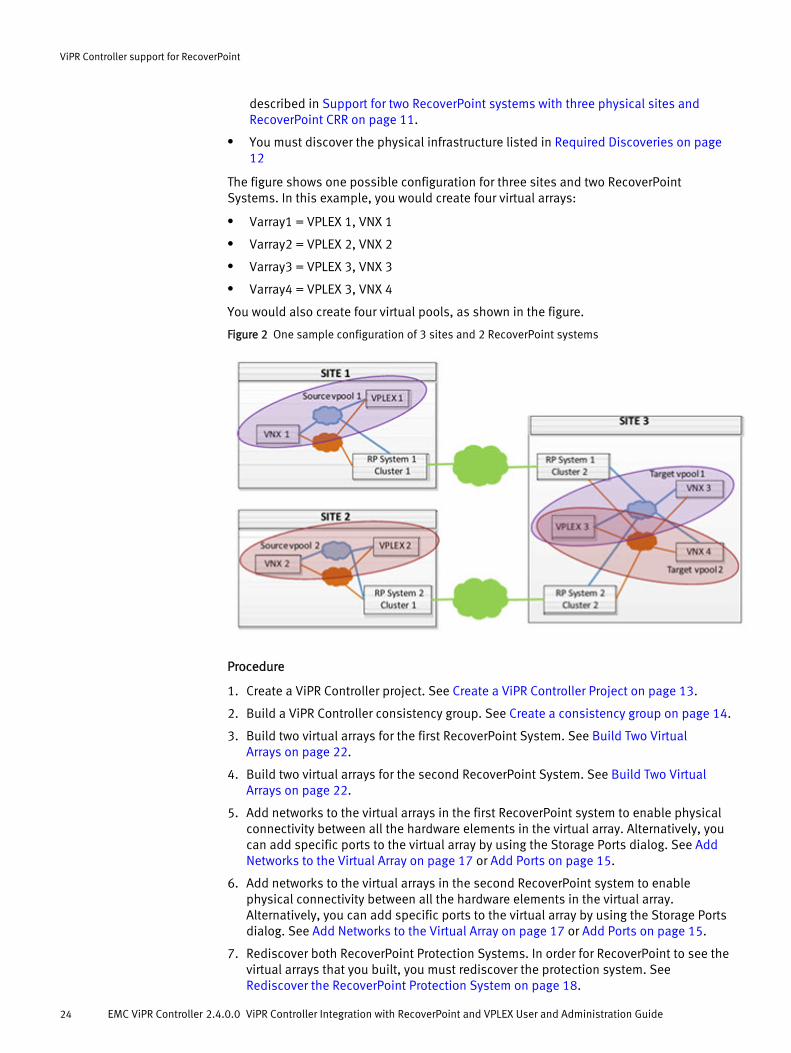
The figure shows one possible configuration for three sites and two RecoverPointSystems. In this example, you would create four virtual arrays:
l Varray1 = VPLEX 1, VNX 1
l Varray2 = VPLEX 2, VNX 2
l Varray3 = VPLEX 3, VNX 3
l Varray4 = VPLEX 3, VNX 4
You would also create four virtual pools, as shown in the figure.
Figure 2 One sample configuration of 3 sites and 2 RecoverPoint systems
Procedure
1. Create a ViPR Controller project. See Create a ViPR Controller Project on page 13.
2. Build a ViPR Controller consistency group. See Create a consistency group on page 14.
3. Build two virtual arrays for the first RecoverPoint System. See Build Two VirtualArrays on page 22.
4. Build two virtual arrays for the second RecoverPoint System. See Build Two VirtualArrays on page 22.
5. Add networks to the virtual arrays in the first RecoverPoint system to enable physicalconnectivity between all the hardware elements in the virtual array. Alternatively, youcan add specific ports to the virtual array by using the Storage Ports dialog. See AddNetworks to the Virtual Array on page 17 or Add Ports on page 15.
6. Add networks to the virtual arrays in the second RecoverPoint system to enablephysical connectivity between all the hardware elements in the virtual array.Alternatively, you can add specific ports to the virtual array by using the Storage Portsdialog. See Add Networks to the Virtual Array on page 17 or Add Ports on page 15.
7. Rediscover both RecoverPoint Protection Systems. In order for RecoverPoint to see thevirtual arrays that you built, you must rediscover the protection system. See Rediscover the RecoverPoint Protection System on page 18.
ViPR Controller support for RecoverPoint
24 EMC ViPR Controller 2.4.0.0 ViPR Controller Integration with RecoverPoint and VPLEX User and Administration Guide
8. Create two virtual pools for the first RecoverPoint system; one for the target and onefor the source. See Create Two Virtual Pools on page 22.
9. Create two virtual pools for the second RecoverPoint system; one for the target andone for the source. See Create Two Virtual Pools on page 22.
10.Create the block volume with RecoverPoint CRR protection. See Create a Block Volumewith RecoverPoint CRR Protection on page 23.
Create a Volume Snapshot using a RecoverPoint BookmarkOnce you create a volume with RecoverPoint protection, you can use RecoverPoint tocreate snapshots of that volume.
Before you begin
Your volume must have been successfully created.
Procedure
1. As a User. choose Block Protection Services > Create Block Snapshot.
2. Choose the project that contains the volume.
3. Choose the volume.
4. Choose RecoverPoint Bookmark.
5. Enter a string name for the snapshot.
6. Click Order.
Block Protection Services > Restore Block SnapshotThe Restore Block Snapshot service allows you to overwrite a volume's data with the dataof a previously created snapshot. This restore operation should be used with caution, asthere is potential for data loss.
Before you begin
You must have previously created a RecoverPoint bookmark snapshot using the CreateBlock Snapshot service.
Procedure
1. From User Mode, run Block Protection Services > Restore Block Snapshot.
2. Enter the name of the project to which the volume you want to restore belongs.
3. Choose the volume you want to restore.
4. Choose the snapshot you want to restore.
5. Click Order.
Run Block Protection Service > Failover Block VolumeAfter building a block volume, you can choose to provide access to the RecoverPointvolume that protects it.
Before you begin
The datacenter must be configured appropriately. See ViPR Controller support for localContinuous Data Protection (CDP) on page 9 or ViPR Controller support for RemoteContinuous Data Protection (CRR) on page 10.
ViPR Controller support for RecoverPoint
Create a Volume Snapshot using a RecoverPoint Bookmark 25

The physical infrastructure must be discovered by ViPR Controller. See RequiredDiscoveries on page 12.
You must have created at least one block volume with RecoverPoint protection. See Procedure Summary - Create Block Volume with CDP Protection on page 12 or ProcedureSummary - Create Block Volume with CRR Protection on page 21 for more information.
The Failover Block Volume catalog service, enables image access on the latest image atthe remote site. The following figure illustrates how the system appears to RecoverPointbefore running the Failover Block Volume catalog service.
Figure 3 RecoverPoint configuration before running the Failover Block Volume service
The following figure illustrates how the system appears to RecoverPoint after running theFailover Block Volume catalog service.
Note
Exporting the target volumes to the host at the remote site is a separate operation, and itcan be done before the failover.
ViPR Controller support for RecoverPoint
26 EMC ViPR Controller 2.4.0.0 ViPR Controller Integration with RecoverPoint and VPLEX User and Administration Guide

Figure 4 RecoverPoint configuration after running the Failover Block Volume service
Note
For ViPR Controller managed RecoverPoint protected volumes in case of a datacenterdisaster: If for any reason you mark a RecoverPoint bookmark on a target volume outsideof ViPR Controller, return the volume to their original state before continuing to managethis resource using ViPR Controller.
Procedure
1. Run Block Protection Services > Failover Block Volume from the service catalog.
2. Choose a Project.
3. Choose the source volume. In this example, you would choose the volume you createdin the Boston virtual array.
4. Choose the target volume in the New York virtual array.
5. Click Order.
ViPR Controller support for RecoverPoint
Run Block Protection Service > Failover Block Volume 27

Run Block Protection Service > Swap Continuous CopiesAfter building a block volume, you can choose to perform a RecoverPoint failover of thevolume to the RecoverPoint volume that protects it.
Before you begin
The datacenter must be configured appropriately. See ViPR Controller support for localContinuous Data Protection (CDP) on page 9 or ViPR Controller support for RemoteContinuous Data Protection (CRR) on page 10.
The physical infrastructure must be discovered by ViPR Controller. See RequiredDiscoveries on page 12.
You must have created at least one block volume with RecoverPoint protection. See Procedure Summary - Create Block Volume with CDP Protection on page 12 or ProcedureSummary - Create Block Volume with CRR Protection on page 21 for more information.
Running the Block Protection Services > Swap Continuous Copies service makes theRecoverPoint source and target reverse personalities. The target becomes the source, andthe source becomes the RecoverPoint target.The following figure illustrates the RecoverPoint configuration before running the SwapContinuous Copies service.
ViPR Controller support for RecoverPoint
28 EMC ViPR Controller 2.4.0.0 ViPR Controller Integration with RecoverPoint and VPLEX User and Administration Guide

Figure 5 RecoverPoint configuration before running the Swap Continuous Copies service
The following figure illustrates the RecoverPoint configuration after running the SwapContinuous Copies service. After running the service, New York is now the source volumeand Boston is the target volume.
Note
Exporting the target volumes to the host at the remote site is a separate operation (and itcan be done before the swap.
ViPR Controller support for RecoverPoint
Run Block Protection Service > Swap Continuous Copies 29

Figure 6 RecoverPoint configuration after running the Swap Continuous Copies service
Note
For ViPR Controller managed RecoverPoint protected volumes in case of a datacenterdisaster: If for any reason you perform a RecoverPoint failover of volumes outside of ViPRController, return volumes to original state before continuing to manage these resourcesusing ViPR Controller.
Procedure
1. Run Block Protection Services > Failover Block Volume from the service catalog.
2. Choose a Project.
3. Choose the source volume. In this example, you would choose the volume you createdin the Boston virtual array.
4. Choose the target volume in the New York virtual array.
5. Click Order.
ViPR Controller support for RecoverPoint
30 EMC ViPR Controller 2.4.0.0 ViPR Controller Integration with RecoverPoint and VPLEX User and Administration Guide

CHAPTER 2
EMC ViPR Controller with VPLEX : Benefits andExamples
This chapter contains the following topics:
l What is VPLEX ...................................................................................................... 32l Supported VPLEX Versions.................................................................................... 32l Installation and integration: supported deployment models..................................32l Discovering VPLEX ................................................................................................ 33l Create a VPLEX -based virtual array........................................................................34l Local fabric virtual arrays ......................................................................................35l Stretched fabric virtual arrays................................................................................36l Adding VPLEX high availability to virtual pools...................................................... 38l Creating VPLEX virtual volumes............................................................................. 41l ViPR Controller naming conventions on VPLEX ...................................................... 42l Adding VPLEX to an existing VMAX/VNX/ViPR Controller environment................... 43l ViPR Controller in pre-provisioned data centers..................................................... 43l Provisioning to VPLEX -enabled stretched clusters.................................................43l Expansion of VPLEX virtual volumes...................................................................... 44l Creating back-end clones of VPLEX virtual volumes............................................... 44l VPLEX data mobility: change virtual array and change virtual pool.........................44
EMC ViPR Controller with VPLEX : Benefits and Examples 31

What is VPLEXVPLEX , with its GeoSynchrony operating system, addresses three primary IT needs:
l Data Mobility: Move data non-disruptively between EMC and third-party storagearrays without host downtime. VPLEX moves data transparently and the virtualvolumes retain the same identities and the same access points to the host. The hostdoes not need to be reconfigured. VPLEX moves applications and data betweendifferent storage installations:
n Within the same data center or across a campus (VPLEX Local)
n Within a geographical region (VPLEX Metro)
n Across even greater distances (VPLEX Geo)
l Availability: VPLEX creates high-availability storage infrastructure across these samevaried geographies with unmatched resiliency. Protect data in the event of disastersor failure of components in your data centers. With VPLEX , you can withstand failuresof storage arrays, cluster components, an entire site failure, or loss of communicationbetween sites (when two clusters are deployed)
l Collaboration: VPLEX provides efficient, real-time data collaboration over distance forBig Data applications. AccessAnywhere provides cache-consistent active-activeaccess to data across VPLEX clusters. Multiple users at different sites can work on thesame data while maintaining consistency of the dataset.
Supported VPLEX VersionsFor information on the VPLEX versions supported by ViPR Controller, refer to the EMC ViPRController Support Matrix.
Installation and integration: supported deployment modelsViPR Controller supports discovery and management of storage provided by VPLEX Localand VPLEX Metro configurations.
VPLEX Geo is not supported. The diagram below shows an example of a VPLEX Metroconfiguration across two data centers. Host 1 and host 2 can access volumes 1, 2, 3, and4 through the locally connected VPLEX . If the hosts are clustered (not shown in Figure 1)they can leverage a distributed virtual volume that spans sites 1 and 2. The environmentin Figure 1 can withstand multiple component failures and continue to operate without adisruption in service.
EMC ViPR Controller with VPLEX : Benefits and Examples
32 EMC ViPR Controller 2.4.0.0 ViPR Controller Integration with RecoverPoint and VPLEX User and Administration Guide

Figure 7 VPLEX Metro example
Discovering VPLEXTo use ViPR Controller with VPLEX you need to discover the back-end arrays, the VPLEXclusters, the hosts that you intend to provision storage to, and the attached fabrics.
For discovery and management activities, ViPR Controller uses the VPLEX ElementManager API. ViPR Controller treats VPLEX systems as a storage provider physical asset.ViPR Controller automatically rediscovers the VPLEX very 60 minutes by default.
To discover a VPLEX system, select Physical Assets > Storage Providers:
l Select VPLEX as the Type.
l Enter the FQDN or IP address of the VPLEX system's management server for the Host.
l Specify whether SSL is used.
l Enter the Port number for the API (443 by default)
l Enter credentials to access the system.
After saving this information, ViPR Controller automatically performs an initial discoveryof the VPLEX cluster(s).
To discover a VPLEX Metro configuration from ViPR Controller, you must discover one ofthe two VPLEX clusters.
EMC ViPR Controller with VPLEX : Benefits and Examples
Discovering VPLEX 33

It is possible to discover both management servers of the VPLEX system. Discoveringboth clusters enables ViPR Controller to continue to discover and manage the VPLEX inthe event that one of the management servers is unavailable.
For more information on ViPR Controller array discoveries, refer to the ViPR ControllerProduct Documentation Index .
Figure 8 Discovering a VPLEX storage provider
Create a VPLEX -based virtual arrayOnce ViPR Controller discovers the physical assets, the next step is to create virtualarrays and virtual pools. The virtual array you create should contain both the VPLEXcluster and the block arrays to which it is physically connected and zoned.
There must be one virtual array for each VPLEX cluster. By configuring the virtual array thisway, ViPR Controller knows where to get the back-end storage and which VPLEX cluster touse when block storage with VPLEX is requested. You should carefully plan and perform
EMC ViPR Controller with VPLEX : Benefits and Examples
34 EMC ViPR Controller 2.4.0.0 ViPR Controller Integration with RecoverPoint and VPLEX User and Administration Guide

this step because it is not possible to change the configuration once resources have beenprovisioned without first disruptively removing the provisioned volumes.
Figure 9 Edit Virtual Array
Local fabric virtual arraysThe easiest way to add the back-end storage and the VPLEX cluster to the virtual array isto select the appropriate fabric from the network selection dialog.
This approach applies when the VPLEX clusters and back-end storage are isolated onseparate local fabrics, as opposed to being stretched fabrics that cross sites. Once youselect networks, ViPR Controller identifies all of the storage systems on the fabric,including the VPLEX , and adds them to the virtual array.
EMC ViPR Controller with VPLEX : Benefits and Examples
Local fabric virtual arrays 35

Figure 10 Virtual array network list
Figure 11 Adding networks to virtual arrays
Stretched fabric virtual arraysWhen you create a virtual array, rather than choose a network, you can use an individualarray and VPLEX port selection. This more granular and configurable method allows youto select individual ports from the back-end array that have been specifically designatedfor use with VPLEX protected storage.
If a fabric across two sites contains both VPLEX clusters in a VPLEX Metro configuration,you must use the port selection method to add the VPLEX and backing arrays to thevirtual array.
You should add both the back-end and front-end ports from the VPLEX as well as portsfrom the appropriate back-end array to the virtual array. The same virtual array must notcontain ports from both VPLEX clusters. This limitation differentiates each cluster at eachsite and ensures the correct back-end storage array is used in conjunction with the VPLEXcluster in the same geographical location.
EMC ViPR Controller with VPLEX : Benefits and Examples
36 EMC ViPR Controller 2.4.0.0 ViPR Controller Integration with RecoverPoint and VPLEX User and Administration Guide

Figure 12 Storage Ports
You can confirm the two clusters in a VPLEX Metro configuration are in two differentvirtual arrays by looking at the physical array in ViPR Controller and reviewing the portsdisplayed as in Figure 6. For VPLEX systems with one engine, the ports that appear inViPR Controller in the group column that start with "director-1" are from the first VPLEXcluster and ones that start with "director-2" are from the second cluster. The followingfigure shows the Add Storage Ports dialog box.
Figure 13 Add Storage Ports
EMC ViPR Controller with VPLEX : Benefits and Examples
Stretched fabric virtual arrays 37

In the example VPLEX Metro configuration in Figure 1, you can create two virtual arrays forthe most flexibility. With one virtual array, you can only create local VPLEX virtualvolumes. When creating one virtual array per site, the first virtual array, vArray1 at site 1,would contain the following:l Back-end array ports from both arrays connected to the local VPLEX .l VPLEX back-end ports connected to local storage.l VPLEX front-end ports connected or capable of being connected to hosts using VPLEX
storage.
The second virtual array should contain similar components; however, all componentsmust be located at the second site (site 2 in the example), as shown in the Figure 8.
Figure 14 Physical assets in virtual arrays
Adding VPLEX high availability to virtual poolsVirtual pools for block storage offer two VPLEX high availability options: VPLEX Local andVPLEX Distributed.
When you specify local high availability for a virtual pool, the VPLEX storage provisioningservices create VPLEX local virtual volumes. If you specify VPLEX distributed highavailability for a virtual pool, the ViPR Controller storage provisioning services createVPLEX distributed virtual volumes. Because ViPR Controller understands the networkingbetween all the components, you could add both virtual arrays in Figure 8 to the samevirtual pool if desired. When creating a virtual pool with VPLEX local high availability:
1. Select the virtual array or arrays for which virtual pool will be used to create localvirtual volumes.
EMC ViPR Controller with VPLEX : Benefits and Examples
38 EMC ViPR Controller 2.4.0.0 ViPR Controller Integration with RecoverPoint and VPLEX User and Administration Guide

2. Specify the desired characteristics for the back-end storage volumes that ViPRController creates and that serve as the VPLEX local virtual volumes. Note that ifmultiple virtual arrays are selected, each virtual array must contain storage thatsatisfies the selected storage characteristics.
3. Select "VPLEX Local" for the Remote Protection/High Availability setting and save thevirtual pool. You now have a virtual pool you can use to provision VPLEX local virtualvolumes from the selected virtual arrays, where the back-end volumes will have thestorage characteristics specified in the virtual pool.
Figure 15 Adding virtual pool with VPLEX local availability
Figure 16 VPLEX local provisioning with a single virtual pool
To enable distributed high availability on block storage created from a virtual pool, select"VPLEX Distributed," select the virtual array and, optionally, select the virtual pool to useat the destination site. When the high availability virtual pool is not specified, thesettings in the current virtual pool are used for the back-end storage on the highavailability side. In that configuration, both virtual arrays from both sites must beselected for use by the virtual pool.
To create a virtual pool with VPLEX distributed high availability:
EMC ViPR Controller with VPLEX : Benefits and Examples
Adding VPLEX high availability to virtual pools 39

1. Select the virtual array or arrays for which the virtual pool will be used to create localvirtual volumes.
2. Specify the storage characteristics desired for the back-end storage volumes. Notethat if multiple virtual arrays are selected, each virtual array must contain storage thatsatisfies the selected storage characteristics.
3. Select "VPLEX Distributed" for the Remote Protection/High Availability setting andsave the virtual pool.
You can now use the virtual pool to provision VPLEX distributed virtual volumes from theselected virtual arrays, where the back-end volumes have the storage characteristicsspecified in the virtual pool.
If you use multiple virtual pools, create the remote virtual pool first, and then edit thesettings of the local virtual pool to specify a "Highly Available Virtual Array" and the"Highly Available Virtual Pool."
With the VPLEX Metro example, when provisioning from the "vPool-VPLEXDistributed"pool, ViPR Controller uses "vArray-Site1" as the primary virtual array and "vArray-Site2"and "vPool-VPLEXLocal" as the high availability virtual array and virtual pool, respectively,for storing the second copy of the distributed volume.
Figure 17 VPLEX Distributed provisioning
EMC ViPR Controller with VPLEX : Benefits and Examples
40 EMC ViPR Controller 2.4.0.0 ViPR Controller Integration with RecoverPoint and VPLEX User and Administration Guide

Creating VPLEX virtual volumesCreating and exporting virtual volumes is the basis for all solutions enabled by ViPRController and VPLEX .
The ability of ViPR Controller to manage VPLEX , the back-end block storage arrays, theSAN fabric, and the hosts/clusters allows you to create virtual volumes and export themusing the Block Storage Services > Create Block Volume for a Host service.
When provisioning orders are executed to a virtual array containing a VPLEX and virtualpool configured with VPLEX availability, ViPR Controller automatically performs thefollowing configuration tasks. These tasks allow the host to use the new storage withoutfurther manual intervention:
1. Creates a volume on the back-end storage array.
2. If necessary, creates all necessary masking constructs on the back-end arrays toexport the back-end volumes to the VPLEX .
3. If necessary, creates all required zoning constructs to establish the connectivitybetween the VPLEX and the back-end storage arrays to make the back-end volumesvisible to the VPLEX .
4. Discovers and claims the new volume on the VPLEX .
5. Creates a new VPLEX extent, local device, and virtual volume using the full capacity ofthe back-end array volume.
6. If necessary, registers the host's initiator on the VPLEX .
7. Performs masking and mapping to a host by adding the virtual volume to a storageview on the VPLEX using automated port selection.
8. If necessary, create zones from the VPLEX cluster to the host/cluster.
9. Rescan the host/cluster to pick up new host devices.
If you request distributed virtual volumes, numbers 1-5 are also performed on the remotesite's arrays and fabrics.
ViPR Controller intelligently executes these steps according to performance andredundancy best practices and its ability to monitor and understand available paths inthe environment. For instance, through its use of the EMC SMI Provider to discover theback-end array, ViPR Controller can monitor ports used as part of the port groups in themasking views. Automatic discoveries occur every hour and if one of those ports isoffline, ViPR Controller does not attempt to allocate storage through that unusable port.
For subsequent provisioning tasks, ViPR Controller can leverage its awareness of theproperties and topology of the environment and reuse constructs on all managedsystems. For example, ViPR Controller reuses storage groups, initiator groups, portgroups, masking views on the array and on VPLEX , and back-end and front-end zones.
EMC ViPR Controller with VPLEX : Benefits and Examples
Creating VPLEX virtual volumes 41

ViPR Controller naming conventions on VPLEXWhen you use ViPR Controller to create new virtual volumes on a VPLEX system, ViPRController uses the following naming patterns for the backing storage and the virtualizedconstructs within the VPLEX :
Table 1 VPLEX object naming patterns and examples
VPLEX Object Naming Pattern Example
Storage Volume ID-[Backend Array Serial #]-[Backend Volume #]
ID-APM00121202922-00493
Extent extent_ID-[Backend ArraySerial #]-[Backend Volume#]_1
extent_ID-APM00121202922-00493_1
Devices device_ID-[Backend ArraySerial #]-[Backend Volume #]
device_ID-APM00121202922-00493
Distributed Devices dd_[Storage Volume1]_[Storage Volume 2]
dd_ID-APM00121202922-00547_ID-APM00112900836-00524
Virtual Volume device_ID-[Backend ArraySerial #]-[Backend Volume#]_vol
device_ID-APM00121202922-00493_vol
Distributed VirtualVolume
dd_[Storage Volume1]_[Storage Volume 2]_vol
dd_ID-APM00121202922-00547_ID-APM00112900836-00524_vol
Storage View (V[vplex_cluster_number]_[cluster_name]_[host_name.FIRST(57)]_[vplex_cluster_serial_number.LAST(3)]).REPLACE("__", "_").
V1_ABCFirstCluster_ABCfirsthost1_418
Initiator Name REGISTERED_[PortWWN] REGISTERED_0x100000e07e000b62
Note
You can change the Storage View naming pattern using Physical Assets > ControllerConfigurations > VPLEX. See Customize the Names of Resources Created on Physical Systemson the ViPR Controller Product Documentation Index .
Additionally, the name you provide in ViPR Controller when placing an order is used as analias on the back-end VMAX or VNX array. This volume alias can be viewed using theappropriate CLI or element manager for the array.
When provisioning storage from the VPLEX to a host for the first time, ViPR Controller willperform the appropriate zoning, discover and then register the appropriate initiators. Theinitiators will first start with the "UNREGISTERED_" prefix and then be changed to startwith "REGISTERED_" when ViPR Controller is complete.
EMC ViPR Controller with VPLEX : Benefits and Examples
42 EMC ViPR Controller 2.4.0.0 ViPR Controller Integration with RecoverPoint and VPLEX User and Administration Guide

Adding VPLEX to an existing VMAX/VNX/ViPR Controllerenvironment
It is simple to add VPLEX systems to an environment managed by ViPR Controller.Creating new virtual arrays and new virtual pools is all that needs to be done afterdiscovery, the physical connectivity, and initial configuration (including provisioning ofthe meta-data and logging volumes) of the VPLEX is complete.
The new virtual arrays should contain the physical arrays that should be used as thebacking array for the virtual volumes and new virtual pools should be created with theVPLEX Local VPLEX or VPLEX Distributed VPLEX settings for remote protectionand availability.
When the first order for VPLEX -based storage is requested, ViPR Controller zones thespecified host using the minimum and maximum path settings from the specified virtualpool. For the zoning from back-end array to the VPLEX , ViPR Controller will follow VPLEXbest practices and ensure that every director must have at least two paths to all storage.Additionally, no director will be connected more than four paths to any storage. Havingmore than four paths causes issues with timeouts taking too long before switching toalternate directors which can cause connectivity loss.
For more information, see ViPR Controller Support for VPLEX-VMAX Multiple Masking Views.
Using ViPR Controller you can then easily convert existing non-exported volumes thatreside on VMAX or VNX arrays to VPLEX virtualized volumes using the Change Virtual Poolservice. See VPLEX data mobility: change virtual array and change virtual pool on page44
ViPR Controller in pre-provisioned data centersViPR Controller provides maximum benefit when it manages new storage from thebeginning of its service time. By having the new environment under ViPR Controllercontrol, ViPR Controller is aware of and can manage all the elements of your storage arraynetwork. In environments configured by other tools, ViPR Controller provides slightly lessfunctionality.
In established data centers, where ViPR Controller is used after a VPLEX and its back-endstorage have already been configured and used for some time, ViPR Controller is unableto manage any of the existing virtual volumes which have been exported to hosts.However, it is possible to ingest virtual volumes that have not been exported or have alocal mirror attached on the VPLEX . This operation can be done on a virtual volume withany backend array including 3rd party arrays that are not supported in ViPR Controller.
For more details on ingestion refer to ViPR Controller Ingest Services for ExistingEnvironments on the ViPR Controller Product Documentation Index .
When you exporting virtual volumes to a host or a RecoverPoint system, you can reuseexisting storage views. For a storage view to be reused, it must contain the samecombination of VPLEX front-end ports and initiator ports that ViPR Controller has selectedfor use in the export group.
Provisioning to VPLEX -enabled stretched clustersViPR Controller takes the work out of making system-wide (long distance) fault-tolerantvirtual storage available to hosts. It is able to do this through its support of VPLEX Metro
EMC ViPR Controller with VPLEX : Benefits and Examples
Adding VPLEX to an existing VMAX/VNX/ViPR Controller environment 43

HA configurations, even with complex configurations consisting of host clusters whichare cross-connected to fabrics across sites.
For instance, configurations using VMware vSphere software, VPLEX , and cross-connected fabrics can tolerate physical host, VPLEX cluster, inter-cluster link, storagearray, and VPLEX witness failures with only the physical host failure requiring anydowntime as the VMware HA software automatically restarts the affected VMs.
For more information on these configurations, see VIPR 2.1 - EMC VIPR Support ForStretched Host Clusters.
Expansion of VPLEX virtual volumesYou can expand existing virtual volumes through the Expand Block Volume service in theViPR Controller user interface.
This service increases the size of the back end array volume through creation orexpansion of a meta-volume, rediscovers the array from the VPLEX side, and thenexecutes an expand-virtual volumes command on the VPLEX to increase the size of thevirtual volume to the new size of the back end array volume.
For more information on the Expand Block Volume see ViPR Controller Integration withVMAX and VNX Storage Systems Guide on the ViPR Controller Product DocumentationIndex .
Creating back-end clones of VPLEX virtual volumesTo achieve even more protection or enable access to other uses of the information storedon the back-end array volume, ViPR Controller can create a full clone of that volume. Theclone can be used for backup and restore purposes or to enable business continuityoperations such as end-of-month reporting.
This advanced configuration is available through theBlock Protection Services > CreateFull Copy service in the Service Catalog. When executing this service you can simplyselect the virtual volume for which a clone is required, a base name for the new clones,and the number of clones required. ViPR Controller handles the rest. Using this servicedoesn't require the end-user to understand the relationship from the virtual volume to theback-end array volume. ViPR Controller traverses this relationship and creates the back-end clone without any additional user input. The resulting clone can then be exported toa host if necessary. Although not available now, a future version of ViPR Controller willallow users to create snapshots of back-end volumes.
VPLEX data mobility: change virtual array and change virtual poolSeveral of the more advanced services available with VPLEX and ViPR Controller areVPLEX Data Migration, Change Volume Virtual Pool, Change VirtualPool, and Change Virtual Array.
These services allow for the migration of virtual volumes within clusters and acrossclusters using the device migration functionality available on the VPLEX .
The VPLEX Data Migration service allows you to:
l Moves VPLEX virtual volumes from one VPLEX cluster to another.
l Change from VPLEX local to VPLEX distributed.
The Change Volume Virtual Pool service works on a single volume and enables you to:
EMC ViPR Controller with VPLEX : Benefits and Examples
44 EMC ViPR Controller 2.4.0.0 ViPR Controller Integration with RecoverPoint and VPLEX User and Administration Guide

l Change virtual pool to create a new VPLEX virtual volume
l Change the VPLEX virtual volume remote protection
Note
If adding RecoverPoint protection, then all volumes in a consistency group are movedto the new virtual pool.
l Change the backend storage volume for a VPLEX virtual volume
l Change from VPLEX local to VPLEX distributed.
The Change Virtual Pool service operates on all volumes in a virtual pool and allows youto:
l Change virtual pool to create a new VPLEX virtual volume
l Change the VPLEX virtual volume remote protection
l Change the backend storage volume for a VPLEX virtual volume
The Change Virtual Array services enables you to:
l Move a VPLEX virtual volume from one VPLEX cluster to another.
l Reassign the VPLEX virtual volume's ViPR Controller virtual array to a different virtualarray.
l Change the back end physical storage volume on which VPLEX virtual volume isbased to another physical storage volume assigned to the new virtual array.
l Move the data on the original physical storage volume to the new storage volume.
See the following for more information:
Data Mobility: Change the ViPR Controller Virtual Pool in a VPLEX Environment on page55
Data Mobility: Change the ViPR Controller Virtual Array in a VPLEX Environment on page47
EMC ViPR Controller with VPLEX : Benefits and Examples
VPLEX data mobility: change virtual array and change virtual pool 45

EMC ViPR Controller with VPLEX : Benefits and Examples
46 EMC ViPR Controller 2.4.0.0 ViPR Controller Integration with RecoverPoint and VPLEX User and Administration Guide

CHAPTER 3
Data Mobility: Change the ViPR Controller VirtualArray in a VPLEX Environment
This chapter contains the following topics:
l About the Change Virtual Array service.................................................................. 48l Use ViPR Controller to change the virtual array used in a VPLEX configuration........49l Understand how changing the ViPR Controller virtual array changes the VPLEX
environment .........................................................................................................49l Supported VPLEX Versions.................................................................................... 53
Data Mobility: Change the ViPR Controller Virtual Array in a VPLEX Environment 47

About the Change Virtual Array serviceViPR Controller includes several features that allow data center administrators to tightlycontrol data mobility in a VPLEX environment. This article describes the Change VirtualArray service in the ViPR Controller service catalog. This service allows you to manageboth the location of the VPLEX virtual volume and the underlying physical storage.
The Change Virtual Array service allows you to perform the following operations:
l Move a VPLEX virtual volume from one VPLEX cluster to another.
l Reassign the VPLEX virtual volume's ViPR Controller virtual array to a different virtualarray.
l Change the back end physical storage volume on which VPLEX virtual volume isbased to another physical storage volume assigned to the new virtual array.
l Move the data on the original physical storage volume to the new storage volume.
Change Virtual Array: Notes on consistency groupsViPR Controller support for application consistent groups.
When you use Change Virtual Array to change the physical backing storage for a VPLEXLocal virtual volume, you must change the backing storage for all VPLEX virtual volumesthat belong to the same VPLEX consistency group as the target volume.
Before you run the Change Virtual Array service, note the following:
l Virtual array changes are only allowed for uningested, unexported, local VPLEXvolumes that have connectivity to the target virtual array.
l If you are migrating volumes that share a VPLEX consistency group created with ViPRController to another virtual array, the matched or assigned storage pools in thevirtual pool of the target virtual array must be on the same physical storage system.
l If the user selects a volume in a consistency group, all volumes in the consistencygroup, and only the volumes in the consistency group must be selected. Otherwise,none of the selected volumes can be in a consistency group.
l For virtual array changes, the virtual pool for the volume does not change. The virtualpool for the volume must be valid for both the source and the target virtual array.
Setting the type of transfer speed for VPLEX data migrationYou can set the type of transfer speed to be used when executing the VPLEX DataMigration operation in the VPLEX Data Migration, Change Volume Virtual Pool, andChange Virtual Pool services. This transfer speed also applies to the Change Virtual Arrayservice.
Procedure
1. Navigate to Physical Assets > Controller Config.
2. Select the VPLEX tab.
3. Select Data Migration Speed in the drop-down list.
4. Click Add
5. Select the Scope Type.
6. Select the Scope Value.
7. Type the Value of your required data migration speed.
Data Mobility: Change the ViPR Controller Virtual Array in a VPLEX Environment
48 EMC ViPR Controller 2.4.0.0 ViPR Controller Integration with RecoverPoint and VPLEX User and Administration Guide

Option Description
Lowest Mapping transfer size is 128 KB.
Note
Less impact on the host I/O but data migration takes longer to complete.
Low Mapping transfer size is 2 MB.
Medium Mapping transfer size is 8 MB.
High Mapping transfer size is 16 MB.
Highest Mapping transfer size is 32 MB.
Note
Data migration completes more quickly, but there is a greater impact onhost I/O.
Use ViPR Controller to change the virtual array used in a VPLEXconfiguration
The ViPR Controller Change Virtual Array service is designed to change the virtual arrayused in a VPLEX environment.
Before you begin
l This operation requires the System Administrator role in ViPR Controller.l This service is only supported on VPLEX local virtual volumes that have not been
exported to a host.l The new block storage volume is created from the same virtual pool as the original
block storage volume. Therefore the new virtual array being chosen must beconfigured with the same virtual pool as the original virtual array that was used forthe VPLEX virtual volume.
l A maximum of 25 volumes at a time can be moved from one virtual array into another.However, if the volumes are in a consistency group, there is no maximum volumelimitation when moving volumes into a different virtual array.
Procedure
1. From the Service Catalog, run Block Storage Services > Change Virtual Array.
2. Select the project to which the volume belongs.
3. Select the volume or volumes to move. If you are moving a volume in a VPLEXconsistency group, choose all the volumes in the VPLEX consistency group.
4. Select the virtual array to which the volumes will be moved.
5. Click Order.
Understand how changing the ViPR Controller virtual arraychanges the VPLEX environment
In a VPLEX configuration, each VPLEX cluster exists on a different virtual array. When anew virtual array is selected for a VPLEX local virtual volume, the local virtual volume is
Data Mobility: Change the ViPR Controller Virtual Array in a VPLEX Environment
Use ViPR Controller to change the virtual array used in a VPLEX configuration 49

moved from the cluster on the original virtual array to the cluster on the selected virtualarray, and a new back end storage volume is created on the selected virtual array for thevirtual volume.
In the following image:
l The VPLEX is configured with Cluster 1 on Virtual Array A, and Cluster 2 on VirtualArray Z.
l The back end storage for VPLEX Virtual Volume A, on Cluster 1 is configured fromVMAX A.2, which is part of Virtual Array A.
Figure 18 Initial setup with Virtual Array A
In the next image the virtual array for VPLEX Virtual Volume A is changed to Virtual ArrayZ.
Data Mobility: Change the ViPR Controller Virtual Array in a VPLEX Environment
50 EMC ViPR Controller 2.4.0.0 ViPR Controller Integration with RecoverPoint and VPLEX User and Administration Guide
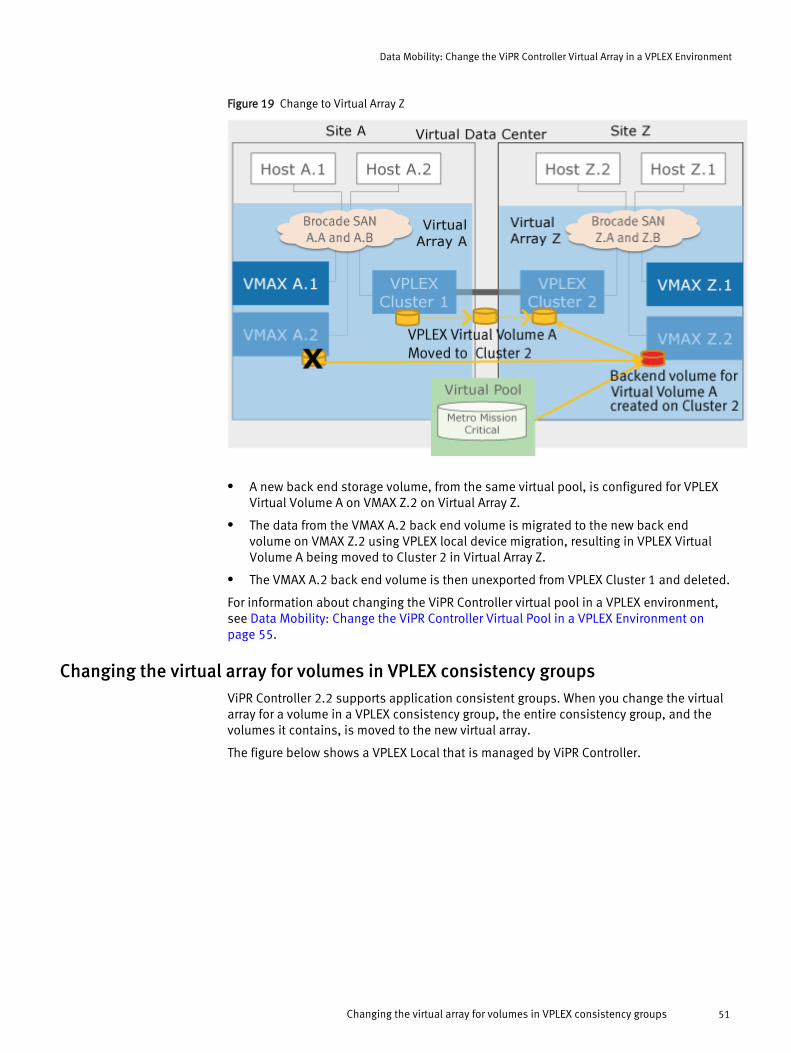
Figure 19 Change to Virtual Array Z
l A new back end storage volume, from the same virtual pool, is configured for VPLEXVirtual Volume A on VMAX Z.2 on Virtual Array Z.
l The data from the VMAX A.2 back end volume is migrated to the new back endvolume on VMAX Z.2 using VPLEX local device migration, resulting in VPLEX VirtualVolume A being moved to Cluster 2 in Virtual Array Z.
l The VMAX A.2 back end volume is then unexported from VPLEX Cluster 1 and deleted.
For information about changing the ViPR Controller virtual pool in a VPLEX environment,see Data Mobility: Change the ViPR Controller Virtual Pool in a VPLEX Environment onpage 55.
Changing the virtual array for volumes in VPLEX consistency groupsViPR Controller 2.2 supports application consistent groups. When you change the virtualarray for a volume in a VPLEX consistency group, the entire consistency group, and thevolumes it contains, is moved to the new virtual array.
The figure below shows a VPLEX Local that is managed by ViPR Controller.
Data Mobility: Change the ViPR Controller Virtual Array in a VPLEX Environment
Changing the virtual array for volumes in VPLEX consistency groups 51

Figure 20 Before Change Virtual Array
In this figure:
l The VPLEX Local has three virtual volumes. The volumes are in a ViPR Controller 2.2consistency group.
l On the VPLEX , the three virtual volumes are in a VPLEX consistency group.
l The three virtual volumes have backing storage on VMAX1. The three physicalvolumes on VMAX1 are in a VMAX consistency group,
Suppose you change the virtual array to one that includes VMAX2 as the backing storage.All three of the physical storage volumes are moved to the new physical array. Thefollowing figure shows the result of a successful execution of the Change Virtual Arrayservice.
Data Mobility: Change the ViPR Controller Virtual Array in a VPLEX Environment
52 EMC ViPR Controller 2.4.0.0 ViPR Controller Integration with RecoverPoint and VPLEX User and Administration Guide

Figure 21 After Change Virtual Array
The following changes result from the service execution:
l The volumes have been moved to the Springfield virtual array.
l The backing storage volumes have been deleted from VMAX1.
l The volumes have been removed from the VMAX1 consistency group, and the VMAX1consistency group has been deleted.
l The volumes are moved to VMAX2.
l A new consistency group is built on VMAX2. The three volumes are added to it.
Supported VPLEX VersionsFor information on the VPLEX versions supported by ViPR Controller, refer to the EMC ViPRController Support Matrix.
Data Mobility: Change the ViPR Controller Virtual Array in a VPLEX Environment
Supported VPLEX Versions 53

Data Mobility: Change the ViPR Controller Virtual Array in a VPLEX Environment
54 EMC ViPR Controller 2.4.0.0 ViPR Controller Integration with RecoverPoint and VPLEX User and Administration Guide

CHAPTER 4
Data Mobility: Change the ViPR Controller VirtualPool in a VPLEX Environment
This chapter contains the following topics:
l About the Change Virtual Pool service................................................................... 56l How to change the ViPR Controller virtual pool used in a VPLEX environment.........56l Setting the type of transfer speed for VPLEX data migration................................... 56l Use cases for changing the ViPR Controller virtual pool in a VPLEX environment.... 57
Data Mobility: Change the ViPR Controller Virtual Pool in a VPLEX Environment 55

About the Change Virtual Pool serviceThe ViPR Controller service catalog includes a Change Virtual Pool service that allows youto fine tune your management of VPLEX virtual volumes in your data center. The ChangeVirtual Pool service allows data center administrators granular control of their datamobility requirements, including control of back end storage location and dataprotection.
The Change Virtual Pools service is used perform these operations:
l Change virtual pool to create a new VPLEX virtual volume on page 57
l Change the VPLEX virtual volume remote protection on page 59
l Change the backend storage volume for a VPLEX virtual volume on page 60
How to change the ViPR Controller virtual pool used in a VPLEXenvironment
The Change Virtual Pools service is located in the ViPR Controller service catalog.
Before you begin
This operation requires the System Administrator role in ViPR Controller.
A maximum of 25 volumes at a time can be moved from one virtual pool into another.However, if the volumes are in a consistency group, there is no maximum volumelimitation when moving volumes into a different virtual pool.
Procedure
1. Select Service Catalog> Block Storage Services > Change Virtual Pool.
2. Select the project to which the volume belongs.
3. Select the current virtual pool.
4. Select the operation.
Note
When using VPLEX Data Migration, you can set the speed of the data migration.
See Setting the type of transfer speed for VPLEX data migration on page 48.
5. Select the target virtual pool.
6. If adding RecoverPoint protection, select the consistency group.
7. Select how you want to filter the volumes. The filter retrieves the volumes, sorts themalphabetically, and lists them.
8. Select the volumes.
9. Select Order.
Setting the type of transfer speed for VPLEX data migrationYou can set the type of transfer speed to be used when executing the VPLEX DataMigration operation in the VPLEX Data Migration, Change Volume Virtual Pool, and
Data Mobility: Change the ViPR Controller Virtual Pool in a VPLEX Environment
56 EMC ViPR Controller 2.4.0.0 ViPR Controller Integration with RecoverPoint and VPLEX User and Administration Guide

Change Virtual Pool services. This transfer speed also applies to the Change Virtual Arrayservice.
Procedure
1. Navigate to Physical Assets > Controller Config.
2. Select the VPLEX tab.
3. Select Data Migration Speed in the drop-down list.
4. Click Add
5. Select the Scope Type.
6. Select the Scope Value.
7. Type the Value of your required data migration speed.
Option Description
Lowest Mapping transfer size is 128 KB.
Note
Less impact on the host I/O but data migration takes longer to complete.
Low Mapping transfer size is 2 MB.
Medium Mapping transfer size is 8 MB.
High Mapping transfer size is 16 MB.
Highest Mapping transfer size is 32 MB.
Note
Data migration completes more quickly, but there is a greater impact onhost I/O.
Use cases for changing the ViPR Controller virtual pool in a VPLEXenvironment
The Change Virtual Pool service supports three different functions for VPLEX . This sectiondescribes those use cases.
Change virtual pool to create a new VPLEX virtual volumeUse the Change Virtual Pool service to import a block storage volume from ViPR Controllerto create a new VPLEX virtual volume.
If creating a VPLEX local virtual volume, an existing block storage volume, which isselected during the virtual pool change operation, is used for the backend storage usedto create the VPLEX local virtual volume. In the following figure:
Data Mobility: Change the ViPR Controller Virtual Pool in a VPLEX Environment
Use cases for changing the ViPR Controller virtual pool in a VPLEX environment 57

Figure 22 Storage volume B virtual pool initial setup
l Storage volume B is on VMAX B array and part of Testing virtual pool.l Metro mission critical virtual pool is associated with VPLEX A.l Storage volume B, and VPLEX A, have no association.
The virtual pool for Storage volume B, is changed to Metro Mission Critical, which is astorage pool configured for VPLEX , as demonstrated in the next figure:Figure 23 Change virtual pool for Storage volume B
l Storage volume B is then moved to the Metro Mission Critical virtual pool, which isassociated to VPLEX A.
l VPLEX local virtual volume B is then created from the backend Storage volume B.
If creating a VPLEX distributed virtual volume from block storage, the VPLEX local virtualvolume is created from the selected virtual pool. Then a new HA backend storage volume
Data Mobility: Change the ViPR Controller Virtual Pool in a VPLEX Environment
58 EMC ViPR Controller 2.4.0.0 ViPR Controller Integration with RecoverPoint and VPLEX User and Administration Guide

is created, and attached as a mirror to the VPLEX local virtual volume and the distributedVPLEX volume is created. The data from the backend storage for the VPLEX local virtualvolume is then copied to the HA backend volume to ensure the two storage volumes aresynchronized.
In the following figure, VPLEX virtual volume B is distributed, Backend volume Z is createdin Virtual Array Z, and attached as a mirror to VPLEX virtual volume B:Figure 24 Change virtual pool for Storage volume B in a distributed environment
Change the VPLEX virtual volume remote protectionUse the Change Virtual Pools service to change the remote protection of a VPLEX virtualvolume from local to distributed.
When the Virtual Pool in a VPLEX environment is changed from local to remote, a new HAbackend storage volume is created, and attached as a mirror to the VPLEX local virtualvolume. The data from the backend storage for the VPLEX local virtual volume is thencopied to the HA backend volume to ensure the two storage volumes are synchronized.
In the initial setup, VPLEX (local) virtual volume A is associated with Local Mission Criticalvirtual pool. Its backend storage is volume A on VMAX array A.1 as demonstrated in thefollowing figure.
Data Mobility: Change the ViPR Controller Virtual Pool in a VPLEX Environment
Use cases for changing the ViPR Controller virtual pool in a VPLEX environment 59
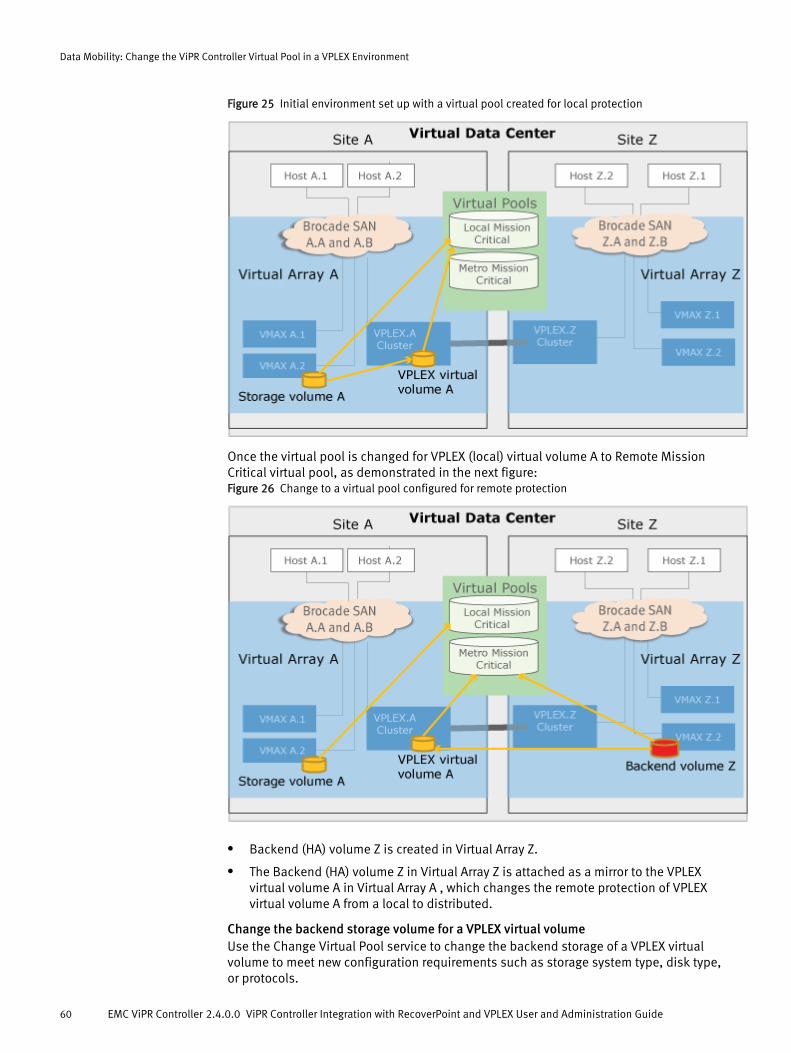
Figure 25 Initial environment set up with a virtual pool created for local protection
Once the virtual pool is changed for VPLEX (local) virtual volume A to Remote MissionCritical virtual pool, as demonstrated in the next figure:Figure 26 Change to a virtual pool configured for remote protection
l Backend (HA) volume Z is created in Virtual Array Z.
l The Backend (HA) volume Z in Virtual Array Z is attached as a mirror to the VPLEXvirtual volume A in Virtual Array A , which changes the remote protection of VPLEXvirtual volume A from a local to distributed.
Change the backend storage volume for a VPLEX virtual volumeUse the Change Virtual Pool service to change the backend storage of a VPLEX virtualvolume to meet new configuration requirements such as storage system type, disk type,or protocols.
Data Mobility: Change the ViPR Controller Virtual Pool in a VPLEX Environment
60 EMC ViPR Controller 2.4.0.0 ViPR Controller Integration with RecoverPoint and VPLEX User and Administration Guide

In the following figure, VPLEX virtual volume A is associated with the VMAX virtual pool.The backend storage for VPLEX virtual volume A is Storage volume A on VMAX A array.Figure 27 Initiall setup with VMAX virtual pool
When the virtual pool is changed to the VNX virtual pool, as demonstrated in thefollowing figure:Figure 28 Change to VNX virtual pool
l Backend Storage volume B is created on VNX A, and associated with VPLEX virtualvolume A.
l Storage volume A on VMAX A is deleted.
Data Mobility: Change the ViPR Controller Virtual Pool in a VPLEX Environment
Use cases for changing the ViPR Controller virtual pool in a VPLEX environment 61

Change the back end storage for a VPLEX virtual volume in a consistency groupYou can use the Change Virtual Pool service operation VPLEX Data Migration to move thebacking storage for a VPLEX virtual volume from one physical array to another.
If the virtual volume you are moving is in a VPLEX consistency group:
l All VPLEX volumes in the consistency group must be selected for the virtual poolchange.
l Only the volumes in the consistency group can be selected for the virtual poolchange. Do not select other volumes.
l The storage pools in the target virtual pool, whether matched or manually assigned,must reside on a single storage system thereby ensuring the back end volumes willbe placed on the same storage array, and as such, can be created in the same backend consistency group. For distributed volumes, the High Availability virtual pool inthe target virtual pool has this same restriction.
l The target virtual pool must specify multi-volume consistency.
Data Mobility: Change the ViPR Controller Virtual Pool in a VPLEX Environment
62 EMC ViPR Controller 2.4.0.0 ViPR Controller Integration with RecoverPoint and VPLEX User and Administration Guide
CHAPTER 5
Export a VPLEX Local Virtual Volume to a Host orCluster
This chapter contains the following topics:
l Export a VPLEX local volume to a host or cluster.................................................... 64l Datacenter requirements.......................................................................................64l Discoveries........................................................................................................... 65l Run Block Storage Services > Create Block Volume................................................ 65l Block Protection Services > Export VPLEX Volume...................................................68l Block Storage Services > Create Block Volume for a Host....................................... 69l Block Storage Services > Remove Block Volume.....................................................70l Worldwide Names on VPLEX Volumes Provisioned through ViPR Controller............70l Supported VPLEX Versions.................................................................................... 71
Export a VPLEX Local Virtual Volume to a Host or Cluster 63

Export a VPLEX local volume to a host or clusterViPR Controller includes several services in the service catalog that build and exportvolumes in a VPLEX Local environment.
To run these services successfully, your datacenter must meet certain physicalconfiguration requirements, and elements in your datacenter must be registered anddiscovered by ViPR Controller.
The three services that allow you to build and manage VPLEX Local virtual volumes are:
l Block Storage Services > Create Block Volume on page 65
l Block Protection Services > Export VPLEX Volume on page 68
l Block Storage Services > Create Block Volume For a Host on page 69
This chapter also describes the Block Storage Services > Remove Block Volumes on page70 service. This service removes a VPLEX virtual volume and its underlying back endstorage.
Datacenter requirementsThe following figure shows a simple datacenter configuration supported by ViPRController. This configuration includes a VPLEX Local configuration with a VMAX and aVNX as the physical storage arrays.
After creating a volume and exporting it, Host 1 can access storage presented by VPLEXLocal C1. The data center requirements are as follows:
l There must be physical connectivity between all the relevant components in yourdatacenter.
Export a VPLEX Local Virtual Volume to a Host or Cluster
64 EMC ViPR Controller 2.4.0.0 ViPR Controller Integration with RecoverPoint and VPLEX User and Administration Guide

l The VPLEX Virtual volume can exist on ViPR Controller-managed block storage such asa VNX or VMAX array.
l The VPLEX virtual volume can also be backed by a third-party block storage array notmanaged by ViPR Controller. The virtual volume built on this storage can be ingestedand exported to Host 1.
l The networks added to the virtual array must contain all the endpoints necessary toprovision the backend array volumes to the VPLEX , and provision the virtual volumesfrom the VPLEX to a host.
DiscoveriesFrom ViPR Controller, you must discover all of the following to export a VPLEX Local virtualvolume to a host.
l The hosts (or cluster) you want to access storage.
l The VPLEX that will contain the virtual volume.
l The block storage arrays on the VPLEX is using.
l Any Brocade or Cisco switches required to connect the host to the VPLEX .
l Any Brocade or Cisco switches required to connect the physical storage to the VPLEX .
Note that the entire route from the host to the physical storage must be discovered byViPR Controller before you can successfully run the VPLEX -related services.
Run Block Storage Services > Create Block VolumeIn an environment that includes a VPLEX Local configuration, Create Block Volumecreates both the physical storage device on the back end array and the VPLEX virtualvolume. This service does not export the volume to the host.
Before you begin
To run this service, your environment must meet all of the following requirements.
l You must log in to ViPR Controller as a tenant administrator, or as a user with accessto the project that contains the volume you want to export.
l Your physical datacenter must meet all of the requirements described in the section Datacenter Requirements on page 64.
l From ViPR Controller, you must discover the physical infrastructure listed in thesection entitled Discoveries on page 65.
Procedure
1. Create a ViPR Controller project.
See Create a ViPR Controller Project on page 13 .
2. Build a virtual array.
See Create a Virtual Array on page 66 .
3. Add networks to the virtual array to enable physical connectivity between all thedatacenter hardware - the host, the switches, the VPLEX and the backend storage.Alternatively, you could add network ports that enable the physical connectivity to anexisting virtual array.
See Add Networks to the Virtual Array on page 66
4. Create the virtual pool from which you will provision the volume. During this step, youchoose virtual arrays to assign to the virtual pool. The virtual pool should have High
Export a VPLEX Local Virtual Volume to a Host or Cluster
Discoveries 65

Availability equal to VPLEX Local, and it should display one or more physical poolswhen you configure it.
See Create a Virtual pool for your virtual array on page 67
5. Run Block Storage Services > Create Block Volume from the service catalog.
See Create a VPLEX Local Block Volume on page 68
Create a Virtual ArrayFrom the user interface, create a virtual array as follows:
Procedure
1. Complete the discoveries described in the section entitled Discoveries on page 65above
2. From the Administrator Mode, select Virtual Assets > Virtual Array.
3. Give the virtual array a name.
4. Select either Automatic or manual SAN Zoning. This example uses automatic SANzoning.
5. Click Save. The new virtual array is added to the list of virtual arrays.
Add Networks to the Virtual ArrayFrom the user interface, add networks to your virtual array as follows:
Procedure
1. Choose Virtual Assets > Virtual Arrays to display the list of virtual arrays.
2. Click the name of the virtual array you created in Create a Virtual Array on page 66.The Edit Virtual Array configuration screen appears.
3. Click Networks. The Networks screen appears.
4. Click Add. The Add Network dialog appears with a list of fabrics.
5. Click the check boxes next to the fabrics you want to add to your virtual array. Thenetworks you add must give you access to the VPLEX and the physical storage arrays.In the following figure, the four fabrics added to the virtual array provide connectivityto the VPLEX and two physical block storage arrays - a VMAX and a VNX.
6. Click Add.
7. Click Edit Virtual Array in the breadcrumb at the top of the screen to navigate back tothe Edit Virtual Array screen. The VPLEX and the physical storage systems shoulddisplay in the Storage Systems list.
Export a VPLEX Local Virtual Volume to a Host or Cluster
66 EMC ViPR Controller 2.4.0.0 ViPR Controller Integration with RecoverPoint and VPLEX User and Administration Guide

Create a Virtual pool for your virtual arrayCreate a virtual pool for your virtual array as follows:
Procedure
1. Choose Virtual Assets > Block Virtual Pools. The Create Virtual Pool screen appears.
2. Enter a string name for the virtual pool.
3. Enter a string describing the virtual pool. This could include any site-specificinformation about the purpose of the pool.
4. Choose the virtual array that includes your physical arrays and your VPLEX.
5. Expand High Availability section and choose VPLEX Local from the options list.
6. Be sure that the number of physical pools meeting your criteria is greater than 0.
7. Click Save.
When you edit the virtual array you built in step 2. The virtual pool should appear in thelist of virtual pools at the bottom of the screen.
Export a VPLEX Local Virtual Volume to a Host or Cluster
Create a Virtual pool for your virtual array 67

Create a VPLEX Local Block VolumeFrom User Mode, create a VPLEX Local block volume as follows:
Procedure
1. Choose User Mode.
2. Run Block Storage Services > Create Block Volume from the service catalog.
3. Choose a virtual array that contains the VPLEX and the physical arrays.
4. Choose the virtual pool that includes the VPLEX Local High Availability setting.
5. Choose the project you built.
6. Give a string description to the block volume.
7. You may optionally specify a ViPR Controller consistency group. It is not required forexporting a VPLEX Local volume to a host.
8. Set the number of volumes to 1 or more.
9. Set the volume size in gigabytes.
10.Click Order.
This service creates both the storage device on the physical storage and the VPLEX virtualvolume as well. You can only run the Export VPLEX Volume service against a volumecreated as part of a virtual pool that includes VPLEX Local High Availability or VPLEXMetro High Availability. You cannot run the Export VPLEX Volume service against a non-VPLEX volume.
Block Protection Services > Export VPLEX VolumeTo run this service, your environment must meet all of the following requirements.
Before you begin
l You must log in to ViPR Controller as a tenant administrator, or as a user with accessto the project that contains the volume you want to export.
l Your Physical Datacenter must meet all of the requirements described in the sectionDatacenter Requirements.
l From ViPR Controller, you must discover the physical infrastructure listed in thesection entitled Discoveries.
l You must have a VPLEX virtual volume to export to a host. The section entitled BlockStorage Services > Create Block Volume on page 65 describes how to build thevolume.
Procedure
1. Select User Mode > Service Catalog > Block Storage Services > Export Volume to a Host.
2. Choose Shared or Exclusive. Shared will export the volume to every host in acluster. Exclusive exports the volume to a single host.
3. Select the Project to which the volume belongs.
4. Select the Host or cluster to which the volume will be exported.
5. Select a virtual array.
Export a VPLEX Local Virtual Volume to a Host or Cluster
68 EMC ViPR Controller 2.4.0.0 ViPR Controller Integration with RecoverPoint and VPLEX User and Administration Guide

6. Select the VPLEX Volume to export.
7. Choose-1 for the default Host Logical Unit number (HLU).
8. Click Order.
The Orders page is displayed with the progress of the order.
Block Storage Services > Create Block Volume for a HostThe Create Block Volume for a Host service creates both the physical storage device onthe back end array and the VPLEX virtual volume. This service also exports the volume tothe host.
Before you begin
To run this service, your environment must meet all of the following requirements.
l You must log in to ViPR Controller as a tenant administrator, or as a user with accessto the project that contains the volume you want to export.
l Your physical datacenter must meet all of the requirements described in the section Datacenter Requirements on page 64.
l From ViPR Controller, you must discover the physical infrastructure listed in thesection entitled Discoveries on page 65.
Procedure
1. Create a ViPR Controller project.
See Create a ViPR Controller Project on page 13.
2. Build a virtual array.
See Create a Virtual Array on page 66 .
3. Add networks to the virtual array to enable physical connectivity between all thedatacenter hardware - the host, the switches, the VPLEX and the back end storage.
See Add Networks to the Virtual Array on page 66.
4. Create the virtual pool to which you will assign the volume, and add the virtual pool tothe virtual array. The virtual pool should have High Availability equal to VPLEX Local,and it should have one or more physical pools when you configure it.
See Create a virtual pool for your virtual array on page 67.
5. Run Block Storage Services > Create Block Volume for a Host from the service catalog.
See Create Block Volume for a Host on page 69
Create Block Volume for a HostFrom User Mode, create and export a VPLEX virtual volume as follows:
Procedure
1. Run Block Storage Services > Create Block Volume for Host from the service catalog.
2. Choose Shared or Exclusive. Shared will export the volume to every host in a cluster.Exclusive exports the volume to a single host.
3. Select a virtual array that contains the VPLEX and the physical arrays.
4. Choose the virtual pool that includes the VPLEX Local High Availability setting.
Export a VPLEX Local Virtual Volume to a Host or Cluster
Block Storage Services > Create Block Volume for a Host 69

5. Choose the project you built.
6. Give a string description to the block volume.
7. You may optionally specify a ViPR Controller consistency group. It is not required forexporting a VPLEX Local volume to a host.
8. Set the number of volumes to 1 or more.
9. Set the volume size in gigabytes.
10.Click Order.
Results
This service creates both the storage device on the physical storage and the VPLEX VirtualStorage as well. You can only run the Create Block Volume for a Host service against avolume created as part of a virtual pool that includes VPLEX Local high availability.
Block Storage Services > Remove Block VolumeYou can run the Remove Block Volume service to remove a VPLEX virtual volume builtwith the Create Block Volume or Create Block Volume for Host services.
To run the Remove Block Volume service:
1. Log in as a ViPR Controller tenant administrator.
2. From the User menu, choose Block Storage Services > Remove Block Volume.
3. Choose the project that contains the volume to remove.
4. Click the check box next to the volume to remove.
5. Choose one of the following Deletion Types:
Full l Deletes the Volume from ViPR Controller.
l Deletes the Virtual Volume from the VPLEX .
l Deletes all exports, snapshots, clones, and mirrors associatedwith the volume.
l Deletes the physical back end storage from the physical arrays,including removing the volume from consistency groups.
InventoryOnly
Deletes the volume from ViPR Controller. All VPLEX and physicalstorage objects are left intact.
6. Click Order.
Worldwide Names on VPLEX Volumes Provisioned through ViPRController
After VPLEX volumes are provisioned through ViPR Controller, those volumes are notimmediately assigned a worldwide name (WWN).
A WWN is only assigned to a VPLEX volume when it is exported.
To view the worldwide name of a volume, choose Resources > Volumes, then click thename of the volume in the list. The following figure shows an example of a volume listing.Notice that the WWN field is blank.
Export a VPLEX Local Virtual Volume to a Host or Cluster
70 EMC ViPR Controller 2.4.0.0 ViPR Controller Integration with RecoverPoint and VPLEX User and Administration Guide

For an unexported VPLEX Local or VPLEX Metro volume, the WWN field on this screen willbe blank as shown here.
Supported VPLEX VersionsFor information on the VPLEX versions supported by ViPR Controller, refer to the EMC ViPRController Support Matrix.
Export a VPLEX Local Virtual Volume to a Host or Cluster
Supported VPLEX Versions 71

Export a VPLEX Local Virtual Volume to a Host or Cluster
72 EMC ViPR Controller 2.4.0.0 ViPR Controller Integration with RecoverPoint and VPLEX User and Administration Guide

CHAPTER 6
Support for VPLEX volume snapshots
This chapter contains the following topics:
l ViPR Controller support for VPLEX volume snapshots.............................................74l Create a VPLEX Local Volume Snapshot using RecoverPoint Bookmarks................ 74l Create a VPLEX local array snapshot...................................................................... 82l Block Protection Services > Remove Block Snapshot..............................................85l Create and delete snapshots for volumes in consistency groups........................... 86
Support for VPLEX volume snapshots 73

ViPR Controller support for VPLEX volume snapshotsViPR Controller allows you to create snapshots on any VPLEX Local or VPLEX Metro virtualvolume whose back end storage allows snapshot creation. There are two types ofsnapshots supported by ViPR Controller for VPLEX virtual volumes: RecoverPointbookmarks and local volume snapshots.
Snapshots are point-in time copies of a volume. They can be created using native blockstorage, such as an EMC VNX or an EMC VMAX.
Create a VPLEX Local Volume Snapshot using RecoverPoint Bookmarks on page 74describes creating snapshots of a VPLEX local virtual volume with RecoverPointprotection whose back end storage resides on a ViPR Controller-managed block storagearray.
Create a VPLEX local array snapshot on page 82 describes how to create snapshotsusing the native array snapshot capabilities of the back end storage used by the VPLEX .
ViPR Controller includes the following services in the service catalog for managing VPLEXand RecoverPoint snapshots.l Block Protection Services > Create Block Snapshot for a Volume on page 76l Block Protection Services > Restore Block Snapshot to a Volume on page 82l Block Protection Services > Remove Block Snapshot on page 85
Consistency GroupsWhen you create a VPLEX virtual volume with RecoverPoint protection, you must create aViPR Controller consistency group. During service execution, ViPR Controller creates andmanages VPLEX and RecoverPoint consistency groups as needed for the specific service.
During provisioning, ViPR Controller uses the name of the consistency group you specifyto create a RecoverPoint consistency group with this name:
ViPR_<ViPR_CG_Name>
Additionally, ViPR Controller creates internal consistency groups as needed to supportprovisioning on VPLEX . These consistency groups are not visible from the ViPR ControllerUser Interface. However, they are visible though the VPLEX user interface.
When you delete the VPLEX volume, the consistency groups created on the RecoverPointand the VPLEX are deleted.
Create a VPLEX Local Volume Snapshot using RecoverPointBookmarks
ViPR Controller supports the creation of VPLEX Local volume snapshots based onRecoverPoint bookmarks.
This section describes how to create snapshots using RecoverPoint bookmarks. ViPRController also supports local volume snapshots. See Create a VPLEX local arraysnapshot on page 82.
Data center requirements for VPLEX local virtual volume snapshots withRecoverPoint bookmarks
ViPR Controller supports a number of data center configurations that include VPLEX ,RecoverPoint , and block storage arrays. The diagram that follows shows a simple data
Support for VPLEX volume snapshots
74 EMC ViPR Controller 2.4.0.0 ViPR Controller Integration with RecoverPoint and VPLEX User and Administration Guide

center setup with a VPLEX Local fronting a VMAX. RecoverPoint is configured to protectthe VPLEX virtual volume.
l There must be physical connectivity between all the relevant components in yourdatacenter.
l The VPLEX virtual volume can exist on ViPR Controller-managed block storage such asa VNX or VMAX array.
l The networks added to the virtual array must contain all the endpoints necessary toprovision the back end array volumes to the VPLEX, and provision the virtual volumesfrom the VPLEX to a host.
l RecoverPoint bookmarks are created on the RecoverPoint appliance.
l The RecoverPoint system should be configured and operational including theRecoverPoint splitter on the VPLEX
DiscoveriesFrom ViPR Controller, you must discover all of the following to create a snapshot of aVPLEX virtual volume.
l The hosts (or cluster) you want to access storage
l The VPLEX that will contain the virtual volume
l The block storage arrays used by the VPLEX for back end storage
Support for VPLEX volume snapshots
Discoveries 75
l Any Brocade or Cisco switches required to connect the host to the VPLEX
l Any Brocade or Cisco switches required to connect the physical storage to the VPLEX
l The RecoverPoint Appliance, This is required only for snapshots using RecoverPointbookmarks.
Note that the entire route from the host to the physical storage must be discovered byViPR Controller before you can successfully run the VPLEX -related services.
Create Block Volume Snapshot using RecoverPoint BookmarksIn an environment that includes a VPLEX Local configuration protected by RecoverPoint ,Create Block Volume Snapshot creates a point-in time copy of a VPLEX Local virtualvolume.
Before you begin
To run this service, your environment must meet all of the following requirements.
l You must log in to ViPR Controller as a tenant administrator, or as a user with accessto the project that contains the volume you want to export.
l Your physical datacenter must meet all of the requirements described in Data centerrequirements for VPLEX local virtual volume snapshots on page 74.
l From ViPR Controller, you must discover the physical infrastructure listed in thesection entitled Discoveries on page 75.
Procedure
1. Create a ViPR Controller project.
See Create a ViPR Controller Project on page 13.
2. Create a ViPR Controller consistency group.
See Create a consistency group on page 14.
3. Build a virtual array.
See Create a Virtual Array on page 77.
4. Add networks to the virtual array to enable physical connectivity between all thedatacenter hardware - the host, the switches, the VPLEX , the back end storage, andthe RecoverPoint appliance. Alternatively, you could add network ports that enablethe physical connectivity to an existing virtual array.
See Add Networks to the Virtual Array on page 77 and Add Ports on page 78.
5. Create the target virtual pool. This virtual pool should have High Availability equal toVPLEX Local, and it should display one or more physical pools when you configureit.
See Build the target virtual pool on page 79.
6. Create the source virtual pool. This virtual pool should have High Availability equal toVPLEX Local, and it should have the Protection System set to EMC RecoverPoint.
See Build the source virtual pool on page 80.
7. Run Block Storage Services > Create Block Volume from the service catalog. Thiscreates a VPLEX Virtual Volume.
Run the Create Block Volume service on page 81.
8. Run Block Protection Services > Create Block Volume Snapshot.
See Create a VPLEX Local Volume Snapshot on page 81.
Support for VPLEX volume snapshots
76 EMC ViPR Controller 2.4.0.0 ViPR Controller Integration with RecoverPoint and VPLEX User and Administration Guide

Create a Virtual ArrayFrom the user interface, create a virtual array as follows:
Procedure
1. Complete the discoveries described in Discoveries on page 75.
2. From the Administrator Mode, select Virtual Assets -> Virtual Array.
3. Give the virtual array a name.
4. Select either Automatic or manual SAN Zoning. This example uses automatic SANzoning.
5. Click Save. The new virtual array is added to the list of virtual arrays.
Add networks to the virtual arrayFrom the user interface, add networks or ports to your virtual array.
Procedure
1. From Admin mode, choose Virtual Assets > Virtual Arrays and click the virtual arrayyou created in Create a Virtual Array on page 77. The Edit Virtual Array configurationscreen appears.
Support for VPLEX volume snapshots
Create Block Volume Snapshot using RecoverPoint Bookmarks 77

2. Use the links and buttons in the Block and File Storage box to build a list of ports foryour virtual array. In this example, you want to enable connectivity between the VPLEXand the physical storage array where your physical storage device will reside.
The ports added must connect the VPLEX to the physical storage array.
3. Click Edit Virtual Array in the breadcrumb at the top of the screen to navigate back tothe Edit Virtual Array screen. The VPLEX and the physical storage systems shoulddisplay in the Storage Systems list.
Add Ports
Another way to enable connectivity in your virtual array is to add ports. Adding specificports to your virtual array gives you a level of granular control over which ports you use tocommunicate with specific resources in your data center. For example, you may set asidecertain ports on your VMAX for communication with VPLEX.
Before you begin
Complete the discoveries listed in the section Required Discoveries on page 75 beforeadding ports to your virtual array.
Support for VPLEX volume snapshots
78 EMC ViPR Controller 2.4.0.0 ViPR Controller Integration with RecoverPoint and VPLEX User and Administration Guide

Procedure
1. From Admin mode, choose Virtual Assets > Virtual Arrays and edit the virtual array youcreated in Create a Virtual Array on page 77. The Edit Virtual Array configurationscreen appears.
2. Click the name of the virtual array you created in Create a Virtual Array on page 77.The Edit Virtual Array configuration screen appears.
3. Click Ports. The Storage Ports screen appears.
4. Click Add. The Add Storage Ports dialog appears.
5. Use the Search field to enter a string that filters the ports list. For example, if you enterfa-2 in the Search field, the Storage Ports list will display only the ports on arrayswhose names matches that string.
6. Click the check boxes next to the ports you want to add to the virtual array.
7. Click Add. The storage ports you selected are added to the virtual array.
Build the target virtual poolYou must create a source and target virtual pool for your RecoverPoint setup. The targetvirtual pool is required for your source virtual pool. Therefore, the target virtual pool getsbuilt first.
Before you begin
All discoveries must be completed, as described in the section entitled Discoveries onpage 75.
The virtual array must be properly configured.
Support for VPLEX volume snapshots
Create Block Volume Snapshot using RecoverPoint Bookmarks 79

Procedure
1. Choose Virtual Assets > Block Virtual Pools.
2. Click Add. The Create Block Virtual Pool screen appears.
3. Enter a string name for the virtual pool.
4. Enter a string describing the virtual pool. This could include any site-specificinformation about the purpose of the pool.
5. Choose the virtual array that you built in Create a Virtual Array on page 77.
6. In the High Availability panel, set the High Availability field to VPLEX Local.
7. Be sure that the number of pools displayed is greater than 0.
8. Click Save.
Build the source virtual poolThe source virtual pool includes the RecoverPoint setup. The target virtual pool isrequired for your source virtual pool. Therefore, the target virtual pool gets built first.
Before you begin
All discoveries must be completed, as described in the section entitled Discoveries onpage 75.
The virtual array must be properly configured.
Your target virtual pool must be configured.
Procedure
1. Choose Virtual Assets > Block Virtual Pools.
2. Click Add. The Create Block Virtual Pool screen appears.
3. Enter a string name for the virtual pool.
4. Enter a string describing the virtual pool. This could include any site-specificinformation about the purpose of the pool.
5. Choose the virtual array that you built in Create a Virtual Array on page 77.
6. In the High Availability panel, set the High Availability field to VPLEX Local or VPLEXDistributed.
7. If you selected VPLEX Distributed, select the virtual array for the distributedvolume.
8. Optionally, if you selected VPLEX Distributed, you can select a different highavailability virtual pool to use when creating the distributed volume.
9. In the Data Protection panel, set Maximum Snapshots to 1 or greater.
10.In the Protection System field, choose EMC RecoverPoint.
11.In the RecoverPoint Copies field, click Add Copy. The RecoverPoint Copies dialogappears.
12.Choose the virtual array you built in Create a Virtual Array on page 77.
Note
If no virtual arrays are visible in the list, save this virtual array, rediscover your Createa Virtual Array on page 77, then try adding the RecoverPoint to this virtual array again.
13.Choose the target virtual pool.
Support for VPLEX volume snapshots
80 EMC ViPR Controller 2.4.0.0 ViPR Controller Integration with RecoverPoint and VPLEX User and Administration Guide

14.Optionally, choose a virtual array for the journal volume of the RecoverPoint copy. Thedefault is the same virtual array as the RecoverPoint copy.
15.Optionally, choose a virtual pool for the journal volume of the RecoverPoint copy. Thedefault is the same virtual pool as the RecoverPoint copy.
16.Specify a journal size according to your data center's requirements.
17.Be sure that the number of pools displayed is greater than 0.
18.Click Save.
Run the Create Block Volume serviceFrom User Mode, create a VPLEX Local block volume as follows:
Procedure
1. Choose User Mode.
2. Run Block Storage Services > Create Block Volume from the service catalog.
3. Choose the virtual array you created for the volume.
4. Choose the source virtual pool.
5. Choose the project you built.
6. Give a string description to the block volume.
7. Choose the consistency group you built for the volume.
8. Set the number of volumes to 1 or more.
9. Set the volume size in gigabytes.
10.Click Order.
This service creates both the storage device on the physical storage and the VPLEX virtualvolume as well.
Create a VPLEX Local Volume Snapshot using a RecoverPoint BookmarkThe last step is to create a snapshot of the volume using the RecoverPoint.
Before you begin
Your volume must have been successfully created.
Procedure
1. As a User. choose Block Protection Services > Create Block Snapshot.
2. Choose the project that contains the volume.
3. Choose the volume.
The selections that appear in the Type field depend on the volume you choose.
l If the volume is a RecoverPoint source volume and the source virtual poolmax_snapshots setting is greater than 0, the Type field will be RecoverPointBookmark or Local Array Snapshot.
l If the volume is a RecoverPoint source volume and source virtual poolmax_snapshots setting is 0, the type field will display only RecoverPointBookmark.
l If the volume is a RecoverPoint target volume and the source virtual poolmax_snapshots is greater than 0, the Type field should display Local ArraySnapshot.
Support for VPLEX volume snapshots
Create Block Volume Snapshot using RecoverPoint Bookmarks 81
4. Choose RecoverPoint Bookmark.
5. Enter a string name for the snapshot.
6. Click Order.
Block Protection Services > Restore Block SnapshotThe Restore Block Snapshot service allows you to overwrite the data of a VPLEX virtualvolume with the data of a previously created snapshot. This restore operation should beused with caution, as there is potential for data loss.
Before you begin
You must have previously created a RecoverPoint bookmark snapshot using the CreateBlock Snapshot service.
Note
You cannot restore a local volume snapshot.
Procedure
1. From User Mode, run Block Protection Services > Restore Block Snapshot.
2. Enter the name of the project to which the volume you want to restore belongs.
3. Choose the volume you want to restore.
4. Choose the snapshot you want to restore.
5. Click Order.
After you finish
When the service successfully completes, you must unmount, then remount the volumefrom the host to see the restored data.
Create a VPLEX local array snapshotViPR Controller supports the creation of VPLEX local array snapshot. Local arraysnapshots are point-in-time copies of a VPLEX virtual volume. They are created on thephysical storage used by the VPLEX .
You can create a local array snapshot on either a VPLEX Local or VPLEX Distributed virtualvolume. If you create a local array snapshot on a VPLEX Distributed virtual volume, thesnapshot is created on the backing storage of the VPLEX Metro Source cluster. Nosnapshot is created on the VPLEX Metro High Availability cluster.
Creating a local array snapshot does not require RecoverPoint , so the configuration issimpler than the RecoverPoint bookmark snapshot.
Support for VPLEX volume snapshots
82 EMC ViPR Controller 2.4.0.0 ViPR Controller Integration with RecoverPoint and VPLEX User and Administration Guide

Data center requirements for local array snapshots of VPLEX local virtual volumesViPR Controller supports the creation of local array snapshots in data centerconfigurations that include a VPLEX Local instance. The diagram that follows shows asimple data center setup with a VPLEX Local fronting a VMAX.
l There must be physical connectivity between all the relevant components in yourdatacenter.
l The VPLEX virtual volume can exist on ViPR Controller-managed block storage such asa VNX or VMAX array.
l The networks added to the virtual array must contain all the endpoints necessary toprovision the back end array volumes to the VPLEX , and provision the virtual volumesfrom the VPLEX to a host.
l Local volume snapshots are created on the same physical array as the sourcevolume. In this example, when you create local volume snapshot, that snapshotresides on the VMAX.
Required Discoveries for Local Array Snapshot CreationFrom ViPR Controller, you must discover all of the following to create a local arraysnapshot of a VPLEX virtual volume.
l The hosts (or cluster) you want to access storage
l The VPLEX that will contain the virtual volume
l The block storage arrays used by the VPLEX for back end storage
l Any Brocade or Cisco switches required to connect the host to the VPLEX
l Any Brocade or Cisco switches required to connect the physical storage to the VPLEX
Support for VPLEX volume snapshots
Data center requirements for local array snapshots of VPLEX local virtual volumes 83

Note that the entire route from the host to the physical storage must be discovered byViPR Controller before you can successfully run the VPLEX -related services.
Create Block Volume Local Array SnapshotIn an environment that includes a VPLEX Local configuration, you can run Create BlockVolume Snapshot to create a point-in time copy of a VPLEX Local virtual volume.
Before you begin
To run this service, your environment must meet all of the following requirements.
l You must log in to ViPR Controller as a tenant administrator, or as a user with accessto the project that contains the volume you want to export.
l Your physical datacenter must meet all of the requirements described in Data centerrequirements for local array snapshots of VPLEX local virtual volumes on page 83.
l From ViPR Controller, you must discover the physical infrastructure listed in thesection entitled Required Discoveries for Local Array Snapshot Creation on page 83.
Procedure
1. Create a ViPR Controller project.
See Create a ViPR Project on page 13.
2. Create a ViPR Controller consistency group.
See Create a consistency group on page 14.
3. Build a virtual array.
See Create a Virtual Array on page 77.
4. Add networks to the virtual array to enable physical connectivity between all thedatacenter hardware - the host, the switches, the VPLEX , the back end storage, andthe RecoverPoint appliance. Alternatively, you could add network ports that enablethe physical connectivity to an existing virtual array.
See Add Networks to the Virtual Array on page 77 and Add Ports on page 78.
5. Create a virtual pool. This virtual pool should have High Availability equal to VPLEXLocal, maximum snapshots set to 1 or greater, and it should display one or morephysical pools when you configure it.
See Build a Virtual Pool on page 84.
6. Run Block Storage Services > Create Block Volume from the service catalog. Thiscreates a VPLEX virtual volume.
Run the Create Block Volume Service on page 81.
7. Run Block Protection Services > Create Block Volume Snapshot.
See Create a Local Array Snapshot of a VPLEX Local Virtual Volume on page 85.
Build a virtual poolYou must create a virtual pool in order to create the local array snapshot.
Before you begin
All discoveries must be completed, as described in the section entitled Discoveries onpage 75.
The virtual array must be properly configured.
Support for VPLEX volume snapshots
84 EMC ViPR Controller 2.4.0.0 ViPR Controller Integration with RecoverPoint and VPLEX User and Administration Guide

Procedure
1. Choose Virtual Assets > Block Virtual Pools.
2. Click Add. The Create Block Virtual Pool screen appears.
3. Enter a string name for the virtual pool.
4. Enter a string describing the virtual pool. This could include any site-specificinformation about the purpose of the pool.
5. Choose the virtual array that you built in Create a Virtual Array on page 77.
6. In the High Availability panel, set the High Availability field to VPLEX Local.
7. In the Data Protection panel, set Maximum Snapshots to a value of 1 or greater.
8. Be sure that the number of pools displayed is greater than 0.
9. Click Save.
Create a Local Array Snapshot of a VPLEX Local Virtual VolumeThe last step is to create a local array snapshot of the VPLEX volume.
Before you begin
Your volume must have been successfully created.
Procedure
1. As a User. choose Block Protection Services > Create Block Snapshot.
2. Choose the project that contains the volume.
3. Choose the volume.
4. Choose Local Array Snapshot.
5. Enter a string name for the snapshot.
6. Click Order.
Block Protection Services > Remove Block SnapshotThe Remove Block Snapshot service allows you to delete a snapshot of a VPLEX virtualvolume. The volume, and any other snapshots associated with the volume, areunaffected by this operation.
Before you begin
You must have previously created a VPLEX volume snapshot using the Create BlockSnapshot service.
Procedure
1. From User Mode, run Block Protection Services > Remove Block Snapshot.
2. Enter the name of the project to which the volume with the snapshot belongs.
3. Choose the volume whose snapshot you want to delete.
4. Choose the snapshot you want to delete.
5. Click Order.
Support for VPLEX volume snapshots
Block Protection Services > Remove Block Snapshot 85

Create and delete snapshots for volumes in consistency groupsViPR Controller 2.2 supports application consistency groups. This feature allows volumesthat are grouped to service a specific application to be managed uniformly andconsistently by ViPR Controller.
When you create snapshots for volumes that are assigned to the same ViPR Controllerconsistency group, ViPR Controller performs snapshot operations on all volumes in theconsistency group. Additionally, all consistency groups on the backing storage for theVPLEX virtual volume are appropriately managed and modified.
Consider this simple use case.Figure 29 Before Snapshot Creation
This example shows the following elements:
l The data center has a VPLEX Local with a VMAX as the backing array.
l Three volumes have been created through the ViPR Controller user inteface. These areassigned to a ViPR Controller consistency group when you run the ViPR Controllerservice Create Block Volume.
l There are three virtual volumes on the VPLEX . These are assigned to a VPLEXconsistency group.
l The VMAX has three physical volumes - one for each VPLEX virtual volume. Thesethree physical volumes are in a VMAX consistency group.
At this point, you run the ViPR Controller service Create Block Snapshot to create asnapshot for vol 1. In the service dialog, you also specify the ViPR Controller consistencygroup to which vol 1 belongs.
The following figure shows the result of the successful service execution.
Support for VPLEX volume snapshots
86 EMC ViPR Controller 2.4.0.0 ViPR Controller Integration with RecoverPoint and VPLEX User and Administration Guide
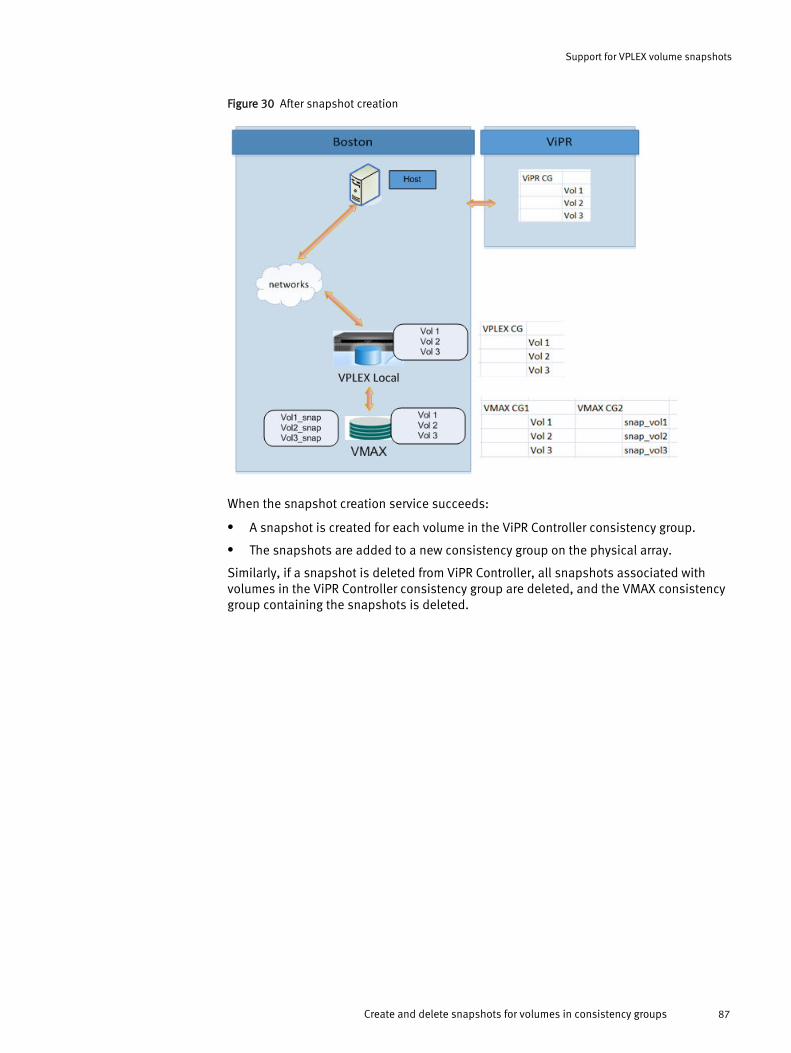
Figure 30 After snapshot creation
When the snapshot creation service succeeds:
l A snapshot is created for each volume in the ViPR Controller consistency group.
l The snapshots are added to a new consistency group on the physical array.
Similarly, if a snapshot is deleted from ViPR Controller, all snapshots associated withvolumes in the ViPR Controller consistency group are deleted, and the VMAX consistencygroup containing the snapshots is deleted.
Support for VPLEX volume snapshots
Create and delete snapshots for volumes in consistency groups 87

Support for VPLEX volume snapshots
88 EMC ViPR Controller 2.4.0.0 ViPR Controller Integration with RecoverPoint and VPLEX User and Administration Guide
CHAPTER 7
Supporting VPLEX Full Copies
This chapter contains the following topics:
l ViPR Controller support for VPLEX full copies......................................................... 90l Block Protection Services > Create Full Copy.......................................................... 91l Block Protection Services > Remove Full Copy........................................................ 91
Supporting VPLEX Full Copies 89

ViPR Controller support for VPLEX full copiesViPR Controller provides services that allow you to create and delete full copies of VPLEXLocal and VPLEX distributed virtual volumes.
You create and delete full copies by calling the following ViPR Controller services from theservice catalog:
l Block Protection Services > Create Full Copy on page 91
l Block Protection Services > Remove Full Copy on page 91
Create Full CopyThe following provides some information on the Block Protection Services > Create FullCopy service.
The volume copied can be either a VPLEX Local or VPLEX distributed virtual volume.
All data is copied when you create a full copy of a VPLEX virtual volume.
Exports, membership in consistency groups, snapshots and mirrors are not replicatedwhen you create a full copy of a VPLEX virtual volume.
When you create a copy of a VPLEX Local virtual volume, the following occurs:
1. ViPR Controller creates a full copy of the back end volume using native full copyservices provided by the back end storage system.
2. ViPR Controller uses the copy of the back end volume to form a new VPLEX localvirtual volume.
When you create a copy of a VPLEX distributed virtual volume, the following occurs:
1. ViPR Controller selects one of the back end volumes of the VPLEX virtual volumebeing copied. This is the source back end volume. This volume is in the same virtualarray as the VPLEX volume.
2. ViPR Controller creates a full copy of the back end volume using native full copyservices provided by the back end storage system.
3. ViPR Controller uses the copy to form a new VPLEX local virtual volume.
4. ViPR Controller exports the new back end volume and zones it so that it is visible tothe VPLEX .
5. ViPR Controller attaches the device built in step 4 to the virtual volume copy createdin step 3 to form a distributed virtual volume copy.
Create Full Copy service limitationsThe ViPR Controller service Create Full Copy fails if the target volume is included in a ViPRController consistency group.
All volumes created with RecoverPoint protection are automatically added to a ViPRController consistency group. Therefore, you cannot make a full copy of a RecoverPoint -protected volume with ViPR Controller.
Remove Full CopyRemove Full Copy does the following:
l Deletes the Volume from ViPR Controller.
Supporting VPLEX Full Copies
90 EMC ViPR Controller 2.4.0.0 ViPR Controller Integration with RecoverPoint and VPLEX User and Administration Guide

l Deletes the Virtual Volume from the VPLEX .
l Deletes all exports, snapshots, and mirrors associated with the volume.
l Removes export and zones for the back end storage so it is no longer visible to theVPLEX .
l Deletes the physical back end storage from the physical arrays
Block Protection Services > Create Full CopyThe Create Full Copy service in the ViPR Controller service catalog creates a clone of yourVPLEX virtual volume.
Before you begin
You must have previously created a VPLEX Local or VPLEX Distributed virtual volume inViPR Controller. Refer to one of the following chapters for more information:
l Export a VPLEX Local Virtual Volume to a Host or Cluster on page 63
l Export a VPLEX Metro Virtual Volume to a Host or Cluster on page 137
Procedure
1. Run Block Protection Services > Create Full Copy.
2. Choose a project.
3. Choose a volume from the list.
4. Enter a name for the clone in the Name field.
5. Choose a number of copies.
6. Click Order.
Block Protection Services > Remove Full CopyOnce you have built a full copy for a volume, you may want to remove it.
Before you begin
You must have previously created a VPLEX Local or VPLEX Metro virtual volume.
You must have successfully created a full copy of that volume.
Procedure
1. Run Block Protection Services > Remove Full Copy.
2. Choose the project that holds your cloned volume.
3. Choose the copy you want to delete.
4. Click Order.
Supporting VPLEX Full Copies
Block Protection Services > Create Full Copy 91

Supporting VPLEX Full Copies
92 EMC ViPR Controller 2.4.0.0 ViPR Controller Integration with RecoverPoint and VPLEX User and Administration Guide

CHAPTER 8
ViPR Controller support for VPLEX Local volumemirrors
This chapter contains the following topics:
l ViPR Controller support for VPLEX Local volume mirrors.........................................94l Datacenter requirements.......................................................................................95l Discoveries........................................................................................................... 96l Supported virtual pool configurations................................................................... 96l Configuration #1: No continuous copies virtual pool............................................. 96l Configuration #2: Using a continuous copy virtual pool within a single virtual array
............................................................................................................................. 97l Configuration #3 - Using separate virtual arrays for the virtual volume and mirror
............................................................................................................................. 98l Remove Continuous Copies.................................................................................104l Detaching a mirror from its VPLEX virtual volume.................................................105
ViPR Controller support for VPLEX Local volume mirrors 93

ViPR Controller support for VPLEX Local volume mirrorsViPR Controller includes several services in the service catalog that allow you to manageVPLEX virtual volumes with mirrors. VPLEX Local volume mirrors enable synchronouswrites to two separate physical storage devices on any write to the VPLEX virtual volume.
To run these services successfully, your datacenter must meet certain physicalconfiguration requirements, and elements in your datacenter must be registered anddiscovered by ViPR Controller. This article describes the data center requirements forimplementing VPLEX Local volume mirrors with ViPR Controller, and describes how tobuild a volume with mirror protection.
The services that allow you to manage VPLEX Local virtual volumes with mirroredprotection are:
l Block Protection Services > Create Continuous Copy
l Block Protection Services > Remove Continuous Copy
ViPR Controller also supports Detaching a mirror from its VPLEX Local virtual volume onpage 105.
ViPR Controller support for VPLEX Local volume mirrors
94 EMC ViPR Controller 2.4.0.0 ViPR Controller Integration with RecoverPoint and VPLEX User and Administration Guide
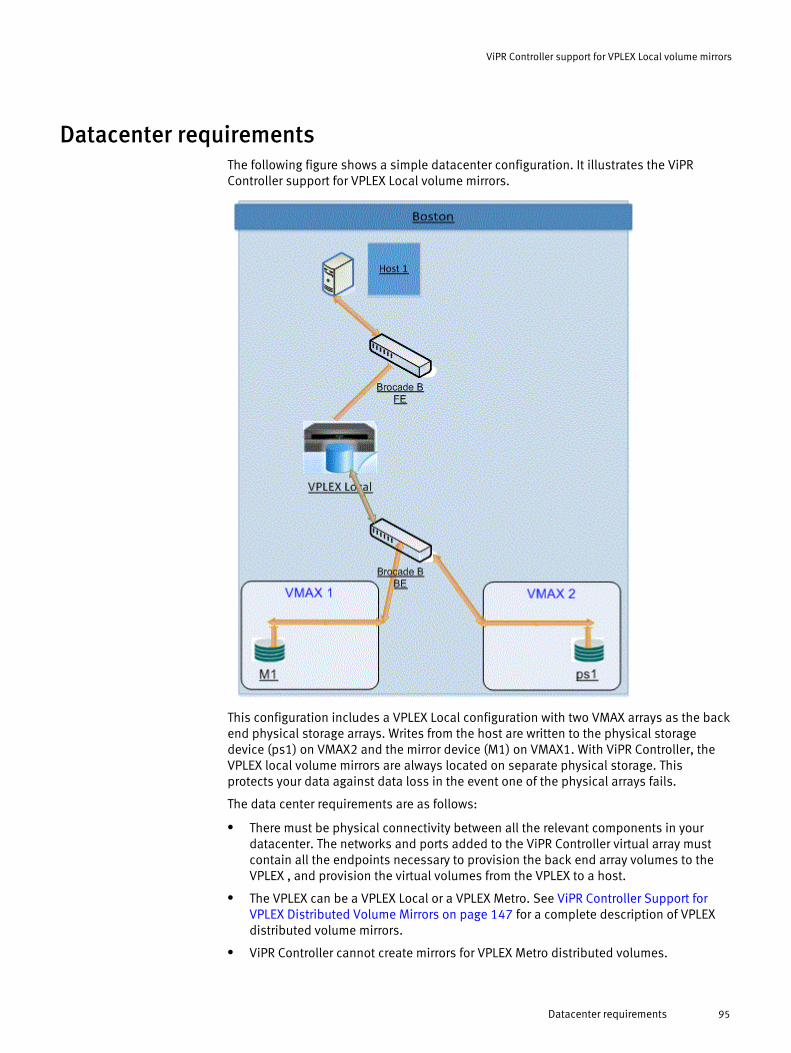
Datacenter requirementsThe following figure shows a simple datacenter configuration. It illustrates the ViPRController support for VPLEX Local volume mirrors.
This configuration includes a VPLEX Local configuration with two VMAX arrays as the backend physical storage arrays. Writes from the host are written to the physical storagedevice (ps1) on VMAX2 and the mirror device (M1) on VMAX1. With ViPR Controller, theVPLEX local volume mirrors are always located on separate physical storage. Thisprotects your data against data loss in the event one of the physical arrays fails.
The data center requirements are as follows:
l There must be physical connectivity between all the relevant components in yourdatacenter. The networks and ports added to the ViPR Controller virtual array mustcontain all the endpoints necessary to provision the back end array volumes to theVPLEX , and provision the virtual volumes from the VPLEX to a host.
l The VPLEX can be a VPLEX Local or a VPLEX Metro. See ViPR Controller Support forVPLEX Distributed Volume Mirrors on page 147 for a complete description of VPLEXdistributed volume mirrors.
l ViPR Controller cannot create mirrors for VPLEX Metro distributed volumes.
ViPR Controller support for VPLEX Local volume mirrors
Datacenter requirements 95

l The back end physical storage for the VPLEX can exist on ViPR Controller-managedblock storage such as a VNX or VMAX array.
DiscoveriesFrom ViPR Controller, you must discover all of the following to run the Create ContinuousCopies service.
l The hosts (or cluster) you want to access storage
l The VPLEX that will contain the virtual volume
l The block storage arrays on the VPLEX is using as its back end storage.
l Any Brocade or Cisco switches required to connect the host to the VPLEX
l Any Brocade or Cisco switches required to connect the physical storage to the VPLEX
Note that the entire route from the host to the physical storage must be discovered byViPR Controller before you can successfully run the VPLEX -related services.
Supported virtual pool configurationsViPR Controller supports several virtual pool configurations for the creation of VPLEXvolume mirrors.
A continuous copies virtual pool is a ViPR Controller virtual pool that can optionally beused to set up VPLEX Local volume mirrors. The purpose of a continuous copies virtualpool is to give you control over where your mirror volume is created in your physical datacenter. If you do not choose to use a continuous copies virtual pool, ViPR Controller willplace the mirror volume on a different physical storage array from that of the physicalback end storage volume used by the VPLEX virtual volume.
The supported virtual pool configurations are as follows:
l No continuous copies virtual pool on page 96 - ViPR Controller decides where yourmirror volume is placed. This is the simplest configuration to set up.
l Using a continuous copies virtual pool within a single virtual array on page 97 - Thisconfiguration gives the data center manager control over the physical location of thedata.
l Set the continuous copies virtual pool. Use two virtual arrays. on page 98 - Thisconfiguration gives the data center manager control over the physical location of thedata.
Configuration #1: No continuous copies virtual poolThe simplest ViPR Controller configuration that supports VPLEX Local volume mirrorsinvolves no continuous copies virtual pool.
This configuration includes these characteristics:
l Only one virtual array.
l The virtual array includes the VPLEX , and two or more physical arrays.
l One virtual pool.
l The Data Protection panel of the virtual pool would be set as follows:
ViPR Controller support for VPLEX Local volume mirrors
96 EMC ViPR Controller 2.4.0.0 ViPR Controller Integration with RecoverPoint and VPLEX User and Administration Guide

Note that there is no Continuous Copies Virtual Pool specified in this screen. ViPRController will place the physical back end storage for the VPLEX Local virtual volume andthe mirror volume on different arrays in the virtual pool.
This is a simple configuration, but you are reliant on ViPR Controller for volumeplacement.
Configuration #2: Using a continuous copy virtual pool within asingle virtual array
In this configuration, you define two virtual pools, including a continuous copies virtualpool. The virtual pools are assigned to a single virtual array.
Before you begin
To build this configuration your environment must meet all of the following requirements.
l You must log in to ViPR Controller as a tenant administrator, or as a user with accessto the project that contains the volume you create.
l Your physical datacenter must meet all of the requirements described in the section Datacenter requirements on page 95.
l From ViPR Controller, you must discover the physical infrastructure listed in Discoveries on page 96.
Procedure
1. Create a project to hold your volume.
2. Create a virtual array.
3. Build connectivity between the hosts, switches, the VPLEX and the two back endstorage arrays. You can add networks to the virtual array, or you can add networkports that enable the physical connectivity. The result should be a virtual arraycontaining a VPLEX and at least two physical arrays.
4. Create the Continuous Copies virtual pool with these settings:
l Assign the pool to the virtual array you built in Step 2.
l Under Hardware, disable the expandable option.
ViPR Controller support for VPLEX Local volume mirrors
Configuration #2: Using a continuous copy virtual pool within a single virtual array 97

l In the High Availability panel, set the High Availability option to VPLEX Local.
5. Create the virtual pool for the VPLEX Local virtual volume with these settings:
l Assign this pool to the virtual array created in step 2.
l In the High Availability panel, set the High Availability option to VPLEX Local.
l In the Data Protection Panel, Maximum continuous copies is set to 1.
l Set to the Continuous Copies virtual pool to the pool you built in this step 4.
6. Run Block Storage Services > Create Block Volume to build a VPLEX Local volumeusing the virtual pool created in step 5.
7. Run Block Protection Services > Create Continuous Copies from the service catalog.
Configuration #3 - Using separate virtual arrays for the virtualvolume and mirror
The sequence in this section shows how to set up your ViPR Controller virtual data centerwith two virtual arrays. One virtual array holds the backing volume for the VPLEX localvolume. The other virtual array holds the backing volume for the mirror. This approachgives the data center administrator the most control over the physical location of thedata.
Before you begin
The Create Continuous Copies service creates a mirror for a VPLEX virtual volume. To runCreate Continuous Copies, your environment must meet all of the following requirements.
l You must log in to ViPR Controller as a tenant administrator, or as a user with accessto the project that contains the volume you create.
l Your physical datacenter must meet all of the requirements described in the section Datacenter requirements on page 95.
l From ViPR Controller, you must discover the physical infrastructure listed asdescribed in the section entitled Discoveries on page 96.
Procedure
1. Create a project to hold your volume. See Create a ViPR Controller Project on page 13
2. Build two virtual arrays. The first will include the VPLEX and the physical storage arraythat holds the primary data. The second will include the VPLEX and the physical arraythat holds the mirror.
3. Build connectivity between the hosts, switches, the VPLEX and the back end storagefor each virtual array. You can add networks to the virtual array, or you can addnetwork ports that enable the physical connectivity.
4. Create the Continuous Copies virtual pool with these settings:
l Assign the pool to the mirror virtual array.
l Under Hardware, disable the expandable option.
l In the High Availability panel, set the High Availability option to VPLEX Local.
5. Create the Primary Storage virtual pool. The Primary Storage virtual pool has thesesettings:
l Assign this pool to both the mirror virtual array and the physical storage virtualarray.
l In the High Availability panel, set the High Availability option to VPLEX Local.
ViPR Controller support for VPLEX Local volume mirrors
98 EMC ViPR Controller 2.4.0.0 ViPR Controller Integration with RecoverPoint and VPLEX User and Administration Guide

l In the Data Protection Panel, Maximum continuous copies is set to 1.
l Continuous Copies Virtual Pool set to the Continuous Copies virtual pool you builtin this step 4.
6. Run Block Storage Services > Create Block Volume to build a VPLEX Local volumeusing the physical storage virtual pool.
7. Run Block Protection Services > Create Continuous Copies from the service catalog.
Step 2 - Create two virtual arraysFrom the user interface, create two virtual arrays - one for the physical storage of theVPLEX Local volume. The second is for the VPLEX Local volume mirror.
Procedure
1. Complete the discoveries described in the section entitled Discoveries on page 96.
2. From the Administrator Mode, select Virtual Assets > Virtual Array.
3. Click Add. The Create Virtual Array dialog appears.
4. Enter the name of the virtual array (varray_primary in this example), and click Save.
5. Repeat steps 2 through 4 to create a second virtual array called varray_mirror.
Step 3 - Add networks to the physical storage virtual arrayFrom the user interface, add networks or ports to your virtual array.
Procedure
1. From Admin mode, choose Virtual Assets > Virtual Arrays and edit the Physical Storagevirtual array you created in Step 2. The Edit Virtual Array configuration screen appears.
ViPR Controller support for VPLEX Local volume mirrors
Step 2 - Create two virtual arrays 99

2. Use the links and buttons in the Block and File Storage box to build a list of ports foryour virtual array. In this example, you want to enable connectivity between the VPLEXand the physical storage array where your physical storage device will reside.
The ports added must connect the VPLEX to the physical storage array.
ViPR Controller support for VPLEX Local volume mirrors
100 EMC ViPR Controller 2.4.0.0 ViPR Controller Integration with RecoverPoint and VPLEX User and Administration Guide

3. Click Edit Virtual Array in the breadcrumb at the top of the screen to navigate back tothe Edit Virtual Array screen. The VPLEX and the physical storage systems shoulddisplay in the Storage Systems list.
Add networks to the mirror virtual arrayFrom the user interface, add networks or ports to your mirror virtual array.
Procedure
1. From Admin mode, choose Virtual Assets > Virtual Arrays and edit the mirror virtualarray you created in Step 2. The Edit Virtual Array configuration screen appears.
2. Use the links and buttons in the Block and File Storage box to build a list of ports foryour virtual array. In this example, you want to enable connectivity between the VPLEXand the physical storage array where your mirror storage device will reside.
The ports added must connect the VPLEX to the mirror storage array.
3. Click Edit Virtual Array in the breadcrumb at the top of the screen to navigate back tothe Edit Virtual Array screen. The VPLEX and the mirror storage systems shoulddisplay in the Storage Systems list.
ViPR Controller support for VPLEX Local volume mirrors
Step 3 - Add networks to the physical storage virtual array 101

Step 4 - Create a virtual pool for your mirror virtual arrayYou must create two virtual pools, one for each virtual array. The pools are configureddifferently.
Procedure
1. Choose Virtual Assets > Block Virtual Pools. The list of block virtual pools on yoursystems appears.
2. Click Add. The Create Virtual Pool screen appears.
3. Enter a string name for the virtual pool.
4. Enter a string describing the virtual pool. This could include any site-specificinformation about the purpose of the pool.
5. Choose the virtual array that contains your mirror physical arrays and your VPLEX .
6. Expand the Hardware panel, and disable the Expandable option.
7. Expand High Availability section and choose VPLEX Local from the options list.
8. Be sure that the number of physical pools meeting your criteria is greater than 0.
9. Click Save.
Edit the mirror virtual array you built in step 2. The virtual pool should appear in the list ofvirtual pools at the bottom of the screen.
ViPR Controller support for VPLEX Local volume mirrors
102 EMC ViPR Controller 2.4.0.0 ViPR Controller Integration with RecoverPoint and VPLEX User and Administration Guide

Step 5 - Create a virtual pool for the physical storage virtual arrayThis virtual pool contains the continuous copy settings. It requires the mirror virtual pool.
Procedure
1. Choose Virtual Assets > Block Virtual Pools. The list of block virtual pools on yoursystems appears.
2. Click Add. The Create Virtual Pool screen appears.
3. Enter a string name for the physical storage virtual pool.
4. Enter a string describing the virtual pool. This could include any site-specificinformation about the purpose of the pool.
5. Choose both virtual arrays you built in step 2 of this procedure.
6. Expand the Hardware panel, and disable the Expandable option.
7. Expand the High Availability section and choose VPLEX Local from the options list.
8. Expand the Data Protection panel.
9. Set Maximum Continuous Copies to 1.
10.Set the Continuous Copies Virtual Pool to varray_mirror.
11.Be sure that the number of physical pools meeting your criteria is greater than 0.
12.Click Save.
Step 6 - Create a VPLEX Local Block VolumeOnce the virtual arrays and virtual pools are configured, you can call the Create BlockVolume service. This service will create the VPLEX virtual volume, the physical device thatis used as backing storage.
Procedure
1. Choose User Mode.
ViPR Controller support for VPLEX Local volume mirrors
Step 5 - Create a virtual pool for the physical storage virtual array 103

2. Run Block Storage Services > Create Block Volume from the service catalog.
3. Choose a virtual array that contains the VPLEX and the Physical Arrays.
4. Choose the virtual pool that includes the VPLEX Local High Availability setting.
5. Choose the project you built.
6. Give a string description to the block volume.
7. Leave the consistency group setting at the default.
8. Set the number of volumes to 1 or more.
9. Set the volume size in gigabytes.
10.Click Order.
Step 7 - Create Continuous CopiesThe last step is to create the mirror for the VPLEX Local volume.
Before you begin
You must log in as a user with write access to the project that holds the VPLEX virtualvolume.
Procedure
1. Run Block Protection Services > Create Continuous Copy from the service catalog.
2. Choose the project that holds your VPLEX Local virtual volume.
3. Choose the volume you created in Step 6.
4. Enter a text description of the mirror volume.
5. Set the number of copies to 1.
6. Click Order.
Remove Continuous CopiesOnce you successfully create a VPLEX volume mirror, you may want to remove the mirror.The Remove Continuous Copy service deletes the mirror, but leaves the VPLEX virtualvolume and the underlying physical back end storage device intact.
Before you begin
Login as a user with write access to the project that holds your VPLEX virtual volume.
Procedure
1. Run Block Protection Services > Remove Continuous Copy from the service catalog.
2. Choose the project that holds your VPLEX virtual volume.
3. Choose the volume whose mirror you want to delete.
4. Click the check box next to the volume mirror in the Continuous Copies field.
5. Click Order.
ViPR Controller support for VPLEX Local volume mirrors
104 EMC ViPR Controller 2.4.0.0 ViPR Controller Integration with RecoverPoint and VPLEX User and Administration Guide

Detaching a mirror from its VPLEX virtual volumeOnce you have created a VPLEX virtual volume mirror, you have the option of detachingthe mirror from the virtual volume. Detaching the VPLEX virtual volume converts theVPLEX virtual volume to an independent VPLEX virtual volume.
Before you begin
To perform the following procedure, you must have a VPLEX virtual volume with a mirror.
You must log in as a user with write access to the project that contains your volume.
Procedure
1. Choose Resources > Volumes. The Volumes screen appears.
2. Click the volume in the list that has the mirror.
3. Expand the Continuous Copies panel.
4. Click Stop.
This detaches the mirror from the VPLEX virtual volume. A new volume appears in thevolume list - this is the volume formerly used as a mirror.
After you finish
After detachment, the mirror becomes a VPLEX Local virtual volume, and you can performany operations on that volume that you choose.
A second way to stop continuous copiesThere is a second location in the user interface that allows you to detach a mirror from aVPLEX virtual volume.
l Follow the steps described in Detaching a mirror from its VPLEX virtual volume onpage 105.
l When you expand the Continuous Copies panel, you should see the continuouscopies name in a link, as shown in the following figure.
l If you click the link to see more details about the continuous copy, there is a StopContinuous Copy option, as shown in the following figure.
ViPR Controller support for VPLEX Local volume mirrors
Detaching a mirror from its VPLEX virtual volume 105

ViPR Controller support for VPLEX Local volume mirrors
106 EMC ViPR Controller 2.4.0.0 ViPR Controller Integration with RecoverPoint and VPLEX User and Administration Guide

CHAPTER 9
Supporting VPLEX high availability volumes withRecoverPoint protection
This chapter contains the following topics:
l ViPR Controller support for VPLEX high availability volumes with RecoverPointprotection........................................................................................................... 108
l Summary of required discoveries........................................................................ 110l Overview of consistency groups creation............................................................. 110l Block Storage Services > Create Block Volume..................................................... 111l Virtual pool settings............................................................................................ 113l Run Block Protection Service > Failover Block Volume.......................................... 115l Add RecoverPoint Protection to a VPLEX Virtual Volume.......................................115l Upgrading an existing RecoverPoint +VPLEX CRR setup to MetroPoint CRR........... 118l Data Protection panel fields................................................................................ 119
Supporting VPLEX high availability volumes with RecoverPoint protection 107

ViPR Controller support for VPLEX high availability volumes withRecoverPoint protection
ViPR Controller supports integrated VPLEX and RecoverPoint environments. These datacenter configurations combine high availability VPLEX virtual volumes with RecoverPointprotection.
This article discusses how to set up ViPR Controller and configure ViPR Controller virtualobjects so that you can run the following services:
l Block Storage Services > Create Block Volume
l Block Protection Services > Failover Block Volume
Supported data center configurationsViPR Controller supports a number of data center configurations where VPLEX andRecoverPoint are integrated to provide high availability and data protection.
Note
For information on configuring VPLEX Metro with RecoverPoint , see EMC ViPR ControllerSupport for MetroPoint on page 121.
Figure 31 VPLEX Local with RecoverPoint Protection
Supporting VPLEX high availability volumes with RecoverPoint protection
108 EMC ViPR Controller 2.4.0.0 ViPR Controller Integration with RecoverPoint and VPLEX User and Administration Guide

Figure 32 VPLEX Metro with RecoverPoint Protection
Figure 33 VPLEX Metro with remote RecoverPoint Protection
Supporting VPLEX high availability volumes with RecoverPoint protection
Supported data center configurations 109

Figure 34 One VPLEX Cluster managing multiple RecoverPoint systems
Summary of required discoveriesFrom ViPR Controller, you must discover all of the hardware listed below in order to eitherexport a VPLEX virtual volume with RecoverPoint protection to a host, or run the otherservices described in this chapter.
l The hosts or host clusters you want to access storage.
l All VPLEX clusters in your configuration.
l Any Brocade or Cisco switches required to connect the hosts to the VPLEX clusters.
l Any Brocade or Cisco switches required to connect the physical storage to the VPLEXclusters.
l The physical arrays fronted by the VPLEX virtual volumes.
l The RecoverPoint that protects your VPLEX virtual volume.
Note
The entire route from the host to the physical storage must be discovered by ViPRController before you can successfully run the VPLEX -related services.
Overview of consistency groups creationThe number of RecoverPoint protections systems that are integrated with your VPLEXdetermines the maximum number of consistency groups that can be provisioned.
A maximum of 128 consistency groups can be provisioned per RecoverPoint system. Ifyou have a storage system connected to a single RecoverPoint system, you can have 128consistency groups across all RPA clusters on that RecoverPoint system. When aconsistency group is provisioned, ViPR Controller will look at the data throughput for
Supporting VPLEX high availability volumes with RecoverPoint protection
110 EMC ViPR Controller 2.4.0.0 ViPR Controller Integration with RecoverPoint and VPLEX User and Administration Guide

each RPA in the RecoverPoint system and create the consistency group on the RPA withthe lesser load.
When you add a volume to an existing consistency group, there is no balancing acrossthe RPAs. The volume is added to the RPA that is servicing the existing consistency group.
If you have one VPLEX cluster managing multiple RecoverPoint protection systems, thenyou can provision more than 128 consistency groups. When a consistency group iscreated is this configuration, ViPR Controller balances the consistency group load acrossthe multiple protection systems.
VPLEX-specific considerations for consistency groupsThe backend volumes for the VPLEX virtual volumes, that are part of a consistency group,can be in multiple storage arrays.
However, if the backend volumes are in multiple storage arrays, you cannot create asnapshot or full copy against that consistency group. You can only create a snapshot orfull copy against a consistency group if the backend volumes are in the same storagearray.
Block Storage Services > Create Block VolumeThis service creates a distributed VPLEX virtual volume with RecoverPoint protection. Theservice creates physical storage devices on the back end arrays. It also creates onevirtual volume to represent the two physical storage volumes that are VPLEX distributedacross cluster 1 and cluster 2 of the VPLEX . Create Block Volume does not export thevolume to the host.
Before you begin
To run this service, your environment must meet all of the following requirements.
l You must log in to ViPR Controller as a tenant administrator, or as a user with accessto the project that contains the volume you want to export.
l Your physical datacenter must meet all of the requirements.
l From VPLEX , you must discover the physical infrastructure listed in the sectionentitled Required discoveries on page 110.
l The RecoverPoint system that provides the disaster recovery features integrates allthree of the RPA clusters, one at each site. All masking and zoning to the protectedarrays must be complete, and the RecoverPoint splitters must be correctly installedbefore you discover the protection system in ViPR Controller.
Once your RecoverPoint Appliance is under ViPR Controller management, you shouldrediscover the Protection System whenever you make a change to the RecoverPointconfiguration.
Procedure
1. Create a ViPR Controller project.
See Create a ViPR Controller Project on page 13
2. Build a VPLEX consistency group.
See Step 2 - Create a consistency group on page 14
3. Build three virtual arrays. The first (Boston, in this example) is for the VPLEX sourcevolume and serves as the source volume for the RecoverPoint protection. The second(New York) is the VPLEX High Availability target on which the source volume will bedistributed. The third (Syracuse) is the RecoverPoint target. See Create a virtualarray on page 162
Supporting VPLEX high availability volumes with RecoverPoint protection
VPLEX-specific considerations for consistency groups 111

4. Enable physical connectivity between all the hardware required by the source VPLEXcluster, the highly available VPLEX cluster and the disaster recovery site. You can addports to your virtual arrays in two ways:
l Open the virtual array and choose Networks. When you add VSANs or fabrics toyour virtual array, ViPR Controller uses the ports defined in those VSANs or fabricsto communicate with the array. See Adding networks to a virtual array on page128
l Open the virtual array and choose Storage Ports. You can hand-select storageports that enable connectivity between your VPLEX , the physical storage array andthe host. See Adding ports to a virtual array on page 129.
5. Create the target virtual pool for the VPLEX Metro high availability volume. Assign theNew York virtual array to this virtual pool.
a. Choose Virtual Assets > Block Virtual Pools.. The Create Virtual Pool screenappears.
b. Enter the information in High Availability in Virtual pool settings on page113.
c. Ensure that the number of physical pools that meet your virtual pool criteria is 1 orgreater.
d. Click Save.
6. Create the target virtual pool for the RecoverPoint target volume. The RecoverPointtarget volume is a VPLEX Local volume in the Syracuse data center. Enter theinformation in RecoverPoint target in Virtual pool settings on page 113.
a. Choose Virtual Assets > Block Virtual Pools.. The Create Virtual Pool screenappears.
b. Enter the information in VPLEX Metro Source in Virtual pool settings on page113.
c. Ensure that the number of physical pools that meet your virtual pool criteria is 1 orgreater.
d. Click Save.
7. Create the source virtual pool. This pool is used when you provision new volumes.This virtual pool is built including the High Availability target volume in New York andthe RecoverPoint protection in Syracuse.
a. Choose Virtual Assets > Block Virtual Pools.. The Create Virtual Pool screenappears.
b. Enter the information in VPLEX Metro source in Virtual pool settings on page113.
c. Ensure that the number of physical pools that meet your virtual pool criteria is 1 orgreater.
d. Click Save.
8. Run Block Storage Services > Create Block Volume from the service catalog to createthe distributed VPLEX virtual volume with RecoverPoint Protection.
Supporting VPLEX high availability volumes with RecoverPoint protection
112 EMC ViPR Controller 2.4.0.0 ViPR Controller Integration with RecoverPoint and VPLEX User and Administration Guide

Virtual pool settingsThis table summarizes the virtual pool configuration settings for the VPLEX Metro source,High Availability, and RecoverPoint target virtual pools.
Table 2 Virtual pool configuration settings
Field VPLEX Metro source High Availability RecoverPointtarget
Name Enter Boston.
Naming conventions are datacenter-specific
For this example,enter New YorkHA .
Naming conventionsare data center-specific.
In this example, enterSyracuse DR.
Naming conventionsare data center-specific.
Description Enter a string description. Enter a stringdescription
Enter a stringdescription.
Virtual Arrays Choose Boston. Choose NewYork.
Choose Syracuse.
Enable Quota DisabledQuotas are not required forthese virtual pools.
Disabled.
Quotas are notrequired for thesevirtual pools.
Disabled.
Quotas are notrequired for thesevirtual pools.
Hardware
ProvisioningType
Thin Thin Thin
Protocols FC FC FC
Drive Type Site-specific. Set these fields tovalues appropriate for your datacenter.If you choose a System Type ofEMC VMAX, note that youcannot set Host IO limits on avirtual pool that includesRecoverPoint protection. Leave
the Host Front EndBandwidth and Host FrontEnd I/O Limit fields at thedefault (0).
Site-specific. Setthese according tothe requirements ofyour data center.
Site-specific. Setthese according tothe requirements ofyour data center.
System Type
RAID Levels
Multi-volumeConsistency
Enabled
Expandable Site-specific
SAN Multi Path(All Fields)
Site-specific Site-specific Site-specific
High Availability
Supporting VPLEX high availability volumes with RecoverPoint protection
Virtual pool settings 113

Table 2 Virtual pool configuration settings (continued)
Field VPLEX Metro source High Availability RecoverPointtarget
High Availability VPLEX Distributed. None VPLEX Local
High AvailabilityVirtual Array
New YorkThis is the virtual array for thesecond VPLEX cluster in theVPLEX Metro.
Not applicable/ Not applicable
High AvailabilityVirtual Pool
New York HAThis is the virtual pool you buildfor the high availability VPLEXcluster.
Data Protection
MaximumSnapshots
Site-specific Site-specific Site-specific
MaximumContinuousCopies
ContinuousCopies VirtualPool
ProtectionSystem
EMC RecoverPoint
RecoverPointSource JournalSize
Site-specific
RecoverPointCopies
Specify one RecoverPoint copy.The active VPLEX Metro clusterreplicates its data on the DRRecoverPoint instance.
Virtual Array Syracuse DR
Virtual Pool Enter the name of theRecoverPoint target virtual pool.In this example, enterSyracuse.
Journal Size Min
RecoverPoint Advanced Settings
Protect SourceSite
Disabled Site-specific Site-specific
Protect HA Site Enabled. In this configuration,
the HA cluster of the VPLEXMetro is protected byRecoverPoint .
Supporting VPLEX high availability volumes with RecoverPoint protection
114 EMC ViPR Controller 2.4.0.0 ViPR Controller Integration with RecoverPoint and VPLEX User and Administration Guide

Table 2 Virtual pool configuration settings (continued)
Field VPLEX Metro source High Availability RecoverPointtarget
Active Site Not applicable. This field onlyapplies to MetroPointconfigurations.
Access Control(all Fields)
Site-specific Site-specific Site-specific
Run Block Protection Service > Failover Block VolumeAfter building the VPLEX distributed volume, in the case of source failure, you canexecute the Failover Block Volume service so that RecoverPoint marks a RecoverPointbookmark as available at the target site. After a successful failover, and everything isback running again, you can use Block Protection Services > Swap Continuous Copiestomake the RecoverPoint source and target reverse personalities. The target then becomesthe source, and the source becomes the RecoverPoint failover target.
Before you begin
The datacenter must be configured according to the data center requirements.
The physical infrastructure must be discovered by ViPR Controller. See Requireddiscoveries on page 110.
You must have created at least one VPLEX volume. In this example the VPLEX volume isdistributed.
Procedure
1. Run Block Protection Services > Failover Block Volume from the service catalog.
2. Choose a Project.
3. Choose the source volume. In this example, you would choose the volume you createdin the Boston virtual array.
4. Choose the target volume in the Syracuse DR virtual array.
5. Click Order.
Add RecoverPoint Protection to a VPLEX Virtual VolumeThe Change Virtual Pool service in the ViPR Controller service catalog is used to addRecoverPoint protection to a VPLEX Virtual Volume.
The Change Virtual Pool service enables you to perform the following operations:
l Move a VPLEX Local virtual volume from a virtual pool that includes VPLEX Local HighAvailability to a virtual pool that includes both VPLEX Local High Availability andRecoverPoint protection.
l Move a VPLEX Metro virtual volume from a virtual pool that includes VPLEX MetroHigh Availability to a virtual pool that includes both VPLEX Metro High Availability andRecoverPoint protection.
ViPR Controller supports RecoverPoint protection for CLR, CDP and CRR configurations.
Supporting VPLEX high availability volumes with RecoverPoint protection
Run Block Protection Service > Failover Block Volume 115

ViPR Controller maintains the following objects and features associated with the VPLEXvirtual volume when you move the volume to another virtual pool.
l Continuous copies
l Exports
l Full Copies
l Local Array Snapshots
Note
Volumes cannot be members of a ViPR Controller consistency group. Before you runChange Virtual Pool, remove the volume that you want to protect with RecoverPoint fromany ViPR Controller consistency group. ViPR Controller creates a consistency group foryour volume and places your volume in it.
Block Storage Services > Change Volume Virtual Pool
The Change Volume Virtual Pool service includes many functions for moving a volume toa virtual pool. Adding a volume to a virtual pool adds the storage capacity of that volumeto the virtual pool. Additionally, volumes added to a virtual pool that includesRecoverPoint protection are automatically protected by RecoverPoint .
Before you begin
Before you can add RecoverPoint protection to a VPLEX virtual volume, your environmentmust meet the following requirements:
l The VPLEX virtual volume must have been provisioned through ViPR Controller. Tolearn more about how to provision VPLEX virtual volumes through ViPR Controller,see:
n Export a VPLEX Local Vritual Volume to a Host or Cluster on page 63
n Export a VPLEX Metro Virtual Volume to a Host or Cluster on page 137
l The volume that you want to protect cannot be a member of a ViPR Controllerconsistency group. Remove the VPLEX virtual volume from all ViPR Controllerconsistency groups. When you run the Change Virtual Pool service, the service addsthe ViPR Controller volume to a ViPR Controller consistency group.
Note
The exception is when you are changing volumes in a consistency group fromRecoverPoint protection to MetroPoint. The change is made on all volumes in theconsistency group.
l The virtual pool to which you are add your volume must have Protection System setto EMC RecoverPoint. It also must have at least one RecoverPoint Copy.
l The target virtual pool must have the same High Availability setting as the sourcevirtual pool.
l If the High Availability setting of your source virtual pool is VPLEX Distributed, theHigh Availability virtual pools of the source and target volumes must specify the samevirtual arrays.
Supporting VPLEX high availability volumes with RecoverPoint protection
116 EMC ViPR Controller 2.4.0.0 ViPR Controller Integration with RecoverPoint and VPLEX User and Administration Guide
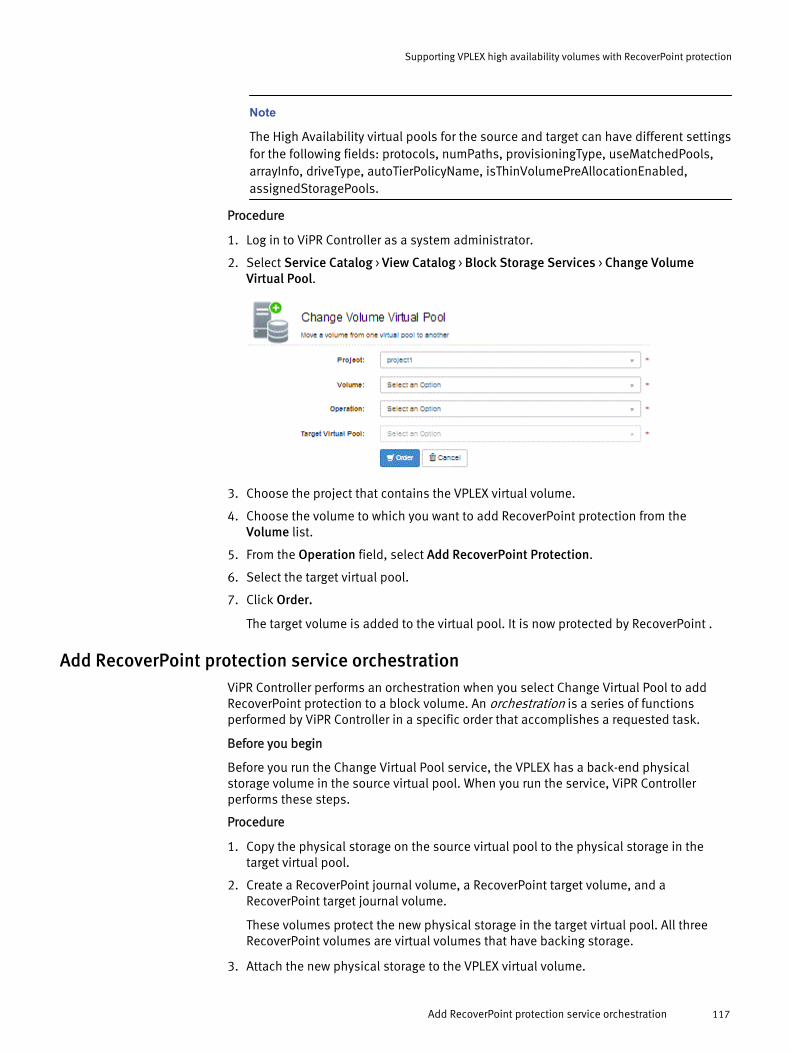
Note
The High Availability virtual pools for the source and target can have different settingsfor the following fields: protocols, numPaths, provisioningType, useMatchedPools,arrayInfo, driveType, autoTierPolicyName, isThinVolumePreAllocationEnabled,assignedStoragePools.
Procedure
1. Log in to ViPR Controller as a system administrator.
2. Select Service Catalog > View Catalog > Block Storage Services > Change VolumeVirtual Pool.
3. Choose the project that contains the VPLEX virtual volume.
4. Choose the volume to which you want to add RecoverPoint protection from theVolume list.
5. From the Operation field, select Add RecoverPoint Protection.
6. Select the target virtual pool.
7. Click Order.
The target volume is added to the virtual pool. It is now protected by RecoverPoint .
Add RecoverPoint protection service orchestrationViPR Controller performs an orchestration when you select Change Virtual Pool to addRecoverPoint protection to a block volume. An orchestration is a series of functionsperformed by ViPR Controller in a specific order that accomplishes a requested task.
Before you begin
Before you run the Change Virtual Pool service, the VPLEX has a back-end physicalstorage volume in the source virtual pool. When you run the service, ViPR Controllerperforms these steps.
Procedure
1. Copy the physical storage on the source virtual pool to the physical storage in thetarget virtual pool.
2. Create a RecoverPoint journal volume, a RecoverPoint target volume, and aRecoverPoint target journal volume.
These volumes protect the new physical storage in the target virtual pool. All threeRecoverPoint volumes are virtual volumes that have backing storage.
3. Attach the new physical storage to the VPLEX virtual volume.
Supporting VPLEX high availability volumes with RecoverPoint protection
Add RecoverPoint protection service orchestration 117

4. Delete the old physical storage.
5. Build a ViPR Controller consistency group using the name of the volume you specifiedin the service dialog.
6. Add the new physical volume to the consistency group.
Upgrading an existing RecoverPoint +VPLEX CRR setup toMetroPoint CRR
You can change the protection of an existing volume from RecoverPoint +VPLEX CRR toMetroPoint CRR.
Before you begin
The target virtual pool must be identical to the original virtual pool, with the except thatthe target virtual pool has:
l Data Protection setting of VPLEX Distributed.
l The target virtual array and virtual pool for the RecoverPoint copy defined in DataProtection > RecoverPoint Copies > Add Copy. Optionally, you can also set a separatevirtual array and virtual pool for the journal volume of the RecoverPoint copy.
l Protect Source Site selected in Data Protection > RecoverPoint Advanced settings.
l Protect HA Site selected in Data Protection > RecoverPoint Advanced settings .
The protection of the volume is changed by moving it to another virtual pool. This changeaffects the entire consistency group and all volumes in the consistency group areupgraded. But the operation is non-disruptive, as all of the bookmarks and history of theconsistency remain the same. There is no need to select a consistency group.
Procedure
1. Select Service Catalog > Block Storage Services > Change Volume Virtual Pool
2. Select the Project that contains the volume.
3. Select the existing RecoverPoint +VPLEX source volume.
4. In the Operation list, select Change RecoverPoint Protection to MetroPoint.
5. Select the Target Virtual Pool that includes the settings described in Pre-requisites.
6. Select Order.
Supporting VPLEX high availability volumes with RecoverPoint protection
118 EMC ViPR Controller 2.4.0.0 ViPR Controller Integration with RecoverPoint and VPLEX User and Administration Guide

Data Protection panel fieldsThe following table shows the fields of the Data Protection panel in the ViPR Controllervirtual pool configuration.
Table 3 Data Protection Panel Fields
Field Description
maximum snapshots Maximum number of local snapshots allowed for resourcesfrom this Virtual Pool. This number is compared to the VNX orVMAX
continuous copies Maximum number of native continuous copies allowed forresources from this Virtual Pool.
Continuous Copies Virtual Pool Select a different Virtual Pool to use for native continuouscopies (applicable only if maximum copies > 0). If this is notspecified, the Continuous Copies will reside in the currentvirtual pool.
Protection Systems None, RecoverPoint , or SRDF.
Replication Mode Synchronous or Asynchronous.Volumes that are replicated by systems like SRDF andRecoverPoint can operate in synchronous or asynchronousstates. When in a synchronous state, writes are notacknowledged back to the host until the remote volume hasbeen written. Writes are slower but that way you areguaranteed that you have a consistent remote copy.
With asynchronous mode the write acknowledge gets back tothe host immediately after the request is issued. The data isbuffered until it is transmitted across the wire and written tothe remote volume as your configuration permits. Withasynchronous mode you can have a more remote copy, butthere is latency between the time of the write request and thetime of the data update on the array.
RPO The RecoverPoint Point Objective (or RPO) is the point in timeto which you are required to recover data, for a specificapplication, as defined by your organization. This is generallya definition of what an organization determines is anacceptable loss in a disaster situation.
For example, suppose a company’s data must be restored towithin 30 minutes of the disaster event and the time it takes toget the recovered data back into production is 6 hours:
l The RPO is 30 minutes
l The RTO is 6 hours
For additional information, see the RecoverPointdocumentation.
RecoverPoint Journal Size The amount of storage (in bytes, MB, GB, TB) allocated toRecoverPoint journals.
Supporting VPLEX high availability volumes with RecoverPoint protection
Data Protection panel fields 119

Table 3 Data Protection Panel Fields (continued)
Field Description
RecoverPoint Copies Click Add Copy to add an instance of a RecoverPoint to thevirtual pool.
Protect Source Site When you are using RecoverPoint to protect a VPLEXDistributed volume, this option protects from the primaryVPLEX site for the source volume to the target virtual array.
Protest HA Site When you are using RecoverPoint to protect a VPLEXdistributed volume, this field enables RecoverPoint protectionfrom the High Availability VPLEX site for the source volume tothe target virtual array.
Active Site Choose Source or High Availability. If you are building aMetroPoint configuration, both legs of the VPLEX distributedvolume are protected by RecoverPoint . You must choosewhich leg of the VPLEX Metro is the active leg. The other leg isthe standby leg of the VPLEX Metro.
Supporting VPLEX high availability volumes with RecoverPoint protection
120 EMC ViPR Controller 2.4.0.0 ViPR Controller Integration with RecoverPoint and VPLEX User and Administration Guide

CHAPTER 10
ViPR Controller Support for MetroPoint
This chapter contains the following topics:
l ViPR Controller support for RecoverPoint MetroPoint Overview............................ 122l ViPR Controller and MetroPoint 3-Site Topology: Physical Datacenter Requirements
........................................................................................................................... 122l ViPR Controller and MetroPoint 2-Site Topology: Physical Datacenter Requirements
........................................................................................................................... 124l Required Discoveries...........................................................................................125l ViPR Controller and MetroPoint: Virtual data center configuration........................125l Create a block volume in a MetroPoint environment............................................ 126
ViPR Controller Support for MetroPoint 121

ViPR Controller support for RecoverPoint MetroPoint OverviewViPR Controller supports MetroPoint topologies in RP-VPLEX integrated sites.
Metropoint offers the operational recovery features of VPLEX Metro with the disasterrecovery capabilities of RecoverPoint . MetroPoint can be either a 2-site or 3-sitetopology.
The MetroPoint 3-site topology is an enhancement that adds the capability to protectboth sides of a VPLEX Metro to a common third site using RecoverPoint CRR.
The MetroPoint 2-site topology has a local copy of RecoverPoint at each site.
This chapter describes a simple 3-site MetroPoint setup. MetroPoint installations caninvolve many configurations and use many types of block storage arrays. For a completelist of ViPR Controller-supported MetroPoint configurations, see the ViPR ControllerSupport Matrix .
For the minimum software revisions for ViPR Controller integration with MetroPoint , seethe . ViPR Controller Support Matrix
ViPR Controller and MetroPoint 3-Site Topology: PhysicalDatacenter Requirements
A MetroPoint 3-site topology typically includes three physical data centers.
Sample MetroPoint 3-site Physical Configuration on page 123 shows an example of thephysical infrastructure of a 3-site MetroPoint configuration.
ViPR Controller Support for MetroPoint
122 EMC ViPR Controller 2.4.0.0 ViPR Controller Integration with RecoverPoint and VPLEX User and Administration Guide

Figure 35 Sample MetroPoint 3-site Physical Configuration
In Figure 35 on page 123, Site 1 and Site 2 host the two clusters in a VPLEX Metro setup.Each site has an RPA configured. Each site has a block storage array as the backingstorage for the VPLEX cluster. The block arrays that provide the backing storage can beany of the following:
l EMC VMAX
l EMC VNX for Block
l EMC XtremIO
The RecoverPoint system that provides the disaster recovery features integrates all threeof the RPA clusters, one at each site. To support MetroPoint, the RecoverPoint systemmust be one of the supported versions. For information on supported versions ofRecoverPoint , see the ViPR Controller Support Matrix.
Additionally, all masking and zoning to the protected arrays must be complete, and theRecoverPoint splitters must be correctly installed before you discover the protectionsystem in ViPR Controller.
Once your RecoverPoint Appliance is under management, you should rediscover theProtection System whenever you make a change to the RecoverPoint configuration.
Site 3 is the disaster recovery site whose data is hosted on a VPLEX with a VMAX backend, in this example but it can also be XtremIO or VNX for Block. The DR site is physicallyseparate from Site 1 and Site 2.
You can use either Cisco or Brocade switches to enable communication between theelements of the three data centers. For more information on supported versions of thenetwork technologies, see the . ViPR Controller Support Matrix
ViPR Controller Support for MetroPoint
ViPR Controller and MetroPoint 3-Site Topology: Physical Datacenter Requirements 123

ViPR Controller and MetroPoint 2-Site Topology: PhysicalDatacenter Requirements
A MetroPoint 2-site topology typically includes two physical data centers.
The figure shows an example of the physical infrastructure of a 2-site MetroPointconfiguration.
Figure 36 Sample MetroPoint 2-site Physical Configuration
In the figure, Site 1 and Site 2 host the two clusters in a VPLEX Metro setup. Each site hasa block storage array as the backing storage for the VPLEX cluster. For information onsupported configurations, and the complete list of block arrays that can provide thebacking storage, see the ViPR Controller Support Matrix which can be found on the ViPRController Product Documentation Index .
For information on supported configurations, see the
The local RPA clusters, one at each site, are part of one RecoverPoint system. However,there is no replication between the two RPA clusters. The metro link from the VPLEX isused to maintain synchronization and replication between the RPA clusters. To supportMetroPoint, the RecoverPoint system must be one of the supported versions. Forinformation on supported versions of RecoverPoint , see the ViPR Controller SupportMatrix.
Additionally, all masking and zoning to the protected arrays must be complete, and theRecoverPoint splitters must be correctly installed before you discover the protectionsystem in ViPR Controller.
Once your RecoverPoint Appliance is under management, you should rediscover theProtection System whenever you make a change to the RecoverPoint configuration.
You can use either Cisco or Brocade switches to enable communication between theelements of the two data centers. For more information on supported versions of thenetwork technologies, see the ViPR Controller Support Matrix.
ViPR Controller Support for MetroPoint
124 EMC ViPR Controller 2.4.0.0 ViPR Controller Integration with RecoverPoint and VPLEX User and Administration Guide

Required DiscoveriesBefore you can set up a virtual data center in ViPR Controller that contains all theelements of your MetroPoint configuration, you must complete the required discoveries.
Discover all of the following elements:
l Discover the physical arrays: three for a 3-site MetroPoint, two for a 2-site MetroPoint.
l The VPLEX Metro.
l For a 3-site MetroPoint, the remote VPLEX in the DR site. The remote VPLEX can beeither a standalone local cluster or one cluster of a Metro VPLEX system.
l The Fabric Managers that enable connectivity between the VPLEX clusters, thephysical arrays, the host and the data protection systems. Typically, there is onefabric manager for each physical site.
l One host or cluster.
l A RecoverPoint appliance with the appropriate number of clusters. The RecoverPointappliance should be discovered last, after all the other elements in your virtual datacenter have been discovered.
Note
The entire route from the host to the physical storage must be discovered by ViPRController before you can successfully run the VPLEX -related services.
ViPR Controller and MetroPoint: Virtual data center configurationTo build a virtual data center from a MetroPoint topology, there are certain prerequisitesyou must complete.
Before you build the virtual arrays for your MetroPoint configuration, you must completethe discoveries of each element - the arrays, the network switch, the RecoverPoint RPAs,and the VPLEX . See Required Discoveries on page 125 for more information.
The example virtual arrays in the following figure each contain a VPLEX cluster fronting aVMAX back end array.
You must add the VSANs or fabrics necessary to establish connections between all theelements in each physical data center to each virtual array.
ViPR Controller Support for MetroPoint
Required Discoveries 125

Figure 37 Virtual Data Center Configuration
Create a block volume in a MetroPoint environmentThe Create Block Volume service creates a distributed VPLEX virtual volume withRecoverPoint protection. The service creates physical storage devices on the back endarrays. It also creates one virtual volume to represent the two physical storage volumesthat are VPLEX distributed across cluster 1 and cluster 2 of the VPLEX . Create BlockVolume does not export the volume to the host.
Before you begin
To run this service, your environment must meet all of the following requirements.
l You must log in to ViPR Controller as a tenant administrator, or as a user with accessto the project that contains the volume you want to export.
l Your physical datacenter must meet all of the requirements described in the section ViPR Controller and MetroPoint: Physical Datacenter Requirements on page 122.
l From ViPR Controller, you must discover the physical infrastructure listed in thesection entitled Required Discoveries on page 125.
Procedure
1. Create a ViPR Controller project.
See Create a ViPR Controller Project on page 13.
2. Build a VPLEX consistency group.
ViPR Controller Support for MetroPoint
126 EMC ViPR Controller 2.4.0.0 ViPR Controller Integration with RecoverPoint and VPLEX User and Administration Guide
See Create a consistency group on page 14.
3. Build three virtual arrays. The first (Boston, in this example) is for the VPLEX sourcevolume and serves as the active volume for the RecoverPoint protection. The second(New York) is the VPLEX High Availability target. The third (Syracuse) is theRecoverPoint target.
See Create_three_virtual arrays on page 127.
4. Add networks to the virtual arrays to enable connectivity between all the hardwarerequired by the source VPLEX cluster, the highly available VPLEX cluster and thedisaster recovery site. Alternatively, you can add specific ports to the virtual array byusing ViPR Controller's Storage Ports dialog.
See Add networks to the virtual arrays on page 128.
5. To ensure that RecoverPoint integration with the elements in the virtual arrays isestablished, rediscover the RecoverPoint appliance from ViPR Controller.
See Rediscover RecoverPoint on page 130.
6. Create the RecoverPoint target virtual pool for the RecoverPoint . Assign the Syracusevirtual array to this virtual pool.
See Create a RecoverPoint Target Virtual Pool on page 131.
7. Create the VPLEX Highly Available virtual pool for the VPLEX Metro high availabilitycluster. Assign the New York virtual array to this virtual pool.
See Create a MetroPoint High Availability Virtual Pool on page 132.
8. Create the source virtual pool. This virtual pool is assigned to the source virtual array(Boston), and has the High Availability option set to VPLEX Distributed. In theHigh Availability option fields, specify the VPLEX Highly Available virtual pool. In theData Protection panel, add a RecoverPoint and specify the Syracuse virtual pool forthe RecoverPoint target. In the VPLEX Distributed Settings for RecoverPoint panel,enable Protect Source Site and Protect HA Site. Set Active Site to Source.
See Create a MetroPoint Source Virtual Pool on page 133.
9. Run Block Storage Services > Create Block Volume from the service catalog to createthe distributed VPLEX virtual volume with RecoverPoint Protection.
See Create a VPLEX distributed block volume in your MetroPoint configuration on page135.
Create the virtual arraysIn this example, there is a VPLEX Metro with two clusters, and a VPLEX Local in the DRsite. You must create three virtual arrays - one for each data center.
Before you begin
l You must log in to the ViPR Controller UI as a System Administrator.
l Complete the discoveries described in the section Required Discoveries on page 125.
From the ViPR Controller user interface, create three arrays as follows:
Procedure
1. Select Virtual Assets > Virtual Array.
2. Click Add.
3. Give the virtual array a name (Boston - Site1).
4. Click Save. The Boston virtual array is added to the list of virtual arrays.
ViPR Controller Support for MetroPoint
Create the virtual arrays 127

5. Click Add a second time, and repeat step 3 to step 4 to create a second virtual arraycalled New York - Site 3. Both virtual arrays are required to set up a VPLEXdistributed volume with ViPR Controller.
6. Click Add a third time, and repeat step 3 to step 4 to create a third virtual array calledSyracuse DR. This virtual array is for your RecoverPoint Target site.
Enable connectivity between elements in your virtual arraysTo add storage systems, hosts and a VPLEX to your virtual array, you must add ports tothe array through which physical data center elements can communicate.
You can add ports to your virtual array in two ways:
l If networks are isolated per site, open the virtual array and choose Networks. Whenyou add VSANs or fabrics to your virtual array, ViPR Controller uses the ports definedin those VSANs or fabrics to communicate with the array.
l If networks are stretched between sites, open the virtual array and choose StoragePorts. You can hand-select storage ports that enable connectivity between yourVPLEX , the physical storage array and the host.
Adding networks to a virtual arrayThe fastest and simplest way to enable communication among resources in your virtualdata center is to add networks to your virtual arrays.
Before you begin
Use ViPR Controller to discover fabric managers.
Networks are collections of ports. You use software provided by your switch vendor todefine networks.
Procedure
1. Edit a virtual array.
The Edit Virtual Array configuration page opens.
2. Click Networks.
The Networks page opens.
3. Click Add Existing.
The Add Network dialog box opens and displays a list of fabrics or VSANs.
4. Select the check box next to each fabric or VSAN you want to add to your virtual array.
The networks that you add must provide connectivity between the VPLEX and thephysical storage arrays.
5. Click Add.
6. Repeat the previous steps for each virtual array in your configuration.
Results
Click the name of the virtual array in the breadcrumb bar at the top of the screen tonavigate back to the Edit Virtual Array page. You should see the VPLEX and the twophysical storage systems in the Associated Storage Systems list.
ViPR Controller Support for MetroPoint
128 EMC ViPR Controller 2.4.0.0 ViPR Controller Integration with RecoverPoint and VPLEX User and Administration Guide

Figure 38 Associated storage systems after adding networks
Adding ports to a virtual arrayYou can enable connectivity between end-points in a virtual array by manually selectingthe ports that should be network connected.
Before you begin
l You must have System Admin privileges to edit a virtual array.
l Before adding ports to your virtual array, complete all required discoveries for yourdatacenter.
Adding specific ports to your virtual array gives you a level of granular control over whichports you use to communicate with specific resources in your data center. For example,you can set aside certain ports on your VMAX to communicate with VPLEX .
It is very important for VPLEX to isolate the front end ports for cluster1 in a virtual arrayand cluster2 in a separate virtual array. You cannot mix VPLEX front end ports from bothclusters in the same virtual array. This will result in errors during service execution.
Procedure
1. At the ViPR Controller UI, select Virtual Assets > Virtual Arrays and select the virtualarray that you want to edit.
The Edit Virtual Array screen appears.
2. Click Storage Ports.
ViPR Controller Support for MetroPoint
Enable connectivity between elements in your virtual arrays 129

The Storage Ports page opens.
3. Click Add. The Add Storage Ports dialog box opens.
4. Type a string that filters the ports list in the Search field. For example, if you enter fa-8in the Search field, the Storage Ports list displays only the ports on arrays whosenames matches that string.
5. Select the check boxes next to each port that you want to add to the virtual array.
6. Click Add.
ViPR Controller adds the storage ports you selected to the virtual array.
Rediscover the RecoverPoint ApplianceTo ensure that the RecoverPoint appliance is integrated with the other elements in thevirtual arrays, you must rediscover the RecoverPoint appliance.
Before you begin
Complete the instructions in Create Three Virtual Arrays on page 127.
Complete the instructions in Enable connectivity between elements in your virtualarrays on page 128.
Procedure
1. Log in to ViPR Controller as a user with access to the RecoverPoint appliance.
ViPR Controller Support for MetroPoint
130 EMC ViPR Controller 2.4.0.0 ViPR Controller Integration with RecoverPoint and VPLEX User and Administration Guide

2. Choose Physical Assets > Fabric Managers.
3. Click the check box next to the fabric manager.
4. Click Rediscover.
Create a RecoverPoint Target Virtual PoolFollow the instructions below to build a RecoverPoint Target virtual pool for your DR site.For the MetroPoint configuration described in this article, three virtual pools are required- one for each virtual array. The MetroPoint source virtual pool establishes Virtual Array 1as the Active leg of the VPLEX Metro. The MetroPoint High Availability virtual poolestablishes Virtual Array 2 as the standby leg of the VPLEX Metro.
Before you begin
Complete all the discoveries described in Required Discoveries on page 125.
Build the virtual arrays described in Create Three Virtual Arrays on page 127.
Enable connectivity between the elements within the virtual arrays, as described in Enable connectivity between elements in your virtual arrays on page 128.
Procedure
1. Select Virtual Assets > Block Virtual Pools . The Create Virtual Pool screen appears.
2. Enter the information in Virtual pool configuration: RecoverPoint Target on page 131.
3. Ensure that the number of physical pools that meet your virtual pool criteria is 1 orgreater.
4. Click Save.
Virtual pool configuration: RecoverPoint TargetA MetroPoint configuration in ViPR Controller requires three virtual arrays and threevirtual pools - a MetroPoint source vpool, a MetroPoint High Availability vpool and aRecoverPoint target vpool. The table below shows the configuration for the RecoverPointtarget virtual pool.
Table 4 RecoverPoint Target Virtual Pool Settings
Field Description
Name Enter a name. Naming conventions are data center-specific.
Description Enter a string description.
Virtual Arrays Choose Varray3.
Enable Quota Disabled. Quotas are not required for these virtual pools.
Hardware
Provisioning Type Thin
Protocols FC
Drive Type Site-specific. Set these according to the requirements of your datacenter.
System Type
RAID Levels
Multi-volume Consistency
ViPR Controller Support for MetroPoint
Create a RecoverPoint Target Virtual Pool 131

Table 4 RecoverPoint Target Virtual Pool Settings (continued)
Field Description
Expandable
SAN Multi Path (AllFields)
Site-specific
High Availability
High Availability VPLEX Local
Data Protection (AllFields)
Site-specific.
Access Control (AllFields)
Storage Pools The number of matching storage pools must be 1 or greater.
Create a MetroPoint High Availability Virtual PoolFollow the instructions below to build a MetroPoint High Availability virtual pool. TheMetroPoint High Availability virtual pool establishes Virtual Array 2 as the standby leg ofthe VPLEX Metro.
Before you begin
Complete all the discoveries described in Required Discoveries on page 125.
Build the virtual arrays described in Create Three Virtual Arrays on page 127.
Enable connectivity between the elements within the virtual arrays, as described in Enable connectivity between elements in your virtual arrays on page 128.
Procedure
1. Select Virtual Assets > Block Virtual Pools . The Create Virtual Pool screen appears.
2. Enter the information in Virtual pool configuration: RecoverPoint Target on page 131.
3. Ensure that the number of physical pools that meet your virtual pool criteria is 1 orgreater.
4. Click Save.
Virtual pool configuration: High AvailabilityA MetroPoint configuration in ViPR Controller requires three virtual arrays and threevirtual pools. The MetroPoint High Availability virtual pool establishes Virtual Array 2 asthe standby leg of the VPLEX Metro. The table below shows the configuration for theMetroPoint High Availability virtual pool.
Table 5 High Availability Virtual Pool Settings
Field Description
Name Enter a name. Naming conventions are data center-specific.
Description Enter a string description.
ViPR Controller Support for MetroPoint
132 EMC ViPR Controller 2.4.0.0 ViPR Controller Integration with RecoverPoint and VPLEX User and Administration Guide

Table 5 High Availability Virtual Pool Settings (continued)
Field Description
Virtual Arrays Choose Varray2.
Enable Quota Disabled. Quotas are not required for these virtual pools.
Hardware
Provisioning Type Thin
Protocols FC
Drive Type Site-specific. Set these according to the requirements of your datacenter.
System Type
RAID Levels
Multi-volume Consistency
Expandable
SAN Multi Path (AllFields)
Site-specific
High Availability
High Availability VPLEX Local
Data Protection (AllFields)
Site-specific.
Access Control (AllFields)
Storage Pools The number of matching storage pools must be 1 or greater.
Create a MetroPoint Source Virtual PoolFor the MetroPoint configuration described in this article, two virtual pools are required.The MetroPoint source virtual pool establishes Virtual Array 1 as the Active leg of theVPLEX Metro. Virtual Array 2 is the standby leg of the VPLEX Metro.
Before you begin
Complete all the discoveries described in Required Discoveries on page 125.
Build the virtual arrays described in Create Three Virtual Arrays on page 127.
Enable connectivity between the elements within the virtual arrays, as described in Enable connectivity between elements in your virtual arrays on page 128.
Create the MetroPoint Target Virtual Pool on page 131.
Procedure
1. Select Virtual Assets > Block Virtual Pools . The Create Virtual Pool screen appears.
2. Enter the information in Virtual pool configuration: MetroPoint Source on page 134.
3. Ensure that the number of physical pools that meet your virtual pool criteria is 1 orgreater.
4. Click Save.
ViPR Controller Support for MetroPoint
Create a MetroPoint Source Virtual Pool 133

Virtual pool configuration: MetroPoint SourceA MetroPoint configuration in ViPR Controller requires three virtual arrays and threevirtual pools. The virtual arrays for site 1 and site 2, which include both clusters of theVPLEX Metro, share a single virtual pool. The settings for the MetroPoint Source virtualpool are shown in the following table.
Table 6 MetroPoint Source Virtual Pool Settings
Field Description
Name Enter MetroPoint_Source. Naming conventions are data center-specific.
Description Enter a string description.
Virtual Arrays Choose Virtual Array 1.
Enable Quota Disabled. Quotas are not required for these virtual pools.
Hardware
Provisioning Type Thin
Protocols FC
Drive Type Site-specific. Set these fields to values appropriate for your datacenter.
If you choose a System Type of EMC VMAX, note that you cannotset Host IO limits on a virtual pool that includes RecoverPoint
protection. Leave the Host Front End Bandwidth and Host FrontEnd I/O Limit fields at the default (0).
System Type
RAID Levels
Multi-volume Consistency Enabled
Expandable Site-specific
SAN Multi Path (AllFields)
Site-specific
High Availability
High Availability VPLEX Distributed
High Availability VirtualArray
VArray2. This is the virtual array for the second VPLEX cluster in
the VPLEX Metro.
High Availability VirtualPool
MetroPoint_HA. This is the virtual pool you built for the highavailability VPLEX cluster.
Data Protection
Maximum Snapshots Site-specific.
Maximum ContinuousCopies
Continuous Copies VirtualPool
Protection System EMC RecoverPoint
ViPR Controller Support for MetroPoint
134 EMC ViPR Controller 2.4.0.0 ViPR Controller Integration with RecoverPoint and VPLEX User and Administration Guide

Table 6 MetroPoint Source Virtual Pool Settings (continued)
Field Description
RecoverPoint SourceJournal Size
Site-specific.
RecoverPoint Copies Specify one RecoverPoint copy. The active VPLEX Metro clusterreplicates its data on the DR RecoverPoint instance.
Virtual Array varray3
Virtual Pool Enter the name of the RecoverPoint target virtual pool. In this
example, enter RP_Target.
Journal Size Min
VPLEX Distributed Settings for RecoverPoint
Protect Source Site Enabled. In a MetroPoint configuration, both legs of the VPLEXMetro are protected by RecoverPoint .
Protect HA Site Enabled. In a MetroPoint configuration, both legs of the VPLEXMetro are protected by RecoverPoint .
Active Site Source
Create a VPLEX distributed block volume in your MetroPoint configurationYou can create a VPLEX distributed block volume in your MetroPoint environment usingthe Block Storage Services > Create Block Volume operation from the Service Catalog atthe ViPR Controller UI.
Before you begin
You must be a System Admin to create a VPLEX block volume.
Procedure
1. Run Block Storage Services > Create Block Volume from the service catalog.
2. Select the virtual array for the active leg of the VPLEX Metro in the Virtual Array field.In this example, choose VArray1.
3. Select the MetroPoint source virtual pool in the Virtual Pool field.
4. Select the project that you created. See Create a ViPR Controller Project on page 13.
5. Type a string description for the block volume.
6. Choose the consistency group that you created. See Create a consistency group onpage 14.
7. Set the number of volumes to 1 or more.
8. Set the size of the volume in gigabytes.
9. Click Order.
ViPR Controller Support for MetroPoint
Create a VPLEX distributed block volume in your MetroPoint configuration 135

ViPR Controller Support for MetroPoint
136 EMC ViPR Controller 2.4.0.0 ViPR Controller Integration with RecoverPoint and VPLEX User and Administration Guide

CHAPTER 11
Exporting a VPLEX Metro Virtual Volume to a Hostor Cluster
This chapter contains the following topics:
l Export a VPLEX Metro Virtual Volume to a Host or Cluster.....................................138l ViPR Controller Integration with VPLEX Metro: Data Center Requirements............ 138l Required Discoveries...........................................................................................139l Block Storage Services > Create Block Volume..................................................... 139l Block Storage Services > Export VPLEX Volume.................................................... 142l Block Storage Services > Create Block Volume for a Host..................................... 143l Block Storage Services > Remove Block Volume...................................................145l Worldwide Names on VPLEX Volumes Provisioned through ViPR Controller..........145l Supported VPLEX Versions.................................................................................. 146
Exporting a VPLEX Metro Virtual Volume to a Host or Cluster 137

Export a VPLEX Metro Virtual Volume to a Host or ClusterEMC ViPR Controller supports VPLEX Metro High Availability. This support includes datacenter configurations that cross-connect hosts and use host failover technologies suchas VMware HA.
The following services in the ViPR Controller service catalog enable you to build andexport VPLEX distributed volumes in a VPLEX Metro environment:
l Block Storage Services > Create Block Volume on page 139
l Block Protection Services > Export VPLEX Volume on page 142
l Block Storage Services > Create Block Volume For a Host on page 143
This article also describes the Block Storage Services > Remove Block Volumes on page70 service. This service removes a VPLEX virtual volume and its underlying back endstorage.
ViPR Controller Integration with VPLEX Metro: Data CenterRequirements
The following figure shows a simple data center configurations that ViPR Controllersupports. The following configuration shows a VPLEX Metro that has two clusters. Twoisolated fabrics enable connectivity between the hardware elements in each physicaldata center.
ViPR Controller can provision a VPLEX distributed volume to Host 1. This volume appearson both VPLEX Metro Cluster 1 and VPLEX Metro Cluster 2. Similarly, ViPR Controller canprovision VPLEX distributed volumes with high availability Host 2.
Exporting a VPLEX Metro Virtual Volume to a Host or Cluster
138 EMC ViPR Controller 2.4.0.0 ViPR Controller Integration with RecoverPoint and VPLEX User and Administration Guide
Writes to the distributed volume are saved on the physical storage managed by eachVPLEX cluster, so data is always saved in 2 places. This feature protects the data in caseof an array failure.
The following list shows the data center requirements for this configuration:
l Physical connectivity must exist among the relevant components in each data center.In the example in the diagram, the Brocade switches in Boston and Cisco switches inNew York enable the connectivity in each data center.
l The VPLEX Metro clusters must communicate.
l The VPLEX virtual volume can exist on ViPR Controller-managed block storage, suchas a VNX or VMAX array.
l The VPLEX clusters also can use storage on a third-party block storage array that ViPRController does not specifically support. ViPR Controller can ingest this storage andexport it to hosts that it manages.
l The networks you add to the virtual arrays must contain the endpoints necessary toprovision the back end array volumes to the VPLEX , and the virtual volumes from theVPLEX to a host. ViPR Controller also enables you to filter the ports in the virtual arrayand select only those ports you need to support provisioning.
Note
ViPR Controller does not support physical data center configurations that include cross-connected back end arrays.
Required DiscoveriesFrom ViPR Controller, you must discover the following hardware in order to export a VPLEXvirtual volume to a host or cluster:
l The hosts (or cluster) to which you want to provision storage
l The VPLEX that manages both clusters in your VPLEX Metro configuration
l The block storage arrays where the VPLEX clusters have claimed storage
l Any Brocade or Cisco switches required to connect the hosts to the VPLEX clusters
l Any Brocade or Cisco switches required to connect the physical storage to the VPLEXclusters
l The physical arrays that host the VPLEX virtual volumes
Note
Before you can run the VPLEX -related services, ViPR Controller must discover the entireroute from the host to the physical storage.
Block Storage Services > Create Block VolumeThe Create Block Volume service creates either a local or distributed VPLEX virtualvolume, depending on the settings within the virtual pool that you select for the order. Italso creates physical storage devices on the back end arrays, the VPLEX virtual volume onthe source VPLEX cluster, and the high availability volume on the target VPLEX cluster.Create Block Volume does not export the volume to the host.
Before you begin
To run this service, your environment must meet all of the following requirements:
Exporting a VPLEX Metro Virtual Volume to a Host or Cluster
Required Discoveries 139

l You must log in to ViPR Controller as a tenant administrator, or as a user with accessto the project that contains the volume you want to export.
l Your physical data center must meet the requirements described in ViPR ControllerIntegration with VPLEX Metro: Data Center Requirements on page 138.
l From ViPR Controller, you must discover the physical infrastructure in Requireddiscoveries on page 139.
Note
If using existing VPLEX Storage Views for distributed devices, the Storage View namesMUST be unique across both VPLEX clusters (in this example, cluster-1 and cluster-2)
Procedure
1. Create a ViPR Controller project. See Create a ViPR Controller Project on page 13
2. Create a source VPLEX virtual array for VPLEX cluster-1.
a. Select Virtual Assets > Virtual Array
b. Click Add.
c. Type the name of the virtual array.
d. Click Save.
e. Set SAN Zoning to Automatic.
f. Add storage ports or networks to the source virtual array to enable physicalconnectivity from VPLEX cluster-1 to the respective connected hosts and clusters.See Adding networks to a virtual array on page 128 or Adding ports to a virtualarray on page 129.
3. Create a target VPLEX virtual array for VPLEX cluster-2.
a. Select Virtual Assets > Virtual Array
b. Click Add.
c. Type the name of the virtual array.
d. Click Save.
e. Set SAN Zoning to Automatic.
f. Add storage ports or networks to the target virtual array to enable physicalconnectivity from VPLEX cluster-2 to the respective connected hosts and clusters.See Adding networks to a virtual array on page 128 or Adding ports to a virtualarray on page 129.
4. Create the target virtual pool.
a. Select Virtual Assets > Block Virtual Pools.
b. Select the target virtual array that you created in step 3.
c. If resources from this virtual pool will support the use of consistency groups, thenselect Hardware and Multi-Volume Consistency.
d. Select High Availability and set High Availability to VPLEX Local
e. Select Storage Pools and then either set Pool Assignment to Automatic or if youwant to manually select a subset of storage pools, then set it to Manual and selectyour storage pools.
Exporting a VPLEX Metro Virtual Volume to a Host or Cluster
140 EMC ViPR Controller 2.4.0.0 ViPR Controller Integration with RecoverPoint and VPLEX User and Administration Guide

f. Select Save.
5. Create the source virtual pool.
a. Select Virtual Assets > Block Virtual Pools.
b. Select the source virtual array that you created in step 2.
c. If resources from this virtual pool will support the use of consistency groups, thenselect Hardware and Multi-Volume Consistency.
d. Select High Availability and set High Availability to VPLEX Distributed andspecify the target virtual array you created in step 3, and the target virtual pool youcreated in step 4.
e. Select Storage Pools and then either set Pool Assignment to Automatic or if youwant to manually select a subset of storage pools, then set it to Manual and selectyour storage pools.
f. Select Save.
6. Run Block Storage Services > Create Block Volume from the service catalog to createthe distributed VPLEX virtual volume.
See Create a VPLEX Distributed Block Volume on page 141
Create a VPLEX Distributed Block VolumeCreate a VPLEX Distributed block volume:
Procedure
1. Run Block Storage Services > Create Block Volume from the service catalog.
2. Select the source virtual array in the Virtual Array field.
3. Select the source virtual pool in the Virtual Pool field.
4. Select the project that you built on page 13.
5. Type a string description for the block volume.
6. Set the consistency group field to a setting appropriate for your environment.
In this example, you can leave the consistency group setting at the default.
7. Set the number of volumes to 1 or more.
8. Set the size of the volume in gigabytes.
9. Click Order.
Results
The following figure shows a successful create block service execution.
Exporting a VPLEX Metro Virtual Volume to a Host or Cluster
Create a VPLEX Distributed Block Volume 141

Block Storage Services > Export VPLEX VolumeTo run this service, your environment must meet the following requirements.
Before you begin
l You must log in to ViPR Controller as a tenant administrator, or as a user with accessto the project that contains the volume you want to export.
l Your physical data center must meet the requirements described in Data centerrequirements on page 138.
l From ViPR Controller, you must discover the physical infrastructure listed in Requireddiscoveries on page 139.
l You must have a VPLEX virtual volume to export to a host. Block Storage Services >Create Block Volume on page 139 explains how to build the volume.
Procedure
1. Select User Mode > Service Catalog > Block Storage Services > Export Volume to a Host.
2. Select Shared or Exclusive. Shared to export the volume to every host in acluster. Exclusive exports the volume to a single host.
3. Select the Project to which the volume belongs.
4. Select the Host or cluster to which the volume will be exported.
5. Select a virtual array.
6. Select the VPLEX Volume to export.
7. Choose -1 for the default Host Logical Unit number (HLU).
8. Click Order.
Exporting a VPLEX Metro Virtual Volume to a Host or Cluster
142 EMC ViPR Controller 2.4.0.0 ViPR Controller Integration with RecoverPoint and VPLEX User and Administration Guide

The Orders page opens with the progress of the order.
Block Storage Services > Create Block Volume for a HostTo run this service, your environment must meet the following requirements.
Before you begin
l You must log in to ViPR Controller as a tenant administrator, or as a user with accessto the project that contains the volume that you want to export.
l Your physical data center must meet all of the requirements described in Datacenter_requirements on page 138.
l From ViPR Controller, you must discover the physical infrastructure listed in Discoveries on page 139.
This service creates both the physical storage device on the back end arrays and theVPLEX distributed volume. This service also exports the volume to a host or cluster.
To configure the VPLEX high availability feature, create a virtual pool with high availabilityenabled, then create a volume and assign it to the high availability virtual pool.
Procedure
1. Create a ViPR Controller project.
See Create aViPR Controller Project on page 13.
2. Create a source VPLEX virtual array for VPLEX cluster-1.
a. Select Virtual Assets > Virtual Array
b. Click Add.
c. Type the name of the virtual array.
d. Click Save.
e. Set SAN Zoning to Automatic.
f. Add storage ports or networks to the source virtual array to enable physicalconnectivity from VPLEX cluster-1 to the respective connected hosts and clusters.See Adding networks to a virtual array on page 128 or Adding ports to a virtualarray on page 129.
3. Create a target VPLEX virtual array for VPLEX cluster-2.
a. Select Virtual Assets > Virtual Array
b. Click Add.
c. Type the name of the virtual array.
d. Click Save.
e. Set SAN Zoning to Automatic.
f. Add storage ports or networks to the target virtual array to enable physicalconnectivity from VPLEX cluster-2 to the respective connected hosts and clusters.See Adding networks to a virtual array on page 128 or Adding ports to a virtualarray on page 129.
4. Create the target virtual pool.
a. Select Virtual Assets > Block Virtual Pools.
b. Select the target virtual array that you created in step 3.
Exporting a VPLEX Metro Virtual Volume to a Host or Cluster
Block Storage Services > Create Block Volume for a Host 143

c. If resources from this virtual pool will support the use of consistency groups, thenselect Hardware and Multi-Volume Consistency.
d. Select High Availability and set High Availability to VPLEX Local
e. Select Storage Pools and then either set Pool Assignment to Automatic or if youwant to manually select a subset of storage pools, then set it to Manual and selectyour storage pools.
f. Select Save.
5. Create the source virtual pool.
a. Select Virtual Assets > Block Virtual Pools.
b. Select the source virtual array that you created in step 2.
c. If resources from this virtual pool will support the use of consistency groups, thenselect Hardware and Multi-Volume Consistency.
d. Select High Availability and set High Availability to VPLEX Distributed andspecify the target virtual array you created in step 3, and the target virtual pool youcreated in step 4.
e. Select Storage Pools and then either set Pool Assignment to Automatic or if youwant to manually select a subset of storage pools, then set it to Manual and selectyour storage pools.
f. Select Save.
6. Run Block Storage Services > Create Block Volume for a Host from the service catalog.
See Create and export block volume on page 144
Run Create Block Volume for a HostTo create and export the VPLEX Distributed volume, call the service Block StorageServices > Create Block Volume for a Host from the service catalog.
Before you begin
You must be in User Mode in the user interface to perform this procedure.
Procedure
1. Run Block Storage Services > Create Block Volume for a Host from the service catalog.
2. Choose Exclusive to export the volume to a single host. Choose Shared to export thevolume to a host cluster.
3. Choose the source virtual array in the Virtual Array field.
4. Choose the source virtual pool in the Virtual Pool field.
5. Choose the project you built on page 13.
6. Give a string description to the block volume.
7. Leave the consistency group setting at the default.
8. Set the number of volumes to 1 or more.
9. Set the size of the volume in gigabytes.
10.Click Order.
Exporting a VPLEX Metro Virtual Volume to a Host or Cluster
144 EMC ViPR Controller 2.4.0.0 ViPR Controller Integration with RecoverPoint and VPLEX User and Administration Guide

Results
This service creates both the storage devices on the physical storage and the VPLEXdistributed volume as well.
Block Storage Services > Remove Block VolumeYou can run the Remove Block Volume service to remove a VPLEX virtual volume builtwith the Create Block Volume or Create Block Volume for Host services.
To run the Remove Block Volume service:
1. Log in as a ViPR Controller tenant administrator.
2. From the User menu, choose Block Storage Services > Remove Block Volume.
3. Choose the project that contains the volume to remove.
4. Click the check box next to the volume to remove.
5. Choose one of the following Deletion Types:
Full l Deletes the Volume from ViPR Controller.
l Deletes the Virtual Volume from the VPLEX .
l Deletes all exports, snapshots, clones, and mirrors associatedwith the volume.
l Deletes the physical back end storage from the physical arrays,including removing the volume from consistency groups.
InventoryOnly
Deletes the volume from ViPR Controller. All VPLEX and physicalstorage objects are left intact.
6. Click Order.
Worldwide Names on VPLEX Volumes Provisioned through ViPRController
After VPLEX volumes are provisioned through ViPR Controller, those volumes are notimmediately assigned a worldwide name (WWN).
A WWN is only assigned to a VPLEX volume when it is exported.
To view the worldwide name of a volume, choose Resources > Volumes, then click thename of the volume in the list. The following figure shows an example of a volume listing.Notice that the WWN field is blank.
Exporting a VPLEX Metro Virtual Volume to a Host or Cluster
Block Storage Services > Remove Block Volume 145

For an unexported VPLEX Local or VPLEX Metro volume, the WWN field on this screen willbe blank as shown here.
Supported VPLEX VersionsFor information on the VPLEX versions supported by ViPR Controller, refer to the EMC ViPRController Support Matrix.
Exporting a VPLEX Metro Virtual Volume to a Host or Cluster
146 EMC ViPR Controller 2.4.0.0 ViPR Controller Integration with RecoverPoint and VPLEX User and Administration Guide

CHAPTER 12
ViPR Controller Support for VPLEX DistributedVolume Mirrors
This chapter contains the following topics:
l Datacenter requirements.....................................................................................148l Discoveries......................................................................................................... 149l Virtual array and virtual pool configuration..........................................................149l Block Storage Services > Create Block Volume..................................................... 149l Remove Continuous Copies.................................................................................159l Detaching a mirror from its VPLEX virtual volume.................................................159
ViPR Controller Support for VPLEX Distributed Volume Mirrors 147

Datacenter requirementsThe following figure shows a simple datacenter configuration. It illustrates the ViPRController support for VPLEX distributed volume mirrors.
Figure 39 VPLEX Distributed Volume Mirrors
This configuration includes a VPLEX Metro configuration with two VMAX arrays (BlockArray 1 and Block Array 4) as the back end physical storage arrays. Writes from the hoststo the distributed virtual volume are written to the physical storage devices on the backend storage, and to the mirror devices on Block Array 2 and Block Array 3. With ViPRController, the VPLEX distributed volume mirrors are always located on physical storagethat is separate from the back end storage used by the VPLEX Metro. This protects yourdata against data loss in the event that one of the physical arrays fails.
The data center requirements are as follows:
l There must be physical connectivity between all the relevant components in yourdatacenter. The networks and ports added to the ViPR Controller virtual array mustcontain all the endpoints necessary to provision the back end array volumes to theVPLEX , and provision the virtual volumes from the VPLEX to a host.
l The VPLEX must be a VPLEX Metro.
l The VPLEX volume must be a VPLEX distributed virtual volume.
l The back end physical storage for the VPLEX can exist on ViPR Controller-managedblock storage such as a VNX or VMAX array.
l Only one mirror is supported for each leg of the VPLEX Metro.
l ViPR Controller does support ingestion of VPLEX volumes that have mirrors alreadyestablished. However, only the volumes are ingested. The mirrors are not.
ViPR Controller Support for VPLEX Distributed Volume Mirrors
148 EMC ViPR Controller 2.4.0.0 ViPR Controller Integration with RecoverPoint and VPLEX User and Administration Guide

DiscoveriesFrom ViPR Controller, you must discover all of the following to run the Create ContinuousCopies service.
l The hosts (or clusters) you want to access storage
l The VPLEX Metro that will contain the distributed virtual volume
l Two block storage arrays - one on each leg of the VPLEX Metro. The VPLEX uses theseas the back end storage for the virtual volume.
l Two block storage arrays - one on each leg of the VPLEX Metro. The VPLEX uses theseto contain the mirror volumes.
Note
Four physical block storage arrays are required for this configuration.
l Any Brocade or Cisco switches required to connect the hosts to the VPLEX
l Any Brocade or Cisco switches required to connect the physical storage arrays to theVPLEX
Note
The entire route from the host to the physical storage must be discovered by ViPRController before you can successfully run the VPLEX -related services.
Virtual array and virtual pool configurationThe following virtual array and virtual pool configuration is supported for a simple VPLEXMetro setup.
l Two virtual arrays - one virtual array for each VPLEX Metro cluster.
l Four virtual pools - one for each cluster of the VPLEX Metro, and one continuous copyvirtual pool for each mirror.
In this configuration, mirrors are created for both legs of the VPLEX Metro. Alternatively,you could configure a single continuous copy virtual pool for one leg of the VPLEX . In thiscase, only one side of the VPLEX would have a mirror volume. This is a supportedconfiguration.
Block Storage Services > Create Block VolumeThe Create Block Volume service creates a distributed VPLEX virtual volume. It alsocreates physical storage devices on the back end arrays. using the virtual poolsdescribed in this procedure, you can create mirror volumes on both legs of the VPLEXMetro. Create Block Volume does not export the volume to the host or create the mirrors.To create the mirrors on each leg of the VPLEX , call Create Continuous Copies.
To run this service, your environment must meet all of the following requirements:
l You must log in to ViPR Controller as a tenant administrator , or as a user with accessto the project that contains the volume that you want to export.
l Your physical data center must meet the requirements. See Datacenterrequirements on page 148
ViPR Controller Support for VPLEX Distributed Volume Mirrors
Discoveries 149

l From ViPR Controller, you must discover the physical infrastructure. See Discoveries on page 149
1. Create a ViPR Controller project. See Create a ViPR Controller Project on page 13
2. Create two virtual arrays: one for the VPLEX source volume and one for the VPLEX HighAvailability target where the source volume will be replicated. See Create Two VirtualArrays on page 150.
3. Add networks to the VPLEX source virtual array to enable physical connectivitybetween all the hardware required by the source VPLEX cluster - the hosts, theswitches, VPLEX , and the back end storage. You can also add specific ports to thevirtual array by using the ViPR Controller Storage Ports dialog.
4. Add networks to the VPLEX high availability virtual array to enable physicalconnectivity between all the hardware required by the VPLEX High Availability cluster- the switches, the VPLEX and the back end storage. Alternatively, you can addspecific ports to the virtual array by using ViPR Controller Storage Ports dialog. See Enable connectivity by adding ports on page 151.
5. Create two continuous copy virtual pools. Both the VPLEX Source and VPLEX Targetvirtual pools reference a continuous copies virtual pool that enables connectivity withthe physical storage arrays that hold the mirror volumes. See Create two continuouscopies virtual pools on page 154.
6. Create the VPLEX High Availability virtual pool. See Create the VPLEX High Availabilityvirtual pool on page 155.
7. Create the VPLEX Source virtual pool. See Create the VPLEX Source virtual pool onpage 157.
8. Run Block Storage Services > Create Block Volume from the service catalog to createthe distributed VPLEX virtual volume with mirrors. See Create a VPLEX DistributedBlock Volume with mirrors on page 158.
9. Run Block Protection Services > Create Continuous Copies to create the mirrors oneach leg of the VPLEX Metro. See Create Continuous Copies on page 159.
Create Two Virtual ArraysIn the data center described in this article, the VPLEX Metro environment has two physicaldata centers, each with its own VPLEX cluster. Create two virtual arrays - one for each datacenter.
Before you begin
l Log in to ViPR Controller as a system administrator.
l Complete the discoveries described in Discoveries on page 149.
Procedure
1. From Administrator Mode, select Virtual Assets > Virtual Array.
2. Click Add.
3. Type the name of the virtual array.
4. Select Automatic SAN Zoning.
5. Click Save to add the new virtual array to the list of virtual arrays.
6. Click Add a second time. Follow steps 3 through 5 to create a second virtual array. Youneed both virtual arrays to set up a VPLEX distributed volume with mirrors.
ViPR Controller Support for VPLEX Distributed Volume Mirrors
150 EMC ViPR Controller 2.4.0.0 ViPR Controller Integration with RecoverPoint and VPLEX User and Administration Guide

Enable connectivity by adding portsTo enable connectivity between the elements in your virtual arrays, you must add ports tothe virtual array.
You can add ports to your virtual array in two ways:
l Add networks (fabrics and VSANs) to your virtual array
l Add storage ports to the virtual array
When you have completed adding ports to the two virtual arrays, both virtual arraysshould display a VPLEX with two physical storage arrays. In each virtual array, onephysical array is the VPLEX back end storage, and one is the physical array that holds themirror volume. The following figures show the source and high availability virtual arraysused in this article.
Figure 40 Storage arrays for cluster 1
Figure 41 Storage arrays for cluster 2
ViPR Controller Support for VPLEX Distributed Volume Mirrors
Enable connectivity by adding ports 151

Add networks to a virtual arrayThe fastest and simplest way to enable communication among resources in your virtualdata center is to add networks to your virtual arrays.
Before you begin
Use ViPR Controller to discover fabric managers.
Networks are collections of ports. You use software provided by your switch vendor todefine networks.
Procedure
1. Edit a virtual array. The Edit Virtual Array configuration page opens.
2. Click Networks. The Networks page opens.
3. Click Add Existing. The Add Network dialog box opens and displays a list of fabrics orVSANs.
4. Select the check box next to each fabric or VSAN you want to add to your virtual array.
The networks that you add must provide connectivity between the VPLEX and thephysical storage arrays.
5. Click Add.
6. Repeat steps 1 through 5 for each virtual array in your configuration.
Results
Click the name of the virtual array in the breadcrumb bar at the top of the screen tonavigate back to the Edit Virtual Array page. You should see the VPLEX and the twophysical storage systems in the Associated Storage Systems list.Figure 42 Associated storage systems after adding networks
Add PortsAnother way to enable connectivity in your virtual array is to add ports.
Before you begin
Before adding ports to your virtual array, complete all required discoveries on page 149for your datacenter.
ViPR Controller Support for VPLEX Distributed Volume Mirrors
152 EMC ViPR Controller 2.4.0.0 ViPR Controller Integration with RecoverPoint and VPLEX User and Administration Guide

Adding specific ports to your virtual array gives you a level of granular control over whichports you use to communicate with specific resources in your data center. For example,you can set aside certain ports on your VMAX to communicate with VPLEX .
It is very important for VPLEX to isolate the ports for cluster1 in a varray and cluster2 in aseparate virtual array. You cannot mix VPLEX ports from both clusters in the same virtualarray. This will result in errors during service execution.
Procedure
1. Edit a virtual array.
The Edit Virtual Array screen appears.
2. Click Storage Ports. The Storage Ports page opens.
3. Click Add. The Add Storage Ports dialog box opens.
4. Type a string that filters the ports list in the Search field. For example, if you enter fa-8in the Search field, the Storage Ports list displays only the ports on arrays whosenames matches that string.
5. Select the check boxes next to each port that you want to add to the virtual array.
6. Click Add.
ViPR Controller adds the storage ports you selected to the virtual array.
ViPR Controller Support for VPLEX Distributed Volume Mirrors
Enable connectivity by adding ports 153

Create two continuous copies virtual poolsBuild two virtual pools. These continuous copy virtual pools must exist before you canbuild the Source virtual pool or the High Availability virtual pool.
Before you begin
Complete all the discoveries described in Discoveries on page 149.
Build the virtual arrays described in Create Two Virtual Arrays on page 150.
Enable connectivity between the elements within the virtual arrays, as described in Eableconnectivity by adding ports on page 151.
Procedure
1. Select Virtual Assets > Block Virtual Pools.
The Create Virtual Pool screen appears.
2. Enter the information in Virtual pool configuration: VPLEX Source Mirror on page 154.
3. Ensure that the number of physical pools that meet your virtual pool criteria is 1 orgreater.
4. Click Save.
5. Select Virtual Assets > Block Virtual Pools . The Create Virtual Pool screen appears.
6. Enter the information in Virtual pool configuration: VPLEX High Availability Mirror onpage 155.
7. Ensure that the number of physical pools that meet your virtual pool criteria is 1 orgreater.
8. Click Save.
Virtual pool configuration: VPLEX Source MirrorThe following table shows example settings for the VPLEX Source Mirror virtual pool.
This virtual pool is referenced as a Continuous Copies virtual pool by the VPLEX Sourcevirtual pool.
Table 7 VPLEX Source Mirror Virtual Pool Settings
Field Description
Name Enter a name. For this example, enter Vplex-Source-Mirror-VP.Naming conventions are data center-specific.
Description Enter a string description.
Virtual Arrays Choose Varray Cluster1.
Enable Quota Disabled. Quotas are not required for these virtual pools.
Hardware (All Fields) Site-specific.
SAN Multi Path (AllFields)
Site-specific .
High Availability
High Availability VPLEX Local
ViPR Controller Support for VPLEX Distributed Volume Mirrors
154 EMC ViPR Controller 2.4.0.0 ViPR Controller Integration with RecoverPoint and VPLEX User and Administration Guide

Table 7 VPLEX Source Mirror Virtual Pool Settings (continued)
Field Description
Data Protection (AllFields)
Site-specific.
Access Control (AllFields)
Storage Pools The number of matching storage pools must be 1 or greater.
Virtual pool configuration: VPLEX High Availability MirrorThe following table shows example settings for the VPLEX High Availability Mirror virtualpool.
This virtual pool is referenced as a Continuous Copies virtual pool by the VPLEX HighAvailability virtual pool.
Table 8 High Availability Mirror Virtual Pool Settings
Field Description
Name Enter a name. For this example, enter Vplex-HA-Mirror-VP.Naming conventions are data center-specific.
Description Enter a string description.
Virtual Arrays Choose Varray Cluster2.
Enable Quota Disabled. Quotas are not required for these virtual pools.
Hardware (All Fields) Site-specific.
SAN Multi Path (AllFields)
Site-specific .
High Availability
High Availability VPLEX Local
Data Protection (AllFields)
Site-specific.
Access Control (AllFields)
Storage Pools The number of matching storage pools must be 1 or greater.
Create the VPLEX High Availability virtual poolBuild a virtual pool for the high availability cluster of the VPLEX Metro. This virtual pooluses the VPLEX-HA-Mirror-vp as a continuous copy virtual pool. The VPLEX HighAvailability virtual pool must exist before you can build the VPLEX Source virtual pool.
Before you beginComplete all the discoveries described in Discoveries on page 149.
Build the virtual arrays described in Create Two Virtual Arrays on page 150.
ViPR Controller Support for VPLEX Distributed Volume Mirrors
Create the VPLEX High Availability virtual pool 155

Enable connectivity between the elements within the virtual arrays, as described in Enable connectivity by adding ports on page 151.
Procedure
1. Select Virtual Assets > Block Virtual Pools . The Create Virtual Pool screen appears.
2. Enter the information in Virtual pool configuration: High Availability on page 156.
3. Ensure that the number of physical pools that meet your virtual pool criteria is 1 orgreater.
4. Click Save.
Virtual pool configuration: High AvailabilityThe following table shows example setting for the VPLEX High Availability virtual pool.
Table 9 High Availability Virtual Pool Settings
Field Description
Name Enter a name. For this example, enter Vplex-HA-VP for thisexample. Naming conventions are data center-specific.
Description Enter a string description.
Virtual Arrays Choose Vplex-Cluster-2.
Enable Quota Disabled. Quotas are not required for these virtual pools.
Hardware
Provisioning Type Site-specific. Set these according to the requirements of your datacenter.
Protocols
Drive Type
System Type
RAID Levels
Multi-volume Consistency
Expandable Disabled. ViPR Controller cannot expand volumes with mirrors.
SAN Multi Path (AllFields)
Site-specific.
High Availability
High Availability VPLEX Local
Data Protection
Maximum Snapshots Site-specific.
Maximum ContinuousCopies
1
Continuous Copies VirtualPool
Vplex-HA-Mirror-VP
Protection System None.
ViPR Controller Support for VPLEX Distributed Volume Mirrors
156 EMC ViPR Controller 2.4.0.0 ViPR Controller Integration with RecoverPoint and VPLEX User and Administration Guide

Table 9 High Availability Virtual Pool Settings (continued)
Field Description
Access Control (AllFields)
Storage Pools The number of matching storage pools must be 1 or greater.
Create the VPLEX Source virtual poolBuild a virtual pool for the source cluster of the VPLEX Metro. This virtual pool uses theVPLEX-Source-Mirror-vp as a continuous copy virtual pool.
Before you begin
l Complete all the discoveries described in Discoveries on page 149.
l Build the virtual arrays described in Create Two Virtual Arrays on page 150.
l Enable connectivity between the elements within the virtual arrays, as described in Enable connectivity by adding ports on page 151.
Procedure
1. Select Virtual Assets > Block Virtual Pools . The Create Virtual Pool screen appears.
2. Enter the information in Virtual pool configuration: VPLEX Source on page 157.
3. Ensure that the number of physical pools that meet your virtual pool criteria is 1 orgreater.
4. Click Save.
Virtual pool configuration: VPLEX SourceThe following table shows example setting for the VPLEX Source virtual pool.
This virtual pool uses Vplex-Source-Mirror-VP as a continuous copies virtual pool. It alsosets the High Availability setting to VPLEX Distributed.
Table 10 VPLEX Source Virtual Pool Settings
Field Description
Name Enter a name. For this example, enter Vplex-Source-VP for thisexample. Naming conventions are data center-specific.
Description Enter a string description.
Virtual Arrays Choose Vplex-Cluster-1.
Enable Quota Disabled. Quotas are not required for these virtual pools.
Hardware
Provisioning Type Site-specific. Set these according to the requirements of your datacenter.
Protocols
Drive Type
System Type
ViPR Controller Support for VPLEX Distributed Volume Mirrors
Create the VPLEX Source virtual pool 157

Table 10 VPLEX Source Virtual Pool Settings (continued)
Field Description
RAID Levels
Multi-volume Consistency
Expandable Disabled. ViPR Controller cannot expand volumes with mirrors.
SAN Multi Path (AllFields)
Site-specific.
High Availability
High Availability VPLEX Distributed
High Availability VirtualArray
VPLEX-Cluster-2
High Availability VirtualPool
Vplex-HA-VP
Data Protection
Maximum Snapshots Site-specific.
Maximum ContinuousCopies
1
Continuous Copies VirtualPool
Vplex-Source-Mirror-VP
Protection System None.
Access Control (AllFields)
Storage Pools The number of matching storage pools must be 1 or greater.
Create a VPLEX Distributed Block Volume.You create the volume in the source virtual array with the source virtual pool.
The service creates all of the following:
l The VPLEX Distributed virtual volume
l Backing storage volumes on the physical storage arrays in both physical datacenters.
Procedure
1. Run Block Storage Services > Create Block Volume from the service catalog.
2. Select the source virtual array (Vplex-Cluster-1) in the Virtual Array field.
3. Select the source virtual pool (Vplex-Source-VP) in the Virtual Pool field.
4. Select the project.
The project you created in Create a project on page 13.
5. Type a string description for the block volume.
ViPR Controller Support for VPLEX Distributed Volume Mirrors
158 EMC ViPR Controller 2.4.0.0 ViPR Controller Integration with RecoverPoint and VPLEX User and Administration Guide

6. Leave the consistency group setting at the default. ViPR Controller does not supportthe creation of mirrors for volumes in a consistency group.
7. Set the number of volumes to 1 or more.
8. Set the size of the volume in gigabytes.
9. Click Order.
Create Continuous CopiesThe last step is to create the mirrors for the VPLEX Distributed volume.
Before you begin
You must log in as a user with write access to the project that holds the VPLEX Distributedvolume.
Procedure
1. Run Block Protection Services > Create Continuous Copy from the service catalog.
2. Choose the project that holds your VPLEX Distributed virtual volume.
3. Choose the volume.
The volume you created in Create a VPLEX distributed block volume on page 158.
4. Enter a text description of the mirror volume.
5. Set the number of copies to 1.
6. Click Order.
Remove Continuous CopiesOnce you successfully create a VPLEX volume mirror, you may want to remove the mirror.The Remove Continuous Copy service deletes the mirror, but leaves the VPLEX virtualvolume and the underlying physical back end storage device intact.
Before you begin
Login as a user with write access to the project that holds your VPLEX virtual volume.
Procedure
1. Run Block Protection Services > Remove Continuous Copy from the service catalog.
2. Choose the project that holds your VPLEX virtual volume.
3. Choose the volume whose mirror you want to delete.
4. Click the check box next to the volume mirror in the Continuous Copies field.
5. Click Order.
Detaching a mirror from its VPLEX virtual volumeOnce you have created a VPLEX virtual volume mirror, you have the option of detachingthe mirror from the virtual volume. Detaching the VPLEX virtual volume converts theVPLEX virtual volume to an independent VPLEX virtual volume.
Before you begin
To perform the following procedure, you must have a VPLEX virtual volume with a mirror.
You must log in as a user with write access to the project that contains your volume.
ViPR Controller Support for VPLEX Distributed Volume Mirrors
Create Continuous Copies 159
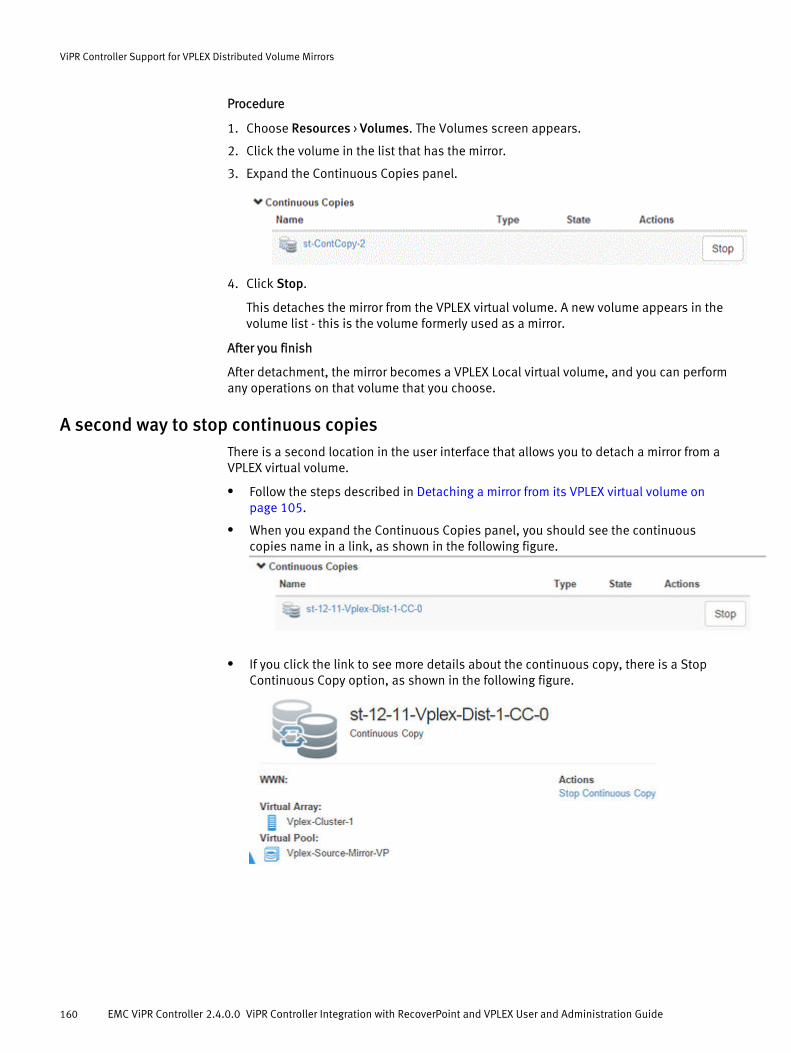
Procedure
1. Choose Resources > Volumes. The Volumes screen appears.
2. Click the volume in the list that has the mirror.
3. Expand the Continuous Copies panel.
4. Click Stop.
This detaches the mirror from the VPLEX virtual volume. A new volume appears in thevolume list - this is the volume formerly used as a mirror.
After you finish
After detachment, the mirror becomes a VPLEX Local virtual volume, and you can performany operations on that volume that you choose.
A second way to stop continuous copiesThere is a second location in the user interface that allows you to detach a mirror from aVPLEX virtual volume.
l Follow the steps described in Detaching a mirror from its VPLEX virtual volume onpage 105.
l When you expand the Continuous Copies panel, you should see the continuouscopies name in a link, as shown in the following figure.
l If you click the link to see more details about the continuous copy, there is a StopContinuous Copy option, as shown in the following figure.
ViPR Controller Support for VPLEX Distributed Volume Mirrors
160 EMC ViPR Controller 2.4.0.0 ViPR Controller Integration with RecoverPoint and VPLEX User and Administration Guide

APPENDIX A
Common UI procedures
The following information is described in this appendix:
l Create a virtual array........................................................................................... 162l Adding networks to a virtual array....................................................................... 162l Adding ports to a virtual array..............................................................................163
Common UI procedures 161

Create a virtual arrayA ViPR Controller system administrator can create a virtual array.
Before you begin
l You must log in to ViPR as a system administrator.
l Complete the required discoveries
From the ViPR Controller UI, create a virtual array as follows. Repeat steps 2 -4 for eachvirtual array that you want to create.
Procedure
1. From the Administrator Mode, select Virtual Assets > Virtual Array.
2. Click Add.
3. Give the virtual array a name.
4. Click Save. Your virtual array is added to the list of virtual arrays.
Adding networks to a virtual arrayThe fastest and simplest way to enable communication among resources in your virtualdata center is to add networks to your virtual arrays.
Before you begin
Use ViPR Controller to discover fabric managers.
Networks are collections of ports. You use software provided by your switch vendor todefine networks.
Procedure
1. Edit a virtual array.
The Edit Virtual Array configuration page opens.
2. Click Networks.
The Networks page opens.
3. Click Add Existing.
The Add Network dialog box opens and displays a list of fabrics or VSANs.
4. Select the check box next to each fabric or VSAN you want to add to your virtual array.
The networks that you add must provide connectivity between the VPLEX and thephysical storage arrays.
5. Click Add.
6. Repeat the previous steps for each virtual array in your configuration.
Results
Click the name of the virtual array in the breadcrumb bar at the top of the screen tonavigate back to the Edit Virtual Array page. You should see the VPLEX and the twophysical storage systems in the Associated Storage Systems list.
Common UI procedures
162 EMC ViPR Controller 2.4.0.0 ViPR Controller Integration with RecoverPoint and VPLEX User and Administration Guide

Figure 43 Associated storage systems after adding networks
Adding ports to a virtual arrayYou can enable connectivity between end-points in a virtual array by manually selectingthe ports that should be network connected.
Before you begin
l You must have System Admin privileges to edit a virtual array.
l Before adding ports to your virtual array, complete all required discoveries for yourdatacenter.
Adding specific ports to your virtual array gives you a level of granular control over whichports you use to communicate with specific resources in your data center. For example,you can set aside certain ports on your VMAX to communicate with VPLEX .
It is very important for VPLEX to isolate the front end ports for cluster1 in a virtual arrayand cluster2 in a separate virtual array. You cannot mix VPLEX front end ports from bothclusters in the same virtual array. This will result in errors during service execution.
Procedure
1. At the ViPR Controller UI, select Virtual Assets > Virtual Arrays and select the virtualarray that you want to edit.
The Edit Virtual Array screen appears.
2. Click Storage Ports.
Common UI procedures
Adding ports to a virtual array 163

The Storage Ports page opens.
3. Click Add. The Add Storage Ports dialog box opens.
4. Type a string that filters the ports list in the Search field. For example, if you enter fa-8in the Search field, the Storage Ports list displays only the ports on arrays whosenames matches that string.
5. Select the check boxes next to each port that you want to add to the virtual array.
6. Click Add.
ViPR Controller adds the storage ports you selected to the virtual array.
Common UI procedures
164 EMC ViPR Controller 2.4.0.0 ViPR Controller Integration with RecoverPoint and VPLEX User and Administration Guide