Embed Size (px)
Citation preview
Dell EMC Unity™ FamilyVersion 4.3
Configuring PoolsH14976
REV 05
Copyright © 2016-2018 Dell Inc. or its subsidiaries All rights reserved.
Published January 2018
Dell believes the information in this publication is accurate as of its publication date. The information is subject to change without notice.
THE INFORMATION IN THIS PUBLICATION IS PROVIDED “AS-IS.“ DELL MAKES NO REPRESENTATIONS OR WARRANTIES OF ANY KIND
WITH RESPECT TO THE INFORMATION IN THIS PUBLICATION, AND SPECIFICALLY DISCLAIMS IMPLIED WARRANTIES OF
MERCHANTABILITY OR FITNESS FOR A PARTICULAR PURPOSE. USE, COPYING, AND DISTRIBUTION OF ANY DELL SOFTWARE DESCRIBED
IN THIS PUBLICATION REQUIRES AN APPLICABLE SOFTWARE LICENSE.
Dell, EMC, and other trademarks are trademarks of Dell Inc. or its subsidiaries. Other trademarks may be the property of their respective owners.
Published in the USA.
Dell EMCHopkinton, Massachusetts 01748-91031-508-435-1000 In North America 1-866-464-7381www.DellEMC.com
2 Unity Family 4.3 Configuring Pools
7
Introduction to pools 9About pools................................................................................................. 10Dynamic pools.............................................................................................10Traditional pools.......................................................................................... 11Storage tiers............................................................................................... 12Pool best practices..................................................................................... 13Spare drive policy (physical deployments only)...........................................14Considerations for expanding pools.............................................................15
Configuring pools 17Create a dynamic pool.................................................................................18Create a traditional pool in physical deployments........................................18Create a pool in virtual deployments........................................................... 19Enable automatic snapshot deletion for a pool........................................... 20Monitor pool space allocation and usage.................................................... 20View drive information ...............................................................................20Change pool properties............................................................................... 21Expand a pool in physical deployments........................................................21Expand a pool in virtual deployments..........................................................22Delete a pool...............................................................................................22
Introduction to Data Efficiency 23Optimizing drive performance using the FAST Cache and FAST VP(supported physical deployments only)...................................................... 24Automatic snapshot deletion...................................................................... 25About data reduction..................................................................................25
Managing the FAST Cache (supported physical deploymentsonly) 27About the FAST Cache .............................................................................. 28FAST Cache best practices........................................................................ 29Create the FAST Cache .............................................................................29Enable or disable the FAST Cache for a pool ............................................. 29View system-level FAST Cache information .............................................. 29View pool-level Fast Cache Information .....................................................30Expand or shrink the FAST Cache capacity ............................................... 30Delete the FAST Cache ............................................................................. 30
Managing FAST VP (supported physical deployments only) 31About FAST VP ..........................................................................................32Data relocation with FAST VP ................................................................... 32FAST VP tiering policy ...............................................................................33Enable or disable scheduled data relocations at the system level................34
Preface
Chapter 1
Chapter 2
Chapter 3
Chapter 4
Chapter 5
CONTENTS
Unity Family 4.3 Configuring Pools 3
Stop a pool from participating in scheduled data relocations .....................35Manually initiate or stop data relocations for a pool ...................................35Pause or resume data relocations for all pools ........................................... 35Change system-level data relocation information ...................................... 35Change data relocation information for a pool ........................................... 36View pool-level FAST VP information ........................................................ 36
Understanding RAID (physical deployments only) 39About RAID ................................................................................................40RAID configurations ................................................................................... 41RAID for dynamic pools in Unisphere ......................................................... 42Drive IOPS by RAID type ........................................................................... 42
Configuring pools using the CLI 45Configure custom pools..............................................................................46
Create pools.................................................................................. 49Change pool settings..................................................................... 54Add drives to pools........................................................................ 55View pools..................................................................................... 57Delete pools................................................................................... 61
Manage pool tiers........................................................................................61View storage tiers..........................................................................62
View pool resources....................................................................................63View storage profiles (physical deployments only)..................................... 65Manage drive groups (physical deployments only)..................................... 68
View drive groups.......................................................................... 69View recommended drive group configurations.............................. 71
Manage storage system capacity settings...................................................71View system capacity settings....................................................... 72
Manage system tier capacity settings.........................................................73View system tier capacity.............................................................. 73
Change disk settings (virtual deployments only).........................................74Pool use cases............................................................................................ 74
Create a pool using drives with specific characteristics................. 74Configure a dynamic pool.............................................................. 75Configure a traditional pool for an all-Flash model......................... 77Add drives to an existing pool........................................................ 78
The show action command......................................................................... 79
Managing the FAST Cache using the CLI (supported physicaldeployments only) 83Manage FAST Cache.................................................................................. 84
Create FAST Cache....................................................................... 84View FAST Cache settings............................................................ 85Extend FAST Cache...................................................................... 85Shrink FAST Cache....................................................................... 86Delete FAST Cache....................................................................... 86
Manage FAST Cache storage objects (physical deployments only)............ 87View FAST Cache storage objects................................................. 87
Managing FAST VP using the CLI (supported physicaldeployments only) 89
Chapter 6
Chapter 7
Chapter 8
Chapter 9
CONTENTS
4 Unity Family 4.3 Configuring Pools
Manage FAST VP pool settings.................................................................. 90View FAST VP pool settings.......................................................... 92Change FAST VP pool settings...................................................... 92Start data relocation......................................................................93Stop data relocation...................................................................... 94
Manage FAST VP general settings............................................................. 95Change FAST VP general settings................................................. 96View FAST VP general settings......................................................97
CONTENTS
Unity Family 4.3 Configuring Pools 5

CONTENTS
6 Unity Family 4.3 Configuring Pools
Additional resources
As part of an improvement effort, revisions of the software and hardware areperiodically released. Therefore, some functions described in this document might notbe supported by all versions of the software or hardware currently in use. The productrelease notes provide the most up-to-date information on product features. Contactyour technical support professional if a product does not function properly or does notfunction as described in this document.
Where to get helpSupport, product, and licensing information can be obtained as follows:
Product informationFor product and feature documentation or release notes, go to Unity TechnicalDocumentation at: www.emc.com/en-us/documentation/unity-family.htm.
TroubleshootingFor information about products, software updates, licensing, and service, go to OnlineSupport (registration required) at: https://Support.EMC.com. After logging in, locatethe appropriate Support by Product page.
Technical supportFor technical support and service requests, go to Online Support at: https://Support.EMC.com. After logging in, locate Create a service request. To open aservice request, you must have a valid support agreement. Contact your SalesRepresentative for details about obtaining a valid support agreement or to answer anyquestions about your account.
Special notice conventions used in this document
DANGER
Indicates a hazardous situation which, if not avoided, will result in death orserious injury.
WARNING
Indicates a hazardous situation which, if not avoided, could result in death orserious injury.
CAUTION
Indicates a hazardous situation which, if not avoided, could result in minor ormoderate injury.
NOTICE
Addresses practices not related to personal injury.
Note
Presents information that is important, but not hazard-related.
Unity Family 4.3 Configuring Pools 7

Additional resources
8 Unity Family 4.3 Configuring Pools
CHAPTER 1
Introduction to pools
This chapter contains the following topics:
l About pools........................................................................................................ 10l Dynamic pools.................................................................................................... 10l Traditional pools.................................................................................................. 11l Storage tiers.......................................................................................................12l Pool best practices............................................................................................. 13l Spare drive policy (physical deployments only).................................................. 14l Considerations for expanding pools.................................................................... 15
Introduction to pools 9

About poolsA pool is a set of drives that provide specific storage characteristics for the resourcesthat use them. For example, the pool configuration defines the types and capacities ofthe drives in the pool. For physical deployments, the pool configuration also definesthe RAID configurations (RAID types and stripe widths) for these drives.
You choose which pool to use when you create a new storage resource.
Note
Before you create storage resources, you must configure at least one pool. You cannotshrink a pool, and you cannot change its storage characteristics without deleting thestorage resources configured in the pool and the pool itself. However, you can adddrives to expand the pool.
Pools generally provide optimized storage for a particular set of applications orconditions. When you create a storage resource for hosts to use, you must choose apool with which to associate the storage resource. The storage that the storageresource uses is drawn from the specified pool. If there are multiple drive types on thesystem, you can define multiple tiers for the pool. In physical deployments, each tiercan be associated with a different RAID type.
Unity supports two types of pools, depending on your Unity model.
l Dynamic pools
l Traditional pools
All-Flash models running Unity OE version 4.2 and later supports both dynamic andtraditional pools. In these models, all new pools created in the Unisphere GUI aredynamic pools. New pools created using the Unisphere CLI or REST API can bedynamic pools (the default) or traditional pools. Although you cannot create traditionalpools in the Unisphere GUI, you can use the GUI to manage existing traditional pools.
All-Flash models running Unity OE version 4.1x and earlier, and all hybrid and VSAmodels support traditional pools only.
Dynamic poolsIn Unity All-Flash models running OE version 4.2.x or later, all new pools created in theUnisphere GUI are dynamic pools, and new pools created in the Unisphere CLI andREST API are dynamic pools by default. Dynamic pools implement advanced RAIDtechnology. In dynamic pools, a RAID group is spread across drive extents in multipledrives. The required spare space is also spread across drive extents in multiple drives.When a drive fails, the extents on the failed drive are rebuilt to spare space extentswithin the pool.
Note
For Unity All-Flash models running OE version 4.2.x or later, you can create traditionalpools using the Unisphere CLI or REST API.
Dynamic pools have the following advantages over traditional pools:
l Drives are not wasted, because there are no fixed spares. All drives in the systemcan be added to a pool. This prolongs the life of the drives in the pool, since theload is spread across additional drives.
Introduction to pools
10 Unity Family 4.3 Configuring Pools
l Rebuild times are usually much faster than with traditional pools. Since sparecapacity for a dynamic pool is spread across multiple drives rather thanconcentrated in on a single hot spare drive, more drives contribute to therebuilding process when a drive fails.
l Pools can usually be expanded based on desired capacity. For example, you canadd one drive at a time to a dynamic pool, providing provisioning flexibility and costsavings.
You can generally provision a dynamic pool with any number of drives, as long as theminimum drive number is satisfied for each specified drive type/capacity combination.The minimum drive number is the selected stripe width for a drive type/capacitycombination plus one additional drive (for example, 6 drives for RAID 5 (4 + 1)).
The following considerations apply to dynamic pools:
l Once a dynamic pool is created, you cannot change its RAID type or stripe width.However, if you expand the pool using a different drive type, the added drives canhave a different stripe width.
l You cannot shrink a dynamic pool or change its storage characteristics withoutdeleting the storage resources configured in the pool and the pool itself. However,you can add drives to expand the pool.
l You can mix Flash drives of the same drive type with different capacities when youprovision a dynamic pool. However, if you do this, the system might not use theentire capacity of the larger drives. This depends on how many drives of eachcapacity are in the pool. The unused capacity in a dynamic pool might becomeavailable during a future pool expansion.
One drive's worth of capacity equal to that of the largest drive in the pool is set asideas spare space for every set of 32 drives in a dynamic storage pool. For example, adynamic pool with 1 to 32 drives of a given drive type has 1 drive's worth of sparespace, while a dynamic pool with 33 to 64 drives of a given drive type has 2 drive'sworth of spare space. At a minimum, there must be the equivalent capacity of onespare drive per pool. Therefore, to minimize the amount of spare capacity required, itis recommended that you create dynamic pools with larger, rather than smaller,numbers of drives of the same drive type.
Dynamic pools can be homogeneous or heterogeneous. All drives in a homogeneouspool have the same drive type, such as SAS Flash 2 or SAS Flash 3 drives. Drives in aheterogeneous pool can include SAS Flash 2 drives, SAS Flash 3 drives, and SAS Flash4 drives.
Traditional poolsPools created in UnityVSA models, hybrid models, and Unity All-Flash models runningOE version 4.1.x or earlier are traditional pools. For Unity All-Flash models running OEversion 4.2.x or later, you can create traditional pools using the Unisphere CLI or RESTAPI, but not the Unisphere GUI.
Traditional pools can be homogeneous or heterogeneous. All drives in a homogeneouspool have the same drive type, such as SAS drives or SAS Flash 2 drives. Drives in aheterogeneous pool have a mixture of drive types, such as a mixture of NL-SAS, SAS,and SAS Flash 2 drives. Traditional pools can also be All-Flash or hybrid. A hybrid poolcontains a mixture of Flash and non-Flash drives. All supported drive types can beincluded in a hybrid pool, except for SAS Flash 4 drives, which must be in an All-Flashpool.
In physical deployments, storage in traditional pools is managed in RAID group units,where:
Introduction to pools
Traditional pools 11
l A drive is consumed by a single RAID group.
l A RAID group is limited to a maximum of 16 drives and is composed of drives of thesame type.
l Each tier supports a single RAID type.
Since storage in traditional pools is managed in RAID group units, adding capacity to apool requires that you add drives in RAID group increments. For example, to add drivesto a pool with RAID 5 (4+1), you must add at least 5 drives to the pool. As drivecapacity increases, the minimum amount of storage that can be added to a pool andthe cost of that storage become increasingly large.
The following considerations apply to traditional pools:
l Once a tier in a traditional pool is created, you cannot change the RAID type orstripe width of the existing drives in the tier. However, if you expand a tier within atraditional pool, you can specify a different stripe width for the newly-addeddrives. When you add a new tier to a traditional pool, you can specify a differentRAID type, stripe width, or both for the newly-added drives.
l You cannot shrink a traditional pool or change its storage characteristics withoutdeleting the storage resources configured in the pool and the pool itself. However,you can add drives to expand the pool.
With traditional pools, the storage system uses dedicated hot spares to replace a drivethat has failed or faulted. Any unused drive in the system with the appropriate drivetechnology and size can be used to replace a failed or faulted drive in a pool. If a sparedrive with the same type and size is not available, the system can use a larger drive ofthe same type. Because spare drives are dedicated hot spares, they cannot be used toimprove pool performance or mitigate Flash drive wear. Also, when a drive fails or isfaulted, the whole drive must be rebuilt on the spare drive. Therefore, the rebuild timecan be very long, because it is limited by the performance of the single drive whosecontents is being rebuilt. This can impact performance. It can also increase thechances of encountering additional drive failures during the rebuild process, which canlead to data loss.
Storage tiersThe storage tiers available for both physical and virtual deployments are described inthe table below.
l For physical deployments, the storage tier is associated with the physical drivetype.
l For virtual deployments, the storage tier is associated with the virtual disk'sunderlying characteristics and must be manually assigned.
l For both types of deployments, if FAST VP is installed on the system, you cancreate tiered pools to optimize drive utilization. A tiered pool consists of multipledrive types, such as SAS Flash 2 drives and SAS drives.
Table 1 Storage tier descriptions
Storage tier Drive types Description Default RAIDconfiguration (physicaldeployments only)
Extreme Performance tier Solid state extremeperformance drives. Thefollowing types are supported:
Provides very fast accesstimes for resources subject tovariable workloads. For
RAID 5 (8 + 1).
Introduction to pools
12 Unity Family 4.3 Configuring Pools
Table 1 Storage tier descriptions (continued)
Storage tier Drive types Description Default RAIDconfiguration (physicaldeployments only)
l SAS Flash 2
l SAS Flash 3
l SAS Flash 4
example, databases canachieve their bestperformance when using SASFlash drives. SAS Flash drivesare more expensive than SASdrives per GB of storage.SAS Flash 2, SAS Flash 3, andSAS Flash 4 drives can beused together in the ExtremePerformance tier. Only SASFlash 2 drives can be used inthe FAST Cache, and onlySAS Flash 2 and SAS Flash 3drives can be used in FASTVP.
Performance tier SAS - Rotating performancedrive
Provides high, all-aroundperformance with consistentresponse times, highthroughput, and goodbandwidth at a mid-level pricepoint. Performance tierstorage is appropriate fordatabase resources accessedcentrally through a network.
RAID 5 (4 + 1).
Capacity tier NL-SAS - Rotating capacitydrive
Provides the highest storagecapacity with generally lowerperformance. Capacitystorage is appropriate forstoring large amounts of datathat is primarily static (suchas video files, audio files, andimages) for users andapplications that do not havestrict performancerequirements.
Note
For data that changes or isaccessed frequently, capacitytier storage has significantlylower performance.
RAID 6 (6 + 2).
Pool best practicesUsing fewer pools reduces complexity and increases flexibility. However, it may beappropriate to configure multiple pools, in order to:
Introduction to pools
Pool best practices 13
l Separate workloads with different I/O profiles.
l Dedicate resources to meet specific performance goals.
l Separate resources for multi-tenancy.
l Create smaller failure domains.
l (Traditional hybrid pools only) Separate pools where FAST Cache is and is notactive.
Pools must maintain free capacity in order to operate properly. By default, the storagesystem raises an alert if a pool has less than 30% free capacity, and will begin toautomatically invalidate snapshots and replication sessions if a pool has less than 5%free capacity. It is recommended that a pool always have at least 10% free capacity.
All-Flash poolsAll-Flash pools provide the highest level of performance in Unity. Use an all-Flash poolfor applications that require the highest storage performance at the lowest responsetime. Note the following about all-Flash pools:
l Compression is only supported in all-Flash pools.
l Snapshots and replication operate most efficiently in all-Flash pools.
l FAST Cache and FAST VP are not applicable to all-Flash pools.
Follow these best practices for dynamic pools:
l Because of the way spare space is reserved for dynamic pools, it is recommendedthat you create dynamic pools with larger, rather than smaller, numbers of drivesof the same drive type. Following this practice minimizes the amount of sparecapacity required for a dynamic pool.
l Expanding a dynamic pool by adding multiples of the pool's RAID stripe width plusone allows space to be available faster than if you expand the pool by adding fewerdrives. You can see the RAID stripe width for a pool with a single drive type byusing the CLI.
For traditional pools, it is recommended that you use a single drive size and a singleRAID width within a traditional all-Flash pool.
Hybrid poolsHybrid pools typically provide greater capacity at a lower cost than all-Flash pools, butalso typically have lower overall performance and higher response times. Use hybridpools for applications that do not require consistently low response times, or that havelarge amounts of mostly inactive data.
It is recommended that you provision a Flash tier in hybrid pools. The Flash tier helpsenable pool performance efficiencies, and improves response times when usingsnapshots or replication, or both. The minimum recommended Flash capacity is atleast 5% of the pool capacity.
You can improve the performance of a hybrid pool by increasing the amount ofcapacity in the Flash tier, so that more of the active dataset resides on and is servicedby the Flash drives.
Hybrid pools can have up to three tiers (Extreme Performance, Performance, andCapacity). It is recommended that you use a single drive speed, size, and RAID widthwithin a tier of a hybrid pool.
Spare drive policy (physical deployments only)The spare drive policy applies only to traditional pools.
Introduction to pools
14 Unity Family 4.3 Configuring Pools
Any unused drive in the system with the appropriate drive technology and size, orlarger, can be used to replace a failed or faulted drive in a traditional pool. Most of thedrive configurations require the use of hot sparing, except for the following:
l If the system has only 8 drives in total, and they are of the same type, you canconfigure RAID 6 (6+2) with no hot spare.
l If the system has only 12 drives in total, and they are of the same type, you canconfigure RAID 6 (10+2) with no hot spare.
Note
When you expand traditional pools for a drive configuration, the system prevents youfrom configuring all available drives, so as to leave some drives as spares.
The spare drive policy follows these rules to determine how many drives are left asspares:
l In general, the system reserves one spare drive for every group of 1-31 drives thathave the same type, capacity, and rotational speed (or Flash type). For example, ifthere are 40 300-GB, 15K-RPM SAS drives in the system, the system reservestwo of those drives as spares.
l The system does not reserve a spare drive for:
n The FAST Cache.
n A system drive, unless it has user data on it.
l Any unused non-system drive can become a spare drive.
l A system drive that does not contain user data can be a spare drive for a failedsystem drive that has user data.
l A spare drive can be used to replace a failed or faulted drive in the FAST Cache.
l When a spare drive swaps into a pool, it becomes a permanent member of thatpool and cannot be used in another pool.
l When a broken drive is fixed or replaced, it can be a candidate for a spare drive orused in another pool.
Refer to the compatibility and interoperability documentation on the support websitefor a listing of basic platform and component support for the storage system, includingcapacity limits.
Considerations for expanding poolsDynamic poolsYou can usually expand dynamic pools based on desired capacity instead of by addingdrives that are multiples of the pool's RAID stripe width plus one. For example, you canadd two drives to a RAID 5 pool instead of six drives. The following exceptions apply:
l If you add a new drive type when you expand a pool, you must expand the poolwith the minimum amount of drives required for the selected RAID configuration.
l Depending on the RAID configuration and number of drives in the pool, there arecertain internal thresholds at which you must expand the pool with multiples of thepool's RAID stripe width plus one. The system tells you how many drives you needto add when you try to expand a pool that has reached one of these thresholds.
Expanding a pool by adding multiples of the pool's RAID strip width plus one allowsspace to be available faster than if you expand the pool by adding fewer drives. Youcan see the RAID stripe width for a pool by accessing the RAID tab on the pool'sproperties page.
Introduction to pools
Considerations for expanding pools 15
Traditional poolsYou expand a traditional pool by adding drives to the pool's existing tiers, adding newtiers that have available drives, or both. When you add drives, you must add them inmultiples of the selected RAID stripe width.
Note
You cannot expand an All-Flash pool in a hybrid model by adding SAS or NL-SASdrives if the pool contains:
l SAS Flash 4 drives.
l Data reduction-enabled thin LUNs or thin file systems.
l Data reduction savings. For example, data reduction was enabled for a period oftime on a resource and then subsequently disabled. The savings for when datareduction was enabled is still available.
Introduction to pools
16 Unity Family 4.3 Configuring Pools
CHAPTER 2
Configuring pools
This chapter contains the following topics:
l Create a dynamic pool........................................................................................ 18l Create a traditional pool in physical deployments............................................... 18l Create a pool in virtual deployments................................................................... 19l Enable automatic snapshot deletion for a pool................................................... 20l Monitor pool space allocation and usage............................................................20l View drive information ...................................................................................... 20l Change pool properties.......................................................................................21l Expand a pool in physical deployments............................................................... 21l Expand a pool in virtual deployments................................................................. 22l Delete a pool...................................................................................................... 22
Configuring pools 17
Create a dynamic poolBefore you begin
In Unity All-Flash models running OE version 4.2.x or later, all new pools created in theUnisphere GUI are dynamic pools, and new pools created in the Unisphere CLI andREST API are dynamic pools by default. Before you create a dynamic pool:
l Decide what RAID protection to use for the pool.
l Decide whether to create a capability profile that has capabilities based on thepool configuration. To use the capability profile for VMware VVols, you mustassign specific usage tags, which are propagated to the VMware vSphereenvironment, and can be used in policy profiles. The virtualization administratorand storage administrator should work together to define these tags.
Note
You cannot change the RAID type of a dynamic pool once it is created. Also, youcannot shrink a dynamic pool or change its storage characteristics without deletingthe storage resources configured in the pool and the pool itself. However, you can adddrives to expand the pool.
Procedure
1. Under Storage, select Pools.
2. Select the Add icon.
3. Follow the steps in the wizard.
The number and types of drives you can choose is based on the RAIDconfiguration, which you can optionally change.
Create a traditional pool in physical deploymentsBefore you begin
All pools created with All-Flash models running Unity OE version 4.1.x and earlier, andall hybrid and VSA models support traditional pools only. With newer All-Flash models,you can create a traditional pool using the Unisphere CLI and REST API.
Before you create a traditional pool:
l If you have a hybrid model, find out whether the storage system is licensed forFAST Cache. To do this, select the Settings icon, and then select StorageConfiguration > FAST Cache. If the storage system is licensed for FAST Cache,you can choose whether to use it for the pool.
l If you have a hybrid model, find out whether the storage system is licensed forFAST VP. To do this, select the Settings icon, and then select StorageConfiguration > FAST VP. If the storage system is licensed for FAST VP you canchoose which storage tiers to add to the pool.
l Decide whether to change the suggested RAID type of the tiers.
l Decide whether to create a capability profile that has capabilities based on thepool configuration. To use the capability profile for VMware VVols, you mustassign specific usage tags, which are propagated to the VMware vSphereenvironment, and can be used in policy profiles. The virtualization administratorand storage administrator should work together to define these tags.
Configuring pools
18 Unity Family 4.3 Configuring Pools
Procedure
1. Under Storage, select Pools.
2. Select the Add icon.
3. Follow the steps in the wizard, taking into account the following considerations:
l On the Tiers screen, you can only select multiple storage tiers if the systemis a hybrid model that is licensed to use FAST VP. The wizard displays amaximum usable capacity for each selected tier, which it calculates based onthe default RAID configuration. You can optionally change the RAIDconfiguration for all selected tiers.
l The number and types of drives you can choose is based on the RAIDconfiguration.
Create a pool in virtual deploymentsBefore you begin
All pools created in virtual deployments are traditional pools.
Before you create a traditional pool:
l From the storage administrator, obtain information about the underlyingcharacteristics of the drives to use in the pool. You will use this information toassign tiers to the virtual disks that do not already have them assigned. You cancreate a multi-tier pool if the system has multiple underlying drive types.
l Decide whether to create a capability profile for VMware VVols that hascapabilities based on the pool configuration. To use the capability profile, you mustassign specific usage tags, which are propagated to the VMware vSphereenvironment, and can be used in policy profiles. The virtualization administratorand storage administrator should work together to define these tags.
Note
You cannot shrink a pool or change its storage characteristics without deleting thestorage resources configured in the pool and the pool itself. However, you can adddrives to expand the pool.
Procedure
1. Under Storage, select Pools.
2. Select the Add icon.
3. Select the tiers and virtual disks to use in the pool. Each virtual disk must havean assigned tier. If the virtual disks you want to include in the pool do not haveassigned tiers, you must assign one. The tier you select for a virtual disk mustbe based on the underlying drive characteristics.
4. Optionally create a VMware capability profile for use by VVols, and specifyusage tags for that profile.
Configuring pools
Create a pool in virtual deployments 19
Enable automatic snapshot deletion for a poolProcedure
1. Under Storage, select Pools.
2. Select the relevant pool, and click the Edit icon.
3. Select the Snapshot Settings tab.
4. In the Automatically delete oldest snapshots section, select whether youwant the automatic deletion to occur when the total pool consumption spacereaches a threshold you set, snapshot pool consumption space reaches athreshold you set, or both. For each option, you can also set the threshold whenthe automatic snapshot deletion stops.
Monitor pool space allocation and usageProcedure
1. Under Storage, select Pools.
2. Select the relevant pool, and then select the Edit icon.
3. Select Usage > Capacity to view pool space usage with metrics on: currentpool capacity, space used, alert threshold, data reduction savings, and a graphshowing the pool's used capacity over time.
Note the following:
l The Used field displays the percentage of the pool's total space that hasbeen reserved by its associated storage resources. This total includes thespace used by thin clones and snapshots. When this value is over 100%, thepool is oversubscribed.
l The Non-base Space field displays the space used by all snapshots and thinclones in the pool.
l The Alert Threshold field displays the percentage of storage allocation atwhich Unisphere generates notifications about the amount of spaceremaining in the pool. You can set this value between 50% and 84%.
4. Select Storage Resources to view a list of storage resources in the pool, alongwith the following metrics: total amount of pool space used by each resourceand amount of pool space used for each resource's snapshots and thin clones.
View drive informationProcedure
1. Select the Settings icon, and then select Storage Configuration > Drives toview the information about the drives in the storage system:
l For physical deployments this includes the drive type, capacity, total numberof drives, number of unconfigured and configured drives, and number ofdrives in the FAST Cache.
l For virtual deployments, this includes the size and WWN of the virtual drivesthat are available for use in a pool. Drives that are already used in a pool orthat are faulted are not included in the list.
Configuring pools
20 Unity Family 4.3 Configuring Pools
2. To view information about unconfigured drives for a specific drive type andcapacity, select the number in the Unconfigured - Available column. Thesystem displays the name, type, drive size, and rotational speed (for harddrives) of the available drives.
Change pool propertiesProcedure
1. Under Storage, select Pools.
2. Select the relevant pool, and then select the Edit icon.
3. On the General tab, optionally change the pool name and description.
4. On the Drives tab, review the characteristics of the drives in the pool.
5. On the Usage tab, select Capacity to view the amount of free space in thepool, subscribed pool capacity, pool used capacity history, and space saved (ifdata reduction for thin LUNs or thin file systems in All-Flash pools is enabled).You can also change the alert threshold.
Note the following:
l The Used field displays the percentage of the pool's total space that hasbeen reserved by its associated storage resources. This total includes thespace used by thin clones and snapshots. When this value is over 100%, thepool is oversubscribed.
l The Non-base Space field displays the space used by all snapshots and thinclones in the pool.
l The Alert Threshold field displays the percentage of storage allocation atwhich Unisphere generates notifications about the amount of spaceremaining in the pool. You can set this value between 50% and 84%.
6. On the Usage tab, select Storage Resources to view a list of storage resourcesin the pool, along with applicable metrics.
7. On the FAST VP tab (which appears if FAST VP is licensed), view datarelocation and tier information for the pool. You can also exclude the pool fromdata relocations, manually start or stop data relocations for the pool, andmanually move data to different tiers. Click Manage FAST VP settings tomanage system-wide FAST VP settings.
8. On the Snapshot Settings tab, review and optionally change the properties forsnapshot automatic deletion.
9. On the RAID tab (dynamic pools only), view the number of drives per drive typein the pool as well as the RAID type and stripe width of each drive type.
Expand a pool in physical deploymentsExpand a dynamic or traditional pool by adding drives to the pool tiers.
Procedure
1. Under Storage, select Pools.
2. Select the pool to expand, and then select Expand Pool.
Configuring pools
Change pool properties 21
Note
If the Expand Pool button is disabled, a tool tip will display with an explanation.
3. On the Storage Tiers tab, select the storage tiers for the drives you want toadd to the pool.
4. On the Drives tab, select the number of drives to add to each tier. You canselect Flash drives by capacity.
Expand a pool in virtual deploymentsExpand a pool by adding virtual disks to the pool. Before you expand a pool, obtaininformation from your storage administrator about the underlying characteristics ofthe virtual disks to use in the pool.
Procedure
1. Under Storage, select Pools.
2. Select the pool to expand, and then select Expand Pool.
3. On the Assign Tier to the Virtual Disk page, assign or optionally change thestorage tiers to which virtual disks are assigned. To do this, select the virtualdisk, select the Edit icon, and then select the tier.
4. On the Tiers page, select one or more tiers to add to the pool.
5. On the Virtual Disks page, select the virtual disks to add to the pool.
Delete a poolYou can delete pools if they contain no allocated storage resources, includingconsistency groups, LUNs, file systems, VMware datastores, or NAS servers.
Procedure
1. Under Storage, select Pools.
2. Select the pool to delete, and click the Delete icon.
Configuring pools
22 Unity Family 4.3 Configuring Pools
CHAPTER 3
Introduction to Data Efficiency
This chapter contains the following topics:
l Optimizing drive performance using the FAST Cache and FAST VP (supportedphysical deployments only)................................................................................ 24
l Automatic snapshot deletion..............................................................................25l About data reduction......................................................................................... 25
Introduction to Data Efficiency 23
Optimizing drive performance using the FAST Cache andFAST VP (supported physical deployments only)
The FAST (Fully Automated Storage Tiering) Suite includes features that enable youto:
l Leverage SAS Flash 2 drives as additional read/write cache for improvedperformance (FAST Cache).
l Dynamically tier data across different types of drives (FAST VP). FAST VP canuse all supported drive types except SAS Flash 4.
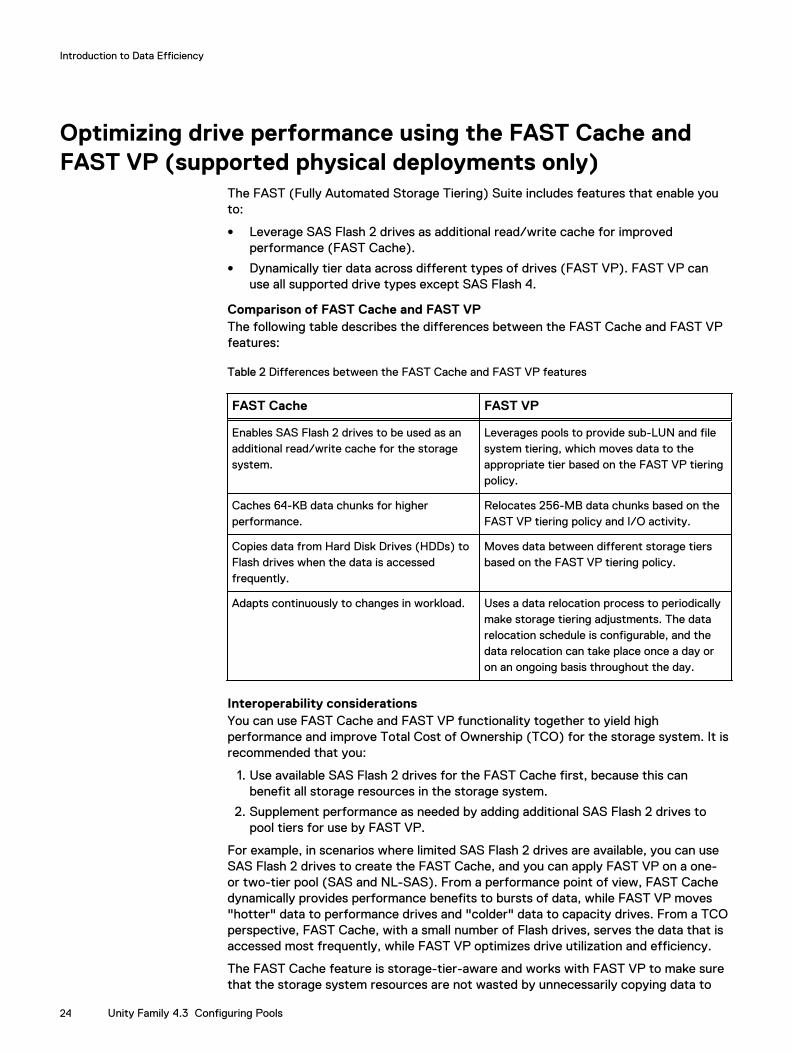
Comparison of FAST Cache and FAST VPThe following table describes the differences between the FAST Cache and FAST VPfeatures:
Table 2 Differences between the FAST Cache and FAST VP features
FAST Cache FAST VP
Enables SAS Flash 2 drives to be used as anadditional read/write cache for the storagesystem.
Leverages pools to provide sub-LUN and filesystem tiering, which moves data to theappropriate tier based on the FAST VP tieringpolicy.
Caches 64-KB data chunks for higherperformance.
Relocates 256-MB data chunks based on theFAST VP tiering policy and I/O activity.
Copies data from Hard Disk Drives (HDDs) toFlash drives when the data is accessedfrequently.
Moves data between different storage tiersbased on the FAST VP tiering policy.
Adapts continuously to changes in workload. Uses a data relocation process to periodicallymake storage tiering adjustments. The datarelocation schedule is configurable, and thedata relocation can take place once a day oron an ongoing basis throughout the day.
Interoperability considerationsYou can use FAST Cache and FAST VP functionality together to yield highperformance and improve Total Cost of Ownership (TCO) for the storage system. It isrecommended that you:
1. Use available SAS Flash 2 drives for the FAST Cache first, because this canbenefit all storage resources in the storage system.
2. Supplement performance as needed by adding additional SAS Flash 2 drives topool tiers for use by FAST VP.
For example, in scenarios where limited SAS Flash 2 drives are available, you can useSAS Flash 2 drives to create the FAST Cache, and you can apply FAST VP on a one-or two-tier pool (SAS and NL-SAS). From a performance point of view, FAST Cachedynamically provides performance benefits to bursts of data, while FAST VP moves"hotter" data to performance drives and "colder" data to capacity drives. From a TCOperspective, FAST Cache, with a small number of Flash drives, serves the data that isaccessed most frequently, while FAST VP optimizes drive utilization and efficiency.
The FAST Cache feature is storage-tier-aware and works with FAST VP to make surethat the storage system resources are not wasted by unnecessarily copying data to
Introduction to Data Efficiency
24 Unity Family 4.3 Configuring Pools
FAST Cache, if it is already on a Flash drive. If FAST VP moves a chunk of data to theExtreme Performance Tier on a pool, the system will not copy that chunk of data intoFAST Cache, even if FAST Cache criteria is met for promotion. This ensures that thestorage system resources are not wasted in copying data from one Flash drive toanother.
Automatic snapshot deletionAutomatic snapshot deletion is a space management feature used to automaticallymanage the number of snapshots in a pool. This feature is triggered when the totalpool consumption or pool consumption by the snapshots reach a high threshold youdefine. The system automatically starts deleting old and expired snapshots until thepool space reaches a set threshold.
Expired snapshots are deleted first. If deleting the expired snapshots does not stillresult in reaching the thresholds, the system starts deleting the detached oldestsnapshots with the automatic deletion option enabled. Automatic deletion does notapply to snapshots attached to hosts, including attached groups of snapshots on aconsistency group. It also does not apply to system snapshots used for replication.
You can set a snapshot of a storage resource for automatic deletion when thesnapshot expires (by setting a snapshot expiration date) or the associated poolreaches the auto delete threshold settings. The following table explains the automaticsnapshot deletion options:
Note
If a snapshot has automatic snapshot deletion enabled, it cannot be used as a sourcesnapshot for creating or refreshing a thin clone.
Table 3 Automatic snapshot deletion options
Options Description
Pool Applies to snapshots of storage resources andpools. When the pool reaches a certainthreshold, the system automatically deletesthe snapshot.
Expiration time Applies to snapshots of storage resources.This is the time when the snapshot expires.
About data reductionApplying data reduction saves space on the system. Data reduction, which includessavings from compression and deduplication, is available for thin LUNs in All-Flashpools and thin file systems created in All-Flash pools. The thin file system must becreated on a Unity system that is running OE version 4.2.x or later.
Data reduction is applied on all new incoming writes. Data reduction stops for newwrites when sufficient resources are not available, and resumes automatically onceenough resources are available. Data that cannot be compressed is detected, and iswritten uncompressed.
Introduction to Data Efficiency
Automatic snapshot deletion 25
Data that already exists on the LUN does not have data reduction applied. In order toapply data reduction to existing LUN data, you must use the LUN Move feature tomove the LUN's data to a destination LUN that has data reduction enabled.
If you need to convert an All-Flash pool to a hybrid pool (adding non-Flash drives to anAll-Flash pool), any LUNs or file systems that use data reduction must be deleted ormoved. Hybrid pools cannot have data reduction enabled, and you cannot create adata reduction-enabled LUN or file system in a hybrid pool. An All-Flash pool cancontain both data reduction-enabled and non-data reduction enabled LUNs or filesystems.
Introduction to Data Efficiency
26 Unity Family 4.3 Configuring Pools
CHAPTER 4
Managing the FAST Cache (supported physicaldeployments only)
This chapter contains the following topics:
l About the FAST Cache ......................................................................................28l FAST Cache best practices................................................................................29l Create the FAST Cache .................................................................................... 29l Enable or disable the FAST Cache for a pool .....................................................29l View system-level FAST Cache information ......................................................29l View pool-level Fast Cache Information ............................................................ 30l Expand or shrink the FAST Cache capacity .......................................................30l Delete the FAST Cache .....................................................................................30
Managing the FAST Cache (supported physical deployments only) 27
About the FAST CacheFAST Cache functionality is available in traditional, hybrid pools with Flash drives. It isnot applicable to dynamic pools.
The FAST Cache is a large capacity secondary cache that uses SAS Flash drives toimprove system performance by extending the storage system's existing cachingcapacity. You can configure individual pools to use the FAST Cache. When you do this,all storage resources created in those pools will use the FAST Cache.
Note
The use of SAS Flash 3 or SAS Flash 4 type drives for the FAST Cache is notsupported.
The FAST Cache provides the following benefits:
l Improved Total Cost of Ownership (TCO)The FAST Cache reduces the number of drive spindles needed for a given level ofperformance and allows you to replace high performance drives with moreeconomical options. This is possible because the load on back-end hard drives isreduced. Because the FAST Cache copies the busy subsets of large storagecapacities in 64 KB data chunks to Flash drives, the busiest areas of many LUNs orfile systems use a small set of Flash drives. This allows a large set of slower, lessexpensive drives to deliver the performance typically provided by faster, moreexpensive drives. Over a period of time, pools with faster SAS drives can bereplaced by new pools with slower NL-SAS drives, while maintaining the sameapplication performance. This improves the financial (IOPS/dollar) and power(IOPS/KWH) efficiency of the storage system.
l Reduced complexityAt a system level, the FAST Cache helps make the most efficient use of Flashdrive capacity. The FAST Cache does this by using Flash drives for the mostfrequently accessed data in the storage system instead of dedicating Flash drivesto a particular application. It adjusts to a hot spot anywhere in the storage system,so that you do not need to analyze specific application requirements. It providesbetter performance to all applications in the storage system while using fewerFlash drives.
l Highly scalable cache capacityThe FAST Cache can scale up to a larger capacity than the maximum DRAM Cachecapacity. This larger cache capacity means that all or a higher percentage of acustomers working set can be promoted into the better performing FAST Cache.The working set is the most active part of an application.
FAST Cache drive configurationsThe FAST Cache uses SAS Flash 2 drives configured in RAID 1 pairs. The drive sizesused to configure the FAST Cache and maximum FAST Cache capacity vary by model.For information, see the compatibility and interoperability documentation. Go to thesupport website to locate this documentation.
You cannot mix drive types or sizes in the FAST Cache.
FAST Cache actionsYou can expand or shrink the FAST Cache by adding or removing drives. You can alsodelete the FAST Cache, but this can impact system performance and the performanceof pools currently using the FAST Cache. The FAST Cache deletion process takestime, because the storage system has to flush all of the cache data to the pool drives.
Managing the FAST Cache (supported physical deployments only)
28 Unity Family 4.3 Configuring Pools
FAST Cache best practicesUse the FAST Cache under the following circumstances:
l Large working sets of data must be stored and read, accessed frequently, andreadily available.
l The system has enough drives for both data storage and performanceimprovement.
For example, use the FAST Cache if the system has enough SAS Flash drives, is activewith daily read/write transactions of big blocks of data, and is not used as long termstorage for archival purposes that would be accessed on a weekly or monthly basis.
Avoid using the FAST Cache for data that is sequential or that uses large-block I/O.For example, do not use the FAST Cache for database logs or circular logs, since theirdata is sequential.
Create the FAST CacheBefore you begin
To create the FAST Cache, the FAST Cache license must be installed on the systemand the system must have available SAS Flash 2 drives in sizes supported by themodel. (See the compatibility and interoperability documentation for this information).
Procedure
1. Select the Settings icon, and then select Storage Configuration > FASTCache.
2. Select Create.
3. Select the size and number of drives to use for the FAST Cache. The availabledrives are based on the number of available SAS Flash drives, spare drive policy,and system limits.
4. Optionally, clear Enable FAST Cache for existing pools, if you do not want theFAST Cache enabled for all existing pools. You can enable the FAST Cache forindividual pools at a later time.
Enable or disable the FAST Cache for a poolProcedure
1. Under Storage, select Pools.
2. Select the relevant pool, and then select the Edit icon.
3. On the General tab, select or clear Use FAST Cache.
View system-level FAST Cache informationProcedure
1. Select the Settings icon, and then select Storage Configuration > FASTCache to view the status, total space, and number of drives in the FAST Cache.
2. Select the Settings icon, and then select Storage Configuration > FASTCache Disks to view the name and size of each drive in the FAST Cache.
Managing the FAST Cache (supported physical deployments only)
FAST Cache best practices 29
View pool-level Fast Cache InformationAt the pool level, you can verify whether a specific pool is configured to use the FASTCache.
Procedure
1. Under Storage, select Pools.
2. Select the pool, and then select the Edit icon.
3. On the General tab, view whether the Use FAST Cache field is enabled.
Expand or shrink the FAST Cache capacityIf you have a small FAST Cache, and your business's growth requires larger blocks ofdata to be read and written, you can expand the FAST Cache capacity by adding SASFlash 2 drives.
On rare occasions, you might want to shrink the FAST Cache capacity. For example,consider doing so under these circumstances:
l The FAST Cache is too large for users' applications.
l You need to repurpose some SAS Flash 2 drives to create storage pools withhigher performance.
l The storage system does not have enough slots left to be populated withadditional drives for storage.
Note
Shrinking the FAST Cache can take a long time and can affect the performance ofpools currently using the FAST Cache, because data on the drives being removed fromthe FAST Cache must be flushed to the pool drives.
Procedure
1. Select the Settings icon, and then select Storage Configuration > FASTCache.
2. To expand the FAST Cache, select Expand. Then select the drives to add to theFAST Cache.
3. To shrink the FAST Cache, select Shrink. Then select the drives to removefrom the FAST Cache.
Delete the FAST CacheDeleting the FAST Cache frees up drives for other uses. However, it can impactsystem performance and the performance of pools currently using the FAST Cache.The FAST Cache deletion process can take a long time, because it has to flush all ofthe cache data to the pool drives.
Procedure
1. Select the Settings icon, and then select Storage Configuration > FASTCache.
2. Select Delete.
Managing the FAST Cache (supported physical deployments only)
30 Unity Family 4.3 Configuring Pools
CHAPTER 5
Managing FAST VP (supported physicaldeployments only)
This chapter contains the following topics:
l About FAST VP ................................................................................................. 32l Data relocation with FAST VP ........................................................................... 32l FAST VP tiering policy ...................................................................................... 33l Enable or disable scheduled data relocations at the system level....................... 34l Stop a pool from participating in scheduled data relocations .............................35l Manually initiate or stop data relocations for a pool .......................................... 35l Pause or resume data relocations for all pools ...................................................35l Change system-level data relocation information ..............................................35l Change data relocation information for a pool ...................................................36l View pool-level FAST VP information ................................................................36
Managing FAST VP (supported physical deployments only) 31
About FAST VPFAST VP functionality is available in traditional, hybrid pools with Flash drives. It is notapplicable to dynamic pools.
Fully Automated Storage Tiering for Virtual Pools (FAST VP) enables the system toretain the most frequently accessed or important data on fast, high-performancedrives and move the less frequently accessed and less important data to lower-performance, cost-effective drives. FAST VP does the following for traditional pools:
l Monitors the usage of the data in a tiered pool. Tiered pools are heterogeneouspools that are configured with multiple classes of drives (SAS Flash 2 and/or SASFlash 3, plus SAS and/or NL-SAS).
l Depending on the tiering policy, uses the monitoring statistics to automaticallyrelocate data chunks, at 256 MB granularity, to other tiers within the pool. Forexample, the Start High then Auto-Tier policy relocates data to the storage tierthat is best suited for that data, based on relative activity.
l Performs load balancing across the drives in tiered and non-tiered pools.
FAST VP is an automated feature that optimizes drive utilization. It requires very littlemanual intervention.
Note
l To configure and use the FAST VP feature, the FAST VP license must be installedon the system. All-Flash models of Unity do not support FAST VP.
l FAST VP can use all supported drive types except for SAS Flash 4.
The data relocation performed by FAST VP can help you achieve the followingbenefits:
l Increased performanceIn some cases, you can double performance throughput by adding less than 10percent of a pool's total capacity in SAS Flash 2 or SAS Flash 3 drives.
l Reduced Total Cost of Ownership (TCO)Using a combination of NL-SAS, SAS, SAS Flash 2, and SAS Flash 3 drives insteadof all SAS drives enables you to address performance requirements and still reducethe drive count. In some cases, you can achieve up to a two-thirds reduction indrive count by using FAST VP.
Data relocation with FAST VPData relocation (also called auto-tiering) is the process by which the system relocatesdata to another tier within the same pool and rebalances data within a tier to achievemaximum pool performance gain. Data relocation can be scheduled or manuallyinitiated.
The data relocation process does the following:
l Relocates the most active data up to the highest available tier.
l Relocates the least active data to lower tiers, as needed to free up space for moreactive data in the higher tiers.
l Rebalances data within a tier.
Managing FAST VP (supported physical deployments only)
32 Unity Family 4.3 Configuring Pools
Scheduled data relocationScheduled data relocation is enabled for all pools by default when FAST VP is installedon your system. The system performs scheduled data relocations for poolsparticipating in the automatic data relocation schedule. By default, the data relocationwindow is every day from 22:00 to 6:00 (UTC time) the next day. The specified datarelocation times provide the window of time in which data relocations occur on anongoing basis, if the system determines the relocations are needed.
You can do the following to configure scheduled data relocations:
l Disable or re-enable scheduled data relocations for the system.
l Change the days on which data relocation occurs and the data relocation windowstart time and end time for each scheduled day.
l Configure individual pools to participate in scheduled data relocations.
l Pause all scheduled data relocations. (This action also pauses manual datarelocations that are currently in progress.)
l Resume all scheduled data relocations (This action also resumes paused manualdata relocations whose specified end times have not expired.)
Note
The system rebalances data within a tier automatically when a pool tier is expanded.
Manual data relocationYou can manually initiate data relocations for individual pools. When you start a manualdata relocation, you specify a data relocation rate and an end time for the datarelocation operation.
You can do the following to control manual data relocations:
l Start or stop a manual data relocation.
l Pause manual relocations that are currently in progress. This action also pauses allscheduled data relocations.
l Resume paused manual relocations whose end times are not over. This action alsoresumes all scheduled data relocations.
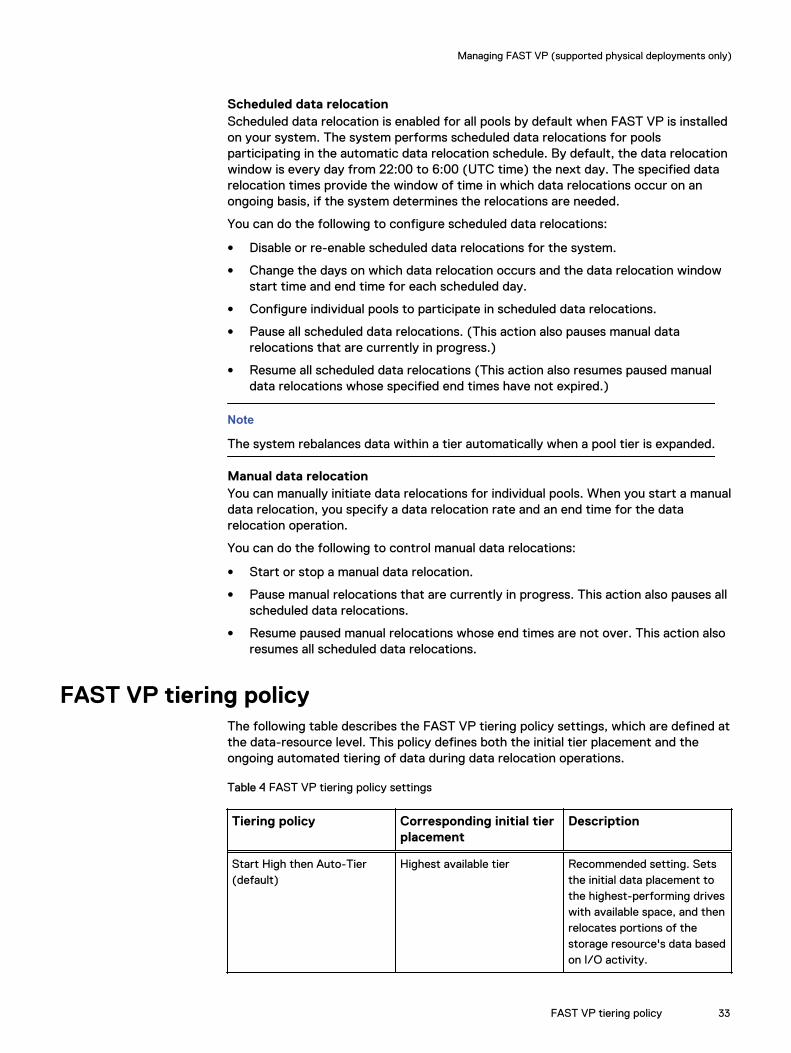
FAST VP tiering policyThe following table describes the FAST VP tiering policy settings, which are defined atthe data-resource level. This policy defines both the initial tier placement and theongoing automated tiering of data during data relocation operations.
Table 4 FAST VP tiering policy settings
Tiering policy Corresponding initial tierplacement
Description
Start High then Auto-Tier(default)
Highest available tier Recommended setting. Setsthe initial data placement tothe highest-performing driveswith available space, and thenrelocates portions of thestorage resource's data basedon I/O activity.
Managing FAST VP (supported physical deployments only)
FAST VP tiering policy 33
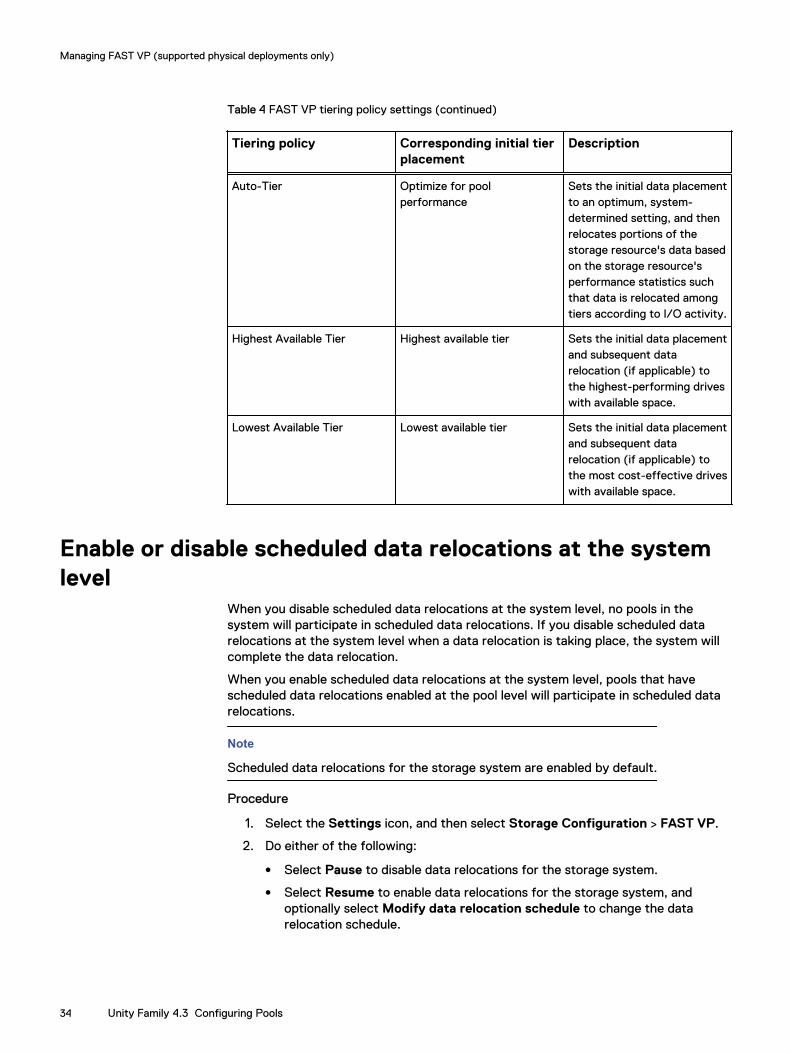
Table 4 FAST VP tiering policy settings (continued)
Tiering policy Corresponding initial tierplacement
Description
Auto-Tier Optimize for poolperformance
Sets the initial data placementto an optimum, system-determined setting, and thenrelocates portions of thestorage resource's data basedon the storage resource'sperformance statistics suchthat data is relocated amongtiers according to I/O activity.
Highest Available Tier Highest available tier Sets the initial data placementand subsequent datarelocation (if applicable) tothe highest-performing driveswith available space.
Lowest Available Tier Lowest available tier Sets the initial data placementand subsequent datarelocation (if applicable) tothe most cost-effective driveswith available space.
Enable or disable scheduled data relocations at the systemlevel
When you disable scheduled data relocations at the system level, no pools in thesystem will participate in scheduled data relocations. If you disable scheduled datarelocations at the system level when a data relocation is taking place, the system willcomplete the data relocation.
When you enable scheduled data relocations at the system level, pools that havescheduled data relocations enabled at the pool level will participate in scheduled datarelocations.
Note
Scheduled data relocations for the storage system are enabled by default.
Procedure
1. Select the Settings icon, and then select Storage Configuration > FAST VP.
2. Do either of the following:
l Select Pause to disable data relocations for the storage system.
l Select Resume to enable data relocations for the storage system, andoptionally select Modify data relocation schedule to change the datarelocation schedule.
Managing FAST VP (supported physical deployments only)
34 Unity Family 4.3 Configuring Pools
Stop a pool from participating in scheduled data relocationsIf you stop a pool from participating in scheduled data relocations when a datarelocation is taking place, the system will complete the data relocation.
Procedure
1. Under Storage, select Pools.
2. Select the relevant pool, and click the Edit icon.
3. Select Fast VP.
4. If the Data relocations scheduled field has a value of No, select the Edit icon,and select Yes on the confirmation message.
Manually initiate or stop data relocations for a poolYou can manually initiate or stop data relocations for pools.
Procedure
1. Under Storage, select Pools.
2. Select the pool for which you want to initiate or stop data relocations, and thenselect the Edit icon.
3. Select FAST VP.
4. Do either of the following:
l To start data relocations for the pool, choose Start Relocation, and selectthe rate and end time for the data relocation. A data relocation rate of Lowhas the least impact on system performance, Medium (the default) has amoderate impact on system performance, and High has the most impact onsystem performance.
l To stop data relocations, choose Stop Relocation. This stops all datarelocations for the pool, including manually initiated data relocations that arecurrently in progress and scheduled data relocations.
Pause or resume data relocations for all poolsPausing data relocations stops all scheduled data relocations as well as manual datarelocations that are in progress. Resuming data relocations restarts these datarelocations.
Procedure
1. Select the Settings icon, and then select Storage Configuration > FAST VP.
2. Pause or resume data relocations.
Change system-level data relocation informationSystem-level data relocation information includes whether scheduled relocations areenabled for the system. If scheduled data relocations are enabled, the informationincludes:
l Total amount of data in the system scheduled to move to higher and lower tiers.
Managing FAST VP (supported physical deployments only)
Stop a pool from participating in scheduled data relocations 35
l Total amount of data in the system to be rebalanced within a tier
l Estimated time needed for the scheduled data relocations.
Procedure
1. Select the Settings icon, and then select Storage Configuration > FAST VP.
2. Optionally, take one of the following actions:
l Select Pause (if enabled) to pause all scheduled data relocations and manualdata relocations that are currently in progress.
l Select Resume (if enabled) to resume paused data relocations.
l Modify the data relocation rate. A data relocation rate of Low has the leastimpact on system performance, Medium (the default) has a moderateimpact on system performance, and High has the most impact on systemperformance.
l Select Modify data relocation schedule to change the data relocationschedule.
Change data relocation information for a poolYou can specify whether a pool is scheduled to participate in scheduled datarelocations. You can also manually start or stop data relocations on the pool.
Procedure
1. Under Storage, select Pools.
2. Select the relevant pool, and click Edit.
3. Select FAST VP.
4. Make the appropriate changes.
View pool-level FAST VP informationIf a FAST VP license is installed on the system, you can view the following informationfor a pool:
l Whether the pool participates in scheduled data relocations.
l Estimated time needed for scheduled data relocations.
l Start and end time for the most recent data relocation.
l Number and type of drives in each tier.
l Amount of data in the pool scheduled to move to higher and lower tiers.
l Amount of data in the pool scheduled to be rebalanced within a tier.
Procedure
1. Under Storage, select Pools.
2. Select the relevant pool, and then select the Edit icon.
3. Select the FAST VP tab.
4. Optionally click Manage FAST VP system settings to view the data relocationrate.
Managing FAST VP (supported physical deployments only)
36 Unity Family 4.3 Configuring Pools
l Low has the least impact on system performance.
l Medium (the default) has a moderate impact on system performance.
l High has the most impact on system performance.
Managing FAST VP (supported physical deployments only)
View pool-level FAST VP information 37
Managing FAST VP (supported physical deployments only)
38 Unity Family 4.3 Configuring Pools
CHAPTER 6
Understanding RAID (physical deploymentsonly)
This chapter contains the following topics:
l About RAID ....................................................................................................... 40l RAID configurations ...........................................................................................41l RAID for dynamic pools in Unisphere .................................................................42l Drive IOPS by RAID type ...................................................................................42
Understanding RAID (physical deployments only) 39
About RAIDRedundant Array of Independent Disks (RAID) is a method for providing high levels ofstorage reliability by arranging drives in groups, and dividing and replicating dataamong the drives in a group. You select drive types and RAID configurations (RAIDtypes and stripe widths) when you create a pool. Once a pool is configured, youcannot change the RAID type of a tier. However, in hybrid models, you can add a newtier with a different RAID type. (All-Flash models have only one tier.)
RAID usually has the characteristics of parity, striping, or both:
l Parity provides redundancy for blocks of data on the drives. Depending on theRAID type, this provides the ability to continue to operate with the loss of one ormore drives.
l Striping provides a mechanism for processing data that allows the comprehensiveread/write performance of a RAID group to exceed the performance of itscomponent drives.
In hybrid models that are licensed for FAST VP and that have unused drives ofdifferent types, you can configure multiple storage tiers for the pool and can specify adifferent RAID configuration for each tier.
The system supports RAID 5, 6, and 1/0 (also called RAID 10).
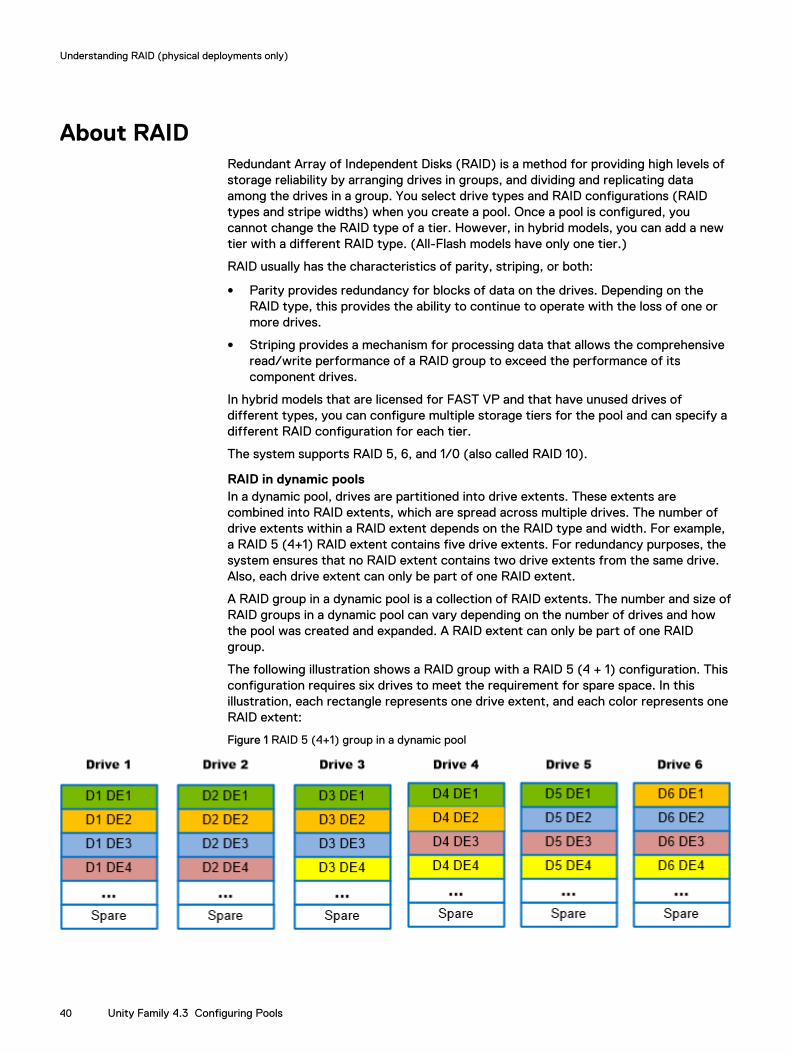
RAID in dynamic poolsIn a dynamic pool, drives are partitioned into drive extents. These extents arecombined into RAID extents, which are spread across multiple drives. The number ofdrive extents within a RAID extent depends on the RAID type and width. For example,a RAID 5 (4+1) RAID extent contains five drive extents. For redundancy purposes, thesystem ensures that no RAID extent contains two drive extents from the same drive.Also, each drive extent can only be part of one RAID extent.
A RAID group in a dynamic pool is a collection of RAID extents. The number and size ofRAID groups in a dynamic pool can vary depending on the number of drives and howthe pool was created and expanded. A RAID extent can only be part of one RAIDgroup.
The following illustration shows a RAID group with a RAID 5 (4 + 1) configuration. Thisconfiguration requires six drives to meet the requirement for spare space. In thisillustration, each rectangle represents one drive extent, and each color represents oneRAID extent:
Figure 1 RAID 5 (4+1) group in a dynamic pool
Understanding RAID (physical deployments only)
40 Unity Family 4.3 Configuring Pools
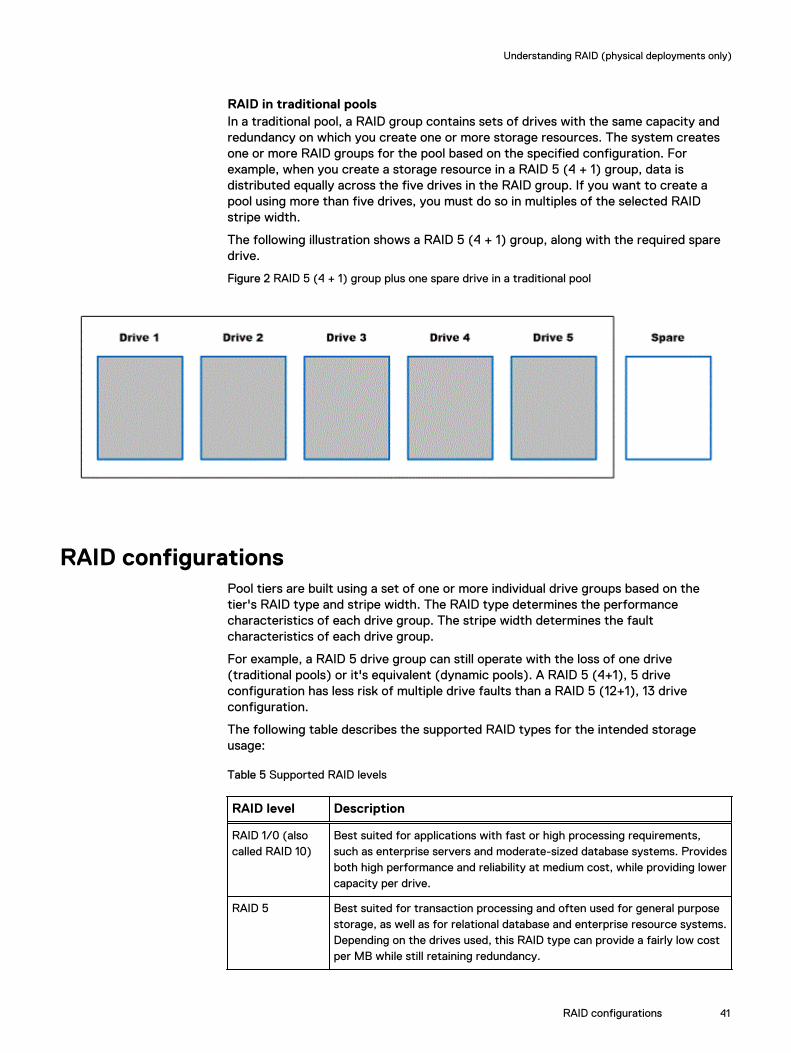
RAID in traditional poolsIn a traditional pool, a RAID group contains sets of drives with the same capacity andredundancy on which you create one or more storage resources. The system createsone or more RAID groups for the pool based on the specified configuration. Forexample, when you create a storage resource in a RAID 5 (4 + 1) group, data isdistributed equally across the five drives in the RAID group. If you want to create apool using more than five drives, you must do so in multiples of the selected RAIDstripe width.
The following illustration shows a RAID 5 (4 + 1) group, along with the required sparedrive.
Figure 2 RAID 5 (4 + 1) group plus one spare drive in a traditional pool
RAID configurationsPool tiers are built using a set of one or more individual drive groups based on thetier's RAID type and stripe width. The RAID type determines the performancecharacteristics of each drive group. The stripe width determines the faultcharacteristics of each drive group.
For example, a RAID 5 drive group can still operate with the loss of one drive(traditional pools) or it's equivalent (dynamic pools). A RAID 5 (4+1), 5 driveconfiguration has less risk of multiple drive faults than a RAID 5 (12+1), 13 driveconfiguration.
The following table describes the supported RAID types for the intended storageusage:
Table 5 Supported RAID levels
RAID level Description
RAID 1/0 (alsocalled RAID 10)
Best suited for applications with fast or high processing requirements,such as enterprise servers and moderate-sized database systems. Providesboth high performance and reliability at medium cost, while providing lowercapacity per drive.
RAID 5 Best suited for transaction processing and often used for general purposestorage, as well as for relational database and enterprise resource systems.Depending on the drives used, this RAID type can provide a fairly low costper MB while still retaining redundancy.
Understanding RAID (physical deployments only)
RAID configurations 41
Table 5 Supported RAID levels (continued)
RAID level Description
RAID 6 Best suited for read-biased workloads, such as archiving and backup todrive.
Mixed RAID configurations (traditional pools only)If FAST VP is installed on the system, you can create a pool with multiple storagetiers. Each tier can have its own RAID type. Only one RAID type can be used within atier, but the tier can have different stripe configurations. For example, you can mixRAID 5 (4+1) and RAID 5 (8+1) in a tier.
To do this:
l Select the Maximum Capacity RAID configuration when you create the pool. Thisconfiguration might mix RAID types in the pool.
l Expand the pool using a different stripe width than currently exists in the pool.
RAID for dynamic pools in UnisphereUnisphere automatically assigns a RAID width to a dynamic pool based on the selectedRAID type and the selected number of drives. The following table describes how theRAID width gets assigned:
RAID level Number of drives RAID Width
RAID 5 6 to 9 4+1
10 to 13 8+1
14 or more 12+1
RAID 6 7 to 8 4+2
9 to 10 6+2
11 to 12 8+2
13 to 14 10+2
15 to 16 12+2
17 or more 14+2
RAID 1/0 3 to 4 1+1
5 to 6 2+2
7 to 8 3+3
9 or more 4+4
Drive IOPS by RAID typeFront-end application workloads translate into different back-end drive workloadsbased on the RAID type in use. For front-end reads, there is no impact by RAID type: 1front-end read I/O equals 1 back-end read I/O.
The following table shows the impact by RAID type for random front-end writes.
Understanding RAID (physical deployments only)
42 Unity Family 4.3 Configuring Pools
Table 6 IOPS by RAID type for front-end writes
RAID type IOPS per 1 front-end write I/O
RAID 1/0 2 back-end write I/0s
RAID 5 2 back-end reads and 2 back-end writes
RAID 6 3 back-end reads and 3 back-end writes
Understanding RAID (physical deployments only)
Drive IOPS by RAID type 43
Understanding RAID (physical deployments only)
44 Unity Family 4.3 Configuring Pools
CHAPTER 7
Configuring pools using the CLI
This chapter contains the following topics:
l Configure custom pools..................................................................................... 46l Manage pool tiers............................................................................................... 61l View pool resources........................................................................................... 63l View storage profiles (physical deployments only).............................................65l Manage drive groups (physical deployments only).............................................68l Manage storage system capacity settings.......................................................... 71l Manage system tier capacity settings................................................................ 73l Change disk settings (virtual deployments only)................................................ 74l Pool use cases....................................................................................................74l The show action command.................................................................................79
Configuring pools using the CLI 45
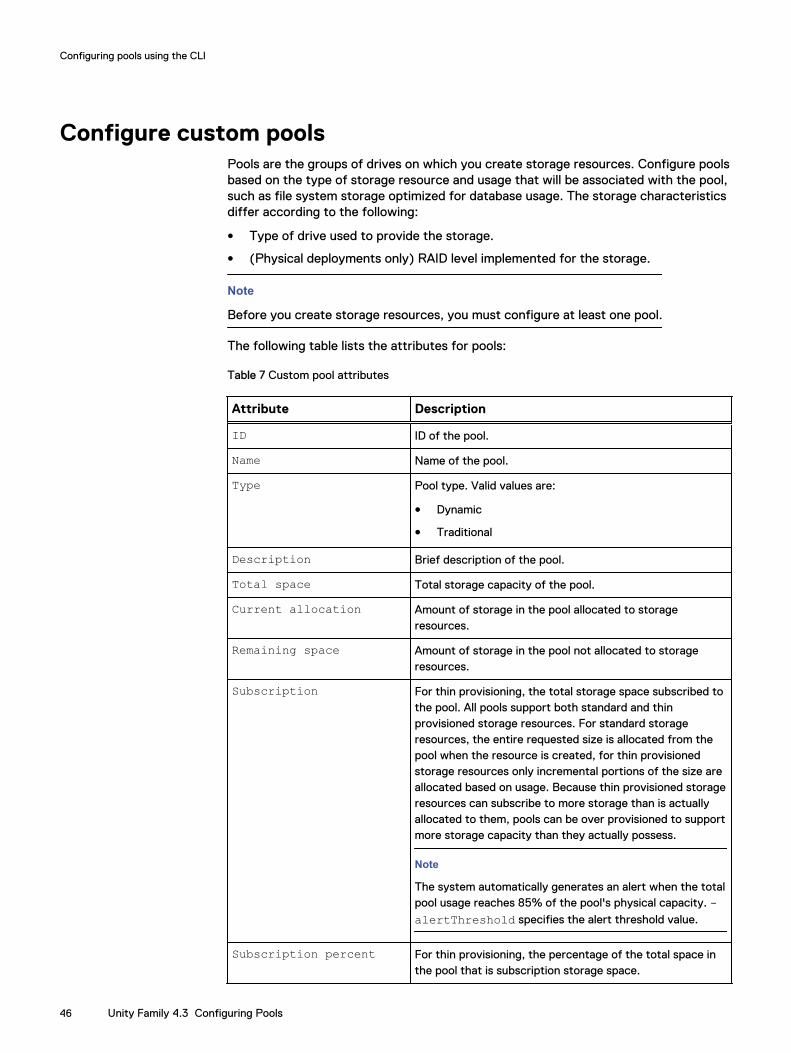
Configure custom poolsPools are the groups of drives on which you create storage resources. Configure poolsbased on the type of storage resource and usage that will be associated with the pool,such as file system storage optimized for database usage. The storage characteristicsdiffer according to the following:
l Type of drive used to provide the storage.
l (Physical deployments only) RAID level implemented for the storage.
Note
Before you create storage resources, you must configure at least one pool.
The following table lists the attributes for pools:
Table 7 Custom pool attributes
Attribute Description
ID ID of the pool.
Name Name of the pool.
Type Pool type. Valid values are:
l Dynamic
l Traditional
Description Brief description of the pool.
Total space Total storage capacity of the pool.
Current allocation Amount of storage in the pool allocated to storageresources.
Remaining space Amount of storage in the pool not allocated to storageresources.
Subscription For thin provisioning, the total storage space subscribed tothe pool. All pools support both standard and thinprovisioned storage resources. For standard storageresources, the entire requested size is allocated from thepool when the resource is created, for thin provisionedstorage resources only incremental portions of the size areallocated based on usage. Because thin provisioned storageresources can subscribe to more storage than is actuallyallocated to them, pools can be over provisioned to supportmore storage capacity than they actually possess.
Note
The system automatically generates an alert when the totalpool usage reaches 85% of the pool's physical capacity. -alertThreshold specifies the alert threshold value.
Subscription percent For thin provisioning, the percentage of the total space inthe pool that is subscription storage space.
Configuring pools using the CLI
46 Unity Family 4.3 Configuring Pools
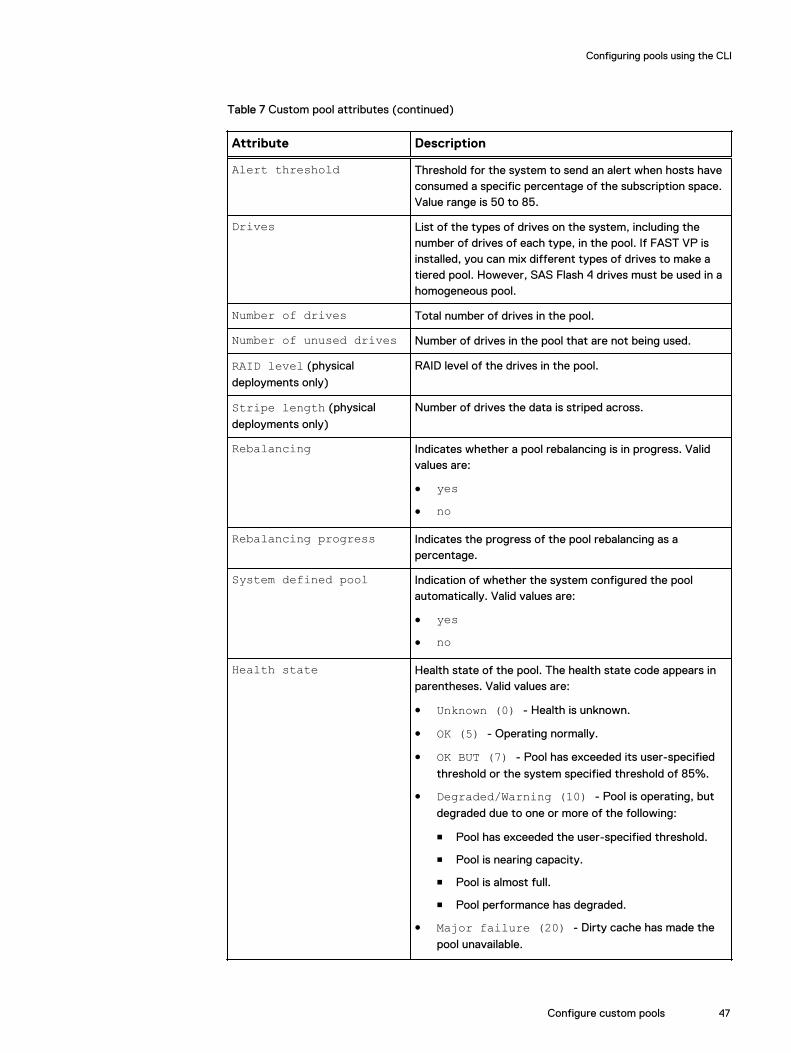
Table 7 Custom pool attributes (continued)
Attribute Description
Alert threshold Threshold for the system to send an alert when hosts haveconsumed a specific percentage of the subscription space.Value range is 50 to 85.
Drives List of the types of drives on the system, including thenumber of drives of each type, in the pool. If FAST VP isinstalled, you can mix different types of drives to make atiered pool. However, SAS Flash 4 drives must be used in ahomogeneous pool.
Number of drives Total number of drives in the pool.
Number of unused drives Number of drives in the pool that are not being used.
RAID level (physical
deployments only)
RAID level of the drives in the pool.
Stripe length (physical
deployments only)
Number of drives the data is striped across.
Rebalancing Indicates whether a pool rebalancing is in progress. Validvalues are:
l yesl no
Rebalancing progress Indicates the progress of the pool rebalancing as apercentage.
System defined pool Indication of whether the system configured the poolautomatically. Valid values are:
l yesl no
Health state Health state of the pool. The health state code appears inparentheses. Valid values are:
l Unknown (0) - Health is unknown.
l OK (5) - Operating normally.
l OK BUT (7) - Pool has exceeded its user-specified
threshold or the system specified threshold of 85%.
l Degraded/Warning (10) - Pool is operating, but
degraded due to one or more of the following:
n Pool has exceeded the user-specified threshold.
n Pool is nearing capacity.
n Pool is almost full.
n Pool performance has degraded.
l Major failure (20) - Dirty cache has made the
pool unavailable.
Configuring pools using the CLI
Configure custom pools 47
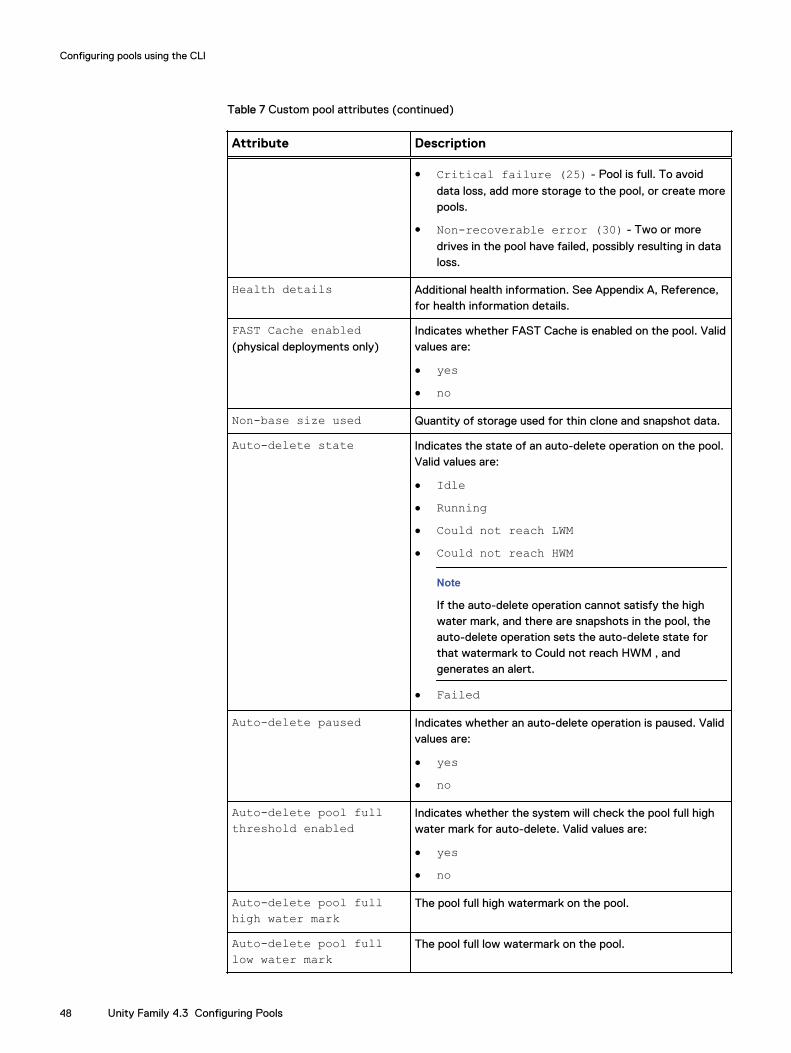
Table 7 Custom pool attributes (continued)
Attribute Description
l Critical failure (25) - Pool is full. To avoid
data loss, add more storage to the pool, or create morepools.
l Non-recoverable error (30) - Two or more
drives in the pool have failed, possibly resulting in dataloss.
Health details Additional health information. See Appendix A, Reference,for health information details.
FAST Cache enabled(physical deployments only)
Indicates whether FAST Cache is enabled on the pool. Validvalues are:
l yesl no
Non-base size used Quantity of storage used for thin clone and snapshot data.
Auto-delete state Indicates the state of an auto-delete operation on the pool.Valid values are:
l Idlel Runningl Could not reach LWMl Could not reach HWM
Note
If the auto-delete operation cannot satisfy the highwater mark, and there are snapshots in the pool, theauto-delete operation sets the auto-delete state forthat watermark to Could not reach HWM , andgenerates an alert.
l Failed
Auto-delete paused Indicates whether an auto-delete operation is paused. Validvalues are:
l yesl no
Auto-delete pool fullthreshold enabled
Indicates whether the system will check the pool full highwater mark for auto-delete. Valid values are:
l yesl no
Auto-delete pool fullhigh water mark
The pool full high watermark on the pool.
Auto-delete pool fulllow water mark
The pool full low watermark on the pool.
Configuring pools using the CLI
48 Unity Family 4.3 Configuring Pools
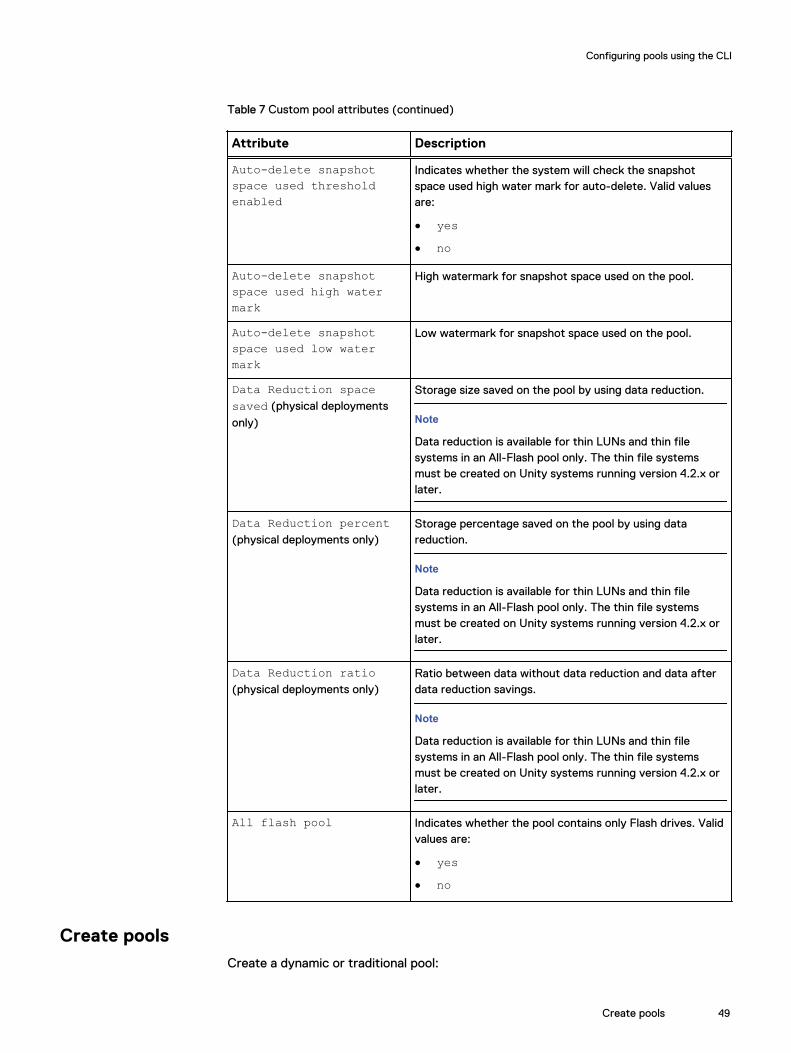
Table 7 Custom pool attributes (continued)
Attribute Description
Auto-delete snapshotspace used thresholdenabled
Indicates whether the system will check the snapshotspace used high water mark for auto-delete. Valid valuesare:
l yesl no
Auto-delete snapshotspace used high watermark
High watermark for snapshot space used on the pool.
Auto-delete snapshotspace used low watermark
Low watermark for snapshot space used on the pool.
Data Reduction spacesaved (physical deployments
only)
Storage size saved on the pool by using data reduction.
Note
Data reduction is available for thin LUNs and thin filesystems in an All-Flash pool only. The thin file systemsmust be created on Unity systems running version 4.2.x orlater.
Data Reduction percent(physical deployments only)
Storage percentage saved on the pool by using datareduction.
Note
Data reduction is available for thin LUNs and thin filesystems in an All-Flash pool only. The thin file systemsmust be created on Unity systems running version 4.2.x orlater.
Data Reduction ratio(physical deployments only)
Ratio between data without data reduction and data afterdata reduction savings.
Note
Data reduction is available for thin LUNs and thin filesystems in an All-Flash pool only. The thin file systemsmust be created on Unity systems running version 4.2.x orlater.
All flash pool Indicates whether the pool contains only Flash drives. Validvalues are:
l yesl no
Create poolsCreate a dynamic or traditional pool:
Configuring pools using the CLI
Create pools 49
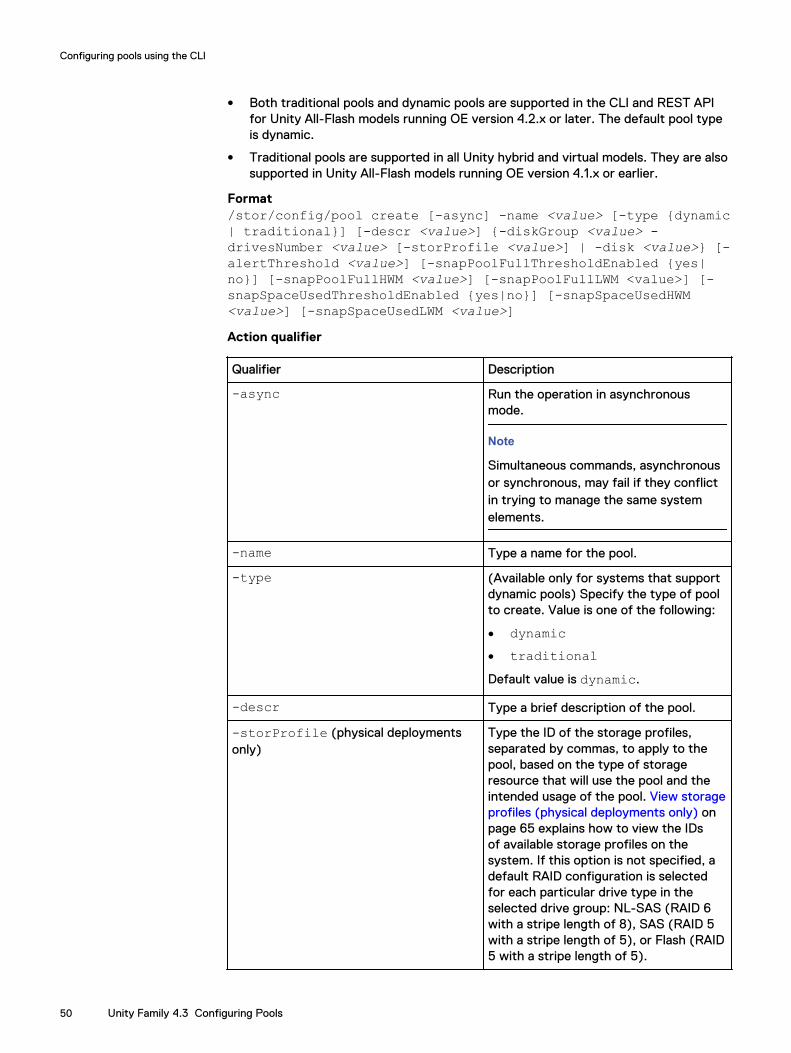
l Both traditional pools and dynamic pools are supported in the CLI and REST APIfor Unity All-Flash models running OE version 4.2.x or later. The default pool typeis dynamic.
l Traditional pools are supported in all Unity hybrid and virtual models. They are alsosupported in Unity All-Flash models running OE version 4.1.x or earlier.
Format/stor/config/pool create [-async] -name <value> [-type {dynamic| traditional}] [-descr <value>] {-diskGroup <value> -drivesNumber <value> [-storProfile <value>] | -disk <value>} [-alertThreshold <value>] [-snapPoolFullThresholdEnabled {yes|no}] [-snapPoolFullHWM <value>] [-snapPoolFullLWM <value>] [-snapSpaceUsedThresholdEnabled {yes|no}] [-snapSpaceUsedHWM<value>] [-snapSpaceUsedLWM <value>]Action qualifier
Qualifier Description
-async Run the operation in asynchronousmode.
Note
Simultaneous commands, asynchronousor synchronous, may fail if they conflictin trying to manage the same systemelements.
-name Type a name for the pool.
-type (Available only for systems that supportdynamic pools) Specify the type of poolto create. Value is one of the following:
l dynamicl traditionalDefault value is dynamic.
-descr Type a brief description of the pool.
-storProfile (physical deploymentsonly)
Type the ID of the storage profiles,separated by commas, to apply to thepool, based on the type of storageresource that will use the pool and theintended usage of the pool. View storageprofiles (physical deployments only) onpage 65 explains how to view the IDsof available storage profiles on thesystem. If this option is not specified, adefault RAID configuration is selectedfor each particular drive type in theselected drive group: NL-SAS (RAID 6with a stripe length of 8), SAS (RAID 5with a stripe length of 5), or Flash (RAID5 with a stripe length of 5).
Configuring pools using the CLI
50 Unity Family 4.3 Configuring Pools
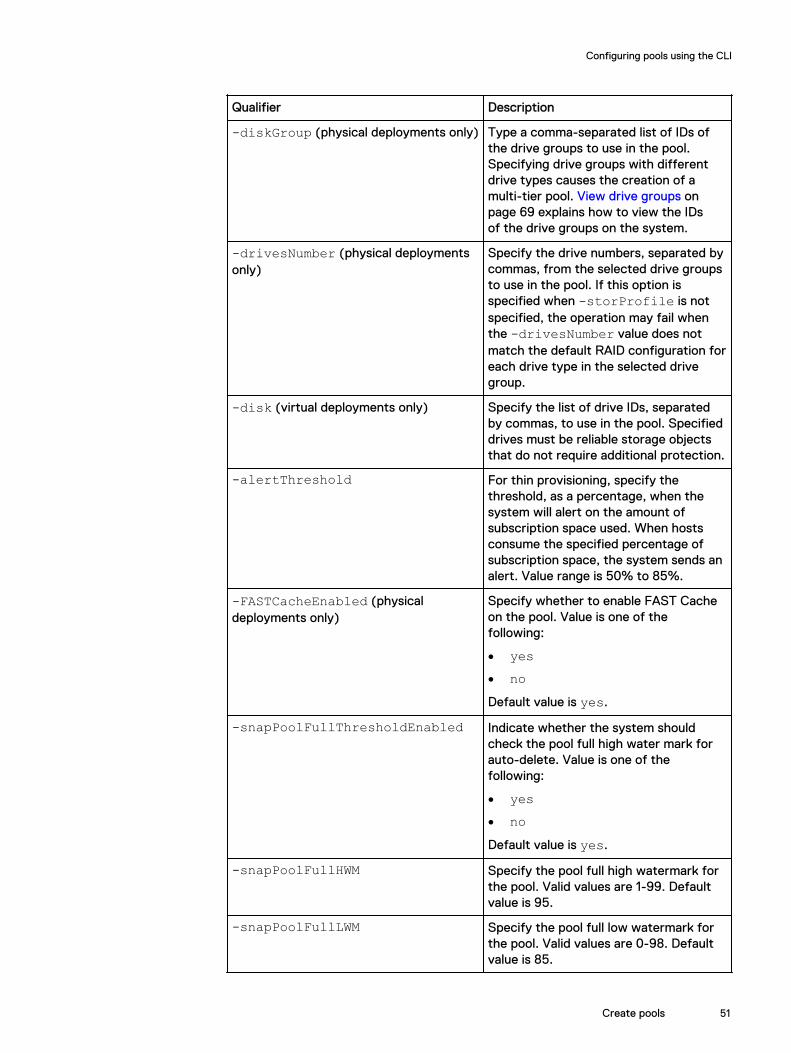
Qualifier Description
-diskGroup (physical deployments only) Type a comma-separated list of IDs ofthe drive groups to use in the pool.Specifying drive groups with differentdrive types causes the creation of amulti-tier pool. View drive groups onpage 69 explains how to view the IDsof the drive groups on the system.
-drivesNumber (physical deploymentsonly)
Specify the drive numbers, separated bycommas, from the selected drive groupsto use in the pool. If this option isspecified when -storProfile is notspecified, the operation may fail whenthe -drivesNumber value does notmatch the default RAID configuration foreach drive type in the selected drivegroup.
-disk (virtual deployments only) Specify the list of drive IDs, separatedby commas, to use in the pool. Specifieddrives must be reliable storage objectsthat do not require additional protection.
-alertThreshold For thin provisioning, specify thethreshold, as a percentage, when thesystem will alert on the amount ofsubscription space used. When hostsconsume the specified percentage ofsubscription space, the system sends analert. Value range is 50% to 85%.
-FASTCacheEnabled (physicaldeployments only)
Specify whether to enable FAST Cacheon the pool. Value is one of thefollowing:
l yesl noDefault value is yes.
-snapPoolFullThresholdEnabled Indicate whether the system shouldcheck the pool full high water mark forauto-delete. Value is one of thefollowing:
l yesl noDefault value is yes.
-snapPoolFullHWM Specify the pool full high watermark forthe pool. Valid values are 1-99. Defaultvalue is 95.
-snapPoolFullLWM Specify the pool full low watermark forthe pool. Valid values are 0-98. Defaultvalue is 85.
Configuring pools using the CLI
Create pools 51
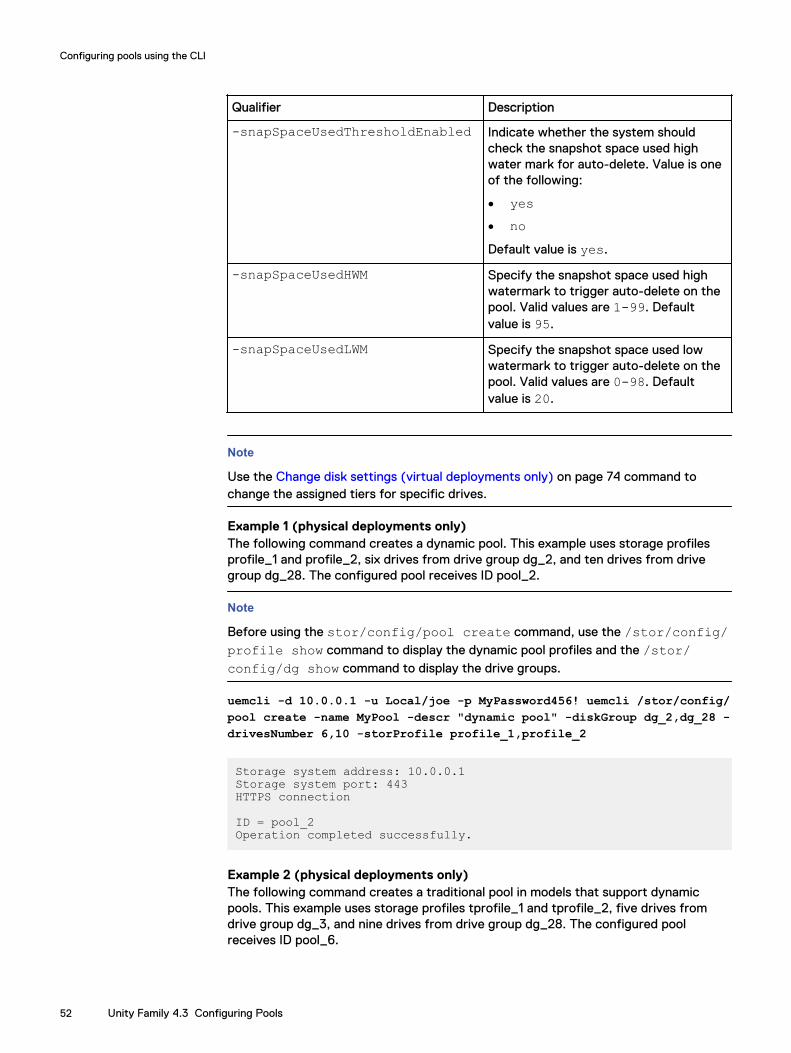
Qualifier Description
-snapSpaceUsedThresholdEnabled Indicate whether the system shouldcheck the snapshot space used highwater mark for auto-delete. Value is oneof the following:
l yesl noDefault value is yes.
-snapSpaceUsedHWM Specify the snapshot space used highwatermark to trigger auto-delete on thepool. Valid values are 1-99. Defaultvalue is 95.
-snapSpaceUsedLWM Specify the snapshot space used lowwatermark to trigger auto-delete on thepool. Valid values are 0-98. Defaultvalue is 20.
Note
Use the Change disk settings (virtual deployments only) on page 74 command tochange the assigned tiers for specific drives.
Example 1 (physical deployments only)The following command creates a dynamic pool. This example uses storage profilesprofile_1 and profile_2, six drives from drive group dg_2, and ten drives from drivegroup dg_28. The configured pool receives ID pool_2.
Note
Before using the stor/config/pool create command, use the /stor/config/profile show command to display the dynamic pool profiles and the /stor/config/dg show command to display the drive groups.
uemcli -d 10.0.0.1 -u Local/joe -p MyPassword456! uemcli /stor/config/pool create -name MyPool -descr "dynamic pool" -diskGroup dg_2,dg_28 -drivesNumber 6,10 -storProfile profile_1,profile_2
Storage system address: 10.0.0.1Storage system port: 443HTTPS connection
ID = pool_2Operation completed successfully.
Example 2 (physical deployments only)The following command creates a traditional pool in models that support dynamicpools. This example uses storage profiles tprofile_1 and tprofile_2, five drives fromdrive group dg_3, and nine drives from drive group dg_28. The configured poolreceives ID pool_6.
Configuring pools using the CLI
52 Unity Family 4.3 Configuring Pools
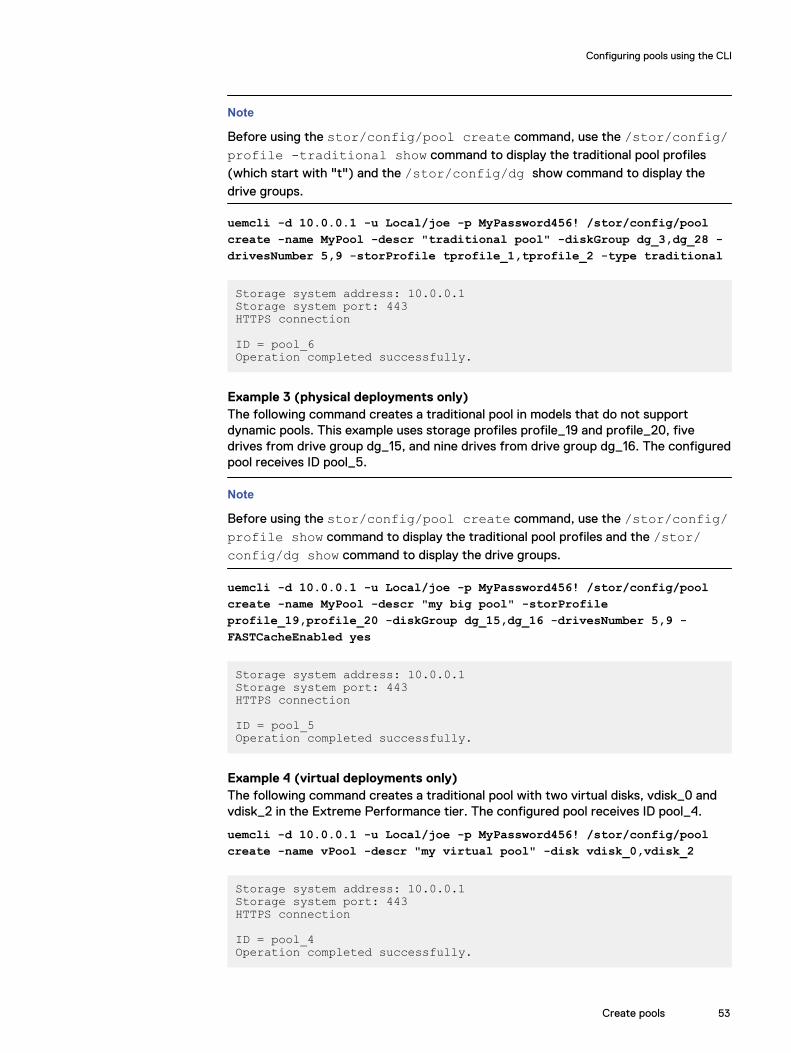
Note
Before using the stor/config/pool create command, use the /stor/config/profile -traditional show command to display the traditional pool profiles(which start with "t") and the /stor/config/dg show command to display thedrive groups.
uemcli -d 10.0.0.1 -u Local/joe -p MyPassword456! /stor/config/poolcreate -name MyPool -descr "traditional pool" -diskGroup dg_3,dg_28 -drivesNumber 5,9 -storProfile tprofile_1,tprofile_2 -type traditional
Storage system address: 10.0.0.1Storage system port: 443HTTPS connection
ID = pool_6Operation completed successfully.
Example 3 (physical deployments only)The following command creates a traditional pool in models that do not supportdynamic pools. This example uses storage profiles profile_19 and profile_20, fivedrives from drive group dg_15, and nine drives from drive group dg_16. The configuredpool receives ID pool_5.
Note
Before using the stor/config/pool create command, use the /stor/config/profile show command to display the traditional pool profiles and the /stor/config/dg show command to display the drive groups.
uemcli -d 10.0.0.1 -u Local/joe -p MyPassword456! /stor/config/poolcreate -name MyPool -descr "my big pool" -storProfileprofile_19,profile_20 -diskGroup dg_15,dg_16 -drivesNumber 5,9 -FASTCacheEnabled yes
Storage system address: 10.0.0.1Storage system port: 443HTTPS connection
ID = pool_5Operation completed successfully.
Example 4 (virtual deployments only)The following command creates a traditional pool with two virtual disks, vdisk_0 andvdisk_2 in the Extreme Performance tier. The configured pool receives ID pool_4.
uemcli -d 10.0.0.1 -u Local/joe -p MyPassword456! /stor/config/poolcreate -name vPool -descr "my virtual pool" -disk vdisk_0,vdisk_2
Storage system address: 10.0.0.1Storage system port: 443HTTPS connection
ID = pool_4Operation completed successfully.
Configuring pools using the CLI
Create pools 53
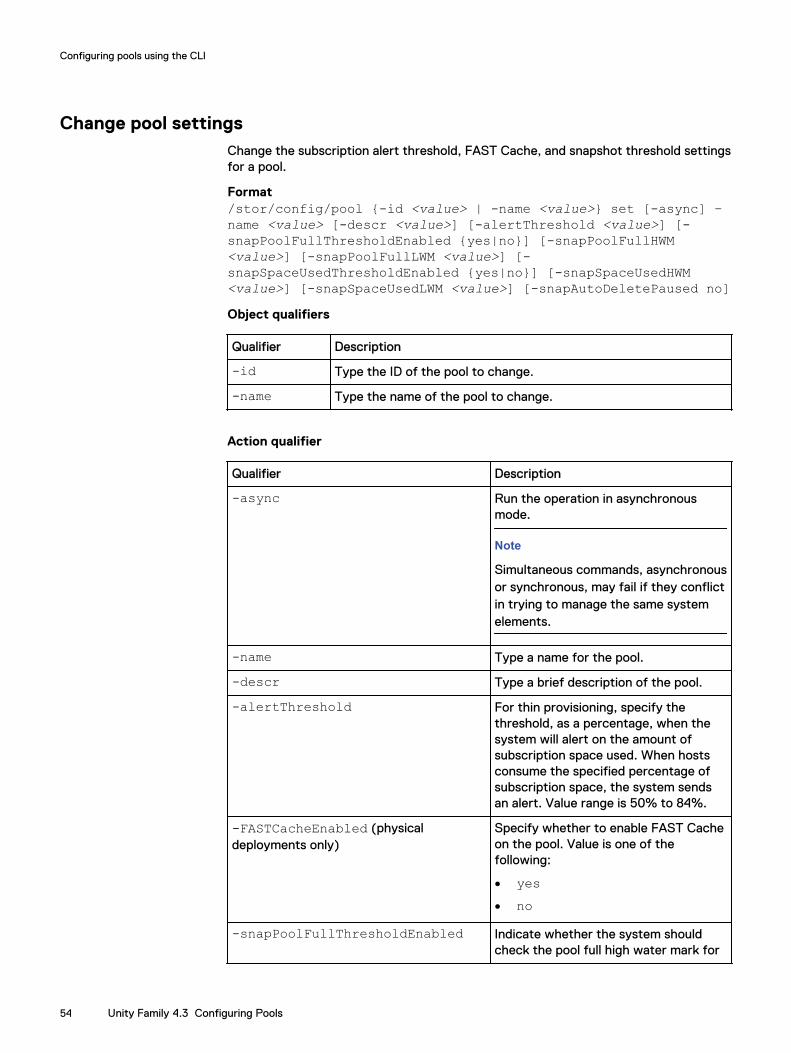
Change pool settingsChange the subscription alert threshold, FAST Cache, and snapshot threshold settingsfor a pool.
Format/stor/config/pool {-id <value> | -name <value>} set [-async] –name <value> [-descr <value>] [-alertThreshold <value>] [-snapPoolFullThresholdEnabled {yes|no}] [-snapPoolFullHWM<value>] [-snapPoolFullLWM <value>] [-snapSpaceUsedThresholdEnabled {yes|no}] [-snapSpaceUsedHWM<value>] [-snapSpaceUsedLWM <value>] [-snapAutoDeletePaused no]Object qualifiers
Qualifier Description
-id Type the ID of the pool to change.
-name Type the name of the pool to change.
Action qualifier
Qualifier Description
-async Run the operation in asynchronousmode.
Note
Simultaneous commands, asynchronousor synchronous, may fail if they conflictin trying to manage the same systemelements.
-name Type a name for the pool.
-descr Type a brief description of the pool.
-alertThreshold For thin provisioning, specify thethreshold, as a percentage, when thesystem will alert on the amount ofsubscription space used. When hostsconsume the specified percentage ofsubscription space, the system sendsan alert. Value range is 50% to 84%.
-FASTCacheEnabled (physicaldeployments only)
Specify whether to enable FAST Cacheon the pool. Value is one of thefollowing:
l yesl no
-snapPoolFullThresholdEnabled Indicate whether the system shouldcheck the pool full high water mark for
Configuring pools using the CLI
54 Unity Family 4.3 Configuring Pools
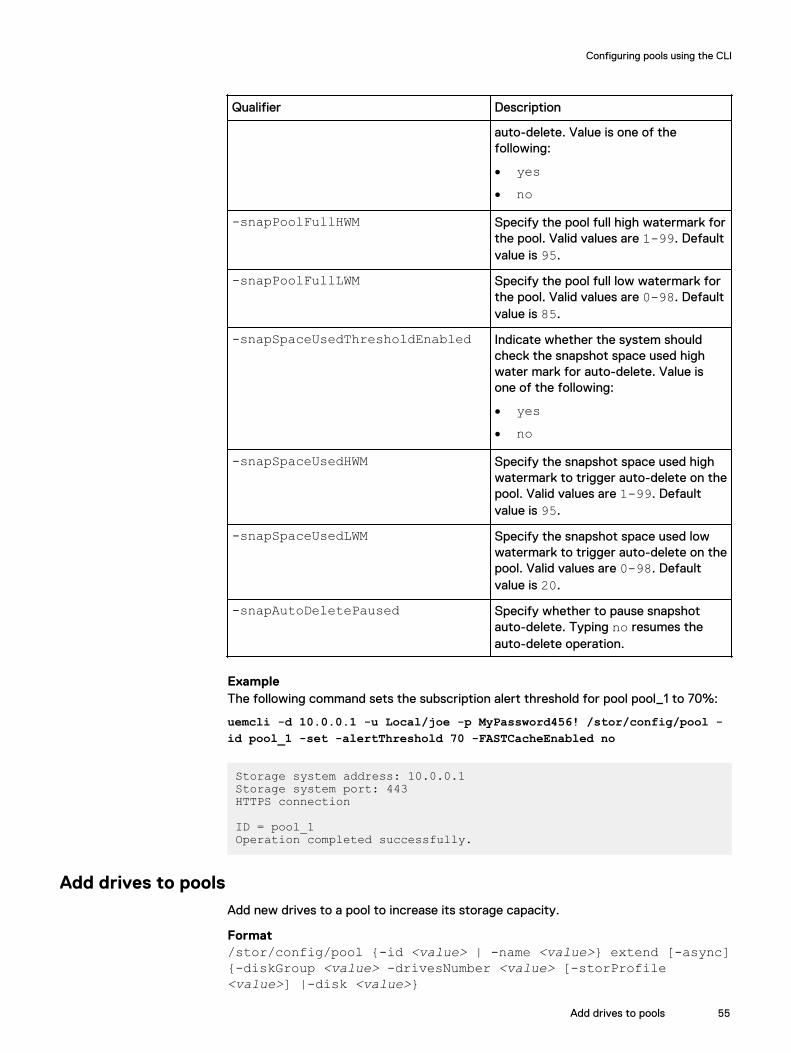
Qualifier Description
auto-delete. Value is one of thefollowing:
l yesl no
-snapPoolFullHWM Specify the pool full high watermark forthe pool. Valid values are 1-99. Defaultvalue is 95.
-snapPoolFullLWM Specify the pool full low watermark forthe pool. Valid values are 0-98. Defaultvalue is 85.
-snapSpaceUsedThresholdEnabled Indicate whether the system shouldcheck the snapshot space used highwater mark for auto-delete. Value isone of the following:
l yesl no
-snapSpaceUsedHWM Specify the snapshot space used highwatermark to trigger auto-delete on thepool. Valid values are 1-99. Defaultvalue is 95.
-snapSpaceUsedLWM Specify the snapshot space used lowwatermark to trigger auto-delete on thepool. Valid values are 0-98. Defaultvalue is 20.
-snapAutoDeletePaused Specify whether to pause snapshotauto-delete. Typing no resumes theauto-delete operation.
ExampleThe following command sets the subscription alert threshold for pool pool_1 to 70%:
uemcli -d 10.0.0.1 -u Local/joe -p MyPassword456! /stor/config/pool -id pool_1 -set -alertThreshold 70 -FASTCacheEnabled no
Storage system address: 10.0.0.1Storage system port: 443HTTPS connection
ID = pool_1Operation completed successfully.
Add drives to poolsAdd new drives to a pool to increase its storage capacity.
Format/stor/config/pool {-id <value> | -name <value>} extend [-async]{-diskGroup <value> -drivesNumber <value> [-storProfile<value>] |-disk <value>}
Configuring pools using the CLI
Add drives to pools 55
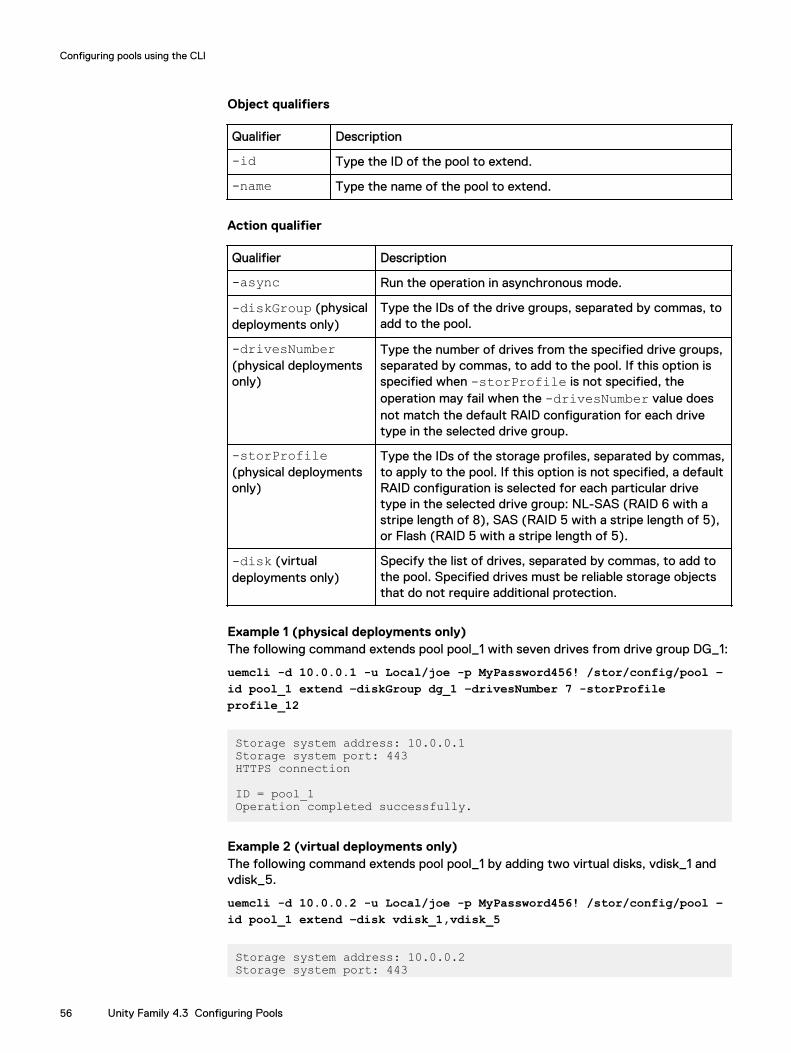
Object qualifiers
Qualifier Description
-id Type the ID of the pool to extend.
-name Type the name of the pool to extend.
Action qualifier
Qualifier Description
-async Run the operation in asynchronous mode.
-diskGroup (physicaldeployments only)
Type the IDs of the drive groups, separated by commas, toadd to the pool.
-drivesNumber(physical deploymentsonly)
Type the number of drives from the specified drive groups,separated by commas, to add to the pool. If this option isspecified when -storProfile is not specified, theoperation may fail when the -drivesNumber value doesnot match the default RAID configuration for each drivetype in the selected drive group.
-storProfile(physical deploymentsonly)
Type the IDs of the storage profiles, separated by commas,to apply to the pool. If this option is not specified, a defaultRAID configuration is selected for each particular drivetype in the selected drive group: NL-SAS (RAID 6 with astripe length of 8), SAS (RAID 5 with a stripe length of 5),or Flash (RAID 5 with a stripe length of 5).
-disk (virtualdeployments only)
Specify the list of drives, separated by commas, to add tothe pool. Specified drives must be reliable storage objectsthat do not require additional protection.
Example 1 (physical deployments only)The following command extends pool pool_1 with seven drives from drive group DG_1:
uemcli -d 10.0.0.1 -u Local/joe -p MyPassword456! /stor/config/pool –id pool_1 extend –diskGroup dg_1 –drivesNumber 7 -storProfileprofile_12
Storage system address: 10.0.0.1Storage system port: 443HTTPS connection
ID = pool_1Operation completed successfully.
Example 2 (virtual deployments only)The following command extends pool pool_1 by adding two virtual disks, vdisk_1 andvdisk_5.
uemcli -d 10.0.0.2 -u Local/joe -p MyPassword456! /stor/config/pool –id pool_1 extend –disk vdisk_1,vdisk_5
Storage system address: 10.0.0.2Storage system port: 443
Configuring pools using the CLI
56 Unity Family 4.3 Configuring Pools
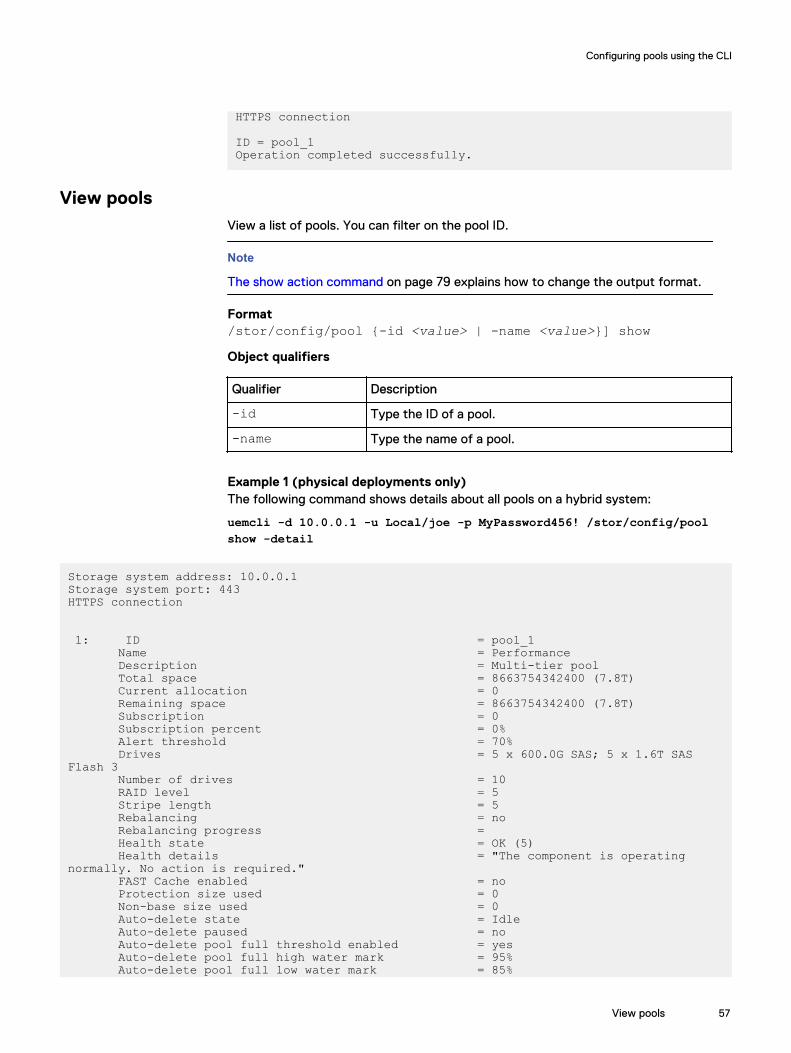
HTTPS connection
ID = pool_1Operation completed successfully.
View poolsView a list of pools. You can filter on the pool ID.
Note
The show action command on page 79 explains how to change the output format.
Format/stor/config/pool {-id <value> | -name <value>}] showObject qualifiers
Qualifier Description
-id Type the ID of a pool.
-name Type the name of a pool.
Example 1 (physical deployments only)The following command shows details about all pools on a hybrid system:
uemcli -d 10.0.0.1 -u Local/joe -p MyPassword456! /stor/config/poolshow -detail
Storage system address: 10.0.0.1Storage system port: 443HTTPS connection
1: ID = pool_1 Name = Performance Description = Multi-tier pool Total space = 8663754342400 (7.8T) Current allocation = 0 Remaining space = 8663754342400 (7.8T) Subscription = 0 Subscription percent = 0% Alert threshold = 70% Drives = 5 x 600.0G SAS; 5 x 1.6T SAS Flash 3 Number of drives = 10 RAID level = 5 Stripe length = 5 Rebalancing = no Rebalancing progress = Health state = OK (5) Health details = "The component is operating normally. No action is required." FAST Cache enabled = no Protection size used = 0 Non-base size used = 0 Auto-delete state = Idle Auto-delete paused = no Auto-delete pool full threshold enabled = yes Auto-delete pool full high water mark = 95% Auto-delete pool full low water mark = 85%
Configuring pools using the CLI
View pools 57
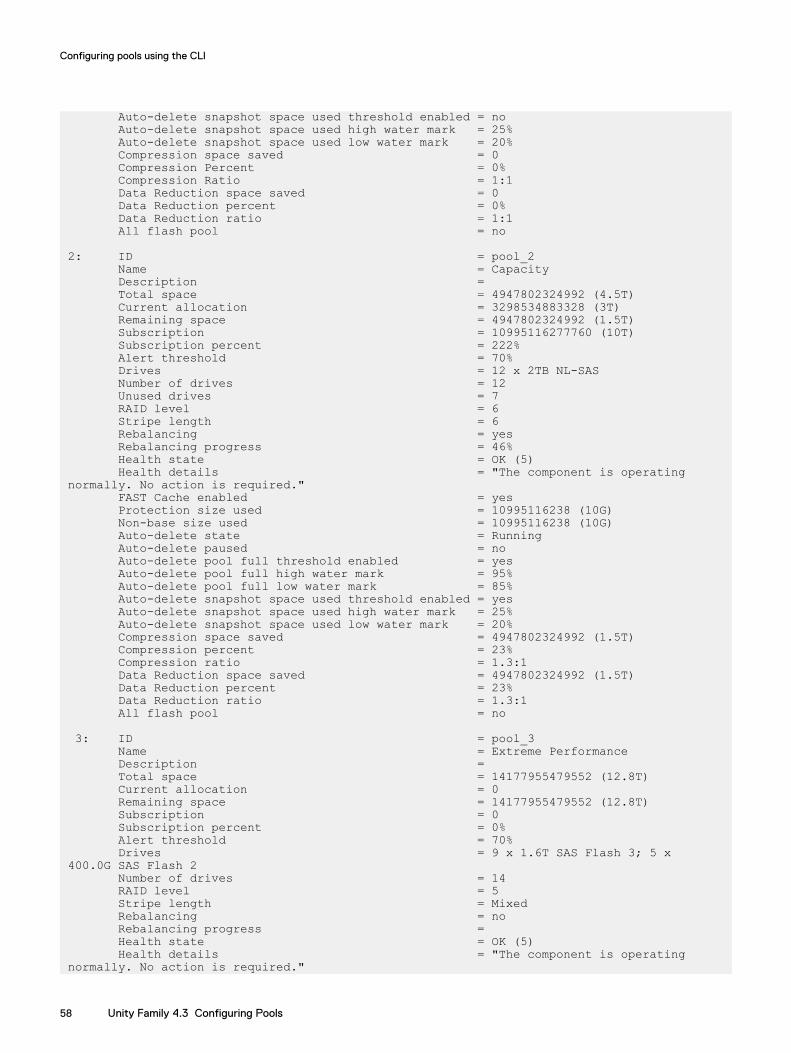
Auto-delete snapshot space used threshold enabled = no Auto-delete snapshot space used high water mark = 25% Auto-delete snapshot space used low water mark = 20% Compression space saved = 0 Compression Percent = 0% Compression Ratio = 1:1 Data Reduction space saved = 0 Data Reduction percent = 0% Data Reduction ratio = 1:1 All flash pool = no
2: ID = pool_2 Name = Capacity Description = Total space = 4947802324992 (4.5T) Current allocation = 3298534883328 (3T) Remaining space = 4947802324992 (1.5T) Subscription = 10995116277760 (10T) Subscription percent = 222% Alert threshold = 70% Drives = 12 x 2TB NL-SAS Number of drives = 12 Unused drives = 7 RAID level = 6 Stripe length = 6 Rebalancing = yes Rebalancing progress = 46% Health state = OK (5) Health details = "The component is operating normally. No action is required." FAST Cache enabled = yes Protection size used = 10995116238 (10G) Non-base size used = 10995116238 (10G) Auto-delete state = Running Auto-delete paused = no Auto-delete pool full threshold enabled = yes Auto-delete pool full high water mark = 95% Auto-delete pool full low water mark = 85% Auto-delete snapshot space used threshold enabled = yes Auto-delete snapshot space used high water mark = 25% Auto-delete snapshot space used low water mark = 20% Compression space saved = 4947802324992 (1.5T) Compression percent = 23% Compression ratio = 1.3:1 Data Reduction space saved = 4947802324992 (1.5T) Data Reduction percent = 23% Data Reduction ratio = 1.3:1 All flash pool = no
3: ID = pool_3 Name = Extreme Performance Description = Total space = 14177955479552 (12.8T) Current allocation = 0 Remaining space = 14177955479552 (12.8T) Subscription = 0 Subscription percent = 0% Alert threshold = 70% Drives = 9 x 1.6T SAS Flash 3; 5 x 400.0G SAS Flash 2 Number of drives = 14 RAID level = 5 Stripe length = Mixed Rebalancing = no Rebalancing progress = Health state = OK (5) Health details = "The component is operating normally. No action is required."
Configuring pools using the CLI
58 Unity Family 4.3 Configuring Pools

FAST Cache enabled = no Protection size used = 0 Non-base size used = 0 Auto-delete state = Idle Auto-delete paused = no Auto-delete pool full threshold enabled = yes Auto-delete pool full high water mark = 95% Auto-delete pool full low water mark = 85% Auto-delete snapshot space used threshold enabled = no Auto-delete snapshot space used high water mark = 25% Auto-delete snapshot space used low water mark = 20% Compression space saved = 0 Compression Percent = 0% Compression Ratio = 1:1 Data Reduction space saved = 0 Data Reduction percent = 0% Data Reduction ratio = 1:1 All flash pool = yes
Example 2The following example shows all pools for a model that supports dynamic pools.
uemcli -d 10.0.0.2 -u Local/joe -p MyPassword456! /stor/config/poolshow -detail
[Response]Storage system address: 10.64.75.201Storage system port: 443HTTPS connection1: ID = pool_3 Type = Traditional Name = MyPool Description = traditional pool Total space = 14177955479552 (12.8T) Current allocation = 0 Remaining space = 14177955479552 (12.8T) Subscription = 0 Subscription percent = 0% Alert threshold = 70% Drives = 9 x 1.6T SAS Flash 3; 5 x 400.0G SAS Flash 2 Number of drives = 14 RAID level = 5 Stripe length = Mixed Rebalancing = no Rebalancing progress = Health state = OK (5) Health details = "The component is operating normally. No action is required." FAST Cache enabled = no Protection size used = 0 Non-base size used = 0 Auto-delete state = Idle Auto-delete paused = no Auto-delete pool full threshold enabled = yes Auto-delete pool full high water mark = 95% Auto-delete pool full low water mark = 85% Auto-delete snapshot space used threshold enabled = no Auto-delete snapshot space used high water mark = 25% Auto-delete snapshot space used low water mark = 20% Compression space saved = 0 Compression Percent = 0% Compression Ratio = 1:1 Data Reduction space saved = 0 Data Reduction percent = 0%
Configuring pools using the CLI
View pools 59
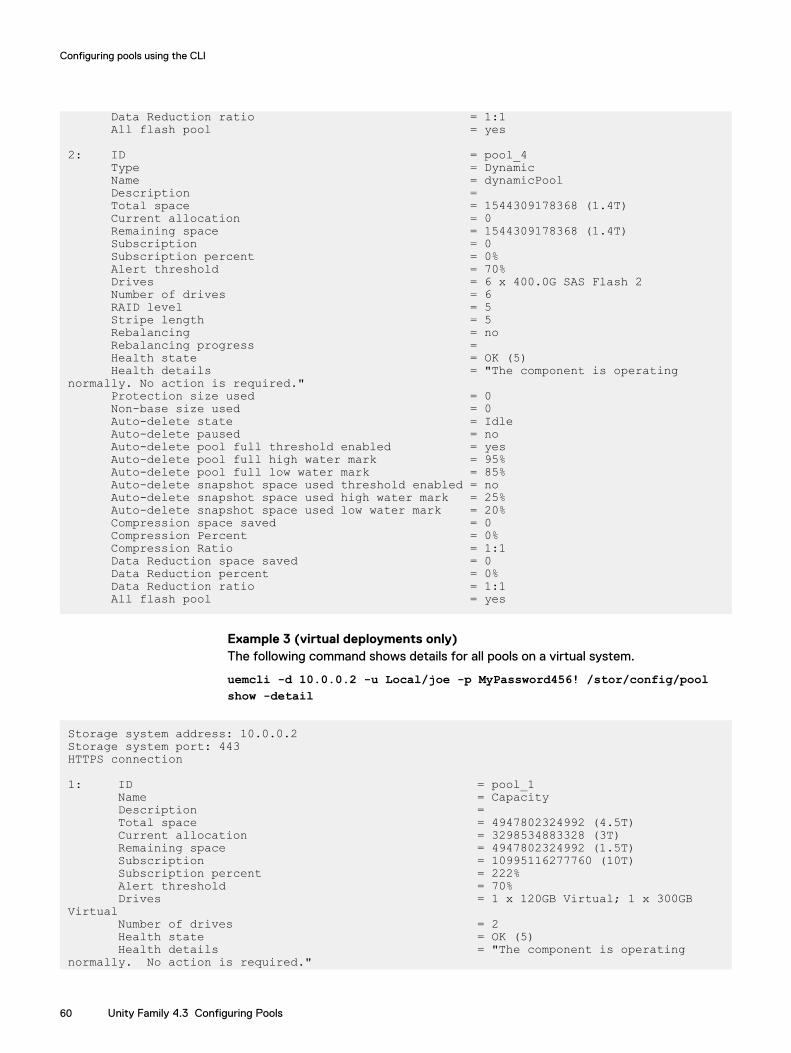
Data Reduction ratio = 1:1 All flash pool = yes
2: ID = pool_4 Type = Dynamic Name = dynamicPool Description = Total space = 1544309178368 (1.4T) Current allocation = 0 Remaining space = 1544309178368 (1.4T) Subscription = 0 Subscription percent = 0% Alert threshold = 70% Drives = 6 x 400.0G SAS Flash 2 Number of drives = 6 RAID level = 5 Stripe length = 5 Rebalancing = no Rebalancing progress = Health state = OK (5) Health details = "The component is operating normally. No action is required." Protection size used = 0 Non-base size used = 0 Auto-delete state = Idle Auto-delete paused = no Auto-delete pool full threshold enabled = yes Auto-delete pool full high water mark = 95% Auto-delete pool full low water mark = 85% Auto-delete snapshot space used threshold enabled = no Auto-delete snapshot space used high water mark = 25% Auto-delete snapshot space used low water mark = 20% Compression space saved = 0 Compression Percent = 0% Compression Ratio = 1:1 Data Reduction space saved = 0 Data Reduction percent = 0% Data Reduction ratio = 1:1 All flash pool = yes
Example 3 (virtual deployments only)The following command shows details for all pools on a virtual system.
uemcli -d 10.0.0.2 -u Local/joe -p MyPassword456! /stor/config/poolshow -detail
Storage system address: 10.0.0.2Storage system port: 443HTTPS connection
1: ID = pool_1 Name = Capacity Description = Total space = 4947802324992 (4.5T) Current allocation = 3298534883328 (3T) Remaining space = 4947802324992 (1.5T) Subscription = 10995116277760 (10T) Subscription percent = 222% Alert threshold = 70% Drives = 1 x 120GB Virtual; 1 x 300GB Virtual Number of drives = 2 Health state = OK (5) Health details = "The component is operating normally. No action is required."
Configuring pools using the CLI
60 Unity Family 4.3 Configuring Pools
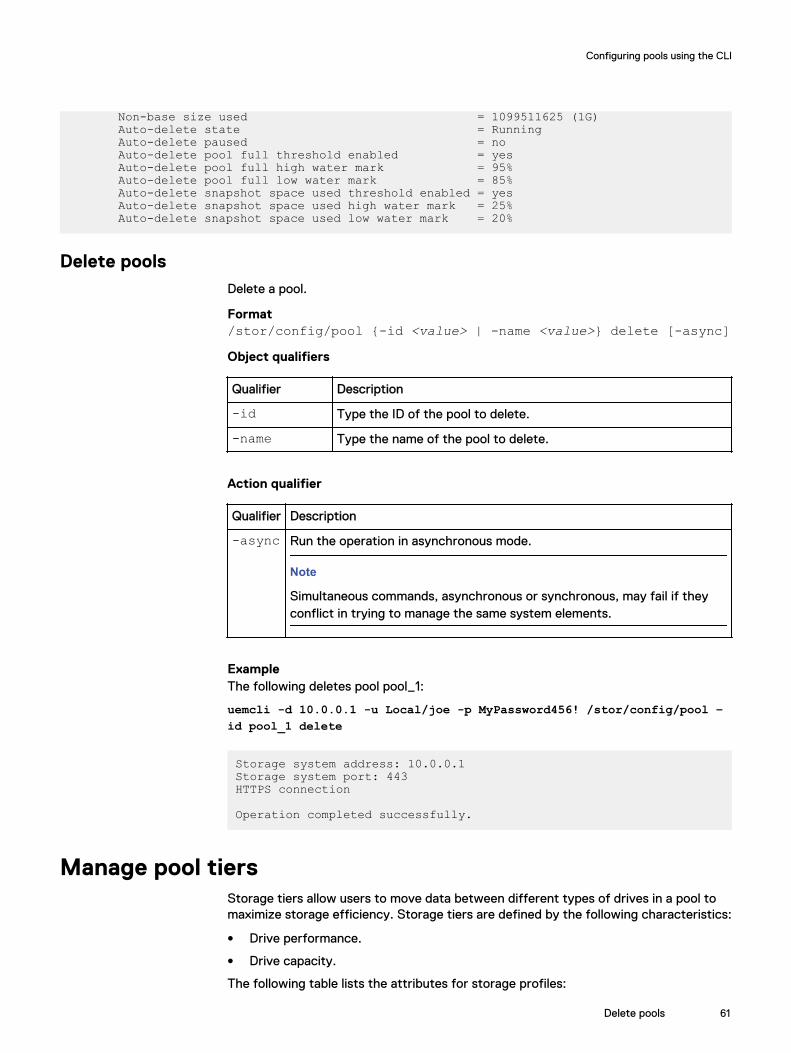
Non-base size used = 1099511625 (1G) Auto-delete state = Running Auto-delete paused = no Auto-delete pool full threshold enabled = yes Auto-delete pool full high water mark = 95% Auto-delete pool full low water mark = 85% Auto-delete snapshot space used threshold enabled = yes Auto-delete snapshot space used high water mark = 25% Auto-delete snapshot space used low water mark = 20%
Delete poolsDelete a pool.
Format/stor/config/pool {-id <value> | -name <value>} delete [-async]Object qualifiers
Qualifier Description
-id Type the ID of the pool to delete.
-name Type the name of the pool to delete.
Action qualifier
Qualifier Description
-async Run the operation in asynchronous mode.
Note
Simultaneous commands, asynchronous or synchronous, may fail if theyconflict in trying to manage the same system elements.
ExampleThe following deletes pool pool_1:
uemcli -d 10.0.0.1 -u Local/joe -p MyPassword456! /stor/config/pool –id pool_1 delete
Storage system address: 10.0.0.1Storage system port: 443HTTPS connection
Operation completed successfully.
Manage pool tiersStorage tiers allow users to move data between different types of drives in a pool tomaximize storage efficiency. Storage tiers are defined by the following characteristics:
l Drive performance.
l Drive capacity.
The following table lists the attributes for storage profiles:
Configuring pools using the CLI
Delete pools 61
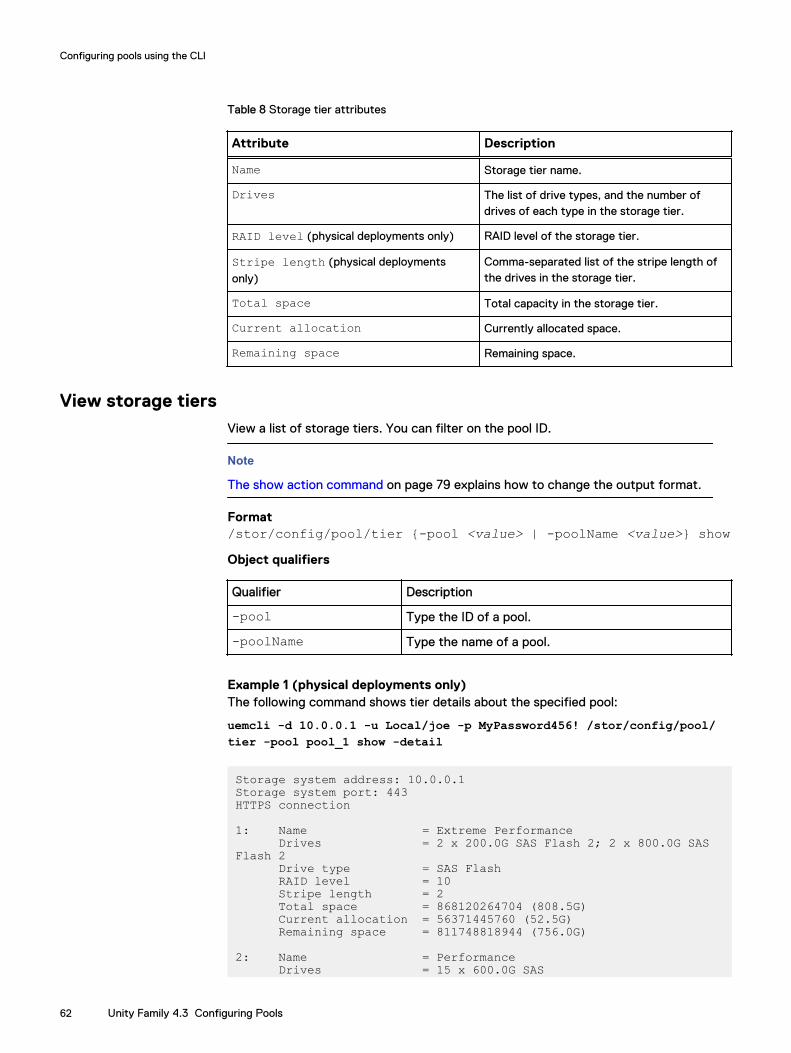
Table 8 Storage tier attributes
Attribute Description
Name Storage tier name.
Drives The list of drive types, and the number ofdrives of each type in the storage tier.
RAID level (physical deployments only) RAID level of the storage tier.
Stripe length (physical deployments
only)
Comma-separated list of the stripe length ofthe drives in the storage tier.
Total space Total capacity in the storage tier.
Current allocation Currently allocated space.
Remaining space Remaining space.
View storage tiersView a list of storage tiers. You can filter on the pool ID.
Note
The show action command on page 79 explains how to change the output format.
Format/stor/config/pool/tier {-pool <value> | -poolName <value>} showObject qualifiers
Qualifier Description
-pool Type the ID of a pool.
-poolName Type the name of a pool.
Example 1 (physical deployments only)The following command shows tier details about the specified pool:
uemcli -d 10.0.0.1 -u Local/joe -p MyPassword456! /stor/config/pool/tier -pool pool_1 show -detail
Storage system address: 10.0.0.1Storage system port: 443HTTPS connection
1: Name = Extreme Performance Drives = 2 x 200.0G SAS Flash 2; 2 x 800.0G SAS Flash 2 Drive type = SAS Flash RAID level = 10 Stripe length = 2 Total space = 868120264704 (808.5G) Current allocation = 56371445760 (52.5G) Remaining space = 811748818944 (756.0G)
2: Name = Performance Drives = 15 x 600.0G SAS
Configuring pools using the CLI
62 Unity Family 4.3 Configuring Pools

Drive type = SAS RAID level = 5 Stripe length = 5 Total space = 7087501344768 (6.4T) Current allocation = 0 Remaining space = 7087501344768 (6.4T)
3: Name = Capacity Drives = 8 x 6.0T NL-SAS Drive type = NL-SAS RAID level = 6 Stripe length = 8 Total space = 35447707271168 (32.2T) Current allocation = 1610612736 (1.5G) Remaining space = 35446096658432 (32.2T)
Example 2 (virtual deployments only)The following command shows details about pool pool_1 on a virtual system.
uemcli -d 10.0.0.2 -u Local/joe -p MyPassword456! /stor/config/pool/tier –pool pool_1 show -detail
Storage system address: 10.0.0.2Storage system port: 443HTTPS connection
1: Name = Extreme Performance Drives = Total space = 0 Current allocation = 0 Remaining space = 0
2: Name = Performance Drives = 1 x 500GB Virtual Total space = 631242752000 (500.0G) Current allocation = 12624855040 (10.0G) Remaining space = 618617896960 (490.0G)
3: Name = Capacity Drives = Total space = 0 Current allocation = 0 Remaining space = 0
View pool resourcesThis command displays a list of storage resources allocated in a pool. This can bestorage resources provisioned on the specified pool and NAS servers that have filesystems allocated in the pool.
The following table lists the attributes for pool resources.
Table 9 Pool resources
Attribute Description
ID Storage resource identifier.
Name Name of the storage resource.
Configuring pools using the CLI
View pool resources 63
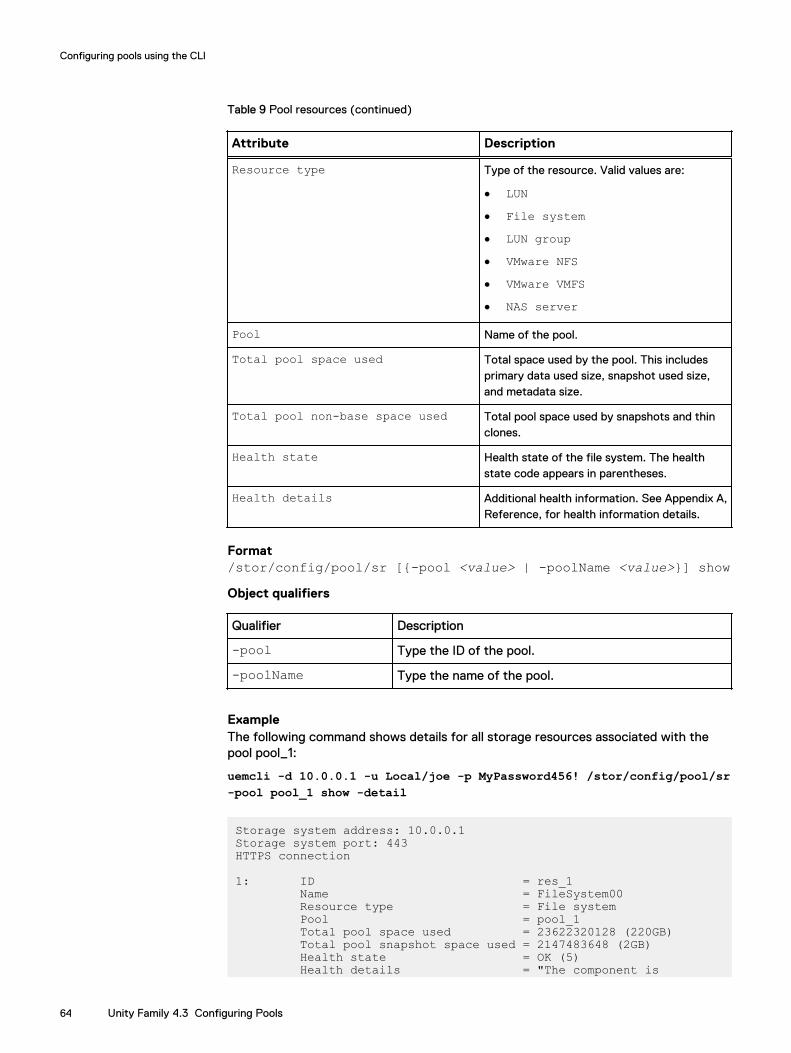
Table 9 Pool resources (continued)
Attribute Description
Resource type Type of the resource. Valid values are:
l LUNl File systeml LUN groupl VMware NFSl VMware VMFSl NAS server
Pool Name of the pool.
Total pool space used Total space used by the pool. This includesprimary data used size, snapshot used size,and metadata size.
Total pool non-base space used Total pool space used by snapshots and thinclones.
Health state Health state of the file system. The healthstate code appears in parentheses.
Health details Additional health information. See Appendix A,Reference, for health information details.
Format/stor/config/pool/sr [{-pool <value> | -poolName <value>}] showObject qualifiers
Qualifier Description
-pool Type the ID of the pool.
-poolName Type the name of the pool.
ExampleThe following command shows details for all storage resources associated with thepool pool_1:
uemcli -d 10.0.0.1 -u Local/joe -p MyPassword456! /stor/config/pool/sr-pool pool_1 show -detail
Storage system address: 10.0.0.1Storage system port: 443HTTPS connection
1: ID = res_1 Name = FileSystem00 Resource type = File system Pool = pool_1 Total pool space used = 23622320128 (220GB) Total pool snapshot space used = 2147483648 (2GB) Health state = OK (5) Health details = "The component is
Configuring pools using the CLI
64 Unity Family 4.3 Configuring Pools

operating normally. No action is required."
2: ID = res_2 Name = LUNGroup00 Resource type = LUN group Pool = pool_1 Total pool space used = 57982058496 (54GB) Total pool snapshot space used = 4294967296 (4GB) Health state = OK (5) Health details = "The component is operating normally. No action is required."
3: ID = nas_1 Name = NASServer00 Resource type = NAS server Pool = pool_1 Total pool space used = Total pool snapshot space used = Health state = OK (5) Health details = "The component is operating normally. No action is required."
View storage profiles (physical deployments only)Storage profiles are preconfigured settings for configuring pools based on thefollowing:
l Types of storage resources that will use the pools.
l Intended usage of the pool.
For example, create a pool for file system storage resources intended for general use.When configuring a pool, specify the ID of the storage profile to apply to the pool.
Note
Storage profiles are not restrictive with regard to storage provisioning. For example,you can provision file systems from an FC or iSCSI database pool. However, thecharacteristics of the storage will be best suited to the indicated storage resourcetype and use.
Each storage profile is identified by an ID.
The following table lists the attributes for storage profiles.
Table 10 Storage profile attributes
Attribute Description
ID ID of the storage profile.
Type (Available only for systems that support dynamic pools) Type ofpool the profile can create. Value is one of the following:
l Dynamicl Traditional
Description Brief description of the storage profile.
Drive type Types of drives for the storage profile.
Configuring pools using the CLI
View storage profiles (physical deployments only) 65
Table 10 Storage profile attributes (continued)
Attribute Description
RAID level RAID level number for the storage profile. Value is one of thefollowing:
l 1 - RAID level 1.
l 5 - RAID level 5.
l 6 - RAID level 6.
l 10 - RAID level 1+0.
Maximum capacity Maximum storage capacity for the storage profile.
Stripe length Number of drives the data is striped across.
Note
For best fit profiles, this value is Best fit .
Disk group List of drive groups recommended for the storage poolconfigurations of the specified storage profile. This is calculatedonly when the -configurable option is specified.
Maximum drives toconfigure
List of the maximum number of drives allowed for the specifiedstorage profile in the recommended drive groups. This iscalculated only when the -configurable option is specified.
Maximum capacity toconfigure
List of the maximum number of free capacity of the drivesavailable to configure for the storage profile in the recommendeddrive groups. This is calculated only when the -configurableoption is specified.
Note
The show action command on page 79 explains how to change the output format.
Format/stor/config/profile [-id <value> | -driveType <value> [-raidLevel <value>] | -traditional] [-configurable] showObject qualifier
Qualifier Description
-id Type the ID of a storage profile.
-driveType Specify the type of drive.
-raidLevel Specify the RAID type of the profile.
-traditional (Available only for systems that support dynamic pools) Specifythis option to view the profiles that you can use for creatingtraditional pools. To view the profiles you can use for creatingdynamic pools, omit this option.
-configurable Show only profiles that can be configured, that is, those withnon-empty drive group information. If specified, calculates thefollowing drive group information for each profile:
Configuring pools using the CLI
66 Unity Family 4.3 Configuring Pools
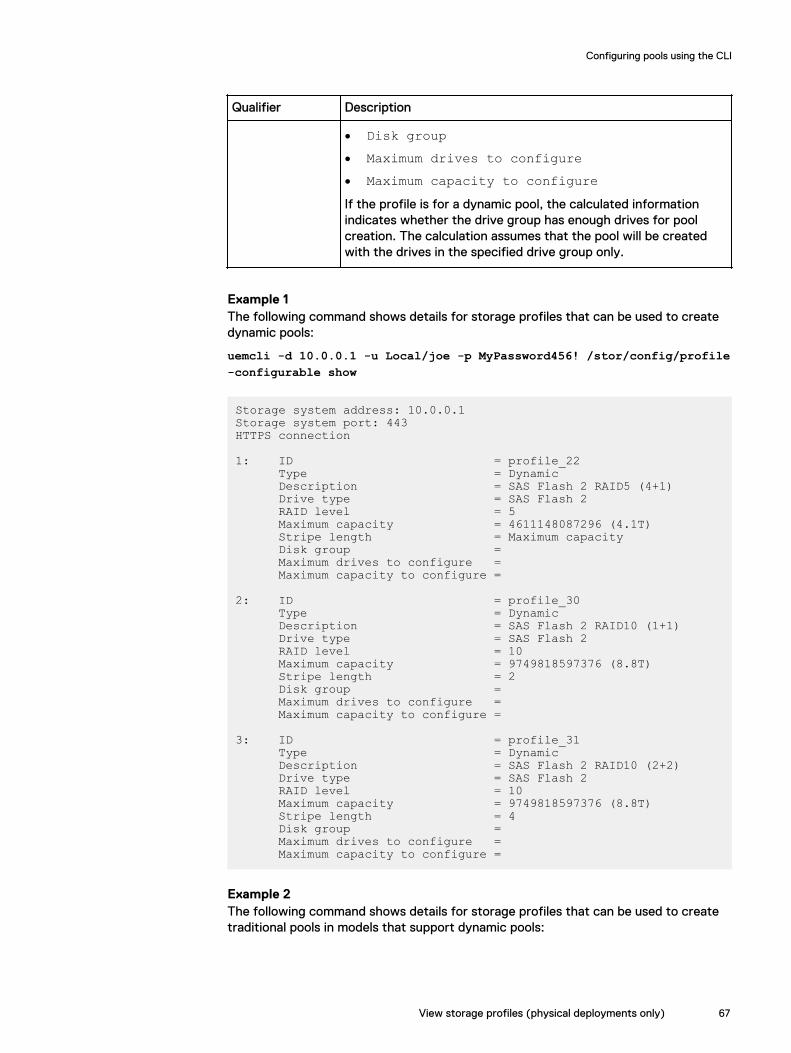
Qualifier Description
l Disk groupl Maximum drives to configurel Maximum capacity to configureIf the profile is for a dynamic pool, the calculated informationindicates whether the drive group has enough drives for poolcreation. The calculation assumes that the pool will be createdwith the drives in the specified drive group only.
Example 1The following command shows details for storage profiles that can be used to createdynamic pools:
uemcli -d 10.0.0.1 -u Local/joe -p MyPassword456! /stor/config/profile-configurable show
Storage system address: 10.0.0.1Storage system port: 443HTTPS connection
1: ID = profile_22 Type = Dynamic Description = SAS Flash 2 RAID5 (4+1) Drive type = SAS Flash 2 RAID level = 5 Maximum capacity = 4611148087296 (4.1T) Stripe length = Maximum capacity Disk group = Maximum drives to configure = Maximum capacity to configure =
2: ID = profile_30 Type = Dynamic Description = SAS Flash 2 RAID10 (1+1) Drive type = SAS Flash 2 RAID level = 10 Maximum capacity = 9749818597376 (8.8T) Stripe length = 2 Disk group = Maximum drives to configure = Maximum capacity to configure =
3: ID = profile_31 Type = Dynamic Description = SAS Flash 2 RAID10 (2+2) Drive type = SAS Flash 2 RAID level = 10 Maximum capacity = 9749818597376 (8.8T) Stripe length = 4 Disk group = Maximum drives to configure = Maximum capacity to configure =
Example 2The following command shows details for storage profiles that can be used to createtraditional pools in models that support dynamic pools:
Configuring pools using the CLI
View storage profiles (physical deployments only) 67
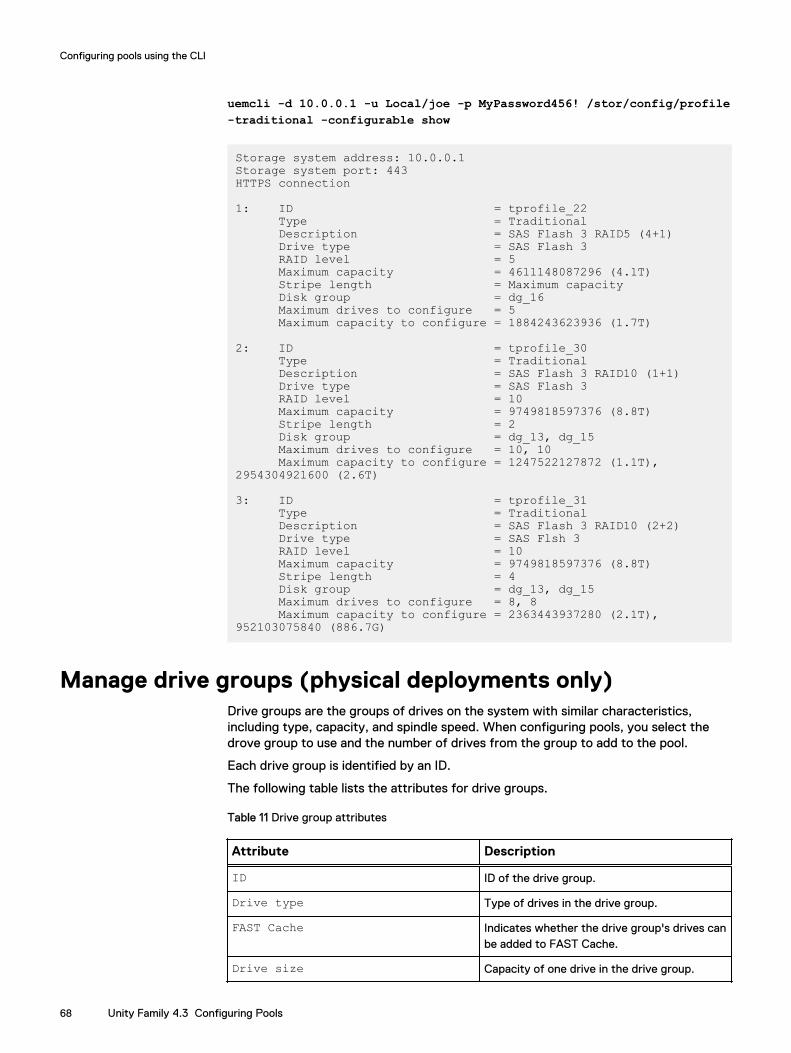
uemcli -d 10.0.0.1 -u Local/joe -p MyPassword456! /stor/config/profile-traditional -configurable show
Storage system address: 10.0.0.1Storage system port: 443HTTPS connection
1: ID = tprofile_22 Type = Traditional Description = SAS Flash 3 RAID5 (4+1) Drive type = SAS Flash 3 RAID level = 5 Maximum capacity = 4611148087296 (4.1T) Stripe length = Maximum capacity Disk group = dg_16 Maximum drives to configure = 5 Maximum capacity to configure = 1884243623936 (1.7T)
2: ID = tprofile_30 Type = Traditional Description = SAS Flash 3 RAID10 (1+1) Drive type = SAS Flash 3 RAID level = 10 Maximum capacity = 9749818597376 (8.8T) Stripe length = 2 Disk group = dg_13, dg_15 Maximum drives to configure = 10, 10 Maximum capacity to configure = 1247522127872 (1.1T), 2954304921600 (2.6T)
3: ID = tprofile_31 Type = Traditional Description = SAS Flash 3 RAID10 (2+2) Drive type = SAS Flsh 3 RAID level = 10 Maximum capacity = 9749818597376 (8.8T) Stripe length = 4 Disk group = dg_13, dg_15 Maximum drives to configure = 8, 8 Maximum capacity to configure = 2363443937280 (2.1T), 952103075840 (886.7G)
Manage drive groups (physical deployments only)Drive groups are the groups of drives on the system with similar characteristics,including type, capacity, and spindle speed. When configuring pools, you select thedrove group to use and the number of drives from the group to add to the pool.
Each drive group is identified by an ID.
The following table lists the attributes for drive groups.
Table 11 Drive group attributes
Attribute Description
ID ID of the drive group.
Drive type Type of drives in the drive group.
FAST Cache Indicates whether the drive group's drives canbe added to FAST Cache.
Drive size Capacity of one drive in the drive group.
Configuring pools using the CLI
68 Unity Family 4.3 Configuring Pools

Table 11 Drive group attributes (continued)
Attribute Description
Rotational speed Rotational speed of the drives in the group.
Number of drives Total number of drives in the drive group.
Unconfigured drives Total number of drives in the drive group thatare not in a pool.
Capacity Total capacity of all drives in the drive group.
Recommended number of spares Number of spares recommended for the drivegroup.
Drives past EOL Number of drives past EOL (End of Life) inthe group.
Drives approaching EOL Number of drives that will reach EOL in 0-30days, 0-60 days, 0-90 days and 0-180 days.
View drive groupsView details about drive groups on the system. You can filter on the drive group ID.
Note
The show action command on page 79 explains how to change the output format.
Format/stor/config/dg [-id <value>] [-traditional] showObject qualifier
Qualifier Description
-id Type the ID of a drive group.
-traditional (Available only for systems that support dynamic pools) Specifythis qualifier to have the system assume that the pools to becreated are traditional pools.
Example 1The following command shows details about all drive groups that can be used toconfigure dynamic pools:
uemcli -d 10.0.0.1 -u Local/joe -p MyPassword456! /stor/config/dg show-detail
Storage system address: 10.0.0.1Storage system port: 443HTTPS connection
1: ID = dg_3 Drive type = SAS Flash 2 FAST Cache = yes Drive size = 393846128640 (366.7G) Vendor size = 400.0G Rotational speed = 0 rpm
Configuring pools using the CLI
View drive groups 69
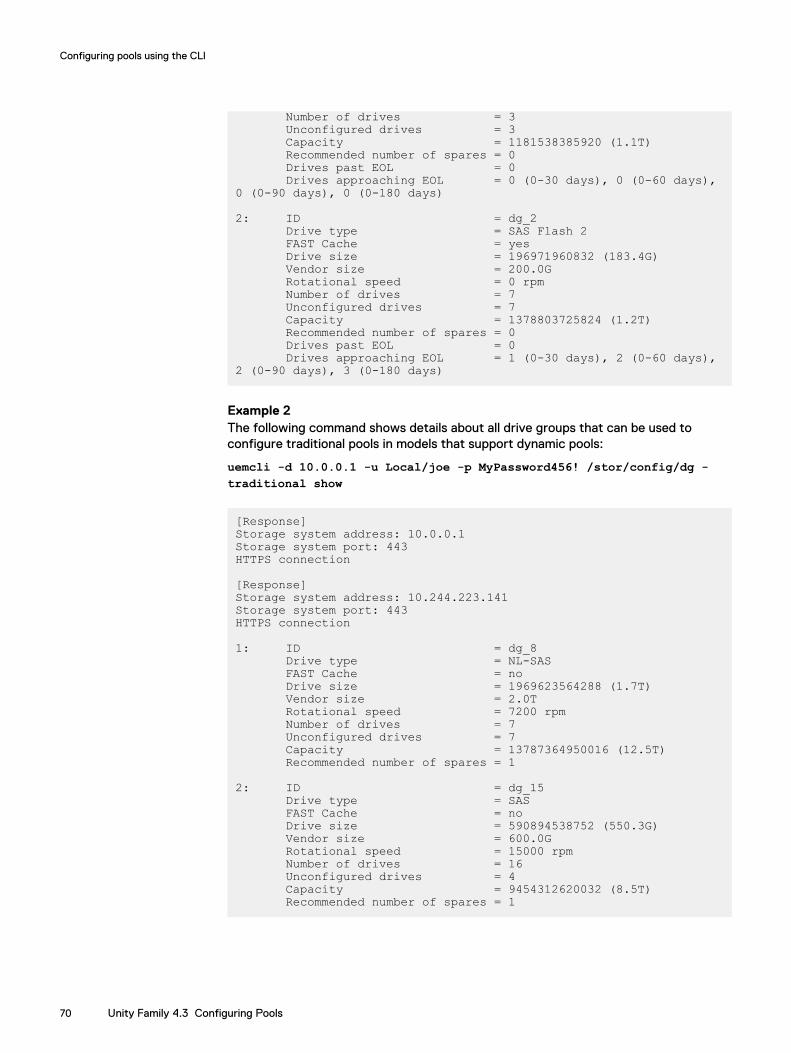
Number of drives = 3 Unconfigured drives = 3 Capacity = 1181538385920 (1.1T) Recommended number of spares = 0 Drives past EOL = 0 Drives approaching EOL = 0 (0-30 days), 0 (0-60 days), 0 (0-90 days), 0 (0-180 days)
2: ID = dg_2 Drive type = SAS Flash 2 FAST Cache = yes Drive size = 196971960832 (183.4G) Vendor size = 200.0G Rotational speed = 0 rpm Number of drives = 7 Unconfigured drives = 7 Capacity = 1378803725824 (1.2T) Recommended number of spares = 0 Drives past EOL = 0 Drives approaching EOL = 1 (0-30 days), 2 (0-60 days), 2 (0-90 days), 3 (0-180 days)
Example 2The following command shows details about all drive groups that can be used toconfigure traditional pools in models that support dynamic pools:
uemcli -d 10.0.0.1 -u Local/joe -p MyPassword456! /stor/config/dg -traditional show
[Response]Storage system address: 10.0.0.1Storage system port: 443HTTPS connection
[Response]Storage system address: 10.244.223.141Storage system port: 443HTTPS connection
1: ID = dg_8 Drive type = NL-SAS FAST Cache = no Drive size = 1969623564288 (1.7T) Vendor size = 2.0T Rotational speed = 7200 rpm Number of drives = 7 Unconfigured drives = 7 Capacity = 13787364950016 (12.5T) Recommended number of spares = 1
2: ID = dg_15 Drive type = SAS FAST Cache = no Drive size = 590894538752 (550.3G) Vendor size = 600.0G Rotational speed = 15000 rpm Number of drives = 16 Unconfigured drives = 4 Capacity = 9454312620032 (8.5T) Recommended number of spares = 1
Configuring pools using the CLI
70 Unity Family 4.3 Configuring Pools
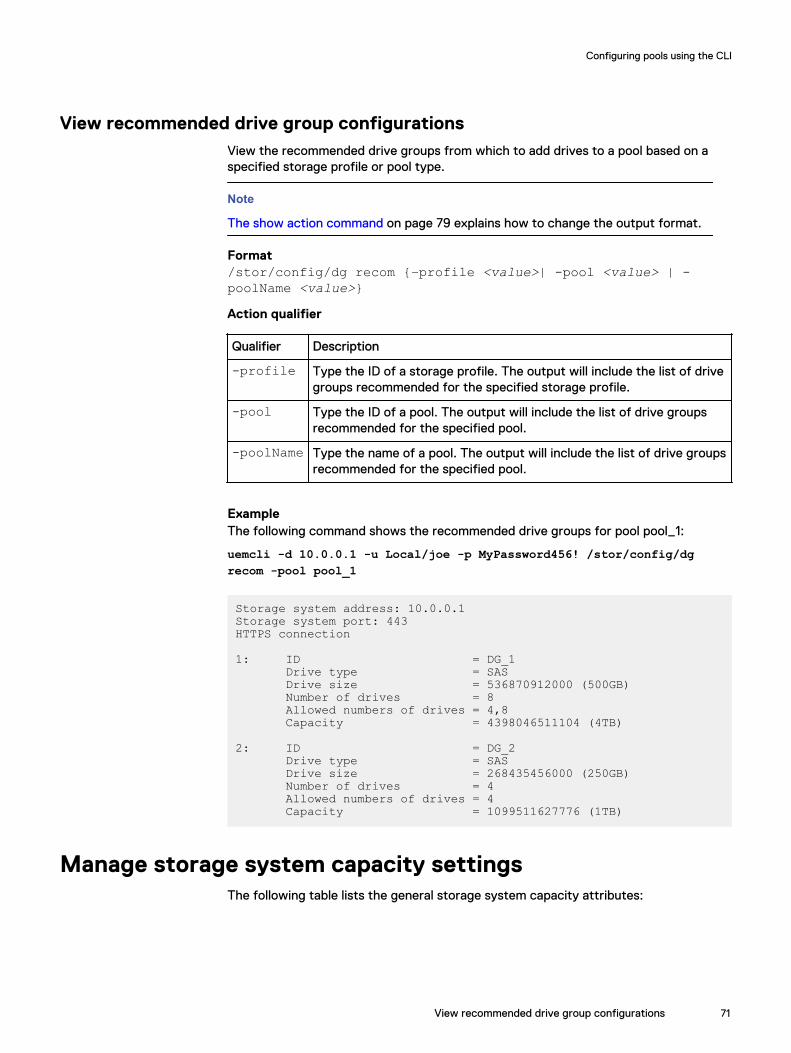
View recommended drive group configurationsView the recommended drive groups from which to add drives to a pool based on aspecified storage profile or pool type.
Note
The show action command on page 79 explains how to change the output format.
Format/stor/config/dg recom {–profile <value>| -pool <value> | -poolName <value>}Action qualifier
Qualifier Description
-profile Type the ID of a storage profile. The output will include the list of drivegroups recommended for the specified storage profile.
-pool Type the ID of a pool. The output will include the list of drive groupsrecommended for the specified pool.
-poolName Type the name of a pool. The output will include the list of drive groupsrecommended for the specified pool.
ExampleThe following command shows the recommended drive groups for pool pool_1:
uemcli -d 10.0.0.1 -u Local/joe -p MyPassword456! /stor/config/dgrecom -pool pool_1
Storage system address: 10.0.0.1Storage system port: 443HTTPS connection
1: ID = DG_1 Drive type = SAS Drive size = 536870912000 (500GB) Number of drives = 8 Allowed numbers of drives = 4,8 Capacity = 4398046511104 (4TB)
2: ID = DG_2 Drive type = SAS Drive size = 268435456000 (250GB) Number of drives = 4 Allowed numbers of drives = 4 Capacity = 1099511627776 (1TB)
Manage storage system capacity settingsThe following table lists the general storage system capacity attributes:
Configuring pools using the CLI
View recommended drive group configurations 71
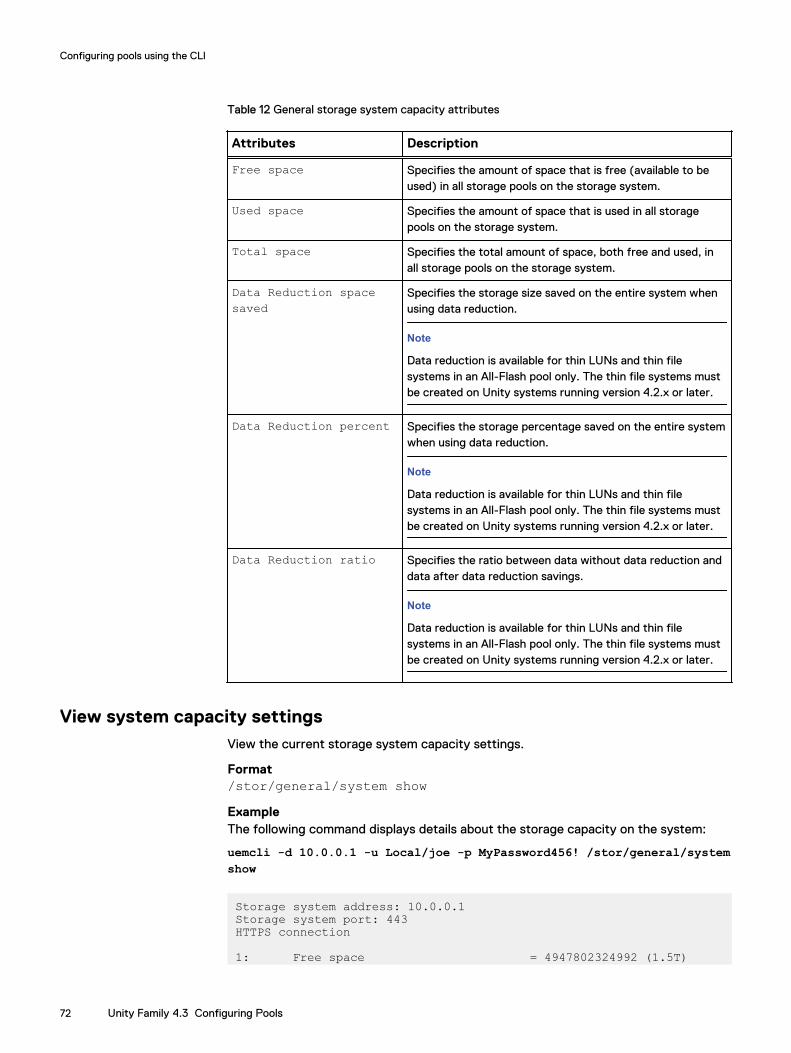
Table 12 General storage system capacity attributes
Attributes Description
Free space Specifies the amount of space that is free (available to beused) in all storage pools on the storage system.
Used space Specifies the amount of space that is used in all storagepools on the storage system.
Total space Specifies the total amount of space, both free and used, inall storage pools on the storage system.
Data Reduction spacesaved
Specifies the storage size saved on the entire system whenusing data reduction.
Note
Data reduction is available for thin LUNs and thin filesystems in an All-Flash pool only. The thin file systems mustbe created on Unity systems running version 4.2.x or later.
Data Reduction percent Specifies the storage percentage saved on the entire systemwhen using data reduction.
Note
Data reduction is available for thin LUNs and thin filesystems in an All-Flash pool only. The thin file systems mustbe created on Unity systems running version 4.2.x or later.
Data Reduction ratio Specifies the ratio between data without data reduction anddata after data reduction savings.
Note
Data reduction is available for thin LUNs and thin filesystems in an All-Flash pool only. The thin file systems mustbe created on Unity systems running version 4.2.x or later.
View system capacity settingsView the current storage system capacity settings.
Format/stor/general/system showExampleThe following command displays details about the storage capacity on the system:
uemcli -d 10.0.0.1 -u Local/joe -p MyPassword456! /stor/general/systemshow
Storage system address: 10.0.0.1Storage system port: 443HTTPS connection
1: Free space = 4947802324992 (1.5T)
Configuring pools using the CLI
72 Unity Family 4.3 Configuring Pools
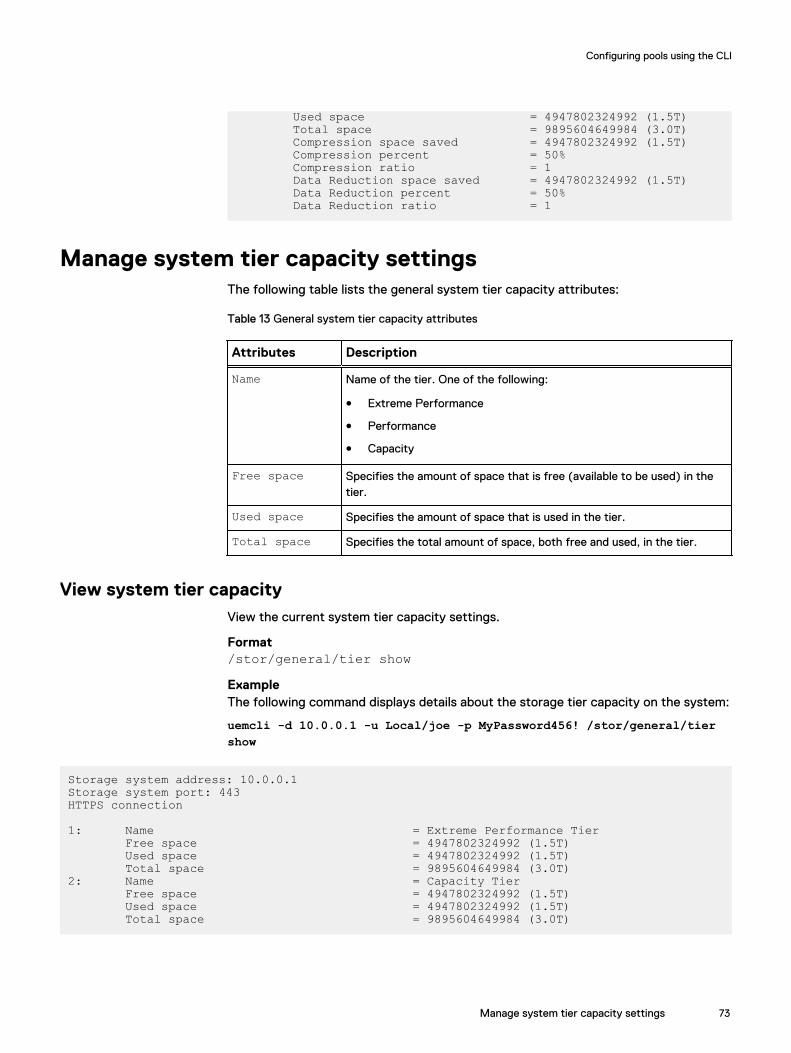
Used space = 4947802324992 (1.5T) Total space = 9895604649984 (3.0T) Compression space saved = 4947802324992 (1.5T) Compression percent = 50% Compression ratio = 1 Data Reduction space saved = 4947802324992 (1.5T) Data Reduction percent = 50% Data Reduction ratio = 1
Manage system tier capacity settingsThe following table lists the general system tier capacity attributes:
Table 13 General system tier capacity attributes
Attributes Description
Name Name of the tier. One of the following:
l Extreme Performance
l Performance
l Capacity
Free space Specifies the amount of space that is free (available to be used) in thetier.
Used space Specifies the amount of space that is used in the tier.
Total space Specifies the total amount of space, both free and used, in the tier.
View system tier capacityView the current system tier capacity settings.
Format/stor/general/tier showExampleThe following command displays details about the storage tier capacity on the system:
uemcli -d 10.0.0.1 -u Local/joe -p MyPassword456! /stor/general/tiershow
Storage system address: 10.0.0.1Storage system port: 443HTTPS connection
1: Name = Extreme Performance Tier Free space = 4947802324992 (1.5T) Used space = 4947802324992 (1.5T) Total space = 9895604649984 (3.0T)2: Name = Capacity Tier Free space = 4947802324992 (1.5T) Used space = 4947802324992 (1.5T) Total space = 9895604649984 (3.0T)
Configuring pools using the CLI
Manage system tier capacity settings 73
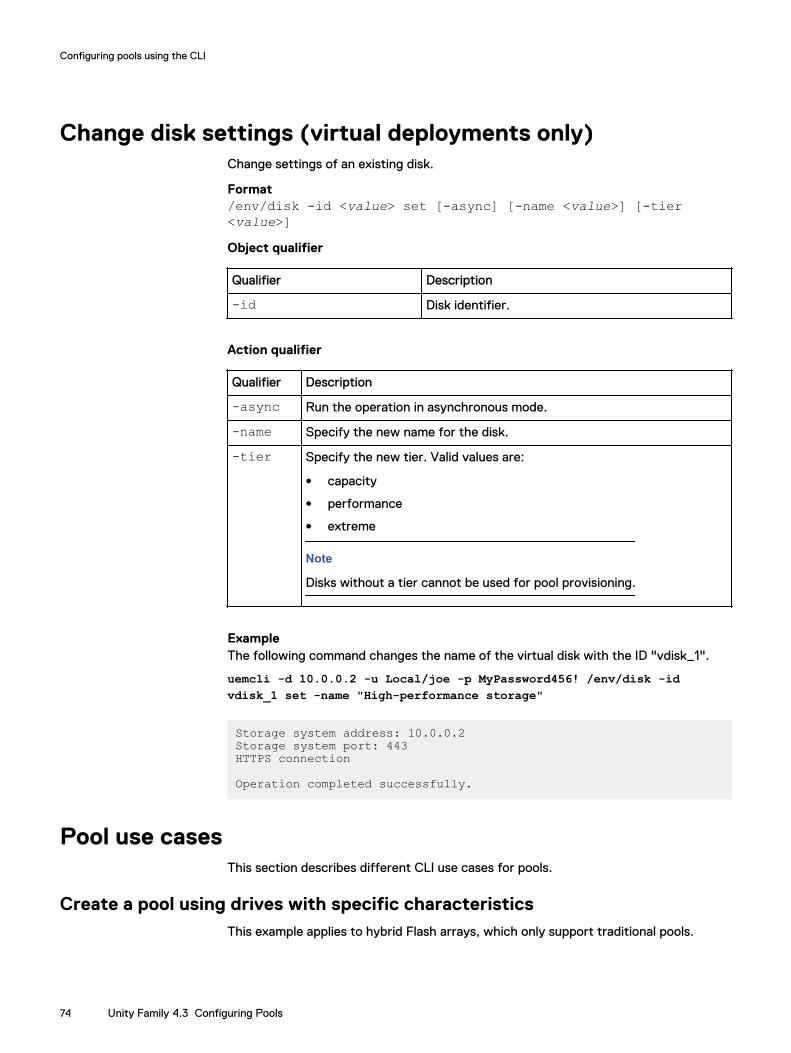
Change disk settings (virtual deployments only)Change settings of an existing disk.
Format/env/disk -id <value> set [-async] [-name <value>] [-tier<value>]Object qualifier
Qualifier Description
-id Disk identifier.
Action qualifier
Qualifier Description
-async Run the operation in asynchronous mode.
-name Specify the new name for the disk.
-tier Specify the new tier. Valid values are:
l capacity
l performance
l extreme
Note
Disks without a tier cannot be used for pool provisioning.
ExampleThe following command changes the name of the virtual disk with the ID "vdisk_1".
uemcli -d 10.0.0.2 -u Local/joe -p MyPassword456! /env/disk -idvdisk_1 set -name "High-performance storage"
Storage system address: 10.0.0.2Storage system port: 443HTTPS connection
Operation completed successfully.
Pool use casesThis section describes different CLI use cases for pools.
Create a pool using drives with specific characteristicsThis example applies to hybrid Flash arrays, which only support traditional pools.
Configuring pools using the CLI
74 Unity Family 4.3 Configuring Pools
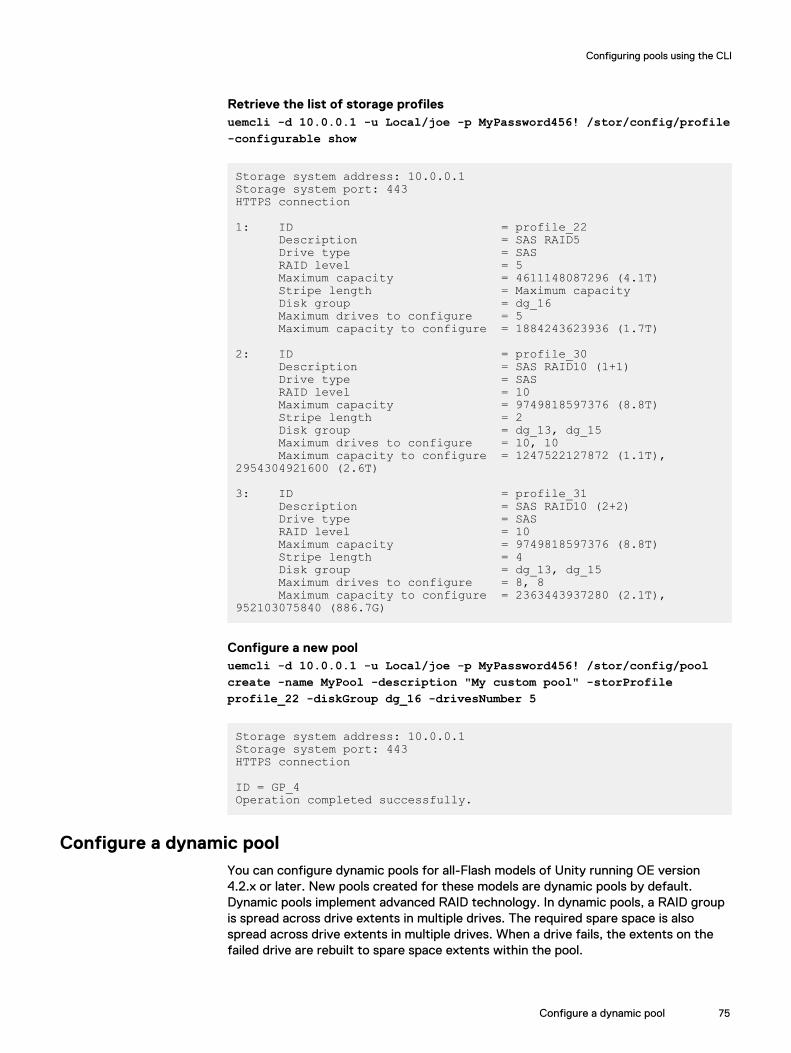
Retrieve the list of storage profilesuemcli -d 10.0.0.1 -u Local/joe -p MyPassword456! /stor/config/profile-configurable show
Storage system address: 10.0.0.1Storage system port: 443HTTPS connection
1: ID = profile_22 Description = SAS RAID5 Drive type = SAS RAID level = 5 Maximum capacity = 4611148087296 (4.1T) Stripe length = Maximum capacity Disk group = dg_16 Maximum drives to configure = 5 Maximum capacity to configure = 1884243623936 (1.7T)
2: ID = profile_30 Description = SAS RAID10 (1+1) Drive type = SAS RAID level = 10 Maximum capacity = 9749818597376 (8.8T) Stripe length = 2 Disk group = dg_13, dg_15 Maximum drives to configure = 10, 10 Maximum capacity to configure = 1247522127872 (1.1T), 2954304921600 (2.6T)
3: ID = profile_31 Description = SAS RAID10 (2+2) Drive type = SAS RAID level = 10 Maximum capacity = 9749818597376 (8.8T) Stripe length = 4 Disk group = dg_13, dg_15 Maximum drives to configure = 8, 8 Maximum capacity to configure = 2363443937280 (2.1T), 952103075840 (886.7G)
Configure a new pooluemcli -d 10.0.0.1 -u Local/joe -p MyPassword456! /stor/config/poolcreate -name MyPool -description "My custom pool" -storProfileprofile_22 -diskGroup dg_16 -drivesNumber 5
Storage system address: 10.0.0.1Storage system port: 443HTTPS connection
ID = GP_4Operation completed successfully.
Configure a dynamic poolYou can configure dynamic pools for all-Flash models of Unity running OE version4.2.x or later. New pools created for these models are dynamic pools by default.Dynamic pools implement advanced RAID technology. In dynamic pools, a RAID groupis spread across drive extents in multiple drives. The required spare space is alsospread across drive extents in multiple drives. When a drive fails, the extents on thefailed drive are rebuilt to spare space extents within the pool.
Configuring pools using the CLI
Configure a dynamic pool 75
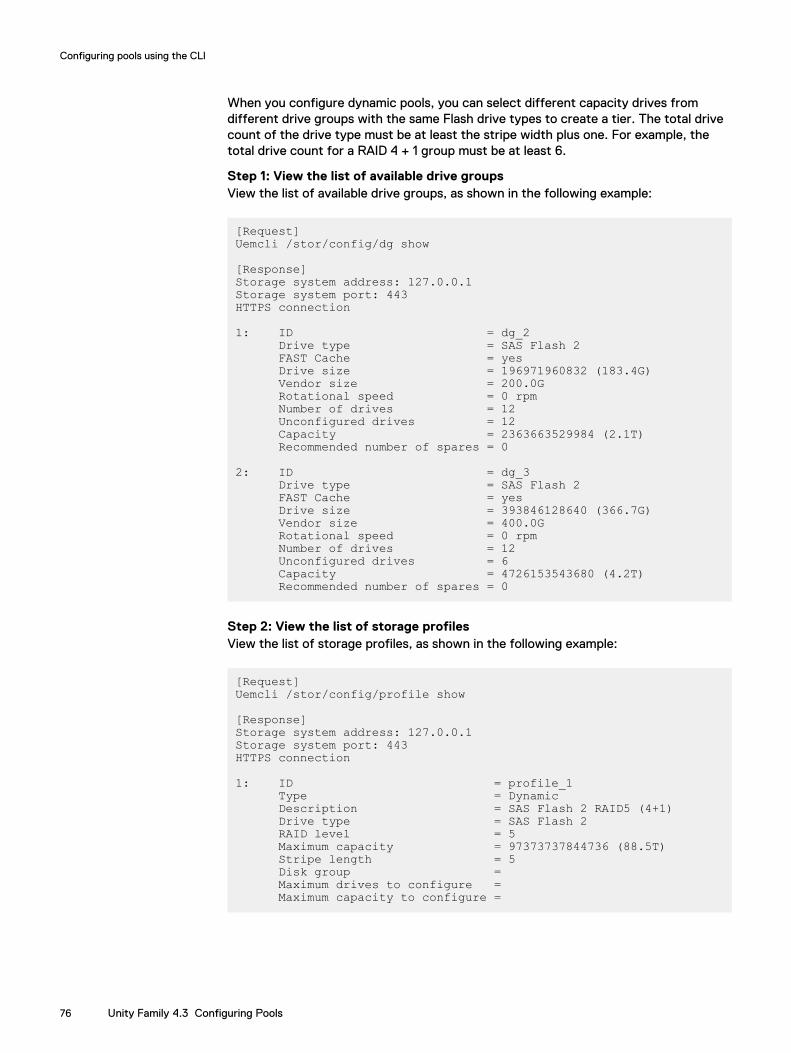
When you configure dynamic pools, you can select different capacity drives fromdifferent drive groups with the same Flash drive types to create a tier. The total drivecount of the drive type must be at least the stripe width plus one. For example, thetotal drive count for a RAID 4 + 1 group must be at least 6.
Step 1: View the list of available drive groupsView the list of available drive groups, as shown in the following example:
[Request]Uemcli /stor/config/dg show
[Response]Storage system address: 127.0.0.1Storage system port: 443HTTPS connection
1: ID = dg_2 Drive type = SAS Flash 2 FAST Cache = yes Drive size = 196971960832 (183.4G) Vendor size = 200.0G Rotational speed = 0 rpm Number of drives = 12 Unconfigured drives = 12 Capacity = 2363663529984 (2.1T) Recommended number of spares = 0
2: ID = dg_3 Drive type = SAS Flash 2 FAST Cache = yes Drive size = 393846128640 (366.7G) Vendor size = 400.0G Rotational speed = 0 rpm Number of drives = 12 Unconfigured drives = 6 Capacity = 4726153543680 (4.2T) Recommended number of spares = 0
Step 2: View the list of storage profilesView the list of storage profiles, as shown in the following example:
[Request]Uemcli /stor/config/profile show
[Response]Storage system address: 127.0.0.1Storage system port: 443HTTPS connection
1: ID = profile_1 Type = Dynamic Description = SAS Flash 2 RAID5 (4+1) Drive type = SAS Flash 2 RAID level = 5 Maximum capacity = 97373737844736 (88.5T) Stripe length = 5 Disk group = Maximum drives to configure = Maximum capacity to configure =
Configuring pools using the CLI
76 Unity Family 4.3 Configuring Pools
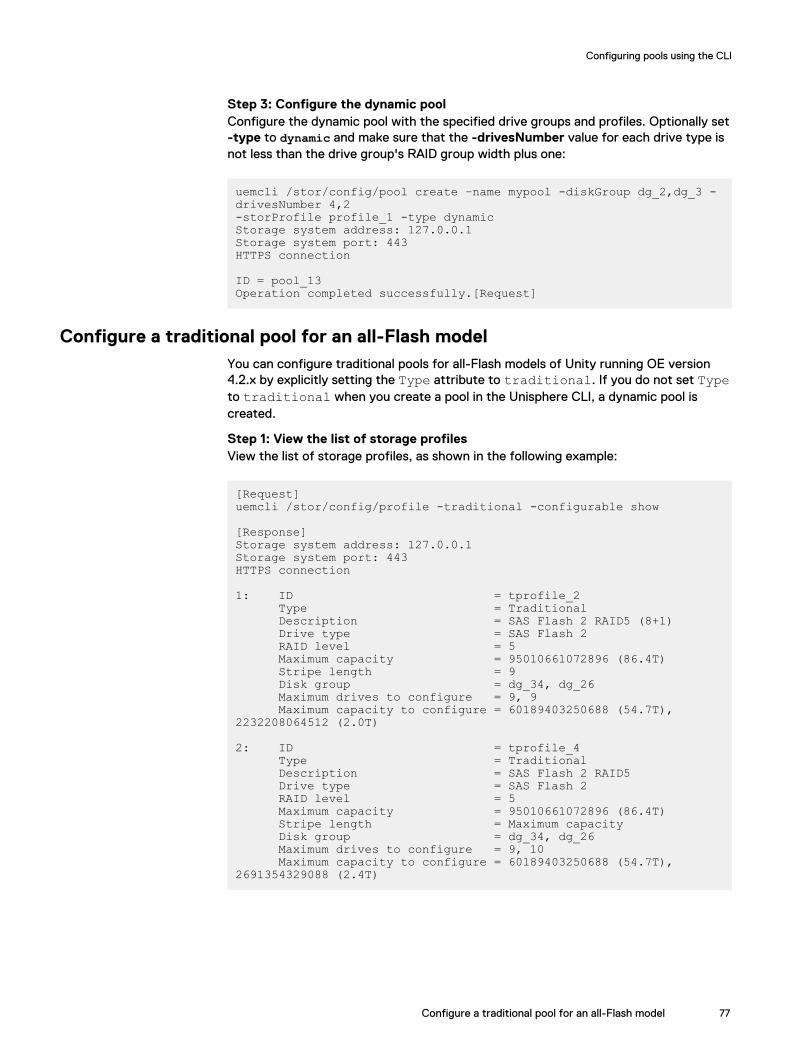
Step 3: Configure the dynamic poolConfigure the dynamic pool with the specified drive groups and profiles. Optionally set-type to dynamic and make sure that the -drivesNumber value for each drive type isnot less than the drive group's RAID group width plus one:
uemcli /stor/config/pool create –name mypool -diskGroup dg_2,dg_3 -drivesNumber 4,2 -storProfile profile_1 -type dynamicStorage system address: 127.0.0.1Storage system port: 443HTTPS connection
ID = pool_13Operation completed successfully.[Request]
Configure a traditional pool for an all-Flash modelYou can configure traditional pools for all-Flash models of Unity running OE version4.2.x by explicitly setting the Type attribute to traditional. If you do not set Typeto traditional when you create a pool in the Unisphere CLI, a dynamic pool iscreated.
Step 1: View the list of storage profilesView the list of storage profiles, as shown in the following example:
[Request]uemcli /stor/config/profile -traditional -configurable show
[Response]Storage system address: 127.0.0.1Storage system port: 443HTTPS connection
1: ID = tprofile_2 Type = Traditional Description = SAS Flash 2 RAID5 (8+1) Drive type = SAS Flash 2 RAID level = 5 Maximum capacity = 95010661072896 (86.4T) Stripe length = 9 Disk group = dg_34, dg_26 Maximum drives to configure = 9, 9 Maximum capacity to configure = 60189403250688 (54.7T), 2232208064512 (2.0T)
2: ID = tprofile_4 Type = Traditional Description = SAS Flash 2 RAID5 Drive type = SAS Flash 2 RAID level = 5 Maximum capacity = 95010661072896 (86.4T) Stripe length = Maximum capacity Disk group = dg_34, dg_26 Maximum drives to configure = 9, 10 Maximum capacity to configure = 60189403250688 (54.7T), 2691354329088 (2.4T)
Configuring pools using the CLI
Configure a traditional pool for an all-Flash model 77
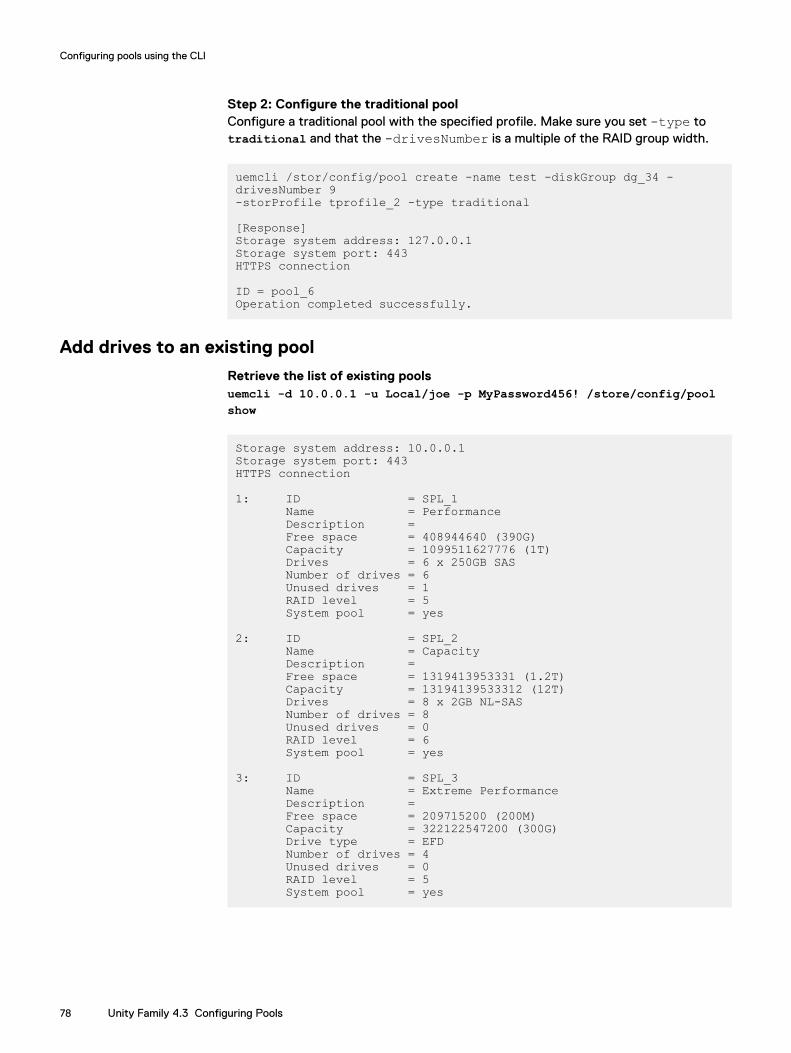
Step 2: Configure the traditional poolConfigure a traditional pool with the specified profile. Make sure you set -type totraditional and that the -drivesNumber is a multiple of the RAID group width.
uemcli /stor/config/pool create -name test -diskGroup dg_34 -drivesNumber 9 -storProfile tprofile_2 -type traditional
[Response]Storage system address: 127.0.0.1Storage system port: 443HTTPS connection
ID = pool_6Operation completed successfully.
Add drives to an existing pool
Retrieve the list of existing poolsuemcli -d 10.0.0.1 -u Local/joe -p MyPassword456! /store/config/poolshow
Storage system address: 10.0.0.1Storage system port: 443HTTPS connection
1: ID = SPL_1 Name = Performance Description = Free space = 408944640 (390G) Capacity = 1099511627776 (1T) Drives = 6 x 250GB SAS Number of drives = 6 Unused drives = 1 RAID level = 5 System pool = yes
2: ID = SPL_2 Name = Capacity Description = Free space = 1319413953331 (1.2T) Capacity = 13194139533312 (12T) Drives = 8 x 2GB NL-SAS Number of drives = 8 Unused drives = 0 RAID level = 6 System pool = yes
3: ID = SPL_3 Name = Extreme Performance Description = Free space = 209715200 (200M) Capacity = 322122547200 (300G) Drive type = EFD Number of drives = 4 Unused drives = 0 RAID level = 5 System pool = yes
Configuring pools using the CLI
78 Unity Family 4.3 Configuring Pools
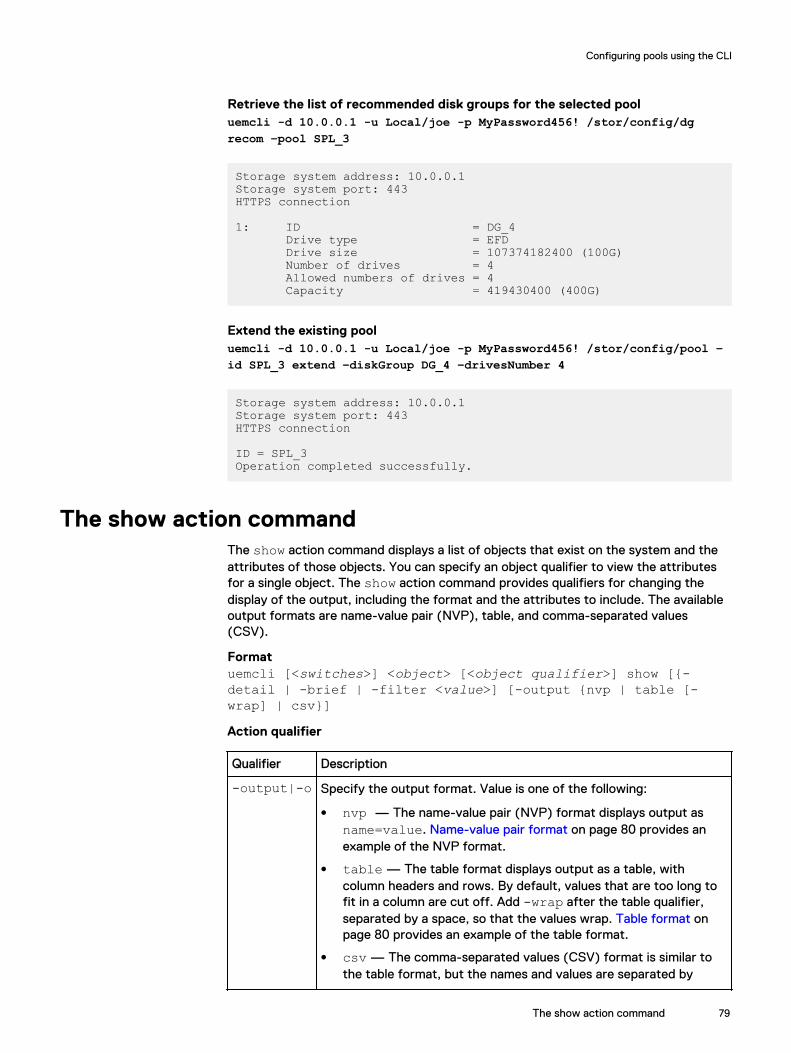
Retrieve the list of recommended disk groups for the selected pooluemcli -d 10.0.0.1 -u Local/joe -p MyPassword456! /stor/config/dgrecom –pool SPL_3
Storage system address: 10.0.0.1Storage system port: 443HTTPS connection
1: ID = DG_4 Drive type = EFD Drive size = 107374182400 (100G) Number of drives = 4 Allowed numbers of drives = 4 Capacity = 419430400 (400G)
Extend the existing pooluemcli -d 10.0.0.1 -u Local/joe -p MyPassword456! /stor/config/pool –id SPL_3 extend –diskGroup DG_4 –drivesNumber 4
Storage system address: 10.0.0.1Storage system port: 443HTTPS connection
ID = SPL_3Operation completed successfully.
The show action commandThe show action command displays a list of objects that exist on the system and theattributes of those objects. You can specify an object qualifier to view the attributesfor a single object. The show action command provides qualifiers for changing thedisplay of the output, including the format and the attributes to include. The availableoutput formats are name-value pair (NVP), table, and comma-separated values(CSV).
Formatuemcli [<switches>] <object> [<object qualifier>] show [{-detail | -brief | -filter <value>] [-output {nvp | table [-wrap] | csv}]Action qualifier
Qualifier Description
-output|-o Specify the output format. Value is one of the following:
l nvp — The name-value pair (NVP) format displays output asname=value. Name-value pair format on page 80 provides anexample of the NVP format.
l table — The table format displays output as a table, withcolumn headers and rows. By default, values that are too long tofit in a column are cut off. Add -wrap after the table qualifier,separated by a space, so that the values wrap. Table format onpage 80 provides an example of the table format.
l csv — The comma-separated values (CSV) format is similar tothe table format, but the names and values are separated by
Configuring pools using the CLI
The show action command 79
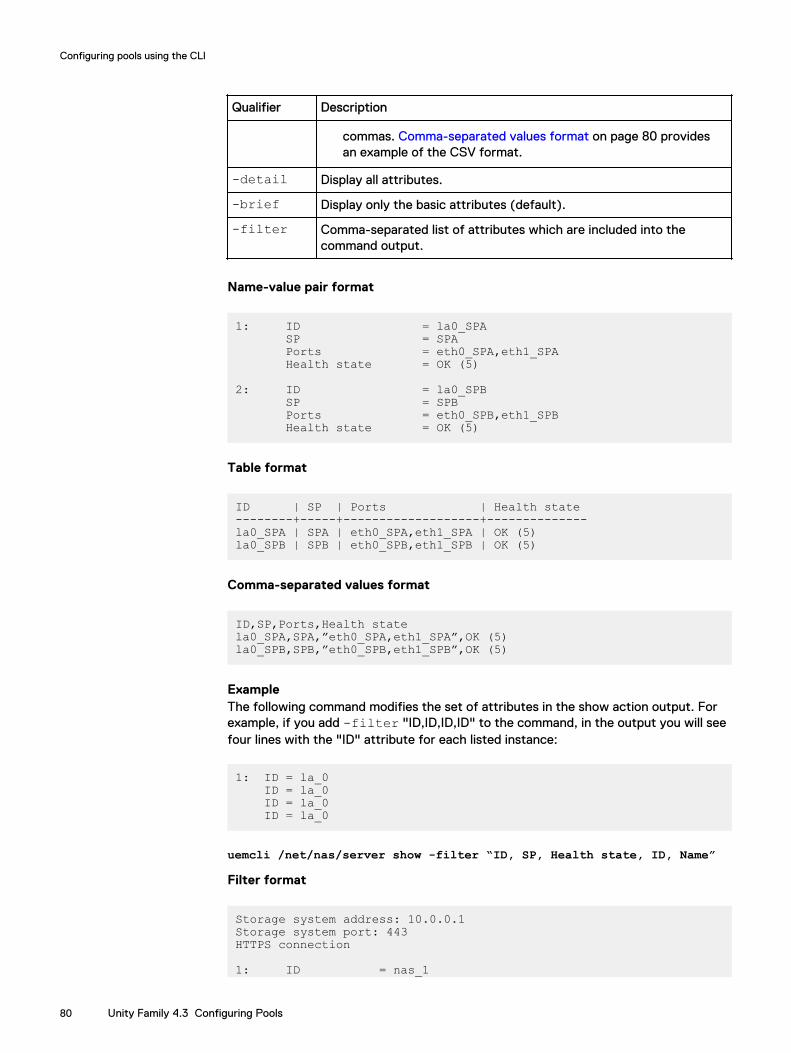
Qualifier Description
commas. Comma-separated values format on page 80 providesan example of the CSV format.
-detail Display all attributes.
-brief Display only the basic attributes (default).
-filter Comma-separated list of attributes which are included into thecommand output.
Name-value pair format
1: ID = la0_SPA SP = SPA Ports = eth0_SPA,eth1_SPA Health state = OK (5)
2: ID = la0_SPB SP = SPB Ports = eth0_SPB,eth1_SPB Health state = OK (5)
Table format
ID | SP | Ports | Health state--------+-----+-------------------+--------------la0_SPA | SPA | eth0_SPA,eth1_SPA | OK (5)la0_SPB | SPB | eth0_SPB,eth1_SPB | OK (5)
Comma-separated values format
ID,SP,Ports,Health statela0_SPA,SPA,”eth0_SPA,eth1_SPA”,OK (5)la0_SPB,SPB,”eth0_SPB,eth1_SPB”,OK (5)
ExampleThe following command modifies the set of attributes in the show action output. Forexample, if you add -filter "ID,ID,ID,ID" to the command, in the output you will seefour lines with the "ID" attribute for each listed instance:
1: ID = la_0 ID = la_0 ID = la_0 ID = la_0
uemcli /net/nas/server show -filter “ID, SP, Health state, ID, Name”
Filter format
Storage system address: 10.0.0.1Storage system port: 443HTTPS connection
1: ID = nas_1
Configuring pools using the CLI
80 Unity Family 4.3 Configuring Pools
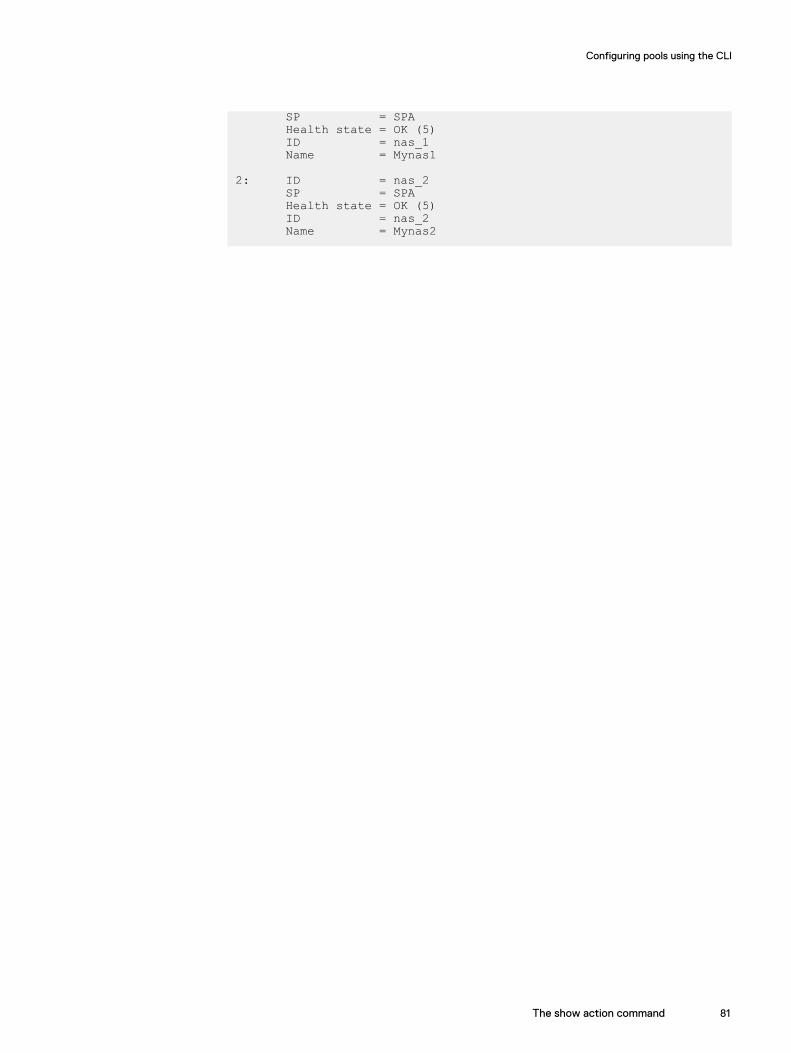
SP = SPA Health state = OK (5) ID = nas_1 Name = Mynas1
2: ID = nas_2 SP = SPA Health state = OK (5) ID = nas_2 Name = Mynas2
Configuring pools using the CLI
The show action command 81
Configuring pools using the CLI
82 Unity Family 4.3 Configuring Pools
CHAPTER 8
Managing the FAST Cache using the CLI(supported physical deployments only)
This chapter contains the following topics:
l Manage FAST Cache..........................................................................................84l Manage FAST Cache storage objects (physical deployments only)....................87
Managing the FAST Cache using the CLI (supported physical deployments only) 83
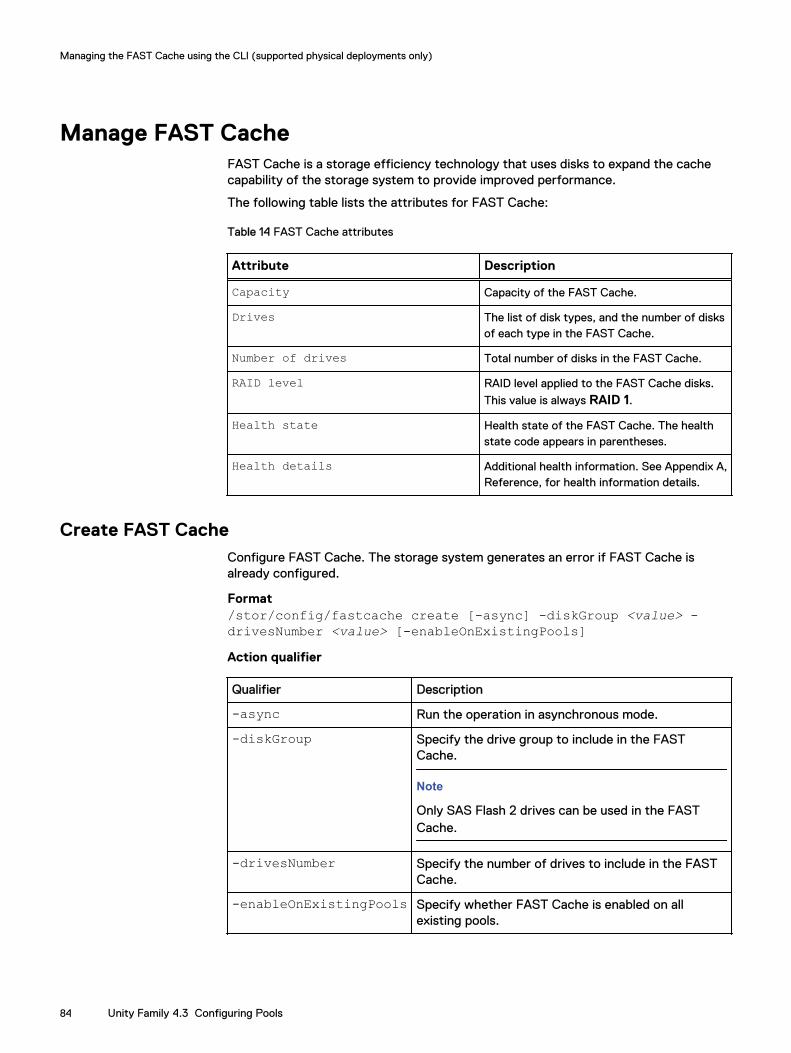
Manage FAST CacheFAST Cache is a storage efficiency technology that uses disks to expand the cachecapability of the storage system to provide improved performance.
The following table lists the attributes for FAST Cache:
Table 14 FAST Cache attributes
Attribute Description
Capacity Capacity of the FAST Cache.
Drives The list of disk types, and the number of disksof each type in the FAST Cache.
Number of drives Total number of disks in the FAST Cache.
RAID level RAID level applied to the FAST Cache disks.
This value is always RAID 1.
Health state Health state of the FAST Cache. The healthstate code appears in parentheses.
Health details Additional health information. See Appendix A,Reference, for health information details.
Create FAST CacheConfigure FAST Cache. The storage system generates an error if FAST Cache isalready configured.
Format/stor/config/fastcache create [-async] -diskGroup <value> -drivesNumber <value> [-enableOnExistingPools]Action qualifier
Qualifier Description
-async Run the operation in asynchronous mode.
-diskGroup Specify the drive group to include in the FASTCache.
Note
Only SAS Flash 2 drives can be used in the FASTCache.
-drivesNumber Specify the number of drives to include in the FASTCache.
-enableOnExistingPools Specify whether FAST Cache is enabled on allexisting pools.
Managing the FAST Cache using the CLI (supported physical deployments only)
84 Unity Family 4.3 Configuring Pools
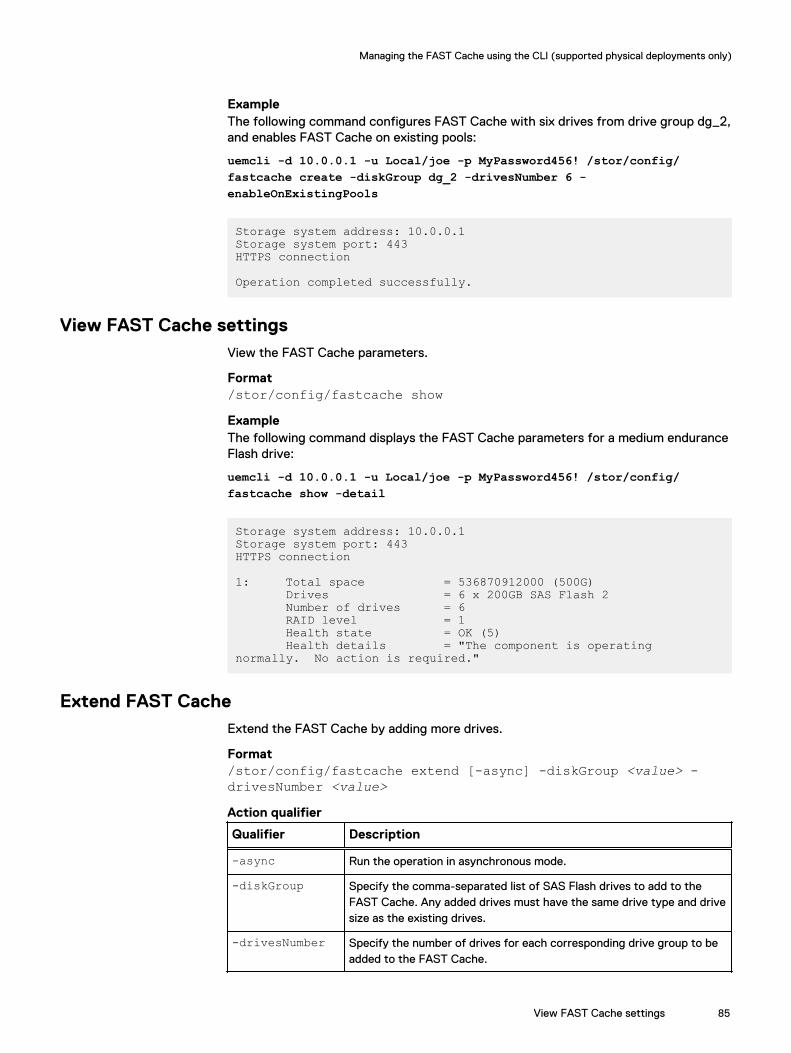
ExampleThe following command configures FAST Cache with six drives from drive group dg_2,and enables FAST Cache on existing pools:
uemcli -d 10.0.0.1 -u Local/joe -p MyPassword456! /stor/config/fastcache create -diskGroup dg_2 -drivesNumber 6 -enableOnExistingPools
Storage system address: 10.0.0.1Storage system port: 443HTTPS connection
Operation completed successfully.
View FAST Cache settingsView the FAST Cache parameters.
Format/stor/config/fastcache showExampleThe following command displays the FAST Cache parameters for a medium enduranceFlash drive:
uemcli -d 10.0.0.1 -u Local/joe -p MyPassword456! /stor/config/fastcache show -detail
Storage system address: 10.0.0.1Storage system port: 443HTTPS connection
1: Total space = 536870912000 (500G) Drives = 6 x 200GB SAS Flash 2 Number of drives = 6 RAID level = 1 Health state = OK (5) Health details = "The component is operating normally. No action is required."
Extend FAST CacheExtend the FAST Cache by adding more drives.
Format/stor/config/fastcache extend [-async] -diskGroup <value> -drivesNumber <value>Action qualifier
Qualifier Description
-async Run the operation in asynchronous mode.
-diskGroup Specify the comma-separated list of SAS Flash drives to add to theFAST Cache. Any added drives must have the same drive type and drivesize as the existing drives.
-drivesNumber Specify the number of drives for each corresponding drive group to beadded to the FAST Cache.
Managing the FAST Cache using the CLI (supported physical deployments only)
View FAST Cache settings 85
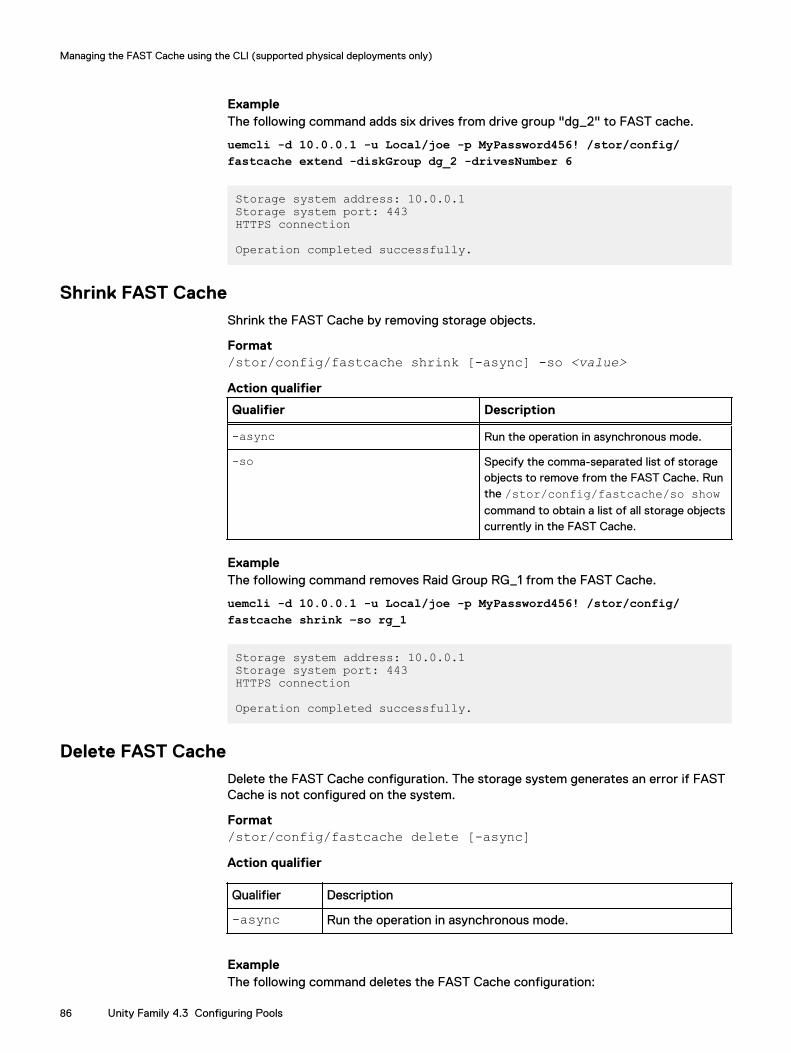
ExampleThe following command adds six drives from drive group "dg_2" to FAST cache.
uemcli -d 10.0.0.1 -u Local/joe -p MyPassword456! /stor/config/fastcache extend -diskGroup dg_2 -drivesNumber 6
Storage system address: 10.0.0.1Storage system port: 443HTTPS connection
Operation completed successfully.
Shrink FAST CacheShrink the FAST Cache by removing storage objects.
Format/stor/config/fastcache shrink [-async] -so <value>Action qualifier
Qualifier Description
-async Run the operation in asynchronous mode.
-so Specify the comma-separated list of storageobjects to remove from the FAST Cache. Runthe /stor/config/fastcache/so showcommand to obtain a list of all storage objectscurrently in the FAST Cache.
ExampleThe following command removes Raid Group RG_1 from the FAST Cache.
uemcli -d 10.0.0.1 -u Local/joe -p MyPassword456! /stor/config/fastcache shrink –so rg_1
Storage system address: 10.0.0.1Storage system port: 443HTTPS connection
Operation completed successfully.
Delete FAST CacheDelete the FAST Cache configuration. The storage system generates an error if FASTCache is not configured on the system.
Format/stor/config/fastcache delete [-async]Action qualifier
Qualifier Description
-async Run the operation in asynchronous mode.
ExampleThe following command deletes the FAST Cache configuration:
Managing the FAST Cache using the CLI (supported physical deployments only)
86 Unity Family 4.3 Configuring Pools
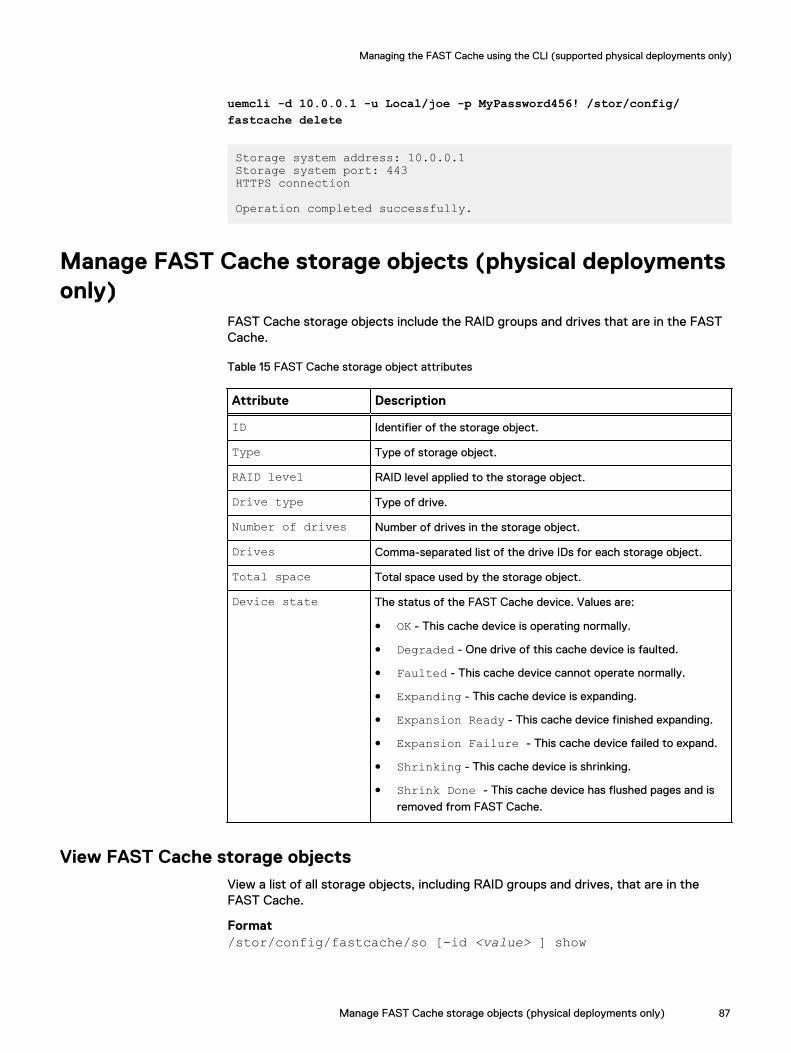
uemcli -d 10.0.0.1 -u Local/joe -p MyPassword456! /stor/config/fastcache delete
Storage system address: 10.0.0.1Storage system port: 443HTTPS connection
Operation completed successfully.
Manage FAST Cache storage objects (physical deploymentsonly)
FAST Cache storage objects include the RAID groups and drives that are in the FASTCache.
Table 15 FAST Cache storage object attributes
Attribute Description
ID Identifier of the storage object.
Type Type of storage object.
RAID level RAID level applied to the storage object.
Drive type Type of drive.
Number of drives Number of drives in the storage object.
Drives Comma-separated list of the drive IDs for each storage object.
Total space Total space used by the storage object.
Device state The status of the FAST Cache device. Values are:
l OK - This cache device is operating normally.
l Degraded - One drive of this cache device is faulted.
l Faulted - This cache device cannot operate normally.
l Expanding - This cache device is expanding.
l Expansion Ready - This cache device finished expanding.
l Expansion Failure - This cache device failed to expand.
l Shrinking - This cache device is shrinking.
l Shrink Done - This cache device has flushed pages and is
removed from FAST Cache.
View FAST Cache storage objectsView a list of all storage objects, including RAID groups and drives, that are in theFAST Cache.
Format/stor/config/fastcache/so [-id <value> ] show
Managing the FAST Cache using the CLI (supported physical deployments only)
Manage FAST Cache storage objects (physical deployments only) 87
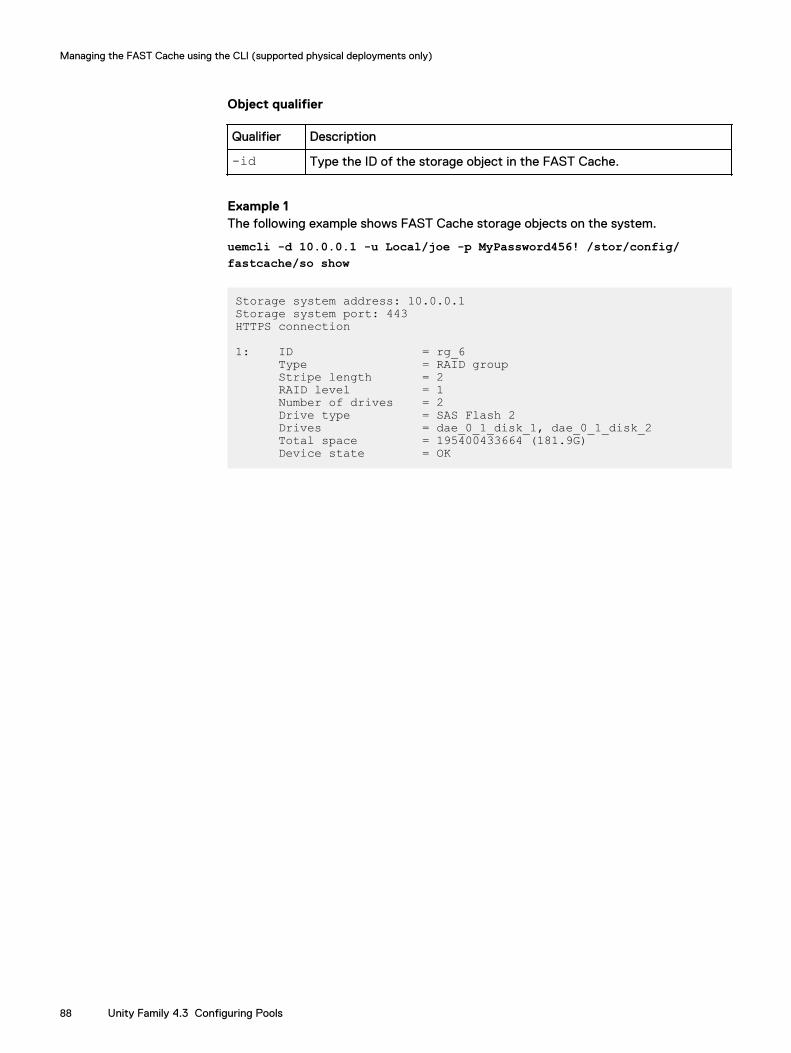
Object qualifier
Qualifier Description
-id Type the ID of the storage object in the FAST Cache.
Example 1The following example shows FAST Cache storage objects on the system.
uemcli -d 10.0.0.1 -u Local/joe -p MyPassword456! /stor/config/fastcache/so show
Storage system address: 10.0.0.1Storage system port: 443HTTPS connection
1: ID = rg_6 Type = RAID group Stripe length = 2 RAID level = 1 Number of drives = 2 Drive type = SAS Flash 2 Drives = dae_0_1_disk_1, dae_0_1_disk_2 Total space = 195400433664 (181.9G) Device state = OK
Managing the FAST Cache using the CLI (supported physical deployments only)
88 Unity Family 4.3 Configuring Pools
CHAPTER 9
Managing FAST VP using the CLI (supportedphysical deployments only)
This chapter contains the following topics:
l Manage FAST VP pool settings..........................................................................90l Manage FAST VP general settings.....................................................................95
Managing FAST VP using the CLI (supported physical deployments only) 89

Manage FAST VP pool settingsFully Automated Storage Tiering for Virtual Pools (FAST VP) is a storage efficiencytechnology that automatically moves data between storage tiers within a pool basedon data access patterns.
The following table lists the attributes for FAST VP pool settings.
Table 16 FAST VP pool attributes
Attribute Description
Pool Identifies the pool.
Status Identifies the status of data relocation on the pool. Value isone of the following:
l Not started - Data relocation has not started.
l Paused - Data relocation is paused.
l Completed - Data relocation is complete.
l Stopped by user - Data relocation was stopped by
the user.
l Active - Data relocation is in progress.
l Failed - Data relocation failed.
Relocation type Type of data relocation. Value is one of the following:
l Manual - Data relocation was initiated by the user.
l Scheduled or rebalancing - Data relocation was
initiated by the system because it was scheduled, orbecause the system rebalanced the data.
Schedule enabled Identifies whether the pool is rebalanced according to thesystem FAST VP schedule. Value is one of the following:
l yesl no
Start time Indicates the time the current data relocation started.
End time Indicates the time the current data relocation is scheduledto end.
Data relocated The amount of data relocated during an ongoing relocation,or the previous relocation if a data relocation is notoccurring. The format is:
<value> [suffix]where:
l value - Identifies the size of the data relocated.
l suffix - Identifies that the value relates to the
previous relocation session.
Managing FAST VP using the CLI (supported physical deployments only)
90 Unity Family 4.3 Configuring Pools
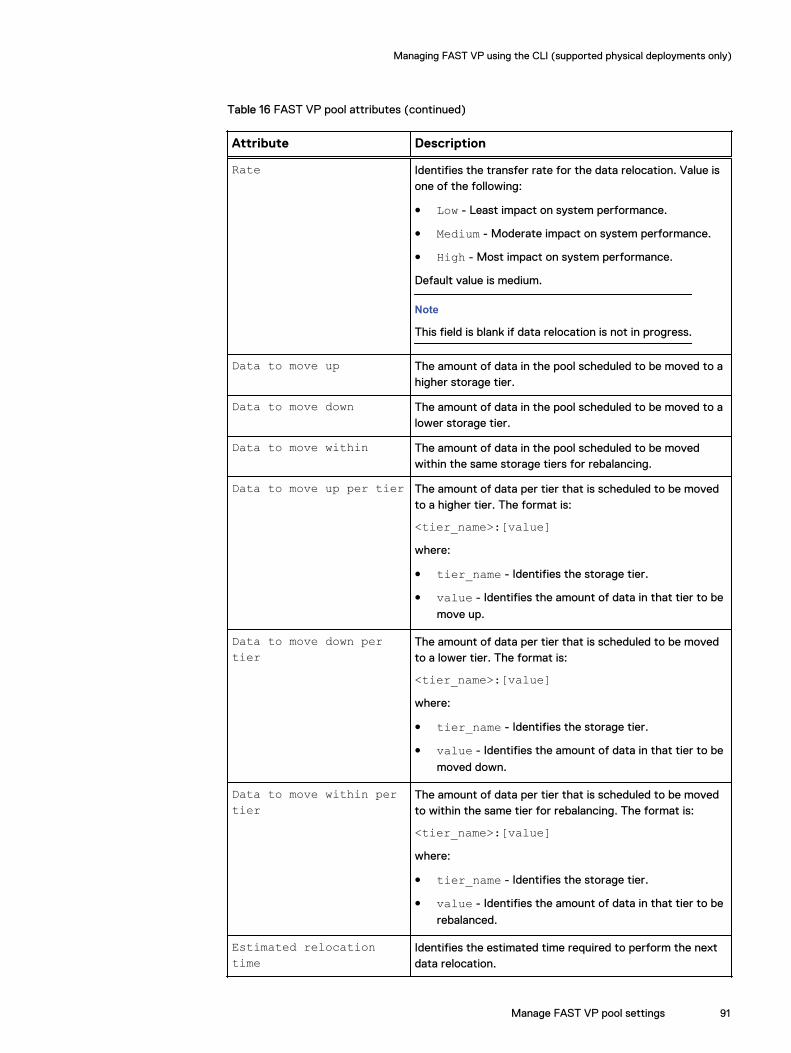
Table 16 FAST VP pool attributes (continued)
Attribute Description
Rate Identifies the transfer rate for the data relocation. Value isone of the following:
l Low - Least impact on system performance.
l Medium - Moderate impact on system performance.
l High - Most impact on system performance.
Default value is medium.
Note
This field is blank if data relocation is not in progress.
Data to move up The amount of data in the pool scheduled to be moved to ahigher storage tier.
Data to move down The amount of data in the pool scheduled to be moved to alower storage tier.
Data to move within The amount of data in the pool scheduled to be movedwithin the same storage tiers for rebalancing.
Data to move up per tier The amount of data per tier that is scheduled to be movedto a higher tier. The format is:
<tier_name>:[value]where:
l tier_name - Identifies the storage tier.
l value - Identifies the amount of data in that tier to be
move up.
Data to move down pertier
The amount of data per tier that is scheduled to be movedto a lower tier. The format is:
<tier_name>:[value]where:
l tier_name - Identifies the storage tier.
l value - Identifies the amount of data in that tier to be
moved down.
Data to move within pertier
The amount of data per tier that is scheduled to be movedto within the same tier for rebalancing. The format is:
<tier_name>:[value]where:
l tier_name - Identifies the storage tier.
l value - Identifies the amount of data in that tier to be
rebalanced.
Estimated relocationtime
Identifies the estimated time required to perform the nextdata relocation.
Managing FAST VP using the CLI (supported physical deployments only)
Manage FAST VP pool settings 91

View FAST VP pool settingsView FAST VP settings on a pool.
Format/stor/config/pool/fastvp [{-pool <value> | -poolName <value>}]showObject qualifiers
Qualifier Description
-pool Type the ID of the pool.
-poolName Type the name of the pool.
ExampleThe following command lists the FAST VP settings on the storage system:
uemcli -d 10.0.0.1 -u Local/joe -p MyPassword456! /stor/config/pool/fastvp –show -detail
Storage system address: 10.0.0.1Storage system port: 443HTTPS connection
1: Pool = pool_1 Relocation type = manual Status = Active Schedule enabled = no Start time = 2013-09-20 12:55:32 End time = 2013-09-20 21:10:17 Data relocated = 100111454324 (100G) Rate = high Data to move up = 4947802324992 (4.9T) Data to move down = 4947802324992 (4.9T) Data to move within = 4947802324992 (4.9T) Data to move up per tier = Performance: 500182324992 (500G), Capacity: 1000114543245 (1.0T) Data to move down per tier = Extreme Performance: 1000114543245 (1.0T), Performance: 500182324992 (500G) Data to move within per tier = Extreme Performance: 500182324992 (500G), Performance: 500182324992 (500G), Capacity: 500182324992 (500G) Estimated relocation time = 7h 30m
Change FAST VP pool settingsModify FAST VP settings on an existing pool.
Format/stor/config/pool/fastvp {-pool <value> | -poolName <value>}set [-async] -schedEnabled {yes | no}Object qualifiers
Qualifier Description
-pool Type the ID of the pool.
-poolName Type the name of the pool.
Managing FAST VP using the CLI (supported physical deployments only)
92 Unity Family 4.3 Configuring Pools
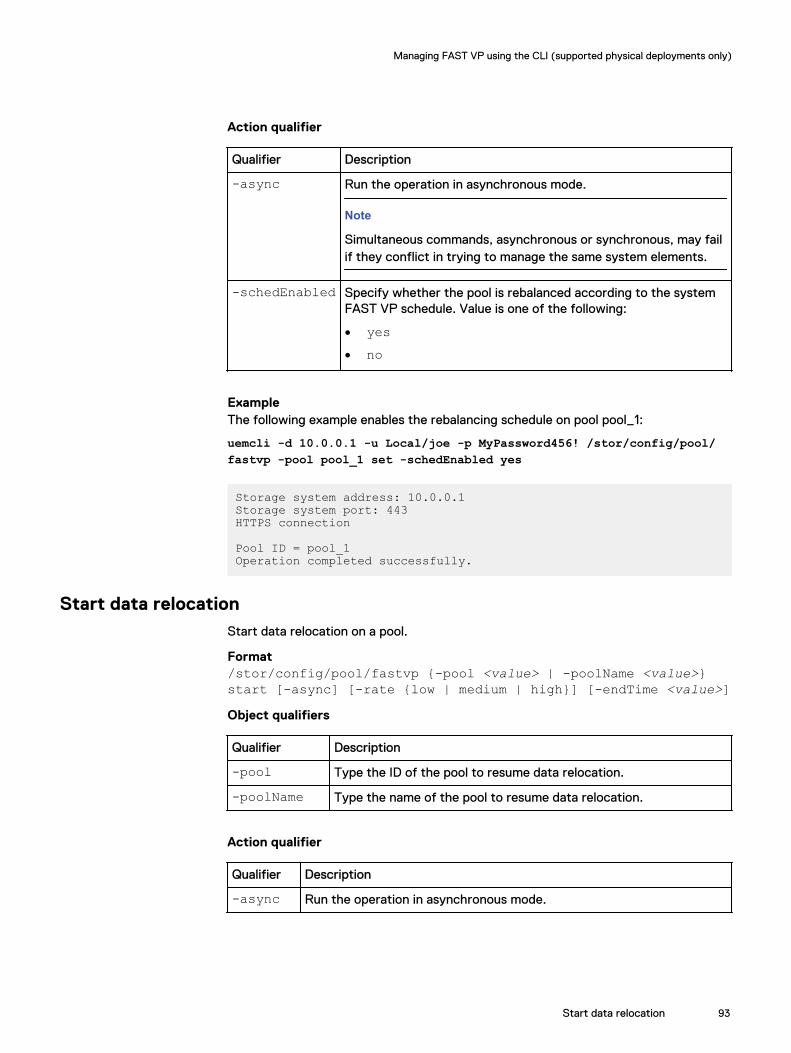
Action qualifier
Qualifier Description
-async Run the operation in asynchronous mode.
Note
Simultaneous commands, asynchronous or synchronous, may failif they conflict in trying to manage the same system elements.
-schedEnabled Specify whether the pool is rebalanced according to the systemFAST VP schedule. Value is one of the following:
l yesl no
ExampleThe following example enables the rebalancing schedule on pool pool_1:
uemcli -d 10.0.0.1 -u Local/joe -p MyPassword456! /stor/config/pool/fastvp -pool pool_1 set -schedEnabled yes
Storage system address: 10.0.0.1Storage system port: 443HTTPS connection
Pool ID = pool_1Operation completed successfully.
Start data relocationStart data relocation on a pool.
Format/stor/config/pool/fastvp {-pool <value> | -poolName <value>}start [-async] [-rate {low | medium | high}] [-endTime <value>]Object qualifiers
Qualifier Description
-pool Type the ID of the pool to resume data relocation.
-poolName Type the name of the pool to resume data relocation.
Action qualifier
Qualifier Description
-async Run the operation in asynchronous mode.
Managing FAST VP using the CLI (supported physical deployments only)
Start data relocation 93
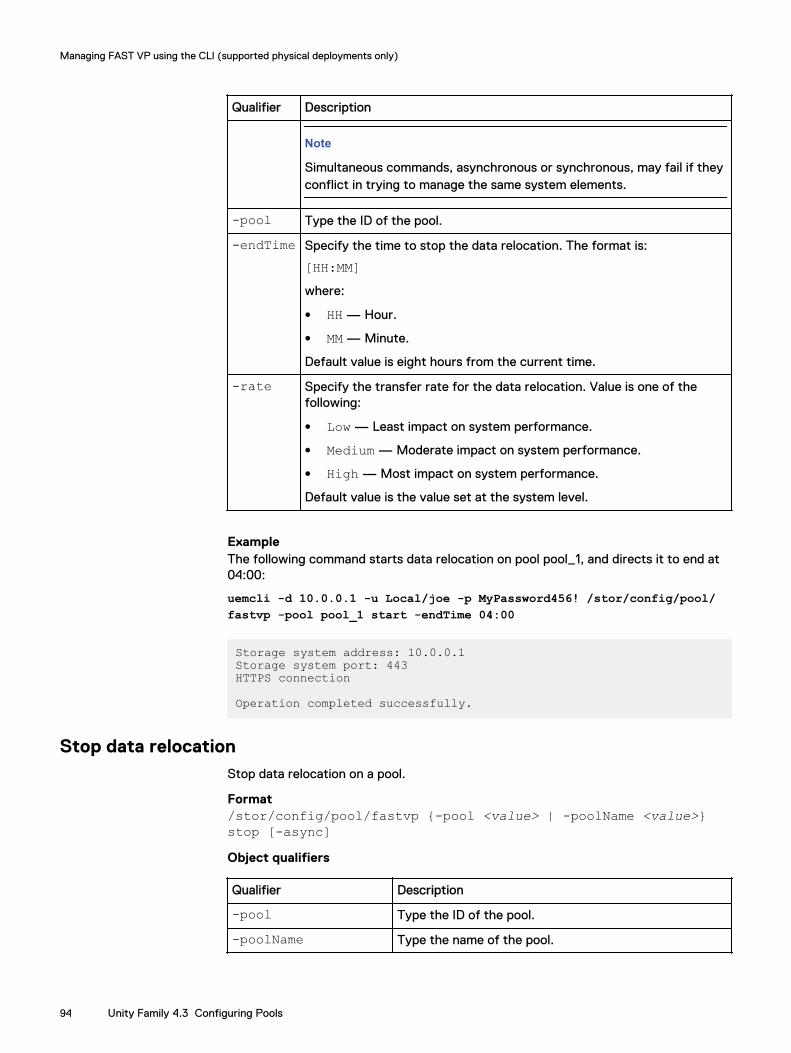
Qualifier Description
Note
Simultaneous commands, asynchronous or synchronous, may fail if theyconflict in trying to manage the same system elements.
-pool Type the ID of the pool.
-endTime Specify the time to stop the data relocation. The format is:
[HH:MM]where:
l HH — Hour.
l MM — Minute.
Default value is eight hours from the current time.
-rate Specify the transfer rate for the data relocation. Value is one of thefollowing:
l Low — Least impact on system performance.
l Medium — Moderate impact on system performance.
l High — Most impact on system performance.
Default value is the value set at the system level.
ExampleThe following command starts data relocation on pool pool_1, and directs it to end at04:00:
uemcli -d 10.0.0.1 -u Local/joe -p MyPassword456! /stor/config/pool/fastvp -pool pool_1 start -endTime 04:00
Storage system address: 10.0.0.1Storage system port: 443HTTPS connection
Operation completed successfully.
Stop data relocationStop data relocation on a pool.
Format/stor/config/pool/fastvp {-pool <value> | -poolName <value>}stop [-async]Object qualifiers
Qualifier Description
-pool Type the ID of the pool.
-poolName Type the name of the pool.
Managing FAST VP using the CLI (supported physical deployments only)
94 Unity Family 4.3 Configuring Pools
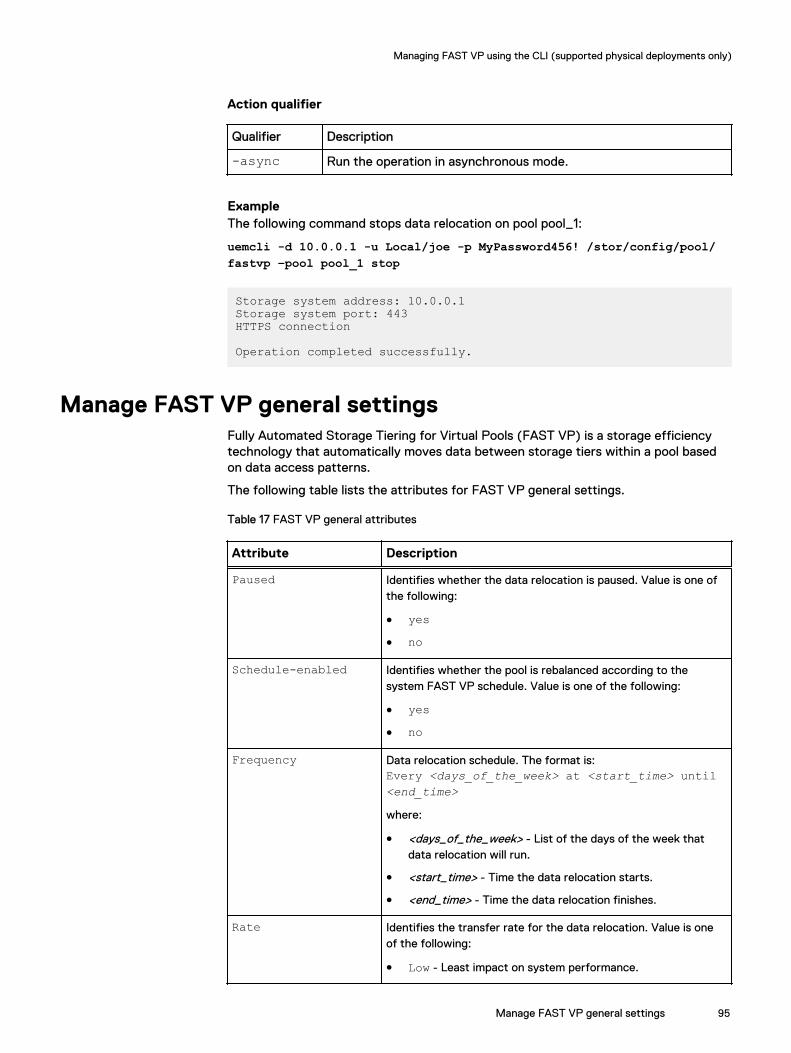
Action qualifier
Qualifier Description
-async Run the operation in asynchronous mode.
ExampleThe following command stops data relocation on pool pool_1:
uemcli -d 10.0.0.1 -u Local/joe -p MyPassword456! /stor/config/pool/fastvp –pool pool_1 stop
Storage system address: 10.0.0.1Storage system port: 443HTTPS connection
Operation completed successfully.
Manage FAST VP general settingsFully Automated Storage Tiering for Virtual Pools (FAST VP) is a storage efficiencytechnology that automatically moves data between storage tiers within a pool basedon data access patterns.
The following table lists the attributes for FAST VP general settings.
Table 17 FAST VP general attributes
Attribute Description
Paused Identifies whether the data relocation is paused. Value is one ofthe following:
l yesl no
Schedule-enabled Identifies whether the pool is rebalanced according to thesystem FAST VP schedule. Value is one of the following:
l yesl no
Frequency Data relocation schedule. The format is:Every <days_of_the_week> at <start_time> until<end_time>
where:
l <days_of_the_week> - List of the days of the week thatdata relocation will run.
l <start_time> - Time the data relocation starts.
l <end_time> - Time the data relocation finishes.
Rate Identifies the transfer rate for the data relocation. Value is oneof the following:
l Low - Least impact on system performance.
Managing FAST VP using the CLI (supported physical deployments only)
Manage FAST VP general settings 95
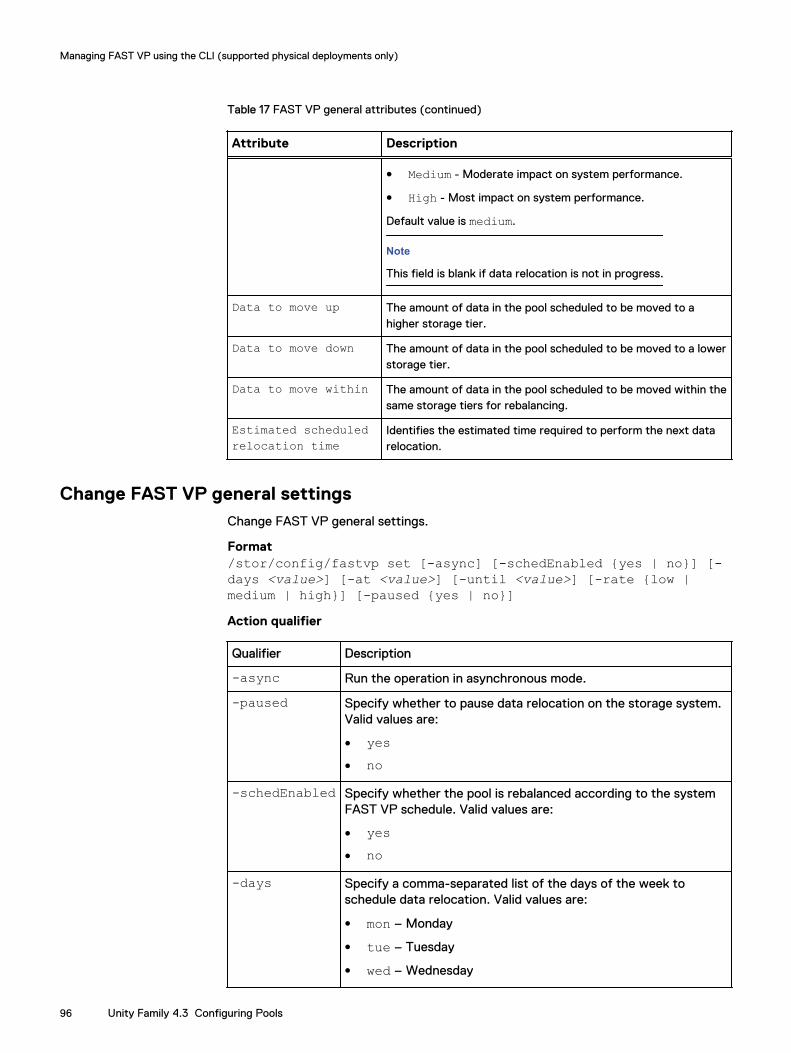
Table 17 FAST VP general attributes (continued)
Attribute Description
l Medium - Moderate impact on system performance.
l High - Most impact on system performance.
Default value is medium.
Note
This field is blank if data relocation is not in progress.
Data to move up The amount of data in the pool scheduled to be moved to ahigher storage tier.
Data to move down The amount of data in the pool scheduled to be moved to a lowerstorage tier.
Data to move within The amount of data in the pool scheduled to be moved within thesame storage tiers for rebalancing.
Estimated scheduledrelocation time
Identifies the estimated time required to perform the next datarelocation.
Change FAST VP general settingsChange FAST VP general settings.
Format/stor/config/fastvp set [-async] [-schedEnabled {yes | no}] [-days <value>] [-at <value>] [-until <value>] [-rate {low |medium | high}] [-paused {yes | no}]Action qualifier
Qualifier Description
-async Run the operation in asynchronous mode.
-paused Specify whether to pause data relocation on the storage system.Valid values are:
l yesl no
-schedEnabled Specify whether the pool is rebalanced according to the systemFAST VP schedule. Valid values are:
l yesl no
-days Specify a comma-separated list of the days of the week toschedule data relocation. Valid values are:
l mon – Monday
l tue – Tuesday
l wed – Wednesday
Managing FAST VP using the CLI (supported physical deployments only)
96 Unity Family 4.3 Configuring Pools
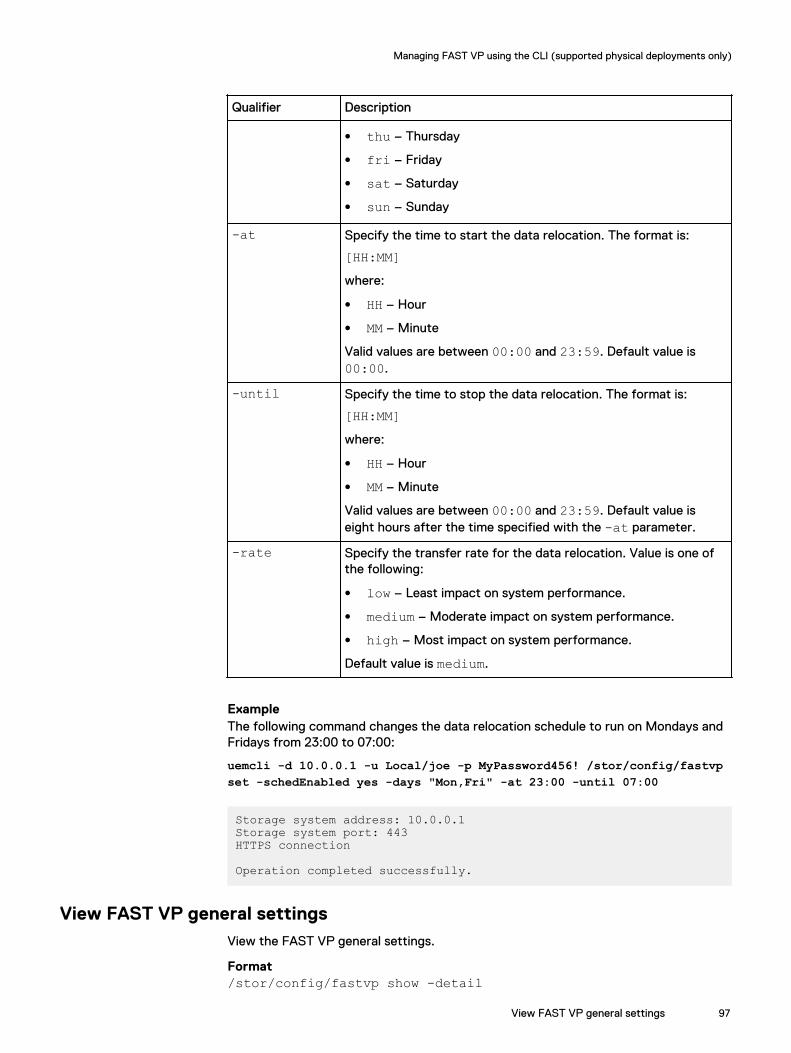
Qualifier Description
l thu – Thursday
l fri – Friday
l sat – Saturday
l sun – Sunday
-at Specify the time to start the data relocation. The format is:
[HH:MM]where:
l HH – Hour
l MM – Minute
Valid values are between 00:00 and 23:59. Default value is00:00.
-until Specify the time to stop the data relocation. The format is:
[HH:MM]where:
l HH – Hour
l MM – Minute
Valid values are between 00:00 and 23:59. Default value iseight hours after the time specified with the -at parameter.
-rate Specify the transfer rate for the data relocation. Value is one ofthe following:
l low – Least impact on system performance.
l medium – Moderate impact on system performance.
l high – Most impact on system performance.
Default value is medium.
ExampleThe following command changes the data relocation schedule to run on Mondays andFridays from 23:00 to 07:00:
uemcli -d 10.0.0.1 -u Local/joe -p MyPassword456! /stor/config/fastvpset -schedEnabled yes -days "Mon,Fri" -at 23:00 -until 07:00
Storage system address: 10.0.0.1Storage system port: 443HTTPS connection
Operation completed successfully.
View FAST VP general settingsView the FAST VP general settings.
Format/stor/config/fastvp show -detail
Managing FAST VP using the CLI (supported physical deployments only)
View FAST VP general settings 97
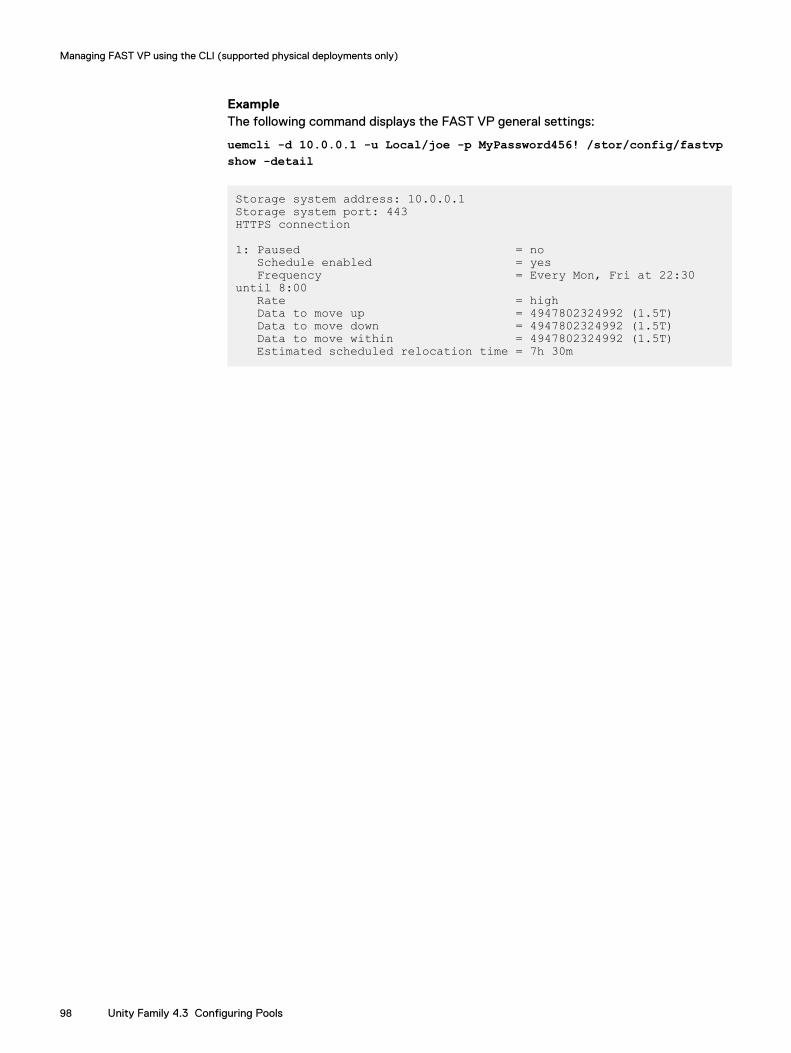
ExampleThe following command displays the FAST VP general settings:
uemcli -d 10.0.0.1 -u Local/joe -p MyPassword456! /stor/config/fastvpshow -detail
Storage system address: 10.0.0.1Storage system port: 443HTTPS connection
1: Paused = no Schedule enabled = yes Frequency = Every Mon, Fri at 22:30 until 8:00 Rate = high Data to move up = 4947802324992 (1.5T) Data to move down = 4947802324992 (1.5T) Data to move within = 4947802324992 (1.5T) Estimated scheduled relocation time = 7h 30m
Managing FAST VP using the CLI (supported physical deployments only)
98 Unity Family 4.3 Configuring Pools


![[Paris Unity meetup] - Unity 3D en entreprise](https://img.dokumen.tips/doc/110x75/55a64ec51a28ab123f8b45ab/paris-unity-meetup-unity-3d-en-entreprise.jpg)