Embed Size (px)
Citation preview

EMC® Symmetrix® Management ConsoleVersion 6.0
Installation GuideP/N 300-004-747
REV A01
EMC CorporationCorporate Headquarters:
Hopkinton, MA 01748-9103
1-508-435-1000www.EMC.com

2
Copyright © 2005 - 2007 EMC Corporation. All rights reserved.
Published March, 2007
EMC believes the information in this publication is accurate as of its publication date. The information is subject to change without notice.
THE INFORMATION IN THIS PUBLICATION IS PROVIDED “AS IS.” EMC CORPORATION MAKES NO REPRESENTATIONS OR WARRANTIES OF ANY KIND WITH RESPECT TO THE INFORMATION IN THIS PUBLICATION, AND SPECIFICALLY DISCLAIMS IMPLIED WARRANTIES OF MERCHANTABILITY OR FITNESS FOR A PARTICULAR PURPOSE.
Use, copying, and distribution of any EMC software described in this publication requires an applicable software license.
For the most up-to-date listing of EMC product names, see EMC Corporation Trademarks on EMC.com.
All other trademarks used herein are the property of their respective owners.
EMC Symmetrix Management Console Installation Guide
Contents
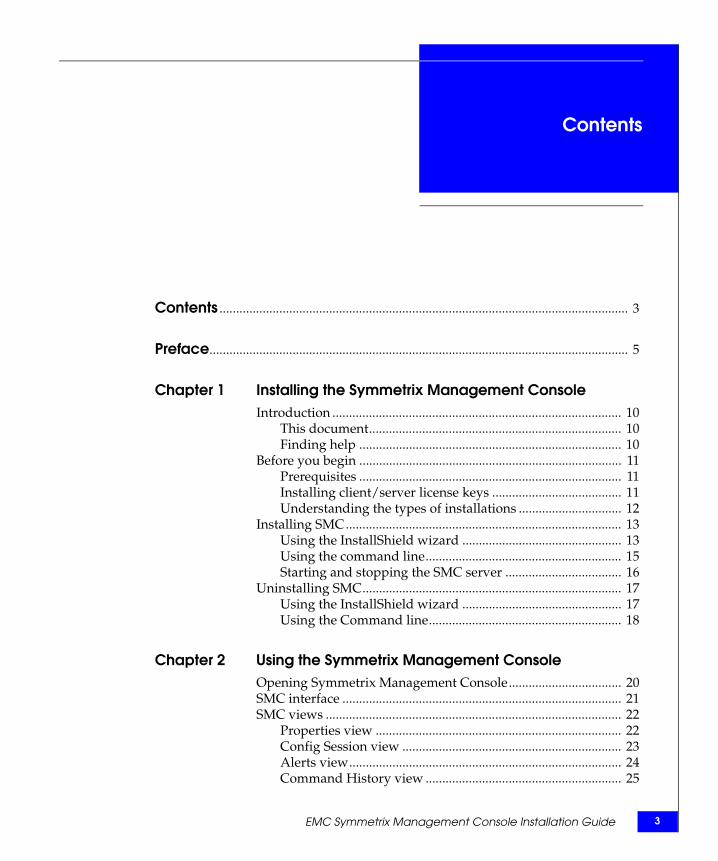
Contents ........................................................................................................................... 3
Preface.............................................................................................................................. 5
Chapter 1 Installing the Symmetrix Management ConsoleIntroduction ....................................................................................... 10
This document............................................................................ 10Finding help ............................................................................... 10
Before you begin ............................................................................... 11Prerequisites ............................................................................... 11Installing client/server license keys ....................................... 11Understanding the types of installations ............................... 12
Installing SMC................................................................................... 13Using the InstallShield wizard ................................................ 13Using the command line........................................................... 15Starting and stopping the SMC server ................................... 16
Uninstalling SMC.............................................................................. 17Using the InstallShield wizard ................................................ 17Using the Command line.......................................................... 18
Chapter 2 Using the Symmetrix Management ConsoleOpening Symmetrix Management Console.................................. 20SMC interface .................................................................................... 21SMC views ......................................................................................... 22
Properties view .......................................................................... 22Config Session view .................................................................. 23Alerts view.................................................................................. 24Command History view ........................................................... 25
EMC Symmetrix Management Console Installation Guide 3

Contents
Replication Monitor view......................................................... 26Quality of Service Monitor....................................................... 27
SMC menu bar .................................................................................. 28File menu .................................................................................... 28Control menu ............................................................................. 28Administration menu ............................................................... 34Help menu options.................................................................... 35
SMC dialog boxes ............................................................................. 36
EMC Symmetrix Management Console Installation Guide4

Preface
As part of its effort to continuously improve and enhance the performance and capabilities of the EMC product line, EMC periodically releases new versions of both the EMC Enginuity Operating Environment and EMC Symmetrix Management Console software. Therefore, some functions described in this document may not be supported by all versions of Enginuity or EMC Symmetrix Management Console software currently in use. For the most up-to-date information on product features, refer to your product release notes.
If an EMC Symmetrix Management Console feature does not function properly or does not function as described in this document, please contact the EMC Customer Support Center for assistance.
Audience This document is intended for use by storage managers who are installing and using the Symmetrix Management Console.
Readers of this document are expected to be familiar with the following topics:
◆ SYMCLI commands
◆ Solutions Enabler options, environment variables, daemons, and events.
Relateddocumentation
Related documents include:
◆ EMC Solutions Enabler Release Notes
◆ EMC Solutions Enabler Symmetrix CLI Command Reference
◆ EMC Solutions Enabler Symmetrix Array Management CLI Product Guide
◆ EMC Solutions Enabler Symmetrix Array Controls CLI Product Guide
EMC Symmetrix Management Console Installation Guide 5
6
Preface
◆ EMC Solutions Enabler Symmetrix TimeFinder Family CLI Product Guide
◆ EMC Solutions Enabler Symmetrix SRDF Family CLI Product Guide
◆ EMC Solutions Enabler Symmetrix Open Replicator CLI Product Guide
◆ EMC Solutions Enabler Symmetrix SRM CLI Product Guide
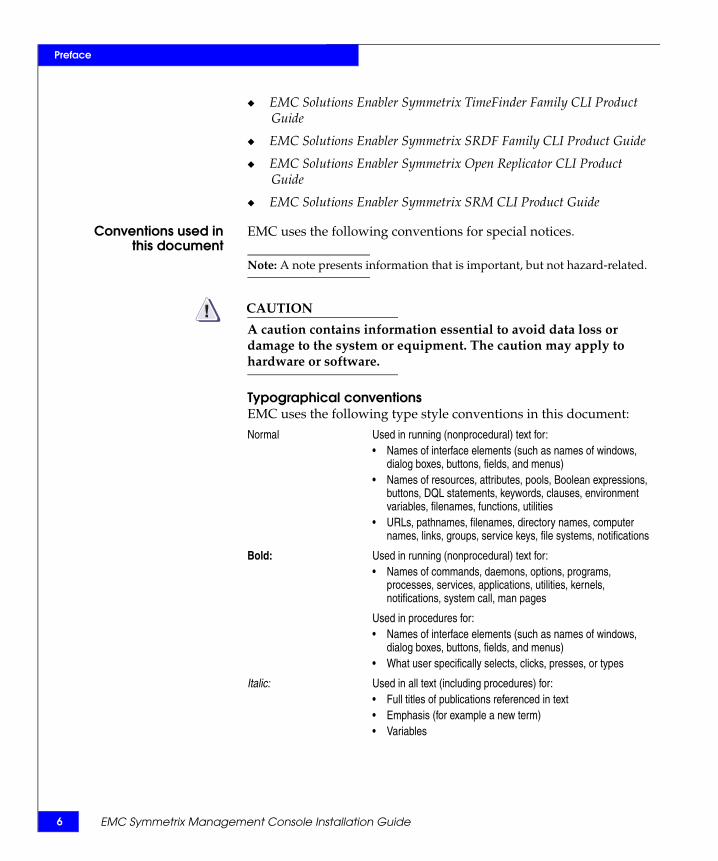
Conventions used inthis document
EMC uses the following conventions for special notices.
Note: A note presents information that is important, but not hazard-related.
CAUTION!A caution contains information essential to avoid data loss or damage to the system or equipment. The caution may apply to hardware or software.
Typographical conventionsEMC uses the following type style conventions in this document:
Normal Used in running (nonprocedural) text for:• Names of interface elements (such as names of windows,
dialog boxes, buttons, fields, and menus)• Names of resources, attributes, pools, Boolean expressions,
buttons, DQL statements, keywords, clauses, environment variables, filenames, functions, utilities
• URLs, pathnames, filenames, directory names, computer names, links, groups, service keys, file systems, notifications
Bold: Used in running (nonprocedural) text for:• Names of commands, daemons, options, programs,
processes, services, applications, utilities, kernels, notifications, system call, man pages
Used in procedures for:• Names of interface elements (such as names of windows,
dialog boxes, buttons, fields, and menus)• What user specifically selects, clicks, presses, or types
Italic: Used in all text (including procedures) for:• Full titles of publications referenced in text• Emphasis (for example a new term)• Variables
EMC Symmetrix Management Console Installation Guide

Preface
Where to get help EMC support, product, and licensing information can be obtained as follows.
Product information — For documentation, release notes, software updates, or for information about EMC products, licensing, and service, go to the EMC Powerlink™ website (registration required) at:
http://Powerlink.EMC.com
Technical support — For technical support, go to EMC Customer Service on Powerlink. To open a service request through Powerlink, you must have a valid support agreement. Please contact your EMC sales representative for details about obtaining a valid support agreement or to answer any questions about your account.
Your commentsYour suggestions will help us continue to improve the accuracy, organization, and overall quality of the user publications. Please send your opinion of this document to:
Courier: Used for:• System output, such as an error message or script • URLs, complete paths, filenames, prompts, and syntax when
shown outside of running text
Courier bold: Used for:• Specific user input (such as commands)
Courier italic: Used in procedures for:• Variables on command line• User input variables
< > Angle brackets enclose parameter or variable values supplied by the user
[ ] Square brackets enclose optional values
| Vertical bar indicates alternate selections - the bar means “or”
{ } Braces indicate content that you must specify (that is, x or y or z)
... Ellipses indicate nonessential information omitted from the example
EMC Symmetrix Management Console Installation Guide 7

8
Preface
EMC Symmetrix Management Console Installation Guide

1Invisible Body Tag
This chapter provides information you need to know prior to installing Symmetrix Management Console, and explains how to install Symmetrix Management Console.
◆ Introduction ........................................................................................ 10◆ Before you begin................................................................................. 11◆ Installing SMC .................................................................................... 13◆ Uninstalling SMC............................................................................... 17
Installing theSymmetrix
Management Console
Installing the Symmetrix Management Console 9
10
Installing the Symmetrix Management Console
IntroductionSymmetrix® Management Console (SMC) is a simple, intuitive, browser-based user interface for the configuration and management of Symmetrix arrays. It was developed to concurrently support all the features of Enginuity™ Version 5x68 and later.
The SMC presents the functionality of the Solutions Enabler SYMCLI (command line interface) in a browser interface. You can use SMC to:
◆ Manage Symmetrix access controls, user accounts, and permission roles
◆ Discover Symmetrix arrays
◆ Perform configuration operations (create devices, map and mask devices, set Symmetrix attributes, set device attributes, set port flags, create SAVE device pools)
◆ Manage devices (change device configuration, set device status, reserve devices, duplicate devices, create/dissolve metadevices)
◆ Perform and monitor replication operations (TimeFinder®/Mirror, TimeFinder/Snap, TimeFinder/Clone, SRDF®, Open Replicator)
◆ Monitor alerts
◆ Monitor an application’s performance
This document This installation guide explains how to install the Symmetrix Management Console. It also provides a high-level introduction to the Console interface, views, controls, and dialog boxes. Its purpose is to familarize the new user with SMC.
Finding help To find help while using Symmetrix Management Console, you can:
◆ Click Help on the SMC menu bar
◆ Click Help on the dialog box
◆ Click the question mark (?) in the View display
To learn more about Symmetrix or SYMAPI functionality, refer to the appropriate EMC® Solutions Enabler Symmetrix CLI product guide, they are listed in “Related documentation” of the Preface.
EMC Symmetrix Management Console Installation Guide

Installing the Symmetrix Management Console
Before you beginBefore you begin installing SMC, you should review the information in this section.
Prerequisites SMC has the following perquisites:
◆ Solutions Enabler V6.4 (minimum) must be installed.
Note: The SMC InstallShield wizard will fail if the proper level of Solutions Enabler is not installed on the host.
◆ After the Solutions Enabler installation, use the SYMCLI command, symlmf, to enter your Symmetrix Management Console license key, as follows:
symlmf LicenseKeyNumber
◆ The SYMAPI event daemon must be running. For information on the event daemon, refer to the EMC Solutions Enabler Installation Guide.
◆ SMC can be installed on the same system as the SYMAPI server, or on a system connected to the SYMAPI server. Refer to Figure 1 and Figure 2 on page 12.
Note: Do not install SMC on a network drive.
◆ Java runtime environment must be enabled on the client browser.
◆ Before launching SMC, you must enter the name of the SMC server (http://<ServerName:Port#>) in your browser pop-up blocker. Or disable pop-up blockers on your client browser.
◆ The minimum SMC client screen resolution is 1024 x 768.
Note: For additional environment requirements and product updates, refer to the EMC Symmetrix Management Console Release Notes.
Installing client/server license keysTo run SMC in client/server mode, install the SMC license key on the SMC server, and the SYMAPI server and Base license keys on the SYMAPI server. (Refer to Figure 2 on page 12.)
Before you begin 11

12
Installing the Symmetrix Management Console
Understanding the types of installationsSMC can be installed in local or remote locations. In a local installation, the SMC software is installed on the same system as the SYMAPI server (Figure 1). In a remote installation, the SMC software is installed on a system connected to the SYMAPI server (Figure 2).
Figure 1 Local installation: SMC on SYMAPI server
Figure 2 Remote installation: SMC on system connected to SYMAPI server
RDFSMC RDFRDF
SMC, SYMAPI, andBase License Keys
SMCSYMAPI Server
RDFRDF
Node NameNet Port
Base and Server License Keys
SMC License Key
SYMAPI Server
SMCServer
EMC Symmetrix Management Console Installation Guide

Installing the Symmetrix Management Console
Installing SMCYou can install/upgrade the Symmetrix Management Console using either an InstallShield wizard (described below), or the command line (described in “Using the command line” on page 15).
Note: Before starting this procedure, enter your SMC license key using the SYMCLI.
Using the InstallShield wizardTo install/upgrade SMC using the InstallShield wizard, do the following:
1. Save all files and exit all Windows applications.
2. Insert the CD into the CD-ROM drive.
3. Change directory to the location of the Solutions Enabler kit by entering the following:
cd /<CD-ROM mount point>
If autorun is enabled, the installation starts automatically. If autorun is not enabled, run the following:
cd /<CD-ROM mount point>/<Executable>
Where Executable can be either of the following operating-specific executables:
• For Windows: smcV6.0.0_win32.exe
• For Linux: smcV6.0.0_linux.bin
4. In the InstallShield Symmetrix Management Console Welcome dialog box, click Next.
Note: This Welcome dialog box can take up to a minute to open.
Note: If you are upgrading from a previous version to SMC V6.0, the installation will be completed according to the options you selected during the previous installation. If this is the case, continue with step 8; otherwise, continue with the remainder of this procedure.
Installing SMC 13

14
Installing the Symmetrix Management Console
5. In the Directory Name dialog box, press Enter to accept the default directory, or specify another directory, and then press Enter.
6. In the SMC Initial Setup User and Connection Type dialog box, specify an initial setup user name (default is smc) and a connection type for the intial login, and then click Next.
The initial setup user's role is to install and set up the SMC environment. It is intended to be a temporary role as it will only allow you to access and perform administrative tasks on Symmetrix arrays that do not have defined permissions (authorization rules). You can use your NT domain name if you have authorization on the SMC server host.
Note: For more information, refer to the EMC Solutions Enabler Symmetrix Array Management CLI Product Guide.
Possible connection types are:
Local — on a SYMAPI server attached to Symmetrix arrays. (Refer to Figure 1 on page 12.)
Remote — on a remote web server connected to a SYMAPI server; you must specify the SYMAPI server Node Name and Net Port. (Refer to Figure 2 on page 12.) The default net port for SYMAPI is 2707.
7. In the HTTP and HTTPS Ports dialog box, specify the ports used to connect to the SMC server.
Note that this dialog box opens displaying the default ports of the SMC web server. If you want to use the default ports, verify that they are available, and then click Next to accept and enable them. Or, you can specify/enable different ports, and then click Next.
8. In the installation summary dialog box, verify the summary information, and then click Install to continue the installation.
9. If you are prompted to install a Java Virtual Machine in a particular directory, click Yes.
10. In the Installation Complete dialog box, click Finish.
EMC Symmetrix Management Console Installation Guide

Installing the Symmetrix Management Console
Using the command lineTo install/upgrade SMC from the command line, do the following:
1. Save all files and exit all Windows applications.
2. Insert the CD into the CD-ROM drive.
3. Change directory to the location of the Solutions Enabler kit by entering the following:
cd /<CD-ROM mount point>
4. Type the following at the command prompt, depending on your operating system:
• For Windows: smcV6.0.0_win32.exe -console
• For Linux: smcV6.0.0_linux.bin -console
5. Once the InstallShield Wizard initializes, press Enter to continue.
Note: If you are upgrading from a previous version to SMC V6.0, the installation will be completed according to the options you selected during the previous installation. If this is the case, continue with step 11; otherwise, continue with the remainder of this procedure.
6. At the Destination Directory prompt, press Enter to accept the default directory, or specify another directory, and then press Enter.
7. At the Initial Setup User prompt, press Enter to accept the default initial setup user name (smc), or specify another another name, and then press Enter.
The initial setup user's role is to install and set up the SMC environment. It is intended to be a temporary role as it will only allow you to access and perform administrative tasks on Symmetrix arrays that do not have defined permissions (authorization rules). You can use your NT domain name if you have authorization on the SMC server host.
Note: For more information, refer to the EMC Solutions Enabler Symmetrix Array Management CLI Product Guide.
8. At Select a connection type prompt, press Enter to accept the default connection type (Local) , or type 2 (for a remote connection), and then press Enter.
Installing SMC 15

16
Installing the Symmetrix Management Console
9. If you specified a remote connection type (2) you will be prompted to enter a Node Name and Net Port. Once done, press Enter to continue.
10. Specify the ports used to connect to the SMC server.
The panel displays the default ports of the SMC server. If you want to use the defaults, verify that they are available and then press Enter for each port to accept and enable them. Or, you can enter different port numbers and then press Enter.
11. Review the installation summary, and then press Enter to continue.
12. When prompted to finish the installation, press Enter.
Starting and stopping the SMC serverTo start/stop the SMC server in Linux, change to this directory:
cd <SMC_Home>/litewave/tomcat/bin
and then use the following commands:
To start/stop the SMC server in Windows, use the Service Control panel.
Operating system Action Command
Linux Start server ./unix_daemon.ksh -s
Stop server ./unix_daemon.ksh -S
EMC Symmetrix Management Console Installation Guide

Installing the Symmetrix Management Console
Uninstalling SMC You can uninstall SMC using the InstallShield wizard (described below) or the command line (described in “Using the Command line” on page 18).
Note: If you change your SYMAPI connection type (local/remote), you must uninstall SMC before reinstalling it. For example, if you change from a local connection to client/server.
CAUTION!Unistalling SMC will terminate all client sessions to the SMC server and any SYMAPI operations in progress.
Using the InstallShield wizardTo uninstall SMC using the InstallShield wizard, do the following:
1. From the Window Start menu, select Settings, Control Panel, Add/Remove Programs.
2. In the Add/Remove Programs dialog, select EMC Symmetrix Management Console and click Change/Remove.
3. In the SMC InstallShield Wizard welcome dialog box, click Next.
Note: This Welcome dialog box can take up to a minute to open.
4. Click Next.
5. In the uninstall summary window, review the summary information, and if correct, click Uninstall.
6. If prompted to unistall the nt_service.bat file, click Yes or Yes to All. It may take a few minutes to remove all of the files.
7. In the summary information dialog box, click Finish to complete the uninstall.
Note: A few files will remain after the uninstall operation. To remove them you can delete the SMC folder.
Uninstalling SMC 17

18
Installing the Symmetrix Management Console
Using the Command lineTo uninstall SMC from the command line:
1. Change directory location to:
<SMC_HOME>/_uninstsem
2. Type the following:
./uninstaller.bin -console
3. Once the Installshield wizard initializes, press Enter to continue.
4. Review the summary and press Enter to continue.
5. At the Finish prompt, press Enter to complete the uninstall.
Note: A few files will remain after the uninstall operation. To remove them you can delete the SMC folder.
EMC Symmetrix Management Console Installation Guide
2Invisible Body Tag
This chapter introduces the Symmetrix Management Console and explains where to find objects in the menus and navigation tree.
◆ Opening Symmetrix Management Console ................................... 20◆ SMC interface ..................................................................................... 21◆ SMC views .......................................................................................... 22◆ SMC menu bar.................................................................................... 28◆ SMC dialog boxes............................................................................... 36
Using the SymmetrixManagement Console
Using the Symmetrix Management Console 19

20
Using the Symmetrix Management Console
Opening Symmetrix Management ConsoleOpen your web broswer, and point to the hostname (SYMAPI server) and the port you entered (or accepted) during the installation:
http://<host>:<http_port>
or for a secure connection:
https://<host>:<https_port>
If you accepted the installation defaults, enter one of the following:
http://localhost:7070 or https://localhost:8443
The EMC Symmetrix Management Web Console login window appears.
Type a Username and Password, according to the following:
◆ If you accepted the default Initial Setup User, type smc (lowercase) for the Username and Password; otherwise, type the username you provided.
◆ If you are a local LDAP user, type the Username and Password you have registered with the LDAP-SSL server.
The SMC Web Console appears.
EMC Symmetrix Management Console Installation Guide

Using the Symmetrix Management Console
SMC interfaceThe following figure describes the components of the SMC interface.
File: Provides controls for seldom performed tasks.Control: Provides the control menu items (same asthe right-click menu).Administration: Provides dialogs for administrative tasks.Help: Provides online help for the Console.Refresh View: Refreshes the view from the Symmetrix database.Export: Saves the tree or view to a file or graphic.Logout: Closes the SMC application.New Alerts: Displays the total new alerts.
Menu Bar
Properties: Displays details about the selected objectConfig Session: Lists the pending configuration tasks and provides controls to verify and commit them.Alerts: Displays a list of Symmetrix array alerts.Command History: Maintains a log of actions performed during the SMC session.Replication Monitor: Tracks thresholds configured forreplication operations.QoS Monitor: Monitors an application’s performancein the categories of the system, the device group, and the cache partition.
View Bar
The navigation tree is the roadmap to your storage array and devices. It contains folders and objects. Each folder contains a collection of objects, such as devices, directors, device groups, and so on. Use the navigation tree to find objects for monitoring and control operations.
Navigation Tree
The view displays information based on which type of view is selected (see View Bar). The Properties view (shown here) displays details about the selected object in the navigation tree. When youselect a folder in the navigation tree, you can select multiple items in the Properties view for a control operation.
Properties View Details
SMC interface 21

22
Using the Symmetrix Management Console
SMC viewsThis section provides an overview of the SMC views (Properties, Config Session, Alerts, Command History, Replication Monitor, and QoS Monitor).
Properties view When you select an object from the navigation tree the details about that object display in the Properties view. This is the default view.
.
Click the tabs to display related information.
Information tabs
Move this bar up or down to change how much information you view on the top and bottom of the split view.
Split Bar
Details about the selected object display on the bottom of the split screen.
Property Details
Select an object folder in the Navigation Treeand a table displays in the Properties view. Selectan object in the table, and the screen splits,displaying the details about that object on the bottom.
Selecting Objects
EMC Symmetrix Management Console Installation Guide
Using the Symmetrix Management Console
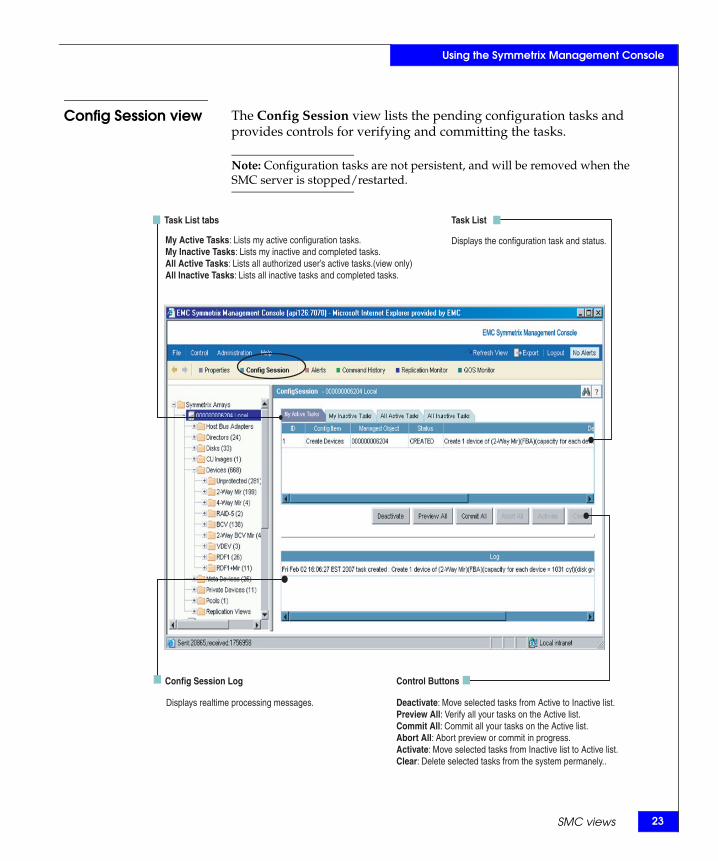
Config Session view The Config Session view lists the pending configuration tasks and provides controls for verifying and committing the tasks.
Note: Configuration tasks are not persistent, and will be removed when the SMC server is stopped/restarted.
Displays the configuration task and status.
Displays realtime processing messages.
Config Session Log
Deactivate: Move selected tasks from Active to Inactive list.Preview All: Verify all your tasks on the Active list.Commit All: Commit all your tasks on the Active list.Abort All: Abort preview or commit in progress.Activate: Move selected tasks from Inactive list to Active list.Clear: Delete selected tasks from the system permanely..
Control Buttons
My Active Tasks: Lists my active configuration tasks.My Inactive Tasks: Lists my inactive and completed tasks.All Active Tasks: Lists all authorized user’s active tasks.(view only)All Inactive Tasks: Lists all inactive tasks and completed tasks.
Task List tabs Task List
SMC views 23
24
Using the Symmetrix Management Console
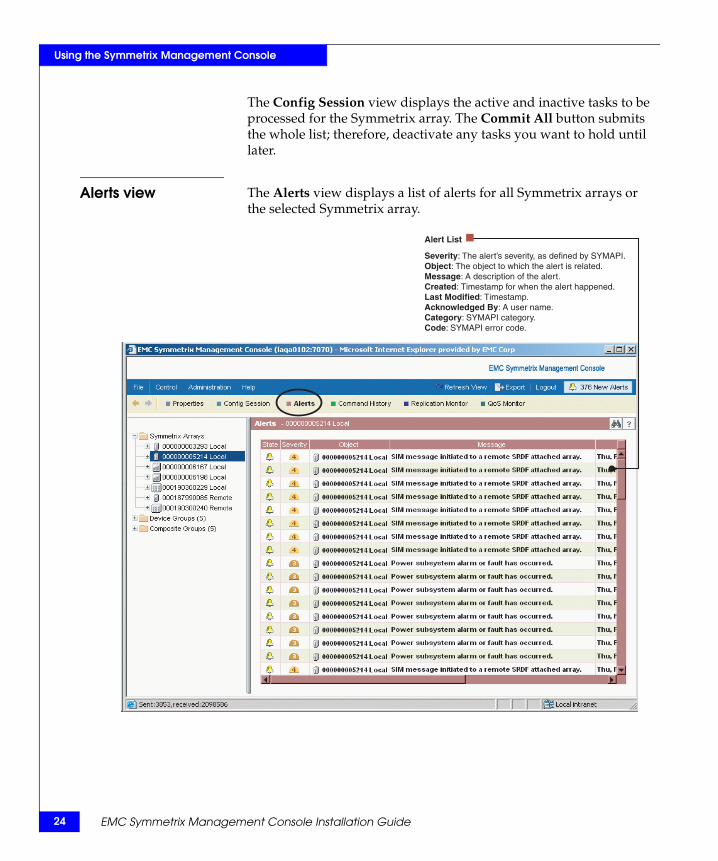
The Config Session view displays the active and inactive tasks to be processed for the Symmetrix array. The Commit All button submits the whole list; therefore, deactivate any tasks you want to hold until later.
Alerts view The Alerts view displays a list of alerts for all Symmetrix arrays or the selected Symmetrix array.
Severity: The alert’s severity, as defined by SYMAPI.Object: The object to which the alert is related.Message: A description of the alert.Created: Timestamp for when the alert happened.Last Modified: Timestamp.Acknowledged By: A user name.Category: SYMAPI category.Code: SYMAPI error code.
Alert List
EMC Symmetrix Management Console Installation Guide
Using the Symmetrix Management Console
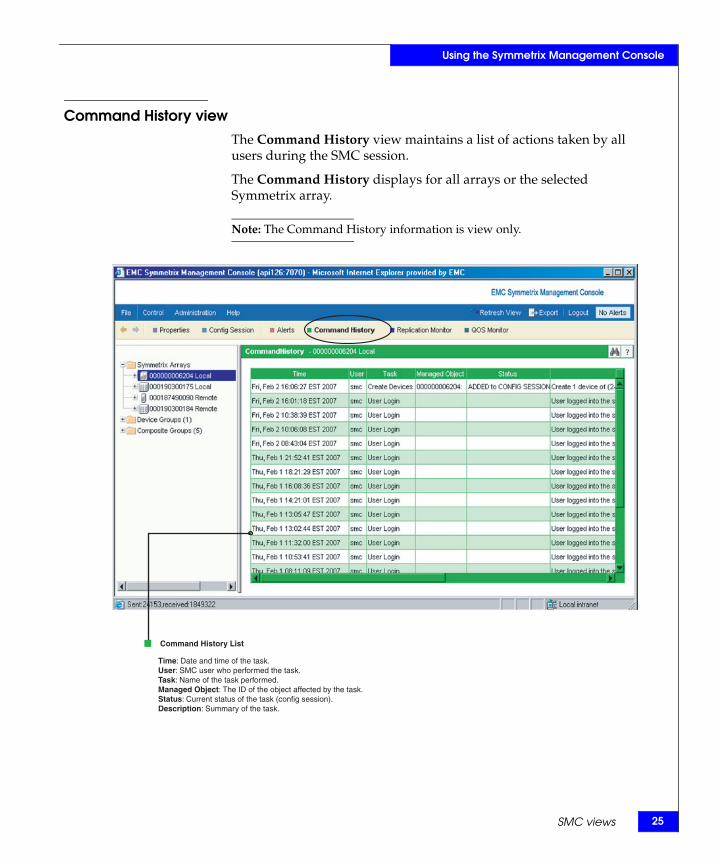
Command History viewThe Command History view maintains a list of actions taken by all users during the SMC session.
The Command History displays for all arrays or the selected Symmetrix array.
Note: The Command History information is view only.
Time: Date and time of the task.User: SMC user who performed the task.Task: Name of the task performed.Managed Object: The ID of the object affected by the task.Status: Current status of the task (config session).Description: Summary of the task.
Command History List
SMC views 25

26
Using the Symmetrix Management Console
Replication Monitor viewThe Replication Monitor view provides progress and status for thresholds that are set for replication operations.
Note: The replication monitor view is only for device groups.
Dashboard: Lists device groups and shows thestatus of the Replication State and Device State with colors.
Replication Monitor View
General: Provides details about the replication operation.Graph: Provides selections for viewing configuredthresholds over a period of time.Threshold Event: Lists any events for the replication operation.
Replication Monitor tabs
EMC Symmetrix Management Console Installation Guide

Using the Symmetrix Management Console
Quality of Service MonitorThe QoS Monitor view provides performance information for the array, a device group, or a cache partition.
Dashboard: QoS monitoring allows you to view an application's performance in the categories of the system, the device group, and the cache partition.
QoS Monitor View
General: Provides performance details for the selected object.Graph: Provides selections for viewing configuredmetrics over a period of time.Threshold Event: Lists any QoS events.
QoS Monitor tabs
SMC views 27

28
Using the Symmetrix Management Console
SMC menu barStorage configuration and management operations are performed by selecting an object (in the navigation tree or Properties view) and opening a dialog box from the menu bar. There are four pull-down menus in the menu bar: File, Control, Administration, and Help.
File menu The File menu provides access to controls that are not frequently used, including the following:
Control menu Most of the operations performed in SMC are done by selecting an object, such as an array or a device, in the navigation tree or the Properties view, and then opening a control dialog box by either right-clicking the object or clicking the Control menu in the menu bar.
In addition, you can also perform an operation on multiple objects at the same time by either selecting a folder (e.g., Ungrouped) in the navigation tree or using the Shift key to select multiple objects (e.g., devices) in a view, and then right-clicking to open the Control menu.
Note: When accessing the Control menu from the folder level, the menu options will remain the same; however, they will be enabled/disabled based on the selected object.
Menu item Description
Export Opens a dialog box from which you can select the contents of the navigation tree or the view to export to a file or an image.
Refresh View Refreshes the view (from the selected object down) with the current contents of the Symmetrix database.
Symmetrix Discover Opens a dialog box from which you can discover the Symmetrix arrays.
Add License Key Opens a dialog from which you can add license keys.
Show License Keys Displays a list of current license keys.
Symmetrix Session Information Provides information about the current SMC session.
Web Server Session Information Provides information about the web session.
Logout Terminates the user session (the server stays up).
EMC Symmetrix Management Console Installation Guide

Using the Symmetrix Management Console
The following table maps the Control menu, dialog box names, and specifies the object you must select to open the control dialog box. After selecting an object you can open the dialog with the right-click menu, or select Control from the menu bar.
Menu item/ Submenu Dialog box name To open the dialog, right-click:
Symmetrix Admin View Symmetrix Audit Log Symmetrix ID
Symmetrix Lock Maintenance Symmetrix ID
Set Symmetrix Attributes Symmetrix ID
Add Hot Spare Symmetrix ID
Remove Hot Spare Data disk
Reservation Admin Symmetrix ID
Symmetrix Environment Data Symmetrix ID (running Enginuity Version 5771 only)
Access Controls Symmetrix ID
Device Masking and Mapping Map Devices Symmetrix IDDevice(s)Device group IDAny device folder (e.g., Unmapped, Mapped, etc.Fibre and Gig-E ports
Unmap Devices Symmetrix IDDevice group Device group IDPort
Masking Local Symmetrix IDDevice group folderIndividual device groupFibre, Gig-E, SCSI ports
Delete Masking Entry HBAiSCSI
SMC menu bar 29

30
Using the Symmetrix Management Console
Device Masking and Mapping(continued)
(submenu)Initiator Authentication,
CHAP Authentication
(submenu)Initiator Authentication,Radius Authentication
Set Initiator Attributes HBA iSCSI
Rename Initiator Alias HBA iSCSI
Replace Initiator HBA iSCSI
Masking Information Maintenance Local Symmetrix IDIndividual HBA record
Masking Backup Records Symmetrix ID
Set CHAP AuthenticationDelete CHAP AuthenticationEnable CHAP Authentication
iSCSI initiatorPort or Host initiatorPort or Host initiator
Set Radius AuthenticaitonDelete Radius AuthenticaitonEnable/Disable
Host initiatorPort or Host initiatorPort or Host initiator
Port and Director Configuration
(submenu)CHAP Authentication
(submenu)Radius Authentication
Set Port Attributes Port
Online Port
Set CHAP AuthenticationDelete CHAP AuthenticationEnable CHAP Authentication
iSCSI initiatorPort or Host initiatorPort or Host initiator
Set Radius AuthenticaitonDelete Radius AuthenticaitonEnable/Disable
Host initiatorPort or Host initiatorPort or Host initiator
Device Configuration Device Lock Maintenance Symmetrix IDDevice Device/Composite group
Create Device Symmetrix ID
Duplicate Device Device
Change Device Configuration Device
Set Device Attributes Device
Menu item/ Submenu Dialog box name To open the dialog, right-click:
EMC Symmetrix Management Console Installation Guide

Using the Symmetrix Management Console
Device Configuration (continued)
Set Device Status Device DirectorDevice/Composite group
Delete Device Symmetrix IDDevice
Create SAVE Device Symmetrix ID
Change Device to RDF Configuration Device
FBA Meta Device Configuration Form FBA Meta Symmetrix ID
Add/Remove Meta Members Device
Dissolve Meta Device
Convert Meta from Concatenated to Striped Device
z/OS Configuration Map Devices Device Port CU Image Folder
Unmap Devices Port CU Image
Copy Mapping Port CU Image
Assign Alias Addresses CU Image
Remove Alias Addresses CU Image
Create CKD Meta Symmetrix ID
DG/CG Management
(submenu)RDF Group Name
Create Group Device Group folder
Add/Remove Devices Device group
Rename Group Device group
Delete Group Device group
Set RDF Group NameEdit RDF Group NameDelete RDF Group Name
RDF groupRDF groupRDF group
Copy Devices to CG Device group
Menu item/ Submenu Dialog box name To open the dialog, right-click:
SMC menu bar 31

32
Using the Symmetrix Management Console
Device Pool Management Enable SAVE Device Device
Disable SAVE Device Device
Create Device Pool Symmetrix ID
Add/Remove Pool Members Pool member
Enable All Pool Members Device pool
Disable All Pool Members Device pool
Delete Device Pool Device pool
Replication
(submenu)SRDF Configuration
(submenu)Open Replicator
TimeFinder/Mirror Device group
TimeFinder/Clone Device group
TimeFinder/Snap Device group
SRDF Control Device group
SRDF Settings Device group
Create SRDF GroupRemove SRDF GroupModify SRDF GroupCreate SRDF PairDelete SRDF PairSet SRDF Group AttributesActivate/Deactivate SRDF/A DSESwap SRDF GroupConvert SRDF Devices from Static to Dynamic
Symmetrix IDRA groupRA groupSymmetrix IDSymmetrix IDRA groupRA groupSymmetrix ID/Device SRDF device(s)
Create Copy SessionSession ControlSet CeilingRemote Port
Symmetrix IDSymmetrix IDSymmetrix IDSymmetrix ID
Consistency Protection Composite group/RDF group
Menu item/ Submenu Dialog box name To open the dialog, right-click:
EMC Symmetrix Management Console Installation Guide

Using the Symmetrix Management Console
Optimizer
(submenu)SwapMove
Start/Stop Symmetrix ID
Settings Symmetrix ID
Approve SwapManual SwapManual MoveRollbackSwap/Move ListSwap/Move History
Symmetrix IDSymmetrix IDSymmetrix IDSymmetrix IDSymmetrix IDSymmetrix ID
Log Symmetrix ID
Priority Control and Cache Partition Create Dynamic Cache Partition Symmetrix ID
Modify Dynamic Cache Partition Cache partition
Rename Dynamic Cache Partition Cache partition
Remove Dynamic Cache Partition Cache partition
Enable/Disable Symmetrix Priority Control Symmetrix ID
Assign Symmetrix Priority Device(s)Device groupSymmetrix ID
Enable/Disable Dynamic Cache Partitioning Symmetrix ID
Assign Dynamic Cache Partition Device(s)Device groupRDF group
Alerts Details Alert
Clear Alerts Alert
Acknowledge Alerts Alert
Menu item/ Submenu Dialog box name To open the dialog, right-click:
SMC menu bar 33
34
Using the Symmetrix Management Console
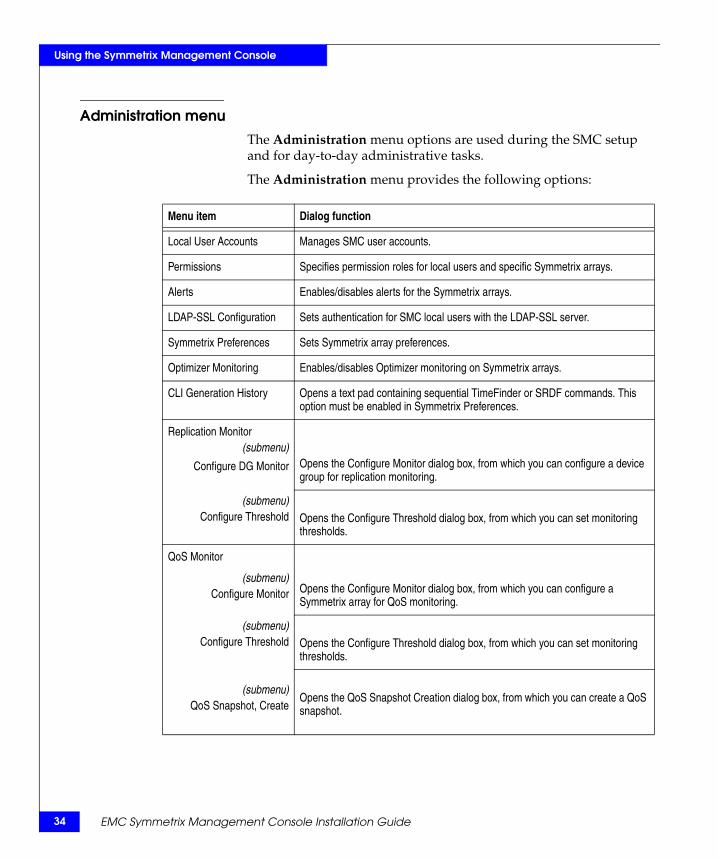
Administration menuThe Administration menu options are used during the SMC setup and for day-to-day administrative tasks.
The Administration menu provides the following options:
Menu item Dialog function
Local User Accounts Manages SMC user accounts.
Permissions Specifies permission roles for local users and specific Symmetrix arrays.
Alerts Enables/disables alerts for the Symmetrix arrays.
LDAP-SSL Configuration Sets authentication for SMC local users with the LDAP-SSL server.
Symmetrix Preferences Sets Symmetrix array preferences.
Optimizer Monitoring Enables/disables Optimizer monitoring on Symmetrix arrays.
CLI Generation History Opens a text pad containing sequential TimeFinder or SRDF commands. This option must be enabled in Symmetrix Preferences.
Replication Monitor(submenu)
Configure DG Monitor
(submenu)Configure Threshold
Opens the Configure Monitor dialog box, from which you can configure a device group for replication monitoring.
Opens the Configure Threshold dialog box, from which you can set monitoring thresholds.
QoS Monitor
(submenu)Configure Monitor
(submenu)Configure Threshold
(submenu)QoS Snapshot, Create
Opens the Configure Monitor dialog box, from which you can configure a Symmetrix array for QoS monitoring.
Opens the Configure Threshold dialog box, from which you can set monitoring thresholds.
Opens the QoS Snapshot Creation dialog box, from which you can create a QoS snapshot.
EMC Symmetrix Management Console Installation Guide

Using the Symmetrix Management Console
Help menu options The Help menu provides online help for the Symmetrix Management Console, and version and copyright information about the SMC software.
The SMC online help provides information for managing and monitoring your storage configuration with SMC.
QoS Monitor (continued)
(submenu)QoS Snapshot, Delete
(submenu)QoS Snapshot, Compare
Opens the QoS Snapshot Delete dialog box, from which you can delete a QoS snapshot.
Opens the QoS Snapshot Compare wizard, from which you can compare QoS snapshots.
Symmetrix Authorization Allows the Administrator or Security Admin to enable authorization on the arrays.
Menu item Dialog function
SMC menu bar 35

36
Using the Symmetrix Management Console
SMC dialog boxesStorage management and configuration operations are set within control dialog boxes. When a dialog has Apply or OK, the operation or task is completed immediately. When a dialog has the button Add to Config Session List, the task is moved to the Config Session view for processing.
Tables within dialog boxes allow formultiple selections. Use Shft-click or Ctrl-click to select mulitple items in the table.
Click Apply to perform the action and keep the dialog box open.
Click OK to perform the action and closethe dialog box.
Click Add to Config Session List to send the action to the Config Session view for processing.
Filters the information in the tables.
EMC Symmetrix Management Console Installation Guide