Embed Size (px)
Citation preview

EMC® Avamar®
Version 7.2
Administration Guide302-001-813
REV 02

Copyright © 2001-2015 EMC Corporation. All rights reserved. Published in USA.
Published August, 2015
EMC believes the information in this publication is accurate as of its publication date. The information is subject to changewithout notice.
The information in this publication is provided as is. EMC Corporation makes no representations or warranties of any kind withrespect to the information in this publication, and specifically disclaims implied warranties of merchantability or fitness for aparticular purpose. Use, copying, and distribution of any EMC software described in this publication requires an applicablesoftware license.
EMC², EMC, and the EMC logo are registered trademarks or trademarks of EMC Corporation in the United States and othercountries. All other trademarks used herein are the property of their respective owners.
For the most up-to-date regulatory document for your product line, go to EMC Online Support (https://support.emc.com).
EMC CorporationHopkinton, Massachusetts 01748-91031-508-435-1000 In North America 1-866-464-7381www.EMC.com
2 EMC Avamar 7.2 Administration Guide

11
13
17
Introduction 21
EMC Avamar system overview....................................................................... 22Avamar server.................................................................................. 22Avamar clients................................................................................. 25User interfaces.................................................................................26Data Domain system support........................................................... 28
Data deduplication........................................................................................28Security and networking................................................................................29
Encryption........................................................................................29IPv4 and IPv6 support...................................................................... 30
Avamar Administrator 31
Overview of Avamar Administrator.................................................................32Installing Avamar Administrator.................................................................... 32
Installing Avamar Administrator on Microsoft Windows.................... 32Installing Avamar Administrator on Linux......................................... 33
Upgrading Avamar Administrator...................................................................34Uninstalling Avamar Administrator................................................................ 34Editing Avamar Administrator client preferences........................................... 35Setting a session time-out for Avamar Administrator..................................... 35Starting Avamar Administrator.......................................................................36Avamar Administrator dashboard.................................................................. 37
Launcher buttons............................................................................. 37System Information panel................................................................ 38Activities panel................................................................................ 40Capacity panel................................................................................. 41Critical Events panel.........................................................................42
Avamar Administrator user interface elements.............................................. 42Status bar........................................................................................ 42Navigation tree features................................................................... 45Mouse shortcuts.............................................................................. 45
Client Management 47
Overview of Avamar clients............................................................................48Client domains..............................................................................................48
Creating a domain............................................................................49Editing domain information..............................................................49Deleting a domain............................................................................50
Client registration..........................................................................................50Client-side registration.....................................................................50
Figures
Tables
Preface
Chapter 1
Chapter 2
Chapter 3
CONTENTS
EMC Avamar 7.2 Administration Guide 3

Registering a client in Avamar Administrator.................................... 51Batch client registration................................................................... 51
Activating a client..........................................................................................53Client paging.................................................................................................54
Pageable clients...............................................................................54Non-pageable clients....................................................................... 55Editing client paging settings........................................................... 56
Editing client information.............................................................................. 56Viewing client properties...............................................................................57Enabling and disabling a client..................................................................... 58Moving a client to a new domain................................................................... 58Retiring a client............................................................................................. 58Deleting a client............................................................................................ 59
User Management and Authentication 61
Overview of Avamar user accounts................................................................ 62User authentication.......................................................................................62
How Avamar authenticates users and assigns roles......................... 63Avamar internal authentication..................................................................... 63Directory service authentication.................................................................... 64
LDAP directory service authentication.............................................. 65OpenLDAP directory service authentication...................................... 70Adding an NIS directory service........................................................ 75Error messages during directory service configuration...................... 76Adding an LDAP map........................................................................77Editing the role for an LDAP map...................................................... 78Deleting an LDAP map......................................................................79Editing the time-out value for directory service processes.................79
Enabling backward compatibility with Enterprise Authentication................... 80Roles.............................................................................................................81
Administrator roles.......................................................................... 81Operator roles..................................................................................81User roles.........................................................................................83
Adding a user to a client or domain............................................................... 83Editing user information................................................................................ 85Deleting a user.............................................................................................. 85
Backup 87
Performing on-demand backups....................................................................88Performing an on-demand backup of a client................................... 88Performing an on-demand group backup..........................................89
Scheduling backups......................................................................................89Datasets.......................................................................................... 90Schedules........................................................................................95Retention policies.......................................................................... 100Groups...........................................................................................105Enabling scheduled backups......................................................... 113
Monitoring backups.................................................................................... 114Canceling backups......................................................................................114Managing completed backups.................................................................... 115
Finding a completed backup to manage......................................... 115Validating a backup....................................................................... 116Changing the expiration date for a backup..................................... 116Changing the retention type for a backup....................................... 117
Chapter 4
Chapter 5
CONTENTS
4 EMC Avamar 7.2 Administration Guide

Viewing backup statistics...............................................................118Deleting a backup.......................................................................... 119
Restore and Recovery 121
Restoring data from a backup......................................................................122Finding a backup............................................................................122Restoring to the original location....................................................125Restoring to a different location..................................................... 125Restoring to multiple locations.......................................................126
Monitoring restores.....................................................................................128Canceling restores.......................................................................................128Windows client system recovery..................................................................128Red Hat and CentOS Linux system recovery................................................. 128
Reconstructing the partition table.................................................. 128Preparing the target recovery client................................................ 130Performing system recovery of a Red Hat or CentOS Linux client..... 130Troubleshooting system recovery of a Red Hat or CentOS Linux client...................................................................................................... 134
SUSE Linux system recovery........................................................................ 135Reconstructing the partition table.................................................. 135Preparing the target recovery client................................................ 136Performing system recovery of a SUSE Linux client......................... 137Troubleshooting system recovery of a SUSE Linux client.................141
Oracle Solaris system recovery.................................................................... 142Preparing for Oracle Solaris system recovery.................................. 142Performing system recovery of an Oracle Solaris client................... 143
Server Administration 147
Server shutdown and restart....................................................................... 148Shutting down the server............................................................... 148Restarting the server...................................................................... 148Stopping the MCS.......................................................................... 149Starting the MCS............................................................................ 149Getting MCS status........................................................................ 149Stopping the EM Tomcat server...................................................... 150Starting the EM Tomcat server........................................................ 150Getting EM Tomcat server status.................................................... 150
Suspending and resuming server activities................................................. 150Suspending and resuming backups and restores........................... 150Suspending and resuming scheduled operations...........................151Suspending and resuming maintenance activities..........................151
Managing client sessions............................................................................151Monitoring client sessions............................................................. 151Viewing a detailed client session log..............................................152Creating a Zip file for EMC Customer Support................................. 153Canceling a client session..............................................................153Resetting a client........................................................................... 154
Managing client agents and plug-ins........................................................... 154Adding a build record.....................................................................155Editing version or build records......................................................155Deleting a build record...................................................................155Disabling all client initiated activations..........................................156Disabling all client initiated backups..............................................156
Backup and maintenance windows............................................................. 156
Chapter 6
Chapter 7
CONTENTS
EMC Avamar 7.2 Administration Guide 5
Editing the backup and maintenance windows...............................158Checkpoints................................................................................................158
Creating a checkpoint.................................................................... 159Deleting a checkpoint.................................................................... 159Rolling back to a checkpoint.......................................................... 159Clearing a data integrity alert......................................................... 161
Generating and installing a server license................................................... 161Obtaining assigned license keys.................................................... 161Generating a license key information file........................................162Generating a permanent license key file.........................................162Installing and activating a license.................................................. 163
Managing services...................................................................................... 164Information on the Services Administration tab..............................164
Changing server passwords and OpenSSH keys.......................................... 165MCS configuration settings......................................................................... 167
Backing up MCS data..................................................................... 168Restoring MCS data........................................................................168Reverting to the default MCS configuration settings....................... 169
Using network address translation (NAT)..................................................... 170Solutions for common NAT problems............................................. 171
Editing network settings for a single-node server.........................................171Adding a custom security notification for web browser logins......................171Viewing and editing server contact information........................................... 172
Server Monitoring 173
Recommended daily server monitoring........................................................174Monitoring activities................................................................................... 174
Activity Monitor details.................................................................. 174Monitoring server status and statistics........................................................ 176
Server Monitor tab......................................................................... 177Server Management tab................................................................. 179
Event monitoring.........................................................................................188Event notifications......................................................................... 189Event profiles.................................................................................190Viewing events in the Event Monitor...............................................196Viewing the event catalog.............................................................. 197Acknowledging system events....................................................... 198Customizing error events................................................................198
Server monitoring with syslog..................................................................... 198Configuring local syslog................................................................. 199Configuring remote syslog..............................................................200
Server monitoring with SNMP...................................................................... 204Configuring server monitoring with SNMP.......................................204
Viewing Avamar server log files................................................................... 207Audit logging...............................................................................................208
Viewing the Audit Log.....................................................................208Automatic notifications to EMC Customer Support.......................................209
Email Home................................................................................... 209ConnectEMC.................................................................................. 211
Verifying system integrity............................................................................ 215
Capacity Management 217
Capacity utilization information...................................................................218Capacity limits and thresholds.................................................................... 218
Chapter 8
Chapter 9
CONTENTS
6 EMC Avamar 7.2 Administration Guide

Capacity forecasting....................................................................................219Customizing capacity limits and behavior....................................................219
Editing capacity settings for Avamar Administrator.........................219
Replication 221
Overview of Avamar replication................................................................... 222Types of replication........................................................................222Replication scheduling...................................................................223Replication authentication............................................................. 224Location of replicas on a destination Avamar system..................... 224Replicas at Source......................................................................... 225Retention of replicas...................................................................... 226Replication with Data Domain systems...........................................227
Enabling Replicas at Source........................................................................ 227Configuring policy-based replication........................................................... 229
Replication destinations................................................................ 229Replication groups......................................................................... 231
Configuring cron-based replication..............................................................236Configuring cron-based replication with Avamar Administrator.......236
Performing on-demand replication.............................................................. 238Performing on-demand replication from the Replication window.... 238Performing on-demand replication from the Policy window............ 239
Performing command line replication.......................................................... 239Command reference.......................................................................239CLI examples..................................................................................248
Monitoring replication.................................................................................250Monitoring replication in Avamar Administrator..............................250
Canceling a replication task........................................................................ 250Restoring by using a replica on a destination system...................................251MCS configuration parameters to support Replicas at Source...................... 252
Changing the configuration of Replicas at Source...........................254
Server Updates and Hotfixes 255
Overview of the Avamar server software update process..............................256Avamar Downloader Service...........................................................256AvInstaller and Avamar Installation Manager..................................257
Installing and configuring the Avamar Downloader Service..........................258Avamar Downloader Service installation requirements................... 258Downloading the Avamar Downloader Service software..................258Installing the Avamar Downloader Service software........................259Enabling HTTPS.............................................................................. 259Configuring the Avamar Downloader Service.................................. 260Updating the Avamar Downloader Service software........................261Uninstalling the Avamar Downloader Service................................. 262
Downloading new packages from the EMC repository.................................. 262Viewing a list of packages available for download....................................... 262Verifying connectivity with the EMC repository.............................................263Monitoring Avamar Downloader Service status............................................263Stopping and starting the Avamar Downloader Service monitor...................264Troubleshooting Avamar Downloader Service issues................................... 264Downloading and installing packages on the Avamar server........................265Viewing a list of installation packages on the Avamar server....................... 266
Repository tab headings................................................................ 266Deleting packages from the Avamar server.................................................. 267
Chapter 10
Chapter 11
CONTENTS
EMC Avamar 7.2 Administration Guide 7

Viewing the history of installations..............................................................268Installation history information...................................................... 268
Avamar Client Manager 271
Overview of Avamar Client Manager............................................................ 272Connection security....................................................................... 272Apache web server authentication................................................. 272Editing the session time-out period................................................272Increasing the JavaScript time-out period....................................... 273Avamar Client Manager configuration properties............................ 274
Starting Avamar Client Manager.................................................................. 275Login page..................................................................................... 276
Global tools................................................................................................ 276Adding an Avamar server................................................................276Removing an Avamar server........................................................... 277Changing the settings for an Avamar server....................................277Selecting a server...........................................................................278Filters.............................................................................................278Viewing details.............................................................................. 284Exporting data................................................................................284Setting the entries per page limit................................................... 284Viewing tool tips............................................................................ 285
Overview..................................................................................................... 285Server Summary.............................................................................285Dashboard..................................................................................... 286
Clients........................................................................................................ 289Client and server tools................................................................... 289Add Clients.................................................................................... 295Registered Clients.......................................................................... 300Activated Clients............................................................................ 300Failed Clients................................................................................. 303Idle Clients.....................................................................................304Upgrade Clients............................................................................. 304
Policies....................................................................................................... 307Adding clients to a group............................................................... 307Removing clients from a group....................................................... 308Viewing the dataset policy of a group.............................................308Viewing the retention policy of a group...........................................308Viewing the schedule policy of a group.......................................... 309
Queues....................................................................................................... 309Canceling a task.............................................................................309
Logs............................................................................................................ 310Viewing the client log after upgrading an Avamar client..................311Clearing all log entries in a section.................................................311
Avamar Desktop/Laptop 313
Overview of Avamar Desktop/Laptop...........................................................314Requirements for Avamar Desktop/Laptop.................................................. 315
Client computer requirements........................................................ 315Web browser requirements............................................................ 316Network requirements....................................................................317
Avamar client software installation..............................................................317Supported systems management tools.......................................... 318Push installation on Windows computers.......................................318
Chapter 12
Chapter 13
CONTENTS
8 EMC Avamar 7.2 Administration Guide

Push installation on Macintosh computers.....................................319Local client installation.................................................................. 320Avamar client software uninstall.................................................... 320
Avamar Desktop/Laptop user authentication.............................................. 321Pass-through authentication.......................................................... 321LDAP authentication.......................................................................322NIS authentication......................................................................... 324Avamar authentication...................................................................324Mixed authentication..................................................................... 325
Avamar Desktop/Laptop user interfaces......................................................325Client UI......................................................................................... 325Web UI........................................................................................... 327
Backup with Avamar Desktop/Laptop..........................................................331Scheduled backups....................................................................... 332Add data option............................................................................. 333Single-click backups...................................................................... 333Interactive backups........................................................................334Disabling on-demand backups.......................................................336Changing the retention policy for on-demand backups...................336
Restore with Avamar Desktop/Laptop......................................................... 337Finding data to restore................................................................... 337Restore types................................................................................. 337Restore requirements.....................................................................338Restore limits.................................................................................339Restore of replicated backups........................................................ 340
Client backup and restore activity history.................................................... 340Editing Avamar Desktop/Laptop parameters............................................... 341
Avamar Desktop/Laptop parameters..............................................341Client log locations..................................................................................... 342
Data Domain System Integration 345
Overview of Data Domain system integration...............................................346Integration of Avamar with Data Domain........................................ 346File system backups on a Data Domain system.............................. 347Application backups on a Data Domain system.............................. 347VMware instant access...................................................................347Checkpoints on a Data Domain system.......................................... 348Data Domain system streams.........................................................348Replication with Data Domain systems...........................................349Monitoring and reporting Data Domain system status.................... 349Security with Data Domain system integration................................350Data migration to a Data Domain system........................................350
Preparing to add a Data Domain system...................................................... 350System requirements for Data Domain system integration..............350Creating a DD Boost user account.................................................. 352
Adding a Data Domain system.....................................................................353
Command Shell Server Logins 355
User accounts............................................................................................. 356Starting command shell sessions................................................................356Switching user IDs.......................................................................................356Using sudo..................................................................................................357
Prefixing commands with sudo.......................................................357Spawning a sudo Bash subshell.....................................................357
Chapter 14
Appendix A
CONTENTS
EMC Avamar 7.2 Administration Guide 9

Plug-in Options 359
How to set plug-in options...........................................................................360Backup options...........................................................................................360Restore options...........................................................................................363
367
Appendix B
Glossary
CONTENTS
10 EMC Avamar 7.2 Administration Guide

Avamar server nodes, stripes, and objects.....................................................................22Avamar server functional block diagram........................................................................ 24Avamar client agent and plug-ins...................................................................................25Data deduplication........................................................................................................ 29Avamar Administrator dashboard.................................................................................. 37Avamar Administrator status bar....................................................................................42Navigation tree features.................................................................................................45Avamar domain example............................................................................................... 48Users in Avamar domains.............................................................................................. 62Schedule start time, end time, and duration.................................................................. 96Default backup and maintenance windows..................................................................157Multi-node server configuration with NAT.....................................................................170Replication domain structure example.........................................................................224View after uploading the example CSV file................................................................... 298Replaceable graphics on the Avamar client web UI...................................................... 328
123456789101112131415
FIGURES
EMC Avamar 7.2 Administration Guide 11

FIGURES
12 EMC Avamar 7.2 Administration Guide

Revision history............................................................................................................. 17Typographical conventions............................................................................................ 18MCS functions............................................................................................................... 24Supported plug-ins........................................................................................................26Avamar system management features of Backup & Recovery Manager...........................27Dashboard launcher buttons......................................................................................... 37System State fields on the Avamar Administrator dashboard......................................... 38Backup job fields in the Avamar Administrator dashboard............................................. 40System alerts in the Critical Events panel.......................................................................42Launcher shortcut icons on the status bar......................................................................43Scheduler and backup dispatching status messages.....................................................43Status messages for unacknowledged events................................................................44Operational status messages for Avamar or Data Domain.............................................. 44Attributes for each entry in a clients definition file......................................................... 52Client properties displayed by Avamar Administrator..................................................... 57Avamar user account information.................................................................................. 62Supported directory service types..................................................................................64Required Key Distribution Center ports.......................................................................... 65Parameter requirements for LDAP base functionality......................................................69Additional parameter for LDAP base functionality ..........................................................69OpenLDAP directory service parameters.........................................................................74Error messages during directory service configuration'...................................................76Administrator roles........................................................................................................ 81Operator roles............................................................................................................... 82User roles...................................................................................................................... 83Directories excluded from Default Dataset backups ...................................................... 91Directories excluded from Unix Dataset backups ...........................................................91Directories excluded from Windows Dataset backups ................................................... 92Schedule types..............................................................................................................95Schedule catalog...........................................................................................................96Settings for each type of schedule................................................................................. 98Basic retention settings............................................................................................... 101Retention policy catalog.............................................................................................. 102VMware groups............................................................................................................106Backup statistics dialog box information..................................................................... 119Target locations for system recovery backups of an Oracle Solaris client......................142Session Monitor tab properties....................................................................................151Avamar server maintenance activities..........................................................................157Checkpoint states........................................................................................................159Services Administration tab information...................................................................... 164Default live file directory for MCS configuration files.................................................... 167MCS backup timestamp files....................................................................................... 168Solutions for common NAT problems........................................................................... 171Read-only fields on the View/Edit Contact Information dialog box................................172Editable fields on the View/Edit Contact Information dialog box.................................. 172System monitoring tools and tasks.............................................................................. 174Session details available in the Activity Monitor ......................................................... 175Client details available in the Activity Monitor..............................................................175Policy details available in the Activity Monitor............................................................. 175Node details on the Avamar tab of the Server Monitor..................................................177CPU details on the Avamar tab of the Server Monitor....................................................177
123456789101112131415161718192021222324252627282930313233343536373839404142434445464748495051
TABLES
EMC Avamar 7.2 Administration Guide 13

Network details on the Avamar tab of the Server Monitor............................................. 177Disk details on the Avamar tab of the Server Monitor................................................... 178Node details on the Data Domain tab of the Server Monitor......................................... 178CPU details on the Data Domain tab of the Server Monitor........................................... 178Disk (KB/S) details on the Data Domain tab of the Server Monitor................................178Network (KB/S) details on the Data Domain tab of the Server Monitor..........................179Data display based on selections on the Server Management tab................................ 179Bytes Protected Summary properties on the Server Management tab...........................180Server Details on the Server Management tab..............................................................180Maintenance Activities Details on the Server Management tab.................................... 181Garbage Collection Details on the Server Management tab.......................................... 181Module properties on the Server Management tab ......................................................182Status indicators on the Node Information part of Server Management........................ 182Server details on the Node Information part of Server Management............................. 183OS details on the Node Information part of Server Management.................................. 184Hardware details on the Node Information part of Server Management........................ 185Status indicators on the Partition Information part of Server Management................... 185Server Details on the Node Information part of Server Management.............................185Data Domain system properties on the Server Management tab...................................186Event information........................................................................................................ 188Example of a batch email notification message........................................................... 189Mappings of syslog fields to Avamar event data...........................................................199Locations for the Avamar MIB definition file.................................................................205Capacity limits and thresholds ....................................................................................218Capacity settings in mcserver.xml................................................................................219Replicas at Source features available through the source Avamar server......................225Descriptions of the integration of Replicas at Source into Avamar tasks.......................226Replication configurations for Avamar replication using DD Boost................................227Read-only fields on the Replication cron job dialog box............................................... 237Account options for the avrepl command.....................................................................240Logging options for the avrepl command..................................................................... 241Replication options for the avrepl command................................................................ 241Avamar-only advanced options for the avrepl command.............................................. 243Numeric plug-in descriptors.........................................................................................246Required options for the avrepl command................................................................... 248MCS configuration parameters to support Replicas at Source...................................... 252Installation requirements for the Avamar Downloader Service......................................258Avamar Downloader Service monitor status messages ................................................263Information on the Repository tab................................................................................266Information on the History tab..................................................................................... 268Details on the History tab............................................................................................ 269Avamar Client Manager configuration properties..........................................................274Characters not allowed in search strings......................................................................279Columns used in the Server Summary section..............................................................286Server information on the Server panel........................................................................ 287Settings on the Advanced tab of Client Details.............................................................292Relationship states during client activation................................................................. 299Failed client filters....................................................................................................... 304Task types on the Queues page................................................................................... 309Task types on the Logs page........................................................................................ 310Avamar Desktop/Laptop hardware requirements......................................................... 316Supported web browsers forAvamar Desktop/Laptop.................................................. 317Environment variables for launching a web browser in Avamar Desktop/Laptop.......... 317Avamar Desktop/Laptop network requirements........................................................... 317Push install launch command arguments.................................................................... 318Avamar Desktop/Laptop client UI functionality............................................................ 326
525354555657585960616263646566676869707172737475767778798081828384858687888990919293949596979899100101102103104105106107
TABLES
14 EMC Avamar 7.2 Administration Guide

Avamar Desktop/Laptop web UI functionality.............................................................. 327Descriptions of methods for starting an Avamar Desktop/Laptop client backup........... 331Datasets for single-click on-demand backups..............................................................333Supported values for the restrictBackupsPerDay property............................................335Avamar Desktop/Laptop data restore filtering..............................................................338Requirements to restore from a different computer with Avamar Desktop/Laptop........ 339Avamar Desktop/Laptop parameters........................................................................... 341Available client logs.................................................................................................... 343Paths to logs on Windows computers ..........................................................................343Paths to logs on Linux and Mac computers ................................................................. 343Replication configurations for Avamar replication using DD Boost................................349Data Domain system requirements.............................................................................. 350Backup plug-in options................................................................................................360Backup plug-in options for (NetWare only) SMS Authentication................................... 361Backup plug-in options for logging.............................................................................. 361Backup plug-in options for file system traversal...........................................................361Backup plug-in options for pre-script........................................................................... 362Backup plug-in options for post-script......................................................................... 362Backup plug-in client cache options............................................................................ 362Backup plug-in advanced options ...............................................................................363Restore plug-in options................................................................................................363Restore plug-in options for (NetWare only) SMS Authentication................................... 364Restore plug-in options for logging.............................................................................. 364Restore plug-in options for pre-script........................................................................... 364Restore plug-in options for post-script......................................................................... 365Restore plug-in client cache options............................................................................ 365Restore plug-in advanced options................................................................................365
108109110111112113114115116117118119120121122123124125126127128129130131132133134
TABLES
EMC Avamar 7.2 Administration Guide 15

TABLES
16 EMC Avamar 7.2 Administration Guide

PREFACE
As part of an effort to improve its product lines, EMC periodically releases revisions of itssoftware and hardware. Therefore, some functions described in this document might notbe supported by all versions of the software or hardware currently in use. The productrelease notes provide the most up-to-date information on product features.
Contact your EMC technical support professional if a product does not function properlyor does not function as described in this document.
Note
This document was accurate at publication time. Go to EMC Online Support (https://support.EMC.com) to ensure that you are using the latest version of this document.
PurposeThis guide describes how to configure, administer, monitor, and maintain the Avamarsystem.
AudienceThe information in this guide is primarily intended for system administrators who areresponsible for maintaining servers and clients on a network, as well as operators whomonitor daily backups and storage devices.
Revision historyThe following table presents the revision history of this document.
Table 1 Revision history
Revision Date Description
01 June, 2015 Initial release of Avamar 7.2.
02 August, 2015 GA release of Avamar 7.2. Clarifies directory service support. Minorchanges in Avamar Client Manager chapter.
Related documentationThe following EMC publications provide additional information:
l EMC Avamar Compatibility and Interoperability Matrix
l EMC Avamar Release Notes
l EMC Avamar Operational Best Practices Guide
l EMC Avamar and EMC Data Domain System Integration Guide
l EMC Avamar Reports Guide
l All EMC Avamar client and plug-in user guides
Special notice conventions used in this documentEMC uses the following conventions for special notices:
NOTICE
Addresses practices not related to personal injury.
EMC Avamar 7.2 Administration Guide 17

Note
Presents information that is important, but not hazard-related.
Typographical conventionsIn this document, EMC uses the typographical conventions shown in the following table:
Table 2 Typographical conventions
Convention Example Description
Bold typeface Click More Options. Use for names of interface elements,such as names of windows, dialogboxes, buttons, fields, tab names, keynames, and menu paths (what a userspecifically selects or clicks).
Italic typeface EMC Avamar Administration Guide Use for full titles of publicationsreferenced in text.
Monospace font Event Type =INFORMATIONEvent Severity = OKEvent Summary = Newgroup created
Use for:
l System code
l System output, such as an errormessage or script
l Pathnames, file names, prompts,and syntax
l Commands and options
Monospace fontwith italictypeface
Type Avamar_server, where
Avamar_server is the DNS name or IPaddress of the Avamar server.
Use for variables.
Monospace fontwith bold typeface
Type yes. Use for user input.
Square brackets [--domain=String(/)] --name=String
Square brackets enclose optionalvalues.
Vertical bar [--domain=String(/)] | --name=String
Vertical bar indicates alternateselections - the bar means “or”.
Braces {[--domain=String(/)] | --name=String}
Braces enclose content that the usermust specify.
Ellipses valid hfs ... Ellipses indicate nonessentialinformation omitted from the example.
Where to get helpThe Avamar support page provides access to licensing information, productdocumentation, advisories, and downloads, as well as how-to and troubleshootinginformation. This information may enable you to resolve a product issue before youcontact EMC Customer Support.
To access the Avamar support page:
1. Go to https://support.EMC.com/products.
2. Type a product name in the Find a Product box.
PREFACE
18 EMC Avamar 7.2 Administration Guide

3. Select the product from the list that appears.
4. Click the arrow next to the Find a Product box.
5. (Optional) Add the product to the My Products list by clicking Add to my products inthe top right corner of the Support by Product page.
DocumentationThe Avamar product documentation provides a comprehensive set of feature overview,operational task, and technical reference information. Review the following documents inaddition to product administration and user guides:
l Release notes provide an overview of new features and known limitations for arelease.
l Technical notes provide technical details about specific product features, includingstep-by-step tasks, where necessary.
l White papers provide an in-depth technical perspective of a product or products asapplied to critical business issues or requirements.
KnowledgebaseThe EMC Knowledgebase contains applicable solutions that you can search for either bysolution number (for example, esgxxxxxx) or by keyword.
To search the EMC Knowledgebase:
1. Click Search at the top of the page.
2. Type either the solution number or keywords in the search box.
3. (Optional) Limit the search to specific products by typing a product name in theScope by product box and then selecting the product from the list that appears.
4. Select Knowledgebase from the Scope by resource list.
5. (Optional) Specify advanced options by clicking Advanced options and specifyingvalues in the available fields.
6. Click Search.
Online communitiesVisit EMC Community Network at http://community.EMC.com for peer contacts,conversations, and content on product support and solutions. Interactively engage onlinewith customers, partners and certified professionals for all EMC products.
Live chatTo engage EMC Customer Support by using live interactive chat, click Join Live Chat onthe Service Center panel of the Avamar support page.
Service RequestsFor in-depth help from EMC Customer Support, submit a service request by clickingCreate Service Requests on the Service Center panel of the Avamar support page.
Note
To open a service request, you must have a valid support agreement. Contact your EMCsales representative for details about obtaining a valid support agreement or withquestions about your account.
To review an open service request, click the Service Center link on the Service Centerpanel, and then click View and manage service requests.
Facilitating supportEMC recommends that you enable ConnectEMC and Email Home on all Avamar systems:
PREFACE
EMC Avamar 7.2 Administration Guide 19
l ConnectEMC automatically generates service requests for high priority events.
l Email Home emails configuration, capacity, and general system information to EMCCustomer Support.
Your commentsYour suggestions will help us continue to improve the accuracy, organization, and overallquality of the user publications. Send your opinions of this document to [email protected].
Please include the following information:
l Product name and version
l Document name, part number, and revision (for example, 01)
l Page numbers
l Other details that will help us address the documentation issue
PREFACE
20 EMC Avamar 7.2 Administration Guide

CHAPTER 1
Introduction
This chapter includes the following topics:
l EMC Avamar system overview................................................................................22l Data deduplication................................................................................................28l Security and networking........................................................................................29
Introduction 21

EMC Avamar system overviewAn EMC® Avamar® system is a client/server network backup and restore solution.
An Avamar system consists of one or more Avamar servers and the network servers ordesktop clients that back up data to those servers. The Avamar system providescentralized management through the Avamar Administrator graphical managementconsole software application.
Avamar serverAvamar is a hard disk based IP network backup and restore solution. Avamar servers useinternal hard disk storage. An Avamar server is a logical grouping of one or more nodesthat is used to store and manage client backups.
Hardware manufacturers typically call their equipment servers (for instance, the DellPowerEdge 2950 server). In the context of an Avamar system, this equipment is called anode. An Avamar node is a self-contained, rack-mountable, network-addressablecomputer that runs Avamar server software on the Linux operating system.
Avamar ensures fault tolerance by managing disk drive space in units of space calledstripes.
In the Avamar system, an object is a single instance of deduplicated data. Each Avamarobject inherently has a unique ID. Objects are stored and managed within stripes on theAvamar server.
Figure 1 Avamar server nodes, stripes, and objects
1. Avamar server.2. Avamar node.3. Disk drive storage on the node.4. Stripe on the disk drive.5. Object on the stripe.
Introduction
22 EMC Avamar 7.2 Administration Guide

All Avamar servers store client backups and also provide essential processes andservices that are required for client access and remote system administration.
Avamar servers are available in either single-node or scalable multi-node configurations.For the most part, when using Avamar Administrator management console software, allAvamar servers look and behave the same. The main differences among Avamar serverconfigurations are the number of nodes and disk drives reported in the server monitor.
Documenting specific differences in Avamar server hardware configurations is beyond thescope of this guide. Whenever specific limitations and best practices for certainconfigurations are known, they are noted. However, these occasional notes should not beconsidered definitive or exhaustive. Consult an EMC sales representative or an EMCreseller for more information about specific hardware.
NodesThe primary building block in any Avamar server is a node. Each node is a self-contained,rack-mountable, network-addressable computer that runs Avamar server software on theLinux operating system.
Nodes can also contain internal storage in the form of hard disk drives. If the node isconfigured with internal storage (that is, a single-node server), it is internally mirrored toprovide robust fault tolerance.
There are three types of nodes.
Utility nodeA utility node is dedicated to scheduling and managing background Avamar server jobs.In scalable multi-node Avamar servers, a single utility node provides essential internalservices for the server:
l Management Console Server (MCS)
l cronjob
l External authentication
l Network Time Protocol (NTP)
l Web access
Because utility nodes are dedicated to running these essential services on multi-nodeAvamar servers, they cannot be used to store backups. Single-node Avamar serverscombine all of the features and functions of utility and storage nodes on a single node.
Storage nodesStorage nodes are nodes that store backup data. Multiple storage nodes are configuredwith multi-node Avamar servers based upon performance and capacity requirements. Youcan add storage nodes to an Avamar server over time to expand performance with nodowntime.
Avamar clients connect directly with Avamar storage nodes. Client connections and dataare load balanced across storage nodes.
NDMP AcceleratorAn NDMP Accelerator node is a specialized node that uses NDMP to provide dataprotection for certain NAS devices, including the EMC Celerra® IP storage systems andNetwork Appliance filers.
Avamar server functional blocksThe major Avamar server functional blocks include the data server, Management ConsoleServer (MCS), and the EM Tomcat server (EMT). The following figure illustrates theinteraction of these components within the server and with other Avamar components.
Introduction
Avamar server 23
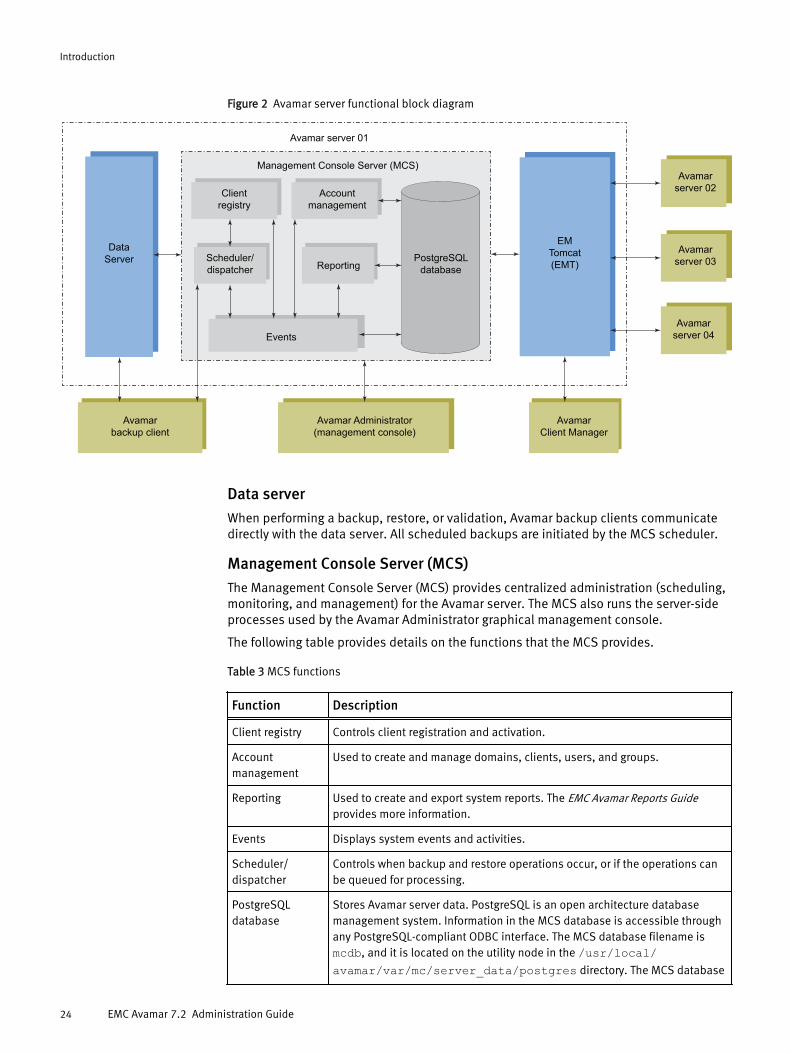
Figure 2 Avamar server functional block diagram
Avamar server 01
Management Console Server (MCS)
PostgreSQL
database
Data
Server
Client
registry
Account
management
Scheduler/
dispatcher Reporting
Events
EM
Tomcat
(EMT)
Avamar
server 02
Avamar
server 03
Avamar
server 04
Avamar
backup client
Avamar Administrator
(management console)
Avamar
Client Manager
Data server
When performing a backup, restore, or validation, Avamar backup clients communicatedirectly with the data server. All scheduled backups are initiated by the MCS scheduler.
Management Console Server (MCS)
The Management Console Server (MCS) provides centralized administration (scheduling,monitoring, and management) for the Avamar server. The MCS also runs the server-sideprocesses used by the Avamar Administrator graphical management console.
The following table provides details on the functions that the MCS provides.
Table 3 MCS functions
Function Description
Client registry Controls client registration and activation.
Accountmanagement
Used to create and manage domains, clients, users, and groups.
Reporting Used to create and export system reports. The EMC Avamar Reports Guideprovides more information.
Events Displays system events and activities.
Scheduler/dispatcher
Controls when backup and restore operations occur, or if the operations canbe queued for processing.
PostgreSQLdatabase
Stores Avamar server data. PostgreSQL is an open architecture databasemanagement system. Information in the MCS database is accessible throughany PostgreSQL-compliant ODBC interface. The MCS database filename ismcdb, and it is located on the utility node in the /usr/local/avamar/var/mc/server_data/postgres directory. The MCS database
Introduction
24 EMC Avamar 7.2 Administration Guide

Table 3 MCS functions (continued)
Function Description
contents are fully backed up on the Avamar server and can be restored if theMCS fails.
NOTICE
The MCS database is intended for read-only access for reporting or querypurposes. Do not manually modify any data in mcdb tables unless instructed
to do so by EMC Customer Support. Directly modifying MCS operational datacan cause loss of referential integrity, which could result in irretrievable loss ofdata.
EM Tomcat server (EMT)
The Avamar EM Tomcat server (EMT) provides essential services that are required todisplay, and work with, Avamar server information.
The EMT also communicates directly with MCS. This communication is a required part ofall Avamar systems.
Avamar clientsAvamar provides client software for various computing platforms. Each client comprises aclient agent and one or more plug-ins.
Figure 3 Avamar client agent and plug-ins
Avamar client
Avamar server
File system
plug-in
Application
plug-in
Agent Management Console Server
(MCS)
AgentsAvamar agents are platform-specific software processes that run on the client andcommunicate with the Management Console Server (MCS) and any plug-ins installed onthat client.
Plug-insThere are two types of Avamar plug-ins:
l File system plug-ins are used to browse, back up, and restore files or directories on aspecific client file system.
l Application plug-ins support backup and restore of databases or other specialapplications.
The following table lists the file system and application plug-ins that Avamar supports.
Introduction
Avamar clients 25

Table 4 Supported plug-ins
Type of plug-in Supported file systems and applications
File system l Free BSD
l HP-UX
l IBM AIX
l Linux
l Mac OS X
l Microsoft Windows
l Microsoft Windows Volume Shadow Copy Service (VSS)
l SCO Open Server
l SCO UnixWare
l Oracle Solaris
l VMware
Application l IBM DB2
l Lotus Domino
l Microsoft Exchange
l Microsoft Hyper-V
l Microsoft Office SharePoint Server (MOSS)
l Microsoft SQL Server
l NDMP for NAS devices, including EMC Celerra IP storage systems andNetwork Appliance filers
l Oracle
l SAP with Oracle
l Sybase ASE
Client compatibility requirements are available in the EMC Avamar Compatibility andInteroperability Matrix on EMC Online Support at https://support.EMC.com. Therequirements in the matrix include supported operating systems and applicationversions.
The Avamar file system client and the plug-ins that you install on the host must have thesame version number.
User interfacesSeveral user interfaces are available in the Avamar system to enable management andmonitoring.
Avamar AdministratorAvamar Administrator is a graphical management console software application that isused to administer an Avamar system from a supported Windows client computer.
Introduction
26 EMC Avamar 7.2 Administration Guide

EMC Backup & Recovery ManagerBackup & Recovery Manager manages all Avamar systems in the enterprise. Backup &Recovery Manager also has an integrated user interface to manage the enterprise’sNetWorker servers and Data Domain backup targets.
The following table lists some of the enterprise management capabilities of Backup &Recovery Manager. The table does not include additional features in Backup & RecoveryManager that are specific to NetWorker servers and to Data Domain backup targets.
Table 5 Avamar system management features of Backup & Recovery Manager
Feature Backup & Recovery Manager
Software host VMware vSphere client
At-a-glance dashboard Select between consolidated and individual status views ofAvamar systems, NetWorker servers, and Data Domainsystems
Detailed backup and capacityinformation for Avamar systems
Yes
Monitor backups Yes, through an Activity Monitor screen. Use the ActivityMonitor screen to view backup and replication details, and tostart, stop, and restart tasks.
Replication management Yes
Launch other managementapplications
l Avamar Administrator
l Avamar Client Manager
l Avamar Installation Manager
l AvInstaller service
Display warnings, errors, andsystem alerts
Yes, in a quick-look graphical display and in detailed text.Filter the view by product, system, and category.
Management reports: select,view, and export
l Backup
l System
l Configuration
The Backup & Recovery Manager product documentation provides complete details onthe user interface.
Avamar Client ManagerAvamar Client Manager is a web-based management application that providescentralized Avamar client administration capabilities for larger businesses andenterprises. Avamar Client Manager helps with the management of large numbers ofAvamar clients.
Avamar Client Manager works with Avamar clients on a supported native operatingsystem and Avamar clients on a supported operating system running in a VMware virtualmachine. Avamar Client Manager cannot work with Avamar clients through virtual center,virtual machine, or virtual proxy configurations. The Avamar Client Manager UI displayssupported Avamar clients and hides all unsupported clients.
Avamar Desktop/LaptopAvamar Desktop/Laptop is a version of the Avamar client software that adds enhancedfeatures for enterprise desktop and laptop computers.
Introduction
User interfaces 27

The Avamar Desktop/Laptop features are designed to improve the functionality of Avamarclient for Windows and Macintosh desktops and laptops. Many of the features are alsosupported on qualifying Linux computers.
Avamar Desktop/Laptop functionality is available through two user interfaces:
l The client local user interface (client UI) is installed on the client computer when youinstall either the Avamar Client for Windows or the Avamar Client for Mac OS X. Withthe client UI, an Avamar icon appears in the notification area ("system tray") onWindows computers or on the menu bar on Mac computers. Right-click the icon onWindows or click the icon on Mac to open the client menu, which provides access tobackup, restore, program settings, and logs.
l Use the web browser user interface (web UI) to start an on-demand backup or restore,view backup and restore activity for a client computer, or configure other backupsettings for a client computer.
Avamar Installation ManagerThe Avamar Installation Manager user interface is part of the AvInstaller software thatEMC Customer Support installs on the utility node during an Avamar server softwareinstallation or upgrade. Use the Avamar Installation Manager to install and upgradesoftware on the Avamar server.
Avamar Downloader ServiceThe Avamar Downloader Service manages the process of checking for and downloadingAvamar server software updates. The Avamar Downloader Service software runs on astand-alone Microsoft Windows server that allows network access to EMC sites on theInternet and to all Avamar servers at a site.
Avamar Web RestoreAvamar Web Restore provides access to the following functionality:
l Search for or browse backed up directories and files to restore.
l Download Avamar client software.
l View Avamar product documentation that is stored on the Avamar server.
Data Domain system supportYou can store backups on either the Avamar server or an EMC Data Domain® system.Backup metadata is stored on the Avamar server.
Before you can store backups on a Data Domain system, you must add the Data Domainsystem to the Avamar configuration by using Avamar Administrator. Then you select theData Domain system in the plug-in options when you perform an on-demand backup orwhen you create a dataset for a scheduled backup. You can also use the command lineinterface (CLI) to perform backups to a Data Domain system.
The steps to restore backups are the same whether you restore from the Avamar server ora Data Domain system. The restore process determines the location of the backup andrestores the backup.
Data deduplicationData deduplication is a key feature of the Avamar system. Data deduplication ensuresthat each unique sub-file, variable length object is stored only once across sites andservers.
During backups, Avamar client software examines the client file system and applies adata deduplication algorithm that identifies redundant data sequences and breaks the
Introduction
28 EMC Avamar 7.2 Administration Guide

client file system into sub-file, variable length data segments. Each data segment isassigned a unique ID.
The client software then determines whether this unique ID has already been stored onthe Avamar server. If this object resides on the Avamar server, a link to the stored objectis referenced in the backup.
Once an object has been stored on the server, it is not sent over the network again, nomatter how many times it is encountered on any number of clients. This featuresignificantly reduces network traffic and provides for greatly enhanced storage efficiencyon the server.
Figure 4 Data deduplication
1. Break data into atoms (variable length segments of file data).2. Send and store each atom only once.3. Up to 500 times daily data reduction in the Avamar backup repository.
Security and networkingThe following sections provide an overview of key Avamar security and networkingfeatures. The EMC Avamar Product Security Guide provides full details on product securityand network configuration.
EncryptionAvamar can encrypt all data sent between clients and the server “in flight.”
To provide enhanced security during client/server data transfers, Avamar supports twolevels of “in-flight” encryption: medium and high.
You can set the encryption level on a client-by-client basis in client properties, or for anentire group of clients in group properties. You also can disable “in-flight” encryptionentirely.
Each individual Avamar server can also be configured to encrypt data stored on the server“at rest.” The decision to encrypt all data stored in an Avamar server is typically a one-time decision that is made when the server is initially deployed at a customer site.
Introduction
Security and networking 29

IPv4 and IPv6 supportInternet Protocol (IP) is a set of communication rules for routing traffic across networks toaddressable devices like Avamar system components. The Avamar system supports bothInternet Protocol Version 4 (IPv4) and IPv6 address notation.
IPv4 notationIPv4 notation is displayed as four octets, that is 1- to 3-digit base 10 numbers in a rangeof 0 to 255. Each octet is separated by periods and represents 8 bits of data for a totaladdress space of 32 bits.
A subnet mask identifies a range (a subnet) of IP addresses on the same network. ForAvamar purposes, the subnet mask is /24, representative of a 255.255.255.0 netmask.
An example IPv4 address and subnet mask is10.99.99.99/24.
IPv4 notation cannot be abbreviated. If an octet has zero (0) value, use a 0 in that octet.
IPv6 notationIPv6 notation is displayed as 16 octets, that is 2-digit hexadecimal (base 16) numbers ina range of 00 to FF. IPv6 notation combines octets by pairs into eight groups that areseparated by colons, each group representing 16 bits of data for a total address space of128 bits.
For Avamar purposes, the subnet mask (called prefix in IPv6) is /64.
An example IPv6 address and prefix is 2001:0db8:85a3:0042:1000:8a2e:0370:7334/64.
As for a group with zero (0) value, IPv6 notation is different from IPv4 in that it can beabbreviated. For example, the following is a valid IPv6 address and prefix:2001:db8:abcd:0012::0/64.
Avamar IP configurationsIn the Avamar user interface, an IP address may be displayed in either IPv4 or IPv6notation. The displayed value depends on how that particular component was configuredwhen the hardware and software were installed.
IPv4 and IPv6 are not interoperable. They operate in separate stacks (that is, parallel,independent networks).
Avamar can be set up in a dual stack configuration. In that case, each Avamar componentmay have an IPv4 address, an IPv6 address, or both (one primary and the othersecondary). The Avamar user interface may display a component's primary address orboth dual stack addresses. For example, the following IP address for a particular deviceindicates that it is configured as dual stack: 10.99.99.99/24,2001:db8:abcd:0012::0/64.
Introduction
30 EMC Avamar 7.2 Administration Guide

CHAPTER 2
Avamar Administrator
This chapter includes the following topics:
l Overview of Avamar Administrator.........................................................................32l Installing Avamar Administrator............................................................................ 32l Upgrading Avamar Administrator...........................................................................34l Uninstalling Avamar Administrator........................................................................ 34l Editing Avamar Administrator client preferences................................................... 35l Setting a session time-out for Avamar Administrator............................................. 35l Starting Avamar Administrator...............................................................................36l Avamar Administrator dashboard.......................................................................... 37l Avamar Administrator user interface elements...................................................... 42
Avamar Administrator 31

Overview of Avamar AdministratorAvamar Administrator is a graphical management console software application that isused to administer an Avamar system from a supported Windows or Linux clientcomputer.
Install Avamar Administrator on a supported computer and launch the software from thedesktop icon or a command shell, or launch the Java Web Start version of the consolesoftware from a web browser or from Backup & Recovery Manager.
Avamar Administrator is the primary user interface for monitoring and configuring theAvamar system. Use it to monitor backup, restore, and system maintenance activities, aswell as to configure backup policies, manage clients and user accounts, and configureother system settings.
You can administer one Avamar system at a time from Avamar Administrator.
The Avamar Administrator dashboard appears when you log in to Avamar Administrator.The dashboard provides an at-a-glance view of Avamar system status, as well as accessto all functionality through menus and launcher buttons.
Installing Avamar AdministratorYou can install Avamar Administrator on supported Microsoft Windows and 64-bit Linuxplatforms.
Details on support for specific operating system versions is available in the EMC AvamarCompatibility and Interoperability Matrix on EMC Online Support at https://support.EMC.com.
Installing Avamar Administrator on Microsoft WindowsProcedure
1. Log in to the computer on which you are installing Avamar Administrator.
2. Open a web browser and type the following URL:
http://Avamar_serverwhere Avamar_server is the DNS name or IP address of the Avamar server.
The EMC Avamar Web Restore page appears.
3. Click Downloads.
4. Click + next to the Windows (32 bit) folder.
5. Click + next to the Microsoft Windows Vista, 7, 8, 8.1, Microsoft Windows Server2008 folder.
6. Locate the Java Runtime Environment (JRE) install package, which is typically the lastentry in the folder.
7. If the JRE on the client computer is older than the JRE hosted on the Avamar server,download and install the newer JRE from the Avamar server:
a. Click the jre-version-windows-i586-p install package, where version is theJRE version.
b. Open the installation file, or download the file and then open it from the savedlocation.
Avamar Administrator
32 EMC Avamar 7.2 Administration Guide

c. Follow the onscreen instructions to complete the JRE installation.
8. Click the AvamarConsoleMultiple-windows-x86-version.exe installpackage, where version is the Avamar Administrator software version.
Avamar Administrator is only available as a 32-bit application. However, it will alsorun on 64-bit Windows computers.
9. Open the installation file, or download the file and then open it from the savedlocation.
10.Follow the onscreen instructions to complete the Avamar Administrator softwareinstallation.
Installing Avamar Administrator on LinuxProcedure
1. Log in to the computer on which you are installing Avamar Administrator.
2. Open a web browser and type the following URL:
http://Avamar_serverwhere Avamar_server is the DNS name or IP address of the Avamar server.
The EMC Avamar Web Restore page appears.
3. Click Downloads.
4. Click + next to the Linux for x86 (64 bit) folder.
5. Click + next to the Red Hat Enterprise Linux 4 folder.
6. Locate the JRE RPM install package, which is typically the last entry in the folder.
7. If the JRE on the client computer is older than the JRE hosted on the Avamar server,then download the install package to a temporary folder such as /tmp.
The install package filename is jre-version-platform.rpm, where version isthe JRE version and platform is the computing platform.
8. Download the AvamarConsole-linux-rhel4-x86_64-version.rpm installpackage to a temporary install folder such as /tmp.
Use the Red Hat Enterprise Linux 4 install packages for all supported Linux versions.
9. Open a command shell and log in as root on the computer where the software will beinstalled.
10.Change directory to the temporary folder to which you downloaded the installpackages by typing a command such as cd /tmp.
11.If you downloaded a JRE, install it by typing rpm -ivh jre-version-platform.rpm.
12.Follow the onscreen instructions to complete the JRE installation.
13.Install Avamar Administrator by typing rpm -ih AvamarConsole-linux-rhel4-x86_64-version.rpm
The install process prompts you to run avsetup_mcc to configure AvamarAdministrator.
14.Configure Avamar Administrator by typing /usr/local/avamar/version/bin/avsetup_mcc.
The configuration process prompts you to specify the location of the JRE installation.
Avamar Administrator
Installing Avamar Administrator on Linux 33

15.Press Enter to accept the default install location.
The configuration process prompts you to specify the root directory of the Avamarsoftware.
16.Press Enter to accept the default install location.
A confirmation message appears.
Upgrading Avamar AdministratorYou can upgrade Avamar Administrator on either Microsoft Windows or Linux computers.
Procedure
l You can install multiple versions of Avamar Administrator on the same MicrosoftWindows computer. If you install Avamar Administrator on a computer where it isalready installed, select a destination folder carefully during the installationprocedure:
n To keep an older version, select a different installation folder.
n To directly upgrade the Avamar Administrator installation, select the sameinstallation folder. The two versions are identified by their full version numbers.
l To upgrade the Avamar Administrator software on the Linux platform, uninstall theprevious version and install the new software. Use of the Linux software upgradecommand (rpm -Uh) is not supported.
Uninstalling Avamar AdministratorYou can uninstall Avamar Administrator from either a Microsoft Windows or a Linuxcomputer.
Before you begin
Close any open Avamar Administrator sessions. Otherwise, the uninstall process may notcomplete successfully, which can complicate future installation of Avamar Administrator.
Procedure
l On a Microsoft Windows computer, open the Windows Start menu and selectPrograms > EMC Avamar > Administrator > version > Uninstall, and then click OK on theconfirmation message.
l On a Linux computer:
a. Open a command shell and log in as root.
b. Determine the package name by typing rpm -qa | grep Av.
c. Type rpm -e AvamarConsole-version, where AvamarConsole-version is theAvamar Administrator install package.
Avamar Administrator
34 EMC Avamar 7.2 Administration Guide

Editing Avamar Administrator client preferencesYou can edit some Avamar Administrator client preferences directly in AvamarAdministrator. However, a number of preferences are only available for editing in themcclient.xml client preferences file.
Procedure
1. Close Avamar Administrator.
2. Open install_dir/var/mc/gui_data/prefs/mcclient.xml in a texteditor, where install_dir is the Avamar Administrator installation directory.
3. Edit the preference elements.
4. Save and close the file.
The changes take effect the next time that you start Avamar Administrator.
Setting a session time-out for Avamar AdministratorAn Avamar Administrator session remains active until a user closes the application bychoosing Exit from the menu. To protect the assets available through AvamarAdministrator, set a session time-out value. The value applies to all Avamar Administratorsessions connected to the Avamar server.
After you set a session time-out value, Avamar Administrator monitors the UI for activity.When Avamar Administrator detects no mouse or keyboard activity within the UI for thenumber of minutes set in the time-out value, it shuts down all processes, closes allwindows, and displays the Inactive dialog box.
Procedure
1. Open a command shell and log in by using one of the following methods:
l For a single-node server, log in to the server as admin.
l For a multi-node server:
a. Log in to the utility node as admin.
b. Load the admin OpenSSH key by typing:
ssh-agent bashssh-add ~admin/.ssh/admin_key
c. When prompted, type the admin_key passphrase and press Enter.
2. Stop the Management Console Server (mcs) service by typing dpnctl stop mcs.
3. Change the working directory to /usr/local/avamar/var/mc/server_data/prefs by typing cd /usr/local/avamar/var/mc/server_data/prefs.
4. Open mcserver.xml in a plain text editor.
5. Find the <node name="mon"> entry.
6. Edit the value of the <entry key="consoleInactiveMinutesToReport"value="n" /> entry within the <node name="mon"> entry, where n is thesession time-out value in minutes.
7. Save the change and close the text editor.
8. Start the MCS and the scheduler by typing:
Avamar Administrator
Editing Avamar Administrator client preferences 35

dpnctl start mcsdpnctl start sched
9. Close the command shell.
Avamar Administrator uses the new session time-out value the next time that youopen Avamar Administrator and connect with the Avamar server.
Starting Avamar AdministratorStart Avamar Administrator by using the console software that is installed on a localcomputer or start Avamar Administrator by using the Java Web Start version of theconsole software.
Before you begin
Ensure that a minimum of 512 MB of system RAM is available on the local computer.Otherwise, Java heap errors may occur when you start Avamar Administrator.Procedure
1. Launch Avamar Administrator by using one of the following methods.
Console softwareversion
Method
Microsoft Windows Double-click the Avamar Administrator icon on theWindows desktop.
Linux Open a command shell, and type mcgui.
Java Web Start Type http://Avamar_server/mcgui in the web addressfield of a web browser, where Avamar_server is the IPaddress or resolvable hostname of an Avamar server.
Java Web Start versionfrom Backup &Recovery Manager
In Backup & Recovery Manager, on the Systems window,select an Avamar system and click Launch ManagementConsole.
The Log On window appears.
2. In User Name, type a username.
To access all Avamar Administrator functionality, the account that is associated withthis username must be assigned the role of Administrator. Other roles providereduced functionality.
To authenticate by using the internal authentication system, type only a username. Toauthenticate by using the enterprise authentication system (deprecated) or directoryservice authentication, type username@server, where username is the username andserver is the fully qualified domain name of the authentication server.
If you use the format username@server for the username, then the system tries toauthenticate the user by using enterprise authentication. If authentication withenterprise authentication fails, then the system tries to authenticate the user by usingdirectory service authentication.
3. In Password, type the password for the user account.
4. In Domain Name, type the Avamar domain to log in to:
l To log in to the root domain, use the default entry of a single slash (/) character.
Avamar Administrator
36 EMC Avamar 7.2 Administration Guide

l To log in to a specific domain or subdomain, type the domain path by using thesyntax /domain/subdomain1/subdomain2.
5. In Administrator Server, type the IP address or DNS name of the Avamar server to login to.
Note
Automatically supply the Administrator Server and Domain Name boxes with anAvamar server name and an Avamar domain by clicking Options and typing the servername in Default Administrator Server and the domain name in Default Domain.
6. Click Log On.
The Avamar Administrator dashboard appears.
Avamar Administrator dashboardThe Avamar Administrator dashboard provides an at-a-glance view of Avamar systemstatus, as well as access to all functionality through menus and launcher buttons.
The dashboard appears when you log in to Avamar Administrator.
Figure 5 Avamar Administrator dashboard
Launcher buttonsThe dashboard launcher buttons invoke persistent windows to perform tasks in AvamarAdministrator.
Table 6 Dashboard launcher buttons
Button Window Available tasks in the window
Policy Policy Create and manage groups, datasets,schedules, and retention policies.
Avamar Administrator
Avamar Administrator dashboard 37

Table 6 Dashboard launcher buttons (continued)
Button Window Available tasks in the window
Backup & Restore Backup, Restore andManage
Perform on-demand backups andrestores, and manage completedbackups.
Administration Administration Create and manage domains, clients,users, system events, and services.
Activity Activity Monitor backup, restore, backupvalidation, and replication activity.
Server Server Monitor server activity and clientsessions.
Replication Replication Configure policy-based replication.
System Information panelThe System Information panel on the Avamar Administrator dashboard provides anoverview of important system statistics.
System StateThe System State icon provides a status indicator for overall system status:
l A green checkmark icon indicates that the system is fully operational.
l A yellow caution icon indicates that there is an issue with the system that requiresattention, but backups can continue.
l A red x icon indicates that there is a problem with the system that requires immediateattention. Backups cannot occur until you resolve the problem.
Click the arrow icon next to the System State field to view more detailed system stateinformation. The following table provides details about system state information in thedashboard.
Table 7 System State fields on the Avamar Administrator dashboard
Field Description
Avamar State Summarizes the current operational state of the Avamar server:
l A green checkmark indicates that the Avamar server is fully operational.
l A yellow caution icon indicates that there are one or more issues with theAvamar server that require attention, but backups can continue.
l A red x icon indicates that the Avamar server is in the Inactive, Offline,Degraded, or Unknown operational state.
CapacityState
Summarizes system capacity usage and health:
l A green checkmark indicates that the system has used greater than 75% ofthe total storage capacity.
l A yellow caution icon indicates that the system has used greater than 75%but less than 90% of the total storage capacity. Consider adding capacity ordeleting old backups.
Avamar Administrator
38 EMC Avamar 7.2 Administration Guide

Table 7 System State fields on the Avamar Administrator dashboard (continued)
Field Description
l A red x icon indicates that the system has used more than 90% of the totalstorage capacity. No new backups can occur until you add capacity ordelete old backups.
CriticalEvents
Summarizes unacknowledged system events:
l A green checkmark indicates that there are no critical system events thatrequire acknowledgment.
l A yellow caution icon indicates that one or more warning events requireacknowledgment.
l A red x icon indicates that one or more system error events requireacknowledgment.
LastCheckpoint
Specifies the amount of time since the last checkpoint occurred:
l A green checkmark indicates that a checkpoint successfully completed onthis Avamar server within the past 24 hours.
l A yellow caution icon indicates that a checkpoint successfully completed onthis Avamar server between 24 and 48 hours ago.
l A red x icon indicates that more than 48 hours have elapsed since acheckpoint successfully completed on this Avamar server.
LastValidatedCheckpoint
Specifies the amount of time since the last checkpoint validation occurred:
l A green checkmark indicates that a checkpoint validation successfullycompleted on this Avamar server within the past 48 hours.
l A yellow caution icon indicates that a checkpoint validation successfullycompleted on this Avamar server between 48 and 72 hours ago.
l A red x icon indicates that more than 72 hours have elapsed since acheckpoint validation successfully completed on this Avamar server.
Last GarbageCollection
Specifies the amount of time since the last garbage collection occurred:
l A green checkmark indicates that garbage collection successfullycompleted on this Avamar server within the past 30 hours.
l A yellow caution icon indicates that garbage collection has not successfullycompleted on this Avamar server within the past 30 hours.
l A red x icon indicates that garbage collection encountered an error the lasttime it was run.
Data DomainSystem(s)State
Summarizes the operational state of all Data Domain systems that have beenadded to this Avamar server:
l A green checkmark indicates that all Data Domain systems are fullyoperational.
l A yellow caution icon indicates that there one or more issues with DataDomain systems that require attention. However, backups can continue.
l A red x icon indicates that there one or more problems with Data Domainsystems that require immediate attention. Backups cannot occur until allproblems are resolved.
Avamar Administrator
System Information panel 39

Scheduler StateThe Scheduler State field indicates whether scheduled activities are running orsuspended. Scheduled activities include backups, email notifications, and replications. Ifscheduled activities are running, then the activities will occur at the scheduled time. Ifscheduled activities are suspended, then the activities will not occur until you resume theactivities.
Click Suspend or Resume to suspend or resume scheduled activities.
Maintenance Activities StateThe Maintenance Activities State field indicates whether maintenance activities arerunning or suspended. Maintenance activities include checkpoints, checkpointvalidation, and garbage collection. If maintenance activities are running, then theactivities will occur at the scheduled time. If maintenance activities are suspended, thenthe activities will not occur until you resume the activities from the Server window.
License ExpirationThe License Expiration field lists the calendar date on which the license for the Avamarserver expires.
Data ProtectedThe Data Protected field lists the total amount of client data protected (in bytes).
Data Protected in last 24 hoursThe Data Protected in last 24 hours field lists the total amount of client data protected (inbytes) during the past 24 hours.
Activities panelThe Activities panel in the Avamar Administrator dashboard provides status and detailedinformation for backup and replication jobs.
Backup JobsThe main status icon for backup jobs in the Activities panel indicates whether scheduledbackups occur at the scheduled time or if there is a problem that is preventing scheduledbackups from occurring.
Click the arrow button next to the Backup Jobs field to display detailed statusinformation. The following table provides details on the status information available forbackup jobs.
Table 8 Backup job fields in the Avamar Administrator dashboard
Field Description
Scheduler State Specifies whether the scheduler for activities such as backups, emailnotifications, and replications is running or suspended.
Dispatcher State Specifies whether the dispatcher is running or suspended. If the dispatcheris suspended, then the Avamar server has reached the health check limitand no backups can occur. Capacity limits and thresholds on page 218provides details.
Backup GroupsEnabled
Specifies the number of backup groups that are enabled. Click the window
icon to the right of the field to open the Policy window and manage groups.
You can also view the total number of backup jobs that:
l Are pending.
Avamar Administrator
40 EMC Avamar 7.2 Administration Guide
l Are currently running.
l Failed within the specified period.
l Succeeded with exceptions within the specified period.
l Succeeded within the specified period.
Select a value from the Period list to control the period for the results of completedbackups.
Click a numeric button to view detailed information for a backup job in the ActivityMonitor.
Replication JobsThe main status icon for replication jobs in the Activities panel indicates whetherreplication jobs occur:
l A green check mark icon indicates that scheduled replication jobs occur at thescheduled time.
l A yellow caution icon indicates that one or more replication groups are disabled.
l A red x icon indicates that scheduled replication jobs are blocked. The block might bedue to the scheduler being in a suspended state, all replication groups beingdisabled, or some other issue with the system.
Click the window icon to the right of the icon to configure replication groups in theReplication window.
You can also view the total number of replication jobs that:
l Are pending.
l Are currently running.
l Failed within the specified period.
l Succeeded with exceptions within the specified period.
l Succeeded within the specified period.
Select a value from the Period list to control the period for the results of completedreplication jobs.
Click a numeric button to view detailed information for a replication job in the ReplicationReport.
Capacity panelThe Capacity panel on the Avamar Administrator dashboard provides system capacityusage information for the Avamar server and any Data Domain systems that have beenadded.
Avamar server capacity informationThe capacity usage of the Avamar server is shown as a vertical bar with color indicatorsfor usage levels that are based on the percentage of total capacity. A text field lists thepercentage of used capacity.
If the Avamar system configuration includes a Data Domain system, then Avamar servercapacity calculations include metadata usage for the Data Domain system.
Click the link on the Avamar server name to view detailed system information in theServer Monitor, including Data Domain metadata utilization, if applicable.
Data Domain system capacity informationEach configured Data Domain system is listed separately in the Capacity panel.
Avamar Administrator
Capacity panel 41

The capacity usage of the Data Domain system is shown as a vertical bar with colorindicators for usage levels that are based on the percentage of total capacity.
Text fields list the total capacity of the Data Domain system in gibibytes (GiB), the amountof used capacity as a percentage and value in GiB, and the total amount of availablecapacity in GiB.
Click the link on the Data Domain system name to view the Data Domain EnterpriseManager web page for that system.
Critical Events panelThe Critical Events panel in the Avamar Administrator dashboard shows the number ofunacknowledged serious system errors and warnings that have occurred, as well ascertain defined system alerts.
To clear these serious system errors and warnings (that is, reset the count to zero), youmust explicitly acknowledge them. Acknowledging system events on page 198 providesdetails.
The following table lists the system alerts that may appear in the Critical Events panel.
Table 9 System alerts in the Critical Events panel
Type of alert Description
HFS check failures If the last checkpoint validation failed, then a data integrity alert isgenerated. Investigate and address the issue as soon as possible. Creating a checkpoint on page 159 provides more information.
Capacity warnings These alerts warn that the system is approaching critical system storagecapacity usage thresholds.
Capacity usagewarnings
These alerts warn that the system is approaching critical system storagecapacity forecasting thresholds.
Avamar Administrator user interface elementsAll of the primary windows in the Avamar Administrator user interface share severalelements and functionality in common, including the status bar, navigation tree features,and mouse shortcuts.
Status barThe status bar at the bottom of each Avamar Administrator persistent window conveysstatus information and provides a single-click shortcut to specific features and functions.
Figure 6 Avamar Administrator status bar
Launcher shortcutsThe shortcut icons on the left side of the status bar provide shortcuts to the six mainAvamar Administrator windows.
The following table lists the shortcut icons that are available on the status bar.
Avamar Administrator
42 EMC Avamar 7.2 Administration Guide

Table 10 Launcher shortcut icons on the status bar
Button Window Available tasks in the window
Policy Policy Create and manage groups, datasets,schedules, and retention policies.
Backup & Restore Backup, Restore andManage
Perform on-demand backups andrestores, and manage completedbackups.
Administration Administration Create and manage domains, clients,users, system events, and services.
Activity Activity Monitor backup, restore, backupvalidation, and replication activity.
Server Server Monitor server activity and clientsessions.
Replication Replication Configure policy-based replication.
Status messagesThe right side of the status bar shows status messages for scheduler and backupdispatching, unacknowledged events, and the Avamar server and Data Domain systems.
Scheduler and backup dispatching statusThe scheduler controls whether scheduled backups occur. The backup dispatching statusindicates whether backups can occur based on whether the health check limit has beenreached. The following table lists the available status messages.
Table 11 Scheduler and backup dispatching status messages
Status message Description
Sch/Disp:Running/Running
Backups will occur at the scheduled time. Scheduled backups are enabled,and the health check limit has not been reached.
Sch/Disp:Running/Suspended
Even though scheduled backups are enabled, backups will not occur at thescheduled time because the health check limit has been reached. Resolvethe system capacity issues and acknowledge the system event to resumebackups. Capacity Management on page 217 and Acknowledging systemevents on page 198 provide details.
Sch/Disp:Suspended/Running
Even though the health check limit has not been reached, backups will notoccur at the scheduled time because scheduled backups are disabled.Backups can resume when you resume scheduled operations.
Sch/Disp:Suspended/Suspended
Backups will not occur at the scheduled time because scheduled backupsare disabled and the health check limit has been reached. Suspending andresuming scheduled operations on page 151Suspending and resumingscheduled operations on page 151 provides details on reenabling thescheduler. Capacity Management on page 217 and Acknowledging systemevents on page 198 provide details on resolving the system capacity issuesand acknowledging system events in order to resume scheduled backups.
Avamar Administrator
Status bar 43

Unacknowledged eventsCertain system events to require acknowledgement by an Avamar server administratoreach time they occur. The following table lists the available status messages.
Table 12 Status messages for unacknowledged events
Status message Description
Have UnacknowledgedEvents
There are entries in the unacknowledged events list that must beexplicitly acknowledged by an Avamar server administrator. Click the
Unacknowledged Events status icon or text label to show the
Administration window Unacknowledged Events pane (tab). Acknowledging system events on page 198 provides details.
No UnacknowledgedEvents
There are no entries in the unacknowledged events list.
Avamar server and Data Domain system statusThis icon lists the operational status of either the Avamar server or any configured DataDomain systems. The following table lists the available status messages.
Table 13 Operational status messages for Avamar or Data Domain
Status message Description
Server: Full Access Normal operational state for an Avamar server. All operations areallowed.
Server: Admin The Avamar server is in an administrative state in which the Avamarserver and root user can read and write data; other users are onlyallowed to read data.
Server: Admin Only The Avamar server is in an administrative state in which the Avamarserver or root user can read or write data; other users are not allowedaccess.
Server: Admin ReadOnly
The Avamar server is in an administrative read-only state in which theAvamar server or root user can read data; other users are not allowedaccess.
Server: Degraded The Avamar server has experienced a disk failure on one or morenodes. All operations are allowed, but immediate action should betaken to fix the problem.
Server: Inactive Avamar Administrator was unable to communicate with the Avamarserver.
Server: Node Offline One or more Avamar server nodes are in an OFFLINE state.
Server: Read Only The Avamar server is in a read-only administrative state in which allusers can read data, but writing data is not allowed.
Server: Suspended Avamar Administrator was able to communicate with the Avamarserver, but normal operations have been temporarily suspended.
Server: Synchronizing The Avamar server is in a transitional state. It is normal for the server tobe in this state during startup and for short periods of time duringmaintenance operations.
Server: Unknown State Avamar Administrator could not determine the Avamar server state.
Avamar Administrator
44 EMC Avamar 7.2 Administration Guide

Table 13 Operational status messages for Avamar or Data Domain (continued)
Status message Description
Data Domain SystemUnresponsive
Avamar can connect to a Data Domain system, but there is a problemwith the connection.
DD System: Inactive Avamar cannot connect to a Data Domain system.
To suspend or resume Avamar server activities, click the Server status icon or text labelto display the Avamar Server window Session Monitor tab. From there, select Actions >Resume Backups/Restores or Actions > Suspend Backups/Restores to resume orsuspend server activities, respectively.
To view additional details about Data Domain system status, open the Server window byclicking Navigation > Server. Select the Server Management tab, and then select the DataDomain system in the tree. The Monitoring Status of the Data Domain system appears inthe right pane. The EMC Avamar and EMC Data Domain System Integration Guide providesdetails on the available detailed status messages.
Navigation tree featuresThe navigation trees in the Administration, Backup, Restore and Manage, andReplication windows provide several controls to facilitate the location of one or moreclients.
Figure 7 Navigation tree features
The upper pane shows the Avamar server domain structure. The lower pane showscontents of any domain selected in the upper pane. You can click the split pane icon tothe left of the filter field between the two panes to split the two panes vertically instead ofhorizontally.
Click the double folder icon to the left of the filter field to show all clients in subfolders.
Type one or more characters in the filter field to filter the list to contain only clients withnames that contain those characters.
Mouse shortcutsThe Avamar Administrator user interface supports context-sensitive left-click, right-click,and double-click shortcuts.
Right-clickAll GUI elements that can enable features or functions when clicked, have right-clicksupport added to them. However, if the GUI element only acts as a navigationmechanism, there is no right-click support. For example, the Policy window client tree has
Avamar Administrator
Navigation tree features 45

a right-click shortcut menu because specific features and functions become availablebased on which node of the tree is selected.
Double-clickFor all tables where properties or edit dialog boxes can be invoked, double-click any rowof the table to display the properties or edit dialog box. Additionally, when lists are usedrather than tables, double-click an element in the list to display the edit dialog box.
Column heading sortClick a table column heading to sort that column. For example, double-click the ActivityMonitor State column to sort the Activity Monitor by the state of each backup.
Press Shift and then click any table column heading to reverse sort the values in a tablecolumn.
Avamar Administrator
46 EMC Avamar 7.2 Administration Guide

CHAPTER 3
Client Management
This chapter includes the following topics:
l Overview of Avamar clients....................................................................................48l Client domains......................................................................................................48l Client registration..................................................................................................50l Activating a client..................................................................................................53l Client paging.........................................................................................................54l Editing client information...................................................................................... 56l Viewing client properties.......................................................................................57l Enabling and disabling a client..............................................................................58l Moving a client to a new domain........................................................................... 58l Retiring a client..................................................................................................... 58l Deleting a client.................................................................................................... 59
Client Management 47

Overview of Avamar clientsAvamar clients are networked computers or workstations that access the Avamar serverover a network connection.
You can organize and segregate clients by using Avamar domains. Domains provideenhanced security by enabling you to define administrative user accounts on a domain-by-domain basis.
Before Avamar can back up or restore data on a client, you must add, or register, theclient with the Avamar server, and then activate the client.
To provide maximum flexibility in deploying Avamar clients, registration and activationare separate events that occur asynchronously. Although they often occur at nearly thesame time, they can also occur hours, days, or even weeks apart.
In Avamar Administrator, the client name must always be the client’s hostname. If youneed to change the client name in Avamar Administrator because the client hostnamechanged, you must first shut down the Avamar software on the client computer, changethe client name by editing the client information, then restart the Avamar client software.This is the only way to ensure that the client maintains its registration with theManagement Console Server (MCS) database, which ensures that past backups continueto be associated with the client.
Client domainsAvamar client domains are distinct zones to organize and segregate clients in the Avamarserver. This provides enhanced security by enabling you to define administrative useraccounts on a domain-by-domain basis.
Avamar client domains are completely internal to the Avamar server and have nothing todo with Internet domains.
Nested structureYou can nest domains to create a rich tree structure. Consider the following exampledomain.
Figure 8 Avamar domain example
Client Management
48 EMC Avamar 7.2 Administration Guide

The root domain, avamar-1.example.com, contains three departmental domains:Accounting, Engineering, and Operations. The Operations domain contains Maintenanceand Shipping subdomains.
There is no functional difference between domains and subdomains. Subdomain ismerely a term that refers to any domain nested within another higher level domain.
Hierarchical managementThe real power of domains is that you can add administrators to a specific level on theclient tree. These domain-level administrators can then manage the clients and policieswithin that domain.
For example, if you add an administrative user to the root domain, then that user canadminister clients and policies anywhere in the system. However, if you add anadministrative user to a domain, then that user can only administer clients and policiesin that domain and its subdomains.
The procedures in this guide assume that you are logged in to the root domain. If you login to a lower-level domain, you may not have access to specific clients, datasets, groups,and event management features outside that domain.
Special domainsYou cannot delete the MC_RETIRED and REPLICATE domains.
The MC_RETIRED domain contains clients that have been retired. Its primary purpose isto facilitate restores from retired client backups.
The REPLICATE domain contains replicated data from other servers.
Creating a domainProcedure
1. In Avamar Administrator, click the Administration launcher button.
The Administration window appears.
2. Click the Account Management tab.
3. In the left pane, select the location in the tree in which to create the domain.
4. From the Actions menu, select Account Management > New Domain.
The New Domain dialog box appears.
5. In the New Domain Name box, type the name of the domain.
Domain names must be 63 characters or fewer, and must not use any of the followingcharacters: =~!@$^%(){}[]|,`;#\/:*?<>'"&.
6. (Optional) Type the name, telephone number, email address, and location for acontact for the domain in the remaining fields on the New Domain dialog box.
7. Click OK.
A confirmation message appears.
8. Click OK.
Editing domain informationYou can edit contact and location information for a domain.
Procedure
1. In Avamar Administrator, click the Administration launcher button.
The Administration window appears.
Client Management
Creating a domain 49

2. Click the Account Management tab.
3. In the tree, select the domain to edit.
4. From the Actions menu, select Account Management > Edit Domain.
The Edit Domain dialog box appears.
5. Edit the domain contact information.
6. Click OK.
7. Click OK on the confirmation message that appears.
Deleting a domainWhen you delete a domain, the process also deletes any clients in the domain. Topreserve the clients in the system, move the clients to a new domain before you deletethe domain.
In addition, if you use directory service authentication, then Avamar removes the LDAPmaps that use that domain for access. The associated directory service groups areotherwise unaffected by the deletion.
Procedure
1. (Optional) Move any clients in the domain to a new domain. Moving a client to a newdomain on page 58 provides instructions.
2. In Avamar Administrator, click the Administration launcher button.
The Administration window appears.
3. Click the Account Management tab.
4. In the tree, select the domain to delete.
5. From the Actions menu, select Account Management > Delete Domain.
A confirmation message appears.
6. Click Yes.
7. Click OK on the second confirmation message that appears.
Client registrationClient registration is the process of establishing an identity with the Avamar server. OnceAvamar “knows” the client, it assigns a unique client ID (CID), which it passes back to theclient during activation.
There are three ways to register a client:
l Client-side registration
l Interactive server-side registration by using Avamar Administrator
l Batch client registration
Client-side registrationThe client-side registration process depends on the operating system.
The EMC Avamar Backup Clients User Guide describes client-side registration for eachsupported operating system.
Client-side registration also activates the client at the same time. For this reason, client-side registration is very popular. However, the client is automatically added to the Default
Client Management
50 EMC Avamar 7.2 Administration Guide

Group and must use the default dataset, schedule, and retention policy. As a result, thismethod may not provide enough control for some sites.
Registering a client in Avamar AdministratorYou can use Avamar Administrator to add a client to the system in a domain and group.This provides a high degree of control. For example, you can assign a specific dataset,schedule, and retention policy. However, it can be very time consuming if you need toadd many clients.
Procedure
1. In Avamar Administrator, click the Administration launcher button.
The Administration window appears.
2. Click the Account Management tab.
In the Account Management tree, the icons for the clients indicate status. An xappears for disabled clients, a question mark appears for unregistered clients, andthere is no special icon designation for active clients.
3. In the tree, select the domain for the new client.
4. From the Actions menu, select Account Management > New Client.
The New Client dialog box appears.
5. From the Client Type list, select Normal.
NOTICE
The EMC Avamar for VMware User Guide provides information on VMware vCenter™,Image Proxy, and Virtual Machine client types.
6. In the New Client Name field, type the client name.
7. (Optional) Type the client contact name, telephone number, email address, andlocation in the remaining fields of the New Client dialog box.
8. Click OK.
A confirmation message appears.
9. Click OK.
Batch client registrationTo support large sites with many clients, the batch client registration feature enables youto define multiple clients in a single client definition file, then validate and import thatfile into the Avamar server.
Batch client registration is very popular at large sites because it provides nearly as muchcontrol as interactively adding the client using Avamar Administrator but is much faster.
Clients definition filesAvamar supports Extensible Markup Language (XML) and comma-separated values (CSV)formats for the clients definition file for batch client registration.
XML formatXML clients definition files must have an .xml file extension and conform to thefollowing structure and format:
<?xml version="1.0" encoding="UTF-8" ?> <registration_stream>
Client Management
Registering a client in Avamar Administrator 51

<registrants> <entry host_name="MyClient.Example.com" mcs_domain="clients" mcs_group="MyGroup" dataset="MyDataset" retention_policy="MyRetentionPolicy" contact_address="192.168.31.5" contact_port="28002" access_list="user1@avamar:password, user2@LDAP" encryption="high" encryption_override="false" /> </registrants> </registration_stream>
NOTICE
The clients definition file in this topic is for reference purposes only. Do not attempt tocopy and paste this example into a clients definitions file. Invisible formatting characterswill prevent you from successfully doing so.
Define each client by using a separate <entry> element. The following table describesthe available attributes for each <entry> element.
Table 14 Attributes for each entry in a clients definition file
Attribute Description
host_name Network hostname or IP address for this client.
mcs_domain Optional Avamar domain for this client. Specifying a value for thisattribute overrides the default clients domain.
mcs_group Optional default group for this client. Specifying a value for thisattribute overrides assignment to the Default Group.
dataset Optional default dataset for this client to use during backups.Specifying a value for this attribute overrides the default dataset thatwould normally be inherited from the group.
retention_policy Optional default backup retention policy for this client. Specifying avalue for this attribute overrides the default retention policy thatwould normally be inherited from the group.
contact_address Optional client IP address.
contact_port Set this to 28002, the default Avamar data port.
access_list Optional list of users who can access the Avamar server from thisclient. The format is user@authentication:password. When
you use the internal authentication system, the word passwordmust follow the colon. This causes the system to prompt users forauthentication when they access the system. When you use anexternal authentication system, omit :password. To define
multiple users, separate each user entry with a comma (,) andenclose the entire list of users in quotation marks (" ").
encryption Encryption method for client/server data transfer:
Client Management
52 EMC Avamar 7.2 Administration Guide

Table 14 Attributes for each entry in a clients definition file (continued)
Attribute Description
l High
l Medium
l None
Note
The encryption technology and bit strength for a client/serverconnection depends on several factors, including the client platformand Avamar server version. The EMC Avamar Product Security Guideprovides details.
encryption_override Optional encryption override. If TRUE, then this client does not use
the group encryption method.
CSV formatCSV clients definition files use the same element and attribute names as the XML format.However, you must define each client on a single line and separate each attribute valueby a comma, as shown in the following example:
host_name,mcs_domain,mcs_group,dataset,retention_policy,contact_address,contact_port,access_list,encryption,encryption_override
Validating and importing a clients definition fileProcedure
1. In Avamar Administrator, click the Administration launcher button.
The Administration window appears.
2. Click the Account Management tab.
3. From the Actions menu, select Account Management > Import Clients from File.
The Validate dialog box appears.
4. Browse to and select the saved clients definition file.
5. Click Validate.
The Validation Results dialog box appears.
6. If the clients definition file is error free, click Commit to import the client list. Or, of theclients definition file contains errors, correct the errors, save the file again, and repeatthe steps in this procedure.
The Validation Results dialog box closes, and the new clients appear in the AccountManagement tree.
Activating a clientClient activation is the process of passing the client ID (CID) back to the client, where it isstored in an encrypted file on the client file system.
There are two ways to activate a client:
Client Management
Activating a client 53

l Initiate activation from the client. The EMC Avamar Backup Clients User Guide describesthis method.
l Invite the client to activate with the server by using Avamar Administrator.
NOTICE
HP-UX, Linux, and Solaris clients can either be activated during installation or by usingAvamar Administrator. There is no client-side command to initiate client activation onthese computing platforms.
Procedure
1. Ensure that the following requirements are met:
l The client must be present on the network.
l The Avamar client software must be installed and running on the client.
l The Avamar server must be able to resolve the hostname that was used to registerthe client.
2. In Avamar Administrator, click the Administration launcher button.
The Administration window appears.
3. Click the Account Management tab.
In the Account Management tree, the icons for the clients indicate status. An xappears for disabled clients, a question mark appears for unregistered clients, andthere is no special icon designation for active clients.
4. In the tree, select the client to activate.
5. From the Actions menu, select Account Management > Invite Client.
A status message indicates that the client was sent an invitation to activate with theserver.
6. Click OK.
Client pagingAvamar clients can be either pageable or non-pageable. If a client is pageable you canspecify settings to control how the MCS determines the appropriate paging settings forthe client. You may need to use workarounds for limitations that exist in environmentswith non-pageable clients.
Pageable clientsPageable clients have provided the Avamar server with a page address and port number,which enables performance of on-demand backups and restores. In addition, AvamarAdministrator can browse the client file system during backups and restores in AvamarAdministrator.
You can specify one of the following client paging settings to control how the MCSdetermines the appropriate paging settings for a client:
l Automatic — With the default setting of automatic paging, the MCS attempts toautomatically determine appropriate paging settings for the client. If the MCSreceives updated paging information from the client, it automatically updates thesettings.
l Manual — With manual paging, you specify the IP address and data port number forclient/MCS communications. You may want to use manual paging if you use Network
Client Management
54 EMC Avamar 7.2 Administration Guide

Address Translation (NAT). With NAT, the MCS probably cannot automaticallydetermine the correct client paging settings. In manual mode, the MCS neveroverwrites the IP address and port number settings for the client.
You can also disable automatic paging without specifying an IP address or data portnumber for client/MCS communications. Disabling automatic paging might be useful tosupport clients that are off the network for extended periods of time, as can be the casewith laptop computers. These clients must initiate their own on-demand backups. For thisreason, you should enable client paging whenever possible.
Non-pageable clientsA client is non-pageable when the Avamar Administrator server running on the Avamarserver utility node or on a single-node server cannot establish a TCP/IP connection to port28002 on the Avamar client.
When a client might be non-pageableA client might be non-pageable in the following situations:
l The environment (including the client) has firewall rules that prevent incomingconnections on port 28002 to the client.
l The client is behind a router that doesn't support port-forwarding for connectionsinitiated from the Avamar server. (This is the common situation that managed serviceproviders could encounter if they deploy Avamar without using VPN, for example.)
l The Avamar Administrator server cannot connect to the Avamar client on the pagingaddress used by the Avamar Administrator server. One example of this is if the clientis multi-homed and the paging address used by the Avamar Administrator server toconnect to the client does not have a route to the paging address.
l The environment requires authentication to establish a host-to-host connection toport 28002 on the client, and the Avamar Administrator server process is not able tosupport the required authentication protocol.
l An IPSEC environment. In a Windows environment Microsoft best practicesrecommend enabling IPSEC, and clients are not pageable in an IPSEC environment.
MCS should automatically detect non-pageable clients and adjust settings. Usually nomanual changes are needed in MCS. You can determine whether a client is pageable ornon-pageable by viewing the properties for the client on the Client tab in the Policywindow of Avamar Administrator. If No appears in the Paging column for the client, thenMCS cannot connect to the avagent process on the client and the client is non-pageable.
Limitations in environments with non-pageable clientsYou can use Avamar Administrator to perform backups or restores, or define policies inenvironments with non-pageable clients. In some cases you must enter explicit pathnames.
The following limitations apply when the client is non-pageable:
l If the MCS cannot page the client on port 28002, then Avamar cannot invite the clientto activate by using Avamar Administrator.
l You cannot browse the client file system when defining datasets or when browsing toselect a target for restore. To work around this limitation, explicitly define the backupdataset without browsing a client. During a restore, explicitly type the restore targetpath.
l You cannot view client logs by double-clicking on the Activities view. To work aroundthis limitation, get the logs from the client computer.
Client Management
Non-pageable clients 55

l You cannot page the client when there is a work order waiting for the client. In thiscase, the client connects to the MCS and polls for the existence of a work orderapproximately once every minute.If you are backing up several hundred or more non-pageable clients, you may need toincrease the polling interval. The default polling interval is 60 seconds. If MCSperformance is slowing down, increase the polling interval until you achieveacceptable performance.
Editing client paging settingsThe MCS can automatically determine client paging settings, or you can manually specifypaging settings for a client. You may need to manually specify paging settings if you useNAT.
Procedure
1. In Avamar Administrator, click the Policy launcher button.
The Policy window appears.
2. Click the Policy Management tab.
3. Click the Clients tab.
4. Select the client.
5. From the Actions menu, select Client > Edit Client.
The Edit Client window appears.
6. Click the Properties tab.
7. Select either the Automatic or Manual paging mode.
8. If you selected Manual, specify the client information for client/MCS communications:
l If the MCS is unable to automatically determine a hostname for this client inautomatic mode, type a valid (un-NAT’d) IP address for the client in the Addressbox.
l In the Port Number box, specify the data port number. The default data port is28002.
9. Click OK.
Editing client informationYou can edit the name, contact information, or location information for a client in AvamarAdministrator.
In Avamar Administrator, the client name must always be the client hostname. If youneed to change the client name in Avamar Administrator because the client hostnamechanged, you must first shut down the Avamar software on the client computer, changethe client name by way of this procedure, then restart the Avamar client software. This isthe only way to ensure that the client maintains its registration with the ManagementConsole Server (MCS) database, which ensures that past backups continue to beassociated with the client.
Procedure
1. In Avamar Administrator, click the Administration launcher button.
The Administration window appears.
2. Click the Account Management tab.
Client Management
56 EMC Avamar 7.2 Administration Guide

In the Account Management tree, the icons for the clients indicate status. An xappears for disabled clients, a question mark appears for unregistered clients, andthere is no special icon designation for active clients.
3. In the tree, select the client to edit.
4. From the Actions menu, select Account Management > Edit Client.
The Edit Client dialog box appears.
5. Edit the name, contact information, or location information for the client.
6. Click OK.
A confirmation message appears.
7. Click OK.
Viewing client propertiesProcedure
1. In Avamar Administrator, click the Policy launcher button.
The Policy window appears.
2. Click the Policy Management tab.
3. Click the Clients tab.
4. Select the client.
The client properties described in the following table appear in the main pane of thewindow.
Table 15 Client properties displayed by Avamar Administrator
Column Description
Client Descriptive client name.
Backups Disabled Whether Avamar can perform backups for the client. Regardless of thissetting, the client can restore files as long as a previous backup exists in thesystem.
Activated Whether the client is activated with the Avamar server.
Domain The Avamar domain for the client.
OS The operating system on the client.
Paging Whether the client has provided the Avamar server with a page address andport number, thereby allowing it to perform on-demand backups and restores.In addition, Avamar Administrator can browse its file system during AvamarAdministrator-initiated backups and restores.
Version The version of Avamar client software on the client.
Last Check-in The date and time that the Avamar client agent last checked in with theAvamar server.
Encryption The encryption method used for client/server data transfer.
CID The Client ID, a unique identifier for this client in the Avamar server. CIDs areassigned during client activation.
Client Management
Viewing client properties 57

Enabling and disabling a clientYou can disable a client so that it cannot use the Avamar server to back up files. This istypically done to place the system in a state that supports maintenance activities. If aclient has been disabled, you must reenable the client before backups for the client canresume.
Procedure
1. In Avamar Administrator, click the Policy launcher button.
The Policy window appears.
2. Click the Policy Management tab.
3. Click the Clients tab.
4. Select the client to disable or enable.
5. From the Actions menu, select Client > Disable all backups of selected client.
A confirmation message appears.
6. Click Yes.
When the client is disabled, a checkmark appears next to the Disable all backups ofselected client option on the Actions > Client menu. When the client is enabled, thecheckmark does not appear.
Moving a client to a new domainProcedure
1. In Avamar Administrator, click the Administration launcher button.
The Administration window appears.
2. Click the Account Management tab.
In the Account Management tree, the icons for the clients indicate status. An xappears for disabled clients, a question mark appears for unregistered clients, andthere is no special icon designation for active clients.
3. In the tree, select the client to move.
4. From the Actions menu, select Account Management > Move Client.
The Move Client dialog box appears.
5. Select the new domain for the client.
6. Click OK.
Retiring a clientWhen you retire a client, Avamar stops running backups of the client. Avamar uses thespecified retention setting for the existing backups of a retired client to determine howlong to retain the existing backups. Avamar also uses the specified retention setting forexisting replicas of a retired client's backups to determine how long to retain the existingreplicas.
To restore data from existing backups or replicas of a retired client, use AvamarAdministrator.
Client Management
58 EMC Avamar 7.2 Administration Guide

Procedure
1. In Avamar Administrator, click the Administration launcher button.
The Administration window appears.
2. Click the Account Management tab.
In the Account Management tree, the icons for the clients indicate status. An Xappears for disabled clients, a question mark appears for unregistered clients, andthere is no special icon designation for active clients.
3. In the tree, select the client to retire.
4. From the Actions menu, select Account Management > Retire Client.
The Retire Client dialog box appears.
5. In the Local Backups section, choose how long to keep backups for the client:
l To keep backups until their existing expiration dates, select Retain local backupswith existing expiration date.
l To keep backups indefinitely, regardless of the existing expiration dates, selectRetain all local backups indefinitely.
l To keep backups until a new expiration date, select Reset local backup expirationdate and in New Expiration Date, select a new date.
6. (Client with replicas) In the Remote Backups section, choose how long to keepreplicas for the client:
l To keep replicas until their existing expiration dates, select Retain remote backupswith existing expiration date.
l To keep replicas indefinitely, regardless of the existing expiration dates, selectRetain all remote backups indefinitely.
l To keep replicas until a new expiration date, select Reset remote backupexpiration date and in New Expiration Date, select a new date.
7. Click OK.
A confirmation message appears.
8. Click Yes.
Deleting a clientDelete a client and all backups of the client. Optionally, choose to delete all replicas thatexisting on replication destination systems.
When you delete a client, Avamar permanently deletes all backups that are stored for thatclient. Only delete a client when you are certain that there is no reason to retain thebackups. If there is any doubt, retire the client instead.
Procedure
1. In Avamar Administrator, click the Administration launcher button.
The Administration window appears.
2. Click the Account Management tab.
In the Account Management tree, the icons for the clients indicate status. An Xappears for disabled clients, a question mark appears for unregistered clients, andthere is no special icon designation for active clients.
Client Management
Deleting a client 59

3. In the tree, select the client to delete.
4. From the Actions menu, select Account Management > Delete Client.
The Delete Client dialog box appears and displays the number of existing backups forthe client.
5. (Clients with replicas) Choose how to handle the client's replicas:
l To delete all replicas for the client, select Also delete remote backups on externalservers.
l To retain all replicas for the client, clear Also delete remote backups on externalservers.
6. Select I understand this action is permanent and irreversible.
This field is a safety net to avoid unintentionally deleting a client and the client'sbackups.
7. Click Delete.
Client Management
60 EMC Avamar 7.2 Administration Guide

CHAPTER 4
User Management and Authentication
This chapter includes the following topics:
l Overview of Avamar user accounts........................................................................ 62l User authentication...............................................................................................62l Avamar internal authentication............................................................................. 63l Directory service authentication............................................................................ 64l Enabling backward compatibility with Enterprise Authentication........................... 80l Roles.....................................................................................................................81l Adding a user to a client or domain....................................................................... 83l Editing user information........................................................................................ 85l Deleting a user...................................................................................................... 85
User Management and Authentication 61

Overview of Avamar user accountsA user account in Avamar can administer a domain or client. The user account defines theauthentication system that is used to grant users access to the Avamar server. It alsodefines the role for the user, which controls the operations that a user can perform.
You can add user accounts to domains or individual clients. When you add a useraccount to a domain, the account can administer that domain and any subdomainsbeneath it. When you add a user account to an individual client, the account can performbackups and restores of that client, and access backups belonging to that client in thesystem.
In Avamar, users are entries in a domain or client access list. When you add a useraccount to the Avamar system, you are adding an entry to a domain or client user accesslist.
In the following example, the user “Gretchen” has been added to both the Accountingdomain and a computer. However, the authentication system and role are completelyseparate user accounts that happen to have the same username.
Figure 9 Users in Avamar domains
The following table describes the information that comprises an Avamar user account.
Table 16 Avamar user account information
Information Description
Username The username depends on the authentication system and must be in theformat that the authentication system accepts. For example, the internalauthentication system uses case-sensitive usernames, whereas WindowsActive Directory usernames are case-insensitive. Usernames cannot belonger than 31 characters.
Authenticationsystem
An authentication system is a username/password system that is used togrant users access to the Avamar server.
Role Roles define the allowable operations for each user account.
User authenticationAn authentication system is a username/password system that is used to grant usersaccess to the Avamar server.
Avamar supports the following authentication systems:
l Avamar internal authentication, as described in Avamar internal authentication onpage 63.
User Management and Authentication
62 EMC Avamar 7.2 Administration Guide

l Directory service authentication, as described in Directory service authentication onpage 64.
Avamar also supports the deprecated authentication method Enterprise Authentication. Enabling backward compatibility with Enterprise Authentication on page 80 describeshow to enable continued support for Enterprise Authentication.
How Avamar authenticates users and assigns rolesTo provide backward compatibility with enterprise authentication and to account for thepossibility of users in more than one LDAP mapped group, Avamar uses the followingauthentication and role assignment sequence for each login try:
1. When the username is in the format user, where user is a username without @serverappended, then Avamar checks the internal Avamar authentication database.If the username, password, and domain match, then the login is successful andAvamar assigns the user a role in the Avamar database. If they do not match, then thelogin fails.
2. When the username is in the format user@server, where user is a username and serveris the fully qualified domain name of the authentication server, then Avamar checksthe login information by using enterprise authentication.If the username, password, and domain match, then the login is successful andAvamar assigns the user a role in the Avamar database. If there is no match, then theevaluation continues.
3. When the username is in the format user@server and authentication by usingenterprise authentication fails, then Avamar checks the LDAP mapping system.The login try is checked against all mapped groups for a match of each of thefollowing identifiers:
l Username, the portion of the User Name field entry before the @ symbol.
l Password, as typed in the Password field.
l Avamar domain, as typed in the Domain Name field.
l Directory service domain, the portion of the User Name field entry after the @symbol.
When all identifiers match, the login is successful and Avamar assigns the user a rolefrom the mapped group.
A user can be the member of mapped groups in different directory service domains.The role of the mapped group that matches the directory service domain that isprovided during login is assigned to the user for that session.
When the user is a member of more than one mapped group in the same directoryservice domain, the role with the greatest authority is assigned.
4. When the login information does not meet the requirements of any of the previoussteps, then the login fails and a failure message appears.
Avamar internal authenticationWith Avamar internal authentication, you define the username and password for Avamaruser accounts, and Avamar stores the information. Usernames are case-sensitive andcannot be longer than 31 characters.
No additional steps are required to use internal Avamar authentication to authenticateuser accounts. You define the username and password for each account when you addthe user in Avamar Administrator.
User Management and Authentication
How Avamar authenticates users and assigns roles 63

Directory service authenticationUse directory service authentication to authenticate and assign roles to Avamar users byusing information from an existing directory service. Directory service authenticationworks with specific LDAP directory services and provides additional functionality whenused with an OpenLDAP directory service. Directory service authentication also workswith a Network Information Service (NIS), on its own or with one of the supported LDAPdirectory services.
Avamar products that use directory service authenticationThe following Avamar products can use directory service authentication to authenticateand authorize users:
l Avamar Administrator
l Avamar Web Restore
l Avamar client web UI (Avamar Desktop/Laptop)
Avamar product that uses directory service client recordsAvamar Client Manager does not use directory service authentication to authenticate andauthorize user logins. However, Avamar Client Manager can use the directory servicemechanism to obtain information about computers that are potential Avamar clients.Avamar Client Manager queries the directory service to obtain information about clientsand, if available, directory service organizational units, such as directory domains, anddirectory groups.
Directory services typesDirectory service authentication supports the following types of directory services:
Table 17 Supported directory service types
Type Supported implementations
LDAP l Active Directory for Windows Server 2003
l Active Directory Domain Services for Windows Server 2008
l Active Directory Domain Services for Windows Server 2012
l 389 Directory Server version 1.1.35
OpenLDAP l SUSE OpenLDAP version 2.4
NIS l Network Information Service
LDAP mapsDirectory service authentication uses LDAP maps to form a group of Avamar domain usersby using information from a directory service. Create LDAP maps to link Avamarauthorization levels to mapped directory service user accounts. Refer to Adding an LDAPmap on page 77 for more information.
NOTICE
Deleting an Avamar domain removes the LDAP maps that rely on that Avamar domain foraccess. However, removing LDAP maps does not affect the directory service groups or thedirectory service user records that are associated with the removed maps.
User Management and Authentication
64 EMC Avamar 7.2 Administration Guide

LDAP directory service authenticationAvamar provides authentication and authorization of Avamar users through supportedLDAP directory services.
Preparing to use LDAP directory service authentication on page 65 describes how toprepare to implement LDAP directory service authentication.
Adding information for a supported LDAP directory service on page 66 describes how toprovide the required information about the LDAP directory service to the Avamar system.
Editing the directory service configuration files on page 68 describes how to perform anoptional manual edit of the ldap.properties and krb5.conf files.
RequirementsAvamar directory service authentication supports the use of supported LDAP directoryservices that meet the following conditions:
l LDAP server permits username bind through both of the following formats:
n username
l LDAP server permits searching for group membership by using a username.
l LDAP server permits searching for groups by using a search string.
l LDAP server account that is provided when adding an LDAP map has permission torun a nested ldapsearch command.
Kerberos protocolAvamar's LDAP directory service authentication normally uses the Kerberos protocol forall communications with the Key Distribution Center. Avamar automatically encryptsusernames and passwords before sending them to port 88 on the Key Distribution Center.
To use Avamar's LDAP directory service authentication without the Kerberos protocol, in aSimple Bind, manually edit the ldap.properties file.
Preparing to use LDAP directory service authenticationTo prepare to use LDAP directory service authentication, give Avamar access to certainports on the Key Distribution Center. Also, create the directory service groups that areassociated with Avamar LDAP maps.
Procedure
1. Ensure that Avamar has access to the following recognized ports on the KeyDistribution Center (KDC).
Table 18 Required Key Distribution Center ports
Port number Description
88 Kerberos authentication system
389 Lightweight Directory Access Protocol (LDAP)
464 Kerberos Change/Set password
The ports are defined in krb5.conf and ldap.properties. Editing the directoryservice configuration files on page 68 provides instructions on editing these files.
User Management and Authentication
LDAP directory service authentication 65

2. Create directory service groups in the directory service (not in Avamar).
Groups can range in size from one member to as many members as the directoryservice allows.
Ideally, create directory service groups specifically for use with an Avamar LDAP map.With dedicated directory service groups, group composition is considered in thecontext of the level of Avamar access being granted. Also, the group name can includea common character pattern to simplify its discovery during mapping. For example,you could start each group name with the characters av, as in avAdministrators.This character pattern would enable you to search for all groups that are associatedwith Avamar by using the wildcard search string av*.
After you finish
Configure Avamar to use the LDAP directory service. Adding information for a supportedLDAP directory service on page 66 provides instructions.
Adding information for a supported LDAP directory serviceUse a wizard to add information for a supported LDAP directory service to use forauthentication and authorization of Avamar users.
Before you begin
Check that the directory service meets the following requirements:
l Provides authentication through a SASL (Simple Authentication and Security Layer)BIND that uses Kerberos.
l Only uses LDAP v.3 base functionality.
l Permits username bind through both of the following formats:
n username
l Permits searching for group membership by using a username.
l Permits searching for groups by using a search string.
l Has an available LDAP server account that has permission to run a nestedldapsearch command.
NOTICE
Do not use the wizard to add a directory service that performs authentication usingSimple Bind (plaintext). Instead, manually edit the ldap.properties file as described
in Editing the directory service configuration files on page 68.
Procedure
1. Log in to the root domain in Avamar Administrator as an administrator.
a. Launch Avamar Administrator.
b. In the Username box in the login window, type a username for an account that isassigned the administrator role at the root domain level.
When Avamar is already configured to use a directory service, alternatively log inby using an LDAP account with administrator authorization at the root domainlevel. Use the format: username@ldap-domain.
c. In Password, type the password for the user account.
User Management and Authentication
66 EMC Avamar 7.2 Administration Guide

d. In Domain Name, use the default entry of a single slash (/) character to specify theroot domain.
e. In Avamar Server, type the IP address or DNS name of the Avamar server.
f. Click Log On.
2. In Avamar Administrator, click the Administration launcher button.
The Administration window appears.
3. Click the LDAP Management tab.
4. Click Directory Service Management.
The Directory Service Management dialog box appears.
5. Add the directory service:
a. Click Add.
The Adding a new Directory Service section appears.
b. Select LDAP.
c. In Enter a fully qualified domain name, type the fully qualified domain name(FQDN) of a directory server.
d. (Optional) If the directory server represents the organization’s default directoryservice domain, then select Make this the default domain LDAP domain.
To allow the Avamar client web UI to authenticate users from Macintoshcomputers, the LDAP server that is assigned to Macintosh users must beconfigured as the default server.
e. Click Add.
A confirmation message appears.
f. Click Yes.
A success message appears. If an error message appears instead, then resolve theissue and re-add the directory service. Error messages during directory serviceconfiguration on page 76 provides details.
g. Click OK.
The changes are applied to the Management Console Server (mcs) and EM Tomcat(emt) services.
6. (Optional) Repeat the previous step to add other authentication domains.
7. Test the directory service entries:
a. In the Directory Service Management dialog box, select one of the entries fromConfigured Directory Services.
The Testing section appears.
b. In Username, type the username for an account that is authorized to read thedirectory service database.
c. In Password, type the password that is associated with the username.
d. Click Run Test.
If an error message appears, then resolve the issue. Error messages duringdirectory service configuration on page 76 provides details.
e. Click Close to close the Testing section.
User Management and Authentication
LDAP directory service authentication 67

8. Click Close on the Directory Service Management dialog box.
After you finish
Create an LDAP map to associate the directory service group to Avamar user information. Adding an LDAP map on page 77 provides instructions.
Editing the directory service configuration filesThe LDAP Management tool provides you with the ability to manually edit theldap.properties and krb5.conf directory service configuration files. Manually editthese files to configure non-standard settings and to resolve problems that occur whenconfiguring Avamar to use a directory service.
Before you begin
Determine the correct format for keys and values in the configuration files.
Procedure
1. Log in to the root domain in Avamar Administrator as an administrator.
a. Launch Avamar Administrator.
b. In the Username box in the login window, type a username for an account that isassigned the administrator role at the root domain level.
When Avamar is already configured to use a directory service, alternatively log inby using an LDAP account with administrator authorization at the root domainlevel. Use the format: username@ldap-domain.
c. In Password, type the password for the user account.
d. In Domain Name, use the default entry of a single slash (/) character to specify theroot domain.
e. In Avamar Server, type the IP address or DNS name of the Avamar server.
f. Click Log On.
2. In Avamar Administrator, click the Administration launcher button.
The Administration window appears.
3. Click the LDAP Management tab.
4. Click Edit LDAP file to edit ldap.properties or Edit KRB5 file to edit krb5.conf.
5. Type additions and changes directly in the Edit file window.
6. Click Save, and then click Close.
Format requirements and settings for LDAP base functionality
The LDAP Management tool in Avamar Administrator creates a correctly formattedldap.properties file for supported LDAP directory services. When you manually editthe file by using the LDAP Management tool, the format must comply with specificparameter requirements. You can manually add other settings to ldap.properties to meetan organization's authentication requirements.
LDAP base functionality parameter requirementsThe following table lists the parameter requirements for LDAP base functionality.
User Management and Authentication
68 EMC Avamar 7.2 Administration Guide

Table 19 Parameter requirements for LDAP base functionality
Rule Description Format
One LDAP URL parameter for eachLDAP server
The LDAP URL parameter maps anLDAP server to a specific domaincontroller.
ldap.url.ds.example.abc.com=ldap://dchost.r1.example.abc.com:389 where:
l ds.example.abc.com is the FQDN of the LDAPserver.
l dchost.example.abc.com is the FQDN of the domaincontroller for the LDAP server.
l 389 is the port that is used by the LDAP service.
Exactly one default serverparameter
The default server parameter isused during authentication of userson clients that are not mapped to aspecific domain. For example, localusers and users that log in from anAIX, FreeBSD, HP-UX, Linux, SCO, orSolaris computer.
ldap.qualified-name-default=dshost.example.abc.com where
dshost.example.abc.com is the FQDN of the defaultLDAP server.
Additional parametersYou can add other parameters to ldap.properties by using the LDAP Managementtool in Avamar Administrator. The following table lists the available settings.
Table 20 Additional parameter for LDAP base functionality
Parameter Description and values
ldap.auth.domain.login-domain-suffix Specifies a login domain name suffix that is included as part of the username valuewhen authenticating through LDAP, where login-domain-suffix is the login domainname suffix and the value is an authentication domain. For example, users can log inusing either: username@boston or [email protected], where this parameter isset as follows:
ldap.auth.domain.boston=boston.edu
Use this parameter along with the next parameter, ldap.query.domain, to map
multiple authentication domains to a single login domain name suffix.
ldap.query.domain.log-in-domain-
suffix
Maps additional authentication domains to a single login domain suffix, where theldap.auth.domain parameterlogin-domain-suffix is defined by the ldap.auth.domainparameter, and the ldap.query.domain values are additional authentication domainswithin the organization's intranet. For example, users from either authenticationdomain log in using the format username@boston, where the two parameters are setas follows:
ldap.auth.domain.boston=boston.eduldap.query.domain.boston=science.boston.edu,art.boston.edu
ldap.entry.lookup.type.ldap-
domain
Defines the method that is used by the LDAP server when looking up a username,where ldap-domain is the authentication domain. Possible values are:
l UN for username, the method that is commonly used by LDAP directory services.
(Default)
User Management and Authentication
LDAP directory service authentication 69

Table 20 Additional parameter for LDAP base functionality (continued)
Parameter Description and values
l DN for distinguished name, the method that is commonly used by OpenLDAP
directory services.
user-login-module Controls the authentication mechanism. The following values are available:
l kerberos — LDAP authentication with Kerberos encryption. This is the default
value.
l ldap — Plaintext LDAP authentication. This parameter also requires the
ldap.auth.force.username.input=true parameter to force user login
even on a Windows domain computer.
l avamar — Avamar authentication.
l mix — Both kerberos and avamar.
ldap.auth.force.username.input Controls whether Avamar requires user log in though a login screen on webapplications that permit Kerberos pass through authentication. Possible values are:
l False — Log in is not required. This is the default value.
l True — Log in is required. Required for the following parameter: user-login-module=ldap.
avamar-authentication-domains Required by the following parameter: user-login-module=mix. The value is a
comma-separated list of domains. Avamar authentication is applied to users fromeach listed domain. LDAP authentication is applied to all other users.
support-nis-authentication Enables (true) or disables (false) NIS authentication support. The default value is
false.
nis.qualified-name-default Specifies the FQDN of the NIS domain server.
nis.url.nisdomainname Specifies the IP address of the NIS domain server, where nisdomainname is the valueof nis.qualified-name-default.
OpenLDAP directory service authenticationAvamar supports authentication and authorization of Avamar users through anOpenLDAP directory service.
Adding information about an OpenLDAP directory service to Avamar is described in Adding an OpenLDAP directory service on page 70.
Configuring Avamar to use an OpenLDAP directory service for authentication includes theability to use optional parameters that exist for OpenLDAP. OpenLDAP directory serviceparameters on page 73 describes the required and optional parameters for OpenLDAP.
Adding an OpenLDAP directory serviceEdit the ldap.properties file to configure an Avamar system to use an OpenLDAPdirectory service for authentication.
Add an OpenLDAP directory service by manually editing the ldap.properties file ofthe Avamar server and adding the required parameters. Optional parameters can also beadded to control how the Avamar system interacts with the OpenLDAP directory service.
User Management and Authentication
70 EMC Avamar 7.2 Administration Guide

OpenLDAP directory service parameters on page 73 provides more information aboutthe required and optional parameters.
Procedure
1. Log in to the root domain in Avamar Administrator as an administrator.
a. Launch Avamar Administrator.
b. In the Username box in the login window, type a username for an account that isassigned the administrator role at the root domain level.
When Avamar is already configured to use a directory service, alternatively log inby using an LDAP account with administrator authorization at the root domainlevel. Use the format: username@ldap-domain.
c. In Password, type the password for the user account.
d. In Domain Name, use the default entry of a single slash (/) character to specify theroot domain.
e. In Avamar Server, type the IP address or DNS name of the Avamar server.
f. Click Log On.
2. In Avamar Administrator, click the Administration launcher button.
The Administration window appears.
3. Click the LDAP Management tab.
4. Click Edit LDAP file to edit ldap.properties.
The Edit ldap.properties file dialog box appears.
5. In the text entry area, type the following, on a new line:
ldap.entry.lookup.type.ldap-domain=DNwhereldap-domain is the domain name of the OpenLDAP server.
This parameter is required.
6. In the text entry area, type the following, on a new line:
ldap.userdn.ldap-domain=rdn-valueswhere:
l ldap-domain is the domain name of the OpenLDAP server
l rdn-values is a semi-colon separated list of the relative distinguished name basesfor users, from the root distinguished name of the LDAP tree.
Each entry in the list is a comma-separated, reverse-hierarchical, representation ofa user group's relative distinguished name base.
This parameter is required, unless either the users are directly under the rootdistinguished name or the LDAP server permits anonymous searches.
For example, if the users for the domain example.com can be found in Users,inside Employees, inside People, at the tree root, and in Admins at the tree root,then type:
ldap.userdn.example.com=ou=Users,ou=Employees,ou=People;ou=Admins7. In the text entry area, type the following, on a new line:
ldap.rootdn.ldap-domain=rootdn-formatwhere:
User Management and Authentication
OpenLDAP directory service authentication 71

l ldap-domain is the domain name of the OpenLDAP server
l rootdn-format is the root distinguished name format that is used by the LDAP server
This parameter is required, unless the LDAP server uses the following rootdistinguished name format: dc=domain-segment,dc=domain-segment
For example, an LDAP server that stores the root distinguished name asdc=example,dc=com, does not require this parameter in ldap.properties.
However, an LDAP server that stores the root distinguished name asu=example,o=com requires the following parameter in ldap.properties:ldap.rootdn.exaple.com=u=example,o=com
8. In the text entry area, add optional OpenLDAP parameters.
Type each parameter on a new line.
9. Click Save.
10.Test the directory service entries:
a. In the Directory Service Management dialog box, select one of the entries fromConfigured Directory Services.
The Testing section appears.
b. In Username, type the username for an account that is authorized to read thedirectory service database.
c. In Password, type the password that is associated with the username.
d. Click Run Test.
If an error message appears, then resolve the issue. Error messages duringdirectory service configuration on page 76 provides details.
e. Click Close to close the Testing section.
11.Click Close on the Directory Service Management dialog box.
Results
The Avamar system enables authentication through the OpenLDAP directory service.
After you finish
Create an LDAP map to associate the directory service group to Avamar user information. Adding an LDAP map on page 77 provides instructions.
Enabling OpenLDAP and Avamar authenticationEdit the ldap.properties file to configure an Avamar system to use Avamarauthentication and OpenLDAP authentication.
Before you begin
Add an OpenLDAP directory service to the Avamar system.
After adding an OpenLDAP directory service for authentication, configure the Avamarsystem to use Avamar authentication for some of the Avamar domains.
Procedure
1. Log in to the root domain in Avamar Administrator as an administrator.
a. Launch Avamar Administrator.
User Management and Authentication
72 EMC Avamar 7.2 Administration Guide

b. In the Username box in the login window, type a username for an account that isassigned the administrator role at the root domain level.
When Avamar is already configured to use a directory service, alternatively log inby using an LDAP account with administrator authorization at the root domainlevel. Use the format: username@ldap-domain.
c. In Password, type the password for the user account.
d. In Domain Name, use the default entry of a single slash (/) character to specify theroot domain.
e. In Avamar Server, type the IP address or DNS name of the Avamar server.
f. Click Log On.
2. In Avamar Administrator, click the Administration launcher button.
The Administration window appears.
3. Click the LDAP Management tab.
4. Click Edit LDAP file to edit ldap.properties.
The Edit ldap.properties file dialog box appears.
5. In the text entry area, type the following, on a new line:
user-login-module=mixThis parameter is required when enabling Avamar authentication with OpenLDAPauthentication.
6. In the text entry area, type the following, on a new line:
user-login-module-mix-ldap=ldapThis parameter is required when enabling Avamar authentication with OpenLDAPauthentication.
7. In the text entry area, type the following, on a new line:
avamar-authentication-domains=av-domain-listwhere av-domain-list is a comma-separated list of Avamar domains.
The Avamar system uses Avamar authentication for login authentication of users fromeach listed domain. The Avamar system uses OpenLDAP authentication for all otherusers.
8. Click Save.
9. Click Close on the Directory Service Management dialog box.
Results
The Avamar system enables the specified mix of Avamar authentication and OpenLDAPauthentication.
OpenLDAP directory service parameters
The following table describes the ldap.properties file parameters for use with anOpenLDAP directory service.
User Management and Authentication
OpenLDAP directory service authentication 73

Table 21 OpenLDAP directory service parameters
Parameter and example Description
ldap.entry.lookup.type.ldap-domain=DN
For an LDAP domain "xyz.com" that uses OpenLDAP:ldap.entry.lookup.type.xyz.com=DN
Specifies OpenLDAP. Replace ldap-domain with the domainname of the LDAP server. Use this parameter for OpenLDAPservers that accept user logins only in distinguished nameformat. For example: uid=jsmith,dc=example,dc=com.
This parameter enables the other OpenLDAP parameters in thistable.
ldap.userdn.ldap-domain=rdn-values
For an LDAP domain "xyz.com" that organizes users in thefollowing organizational units:
l Managers which is under the tree root
l Accountants, under people, which is under the tree
root
l HRs, under Employees, under Users, which is under the
tree root
l Users, which is under the tree root
ldap.userdn.xyz.com=ou=Managers;ou=Accountants,ou=people;ou=HRs,ou=Employees,ou=Users;ou=Users
Specifies the relative distinguished name bases that areassigned to the organizational units that contains users.Replace ldap-domain with the domain name of the LDAP serverand replace rdn-values with a semi-colon separated list ofrelative distinguished name bases for users, from the rootdistinguished name of the LDAP tree. Each entry in the list is acomma-separated reverse-hierarchical representation of a usergroup's relative distinguished name base.
ldap.rootdn.ldap-domain=rootdn-format
For an LDAP domain "xyz.com" that stores the root distinguishedname as u=xyz,o=com:ldap.rootdn.xyz.com=u=xyz,o=com
Specifies the root distinguished name format of the LDAP server.This parameter is required unless the root distinguished nameformat is dc=domain-segment,dc=domain-segment.
Replace ldap-domain with the domain name of the LDAP serverand replace rootdn-format with the root distinguished nameformat that is used by the LDAP server.
ldap.user.search.classes.ldap-domain=search-object
For an LDAP domain "xyz.com" that uses the object class type"person" in user searches:ldap.user.search.classes.xyz.com=person
Specifies the object class type that is used by the user searchfilter. This parameter is optional. Replace ldap-domain with thedomain name of the LDAP server and replace search-object withthe value used to specify the object class type that is used bythe user search filter. Comma separated values can be used.The default value is *.
ldap.user.search.attrs.ldap-domain=search-attribute
For an LDAP domain "xyz.com" that uses the object classattribute "cn" in user searches:ldap.user.search.attrs.xyz.com=cn
Specifies the object class attribute that is used by the usersearch filter. This parameter is optional. Replace ldap-domainwith the domain name of the LDAP server and replace search-attribute with a single attribute used by the user search filter.The default value is uid.
ldap.group.search.byUpn.classes.ldap-domain=search-upn
For an LDAP domain "xyz.com" that uses the User PrincipalName object class types: sambaGroupMapping and posixGroupin group searches:ldap.group.search.byUpn.classes.xyz.com=sambaGroupMapping,posixGroup
Specifies the object class type that is used by the group searchUser Principal Name filter. This parameter is optional. Replaceldap-domain with the domain name of the LDAP server andreplace search-upn with the value used to specify the objectclass type that is used by the group search User Principal Namefilter. Comma separated values can be used. The default value is*.
ldap.group.search.byUpn.attrs.ldap-domain=upn-attributes
Specifies the object class attributes used by the group searchUser Principal Name filter. This parameter is optional. Replaceldap-domain with the domain name of the LDAP server andreplace upn-attributes with the value used to specify the object
User Management and Authentication
74 EMC Avamar 7.2 Administration Guide

Table 21 OpenLDAP directory service parameters (continued)
Parameter and example Description
For an LDAP domain "xyz.com" that uses the User PrincipalName object class attributes: memberUid and uniqueMember ingroup searches:ldap.group.search.byUpn.attrs.xyz.com=memberUid,uniqueMember
class attributes used by the group search User Principal Namefilter. Comma separated values can be used. The default value ismemberUid,uniqueMember.
ldap.unique.group.search.classes.ldap-domain=unique-type
For an LDAP domain "xyz.com" that uses the object class type"posixGroup" in Unique Groups group searches:ldap.unique.group.search.classes.xyz.com=posixGroup
Specifies the object class type that is used by the UniqueGroups group search filter. This parameter is optional. Replaceldap-domain with the domain name of the LDAP server andreplace unique-type with the value used to specify the objectclass type that is used by the Unique Groups group search filter.Comma separated values can be used. The default value issambaGroupMapping,posixGroup,groupOfUniqueNames.
ldap.unique.group.search.attrs.ldap-domain=unique-attributes
For an LDAP domain "xyz.com" that uses the object classattributes "cn" and "uid" in Unique Groups group searches:ldap.unique.group.search.attrs.xyz.com=cn,uid
Specifies the object class attributes used by the Unique Groupsgroup search filter. This parameter is optional. Replace ldap-domain with the domain name of the LDAP server and replaceunique-attributes with the value used to specify the object classattributes used by the Unique Groups group search filter.Comma separated values can be used. The default value is cn.
user-login-module=mix Enables authentication using the mix mode of Avamarauthentication with OpenLDAP authentication. Configurationmust also include: user-login-module-mix-ldap=ldapand avamar-authentication-domains=av-domain-list.
user-login-module-mix-ldap=ldap Specifies that the Avamar system uses Avamar authenticationwith OpenLDAP authentication. Configuration must also include:user-login-module=mix and avamar-authentication-domains=av-domain-list.
avamar-authentication-domains=av-domain-list
For an Avamar system that uses OpenLDAP and uses Avamarauthentication for the domains: /, /swclients, and /adminclients:avamar-authentication-domains=/,/swclients,/adminclients
Specifies the internal Avamar domains that the Avamar systemchecks during Avamar authentication. Replace av-domain-listwith a comma-separated list of Avamar domains. Configurationmust also include: user-login-module=mix and user-login-module-mix-ldap=ldap.
Adding an NIS directory serviceProvide authentication and authorization of Avamar users through an NIS directoryservice.
Procedure
1. Log in to the root domain in Avamar Administrator as an administrator.
a. Launch Avamar Administrator.
b. In the Username box in the login window, type a username for an account that isassigned the administrator role at the root domain level.
If you already configured a directory service, then you can log in with an accountfor an LDAP user with the administrator role at the root domain level.
User Management and Authentication
Adding an NIS directory service 75

c. In Password, type the password for the user account.
d. In Domain Name, use the default entry of a single slash (/) character to specify theroot domain.
e. In Avamar Server, type the IP address or DNS name of the Avamar server.
f. Click Log On.
2. In Avamar Administrator, click the Administration launcher button.
The Administration window appears.
3. Click the LDAP Management tab.
4. Click Directory Service Management.
The Directory Service Management dialog box appears.
5. In the Directory Service Management dialog box, click Add.
The Adding a new Directory Service section appears.
6. Select NIS.
7. In Enter a fully qualified domain name, type the NIS domain name.
8. In NIS Domain IP address, type the IP address of the NIS server.
9. Click Add.
A confirmation message appears.
10.Click Yes.
If an error message appears, then resolve the issue and retry this task. Error messagesduring directory service configuration on page 76 provides details.
A success message appears.
11.Click OK.
Results
The changes are applied to the Management Console Server (mcs) and EM Tomcat (emt)services.
After you finish
Create an LDAP map to associate the directory service group to Avamar user information. Adding an LDAP map on page 77 provides instructions.
Error messages during directory service configurationError messages appear when issues occur during adding or testing of a directory serviceconfiguration.
The following table lists some of the potential messages and provides a description ofthe cause.
Table 22 Error messages during directory service configuration'
Error message Description
Cannot discover KDC A key distribution center (KDC) could not be found by using the specifieddomain information.
No URL is present The specified domain is not present in the ldap.properties file.
User Management and Authentication
76 EMC Avamar 7.2 Administration Guide

Table 22 Error messages during directory service configuration' (continued)
Error message Description
Parameters are not correct The directory service domain information in the ldap.properties file is
invalid.
Client not found in Kerberosdatabase
The specified username is invalid.
Pre-authentication informationwas invalid
The specified password is incorrect.
Query fails The specified user account does not have sufficient privileges to read thedirectory service database.
Clock skew too great The differential between the clock on the Avamar server host and the clock onthe directory service host is too large.
Cannot open LDAP configurationfile
The ldap.properties file does not exist or the file permissions prevent
access.
Cannot open Kerberosconfiguration file
The krb5.conf file does not exist or the file permissions prevent access.
GSS initiate failed Authentication of credentials failed. Usually authentication failure is becausereverse DNS is improperly configured. Add the KDC host to /etc/hosts on the
Avamar server.
Cannot get kdc for realm The KDC is improperly configured in the krb5.conf file.
Domain <domain> exists inldap.properties file
The specified domain is in the ldap.properties file already.
Adding an LDAP mapCreate an LDAP map to associate the directory service group to Avamar user information.An LDAP map is a database construct that ties a group of users to an authenticationsystem, domain or subdomain access list, and role.
Before you begin
Add directory service domains to the Avamar configuration.
Procedure
1. In Avamar Administrator, click the Administration launcher button.
The Administration window appears.
2. Click the Account Management tab.
3. Click the LDAP Maps tab.
4. In the left-pane hierarchical tree, select a domain or a subdomain to specify theaccess level of the directory service group.
5. Select Actions > Account Management > New LDAP Map.
The New LDAP Group Map dialog box appears.
6. From the LDAP Domains list, select a directory service domain to map.
User Management and Authentication
Adding an LDAP map 77

7. In the Group Search box, type a search string specific to the group being mapped.
You can use an asterisk (*) as a wildcard that represents one or more alphanumericcharacters.
8. Click Search.
The Directory Service Authentication dialog box appears.
9. Specify the authentication information required for querying the directory service.
Authentication can be through a domain different from the one being mapped, as longas there is a trust relationship between the two domains.
a. From the Auth Domain list, select a domain to use for authentication.
b. In the User Name box, type a username for an account that has Read privileges forthe domain.
c. In the Password box, type the password for the username.
d. Click OK.
The Directory Service Authentication dialog box closes and the search starts. TheSearch button on the New LDAP Group Map dialog box changes to Stop.
To terminate a search, click Stop. Searching a directory service can take a long time.
The search is complete when groups appear in the LDAP Groups list.
10.From the LDAP Groups list, select the group to map.
11.From the Role list, select a role for the group.
12.Click OK.
The group is mapped and the New LDAP Group Map dialog closes. Select theappropriate administrative node to see the mapping on the LDAP Maps tab.
Editing the role for an LDAP mapProcedure
1. In Avamar Administrator, click the Administration launcher button.
The Administration window appears.
2. Click the Account Management tab.
3. Click the LDAP Maps tab.
4. In the left-pane hierarchical tree, select a domain or a subdomain.
The maps for the domain or subdomain appear in the LDAP Maps area.
5. Select the map to edit.
6. Select Actions > Account Management > Edit LDAP Map.
The Edit LDAP Map dialog appears.
7. In Role, select a new role to assign to the map.
8. Click OK.
The map is assigned the new role. Group members are assigned the new role in allsubsequent sessions.
User Management and Authentication
78 EMC Avamar 7.2 Administration Guide

Deleting an LDAP mapProcedure
1. In Avamar Administrator, click the Administration launcher button.
The Administration window appears.
2. Click the Account Management tab.
3. Click the LDAP Maps tab.
4. In the left-pane hierarchical tree, select a domain or a subdomain.
The maps for the domain or subdomain appear in the LDAP Maps area.
5. Select the map to delete.
6. Select Actions > Account Management > Delete LDAP Map.
The Delete LDAP Map dialog appears.
7. Click Yes.
Editing the time-out value for directory service processesDirectory service processes wait as long as five minutes for a response from the directoryservice. After this time period, the attempt is discarded and a time-out message appears.You can edit the time-out value.
The time-out value is used by the following directory service authentication processes:
l Authentication requests through the directory service
l Addition of a directory service to the Avamar configuration
l Testing of a directory service in the Avamar configuration
Procedure
1. Open a command shell and log in by using one of the following methods:
l For a single-node server, log in to the server as admin.
l For a multi-node server:
a. Log in to the utility node as admin.
b. Load the admin OpenSSH key by typing:
ssh-agent bashssh-add ~admin/.ssh/admin_key
c. When prompted, type the admin_key passphrase and press Enter.
2. Stop the Management Console Server (mcs) service by typing dpnctl stop mcs.
3. Change the working directory by typing the following command:
cd /usr/local/avamar/var/mc/server_data/prefs
4. Open mcserver.xml in a text editor.
5. Find the <node name="ldap"> node.
6. Change the value of <entry key="ldap_services_timeout_seconds"value="n" /> to a new time-out value in seconds, where n is the new value.
The default value is 300 seconds (five minutes).
User Management and Authentication
Deleting an LDAP map 79

7. Save the change and close the file.
8. Start the MCS and the scheduler by typing:
dpnctl start mcsdpnctl start sched
9. Close the command shell.
Enabling backward compatibility with Enterprise AuthenticationTo continue to authenticate users through the deprecated Enterprise Authenticationmechanism enable the capability.
With Enterprise Authentication, Avamar uses the Pluggable Authentication Module (PAM)library of the host Linux operating system to provide access to external authenticationdatabases. Enterprise Authentication, which is described in the EMC Avamar ProductSecurity Guide, is deprecated and will be removed in future releases. By default, youcannot select an Enterprise Authentication domain when you add a user to a domain orclient. To continue to use Enterprise Authentication as an authentication mechanism,configure the system to enable selection of Enterprise Authentication when adding a userby changing the Enterprise Authentication selection setting in mcserver.xml.
Procedure
1. Open a command shell and log in by using one of the following methods:
l For a single-node server, log in to the server as admin.
l For a multi-node server:
a. Log in to the utility node as admin.
b. Load the admin OpenSSH key by typing:
ssh-agent bashssh-add ~admin/.ssh/admin_key
c. When prompted, type the admin_key passphrase and press Enter.
2. Stop the Management Console Server (mcs) service by typing dpnctl stop mcs.
3. Change the working directory by typing the following command:
cd /usr/local/avamar/var/mc/server_data/prefs
4. Open mcserver.xml in a text editor.
5. Find the <node name="ldap"> node.
6. Change the value of <entrykey="enable_new_user_authentication_selection"value="false" /> from false to true.
7. Save the change and close the file.
8. Start the MCS and the scheduler by typing:
dpnctl start mcsdpnctl start sched
9. Close the command shell.
User Management and Authentication
80 EMC Avamar 7.2 Administration Guide

RolesRoles define the allowable operations for each user account.
There are three types of roles:
l Administrator roles
l Operator roles
l User roles
Administrator rolesAdministrators are responsible for maintaining the system.
You can only assign the role of administrator to user accounts at a domain level. Domainlevel includes the top-level (root) domain and any other domain or subdomain. Youcannot assign the administrator role to user accounts at a client level.
You can assign the administrator role to users at the top-level (root) domain or to aspecific domain or subdomain.
Table 23 Administrator roles
Administrator type Description
Root administrators Administrators at the top-level (root) domain have full control of the system. They are sometimesreferred to as “root administrators.”
Domain administrators Administrators at domains other than root generally have access to most of the features that aredescribed in this guide. Administrators typically can only view or operate on objects in the domain. Anyactivity that would allow a domain administrator to view data outside the domain is disallowed. Accessto server features of a global nature (for example, suspending or resuming scheduled operations orchanging runtimes for maintenance activities) is disallowed. Domain administrators:
l Cannot add or edit other subdomain administrators.
l Cannot change their assigned role.
l Can change their password.
Operator rolesOperator roles are generally implemented to allow certain users limited access to certainareas of the system to perform backups and restores, or obtain status and run reports.These roles allow greater freedom in assigning backup, restore, and reporting tasks topersons other than administrators.
You can only assign operator roles to user accounts at the domain level. You cannotassign these roles to user accounts at the client level. To add the user account tosubdomains, you must have administrator privileges on the parent domain or above.
Users with an operator role do not have access to all features in Avamar Administrator.Instead, after login, they are presented with a single window that provides access to thefeatures that they are allowed to use.
The following table describes the four operator roles.
User Management and Authentication
Roles 81

Table 24 Operator roles
Operator type Description
Restore only operator Restore only operators are generally only allowed to perform restores and to monitor those activities todetermine when they complete and if they completed without errors. Restore only operators at the top-level (root) domain can perform restores for any client in the system. Restore only operators at a domainother than root can only perform restores for clients in that domain. Restore only operators can restorebackup data and monitor activities in the assigned domain. By default, restore only operators cannotbrowse backups from the command line or the Avamar Web Restore interface. To enable these activitiesfor a restore only operator, add the noticketrequired privilege by using the avmgr chgvcommand:avmgr chgv --acnt=location --u=name --ud=auth \ --pv="enabled,read,mclogin,noticketrequired" where location is the subdomain of the
operator, name is the Avamar username of the user, and auth is the external authentication system usedto authenticate the user.
Back up only operator Back up only operators are generally only allowed to perform backups and to monitor those activities todetermine when they complete and if they completed without errors. Back up only operators at the top-level (root) domain can perform backups for any client or group in the system. Back up only operators atdomains other than root can only perform backups for clients or groups in that domain. Back up onlyoperators can perform on-demand backups of a client or a group, as well as monitor activities in theassigned domain. By default, back up only operators cannot perform backups from the command line.To enable command line backups for a back up only operator, add the noticketrequired privilege
by using the avmgr chgv avmgr chgv --acnt=location --u=name --ud=auth \ --pv="enabled,read,mclogin,backup,noticketrequired"command: where location is the
subdomain of the operator, name is the Avamar username of the user, and auth is the externalauthentication system used to authenticate the user.
Back up/restoreoperator
Back up/restore operators are generally only allowed to perform backups or restores and to monitorthose activities to determine when they complete and if they completed without errors. As with rolesassigned to other domain user accounts, back up/restore operators at the top-level (root) domain canperform backups and restores for any client or group in the system. Back up/restore operators atdomains other than root can only perform backups and restores for clients or groups in that domain.Back up/restore operators can perform the following tasks in the assigned domain:
l Perform on-demand backups for a client or group.
l Perform restores.
l Monitor activities.
By default, back up/restore operators cannot browse backups from the command line or by using theAvamar Web Restore interface, and cannot perform backups from the command line. To enable theseactivities, add the noticketrequired privilege by using the avmgr chgv command: avmgr chgv--acnt=location --u=name --ud=auth \ --pv="enabled,read,mclogin,backup,noticketrequired" where location is the subdomain
of the operator, name is the Avamar username of the user, and auth is the external authenticationsystem used to authenticate the user.
Activity operator Activity operators are generally only allowed to monitor backup and restore activities and to createcertain reports. Activity operators at the top-level (root) domain can view or create reports for backupand restore activities in all domains and subdomains. Activity operators at domains other than root canonly view or create reports for backup and restore activities in that domain. Activity operators canperform the following tasks in the assigned domain:
l Monitor activities.
l View the group status summary.
l View the Activity Report.
User Management and Authentication
82 EMC Avamar 7.2 Administration Guide

Table 24 Operator roles (continued)
Operator type Description
l View the Replication Report.
User rolesUser roles limit the operations that are allowed for a user account to a specific client.
Users who are assigned to one of the user roles cannot log in to Avamar Administrator,Avamar Client Manager, or the Avamar client web UI.
The following table describes the four user roles.
Table 25 User roles
User type Description
Back Up Only User Users assigned this role can start backups directly from the client by using the avtar command line.
Restore (Read) OnlyUser
Users assigned this role can start restores directly from the client by using the avtar command line or
MCS web services.
Back Up/Restore User Users assigned this role can start backups and restores directly from the client by using the avtarcommand line or MCS web services.
Restore (Read) Only/Ignore File Permissions
Similar to the Restore (Read) Only User role except that operating system file permissions are ignoredduring restores. This user is allowed to restore any file that is stored for an Avamar client. This role isonly available when users are authenticated by using Avamar internal authentication. To ensure trouble-free restores, Windows client user accounts should be assigned this role only when both of thefollowing are true:
l Users are authenticated using Avamar internal authentication.
l Users do not require access to the Avamar client web UI.
Adding a user to a client or domainYou can add a user account to a client or domain when the user account is authenticatedby using Avamar internal authentication or the deprecated enterprise authenticationsystem.
Preparing to use LDAP directory service authentication on page 65 provides details onadding a user that uses an existing directory service for authentication.
Procedure
1. Review Roles on page 81 to ensure that you will assign the correct role to this user.
2. In Avamar Administrator, click the Administration launcher button.
The Administration window appears.
3. Click the Account Management tab.
4. Click the Users tab
5. In the left-pane hierarchical tree, select the domain or client for the new user.
User Management and Authentication
User roles 83

Note
You cannot add user accounts to the MC_RETIRED domain or to clients in the
MC_RETIRED domain.
6. From the Actions menu, select Account Management > New User(s).
The New User(s) dialog box appears.
7. (Optional) From the Authentication System list, select an authentication system.
The Authentication System list normally appears in a dimmed state, with AxionAuthentication System (the internal system) selected. This indicates that the ability toselect an enterprise authentication system is not currently enabled.
The enterprise authentication system, which is described in the EMC Avamar ProductSecurity Guide, is deprecated and will be removed in future releases. However it canbe used with this release. To enable the ability to select an enterprise authenticationsystem, complete the procedure described in Enabling backward compatibility withEnterprise Authentication on page 80.
For a more robust alternative to enterprise authentication, use the method describedin Preparing to use LDAP directory service authentication on page 65.
8. (Optional) If you select the enterprise authentication system, select the Everyoneoption to designate roles for all users on this client or domain.
9. Select the User Name option and type the new username.
The username must meet the following requirements:
l If you use enterprise authentication, this must be the username assigned by thatsystem.
l The username cannot contain more than 31 characters.
l The username cannot contain any of the following characters: ~!@$^%(){}[]|,`;#\/:*?<>'"&.
10.From the Role list, select a role for the user.
11.In the Password box, type a password for the user.
Passwords are case-sensitive and must meet the following requirements:
l The password must be between six and 31 characters in length.
l The password must contain only alphanumeric, hyphen, period, or underscorecharacters.
l The password must contain at least one alphabetic character.
This field is not used with enterprise authentication.
12.In the Confirm box, retype the password.
This field is not used with enterprise authentication.
13.Click OK.
A confirmation message appears.
14.Click OK.
User Management and Authentication
84 EMC Avamar 7.2 Administration Guide

Editing user informationProcedure
1. In Avamar Administrator, click the Administration launcher button.
The Administration window appears.
2. Click the Account Management tab.
In the Account Management tree, the icons for the clients indicate status. An xappears for disabled clients, a question mark appears for unregistered clients, andthere is no special icon designation for active clients.
3. In the left-pane hierarchical tree, select the domain or client with the user.
4. Select the user.
5. From the Actions menu, select Account Management > Edit User.
The Edit User dialog box appears.
6. Select the role for the user.
7. (Optional) Change the password for the user:
a. Click Set Password.
The Set Password dialog box appears.
b. Type the new password into both the New Password and Confirm Password boxes.
c. Click OK on the Set Password dialog box.
8. Click OK.
A confirmation message appears.
9. Click OK.
Deleting a userProcedure
1. In Avamar Administrator, click the Administration launcher button.
The Administration window appears.
2. Click the Account Management tab.
3. In the left-pane hierarchical tree, select the domain or client with the user.
4. Select the user.
5. From the Actions menu, select Account Management > Delete User.
A confirmation message appears.
6. Click Yes.
A second confirmation message appears.
7. Click OK.
User Management and Authentication
Editing user information 85

User Management and Authentication
86 EMC Avamar 7.2 Administration Guide

CHAPTER 5
Backup
This chapter includes the following topics:
l Performing on-demand backups............................................................................88l Scheduling backups..............................................................................................89l Monitoring backups............................................................................................ 114l Canceling backups..............................................................................................114l Managing completed backups............................................................................ 115
Backup 87

Performing on-demand backupsYou can perform an on-demand backup of an individual client. If you configure scheduledbackups for a group of clients, then you can also perform an on-demand backup of agroup or an on-demand backup of a single client by using group policy settings.
An on-demand backup is a one-time backup of data on an Avamar client computer. Youmay want to perform an on-demand backup for the first backup of the client immediatelyafter you install the Avamar client software. You should also perform an on-demandbackup before system maintenance, software installations, or software upgrades.
Performing an on-demand backup of a clientProcedure
1. In Avamar Administrator, click the Backup & Restore launcher button.
The Backup, Restore and Manage window appears.
2. In the domain tree, select the domain for the client.
3. From the list of clients, select the client computer to back up.
You can only view clients in the domain for the login account. To view all clients, log into the root domain.
4. Click the Backup tab.
A list of plug-ins on the client appears in the left pane of the Backup tab.
5. Browse to and select the checkbox next to the data to back up.
6. If you browse the client file system, specify a valid client username and password,then click OK.
The username and password must have read permissions on the files and directoriesthat you select for backup.
7. (Optional) To view a summary of all directories and files that you selected for backup,select Actions > Preview List.
8. Select Actions > Back Up Now.
The On Demand Backup Options dialog box appears.
9. Select the backup retention setting:
l To automatically delete this backup from the Avamar server after a specific amountof time, select Retention period and then specify the number of days, weeks,months, or years for the retention period.
l To automatically delete this backup from the Avamar server on a specific calendardate, select End date and browse to that date on the calendar.
l To keep this backup for as long as this client remains active in the Avamar server,select No end date.
10.From the Avamar encryption method list, select the encryption method to use for datatransfer between the client and the Avamar server during the backup.
The encryption technology and bit strength for a client/server connection depends onseveral factors, including the client operating system and Avamar server version. TheEMC Avamar Product Security Guide provides additional information.
11.Click More Options.
Backup
88 EMC Avamar 7.2 Administration Guide
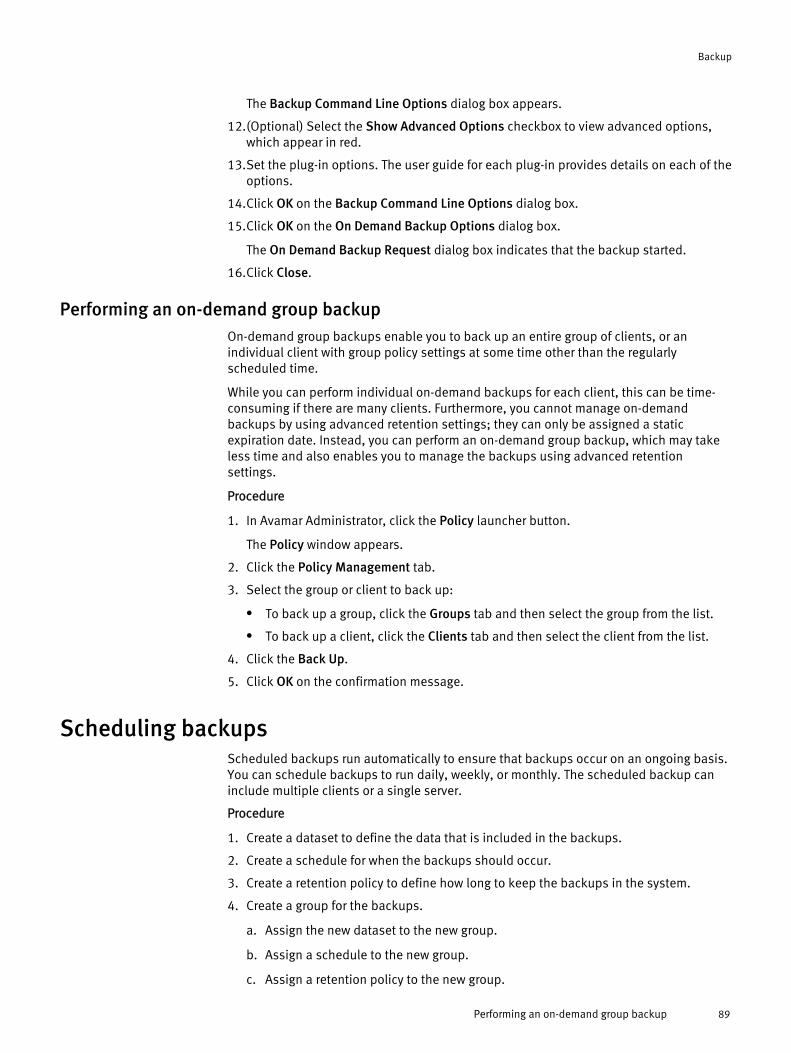
The Backup Command Line Options dialog box appears.
12.(Optional) Select the Show Advanced Options checkbox to view advanced options,which appear in red.
13.Set the plug-in options. The user guide for each plug-in provides details on each of theoptions.
14.Click OK on the Backup Command Line Options dialog box.
15.Click OK on the On Demand Backup Options dialog box.
The On Demand Backup Request dialog box indicates that the backup started.
16.Click Close.
Performing an on-demand group backupOn-demand group backups enable you to back up an entire group of clients, or anindividual client with group policy settings at some time other than the regularlyscheduled time.
While you can perform individual on-demand backups for each client, this can be time-consuming if there are many clients. Furthermore, you cannot manage on-demandbackups by using advanced retention settings; they can only be assigned a staticexpiration date. Instead, you can perform an on-demand group backup, which may takeless time and also enables you to manage the backups using advanced retentionsettings.
Procedure
1. In Avamar Administrator, click the Policy launcher button.
The Policy window appears.
2. Click the Policy Management tab.
3. Select the group or client to back up:
l To back up a group, click the Groups tab and then select the group from the list.
l To back up a client, click the Clients tab and then select the client from the list.
4. Click the Back Up.
5. Click OK on the confirmation message.
Scheduling backupsScheduled backups run automatically to ensure that backups occur on an ongoing basis.You can schedule backups to run daily, weekly, or monthly. The scheduled backup caninclude multiple clients or a single server.
Procedure
1. Create a dataset to define the data that is included in the backups.
2. Create a schedule for when the backups should occur.
3. Create a retention policy to define how long to keep the backups in the system.
4. Create a group for the backups.
a. Assign the new dataset to the new group.
b. Assign a schedule to the new group.
c. Assign a retention policy to the new group.
Backup
Performing an on-demand group backup 89
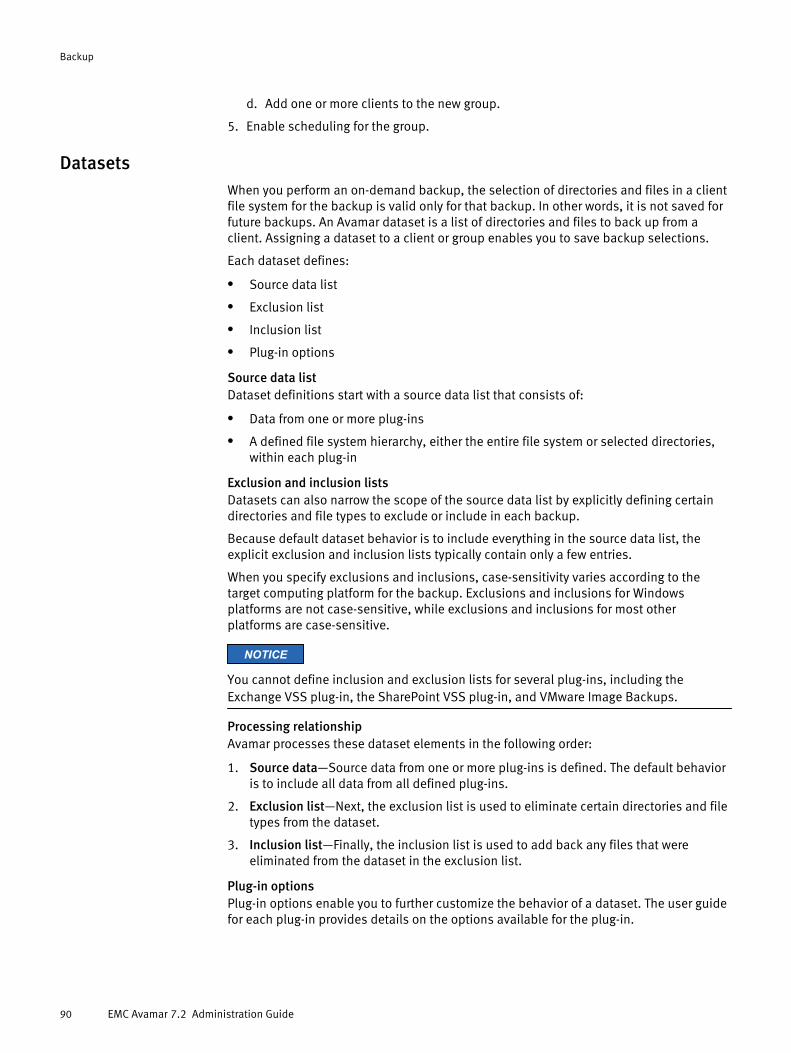
d. Add one or more clients to the new group.
5. Enable scheduling for the group.
DatasetsWhen you perform an on-demand backup, the selection of directories and files in a clientfile system for the backup is valid only for that backup. In other words, it is not saved forfuture backups. An Avamar dataset is a list of directories and files to back up from aclient. Assigning a dataset to a client or group enables you to save backup selections.
Each dataset defines:
l Source data list
l Exclusion list
l Inclusion list
l Plug-in options
Source data listDataset definitions start with a source data list that consists of:
l Data from one or more plug-ins
l A defined file system hierarchy, either the entire file system or selected directories,within each plug-in
Exclusion and inclusion listsDatasets can also narrow the scope of the source data list by explicitly defining certaindirectories and file types to exclude or include in each backup.
Because default dataset behavior is to include everything in the source data list, theexplicit exclusion and inclusion lists typically contain only a few entries.
When you specify exclusions and inclusions, case-sensitivity varies according to thetarget computing platform for the backup. Exclusions and inclusions for Windowsplatforms are not case-sensitive, while exclusions and inclusions for most otherplatforms are case-sensitive.
NOTICE
You cannot define inclusion and exclusion lists for several plug-ins, including theExchange VSS plug-in, the SharePoint VSS plug-in, and VMware Image Backups.
Processing relationshipAvamar processes these dataset elements in the following order:
1. Source data—Source data from one or more plug-ins is defined. The default behavioris to include all data from all defined plug-ins.
2. Exclusion list—Next, the exclusion list is used to eliminate certain directories and filetypes from the dataset.
3. Inclusion list—Finally, the inclusion list is used to add back any files that wereeliminated from the dataset in the exclusion list.
Plug-in optionsPlug-in options enable you to further customize the behavior of a dataset. The user guidefor each plug-in provides details on the options available for the plug-in.
Backup
90 EMC Avamar 7.2 Administration Guide

Dataset catalogThe Avamar system includes a set of preconfigured datasets by default. You can usethese datasets for scheduled backups of clients, or you can create a custom dataset.
Base DatasetThe Base Dataset defines a set of minimum, or baseline, backup requirements. The initialsettings in the Base Dataset are:
l No source data plug-ins
l No explicit exclusion or inclusion list entries
This is essentially an empty dataset.
Default DatasetThe Default Dataset defines persistent backup selections for the Default Group. The initialsettings in the Default Dataset are:
l All available source data plug-ins
l No explicit exclusion or inclusion list entries
This ensures that all members of the Default Group can back up their client computersregardless of platform type.
If you edit these settings, the changes are enforced on all members of the Default Group,unless you override the group settings and assign another dataset at the client level.
The directories listed in the following table are also inherently excluded from all backups,even though they do not explicitly appear in the exclusion list.
Table 26 Directories excluded from Default Dataset backups
Exclusion Description
.snapshot/ NetApp mounts
VARDIR/f_cache.dat Local avtar file cache
VARDIR/p_cache.dat Local avtar “is present” cache
Unix DatasetThe Unix Dataset is optimized for use with AIX, FreeBSD, HP-UX, Linux, and Solarisclients. The initial settings in the Unix Dataset are:
l Only the AIX, FreeBSD, HP-UX, Linux, Macintosh OS X, and Solaris file system sourcedata plug-ins
l Explicit exclusion of various temp directories (/tmp, /var/tmp, /usr/tmp), coredump files (core), and local cache files (*cache.dat, *scan.dat)
l No explicit inclusion list entries
The directories listed in the following table are also inherently excluded from all UnixDataset backups, even though they do not explicitly appear in the exclusion list.
Table 27 Directories excluded from Unix Dataset backups
Exclusion Description
.snapshot/ NetApp mounts
Backup
Datasets 91

Table 27 Directories excluded from Unix Dataset backups (continued)
Exclusion Description
VARDIR/f_cache.dat Local avtar cache files
VARDIR/p_cache.dat Local avtar cache files
/proc Pseudo file system that cannot be restored
/dev Excluded only if not running as root
/devices Excluded only for Solaris
Windows DatasetThe Windows Dataset is optimized for use with Microsoft Windows clients. The initialsettings in the Windows Dataset are:
l Only Windows file system source data plug-in
l No explicit exclusion or inclusion list entries
The directories listed in the following table are also inherently excluded from all WindowsDataset backups, even though they do not explicitly appear in the exclusion list.
Table 28 Directories excluded from Windows Dataset backups
Exclusion Description
.snapshot/ NetApp mounts
VARDIR/f_cache.dat Local avtar cache files
VARDIR/p_cache.dat Local avtar cache files
All files that are referenced by the following registrykeys:
l HKEY_LOCAL_MACHINE\SYSTEM\CurrentControlSet\Control\BackupRestore\FilesNotToBackup
l HKEY_CURRENT_USER\SYSTEM\CurrentControlSet\Control\BackupRestore\FilesNotToBackup
Files that are explicitly designated byMicrosoft to exclude from backups
Temporary Internet files Internet Explorer temporary files
outlook.ost Outlook local cache files
outlook\*.ost Outlook local cache files
VMware Image DatasetThe VMware Image Dataset is the default dataset for protecting VMware entities withimage backup. In many respects, the VMware Image Dataset is simpler than most otherdatasets:
l The only available source data plug-ins are Linux and Windows virtual disks, andboth are selected by default.
l The Select Files and/or Folders option, as well as the Exclusions and Inclusions tabs,are disabled.
Backup
92 EMC Avamar 7.2 Administration Guide
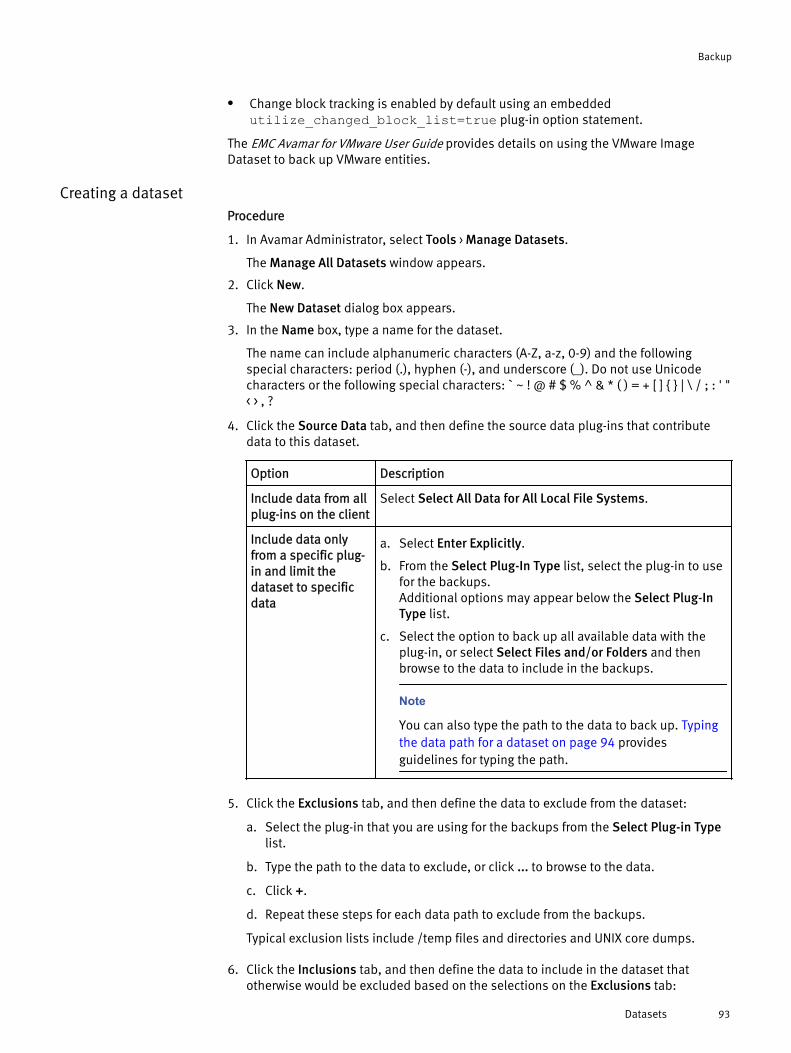
l Change block tracking is enabled by default using an embeddedutilize_changed_block_list=true plug-in option statement.
The EMC Avamar for VMware User Guide provides details on using the VMware ImageDataset to back up VMware entities.
Creating a datasetProcedure
1. In Avamar Administrator, select Tools > Manage Datasets.
The Manage All Datasets window appears.
2. Click New.
The New Dataset dialog box appears.
3. In the Name box, type a name for the dataset.
The name can include alphanumeric characters (A-Z, a-z, 0-9) and the followingspecial characters: period (.), hyphen (-), and underscore (_). Do not use Unicodecharacters or the following special characters: ` ~ ! @ # $ % ^ & * ( ) = + [ ] { } | \ / ; : ' "< > , ?
4. Click the Source Data tab, and then define the source data plug-ins that contributedata to this dataset.
Option Description
Include data from allplug-ins on the client
Select Select All Data for All Local File Systems.
Include data onlyfrom a specific plug-in and limit thedataset to specificdata
a. Select Enter Explicitly.
b. From the Select Plug-In Type list, select the plug-in to usefor the backups.Additional options may appear below the Select Plug-InType list.
c. Select the option to back up all available data with theplug-in, or select Select Files and/or Folders and thenbrowse to the data to include in the backups.
Note
You can also type the path to the data to back up. Typingthe data path for a dataset on page 94 providesguidelines for typing the path.
5. Click the Exclusions tab, and then define the data to exclude from the dataset:
a. Select the plug-in that you are using for the backups from the Select Plug-in Typelist.
b. Type the path to the data to exclude, or click ... to browse to the data.
c. Click +.
d. Repeat these steps for each data path to exclude from the backups.
Typical exclusion lists include /temp files and directories and UNIX core dumps.
6. Click the Inclusions tab, and then define the data to include in the dataset thatotherwise would be excluded based on the selections on the Exclusions tab:
Backup
Datasets 93

a. Select the plug-in that you are using for the backups from the Select Plug-in Typelist.
b. Type the path to the data to include, or click ... to browse to the data.
c. Click +.
d. Repeat these steps for each data path to include in the backups.
7. Click the Options tab, and then set plug-in options either by using the graphicalcontrols or by typing option names and values as text entries.
The user guide for each plug-in provides details on the available options.
8. Click OK.
Typing the data path for a dataset
You can limit scheduled backups to a set of data by specifying the path to the data in thedataset. You can browse to or type the path to the data. Several rules apply when youtype the path.
WildcardsIf you are using a file system plug-in, then the first occurrence of an asterisk (*) in a pathis treated as a folder wildcard. For example, to specify the My Documents folder for allusers on a Windows computer, type C:\Documents and Settings\*\My Documents.To specify the Documents folder for all users on a Macintosh, type /Users/*/Documents.
NOTICE
When you specify a data path, only the first occurrence of an asterisk is treated as afolder wildcard. Subsequent occurrences are interpreted literally.
Supported characters in the data pathThe path can include alphanumeric characters (A-Z, a-z, 0-9) and an asterisk (*) as awildcard. Do not use any of the following characters in the data path: ~!@$^%(){}[]|,`;#:*?<>'"&.
Editing a datasetProcedure
1. In Avamar Administrator, select Tools > Manage Datasets.
The Manage All Datasets window appears.
2. Select a dataset and click Edit.
The Edit Dataset dialog box appears.
3. Edit the dataset settings.
4. Click OK.
Dataset changes take effect on the next scheduled backup. Backups that have alreadybegun or have been completed are not affected.
Copying a datasetProcedure
1. In Avamar Administrator, select Tools > Manage Datasets.
The Manage All Datasets window appears.
Backup
94 EMC Avamar 7.2 Administration Guide

2. Select the dataset and click Copy.
The Save As dialog box appears.
3. Type a name for the new dataset and click OK.
Deleting a dataset
Before you begin
Ensure that the dataset is not currently assigned to a client or group. You cannot delete adataset if it is currently assigned to a client or group.
Procedure
1. In Avamar Administrator, select Tools > Manage Datasets.
The Manage All Datasets window appears.
2. Select the dataset and click Delete.
3. Click Yes on the confirmation message.
SchedulesSchedules are reusable objects that control when group backups, custom event profileemail notifications, and policy-based replication occur.
Schedule typesYou can configure an Avamar schedule to repeat a system activity at one of the intervalsthat are listed in the following table.
Table 29 Schedule types
Scheduletype
Description
Daily Repeats a system activity every day at one or more times of the day. With dailyschedules, you must also limit the duration of the activity to prevent job overlap.
Weekly Repeats a system activity every week on one or more days of the week. Withweekly schedules, you must also define the earliest start time for the activity, aswell as the time at which the activity is stopped, even if it is still in progress.
Monthly Repeats a system activity on a specific calendar date or on a designated day ofthe week each month, such as the first Sunday of every month. With monthlyschedules, you must also define the earliest start time for the activity, as well asthe time at which the activity is stopped, even if it is still in progress.
On-demand Defines a schedule that does not run automatically. This option is useful forcreating schedules that you can assign today but activate in the future. The optionis also useful to create schedules that are assigned to groups that only performon-demand backups, such as groups that contain only laptop clients.
Schedule start time, end time, and durationWhen you create a schedule, you also define when the schedule should take effect, andwhen it should be discontinued. For example, assume that you know that the clientcomputers used for a specific development project will be obsolete at a specific futuredate. You could create a schedule for those group backups that would automaticallycease backups on a certain date. Similarly, if you are administering a large site, you couldcreate schedules ahead of time, assign them to groups, and then activate them on acertain date. These group backups would not occur until the schedule took effect.
Backup
Schedules 95

Because scheduled activities often straddle two calendar days, it is important tounderstand that Avamar allocates the full window of time to any activity started by aschedule. For example, consider a schedule with an earliest start time of 10 p.m., a latestend time of 6 a.m. (the following morning), and an end after date of December 31 of thecurrent calendar year. On the evening of December 31, the activity starts as expected andruns until completed, typically sometime during the morning of January 1 the followingyear. However, beginning January 1, the schedule does not start any new scheduledactivities.
The following figure illustrates how the start time, end time, and duration of a scheduleinteract with one another, using the initial settings of the Default schedule.
Figure 10 Schedule start time, end time, and duration
This system activity begins at 10 p.m. (22:00), and can run until 6 a.m. (06:00) the nextday, creating an effective eight hour duration.
In practice, scheduled activities rarely start or end precisely on time. Server load affectsactual start times, and complexity of the activity affects actual end times. The complexityof the activity includes the amount of new client data that must be backed up, thenumber of group backups that are started, and the number of email messages that mustbe sent.
Specifying a schedule start time sets that time as the earliest point that the systemactivity can begin. Also, specifying a duration or end time establishes the latest possibleend time for the system activity.
Schedule time zonesWhen you create or edit schedules, all times are shown relative to the local time zone forthe Avamar Administrator client. For example, assume that you create a schedule in thePacific Standard time zone with a next runtime of 10 p.m..The next runtime for theschedule appears as 1 a.m. the following day (3 hours later) for an administrative user inthe Eastern Standard time zone.
Schedule catalogThe Avamar system includes a set of preconfigured schedules by default. You can usethese schedules or create a custom schedule.
The following schedules are available by default.
Table 30 Schedule catalog
Schedule name Description
Default Schedule Controls backup scheduling for the Default Group. It is initially configuredto run once per day at 10 p.m. If you edit these settings, the changes areenforced on all members of the Default Group.
Default Replication Controls replication for replication groups.
Daily Schedule Avamar supplies a predefined Daily Schedule.
Backup
96 EMC Avamar 7.2 Administration Guide
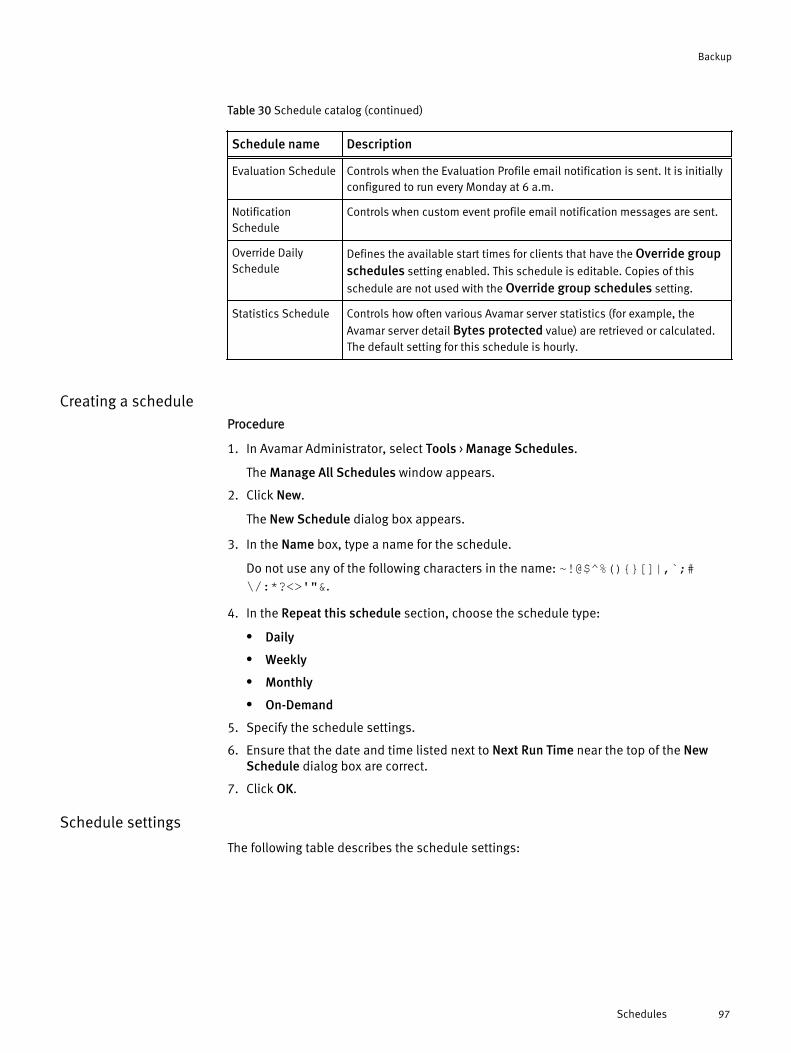
Table 30 Schedule catalog (continued)
Schedule name Description
Evaluation Schedule Controls when the Evaluation Profile email notification is sent. It is initiallyconfigured to run every Monday at 6 a.m.
NotificationSchedule
Controls when custom event profile email notification messages are sent.
Override DailySchedule
Defines the available start times for clients that have the Override groupschedules setting enabled. This schedule is editable. Copies of this
schedule are not used with the Override group schedules setting.
Statistics Schedule Controls how often various Avamar server statistics (for example, the
Avamar server detail Bytes protected value) are retrieved or calculated.The default setting for this schedule is hourly.
Creating a scheduleProcedure
1. In Avamar Administrator, select Tools > Manage Schedules.
The Manage All Schedules window appears.
2. Click New.
The New Schedule dialog box appears.
3. In the Name box, type a name for the schedule.
Do not use any of the following characters in the name: ~!@$^%(){}[]|,`;#\/:*?<>'"&.
4. In the Repeat this schedule section, choose the schedule type:
l Daily
l Weekly
l Monthly
l On-Demand
5. Specify the schedule settings.
6. Ensure that the date and time listed next to Next Run Time near the top of the NewSchedule dialog box are correct.
7. Click OK.
Schedule settings
The following table describes the schedule settings:
Backup
Schedules 97

Table 31 Settings for each type of schedule
Scheduletype
Settings
Daily 1. Use the Select Daily Times lists to specify the time of day at which the
schedule should run, and then click Add to add the time to the ScheduledTimes list.
2. Repeat the previous step for each time at which the schedule should run eachday.
3. (Optional) To remove a time from the Scheduled Times list, select the time
and click Remove.
4. Limit the duration of scheduled system activities to prevent job overlap by
selecting a time limit from the Limit each run to (hours) list.
5. From the Delay until list, select the date when the schedule should take effect.To make a schedule effective immediately, select the current date from the list.
6. Choose when to discontinue the schedule:
l To enable a schedule to run indefinitely, select No End Date.
l To discontinue a schedule on a specific date, select End after and thenselect a date from the list.
Weekly 1. Select the checkbox next to the days of the week on which the schedule shouldrun.
2. Define the activity operating hours by using the Earliest start time and Endno later than boxes. You can type the times, or select the time and use thearrow buttons to change the times.
The server workload affects the start time for an activity. Also, the first time thata backup is performed for any client, the backup is allowed to continue past thespecified end time. This behavior is permitted because initial backups can takelonger than subsequent backups of the same client.
3. From the Delay until list, select the date when the schedule should take effect.To make a schedule effective immediately, select the current date from the list.
4. Choose when to discontinue the schedule:
l To enable a schedule to run indefinitely, select No End Date.
l To discontinue a schedule on a specific date, select End after and thenselect a date from the list.
Monthly 1. Choose whether to repeat the activity on a specific calendar date or on adesignated day of the week each month:
l To repeat the activity on a specific calendar date, select Day of everymonth, and then select the day from the list.
l To repeat the activity on a designated day of the week each month, select
The ... of every month and then select the day from the lists.
2. Define the activity operating hours by using the Earliest start time and Endno later than boxes. You can type the times, or select the time and use thearrow buttons to change the times.
Backup
98 EMC Avamar 7.2 Administration Guide

Table 31 Settings for each type of schedule (continued)
Scheduletype
Settings
The server workload affects the start time for an activity. Also, the first time thata backup is performed for any client, the backup is allowed to continue past thespecified end time. This behavior is permitted because initial backups can takelonger than subsequent backups of the same client.
3. From the Delay until list, select the date when the schedule should take effect.To make a schedule effective immediately, select the current date from the list.
4. Choose when to discontinue the schedule:
l To enable a schedule to run indefinitely, select No End Date.
l To discontinue a schedule on a specific date, select End after and thenselect a date from the list.
On-demand There are no additional settings for on-demand schedules.
Editing a scheduleProcedure
1. In Avamar Administrator, select Tools > Manage Schedules.
The Manage All Schedules window appears.
2. Select a schedule and click Edit.
The Edit Schedule dialog box appears.
3. Edit the schedule settings.
4. Click OK.
Editing the start times for client overrides of group schedulesWhen you allow users to override group backup schedules by using the web UI, you mustconfigure the start times that are available for clients to use. To configure the start times,add entries to the Override Daily Schedule.
Access to the web UI is part of the enhanced features for enterprise desktop and laptopcomputers.
Procedure
1. In Avamar Administrator, select Tools > Manage Schedules.
The Manage All Schedules window appears.
2. From the list of schedules, select Override Daily Schedule and click Edit.
The Edit Schedule dialog box appears.
3. Use the Select Daily Times lists to specify a time of day to add to the selection listavailable to users on the web UI, and then click Add to add the time to the ScheduledTimes list.
To remove a time from the Scheduled Times list, select the time and click Remove.
4. Repeat the previous step to add time entries to the selection list available to users.
Backup
Schedules 99

5. Limit the duration of scheduled system activities to prevent job overlap by selecting atime limit from the Limit each run to (hours) list.
6. Click OK.
Copying a scheduleProcedure
1. In Avamar Administrator, select Tools > Manage Schedules.
The Manage All Schedules window appears.
2. Select the schedule and click Copy.
The Save As dialog box appears.
3. Type a name for the new schedule and click OK.
Running a schedule on-demandYou can initiate scheduled operations immediately on an on-demand basis. Thescheduler does not need to be running when you run a schedule on-demand.
Procedure
1. In Avamar Administrator, select Tools > Manage Schedules.
The Manage All Schedules window appears.
2. Select a schedule and click Run Now.
Deleting a schedule
Before you begin
Ensure that the schedule is not currently assigned to a group. You cannot delete aschedule if it is currently assigned to a group.
Procedure
1. In Avamar Administrator, select Tools > Manage Schedules.
The Manage All Schedules window appears.
2. Select the schedule and click Delete.
3. Click Yes on the confirmation message.
Retention policiesBackup retention policies enable you to specify how long to keep a backup in the system.
A retention policy is assigned to each backup when the backup occurs. Specify a customretention policy when you perform an on-demand backup, or create a retention policythat is assigned automatically to a group of clients during a scheduled backup.
When the retention for a backup expires, then the backup is automatically marked fordeletion. The deletion occurs in batches during times of low system activity.
If required, you can manually change the retention setting for an individual backup thathas already occurred. Changing the retention type for a backup on page 117 providesinstructions. If you change a configured retention policy, however, the change appliesonly to backups that occur after the change. The retention setting remains the same forbackups that have already been performed. Therefore, it is important to consider andimplement the best retention policy for a site before too many backups occur.
There are two types of retention settings:
Backup
100 EMC Avamar 7.2 Administration Guide

l Basic retention settings specify a fixed expiration date.
l Advanced retention settings specify the number of daily, weekly, monthly, and yearlybackups to keep.
Basic retention settingsBasic retention settings are used to assign a fixed expiration date to a backup using onethe settings in the following table.
Table 32 Basic retention settings
Retentionsetting
Description
Retention period Enables you to define a fixed retention period in days, weeks, months, oryears after the backup is performed. For example, you could specify thatbackups expire after 6 months.
End date Enables you to assign a calendar date as the expiration date. For example,you could specify that backups expire on December 31, 2013.
No end date Enables you to keep backups indefinitely. This setting is useful for ensuringthat all backups that are assigned this retention policy are retained for thelife of the system.
NOTICE
For backups of 32-bit Windows or 32-bit Linux client computers, do not assign a retentionperiod for a date after February 7, 2106. If you assign an extended retention period to a32-bit Windows client, the backup completes with exceptions. For 32-bit Linux clients,the backups complete but do not appear in Avamar Administrator.
Advanced retention settingsWith advanced retention settings, it is possible to assign the expiration of backupsdynamically by using the number of daily backups, weekly backups, monthly backups,and yearly backups to retain in the system.
For scheduled daily backups, some backups are automatically assigned an advancedretention type:
l The first successful scheduled backup each day is designated as the daily backup.
l The first successful scheduled backup each week is designated as the weeklybackup.
l The first successful scheduled backup each month is designated as the monthlybackup.
l The first successful scheduled backup each year is designated as the yearly backup.
For assigning advanced retention types, each day begins at 00:00:01 GMT, each weekbegins on Sunday, each month begins on the first calendar day of that month, and eachyear begins on January 1.
NOTICE
You cannot apply advanced retention settings to on-demand backups. On-demandbackups can occur at any time, and are therefore inherently asynchronous— the systemcannot tag them as daily, weekly, monthly, or yearly.
Always use daily scheduled backups with retention policies with advanced retentionsettings. The reason for this is that the Always keep: n weeks of daily backups setting
Backup
Retention policies 101

has no effect unless there are daily backups in the system. Depending on the scheduleyou use, daily backups may not be in the system. For example, if you assign a schedule toa group that only performs weekly backups, then there are no daily backups in thesystem.
Retention policy catalogThe Avamar system includes a set of preconfigured retention policies by default. You canuse these retention policies for scheduled backups of clients, or you can create a customretention policy.
The retention policies in the following table are available by default.
Table 33 Retention policy catalog
Retentionpolicy name
Description
MinimalRetention
Enables you to enforce a minimum basic retention setting across an entire site.For example, you can keep all backups for at least 90 days regardless of whatother retention policies specify. This feature is intended to address the need ofsome enterprises to enforce site-wide minimum retention standards regardlessof what individual organizations might decide to implement with otherretention policies. The Minimal Retention policy is a global system object thatcontrols only the minimal retention setting. Therefore, you cannot assign theMinimal Retention policy to a group.
DefaultRetention
Defines backup retention settings for the Default Group. By default, the DefaultRetention policy assigns a retention period of 60 days and retains 60 days ofdaily backups.
End User OnDemandRetention
Controls the retention settings for on-demand backups initiated by the client,
such as when you use the Back Up Now command on the Avamar Windowsclient. Advanced retention settings are disabled on this retention policybecause advanced retention settings never apply to on-demand backups. TheEnd User On Demand Retention policy is a global system object that onlycontrols retention for on-demand backups initiated by the client. Therefore,you cannot assign the End User On Demand Retention policy to a group.
MonthlyRetention policy
Sets the expiration date to one month after the backup is performed.
WeeklyRetention policy
Sets the expiration date to one week after the backup is performed.
Creating a retention policyProcedure
1. In Avamar Administrator, select Tools > Manage Retention Policies.
The Manage All Retention Policies window appears.
2. Click New.
The New Retention Policy dialog box appears.
3. In the Name box, type a name for the retention policy.
Do not use any of the following characters in the retention policy name: ~!@$^%(){}[]|,`;#\/:*?<>'"&.
Backup
102 EMC Avamar 7.2 Administration Guide

4. Complete the steps for either basic retention settings or advanced retention settings.
Retentionsetting
Steps
Basic Select one of the following settings:
l To delete backups automatically after a specific number of days,weeks, months, or years, select Retention period and specify thenumber of days, weeks, months, or years.
l To delete backups automatically on a specific calendar date, selectEnd date and then browse to that date on the calendar.
l To keep backups for the period that a client is active, select No enddate.
The best practice is to specify a retention that is greater than or equalto 14 days. When you create a retention policy for less than 14 days,an alert appears.
Advanced a. Select Override basic retention policy for scheduled backups.
b. Click Advanced.
The Edit Advanced Retention Policy dialog box appears.
c. Specify the maximum number of daily, weekly, monthly, and yearlybackups to retain.
d. Click OK on the Edit Advanced Retention Policy dialog box.
5. Click OK on the New Retention Policy dialog box.
Editing a retention policyProcedure
1. In Avamar Administrator, select Tools > Manage Retention Policies.
The Manage All Retention Policies window appears.
2. Select a retention policy and click Edit.
The Edit Retention Policy dialog box appears.
3. Edit the retention policy settings.
Click OK.
Copying a retention policyProcedure
1. In Avamar Administrator, select Tools > Manage Retention Policies.
The Manage All Retention Policies window appears.
2. Select a retention policy and click Copy.
The Save As dialog box appears.
3. Type a name for the new retention policy and click OK.
Backup
Retention policies 103
Deleting a retention policy
Before you begin
Ensure that the retention policy is not currently assigned to a client or group. You cannotdelete a retention policy if it is currently assigned to a client or group.
Procedure
1. In Avamar Administrator, select Tools > Manage Retention Policies.
The Manage All Retention Policies window appears.
2. Select the retention policy and click Delete.
3. Click Yes on the confirmation message.
Enforcing a minimum retention settingMinimal retention enables you to enforce a minimum basic retention setting across anentire site. For example, you can keep all backups for at least 90 days regardless of whatother retention policies specify.
This feature is intended to address the need of some enterprises to enforce site-wideminimum retention standards regardless of what individual organizations might decideto implement with other retention policies.
To enforce minimal retention, enable and configure the Minimal Retention policy, whichis a default retention policy in the system. The Minimal Retention policy is a globalsystem object that controls only the minimal retention setting. Therefore, you cannotassign the Minimal Retention policy to a group.
Procedure
1. In Avamar Administrator, select Tools > Manage Retention Policies.
The Manage All Retention Policies window appears.
2. Select the Minimal Retention policy and click Edit.
The Edit Retention Policy dialog box appears.
3. Select Retention period.
4. Specify the number of days, weeks, months, or years to ensure that backups areretained.
5. Click OK.
Automatically retaining the last backupTo retain the last backup of all clients, even after the backup exceeds its retention period,enable last backup retention. Last backup retention changes the default retentionbehavior for client backups that occur after it is enabled. With last backup retention, thelast backup of a client is not marked for deletion when its retention period expires.Instead, the latest backup is the “last backup” and the previous “last backup” expires oris retained according to its retention policy.
Last backup retention is designed for clients that do not back up frequently. For thoseclients, the default behavior can lead to the last backup expiring before a new backupoccurs and clients that do not have an available backup.
Clients that are not permanently connected to a domain, such as remote desktops andlaptops, may encounter this situation more frequently than clients that haveuninterrupted server access.
Backup
104 EMC Avamar 7.2 Administration Guide

NOTICE
When you enable last backup retention, Avamar retains a single backup for each client,even if you perform multiple types of backups of a client. For example, if you performboth file system and application backups of a client, and the file system backup is thelast backup, then all application backups can expire.
Procedure
1. Open a command shell and log in by using one of the following methods:
l For a single-node server, log in to the server as admin.
l For a multi-node server:
a. Log in to the utility node as admin.
b. Load the admin OpenSSH key by typing:
ssh-agent bashssh-add ~admin/.ssh/admin_key
c. When prompted, type the admin_key passphrase and press Enter.
2. Change directories by typing:
cd /usr/local/avamar/var/mc/server_data/prefs
3. Open mcserver.xml in a text editor.
4. Find the dpn node.
5. In the dpn node, change the value of the keep_last_backup entry key fromfalse to true.
6. Save the change and close the text editor.
7. Stop and restart the MCS, and start the scheduler by typing the following commands:
dpnctl stop mcsdpnctl start mcsdpnctl start sched
8. Close the command shell.
GroupsAvamar uses groups to implement various policies to automate backups and enforceconsistent rules and system behavior across an entire segment, or group, of the usercommunity.
Group membersGroup members are client machines that have been added to a particular group for thepurposes of performing scheduled backups. Because the normal rules for domainadministrators apply, these clients must be located within the same domain or within asubdomain of where the group exists.
Group policyWhen you create a group, you specify the dataset, schedule, and retention policy for thegroup. These three objects comprise the group policy. The group policy controls backupbehavior for all members of the group.
Backup
Groups 105

You can override group dataset and retention policy settings for a client by makingexplicit dataset or retention policy assignments for the client. However, schedules applyonly to groups, not individual clients.
Default GroupThe Avamar system includes a Default Group. In the default Avamar server configuration,the Default Group always uses the system default dataset, schedule, and retentionpolicy. You cannot change these system default assignments. However, you can edit thesettings within the system default dataset, schedule, and retention policy.
If you do not create any other groups, then new clients are automatically added to theDefault Group.
VMware groupsThe following table describes the special groups that apply to VMware environments.
Table 34 VMware groups
Group Description
Default ProxyGroup
The Default Proxy Group is the default group for VMware Image Proxy clients.You cannot delete the Default Proxy Group. Enabling the Default Proxy Groupdoes not conflict with scheduled backups performed by other plug-insconfigured on the proxy client.
Default VirtualMachine Group
New virtual machine clients are automatically added to the Default VirtualMachine Group when they are registered. You cannot manually delete theDefault Virtual Machine Group, but it is automatically deleted if you deletethe vCenter domain.
VM BackupValidation groups
VM Backup Validation groups are used to implement the restore rehearsalfeature for VMware virtual machines.
The EMC Avamar for VMware User Guide provides additional details on each of thesegroups.
Creating a groupWhen you create a group, you define the dataset, schedule, and retention policy, whichtogether comprise the group policy for scheduled backups of all members of the group. Agroup must contain at least one Avamar client. If the group contains two or more clients,then the clients must belong to the same Avamar domain. You can override group policysettings at the client level.
Before you begin
You cannot edit schedules or retention policies when you use the New Group wizard tocreate a group. Review existing schedules and retention policies. If required, create newones before you create the group.
Procedure
1. In Avamar Administrator, click the Policy launcher button.
The Policy window appears.
2. Click the Policy Management tab.
3. Click the Groups tab.
4. Select the domain for the group.
The Policy window displays a table that contains groups for the domain.
Backup
106 EMC Avamar 7.2 Administration Guide

5. Select Actions > Group > New > Backup Group.
The New Group wizard appears.
6. Type a name for the new group in the Name box.
The name can include alphanumeric characters (A-Z, a-z, 0-9) and the followingspecial characters: period (.), hyphen (-), and underscore (_). Do not use Unicodecharacters or the following special characters: ` ~ ! @ # $ % ^ & * ( ) = + [ ] { } | \ / ; : ' "< > , ?
7. Clear the Disabled checkbox to use this group for scheduled client backups.
Selecting the checkbox disables backups for the group.
8. From the Avamar encryption method list, select an encryption method to use for datatransfer between the Avamar server and the client during the backup.
The encryption technology and bit strength for a client/server connection depends onseveral factors, including the client operating system and Avamar server version. TheEMC Avamar Product Security Guide provides additional information.
9. (Optional) Select Override Schedule to override the assigned schedule for this group:
l To skip the next scheduled backup, select Skip Next Backup.
l To perform the next scheduled backup one time only, select Run Next BackupOnce.
10.Click Next.
The next New Group wizard page appears with dataset information.
11.From the Select An Existing Dataset list, select the dataset that you created, and thenclick Next.
The next New Group wizard page appears with schedule information.
12.Select a schedule from the Select An Existing Schedule list, and click Next.
The next New Group wizard page appears with retention policy information.
13.Select a retention policy from the Select an Existing Retention Policy list, and clickNext.
The final New Group wizard page appears. A list of domains appears in the ChooseDomain pane.
14.Select the domain for the client.
A list of Avamar clients appears in the pane below the Choose Domain pane.
15.Select the checkbox next to the clients to include in the group.
The clients appear in the Members pane.
16.(Optional)To remove a client from the group, select the client from the Members list,and then click the red X.
17.Click Finish.
Managing group membershipYou can manage group membership in Avamar Administrator either by adding orremoving members for a group or adding or removing groups to which a client belongs.
The method that you use to manage group membership depends on the situation. Forexample, if you are adding or deleting multiple clients from a single group, then the
Backup
Groups 107

group-centric method is efficient. Conversely, if you are adding or removing a single clientfrom multiple groups, then the client-centric method is most efficient.
Editing membership for a group
Procedure
1. In Avamar Administrator, click the Policy launcher button.
The Policy window appears.
2. Click the Policy Management tab.
3. Click the Groups tab.
4. Select the group.
5. Select Actions > Group > Edit Group.
The Edit Group dialog box appears.
6. Click the Members tab.
7. Complete the steps to add or remove members for the group.
Task Steps
Add members to thegroup
Select the checkboxes next to the clients to add.
Remove members fromthe group
Select the clients to remove and click X.
Move members to anothergroup
Select the client from the Member(s) list and click Move.In the Move Group Members dialog box, select the newgroup for the client and click OK.
8. Click OK.
Editing the groups for a client
Procedure
1. In Avamar Administrator, click the Policy launcher button.
The Policy window appears.
2. Click the Policy Management tab.
3. Click the Clients tab.
4. Select the client to edit.
5. Select Actions > Group > Edit Client.
The Edit Client dialog box appears.
6. Click the Groups tab.
7. Add and remove groups for the client:
l To add groups, click Add, select the groups, and then click OK.
l To remove groups, select the groups from which to remove the client, and clickRemove.
8. Click OK.
Backup
108 EMC Avamar 7.2 Administration Guide

Monitoring groupsYou can monitor groups by using the Group Summary Reports and Group StatusSummary.
Procedure
l To view the Group Summary Reports, click the Policy launcher button in AvamarAdministrator, and then click the Group Summary Reports tab on the Policy window.
The Group Summary Reports are a combined “at a glance” view of all current groupproperties and settings, including group policy overrides. The reports also display thedatasets, schedules, and retention policies assigned to various groups.
l To view the Group Status Summary, click the Activity launcher button in AvamarAdministrator, and then click the Group Status Summary tab on the Activity window.
The Group Status Summary is a simplified presentation of all backup activity initiatedas a result of group policies, including the total number of backups initiated by way ofthe group policy, as well as the number of active, successfully completed, canceled,and failed backups.
Editing group propertiesYou can edit properties for a single group or for multiple groups. When you selectmultiple groups, you cannot edit all group properties.
The Default Proxy Group and the Default Virtual Machine Group contain special settingsthat are only of interest to persons managing the VMware Image backup and restorefeature. The EMC Avamar for VMware User Guide provides details on these settings.
Procedure
1. In Avamar Administrator, click the Policy launcher button.
The Policy window appears.
2. Click the Policy Management tab.
3. Click the Groups tab.
4. Select one or more groups to edit.
5. Select Actions > Group > Edit Group.
If you selected a single group, then the Edit Group dialog box appears. If you selectedmultiple groups, then the Edit Multiple Groups dialog box appears.
6. Edit the group information:
l When you edit a single group, you can edit only basic group properties, such asthe name, client list, and the dataset, schedule, and retention policy that areassigned to the group. You cannot edit the settings for the assigned dataset,schedule, and retention policy.
l When you edit the Default Group, you cannot edit Default Group policy objectassignments. The Default Group always uses the default dataset, defaultschedule, and default retention policy. Therefore, the Dataset, Schedule, andRetention Policy tabs do not appear when you edit the Default Group.
l When you edit multiple groups, select the new settings from the lists, or selectDon’t Change to leave a setting unchanged for the selected groups. You can editonly basic group properties, such as whether the group is enabled or disabled, theencryption setting, and the dataset, schedule, and retention policy that are
Backup
Groups 109

assigned to the groups. You cannot edit the settings for the assigned dataset,schedule, and retention policy.
7. Click OK.
Copying a groupYou must copy groups within the same domain. You cannot copy a group to anotherdomain.
Procedure
1. In Avamar Administrator, click the Policy launcher button.
The Policy window appears.
2. Click the Policy Management tab.
3. Click the Groups tab.
4. Select the group to copy.
5. Select Actions > Group > Copy Group.
The Save As dialog box appears.
6. Type a name for the new group.
7. Select the Include Client Members to copy the entire client list to this new group.
8. Click OK.
Enabling and disabling a groupYou can disable a group to prevent scheduled backups from occurring for the group. Thisis typically done to place the system in a state that supports various maintenanceactivities.
If you disable a group, you must re-enable the group to resume scheduled groupbackups.
Procedure
1. In Avamar Administrator, click the Policy launcher button.
The Policy window appears.
2. Click the Policy Management tab.
3. Click the Groups tab.
4. Select the group to enable or disable.
5. Right-click the group and select Disable Group.
If the group is disabled, this action clears the checkmark and enables the group. If thegroup is enabled, this action sets the checkmark and disables the group.
6. Click Yes.
Deleting a group
Before you begin
Assign the clients in the group to a different group so that scheduled backups for theclients can continue uninterrupted.
Procedure
1. In Avamar Administrator, click the Policy launcher button.
The Policy window appears.
Backup
110 EMC Avamar 7.2 Administration Guide

2. Click the Policy Management tab.
3. Click the Groups tab.
4. Select the group to delete.
5. Select Actions > Group > Delete Group.
6. Click Yes on the confirmation message.
A second confirmation message appears.
7. Click OK.
Overriding group policy settings for a clientOverride group policy settings for a single client, including the dataset, schedule, andencryption method for client/server data transfers. Allow users to start on-demandbackups from the client by using the Avamar client web UI, or specify a maximum size inMB for backups from the client.
NOTICE
Too many overrides can make group policies less effective. Instead, implement a newgroup policy rather than repeatedly overriding an existing policy at the client level.
Procedure
1. In Avamar Administrator, click the Policy launcher button.
The Policy window appears.
2. Click the Policy Management tab.
3. Click the Clients tab.
4. In the left pane, select the domain for the client.
5. In the right pane, select the client.
6. Click Edit.
The Edit Client window appears.
7. Click the Properties tab.
8. To allow users on the client to start on-demand backups, select Allow client initiatedbackups.
If no additional configuration is performed, backups started from the client includeonly those files that the user selects. Also, End User On-Demand Retention is applied.However, you can enforce the use of a particular dataset and retention policy for allclient-initiated backups.
9. To allow users to create sets of folders and files to back up through an on-demandbackup by using the Avamar client web UI, select Allow file selection on clientinitiated backups.
When this feature is enabled, users can:
l Specify the folders and files to include in a backup set.
l Create multiple backup sets.
l Save backup sets for reuse.
l Perform an on-demand backup of the folders and files in the backup sets theycreate.
Backup
Groups 111

NOTICE
Folders and files that are selected through this feature are not subject to groupdataset source limits, exclusions, or inclusions. Also, this feature does not affectautomatic backup of clients according to their group policies.
Note
Windows, Mac, and Linux clients that use the desktop and laptop clientenhancements require an additional configuration step to enable this setting. Allowing users to create on-demand backup sets on page 334 provides moreinformation.
10.Choose whether to override the group schedule duration setting for a client byselecting a value from the Overtime list:
Option Description
No overtime allowed Scheduled group backups are never allowed to run pastthe schedule duration setting.
Overtime on nextbackup only
Only the next scheduled group backup is allowed to runpast the schedule duration setting.
Overtime untilsuccessful backup
Scheduled group backups are allowed to run past theschedule duration setting until a successful backupcompletes.
Always allow overtime Scheduled group backups are always allowed to run pastthe schedule duration setting.
11.Select Override group encryption to, and then select the encryption setting to use forclient/server data transfer for the client.
The encryption technology and bit strength for a client/server connection depends onseveral factors, including the client operating system and Avamar server version. TheEMC Avamar Product Security Guide provides details.
12.To allow users in the Avamar client web UI to select a different backup start time fordaily backups from a list of available times that you specify, select Allow override ofgroup’s daily schedule.
Editing the start times for client overrides of group schedules on page 99 providesmore information on specifying the list of available times.
13.To specify a maximum allowed size in MB for the client's backups, type an integerbetween 1 and 99999 in Hard limit (MB).
Backups from the client that exceed that size are canceled. The Activity Report entryfor the backup displays True in the hard_limit_exceeded column, and thestatus entry Hard limit exceeded appears in the Activity Monitor.
14.To specify a maximum size in MB beyond which the client's backups are flagged forexcessive size, type an integer between 1 and 99999 in Soft limit (MB).
Backups from the client that exceed that size are allowed, but the Activity Report entryfor the client’s backup displays True in the soft_limit_exceeded column, andthe status entry Completed appears in the Activity Monitor.
15.If you allow users on the client to start on-demand backups, select the retentionpolicy for all client-initiated backups:
Backup
112 EMC Avamar 7.2 Administration Guide

a. Click the Retention Policy tab.
b. Choose whether to use the group retention policy or a different retention policy forall client-initiated backups by selecting or clearing the Override group retentionpolicy checkbox. Clear the checkbox to use the retention policy that is assigned tothe group, or select the checkbox to use a different retention policy.
c. If you select the checkbox to use a different retention policy, select the Overrideretention policy on client initiated backups checkbox, and then select theretention policy from the Select an Existing Retention Policy list.
16.To assign separate override datasets for each group in which the client is a member:
a. Click the Groups tab.
b. For each group in which the client is a member, select a dataset from the list in theOverride Dataset column.
17.To allow users to use the Avamar client web UI to add folders to the source data forthe group datasets that are assigned to the users’ clients, click the Dataset Additionstab and then select Allow additions to source data.
The Avamar system includes the selected folders in every automatic and on-demandbackup for every group that is assigned to the client, and group exclusion andinclusion lists are applied to the added data.
18.Click OK.
Overriding group policy settings for multiple clientsYou can override group policy settings for multiple clients at a time, including theencryption method, whether backups can run beyond the schedule end time, andwhether users on the client can initiate on-demand backups and select a differentbackup start time.
Procedure
1. In Avamar Administrator, click the Policy launcher button.
The Policy window appears.
2. Click the Policy Management tab.
3. Click the Clients tab.
4. Select the clients.
5. Click Edit.
The Edit Multiple Clients dialog box appears.
6. Select an override value from the list, and select Apply the change.
Overriding group policy settings for a client on page 111 provides more information oneach of the settings.
7. Click OK.
Enabling scheduled backupsScheduled backups occur only for enabled groups. Groups are disabled by default unlessyou select the Enabled checkbox on the first page of the New Group wizard. If you did not
Backup
Enabling scheduled backups 113
enable the group when you created it, use the menu options in the Policy window toenable backups.
Procedure
1. In Avamar Administrator, click the Policy launcher button.
The Policy window appears.
2. Click the Policy Management tab.
3. Click the Groups tab.
4. Select the group that you created.
5. Enable the group by selecting Actions > Group > Disable Group.
Perform this step only if a check mark appears next to the Disable Group menu option.
6. Click Yes to enable this group.
Monitoring backupsYou can monitor backups to ensure that the backups complete successfully and totroubleshoot issues. The Activity Monitor in Avamar Administrator enables you to viewstatus information for both on-demand and scheduled backups.
Procedure
1. In Avamar Administrator, click the Activity launcher button.
The Activity window appears.
2. Click the Activity Monitor tab.
A list of all activities appears.
3. To filter the results to display only backup activity, select Actions > Filter.
The Filter Activity dialog box appears.
4. Select All Backups from the Type list.
5. Click OK.
Canceling backupsYou can cancel a backup any time before it completes. The cancellation might take fiveminutes or longer. The backup may complete before the cancellation finishes.
Procedure
1. In Avamar Administrator, click the Activity launcher button.
The Activity window appears.
2. Click the Activity Monitor tab.
A list of all activities appears.
3. Select the backup from the list.
4. Select Actions > Cancel Activity.
A confirmation message appears.
5. Click Yes.
Backup
114 EMC Avamar 7.2 Administration Guide

Managing completed backupsAfter you perform an on-demand or scheduled backup, you can validate the backup,change settings for the backup, or delete the backup.
Finding a completed backup to manageYou can find a completed backup by searching for a backup that occurred on a specificcalendar date or during a specific date range, or by searching for a backup with a specificretention type.
NOTICE
Avamar generally supports the use of specific supported international characters indirectory, folder, and filenames. However, proper display of international languagecharacters is contingent on the client computer’s Java locale and installed system fontsbeing compatible with the original language. If you browse backups that were createdwith international characters and a compatible font is not installed, then any charactersthat cannot be resolved by the system appear as rectangles. This is a normal limitation ofthat particular situation and does not affect the ability to restore these directories,folders, or files. The EMC Avamar Release Notes provide additional international languagesupport information.
Procedure
1. In Avamar Administrator, click the Backup & Restore launcher button.
The Backup, Restore and Manage window appears.
2. In the clients tree, browse to and select the client with the backups to manage.
3. Click the Manage tab.
4. Complete the steps to find the backup either by date, date range, or retention type.
Search method Steps
By date a. Select By day.
b. Select the backup date from the calendar. Valid backupsoccurred on dates with a yellow highlight.
By date range a. Select By date range.
b. Click the From Date list, and browse the calendar for the startdate for the range.
c. Click the To Date list, and browse the calendar for the enddate for the range.
d. Click Retrieve.
By retention type a. Select By retention.
b. Select the checkbox next to the retention type for the backup.
c. Click Retrieve.
A list of backups on that date, within that date range, or with the retention typeappears in the Backup History list.
Backup
Managing completed backups 115

Validating a backupYou can verify that files can be restored from a backup. This validation starts a “virtual”restore of all files in the backup, but does not actually restore any files to the client filesystem.
Procedure
1. In Avamar Administrator, click the Backup & Restore launcher button.
The Backup, Restore and Manage window appears.
2. Find the backup. Finding a completed backup to manage on page 115 providesinstructions.
3. In the Backup History list, select the backup to validate.
4. Select Actions > Validate Backup.
The Select Client to Perform Validation dialog box appears.
5. Select the client on which to validate the backup:
l To validate the backup on the same client from which the backup was originallyperformed, select Validate using the backup client.
l To validate the backup on a different client, select Validate using a different client,and then click Browse to browse to the client.
6. From the Validation Plug-in Type list, select the plug-in on which to validate thebackup. Only the plug-ins that are installed on the selected client appear in the list.
7. From the Avamar encryption method list, select the encryption method to use forclient/server data transfer during the validation.
Note
The default encryption setting for backup validations is high, regardless of theencryption setting that is used for the original backup.
8. Click OK.
A confirmation message appears.
9. Click OK.
After you finish
Backup validations appear as activities in the Activity window. You can monitor andcancel the backup validation activity the same way that you monitor or cancel a backup. Monitoring backups on page 114 and Canceling backups on page 114 provideinstructions.
Changing the expiration date for a backupYou can change the date that a backup expires. When the backup expires, Avamar userscannot recover data from the expired backup. A garbage collection process runs on anightly basis to clean up and reclaim space from orphaned data (data that is unique tothe expired backups).
The expiration date can be a specific date that you select or a retention period of a certainnumber of days, weeks, months, or years. You also can configure a backup to remain inbackup storage for as long as the client remains active on the Avamar server.
Backup
116 EMC Avamar 7.2 Administration Guide

Procedure
1. In Avamar Administrator, click the Backup & Restore launcher button.
The Backup, Restore and Manage window appears.
2. Find the backup. Finding a completed backup to manage on page 115 providesinstructions.
3. In the Backup History list, select the backup to manage. To select multiple backups,press Ctrl while you select the backups.
4. Select Actions > Change Expiration Date.
The Change Expiration Date dialog box appears.
5. Select the new expiration date:
l To automatically delete this backup from the Avamar server after a specific amountof time, select Retention period and then specify the number of days, weeks,months, or years for the retention period.
l To automatically delete this backup from the Avamar server on a specific calendardate, select End date and browse to that date on the calendar.
l To keep this backup for as long as this client remains active in the Avamar server,select No end date.
6. Click OK.
A confirmation message appears.
7. Click Yes.
An event code dialog box appears.
8. Click OK.
9. Click OK on the confirmation message.
Changing the retention type for a backupTo support certain advanced features, Avamar Administrator automatically assigns one ormore retention types to every backup. For example, the first backup created on anAvamar system is tagged as a daily, weekly, monthly, or yearly. You can manually changethe retention types assigned to a backup.
When you manually change the retention types assigned to a backup, especially one thathas multiple retention types, be certain that you are not inadvertently removing a weekly,monthly, or yearly backup that you need to retain. For example, consider a backup that isassigned daily, weekly, monthly, and yearly retention types. If you remove the yearlyretention type designation, you might not have another yearly backup in the system forquite a long time.
Procedure
1. In Avamar Administrator, click the Backup & Restore launcher button.
The Backup, Restore and Manage window appears.
2. Find the backup. Finding a completed backup to manage on page 115 providesinstructions.
3. In the Backup History list, select the backup to manage. To select multiple backups,press Ctrl while you select the backups.
4. Select Actions > Change Retention Type.
The Change Retention Type dialog box appears.
Backup
Changing the retention type for a backup 117

5. Select one of the following retention types for the backups:
l To explicitly assign a daily, weekly, monthly or yearly retention type to this backup,select Tags and then select the checkbox next to the retention types.
l If you do not want to explicitly assign a daily, weekly, monthly, or yearly retentiontype to the backup, select Not tagged. The backup is designated as untagged.
6. Click OK.
A confirmation message appears.
7. Click Yes.
A second confirmation message appears.
8. Click OK.
Viewing backup statisticsYou can view detailed statistics for completed backups from both the Activity windowand the Manage tab of the Backup, Restore and Manage window.
The Manage tab of the Backup, Restore and Manage window provides statistics for anystored backup. The Activity window shows only recent backup activity. Typically, only thebackups within the past 72 hours appear in the Activity window.
The same statistics appear for each backup, regardless of whether you view the statisticsfrom the Backup, Restore and Manage window or the Activity window.
Procedure
1. Complete the steps to find the backup in either the Backup, Restore and Managewindow or the Activity window.
Window Steps
Backup,Restore andManagewindow
a. In Avamar Administrator, click the Backup & Restore launcherbutton.The Backup, Restore and Manage window appears.
b. Find the backup. Finding a completed backup to manage onpage 115 provides instructions.
c. In the Backup History list, select the backup.
Activitywindow
a. In Avamar Administrator, click the Activity launcher button.The Activity window appears.
b. Click the Activity Monitor tab.
c. Select a backup activity from the list.
2. Select Actions > View Statistics.
The Backup Statistics dialog box appears.
3. (Optional) To export the data on a tab of the Backup Statistics dialog box to a comma-separated values (.csv) file, click Export and then specify the location and file namefor the file.
4. Click Close.
Information in the backup statistics dialog box
The following information is available on the tabs of the Backup Statistics dialog box.
Backup
118 EMC Avamar 7.2 Administration Guide

Table 35 Backup statistics dialog box information
Tab Information
Details Detailed information from the v_activities_2 database view. The EMC
Avamar Reports Guide provides more information about the v_activities_2database view.
Files A list of files that are included in the backup.
File Aggregation A representative sampling of resource-intensive file types that are included inthe backup, and aggregates deduplication statistics by file type.
Options Any special options for the backup.
Errors Any errors that occurred during the backup.
Deleting a backupWhen you delete a backup, Avamar immediately and permanently deletes all data in thatbackup from the server.
Procedure
1. In Avamar Administrator, click the Backup & Restore launcher button.
The Backup, Restore and Manage window appears.
2. Find the backup to delete. Finding a completed backup to manage on page 115provides instructions.
3. In the Backup History list, select the backup to delete.
4. Select Actions > Delete Backup.
A confirmation message appears.
5. Click OK.
Backup
Deleting a backup 119

Backup
120 EMC Avamar 7.2 Administration Guide

CHAPTER 6
Restore and Recovery
This chapter includes the following topics:
l Restoring data from a backup..............................................................................122l Monitoring restores.............................................................................................128l Canceling restores...............................................................................................128l Windows client system recovery.......................................................................... 128l Red Hat and CentOS Linux system recovery......................................................... 128l SUSE Linux system recovery................................................................................ 135l Oracle Solaris system recovery............................................................................ 142
Restore and Recovery 121

Restoring data from a backupYou can find a backup to restore either by date or by the contents of the backup. Whenyou perform the restore, you can restore to either the original location, a differentlocation, or multiple locations.
NOTICE
The options for the restore destination depend on the plug-in type. For example, the SQLServer plug-in enables you to restore to a file instead of to SQL Server, and you cannotrestore to multiple locations with the Oracle plug-in. The user guide for each plug-inprovides details on the available options and how to perform each available type ofrestore.
Finding a backupThe first step to restore data is to find the backup with the data that you want to restore.You can find Avamar client backups by searching either for a specific date or for specificcontent.
Locate backups by date when one or more of the following situations apply:
l You save all data for the client in a single backup set.
l The exact pathname or name of the data to restore is unknown.
l The backup you want to restore is before a specific date or event. For example, youknow the approximate date when data was lost or corrupted. You can search for abackup before that date.
l The specific types of backups are known. For example, you run scheduled disasterrecovery backups every Wednesday and Saturday night, and you run full volumebackups daily. When you need to rebuild a server, select the disaster recoverybackup with the date closest to the event that caused the loss of data.
Locate backups by the content of the backup when one or more of the followingsituations apply:
l You back up data on the client in separate backup sets.
l You want to view multiple versions of the same file so that you can decide the versionto restore.
l The date of the backup or the content of a backup is unknown, but you know thename of the data to restore.
NOTICE
Avamar generally supports the use of specific supported international characters indirectory, folder, and filenames. However, proper display of international languagecharacters is contingent on the client computer’s Java locale and installed system fontsbeing compatible with the original language. If you browse backups that were createdwith international characters and a compatible font is not installed, then any charactersthat cannot be resolved by the system appear as rectangles. This is a normal limitation ofthat particular situation and does not affect the ability to restore these directories,folders, or files. The EMC Avamar Release Notes provide additional international languagesupport information.
Restore and Recovery
122 EMC Avamar 7.2 Administration Guide

ReplicasWhen the Replicas at Source feature is enabled on the Avamar server, AvamarAdministrator lists replicas on the Restore tab in the same table that lists backups.
View and restore data from replicas through the Restore tab of Avamar Administrator.Replicas appear with the following information:
l Remote in the Type column
l Name/IP address and system type of the remote destination system in the Servercolumn
Note
When Avamar Administrator lists data from a backup as both Local and Remote, the
Avamar system always uses the local backup to restore the data. However, when backupdata that is listed as Remote is selected for validation, the Avamar system stages and
validates the referenced replica.
Replicas at Source on page 225 provides additional information about the Replicas atSource feature.
Finding a backup by dateProcedure
1. In Avamar Administrator, click the Backup & Restore launcher button.
The Backup, Restore and Manage window appears.
2. Click the Restore tab.
The upper left pane contains a list of domains.
3. Select the domain that contains the client.
You cannot view clients outside the domain for the login account. To view all clients,log in to the root domain.
A list of Avamar clients appears in the pane under the domains list.
4. Select the client from the list.
5. Click the By Date tab.
6. Select the backup date from the calendar. Valid backups occurred on dates with ayellow highlight.
A list of backups on that date appears in the Backups table next to the calendar.
7. Select the backup to restore from the Backups table.
8. Select the data to restore from the Contents of Backup pane at the bottom of theSelect for Restore tab.
9. If you browse the client file system, specify a valid client username and password,then click OK.
The username and password must have read permissions on the files and directoriesthat you select for restore.
10.Select Actions > Restore Now.
Restore and Recovery
Finding a backup 123

Finding a backup by contentProcedure
1. In Avamar Administrator, click the Backup & Restore launcher button.
The Backup, Restore and Manage window appears.
2. Click the Restore tab.
The upper left pane contains a list of domains.
3. Select the domain that contains the client.
You cannot view clients outside the domain for the login account. To view all clients,log in to the root domain.
A list of Avamar clients appears in the pane under the domains list.
4. Select the client from the list.
5. Click the By File/Folder tab.
6. In the Enter path to retrieve history for text box, specify the pathname to the contentby using one of the methods in the following table.
Option Description
Type thepath
Type the full pathname to the content in the Enter path to retrievehistory for box.
Browse a. Click Browse.The Select File or Folder window appears.
b. Select the client.
c. Select the plug-in.A list of folders appears in a table to the right of the plug-ins pane.
d. Select the content to restore.
e. Click OK.The selected content appears in the Enter path to retrieve historyfor box.
7. Click Retrieve.
The Version History table lists all versions and sizes of the content in backups for theclient.
8. Select the version in the Version History table.
All backups for the client that contain the version appear in the Backups table next tothe Version History table.
9. Select the data to restore from the Contents of Backup pane at the bottom of theSelect for Restore tab.
10.If you browse the client file system, specify a valid client username and password,then click OK.
The username and password must have read permissions on the files and directoriesthat you select for restore.
11.Select Actions > Restore Now.
Restore and Recovery
124 EMC Avamar 7.2 Administration Guide

Restoring to the original locationProcedure
1. In Avamar Administrator, click the Backup & Restore launcher button.
The Backup, Restore and Manage window appears.
2. Find the backup to restore:
l Finding a backup by date on page 123
l Finding a backup by content on page 124
The backup to restore is selected in the Backups table.
3. Select Actions > Restore Now.
The Restore Options dialog box appears.
4. Leave the default selection of the original client in the Restore Destination Client box.
5. Leave the default selection of the original backup plug-in in the Restore Plug-in list.
6. From the Avamar encryption method list, select an encryption method for client/server data transfers during this restore.
Note
The encryption technology and bit strength for a client/server connection depends onseveral factors, including the client operating system and Avamar server version. TheEMC Avamar Product Security Guide provides details.
7. Select Restore everything to its original location.
8. To include plug-in options with this restore, click More Options, and then configurethe settings. The user guide for each plug-in provides details on each plug-in option.
9. Click OK on the Restore Options dialog box.
10.Click Close.
Restoring to a different locationProcedure
1. In Avamar Administrator, click the Backup & Restore launcher button.
The Backup, Restore and Manage window appears.
2. Find the backup to restore:
l Finding a backup by date on page 123
l Finding a backup by content on page 124
The backup to restore is selected in the Backups table.
3. Select Actions > Restore Now.
The Restore Options dialog box appears.
4. Select the destination client for the data to restore:
l To restore to a different location on the same client, leave the default selection ofthe original client in the Restore Destination Client box.
l To restore to a different client, click the Browse button next to the RestoreDestination Client box, and then browse to and select the destination client.
Restore and Recovery
Restoring to the original location 125

5. Select the plug-in to use for the restore from the Restore Plug-in list.
6. From the Avamar encryption method list, select an encryption method for client/server data transfers during this restore.
Note
The encryption technology and bit strength for a client/server connection depends onseveral factors, including the client operating system and Avamar server version. TheEMC Avamar Product Security Guide provides details.
7. Select Restore everything to a different location.
NOTICE
When you restore a single directory to a different location, Avamar restores only thecontents of the directory. Avamar does not restore the original parent directory.
8. Select the destination directory on the client for the data to restore:
a. Click Set Destination below the Items Marked for Restore list.
The Set Destination dialog box appears.
b. Type the path to the destination directory in the Save Target(s) in Directory box, orclick Browse to browse to a directory.
If you type a path and the directory does not already exist, then the restore processcreates the directory.
c. Click OK on the Set Destination dialog box.
When a file with the same name already exists in the path to which you arerestoring a file, use the Overwrite Existing Files option on the Restore CommandLine Options dialog box to control whether the restore process overwrites the file.
9. To include plug-in options with this restore, click More Options, and then configurethe settings. The user guide for each plug-in provides details on each plug-in option.
10.Click OK on the Restore Options dialog box.
11.Click Close.
Restoring to multiple locationsYou can restore backup data to multiple locations on a destination client.
Procedure
1. In Avamar Administrator, click the Backup & Restore launcher button.
The Backup, Restore and Manage window appears.
2. Find the backup to restore:
l Finding a backup by date on page 123
l Finding a backup by content on page 124
The backup to restore is selected in the Backups table.
3. Select Actions > Restore Now.
The Restore Options dialog box appears.
4. Select the destination client for the data to restore:
Restore and Recovery
126 EMC Avamar 7.2 Administration Guide

l To restore to multiple locations on the same client, leave the default selection ofthe original client in the Restore Destination Client box.
l To restore to multiple locations on a different client, click the Browse button nextto the Restore Destination Client box and then browse to and select thedestination client.
5. Select the plug-in to use for the restore from the Restore Plug-in list.
6. From the Avamar encryption method list, select an encryption method for client/server data transfers during this restore.
Note
The encryption technology and bit strength for a client/server connection depends onseveral factors, including the client operating system and Avamar server version. TheEMC Avamar Product Security Guide provides details.
7. Select Restore everything to multiple locations.
NOTICE
When you restore multiple directories to multiple locations, Avamar restores only thecontents of the directory. Avamar does not restore the original parent directory.
8. Select the destination directories on the client for the data to restore:
a. Click Set Destination below the Items Marked for Restore list.
The Set Destination dialog box appears.
b. Select a row in the list.
c. Type the path to the destination directory in the Destination (Save As) column inthe list, or click Browse to browse to a directory.
If you type a path and the directory does not already exist, then the restore processcreates the directory.
d. Repeat the previous two steps for each row in the list on the Set Destination dialogbox.
e. Click OK on the Set Destination dialog box.
When a file with the same name already exists in the path to which you arerestoring a file, use the Overwrite Existing Files option on the Restore CommandLine Options dialog box to control whether the restore process overwrites the file.
9. To include plug-in options with this restore, click More Options, and then configurethe settings. The user guide for each plug-in provides details on each plug-in option.
10.Click OK on the Restore Options dialog box.
11.Click Close.
Restore and Recovery
Restoring to multiple locations 127
Monitoring restoresYou can monitor restores to ensure that the restores complete successfully and totroubleshoot issues. The Activity Monitor in Avamar Administrator enables you to viewstatus information for restores.
Procedure
1. In Avamar Administrator, click the Activity launcher button.
The Activity window appears.
2. Click the Activity Monitor tab.
A list of all activities appears.
3. To filter the results to display only restore activity, select Actions > Filter.
The Filter Activity dialog box appears.
4. Select Restore from the Type list.
5. Click OK.
Canceling restoresYou can cancel a restore any time before the restore completes. The cancellation mighttake five minutes or longer. The restore may complete before the cancellation finishes.
Procedure
1. In Avamar Administrator, click the Activity launcher button.
The Activity window appears.
2. Click the Activity Monitor tab.
A list of all activities appears.
3. Select the restore from the list.
4. Select Actions > Cancel Activity.
A confirmation message appears.
5. Click Yes.
Windows client system recoveryComprehensive details about the necessary backups for Windows client system recoveryand the procedures to perform the recovery are available in the EMC Avamar for WindowsServer User Guide.
Red Hat and CentOS Linux system recoveryThe following topics describe how to restore a Red Hat or CentOS Linux client system toits original system state.
Reconstructing the partition tableBefore you perform system recovery of a Linux client, you must reconstruct the partitiontable used in the original Avamar backup by running an avtar --showlog mounts
Restore and Recovery
128 EMC Avamar 7.2 Administration Guide

command on a temporary client computer, then examining the output to determine thenumber and size of partitions to create when you install the operating system on thetarget recovery client.
Procedure
1. Locate the backup to use for the system state recovery:
a. In Avamar Administrator, click the Backup & Restore launcher button.
The Backup, Restore and Manage window appears.
b. Click the Restore tab.
c. In the clients tree, select the original Linux client.
d. Find the full system backup to use to recover the system state.
e. Note the backup label number.
f. Leave Avamar Administrator open for the remainder of the system state recoveryprocedure.
2. On a temporary client computer with network connectivity to the Avamar server, opena command shell and log in as root.
3. Type the following command:
/usr/local/avamar/bin/avtar --avamaronly --showlog mounts --server=Avamar_server --id=username --ap=password --path=/domain/client --labelnumber=nwhere:
l Avamar_server is the IP address or fully qualified hostname as defined in DNS forthe Avamar server.
l username and password are the login credentials for a user account with asufficient role and privileges to perform a restore.
l /domain/client is the full location of the original Linux client on the Avamar server.
l n is the label number of the backup to use for the system state recovery.
4. Examine the command output to locate entries beginning with mount_decision.
For example:
mount_decision: reason="starting_point" fstype="ext3"path="/"mount_decision: reason="default_backup" fstype="ext3"path="/boot"mount_decision: reason="default_backup" fstype="ext3"path="/home"
These are entries for the mount points on the original system. Earlier in the output,there are entries for each of these mount points. For example:
mount: status="user_directed_backup" path="/" hdev="/dev/root" kind="ext3" blksize=4096 freeblks=1189334maxblks=2405872 freefiles=2259654 maxfiles=2432000 dev=2050mount: status="default_backup" path="/boot" hdev="/dev/sda1"kind="ext3" blksize=1024 freeblks=183371 maxblks=194442freefiles=50167 maxfiles=50200 dev=2049
Restore and Recovery
Reconstructing the partition table 129

mount: status="default_backup" path="/home" hdev="/dev/sdb1"kind="ext3" blksize=4096 freeblks=1027161 maxblks=5158925freefiles=2530548 maxfiles=2621440 dev=2065These entries contain mount point size and path information.
5. Calculate the original file system size or each mount point in bytes by multiplying theblksize value by the maxblks value.
NOTICE
Multiplying the blksize value by the maxblks value calculates the free space used
on the original device. However, you should create the root partition with anadditional 2 GB to 3 GB of free space to ensure sufficient space for the minimal installused for the restore process.
6. Note which paths are mounted from separate file systems. This information isrequired later in the restore process.
Preparing the target recovery clientProcedure
1. Ensure that the recovery destination disk is connected to the target recovery client.
2. Perform a minimal installation of a compatible operating system. For the purposes ofthis procedure:
l Minimal installation means that desktop environment entries such as Desktop -Gnome should not be selected for installation.
l In the Customize Now dialog box Base System category, select the Base option.Leave all other options disabled.
l Compatible operating system means the same version. For example, if the originalclient backup on the Avamar server was performed on an RHEL3 client, then installRHEL3 on the target recovery client.
l Use the information that you gathered during Reconstructing the partition table onpage 128 to create as many partitions as necessary to replicate the originalconfiguration.
3. (Optional) Save a copy of the /etc/fstab file so that you can compare it to therestored /etc/fstab file.
4. Install the Avamar Client for Linux. The EMC Avamar Backup Clients User Guide providesinstructions.
Performing system recovery of a Red Hat or CentOS Linux clientBefore you begin
Perform the steps in Reconstructing the partition table on page 128 and Preparing thetarget recovery client on page 130.
Procedure
1. Start the recovery target client from the install media (first CD/DVD):
l On Red Hat or CentOS 4 or 5, type linux rescue at the command prompt.
l On Red Hat or CentOS 6.0 or later, select Rescue installed system.
Restore and Recovery
130 EMC Avamar 7.2 Administration Guide

2. Follow the onscreen instructions.
Be sure to enable networking by providing IP address, network mask, default gateway,and DNS server values when prompted. You can use a temporary hostname and IP, orthe original information from the computer that you are restoring.
3. Allow the installer to search for installations and mount the /mnt/sysimage filesystem as read/write.
The /mnt/sysimage file system is the target of the restore, and is also referred to asthe recovery destination disk.
Note
You cannot restore the root file system directly to /mnt/sysimage because there is
no method to restrict the restore operation to only the local partition withouttraversing network mount points. Therefore, a restore directly to /mnt/sysimagemight copy files from all the partitions, and /mnt/sysimage could fill up before all
required files were restored.
4. Ensure that the following directories are all present in the LD_LIBRARY_PATHsystem variable:
l /libl /lib64l /usr/libl /usr/lib64l /mnt/sysimage/libl /mnt/sysimage/lib64l /mnt/sysimage/usr/local/avamar/libIf any directories are missing from LD_LIBRARY_PATH, add them.
5. Create a temporary /tmp/avtar.cmd flag file with a UNIX text editor. For example:
cd /tmpvi avtar.cmd--bindir=/mnt/sysimage/usr/local/avamar/bin--vardir=/mnt/sysimage/usr/local/avamar/var--sysdir=/mnt/sysimage/usr/local/avamar/etc--server=Avamar_server--account=/domain/client--id=username--ap=password--target=.
where:
l Avamar_server is the Avamar server IP address or fully qualified hostname asdefined in DNS.
l /domain/client is the full location of the original Linux client on the Avamar server.
l username and password are the login credentials for a user account with sufficientrole and privileges to perform the restore.
Restore and Recovery
Performing system recovery of a Red Hat or CentOS Linux client 131

6. Restore most of the directories that originally existed under root (/):
NOTICE
Do not restore files that are on file systems other than the root file system at this time.These directories and files are restored later in this procedure.
a. Create a temporary restore directory under the client /mnt/sysimage directoryand change directory to it by typing commands similar to the following examples:
mkdir /mnt/sysimage/restorecd /mnt/sysimage/restore
b. Restore the contents of the root file system from the backup by typing thefollowing command on a single command line:
/mnt/sysimage/usr/local/avamar/bin/avtar.bin -x --flagfile=/tmp/avtar.cmd --labelnumber=n [--exclude=./boot --exclude=./home] /where n is the label number of the backup to use for the system state recovery.
Use --exclude=path options to exclude paths that were identified as separatemount points. These directories and files are separately restored later in thisprocedure.
The first two --exclude options in the previous command are included as anexample. Replace the values with options appropriate to the system that you arerestoring. Specify exclude options relative to the root of the original backup. Forexample, --exclude=./boot instead of --exclude=/boot.
c. For each directory that was restored, delete the original directory from /mnt/sysimage, and move the restored directory from the /mnt/sysimage/restore directory to /mnt/sysimage by typing commands similar to thefollowing examples:
rm -rf /mnt/sysimage/etcmv /mnt/sysimage/restore/etc /mnt/sysimage/etc
d. Repeat the previous step for each directory that successfully restored to /mnt/sysimage/restore.
7. Restore individual files in the root (/) directory:
a. Change directory to /mnt/sysimage/restore by typing the followingcommand:
cd /mnt/sysimage/restore
b. Restore the individual files in the root (/) directory by typing the followingcommands:
mv ./* /mnt/sysimagemv ./.* /mnt/sysimage
8. Restore other mount points:
a. Check that file systems are mounted as expected by typing df -h at the commandprompt.
Restore and Recovery
132 EMC Avamar 7.2 Administration Guide

b. Compare the output to the expected set of mounted file systems. If there arediscrepancies, mount the devices onto the correct mount points.
c. Change directory to each mount point by typing a command similar to thefollowing example:
cd /mnt/sysimage/home
d. Create a temporary restore directory, then change directory to it by typingcommands similar to the following examples:
mkdir ./restorecd ./restore
e. Restore the contents of the mount point by typing the following command:
/mnt/sysimage/usr/local/avamar/bin/avtar.bin -x --flagfile=/tmp/avtar.cmd --labelnumber=n /homewhere n is the label number of the backup to use for the restore, and /home is anexample mount point.
f. Return to the mount point directory, and delete all files except for the restoredirectory by typing commands similar to the following examples:
alias ls=/usr/bin/lscd /mnt/sysimage/home; rm -rf `ls --hide restore`rm -rf ./.*
g. Change directory to the restore directory, then move the contents into thecorrect place in the mount point by typing the following command:
cd ./restore;mv `ls -A ./` ..
h. Remove the restore directory by typing the following commands:
cd ..rmdir restore
i. Repeat steps d through i for each remaining mount point.
9. Perform final system checks:
a. Inspect /mnt/sysimage/etc/fstab, and verify that there are valid statementsfor each file system to be mounted on the new system.
There are three ways that devices might be listed in the fstab file: device path,volume label, and Universally Unique Identifier (UUID).
You can determine this information about the file systems by typing /mnt/sysimage/lib/udev/vol_id device_path, where device_path is the /dev pathto the device.
If that program is not present on the system, type /mnt/sysimage/sbin/blkiddevice_path.
If you created partitions manually during the minimal system install, the deviceUUIDs might have changed. Update the device UUIDs in /mnt/sysimage/etc/fstab. If some volumes are missing expected labels, set the label bytyping /mnt/sysimage/sbin/e2label device_path label.
Restore and Recovery
Performing system recovery of a Red Hat or CentOS Linux client 133

b. Re-examine the fstab carefully.
The restored system cannot start correctly if the fstab entries do not exactlymatch the storage device configuration, and the rescue system on the installmedia has difficulty discovering which file systems to mount to /mnt/sysimage.
Note
If you saved a reference copy of the fstab file when you were preparing the target
client for recovery, then you can find the disk information in that file. For systemswith few manual changes to the restored fstab file, it might be possible to use
the reference fstab file instead of the restored copy of the file.
c. Verify that no more files are present in /mnt/sysimage/restore by typing thefollowing command:
ls -al /mnt/sysimage/restore
d. If the directory is empty, remove it by typing the following command:
rmdir /mnt/sysimage/restore
e. If the command fails because the directory is not empty, then there might bedirectories that you failed to move in when you restored most of the directories inroot (/). Move the directories to the proper restore locations.
10.Exit the command shell and restart the system by typing exit.
If you are rebooting a Red Hat or CentOS 6 system, a menu appears.
11.Select reboot, then OK and press Enter.
The system restarts.
12.Eject the install media and start normally.
13.Confirm correct client operation.
Troubleshooting system recovery of a Red Hat or CentOS Linux clientThe following topics provide details on troubleshooting issues that may occur after youperform system recovery of a Red Hat or CentOS Linux client.
Troubleshooting a boot failure after system recoveryIf the restored system does not boot at the end of the restore procedure, then the versionof GRUB installed by the minimal OS might be too dissimilar to the version previouslyused on the machine. You must boot into the restore environment and reinstall GRUB.
Procedure
1. Boot into the restore environment by starting the client from the install media with therescue option.
2. If the startup process cannot find the restored operating system, then its fstab isprobably configured incorrectly. Mount the partitions manually, and correct thecontents of the file.
3. Reinstall GRUB by typing the following commands:
chroot /mnt/sysimagegrub-install device
where device is the boot device (for example, /dev/sda).
Restore and Recovery
134 EMC Avamar 7.2 Administration Guide

4. Exit the chroot environment by typing exit.
5. Exit the command shell and restart the system by typing exit.
If you are rebooting a Red Hat or CentOS 6 system, a menu appears.
6. Select reboot, then OK and press Enter.
The system restarts.
7. Eject the install media and start normally.
Restoring network settings after system recovery of a Linux clientIf the operating system detects that you have restored the system to new hardware, itmight revert the network settings to defaults (for example, DHCP name resolution insteadof static IP). You can recover the previous network settings by manually reconfiguring thesettings.
To examine the previous settings, open the .bak files in /etc/sysconfig/network-scripts in a text editor. These files contain useful information, but shouldnot be used in the current configuration in an unmodified form, since they include MACaddress information from the previous hardware.
SUSE Linux system recoveryThe following topics describe how to restore a SUSE Linux client system to its originalsystem state.
Reconstructing the partition tableBefore you perform system recovery of a Linux client, you must reconstruct the partitiontable used in the original Avamar backup by running an avtar --showlog mountscommand on a temporary client computer, then examining the output to determine thenumber and size of partitions to create when you install the operating system on thetarget recovery client.
Procedure
1. Locate the backup to use for the system state recovery:
a. In Avamar Administrator, click the Backup & Restore launcher button.
The Backup, Restore and Manage window appears.
b. Click the Restore tab.
c. In the clients tree, select the original Linux client.
d. Find the full system backup to use to recover the system state.
e. Note the backup label number.
f. Leave Avamar Administrator open for the remainder of the system state recoveryprocedure.
2. On a temporary client computer with network connectivity to the Avamar server, opena command shell and log in as root.
3. Type the following command:
/usr/local/avamar/bin/avtar --avamaronly --showlog mounts --server=Avamar_server --id=username --ap=password --path=/domain/client --labelnumber=n
Restore and Recovery
SUSE Linux system recovery 135

where:
l Avamar_server is the IP address or fully qualified hostname as defined in DNS forthe Avamar server.
l username and password are the login credentials for a user account with asufficient role and privileges to perform a restore.
l /domain/client is the full location of the original Linux client on the Avamar server.
l n is the label number of the backup to use for the system state recovery.
4. Examine the command output to locate entries beginning with mount_decision.
For example:
mount_decision: reason="starting_point" fstype="ext3"path="/"mount_decision: reason="default_backup" fstype="ext3"path="/boot"mount_decision: reason="default_backup" fstype="ext3"path="/home"
These are entries for the mount points on the original system. Earlier in the output,there are entries for each of these mount points. For example:
mount: status="user_directed_backup" path="/" hdev="/dev/root" kind="ext3" blksize=4096 freeblks=1189334maxblks=2405872 freefiles=2259654 maxfiles=2432000 dev=2050mount: status="default_backup" path="/boot" hdev="/dev/sda1"kind="ext3" blksize=1024 freeblks=183371 maxblks=194442freefiles=50167 maxfiles=50200 dev=2049mount: status="default_backup" path="/home" hdev="/dev/sdb1"kind="ext3" blksize=4096 freeblks=1027161 maxblks=5158925freefiles=2530548 maxfiles=2621440 dev=2065These entries contain mount point size and path information.
5. Calculate the original file system size or each mount point in bytes by multiplying theblksize value by the maxblks value.
NOTICE
Multiplying the blksize value by the maxblks value calculates the free space used
on the original device. However, you should create the root partition with anadditional 2 GB to 3 GB of free space to ensure sufficient space for the minimal installused for the restore process.
6. Note which paths are mounted from separate file systems. This information isrequired later in the restore process.
Preparing the target recovery clientProcedure
1. Ensure that the recovery destination disk is connected to the target recovery client.
2. Perform a minimal installation of a compatible operating system. For the purposes ofthis procedure:
Restore and Recovery
136 EMC Avamar 7.2 Administration Guide

l Minimal installation means that only Base System and Minimal System(Appliances) packages are installed from the Software selection page. Clear theselection of all other packages so that they are not installed.
l Compatible operating system means the same version. For example, if the originalclient backup on the Avamar server was performed on an SLES10 client, theninstall SLES10 on the target recovery client.
l Use the information that you gathered during Reconstructing the partition table onpage 128 to create as many partitions as necessary to replicate the originalconfiguration.
3. (Optional) Save a copy of the /etc/fstab file so that you can compare it to therestored /etc/fstab file.
4. Install the Avamar Client for Linux. The EMC Avamar Backup Clients User Guide providesinstructions.
Performing system recovery of a SUSE Linux clientBefore you begin
Perform the steps in Reconstructing the partition table on page 128 and Preparing thetarget recovery client on page 136.
Procedure
1. Start the recovery target client from the install media (first CD/DVD) and select RescueSystem.
2. Open a command shell on the recovery target client and log in as root.
3. Mount the root partition that is created in the minimal install to /mnt by typing thefollowing command:
mount /dev/sda# /mntwhere /dev/sda# is the device that contains the root file system. If the drive wasconfigured to use Linux Logical Volume Management, then the root device might be inthe form of /dev/VolGroup##/LogVol##.
4. Rebind the pseudo-file systems into the /mnt tree by typing the following commands:
mount --rbind /proc /mnt/procmount --rbind /sys /mnt/sysmount --rbind /dev /mnt/dev
5. Change the current file system root by typing the following command:
chroot /mnt
6. Start the network as configured in the prerequisites by typing the following command:
rcnetwork start
7. Mount the auto-mount file systems and verify that the correct file systems weremounted by typing the following command:
mount -a;df -h
8. If any file systems are missing (for example, if /boot is not set to auto-mount), thenmanually mount them to the correct locations by using additional mount commands.
Restore and Recovery
Performing system recovery of a SUSE Linux client 137

9. Exit the chroot environment by typing exit.
10.Copy the network name resolution file from the chroot environment into the workingrestore environment by typing the following command:
cp /mnt/etc/resolv.conf /etc/resolv.conf11.Ensure that the following directories are all present in the LD_LIBRARY_PATH
system variable:
l /libl /lib64l /usr/libl /usr/lib64l /mnt/libl /mnt/lib64l /mnt/usr/local/avamar/libIf any directories are missing from LD_LIBRARY_PATH, add them.
12.Create a temporary /tmp/avtar.cmd flag file with a UNIX text editor. For example:
cd /tmpvi avtar.cmd--bindir=/mnt/usr/local/avamar/bin--vardir=/mnt/usr/local/avamar/var--sysdir=/mnt/usr/local/avamar/etc--server=Avamar_server--account=/domain/client--id=username--ap=password--target=.
where:
l Avamar_server is the Avamar server IP address or fully qualified hostname asdefined in DNS.
l /domain/client is the full location of the original Linux client on the Avamar server.
l username and password are the login credentials for a user account with sufficientrole and privileges to perform the restore.
13.Restore most of the directories that originally existed under root (/):
NOTICE
Do not restore files that are on file systems other than the root file system at this time.These directories and files are restored later in this procedure.
a. Create a temporary restore directory under the client /mnt directory and changedirectory to it by typing commands similar to the following examples:
mkdir /mnt/restorecd /mnt/restore
b. Restore the contents of the root file system from the backup by typing thefollowing command on a single command line:
Restore and Recovery
138 EMC Avamar 7.2 Administration Guide

/mnt/usr/local/avamar/bin/avtar.bin -x --flagfile=/tmp/avtar.cmd--labelnumber=n [--exclude=./boot --exclude=./home] /where n is the label number of the backup to use for the system state recovery.
Use --exclude=path options to exclude paths that were identified as separatemount points. These directories and files are separately restored later in thisprocedure.
The first two --exclude options in the previous command are included as anexample. Replace the values with options appropriate to the system that you arerestoring. Specify exclude options relative to the root of the original backup. Forexample, --exclude=./boot instead of --exclude=/boot.
c. For each directory that was restored, delete the original directory from /mnt, andmove the restored directory from the /mnt/restore directory to /mnt by typingcommands similar to the following examples:
rm -rf /mnt/etcmv /mnt/restore/etc /mnt/etc
d. Repeat the previous step for each directory that successfully restored to /mnt/restore.
14.Restore individual files in the root (/) directory:
a. Change directory to /mnt/restore by typing cd /mnt/restore.
b. Restore the individual files in the root (/) directory by typing the followingcommands:
mv ./* /mntmv ./.* /mnt
15.Restore other mount points:
a. Check that file systems are mounted as expected by typing df -h at the commandprompt.
b. Compare the output to the expected set of mounted file systems. If there arediscrepancies, mount the devices onto the correct mount points.
c. Change directory to each mount point by typing a command similar to thefollowing example:
cd /mnt/home
d. Create a temporary restore directory, then change directory to it by typingcommands similar to the following examples:
mkdir ./restorecd ./restore
e. Restore the contents of the mount point by typing the following command:
/mnt/usr/local/avamar/bin/avtar.bin -x --flagfile=/tmp/avtar.cmd--labelnumber=n /homewhere n is the label number of the backup to use for the restore, and /home is anexample mount point.
Restore and Recovery
Performing system recovery of a SUSE Linux client 139

f. Return to the mount point directory, and delete all files except for the restoredirectory by typing commands similar to the following examples:
alias ls=/usr/bin/lscd /mnt/home; rm -rf `ls --hide restore`rm -rf ./.*
g. Change directory to the restore directory, then move the contents into thecorrect place in the mount point by typing the following command:
cd ./restore;mv `ls -A ./` ..
h. Remove the restore directory by typing the following commands:
cd ..rmdir restore
i. Repeat steps d through i for each remaining mount point.
16.Perform final system checks:
a. Inspect /mnt/etc/fstab, and verify that there are valid statements for each filesystem to be mounted on the new system.
There are three ways that devices might be listed in the fstab file: device path,volume label, and Universally Unique Identifier (UUID).
You can determine this information about the file systems by typing /mnt/lib/udev/vol_id device_path, where device_path is the /dev path to the device.
If you created partitions manually during the minimal system install, the deviceUUIDs might have changed. Update the device UUIDs in /mnt/etc/fstab. Ifsome volumes are missing expected labels, set the label by typing /mnt/sbin/e2label device_path label.
b. Re-examine the fstab carefully.
The restored system cannot start correctly if the fstab entries do not exactlymatch the storage device configuration, and the rescue system on the installmedia has difficulty discovering which file systems to mount to /mnt.
Note
If you saved a reference copy of the fstab file when you were preparing the target
client for recovery, then you can find the disk information in that file. For systemswith few manual changes to the restored fstab file, it might be possible to use
the reference fstab file instead of the restored copy of the file.
c. Verify that no more files are present in /mnt/sysimage/restore by typing thefollowing command:
ls -al /mnt/restore
d. If the directory is empty, remove it by typing the following command:
rmdir /mnt/restore
Restore and Recovery
140 EMC Avamar 7.2 Administration Guide

e. If the command fails because the directory is not empty, then there might bedirectories that you failed to move in when you restored most of the directories inroot (/). Move the directories to the proper restore locations.
17.Restart the system by typing reboot.
18.Eject the install media and start normally.
19.Confirm correct client operation.
Troubleshooting system recovery of a SUSE Linux clientThe following topics provide details on troubleshooting issues that may occur after youperform system recovery of a SUSE Linux client.
Troubleshooting a boot failure after system recoveryIf the restored system does not boot at the end of the restore procedure, then the versionof GRUB installed by the minimal OS might be too dissimilar to the version previouslyused on the machine. You must boot into the restore environment and reinstall GRUB.
Procedure
1. Boot into the restore environment:
a. Start the recovery target client from the install media (first CD/DVD) and selectRescue System.
b. Open a command shell on the recovery target client and log in as root.
c. Mount the root partition created in the minimal install to /mnt by typing thefollowing command:
mount /dev/sda# /mntwhere /dev/sda# is the device that contains the root file system. If the drive wasconfigured to use Linux Logical Volume Management, then the root device mightbe in the form of /dev/VolGroup##/LogVol##.
d. Rebind the pseudo-file systems into the /mnt tree by typing the followingcommands:
mount --rbind /proc /mnt/procmount --rbind /sys /mnt/sysmount --rbind /dev /mnt/dev
e. Change the current file system root by typing the following command:
chroot /mnt
f. Start the network as configured in the prerequisites by typing the followingcommand:
rcnetwork start
g. Mount the auto-mount file systems and verify that the correct file systems weremounted by typing the following command:
mount -a;df -h
h. If any file systems are missing (for example, if /boot is not set to auto-mount),then manually mount them to the correct locations by using additional mountcommands.
Restore and Recovery
Troubleshooting system recovery of a SUSE Linux client 141

2. Reinstall GRUB by typing the following commands:
chroot /mntgrub-install device
where device is the boot device (for example, /dev/sda).
3. Exit the chroot environment by typing exit.
4. Reboot the system by typing reboot.
5. Eject the install media and start normally.
Restoring network settings after system recovery of a Linux clientIf the operating system detects that you have restored the system to new hardware, itmight revert the network settings to defaults (for example, DHCP name resolution insteadof static IP). You can recover the previous network settings by manually reconfiguring thesettings.
To examine the previous settings, open the .bak files in /etc/sysconfig/network-scripts in a text editor. These files contain useful information, but shouldnot be used in the current configuration in an unmodified form, since they include MACaddress information from the previous hardware.
Oracle Solaris system recoveryThe following topics describe how to restore an Oracle Solaris client system to its originalsystem state.
Preparing for Oracle Solaris system recoveryEnsure that the environment meets the following prerequisites before you performsystem recovery for an Oracle Solaris system.
Available backup with critical system filesTo successfully restore an Oracle Solaris client system to its original system state, youmust have an Avamar backup of the entire local file system and the following criticalsystem files and virtual file systems. This is accomplished by forcing traversal of thetargets listed in the following table during a backup.
Table 36 Target locations for system recovery backups of an Oracle Solaris client
Target Description
mntfs /etc/svc/volatile
tmpfs /etc/mnttab
cachefs Solaris Cache File System
fdfs Solaris File Descriptor File System
fifofs Solaris FIFO File System
namefs Solaris Name File System
specfs Solaris Device Special File System
swapfs Solaris Swap File System
Restore and Recovery
142 EMC Avamar 7.2 Administration Guide

Table 36 Target locations for system recovery backups of an Oracle Solaris client (continued)
Target Description
tfs Solaris Translucent File System
Use one of the following backup methods to ensure that these targets are included in abackup:
l In Avamar Administrator, explicitly add these targets in an on-demand backup ordataset by specifyingmntfs,tmpfs,cachefs,fdfs,fifofs,namefs,specfs,swapfs,tfs in the Forcetraversal of the specified file system type(s) box in the plug-in options.
l Specify --forcefs=”mntfs,tmpfs,cachefs,fdfs,fifofs,namefs,specfs,swapfs,tfs”on the avtar command line.
Available /var and /opt file systemsThe original file system tables must have partitions for /opt and /var. The partitionsfor /opt and /var are mounted when you boot Solaris in read-only mode.
If the partitions do not mount, then you must create new, temporary file systems for /optand /var when you install a minimal version of Solaris on the client.
Other file systemsIf you are using zfs or any other add-on file system, ensure that these file systems areproperly re-created and mounted before beginning system recovery.
Installation of a minimal version of SolarisCreate a file system layout that matches the original system as closely as possible.Ensure that there are separate file systems for /opt and /var.
Performing system recovery of an Oracle Solaris clientBefore you begin
Perform the steps in Preparing for Oracle Solaris system recovery on page 142.
Procedure
1. Start from CD by typing reboot -- cdrom or by changing the boot order in the BIOSmenu, depending on the platform.
2. (Solaris 11 and 10 only) At the boot options menu, select one of the followingoptions:
l 3. Solaris Interactive Text (Desktop session)
l 4. Solaris Interactive Text (Console session)
3. Continue through the prompts, providing the client hostname, IP address, defaultgateway, and corporate DNS server name when prompted to do so.
4. Exit the command prompt and return to a shell prompt:
l On Solaris 8, press ! when you are prompted to install software for Solaris withSolaris Web Start.
l On Solaris 10 or 11, press F5 to exit when you are prompted to select aninstallation type, and then press F2 to confirm the exit.
5. Mount the / partition under /a as the target of the restore by typing the followingcommand:
Restore and Recovery
Performing system recovery of an Oracle Solaris client 143

mount /dev/dsk/c1t0d0s0 /aUse the correct site-specific disk partition and mount parameters for the root volume.
6. Mount the /opt partition under /opt by typing the following command:
mount /dev/dsk/c1t0d0s5 /optUse the correct site-specific disk partition and mount parameters for the /optvolume.
7. Mount the /var partition under /var by typing the following command:
mount /dev/dsk/c1t0d0s4 /varUse the correct site-specific disk partition and mount parameters for the /varvolume.
8. Mount any additional file systems in their respective mount points under /a.
If the mount point does not exist, create it. For example, to mount file system /data01 on c1t0d0s7, type the following command:
mount /dev/dsk/c1t0d0s7 on /a/data01
9. Install the proper version of the Avamar Client for Solaris software by using theinstructions in the EMC Avamar Backup Clients User Guide.
NOTICE
The installation program displays a warning about root (/) having 0 free bytes, as wellas errors related to read-only file systems when trying to create /etc/init.d/avagent and various links in /usr/bin and /etc/rc.d/rcX.d. However,
despite these warnings, all the binaries are correctly installed in /opt/AVMRclnt/bin.
10.Restore /etc to /a/etc by typing the following commands:
cd /a/etc/opt/AVMRclnt/bin/avtar -x --server=Avamar_server --id=username --password=password --account=/domain/client --target=. /etc --labelnumber=n --overwrite=always
where:
l Avamar_server is the hostname or IP address of the Avamar server.
l username and password are the Avamar login credentials for a user with a role thatallows access to the backups for this client.
l /domain/client is the Avamar domain and Solaris client to restore.
l n is the label number of the backup to restore. If you do not specify a labelnumber, then the most recent backup is used for the restore.
NOTICE
You cannot restore the root file system directly to /a, because there is no way to
restrict the restore operation to only the local partition without traversing networkmount points. A restore directly to /a might copy files from all partitions, causing /ato fill up before all required files are restored.
Restore and Recovery
144 EMC Avamar 7.2 Administration Guide

11.Inspect /a/etc/vfstab to verify the original mount points for the local file system.
12.In Avamar Administrator, click the Backup & Restore launcher button.
The Backup, Restore and Manage window appears.
13.Click the Restore tab.
14.In the clients tree, select the original Solaris client.
15.Find and select the backup to use for the restore.
16.Examine the directories and files that originally existed under root (/).
17.For each directory that originally existed under root (/), perform the following steps:
a. If the directory does not exist, then manually create an empty directory with thesame name under /a.
b. Change directory to that directory.
c. From the command line, restore the contents of the directory from the backup.
For example, consider the following commands to restore /usr:
mkdir /a/usr; cd /a/usr/opt/AVMRclnt/bin/avtar -x --server=Avamar_server --id=username --password=password --account=/domain/client --labelnumber=n --overwrite=always --target=. /usr
If /opt and /var were originally on the root partition, then you can restoreto /a/opt and /a/var. If /opt and /var were separate file systems, then restoreto new, temporary locations, such as /a/newopt and /a/newvar. After completingall restores, move the contents of /a/newopt to /opt and /a/newvar to /var.
18.To restore the individual files that originally existed under root, run the restorecommand with the --norecursionoption to restore files without descending intosubdirectories:
/opt/AVMRclnt/bin/avtar -x --server=Avamar_server --id=username --password=password --account=/domain/client --labelnumber=n --norecursion --overwrite=always --target=. /
19.Restart the client normally and confirm correct operation.
Restore and Recovery
Performing system recovery of an Oracle Solaris client 145

Restore and Recovery
146 EMC Avamar 7.2 Administration Guide

CHAPTER 7
Server Administration
This chapter includes the following topics:
l Server shutdown and restart............................................................................... 148l Suspending and resuming server activities......................................................... 150l Managing client sessions.................................................................................... 151l Managing client agents and plug-ins................................................................... 154l Backup and maintenance windows..................................................................... 156l Checkpoints........................................................................................................158l Generating and installing a server license........................................................... 161l Managing services.............................................................................................. 164l Changing server passwords and OpenSSH keys.................................................. 165l MCS configuration settings................................................................................. 167l Using network address translation (NAT)............................................................. 170l Editing network settings for a single-node server.................................................171l Adding a custom security notification for web browser logins.............................. 171l Viewing and editing server contact information................................................... 172
Server Administration 147

Server shutdown and restartThe dpnctl program enables you to gracefully shut down and restart the entire Avamarserver or selected subsystems.
Shutting down the serverBefore you begin
Ensure that there is a recent and validated checkpoint before you perform a full systemshutdown.
Procedure
1. Open a command shell and log in by using one of the following methods:
l For a single-node server, log in to the server as admin.
l For a multi-node server:
a. Log in to the utility node as admin.
b. Load the admin OpenSSH key by typing:
ssh-agent bashssh-add ~admin/.ssh/admin_key
c. When prompted, type the admin_key passphrase and press Enter.
2. Type dpnctl stop.
A confirmation message prompts whether to shut down the local instance of EMTomcat.
3. Type y to shut down the local EM Tomcat instance, and then press Enter.
The output displays the status of the shutdown process until the shut down iscomplete.
Restarting the serverProcedure
1. Open a command shell and log in by using one of the following methods:
l For a single-node server, log in to the server as admin.
l For a multi-node server:
a. Log in to the utility node as admin.
b. Load the admin OpenSSH key by typing:
ssh-agent bashssh-add ~admin/.ssh/admin_key
c. When prompted, type the admin_key passphrase and press Enter.
2. Type dpnctl start.
The output displays a confirmation message.
3. Type y to proceed with restarting the server, and then press Enter.
The output displays the status of the restart process until the restart is complete.
Server Administration
148 EMC Avamar 7.2 Administration Guide

Stopping the MCSProcedure
1. Open a command shell and log in by using one of the following methods:
l For a single-node server, log in to the server as admin.
l For a multi-node server:
a. Log in to the utility node as admin.
b. Load the admin OpenSSH key by typing:
ssh-agent bashssh-add ~admin/.ssh/admin_key
c. When prompted, type the admin_key passphrase and press Enter.
2. Type dpnctl stop mcs.
Starting the MCSProcedure
1. Open a command shell and log in by using one of the following methods:
l For a single-node server, log in to the server as admin.
l For a multi-node server:
a. Log in to the utility node as admin.
b. Load the admin OpenSSH key by typing:
ssh-agent bashssh-add ~admin/.ssh/admin_key
c. When prompted, type the admin_key passphrase and press Enter.
2. Type dpnctl start mcs.
3. Resume scheduled operations by typing dpnctl start sched.
Getting MCS statusProcedure
1. Open a command shell and log in by using one of the following methods:
l For a single-node server, log in to the server as admin.
l For a multi-node server:
a. Log in to the utility node as admin.
b. Load the admin OpenSSH key by typing:
ssh-agent bashssh-add ~admin/.ssh/admin_key
c. When prompted, type the admin_key passphrase and press Enter.
2. Type dpnctl status mcs.
Server Administration
Stopping the MCS 149

Stopping the EM Tomcat serverProcedure
1. Open a command shell and log in by using one of the following methods:
l For a single-node server, log in to the server as admin.
l For a multi-node server, log in to the utility node as admin.
2. Type dpnctl stop emt.
Starting the EM Tomcat serverBefore you begin
Ensure that EM Tomcat server has been correctly shut down.
Procedure
1. Open a command shell and log in by using one of the following methods:
l For a single-node server, log in to the server as admin.
l For a multi-node server, log in to the utility node as admin.
2. Type dpnctl start emt.
Getting EM Tomcat server statusProcedure
1. Open a command shell and log in by using one of the following methods:
l For a single-node server, log in to the server as admin.
l For a multi-node server:
a. Log in to the utility node as admin.
b. Load the admin OpenSSH key by typing:
ssh-agent bashssh-add ~admin/.ssh/admin_key
c. When prompted, type the admin_key passphrase and press Enter.
2. Type dpnctl status emt.
Suspending and resuming server activitiesYou can suspend and resume backups and restores, scheduled operations, andmaintenance activities.
Suspending and resuming backups and restoresProcedure
1. In Avamar Administrator, click the Server launcher button.
The Server window appears.
2. Click the Server Management tab.
3. In the left pane, select the Avamar server node.
Server Administration
150 EMC Avamar 7.2 Administration Guide

4. Open the Actions menu and select Suspend Backups/Restores or Resume Backups/Restores.
A confirmation message appears.
5. Click Yes.
Suspending and resuming scheduled operationsProcedure
1. In Avamar Administrator, select Tools > Manage Schedules.
The Manage All Schedules window appears.
2. Click Suspend All or Resume All.
Suspending and resuming maintenance activitiesProcedure
1. In Avamar Administrator, click the Server launcher button.
The Server window appears.
2. Open the Actions menu and select Suspend Maintenance Activities or ResumeMaintenance Activities.
A confirmation message appears.
3. Click OK.
Managing client sessionsYou can view a detailed log of a client session to perform troubleshooting or analysis of abackup or restore. If necessary, you can cancel a client session or reset a client whenunexpected system behavior occurs.
Monitoring client sessionsThe Session Monitor displays a list of active client backup and restore sessions.
Procedure
1. In Avamar Administrator, click the Server launcher button.
The Server window appears.
2. Click the Session Monitor tab.
The information in the following table appears for each session in the SessionMonitor.
Table 37 Session Monitor tab properties
Property Description
User
User Avamar user ID (account name).
Path Specifies a hierarchical location in the Avamar server. This option is relative tothe user's home location unless slash (/) is prefixed to the path designation, inwhich case an absolute path is assumed.
Server Administration
Suspending and resuming scheduled operations 151

Table 37 Session Monitor tab properties (continued)
Property Description
Domain Avamar domain where this user resides.
Client ID Unique identifier for this Avamar client.
Session
Type This activity is either avtarbackup or avtarrestore.
Root Top level of the file system being backed up, restored, or validated.
Start time Date and time that this client session started.
Plug-in Plug-in used for this activity.
Session ID Unique identifier for this client session.
Work order ID Unique identifier for this activity.
Elapsed Length of time that this client session has been running.
Progress bytes Total number of bytes examined during this activity.
New bytes Percentage of new bytes backed up to either the Avamar server or a Data Domainsystem. Low numbers indicate high levels of data deduplication.
System
Name Client hostname.
OS name Operating system used by this client.
App version Avamar client software version.
Viewing a detailed client session logYou can view a detailed log of a client session to perform troubleshooting or analysis.
Procedure
1. In Avamar Administrator, click the Activity launcher button.
The Activity window appears.
2. Click the Activity Monitor tab.
By default, the Activity Monitor shows a detailed log of all client backup activity for thepast 72 hours.
3. Specify the session log options:
a. Select Action > Session Log Options.
The Session Log Options dialog box appears.
b. Select Show HTML logs to view the session log summary in HTML format, or Showraw logs to view the session log summary as unformatted text.
c. (Optional) If you select the HTML log format, select the Show debug informationcheckbox to include debug information in the session log summary.
d. Click OK.
Server Administration
152 EMC Avamar 7.2 Administration Guide

4. Select an activity in the list.
5. Select Actions > View Session Log.
The Activity Session Drill-down dialog box appears.
6. Perform any of the following tasks in the session log summary:
l (HTML format only) In the Log Files section, click a hyperlink to go to the log file.
l Search for a specific text string in the session log summary by typing a text stringin the Find field and then clicking Next or Previous.
l Return to the top of the session log summary by clicking Back to Top.
l Export the session log summary to a file by clicking Export, specifying a locationfor the file, and clicking Save.
l Update the contents in the session log summary by clicking Refresh.
7. Click Close.
Creating a Zip file for EMC Customer SupportThe Activity window enables you to create a Zip file of session log information for EMCCustomer Support and upload the Zip file to the Avamar server.
Procedure
1. In Avamar Administrator, click the Activity launcher button.
The Activity window appears.
2. Select an activity in the list.
3. Select Actions > Download Support Bundle.
The Download Support Bundle dialog box appears.
4. Navigate to a directory for the zip file.
5. Click Save.
A progress dialog box displays the status of the operation.
6. When the operation completes, click Close on the progress dialog box.
7. To create a Zip file and copy it to the Avamar server, select Actions > Upload SupportBundle to Server.
The upload process creates a Zip file for session log summary information and copiesthe Zip file to the /tmp folder on the Avamar server. A progress dialog box displaysthe status of the operation.
Canceling a client sessionOccasionally, a client might experience unexpected system behavior while it isperforming a backup or restoe. In these cases, it might be necessary to force an end tothese client sessions from Avamar Administrator.
Procedure
1. In Avamar Administrator, click the Server launcher button.
The Server window appears.
2. Click the Session Monitor tab.
A list of active client sessions appears.
Server Administration
Creating a Zip file for EMC Customer Support 153

3. Select the client session to cancel.
4. Select Actions > Cancel Session.
A dialog box shows the progress of the cancellation.
5. When the cancellation is complete, click Close.
After you finish
If you cannot cancel the client session, reset the client. This immediately and forciblyterminates active avtar sessions on the client.
Resetting a clientResetting a client immediately and forcibly terminates active client avtar session onthat client. In most cases, you should try to cancel the client session before resetting it.
Procedure
1. In Avamar Administrator, click the Policy launcher button.
The Policy window appears.
2. Click the Policy Management tab.
3. Click the Clients tab.
4. Select the client to reset.
5. From the Actions menu, select Client > Reset Client.
Managing client agents and plug-insEach time a client communicates with an Avamar server, it identifies itself by sending theclient ID, the specific agent version and build running on that client, and a list of plug-ins(version and build) currently installed on that client. Occasionally, because of knownincompatibilities, you may want to deny Avamar server access to all clients running aspecific version (all builds) or a specific build of a client agent or plug-in.
You can also selectively allow or disallow the following plug-in operations for all clientsrunning a specific plug-in version (all builds) or build:
l Client activations initiated from the client
l On-demand backups initiated from the client
l Scheduled backups
l Restores
l Backup validation
l Ability to browse stored backups on the server
Any specific version (all builds) or build that is designated as obsolete is denied accessto the Avamar server. A build is designated as obsolete only in cases of knownincompatibility between the client agent or plug-in and the specific version of serversoftware that was installed. Therefore, to prevent potential problems, this obsoletedesignation cannot be overridden using the feature to edit properties for that version orbuild.
Server Administration
154 EMC Avamar 7.2 Administration Guide

Adding a build recordYou can add an MCS database record for a specific client agent or plug-in build. You canonly add records at the build level. New version records are automatically added afterAvamar server software upgrades.
Procedure
1. In Avamar Administrator, select Tools > Manage Agents & Plug-ins.
The Manage All Agents & Plug-ins window appears.
2. In the left pane, select the agent or plug-in version for the build.
3. Click New.
The New Build dialog box appears.
4. In the Build box, type a valid agent or plug-in build number.
5. To deny Avamar server access to clients with this agent or plug-in build, select theDisable checkbox.
6. (Optional) Type a descriptive comment in the Comment box.
7. Click OK.
Editing version or build recordsProcedure
1. In Avamar Administrator, select Tools > Manage Agents & Plug-ins.
The Manage All Agents & Plug-ins window appears.
2. In the left pane, select the agent or plug-in.
3. In the right pane, select the version or build to edit.
4. Click Edit.
The Edit Build dialog box appears.
5. To deny Avamar server access to clients with this agent or plug-in build, select theDisable checkbox.
6. (Optional) Type a descriptive comment in the Comment box.
7. Click OK.
Deleting a build recordYou can delete an MCS database record for a specific client agent or plug-in build. Youcannot delete a record for an entire version.
Procedure
1. In Avamar Administrator, select Tools > Manage Agents & Plug-ins.
The Manage All Agents & Plug-ins window appears.
2. In the left pane, select the agent or plug-in.
3. In the right pane, select the build to delete.
Click Delete.
Server Administration
Adding a build record 155

Disabling all client initiated activationsYou may want to temporarily prevent clients from activating with the Avamar server toplace the system in a state that supports maintenance activities. Client Invite will notwork when clients are prevented from activating.
Procedure
1. In Avamar Administrator, select Tools > Manage Agents & Plug-ins.
The Manage All Agents & Plug-ins window appears.
2. Click Disable All Client Initiated Activations.
3. To re-enable client initiated activations, click Enable All Client Initiated Activations.
Disabling all client initiated backupsYou can temporarily prevent Avamar clients from initiating on-demand backups to placethe system in a state that supports various maintenance activities.
Procedure
1. In Avamar Administrator, select Tools > Manage Agents & Plug-ins.
The Manage All Agents & Plug-ins window appears.
2. Click Disable All Client Initiated Backups.
3. To re-enable client initiated on-demand backups, click Enable All Client InitiatedBackups.
Backup and maintenance windowsEach 24-hour day is divided into two operational windows, the backup window and themaintenance window.
The following figure shows the default backup and maintenance windows.
Server Administration
156 EMC Avamar 7.2 Administration Guide

Figure 11 Default backup and maintenance windows
Backup windowThe backup window is that portion of each day that is reserved to perform normalscheduled backups. No maintenance activities are performed during the backup window.
The default backup window begins at 8 p.m. local server time and continuesuninterrupted for 12 hours until 8 a.m. the following morning. You can customize thebackup window start time and duration.
Maintenance windowThe maintenance window is that portion of each day that is reserved to perform theroutine server maintenance activities in the following table.
Table 38 Avamar server maintenance activities
Activity Description
Checkpoint A snapshot of the Avamar server that is taken for the express purpose ofserver rollbacks.
Checkpointvalidation
An internal operation that validates the integrity of a specific checkpoint.Checkpoint validation is also known as a Hash File System (HFS) check. Aftera checkpoint passes an HFS check, it can be considered reliable enough to beused for a server roll back.
Garbagecollection
An internal operation that recovers storage space from deleted or expiredbackups.
Although you can perform backups and restores during the maintenance window, doingso impacts the backup, restore, and maintenance activities. For this reason, minimize
Server Administration
Backup and maintenance windows 157

any backup, restore, or administrative activities during the maintenance window. Theremight be brief periods of time when backup or administrative activities are not allowed.
The default maintenance window begins at 8 a.m. local server time and continuesuninterrupted for 12 hours until 8 p.m. Although you cannot directly customize themaintenance window, its start time and duration are derived from backup windowsettings.
Editing the backup and maintenance windowsYou can edit the backup and maintenance windows by setting the backup window starttime and duration, as well as the time zone for the backup and maintenance windows.
Any changes to the backup window duration also affect the maintenance windowduration. For example, changing the backup window duration from 12 hours to 14 hoursreduces the maintenance window duration by 2 hours.
The following best practices apply when you schedule system activities:
l Limit on-demand backups during the maintenance window
You might want to advise users to avoid initiating any on-demand backups from theirclient computers during the first hour and thirty minutes of the maintenance window(8 a.m. to 8 p.m. local time for most systems).
l Avoid initiating on-demand maintenance activities
Manually initiating maintenance activities such as checkpoints, checkpointvalidation, or garbage collection temporarily disables all scheduled maintenanceactivities until the manually initiated operation completes. Unless there is a pressingneed to initiate an on-demand maintenance activity, it is best to rely on scheduledmaintenance activities to ensure that sufficient time is allocated for each activitydaily.
Procedure
1. In Avamar Administrator, select Tools > Manage Schedules.
The Manage All Schedules window appears.
2. Click the Maintenance Window tab.
3. Change the backup window start time, duration, or time zone by selecting a new valuefrom the corresponding list.
4. Click OK.
CheckpointsCheckpoints are system-wide backups that are taken for the purpose of assisting withdisaster recovery.
A checkpoint occurs automatically during the maintenance window. You can alsomanually start checkpoints at any time.
You can delete checkpoints to reclaim server storage capacity.
The Checkpoint Management tab on the Server window in Avamar Administrator displaysthe status of individual checkpoints. The following table provides the possible states fora checkpoint.
Server Administration
158 EMC Avamar 7.2 Administration Guide

Table 39 Checkpoint states
State Description
The checkpoint failed validation or was canceled before it could complete.
The checkpoint has not yet been validated.
Validation is being performed on this checkpoint.
The checkpoint passed validation.
Creating a checkpointA checkpoint occurs automatically during the maintenance window. You can alsomanually initiate checkpoints at any time.
Procedure
1. In Avamar Administrator, click the Server launcher button.
The Server window appears.
2. Click the Checkpoint Management tab.
3. Select Actions > Create Checkpoint.
A progress dialog box displays the status of the operation.
4. When the checkpoint completes, click Close.
Deleting a checkpointYou can delete checkpoints to reclaim additional server storage capacity. Generally, it isbest to delete unvalidated checkpoints before you delete validated checkpoints.
Procedure
1. In Avamar Administrator, click the Server launcher button.
The Server window appears.
2. Click the Checkpoint Management tab.
3. Select the checkpoint and select Actions > Delete Checkpoint.
A confirmation message appears.
4. Click OK.
Rolling back to a checkpointRollback is the process of restoring the Avamar server to a known good state using datastored in a validated checkpoint. You cannot roll back an Avamar 7.2 server to a version4.x or earlier checkpoint.
Before you begin
If you added nodes to the Avamar server after the checkpoint occurred, remove theentries for the nodes from the probe.out file.
EMC recommends using a validated checkpoint for roll back. Checkpoint validationoccurs during each maintenance window.
Server Administration
Creating a checkpoint 159

Note
If you need a validated checkpoint before the next maintenance window completes,contact EMC Customer Support for assistance.
Procedure
1. Open a command shell and log in by using one of the following methods:
l For a single-node server, log in to the server as admin.
l For a multi-node server:
a. Log in to the utility node as admin.
b. Load the admin OpenSSH key by typing:
ssh-agent bashssh-add ~admin/.ssh/admin_key
c. When prompted, type the admin_key passphrase and press Enter.
2. Shut down the server by typing dpnctl stop.
3. Display a list of checkpoints by typing cplist.
The checkpoint list appears similar to the following example:
cp.20140106170113 Fri Jan 6 17:01:13 2014 valid hfs delnodes 4 stripes 396cp.20140107170042 Sat Jan 7 17:00:42 2014 valid hfs delnodes 4 stripes 396cp.20140108170040 Sun Jan 8 17:00:40 2014 valid hfs ...nodes 4 stripes 396cp.20140109170043 Mon Jan 9 17:00:43 2014 valid hfs ...nodes 4 stripes 396
where:
l cp.yyyymmddhhmmss is the checkpoint ID.
l valid hfs indicates a validated checkpoint.
l valid par indicates a partially validated checkpoint.
4. Note the checkpoint ID of the checkpoint that you plan to use for the checkpoint.
Generally, roll the system back to the most recent fully validated checkpoint unlessyou have a good reason to roll back to an earlier checkpoint.
5. Start the roll back by typing the following command:
rollback.dpn --cptag=checkpoint_id >& filewhere checkpoint_id is the checkpoint ID and file is a temporary file.
6. Wait for the roll back to complete. The roll back might take an hour, depending on theamount of data present in the Avamar server.
When the roll back is complete, the command prompt returns.
7. Open the user-defined temporary file that was created during the roll back, and verifythat the roll back successfully completed without errors.
The server automatically restarts after a successful roll back.
Server Administration
160 EMC Avamar 7.2 Administration Guide

Clearing a data integrity alertTo ensure data integrity, the Avamar server issues an alert any time a checkpointvalidation fails. The only way to clear this alert is to contact EMC Customer Support toobtain a reset code, and then input that code in the Clear Data Integrity Alert dialog box.
Before you begin
Obtain a reset code from EMC Customer Support.
Procedure
1. In Avamar Administrator, click the Administration launcher button.
The Administration window appears.
2. Click the Event Management tab.
3. Click the Unacknowledged Events tab near the bottom of the window.
4. Select Actions > Event Management > Clear Data Integrity Alert.
The Clear Data Integrity Alert dialog box appears.
5. Type the reset code in the Enter reset code field and click OK.
Generating and installing a server licenseThe Avamar server requires a license key for permanent operation. Otherwise, the Avamarserver stops performing several functions after a 30-day grace period. To avoidinterruptions to the Avamar server functioning, generate and install a permanent license.
Procedure
1. Obtain the assigned license key for the Avamar server software.
2. Use the gathergsankeydata utility to generate a gsankeydata.xml license keyinformation file.
If you already generated the gsankeydata.xml file during the Avamar serversoftware installation and configuration, then skip this step.
3. Generate a permanent license key file.
4. Install and activate the license on the Avamar server.
Obtaining assigned license keysThe assigned license key for the Avamar server software includes the customer accountidentification number and the Avamar system asset identification number. These valuesare required to generate a permanent license.
The following example is an assigned license key:
EMC Avamar Software License Key InformationAvamar System Customer Account ID: CN-10062734404Avamar System Asset ID: A-2010014578
Procedure
l Find the assigned license keys on EMC Online Support on the license managementpage.
To access EMC Online Support, type the login credentials provided in the EMC LicenseAuthorization (LAC) email sent to you from [email protected],
Server Administration
Clearing a data integrity alert 161

[email protected], or [email protected]. If you cannot find theemail, send an email to [email protected] to request that the EMC LicenseAuthorization email be resent. Include the EMC product SO number in the email. TheEMC product SO number is required.
To access the license management page on EMC Online Support, click the Get andManage Licenses link below the Service Center section of the home page.
Generating a license key information fileProcedure
1. Open a command shell and log in by using one of the following methods:
l For a single-node server, log in to the server as admin.
l For a multi-node server:
a. Log in to the utility node as admin.
b. Load the admin OpenSSH key by typing:
ssh-agent bashssh-add ~admin/.ssh/admin_key
c. When prompted, type the admin_key passphrase and press Enter.
2. Type gathergsankeydata.
The output prompts you to specify the customer account number.
3. Type the Avamar system customer account number and press Enter.
A valid Avamar system customer account number (account ID) conforms to the formatCN-yymmddnnnnn, where yymmdd is a year, month, and day, and nnnnn is a five-digitnumeric sequence.
The output prompts you to specify the Avamar system asset ID number.
4. Type the Avamar system asset ID number and press Enter.
A valid Avamar system asset ID number (asset reference ID) conforms to the format A-yyyynnnnnn, where yyyy is a year and nnnnnn is a six-digit numeric sequence.
The output prompts you to specify the Internet domain for the account.
5. Type the Internet domain and press Enter.
The output prompts you to confirm the data that you specified.
6. Type y and press Enter.
The local directory contains the gsankeydata.xml license key information file. Thisfile is used to generate the permanent license key.
Generating a permanent license key file
Procedure
1. Access EMC Online Support (https://support.EMC.com) and type the login credentialsfrom the EMC License Authorization (LAC) email [email protected], [email protected], [email protected] sent to you.
The Welcome to the EMC Online Support Site page appears.
Server Administration
162 EMC Avamar 7.2 Administration Guide

Note
If you cannot find the email from LAC, send an email to [email protected] to requestthat the LAC email be sent again. Include the EMC product SO number in the email.The EMC product SO number is required.
2. To access the license management page on EMC Online Support, click Get ManageLicense, below the Service Center section.
The Manage Licenses page appears.
3. Click Avamar from the list of products.
4. Click Activate Licenses and upload the gsankeydata.xml file.
5. In the Qty box, type the authorized quantity of terabyte licenses to allocate to thesystem.
6. Click Next.
This process creates the XML file that contains an activated license key.
7. Save the XML file to a local drive.
You can also email the XML to one or more email addresses.
Installing and activating a licenseAfter you receive the license key file from EMC Licensing, install and activate the licenseon the Avamar server.
Procedure
1. Log in to the email account to which the license key file was sent.
2. Open the email message from [email protected] with a subject line of EMCAvamar Key Information.
The email message contains the license key file as an attached XML file namedasset_Key.xml, where asset is the DNS name of the Avamar server.
3. Save the attachment to a temporary directory.
4. Use WinSCP or an equivalent program to copy the asset_Key.xml file to the /tmpdirectory on a single-node server or to the /tmp directory on the utility node in amulti-node server.
5. Open a command shell and log in by using one of the following methods:
l For a single-node server, log in to the server as admin.
l For a multi-node server:
a. Log in to the utility node as admin.
b. Load the admin OpenSSH key by typing:
ssh-agent bashssh-add ~admin/.ssh/admin_key
c. When prompted, type the admin_key passphrase and press Enter.
6. Ensure that the Avamar server subsystem (also known as GSAN) is running by typingdpnctl status gsan.
If GSAN is running, the output displays a status of ready.
Server Administration
Installing and activating a license 163

7. Use the correct command sequence to change file permissions on theasset_Key.xml file and activate the license.
Server status Command sequence
Running chmod 644 /tmp/asset_Key.xmlavmaint license /tmp/asset_Key.xml --avamaronly
where asset_Key.xml is the license key file.
Not running cd /usr/local/avamar/etcmv license.xml license.xml.oldcp /tmp/asset_Key.xml license.xmlchmod 644 license.xml
where asset_Key.xml is the license key file.
8. If the Avamar server is not running, start it by typing dpnctl start.
9. After the Avamar server restarts, verify that the server license is correctly installed bytyping the following command:
avmaint license --avamaronly
License information appears in the command shell.
Managing servicesThe Services Administration tab on the Administration window in Avamar Administratorenables you to start, stop, suspend, or resume individual services on the Avamar server.
Procedure
1. In Avamar Administrator, click the Administration launcher button.
The Administration window appears.
2. Click the Services Administration tab.
3. Manage the services:
l To start a service, right-click the service and select Start.
l To stop a service, right-click the service and select Stop.
l To suspend a service temporarily, until you explicitly resume it, right-click theservice and select Suspend.
l To resume a service that you previously suspended, right-click the service andselect Resume.
Information on the Services Administration tabThe following information appears on the Services Administration tab.
Table 40 Services Administration tab information
Name Description
Hostname DNS name of the Avamar server.
IP Address IP address of the Avamar server.
Server Administration
164 EMC Avamar 7.2 Administration Guide

Table 40 Services Administration tab information (continued)
Name Description
Load Average Average number of CPU threads over the past minute.
Last Administrator DatastoreFlush
Date and time of the last MCS flush.
PostgreSQL database Status of the MCS database.
Web Services Status of MCS web services.
Web Restore Disk SpaceAvailable
Number of hard drive bytes that MCS web services can use tocreate the restore Zip file.
Login Manager Status of the Avamar Login Manager service.
snmp sub-agent Status of the Avamar SNMP sub-agent service
ConnectEMC Status of the ConnectEMC service.
VMware vCenter ConnectionMonitor
Status of the VMware vCenter connections. This service is onlylisted when at least one vCenter client is added to the system.
snmp daemon Status of the Avamar SNMP master agent service.
ssh daemon Status of the Avamar Secure Shell (SSH) service.
syslog daemon Status of the Avamar syslog service.
Data Domain SNMP Manager Status of the SNMP service for monitoring configured DataDomain systems.
Remote Backup ManagerService
Status of the external backup manager service that is used by theReplicas at Source feature.
RabbitMQ Status of the RabbitMQ message broker service.
Replication cron job Status of the replication cron job on the Avamar server.
Note
The list of services on the Services Administration tab varies according to theconfiguration of the Avamar system.
Changing server passwords and OpenSSH keysUse the change-passwords utility to change the passwords for operating system useraccounts and Avamar server user accounts. Also use change-passwords to create andmodify SSH keys for those accounts.
The change-passwords utility guides you through the following operations:
l Changing passwords for the operating system accounts: admin, dpn, and root
l Changing passwords for the internal Avamar server accounts: root, MCUser, repluser,and viewuser
l Creating and changing SSH keys
Server Administration
Changing server passwords and OpenSSH keys 165

Procedure
1. Suspend all scheduled operations:
a. In Avamar Administrator, select Tools > Manage Schedules.
b. On the Manage All Schedules window, click Suspend All.
2. Open a command shell and log in using one of the following methods:
l To log in to a single-node server, log in to the server as dpn.
l To log in to a multi-node server, log in to the utility node as dpn.
3. Start the utility by typing change-passwords.
On a multi-node server, the output prompts you to specify whether to changepasswords on all nodes or selected nodes.
4. Type y to change passwords on all nodes or n to change passwords on selectednodes, and then press Enter.
The output prompts you to indicate whether you plan to specify SSH private keys thatare authorized for root operations.
5. Type n and press Enter.
The output prompts you to specify whether to change admin, dpn, or root operatingsystem user account passwords.
6. Type y to change the passwords or n to skip the process of changing the passwords,and then press Enter.
7. If you typed y in the previous step, then follow the system prompts to change thepasswords for one or more of the admin, dpn, or root operating system user accounts.
The output prompts you to specify whether to change SSH keys.
8. Type y to change or create an SSH key, or type n, and then press Enter.
9. If you typed y in the previous step, then follow the system prompts to change orcreate the keys.
The output prompts you to specify whether to change Avamar server passwords.
10.When prompted, type y to change the MCUser, Avamar root, repluser, and viewuserpasswords, or if you do not want to change the passwords, type n, and then pressEnter.
11.If you typed y in the previous step, then follow the system prompts to change thepasswords.
The output prompts you to accept or reject the changes that are made to passwords orSSH keys during this utility session.
12.Type y to accept the changes or type n to exit this utility session without changes, andthen press Enter.
The output provides the status of the operation.
13.When the operation completes, resume scheduled operations:
a. In Avamar Administrator, select Tools > Manage Schedules.
b. On the Manage All Schedules window, click Resume All.
Server Administration
166 EMC Avamar 7.2 Administration Guide

MCS configuration settingsAvamar Administrator consists of both client and server software applications. You canindependently configure each application by editing either the server or clientpreferences file.
Changes to the server preferences file, mcserver.xml, affect all Avamar Administratorsessions. Changes to a client preferences file, mcclient.xml, only affect AvamarAdministrator sessions on that client. Both files conform to the preferences.dtd XMLDocument Type Description (DTD) referenced by the JSDK 1.4 API.
Default and live copiesTwo copies of each of these files are present on the system:
l An initial default copy is used to initialize each application after installation.
l A live copy contains the current settings used by the application.
The default copies are located in the /lib directory for each application. The live copiesare located in a “live file” directory. The following table lists the default live file directoryfor each application.
Table 41 Default live file directory for MCS configuration files
Application Default live file directory
Server /usr/local/avamar/var/mc/server_data/prefs
Client install_directory/var/mc/gui_data/prefs, where install_directory is
typically C:\Program Files\avs\administrator on Microsoft Windows
computers and /usr/local/avamar on Linux computers.
Initialization behaviorWhen either the server or client application is initialized, the respective defaultpreferences file in the \lib directory is loaded into memory and replicated to the live filedirectory.
Note
Reinitializing a running MCS is highly destructive. It completely overwrites any custompreference settings stored in the live file and reverts the system configuration back todefault settings. If this occurs, you must recover custom preference settings from aprevious flush (backup) if they are overwritten.
Upgrade behaviorDuring server upgrades, any mcserver.xml entry that is marked with themerge="delete" attribute in the new default mcserver.xml file is not merged intothe new live copy. These entries are obsolete. They are retained in the defaultmcserver.xml file so that the MCS knows to delete the preferences on an upgradedcustomer system.
You can manually add a merge="keep" attribute to any entry in the live /usr/local/avamar/var/mc/server_data/prefs/mcserver.xml file. Settings withmerge="keep" attributes are retained in the new live copy after the upgrade.
Server Administration
MCS configuration settings 167

Backing up MCS dataTo protect itself from hardware failures, the MCS automatically backs up or flushes itspersistent data to the Avamar server hourly and as part of system checkpoints. Flushesare done by way of an avtar client session. You can also force an on-demand flush.
The flush process generates the timestamp files in the following table.
Table 42 MCS backup timestamp files
File Description
flush.timestamp Before every flush, flush.timestamp is created in the server_datadirectory. This file includes the time and date of the flush. On a serverrollback, this file is restored and can be used to verify that the rollbackwas successful to the selected time and date. The contents offlush.timestamp are also accessible by using of the mcserver.sh--status command.
init.timestamp During system initialization, the init.timestamp file is created or
overwritten in the server_data directory. This file includes the time and
date of the system initialization and can be used to verify that initializationwas successful on the selected time and date.
Procedure
1. Open a command shell and log in by using one of the following methods:
l For a single-node server, log in to the server as admin.l For a multi-node server:
a. Log in to the utility node as admin.
b. Load the admin OpenSSH key by typing:
ssh-agent bashssh-add ~admin/.ssh/admin_key
c. When prompted, type the admin_key passphrase and press Enter.
2. Type the following command to initiate an on-demand MCS flush:
mcserver.sh --flush
Restoring MCS dataBefore you begin
If you are planning to restore MCS data to a specific backup instead of the most recentbackup, then find the label number for the backup either by browsing for the backup inAvamar Administrator or by using the avtar command:
l In Avamar Administrator, open the Backup, Restore and Manage window, and browsefor backups in the /MC_BACKUPS account.
l Type the following command on a single command line:
avtar --backups --id=root --ap=password --path=/MC_BACKUPS --hfsaddr=Avamar_server --count=nwhere password is the Avamar root user account password (not the operating systemroot password), Avamar_server is the IP address or DNS name of the Avamar server,
Server Administration
168 EMC Avamar 7.2 Administration Guide

and n is the number of backups to list. A total number of 26 MCS flushes typicallyoccurs each day for an Avamar server — one per hour and one each during themorning and evening system checkpoints. Therefore, to list all MCS backups for aspecific past number of days, specify --count=n in increments of 26.
Procedure
1. Open a command shell and log in by using one of the following methods:
l For a single-node server, log in to the server as admin.
l For a multi-node server:
a. Log in to the utility node as admin.
b. Load the admin OpenSSH key by typing:
ssh-agent bashssh-add ~admin/.ssh/admin_key
c. When prompted, type the admin_key passphrase and press Enter.
2. Stop the MCS by typing dpnctl stop mcs.
3. Restore the MCS by typing one of the following commands:
l To restore to the most recent backup, type mcserver.sh --restore.
l To restore to a specific backup, type mcserver.sh --restore --labelnum=n,where n is the label number of the backup.
4. Open /usr/local/avamar/var/mc/server_log/restore.log to verify thesuccess of the restore.
5. Start the MCS and the scheduler by typing:
dpnctl start mcsdpnctl start sched
Reverting to the default MCS configuration settingsProcedure
1. Open a command shell and log in by using one of the following methods:
l For a single-node server, log in to the server as admin.
l For a multi-node server:
a. Log in to the utility node as admin.
b. Load the admin OpenSSH key by typing:
ssh-agent bashssh-add ~admin/.ssh/admin_key
c. When prompted, type the admin_key passphrase and press Enter.
2. Stop the MCS by typing dpnctl stop mcs.
3. Change the working directory by typing the following command:
cd /usr/local/avamar/var/mc/server_data/prefs
4. Rename mcserver.xml to old.mcserver.xml by typing the following command:
mv mcserver.xml old.mcserver.xml
Server Administration
Reverting to the default MCS configuration settings 169

5. Copy the default server preferences file to the current directory by typing the followingcommand on a single command line:
cp /usr/local/avamar/lib/mcserver.xml /usr/local/avamar/var/mc/server_data/prefs/mcserver.xml
6. Start the MCS and the scheduler by typing:
dpnctl start mcsdpnctl start sched
Using network address translation (NAT)Avamar clients can access Avamar storage nodes by using a set of addresses thatundergo NAT.
To make NAT information available to the Avamar server, the probe.xml file mustcontain nat-address elements for storage nodes. After a client makes initial contactwith the utility node on the Avamar server, the Avamar server provides a set of routableaddresses for the storage nodes to each client. In the absence of a nat-addresselement, a client uses a pre-configured “real” (untranslated) network interface address.
The following figure illustrates an example of a 1x4 multi-node server configuration inwhich Avamar uses NAT.
Figure 12 Multi-node server configuration with NAT
Real: 10.6.250.90 0.3
Storage Node
Storage Node
Storage Node
Storage Node
Utility Node
Avamar ServerReal IP address
of each server
node
NAT IP address
of each server
node
NAT/real IP
address
translation
ROUTER
AVAMAR
CLIENT 1
192.168.6.2
AVAMAR
CLIENT 2
192.168.6.3
SWITCH
2
(NAT: 192.168.6.8)
Real: 10.6.250.89 0.2
(NAT: 192.168.6.7)
Real: 10.6.250.88 0.1
(NAT: 192.168.6.6)
Real: 10.6.250.87 0.0
(NAT: 192.168.6.5)
Real: 10.6.250.86 0.s
10.6.250.88
(NAT: 192.168.6.4)
SWITCH
1
192.168.6.6
192.168.6.7
192.168.6.8
192.168.6.5
192.168.6.4
192.168.6.6
192.168.6.7
192.168.6.8
192.168.6.5
192.168.6.4
10.6.250.87
10.6.250.89
10.6.250.90
10.6.250.91
192.168.6.1
10.6.250.86
The following instructions assume that each Avamar node has a unique address (from theAvamar client perspective), and that you configure a router on the network to applytransparent one-to-one network address translation. You can also use these instructionsto enable NAT for use in a single-node server configuration.
Procedure
1. Use either the dpnnetutil or nodedb program to add NAT addresses toprobe.xml.
Command Command prompt example
dpnnetutil su - rootdpnnetutil
Respond to the interactive prompts displayed by dpnnetutil.
Server Administration
170 EMC Avamar 7.2 Administration Guide

Command Command prompt example
nodedb nodedb update if --addr=10.6.250.87 --new-nat=192.168.6.4=192.168.6.5
2. If the Avamar storage subsystem is stopped, restart it by typing dpnctl start gsan.
3. If the Avamar storage subsystem is running, reread the probe.xml file by typing thefollowing command:
avmaint networkconfig /usr/local/avamar/var/probe.xml --avamaronly
4. Register clients by using the avregister (UNIX) or avregister.bat (Windows)command, or by using Avamar Administrator.
Solutions for common NAT problemsTo determine whether NAT is in use, the client and Avamar server must have a networkconnection. The following table provides solutions for common NAT connection andconfiguration problems.
Table 43 Solutions for common NAT problems
Problem Solution
The Avamar serverterminates with aFATAL ERRORmessage.
Ensure that the probe.xml file:
l Exists in the /usr/local/avamar/var/ directory.
l Is a valid XML file and adheres to the node resource databaseformat.
l Lists NAT IP addresses correctly.
Use the nodedb print --say command to view the contents of
probe.xml. The --say option displays the path and name of the
current node resource database.
The server/clientconnection fails.
Use network diagnostic tools such as ping, traceroute, tracert,
or iperf to verify network connectivity.
Editing network settings for a single-node serverThe Changing the Name and IP Addressing of Avamar Systems Technical Note, which isavailable on EMC Online Support at https://support.EMC.com, provides instructions onhow to edit the network settings for a single-node server.
Adding a custom security notification for web browser loginsYou can include a custom security notification on the login page of Avamar Web Restore.This notification typically explains that only authorized users are permitted access. It canalso list the penalties for unauthorized access.
Procedure
1. In a text editor, create a file that is named disclaimer_Web_Restore.txt.
Server Administration
Solutions for common NAT problems 171

2. Add the notification content to the file.
You can use some basic HTML tags and CSS inline styles in the notification content.
3. Copy the file to the following location on a single-node server, or on the utility node ofa multi-node server:
/usr/local/avamar/var/em/server_data/
Viewing and editing server contact informationThe Avamar server sends contact information for the Avamar server to EMC with everyevent it reports, including capacity reports that help prevent the system from exceedingcritical thresholds. Keep this information current.
A server roll back applies the contact information that existed at the time of thecheckpoint. When the roll back completes, you can view or edit the contact information toensure that the information is current.
Procedure
1. In Avamar Administrator, select Help > View/Edit Contact Information.
The View/Edit Contact Information dialog box appears. The fields in the followingtable are read-only on the dialog box.
Table 44 Read-only fields on the View/Edit Contact Information dialog box
Field Description
EMC site ID Unique customer site identifier, which is specified during initial server installation.This field is read-only.
System ID Unique Avamar server identifier, created during initial server installation. This fieldis read-only.
AVE Yes (Y) if this server is an Avamar Virtual Edition (AVE) server or no (N) if it is not.This field is read-only.
2. Edit the contact information.
Table 45 Editable fields on the View/Edit Contact Information dialog box
Field Description
Data Domain S/N Serial number of Data Domain systems that have been added to this
server. If no Data Domain systems have been added, type (N/A).
Server location Physical location of the Avamar server at the customer site.
Company Information Name and address of the company that owns this Avamar server.
Contact Information Name, telephone number, and email address of the primary contact forthis Avamar server.
3. Click OK.
Server Administration
172 EMC Avamar 7.2 Administration Guide

CHAPTER 8
Server Monitoring
This chapter includes the following topics:
l Recommended daily server monitoring................................................................174l Monitoring activities........................................................................................... 174l Monitoring server status and statistics................................................................ 176l Event monitoring.................................................................................................188l Server monitoring with syslog..............................................................................198l Server monitoring with SNMP.............................................................................. 204l Viewing Avamar server log files........................................................................... 207l Audit logging.......................................................................................................208l Automatic notifications to EMC Customer Support...............................................209l Verifying system integrity.................................................................................... 215
Server Monitoring 173

Recommended daily server monitoringTo ensure that the Avamar server is working properly, EMC recommends that you performthe system monitoring tasks listed in the following table on a daily basis.
Table 46 System monitoring tools and tasks
Monitoring tool Monitoring task
Activity Monitor Investigate any abnormal client activity, such as backups thatcomplete with exceptions.
Server Monitor Confirm that the last checkpoint and validated checkpoint arerecent. Ideally, they should have occurred within the past 24 hours.
Event Monitor Investigate any system errors or warnings.
Unacknowledged Events list Investigate and clear (acknowledge) any unacknowledged events.
NOTICE
EMC recommends that you enable the Email Home feature and the ConnectEMC feature,which automatically email EMC Customer Service with the status of the daily dataintegrity check and other important server messages.
Monitoring activitiesProcedure
1. In Avamar Administrator, click the Activity launcher button.
The Activity window appears.
2. Click the Activity Monitor tab.
Activity Monitor details on page 174 provides details on the information available inthe Activity Monitor.
3. (Optional) Filter the information in the Activity Monitor to display only activities with aspecific state, type, group, client, or plug-in:
a. Select Actions > Filter.
The Filter Activity dialog box appears.
b. Define the filtering criteria and click OK.
Activity Monitor detailsBy default, the Activity Monitor tab displays the most recent 5,000 client activities duringthe past 72 hours. You can increase or reduce the amount of information in the ActivityMonitor by editing the com.avamar.mc.wo completed_job_retention_hourspreference in the /usr/local/avamar/var/mc/server_data/prefs/mcserver.xml file, and then restarting the MCS.
The following tables provide details on the information that is available in the ActivityMonitor.
Server Monitoring
174 EMC Avamar 7.2 Administration Guide

Table 47 Session details available in the Activity Monitor
Column Description
Status Status of the backup, restore, or validation activity. The Avamar Administratoronline help provides details on each status.
Error Code If the activity did not successfully complete, a numeric error code appears.Double-click the error code to view a detailed explanation.
Start Time Date and time that this activity began, adjusted for the prevailing time zone,which is shown in parentheses. Daylight Savings Time (DST) transitions areautomatically compensated.
Elapsed Time Elapsed time for this activity.
End Time Date and time that this activity completed, adjusted for the prevailing time zone,which is shown in parentheses. Daylight Savings Time (DST) transitions areautomatically compensated.
Type Type of activity. The Avamar Administrator online help provides details on eachtype.
Server Server on which the activity occurred, either the Avamar server or a Data Domainsystem.
Progress Bytes Total number of bytes examined during this activity.
New Bytes Percentage of new bytes backed up to either the Avamar server or a Data Domainsystem. Low numbers indicate high levels of data deduplication.
Table 48 Client details available in the Activity Monitor
Column Description
Client Avamar client name.
Domain Full location of the client in the Avamar server.
OS Client operating system.
Client Release Avamar client software version. If this activity is a VMware image backup orrestore, then this value is the Avamar client software version running on theimage proxy client.
Proxy If this activity is a VMware image backup or restore, then this value is the name ofthe proxy client performing the backup or restore on behalf of the virtual machine.Blank for all other activities.
Table 49 Policy details available in the Activity Monitor
Column Description
Sched. StartTime
Date and time that this activity was scheduled to begin.
Sched. EndTime
Date and time that this activity was scheduled to end.
Server Monitoring
Activity Monitor details 175

Table 49 Policy details available in the Activity Monitor (continued)
Column Description
Elapsed Wait Total amount of time that this activity spent in the activity queue. That is, thescheduled start time minus the actual start time.
Group Group that started this activity. One of the following values:
l If the activity was a scheduled backup, the group that this client was amember of when this scheduled activity started.
l On-demand is shown for other backup, restore, and validation activities.
l If the activity was a scheduled replication, then this value is the replicationgroup.
l Admin On-Demand Group is shown for-demand replication activities.
Plug-in Plug-in that is used for this activity.
Retention Retention types that are assigned to this backup. One or more of the followingvalues:
l D—Daily
l W—Weekly
l M—Monthly
l Y—Yearly
l N—No specific retention type
Schedule If the activity was a scheduled backup, the schedule that began this activity. On-Demand or End User Request is shown for all other activities that are startedfrom Avamar Administrator or the client, respectively.
Dataset Name of the dataset that is used to create the backup. If the activity is areplication job, this column lists the source system name on the destinationsystem, and the destination name on the source system.
WID Work order ID. Unique identifier for this activity.
Monitoring server status and statisticsThe Server window in Avamar Administrator enables you to monitor status and statisticsfor the Avamar server as a whole, for individual nodes on the Avamar server, and for anyconfigured Data Domain systems.
The following tabs appear on the Server window:
l The Server Monitor tab presents a summarized view of CPU, network, and hard driveperformance statistics for the Avamar server. A separate subtab provides the sameinformation for any configured Data Domain systems.
l The Server Management tab shows a detailed view of the server hardware resourcesfor the Avamar server and any configured Data Domain systems.
l The Session Monitor tab shows a list of active client backup and restore sessions.
l The Checkpoint Management tab shows detailed information for all systemcheckpoints performed for this Avamar server.
Server Monitoring
176 EMC Avamar 7.2 Administration Guide

l The Data Domain NFS Datastores tab lists the temporary NFS share for VMwareinstant access on any configured Data Domain systems. The EMC Avamar for VMwareUser Guide provides more information on instant access.
Server Monitor tabThe Server Monitor tab on the Server window in Avamar Administrator includes separatetabs for the Avamar server and any configured Data Domain systems.
Avamar tabThe Avamar tab in the Server Monitor presents a summarized view of CPU, network, andhard drive performance statistics for the Avamar server.
The following tables describe the information available on the Avamar tab.
Table 50 Node details on the Avamar tab of the Server Monitor
Property Description
Statusindicators
Status of the node. One of the following values:
l Online (green)—The node is functioning correctly.
l Read-Only (blue)—This status occurs normally as background operations areperformed and when backups have been suspended.
l Time-Out (gray)—MCS could not communicate with this node.
l Unknown (yellow)—Node status cannot be determined.
l Offline (red)—The node has experienced a problem. If ConnectEMC has beenenabled, a Service Request (SR) is logged. Go to EMC Online Support to viewexisting SRs. Search the knowledgebase for Avamar Data Node offline solutionesg112792.
ID Each node in the Avamar server has a unique logical identifier. This node ID isexpressed in the format module.node.
Note
Module and node numbering begins with zero. Therefore, the ID for the third nodein the first module is 0.2.
Table 51 CPU details on the Avamar tab of the Server Monitor
Property Description
Load Average number of CPU threads over the past minute.
User Percentage of CPU capacity that is consumed by running server instructions (anythingother than operating system overhead).
Sys Percentage of CPU capacity that is consumed by operating system overhead.
Table 52 Network details on the Avamar tab of the Server Monitor
Property Description
Ping Time in seconds that this node took to respond to a ping request.
Server Monitoring
Server Monitor tab 177

Table 52 Network details on the Avamar tab of the Server Monitor (continued)
Property Description
In Received packet throughput reported in KB per second.
Out Sent packet throughput reported in KB per second.
Table 53 Disk details on the Avamar tab of the Server Monitor
Property Description
Reads Average number of hard drive reads per second as reported by the operating system.
Writes Average number of hard drive writes per second as reported by the operating system.
Utilization Percentage of total available server storage capacity currently used.
Data Domain tabThe Data Domain tab in the Server Monitor provides CPU, disk activity, and networkactivity for each node on the Data Domain system.
The following tables describe the information available on the Data Domain tab.
Table 54 Node details on the Data Domain tab of the Server Monitor
Property Description
Statusindicators
Status of the node. One of the following values:
l OK (green)—The Data Domain system is functioning correctly.
l Warning (yellow)—There is a problem with the Data Domain system, butbackups and restores can continue.
l Error (red)—There is a problem with the Data Domain system, and backupsand restores are stopped until the problem is resolved.
If the status is yellow or red, you can view additional status information todetermine and resolve the problem. The EMC Avamar and EMC Data Domain SystemIntegration Guide provides details.
Name Hostname of the Data Domain system as defined in corporate DNS.
Table 55 CPU details on the Data Domain tab of the Server Monitor
Property Description
Busy Avg. Average CPU usage as a percentage of total possible CPU usage.
Max Maximum CPU usage that has occurred as a percentage of total possible CPU usage.
Table 56 Disk (KB/S) details on the Data Domain tab of the Server Monitor
Property Description
Read Disk read throughput in kilobytes per second.
Server Monitoring
178 EMC Avamar 7.2 Administration Guide

Table 56 Disk (KB/S) details on the Data Domain tab of the Server Monitor (continued)
Property Description
Write Disk write throughput in kilobytes per second.
Busy Disk I/O usage as a percentage of total possible disk I/O usage.
Table 57 Network (KB/S) details on the Data Domain tab of the Server Monitor
Property a Description
Eth#1Desc—Description of the network interface.
In/Out—Network bandwidth usage in kilobytes per second on network interface1.
Eth#2Desc—Description of the network interface.
In/Out—Network bandwidth usage in kilobytes per second on network interface2.
Eth#3Desc—Description of the network interface.
In/Out—Network bandwidth usage in kilobytes per second on network interface3.
Eth#4Desc—Description of the network interface.
In/Out—Network bandwidth usage in kilobytes per second on network interface4.
a. The number of Eth# columns depends on the maximum number of network interfaces that theconfigured Data Domain systems support.
Server Management tabThe Server Management tab on the Server window in Avamar Administrator shows adetailed view of the server hardware resources, including both the Avamar server and anyconfigured Data Domain systems.
Avamar server information is listed under the Avamar folder in the tree, and configuredData Domain systems are listed under the Data Domain folder in the tree.
The information in the right pane of the window changes when you select different itemsin the tree.
Table 58 Data display based on selections on the Server Management tab
Selected item Information in the right pane of the Server Managementtab
Servers node Summary of bytes protected
Avamar or Data Domain nodes Blank
Avamar server name Detailed information for the Avamar server
Module Detailed information for that module
Server Monitoring
Server Management tab 179

Table 58 Data display based on selections on the Server Management tab (continued)
Selected item Information in the right pane of the Server Managementtab
Node Detailed information for that node
Partition Detailed information for that logical hard drive partition
Data Domain system Detailed information for that Data Domain system
NOTICE
Avamar is licensed in decimal units. Therefore, Total capacity and Capacity used aredisplayed in decimal units on the Server Management tab. All other parts of the productthat output capacity are displayed in binary units.
Bytes Protected Summary
The following table provides details on the Bytes Protected Summary properties on theServer Management tab.
Table 59 Bytes Protected Summary properties on the Server Management tab
Property Description
Properties Name of the Avamar server and configured Data Domain systems.
Values Number of bytes of protected data on the server or Data Domain system.
Server information
The following tables describe the Server Information that is provided when an Avamarserver is selected on the Server Management tab.
Table 60 Server Details on the Server Management tab
Property Description
Active sessions Current number of active client sessions. Click the Session Monitor tabfor more information.
Total capacity Total amount of server storage capacity.
Server utilization Percentage of total available server storage capacity currently used. This
value is derived from the largest Disk Utilization value on the Avamartab in the Server Monitor, and therefore represents the absolute maximumAvamar server storage utilization. Actual utilization across all modules,nodes, and drives might be slightly lower.
Bytes protected Total amount of client data in bytes that has been backed up (protected)on this server.
Bytes protectedquota
Maximum amount of client data in bytes that is licensed for protection onthis server.
License expiration Calendar date on which this server's licensing expires. When the licensingis perpetual, the value is never.
Server Monitoring
180 EMC Avamar 7.2 Administration Guide

Table 60 Server Details on the Server Management tab (continued)
Property Description
Time since Serverinitialization
Number of hours, days, and minutes that have elapsed since this Avamarserver was initialized.
Last checkpoint Date and time that the last server checkpoint was performed. Checkpointsare typically performed twice daily.
Last validatedcheckpoint
Date and time that the server checkpoint was last validated. Checkpoint
validation normally occurs once per day. Therefore, the Last validatedcheckpoint time and Last checkpoint time might be differentdepending on the time of day that you view this information.
Note
If the Last validated checkpoint and Last checkpoint times are morethan 36 hours apart, checkpoint validation is not occurring, which is aproblem.
System Name User-assigned name of this Avamar server.
System ID Unique identifier for this Avamar server.
HFSAddr Hash File System (HFS) address (Addr). The hostname or IP address thatbackup clients use to connect to this Avamar server.
HFSPort HFS data port. The data port that backup clients use to connect to thisAvamar server. The default is port 27000.
IP Address IP address of this Avamar server. If the HFSAddr is an IP address, this valueis the same as the HFSAddr.
Table 61 Maintenance Activities Details on the Server Management tab
Property Description
Suspended One of the following values:
l No — Server maintenance activities are not currently suspended (that is, servermaintenance activities will run normally during the next maintenance window).
l Yes — Server maintenance activities are currently suspended.
Table 62 Garbage Collection Details on the Server Management tab
Property Description
Status One of the following values:
l Idle — Garbage collection is not currently taking place.
l Processing — Garbage collection is taking place.
Result One of the following values:
l OK — Last garbage collection activity successfully completed.
Server Monitoring
Server Management tab 181

Table 62 Garbage Collection Details on the Server Management tab (continued)
Property Description
l Error code — Last garbage collection activity did not successfullycomplete.
Start time Date and time that the last garbage collection activity began.
End time Date and time that the last garbage collection activity ended.
Passes Total number of passes during the last garbage collection activity.
Bytes recovered Total amount of storage space in bytes that was recovered during the lastgarbage collection activity.
Chunks deleted Total number of data chunks that were deleted during the last garbagecollection activity.
Index stripes Total number of index stripes.
Index stripesprocessed
Total number of index stripes that were processed during the last garbagecollection activity.
Module information
The following table provides details on the Module properties on the Server Managementtab.
Table 63 Module properties on the Server Management tab
Property Description
Total capacity Total amount of server storage capacity.
Server utilization Percentage of total available server storage capacity currently used. This value
is derived from the largest Disk Utilization value shown on the Avamar tab inthe Server Monitor, and therefore represents the absolute maximum Avamarserver storage utilization. Actual utilization across all modules, nodes anddrives might be slightly lower.
Number of nodes Total number of nodes in this module.
IP address Base IP address of this module.
Node information
The following tables provide details on the Node properties on the Server Managementtab.
Table 64 Status indicators on the Node Information part of Server Management
Property Description
Statusindicators
One of the following values:
l Online (green) — Node is functioning correctly.
Server Monitoring
182 EMC Avamar 7.2 Administration Guide

Table 64 Status indicators on the Node Information part of Server Management
Property Description
l Read-Only (blue) — This occurs normally as background operations areperformed and when backups have been suspended.
l Time-Out (gray) — MCS could not communicate with this node.
l Unknown (yellow) — Node status cannot be determined.
l Offline (red) — Node has experienced a problem. If ConnectEMC has beenenabled, a Service Request (SR) should have been logged. Go to EMC OnlineSupport to view existing SRs. Search the knowledgebase for Avamar DataNode offline solution esg112792.
Table 65 Server details on the Node Information part of Server Management
Property Description
State Current operational state of the server. One of the following values:
l ONLINE — Node is functioning correctly.
l DEGRADED — One or more disk errors have been detected.
l OFFLINE — Node has experienced a problem. If ConnectEMC has beenenabled, a Service Request (SR) should have been logged. Go to EMCOnline Support to view existing SRs. Search the knowledgebase for AvamarData Node offline solution esg112792.
l READONLY — Occurs normally as background operations are performedand when backups have been suspended.
Runlevel Current operational state of the server. One of the following values:
l fullaccess — This Avamar server is fully operational.
l admin — Avamar server is fully operational but only the administrator rootaccount can access the server.
l adminonly — Avamar server is fully operational but only the administratorroot account can access the server.
l adminreadonly — Avamar server is in a read-only condition and only theadministrator root account can access the server.
l readonly — Avamar server is in a read-only condition. Restores are allowedbut no new backups can be taken.
l suspended — Scheduled backups are disabled until you reenable thescheduler.
l synchronizing — Avamar server is priming or synchronizing stripes. Atemporary condition. Some operations might be delayed.
Accessmode Current access level of the server. The full server access mode is typicallyrepresented as three four-bit fields. For example: mhpu+mhpu+0000 The
most significant bits show server privileges, the middle bits show root userprivileges, and the least significant bits show privileges for all other users.Individual bits in these fields convey the following information:
l m — Migrate allowed.
Server Monitoring
Server Management tab 183

Table 65 Server details on the Node Information part of Server Management (continued)
Property Description
l h — Hash File System (HFS) is writable.
l p — Persistent store is writable.
l u — User accounting is writable.
Port Data port that is used for intra-node communication.
Dispatcher Data port that is used by various utilities to communicate with this node.
Server uptime Number of hours, days, and minutes that have elapsed since this Avamarserver was initialized.
Total capacity Total amount of server storage capacity.
Capacity used Total amount of server storage capacity that has been used for any reason.
Serverutilization
Percentage of total available node storage capacity currently used.
Number ofstripes
Total number of stripes on this node.
Server version Version of Avamar software running on this node.
Table 66 OS details on the Node Information part of Server Management
Property Description
Version Current operating system version running on this node.
Node uptime Number of hours, days, and minutes that have elapsed since this node was laststarted.
Load average The average number of CPU threads over the past minute.
CPU % Percentage of this node’s CPU currently being used.
Ping time (sec) Time in seconds this node took to respond to a ping request.
Disk reads Number of hard drive read operations per second.
Disk writes Number of write operations per second for the hard drive.
Network reads Number of kilobytes per second read by way of this node’s network connection.
Network writes Number of kilobytes per second written by way of this node’s networkconnection.
Server Monitoring
184 EMC Avamar 7.2 Administration Guide

Table 67 Hardware details on the Node Information part of Server Management
Property Description
IP address IP address of this node.
MAC address Media Access Control (MAC) address. A low-level hardware address thatuniquely identifies this node in the Avamar server.
Number of partitions Total number of logical hard drive partitions in this node.
Partition information
The following tables provides details on the Partition Information that is available when apartition is selected on the Server Management tab.
Table 68 Status indicators on the Partition Information part of Server Management
Property Description
Statusindicators
One of the following values:
l Online (green) — The partition is functioning correctly.
l Offline (yellow) — The partition has one or more offline stripes. If ConnectEMChas been enabled, a Service Request (SR) should have been logged. Go toEMC Online Support website to view existing SRs.
l Read-Only (blue) — The partition is read-only.
l Nonfunctional (red) — The partition is not functioning. Search theknowledgebase on EMC Online Support website for solution esg108474.
Table 69 Server Details on the Node Information part of Server Management
Property Description
Total capacity Total amount of server storage capacity.
Server utilization Percentage of total available partition storage capacity that is used.
State Current operational state of this partition. One of the following values:
l ONLINE — The partition is functioning correctly.
l MIGRATING — Transitional state that might or might not be due tonormal operation.
l OFFLINE — Transitional state that might or might not be due to normaloperation.
l READY — Transitional state that might or might not be due to normaloperation.
l RESTARTING — Transitional state that might or might not be due tonormal operation.
Number of offlinestripes
Total number of stripes on this partition that are offline due to mediaerrors.
Server Monitoring
Server Management tab 185

Table 69 Server Details on the Node Information part of Server Management (continued)
Property Description
Number oftransitioning stripes
Total number of stripes on this partition that are in a transitional state thatmight or might not be due to normal operation.
Properties Various operating system properties (if known).
Values Settings for operating system properties (if known).
Data Domain system information
The following table provides details on the Data Domain system properties on the ServerManagement tab.
Table 70 Data Domain system properties on the Server Management tab
Property Description
Status indicators One of the following values:
l Online (green)—The Data Domain system is functioning correctly.
l Offline (yellow)—The Data Domain system is offline. The Data DomainOffline Diagnostics Suite User Guide, which is available on EMC OnlineSupport, provides more information.
l Read-Only (blue)—The Data Domain system is read-only.
l Nonfunctional (red)—The Data Domain system is not functioning. TheData Domain Offline Diagnostics Suite User Guide provides moreinformation.
Hostname The network hostname of the Data Domain system as defined in DNS.
Total Capacity(post-comp size)
The total capacity for compressed data on the Data Domain system.
Server Utilization(post-comp use%)
The percentage of capacity that is used on the Data Domain system for anyreason after compression of the data.
Bytes Protected The total number of bytes of data that are protected, or backed up, on theData Domain system. This value is the number of bytes before the data iscompressed.
File SystemAvailable (post-comp avail)
The total amount of disk space available for compressed data in the DDFS.
File System Used(post-comp used)
The total amount of disk space that is used in the DDFS for compressed data.
User Name The username of the Data Domain OpenStorage (OST) account that Avamarshould use to access the Data Domain system for backups, restores, andreplication, if applicable. This username is specified when you add the DataDomain system to the Avamar configuration.
DefaultReplicationStorage System
Whether the Data Domain system is configured as default replication storage.This option is selected or cleared when you add the Data Domain system tothe Avamar configuration.
Server Monitoring
186 EMC Avamar 7.2 Administration Guide

Table 70 Data Domain system properties on the Server Management tab (continued)
Property Description
MaximumStreams
The maximum number of Data Domain system streams that Avamar can useat any one time to perform backups and restores. This number is configuredfor the Data Domain system when you add the system to the Avamarconfiguration.
DDOS Version Version number of the Data Domain Operating System (DD OS) on the DataDomain system.
Serial Number The manufacturer’s serial number for the disk in the Data Domain system.
Model number Model number of the Data Domain system.
Monitoring Status Monitoring status of the Data Domain system. The EMC Avamar and EMC DataDomain System Integration Guide provides details on the available values.
Monitoring statusdetails
When the monitoring status is a value other than OK, then additional
information appears in a list below the Monitoring Status row. Thefollowing entries describe the available values.
Note
The EMC Avamar and EMC Data Domain System Integration Guide providesdetails on how to troubleshoot error conditions that result from each of thesevalues.
DD Boost licensing status, either:
l DDBoost Licensed
l DDBoost not Licensed
DD Boost status, either:
l DDBoost Enabled
l DDBoost Disabled
Whether the DD Boost user is enabled or disabled, either:
l DDBoost User Enabled
l DDBoost User Disabled
DD Boost user status, either:
l DDBoost User Valid
l DDBoost User Changed
DD Boost option status, either:
l DDBoost Option Enabled
l DDBoost Option Disabled
l DDBoost Option not Available
Status of the non-OST user, if configured, either:
l Non-ost user state is Unknown
l Non-ost user Invalid
l Non-ost user disabled
l Non-ost user is not an admin user
Server Monitoring
Server Management tab 187

Table 70 Data Domain system properties on the Server Management tab (continued)
Property Description
Note
The non-OST user row does not appear if a non-OST user has not beenconfigured.
SNMP status, either:
l SNMP Enabled
l SNMP Disabled
Status of the Data Domain file system, either:
l File System Running
l File System Enabled
l File System Disabled
l File System Unknown
l File system status unknown since SNMP is disabled
Whether synchronization of maintenance operations, such as checkpoints,HFS checks, and Garbage Collection, between the Avamar server and theData Domain system can occur, either:
l Synchronization of maintenance operations is off.
l Synchronization of maintenance operations is on.
Event monitoringAll Avamar system activity and operational status is reported as events to the MCS.Examples of Avamar events include client registration and activation, successful andfailed backups, and hard disk status.
Each event contains the information in the following table.
Table 71 Event information
Information Description
Event code Unique identifier
Date and time Date and time the event was reported
Category Category of event:
l SYSTEM
l APPLICATION
l USER
l SECURITY
Type Type of event:
l INTERNAL
Server Monitoring
188 EMC Avamar 7.2 Administration Guide

Table 71 Event information (continued)
Information Description
l ERROR
l WARNING
l INFORMATION
l DEBUG
Summary A one-line summary description of the event
Hardware source System node that reported the event
Software source System or application module that reported the event
Event notificationsThe following features generate notifications when specific events occur.
Pop-up alertsYou can configure individual events to generate a graphical pop-up alert each time theevent occurs. Avamar Administrator must be running for the pop-up alerts to appear.
Acknowledgment required listYou can specify that when a certain event type occurs, the Avamar system administratormust acknowledge the event.
Email messagesYou can specify that when a certain event type occurs, an email message is sent to adesignated list of recipients. Email notifications can be sent immediately or in batches atscheduled times.
A typical batch email notification message looks like the following example.
Table 72 Example of a batch email notification message
MCS: avamar-1.example.com
MCS Version: 7.1.0-nnnAvamar Server: avamar-1.example.comAvamar Server Version: 7.1.0-nnn
Event profile: My Custom ProfileCount of events: 3
Summary of events:Type-----------INFORMATIONINFORMATIONINFORMATION
Server Monitoring
Event notifications 189

Table 72 Example of a batch email notification message (continued)
Type-----------INFORMATIONINFORMATIONINFORMATION
Code------222072220822209
Count------111
Summary-------New group createdGroup modifiedGroup deleted
Event Code = 22207Event Date/Time = 5/10/14 09:58:20 PDTEvent Type = INFORMATIONEvent Severity = OKEvent Summary = New group createdSoftware Source = MCS:CR
Event Code = 22209Event Date/Time = 5/10/14 09:58:25 PDTEvent Type = INFORMATIONEvent Severity = OKEvent Summary = Group deletedSoftware Source = MCS:CR
Event Code = 22208Event Date/Time = 5/10/14 10:55:28 PDTEvent Type = INFORMATIONEvent Severity = OKEvent Summary = Group modifiedSoftware Source = MCS:CR
Syslog supportYou can specify that when an event type occurs, Avamar logs information to local orremote syslog files that are based on filtering rules that are configured for the syslogdaemon that receives the events. Third-party monitoring tools and utilities capable ofexamining log entries can access the syslog files and process them to integrate Avamarevent information into larger site activity and status reports.
SNMP supportThe Avamar SNMP implementation provides two ways to access Avamar server eventsand activity completion status:
l SNMP requests provide a mechanism for SNMP management applications to “pull”information from a remote SNMP-enabled client (in this case, the Avamar server).
l SNMP traps provide a mechanism for the Avamar server to “push” information toSNMP management applications whenever designated Avamar events occur. You canconfigure an event type to output SNMP traps.
Event profilesProfiles are a notification management feature that are used to logically group certainevent codes together and specify which notifications to generate when the events occur.
There are two basic types of event profiles:
Server Monitoring
190 EMC Avamar 7.2 Administration Guide

l System profile — There is only one system event profile. It contains all possiblesystem event codes.
l Custom profiles — Custom profiles are used to send various notifications whencertain system events occur. You can create as many custom profiles as you need toorganize system events and generate notifications when any of those events occur.
Profile catalogThe Avamar system includes a set of preconfigured event profiles by default.
System profileThere is only one system event profile. It contains all possible system event codes.
Evaluation profileThe evaluation profile is primarily intended to be used to support system evaluations. Ifenabled, this profile generates an email notification and attaches two weeks’ worth ofActivities - DPN Summary report information to the email message. The EMC AvamarReports Guide provides more information about the Activities - DPN Summary report.
High Priority Events profileThe High Priority Events profile is enabled by default. This special event profileautomatically emails the following information to EMC Customer Support([email protected]) twice daily:
l Status of the daily data integrity check
l Selected Avamar server warnings and information messages
l Any Avamar server errors
The only change you can make to the High Priority Events profile is to add emailaddresses to the Recipient Email List. If you require custom High Priority Events profilesettings, copy the profile and then edit the copy.
Local SNMP Trap profileThe Local SNMP Trap profile is read-only and is intended to be used for test purposesonly. The profile enables you to verify that traps are successfully generated and receivedby the local snmptrapd process, which then writes the trap information to a syslog file.
Local Syslog profileIf enabled, the Local Syslog profile reports status by way of the local syslogd processon the Avamar server.
Editing the system event profileThe system event profile contains all possible system event codes. You can edit thesystem event profile to control whether an event generates a pop-up alert in AvamarAdministrator, an entry in the common unacknowledged events list, or neither.
Procedure
1. In Avamar Administrator, select Tools > Manage Profiles.
The Manage All Profiles window appears.
2. Select System Profile in the left pane and click Edit.
The Edit Profile dialog box appears with a list of event codes.
3. To show a graphical pop-up alert in Avamar Administrator each time an event occurs,select the GUI Alert checkbox next to the event.
4. To add an entry to the common unacknowledged events list each time an eventoccurs, select the Acknowledgement Required checkbox.
Server Monitoring
Event profiles 191

5. Click OK.
Creating a custom event profileCustom event profiles enable you to send notifications when specific system eventsoccur.
You cannot view system events and profiles outside the domain that you are logged in to.This affects the profiles that you can edit and the events that you can add to a profile.
Procedure
1. In Avamar Administrator, select Tools > Manage Profiles.
The Manage All Profiles window appears.
2. In the left pane, select the domain for the custom event profile, and click New.
The New Profile wizard appears.
3. In the Profile Name box, type a name for the event profile.
4. Choose whether to enable or disable the profile by selecting or clearing the ProfileEnabled checkbox.
5. Choose whether to enable email notifications for the profile by selecting or clearingthe Email Enabled checkbox.
6. If you enabled email notifications, then specify whether to send email notifications assoon as events occur or on a scheduled basis:
l To send email notifications as soon as events occur, select Send data as eventsoccur.
l To send email notifications on a scheduled basis, select Send data on a schedule,and then select the schedule from the list.
7. Choose whether to enable or disable syslog notification for the profile by selecting orclearing the Syslog Notification – Enabled checkbox.
8. Choose whether to enable or disable SNMP notification for the profile by selecting orclearing the SNMP Trap Notification – Enabled checkbox.
9. Click Next.
The Event Codes page appears.
10.Click the All Codes tab, and then select the Notify checkbox next to the errors thatshould trigger notifications.
NOTICE
An asterisk (*) next to an event indicates an event of such severity that a notificationis sent when that event occurs, even if other event notifications are sent on aschedule.
11.Click the Audit Codes tab, and then select the Notify checkbox next to the auditevents that should trigger notifications.
NOTICE
An asterisk (*) next to an event code indicates an event of such severity that anotification is sent when that event occurs, even if other event notifications are senton a schedule.
Server Monitoring
192 EMC Avamar 7.2 Administration Guide

12.If you are adding this custom event profile at the top-level (that is, not to a domain orsubdomain), specify the parameters to control capacity forecast alerts:
a. Click the Parameters tab.
b. Select the checkbox next to the parameter, and then type a new value for theparameter.
c. Repeat the previous step as necessary for each parameter.
13.Click Next.
The Attachments page appears.
14.(Optional) If the profile includes email notification messages, select the Attach Serverstatus in email (XML) checkbox to include a report of overall Avamar server status inXML format in the messages.
15.(Optional) To include Avamar server logs in email notification messages, select theAttach Server logs in email checkbox and then type the full path to the location ofAvamar server logs in the Directory box. The default location is /usr/local/avamar/var/cron/.
16.Specify the reports to include in email notification messages:
a. Select the Attach checkbox next to the report to include.
b. Select the checkbox next to the report for the file formats in which to send thereport. You can select XML, CSV, or TXT.
c. Specify the number of historical reports of this type to send with each notificationmessage using the Since Count and Since Unit fields. For example, send the pasttwo months of these reports.
The following values are available from the Since Count list:
l day(s) ago
l week(s) ago
l month(s) ago
l since last modified
17.Click Next.
The Email Notification page appears.
18.If the profile includes email notification messages, then specify the recipients andoptions for the email notification messages:
a. In the Email Subject Header box, type an email subject line for the notificationmessage.
b. Add an email recipient to the list by typing a valid email address in the EnterRecipient box and then clicking +.
c. (Optional) To remove a recipient from the Recipient Email List, select the recipientand click -.
d. To insert all attachments into the body of the email notification message, selectthe Inline attachments checkbox.
NOTICE
When you insert the attachments, the email message may be very long.
Server Monitoring
Event profiles 193

e. To immediately send a test email message, click Send Email.
If the test email message is sent successfully, an Email accepted bytransport layer confirmation message appears.
19.Click Next.
The Syslog Notification page appears.
20.If the profile includes syslog notification messages, then specify the syslognotification parameters:
a. In the Address (IP or hostname) box, type the IP address or hostname of theAvamar server node running the syslogd process.
b. In the Port Number box, type the port number used for syslog communication.
c. Choose whether to include extended event code information in the syslogmessage by selecting or clearing the Include extended event data checkbox.
The extended information is delimited by using the following tags:
<Code><Type><Severity><Category><HwSource><Summary><active><lastEmailSendDate><domain><scheduleID><num_prefs><name><isSystem>
d. From the Facility list, select one of the following: user, local0, local1, local2,local3, local4, local5, local6, or local7.
e. To test the syslog notification parameters, click Send Test Syslog Entry.
21.Click Next.
The SNMP Trap Notification page appears.
22.If the profile includes SNMP notification messages, then specify SNMP notificationparameters:
a. In the SNMP Trap address (IP or hostname) box, type the IP address or hostnameof the computer running an application that is capable of receiving and processingan SNMP trap.
b. In the Port Number box, type the port number on the host machine that is listeningfor SNMP traps. The default data port is 162.
c. In the SNMP Community box, type the name of the SNMP community that theSNMP trap listener is configured to use.
The SNMP community is a text string that the local Net-SNMP agent uses toauthenticate itself with the SNMP management application.
d. To test the SNMP notification parameters, click Send Test SNMP Trap.
23.Click Finish.
Server Monitoring
194 EMC Avamar 7.2 Administration Guide

Editing a custom event profileAfter you create a custom event profile for notifications of specific system events, you canedit any of the properties of the profile.
You cannot view system events and profiles outside the domain that you are logged in to.This affects the profiles that you can edit and the events that you can add to a profile.
Procedure
1. In Avamar Administrator, select Tools > Manage Profiles.
The Manage All Profiles window appears.
2. In the left pane, select the custom event profile and click Edit.
The Edit Profile dialog box appears.
3. Edit the custom event profile. The properties are the same as when you create theprofile.
4. Click OK.
Copying a custom event profileYou can create a custom event profile with the same properties as a profile that youalready created by copying the profile. You can copy the profile to the same domain or toa different domain.
Procedure
1. In Avamar Administrator, select Tools > Manage Profiles.
The Manage All Profiles window appears.
2. In the left pane, select the profile and click Copy.
The Save As dialog box appears.
3. Type a name for the new custom event profile in the Save As box.
4. (Optional) To copy the new custom event profile to a different domain, click the ...button, browse to the new domain, and then click OK.
5. Click OK.
Testing custom event profile notificationsYou can test custom event profile notification mechanisms by sending a short emailmessage or writing a short message to the syslog file.
Procedure
1. In Avamar Administrator, select Tools > Manage Profiles.
The Manage All Profiles window appears.
2. In the left pane, select the custom event profile and click Edit.
The Edit Profile dialog box appears.
3. Test the custom event profile:
l To send a test email message, select the Email Notification tab and click SendEmail.
l To write a test message to the syslog file, select the Syslog Notification tab andclick Send Test Syslog Entry.
Server Monitoring
Event profiles 195

l To send a test SNMP trap message, select the SNMP Trap Notification tab and clickSend Test SNMP Trap.
If the test message is successfully sent, a confirmation message appears.
4. Click OK.
5. Click OK to close the Edit Profile dialog box.
Enabling and disabling a custom event profileWhen you disable an event profile, no email notifications are sent until you reenable theprofile. You can disable any profile except the system events profile.
Procedure
1. In Avamar Administrator, select Tools > Manage Profiles.
The Manage All Profiles window appears.
2. In the left pane, select the event profile.
3. Click Disable to disable the event profile, or Enable to enable the event profile.
Deleting a custom event profileYou can permanently delete any custom event profile except the system events profile.
Procedure
1. In Avamar Administrator, select Tools > Manage Profiles.
The Manage All Profiles window appears.
2. Select the event profile and click Delete.
A confirmation message appears.
3. Click Yes.
Viewing events in the Event MonitorProcedure
1. In Avamar Administrator, click the Administration launcher button.
The Administration window appears.
2. Click the Event Management tab.
3. Click the Event Monitor tab near the bottom of the window.
The Avamar Administrator online help provides details on each of the columns in theEvent Monitor.
4. Select the display mode for the Event Monitor:
l Select Query to display the most recent 5,000 system events for a defined range ofdates.
l Select Monitor to display the most recent 5,000 system events during the past 24hours.
5. (Optional) Filter the events that appear in the Event Monitor:
a. Open the Actions menu and select Event Management > Filter.
The Filter dialog box appears.
b. If you selected the Query display mode for the Event Monitor, select the range ofdates for the events to display by using the From Date and To Date fields.
Server Monitoring
196 EMC Avamar 7.2 Administration Guide

c. From the Category list, select the category of events to display.
d. From the Type list, select the type of events to display.
e. From the Severity list, select the severity of the events to display.
f. To view events for all domains, select All Domains. Or, to view events for a specificdomain, select Domain and then browse to or type the domain name.
g. To display only events that contain certain case-sensitive keywords in the eventcode data XML element, type the keyword in the Data box.
This criterion promotes easy filtering on important keywords across eventattributes. For example, filtering the Event Monitor on error returns all eventsthat contain the word error in any XML attribute (for example, category, type, orseverity).
h. Choose whether to display events from all sources, from only the Avamar server,from all Data Domain systems, or from a single Data Domain system:
l To view events from all sources, leave the default selection of All Sources in theSource list.
l To view events from only the Avamar server, select Avamar from the Source list.
l To view events from all Data Domain systems, select Data Domain Systemsfrom the Source list and leave the default selection of All Systems.
l To view events from a single Data Domain system, select Data Domain Systemsfrom the Source list, select the System option, and then either type or browseto the Data Domain system.
i. Click More to view additional filtering criteria.
j. To limit the Event Monitor to events with a certain event code, select Only includecodes and then add and remove codes from the list. Or, to exclude events with acertain event code from the Event Monitor, select Exclude codes and then add andremove codes from the list.
k. Click OK.
Viewing the event catalogA sequential listing of all event codes and summary information is available in /usr/local/avamar/doc/event_catalog.txt on the Avamar server. You can also viewevent_catalog.txt by using a web browser.
Procedure
1. Open a web browser and type the following URL:
http://Avamar_serverwhere Avamar_server is the DNS name or IP address of the Avamar server.
The EMC Avamar Web Restore page appears.
2. Click Documentation.
The Avamar Documentation page appears.
3. Click the plus icon next to Avamar Event Codes.
4. Click event_catalog.txt.
The file opens in the web browser.
Server Monitoring
Viewing the event catalog 197

Acknowledging system eventsSystem events that are configured to require acknowledgment each time they occur,remain in the unacknowledged events list until they are explicitly cleared, oracknowledged, by an Avamar server administrator.
Procedure
1. In Avamar Administrator, click the Administration launcher button.
The Administration window appears.
2. Click the Event Management tab.
3. Click the Unacknowledged Events tab near the bottom of the window.
4. Acknowledge the events:
l To acknowledge one or more events, select the event entries and select Actions >Event Management > Acknowledge Unacknowledged Events.
l To acknowledge all events in the list, select Actions > Event Management > Clear AllAlerts.
Customizing error eventsBy default, Avamar software continually monitors /var/log/messages for anyoccurrence of the case-insensitive search string error. Any occurrences of error createan event code of the type ERROR. You can customize this default behavior.
Procedure
1. Define additional case-insensitive search strings that also create Avamar ERRORevents.
2. Add the search strings to /usr/local/avamar/var/mc/server_data/adminlogpattern.xml.
Server monitoring with syslogThe syslog system logging feature on UNIX and Linux systems collects system logmessages and writes them to a designated log file. You can configure the Avamar serverto send event information in syslog format.
The Avamar server supports both syslog and syslog-ng implementations.
Note
Persons configuring syslog monitoring of an Avamar server should be familiar with basicsyslog concepts. A complete discussion of basic syslog concepts and implementation isbeyond the scope of this guide. The www.syslog.org website provides additionalinformation.
At the operating system level, system monitoring and logging relies on the syslogdprocess to collect system log messages and write them to a designated log file. Thesyslogd process runs locally on every Avamar server node.
However, without additional configuration, each node’s syslogd only collects systeminformation for that node, and writes it to a local log file on that node. From a syslogperspective, each Avamar server node is unaware that any other server nodes exist. Also,the utility node syslogd process is not aware that the Avamar Management ConsoleServer (MCS) is collecting and logging Avamar event information.
Server Monitoring
198 EMC Avamar 7.2 Administration Guide

You can configure an Avamar event profile to format Avamar server event messages insyslog format and send this data to the syslogd process running on the Avamar serverutility node.
The following table describes how an event profile maps Avamar server event data tosyslog fields.
Table 73 Mappings of syslog fields to Avamar event data
Field in syslog Avamar event data
Facility Either User or Local#, where # is a number from 0 to 7.
Priority One of the following values, which are based on the Avamar event type:
l debug, if the Avamar event type is DEBUG
l err, if the Avamar event type is ERROR
l info, if the Avamar event type is INFO
l none, if the Avamar event type is INTERNAL
l warning, if the Avamar event type is WARNING
Date Avamar event date.
Time Avamar event time.
Hardware source Avamar event hardware source.
Software source Avamar event software source.
Message The following fields from the Avamar event code:
l event code
l category
l summary
l event data
Configuring local syslogThe most basic way to implement Avamar server syslog monitoring is to configure theMCS to output Avamar event information to the local syslogd process running on theutility node. The local syslogd service merges the Avamar event information with theoperating system messages in a single local log file.
Procedure
1. Enable the Local Syslog event profile on the Avamar server:
a. In Avamar Administrator, select Tools > Manage Profiles.
b. Select the Local Syslog event profile in the left pane and click Enable.
2. On single-node servers and utility nodes with SLES 11 or later, configure the localutility node syslogd process to listen for MCS event messages on UDP data port 514:
a. Open a command shell and log in as admin on the single-node server or the utilitynode of a multi-node server.
b. Switch user to root by typing su -.
Server Monitoring
Configuring local syslog 199
c. Open /etc/syslog-ng/syslog-ng.conf in a text editor.
d. Locate the following entry:
## uncomment to process log messages from network:## udp(ip("0.0.0.0") port(514));
e. Add the following entry, including the comment:
## uncomment to process log messages from MCS:#udp(ip("0.0.0.0") port(514));
f. Save and close the file.
g. Restart the syslog process by typing the following command:
service syslog restart
h. Verify that syslog is listening on port 514 by typing the following command:
netstat -nap | grep 514
The following output appears in the command shell:
udp 0 0 127.0.0.1:514 127.0.0.1:* 8043/syslog-ng
Configuring remote syslogRemote syslog monitoring involves configuring each server node to send syslog data to aremote logging host, and creating a custom syslog event profile that sends Avamar serverevent messages in syslog format to the remote logging host.
EMC expects that sites implementing remote syslog monitoring of an Avamar server willin most cases already have a remote logging host configured and deployed.
Many different syslog monitoring tools are available. Any syslog monitoring tool willgenerally work with Avamar as long as it is configured to listen for remote syslogmessages over a LAN connection on UDP data port 514.
NOTICE
For maximum security, EMC recommends implementing remote syslog monitoring.
Procedure
1. Create a custom syslog event profile that sends Avamar server event messages insyslog format to the remote logging host.
2. Configure all server nodes to send syslog messages to the remote logging host.
3. Configure the remote logging host to listen for syslog messages over a LAN connectionon UDP data port 514.
4. If a firewall is enabled on the remote logging host, configure the firewall to allow UDPtraffic on port 514 for a defined IP range.
Server Monitoring
200 EMC Avamar 7.2 Administration Guide

Creating a custom syslog event profileProcedure
1. In Avamar Administrator, select Tools > Manage Profiles.
The Manage All Profiles window appears.
2. Select the Local Syslog event profile in the left pane and click Copy.
The Save As dialog box appears.
3. Type a name for the new custom event profile in the Save As field.
4. Leave the domain set to root (/). Custom syslog profiles must reside in the rootdomain.
5. Click OK.
6. In the Manage All Profiles dialog box, select the custom syslog event profile that youcreated and click Edit.
The Edit Profile dialog box appears.
7. Select the Syslog Notification tab and specify syslog notification parameters:
a. In the Address (IP or hostname) field, type the IP address or hostname of theremote logging host.
b. In the Port Number field, leave the port number set to 514.
c. Select the Include extended event data option to include extended event codeinformation in the syslog message.
The extended information is delimited by using the following tags:
<Code><Type><Severity><Category><HwSource><Summary><active><lastEmailSendDate><domain><scheduleID><num_prefs><name><isSystem>
d. From the Facility list, select one of the following values: user, local0, local1,local2, local3, local4, local5, local6, or local7.
8. (Optional) To test the syslog notification parameters, click Send Test Syslog Entry.
9. Click OK.
Server Monitoring
Configuring remote syslog 201

Configuring server nodes to send syslog messages to the remote logging serverAs part of the process to configure remote syslog, you must configure all Avamar servernodes to send syslog messages to a remote logging server over a LAN connection on UDPdata port 514.
Procedure
1. Open a command shell and log in by using one of the following methods:
l For a single-node server:
a. Log in to the server as admin.
b. Switch user to root by typing su -.
l For a multi-node server:
a. Log in to the utility node as admin.
b. Load the dpnid OpenSSH key by typing:
ssh-agent bashssh-add ~admin/.ssh/dpnid
c. When prompted, type the dpnid passphrase and press Enter.
2. Open /etc/syslog-ng/syslog-ng.conf in a text editor.
3. Add the following entry:
destination logserver {udp("ip_address" port(514)); };log { source(src); destination(logserver); };
where ip_address is the IP address of the remote logging host.
4. Save and close the file.
5. Restart the syslog process by typing the following command:
service syslog restart
6. On multi-node servers, repeat the previous steps for each node.
Configuring RHEL remote logging hosts running syslogProcedure
1. Open a command shell and log in to the remote logging host as root.
2. Open /etc/sysconfig/syslog in a text editor.
3. Locate the following entry:
SYSLOGD_OPTIONS="-m 0"4. Add the -r parameter to the entry:
SYSLOGD_OPTIONS="-r -m 0"5. Save and close the file.
6. Restart the syslogd process by typing the following command:
service syslog restart
Server Monitoring
202 EMC Avamar 7.2 Administration Guide

Configuring SLES remote logging hosts running syslog-ngProcedure
1. Open a command shell and log in to the remote logging host as root.
2. Open /etc/syslog-ng/syslog-ng.conf in a text editor.
3. Locate the following entry:
## uncomment to process log messages from network:## udp(ip("0.0.0.0") port(514));
4. Uncomment the entry:
## uncomment to process log messages from network:#udp(ip("0.0.0.0") port(514));
5. Save and close the file.
6. Restart the syslog process by typing the following command:
service syslog restart
7. Verify that syslog is listening on port 514 by typing the following command:
netstat -nap | grep 514
The following output appears in the command shell:
udp 0 0 0.0.0.0:514 0.0.0.0:* 8043/syslog-ng
Configuring the firewall on the remote logging hostIf a firewall is enabled on the remote logging host, configure the firewall to allow UDPtraffic on port 514 for a defined IP range.
Procedure
1. Restrict the source IP addresses of the remote log messages in iptables or anotherfirewall to avoid Denial Of Service (DOS) attacks on the remote logging host.
The following example rule for iptables would allow client system logs for an IPaddress range of Avamar server nodes:
# Rules to allow remote logging for syslog(-ng) on the logHOST systemiptables -A INPUT -p udp -s 192.168.1.0/24 --dport 514 -jACCEPT
where 192.168.1.0/24 is in the IP address range of the Avamar server nodes.
The following example rule for iptables specifies the IP address for each Avamarserver node on a single line and includes the Mac address of the Network InterfaceCard (NIC) for the node:
iptables -A INPUT -p udp -s 192.168.1.12 -m mac --mac-source00:50:8D:FD:E6:32 --dport 514 -j ACCEPTiptables -A INPUT -p udp -s 192.168.1.13 -m mac --mac-source00:50:8D:FD:E6:33 --dport 514 -j ACCEPT
Server Monitoring
Configuring remote syslog 203

iptables -A INPUT -p udp -s 192.168.1.14 -m mac --mac-source00:50:8D:FD:E6:34 --dport 514 -j ACCEPTiptables -A INPUT -p udp -s 192.168.1.15 -m mac --mac-source00:50:8D:FD:E6:35 --dport 514 -j ACCEPT...No rules are necessary for the outgoing syslog traffic on the client side.
2. Restart the firewall service on the remote logging host for the changes to take effect.
3. Restart the syslog-ng service on all server nodes and the remote logging host forthe changes to take effect:
service syslog restart
Server monitoring with SNMPSimple Network Management Protocol (SNMP) is a protocol for communicating andmonitoring event notification information between an application, hardware device, orsoftware application and any number of monitoring applications or devices.
Note
Persons configuring an Avamar server to send event information over SNMP should befamiliar with basic SNMP concepts. A complete discussion of basic SNMP concepts andimplementation is beyond the scope of this guide. The www.net-snmp.org websiteprovides additional information.
The Avamar SNMP implementation provides SNMP requests and SNMP traps to accessAvamar server events and activity status.
SNMP requestsSNMP requests provide a mechanism for SNMP management applications to “pull”information from a remote SNMP-enabled application or device (in this case, the Avamarserver). The SNMP management application sends a request to an SNMP master agentrunning on the Avamar server. The SNMP master agent then communicates with theAvamar SNMP sub-agent, which passes the request to the MCS. The MCS retrieves thedata and sends it back to the Avamar SNMP sub-agent, which passes it back to themanagement application by way of the SNMP master agent. Data port 161 is the defaultdata port for SNMP requests.
Avamar servers that are purchased directly from EMC use the Net-SNMP master agent.Avamar servers that are built with other industry standard hardware likely use an SNMPmaster agent that is provided by the hardware manufacturer.
SNMP trapsSNMP traps provide a mechanism for the Avamar server to “push” information to SNMPmanagement applications when designated Avamar events occur. Data port 162 is thedefault data port for SNMP traps. Typically, the SNMP management application listens forthe SNMP traps that designated remote hosts generate.
Configuring server monitoring with SNMPProcedure
1. To enable an SNMP management application to monitor an Avamar server, load theAvamar Management Information Base (MIB) definition file (AVAMAR-MCS-MIB.txt) into the master MIB used by the SNMP management application.
Server Monitoring
204 EMC Avamar 7.2 Administration Guide

The MIB contains definitions of the information that can be monitored or which trapsare sent for each SNMP application or device.
The following table provides the locations for the Avamar MIB definition file.
Table 74 Locations for the Avamar MIB definition file
Computer type MIB location
Single-node server /usr/local/avamar/doc
Multi-node server /usr/local/avamar/doc on the utility node
Computer with AvamarAdministrator
install_dir/doc, where install_dir is typically:
l C:\Program Files\avs\administrator on Microsoft
Windows computers
l /usr/local/avamar on Linux computers
l /opt/AVMRconsl on Solaris computers
A copy of the Avamar MIB definition file also resides in the /usr/share/snmp/mibs directory on single-node servers and utility nodes. This copy is used by theAvamar SNMP sub-agent and should not be moved or distributed.
2. Install and configure an AgentX compliant master agent:
l If the Avamar server was purchased directly from EMC, the Net-SNMP master agentis already installed, but the Net-SNMP agent must be configured. Configuring theNet-SNMP agent on page 205 provides instructions.
l If the Avamar server is built with other industry standard hardware, install andconfigure the AgentX compliant master agent that is provided by the hardwarevendor.
3. Configure a custom event profile to output designated Avamar server events to anSNMP trap. Creating a custom event profile for an SNMP trap on page 207 providesinstructions.
Configuring the Net-SNMP agentThe avsetup_snmp command line utility configures the Net-SNMP agent tocommunicate with the Avamar server by using the Avamar SNMP sub-agent.
Procedure
1. Open a command shell and log in by using one of the following methods:
l For a single-node server:
a. Log in to the server as admin.
b. Switch user to root by typing su -.
l For a multi-node server:
a. Log in to the utility node as admin.
b. Load the dpnid OpenSSH key by typing:
ssh-agent bashssh-add ~admin/.ssh/dpnid
c. When prompted, type the dpnid passphrase and press Enter.
Server Monitoring
Configuring server monitoring with SNMP 205

2. Type the following commands to launch the utility:
cd /rootavsetup_snmp
The output prompts you to specify the port on which to listen for SNMP requests.
3. Specify the SNMP request data port:
l To use port 161, the default SNMP request data port, press Enter.
l To use a different SNMP request data port, type the data port number and pressEnter.
If avsetup_snmp was not able to detect any SNMP communities, the outputprompts you to specify whether to allow SNMPv3 read-write user based access.
4. Type n and press Enter.
The output prompts you to specify whether to allow SNMPv3 read-only user basedaccess.
5. Type n and press Enter.
The output prompts you to specify whether to allow SNMPv1/v2c read-writecommunity access.
6. Type n and press Enter.
The output prompts you to specify whether to allow SNMPv1/v2c read-onlycommunity access.
7. Press Enter to accept the default value of y.
The output prompts you to specify the community name to which to add read-onlyaccess. The SNMP community is a text string that the local Net-SNMP agent uses toauthenticate itself with the SNMP management application.
8. Type the SNMP community name and press Enter.
The output prompts you to specify the hostname or network address from which toaccept this community name.
9. Press Enter to accept the community name from all hostnames or network addresses.
The output prompts you to specify the OID to which this community should berestricted.
10.Press Enter to specify no restriction.
The output prompts you to specify whether to configure another community.
11.Type n and press Enter.
The output indicates that /etc/snmp/snmpd.conf was created and run toconfigure the system_setup group. Then the output prompts you to specify thelocation of the system.
12.Type the physical location of the Avamar server and press Enter.
The output prompts you to specify contact information.
13.Type contact information (for example, email address, telephone extension, and soforth) and press Enter.
The output prompts you to specify whether to properly set the value of thesysServices.0 OID.
14.Type n and press Enter.
Server Monitoring
206 EMC Avamar 7.2 Administration Guide

The output indicates that /etc/snmp/snmpd.conf was installed and that snmpdwas enabled.
Creating a custom event profile for an SNMP trapAs part of the process of configuring server monitoring with SNMP, create a custom eventprofile to output designated Avamar server events to an SNMP trap.
The default Avamar configuration includes a Local SNMP Trap profile that outputs Avamarserver event messages to the local Net-SNMP trap listener (snmptrapd process).However, you cannot edit the Local SNMP Trap profile. The profile is intended to be usedfor test purposes only, to verify that the local snmptrapd process can successfullygenerate and receive the traps. The process then writes the trap information to a syslogfile. Usually, the next step is to configure another custom profile to send Avamar SNMPtraps to a remote Net-SNMP trap listener.
Procedure
1. Create a custom event profile by using the steps in Creating a custom event profile onpage 192.
On the first page of the New Profile wizard, select the option to enable SNMP trapnotification.
2. Continue through the wizard until the SNMP Trap Notification page appears.
3. In the SNMP Trap Address (IP or hostname) box, type the IP address or hostname of acomputer with an application capable of receiving and processing an SNMP trap.
4. In the Port Number box, type the port number on the host computer that listens forSNMP traps.
5. In the SNMP Community box, type the name of the SNMP community that the SNMPtrap listener is configured to use.
6. (Optional) To test the SNMP notification parameters, click Send Test SNMP Trap.
7. Click Finish.
Viewing Avamar server log filesBy default, the Avamar storage process log file (gsan.log) is limited to 25 MB in sizeand always contains the most recent information. Additional historic log files (forexample, gsan.log.1, gsan.log.2, and so forth) might also exist. You can collectand view these log files by using command line operations.
Procedure
1. Open a command shell and log in by using one of the following methods:
l For a single-node server, log in to the server as admin.
l For a multi-node server:
a. Log in to the utility node as admin.
b. Load the admin OpenSSH key by typing:
ssh-agent bashssh-add ~admin/.ssh/admin_key
c. When prompted, type the admin_key passphrase and press Enter.
2. Create a new user-defined temporary directory and change directory to it by typing thefollowing commands:
Server Monitoring
Viewing Avamar server log files 207
mkdir directorycd directory
where directory is the directory name.
3. Retrieve copies of the storage node log files by typing the following command:
getlogsThe getlogs command gathers the important log files from a particular node,compresses them into a single tar file, nodelogs.tgz, then copies these files tonumbered subdirectories in the current working directory.
4. Examine the nodelogs.tgz files for any entry that contains the string ERROR. Toaccomplish this, run the following shell commands, which write any nodelogs.tgzentries that contain the string ERROR to a user-defined temporary file:
for p in [01].[!sm]*/nodelogs.tgz; dotar xzf $pgrep ERROR: cur/gsan.log*rm -rf cur/*done
5. Remove the user-defined temporary directory by typing the following commands:
cd ../rm -rf directory
Audit loggingThe audit log keeps a permanent log of system actions initiated by users. The data in thislog enables enterprises that deploy Avamar to enforce security policies, detect securitybreaches or deviation from policies, and hold users accountable for those actions.
Only actions that are initiated by users are logged. Actions initiated by the systemwithout a user account, such as scheduled backups, maintenance activities, and so forth,are not logged.
System events with a category of SECURITY and type of AUDIT are used to implement theAvamar audit logging feature. Because the underlying data for audit log entries aresystem events, this information is available in two places:
l Event Monitor, which also contains all other system events
l Audit Log, which only contains events that are also audit log entries
By default, audit log information is retained for one year.
You can increase or reduce the audit log retention period by editing the value ofclean_db_audits_days in /usr/local/avamar/var/mc/server_data/prefs/mcserver.xml, and restarting the MCS.
Viewing the Audit LogProcedure
1. In Avamar Administrator, click the Administration launcher button.
The Administration window appears.
Server Monitoring
208 EMC Avamar 7.2 Administration Guide

2. Click the Event Management tab.
3. Click the Audit Log tab near the bottom of the window.
The Avamar Administrator online help provides details on each of the columns in theAudit Log.
4. Select the display mode for the Audit Log:
l Select Query to display the most recent 5,000 audit log entries for a defined rangeof dates.
l Select Monitor to display the most recent 5,000 audit log entries during the past24 hours.
5. (Optional) Filter the entries that appear in the Audit Log:
a. Open the Actions menu and select Event Management > Filter.
The Filter dialog box appears.
b. If you selected the Query display mode for the Audit Log, select the range of datesfor the entries to display by using the From Date and To Date fields.
c. From the Severity list, select the severity of the log entries to display.
d. To view log entries for all domains, select All Domains. Or, to view entries for aspecific domain, select Domain and then browse to or type the domain name.
e. To display only log entries that contain certain case-sensitive keywords in theaudit log entry data XML element, type the keyword in the Data box.
This criterion promotes easy filtering on important keywords across log entryattributes. For example, filtering the log in error returns all log entries thatcontain the word error in any XML attribute (for example, category, type, orseverity).
f. Click More to view additional filtering criteria.
g. To limit the Audit Log to events with a certain event code, select Only includecodes and then add and remove codes from the list. Or, to exclude events with acertain event code from the Audit Log, select Exclude codes and then add andremove codes from the list.
h. Click OK.
Automatic notifications to EMC Customer SupportThe Email Home and ConnectEMC features automatically send notifications to EMCCustomer Support. These notifications include alerts for high priority events and dailyreports to facilitate monitoring the Avamar server.
Email HomeThe Avamar Email Home feature automatically sends configuration, capacity, and generalsystem information to EMC Customer Support once daily, and provides critical alerts innear-real time as needed.
By default, notification schedule email messages are sent at 6 a.m. and 3 p.m. each day.The Notification Schedule controls the timing of these messages. Schedules on page 95provides more information on editing schedules.
Server Monitoring
Automatic notifications to EMC Customer Support 209

Editing Email Home mail settingsEmail Home is configured and enabled during Avamar server installation. You can edit themail settings for Email Home after the installation.
Procedure
1. Open a command shell and log in by using one of the following methods:
l For a single-node server, log in to the server as admin.
l For a multi-node server:
a. Log in to the utility node as admin.
b. Load the admin OpenSSH key by typing:
ssh-agent bashssh-add ~admin/.ssh/admin_key
c. When prompted, type the admin_key passphrase and press Enter.
2. Change directories by typing the following command:
cd /usr/local/avamar/var/mc/server_data/prefs
3. Open mcserver.xml in a UNIX text editor.
4. Find the com.avamar.asn.module.mail node.
The com.avamar.asn.module.mail node contains the smtpHost andadmin_mail_sender_address entries.
5. Verify that the value for the smtpHost entry is the DNS name of the outgoing SMTPmail server that is used to send Email Home messages, such assmtp.example.com.
If the value for the entry is incorrect, edit the value.
NOTICE
The Avamar 6.0 and later server installation or upgrade automatically completes thevalue for the smtpHost entry. In most cases, some arrangement must be made to
enable emails originating from the Avamar server to be forwarded through theoutgoing SMTP mail server to EMC Customer Support over the Internet.
6. Specify a valid email address with access to a corporate outgoing SMTP mail server asthe value for the admin_mail_sender_address entry.
NOTICE
If you do not configure the Email Home feature to send messages from a valid emailaddress, messages generated by the Email Home feature are rejected by the EMCincoming email server. EMC Customer Support is completely unaware that theseprogrammatically generated messages were rejected. In addition, because a validsending email account is not known, programmatically-generated warnings to thesender that these messages could not be sent are never viewed by anyone who cancorrect the problem.
7. Save the changes and close the file.
8. Restart the MCS by typing the following commands:
Server Monitoring
210 EMC Avamar 7.2 Administration Guide

dpnctl stop mcsdpnctl start
9. Close the command shell.
ConnectEMCConnectEMC is a program that runs on the Avamar server and sends information to EMCCustomer Support. ConnectEMC is typically configured to send alerts for high priorityevents as they occur, as well as reports once daily.
ConnectEMC is integrated with EMC Secure Remote Support (ESRS), provided that it isinstalled, operational, and network accessible by the Avamar server. Contact your EMCSales Representative for additional information about implementing ESRS.
Although ConnectEMC is initially configured during Avamar server software installation,Avamar Administrator enables you to manage ConnectEMC settings, in the form of threeuser-configurable transports, after the server is operational:
l Primary transport
l Failover transport
l Notification transport
The primary and failover transports send alerts for high priority events as they occur. Theprimary transport is used unless it fails, at which time the failover transport is used.
The notification transport sends email notifications messages to one or more customeremail addresses under certain conditions.
You also can control whether the MCS generates and sends ConnectEMC messages byenabling, disabling, stopping, and starting ConnectEMC.
Enabling and disabling ConnectEMCDisabling ConnectEMC causes the MCS to stop generating ConnectEMC messages untilConnectEMC is reenabled. To allow the MCS to continue generating ConnectEMCmessages but to queue the messages, stop ConnectEMC.
Procedure
1. In Avamar Administrator, select Tools > Manage ConnectEMC.
The Manage ConnectEMC window appears.
2. Specify whether the MCS generates and sends ConnectEMC messages:
l To stop the MCS from generating messages, click Disable.
l To restart the generation of messages, click Enable.
l To continue generating messages but queue the messages, click Stop.
l To start sending the messages, click Start.
If you disable ConnectEMC, you are prompted to type a password.
3. Type a valid password and click OK.
Editing the primary and failover transportsProcedure
1. In Avamar Administrator, select Tools > Manage ConnectEMC.
The Manage ConnectEMC window appears.
Server Monitoring
ConnectEMC 211

2. Select either Primary Transport or Failover Transport in the left pane, and click Edit.
The Edit Primary/Secondary Transport dialog box appears.
3. Select the transport type from the Transport Type list:
l Email
l FTP
l HTTPS
Note
An operational EMC Secure Remote Support gateway is required to use the FTP orHTTPS transport types.
4. (Email only) After selecting Email, complete the following steps.
a. In the SMTP Host (Email Server) field, specify the mail server hostname or IPv4address.
b. In the Email Address field, specify one or more recipients of these email messages.Separate multiple email addresses with commas.
c. In the Email Sender Address field, specify the email address from which to sendthe message.
d. (Optional) To configure advanced settings, click Advanced, and then specify thefollowing settings in the Edit Advanced Email Settings dialog box:
l Retries – The number of retries to perform before reporting a failure. Thedefault setting is five retries.
l Timeout – The number of seconds to wait before reporting that the operationtimed out. The default setting is 5 minutes (300 s).
l Description – A description of this transport that appears in the ManageConnectEMC window. The default description is Email Transport.
l Email Subject – The subject line in the email. The default subject line isAvamar ConnectEMC Notification Email.
Do not change the email subject unless instructed to do so by EMC CustomerSupport. EMC spam filters can reject email messages with other subject lines.
e. Click OK.
5. (FTP only) After selecting FTP, complete the following steps.
a. In the IP Address field, specify an IPv4 address.
b. In the Username field, specify an FTP username. The setting depends on the FTPserver software.
c. In the Password field, specify the password for the username.
d. (Optional) To configure advanced settings, click Advanced, and then specify thefollowing settings in the Edit Advanced FTP Settings dialog box:
l Retries – The number of retries to perform before reporting a failure. Thedefault setting is five retries.
l Timeout – The number of seconds to wait before reporting that the operationtimed out. The default setting is 5 minutes (300 s).
l Description – A description of this transport that appears in the ManageConnectEMC window. The default description is FTP Transport.
Server Monitoring
212 EMC Avamar 7.2 Administration Guide

l FEP Folder – A unique customer UNIX path in the ConnectEMC Front EndProcessor (FEP). Use the folder location that is supplied by EMC CustomerSupport.
l FTP Port – An IP port. The default setting is port 21.
l Mode – Either Active or Passive. The default setting is Active.
Do not change the email subject unless instructed to do so by EMC CustomerSupport. EMC spam filters can reject email messages with other subject lines.
e. Click OK.
6. (HTTPS only) After selecting HTTPS, complete the following steps.
a. Type a valid URL for the EMC Secure Remote Support home page in the URL field.
Valid URLs use the following format:
https://home_name[:port]/target_directorywhere home_name, port, and target_directory are the home name, data port, andtarget directory, respectively.
Use the URL provided by EMC Customer Support.
b. (Optional) To configure advanced settings, click Advanced, and then specify thefollowing settings in the Edit Advanced HTTPS Settings dialog box:
l Retries – The number of retries to perform before reporting a failure. Thedefault setting is five retries.
l Timeout – The number of seconds to wait before reporting that the operationtimed out. The default setting is 5 minutes (300 s).
l Private Key Pass Phrase – The passphrase that is associated with the privatekey file.
l Private Key File – The file name of the private key file.
l Client Certificate – The client certificate to use. The default setting is “Default,”which uses the certificate that the MCS uses. Otherwise, type the file name ofthe client certificate.
l Server CA Bundle – File containing a list of root certificates.
l Verify Server Name – Whether to verify the server name. Either Yes or No. Thedefault setting is No.
c. Click OK.
Sample key files are provided in /opt/connectemc/certs/ and https-privatekey.pem. Sample client certificates are provided in /opt/connectemc/certs/ and https-cert.pem. Sample root certificate bundles are providedin /opt/connectemc/certs/ and https-ca-cert.pem.
7. Click OK on the Edit Primary/Secondary Transport dialog box.
Editing the notification transportProcedure
1. In Avamar Administrator, select Tools > Manage ConnectEMC.
The Manage ConnectEMC window appears.
2. Select Notification Transport and click Edit.
Server Monitoring
ConnectEMC 213
The Edit Notification Transport dialog box appears.
3. From the Notification Type list, select one of the following types:
l On Success — Notify recipients when an event file is successfully transferred toEMC.
l On Failure — Notify recipients when an event file is not successfully transferred toEMC.
l On Success or Failure — Notify recipients when an attempt is made to transfer anevent file to EMC, regardless of the outcome.
l On All Failure — Notify recipients when all attempts to transfer an event file to EMChave failed.
4. In the SMTP Host (Email Server) box, type the mail server hostname or IPv4 address.
5. In the Email Address box, type one or more recipients of these emails. Separatemultiple email addresses with commas.
6. In the Email Sender Address box, type the email address from which the notificationis sent.
7. (Optional) To specify advanced settings, click Advanced and then specify the settingsin the Edit Advanced Email Settings dialog box:
a. In the Retries box, specify the number of retries to attempt before reporting afailure. The default setting is 5 retries.
b. In the Timeout box, specify the number of seconds to wait before reporting that theoperation timed out. The default setting is 300 seconds (5 minutes).
c. In the Description box, specify the description of this transport that appears in theManage ConnectEMC window. The default description is Email Transport.
d. In the Email Subject box, specify the subject line for the email. The default subjectline is Avamar ConnectEMC Notification Email.
NOTICE
Do not change the email subject unless instructed to do so by EMC CustomerSupport. Email messages with other subject lines might be rejected by EMC spamfilters.
e. From the Email Format list, select the format of the email, either ASCII or HTML. Thedefault setting is ASCII.
f. Choose whether to include attachments sent to ConnectEMC in the notificationemail message by selecting or clearing the Include CallHome Data checkbox.
g. Click OK.
8. On the Edit Notification Transport dialog box, click OK.
Testing transportsProcedure
1. In Avamar Administrator, select Tools > Manage ConnectEMC.
The Manage ConnectEMC window appears.
2. Click Test.
Server Monitoring
214 EMC Avamar 7.2 Administration Guide

Verifying system integrityTo verify Avamar server integrity, you must first ensure that a validated server checkpointexists.
You might also want to collect and examine the server log files to ensure that no errorshave occurred since that checkpoint was performed. Viewing Avamar server log files onpage 207 provides instructions.
Procedure
1. In Avamar Administrator, click the Server launcher button.
The Server window appears.
2. Click the Server Management tab.
3. Select the Avamar server name in the left pane.
4. Verify that the Last validated checkpoint field shows a recent calendar date.
Server Monitoring
Verifying system integrity 215

Server Monitoring
216 EMC Avamar 7.2 Administration Guide

CHAPTER 9
Capacity Management
This chapter includes the following topics:
l Capacity utilization information...........................................................................218l Capacity limits and thresholds............................................................................ 218l Capacity forecasting............................................................................................219l Customizing capacity limits and behavior............................................................219
Capacity Management 217

Capacity utilization informationView real-time capacity utilization information for a single server in Avamar Administratoror for multiple servers in Backup & Recovery Manager.
In Avamar Administrator, view capacity utilization information for a single Avamar serveron the Capacity panel of the Avamar Administrator dashboard and on the ServerManagement tab in the Server window.
Capacity utilization information for multiple servers is available through Backup &Recovery Manager. For information about this capability, refer to the Backup & RecoveryManager product documentation.
Capacity limits and thresholdsThis following table describes how an Avamar server behaves as it crosses variousconsumed storage thresholds.
Table 75 Capacity limits and thresholds
Storageutilization
Status Description
Less than75%
The system is considered to have adequate capacity to store futurebackups.
75% Study server storage utilization to determine whether the server hasadequate capacity to store future backups.
80% A pop-up notification warns you that the server has consumed 80% ofits available storage capacity. Study server storage utilization todetermine whether the server has adequate capacity to store futurebackups.
90% Study server storage utilization to determine whether the server hasadequate capacity to store future backups.
95% The server has reached the default health check limit, which is theamount of storage capacity that can be used and still have a “healthy”server. Avamar completes all in-progress backups, but the dispatcherstops new backup activity. When you log in to Avamar Administrator, anotification appears. Acknowledge the system event to resume futurebackup activity. You can customize the health check limit, but settingthe limit higher than 95% is not recommended. Customizing capacitylimits and behavior on page 219 provides instructions.
100% The server has reached the read-only limit and automatically becomesread-only to protect the integrity of the data that is already stored on theserver. If ConnectEMC has been enabled, a Service Request (SR) islogged. Go to EMC Online Support to view existing SRs for the system.Search the knowledgebase for "Avamar User and OS CapacityManagement solution esg118578".
Capacity Management
218 EMC Avamar 7.2 Administration Guide

Capacity forecastingEvery Avamar server continuously tracks and analyzes the rate at which storage capacityis consumed, and projects how long storage capacity can be consumed at that rate. Thisforecasting occurs in the background.
Capacity forecasting results for an Avamar server and configured Data Domain systemsare available in the Capacity panel of Avamar Administrator. For more information, see Capacity panel on page 41.
Customizing capacity limits and behaviorEdit the Avamar Administrator preferences file to customize the settings that controlcapacity limits and system behavior.
Editing capacity settings for Avamar AdministratorProcedure
1. Open a command shell and log in by using one of the following methods:
l For a single-node server, log in to the server as admin.
l For a multi-node server:
a. Log in to the utility node as admin.
b. Load the admin OpenSSH key by typing:
ssh-agent bashssh-add ~admin/.ssh/admin_key
c. When prompted, type the admin_key passphrase and press Enter.
2. Shut down the Management Console Server (MCS) by typing the following command:
dpnctl stop mcs
3. Change directory by typing the following command:
cd /usr/local/avamar/var/mc/server_data/prefs
4. Open mcserver.xml in a text editor.
5. Find the com.avamar.mc.mcsm section of the preferences file.
6. Edit the following settings.
Table 76 Capacity settings in mcserver.xml
Setting Description Defaultvalue
capErrPercent When capacity usage reaches this percentage,the capacity state icon is red.
95%
capForecastDataDays Amount of historical capacity usage data that isused for forecasting.
30 days
capForecastDataMinDays Minimum amount of historical capacity usagedata that is required for forecasting.
14 days
Capacity Management
Capacity forecasting 219

Table 76 Capacity settings in mcserver.xml (continued)
Setting Description Defaultvalue
capForecastReachedDays When forecasted capacity falls below this numberof days, Avamar Administrator begins generatingevents that require acknowledgment anddisplaying pop-up alerts at login.
30 days
capMonitorIntervalMin This setting controls how often AvamarAdministrator checks forecasted capacity.
1 day (daily)
capReachedPercentage When total capacity utilization reaches thispercentage threshold, the Avamar Administratorprocess generates an event notification that thesystem is full.
95%
capWarnPercent When capacity usage reaches this percentage,the capacity state icon is yellow.
80%
hcMonitorIntervalMin This setting controls how often AvamarAdministrator performs a health check (that is,verifies whether consumed capacity has reachedthe health check limit).
1 day (daily)
hcOffsetROPercentage Percentage that, when subtracted from the serverread-only limit (100%), produces the healthcheck limit.
5%
hcReminderIntervalMin This setting controls how often AvamarAdministrator issues events and pop-up alertsonce the health check limit has been reached.
60 minutes(hourly)
7. Save the changes and close the file.
8. Start the MCS and the scheduler by typing:
dpnctl start mcsdpnctl start sched
Capacity Management
220 EMC Avamar 7.2 Administration Guide

CHAPTER 10
Replication
This chapter includes the following topics:
l Overview of Avamar replication........................................................................... 222l Enabling Replicas at Source................................................................................ 227l Configuring policy-based replication................................................................... 229l Configuring cron-based replication......................................................................236l Performing on-demand replication...................................................................... 238l Performing command line replication.................................................................. 239l Monitoring replication.........................................................................................250l Canceling a replication task................................................................................ 250l Restoring by using a replica on a destination system...........................................251l MCS configuration parameters to support Replicas at Source.............................. 252
Replication 221

Overview of Avamar replicationThe Avamar replication process copies client backups from a source Avamar system to adestination system.
Replication prevents data loss if the source Avamar system fails because copies of thebackups (replicas) are stored on the destination system.
Types of replicationAvamar provides policy-based replication and command line replication. Avamarcontinues to support cron-based replication.
Policy-based replicationPolicy-based replication provides greater control of the replication process. With policy-based replication, create replication groups in Avamar Administrator that define thefollowing replication settings:
l Replication group members, either domains or clients
l Priority order for replication tasks
l Backups to replicate, based on the retention setting or the backup date
l Maximum number of backups to replicate for each client
l Destination system for the replicas
l Replication schedule
l Retention of replicas
Command line replicationPerform on-demand replication from the command line by logging in to the utility nodeand using the avrepl command line interface (CLI). Command line replication providesgreater control of the replication process. Options for the avrepl command define thefollowing replication settings:
l Domains or clients to replicate
l Backups to replicate, based on:
n Plug-in that is used for the backup
n Retention setting for the backup
n Backup date
l Maximum number of backups to replicate for each client
l Destination system for the replicas
l Retention of replicas
Cron-based replicationFor Avamar systems, cron-based replication is a legacy method of replication and isdeprecated. As of Avamar server version 7.0, policy-based replication is the default on allnew Avamar servers. Avamar servers that use cron-based replication can continue to usethat mechanism concurrent with, or instead of, policy-based replication.
The cron-based replication mechanism replicates the backup data of all clients on theAvamar system. Cron-based replication can be configured to limit replication to backupswith a certain retention type. Cron-based replication runs daily at the time that isspecified in the replication configuration.
Replication
222 EMC Avamar 7.2 Administration Guide

Replication schedulingThe method for scheduling replication tasks depends on the type of replication that isused. For policy-based replication, define schedules similar to how backup schedules aredefined. For cron-based replication, define a daily start time and a maximum duration forreplication tasks. For command line replication, no schedule is defined because areplication task is manually started by running the avrepl command on the utility node.
Defining a schedule for policy-based replicationTo configure schedules for policy-based replication, select Tools > Manage Schedules toopen the Manage All Schedules window. From this window, define a schedule to startreplication tasks automatically on a daily, weekly, or monthly interval. You can alsocreate an on-demand schedule that does not run automatically.
The schedule includes a start time and end time to specify the replication window.
Defining a schedule for cron-based replicationTo configure a cron-based replication schedule define the daily start time and an optionaltimeout value. The timeout value controls the maximum number of seconds that thereplication task can run. The default cron-based timeout setting is 72,000 seconds, or 20hours.
Consider initially configuring a longer timeout value to prevent the replication task fromstopping before all backups are replicated. Stopping before all backups are replicatedcan occur because the cron-based replication task replicates backups alphabetically byclient name, and earliest backups before later backups. Regularly examine the recentreplicas on the destination system to ensure that all backups are replicating. It may benecessary to increase the optional timeout value during the first few weeks of replication.
The timeout value can be decreased over time. As more data replicates to the destinationsystem, data deduplication increases and transfer times decrease.
Do not perform normal source server background maintenance tasks such as checkpointvalidation and garbage collection while replication is in progress.
Time zone considerationsWhen using Avamar Administrator to schedule replication tasks be aware that the starttime appears in the time zone of the computer that is running Avamar Administrator. Thestart time does not appear in the time zone of the source system or in the time zone ofthe destination system.
For example, consider using Avamar Administrator in the Pacific time zone with a sourcesystem in the Eastern time zone. The source system compensates for the three-hourdifference between the two time zones. An 8 p.m. PT start time that is specified in AvamarAdministrator means that the source system starts the replication task at 11 p.m ET.
Best practices for replication schedulingSchedule replication tasks during periods of low backup activity to ensure that thegreatest number of client backups successfully replicate during each replication session.This scheduling consideration accommodates the fact that only completed clientbackups are replicated.
For policy-based replication, consider the size of each replication group so that allbackups replicate successfully during each scheduled replication task. When a groupgrows so large that backups are not all replicating successfully, edit the schedule toenable more time, or split the group into smaller groups that run separately.
Replication
Replication scheduling 223

Replication authenticationSpecify valid credentials for an account on the destination system when you configurepolicy-based replication or cron-based replication. For command line replication, specifyvalid credentials for the source Avamar system and for the destination system at thecommand prompt.
For policy-based replication, specify the credentials when adding a destination system onthe Destinations tab in the Replication window.
For cron-based replication, specify the credentials in the Destination User ID andDestination User Password boxes in the Replication cron job dialog box in AvamarAdministrator.
For command line replication, specify the user account and password for the destinationsystem by using the --[replscript]dstid and --dstpassword options. Use the--[avtar]id and --password options to specify the user account and password forthe source system.
On the source Avamar system, the repluser account is the default account forreplication. When you use the repluser account for command line replication, omit the--[avtar]id option from the command and specify the password for the repluseraccount with the --password option. The EMC Avamar Product Security Guide provides acomplete list of default accounts and passwords on the Avamar system.
Location of replicas on a destination Avamar systemOn a destination Avamar system, replicas are available in the REPLICATE domain. Thisdomain contains a duplicate representation of the client hierarchy that exists on thesource Avamar system.
In the following figure, the avamar-1.example.com destination Avamar systemcontains both local clients and replicas from the avamar-2.example.com sourceserver.
Figure 13 Replication domain structure example
All data in the REPLICATE domain is read-only. You can perform only the followingoperations on replicas in the REPLICATE domain:
l Change the expiration date of the replica
l View backup statistics
l Delete a replica
Replication
224 EMC Avamar 7.2 Administration Guide

Replicas at Source on page 225 describes the Replicas at Source feature that providesmanagement of replicas through the replication source Avamar server instead of theREPLICATE domain on the destination system.
Replicas at SourceWith Replicas at Source, view and manage replicas by using an Avamar Administratorsession on the Avamar server that is the replication source.
FeaturesThe Replicas at Source feature is in Avamar server version 7.2 and newer. EnablingReplicas at Source on page 227 describes how to enable the feature.
The following table describes the features that Replicas at Source provides on the sourceAvamar server.
Table 77 Replicas at Source features available through the source Avamar server
Feature Description
View replicas onRestore tab
Replicas appear along with backups on the Restore tab of the
Backup, Restore and Manage window in Avamar Administrator.
Manage replica settings Use Avamar Administrator or the CLI to perform the following actionswith a replica:
l Change expiration date
l Change retention
l Delete
l Validate
l View statistics
Restore from replica Using the same methods that are available for backups, select a replicaand restore it.
Periodicsynchronization
Periodically, the source Avamar system synchronizes with each activedestination system. This synchronization includes the followingactions:
l Apply expiration setting changes
l Apply retention setting changes
l Delete local listing if replica does not exist on remote destination
l Add local listing when unlisted replica is found on remotedestination
Note
Replicas at Source does not support replicas of virtual machine backups.
IntegrationSeveral Avamar tasks integrate Replicas at Source. The sections that document thesetasks include information about the integration of Replicas at Source features. Thefollowing table provides an overview of the Replicas at Source integration.
Replication
Replicas at Source 225

Table 78 Descriptions of the integration of Replicas at Source into Avamar tasks
Task Description
Remotedestinationmanagement
Prevents deletion of a remote destination listing from the source Avamarserver when replicas from the source Avamar server exist on the destinationsystem. Includes an override option to force the deletion of the remotedestination listing and delete all the source server's replicas from thedestination system.
Restore Lists replicas with backups on the Restore tab of the Backup, Restore andManage window in Avamar Administrator. When a backup exists on thesource Avamar system and replicas exist on remote destination systems, theAvamar system uses the backup to restore.
Retire client When retiring a client, Replicas at Source provides additional choices thatare related to the retention and expiration of replicas.
Delete client When deleting a client, Replicas at Source provides an option to also deletethe client's replicas.
Servicesadministration
Adds the External Backup Manager Service to the Services Administrationtab of the Administration window in Avamar Administrator. The serviceincludes standard service actions: Start, Stop, Restart, and View Properties.When the External Backup Manager Service is stopped, AvamarAdministrator prevents Replicas at Source management of replicas.
MCS Replicas at Source adds customizable settings to mcserver.xml.
MCCLI Replicas at Source adds hostname and location information to the output ofmccli backup show. Replicas at Source also provides the --locationoption for identifying replicas when running any of the following commands:
l mccli backup validatel mccli backup deletel mccli backup editl mccli backup restore
Retention of replicasWhen you replicate backups, the retention setting for the backup on the source Avamarsystem automatically applies to the replica on the destination system. However, you canchange the retention setting for the replica.
Set retention before replication occursFor policy-based replication, specify a different retention setting for replicas on theExpiration page when you configure the replication group.
For command line replication, use the --[avtar]expires option to specify a differentretention setting for replicas.
However, for backups that are replicated through cron-based replication, manuallychanging the expiration date after replication is the only way to edit retention.
Set retention after replication occursEnable Replicas at Source to use an Avamar Administrator session on the source Avamarserver to set the retention of replicas on the destination system.
Replication
226 EMC Avamar 7.2 Administration Guide

Or log in to a destination Avamar system using Avamar Administrator and manuallychange the expiration date of the replica after replication occurs. Changing the expirationdate for a backup on page 116 provides instructions for changing the retention ofbackups. These instructions apply equally to replicas on an Avamar system.
Replication with Data Domain systemsWhen an Avamar system stores backups on a Data Domain system, Avamar replicationuses DD Boost to copy backups from the original Data Domain system and to createreplicas on another Data Domain system.
Supported replication configurationsThe following table lists the supported replication configurations for Avamar replicationusing DD Boost.
Table 79 Replication configurations for Avamar replication using DD Boost
Backup storage Replication storage
Single Data Domain system Single Data Domain system
Single Data Domain system Multiple Data Domain systems
Multiple Data Domain systems Single Data Domain system
Multiple Data Domain systems Multiple Data Domain systems
In a configuration where the replication storage consists of multiple Data Domainsystems, control which system receives the replicas by mapping a domain on the sourceAvamar server to a destination Data Domain system. Also specify which Data Domainsystem is the default destination. Avamar replicates to the default destination when adestination Data Domain system is not identified on the Storage Mapping tab of theReplication window in Avamar Administrator.
The EMC Avamar and EMC Data Domain System Integration Guide provides instructions onstorage mapping and specifying the default destination Data Domain system.
Replication detailsThe following details apply to Avamar replication with Data Domain systems:
l Data transfer during replication is between the Data Domain systems, withoutintermediate staging
l Replication uses DD Boost to copy backups and to write replicas
l Requires a Data Domain replication license
l Does not use Data Domain replication
l Replication is configured and monitored on the Avamar server
l Replication task scheduling uses Avamar replication schedules only
l Data Domain administration tools are not used
Enabling Replicas at SourceThe Replicas at Source feature is in Avamar server versions 7.2 and newer. To enable thefeature, modify mcserver.xml and then start the Remote Backup Manager Service.
Before you begin
Install or upgrade the Avamar server software to version 7.2 or newer.
Replication
Replication with Data Domain systems 227

Procedure
1. Open a command shell and log in by using one of the following methods:
l For a single-node server, log in to the server as admin.
l For a multi-node server:
a. Log in to the utility node as admin.
b. Load the admin OpenSSH key by typing:
ssh-agent bashssh-add ~admin/.ssh/admin_key
c. When prompted, type the admin_key passphrase and press Enter.
2. Stop the MCS by typing the following command:
dpnctl stop mcs
3. Change the working directory by typing the following command:
cd /usr/local/avamar/var/mc/server_data/prefs
4. Open mcserver.xml in a text editor.
5. In the repl container element, set the value of theallow_dest_replica_management parameter to true.
The default value is false.
6. In the repl container element, set the value of the show_external_backupsparameter to true.
The default value is true.
7. In the repl container element, set the value of theallow_manage_remote_backups_at_source parameter to true.
The default value is true.
8. Save the change and close the file.
9. Start the MCS and the scheduler by typing:
dpnctl start mcsdpnctl start sched
10.Log in to Avamar Administrator on the Avamar server that is associated with the clientbackups (source server).
11.In Avamar Administrator, click the Administration launcher button.
The Administration window appears.
12.Click the Services Administration tab.
13.Right-click the Remote Backup Manager Service, and select Start.
Results
The Avamar server enables the Replicas at Source feature.
Replication
228 EMC Avamar 7.2 Administration Guide

Configuring policy-based replicationPreparing to use policy-based requires the completion of several distinct tasks.
Before you begin
Log in to Avamar Administrator on the Avamar server that is associated with the clientbackups (source server).
The following steps provide an overview of the order of the tasks for configuring policy-based replication. Each step is explained in more detail in a separate task section.
Procedure
1. Using Avamar Administrator, add a replication destination for each system that storesreplicas from the source server (destination system).
Replication destinations on page 229 provides information about replicationdestinations, including how to add a destination system.
2. Using Avamar Administrator, create daily, weekly, or monthly schedules to use forreplication scheduling.
In Avamar, creating a replication schedule is the same as creating a backup schedule. Schedules on page 95 describes Avamar schedules and how they are created.
3. Using Avamar Administrator, create one or more replication groups to define thesettings for the policy-based replication.
Replication groups on page 231 provides information about replication groups,including how to create a replication group.
Replication destinationsAdd replication destinations to begin configuring policy-based replication on an Avamarserver.
Provide connection details for a supported data storage system to add it as a replicationdestination.
Avamar supports replication to other Avamar systems and to Data Domain systemsthrough DD Boost. An Avamar system can replicate to another Avamar system that isrunning a different version of the Avamar server software, but best results occur with thesame server software version.
Adding an Avamar system as a replication destinationProvide connection information for an Avamar system to add it as a replicationdestination.
Procedure
1. In Avamar Administrator, click the Replication launcher button.
The Replication window appears.
2. Select the Destinations tab.
3. Select Actions > New Destination.
The New Replication Destination dialog box appears.
4. In Name, type a reference name for the destination Avamar system.
5. In Destination server type, select Replicate.
Replication
Configuring policy-based replication 229
6. In Encryption, select an encryption level.
The selected encryption level applies to replication data transfers with the destinationAvamar system.
7. In Target server address, type the DNS name or the IP address of the destinationAvamar system.
8. In Target server connection port, type the number of the outbound port on the sourceAvamar system to use when communicating with the destination Avamar system.
The default port value is 27000.
Selecting High or Medium in Encryption results in an offset being applied to port toallow connections through firewalls. The default offset is +2000. Edit the offset bymanually editing the secured_port_offset preference in mcserver.xml, andthen restarting the MCS.
9. In Target MCS connection port, type the number of the inbound port on thedestination Avamar server to use for data connections with MCS on the destinationsystem.
The default port value is 28001.
10.In User ID on target server, type a username for an account on the destination Avamarsystem that has the backup privilege and the admin privilege.
Normally, type repluser or root.
Note
For a user with access limited to a domain beneath the root domain (tenant access),both the source Avamar server and the destination system must be running Avamarserver version 7.2 or newer.
11.In Password on target server, type the password that is associated with theusername.
12.Click Verify Authentication.
The source Avamar system authenticates with the destination Avamar system by usingthe specified settings.
In the Verifying Authentication dialog box, a results message appears.
13.In the Verifying Authentication dialog box, click Close.
14.In the New Replication Destination dialog box, click OK.
Results
Avamar Administrator adds the replication destination to the list on the Destinations tab.
Editing a replication destinationChange the connection information for a replication destination.
Procedure
1. In Avamar Administrator, click the Replication launcher button.
The Replication window appears.
2. Click the Destinations tab.
3. Select the replication destination to edit.
Replication
230 EMC Avamar 7.2 Administration Guide

4. Select Actions > Edit Destination.
The Replication Destination dialog box appears.
5. Edit the settings for the replication destination.
6. Click OK.
Results
Avamar Administrator modifies the settings of the selected replication destination.
Deleting a replication destination recordDelete the record for a replication destination from a source Avamar system.
When Replicas at Source is enabled, the Avamar system checks for replicas on thereplication destination system. If replicas associated with the source Avamar systemexist, Avamar Administrator prevents the deletion of the replication destination record.Override this setting to delete the replication destination record even when replicas exist.
When Replicas at Source is disabled, the Avamar system does not check for replicas onthe replication destination system before deleting the replication destination record. Anyexisting replicas remain on the replication destination system until they expire or untilthey are deleted by using the destination system interface.
Procedure
1. In Avamar Administrator, click the Replication launcher button.
The Replication window appears.
2. Click the Destinations tab.
3. Select the replication destination record to delete.
4. Select Actions > Delete Destination.
A confirmation message appears.
5. Click Yes.
Replicas atSource
Result
Enabled The Avamar system checks for replicas on the replicationdestination system and if no replicas exist, deletes the replicationdestination record. To prevent the Avamar system from checking forreplicas, and delete the replication destination record even ifreplicas exist on the replication destination system, clear Check forremote backups before deletion, then click Yes.
Disabled The Avamar system deletes the replication destination record.
Replication groupsReplication groups enable you to define the settings for policy-based replication,including the domain and client members of the replication group, the backup types toreplicate, the number of backups to replicate, the destination server, the replicationschedule, and how long replicated backups are retained on the destination server.
You also specify the priority for which backup data replicates first. When you define themembers of the replication group, the order in which members are listed in theMember(s) list controls the order in which backup data is replicated.
Replication
Replication groups 231

Backup data for a client replicates only once, even if a client is listed individually and isalso a member of a domain in the Member(s) list.
In addition, if an individual client is a higher priority in the Member(s) list than thedomain to which it belongs, then the backup data for the individual client replicatesbefore the backup data for any other clients in the domain.
Creating a replication group
Before you begin
l Add a destination Avamar server to the configuration on the source Avamar server.
l (Optional) Create a schedule for when replication for the group should occur. Creatinga schedule on page 97 provides instructions.
Procedure
1. In Avamar Administrator, click the Replication launcher button.
The Replication window appears.
2. Select the Groups tab.
3. Select Actions > New Replication Group.
The New Replication Group wizard opens, starting with the General page.
4. Type a name for the replication group in the Replication group name box.
5. Choose whether to enable or disable replication for the replication group:
l Select the Disabled checkbox to disable replication for the replication group.
l Leave the checkbox clear to enable replication for the replication group.
6. From the Encryption method list, select the encryption setting for data transfersbetween the source and destination servers.
The encryption technology and bit strength that is used for a connection depends onseveral factors, including the server platform and Avamar server version. The EMCAvamar Product Security Guide provides details.
7. Click Next.
The Source page appears.
8. Complete the steps that are required for the members in the replication group.
Members in thereplicationgroup
Steps
All clients Select Replicate all client backups.
Specificdomains orclients
a. Select Choose specific client(s) and/or domain(s) to replicate.
b. Click Choose Membership.
The Replication Group Membership dialog box appears.
c. Select the checkboxes next to the domains or clients to add tothe replication group.
Selected members appear in the Member(s) list.
d. Set replication priority for the replication group members bycontrolling the order in which domains and clients appear in
Replication
232 EMC Avamar 7.2 Administration Guide

Members in thereplicationgroup
Steps
the Member(s) list. Select members in the list and use thearrow buttons to change the order of the list.
e. To remove a member from the replication group, select themember in the Member(s) list and click X.
f. Click Finish.
9. Complete the steps that are required for the type of backups to replicate.
Type of backupsto replicate
Steps
All backups fromall members ofthe replicationgroup
Select Replicate all backups.
Specific backups a. Select Include/exclude backups by type, date, and more.
b. Click Change Filter.
The Replication Filter Options dialog box appears.
c. Select the type of backups to replicate: Daily, Weekly,Monthly, Yearly, or Not tagged.
Select at least one backup type.
d. Specify the maximum number of backups to replicate foreach client that is a member of the replication group.
To replicate all backups (no maximum), select No limit.
To replicate a certain number of the most recent backups foreach member client, select backup(s) and then specify themaximum number in the list.
e. Specify date restrictions for the backups to replicate for eachclient that is a member of the replication group.
To replicate all backups regardless of when the backupsoccurred, select No Date Restrictions.
To replicate only backups that occurred within a recentperiod, select Last and then specify an amount of pastDay(s), Weeks(s), Month(s), or Year(s) to include.
To replicate only backups that occurred during a range ofdates, select Range and specify the start date/time in theFrom fields, or the end date/time in the To fields, or both.
f. Click OK.
10.Click Next.
The Destination page appears.
11.Select the destination server from the Where would you like to replicate backups to?list.
Replication
Replication groups 233

You can also add a destination server by selecting New Destination from the list, oredit the settings for a destination server by selecting the server from the list and thenclicking Modify.
12.Click Next.
The Expiration page appears.
13.Specify when the replicated backups should expire on the destination server:
l To expire the replicated backups at the current expiration setting, select Keepcurrent backup expiration.
l To expire the replicated backups at a different time than the current expirationsetting, select Set expiration by backup type and then specify the number of days,weeks, months, or years to retain each backup type.
If a backup is of multiple types, then the expiration for the replicated backup is setto the specified value for the longest duration backup type. For example, if abackup is both a daily and a monthly backup, then the expiration for the replicatedbackup is set to the value that you specify for monthly backups.
14.Click Next.
The Schedule page appears.
15.Select the replication schedule from the How often would you like this replication torun? list.
You can also create a schedule by selecting New Schedule from the list, or edit thesettings for a schedule by selecting the schedule from the list and then clickingModify.
16.Click Next.
The Overview page appears.
17.Review the settings for the replication group.
18.(Optional) Specify plug-in options for the replication group:
a. Click More Options.
b. To replicate only backups from specific plug-ins, specify the numeric plug-indescriptor in the Include plug-in specific backups box.
Separate multiple entries with a comma, or leave the box empty to replicate allbackups. Numeric plug-in descriptors on page 246 provides a list of numeric plug-in descriptors.
c. To exclude backups from specific plug-ins from replication, specify the numericplug-in descriptor in the Exclude plug-in specific backups box.
Separate multiple entries with a comma, or leave the box empty to replicate allbackups.
d. From the Informational message level list, select the verbosity for informationalmessages in the replication log files:
l Select No informationals to suppress all informational messages but includeerrors and warnings in the log files.
l Select Some informationals to provide some information messages in the logfiles with errors and warnings.
l Select Many informationals to provide additional status information in the logfiles with errors and warnings.
Replication
234 EMC Avamar 7.2 Administration Guide

l Select All informationals to provide maximum information in the log files,including all informational messages, errors, and warnings.
e. Specify whether to include advanced timing and deduplication statistics in thereplication log files by selecting or clearing the Report advanced statisticscheckbox.
f. From the Maximum concurrent processes list, select the maximum number ofclients to replicate simultaneously.
g. Select the Show Advanced Options checkbox to specify advanced options.
The advanced options appear in red on the More Options dialog box.
h. To replicate only a specific backup, specify the backup sequence number in theBackup sequence number box or the backup label in the Backup label box. Specifythe complete backup sequence number or label.
i. To replicate backups that have a label that matches a specific pattern, specify thepattern in the Backup label pattern box.
j. From the List contents being replicated list, specify how much information aboutthe replicated backups to include in the replication log files:
l No file listing
l List file names
l List files and dates
Use caution when including file information in the replication log files. Replicationperformance decreases, and the size of the log files can be very large.
k. To write the maximum amount of information to log files for troubleshooting, selectthe Enable debugging messages checkbox.
The replication process generates very large log files.
l. To reduce network usage to a specified rate in megabits per second, specify thenumber of megabits in the Network usage throttle box.
Specify 0 (zero) for unrestricted network usage. Specify 0.772 to use 50 percent ofa T1.
m. Click OK.
19.Click Finish.
Enabling and disabling a replication groupYou can disable a replication group to prevent scheduled replications from occurring forthat group. This is typically done to place the system in a state that supportsmaintenance activities. If you disable a replication group, you must re-enable the groupto resume scheduled replications.
Procedure
1. In Avamar Administrator, click the Replication launcher button.
The Replication window appears.
2. Select the Groups tab.
3. Select the replication group.
4. Select Actions > Disable Replication Group.
Replication
Replication groups 235

If the group is enabled, then a check mark appears next to Disable Replication Groupto indicate that the group has been disabled. If the group is disabled, then the checkmark clears to indicate that the group has been disabled.
5. Click Yes on the confirmation message.
Editing a replication groupProcedure
1. In Avamar Administrator, click the Replication launcher button.
The Replication window appears.
2. Select the Groups tab.
3. Select the replication group to edit.
4. Select Actions > Edit Replication Group.
The Edit Replication Group wizard appears.
5. Edit the settings for the replication group.
The settings are the same settings that you specified when you created the group.
6. Click OK.
Deleting a replication groupWhen you delete a replication group from the configuration on the source Avamar server,any data that you already replicated to the destination server for the group remains onthe destination server until the replicated backups expire or you delete the backups.
Procedure
1. In Avamar Administrator, click the Replication launcher button.
The Replication window appears.
2. Select the Groups tab.
3. Select the replication group to delete
4. Select Actions > Delete Replication Group.
A confirmation message appears.
5. Click Yes.
Configuring cron-based replicationYou can configure cron-based replication for a single server in Avamar Administrator.
Cron-based replication was deprecated starting in Avamar 7.0 in favor of policy-basedreplication. Policy-based replication provides more granular control of the replicationprocess. Avamar servers that were using cron-based replication before Avamar 7.0 cancontinue to use that replication method concurrently with or instead of policy-basedreplication.
Configuring cron-based replication with Avamar AdministratorProcedure
1. In Avamar Administrator, click the Administration launcher button.
The Administration window appears.
Replication
236 EMC Avamar 7.2 Administration Guide
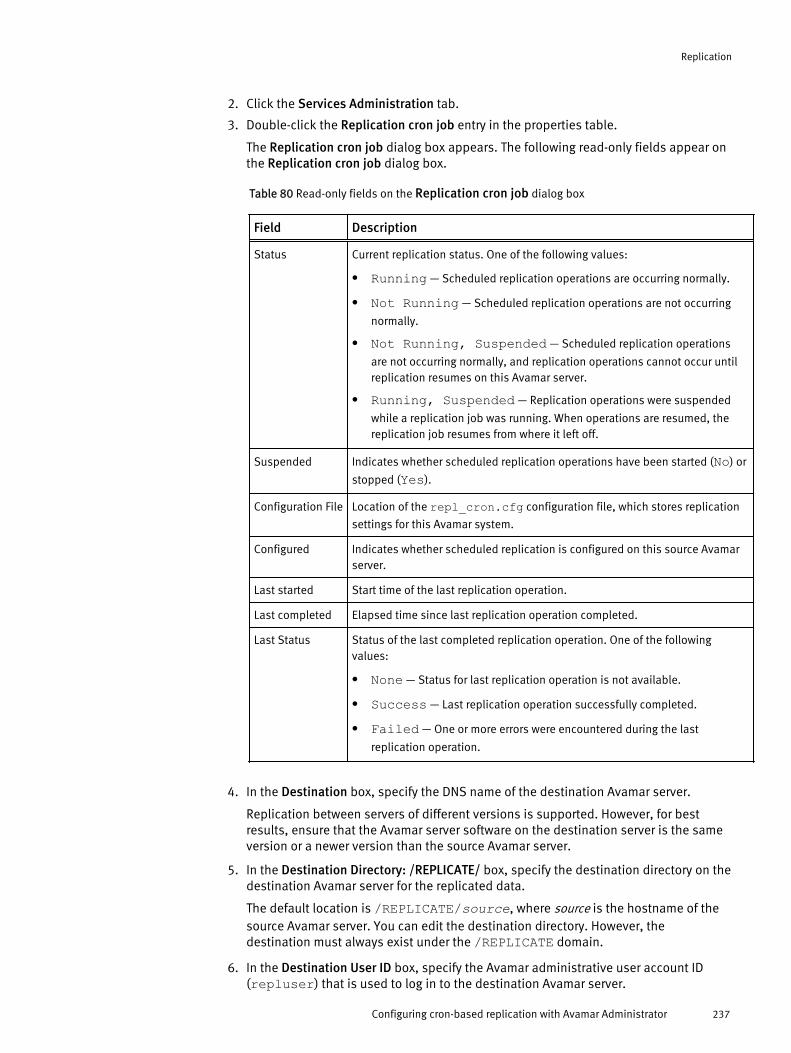
2. Click the Services Administration tab.
3. Double-click the Replication cron job entry in the properties table.
The Replication cron job dialog box appears. The following read-only fields appear onthe Replication cron job dialog box.
Table 80 Read-only fields on the Replication cron job dialog box
Field Description
Status Current replication status. One of the following values:
l Running — Scheduled replication operations are occurring normally.
l Not Running — Scheduled replication operations are not occurring
normally.
l Not Running, Suspended — Scheduled replication operations
are not occurring normally, and replication operations cannot occur untilreplication resumes on this Avamar server.
l Running, Suspended — Replication operations were suspended
while a replication job was running. When operations are resumed, thereplication job resumes from where it left off.
Suspended Indicates whether scheduled replication operations have been started (No) or
stopped (Yes).
Configuration File Location of the repl_cron.cfg configuration file, which stores replication
settings for this Avamar system.
Configured Indicates whether scheduled replication is configured on this source Avamarserver.
Last started Start time of the last replication operation.
Last completed Elapsed time since last replication operation completed.
Last Status Status of the last completed replication operation. One of the followingvalues:
l None — Status for last replication operation is not available.
l Success — Last replication operation successfully completed.
l Failed — One or more errors were encountered during the last
replication operation.
4. In the Destination box, specify the DNS name of the destination Avamar server.
Replication between servers of different versions is supported. However, for bestresults, ensure that the Avamar server software on the destination server is the sameversion or a newer version than the source Avamar server.
5. In the Destination Directory: /REPLICATE/ box, specify the destination directory on thedestination Avamar server for the replicated data.
The default location is /REPLICATE/source, where source is the hostname of thesource Avamar server. You can edit the destination directory. However, thedestination must always exist under the /REPLICATE domain.
6. In the Destination User ID box, specify the Avamar administrative user account ID(repluser) that is used to log in to the destination Avamar server.
Replication
Configuring cron-based replication with Avamar Administrator 237

7. In the Destination User Password box, specify the password for the Avamaradministrative user account ID (repluser).
NOTICE
If you change the password for the replonly account on the target server, then
remember to update the Destination User Password value in the replicationconfiguration on the source server.
8. In the Timeout (seconds) box, specify the maximum length of time that eachreplication operation should run.
9. In the Bandwidth (Mbps) box, specify the network utilization throttling setting thatspecifies the maximum average network utilization that is allowed in megabits persecond (Mbps).
If the replication operation exceeds this setting, it is “throttled back” by introducingdelays until the average network utilization falls below the specified threshold.
10.In the Work directory box, specify the full path to the temporary folder or directory forreplication log files.
11.To limit the replication operation to only backups that have been assigned a specificretention type, select the checkbox next to the retention type in the Include backupswith the following retention section.
12.From the Schedule list, select the time of day at which to start replication, or selectDon’t Run to suspend replication temporarily.
13.If the Start button is available, and the Stop button is dimmed, click Start.
Clicking Start starts the Replication Cron Job service.
14.If the Resume button is available, and the Suspend button is dimmed, click Resume.
Clicking Resume changes the Replication Cron Job service state from suspended torunning.
15.Click Apply.
Performing on-demand replicationYou can perform on-demand replication of a replication group when you use policy-basedreplication. An on-demand replication is a one-time replication of data for the replicationgroup. You may want to perform an on-demand replication for the first replication of thereplication group after you configure policy-based replication. You should also performon-demand replication before system maintenance, software installations, or softwareupgrades.
You can initiate on-demand replication from either the Replication window or the Policywindow.
Performing on-demand replication from the Replication windowProcedure
1. In Avamar Administrator, click the Replication launcher button.
The Replication window appears.
2. Select the Groups tab.
Replication
238 EMC Avamar 7.2 Administration Guide

3. Select the replication group.
4. Select Actions > Replicate Now.
An On-Demand Replication Request dialog box indicates that the replication requestwas submitted.
5. Click Close.
Performing on-demand replication from the Policy windowProcedure
1. In Avamar Administrator, click the Policy launcher button.
The Policy window appears.
2. Click the Policy Management tab.
3. Click the Groups tab.
4. Select the replication group from the list.
Replication groups appear with a value of Replication in the Type column for thegroup.
5. Click Run.
A confirmation message appears.
6. Click Close.
Performing command line replicationThe avrepl command line interface (CLI) enables you to replicate data from a sourceAvamar server to a destination Avamar server.
The avrepl binary is located in the \usr\local\avamar\bin directory on the serverutility node. You must log in as admin or root and run the command from that location.
Command referenceThe following topics provide a reference for the operations and options that the avreplcommand supports.
Synopsis
avrepl --operation=replicate [options] [target]
OperationsThe only supported operation for avrepl is --operation=replicate, whichreplicates data from the source Avamar server to a destination Avamar server.
OptionsUse the avrepl command options to control replication behavior.
Account options
Account options for the avrepl command enable you to specify credentials to connectto the destination Avamar server for replication.
The following account options are available for the avrepl command.
Replication
Performing on-demand replication from the Policy window 239

Table 81 Account options for the avrepl command
Option Description
--account=location
--acnt=location
--path=location
Specifies a hierarchical location on the destination Avamar server. This option isrelative to the current home location, unless you use a slash (/) as a prefix tothe path designation, in which case an absolute path is assumed. The defaultaccount is REPLICATE.
--[replscript]dstaddr=destination_server Specifies the DNS name or IP address of the destination Avamar server.Replication between servers of different versions is supported. However, forbest results, ensure that the Avamar server software on the destination server isthe same version or a newer version than the source Avamar server.
--[replscript]dstid=repluser Specifies the Avamar user ID and domain to use for authentication on thedestination Avamar server.
Note
The repluser account is the only user account that is known to work reliably onall destination servers.
--dstpassword=password
--dstap=password
--dstpswd=password
Specifies the password for repluser account on the destination Avamar server.
--[replscript]dstpath=domain Specifies a location (domain) on the destination Avamar server to storereplicated source data. The default value is the top-level directory (/), which
stores the replicated data in a new domain that is named for the source Avamarserver. Use this option with the --[replscript]srcpath option. You
cannot use this option with the --[replscript]dpnname option.
--[replscript]dstport=port Specifies the data port to use when connecting to the destination Avamarserver. The default value is 27000.
--hfsaddr=Avamar_server
--server=Avamar_server
Specifies the DNS name or IP address of the source Avamar server.
--[avtar]id=user@auth Specifies the Avamar user ID and authentication system to use forauthentication on the source Avamar server. The default value is repluser,
which is the default replication user account on the Avamar server. Toauthenticate with the Avamar authentication system, specify avamar for auth.
For example: --[avtar]id=jdoe@avamar.
--password=password
--ap=password
--pswd=password
Specifies the password for the Avamar user ID to use for authentication on thesource Avamar server.
Replication
240 EMC Avamar 7.2 Administration Guide

Logging options
Logging options for the avrepl command enable you to specify the path and file namefor the avrepl log file, and to control how much information the plug-in writes to the logfile.
The following logging options are available for the avrepl command.
Table 82 Logging options for the avrepl command
Option Description
--[avtar]informationals=n Sets the information level for status messages, where n is a single-digitinteger value.
--[avtar]noinformationals={true |false}
Specify true to disable all status messages.
--[avtar]statistics={true | false} Specify true to include advanced timing and deduplication statistics in the
replication log files.
--log=file
--logfile=file
Specifies the full path and file name of the avrepl plug-in log file.
--nostdout={true | false} Specify true to disable output to STDOUT. However, if you use the --log or
--logfile option, output still goes to the log file.
--nowarnings={true | false} Specify true to disable warning messages.
--quiet={true | false} Specify true to suppress all messages. This option is equivalent to using
both --[avtar]noinformationals=true and --nowarnings=true.
--verbose--v
Specify either --verbose or --v to enable all messages, including status
and warning messages. Specify --verbose=n to control the level of
verbosity. The default value is --verbose=6.
Replication options
Replication options for the avrepl command enable you to control replicationfunctionality, such as which backups should replicate and how long to retain replicatedbackups on the destination server.
The following replication options are available for the avrepl command.
Table 83 Replication options for the avrepl command
Option Description
--[avtar]after=timestamp Specifies that only backups matching timestamp and later should be replicated.For timestamp, use 24 hour local time zone values that conform to the syntax yyyy-mm-dd hh:mm:ss. You can use partial timestamp values. The resolution istruncated to the last supplied value. For example, 2014-02 is equivalent to
2014-02-01 00:00:00. You can also use this option with --[avtar]before=timestamp to define a range of effective dates. Only backups
that occurred within the date range are replicated.
Replication
Command reference 241

Table 83 Replication options for the avrepl command (continued)
Option Description
--[avtar]allsnapups={true |false}
The default value is true, which replicates all backups. If false, then only the
most recent backup for each client is replicated. If you specify the --[avtar]count option, then the --[avtar]count option overrides the --[avtar]allsnapups option. Only the specified number of most recent
backups replicates for each client.
--[avtar]before=timestamp Specifies that only backups that occurred before timestamp should be replicated.For timestamp, use 24 hour local time zone values that conform to the syntax yyyy-mm-dd hh:mm:ss. You can use partial timestamp values. The resolution istruncated to the last supplied value. For example, 2014-02 is equivalent to
2012-02-01 00:00:00. You can also use this option with --[avtar]after=timestamp to define a range of effective dates. Only backups
that occurred within the date range are replicated.
--[avtar]count=n Limits replicated backups to this maximum number (n) of most recent backups foreach client.
--[avtar]exclude-pluginid-list=list
Excludes backups that are performed with the specified plug-in, where list is acomma-separated list of plug-in IDs.
--[avtar]expires={n | period | timestamp} Specifies how long to retain replicated backups on the destination server:
l A number of days (n).
l An expiration period as a specific number of days, weeks, months, or years. Tospecify a period, use one of the following values:
days=n
weeks=n
months=n
years=n
where n is a positive integer. For example, supply --[avtar]expires=years=2 to retain replicated backups for two years on
the destination server. Also, --[avtar]expires=30 and --[avtar]expires=days=30 are equivalent.
l A timestamp for the date and time at which the replicated backup expires. Use24 hour local time zone values that conform to the syntax yyyy-mm-ddhh:mm:ss. You can use partial timestamp values. The resolution is truncated tothe last supplied value. For example, 2014-02 is equivalent to 2014-02-0100:00:00.
--[avtar]pluginid-list=list Replicates only backups that are performed with the specified plug-ins, where listis a comma-separated list of plug-in IDs.
--[avtar]retention-type={daily |weekly | monthly | yearly |none}
Replicates only backups with one of the following retention types:
l dailyl weeklyl monthlyl yearly
Replication
242 EMC Avamar 7.2 Administration Guide

Table 83 Replication options for the avrepl command (continued)
Option Description
l noneIf you supply none, then only backups without a specific retention type are
replicated.
--[replscript]dpnname=source_server
--dpn=source_server
Specifies a name to use to represent the source Avamar server (source_server) aspart of the path for the replicated files in the REPLICATE domain on the
destination server. Specify the fully qualified domain name of the source server.You cannot use this option with the --[replscript]dstpath or --[replscript]srcpath options.
--[replscript]dstencrypt={ssl |tls}
Enables the specified encryption method for avtar, avmaint, and avmgr on
the destination server. Valid encryption methods are ssl and tls.
--[replscript]srcpath=domain Specifies a location (domain) on the source Avamar server from which to beginreplication. Only data within this location is replicated. The default setting is thetop-level domain (/), which replicates the entire server. Use this option with the
--[replscript]dstpath option. You cannot use this option with the --[replscript]dpnname option.
--backup-type=type Replicates only the specified type of backup, where type is one of the followingvalues:
l differentiall differential_fulll incrementall incremental_fulll level0_fulll synthetic_full
--within={days | weeks | months| years}=n
Replicates backups that occurred within this most recent days, weeks, months,
or years, where n is a positive integer. For example, supply --within=months=3 to replicate three months' worth of backups for each client.
Avamar-only options
Avamar-only options access advanced functionality that is normally reserved for use byEMC personnel only. Misuse of these advanced options can cause loss of data. If you areunsure about any aspect of these options, contact EMC Customer Support for moreinformation before using them.
The following Avamar-only options are available for the avrepl command.
Table 84 Avamar-only advanced options for the avrepl command
Option Description
--bindir=path Specifies the directory that contains Avamar binary files. The default value is /usr/local/avamar/bin.
Replication
Command reference 243
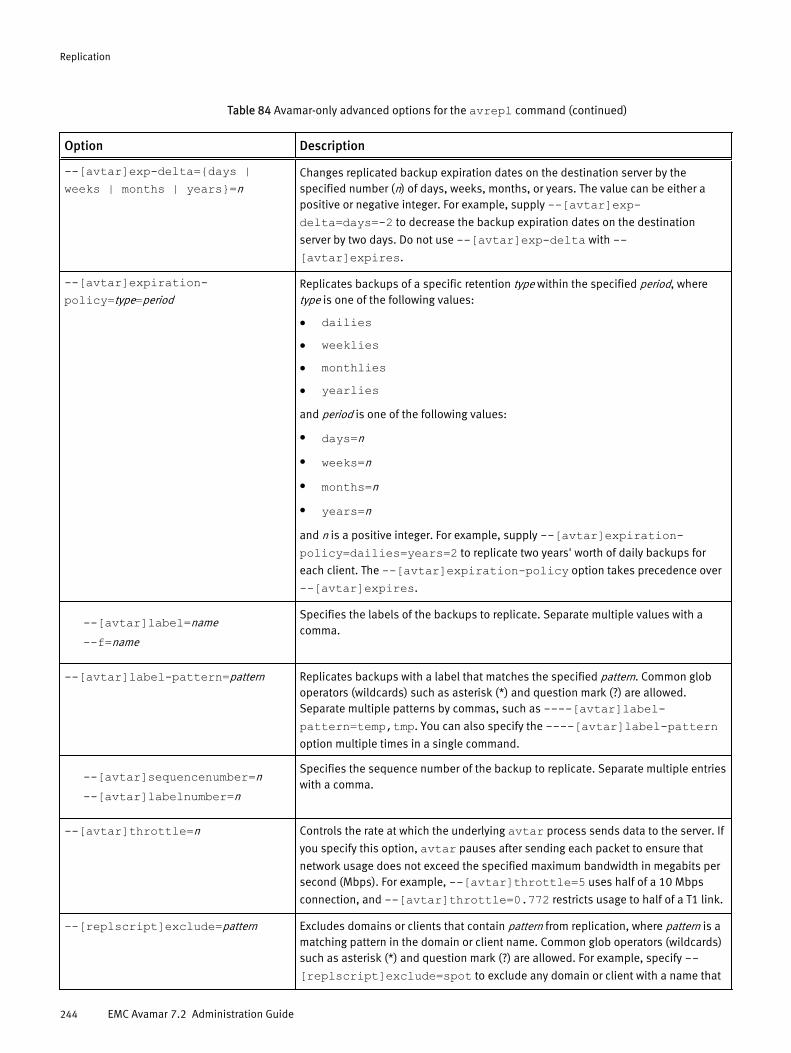
Table 84 Avamar-only advanced options for the avrepl command (continued)
Option Description
--[avtar]exp-delta={days |weeks | months | years}=n
Changes replicated backup expiration dates on the destination server by thespecified number (n) of days, weeks, months, or years. The value can be either apositive or negative integer. For example, supply --[avtar]exp-delta=days=-2 to decrease the backup expiration dates on the destination
server by two days. Do not use --[avtar]exp-delta with --[avtar]expires.
--[avtar]expiration-policy=type=period
Replicates backups of a specific retention type within the specified period, wheretype is one of the following values:
l dailiesl weekliesl monthliesl yearliesand period is one of the following values:
l days=n
l weeks=n
l months=n
l years=n
and n is a positive integer. For example, supply --[avtar]expiration-policy=dailies=years=2 to replicate two years' worth of daily backups for
each client. The --[avtar]expiration-policy option takes precedence over
--[avtar]expires.
--[avtar]label=name
--f=name
Specifies the labels of the backups to replicate. Separate multiple values with acomma.
--[avtar]label-pattern=pattern Replicates backups with a label that matches the specified pattern. Common globoperators (wildcards) such as asterisk (*) and question mark (?) are allowed.Separate multiple patterns by commas, such as ----[avtar]label-pattern=temp,tmp. You can also specify the ----[avtar]label-patternoption multiple times in a single command.
--[avtar]sequencenumber=n
--[avtar]labelnumber=n
Specifies the sequence number of the backup to replicate. Separate multiple entrieswith a comma.
--[avtar]throttle=n Controls the rate at which the underlying avtar process sends data to the server. If
you specify this option, avtar pauses after sending each packet to ensure that
network usage does not exceed the specified maximum bandwidth in megabits persecond (Mbps). For example, --[avtar]throttle=5 uses half of a 10 Mbps
connection, and --[avtar]throttle=0.772 restricts usage to half of a T1 link.
--[replscript]exclude=pattern Excludes domains or clients that contain pattern from replication, where pattern is amatching pattern in the domain or client name. Common glob operators (wildcards)such as asterisk (*) and question mark (?) are allowed. For example, specify --[replscript]exclude=spot to exclude any domain or client with a name that
Replication
244 EMC Avamar 7.2 Administration Guide

Table 84 Avamar-only advanced options for the avrepl command (continued)
Option Description
contains the pattern spot. Specify --[replscript]exclude=/clients/ to
exclude all clients in the /clients domain. Separate multiple patterns by
commas, such as --[replscript]exclude=spot,/clients/. You can also
specify the --[replscript]exclude option multiple times in a single
command to specify more than one pattern.
--[replscript]forcecreate={true| false}
Specify true to force the creation of all source server accounts on the destination
server, even if no data for an account is in the replication. The default value isfalse, which creates accounts on the destination server only for clients that
replicate data.
--[replscript]force-move={1 |0}
Specify 1 (true) to force a move to the target server backup account. Specify 0 (false)
if you do not want to force a move.
--[replscript]fullcopy={true |false}
Specify true to assert full root-to-root replication mode, which creates a complete
logical copy of an entire source server on the destination server. The replicated datais not copied to the REPLICATE domain but is added directly to the root domain as
if the source clients had registered with the destination server. Source server datathat is replicated in this manner is fully modifiable on the destination server.
--[replscript]globalcid={true |false}
Specify true to use global client IDs (CIDs) during replication. Global CIDs are
primarily used to enable fast failovers from one server to another after a root-to-rootreplication. true is the default setting.
--[replscript]reportonly={true| false}
Specify true to assert report-only operational mode. Report-only operational mode
is used to predetermine the amount of storage a replication activity might consumeon a destination server by running the replication job without actually saving anydata to the destination server.
--[replscript]restore={true |false}
Specify true to assert restore operational mode. If you previously replicated a
source Avamar server to a destination Avamar server, you can run avrepl from the
destination server and supply this command with the --[replscript]dpnname=original_source_server option to restore that data to an
Avamar server.
--[replscript]small-client-mb=n Threshold in MB before which the new data for a client is considered “small.” Thedefault setting is 128 MB of new data. Specify 0 to disable this optimization.
--rechunk={disable | enable |default}
Controls whether replicated data should be rechunked to maximize datadeduplication on the destination server. Use one of the following values:
l disable — Do not rechunk data before storing on the destination server.
l enable — Rechunk data before storing on the destination server to maximize
data deduplication.
l default — Automatically rechunk data when source and destination server
chunking parameters are different.
Help option
The --help option displays a list of available options for the avrepl command:
avrepl --help
Replication
Command reference 245

Version option
The --version option displays the software version of the avrepl command:
avrepl --version
Target listTo replicate specific clients or Avamar domains, include a list of the clients and domainsat the end of the avrepl command. Separate multiple entries with a space.
If you do not supply a list, then the replication includes all client backups on the sourceAvamar server.
Numeric plug-in descriptorsSome command options require one or more numeric plug-in descriptors as values. Validnumeric plug-in descriptors are listed in the following table.
Table 85 Numeric plug-in descriptors
Descriptor Plug-in name
1000 Linux avagent
1001 Linux avtar
1002 Linux Oracle RMAN
1003 Linux NDMP
1009 Linux DB2
1014 Linux Lotus
1016 Linux VMware image
1019 Linux VMware File Level Restore (FLR)
1024 Linux extended retention
1025 Linux extended retention restore
1029 Linux Sybase
1030 Linux SAP
1034 Linux extended retention import
1035 Linux VDR Migration
1038 Linux VMware image restore
1039 Linux vApp image
2000 Oracle Solaris avagent
2001 Oracle Solaris avtar
2002 Oracle Solaris RMAN
2009 Oracle Solaris DB2
2014 Oracle Solaris Lotus
2029 Oracle Solaris Sybase
Replication
246 EMC Avamar 7.2 Administration Guide

Table 85 Numeric plug-in descriptors (continued)
Descriptor Plug-in name
2030 Oracle Solaris SAP
3000 Windows avagent
3001 Windows avtar
3002 Windows Oracle RMAN
3004 Windows Exchange message
3005 Windows Exchange database
3006 Windows SQL
3009 Windows DB2
3011 Windows Exchange 2007 database
3012 Windows Exchange 2007 web
3014 Windows Lotus
3015 Windows VSS
3016 Windows VMware image
3017 Windows MOSS
3018 Windows Exchange VSS
3019 Windows VMware File Level Restore (FLR)
3026 Windows MOSS VSS
3027 Windows Exchange Granular Level Restore (GLR)
3028 Windows MOSS Granular Level Restore (GLR)
3029 Windows Sybase
3030 Windows SAP
3032 Windows Hyper-V VSS
3033 Windows Hyper-V Granular Level Restore (GLR)
3036 Windows cluster file system
3041 Windows VMware Granular Level Restore (GLR)
4000 HP-UX avagent
4001 HP-UX avtar
4002 HP-UX Oracle RMAN
4009 HP-UX DB2
4029 HP-UX Sybase
4030 HP-UX SAP
5000 IBM AIX avagent
5001 IBM AIX avtar
Replication
Command reference 247

Table 85 Numeric plug-in descriptors (continued)
Descriptor Plug-in name
5002 IBM AIX Oracle RMAN
5009 IBM AIX DB2
5014 IBM AIX Lotus
5029 IBM AIX Sybase
5030 IBM AIX SAP
6000 Mac OSX avagent
6001 Mac OSX avtar
7003 NetApp NDMP
8003 EMC Celerra NDMP
10000 Novell NetWare avagent
10001 Novell NetWare avtar
10003 Novell NetWare NDMP
11000 FreeBSD avagent
11001 FreeBSD avtar
12000 SCO OpenServer avagent
12001 SCO OpenServer avtar
13000 SCO UnixWare avagent
13001 SCO UnixWare avtar
14003 EMC Isilon NDMP
CLI examplesReview the avrepl command examples for details on how to use options to controlreplication behavior.
Specify the following options with the avrepl command:
Table 86 Required options for the avrepl command
Option Description
--operation=replicate Command operation for avrepl.
--[replscript]dpnname=source_server Fully qualified domain name of the sourceAvamar server.
--[avtar]id=user@auth User account for the source Avamar server. Thedefault value is repluser. To use the
repluser account, you can omit --[avtar]id and specify only the password for
Replication
248 EMC Avamar 7.2 Administration Guide

Table 86 Required options for the avrepl command (continued)
Option Description
the repluser account with the --passwordoption.
--password=password Password for the user account on the sourceAvamar server.
--[replscript]dstaddr=destination_server Destination Avamar server.
--[replscript]dstid=repluser Specifies the Avamar user ID and domain touse for authentication on the destinationAvamar server.
Note
The repluser account is the only user accountthat is known to work reliably on alldestination servers.
--dstpassword=password
--dstap=password
--dstpswd=password
Specifies the password for repluser account onthe destination Avamar server.
If the firewall is installed and enabled on the destination server, then specify the --[replscript]dstencrypt option with the correct encryption method, which is eitherssl or tls.
Replicating all client backupsThe following command replicates all client backups from theavamar-1.example.com source server to the replication-server-1.example.com destination server. The user account on the source server isjdoe@avamar (the jdoe user account with the Avamar internal authentication system),and the password is password. The user account on the destination server isrepluser, and the password is password.
avrepl --operation=replicate --[replscript]dpnname=avamar-1.example.com --[avtar]id=jdoe@avamar --password=password --[replscript]dstaddr=replication-server-1.example.com --[replscript]dstid=repluser --dstpassword=password --[replscript]dstencrypt=ssl
Replicating backups for specific clients or domainsThe following command replicates all backups for the client1 and client2 clients, aswell as for all clients in the domain3 domain.
avrepl --operation=replicate --[replscript]dpnname=avamar-1.example.com --[avtar]id=jdoe@avamar --password=password --[replscript]dstaddr=replication-server-1.example.com --[replscript]dstid=repluser --dstpassword=password --[replscript]dstencrypt=ssl client1 client2domain3
Replication
CLI examples 249

Replicating specific types of backupsThe following command replicates all full (level 0) backups that occurred after February 1,2014 for the client1 and client2 clients.
avrepl --operation=replicate --[replscript]dpnname=avamar-1.example.com --[avtar]id=jdoe@avamar --ap=password --[replscript]dstaddr=replication-server-1.example.com --[replscript]dstid=repluser --dstpassword=password --[replscript]dstencrypt=ssl --[avtar]after=2014-02-01 --backup-type=level0_full client1 client2
Monitoring replicationMonitor replication to ensure that it is completing successfully and to troubleshootissues.
The Activity Monitor in Avamar Administrator enables you to view status information forboth on-demand and scheduled replication activity, including both policy-based andcron-based replication.
Monitoring replication in Avamar AdministratorProcedure
1. In Avamar Administrator, click the Activity launcher button.
The Activity window appears.
2. Click the Activity Monitor tab.
A list of all activities appears.
3. To filter the results to display only replication activity, select Actions > Filter.
The Filter Activity dialog box appears.
4. Select All Replication Source & Destination from the Type list.
5. Click OK.
6. To view statistics for a replication activity, select the activity and then select Actions >View Statistics.
The Replicate Statistics dialog box appears. The Details tab provides detailedinformation from the v_repl_activities database view. The Backups tabprovides a list of backups that were included in the replication operation. The Errorstab shows any errors that occurred during the replication operation.
7. Click Close.
Canceling a replication taskYou can cancel a policy-based or cron-based replication task in the Activity Monitor anytime before it completes. The cancellation might take five minutes or longer. Thereplication may complete before the cancellation finishes.
Procedure
1. In Avamar Administrator, click the Activity launcher button.
The Activity window appears.
Replication
250 EMC Avamar 7.2 Administration Guide

2. Click the Activity Monitor tab.
A list of all activities appears.
3. Select the replication task from the list.
4. Select Actions > Cancel Activity.
A confirmation message appears.
5. Click Yes.
Restoring by using a replica on a destination systemRestore replicated data from a client in the REPLICATE domain of a destination server.The restore target can be any client that is a member of a domain on the destinationserver, including the client that is the source of the original backup.
Use this method to restore data from a replica when the source Avamar server isunavailable and when Replicas at Source is not enabled on the source Avamar system.
Procedure
1. Register and activate the client that is the restore target with the destination Avamarserver that manages the replicated data:
a. On a Windows client, right-click the Avamar system tray icon and select Manage >Activate Client.
The Activate Client Setup dialog box appears.
b. Type the hostname of the destination Avamar server in the Administrator ServerAddress box.
c. Type 28001 in the Administrator Server Port box.
d. Type the Avamar domain for the client in the Client Domain box.
e. Click Activate.
Client registration on page 50 provides instructions for other registration methods.You can also use Avamar Client Manager to activate clients with the destinationserver. Moving a client to a new server on page 301 provides instructions.
2. In Avamar Administrator, click the Backup & Restore launcher button.
The Backup, Restore and Manage window appears.
3. Click the Restore tab.
The upper left pane contains a list of domains.
4. Select the REPLICATE domain, and then select the hostname of the source Avamarserver.
5. Select the domain that contains the client that is the source of the original backup.
6. Select the client from the list.
7. Click the By Date tab or the By File/Folder tab and select the data to restore.
Note
Restoring data from a backup on page 122 provides alternate methods to find abackup and perform a restore.
Replication
Restoring by using a replica on a destination system 251

8. Select Actions > Restore Now.
The Restore Options dialog box appears.
9. Click Browse next to the Restore Destination Client box, and then browse to andselect the client that is the restore target.
Do not select a client in the REPLICATE domain as the restore target. Select a clientthat is listed in the clients domain, or in another domain on the Avamar server.
10.Select the plug-in to use for the restore from the Restore Plug-in list.
11.From the Avamar encryption method list, select an encryption method for client/server data transfer during the restore.
Note
The encryption technology and bit strength for a client/server connection depend onseveral factors, including the client operating system and Avamar server version. TheEMC Avamar Product Security Guide provides details.
12.Select either Restore everything to a different location or Restore everything tomultiple locations.
13.Click Set Destination below the Items Marked for Restore list, and then select thedestination paths for the data to restore.
14.To include plug-in options with this restore, click More Options, and then configurethe settings.
15.Click OK on the Restore Options dialog box.
The Restore Request dialog box indicates that the restore was started.
16.Click Close.
17.(Optional) Change the registration of the restore target client back to the sourceAvamar server.
Perform this step when the source Avamar server is available.
MCS configuration parameters to support Replicas at SourceConfigure MCS management of Replicas at Source through configuration parameters inmcserver.xml.
Changing the configuration of Replicas at Source on page 254 describes how to changemcserver.xml. The following table describes the Replicas at Source parameters inmcserver.xml.
Table 87 MCS configuration parameters to support Replicas at Source
Container Parameter Default value Description
repl external_sync_interval_minute 120 Sets the number of minutes between tries tosynchronize the replica metadata from thedestination system to the MCS database onthe source Avamar system. Settingget_backups_from_external_serverto true overrides this parameter.
Replication
252 EMC Avamar 7.2 Administration Guide

Table 87 MCS configuration parameters to support Replicas at Source (continued)
Container Parameter Default value Description
repl allow_dest_replica_management false Set to true to permit synchronization of
replica metadata between the remotedestination system and the source Avamarserver. Set to false to disable
synchronization and effectively disable theReplicas at Source feature.
repl get_backups_from_external_server false Set this value to true to override the default
behavior and force MCS to obtain replicametadata directly from the destinationsystem. By default, MCS obtains replicametadata from the destination system byperiodic synchronization. Thissynchronization writes the metadata to thelocal MCS database on the source Avamarsystem. Avamar Administrator accesses thelocal database to provide replica information.
repl show_external_backups true Set to true to enable the listing of replicas
on the Restore tab. Set to false to disable
the listing of replicas on the Restore tab.
ebms ebms_home lib/mcebms.war
Sets the location of the web archive file forthe external backup manager service.
ebms ebms_descriptor /WEB-INF/web.xml
Sets the location of the XML descriptor file forthe external backup manager service.
ebms ebms_port 9090 Sets the inbound (listening) port for theexternal backup manager service.
ebms ebms_use_https true Set to true to force the external backup
manager service to use SSL/TLS encryptionfor communication with destination systems.
mon ebmsIntervalMinutes 720 Sets the number of minutes between checksof the state of the Remote Backup ManagerService.
mon ebmsFailEventIntervalMinutes 120 Sets the number of minutes betweenpublished updates of Remote BackupManager Service stop events and failevents.
mon ebmsMonitorTimeout 300 Sets the number of minutes to try to check thestate of the Remote Backup Manager Service.
repl allow_manage_remote_backups_at_source true Set to true to permit management of
replicas on the source Avamar server.Management includes: Delete, ChangeExpiration, and Change Retention. Set tofalse to disable management of replicas on
the source Avamar server.
Replication
MCS configuration parameters to support Replicas at Source 253

Changing the configuration of Replicas at SourceTo change the configuration of the Replicas at Source feature change the parametervalues in mcserver.xml.
This topic describes how to change the Replicas at Source configuration parameters inmcserver.xml. Refer to MCS configuration parameters to support Replicas at Source onpage 252 for descriptions of the configuration parameters.
Procedure
1. Open a command shell and log in by using one of the following methods:
l For a single-node server, log in to the server as admin.
l For a multi-node server:
a. Log in to the utility node as admin.
b. Load the admin OpenSSH key by typing:
ssh-agent bashssh-add ~admin/.ssh/admin_key
c. When prompted, type the admin_key passphrase and press Enter.
2. Stop the MCS by typing the following command:
dpnctl stop mcs
3. Change the working directory by typing the following command:
cd /usr/local/avamar/var/mc/server_data/prefs
4. Open mcserver.xml in a text editor.
5. Find the container element of the parameter, and within that element, find theparameter.
6. Change the value of the parameter.
7. Save the change and close the file.
8. Start the MCS and the scheduler by typing:
dpnctl start mcsdpnctl start sched
Replication
254 EMC Avamar 7.2 Administration Guide

CHAPTER 11
Server Updates and Hotfixes
This chapter includes the following topics:
l Overview of the Avamar server software update process......................................256l Installing and configuring the Avamar Downloader Service..................................258l Downloading new packages from the EMC repository.......................................... 262l Viewing a list of packages available for download............................................... 262l Verifying connectivity with the EMC repository.....................................................263l Monitoring Avamar Downloader Service status....................................................263l Stopping and starting the Avamar Downloader Service monitor...........................264l Troubleshooting Avamar Downloader Service issues........................................... 264l Downloading and installing packages on the Avamar server................................265l Viewing a list of installation packages on the Avamar server............................... 266l Deleting packages from the Avamar server.......................................................... 267l Viewing the history of installations......................................................................268
Server Updates and Hotfixes 255

Overview of the Avamar server software update processEMC periodically provides updates and hotfixes for the Avamar server software. EMCstores update packages and hotfix packages in the EMC repository. Use the AvamarDownloader Service to download the installation packages to a local Windows server andthen push the packages to an Avamar server. Then use Avamar Installation Manager toinstall the packages on the Avamar server.
This process minimizes network bandwidth usage by enabling you to download files fromthe EMC repository one time (to the Avamar Downloader Service computer) and thendistribute the files to each Avamar server by using Avamar Installation Manager.
When required, you can remove old installation packages from the local repository on theAvamar server and then download them from the Avamar Downloader Service computeragain.
If Internet access is unavailable, manually copy packages to the /data01/avamar/repo/packages directory on the utility node or single-node server instead of using theAvamar Downloader Service. Then use Avamar Installation Manager to install thepackages on the Avamar server.
Avamar Downloader ServiceThe Avamar Downloader Service downloads software packages from the EMC repositoryto a single local computer. You can then distribute the packages to all Avamar servers inthe environment.
EMC Customer Support typically installs the Avamar Downloader Service software duringthe installation or upgrade of an Avamar server. You can also download the AvamarDownloader Service from the Avamar server and install the software yourself.
The Avamar Downloader Service computer is a standalone Microsoft Windows computerwith network access to EMC sites on the Internet and to all internal Avamar servers. If theAvamar Downloader Service computer is on a private network with restrictions on accessto the EMC repository server, then you can set up a proxy server for communicationbetween the Avamar Downloader Service computer and the EMC repository server.
The Avamar Downloader Service runs as a Windows service to monitor the EMCrepository. A desktop shortcut, task tray icon, and Windows Start menu items provideaccess to the Avamar Downloader Service user interface, which enables you to configurethe Avamar Downloader Service and check the EMC repository for installation packages.The Avamar Downloader Service monitor contains status messages for the service.
Local repositoryThe C:\Program Files\EMC\Avamar Downloader Service\repositorydirectory on the Avamar Downloader Service computer serves as the local repository fordownloaded installation packages.
Note
Do not rename client installation packages. The Avamar push upgrade mechanisms areincompatible with renamed packages.
The manifest.xml file in the local repository contains a list of all server, client, andworkflow packages that are currently available for download from the EMC repository.
Server Updates and Hotfixes
256 EMC Avamar 7.2 Administration Guide

SecurityThe Avamar Downloader Service encrypts outgoing communication to the EMC repositoryby using SSL (Secure Socket Layers) over an HTTP connection. The Avamar DownloaderService validates each package that it downloads to ensure the package has beencorrectly signed and transmitted.
Also, the Avamar Downloader Service accepts incoming requests for installationpackages only from Avamar systems that are on a known systems list.
AvInstaller and Avamar Installation ManagerThe AvInstaller process controls the download and installation process for installationpackages on the Avamar server. Use Avamar Installation Manager to manage theAvInstaller process.
InstallationEMC Customer Support installs AvInstaller during the installation or upgrade of anAvamar server. AvInstaller is installed on the utility node in a multi-node environment orthe server in a single-node environment.
Local repositoryAvInstaller uses the /data01/avamar/repo/packages directory on the Avamarutility node or single-node server serves as the local repository for downloadedinstallation packages. AvInstaller also manages a temporary directory that is used toextract the packages during installation.
To determine if new packages are available, the Avamar Downloader Serviceautomatically downloads the manifest file from the EMC repository once a day. Then theAvamar Downloader Service sends the updated manifest file to the local repository foreach known Avamar system. AvInstaller uses the manifest file to obtain currentinformation about all software packages that are available for download from the EMCrepository.
User interfaceUse the Avamar Installation Manager user interface to manage AvInstaller. AvamarInstallation Manager is installed automatically with AvInstaller. Avamar InstallationManager provides the following features:
l Download software packages from the Avamar Downloader Service computer.
l Install the packages on the Avamar server.
l View a list of the software packages in the repository of the Avamar server.
l Delete old installation packages from the Avamar server to reclaim storage.
l View the software installation history for the Avamar server.
Server Updates and Hotfixes
AvInstaller and Avamar Installation Manager 257

Installing and configuring the Avamar Downloader ServiceThe following topics explain how to prepare for, install, and configure the AvamarDownloader Service software on a Microsoft Windows system, as well as how to updateand uninstall the software.
Avamar Downloader Service installation requirementsThe Avamar Downloader Service is available as either a 32-bit or 64-bit application. Youinstall the Avamar Downloader Service on a Microsoft Windows server that has networkaccess to the Avamar server. This system can be a desktop or laptop system.
The following table provides the installation requirements for the computer on which youinstall the Avamar Downloader Service.
Table 88 Installation requirements for the Avamar Downloader Service
Software/hardware Requirement
Operating system l Microsoft Windows Server 2012 (64-bit only)
l Microsoft Windows Server 2008
l Microsoft Windows 8
l Microsoft Windows 7
l Microsoft Windows Vista
File system Any file system
Hard drive space Minimum of 12 MB
RAM Minimum of 20 MB
Downloading the Avamar Downloader Service softwareDownload the Avamar Downloader Service software from the EMC Avamar Web Restorepage on the Avamar server.
Procedure
1. Log in to the Windows host system as an administrator.
2. Type the URL of the Avamar server into the web browser:
http://Avamar_serverwhere Avamar_server is the Avamar system network hostname (as defined in DNS) orIP address.
The EMC Avamar Web Restore page appears.
3. Click Downloads.
The Downloads. list appears.
4. Click + next to the platform heading for the Windows computer.
5. Click + next to the operating system heading for the Windows computer.
6. Click the link for AvamarDownloaderService-windows-platform-version.exe.
where:
Server Updates and Hotfixes
258 EMC Avamar 7.2 Administration Guide

l platform is the type of Windows platform (32-bit or 64-bit).
l version is the version of the Avamar server software.
A dialog box prompts you to either run the file or save it.
7. Save the installation file to a temporary directory.
Installing the Avamar Downloader Service softwareProcedure
1. Log in to the Windows host computer as an administrator.
2. Navigate to the directory that contains AvamarDownloaderService-windows-platform-version.exe, and then double-click the file to start the installation.
The setup wizard opens, starting with the welcome page.
3. Click Next.
The Destination Folder page appears.
4. Specify the folder for the Avamar Downloader Service installation:
l To accept the default folder, C:\Program Files\EMC\Avamar DownloaderService, click Next.
l To specify a different folder, click Change and then browse to the folder. Then clickNext.
The Ready to install Avamar Downloader Service page appears.
5. Click Install.
The Installing Avamar Downloader Service page appears and displays the progress ofthe installation. After the installation completes, the Completed the AvamarDownloader Service Setup Wizard page appears.
6. Click Finish.
The installation adds an Avamar Downloader Service icon to the Control Panel and thesystem tray. The installation also adds the AvamarDownloaderService toWindows Services.
Enabling HTTPSHTTPS functionality must be enabled on the Microsoft Windows computer hosting theAvamar Downloader Service. In some circumstances, HTTPS might already be enabled onthe computer. If not, perform the following steps on the computer.
Procedure
1. Select Control Panel > Windows Firewall > Advanced settings.
The Windows Firewall with Advanced Security console appears.
2. In the navigation pane, click Outbound Rules.
3. In the Actions pane, click New Rule.
The New Outbound Rule Wizard appears.
4. Select Port, and then click Next.
5. Select Specific remote ports, enter 443 in the text box, and click Next.
6. Click Allow the connection and clickNext.
Server Updates and Hotfixes
Installing the Avamar Downloader Service software 259

7. Accept the default settings and click Next.
8. Provide a name for the outbound rule (for instance, “Avamar Downloader Service”)and click Finish.
The New Outbound Rule Wizard appears.
9. In the Outbound Rules pane, right-click the outbound rule you created above (shouldbe at the top of list) and select Properties.
The Properties window appears.
10.Select the Programs and Services tab.
11.Click Settings.
12.Select Apply to this service.
13.From the list of services, select Avamar Downloader Service and click OK.
14.Click Apply and thenOK.
15.Close the Windows Firewall with Advanced Security console.
Configuring the Avamar Downloader ServiceConfigure Avamar Downloader Service before using it to download packages from theEMC repository server. Configuration tasks include verifying the connection, building aknown systems list, and specifying proxy server settings.
Before you begin
Install the Avamar Downloader Service software.
Procedure
1. On the Avamar Downloader Service computer, right-click the Avamar DownloaderService task tray icon and select Configure Service.
The Avamar Downloader Service configuration wizard opens, starting with thewelcome page.
2. (Optional) To use the local version of the manifest.xml file, select Disable Internetaccess. Use only local files.
Use this option when the Avamar Downloader Service computer cannot connect overthe Internet with the EMC repository.
3. On the welcome page of the configuration wizard, click Next.
The EMC Credentials page appears.
4. On this page, specify the EMC Online Support Username and Password (plusconfirmation) that you received with the EMC Avamar license at the time of productpurchase, and then click Next.
The Proxy Configuration page appears.
Note
To edit EMC credentials later, open the Show Advanced Settings window by right-clicking the task tray icon and selecting Show Advanced Settings.
5. (Optional) Specify the hostname or IP address and the port number for the proxyserver as well as EMC credentials: Username, Password, and Confirm Password.
Supply proxy server information to use a proxy server as an intermediary for requestsfrom the Avamar Downloader Service computer to the EMC repository server. The pagealso allows you to select Use Authentication.
Server Updates and Hotfixes
260 EMC Avamar 7.2 Administration Guide

For example, use a proxy server when the Avamar Downloader Service computer is ona private network and access to the EMC repository server is restricted.
6. Click Next.
The Avamar Systems page appears.
7. Click Add.
The Avamar Downloader Service - Add Known System dialog box appears.
8. Specify the hostname, username, and password for an Avamar server:
a. In the Hostname box, type the IP address or hostname for the Avamar server.
b. In the Username box, type root to specify the Linux operating system root user.
c. In the Password and Confirm Password boxes, type the password for the root user.
9. Click OK.
When the configuration process cannot resolve the hostname, an informationalmessage appears. Click Yes to add the system or No to cancel the add operation. Youcan add systems with unresolvable hostnames, such as offline systems, to the knownsystems list.
10.Add other Avamar servers.
11.After all Avamar servers have been added, click Next.
The Review Configuration page appears.
12.Review the configuration details, and then click Finish.
After you finish
When required, rerun the configuration wizard to edit the hostname, IP address, or portnumber for a proxy server, or to edit the known systems list to add and remove Avamarservers.
Updating the Avamar Downloader Service softwareUse the Avamar Downloader Service to check for updates of the Avamar DownloaderService software, and to download and install the updates.
Procedure
1. Right-click Avamar Downloader Service task tray icon and select Check for Updates.
If an update is available, the message Update is ready to install appears.
If no updates are available, then the message Your software is up to dateappears.
The Avamar Downloader Service Updater dialog box appears.
2. When an update is available, click Install.
TheAvamar Downloader Service setup wizard appears.
3. Follow the prompts to continue through the wizard and install the new software build.
Server Updates and Hotfixes
Updating the Avamar Downloader Service software 261

Uninstalling the Avamar Downloader ServiceUninstall Avamar Downloader Service through the Windows Programs and Featuresconsole.
Procedure
1. On the Avamar Downloader Service computer, close all running applications.
2. Open the Windows Programs and Features console from the Control Panel.
3. In the Name column, select Avamar Downloader Service.
4. Click Uninstall.
Results
The uninstall process removes all files, including file cache contents, configuration items,and Windows registry entries for the Avamar Downloader Service
Downloading new packages from the EMC repositoryYou can check the EMC repository for new server, client, and workflow packages, andthen download the packages to install them.
Before you begin
Ensure that the status of the Avamar Downloader Service is either OK or Waiting forconfiguration. Otherwise, you cannot check for new packages.
Procedure
1. Right-click the Avamar Downloader Service task tray icon and select Check for NewPackages.
The Check for New Packages dialog box appears and provides status messages whilethe Avamar Downloader Service downloads the manifest file from the EMC repositoryserver to the local repository on the Windows server and to Avamar servers on theknown systems list.
A check mark next to a status message indicates that the process was successful. AnX next to a status message indicates that the process failed.
2. To view details about failed processes, double-click the X next to the status message.
3. Click Close on the Check for New Packages dialog box.
Viewing a list of packages available for downloadThe manifest.xml file in the repository folder on the Avamar Downloader Servicecomputer contains a list of software packages that are currently available for downloadfrom the EMC repository.
Procedure
1. Right-click the Avamar Downloader Service task tray icon and select Open Repository.
Windows Explorer opens and displays the C:\Program Files\EMC\AvamarDownloader Service\repository folder, which contains the manifest.xmlfile.
2. Open the manifest.xml to view the package information.
Server Updates and Hotfixes
262 EMC Avamar 7.2 Administration Guide

Package names use the .avp file name extension and appear within <filename>tags.
Verifying connectivity with the EMC repositoryAfter editing repository connection settings, or after package download failures, verifythat the Avamar Downloader Service computer can connect to the EMC repository server.
Procedure
1. Right-click the Avamar Downloader Service task tray icon and select Run Diagnosis.
The status of the process appears in the Run Diagnosis dialog box. An X next to astatus message indicates a problem with the network connection, Click the X next tofailures to view more information about the error in the Error Information dialog box.
The Run Diagnosis dialog box appears, and the process to check network connectivitystarts automatically.
2. (Optional) To stop the verification process before it completes, click Stop SystemCheck.
3. When the verification completes, click Close.
Monitoring Avamar Downloader Service statusThe Avamar Downloader Service monitor automatically starts when you log in to theAvamar Downloader Service computer. Use the monitor to view the status of the AvamarDownloader Service.
Procedure
l To view the status from the monitor, hover the mouse over the Avamar DownloaderService task tray icon.
A popup window with a status message appears.
The following table describes Avamar Downloader Service monitor status messages.
Table 89 Avamar Downloader Service monitor status messages
Status message Description
Avamar Downloader Service Default status message.
Authentication Failure with the EMC Repository. HTTP basic authentication failure.
Authentication Failure with one or more“Known Systems.”
HTTP basic authentication failure including:
n Failed communication with the EMCrepository.
n SSL (Secure Socket Layers) handshakefailed.
n HTTP dropped connection.
n HTTP NAK (negatively acknowledgedmessage).
Failed communication with one or more“Known Systems.”
Possible causes:
n SSL handshake failed.
Server Updates and Hotfixes
Verifying connectivity with the EMC repository 263

Table 89 Avamar Downloader Service monitor status messages (continued)
Status message Description
n HTTP dropped connection.
n HTTP NAK.
Failed file download from the EMC repository. File transfer was aborted.
Failed file transfer to one or more knownsystems.
File transfer was aborted.
Network Error HTTPS browser settings prevent the AvamarDownloader Service from requesting files fromthe Avamar Online Support site.
Out of space. The Avamar Downloader Service file cache isfull. To free up disk space, remove files from thelocal repository.
Running. The service is running and communicating withall known systems as well as the EMCrepository.
Socket failure on host computer. Possible causes:
n The host computer is out of socketresources.
n A binding problem with the NIC.
n Deadlock condition within Winsock.
Waiting for configuration. The Avamar Downloader Service was installed,but not configured.
Stopping and starting the Avamar Downloader Service monitorThe Avamar Downloader Service monitor starts automatically when you log in to theAvamar Downloader Service computer.
Procedure
l To stop the monitor, right-click the Avamar Downloader Service task tray icon andselect Exit.
l To start the monitor, open the Windows Start menu and select All Programs > EMCAvamar Downloader Service version > Avamar Downloader Service Monitor.
Troubleshooting Avamar Downloader Service issuesResolve common issues with the Avamar Downloader Service.
Package download failsSYMPTOM: The utility node or the single-node server cannot access the Windows hostcomputer, and a message similar to the following message appears when downloading apackage.
The selected package cannot be downloaded.
Server Updates and Hotfixes
264 EMC Avamar 7.2 Administration Guide

RESOLUTION: Add a line to the /etc/hosts file on the utility node with the IP address,fully qualified domain name, and short name of the Avamar Downloader Servicecomputer.
SAMPLE ENTRY: 10.6.172.50 avamar-1.example.com avamar-1Temporary IPv6 addresses cause package download to failSYMPTOM: The Avamar Downloader Service fails to download a package and displaysconnection refused errors.
POSSIBLE CAUSE: Temporary IPv6 addresses are in use on all operating systems. Theconnection refused errors are due to the use of temporary IPv6 addresses.Windows Vista, Windows 2008 Server, or later versions of Windows use temporary IPv6addresses by default.
RESOLUTION: To work around this issue, block temporary IPv6 addresses on the AvamarDownloader Service computer. Type each of the following netsh commands at thecommand prompt on the Avamar Downloader Service computer. Type each netshcommand on a separate line.
netsh interface ipv6 set privacy state=disabled store=activenetsh interface ipv6 set privacy state=disabled store=persistentnetsh interface ipv6 set global randomizeidentifiers=disabledstore=activenetsh interface ipv6 set global randomizeidentifiers=disabledstore=persistent
Downloading and installing packages on the Avamar serverUse Avamar Installation Manager to download and install software packages, patches,and hotfixes.
Before you begin
Use a computer with at least 2 GB of RAM.
Procedure
1. Open a web browser and log in to Avamar Installation Manager:
a. Type the following URL:
https://Avamar-server/aviwhere Avamar-server is the IP address or the resolvable hostname of the Avamarserver.
The Avamar Installation Manager login page appears.
b. Type the username of the Avamar administrator user account in the User Namefield and the password in the Password field.
c. Click Login.
2. If a Download button appears for the package, click the button to download thepackage to the local repository.
After the download completes, the Download button is replaced with an Install buttonand a Delete button.
3. To start the installation, click Install.
The background color for the package changes to yellow and the initialization begins.When the initialization process completes, the Installation Setup page appears.
Server Updates and Hotfixes
Downloading and installing packages on the Avamar server 265

4. Provide installation setup information.
Some packages do not require setup information.
5. To provide advanced settings, select Show advanced settings.
6. Click Continue.
The Installation Progress page displays the status of the installation.
NOTICE
If you close the browser during the installation of a package, the installation pausesbut does not stop. To resume the installation, open a browser window and log in toAvamar Installation Manager. The installation continues from the point that thebrowser window closed.
7. Respond to all installation prompts.
After the installation completes, the Install button becomes a Run button for workflowpackages. The Run button enables you to run the workflow package again.
Viewing a list of installation packages on the Avamar serverView a list of installation packages in the repository on an Avamar server on theRepository tab of Avamar Installation Manager.
Procedure
1. Open a web browser and log in to Avamar Installation Manager:
a. Type the following URL:
https://Avamar-server/aviwhere Avamar-server IP address or resolvable hostname of the Avamar server.
The Avamar Installation Manager login page appears.
b. Type the username of the Avamar administrator user account in the User Namefield and the password in the Password field.
c. Click Login.
2. Click Repository.
The Repository tab appears.
3. (Optional) Toggle the sort order of the packages in the list by clicking a columnheading.
Repository tab headingsThe packages in the repository on an Avamar server appear on the Repository tab ofAvamar Installation Manager. The most recently installed package appears at the bottomof the list.
The following table describes the information that appears for each package.
Table 90 Information on the Repository tab
Heading Description
FileName The name of the package.
Server Updates and Hotfixes
266 EMC Avamar 7.2 Administration Guide
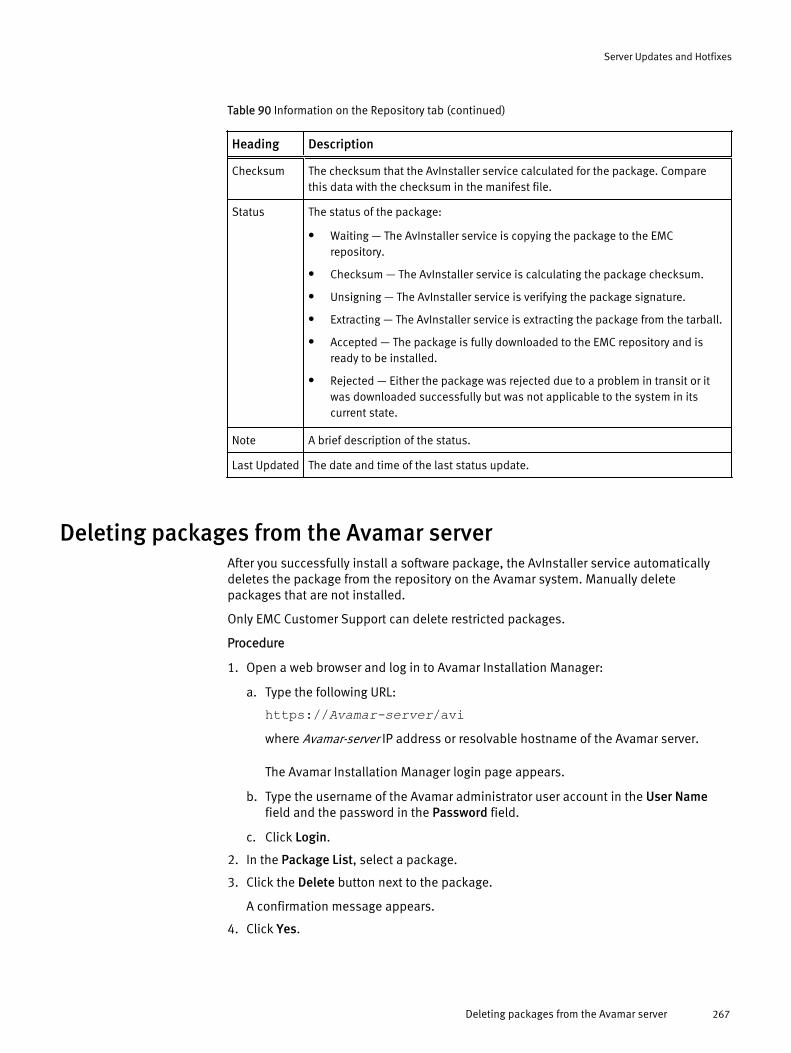
Table 90 Information on the Repository tab (continued)
Heading Description
Checksum The checksum that the AvInstaller service calculated for the package. Comparethis data with the checksum in the manifest file.
Status The status of the package:
l Waiting — The AvInstaller service is copying the package to the EMCrepository.
l Checksum — The AvInstaller service is calculating the package checksum.
l Unsigning — The AvInstaller service is verifying the package signature.
l Extracting — The AvInstaller service is extracting the package from the tarball.
l Accepted — The package is fully downloaded to the EMC repository and isready to be installed.
l Rejected — Either the package was rejected due to a problem in transit or itwas downloaded successfully but was not applicable to the system in itscurrent state.
Note A brief description of the status.
Last Updated The date and time of the last status update.
Deleting packages from the Avamar serverAfter you successfully install a software package, the AvInstaller service automaticallydeletes the package from the repository on the Avamar system. Manually deletepackages that are not installed.
Only EMC Customer Support can delete restricted packages.
Procedure
1. Open a web browser and log in to Avamar Installation Manager:
a. Type the following URL:
https://Avamar-server/aviwhere Avamar-server IP address or resolvable hostname of the Avamar server.
The Avamar Installation Manager login page appears.
b. Type the username of the Avamar administrator user account in the User Namefield and the password in the Password field.
c. Click Login.
2. In the Package List, select a package.
3. Click the Delete button next to the package.
A confirmation message appears.
4. Click Yes.
Server Updates and Hotfixes
Deleting packages from the Avamar server 267

Viewing the history of installationsYou can view a history of the software installations, updates, and hotfixes for an Avamarserver on the History tab of Avamar Installation Manager.
Procedure
1. Open a web browser and log in to Avamar Installation Manager:
a. Type the following URL:
https://Avamar-server/aviwhere Avamar-server IP address or resolvable hostname of the Avamar server.
The Avamar Installation Manager login page appears.
b. Type the username of the Avamar administrator user account in the User Namefield and the password in the Password field.
c. Click Login.
2. Click History.
The History tab appears.
3. (Optional) Toggle the sort order of the packages in the list by clicking the heading ofany column.
4. (Optional) Filter the list of packages by selecting a filter value from the Show list.
5. (Optional) View details about a package in the list by selecting the row for thepackage.
6. (Optional) View the log file for a packages that has a processing status by clickingLogs in the Details table.
7. (Optional) Export the log information to a Microsoft Excel or PDF file by clicking Export.
Installation history information
History columnsThe following table describes the information that appears on the Avamar InstallationManager History tab for each package.
Table 91 Information on the History tab
Heading Description
Title The name of the package.
Version The version of Avamar server software.
Description A brief description of the package.
Status The status of the package:
l Available — The package is in the manifest and is available to download.
l Completed — The package installation completed.
l Processing — A package installation is in progress.
l Ready — The package is ready to install.
Server Updates and Hotfixes
268 EMC Avamar 7.2 Administration Guide

Table 91 Information on the History tab (continued)
Heading Description
l Removed — The package has been deleted from the Avamar grid.
Last Updated The date and time of the last status update for the package.
Details columnsThe following table describes the information that appears in the Details table in thelower right pane of the History tab.
Table 92 Details on the History tab
Details tablecolumnheading
Description
Status Status details for a package:
l Available — The package is in the manifest and is available to download.
l Ready — The package is ready to install.
l Deployed — The start of the installation initialization.
l Deploying — The start of the package deployment.
l Processing — The start of the package installation.
l Completed — The completion of the package installation.
l Removed — The removal of the package.
Last Updated The corresponding date and time of the package status message.
Logs Displays a Logs button for packages with a processing status. Click Logs toopen a window that provides details about the tasks that are performed to installthe package.
Server Updates and Hotfixes
Installation history information 269

Server Updates and Hotfixes
270 EMC Avamar 7.2 Administration Guide

CHAPTER 12
Avamar Client Manager
This chapter includes the following topics:
l Overview of Avamar Client Manager.................................................................... 272l Starting Avamar Client Manager.......................................................................... 275l Global tools........................................................................................................ 276l Overview............................................................................................................. 285l Clients................................................................................................................ 289l Policies............................................................................................................... 307l Queues............................................................................................................... 309l Logs.................................................................................................................... 310
Avamar Client Manager 271

Overview of Avamar Client ManagerAvamar Client Manager is a web-based management application that providescentralized Avamar client administration capabilities for larger businesses andenterprises. Avamar Client Manager facilitates the management of large numbers ofAvamar clients.
Avamar Client Manager works with Avamar clients on a supported native operatingsystem and Avamar clients on a supported operating system running in a VMware virtualmachine. Avamar Client Manager cannot work with Avamar clients through virtual center,virtual machine, or virtual proxy configurations. The Avamar Client Manager UI displayssupported Avamar clients and hides all unsupported clients.
Connection securityTo secure data transmissions between a computer and the Avamar server, a secureconnection is created using HTTPS.
This form of the HTTP protocol encrypts messages before they are sent and decrypts themwhen they are received. HTTPS is used for all login transmissions and for all transmissionof data during registration and activation operations.
All attempts to access the Avamar server through the UI over standard HTTP protocol areredirected to HTTPS to prevent plain text transmissions.
Apache web server authenticationThe Avamar Client Manager UI uses only secure web pages, and an authenticationwarning appears in web browsers that access those pages unless you install a trustedpublic key certificate on the Apache web server that is provided with Avamar.
The EMC Avamar Product Security Guide describes how to obtain and install a trustedpublic key certificate for the Apache web server.
Editing the session time-out periodWhen a session has been running for 72 hours or more without any interaction betweenthe web browser and the Avamar Client Manager server, Avamar Client Manager ends thesession. The automatic session time-out protects the security of the assets accessiblethrough Avamar Client Manager. You can increase or decrease the time-out period.
When Avamar Client Manager ends a session, close the web browser window or tab inwhich the session was running, and restart Avamar Client Manager. Avamar ClientManager does not end a session while a commit task is in progress.
Procedure
1. Open a command shell and log in by using one of the following methods:
l For a single-node server:
a. Log in to the server as admin.
b. Switch user to root by typing su -.
l For a multi-node server:
a. Log in to the utility node as admin.
b. Load the dpnid OpenSSH key by typing:
Avamar Client Manager
272 EMC Avamar 7.2 Administration Guide

ssh-agent bashssh-add ~admin/.ssh/dpnid
c. When prompted, type the dpnid passphrase and press Enter.
2. Stop the EM Tomcat server by typing dpnctl stop emt.
3. Open the following file in a text editor:
/usr/local/avamar-tomcat/webapps/aam/WEB-INF/web.xml4. Change the value of the session-timeout tag to a new value in minutes.
The following example illustrates the session-timeout tag with the default valueof 4320 minutes (72 hours):
<session-config> <session-timeout>4320</session-timeout></session-config>
5. Save and close the file.
6. Start the EM Tomcat server by typing dpnctl start emt.
Increasing the JavaScript time-out periodThe Avamar Client Manager UI uses JavaScript to perform many of its tasks. Sometimesan Avamar Client Manager UI script requires more time to finish than is permitted by aweb browser’s default script time-out value.
When this happens, a message appears and the script is stopped. You can click continueto allow the script to finish its work.
To avoid seeing this message, increase the script time-out period. The steps depend onthe web browser.
Increasing the JavaScript time-out period in Internet Explorer on WindowsProcedure
1. Open a registry editor, such as Regedt32.exe.
2. Open the following registry key:
HKEY_CURRENT_USER\Software\Microsoft\InternetExplorer\StylesIf the key does not exist, create it.
3. Create a DWORD value called MaxScriptStatements under the key.
4. Set the value of the DWORD to 20,000,000.
This number represents the number of script statements.
5. Restart the web browser.
Increasing the JavaScript time-out period in FirefoxProcedure
1. In the browser address bar, type about:config.
A warning message appears.
2. Click I’ll be careful, I promise!.
The preferences window opens.
Avamar Client Manager
Increasing the JavaScript time-out period 273

3. In Filter, type dom.max_script_run_time.
The script runtime preference appears.
4. Double-click the preference.
The Enter integer value dialog box appears.
5. Type 30 and click OK.
6. Restart the browser.
Avamar Client Manager configuration propertiesAvamar Client Manager normally does not require any changes to its defaultconfiguration. However, some properties can be adjusted to suit a particular deploymentrequirement.
Avamar Client Manager properties are in the /usr/local/avamar/etc/acm.properties file.
The following table provides information about the properties.
Table 93 Avamar Client Manager configuration properties
Property Description Default value
activation.retry.attempts The number tries to activate a client activationbefore activation fails.
24
activation.retry.frequency.minutes The number of minutes between client activationtries.
120
move.getactivities.retry.attempts The number of checks to determine whether aclient is inactive (so that it can be moved).
7
move.getactivities.frequency.seconds The number of seconds between checks todetermine whether a client is inactive (so that itcan be moved).
5
move.queue.error.codes Sets a comma-separated list of error codes thatdetermine whether a move task failure is added tothe queue. A move is only added to the queue if itsfailure generates one of these error codes. Use thevalue none to prevent all failed move tasks from
being added to the queue. Use the value empty to
add all failed move tasks to the queue.
22271, 22280, 22282,22295, 30006, 30012,30016, 30017, 30019
move.retry.attempts Sets the number of times a failed move task isretried.
24
move.retry.frequency.minutes Sets the span of time in minutes between retrytries.
120
orgu.name.append.domain Determines whether clients displayed in the ClientInformation area of the UI are listed using theclient hostname or FQDN. The default valuedisplays the FQDN for each client.
true
toolbar.displaytime.client Determines whether time displayed within AvamarClient Manager uses the time zone of the webbrowser’s host computer or time zone of the
true
Avamar Client Manager
274 EMC Avamar 7.2 Administration Guide
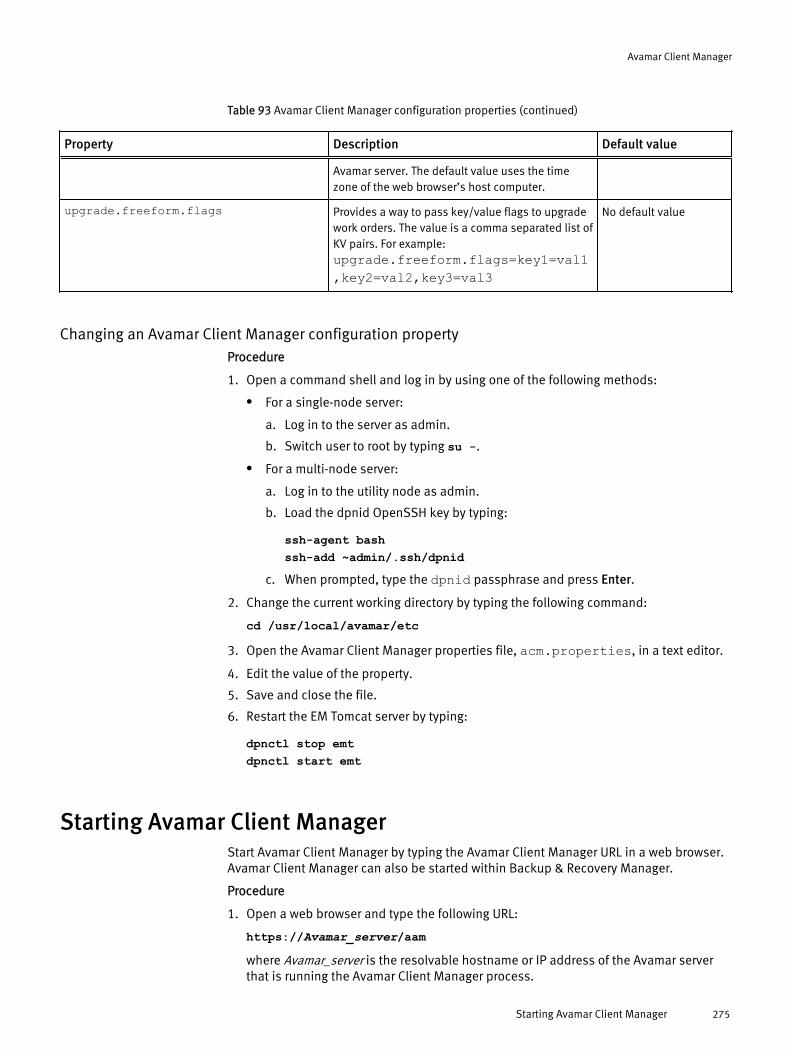
Table 93 Avamar Client Manager configuration properties (continued)
Property Description Default value
Avamar server. The default value uses the timezone of the web browser’s host computer.
upgrade.freeform.flags Provides a way to pass key/value flags to upgradework orders. The value is a comma separated list ofKV pairs. For example:upgrade.freeform.flags=key1=val1,key2=val2,key3=val3
No default value
Changing an Avamar Client Manager configuration propertyProcedure
1. Open a command shell and log in by using one of the following methods:
l For a single-node server:
a. Log in to the server as admin.
b. Switch user to root by typing su -.
l For a multi-node server:
a. Log in to the utility node as admin.
b. Load the dpnid OpenSSH key by typing:
ssh-agent bashssh-add ~admin/.ssh/dpnid
c. When prompted, type the dpnid passphrase and press Enter.
2. Change the current working directory by typing the following command:
cd /usr/local/avamar/etc
3. Open the Avamar Client Manager properties file, acm.properties, in a text editor.
4. Edit the value of the property.
5. Save and close the file.
6. Restart the EM Tomcat server by typing:
dpnctl stop emtdpnctl start emt
Starting Avamar Client ManagerStart Avamar Client Manager by typing the Avamar Client Manager URL in a web browser.Avamar Client Manager can also be started within Backup & Recovery Manager.
Procedure
1. Open a web browser and type the following URL:
https://Avamar_server/aamwhere Avamar_server is the resolvable hostname or IP address of the Avamar serverthat is running the Avamar Client Manager process.
Avamar Client Manager
Starting Avamar Client Manager 275

2. In User Name, type the username of an administrator account on the Avamar server.
3. In Password, type the password for the account.
Results
Avamar Client Manager opens to Server Summary section of the Overview page.
Login pageThe login page limits access to the Avamar Client Manager UI by requiring a usernameand a password.
The login page authenticates the username and the password through comparison withadministrator accounts registered on the Avamar server. Avamar Client Manager onlyallows access for accounts with administrator privileges on the Avamar server that isrunning the Avamar Client Manager process.
After a successful login, the Avamar Client Manager UI opens to the Server Summarysection of the Overview page.
Global toolsAvamar Client Manager provides several tools that you can use with more than one page.
Use these tools to help with the following tasks:
l Adding an Avamar server
l Removing an Avamar server
l Changing the settings for an Avamar server
l Selecting an Avamar server to work with
l Filtering a page's summary view
l Viewing context relevant details
l Exporting information from a page
l Enabling tool tips
Adding an Avamar serverTo enable management of the Avamar clients of an Avamar server, add the Avamar serverto Avamar Client Manager.
Before you begin
Determine the following information:
l The resolvable hostname or IP address of the Avamar server.
l The inbound RMI port on the Avamar server.
l The password for the MCUser account on the Avamar server.
Procedure
1. Browse to the Server Summary section of the Overview page.
2. Click Add Server.
The Add Server window appears.
3. In System name (or) IP, type the resolvable hostname, or IP address, of the Avamarserver.
Avamar Client Manager
276 EMC Avamar 7.2 Administration Guide

4. In Port, type the inbound RMI port for the Avamar server.
The field appears with the default value of 9443. Leave the default value unchangedunless a non-default port is used on the Avamar server.
5. In MCUser Password, type the password for the MCUser account on the Avamarserver.
6. Click Save.
Results
Avamar Client Manager checks the values and adds the Avamar server.
Removing an Avamar serverTo stop management of the Avamar clients of an Avamar server, remove the Avamarserver from Avamar Client Manager.
Procedure
1. Browse to the Server Summary section of the Overview page.
2. Select the Avamar servers to remove.
The Avamar server that hosts the Avamar Client Manager process cannot be removed.
3. Click Remove Server.
A warning dialog box appears.
4. Click Yes.
Results
Avamar Client Manager removes the selected Avamar servers from the group of managedservers.
Changing the settings for an Avamar serverChanges on an Avamar server to the inbound RMI port or to the password for the MCUseraccount prevent management of the Avamar server by Avamar Client Manager. Edit thestored settings for the Avamar server to reenable management by Avamar ClientManager.
Before you begin
Determine the following information:
l The new inbound RMI port on the Avamar server.
l The new password for the MCUser account on the Avamar server.
Procedure
1. Suspend all activity on the Avamar server.
Suspending and resuming server activities on page 150describes how to suspendAvamar server activity.
2. Browse to the Server Summary section of the Overview page.
3. Select an Avamar server.
4. Click Edit Server.
The Edit Server window appears.
5. In Port, type the inbound RMI port on the selected Avamar server.
Avamar Client Manager
Removing an Avamar server 277

6. In MCUser Password, type the password for the MCUser account on the selectedAvamar server.
7. Click Save.
Results
Avamar Client Manager checks the values and reestablishes management of the Avamarserver.
Selecting a serverUse the server selection field to display, and work with, information for a specific server.
Before you begin
Expand the Navigation panel on the left side of the UI so that the server selection field isvisible at the top of the panel. Browse to a page that displays the server selection field inan active, selectable, state.Procedure
1. On the server selection field, click the arrow icon.
When the server selection field is not visible, expand the Navigation panel on the leftside of the UI. When the server selection field is not relevant to the current page viewit appears in a dimmed state, that is, it is not active and selectable.
2. From the list of servers, select a server.
The page view refreshes. Information about the server and its tasks appears.
FiltersAvamar Client Manager offers you a wide range of filters.
Use a filter to determine which objects appear in the list on the current page. Filters workwith a variety of objects. The type of object and the available filters depend on the page'scontext. In Avamar Client Manager you can filter the following types of objects:
l Servers
l Clients
l Policies
l Groups
l Tasks
l Log entries
Filters that apply to the current context appear on the Filters bar at the top of the page.
Searching by nameTo find objects by comparing a search string to object names, use the search field.
Before you begin
Browse to a view that has one of the following search-enabled fields on the Filters bar:
l User name
l Client name
l Group name
l Domain name
Use search to limit the list to objects with the same and similar names.
Avamar Client Manager
278 EMC Avamar 7.2 Administration Guide

Procedure
1. Click the arrow next to the search-enabled field.
A text entry box appears.
2. In the text entry box, type a search string.
Avamar Client Manager compares the search string that you type to the names ofobjects and includes matching objects on the list. Objects match when a portion ofthe name contains the search string.
3. Click the magnifying glass icon.
Results
Avamar Client Manager refreshes the list and only objects with names that match thesearch string appear.
Example 1 Searching by username
To include all clients that have a user with the characters "eng" in their username, type*eng* in the text entry field.
After you finish
(Optional) To remove the search string and to display all objects, click X next to the textentry field.
Search string rules
A search string is one or more characters that you type into a name search field. AvamarClient Manager compares the search string with all object names. When the search stringmatches all or part of an object's name, Avamar Client Manager adds the object's nameto the results.
The following rules apply to a search string:
l No more than 24 characters
l Can use an asterisk (*) character to represent zero or more characters
l Cannot start with a period character
l Cannot include any of the characters listed in the Character column of the followingtable:
Table 94 Characters not allowed in search strings
Character Name Unicode
/ a Solidus 002F
: Colon 003A
; Semicolon 003B
? Question Mark 003F
" Quotation Mark 0022
< Less-than Sign 003C
> Greater-than Sign 003E
\ Reverse Solidus 005C
Avamar Client Manager
Filters 279

Table 94 Characters not allowed in search strings (continued)
Character Name Unicode
, Comma 002c
~ Tilde 007E
! Exclamation Mark 0021
@ Commercial At 0040
# Number Sign 0023
$ Dollar Sign 0024
% Percent Sign 0025
^ Circumflex Accent 005E
| Vertical Line 007C
& Ampersand 0026
' Apostrophe 0027
` Grave Accent 0060
( Left Parenthesis 0028
) Right Parenthesis 0029
{ Left Curly Bracket 007B
} Right Curly Bracket 007D
[ Left Square Bracket 005B
] Right Square Bracket 005D
a. An exception to this exclusion permits the solidus character in the Domain Name filter on thePolicies page.
Using the activity type filterUse the activity type filter to limit a list to one type of activity.
Before you begin
Browse to a view that includes Activity Type on the Filters bar.Procedure
1. On the Filters bar, click the arrow next to Activity Type.
A selection list appears, with the values: Backup and Restore.
2. Select a value.
Select Backup to include only backup tasks in the list. Select Restore to include onlyrestore tasks in the list.
For example, in the Idle Clients section of the Clients page, select Backup on theActivity Type filter. Avamar Client Manager limits the list to clients without any backupactivity during the defined period.
Results
Avamar Client Manager filters the results using the activity type that you selected.
Avamar Client Manager
280 EMC Avamar 7.2 Administration Guide

Using the client status filterUse the client status filter to add clients with the specified client status to the list.
Before you begin
Browse to a view that includes Client Status on the Filters bar.Procedure
1. On the Filters bar, click the arrow next to Client Status.
A selection list of the client statuses for all clients in that context appears.
2. Select a status.
For example, in the Add Clients section of the Clients page, select Activation Failureon the Client Status filter. Avamar Client Manager limits the list to registeredcomputers with at least one unsuccessful activation try.Avamar Client Manager refreshes the list. Only entries with the selected client statusappear on the list.
3. (Optional) Repeat the steps to select additional statuses.
Results
Avamar Client Manager refreshes the list. Only entries with the selected client statusesappear on the list.
Using the failure criteria filterUse the failure criteria filter to define which clients Avamar Client Manager includes in alist of failed clients.
Before you begin
Browse to a view that includes Failure Criteria on the Filters bar.Procedure
1. On the Filters bar, click the arrow next to Failure Criteria.
A selection list appears, with the values: At least one activity failed, All activitiesfailed, and Last activity failed.
2. Select a value.
The value that you select determines which clients Avamar Client Manager includes inthe list of failed clients. Avamar Client Manager includes only clients that match theselected activity status.
For example, select Last activity failed. Avamar Client Manager refreshes the list andincludes clients only when their most recent activity failed. The failed activity can beeither a backup or a restore.
Results
Avamar Client Manager refreshes the list. Only clients with an activity status that matchesthe selected value appear on the list.
Using the OS filterUse the OS filter to limit a list to clients with specific operating systems.
Before you begin
Browse to a view that includes OS on the Filters bar.
Avamar Client Manager
Filters 281
Procedure
1. On the Filters bar, click the arrow next to OS.
A list of the OS versions of all clients in that context appears.
2. Select an OS version.
Avamar Client Manager refreshes the list. Only clients with the selected OS versionappear on the list.
3. (Optional) Repeat the steps to select additional OS versions.
Results
Avamar Client Manager refreshes the list. Only clients with the selected OS versionsappear on the list.
Using the period filterUse the period filter to define the calendar date boundaries of the displayed results.
Before you begin
Browse to a view that includes Period on the Filters bar.Procedure
1. On the Filters bar, click the arrow next to Period.
A selection list appears, with the values: Before, After, and On.
2. Select a value.
3. Click the arrow next to the selected value.
A date entry field and a small calendar icon appear.
4. Click the calendar icon, browse to a specific date, and then click the date.
Alternatively, in the date entry field, type a date using the format m/d/yy, and click themagnifying glass icon.
Avamar Client Manager refreshes the list. Only entries within the specified periodappear on the list.
5. (Optional) Further refine the results by repeating these steps using the other values.
Results
Avamar Client Manager refreshes the list. Only entries within the specified period appearon the list.
Using the status filterUse the status filter to limit a list to entries with specific statuses.
Before you begin
Browse to a view that includes Status on the Filters bar.
Procedure
1. On the Filters bar, click the arrow next to Status.
A selection list of all statuses for all entries in that context appears.
2. Select a status.
Avamar Client Manager refreshes the list. Only entries with the selected status appearon the list.
Avamar Client Manager
282 EMC Avamar 7.2 Administration Guide

3. (Optional) Repeat the steps to select additional statuses.
Results
Avamar Client Manager refreshes the list. Only entries with the selected statuses appearon the list.
Using the status code filterUse the status code filter to limit a list to entries with specific status codes.
Before you begin
Browse to a view that includes Status Code on the Filters bar.
Procedure
1. On the Filters bar, click the arrow next to Status Code.
A selection list of the status codes for all entries in that context appears.
2. Select a status code.
Avamar Client Manager refreshes the list. Only entries with the selected status codeappear on the list.
3. (Optional) Repeat the steps to select additional status codes.
Results
Avamar Client Manager refreshes the list. Only entries with the selected status codesappear on the list.
Using the success criteria filterUse the success criteria filter to define which clients Avamar Client Manager includes in alist of successful clients.
Before you begin
Browse to a view that includes Success Criteria on the Filters bar.Procedure
1. On the Filters bar, click the arrow next to Success Criteria.
A selection list appears, with the values: At least one activity successful, All activitiessuccessful, and Last activity successful.
2. Select a value.
The value that you select determines which clients Avamar Client Manager includes inthe list of successful clients. Avamar Client Manager only includes clients that matchthe selected activity status.
For example, select Last activity successful. Avamar Client Manager refreshes the listand only includes the clients with a successful backup or restore.
Results
Avamar Client Manager refreshes the list. Only clients with an activity status that matchesthe selected value appear on the list.
Using the version filterUse the version filter to limit a list to clients with specific versions of the Avamar clientsoftware.
Before you begin
Browse to a view that includes Version on the Filters bar.
Avamar Client Manager
Filters 283

Procedure
1. On the Filters bar, click the arrow next to Version.
A selection list of the Avamar client software versions for all clients in that contextappears.
2. Select a version.
Avamar Client Manager refreshes the list. Only clients with the selected softwareversion appear on the list.
3. (Optional) Repeat the steps to select additional software versions.
Results
Avamar Client Manager refreshes the list. Only clients with the selected software versionsappear on the list.
Viewing detailsUse the Details panel to view context relevant details.
Before you begin
Browse to a view that includes the Details panel or Details bar on the right-side.Procedure
1. On the right-side of the page, click the Details bar.
The Details panel expands.
2. In Summary, select an object.
The page context determines the object type. An object can be a client or a group. Youcan select more than one object.
Detailed information for the selected object appears in the Details panel.
3. (Optional) When you select more than one object, use the paging controls at thebottom of the Details panel to view information for each selected object.
Exporting dataUse export to download the selected summary as an Excel spreadsheet.
Before you begin
Browse to a page view that includes Export on the page bar.Procedure
1. On the page bar, click Export.
Avamar Client Manager includes all information from the summary in the exporteddata.
The web server pushes an Excel file containing the summary information to thebrowser.
2. Save the file locally.
3. Use an application that can read the Excel-formatted spreadsheets to open the file.
Setting the entries per page limitIncrease the limit on the number of entries displayed in summary lists.
By default, Avamar Client Manager limits its summary lists to 25 entries per page. Whenthere are more entries than the current entries per page limit, the entries appear on 2 or
Avamar Client Manager
284 EMC Avamar 7.2 Administration Guide

more pages. You can increase the entries per page limit to make it easier to work withmany entries.
Procedure
1. On the status bar at the bottom of Avamar Client Manager, click Entries Per Page.
The list of choices appears.
2. Click a number on the list.
Results
Avamar Client Manager sets the selected number as the new limit and refreshes the page.
Viewing tool tipsEnable and display tool tips to view concise help messages for various elements of theUI.
Procedure
1. On the status bar at the bottom of Avamar Client Manager, select Show Tooltips.
2. Hover the pointer over a user interface element that has a tool tip.
The following elements may have tool tips:
l Dashboard chart sections
l Controls
l Column headings
OverviewThe Overview page provides access to high-level information about the management ofAvamar clients. It also provides tools for the administration of Avamar servers.
From the left-side menu of the Overview page, select:
l Server SummarySelect Server Summary to view information about the selected Avamar server, to addan Avamar server, to remove an Avamar server, or to edit the settings for an Avamarserver.
l DashboardSelect Dashboard to view information about the client backups for the selectedAvamar server.
Server SummaryThe Server Summary section of the Overview page provides columns of information aboutthe Avamar servers that Avamar Client Manager manages.
Filter this information by using the filters available on the Filters bar. Change the sortingmethod that is used for the list by clicking a column heading.
In each of the following columns, click a nonzero value to see a more detailed reportabout that column's information:
l Active Clients
l Idle Clients
l Successful Clients
Avamar Client Manager
Viewing tool tips 285

l Failed Clients
Server Summary columns
The following table describes the columns that are used in the Server Summary sectionof the Overview page.
Table 95 Columns used in the Server Summary section
Column Description
Server Hostname or IP address of the Avamar server.
Version Version of Avamar server software that is installed on the Avamar server.
Total Clients Total number of clients that are registered with the Avamar server. Does notinclude retired clients.
Active Clients Total number of clients with activity (backup or restore) during the specifiedperiod.
Idle Clients Total number of clients with no backup activity during the specified period.
Successful Clients Total number of clients with a backup status that matches the value set inthe Successful Backups filter. Also includes the average amount of time forthose backups.
Failed clients Total number of clients with failed backups during the specified period.
Clients with Restore Total number of clients with restore activity (successful or unsuccessful)during the specified period.
DashboardThe Dashboard section of the Overview page provides a graphical snapshot view of aselected server.
The dashboard provides information in panels that you can expand, collapse, or delete tocreate the view you need.
Usage tips:
l Collapse or expand a panel by clicking the arrow icon in the panel's title bar.
l Return the dashboard to its default view by reloading the page in your web browser.
Setting a panel's periodSet a panel's period to define the number of days of data in the display.
Before you begin
Browse to the Dashboard section of the Overview page, with any of the following panelsdisplayed: Analyze, Backup Report, and Backup Trend.Procedure
1. On a panel, in the period field, click the arrow icon.
The period field is available on the following panels:
l Analyze
l Backup Report
l Backup Trend
Avamar Client Manager
286 EMC Avamar 7.2 Administration Guide

The period list appears.
2. Select a period.
The available choices are:
l Last 24 hours
l Last 7 days
l Last 30 days
Avamar Client Manager refreshes the panel with data for the selected period.
Client panelThe Client panel uses a pie chart to represent the total number of potential clients for theselected server. Colors represent the percentage of the total for:
l ActivatedGreen represents the percentage of clients that the selected server has activated.
l Not activatedRed represents the percentage of clients that the selected server has registered, butnot activated.
l FreeGray represents the percentage of unused client connections available on theselected server.
Server panelThe Server panel provides a grid view of information about the selected server.
Table 96 Server information on the Server panel
Column Description
Node Type Specifies the server's node type: Single or Multi.
Active Backup Number of running backups.
Backup in Queue Number of backups in the server's queue waiting to run.
Replication Current state of the replication cron job:
l Running
l Not running
Status Current state of the server's Management Console Server (MCS) system:
l Active
l Down
Backup Trend panelThe Backup Trend panel is a line chart that shows the size of data that is backed up atspecific points in time over a defined period. The x-axis represents points in time over theselected period. The y-axis represents the size of data in the backup at each point intime.
The line that is drawn between the plotted points represents the backup trend, which isthe change in backed up data over time.
Avamar Client Manager
Dashboard 287

Client Type panelThe Client Type panel uses a bar chart to represent for the selected server the number ofactivated clients that are in each of the following categories:
l RegularAll activated clients that do not fit into one of the other three categories.
l vMachineGuest clients. The virtual computers that are backed up through Avamar clientsoftware running on the host computer.
l ProxyProxy virtual machine clients. Clients that use Avamar for VMware image backup andrestore.
l vCenterAvamar clients that protect vCenter management infrastructure by backing up vCenterhosts.
Analyze panelThe Analyze panel uses a bar chart to represent the number of clients that are in each ofthe following states during the selected period:
l SuccessfulClients with at least one successful backup.
l FailedClients with backup activity but no successful backups.
l IdleClients with no backup activity.
Backup Report panelFor backups started during the selected period, the Backup Report panel uses a bar chartto represent the number of each of the following results:
l SuccessfulSuccessfully completed backups, with or without errors.
l FailedBackups that failed to complete.
l CanceledBackups that are canceled before completion.
Client Queues panelThe Client Queues panel uses a bar chart to display the number of clients in each of thefollowing queues:
l Upgrade
l Move to server
l Activation
Storage Capacity panelThe Storage Capacity panel uses a pie chart to represent the total storage capacity of theselected server. Colored slices represent the following:
l UsedRed represents the portion of storage that contains data.
Avamar Client Manager
288 EMC Avamar 7.2 Administration Guide

l Free CapacityGreen represents the portion of storage that is unused and available.
Backup Health panelThe Backup Health panel uses a bar chart to represent the number of clients that haveretained backup data for specific periods of time. The panel uses the periods: 1 day, 30days, 60 days, and 90 days.
On the bar chart, the x-axis represents the period that Avamar has retained the data andthe y-axis represents the number of clients.
ClientsThe Clients page provides information and tools for working with Avamar clients.
From this page you can:
l Select the computers in your enterprise's domain and add them as Avamar clients
l View detailed information about individual clients
l Move, retire, and delete clients
l Change a client's group associations
l Upgrade the Avamar software on the client
To navigate between the sections of the Clients page, select from the choices in the left-side menu.
Client and server toolsAvamar Client Manager provides several tools to help manage Avamar clients and Avamarservers.
A tool only appears when it is relevant to the context. Changes made by the tool apply tothe selected client and the selected server. Launch a tool by clicking its command button.
Creating an Avamar domainCreate an Avamar domain to add a branch to an Avamar server's administrative hierarchy.
Before you begin
Browse to a view that includes Create Domain: either the Add New Clients dialog box orthe Client Move dialog box.
Procedure
1. In the Domain Selection pane, select the location for the new domain.
To locate the new domain directly beneath the root domain, select the server icon. Tolocate the new domain beneath another domain, select that domain.
2. Click Create Domain.
The New domain dialog box appears.
3. In New Domain Name, type a name for the domain.
Avamar does not allow the following characters in a domain name: =~!@$^%(){}[]|,`;#\/:*?<>'"&+
4. (Optional) Type information in the Contact, Phone, Email, and Location fields.
Avamar Client Manager
Clients 289

5. Click OK.
Results
Avamar Client Manager adds the new domain to the selected server and the new domainappears on the Domain Selection pane.
Viewing the group associations of a clientTo determine the policies that apply to a client, view the groups that include the client.
Before you begin
Browse to a view that includes Group Associations on the Actions bar.
The group associations of a client determine the client's backup dataset, the client'sbackup schedule, and the client's backup retention period.
Procedure
1. Select a client.
2. Click Group Associations.
Results
The Groups for Client dialog box appears and lists the client's groups.
Adding group associations to a clientTo apply the policies of a group to a client, add the group association to the client.
Before you begin
Browse to a view that includes Group Associations on the Actions bar.
This task results in an association between a client and a group. The Avamar serverapplies the group's policies to the client.
Procedure
1. Select a client.
2. Click Group Associations.
3. On the Groups for Client dialog box, click Add Groups.
The Add Groups for Client dialog box appears.
4. Select a group.
You can select more than one group.
5. Click Add.
Results
Avamar Client Manager adds the group associations to the client.
Creating a groupTo make a new set of policies available for assignment to clients, create a group with thepolicies. The Create Group command is available when adding a client to a group, andwhen moving a client to a new domain or to a new server.
Before you begin
Browse to a view that includes Create Group: either the Add Groups dialog box or theClient Move dialog box.
Avamar Client Manager
290 EMC Avamar 7.2 Administration Guide

Procedure
1. Click Create Group.
On the Client Move dialog box, selecting a domain enables the button.
The Create Group in Domain dialog box appears.
2. In Group Name, type a name for the new group.
Avamar does not allow any of the following characters in a group's name: =~!@$^%(){}[]|,`;#\/:*?<>'"&+
3. (Optional) Select Enable to enable scheduled backups of clients that you assign to thegroup.
Clear this checkbox to disable scheduled backups of clients that you assign to thegroup.
4. In Dataset, select a dataset for the group.
5. In Schedule, select a schedule for the group.
6. In Retention Policy, select a retention policy for the group.
7. Click OK.
Results
Avamar Client Manager creates the new group in the selected domain.
Removing group associations from a clientTo stop applying a group's policies to a client, remove the group association from theclient.
Before you begin
Browse to a view that includes Group Associations on the Actions bar.
This task removes the association between a client and a group. When you complete thetask the group's policies no longer apply to the client.
Procedure
1. Select a client.
2. Click Group Associations.
3. On the Groups for Client dialog box, select a group.
You can select more than one group.
4. Click Remove.
Results
Avamar Client Manager removes the association between the client and the selectedgroups.
Overriding group policy settings for a clientTo modify policies applied to a client, override the policies of its group.
Before you begin
Browse to a view where View/Edit Details appears on the Actions bar and the clientappears in the clients list.
Avamar Client Manager
Client and server tools 291

Procedure
1. Select a client.
2. On the Actions bar, click View/Edit Details.
The Client Details dialog box appears.
3. Select the Advanced tab.
The policy override settings appear with the client's current state shown.
4. Make changes to the client's current state by selecting or clearing settings.
5. Click OK.
Results
Avamar Client Manager changes the group policy settings for the client.
Group policy override settings
To modify a policy that is applied to a client, use one of the policy override settings.
The following table describes the policy override settings on the Advanced tab of theClient Details dialog box.
Table 97 Settings on the Advanced tab of Client Details
Setting Description
Override groupretention
Permits you to assign to a client a retention setting that is different fromthe group setting. After selecting this option, assign a retention setting by
selecting it from the Select an existing retention policy list.
Select an existingretention policy
List of available retention settings that you can assign to a client. To use
this list, first select Override group retention.
Disable all backups Disables all backups of the client. Users can still restore data.
Activated Places a registered client in an activated state. When you clear this setting,users cannot perform backups or restores.
Allow client-initiatedbackups
Permits users to begin backups from the client.
Allow file selectionfor client-initiatedbackups
Permits users to select files to include in backups that are started from theclient. The Exclude list for the group's dataset does not apply.
Allow client to add todataset
Permits users to add folders to the datasets of the client's groups. Thefollowing rules apply to this setting:
l The Avamar server filters the added data with the group's Exclude listand Include list.
l The added data is in every scheduled and on-demand backup for eachgroup that is assigned to the client.
l User must have access to the Avamar client web UI to add folders orremove folders.
Allow client tooverride daily groupschedules
Permits users to select a start time for scheduled backups that is differentfrom the group start time. Prerequisites:
l Add time entries to the Avamar server's Override schedule.
Avamar Client Manager
292 EMC Avamar 7.2 Administration Guide

Table 97 Settings on the Advanced tab of Client Details (continued)
Setting Description
l Assign a daily schedule to the client's group.
l Provide users access to the Avamar client web UI to allow them toselect a new schedule.
Allow client tooverride retentionpolicy on client-initiated backups
Assigns the retention policy that is specified in Select an existingretention policy to client-initiated backups. Prerequisites:
l Enable Override group retention.
l Enable Allow client-initiated backups.
Viewing summary information about a clientUse Client Details to see information about a client and its users.
Before you begin
Browse to a view where View/Edit Details appears on the Actions bar and the clientappears in the clients list.
Procedure
1. Select a client.
2. On the Actions bar, click View/Edit Details.
The Client Details dialog box appears.
3. Select the Summary tab.
Results
Information about the client appears. Also, a list of users associated with the clientappears.
Changing a client's name on the serverWhen you change a computer's hostname, also change the name that is used by theAvamar server to identify the computer as an Avamar client.
Before you begin
Change the hostname on the computer, and in DNS, before performing this task. Browseto a view where View/Edit Details appears on the Actions bar and the computer appearsin the clients list.
Procedure
1. Select a client.
2. On the Actions bar, click View/Edit Details.
The Client Details dialog box appears.
3. Select the Summary tab.
4. In Client name, type the new hostname for the computer.
5. Click OK.
Avamar Client Manager
Client and server tools 293

Results
Avamar Client Manager replaces the old hostname with the new hostname for the Avamarclient on the Avamar server.
Viewing a client's backup historyTo determine whether an Avamar server has backed up a client as expected, view theclient's backup history.
Before you begin
Browse to a view where View/Edit Details appears on the Actions bar and the clientappears in the clients list.
Procedure
1. Select a client.
2. On the Actions bar, click View/Edit Details.
The Client Details dialog box appears.
3. Select the Backups tab.
4. In From, select the earliest date of the period to view.
5. In To, select the latest date of the period to view.
6. (Optional) Select On-demand backups.
Select this choice to include user-initiated backups in the results. Clear this choice toexclude those backups.
7. (Optional) Select Scheduled backups.
Select this choice to include backups initiated by a group schedule in the results.Clear this choice to exclude those backups.
Results
A list of the client's backups that match the filter settings appears.
Viewing a client's installed plug-insView the Avamar plug-ins that are installed on an Avamar client to help determine thetypes of data in its backups.
Before you begin
Browse to a view where View/Edit Details appears on the Actions bar and the clientappears in the clients list.
Procedure
1. Select a client.
2. On the Actions bar, click View/Edit Details.
The Client Details dialog box appears.
3. Select the Plug-ins tab.
Results
The plug-ins that are installed on the client appear.
Avamar Client Manager
294 EMC Avamar 7.2 Administration Guide

Deleting a client from a serverTo remove a client's records and backups from an Avamar server, delete the client fromthe server.
Before you begin
Browse to a view where the client appears in the client list and Delete appears on theActions bar.
When Avamar Client Manager deletes a client from an Avamar server it stops all activitywith that client, deletes the client's backups, and removes all record of the client from theserver's database.
Procedure
1. Select a client.
2. On the Actions bar, click Delete.
3. On the Confirm dialog box, type the password.
Use the password of the account that is logged in to Avamar Client Manager.
4. Click OK.
The Alert dialog box appears.
5. Click OK.
Results
Avamar Client Manager runs a background process that removes all the client'sinformation and data from the server.
Add ClientsThe Add Clients section provides information and tools to register and activate enterprisecomputers as Avamar clients.
Use the Add Clients section to import information about the computers in the enterprise.Import the information from a supported LDAP naming system or from a CSV file.
After import, filter the information by client status and client name to help in the selectionof prospective Avamar clients.
Use Avamar Client Manager to register and activate the selected computers to an Avamarserver. Completion of the activation process requires installation of the Avamar clientsoftware on the computers and access to Avamar client processes from the server. Thenormal workflow is to install the client software on a computer before selecting it foractivation.
Directory service informationYou can use an enterprise's directory service to provide Avamar Client Manager withinformation about the computers that are potential Avamar clients.
Use a supported directory service that has information about the potential Avamar clientcomputers. Avamar Client Manager queries the directory service to obtain informationabout clients and, if available, directory service organizational units, such as directorydomains, and directory groups.
Before using the directory service method to obtain information about computers in adomain, configure Avamar Client Manager to use the directory service.
The directory service method requires the following:
Avamar Client Manager
Add Clients 295

l TCP/IP access to the directory service from the server that is running Avamar ClientManager.
l Account information for a user account with read access to the directory service.
l The name of the directory service domain for the computers that you want to import.
Importing information from a directory service
To prepare to add computers as Avamar clients, import information about the computersfrom the directory service.
Before you begin
Do the following:
l Configure Avamar Client Manager to use the directory service.
l Obtain a username, and its associated domain and password for an account withread access to the directory service.
l Have available the name of the directory service domain of the computers that arebeing imported.
Procedure
1. In the left-side menu, click Clients > Add Clients.
2. On the Actions bar, click New Clients.
The Client Information Source dialog box appears.
3. Select Active Directory.
4. In User Domain, select the domain of the account you are using to access thedirectory service.
To add directory service domains to this list, refer to the administration guide.
5. In User Name, type the name of the account.
6. In Password, type the password of the account.
7. In Directory Domain, select the name of the directory service domain for the computerinformation you are importing.
8. Click OK.
Results
Avamar Client Manager imports the information from the directory service.
After you finish
Using the imported computer information, select and activate computers as clients of anAvamar server.
CSV file informationYou can use a comma-separated values (CSV) file to provide Avamar Client Manager withinformation about the computers that are potential Avamar clients.
Create the CSV file manually or create it by using the output of a Systems managementtool such as the Microsoft System Center Configuration Manager or the Microsoft SystemsManagement Server.
You can use the output that a Systems management tool generates during installation ofthe Avamar client software a group of computers to create the CSV file. However, onlythose clients with the Avamar client software successfully installed appear in AvamarClient Manager.
Avamar Client Manager
296 EMC Avamar 7.2 Administration Guide

During the upload of a CSV file, Avamar Client Manager checks the file for correctformatting, and cancels the upload when it finds a problem.
CSV file format
A correctly formatted CSV file complies with the following rules:
l At least two rows.
l The values are separated only by a comma.
l The first row of the file must consist of the literal names for each type of value.The name for the first value is Hostname. The name for the second value is Group.
l The second row, and all subsequent rows, must have at least one value and no morethan two values.
l The formatting rules require a first value that is a valid hostname for a computer anda trailing comma.
l The second value is optional, but when you include it, it must be the directory servicelogical group name for the computer.When you do not provide the second value for a computer, Avamar Client Managerlists the computer at the root level in the hierarchical display.
l In the second value, use a forward slash (/) to separate the hierarchical levels of thedirectory service logical group name.
If you use spreadsheet software to create or edit the client list, do not add a comma withthe value to try to create comma separated values. Adding a comma to the value withinthe spreadsheet software can result in an incorrectly formatted file. When you save theclient list in the editor as a CSV file type, the editor adds the comma separators as part ofthe file conversion process. To check the formatting, open the client list in a plain texteditor.
Example of a correctly formatted client list fileIn a plain text editor, a correctly formatted client list file looks like the following example.
Hostname,GroupUser1-desktop.Acme.corp.com,acme.corp/USA/MAUser1-laptop.Acme.corp.com,acme.corp/USA/CA/SFOUser2-desktop.Acme.corp.com,acme.corp/EngineeringUser3-desktop.Acme.corp.com,User4-desktop.Acme.corp.com,
The first line lists the literal names of each type of value.
The second line contains the hostname User1-desktop.Acme.corp.com, theseparating comma, and the group acme.corp/USA/MA.
The third line contains the hostname User1-laptop.Acme.corp.com, theseparating comma, and the group acme.corp/USA/CA/SFO.
The fourth line contains the hostname User2-desktop.Acme.corp.com, theseparating comma, and the group acme.corp/Engineering.
The fifth and sixth lines contain only the hostnames User3-desktop.Acme.corp.com and User4-desktop.Acme.corp.com, each followedby a comma. The formatting rules require a comma, even without a group. The lines donot list groups, so both hostnames appear at the root level of the hierarchical display.
Avamar Client Manager
Add Clients 297

Figure 14 View after uploading the example CSV file
Uploading information in a CSV file
To prepare to add computers as Avamar clients, upload information about the computersin a comma-separated values (CSV) file.
Before you begin
Generate or create a correctly formatted CSV file and have a copy available on the webbrowsing computer.Procedure
1. In the left-side menu, click Clients > Add Clients.
2. On the Actions bar, click New Clients.
The Client Information Source dialog box appears.
3. Select CSV File.
4. Click Browse.
The Choose File to Upload dialog box appears.
5. Browse to the CSV file, select it, and click Open.
6. On the Client Information Source dialog box, click OK.
Results
Avamar Client Manager uploads the information from the CSV file.
After you finish
Using the uploaded computer information, select and activate computers as clients of anAvamar server.
ActivationActivation consists of changing the relationship between a computer and an Avamarserver to enable the server to manage backups of the computer.
The relationship moves through the three states that are shown in the following table.
Avamar Client Manager
298 EMC Avamar 7.2 Administration Guide

Table 98 Relationship states during client activation
State Description
No relationship The computer is unknown to the server. Computers in this state appear
in Add Clients, when you first add the computer information to AvamarClient Manager.
Registered Avamar Client Manager added the information about the computer to theAvamar server's database. Computers in this state appear in
Registered Clients after Avamar Client Manager starts the activationprocess and completes registration with the Avamar server. The changed
state of these computers also appears in Add Clients.
Activated The computer has Avamar client software that is installed and running.The client software and the server are in communication and haveexchanged an encrypted key to verify their identities. Computers in this
state appear in Activated Clients after activation is complete. The
changed state of these computers also appears in Add Clients and
Registered Clients.
A computer that is in the activation process appears on the Queues page, in Activation.Avamar Client Manager tries to activate a computer every 2 hours until it succeeds or untilit reaches the limit of 24 tries. When the process completes, Avamar Client Managerremoves the computer from this view and adds an entry on the Logs page, in Activation.
Activating computers to enable backup management
To enable backup management of a client, activate it with an Avamar server.
Before you begin
Install Avamar client software on the computers being activated and import informationabout the computers from either a directory service or a CSV file.Procedure
1. On the left-side menu, click Clients > Add Clients.
A hierarchical view of the computers in the enterprise appears. Avamar ClientManager generates this view from the information that you imported.
2. Browse or search the hierarchy to find the computers to activate.
3. Select each computer to activate.
To select all computers in a folder, expand the folder to show the computers, thenselect the folder.
4. Click Activate.
The Server - Domain Selection dialog box appears.
5. Expand the listing for a server, and select an Avamar domain.
Avamar Client Manager assigns the computers to the selected server and domainduring activation.
6. Click Next.
The Server - Group Selection dialog box appears.
7. Select a group or multiple groups.
Avamar Client Manager assigns the computers to the selected group or groups duringactivation.
Avamar Client Manager
Add Clients 299

8. Click Finish.
Results
Avamar Client Manager sends the activation task to the queue.
After you finish
Check the Activation section of the Queues page to determine the status of the activationprocess. After the process completes, check the Activation section of the Logs page todetermine its final status.
Registered ClientsClients that an Avamar server has registered but not activated appear in the RegisteredClients section.
Use the Registered Clients section to select clients and perform the following client-related tasks:
l Activate
l Delete
l Associate with groups
l View and edit details
l Add and remove group override settings
Activating a registered clientTo enable backup management of a registered client that failed to activate when it wasregistered, activate it from the Registered Clients section.
Before you begin
Install the Avamar client software on the computers you want to activate.
When activation of a computer as a client of an Avamar server fails, Avamar ClientManager still registers the computer with the server. Correct any problems that preventedthe activation. Then retry the activation of the registered client.
Procedure
1. On the left-side menu, click Clients > Registered Clients.
2. Select each client to activate.
3. Click Activate.
Results
Avamar Client Manager sends the activation task to the queue.
After you finish
Check the Activation section of the Queues page to determine the status of the activationprocess. After the process completes, check the Activation section of the Logs page todetermine its final status.
Activated ClientsClients that are activated with the selected Avamar server appear in the Activated Clientssection.
Use the Activated Clients section to perform the following tasks:
Avamar Client Manager
300 EMC Avamar 7.2 Administration Guide

l Move client to a different server
l Move client to a different Avamar domain
l Retire a client
l Delete a client
l Manage a client's group associations
l View and edit a client's details
l Add and remove group override settings
Moving a client to a new serverTo manage an Avamar client through a new Avamar server, move the Avamar client'sregistration, activation, and backups to the new server.
Before you begin
Do the following:
l Add the target server to Avamar Client Manager as described in Adding an Avamarserver on page 276.
l Select a client that is activated to a server with Avamar server software version5.0.1.31 or newer.
l For a client activated with an Avamar server older than version 6.x, fully initialize theMCS process on that server.
Procedure
1. On the left-side menu, click Clients > Activated Clients.
2. Select a client.
Do not select an NDMP client. Do not select a client that has backups on a DataDomain server.
3. On the Actions bar, click Move.
The Domain Selection pane of the Client Move dialog box appears.
4. At the top of the Domain Selection pane, from the server selection list, select theAvamar server that is the target of the move.
The target server's domains appear in the Domain Selection pane.
5. In the Domain Selection pane, select the target domain.
6. Click Next.
The Group Selection pane of the Client Move dialog box appears.
7. Select a target group.
You can optionally select more than one target group. Avamar Client Manager addsthe client to all selected groups.
8. In Replicate Existing Backups at the bottom of the Group Selection pane, select avalue.
Option Description
All Replicate all the client's backups to the target server.
Last Replicate only the last backup.
Avamar Client Manager
Activated Clients 301

Option Description
None Replicate none of the backups.
Replication makes the backups available from the target server.
9. (Optional) In Delete From Source:
l Select to remove all the client's backups from the source server.
l Clear to move the source server's registration of the client to the source server'sMC_RETIRED domain and retain copies of the client's backups on the sourceserver.
10.Click Finish.
The Confirm Replication Authentication dialog box appears.
11.In Source Server, type the password for the repluser account on the source server.
12.In Target Server, type the password for the repluser account on the target server.
13.Click OK.
Results
In a background process, Avamar Client Manager moves the client to the selected target.
Moving a client to a different Avamar domainTo change the administrative relationship between an Avamar client and an Avamarserver you can move the client to a different Avamar domain.
Before you begin
Select a client that is activated to a server with Avamar server software version 6.x ornewer.
Procedure
1. On the left-side menu, click Clients > Activated Clients.
2. Select a client.
3. On the Actions bar, click Move.
The Client Move dialog box appears.
4. In the Domain Selection pane of the Client Move dialog box, select the target domain.
5. Click Next.
The Group Selection pane appears on the Client Move dialog box.
6. Select a target group.
You can optionally select more than one target group. Avamar Client Manager addsthe client to all the selected groups.
7. Click Finish.
An alert box appears.
8. Click OK.
Results
In a background process, Avamar Client Manager moves the client to the selected target.
Avamar Client Manager
302 EMC Avamar 7.2 Administration Guide

Retiring a clientTo stop backups of an Avamar client, retire the Avamar client. Avamar Client Managerretains backups that exist at the time of retirement so that you can restore data whennecessary.
Procedure
1. On the left-side menu, click Clients > Activated Clients.
2. Select a client.
You can select more than one client. The retention policy setting you select applies toall selected clients.
3. On the Actions bar, click Retire.
The Retire Client dialog box appears.
4. In Select Retention Policy, select one of the options.
Option Description
Retire client and retain backupswith existing expiration date
The Avamar server retains the backups for theexisting retention period
Retire client and retain all backupsindefinitely
The Avamar server retains the backups untilyou manually delete them
Retire client and reset backupexpiration date
The Avamar server retains the backups until thedate set in New Expiration Date
5. If you select Retire client and reset backup expiration date in the previous step then,in New Expiration Date, select a date.
The Confirm dialog box appears.
6. Click Yes.
The Alert dialog box appears.
7. Click OK.
Results
In a background process, Avamar Client Manager retires the selected client.
Failed ClientsClients that have unsuccessful backup or restore activity appear in the Failed Clientssection.
Use the Failed Clients section to perform the following tasks:
l Delete a client
l Manage a client's group associations
l View and edit a client's details
l Add and remove group override settings
When working with failed clients, use the filters that are described in the following table.
Avamar Client Manager
Failed Clients 303

Table 99 Failed client filters
Filter Description
Period Specifies the period that Avamar Client Manager examines.
Activity Type Specifies the type of activity that Avamar Client Manager examines.
Failure Criteria Defines the failure threshold that is used by Avamar Client Manager.
Idle ClientsActivated Avamar clients, that do not have activity during a specified period, appear inthe Idle Clients section.
When working with idle clients, use the Period filter to specify the period that AvamarClient Manager examines for activity, and the Activity Type filter to specify the type ofactivity.
Use the Idle Clients section to perform the following tasks:
l Delete a client
l Manage a client's group associations
l View and edit a client's details
l Add and remove group override settings
Upgrade ClientsThe Upgrade Clients section provides information and tools you can use to applyupgrades and hot fixes to Avamar clients.
Use the Upgrade Clients section to perform the following tasks:
l Download an upgrade package to a server
l Select an upgrade package
l Apply the package to selected clients
l Remove an upgrade package from a server
Upgrade Clients section requirements
Before using the Avamar Client Manager Upgrade Clients section, do the following:
l For each client or plug-in, install the minimum client version that is listed in the EMCAvamar Push Client upgrade compatibility table of the EMC Avamar Compatibility andInteroperability Matrix. Obtain the latest version of this document from EMC OnlineSupport (https://support.emc.com).
Note
Use of the Upgrade Clients feature to upgrade Avamar client software on Windowscluster nodes is not supported. The EMC Avamar for Windows Server User Guidedescribes how to upgrade Avamar client software on Windows cluster nodes.
l Install, configure, and run the Avamar Downloader Service. The Avamar DownloaderService obtains the client packages and plug-in packages that are required by theupgrade feature. This service pulls the packages from EMC and pushes them onto theAvamar data server subsystem (GSAN). After the packages are updated in GSAN, the
Avamar Client Manager
304 EMC Avamar 7.2 Administration Guide

packages appear in the Avamar Client Manager Select Package window, andupgrades can be performed.
Multiple system deploymentsFor Avamar deployments that include more than one Avamar system, Avamar ClientManager running on one of the Avamar systems (managing system) can be used tomanage clients that are associated with other Avamar systems (managed systems).
The managed systems must meet the following requirements:
l Managed system is added to Avamar Client Manager on the managing system.Adding managed systems to Avamar Client Manager on the managing systemprovides the managing system with the information that it requires to support clientupgrades on the managed systems.
l Managed system is running a "near version" of Avamar software that is no more thantwo versions earlier than the managing system.
The near version requirement ensures that all packages required by clients on themanaged systems are available for deployment through the managing system.
To provide full client upgrade support for clients that are associated with Avamar systemsthat do not meet the near version requirement, run Avamar Client Manager on thosesystems.
Downloading upgrade and hotfix packagesUse Avamar Client Manager to download upgrade and hotfix packages to an Avamarserver.
Before you begin
Do the following:
l Install and configure the Avamar Downloader Service and the AvInstaller service.Refer to the administration guide for information about these tasks.
l Select an Avamar server.
Before applying an upgrade or hotfix package to an Avamar client, download the packageto the Avamar server associated with the Avamar client.
Procedure
1. On the left-side menu, click Clients > Upgrade Clients.
2. On the Actions bar, click Select Package.
The Upgrade Client dialog box appears.
3. In the Status column for the package, click Download.
The status of the package must be Available.
Results
Avamar Client Manager begins the download. A progress bar appears. After the downloadfinishes, Avamar Client Manager updates the package status, in sequence, to each of thefollowing values: Waiting, Processing, and Ready.
Selecting an upgrade packageSelect an upgrade package or hotfix package to apply to Avamar clients.
Before you begin
Do the following:
Avamar Client Manager
Upgrade Clients 305

l Install and configure the Avamar Downloader Service and the AvInstaller service.Refer to the administration guide for information about these tasks.
l Select an Avamar server.
l Download the upgrade or hotfix package to the selected Avamar server.
Procedure
1. On the left-side menu, click Clients > Upgrade Clients.
2. On the Actions bar, click Select Package.
The Upgrade Client dialog box appears.
3. Select a package.
Before you can select a package, the package must have a Ready status.
4. Click Select.
The Upgrade Client dialog box closes.
Results
The Avamar clients that are eligible for the upgrade or the hotfix appear.
After you finish
Select clients and apply the upgrade or hotfix package to them.
Applying the upgrade packageSelect Avamar clients and apply the upgrade package or the hotfix package.
Before you begin
Select an upgrade package or a hotfix package. View the list of Avamar clients that areeligible for the selected package.
NOTICE
Applying an upgrade to an Avamar NDMP Accelerator node (accelerator node) causes theaccelerator node to drop running backups. After the upgrade, the accelerator node startsand completes NDMP backups normally.
Procedure
1. From the list of Avamar clients that are eligible for the upgrade or the hotfix, select aclient.
You can select more than one client.
2. On the Actions bar, click Upgrade.
Results
Avamar Client Manager starts upgrading the selected clients. The upgrade runs in thebackground.
After you finish
Track the progress of the upgrade in the Upgrade section of the Queues page. View thefinal status of the upgrade in the Upgrade section of the Logs page.
Avamar Client Manager
306 EMC Avamar 7.2 Administration Guide

Deleting upgrade and hotfix packagesUse Avamar Client Manager to delete upgrade and hotfix packages from an Avamarserver.
Before you begin
Select an Avamar server that has an unneeded upgrade or hotfix package.
Procedure
1. On the left-side menu, click Clients > Upgrade Clients.
2. On the Actions bar, click Select Package.
The Upgrade Client dialog box appears.
3. Select a package.
You can only delete packages that have a Ready status.
4. Click Delete.
Results
Avamar Client Manager removes the selected package from the Avamar server.
PoliciesThe Policies page provides access to group policy tasks and information.
The Policies page includes a summary of each group policy on the selected Avamarserver.
Use the Policies page to perform the following tasks:
l Add clients to a group
l Remove clients from a group
l View the details of a group's dataset policy, retention policy, and schedule policy
Adding clients to a groupTo apply the policies of a group to selected clients, add the clients to the group.
Completion of this task results in association between the selected clients and a group.The Avamar server then applies the group's policies to the selected clients.
Procedure
1. Click Policies > Groups.
2. Select a group.
3. Click Edit Group Members.
The Edit Group Members dialog box appears.
4. Click Add.
The Add Clients to Group dialog box appears.
5. Select a client.
You can select more than one client.
6. Click Add.
Avamar Client Manager
Policies 307

Results
Avamar Client Manager adds the clients to the group.
Removing clients from a groupTo remove the policies of a group from selected clients, remove the clients from thegroup.
This task removes the association between selected clients and a group. When youcomplete the task, the group's policies no longer apply to the selected clients.
Procedure
1. Click Policies > Groups.
2. Select a group.
3. Click Edit Group Members.
The Edit Group Members dialog box appears.
4. Select a client.
You can select more than one client.
5. Click Remove.
Results
Avamar Client Manager removes the clients from the group.
Viewing the dataset policy of a groupUse the entry for a group on the Policies page to view details of the dataset policy of thegroup.
Procedure
1. Select an Avamar server.
2. Click Policies > Groups.
A summary view of the groups on the selected server appears.
3. On the entry for a group, in the Dataset column, click the name of the dataset policy.
Results
The dataset policy details for the selected group appear in a dialog box.
Viewing the retention policy of a groupUse the entry for a group on the Policies page to view details of the retention policy of thegroup.
Procedure
1. Select an Avamar server.
2. Click Policies > Groups.
A summary view of the groups on the selected server appears.
3. On the entry for a group, in the Retention column, click the name of the retentionpolicy.
Avamar Client Manager
308 EMC Avamar 7.2 Administration Guide

Results
The retention policy details for the selected group appear in a dialog box.
Viewing the schedule policy of a groupUse the entry for a group on the Policies page to view details of the schedule policy of thegroup.
Procedure
1. Select an Avamar server.
2. Click Policies > Groups.
A summary view of the groups on the selected server appears.
3. On the entry for a group, in the Schedule column, click the name of the schedulepolicy.
Results
The schedule policy details for the selected group appear in a dialog box.
QueuesThe Queues page provides access to the Avamar Client Manager activity queues.
The Queues page provides a summary view of active and pending Avamar Client Managertasks for the selected Avamar server. Tasks appear in separate sections that are based onthe type of task.
Table 100 Task types on the Queues page
Type of task Browse path Description
Activation Queues > Activation View active and pending tasks that are relatedto client activation.
Delete Queues > Delete View active and pending tasks that are relatedto the removal of clients from Avamar servers.
Move Queues > Move View active and pending tasks that are relatedto moving clients from one Avamar server toanother
Retire Queues > Retire View active and pending tasks that are relatedto retiring Avamar clients.
Upgrade Queues > Upgrade View active and pending tasks that are relatedto upgrading the software on Avamar clients.
Use the Queues page to perform the following tasks:
l View the details of active and pending tasks
l Cancel tasks
Canceling a taskCancel a pending task to prevent it from running.
You can stop a task from running by canceling it while it is in the pending state.
Avamar Client Manager
Viewing the schedule policy of a group 309

Procedure
1. On the left-side menu, click Queues > task_queue, where task_queue is the Queuespage section for the type of task you are canceling.
For example to cancel a client activation, click Queues > Activation.
2. Select a task.
3. Click Cancel.
A confirmation dialog box appears.
4. Click OK.
Results
Avamar Client Manager removes the task from the queue, cancels the task, and adds anentry to the log.
LogsThe Logs page provides access to the Avamar Client Manager logs.
The Logs page provides a summary view of Avamar Client Manager logs. Log entriesappear in separate sections that are based on the type of task that generated the entry.
Table 101 Task types on the Logs page
Task type Browse path Description
Activation Logs > Activation View log entries that are related to clientactivation.
Delete Logs > Delete View log entries that are related to the removalof clients from Avamar servers.
Move Logs > Move View log entries that are related to movingclients from one Avamar server to another.
Retire Logs > Retire View log entries that are related to retiringAvamar clients.
Upgrade Logs > Upgrade View log entries that are related to upgradingthe software on Avamar clients.
l ActivationClick Logs > Activation to view log entries that are related to client activation.
l DeleteClick Logs > Delete to view log entries that are related to the removal of clients fromAvamar servers.
l MoveClick Logs > Move to view log entries that are related to moving clients from oneAvamar server to another.
l RetireClick Logs > Retire to view log entries that are related to retiring Avamar clients.
l UpgradeClick Logs > Upgrade to view log entries that are related to upgrading the software onAvamar clients.
Use the Logs page to perform the following tasks:
Avamar Client Manager
310 EMC Avamar 7.2 Administration Guide

l View log entries
l View the client log for upgrades
l Clear all log entries in a section
Viewing the client log after upgrading an Avamar clientView the Avamar client's local log after a completed upgrade try.
Before you begin
Use Avamar Client Manager to apply an upgrade package or hotfix to an Avamar client.
Viewing the Avamar client's local log can provide details about the reasons for anunsuccessful client upgrade.
Procedure
1. On the left-side menu, click Logs > Upgrade.
2. On the right-side of the page, click the Details bar.
The Details panel expands.
3. In Summary, select a client upgrade log entry.
Detailed information for the selected log entry appears in the Details panel.
4. On the Details panel, in Log, click View Log.
Results
The Upgrade Log window opens and the client's local log appears in the window.
After you finish
(Optional) Select and copy information from the client's local log. Paste the copiedinformation into a text editor.
Clearing all log entries in a sectionAvamar Client Manager provides a method for you to remove all log entries from a tasksection of Logs.
Before you begin
Complete at least one task that results in a log entry in one of the task sections of theLogs page.
Procedure
1. On the left-side menu, click Logs > task_log, where task_log is a Logs page section.
For example, to clear all upgrade entries, click Logs > Upgrade.
2. Click Clear All.
The Alert dialog box appears.
3. Click Yes.
Results
Avamar Client Manager removes all log entries for the selected section.
Avamar Client Manager
Viewing the client log after upgrading an Avamar client 311

Avamar Client Manager
312 EMC Avamar 7.2 Administration Guide

CHAPTER 13
Avamar Desktop/Laptop
This chapter includes the following topics:
l Overview of Avamar Desktop/Laptop...................................................................314l Requirements for Avamar Desktop/Laptop.......................................................... 315l Avamar client software installation......................................................................317l Avamar Desktop/Laptop user authentication...................................................... 321l Avamar Desktop/Laptop user interfaces..............................................................325l Backup with Avamar Desktop/Laptop..................................................................331l Restore with Avamar Desktop/Laptop................................................................. 337l Client backup and restore activity history............................................................ 340l Editing Avamar Desktop/Laptop parameters....................................................... 341l Client log locations..............................................................................................342
Avamar Desktop/Laptop 313

Overview of Avamar Desktop/LaptopAvamar Desktop/Laptop is a version of the Avamar client software for Windows andMacintosh that adds enhanced features for enterprise desktop and laptop computers.Many Avamar Desktop/Laptop features are also available on supported Linux computers.
Client installation and managementIn a corporate environment, you can push install Avamar Desktop/Laptop on Windowsand Macintosh desktop and laptop computers by using systems management tools suchas Microsoft Systems Management Server 2003 (SMS).
You can also install the Avamar Desktop/Laptop software locally by launching aninstallation wizard.
After client installation, you can activate, upgrade, analyze, and manage clients by usingthe Avamar Client Manager web browser UI.
User authenticationAvamar Client Manager users authenticate through the enterprise Active Directory orOpenLDAP-compliant directory service, with or without Kerberos encryption. Users canalso authenticate by using built-in Avamar authentication, or a combination of Avamarauthentication and LDAP authentication. NIS authentication is also supported.
Pass-through authentication enables users to access the web UI without using the loginscreen. A secure message mechanism authenticates users based on information from theclient computer. Pass-through authentication also enables administrators to allow non-domain users to restore files to their local account on the computer.
User interfacesAvamar Desktop/Laptop functionality is available through two user interfaces:
l The client local user interface (client UI) is installed on the client computer when youinstall either the Avamar Client for Windows or the Avamar Client for Mac OS X. Withthe client UI, an Avamar icon appears in the notification area ("system tray") onWindows computers or on the menu bar on Mac computers. Right-click the icon onWindows or click the icon on Mac to open the client menu, which provides access tobackup, restore, program settings, and logs.
l Use the web browser user interface (web UI) to start an on-demand backup or restore,view backup and restore activity for a client computer, or configure other backupsettings for a client computer.
BackupUsers can start an on-demand backup with a single click on the client menu, or open theweb UI for an interactive on-demand backup. Options to customize on-demand backupbehavior include:
l Allowing users to create on-demand backup sets.
l Limiting the total number of backups that can occur each day for each clientcomputer.
l Changing the retention policy for on-demand backups.
l Disabling on-demand backups.
You should perform scheduled backups of all Avamar Desktop/Laptop clients. For dailyscheduled backups, you can allow users to select a different start time for thier backupsfrom a list of available times that you create. The system runs the backup as soon aspossible after the selected time.
Avamar Desktop/Laptop
314 EMC Avamar 7.2 Administration Guide

You can also allow users to add folders to the source data defined by the groups to whicha client belongs. The folders are included in both on-demand and scheduled backups forthe client.
RestoreUsers can search for or browse to folders, files, and file versions to either the originallocation or to a new location on the same computer. Users can restore data with the samename or a new name.
When users restore data to the original location with the same name, the restore processoverwrites any current local file versions with the restored files. This type of restore isuseful in situations where the current local versions contain errors or have datacorruption issues.
To avoid overwriting the current local file versions, users can restore to a new location,restore with a new name, or both.
Domain users can restore files from any Windows or Mac computer on which they have auser profile to the Windows or Mac computer to which they are logged in.
If large restore tasks are impacting network performance, you can specify a limit for theamount of data that users are allowed to restore.
Users are allowed to initiate only one restore task at a time. Additional requests areblocked and a message appears to the user. You can change this behavior to allow usersto start multiple restore tasks.
Activity historyThe History page in the web UI provides a 14-day history of the status of restore andbackup tasks for a client computer, as well as listings of the folders and files backed upduring that period. If you are a domain user with a user profile on the source computer,then you can view the activity history for the source computer from a different computer.
Requirements for Avamar Desktop/LaptopYou should work with an EMC field sales representatives when deciding on thecharacteristics of the Avamar system deployment that work best to support desktop andlaptop clients for an enterprise. The environment must meet the requirements in thefollowing topics.
Due to the wide range of differences in desktop and laptop topology for each enterprise,a description of the requirements for an Avamar system to support desktops and laptopsat any one enterprise is beyond the scope of this guide.
Client computer requirementsAvamar client computers with Avamar Desktop/Laptop must meet the minimumrequirements in the following sections.
Operating system requirementsAvamar Desktop/Laptop client computers require a Windows, Mac, or Linux operatingsystem that is supported for use with the Avamar client. The EMC Avamar Compatibility andInteroperability Matrixon EMC Online Support provides a complete and updated list.
Windows Server, Mac OS X Server, and Linux computers that meet the requirements thatare specified in the EMC Avamar Backup Clients User Guide are supported as server-classclients. Generally, the Avamar Desktop/Laptop enhancements function the same forserver-class computers as for desktop and laptop computers. Differences include:
Avamar Desktop/Laptop
Requirements for Avamar Desktop/Laptop 315

l On a server-class computer, clicking Back Up Now on the Client menu or on theBackup reminder launches a backup of the dataset that is assigned individually tothe computer, instead of the dataset that is assigned to a group.
To view or edit the dataset that is assigned to a server-class computer use AvamarAdministrator to edit the policy settings for the client. Overriding group policy settingsfor a client on page 111 provides instructions.
l The Avamar Desktop/Laptop feature for disabling backups for computers running onbattery power is not available for server-class computers.
Backups are always enabled on server-class computers.
l After disabling locally started restores on Windows server-class computers andMacintosh server-class computers, a restore can only be performed by using AvamarAdministrator.
However, users with local administrative rights on the server-class computer canrestore backups to a different computer.
Hardware requirementsThe following table lists hardware requirements for Avamar Desktop/Laptop clientcomputers.
Table 102 Avamar Desktop/Laptop hardware requirements
Category Requirement
CPU 1 GHz
RAM 1 GB
Hard drive space 250 MB permanent hard drive space minimum for software installation.Snapshot technology and system state backup may require additional space.
Network interface Either of the following:
l 10BaseT or higher, configured with the latest drivers for the platform
l IEEE 802.11a/b/g, configured with the latest drivers for the platform
Supported Avamar plug-insAvamar Desktop/Laptop supports backup and restore with the following Avamar FileSystem plug-ins:
l Windows
l Mac
l Linux
Avamar Desktop/Laptop does not support application plug-ins or file system plug-ins forother operating systems.
Port requirementsThe TCP data port must allow bi-directional communication with the Avamar server.
Web browser requirementsThe web browser that you use for the Avamar Desktop/Laptop user interface must beJavaScript-enabled and meet other requirements.
The following table lists supported web browsers.
Avamar Desktop/Laptop
316 EMC Avamar 7.2 Administration Guide
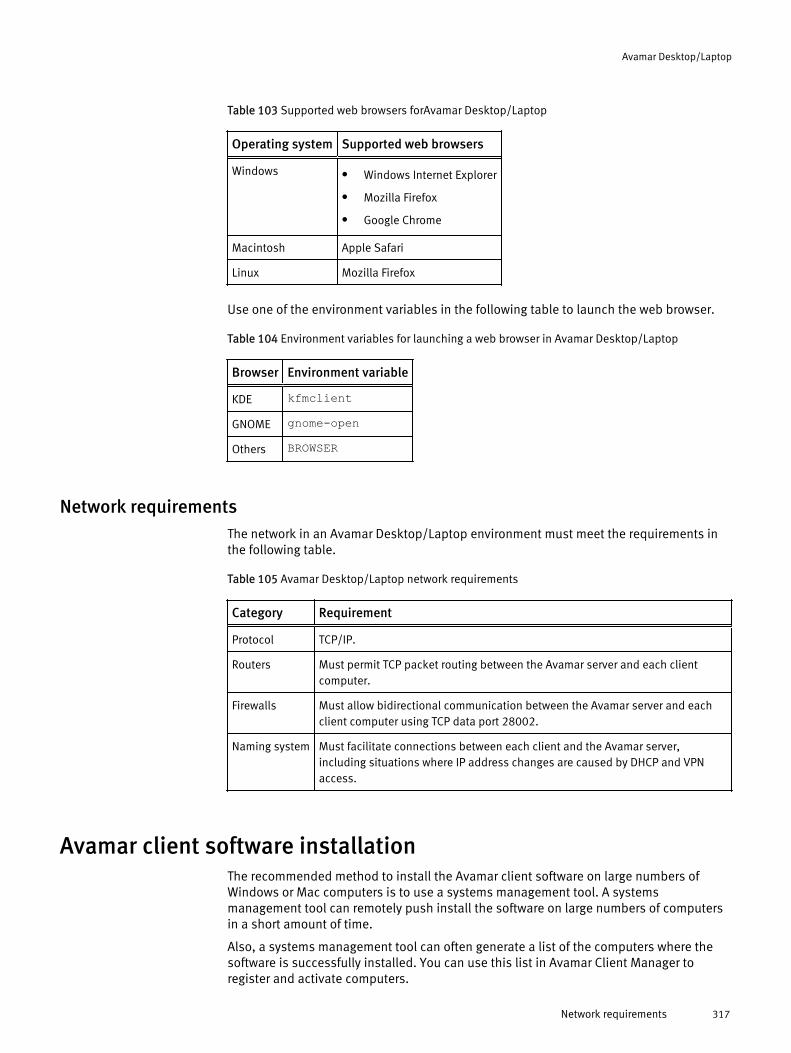
Table 103 Supported web browsers forAvamar Desktop/Laptop
Operating system Supported web browsers
Windows l Windows Internet Explorer
l Mozilla Firefox
l Google Chrome
Macintosh Apple Safari
Linux Mozilla Firefox
Use one of the environment variables in the following table to launch the web browser.
Table 104 Environment variables for launching a web browser in Avamar Desktop/Laptop
Browser Environment variable
KDE kfmclient
GNOME gnome-open
Others BROWSER
Network requirementsThe network in an Avamar Desktop/Laptop environment must meet the requirements inthe following table.
Table 105 Avamar Desktop/Laptop network requirements
Category Requirement
Protocol TCP/IP.
Routers Must permit TCP packet routing between the Avamar server and each clientcomputer.
Firewalls Must allow bidirectional communication between the Avamar server and eachclient computer using TCP data port 28002.
Naming system Must facilitate connections between each client and the Avamar server,including situations where IP address changes are caused by DHCP and VPNaccess.
Avamar client software installationThe recommended method to install the Avamar client software on large numbers ofWindows or Mac computers is to use a systems management tool. A systemsmanagement tool can remotely push install the software on large numbers of computersin a short amount of time.
Also, a systems management tool can often generate a list of the computers where thesoftware is successfully installed. You can use this list in Avamar Client Manager toregister and activate computers.
Avamar Desktop/Laptop
Network requirements 317

You can install the Avamar Client for Windows by using several silent install options.
NOTICE
Do not rename client installation packages. The Avamar push upgrade mechanisms areincompatible with renamed packages.
Supported systems management toolsRemote installation has been tested and approved using the following systemsmanagement tools:
l Microsoft Systems Management Server 2003 (SMS) on Windows computers
l SMS with Quest Software’s Quest Management Xtensions for SMS on Macintoshcomputers
You may also be able to use other systems management tools, such as the tools in thefollowing list, to remotely push install the Avamar client software:
l Microsoft System Center Configuration Manager 2007
l IBM Tivoli Management Framework
l HP OpenView ServiceCenter
l Symantec Altiris
l Apple Remote Desktop
Systems management tools vary. The steps required to push software to a set ofcomputers depend on the tool. Consult the documentation for the tool to determine thesteps required to perform these tasks.
Push installation on Windows computersProcedure
1. Copy the installer package for the Avamar Client for Windows to a location that isaccessible to the systems management tool.
2. Configure the systems management tool to copy the correct installer package to eachcomputer.
3. Designate the computers on which to install the software.
4. Provide an installation launch command that uses the following format:
msiexec /qn /I "path_to_MSI_pkg" SERVER=server DOMAIN=domainGROUP=”groups” UICOMPONENT={0|1} PROGRESSBAR={true|false}BALLOONMESSAGE={true|false} BACKUPREMINDER=daysThe following table provides details on the arguments for the installation launchcommand.
Table 106 Push install launch command arguments
Argument Description
"path_to_MSI_pkg" Specifies the full path to the location of the installer packagerelative to the root of the computer file system.
SERVER=server Specifies the IP address or FQDN of the Avamar server that isassigned to the client. When this argument is omitted or
Avamar Desktop/Laptop
318 EMC Avamar 7.2 Administration Guide

Table 106 Push install launch command arguments (continued)
Argument Description
incorrect, the client is successfully installed but is notactivated.
DOMAIN=domain Specifies the Avamar domain for the client. The path muststart with a slash path character (Unicode 002F: /). The
default value is /clients.
GROUP=groups Specifies a comma-separated list of Avamar backup groupsfor the client. Start the path for each group with a slash pathcharacter (Unicode 002F: /), and enclose the group path in
quotation marks. For example: GROUP=”/clients/text,/clients/admin”. The default value is “/DefaultGroup”.
UICOMPONENT={0|1} Specifies whether to enable the Avamar client with thestandard GUI (1) or as an agent process with no user interface
(0). When you specify 0, all remaining options are ignored.
PROGRESSBAR={true|false}
Specifies whether to show (true) or hide (false) the
progress window on the client during tasks.
BALLOONMESSAGE={true|false}
Specifies whether to show (true) or hide (false) balloon
messages on the client during tasks.
BACKUPREMINDER=days Specifies the number of days after the last backup before abackup reminder appears. The possible values for days arenumbers 1 through 7 and Never. The default value is 3.
Users can change the values set by the UICOMPONENT, PROGRESSBAR,BALLOONMESSAGE, and BACKUPREMINDER by using options on the client menu inthe client UI. You can also change the values during an upgrade.
5. Launch the systems management tool installation process.
Push installation on Macintosh computersProcedure
1. Copy the installer package for the Avamar Client for Mac OS X to a location that isaccessible to the systems management tool.
2. Configure the systems management tool to copy the correct installer package to eachcomputer.
3. Designate the computers on which to install the software.
4. Provide the installation launch command:
/usr/sbin/installer -pkg "path_to_install_pkg" -targetinstall_location
where path_to_install_pkg is the full path to the location of the installer packagerelative to the root of the computer file system, and install_location is the location inwhich to install the software. Normally, install_location is the root (/), but any localvolume is allowed.
Avamar Desktop/Laptop
Push installation on Macintosh computers 319

5. Launch the systems management tool installation process.
After you finish
After installation of the Avamar Client for Mac OS X, a restart of some clients may berequired. This is caused by a change to the process data size setting that is made onthose computers. During installation, the installer determines if the process data size isless than 96 MB. A minimum process data size of 96 MB is required for optimalperformance of the Avamar Client for Mac OS X.
If the process data size is less than 96 MB, then the installer changes it to 96 MB anddisplays a restart reminder. If you leave the message open for more than 30 secondswithout clicking a button to restart immediately or at a later time, then the reminder ishidden and appears again in 2 hours.
If you choose to restart the computer but the restart process is interrupted, then thereminder does not appear again. You must remember to restart the computer to completeth process data size change.
Local client installationYou can install the Avamar Desktop/Laptop software locally by launching a graphicalinstallation interface. After the installation, the computer is ready to register and activatewith an Avamar server.
To perform a local installation, you can download the client installer by using thedownloads link. If the downloads link is disabled, you must transfer the client installer tothe computer by some other file transfer method.
The disadvantages of using local installation are:
l It is very time consuming when performed individually on thousands of computers.
l It does not provide a list that you can use to register and activate groups ofcomputers in Avamar Client Manager.
The EMC Avamar Backup Clients User Guide provides more information on localinstallation, upgrade, and uninstall of Avamar Desktop/Laptop.
Avamar client software uninstallWhen you uninstall Avamar client software from a client computer, scheduled backups nolonger occur for the client. You cannot restore backups to the client after you uninstall thesoftware.
When you uninstall the Avamar client software, you can keep or delete the backups forthe client:
l To keep the backups for the client so that you can restore the backups to a differentclient, retire the client by using Avamar Administrator.
l To delete the backups for the client, delete the client by using Avamar Administrator.
Retire or delete the client either before or after you uninstall the Avamar client software.
Uninstall on WindowsProcedure
1. Open the Windows Add or Remove Programs or Programs and Features applet.
2. In the list of currently installed programs, select EMC Avamar for Windows.
3. Click Remove.
A confirmation message appears.
Avamar Desktop/Laptop
320 EMC Avamar 7.2 Administration Guide

4. Click Yes.
Uninstall on MacintoshProcedure
1. Open a Terminal (shell) session.
2. Log in as an administrator.
The uninstall command requires root (super-user) permissions. The sudo command isused to run the command with root permissions. An administrator account or anotheraccount listed in sudoers is required by sudo.
3. Run the uninstall script by typing the following command:
sudo /usr/local/avamar/bin/avuninstall.sh
Avamar Desktop/Laptop user authenticationAvamar Desktop/Laptop protects backup data by authenticating users and enforcingaccess rights. Avamar Desktop/Laptop uses a separate server process running on theAvamar system to facilitate authentication through both internal and external methods.Every Avamar system installation includes the Avamar Desktop/Laptop server process.
Pass-through authenticationPass-through authentication uses encrypted channels to access user credentials from aclient computer and associate the credentials with file ownership properties. The clientcomputer operating system obtains the user credentials during login to the computer orthrough common access card (CAC) technology.
Avamar Desktop/Laptop performs pass-through authentication transparently. Users canback up and restore files without viewing the Avamar Desktop/Laptop login screen.
Avamar Desktop/Laptop enables pass-through authentication by default. It is limited tousers on Windows computers and Mac computers. Also, Windows users with localadministrator privileges can restore files that are owned by anyone on the computerwithout additional login.
Pass-through authentication is supported with LDAP authentication, NIS authentication,and Avamar authentication. With Avamar authentication, Avamar Desktop/Laptopdetermines if the client computer is in one of the specified Avamar domains. Itauthenticates users of those computers through Avamar authentication. It authenticatesother users through pass-through authentication.
Enabling local user access for pass-through authenticationYou can configure Avamar Desktop/Laptop to allow local user access through pass-through authentication. A local user is a user that is authenticated through a localcomputer account instead of a domain account.
With local user access enabled, local users can access the Avamar client web UI torestore data they own on the authenticating computer.
Local user access requires pass-through authentication on a Windows computer or a Maccomputer. By default local user access is disabled.
Avamar Desktop/Laptop
Avamar Desktop/Laptop user authentication 321

Note
Enabling local user access applies to all clients and backups associated with the server.Before you enable local user access, carefully consider its security implications within thecontext of the organization. Local user authentication is inherently less secure thandomain authentication.
To enable local user access for pass-through authentication, uncomment theallowLocalUsers property in the dtlt.properties file on the Avamar server, andthen set its value to true by changing #allowLocalUsers=false toallowLocalUsers=true.
Disabling pass-through authenticationYou can disable pass-through authentication and require that all users log in through theAvamar Desktop/Laptop login screen. When pass-through authentication is disabled,configure one of other methods of authentication for Windows users and Mac users.
To diable pass-through authentication, set the value of the userLoginRequiredproperty in the dtlt.properties file on the Avamar server to true.
LDAP authenticationConfigure Avamar Desktop/Laptop to use a supported LDAP directory service toauthenticate users by using the directory service user names and passwords.
The authentication process uses Kerberos in a Simple Authentication and Security Layer(SASL) Bind by default. Alternatively, configure the authentication process to useplaintext in a Simple Bind. Only SASL Bind is supported with pass-throughauthentication. Plaintext Simple Bind is not compatible with pass-throughauthentication.
With LDAP authentication, users log in to the client computer with a domain accountauthenticated through a domain directory service. To use a local account, enable localuser access.
To increase the security of user data, Avamar Desktop/Laptop obtains the domainusername of a Windows user or Mac user from the client computer and displays it in aread-only field on the Avamar Desktop/Laptop login screen.
Note
Do not use the root account on a Mac to restore files from backups.
Configuring LDAP authentication for Avamar Desktop/LaptopTo configure Avamar Desktop/Laptop to authenticate users through a supported LDAPdirectory service, with either Kerberos in an SASL Bind or plaintext in a Simple Bind, editthe LDAP configuration file.
Before you begin
l Configure Avamar with information about the directory service. Adding information fora supported LDAP directory service on page 66 provides instructions.
l Ensure that the configuration of the Avamar Desktop/Laptop server correctlydescribes any domain components that are used to segregate authentication.
l To use Kerberos in an SASL Bind, ensure that the Kerberos realm for LDAP userauthentication from Macintosh computers is the default Kerberos realm.
Avamar Desktop/Laptop
322 EMC Avamar 7.2 Administration Guide

Procedure
1. In Avamar Administrator, click the Administration launcher button.
The Administration window appears.
2. Click the LDAP Management tab.
3. Click Edit LDAP file.
4. In the text area, edit or create the user-login-module key:
l To specify Kerberos in an SASL Bind, set user-login-module=kerberos.
l To specify plaintext in a Simple Bind, set user-login-module=ldap.
Kerberos is the default value. Avamar Desktop/Laptop assumes this value when thekey is missing.
5. Click Save.
6. Click Close.
Changing the Kerberos encryption typeIf you use LDAP authentication with Kerberos, you may need to change the Kerberosencryption type.
Avamar Desktop/Laptop uses the MIT Kerberos encryption type “DES cbc mode withCRC-32” to communicate with LDAP servers by default. This encryption type may conflictwith a key distribution center (KDC) in the Active Directory environment. If that occurs, themessage KDC has no support for encryption type appears. To resolve thisissue, remove the specified encryption type from the krb5.conf configuration file,which enables the KDC to select the encryption type.
Procedure
1. In Avamar Administrator, click the Administration launcher button.
The Administration window appears.
2. Click the LDAP Management tab.
3. Click Edit KRB5 file.
4. In the text area, find the following entries:
[libdefaults]default_tgs_enctypes = des3-cbc-sha1-kd des-cbc-crc des-cbc-md5default_tkt_enctypes = des3-cbc-sha1-kd des-cbc-crc des-cbc-md5
5. Comment out the entries:
[libdefaults]#default_tgs_enctypes = des3-cbc-sha1-kd des-cbc-crc des-cbc-md5#default_tkt_enctypes = des3-cbc-sha1-kd des-cbc-crc des-cbc-md5
6. Click Save.
7. Click Close.
Avamar Desktop/Laptop
LDAP authentication 323

NIS authenticationYou can configure Avamar Desktop/Laptop to authenticate Linux users through theenterprise NIS.
When you use NIS authentication, client computers must all use the same static,resolvable, fully qualified NIS domain name. Also, users must have correctly configureduser accounts in the NIS domain.
Adding information for a supported LDAP directory service on page 66 providesinstructions on configuring NIS authentication.
Avamar authenticationYou can configure Avamar Desktop/Laptop to authenticate users by using Avamarauthentication, which uses internal Avamar domain information.
Avamar authentication works with users who authenticate at the Avamar root level,Avamar domain levels, or Avamar subdomain levels. The mechanism first checks at thesubdomain level. If the username is found at that level, then authentication proceeds. Ifthe username is not found, then the next level is checked. This continues until theusername is found, or the Avamar root is reached without finding the username.
For example, if the login computer 123abc.example.com is activated with the /clients/mountain Avamar subdomain, then the mechanism checks the Avamarsystem in the following order until the username is found:
1. /clients/mountain (activation subdomain)
2. /clients (next level up)
3. / (root)
With Avamar authentication, client computers must have a static, resolvable, fullyqualified domain name. In addition, users must have a local or domain login account forthe client computer and an account on the Avamar domain associated with the clientcomputer.
Avamar Desktop/Laptop applies the role assigned to the Avamar user account when itgrants access to the account through Avamar authentication. Users can perform onlythose operations that are allowed by their role. The one exception is that users with theRestore only operator role can launch a backup from Avamar Desktop/Laptop.
Configuring Avamar authenticationConfigure an Avamar system to use Avamar authentication through the LDAPManagement tab of Avamar Administrator.
Before you begin
Add Avamar user records to domain-level lists. Adding a user to a client or domain onpage 83 provides instructions.
Procedure
1. In Avamar Administrator, click the Administration launcher button.
The Administration window appears.
2. Click the LDAP Management tab.
3. Click Edit LDAP file.
4. Edit or create the user-login-module key:
Avamar Desktop/Laptop
324 EMC Avamar 7.2 Administration Guide
l To use Avamar authentication and all other configured and enabled authenticationmethods, set user-login-module=mix.
l To use Avamar authentication and all other configured and enabled authenticationmethods except LDAP, set user-login-module=avamar.
5. In the text area, type the following key/value pair:
avamar-authentication-domains=/domain1,/domain2,/domain3,/...
where domain1, domain2, and domain3 are Avamar domain names that are combinedin a comma-separated list. Each domain name must begin with the root pathdesignator: /.
For example, to use Avamar authentication for the following domains:
//clients/accounting/clients/shipping
Type the following key/value pair:
avamar-authentication-domains=/,/clients/accounting,/clients/shipping
6. Click Save.
7. Click Close.
Mixed authenticationYou can use multiple authentication methods in the same environment.
The authentication process occurs in the following order when you enable multipleauthentication methods:
1. Users on a client in an Avamar domain are authenticated by using Avamarauthentication.
2. Users who are not logged in to a client in an Avamar domain are authenticated byusing pass-through authentication.
3. Linux users who are not logged in to a client in an Avamar domain are authenticatedthrough NIS.
4. When mixed authentication is enabled and LDAP is configured, authenticates users,who are not logged in to a client assigned to a specified Avamar domain, throughLDAP.
Avamar Desktop/Laptop user interfacesAvamar Desktop/Laptop functionality is available through the client UI and the web UI.
Client UIThe client local user interface (client UI) is installed on the client computer when youinstall either the Avamar Client for Windows or the Avamar Client for Mac OS X. With theclient UI, an Avamar icon appears in the notification area ("system tray") on Windowscomputers or on the menu bar on Mac computers. Right-click the icon on Windows orclick the icon on Mac to open the client menu, which provides access to backup, restore,program settings, and logs.
The following table lists the functionality that is available in the client UI.
Avamar Desktop/Laptop
Mixed authentication 325

Table 107 Avamar Desktop/Laptop client UI functionality
Client menu item Description
Back Up Now Launches a single-click on-demand backup.
Back Up... Launches an interactive on-demand backup.
Restore... Launches an interactive restore.
Settings > Show BackupReminder (days)
Controls when a backup reminder appears to remind you that thecomputer has not been backed up for a period of time between oneand seven days. You can also disable the reminder by selecting
Never.
Settings > Show ProgressBar
Controls whether the Progress window appears during a backup. You
can cancel, pause, or view logs for a backup from the Progresswindow.
Settings > Show BalloonMessages
Controls whether system status balloon messages appear near theAvamar icon on supported Windows computers.
Settings > Back Up OnBattery Power
Controls whether scheduled or on-demand backups can occur for thecomputer when the computer is running on battery power.
Settings > Back Up OnWireless
Controls whether scheduled or on-demand backups can occur for thecomputer when the computer is joined to the network solely by awireless connection.
Languages Enables you to select the language for the client UI.
Manage > Activate Client Activates the client, which provides a unique ID for the client and linksthe client to a specific Avamar server.
Manage > View Console Opens the client console, which provides access to local statusrecords for tasks, the Agent Log, the Console Log, and the Work OrderLog.
Manage > Create ZIP Fileof Logs
Creates a ZIP file of logs required by administrators to diagnosebackup and restore problems.
(Mac only) Client AgentTasks
Stops or restarts the backup agent process.
(Mac only) Logs Provides access to the Agent Log, Console Log, and functionality forcreating a ZIP file of logs required by administrators to diagnosebackup and restore problems.
About Provides version, server, and copyright information for AvamarDesktop/Laptop.
Help Launches online help for Avamar Desktop/Laptop when the client isactivated to an Avamar server.
Exit Shuts down the Avamar client.
Avamar Desktop/Laptop
326 EMC Avamar 7.2 Administration Guide
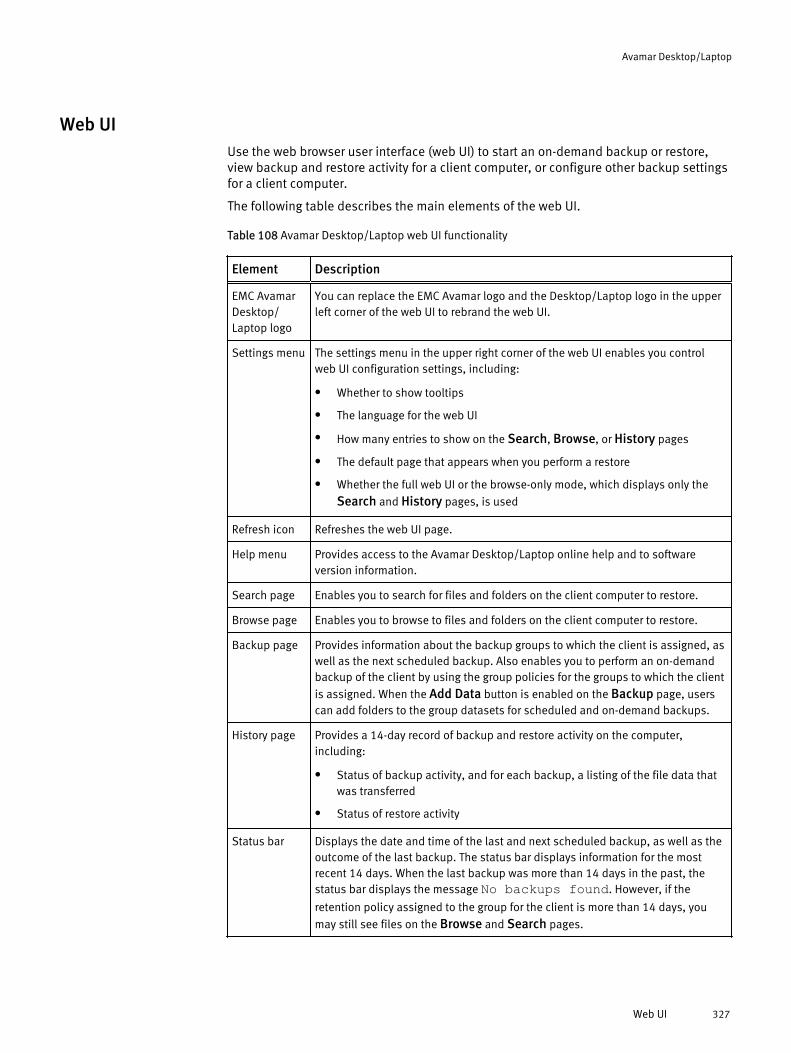
Web UIUse the web browser user interface (web UI) to start an on-demand backup or restore,view backup and restore activity for a client computer, or configure other backup settingsfor a client computer.
The following table describes the main elements of the web UI.
Table 108 Avamar Desktop/Laptop web UI functionality
Element Description
EMC AvamarDesktop/Laptop logo
You can replace the EMC Avamar logo and the Desktop/Laptop logo in the upperleft corner of the web UI to rebrand the web UI.
Settings menu The settings menu in the upper right corner of the web UI enables you controlweb UI configuration settings, including:
l Whether to show tooltips
l The language for the web UI
l How many entries to show on the Search, Browse, or History pages
l The default page that appears when you perform a restore
l Whether the full web UI or the browse-only mode, which displays only the
Search and History pages, is used
Refresh icon Refreshes the web UI page.
Help menu Provides access to the Avamar Desktop/Laptop online help and to softwareversion information.
Search page Enables you to search for files and folders on the client computer to restore.
Browse page Enables you to browse to files and folders on the client computer to restore.
Backup page Provides information about the backup groups to which the client is assigned, aswell as the next scheduled backup. Also enables you to perform an on-demandbackup of the client by using the group policies for the groups to which the client
is assigned. When the Add Data button is enabled on the Backup page, userscan add folders to the group datasets for scheduled and on-demand backups.
History page Provides a 14-day record of backup and restore activity on the computer,including:
l Status of backup activity, and for each backup, a listing of the file data thatwas transferred
l Status of restore activity
Status bar Displays the date and time of the last and next scheduled backup, as well as theoutcome of the last backup. The status bar displays information for the mostrecent 14 days. When the last backup was more than 14 days in the past, thestatus bar displays the message No backups found. However, if the
retention policy assigned to the group for the client is more than 14 days, you
may still see files on the Browse and Search pages.
Avamar Desktop/Laptop
Web UI 327

Limited user interfaceThe Avamar server presents a limited version of the web UI to a client when the number offiles and directories in a client backup exceeds about 4 million or when there isinsufficient allocated memory for Avamar Desktop/Laptop.
Large number of files and directories in a client backupThe exact number of files and directories that causes these changes is based on theavailable memory on the Avamar server.
There is no upper limit to the number of files and directories that can be in a backup.
Insufficient allocated memoryThe limited version of the web UI also appears for all clients accessing the Avamar serverwhen the memory it requires to satisfy its current Avamar Desktop/Laptop requestsexceeds the memory that it has allocated for Avamar Desktop/Laptop.
Encouraging users to log out of the web UI at the end of their session helps prevent thisissue.
Description of the limited web UIThe limited version of the web UI has the following changes:
l The Search and History pages do not appear the web UI.
l File versions are not available on the Browse page.
l Restore is only allowed for users with local administrator rights on the computer.Non-administrator users cannot restore any files, including those that they ownlocally on a server-class computer.
l Restore data size limits are not enforced.
Apache web server authenticationTo protect user security, web browsers display an authentication warning when accessinga secure web page unless the web server provides a trusted public key certificate with thepage. The Avamar Desktop/Laptop web UI uses only secure web pages, and this warningis seen in browsers that access those pages. To avoid the warning, install a trusted publickey certificate on the Apache web server provided with Avamar.
The EMC Avamar Product Security Guide describes how to obtain and install a trustedpublic key certificate for the Apache web server.
Rebranding the web UIYou can rebrand the Avamar client web UI by replacing the two logo graphics in the upperleft corner of the UI.
Figure 15 Replaceable graphics on the Avamar client web UI
Avamar Desktop/Laptop
328 EMC Avamar 7.2 Administration Guide

Procedure
1. Create two replacement graphics that are named ProductNameAvamar.png andProductNameDTLT.png.
The replacement graphics must meet the following requirements:
l The file format must be Portable Network Graphic (.png).
l The background must be transparent so that the background gradient is visiblebehind the graphic text and images.
l ProductNameAvamar.png Must be 97 pixels wide and 18 pixels tall.
l ProductNameDTLT.png Must be 128 pixels wide and 18 pixels tall.
2. Open a command shell and log in by using one of the following methods:
l For a single-node server:
a. Log in to the server as admin.
b. Switch user to root by typing su -.
l For a multi-node server:
a. Log in to the utility node as admin.
b. Load the dpnid OpenSSH key by typing:
ssh-agent bashssh-add ~admin/.ssh/dpnid
c. When prompted, type the dpnid passphrase and press Enter.
3. Change the working directory by typing the following command:
cd /usr/local/avamar-dtlt-tomcat/webapps/dtlt/images/banner
4. Make backup copies of the original graphics by typing the following commands:
cp ProductNameAvamar.png ProductNameAvamar.png_origcp ProductNameDTLT.png ProductNameDTLT.png_orig
5. Move the new logos to the current working directory as ProductNameAvamar.pngand ProductNameDTLT.png.
6. If the new graphics do not appear, delete the cached copies of previously viewed filesin the web browser, and then refresh the page.
Changing the web UI portAccess to the web UI requires HTTPS communication between the Avamar server and theclient web browser. When a user requests a backup or restore by using the Avamar clientmenu, the default web browser on the client is instructed to contact the Avamar server onport 443, the standard HTTPS port. On the Avamar server, this initial request to port 443is redirected to port 8443, the HTTPS port for the web UI. You can change the initialcontact port by editing the avscc.cfg configuration file on the client and the ApacheSSL configuration file on the server.
Procedure
1. Edit the avscc.cfg file on the client computer to use the new port number:
a. Open avscc.cfg in a text editor.
Avamar Desktop/Laptop
Web UI 329

On Windows clients, the file is in the %SystemDrive%\Program Files\avs\var directory. On all other clients, the file is in the /usr/local/avamar/vardirectory.
If avscc.cfg does not exist at this location, then create the file.
b. Add the following line to the file:
--dtlt-port=n
where n is the initial contact port number.
c. Save and close avscc.cfg.
d. Restart the client.
2. Edit the Apache SSL configuration file on the Avamar server:
a. Open a command shell and log in as admin on a single-node server or on the utilitynode of a multi-node server.
b. Open the Apache SSL configuration file in a text editor.
On Red Hat Enterprise Linux, the file is /etc/httpd/conf.d/ssl.conf. OnSuSE Linux Enterprise Server, the file is /etc/apache2/vhosts.d/vhost-ssl.conf.
c. Find the HTTPS port listening directive and change Listen 443 to Listen n,where n is the initial contact port number.
d. Save and close the file.
e. Restart the Apache server process by typing apachectl restart.
Changing the secure token time-out valueAvamar Desktop/Laptop includes a temporary secure token as part of the URL it uses tobegin a backup or restore session in a client web browser. The client web browser mustestablish an HTTPS connection with the Avamar server before the token expires or thesession is rejected and the backup or restore cannot proceed. You can edit the defaulttime-out value of 20 seconds.
Procedure
1. Open a command shell and log in by using one of the following methods:
l For a single-node server, log in to the server as admin.
l For a multi-node server:
a. Log in to the utility node as admin.
b. Load the admin OpenSSH key by typing:
ssh-agent bashssh-add ~admin/.ssh/admin_key
c. When prompted, type the admin_key passphrase and press Enter.
2. Stop the MCS by typing the following command:
dpnctl stop mcs
3. Change the working directory by typing the following command:
cd /usr/local/avamar/var/mc/server_data/prefs
Avamar Desktop/Laptop
330 EMC Avamar 7.2 Administration Guide

4. Open mcserver.xml in a text editor.
5. In the <node name="dtlt"> section, edit the value of <entrykey="expire_data_after_secs" value="20" /> from 20 to the newtime-out value in seconds.
6. Save the change and close the file.
7. Start the MCS and the scheduler by typing:
dpnctl start mcsdpnctl start sched
Forcing clients to use the alternate file browsing methodThe Avamar client web UI uses the OS-specific file browsing services on the clientcomputer to provide a file manager interface for users to select local files and folders toback up or restore. However, if these services are not available because the client usesNAT or because port 28002 on the client is blocked by a firewall rule, then an alternatefile browsing method is offered. You can require clients to use the alternate file browsingmethod.
One reason to make this change is to provide support for removable media. The defaultfile browsing method does not support removable media, but the alternate method does.
The alternate method uses a Java applet to provide file browsing services. When thedefault services are unavailable, and the user elects to permit the alternate method, theJava applet is loaded. During loading of the applet, the user may see authenticationwarnings about the website certificate of the Avamar server and the digital signature ofthe Java applet. You must acknowledge these warnings or the applet does not load.
After the applet loads, the web page is automatically refreshed to allow the Avamar clientweb UI to use the applet. The user must restart the task after the page is refreshed.
To force clients to use the alternate file browsing method, add theuseAppletToBrowseLocalFile property to the dtlt.properties file on theAvamar server, and set the value to true.
Backup with Avamar Desktop/LaptopAvamar Desktop/Laptop provides several methods for starting a client backup.
The following table describes the methods for starting a client backup, and the optionsthat are available for the method.
Table 109 Descriptions of methods for starting an Avamar Desktop/Laptop client backup
Method Description Options Dataset
Scheduled Avamar server automatically backs upthe client according to the schedulespecified for the client's group.
l User selectedbackup time
l Add data
The dataset that is specified for thescheduled group, or the dataset thatis assigned to the computer. When
Add Data is enabled, the datasetalso includes folders that the userhas added.
Single-click Avamar server queues a backup of
the client when a user clicks Back UpNow on the client.
l Add data The dataset for each group that isassociated with the computer, or thedataset that is assigned to the
Avamar Desktop/Laptop
Backup with Avamar Desktop/Laptop 331

Table 109 Descriptions of methods for starting an Avamar Desktop/Laptop clientbackup (continued)
Method Description Options Dataset
computer. When Add Data isenabled, the dataset also includesfolders that the user has added.
Interactive User clicks Back Up and the web UIappears. User selects from availablestart and data options and clicks
Back Up Now on the Backup page.Avamar server adds the backup to thebackup queue on the Avamar server.
l Add data
l On-demand backupset
The dataset of the group that the userselects from the groups that are
assigned to the client. When AddData is enabled, the dataset alsoincludes folders that the user has
added. When Select Now (on-demand backup set option) isenabled and clicked, the dataset onlyincludes the files and folders that theuser selects.
Scheduled backupsPerform scheduled backups of Avamar Desktop/Laptop client computers the same waythat you back up other Avamar client computers in the environment. Create datasets,schedules, retention policies, and groups for the backups by using Avamar Administrator.
Users see the groups that are associated with an Avamar Desktop/Laptop client on theBackup page in the web UI.
The next scheduled backup time for each group associated with an Avamar Desktop/Laptop client also appears on the Backup page. The group's policy normally determinesthe schedule start time for that group's backups. For individual Avamar Desktop/Laptopclients, you can permit users to select a different start time for their client's scheduledbackups.
Allowing users to select the start time for scheduled backupsPermit users of an Avamar Desktop/Laptop client to select a start time for the client'sscheduled backups that is different from the start time that is assigned through grouppolicy.
When you enable this feature for an Avamar Desktop/Laptop client, users can select froma list of administrator-defined times that appear on the Backup page in the web UI. Theselected start time applies to all subsequent scheduled backups for the client.
To prevent gaps in protection, Avamar Desktop/Laptop clients continue to use the user-selected backup start time even when you remove that time from the Override DailySchedule. When the user next logs in to the web UI Avamar Desktop/Laptop prompts theuser to select a new start time from the Backup page.
The Avamar server associates a user-selected start time with the client's group. Removingthe client from a group also removes the user-selected start time for that client.
Procedure
1. Ensure that the client belongs to a group that uses a daily schedule.
2. Using Avamar Administrator, add time entries to the Override Daily Schedule.
To add time entries to the Override Daily Schedule, complete the task that isdescribed in Editing the start times for client overrides of group schedules on page 99.
Avamar Desktop/Laptop
332 EMC Avamar 7.2 Administration Guide

Note
The Override Daily Schedule displays time values using the time zone of the Avamarserver. Avamar Desktop/Laptop uses the time zone of the client when displaying thetimes that appear on the Backup page.
3. Using Avamar Administrator, enable Allow override of group's daily schedule for theclient.
Overriding group policy settings for a client on page 111 provides instructions forsetting Allow override of group's daily schedule.
Add data optionFor scheduled backups and for on-demand backups, allow users to specify folders toinclude in the group policy-based backups of an Avamar Desktop/Laptop clientcomputer.
When the Add data option is enabled, Avamar Desktop/Laptop creates backup datasetsfor the client computer by adding the folders that the user selects to the dataset of eachgroup that the Avamar Desktop/Laptop client computer belongs to. Avamar Desktop/Laptop applies the exclusions and inclusions in the dataset policy of each group to thefolders that the user specifies.
Use Avamar Administrator to enable this option. Overriding group policy settings for aclient on page 111 provides instructions for using Avamar Administrator to enable Allowadditions to source data.
After you enable the Add data option, users add folders by clicking Add Data on theBackup page of the web UI, and selecting the folders.
Single-click backupsUsers can start an on-demand backup on an Avamar Desktop/Laptop client computer bya single click on the Back Up Now button on the client menu or on the backup reminderdialog box.
The data that is included in a single-click backup depends on the operating system of theclient computer. The following table describes the data that is included for specificoperating systems. When the Add data option is enabled, Avamar Desktop/Laptop alsoadds user selected folders to the data included in the backup.
Table 110 Datasets for single-click on-demand backups
Operating system Data included in the backup
l Windows
l Mac
Dataset for each group that the client belongs to
l Linux
l Windows Server
l Mac OS X Server
Dataset assigned to the computer
Avamar Desktop/Laptop
Add data option 333

Interactive backupsInteractive backups allow users to select a backup group that is associated with theclient and back up the client by using the group's settings. When on-demand backup setsare enabled, interactive backups also allow users to choose instead to back up onlyselected files and folders.
Group selectionUsers perform an interactive backup of a single group by selecting Back Up... on theclient menu, selecting the backup group on the Backup page in the web UI, and thenclicking Back Up Now.
When a user runs an interactive backup of a group, all policies that are associated withthe selected group apply to the backup.
An interactive backup of a group differs from a single-click backup because in aninteractive backup of a group only the selected group is backed up.
File and folder selectionTo allow users to back up selected files on an Avamar Desktop/Laptop client withoutregard for the group policies that are assigned to the client, enable on-demand backupsets. After enabling on-demand backup sets, users on Windows, Mac, and Linuxcomputers that are Avamar Desktop/Laptop clients can create sets of folders and files toback up through on-demand backups. Users can create multiple sets, save the sets forreuse, and send a backup that is based on a set to the backup queue of the Avamarserver.
On-demand backup sets do not change the data that is backed up according to the grouppolicies that are assigned to the Avamar Desktop/Laptop client.
The Avamar server can be configured to limit the number of on-demand backup setbackups that can be started from an Avamar Desktop/Laptop client.
Allowing users to create on-demand backup setsEnable users on Windows, Mac, and Linux clients that use Avamar Desktop/Laptop tocreate on-demand backup sets.
Procedure
1. Enable the Allow file selection on client initiated backups setting in AvamarAdministrator. Overriding group policy settings for a client on page 111 providesinstructions.
2. Change the value of the allowUserInititedBackupsFileSelection key inthe dtlt.properties file on the Avamar server to true.
3. Users create the on-demand backup sets:
a. On the Avamar Desktop/Laptop client computer, right-click the Avamar icon andselect Back Up....
The web UI opens to the Backup page.
b. In Select folders and files to backup, click Select Now.
The On-Demand Backup Sets dialog box appears.
c. Select the folders and files to back up, and click OK.
d. To save the backup set for reuse, type a name for the backup set in Save backupset as, and click Save.
Avamar Desktop/Laptop
334 EMC Avamar 7.2 Administration Guide

e. (Optional) To instruct the Avamar server to add a backup of the on-demand backupset to the backup queue, click Start Backup, and click OK.
4. Users instruct the Avamar server to add a backup of a saved on-demand backup set tothe backup queue:
a. On the Avamar Desktop/Laptop client computer, right-click the Avamar icon andselect Back Up....
The web UI opens to the Backup page.
b. In Select folders and files to backup, click Select Now.
The On-Demand Backup Sets dialog box appears.
c. In Load Backup Set, select the backup set.
d. Click Start Backup, and click OK.
Setting an on-demand backup limit
Set a limit on the number of on-demand backup set backups that a user can add to theAvamar server's task queue.
By default, Avamar server uses the following rules for on-demand backup set backups:
l Only one on-demand backup set backup from a client is allowed in the task queue ata time.
l An on-demand backup set backup cannot start while a backup for the client isrunning.
l No limit on the number of on-demand backup set backups of a client that a user canadd to the task queue.
To set a limit on the number of on-demand backup set backups that can occur each dayfor Avamar Desktop/Laptop client computers, set the restrictBackupsPerDayproperty in the dtlt.properties file on the Avamar server.
The following table describes the available values.
Table 111 Supported values for the restrictBackupsPerDay property
Value Description
false There is no limit on the number of on-demand backup set backups that can successfullyrun in a day. No limit is the default setting.
0 Users cannot run on-demand backup set backups.
n No more than n on-demand backup set backups can occur for each client in a day. Asused here, n is any positive integer less than or equal to 100, and a day is defined asmidnight to midnight in the time zone for the Avamar server.
The specified value applies to all clients activated on the Avamar server. All successfullycompleted backups for all users on an Avamar Desktop/Laptop client computer counttoward the total number of backups allowed each day.
Note
This limit applies only to backups that are based on a user-created on-demand backupset.
Avamar Desktop/Laptop
Interactive backups 335

Disabling on-demand backupsPrevent users from performing on-demand backups from Avamar Desktop/Laptop clientcomputers. This setting applies to both single-click on-demand backups and interactiveon-demand backups.
Procedure
1. In Avamar Administrator, click the Policy launcher button.
The Policy window appears.
2. Click the Clients tab.
3. Disable on-demand backups for either a single client or multiple clients.
Number ofclients
Steps to disable on-demand backups
One a. Select the client and click Edit.
b. In the Edit Client dialog box, clear Allow client initiatedbackups.
c. Click OK.
Two or more a. Select the clients and click Edit.
b. In the Edit Multiple Clients dialog box, change Allow clientinitiated backups to No.
c. Click Apply Change.
d. Click OK.
Changing the retention policy for on-demand backupsThe End User On Demand Retention policy controls the retention of data for on-demandbackups. You can change the End User On Demand Retention policy on an Avamar serverby using Avamar Administrator. The change applies to all on-demand backups initiatedby a client activated with that server. However, the change only applies to on-demandbackups that occur after the change.
Procedure
1. In Avamar Administrator, select Tools > Manage Retention Policies.
The Manage All Retention Policies window appears.
2. Select End User On Demand Retention from the list and click Edit.
The Edit Retention dialog box appears.
3. In Retention period, type a number and select a unit of time (days, weeks, months, oryears).
4. Click OK.
Avamar Desktop/Laptop
336 EMC Avamar 7.2 Administration Guide

Restore with Avamar Desktop/LaptopThe following topics provide information on performing a restore and controlling restore-related settings in Avamar Desktop/Laptop.
Finding data to restoreAvamar Desktop/Laptop users can use the web UI to either browse to or search forfolders, files, and file versions to restore.
Browsing for data to restoreFrom the left-side menu, select Browse to view the backups for a client computer in a treeview that you can browse to find folders and files to restore.
To browse a specific backup instead of all backups for the client, use Backup Date andTime to select the date and time of the backup.
Searching for data to restoreFrom the left-side menu in the web UI, select Search to search for specific folders andfiles to restore. To start a search, type a search string in the search field, and click Search.Results appear as they are gathered, and a progress indicator provides information aboutthe length of the search.
The search string that you specify in the search field must be 255 characters or fewer andis not case sensitive. Supported wildcards in the search string include an asterisk (*) torepresent zero or more characters and a question mark (?) to represent one character.
The string is compared to the names of all folders and files in the backups for the clientcomputer. If all or part of a folder or file name matches the string, then the folder or filename appears in the search results.
Selecting a file versionThe backups for a client computer contain more than one version of many of the files thatare backed up. When a file is backed up and then subsequently edited, the next backupcontains a new version of the file. Each version is kept for the retention period set by theAvamar administrator.
The number of versions of a file in the client backups depends on many factors,including:
l The length of time that backed up data is retained
l The frequency of backups
l How often the file is edited
When there are multiple versions of a file in the backups for a client, a version iconappears next to the file name when you browse or search for data to restore. To select aversion of the file other than the most recent version, click the version icon and thenselect the version. Then choose whether to overwrite the existing file on the clientcomputer or to restore the file version with a new name.
Restore typesAvamar Desktop/Laptop users can restore data to the original location or to a newlocation on the same computer. Users can restore data with the same name or a newname.
When users restore data to the original location with the same name, the restore processoverwrites any current local file versions with the restored files. This type of restore is
Avamar Desktop/Laptop
Restore with Avamar Desktop/Laptop 337

useful in situations where the current local versions contain errors or have datacorruption issues.
To avoid overwriting the current local file versions, users can restore to a new location,restore with a new name, or both.
Domain users can restore files from any Windows or Mac computer on which they have auser profile to the Windows or Mac computer to which they are logged in. You can disablerestore from a different computer by setting the value of thedisableRestoreFromAlternateComputer property in the dtlt.propertiesfile on the Avamar server to true. This is a global property that affects all clients.
Restore requirementsReview the permissions requirements and the requirements to restore from a differentcomputer before you perform a restore.
Restore permissionsThe data that users can browse to, search for, and restore depends on user login accountpermissions.
When users search or browse for data to restore, the results that appear are filteredbased on the current login credentials and the data that has been backed up from theclient computer. The following table provides details on the filtering.
Table 112 Avamar Desktop/Laptop data restore filtering
Data type Filtering on Windows Filtering on Mac
Folders Displays all folders for which the logged inuser is owner or is a member of a group withownership rights, and any folder thatcontains folders or files for which the userhas rights.
Displays all folders for which thelogged in user has Read permissioneither as owner or based on thefolder's group or other permissions.
Files Displays all files that the logged in userowns.
Displays all files that the logged inuser owns.
When users browse for data to restore, a folder that a user does not have ownershiprights for appears when it is on the file system path for a folder or file for which the userdoes have ownership rights. This helps to provide a more accurate representation of thefile system on the computer. A dimmed checkbox appears next to the folders, and thefolders are not restored when you restore a folder or file that includes them in its path.
Users can restore data only if their login credentials grant operating system Writepermission for the restore location. Also, to restore data that has the same path andname as data on the client computer, the login credentials must authenticate the user asthe owner of the existing data before andthe restore proceeds.
To restore files on Windows, the login account must have the Restore files anddirectories user right in Local Security. This user right is assigned by default toaccounts that are members of either the Administrators or Backup Operators groups. Youmust assign this right to an account that is not a member of either of these groups, or ofanother group that includes this user right, before a user can use the account to restoredata.
Avamar Desktop/Laptop
338 EMC Avamar 7.2 Administration Guide

Requirements to restore from a different computer
To restore from a different computer, the requirements in the following table must bemet.
Table 113 Requirements to restore from a different computer with Avamar Desktop/Laptop
Category Requirement
Operating system l Windows operating system
l Mac operating system
Note
Restores between Windows and Mac computers are supported.
Account type Domain
Profile Both source and target computers have a local profile for the user’s domainaccount.
Note
A local profile for a domain account is created automatically at a user’s firstlogin on the computer.
Avamar client Version 7.0 or later is installed on both source and target.
Avamar server Both source and target are activated with the same Avamar server and theserver is running Avamar 7.0 or later.
Backup There is at least one qualifying backup. A qualifying backup is one completedsuccessfully after both:
l Avamar Desktop/Laptop 7.0 or later is installed on the source computer.
l A local profile for the user’s domain account is created on the sourcecomputer.
By default, users with local administrator rights on a Windows source computer at thetime of a backup can restore any file from that source computer to a target computer,regardless of file ownership. You can change this behavior to restrict their access to onlyfiles that they own. To restrict file access for Windows administrators, change the value ofthe checkAlternateComputerOwnership property in the dtlt.properties fileon the Avamar server to true.
Restore limitsYou can limit the amount of data in a single restore task and the number of concurrentrestore tasks for a client computer.
Restore data size limitAvamar client users do not normally have a limit on the amount of data that is restored ina single task. This default setting enables a user to restore an entire backup in a singletask. Very large restore tasks can sometimes cause undesirable load on the network. Seta restore data size limit to control the network load caused by these large restore tasks.
Avamar Desktop/Laptop
Restore limits 339

When you set a limit, individual users cannot restore more than the limit in any onerestore task. Users must restore files that exceed the limit in multiple tasks that do notexceed the limit, or an administrator must perform the restore.
NOTICE
By design, the restore data size limit does not apply to server-class clients (those clientswith a very large backup data set).
To specify a restore data size limit, uncomment the limitRestoreSize key in thedtlt.properties file on the Avamar server, and set the value to the data size limit inMB.
Restore queue limitThe Avamar client web UI minimizes network and server load by blocking restore requestsfor clients that already have a restore task in the queue. Users who attempt to start a newrestore while one is pending receive a message, and the request is blocked. After thepending task is complete, users can initiate a new restore task. You can change thisbehavior to allow users to start multiple restore tasks. The change applies to all clients ofthe Avamar server.
To remove the restore queue limit, change the value of thedisallowMultipleRestores property in the dtlt.properties file on theAvamar server to false.
Restore of replicated backupsYou can move an Avamar client to a new Avamar server by using Avamar Client Managerreplication commands. When you move a client, the backups for the client are replicatedon the new server. Avamar Desktop/Laptop must index replicated backups before theyare available to browse or search in the web UI.
When a user logs in from the web UI on the client after the client has been moved, theReplicated Backups Available dialog box appears. The user can either start indexing ofthe replicated backups or close the dialog box without starting indexing. When the usercloses the dialog box without indexing, an alert icon appears on the web UI banner bar.The user can also start indexing from the alert icon.
Indexing is a one-time task for a computer that has been moved to a new server. It runs inthe same session in which it is started. When it completes, Avamar Desktop/Laptopsends the web browser a refresh command, and the data from the replicated backupsappears in the web UI.
Client backup and restore activity historyThe History page in the Avamar Desktop/Laptop web UI provides a 14-day record ofbackup and restore activity on the client computer.
The Activity History section of the History page provides information about each backupand restore initiated during the past 14 days. It also provides links to more detailedinformation about the backups. Information includes the results of the activity, the startdate and time, the duration of the activity, the amount of data, and the workorder ID.Click the activity label for a backup to view a list of files in the dataset for the backup.
To view the backup history for a different computer, select the computer from the list. Therequirements in Requirements to restore from a different computer on page 339 must bemet before you can view the backup history for a different computer.
Avamar Desktop/Laptop
340 EMC Avamar 7.2 Administration Guide

Editing Avamar Desktop/Laptop parametersThe Avamar Desktop/Laptop properties file, dtlt.properties, enables you to changeparameters that affect functionality for all Avamar Desktop/Laptop clients that connect tothe Avamar server. The file is on the Avamar server at: /usr/local/avamar/etc/dtlt.properties.
Procedure
1. Open a command shell and log in by using one of the following methods:
l For a single-node server:
a. Log in to the server as admin.
b. Switch user to root by typing su -.
l For a multi-node server:
a. Log in to the utility node as admin.
b. Load the dpnid OpenSSH key by typing:
ssh-agent bashssh-add ~admin/.ssh/dpnid
c. When prompted, type the dpnid passphrase and press Enter.
2. Change directory to /usr/local/avamar/etc by typing the following command:
cd /usr/local/avamar/etc
3. Open dtlt.properties in a text editor.
4. Create or edit parameters.
5. Save and close the file.
Avamar Desktop/Laptop parametersThe following table lists the parameters that are available in the dtlt.propertiesfile.
Table 114 Avamar Desktop/Laptop parameters
Parameter Description
allowLocalUsers Enables and disables local user access for pass-through authentication.Uncomment the parameter by removing the # in front of the parameter, and
then set the value to true to enable local user access for pass-through
authentication. Use the default value of false to disable local user access
for pass-through authentication.
allowServerRestores Enables or disables locally started restores on server class computers. Usethe default value of true to allow restores on server class computers, or
false to disable restores on server class computers.
allowUserInititedBackupsFileSelection Enables or disables the ability for users to create sets of folders and files toback up in on-demand backups. To enable selectable backup sets, enable
the Allow file selection on client initiated backups setting for the clientin Avamar Administrator, and then set the value of the
Avamar Desktop/Laptop
Editing Avamar Desktop/Laptop parameters 341

Table 114 Avamar Desktop/Laptop parameters (continued)
Parameter Description
allowUserInititedBackupsFileSelection parameter to true.
Use the default value of false to disable selectable backup sets.
checkAlternateComputerOwnership Controls whether users with local administrator rights can restore any filefrom the source computer or only files that they own. Specify true to
restrict local administrators to restore only files that they own, or the defaultvalue of false to allow local administrators restore any file from the source
computer.
disableRestoreFromAlternateComputer Enables or disables restore from a different computer. Specify true to
disable restore from a different computer, or the default value of false to
enable restore from a different computer.
disallowMultipleRestores Controls whether users can start multiple restore tasks for a client computersimultaneously. Specify false to allow multiple simultaneous restores, or
use the default value of true to prevent multiple simultaneous restores.
limitRestoreSize Controls whether to limit the amount of data that is restored in a single task.To specify a limit, uncomment the limitRestoreSize parameter and
specify the data size limit in MB. The default limit is 500 MB.
maxDirectoryDepth Specifies the number of nested subfolders in each hierarchical branch of abackup that the Avamar Desktop/Laptop server traverses during indexing.The default value is 3000.
restrictBackupsPerDay Controls whether there is a limit to the number of on-demand backups thatcan be performed from the client computer in a single day, and if so, themaximum number. Use the default value of false if you do not want to
limit the number of on-demand backups that can successfully run in a day.Specify 0 to disable on-demand backups on the client computer. To limit the
number of on-demand backups that can successfully run in a day, specifythe limit as a positive integer that is less than or equal to 100.
useAppletToBrowseLocalFile Controls whether users use the OS-specific file browsing services on theclient computer or the alternate file browsing method. Specify false to
allow users to use the OS-specific file browsing services, or true to force
users to use the alternate file browsing method. The default value is false.
userLoginRequired Enables and disables pass-through authentication. Use the default value offalse to enable pass-through authentication, or true to disable pass-
through authentication.
Client log locationsLocal logs on client computers provide information about backup and restore operationsand UI functionality.
Available logsThe following table lists the available logs on client computers.
Avamar Desktop/Laptop
342 EMC Avamar 7.2 Administration Guide

Table 115 Available client logs
Log type Log file name Description
Workorder workorder_name.log, where
workorder_name is the full name of atask
Provide detailed information about aspecific task.
Agent avagent.log Provides information about the status of allbackup and restore activity on the computer.
Console avscc.log Provides information about the performanceof the UI. A console log is created for eachuser on a computer.
These logs are accessible through the client UI, and also can be accessed directly.
Log locations on Windows computersOn Windows computers the logs are available through the paths in the following table.
Table 116 Paths to logs on Windows computers
Log Path
Workorder %SystemDrive%\Program Files\avs\var\clientlogs\
Agent %SystemDrive%\Program Files\avs\var\
Console %APPDATA%\Avamar\
Log locations on Linux and Mac computersOn Linux and Mac computers the logs are available through the paths in the followingtable.
Table 117 Paths to logs on Linux and Mac computers
Log Path
Workorder /usr/local/avamar/clientlogs
Agent /var/avamar/
ConsoleOn Linux: $HOME/On Mac:$HOME/.avamardata/
Avamar Desktop/Laptop
Client log locations 343

Avamar Desktop/Laptop
344 EMC Avamar 7.2 Administration Guide

CHAPTER 14
Data Domain System Integration
This chapter includes the following topics:
l Overview of Data Domain system integration.......................................................346l Preparing to add a Data Domain system.............................................................. 350l Adding a Data Domain system.............................................................................353
Data Domain System Integration 345

Overview of Data Domain system integrationYou can store Avamar backups on one or more Data Domain systems, and thenseamlessly restore data from the backups.
You can back up both file system and application data to a Data Domain system. Storageof Avamar backups on a Data Domain system is recommended in environments withdatabases that are large and have a high change rate. Store the following types ofbackups on the Avamar server instead:
l File system backups
l Virtual machine backups
l Remote office backups
l Desktop/laptop backups
l Backups of databases with low change rates
When you store VMware image backups on a Data Domain system, you can boot a lost orcorrupted virtual machine almost instantly from the backup by using the instant accessfeature.
You also can store Avamar checkpoints for a single-node server or Avamar Virtual Edition(AVE) on a Data Domain system.
Integration of Avamar with Data DomainDD OS software handles the deduplication of data on a Data Domain system. The DataDomain Boost (DD Boost) library provides an interface for an Avamar system to send datathat is deduplicated at the source to a Data Domain system.
Avamar uses the DD Boost library through API-based integration to access and work withdirectories, files, and other items on the Data Domain File System. The DD Boost API givesan Avamar system an interface into some of the properties and capabilities of the DataDomain system. This interface enables an Avamar system to control backup images thatare stored on Data Domain systems. It also enables Avamar to manage maintenanceactivities and to control replication to remote Data Domain systems.
DD Boost is installed on the backup clients and on the Avamar utility node or an Avamarsingle node system. DD Boost is installed automatically when you install the Avamarclient or server software.
You can specify whether specific backup datasets are stored on an Avamar server or aData Domain system.
When you select an Avamar server as the backup target, the Avamar client on each hostperforms deduplication segment processing. The Avamar client sends the backup dataand the associated metadata to the Avamar server.
When you select a Data Domain system as the backup target, the backup data istransferred to the Data Domain system. Simultaneously, the Avamar client sends theassociated metadata to the Avamar server for storage. The metadata enables the Avamarmanagement system to perform restore operations directly from the Data Domain systemwithout first staging the restored data on the Avamar system.
The process of data recovery is transparent to the backup administrator. The backupadministrator uses the same Avamar recovery processes that are native to current Avamarimplementations.
Data Domain System Integration
346 EMC Avamar 7.2 Administration Guide

File system backups on a Data Domain systemAvamar supports Data Domain system storage of file system backups for the followingoperating systems:
l Windows and Windows Server
l IBM AIX
l HP-UX (IA-64 only, requires ONCPlus Library revision 11.31.06 or later)
l Solaris (for Solaris 10 on SPARC, client side deduplication is disabled anddeduplication is performed on the Data Domain system)
l Red Hat Enterprise Linux (RHEL)
l SUSE Linux Enterprise Server (SLES)
l Mac 10.8, 10.9, and 10.10
Only 64-bit operating systems are supported. You cannot store file system backups ofdesktop/laptop computers on a Data Domain system. The EMC Avamar Compatibility andInteroperability Matrix on EMC Online Support provides updated client compatibilityinformation, including a complete list of supported operating system versions and servicepacks.
Application backups on a Data Domain systemYou can store application data backups from the following Avamar plug-ins on a DataDomain system:
l Avamar Plug-in for DB2
l Avamar Plug-in for Exchange VSS
l Avamar Plug-in for Hyper-V VSS
l Avamar Plug-in for Lotus Domino
l Avamar Plug-in for Oracle
l Avamar Plug-in for SAP with Oracle
l Avamar Plug-in for SharePoint VSS
l Avamar Plug-in for Sybase ASE
l Avamar Plug-in for SQL Server
You can also store VMware image backups and backups with the Avamar NDMPAccelerator on a Data Domain system.
VMware instant accessWhen you store VMware image backups on a Data Domain system, you can boot a lost orcorrupted virtual machine almost instantly from the backup by using the instant accessfeature.
With instant access, the virtual machine image backup is staged to a temporary NFSshare on the Data Domain system. You can then use the vSphere Client to power on thevirtual machine and initiate a vMotion of the virtual machine to a datastore within thevCenter. When the vMotion is complete, the restored virtual machine files no longer existon the Data Domain system. Then you use Avamar Administrator to delete the NFS shareon the Data Domain system.
Data Domain System Integration
File system backups on a Data Domain system 347

Note
When you use instant access, do not leave the virtual machine running on the DataDomain system for extended periods. When the virtual machine runs on the Data Domainsystem, performance might degrade because of the workflow.
You can also restore a virtual machine to the production environment instead of usinginstant access. The Avamar software leverages Changed Block Tracking (CBT) todramatically speed the recovery process.
The EMC Avamar for VMware User Guide provides details on instant access and restore ofimage backups.
Checkpoints on a Data Domain systemYou can store Avamar checkpoints for a single-node server or Avamar Virtual Edition(AVE) on a Data Domain system that uses DD OS 5.3 or later. Checkpoints are system-wide backups of the Avamar server for disaster recovery purposes.
Storage of checkpoints on a Data Domain system is recommended in environments thatdo not include replication to a secondary Avamar server or in environments where mostclient backups are stored on a Data Domain system.
To configure storage of checkpoints on a Data Domain system, select the Use as targetfor Avamar Checkpoint Backups checkbox when you add or edit the Data Domain systemin Avamar Administrator.
Contact EMC Professional Service representatives for assistance with rolling back theAvamar server to a checkpoint on a Data Domain system.
Data Domain system streamsEach Data Domain system has a soft limit to the maximum number of connection anddata streams that can be sustained simultaneously while maintaining performance. Thenumber of streams varies depending on the Data Domain system model.
You configure the maximum number of streams Avamar can use when you add a DataDomain system to the Avamar server. The Avamar server uses the backup stream value tolimit the number of concurrent backup or restore jobs.
If the Data Domain system is fully dedicated to the Avamar server, the stream valueentered in Avamar Administrator could potentially be the maximum number of streamssupported by the Data Domain system model. In cases where the Data Domain system isshared with other third-party applications or another Avamar server, then a subset of thenumber of streams should be allocated.
Each Avamar backup client that supports multi-stream backups can be configured to usethe appropriate number of streams (typically based on the number of databases) throughmulti-streaming configuration when the Avamar backup job is configured. The streamsare released when the backup or restore operation completes. The number of streamsallocated should depend on the number and type of Avamar clients that backs up data atabout the same time.
Data Domain System Integration
348 EMC Avamar 7.2 Administration Guide

Replication with Data Domain systemsWhen an Avamar system stores backups on a Data Domain system, Avamar replicationuses DD Boost to copy backups from the original Data Domain system and to createreplicas on another Data Domain system.
Supported replication configurationsThe following table lists the supported replication configurations for Avamar replicationusing DD Boost.
Table 118 Replication configurations for Avamar replication using DD Boost
Backup storage Replication storage
Single Data Domain system Single Data Domain system
Single Data Domain system Multiple Data Domain systems
Multiple Data Domain systems Single Data Domain system
Multiple Data Domain systems Multiple Data Domain systems
In a configuration where the replication storage consists of multiple Data Domainsystems, control which system receives the replicas by mapping a domain on the sourceAvamar server to a destination Data Domain system. Also specify which Data Domainsystem is the default destination. Avamar replicates to the default destination when adestination Data Domain system is not identified on the Storage Mapping tab of theReplication window in Avamar Administrator.
The EMC Avamar and EMC Data Domain System Integration Guide provides instructions onstorage mapping and specifying the default destination Data Domain system.
Replication detailsThe following details apply to Avamar replication with Data Domain systems:
l Data transfer during replication is between the Data Domain systems, withoutintermediate staging
l Replication uses DD Boost to copy backups and to write replicas
l Requires a Data Domain replication license
l Does not use Data Domain replication
l Replication is configured and monitored on the Avamar server
l Replication task scheduling uses Avamar replication schedules only
l Data Domain administration tools are not used
Monitoring and reporting Data Domain system statusAvamar can collect and display data for health monitoring, system alerts, and capacityreporting on a Data Domain system by using Simple Network Management Protocol(SNMP).
SNMP enables you to monitor Data Domain activities, events, capacity, and system statusin the same way that you monitor activities, events, capacity, and system status for theAvamar server. You configure SNMP settings when you add a Data Domain system to theAvamar configuration.
You can also run reports to analyze the system. The EMC Avamar Reports Guide providesmore information about creating reports.
Data Domain System Integration
Replication with Data Domain systems 349

The EMC Avamar and EMC Data Domain System Integration Guide provides more informationon monitoring system status for a Data Domain system.
Security with Data Domain system integrationThe following sections provide details on security in an Avamar environment with DataDomain for encryption and user access.
EncryptionThe DD Boost library supports data encryption between the Avamar client and the DataDomain system for DDOS 5.5 and DDOS 5.6. The DD Boost library does not support dataencryption between the Avamar client and the Data Domain system for DDOS 5.4.
Backups from the Avamar client to the Avamar server are always compressed andencrypted.
User accessUse caution when granting users access to the Data Domain system. Never provideauthorization for a user to access the Data Domain system and manually delete data.
Data migration to a Data Domain systemYou cannot migrate backup data directly from the Avamar server to the Data Domainsystem.
To start using the Data Domain system as the backup target for an Avamar client insteadof the Avamar server, edit the dataset to use the Data Domain system, and startperforming backups to the Data Domain system. When you change the backup target tothe Data Domain system, you must perform a full backup.
After you successfully perform a backup to the Data Domain system, you can delete theearlier backups from the Avamar server.
Preparing to add a Data Domain systemBefore you add a Data Domain system to the Avamar configuration, install and configureboth the Avamar server and the Data Domain system. You must also ensure that theenvironment meets the system requirements, and create a DD Boost user account on theData Domain system.
System requirements for Data Domain system integrationEnsure that the environment meets the necessary system requirements before you add aData Domain system to the Avamar configuration.
The following table lists the requirements for the Data Domain system.
Table 119 Data Domain system requirements
Feature orspecification
Requirement for use with Avamar
Data DomainOperating System(DD OS)
DD OS 5.3 or newer
DD Boost DD Boost 2.6 or newer
Data Domain System Integration
350 EMC Avamar 7.2 Administration Guide

Table 119 Data Domain system requirements (continued)
Feature orspecification
Requirement for use with Avamar
Note
DD Boost software enables backup servers to communicate with storagesystems without the need for Data Domain systems to emulate tape. Thereare two components to DD Boost: one component that runs on the backupserver and another that runs on the Data Domain system. In the context ofAvamar, the component that runs on the backup server (DD Boost libraries)is integrated into the Avamar client. DD Boost software is an optionalproduct that requires a license to operate on the Data Domain system.
Data Domaindevice type
Avamar supports any Data Domain system that supports the execution ofthe required DD OS version.
Data Domain FileSystem
Enable Data Domain File System by using either the Data Domain SystemManager or CLI. After you enable file system operations, it may take up to 10minutes before Avamar Administrator correctly reflects the status of theData Domain system. The time delay is increased slightly when the DataDomain system is using the DD Extended Retention option. Do not performbackups, restores, or system maintenance operations until the statusappears correctly in Avamar Administrator. Otherwise, backups, restores, orsystem maintenance operations may fail.
DD Boost Enable DD Boost on the Data Domain system. When you enable DD Boost,DD Boost becomes the preferred method of connectivity for any clients thatare enabled for DD Boost. While this method is acceptable for clients thatcan take advantage of DD Boost features, it can result in performancedegradation for other clients. Proper due diligence and effective datagathering are keys to avoiding such interactions, especially duringupgrades.
DD Boost useraccount
The DD Boost library uses a unique login account name that is created onthe Data Domain system, this account name is known as the DD Boostaccount. Only one DD Boost account exists per Data Domain system. If theaccount is renamed and/or the password is changed, these changes mustbe immediately updated on the Avamar system by editing the Data Domainconfiguration options. Failure to update the DD Boost account informationcould potentially yield integrity check errors or backup and restoreproblems. The DD Boost account must have administrator privileges.
Capacity requirementsCarefully assess backup storage needs when evaluating how much data to store on theData Domain system and the Avamar server. Include estimates from data that is sent tothe Data Domain system from any other servers.
When the Data Domain system reaches its maximum storage capacity, no furtherbackups to the Data Domain system occur until additional capacity is added or oldbackups are deleted.
Data Domain System Integration
System requirements for Data Domain system integration 351

Requirements when using other backup productsData Domain systems can use other third-party backup and archiving software. TheAvamar server does not assume it has sole ownership of the Data Domain system. Ensurethat proper sizing is evaluated if the system is shared with other software products.
The Avamar server makes no use of the native Data Domain system snapshot andreplication features. Replication occurs through the DD Boost SDK library by usingcopying and cloning. However, other third party products may make use of the nativeData Domain system snapshot and replication features. In this case, a snapshot of anentire Data Domain system or a replication of an entire Data Domain system includes theAvamar data.
Network requirementsThe Avamar server and all Data Domain systems must be on the same local network. Donot connect the Avamar server and Data Domain systems over a Wide Area Network(WAN). Configurations that use a WAN are not supported.
You can use Avamar replication over a WAN to replicate data from source Avamar serversand Data Domain systems to target Avamar servers and Data Domain systems.
Before integrating a Data Domain system with an Avamar server, ensure that enoughnetwork bandwidth is available. To obtain the maximum throughput available on a DataDomain system (for restores, level zero backups, and subsequent incremental backupsafter a level-zero backup), verify that the network infrastructure provides more bandwidththan the bandwidth required by the maximum throughput of the Data Domain system.
The network configuration must also meet the following requirements:
l Assign a Fully Qualified Domain Name (FQDN) to each Data Domain system.l Do not use IP addresses in place of hostnames when registering a Data Domain
system. This can limit the ability to route optimized duplication traffic exclusivelythrough a registered interface.
l Ensure that DNS on the Data Domain system is properly configured.l Ensure that forward and reverse DNS lookups work between the Avamar server, the
Data Domain system, and all backup and restore clients.l Use Hosts files to resolve hostnames to non-routable IP addresses.l Do not create secondary hostnames to associate with alternate or local IP interfaces.
NTP requirementsThe Avamar server and the Data Domain system must use the same Network TimeProtocol (NTP) server.
Port usage and firewall requirementsTo enable communication between Avamar and the Data Domain systems, review andimplement the port usage and firewall requirements in the following documents, whichare available on EMC Online Support:
l EMC Avamar Product Security Guidel Port Requirements for Allowing Access to Data Domain System Through a Firewall
Technical Note
Creating a DD Boost user accountBefore you can add a Data Domain system to the Avamar configuration, prepare the DataDomain system by enabling DD Boost and creating a DD Boost user account for the
Data Domain System Integration
352 EMC Avamar 7.2 Administration Guide

Avamar server to use to access the Data Domain system for backups and restores (andreplication, if applicable).
If you change the DD Boost account name or password after you create the account,remember to edit the Data Domain system configuration in Avamar Administrator.Otherwise all backups, restores and maintenance activities fail.
Procedure
1. Disable DD Boost on the Data Domain system by logging into the Data Domain CLI asan administrative user and typing the following command:
ddboost disable
2. Create the DD Boost user account with administrator privileges by typing the followingcommand:
user add username role adminwhere username is the username for the new account.
3. Set the new account as the DD Boost user by typing the following command:
ddboost set user-name usernamewhere username is the username for the account.
4. Enable DD Boost to allow the changes to take effect by typing the following command:
ddboost enable
Adding a Data Domain systemProcedure
1. In Avamar Administrator, click the Server launcher button.
The Server window appears.
2. Click the Server Management tab.
3. Select Actions > Add Data Domain System.
The Add Data Domain System dialog box appears.
4. On the System tab, specify Data Domain system information:
a. In the Data Domain System Name box, type the fully qualified domain name of theData Domain system to add.
Note
Do not use an IP address or a secondary hostname that associates with alternativeor local IP interfaces. It may limit the ability of Avamar to route optimizeddeduplication traffic.
b. In the DDBoost User Name box, type the username of the DD Boost account forAvamar to use to access the Data Domain system for backups, restores, andreplication.
c. In the Password box, type the password for the account that Avamar should use toaccess the Data Domain system for backups, restores, and replication.
d. In the Verify Password box, type the password again to verify it.
Data Domain System Integration
Adding a Data Domain system 353

e. If you have more than one Data Domain system associated with Avamar, you canspecify one Data Domain system to be the default replication storage. Select Usesystem as default replication storage if this system is the default replicationstorage.
f. To store checkpoints for a single-node Avamar server or Avamar Virtual Edition(AVE) server on the Data Domain system instead of the Avamar server, select theUse as target for Avamar Checkpoint Backups checkbox.
g. Click Get Stream Info to view the maximum number of streams that the DataDomain system supports.
h. Specify the maximum number of streams that Avamar can use at any one time toperform backups and restores:
l To specify a defined number of streams, type the number in the Max used byAvamar box.
l To specify a maximum number of streams based on the percentage of the totalnumber of supported streams, type the percentage in the Max used by Avamarbox and then select the As percentage of the max limit checkbox.
Consider both the maximum number of streams that the Data Domain systemsupports, as well as whether other applications are using streams to send data toand receive data from the Data Domain system.
If the processes writing to and reading from the Data Domain system use allavailable streams, then Avamar queues backup or restore requests until one ormore streams become available.
5. To configure SNMP, click the SNMP tab.
SNMP configuration enables Avamar to collect and display data for system healthmonitoring, system alerts, and capacity reporting.
6. Verify the SNMP configuration:
l The Getter/Setter Port Number box lists the port on the Data Domain system fromwhich to receive and on which to set SNMP objects. The default value is 161.
l The SNMP Community String box lists the community string Avamar uses for read-only access to the Data Domain system.
l The Trap Port Number box lists the trap port on the Avamar server. The defaultvalue is 163.
7. Click OK.
A progress message appears.
8. When the operation completes, click Close.
Results
When you add a Data Domain system to the Avamar configuration, Avamar creates anMTree on the Data Domain system for the Avamar server. The MTree refers to the directorycreated within the DD Boost path. Data Domain systems support a maximum of 100MTrees. If you reach the limit, then you cannot add the Data Domain system to theAvamar configuration.
Data Domain System Integration
354 EMC Avamar 7.2 Administration Guide

APPENDIX A
Command Shell Server Logins
l User accounts..................................................................................................... 356l Starting command shell sessions........................................................................356l Switching user IDs...............................................................................................356l Using sudo..........................................................................................................357
Command Shell Server Logins 355
User accountsThe following user accounts are commonly used for system administration andmaintenance tasks:
l root
l admin
l dpn
The admin and dpn user accounts require authentication by way of Secure Shell (SSH).
Starting command shell sessionsLog in to an Avamar server or utility node through SSH as the admin user to performconfiguration and maintenance tasks for the Avamar system.
Procedure
l To start a command shell session on a single-node server, open a command shell andlog in to the server as admin.
l To start a command shell session on a multi-node server:
a. Open a command shell and log in to the utility node as admin.
b. Load the admin OpenSSH key by typing the following commands:
ssh-agent bashssh-add ~admin/.ssh/admin_key
c. When prompted, type the admin_key passphrase and press Enter.
Switching user IDsYou can switch the user of a command shell session to root by typing su, and switch backto the previous login ID by typing exit. When you switch the user of a command shellsession to dpn, you must also load the dpn OpenSSH key.
Procedure
1. Switch user to the dpn user account and login shell by typing su - dpn.
2. When prompted for a password, type the dpn password and press Enter.
3. Load the dpn OpenSSH key by typing:
ssh-agent bashssh-add ~dpn/.ssh/dpnid
Note
To determine the active user account (login ID) of a shell session, type whoami.
Command Shell Server Logins
356 EMC Avamar 7.2 Administration Guide

Using sudoOn Gen4 and later Avamar Data Stores, the admin and dpn user accounts areautomatically added to the sudoers file. This enables admin and dpn users to execute alimited set of commands that would otherwise require operating system root permission.
Prefixing commands with sudoInstead of switching user to root with the su command, admin and dpn users can directlyissue commands normally requiring root permissions by prefixing each command withsudo.
For example, the following command installs MyPackage.rpm:
sudo rpm -ivh MyPackage.rpmIf prompted for a password, type the password and press Enter.
You might be periodically prompted to retype the admin or dpn password when prefixingother commands with sudo. This is normal.
Spawning a sudo Bash subshellIf you need to execute several commands that normally require root permissions, you canspawn a persistent sudo Bash subshell by typing sudo bash. Using sudo bash enablesyou to directly type multiple commands with no additional changes to the command linesyntax when the commands normally require root permissions.
For example:
sudo bashrpm -ivh MyPackage1.rpmrpm -ivh MyPackage2.rpmrpm -ivh MyPackage3.rpmexit
Command Shell Server Logins
Using sudo 357

Command Shell Server Logins
358 EMC Avamar 7.2 Administration Guide

APPENDIX B
Plug-in Options
l How to set plug-in options...................................................................................360l Backup options...................................................................................................360l Restore options...................................................................................................363
Plug-in Options 359

How to set plug-in optionsPlug-in options enable you to control specific actions for on-demand backups, restores,and scheduled backups. The plug-in options that are available depend on the operationtype and plug-in type.
You specify plug-in options in Avamar Administrator for on-demand backup or restoreoperations, or when you create a dataset for a scheduled backup. You set plug-in optionswith the graphical user interface (GUI) controls (text boxes, checkboxes, radio buttons,and so forth). In addition to using the GUI controls for the options, you can type an optionand its value in the Enter Attribute and Enter Attribute Value fields.
NOTICE
The Avamar software does not check or validate the information that you type in the EnterAttribute and Enter Attribute Value fields. In addition, the values in the Enter Attributeand Enter Attribute Value fields override settings that you specify with the GUI controlsfor the options.
Backup optionsThe backup options that appear depend on the type of plug-in.
This section describes the backup options for the following plug-ins:
l AIX file system
l FreeBSD file system
l HP-UX file system
l Linux file system
l Macintosh file system
l NetWare file system
l SCO OpenServer file system
Backup options for the Avamar Plug-in for Microsoft Windows are available in the EMCAvamar for Windows Server User Guide. Backup options for application plug-ins, such asSQL Server and SharePoint VSS, are available in the user guide for the plug-in.
The following tables describe the options that are available when you perform an on-demand backup or when you configure a dataset for scheduled backups for the listed filesystem plug-ins.
Table 120 Backup plug-in options
Option Description
Store backup on DataDomain system
(AIX, HP-UX, Linux, and Macintosh only) Stores the backup on aconfigured Data Domain system instead of on the Avamar server. Tostore the backup on a Data Domain system, select the checkbox andthen select the Data Domain system from the list.
Encryption method toData Domain system
(AIX, HP-UX, Linux, and Macintosh only) Specifies the encryptionmethod for data transfer between the client and the Data Domainsystem.
Plug-in Options
360 EMC Avamar 7.2 Administration Guide

Table 120 Backup plug-in options (continued)
Option Description
Backup label Assigns this descriptive label to the backup.
Table 121 Backup plug-in options for (NetWare only) SMS Authentication
Option Description
Server login ID (NetWare only) Specifies the SMS login username. For example,CN=admin.O=HOSTNAME_CTX.
Server password (NetWare only) Specifies the password for the SMS login username.
Snapshot stored-onpool
(NetWare only) Specifies the snapshot stored-on pool name.
Table 122 Backup plug-in options for logging
Option Description
List backupcontents
Specifies how much information about the backup contents to include inthe log files. One of the following:
l No file listing
l List file names
l List files and dates
Informationalmessage level
Specifies how many informational messages to include in the log files. Oneof the following:
l No informationals—Suppresses all informational messages, butincludes errors and warnings in the log files.
l Some informationals—Includes some informational messages in thelog files.
l Many informationals—Includes additional status information in the logfiles.
l All informationals—Provides maximum information. Includes allinformational messages, errors, and warnings in the log files.
Report advancedstatistics
Specifies whether to write advanced timing and deduplication statistics tothe log files.
Enable debuggingmessages
Specifies whether to write maximum information to log files, which createsvery large log files.
Table 123 Backup plug-in options for file system traversal
Option Description
Do not traverse any mounts Specifies whether to traverse mount points during the backup.
Traverse fixed-disk mounts Specifies whether to traverse only hard disk file system mountduring the backup.
Plug-in Options
Backup options 361

Table 123 Backup plug-in options for file system traversal (continued)
Option Description
Traverse fixed-disk andremote network mounts
Specifies whether to traverse both hard disk and NFS networkmount points during the backup.
Force traversal of specifiedfile system type(s)
Accepts a comma-separated list of one or more file system types(for example, nfs, ext2, jfs, xfs) that should not be traversedduring this backup.
Table 124 Backup plug-in options for pre-script
Option Description
Run user-defined script atbeginning of backup
Runs a user-defined script at the beginning of the backupsession. The script must be located in /usr/local/avamar/etc/scripts.
Abort backup if script fails Specifies whether to stop the backup if the script returns a non-zero status code.
Table 125 Backup plug-in options for post-script
Option Description
Run user-defined script atend of backup
Runs a user-defined script at the end of the backup session. Thescript must be located in /usr/local/avamar/etc/scripts.
Exit process with scriptfailure exitcode
Specifies whether avtar should exit with the exit code of the
script instead of a standard avtar exit code.
Table 126 Backup plug-in client cache options
Option Description
Check client-side cachesand report inconsistencies
If selected, a backup does not occur. Instead, Avamar performs avalidation check of the client-side cache with the Avamar server.
Check and repair client-side caches
If selected, a backup does not occur. Instead, Avamar performs avalidation check of the client-side cache with the Avamar server,and repairs inconsistencies.
Maximum client file cachesize (MBs)
Specifies the maximum client file cache size in MB. A negative valueindicates a fraction of RAM. For example, -8 specifies that no morethan 1/8th of physical RAM should be allocated to the client filecache.
Maximum client hashcache size (MBs)
Specifies the maximum client hash cache size in MB. A negativevalue indicates a fraction of RAM. For example, -8 specifies that nomore than 1/8th of physical RAM should be allocated to the clienthash cache.
Plug-in Options
362 EMC Avamar 7.2 Administration Guide

Table 127 Backup plug-in advanced options
Option Description
Client-side flag file Specifies the path to a flag file on the client that contains additionaloption settings.
Network usage throttle(Mbps)
Specifies a setting that reduces network usage to a specified rate,expressed as megabits/second. For example, 0 = unrestricted, 50% ofa T1 = 0.72.
Directly connect to allserver nodes
Specifies whether to establish multiple connections to the server.Multiple connections can improve backup performance.
Restore optionsThe restore options that are available depend on the type of plug-in.
This section describes the backup options for the following plug-ins:
l AIX file system
l FreeBSD file system
l HP-UX file system
l Linux file system
l Macintosh file system
l NetWare file system
l SCO OpenServer file system
Restore options for the Avamar Plug-in for Microsoft Windows are available in the EMCAvamar for Windows Server User Guide. Restore options for application plug-ins, such asSQL Server and SharePoint VSS, are available in the user guide for the plug-in.
The following tables describe the options that are available when you perform a restoreusing the listed file system plug-ins.
Table 128 Restore plug-in options
Option Description
Overwrite existing files Controls behavior when the file to be restored exists. One of thefollowing:
l Never
l Always
l Generate New Name
l If Modified
l If Newer
Encryption methodfrom Data Domainsystem
If the backup was stored on a Data Domain system, select the encryptionmethod to use for data transfer from the Data Domain system to theclient.
Plug-in Options
Restore options 363

Table 129 Restore plug-in options for (NetWare only) SMS Authentication
Option Description
Server login ID (NetWare only) Specifies the SMS login username. For example,CN=admin.O=HOSTNAME_CTX.
Server password (NetWare only) Specifies the password for the SMS login username.
Table 130 Restore plug-in options for logging
Option Description
List backupcontents
Specifies how much information about the backup contents to include inthe log files. One of the following:
l No file listing
l List file names
l List files and dates
Informationalmessage level
Specifies how many informational messages to include in the log files. Oneof the following:
l No informationals—Suppresses all informational messages, butincludes errors and warnings in the log files.
l Some informationals—Includes some informational messages in thelog files.
l Many informationals—Includes additional status information in the logfiles.
l All informationals—Provides maximum information. Includes allinformational messages, errors, and warnings in the log files.
Report advancedstatistics
Specifies whether to write advanced timing and deduplication statistics tothe log files.
Enable debuggingmessages
Specifies whether to write maximum information to log files, which createsvery large log files.
Table 131 Restore plug-in options for pre-script
Option Description
Run user-defined script atbeginning of restore
Runs a user-defined script at the beginning of the restore session.The script must be located in /usr/local/avamar/etc/scripts.
Abort restore if script fails When the script returns a non-zero status code, specifies whetherto stop the restore.
Plug-in Options
364 EMC Avamar 7.2 Administration Guide

Table 132 Restore plug-in options for post-script
Option Description
Run user-defined script atend of restore
Runs a user-defined script at the end of the restore session. Thescript must be located in /usr/local/avamar/etc/scripts.
Exit process with scriptfailure exitcode
Specifies whether avtar should exit with the exit code of the
script instead of a standard avtar exit code.
Table 133 Restore plug-in client cache options
Option Description
Check client-side caches andreport inconsistencies
If selected, a restore does not occur. Instead, Avamar performsa validation check of the client-side cache with the Avamarserver.
Check and repair client-sidecaches
If selected, a restore does not occur. Instead, Avamar performsa validation check of the client-side cache with the Avamarserver, and repairs inconsistencies.
Rebuild client-side caches frommost recent backup
Does not restore data. If selected, Avamar uses the contents ofthe last backup to re-create the client-side file cache.
Table 134 Restore plug-in advanced options
Option Description
Do not descend intosubdirectories
Specifies whether to restore only the specified top-level directoryand not any subdirectories.
Recreate original pathbeneath target directory
Specifies whether to re-create the original path to files anddirectories beneath the specified target directory. For example, ifyou restore /usr/MyDir/MyFile to /tmp and you select this
option, then the full path to the restored file is /tmp/usr/MyDir/MyFile.
Directly connect to allserver nodes
Specifies whether to establish multiple connections to the server.Multiple connections can improve restore performance undercertain circumstances.
Plug-in Options
Restore options 365

Plug-in Options
366 EMC Avamar 7.2 Administration Guide

GLOSSARY
A
accelerator The Avamar NDMP Accelerator (accelerator) is a specialized Avamar server node that, whenused as part of an Avamar system, enables backup and restore of network addressedstorage (NAS) systems by way of the network data management protocol (NDMP).
activation The process of passing the client ID (CID) back to the client, where it is stored in anencrypted file on the client file system. See also client activation
authentication system A username and password system that is used to grant user access to the Avamar server.Avamar supports its own internal authentication system (avs), as well as several externalauthentication systems (OpenLDAP, Windows Active Directory, NIS, and SMB).
Avamar Administrator A graphical management console software application that is used to remotely administeran Avamar system from a supported Windows or Linux client computer.
Avamar client A computer or workstation that runs Avamar software and accesses the Avamar server overa network connection. Avamar client software comprises a client agent and one or moreplug-ins.
Avamar DownloaderService
A Windows-based file distribution system that delivers software installation packages totarget Avamar systems.
Avamar File System(AvFS)
A browsable virtual file system view of the normally inaccessible Avamar HFS. The AvamarFile System provides read-only accessibility to all backups stored on an Avamar serverdown to the individual file level. This allows an Avamar server to be used as an online long-term historical strategic enterprise information store in addition to a backup and restorerepository.
Avamar InstallationManager
A web interface that manages installation packages.
Avamar server The server component of the Avamar client/server system. Avamar server is a fault-tolerant, high-availability system that efficiently stores the backups from all protectedclients. It also provides essential processes and services required for data restores, clientaccess, and remote system administration. Avamar server runs as a distributed applicationacross multiple networked storage nodes.
Avamar Web Access A browser-based user interface that provides access to the Avamar server for the expresspurpose of restoring files to a client.
AvInstaller A backend service that executes and reports package installations.
EMC Avamar 7.2 Administration Guide 367

B
backup A point-in-time copy of client data that can be restored as individual files, selected data, oras an entire backup.
C
client activation The process of passing the client ID (CID) back to the client, where it is stored in anencrypted file on the client file system. See also activation
client agent A platform-specific software process that runs on the client and communicates with theManagement Console Server (MCS) and with any plug-ins installed on that client.
client registration The process of establishing an identity with the Avamar server. When Avamar recognizesthe client, it assigns a unique client ID (CID), which it passes back to the client duringclient activation. See also registration
ConnectEMC A program that runs on the Avamar server and that sends information to EMC TechnicalSupport. ConnectEMC is typically configured to send alerts for high priority events as theyoccur, as well as reports once daily.
D
dataset A policy that defines a set of files, directories, and file systems for each supported platformthat are included or excluded in backups across a group of clients. A dataset is apersistent and reusable Avamar policy that can be named and attached to multiple groups.
DNS Domain Name Server. A dynamic and distributed directory service for assigning domainnames to specific IP addresses.
domain A feature in Avamar Administrator that is used to organize large numbers of clients intonamed areas of control and management.
E
Email Home An optional feature that uses the High Priority Events profile and Notification schedule toregularly send server error and status messages to EMC Technical Support.
EMC repository A repository that contains server installation packages, client installation packages, andmanifest files. The repository is located on the EMC network. Each EMC customer has adownload center that contains files available to them. Outgoing communication from theAvamar Downloader Service to the EMC repository is encrypted with SSL over an HTTPconnection.
EM Tomcat server (EMT) The Avamar EM Tomcat server (EMT) provides essential services required to displayAvamar system information, and provides a mechanism for managing Avamar systemsusing a standard web browser. The EMT also communicates directly with MCS.
Glossary
368 EMC Avamar 7.2 Administration Guide

ESRS EMC Secure Remote Support.
F
full replication A full “root-to-root” replication creates a complete logical copy of an entire source systemon the destination system. The replicated data is not copied to the REPLICATE domain.Instead, it is added to the root domain just as if source clients had registered with thedestination system. Also, source server data replicated in this manner is fully modifiableon the destination system. This replication method is typically used for system migration(from a smaller Avamar configuration to a larger, possibly multi-node configuration) orsystem replacement (for instance, in a case of disaster recovery).
G
group A level of organization in Avamar Administrator for one or more Avamar clients. All clientsin an Avamar group use the same group policies, which include the dataset, schedule, andretention policy.
group policy The dataset, schedule, and retention policy for all clients in an Avamar group.
H
HFS Hash File System. The content addressed storage area inside the Avamar server used tostore client backups.
HFS check An Avamar Hash File System check (HFS check) is an internal operation that validates theintegrity of a specific checkpoint. Once a checkpoint has passed an HFS check, it can beconsidered reliable enough to be used for a server rollback.
J
JRE Java Runtime Environment.
L
LAN Local Area Network.
local repository The /data01/avamar/repo/packages directory on the utility node or single-nodeserver. This directory contains the most current manifest file from the EMC repository. TheAvamar Downloader Service pushes packages from the EMC repository to the localrepository. If a customer site does not allow Internet access, you can manually copypackages into the local repository.
LOFS Loopback File System
Glossary
EMC Avamar 7.2 Administration Guide 369
M
MAC address Media Access Control Address. A unique hardware address, typically embedded at thelowest level in a hardware assembly, that uniquely identifies each device on a network.
manifest file An XML file listing all the server, client, and workflow packages currently available fordownload from the EMC repository.
MCS Management console server. The server subsystem that provides centralizedadministration (scheduling, monitoring, and management) for the Avamar server. The MCSalso runs the server-side processes used by Avamar Administrator.
module Avamar 1.2.0 and earlier multi-node Avamar servers utilized a dual-module synchronousRAIN architecture in which nodes were equally distributed in two separate equipmentcabinets on separate subnets. The term “module” is a logical construct used to describeand support this architecture (older multi-node Avamar servers comprised a primarymodule and a secondary module). These legacy systems continue to be supported.However, newer multi-node Avamar servers use a single module architecture, and eventhough Avamar Administrator provides “module detail” information, a module is thereforelogically equivalent to the entire server.
N
NAT Network Address Translation.
NDMP Network data management protocol. An open protocol that is used to move data from aNAS system to a backup server.
NFS Network file system.
NIS Network Information Service. An external authentication system that can be used to log into an Avamar server.
node A networked storage subsystem that consists of both processing power and hard drivestorage, and runs Avamar software.
NTP Network Time Protocol. Controls the time synchronization of a client or server computer toanother reference time source.
O
ODBC Open DataBase Connectivity. A standard database access method that makes it possibleto access any data from any application, regardless of which database managementsystem (DBMS) is handling the data.
OpenLDAP Open Lightweight Directory Access Protocol. An external authentication system that can beused to log in to an Avamar server.
Glossary
370 EMC Avamar 7.2 Administration Guide

P
packages Avamar software installation files, hotfix patches, and OS patches available from the EMCrepository. Packages comprise three types:
l Client—A release of Avamar file system or application backup software.
l Server—A new release of Avamar server software, a service pack, or a patch for theoperating system, MC, or GSAN.
l Workflow—A package that runs operations such as adding a node or replacing a node.
Package files use the .avp file extension.
PAM Pluggable Authentication Module. A Linux library that enables a local system administratorto define how individual applications authenticate users.
plug-in Avamar client software that recognizes a particular kind of data resident on that client.
plug-in options Options that you specify during backup or restore to control backup or restorefunctionality.
policy A set of rules for client backups that can be named and applied to multiple groups. Groupshave dataset, schedule, and retention policies.
R
RAIN Redundant Array of Independent Nodes. A flexible, fault-tolerant architecture that enablesan Avamar server to maintain availability and preserve data storage if single nodes fail inan Avamar module.
RDMS Relational Database Management System.
registration The process of establishing an identity with the Avamar server. When Avamar recognizesthe client, it assigns a unique client ID (CID), which it passes back to the client duringclient activation. See also client registration
replica Replicated copy of a backup.
replication Replication is an optional feature that enables an Avamar system to store read-only copiesof its data on a remote system. The replicated data can be replicas of client backups andcopies of Avamar system data. Replication supports disaster recovery of the Avamarsystem.
restore An operation that retrieves one or more file systems, directories, files, or data objects froma backup and writes the data to a designated location.
retention The time setting to automatically delete backups on an Avamar server. Retention can beset to permanent for backups that should not be deleted from an Avamar server. Retentionis a persistent and reusable Avamar policy that can be named and attached to multiplegroups.
roles A setting in Avamar Administrator that controls which operations each user can perform inthe Avamar server. Roles are assigned on a user-by-user basis.
Glossary
EMC Avamar 7.2 Administration Guide 371

S
schedule The ability to control the frequency and the start and end time each day for backups ofclients in a group. A schedule is a persistent and reusable Avamar policy that can benamed and attached to multiple groups.
SSH Secure Shell. A remote login utility that authenticates by way of encrypted security keysinstead of prompting for passwords. This prevents passwords from traveling acrossnetworks in an unprotected manner.
storage node A node in the Avamar server that provides storage of data.
system migration A planned operation that uses full “root-to-root” replication to copy all data residing on asource Avamar server to a new destination server. If global client IDs (global CIDs) areused, clients that formerly backed up to the source server can continue to operatetransparently without reregistering with the new destination server.
T
TFTP Trivial File Transfer Protocol. A version of the TCP/IP FTP protocol that has no directory orpassword capabilities.
U
utility node In scalable multi-node Avamar servers, a single utility node provides essential internalservices for the server. These services include MCS, cronjob, Domain Name Server (DNS),External authentication, Network Time Protocol (NTP), and Web access. Because utilitynodes are dedicated to running these essential services, they cannot be used to storebackups.
V
VLAN Virtual Local Area Network.
Glossary
372 EMC Avamar 7.2 Administration Guide