Embed Size (px)
Citation preview
ActivityGuide
ActivityGuide
Published By
Edit, Personalize Photos for Cards, Invitations, Calendars, and More! ®
Edit Photos with Graphics and Digital Art Tools!
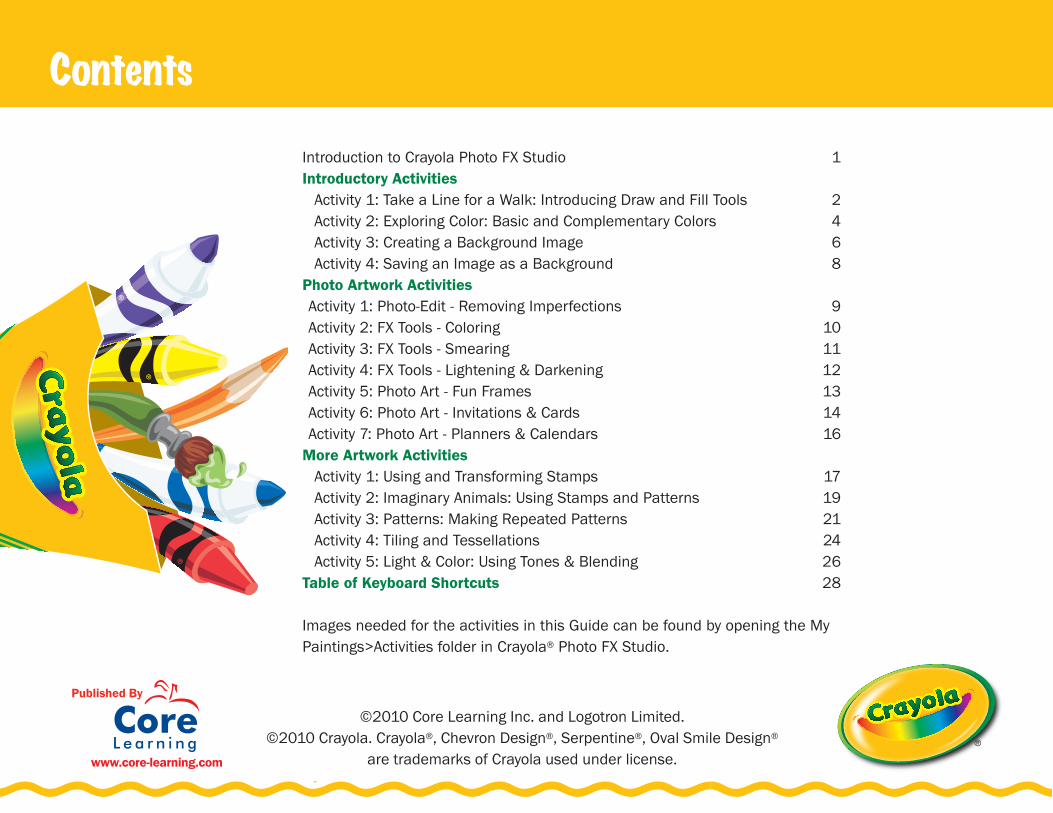
Contents
Introduction to Crayola Photo FX Studio 1Introductory Activities
Activity 1: Take a Line for a Walk: Introducing Draw and Fill Tools 2Activity 2: Exploring Color: Basic and Complementary Colors 4Activity 3: Creating a Background Image 6Activity 4: Saving an Image as a Background 8
Photo Artwork ActivitiesActivity 1: Photo-Edit - Removing Imperfections 9Activity 2: FX Tools - Coloring 10Activity 3: FX Tools - Smearing 11Activity 4: FX Tools - Lightening & Darkening 12Activity 5: Photo Art - Fun Frames 13Activity 6: Photo Art - Invitations & Cards 14Activity 7: Photo Art - Planners & Calendars 16
More Artwork Activities Activity 1: Using and Transforming Stamps 17Activity 2: Imaginary Animals: Using Stamps and Patterns 19Activity 3: Patterns: Making Repeated Patterns 21Activity 4: Tiling and Tessellations 24Activity 5: Light & Color: Using Tones & Blending 26
Table of Keyboard Shortcuts 28
Images needed for the activities in this Guide can be found by opening the My Paintings>Activities folder in Crayola® Photo FX Studio.
©2010 Core Learning Inc. and Logotron Limited.©2010 Crayola. Crayola®, Chevron Design®, Serpentine®, Oval Smile Design®
are trademarks of Crayola used under license. www.core-learning.com
Published By
1Crayola® Photo FX Studio A C T I V I T Y G U I D E
Introduction to Crayola Photo FX Studio
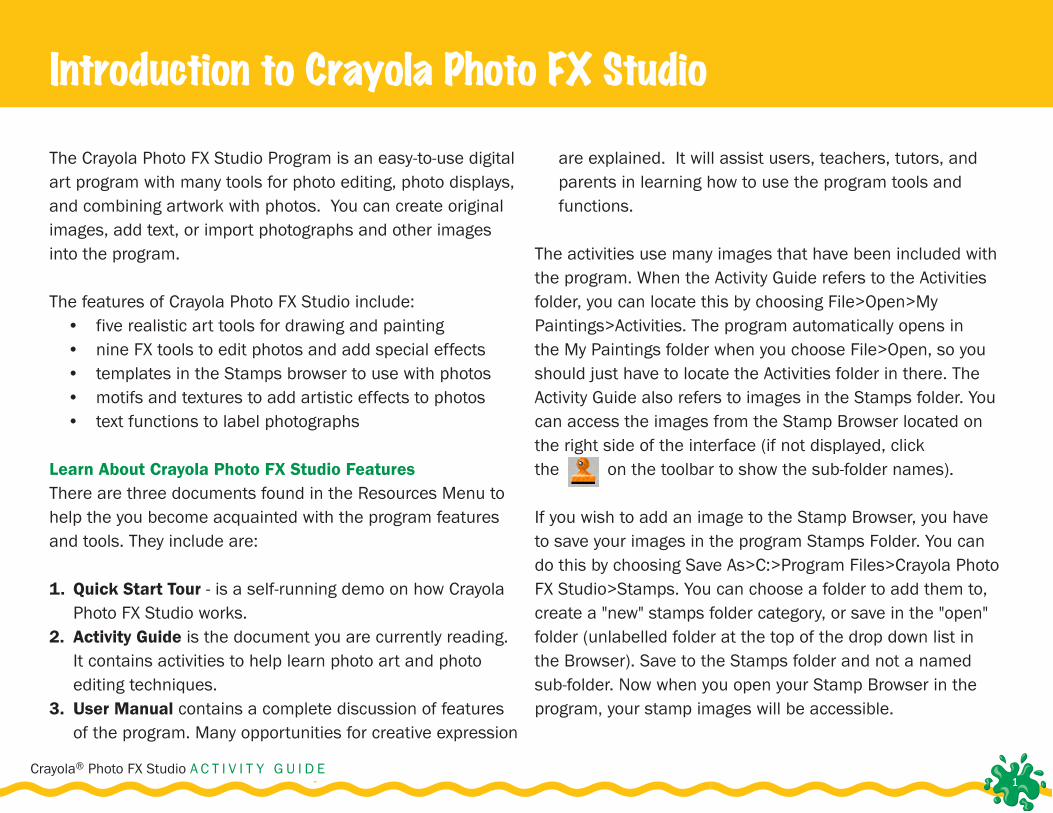
The Crayola Photo FX Studio Program is an easy-to-use digital art program with many tools for photo editing, photo displays, and combining artwork with photos. You can create original images, add text, or import photographs and other images into the program.
The features of Crayola Photo FX Studio include:• five realistic art tools for drawing and painting• nine FX tools to edit photos and add special effects• templates in the Stamps browser to use with photos• motifs and textures to add artistic effects to photos• text functions to label photographs
Learn About Crayola Photo FX Studio Features There are three documents found in the Resources Menu to help the you become acquainted with the program features and tools. They include are:
1. Quick Start Tour - is a self-running demo on how Crayola Photo FX Studio works.
2. Activity Guide is the document you are currently reading. It contains activities to help learn photo art and photo editing techniques.
3. User Manual contains a complete discussion of features of the program. Many opportunities for creative expression
are explained. It will assist users, teachers, tutors, and parents in learning how to use the program tools and functions.
The activities use many images that have been included with the program. When the Activity Guide refers to the Activities folder, you can locate this by choosing File>Open>My Paintings>Activities. The program automatically opens in the My Paintings folder when you choose File>Open, so you should just have to locate the Activities folder in there. The Activity Guide also refers to images in the Stamps folder. You can access the images from the Stamp Browser located on the right side of the interface (if not displayed, click the on the toolbar to show the sub-folder names).
If you wish to add an image to the Stamp Browser, you have to save your images in the program Stamps Folder. You can do this by choosing Save As>C:>Program Files>Crayola Photo FX Studio>Stamps. You can choose a folder to add them to, create a "new" stamps folder category, or save in the "open" folder (unlabelled folder at the top of the drop down list in the Browser). Save to the Stamps folder and not a named sub-folder. Now when you open your Stamp Browser in the program, your stamp images will be accessible.
2Crayola® Photo FX Studio A C T I V I T Y G U I D E
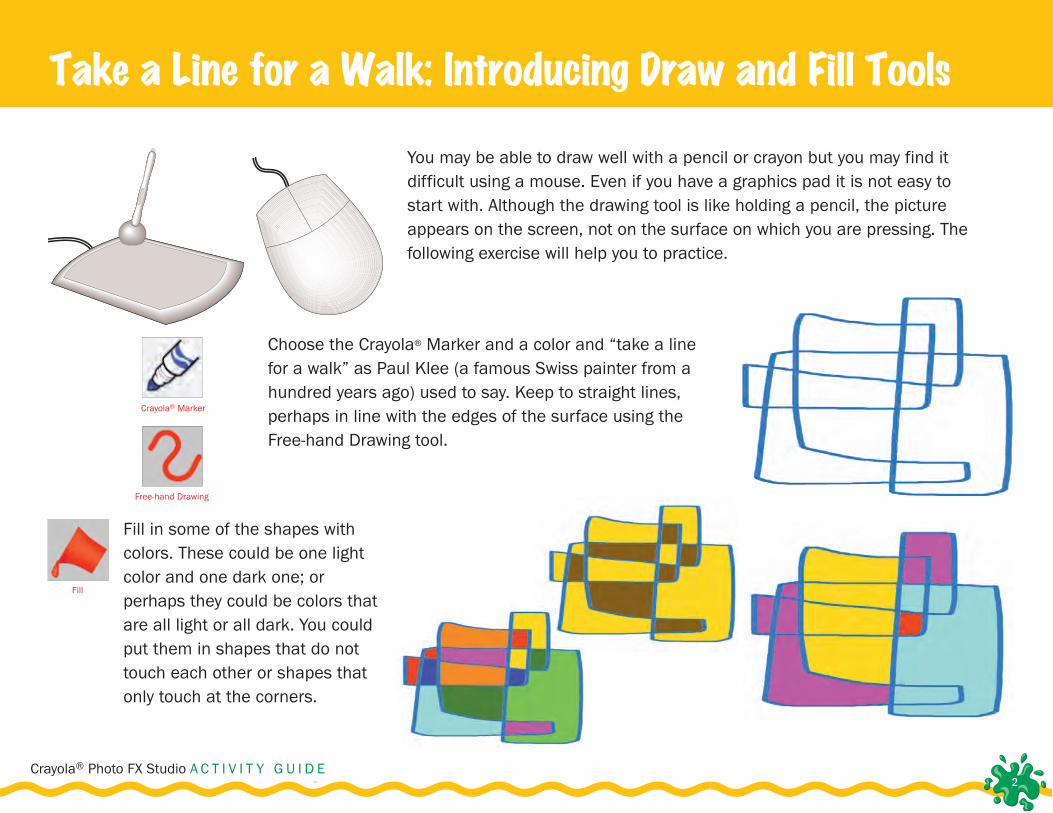
You may be able to draw well with a pencil or crayon but you may find it difficult using a mouse. Even if you have a graphics pad it is not easy to start with. Although the drawing tool is like holding a pencil, the picture appears on the screen, not on the surface on which you are pressing. The following exercise will help you to practice.
Choose the Crayola® Marker and a color and “take a line for a walk” as Paul Klee (a famous Swiss painter from a hundred years ago) used to say. Keep to straight lines, perhaps in line with the edges of the surface using the Free-hand Drawing tool.
Fill in some of the shapes with colors. These could be one light color and one dark one; or perhaps they could be colors that are all light or all dark. You could put them in shapes that do not touch each other or shapes that only touch at the corners.
Take a Line for a Walk: Introducing Draw and Fill Tools
Free-hand Drawing
Fill
Crayola® Marker
3Crayola® Photo FX Studio A C T I V I T Y G U I D E
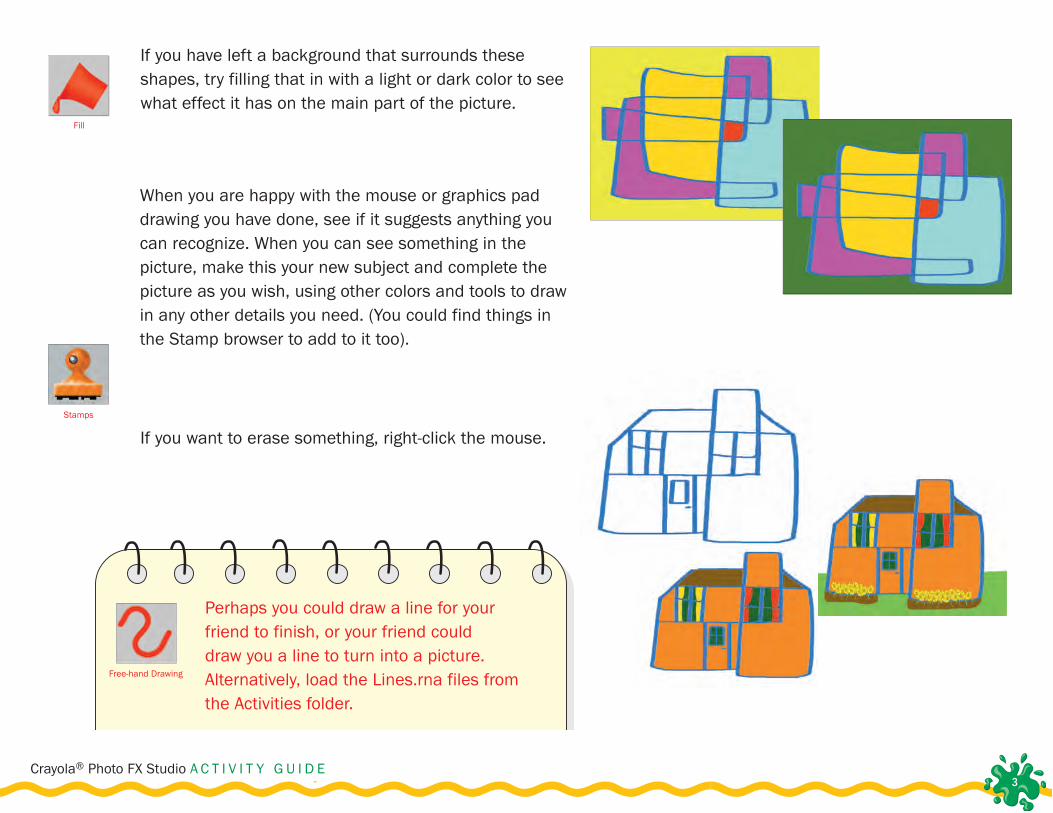
If you have left a background that surrounds these shapes, try filling that in with a light or dark color to see what effect it has on the main part of the picture.
If you want to erase something, right-click the mouse.
When you are happy with the mouse or graphics pad drawing you have done, see if it suggests anything you can recognize. When you can see something in the picture, make this your new subject and complete the picture as you wish, using other colors and tools to draw in any other details you need. (You could find things in the Stamp browser to add to it too).
Perhaps you could draw a line for your friend to finish, or your friend could draw you a line to turn into a picture. Alternatively, load the Lines.rna files from the Activities folder.
Free-hand Drawing
Fill
Stamps
4Crayola® Photo FX Studio A C T I V I T Y G U I D E
Exploring Color: Basic & Complementary Colors
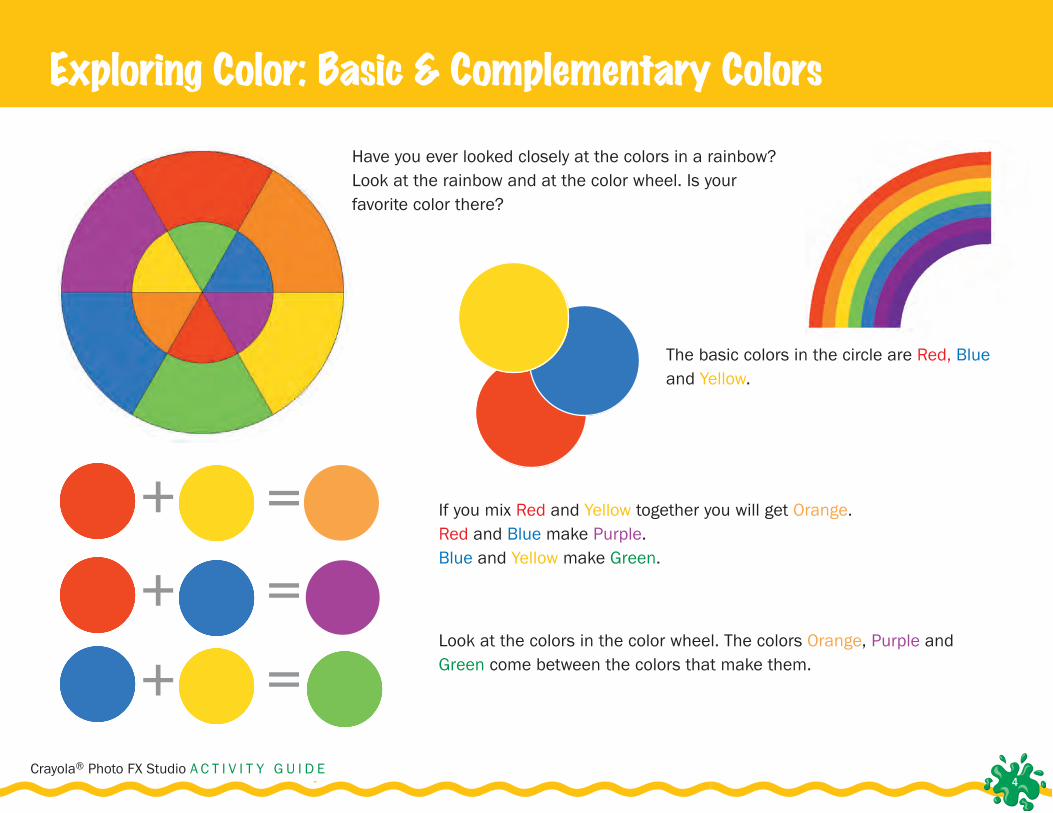
Have you ever looked closely at the colors in a rainbow? Look at the rainbow and at the color wheel. Is your favorite color there?
The basic colors in the circle are Red, Blue and Yellow.
+
+
===
If you mix Red and Yellow together you will get Orange. Red and Blue make Purple. Blue and Yellow make Green.
Look at the colors in the color wheel. The colors Orange, Purple and Green come between the colors that make them.
+

5Crayola® Photo FX Studio A C T I V I T Y G U I D E
In some of your pictures keep the related colors close to each other. In others try putting an opposite color in with the related ones. Try putting the dark ones together and adding a pale one to them.
Some of these colors form families. Purple, Red and Orange, for instance, are related because they all contain Red.
On the other hand, some colors are opposites, such as Red and Green. Look straight across the color wheel and see if you can find other opposite colors. Opposite Colors are called Complementary Colors.
Some of the colors are light and some are dark.
Think of a good subject containing bright colors. Here are a few suggestions: a bed of flowers; a bunch of bal-loons; kites flying against a colorful sky; a mixture of all of these. Use any drawing tool plus the Fill tool. See if you can find pictures in the Stamp browser to help you or load the Colors.rna file from the Activities folder.
Fill
Stamps
6Crayola® Photo FX Studio A C T I V I T Y G U I D E
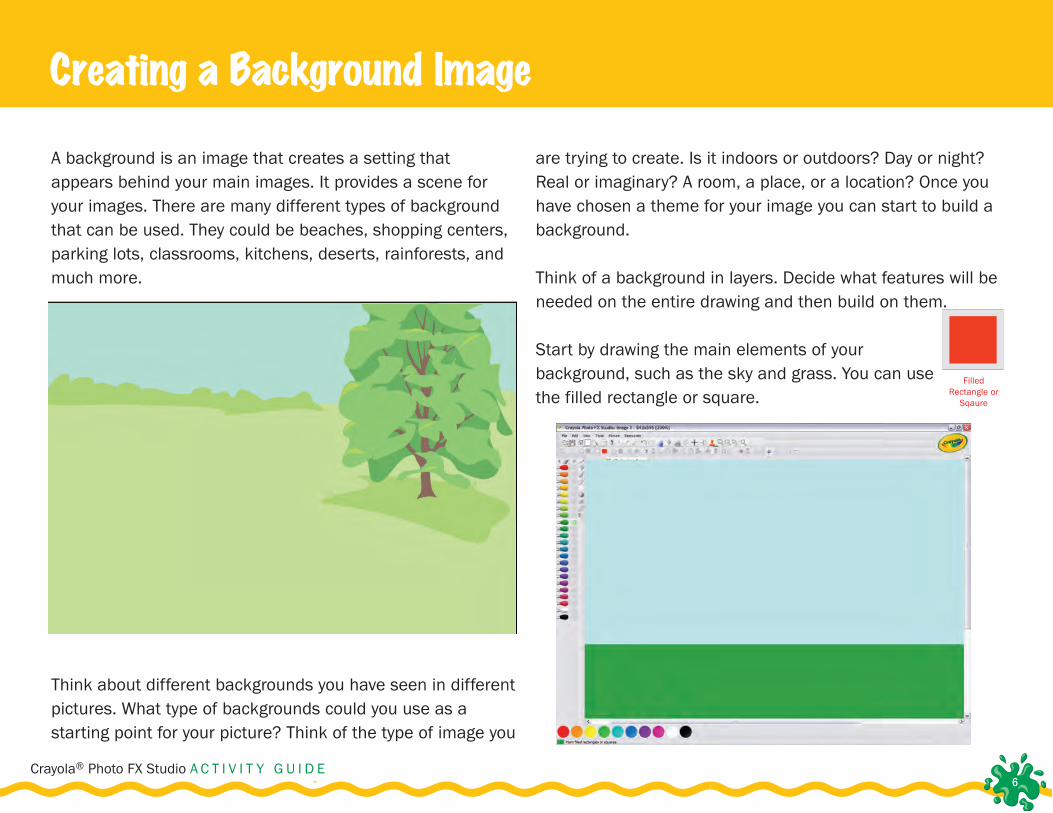
A background is an image that creates a setting that appears behind your main images. It provides a scene for your images. There are many different types of background that can be used. They could be beaches, shopping centers, parking lots, classrooms, kitchens, deserts, rainforests, and much more.
Think about different backgrounds you have seen in different pictures. What type of backgrounds could you use as a starting point for your picture? Think of the type of image you
are trying to create. Is it indoors or outdoors? Day or night? Real or imaginary? A room, a place, or a location? Once you have chosen a theme for your image you can start to build a background.
Think of a background in layers. Decide what features will be needed on the entire drawing and then build on them.
Start by drawing the main elements of your background, such as the sky and grass. You can use the filled rectangle or square.
Creating a Background Image
Filled Rectangle or
Sqaure
7Crayola® Photo FX Studio A C T I V I T Y G U I D E
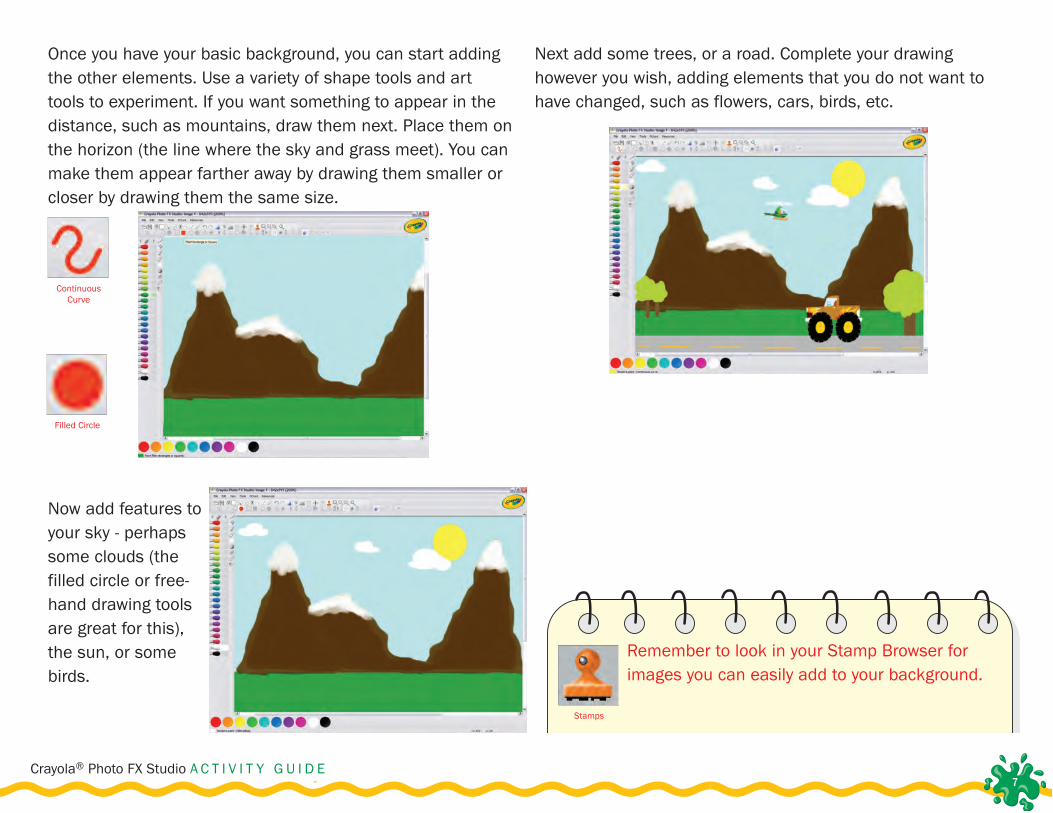
Once you have your basic background, you can start adding the other elements. Use a variety of shape tools and art tools to experiment. If you want something to appear in the distance, such as mountains, draw them next. Place them on the horizon (the line where the sky and grass meet). You can make them appear farther away by drawing them smaller or closer by drawing them the same size.
Now add features to your sky - perhaps some clouds (the filled circle or free-hand drawing tools are great for this), the sun, or some birds.
Next add some trees, or a road. Complete your drawing however you wish, adding elements that you do not want to have changed, such as flowers, cars, birds, etc.
Remember to look in your Stamp Browser for images you can easily add to your background.
Stamps
Continuous Curve
Filled Circle

8Crayola® Photo FX Studio A C T I V I T Y G U I D E
You can use any of the pictures you draw, or pictures you have saved on your computer as a background (this means that art tools such as the Erasing tool will not work on your image).
Select your picture using a selection tool and drawing a shape around the entire picture, or press the CTRL>A keys on your keyboard. With your picture selected, right click your mouse. A dropdown menu will appear. Go to Use as Background. A pop-out menu will appear with these options: Center, Fit, Resize, and Tile.
Choose Resize to have your background fill the page. Now your image is the background. Even if you clear the page using the Clear picture feature, your image will remain the background.
You can now complete your picture by adding other elements - drawing objects, adding stamp images, or adding text to it.
You can also save your image as a background by saving it as a Stamp (File >Save As>My Computer>Local Disk (C:)>Program Files>Crayola Photo FX Studio>Stamps> Backgrounds>your filename.rna). This will store your background for later use. When you use the stamp you will have to right click the mouse again to have the Use as Background options appear.
Saving an Image as a Background
RectangularSelection
RoundSelection
CustomSelection
9Crayola® Photo FX Studio A C T I V I T Y G U I D E
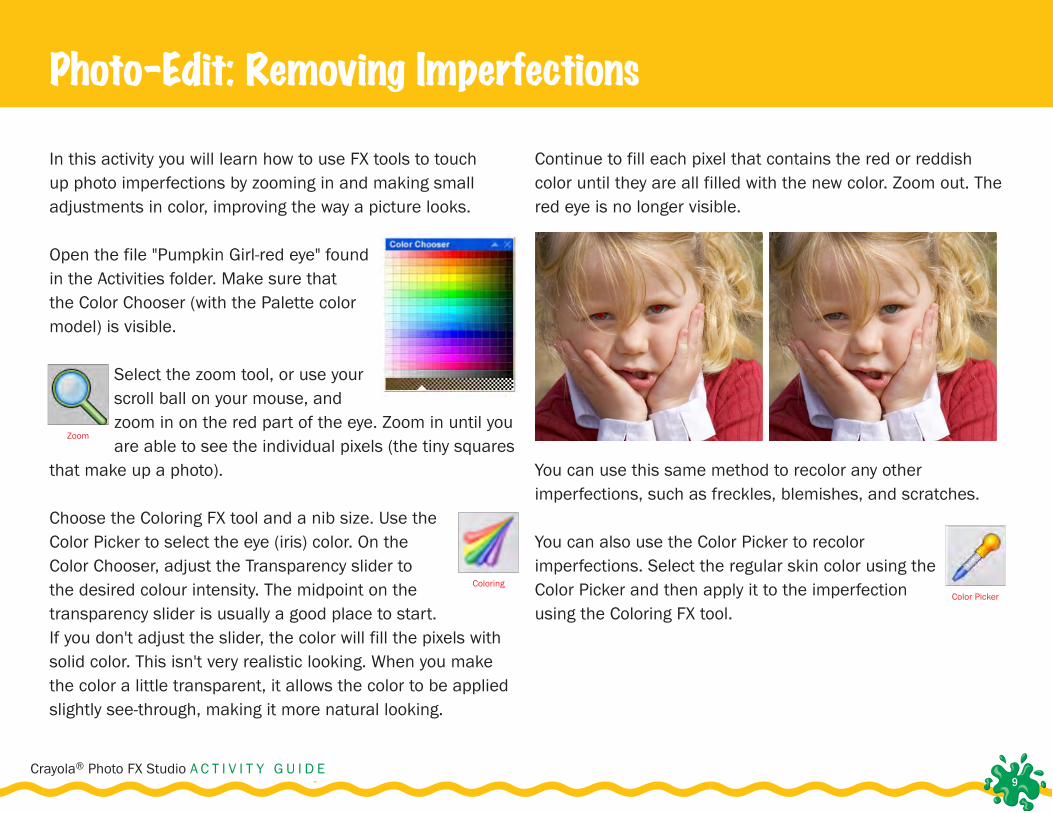
In this activity you will learn how to use FX tools to touch up photo imperfections by zooming in and making small adjustments in color, improving the way a picture looks.
Open the file "Pumpkin Girl-red eye" found in the Activities folder. Make sure that the Color Chooser (with the Palette color model) is visible.
Select the zoom tool, or use your scroll ball on your mouse, and zoom in on the red part of the eye. Zoom in until you are able to see the individual pixels (the tiny squares
that make up a photo).
Choose the Coloring FX tool and a nib size. Use the Color Picker to select the eye (iris) color. On the Color Chooser, adjust the Transparency slider to the desired colour intensity. The midpoint on the transparency slider is usually a good place to start. If you don't adjust the slider, the color will fill the pixels with solid color. This isn't very realistic looking. When you make the color a little transparent, it allows the color to be applied slightly see-through, making it more natural looking.
Continue to fill each pixel that contains the red or reddish color until they are all filled with the new color. Zoom out. The red eye is no longer visible.
You can use this same method to recolor any other imperfections, such as freckles, blemishes, and scratches.
You can also use the Color Picker to recolor imperfections. Select the regular skin color using the Color Picker and then apply it to the imperfection using the Coloring FX tool.
Photo-Edit: Removing Imperfections
Zoom
ColoringColor Picker
10Crayola® Photo FX Studio A C T I V I T Y G U I D E
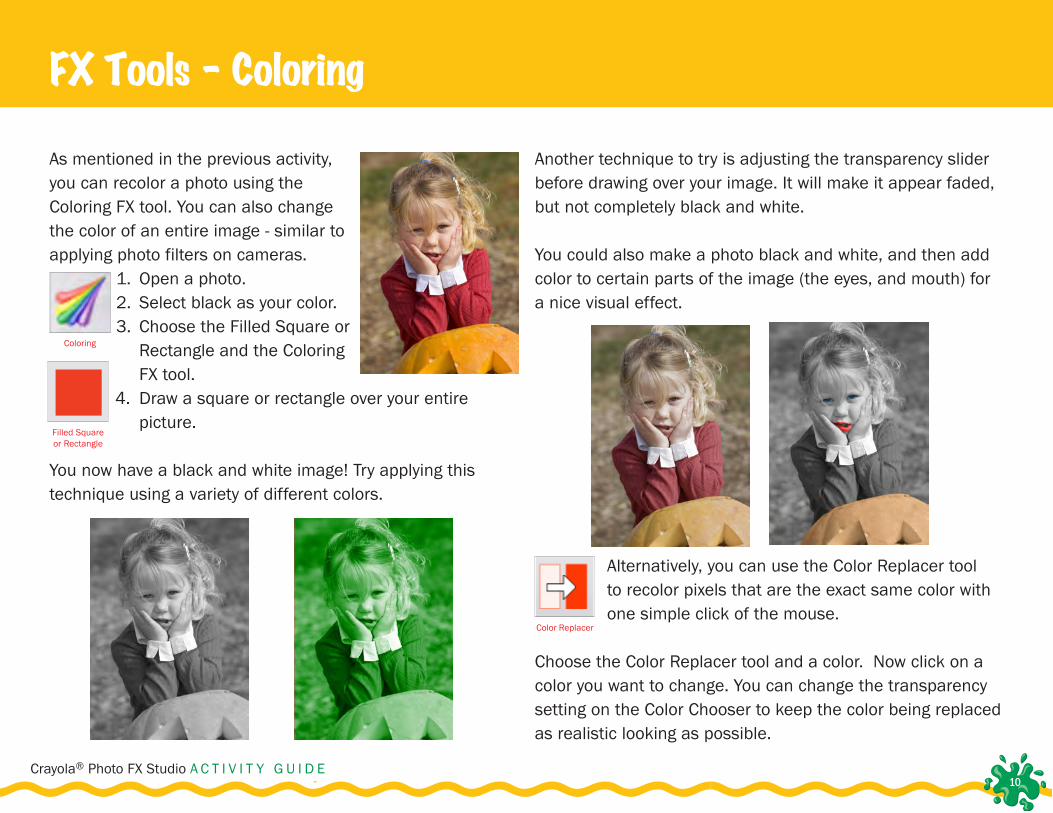
As mentioned in the previous activity, you can recolor a photo using the Coloring FX tool. You can also change the color of an entire image - similar to applying photo filters on cameras.
1. Open a photo. 2. Select black as your color. 3. Choose the Filled Square or
Rectangle and the Coloring FX tool.
4. Draw a square or rectangle over your entire picture.
You now have a black and white image! Try applying this technique using a variety of different colors.
Another technique to try is adjusting the transparency slider before drawing over your image. It will make it appear faded, but not completely black and white.
You could also make a photo black and white, and then add color to certain parts of the image (the eyes, and mouth) for a nice visual effect.
Alternatively, you can use the Color Replacer tool to recolor pixels that are the exact same color with one simple click of the mouse.
Choose the Color Replacer tool and a color. Now click on a color you want to change. You can change the transparency setting on the Color Chooser to keep the color being replaced as realistic looking as possible.
FX Tools - Coloring
Color Replacer
Coloring
Filled Square or Rectangle
11Crayola® Photo FX Studio A C T I V I T Y G U I D E
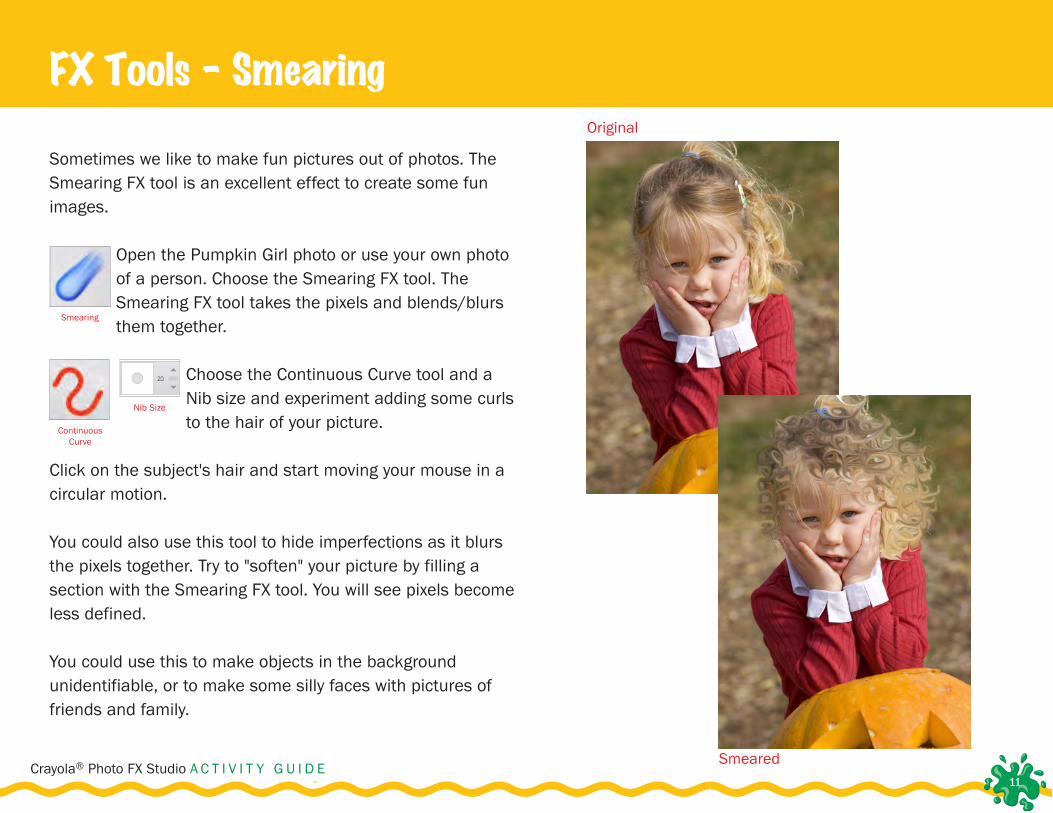
Sometimes we like to make fun pictures out of photos. The Smearing FX tool is an excellent effect to create some fun images.
Open the Pumpkin Girl photo or use your own photo of a person. Choose the Smearing FX tool. The Smearing FX tool takes the pixels and blends/blurs them together.
Choose the Continuous Curve tool and a Nib size and experiment adding some curls to the hair of your picture.
Click on the subject's hair and start moving your mouse in a circular motion.
You could also use this tool to hide imperfections as it blurs the pixels together. Try to "soften" your picture by filling a section with the Smearing FX tool. You will see pixels become less defined.
You could use this to make objects in the background unidentifiable, or to make some silly faces with pictures of friends and family.
FX Tools - Smearing
Smearing
Nib Size
Continuous Curve
Original
Smeared
12Crayola® Photo FX Studio A C T I V I T Y G U I D E
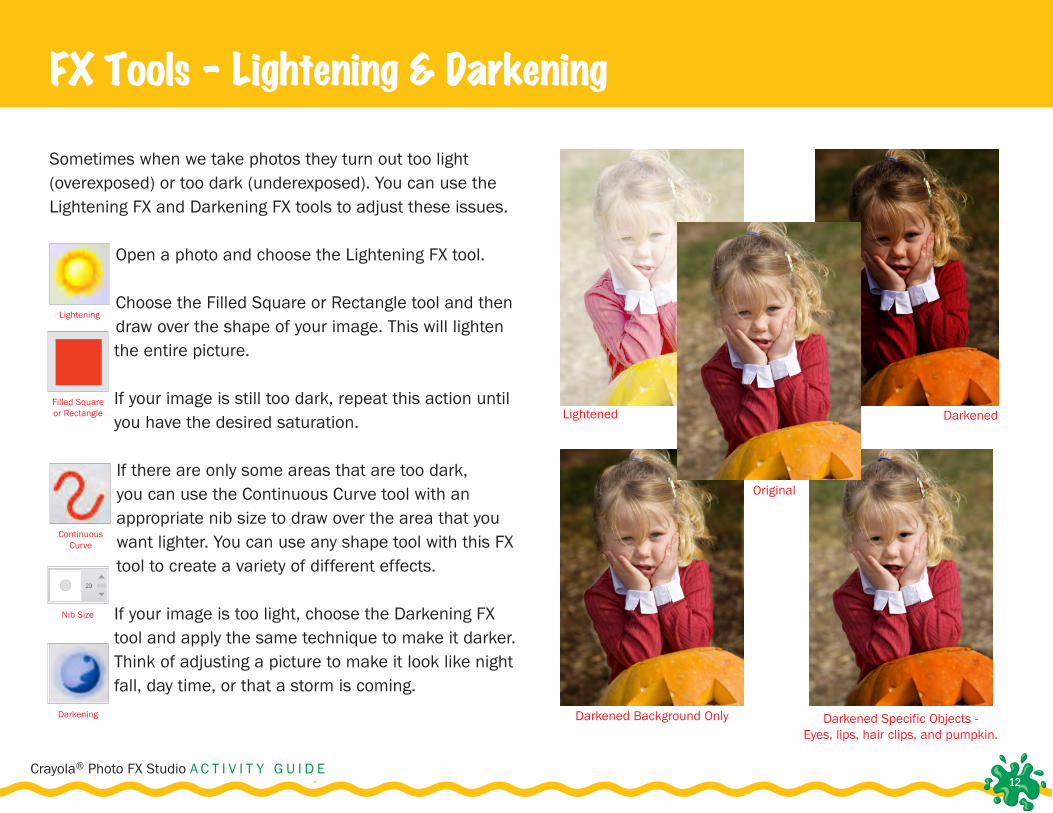
Sometimes when we take photos they turn out too light (overexposed) or too dark (underexposed). You can use the Lightening FX and Darkening FX tools to adjust these issues.
Open a photo and choose the Lightening FX tool.
Choose the Filled Square or Rectangle tool and then draw over the shape of your image. This will lighten the entire picture.
If your image is still too dark, repeat this action until you have the desired saturation.
If there are only some areas that are too dark, you can use the Continuous Curve tool with an appropriate nib size to draw over the area that you want lighter. You can use any shape tool with this FX tool to create a variety of different effects.
If your image is too light, choose the Darkening FX tool and apply the same technique to make it darker. Think of adjusting a picture to make it look like night fall, day time, or that a storm is coming.
FX Tools - Lightening & Darkening
Filled Square or Rectangle
Lightening
Darkening
Nib Size
Continuous Curve
Darkened Background Only Darkened Specific Objects - Eyes, lips, hair clips, and pumpkin.
Lightened Darkened
Original
13Crayola® Photo FX Studio A C T I V I T Y G U I D E
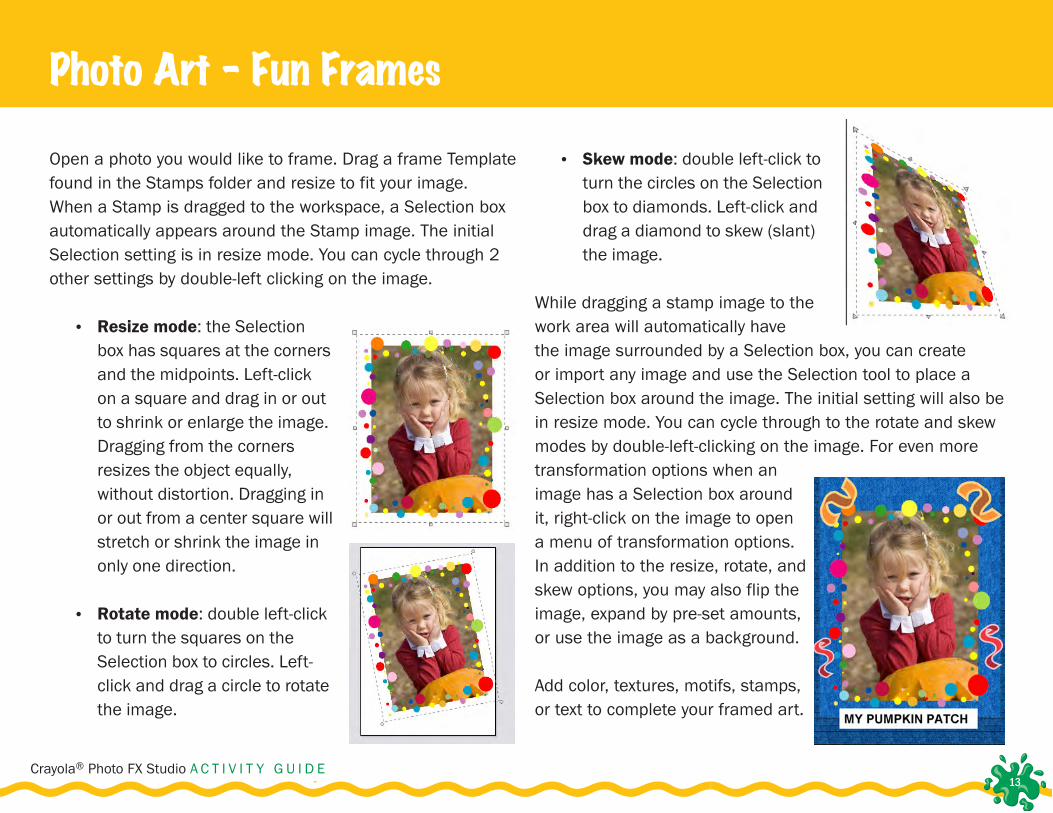
Open a photo you would like to frame. Drag a frame Template found in the Stamps folder and resize to fit your image. When a Stamp is dragged to the workspace, a Selection box automatically appears around the Stamp image. The initial Selection setting is in resize mode. You can cycle through 2 other settings by double-left clicking on the image.
• Resize mode: the Selection box has squares at the corners and the midpoints. Left-click on a square and drag in or out to shrink or enlarge the image. Dragging from the corners resizes the object equally, without distortion. Dragging in or out from a center square will stretch or shrink the image in only one direction.
• Rotate mode: double left-click to turn the squares on the Selection box to circles. Left-click and drag a circle to rotate the image.
• Skew mode: double left-click to turn the circles on the Selection box to diamonds. Left-click and drag a diamond to skew (slant) the image.
While dragging a stamp image to the work area will automatically have the image surrounded by a Selection box, you can create or import any image and use the Selection tool to place a Selection box around the image. The initial setting will also be in resize mode. You can cycle through to the rotate and skew modes by double-left-clicking on the image. For even more transformation options when an image has a Selection box around it, right-click on the image to open a menu of transformation options. In addition to the resize, rotate, and skew options, you may also flip the image, expand by pre-set amounts, or use the image as a background.
Add color, textures, motifs, stamps, or text to complete your framed art.
Photo Art - Fun Frames
14Crayola® Photo FX Studio A C T I V I T Y G U I D E
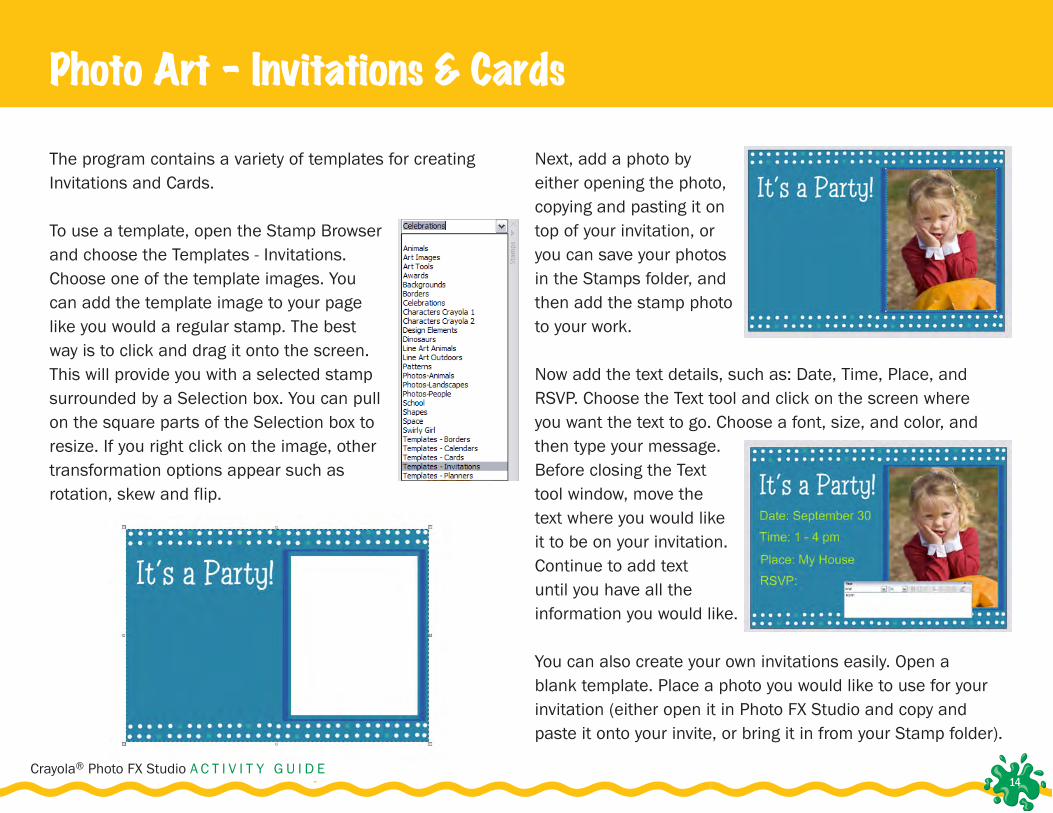
The program contains a variety of templates for creating Invitations and Cards.
To use a template, open the Stamp Browser and choose the Templates - Invitations. Choose one of the template images. You can add the template image to your page like you would a regular stamp. The best way is to click and drag it onto the screen. This will provide you with a selected stamp surrounded by a Selection box. You can pull on the square parts of the Selection box to resize. If you right click on the image, other transformation options appear such as rotation, skew and flip.
Next, add a photo by either opening the photo, copying and pasting it on top of your invitation, or you can save your photos in the Stamps folder, and then add the stamp photo to your work.
Now add the text details, such as: Date, Time, Place, and RSVP. Choose the Text tool and click on the screen where you want the text to go. Choose a font, size, and color, and then type your message. Before closing the Text tool window, move the text where you would like it to be on your invitation. Continue to add text until you have all the information you would like.
You can also create your own invitations easily. Open a blank template. Place a photo you would like to use for your invitation (either open it in Photo FX Studio and copy and paste it onto your invite, or bring it in from your Stamp folder).
Photo Art - Invitations & Cards
15Crayola® Photo FX Studio A C T I V I T Y G U I D E
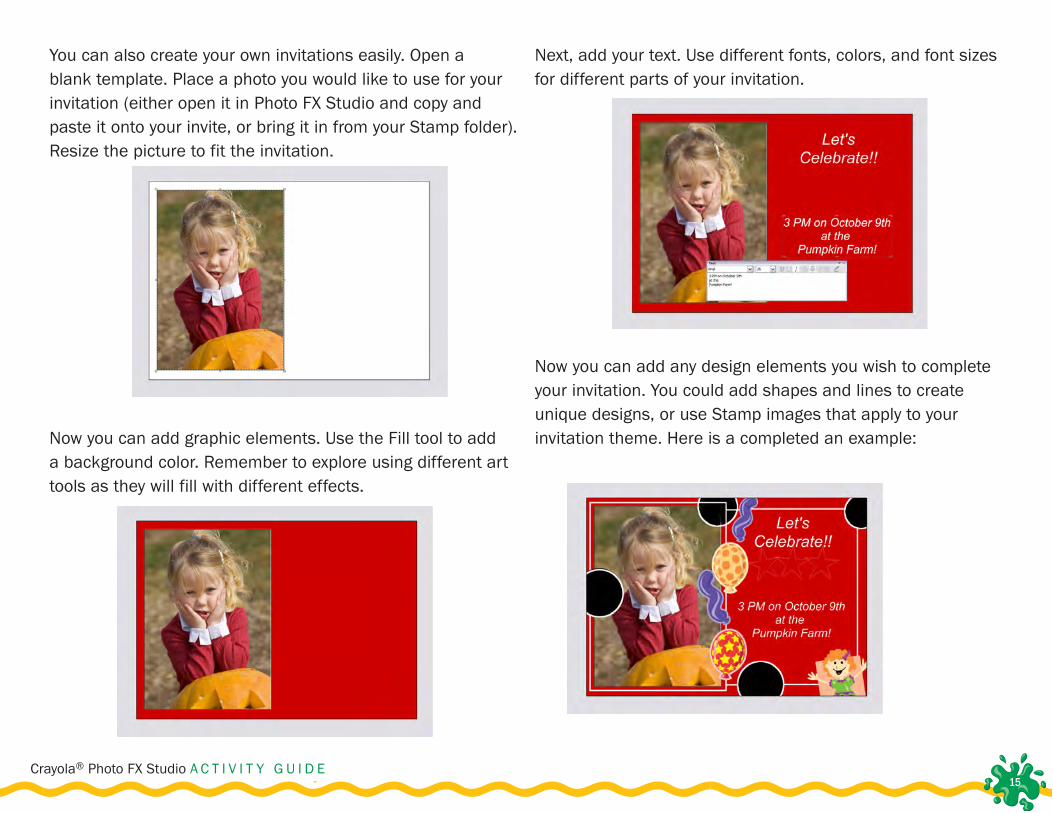
You can also create your own invitations easily. Open a blank template. Place a photo you would like to use for your invitation (either open it in Photo FX Studio and copy and paste it onto your invite, or bring it in from your Stamp folder). Resize the picture to fit the invitation.
Now you can add graphic elements. Use the Fill tool to add a background color. Remember to explore using different art tools as they will fill with different effects.
Next, add your text. Use different fonts, colors, and font sizes for different parts of your invitation.
Now you can add any design elements you wish to complete your invitation. You could add shapes and lines to create unique designs, or use Stamp images that apply to your invitation theme. Here is a completed an example:
16Crayola® Photo FX Studio A C T I V I T Y G U I D E
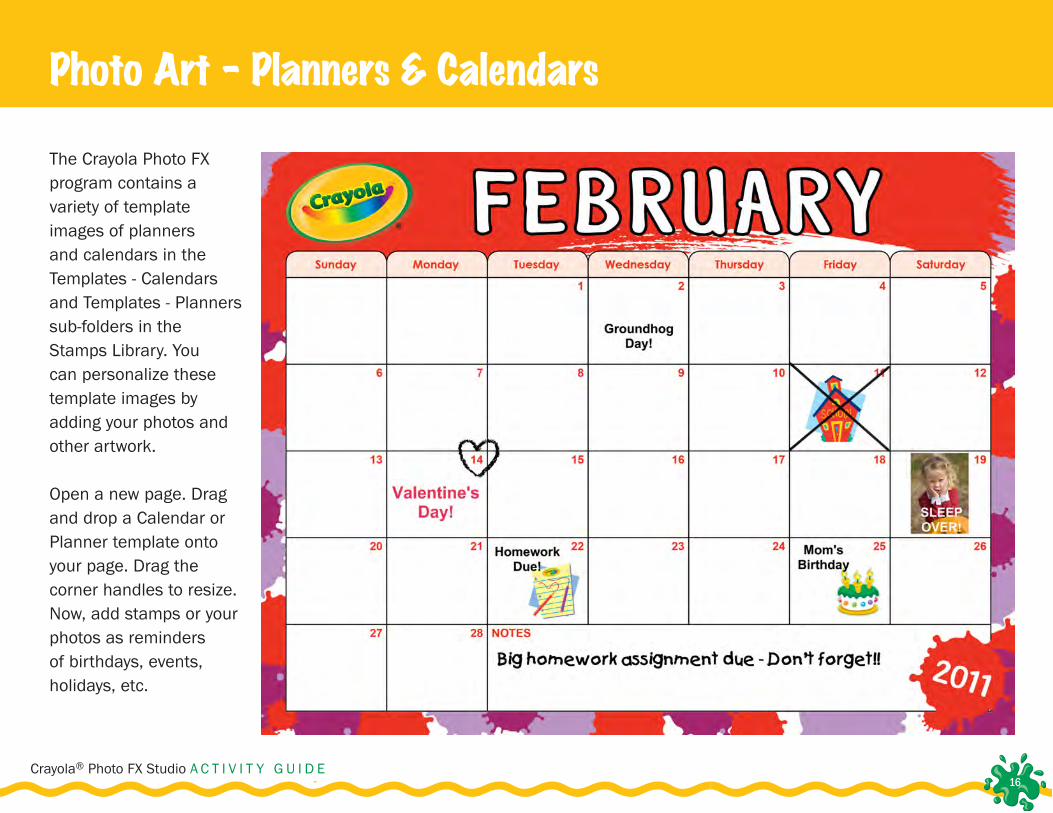
The Crayola Photo FX program contains a variety of template images of planners and calendars in the Templates - Calendars and Templates - Planners sub-folders in the Stamps Library. You can personalize these template images by adding your photos and other artwork.
Open a new page. Drag and drop a Calendar or Planner template onto your page. Drag the corner handles to resize. Now, add stamps or your photos as reminders of birthdays, events, holidays, etc.
Photo Art - Planners & Calendars
17Crayola® Photo FX Studio A C T I V I T Y G U I D E
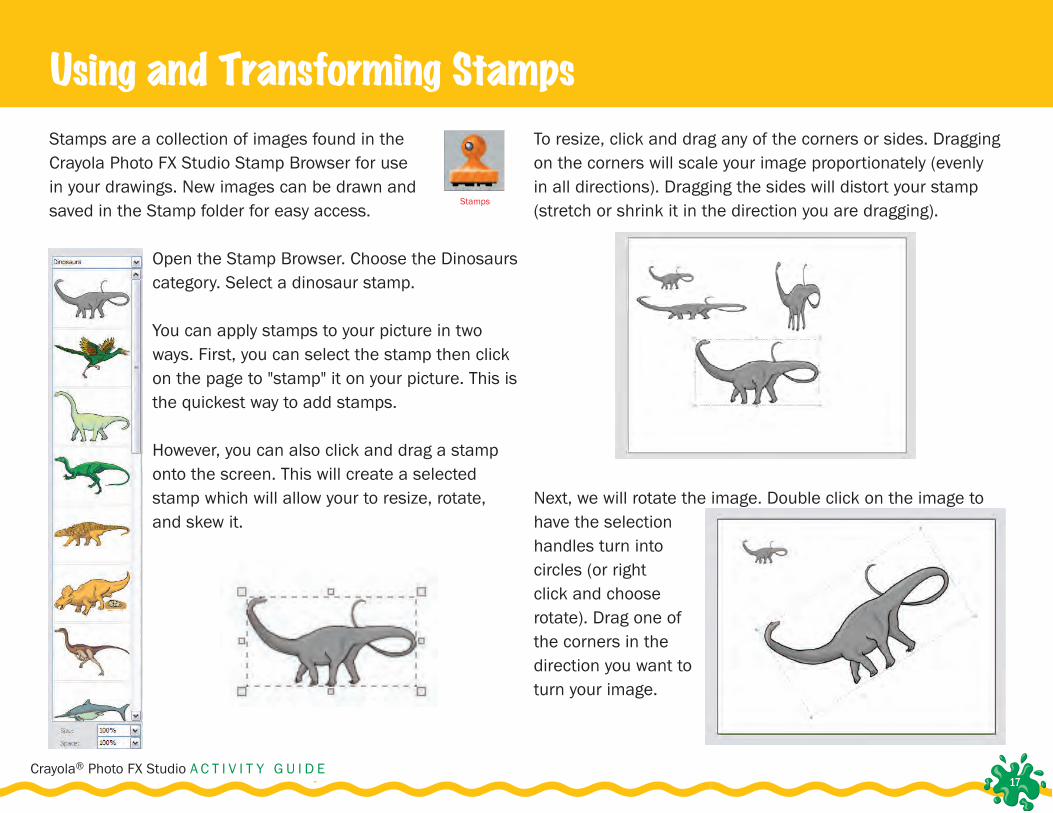
Stamps are a collection of images found in the Crayola Photo FX Studio Stamp Browser for use in your drawings. New images can be drawn and saved in the Stamp folder for easy access.
Open the Stamp Browser. Choose the Dinosaurs category. Select a dinosaur stamp.
You can apply stamps to your picture in two ways. First, you can select the stamp then click on the page to "stamp" it on your picture. This is the quickest way to add stamps.
However, you can also click and drag a stamp onto the screen. This will create a selected stamp which will allow your to resize, rotate, and skew it.
To resize, click and drag any of the corners or sides. Dragging on the corners will scale your image proportionately (evenly in all directions). Dragging the sides will distort your stamp (stretch or shrink it in the direction you are dragging).
Next, we will rotate the image. Double click on the image to have the selection handles turn into circles (or right click and choose rotate). Drag one of the corners in the direction you want to turn your image.
Using and Transforming Stamps
Stamps
18Crayola® Photo FX Studio A C T I V I T Y G U I D E
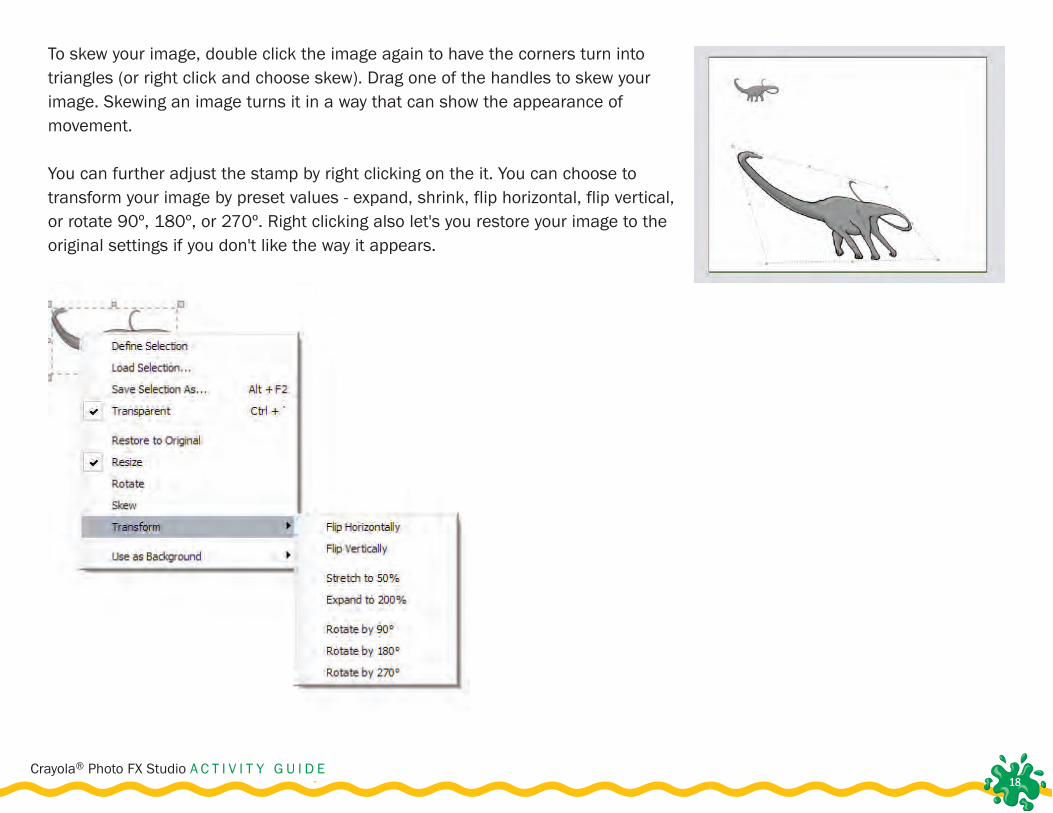
To skew your image, double click the image again to have the corners turn into triangles (or right click and choose skew). Drag one of the handles to skew your image. Skewing an image turns it in a way that can show the appearance of movement.
You can further adjust the stamp by right clicking on the it. You can choose to transform your image by preset values - expand, shrink, flip horizontal, flip vertical, or rotate 90º, 180º, or 270º. Right clicking also let's you restore your image to the original settings if you don't like the way it appears.
19Crayola® Photo FX Studio A C T I V I T Y G U I D E
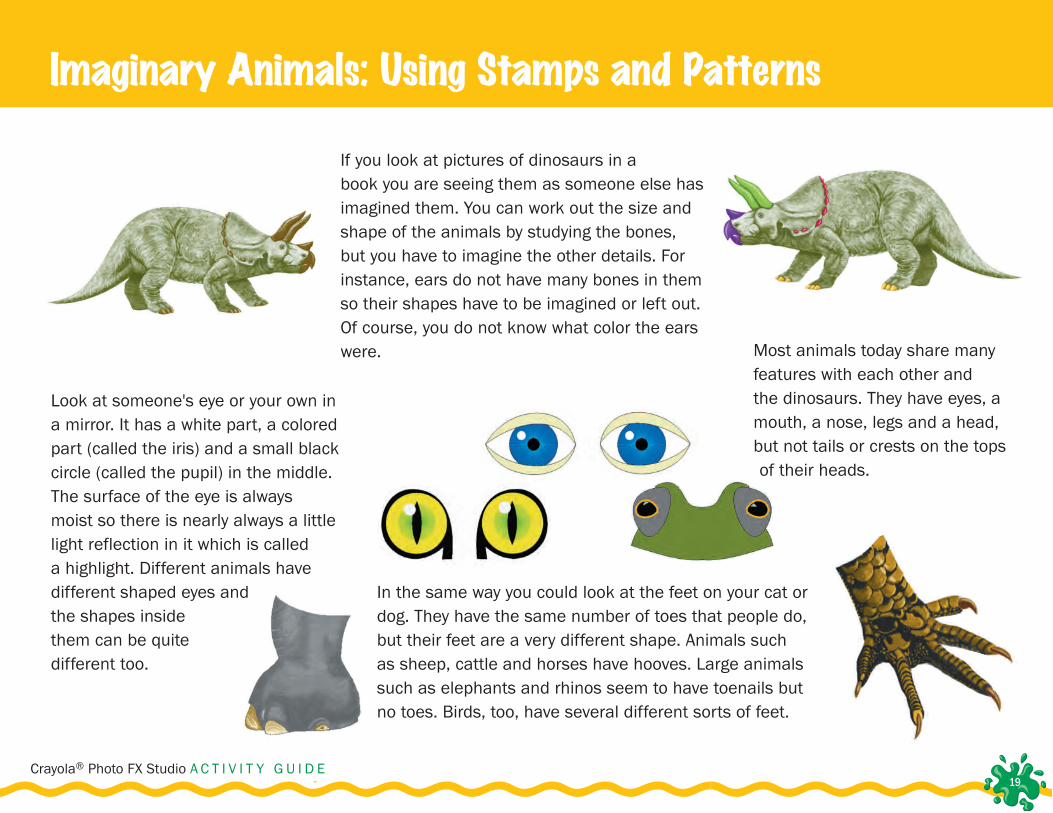
If you look at pictures of dinosaurs in a book you are seeing them as someone else has imagined them. You can work out the size and shape of the animals by studying the bones, but you have to imagine the other details. For instance, ears do not have many bones in them so their shapes have to be imagined or left out. Of course, you do not know what color the ears were. Most animals today share many
features with each other and the dinosaurs. They have eyes, a mouth, a nose, legs and a head, but not tails or crests on the tops of their heads.
Look at someone's eye or your own in a mirror. It has a white part, a colored part (called the iris) and a small black circle (called the pupil) in the middle. The surface of the eye is always moist so there is nearly always a little light reflection in it which is called a highlight. Different animals have different shaped eyes and the shapes inside them can be quite different too.
In the same way you could look at the feet on your cat or dog. They have the same number of toes that people do, but their feet are a very different shape. Animals such as sheep, cattle and horses have hooves. Large animals such as elephants and rhinos seem to have toenails but no toes. Birds, too, have several different sorts of feet.
Imaginary Animals: Using Stamps and Patterns
20Crayola® Photo FX Studio A C T I V I T Y G U I D E
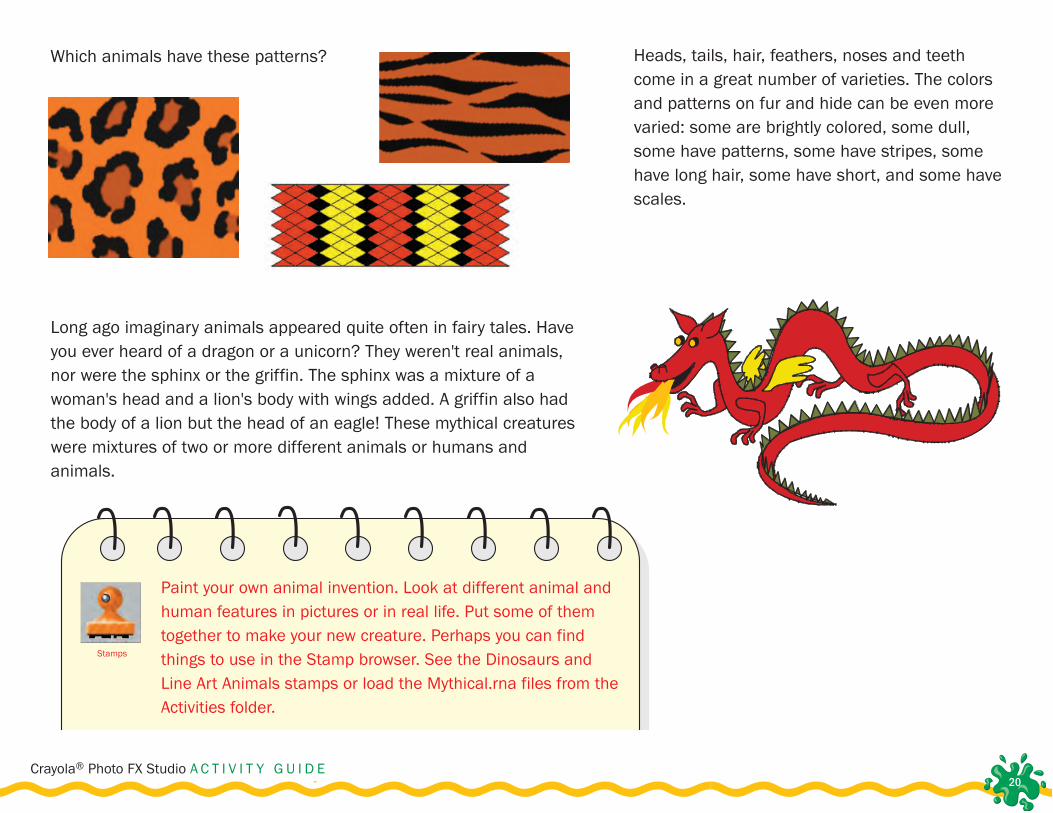
Heads, tails, hair, feathers, noses and teeth come in a great number of varieties. The colors and patterns on fur and hide can be even more varied: some are brightly colored, some dull, some have patterns, some have stripes, some have long hair, some have short, and some have scales.
Long ago imaginary animals appeared quite often in fairy tales. Have you ever heard of a dragon or a unicorn? They weren't real animals, nor were the sphinx or the griffin. The sphinx was a mixture of a woman's head and a lion's body with wings added. A griffin also had the body of a lion but the head of an eagle! These mythical creatures were mixtures of two or more different animals or humans and animals.
Paint your own animal invention. Look at different animal and human features in pictures or in real life. Put some of them together to make your new creature. Perhaps you can find things to use in the Stamp browser. See the Dinosaurs and Line Art Animals stamps or load the Mythical.rna files from the Activities folder.
Stamps
Which animals have these patterns?
21Crayola® Photo FX Studio A C T I V I T Y G U I D E
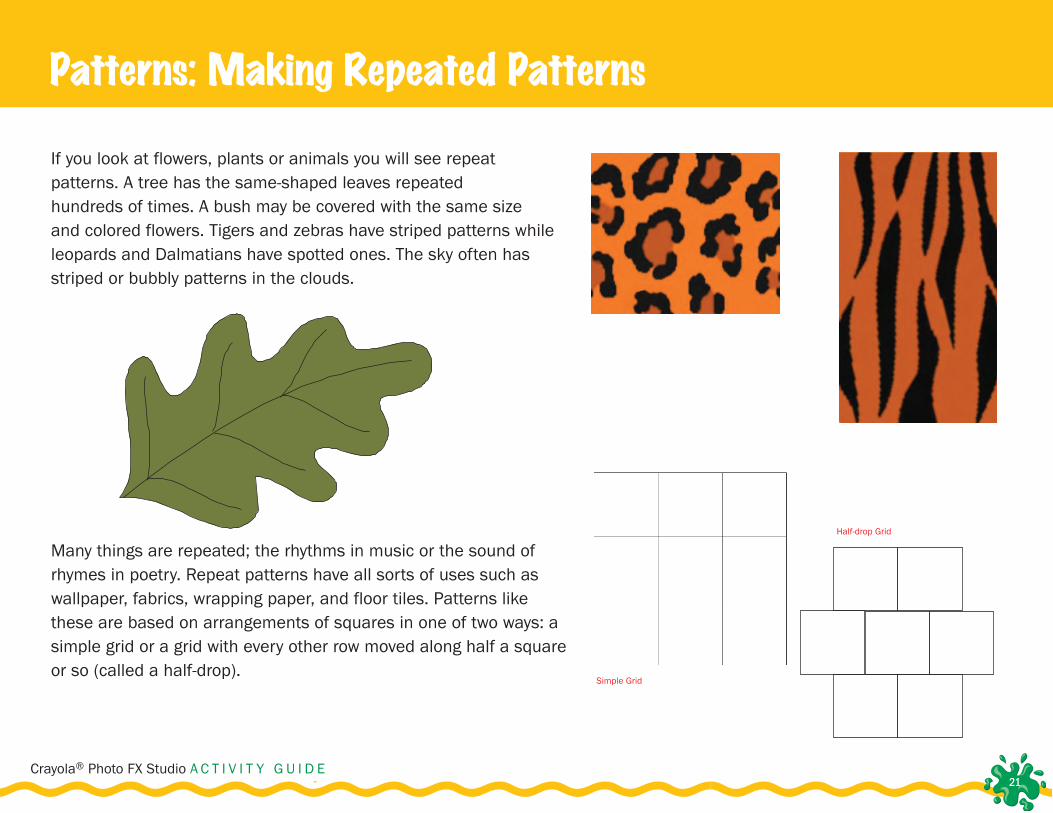
If you look at flowers, plants or animals you will see repeat patterns. A tree has the same-shaped leaves repeated hundreds of times. A bush may be covered with the same size and colored flowers. Tigers and zebras have striped patterns while leopards and Dalmatians have spotted ones. The sky often has striped or bubbly patterns in the clouds.
Many things are repeated; the rhythms in music or the sound of rhymes in poetry. Repeat patterns have all sorts of uses such as wallpaper, fabrics, wrapping paper, and floor tiles. Patterns like these are based on arrangements of squares in one of two ways: a simple grid or a grid with every other row moved along half a square or so (called a half-drop).
Patterns: Making Repeated Patterns
Simple Grid
Half-drop Grid
22Crayola® Photo FX Studio A C T I V I T Y G U I D E
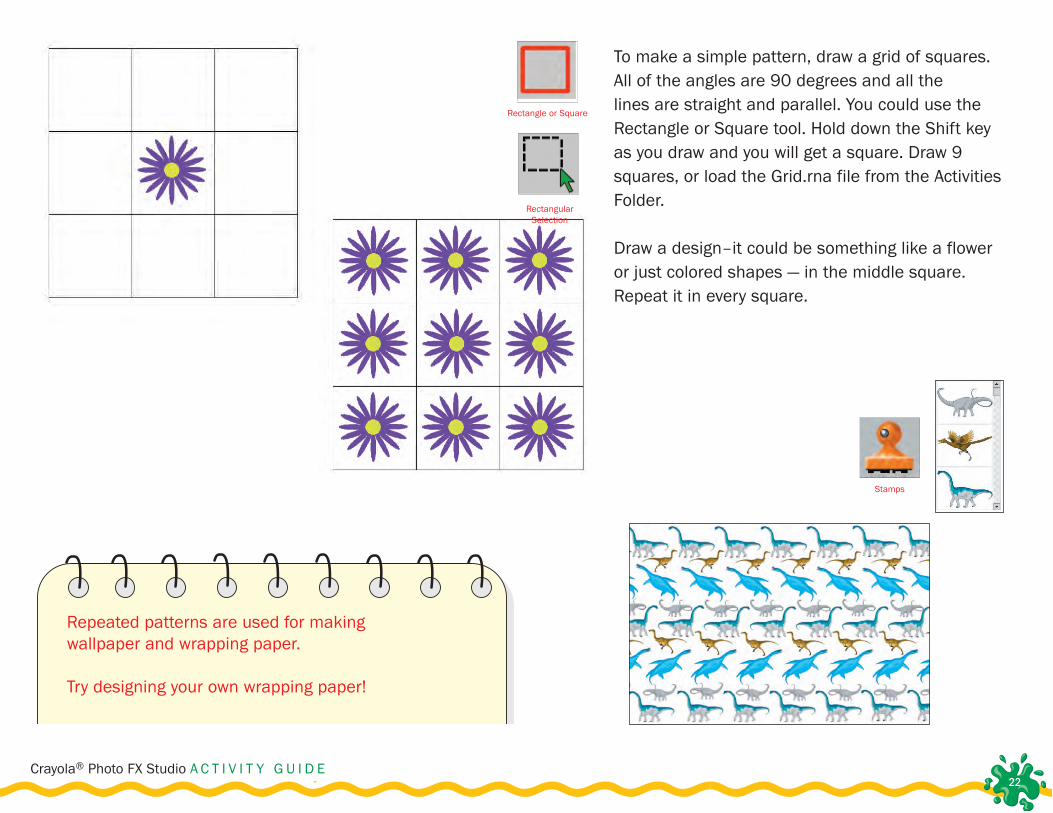
To make a simple pattern, draw a grid of squares. All of the angles are 90 degrees and all the lines are straight and parallel. You could use the Rectangle or Square tool. Hold down the Shift key as you draw and you will get a square. Draw 9 squares, or load the Grid.rna file from the Activities Folder. Draw a design–it could be something like a flower or just colored shapes — in the middle square. Repeat it in every square.
Repeated patterns are used for making wallpaper and wrapping paper. Try designing your own wrapping paper!
Rectangle or Square
RectangularSelection
Stamps
23Crayola® Photo FX Studio A C T I V I T Y G U I D E
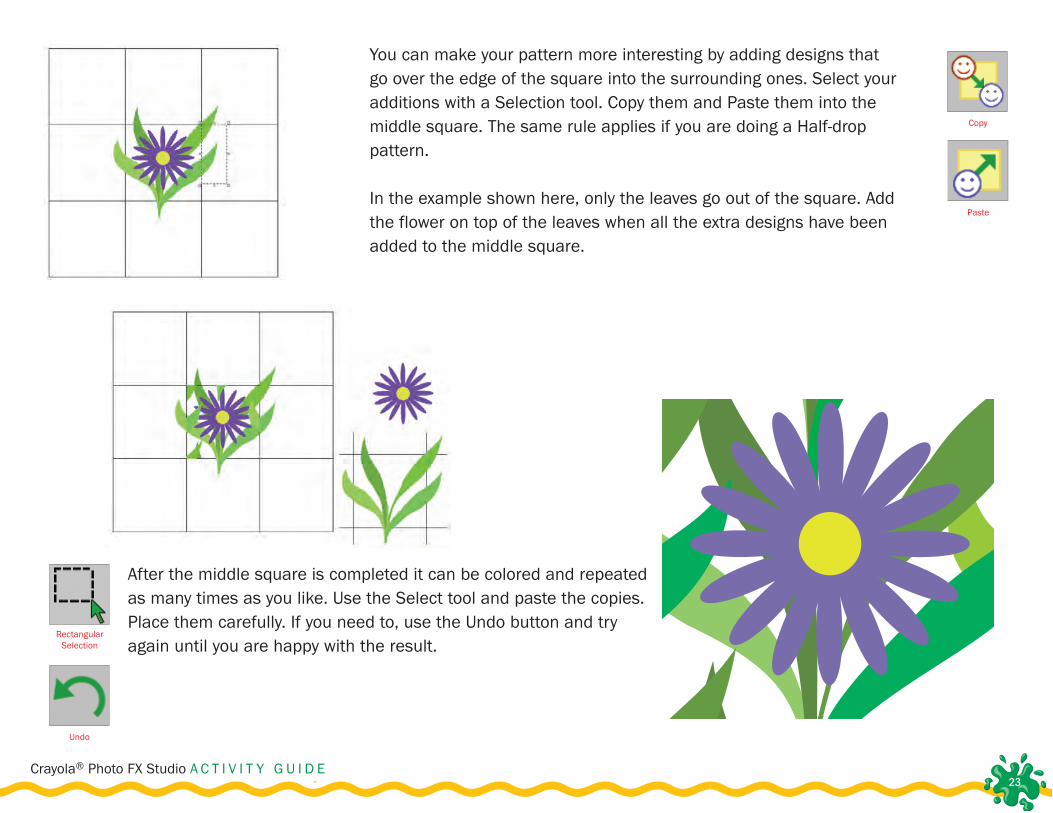
After the middle square is completed it can be colored and repeated as many times as you like. Use the Select tool and paste the copies. Place them carefully. If you need to, use the Undo button and try again until you are happy with the result.
Rectangular Selection
You can make your pattern more interesting by adding designs that go over the edge of the square into the surrounding ones. Select your additions with a Selection tool. Copy them and Paste them into the middle square. The same rule applies if you are doing a Half-drop pattern.
In the example shown here, only the leaves go out of the square. Add the flower on top of the leaves when all the extra designs have been added to the middle square.
Undo
Paste
Copy
24Crayola® Photo FX Studio A C T I V I T Y G U I D E
A tessellation is a pattern created by completely covering a surface with repetitions of one or more identical shapes, without gaps or overlapping. The shapes are called tiles.
Many tessellations are found in man-made objects as well as in nature. Using different colors and shapes in tessellations can produce some attractive artistic patterns. Tiled kitchen and bathroom floors are common examples of tessellations. Tessellations are also frequently used in tiled patios, walkways, and for patterns in clothing and fabrics. Any triangle and any quadrilateral (a four sided shape, including squares and rectangles) can be used in a tessellation.
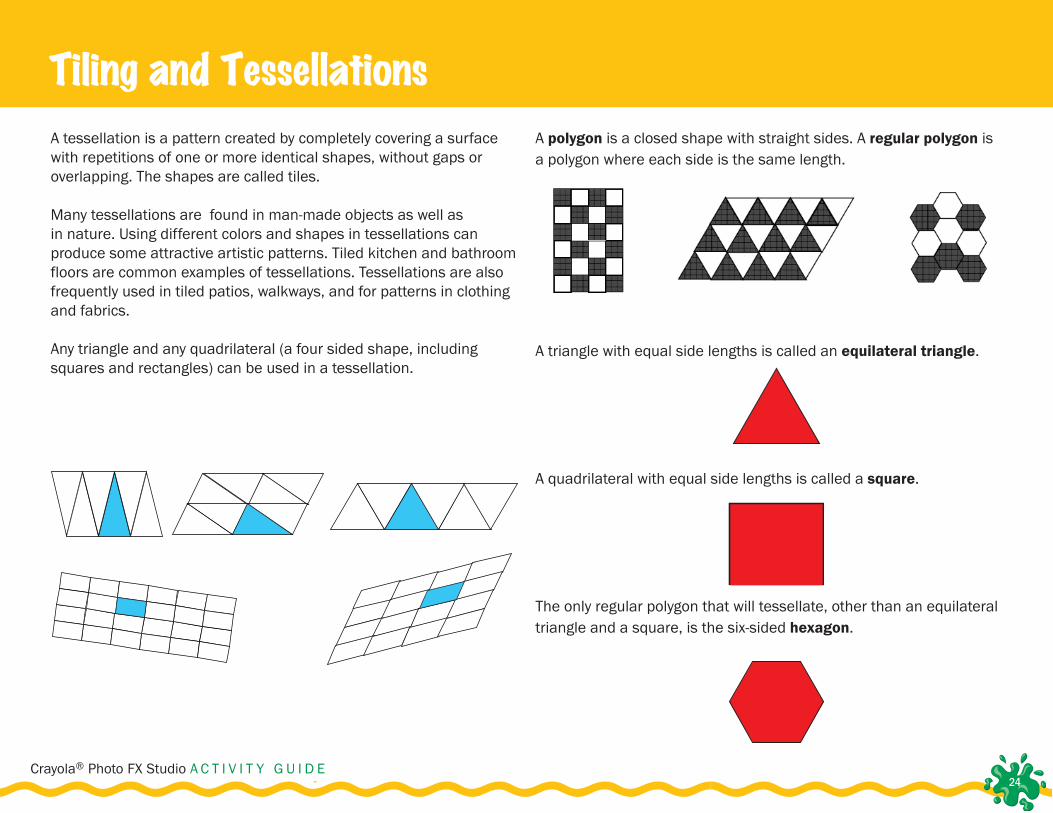
A polygon is a closed shape with straight sides. A regular polygon is a polygon where each side is the same length.
A triangle with equal side lengths is called an equilateral triangle.
A quadrilateral with equal side lengths is called a square.
The only regular polygon that will tessellate, other than an equilateral triangle and a square, is the six-sided hexagon.
Tiling and Tessellations

25Crayola® Photo FX Studio A C T I V I T Y G U I D E
Try to make a tessellation of your own:
• use the Line or Closed Polygon tools to create an equilateral triangle.• use the Selection tool to copy the triangle, place the second triangle
along one of the sides of the first triangle, and paste the second triangle.
• use the rotate or transform functions if necessary to move additional triangle images into place.
• after filling the area with triangles, use the Fill tool to add a repeating color pattern inside the triangles.
For a more challenging tessellation, try using a diamond shape, parallelogram shape (a quadrilateral with 2 parallel sides), or a regular hexagon instead of a triangle.
26Crayola® Photo FX Studio A C T I V I T Y G U I D E
Look at the color wheel on the next page. There are more variations of each color. Red, yellow and blue are the Primary colors. When mixed together in pairs they make orange, green and purple, which are the Secondary colors. The colors between these are what you get from mixing a Primary and its opposite (Secondary) color. These are called Tertiary colors.
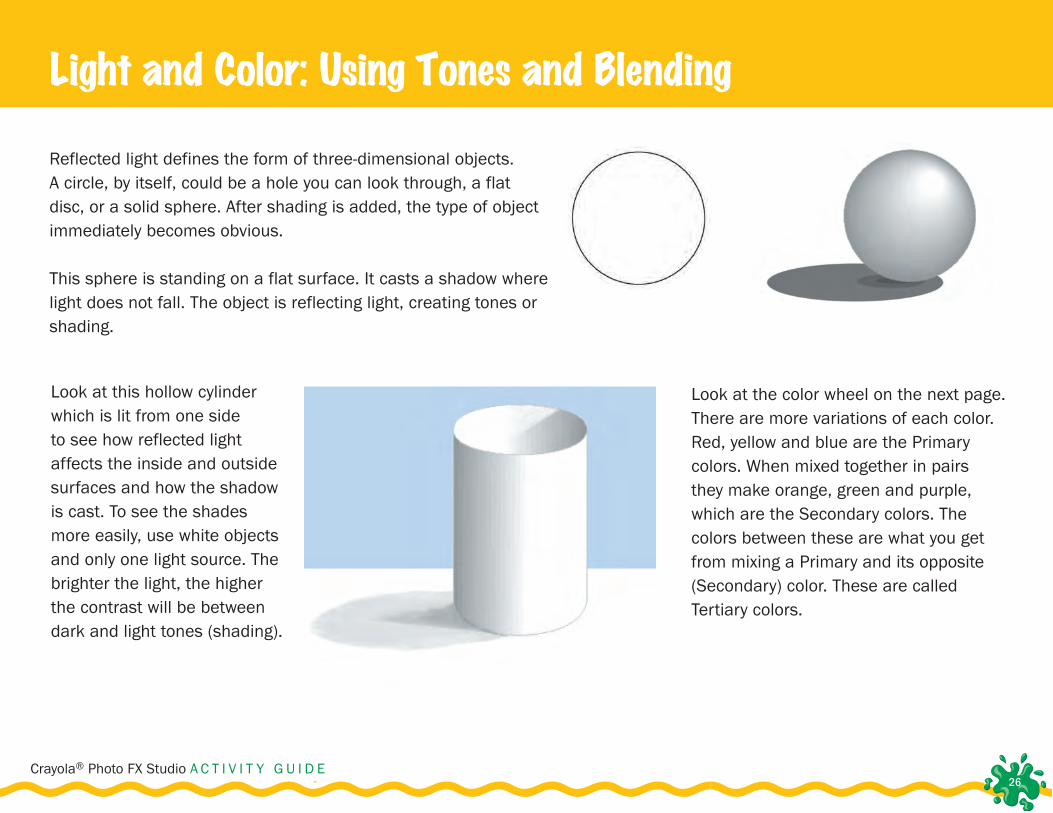
Reflected light defines the form of three-dimensional objects. A circle, by itself, could be a hole you can look through, a flat disc, or a solid sphere. After shading is added, the type of object immediately becomes obvious.
This sphere is standing on a flat surface. It casts a shadow where light does not fall. The object is reflecting light, creating tones or shading.
Look at this hollow cylinder which is lit from one side to see how reflected light affects the inside and outside surfaces and how the shadow is cast. To see the shades more easily, use white objects and only one light source. The brighter the light, the higher the contrast will be between dark and light tones (shading).
Light and Color: Using Tones and Blending
27Crayola® Photo FX Studio A C T I V I T Y G U I D E
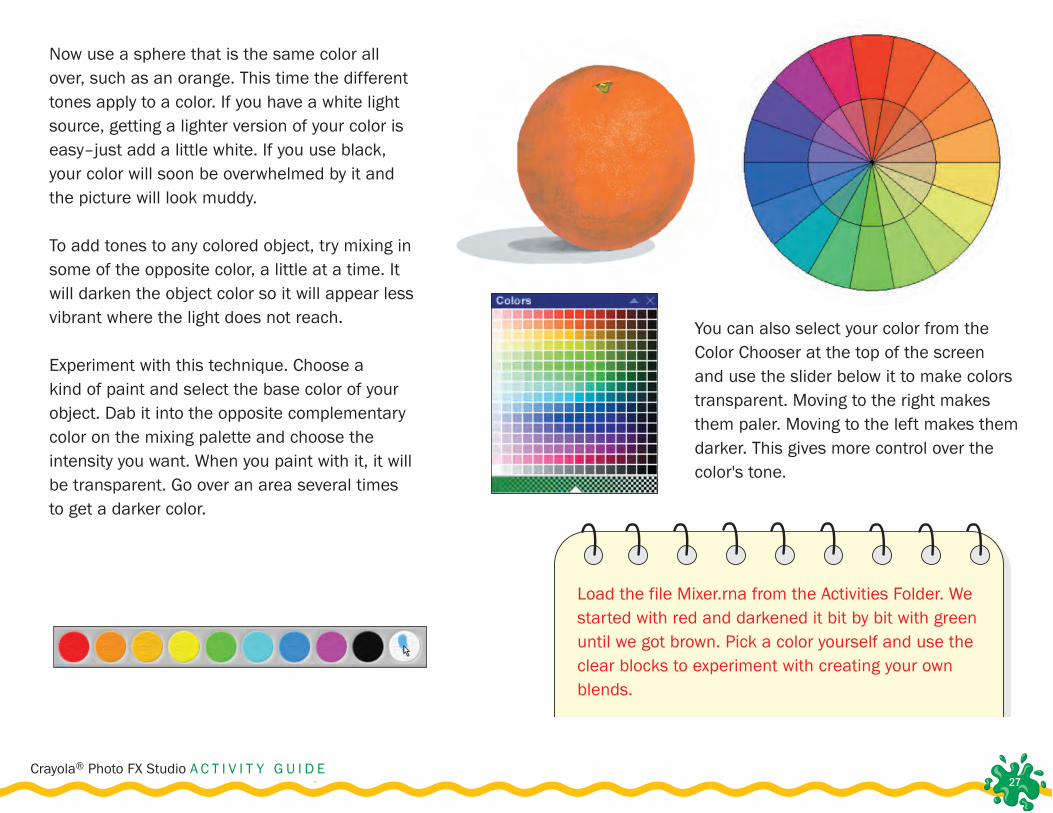
Now use a sphere that is the same color all over, such as an orange. This time the different tones apply to a color. If you have a white light source, getting a lighter version of your color is easy–just add a little white. If you use black, your color will soon be overwhelmed by it and the picture will look muddy.
To add tones to any colored object, try mixing in some of the opposite color, a little at a time. It will darken the object color so it will appear less vibrant where the light does not reach.
Experiment with this technique. Choose a kind of paint and select the base color of your object. Dab it into the opposite complementary color on the mixing palette and choose the intensity you want. When you paint with it, it will be transparent. Go over an area several times to get a darker color.
You can also select your color from the Color Chooser at the top of the screen and use the slider below it to make colors transparent. Moving to the right makes them paler. Moving to the left makes them darker. This gives more control over the color's tone.
Load the file Mixer.rna from the Activities Folder. We started with red and darkened it bit by bit with green until we got brown. Pick a color yourself and use the clear blocks to experiment with creating your own blends.
28Crayola® Photo FX Studio A C T I V I T Y G U I D E
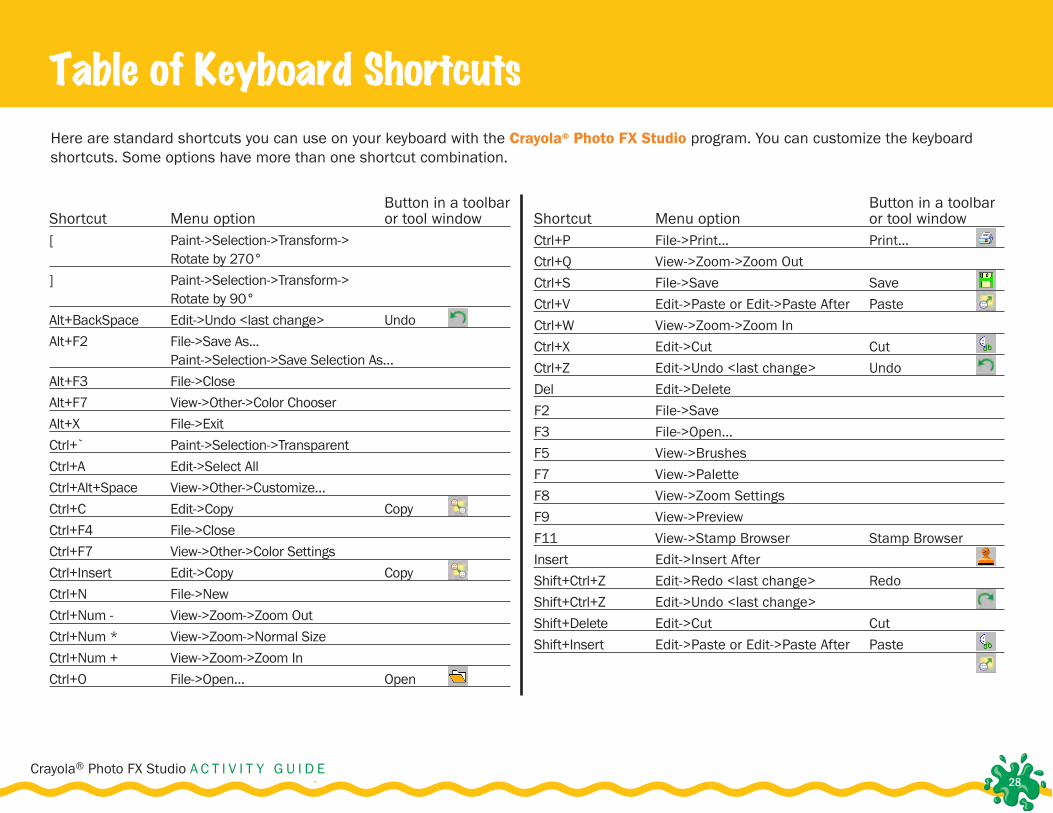
Button in a toolbar Shortcut Menu option or tool window[ Paint->Selection->Transform-> Rotate by 270° ] Paint->Selection->Transform-> Rotate by 90° Alt+BackSpace Edit->Undo <last change> UndoAlt+F2 File->Save As... Paint->Selection->Save Selection As… Alt+F3 File->Close Alt+F7 View->Other->Color Chooser Alt+X File->Exit Ctrl+` Paint->Selection->Transparent Ctrl+A Edit->Select All Ctrl+Alt+Space View->Other->Customize… Ctrl+C Edit->Copy CopyCtrl+F4 File->CloseCtrl+F7 View->Other->Color SettingsCtrl+Insert Edit->Copy CopyCtrl+N File->New Ctrl+Num - View->Zoom->Zoom Out Ctrl+Num * View->Zoom->Normal Size Ctrl+Num + View->Zoom->Zoom In Ctrl+O File->Open… Open
Button in a toolbar Shortcut Menu option or tool windowCtrl+P File->Print… Print…Ctrl+Q View->Zoom->Zoom Out Ctrl+S File->Save SaveCtrl+V Edit->Paste or Edit->Paste After PasteCtrl+W View->Zoom->Zoom In Ctrl+X Edit->Cut CutCtrl+Z Edit->Undo <last change> UndoDel Edit->Delete F2 File->Save F3 File->Open… F5 View->Brushes F7 View->Palette F8 View->Zoom Settings F9 View->PreviewF11 View->Stamp Browser Stamp BrowserInsert Edit->Insert After Shift+Ctrl+Z Edit->Redo <last change> RedoShift+Ctrl+Z Edit->Undo <last change> Shift+Delete Edit->Cut CutShift+Insert Edit->Paste or Edit->Paste After Paste
Here are standard shortcuts you can use on your keyboard with the Crayola® Photo FX Studio program. You can customize the keyboard shortcuts. Some options have more than one shortcut combination.
Table of Keyboard Shortcuts