Embed Size (px)
Citation preview

ECMS II – Design
Reference Guide
January 2009
ECMS II - Design Reference Guide January 2009
i
TABLE OF CONTENTS COMMON FUNCTIONS & NAVIGATION ..................................................................................................................................................................... 1
SCREEN ELEMENTS........................................................................................................................................................................................... 2
ECMS BANNER .................................................................................................................................................................................................... 2
MENU BAR ............................................................................................................................................................................................................ 2
TOOLBAR .............................................................................................................................................................................................................. 3
MESSAGE AREA .................................................................................................................................................................................................. 3
SCREEN TITLE .................................................................................................................................................................................................... 4
COMMON HEADERS .......................................................................................................................................................................................... 4
SECTION HEADINGS .......................................................................................................................................................................................... 5
REQUIRED FIELDS ............................................................................................................................................................................................. 5
SEARCH SCREENS (PORTALS) ....................................................................................................................................................................... 6
PERFORM A SEARCH ................................................................................................................................................................................. 7
SAVE OR RETRIEVE A SEARCH .............................................................................................................................................................. 8
COMMON SELECTION SCREENS ................................................................................................................................................................... 9
MY WORK QUEUE ............................................................................................................................................................................................ 10
PRINTING FROM ECMS II .............................................................................................................................................................................. 11
ON-LINE HELP ................................................................................................................................................................................................... 12
WORKFLOW /ECMS REVIEW & APPROVALS .......................................................................................................................................... 13
LOGIN / LOGOUT` ............................................................................................................................................................................................. 14
PROJECT INFORMATION SCREEN LAYOUT .......................................................................................................................................................... 15
PROJECT MILESTONES ................................................................................................................................................................................................ 17
ADD PROJECT TEAM MEMBER .................................................................................................................................................................................. 18
PROJECT DEVELOPMENT CHECKLIST .................................................................................................................................................................. 19
CREATE OR APPEND ....................................................................................................................................................................................... 19
ADD CHECKLIST ITEM ................................................................................................................................................................................... 20
PROJECT SPECIAL PROVISIONS................................................................................................................................................................................ 21
ADD PROJECT SPECIAL PROVISION .......................................................................................................................................................... 21
LINK SPECIAL PROVISION TO DESIGN ITEM ......................................................................................................................................... 22
DESIGN ITEMS ................................................................................................................................................................................................................. 23
ADD STANDARD OR MODIFIED STANDARD ITEM TO A PROJECT ................................................................................................... 23
ADD NON-STANDRAD ITEM TO A PROJECT ............................................................................................................................................ 24
ADD WORK CLASS CODES ............................................................................................................................................................................. 25
ADD ITEM TO COMPONENET ITEM BREAKDOWN ............................................................................................................................... 26
CREATE AN AS-DESIGNED (EITHER) ITEM .............................................................................................................................................. 27
CREATE AN (AND) ITEM ................................................................................................................................................................................. 28
CREATE AN ALTERNATE (OR) ITEM .......................................................................................................................................................... 29
ADD A PLAN STATION ..................................................................................................................................................................................... 30
IMPORT A PLAN STATION ............................................................................................................................................................................. 30
IMPORT DESIGN ITEMS ................................................................................................................................................................................. 31
COPY DESIGN ITEMS FROM AN EXISTING PROJECT ........................................................................................................................... 32
January 2009 ECMS II – Design Reference Guide
ii
TABLE OF CONTENTS
(Continued)
MINORITY GOAL SUMMARY ...................................................................................................................................................................................... 33
MINORITY GOAL WORKSHEET ................................................................................................................................................................... 33
BID PACKAGE .................................................................................................................................................................................................................. 34
CREATE A BID PACKAGE .............................................................................................................................................................................. 34
EXECUTE RULES .............................................................................................................................................................................................. 35
SUBMIT/PUBLISH A BID PACKAGE ............................................................................................................................................................. 36
RESPOND TO BID PACKAGE QUESTION ................................................................................................................................................... 37
ADDENDUM ...................................................................................................................................................................................................................... 38
CREATE AN ADDENDUM ................................................................................................................................................................................ 38
ADD ITEM VIA ADDENDUM ........................................................................................................................................................................... 39
MODIFY EXISTING ITEM VIA ADDEMDUM ............................................................................................................................................. 41
DELETE DESIGN ITEM FROM ORIGINAL BID PACKAGE VIA ADDENDUM ................................................................................... 42
ADD NEW CHECKLIST ITEM VIA AN ADDENDUM ................................................................................................................................. 43
ADD PROJECT SPECIFIC SPECIAL PROVISION VIA AN ADDENDUM ............................................................................................... 44
DELETE EXISTING PROJECT SPECIFIC SPECIAL PROVISION
FROM ORIGINAL BID PACKAGE VIA ADDENDUM ............................................................................................................................ 45
DELETE ITEM FROM ADDENDUM .............................................................................................................................................................. 46
ECMS II - Design Reference Guide January 2009
1
COMMON FUNCTIONS AND NAVIGATION
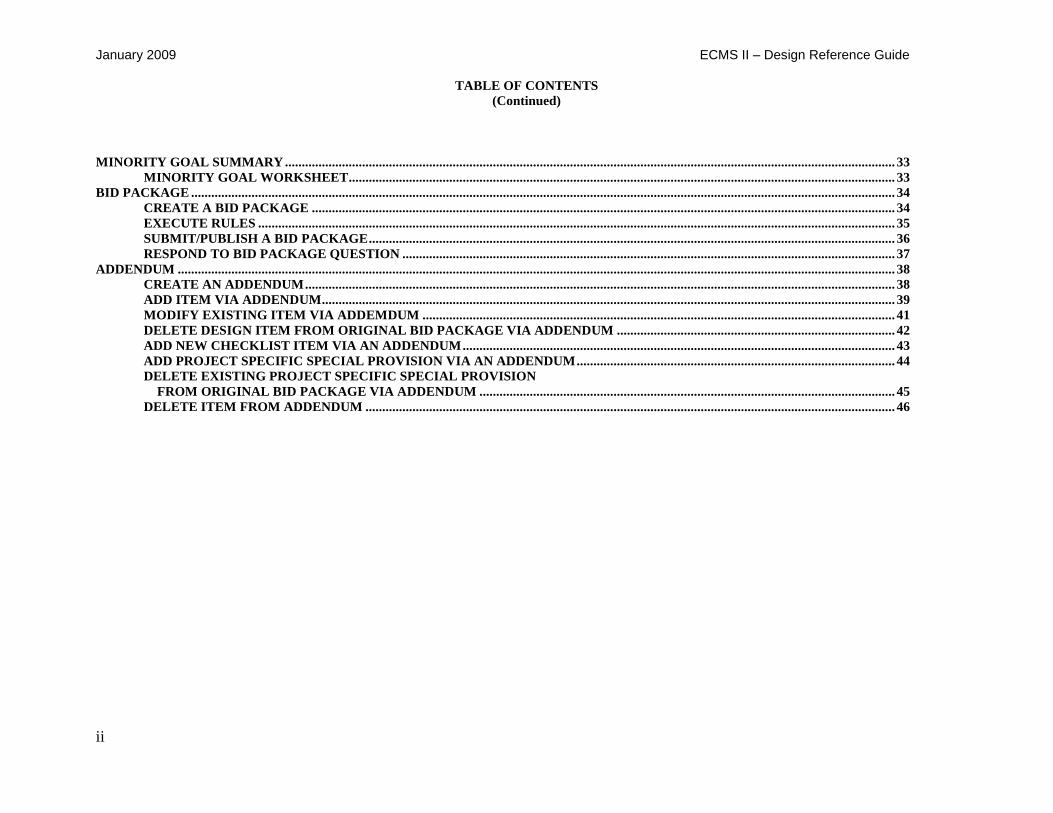
TYPICAL ECMS SCREEN LAYOUT
The elements of a typical ECMS screen are described below. (see screens on following pages)
ECMS BANNER –
LOGOUT HYPERLINK - Appears in far right corner of ECMS Banner (after you are logged in to ECMS)
CURRENT USER HYPERLINK - Current User Name appears in far right corner of ECMS Banner
MENU BAR - replaces navigation bar on left – now located at top of screen, used to navigate between
functional areas
HOME/SITE INDEX/HELP HYPERLINKS - Hyperlinks appear in far left corner of ECMS Banner. clicking on::
HOME hyperlink - from anywhere in ECMS returns you to the ECMS Home Page
SITE MAP hyperlink - displays an index of ECMS pages divided by sections with hyperlinks for quick-jump capability.
HELP hyperlink - displays a listing of Help topics and sub-topics.
TOOLBAR - Displays buttons for most common operations on the current screen
MESSAGE AREA - replaces most pop-up messages - Displays all informational, warnings and error messages
SCREEN TITLE - Displays name of current screen
COMMON HEADERS - Provide common information and hyperlinks to other areas of ECMS as follows:
--PROJECT hyperlink takes you to main screen with more information (just one click away) --QUICK JUMP CAPABILITY by changing project number and clicking the GO button
SECTION HEADINGS - Screens are divided into sections and sub-sections. Section and sub-section headings
contain buttons or hyperlinks to Create or Edit section data.
REQUIRED FIELDS - Required fields denoted with a flag icon
January 2009 ECMS II – Design Reference Guide
2
SCREEN ELEMENTS
ECMS
ECMS II ECMS BANNER
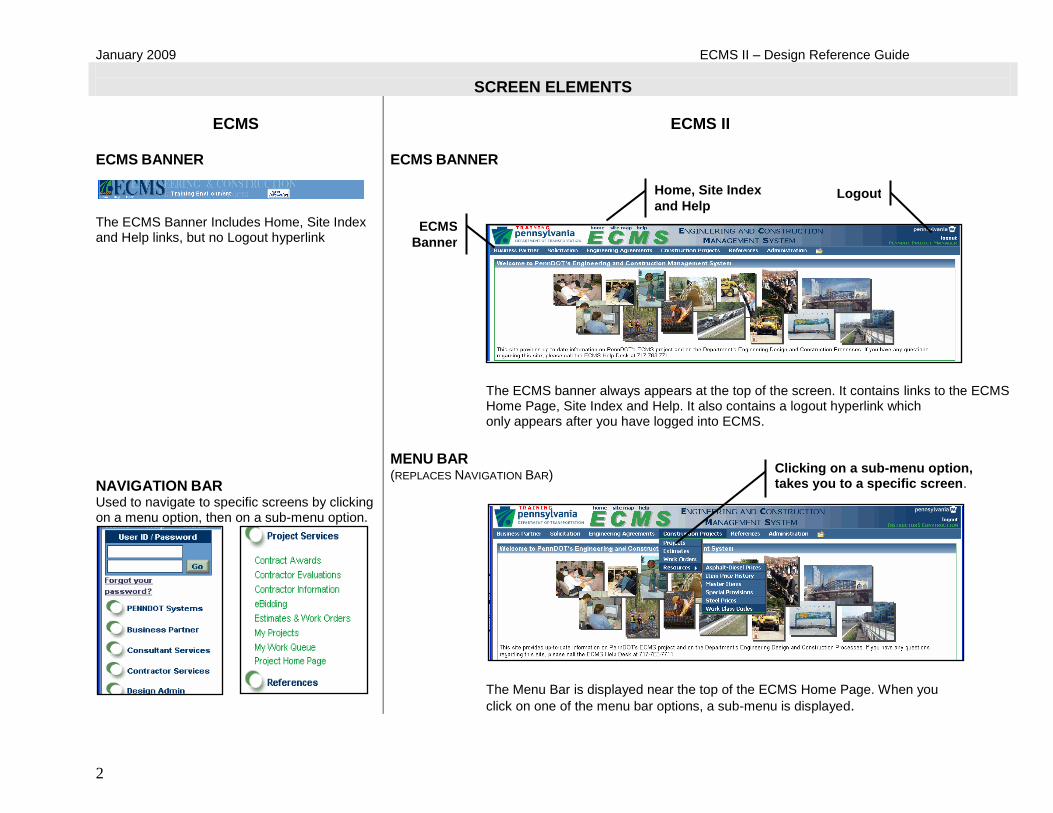
The ECMS Banner Includes Home, Site Index and Help links, but no Logout hyperlink
NAVIGATION BAR Used to navigate to specific screens by clicking on a menu option, then on a sub-menu option.
ECMS BANNER
The ECMS banner always appears at the top of the screen. It contains links to the ECMS Home Page, Site Index and Help. It also contains a logout hyperlink which only appears after you have logged into ECMS.
MENU BAR (REPLACES NAVIGATION BAR)
The Menu Bar is displayed near the top of the ECMS Home Page. When you
click on one of the menu bar options, a sub-menu is displayed.
ECMS
Banner
Home, Site Index
and Help Logout
Clicking on a sub-menu option, takes you to a specific screen.
ECMS II - Design Reference Guide January 2009
3
SCREEN ELEMENTS
ECMS
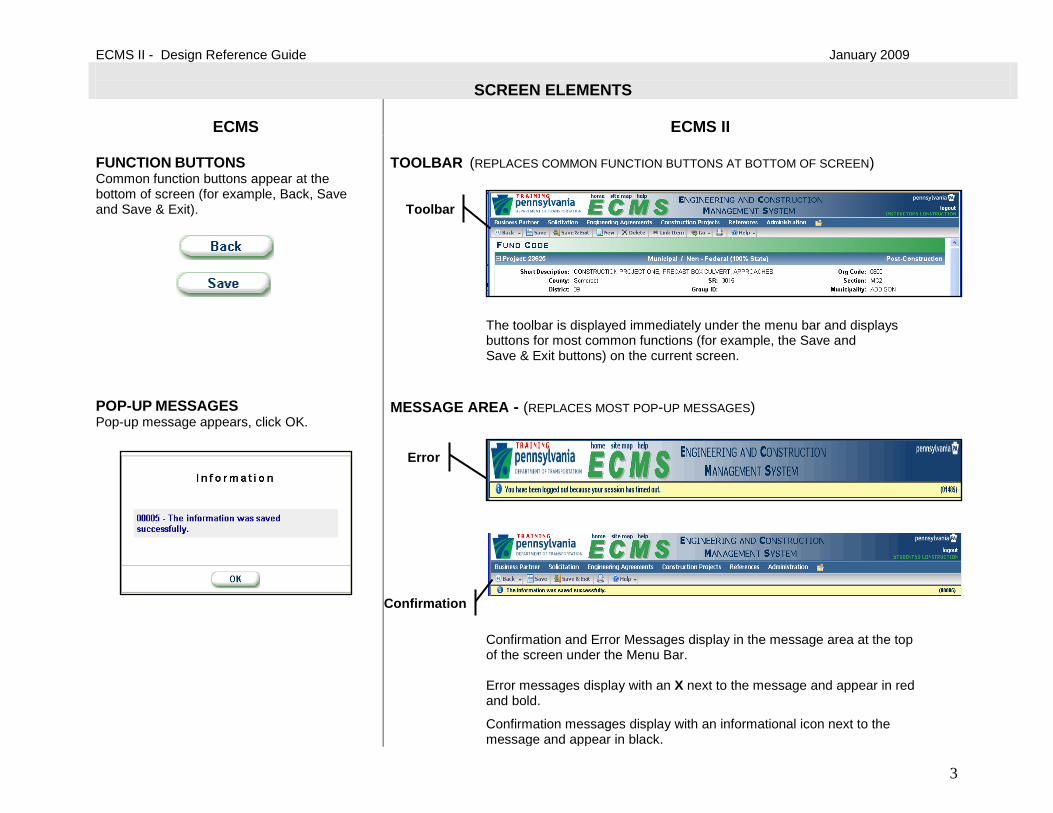
ECMS II FUNCTION BUTTONS Common function buttons appear at the bottom of screen (for example, Back, Save and Save & Exit).
POP-UP MESSAGES Pop-up message appears, click OK.
TOOLBAR (REPLACES COMMON FUNCTION BUTTONS AT BOTTOM OF SCREEN)
The toolbar is displayed immediately under the menu bar and displays buttons for most common functions (for example, the Save and Save & Exit buttons) on the current screen.
MESSAGE AREA - (REPLACES MOST POP-UP MESSAGES)
Confirmation and Error Messages display in the message area at the top of the screen under the Menu Bar. Error messages display with an X next to the message and appear in red and bold.
Confirmation messages display with an informational icon next to the message and appear in black.
Toolbar
Error
Confirmation
January 2009 ECMS II – Design Reference Guide
4
SCREEN ELEMENTS
ECMS
ECMS II
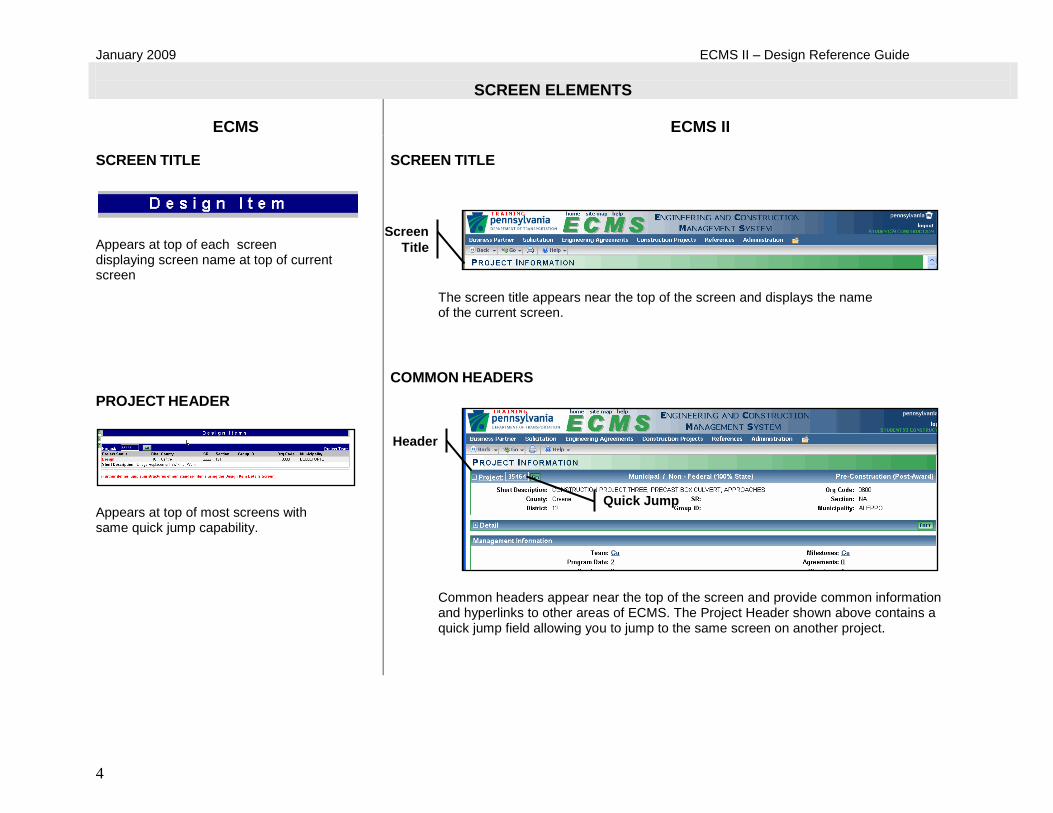
SCREEN TITLE
Appears at top of each screen displaying screen name at top of current screen
PROJECT HEADER
Appears at top of most screens with same quick jump capability.
SCREEN TITLE
The screen title appears near the top of the screen and displays the name of the current screen.
COMMON HEADERS
Common headers appear near the top of the screen and provide common information and hyperlinks to other areas of ECMS. The Project Header shown above contains a quick jump field allowing you to jump to the same screen on another project.
Header
Quick Jump
Screen
Title
ECMS II - Design Reference Guide January 2009
5
SCREEN ELEMENTS
ECMS
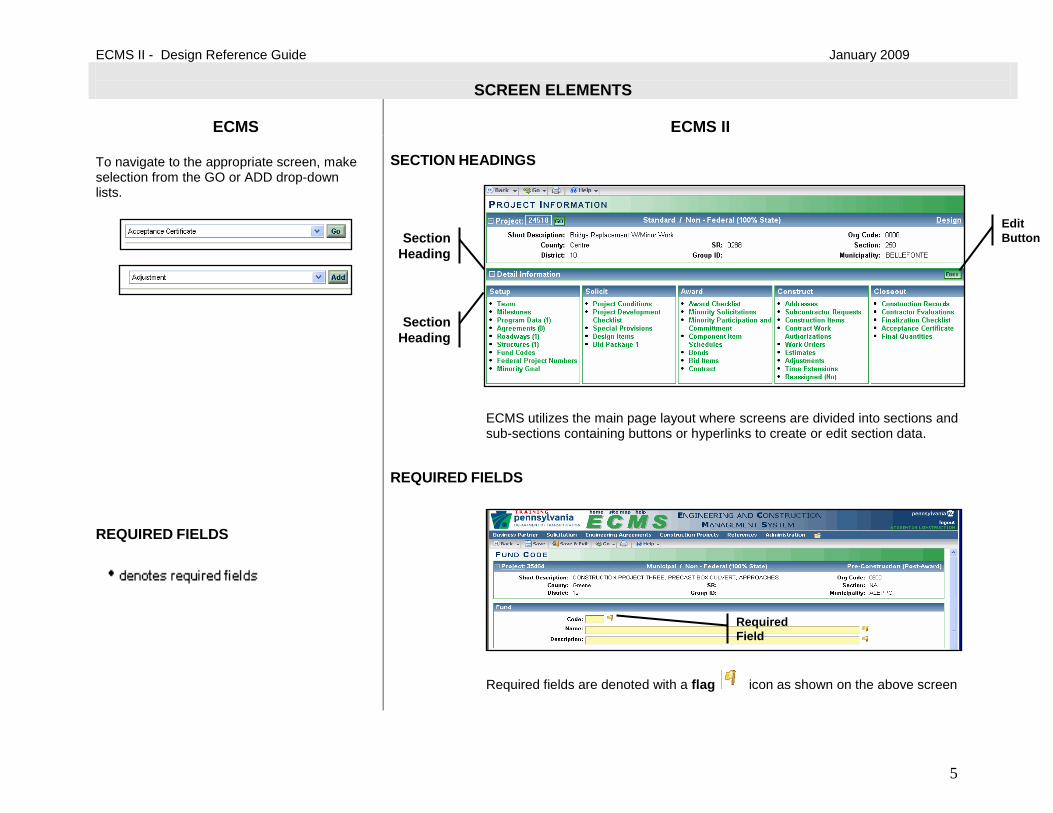
ECMS II To navigate to the appropriate screen, make selection from the GO or ADD drop-down lists.
REQUIRED FIELDS
SECTION HEADINGS
ECMS utilizes the main page layout where screens are divided into sections and sub-sections containing buttons or hyperlinks to create or edit section data.
REQUIRED FIELDS
Required fields are denoted with a flag icon as shown on the above screen
Required
Field
Edit
Button Section
Heading
Section
Heading
January 2009 ECMS II – Design Reference Guide
6
SCREEN ELEMENTS
ECMS
ECMS II SEARCH SCREENS
Enter search criteria and click Search at bottom of screen.
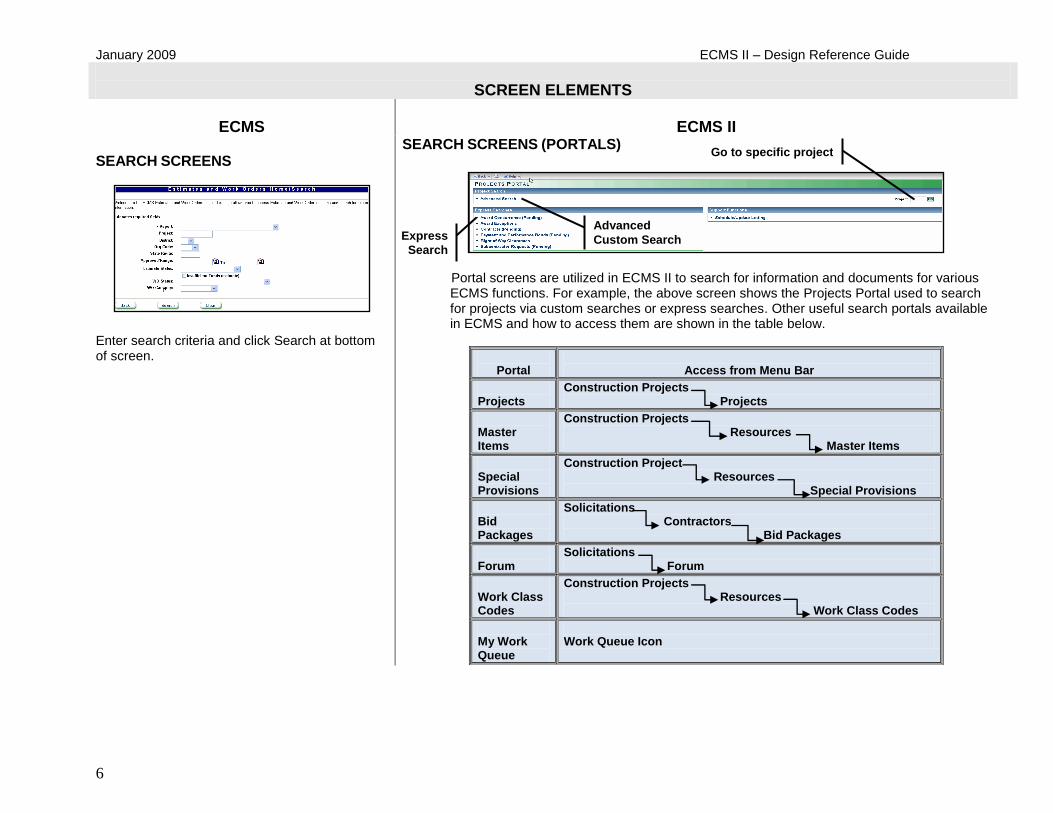
SEARCH SCREENS (PORTALS)
Portal screens are utilized in ECMS II to search for information and documents for various ECMS functions. For example, the above screen shows the Projects Portal used to search for projects via custom searches or express searches. Other useful search portals available in ECMS and how to access them are shown in the table below.
Portal
Access from Menu Bar
Projects
Construction Projects Projects
Master Items
Construction Projects Resources
Master Items
Special Provisions
Construction Project Resources Special Provisions
Bid Packages
Solicitations Contractors Bid Packages
Forum
Solicitations Forum
Work Class Codes
Construction Projects Resources Work Class Codes
My Work Queue
Work Queue Icon
Advanced
Custom Search Express
Search
Go to specific project
ECMS II - Design Reference Guide January 2009
7
PERFORM A SEARCH
ECMS
SEARCH FOR A DESIGN PROJECT
ECMS II
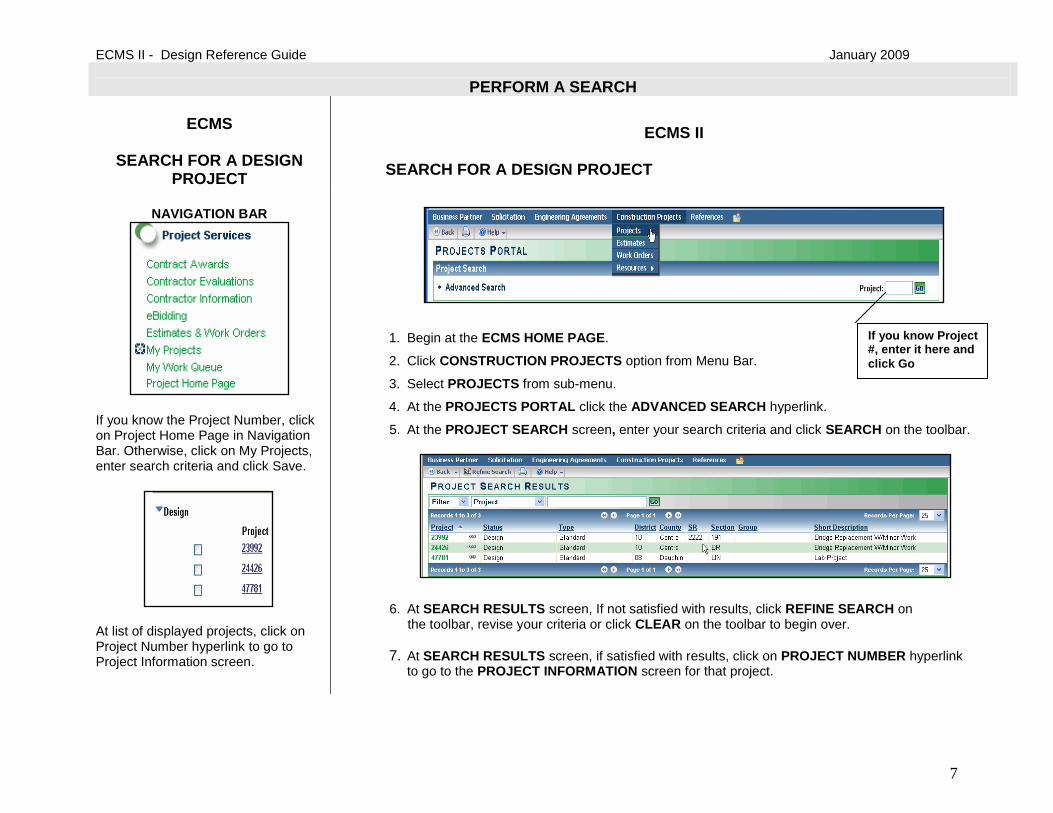
SEARCH FOR A DESIGN PROJECT
NAVIGATION BAR
If you know the Project Number, click on Project Home Page in Navigation Bar. Otherwise, click on My Projects, enter search criteria and click Save.
At list of displayed projects, click on Project Number hyperlink to go to Project Information screen.
1. Begin at the ECMS HOME PAGE.
2. Click CONSTRUCTION PROJECTS option from Menu Bar.
3. Select PROJECTS from sub-menu.
4. At the PROJECTS PORTAL click the ADVANCED SEARCH hyperlink.
5. At the PROJECT SEARCH screen, enter your search criteria and click SEARCH on the toolbar.
6. At SEARCH RESULTS screen, If not satisfied with results, click REFINE SEARCH on the toolbar, revise your criteria or click CLEAR on the toolbar to begin over.
7. At SEARCH RESULTS screen, if satisfied with results, click on PROJECT NUMBER hyperlink to go to the PROJECT INFORMATION screen for that project.
If you know Project #, enter it here and
click Go
January 2009 ECMS II – Design Reference Guide
8
SAVE OR RETRIEVE A SEARCH
ECMS
ECMS II
NAVIGATION BAR
If you know the Project Number, click on Project Home Page in Navigation Bar. Otherwise, click on My Projects, enter search criteria and click Save.
At list of displayed projects, click on Project Number hyperlink to go to Project Information screen.
Cannot save a named search.
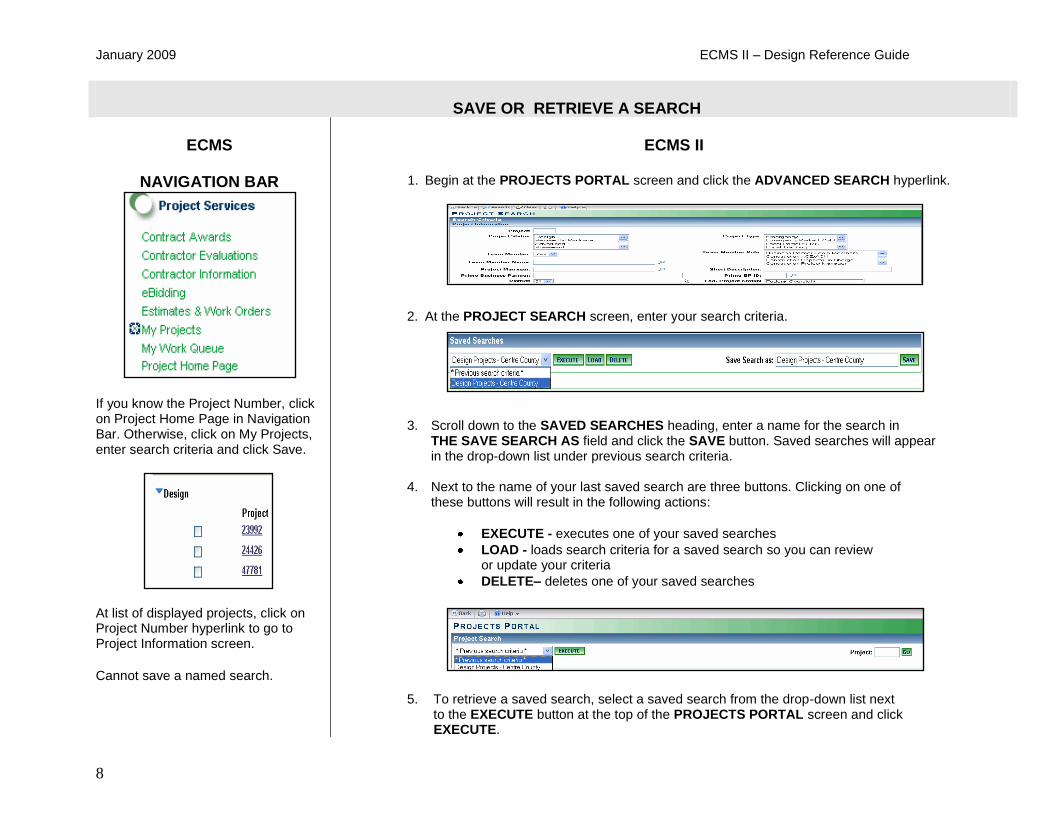
1. Begin at the PROJECTS PORTAL screen and click the ADVANCED SEARCH hyperlink.
2. At the PROJECT SEARCH screen, enter your search criteria.
3. Scroll down to the SAVED SEARCHES heading, enter a name for the search in
THE SAVE SEARCH AS field and click the SAVE button. Saved searches will appear in the drop-down list under previous search criteria.
4. Next to the name of your last saved search are three buttons. Clicking on one of
these buttons will result in the following actions:
EXECUTE - executes one of your saved searches
LOAD - loads search criteria for a saved search so you can review or update your criteria
DELETE– deletes one of your saved searches
5. To retrieve a saved search, select a saved search from the drop-down list next to the EXECUTE button at the top of the PROJECTS PORTAL screen and click EXECUTE.
ECMS II - Design Reference Guide January 2009
9
COMMON SELECTION SCREENS
ECMS
SELECTION POP-UP WINDOWS Selection pop-up windows are available in ECMS by clicking on a drop-down selection arrow. A typical ECMS selection window is shown below.
ECMS II
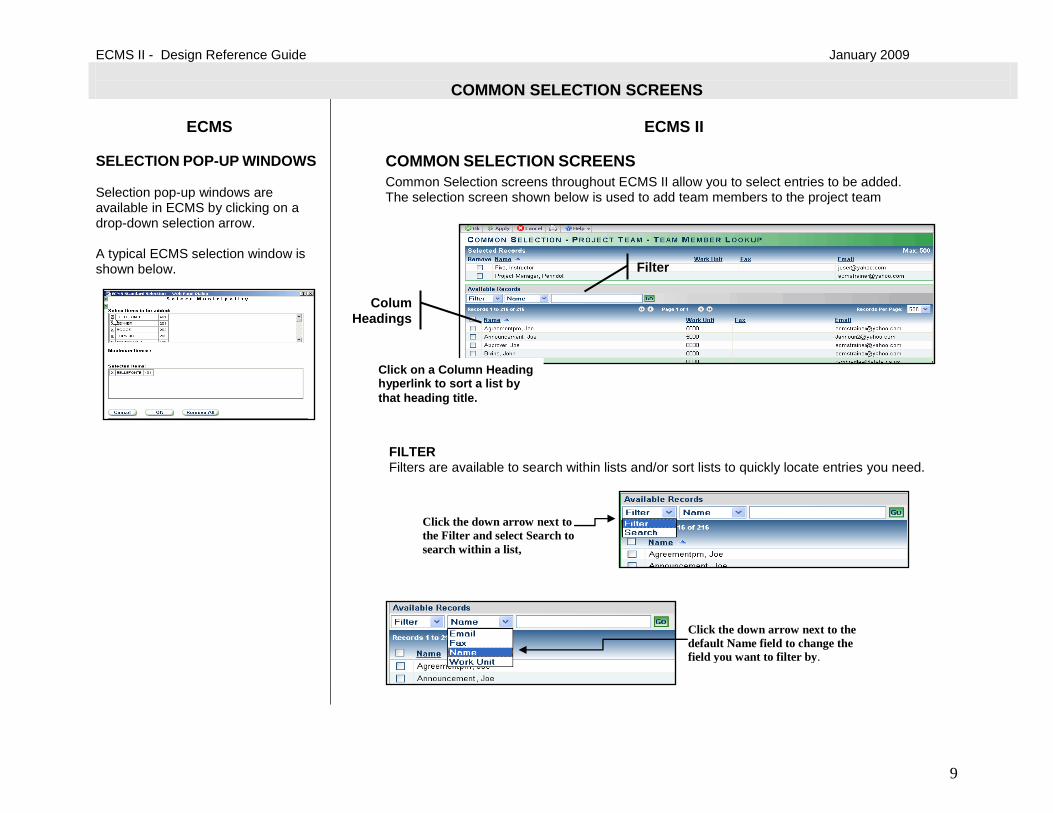
COMMON SELECTION SCREENS
Common Selection screens throughout ECMS II allow you to select entries to be added. The selection screen shown below is used to add team members to the project team
. FILTER Filters are available to search within lists and/or sort lists to quickly locate entries you need.
Filter
Colum
Headings
Click the down arrow next to
the Filter and select Search to
search within a list,
Click the down arrow next to the
default Name field to change the
field you want to filter by.
Click on a Column Heading hyperlink to sort a list by
that heading title.

January 2009 ECMS II – Design Reference Guide
10
MY WORK QUEUE
ECMS
MY WORK QUEUE
NAVIGATION BAR
From the Navigation Bar, under Project Services, click on My Work Queue option.
ECMS II
MY WORK QUEUE (REPLACES MANY ECMS GENERATED EMAILS) The My Work Queue function was designed to reduce the number of emails generated from ECMS. Log into ECMS daily and check My Work Queue to view any documents requiring your action.
1. Login to ECMS and at the ECMS HOME PAGE click on MY WORK QUEUE icon.
2. At the MY WORK QUEUE PORTAL, under the CUSTOM SEARCHES, heading click ADVANCED SEARCH.
3. Under the SEARCH CRITERIA heading, click in the checkbox(es) in the EXCLUDE GROUPS or EXCLUDE SECTIONS you want to exclude. from the Exclude Groups or Sections from your search and click SEARCH on the toolbar.
4. At the MY WORK QUEUE ITEMS screen, click on a hyperlink next to the item requiring an action.
Work Queue
Icon
Express Searches
Custom
Searches
Exclude Groups
(Roles) Exclude
Sections)
Item
Hyperlink
ECMS II - Design Reference Guide January 2009
11
PRINTING FROM ECMS
ECMS
PRINT AN ECMS SCREEN
Use the Print Screen button to print
the entire screen.
ECMS II
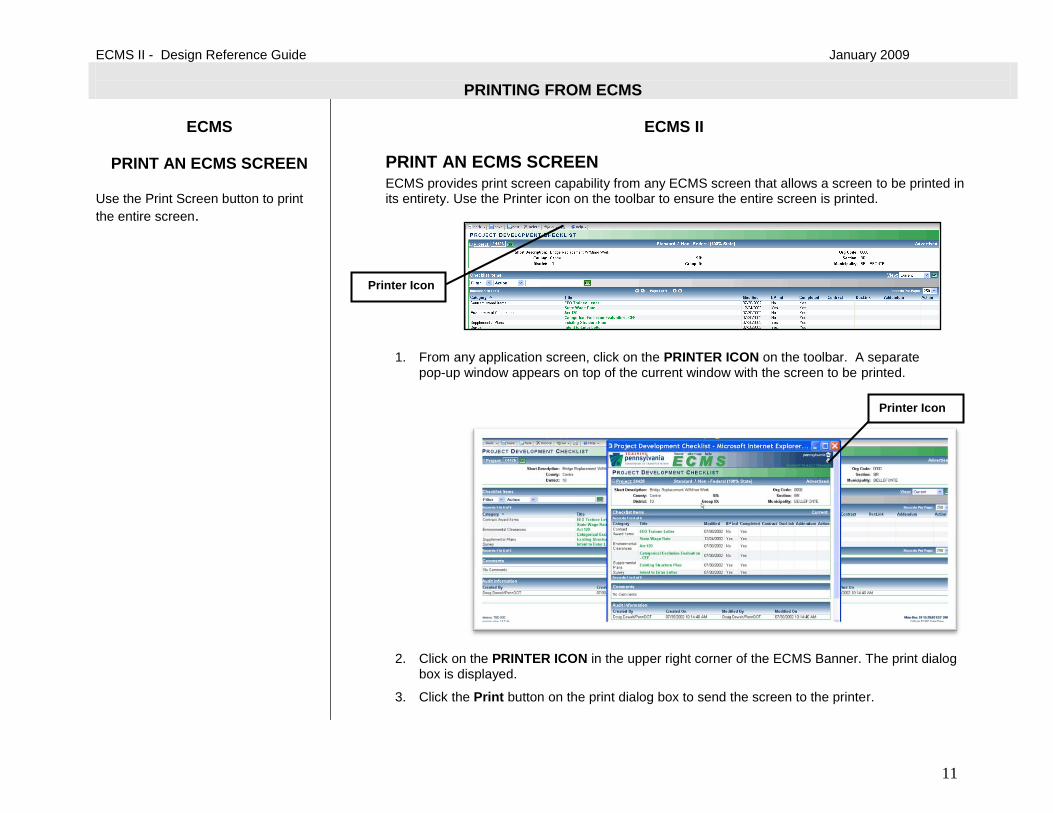
PRINT AN ECMS SCREEN ECMS provides print screen capability from any ECMS screen that allows a screen to be printed in its entirety. Use the Printer icon on the toolbar to ensure the entire screen is printed.
1. From any application screen, click on the PRINTER ICON on the toolbar. A separate pop-up window appears on top of the current window with the screen to be printed.
2. Click on the PRINTER ICON in the upper right corner of the ECMS Banner. The print dialog box is displayed.
3. Click the Print button on the print dialog box to send the screen to the printer.
Printer Icon
Printer Icon
January 2009 ECMS II – Design Reference Guide
12
ON LINE HELP
ECMS
ON-LINE HELP
Click the Help hyperlink on the ECMS banner. At the ECMS Help screen, click the Blue Twistie to expand a Help category to see the help topics beneath and click the Help Document hyperlink to open the Help document. Context sensitive help for a current screen can be accessed by clicking the Question Mark icon in the upper left corner of any ECMS screen.
ECMS II
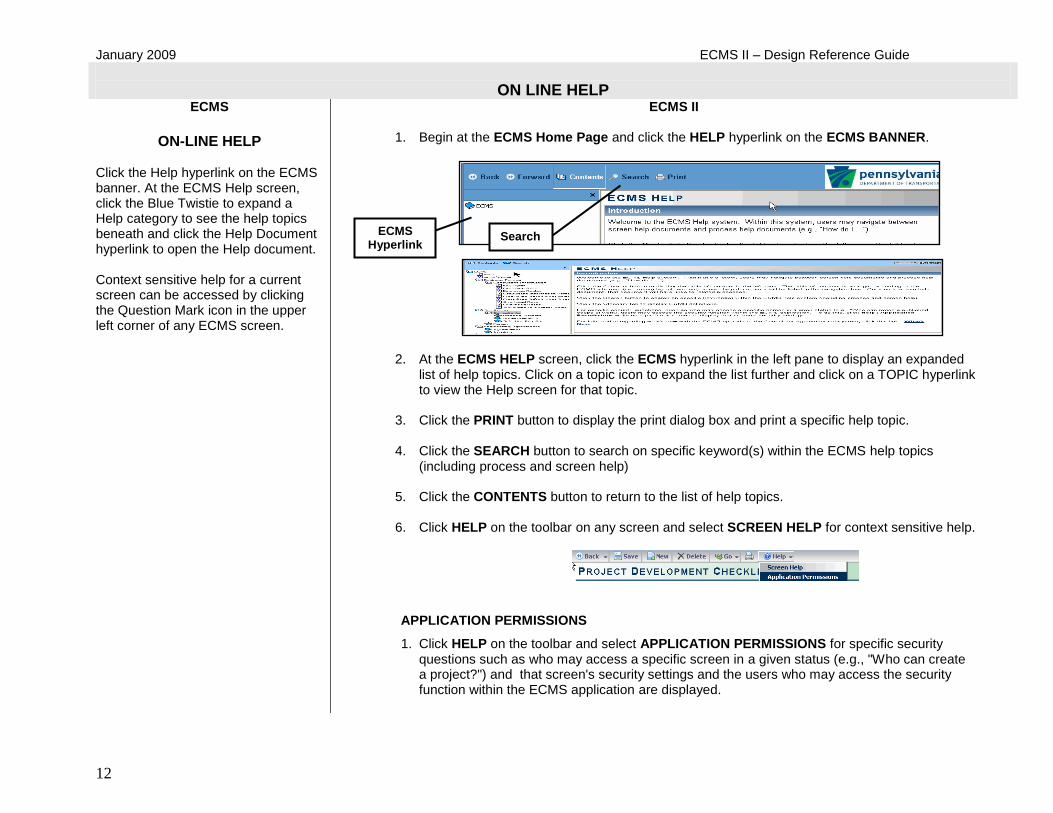
1. Begin at the ECMS Home Page and click the HELP hyperlink on the ECMS BANNER.
2. At the ECMS HELP screen, click the ECMS hyperlink in the left pane to display an expanded list of help topics. Click on a topic icon to expand the list further and click on a TOPIC hyperlink to view the Help screen for that topic.
3. Click the PRINT button to display the print dialog box and print a specific help topic.
4. Click the SEARCH button to search on specific keyword(s) within the ECMS help topics (including process and screen help)
5. Click the CONTENTS button to return to the list of help topics.
6. Click HELP on the toolbar on any screen and select SCREEN HELP for context sensitive help.
APPLICATION PERMISSIONS
1. Click HELP on the toolbar and select APPLICATION PERMISSIONS for specific security questions such as who may access a specific screen in a given status (e.g., "Who can create a project?") and that screen's security settings and the users who may access the security function within the ECMS application are displayed.
Search ECMS Hyperlink

ECMS II - Design Reference Guide January 2009
13
WORKFLOW
ECMS
ECMS REVIEW
AND APPROVALS
Reviews and approvals are performed at specific function screens, as required.
Approve and Reject buttons appear at the bottom of the screen.
ECMS II
ECMS REVIEW & APPROVALS
The Workflow process allows ECMS users to review and approve or reject items or documents within ECMS. The WORKFLOW button on the toolbar has several options as described in the table below.
Acknowledge Allows an ECMS user to acknowledge an item in ECMS
Approve Allows for the approval by various ECMS users.
Reject Allows ECMS users to reject an item in review. This option requires items to be recreated and resubmitted for review.
Reject/Revise Allows ECMS users to reject an item in review and allow for revisions to be made. The Reject/Revise option allows the item to be revised and resubmitted.
Revise Allows an ECMS user to revise a document after it has been submitted. Revisions can be made by either the Consultant or by PENNDOT. Various business rules dictate when and who can revise a document.
Submit Allows an ECMS user to submit an item for review.
1. Select the WORKFLOW button on the toolbar and then select the appropriate action. The WORKFLOW section at the bottom of many ECMS screens displays who approved an item with the action taken and a date/time stamp.
2. If an item is being rejected, you must enter a comment in the COMMENTS text box under the WORKFLOW heading. (Note: Comments are associated to a workflow action and will only be saved when performing a workflow action.)
January 2009 ECMS II – Design Reference Guide
14
LOGIN / LOGOUT ECMS
LOGGING IN
NAVIGATION BAR
Enter login name and password. Click the Go button.
LOGGING OUT
NAVIGATION BAR
Click on logout in Navigation Bar and OK on pop-up message.
ECMS II
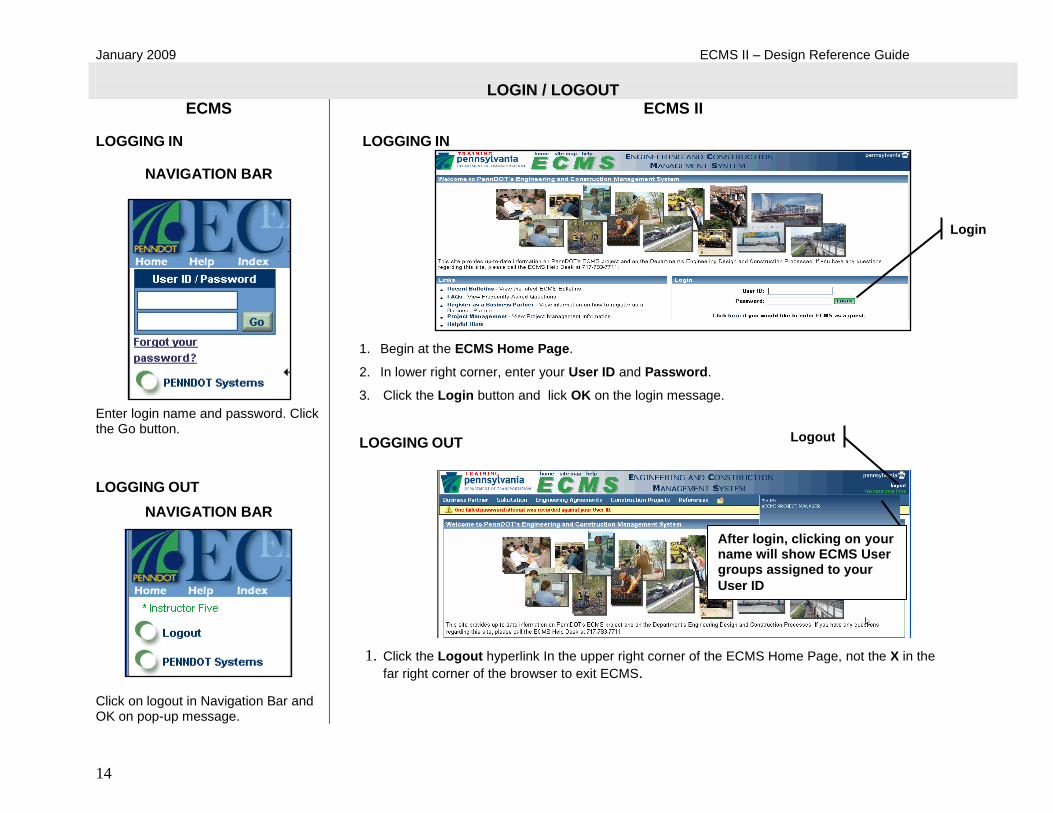
LOGGING IN
1. Begin at the ECMS Home Page.
2. In lower right corner, enter your User ID and Password.
3. Click the Login button and lick OK on the login message.
LOGGING OUT
1. Click the Logout hyperlink In the upper right corner of the ECMS Home Page, not the X in the
far right corner of the browser to exit ECMS.
Login
Logout
After logging in, you can click on your name to see the ECMS User Groups
After login, clicking on your name will show ECMS User groups assigned to your
User ID
Logout
ECMS II - Design Reference Guide January 2009
15
PROJECT INFORMATION SCREEN LAYOUT
ECMS
ECMS II
PROJECT INFORMATION SCREEN
Basic project information is entered on the Project Information screen in each of the six tabs provided. You must click Edit first and then click on each tab to enter data. When finished entering data, click Save & Exit.
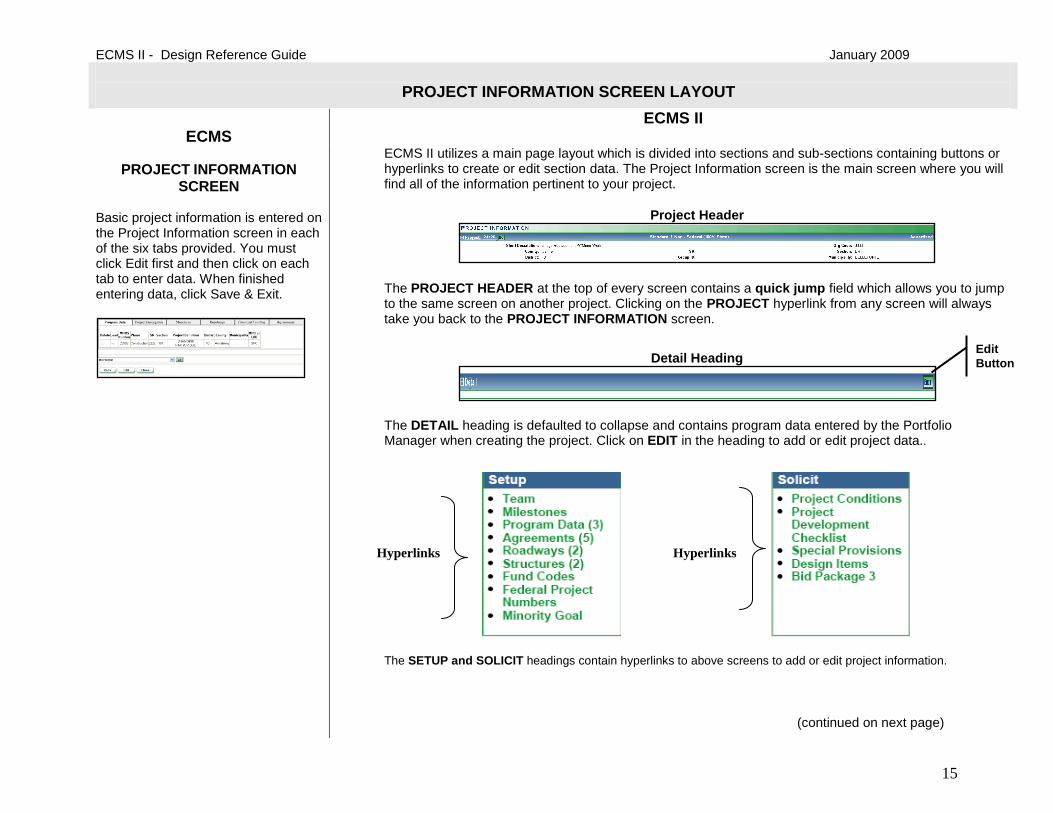
ECMS II utilizes a main page layout which is divided into sections and sub-sections containing buttons or hyperlinks to create or edit section data. The Project Information screen is the main screen where you will find all of the information pertinent to your project.
Project Header
The PROJECT HEADER at the top of every screen contains a quick jump field which allows you to jump to the same screen on another project. Clicking on the PROJECT hyperlink from any screen will always take you back to the PROJECT INFORMATION screen.
Detail Heading
The DETAIL heading is defaulted to collapse and contains program data entered by the Portfolio Manager when creating the project. Click on EDIT in the heading to add or edit project data..
The SETUP and SOLICIT headings contain hyperlinks to above screens to add or edit project information.
(continued on next page)
Edit
Button
Hyperlinks Hyperlinks
January 2009 ECMS II – Design Reference Guide
16
PROJECT INFORMATION SCREEN LAYOUT (CONT.)
ECMS
ECMS II
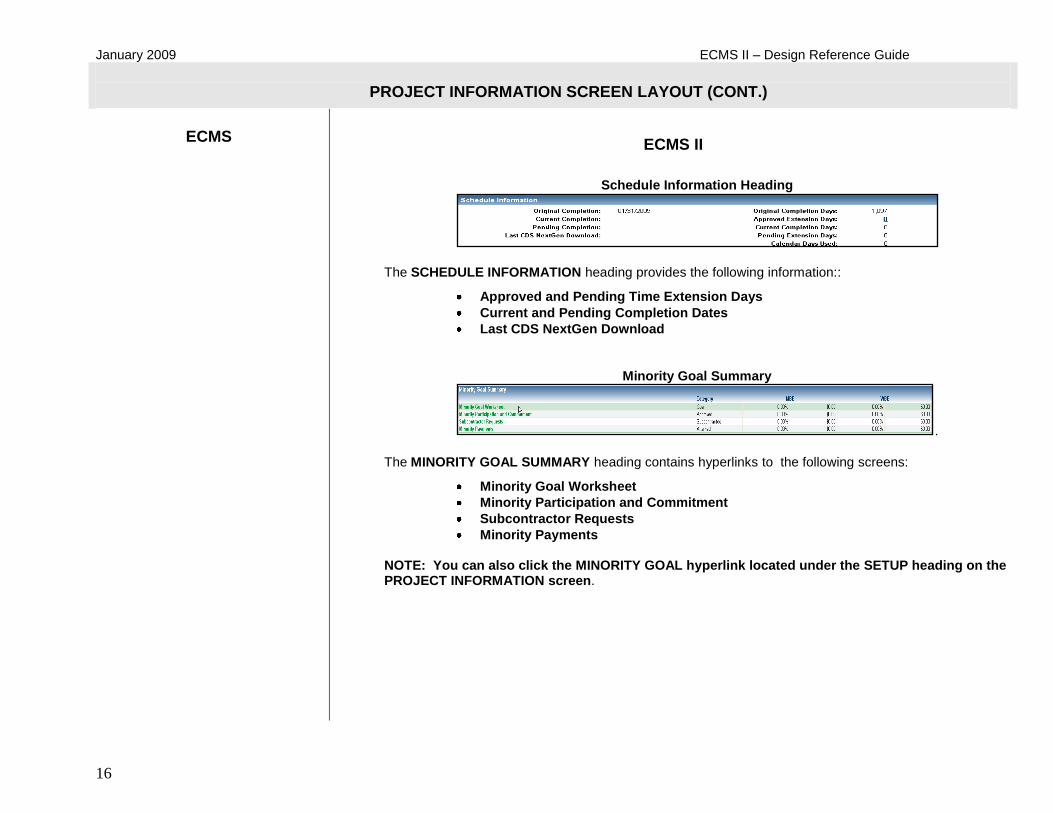
Schedule Information Heading
The SCHEDULE INFORMATION heading provides the following information::
Approved and Pending Time Extension Days
Current and Pending Completion Dates
Last CDS NextGen Download
Minority Goal Summary
.
The MINORITY GOAL SUMMARY heading contains hyperlinks to the following screens:
Minority Goal Worksheet
Minority Participation and Commitment
Subcontractor Requests
Minority Payments
NOTE: You can also click the MINORITY GOAL hyperlink located under the SETUP heading on the PROJECT INFORMATION screen.

ECMS II - Design Reference Guide January 2009
17
PROJECT MILESTONES
ECMS
ECMS II
ENTER PROJECT MILESTONES
From the My Projects Screen, click the checkbox next to the Project Number hyperlink.
Select Project Milestones from the Go drop-down list at the bottom of the screen and click Go. At the Project Milestones screen click Edit and Enter milestones, Click Save and OK.
ENTER PROJECT MILESTONES
1. Begin at the PROJECT INFORMATION screen, scroll down to the SETUP heading and click on the MILESTONES hyperlink.
2. At the MILESTONES screen, enter dates in the ECMS ANTICIPATED DATE column and click SAVE & EXIT on the toolbar.
January 2009 ECMS II – Design Reference Guide
18
ADD PROJECT TEAM MEMBER
ECMS
ECMS II
ADD PROJECT TEAM MEMBER
From My Projects screen, click Project Number hyperlink. Select Project Team from the Go drop-down list at the bottom of the project information screen and click Go.
At the Project Tean screen, click Edit and then click the Selection Arrow next to the project team role you want to add. Select the team member(s) and click Save and OK on the success message when finished.
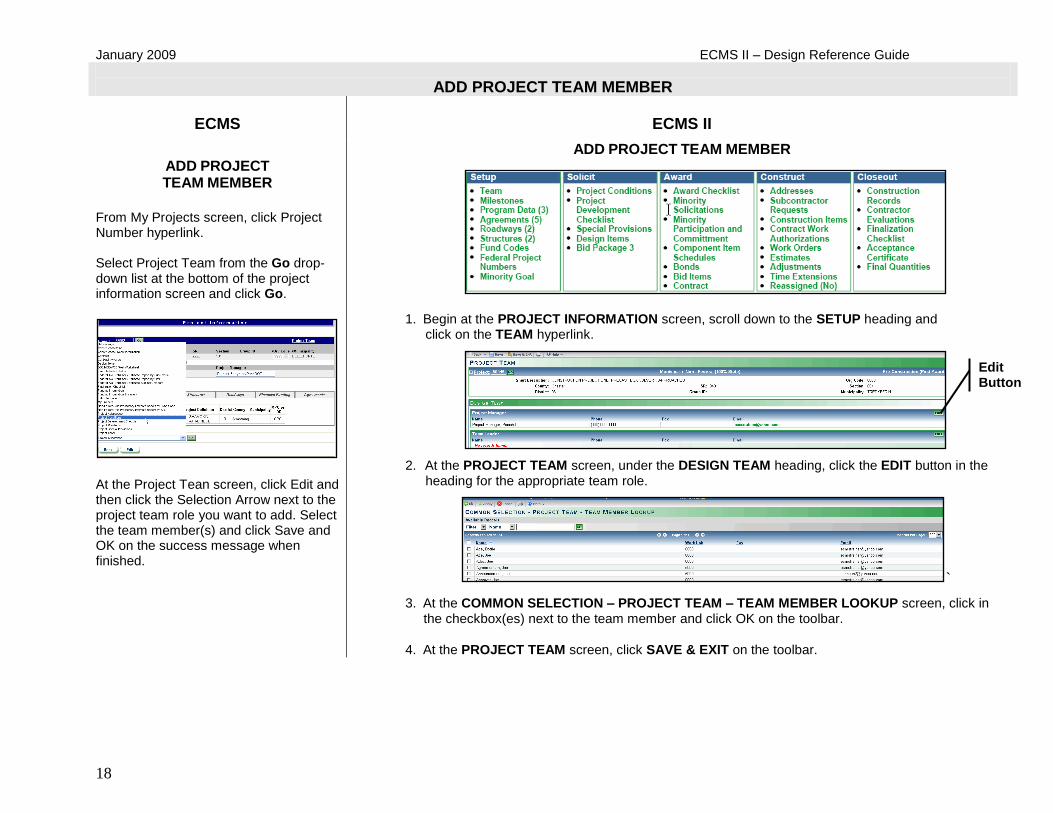
ADD PROJECT TEAM MEMBER
1. Begin at the PROJECT INFORMATION screen, scroll down to the SETUP heading and click on the TEAM hyperlink.
2. At the PROJECT TEAM screen, under the DESIGN TEAM heading, click the EDIT button in the heading for the appropriate team role.
`
3. At the COMMON SELECTION – PROJECT TEAM – TEAM MEMBER LOOKUP screen, click in the checkbox(es) next to the team member and click OK on the toolbar.
4. At the PROJECT TEAM screen, click SAVE & EXIT on the toolbar.
Edit Button
ECMS II - Design Reference Guide January 2009
19
PROJECT DEVELOPMENT CHECKLIST
ECMS
ECMS II
CREATE/UPDATE PROJECT DEVELOPMENT
CHECKLIST
At the project information screen click EDIT.
Click Create Checklist or Append button and OK to generate or update the project development checklist. Click Save.
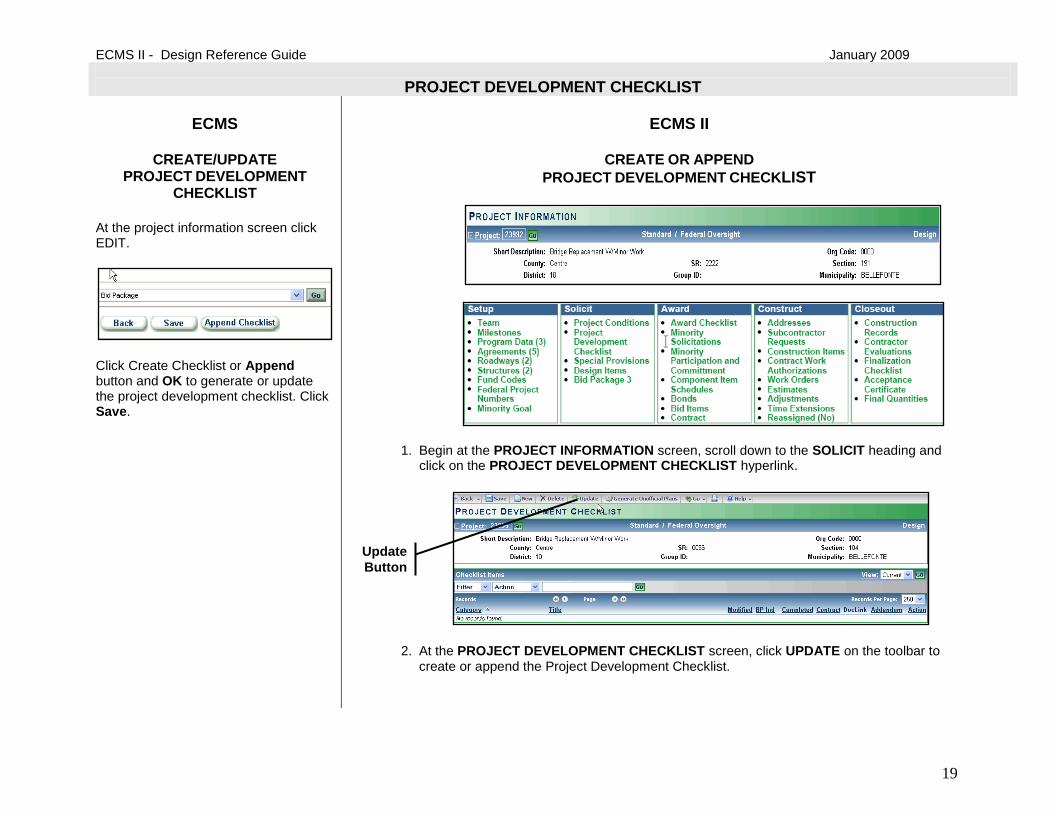
CREATE OR APPEND
PROJECT DEVELOPMENT CHECKLIST
1. Begin at the PROJECT INFORMATION screen, scroll down to the SOLICIT heading and click on the PROJECT DEVELOPMENT CHECKLIST hyperlink.
2. At the PROJECT DEVELOPMENT CHECKLIST screen, click UPDATE on the toolbar to create or append the Project Development Checklist.
Update
Button
January 2009 ECMS II – Design Reference Guide
20
PROJECT DEVELOPMENT CHECKLIST
ECMS
ECMS II
ADD A CHECKLIST ITEM
At the Project Development Checklist screen, click Edit at bottom of screen. From the Add drop-down list select Add Checklist Item and click the Add button.
At the Add Checklist Items screen, click the selection down arrow next to Select Items To Be Added. At the pop-up selection window click the X next to the item and click OK. At the Project Development Checklist click on the Checklist Item hyperlink and enter information. When finished, click Save & Exit at the bottom of the screen.
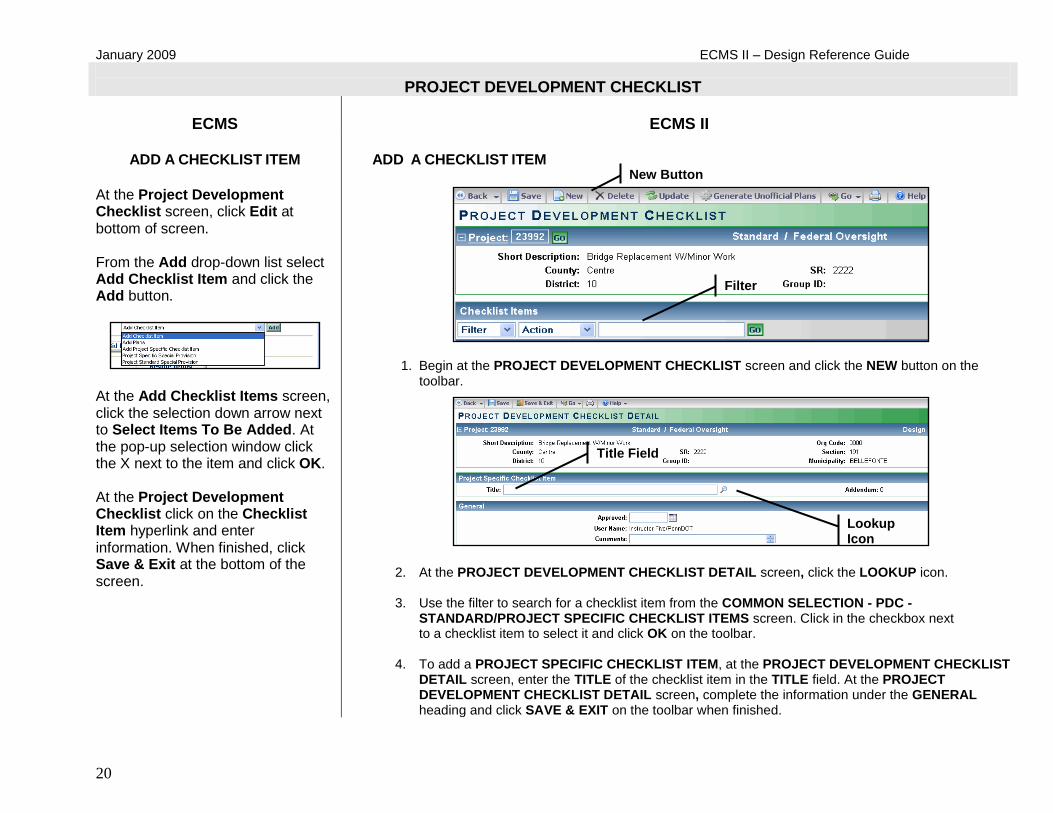
ADD A CHECKLIST ITEM
1. Begin at the PROJECT DEVELOPMENT CHECKLIST screen and click the NEW button on the toolbar.
2. At the PROJECT DEVELOPMENT CHECKLIST DETAIL screen, click the LOOKUP icon. 3. Use the filter to search for a checklist item from the COMMON SELECTION - PDC -
STANDARD/PROJECT SPECIFIC CHECKLIST ITEMS screen. Click in the checkbox next to a checklist item to select it and click OK on the toolbar.
4. To add a PROJECT SPECIFIC CHECKLIST ITEM, at the PROJECT DEVELOPMENT CHECKLIST
DETAIL screen, enter the TITLE of the checklist item in the TITLE field. At the PROJECT DEVELOPMENT CHECKLIST DETAIL screen, complete the information under the GENERAL heading and click SAVE & EXIT on the toolbar when finished.
New Button
Lookup Icon
Filter
Title Field
ECMS II - Design Reference Guide January 2009
21
PROJECT SPECIAL PROVISIONS
ECMS
ECMS II
ADD A PROJECT
SPECIAL PROVISION
At Special Provisions screen, Click Edit
at bottom of screen.
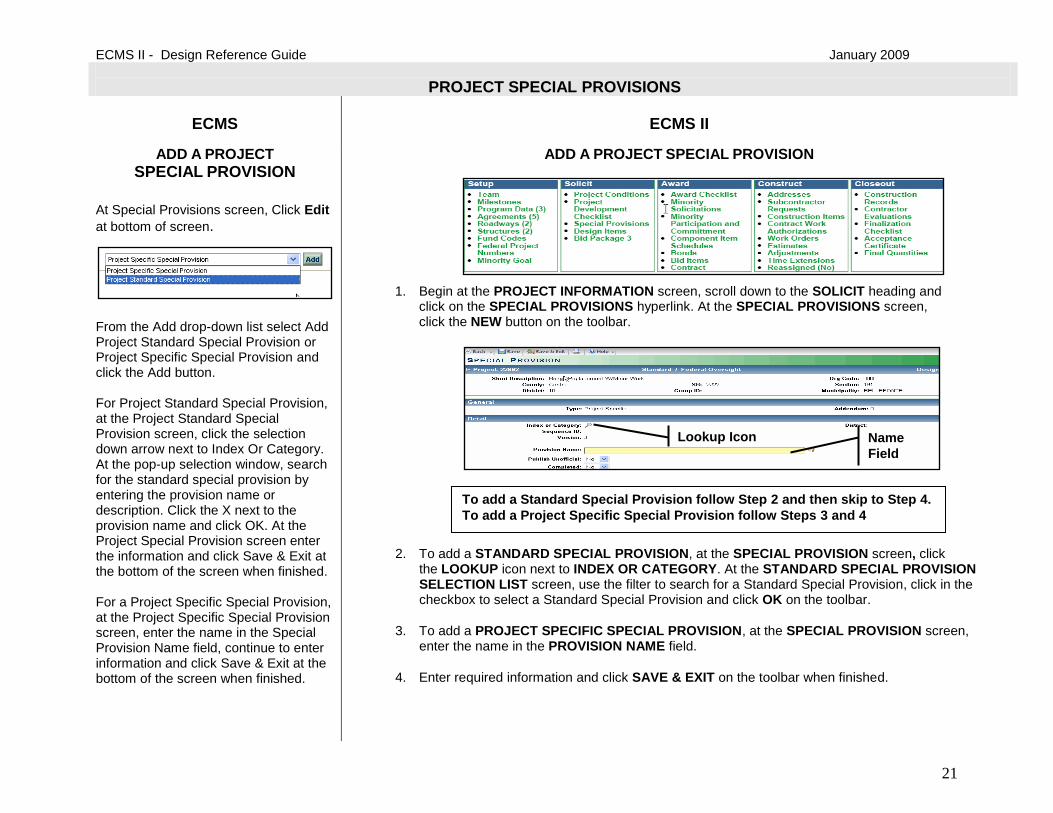
From the Add drop-down list select Add Project Standard Special Provision or Project Specific Special Provision and click the Add button. For Project Standard Special Provision, at the Project Standard Special Provision screen, click the selection down arrow next to Index Or Category. At the pop-up selection window, search for the standard special provision by entering the provision name or description. Click the X next to the provision name and click OK. At the Project Special Provision screen enter the information and click Save & Exit at the bottom of the screen when finished. For a Project Specific Special Provision, at the Project Specific Special Provision screen, enter the name in the Special Provision Name field, continue to enter information and click Save & Exit at the bottom of the screen when finished.
ADD A PROJECT SPECIAL PROVISION
1. Begin at the PROJECT INFORMATION screen, scroll down to the SOLICIT heading and click on the SPECIAL PROVISIONS hyperlink. At the SPECIAL PROVISIONS screen, click the NEW button on the toolbar.
2. To add a STANDARD SPECIAL PROVISION, at the SPECIAL PROVISION screen, click
the LOOKUP icon next to INDEX OR CATEGORY. At the STANDARD SPECIAL PROVISION SELECTION LIST screen, use the filter to search for a Standard Special Provision, click in the checkbox to select a Standard Special Provision and click OK on the toolbar.
3. To add a PROJECT SPECIFIC SPECIAL PROVISION, at the SPECIAL PROVISION screen, enter the name in the PROVISION NAME field.
4. Enter required information and click SAVE & EXIT on the toolbar when finished.
Lookup Icon Name
Field
To add a Standard Special Provision follow Step 2 and then skip to Step 4.
To add a Project Specific Special Provision follow Steps 3 and 4
January 2009 ECMS II – Design Reference Guide
22
PROJECT SPECIAL PROVISIONS
ECMS
ECMS II
LINK SPECIAL PROVISION TO
DESIGN ITEM
Begin at the Special Provisions screen,
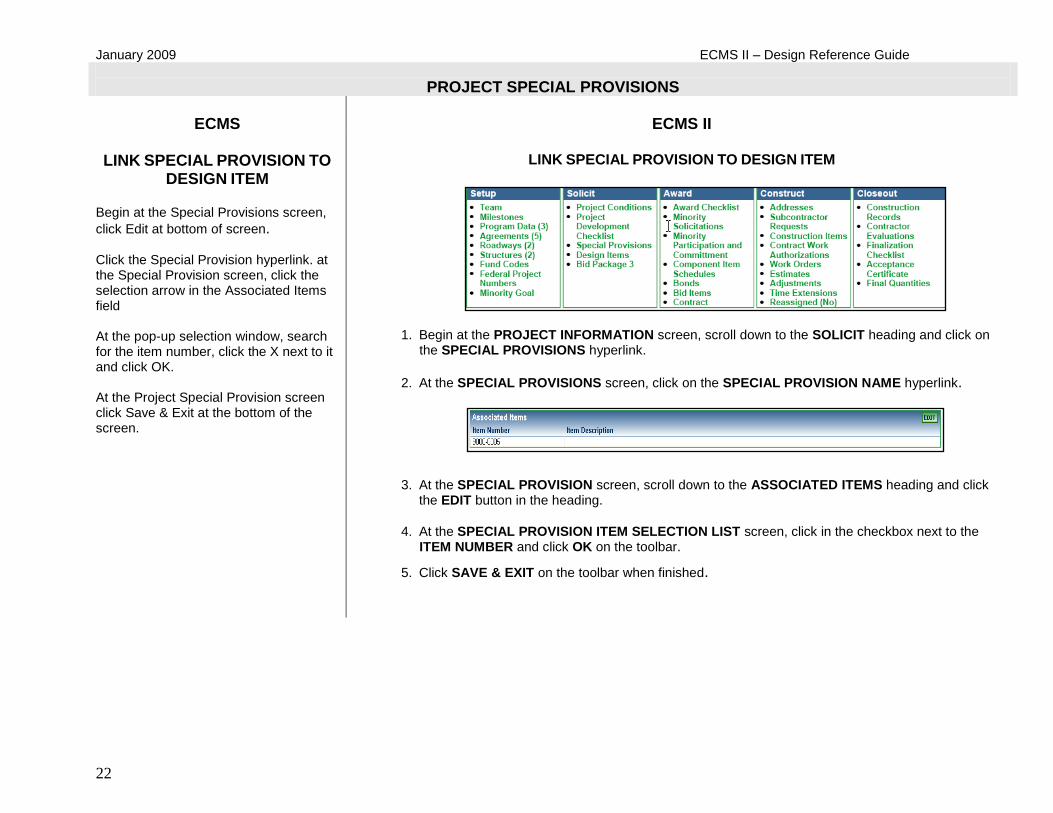
click Edit at bottom of screen. Click the Special Provision hyperlink. at the Special Provision screen, click the selection arrow in the Associated Items field At the pop-up selection window, search for the item number, click the X next to it and click OK. At the Project Special Provision screen click Save & Exit at the bottom of the screen.
LINK SPECIAL PROVISION TO DESIGN ITEM
1. Begin at the PROJECT INFORMATION screen, scroll down to the SOLICIT heading and click on the SPECIAL PROVISIONS hyperlink.
2. At the SPECIAL PROVISIONS screen, click on the SPECIAL PROVISION NAME hyperlink.
3. At the SPECIAL PROVISION screen, scroll down to the ASSOCIATED ITEMS heading and click the EDIT button in the heading.
4. At the SPECIAL PROVISION ITEM SELECTION LIST screen, click in the checkbox next to the ITEM NUMBER and click OK on the toolbar.
5. Click SAVE & EXIT on the toolbar when finished.
ECMS II - Design Reference Guide January 2009
23
DESIGN ITEMS
ECMS
ECMS II
ADD STANDARD OR MODIFIED
STANDARD ITEM TO A
PROJECT Begin at the My Projects screen, click on the checkbox next to the Project Number.
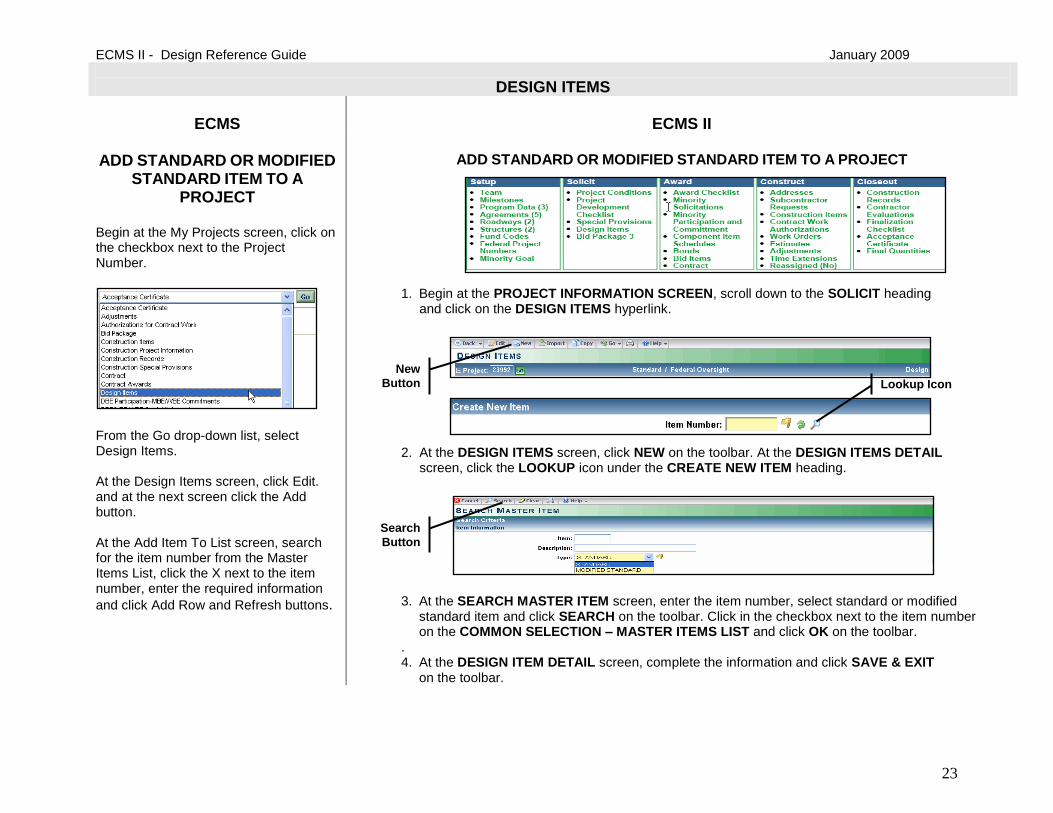
From the Go drop-down list, select Design Items. At the Design Items screen, click Edit. and at the next screen click the Add button. At the Add Item To List screen, search for the item number from the Master Items List, click the X next to the item number, enter the required information
and click Add Row and Refresh buttons.
ADD STANDARD OR MODIFIED STANDARD ITEM TO A PROJECT
1. Begin at the PROJECT INFORMATION SCREEN, scroll down to the SOLICIT heading and click on the DESIGN ITEMS hyperlink.
2. At the DESIGN ITEMS screen, click NEW on the toolbar. At the DESIGN ITEMS DETAIL screen, click the LOOKUP icon under the CREATE NEW ITEM heading.
3. At the SEARCH MASTER ITEM screen, enter the item number, select standard or modified standard item and click SEARCH on the toolbar. Click in the checkbox next to the item number on the COMMON SELECTION – MASTER ITEMS LIST and click OK on the toolbar.
. 4. At the DESIGN ITEM DETAIL screen, complete the information and click SAVE & EXIT
on the toolbar.
New
Button Lookup Icon
Search
Button
January 2009 ECMS II – Design Reference Guide
24
DESIGN ITEMS
ECMS
ECMS II
ADD NON-STANDARD ITEM TO A PROJECT
Begin at the My Projects screen. Click in the checkbox next to the Project Number.
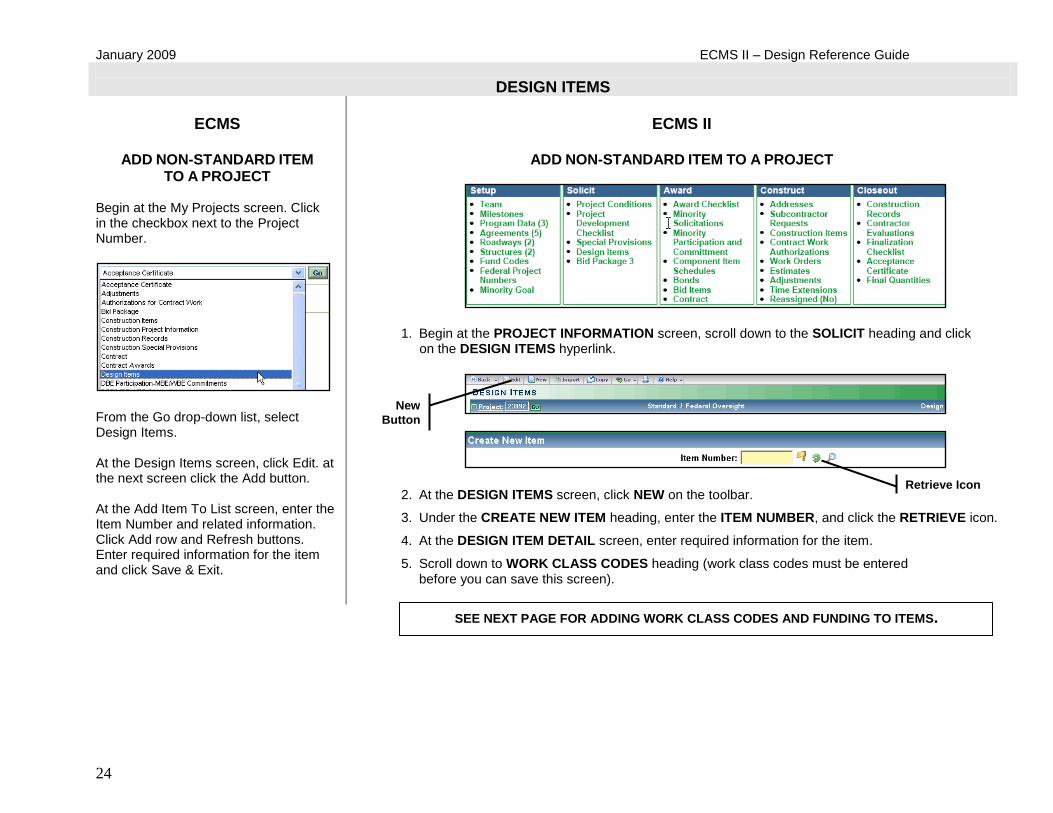
From the Go drop-down list, select Design Items. At the Design Items screen, click Edit. at the next screen click the Add button. At the Add Item To List screen, enter the Item Number and related information. Click Add row and Refresh buttons. Enter required information for the item and click Save & Exit.
ADD NON-STANDARD ITEM TO A PROJECT
1. Begin at the PROJECT INFORMATION screen, scroll down to the SOLICIT heading and click on the DESIGN ITEMS hyperlink.
2. At the DESIGN ITEMS screen, click NEW on the toolbar.
3. Under the CREATE NEW ITEM heading, enter the ITEM NUMBER, and click the RETRIEVE icon.
4. At the DESIGN ITEM DETAIL screen, enter required information for the item.
5. Scroll down to WORK CLASS CODES heading (work class codes must be entered before you can save this screen).
New
Button
Retrieve Icon
SEE NEXT PAGE FOR ADDING WORK CLASS CODES AND FUNDING TO ITEMS.
ECMS II - Design Reference Guide January 2009
25
DESIGN ITEMS
ECMS
ECMS II
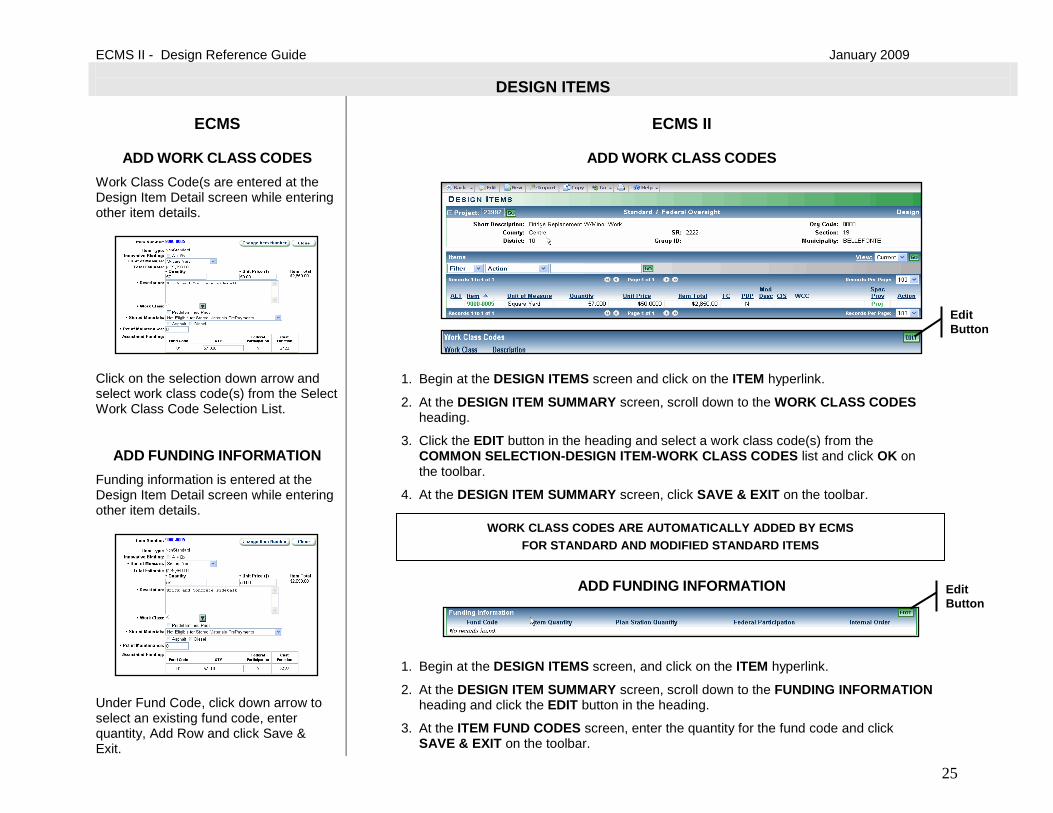
ADD WORK CLASS CODES
Work Class Code(s are entered at the Design Item Detail screen while entering other item details.
Click on the selection down arrow and select work class code(s) from the Select Work Class Code Selection List.
ADD FUNDING INFORMATION
Funding information is entered at the Design Item Detail screen while entering other item details.
Under Fund Code, click down arrow to select an existing fund code, enter quantity, Add Row and click Save & Exit.
ADD WORK CLASS CODES
1. Begin at the DESIGN ITEMS screen and click on the ITEM hyperlink.
2. At the DESIGN ITEM SUMMARY screen, scroll down to the WORK CLASS CODES heading.
3. Click the EDIT button in the heading and select a work class code(s) from the COMMON SELECTION-DESIGN ITEM-WORK CLASS CODES list and click OK on the toolbar.
4. At the DESIGN ITEM SUMMARY screen, click SAVE & EXIT on the toolbar.
ADD FUNDING INFORMATION
1. Begin at the DESIGN ITEMS screen, and click on the ITEM hyperlink.
2. At the DESIGN ITEM SUMMARY screen, scroll down to the FUNDING INFORMATION heading and click the EDIT button in the heading.
3. At the ITEM FUND CODES screen, enter the quantity for the fund code and click SAVE & EXIT on the toolbar.
Edit
Button
WORK CLASS CODES ARE AUTOMATICALLY ADDED BY ECMS
FOR STANDARD AND MODIFIED STANDARD ITEMS
Edit
Button

January 2009 ECMS II – Design Reference Guide
26
DESIGN ITEMS
ECMS
ECMS II
ADD ITEM TO COMPONENT ITEM BREAKDOWN
Begin at the Design Items screen, click Edit and then click the Add button.
At the Add Component Item To List screen, required information and click Add Row and Back buttons. At the Design Items Screen, click Refresh.
ADD ITEM TO COMPONENT ITEM BREAKDOWN
1. Begin at the DESIGN ITEMS screen and click on the LUMP SUM Item hyperlink under the ITEMS heading.
2. At the DESIGN ITEMS SUMMARY screen, scroll down and click the NEW button in the COMPONENT ITEMS heading. At the COMPONENT ITEM DETAIL screen, click on the LOOKUP icon next to COMPONENT ITEM. At the SEARCH MASTER ITEM screen, enter the ITEM NUMBER and click SEARCH on the toolbar.
3. At the COMMON SELECTION – MASTER ITEM LIST screen, click in the checkbox next to the ITEM NUMBER and click OK on the toolbar.
4. At the COMPONENT ITEM DETAIL screen, enter required information for the component item and click SAVE & EXIT on the toolbar.
Lookup
Icon
New
Button

ECMS II - Design Reference Guide January 2009
27
DESIGN ITEMS
ECMS
ECMS II
CREATE AN AS-DESIGNED (EITHER) ITEM
Begin at the Design Items screen, click Edit and then click the Add button.
At the Add Item To List screen, enter the required information, click the down arrow under the Alt column and select Either. Then click Add Row, OK and Back buttons. At the Design Items screen, click Refresh.
CREATE AN AS-DESIGNED (EITHER) ITEM
1. Begin at the DESIGN ITEMS screen and click NEW on the toolbar.
2. Enter the item number and click the RETRIEVE icon under the CREATE NEW ITEM heading.
3. At the DESIGN ITEM DETAIL screen, enter required information for the item.
4. If necessary, scroll down to WORK CLASS CODES heading and click EDIT in the heading. Enter the work class code(s) and click SAVE & EXIT on the toolbar.
5. At the DESIGN ITEMS screen, click on the ITEM hyperlink.
6. At the DESIGN ITEM SUMMARY screen, click EDIT in the ITEM DETAIL heading.
7. At the DESIGN ITEM DETAIL screen, click the CREATE EITHER button on the toolbar and click SAVE & EXIT on the toolbar.
Create Either
Button
Retrieve
Icon
Edit
Button
New
Button

January 2009 ECMS II – Design Reference Guide
28
DESIGN ITEMS
ECMS
ECMS II
CREATE AN (AND) ITEM
Begin at the Design Items screen. Click on the Either (E) or Or (O) hyperlink. At the Alternate Grouping screen, click Edit and select As-Designed or Alternate from the Select A Group drop-down list. Click Insert “And” button.
At the Add Item To List screen, select the Item Number radio button in the Search By field and select Standard Or Modified Standard radio button in the Select Item Type field. Enter required information and click Add Row and OK. At the Design Items screen, click the Refresh button.
CREATE AN (AND) ITEM
1. Begin at the DESIGN ITEMS screen and click on the E or the O under the ALT column.
2. At the ALTERNATE GROUPING screen, click on the NEW button in the AS-DESIGNED or ALTERNATE NUMBER heading.
3. At the DESIGN ITEM DETAIL screen, search for the item number using the LOOKUP icon, click in the checkbox next to the item number on the COMMON SELECTION – MASTER ITEMS LIST and click OK on the toolbar.
4. At the DESIGN ITEM DETAIL screen, enter the required information and click SAVE & EXIT on the toolbar.
New
Button
New
Button
ECMS II - Design Reference Guide January 2009
29
DESIGN ITEMS
ECMS
ECMS II
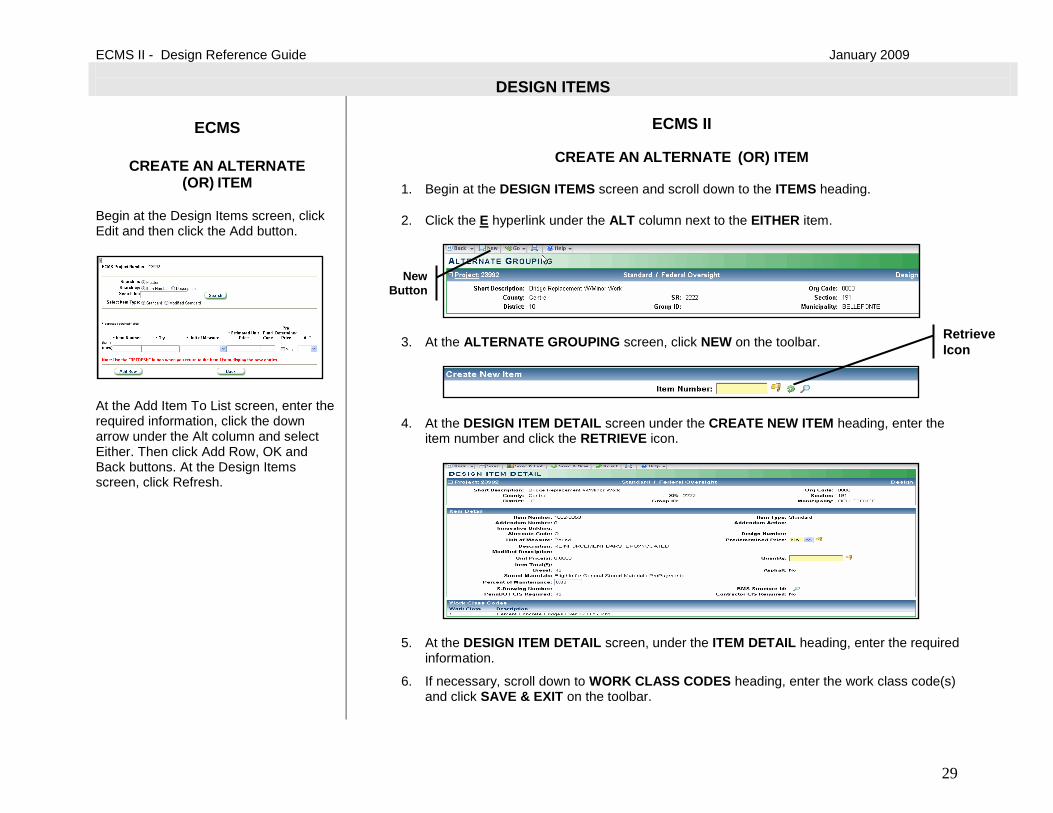
CREATE AN ALTERNATE
(OR) ITEM Begin at the Design Items screen, click Edit and then click the Add button.
At the Add Item To List screen, enter the required information, click the down arrow under the Alt column and select Either. Then click Add Row, OK and Back buttons. At the Design Items screen, click Refresh.
CREATE AN ALTERNATE (OR) ITEM
1. Begin at the DESIGN ITEMS screen and scroll down to the ITEMS heading.
2. Click the E hyperlink under the ALT column next to the EITHER item.
3. At the ALTERNATE GROUPING screen, click NEW on the toolbar.
4. At the DESIGN ITEM DETAIL screen under the CREATE NEW ITEM heading, enter the item number and click the RETRIEVE icon.
5. At the DESIGN ITEM DETAIL screen, under the ITEM DETAIL heading, enter the required
information.
6. If necessary, scroll down to WORK CLASS CODES heading, enter the work class code(s) and click SAVE & EXIT on the toolbar.
Retrieve
Icon
New
Button
January 2009 ECMS II – Design Reference Guide
30
DESIGN ITEMS
ECMS
ECMS II
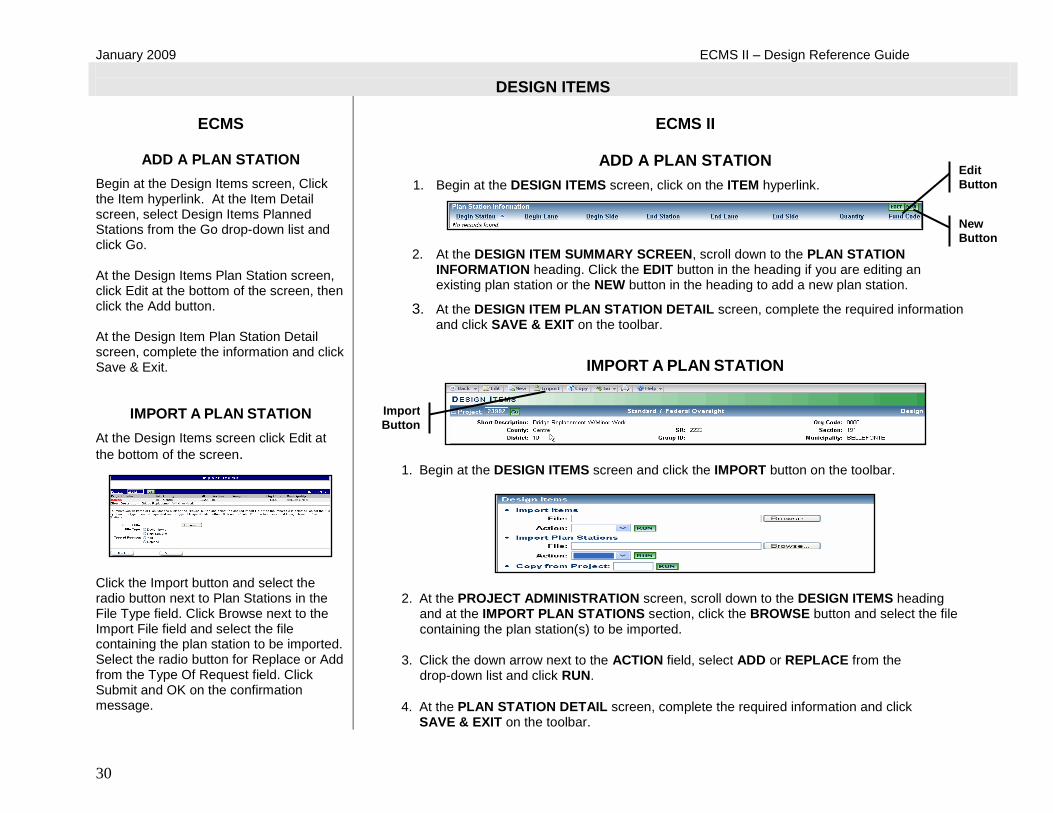
ADD A PLAN STATION
Begin at the Design Items screen, Click the Item hyperlink. At the Item Detail screen, select Design Items Planned Stations from the Go drop-down list and click Go. At the Design Items Plan Station screen, click Edit at the bottom of the screen, then click the Add button. At the Design Item Plan Station Detail screen, complete the information and click Save & Exit.
IMPORT A PLAN STATION
At the Design Items screen click Edit at
the bottom of the screen.
Click the Import button and select the radio button next to Plan Stations in the File Type field. Click Browse next to the Import File field and select the file containing the plan station to be imported. Select the radio button for Replace or Add from the Type Of Request field. Click Submit and OK on the confirmation message.
ADD A PLAN STATION
1. Begin at the DESIGN ITEMS screen, click on the ITEM hyperlink.
2. At the DESIGN ITEM SUMMARY SCREEN, scroll down to the PLAN STATION INFORMATION heading. Click the EDIT button in the heading if you are editing an existing plan station or the NEW button in the heading to add a new plan station.
3. At the DESIGN ITEM PLAN STATION DETAIL screen, complete the required information and click SAVE & EXIT on the toolbar.
IMPORT A PLAN STATION
1. Begin at the DESIGN ITEMS screen and click the IMPORT button on the toolbar.
2. At the PROJECT ADMINISTRATION screen, scroll down to the DESIGN ITEMS heading and at the IMPORT PLAN STATIONS section, click the BROWSE button and select the file containing the plan station(s) to be imported.
3. Click the down arrow next to the ACTION field, select ADD or REPLACE from the drop-down list and click RUN.
4. At the PLAN STATION DETAIL screen, complete the required information and click SAVE & EXIT on the toolbar.
New
Button
Edit
Button
Import
Button
ECMS II - Design Reference Guide January 2009
31
DESIGN ITEMS
ECMS
ECMS II
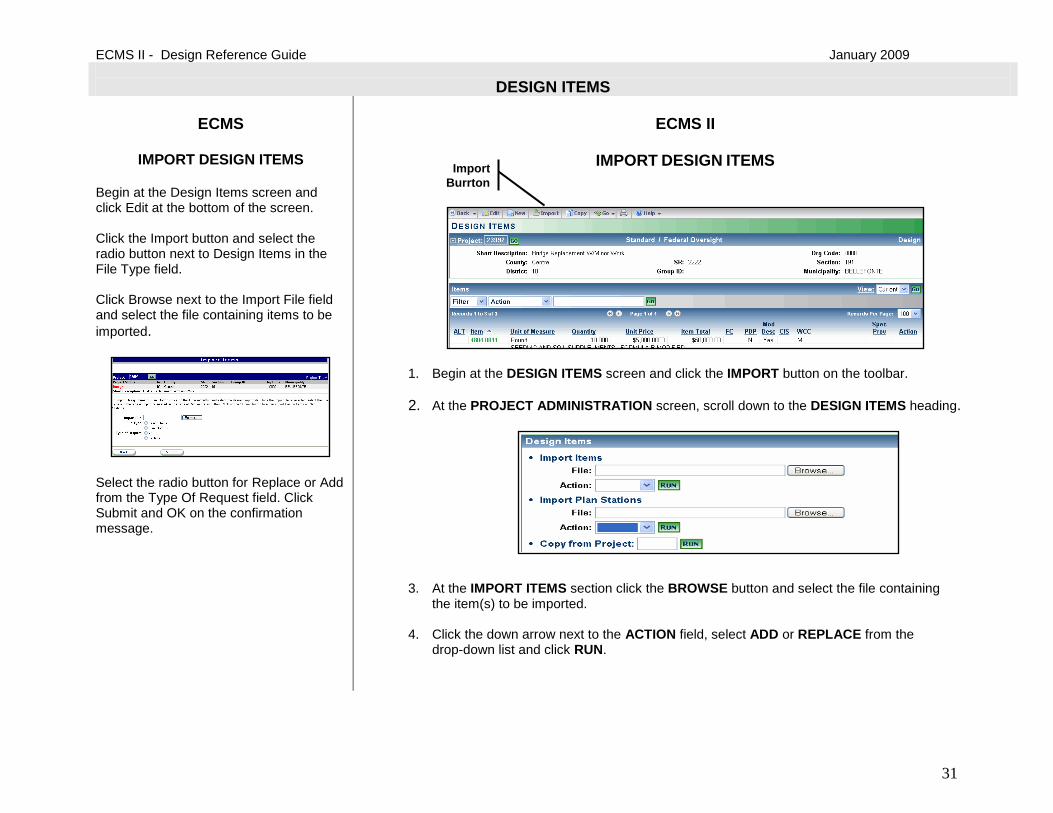
IMPORT DESIGN ITEMS
Begin at the Design Items screen and click Edit at the bottom of the screen. Click the Import button and select the radio button next to Design Items in the File Type field. Click Browse next to the Import File field and select the file containing items to be
imported.
Select the radio button for Replace or Add from the Type Of Request field. Click Submit and OK on the confirmation message.
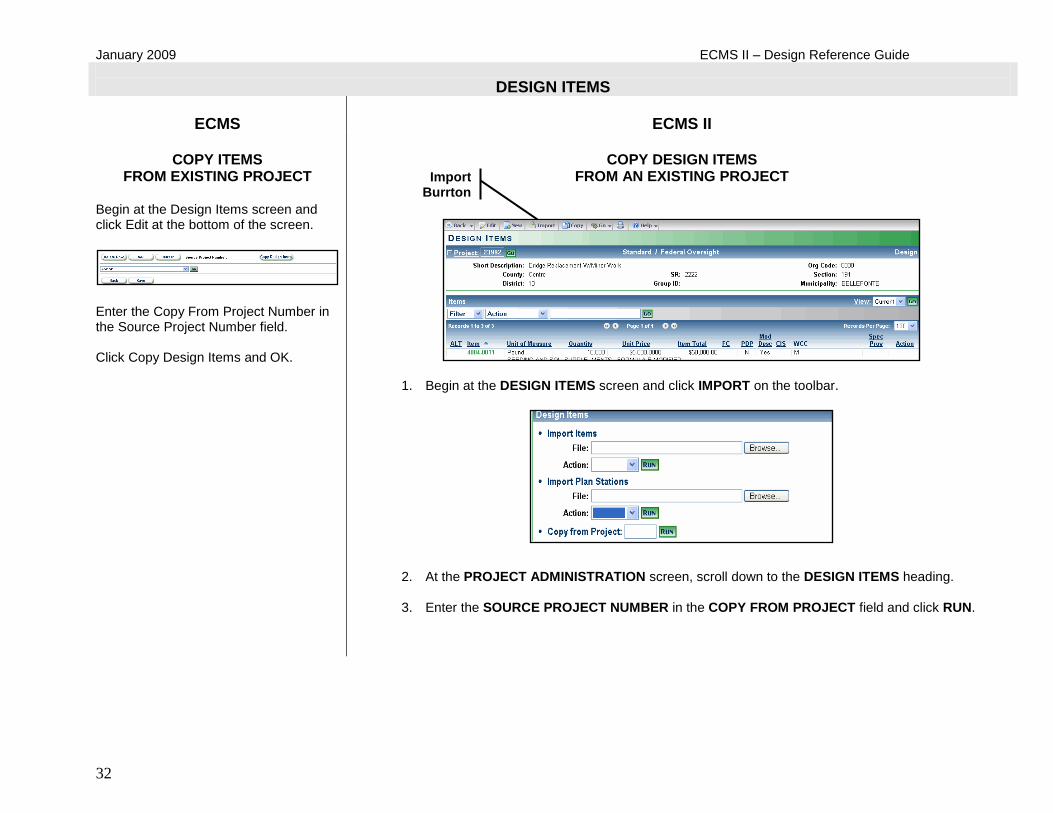
IMPORT DESIGN ITEMS
1. Begin at the DESIGN ITEMS screen and click the IMPORT button on the toolbar.
2. At the PROJECT ADMINISTRATION screen, scroll down to the DESIGN ITEMS heading.
3. At the IMPORT ITEMS section click the BROWSE button and select the file containing the item(s) to be imported.
4. Click the down arrow next to the ACTION field, select ADD or REPLACE from the
drop-down list and click RUN.
Import
Burrton
January 2009 ECMS II – Design Reference Guide
32
DESIGN ITEMS
ECMS
ECMS II
COPY ITEMS FROM EXISTING PROJECT
Begin at the Design Items screen and click Edit at the bottom of the screen.
Enter the Copy From Project Number in the Source Project Number field. Click Copy Design Items and OK.
COPY DESIGN ITEMS
FROM AN EXISTING PROJECT
1. Begin at the DESIGN ITEMS screen and click IMPORT on the toolbar.
2. At the PROJECT ADMINISTRATION screen, scroll down to the DESIGN ITEMS heading.
3. Enter the SOURCE PROJECT NUMBER in the COPY FROM PROJECT field and click RUN.
Import Burrton
ECMS II - Design Reference Guide January 2009
33
MINORITY GOAL SUMMARY
ECMS
ECMS II
MINORITY GOAL WORKSHEET
Begin at the Project Development Checklist screen. From the drop-down list select DBE/MBE/WBE Goal Worksheet and click Go.
At the DBE/MBE/WBE Goal Work-Sheet, click Edit at the bottom of the screen. Enter the percentage in the DBE field and enter comments if necessary. Click Save & Exit and OK.
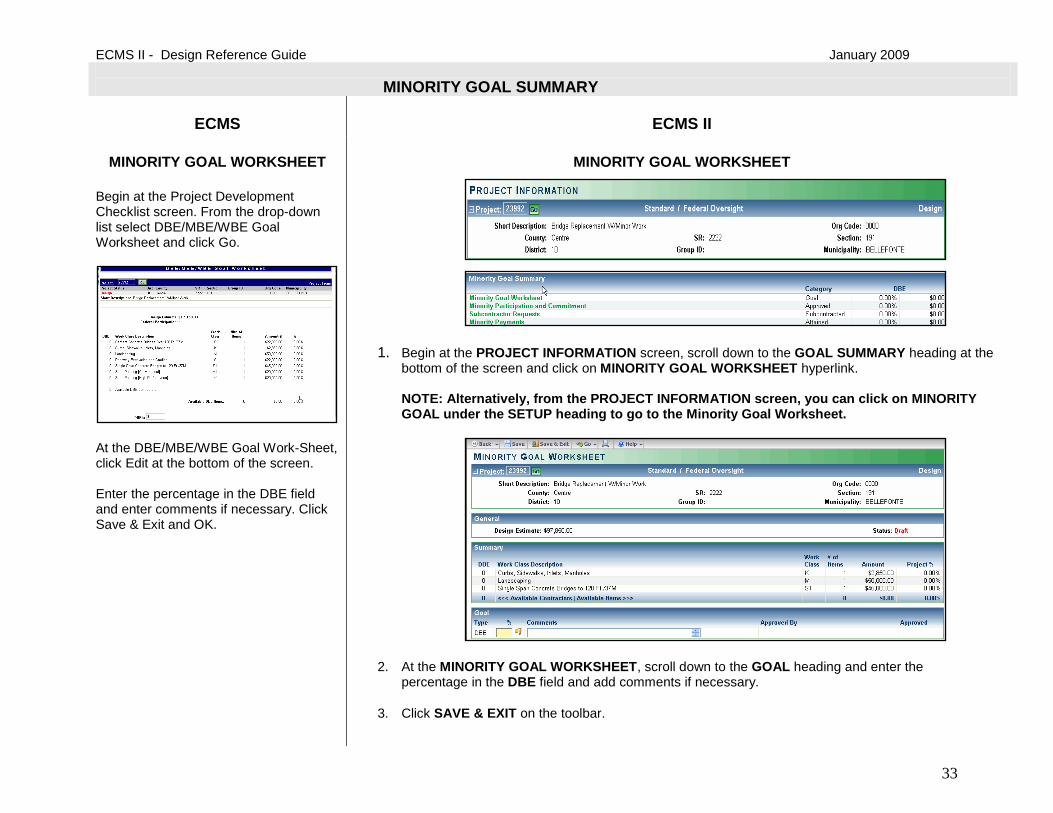
MINORITY GOAL WORKSHEET
1. Begin at the PROJECT INFORMATION screen, scroll down to the GOAL SUMMARY heading at the bottom of the screen and click on MINORITY GOAL WORKSHEET hyperlink. NOTE: Alternatively, from the PROJECT INFORMATION screen, you can click on MINORITY GOAL under the SETUP heading to go to the Minority Goal Worksheet.
2. At the MINORITY GOAL WORKSHEET, scroll down to the GOAL heading and enter the percentage in the DBE field and add comments if necessary.
3. Click SAVE & EXIT on the toolbar.
January 2009 ECMS II – Design Reference Guide
34
CREATE BID PACKAGE
ECMS
ECMS II
CREATE A BID PACKAGE
Begin at the My Projects screen and click the checkbox next to the Project Number hyperlink. Select Project Development Checklist from the Go drop-down list and click the Go button.
Scroll to bottom of screen
At the Project Development Checklist, scroll down to the bottom of the screen and click the Create Bid Package button. Enter the required information and click Save.
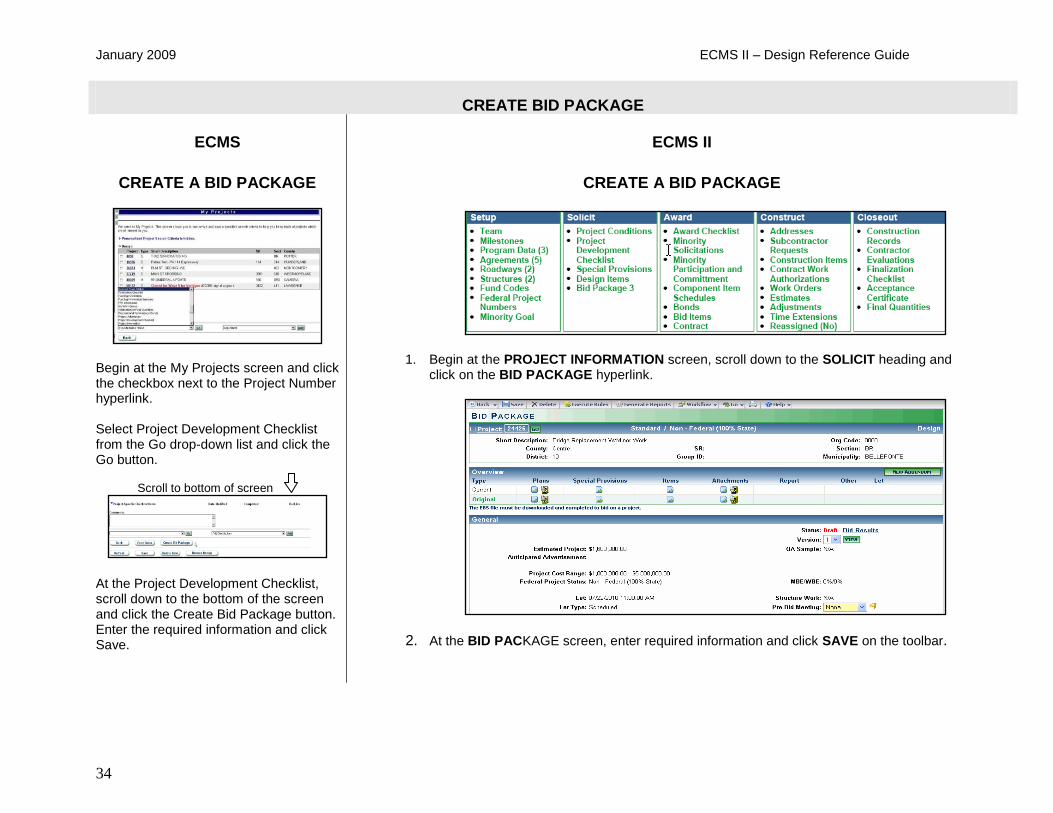
CREATE A BID PACKAGE
1. Begin at the PROJECT INFORMATION screen, scroll down to the SOLICIT heading and click on the BID PACKAGE hyperlink.
2. At the BID PACKAGE screen, enter required information and click SAVE on the toolbar.
ECMS II - Design Reference Guide January 2009
35
BID PACKAGE – EXECUTE RULES
ECMS
ECMS II
EXECUTE RULES
Scroll to bottom of screen
Begin at the Bid Package screen and scroll down to the bottom of the screen. Click Execute Rules button. If there are errors, the Execute Rules Status screen is displayed. Errors must be fixed or overridden before submitting or publishing a bid package. To view the results of Execute Rules, from My Projects, click the checkbox next to the Project Number hyperlink and select Execute Rules from the Go drop-down list and click the Go button.
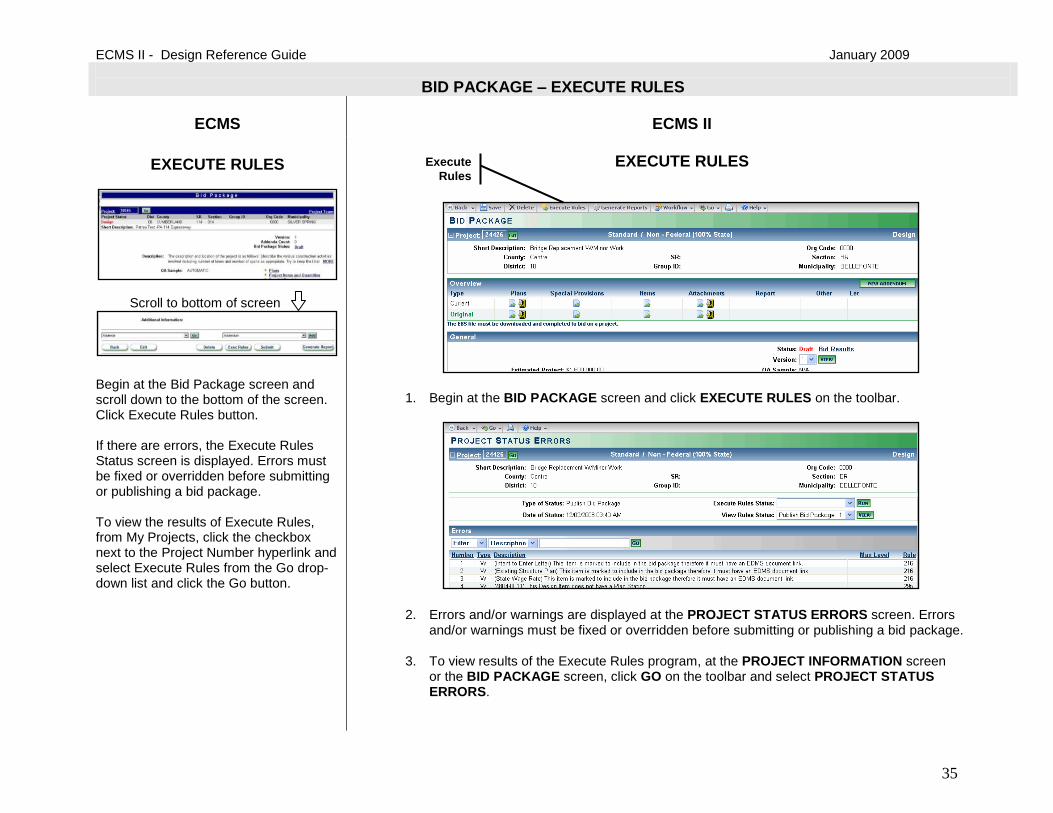
EXECUTE RULES
1. Begin at the BID PACKAGE screen and click EXECUTE RULES on the toolbar.
2. Errors and/or warnings are displayed at the PROJECT STATUS ERRORS screen. Errors and/or warnings must be fixed or overridden before submitting or publishing a bid package.
3. To view results of the Execute Rules program, at the PROJECT INFORMATION screen or the BID PACKAGE screen, click GO on the toolbar and select PROJECT STATUS ERRORS.
Execute
Rules

January 2009 ECMS II – Design Reference Guide
36
SUBMIT / PUBLISH A BID PACKAGE
ECMS
ECMS II
SUBMIT OR PUBLISH A BID PACKAGE
Begin at the My Projects screen, click the checkbox next to the Project Number hyperlink and select Bid Package.
Scroll to bottom of screen
To Submit or Publish a Bid Package, at the Bid Package screen, scroll down to the bottom of the screen and click Submit or Publish and OK on the confirmation message.
CREATE BID COMMENT
To create a Bid Package Comment, at the Bid Package screen, scroll down to the bottom of the screen and select Bid Package Comment from the Add drop-down list and click Add. Enter comments in the Comment field and click Save.
SUBMIT OR PUBLISH A BID PACKAGE
1. Begin at the BID PACKAGE screen. Scroll down to the WORKFLOW heading and add comments in the comments text box, if necessary. (Note: The comments are associated to a workflow action and will only be saved when performing a workflow action.)
2. Click WORKFLOW on the toolbar and select SUBMIT or PUBLISH. Any comments entered under the WORKFLOW heading will be saved at this time.
3. The Bid Package Status changes from DRAFT to PENDING.
Bid Package
Status
ECMS II - Design Reference Guide January 2009
37
BID PACKAGE
ECMS
ECMS II
RESPOND TO BID PACKAGE
QUESTION
From the Navigation Bar, select PROJECT SERVICES and then EBIDDING option.
At the Ebidding screen and click Bid Packages Questions For Review hyperlink under the Information For Review field. At the Bid Package Questions For Review screen, click the Subject hyperlink in the Short Description field.
At the Bid Package Clarification screen, enter a response in the Answer field and click Publish and OK on the confirmation message.
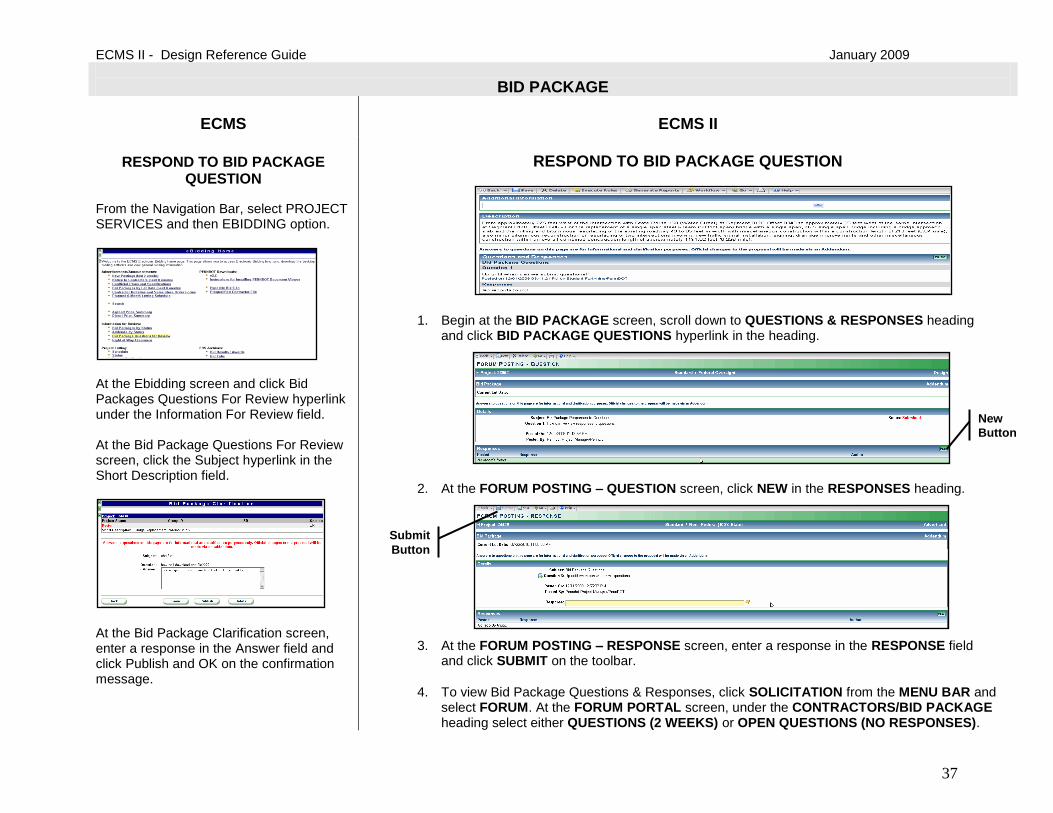
RESPOND TO BID PACKAGE QUESTION
1. Begin at the BID PACKAGE screen, scroll down to QUESTIONS & RESPONSES heading and click BID PACKAGE QUESTIONS hyperlink in the heading.
2. At the FORUM POSTING – QUESTION screen, click NEW in the RESPONSES heading.
3. At the FORUM POSTING – RESPONSE screen, enter a response in the RESPONSE field and click SUBMIT on the toolbar.
4. To view Bid Package Questions & Responses, click SOLICITATION from the MENU BAR and select FORUM. At the FORUM PORTAL screen, under the CONTRACTORS/BID PACKAGE heading select either QUESTIONS (2 WEEKS) or OPEN QUESTIONS (NO RESPONSES).
New
Button
Submit
Button

January 2009 ECMS II – Design Reference Guide
38
ADDENDUM
ECMS
ECMS II
CREATE AN ADDENDUM
Scroll to bottom of screen
Begin at the Bid Package screen, scroll down to the bottom and select Addendum from the Add drop-down list and click Add. Enter the required information and click Save and OK.
CREATE AN ADDENDUM
1. Begin at the BID PACKAGE screen, scroll down to the OVERVIEW section heading and click NEW ADDENDUM in the heading.
2. At the ADDENDUM screen, enter required information under the GENERAL heading and click SAVE on the toolbar.
ECMS II - Design Reference Guide January 2009
39
ADDENDUM
ECMS
ECMS II
ADD ITEM VIA ADDENDUM
Begin at the Bid Package screen and select Addenda from the Go drop-down list and click Go.
At the Addenda screen, click the Addendum
Number hyperlink.
At the Addendum screen, scroll to the bottom and select Design Items and click Add. If necessary, click Edit.
At the DESIGN ITEMS screen, click Add and at the Select From Master Item List screen, click the Item Number radio button, enter the item number, click Standard or Modified Standard radio button and click Search.
(continued)
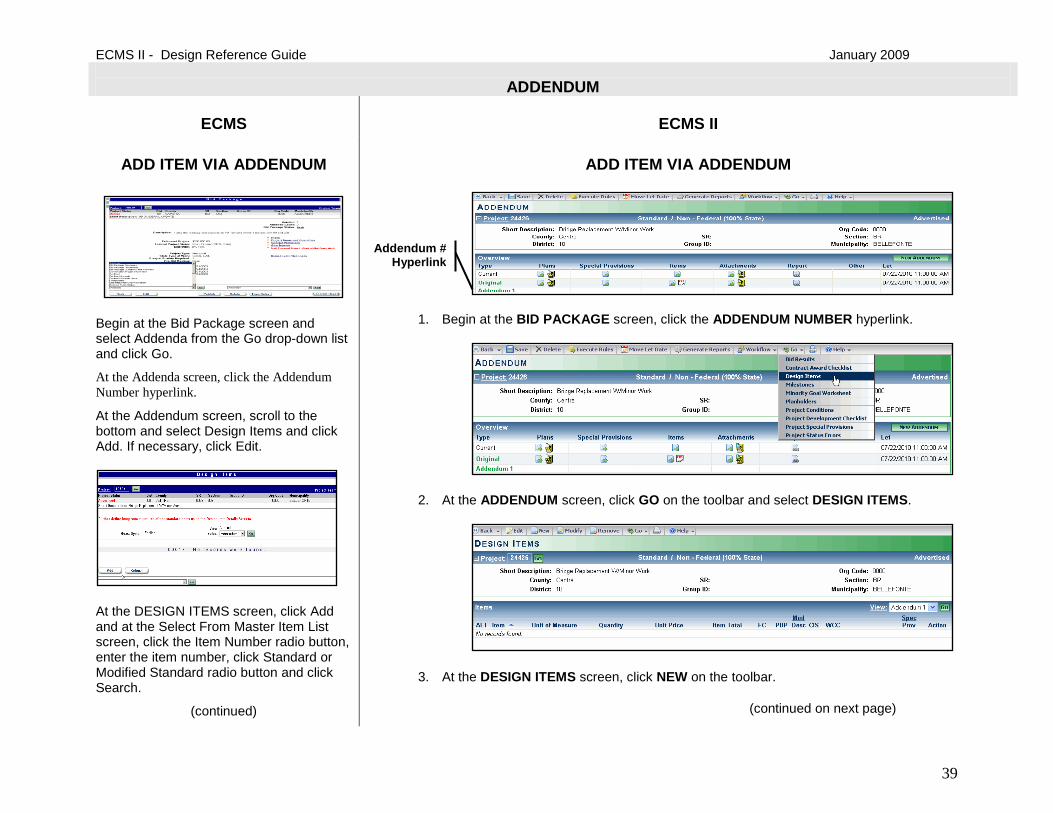
ADD ITEM VIA ADDENDUM
1. Begin at the BID PACKAGE screen, click the ADDENDUM NUMBER hyperlink.
2. At the ADDENDUM screen, click GO on the toolbar and select DESIGN ITEMS.
3. At the DESIGN ITEMS screen, click NEW on the toolbar.
(continued on next page)
Addendum # Hyperlink
Rules
January 2009 ECMS II – Design Reference Guide
40
ADDENDUM
ECMS
ECMS II
ADD ITEM VIA ADDENDUM (Cont.)
At the Add Item To List screen, enter item information, click Add Row, OK and Back buttons. At the Design Items screen, click Refresh.
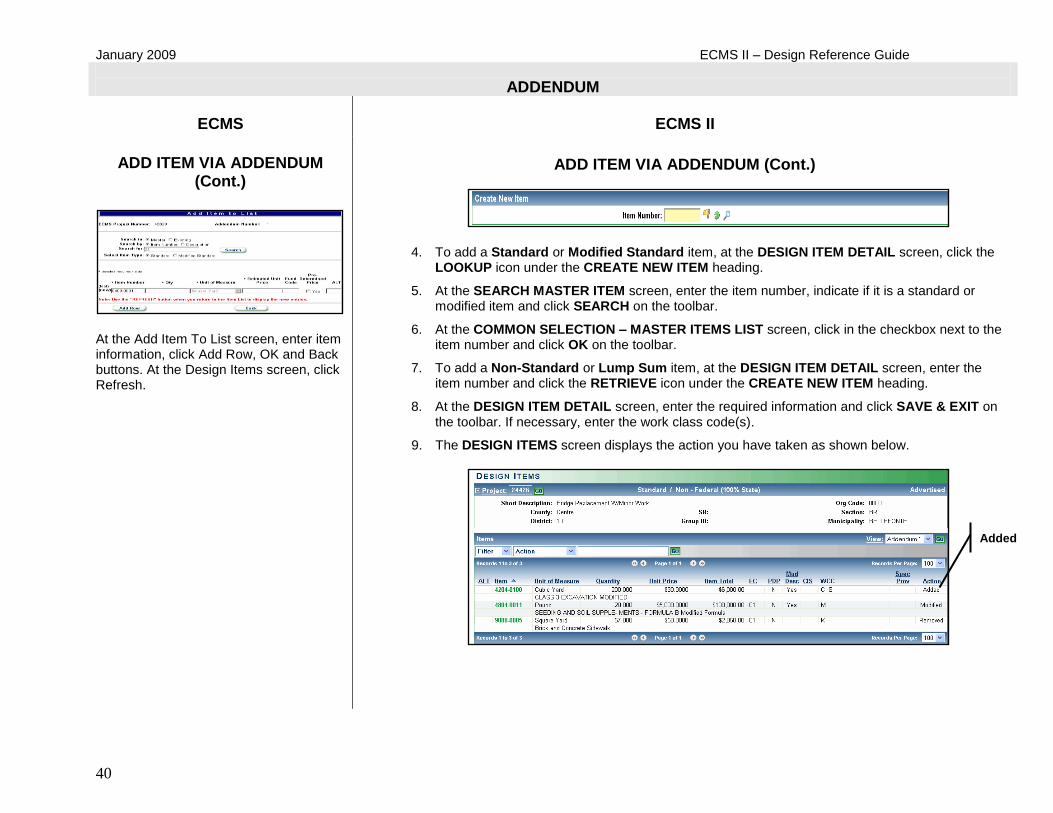
ADD ITEM VIA ADDENDUM (Cont.)
4. To add a Standard or Modified Standard item, at the DESIGN ITEM DETAIL screen, click the LOOKUP icon under the CREATE NEW ITEM heading.
5. At the SEARCH MASTER ITEM screen, enter the item number, indicate if it is a standard or modified item and click SEARCH on the toolbar.
6. At the COMMON SELECTION – MASTER ITEMS LIST screen, click in the checkbox next to the item number and click OK on the toolbar.
7. To add a Non-Standard or Lump Sum item, at the DESIGN ITEM DETAIL screen, enter the item number and click the RETRIEVE icon under the CREATE NEW ITEM heading.
8. At the DESIGN ITEM DETAIL screen, enter the required information and click SAVE & EXIT on the toolbar. If necessary, enter the work class code(s).
9. The DESIGN ITEMS screen displays the action you have taken as shown below.
Added

ECMS II - Design Reference Guide January 2009
41
ADDENDUM
ECMS
ECMS II
MODIFY EXISTING ITEM VIA ADDENDUM
Begin at the Bid Package screen and select Addenda from the Go drop-down list and click Go. at the Addenda screen,
click the Addendum Number hyperlink.
At the Addendum screen, scroll to the bottom and select Design Items and click Add. If necessary, click Edit.
At the Design Items screen, click Add and at the Select From Master Item List screen, select the radio buttons for Existing Item and Item Number, Enter the item number in the Search For field and click Search. Select the item, then click Modify Row, OK and Back buttons.
At the Design Items screen, click Refresh. Click the Modified Item Number in the Alt Item Number field, click Edit and enter changes. Click Save & EXIT and OK when finished.
MODIFY EXISTING ITEM VIA ADDENDUM
1. Begin at the ADDENDUM screen, click GO on the toolbar and select DESIGN ITEMS.
2. At the DESIGN ITEMS screen, click MODIFY on the toolbar
3. At the COMMON SELECTION – SELECT DESIGN ITEMS TO MODIFY screen, click the checkbox next to the existing item(s) you want to modify and click OK on the toolbar.
4. At the DESIGN ITEM DETAIL screen, enter the information and click SAVE & EXIT on the toolbar.
5. The DESIGN ITEMS screen displays the action you have taken as shown below.
Modified
January 2009 ECMS II – Design Reference Guide
42
ADDENDUM
ECMS
ECMS II
DELETE DESIGN ITEM FROM ORIGINAL BID PACKAGE VIA
ADDENDUM
Begin at the Bid Package screen and select Addenda from the Go drop-down list. Click Go at the Addenda screen and
click the Addendum Number hyperlink.
At the Addendum screen, scroll to the bottom and select Design Items and click Add. If necessary click Edit.
At the Add Item To List screen, select Existing And Item Number radio buttons in the Search For field and click Search. Select the item, then click MODIFY ROW, OK and BACK buttons.
At the Design Items screen, click Refresh. Click the Item Number hyperlink in the Item Number field. Click the checkbox next to the Delete Item From Bid Package/ Proposal/Project field.
Click Save & Exit and OK when finished.
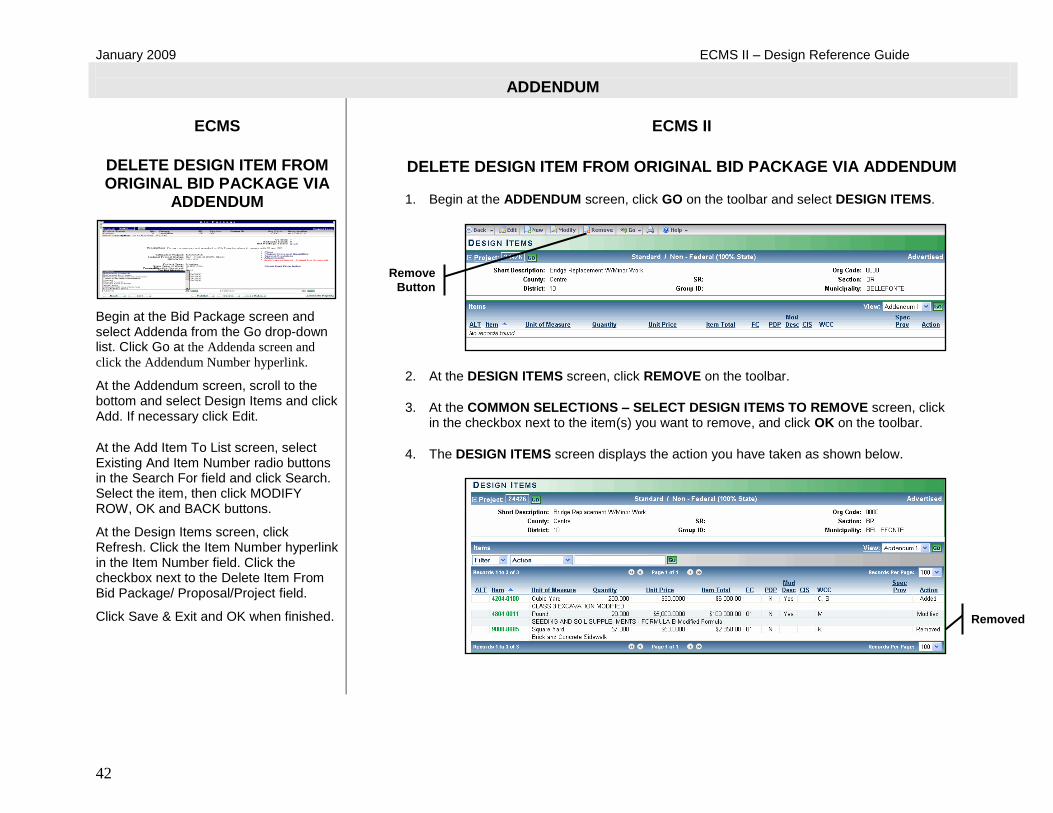
DELETE DESIGN ITEM FROM ORIGINAL BID PACKAGE VIA ADDENDUM
1. Begin at the ADDENDUM screen, click GO on the toolbar and select DESIGN ITEMS.
2. At the DESIGN ITEMS screen, click REMOVE on the toolbar.
3. At the COMMON SELECTIONS – SELECT DESIGN ITEMS TO REMOVE screen, click in the checkbox next to the item(s) you want to remove, and click OK on the toolbar.
4. The DESIGN ITEMS screen displays the action you have taken as shown below.
Remove
Button
Removed
ECMS II - Design Reference Guide January 2009
43
ADDENDUM ECMS ECMS II
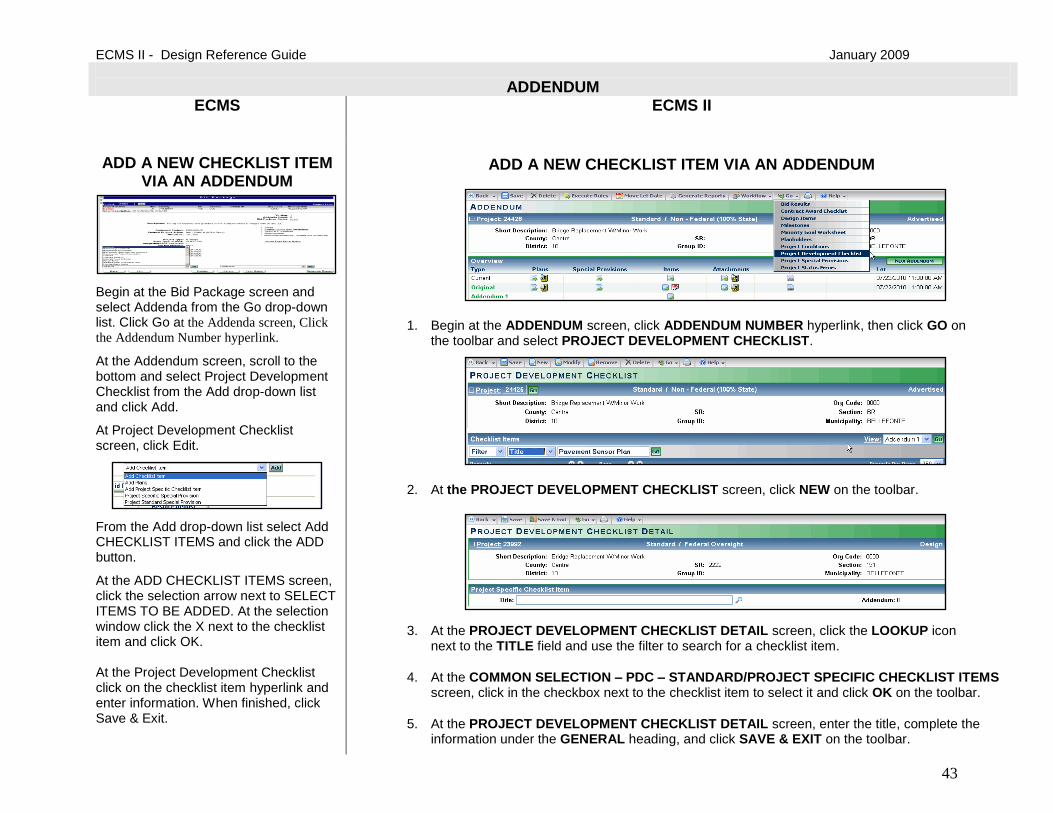
ADD A NEW CHECKLIST ITEM VIA AN ADDENDUM
Begin at the Bid Package screen and select Addenda from the Go drop-down list. Click Go at the Addenda screen, Click
the Addendum Number hyperlink.
At the Addendum screen, scroll to the bottom and select Project Development Checklist from the Add drop-down list and click Add.
At Project Development Checklist screen, click Edit.
From the Add drop-down list select Add CHECKLIST ITEMS and click the ADD button.
At the ADD CHECKLIST ITEMS screen, click the selection arrow next to SELECT ITEMS TO BE ADDED. At the selection window click the X next to the checklist item and click OK. At the Project Development Checklist click on the checklist item hyperlink and enter information. When finished, click Save & Exit.
ADD A NEW CHECKLIST ITEM VIA AN ADDENDUM
1. Begin at the ADDENDUM screen, click ADDENDUM NUMBER hyperlink, then click GO on the toolbar and select PROJECT DEVELOPMENT CHECKLIST.
2. At the PROJECT DEVELOPMENT CHECKLIST screen, click NEW on the toolbar.
3. At the PROJECT DEVELOPMENT CHECKLIST DETAIL screen, click the LOOKUP icon next to the TITLE field and use the filter to search for a checklist item.
4. At the COMMON SELECTION – PDC – STANDARD/PROJECT SPECIFIC CHECKLIST ITEMS screen, click in the checkbox next to the checklist item to select it and click OK on the toolbar.
5. At the PROJECT DEVELOPMENT CHECKLIST DETAIL screen, enter the title, complete the information under the GENERAL heading, and click SAVE & EXIT on the toolbar.

January 2009 ECMS II – Design Reference Guide
44
ADDENDUM
ECMS
ECMS II
ADD PROJECT SPECIFIC
SPECIAL PROVISION VIA ADDENDUM
Begin at the Bid Package screen and select Addenda from the Go drop-down list. click Go at the Addenda screen, Click
the Addendum Number hyperlink.
At the Addendum screen, scroll to the bottom and select Project Special Provisions from the Add drop-down list and click Add.
At Project Special Provisions screen, select Project Specific Special Provision from the Add drop-down list and click Add.
At the Project Specific Special Provision screen, enter the required information and click Save & Exit and OK.
.
ADD PROJECT SPECIFIC SPECIAL PROVISION VIA ADDENDUM
1. Begin at the ADDENDUM screen, click ADDENDUM NUMBER hyperlink, then click GO on the toolbar and select PROJECT SPECIAL PROVISIONS.
2. At the PROJECT SPECIAL PROVISIONS screen, click NEW on the toolbar.
3. At the PROJECT SPECIAL PROVISION screen, enter the name of the Project Specific Special Provision, continue to enter the required information and click SAVE & EXIT on the toolbar.

ECMS II - Design Reference Guide January 2009
45
ADDENDUM
ECMS
ECMS II
DELETE AN EXISTING PROJECT SPECIFIC SPECIAL PROVISION FROM ORIGINAL BID PACKAGE
VIA ADDENDUM
Begin at the Bid Package screen and select Addenda from the Go drop-down list. Click Go at the Addenda screen, click
the Addendum Number hyperlink.
At the Addendum screen, scroll to the bottom and select Project Special Provisions from the Add drop-down list and click Add.
At Project Special Provisions screen, select Add Existing Project Development Checklist Item from the Add drop-down list and click Add.
At the Add Checklist Item(s) screen, click the selection arrow in the Select Item(s) To Be Added field. Select the Project Specific Special Provision and click Save & Exit.
At the Project Specific Special Provision screen, click the Special Provision hyperlink, scroll down to the bottom and click in the checkbox in the Delete Item From Bid Package/ Proposal/Project field. Click Save & Exit and OK.
DELETE AN EXISTING PROJECT SPECIFIC SPECIAL PROVISION
FROM ORIGINAL BID PACKAGE VIA ADDENDUM
1. Begin at the ADDENDUM screen, click ADDENDUM 1NUMABER hyperlink, then click GO on the toolbar and select PROJECT SPECIAL PROVISIONS.
2. At the PROJECT SPECIAL PROVISIONS screen, click DELETE on the toolbar.
3. At the COMMON SELECTION – PDC – SPECIAL PROVISIONS screen, click in the checkbox next to the Special Provision and click OK on the toolbar.
4. At the SPECIAL PROVISIONS screen you will see a message that the information was removed successfully.
Delete Button
January 2009 ECMS II – Design Reference Guide
46
ADDENDUM
ECMS
ECMS II`
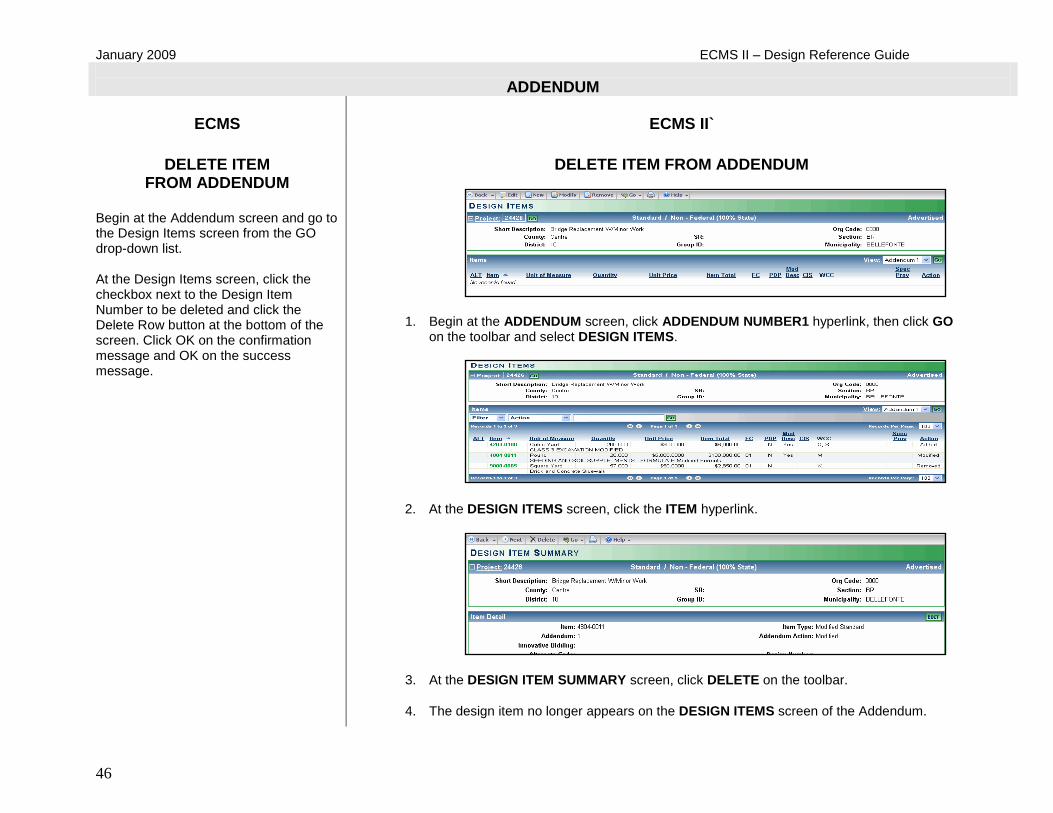
DELETE ITEM
FROM ADDENDUM
Begin at the Addendum screen and go to the Design Items screen from the GO drop-down list. At the Design Items screen, click the checkbox next to the Design Item Number to be deleted and click the Delete Row button at the bottom of the screen. Click OK on the confirmation message and OK on the success message.
DELETE ITEM FROM ADDENDUM
1. Begin at the ADDENDUM screen, click ADDENDUM NUMBER1 hyperlink, then click GO on the toolbar and select DESIGN ITEMS.
2. At the DESIGN ITEMS screen, click the ITEM hyperlink.
3. At the DESIGN ITEM SUMMARY screen, click DELETE on the toolbar.
4. The design item no longer appears on the DESIGN ITEMS screen of the Addendum.