Embed Size (px)
Citation preview

INSTRUCTION MANUAL
MULTI-STAGE DRY VACUUM PUMP
A70W (A70W-S,A70W-C)A30W (A30W-S, A30W-C)A25S (A25S-S)A10S (A10S-S)A07V (A07V-S)
(505)872-0037idealvac.com
idealvac.com

Do not reproduce or reprint any portion of this manual without permission. Manufacturer reserves the right to discontinue or change any specifications or designs without notice and without incurring obligations.
All rights reserved, copyright EBARA Corporation.

(i)
Record of Changes Rev. Date Page Position Contents Reason
0 2-Jun-94 Newly issued 1 13-Jul-94 5
6-10 14 17 21 22
A07V Spec. Outline Drawing Fig. 3.4 Fig. 4.2 Fig. 4.6 Table 4.5
Pumping Speed Water Sup./Rtn Sys. Flow Coupler Ctrl. Wiring Pin Assign.
Correction Add NPT Add Note
Add Drawing Correction Add note
2 14-Nov-96 ⅲ ,ⅳ
ⅴ ,ⅵ ,ⅶ 4
21 25 26 33
35,36 37
44,45
Fig. 1,2,3,4,5 Drawing 3.3 List Dig. 4.4 Table 4.6 Fig. 4.7 Table 6.1 6.3 7 (8) 9
Safety warning labels Warning label Location Detailed specifications Power Sup. Rec Dipswitch S.W setting Typical check items Spare Parts Pump Lifting Service Net.
Add
Add
Add List
Correction Design ChangeDesign Change
Add Table
Add List Add Note Add List
A 12-Dec-97 New release per ECO 2905
3 20-May-99 21 44,45
5,6,18, 27,28,
32
Tab. 4.2 9. Service Network -----
Suitable wire Japan, Taiwan (Add., Phone, Fax) The Unit was changed in terms of Domestic regulation for Measurement low.
Correction Change
-----
3A 27-Apr-01 ETI release of EC Rev 3 per ECO 5394.
3B June 2002 20
iv
Thruout
Add UL grounding note Add LCD “hot surface” note Add appendices Language Edit
Third-party marking
Third-party marking SEMI S2
ECO 5771
EBARA Corporation

(ii)
Safety Information Anyone operating this pump must have the knowledge to identify and avoid hazardous conditions associated with the pump. Rash actions or improper operation may cause dangerous accidents and serious injuries. Before installation and operation, the operator first should have a thorough knowledge of the pump’s construction, operating procedures, and hazards. The operator should read this instruction manual and other documents issued by EBARA. If you have any questions on pump operation, safety, or maintenance, please do not hesitate to contact EBARA directly. Three terms in this manual designate different levels of hazard:
DANGER indicates an imminently hazardous situation that, if not avoided, will result in death or serious injury.
WARNING indicates a potentially hazardous situation that, if not avoided, could result in death or serious injury.
CAUTION indicates an imminently hazardous situation that, if not avoided, may result in minor or moderate injury. This term may also indicate situations that might damage equipment.
EBARA Corporation

(iii)
Important Precautions
DANGER Keep out from under the pump when it is elevated. Only qualified personnel should unload and lift the pump.
WARNING Be careful not to overturn the pump when pushing or pulling it sideways. The pump is narrow in comparison to its height.
WARNING Only a qualified electrician, observing all national and local regulations, should perform electrical work.
WARNING Cut and lock out electrical power before beginning wiring or maintenance work. Do not switch on the power supply to the pump until work is completed and pump and piping are back in safe operating condition.
WARNING Supply N2 gas to the exhaust piping when necessary to dilute flammable or toxic gases down to a safe concentration.
WARNING Purge system with sufficient N2 gas before removing and cleaning the vacuum lines and exhaust piping. Prevent dispersal of flammable, toxic or dangerous materials and guard against their contact with the human body. Work only in locations with an emergency escape route.
WARNING Do not convert the pump from one process to another without an intervening overhaul. Gases or reaction products remaining in the pump may react and lead to accidents or to the formation of large amounts of byproduct.
WARNING Check Safety Interlock functions periodically (every 6 months) to confirm correct operation. See Appendix 2 for a description of these interlocks.
WARNING Connect exhaust from pumps handling process gases to an appropriate exhaust abatement system that is equipped with discharge quality monitors to provide warnings and to shut down the process gas flow if concentrations exceed allowable limits.
WARNING Check for gas leaks after initial installation of the piping and after reassembly following maintenance or, at least, annually. Gas leaks can result in the discharge of harmful and dangerous substances and in abnormal reactions due to the admission of air into the pump. Replace o-rings as required to correct leaks. See Appendix 4.
WARNING Do not modify the pump or any of its parts without EBARA's approval.
EBARA Corporation

(iv)
WARNING Do not place the LCD controller on or near a surface with a temperature exceeding 65ºC.
WARNING The pump casing and exhaust piping become extremely hot during operation and remain hot for some time after stopping. Keep pump and exhaust piping away from contact with personnel and flammable substances. Do not remove pump enclosure panels during operation.
CAUTION Disposal of process byproducts must be in strict accord with all local and national environmental and safety regulations.
CAUTION Dispose of printed circuit boards containing lithium batteries in strict accord with all applicable local and national environmental regulations.
CAUTION The height of EBARA dry pumps may place the EMO button and the LCD controller below the heights recommended in SEMI S8-95. See Appendix 3.
The following safety warning labels appear on the pump covers: High temperature warning Hazardous voltage warning Hazardous materials warning Electric charge mark Hazardous weight danger High temperature warning
Hot surface may burn or cause injury. Allow the piping and casing to cool before servicing.
EBARA Corporation
(v)
Hazardous voltage warning Hazardous Voltage may shock, burn, or cause death. Turn power off and lockout before servicing.
Hazardous materials warning
(Applies only when pumping hazardous materials) Run the pump only with N2 gas purge before servicing. Take adequate measures against dangerous reaction and contact with human body.
Electric charge mark
EBARA Corporation

(vi)
Hazardous weight danger Heavy weight may cause severe injury or death due to overturning or falling pump. Keep out from under the lifted pump. Raise all adjuster feet fully when moving.
EBARA Corporation

(vii)
EBARA Corporation

(viii)
EBARA Corporation

(ix)
EBARA Corporation
(x)
Contents Record of Changes......................................................................................................... i Safety Information ......................................................................................................... ii Important Precautions.................................................................................................. iii Contents .........................................................................................................................x 1 Foreword..................................................................................................................1 2 Introduction .............................................................................................................1 3 Product Description................................................................................................2
3.1 Summary ........................................................................................................2 3.1.1 Pump Module....................................................................................2 3.1.2 N2 Gas ...............................................................................................2 3.1.3 Cooling Water...................................................................................2 3.1.4 Exhaust .............................................................................................2
3.2 Control System ..............................................................................................2 3.2.1 Warning.............................................................................................3 3.2.2 Operation Status Control.................................................................3
3.3 Moving the Pump...........................................................................................3 3.3.1 Preparation .......................................................................................3 3.3.2 Moving Method.................................................................................4
3.4 Detailed Specifications .................................................................................4 4 Installation .............................................................................................................16
4.1 Location .......................................................................................................16 4.2 Piping ...........................................................................................................17
4.2.1 Vacuum and Exhaust Piping .........................................................17 4.2.2 Cooling Water Piping .....................................................................17 4.2.3 N2 Gas Piping..................................................................................19 4.2.4 Ventilation Duct ..............................................................................19
4.3 Electrical Wiring ..........................................................................................20 4.3.1 Power Supply Wiring .....................................................................20 4.3.2 Control Signal Wiring.....................................................................21
4.4 Operation Mode ...........................................................................................24 5 Operation ...............................................................................................................26
5.1 Before Starting.............................................................................................26 5.2 Operation .....................................................................................................30
5.2.1 Local (Pump side) Operation ........................................................31 5.2.2 Remote (Distant) Operation...........................................................31
6 Maintenance and Overhaul...................................................................................32 6.1 Routine Inspection ......................................................................................32 6.2 Piping Maintenance.....................................................................................33 6.3 Lubricant Oil ................................................................................................33 6.4 Spare (Maintenance) Parts List ..................................................................34 6.5 Overhaul .......................................................................................................35
EBARA Corporation

(xi)
7 Removal and Transportation................................................................................36 8 Troubleshooting ....................................................................................................38
8.1 Troubleshooting (1) Basic Trouble ............................................................38 8.2 Troubleshooting (2) ALARM .......................................................................39 8.3 Troubleshooting (3) TRIP............................................................................41 8.4 Troubleshooting (4) TRIP [Options] ...........................................................42
9 Inquiries .................................................................................................................43 9.1 North America ..............................................................................................43 9.2 Asia ...............................................................................................................44 9.3 Europe ..........................................................................................................45
Appendices
1. Material Safety Data Sheet – Vacuum Pump Oil.................................................I 2. Safety Interlocks ..............................................................................................III 3. Ebara Dry Pumps and SEMI S2-93A (S2-0200)................................................ V 4. Leak Check Procedure ..................................................................................... VI 5. Returning pumps for Rebuild in U.S. ............................................................... VII
EBARA Corporation

(xii)
[Blank page]
EBARA Corporation

(1)
1 Foreword We appreciate your selection of an EBARA A Series dry vacuum pump. EBARA has manufactured this pump with much care and attention to permit safe and satisfactory operation. Incorrect operation will result in lack of performance and may cause accidents and injuries to personnel. [NOTE] This instruction manual contains necessary information on operation and
maintenance of the pump. Operate the pump correctly in accordance with these instructions to ensure a long
service life. Keep this instruction manual in a suitable place for immediate reference whenever
needed. 2 Introduction Check the following items on receipt of the pump package. Check the nameplate affixed to the outer cover of the pump to confirm that the pump supplied agrees with your order. Check the accessories against the packing list and the previously submitted drawings and documents to confirm that the all ordered accessories have arrived. Check for damage and for screws/bolts that have worked loose in transit.
CAUTION Notify EBARA without delay when there is damage or when components are missing. Do not use when a leak is present as this may result in an accident.
Store the pump in a dry and clean place until installation.
Temperature : 5 – 40 °C Humidity : 80 % or less
Do not stack the pump. Place it in an upright position.
EBARA Corporation

(2)
3 Product Description 3.1 Summary The A Series dry vacuum pump has a compact design and includes various sensors and controls to enhance reliability and operation. 3.1.1 Pump Module The pump is a roots-type vacuum pump that rotates a pair of non-contact, multi-stage rotors synchronized by timing gears. High-capacity units have a Booster Pump (BP) connected in series with the Main Pump (MP). A compartment, isolated from the pump casing, encloses the timing gears and bearings, which require lubrication with Perfluoro-Polyether (PFPE) oil and grease. The pumps of this series are factory-filled with lubricating oil. Replenish or replace only with the recommended oil grades shown in Specification Tables 3.1 and 3.2. 3.1.2 N2 Gas Pressurized nitrogen, supplied to the labyrinth seal section, isolates the vapor stream from the lubricated components, enabling the pump to draw a clean vacuum without admitting lubricant oil to the pump casing. Additional N2 gas, injected in various pump stages, reduces corrosion due to process gas and retards the accumulation of reaction byproducts. For processes that do not produce corrosion or reaction byproducts, the selector valve can stop completely the dilution N2 flow. Adjusting the regulation pressure to the specified value supplies the correct amount of N2 gas for these two types of purge operation. The pumps of this series are equipped with a dilution N2 gas control valve. Consult EBARA before adjusting the N2 gas supply to the appropriate level for specific conditions of use. (Maximum dilution N2 flow rate: 76 Pam3/s.) 3.1.3 Cooling Water Compressing gas from vacuum to atmospheric pressure generates heat. Therefore, cool motors and casings with cooling water. Quick-connect cooling water couplers make connection and disconnection easy. 3.1.4 Exhaust The exhaust check valve, a standard accessory, prevents reverse flow of gas from the exhaust back through the pump to the vacuum chamber when pump stops. A silencer (optional) reduces exhaust noise. 3.2 Control System A Series dry vacuum pumps have a built-in sensing unit consisting of an Earth Leakage Breaker (ELB), an electro-magnetic switch and a control circuit or an overcurrent circuit breaker (CB). To improve reliability and safety, sensors monitor the condition of each utility
EBARA Corporation

(3)
and pump section. During pump operation the central processing unit monitors all operating conditions, including power supply, cooling water flow, N2 gas flow, lubrication oil level, casing and motor coil temperature, motor current and suction pressure. Pump operation “rides through” a transient power outage up to 500 milliseconds long. (Two-second ride through is available as an option.) 3.2.1 Warning To improve the reliability of the vacuum exhaust system, the pump control scheme generates two levels of trouble warning: ALARM and TRIP. An ALARM signal draws attention to an operating parameter value that has exceeded the normal operating range; it does not signify that danger is imminent. The pump will continue to operate in this condition, which enables the operator to complete the wafer cycle before checking the pump. The pump will stop automatically and generate a TRIP signal output if a parameter approaches a mechanical safety limit. Contact EBARA Corporation for details on checking the ALARM and TRIP setting conditions. 3.2.2 Operation Status Control To facilitate operation status control and daily inspection, the LCD controller displays the sensor data. The LCD controller displays all ALARM and TRIP signals. For remote operation and monitoring, the signals are available individually and as collective outputs. 3.3 Moving the Pump 3.3.1 Preparation Raise all four adjuster feet fully before moving the pump; otherwise, an obstacle on the floor may cause the moving pump to tip over.
Caster
Adjusterf
fullyraised
EBARA Corporation

(4)
3.3.2 Moving Method Move pump slowly by pushing eyebolt along the long axis of the pump (Direction A). Keep toes and fingers away from moving wheels. If placing the pump in a corner or narrow space requires moving it along the short axis (Direction B), two persons should “walk” the pump over by alternately pushing the ends as shown below.
A
B
To move the pump across cracks or joints in the floor, spread a steel plate or similar device, which can sustain the pump’s weight, over the discontinuity. At least two persons, using great caution, should move the pump.
Steel Plate
DANGER If, when moving a pump, it loses balance and starts to tip over, do not attempt to stop it. Get away from the pump immediately and let it fall.
3.4 Detailed Specifications Refer to the following tables and figures for detailed specifications, size, and pump performance.
List of Tables and Figures
Category Contents Page Table 3.1, 3.2 Specification 5,6 Outline Drawing 1 A70W 7 Outline Drawing 2 A30W 8 Outline Drawing 3 A25S 9 Outline Drawing 4 A10S 10 Outline Drawing 5 A07V 11 Figure 3.1 Performance Curve (A70W, A30W) 12 Figure 3.2 Performance Curve (A25S, A10S) 13 Figure 3.3 Performance Curve (A07V) 14 Figure 3.4 System Flow 15
EBARA Corporation

(5)
Table 3.1 Specification (A70W, A30W) Model A70W A30W
Pumping Speed (50 / 60Hz) 7000 / 8400 L/min 3000 / 3600 L/minUltimate Pressure (50 / 60Hz) 0.27 / 0.13 Pa 0.4 / 0.27 Pa
Gas Inlet NW50 Connection Gas Outlet NW40
Motor 2P 2.2 kW + 3.7 kW 2P 1.5 kW + 2.2 kWConnection Coupler (Rc 3/8)
Pressure [Gauge Press.]
Supply : Max 0.4 MPa
Differential Press. : 0.1 MPa
Flow Rate Min. 3.5 L/min
Cooling Water
Temperature Max. 30 deg C Connection 1/4” Tube Fitting (Same as Swagelok®) Pressure
[Gauge Press.] Supply : 0.1-0.7 MPa
Setting : 0.04-0.07 MPa N2 Gas Approx. Flow
Rate [Dilution 0 Mode]
24-27 Pa m3/s [3.4 Pa m3/s]
17-22 Pa m3/s [3.4 Pa m3/s]
Connection d50 mm×L50 mm
Pressure -196 Pa Duct Ventilation
Approx. Flow Rate
0.5 m3/min
Brand
FOMBLIN Y-L VAC 25/6 BARRIERTA J100
DEMNUM S-65 KRYTOX VPF 1525
Lubrication Oil
Quantity 0.8 L Approximate Weight 380 kg 330 kg
Phase/Volt/Freq. 3 Phase, 200V (50 Hz), 200-220 V (60Hz) Current Rating
(50 / 60 Hz) 29.5 / 28.1 A 19.7 / 18.5 A Power Supply
Connection MS Series 22-22 (Japan Aviation Electronics Industry)
Control Signal 57 Series 50 (DDK. Ltd) [Note] Approximate flow rate of N2 gas shows a necessary total amount for seal N2 and
dilution N2. LCD controller displays only the flow rate of dilution N2.
EBARA Corporation
(6)
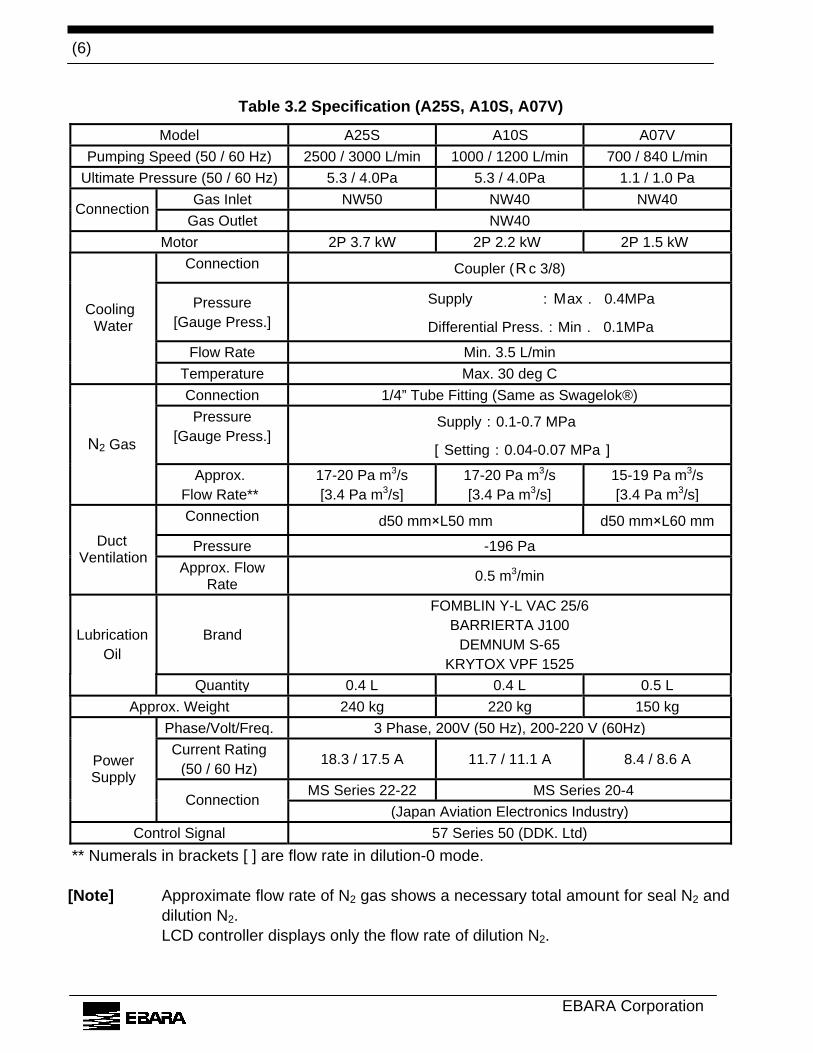
Table 3.2 Specification (A25S, A10S, A07V) Model A25S A10S A07V
Pumping Speed (50 / 60 Hz) 2500 / 3000 L/min 1000 / 1200 L/min 700 / 840 L/minUltimate Pressure (50 / 60 Hz) 5.3 / 4.0Pa 5.3 / 4.0Pa 1.1 / 1.0 Pa
Gas Inlet NW50 NW40 NW40Connection Gas Outlet NW40
Motor 2P 3.7 kW 2P 2.2 kW 2P 1.5 kWConnection Coupler (Rc 3/8)
Pressure [Gauge Press.]
Supply :Max. 0.4MPa
Differential Press.:Min. 0.1MPa
Flow Rate Min. 3.5 L/min
Cooling Water
Temperature Max. 30 deg C Connection 1/4” Tube Fitting (Same as Swagelok®) Pressure
[Gauge Press.] Supply:0.1-0.7 MPa
[Setting:0.04-0.07 MPa] N2 Gas
Approx. Flow Rate**
17-20 Pa m3/s [3.4 Pa m3/s]
17-20 Pa m3/s [3.4 Pa m3/s]
15-19 Pa m3/s [3.4 Pa m3/s]
Connection d50 mm×L50 mm d50 mm×L60 mm
Pressure -196 Pa Duct Ventilation
Approx. Flow Rate 0.5 m3/min
Brand
FOMBLIN Y-L VAC 25/6 BARRIERTA J100
DEMNUM S-65 KRYTOX VPF 1525
Lubrication Oil
Quantity 0.4 L 0.4 L 0.5 LApprox. Weight 240 kg 220 kg 150 kg
Phase/Volt/Freq. 3 Phase, 200V (50 Hz), 200-220 V (60Hz) Current Rating
(50 / 60 Hz) 18.3 / 17.5 A 11.7 / 11.1 A 8.4 / 8.6 A
MS Series 22-22 MS Series 20-4
Power Supply
Connection (Japan Aviation Electronics Industry)
Control Signal 57 Series 50 (DDK. Ltd) ** Numerals in brackets [ ] are flow rate in dilution-0 mode. [Note] Approximate flow rate of N2 gas shows a necessary total amount for seal N2 and
dilution N2. LCD controller displays only the flow rate of dilution N2.
EBARA Corporation

(7)
EBARA Corporation
Out
line
Dra
win
g A
70W

(8)
Out
line
Dra
win
g A
30W
EBARA Corporation

(9)
EBARA Corporation
Out
line
Dra
win
g A
25S
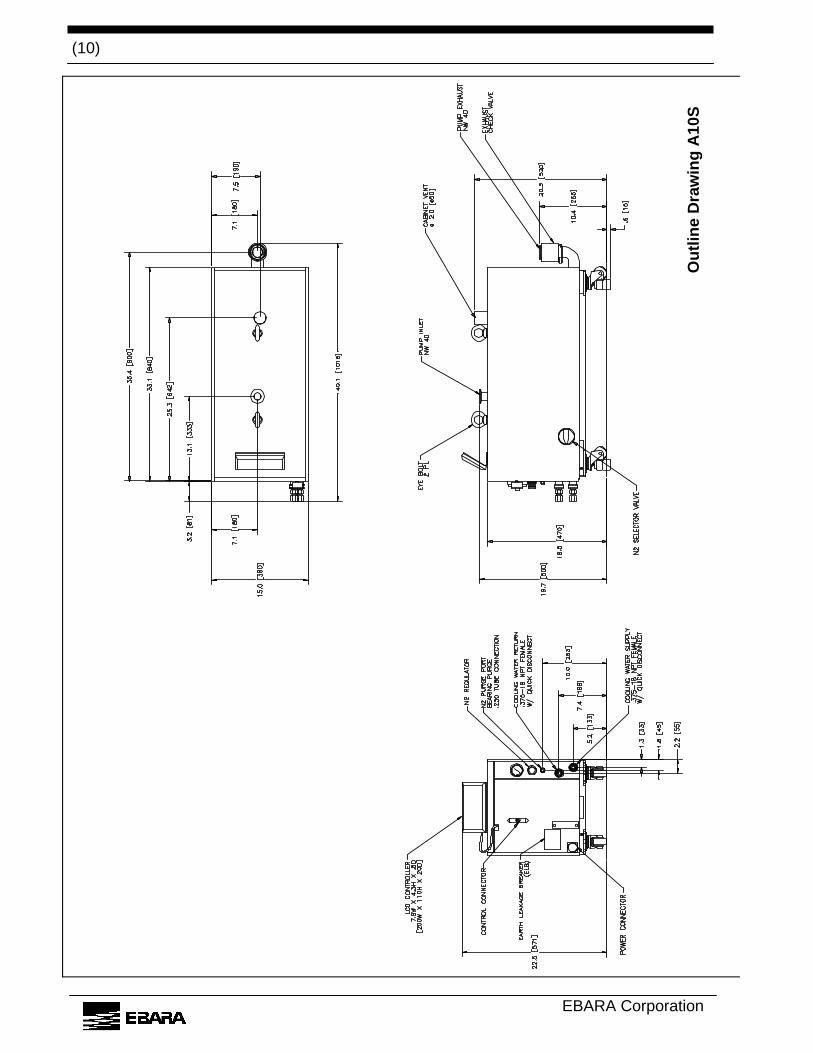
(10)
EBARA Corporation
Out
line
Dra
win
g A
10S

(11)
EBARA Corporation
Out
line
Dra
win
g A
07V

(12)
[50Hz]
1
10
100
1000
10000
100000
10-2 10 -1 10 0 101 102 103 104 105 [Pa]
[l/m
in]
A70W
A70W
A30W
A30W
[60Hz]1
10
100
1000
10000
100000
10-2 10 -1 10 0 101 102 103 104 105 [Pa]
[l/m
in]
A70W
A70W
A30W
A30W
Figure 3.1 Performance Curve (A70W, A30W)
EBARA Corporation

(13)
[50Hz]
10
100
1000
10000
100000
[l/m
in]
A25S
A10S
110-2 10 -1 10 0 101 102 103 104 105 [Pa]
[60Hz]
1
10
100
1000
10000
100000
10-2 10 -1 10 0 101 102 103 104 105 [Pa]
[l/m
in]
A25S
A10S
Figure 3.2 Performance Curve (A25S, A10S)
EBARA Corporation

(14)
[50Hz]
1
10
100
1000
10000
100000
10-2 10 -1 10 0 101 102 103 104 105 [Pa]
[l/m
in] A07V
[60Hz]
1
10
100
1000
10000
100000
10-2 10 -1 10 0 101 102 103 104 105 [Pa]
[l/m
in] A07V
Figure 3.3 Performance Curve (A07V)
EBARA Corporation

(15)
Check Valve
Gas Inlet
Power
Motor Starter 1
Circuit Breaker (ELB)
Gas Outlet
Seal N2 Gas Flow Sensor FT1
Dilluting N2 Gas Flow Sensor
Selector Valve
Pressure Gauge P
Regulator
Cooling Water Flow Sensor FT3
Water FT2
N2 Gas
Motor 1 Main Pump (MP)
Booster Pump (BP)
Connector LCD Controller
Motor Starter 2
Motor 2
Control Circuit
[NOTE] A25S, A10S and A07V do not have a booster pump.
Figure 3.4 System Flow
EBARA Corporation

(16)
4 Installation Observe the following precautions and instructions when installing the pump. 4.1 Location This pump is suitable for indoor installation. To install the pump, select a place not exposed to dust or humidity and not subject to dew condensation. Also, allow sufficient space to ensure easy pump installation and disassembly for maintenance. If the pump has an interface box, locate it within 3m of the pump.
CAUTION Install pump in a location where ambient temperature does not exceed 30℃. Exercise extra caution when operating the pump in an enclosed room.
CAUTION Leave a gap of at least 50mm between the pump cover and adjacent equipment for ventilation.
Four integral mobile support units, each consisting of a caster and a height-adjustment foot, support the pump base. To move the pump, raise the four adjustment feet by turning the holding nuts in the counterclockwise direction.
Figure 4.1 Caster
WARNING Be careful not to overturn the pump when pushing or pulling it sideways. The pump is narrow in comparison to its height.
CAUTION The neck portion of the casters will vibrate when the caster is moving. Keep fingers and feet away.
CAUTION Do not step on the pump or place objects upon it. Turn the holding nuts in the clockwise direction to lower the height-adjustment feet and secure the pump. Adjust the height of the feet evenly to level the pump base.
The difference in height between the two sides of the pump base shall not exceed 1mm. The adjustment allowance is approximately 15 mm.
[NOTE] An unleveled pump may generate an OIL LEVEL LOW ALARM.
[NOTE] Failure to use adjustment feet will increase floor vibrations.
EBARA Corporation

(17)
4.2 Piping 4.2.1 Vacuum and Exhaust Piping Connect the vacuum and exhaust pipes to the suction and exhaust flanges respectively. Because of the narrow clearance between pump rotors, ingested foreign objects will prevent the pump from operating. Observe the following cautions when making the flange connections: a) Remove all foreign matter from inside the piping. b) When connecting flanges, ensure that no dirt or dust particles adhere to the flange
surfaces and that the flange surfaces are undamaged. c) Prevent the ingestion of wafer fragments and of reaction byproducts that may adhere to
the APC valve. For this purpose, a filter or screen may be advisable. d) The weight of the pipes attached to the pump can cause misalignment and leaks from
the flange connections. Support the piping properly and do not apply excessive force to align flange faces.
e) EBARA recommends the insertion of a flexible bellows between the piping and the suction and exhaust flanges of the pump.
f) Length of the flexible bellows on the suction side will vary according to the vacuum drawn. Connect without applying undue force to the flexible bellows.
DANGER Check for leaks after installing the pump. A leak may lead to the dangerous discharge of hazardous substances or to unpredictable reactions with air admitted into the pump.
4.2.2 Cooling Water Piping Connect the cooling water pipes to the correct inlet and outlet ports. The water ports are quick-connect couplers. Seat the plug firmly in the socket. The socket sleeve will return to the front (Figure 4.2). Do not connect the supply/return plugs in reverse. The diameters are slightly different, and there are In/Out markings on the plugs. Disconnection automatically blocks water flow. Use cooling water corresponding to the specifications of Table 4.1.
EBARA Corporation

(18)
Table 4.1 Industrial Water Supply Quality Specifications (Japan Industrial Water Association, Industrial Water Quality Standards Committee)
Turbidity pH Alkalinity(CaCO3) Hardness(CaCO3) Evaporation residue Chlorine ion Iron Manganese
(ppm) (ppm) (ppm) (ppm) (ppm) (ppm) (ppm)
20 6.5-8.0 75 120 250 80 0.3 0.2
Correct
Wrong
Socket
Plug
In / OutMarking
Sleeve
Figure 4.2 Coupler
DANGER When disconnecting water, first close the supply valve and then remove the supply coupler. When connecting, insert the return coupler first. Connecting or disconnecting in the wrong order may cause a rapid pressure rise—leading to a water leak.
CAUTION Even if the cooling water flow rate drops, the pump will continue to operate until the casing temperature reaches the TRIP limit.
Select facility water piping rated for at least 70 ℃ at the operating pressure.
CAUTION Do not connect pump cooling water loops in series. Select piping to ensure sufficient flow through each pump.
CAUTION Connect supply and return couplers correctly to avoid reverse flow. Reverse flow will read incorrectly on the LCD, will not cool the pump properly, and may lead to an accident.
CAUTION In humid locations, allowing the cooling water to run when the pump is stopped will lead to condensation on parts of the pump. If droplets appear on the outside of the water tubes when the pump is not running, cut off water flow.
EBARA Corporation

(19)
4.2.3 N2 Gas Piping Cut tube at right angles and make the end-face perfectly smooth. Then connect the tube to the tube fitting assembly of the N2 gas purge port. The tube will push fit onto the shoulder of the tube fitting assembly. Secure the tube fitting assembly properly and tighten the retaining nut by hand. Then use a tool to tighten the nut an additional 1¼ turns. To reconnect the tube again after subsequent removal, install the tube already fitted to the ferrule and retighten the retaining nut slightly (about ¼ turn) beyond hand tight.
BodyFront
Ferrule
Back
FerruleNut 1 + 1/4
Rotation
Figure 4.3 Tube Fitting Assembly 4.2.4 Ventilation Duct Exhaust hot air from the pump enclosure through the ventilating duct port in the top cover. Without proper ventilation, the temperature inside the cover may rise, causing an ALARM. The pump does not have a gas leak detector. For hazardous gases, EBARA recommends installing a gas leak detector, interlocked to gas flow, in the ventilation duct piping. Use an exhaust duct material that resists corrosion from the gas(es) pumped.
CAUTION For safety, ventilate through the enclosure exhaust duct when the pump application is toxic and/or flammable gases. Do not combine the ventilation duct with the pump exhaust piping.
[NOTE] Even when pumping process gases that are not toxic or flammable, do not combine the ventilation duct with the pump exhaust piping. The exhaust noise of the pump may cause acoustic resonance inside the pump unit and result in abnormal noise.
EBARA Corporation

(20)
4.3 Electrical Wiring
WARNING Keep the power supply to the pump turned off and locked out until you have finished the wiring and connecting work. Interrupt the Earth Leakage Breaker (ELB) or circuit breaker (CB).
4.3.1 Power Supply Wiring
CAUTION Ensure that the grounding wire is connected. Connect this product to a grounded, metallic, permanent wiring system.
CAUTION Match the wiring size and material to the power consumption and ambient air temperature of the pump.
CAUTION Use the threaded-coupling power connector provided with the pump. At the power source size connect direct to distribution panel wiring terminals or use a twist-lock, Hubbel-type connector.
Wire the connector for the main power supply (200V AC at 3-phase and 50Hz, 200-220V AC at 3-phase and 60Hz). See figure and tables below for connector pin assignments and specifications.
D A
C B
Table 4.3 Receptacle Specif
Pump Model A70W A30W A2Receptacle manufacturer
Japan Aviation Electr
Receptacle type MS3102A 22-22P Current A (50/60 Hz) 29.5 / 28.1 19.7 / 18.5 18.3Adapted plug type MS3106B 22-22S Suitable wire AWG #8 - #10
Figure 4.4 Power Supply Receptacle (As seen from connecting side)
Table 4.2 Pin Assignments Power Supply Receptacle
ications
5S onics Indu
/ 17.5
No. Phase
A R
B S
C T
D Ground
A10S A07V stry Co., Ltd.
MS3102A 20-4P 11.7 / 18.5 8.4 / 8.6
MS3106B 20-4S AWG #12 - #14
EBARA Corporation

(21)
4.3.2 Control Signal Wiring Connect wires to the control connector for remote operation and remote monitoring. Tables 4.4 and 4.5 and Figures 4.5 and 4.6 show the pin assignments.
Table 4.4 Receptacle Specifications (Identical for all types)
Receptacle type 57FE-40500 Receptacle manufacturer DDK. Ltd. Adapted plug type 57-30500 Suitable wire size AWG #24 Applied voltage for input *1 12V DC 20 mA Contact capacity of output *2 50V DC/Maximum. 50 mA
*1. Apply voltage through pump. *2. Apply voltage through equipment.
1 2 6
5 02 5
Figure 4.5 Control Signal Receptacle
(As seen from connecting side)
CAUTION Do not wire vacant pins.
CAUTION Apply 12V DC power for input signals on the pump side. Do not apply this voltage on the equipment side. The output signals are generated from an open collector output. Apply a voltage not exceeding 50V DC on the equipment side.
CAUTION Wire all signals with the correct polarity (SIGNAL/COMMON).
CAUTION When output signals energize an inductive load, such as a relay, insert a diode (100V. 1A class) to absorb the back electromotive force from surge currents.
EBARA Corporation

(22)
2. Output Signal
1. Input signal
MP Start
BP Start
Reset
Emergency StopSwitch [ OPTION ]
Remote / Local
Casing Temp. (TRIP)
MP Run
BP Run
MP Stop
BP Stop
6+DC12V
(-)
2 (+)
11 kOHM
(+)
Opencollector
Drycontact
ControlConnector
3
4
8
9
50 +
27
+
26
Inductiveload
12
14 +
Resistanceload
11
+DC50V
Max. 50mADC50V
Max. 50mA
5
(+)
(+)
(+)
[ NOTE ]1. Insert a diode (100V / 1A class) when connecting inductive load by output signal.2. Do not connect wiring to opened pins. It may cause malfunction.
DC50VMax. 50mA
DC50VMax. 50mA
Figure 4.6 Control Signal Wiring
EBARA Corporation

(23)
Table 4.5 Pin Assignment (Do not connect wires to unassigned pins.) No Signal name I/O Signal type No Signal name I/O Signal type 1 MP start IN N.O., Alternate *1 26 REMOTE/LOCAL OUT N.O., Alternate 2 BP start *6 IN N.O., Alternate *1 27 Casing Temp. (TRIP) OUT N.O., Alternate 3 ALARM/TRIP Reset IN N.O., Momentary *2 28 MP Motor Temp. (TRIP) OUT N.O., Alternate 4 MP Stop IN N.O., Momentary *1 29 BP Motor Temp. (TRIP) *6 OUT N.O., Alternate 5 BP Stop *6 IN N.O., Momentary *1 30 MP Overload (TRIP) OUT N.O., Alternate 6 COM of 1-5 IN 31 BP Overload (TIRP) *6 OUT N.O., Alternate 7 32 Phase Error (TRIP) OUT N.O., Alternate 8 Emergency Stop *3 OUT N.C., Alternate 33 9 COM of 8 OUT 34 Water Leak (TRIP) *3 OUT N.O., Alternate 10 35 Exhaust Press. (TRIP) *3 OUT N.O., Alternate 11 MP Operation OUT N.O., Alternate 36 12 BP Operation *6 OUT N.O., Alternate 37 Water Flow (ALARM) *4 OUT N.O., Alternate 13 38 Sealing N2 Flow (ALARM) *4 OUT N.O., Alternate 14 COM of 11-12 OUT 39 Dilut. N2 Flow (ALARM) *4 *5 OUT N.O., Alternate 15 40 Casing Temp. (ALARM) OUT N.O., Alternate 16 41 MP Current (ALARM) OUT N.O., Alternate 17 42 BP Current (ALARM) *6 OUT N.O., Alternate 18 43 Oil Level (ALARM) OUT N.O., Alternate 19 TRIP/Collective OUT N.C., Alternate 44 20 COM of 19 OUT 45 Bearing Temp. (ALARM) *6 OUT N.O., Alternate 21 46 22 ALARM/Collective OUT N.C., Alternate 47 23 COM of 22 OUT 48 24 49 25 50 COM of 26-45 OUT MP = Main Pump, BP = Booster Pump. Models A25S, A10S, A07V do not have a BP. [NOTE] *1 Dipswitch No. 5 selects external start / stop signal type. Off : Alternate signal (Use only Pins 1 and 2.) On : Pulse signal (Use Pins 1 and 2 for start and Pins 4 and 5 for stop, Change Pins 1 and 2 to momentary signals with Dipswitch No. 5.) In remote mode, select pump operation “according to signal” or “automatically stop” with
Dipswitch No.4. Use Dipswitch No.8 to configure remote BP operation as “automatic” or “according to
signal.” *2 Input signal duration for Pin No. 3 (ALARM / TRIP Reset) and Pins No. 1, 2, 4, and 5
(Momentary Start / Stop) is 200ms. *3 Pins No. 8 (Emergency Stop Switch), 34 (Water Leakage), and 35 (Exhaust Pressure)
are for options. Pin No. 8 (Emergency Stop Switch) output remains OFF until the switch is closed and a RESET signal is entered.
*4 Dipswitch No.2 selects observation of cooling water and N2 gas flow as “always” or “operating period only.”
EBARA Corporation
(24)
*5 When Dipswitch No. 7 is OFF (Normal Mode), a decrease in dilution N2 flow will cause an output on Pin No. 39. When Dipswitch No. 7 is ON (Dilution 0 Mode), this same output on Pin 39 indicates that the dilution N2 selector valve is open.
*6 Pins No. 2 (BP Start), 5 (BP Stop), 12 (BP Operation), 29 (BP Motor Temp.), 31 (BP Overload), 42 (BP Current) apply to Models A70W and A30W. Only Model A07V uses Pin No. 45 (Bearing Temperature).
CAUTION Do not wire vacant pins.
CAUTION Apply 12V DC power for input signals on the pump side. Do not apply this voltage on the equipment side. The output signals are generated from an open collector output. Apply a voltage not exceeding 50V DC on the equipment side.
CAUTION Wire all signals with the correct polarity (SIGNAL/COMMON).
CAUTION When output signals energize an inductive load, such as a relay, insert a diode (100V. 1A class) to absorb the back electromotive force from surge currents.
4.4 Operation Mode Set the dipswitches on the control panel in accordance with the conditions (Table 4.6).
Table 4.6 Dipswitch Settings
No. Mode Off On 1 RS232C Data Length 7bit 8bit 2 Service observation Always Operating period only 3 Buzzer Not used Used 4 Operation switched to remote According to signal Automatically stop 5 Remote start signal Alternating Momentary (Pulse) 6 ----- ----- ----- 7 Dilution N2 With dilution Without dilution 8 BP operation Automatic According to signal
When using the RS232C communication port to monitor pump status, select a Data Length of either 7 bits or 8 bits. Dipswitch No. 2 configures observation of cooling water and N2 gas flow as either "always" or "operating period only." Even when "operating period only" is selected, observation of cooling water flow continues for 15 minutes after pump stops. Dipswitch No. 3 selects Buzzer usage in ALARM / TRIP condition. In remote mode, select pump operation “according to signal” or “automatically stop” with Dipswitch No.4.
EBARA Corporation

(25)
Dipswitch No. 5 sets configuration for remote START / STOP signals as either "alternate (maintained) signal" or "pulse (momentary) signal." Pins 1, 2, 4, and 5 pins become momentary signal ports when Dipswitch No. 5 is ON. Dipswitch No. 7 sets dilution N2 usage.
For applications that neither deposit byproducts nor corrode the pump (e.g. load lock, sputtering, SEM) the user may reduce nitrogen consumption by closing the dilution N2 selector valve located on the side of the pump and turning on Dipswitch No. 7, In dilution mode, the pump outputs a Dilution N2 Flow ALARM when dilution N2 flow decreases; in zero dilution mode, the pump outputs a Dilution N2 Flow ALARM when dilution N2 selector valve is open.
[NOTE] Select compatible settings for the dilution N2 selector valve and Dipswitch No. 7
together. Set Dipswitch No. 8 ON to start and stop BP automatically based on inlet vacuum; set Dipswitch No. 8 OFF to start and stop BP with a remote signal. [NOTE] The user may toggle remote / local switch and use of the buzzer at any time. The
pump stores the setting of other switches at start up. Turn power OFF to change the settings.
Default factory settings at time of shipment are: Data Length = 8 bits, always observation, buzzer in use, according to signal, alternating signal, with dilution mode, BP automatic operation, and Local operation. Refer to Figure 4.7.
Figure 4.7 Switch Settings
1
8
ON
LOCAL
REMOTE
DipSwitch
ToggleSwitch
PowerLED
RotarySwitch
RS232CPort
EBARA Corporation

(26)
5 Operation
WARNING Following an Emergency Stop or TRIP (auto shut down), troubleshoot the pump as described in Section 8 before restarting.
[NOTE] These pumps are factory filled with lubrication oil.
5.1 Before Starting Turn on the cooling water flow and check piping for water leaks.
CAUTION Without sufficient cooling water, the pump temperature will rise, which may cause rotor contact or other problems.
[NOTE] The pump unit has no cooling water valve. Turn on the N2 gas supply. Check that the regulator attached to the pump is closed, i.e. the pressure adjustment knob is fully counterclockwise. Open the main valve and check that there are no N2 gas leaks from the pipe connections. Slowly turn the pressure adjustment knob clockwise to set the pressure (gauge pressure) to 0.05 MPa. Then press the red stopper to lock the knob in position.
WARNING Supply N2 gas to the exhaust piping when it is necessary to dilute flammable or toxic gases down to safe concentration.
CAUTION Set N2 flow rate appropriately to avoid problems such as oil carryover, corrosion inside the pump and deposition of byproducts.
Operate dilution N2 selector valve, located on the side face of pump cover, in accord with the dilution N2 mode setting of dipswitch. Dipswitch No. 7 ON OFF Selector Valve CLOSED OPEN [NOTE] N2 gas flow requires several seconds to stabilize after opening valve.
[NOTE] During regular operation, open dilution N2 gas selector valve except for processes that are non-corrosive and do not produce reaction byproducts.
EBARA Corporation

(27)
Turn on power. Turn on the ELB and ensure that the yellow LED (beside the dipswitches) lights. The LCD controller counts down 10 seconds. Refer to Table 5.2 and Figure 5.1.
[NOTE] After turning on power, the instruments warm up for 10 seconds before the pump
will start. Ensure cooling water flow is 3.5 L/min or more. Readjust regulator so that dilution N2 gas is within the range described below.
Table 5.1 Dilution N2 gas flow
A70W 20-24 Pa m3/s A30W 15-19 Pa m3/s A25S 14-17 Pa m3/s A10S 14-17 Pa m3/s A07V 12-15 Pa m3/s
Then ensure that pressure gauge indicates 0.04-0.07 MPa. After setting, push the red stopper of knob to lock. Under this condition, shaft seal N2 flow rate is 2.7-3.4 Pa m3/s. (Shaft seal N2 flow rate is not shown on LCD.) Check that LCD displays no ALARM/TRIP signal. The motor current is indicated as "00.0 A" on LCD. When LCD indicates an ALARM/TRIP signal or an abnormal symptom appears, take necessary measures in accordance with Section 8. [NOTE] ALARM/TRIP signal persists until entry of a RESET signal even if the causes are
remedied. After taking necessary measures, either press the RESET switch on the LCD controller or input RESET signal through the control connector. When buzzer is in use, pressing BUZZER OFF mutes the buzzer despite an ALARM/TRIP condition.
Open the valve on the exhaust piping before starting the pump. If the system has an exhaust gas scrubber, open its inlet and outlet valves.
CAUTION Operating pump with these valves closed will pressurize the exhaust and overload the pump.
EBARA Corporation

(28)
ALARM
TRIP
ERROR
B.P.RUN
M.P.RUN
LOCAL
LCD ( Liquid Crystal Display )
Push Button
BuzzerLED ( Green )
BUZZER OFFSTOPSTART DISP.
SELECT RESET
LED ( Red ) LED ( Orange )
Figure 5.1 LCD Controller
[Buttons] START: Start MP and BP
STOP: Start of MP and BP
DISP. SELECT: Change LCD indication
RESET: Reset ALARM and TRIP
BUZZER OFF: Mute buzzer in ALARM / TRIP
[LED] B.P. RUN: BP running
M.P. RUN: MP running
LOCAL: LOCAL mode
ALARM: ALARM condition
TRIP: TRIP condition
ERROR: Microprocessor malfunction
EBARA Corporation

(29)
Table 5.2 LCD Controller Indication
No ITEM INDICATION 1.1 Operating mode selection 1
(10 second count down) & & & & & & & % U T Y : S T D R E M : S I G @
1.2 Operating mode selection 2 (10 sec count down)
& & & & & & & R U N : A L T % D I L : S T D B P : A T @
2 Motor current B P : # # . # A % M P : # # . # A
3 Cooling water flow W A T E R F L O W % # # . # L / m i n
4 Dilution N2 gas flow (with dilution mode)
D I L . N 2 F L O W % # # . # P a m 3 / s
5 Dilution N2 gas flow (without dilution mode)
%W / O D I L . N 2 M O D E
6 Pump casing temperature P U M P C A S I N G % # # # * C
7 Total operation time O P E . T I M E % # # # # # h
8 ALARM / TRIP $ $ $ $ $ : $ $ $ $ $ $ $ % $ $ $ $ $ $ $ $ $ $ $ $ $ $
" &&&&&&& " shows pump serial number. " % " shows present number of ALARM / TRIP. " @ " shows 10 second countdown after turning on power. Mode selection contains items below.
UTY : Service observation REM : Operation switched to remote RUN : Remote start signal DIL : Dilution N2 BP : BP operation
Dilution N2 gas flow displays the amount of N2 gas excluding seal N2; therefore, it differs from the N2 approximate flow rate in Table 3.1. Total operation time displays the hours of operation after initialization at factory. Upper row " $$$$$$ " describes cause of ALARM / TRIP. Lower row " $$$$$$ " shows value of parameter that caused ALARM / TRIP. Display defaults to No. 2 (Motor Current) when buttons on LCD controller are not operated for one minute. "DISP. SELECT" scrolls the display in order. It will display progressively all present ALARM/TRIP’s.
EBARA Corporation
(30)
5.2 Operation REMOTE / LOCAL and USE OF BUZZER can be toggled at any time. Select properly according to the working conditions. If Dipswitch No. 4 is ON, pump automatically stops when changed to remote mode.
WARNING The pump casing and exhaust piping become extremely hot during operation and for some time after stopping. Keep pump and exhaust piping away from contact with personnel and flammable substances. Do not remove the pump cover during operation.
CAUTION When the production process leads to reaction byproducts in the pump or when the process handles corrosive gases, do not stop the pump until after at least 30 minutes after stopping the flow of process gases.
WARNING Purge with N2 gas for one (1) hour or more after the pump stops to remove the residual process gas inside the pump.
CAUTION The pump will remain at a very high temperature even after it has stopped. Leave the cooling water running for about one (1) hour after shutdown. Shutting off cooling water immediately after the pump stops causes a pressure rise in the cooling water piping, which may cause a water leak.
[NOTE] Do not pump process gases until the pump has run at least one hour. If possible, wait four hours for the pump casing temperature to stabilize before pumping process gases.
[NOTE] In service observation mode “Always,” cooling water and dilution N2 ALARMs can occur when the pump is stopped.
[NOTE] The pump will not start while an ALARM/TRIP signal remains active. Pressing START button will bring STARTFAIL to the display.
EBARA Corporation

(31)
5.2.1 Local (Pump side) Operation Start
Press controller START button. MP (Main Pump) starts and MP RUN LED lights. BP (Booster Pump) starts automatically, and BP RUN LED lights. While pump is running, the default LCD display is motor current(s). For other indications of pump condition, refer to Table 5.2.
[NOTE] The pump will not start while an ALARM/TRIP signal remains active.
Pressing START button will bring STARTFAIL to the display.
Stop
Press controller STOP button. Both MP and BP stop and both RUN LED go out. Motor current is indicated as "00.0 A.”
5.2.2 Remote (Distant) Operation Start [NOTE] External signal type must comply with dipswitch settings.
Input external MP START signal from control connector. MP starts. In BP automatic operation mode, BP starts and stops automatically based on the pump inlet vacuum. When operating BP by remote signal, input external BP START signal from control connector only when inlet pressure is less than or equal to 4000 Pa.
Stop [Alternating signal mode] Turn MP START signal off, both MP and BP stop. [Momentary (Pulse) signal mode] Input external MP STOP signal, both MP and BP stop.
EBARA Corporation

(32)
6 Maintenance and Overhaul 6.1 Routine Inspection Check periodically that there is no ALARM signal on the LCD controller or remote output. Any ALARM indicates that the pump is operating in abnormal condition.
Table 6.1 Typical Check Items No. Item Sensor Interval(recommended)1 Motor Current CT 2 N2 Gas Flow Flow sensor 3 Vibration / Noise ----- 4 Lubrication oil Quantity Level switch5 Cooling water flow Flow sensor 6 Pump casing Temp. T/C
1 time/week
7 Color of lubrication oil ----- 1 time/month If any ALARM/TRIP occurs, take necessary measures according to Section 8.
WARNING Switch off the power supply to the pump; interrupt the ELB or CB and lockout power before you start maintenance.
WARNING The pump and exhaust piping will remain at a high temperature during operation and for a short time after the pump has stopped. Avoid contact and keep flammable substances out of reach. Do not remove the outer cover during operation.
[NOTE] Even after clearing the cause of the ALARM/TRIP signal, the display will persist until the RESET signal is entered. After you have taken the remedial action, press the RESET button on the controller or enter the RESET signal from the control signal connector to reset the ALARM/TRIP status.
CAUTION An ALARM signal will not stop the pump. However, continuing pump operation in this condition may lead to a TRIP signal or a serious breakdown. After completion of the next wafer cycle, check the pump in accordance with the instructions of Section 8.
CAUTION In the REMOTE operating mode, when a TRIP signal has occurred, interrupt the external start signal before beginning maintenance. If the external ALTERNATE start signal is present, the pump will start as soon as the TRIP is RESET.
EBARA Corporation

(33)
6.2 Piping Maintenance
WARNING Purge system with sufficient N2 gas before removing and cleaning the vacuum lines and exhaust piping. Prevent dispersal of flammable, toxic or dangerous materials and guard against their contact with the human body. Work only in locations with an emergency escape route.
WARNING Check for gas leaks after installing and maintaining the piping. Gas leaks will result in the discharge of harmful and dangerous substances and in abnormal reactions due to the admission of air into the pump
CAUTION Dispose of process byproducts in strict accord with all local and national environmental and safety regulations.
Follow the instructions below when carrying out maintenance work on the vacuum and exhaust piping of the pump. Before you remove and wash the piping, purge with a sufficient volume of N2 gas. On systems with an exhaust gas scrubber, interrupt N2 purge and close the inlet valve of the scrubber before removing the piping. Switch off the power supply. After cleaning the piping, do not reconnect until it has dried completely. 6.3 Lubricant Oil
CAUTION Do not start filling oil until the pump interior reaches atmospheric pressure. During pump operation, the chamber containing the oil is under vacuum. Removing the oil fill plug while the pump is running will cause oil carryover and damage the pump.
CAUTION A licensed industrial waste disposal dealer should dispose of waste oil in accordance with Material Safety Data Sheet (Appendix 1).
Upon an OIL LEVEL LOW ALARM or whenever the lubricant oil needs replenishing, fill the oil chamber and drain the oil that has collected in the secondary reservoir.
EBARA Corporation

(34)
6.4 Spare (Maintenance) Parts List Pump maintenance requires the following parts at customer site.
Table 6.2 1. Standard Consumable
Item Type EC Part No. ETI Part No.
PFPE oil
FOMBLIN Y-L VAC 25/6 BARRIERTA J100 DEMNUM S-65 KRYTOX VPF 1525
CER01-4002 927009
2. Parts Recommended for Safe Operation
Item Type EC Part No. ETI Part No.
NW25 CER01-4746 980928 NW40 CER01-4747 980927 O-ring (Viton A) G55 (For exhaust check valve)
CER01-4402-2 923111
3. Parts Recommended for Quick Maintenance
Item Type EC Part No. ETI Part No.
Exhaust check valve 32X80L CER01-4402 980083 4. Recommended Spare Parts (not needed for each pump)
Item Type EC Part No. ETI Part No.
Oil level switch NOR. CLOSE CER90-6515 ----- Water flow sensor 20 L/min CER90-6018 942020 Pump gas flow sensor (seal) 3.4 Pam3/s CER90-6012 N2 flow sensor 84.4 Pam3/s CER90-6017 ----- T/C bolt T TYPE, M8 CER90-6035 913046 N2 gas pressure regulator R31-200-C121 CER01-4420 980086
(EC: EBARA CORPORATION; ETI: EBARA TECHNOLOGIES INCORPORATED)
EBARA Corporation

(35)
The pump enclosure panels carry the following labels. If a label should peel off or become illegible, replace it as directed in the Warning Label Drawings.
Table 6.3 Labels
Label Name EC Part No. ETI Part No. [DANGER] HAZARDOUS WEIGHT DANGER CER90-9193 322237 [WARNING] HAZARDOUS VOLTAGE WARNING CER90-9115 321868 [WARNING] HIGH TEMPERATURE WARNING CER90-9113 321866 [WARNING] HAZARDOUS MATERIAL WARNING CER90-9116 321869 [CAUTION] CHARGE MARK CER90-9112 321865
6.5 Overhaul Properly trained personnel should perform overhaul work. Contact EBARA sales office or overhaul service center.
EBARA Corporation

(36)
7 Removal and Transportation
WARNING When a pump exhausts highly toxic gases such as arsenic and mercury compounds, contact EBARA Corporation before you return the pump.
CAUTION In the interest of safety during the transportation, disassembly and cleaning of the pump, take note of the gases that it has pumped.
[NOTE] In the U.S., Department of Transportation regulations may apply to the shipment of your pump. See Appendix 5.
To disconnect and transport the pump, proceed as follows. Stop the pump and replace all gases inside the pump by purging them with N2 gas. Switch off the power supply to the pump; remove the power and signal wires. After fully closing the N2 regulator and removing the N2 pipe, seal off the N2 purge port with a sealing flange. Remove the cooling water pipes. Remove the vacuum and exhaust pipes and completely seal off the suction and exhaust ports of the pump with a blind flange or similar seal. Seal off other process gas connection points, such as the differential port, with a blind flange. Tape the LCD controller, face down, to the pump‘s top cover. Wrap the pump in a vinyl sheet. Use the eyebolts provided on the pump for slinging the pump to load and unload. Fasten eyebolts completely; turn in until flush with the seating surface. For sling, use a wire with a length so that the slinging angle (that is, the angled subtended by the two wires) is 60° or less.
[NOTE]: A07V has only one eyebolt.
DANGER Do not enter the zone underneath the suspended pump.
WARNING Only qualified personnel should lift the pump. Ensure that the wire rope and crane used for lifting the pump are in proper order and match the weight of the pump. To prevent unequal weight distribution, suspend the pump with symmetrically centered slinging angle.
CAUTION To avoid oil leaks when lifting or transporting the pump, do not keep it more than 10° off the horizontal longer than five minutes.
EBARA Corporation

(37)
60° or less
LCD Controller Figure 7.1
Route the sling to avoid damaging any options, such as an interface box, mounted on the pump. To transport an uncrated pump, lower the adjustment feet. Place a protective cloth around the pump and use protective members between the outer cover and the tie down straps to distribute the strap load.
EBARA Corporation

(38)
8 Troubleshooting 8.1 Troubleshooting (1) Basic Trouble
Abnormal symptom Check Item Corrective Action Incorrect wiring Check wiring Ground fault Replace or overhaul pump
Circuit breaker is activated.(Leakage detector is on.)
Short circuit Replace or overhaul pump No power supply to pump Check power supply Connector is not connected Connect power connector
Power LED does not come on.
ELB is not mode ON Switch ELB ON ELB is not mode ON Switch ELB ON Nothing appears on LCD.
Display is abnormal. Instruments are in failure Replace instruments Mode is set in “Remote” Set switch to “Local” mode Start-up conditions are not satisfied (“STARTFAIL” is displayed)
Satisfy all start-up conditions MP does not start when pressing START button.
Instruments are in failure Replace instruments Mode is set in “Local” Set switch to “Remote” mode Mode is set in “Alternate” (Pump jogs)
Apply “Alternate” start signal Set to “Momentary” mode
MP does not start when applying START signal.
Instruments are in failure Replace instruments Leakage on vacuum piping Check piping MP insufficient vacuum Replace or overhaul BP start signal is not applied Apply BP start signal
BP does not start.
Instrument failure Replace instruments Adjuster foot is not lowered Properly set all adjuster feet Cover is in contact with other items Remove objects from cover Cover screws loose Tighten mounting screws
Abnormal noise. Excessive vibration.
Pump part is damaged Replace or overhaul pump Byproducts settled in piping Clean up piping N2 pressure setting is high Set pressure for correct value Leakage from vacuum piping Check piping
Vacuum pressure increase.
Byproducts settled in pump Replace or overhaul pump
WARNING Interrupt Earth Leakage Breaker (ELB) or CB and lock out power before starting on wiring and maintenance work. Do not switch on the power supply to the pump until work is completed.
WARNING The pump casing and exhaust piping become extremely hot during operation and for some time after stopping. Keep pump and exhaust piping away from contact with personnel and flammable substances. Do not remove the pump cover during operation.
WARNING Check for gas leaks after installing and maintaining the piping. Gas leaks will result in the discharge of harmful and dangerous substances and in abnormal reactions due to the admission of air into the pump
EBARA Corporation

(39)
8.2 Troubleshooting (2) ALARM Display Symptom Check Item Corrective Action
Coupler is disconnected Connect coupler Pressure is not sufficient Apply sufficient pressure Source valve is closed Open valve Water piping is clogged Clean or replace piping Water piping leaks Check the fittings Instruments are in failure Replace instruments
ALARM: WATER FLOW LOW ##.#
Water flow decreases.
Inlet/Outlet is reverse (Flow rate 0L/min)
Connect correctly
N2 port is not connected Connect N2 pipe fitting Primary pressure is insufficient
Apply sufficient pressure
Regulator setting low Increase pressure setting N2 piping is clogged Replace N2 piping N2 piping leaks Check the fittings Instruments are in failure Replace instruments Selector valve is closed *1 Open the valve
Set to zero dilution mode”
ALARM: SEAL N2 FLOW LOW ALARM: DIL. N2 FLOW LOW ##.# [w/ dilution mode] ALARM: DIL. N2. VALVE OPEN [w/o dilution mode]
Shaft seal. N2 flow decreases. Dilution N2. flow decreases. *1 [w/ dilution mode] Dilution N2 valve open. *2 [w/o dilution mode]
Selector valve is open *2 Close the valve Set to “standard mode”
Exhaust pressure rises Check exhaust piping Rotor is in contact (Byproducts) (Substance plunge) (Cooling water decrease) (Gear or bearing damage)
Replace or overhaul pump Replace or overhaul pump Increase water slowly Replace or overhaul pump
Instruments are in failure Replace instruments
ALARM: BP MOTOR CURRENT HIGH##.# ALARM: MP MOTOR CURRENT HIGH##.#
BP motor current rises. MP motor current rises.
Power supply failure Check power supply Exhaust pressure rise Check exhaust piping Duct ventilation is insufficient
Ventilate sufficiently
Byproduct is clogged Replace or overhaul pump
ALARM: CASING TEMP HIGH ##.#
Casing temperature rises.
Cooling water decrease Increase water slowly Decrease of oil Fill the lubricating oil Insufficient sealing N2 Check sealing N2 ALARM
ALARM: BP-GEAR OIL LEVEL LOW ALARM: BP-MOTOR
BP gear side oil level low BP motor side oil
Pump is inclined Level the pump with adjuster feet
EBARA Corporation

(40)
Display Symptom Check Item Corrective Action OIL LEVEL LOW level low ALARM: MP-GEAR OIL LEVEL LOW ALARM: MP-MOTOR OIL LEVEL LOW ALARM: OIL LEVEL LOW
MP gear side oil level low MP motor side oil level low Oil level low in oil pan. [A07V only]
Instruments are in failure Replace instruments
Cooling water decrease Increase water slowly Decrease of grease Change the grease
ALARM: DRV BRG TEMP HIGH ALARM: DRVN BRG TEMP HIGH
Driving shaft brg temp. rises. [A07V] Driven shaft brg temp. rises. [A07V]
Bearing is damaged Replace or overhaul pump
Duct ventilation not sufficient Ventilate sufficiently ALARM: PUMP BOX TEMP HIGH
Temperature in pump cover rises. Cooling water decrease Increase water
After taking corrective action, input RESET signal or push RESET button. The pump will not RESET while the cause of the ALARM remains.
WARNING Interrupt Earth Leakage Breaker (ELB) or CB and lock out power before starting on wiring and maintenance work.
WARNING The pump casing and exhaust piping become extremely hot during operation and for some time after stopping. Keep pump and exhaust piping away from contact with personnel and flammable substances. Do not remove the pump cover during operation.
WARNING Check for gas leaks after installing and maintaining the piping. Gas leaks will result in the discharge of harmful and dangerous substances and in abnormal reactions due to the admission of air into the pump
Do not switch on the power supply to the pump until work is completed.
EBARA Corporation
(41)
8.3 Troubleshooting (3) TRIP Display Symptom Check Item Corrective Action
Exhaust pressure rise Check exhaust piping Cooling water decrease Increase water slowly Byproduct clog Replace or overhaul pump
TRIP: CASING TEMP H.HIGH
Pump casing temp. rises.
Duct ventilation insufficient Ventilate sufficiently Cooling water decrease Increase water slowly TRIP: BP MOTOR
TEMP HIGH TRIP: MP MOTOR TEMP HIGH
BP motor temp. rises. MP motor temp. rises.
Motor is in failure Replace or overhaul pump
Exhaust pressure rise Check exhaust piping Byproduct clog Replace or overhaul pump Object ingestion Replace or overhaul pump Instruments are in failure Replace instruments
TRIP: BP MOTOR OVERLOAD TRIP: MP MOTOR OVERLOAD
BP current rises. (thermal relay trip) MP current rises. (thermal relay trip) Power supply failure Check power supply
Incorrect wiring Wire R/S/T/E correctly Negative phase Instruments are in failure Replace instruments
TRIP: PHASE ERROR
Open phase Incorrect wiring Check power supply TRIP: BP MOTOR NO CURRENT TRIP: MP MOTOR NO CURRENT
BP motor current value is 0. MP motor current value is 0.
Instruments are in failure Replace instruments
Starting in ALARM / TRIP condition
Satisfy all starting conditions
TRIP: STARTFAIL ALARM/TRIP EXIST
Start fault
Instruments are in failure Replace instruments After taking corrective action, input RESET signal or push RESET button. The pump will not RESET while the cause of the TRIP remains. In remote operation mode, interrupt external START signal before resetting.
WARNING Interrupt Earth Leakage Breaker (ELB) or CB and lock out power before starting on wiring and maintenance work. Do not switch on the power supply to the pump until work is completed.
WARNING The pump casing and exhaust piping become extremely hot during operation and for some time after stopping. Keep pump and exhaust piping away from contact with personnel and flammable substances. Do not remove the pump cover during operation.
WARNING Check for gas leaks after installing and maintaining the piping. Gas leaks will result in the discharge of harmful and dangerous substances and in abnormal reactions due to the admission of air into the pump.
EBARA Corporation

(42)
8.4 Troubleshooting (4) TRIP [Options] Display Symptom Check Item Corrective Action
Tube fitting loose Tighten fittings TRIP: WATER LEAKAGE
Water leakage Instruments are in failure Replace instruments Exhaust valve is closed Check exhaust piping TRIP:
BACK PRESS. HIGH Exhaust pressure rises. (0.1 MPa)
Instruments are in failure Replace instruments
TRIP: EMG. STOP SWITCH
Emergency stop switch
Stop by emergency stop button
Check that pump can be operated and turn the button head to reset
After taking corrective action, input RESET signal or push RESET button. The pump will not RESET while the cause of the TRIP remains. In remote operation mode, interrupt external START signal before resetting.
WARNING Interrupt Earth Leakage Breaker (ELB) or CB and lock out power before starting on wiring and maintenance work. Do not switch on the power supply to the pump until work is completed.
WARNING The pump casing and exhaust piping become extremely hot during operation and for some time after stopping. Keep pump and exhaust piping away from contact with personnel and flammable substances. Do not remove the pump cover during operation.
WARNING Check for gas leaks after installing and maintaining the piping. Gas leaks will result in the discharge of harmful and dangerous substances and in abnormal reactions due to the admission of air into the pump
EBARA Corporation

(43)
9 Inquiries For all inquiries and queries in connections with any of the details given in this Operating Instruction Manual or the pump in general, please contact EBARA Corporation directly with pump model and serial number.
9.1 North America EBARA TECHNOLOGIES, INC. (1) Western Region CALIFORNIA
Headquarters 51 Main Avenue Sacramento, CA 95838, U.S.A. Phone: (916) 920-5451 Fax: (916) 925-6654
Silicon Valley Operations 45 Plumeria San Jose, CA 95134-2103, U.S.A. Phone: (408) 934-2888 Fax: (408) 934-2801
(2) Eastern Region CONNECTICUT
1 Parklawn Drive Bethel, CT, 06801, U.S.A. Phone: (203) 790-1080 Fax: (203) 790-7404
(3) Southwest Region TEXAS
8201-6 E. Riverside Drive, Suite 600 Austin, TX 78744, U.S.A. Phone: (512) 389-3993 Fax: (512) 389-3995
EBARA Corporation

(44)
9.2 Asia EBARA Corporation (1) Japan Precision Machinery Group
Nissay Aroma Square 5-37-1 Kamata Ohta-Ku, Tokyo 144-8721 Japan Phone: 81-3-5714-6111 Fax: 81-3-5714-6081
(2) Korea EBARA Precision Machinery Korea, Inc.
15 FL, Kangnam Bldg. 1321 Seocho-Dong, Seocho-Ku, Seoul, Korea Phone: 82-2-581-6901 Fax: 82-2-581-4211
(3) Taiwan EBARA Densan (TED)
No. 7 Nan Yuen 2nd Road Chung Li City, Tao Yuen Hsien, Taiwan Phone: 886-3-451-5881 Fax: 886-3-452-7904
EBARA Precision Machinery Taiwan, Inc. EBARA Corporation, Taipei Office Room 1402 Chia Hsin Bldg., No. 96, Sec. 2 Chung Shan N. RD., Taipei Taiwan Phone: 886-2-2560-1166 Fax: 886-2-2560-1177
(4) Singapore EBARA Engineering Singapore (E.E.S.)
No. 1 Tuas Link #2 Singapore, 638550 Phone: 65-862-3536 Fax: 65-861-0589
EBARA Corporation

(45)
9.3 Europe (1) United Kingdom EBARA Corporation Scotland Branch
3 & 4 Adam Square-Brucefield Industrial Estate Livingston, G-8West Lothian, EH54 9DE U.K. Phone: 44-1509-460232 Fax: 44-1506-460222
(2) Germany EBARA Germany GmbH
Donaustabe 7, D-63452 Hanau, Germany Phone: 49-16181-1876-0 Fax: 49-1618¥1-1876-40
EBARA Corporation

(46)
[Blank Page]
EBARA Corporation

(I)
Appendix 1 Material Safety Data Sheet Vacuum Pump Oil INLAND VACUUM INDUSTRIES -- FOMBLIN Y-LVAC 25-6 MATERIAL SAFETY DATA SHEET NSN: 915000F045542 Manufacturer's CAGE: 59149 Part No. Indicator: A Part Number/Trade Name: FOMBLIN Y-LVAC 25/6 =========================================================================== General Information =========================================================================== Company's Name: INLAND VACUUM INDUSTRIES INC Company's Street: 35 HOWARD AVE Company's P. O. Box: 373 Company's City: CHURCHVILLE Company's State: NY Company's Country: US Company's Zip Code: 14428 Company's Emerg Ph #: 716-293-3330 Company's Info Ph #: 716-293-3330 Record No. For Safety Entry: 001 Tot Safety Entries This Stk#: 001 Status: SE Date MSDS Prepared: 01OCT92 Safety Data Review Date: 08DEC95 Preparer's Company: INLAND VACUUM INDUSTRIES INC Preparer's St Or P. O. Box: 35 HOWARD AVE Preparer's City: CHURCHVILLE Preparer's State: NY Preparer's Zip Code: 14428 MSDS Serial Number: BYQMW =========================================================================== Ingredients/Identity Information =========================================================================== Proprietary: NO Ingredient: 1-PROPENE 1,1,2,3,3,3-HEXAFLUORO-OXIDIZED, POLYMD. FOMBLIN Y *95-4* Ingredient Sequence Number: 01 NIOSH (RTECS) Number: 1008240PH CAS Number: 69991-67-9 =========================================================================== Physical/Chemical Characteristics =========================================================================== Appearance And Odor: CLEAR COLORLESS LIQUID W/NO ODOR Boiling Point: >518F Vapor Pressure (MM Hg/70 F): <0.01 Specific Gravity: 1.9 Solubility In Water: INSOLUBLE Percent Volatiles By Volume: 0 =========================================================================== Fire and Explosion Hazard Data =========================================================================== Flash Point: NONE Special Fire Fighting Proc: KEEP CONTAINERS COOL BY SPRAYING W/WATER WHEN EXPOSED TO FIRE, IF FLAMES HAVE REACHED THE PRODUCT CAUSING A POSSIBLE DECOMPOSITON YIELDING, USE SCBA. Unusual Fire And Expl Hazrds: NONE ===========================================================================
EBARA Corporation

(II)
Reactivity Data =========================================================================== Stability: YES Cond To Avoid (Stability): HEATING >554F, FIRE, HEAT SOURCES/HOT SURFACES & OTHER IGNITION SOURCES Materials To Avoid: STRONG/NON-AQUEOUS ALKALI & LEWIS ACIDS >212F. Hazardous Decomp Products: FROM THERMAL DECOMPOSITION IN AIR: HYDROGEN FLUORIDE, CARBONYL FLUORIDE Hazardous Poly Occur: NO =========================================================================== Health Hazard Data =========================================================================== Route Of Entry - Inhalation: NO Route Of Entry - Skin: NO Route Of Entry - Ingestion: NO Carcinogenicity - NTP: NO Carcinogenicity - IARC: NO Carcinogenicity - OSHA: NO Explanation Carcinogenicity: NONE Emergency/First Aid Proc: EYES: CLEAN & WASH W/WATER. SKIN: CLEAN & WASH W/WATER & SOAP. INGESTION: INDUCE VOMITING. OBTAIN MEDICAL ATTENTION IN ALL CASES. =========================================================================== Precautions for Safe Handling and Use =========================================================================== Steps If Matl Released/Spill: ELIMINATE FREE FLAMES FROM THE AREA. STOP LEAK & ABSORB THE LIQUID W/SAND/OTHER ABSORBENTS & SEND TO DISPOSAL. Waste Disposal Method: LANDFILL/DISPOSE OF IN ACCORDANCE W/LOCAL, STATE & FEDERAL REGULATIONS/DESTROY BY USING HIGH TEMPERATURE INCINEATOR DESIGNED TO BURN FLUORINE CONTAINING MATERIALS. Precautions-Handling/Storing: FOR PACKAGING & TRANSPORT, USE EITHER BOTTLES/DRUMS OF GLASS/POLYETHYLENE. DON'T STORE NEAR FLAMMABLE/EXPLOSIVE MATERIALS. Other Precautions: KEEP AWAY FROM FIRE, HEAT SOURCES/HOT SURFACES. DON'T SMOKE IN WORKING AREAS. AVOID CONTAMINATION OF SMOKING PRODUCTS. =========================================================================== Control Measures =========================================================================== Respiratory Protection: UNNECESSARY Protective Gloves: NOT REQUIRED Eye Protection: NOT REQUIRED Other Protective Equipment: NOT REQUIRED, FOLLOW INTERNAL AREA REQUIREMENTS. =========================================================================== Transportation Data =========================================================================== Disposal Data =========================================================================== Label Data =========================================================================== Label Required: YES Label Status: G Common Name: FOMBLIN Y-LVAC 25/6 Special Hazard Precautions: N/K N/K Label Name: INLAND VACUUM INDUSTRIES INC Label Street: 35 HOWARD AVE Label P.O. Box: 373 Label City: CHURCHVILLE Label State: NY Label Zip Code: 14428
EBARA Corporation

(III)
Label Country: US Label Emergency Number: 716-293-3330
EBARA Corporation
(IV)
Appendix 2 Safety Interlocks In compliance with SEMI S2, Safety Guidelines for Semiconductor Manufacturing Equipment, EBARA A Dry Vacuum pumps include a set of safety interlocks, which shut down the pump upon detecting a violation of "safe" condition. The following interlocks are standard equipment on all A Series Pumps: Emergency Off (EMO): A manually activated button breaks a low-voltage control circuit that, in turn, interrupts line power. Restarting the pump(s) requires a manual reset of the twist-lock button. Design implementation of this important interlock can take diverse forms based on process tool specifications and fab electrical distribution. Typical variations include: Pump-only EMO: A button, mounted on or near the pump, controls activating power to the pump motor starter relay(s). Activation interrupts all electrical energy beyond the pump control panel. Tool EMO: A button, included in an interface panel, connects in series (“daisy chain”) with a set of EMO buttons. Activating any of the buttons de-energizes contactor coils in the tool distribution panel and interrupts power to the process tool and its ancillary equipment, including the pump(s). Gang EMO: A button, mounted near a set of pumps, controls power to the coil of a contactor feeding a distribution panel. Activation cuts power to the entire panel. Nitrogen Flow Low A flow sensor trips when nitrogen supply to the pump (oil bearing(s) and inter-stage injection) drops below its factory set point, opening the motor starter relay(s) and shutting down the pump. Restoration of sufficient nitrogen flow permits restarting the pump. Motor Overload Motor overload relays protect the pump motor(s) from overheating due to extended current draws in excess of the motor rating without tripping due to current transients such as start up inrush current. Current (for each phase of line power) passing through a coil heats a bimetallic element simulating motor heating under load. Under a persistent overload condition, differential expansion of the bimetallic element opens a contact, which interrupts the motor run circuit. A brief cool down interval permits restarting the pump. Overcurrent Protection The nearly instantaneous current rise from a line-to-line or line-to-ground short very rapidly heats a thermal element in the circuit breaker, opening of a snap action switch and interrupting all power to the electrical panel. Manual reset, which requires clearing the fault condition, is necessary before restarting the pump. The circuit breaker also serves as a lockable interrupt device for servicing the pump system.
EBARA Corporation

(V)
The following interlocks are available as customer-specified options on A Series pumps for toxic/flammable/pyrophoric applications: Exhaust Purge (Dilution) Nitrogen Flow Low A flow switch trips when nitrogen supply to the exhaust line drops below the field-adjustable set point, opening the motor starter relay(s) and shutting down the pump. Restoration of sufficient nitrogen flow permits restarting the pump. Users must determine appropriate flow setting based on process gas types and amounts found in the pump exhaust stream. Cabinet Exhaust Pressure High (Cabinet Exhaust Flow Low) A "spool piece" mounted on the cabinet exhaust port and connected to the user's exhaust system provides a mounting point and sense tap for a differential pressure switch, which detects vacuum level in the exhaust line. If the pressure differential between the exhaust vacuum and atmosphere (inside the pump enclosure) drops below the level required to maintain sufficient exhaust flow, the normally-closed contacts in the pressure switch break, opening the motor starter relay(s) and shutting down the pump. Because vacuum pumps typically operate unattended, the interlock does not provide visual and audible alarms. Restoration of differential pressure, and thereby cabinet exhaust flow, permits restarting the pump. The spool also provides an auxiliary port (¼" tube) for connection of a vacuum gauge/manometer or insertion of a hot-wire anemometer to measure exhaust parameters. Additional Sensor (Optional) Liquid Leak Detector: While not a safety interlock, a leak detector installed in the pump serves the function of providing protection for personnel and equipment. A controller senses resistance between two conductive elements in the base of the pump. The presence of moisture reduces this resistance below a set point, and the controller ports a signal to the pump CPU, stopping the pump. Optional Features Note Cabinet Exhaust Flow Sensor and Liquid Leak Sensor: Strict compliance with SEMI S2-93A (and S2-0200) requires a cabinet exhaust flow interlock and a leak detector. Most customers find incorporating these features, as needed, into facilities sensors is more economical than including the capability with each individual pump. See Appendix 3.
EBARA Corporation

(VI)
Appendix 3 EBARA Dry Pumps and SEMI S2-93A (S2-0200) In many cases, strict compliance with all aspects of the SEMI health and safety guidelines is not the most desirable or economical way to meet the customer’s actual needs. ETI technical staff can assist the user’s equipment engineers and safety professionals in selecting the best practices for a specific installation. An appropriate guideline is evaluation of the intended installed configuration of the system, including the pump, process tool, power distribution and facilities. Items in question include: Circuit Breaker As a general practice equipment manufactured in the U.S. employs thermal-magnetic circuit breakers for overcurrent protection. SEMI S2 further requires that these circuit breakers have a minimum of 10,000 AIC (amp interrupt capacity). Many EBARA pumps, following the common Japanese practice, employ an earth leakage breaker. Connecting the pump to an appropriately rated circuit breaker in a distribution panel creates a system that meets the SEMI requirements. Lockout – Tagout A nearby distribution panel may also be an appropriate location for the lockout-tagout bracket. Exhaust Dilution Flow Sensor For pumps requiring auxiliary nitrogen in the exhaust, ETI offers a hardware-only, normally open flow switch. However, the standard configuration is a firmware-driven shutdown, executing through the pump processor and preserving an explanation of the trip. Cabinet Exhaust Flow Most customers prefer to monitor the condition of exhaust systems at the facility level rather than the pump level. Liquid Leak Detector Because cooling water leaks inside a pump enclosure are extremely rare, most users find that a liquid leak detector in each pump represents an unnecessary expense. Moisture sensors on the subfab floor can detect a leak either from within a pump or from the utility piping. EBARA Dry Pumps and Ergonomics SEMI S8-95, Safety Guidelines for Ergonomic/Human Factors Engineering of Semiconductor Manufacturing Equipment, which is referenced in SEMI S2, specifies height ranges for location of equipment controls and emergency off (EMO) buttons. The minimum height exceeds the overall height of some EBARA A Series dry pumps. Because vacuum pumps run unattended for long periods of time, EBARA's technical staff believes that relocating the infrequently used controls is unwarranted. Should your vacuum pump application require frequent manual operation of the controls, you may contact your sales representative or the nearest EBARA office for assistance in mounting the controls at a convenient height.
EBARA Corporation
(VII)
Appendix 4 Leak Check Procedure NOTE: This general procedure is not a substitute for user's work instructions or leak detector operations manual. Read and follow the instructions for your leak detection apparatus. Perform leak check after initial system assembly and after any breach of the system for maintenance. Check pump down time (that is time to go from atmosphere to target pressure) of foreline to confirm the absence of gross leaks. For vacuum systems and process pump exhaust lines, pressurize the system with helium and run the probe (“sniffer”) of a mass spectrometer leak detector around all joints, seals and fittings. Realign joints, tighten fittings, replace seals, etc. Repeat as necessary to eliminate all leaks. Disconnect helium supply and place system in operating condition.
EBARA Corporation

(VIII)
Appendix 5 Returning Pumps for Rebuild in U.S. In the United States, returned pump shipments must conform to Department of Transportation regulations:
• Hermetically seal contaminated equipment in two (2) heavy gauge polyethylene bags or equivalent.
• Tag or label equipment stating the possible hazardous material and/or the environment in which it was used.
• Obtain an RMA number from the EBARA Service department and post on all bags, containers, and packing list along with a copy of the Environmental Health & Safety Clearance Form.
Failure to observe these procedures may delay the processing and rebuilding of your pump.
EBARA Corporation

(IX)
[Blank Page]
EBARA Corporation