Embed Size (px)
DESCRIPTION
Halloween crafts
Citation preview
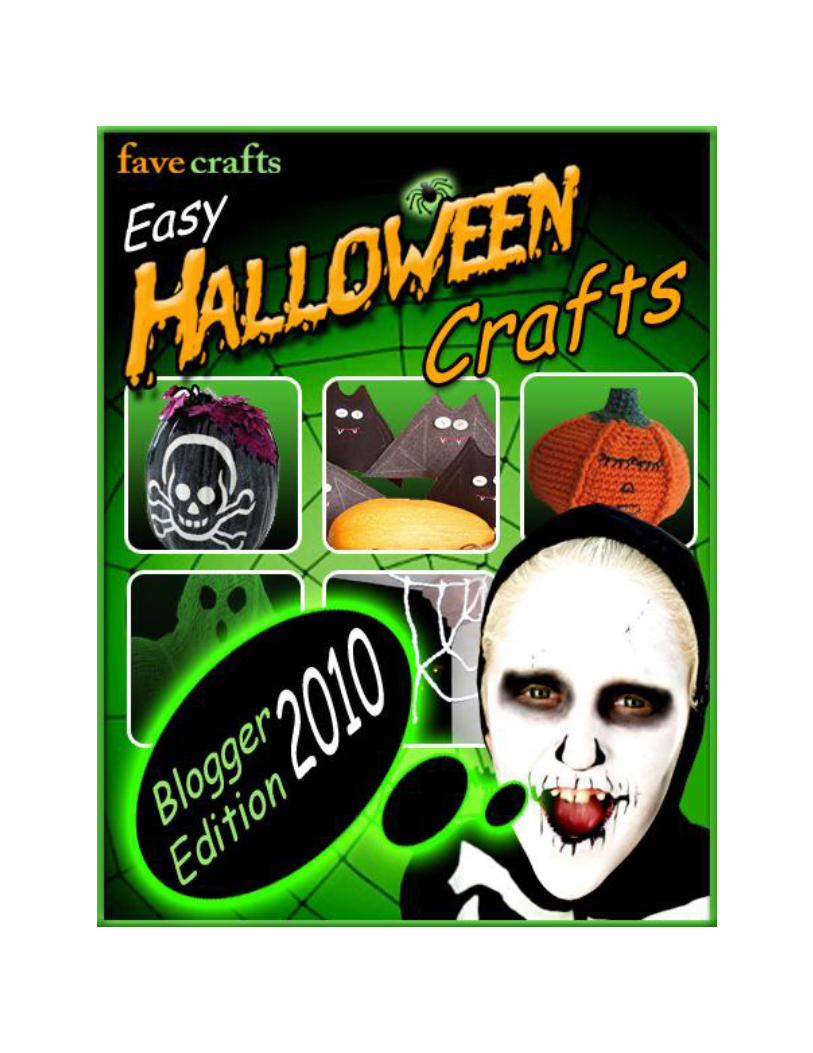
Easy Halloween Crafts: Blogger Edition 2010
Find thousands of free craft projects, decorating ideas, gifts and more at www.FaveCrafts.com.
2
Easy Halloween Crafts: Blogger Edition 2010
Copyright 2010 by Prime Publishing LLC
All rights reserved. No part of this book may be reproduced or transmitted in any form or by any means,
electronic or mechanical, including photocopying, recording, or by any information storage or retrieval
system, without written permission from the publisher, except in the case of brief quotations embodied
in critical articles and reviews.
Trademarks are property of their respective holders. When used, trademarks are for the benefit of the
trademark owner only.
Published by Prime Publishing LLC, 3400 Dundee Road, Northbrook, IL 60062 – www.primecp.com
Free Craft Projects
Free Crochet Projects Free Knitting Projects Free Sewing Projects
Easy Halloween Crafts: Blogger Edition 2010
Find thousands of free craft projects, decorating ideas, gifts and more at www.FaveCrafts.com.
3
Letter from the Editors
Dear Reader,
Halloween is a holiday for crafters! From homemade costumes to scary decorations, easy Halloween
crafts are a great way to prepare for the festivities. With this collection of 7 easy Halloween crafts, even
the busiest crafter can find a craft project to wear, give or decorate this Halloween. Find bats, ghosts,
pumpkins and more in Easy Halloween Crafts: Blogger Edition 2010.
We love working with craft bloggers at FaveCrafts. Our goal has always been to create and nurture a
vibrant and varied community of crafters. In addition to publishing blogger craft projects on the main
website and on the blog, we now promote creative bloggers in the Craft Designers area through custom
profile pages. You will see many bloggers featured in this eBook in the Craft Designers category.
Find more mini craft eBooks, free projects and extensive decorating ideas at www.favecrafts.com. Our
eBooks, like all our craft projects, are absolutely FREE to members of our crafting community. Please
feel free to share with family and friends and ask them to sign up at our website for our free e-mail
newsletter.
We hope you enjoy reading and crafting!
Sincerely,
The Editors of FaveCrafts.com
www.FaveCrafts.com
www.FaveCraftsBlog.com
Easy Halloween Crafts: Blogger Edition 2010
Find thousands of free craft projects, decorating ideas, gifts and more at www.FaveCrafts.com.
4
Easy Halloween Crafts: Blogger Edition 2010
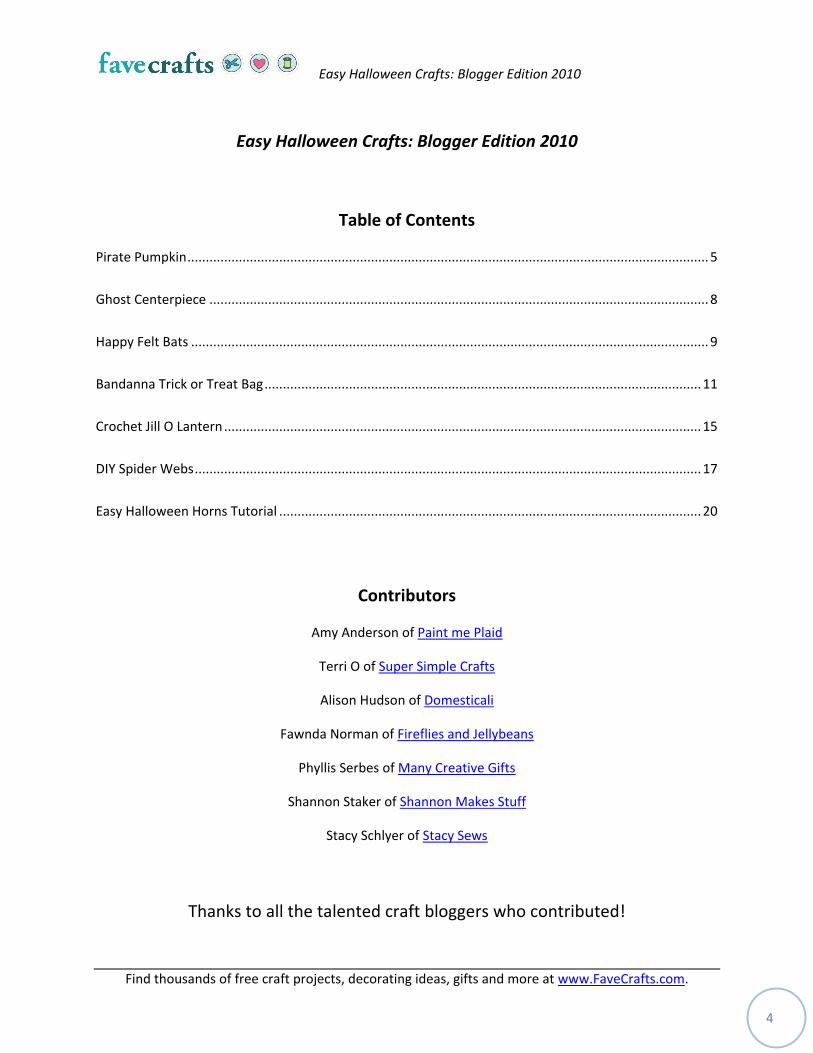
Table of Contents
Pirate Pumpkin .............................................................................................................................................. 5
Ghost Centerpiece ........................................................................................................................................ 8
Happy Felt Bats ............................................................................................................................................. 9
Bandanna Trick or Treat Bag ....................................................................................................................... 11
Crochet Jill O Lantern .................................................................................................................................. 15
DIY Spider Webs .......................................................................................................................................... 17
Easy Halloween Horns Tutorial ................................................................................................................... 20
Contributors
Amy Anderson of Paint me Plaid
Terri O of Super Simple Crafts
Alison Hudson of Domesticali
Fawnda Norman of Fireflies and Jellybeans
Phyllis Serbes of Many Creative Gifts
Shannon Staker of Shannon Makes Stuff
Stacy Schlyer of Stacy Sews
Thanks to all the talented craft bloggers who contributed!
Easy Halloween Crafts: Blogger Edition 2010
Find thousands of free craft projects, decorating ideas, gifts and more at www.FaveCrafts.com.
5
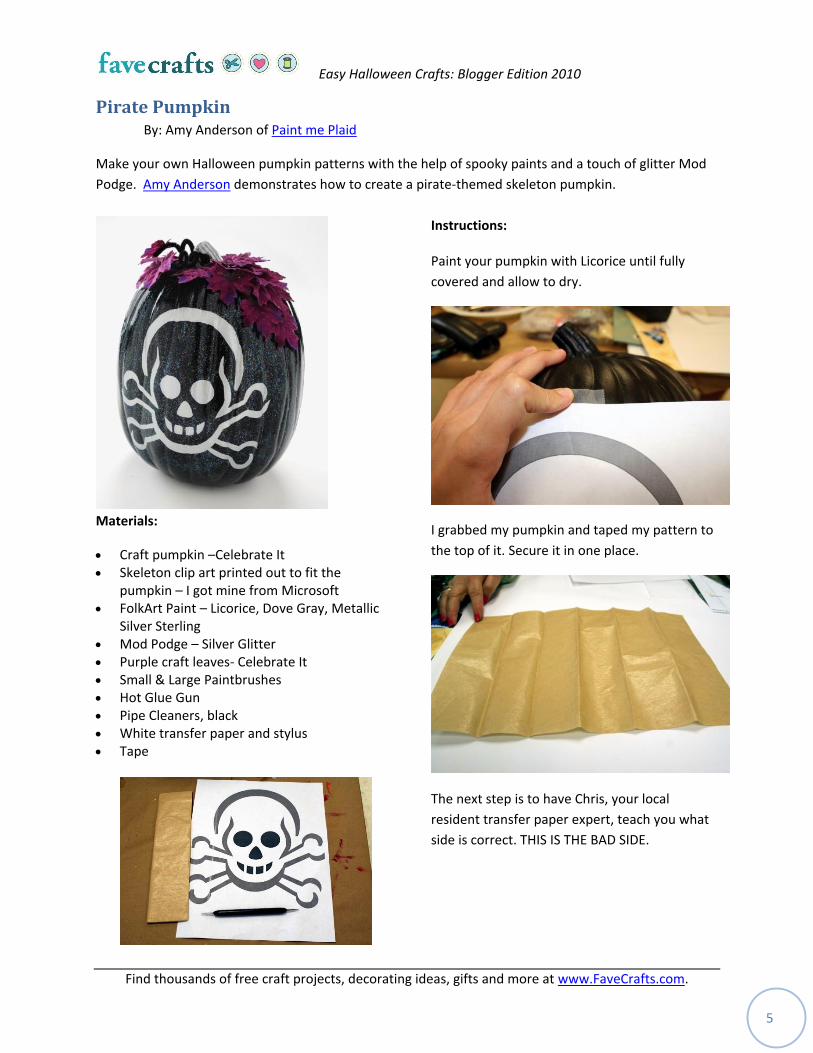
Pirate Pumpkin By: Amy Anderson of Paint me Plaid
Make your own Halloween pumpkin patterns with the help of spooky paints and a touch of glitter Mod
Podge. Amy Anderson demonstrates how to create a pirate-themed skeleton pumpkin.
Materials:
Craft pumpkin –Celebrate It Skeleton clip art printed out to fit the
pumpkin – I got mine from Microsoft FolkArt Paint – Licorice, Dove Gray, Metallic
Silver Sterling Mod Podge – Silver Glitter Purple craft leaves- Celebrate It Small & Large Paintbrushes Hot Glue Gun Pipe Cleaners, black White transfer paper and stylus Tape
Instructions: Paint your pumpkin with Licorice until fully
covered and allow to dry.
I grabbed my pumpkin and taped my pattern to
the top of it. Secure it in one place.
The next step is to have Chris, your local
resident transfer paper expert, teach you what
side is correct. THIS IS THE BAD SIDE.
Easy Halloween Crafts: Blogger Edition 2010
Find thousands of free craft projects, decorating ideas, gifts and more at www.FaveCrafts.com.
6
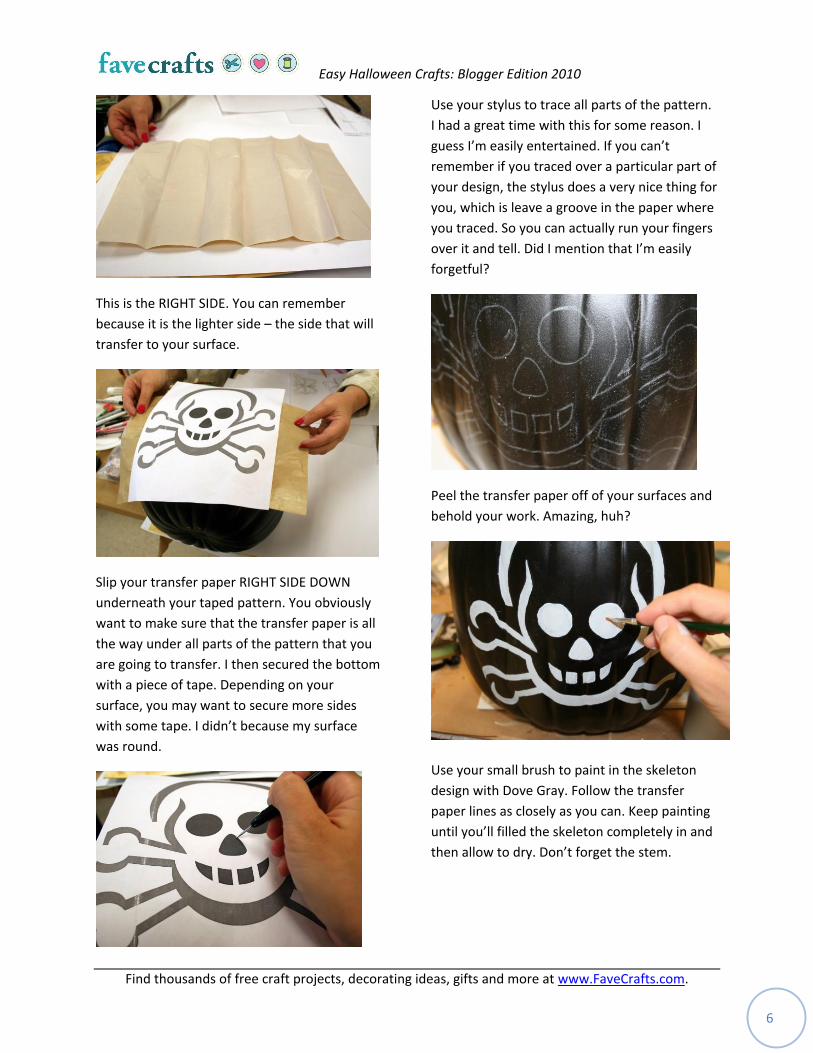
This is the RIGHT SIDE. You can remember
because it is the lighter side – the side that will
transfer to your surface.
Slip your transfer paper RIGHT SIDE DOWN
underneath your taped pattern. You obviously
want to make sure that the transfer paper is all
the way under all parts of the pattern that you
are going to transfer. I then secured the bottom
with a piece of tape. Depending on your
surface, you may want to secure more sides
with some tape. I didn’t because my surface
was round.
Use your stylus to trace all parts of the pattern.
I had a great time with this for some reason. I
guess I’m easily entertained. If you can’t
remember if you traced over a particular part of
your design, the stylus does a very nice thing for
you, which is leave a groove in the paper where
you traced. So you can actually run your fingers
over it and tell. Did I mention that I’m easily
forgetful?
Peel the transfer paper off of your surfaces and
behold your work. Amazing, huh?
Use your small brush to paint in the skeleton
design with Dove Gray. Follow the transfer
paper lines as closely as you can. Keep painting
until you’ll filled the skeleton completely in and
then allow to dry. Don’t forget the stem.
Easy Halloween Crafts: Blogger Edition 2010
Find thousands of free craft projects, decorating ideas, gifts and more at www.FaveCrafts.com.
7
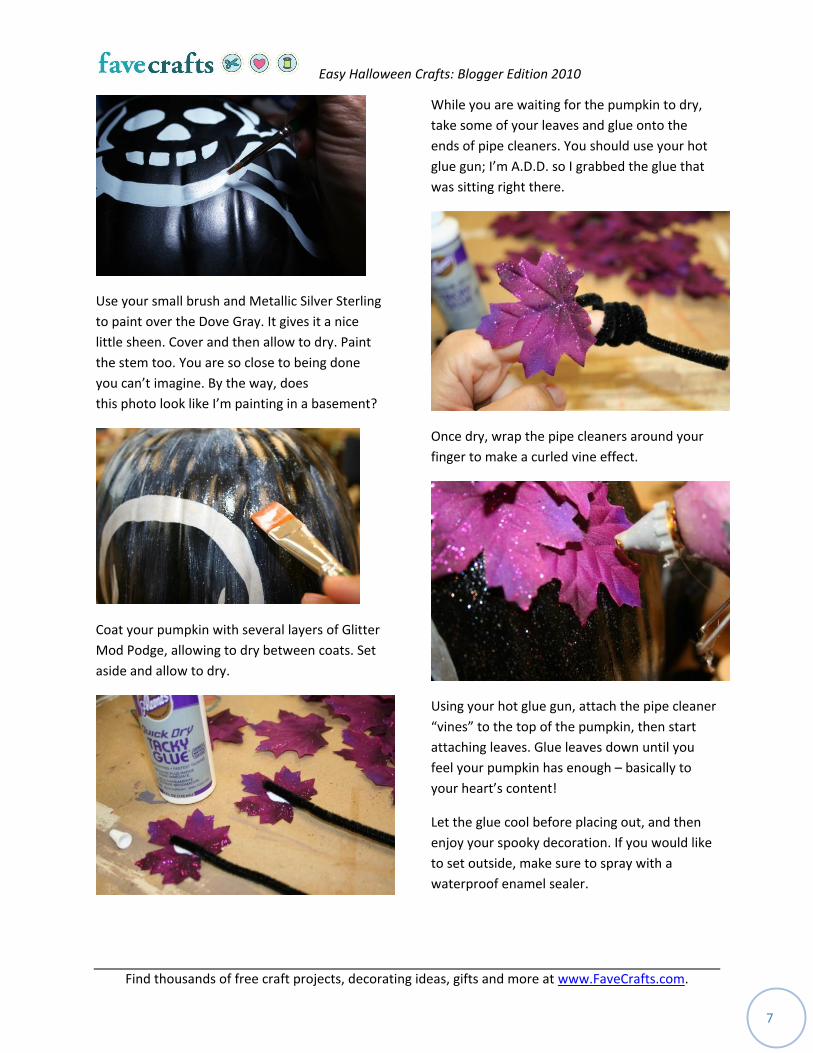
Use your small brush and Metallic Silver Sterling
to paint over the Dove Gray. It gives it a nice
little sheen. Cover and then allow to dry. Paint
the stem too. You are so close to being done
you can’t imagine. By the way, does
this photo look like I’m painting in a basement?
Coat your pumpkin with several layers of Glitter
Mod Podge, allowing to dry between coats. Set
aside and allow to dry.
While you are waiting for the pumpkin to dry,
take some of your leaves and glue onto the
ends of pipe cleaners. You should use your hot
glue gun; I’m A.D.D. so I grabbed the glue that
was sitting right there.
Once dry, wrap the pipe cleaners around your
finger to make a curled vine effect.
Using your hot glue gun, attach the pipe cleaner
“vines” to the top of the pumpkin, then start
attaching leaves. Glue leaves down until you
feel your pumpkin has enough – basically to
your heart’s content!
Let the glue cool before placing out, and then
enjoy your spooky decoration. If you would like
to set outside, make sure to spray with a
waterproof enamel sealer.
Easy Halloween Crafts: Blogger Edition 2010
Find thousands of free craft projects, decorating ideas, gifts and more at www.FaveCrafts.com.
8
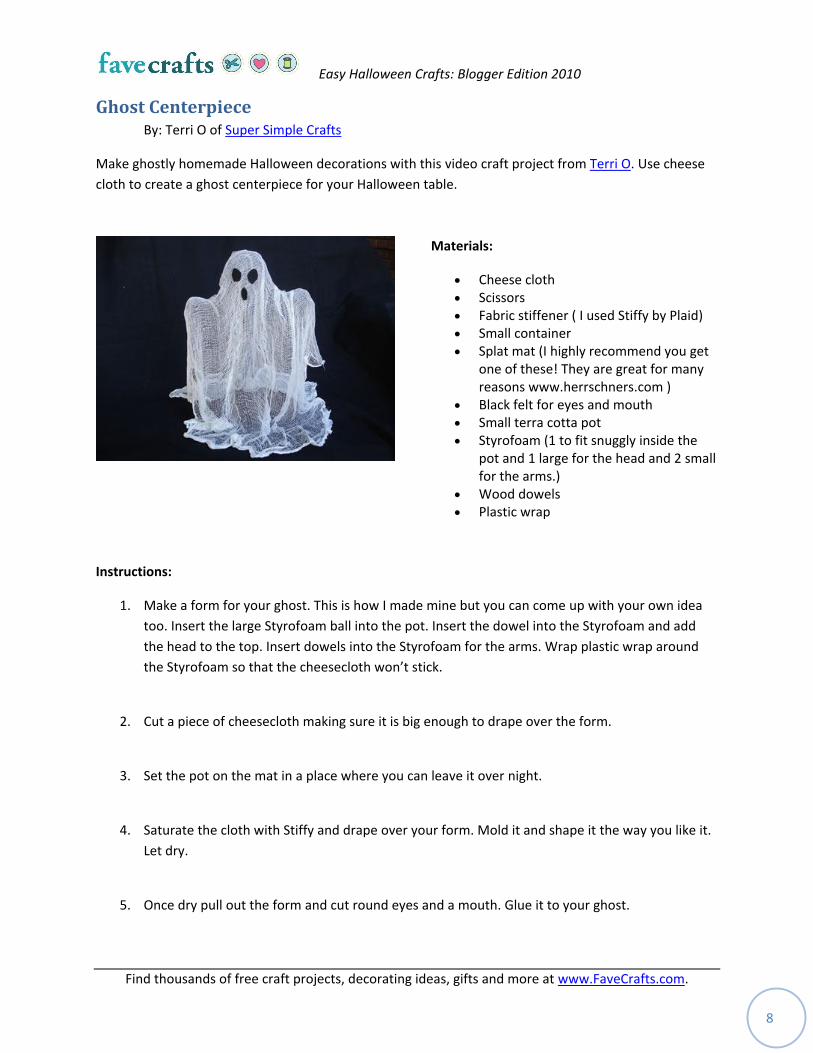
Ghost Centerpiece By: Terri O of Super Simple Crafts
Make ghostly homemade Halloween decorations with this video craft project from Terri O. Use cheese
cloth to create a ghost centerpiece for your Halloween table.
Materials:
Cheese cloth Scissors Fabric stiffener ( I used Stiffy by Plaid) Small container Splat mat (I highly recommend you get
one of these! They are great for many reasons www.herrschners.com )
Black felt for eyes and mouth Small terra cotta pot Styrofoam (1 to fit snuggly inside the
pot and 1 large for the head and 2 small for the arms.)
Wood dowels Plastic wrap
Instructions:
1. Make a form for your ghost. This is how I made mine but you can come up with your own idea
too. Insert the large Styrofoam ball into the pot. Insert the dowel into the Styrofoam and add
the head to the top. Insert dowels into the Styrofoam for the arms. Wrap plastic wrap around
the Styrofoam so that the cheesecloth won’t stick.
2. Cut a piece of cheesecloth making sure it is big enough to drape over the form.
3. Set the pot on the mat in a place where you can leave it over night.
4. Saturate the cloth with Stiffy and drape over your form. Mold it and shape it the way you like it.
Let dry.
5. Once dry pull out the form and cut round eyes and a mouth. Glue it to your ghost.
Easy Halloween Crafts: Blogger Edition 2010
Find thousands of free craft projects, decorating ideas, gifts and more at www.FaveCrafts.com.
9
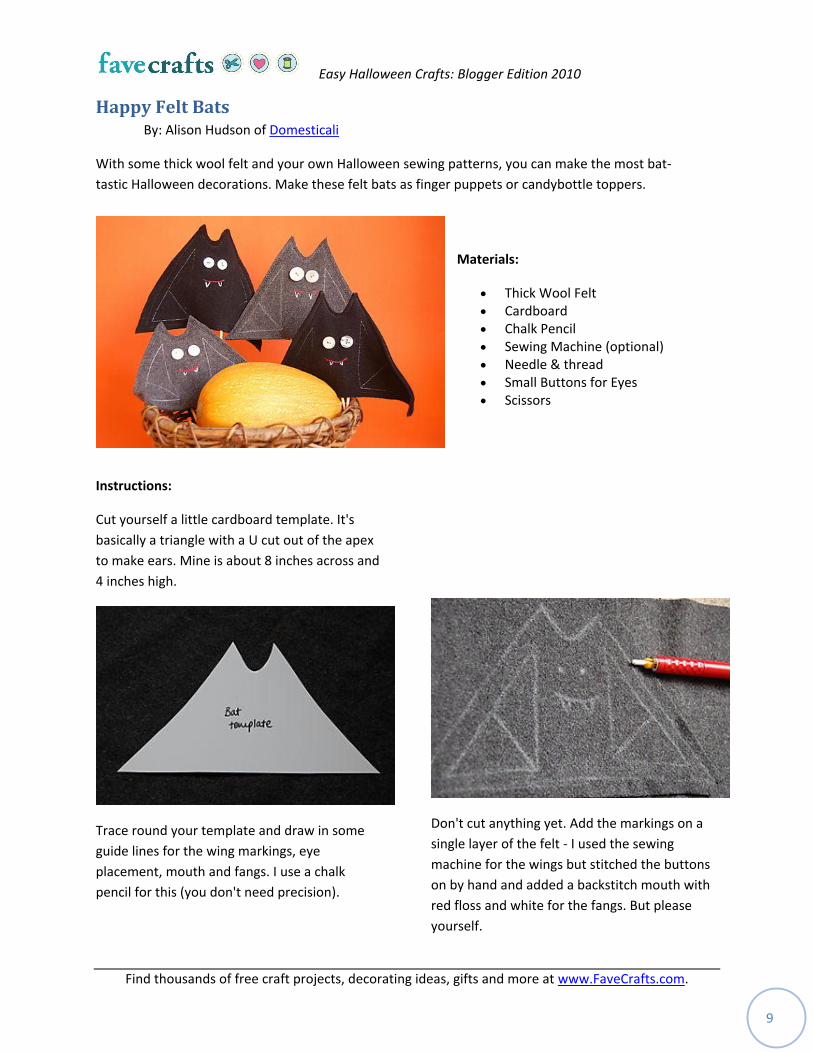
Happy Felt Bats By: Alison Hudson of Domesticali
With some thick wool felt and your own Halloween sewing patterns, you can make the most bat-
tastic Halloween decorations. Make these felt bats as finger puppets or candybottle toppers.
Materials:
Thick Wool Felt Cardboard Chalk Pencil Sewing Machine (optional) Needle & thread Small Buttons for Eyes Scissors
Instructions:
Cut yourself a little cardboard template. It's
basically a triangle with a U cut out of the apex
to make ears. Mine is about 8 inches across and
4 inches high.
Trace round your template and draw in some
guide lines for the wing markings, eye
placement, mouth and fangs. I use a chalk
pencil for this (you don't need precision).
Don't cut anything yet. Add the markings on a
single layer of the felt - I used the sewing
machine for the wings but stitched the buttons
on by hand and added a backstitch mouth with
red floss and white for the fangs. But please
yourself.
Easy Halloween Crafts: Blogger Edition 2010
Find thousands of free craft projects, decorating ideas, gifts and more at www.FaveCrafts.com.
10
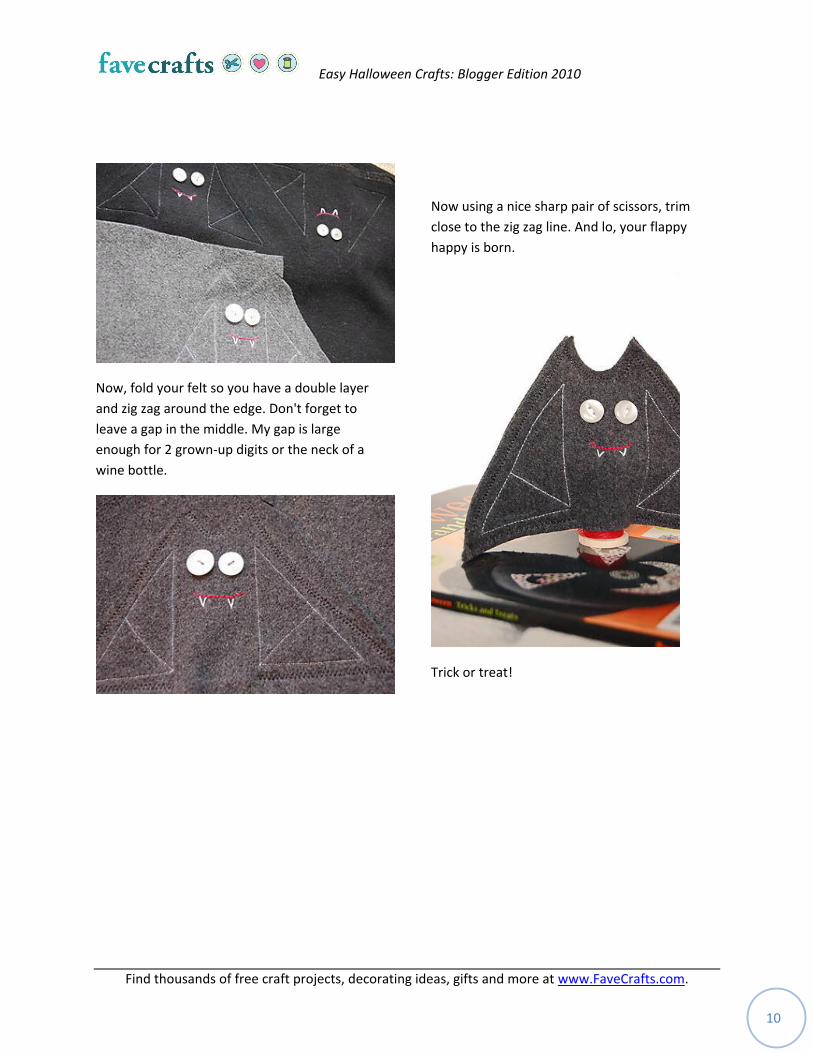
Now, fold your felt so you have a double layer
and zig zag around the edge. Don't forget to
leave a gap in the middle. My gap is large
enough for 2 grown-up digits or the neck of a
wine bottle.
Now using a nice sharp pair of scissors, trim
close to the zig zag line. And lo, your flappy
happy is born.
Trick or treat!

Easy Halloween Crafts: Blogger Edition 2010
Find thousands of free craft projects, decorating ideas, gifts and more at www.FaveCrafts.com.
11
Bandanna Trick or Treat Bag By: Fawnda of Fireflies and Jellybeans
Make a bandanna trick or treat bag with these Halloween sewing projects from Fawnda Norman. This
bag is made from a bandanna and some stenciling, and your child can use it on Halloween night!
Materials:
A bandanna Coordinating thread Sewing machine Scissors Optional: Freezer paper, paint
Instructions:
1. Fold your bandanna in half with right sides
together.
2. Measure and cut 12 inches in length.
(Save the extra piece for the straps)
2. On the bottom corners (on the fold) cut out
2 X 2 inch squares.
3. Now grab your extra piece and cut two 4
inch strips from it for the straps. (Mine are
still folded in half).
Easy Halloween Crafts: Blogger Edition 2010
Find thousands of free craft projects, decorating ideas, gifts and more at www.FaveCrafts.com.
12
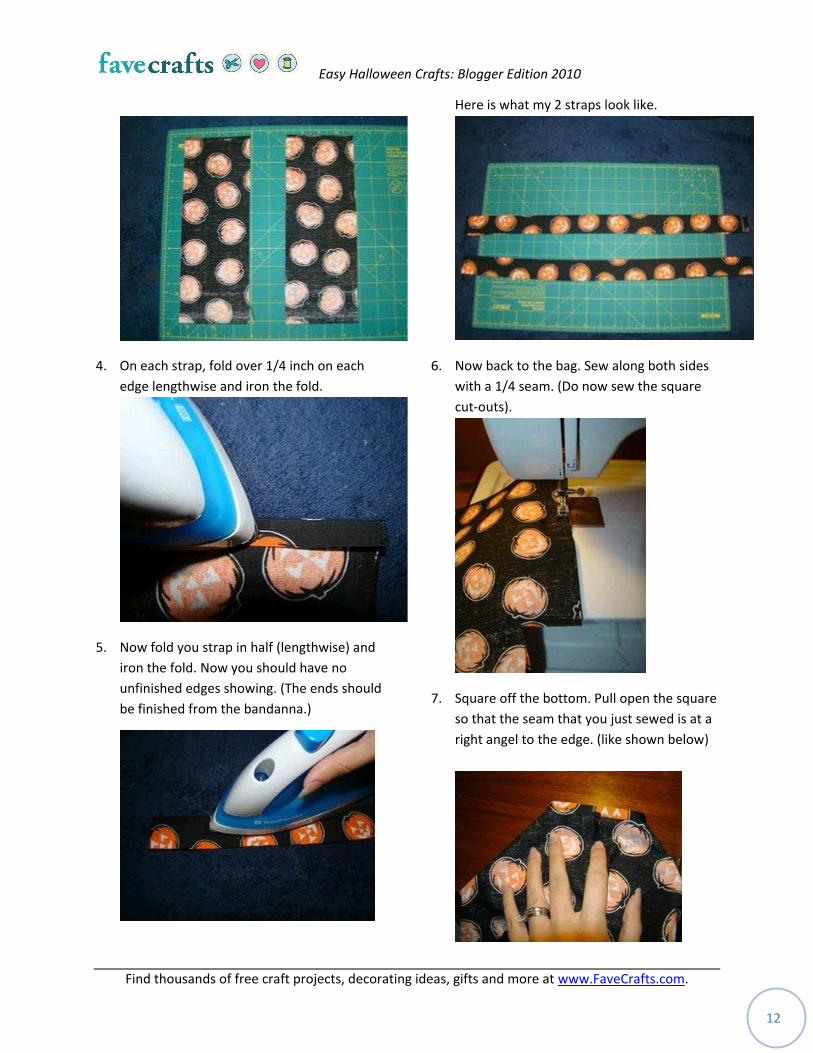
4. On each strap, fold over 1/4 inch on each
edge lengthwise and iron the fold.
5. Now fold you strap in half (lengthwise) and
iron the fold. Now you should have no
unfinished edges showing. (The ends should
be finished from the bandanna.)
Here is what my 2 straps look like.
6. Now back to the bag. Sew along both sides
with a 1/4 seam. (Do now sew the square
cut-outs).
7. Square off the bottom. Pull open the square
so that the seam that you just sewed is at a
right angel to the edge. (like shown below)
Easy Halloween Crafts: Blogger Edition 2010
Find thousands of free craft projects, decorating ideas, gifts and more at www.FaveCrafts.com.
13
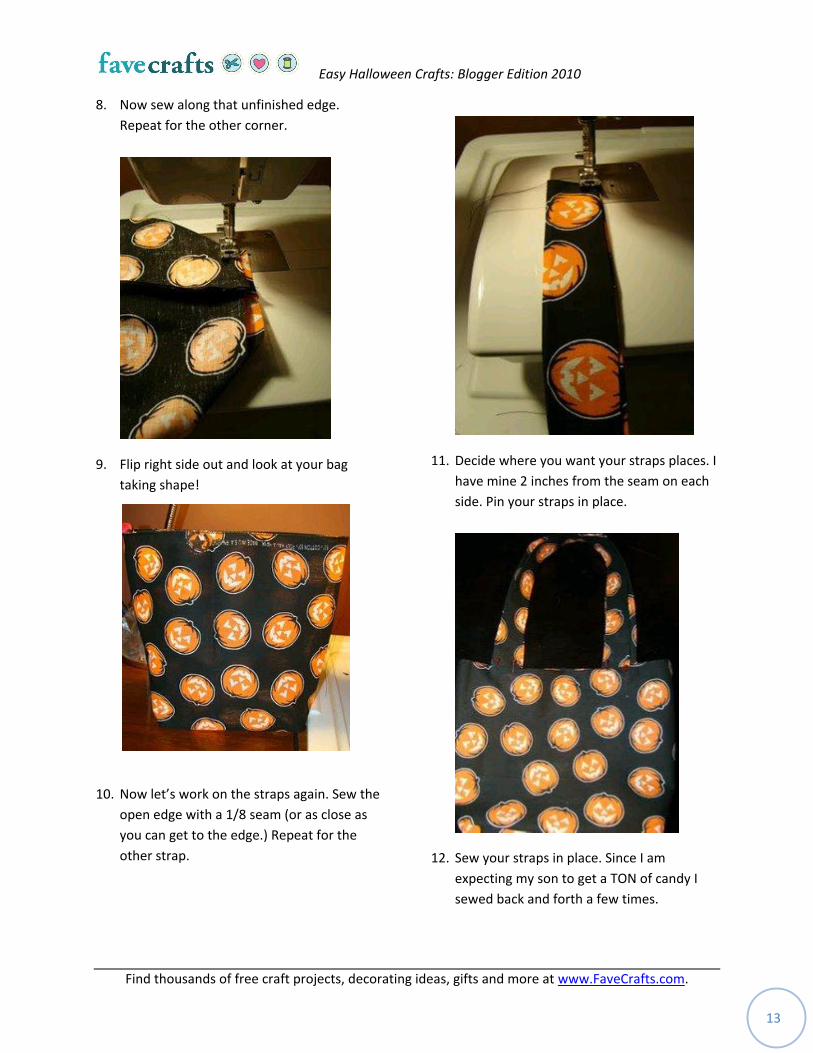
8. Now sew along that unfinished edge.
Repeat for the other corner.
9. Flip right side out and look at your bag
taking shape!
10. Now let’s work on the straps again. Sew the
open edge with a 1/8 seam (or as close as
you can get to the edge.) Repeat for the
other strap.
11. Decide where you want your straps places. I
have mine 2 inches from the seam on each
side. Pin your straps in place.
12. Sew your straps in place. Since I am
expecting my son to get a TON of candy I
sewed back and forth a few times.
Easy Halloween Crafts: Blogger Edition 2010
Find thousands of free craft projects, decorating ideas, gifts and more at www.FaveCrafts.com.
14
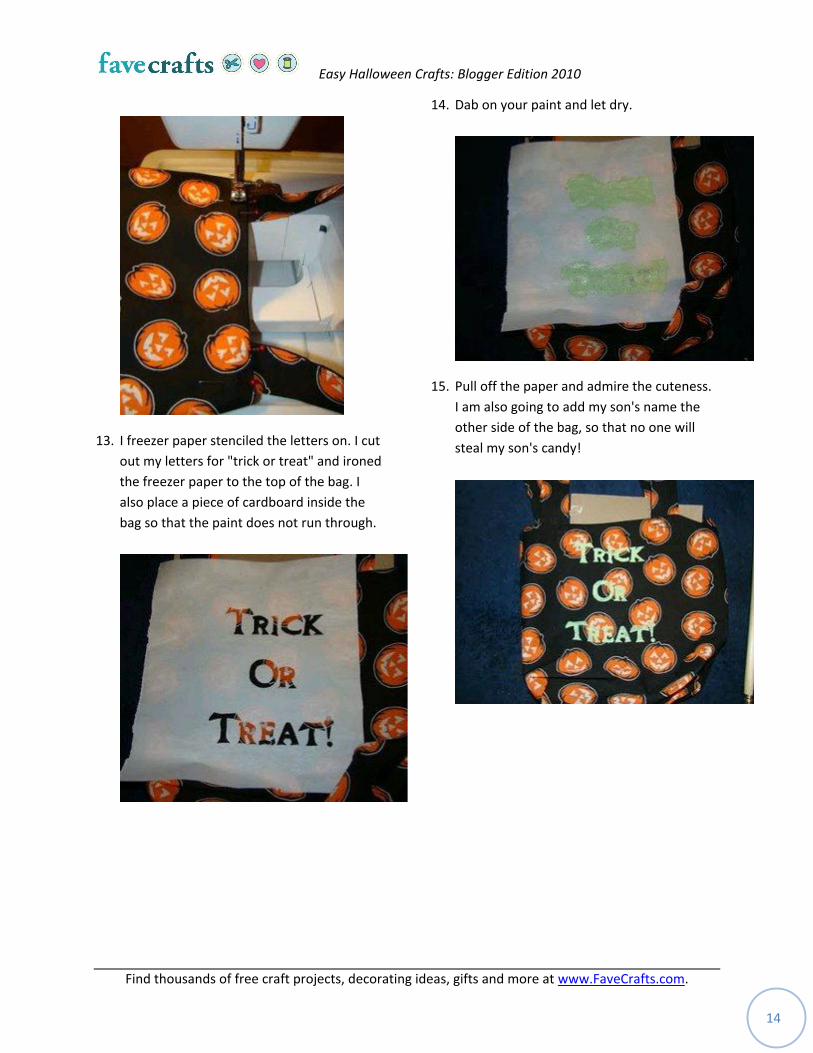
13. I freezer paper stenciled the letters on. I cut
out my letters for "trick or treat" and ironed
the freezer paper to the top of the bag. I
also place a piece of cardboard inside the
bag so that the paint does not run through.
14. Dab on your paint and let dry.
15. Pull off the paper and admire the cuteness.
I am also going to add my son's name the
other side of the bag, so that no one will
steal my son's candy!
Easy Halloween Crafts: Blogger Edition 2010
Find thousands of free craft projects, decorating ideas, gifts and more at www.FaveCrafts.com.
15
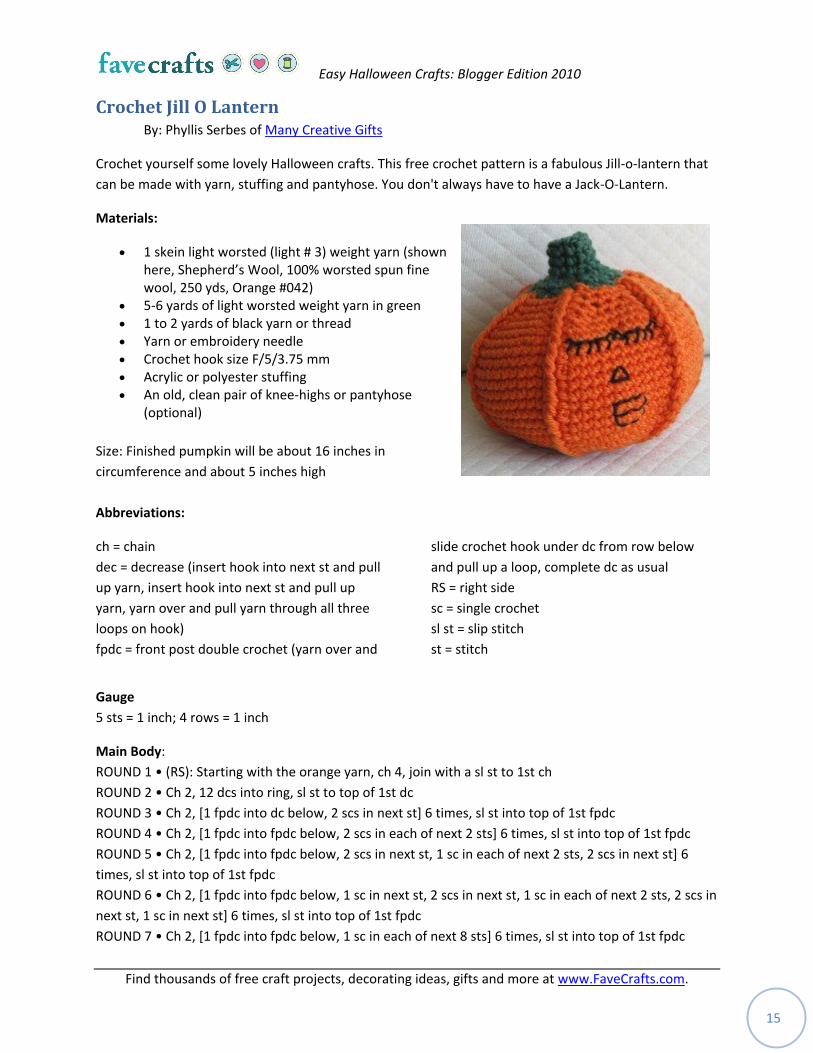
Crochet Jill O Lantern By: Phyllis Serbes of Many Creative Gifts
Crochet yourself some lovely Halloween crafts. This free crochet pattern is a fabulous Jill-o-lantern that
can be made with yarn, stuffing and pantyhose. You don't always have to have a Jack-O-Lantern.
Materials:
1 skein light worsted (light # 3) weight yarn (shown here, Shepherd’s Wool, 100% worsted spun fine wool, 250 yds, Orange #042)
5-6 yards of light worsted weight yarn in green 1 to 2 yards of black yarn or thread Yarn or embroidery needle Crochet hook size F/5/3.75 mm Acrylic or polyester stuffing An old, clean pair of knee-highs or pantyhose
(optional)
Size: Finished pumpkin will be about 16 inches in
circumference and about 5 inches high
Abbreviations:
ch = chain
dec = decrease (insert hook into next st and pull
up yarn, insert hook into next st and pull up
yarn, yarn over and pull yarn through all three
loops on hook)
fpdc = front post double crochet (yarn over and
slide crochet hook under dc from row below
and pull up a loop, complete dc as usual
RS = right side
sc = single crochet
sl st = slip stitch
st = stitch
Gauge
5 sts = 1 inch; 4 rows = 1 inch
Main Body:
ROUND 1 • (RS): Starting with the orange yarn, ch 4, join with a sl st to 1st ch
ROUND 2 • Ch 2, 12 dcs into ring, sl st to top of 1st dc
ROUND 3 • Ch 2, *1 fpdc into dc below, 2 scs in next st] 6 times, sl st into top of 1st fpdc
ROUND 4 • Ch 2, *1 fpdc into fpdc below, 2 scs in each of next 2 sts+ 6 times, sl st into top of 1st fpdc
ROUND 5 • Ch 2, *1 fpdc into fpdc below, 2 scs in next st, 1 sc in each of next 2 sts, 2 scs in next st+ 6
times, sl st into top of 1st fpdc
ROUND 6 • Ch 2, *1 fpdc into fpdc below, 1 sc in next st, 2 scs in next st, 1 sc in each of next 2 sts, 2 scs in
next st, 1 sc in next st] 6 times, sl st into top of 1st fpdc
ROUND 7 • Ch 2, *1 fpdc into fpdc below, 1 sc in each of next 8 sts] 6 times, sl st into top of 1st fpdc
Easy Halloween Crafts: Blogger Edition 2010
Find thousands of free craft projects, decorating ideas, gifts and more at www.FaveCrafts.com.
16
ROUND 8 • Repeat Round 7
ROUND 9 • Ch 2, *1 fpdc into fpdc below, 2 scs in next st, 1 sc in each of next 6 sts, 2 scs in next st+ 6
times, sl st into top of 1st fpdc
ROUND 10 • Ch 2, *1 fpdc into fpdc below, 1 sc in each of next 10 sts] 6 times, sl st into top of 1st fpdc
ROUNDS 11 through 19 • Repeat Round 10
ROUND 20 • Ch 2, *1 fpdc into fpdc below, 1 dec, 1 sc in each of next 6 sts, 1 dec+ 6 times, sl st into top
of 1st fpdc
ROUND 21 • Ch 2, *1 fpdc into fpdc below, 1 dec, 1 sc in each of next 4 sts, 1 dec] 6 times, sl st into top
of 1st fpdc
ROUND 22 • Ch 2, *1 fpdc into fpdc below, 1 sc in each of next 4 sts+ 6 times, sl st into top of 1st fpdc
At this point, you might want to go ahead and embroider a face on your pumpkin and stuff it (tip: first
you might want to cut off the foot and part of the ankle of a pair of pantyhose and put some of the
stuffing in the hose, then place it inside the pumpkin and put in more stuffing until it’s stuffed the way
you want it, then tuck in the ends of the hose and go on to Round 23).
ROUND 23 • Repeat Round 22
Stem:
ROUND 24 • Attach green yarn, ch1, 1 sc in same st (should be on top of 1 fpdc below), *1 dec in next 2
sts, 1 dec in next 2 sts, 1 sc on top of 1 fpdc below] 6 times, sl st to 1st st (18 sts)
ROUND 25 • Ch 1, 1 sc in same st and each of next 17 sts, sl st to
1st st (18 sts)
ROUND 26 • Ch 1, *1 dec in next 2 sts+ 9 times, sl st to 1st st (9 sts)
ROUND 27 • Ch 1, 1 sc in same and each of next 8 sts, sl st to 1st st (9 sts)
ROUND 28 • Repeat Round 27, fasten off.
Easy Halloween Crafts: Blogger Edition 2010
Find thousands of free craft projects, decorating ideas, gifts and more at www.FaveCrafts.com.
17
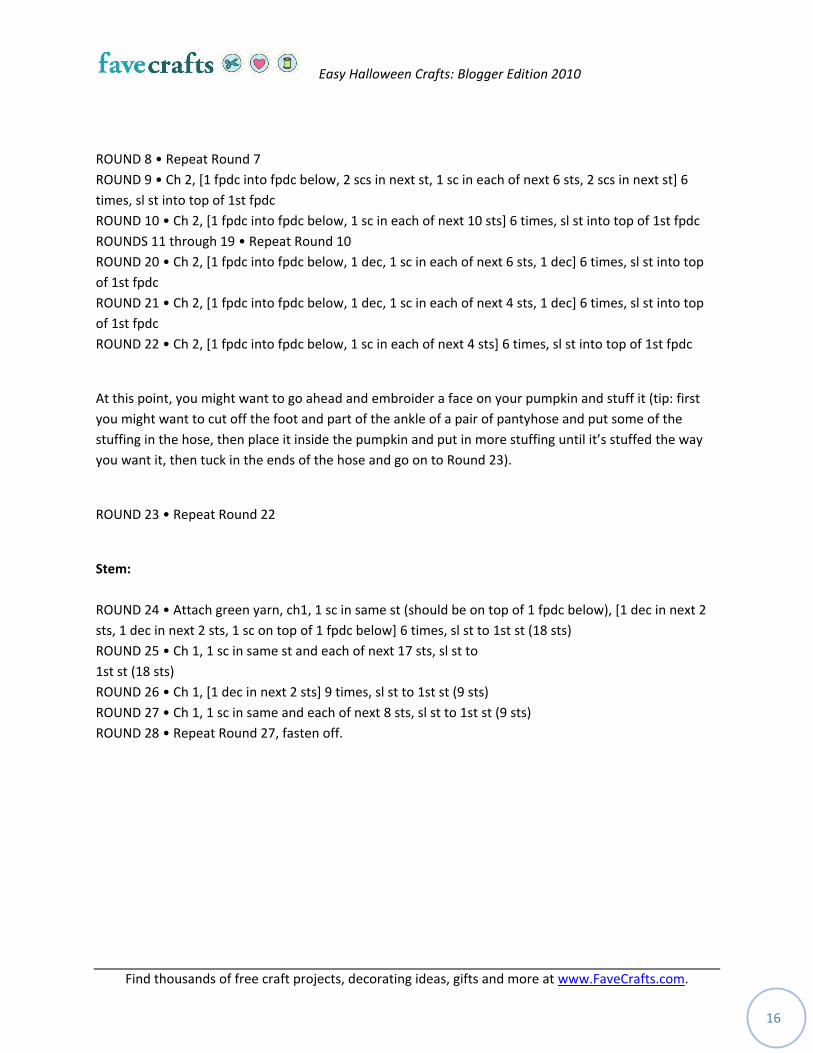
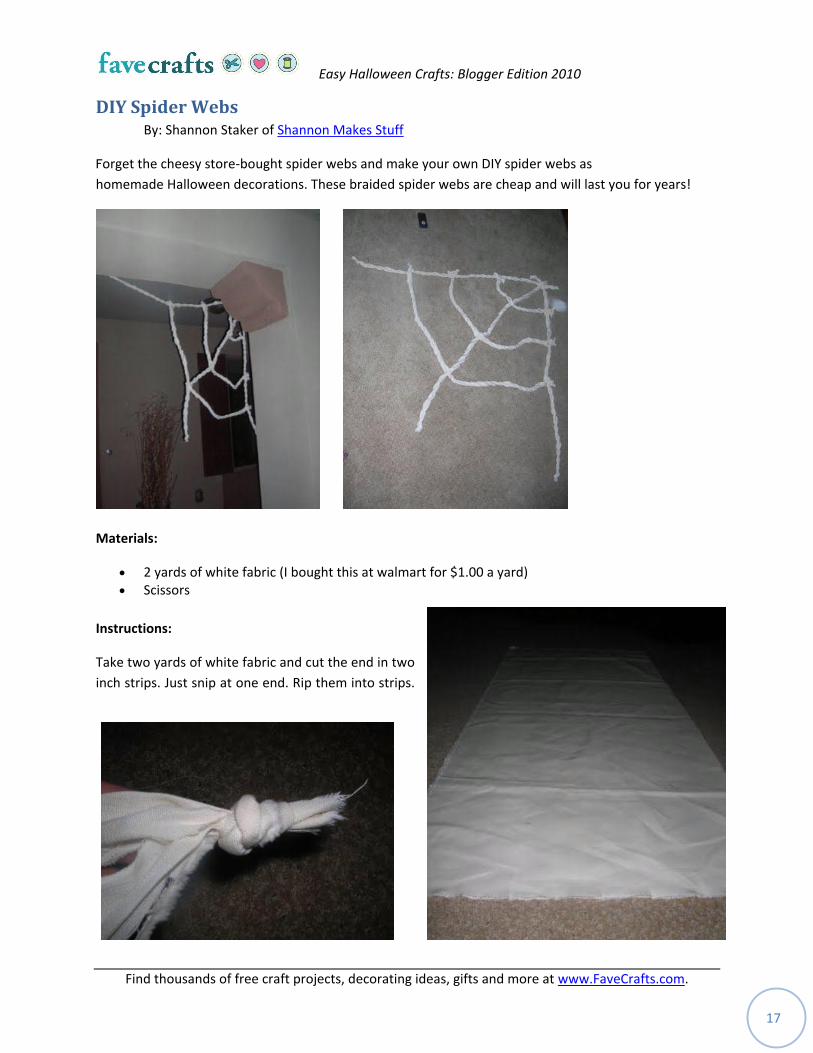
DIY Spider Webs By: Shannon Staker of Shannon Makes Stuff
Forget the cheesy store-bought spider webs and make your own DIY spider webs as
homemade Halloween decorations. These braided spider webs are cheap and will last you for years!
Materials:
2 yards of white fabric (I bought this at walmart for $1.00 a yard) Scissors
Instructions:
Take two yards of white fabric and cut the end in two
inch strips. Just snip at one end. Rip them into strips.
Easy Halloween Crafts: Blogger Edition 2010
Find thousands of free craft projects, decorating ideas, gifts and more at www.FaveCrafts.com.
18
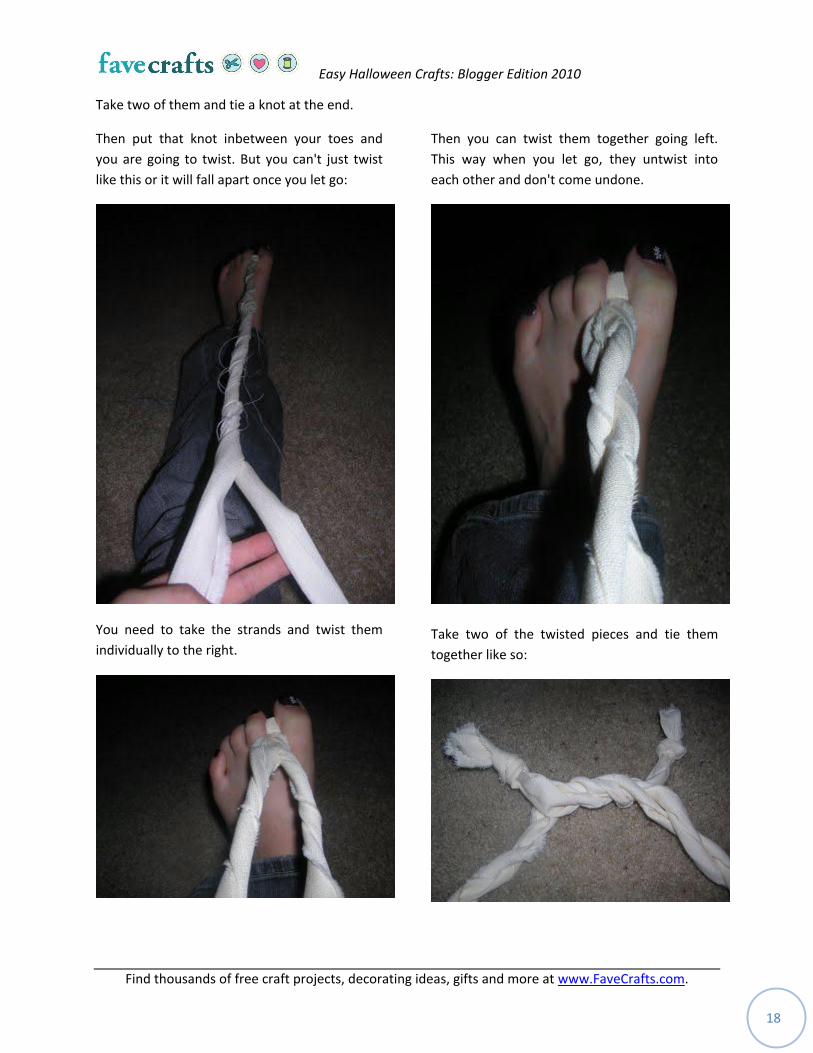
Take two of them and tie a knot at the end.
Then put that knot inbetween your toes and
you are going to twist. But you can't just twist
like this or it will fall apart once you let go:
You need to take the strands and twist them
individually to the right.
Then you can twist them together going left.
This way when you let go, they untwist into
each other and don't come undone.
Take two of the twisted pieces and tie them
together like so:
Easy Halloween Crafts: Blogger Edition 2010
Find thousands of free craft projects, decorating ideas, gifts and more at www.FaveCrafts.com.
19
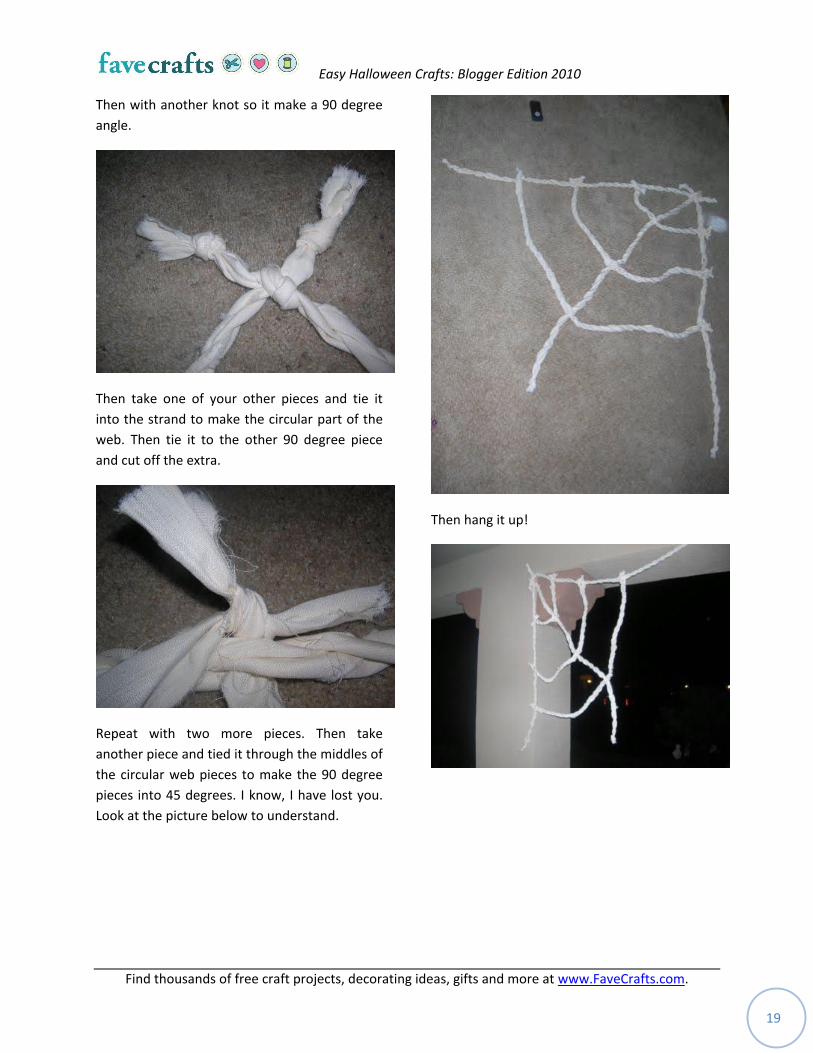
Then with another knot so it make a 90 degree
angle.
Then take one of your other pieces and tie it
into the strand to make the circular part of the
web. Then tie it to the other 90 degree piece
and cut off the extra.
Repeat with two more pieces. Then take
another piece and tied it through the middles of
the circular web pieces to make the 90 degree
pieces into 45 degrees. I know, I have lost you.
Look at the picture below to understand.
Then hang it up!
Easy Halloween Crafts: Blogger Edition 2010
Find thousands of free craft projects, decorating ideas, gifts and more at www.FaveCrafts.com.
20
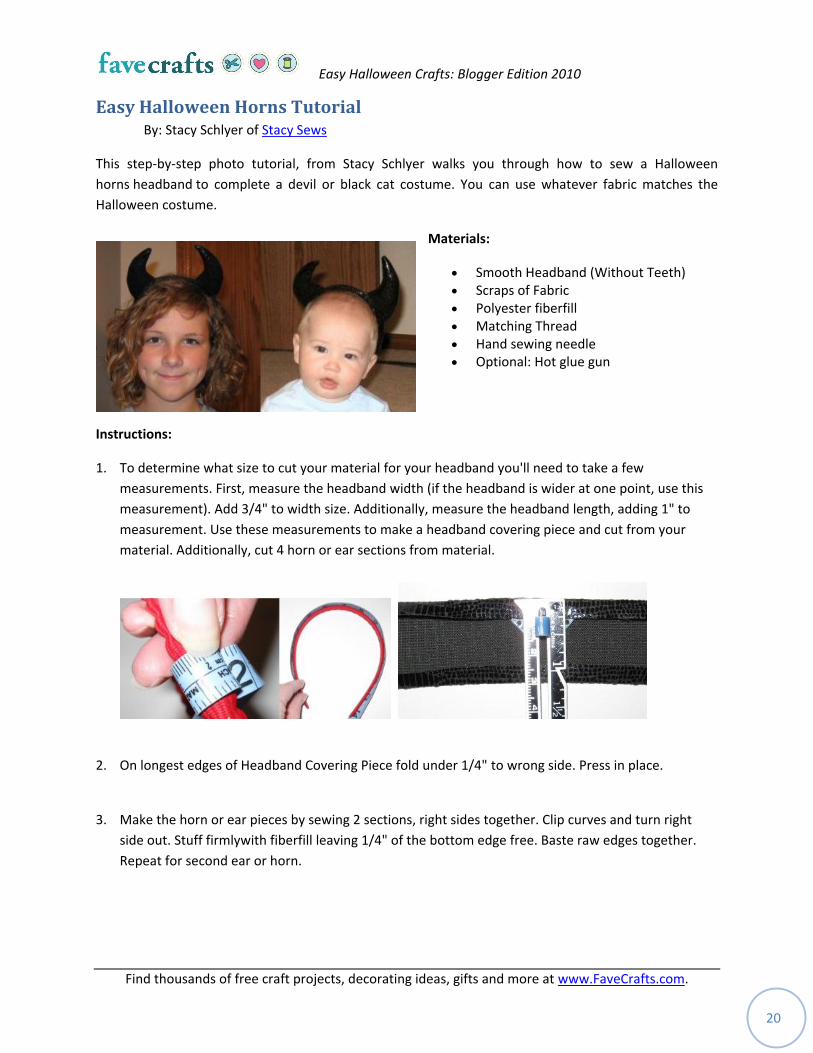
Easy Halloween Horns Tutorial By: Stacy Schlyer of Stacy Sews
This step-by-step photo tutorial, from Stacy Schlyer walks you through how to sew a Halloween
horns headband to complete a devil or black cat costume. You can use whatever fabric matches the
Halloween costume.
Materials:
Smooth Headband (Without Teeth) Scraps of Fabric Polyester fiberfill Matching Thread Hand sewing needle Optional: Hot glue gun
Instructions:
1. To determine what size to cut your material for your headband you'll need to take a few
measurements. First, measure the headband width (if the headband is wider at one point, use this
measurement). Add 3/4" to width size. Additionally, measure the headband length, adding 1" to
measurement. Use these measurements to make a headband covering piece and cut from your
material. Additionally, cut 4 horn or ear sections from material.
2. On longest edges of Headband Covering Piece fold under 1/4" to wrong side. Press in place.
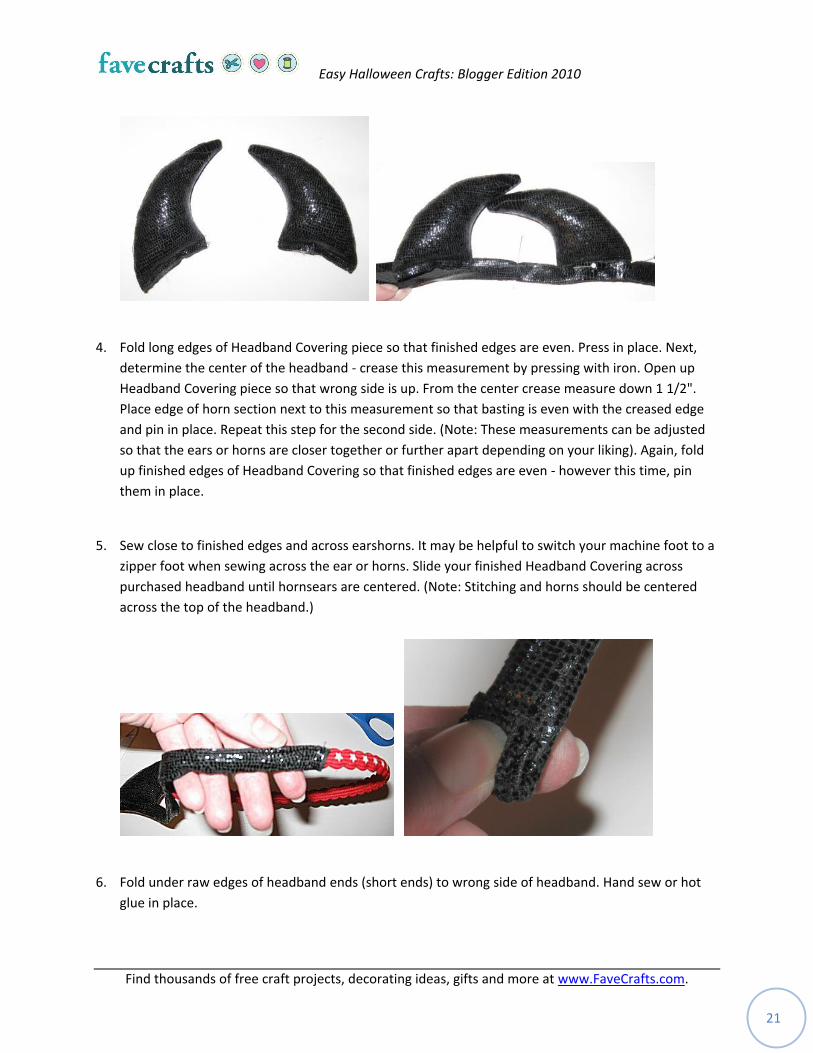
3. Make the horn or ear pieces by sewing 2 sections, right sides together. Clip curves and turn right
side out. Stuff firmlywith fiberfill leaving 1/4" of the bottom edge free. Baste raw edges together.
Repeat for second ear or horn.
Easy Halloween Crafts: Blogger Edition 2010
Find thousands of free craft projects, decorating ideas, gifts and more at www.FaveCrafts.com.
21
4. Fold long edges of Headband Covering piece so that finished edges are even. Press in place. Next,
determine the center of the headband - crease this measurement by pressing with iron. Open up
Headband Covering piece so that wrong side is up. From the center crease measure down 1 1/2".
Place edge of horn section next to this measurement so that basting is even with the creased edge
and pin in place. Repeat this step for the second side. (Note: These measurements can be adjusted
so that the ears or horns are closer together or further apart depending on your liking). Again, fold
up finished edges of Headband Covering so that finished edges are even - however this time, pin
them in place.
5. Sew close to finished edges and across earshorns. It may be helpful to switch your machine foot to a
zipper foot when sewing across the ear or horns. Slide your finished Headband Covering across
purchased headband until hornsears are centered. (Note: Stitching and horns should be centered
across the top of the headband.)
6. Fold under raw edges of headband ends (short ends) to wrong side of headband. Hand sew or hot
glue in place.
Easy Halloween Crafts: Blogger Edition 2010
Find thousands of free craft projects, decorating ideas, gifts and more at www.FaveCrafts.com.
22
Easy Halloween Crafts: Blogger Edition 2010
eBook from www.FaveCrafts.com
1. Pirate Pumpkin
2. Ghost Centerpiece
3. Happy Felt Bats
4. Bandanna Trick or Treat Bag
5. Crochet Jill O Lantern
6. DIY Spider Webs
7. Easy Halloween Horns Tutorial
Sign up for our free crafting newsletter and receive more holiday fun, craft projects, quick tips,
home décor ideas and more right in your inbox every week.