Embed Size (px)
Citation preview

Page 1 of 22
Easy Attendant User Guide
Easy Attendant will provide your business with a convenient and virtual means to answer your business’ incoming telephone calls. Easy Attendant is an easy to use solution that combines advanced web and telephone features to create a professional caller interface for your business. For more complex applications, you may want to take advantage of Premium Attendant which is described in a separate guide.
Designing your new Easy Attendant involves deciding how you would like to present your business to your callers. What options would you like your callers to have? What greetings will they hear and who can they reach? Do you want callers to be able to reach your employees directly from the Easy Attendant by dialing an extension number? Do you want to present your callers with a different menu after hours or on holidays? Before setting up your Easy Attendant through the web‐based interface, we suggest you take a few minutes to read through this section on designing the best application for your business. Caller Routing Options
As you design your application, you will need to understand the call routing options available to you. With these routing options you can: Transfer to Phone – Transfers callers to a phone number that you program. Transfer to Voicemail – Transfers callers directly to a voice mailbox to leave a message or to an information mailbox. Dial‐by‐Extension – Allows callers to enter an extension number and be transferred to the phone line of their choice. Note that this feature requires Extensions to be set up as described in the next section.
Welcome
Designing Your New Easy Attendant Application

Page 2 of 22
Easy Attendant User Guide Dial‐by‐Name – Allows callers to spell a name with their telephone keypad, hear the recorded name, and be transferred to the phone line of their choice. Note that this feature requires set up in the Extensions tab, as described in the next section. Play Announcement – Plays an announcement to callers, then allows them to replay the information or return to the previous menu. Extensions
The Extensions feature allows you to provide Dial‐by‐Name and Dial‐by‐Extension options to your callers. When your Easy Attendant is part of a Business Group, all Business Group members will be pre‐populated on the Extensions tab of your Easy Attendant. As lines are added or deleted from your Business Group, they will be automatically added and deleted from the Extensions list. However, you can click on any line to exclude it from your Easy Attendant’s Dial‐by‐Extension and Dial‐by‐Name menu. You can also add other extensions under the Additional Extensions tab. The Extension is the number callers will enter to be routed directly to the employee or department of their choice. For more detailed information about managing extensions, see Step 5: Manage Extensions. Other Considerations
Put frequently used options first in the menu. This helps serve callers more quickly.
Speak slowly and distinctly, keeping options concise and direct for easy understanding by all callers.
Consider using a branding statement in your greeting as you welcome callers to your business.
Think about information your callers request frequently. Announcements are great for recording answers to commonly asked questions like business hours, mailing address, email address, fax number, driving directions, etc.
Avoid making your callers feel like they are in “voicemail jail.” Where possible, offer a live attendant transfer option. Never transfer callers back to the number they’ve just called which could route them back into the Easy Attendant if you can’t answer their call.
If your business needs multiple menus (sub‐menus), you should consider using Premium Attendant, or you can link your Easy Attendant to another Easy Attendant.

Page 3 of 22
Easy Attendant User Guide Business Hours
You can take full advantage of this application’s capabilities by setting up Business Hours and Non‐Business‐Hours schedules. The web‐based Easy Attendant Schedule feature provides an easy and flexible way to configure and change greetings and menus. The Business Hours and Non‐Business‐Hours schedules can vary from day to day or they can be the same every day. During the business day, the Business Hours greeting and menus will play. When you are closed, the Non‐Business‐Hours greeting and menus will play. You may select open and close times in 15 minute increments. Special Days
You may also define Special Days (Holidays). For each Special Day, the Non‐Business‐Hours menu is automatically played throughout the year. These dates, which might be holidays, vacation days, or closed dates specific to your business, can be set several years in advance or selected as needed throughout each year. You will have an option to add all Public Holidays and/or select dates as needed. You will find more detailed information about establishing Special Days in Step 1: Schedule. Greetings
As mentioned in the Business Hours section, the Easy Attendant can use different greetings based on your defined schedule. These greetings provide instructions to callers on how to access the people and information they need from your business, whenever they call.
As noted before, you can have a Business Hours greeting and a Non‐Business‐Hours greeting, where the Non‐Business‐Hours greeting can also be used for Special Days like holidays. You can also choose to use a single menu greeting that will be used at all times.
Your greetings should welcome your caller as well as provide instructions on the services available to them. Before you record your greetings, write down (or type up) what you would like the greetings to say. Based on what you have learned so far, consider the complete planned menu structure of your Easy Attendant as you script these greetings.

Page 4 of 22
Easy Attendant User Guide
The Business Hours greeting will be played during normal business hours. The menu can use key presses 0 through 9, where 0 is normally reserved for Live Operator.
For example: “Thank you for calling ACME Corporation. For Technical Support, press 1; For Sales, press 2; For Product Information, press 3; For Marketing, press 4; For Help with Online Orders, press 4; For Directions to our office, press 6; or to speak with the Operator, press 0.”
The Non‐Business‐Hours greeting will be played outside of normal business hours. This greeting has its own menu selections separate from the Business Hours greeting.
For Example: “Thank you for calling ACME Corporation. Our office is now closed. Our regular business hours are Monday through Friday, 8AM to 5PM, excluding holidays. For Technical Support or Help with Online Orders, please call back during regular business hours. To leave a message for Sales, press 2; For Product Information, press 3; To leave a message for Marketing, press 4; For Directions to our office, press 6; For all other business, please call back during our regular business hours.”
The Non‐Business‐Hours greeting is also played on the Special Days you have defined for your business. This greeting plays for the 24 hours of the Special Day, in place of the Business Hours greeting and menus.
Announcements
Announcement recordings offer you the opportunity to record information frequently requested by your callers. This information could include information such as business hours, directions, mailing address, email address, fax, etc.
For example: “Our business hours are weekdays from 9 a.m. to 5 p.m., excluding holidays. We are located at 3 Free St, directly across from the park.”

Page 5 of 22
Easy Attendant User Guide
1. Access www.fairpoint.com/hostedpbxfrom any web browser. From here you can access a login URL specific to your geographic location. To access the auto attendant Graphical User Interface (GUI) directly, chose the appropriate CommPortal account link on this web page. (Please note that if you are have Business group administration rights, this GUI can also be indirectly accessed through the appropriate Business Group portal link, as well. Simply log into the BG portal and click on the blue Line tab on the right. Then Click the green arrow, individual line icon to the right of the easy attendant line to login to the Easy Attendant.)
2. You will be presented with a simple login box (Figure 1).
3. In the Phone Number field, enter your 10‐digit Easy Attendant number.
4. In the Password field, enter your CommPortal Password.
5. Click the Login button.
Figure 1 ‐ Login Screen
Accessing Easy Attendant on the Web

Page 6 of 22
Easy Attendant User Guide The first time you login, the application will ask if you want to offer your callers different options during Business Hours and Non‐Business‐Hours, or if you want to offer your callers the same options all of the time. This is just to get you started. You can always switch options later if your business needs change. Make a selection and click Continue (Figure 2).
Figure 2 ‐ Menu Options
Once you have logged in, you’ll see the Main Easy Attendant tab (Figure 3). If you have chosen to offer your callers different menus for Business Hours and Non‐Business Hours, you will see a screen like the one shown below. From this tab you can route directly to Schedule, Business Hours Menu, Non‐Business‐Hours Menu, and Extensions.
If you have chosen to offer your callers one menu at all times, you will see only one Easy Attendant Menu tab at the top of the screen, along with the Extensions tab.

Page 7 of 22
Easy Attendant User Guide
Figure 3 Easy Attendant Main Tab
Caution:
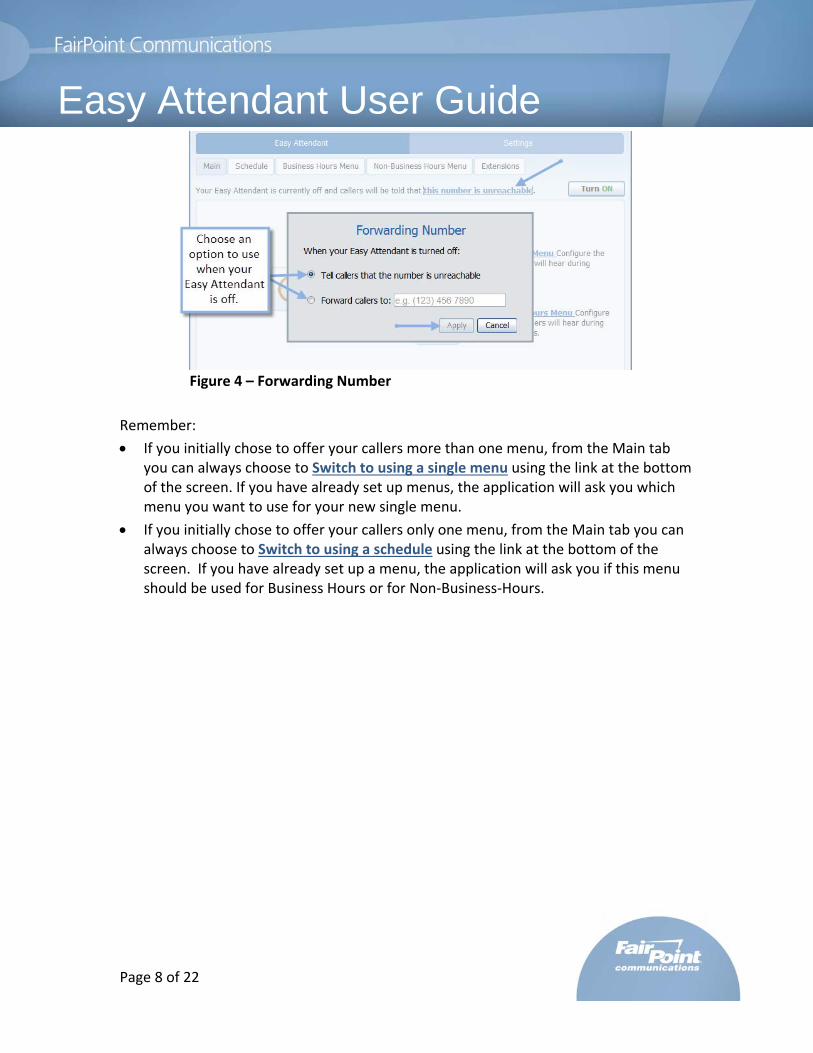
When your Easy Attendant is turned off, callers will hear a system generated message stating that “this number is unreachable” unless you specify another number for the calls to be routed to. When you click on the link this number is unreachable in the Main tab, a pop‐up box will allow you to enter a forwarding number (Figure 4), if desired. Make your selection and click Apply.
You can’t turn your Easy Attendant ON until you create your menus and all required recordings are made.
Page 8 of 22
Easy Attendant User Guide
Figure 4 – Forwarding Number
Remember:
If you initially chose to offer your callers more than one menu, from the Main tab you can always choose to Switch to using a single menu using the link at the bottom of the screen. If you have already set up menus, the application will ask you which menu you want to use for your new single menu.
If you initially chose to offer your callers only one menu, from the Main tab you can always choose to Switch to using a schedule using the link at the bottom of the screen. If you have already set up a menu, the application will ask you if this menu should be used for Business Hours or for Non‐Business‐Hours.

Page 9 of 22
Easy Attendant User Guide
For security reasons you should immediately change your starter Password and starter PIN right away. The Password is used to access your Easy Attendant online using the CommPortal. The PIN is used to access your Easy Attendant by telephone.
To change your Account Password:
1. Click on the Settings bar on the top right hand side of the screen.
2. Click the change link to the right of Account Password.
3. Enter your old password and your new password in the fields provided (Figure 5). Your password must be 8 to 15 characters long and include at least one number, at least one letter, and at least one special character.
4. Confirm your new password by entering it again.
5. Click Confirm.
Figure 5 – Change Password
Securing Your Easy Attendant

Page 10 of 22
Easy Attendant User Guide
To change your Voicemail PIN:
1. Click on the Settings bar on the top right hand side of the screen.
2. Click the change link to the right of Voicemail PIN.
3. Enter your new PIN in the field provided. Your PIN must be 4 to 8 digits. It cannot be repeating digits, digits in a series (like 1234 or 7654) and it cannot be part of your phone number. It should be a number that is easy for you to remember, but hard for others to guess.
4. Click Confirm.
Once you have completed the design process described under “Designing Your New Easy Attendant Application,” we recommend that you set up your application following these five easy steps: Schedule, Business Hours, Non‐Business‐Hours, Record Greetings and Manage Extensions.
STEP 1: Schedule If you DO NOT want to offer your callers different options during Business Hours and Non‐Business‐Hours, skip this Step. If you DO want to offer your callers different options during Business Hours and Non‐Business‐Hours, follow these instructions from the Easy Attendant main tab: 1. Click the Schedule tab or schedule icon to display the Schedule page. 2. Click on the first link shown on the next screen to start with an example schedule
that you can customize. The system displays a default Business Hours schedule of 9AM to 5PM (Figure 6).
3. Click a cell to toggle boxes, or drag blue boxes for Business Hours or white boxes for Non‐Business‐Hours to choose the hours you will be open for each day of the week. Click Zoom‐In to select times in 15 minute increments.
Setting Up Your Easy Attendant

Page 11 of 22
Easy Attendant User Guide
Figure 6 – Set a Schedule 4. If you want to designate Special Days (like holidays or vacations), click the red
calendar icon on the right side of the screen.

E
Page
Easy 5. U
Sitthm
6. W
A
12 of 22
AtteUsing the mopecial Days (t. You can adhe arrows unmonths. Whe
Figure 7 –
When you happly button
Figure
ndanonthly calend(Figure 7). Ifdd all publicnderneath then done, clic
Select Spec
ave finished in the lowe
8 ‐ Apply yo
nt Usdars displayef you changeholidays byhe calendarsk OK.
cial Days and
defining your right corne
our Schedule
ser Ged, click on te your mind, clicking on ts to move fo
d Holidays
ur Business Her of the Sch
e
Guidethe dates yo, click on thethe Add Puborward and b
Hours and anhedule page
e ou want to see date again blic Holidaysbackward to
ny Special D(Figure 8).
elect for youto unselect button. Useo different
Days, click the
ur
e
e

Page 13 of 22
Easy Attendant User Guide Caution: The Non‐Business‐Hours greeting is played when the Business Hours greeting is not in effect. If you set up Business Hours and do not record a Non‐Business‐Hours greeting, you cannot turn your Easy Attendant ON. STEP 2: Create your Business Hours Menu
1. If you are using a Schedule, click on the Business Hours Menu tab. If you are using a single menu, click on the Easy Attendant Menu tab.
2. You will see the Business Hours Menu page (Figure 9) or the Easy Attendant Menu page (Figure 10). From this page, you will be able to assign each key press on your menu and record your greeting.
3. Following the design you have developed previously, set up your menu by clicking the down arrow associated with each key press and selecting the desired function for that key press from the drop down list.
Figure 9 – Create a Business Hours Menu

Page 14 of 22
Easy Attendant User Guide
Figure 10 – Create an Easy Attendant Menu
Functions:
Unassigned ‐ Your callers will be informed that it is an invalid extension should they press this key.
Transfer to Phone ‐ Places an out dial to the phone number you enter. You can select from a drop down menu of your Business Group phones or type a number. Remember to enter the number the way you would dial it from your Business Group. For example, if you must dial 9 to complete an outside call, be sure to include the 9 here.
Transfer to Voicemail ‐ Transfers callers to another mailbox on the system. You can select mailboxes in your business group from a drop down menu or enter the 10‐digit mailbox number. You cannot transfer directly to another Auto Attendant.

Page 15 of 22
Easy Attendant User Guide
Dial‐by‐Extension – Transfers callers to the phone line of their choice. If you offer this option to callers, you must also:
1) Go to the Extensions tab and define the extensions your callers can dial (see Step 5 Manage Extensions).
2) Include appropriate instructions to your callers in your greeting directing them how to use this option. For example: “If you know your party’s extension, press 4 then dial the 3‐digit extension number followed by the pound key.”
Dial‐by‐Name – Allows callers to reach their party by entering a name. If you offer this option to callers, you must also:
1) Go to the Extensions tab and define the names your callers can dial. A recorded name is also required for each person you wish to be reached by Dial‐by‐Name (see Step 5 Manage Extensions).
2) Include appropriate instructions to your callers in your greeting directing them how to use this option. For example: “If you know the name of the person you want to reach, press 5 and enter the first few letters of their first name.”
Announcement – Plays the information that you have recorded and then prompts your caller to replay it or return to the previous menu. No voicemail message option is offered (this is useful for store hours, product information, directions, etc).
4. Record the greeting for this menu now or you can wait until you have completed configuration of all menus and make all recordings as described in Step 4. To record the Business Hours Greeting now, click on the red record link on the right side of the screen. Also, if you have selected Play Announcement for any key press, be sure to click and record those as well.
5. When you have finished, click Apply to save your menu.
Caution:
If you do not record your greeting and announcements at this point, you can always record them later either by using your computer microphone or by calling into the voicemail system and following the prompts. Until all recordings are completed, you cannot turn your Easy Attendant on.

Page 16 of 22
Easy Attendant User Guide STEP 3: Create your Non‐Business‐Hours Menu If you have NOT defined a schedule in Step 1 and will play the same menu to callers at all times, skip this Step. If you HAVE defined a schedule in Step 1, click on the Non‐Business‐Hours tab. Follow actions 3 through 5 as outlined in Step 2 above to assign the functions you want your callers to have when they call you outside of normal business hours (Figure 11).
Figure 11 – Non‐Business Hours Menu
Just as in Step 2, you can record your Greeting and any Announcements now, or you can complete recordings as outlined in Step 4.
Page 17 of 22
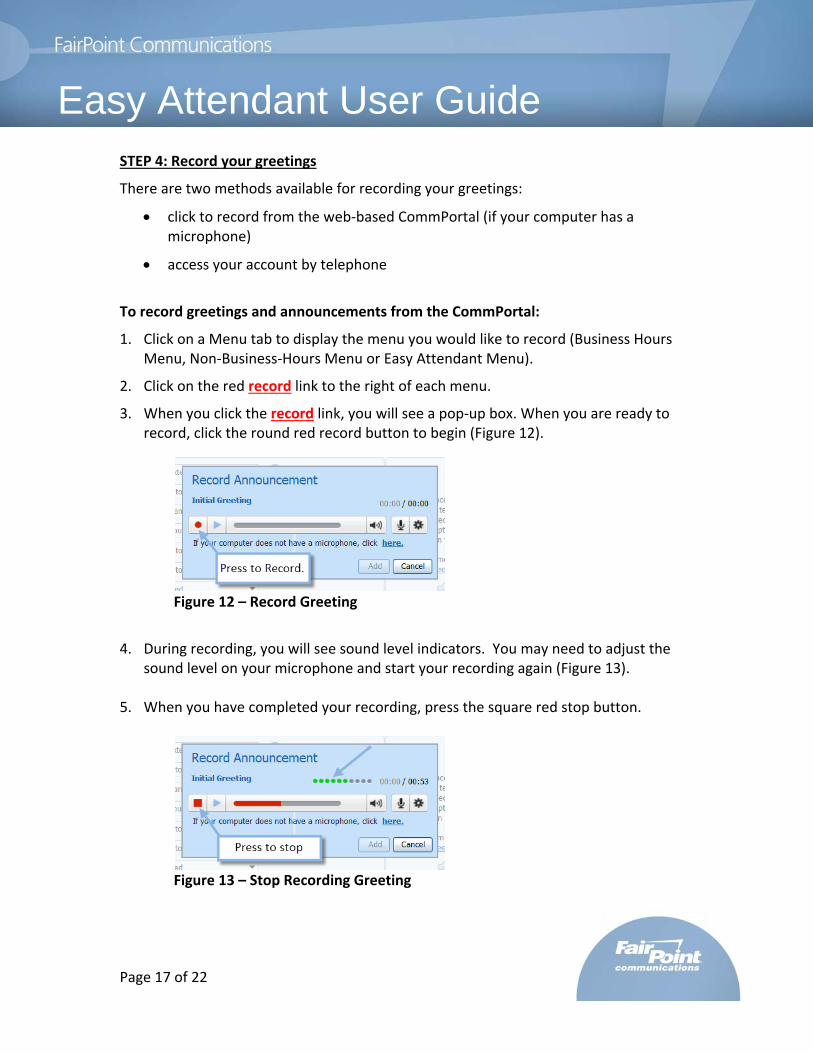
Easy Attendant User Guide STEP 4: Record your greetings
There are two methods available for recording your greetings:
click to record from the web‐based CommPortal (if your computer has a microphone)
access your account by telephone
To record greetings and announcements from the CommPortal:
1. Click on a Menu tab to display the menu you would like to record (Business Hours Menu, Non‐Business‐Hours Menu or Easy Attendant Menu).
2. Click on the red record link to the right of each menu.
3. When you click the record link, you will see a pop‐up box. When you are ready to record, click the round red record button to begin (Figure 12).
Figure 12 – Record Greeting
4. During recording, you will see sound level indicators. You may need to adjust the
sound level on your microphone and start your recording again (Figure 13).
5. When you have completed your recording, press the square red stop button.
Figure 13 – Stop Recording Greeting
Page 18 of 22
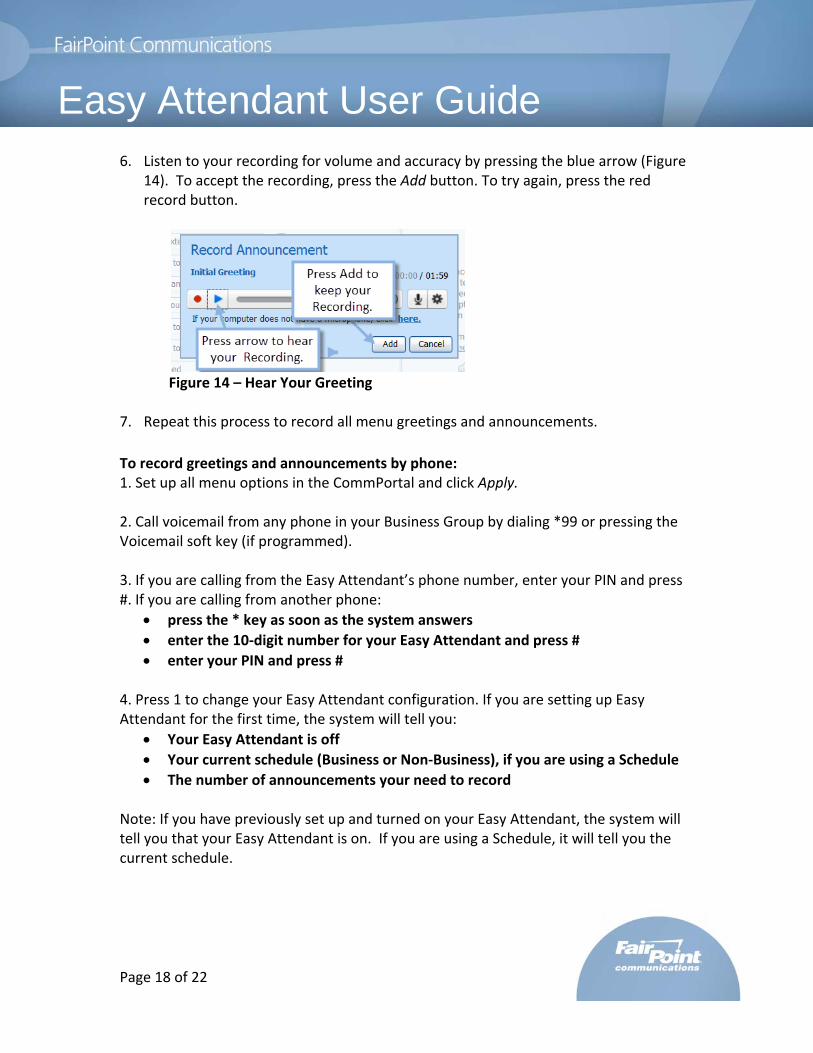
Easy Attendant User Guide 6. Listen to your recording for volume and accuracy by pressing the blue arrow (Figure
14). To accept the recording, press the Add button. To try again, press the red record button.
Figure 14 – Hear Your Greeting
7. Repeat this process to record all menu greetings and announcements.
To record greetings and announcements by phone: 1. Set up all menu options in the CommPortal and click Apply. 2. Call voicemail from any phone in your Business Group by dialing *99 or pressing the Voicemail soft key (if programmed). 3. If you are calling from the Easy Attendant’s phone number, enter your PIN and press #. If you are calling from another phone:
press the * key as soon as the system answers
enter the 10‐digit number for your Easy Attendant and press #
enter your PIN and press # 4. Press 1 to change your Easy Attendant configuration. If you are setting up Easy Attendant for the first time, the system will tell you:
Your Easy Attendant is off
Your current schedule (Business or Non‐Business), if you are using a Schedule
The number of announcements your need to record Note: If you have previously set up and turned on your Easy Attendant, the system will tell you that your Easy Attendant is on. If you are using a Schedule, it will tell you the current schedule.

Page 19 of 22
Easy Attendant User Guide 5. If you are setting up Easy Attendant for the first time, do not turn your Easy Attendant on until you have completed all of your recordings. Choose one of the following to create or change recordings:
To edit announcements for your Easy Attendant Menu, press 2
To edit announcements for Business Hours press 2
To edit announcements for Non‐Business‐Hours press 3 6. The system will tell you any key press options that require recordings. If you are setting up Easy Attendant for the first time, it will also tell you that you need to record your initial greeting. Record your initial greeting first:
Press # to record your initial greeting.
When finished recording press # o To save the recording as is press 1 o To re‐record press 2 o To exit press 3 o To continue recording press 4
7. Once you have recorded your initial greeting, record any announcements needed for your key press options. The system will again tell you which key press options need recordings. Press a key to record the announcement for it. When finished, press #.
To save the recording as is press 1
To re‐record press 2
To exit press 3
To continue recording press 4 8. When you have finished all of your recordings, you can turn your Easy Attendant ON. In the Easy Attendant configuration menu, press 1 to turn your application ON. Or you may login to your Easy Attendant through the CommPortal to turn it on. The next time you log into your Easy Attendant on CommPortal, you will see a green listen/change link next to each recording you have made. By clicking on these links, you can hear your recordings through your PC speakers and can re‐record them using your PC microphone. STEP 5: Manage Extensions The Extensions tab provides a list of all lines/extensions in your Business Group. Initially, all extensions in your Business Group are automatically “included” for use with

Page 20 of 22
Easy Attendant User Guide Dial‐by‐Name and Dial‐by‐Extension within your Easy Attendant. However, you can easily select lines to be excluded. In addition, you can change the default for your Business Group so that new lines are not automatically included. If you chose this option in CommPortal, once new lines are working, you can log into your Easy Attendant and select which ones to include. When a line is “included”, it is shown in bold type in the Extensions tab. When a line is excluded, it is shown in plain type. You can easy include or exclude a line at any time, as the needs of your business change. Simply click on the box to the left of an extension then click on either Mark as Included or Mark as Excluded at the bottom of the screen (Figure 15).
Figure 15 – Including/Excluding Extensions

Page 21 of 22
Easy Attendant User Guide Dial‐by‐Name and Dial‐by‐Extension features can be used by your callers only if you offer that option in your Easy Attendant menus. For Dial‐by‐Extension, your callers will simply enter the extension number of the party they are trying to reach (typically 3 or 4 digits), followed by the pound key. When your callers select Dial‐by‐Name, they will be prompted to “spell’ the name of the person that they are trying to reach using the dial pad. However, for a name to be included in the Dial‐by‐Name search, one additional step is required. For every line you want to include in Dial‐by‐Name, a spoken name must be recorded. Normally, users in your Business Group will record their name as part of individual mailbox set up. If a name has not been recorded yet, you will see a red record link on the right side of the extension list. You have the option to record this name yourself by using the record link or you can ask each user to complete their mailbox set up and record their name. You also have the option to override a user’s recorded name. This override recording will be used only in the Easy Attendant Dial‐by‐Name application and will not replace the recording in a voicemail mailbox. Caution:
Spelling accuracy and a complete list of extensions are important in keeping the Dial‐by‐Name and Dial‐by‐Extension features useful for your callers. As people enter or leave your company, simply log onto the CommPortal to review your extensions for completeness and accuracy. If you need spelling corrected, contact your Business Group Administrator.
The Dial‐by‐Name option begins with the first name. If you offer Dial‐by‐Name, remember to tell your callers that they can reach employees “by spelling their name with the telephone keypad, beginning with their first name.”
If you offer the Dial‐by‐Extension option, remember to tell your callers to press the programmed key, followed by the extension number. For example, “If you know your party’s 3‐digit extension number, press 4 followed by that 3‐digit extension number, then press #.”
You can also set up Additional Extensions for numbers outside of your Business Group that you’d like your callers to reach using Dial‐by‐Name and/or Dial‐by‐Extension. For each entry, you must choose an extension number that is 1 to 7 digits long, and enter the phone number that callers should be transferred to.

Page 22 of 22
Easy Attendant User Guide These extensions must be different from any "internal" extension numbers you may use for dialing colleagues within your Business Group. Enter the telephone number the way you would dial it from your business group (e.g. 9 555‐6789). If you are using Dial‐by‐Name, you must also record a name for each person you wish to be contacted. To configure additional extensions: 1. Click on the Additional Extensions link at the top of the Extensions page. 2. Click on the Add Extension button (Figure 16). 3. Enter the extension number, name, and telephone number. 4. Record or Upload a spoken name for this additional extension for use with Dial‐by‐
Name. 5. When done, click Add to include this extension in your Easy Attendant application.
Figure 16 – Add Extensions Congratulations!! You have successfully set up your Easy Attendant.