Embed Size (px)
Citation preview

© 2015 ScaleArc. All Rights Reserved.
Deployment Guide
Drupal Deployment Guide: Installing, Tuning, and Using Drupal with ScaleArc + MySQL Replication

Deployment Guide | Drupal with ScaleArc + MySQL Replication
© 2015 ScaleArc. All Rights Reserved. | 1
Contents
1. Background.............................................................................................................4
1.1 What is ScaleArc? .........................................................................................4
1.2 What is MySQL? ..........................................................................................4
1.3 What is Drupal?............................................................................................4
1.4 How do these applications work in concert? .................................................4
1.5 Where can I go for additional help? ..............................................................5
1.6 Documentation conventions ..........................................................................5
2. Application Architecture .........................................................................................5
2.1 Website architectures ...................................................................................5
2.1.1 Conventional static website .................................................................5
2.1.2 Drupal dynamic website ......................................................................6
2.2 Replication ....................................................................................................7
2.3 Clustering ......................................................................................................8
2.4 Automatic promotion .....................................................................................8
2.5 High availability .............................................................................................9
3. Preparation ............................................................................................................9
3.1 Servers ..........................................................................................................9
3.2 Internet protocol addressing ...................................................................... 10
3.2.1 ScaleArc use .................................................................................... 10
3.2.2 MySQL use ....................................................................................... 10
3.2.3 Web server use ................................................................................ 10
3.2.4 Example ............................................................................................ 10
3.3 User management ..................................................................................... 11
3.3.1 MySQL user accounts ...................................................................... 11
3.3.2 ScaleArc user accounts .................................................................... 11
3.3.3 Drupal user accounts........................................................................ 11
3.4 Licenses ..................................................................................................... 11
3.5 Security and networking issues ................................................................. 12
3.5.1 Allow password-free login during integration ................................... 12
3.5.2 Open the appropiate firewall port ..................................................... 12
3.5.3 Allow unauthenticated network connection ...................................... 12
3.5.4 Increase the maximum connection limit ........................................... 12
3.5.5 Domain name service configuration ................................................. 13
4. ScaleArc Installation ........................................................................................... 13
4.1 Licensing .................................................................................................... 13

Deployment Guide | Drupal with ScaleArc + MySQL Replication
© 2015 ScaleArc. All Rights Reserved. | 2
4.2. Active server installation ........................................................................... 13
4.2.1 Network parameters ......................................................................... 14
4.2.2 Initial configuration............................................................................ 14
4.2.3 Create a virtual IP ............................................................................. 16
4.2.4 Clearing events ................................................................................. 17
4.3 Database clustering ................................................................................... 17
4.3.1 Creating the cluster with a primary master member ........................ 18
4.3.2 Adding additional cluster members .................................................. 20
4.3.3 Write ignore rules ............................................................................. 20
4.3.4 Proxy authentication ......................................................................... 21
4.4 High availability configuration .................................................................... 22
4.4.1 Configure basic networking on the secondary appliance ................. 22
4.4.2 Joining the secondary appliance for HA ........................................... 23
5. Drupal Configuration ........................................................................................... 23
6. ScaleArc Performance Monitoring and Tuning................................................... 24
6.1 Live monitor without caching ...................................................................... 25
6.2 Viewing stored analytics ............................................................................ 25
6.3 Analytics drill down .................................................................................... 26
6.3.1 Choose a single busy hour ............................................................... 26
6.3.2 Choose a user .................................................................................. 26
6.3.3 Add cache rules for the busiest queries ........................................... 27
6.4 Verifying cache performance ..................................................................... 28
7. Drupal Query Caching Guidance ....................................................................... 29
7.1 Heuristic guidance ..................................................................................... 29
7.1.1 Site purpose ..................................................................................... 29
7.1.2 Update frequency ............................................................................. 29
7.1.3 Organizational impact ....................................................................... 29
7.1.4 Be conservative ................................................................................ 29
7.2 Structured-based guidance ........................................................................ 30
7.2.1 Optimization tables ........................................................................... 30
7.2.2 Content ............................................................................................. 30
7.2.3 Taxonomy ......................................................................................... 30
7.2.4 Site administration ............................................................................ 30
8. Summary ............................................................................................................ 30
Appendix A – MySQL Installation ............................................................................ 32
A.1 Server installation ...................................................................................... 32
A.2 MySQL replication user creation ............................................................... 32
A.3 Replication configuration ........................................................................... 33
A.3.1 Overview .......................................................................................... 33

Deployment Guide | Drupal with ScaleArc + MySQL Replication
© 2015 ScaleArc. All Rights Reserved. | 3
A.3.2 Master node replication configuration .............................................. 33
A.3.3 Collect replication service parameters ............................................. 33
A.3.4 Slave node replication configuration ................................................ 34
A.3.5. Join a slave to a replication configuration master ........................... 34
A.3.6 Installing MySQL replication with existing data ................................ 35
A.4 Replication testing ..................................................................................... 36
A.4.1 Creating shared users ...................................................................... 36
A.4.2 Replication verification ..................................................................... 37
A.4.3 Performance verification .................................................................. 37
Appendix B – ScaleArc Feature/Benefits for Percona XtraDB Cluster (Galera) ..... 38
Appendix C – Result Set Cache Rules .................................................................... 40

Deployment Guide | Drupal with ScaleArc + MySQL Replication
© 2015 ScaleArc. All Rights Reserved. | 4
1. Background This deployment guide documents how to install a complete, high-performance Drupal site for administrators, developers, and owners. This solution consists of multiple components:
ScaleArc – database load balancing software
MySQL – an open source database, running with replication
Drupal – an open-source website content management system (CMS)
Although this guide assumes a “from scratch” installation, the processes presented may be adapted by those adding ScaleArc or MySQL replication to an existing web installation.
1.1 What is ScaleArc? ScaleArc For MySQL (hereinafter referred to as ScaleArc) is an SQL traffic management engine that proxies communication between applications and databases. It performs read/write splitting, replication-aware load balancing, and query routing. Performance is accelerated via these techniques as well as query result set caching. Security is strengthened with SQL firewall capabilities.
ScaleArc operates at the database connector level and requires no modifications to applications or databases. It supports MySQL and runs on x86-64 servers, x86 compatible hypervisors, or as a cloud component via Amazon AWS EC2, GoGrid, Joyent, Liquid Web Hosting, NephoScale, or any cloud capable of running a Centos 6.4 based VM.
1.2 What is MySQL? MySQL is the world’s most popular open source database. It is available in commercial and GPL editions, and supports multiple storage engines, including transactional and in-memory tables.
MySQL offers two different redundancy modes: replication, where servers back each other up in master/master or master/slave configurations; and clustering, where databases are partitioned among multiple servers. We use replication, the simpler mode, as our redundancy mechanism.
1.3 What is Drupal? Drupal is is a popular open source CMS for creating and publishing dynamic content web sites. Drupal is written in PHP and has an active and vibrant development community supporting specialized web applications. Drupal is preferred by some developers as it can manage multiple sites in different databases simultaneously.
1.4 How do these applications work in concert? ScaleArc works between Drupal and MySQL, presenting a single connector interface to Drupal while managing multiple back-end MySQL servers automatically. This one-to-many relation separates web site design and development from database deployment and operation, allowing administrators to dynamically add and drop servers depending on a site’s load.
Developers need not manage multiple database partitions or connections to improve performance. Instead, Drupal web sites using ScaleArc for performance enhancement can be designed using the far simpler single thread, single connection model.

Deployment Guide | Drupal with ScaleArc + MySQL Replication
© 2015 ScaleArc. All Rights Reserved. | 5
1.5 Where can I go for additional help? For further assistance with any ScaleArc product or service, please contact us.
1.6 Documentation conventions
Note: by convention, SQL command verbs are usually always capitalized while SQL objects are not. Consider the following example:
SELECT user, host, password FROM mysql.user;
In this case, the tokens SELECT and FROM represent SQL reserved words, which is why they are capitalized. The other tokens are user (or system) defined column and table names. We follow this convention throughout the guide.
2. Application Architecture This This chapter examines architectural concepts behind a dynamic web site solution integrating ScaleArc with MySQL under Drupal. We first provide an overview discussing key differences between this solution and a conventional static web site. Next, we introduce the concept of replication, necessary for config¬uring a master/slave relationship between multiple MySQL database servers. Finally we introduce the concept of clustering, which ScaleArc uses to manage multiple MySQL servers.
2.1 Website architectures In this section, we compare and contrast a traditional static website, using a web server to retrieve documents on behalf of a user agent (UA), with a dynamic website, where an application server populates document templates with database calls to produce a “live” document on demand.
2.1.1 Conventional static website
The Hyper Text Transfer Protocol (HTTP) defines a mechanism for retrieving static documents from a server and delivering them to an end user. HTTP defines a request/response protocol where a UA, usually a web browser, issues a request, typically GET, to a web server. The web server then interprets this request and returns a document, usually in Hyper Text Markup Language (HTML) format, to the UA. This basic architecture is illustrated below:
:
Meaning Typography Description
Substitutable parameter <parameter> Substitute the desired value for this token
Source code command Type the command as shown
User interface Button Look for or interact with the identified element
Literal file.txt Look for or type the literal text indicated

Deployment Guide | Drupal with ScaleArc + MySQL Replication
© 2015 ScaleArc. All Rights Reserved. | 6
In a static architecture, the performance limiters are typically the network and the web server. Improving poor performance usually means increasing network bandwidth between the UA and the server and perhaps upgrading the server to transfer more documents per unit of time.
Although a static website is architecturally simple and yields high performance, it has one key limitation: all of the content must be generated in advance. This architecture makes it difficult to present different content to different users. Providing custom, per-consumer content implies using a dynamic website architecture, which is discussed in the following section.
2.1.2 Drupal dynamic website
The front-end architecture of a dynamic website is similar to that of a static one: a UA still makes requests via HTTP to a web server, which returns HTML documents in the response. But rather than merely returning a static document, the server instead invokes an application to generate the document “on the fly.” This application merges static data from templates with data fetched via database calls. The following diagram illustrates this more complex architecture:
index.html
about.html
products.html
contact.html
User
Agent Web
Server

Deployment Guide | Drupal with ScaleArc + MySQL Replication
© 2015 ScaleArc. All Rights Reserved. | 7
The network and web server are still performance limiters in a dynamic architecture. However, additional limiters exist in the dynamic architecture. One is the speed of page assembly performed by the application server, which is Drupal in this case.1 Another performance limiter is the latency of the database itself.
Page assembly speed can be improved in much the same way as improving web server performance: upgrade the server hosting the application. Improving database performance, however, usually involves adding additional, replicated servers. We discuss this approach in the next section.
2.2 Replication Just like any other server, database server performance may be increased by the addition of resources. However SQL databases have an architectural feature, namely transaction integrity, which limits gain from simply adding resources.
A conventional web server may distribute multiple static documents to multiple consumers simultaneously without corrupting the original sources. But since a write transaction must be atomic, no more than one query may write to a given row at a time.2 Otherwise one producer’s write request could change the database in such a way as to invalidate a subsequent consumer’s read request.
MySQL uses replication to provide for data integrity and redundancy. In addition, database applications may use this feature to serve multiple consumers in parallel. Consumers with write requests interact with database masters, while consumers with read requests interact with slaves. Since most applications read more than they write, most replication sets include more slaves than masters.
One problem with this strategy is the application must determine if a request is read only (SELECT) or read/write (DELETE, INSERT, UPDATE) and then route the request to the appropriate server. This approach introduces more complexity into the application.
1 If performance is sufficient, the web and application server may run on the same processor. 2 In practice a query analyzer is employed to determine whether multiple queries contend for the
same row, so it is possible to actually execute more than one query simultaneously.
User
Agent Web
Server
Drupal
Database
Template
Library

Deployment Guide | Drupal with ScaleArc + MySQL Replication
© 2015 ScaleArc. All Rights Reserved. | 8
ScaleArc, however, uses clustering to isolate this increased complexity. This topic is discussed further in the next section.
2.3 Clustering Among other features, ScaleArc serves as a SQL database proxy: applications connect to ScaleArc, which then connects to the underlying database servers. ScaleArc groups elements of a replication set into an entity known as a cluster. ScaleArc then uses the cluster configuration to determine how to route incoming SQL transactions.
In theory, one cluster member is designated as the master with read/write capability. Other members are slaves with read-only capability. In practice, the number of cluster masters and slaves is an operational decision, and site administrators can change these numbers to reflect actual performance needs.3
ScaleArc examines each incoming SQL transaction and then routes the request to the appropriate server. For example SELECT requests are routed to a read-only node, while DELETE, INSERT, and UPDATE requests are routed to a read/write node. ScaleArc uses a modified round-robin algorithm to automatically perform load balancing of the incoming requests.
Centralizing this load balancing and routing decision within ScaleArc offers application developers multiple advantages. First, they need not modify the application to match the actual composition of the underlying cluster. ScaleArc instead manages multiple connections to multiple database servers on the application’s behalf.
Second, developers may use a simple single-user, single-threaded model for database logic. Developers need not write a “least busy” routing algorithm. Instead, developers write the application as if it is the sole user of a single server, yet they still reap the performance benefits from load balancing and intelligent routing.
ScaleArc also leverages automatic promotion: in case of failure, a standby mode is promoted to the master role. This benefit is discussed in the next section.
2.4 Automatic promotion Drupal websites driving e-commerce and other mission-critical business applications often employ cluster software, such as MySQL Cluster or Percona xtraDB Cluster, for even higher availability. In this mode, the cluster has at least two master database servers: a primary and a secondary. Write transactions are routed to the primary master. If this node fails, then write transactions are instead routed to a server designated as a secondary master. Once the initial primary server comes back on-line, all masters synchronize. Then each node assumes its original role.
ScaleArc includes the ability to perform these routing changes on behalf of Drupal. The primary master is configured as a Read + Write node, while the secondary master is configured as Read + Standby. When a failover occurs, ScaleArc queues transactions during switchover and reroutes traffic to the secondary server.
3 In this document, we define a replication set as a single MySQL read/write master and its
associated read-only slaves.

Deployment Guide | Drupal with ScaleArc + MySQL Replication
© 2015 ScaleArc. All Rights Reserved. | 9
With ScaleArc managing automatic promotion, the application maintains a single connection to the ScaleArc software appliance, and it handles all of the associated failover logic. As a result, failover time is reduced by an order of magnitude.
This method supports a choice of clustering software: either MySQL Cluster itself, or third-party choices such as Galera Cluster and Percona XtraDB. It is even possible to switch the cluster layer during operations without changing the driving application.
If there is a disadvantage to using ScaleArc, it is simply that the service must be available for an application to function well. Fortunately ScaleArc supports a high-availability deployment model to achieve maximum uptime. The next section discusses this option.
2.5 High availability Because ScaleArc is used in mission-critical applications, the product supports a high-availability (HA) mode for maximum uptime. In particular, ScaleArc uses an active/standby reliability model with automatic failover in case of service failure.
In HA mode, a pair of ScaleArc instances are running. The master ScaleArc instance sends a “heartbeat” signal to the slave instance. The master also shares all state changes with the slave.
When the ScaleArc slave detects “heartbeat” failure, it assumes the master’s role and begins serving database requests. Once the ScaleArc master is repaired and brought back on-line, the slave then reverts to a monitoring state, awaiting the next failure.
Although the active and standby instances each have a unique static IP address, the pair shares a virtual IP address. Applications connect to the virtual IP, which is constant during failover. Allocating IP addresses to ScaleArc and MySQL, as well as the creation of user accounts, is discussed in the next chapter.
3. Preparation Since our solution consists of ScaleArc, MySQL, and Drupal components integrated together and communicating with each other, IP address allocation and user management must be coordinated. The deployment also requires licenses for the ScaleArc nodes. This chapter presents guidelines for configuring these items in advance.
3.1 Servers Our solution consumes six servers in total: two ScaleArc servers – one master and one HA slave; three MySQL servers – one read/write master and two replication slave nodes; and a one web server hosting the combination of Apache, PHP, and Drupal.
These servers may be physical, virtual, or a combination of both. To serve site traffic, the web server should be accessible via either a public IP address or a pinhole, but other IP addresses may be private.
The servers running ScaleArc are considered appliances, each with a self-contained Linux-based x86_64 architecture operating system and the ScaleArc application. The other servers may run any operating system supported by Apache or MySQL as appropriate.

Deployment Guide | Drupal with ScaleArc + MySQL Replication
© 2015 ScaleArc. All Rights Reserved. | 10
3.2 Internet protocol addressing Our solution requires that all networked elements be able to communicate with each other at all times. One method for meeting this requirement is by assigning static IP addresses to all elements. Another method, although it is not discussed further in this document, is to use provisioned DHCP assignments based on Ethernet addresses.
3.2.1 ScaleArc use
Since there are two ScaleArc instances running in this solution, one active and one standby forming an HA pair, we need two IP addresses. We also need a third address, a virtual IP address. This address is what Drupal will use as the DB_HOST parameter in settings.php to connect with ScaleArc, making HA failover trans-parent. A total of seven IP addresses are needed – three for ScaleArc, three for MySQL, and one for the public website.
3.2.2 MySQL use
We are using one MySQL master and two replication nodes, for a total of three addresses. All of our nodes may operate on the standard MySQL port of 3306.
It is possible to have three MySQL instances installed on the same host and differentiate between them via different port numbers. This setup is not recom-mended for production purposes because it substantially limits performance.
3.2.3 Web server use
The web server has a unique requirement: it must accept HTTP requests from the public Internet and deploy SQL commands from Drupal on our private intranet. Depending on our network configuration, we need either one or two IP addresses.
If we can route a public IP address and port number as a pinhole to a private IP address, we can use this same private IP address for both purposes. But if not, we may need to configure a public IP address for use by the Apache web server and a private IP address for use by Drupal.
3.2.4 Example
We present an example IP table for this installation scenario assuming our firewall or router can provide a pinhole for the public/private network interface:
4 Note we do not consider application server redundancy, meaning multiple Apache web servers
running PHP and Drupal, but this may be required for some applications.
IP Address Hostname Purpose
172.31.1.1 None Default gateway
172.31.1.110 ScaleArc-01A ScaleArc master node
172.31.1.111 ScaleArc-01B ScaleArc HA standby node
172.31.1.112 None ScaleArc virtual IP address
172.31.1.113 MySQL-01 MySQL read/write primary master
172.31.1.114 MySQL-02 MySQL standby-read secondary master
172.31.1.115 MySQL-03 MySQL read only replication slave
172.31.1.116 Drupalator4 Apache running PHP and Drupal

Deployment Guide | Drupal with ScaleArc + MySQL Replication
© 2015 ScaleArc. All Rights Reserved. | 11
Although this table must be adapted to a particular installation, we use its values for examples throughout the rest of the document.
3.3 User management All of the solution components interact with a MySQL user. MySQL has root, a password-free, local user with administrative privileges. We now discuss user account assignments, starting with MySQL itself.
3.3.1 MySQL user accounts
MySQL recommends creating a dedicated user for replication. This user may be limited to connect only from those nodes actually hosting MySQL itself.
Additionally, we also need a remote root user for ScaleArc. We may limit this user to connect only from the IP addresses used by ScaleArc. But this user is required for ScaleArc cluster setup. Specific details about this user’s privileges are documented in Section A.4.1.
Finally, we need to configure a database and user name for use by Drupal to publish the web site. We recommend this user be restricted to the IP address of the web server itself for security reasons.
One final note: in a MySQL installation with replication, execute all user creation commands on a master. Then the replication mechanism will propagate these changes to the slaves..
3.3.2 ScaleArc user accounts
ScaleArc has two users: the boot user, available only via the server console, and the main administrator, available via the web console.
The default boot user name is admin with a password of admin as well. This account is used to set the appliance IP address, subnet mask, and gateway.
The main ScaleArc administrator user name and password are defined during ScaleArc initial setup. This setup is performed via the web console, which resides on port 80 at the appliance IP address..
3.3.3 Drupal user accounts
There are two different classes of Drupal users: internal, assigned by Drupal for site publication purposes; and external, defined within MySQL and used to access the database.
We need to specify the external MySQL user when starting Drupal installation. While installing, we later define the internal administrative user.
3.4 Licenses Some components of our solution require licensing. The Apache web server, PHP, and Drupal are all open source products. None requires a license.
MySQL is available in both commercial and GPL (open source) versions. To use the commercial version, please obtain valid MySQL licenses.
ScaleArc is a proprietary product requiring licenses. We need two, one for each server in the high availability (HA) pair. ScaleArc is glad to provide free thirty data trial licenses for evaluation purposes. Please contact us to obtain these licenses.

Deployment Guide | Drupal with ScaleArc + MySQL Replication
© 2015 ScaleArc. All Rights Reserved. | 12
3.5 Security and networking issues By default, both Linux and Windows come pre-configured to prevent networking MySQL servers together. In this section, we discuss some basic setup requirements for allowing this networking..
3.5.1 Allow password-free login during integration
As mentioned earlier, MySQL installs by default with a password-free root login from localhost. Once the solution has been completely installed and tested, one may constrain this password-free account. We recommend that all other accounts, including the replication, ScaleArc, and Drupal accounts, be created with password authentication and named host limitations.
3.5.2 Open the appropiate firewall port
MySQL typically communicates on port 3306 via the TCP/IP protocol. Configure firewalls such that ScaleArc and Drupal may connect on this port. If corporate security policy prevents opening this particular port, consider installing MySQL to run on an unblocked port, such as 8080. Then use this port instead of the default port, which is 3306, during solution integration.
3.5.3 Allow unauthenticated network connection
Both ScaleArc and Drupal work with the user authentication service built into MySQL. The network connection to MySQL, however, is unauthenticated.
Mandatory access controls requiring authentication prior to establishment of a network connection may prevent MySQL connections. Please disable any service that enforces such control. In Linux, this step usually means disabling some port restrictions imposed by selinux. In Windows, this step usually means disabling a specific group policy object.
3.5.4 Increase the maximum connection limit
By default, MySQL ships with a maximum limit of 151 simultaneous connections, primarily for historical purposes. Also by default, ScaleArc maintains a pool of 300 simultaneous connections. Either the MySQL connection limit must be increased or the ScaleArc pool must be decreased.
Note MySQL 5.1.17 and later can handle up to 100,000 connections and 500-1,000 connections are routine. We recommend setting the maximum connection limit to at least 500 for this solution by performing the following steps:
1. Stop the MySQL service. Use the sc stop MySQL command in Windows or
the service mysqld stop command in Linux to perform this task.5
2. Open the my.ini file in the Windows installation directory or the
/etc/my.cnf file in Linux using a text editor.
3. Find the [mysqld] section within this file and add the following statements
within this section:
max_connections=500
max_connect_errors=999999
5 One chooses the service name at installation. This name may be something else, like MySQL56.
Or use the Services snap-in under Administrative Tools in the Control Panel to manage this
service.

Deployment Guide | Drupal with ScaleArc + MySQL Replication
© 2015 ScaleArc. All Rights Reserved. | 13
4. Start the MySQL service using either the sc start MySQL command in
Windows or the service mysqld start command in Linux.
Alternatively one may use the MySQL SET command to alter these variables on a
running server. But unless recorded in the configuration file, these changes will be
lost upon server restart.
3.5.5 Domain name service configuration
During login of a remote user, MySQL uses reverse Domain Name Service (DNS) lookup for comparison with the host field in the mysql.user table. This process allows MySQL to allow authentication from some IP addresses but not others.
For this operation to work properly, one of the following options must be implemented:
Enable the reverse lookup service. This option is disabled by default on Windows DNS servers.
Define the hostname and IP address in the hosts file.
Enable skip_name_resolve within MySQL. This option is typically
disabled.
Implementing one of these options will reduce the latency before a login is attempted and granted. Otherwise ScaleArc will time out when attempting to connect to MySQL.
4. ScaleArc Installation This chapter discusses the requirements for installing the ScaleArc component of the solution. These steps must be completed after MySQL replication has been installed but before Drupal is installed.
4.1 Licensing ScaleArc is licensed based on anticipated workload (number of cores, amount of RAM) and time (one year or three year). In addition, ScaleArc offers 30-day evaluation licenses.
Licenses are stored as encrypted data in a file that is uploaded during initial configuration. Before installing ScaleArc, please contact us to obtain license files. Two are needed for this solution: one for the active unit, and another for the HA standby node.
4.2. Active server installation ScaleArc comes packaged as a software appliance in two forms: a bootable ISO CD-ROM image or an Open Virtual Archive (OVA) ready for import. The ISO image is recommended for physical machine installation and the OVA format is recommended for virtual machine implementation.
Both formats are self-installing.6 The OVA specifies a correctly sized virtual hard drive. For ISO installations, we recommend dedicating an entire spindle for the sole use of ScaleArc, for two reasons: the installer reformats the disk partition, and a dedicated spindle delivers maximum performance.
6 For Dell machines, biodevname=0 must be specified as a Linux boot option.

Deployment Guide | Drupal with ScaleArc + MySQL Replication
© 2015 ScaleArc. All Rights Reserved. | 14
4.2.1 Network parameters
Once ScaleArc has booted, the following prompt appears on the console:
ScaleArc Version-3.0
localhost login:
Enter the network configuration user name and password, both of which are admin
The next screen is ScaleArc’s initial configuration menu7 as follows:
Please setup your IP/Gateway so you can access this appliance
over the network, and complete the setup.
We will apply the settings you choose to the (eth0) interface.
IP Address for (eth0): 172.31.1.1.110
Subnet Mask for (eth0): 255.255.255.0.
Gateway for (eth0):172.31.1.1
After entering the gateway IP address, the console displays the data captured for confirmation, editing, or disposal. Please type 1 for Apply and press Enter.
At this point, networking restarts. When this process finishes, one may access the web console at the appliance IP address to perform initial configuration. We discuss this topic in the next section.
4.2.2 Initial configuration
We perform initial configuration of ScaleArc via its web console. To start the console, enter the appliance’s IP address, in our example 172.31.1.1.110, in the address bar of a web browser. The web console loads with the following welcome screen. Note that the ScaleArc software was formerly known as iDB.
7 On subsequent logins, a menu for either resetting the IP address or performing a factory reset will
appear first. Choose the appropriate action as desired.

Deployment Guide | Drupal with ScaleArc + MySQL Replication
© 2015 ScaleArc. All Rights Reserved. | 15
To perform initial configuration, click the Setup ScaleArc button. The Initial Configuration screen illustrated on the following page loads. On this screen, perform the following steps:
5. Enter a Hostname to identify this ScaleArc appliance with the network.
6. Inspect the Default Gateway and verify it is correct. Otherwise change this
address as necessary.
7. Enter a Primary DNS and Secondary DNS for public Internet access. The
appliance uses settings to check for software updates.
8. Set the Time Zones as desired. Note the default zone is GMT.
9. Enter a NTP Time Server hostname if DNS has been set or an IP address if not.
Or clear this field and manually set the current date and time.
10. Enter a User Name and Password for the appliance’s main administrative
user. These fields are used for subsequent logins to this web console.
11. Click the Upload New License button, and browse for a license file. Note that
since this appliance is the master, by convention we use the first license.
12. Wait for the appliance to upload the license, and confirm it is working. This
status is indicated by the text on the Upload New License button turning from white
to gray.
13. Click the Apply Settings button. The appliance loads an animated “Applying
Configuration” dialog and then displays a “Settings are saved successfully” dialog.
14. Click “OK” on this dialog and then log into the web console using the
administrator user name and password set earlier.
Once logged in to the web console, one may clear existing events, if any. Then one can configure a database cluster. The process for clearing events is documented in the next section.

Deployment Guide | Drupal with ScaleArc + MySQL Replication
© 2015 ScaleArc. All Rights Reserved. | 16
4.2.3 Create a virtual IP
Clients should connect with ScaleArc via a virtual IP address. Then clients can use the same IP even if the physical IP address changes, as it will during HA failover. To create a virtual IP for this purpose, perform the following steps:
1. Navigate to Settings → Network Settings via the main menu. The
screen shown below loads:
2. Click the Add Virtual IP button adjacent to the appropriate network
interface, usually eth0.
3. Enter the desired virtual IP address in the top-most entry field.
4. Select the desired subnet mask from the drop-down control.
5. Click the Add button as shown below:

Deployment Guide | Drupal with ScaleArc + MySQL Replication
© 2015 ScaleArc. All Rights Reserved. | 17
Now when an HA failover event occurs, clients may still communicate with ScaleArc via this virtual IP address.
4.2.4 Clearing events
At this point of the ScaleArc installation, two standard event notifications may show. Click on the flashing menu bar indicator as shown below:
The “license…is about to expire” event is automatically posted whenever the license is scheduled to expire in 30 days or shorter. Note that all free trial licenses are valid for only 30 days. This event is continuous: one may clear it, but the event does reappear every few minutes.
The “changes will require a system restart” event may appear after the initial installation. If this event appears, clear it by performing the following steps:
1. Click the 0 More Events List button and navigate to the Events List.
2. Click the remove icon adjacent to this event. Confirm the event’s deletion.
3. Click the Close icon in the Events List.
4. Navigate to Settings → System Settings.
5. Scroll down to the bottom of the screen and click the Reboot System icon
as shown in the following screen shot:
6. Confirm rebooting the system. After a few minutes, manually reload the
web page.
We are now ready to form a database cluster.
4.3 Database clustering ScaleArc uses a cluster of database servers to perform several performance acceleration tasks including load balancing and read/write splitting. Prior to creating

Deployment Guide | Drupal with ScaleArc + MySQL Replication
© 2015 ScaleArc. All Rights Reserved. | 18
a cluster, however, the database servers must be installed in replication mode as documented in Appendix A, MySQL Installation. Afterwards, we add these servers to a database cluster.
We begin by creating the cluster with one member: the primary master node as a read/write member. After the cluster is operating, we add secondary masters as standby nodes and slaves as read-only nodes. We document these tasks in the following sections.
.
4.3.1 Creating the cluster with a primary master member
After we complete initial configuration, the appliance is ready to form the initial cluster. To do so, click Clusters in the main menu followed by the Setup Cluster button on the Welcome! screen. This step loads the Create Cluster screen that follows. To create a cluster, perform the following steps:
1. Enter a Cluster Name, such as Accounting or Product-Catalog. This
name is descriptive and used throughout the web console.
2. Set both the Load Balancer Virtual IP Address and the Outbound
Virtual IP Address to All IPs [Any]. This step allows the cluster to use
all member IP resources.
3. Set the Database TCP Port to 3306 so existing clients may connect with
the cluster via the standard MySQL port. Otherwise, set the port that
ScaleArc should use for this purpose.
Set the Username and Password of the user created for ScaleArc as documented in Section 3.3.1, MySQL user accounts. All of the solution components interact with a MySQL user. MySQL has root, a password-free, local user with administrative privileges. We now discuss user account assignments, starting with MySQL itself.
4. 3.3.1 MySQL user accounts
5. The Add Server button changes from an unavailable to an available state.
Click this button.
6. On the Adding Server dialog, enter the IP Address (or the FQDN if
available) of the primary MySQL replication master.

Deployment Guide | Drupal with ScaleArc + MySQL Replication
© 2015 ScaleArc. All Rights Reserved. | 19
7. Leave the Server Status as Read + Write, as this first cluster member is
the primary master.
8. Verify the other settings on this screen are correct. Verify the Port
Number and Maximum Concurrent Server Connections meet the
environment’s requirements. Then click Add Server.
9. An animated “Adding Server” dialog appears. ScaleArc adds the
replication master to the cluster as illustrated in the following Servers
section screen shot:
10. Click “Setup Cluster” at the bottom of the web page. An animated
“Please wait, saving data… ” dialog appears. Eventually cluster setup
completes and the Cluster Control Panel loads.
11. Verify the cluster is up and running as indicated under the Cluster Info
heading and the master node is in green status under the Database
Server heading.
Deployment Guide | Drupal with ScaleArc + MySQL Replication
© 2015 ScaleArc. All Rights Reserved. | 20
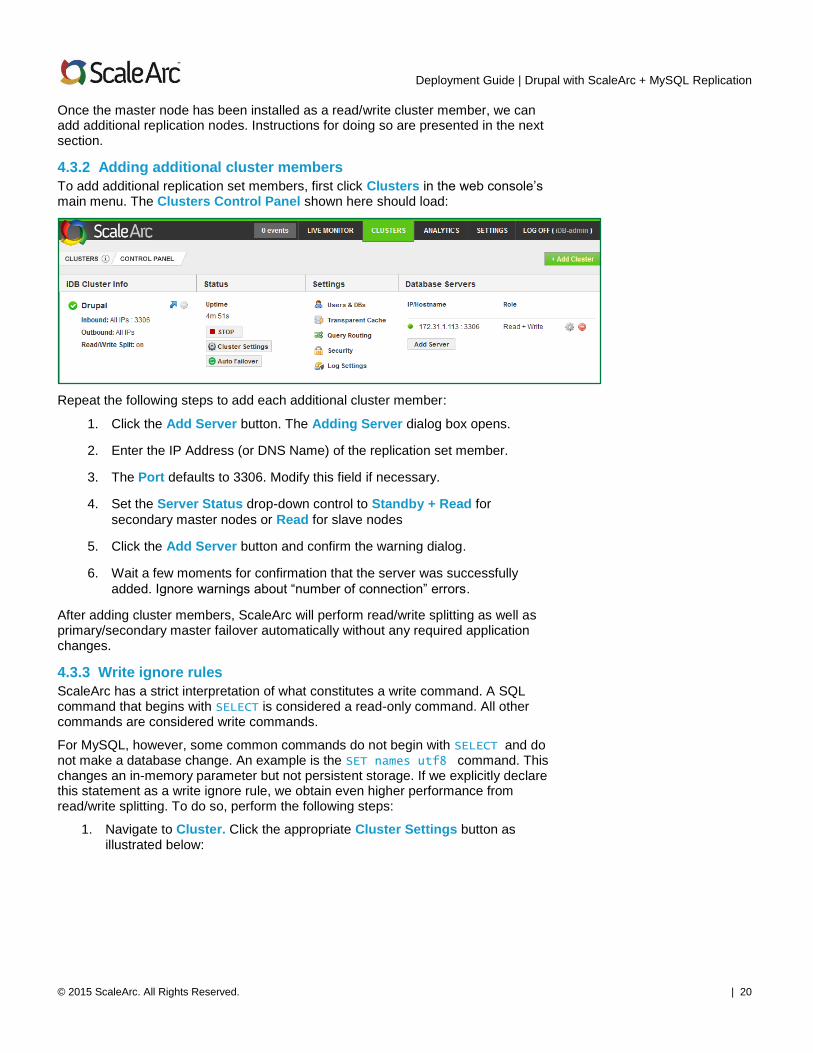
Once the master node has been installed as a read/write cluster member, we can add additional replication nodes. Instructions for doing so are presented in the next section.
4.3.2 Adding additional cluster members
To add additional replication set members, first click Clusters in the web console’s main menu. The Clusters Control Panel shown here should load:
Repeat the following steps to add each additional cluster member:
1. Click the Add Server button. The Adding Server dialog box opens.
2. Enter the IP Address (or DNS Name) of the replication set member.
3. The Port defaults to 3306. Modify this field if necessary.
4. Set the Server Status drop-down control to Standby + Read for
secondary master nodes or Read for slave nodes
5. Click the Add Server button and confirm the warning dialog.
6. Wait a few moments for confirmation that the server was successfully
added. Ignore warnings about “number of connection” errors.
After adding cluster members, ScaleArc will perform read/write splitting as well as primary/secondary master failover automatically without any required application changes.
4.3.3 Write ignore rules
ScaleArc has a strict interpretation of what constitutes a write command. A SQL command that begins with SELECT is considered a read-only command. All other commands are considered write commands.
For MySQL, however, some common commands do not begin with SELECT and do not make a database change. An example is the SET names utf8 command. This changes an in-memory parameter but not persistent storage. If we explicitly declare this statement as a write ignore rule, we obtain even higher performance from read/write splitting. To do so, perform the following steps:
1. Navigate to Cluster. Click the appropriate Cluster Settings button as illustrated below:

Deployment Guide | Drupal with ScaleArc + MySQL Replication
© 2015 ScaleArc. All Rights Reserved. | 21
2. A multi-tab control loads. Click on the Settings tab.
3. Navigate to the Write Ignore section as shown in the following screen shot:
4. Click on the On button, then click the Set Rules link.
5. Write Ignore Rules dialog opens. Click Add Rules, then type SET names
utf8 in the newly created rule. Before proceeding, verify the screen looks
similar to the following one:
6. If everything appears in order, click the Save button.
Now ScaleArc will route this command, commonly used by Drupal, to the least-busy database server and not just a read/write server.
4.3.4 Proxy authentication
ScaleArc can perform connection pooling by authenticating with MySQL on behalf of the Drupal user. But first, the user name, password, and database must be stored in the cluster settings. To do so, perform the following steps:
1. Navigate to Clusters.
2. In the Settings column, click on Users & DBs for the appropriate cluster.
Deployment Guide | Drupal with ScaleArc + MySQL Replication
© 2015 ScaleArc. All Rights Reserved. | 22
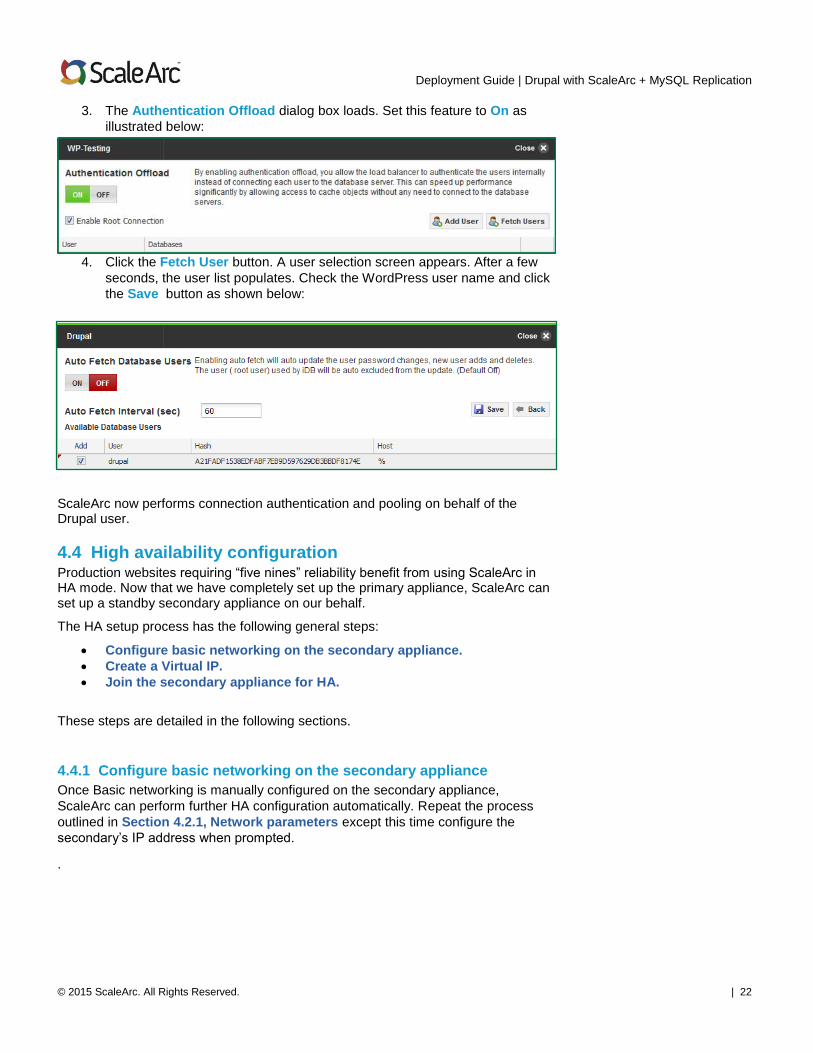
3. The Authentication Offload dialog box loads. Set this feature to On as
illustrated below:
4. Click the Fetch User button. A user selection screen appears. After a few
seconds, the user list populates. Check the WordPress user name and click
the Save button as shown below:
ScaleArc now performs connection authentication and pooling on behalf of the Drupal user.
4.4 High availability configuration Production websites requiring “five nines” reliability benefit from using ScaleArc in HA mode. Now that we have completely set up the primary appliance, ScaleArc can set up a standby secondary appliance on our behalf.
The HA setup process has the following general steps:
Configure basic networking on the secondary appliance.
Create a Virtual IP.
Join the secondary appliance for HA.
These steps are detailed in the following sections.
4.4.1 Configure basic networking on the secondary appliance
Once Basic networking is manually configured on the secondary appliance,
ScaleArc can perform further HA configuration automatically. Repeat the process
outlined in Section 4.2.1, Network parameters except this time configure the
secondary’s IP address when prompted.
.

Deployment Guide | Drupal with ScaleArc + MySQL Replication
© 2015 ScaleArc. All Rights Reserved. | 23
4.4.2 Joining the secondary appliance for HA
Once the primary is fully configured and the secondary has a working networking configuration, ScaleArc can copy all of the remaining settings from the primary to the secondary. To create an HA pair, perform the following steps on the primary:
1. Navigate to Settings → HA Settings via the main menu.
2. Verify the High Availability Settings status is “Appliance <Settings
physical ip> Running as Standalone.” This status indicates the primary is
ready to accept a secondary node.
3. Choose the appropriate Ethernet adapter from the Configure High
Availability drop-down menu.
4. Enter the secondary’s physical IP address in the Remote IP field.
5. Click the Add As Secondary button as shown in the following screen shot:
HA configuration will commence and may take a few minutes. Configuration is complete when the status changes to indicate HA mode is running.
5. Drupal Configuration Now that MySQL and ScaleArc are installed, we simply adapt Drupal by changing the database connection settings. We do so by editing the settings.php file in the Drupal home directory, usually in sites/default, as documented in the following steps:
1. Stop the Apache service with the Service httpd stop command. This
step will block all Drupal requests and take the site down momentarily.
2. Issue a chmod a+w settings.php command so that changes to this file
are possible.
3. Open the setting.php file and scroll to the $databases array that starts
on a new line (as opposed to several that are only comments). You may
use /^\$databases in vi to find this location. An example of the complete
array follows:
$databases = array (
'default' =>

Deployment Guide | Drupal with ScaleArc + MySQL Replication
© 2015 ScaleArc. All Rights Reserved. | 24
array (
'default' =>
array (
'database' => 'drupal',
'username' => 'drupal',
'password' => 'dRupal!',
'host' => 'localhost',
'port' => '',
'driver' => 'mysql',
'prefix' => '',
),
),
);
4. This section is a series of definitions that pair Drupal internal names, in
single quotes, with their corresponding values, also in single quotes. For
the databases pair, verify the value matches the MySQL database
allocated for Drupal.
5. For the username pair, verify the value matches the MySQL user name for
Drupal.
6. For the password pair, verify the value matches the password for this
MySQL user.
7. For the host pair, change the value to a host name or IP address
corresponding to the virtual IP used by the ScaleArc HA pair.
8. Save the settings.php file.
9. As a security precaution, issue a chmod a-w settings.php command to
remove all write permissions from this file.
10. Start the Apache service by issuing the Service httpd start command.
Now Drupal should immediately start using ScaleArc as its proxy to the MySQL-replicated database servers. No other application change is required. We can verify this setup using the Live Monitor, which, among other topics, is discussed in the next chapter.
6. ScaleArc Performance Monitoring and Tuning Once configured, ScaleArc automatically provides several immediate performance benefits. One is read/write splitting, which means SELECT queries won’t wait while other queries block. ScaleArc also performs load balancing among a pool of servers. A third capability is connection pooling, where ScaleArc maintains consis-tent connections to the database, recycling these among hundreds of dynamic client connections.
One major ScaleArc performance benefit requires manual authorization, and that is query results caching. ScaleArc can store the result set of a site’s busiest queries in memory and return those results on demand. Programmers do not have to write even one line of code or use a different storage engine to obtain these benefits. Instead, a database administrator just sets a read request to be cached.

Deployment Guide | Drupal with ScaleArc + MySQL Replication
© 2015 ScaleArc. All Rights Reserved. | 25
So how does one determine, out of the thousands of queries coming to a site, which queries account for the biggest percentage of server load? Simple: run live traffic through the ScaleArc software appliance and use the analytics feature to characterize and isolate queries. Then use the GUI to cache frequent, slow queries with one click. This chapter provides step-by-step instructions for doing so.
6.1 Live monitor without caching Once ScaleArc is serving a site, use the live monitor to view the queries per second served between applications and each database cluster. To do so, perform the following steps:
1. Navigate to Live Monitor → Cluster Stats via the main menu, then click
on the desired cluster.
2. Observe the real-time display showing the past thirty seconds of actual
traffic.
3. Scroll to the middle pane showing Queries/Second and the Cache Hit
Rate.
The display should be similar to the following screen shot. Note that even though several queries are running through ScaleArc, the hit rate is zero, since caching is not yet turned on.
6.2 Viewing stored analytics While the live monitor displays various traffic parameters collected during the past thirty seconds in real time, the analytics display records traffic statistics over a much longer period and displays this data in graph form over periods of one day, one week, one month, and three months.
To start using this capability, click on Analytics in the main menu. This step loads the summary page, which displays an overview of the selected sample period. Change the start date and sample period using the controls in the upper right-hand corner. Mouse over the graph to get peak readings at the major intervals. These features are illustrated in the following screen shot:

Deployment Guide | Drupal with ScaleArc + MySQL Replication
© 2015 ScaleArc. All Rights Reserved. | 26
Use stored analytics to identify which queries consume the most storage time. Then add rules, with one click, to cache these queries. The next section lays out the steps to follow.
6.3 Analytics drill down From this same analytics page, one may drill down and add specific queries. The general process for doing so is:
Choose a single busy hour.
Choose a user.
Add rules for the busiest queries.
Step-by-step instructions follow.
The Analytics interface uses a “mouse over” mode. Many items
automatically open to expose further details without clicking. Also,
expand the web browser window fully to see as much as the interface as
possible. Finally, use a pointing device that has a scrolling function.
6.3.1 Choose a single busy hour
From the Cluster Stats display described in Section 6.2 Viewing stored analytics, scroll to the middle of the page to view traffic on an hour-by-hour basis. Find the row containing the busiest hour with no cache hits – at this point, it should be all hours since no query is cached – and click that row. The user page loads.
6.3.2 Choose a user
The next analytics page shows the various database users. Drupal has two users: the Drupal user itself, which represents actual traffic, and NULL, which represents system functions. Scroll the page down and mouse over the row containing the Drupal user summary statistics, which are illustrated in the following screen shot. Finally, click on this row to load the Query Types browser.

Deployment Guide | Drupal with ScaleArc + MySQL Replication
© 2015 ScaleArc. All Rights Reserved. | 27
6.3.3 Add cache rules for the busiest queries
The Query Types browser begins with a graph showing all queries plotted by number of repetitions and execution. As a result, the queries responsible for the most system load “land” in the upper-right (light pink) quadrant. One may mouse over these queries to see the underlying SQL as illustrated in the following screen shot:
Click the down arrow icon (▼) in the Server Time to sort the query types by system
load. Find the row containing the first query in the list. Mouse over that row, and it
automatically expands to show details and a regular expression pattern, as shown
here:
This query is consuming the most resources based on statistics collected
automatically by ScaleArc. Click the Cache button (lightning bolt on disk) to open
the Query Pattern tool as illustrated here:
Deployment Guide | Drupal with ScaleArc + MySQL Replication
© 2015 ScaleArc. All Rights Reserved. | 28
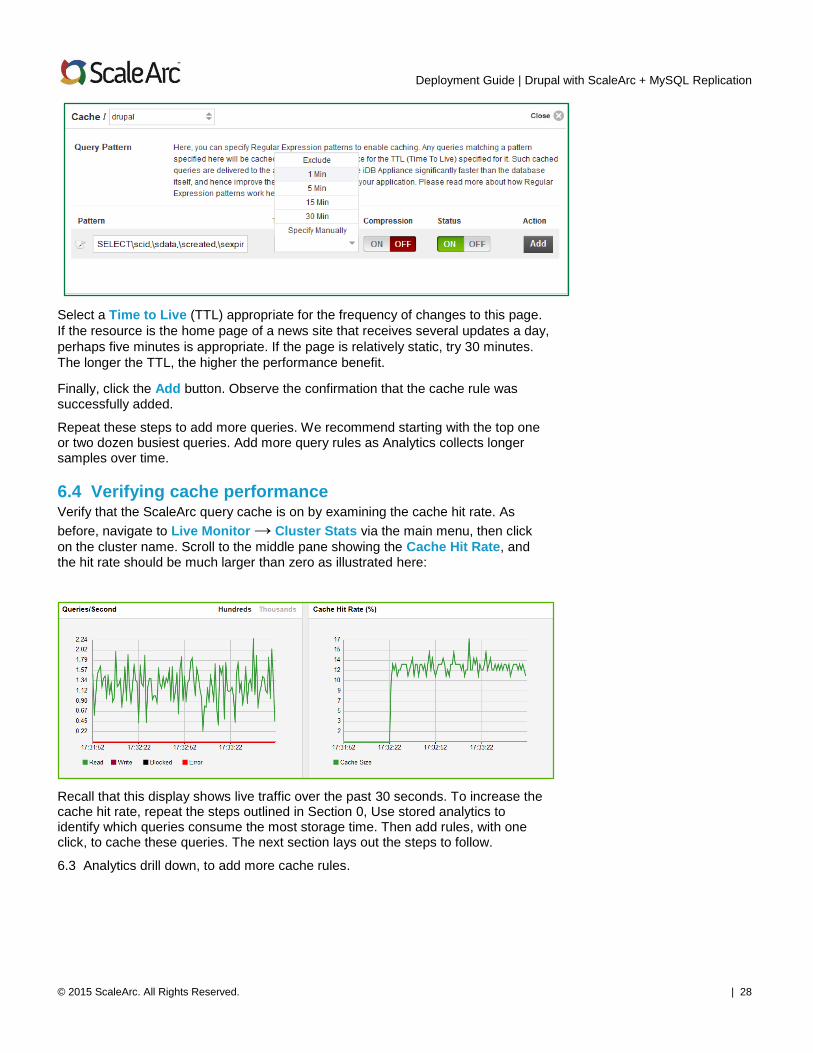
Select a Time to Live (TTL) appropriate for the frequency of changes to this page.
If the resource is the home page of a news site that receives several updates a day,
perhaps five minutes is appropriate. If the page is relatively static, try 30 minutes.
The longer the TTL, the higher the performance benefit.
Finally, click the Add button. Observe the confirmation that the cache rule was successfully added.
Repeat these steps to add more queries. We recommend starting with the top one or two dozen busiest queries. Add more query rules as Analytics collects longer samples over time.
6.4 Verifying cache performance Verify that the ScaleArc query cache is on by examining the cache hit rate. As
before, navigate to Live Monitor → Cluster Stats via the main menu, then click
on the cluster name. Scroll to the middle pane showing the Cache Hit Rate, and the hit rate should be much larger than zero as illustrated here:
Recall that this display shows live traffic over the past 30 seconds. To increase the cache hit rate, repeat the steps outlined in Section 0, Use stored analytics to identify which queries consume the most storage time. Then add rules, with one click, to cache these queries. The next section lays out the steps to follow.
6.3 Analytics drill down, to add more cache rules.

Deployment Guide | Drupal with ScaleArc + MySQL Replication
© 2015 ScaleArc. All Rights Reserved. | 29
7. Drupal Query Caching Guidance This chapter contains advice for determining what Drupal queries may be safely cached, why, and for how long – the time to live (TTL) to assign. This guidance is based on documentation from the Drupal Structure Guide using query frequency statistics gathered from internal product testing.
7.1 Heuristic guidance Drupal issues dozens of database queries for each and every web page. Consequently, it may be more appropriate to base TTL values on heuristics such as the site’s purpose, how frequently the content changes, and the site’s organizational impact. Such heuristics are presented in the following sections.
7.1.1 Site purpose
One heuristic to consider when setting TTL values is what the overall purpose of the Drupal site is. A site publishing gossip about popular culture has a different purpose and revenue-generation model than a site that books tickets for specialized events. While the former site may meet its mission with some content being as much as five minutes out of date, the latter may not be able to afford being even five seconds out of date.
7.1.2 Update frequency
Another heuristic to consider is how often site content is updated. Let’s consider Whitehouse.gov, which averages four to six thousand page views per day.8 For the week of March 16-22, 2014, the site had twenty blog posts, which is on the order of three publishing events per day. Given eight hours per work day, this rate equates to one publishing event every 160 minutes.
Using Nyquist-Shannon,9 a TTL value of 80 minutes should be short enough that, in theory, no visitor will miss more than the most recent blog post. Depending on a site’s fidelity goal, computed TTL values may be relaxed or tightened.
7.1.3 Organizational impact
A third heuristic to consider is the consequence of site failure to the organization. Also consider, among failure types, whether avoiding failure from lack of availability or lack of integrity is more important.
This impact may change over time. Consider a site serving an annual conference as an example. In the days leading up to the conference, lack of availability to accept new registrations may have the highest impact. During this time, the best course would be to set TTL values longer so that website performance is fastest. During the conference itself, lack of integrity to report last-minute room assignments may be more worrisome. At this point, setting TTL values shorter is important.
7.1.4 Be conservative
In debating whether a TTL value should be longer or shorter, be conservative. Our testing shows that TTL values as short as one minute yield huge performance benefits, a 15-fold improvement between a query request and its associated response. Although longer TTL values should yield higher performance, more conservative values may be sufficient to address a site’s performance issues.
8 According to Alexa, Whitehouse.gov is the 935th most popular website in the US. 9 To digitally represent an analog event at some frequency, sample at double that frequency.

Deployment Guide | Drupal with ScaleArc + MySQL Replication
© 2015 ScaleArc. All Rights Reserved. | 30
7.2 Structured-based guidance We can offer specific guidance on setting a TTL value based on what table is queried. Some Drupal tables are used to store content, others store associations between and groupings of content, and still others serve site administration. The following sections offer guidance for each of these table types.
7.2.1 Optimization tables
Drupal’s schema includes several tables to optimize the interaction with the database. Notably, Drupal implements its own caching scheme. It also stores session information in the database, not the file system. Further, Drupal places contention information in the database so locking items are updated. Consequently, we recommend not caching the following tables:
cache*
queue
semaphore
session
system
watchdog
Other Drupal tables can be cached as discussed in the following sections.
7.2.2 Content
Drupal uses nodes as its main content structure. Nodes can be of different types, such as blog posts or pages. Custom nodes can serve specific purposes.
If a site is fairly static, the nodes* tables can be cached with fairly long TTL values. Five minutes on a site that posts five posts a day is sufficiently generous.
7.2.3 Taxonomy
Drupal uses two sets of tables to build a taxonomy. The field* tables define the element names and descriptions, and the taxonomy* tables define the relations between elements.
TTL values should be selected based on how often the site taxonomy changes. Sites that use a relatively static taxonomy, updated only by content owners, might consider longer TTL values for these tables. Sites that have dynamic updates to these tables from site users – such as sites offering end-user tagging – should consider shorter TTL values.
7.2.4 Site administration
Drupal has two sets of tables to administer users and permissions. The user* tables define accounts, while the role* tables define the permission set for each account.
TTL values should be selected based on the site’s purpose. Broadcast sites not accepting end-user content submissions may consider longer TTL values. Blogging sites, in contrast, should consider shorter TTL values for these tables.
8. Summary This guide documents step-by-step installation of an entire solution for sluggish Drupal website performance by incorporating the ScaleArc for MySQL database load balancing software. The documented solution involves multiple phases:
Install MySQL in replication mode for data integrity and reliability.

Deployment Guide | Drupal with ScaleArc + MySQL Replication
© 2015 ScaleArc. All Rights Reserved. | 31
Install ScaleArc for MySQL for performance optimization.
Install Drupal for content management.
Tune ScaleArc performance and enable in-memory caching.
Internal testing shows that ScaleArc provides up to a 55x database performance boost to Drupal sites and allows seamless database scaling of up to 10x – all without application or database change.
Have comments on ScaleArc or this solution guide? We’d love to hear from you. Contact us directly, connect via LinkedIn, visit our Facebook page, or follow us on Twitter.

Deployment Guide | Drupal with ScaleArc + MySQL Replication
© 2015 ScaleArc. All Rights Reserved. | 32
Appendix A – MySQL Installation This chapter discusses the requirements for installing MySQL database servers, along with commands for adding appropriate users and configuring master/slave replication. These steps must be completed before installing either the ScaleArc software or Drupal.
A.1 Server installation MySQL installs differently depending on whether the host operating system is Windows or Linux. For Windows, visit the MySQL download page, and download the web installer. This installer downloads the appropriate MySQL version for the server’s operating system and architecture.
Linux servers have more installation options. In addition to downloading MySQL as a binary, Linux users can use command line tools to install MySQL directly, for example on Centos:
sudo yum install mysqld-server
We recommend performing an Internet search for community directions on performing such an installation. You can also visit the MySQL reference manual page to find detailed installation instructions.
A.2 MySQL replication user creation As mentioned earlier, we need to create additional MySQL users: one for ScaleArc, one for MySQL replication, and one for Drupal. Recall that the ScaleArc user requires full privileges.
Let’s create the replication user first. Start the MySQL command prompt as the local root user on the database master node via the command:
mysql -u root
Then type the commands indicated below:
CREATE USER '<replication-user>'@'<replication-host>' IDENTIFIED BY
'<replication-password>';
GRANT REPLICATION CLIENT, REPLICATION SLAVE ON *.* TO '<replication-
user>'@'<replication-host>';
FLUSH PRIVILEGES;
Here is an example session using the example environment described earlier in this document:
CREATE USER 'replication'@'172.31.1.11%' IDENTIFIED BY
'rEpl1cat10n';
GRANT REPLICATION CLIENT, REPLICATION SLAVE ON *.* TO
'replication'@'172.31.1.11%';
FLUSH PRIVILEGES;
This process creates a user with appropriate connection limitations. Note that since we create this user before starting replication configuration, this user will not be copied to the mysql.user table on the slave nodes.
Please record this user name and password for recall during later
installation tasks.

Deployment Guide | Drupal with ScaleArc + MySQL Replication
© 2015 ScaleArc. All Rights Reserved. | 33
A.3 Replication configuration Configuring MySQL replication has several options. The simplest setup is one master node and multiple slave nodes where the slaves are fresh and do not have any data. For this solution, we consider only this simplest setup.
A.3.1 Overview
The general replication configuration steps are as follows:
For each master,
o Stop the corresponding MySQL service.
o Edit the master configuration parameter file.
o Start the MySQL service.
o Collect replication service parameters.
For each slave,
o Stop the corresponding MySQL service.
o Edit the slave configuration file.
o Start the corresponding MySQL service.
o Join the master node using replication service parameters.
These steps are detailed in the following paragraphs.
A.3.2 Master node replication configuration
To configure a master node for replication, first stop the MySQL service. Use the sc stop MySQL command in Windows or the service mysqld stop command in Linux to perform this task.10
Next, open the my.ini file in the Windows installation directory or the /etc/my.cnf file in Linux using a text editor. Find the [mysqld] section within this file and add the following statements at the end of this section:
log-bin=<binary log file name>
server-id=1
max_connections=500
max_connect_errors=999999
Note <binary log file name>is an arbitrary parameter. One may use any file for which the MySQL service user has read/write permission.
Continuing, start the MySQL service using either the sc start MySQL command in Windows or the service mysqld start command in Linux.
If the service fails to start, verify the MySQL service user has
read/write/execute permission for the directory containing the binary log
file and try again.
A.3.3 Collect replication service parameters
Replication is now running on the master node. To join a slave node, we need to determine a reference point from which to start copying data.
10 Note that for Windows, one chooses the service name at installation. This name may be MySQL
or it may be something else, like MySQL56. Or use the Services snap-in under Administrative
Tools in the Control Panel to manage this service.

Deployment Guide | Drupal with ScaleArc + MySQL Replication
© 2015 ScaleArc. All Rights Reserved. | 34
We can do this step by flushing all tables and then recording the master’s replication status. To do so, first login to the MySQL prompt via the mysql –u root command. Now issue the following two commands at the mysql> prompt:
FLUSH TABLES WITH READ LOCK;
SHOW MASTER STATUS;
This last command retrieves four data items as shown here:
Record the first two data items: the File, a string; and the Position, an integer. Then proceed with joining slaves to the master for replication as detailed in the next section.
To avoid releasing the table lock, do not exit this master session until
replication setup is completed on all slaves.
A.3.4 Slave node replication configuration
Joining a slave with the master node for replication purposes follows a pattern similar to the one used for configuring replication on the master: stop the service, edit the configuration file, start the service, and issue some SQL commands. These steps must be performed on each slave node as detailed here:
First, stop the MySQL service using the sc stop MySQL or service mysqld stop command as appropriate.
Next, edit the my.ini or my.cnf file and add the following lines at the end of the [mysqld] section:
server-id=<slave ordinal +1>
max_connections=500
max_connect_errors=999999
Since the master server-id is 1, use 2 for the first slave, 3 for the second, and so on.
Save the changes to this file and then issue the sc start MySQL or service mysqld start command as appropriate. Then join the slave to the master as discussed in the next section.
A.3.5. Join a slave to a replication configuration master
After the slave MySQL service is up and running, log into the mysql> prompt using the mysql –u root command. Then issue the following SQL commands:
CHANGE MASTER TO
master_host='<master-IP>',
master_user='<replication-user-name>',
master_password='<replication-password>',
master_log_file='<File>’,

Deployment Guide | Drupal with ScaleArc + MySQL Replication
© 2015 ScaleArc. All Rights Reserved. | 35
master_log_pos=<Position>;
START SLAVE;
Note the MySQL client displays a -> continuation prompt after each Enter in a multi-line command. Also, the <Position> parameter is an integer and should not be enclosed in quotes.
To verify this particular slave is synchronized with the master, execute the following SQL command:
SHOW SLAVE STATUS \G
The \G terminates the command while asking for single row output. This command results in a status screen something like the following one:
When Slave_IO_Running and Slave_SQL_Running are both Yes, replication is running properly. When Slave_IO_State is “Waiting for a master to send event,” the slave is in synchronization with the master. Once success is achieved and replication is finished, continue with the testing as discussed in the next section.
A.3.6 Installing MySQL replication with existing data
If a website is running from one single MySQL database server, dump the appropriate tables from the replication master and upload these tables to all slaves.

Deployment Guide | Drupal with ScaleArc + MySQL Replication
© 2015 ScaleArc. All Rights Reserved. | 36
Note that replication does not copy existing data from master to slave – only changes made after replication is working.
MySQL provides the SQL function MASTER_POS-WAIT (<log-file-name>, <Position> to block updates until slaves catch up. See Appendix B.13 of the MySQL Reference Manual for further details.
A.4 Replication testing We can use our need to create additional users, specifically the ScaleArc and Drupal users, as a replication test case. We also need to verify that the server hosting Drupal can access its database from all MySQL nodes. To test and verify replication is working correctly, perform the steps documented in this next section.
A.4.1 Creating shared users
When replication is running properly, objects created on the master are propagated to the slaves. Let’s create a ScaleArc user as well as a Drupal database and user on the master while verifying replication is working. To do so, issue the following commands from the master mysql> prompt:
To create an administrative user for ScaleArc, execute the following commands at the mysql> prompt, substituting the parameters as appropriate:
UNLOCK TABLES;
CREATE USER '<scalearc-cluster @'<host-name>' IDENTIFIED BY
'<password>';
GRANT ALL ON *.* TO '<scalearc-cluster>'@' <host-name>';
FLUSH PRIVILEGES;
We recommend using a <host-name> parameter that is as restrictive as possible given the installation’s IP addressing scheme. For example, the commands:
UNLOCK TABLES;
CREATE USER 'scalearc_root'@'172.31.1.11%' IDENTIFIED BY
'sCaleaRc-1Db';
GRANT ALL ON *.* TO 'scalearc_root'@'172.31.1.11%';
FLUSH PRIVILEGES;
create a user with access to all database objects that may only connect from clients in the IP address range 172.31.1.110-172.31.1.119.
Now create a database and user for the Drupal application user:
CREATE DATABASE <drupal-db>;
CREATE USER '<drupal-user>'@'<webhost-name> ' IDENTIFIED BY
'<drupal-password>';
GRANT ALL ON <drupal-db>.* TO '<drupal-user>'@'<webhost-name>';
Here is an example following our previous cases:
CREATE DATABASE drupal;
CREATE USER ‘drupal’@'172.31.1.116' IDENTIFIED BY ‘dRupal!’;
GRANT ALL ON drupal.* TO ‘drupal’@'172.31.1.116';
FLUSH PRIVILEGES;
Note the use of a fully qualified IP address for the <webhost-name> parameter: in this example, the Drupal MySQL user is allowed to connect only from a specific web host.

Deployment Guide | Drupal with ScaleArc + MySQL Replication
© 2015 ScaleArc. All Rights Reserved. | 37
A.4.2 Replication verification
We can verify replication is working by issuing the following queries from the mysql> prompt on all slaves and verifying the results match what we expect:
SHOW DATABASES;
SELECT user, host, password FROM mysql.user WHERE user = '<drupal-
user> ';
We should see the <drupal-db> and <drupal-user> parameters are reported correctly on each slave.
A.4.3 Performance verification
Before proceeding with the ScaleArc installation, let’s verify that MySQL with replication turned on exhibits reasonable performance. Connect to each database server from the web server node using these commands:
mysql –u <drupal-user> -p –h <server-IP>
Enter password: <drupal-password>
Verify the mysql> prompt returns in a reasonable amount of time. If not, it may be necessary to adjust ScaleArc timeouts.11 Second, while still connected, verify these queries execute almost immediately:
SHOW DATABASES;
USE <drupal-db>;
SHOW TABLES;
SELECT 1+2;
If the response is not instantaneous, then MySQL’s raw performance is inhibited. ScaleArc cannot compensate for poor raw server performance.
11 If the MySQL client fails to connect at all, please see Section 3.5, Security and networking issues,
for troubleshooting information.

Deployment Guide | Drupal with ScaleArc + MySQL Replication
© 2015 ScaleArc. All Rights Reserved. | 38
Appendix B – ScaleArc Feature/Benefits for
Percona XtraDB Cluster (Galera)
ScaleArc provides additional benefits for Percona XtraDB Cluster, by monitoring the cluster/replication status and taking appropriate actions. The following features and benefits highlight the main advantages of combining ScaleArc and Galera.
Feature: Read/Write split
Benefit: Avoiding deadlocks
Percona XtraDB Cluster does allow for all nodes to become masters, but deadlocks result in performance loss if writes are sent to all nodes. ScaleArc can send writes to only one node and spread the reads across all of the nodes. ScaleArc’s read/write split will result in better performance with increased write capacity of the Galera cluster.
Feature: Read/Write split
Benefit: Scale out without app modification
ScaleArc simplifies application engineering with native read/write split that sends reads to the master and all servers marked as read-only/standby-read and writes only to the master server. ScaleArc also performs replication lag-aware load balancing by monitoring the replication status of each node in the cluster. If a node is out of sync or gets disconnected from the cluster, ScaleArc automatically stops using the node.
Feature: Replication awareness/graceful server shutdown
Benefit: Easier planned maintenance
ScaleArc’s RESTful API/UI allows for a node to be taken out gracefully for maintenance, without impacting application traffic. ScaleArc is replication aware and keeps track of the node status within the XtraDB cluster. When a server becomes a part of the Galera cluster, the ScaleArc software waits until replication status reports are good before sending traffic to that node.
Feature: Automated Failover with Surge Protection
Benefit: Zero Downtime for Apps for unplanned events
ScaleArc’s auto failover mechanism handles all unplanned server downtime events automatically, without requiring any application downtime. ScaleArc’s automatic failover also results in minimal client connection resets, which prevents any need for application server restarts. ScaleArc’s automatic failover for databases is also customizable to handle the complex replication topologies needed for some cross-data center deployments involving MySQL replication and Galera.

Deployment Guide | Drupal with ScaleArc + MySQL Replication
© 2015 ScaleArc. All Rights Reserved. | 39
How it works: Automated Failover with Surge Protection
ScaleArc has a built-in auto failover module that gets triggered on database server failures. Once the current master is declared as failed, ScaleArc engages the surge protection mechanism to queue the writes. The reads happening during failover can be served from the read/standby-read servers within the cluster. The ScaleArc failover module takes over and initiates the healing mechanism by finding the most up to date standby-read server within the cluster to be used as the new master.

ScaleArc is the leading provider of database load balancing software. The ScaleArc software inserts transparently between applications and databases, creating an agile data tier that provides continuous availability and increased performance for all apps. With ScaleArc, enterprises also gain instant database scalability and a new level of real-time visibility for their application environments, both on prem and in the cloud. Learn more about ScaleArc, our customers, and our partners at www.ScaleArc.com.
© 2015 ScaleArc. All Rights Reserved. ScaleArc and the ScaleArc logo are trademarks or registered trademarks of ScaleArc in the United States and other countries. All brand names, product names, or trademarks belong to their respective holders.
01/07/15
2901 Tasman Drive, Suite 205 Santa Clara, CA 95054 Phone: 1-408-780-2040 Fax: 1-408-427-3748 www.scalearc.com
Deployment Guide | Drupal with ScaleArc + MySQL Replication
Appendix C – Result Set Cache Rules The following listing presents the read-only query result set cache rules employed during performance testing of our internal Drupal test site. Note the time to live for each rule used was one minute.
Since each installation is different, please consult with ScaleArc customer support before adding any rule to the result set cache.
SELECT base\.tid AS tid, base\.vid AS vid, base\.name AS name,
base\.description AS description, base\.format AS format, base\.weight AS
weight, v\.machine_name AS vocabulary_machine_name FROM taxonomy_term_data
base INNER JOIN taxonomy_vocabulary v ON base\.vid = v\.vid WHERE
\(base\.tid IN \(("[^"]*(\"[^"]*)*"|'[^']*(\'[^']*)*')\)\)
SELECT cid, data, created, expire, serialized FROM cache WHERE cid IN
\(("[^"]*(\"[^"]*)*"|'[^']*(\'[^']*)*')\)
SELECT cid, data, created, expire, serialized FROM cache_bootstrap WHERE cid IN
\(("[^"]*(\"[^"]*)*"|'[^']*(\'[^']*)*')\)
SELECT cid, data, created, expire, serialized FROM cache_field WHERE cid IN
\(("[^"]*(\"[^"]*)*"|'[^']*(\'[^']*)*')\)
SELECT cid, data, created, expire, serialized FROM cache_menu WHERE cid IN
\(("[^"]*(\"[^"]*)*"|'[^']*(\'[^']*)*')\)