Embed Size (px)
Citation preview
8/2/2019 Drawing in Perspective
http://slidepdf.com/reader/full/drawing-in-perspective 1/19
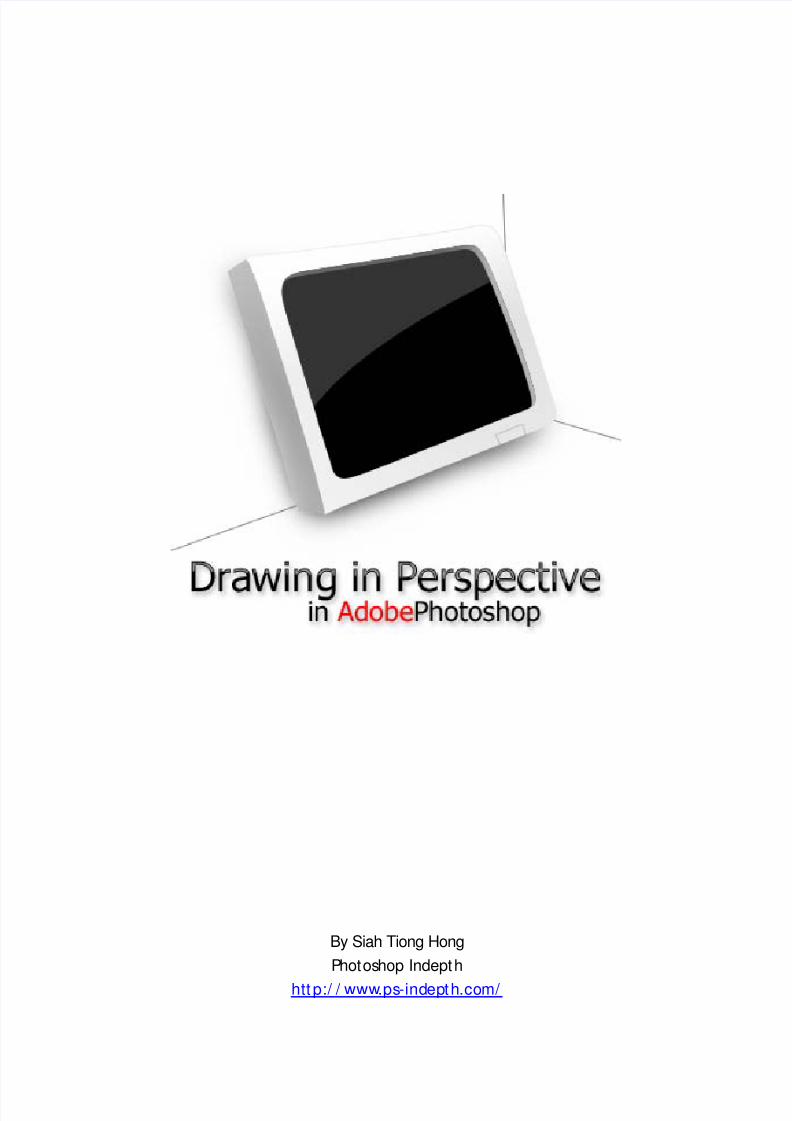
By Siah Tiong Hong
Photoshop Indepth
htt p:/ / www.ps-indepth.com/
8/2/2019 Drawing in Perspective
http://slidepdf.com/reader/full/drawing-in-perspective 2/19
Preface
Drawing to scale in Adobe Photoshop is not a topic that has been discussed in
the online community. However, I came across this idea of drawing
perspect ive images in Photoshop and devised a simplified method to do it.
What’s more, I am crazy enough to turn it into an e-book and distribute it.
That said, the method of drawing in perspective described in this e-book has
been greatly simpli fi ed. Perspect ive art is not, and should not be reduced to
such a crude and simple procedure. If you find perspective art interesting,
why not check around the Internet for more in-depth informat ion?
So please remember, the information found inside t his e-book is the workflow
I roughly work through when I want to draw something in perspective, to
make things “ look right” . Under no circumstances should this crude method
be deemed “ scient if icall y accurate” . I am only focusing on the visual appeal
part.
If you have finished reading this e-book and do find it interest ing, please takesome time to visit my website, ht tp:/ / www.ps-indepth.com/ . I write and
post my Photoshop tutorials there regularly, so don’ t forget to subscribe to
the newsletter here to be reminded for new tutorials.
Finally, enjoy the e-book! ☺
Thank you,
Siah Tiong Hong
ht tp:/ / www.ps-indepth.com/
8/2/2019 Drawing in Perspective
http://slidepdf.com/reader/full/drawing-in-perspective 3/19
Chapter 1 – Introduction
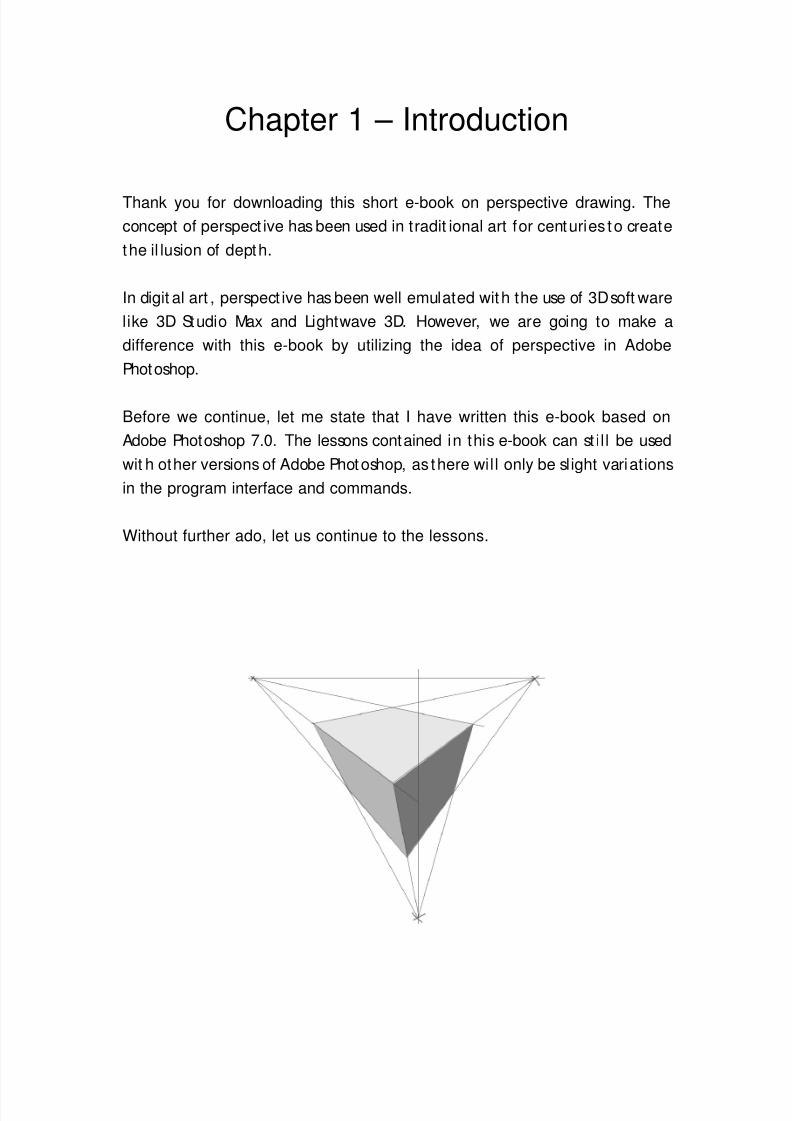
Thank you for downloading this short e-book on perspective drawing. The
concept of perspect ive has been used in tradit ional art for centuries to create
the il lusion of depth.
In digit al art , perspect ive has been well emulated with the use of 3D soft ware
like 3D Studio Max and Lightwave 3D. However, we are going to make a
difference with this e-book by utilizing the idea of perspective in Adobe
Photoshop.
Before we continue, let me state that I have written this e-book based on
Adobe Photoshop 7.0. The lessons contained in this e-book can st il l be used
wit h other versions of Adobe Photoshop, as there will only be slight variations
in the program interface and commands.
Without further ado, let us continue to the lessons.
8/2/2019 Drawing in Perspective
http://slidepdf.com/reader/full/drawing-in-perspective 4/19
8/2/2019 Drawing in Perspective
http://slidepdf.com/reader/full/drawing-in-perspective 5/19
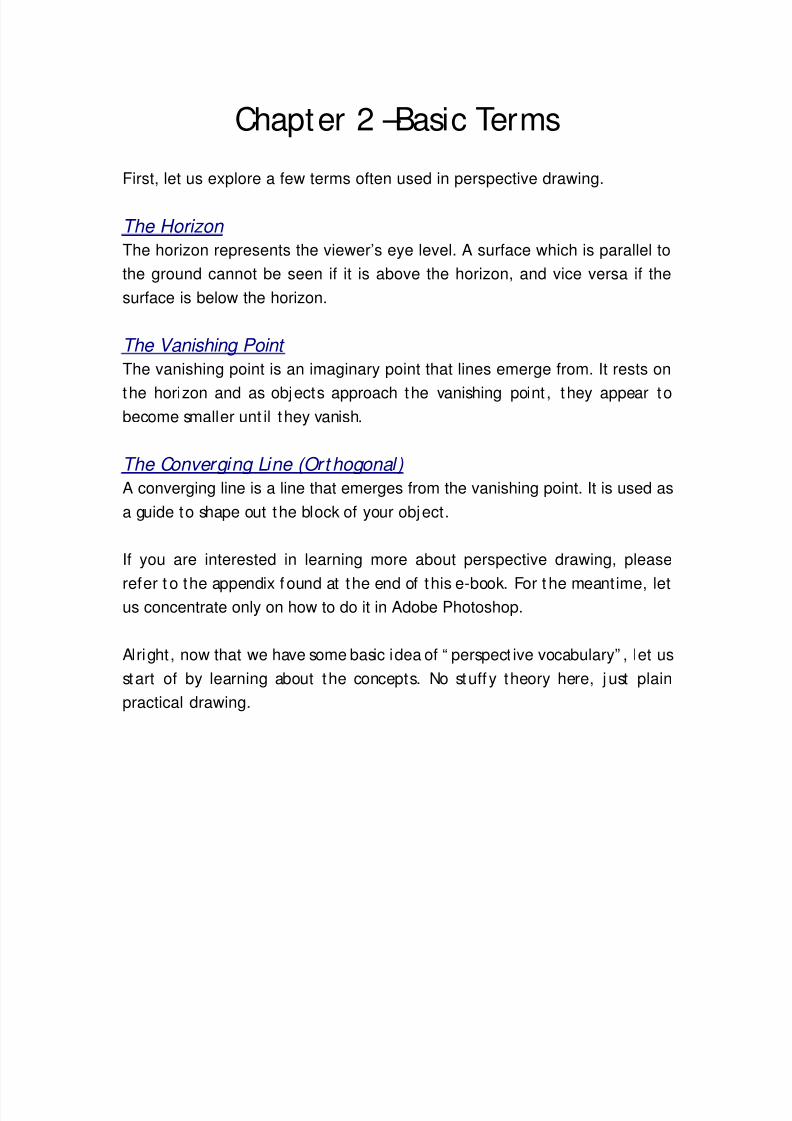
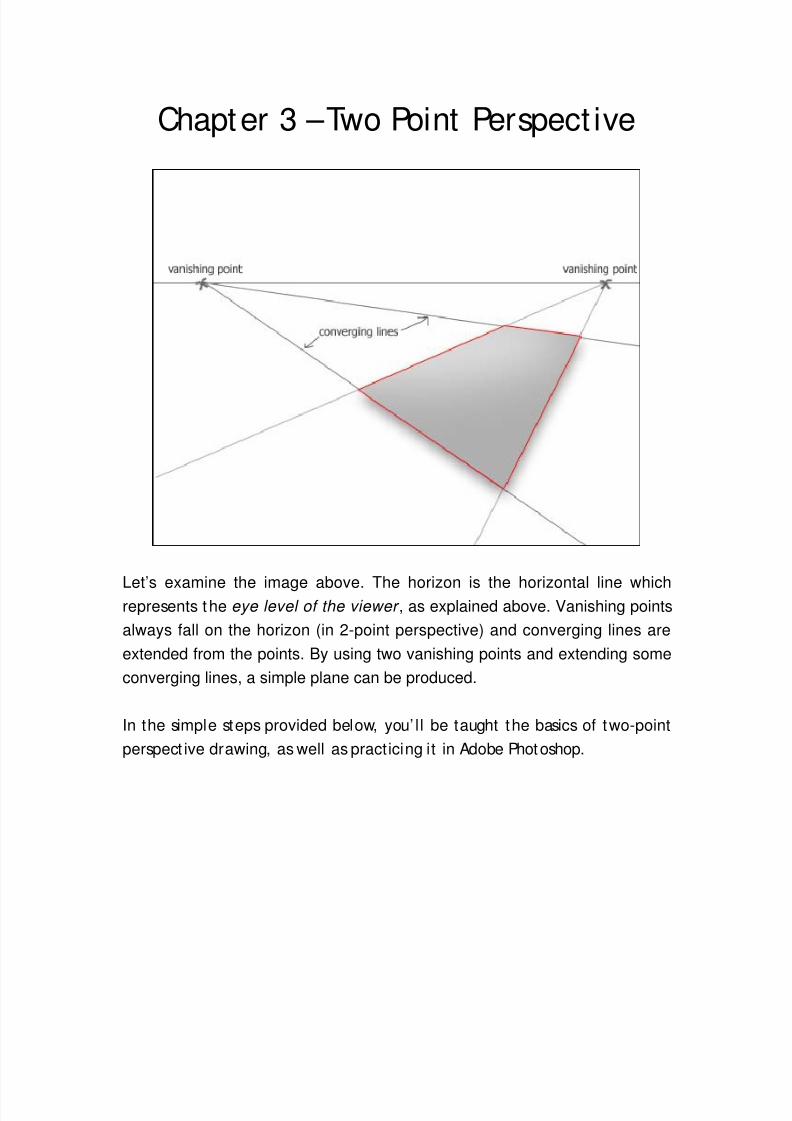
Chapter 3 – Two Point Perspect ive
Let’s examine the image above. The horizon is the horizontal line whichrepresents the eye level of the viewer , as explained above. Vanishing points
always fall on the horizon (in 2-point perspective) and converging lines are
extended from the points. By using two vanishing points and extending some
converging lines, a simple plane can be produced.
In the simple steps provided below, you’ ll be taught the basics of two-point
perspect ive drawing, as well as practicing it in Adobe Photoshop.
8/2/2019 Drawing in Perspective
http://slidepdf.com/reader/full/drawing-in-perspective 6/19
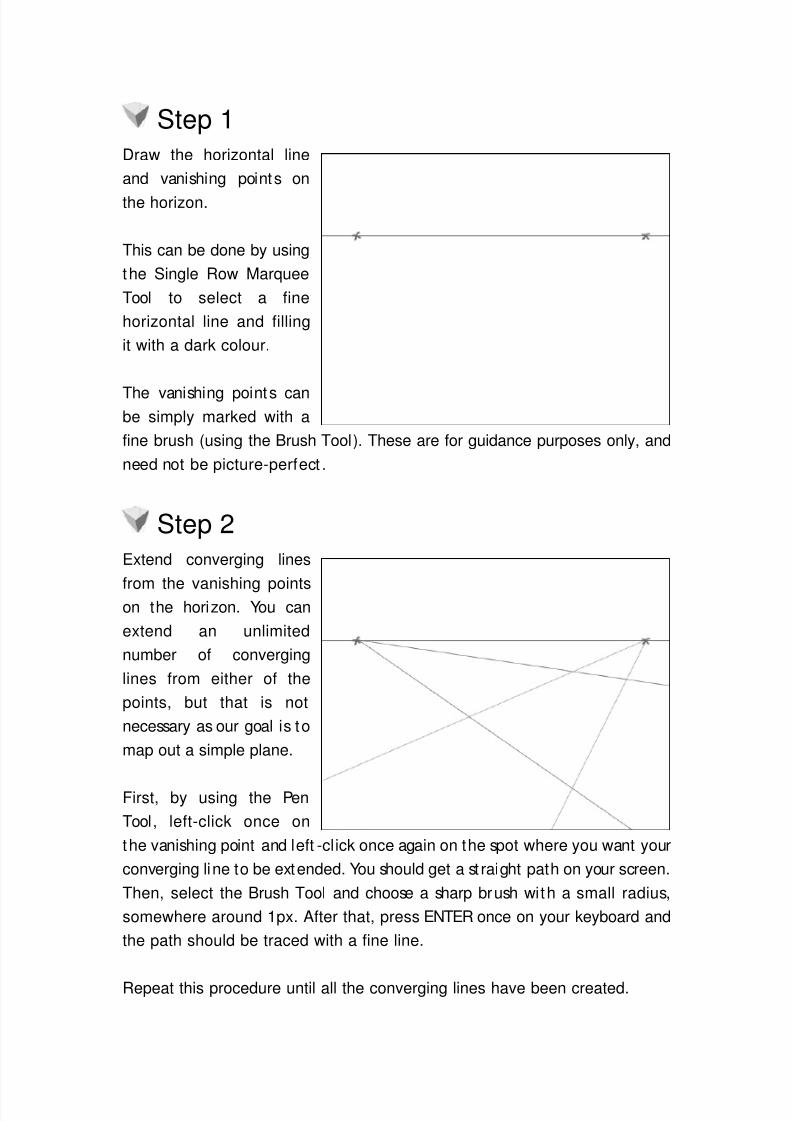
Step 1Draw the horizontal line
and vanishing points on
the horizon.
This can be done by using
the Single Row Marquee
Tool to select a fine
horizontal line and filling
it with a dark colour.
The vanishing points canbe simply marked with a
fine brush (using the Brush Tool). These are for guidance purposes only, and
need not be picture-perfect .
Step 2 Extend converging lines
from the vanishing pointson the horizon. You can
extend an unlimited
number of converging
lines from either of the
points, but that is not
necessary as our goal is to
map out a simple plane.
First, by using the Pen
Tool, left-click once on
the vanishing point and left -click once again on the spot where you want your
converging line to be extended. You should get a st raight path on your screen.
Then, select the Brush Tool and choose a sharp brush with a small radius,
somewhere around 1px. After that, press ENTER once on your keyboard and
the path should be traced with a fine line.
Repeat this procedure until all the converging lines have been created.
8/2/2019 Drawing in Perspective
http://slidepdf.com/reader/full/drawing-in-perspective 7/19
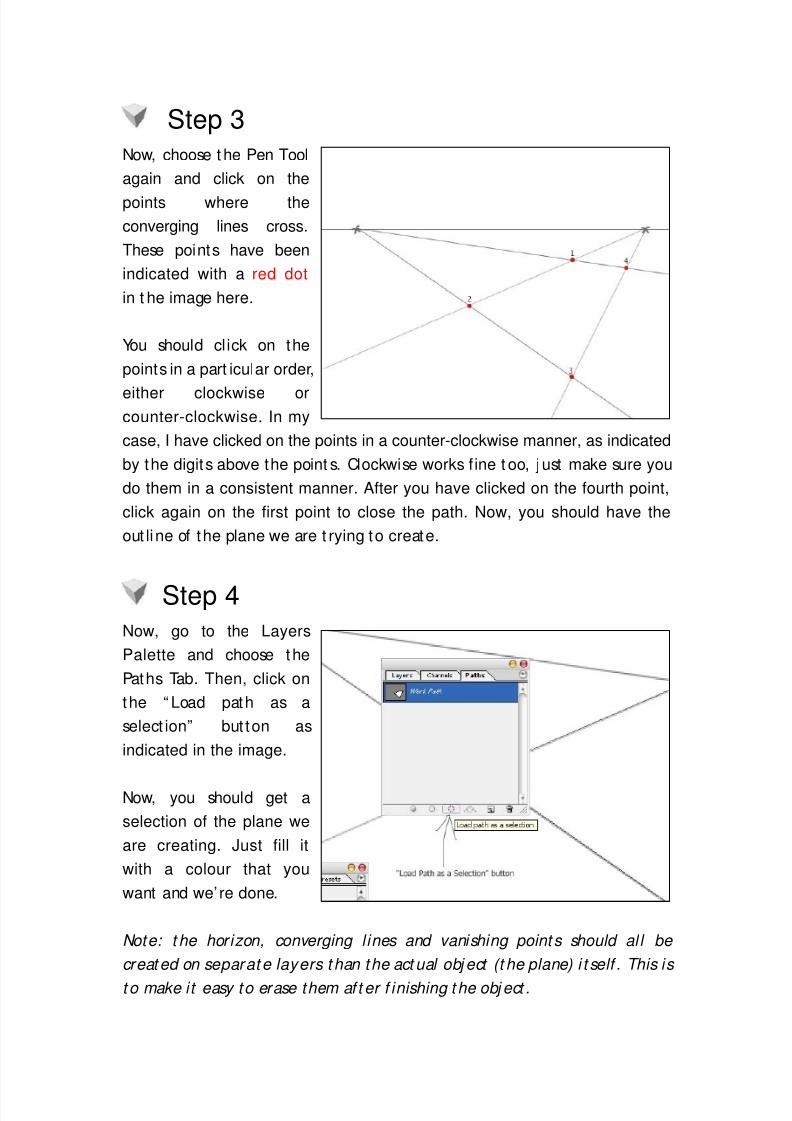
Step 3 Now, choose t he Pen Tool
again and click on the
points where the
converging lines cross.
These points have been
indicated with a red dot
in t he image here.
You should cl ick on the
points in a part icular order,
either clockwise orcounter-clockwise. In my
case, I have clicked on the points in a counter-clockwise manner, as indicated
by the digits above the point s. Clockwise works f ine t oo, j ust make sure you
do them in a consistent manner. After you have clicked on the fourth point,
click again on the first point to close the path. Now, you should have the
out line of the plane we are t rying to create.
Step 4 Now, go to the Layers
Palette and choose the
Paths Tab. Then, click on
the “ Load path as a
select ion” but ton as
indicated in the image.
Now, you should get a
selection of the plane we
are creating. Just fill it
with a colour that you
want and we’ re done.
Note: t he horizon, converging l ines and vanishing point s should al l be
created on separate layers t han the act ual obj ect (t he plane) i t self . This is
t o make it easy to erase them af t er f inishing t he obj ect .
8/2/2019 Drawing in Perspective
http://slidepdf.com/reader/full/drawing-in-perspective 8/19
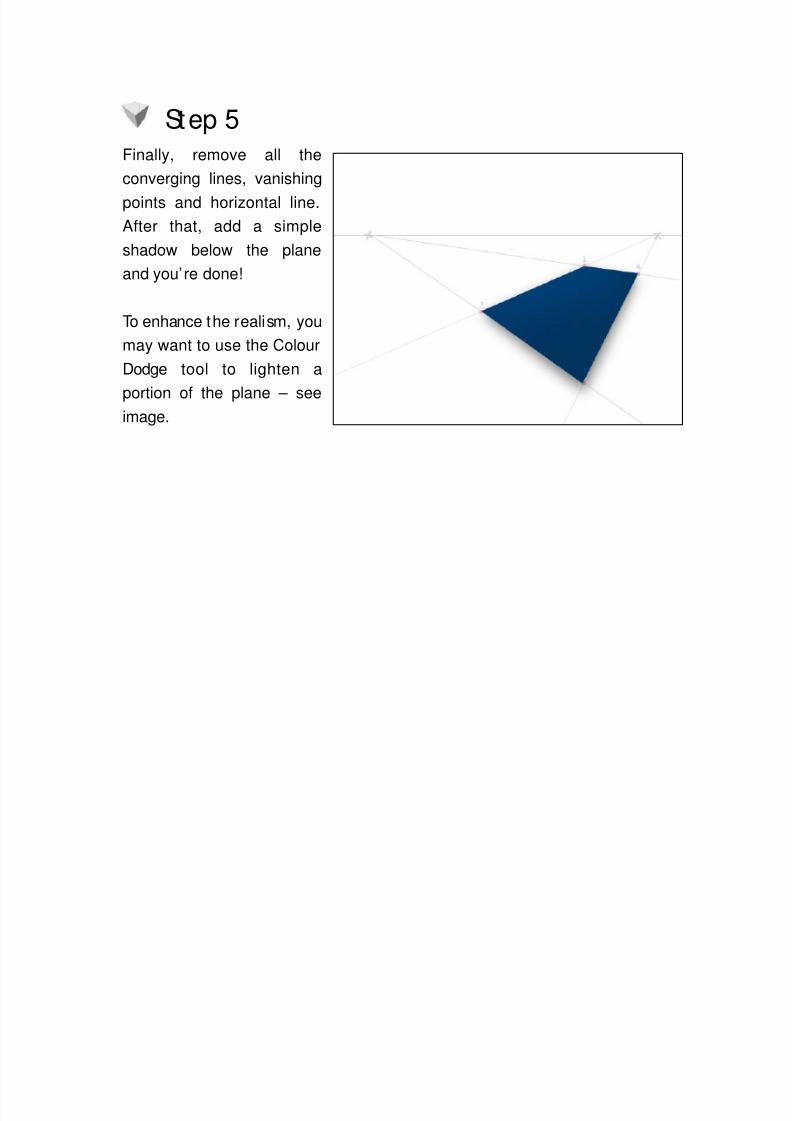
Step 5
Finally, remove all the
converging lines, vanishing
points and horizontal line.
After that, add a simple
shadow below the plane
and you’re done!
To enhance the realism, you
may want to use the Colour
Dodge tool to lighten a
portion of the plane – seeimage.
8/2/2019 Drawing in Perspective
http://slidepdf.com/reader/full/drawing-in-perspective 9/19
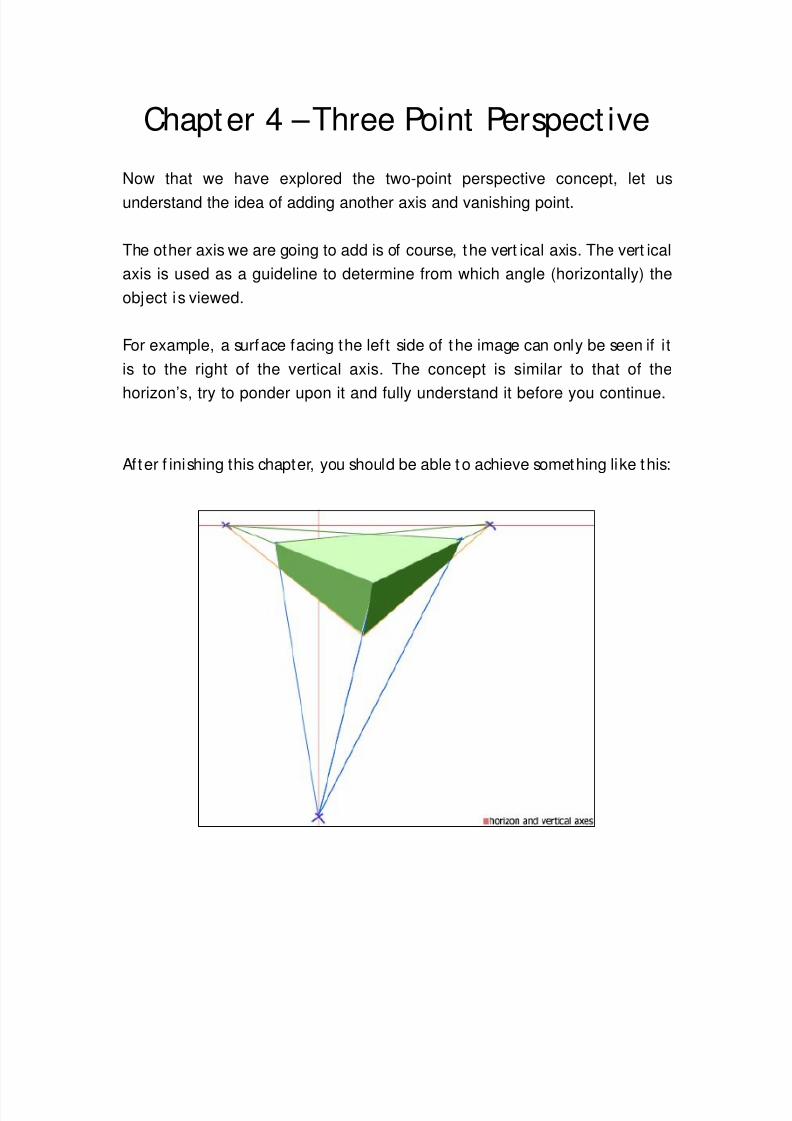
Chapter 4 – Three Point Perspect ive
Now that we have explored the two-point perspective concept, let us
understand the idea of adding another axis and vanishing point.
The other axis we are going to add is of course, the vert ical axis. The vert ical
axis is used as a guideline to determine from which angle (horizontally) the
object is viewed.
For example, a surface facing the left side of the image can only be seen if it
is to the right of the vertical axis. The concept is similar to that of the
horizon’s, try to ponder upon it and fully understand it before you continue.
After f inishing this chapter, you should be able t o achieve something like this:
8/2/2019 Drawing in Perspective
http://slidepdf.com/reader/full/drawing-in-perspective 10/19
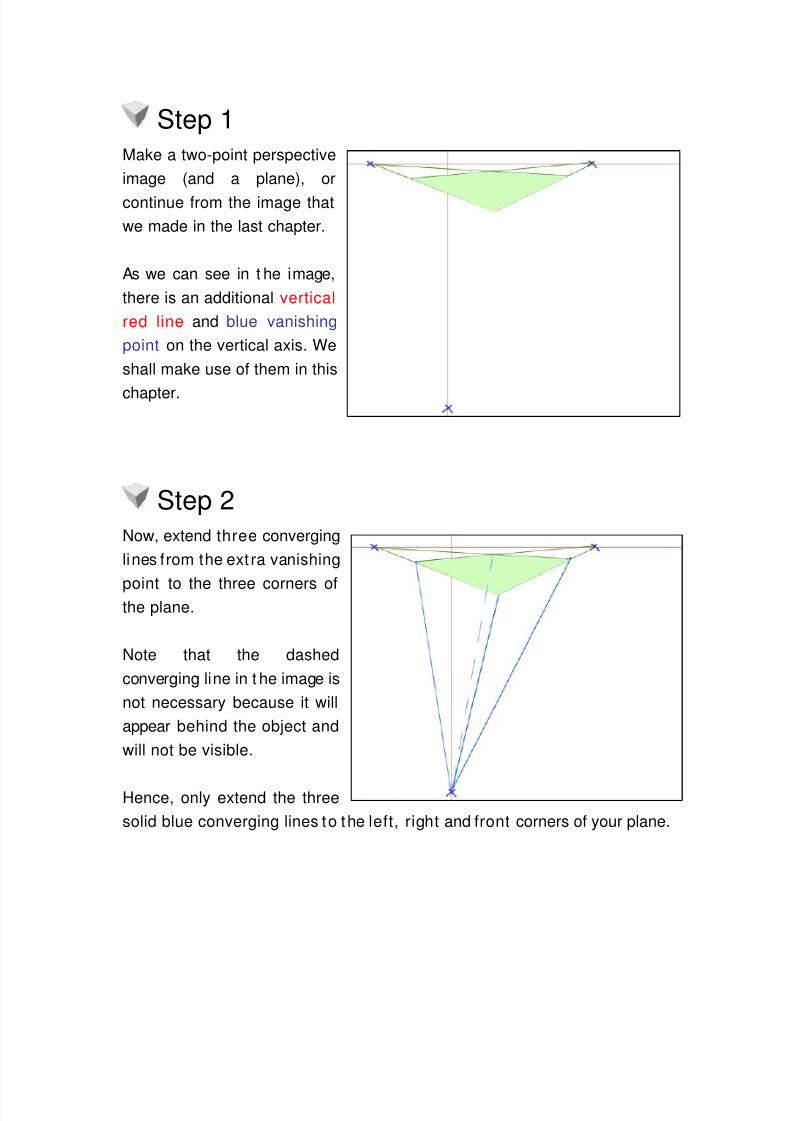
Step 1Make a two-point perspective
image (and a plane), or
continue from the image that
we made in the last chapter.
As we can see in t he image,
there is an additional vertical
red line and blue vanishing
point on the vertical axis. We
shall make use of them in this
chapter.
Step 2Now, extend three converging
lines from the ext ra vanishing
point to the three corners ofthe plane.
Note that the dashed
converging line in t he image is
not necessary because it will
appear behind the object and
will not be visible.
Hence, only extend the three
solid blue converging lines to the left, right and front corners of your plane.
8/2/2019 Drawing in Perspective
http://slidepdf.com/reader/full/drawing-in-perspective 11/19
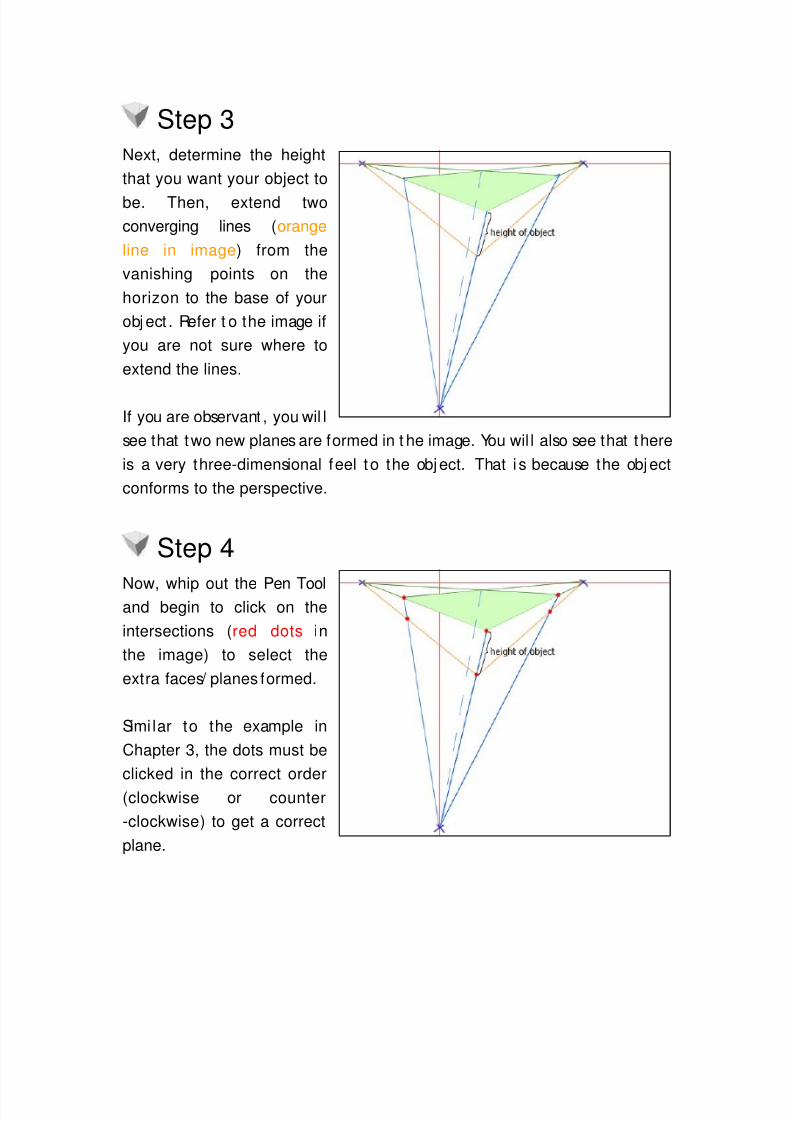
Step 3Next, determine the height
that you want your object to
be. Then, extend two
converging lines (orange
line in image) from the
vanishing points on the
horizon to the base of your
obj ect . Refer t o the image if
you are not sure where to
extend the lines.
If you are observant , you wil l
see that two new planes are formed in t he image. You wil l also see that there
is a very three-dimensional feel to the object. That i s because the object
conforms to the perspective.
Step 4
Now, whip out the Pen Tool and begin to click on the
intersections (red dots in
the image) to select the
extra faces/ planes formed.
Simi lar to the example in
Chapter 3, the dots must be
clicked in the correct order
(clockwise or counter
-clockwise) to get a correct
plane.
8/2/2019 Drawing in Perspective
http://slidepdf.com/reader/full/drawing-in-perspective 12/19
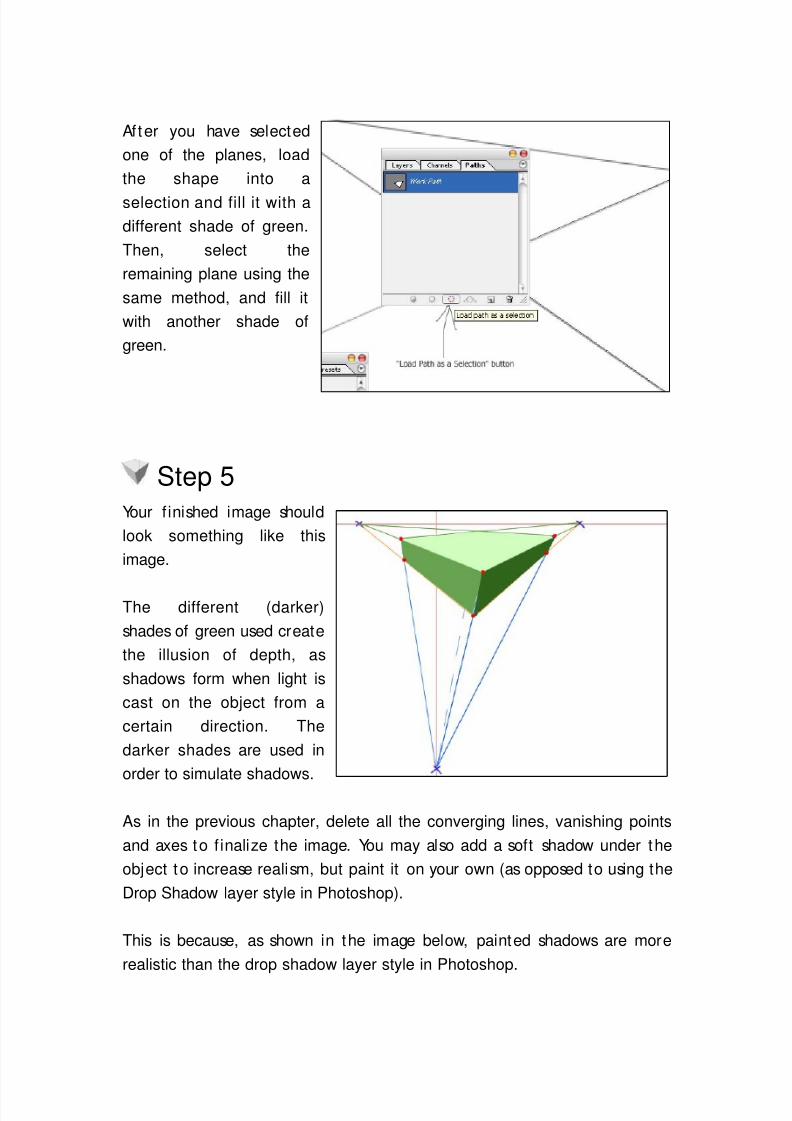
After you have selected
one of the planes, load
the shape into a
selection and fill it with a
different shade of green.
Then, select the
remaining plane using the
same method, and fill it
with another shade of
green.
Step 5
Your f inished image should
look something like this
image.
The different (darker)
shades of green used create
the illusion of depth, as
shadows form when light is
cast on the object from a
certain direction. The
darker shades are used in
order to simulate shadows.
As in the previous chapter, delete all the converging lines, vanishing points
and axes to f inalize the image. You may also add a soft shadow under the
object to increase realism, but paint it on your own (as opposed to using the
Drop Shadow layer style in Photoshop).
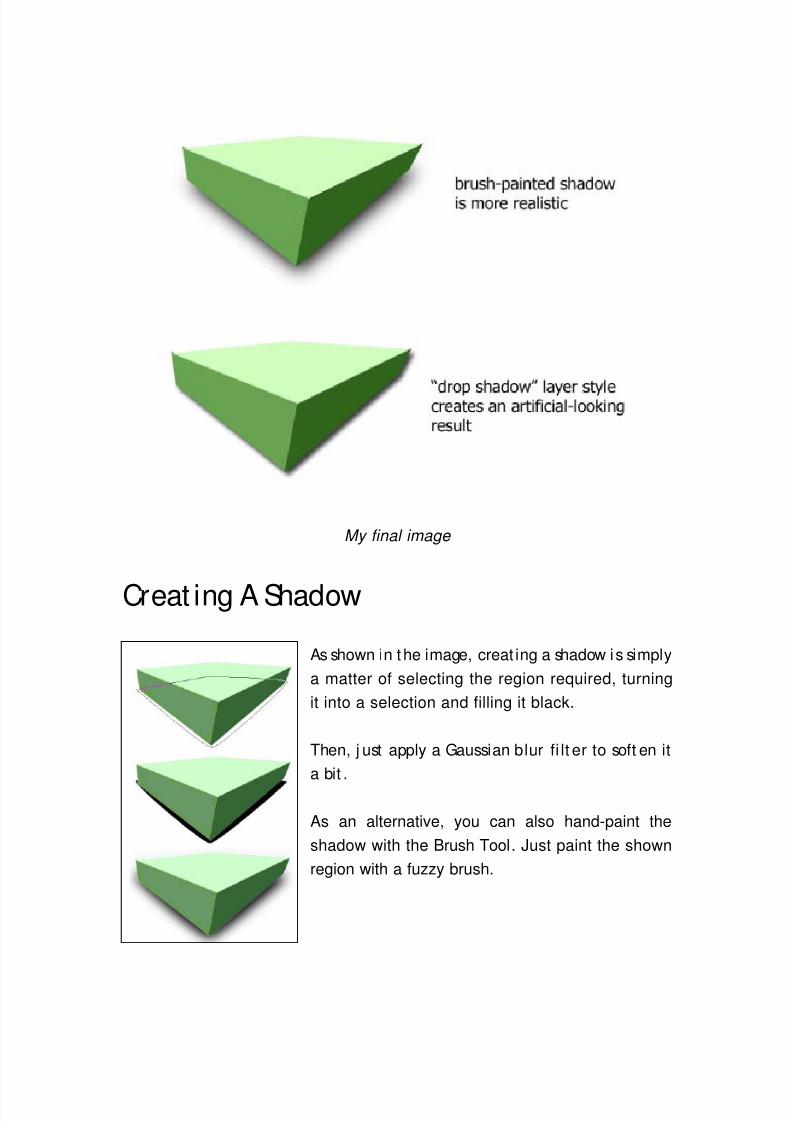
This is because, as shown in the image below, painted shadows are more
realistic than the drop shadow layer style in Photoshop.
8/2/2019 Drawing in Perspective
http://slidepdf.com/reader/full/drawing-in-perspective 13/19
My final image
Creat ing A Shadow
As shown in the image, creat ing a shadow is simply
a matter of selecting the region required, turning
it into a selection and filling it black.
Then, j ust apply a Gaussian blur fi lt er to soft en it
a bit .
As an alternative, you can also hand-paint the
shadow with the Brush Tool. Just paint the shown
region with a fuzzy brush.
8/2/2019 Drawing in Perspective
http://slidepdf.com/reader/full/drawing-in-perspective 14/19
Chapter 5 – Enough with Boxes!
Up t il l now, we have only created “ boxes” as objects. In this chapter, we are
going to explore the possibi lit ies of creating oddly shaped objects with the
help of some extra methodology.
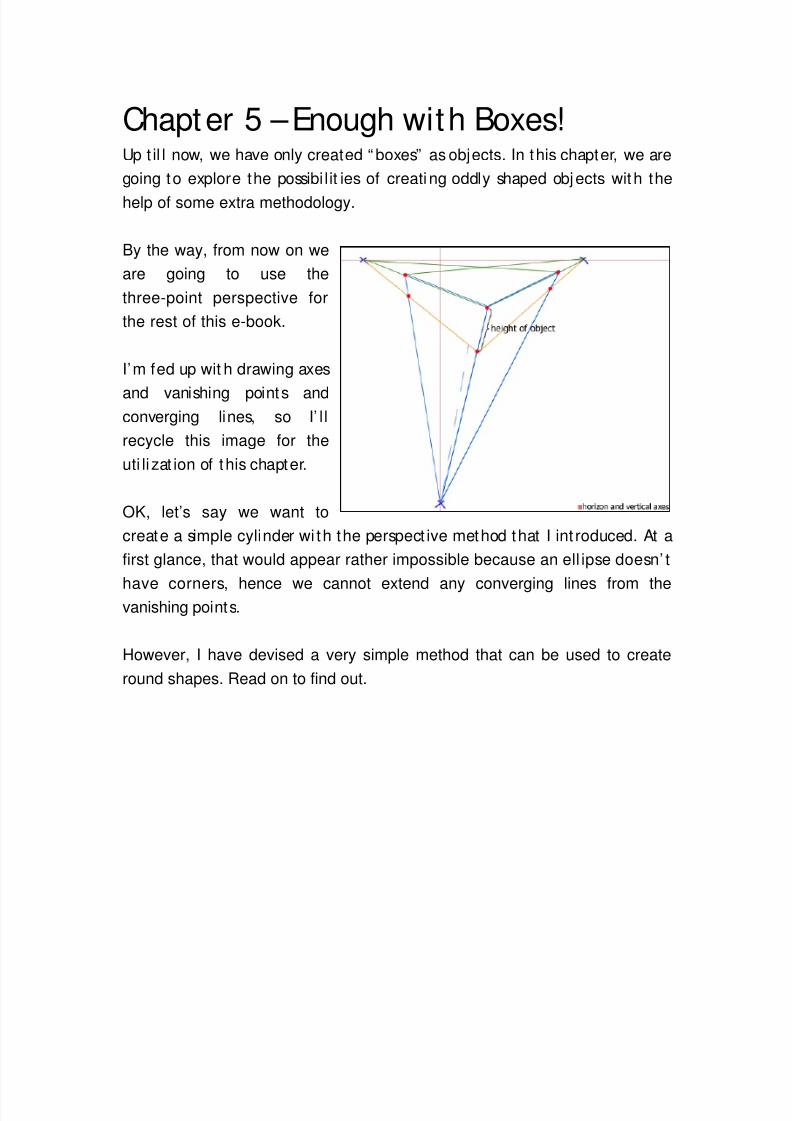
By the way, from now on we
are going to use the
three-point perspective for
the rest of this e-book.
I’m fed up wit h drawing axes
and vanishing points andconverging lines, so I’ l l
recycle this image for the
uti li zat ion of this chapter.
OK, let’s say we want to
create a simple cylinder wi th the perspect ive method that I int roduced. At a
first glance, that would appear rather impossible because an ell ipse doesn’ t
have corners, hence we cannot extend any converging lines from thevanishing points.
However, I have devised a very simple method that can be used to create
round shapes. Read on to find out.
8/2/2019 Drawing in Perspective
http://slidepdf.com/reader/full/drawing-in-perspective 15/19
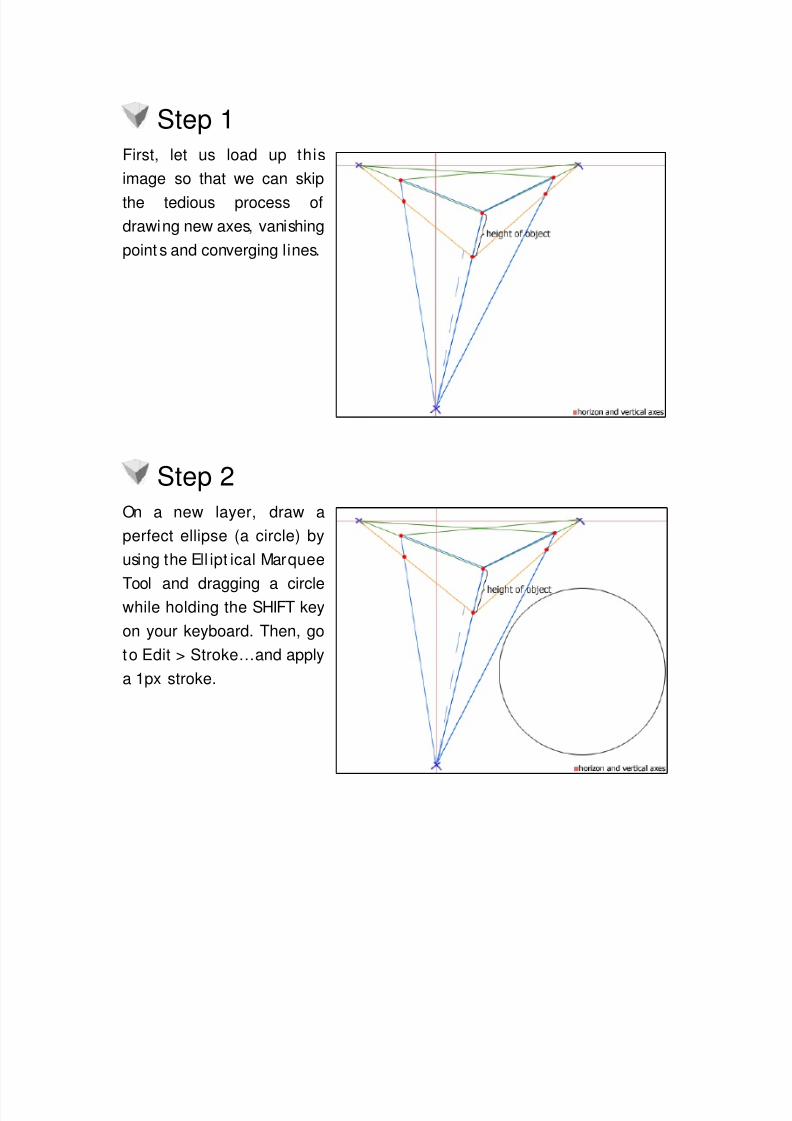
Step 1First, let us load up this
image so that we can skip
the tedious process of
drawing new axes, vanishing
point s and converging lines.
Step 2
On a new layer, draw a
perfect ellipse (a circle) by
using the Ell ipt ical Marquee
Tool and dragging a circlewhile holding the SHIFT key
on your keyboard. Then, go
to Edit > Stroke…and apply
a 1px stroke.
8/2/2019 Drawing in Perspective
http://slidepdf.com/reader/full/drawing-in-perspective 16/19
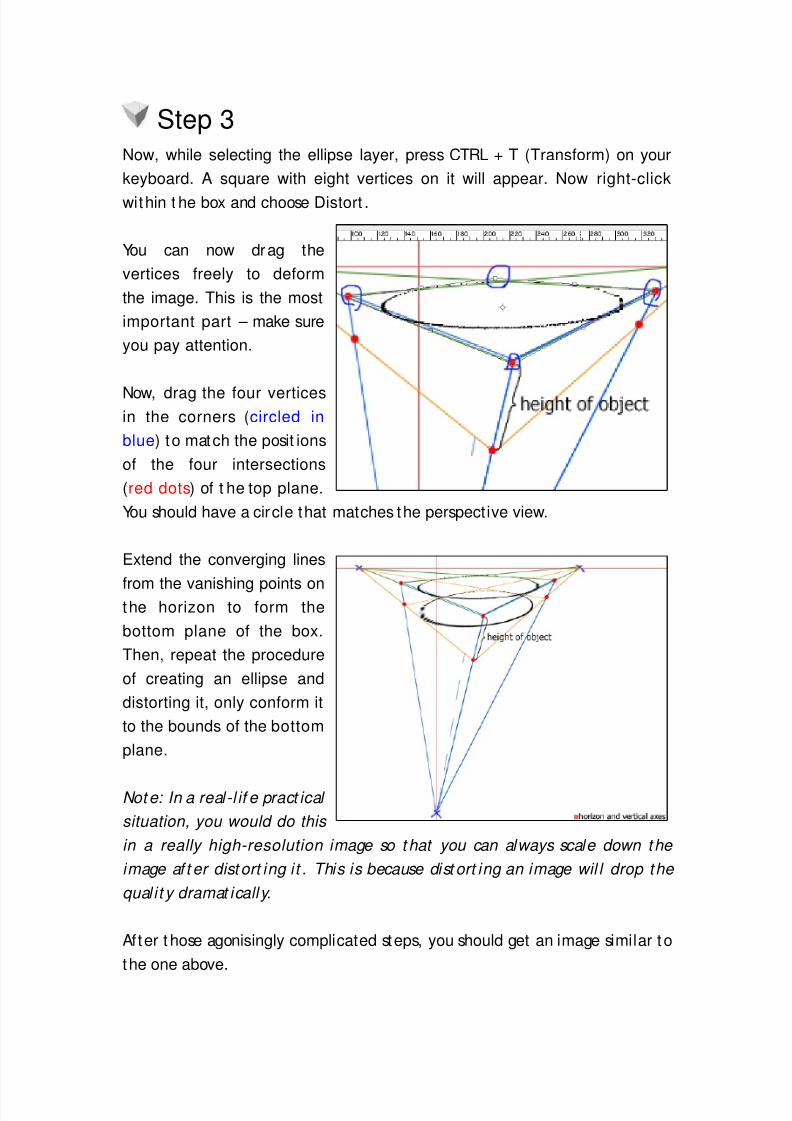
Step 3Now, while selecting the ellipse layer, press CTRL + T (Transform) on your
keyboard. A square with eight vertices on it will appear. Now right-click
within t he box and choose Distort .
You can now drag the
vertices freely to deform
the image. This is the most
important part – make sure
you pay attention.
Now, drag the four verticesin the corners (circled in
blue) to match the posit ions
of the four intersections
(red dots) of t he top plane.
You should have a circle that matches the perspective view.
Extend the converging lines
from the vanishing points onthe horizon to form the
bottom plane of the box.
Then, repeat the procedure
of creating an ellipse and
distorting it, only conform it
to the bounds of the bottom
plane.
Note : In a real-l if e pract ical
situation, you would do this
in a really high-resolution image so t hat you can always scale down the
image af t er dist ort ing it . This is because dist ort ing an image wil l drop the
qual it y dramat ically.
After t hose agonisingly complicated steps, you should get an image similar to
the one above.
8/2/2019 Drawing in Perspective
http://slidepdf.com/reader/full/drawing-in-perspective 17/19
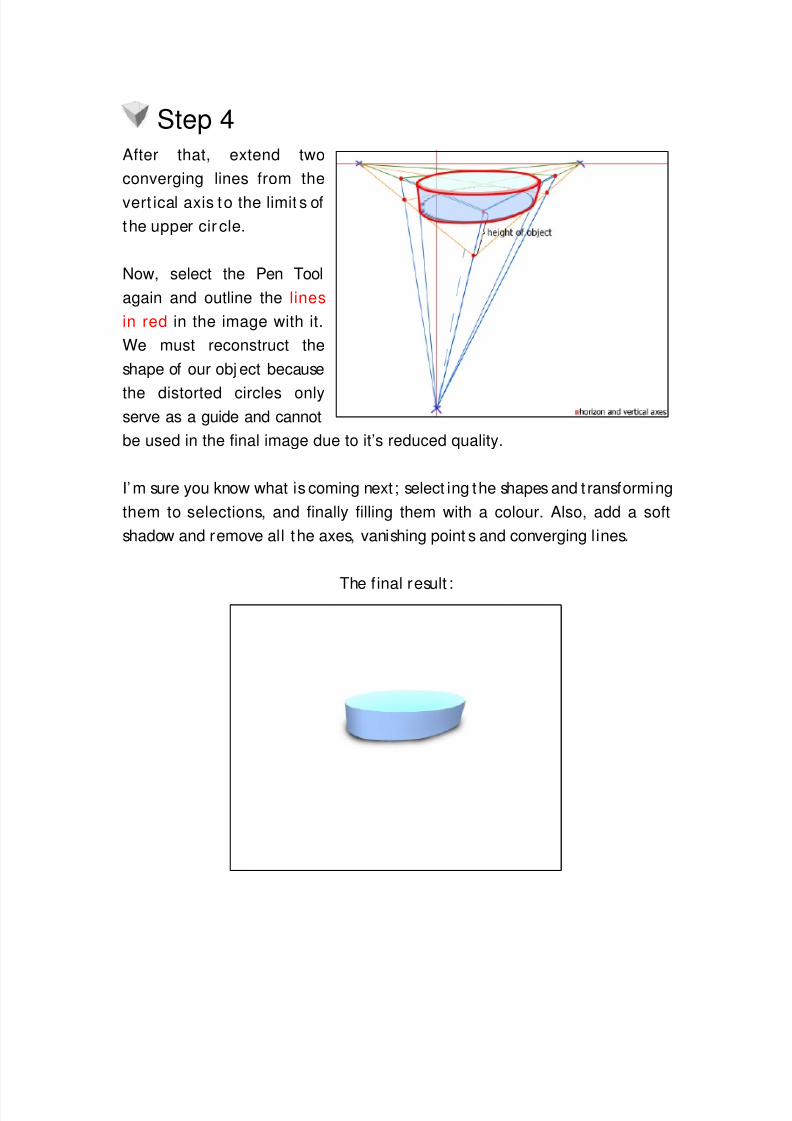
Step 4After that, extend two
converging lines from the
vert ical axis to the limit s of
the upper cir cle.
Now, select the Pen Tool
again and outline the lines
in red in the image with it.
We must reconstruct the
shape of our obj ect because
the distorted circles onlyserve as a guide and cannot
be used in the final image due to it’s reduced quality.
I’ m sure you know what is coming next; select ing the shapes and t ransforming
them to selections, and finally filling them with a colour. Also, add a soft
shadow and remove all the axes, vanishing point s and converging lines.
The final result :

8/2/2019 Drawing in Perspective
http://slidepdf.com/reader/full/drawing-in-perspective 18/19
Chapter 6 – Conclusion
And there you have it, drawing in perspective in Adobe Photoshop.
One may ask why do you go to such great lengths to create a “ perspect ive”
image? One can j ust est imate the way objects would appear in a cert ain
perspect ive, and yet achieve similar result s.
The fact is, the examples shown in this e-book are very simple in nature t o
make it easier for you to understand. Once you have grasped the concept of it,
you can create far more sophisticated images with this method. Only then
wil l you be able to realise the power this method holds.
Good luck in learning and utilizing this method in the future!
Siah Tiong Hong,Photoshop Indepth
http:/ / www.ps-indepth.com/
P/ S:
If you are interested in the topics discussed in this e-book, you will li ke the tut orials on my
websit e too! Just visit www.ps-indepth.com/ lessons/ right now t o check out my current
tutorials.
I also add new tutorials regularly, so don’ t forget to subscribe t o the newslet ter!
8/2/2019 Drawing in Perspective
http://slidepdf.com/reader/full/drawing-in-perspective 19/19
Appendix: Perspect ive Art Resources
Here, I have listed some nice resources regarding perspective art. Please
check them out if you are interested!
Introduction to Perspective
htt p:/ / drawsketch.about.com/ library/ weekly/ aa021603a.htm
Mathemat ics of Perspect ive Art
htt p:/ / www.math.utah.edu/ ~t reiberg/ Perspect/ Perspect. htm
Drawing in One-Point -Perspect ive
ht tp:/ / www.olejarz.com/ art ed/ perspective/
Perspective Drawing
htt p:/ / www.mpsaz.org/ art s/ online_lessons/ persp/
You can also f ind tons of other perspect ive resources by searching at major
search engines, such as www.google.com
Good luck wit h perspective drawing!


![[2011] Perspective Drawing in Adobe Illustrator CS5](https://img.dokumen.tips/doc/110x75/55cf9d3e550346d033acd768/pdf-2011-perspective-drawing-in-adobe-illustrator-cs5.jpg)