Embed Size (px)
Citation preview

D01242120C
REFERENCE MANUAL
DR-40Linear PCM Recorder

2 TASCAM DR-40
Table of Contents1 – Introduction ................................................................. 6
Features.......................................................................................................... 6Conventions used in this manual ......................................................... 8Trademarks and copyrights.................................................................... 8
2 – Names and Functions of Parts .................................... 9Top panel ....................................................................................................... 9Front panel .................................................................................................. 13Left side panel ...........................................................................................14Right side panel ........................................................................................14Bottom Panel ............................................................................................. 15Home Screen ..............................................................................................16Recording Screen .....................................................................................18Playback Control screen ........................................................................20Menu item list ............................................................................................21Using menus ..............................................................................................22Basic operation..........................................................................................23
3 – Preparation ................................................................ 25Powering the unit.....................................................................................25
Using AA batteries ...........................................................................25Using an AC adaptor (sold separately) ....................................26Using USB bus power .....................................................................26
Start-up & shutdown ...............................................................................27Starting up the unit .........................................................................27Selecting a language ......................................................................27Shutting down ..................................................................................28Resume function ..............................................................................28
Setting the date and time .....................................................................29Inserting and removing SD cards.......................................................30
Inserting the SD card ......................................................................30Removing the card ..........................................................................30Card write protection .....................................................................30
Preparing an SD card for use ...............................................................31Using the built-in speaker .....................................................................31Connecting monitors and headphones ..........................................32Using the built-in microphone ............................................................32
Setting the mics to record a wide stereo sound (A-B position)...32Setting the mics to record a clear stereo sound (X-Y position) ..33
Swapping the left-right channels of the built-in microphone pair ...33Microphone position detection .................................................34
Attaching the tilt foot ............................................................................34
4 – Recording ................................................................... 36Selecting file format, sampling frequency .....................................36Preparing the recording inputs ..........................................................37
Recording with the built-in mics ..............................................37Recording with external mics (EXT MIC IN) ...........................37Recording an external device (LINE IN) ...................................38Setting the external input type .................................................38Using phantom power ..................................................................39
Adjusting the input level .......................................................................39Manually adjusting the input level ...........................................40Independent L/R channel EXT IN input level setting function .. 41Using the Level Control Function ..............................................42
Overview of recording modes ............................................................43Recording (MONO/STEREO recording) ............................................43
Make recording settings ...............................................................43Set where to save the file..............................................................44Starting the recording ...................................................................44

TASCAM DR-40 3
Table of Contents
File names when recording in MONO/STEREO ....................45Simultaneously recording two files at different input levels (DUAL REC) ..................................................................................................45
Enabling dual recording ..............................................................46Starting dual recording ................................................................47Dual recording file names ............................................................48Recording 3 or 4 channels ............................................................48Making settings for 3/4-channel recording ..........................48Starting 3/4-channel recording ..................................................50File names when recording in 4-channel ...............................50
Recording playback and input sounds together (overdubbing) ..50Setting the overdubbing mode .................................................51Select the file you want to overdub .........................................52Start the overdubbing ...................................................................52File names when recording in overdubbing .........................53
Recording automatically (AUTO REC) ...............................................54Creating and changeover to a new file during continued recording (Track increment) .........................................................................................55
Manual track increment during recording ...........................56Automatic track incrementation by set time ........................56
Mark function ............................................................................................57Adding marks manually to a recording...................................57Adding marks automatically to a recording..........................57Moving to a mark position ...........................................................57
Setting the low cut filter ........................................................................58Recording the moment before pushing RECORD (PRE REC) ...58Using the AUTO TONE function ..........................................................59
Setting the AUTO TONE function ..............................................60Setting auto tone length ..............................................................60
Adjusting the AUTO TONE volume ...........................................60Self-timer function ...................................................................................61Solo function ..............................................................................................61Recording duration .................................................................................62
5 – Working with Files and Folders (BROWSE screen) .. 63Screen navigation ....................................................................................63Icons on the BROWSE screen ...............................................................64File operations ...........................................................................................64Folder operations .....................................................................................66Creating a new folder .............................................................................67
6 – Playback .....................................................................68Adjusting playback volume .................................................................68Setting the playback area (AREA) ......................................................68Selecting a folder for the playback area (1) ....................................69Selecting a folder for the playback area (2)....................................70Playlist ...........................................................................................................71
Adding files to the playlist ...........................................................71Editing the playlist ...........................................................................71
Selecting files for playback (skip) .......................................................73Playback .......................................................................................................73
Pausing ................................................................................................ 74Stopping .............................................................................................. 74Rewinding and fast-forwarding (search) ................................ 74
Repeat playback (REPEAT) .................................................................... 74Special Playback Control Functions ..................................................75
Playback Control Screen ...............................................................75Repeated Playback of Selection (Loop Playback) ................. 76Changing the playback speed (VSA) ........................................77
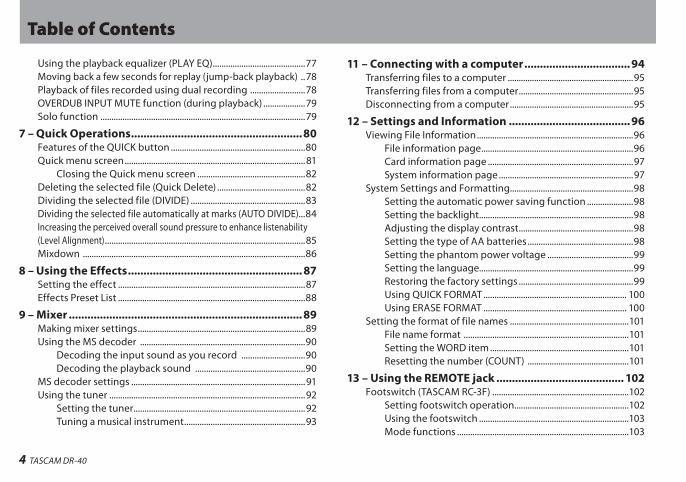
4 TASCAM DR-40
Table of Contents
Using the playback equalizer (PLAY EQ) ..........................................77Moving back a few seconds for replay (jump-back playback) ..78Playback of files recorded using dual recording .........................78OVERDUB INPUT MUTE function (during playback) ...................79Solo function .............................................................................................79
7 – Quick Operations .......................................................80Features of the QUICK button .............................................................80Quick menu screen ..................................................................................81
Closing the Quick menu screen .................................................82Deleting the selected file (Quick Delete) ........................................82Dividing the selected file (DIVIDE) ....................................................83Dividing the selected file automatically at marks (AUTO DIVIDE)...84Increasing the perceived overall sound pressure to enhance listenability (Level Alignment) ...........................................................................................85Mixdown .....................................................................................................86
8 – Using the Effects ........................................................ 87Setting the effect .....................................................................................87Effects Preset List .....................................................................................88
9 – Mixer ........................................................................... 89Making mixer settings ............................................................................89Using the MS decoder ...........................................................................90
Decoding the input sound as you record .............................90Decoding the playback sound ..................................................90
MS decoder settings ...............................................................................91Using the tuner .........................................................................................92
Setting the tuner ..............................................................................92Tuning a musical instrument .......................................................93
11 – Connecting with a computer ..................................94Transferring files to a computer .........................................................95Transferring files from a computer ....................................................95Disconnecting from a computer ........................................................95
12 – Settings and Information .......................................96Viewing File Information .......................................................................96
File information page .....................................................................96Card information page ..................................................................97System information page .............................................................97
System Settings and Formatting........................................................98Setting the automatic power saving function .....................98Setting the backlight ......................................................................98Adjusting the display contrast ....................................................98Setting the type of AA batteries ................................................98Setting the phantom power voltage .......................................99Setting the language......................................................................99Restoring the factory settings ....................................................99Using QUICK FORMAT ................................................................. 100Using ERASE FORMAT ................................................................. 100
Setting the format of file names ......................................................101File name format ...........................................................................101Setting the WORD item ...............................................................101Resetting the number (COUNT) ..............................................101
13 – Using the REMOTE jack ......................................... 102Footswitch (TASCAM RC-3F) ..............................................................102
Setting footswitch operation ....................................................102Using the footswitch ....................................................................103Mode functions ..............................................................................103

TASCAM DR-40 5
Table of Contents
Remote control (TASCAM RC-10) ......................................................103Setting the wired remote control ...........................................103Using the wired remote control ............................................. 104Overview of mode functions ................................................... 104
14 – Messages ................................................................ 10515 – Troubleshooting ....................................................10816 – Specifications ........................................................ 110
Ratings ........................................................................................................110Input/output ratings .............................................................................110
Analog audio input/output ratings ........................................110Control input/output ratings ....................................................110
Audio performance ............................................................................... 111Other specifications .............................................................................. 112Dimensional drawings .........................................................................114

6 TASCAM DR-40
1 – IntroductionThank you very much for purchasing the TASCAM DR-40 Linear PCM Recorder. Please read this Owner’s Manual carefully in order to maximize your use of all the unit’s features. We hope that you will enjoy using this recorder for many years to come. After you have finished reading this manual, please keep it in a safe place for future reference.You can also download the Owner’s Manual from the TASCAM web site (http://tascam.com/).
Features
• Compact audio recorder that uses SD/SDHC/SDXC cards as recording media
• High-performance directional stereo mics can be adjusted, enabling both A-B and X-Y recording
• Can record with different types of stereo sound depending on the angle of the microphonesClose(X-Y): Clear Stereo Sound with less phase differenceOpen(A-B): Wide Stereo Sound
• Mid-side decoding function can be used with MS mics
• Recording of up to four channels simultaneously possible
• 44.1/48/96 kHz, 16/24-bit, linear PCM (WAV format) recording possible
• Compatible with BWF format
• 32–320 kbps MP3 format recording possible (compatible with ID3 tag v2.4)
• Dual recording allows two files to be recorded simultaneously at different levels
• Overdubbing in mix mode allows the playback signal and the input signal to be mixed and recorded as a new file
• Overdubbing in separate mode allows the playback signal and the input signal to be mixed and recorded as a new file, while saving the original file
• Built-in 0.3 W monaural monitor speaker
• Built-in effect (reverb) can be used during recording and playback
• Auto-record function starts recording automatically when a set sound input level is detected
• Automatic tone insertion function convenient for synchronizing with video files when editing
• A QUICK button is available for easy access to various functions
• Track incrementing function allows a recording to be split by creating a new file when desired
• Pre-recording (PRE REC) function allows the unit to record the 2 seconds of sound before recording is activated
• Peak reduction function is available to reduce the level automatically in case of excessively large input.

TASCAM DR-40 7
1 – Introduction
• Automatic level control is available to increase or decrease the recording volume when the input sound is too low or too high, respectively.
• Limiter function automatically reduces the level suitably in particular portions where the input level is too high
• Low cut filter conveniently reduces low-frequency noise
• VSA function can change the playback speed in the range from 0.5 to 1.5 times (in 0.1 increments) the normal speed without changing pitch
• Repeat playback and IN-OUT loop playback functions
• PB CONT button is available to show settings screens for playback speed control and IN-OUT loop
• Tuner function to tune musical instruments
• Self-timer function to start recording after a set period of time.
• Jump back and play function allows the last several seconds of the currently played file to be replayed again by simply pressing a button
• Delay compensation function that eliminates time lags caused by differences in the distances of two sets of inputs from the sound source
• Playlist function
• DIVIDE function allows files to be split where desired (only for WAV files)
• MARK function convenient for moving to specific locations
• Equalizers function for playback, and level alignment function to enhance the perceived overall sound pressure
• File name format can be set to use a user-defined word or the date
• Resume function to memorize the playback position before the unit is turned off.
• 3.5 mm (1/8”) line/headphones output jack
• 128 x 64 pixel LCD with backlight
• Mini-B type USB 2.0 port
• Operates on 3 AA batteries, an AC adaptor (sold separately: TASCAM PS-P520E), or USB bus power
• Tripod attachment screw-hole built into unit
• USB cable included
• Mic inputs can provide +24V/+48V phantom power
• Two balanced mic/line inputs (XLR/TRS combo jacks)

8 TASCAM DR-40
1 – Introduction
Conventions used in this manualThe following conventions are used in this manual.
• When we refer to a button or connector or control on the DR-40, the typeface looks like this: MENU.
• When we show messages, for example, that appears on the unit’s display, the typeface looks like this: REPEAT.
• When we show messages, for example, that appear on the computer’s screen, we show them like this: DR-40.
• SD, SDHC and SDXC memory cards are called “SD cards”.
• Additional information is introduced in the styles below when needed:
TIPWe give hints and tips on using the DR-40 when you see this icon.
NOTEA note provides additional explanations for special situations.
CAUTIONA caution shows that you may lose data (recordings) if you do not follow the instructions.
Trademarks and copyrights
• TASCAM is a trademark of TEAC CORPORATION, registered in the U.S. and other countries.
• SDXC Logo is a trademark of SD-3C, LLC.
• MPEG Layer-3 audio coding technology licensed from Fraunhofer IIS and Thomson.
• Supply of this product does not convey a license nor imply any right to distribute MPEG Layer-3 compliant content created with this product in revenue-generating broadcast systems (terrestrial, satellite, cable and/or other distribution channels), streaming applications (via Internet, intranets and/or other networks), other content distribution systems (pay-audio or audio-on-demand applications and the like) or on physical media (compact discs, digital versatile discs, semiconductor chips, hard drives, memory cards and the like). An independent license for such use is required. For details, please visit http://mp3licensing.com.
• Other company names, product names and logos in this document are the trademarks or registered trademarks of their respective owners.

TASCAM DR-40 9
2 – Names and Functions of Parts
Top panel 1 Built-in stereo microphoneCardioid stereo electret condenser microphone. You can set the microphone angles to open (A-B), or close (X-Y).
2 DUAL indicatorThis lights orange when recording in dual recording mode.
3 4CH indicatorThis lights orange when recording in 4-channel recording mode.
4 OVER DUB indicatorThis lights orange when recording in overdubbing mode.
5 3/4 [SOLO] buttonWhen in 4-channel recording mode, press this to open a display pull-up that shows meters with the input level settings for 3/4. Press when the 1/2 input level meter pull-up is displayed to switch to the 3/4 input level meter pull-up. Press and hold when recording or playing back in DUAL or 4CH mode to use the solo function, which switches the monitored sound to sources other than channels 1 and 2. Press and hold to solo channels 3 and 4.
6 1/2 [SOLO] buttonPress this to open a display pull-up that shows meters with the input level settings for 1/2.

10 TASCAM DR-40
2 – Names and Functions of Parts
Press when the 3/4 input level meter pull-up is displayed to switch to the 1/2 input level meter pull-up. Press and hold when recording or playing back in DUAL or 4CH mode to use the solo function, which switches the monitored sound from other sources to channels 1 and 2. Press and hold to solo channels 1 and 2.
7 (HOME) [8] buttonPress this button during playback to cause the playback to pause at the current position. Press this button during pause time to return to the beginning of the playback file. Press this button during recording or recording standby to cause the recording to stop.When any other screen is open, press this button to return to the Home Screen. Use this button to answer “NO” to a confirmation message.Press and hold this button to turn the unit’s power ON or OFF.
8+ buttonWhen the Home Screen is displayed, press this button to increase the output level from the built-in speaker or
/LINE OUT jack. During adjustment, a volume indicator will be displayed in a pull-up window.When the Playback Control screen is displayed, press this button to increase the playback speed.
When a setting screen is open, use the button to change the setting of the selected item.
9MENU button When the Home Screen is displayed, press this button to open the MENU Screen. Press this button to return to the MENU Screen from the various setting screens.When the MENU Screen is displayed, press this button to return to the Home Screen. When the IN and OUT points are set in the file and the Playback Control screen is displayed, press this button to turn on or off loop playback.
0 . button Press this button to return to the beginning of a playback file that is playing or stopped in the middle. When the IN and OUT points are set between the current position and the beginning of the playback file, pressing this button skips to those points. If you press this button when a file is stopped at its beginning, the unit will skip to the beginning of the previous file. Press and hold this button to search backwards. Press this button while pressing and holding the ENTER/MARK button to return to the previous mark.

TASCAM DR-40 11
2 – Names and Functions of Parts
On the setting screens, use this button to move the cursor left. On the BROWSE Screen, press this button to move up a level.
q PB CONT buttonThis button activates the Playback Control screen. When the Playback Control screen is displayed, press this button to return to the Home Screen.Press this button during recording standby to turn off the self-timer function or change the time period.
w– buttonWhen the Home Screen is displayed, press this button to decrease the output level from the built-in speaker or
/LINE OUT jack. During adjustment, a volume indicator will be displayed in a pull-up window.When the Playback Control screen is open, press this button to decrease the playback speed.When a setting screen is open, use the button to change the setting of the selected item.
e Display Shows a variety of information.
rPEAK indicator Lights when the input volume is too high.
t REC MODE buttonPress this button to open the REC MODE screen.
When the REC MODE screen is open, press this button to return to the Home Screen.
yRECORD [0] button/indicatorPress this button when stopped to start recording standby. The recording indicator will blink when in standby.Press this button when in recording standby to start recording. The recording indicator will light when recording. Press this button when recording to pause recording.
uPLAY [7] buttonWhen the Home Screen is displayed and playback is stopped, press this button to start playback. During playback, press this button to start jump-back playback.
i QUICK buttonWhen playing back, stopped, paused or in recording standby in the Home Screen or when the Playback Control screen is displayed, press this button to display the Quick Menu screen. The function to be shown depends on the state of the unit when the button is pressed.
• Stopped: delete, division, level alignment, or mixdown for the current playback file
• Playback/Playback Control screen: level alignment

12 TASCAM DR-40
2 – Names and Functions of Parts
• Recording standby: level control, swap left and right built-in mics
• MIXER screen: MS DECODER settingWhen the BROWSE screen or PLAYLIST screen is displayed, press this button to show or cancel the popup menu for file/folder operations.
o/ button Press this button during playback or when playback is stopped to skip to the beginning of the next file. When the IN and OUT points are set between the current position and the end of the file, pressing this button skips to those points.Press and hold this button to search forward. On the setting screens, use this button to move the cursor right. Press this button while pressing and holding the ENTER/MARK button to move to the next mark.On the BROWSE Screen, press this button to move down a level. If a file is selected, the file is loaded and the unit returns to the Home Screen and stops.
pENTER/MARK buttonUse this to confirm the selection of a setting item or to answer “YES” to a confirmation message.When recording, use it to add markers manually.
Press the . or / button while pressing and holding this button to move to the previous or next mark, respectively.When the Playback Control screen is open, use this button to set the IN (start) and OUT (end) points of the interval that you want to set for loop playback. When the IN and OUT points are already set, press this button to cancel loop playback and clear the IN and OUT points.
aMIXER buttonPress this button to open the MIXER screen. When the MIXER screen is open, press this button to return to the Home Screen.

TASCAM DR-40 13
2 – Names and Functions of Parts
Front panel
s EXT MIC/LINE IN L/R jacks (XLR/TRS)These are balanced analog XLR/TRS combo jacks for microphone and line level inputs.XLR (1: GND, 2: HOT, 3: COLD)TRS (Tip: HOT, Ring: COLD, Sleeve: GND)
CAUTION
• Confirm that phantom power is OFF before connecting a line level device to a EXT MIC/LINE IN jack. If you connect a line level device while phantom power is being supplied, that device and this unit could be damaged.
• Do not connect or disconnect mics with the EXT MIC/LINE IN jacks when the phantom power switch is set to ON. Doing so could cause a loud noise and might damage this unit and connected equipment.
• Set the phantom power switch to ON only when using a condenser microphone that requires phantom power. Turning phantom power on when a dynamic mic or other mic that does not require it is connected could damage this unit and connected equipment.
• When using condenser mics that require phantom power and dynamic mics together, be sure to use balanced dynamic mics. Unbalanced dynamic mics cannot be used when phantom power is enabled.
• Supplying phantom power to some ribbon mics will break them. If you are unsure, do not supply phantom power to a ribbon mic.
dREMOTE jack (2.5 mm dia. TRS jack)Connect a TASCAM RC-3F footswitch or TASCAM RC-10 wired remote control (both sold separately) here to enable remote starting and stopping of playback and other functions.

14 TASCAM DR-40
2 – Names and Functions of Parts
Left side panel
f /LINE OUT jackUse this to connect with headphones or the line input jack of an amp or other equipment.
g EXT IN switchUse this to set the input type of the EXT MIC/LINE IN jacks and whether phantom power is on or off.
h HOLD switchShift to the left end (in the direction of the arrow) to engage the hold function.All buttons are inoperative when hold is ON.
j INPUT LEVEL (+/–) buttonsUse these to adjust the input level.During adjustment, the input level setting status will be displayed in a pop-up window.
Right side panel
k USB portUse the included USB cable to connect with a computer USB port. (See “11 – Connecting with a computer” on page 94.)Power can be supplied through the USB cable provided with the unit or an AC adaptor (sold separately: TASCAM PS-P520E).
NOTEAlways connect the recorder directly to a computer. Do not use a USB hub.
l SD card slotInsert an SD card into this slot.

TASCAM DR-40 15
2 – Names and Functions of Parts
Bottom Panel
; Mono speakerUse this built-in speaker to listen to recordings.
The speaker will not produce sound in the following situations.
• When in recording standby
• When headphones are connected
• When recording
• When the speaker output setting is off
• When in overdubbing mode
z Mounting thread for tripod or tilt foot (1/4-inch) Use this to attach a tripod or the included tilt foot to the recorder.
CAUTION
• Tighten the unit securely to the tripod or microphone stand to prevent it from falling off.
• Place the tripod or microphone stand on a level surface when using it with this unit.
x Battery compartment coverWhen not using the included tilt foot, it can be stored by inserting it between the two protrusions on the inside of the battery compartment cover.
c Hole for strap

16 TASCAM DR-40
2 – Names and Functions of Parts
v Battery compartmentInstall batteries (3 AA) in this compartment to power the unit. (See “Using AA batteries” on page 25.)
Home Screen
1 Playback area ALL All files in the MUSIC folderFOLDER All files in the selected folderP.LIST All files added to the playlist
2 Loop/repeat playback status : Single playback : Single file repeat playback : All file repeat playback : Loop playback
3 Current playback file number/total number of files This shows the current file number and total number of files in the current playback area.

TASCAM DR-40 17
2 – Names and Functions of Parts
4Elapsed timeThis shows the elapsed time (hours: minutes: seconds) of the current file.
5 Speaker output status Icon shown: Speaker output ON Icon not shown: Speaker output OFF
6Power supply statusWhen a battery is being used, a battery icon shows the amount of power remaining in bars ( , , ). The battery is almost dead and the power will soon turn off if the icon has no bars . When using the PS-P520E AC adaptor (sold separately) or USB bus power, appears.
NOTESometimes a Battery Low warning appears when recording or conducting other demanding operations even when battery power remains.
7 Recorder operation status8 Stopped9 Paused7 Playing back, Fast-forwarding m Fast-rewinding / Skipping forward. Skipping backward
8 Level meterThe level of the input or playback sounds is shown.During OVER DUB (MIX), this shows the mixed level of the input and playback signals.
9 Track status displayThe display changes according to the recording mode.
: Playing a file recorded in MONO or STEREO mode
: Playing a file recorded in dual recording mode
: Playing a file recorded in 4-channel recording mode
or : In OVERDUB SEPARATE mode
or : In OVERDUB MIX mode
NOTEWhen a track is soloed, its name appears highlighted .
0 Loop playback IN (starting) and OUT (ending) pointsThe set starting and ending points of the loop are shown.The icon appears at the playback position when the starting point is set.The icon appears at the playback position when the ending point is set.

18 TASCAM DR-40
2 – Names and Functions of Parts
qRemaining timeThis shows the remaining time (hours: minutes: seconds) of the current file.
wPlayback speed setting status
Indication Playback speed
x1.0
x1.1 - x1.5
x0.5 - x0.9
Playback speed not controllable
e Effect statusShows whether the effect function is ON or OFF.
: Effect off : Effect on
r Peak value in decibels (dB)The maximum level that occurs in a fixed period of time is displayed digitally.
t File name This shows the name of the file playing back or its tag information.ID3 tag information is shown when available for an MP3 file being played.
Two project names are shown when there are two files that have been recorded in 4-channel recording mode, dual recording mode or overdub separate mode.
NOTEID3 tag information includes the titles and artists names that can be saved in MP3 files.
y Playback position displayThe current playback position is shown by a bar. As playback progresses, the bar extends to the right.
Recording ScreenThis screen appears when recording or in recording standby.
y1 Recording format
This shows the file recording format. WAV 16/WAV 24/BWF 16/BWF 24/MP3 320k/MP3 256k/MP3 192k/MP3 128k/MP3 96k/MP3 64k/MP3 32k

TASCAM DR-40 19
2 – Names and Functions of Parts
2 Prerecording or Auto recording function status appears when the prerecording function is ON, and in
recording standby. appears when the auto recording function is ON, and
recording.
3 Recording sampling frequency This shows the file recording sampling frequency.
44.1k/48k/96k4 Number of recording channels
This shows the number of recording channels in the file. ST/MONO
5 Elapsed recording timeThe elapsed recording time of the file appears as hours: minutes: seconds.
6 Left-right setting of built-in stereo mics When not correct for the mic angle setting, the current left-right setting of the built-in stereo mics is shown.
Indications Mic angles Mic settingsClosed (X-Y) L-ROpen (A-B) R-L
7 Recorder operation status09 Recording standby or Recording paused0 Recording
8Input sourceThis icon shows the input source.
: Input source set to built-in mics
: Input source set to EXT MIC/LINE IN jacks
: Second recording level setting (−6 – −12) when dual recording enabled
: When in OVERDUB SEPARATE mode, this shows that channels 1/2 are a playback file.
: When in OVERDUB MIX mode, this shows that the input source is set to a mix of the playback file and built-in mic signals
: When in OVERDUB MIX mode, this shows that the input source is set to a mix of the playback file and EXT MIC/LINE IN jack signals
NOTEWhen a track is soloed, its name appears highlighted .
9Recording level metersThe input signal level is shown.During overdub recording, the level of the combined input and playback sounds is shown.A b mark is given at the –12 dB position on the scale as a guide mark for input level adjustment.

20 TASCAM DR-40
2 – Names and Functions of Parts
0 File nameThis shows the file name that is automatically assigned to a recording file.The project name is shown when multiple files have been recorded in 4-channel recording mode, dual recording mode or OVERDUB SEPARATE mode.
q Remaining recording timeThe remaining recording time until the selected max file size is reached appears in hours: minutes: seconds.If the remaining recording time on the card is less than the remaining time until the selected max file size is reached, the remaining recording time on the card is displayed.
w Low cut filter statusThis shows whether the low cut filter is ON/OFF. The icon appears highlighted when set to 40Hz, 80Hz or 120Hz.
: Low cut filter off : Low cut filter on
eLevel control function status : Level control off : Peak reduction on : Automatic level control on : Limiter on
rEffect statusShows whether the effect function is ON or OFF.
: Effect off : Effect on
tPeak value in decibels (dB)Peak input level values are shown digitally.
y Auto tone function statusThis icon appears when the auto tone function is on.No icon: Auto tone off
:Auto tone on
Playback Control screenThe Playback Control screen is displayed if the PB CONT button is pressed during playback or when playback is stopped.
1 Loop playback statusThe icon is displayed when loop playback is enabled.
2 Playback speed

TASCAM DR-40 21
2 – Names and Functions of Parts
Playback speed as compared with the normal speed is shown.VSA shown on the left to indicate that the VSA (variable speed audition: enables the tempo to be changed without changing the pitch) function is enabled.
3 Available buttonsThe buttons available in the Playback Control screen are as follows.ENTER : Creates or deletes an IN or OUT point.MENU : Switch over between ON and OFF status of the loop playback function.
NOTE
• Unlike the other screens, the QUICK button in this screen works to display the quick menu containing only the LEVEL ALIGN function, and no other functions will be available.
• Recording is not possible on this screen.
• On this screen, the . and / buttons can be used to skip to loop IN (starting) and OUT (ending) points and the beginnings and ends of files, but not to the previous or next tracks.
4 Loop playback IN (starting) and OUT (ending) pointsThe set starting and ending points of the loop are shown.The icon appears at the playback position on the bar when the starting point is set.
The icon appears at the playback position on the bar when the ending point is set.
5 Playback position displayThe current playback position is shown by a bar. As playback progresses, the bar extends to the right.
Menu item listThis list provides an overview of the various menu items.
Menu item Function Pages
REC SETTING Recording mode settings 36
PLAY SETTING Play area select, repeat setting, playback equalizer, jump-back settings
68, 74, 77
BROWSE SD card file and folder operations 65
SPEAKER ON/OFF status of built-in speaker 31
OTHERS OTHERS submenu display 22

22 TASCAM DR-40
2 – Names and Functions of Parts
The OTHERS submenu appears when OTHERS is selected in the MENU screen. The menu items contained are as follows.Submenu item Function Pages
INFORMATION Information about the file, SD card, and system 96
TUNER Tuner settings 92
EFFECT Effects settings 87
FILE NAME File name settings 101
DATE/TIME Date and time settings 29
REMOTESettings for the TASCAM RC-3F footswitch and TASCAM RC-10 wired remote control (both sold separately)
104
SYSTEM Various system settings 98
CAUTION
• When recording/in recording standby, the following screens and items are shown.
LOW CUT and AUTO REC setting MODE and LEVEL on the REC SETTING screen (AUTO REC settings are shown, but cannot be changed)EFFECT, PRESET, LEVEL and SOURCE on EFFECT screen
• The MENU button is disabled in the Playback Control screen, but works to change over between ON and OFF status of the loop playback function. (See “Repeated Playback of Selection (Loop Playback)” on page 76.)
Using menusUse the MENU screen to make various settings. Example: setting the playback area
1 Press the MENU button to open the MENU screen.
2 Use the + or – button to select a menu item (highlighted), and use the ENTER/MARK or / button to move to various settings screens.
Example: PLAY SETTING screen
3 Use the + or – button to select a menu item (highlighted) to be set.
Example: AREA is selected.

TASCAM DR-40 23
2 – Names and Functions of Parts
4 Use the ENTER/MARK or / button to move the cursor to highlight the value of the setting.
5 Use the + or – button to change the setting.6 Press the . button to set a different item in the same
menu. This enables you to select a new item. Use the + or −
button again to select an item to be set.7 Repeat step 3 to 6 as necessary to set each item.8 To open the MENU screen (or OTHERS submenu screen),
press the MENU button. To return to the Home Screen, press the (HOME) [8]
button.
Basic operationUse the following buttons to operate the various screens. MENU button:
Opens the MENU screen. PB CONT button:
This opens the Playback Control screen. (HOME) [8] button:
When any other screen is open, press this to return to the Home Screen. Use this to answer “NO” to a confirmation message.
ENTER/MARK button: Use this to confirm the selection of a setting item or to answer “YES” to a confirmation message.
/ button:Use this to move the cursor (the highlighted area) to the right on the screen, and to open folders on the BROWSE screen.
. button: Use this to move the cursor (the highlighted area) to the left on the screen, and to close folders on the BROWSE screen.

24 TASCAM DR-40
2 – Names and Functions of Parts
+ button:Use this to move the cursor (the highlighted area) upward on the screen, or increase values.
– button: Use this to move the cursor (the highlighted area) downward on the screen, or decrease values.
QUICK button: This opens the Quick menu.
• Stopped: current playback file deletion, division, level alignment and mixdown functions
• Playing back/playback control screen: level alignment function
• Recording standby: level control function, mic left-right swapping function
A popup menu is turned on or off in the BROWSE screen or PLAYLIST screen.Press when the MIXER screen is open to set the MS decoder.
REC MODE button Opens the REC MODE screen. When the REC MODE screen is open, returns to the Home Screen.
MIXER button Opens the MIXER screen.
When the MIXER screen is open, returns to the Home Screen.
1/2 [SOLO] button Opens a meter display that shows the 1/2 input level setting status. In DUAL or 4CH mode, press and hold during recording or playback to solo channels 1/2.
3/4 [SOLO] button Opens a meter display that shows the 3/4 input level setting status. In DUAL or 4CH mode, press and hold during recording or playback to solo channels 3/4.

TASCAM DR-40 25
Powering the unitDR-40 can operate on three AA batteries, or through an optional AC adapter (TASCAM PS-P520E) or USB cable provided with the unit (USB bus power). Alkaline or Ni-MH batteries can be used.
Using AA batteriesOpen the battery compartment cover on the back of the unit. Fit three AA batteries to the + and – marks shown in the compartment, and close the battery compartment cover.
When using AA batteries, set the type of battery in order to accurately show the amount of power remaining and allow the unit to accurately determine whether power is available for proper operation. (See “Setting the type of AA batteries” on page 98.)
NOTE
• Manganese dry cell batteries (R6) cannot be used with this unit.
• This unit cannot recharge Ni-MH batteries. Use a commercially available recharger.
• The included alkaline batteries are for confirming operation of the unit and might not last very long.
• Before putting the bottom battery in, put the ribbon inside the compartment first. Failure to do so could make removing the batteries difficult.
• A great amount of power is required to provide phantom power to a condenser microphone. If you use a condenser microphone while running the unit on AA batteries (Ni-MH rechargeable or alkaline), the operation time will be greatly shortened because of their low capacities. If you need to operate the unit for a long time, use the AC adaptor (TASCAM PS-P520E) or the USB cable provided with the unit (USB bus power).
3 – Preparation

26 TASCAM DR-40
3 – Preparation
Using an AC adaptor (sold separately)Connect the PS-P520E AC adaptor and the USB cable to the USB port of the unit as shown in the illustration.
TASCAMPS-P520E
AC outlet
Mini-B USB plug
CAUTIONNever use any adaptor other than the designated PS-P520E AC adaptor. Use of a different adaptor could cause malfunction, fire or electric shock.
NOTE
• Noise may occur when recording with a microphone if the unit is too close to the AC adaptor. In such a case, keep sufficient distance between the AC adaptor and the unit.
• When both batteries are installed and the AC adaptor is connected, power will be supplied from the AC adaptor.
Using USB bus powerConnect the unit to a PC using the attached USB cable as shown in the illustration.
USB
Mini-B USB plugComputer
The USB SELECT screen appears to choose between USB bus power for power supply or connection with a PC through the USB cable when USB cable is connected after the unit is turned on or when the unit is turned on after connecting the USB cable. Use the + or – button to select BUS POWER and press the ENTER/MARK button to select power supply from the USB port. The Home Screen will appear.
NOTE
• Power is supplied from the USB port if the USB cable is connected to the unit that contains batteries (USB bus power prioritized).
• The AC adaptor also connects using the USB cable, so set it to BUS POWER in the same way.

TASCAM DR-40 27
3 – Preparation
Start-up & shutdown
CAUTION
• The unit goes in standby mode if shut down when the unit is operating on AC power supplied through the AC adapter (TASCAM PS-P520E, sold separately), or bus power supplied from a USB port of a PC.
• Turn down the volume of the sound system connected to the unit before starting up or shutting down the unit.
• Do not use headphones when starting up or shutting down the unit. Otherwise, a large noise would cause damage to headphones or your ears.
Starting up the unitTo start up the unit from the stopped state, press and hold the
(HOME) [8] button until TASCAM DR-40 (start-up screen) is displayed on the display. The Home Screen appears when the unit starts up.
Start -Up Screen Home Screen
Selecting a languageThe first time you turn a new unit on after purchase, the following setting must be made.A screen appears to set the language shown on the display.
Press the + or − button to move the cursor and select (highlight with light letters on a black background) the language to be shown on the display.
English : use English日本語 : use JapaneseFrançais : use FrenchEspañol : use SpanishDeutsch : use GermanItaliano : use ItalianРусский : use Russian中文 : use Chinese
After selection, press the ENTER/MARK button to confirm it.
NOTEYou can change this setting with the SYSTEM screen LANGUAGE item. (See “Setting the language” on page 99.)

28 TASCAM DR-40
3 – Preparation
CAUTIONWhen the unit is started up for the first time (or when the built-in clock is reset after being left unused without batteries), the DATE/TIME screen appears before the start-up screen to adjust the date and time. (See “Setting the date and time” on page 29.)
Press the . or / button to move the cursor (highlighted area), and use the + or – button to change values.Press the ENTER/MARK button to fix the settings.The start-up screen is displayed, and then the Home Screen appears after the unit has started up.Date/time adjustment may be skipped by pressing the ENTER/MARK button, and made later. (See “Setting the date and time” on page 29.)
Shutting downPress and hold the (HOME) [8] button until LINEAR PCM RECORDER appears on the display.The power turns off after the unit completes its shutdown process.
CAUTIONAlways use the (HOME) [8] button to shutdown the unit.Do not remove the batteries or disconnect the power cable (AC adaptor TASCAM PS-P520E or USB cable) accidently while the unit is operating. If you do so, the unit cannot shut down properly and all recordings, settings and other data will be lost. Lost data cannot be restored.
Resume functionThe unit has resume function. When started up, the unit is located to the position (time) where it left off when shut down previously. If the PLAY [7] button is pressed after start-up, the file the unit was playing when shut down previously starts to be played from the position (time) where the unit left off when shut down.
NOTEThe required data are stored in the SD card. The resume function does not work if the card is exchanged or formatted.

TASCAM DR-40 29
3 – Preparation
Setting the date and timeUsing its internal clock, this unit remembers the date and time when a file is recorded.
1 Press the MENU button to open the MENU screen.
2 Use the + or – button to select the OTHERS menu item (highlighted), and press the ENTER/MARK or / button.
The OTHERS screen is displayed.
3 Use the + or – button to select the DATE/TIME menu item, and press the ENTER/MARK or / button.
The DATE/TIME screen is displayed.
4 Press the . or / button to move the cursor (highlighted area), and use the + or – button to change values.
5 Press the ENTER/MARK button to confirm the change and return to the OTHERS screen.
NOTEYou can set the unit to automatically add the date to file names. (See “File name format” on page 101.)
CAUTIONThe date and time setting can only be maintained for a few minutes if the unit is not powered from batteries or through the AC adaptor TASCAM PS-P520E or the USB cable. When using batteries, replace them before they completely lose power.

30 TASCAM DR-40
3 – Preparation
Inserting and removing SD cards
Inserting the SD card
NOTE
• An SD card is already installed when the unit is shipped from the factory. If you want to use this card to record and play tracks, there is no need to reinstall it.
• SD cards that meet SD, SDHC or SDXC standards can be used with this unit.
• A list of SD cards that have been confirmed to work with this unit can be found on our website (http://tascam.com/).
1 Open the SD slot cover on the right side panel.2 Insert the SD Card into the slot as shown in the
following illustration until it clicks into place.
Removing the card1 Open the SD slot cover on the right side panel.2 Press the SD card in gently and then release it to allow it to come out.
CAUTIONDo not remove the SD card from the unit when it is connected to a computer by USB.
Card write protectionSD cards have protect switches that prevent writing new data to them.
Writing possible Writing not possible

TASCAM DR-40 31
3 – Preparation
If you slide the protect switch to the “LOCK” position, file recording and editing is not possible. Move the switch to the unlocked position in order to record, erase and otherwise edit data on the card.
Preparing an SD card for useIn order to use an SD card in this unit, you must format it first.
CAUTION
• When formatting a card, the unit should be operating on AC power supplied through the PS-P520E adaptor (sold separately), USB bus power supplied from a computer, or batteries with sufficient remaining power.
• Formatting a card erases all the data on it.
1 Confirm that an SD card is installed and turn the power ON. 2 The following message appears when a new card or a
card formatted for use with another device is installed in the unit.
3 Press the ENTER/MARK button to start formatting. 4 When formatting ends, the Home Screen opens.
You can also reformat the card in this unit at any time. (See “System Settings and Formatting” on page 98.)
Using the built-in speakerEnable SPEAKER on the MENU screen to allow the unit to play over the built-in speaker.
1 Press the MENU button to open the MENU screen.
2 Use the + or – button to select the SPEAKER and press the ENTER/MARK or / button.
The SPEAKER screen is displayed.
3 Use the + or – button to select ON.
4 When finished, press the (HOME) [8] button to return to the Home Screen.
NOTEEven if SPEAKER is enabled, the unit will not play through the speaker when the unit is recording sound, in recording standby, or muted with headphones or external speaker system connected.

32 TASCAM DR-40
3 – Preparation
Connecting monitors and headphonesTo listen with headphones, connect them to the /LINE OUT jack.To listen with an external monitoring system (powered monitor speakers or an amplifier and speakers), connect it to the /LINE OUT jack.
Powered monitor speakers oramplifer and speakers
Headphones
Using the built-in microphoneThis unit’s built-in microphones can be adjusted, allowing the angles of the microphones to be changed. You can choose clear stereo sound or wide stereo sound according to the recording source, situation, etc. by opening or closing the microphone pair.
Setting the mics to record a wide stereo sound (A-B position)
Spread the stereo microphone to the left and right. (A-B position)Set this way, the two microphones are spread widely left and right, and recording is possible with a strong stereo field that is good for music, for example.If you open or close the microphone pair while using the built-in stereo microphone and the left-right channels does not suit the angle of the microphone, a pop-up message appears to ask whether you want to swap the left-right channels of the microphone. (See “Microphone position detection” on page 34.)
NOTESet the left-right channels of the built-in microphone to L-R. When you are using the built-in microphone and the setting is not L-R, appears on the Home Screen. (See “Swapping the left-right channels of the built-in microphone pair” on page 33.)

TASCAM DR-40 33
3 – Preparation
Setting the mics to record a clear stereo sound (X-Y position)
Close the stereo microphone. (X-Y position)Set this way, the microphone pair is close, and recording is possible with a clear stereo field with less phase difference.If you open or close the microphone pair while using the built-in stereo microphone and the left-right channels does not suit the angle of the microphone, a pop-up message appears to ask whether you want to swap the left-right channels of the microphone. (See “Microphone position detection” on page 34.)
NOTESet the left-right channels of the built-in microphone to R-L. When you are using the built-in microphone and the setting is not R-L, appears on the Home Screen. (See “Swapping the left-right channels of the built-in microphone pair” below.)
Swapping the left-right channels of the built-in microphone pair
Depending on the angles at which the microphones are set, the recording channels of the left and right microphones can be swapped.When the microphone pair is open, the left microphone should be set to the left channel and the right microphone should be set to the right channel (When A-B position, L-R). When the microphone pair is closed, the left microphone should be set to the right channel and the right microphone should be set to the left channel (When X-Y position, R-L).If you are using the built-in microphone and this setting is not used, the current microphone setting icon appears as a warning on the Home Screen.
1 Press the RECORD [0] button to bring the unit in recording standby. The indicator will flash and the recording screen will appear.
2 Press the QUICK button.The Quick menu screen will appear.

34 TASCAM DR-40
3 – Preparation
3 Use the + or − button to select (highlight) MIC LR SWAP, and press the ENTER/MARK button.The MIC LR swap screen will appear.
4 Use the + button or – button to select (highlight) L-R or R-L depending on the microphone pair’s status.
5 Press the ENTER/MARK button to fix the setting, and to return to the Home Screen.
Microphone position detectionThe following pop-up message appears automatically whenever the right microphone is opened or closed and the left-right channels does not suit the angle of the microphone. If only the left microphone is opened or closed, it does not appear.
Press the ENTER/MARK button to change the setting.Press the (HOME) [8] button to leave the setting as it is.
NOTE
• When you change the microphone angle setting and the pop-up message appears, you must press the ENTER/MARK button to change the L–R setting, press the (HOME) [8] button to keep this setting as is, or restore the previous microphone angle to close the pop-up message before you can begin recording.
• The pop-up message does not appear if you change the microphone position when recording. If necessary, use the MIC LR SWAP setting by pressing the QUICK button to switch the setting after change the setting to recording standby mode by pressing the RECORD [0] button.
Attaching the tilt foot When recording with the built-in mics, placing the recorder with the battery compartment cover side down will cause the built-in mic orientation to be low. You can attach the included tilt foot to the tripod threads in order to keep the mic orientation from being too low.Attach it as shown below.

TASCAM DR-40 35
3 – Preparation
When not using the tilt foot, it can be stored by inserting it between the two protrusions on the inside of the battery compartment cover.

36 TASCAM DR-40
4 – RecordingIn addition to using the built-in microphone, you can record using an external microphone or record the output signal from a mixer or other audio source. You can select among MP3 (44.1/48 kHz, 32–320 kbps) and WAV/BWF (44.1/48/96 kHz, 16/24-bit) audio recording formats.Marks added when recording to Broadcast Wave Format (BWF) can be used with software that supports this format, for example. This recorder has five recording modes. Using the overdubbing function, you can mix input signals with an audio file that is played back and record either the combined signals or just the input signal as a new file. With dual recording you can simultaneously record the same input signals at two different levels. You can also use external mics with the built-in mics for 4-channel recording.
Selecting file format, sampling frequencySelect the audio file type that you want to record before you start recording.
1 Press the MENU button to open the MENU Screen.2 Use the + or − button to select REC SETTING, and press
the ENTER/MARK or / button.
REC SETTING screen appears.
3 Use the + or − button to select FORMAT, and press the ENTER/MARK or / button.
4 Set the file format with the + or − button to one of the following options:
BWF: BWF 16bit, BWF 24bitWAV: WAV 16bit (default), WAV 24bitMP3: MP3 32k bps, MP3 64k bps, MP3 96k bps,
MP3 128k bps, MP3 192k bps, MP3 256k bps, MP3 320k bps
NOTE
• BWF is a format created for broadcasting that has the same sound quality as the standard WAV format. It also uses the same “.wav” file extension as WAV files. In this manual, we distinguish these file types by using the terms BWF and WAV.

TASCAM DR-40 37
4 – Recording
• Higher values provide better recording quality.
• WAV/BWF files are higher quality than MP3 files, but they take up more space, so MP3 formats allow for longer recordings.
5 Press the . button to show settings.6 Use the + or – button to select SAMPLE, and press the
ENTER/MARK or / button.
7 Set the sampling frequency with the + or − button to one of the following options.44.1k (default), 48k, 96k
NOTE
96k cannot be selected if FORMAT is set to MP3.8 Press the (HOME) [8] button to return to the Home
Screen.
Preparing the recording inputs
Recording with the built-in mics Point the mics at the sound source and place the unit in a stable location where there is little vibration.
Recording with external mics (EXT MIC IN)Connect external mics to the EXT MIC/LINE IN connectors. Point the mics at the sound source and place the unit in a stable location where there is little vibration.
Microphones
NOTEThe setting of left-right channels is disabled if external microphones are connected to the EXT MIC/LINE IN jack.

38 TASCAM DR-40
4 – Recording
Recording an external device (LINE IN)Use stereo plug cables to connect to the output of an external audio device.
Other audio equipmentor external sound source
CAUTION
• Reduce the output level of the external audio device if the input sound is distorted even when reducing the input gain level on the unit.
• When an external audio device with a fixed output line level is connected, it would be impossible to control the gain level appropriately because of excessively large input signals. In such cases, use the headphone jack or other level-controllable output for connection to the unit.
Setting the external input typeWhen using an external input source, set the EXT IN switch on the left side panel according to the type of equipment connected.
LINE: Use this setting when connecting line output jacks of external devices to the analog inputs of this recorder.
MIC: Use this setting when connecting mics to the recorder.
MIC+PHANTOM: Use this setting when connecting condenser mics that require phantom power (+24V or +48V) to the recorder.
CAUTIONDepending on this setting, the input level setting range changes. For this reason, the input level might change greatly when this setting is changed. Before changing it, you should turn the power OFF or turn the output level all the way down.
TASCAM DR-40 39
4 – Recording
Using phantom power When the EXT IN switch on the left side panel is set to MIC+PHANTOM, phantom power (+24V or +48V) is turned on and sent to the connected mics.
CAUTION
• Confirm that phantom power is OFF before connecting a line level device to a EXT MIC/LINE IN jack. If you connect a line level device while phantom power is being supplied, that device and this unit could be damaged.
• Do not connect or disconnect mics with the EXT MIC/LINE IN jacks when the phantom power switch is set to ON. Doing so could cause a loud noise and might damage this unit and connected equipment.
• Set the phantom power switch to ON only when using a condenser microphone that requires phantom power. Turning phantom power on when a dynamic mic or other mic that does not require it is connected could damage this unit and connected equipment.
• When using condenser mics that require phantom power and dynamic mics together, be sure to use balanced dynamic mics. Unbalanced dynamic mics cannot be used when phantom power is enabled.
• Supplying phantom power to some types of ribbon microphones could break them. Do not supply phantom power to a ribbon microphone if you are in doubt.
• When using USB bus power, the unit might not be able to supply phantom power depending on the computer. In this case, use a TASCAM PS-P520E AC adaptor (sold separately).
• Some condenser microphones will not operate when phantom power is set to +24V.
• Do not connect or disconnect the USB cable connected to the USB port when using phantom power. Even when batteries are loaded in this unit, the power supply could be interrupted, resulting in the loss of or damage to data when recording.
Adjusting the input levelBefore starting recording, the input level should be adjusted to prevent the recorded sounds or signals from being distorted due to excessively large input signals or from being inaudible due to excessively low input signals compared to noise.In addition to manual adjustment, the unit has the following three level adjustment functions: peak reduction, automatic level control, and limiter. Any of these can be used as required.
TIPIn addition to adjusting the INPUT level, try changing the distance and angle between the microphone and the sound source. The angle and distance of the microphone can also change the character of the recorded sound.

40 TASCAM DR-40
4 – Recording
Manually adjusting the input levelThe following procedures explain how to use the Record Screen to set the levels.
CAUTIONManual adjustment cannot be performed when the automatic level control mode is selected as a level control function ( appears to the right of the elapsed time on the recording screen). To enable manual input level adjustment, select OFF or other mode in the level control setting screen. (See “Using the Level Control Function” on page 42.)
1 Press the RECORD [0] button to begin recording standby.The record indicator flashes red and the recording screen appears.
2 Adjust the input level using the INPUT LEVEL + or – button on the left side panel.
When you press the INPUT LEVEL + or – button, a pull-up menu screen appears to indicate the input level setting.
The PEAK indicator to the right of the display lights red when the input level is too high. A b mark is provided at –12 dB on the level meters. Set the input level so that the indicator bars move to and fro with this mark at about the center without causing the PEAK indicator to light red when the loudest sounds occur.
NOTE
• The INPUT LEVEL setting pull-up menu that opens when you press an INPUT LEVEL (+/−) button on the left side of the unit will appear according to the input source. One of the following four labels will appear.
INT MIC LVL: Built-in mic levelEXT IN LVL: EXT IN levelEXT Lch LVL: EXT IN left channel levelEXT Rch LVL: EXT IN right channel level
• If the input selection (SOURCE or EXT IN) on the REC MODE screen is set to EXT INDEP., use the following buttons to switch between EXT Lch LVL and EXT Rch LVL.

TASCAM DR-40 41
4 – Recording
STEREO MODE/DUAL MODE/OVERDUB SEPARATE MODE: 1/2 button4CH MODE/OVERDUB MIX MODE: 3/4 button
• Press the (HOME) [8] button to exit recording standby.
• When in recording standby or during recording, the speaker does not output sound even if the SPEAKER setting is enabled. Connect headphones to the /LINE OUT jack if you want to adjust the level or record while monitoring the input. Use the + or − button in the Home Screen to adjust the monitoring volume. This does not affect the sound to be recorded.
Independent L/R channel EXT IN input level setting function
You can set the EXT IN input levels for the left and right channels independently. Use this function when, for example, using two different mics or when volume differences are great.
1 Press the REC MODE button to open the REC MODE screen.
2 Use the + and − buttons to select SOURCE (or EXT IN in 4CH MODE) and press the ENTER/MARK or / button.
3 Use the + and − buttons to set the input source to EXT INDEP.
4. Press the HOME button to return to the Home Screen.5. Press the RECORD [0] button to enter recording standby.6. Press an INPUT LEVEL (+/−) button on the left side of
the unit to open a pull-up with a meter showing the input level setting at the bottom of the display.
7. To set the input level for the other channel (L/R), press one of the following buttons.STEREO MODE/DUAL MODE/OVERDUB SEPARATE MODE: 1/2 button4CH MODE/OVERDUB MIX MODE: 3/4 button
NOTE
• If the input selection (SOURCE or EXT IN) on the REC MODE screen is set to EXT IN 1/2, the EXT IN input level will affect the both L/R channels.
• If you apply an effect to the input sound and the SOURCE item on the EFFECT screen is set to EXT IN or INT MIC, sound from both left and right channels will be included in the effect sound. In other words, sound from the opposite channel will be included in the recorded result.

42 TASCAM DR-40
4 – Recording
Using the Level Control FunctionThe level control function for recording through a microphone is set as follows.
1 Press the RECORD [0] button to bring the unit in recording standby. The indicator will flash and the recording screen will appear.
2 Press the QUICK button.The Quick menu screen will appear.
3 Use the + or − button to select (highlight) LEVEL CTRL, and press the ENTER/MARK button. The level control setting screen will appear.
Options: OFF (default), PEAK REDUCTION, AUTO LEVEL, LIMITER
4 Use the + or − button to select (highlight) a mode, and press the ENTER button to enable the mode and return to the recording screen.The selected mode is shown with an icon in the recording screen.
PEAK REDUCTION:The input volume is reduced automatically to an appropriate level when excessively large signals come in. This allows input level setting to be performed easily.The input level can be raised manually if required.
TIPWhen recording live performances, for example, test for peak reduction may be performed before actual recording.Select the peak reduction mode in recording standby, and maximize the input level.As a test performance is given subsequently, the input gain for recording is reduced to an appropriate level to meet the input signals, and an optimum input level for the performance is set.Recording will be stored at this input level if this mode is disabled before starting recording.Otherwise, the input level will continue to be controlled automatically during recording.It is also possible to store the recording in the limiter mode after automatically setting the input level in the peak reduction mode.
AUTO LEVEL:The input level is controlled automatically to increase or decrease the input level when the input signals are too small or too large, respectively. This mode is useful for recording at meetings. In this mode, the input level cannot be changed manually.

TASCAM DR-40 43
4 – Recording
LIMITER:This prevents distortion of sounds when excessively large input signals come in suddenly.This mode is also suited for recording of live performances with large volume changes.In this mode, the input level can be changed manually during recording.
NOTE
• Distortion of sounds may occur when excessively large input signals come in even if the LIMITER function is activated. In such a case, lower the input level or keep proper distance between the unit and the source.
• When using LINE input, the level controls have no effect.
Overview of recording modesThis recorder has five recording modes. Use the REC MODE item on the REC MODE screen to set the recording mode. The settings available are different for each recording mode.
MONO mode This is a mode for mono recording.
STEREO mode (default)This is a mode for stereo recording of two independent left and right channels.
DUAL mode This mode uses one input source (mono or stereo pair) to create two files with different input level settings (LEVEL CTRL setting screen). Either two mono or two stereo recording files are created.
4CH mode This mode uses both the built-in mics and the external inputs to record two pairs of inputs as two files. Two stereo recording files are created.
OVERDUB modeThis recording mode add new sounds to the playback file. There are two types of OVERDUB mode: MIX and SEPARATE.The MIX OVERDUB mode mixes the playback sound and input sound to create a new file. The SEPARATE OVERDUB mode creates a new recording file with only the input sound.This mode can be selected from the parameters.
Recording (MONO/STEREO recording)
Make recording settings1 Press the REC MODE button to open the REC MODE
screen.2 Use the + or − button to select REC MODE, and press the
ENTER/MARK or / button.

44 TASCAM DR-40
4 – Recording
3 Use the + or − button to select MONO or STEREO. (Default: STEREO)
Mono recording Stereo recording
4 Press the . button to select the other item.5 Use the + or − button to select SOURCE, and press the
ENTER/MARK or / button.6 Use the + or − button to select the input source.
REC MODE SOURCE (options) Explanation
MONO
INT MIC MONO (default)
L/R signals of built-in mics are mixed and recorded in mono
EXT IN 1 L external input is recorded in mono
STEREO
INT MIC ST (default) Built-in mics are recorded in stereo
EXT IN 1/2 External inputs are recorded in stereo
EXT INDEP.Use two external input channels with independent level setting
7 Press the . button to select the other item.8 If REC MODE is set to STEREO, you can also set MS mic
decoding.
When using MS mics, use the + and – buttons to select the MS DECODE item, and press the ENTER/MARK or / button.
Use the + and – buttons to set MS DECODE to ON. 9 Press the (HOME) [8] button to return to the
Home Screen.
Set where to save the fileSet the folder where recorded files are saved. The created sound file will be saved in the currently selected folder. For details, see SELECT popup menu under “Folder operations” on page 66.If no setting is made, new recording files are placed in the MUSIC folder.
Starting the recording1 Press the RECORD [0] button to begin recording
standby.
Mono Recording Stereo Recording

TASCAM DR-40 45
4 – Recording
The screen shows the recording file name, the input source, the recording audio file type and sampling frequency. Please confirm that these are as desired before starting recording.
2 To start recording, press the RECORD [0] button again.
Mono Recording Stereo RecordingWhen recording starts, the indicator lights continuously, and the display shows the elapsed recording time and the remaining recording time.
3 Press the (HOME) [8] button to end recording and create the audio file.
To pause recording, press the RECORD [0] button. Press the RECORD [0] button again to restart recording in the same file. If you press the (HOME) [8] button after pausing a recorded audio file up to the moment that you paused recording is created.
CAUTIONNoise may occur when recording with a microphone if the unit is too close to the AC adaptor. In such a case, keep sufficient distance between the AC adaptor and the unit.
File names when recording in MONO/STEREOTASCAM_0001.WAV
1: Set with the WORD item on the FILE NAME screen 2: Recording file base number
Simultaneously recording two files at different input levels (DUAL REC)
This unit can simultaneously make two recordings at different input levels (dual recording). For example, when recording with mics, you can record the main recording with the input level set as high as possible while recording a backup recording with the input level set slightly lower to prevent the sound from distorting and record both at the same time. The main and backup recordings will each be saved as a separate file. The input level setting will apply to the main recording (see “Preparing the recording inputs” on page 37 and “Adjusting the input level” on page 39). The input level of the backup recording is set relative to the input level of the main recording. So, you should set the input level of the main recording first and then set the dual level (DUAL LVL) of the backup recording.

46 TASCAM DR-40
4 – Recording
NOTE
• Dual recording and overdubbing cannot be used simultaneously.
• In this mode, you cannot record the sound with the effect applied, but you can use the effect for monitoring.
Enabling dual recording 1 Press the REC MODE button to open the REC MODE
screen. 2 Use the + and – buttons to select REC MODE, and press
the ENTER/MARK or / button. 3 Use the + and – buttons to set it to DUAL.
4 Press the . button to return to setting item selection.
5 Use the + and – buttons to select SOURCE, and press the ENTER/MARK or / button.
6 Use the + and – buttons to set the input source. SOURCE Explanation INT MIC ST (default value)
Stereo recording with built-in mics
INT MIC MONO L/R signals of built-in mics are mixed and recorded in mono
EXT IN 1 Mono recording with external mics or equipment
EXT IN 1/2 Stereo recording with external mics or equipment
EXT INDEP. Use two external input channels with independent level setting
7 Press the . button to return to setting item selection.
8 Use the + and – buttons to select DUAL LVL, and press the ENTER/MARK or / button.
9 Use the + and − buttons to set the dual level for the backup recording.
Setting range: –6dB (default value) to –12dB10 Press the . button to return to setting item
selection. 11 Use the + and – buttons to select LVL CTRL, and press
the ENTER/MARK or / button.

TASCAM DR-40 47
4 – Recording
12 Use the + and − buttons to set the backup recording input level control function.
LVL CTRL Explanation OFF (default value) No level control
PEAK REDUCTIONIf the input sound is too loud, the input level is automatically lowered to a suitable level. This function makes handling difficult input level settings easier.
AUTO LVLLow input levels are raised and high input levels are lowered automatically, making this useful for recording meetings, for example.
LIMITERThis prevents distortion if the input level becomes too loud suddenly. This is useful for live performances and other recordings when extreme volume changes occur.
13 Press the . button to return to setting item selection.
14 If using MS mics, use the + and – buttons to select MS DECODE, and press the ENTER/MARK or / button.
Use the + and – buttons to set MS DECODE to ON (default value: OFF).
15 When setting is complete, press the (HOME) [8] button to return to the Home Screen.
Starting dual recording Press the RECORD [0] button to start dual recording.
During dual recording, the recording screen appears as follows.
On the recording screen, the top meter shows the main recording input level and the bottom meter shows the backup recording input level.

48 TASCAM DR-40
4 – Recording
Dual recording file namesDual recording allows two files to be recorded simultaneously. The name of the backup recording is the same as the file name of the main recording with “DXX” added to it. The “XX” in “DXX” is the DUAL LVL setting value.
TASCAM_0002S12.WAV
TASCAM_0002S34D12.WAV
1: Set with the WORD item on the FILE NAME screen2: Recording file base number3: “S” is the source file 4: Assigned channels (“12” is channels 1/2 and “34” is
channels 3/4)5: Dual level setting value (This would be “D06” if recorded at
−6 dB or “D10” if recorded at −10dB, for example.)
NOTE
• If the input level is less than –24 dB, dual recording might not have the expected result.
• If LVL CTRL is set to AUTO LVL or PEAK REDUCTION, then the DUAL LVL cannot be changed.
Recording 3 or 4 channelsYou can use the built-in mics and connect external mics or other equipment to record three or four channels. The recordings will be saved as two stereo files (channels 1/2 and channels 3/4).If the INT MIC, EXT IN L channel and EXT IN R channel are different distances from their sound sources, you can set time delays for the EXT IN L and EXT IN R channels to compensate, using the INT MIC position as the baseline.
Making settings for 3/4-channel recording 1 Press the REC MODE button to open the REC MODE
screen. 2 Use the + and – buttons to select REC MODE, and press
the ENTER/MARK or / button. 3 Use the + and – buttons to set it to 4CH.
4 Press the . button to return to setting item selection.
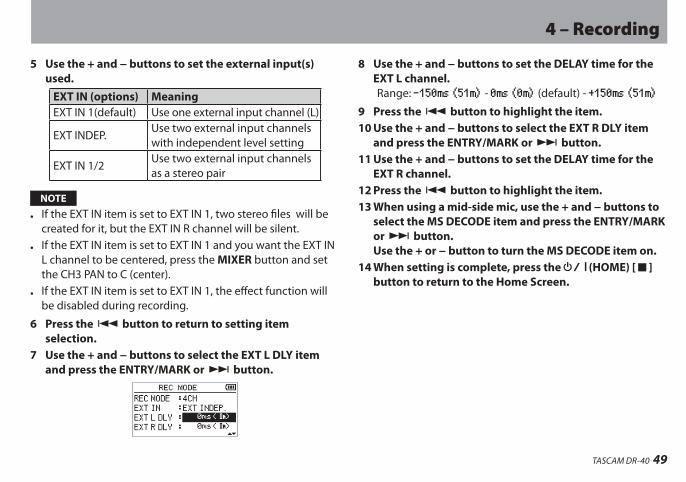
TASCAM DR-40 49
4 – Recording
5 Use the + and − buttons to set the external input(s) used.
EXT IN (options) MeaningEXT IN 1(default) Use one external input channel (L)
EXT INDEP.Use two external input channels with independent level setting
EXT IN 1/2Use two external input channels as a stereo pair
NOTE
• If the EXT IN item is set to EXT IN 1, two stereo files will be created for it, but the EXT IN R channel will be silent.
• If the EXT IN item is set to EXT IN 1 and you want the EXT IN L channel to be centered, press the MIXER button and set the CH3 PAN to C (center).
• If the EXT IN item is set to EXT IN 1, the effect function will be disabled during recording.
6 Press the . button to return to setting item selection.
7 Use the + and − buttons to select the EXT L DLY item and press the ENTRY/MARK or / button.
8 Use the + and − buttons to set the DELAY time for the EXT L channel.Range: -150ms (51m) - 0ms (0m) (default) - +150ms (51m)
9 Press the . button to highlight the item.10 Use the + and − buttons to select the EXT R DLY item
and press the ENTRY/MARK or / button.11 Use the + and − buttons to set the DELAY time for the
EXT R channel.12 Press the . button to highlight the item.13 When using a mid-side mic, use the + and − buttons to
select the MS DECODE item and press the ENTRY/MARK or / button. Use the + or − button to turn the MS DECODE item on.
14 When setting is complete, press the (HOME) [8] button to return to the Home Screen.

50 TASCAM DR-40
4 – Recording
Starting 3/4-channel recording1 Press the RECORD [0] button to begin recording
standby.
NOTEBefore you start recording you can confirm the recording audio file format and sampling frequency at the top of the recording screen, as well as the input sources on the left and the recording project name beneath the meter bars.
2 Press the RECORD [0] button again to start recording.
File names when recording in 4-channel4-channel recording creates two files simultaneously. Two files – one for the built-in mics (channels 1/2) and one for the external mics or equipment (channels 3/4) – are created as a set.
TASCAM_0002S12.WAV
TASCAM_0002S34.WAV
1: Set with the WORD item on the FILE NAME screen2: Recording file base number3: “S” is the source file 4: Assigned channels (“12” is channels 1/2 and “34” is channels 3/4)
Recording playback and input sounds together (overdubbing)
Overdubbing has two modes.Using the overdubbing function, you can mix input signals with an audio file that is played back and record either the combined signals or just the input signal as a new file.
NOTE
• In OVERDUB mode, the pre-recording and auto-recording functions are disabled.
• In OVERDUB mode, you cannot start new files manually.
• You cannot pause in OVERDUB mode. (You cannot use the RECORD [0] button.)
• In OVERDUB mode, the recording format and sampling frequency used are the same as those of the playback file regardless of the settings.

TASCAM DR-40 51
4 – Recording
• Overdubbing and dual recording cannot be used simultaneously.
• In OVERDUB mode, you cannot use the MS decoder.
• If the playback file is a mono file, the recording file will also be mono.
CAUTION
• If the playback files are two 96 kHz WAV/BWF or two MP3 format files, recording cannot be conducted in MIX mode. Mix them down to one file and then OVERDUB again (see “Mixdown” on page 86).
• If the playback file is mono, SEPARATE mode cannot be used for recording. In this case, use MIX mode.
If you press the RECORD [0] button, an "X" will appear next to the file name and an error pop-up message will be shown.
Setting the overdubbing mode1 Press the REC MODE button to open the REC MODE screen. 2 Use the + and – buttons to select REC MODE, and press
the ENTER/MARK or / button. 3 Use the + and – buttons to set it to OVERDUB.
4 Press the . button to return to setting item selection. 5 Use the + and – buttons to select DUB MODE, and press
the ENTER/MARK or / button. 6 Use the + and – buttons to set the overdubbing mode.
DUB MODE Explanation
MIXThe playback signals of the files on channels 1/2 and 3/4 and the input signals are mixed and recorded as a new file. The playback file will not be overwritten.
SEPARATE (default value)
The file on channels 1/2 is played back and a new file is recorded on channels 3/4. The playback signals of channels 1/2 are not recorded.The playback file will not be overwritten.
NOTE
• When a file is recorded using SEPARATE mode, the playback signal is not included in the recording.
• Since a recording made in SEPARATE mode does not include the playback signal, you can record again with the same playback file as many times as you want. You can then listen to and select the best one from multiple recordings afterward.

52 TASCAM DR-40
4 – Recording
7 Press the . button to return to setting item selection. 8 Use the + and – buttons to select SOURCE, and press the
ENTER/MARK or / button.9 Use the + and – buttons to set the input source.
SOURCE Explanation INT MIC (default value)
Record using built-in mics.
EXT IN 1 Record using external inputs.When creating a stereo file, the same sound is added to both L/R channels.
EXT IN 1/2 Record using external inputs.When creating a mono recording, the L channel is recorded.
EXT INDEP. Use two external input channels with independent level setting
10 Press the . button to return to setting item selection. 11 When setting is complete, press the (HOME) [8]
button to return to the Home Screen.
Select the file you want to overdub Use the . and / buttons and the BROWSE screen to
select that files that you want to overdub.
NOTESee “5 – Working with Files and Folders (BROWSE screen)” on page 63 for selecting files using the BROWSE screen.
Start the overdubbing1 Press the RECORD [0] button to set the unit to record
standby.
MIX recording Separate recordingWhen in MIX mode, press the 1/2 [SOLO] button to mute monitoring of the input sound. When in SEPARATE mode, if there are two playback files, press the 3/4 [SOLO] button to switch between the input sound and the playback file. If there is only one file, this mutes the input sound.
2 Press the RECORD [0] button to start overdubbing.
MIX recording Separate recordingWhen recording starts, the indicator lights and the display shows the elapsed and remaining recording times.The following error message appears if the selected file cannot be played back.

TASCAM DR-40 53
4 – Recording
3 To stop recording, press the (HOME) [8] button.
File names when recording in overdubbingWhen overdubbing, file names are generated differently according to the DUB mode setting.
8 SEPARATE mode Playback file
File-A:
TASCAM_0004S12.WAV
The newly recorded file (recorded without the playback signal)
File-B:
TASCAM_0004S34.WAV
If you record again using the same playback file (File-A), the name of File-B above is changed to the file name below (File-C), and the new recording file is given the File-B file name.
File-C:
TASCAM_0004V34t1.WAV
If you record one more time using the same playback file (File-A) (and File-B and File-C above are saved), the file name for File-B changes as shown below, with the number at 6 increased by one, and the new recording file given the File-B file name.
File-D:
TASCAM_0004V34t2.WAV
8 MIX modePlayback file
File-A:
TASCAM_0004S12.WAV
The newly recorded file (recorded with the playback signal (File-A))
File-E:
TASCAM_0005S12.WAV
If you record again using the same playback file (File-A), the file name of the new recording will be as follows.
File-F:
TASCAM_0006S12.WAV

54 TASCAM DR-40
4 – Recording
In this mode, each time you record with the same playback file, the number in item 2 increases by one for the name of each new file. 1: Set with the WORD item on the FILE NAME screen2: Recording file base number3: “S” is the source file and “V” is the virtual file 4: Assigned channels (“12” is channels 1/2 and “34” is channels 3/4)6: Backup number in the virtual file
NOTE
• In OVERDUB SEPARATE mode, the base number of the recording file and “S12” are added to the file name of the playback file.
• If writing files copied from elsewhere is not possible, enable writing using a computer, for example.
CAUTIONIf you overdub record in separate mode a file recorded by this unit with dual recording, its file name will change and it will no longer be handled as a dual recording file. (See “Playback of files recorded using dual recording” on page 78.)
Recording automatically (AUTO REC)This function allows the unit to respond to input sound levels and start and pause recording, as well as set marks and create new files, for example.
1 Press MENU to open the MENU Screen.2 Use the + or – button to select REC SETTING, and press
the ENTER/MARK or / button.REC SETTING screen appears.
3 Use the + or – button to select the MODE and press the ENTER/MARK button or / button.
4 Use the + or – button to set the MODE of the AUTO REC setting.
OFF(Default): OffNEW FILE: Records and pauses automaticallyMARK: Sets marks automatically during recording

TASCAM DR-40 55
4 – Recording
5 Press the . button to select the other item.6 Use the + or – button to select LEVEL and press the
ENTER/MARK button or / button.
7 Use the + or – button to select the level that signal is judged to have been input when it exceeds this level.
Set the value to one of the following selection.-6dB/-12dB (default)/-24dB/-48dB
8 Press the (HOME) [8] button to return to the Home Screen.
9 Press the RECORD [0] button to put the unit into recording standby.Recording starts automatically when the input signal exceeds the LEVEL.
10 The recording mode changes according to the setting of the MODE.NEW FILE:If the input signal level falls below the standard level for more than five seconds, which is set on LEVEL, the unit goes into in recording standby. When the input signal level becomes higher than the standard level, the unit restarts recording on a new file.
MARK:If the input signal level falls below the standard level for more than five seconds, which is set on LEVEL, the unit adds marks when the input signal level becomes higher than the standard level again.
11 Press the (HOME) [8] button to stop automatic recording.
TIPBy using this in combination with the PRE REC function, you can record events without losing the beginnings of sounds.
CAUTION
• Auto-recording does not work in OVERDUB mode.
• When the auto-recording function is on, unless overridden by overdubbing mode, the self-timer cannot be used.
Creating and changeover to a new file during continued recording (Track increment)
You can manually or automatically split a recording by creating a new file. (Track increment)

56 TASCAM DR-40
4 – Recording
Manual track increment during recording You can manually split a recording by creating a new file.
Press the / button while recording.
NOTE
• When new files are created, incremental numbers are added to the end of each project name.
• A new file cannot be created if the total number of files and folders would exceed 5000.
• Files shorter than two seconds cannot be created. If the sampling frequency is 96 kHz, files shorter than four seconds cannot be created.
• If the name of a newly created file would be the same as that of an existing file, the number will be incremented until the new file has a unique name.
• Track increment is not possible in OVERDUB mode.
Automatic track incrementation by set timeWithout pausing recording, a new file can be created automatically during recording when the time set on the TRACK INC screen is reached. Follow these procedures to set the amount of time that triggers track incrementation.
1 Press the MENU button to open the MENU screen.
2 Use the + and − buttons to select the REC SETTING item and press the ENTRY/MARK or / button. The REC SETTING screen opens.
3 Use the + and − buttons to select the TRACK INC item and press the ENTRY/MARK or / button.
Use the + and − buttons to set the automatic track time. Options: OFF (default), 5min, 10min, 15min, 30min, 60min
4. After completing the setting, press the (HOME) [8] button to return to the Home Screen.
CAUTIONA new file cannot be created if the total number of folders and files would exceed 5000.
NOTEDepending on the file format, the amount of recording time will differ for the same file size.
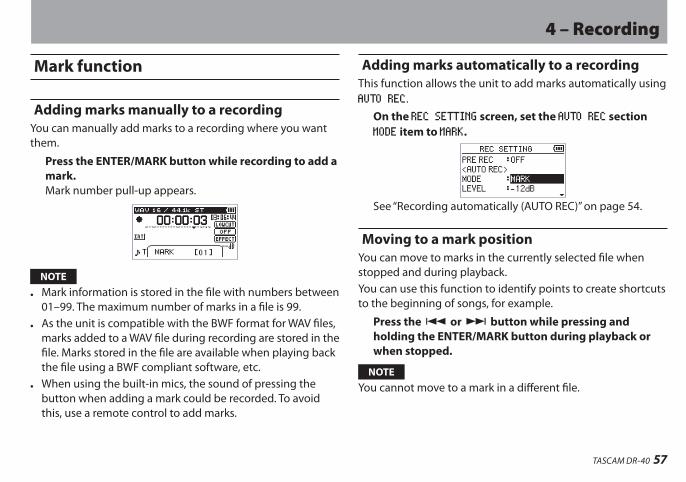
TASCAM DR-40 57
4 – Recording
Mark function
Adding marks manually to a recordingYou can manually add marks to a recording where you want them.
Press the ENTER/MARK button while recording to add a mark.Mark number pull-up appears.
NOTE
• Mark information is stored in the file with numbers between 01–99. The maximum number of marks in a file is 99.
• As the unit is compatible with the BWF format for WAV files, marks added to a WAV file during recording are stored in the file. Marks stored in the file are available when playing back the file using a BWF compliant software, etc.
• When using the built-in mics, the sound of pressing the button when adding a mark could be recorded. To avoid this, use a remote control to add marks.
Adding marks automatically to a recordingThis function allows the unit to add marks automatically using AUTO REC. On the REC SETTING screen, set the AUTO REC section
MODE item to MARK.
See “Recording automatically (AUTO REC)” on page 54.
Moving to a mark positionYou can move to marks in the currently selected file when stopped and during playback.You can use this function to identify points to create shortcuts to the beginning of songs, for example.
Press the . or / button while pressing and holding the ENTER/MARK button during playback or when stopped.
NOTEYou cannot move to a mark in a different file.

58 TASCAM DR-40
4 – Recording
Setting the low cut filterThe low cut filter can reduce noise such as offensive wind noise from air-conditioners and projectors.
1 Press the MENU button to open the MENU Screen.2 Use the + or − button to select REC SETTING, and press
the ENTER/MARK or / button.REC SETTING screen appears.
3 Use the + or − button to select LOW CUT, and press the ENTER/MARK or / button.
4 Use the + or − button to select the cut off frequency of the low cut filter for mic input.Options: OFF (default), 40Hz, 80Hz, 120Hz
CAUTION
• When an external input is selected, the low-cut filter cannot be used.
• Use headphones to monitor when you are recording with a microphone. If you use speakers to monitor, the sound output from the speakers may also be recorded, causing a poor recording and even feedback.
NOTE
LOW CUT can be set when recording/in recording standby.
TIPUse the built-in effects of this unit as necessary on the input source. (See “8 – Using the Effects” on page 87.)
Recording the moment before pushing RECORD (PRE REC)
By using prerecording, when the unit is in recording standby you can record up to two seconds of the signal input before the RECORD [0] button is pushed to start recording.
1 Press the MENU button to open the MENU screen. 2 Use the + or − button to select REC SETTING, and press
the ENTER/MARK or / button.3 Use the + or − button to select PRE REC, and press the
ENTER/MARK or / button.4 Use the + or − button to select ON.
(Default: OFF)

TASCAM DR-40 59
4 – Recording
5 Press the (HOME) [8] button to return to the Home Screen.
TIPBy using this in combination with the AUTO REC function, you can record events without losing the beginnings of sounds.
NOTE
• If the amount of time in record standby is less than two seconds, the sound for that amount of time is recorded.
• The prerecording function is disabled in OVERDUB mode.
Using the AUTO TONE function
The AUTO TONE function can be used to automatically insert a tone signal whenever recording starts and stops.Connect the /LINE OUT jack on the left side of the unit to the external mic input jack of a video camera or digital camera capable of recording video. Then, use the AUTO TONE function to allow both units to record the same tone signals, which can be used to synchronize their files in video editing software.
External mic input jack
Digital SLR camera

60 TASCAM DR-40
4 – Recording
Setting the AUTO TONE function1 Press the MENU button to open the MENU screen.2 Use the + and − buttons to select the REC SETTING
menu and press the ENTER/MARK or / button to open the REC SETTING screen.
3 Use the + and − buttons to select the AUTO TONE item and press the ENTER/MARK or / button.
4 Use the + and − buttons to set when tone signals are inserted.Options: OFF (default), HEAD (recording start only), HEAD+TAIL (recording start and stop)
5 After completing the setting, press the (HOME)[8] button to return to the Home Screen.
NOTEThe icon appears on the recording screen when the auto tone function is on.
CAUTIONWhen recording is stopped by the AUTO REC function, no tone signal will be recorded when it stops.
Setting auto tone lengthYou can set the length of the auto tone.
1 Press the MENU button to open the MENU screen.2 Use the + and − buttons to select the REC SETTING
menu and press the ENTER/MARK or / button to open the REC SETTING screen.
3 Use the + and − buttons to select the TONE SECS item and press the ENTER/MARK or / button.
4 Use the + and − buttons to set the tone length.Options: 0.5SEC., 1SEC.(default), 2SEC., 3SEC.
5 After completing the setting, press the (HOME)[8] button to return to the Home Screen.
Adjusting the AUTO TONE volumeYou can adjust the volume of the AUTO TONE.
1 Press the MENU button to open the MENU screen.2 Use the + and − buttons to select the REC SETTING
menu and press the ENTER/MARK or / button to open the REC SETTING screen.

TASCAM DR-40 61
4 – Recording
3 Use the + and − buttons to select the TONE VOL item and press the ENTER/MARK or / button.
4 Use the + and − buttons to adjust the tone volume.Options: −12dB, −18dB (default), −24dB, −30dB, −36dB
5 After completing the setting, press the (HOME)[8] button to return to the Home Screen.
Self-timer functionLike a camera, the unit has a self-timer to trigger the start of recording after a set period of time.
1 Press RECORD [0] button when stopped or playing back to set the unit in recording standby, and press the PB CONT button.
2 The self-timer icon appears in the recorder status screen, and time is shown on the right.
Each time you press the PB CONT button, the setting changes as follows: OFF (default) q 5S (5 seconds) q 10S (10 seconds) q OFF
3 Set the time period, and press the RECORD[0] or PLAY [7] button.Recording will start after the set time period.
NOTE
• This function cannot be used when recording is paused in the middle of recording.
• Self-timer function is not possible when using the AUTO REC function.
Solo functionPress and hold the 1/2 [SOLO] or 3/4 [SOLO] button to enable the solo function.Use this in 4-channel mode and other cases when multiple inputs are being recorded to monitor only one of the inputs.
You can check the solo status with the input source icons.

62 TASCAM DR-40
4 – Recording
Recording durationThe table below shows the maximum recording time on SD/SDHC/SDXC cards of different capacities for different file formats for recording.
File format (recording setting)SD/SDHC/SDXC card capacity (hours:minutes)
1 GB 2 GB 4 GB 8 GB
WAV/BWF(stereo)
16 bit44.1 kHz 1:41 3:22 6:44 13:2848 kHz 1:33 3:06 6:12 12:2496 kHz 0:46 1:33 3:06 6:12
24 bit44.1 kHz 1:07 2:15 4:30 9:0048 kHz 1:02 2:04 4:08 8:1696 kHz 0:31 1:02 2:04 4:08
MP3(stereo/mono)
32 kbps 44.1 kHz/48 kHz 74:32 149:04 298:08 596:1664 kbps 44.1 kHz/48 kHz 37:16 72:32 149:04 298:0896 kbps 44.1 kHz/48 kHz 24:50 49:40 99:20 198:40
128 kbps 44.1 kHz/48 kHz 18:38 37:16 74:32 149:04192 kbps 44.1 kHz/48 kHz 12:25 24:50 49:40 99:20256 kbps 44.1 kHz/48 kHz 9:19 18:37 37:16 74:32320 kbps 44.1 kHz/48 kHz 7:27 14:54 29:48 59:36
• The recording times shown above are estimates. They might differ depending on the SD/SDHC/SDXC card in use.
• The recording times shown above are not continuous recording times, but rather they are the total possible recording times for the SD/SDHC/SDXC card.
• If the recording time exceeds 24 hours, a new file will be created automatically and recording will continue without pause.
• If recorded in mono in WAV files, the maximum recording time will be double the figures above.
• For dual and 4-channel recording in WAV/BWF format, the recording times are about half those shown above.

TASCAM DR-40 63
On the BROWSE Screen, you can view the contents of the Music Folder, which contains the audio files on the SD card that you can use with the DR-40. On this screen, you can also play and erase selected audio files, create folders, add files to the playlist and so on. (See “Playlist” on page 71.)
TIPIf you connect the DR-40 with a computer by USB, or mount the SD card on a computer using a card reader or other input, you can change the folder structure within the MUSIC Folder and erase files from the computer as you would the contents of a hard drive. Furthermore, you can change file names from the computer.
To open the BROWSE Screen, press the MENU button to open the MENU screen. Use the + or − button to select BROWSE and press the ENTER/MARK or / button.
The contents of the folder that contains the file that was selected on the Home Screen before the BROWSE Screen was opened appears on the display.
Screen navigationOn the BROWSE Screen, folders and music files appear in a hierarchical structure much like they would appear on a computer. On the DR-40, folders can only be used to two levels.
• Use the + or − button to select files and folders.
• When a folder is selected, press the / button to show the contents of that folder.
• When a file or folder is selected, press the . button to exit the currently open folder and go to a higher level in the folder structure.
• When a file or folder is selected, press the QUICK button to open the pop-up window.
• When a file is selected, press the ENTER/MARK or / button to return to the Home Screen and play the file. This folder that contains this file becomes the current folder, and new recorded file will be saved in this folder. If the playback area has been set to FOLDER, this folder becomes the new playback area.
• When a folder is selected, press the ENTER/MARK button to return to the Home Screen. The first file in the folder (shown at the top of the file list) will be played. This folder becomes the current folder, and new recorded les will be saved in this folder. Regardless of the previous setting, the playback area is set to FOLDER, and this folder becomes the new playback area.
5 – Working with Files and Folders (BROWSE screen)

64 TASCAM DR-40
5 – Working with Files and Folders (BROWSE screen)
Icons on the BROWSE screenThe meanings of icons that appear on the BROWSE Screen are as follows.
Root Music Folder (MUSIC)The MUSIC Folder is the highest (root) level folder in the hierarchy shown on the BROWSE Screen.
Audio fileThis icon appears before the names of music files.
Plus folderThis icon shows folders that contain subfolders.
Plain folderThis icon shows folders that do not contain subfolders.
Open folderThe contents of the folder marked with this icon currently appear on this screen.
File operationsSelect the desired audio file on the BROWSE Screen and press the QUICK button to open the pop-up window that is shown below.
Use the + or − button to select the item you want from the following list and press ENTER/MARK button to execute it.
INFOInformation (date/time, size) about the selected file appears. Press the ENTER/MARK button again or press the (HOME) [8] button to return to the BROWSE screen.
ADD LISTAdds the selected file to the playlist. (See “Playlist” on page 71.)

TASCAM DR-40 65
5 – Working with Files and Folders (BROWSE screen)
FILE SWAPFiles recorded during the following recording modes can be swapped.
4CH mode: A file recorded by the built-in mics (channels 1/2) can be swapped with a file recorded by external mics or equipment (channels 3/4).
Example:TASCAM_0002S12.WAV q TASCAM_0002S34.WAV TASCAM_0002S34.WAV q TASCAM_0002S12.WAV
OVERDUB SEPARATE mode: [1] The playback file and a newly recorded file can be
swapped. Example:TASCAM_0004S12.WAV q TASCAM_0004S34.WAV TASCAM_0004S34.WAV qTASCAM_0004S12.WAV
The above is the same as swapping File-A and File-B as described on page 53.
[2] A newly recorded file and a virtual file saved based on it can be swapped.
Example:TASCAM_0004S34.WAV q TASCAM_0004V34t1.WAV
TASCAM_0004V34t1.WAV q TASCAM_0004S34.WAV
The above is the same as swapping File-B and File-C as described on page 53. In addition, since you can choose the virtual file freely when swapping the above, you can also swap File-B and File-D as on page 53. However, you cannot swap two virtual files (for example, File-C and File-D as on page 53).
FILE DELETEA message appears to confirm that you want to delete the file. Press the ENTER/MARK button to erase the file and the (HOME) [8] button to cancel the deletion operation.

66 TASCAM DR-40
5 – Working with Files and Folders (BROWSE screen)
PROJECT DELA pop-up message appears confirming that you want to erase the project containing the selected file. Press the ENTER/MARK button for each project to erase. Press the (HOME) [8] button to cancel deletion.
CAUTIONThis deletes all the files in the selected project.
CANCELThe operation for the selected (highlighted) file is canceled, and the pop-up menu is closed.
NOTEThe pop-up menu can also be closed by pressing the QUICK button.
Folder operationsSelect the desired folder on the BROWSE Screen and press the QUICK button to open the pop-up window that is shown below.
Use the + or − button to select the item you want from the following list and press the ENTER/MARK button to execute it.
SELECTReturns to the Home Screen and selects the first file in the folder. Regardless of the previous setting, the playback area is set to FOLDER, and this folder becomes the new playback area. When recording, files are created in this folder.

TASCAM DR-40 67
5 – Working with Files and Folders (BROWSE screen)
ALL DELA pop-up message appears to confirm that you want to delete all the files in the selected folder at once.Press the ENTER/MARK button to erase the files or press the
(HOME) [8] button to cancel.
NOTEYou cannot erase read-only files and files that are not recognized by this unit.
CANCELThe operation for the selected (highlighted) file is canceled, and the pop-up menu is closed.
NOTEThe pop-up menu can also be closed by pressing the QUICK button.
Creating a new folderIn the file list, NEW FOLDER appears at the bottom.
Select (highlight) NEW FOLDER, and press the ENTER/MARK or / button. A pop-up appears to confirm that you want to create a new folder.
Press the ENTER/MARK button to create a new folder or press the (HOME) [8] button to cancel.Note that the unit supports only a two-level folder structure, and accordingly NEW FOLDER does not exist in the second-level folders.A newly created folder becomes the current one, and new recorded files are saved in this folder. If the playback area has been set to FOLDER, this folder becomes the playback area.

68 TASCAM DR-40
On the Home Screen, you can use the . and / buttons to select the playback file. The files that you can select are determined by the playback area setting.Limiting the playback area makes file selection easier when you have numerous recorded and copied files on the SD card.On the PLAY SETTING Screen, you can select all files, the current folder or the playlist as the playback area. You can also use the BROWSE Screen to set a folder as the playback area.
TIPOn the BROWSE Screen, regardless of the playback area setting, you can select any file on the card that you want.
Adjusting playback volumeThe volume of output through the built-in speaker or the
/LINE OUT connector can be adjusted using the + or − button while the Home Screen is shown.A pull-up volume indicator appears.
Setting the playback area (AREA)Set the playback area for repeat and ordinary playback on the PLAY SETTING screen. 1 Press the MENU button to open the MENU Screen. 2 Use the + or − button to select PLAY SETTING and press
the ENTER/MARK or / button.
3 Use the + or − button to select (highlight) AREA, and press the ENTER/MARK or / button.
4 Use the + or − button to set the playback area.ALL FILESSet the playback area as all files in the Music Folder on the SD card.
6 – Playback

TASCAM DR-40 69
FOLDER (default)Set the playback area as all the files in the currently selected folder.
PLAYLISTSet the playback area as the files in the playlist. (See “Playlist” on page 71.)If there is no playlist defined, a No PLAYLIST pop-up appears.
5 Press the (HOME) [8] button to return to the Home Screen.
NOTEThe current playback area setting appears in the upper left of the Home Screen.
Playback areaindication
Selecting a folder for the playback area (1)Regardless of the current playback area, if you select a folder on the BROWSE Screen, the playback area changes to the selected folder.
1 Press the MENU button to open the MENU screen.2 Use the + or − button to select BROWSE, and press the
ENTER/MARK or / button.BROWSE screen appears.
A file list of the folder that contains the file selected in the Home Screen is displayed.
3 Use the . or / button to select a folder level, and use the + or − button to select a folder.For an explanation of how to use the BROWSE Screen, see “Screen navigation” on page 63.
4 Press the QUICK button to open the following pop-up window.
6 – Playback

70 TASCAM DR-40
6 – Playback
5 Use the + or − button to select SELECT, and press the ENTER/MARK button.The display returns to the Home Screen. The first file in the folder is selected, and the unit is stopped.Regardless of the previous setting, the playback area is set to FOLDER, and this folder becomes the playback area. This folder becomes the current folder, and new recorded files will be saved in this folder.
Selecting a folder for the playback area (2)When the playback area is set to FOLDER, if you select a file on the BROWSE Screen, the folder that contains the selected file becomes the playback area.
1 Press the MENU button to open the MENU screen.2 Use the + or − button to select BROWSE, and press the
ENTER/MARK or / button.BROWSE screen appears.
A file list of the folder that contains the file selected in the Home Screen is displayed.
3 Use the . or / button to select a folder level, and use the + or − button to select the folder that contains the file you want to play.For an explanation of how to use the BROWSE Screen, see “Screen navigation” on page 63.
4 Press the / button.5 Use the + or − button to select the desired file.6 Press the ENTER/MARK or / button.
The display returns to the Home Screen, and the selected file starts playing. This folder becomes the current folder, and new recorded files will be saved in this folder. In addition, the folder that contains this file becomes the playback area regardless of the playback area folder set previously.

TASCAM DR-40 71
6 – Playback
PlaylistYou can make a list of files for playback (playlist). On the PLAY SETTING Screen if you select PLAYLIST for the AREA item, you can set playback to just the files in your playlist.
Adding files to the playlist1 Press the MENU button to open the MENU screen. 2 Use the + or − button to select BROWSE, and press the
ENTER/MARK or / button. BROWSE screen appears.
NOTEFor an explanation of how to use the BROWSE Screen, see “Screen navigation” on page 63.
3 Use the + or − button to select the file you want to add to the playlist, and press the QUICK button.
NOTEFor details about how to select the file, see “Screen navigation” on page 63.
A pop-up window appears.
4 Use the + or – button to select ADD LIST.
5 Press the ENTER/MARK button.The file is added to the playlist and the popup window closes.
6 Repeat steps 3, 4, and 5 as necessary to add more files to the playlist. The files are numbered in the order that they are added.
Editing the playlistYou can view and edit the playlist you have made on the PLAYLIST screen.You can also use this screen to play files and to edit the playlist.
1 Press the MENU button to open the MENU screen.2 Use the + or − button to select BROWSE, and press the
ENTER/MARK or / button.BROWSE screen appears.
3 Use the . button to move to the top folder level.

72 TASCAM DR-40
6 – Playback
4 Use the + or − button to select PLAYLIST, and press the / button.PLAYLIST screen appears.
5 Use the + or − button to select the file you want to edit, and press the QUICK button.A pop-up window appears.
6 Use the + or − button to select an item, and press the ENTER/MARK button to cause the unit to work as follows.
ALL CLRA confirmation message appears to confirm that you want to remove all the files from the playlist. Press the ENTER/MARK button to remove all the files or the (HOME) [8] button to cancel this operation.For this operation, it does not matter which file you select in step 5. All the files are removed from the playlist, but they are not erased from the SD card.
DELETERemove the selected file from the playlist.The file is removed from the playlist, but it is not erased from the SD card.
MOVESelect this to change the order of files in the playlist.In addition to the file name, the file number also appears highlighted in inverse.
• Use the + or − button to move the selected file to a different position in the playlist.

TASCAM DR-40 73
6 – Playback
In the above example, the 4th file has been moved to the 3rd file position.
• Press the ENTER/MARK button. The display returns to the PLAYLIST screen.
CANCELThe operation for the selected file is canceled.
Selecting files for playback (skip)When the Home Screen is open, press the . and / buttons to select the file for playback. If you press the . button when the playback position is located at the middle of a file, it will return to the beginning of that file. If you press the . button when located at the beginning of a file, the playback position will skip to the beginning of the previous file. If you press the / button when located at the beginning of or middle of a file, the playback position will skip to the beginning of the next file.
NOTE
• Only files in the playback area that is currently set can be selected for playback.
• The track name, file number and other file information for the currently playing file appear on the display.
• The 8 icon appears on the display when playback is stopped at the beginning of a file, and the 9 icon appears when playback is stopped in the middle of a file (paused).
• When the IN and OUT points are set in the file, pressing the . or / button skips to those points. Press the button repeatedly until the file you want is selected.
Playback
When the Home Screen is open and playback is stopped, press the PLAY [7] button to start playback.
NOTE
• Files in the playback area can be played.
• You can also choose files for playback by name on the BROWSE screen.

74 TASCAM DR-40
6 – Playback
Pausing When the Home Screen is open and a file is playing
back, press the (HOME) [8] button to pause playback at the current position. (PAUSE)
Press the PLAY [7] button again to restart playback from that position.
Stopping When the Home Screen is open and a file is playing
back, press the (HOME) [8] button to pause playback, and press the (HOME) [8] button to return to the beginning of the file. (STOP)
Rewinding and fast-forwarding (search) When the Home Screen is open and a file is playing
back or stopped, press and hold the . or / button to rewind or fast-forward and search the playback file.
NOTEPress and hold the . or / button to accelerate the search speed.
Repeat playback (REPEAT)You can repeatedly playback one file or multiple files within a designated area.
1 Press the MENU button to open the MENU screen. 2 Use the + or − button to select PLAY SETTING, and press
the ENTER/MARK or / button. PLAY SETTING screen appears.
3 Use the + or − button to select REPEAT, and press the ENTER/MARK or / button.
4 Use the + or − button to select a repeat mode.CONTINUOUS (default):All files in the playback area are played in sequence one time. (This setting is the ordinary playback mode.)SINGLE:The selected file is played once without repeating. The icon appears on the Home Screen.

TASCAM DR-40 75
6 – Playback
1 REPEAT:The current file is played repeatedly. The icon appears on the Home Screen.ALL REPEAT:All files in the selected playback area are played back repeatedly. The icon appears on the Home Screen.
NOTEIf you start loop playback, the repeat operation automatically switches to CONTINUOUS if it is in SINGLE, 1 REPEAT, or ALL REPEAT mode.5 Press the (HOME) [8] button to return to the Home
Screen.
Special Playback Control FunctionsThe unit has some special playback control functions. For example, you can playback a selected section of a file repeatedly or change the tempo of music without changing the pitch. You can also enhance the perceived overall sound pressure for comfortable listening when the playback is indiscernible.These playback control functions serve for effective practice on musical instruments and analysis of musical passages.
Playback Control ScreenUse the Playback Control screen to set the playback control functions.While the Home Screen is open when stopped or playing back, press the PB CONT button to open the Playback Control screen.
This screen can be used to make settings for the playback speed and loop playback.After you finish making settings on this screen, press the (HOME) [8] button (or press the PB CONT button) to return to the Home Screen.

76 TASCAM DR-40
6 – Playback
Repeated Playback of Selection (Loop Playback)With this function, you can continuously repeat (loop) the playback of a selection that you make.
1 While the Home Screen is open when stopped or playing back, press the PB CONT button to open the Playback Control screen.
2 Press the PLAY [7] button to start playback, and press the ENTER/MARK button at the start point of the section that you want to play repeatedly. This position is set as IN (start) point. Then, appears at the corresponding point on the playback indicator bar.
3 Press the ENTER/MARK button at the end point of the section that you want to play repeatedly. This position is set as OUT (end) point. Then, appears at the corresponding point on the playback indicator bar.
Loop playback of the section between the IN and OUT points starts.During loop playback the indicator also appears.
Press the PB CONT button to return to the Home Screen while maintaining the I/O and loop settings effective. Even after returning to the Home Screen, the icon
continue to be shown, along with the and marks shown at the points corresponding to the IN and OUT points on the playback indicator bar.
NOTE
• The pop-up message of I/O Too Short appears if the section between the IN and OUT points is too short. Set them again. The section should be 1 second or longer.
• Press the ENTER/MARK button again to clear the IN and OUT points.
• To stop loop playback, press the MENU button when the Playback Control screen is open. Press the MENU button again to start loop playback between the set IN and OUT points.
• You cannot set the IN and OUT points in different files.
• The previous IN and OUT point settings are lost when you set the IN point on a different file.
• Accurate assignment of IN and OUT points is not always possible for variable bit rate (VBR) MP3 files.

TASCAM DR-40 77
6 – Playback
Changing the playback speed (VSA)The unit features the VSA (Variable Speed Audition) function that changes the playback speed without changing its pitch.
NOTEVSA function cannot be used when a file that was recorded at 96 kHz sampling frequency or a file that was recorded in a mode other than MONO/STEREO or OVERDUB/MIX is selected. However, will be shown in the Home Screen and the setting of playback speed can be changed. To apply the adjustment of playback speed, select a file recorded with a sampling frequency of 44.1 kHz or 48 kHz by using the . or / button.Press the + or – button after opening the Playback Control screen to increase or decrease the playback speed.
The VSA function can change the playback speed in the range from 0.5 (50%) to 1.5 (150%) times (in 0.1 increments) the normal speed.Press the PB CONT button to return to the Home Screen while maintaining the set playback speed effective. The or icon appears if the playback speed is set to a value larger or smaller than 1.0, respectively.
Using the playback equalizer (PLAY EQ)You can choose from different sound types to enhance the listenability (PLAY EQ: playback equalizer).Set the playback equalizer in the PLAY SETTING screen.
1 Press the MENU button to open the MENU screen. 2 Use the + or − button to select PLAY SETTING, and press
the ENTER/MARK or / button. PLAY SETTING screen appears.
3 Use the + or − button to select PLAYEQ, and press the ENTER/MARK or / button.
4 Use the + or − button to set the equalizer. TREBLE, MIDDLE, and BASS indicate that adjustment in the high, middle, or low frequency range is enabled, and + and – indicate that the sound level in that range is increased or decreased, respectively.Options: OFF (factory setting), TREBLE +, TREBLE -, MIDDLE +, MIDDLE -, BASS +, BASS -
5 When finished, press the (HOME) [8] button to return to the Home Screen.

78 TASCAM DR-40
6 – Playback
Moving back a few seconds for replay (jump-back playback)
Press the PLAY [7] button during playback to move back a few seconds (adjustable) and restart playback. (Jump-back playback). If you find a favorite passage of music or lyrics during playback, press the PLAY [7] button to go back a few seconds and replay that passage.The jump-back time is set as a JUMPBACK setting.
1 Press the MENU button to open the MENU screen. 2 Use the + or − button to select PLAY SETTING, and press
the ENTER/MARK or / button. PLAY SETTING screen appears.
3 Use the + or − button to select JUMPBACK, and press the ENTER/MARK or / button.
4 Use the + or − button to set the jump-back time.The setting options include 1SEC. (1 second) to 10SEC. (10 seconds) in increments of 1 second, and 20SEC. (20 seconds), and 30SEC. (30 seconds) (default: 3SEC.).
5 When finished, press the (HOME) [8] button to return to the Home Screen.
Playback of files recorded using dual recording
When dual recording has been used, press and hold the 1/2 [SOLO] button to select the main recording file or press and hold the 3/4 [SOLO] button to select the backup recording file.The file will be played for the input source that has an icon with a dark background.
NOTEThis function (using the 1/2 [SOLO] and 3/4 [SOLO] buttons to switch between files) finds the files by the first 11 characters of file names. If file names are changed, this function will not work.

TASCAM DR-40 79
6 – Playback
OVERDUB INPUT MUTE function (during playback)
SEPARATE MODEPress the 3/4 [SOLO] button to switch between the input sound and the 3/4 track playback sound. After overdubbing, you can use this to listen to the recorded file.
MIX MODEPress the 1/2 [SOLO] button to mute the input sound.
Solo function Press and hold the 1/2 [SOLO] button or 3/4 [SOLO] button to enable the solo function. Use for projects that have been recorded in 4-channel mode and in other cases when multiple files are being played back to monitor only one of the files.You can check the solo status with the track status indications.

80 TASCAM DR-40
7 – Quick Operations
Features of the QUICK buttonThe QUICK button serves for the following purposes.
• While the Home Screen is open and when stopped or paused, opens the Quick menu screen for deletion, division, and level alignment (enhancing the perceived overall sound pressure) of the current playback file. During playback, the Quick menu screen appears only for level alignment.
• While the Home Screen is open during recording standby, the Quick menu screen appears for the setting of level control or the left-right channels for the built-in stereo microphones.
• A pop-up menu to work with a selected file or folder appears if the BROWSE screen or the PLAYLIST screen is open.
NOTEThe QUICK button is disabled if the MENU screen, OTHERS submenu, REC SETTING screen, or a settings screen is open for various settings.
Actions of the QUICK button for different screens and states are as follows.
Screen State Action
Home
Stop/Pause Opens Quick menu for deletion, division, level alignment, and mixdown
Playback Opens Quick menu only for level alignment
Recording Standby
Opens Quick menu for level control and MIC LR swap
Playback Control Opens Quick menu only for level alignment
BROWSE, PLAYLIST Opens pop-up menu for working with selected file (or folder)
MENU screen, OTHERS submenu, Other settings screens
—
MIXER screen Turn MS DECODE on/off and select channels 1/2 and 3/4

TASCAM DR-40 81
Quick menu screenTo show the Quick menu screen, press the QUICK button while the Home Screen is open. The contents of this screen depend on the state of the unit at the time when the QUICK button is pressed.
When stopped with the Home Screen openDeletion, division, and level alignment of the current playback file can be selected.
DELETE: The current file can be deleted. (See “Deleting the selected file (Quick Delete)” on page 82.)DIVIDE: The current file can be divided.(See “Dividing the selected file (DIVIDE)” on page 83.) AUTO DIVIDE: The current file can be divided automatically. (See “Dividing the selected file automatically at marks (AUTO DIVIDE)” on page 84.)LEVEL ALIGN: The perceived overall sound pressure can be increased to
enhance listenability. (See “Increasing the perceived overall sound pressure to enhance listenability (Level Alignment)” on page 85.)MIX DOWN:This function combines four channels (with a file each for channels 1/2 and channels 3/4) into one 2-channel L/R file. When using this, you can make effect level, volume level and stereo position settings freely on the MIXER screen. (See “Mixdown” on page 86.)
During playback with the Home Screen open, or while the Playback Control screen is openOnly level alignment can be selected.
During recording standby with the Home Screen openYou can select the settings of level control or left-right channels for the built-in stereo microphones.
7 – Quick Operations

82 TASCAM DR-40
7 – Quick Operations
Select LEVEL CTRL, and press the ENTER/MARK button to open the level control setting pop-up window.
In this window, you can choose from the following three level control options.PEAK REDUCTION: When the input sound is too large, the input level is decreased automatically to an appropriate level. AUTO LEVEL: When the input sound is too small or too large, the input level is increased or decreased, respectively, automatically to an appropriate level.LIMITER: This prevents distortion of sound due to sudden excessive input.For details of the level control function, see “Using the Level Control Function” on page 42.
NOTEThe input level cannot be changed if the level control function is set to AUTO LEVEL.
Closing the Quick menu screenPress the QUICK button to close the Quick menu screen.
Deleting the selected file (Quick Delete)The currently selected file can be deleted without using the BROWSE screen.1 To delete a file, select it using the . or / button.2 Open the Quick menu screen by pressing the QUICK
button while the Home Screen is open when stopped.
3 Use the + or − button to select DELETE.4 Press the ENTER/MARK button. A confirmation screen
for file deletion appears.
5 Press the ENTER/MARK button to delete the file, or press the (HOME) [8] button to cancel the deletion.

TASCAM DR-40 83
7 – Quick Operations
Dividing the selected file (DIVIDE)A recorded file can be divided into two at a specified position.
1 Select a file to be divided using the . or / button or the BROWSE screen.
2 While the Home Screen is open when stopped, press the QUICK button to show the Quick menu screen.
3 Use the + or − button to select DIVIDE, and press the ENTER/MARK button.DIVIDE screen appears.
4 Use the + or − button to specify the position for file division, and press the RECORD [0] button. The following pop-up window appears.
5 Press the ENTER/MARK button to divide the file. Or press the (HOME) [8] button to return to the DIVIDE screen without dividing the file.
NOTE
• When the DIVIDE screen is open, you can press the PLAY [7] button and set the divide position while playing the file.
• When the DIVIDE screen is open, press the PLAY [7]button to pause/resume playback and press the . or / button to move to the beginning or the end of the playback file. Adjust the position for file division using the + or − button. Press and hold the + or − button to move the position continuously.
• After dividing a file, two new files with ”a” and ”b” added to the end of the original file name are created.(4-channel recording file example)
File names before dividingTASCAM_0003S12.wavTASCAM_0003S34.wav
File names after dividing TASCAM_0003aS12.wav (part before division point)TASCAM_0003aS34.wav (part before division point)TASCAM_0003bS12.wav (part after division point)TASCAM_0003bS34.wav (part after division point)
• MP3 files cannot be divided.

84 TASCAM DR-40
7 – Quick Operations
• If the SD card has insufficient open space, division might not be possible.
• Division is not possible if the file name would become more than 200 characters long.
• Division is not possible if a file that already exists has the same name as the name that would be given to a new file created by division.
TIPAdd marks during recording at positions where you want to divide a file. (See “Mark function” on page 57.)
Dividing the selected file automatically at marks (AUTO DIVIDE)
You can automatically divide a file that has marks added during recording into multiple files.
1. Select a file to be divided using the . and / buttons or the BROWSE screen.
2. While the Home Screen is open when stopped, press the QUICK button to open the Quick menu.
3. Use the + and − buttons to select AUTO DIVIDE, and press the ENTER/MARK button. The AUTO DIVIDE screen will open.
NOTEIf the file does not have any marks, a Can't Divide. No Mark pop-up message appears,
4. Press the ENTER/MARK button to divide the file and return to the Home Screen.Press the (HOME) [8] button to return to the Home Screen without dividing the file.
NOTEAfter dividing a file, new files with "_XX" added to the end of the original file name are created.
Example of 4-channel recording modeFile name before division
TASCAM_0003S56.wav TASCAM_0003S78.wav

TASCAM DR-40 85
7 – Quick Operations
File names after division TASCAM_0003S56_01.wav (part before division point)TASCAM_0003S78_01.wav (part before division point) TASCAM_0003S56_02.wav (part after division point)TASCAM_0003S78_02.wav (part after division point)
• MP3 files cannot be divided.
• Division will not be possible if the time between any marks is less than two seconds.
• If the SD card has insufficient open space, division might not be possible.
• Division is not possible if the file name would become more than 200 characters long.
• Division is not possible if the name that would be given to a new file is the same as the name of an existing file.
• If you divide a project that has virtual files, those files will also be divided simultaneously.
TIPAdd marks during recording at positions where you want to divide a file. (See “Mark function” on page 57.)
Increasing the perceived overall sound pressure to enhance listenability (Level Alignment)
If the playback sound is very small and indiscernible, the perceived overall sound pressure can be increased to enhance listenability. (Level Alignment)
1 While the Home Screen is open when stopped or playing back, press the QUICK button to open the Quick menu screen.
When stopped During playback
2 Use the + or − button to select LEVEL ALIGN and press the ENTER/MARK button.
3 A screen to enable/disable the level alignment function appears.

86 TASCAM DR-40
7 – Quick Operations
4 Use the + or − button to select ON, and press the ENTER/MARK button to enable the level alignment function. Or select OFF and press the ENTER/MARK button to disable the level alignment function.
NOTEThe level alignment function may not be able to achieve sufficient effect depending on the source of the sound (example: a music file whose sound pressure has been already adjusted).
Mixdown This function combines four channels (a file each for channels 1/2 and channels 3/4) into one 2-channel L/R file.Before mixing down, you can make effect level (SEND), stereo position (PAN, or BAL for mono) and volume level (LVL) settings freely on the MIXER screen (see “9 – Mixer” on page 89).
1 Use the . and / buttons or the BROWSE screen to select the file that you want to mix down.
2 From the Home Screen when stopped, press the QUICK button to open the Quick Menu screen.
3 Use the + and – buttons to select MIXDOWN, and press the ENTER/MARK button to open the MIXDOWN screen.
4 Press the ENTER/MARK button to start mixdown.
5 After mixdown completes, the playback Home Screen opens with the mixed down file ready to play. (The project name number is the final number before mixdown increased by one.)
In this state, you can press the PLAY [7] button to start playback of the mixed-down file.
NOTEIf the playback file is mono, the file created will also be mono. When mixing down mono files, set the BAL knob on the MIXER window to L12.

TASCAM DR-40 87
8 – Using the EffectsThe DR-40 has built-in effects that can be applied to the input signal during recording and practice. They can also be applied to the output signal during playback.The icon appears as light letters on a dark background.
Eects ON indication
Setting the effect
1 Press the MENU button to open the MENU screen.2 Use the + or − button to select OTHERS, and press
the ENTER/MARK or / button to open the OTHERS submenu.
3 Use the + or – button to select EFFECT, and press the ENTER/MARK or / button. The EFFECT screen appears.
As shown in the above illustration, there are four setting items on the EFFECT screen.
Set each item using the . or / buttons or + or – buttons.
EFFECT:Use this to turn the effect on or off.The default setting is OFF.
PRESET:Select the preset for the effect being used. (default: Hall 1)See the “Effects Preset List” on page 88 for details about the preset effects.
LEVEL:Use this to change the output level of the preset effect selected in the PRESET item.Setting range: 0 - 20 (default: 10)
SOURCE:You can choose one of the following as the sound that the effect is applied to (default value: MIX).
SOURCE Explanation MIX (default value)
Apply the effect to the output of an overdubbed recording or a mixed down recording
INT MIC ST Apply the effect to signals input through the built-in mics
EXT IN 1/2 Apply the effect to signals input through external mics or equipment

88 TASCAM DR-40
When MIX is selected, you can set the level (SEND) of each signal sent to the effect on the MIXER screen. (See “9 – Mixer” on page 89.)
4 Use the + or – button to select the desired item and press the ENTER/MARK button or / button to access that item’s settings.
5 Use the + or – button to set the desired value.6 Press the . button when you are done making the
setting to return to item selection status.7 Press the (HOME) [8] button to return to the Home
Screen.
NOTEWhen the sampling frequency is set to 96 kHz, or a WAV file with a sampling frequency of 96 kHz is played, the built-in effects do not work.However, you can still set the built-in effects.
Effects Preset List
Preset name Effects
Hall 1 (default value) This is a bright reverb modeled after a large hall-like space.
Hall 2 This is a warm reverb modeled after a large hall-like space.
Room This reverb is modeled on a small indoor space.
Studio This reverb is modeled on a studio-like space.Plate 1 This is a bright plate reverb.Plate 2 This is a warm plate reverb.
8 – Using the Effects

TASCAM DR-40 89
This recorder has a mixer function that allows you to set the built-in effect, stereo balance and volume level for each channel. During mixdown (see “Mixdown” on page 86) and playback, you can make fine adjustments to the recorded sound by using this.
Making mixer settings
1 From the Home Screen, press the MIXER button to open the MIXER screen.
During 4-channel file playback
During overdubbing (mix) mode
During 4-channel file playback (MS decoding of channels 3/4)
2 Use the . and / buttons and the + and – buttons to move to and select the item that you want to adjust. Each column is a channel and each row is a setting type.
3 Press the ENTER/MARK button to open the setting name and value in a pop-up window at the top right.
4 Use the + and – buttons to change the setting value.Item Setting range Operation details
SEND 0–100Adjusts the send level of the selected effect is used on the signal (see “8 – Using the Effects” on page 87)(0 (min.)–100 (max.))
PAN/BAL L12–C–R12 Adjusts left-right balance
(L12 (left)–C (center)–R12 (right))
LEV 0–100 Volume level(0 (min.)–100 (max.))
5 Press the ENTER/MARK button to return to the previous screen where you can select the next setting that you want to adjust.
NOTE
• The mixer can be used when recording, in recording standby, playing back, paused or stopped.
9 – Mixer

90 TASCAM DR-40
9 – Mixer
• Even when the MIXER screen is open, you can use the PLAY [7] button to start playback and the (HOME) [8] button to pause playback.
• If MS DECODE is set to ON on the REC MODE screen, the MIXER screen QUICK menu MS DECODER item will show Using by Input and will not be usable.
Using the MS decoder When using MS mics to record, you have two decoding options. You can decode the input sound as you record or you can record as is and decode during playback.
Decoding the input sound as you record 1 Connect MS mics to the external input connectors. Connect the mid mic to the EXT MIC L connector and
the side mic to the EXT MIC R connector. Decoding cannot be conducted properly if the mid and
side mics are connected in reverse. 2 On the REC MODE screen, set the REC MODE to STEREO,
DUAL or 4CH, and set the SOURCE to EXT IN 1/2 (in 4CH mode, this item does not appear).
3 Set MS DECODE to ON. 4 Start recording to record a decoded MS signal.
Decoding the playback sound 1 Select a file that was recorded by MS mics with MS
DECODE set to OFF. 2 When the Home Screen is open, press the MIXER button
to open the MIXER screen. 3 Press the QUICK button to select the CH to be used by
the MS decoder.
4 Start playback to decode during playback.

TASCAM DR-40 91
9 – Mixer
MS decoder settingsUse the WIDE parameter on the MIXER screen to adjust the width of the sound. To decode while recording, open the MIXER screen during recording standby. When decoding the input, MS INPUT appears on the MIXER screen. When decoding playback, MS MONITOR appears on the MIXER screen.
Item Setting range Operation detailsWIDE 0–100 Adjusts the width of the sound
At “0”, mid is 100%. As the number increases, the amount of side signal increases.
NOTEIf MS DECODE is set to ON on the REC MODE screen, it cannot be selected on the MIXER screen (Using by Input appears).To use the MS decoder during playback, set MS DECODE to OFF on the REC MODE screen.

92 TASCAM DR-40
10 – Tuning a Musical Instrument (Tuner)TASCAM DR-40 has a built-in tuner. The unit receives a sound from a musical instrument and allows you to tune it accurately on the tuning meter shown in the display.
Using the tuner
Setting the tuner1 Press the MENU button to open the MENU screen. 2 Use the + or − button to select OTHERS, and press
the ENTER/MARK or / button to open the OTHERS submenu.
3 Use the + or − button to select TUNER, and press the ENTER/MARK or / button. TUNER screen appears.
The TUNER screen contains the CALIB option to set the fundamental frequency of the A. Press the . or / button to decrease or increase the fundamental frequency.Setting range: 435Hz - 445Hz (in 1 Hz increments, default: 440Hz)
NOTEWhen the TUNER screen is open, press the ENTER/MARK button to reverse the screen orientation.

TASCAM DR-40 93
Tuning a musical instrument1 Open the TUNER screen, and sound a note near the unit.2 Tune the instrument so that the target pitch name
appears and the center of the tuner lights.
Bars appear to the left if the pitch is lower than the target or to the right if higher. The bars increase as the pitch shifts away from the target.
NOTEThe tuner can only be used with the built-in mics.
10 – Tuning a Musical Instrument (Tuner)
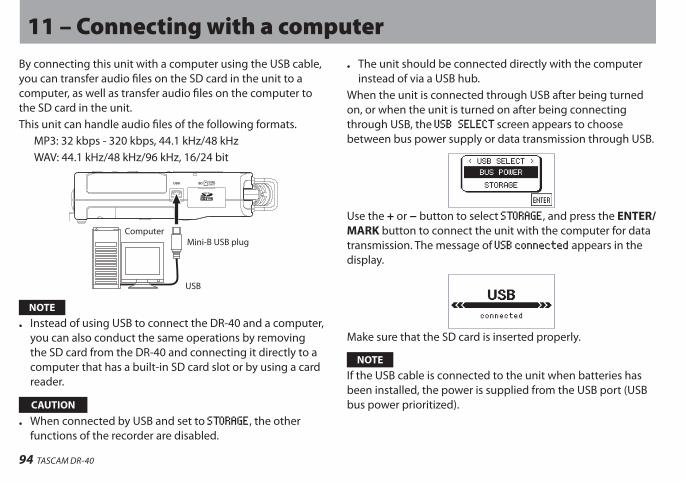
94 TASCAM DR-40
11 – Connecting with a computerBy connecting this unit with a computer using the USB cable, you can transfer audio files on the SD card in the unit to a computer, as well as transfer audio files on the computer to the SD card in the unit. This unit can handle audio files of the following formats.
MP3: 32 kbps - 320 kbps, 44.1 kHz/48 kHzWAV: 44.1 kHz/48 kHz/96 kHz, 16/24 bit
USB
Mini-B USB plugComputer
NOTE
• Instead of using USB to connect the DR-40 and a computer, you can also conduct the same operations by removing the SD card from the DR-40 and connecting it directly to a computer that has a built-in SD card slot or by using a card reader.
CAUTION
• When connected by USB and set to STORAGE, the other functions of the recorder are disabled.
• The unit should be connected directly with the computer instead of via a USB hub.
When the unit is connected through USB after being turned on, or when the unit is turned on after being connecting through USB, the USB SELECT screen appears to choose between bus power supply or data transmission through USB.
Use the + or − button to select STORAGE, and press the ENTER/MARK button to connect the unit with the computer for data transmission. The message of USB connected appears in the display.
Make sure that the SD card is inserted properly.
NOTEIf the USB cable is connected to the unit when batteries has been installed, the power is supplied from the USB port (USB bus power prioritized).

TASCAM DR-40 95
If an SD card is not properly inserted before making the USB connection, Can't Save Data appears on the screen. This unit appears on the computer screen as external volume named DR-40.
Transferring files to a computer
1 Click the DR-40 drive on the computer screen to show the MUSIC and UTILITY folders.
2 Open the MUSIC folder and drag and drop the files that you want to transfer to the computer to destinations of your choice.
Transferring files from a computer
1 Click the DR-40 drive on the computer screen to show the MUSIC and UTILITY folders.
2 Drag and drop files on the computer that you want to transfer to the unit to the MUSIC folder.
TIP
• You can manage the MUSIC folder from the computer.
• You can create subfolders in the MUSIC folder up to the second level for use with this unit. The DR-40 cannot recognize subfolders and audio files on the third level or below.
• Since you can set the DR-40 to only play the contents of a specific folder, you can organize files into genres, artists or other categories as you like.
• If you name the subfolders and music files, these names will appear on the screen of this unit.
Disconnecting from a computerBefore disconnecting the USB cable, use the proper procedures for your computer to unmount the DR-40 (as an external drive). The power turns off after disconnecting the USB cable. See the computer’s operation manual for instructions about how to unmount an external drive.
11 – Connecting with a computer

96 TASCAM DR-40
12 – Settings and Information
Viewing File InformationUse the INFORMATION Screen to view various types of information about your DR-40.
1 Press the MENU button to open the MENU screen. 2 Use the + or − button to select OTHERS, and press
the ENTER/MARK or / button to open the OTHERS submenu.
3 Use the + or – button to select INFORMATION, and press the ENTER/MARK or / button.
The INFORMATION screen contains the following three pages. Use the + or − button to move through the pages.
File information page (FILE)Shows information about the currently loaded file.
Card information page (CARD)Shows the use status of the currently inserted SD card.
System information page (SYSTEM)Shows the unit’s system setting information and firmware version.
File information pageThe FILE page shows information about the currently selected file.
WAV, BWF or MP3Shows the audio file type.For WAV or BWF files, bit length, stereo/mono, and sampling frequency (Hz) also appear.For MP3 files, the bit rate (kbps), CBR (constant bit rate) or VBR (variable bit rate) type, and sampling frequency (Hz) also appear.
TITLEShows the file name. If an MP3 file has ID3 tag title information that information appears.
DATE Date of file creation
SIZE File size

TASCAM DR-40 97
Card information pageThe CARD page shows the status of the currently inserted SD card.
TOTAL MUSICShows the number of playable files contained by the Music Folder.
TOTAL FOLDERShows the total number of folders in the Music Folder.
TOTAL SIZE Shows the total SD card capacity.
REMAIN SIZE/USED SIZEShows the amount of unused/used capacity on the SD card.Press the . or / button to switch between REMAIN SIZE and USED SIZE.
System information pageThe SYSTEM page shows information about the DR-40’s system settings and firmware version.
AUTO PWR SAVEThis shows the setting of the automatic power saving function.
BACKLIGHTShows the automatic backlight OFF setting.
BATTERYShows the battery type options.
System Ver.Shows the system firmware version.
12 – Settings and Information

98 TASCAM DR-40
12 – Settings and Information
System Settings and FormattingFrom the SYSTEM Screen, you can change various settings to optimize the device for your use environment and other requirements. You can also initialize the unit and format the SD card.
1 Press the MENU button to open the MENU screen. 2 Use the + or − button to select OTHERS, and press
the ENTER/MARK or / button to open the OTHERS submenu.
3 Use the + or – button to select SYSTEM, and press the ENTER/MARK or / button.SYSTEM screen appears.
The following settings can be made for the items on the SYSTEM screen. Use the . or / button and the + or − button to set each item.
Setting the automatic power saving functionUse the AUTO PWR SAVE item to set the time before the unit power automatically turns OFF after the last activity or use when powered by the battery.Options: OFF (factory setting—the unit does not automatically turn OFF), 3min, 5min, 10min, 30min
Setting the backlightUse BACKLIGHT to set the time until the backlight automatically turns OFF after the last operation when powered by the internal battery.Options: OFF (turned off), 5SEC. (factory setting), 10SEC., 15SEC., 30SEC., ALWAYS (always on)
Adjusting the display contrastUse CONTRAST to adjust the display contrast.Options: 1–20 (factory setting: 5)
Setting the type of AA batteriesUse BATTERY TYPE to set the type of the AA batteries that you are using. This setting is used to show the amount of remaining battery charge and determine if the unit has enough power for normal operation.Values: ALKAL (alkaline batteries, default), Ni-MH (nickel-metal hydride batteries)

TASCAM DR-40 99
12 – Settings and Information
Setting the phantom power voltageUse the PHANTOM VOLT item to set the voltage of the phantom power supplied when external mics that require it are connected. Options: +24V, +48V (factory setting)
Setting the languageUse the LANGUAGE item to set the language shown on the display.
1. Use the + or − button to select the LANGUAGE item and press the ENTER/MARK button.Options
ENG: use English日本語: use JapaneseFRA: use FrenchESP: use SpanishDEU: use GermanITA: use ItalianRUS: use Russian中文: use Chinese
2. Press the ENTER/MARK button to open a pop-up confirmation window.
3. Press the ENTER/MARK button to confirm the language selection. To cancel language selection, press the ¤ (HOME) [8] button.
Restoring the factory settingsUse the INITIALIZE item to restore the various settings of this unit to their factory settings.
1 Use the + or − button to select INITIALIZE, and press the ENTER/MARK or / button to highlight Exec.
2 Press the ENTER/MARK button again to open a confirmation pop-up window.
3 Press the ENTER/MARK button to initialize the unit. Press (HOME) [8] to cancel initialization.

100 TASCAM DR-40
12 – Settings and Information
Using QUICK FORMATUsing QUICK FORMAT erases all music files on the card and automatically creates new MUSIC and UTILITY folders as well as the “dr-1.sys” file that is necessary to use the SD card with the DR-40.
1 Use the + or − button to select QUICK FORMAT, and press the ENTER/MARK or / button to highlight Exec.
2 Press the ENTER/MARK button to open a pop-up confirmation window.
3 Press the ENTER/MARK button to execute the quick formatting, or press the (HOME) [8] button to cancel formatting.
Using ERASE FORMATUse the ERASE FORMAT item to completely format the SD card.Full formatting checks the memory for errors while formatting, so it takes more time than quick formatting.Using ERASE FORMAT erases all music files on the card and automatically creates new MUSIC and UTILITY folders as well as the “dr-1.sys” file that is necessary to use the SD card with the DR-40.
1 Use the + or − button to select ERASE FORMAT, and press the ENTER/MARK or / button to highlight Exec.
2 Press the ENTER/MARK button to open a pop-up confirmation window.
3 Press the ENTER/MARK button to execute the full formatting, or press the (HOME) [8] button to cancel formatting.
CAUTIONWhen formatting a card, the unit should be operating on AC power supplied through the PS-P520E adapter (sold separately), USB bus power supplied from a computer, or batteries with sufficient remaining power. If the power fails during formatting, the formatting may not occur correctly.
NOTEThis function cannot be used with SDXC cards. Use the QUICK FORMAT function. (See “Using QUICK FORMAT” on page 100.)

TASCAM DR-40 101
12 – Settings and Information
Setting the format of file namesYou can select the format of names given to files recorded by this unit.
1 Press the MENU button to open the MENU screen. 2 Use the + or − button to select OTHERS, and press
the ENTER/MARK or / button to open the OTHERS submenu.
3 Use the + or − button to select FILE NAME, and press the ENTER/MARK or / button. FILE NAME screen appears.
Use the . or / button and the + or − button to set each item.On this screen you can make the following settings for each item.
File name format The TYPE item can be set to either WORD (default setting) or DATE.
WORD: When set to WORD, a 6-character file name is used as the beginning of each file name. Example: TASCAM_0001S12.wavDATE: The date is used as the file name (in yymmdd format). Example: 110101_0000.wav
NOTEThe date is set using the unit’s internal clock. (See “Setting the date and time” on page 29.)
Setting the WORD itemTo set the WORD item, use the . and / buttons to move the cursor, and use the + or − button to select the character. In addition to the alphabet and numbers, the following characters can be used:! # $ % & ‘ ( ) + , - . ; = @ [ ] ^ _ ` ~
Resetting the number (COUNT) Select COUNT INIT, and press the ENTER/MARK button to execute it. The next file created after this will have the number “0001” after the characters set using the WORD item.

102 TASCAM DR-40
13 – Using the REMOTE jackThis unit has a REMOTE jack to which you can connect a TASCAM RC-3F footswitch-type remote control or TASCAM RC-10 wired remote control (both sold separately) that can be used to operate the unit.
Footswitch (TASCAM RC-3F)
FootswitchTASCAM RC-3F(sold separately)
Setting footswitch operationUse the REMOTE setting screen to make footswitch settings.
1 Press the MENU button to open the MENU screen.
2 Use the + or − button to select OTHERS, and press the ENTER/MARK or / button to open the OTHERS submenu.
3 Use the + or − button to select (highlight) REMOTE menu item, and press the ENTER/MARK or / button to open the REMOTE screen.
4 Use the + or − button to select (highlight) CONTROLLER menu item, and press the ENTER/MARK or / button.
5 Use the + or – button to change the CONTROLLER item to RC-3F. (Default: RC-3F).
6 Use the . and + or − button to select (highlight) MODE item, and press the ENTER/MARK or / button.
7 Use the + or – button to change the MODE item.Options: PLAY (default), RECORD1, RECORD2, MINUTES
8 Press the (HOME) [8] button to return to the Home Screen.
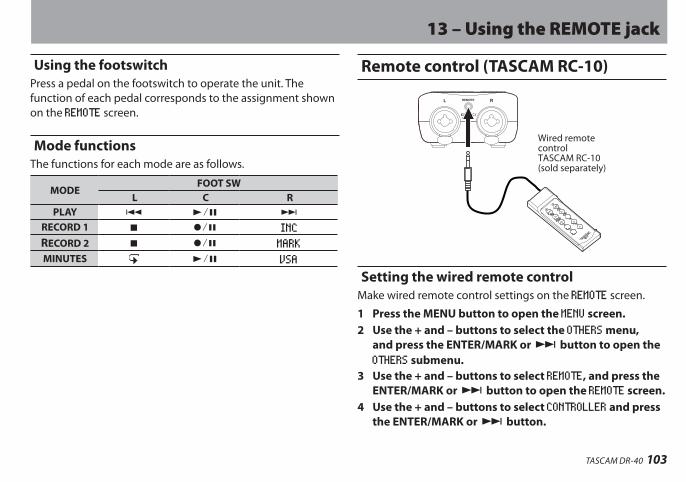
TASCAM DR-40 103
13 – Using the REMOTE jack
Using the footswitchPress a pedal on the footswitch to operate the unit. The function of each pedal corresponds to the assignment shown on the REMOTE screen.
Mode functionsThe functions for each mode are as follows.
MODEFOOT SW
L C RPLAY . 7/9 /
RECORD 1 8 0/9 INCRECORD 2 8 0/9 MARKMINUTES 7/9 VSA
Remote control (TASCAM RC-10)
Wired remotecontrolTASCAM RC-10(sold separately)
Setting the wired remote control Make wired remote control settings on the REMOTE screen.
1 Press the MENU button to open the MENU screen. 2 Use the + and – buttons to select the OTHERS menu,
and press the ENTER/MARK or / button to open the OTHERS submenu.
3 Use the + and – buttons to select REMOTE, and press the ENTER/MARK or / button to open the REMOTE screen.
4 Use the + and – buttons to select CONTROLLER and press the ENTER/MARK or / button.

104 TASCAM DR-40
13 – Using the REMOTE jack
5 Use the + and – buttons to set CONTROLLER to RC-10 (default value: RC-3F).
6 When setting is complete, press the HOME button to return to the Home Screen.
Using the wired remote control Press the function buttons (F1 and F2) on the wired remote control to use the function assigned on the REMOTE screen.
Overview of mode functions
MODESFunction buttons
F1 F2 F3 F4
- - - 1/2 [SOLO] 3/4 [SOLO] INPUT VOL +
INPUT VOL –

TASCAM DR-40 105
14 – MessagesThe following is a list of the popup messages that might appear on the DR-40 under certain conditions. Refer to this list if one of these popup messages appears and you want to check the meaning or determine a proper response.
Message Meaning and response
File Name ERRThe DIVIDE function would cause the file name to exceed 200 characters. The DIVIDE function adds “a” or “b” to the end of the original file name. Before choosing the DIVIDE function, connect the unit to a computer and edit the file name to less than 200 characters.
Dup File NameThe DIVIDE function would cause the file name to be the same as that of an existing file. The DIVIDE function adds “a“ or “b” to the end of the original file name. Before choosing the DIVIDE function, connect the unit to a computer and edit the file name.
File Not Found The file added to the playlist cannot be found or a file could be damaged. Please check the file in question.
Non-Supported The audio file is not a supported format. Please see “11 - Connecting with a computer” for file formats that this unit can use.
Battery Empty The battery is almost out of power. Replace the AA batteries.
I/O Too Short The IN and OUT points are too close together. Reset the IN and OUT points with at least 1 second between them.
File Not FoundPLAYLIST
The file in the Playlist cannot be found. Please confirm that the file is still in the Music Folder.
No PLAYLISTNo files have been added to the Playlist. Add a file to the Playlist or change the play mode to something besides PLAYLIST.
PLAYLIST Full The playlist is full. You cannot add more than 99 files to the Playlist.
MBR Error Init CARDThe card is not formatted properly or the formatting is broken. Change the card or press the ENTER/MARK button when this message appears to format the card in FAT format. CAUTION: Execution of FAT formatting erases all data currently on the card.
Format ErrorFormat CARD
The FAT formatting of the card is abnormal or broken. This message also appears if you FAT formatted the card using a computer connected by USB and if a new card is inserted in the unit. Always use the DR-40 to conduct FAT formatting of cards to be used with it. Change the card or press the ENTER/MARK button when this message appears to format the card in FAT format.CAUTION: Execution of FAT formatting erases all data currently on the card.

106 TASCAM DR-40
Message Meaning and responseFile Not FoundMake Sys File
The system file is missing. This unit requires a system file for operation. When this message appears, press the ENTER/MARK button to automatically create a system file.
Invalid SysFileMake Sys File
The system file required to operate this unit is invalid. When this message appears, press the ENTER/MARK button to automatically create a system file.
Invalid CardChange Card
Something might be wrong with the card. Change the card.
Write Timeout Writing to the card timed out. Backup files on the card to your computer, and format the card.
Card Full The card has no remaining capacity. Erase unnecessary files or move them to your computer to make open space.
Can't Divide The position selected for divide is not suitable (too close to the beginning or end of a file).
Max File Size The file is larger than the designated size, or the recording time has exceeded 24 hours when the total number of folders and files was already at the limit (5000).
File Full The total number of folders and files exceeds 5000. Erase unnecessary files or move them to your computer.
Card Error The card could not be handled properly. Replace the card.
Current File MP3 MP3 files cannot be divided.
File Protected The file is read only and cannot be erased.
No Card No SD card is in the unit. Install a recordable SD card.
No PB File There is no file that can be played back. The file might be damaged.
No MUSIC File There is no playback file, so DIVIDE and OVERDUB cannot be executed.
Cannot overdub!See REC setting
You cannot overdub a WAV file with a sampling frequency of 96 kHz in MP3 format. Change the recording format to WAV.
Using by InputThe MS decoder is being used on the input. To use it on monitoring, on the REC MODE screen, set MS DECODE to OFF.
Now DUAL REC In dual recording mode, change the input level control setting on the REC MODE screen.
14 – Messages

TASCAM DR-40 107
14 – Messages
Message Meaning and responseNow OVERDUB The MS decoder cannot be used in overdubbing mode.
Virtual File! Virtual files cannot be played back or added to playlists. To play the file back use FILE SWAP.
Can't File Swap FILE SWAP cannot be used with projects that have only one file.
Now Auto Rec When auto-recording is enabled, the Self Timer does not function. Set AUTO REC OFF on the REC SETTING screen.
Not Continued
If any of these errors occurs, turn the unit’s power off and restart it. If the power cannot be turned off, remove the batteries, disconnect the AC adaptor (TASCAM PS-P520E), and/or disconnect the USB cable for bus power supply. If the error message continues to appear frequently, please contact a TASCAM Customer Support.
File ErrorCan't Save DataPlayer ErrorDevice ErrorWriting FailedSys Rom ErrSystem Err XX (XX is a number.)

108 TASCAM DR-40
15 – TroubleshootingIf you are having trouble with the operation of this unit, please try the following before seeking repair. If these measures do not solve the problem, please contact the store where you bought the unit, an authorized distributor or a TASCAM Customer Support.
8 Power will not turn ON.• Confirm that the batteries are not dead.
• Confirm that the batteries are installed with the correct +/– orientation.
• Confirm that the AC adapter (TASCAM PS-P520E, sold separately) is firmly connected to both the socket and the unit.
• Confirm that the USB cable (if used for USB bus power supply) is firmly connected.
• Confirm that the USB cable (if used for USB bus power supply) is not connected via a USB hub.
8 The unit turns off automatically.• Is the automatic power saving function on? (See “Setting
the automatic power saving function” on page 98.)
• Since this unit complies with the European Standby Power Regulations (ErP), the automatic power saving function operates regardless of whether the unit is being powered by an AC adapter or batteries. If you do
not want to use the automatic power saving function, set it to “OFF”. (The factory default setting is “30min”.)
8 The unit does not function. • Confirm that the HOLD switch is not set in the direction of
the arrow.
• Is the unit connected to a PC with the USB cable? (Is USB connected shown on the display?)
8 The SD card is not recognized. • Confirm that the SD card is inserted completely.
8 Playback does not work.• If you are trying to play a WAV file, confirm that the sampling
frequency is supported by this unit.
• If you are trying to play an MP3 file, confirm that the bit rate is supported by this unit.
8 The speakers do not work. • Are headphones connected?
• Is SPEAKER set to OFF?
• Check the connections with the monitoring system.
• Is the volume of the monitoring system minimized?
• Is the OUTPUT LEVEL setting of the unit minimized?
8 Recording does not work. • If you are using an external device, check the connection
again.

TASCAM DR-40 109
• Check the input settings again.
• Confirm that the input level is not too low.
• Confirm that the SD card is not full.
• Confirm that the number of files has not reached the maximum that the unit can handle.
8 The input level is low. • Confirm that the input level setting is not too low.
• Confirm that the output level of a connected external device is not too low.
8 The sound I am trying to record sounds distorted. • Confirm that the input level setting for recording (INPUT LEVEL) is not too high.
• Do the built-in effects work?
8 The playback sounds unnatural. • Confirm that the playback speed is not being adjusted.
• Confirm the setting of the playback equalizer.
• Confirm that the level alignment function is not enabled.
• Do the built-in effects work?
8 I cannot erase a file.• Confirm that you are not trying to erase a file that has been
copied from a computer after being write-protected.
8 This unit’s files do not appear on the computer.
• Confirm that the unit is connected to the computer using its USB port.
• Confirm that USB hubs are not used.
• Confirm that the unit is not recording or in recording standby mode.
8 The wrong language was set accidentally.After pressing the ¤ (HOME) [8] button to turn the unit off, press the ¤ (HOME) [8] button while pressing and holding the MENU button.The language selection menu will appear, and you will be able to select the language.
15 – Troubleshooting

110 TASCAM DR-40
16 – Specifications
Ratings
Recording mediaSD card (64 MB - 2 GB)SDHC card (4 GB - 32 GB)SDXC card (48 GB - 128 GB)
Recording/playback formatBWF: 44.1/48/96 kHz, 16/24-bitWAV: 44.1/48/96 kHz, 16/24-bitMP3: 44.1/48 kHz, 32/64/96/128/192/256/320 kbps
Number of channels4 channels (stereo x 2)
Input/output ratings
Analog audio input/output ratingsEXT MIC/LINE IN jacks
Connector: XLR-3-31 (1: GND, 2: HOT, 3: COLD) (phantom power supported)6.3 mm (1/4”) TRS Standard jack (Tip: HOT, Ring: COLD,
Sleeve: GND)
When EXT IN switch set to MIC, MIC + PHANTOMInput impedance: 2.2 kΩNominal input level: –19 dBVMaximum input level: –3 dBV
When EXT IN switch set to LINEInput impedance: 10 kΩ or moreNominal input level: +4 dBuMaximum input level: +20 dBu
/LINE OUT jackConnector: 1/8” (3.5 mm) stereo miniOutput impedance: 12ΩNominal output level: –14 dBV (10 kΩ load)Maximum output level: +2 dBV (10 kΩ load)Maximum output: 20 mW + 20 mW (when connected to headphones, 32Ω load)
Built-in speaker0.3 W (monaural)
Control input/output ratingsUSB jackConnector: Mini-B typeFormat: USB 2.0 HIGH SPEED mass storage class
REMOTE jackConnector: 2.5 mm TRS jack

TASCAM DR-40 111
Audio performanceFrequency response20 - 20 kHz +1/–3 dB
(EXT IN to LINE OUT, Fs 44.1 kHz, JEITA)20 -22 kHz +1/–3 dB
(EXT IN to LINE OUT, Fs 48 kHz, JEITA)20 - 40 kHz +1/–3 dB
(EXT IN to LINE OUT, Fs 96 kHz, JEITA)
Total harmonic distortion0.05% or lower (EXT IN to LINE OUT, Fs 44.1/48/96 kHz, JEITA)
S/N ratio92 dB or higher (EXT IN to LINE OUT, Fs 44.1/48/96kHz, JEITA)Note) JEITA: Conforming to JEITA CP-2150
16 – Specifications

112 TASCAM DR-40
16 – Specifications
Other specifications
PowerThree AA batteries (Alkaline or Ni-MH)USB bus power supplied from a computerAC adaptor (TASCAM PS-P520E, sold separately)
Power consumption1.7 W (maximum)
Current consumption0.34 A (maximum)
Battery operation time (continuous operation)Alkaline type battery (EVOLTA)
Format Continuous operation time Note
Recording, 2 ch WAV, 96 kHz, 24 bit
About 16 hours Built-in stereo microphone
Recording, 2 ch WAV , 44.1 kHz, 16 bit
About 20.5 hours Built-in stereo microphone
Recording, 2 ch WAV , 44.1 kHz, 16 bit
About 2 hours When using phantom power
Recording, 2 ch MP3, 44.1 kHz, 128 kbps
About 18 hours Built-in stereo microphone
Recording, 4 ch WAV, 96 kHz, 24 bit
About 8.5 hours Built-in stereo microphone + line
Format Continuous operation time Note
Recording, 4 ch WAV, 44.1 kHz, 16 bit
About 9 hours Built-in stereo microphone + line
Recording, 4 ch MP3, 44.1 kHz, 128 kbps
About 9.5 hours Built-in stereo microphone + line
Playback, 2 ch WAV, 96 kHz, 24 bit
About 16 hours Headphones
Playback, 2 ch WAV, 44.1 kHz, 16 bit
About 21.5 hours Headphones
Playback, 2 ch MP3, 44.1 kHz, 128 kbps
About 17.5 hours Headphones
Playback, 4 ch WAV, 96 kHz, 24 bit
About 15.5 hours Headphones
Playback, 4 ch WAV, 44.1 kH, 16 bit
About 17.5 hours Headphones
Playback, 4ch MP3, 44.1 kHz, 128 kbps
About 16.5 hours Headphones
Ni-MH type battery (eneloop)
Format Continuous operation time Note
Recording, 2 ch WAV, 96 kHz, 24 bit
About 12 hours Built-in stereo microphone
Recording, 2 ch WAV , 44.1 kHz, 16 bit
About 17 hours Built-in stereo microphone
Recording, 2 ch WAV , 44.1 kHz, 16 bit
About 3 hours When using phantom power
Recording, 2 ch MP3, 44.1 kHz, 128 kbps
About 15 hours Built-in stereo microphone

TASCAM DR-40 113
16 – Specifications
Format Continuous operation time Note
Recording, 4 ch WAV, 96 kH, 24 bit
About 8 hours Built-in stereo microphone + line
Recording, 4 ch WAV, 44.1 kHz, 16 bit
About 8.5 hours Built-in stereo microphone + line
Recording, 4 ch MP3, 44.1 kHz, 128 kbps
About 8.5 hours Built-in stereo microphone + line
Playback, 2 ch WAV, 96 kHz, 24 bit
About 14 hours Headphones
Playback, 2 ch WAV, 44.1 kHz, 16 bit
About 17.5 hours Headphones
Playback, 2 ch MP3, 44.1 kHz, 128 kbps
About 14.5 hours Headphones
Playback, 4 ch WAV, 96 kH, 24 bit
About 13 hours Headphones
Playback, 4 ch WAV, 44.1 kHz, 16 bit
About 15 hours Headphones
Playback, 4ch MP3, 44.1 kHz, 128 kbps
About 15 hours Headphones
NOTEThe battery operation times (during continuous operation) could vary depending on the media being used.
Dimensions (W x H x D)70 x 155 x 35 mm/2.756 x 6.102 x 1.378 inches
(when the microphone pair is close)90 x 155 x 35 mm/3.543 x 6.102 x 1.378 inches
(when the microphone pair is open)
Weight285 g/10.05 oz (including batteries)213 g/7.51 oz (not including batteries)
Operating temperature range0 - 40°C (32°F - 104°F)

114 TASCAM DR-40
16 – Specifications
Dimensional drawings
70 mm 35 mm 2 mm
155
mm
4 m
m
90 mm
Dimension of the microphone opened
• Illustrations and other depictions may differ in part from the actual product.
• Specifications and external appearance may be changed without notification to improve the product.

TEAC CORPORATION https://tascam.jp/jp/Phone: +81-42-356-91431-47 Ochiai, Tama-shi, Tokyo 206-8530 Japan TEAC AMERICA, INC. http://tascam.com/Phone: +1-323-726-03031834 Gage Road, Montebello, California 90640 USA TEAC MEXICO, S.A. de C.V. http://teacmexico.net/Phone: +52-55-5010-6000Río Churubusco 364, Colonia Del Carmen, Delegación Coyoacán, CP 04100, México DF, México TEAC UK Ltd. http://tascam.eu/Phone: +44-8451-3025112 Huxley Road, Surrey Research Park, Guildford, GU2 7RE, United Kingdom TEAC EUROPE GmbH http://tascam.eu/Phone: +49-611-71580Bahnstrasse 12, 65205 Wiesbaden-Erbenheim, Germany TEAC SALES & TRADING(SHENZHEN) CO., LTD http://tascam.cn/Phone: +86-755-88311561~2Room 817, Block A, Hailrun Complex, 6021 Shennan Blvd., Futian District, Shenzhen 518040, China