Embed Size (px)
Citation preview

DP4 User Manual D4.doc, 4/30/09
Amptek Inc. DP4 Digital Pulse Processor Page 1 of 34
DP4 User Manual and Operating Instructions Amptek, Inc.
14 De Angelo Dr. Bedford, MA 01730
PH: +1 781-275-2242 FAX: +1 781-275-3470 [email protected] www.amptek.com
Other DP4 documents: DP4 Quick Start Guide and DP4 Programmer’s Guide
1 DP4 Design and Operation ..................................................................................................................2
1.1 Major Function Blocks...................................................................................................................2 1.2 DP4 Input ......................................................................................................................................3 1.3 Pulse Shaping and Selection ........................................................................................................4
1.3.1 Pulse Shaping........................................................................................................................4 1.3.2 Baseline Restoration (BLR) ...................................................................................................6
1.3.2.1 Auto-Baseline ...................................................................................................................6 1.3.2.2 BLR...................................................................................................................................6
1.3.3 Pulse Selection ......................................................................................................................7 1.3.3.1 Pile-Up Rejection..............................................................................................................7 1.3.3.2 Risetime Discrimination ....................................................................................................7 1.3.3.3 Thresholds ........................................................................................................................8 1.3.3.4 Gate ..................................................................................................................................8
1.3.4 Multichannel Analyzer............................................................................................................8 1.3.5 Single Channel Analyzer .......................................................................................................8
1.4 DP4 Interface ................................................................................................................................9 2 DP4 Specifications .............................................................................................................................10
2.1 Dimensions .................................................................................................................................10 2.2 Connections ................................................................................................................................10
2.2.1 JP7 – Analog input...............................................................................................................11 2.2.2 JP6 – Power and Interface ..................................................................................................12 2.2.3 J2 – Analog output...............................................................................................................12 2.2.4 JP9 External Logic I/O .........................................................................................................13 2.2.5 J15 I2C Bus .........................................................................................................................13 2.2.6 Diagnostic Testpoint .5 ........................................................................................................13 2.2.7 JP10 Extra signals for OEM use..........................................................................................14
2.3 Controls and Adjustments...........................................................................................................14 2.3.1 Analog Prefilter ....................................................................................................................14 2.3.2 Pulse Shaping......................................................................................................................15 2.3.3 Pulse Selection ....................................................................................................................15 2.3.4 MCA Control ........................................................................................................................16 2.3.5 SCA Controls .......................................................................................................................16
3 Quick Start Instructions ......................................................................................................................17 3.1 Set-Up Instructions .....................................................................................................................18
3.1.1 USB Driver and ADMCA software installation .....................................................................18 3.1.2 VB Test Application installation and RS232 serial port connection.....................................18 3.1.3 Hardware connections .........................................................................................................18 3.1.4 Hardware adjustments.........................................................................................................18
4 VB APP Control and Display Demonstration Software ......................................................................19 5 Use of the DP4 with Amptek’s XR100 Detectors ...............................................................................21
5.1 Users with an XR100 ..................................................................................................................21 5.2 Users with a DP4, PC4-3, and PA-210 Preamplifier...................................................................22

DP4 User Manual D4.doc, 4/30/09
Amptek Inc. DP4 Digital Pulse Processor Page 2 of 34
5.3 Use of the DP4 with Tail Pulse Preamps....................................................................................23 5.4 Analog Prefilter Circuit Description .............................................................................................24
5.4.1 Differential amplifier .............................................................................................................24 5.4.2 High Pass Filter ...................................................................................................................24 5.4.3 First Gain Stage...................................................................................................................24 5.4.4 Final Gain Stage ..................................................................................................................24
5.5 Procedures for Common Changes .............................................................................................27 5.5.1 Preamplifier Tail Cancellation..............................................................................................27 5.5.2 Inversion ..............................................................................................................................28 5.5.3 Input Range Adjustment ......................................................................................................28 5.5.4 Single Ended Operation.......................................................................................................28 5.5.5 DP4 with Onboard Charge Amplifier Configuration.............................................................29
6 Dead Time in the Amptek DP4...........................................................................................................31 6.1 Fast Channel...............................................................................................................................31 6.2 Slow Channel ..............................................................................................................................32 6.3 Acquisition Time..........................................................................................................................33 6.4 Timing Summary.........................................................................................................................34
7 Trouble-Shooting Guide .....................................................................................................................34 8 Index...................................................................................................................................................34
1 DP4 DESIGN AND OPERATION
1.1 MAJOR FUNCTION BLOCKS
The DP4 is a component in the complete signal processing chain of a nuclear instrumentation system, as shown in Figure 1. The input to the DP4 is the preamplifier output. The DP4 digitizes the preamplifier output, applies real-time digital processing to the signal, detects the peak amplitude (digitally), and bins this value in its histogramming memory, generating an energy spectrum. The spectrum is then transmitted over the DP4’s serial interface to the user’s computer.
The Amptek DP4 has 6 main function blocks to implement these functions: (1) an analog prefilter, (2) an ADC, (3) a digital pulse shaper, (4) pulse selection logic, (5) histogram logic, and (6) interfacing hardware (which includes a microcontroller) and software. These six functions will be discussed below. Clearly, the DP4 must be used with other components, including (at a minimum) a detector and preamplifier, a computer with a serial interface and software to communicate, and a power supply.
Detector and Preamplifier
Analog Prefilter ADC Digital Pulse
Shaper
Pulse Selection
Logic
Histogram Logic
Microcontroller &
InterfaceComputer
Power Supply
DP4
Figure 1. Block diagram of the DP4 in a complete system.
It is important to recognize that the DP4 is designed for OEM use as part of a complete instrument. It can also be tailored for laboratory use, but it is not intended as a stand-alone module for general purpose use. Amptek’s PX4 is a general purpose laboratory module which includes the functionality of the DP4 and much more, such as power supplies. Amptek strongly recommends the PX4 for non-OEM users.
The DP4 interface and control hardware are designed with considerable flexibility so the OEM user can tailor it to a specific application. Amptek supplies software with the DP4 that includes two fully functional demonstration programs. One program runs on the embedded microcontroller and interfaces between the

DP4 User Manual D4.doc, 4/30/09
Amptek Inc. DP4 Digital Pulse Processor Page 3 of 34
pulse shaping/histogram functions and a PC. The other program runs on a PC and interfaces between the DP4 and the user. Both of these are intended as demonstration programs, which the user will tailor. The DP4 also includes an FPGA. The FPGA logic, the “FPGA Configuration Bitstream”, is copyrighted by Amptek, Inc. and may not be copied, modified, or used without the express, written approval of Amptek, Inc.
Analog Prefilter: The input to the DP4 is the output of a charge sensitive preamplifier. The analog prefilter circuit prepares this signal for accurate digitization. The main functions of this circuit are (1) applying appropriate gain, offset, and inversion (if necessary) to utilize the dynamic range of the ADC, and (2) carrying out some filtering and pulse shaping functions to optimize the digitization.
ADC: The ADC digitizes the output of the analog prefilter at a 20 MHz rate. This stream of digitized values is sent, in real time, into the digital pulse shaper.
Digital Pulse Shaper: The ADC output is processed continuously using a pipeline architecture to generate a real time shaped pulse. This carries out pulse shaping as in any other shaping amplifier. The shaped pulse is a purely digital entity. Its output can be routed to a DAC, for diagnostic purposes, but this is not necessary. The peak value of the digital shaped pulse is determined by a peak detect circuit in the pulse shaper. The peak value for each pulse, a single digital quantity, is the primary output of the pulse shaper.
Pulse Selection Logic: The pulse selection logic rejects pulses for which an accurate measurement cannot be made. It includes pile-up rejection and risetime discrimination. These are discussed in more detail below.
Histogram Memory: The histogram memory operates as in a traditional MCA. When a pulse occurs with a particular peak value, a counter in a corresponding memory location is incremented. The result is a histogram, an array containing, in each cell, the number of events with the corresponding peak value. This is the energy spectrum and is the primary output of the DP4. The DP4 uses 3 bytes per channel, which allows up to 16.7M counts per channel.
Interface: The DP4 includes hardware and software to interface between these various functions and the user’s computer. A primary function of the interface is to transmit the spectrum to the user. The interface also controls data acquisition, by starting and stopping the processing and by clearing the histogram memory. It also controls certain aspects of the analog and digital shaping, for example setting the analog gain or the pulse peaking time.
The interface includes a microcontroller and serial interface hardware. Both RS232 and USB interfaces are currently implemented and described in this manual. The interface also contains an I2C interface and several unallocated microcontroller pins that are available to the user. The interface includes two distinct software packages, embedded software which runs on the microcontroller on the DP4 and acquisition and control software that runs on the attached personal computer. The DP4 is shipped with a demonstration version of the acquisition and control software package ( Visual Basic 5 source code is provided.) Source code for the embedded software (8051 assembly language) is also available – contact Amptek for more information.
1.2 DP4 INPUT
The DP4 was designed to process signals coming directly from a charge sensitive preamplifier used with a solid-state radiation detector. These signals typically have (1) a small amplitude, in the range of a few mV, (2) a fast rise (tens of nsec to μsec), and (3) following the signal, either a slow decay (of order msec) or no decay. A charge sensitive preamplifier integrates the current into its input, so over time the output drifts towards the rail. One of two methods is usually used to restore the output.
Some preamplifiers use a pulsed reset to periodically restore the input charge. In such preamps, there is no tail after the signal. A radiation interaction generates a voltage step, then the output is constant until the next step, as illustrated in Figure 2(a). Eventually, the output will drift near the supply rail and is then reset to its initial value, leading to a very large and fast reset signal. The DP4 is configured from the factory for use with such reset-type preamplifiers. The reset results in a large, negative going pulse into the ADC, which disrupts the signal processing. The preamplifier output can take a significant time to fully recover from a reset. Pulses received during reset recovery will have a distorted amplitude and degrade the spectrum. Therefore the DP4 includes hardware to lock out data acquisition during reset.
DP4 User Manual D4.doc, 4/30/09
Amptek Inc. DP4 Digital Pulse Processor Page 4 of 34
(a) (b)
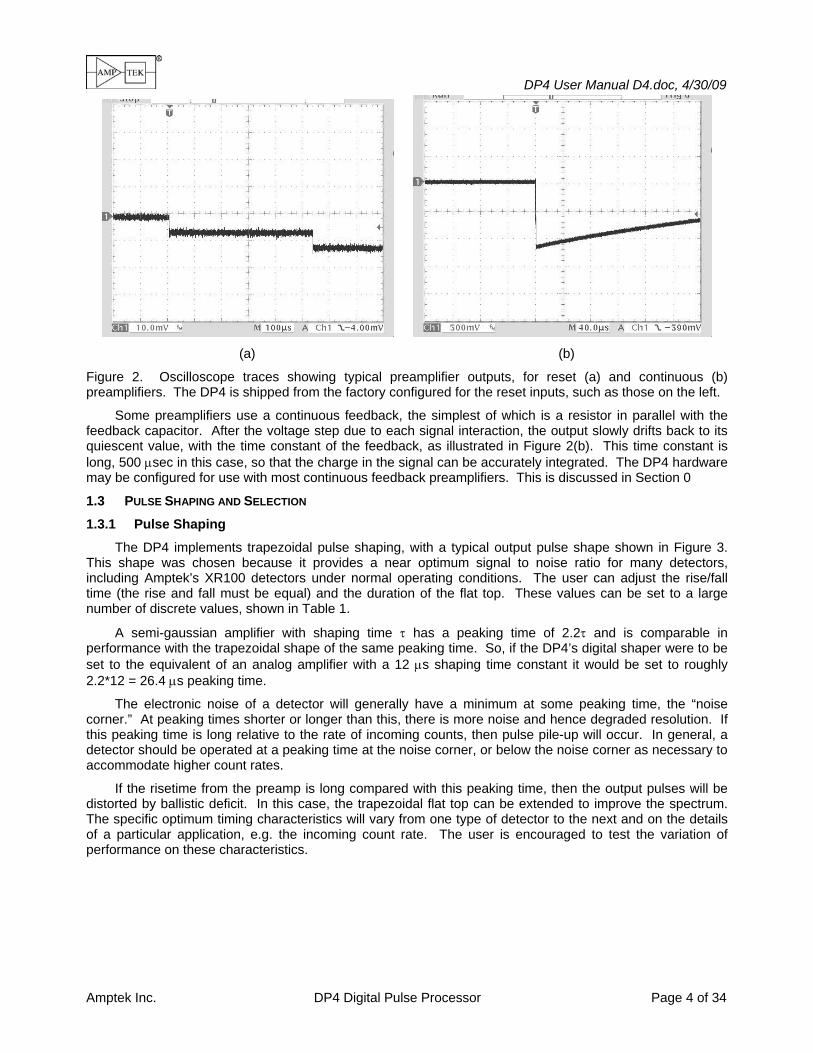
Figure 2. Oscilloscope traces showing typical preamplifier outputs, for reset (a) and continuous (b) preamplifiers. The DP4 is shipped from the factory configured for the reset inputs, such as those on the left.
Some preamplifiers use a continuous feedback, the simplest of which is a resistor in parallel with the feedback capacitor. After the voltage step due to each signal interaction, the output slowly drifts back to its quiescent value, with the time constant of the feedback, as illustrated in Figure 2(b). This time constant is long, 500 μsec in this case, so that the charge in the signal can be accurately integrated. The DP4 hardware may be configured for use with most continuous feedback preamplifiers. This is discussed in Section 0
1.3 PULSE SHAPING AND SELECTION
1.3.1 Pulse Shaping
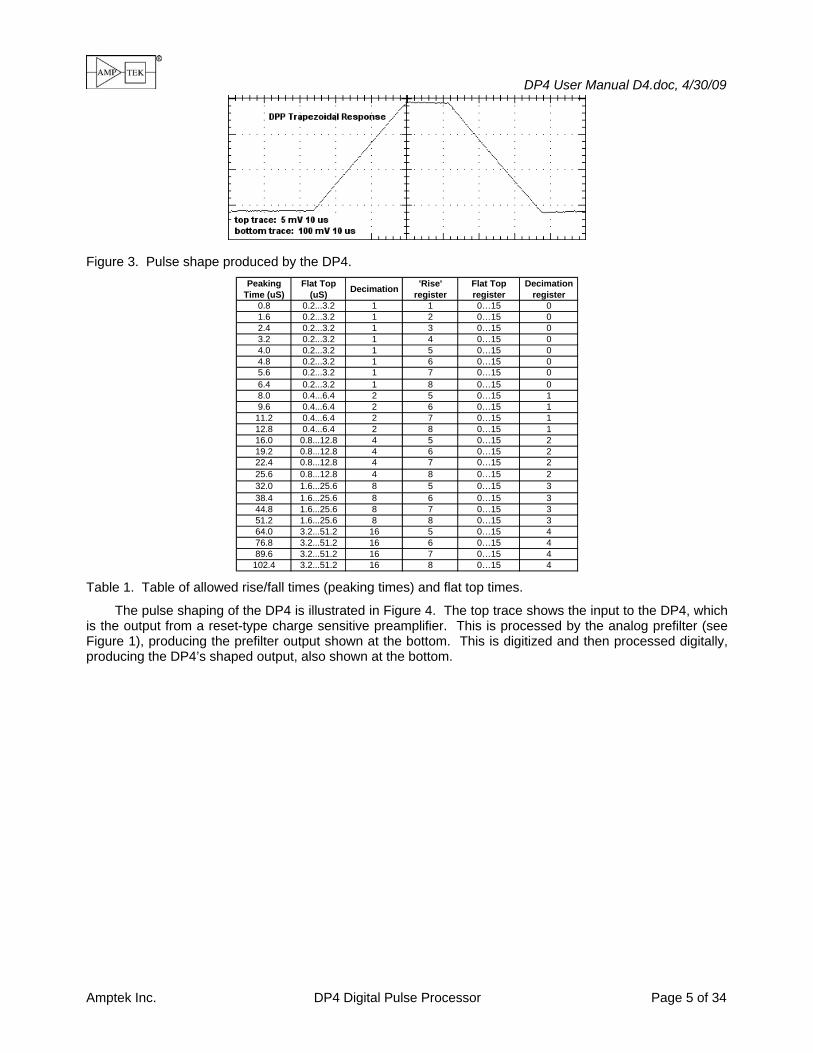
The DP4 implements trapezoidal pulse shaping, with a typical output pulse shape shown in Figure 3. This shape was chosen because it provides a near optimum signal to noise ratio for many detectors, including Amptek’s XR100 detectors under normal operating conditions. The user can adjust the rise/fall time (the rise and fall must be equal) and the duration of the flat top. These values can be set to a large number of discrete values, shown in Table 1.
A semi-gaussian amplifier with shaping time τ has a peaking time of 2.2τ and is comparable in performance with the trapezoidal shape of the same peaking time. So, if the DP4’s digital shaper were to be set to the equivalent of an analog amplifier with a 12 μs shaping time constant it would be set to roughly 2.2*12 = 26.4 μs peaking time.
The electronic noise of a detector will generally have a minimum at some peaking time, the “noise corner.” At peaking times shorter or longer than this, there is more noise and hence degraded resolution. If this peaking time is long relative to the rate of incoming counts, then pulse pile-up will occur. In general, a detector should be operated at a peaking time at the noise corner, or below the noise corner as necessary to accommodate higher count rates.
If the risetime from the preamp is long compared with this peaking time, then the output pulses will be distorted by ballistic deficit. In this case, the trapezoidal flat top can be extended to improve the spectrum. The specific optimum timing characteristics will vary from one type of detector to the next and on the details of a particular application, e.g. the incoming count rate. The user is encouraged to test the variation of performance on these characteristics.
DP4 User Manual D4.doc, 4/30/09
Amptek Inc. DP4 Digital Pulse Processor Page 5 of 34
Figure 3. Pulse shape produced by the DP4.
Peaking Time (uS)
Flat Top (uS) Decimation 'Rise'
registerFlat Top register
Decimation register
0.8 0.2...3.2 1 1 0…15 01.6 0.2...3.2 1 2 0…15 02.4 0.2...3.2 1 3 0…15 03.2 0.2...3.2 1 4 0…15 04.0 0.2...3.2 1 5 0…15 04.8 0.2...3.2 1 6 0…15 05.6 0.2...3.2 1 7 0…15 06.4 0.2...3.2 1 8 0…15 08.0 0.4...6.4 2 5 0…15 19.6 0.4...6.4 2 6 0…15 1
11.2 0.4...6.4 2 7 0…15 112.8 0.4...6.4 2 8 0…15 116.0 0.8...12.8 4 5 0…15 219.2 0.8...12.8 4 6 0…15 222.4 0.8...12.8 4 7 0…15 225.6 0.8...12.8 4 8 0…15 232.0 1.6...25.6 8 5 0…15 338.4 1.6...25.6 8 6 0…15 344.8 1.6...25.6 8 7 0…15 351.2 1.6...25.6 8 8 0…15 364.0 3.2...51.2 16 5 0…15 476.8 3.2...51.2 16 6 0…15 489.6 3.2...51.2 16 7 0…15 4102.4 3.2...51.2 16 8 0…15 4
Table 1. Table of allowed rise/fall times (peaking times) and flat top times.
The pulse shaping of the DP4 is illustrated in Figure 4. The top trace shows the input to the DP4, which is the output from a reset-type charge sensitive preamplifier. This is processed by the analog prefilter (see Figure 1), producing the prefilter output shown at the bottom. This is digitized and then processed digitally, producing the DP4’s shaped output, also shown at the bottom.

DP4 User Manual D4.doc, 4/30/09
Amptek Inc. DP4 Digital Pulse Processor Page 6 of 34
1) DP4 Input (Preamp Output) 5 mV/div 20 μsec/div
Both traces: 200 mV/div 20 μsec/div
2) Prefilter Output(ADC Input)
3) DP4 ShapedOutput
Figure 4. Oscilloscope trace illustrating the normal operation of a DP4.
1.3.2 Baseline Restoration (BLR)
The “baseline” of a digital processor has some significant differences from traditional analog shaping amplifiers. Traditional amplifiers generally include some form of baseline restoration, DC feedback, to prevent drift at high count rates. Because the DP4’s transfer function has a finite impulse response, after a pulse has passed through the processing pipeline it has no impact on the output. This is fundamentally different from an analog differentiator and results in vastly enhanced baseline stability at high count rates. However, unlike analog shapers the DP4 has to establish a DC baseline, at all count rates. There are two options available in the DP4 to establish the DC baseline: “auto-baseline”, which involves measuring the input offset, and baseline restoration, which uses closed loop, quasi-DC feedback.
1.3.2.1 Auto-Baseline
The ‘Auto-Baseline’ function does not correct baseline variations resulting from count-rate changes or other detector effects; rather, it corrects for drift in the DP4’s analog section, due mostly to temperature changes. It is intended to be used with reset-style preamps that do not otherwise require BLR (i.e. the Amptek XR100CR). When the DP4 detects that reset has occurred, it temporarily disconnects the detector from the DP4 front-end electronics and averages the voltage offset produced by the front end. The detector is reconnected and the measured offset is used to correct the digital baseline. This doesn’t affect throughput since the processing is suspended anyway during reset to allow the preamp signal to settle.
Auto-Baseline should not longer be used. It has been replaced by the BLR (see next section). Always set Auto-Baseline to OFF in any software.
1.3.2.2 BLR
The DP4 has an asymmetric baseline restorer, which can be used when baseline shifts due to count-rate changes, power supply drift, or if other detector effects need to be nulled. It works as follows:
a. All digital samples below the existing baseline are integrated. When the sum reaches a preset value (the “BLR Correction Threshold”), an upward correction (the “Baseline Up Correction”) is added to the baseline.
DP4 User Manual D4.doc, 4/30/09
Amptek Inc. DP4 Digital Pulse Processor Page 7 of 34
b. Countering this occasional upward correction is a periodic downward correction (the “Baseline Down Correction.)
As the magnitude of these corrections is typically much less than one channel, the periodic downward correction and occasional upward correction should not adversely affect resolution. Each of the corrections has four settings (very slow, slow, medium and fast) and the correction threshold also has four settings (very fast, fast, normal and slow.) It should be noted that the relative size of these corrections is dependent on peaking time; thus a setting that works well at a particular peaking time may not necessarily be ideal for a different peaking time.
BLR and Auto-Baseline should not be used at the same time. Always make sure that Auto-Baseline if OFF.
1.3.3 Pulse Selection
1.3.3.1 Pile-Up Rejection
The goal of the pile-up reject (PUR) logic is to determine if two interactions occurred so close together in time that they appear as a single output pulse with a distorted amplitude. The DP4 PUR uses a “fast-slow” system, in which the pulses are processed by a fast shaping channel in parallel with the slower main channel (both channels are purely digital). Though similar in principle to the techniques of an analog shaper, the pile-up reject circuitry and the dead time of the DP4 differ in significant ways, resulting in much better performance at high count rates. First, the symmetry of the shaped pulse permits the dead time and pile-up interval to be much shorter. Second, there is no dead time associated with peak acquisition and digitization, only that due to the pulse shaping. [Setting 0 = off].
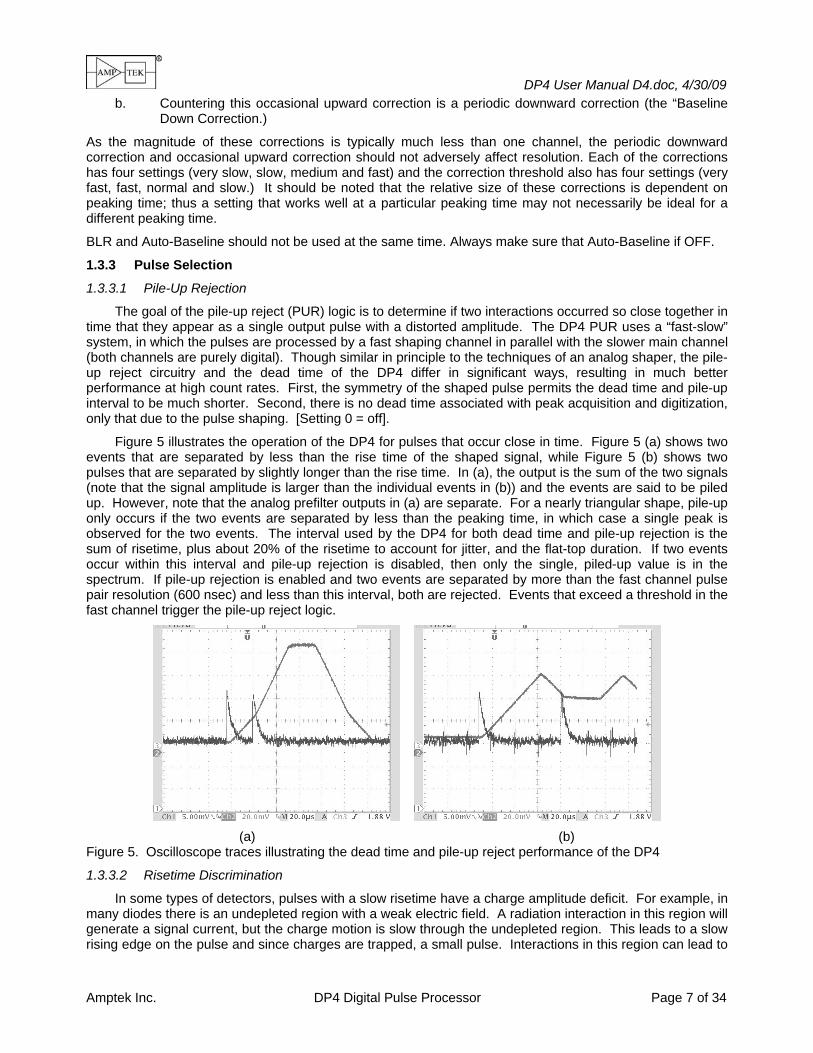
Figure 5 illustrates the operation of the DP4 for pulses that occur close in time. Figure 5 (a) shows two events that are separated by less than the rise time of the shaped signal, while Figure 5 (b) shows two pulses that are separated by slightly longer than the rise time. In (a), the output is the sum of the two signals (note that the signal amplitude is larger than the individual events in (b)) and the events are said to be piled up. However, note that the analog prefilter outputs in (a) are separate. For a nearly triangular shape, pile-up only occurs if the two events are separated by less than the peaking time, in which case a single peak is observed for the two events. The interval used by the DP4 for both dead time and pile-up rejection is the sum of risetime, plus about 20% of the risetime to account for jitter, and the flat-top duration. If two events occur within this interval and pile-up rejection is disabled, then only the single, piled-up value is in the spectrum. If pile-up rejection is enabled and two events are separated by more than the fast channel pulse pair resolution (600 nsec) and less than this interval, both are rejected. Events that exceed a threshold in the fast channel trigger the pile-up reject logic.
(a) (b)
Figure 5. Oscilloscope traces illustrating the dead time and pile-up reject performance of the DP4
1.3.3.2 Risetime Discrimination
In some types of detectors, pulses with a slow risetime have a charge amplitude deficit. For example, in many diodes there is an undepleted region with a weak electric field. A radiation interaction in this region will generate a signal current, but the charge motion is slow through the undepleted region. This leads to a slow rising edge on the pulse and since charges are trapped, a small pulse. Interactions in this region can lead to

DP4 User Manual D4.doc, 4/30/09
Amptek Inc. DP4 Digital Pulse Processor Page 8 of 34
various spectral distortions: background counts, shadow peaks, asymmetric peaks, etc. In risetime discrimination, events with a slow rise do not contribute to the spectrum but are rejected.
The DP4 implements RTD by measuring the width of the fast channel response: a slower input rise time leads to a broader fast channel output. Because a broader fast channel output also has a lower amplitude (to maintain the same net area), the DP4 measures the Half-Width, Half-Max (HWHM) of the resulting response. This measured width is compared to a preset width (the “RTD Time Threshold”) and the event is rejected if the measured width is too wide. [Note that the event can only be rejected if the Fast Channel is over threshold. See the next section for a discussion of thresholds.]
Because the fast channel is inherently much noisier than the slower shaped channel, an RTD threshold is also implemented on the shaped channel. Events which fall below this threshold (the “RTD Slow Threshold”) are not processed by the RTD and are thus accepted (unless otherwise rejected by Pileup Rejection or some other criterion). Because RTD is most often needed on interactions deep in a detector, arising from high-energy events, low-amplitude events are unlikely to benefit from RTD rejection. These fall below the RTD Slow Threshold and are thus accepted.
To summarize the RTD rules:
a. Events whose shaped (slow) channel amplitude is below the RTD Slow Threshold are kept; otherwise…
b. Events whose fast channel amplitude is below the fast threshold are rejected; otherwise…
c. Events whose measured HWHM is wider than the RTD Time Threshold are rejected.
1.3.3.3 Thresholds
Slow channel threshold: The DP4 uses the Slow Channel Threshold to distinguish between events that should be added to the stored spectrum and those that shouldn’t. Events with an amplitude lower than the Slow Channel Threshold are ignored – they do not contribute to the stored spectrum. The slow channel threshold is the equivalent of a low-level discriminator (LLD).
Fast Channel Threshold: The Fast Channel Threshold is used for two functions: Rise Time Discrimination (RTD), as described in section 1.3.3.2, and Pile-up Rejection (PUR). The DP4 can only reject piled-up events if both events fired the fast channel; therefore, it is usually desirable to set the Fast Channel Threshold as close to the noise as is practical. This is discussed in more detail in later sections. If RTD and PUR are not used, then the fast channel threshold is not important.
1.3.3.4 Gate
The gate input is used with external circuitry to determine if events should be included or excluded from the spectrum. The gate can be active high or active low (or disabled). If disabled, then this input is ignored and all events (which meet the criteria above) are counted. If active high (low), then if the gate input is high (low), the event is counted in the spectrum. When counts are gated off, the clock is also gated off so that an accurate count rate can be determined.
The timing of this gate input is important. If the gate input is active while the fast channel threshold is triggered, then the event is counted as a fast count. If the gate input is active when the peak detect is triggered, then the event is counted as a slow count and shows up in the spectrum. Note that the fast and slow channels are triggered at different times, since they have different shaping times. We recommend that the gate input duration be equal to or greater than the sum of the peaking and flat top durations.
1.3.4 Multichannel Analyzer
The MCA portion of the DP4 supports 256, 512, 1024, 2048, 4096 or 8192 channels. (8192 channels is only available via the USB interface – it is not supported via RS232.) The DP4 uses 3 bytes per channel, which allows up to 16.7M counts per channel. The MCA has two spectral buffers available, A and B, which can be selected either via software, or by a hardware signal.
1.3.5 Single Channel Analyzer
The DP4 contains eight single channel analyzers (SCAs). Each SCA has an upper and a lower threshold. If an event occurs with a shaped output within the range defined by these thresholds, then a logic
DP4 User Manual D4.doc, 4/30/09
Amptek Inc. DP4 Digital Pulse Processor Page 9 of 34
pulse is generated and is output to the JP9 connector on the DP4, where it can be connected to external hardware. The upper and lower limits of the 8 SCAs can be set independently in the software. SCA8 serves a dual purpose – not only does it operate like the other SCAs, but it is also used to set the Region-of-Interest (ROI) for the Preset Count mode of MCA operation. That is, when a Preset Count is selected, the MCA will stop after the programmed number of counts occurs in the SCA8 ROI.
1.4 DP4 INTERFACE
There are two distinct components to the DP4 software. The microcontroller on the DP4 contains embedded software that controls data acquisition and the interface. The computer to which the DP4 interfaces must contain software to communicate via the serial port (USB or RS-232). The current revision of the DP4 is designed primarily for use in OEM applications, embedded in an end-user’s product. As such, the user may access the embedded software to tune the instrument for his/her application. Further, the personal computer software that is supplied is essentially a demonstration program. It permits the user to fully access the DP4 functionality and can be used as is, but more importantly it shows how to carry out the various functions. We presume that the user will tailor this software to meet the specific requirements of his/her application.
The DP4 has both a USB interface and a standard RS232 interface. Specifically, it has a full-speed (12Mbps) USB 1.1 interface (which is also compatible with newer USB 2.0 ports.) Amptek has licensed a USB device driver for use with Windows 98, Windows ME, Windows NT, Windows 2000 and Windows XP, which makes it easy to write Windows software to communicate with the DP4.

DP4 User Manual D4.doc, 4/30/09
Amptek Inc. DP4 Digital Pulse Processor Page 10 of 34
Note on the USB device driver
The USB device driver is licensed from Andrew Pargeter & Associates (www.devicedriver.com) for the Amptek DP4. The license agreement allows Amptek to provide the driver to the OEM, and the OEM to provide the driver to the end user provided that the embedded code doesn’t change. In practice, an OEM who wishes to write his own embedded code will either need to relicense the USB driver or find another driver solution. If the OEM wishes only minor changes to the existing embedded code, he should contact Amptek to see if the changes could be made to the standard code, and thus would be covered by the license agreement.
The USB Vendor ID (VID) and Product ID (PID) are provided to Amptek from Andrew Pargeter & Associates (“APA”) as part of the license agreement. The VID (0x0BD7) is owned by APA, and the PID (0xA021) is licensed for use only with the Amptek DP4. OEMs may not use this VID/PID combination, except with the standard Amptek DP4 embedded code. Contact Amptek for more information. For more information on VIDs & PIDs, refer to the USB Implementer’s Forum (www.usb.org).
2 DP4 SPECIFICATIONS
2.1 DIMENSIONS
2.2 CONNECTIONS
There are two primary connectors, which are necessary for the DP4’s operation, along with some auxiliary connectors. JP7 is the analog input, which connects to a preamplifier output. JP6 contains the power supply connections and the serial interface. These are the primary connectors and are required for operation. Their use is shown graphically in Figure 6.
DP4 User Manual D4.doc, 4/30/09
Amptek Inc. DP4 Digital Pulse Processor Page 11 of 34
1
2
1
FILTER
GND
GND
IN-
IN+
JP7
DP4
ADC DigitalProcessor
MCAMemory μprocessor
DAC 1
2 GND
OUT
2 3 4,5
+3.3V +5V -5V
JP6
AMP3
6,7
I2C GND
8,13
/RST
9-12 14
RS232 USB
15,16
J2
GND+3.3V +5V -5V
POWER
or
3
JP9 1-8
SCA1-8
9 10 11,12
GNDGATE BUFFER_SEL
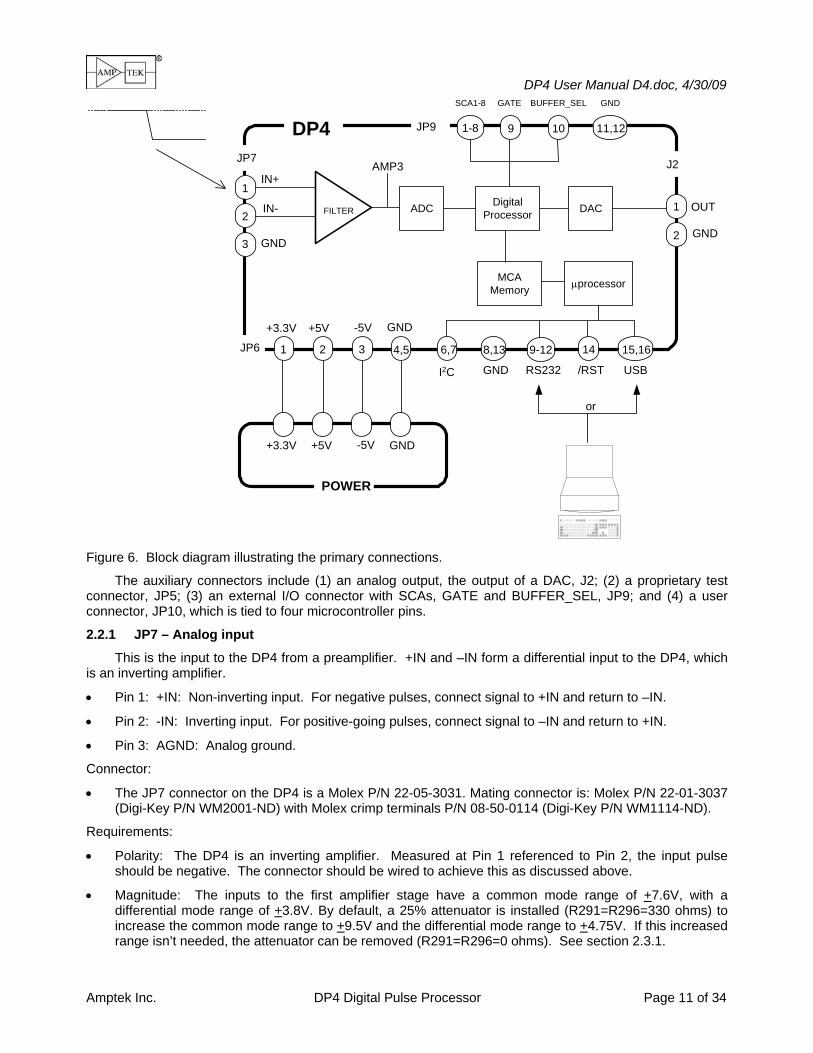
Figure 6. Block diagram illustrating the primary connections.
The auxiliary connectors include (1) an analog output, the output of a DAC, J2; (2) a proprietary test connector, JP5; (3) an external I/O connector with SCAs, GATE and BUFFER_SEL, JP9; and (4) a user connector, JP10, which is tied to four microcontroller pins.
2.2.1 JP7 – Analog input
This is the input to the DP4 from a preamplifier. +IN and –IN form a differential input to the DP4, which is an inverting amplifier.
• Pin 1: +IN: Non-inverting input. For negative pulses, connect signal to +IN and return to –IN.
• Pin 2: -IN: Inverting input. For positive-going pulses, connect signal to –IN and return to +IN.
• Pin 3: AGND: Analog ground.
Connector:
• The JP7 connector on the DP4 is a Molex P/N 22-05-3031. Mating connector is: Molex P/N 22-01-3037 (Digi-Key P/N WM2001-ND) with Molex crimp terminals P/N 08-50-0114 (Digi-Key P/N WM1114-ND).
Requirements:
• Polarity: The DP4 is an inverting amplifier. Measured at Pin 1 referenced to Pin 2, the input pulse should be negative. The connector should be wired to achieve this as discussed above.
• Magnitude: The inputs to the first amplifier stage have a common mode range of +7.6V, with a differential mode range of +3.8V. By default, a 25% attenuator is installed (R291=R296=330 ohms) to increase the common mode range to +9.5V and the differential mode range to +4.75V. If this increased range isn’t needed, the attenuator can be removed (R291=R296=0 ohms). See section 2.3.1.

DP4 User Manual D4.doc, 4/30/09
Amptek Inc. DP4 Digital Pulse Processor Page 12 of 34
• The default configuration is for reset preamps. For continuous feedback preamplifiers, the hardware will require reconfiguration, as discussed in Section 0.
• Risetime >100 nsec
2.2.2 JP6 – Power and Interface
JP6 is a 16-pin 1mm flex connector. Pin # Name Pin # Name
1 +3.3V 9 RS232-RX
2 +5V 10 RS232-TX
3 -5V 11 RS232-CTS
4 GND 12 RS232-RTS
5 GND 13 GND
6 I2C SDA 14 /RESET
7 I2C SCL 15 USB-
8 GND 16 USB+
Table 2. Pinout for JP6, the primary power and serial interface connector
• +3.3V: This supply powers the majority of the DP4. Average operating current is 100-200mA, depending on configuration. Peak current is 500 mA at startup.
• +5V, -5V: These supplies power the analog front end. Average operating current is 10 mA for each. These should be well filtered, since ripple is likely to degrade performance. There is no overcurrent or reverse voltage protection implemented on the DP4.
• SDA, SCL: These are the I2C bus signals. The DP4 microcontroller is the bus master, so any peripherals connected to the I2C bus must be slaves. The only I2C devices on the DP4 (other than the μC) are the 24AA64 boot prom and a temperature sensor.
• RS232-RX, RS232-TX, RS232-CTS, RS232-RTS: These are RS232 signals for interfacing the DP4 to a host system. The signal names are relative to the DP4, i.e. the DP4 receives on the RX pin and transmits on the TX pin. The handshaking signals CTS and RTS are not used but are available for custom applications.
• /RESET: Pulling this signal low will hold the entire DP4 in reset. Floating it or pulling it high allows normal operation.
• USB+, USB-: This is the USB (Universal Serial Bus) communication bus. The DP4 microcontroller contains a USB communication core.
Connector:
• Connector: 16 position right angle, Hirose Electronic Co. Ltd: FH21-16S-1DS, Digi-Key: HFG16T-ND
• Mating cable: 1mm Flat Flex Cable 4", Parlex: 100-16-102B, Digi-Key: HF16U-04-ND (other lengths are available)
2.2.3 J2 – Analog output
This is the shaped output from the DAC. The decimated input and other diagnostic signals can also be output from the DAC.
• Pin 1: +OUT: This is the output of the DAC. Output range is 0-1V.

DP4 User Manual D4.doc, 4/30/09
Amptek Inc. DP4 Digital Pulse Processor Page 13 of 34
• Pin 2: AGND: Analog ground. Care should be taken in connecting this ground externally, as ground currents can disturb the analog front end.
Connector:
• The J2 connector on the DP4 is a Molex P/N 22-05-3021. Mating connector is: Molex P/N 22-01-3027. (Digi-Key P/N WM2000-ND) with Molex crimp terminals P/N 08-50-0114 (Digi-Key P/N WM1114-ND)
2.2.4 JP9 External Logic I/O
JP9 is an 8x2 2mm header, which offers functionality which is required by some but not all users. Pins 1 through 8 are the outputs of the single channel analyzer outputs, discussed in section 1.3.5. Pins 9 and 10 are the gate input (section 1.3.3.4) and buffer select input (section 2.3.4), respectively. Pins 11 and 12 are ground.
Pin Function Pin Function Pin Function
1 SCA1 5 SCA3 9 GATE IN
2 SCA8 6 SCA6 10 BUFFER SEL
3 SCA2 7 SCA4 11 GND
4 SCA7 8 SCA5 12 GND
GATE and BUFFER_SEL inputs:
VIL (logic low): -0.5 to + 0.7V VIH (logic high): +2.4 to +5.5V
Inputs: SN74LVC2G14, Vcc=3.3V, 100 kΩ pull-downs
SCA Outputs:
VOL (logic low): 0.1V @ 100uA VOH (logic high): +3.1V @ 100uA
Outputs: SN74LVC245A, Vcc=3.3V, 49.9 Ω series termination
Pulse width: 50nS
2.2.5 J15 I2C Bus
J15 includes the I2C bus signals (SCL & SDA), and a global active low reset input (/RESET). This header can be used for in-circuit programming of the microcontroller EEPROM, or it can be used by custom applications to communicate with other I2C devices.
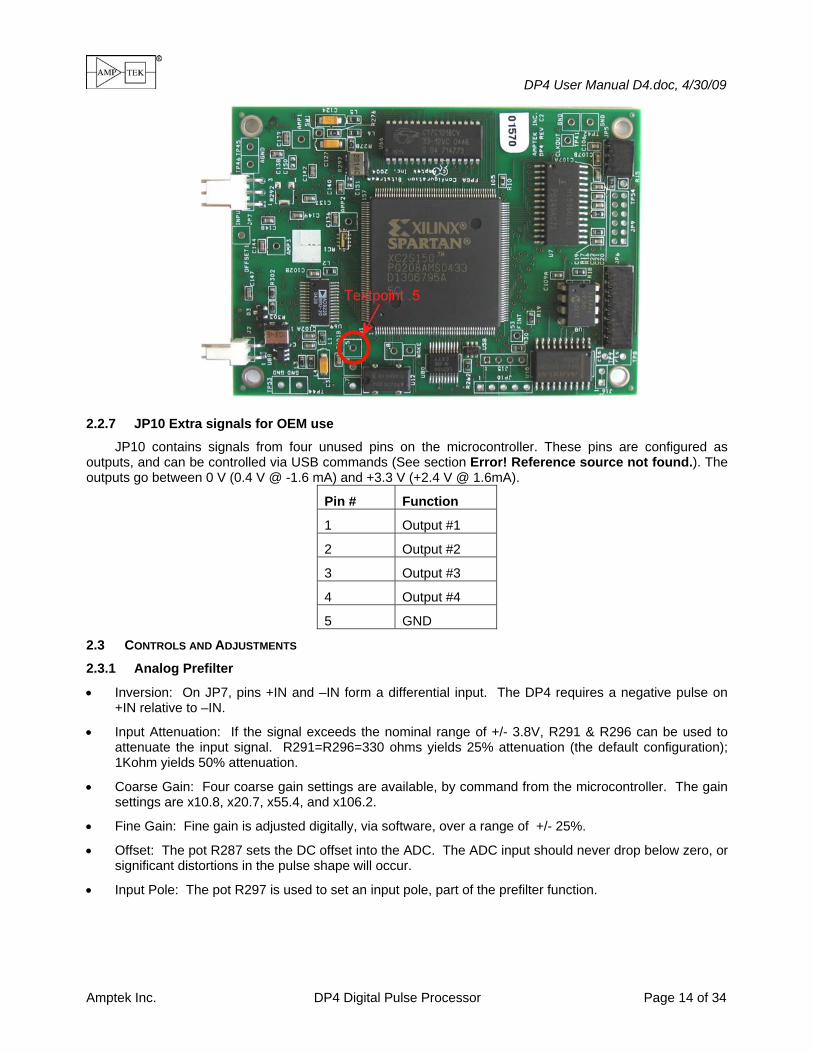
2.2.6 Diagnostic Testpoint .5
The DP4 has a diagnostic testpoint, labeled ‘.5’, which is located near the FPGA (see picture below). This testpoint can be configured via the application software to output a number of useful signals, as listed below:
Signal Name Function
ICR Input Count Rate, i.e. Fast Channel fired
PILEUP Piled-up event detected
HOLD (Internal diagnostic)
ONESHOT Period during which a 2nd event would be considered piled-up
DET_RES_ Active-Low Detector Reset Lockout Period
MCA_EN High=MCA Enabled, Low=MCA Disabled
TRIGGER Peak Detect Fired
SCA8 Single Channel Analyzer output #8 (Also available on JP9)
DP4 User Manual D4.doc, 4/30/09
Amptek Inc. DP4 Digital Pulse Processor Page 14 of 34
2.2.7 JP10 Extra signals for OEM use
JP10 contains signals from four unused pins on the microcontroller. These pins are configured as outputs, and can be controlled via USB commands (See section Error! Reference source not found.). The outputs go between 0 V (0.4 V @ -1.6 mA) and +3.3 V (+2.4 V @ 1.6mA).
Pin # Function
1 Output #1
2 Output #2
3 Output #3
4 Output #4
5 GND
2.3 CONTROLS AND ADJUSTMENTS
2.3.1 Analog Prefilter
• Inversion: On JP7, pins +IN and –IN form a differential input. The DP4 requires a negative pulse on +IN relative to –IN.
• Input Attenuation: If the signal exceeds the nominal range of +/- 3.8V, R291 & R296 can be used to attenuate the input signal. R291=R296=330 ohms yields 25% attenuation (the default configuration); 1Kohm yields 50% attenuation.
• Coarse Gain: Four coarse gain settings are available, by command from the microcontroller. The gain settings are x10.8, x20.7, x55.4, and x106.2.
• Fine Gain: Fine gain is adjusted digitally, via software, over a range of +/- 25%.
• Offset: The pot R287 sets the DC offset into the ADC. The ADC input should never drop below zero, or significant distortions in the pulse shape will occur.
• Input Pole: The pot R297 is used to set an input pole, part of the prefilter function.

DP4 User Manual D4.doc, 4/30/09
Amptek Inc. DP4 Digital Pulse Processor Page 15 of 34
2.3.2 Pulse Shaping
• Rise and Fall Time: The rise time of the shaped pulse, which must equal the fall time, can be set to any one of several values, listed in Table 1. This is adjusted digitally: the microcontroller writes the desired value to a register in the pulse shaping hardware. The demonstration software provides a simple control for this. Setting this value by the demonstration software is described in sections Error! Reference source not found. and 4.
• Flat Top Duration: The duration of the trapezoidal flat top can also be set to one of several values, by a digital command.
• Decimation: For long rise times, the input ADC values are decimated, as is common with digital processing. The decimation setting is related to the rise/fall time and the flat top duration. This is also set by digital command.
• DAC Controls: The DAC has several controls, described more fully in section Error! Reference source not found.. The DAC provides an analog display of the digital processing that is occurring. The analog display is not needed but is convenient for setup and debugging. First, the DAC can be enabled or disabled. Second, several different waveforms may be sent to the DAC. This includes the fast channel output, the decimated input, the shaped output, and the BLR correction. Third, a DC offset can be sent to the DAC. The DAC responds to underflows (outputs below 0V) by wrapping over, so it is recommended practice to set a DC offset that avoids this.
• Preamp Reset Controls: These are utilized with reset type preamps and their operation is described in section 1.3.2.1. The user may enable or disable Autobaseline. The user may also set a reset period, which is the length of time following a reset signal during which data processing is shut down, to permit the electronics to fully recover. The user may also elect to disable reset detection. These controls are sent by software to the pulse processing FPGA.
• Baseline Restoration Controls: The operation of the baseline restorer is described in section 1.3.2.2. The user may enable or disable BLR. If enabled, then the user may choose to set three parameters: up, down, and threshold, each set to one of four values. “Up” (“Down”) determines the size of the upward (downward) step to the baseline. “Threshold” determines when an upward correction is required. These controls are sent by software to the pulse processing FPGA. Autobaseline should be disabled if BLR is enabled or if a non-reset style preamp is used.
2.3.3 Pulse Selection
• Fast Threshold: A low level threshold for the fast channel can be set by a digital command. The logic output is used in subsequent pulse processing.
• Pile-Up Rejection: The pile-up rejection (PUR) has one direct control, the on/off control. Indirectly, the operation of the PUR is greatly affected by the setting of the Fast Channel Threshold. Only signals with a fast channel response exceeding this threshold are evaluated for possible pile-up. If this threshold is set too low, then electronic noise triggers the PUR detect circuits. Pulses are rejected if they occur close in time with noise, and therefore there is very low data throughput. If this threshold is set too high, then real events are missed and therefore pile-up will be present in the spectrum. Common practice is to set the fast threshold to generate 5-10 cps, in the absence of any signal, which puts this level as close to the noise as possible without degrading throughput.
• Pile-up period: the pile-up period (the minimum interval between two successive peaks which are not considered piled up) is programmable. The optimal setting is:
(RisetimeRegister * 19 + (FlatTopRegister + 1) * 4) / 2.
• Risetime Discrimination: Risetime discrimination is described in section 1.3.3.2. There are three controls, each sent via software to the FPGA. First, RTD may be enabled or disabled. Second, if enabled, then the user may set the threshold. This threshold applies to the slow channel. Only events exceeding this threshold will be analyzed by the RTD circuit; all events below this threshold are accepted. Third, the user may set the HWHM for the fast channel. Only events with a HWHM below this value will be accepted.

DP4 User Manual D4.doc, 4/30/09
Amptek Inc. DP4 Digital Pulse Processor Page 16 of 34
2.3.4 MCA Control
• Number of channels: The MCA can be set to have 256, 512, 1024, 2048, 4096, or 8192 channels.
• Slow Channel Threshold (LLD): As with most MCAs, there is a low level discriminator on the slow channel. Only pulses exceeding this threshold will be recorded in the MCA spectrum. The register setting of 0-255 corresponds to about 0-25% of the full-scale output.
• Gate: In software, the user may set the gate “off”, in which case the gate input is ignored. The user may also set it to active high or active low.
• Buffer: There are two memory buffers in the hardware, designated A and B. The user may choose to use either. In addition, the user may choose to enable “Hardware Select”. If this is enabled, then an external logic input controls whether the data go into buffer A or B.
• Preset Time: The accumulation time may be preset, from 100ms to 19.4 days, with 100ms precision. This is set in software. After this time has elapsed, acquisition will stop. This will be the accumulation time, the duration of data acquisition, not live time and not elapsed clock time. See section 6.3 for details on accumulation time.
• Preset Counts: The DP4 can be programmed to acquire a preset number of counts in a region of interest. Acquisition will stop when this number of counts is reached. SCA8 must be configured with the region of interest.
2.3.5 SCA Controls
There are 8 SCA channels, each of which has the following three controls.
• Enable: If this is selected, then that channel outputs counts.
• Lower and Upper Thresholds: These define the range of the SCA. These are in MCA channels: if the MCA is is 1024 channel mode, and SCA 1 has a range of 712 to 800 for example, then any time a count is binned in this range of MCA channels, there will be a logic pulse on the SCA output.
DP4 User Manual D4.doc, 4/30/09
Amptek Inc. DP4 Digital Pulse Processor Page 17 of 34
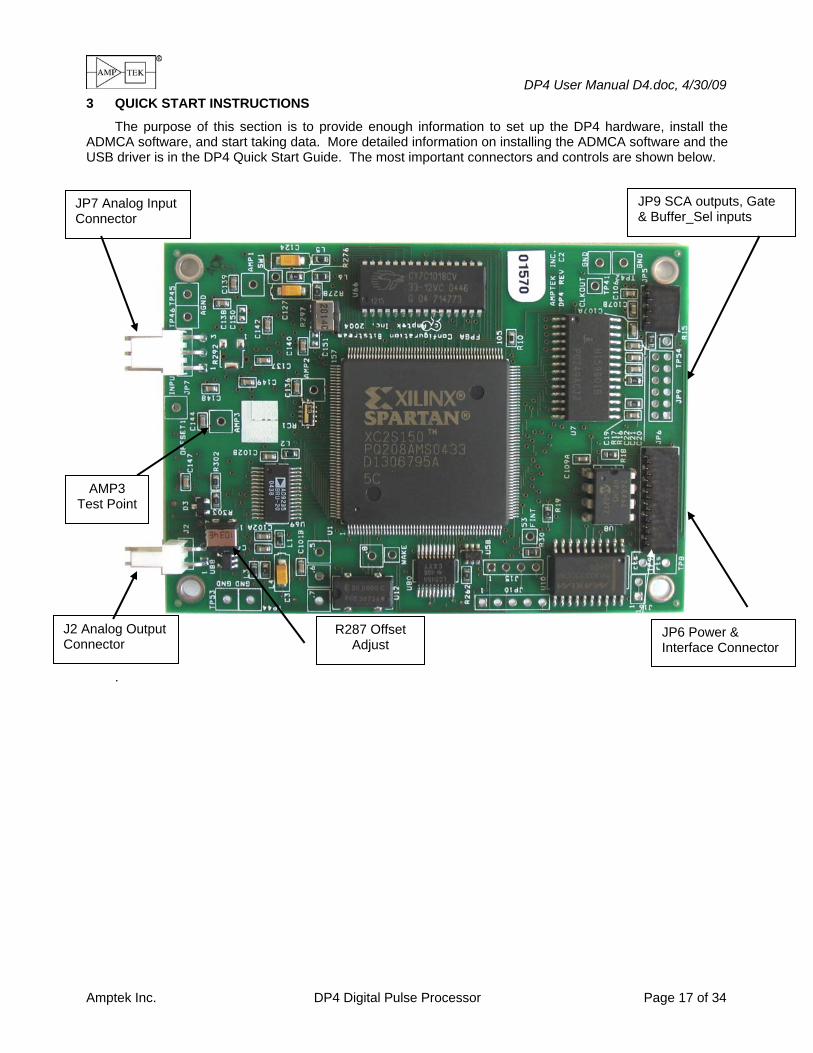
3 QUICK START INSTRUCTIONS
The purpose of this section is to provide enough information to set up the DP4 hardware, install the ADMCA software, and start taking data. More detailed information on installing the ADMCA software and the USB driver is in the DP4 Quick Start Guide. The most important connectors and controls are shown below.
JP6 Power & Interface Connector
JP7 Analog Input Connector
J2 Analog Output Connector
JP9 SCA outputs, Gate & Buffer_Sel inputs
R287 Offset Adjust
AMP3 Test Point
.

DP4 User Manual D4.doc, 4/30/09
Amptek Inc. DP4 Digital Pulse Processor Page 18 of 34
3.1 SET-UP INSTRUCTIONS Note for users of the original DP4: The original DP4 only supported up to 4096 channel spectra, and therefore the USB driver was configured to not allow transfers larger than that. The DP4 Rev. C and higher now supports 8192 channel spectra, which may not work properly with the previous driver configuration if the DP4 is configured for 8192 channels. There are 2 solutions: 1) Uninstall the USB driver, and reinstall as described above. 2) Edit the registry entry which limits the transfer size to 4096 channels. Please contact Amptek for guidance if this issue affects you.
3.1.1 USB Driver and ADMCA software installation
Please see the “DP4 Quick Start Guide” for instructions on installing the USB driver and the ADMCA display and acquisition software. The ADMCA software only supports USB for the DP4. If RS232 is needed, install the VB App as described below.
3.1.2 VB Test Application installation and RS232 serial port connection
1) On the CD, locate the “Additional DPP Software\VB App” directory and run the setup.exe program. The Visual Basic source code of this program is in the “VB App\Source” directory.
2) Connect the RS232 interface to the serial port of a personal computer. The RS232 handshaking lines RTS & CTS don’t need to be connected unless custom software is used. Amptek offers several different DP4 power supply solutions (PC4 interface boards) which include RS232 connectors.
3.1.3 Hardware connections
1) Connect the power supply and the RS232 or USB interface, per section 2.2.2 on page 12. The +3.3V, +/-5V, GND, and RS232 or USB lines must be connected. We recommend verifying the voltages and current limits of the power supply before connecting to the DP4. The RS232 lines should connect to the serial port of a personal computer; the USB lines can connect to the USB port of a PC or to a USB hub. The RS232 handshaking lines RTS & CTS don’t need to be connected unless custom software is used.
2) Connect the preamplifier output to the DP4 input JP7, per section 2.2.1 on page 11.
3) Connect the DP4 analog output J2, per section 2.2.3 on page 12, to an oscilloscope. Although this output from the DAC is not required for operation, it is recommended during initial set up.
4) Power On
1) Turn on the detector and preamplifier and place an appropriate radioactive source in front of the detector. It may be useful to verify, using an oscilloscope, that the preamplifier is producing signals of the correct size and polarity.
2) Turn on power to the DP4. The +3.3V line should draw 100 to 180 mA, while the +/-5 V lines should draw <10 mA. No output should be visible on the screen or on the oscilloscope until the unit has been configured.
3) Click connect in the ADMCA software.
4) You can confirm that the DP4 & PC are communicating by ensuring that the USB symbol in the bottom right of the screen of the ADMCA software is green, and that the serial number of the unit is displayed in the upper part of the right hand information panel. If using the VB App, the firmware should return a valid number at thebottom of the display window.
3.1.4 Hardware adjustments
1) Connect an oscilloscope probe to the test point labeled AMP3. The signal should look like the traces shown previously, as the “analog prefilter output” in Figure 4.
2) The pulses of interest should have a magnitude of approximately 1V, with an offset of 100 to 200 mV. The offset must be large enough that the signal normally does not drop below ground – it can go below ground during detector reset.
If the polarity is incorrect, refer to section 2.3.1. The coarse gain is adjusted via software, as discussed below. If the signal amplitude is too large, with the coarse gain at its minimum, set the input attenuator as described in section 2.3.1. If the offset is incorrect, adjust R287.
DP4 User Manual D4.doc, 4/30/09
Amptek Inc. DP4 Digital Pulse Processor Page 19 of 34
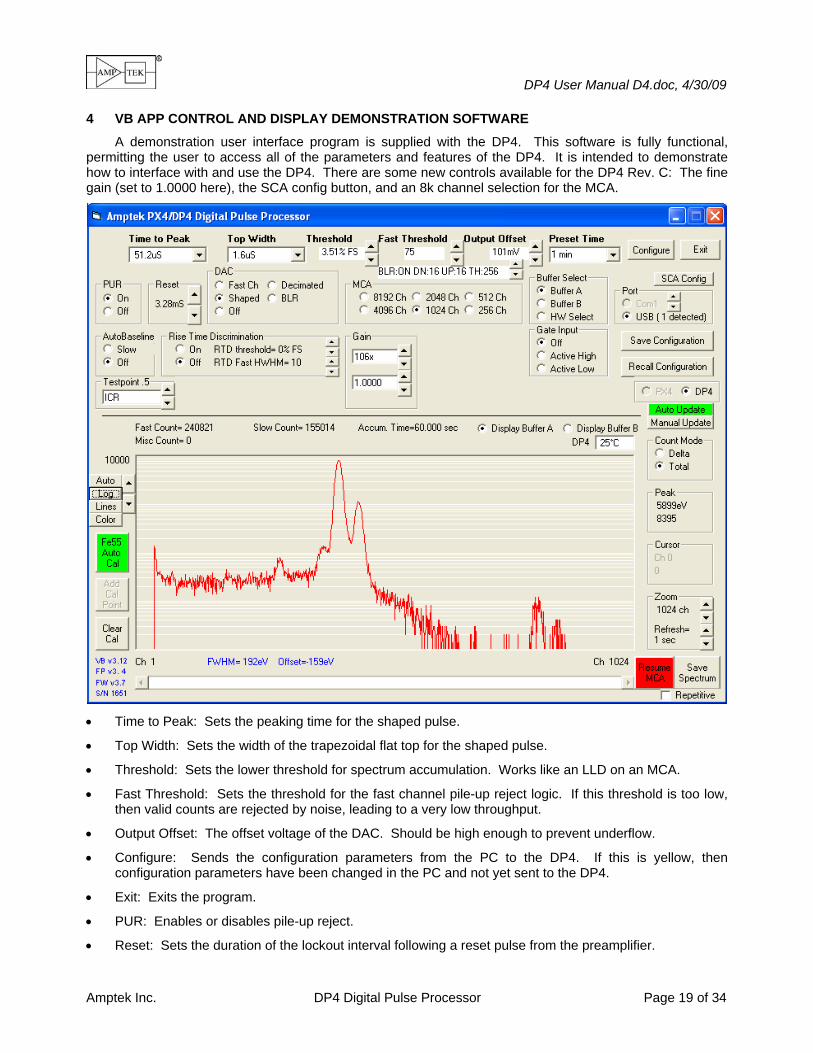
4 VB APP CONTROL AND DISPLAY DEMONSTRATION SOFTWARE
A demonstration user interface program is supplied with the DP4. This software is fully functional, permitting the user to access all of the parameters and features of the DP4. It is intended to demonstrate how to interface with and use the DP4. There are some new controls available for the DP4 Rev. C: The fine gain (set to 1.0000 here), the SCA config button, and an 8k channel selection for the MCA.
• Time to Peak: Sets the peaking time for the shaped pulse.
• Top Width: Sets the width of the trapezoidal flat top for the shaped pulse.
• Threshold: Sets the lower threshold for spectrum accumulation. Works like an LLD on an MCA.
• Fast Threshold: Sets the threshold for the fast channel pile-up reject logic. If this threshold is too low, then valid counts are rejected by noise, leading to a very low throughput.
• Output Offset: The offset voltage of the DAC. Should be high enough to prevent underflow.
• Configure: Sends the configuration parameters from the PC to the DP4. If this is yellow, then configuration parameters have been changed in the PC and not yet sent to the DP4.
• Exit: Exits the program.
• PUR: Enables or disables pile-up reject.
• Reset: Sets the duration of the lockout interval following a reset pulse from the preamplifier.

DP4 User Manual D4.doc, 4/30/09
Amptek Inc. DP4 Digital Pulse Processor Page 20 of 34
• DAC: Selects which signal is sent to the DAC. If the DAC is off, power consumption is reduced.
• MCA: Selects the number of MCA channels to be used.
• Buffer Select: May use memory buffer A or B, or enable hardware selection of the buffers.
• SCA Config: Clicking on this button will bring up another window, with the SCA controls. In this window, each of the eight SCAs has an enable check box, a lower level, and an upper level. The ‘Preset Counts’ setting is also found here (it uses the ROI for SCA8.)
• Port: Selects PC serial port COM1-COM8 (for an RS232 interface), or USB Port (for the USB Interface).
• AutoBaseline: Enables AutoBaseline.
• Risetime Discrimination: Turns RTD on, and sets the amplitude and timing thresholds.
• Analog Coarse Gain: Selects one of 4 gain settings. A setting of 100 (10 keV) implies that the full-scale energy will be approximately 10 keV, using an Amptek XR100.
• Digital Fine Gain: Sets the gain to a range of 0.75 to 1.25 in steps of ?? 0.001.
• Gate Input: Enables Gate and selects active High or Low.
• Save/Recall Configuration: Saves or recalls the configuration parameters set in this software. The configuration file is named ‘DP4.CFG’ and is stored in the current folder.
• Fast Count: Displays the number of counts that have accumulated in the fast channel in the present data acquisition interval.
• Slow Count: Displays the number of counts that have accumulated in the slow channel in the present data acquisition interval.
• Accumulation Time: Displays the duration (real time) of the present data acquisition interval.
• Auto/Manual Update: In Auto update mode, the PC periodically queries the DP4 and downloads the spectrum. In Manual Update mode, the data are only transmitted from the DP4 when the user selects the manual update button. In auto update with the RS232 interface, the update rate is a function of MCA channels: 4 sec for 4096 channels, 2 sec for 2048 channels, 1 sec for 1024 channels, 500 msec for 512 channels, and 250 msec for 256 channels. (8192 channel mode is not supported via the RS232 interface.)
• Count Mode: In Delta mode, the spectrum only displays counts received in the most recent data update interval (i.e., 1 second). The histogram memory is cleared after each update. In Total mode, counts are integrated. Integration begins at the end of the update when Total was pressed and continuous until the update after Delta was pressed. Selecting Delta mode is used to clear the spectrum. (Note: the integration takes place in the DP4, not the host PC.)
• Peak: Indicates the MCA channel with the maximum number of counts, and the number of counts in that channel.
• Cursor: Indicates the MCA channel selected by the cursor and the number of counts in that channel (Left-click with the mouse to set the cursor. The right & left arrow keys move the cursor when the graph is selected.)
• Zoom: Permits the user to zoom in on a subset of the MCA channels. For the RS232 interface, only the selected channels are sent from the DP4 to the host PC, which allows a faster refresh rate. For the USB interface, the DP4 always sends the entire spectrum.
• Save Spectrum: Saves the spectrum to a file. The user will be prompted for a file name. The file is written in the standard format of Amptek’s PMCA software. This is an ASCII format, with several lines of header information, followed by the spectrum, with one line per channel. It can be read using Amptek’s PMCA software or by any software which reads ASCII, e.g. Excel or WordPad. When saved as a PMCA file the data can be processed by the XRF-FP Quantitative analysis software.

DP4 User Manual D4.doc, 4/30/09
Amptek Inc. DP4 Digital Pulse Processor Page 21 of 34
• Scale: Sets the vertical scale for spectrum display. By default, the software uses autoscaling based on the maximum counts. The user may also manually scale. Scaling can be either linear or logarithmic.
• 55Fe Auto Cal: Provides a convenient automatic calibration, assuming an 55Fe source is used. Selects appropriate peaks for the 5.9 and 6.4 keV lines and performs a simple, two-point calibration. (For this to function correctly, the 55Fe peaks must be the highest peaks in the spectrum.)
• Add Cal Point: Permits the user to add additional calibration points for a linear regression.
• Pause MCA: Manually starts and stops data acquisition. Only functional with USB.
5 USE OF THE DP4 WITH AMPTEK’S XR100 DETECTORS
Amptek’s DP4 Digital Pulse Processor is easily configured for use with Amptek’s family of XR-100 detectors and preamplifiers. The DP4 generally comes configured for use with reset type preamplifiers, which are used in the XR-100CR for Si-PIN. This section is intended to guide a user through the set-up of the DP4 for use with these detectors. Configuration of the DP4 for other preamplifiers is described in later sections.
Section 6.1 describes setup of the DP4 with the PC4-3 power board and the PA-210 peamplifier.
5.1 USERS WITH AN XR100
1
2
3
4
5
9
8
6
11
10
7
12
TEMPERATURESENSOR
AD590
ELECTRICCOOLER
THERMO-
FEEDBACK
PREAMP
FILTER
1
2
3
4
5
6
1
2
3
4
5
6,8,9
7
GND
-9 VDC
+9 VDC
BIAS
COOLER-
COOLER+
TEMP
DETECTOR
FET
Cf = 40 f F
Ctest = 40 f F 50 ohm
THERMAL SW.
9 PIN DCONN.
LEMOCONN.
XR-100CR POWER
AXRCR
OUT
TEST
X-RAYS
Be
CASE
1
2
1
FILTER
GND
GND
IN-
IN+
JP7
DP4
ADC DigitalProcessor
MCAMemory μprocessor
DAC 1
2 GND
OUT
2 3 4,5
3.3V +5V -5V
JP1&
JP6
AMP3
6,7
I2C GND
8,13
/RST
9-12 14
RS232 USB
15,16
J2
3.3V +5V -5V
GND
3
Figure 7. Block diagram of an XR100, DP4, and power supply.
A suitable power supplies must be used. The hardware should be connected as shown in Figure 7. The power supply requirements for the DP4 are given in section 2.2.2. See the XR100 Manual for specifications on the XR100 power requirements and appropriate setup.
1) Make all the connections above and connect the preamplifier output to an oscilloscope. Apply power to the preamp and detector (+/-8V, bias, cooler). Monitor the temperature to verify that the detector is cooing (See XR100CR manual for details).

DP4 User Manual D4.doc, 4/30/09
Amptek Inc. DP4 Digital Pulse Processor Page 22 of 34
5.2 USERS WITH A DP4, PC4-3, AND PA-210 PREAMPLIFIER
Many OEMs use the DP4 together with the PC4-3 power supply board and the PA-210 preamplifier. This total OEM solution is configured as shown below.
AmptekPA-210
Preamplifier
PC4-3Power Supply
DP4Digital Processor
+5VDC
USB
AmptekAXR
Detector
Signal
Signal &Power
Power &USB/RS-232
flex cableflex cable
coax cable
Signal to pin 1Shield to pin 2
INPUTJP7
OUT
J1
J3
JP6J4AJ1
J5
RS232
The picture to the right is a close up of the J4A connector, which connects between the PC4-3 and the PA-210, and the OUT connection, which connects with a coax cable to the DP4 input (J7: signal pin 1, shield pin 2).

DP4 User Manual D4.doc, 4/30/09
Amptek Inc. DP4 Digital Pulse Processor Page 23 of 34
5.3 USE OF THE DP4 WITH TAIL PULSE PREAMPS
The DP4 is configured at the factory for particular preamplifier properties, specifically for reset type feedback, for negative input signals of tens of mV, etc. It can readily be used with other preamplifiers, but this requires hardware reconfiguration. This section will guide the user in making these changes.
As shown in Figure 1, the DP4 contains an analog prefilter circuit. The output of this analog prefilter, which is the input to the ADC and can be measured a test point marked AMP3 on the DP4 board, is shown in Figure 8 as the Prefilter Output. The key to adapting the DP4 for various preamps is modifying the prefilter to generate the Prefilter Output pulse shape shown in Figure 8. If the signal measured at AMP3 has the proper characteristics, the DP4 will operate properly. This section provides suggestions regarding how the analog prefilter should be adapted for a few common situations, but it cannot cover all possibilities. In any and all cases, measuring the signal at AMP3 will allow the user to determine if the hardware has been properly configured.
DP4 Input(Preamp Output)
Prefilter Output(ADC Input) DP4 Output
Figure 8. Oscilloscope trace showing the proper signal at AMP3.
The important characteristics of the signal at AMP3 , the output of the analog prefilter, are:
• Rise time should be >100 nsec but much faster than the peaking time to be set in the DP4 software
• The decay time must be 3.2 μsec and must be a simple, single pole decay
• The DC offset should be sufficient to keep the ADC input positive. Typically, 200 mV is good. The ADC has a range of 0 to 2V, so if AMP3 drops below 0 V, signal processing anomalies will occur. The DC offset may be increased if necessary. [AMP3 should only drop below 0V during detector reset.]
• The amplitude of the pulse must be about 1V, positive going. The ADC has a range of 0 to 2V, so if AMP3 exceeds 2V, signal processing anomalies will occur.

DP4 User Manual D4.doc, 4/30/09
Amptek Inc. DP4 Digital Pulse Processor Page 24 of 34
5.4 ANALOG PREFILTER CIRCUIT DESCRIPTION
The analog prefilter circuit is shown in Figure 9. The main elements are (1) a differential amplifier (U83), (2) a high pass filter with a 3.2 μsec time constant, (3) a gain stage (U86), and (4) an amplifier (U82B) providing gain, polarity reversal, and DC offset adjustment. We will now discuss these in more detail.
5.4.1 Differential amplifier
This is a (nominally) unity gain differential amplifier, used to reduce common mode ripple. This circuit also permits the user to invert the signal: the output of the differential amplifier should be a negative going pulse, so the preamp signal can be connected to either the inverting or noninverting node of the differential amplifier. This circuit can also provide some gain or attenuation, using the input resistors.
Note that this signal return is connected to the differential amplifier input and not to DP4 ground. The signal reference does not provide a ground connection. The preamplifier ground must be connected directly to the DP4 ground. Pin 3 of JP7 may be used or some other ground point. Failure to ground the preamp, connecting the preamp ground only to the differential amplifier input, has caused many users significant grounding problems!
5.4.2 High Pass Filter
(R4 + R300) together with C133 form a high pass filter, which provides the 3.2 μsec decay seen in the Prefilter Output in Figure 8. Pot R297 is used to fine-tune the time constant. If this pole is set correctly, then the shaped trapezoidal output from the DP4 DAC will have a flat top and a clean tail (no undershoot or overshoot). Setting this pole is very important to the proper operation of the digital pulse processor.
If a preamplifier with a tail is used, i.e. one using resistive feedback, then there will be an undershoot at the output of this filter. This can be seen at AMP2, AMP3, and at the DAC’s shaped output. A pole zero resistor must be installed in R292 to cancel the preamp tail. The procedure for doing this is contained in section 5.5.1.
The switch U84 was used in the early development of the DP4 for the Autobaseline function. Autobaseline has been replaced by the Base-Line Restorer (BLR) function. Autobaseline should not be used, and should always be set to OFF in software.
5.4.3 First Gain Stage
The first gain stage, based on U86, can provide a gain of either 5 or 10. The gain is changed by switch U85A, under command from the microprocessor. Note that any DC output from the high pass filter is amplified by this gain.
5.4.4 Final Gain Stage
The final gain stage, U82B, implements several important functions:
1) It provides additional coarse gain, of approximately 2 or 10, by switch U85B.
2) It inverts the signal. The pulse measured at AMP3 must be positive going.
3) It provides a DC offset, by pot R287. The offset input to this amplifier stage ranges from -100 to +100 mV. The pulse measured at AMP3 must have a DC offset sufficient to ensure that the ADC input does not go negative.

DP4 User Manual D4.doc, 4/30/09
Amptek Inc. DP4 Digital Pulse Processor Page 25 of 34
Rev
Title
Size Document Number
Date: Sheet of
DPP301B1.DSN
DP4 Analog Pref ilter
1 1Wednesday , April 15, 2009
B0
3
26
74
+
-
U86AD8011R44
0
R74.3K
R2841K
18
23
47
6 Vdd
VssG
U85ADG636(A)
R43NOT INSTALLED
Gain2
Gain1
Zero
ADC
Final Gain and Offset Adjust
First Gain Stage
High Pass Filter
Input Differential Amplifier
+2.5V
C125NI
R27710
R279360
AC
D1
-2.5V
R4100
5
67
84
+
-
U82BAD8032
R3011.0K
R2981.0K
R2991.0K
R2931.0K
1
AMP1
R2941.0K
18
2 3
47
6Vdd
VssG
U85ADG636(B)
Amptek, Inc.
12
3R297NI
R2910
R2960
3
26
74
+
-
U83AD8011
18
23
47
6 Vdd
VssG
U84ADG619
12
3
R292NOT INSTALLED
R300330
1
AMP2
AMP2AMP2AMP2
1
AMP3
1
OFFSET
V+
V-
V-
V+
R2854.3K
R288470
C1336.8NF
V-V-
V+V+
123
JP7
R283130
AMP2AMP2AMP2AMP2AMP2AMP2
12
3R28710K
R5149.9k
C132100NF
R46475

DP4 User Manual D4.doc, 4/30/09
Amptek Inc. DP4 Digital Pulse Processor Page 26 of 34
Figure 9. Schematic of the analog prefilter and gain in the DP4.

DP4 User Manual D4.doc, 4/30/09
Amptek Inc. DP4 Digital Pulse Processor Page 27 of 34
5.5 PROCEDURES FOR COMMON CHANGES
The following sections recommend ways in which the DP4 can be modified to match the output requirements of given preamplifiers.
5.5.1 Preamplifier Tail Cancellation
The most common change required is to add a pole zero resistor to cancel the tail of a preamplifier with continuous feedback. The following procedure is suggested:
1) Estimate the value of R292. Let τ be the preamplifier time constant, the time in which the preamp tail decays to 1/e of its peak value after a step. Then R292 = τ/6.8 nF. For τ=1 msec, R292=147kΩ.
2) Install R292. It is usually best to first install a pot to accommodate tolerances in the various components. With the pot installed and set to the approximate value, turn on the system and measure at AMP3 with an oscilloscope, with signals coming through. Look for a long undershoot or overshoot, comparable to the preamp tail. Typical waveforms are shown in Figure 10. If there is an overshoot, decrease R292. If there is an undershoot, increase R292. Once the precise value is found, a fixed resistor may be installed.
R292 too low
R292 correct
R292 too high
Figure 10. Oscilloscope traces showing AMP3 under several conditions. (a) R292 properly adjusted. (b) R292 too large. (c) R292 too small. When R292 is correct, there is neither undershoot nor overshoot on the tail.
3) The presence of R292 will change the time constant of the high pass filter, leading to a slope on the trapezoidal top and to an undershoot or overshoot of short time constant. Typical waveforms are shown in Figure 11. Using the DP4 DAC output, set the peaking time to a short value and the flat top duration as long as permitted. Remove R4 and install a 200 Ohm potentiometer into R297. Adjust R297 until the top is flat and no undershoot or overshoot is visible.

DP4 User Manual D4.doc, 4/30/09
Amptek Inc. DP4 Digital Pulse Processor Page 28 of 34
Correct
Incorrect
Incorrect
Figure 11. Oscilloscope traces showing the DAC shaped output under several conditions. (a) R297 properly adjusted. (b) R297 improperly adjusted. When R297 is incorrect, the top of the trapezoid is sloped and there is an undershoot or overshoot at the end.
4) The presence of R292 also leads to a DC offset into the circuitry. A preamp generally has some DC offset at its output, and R292 combines with (R297+R300) to form a DC divider, coupling a fraction of this offset into the amplifiers, which is then amplified. The DC offset should be measured, first at AMP2 and then at AMP3. If the offset is small enough, then the offset adjust pot R287 can accommodate it. If the offset is a bit larger, then R51 and/or R303 can be decreased to provide more range.
5) The diode D1 is only needed to clamp the ADC input in the presence of large, negative reset pulses. We recommend removing it for non-reset preamplifiers.
This procedure will only work if the tail from the preamplifier is a simple exponential (a single pole) and is constant. If there are multiple poles in the preamplifier response, then the dominant pole may be cancelled. The remaining pole(s) may or may not affect proper operation. If the time constant varies, i.e. with temperature or count rate, then the pole will not be cancelled under all conditions.
5.5.2 Inversion
JP7 is the input connector. For positive (negative) going preamp outputs, connect the signal to pin 2 (1). The signal reference from the preamp should be connected to pin 2 (1), respectively.
5.5.3 Input Range Adjustment
U83 has a signal range of +4V. Many preamps have a larger dynamic range, i.e. their output may swing from +/- 12V. In such cases the input resistors may be used to attenuate the preamplifier signal. Change R291 and R296 (which must be equal) to provide the necessary attenuation. This will cause a slight loss of resolution so should only be used if it is really needed. Alternately, if the preamplifier signal is limited to a smaller range, then this circuit can be configured to provide a small amount of gain, using resistors R293 and R298.
5.5.4 Single Ended Operation
The DP4 is configured at the factory with a differential input, but may be reconfigured for single ended operation. Using differential input has several advantages: it reduces common mode interference (with proper grounding) and it uses a buffer which separates the output impedance of the preamplifier from the
DP4 User Manual D4.doc, 4/30/09
Amptek Inc. DP4 Digital Pulse Processor Page 29 of 34
DP4’s high pass filter. However, some users prefer single ended operation. If not using an Amptek detector, the high pass filter may need to be adjusted as explained above.
To achieve single-ended operation:
1. Remove resistors R291, R296, and R44.
2. Install a zero ohm resistor in R43.
Pin 1 of JP7 is the input and will now go directly to the high pass filter. Pin 2 is not used, while Pin 3 is the ground node.
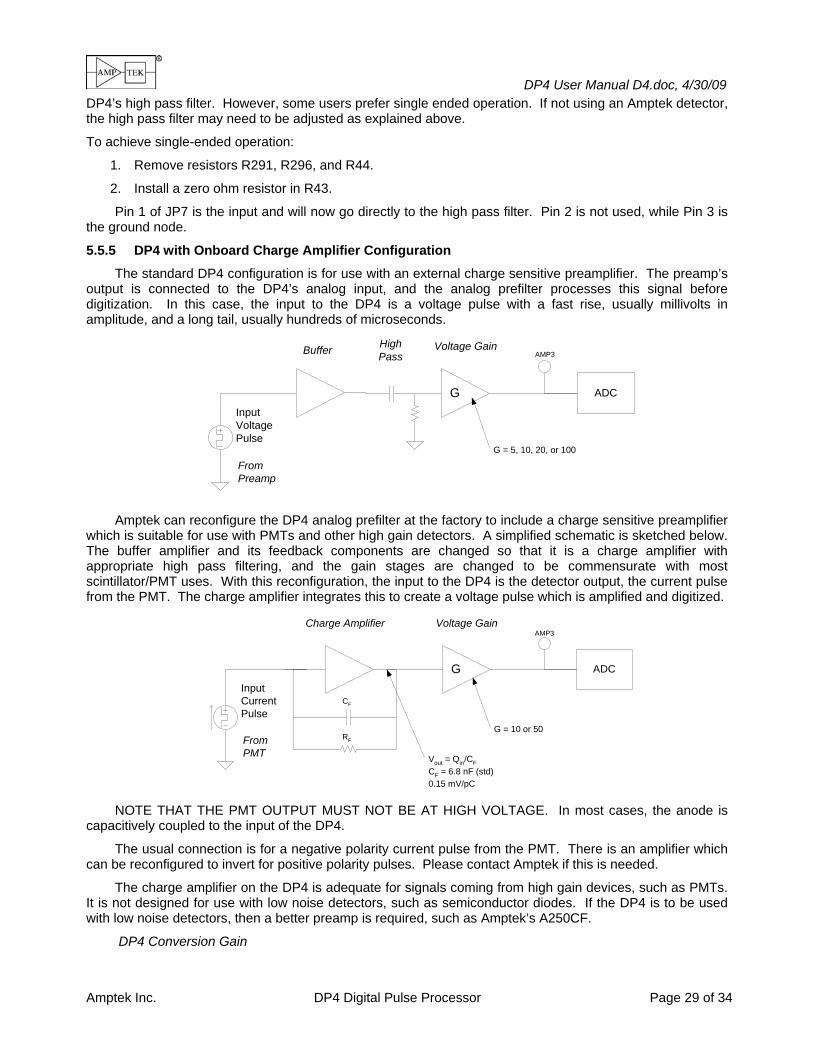
5.5.5 DP4 with Onboard Charge Amplifier Configuration
The standard DP4 configuration is for use with an external charge sensitive preamplifier. The preamp’s output is connected to the DP4’s analog input, and the analog prefilter processes this signal before digitization. In this case, the input to the DP4 is a voltage pulse with a fast rise, usually millivolts in amplitude, and a long tail, usually hundreds of microseconds.
G
Voltage GainBuffer
G = 5, 10, 20, or 100
ADC
AMP3
InputVoltagePulse
HighPass
FromPreamp
Amptek can reconfigure the DP4 analog prefilter at the factory to include a charge sensitive preamplifier
which is suitable for use with PMTs and other high gain detectors. A simplified schematic is sketched below. The buffer amplifier and its feedback components are changed so that it is a charge amplifier with appropriate high pass filtering, and the gain stages are changed to be commensurate with most scintillator/PMT uses. With this reconfiguration, the input to the DP4 is the detector output, the current pulse from the PMT. The charge amplifier integrates this to create a voltage pulse which is amplified and digitized.
CF
G
Voltage Gain
RF
Charge Amplifier
Vout = Qin/CFCF = 6.8 nF (std)0.15 mV/pC
G = 10 or 50
ADC
AMP3
InputCurrentPulse
FromPMT
NOTE THAT THE PMT OUTPUT MUST NOT BE AT HIGH VOLTAGE. In most cases, the anode is
capacitively coupled to the input of the DP4.
The usual connection is for a negative polarity current pulse from the PMT. There is an amplifier which can be reconfigured to invert for positive polarity pulses. Please contact Amptek if this is needed.
The charge amplifier on the DP4 is adequate for signals coming from high gain devices, such as PMTs. It is not designed for use with low noise detectors, such as semiconductor diodes. If the DP4 is to be used with low noise detectors, then a better preamp is required, such as Amptek’s A250CF.
DP4 Conversion Gain
DP4 User Manual D4.doc, 4/30/09
Amptek Inc. DP4 Digital Pulse Processor Page 30 of 34
The charge amplifier uses a 6.8 nF feedback capacitor, which gives the charge amp a conversion gain of 0.15 mV per pC. This is followed by a gain stage which can be switched between 10 or 50, for a signal into the ADC of 1.5 or 7.5 mV per picoCoulomb. The ADC has a maximum input of 1V, so the full-scale inputs are 13 and 66 pC for the two gain settings.
PMT Settings
Users commonly want to know how to set the PMT gain. The answer is “It depends on the scintillator, PMT, and radiation source”. Consider the following typical example:
1. A gamma-ray interacts in the scintillator, depositing some energy Eγ, for example 662 keV.
2. The scintillator will have a light yield of λ. For NaI(Tl), this is 3.8x10⁴ photons/MeV.
3. The photons are emitted in all directions. The scintillator is usually surrounded by a diffuse reflector so that some fraction εC reach the photocathode. A typical detector might have εC=80%.
4. The photocathode has a quantum efficiency εQE, which is typically of order 25%.
5. The number of photoelectrons emitted from the photocathode is Eγ λ εC εQE. For our example, we have (0.662 MeV)( 3.8x10⁴ photons/MeV)(0.8)(0.25)= 5x10³ photoelectrons, or 0.8 femtoCoulomb.
6. A “typical” 12 stage PMT might have a gain of 6x10⁴ at 600 volts. The output current pulse is (0.8x10⁻¹⁵ coul) (6x10⁴) = 5x10-11 coul = 50 pC. This is the input to the DP4.
7. The DP4 charge amp has a gain of 0.15 mV/pC, so 7.5 mV for this example.
8. With the voltage gain set to 50, this gives an input to the ADC of 375 mV, or somewhat under full scale.
The ideal settings for a particular application will depend on the gamma-ray energy, light yield, PMT gain, and so on. The usual procedure is to adjust the HV to get the PMT gain close to the correct range, and then use the DP4’s digital fine gain to put the peak precisely where it is needed.
If the gain of the charge amp is not appropriate, then the feedback capacitor can be increased or decreased. Please contact Amptek because other components must be changed commensurately.
Procedure
1. We recommend that the user connect the PMT to the DP4 with the high voltage off, and observe the AMP3 test point on an oscilloscope. Set the DP4 coarse gain to 50.
2. Turn on the HV, with a very low bias voltage. Slowly bring up the bias. Under most circumstances, pulses will become visible at a few hundred volts.
3. Continue to raise the bias voltage until the pulses seen at AMP3 have peak amplitudes of just under a volt. Verify that the DC offset is positive, typically by 100 mV. Pulses should be visible on the MCA display in software. Using the scope, verify that the pulse waveforms at AMP3 look like the “correct” trace in Fig 15.

DP4 User Manual D4.doc, 4/30/09
Amptek Inc. DP4 Digital Pulse Processor Page 31 of 34
Charge Amp Schematic
R5149.9K A
A
3
26
74 5
+
-
U86AD8011
R3910
A
R440
A
5.0V
Vdd
VssG
U85BNI
-5.0V
A
2.5V
A
C125
NI
Charge Amplifier
-2.5VFixed Gain
Switched Gain and Offset Adjust
IN+
5.0VADCGAIN2
1
D41N4148
18
23
47
6 Vdd
VssG
U85ANI
R74.3K
5
67
84
+
-
U82BAD8032
R27710
R279360
AC
D110MQ040N
R8100K
5.0V
C12815PF
R2854.3K
R298100
1
AMP1
R29410
R10
R2960
3
26
74 5
+
-
U83AD8031
A
A
1
AMP2
1
AMP35.0V
1
OFFSET
-5.0V-5.0V
5.0V
-5.0V
R284NI
R288NI
-5.0V
R283130
R3011.0K
123
JP7
CON3
13
2R28710K
C132
1UF
R20
AR5453
C1336.8NF
AA
GAIN1
R303
1K
6 DEAD TIME IN THE AMPTEK DP4
Many users have asked “what is the dead time in the DP4”? Often, they are used to working with MCAs which have a “live time clock” which is turned off during “conversion”, the time the peak height is sampled and digitized. But the DP4 has no dead time associated with digitizing the peak amplitude. The incoming pulse stream is digitized at a high rate (20 MHz, every 50 nsec) and then filtered. The peak digital value is determined with no conversion delay (one of the advantages of digital processing). Another advantage of the digital processing arises from the triangular pulse shapes, which are symmetric and return to a true baseline after twice the peaking time. This makes the timing intervals for pile-up and pulse losses very predictable.
In most cases, the reason a user asks for the dead time is to accurately determine the true incoming count rate (ICR). Even though there is no conversion dead time in the DP4, there are counting losses in both the fast and slow channels. This section will explain these losses and how to determine the ICR from the measured rates. This ection also explains how to compute the pulse counting losses one can expect.1
6.1 FAST CHANNEL
The DP4 fast channel signal has a 400 nsec peaking time, and it is this peaking time which is the dead period of the fast channel. It is the rising portion, not the full width. If a second event occurs within 400 nsec of the first, then the second is not counted and a single fast count is recorded. This dead period occurs for 400 nsec after every event, whether recorded or not, so the fast channel counts are described by a paralyzable model. If the true input count rate is RIn, the fast channel dead time is τFAST=400 nsec. and the output count rate from the fast channel (RFAST) is given by
R R eFAST InRIn FAST= − τb g
[1]
The PX4 does not stop its clock during these dead periods. To estimate the incoming count rate, this equation cannot be used. There is no closed form solution for the true rate, given the fast rate. One can approximate this as a non-paralyzable system and obtain
R RR
RIn approxFAST
FAST FAST≅ =
−1 τ [2]
1 This discussion and the equations are based on the discussion by G.F. Knoll, General properties of
radiation detectors, Chap 4 in Radiation Detection and Measurement, John Wiley & Sons, New York (1989), pp 120-122
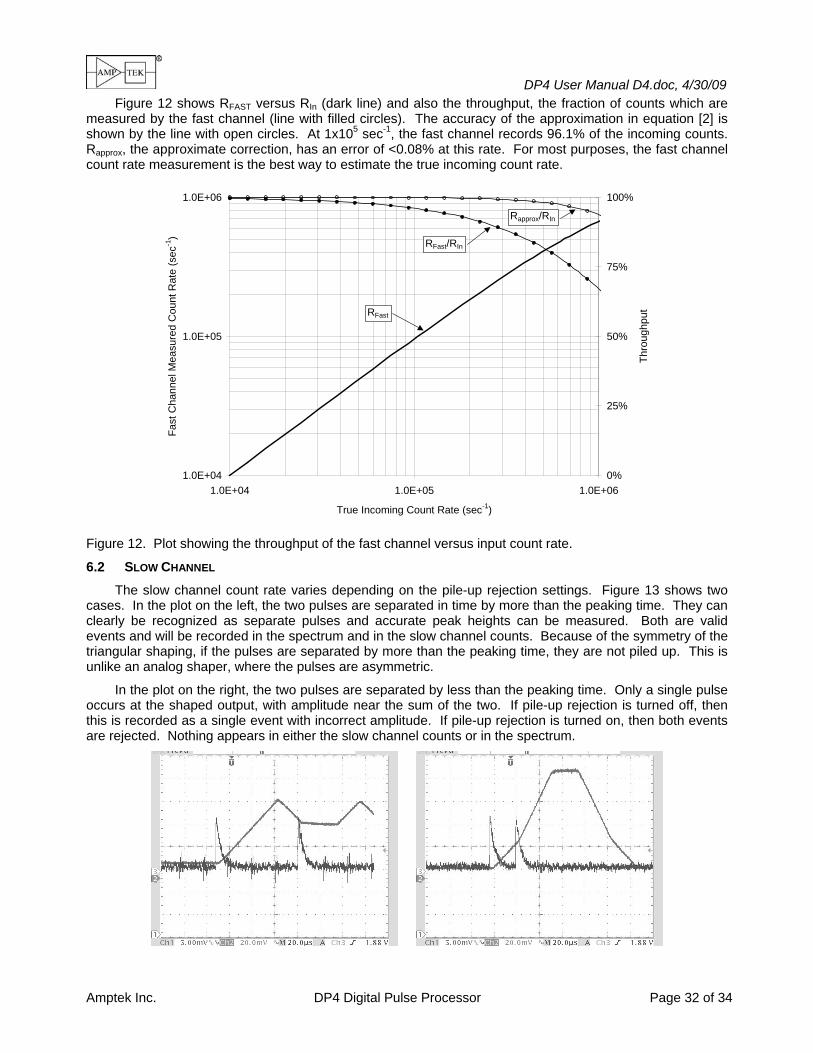
DP4 User Manual D4.doc, 4/30/09
Amptek Inc. DP4 Digital Pulse Processor Page 32 of 34
Figure 12 shows RFAST versus RIn (dark line) and also the throughput, the fraction of counts which are measured by the fast channel (line with filled circles). The accuracy of the approximation in equation [2] is shown by the line with open circles. At 1x10⁵ sec-1, the fast channel records 96.1% of the incoming counts. Rapprox, the approximate correction, has an error of <0.08% at this rate. For most purposes, the fast channel count rate measurement is the best way to estimate the true incoming count rate.
1.0E+04
1.0E+05
1.0E+06
1.0E+04 1.0E+05 1.0E+06
True Incoming Count Rate (sec-1)
Fast
Cha
nnel
Mea
sure
d C
ount
Rat
e (s
ec-1
)
0%
25%
50%
75%
100%
Thro
ughp
utRFast
RFast/RIn
Rapprox/RIn
Figure 12. Plot showing the throughput of the fast channel versus input count rate.
6.2 SLOW CHANNEL
The slow channel count rate varies depending on the pile-up rejection settings. Figure 13 shows two cases. In the plot on the left, the two pulses are separated in time by more than the peaking time. They can clearly be recognized as separate pulses and accurate peak heights can be measured. Both are valid events and will be recorded in the spectrum and in the slow channel counts. Because of the symmetry of the triangular shaping, if the pulses are separated by more than the peaking time, they are not piled up. This is unlike an analog shaper, where the pulses are asymmetric.
In the plot on the right, the two pulses are separated by less than the peaking time. Only a single pulse occurs at the shaped output, with amplitude near the sum of the two. If pile-up rejection is turned off, then this is recorded as a single event with incorrect amplitude. If pile-up rejection is turned on, then both events are rejected. Nothing appears in either the slow channel counts or in the spectrum.

DP4 User Manual D4.doc, 4/30/09
Amptek Inc. DP4 Digital Pulse Processor Page 33 of 34
Figure 13. Oscilloscope traces showing (left) two pulses which are separately detected and accurate pulse heights measured and (right) two pulses which overlap in time. These plots show the output of the analog prefilter (the tail pulses) and the shaped output.
The window for pile-up rejection is (1 + 3/16) of the peaking time. If pile-up reject is on, this is the dead period and the equation for OCR reflects the fact that two events are removed. If pile-up reject is off, the dead period is closer to the peaking time (plus some small jitter) and only one event is removed. The measured rates are
R R e
R R e
PUR Off InR
PUR On InR
In peak
In peak
_
_
=
=
−
−
τ
τ
d i
b gd i2 19 16 [3]
Figure 14 shows computed (lines) and measured (circles) output count rates versus input count rates, at several peaking times. The computations use the formula in equation [3]. Excellent agreement is clearly seen between measurement and calculations.
1.0E+03
1.0E+04
1.0E+05
1.0E+06
1.0E+03 1.0E+04 1.0E+05 1.0E+06
ICR (sec-1)
OC
R (s
ec-1
)
Fast Counts
0.8 usec peak
1.6 usec peak
12.8 usec peak
19.2 usec peak
Figure 14. Plot showing measured and computed input and output count rates, with pile-up rejection on, for various peaking times.
6.3 ACQUISITION TIME
The DP4 provides the fast counts, the slow counts, and the “acquisition time”. It is important to define this acquisition time. This is the real elapsed time during which data are being acquired. The real time clock is turned off during certain events, including data transfers over the serial bus and also including reset intervals. If a reset preamplifier is used, and the DP4 is configured for a certain reset time period, then acquisition is shut down during the reset period and the acquisition clock is stopped. This acquisition time is measured using a typical 20 ppm crystal oscillator so is quite accurate. The true count rate should be computed using the actual acquisition time rather than the nominal data transfer time.
Data transfers occur based on an approximate real time clock. For example, one might configure the DP4 to update every second. When the data transfer occurs, the acquisition time is shown and this will probably differ from the nominal “1 second”, due to the approximate clock and also due to reset losses. A typical value is 1.05 second. At high count rates, a reset preamp resets more often, and so there is less

DP4 User Manual D4.doc, 4/30/09
Amptek Inc. DP4 Digital Pulse Processor Page 34 of 34
acquisition time per transfer. In this case, the acquisition time might become 0.85 seconds. On the screen, this time is displayed along with the fast counts and the slow counts during the same interval. The actual count rate is found by dividing the observed counts by the observed acquisition time, 0.85 seconds for this example.
6.4 TIMING SUMMARY
In the following, the pulse separation time is denoted T.
1) T > (19/16)τpeak : Both are recorded in the spectrum with correct amplitude, and both are recorded in both fast and slow counts. True for PUR on and off.
2) (19/16)τpeak > T > 400 nsec: With PUR on, neither is recorded in the spectrum or in slow counts but both are recorded as fast counts.
3) τpeak > T > 400 nsec: With PUR off, a single event is recorded in the spectrum (with incorrect amplitude), a single slow count is recorded, but both are recorded as fast counts.
4) 400 nsec > T: A single event is recorded in the spectrum (with incorrect amplitude), a single slow count is recorded, and a single fast count is recorded. True for PUR on and off.
This presumes that both events are above both the fast and the slow thresholds. For signal amplitudes near threshold, one or both might not be recorded. The fast and slow thresholds are different (the fast threshold is usually higher than the slow) so an event may be recorded in one channel but not the other.
7 TROUBLE-SHOOTING GUIDE
Configuration
• If the fast threshold is too low, then noise counts will trigger the pile-up reject circuit. This can veto most or all of the actual events. This threshold can be raised or the PUR can be disabled.
• If the fast threshold is too high, then piled up events might not be rejected.
• Both pile-up rejection (PUR) and risetime discrimination (RTD) are used to select those pulses which are recorded. If the settings are wrong, the incorrect pulses are recorded and in many cases, no pulses are recorded. If no spectrum appears, the first diagnostic step should be to turn off PUR and RTD
Grounding
• Care must be taken in grounding the DP4. In particular, noise problems may occur if the signal ground that connects the preamplifier to the DP4 input is a power return.
• Amptek has observed at least one Dell laptop that injects significant current via the RS232 ground into the DP4, which seriously upsets performance. Our solution is to use a 3-prong to 2-prong AC adapter on the laptop, which disconnects the laptop power supply from AC ground.
8 INDEX
analog prefilter ......................... 3, 6, 15, 42, 43, 44
auto baseline ............................... 7, 16, 22, 25, 31
baseline restoration ..................................7, 16, 31
gate .....................................................9, 17, 25, 32
MCA....................................................4, 17, 24, 25
pile up rejection............................ 7, 17, 22, 24, 31
preamplifier ........ 3, 4, 6, 11, 12, 16, 21, 37, 42, 45
pulse shaping........................................3, 5, 16, 22
reset preamplifier4, 6, 13, 16, 22, 25, 30, 31, 37, 42
risetime discrimination ................. 8, 17, 22, 25, 31
RS232 interface ............................................20, 25
serial interface.............................. 4, 10, 11, 13, 20
threshold ............................ 7, 8, 17, 22, 24, 30, 51
USB interface................................................20, 25
Current versions as of 4/30/2009: DP4 board D1, VB App 3.26, FP 4.02, FW 4.02