Embed Size (px)
Citation preview

Interesting feature
Cross-Platform Development with the SDK
Apache Cordova :: the framework formerly known as PhoneGap
EnyoJS, Phonegap and node.js for Cross-Platform-Development:
Developing a todo application
Hybrid Applications Help Relieve Cross Platform Pain
PLUSContinuous Deployment in Perl: Code & Folks Dancing Polonaise With Perl Native Mobile Apps with ASP.NET MVC Clean Coding OCTREES Porting existing web applications to Windows Azure O/RMs Dissected
Issue 02/2012 (4)ISSN: 1734-3933
extra
Porting GCC to a new targetTHE CASE OF ATARI ST COMPUTERS
02/2012 en.sdjournal.org 3
Editor’s Note
Der Readers!We are giving in your hands the fourth issue of Software Developer’s Journal. We hope you’ve enjoyed previous ones.In this issue you will find interesting articles about most up to date devices and solutions from cross platform development, programming in Pearl language and other various topics from software development field.The authors, who have contributed to this issue, should be proud of themselves. We are sure you will read this issue from cover to cover.
We begin with the chapter concerning Cross Platform Development that contains five fascinating articles from this field. At the beginning we present you brilliant Vincent Riviere’s article about porting GCC to a new target based on the case of Atari ST computers. The next article written by Jerome St-Louis crross-platform development with the SDK. From the next article by Jesse MacFadyen you will learn about Apache Cordova - the framework formerly known as PhoneGap.
Then Robert Kowalski writes about EnyoJS, Phonegap and node.js for cross platform development: developing a todo application. And the last but not least article is written by Andrew Smith titled “Hybrid Applications Help Relieve Cross Platform Pain”.The second chapter concerns programming in Pearl language and consists of two articles. From the first one written by Alexandre Masselot and Pierre-Antoine Queloz you will learn about continuous deployment in Perl. The second article is titled “Dancing Polonaise With Perl” and its autor is Alberto Simoes and Nuno Carvalho.
The last chapter contains six various articles from software development in general. We begin with Daniel Jebaraj’s terrific article about native mobile apps with ASP.NET MVC. Then we serve you something completely different which is article about clean coding by Łukasz Kieda. After that you can read about structures that help in spatially partitioning large sets of data called Octrees in article written by Adrian Jurca. In the following article Gunnar Peipman will tell you about porting existing web applications to Windows Azure. The next hot topic is Object/Relational Mapping or O/RM great explained by Ricardo Peres. In the last article in this chapter its autor Toby Osbourn wanted to outline his thoughts on how developers can leverage social media to our advantage whilst we do a variety of things.
Enjoy the reading!Sylwia Wilkand Software Developer’s Journal Team
Managing Editor: Sylwia [email protected]
Senior Consultant/Publisher: Paweł Marciniak
Editor in Chief: Grzegorz [email protected]
Art Director: Anna [email protected]
DTP: Anna [email protected]
Production Director: Andrzej [email protected]
Marketing Director: Sylwia [email protected]
Proofreadres: Dan Dieterle, Aby Rao
Betatesters: Pawel Brzek, Dawid Esterhuizen (MBA), Laszlo Acs, Da Co, Demazy Mbella
Publisher: Software Media Sp. z o.o.02-682 Warszawa, ul. Bokserska 1Phone: 1 917 338 3631www.sdjournal.org/en
Whilst every eff ort has been made to ensure the high quality of the magazine, the editors make no warranty, express or implied, concerning the results of content usage.
All trade marks presented in the magazine were used only for informative purposes.All rights to trade marks presented in the maga-zine are reserved by the companies which own them.
To create graphs and diagrams we used program by Mathematical formulas created by Design Science MathType™
DISCLAIMER!The techniques described in our articles may only be used in private, local networks. The editors hold no responsibility for misuse of the presented techniques or consequent data loss.

4
Table of Contents
02/2012 en.sdjournal.org
CROSS PLATFORM DEVELOPMENT
06 Porting GCC to a new target. The case of Atari ST computersby Vincent RiviereIn this article, the autor will describe the internals of the GNU toolchain, and he will show you how to port it to a new target by patching the binutils and GCC sources. The autor will use the example of the Ata-ri ST, referred as the “MiNT target”, but the information will be general enough to be useful for any other target. The autor will first make a brief reminder on the key steps about building an executable, then he will focus on the 2 major parts of the GNU tool-chain: binutils and GCC.
12 Cross-Platform Development with the SDKby Jerome St-LouisAt the moment of writing, applications built with the SDK will work on Windows and Linux. It is also possible to build the SDK and the applications on other plat-forms, such as Mac OS X and FreeBSD, but there are still some minor issues to be re-solved. Mobile platforms such as Android and iPad/iPhone are also targets we hope to support in the near future. The gene-ral idea is that you write your application once, with no particular attention to plat-forms, and then the exact same source code can be compiled and deployed for all supported platforms.
26 Apache Cordova :: the framework formerly known as PhoneGapby Jesse MacFadyenPhoneGap is a collection of tools, and libra-ries that allow you to build native mobile applications for multiple devices. Phone-Gap supports the development of portable application code that can run on Apple iOS iPhones, iPads, iPods, all Android devices, Windows Phone 7 devices, BlackBerry pho-nes and PlayBooks, HP WebOS phones and TouchPad, as well as Symbian and Sam-sung Bada devices. PhoneGap embraces web technology, so web developers can leverage their existing skills and write their applications in HTML, CSS, and JavaScript.
34 EnyoJS, Phonegap and node.js for Cross-Platform-Development:
Developing a todo applicationby Robert KowalskiIn most companies that want to go mobile with apps and possibly with a mobile site alot of skilled web developers are wor-king inhouse already. They can use HTML5 and cross-platform tools to create their applications. But action games or other performance-criticial applications are currently no target for HTML5 cross-plat-form-developing. For most other use ca-ses HTML5 can be used with good results. There exist alot of cross-plattform-deve-lopment tools and frameworks, This article focuses on the Enyo framework, packing it as native app for iOS or Android and de-ploying it as mobile webapp.
42 Hybrid Applications Help Relieve Cross Platform Painby Andrew SmithAs mobile device technology has impro-ved, HTML5 has become a real option for creating a single user interface for both native applications as well as for the Web. Many giants in technology believe that HTML5 will eventually be the only cross--platform programming language. Chan-ces are good that in the future HTML5 will be the vernacular for everything mobile. Rather than writing an application native-ly for each and every mobile platform, and then once again for the mobile web, con-sider this instead. Set up web services to handle any server-side data manipulation your application might need to provide and use HTML5 to create and maintain a single user interface. A novel approach to native applications known as hybrid appli-cations could be your answer.

5
Table of Contents
02/2012 en.sdjournal.org
PROGRAMMING IN PEARL LANGUAGE
48 Continuous Deployment in Perl: Code & Folksby Alexandre Masselot and Pierre-Antoine QuelozContinuous Integration is the tactic of de-creasing the latency between the imple-mentation of a new piece of code and its integration in the overall project. It is the backbone of Continuous Deployment that is often defined as releasing software very frequently in order to satisfy customer ne-eds and get their feedback as soon as po-ssible. Both have shown their benefits and play an important role in the success of the current Agile software development trend.
56 Dancing Polonaise With Perlby Alberto SimoesIn the last year the size of the Dancer com-munity has quadrupled, and the number of Dancer websites is, every day, larger. With this article you will learn how to bo-otstrap a Dancer website, how to run it lo-cally for development purposes, and how to develop a complete Dancer application.
SOFTWARE DEVELOPMENT
62 Native Mobile Apps with ASP.NET MVCby Daniel JebarajSmartphones and other mobile devices such as tablets are everywhere. They are available at multiple price points and are increasingly affordable. In fact, for many in the developing world, their only computer is the powerful smartphone they own.
68 Clean Codingby Łukasz KiedaIf you have ever read code written by ano-ther person, you were probably having difficult time figuring out what was the author’s intention and what is the actual workflow of the algorithm. Therefore it is common practice to let the author fix bugs in his own code should problems arise. Nevertheless, even your own code tends to become more difficult to understand as the time passes.
76 Octreesby Adrian JurcaOctrees are structures that help in spatial-ly partitioning large sets of data. They can be viewed as an implementation of hierar-chical clustering in which the data is recur-sively split in smaller, more manageable chunks. Octrees can have many uses but are mostly used in game development to speed up certain tasks that would otherwi-se take too much time to complete.
80 Porting existing web applications to Windows Azureby Gunnar PeipmanWindows Azure is a good offer for sites and services that need to scale. Windows Azure is Microsoft cloud services system that offers the following services: hosting and scaling of web sites and background services; cloud-based storage (blobs, qu-eues and tables); SQL Azure database; SQL reporting services; cloud-based cache; en-terprise service bus; access control servi-ces.
86 O/RMs Dissectedby Ricardo PeresObject/Relational Mapping, or O/RM, is a hot topic. Talk is everywhere, it seems that new O/RM libraries pop up every month - everyone is writing their own, and Micro-soft itself is putting a considerable amount of its weight behind its own solution. So, what exactly is an O/RM for, and why sho-uld you care?
92 How we can use social networks?By Toby OsbournThe autor wanted to outline his thoughts on how we as developers can leverage so-cial media to our advantage whilst we do a variety of things. The reason he wants to do this is that whilst design and gaming in-dustries have leveraged social media well, as developers we are maybe falling behind somewhat.

CROSS PLATFORM DEVELOPMENT
6 02/2012 en.sdjournal.org
10 years ago, I was looking for a solution to use mod-ern C and C++ on embedded devices. I naturally se-lected GCC, the famous GNU Compiler Collection, and I chose my favorite target as a training device: the Atari ST. I discovered that there was still an active commu-nity around the MiNT kernel, using an old GCC version. So I decided to port the GCC patches to newer versions, and I still maintain them today. On my website, I pro-vide a complete GCC toolchain for building Atari ST ex-ecutables from Cygwin, Ubuntu or other operating sys-tems. Some people even use my patches for building a native toolchain running on modern Atari computers.
In this article, I will describe the internals of the GNU toolchain, and I will show you how to port it to a new target by patching the binutils and GCC sources. I will use the example of the Atari ST, referred as the “MiNT target”, but the information will be general enough to be useful for any other target. I will first make a brief reminder on the key steps about building an execut-able, then I will focus on the 2 major parts of the GNU toolchain: binutils and GCC.
How executables are producedA program is made of one or more source files (C,
C++, assembly...) combined into a single executable. The compilation process is usually transparent, but sev-eral intermediate files are generated during the pro-cess. This is important to know the overall process in order to understand which tools will be required in a cross-compilation environment (Figure 1).
In a GNU toolchain, the high-level tools (preproces-sor, compiler) are provided by the GCC package, while the low-level tools (assembler, linker) are provided by the binutils package.
Porting GCC to a new targetThe case of Atari ST computersCross-compilation is comfortable. You build software on your modern computer, then you can run the resulting binary on the target machine or on an emulator. This is the only way to go for cell phones, game consoles or embedded devices. This is also useful for retrocomputing, where modern development tools are not usable on the target machines.
The Atari ST computer and its successors were very popular between 1985 and 1995. The original processor was a Motorola 68000 at 8 MHz. The operating system was named TOS. Internally, it was inspired from MS-DOS, while externally it looked similar to the Macintosh. In 1993, a new kernel named MiNT appeared, bringing multitasking and POSIX compatibility to the TOS computers. Today the Atari community is still active, with hardware extensions like the CT60/CTPCI, and even new computers like the FireBee. The kernel has become Free Software and is now called FreeMiNT.
Figure 1: Typical workflow for building executables

Porting GCC to a new target. The case of Atari ST computers
702/2012 en.sdjournal.org
Executable file formatWhen porting a toolchain to a new target, the first
question is how to configure the linker to produce the right file format. Adding a new executable format from scratch is a big deal, so usually it is easier to make changes to an existing one.
The original TOS/MiNT executable format is rather simple. It is composed of a small header followed by the TEXT and DATA segments, and an optional symbol table used only by debuggers. Since TOS and MiNT don’t support virtual memory, the executables are loaded at a random address in the physical memory. Thus executables also contains a relocation table for fixing the references to absolute addresses.
That being said, people who originally ported the GNU toolchain to MiNT in the Nineties noticed that the file format was actually very close to the a.out format used in early UNIX versions. So they wrote support for the MiNT/TOS executable format as a variant of a.out. The benefit is huge: since all the binutils tools already support a.out, they will be compatible with the MiNT/TOS executable format. Note that the a.out format is now obsolete, new ports should use the modern ELF format instead.
Note: a.out can refer to 2 completely different things that must not be confused:- the original UNIX object file format- the default filename for gcc output
Configuration names: tripletsIn a cross-compilation environment, each system
is identified by a configuration name (often referred as triplet), composed by 3 or 4 parts in the form cpu-manufacturer[-kernel]-os. For example:
- GNU/Linux: i686-pc-linux-gnu - Cygwin: i686-pc-cygwin - MiNT: m68k-atari-mint
Typically, building a cross-compiler involves 3 triplets: - The build system, where the cross-compiler is built. - The host system, where the cross-compiler will run. - The target system, for which the new cross-compil
er will build executables.
The target triplet is used in several ways: - As prefix for the cross-tools commands. While gcc is
the native compiler for the build system, m68k-at-ari-mint-gcc is the cross-compiler for the MiNT target. Same for as, ld and so on.
- As subdirectory for the target development files. For example, the native libraries are stored in /usr/lib as usual, while the target libraries are stored in /usr/m68k-atari-mint/lib. Similarly, the
native includes reside in /usr/include while the target includes are in /usr/m68k-atari-mint/include.
On the build system, the cross-tools such as m68k-atari-mint-gcc are normally installed in /usr/bin along with native commands, away from other target files. This means that the cross-tools compo-nents are scattered in several directories. This is not a problem on systems such as Ubuntu where the files are installed by a robust package manager. In contrast, on Cygwin, there is no easy way to provide third-party software, so I chose to provide a custom automated in-staller which installs everything in /opt/cross-mint instead of /usr. As a result, all the cross-tools files can be easily uninstalled.
The GNU Autotools (mainly Autoconf and Automake) allow the creation of portable source packages, inc-luding the popular configure script. They fully support cross-compilation. The main configure options are:--host to enable cross-compilation mode and specify the system where the binaries will run.
--prefix to indicate where make install will install the files, which defaults to /usr.--target used only when building cross-to-ols like binutils or GCC, to specify for which sys-tem the executables will be produced.During the configuration phase, the actual ma-kefiles are instantiated from templates, so make automatically uses the right cross-tools.
The binutils: assembler and linkerThe most basic operation is to transform an assem-
bly source file into a compiled object file. This is the job of gas, the GNU assembler. Then multiple object files have to be combined into a single executable. That’s a job for ld, the linker.
Object files contain several sections. The typical ones are:
.text: The machine code, namely the compiled function bodies. Read-only.
.rodataRead-only data, including const global variables and string literals. Merged with .text section in a.out files.
.data: Initialized global variables. Read/write.
.bss:Global variables initialized to 0, including uninitialized global C variables.

CROSS PLATFORM DEVELOPMENT
8 02/2012 en.sdjournal.org
When linking, the sections of the object files (input sections) are merged into sections in the executable file (output sections), which will then be loaded into memory segments at run time. This process is precisely described in the target linker script.
Depending on the target OS and the compiler type, the object file format differs.
COMMON OBJECT FILE FORMATS
a.out: Initial object file format used on UNIX systems, now obsolete. It can only contain .text, .data and .bss sections.
COFF: Supports multiple named sections, with some limitations. Also supports shared libraries. Still in use today on Microsoft Windows.
ELF: The most versatile object file format, now widely used on most UNIX-like systems (includ ing Linux) and embedded systems. It allows any sections, and supports any processor or architecture.
Since there are many different object file formats and several generic tools, the binutils team chose to move all the functions for manipulating specific file formats to a library named BFD (Binary File Descriptor). Having this common library allows all the tools to ma-nipulate the object files in the same way by calling the BFD functions. Basically, when support for a new object file format is added to BFD, all the tools such as gas or ld are able to handle it.
For the m68k-atari-mint target, the standard a.out-zero-big format was chosen as intermediate object file format, while a custom executable format named a.out-mintprg was developed to be compatible with both the TOS/MiNT operating systems and the GNU tools.
In the binutils vocabulary, m68k refers to the whole range of Motorola/Freescale 32-bit processors from 68000 to 68060 and ColdFire. They use big-endian byte order (most significant byte stored first), unlike Intel processors.
Adding new target supportNow we see the big picture to port the binutils to
the MiNT platform:
1. gas must be configured to use the a.out-zero-big object file format.
2. The BFD library must be patched to support the a.out-mintprg executable format, as an a.out variant.
This includes a custom file header, the standard a.out sections, the debug information, and the TOS relocation table.
3. Various configure and makefile fragments must be patched to add the new m68k-atari-mint triplet as a supported target.
Basically, specific support for an object file format in BFD is called a “back-end”. Each back-end provi-des a bfd_target structure (a.k.a target vector) conta-ining a set of functions to identify and manipulate the supported format. The main configuration file is bfd/config.bfd where each target triplet is associated to a default target vector targ_defvec to define the object file format used by gas, and additional target vectors targ_selvecs which may used by ld as input or output.
The gas configuration is minimal. The CPU is de-ducted from the target triplet, and the object file for-mat is always BFD’s default one. Optionally, a file gas/config/te-*.h can be added to fine tune the assembler behavior.
The ld configuration is more complicated. A specific target can support multiple linker styles, named emu-lations. This allows the linker to produce different exe-cutable formats, for example a.out and ELF. The MiNT target defines a single emulation named m68kmint. The emulations are associated to the target triplets in ld/configure.tgt.
The emulations themselves are parameterized in small shell scripts located in the ld/emulparams sub-directory. They define some variables, such as the linker script template to be used and an optional extra emulation file. All those fragments are then processed by ld/genscripts.sh to produce the actual emulation source files.
The extra emulation file is actually a C source wrap-ped into a shell script to allow the usage of configu-ration parameters. This source file allows customi-zing the default linker behavior by overriding some callbacks, and defining additional ld command-line parameters.
The linker script template is located in ld/scripttempl. It is a shell script which is used to generate all the linker script variants. A linker script selects the output execut-able format and describes precisely how to combine the sections from the input object files to the sections of the output executable.
Finally, the typical configuration of the binutils is:
configure --target=m68k-atari-mint

Porting GCC to a new target. The case of Atari ST computers
902/2012 en.sdjournal.org
GCC: the C and C++ compilersThanks to the binutils, we can assemble and link assem-
bly source files into a target executable. Now we need to convert C and C++ source files into assembly source files. This is the job of GCC, the GNU Compiler Collection.
Porting GCC to a new target is less complicated than the binutils, thanks to its huge flexibility. Most proces-sors are already supported and ready to use, including the m68k processors used by the MiNT target.
The main configuration file is gcc/config.gcc. It is a shell script which associates the target triplet to a few varia-bles describing the target machine. This information will be used to generate the tm.h file included by the gcc sources and to provide customizations to the makefiles.
The first important variable is tm_file. It is a list of inc-lude files which will be put in tm.h. A target can use a mix of standard include files and specific ones. The MiNT tar-get uses a single include named gcc/config/m68k/mint.h. This is the core GCC configuration file. It contains macros to tweak the assembly code generation; it also conta-ins implicit target defines such as _ _ MINT _ _ , as well as mappings from compiler options to additional defines, alignment constraints, and other options. All the macros override the defaults from gcc/config/m68k/m68k.h, which are appropriate in most cases.
Back to gcc/config.gcc, the tm_defines variable con-tains additional defines which will be put into tm.h, as a way to customize the behavior of standard tm files.
Last but not least, the tmake_file variable contains a list of makefile fragments which are used to build GCC. Again, a mix of standard and custom files can be used. The MiNT target uses this method to configure the multilibs.
Multilibs is a solution to provide libraries for multiple processor variants. Typical differences are the CPU fe-atures (68000, 68020, ColdFire...), FPU support or not, size of the int type... The libraries are compiled multi-ple times, once per multilib variant. When linking a user program, the right library variant is automatically used. This feature is also used on x86_64 systems to build 32-bit software.
That’s enough to build a cross-compiler for the tar-get, able to compile a C file into a target object file. Dur-ing the build process, that new compiler is available as gcc/xgcc and is used to build the target libraries.
Normal programs require a few additional libraries. For example, some basic operations commonly found in high level languages may not be directly supported by all processors or multilibs. This includes float operations, big integer manipulation functions, etc. Those opera-tions are supported by GCC through the library libgcc. Even full C++ support is shipped with GCC through the
libstdc++-v3 library. Amazingly, fancy C++ features such as exceptions, iostream, and templates are immediately available. But GCC lacks a standard library (Figure 2).
The typical configuration of GCC is:configure --target=m68k-atari-mint –enable-languages=”c,c++”
The standard libraryYour first C program was probably something like:#include <stdio.h>int main(int argc, char* argv[]){ printf(“Hello world!\n”);return 0;}
But even in this trivial example, there are many ele-ments which are not directly handled by GCC, and which must be provided by a standard library, which is generally named libc. The printf() body comes from libc, as well as the corresponding stdio.h header. Less obvious, the standard library also provides the startup code. It is actually the real entry point of the program. The startup code is in charge of initializing the process, getting the command line and environment variables from the OS, then calling the main() function. When main() exits, the startup code terminates the process and forwards the return code to the OS.
Most GNU/Linux systems use GLIBC, the GNU stan-dard library. It is very complete, but rather huge, and is mainly designed for UNIX-like systems. There are other alternatives. Red Hat’s Newlib is very portable, and intended for embedded systems. Cygwin also uses Newlib. There are other standard libraries like uClibc or dietlibc which tries to be as small as possible. The underlying OS is generally called through the syscall() function on UNIX-like systems, or inline assembly in C headers on other systems such as MiNT.
The MiNT target uses the MiNTLib as its standard library. This is a remarkable compatibility layer. It is a subset of
Figure 2: Compiling source files

CROSS PLATFORM DEVELOPMENT
10 02/2012 en.sdjournal.org
earlier GLIBC. It features the standard C functions, as well as most POSIX system calls. Of course it prefers running on a modern MiNT kernel, but when this is not present the MiNTLib functions fall back on old TOS system calls for compatibility and reduced functionality. For example, ex-ecutables linked with the MiNTLib can use long filenames when MiNT is present, but they also work unmodified on plain TOS with short file names. In practice, most GNU/Linux command-line software can be compiled out of the box for the MiNT target, thanks to the MiNTLib.
The companion of the standard library is the standard math library. Basically, it contains all math.h functions, such as sin(), sqrt(), etc. Surprisingly, there is no stan-dard implementation. GLIBC has its own math library, Newlib has its one... Most of them are derived from Sun’s fdlibm. In my MiNT cross-tools, I use the old PML library because it was the first I found, and it works well enough.
Finally, after all this effort, we can use our homebrew toolchain to compile a standard “Hello, World” for the target.
Current tools versions on the MiNT targetbinutils: 2.22GCC: 4.6.2MiNTLib: CVS versionGDB: 5.1, sorely outdated
GDB: the debuggerSometimes things do not work as we expect, and it
is useful to run the programs step by step in order to examine the variables. This is the purpose of gdb, the GNU debugger.
gdb uses the BFD library from the binutils. As a re-sult, it can load any executable format and its debug information for source debugging. The debugged process is driven using the ptrace() system call, or any other mechanism. gdb provides an interface for
reading the target process registers, setting breakpo-ints, and facilitating other debugging tasks.
Things are more complicated when cross-debug-ging, because gdb and the target process do not run on the same host. To solve this issue, gdb provide a small stub named gdbserver which runs on the tar-get machine. Its responsibility is to act as a proxy be-tween gdb and the target processes. gdb and gdb-server can communicate via TCP/IP. There are also gdb implementations where gdb can directly debug processes from hardware evaluation boards.
gdb needs a few configuration elements in addition to the BFD library. Basically, gdb/configure.host indicates the configuration to use when gdb itself runs natively on the target. On the MiNT target, this leads to gdb/config/m68k/mint.mh, which is a makefile fragment indicating the files to build for the native gdb. The target gdbserver used to be in a separate subdirectory in the old GDB 5.x, but things are quite different in modern versions.
Finally, the the cross-debugger m68k-atari-mint-gdb can be used to remotely debug a target process. It can even be used with standard graphical front-ends such as DDD (Figure 3).
CaveatsThe binutils and GCC sources are huge. Compiling
them takes a while. When something goes wrong, it is sometimes complicated to find the initial cause of the problem among generated sources and makefile frag-ments. Fortunately, the GNU tools are extremely popu-lar and there are a lot of discussions on the web. Search-ing for the right keyword can bring lots of information. The official documentation and mailing lists are a major source of information and mutual assistance. Some-times real bugs are found; then one should submit bug reports in the project’s bug tracker and help solve them.
Figure 2: Debugging session using Cygwin, ARAnyM, gdb and DDD

Porting GCC to a new target. The case of Atari ST computers
1102/2012 en.sdjournal.org
While the binutils are standalone, GCC and the stan-dard library have inter-dependencies making the bu-ild process tricky. GCC has explicit support for building GLIBC and Newlib in the same source tree for ease of use, but it is more complicated with a third-party stan-dard library. Personally, I build the first GCC stage with make all-gcc, then I build the MiNTLib and PML using the temporary xgcc, and finally I go back to GCC to build the remaining parts with make. This is not the cleanest solution but it works well in practice.
GDB 5.1 works fine on MiNT, but I didn’t finish port-ing patches to newer versions. Also GCC 4.x seems to sometimes produce invalid STABS debug information on a.out targets, which makes source debugging al-most unusable. I will have to investigate that.
Going furtherUsing the standard library is generally a good thing,
but not always. It can quickly increase the size of the final executable on targets only supporting static libraries. So-metimes there is simply no standard library available, for example when building firmware or operating systems (such as the EmuTOS replacement ROM or the FreeMiNT kernel). Such situations are named freestanding environ-ments. GCC supports them without trouble. One will just have to compile using the options -ffreestanding -nostartfiles and -nodefaultlibs. Also one will have to provide the startup code and system interface, or implement a method of direct hardware usage.
For example, I built custom Amiga ROMs with the MiNT GCC without any trouble. I also saw Sega Mega Drive/Genesis enthusiasts using my MiNT toolchain as a direct replacement for their older one. I also use this toolchain to write software for ColdFire evaluation boards and the FireBee.
Some standard GCC targets can exclusively be bu-ilt for freestanding environments, such as the generic m68k-elf target. It does not require any standard libra-ry, and uses the powerful ELF object file format. The executable format can optionally be fine tuned with a custom linker script, then converted to raw binary form with the objcopy tool.
I must also mention Mentor Graphics’ Sourcery Code-Bench Lite, which is a collection of GNU toolchains for most popular embedded targets. The m68k-elf target described above is available for ColdFire and shipped with Newlib. Those toolchains are free and ready to use, moreover they also contains very valuable docu-mentation about the generic GNU tools.
As a long term project, I would like to get rid of the obsolete a.out object file format in the MiNT target, and replace it by the modern ELF format and DWARF debugging information. I got promising success by
mixing ELF object files and a.out executables, but the debug information was lost. Ideally, a new executable format should be created, mixing MiNT/TOS system re-quirements and ELF features. That’s pretty challenging.
ConclusionIn this article, I briefly described the main steps to
port the full GNU toolchain to a new target. This can be tricky, it requires good knowledge of the overall tools and processes, as well as solid skills in C, make and bash. The path is long and sometimes difficult, but it’s worth the trouble it takes. When everything is put together, using the cross-compiler is just as easy as using a na-tive compiler. It combines comfortable development on a fast machine, and the production of high quality executables for the target machine. Compared to emu-lators, this really reduces the development cycle. While some veterans still use the native tools on the target computer to feel like the old good days, more profes-sional developers will prefer cross-compilation.
CreditsI would like to thank Guido Flohr and the late Frank
Naumann for their initial port of the GNU toolchain to the MiNT platform. Patrice Mandin, who shared his toolchain work on his website, which gave me the the courage to start this adventure 10 years ago. Cédric Souchon, for letting me know GCC and cross-compil-ers when we were students. And all the people on the MiNT Mailing List who actively use my MiNT patches.
ON THE WEB:Vincent Rivière’s cross-tools for MiNThttp://vincent.riviere.free.fr/soft/m68k-atari-mint/Binutils http://www.gnu.org/software/binutils/GCC http://gcc.gnu.org/
Vincent RivièreVincent Rivière is a French software engineer. He has 14 years of experience in various development do-mains including video games, industry, web, finance and education. In his spare time, he is interested in retrocomputing, embedded systems, emulators and cross-compilers. Vincent currently works as develop-er at the University Paris 1 Panthéon-Sorbonne.
Contact: [email protected]
CROSS PLATFORM DEVELOPMENT
12 02/2012 en.sdjournal.org
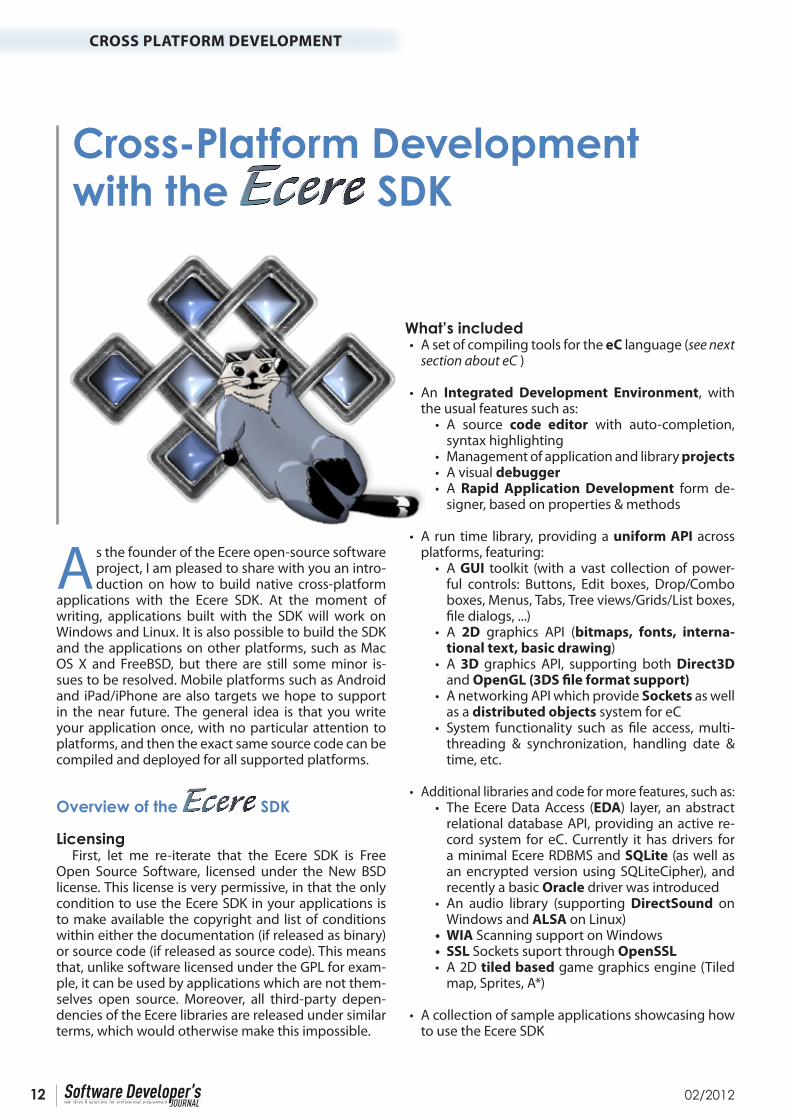
As the founder of the Ecere open-source software project, I am pleased to share with you an intro-duction on how to build native cross-platform
applications with the Ecere SDK. At the moment of writing, applications built with the SDK will work on Windows and Linux. It is also possible to build the SDK and the applications on other platforms, such as Mac OS X and FreeBSD, but there are still some minor is-sues to be resolved. Mobile platforms such as Android and iPad/iPhone are also targets we hope to support in the near future. The general idea is that you write your application once, with no particular attention to platforms, and then the exact same source code can be compiled and deployed for all supported platforms.
Overview of the SDK
LicensingFirst, let me re-iterate that the Ecere SDK is Free
Open Source Software, licensed under the New BSD license. This license is very permissive, in that the only condition to use the Ecere SDK in your applications is to make available the copyright and list of conditions within either the documentation (if released as binary) or source code (if released as source code). This means that, unlike software licensed under the GPL for exam-ple, it can be used by applications which are not them-selves open source. Moreover, all third-party depen-dencies of the Ecere libraries are released under similar terms, which would otherwise make this impossible.
What’s included• A set of compiling tools for the eC language (see next
section about eC )
• An Integrated Development Environment, with the usual features such as:• A source code editor with auto-completion,
syntax highlighting• Management of application and library projects• A visual debugger• A Rapid Application Development form de-
signer, based on properties & methods
• A run time library, providing a uniform API across platforms, featuring:• A GUI toolkit (with a vast collection of power-
ful controls: Buttons, Edit boxes, Drop/Combo boxes, Menus, Tabs, Tree views/Grids/List boxes, file dialogs, ...)
• A 2D graphics API (bitmaps, fonts, interna-tional text, basic drawing)
• A 3D graphics API, supporting both Direct3D and OpenGL (3DS file format support)
• A networking API which provide Sockets as well as a distributed objects system for eC
• System functionality such as file access, multi-threading & synchronization, handling date & time, etc.
• Additional libraries and code for more features, such as:• The Ecere Data Access (EDA) layer, an abstract
relational database API, providing an active re-cord system for eC. Currently it has drivers for a minimal Ecere RDBMS and SQLite (as well as an encrypted version using SQLiteCipher), and recently a basic Oracle driver was introduced
• An audio library (supporting DirectSound on Windows and ALSA on Linux)
• WIA Scanning support on Windows• SSL Sockets suport through OpenSSL• A 2D tiled based game graphics engine (Tiled
map, Sprites, A*)
• A collection of sample applications showcasing how to use the Ecere SDK
Cross-Platform Development with the SDK

Cross-Platform Development with the SDK
1302/2012 en.sdjournal.org
About eCThe Ecere SDK is implemented with and pro-
vides its API for the eC programming language. eC is an object-oriented programming language based on C (it’s a ‘C with classes’, like C++, C#, D, Java...). While maintaining all of C’s syntax, features and functionality (such as compiling to native code, high portability and performance, access to system libraries, great level of interoperability and compatibility with existing librar-ies), eC provides modern features, including:
• Classes with inheritance and polymorphism
• Virtual methods at the instance level (a new class is not required to override a method)
• Object properties (set/get encapsulation)
• Reflection (Querying methods, members, proper-ties, classes...)
• Importing mechanism (no need for header files)
• Dynamic module importing (Loading/unloading modules at runtime, useful for plugins)
• No need for prototypes (forward declaration)
In the future, we might provide APIs to develop with the Ecere SDK using other object oriented program-ming languages. We hope to allow interoperability be-tween eC and those languages through an automatic bindings generation system.
The eC compiler is currently implemented by com-piling to C as an intermediate language. The build system will then automatically invoke GCC to compile those intermediate C files to object files (this process is mostly transparent to the user when using the Ecere IDE or Makefile generation tool).
Through its properties, which enable assignments to dynamically reflect state changes, its simple instan-tiation notation Class object { member = value } and its object data types, eC provides an elegant syntax well suited for GUI applications.
Although the object instances are in fact pointers, they are not presented to the programmer as such, and so the confusion added by the extra reference level, the pointer notation (Class *) and the -> used in C++ are avoided, keeping the simpler member access notation: object.member = value.
For the sake of example, here is an entire message box application written in eC with the Ecere toolkit:
import “ecere”
MessageBox msgBox { caption = “Title”, contents = “hello, world!!” };
Obtaining and installing the SDK
The home of the Ecere SDK on the web is at http://ecere.com .
There you will find both binary and source distribu-tions of the SDK, as well as links to our support forums, bug trackers, and other useful resources. On the front page, you will find platform icons which will bring you to the corresponding sections of our Download page.
WindowsIf you click the Windows icon, you will find our bi-
nary installer for the latest release, as well as instruc-tions regarding MinGW, should you chose to use your own installation of MinGW (A minimal system to run the GNU GCC compiler on Windows). If you use the full installer, the process should be quite straightforward, and you’ll be able to simply click the Ecere IDE icon for a fully configured IDE to come up. If you use your own installation of MinGW, you’ll have to make sure that it is properly installed and that the path to gcc.exe and mingw32-make.exe are in your PATH environment vari-able, or you can alternatively configure the paths in the File → Global Settings dialog of the IDE, under Compil-ers → Directories →Executables.
Figure 2: Ecere Fractals Explorer
Figure 1: Acovel Media Player

CROSS PLATFORM DEVELOPMENT
14 02/2012 en.sdjournal.org
LinuxIf you click the GNU / Linux icon, you will find instruc-
tions on how to obtain Ecere for Ubuntu from the Ecere PPA archives, as well as down-loadable Debian packag-es. You will find there a list of package dependencies, as well as notes regarding problems you might encounter where text does not show up (either a missing font or outdated graphics driver issue). There are also links to ArchLinux packages, and other distributions, for which you will have to build the SDK from source.
The Mac icon will, sadly, bring you to notes on the cur-rently experimental status of the SDK on the Mac, which at this point can only run through the X11 server and suf-fers some usability issues. We hope to change this soon.
GitThe Git icon will bring you to our home on GitHub,
where we host code with the Git version control system. GitHub has a great front end to Git, and is a great place to collaborate. If you want to keep up with the code chang-es to Ecere or contribute, this is where it all happens. You can use Git to clone the sdk source code from here and simply issue a pull to download the latest incremental changes. The command to clone the SDK into a folder within the current working directory ‘sdk’ would be: git clone git://github.com/ecere/sdk.git. On Win-dows the msys-git implementation of git works great. You will find a link to the latest version from the Source section on our wiki’s download section.
SourceFinally, if you don’t feel like setting up a git clone, a
big shiny Download button will download the very lat-est code as single tarball. Regardless of your platform, after you’ve cloned or extracted the source code you should be able to go to the sdk’s top level directory and simply issue a ‘make’ command (mingw32-make on Windows). Hopefully everything will go well and you will see ‘The Ecere SDK has been built successfully’, at which point you can proceed to issue a ‘sudo make install’ on Linux, or a ‘mingw32-make install’ on Win-dows. For make install to work on Windows Vista/7, you will need an Elevated Command Prompt. You can be start one by clicking on the Start button, typing cmd, right clicking the cmd.exe icon selecting Run as ad-ministrator, and selecting ‘Yes’ in the UAC prompt. If you have any issue with the build or installation, you’re welcome to ask for help in the forums.
Setting up a new project with the IDELet’s start! First, launch the Ecere IDE. To be able to
build any application, we will require a project. Let’s cre-ate a new project: using the menu bar’s Project → New. We need to provide a location for our project, and a proj-ect name. Use a new folder for it, making sure you have the right permissions in the parent folder to create it. For the folder location, if you are on Windows, use a path
containing only ASCII characters (MinGW-make does not seem to support Unicode paths properly). Always Stick to ASCII characters for the project name. We’ll be making a TicTacToe game, so let’s name our project TicTacToe. The IDE will create the folder if it does not exist.
Leave the ‘Create Form’ check box ticked, as we will be making a GUI application (As opposed to a con-sole based application, such as the typical hello, world!!). The target type specifies whether we want to build an executable application or a library to be used as a component part of another application. In our case we want to build an executable. After pressing OK, our project will be ready to use.
You should now be seeing a blank form, with a default file name of “form1.ec”. We would like to use a different file name, so we will change that. Press F8 (twice if the form was not active) to toggle back to the Code Editor (as opposed to the Form Designer). You should now be looking at the code for form1.ec. Select All (Ctrl-A), cut it into your clipboard (Ctrl-X), close it (Ctrl-F4 – twice to close the form designer as well, No for not saving), go to the project view (Alt-0), hit ‘Delete’ on form1.ec to take it out of the project. Now we’ll add a file named TicTacToe.ec instead. Move up to the project node (TicTacToe.epj), and either right click on it and select Add Files to Proj-ect, or simply press enter while it is selected. Then type in the name of the file to add, TicTacToe.ec (it does not need to exist prior to adding it). Notice how the new file is added under the target node. Now double click on it and add back the initial form code from your clipboard:
import “ecere”
class Form1 : Window { caption = “Form1”; background = formColor; borderStyle = sizable; hasMaximize = true; hasMinimize = true; hasClose = true; size = { 576, 432 }; }
Form1 form1 {};
Figure3 : New Project

Cross-Platform Development with the SDK
1502/2012 en.sdjournal.org
Now, try building the application. Select from the menu bar Project → Build (shortcut key – F7). If every-thing is configured correctly, you should get the follow-ing output in the build output tab:
Default Compiler TicTacToe-Debug.Makefile - Project has been modified. Updating makefile for Debug config... Building project TicTacToe using the Debug configuration... Generating symbols... TicTacToe.ec Compiling... TicTacToe.ec TicTacToe.c Writing symbol loader... TicTacToe.main.ec TicTacToe.main.ec TicTacToe.main.c Linking...
TicTacToe (Debug) - no error, no warning
If you are not getting this, but errors instead, the Ecere SDK might not be installed properly. Please refer to the installation notes again. If you are getting syntax errors, you might not have pasted the code properly. Here is the unfortunate result of missing the last semicolon:
Compiling... TicTacToe.ec TicTacToe.ec:15:1: error: syntax error
TicTacToe (Debug) - 1 error, no warning
Double clicking or hitting enter on the error line in the build output view will bring you directly to the offending line of code. If everything went right, you should now have built your first eC program. You can now try running with F5 (Debug → Start). You should see your blank form coming up; it can be closed either with the Close button or the Alt-F4 keyboard shortcut.
Quick Introduction to eC and the GUI system
Now let’s tweak it a bit. We’ll change the name of the class from Form1 to TicTacToe, and its instantiation at the bottom. We will name the class instance mainForm instead of form1. We will also change the caption of the window from “Form1” to “TicTacToe”. All of the changes within the class (i.e. all changes except for those to the instantiation at the end) can be performed through the property sheet on the left side of the form designer (F4 to toggle between properties and methods). The code should now look like this:
import “ecere
class TicTacToe : Window{caption = “TicTacToe”;background = formColor;borderStyle = sizable;hasMaximize = true;hasMinimize = true;hasClose = true;size = { 576, 432 };}TicTacToe mainForm {};
Figure 4: ide2
Try to run the new code; notice your changes. Now let’s try adding a button that will perform an action. Use F8 to switch back to the Form Designer, click the “Button” icon in the Toolbox at your right, and drag it (while holding left mouse button down) onto the form. You can try moving the button around on the form by click-and-dragging it. Double-clicking the button will automatically override the NotifyClicked event for the button, which is invoked whenever the user clicks the button. The code will now look like this:
import “ecere”class TicTacToe : Window { caption = “TicTacToe”; background = formColor; borderStyle = sizable; hasMaximize = true; hasMinimize = true; hasClose = true; clientSize = { 576, 392 }; Button button1 { this, caption = “TicTacToe”, position = { 8, 8 };
bool NotifyClicked(Button button, int x, int y, Modifiers mods) { return true; } }; } TicTacToe mainForm {};
The Button class, like all visible GUI components in the Ecere GUI, inherits from the base Window class. Our TicTacToe class also inherits from Window, as the class TicTacToe : Window stipulates, a syntax which will be familiar to programmers of most other ‘C with classes’ languages.
The this identifier, which you see within the instan-tiation of the Button object, refers to the current class (TicTacToe). It is being assigned to the ‘parent’ property of the Button class, parent being the first initializable member of all classes deriving from Window. As anoth-er example, x and y are the first (and only) initializable

CROSS PLATFORM DEVELOPMENT
16 02/2012 en.sdjournal.org
members of the Point class expected for the position property where the code says: position = { 8, 8 }. Thus, the parent could alternatively be assigned as: parent = this.
The parent of a window in the Ecere GUI is the win-dow within which it is confined. The parent of top level windows is the desktop, which is the default if no par-ent is specified (or if a value of null is specified).
Note that the property assignments directly within the class (e.g. caption, background, borderStyle, hasMax-imize...) are default property values for the TicTacToe class (all instances of it), whereas the property assign-ments within the instantiation of the button1 object are values assigned specifically to that particular instance of the Button class. Default values for a class can be over-ridden at the instance level, for example here we could override these values when instantiating mainForm.
Now within this NotifyClicked event, we will bring up a message box that says Tic Tac Toe!. To do so, we need to instantiate an object of the MessageBox class. Be-cause the message box is temporary, it does not need to be named, so we’ll use an anonymous instance. The syntax is very similar to the instantiation of our named TicTacToe class (the mainForm instance), without the name:
bool NotifyClicked(Button button, int x, int y, Modifiers mods) { MessageBox { master = this, caption = “TicTacToe”,contents = “Tic Tac Toe!” }.Modal(); return true; }
In eC, the curly braces are the instantiation opera-tors, inspired from the declaration list initializers of C, taking out the assignment operator (Vector3D vec = { 3, 4, 5 }; becomes Vector3D vec { 3, 4, 5 }). The use of curly braces for objects will also be familiar to those accustomed to the Java Script Object Notation (JSON). Whereas an anonymous instantiation is consid-ered a statement, a named instantiation is considered a declaration. This is important to note, since eC requires all declarations to be grouped at the beginning of a compound block: no declaration can follow a state-ment within the same compound block. This follows the C89 convention. A syntax error will result if a decla-ration comes after a statement.
As in our early example, we will set properties for the message box: the caption (what shows up in the title bar), and the contents (the actual text that goes within the box). Both properties (that can perform actions) and data members (regular C structures data mem-bers) can be assigned within the curly braces. We will keep the default type, which is a message box with only an OK button.
To establish the relationship between the message box and our main form, we will set its master property to be the current instance of the TicTacToe class. This will state that the message box is owned by the main form. If no master is specified for a window, the default is that window’s parent. The master for a control also determines who will receive the notification events. For example, in the case of our button, the TicTacToe class (the parent of the button, also the master since no master is specified) receives notification events for the window, so the TicTacToe class can be referred to as this within the NotifyClicked event. Setting the master of the MessageBox to be the main form will enable the message box to be modal in respect to the main form, as explained below.
In addition to instantiating the GUI object itself, whose purpose is to hold the associated data, the Mes-sageBox (like any Window) must be explicitly created, unless it is auto-created by virtue of being a global in-stance or a member instance of another Window being created (such as the case of our mainForm instance of the TicTacToe class). This is normally done through the Window::Create() method, though here we will use the Window::Modal() method, which has the triple purpose of making the dialog modal (through the isModal prop-erty, no other related window will accept input until the message box is closed), creating the window and waiting for the window to be closed before returning from the method call. Run the program again it to see it in action.
For a more in depth coverage of the features of the eC programming language, please consult the Ecere Tao of Programming, a Programmer’s Guide for the Ecere SDK (a work in progress). You will find the Tao in-stalled along with the SDK (In Program Files/Ecere SDK/doc on Windows, /usr/share/doc/ on Linux), or online at http://ecere.com/tao.pdf. The first section of the Tao covers the C foundations of eC, whereas the second section goes over the object oriented concepts of eC.
For the rest of this article, we will focus on the func-tionality allowing us to build a TicTacToe game with the SDK (which, of course, can be compiled and deployed on any supported platform).
Drawing graphics with The application model of Ecere is built around the
classic game development main loop concept:
While the application is running:• Wait for input• Process input• Render current state
As such, the GUI system expects drawing to oc-cur solely as part of this last rendering step. Any GUI

Cross-Platform Development with the SDK
1702/2012 en.sdjournal.org
component must therefore keep track of its current state, and any visual change is initiated by a two steps process:
1. Modify the state: usually done by modifying mem-ber variables of the GUI (Window) object
2. Request an update: a passive request to the GUI sys-tem to be updated on the Rendering phase of the next cycle. This is done by the Window::Update() method, with an optional parameter specifying the area to be updated (or null for the entire Window to be updated).
The drawing itself is handled in the Window::OnRedraw virtual method, called back by the GUI system during the rendering phase. The OnRedraw method receives a Surface in which to render the current state of the ob-ject. The Surface class provides the methods for render-ing bitmaps, text (with support for various fonts and international text using UTF-8), as well as basic opera-tions such as line drawing and area filling.
The following OnRedraw sample renders a simple blue, horizontal, 360 pixels wide by 10 pixels high, filled rectangle, at position (x = 20, y = 135) from the top-left corner of the window’s client area (the portion of the window excluding its decorations such as the title bar, resizing bars, scroll bars):
void OnRedraw(Surface surface){surface.background = blue;surface.Area(20, 135, 379, 144); }
Note that the background property affects the color of calls to Area(), whereas foreground affects the color of lines drawn with calls such as Rectangle(), DrawLine(), HLine(), VLine(), as well as the color of text rendered with methods such as WriteText().
Now let’s try to display a TicTacToe grid. First, we will tweak our TicTacToe form class definition to have a square shape, by settings the clientSize property to
400x400. We will also get rid of the resizable border, minimize and mazimize button, keeping only the close button (which automatically gives the window a fixed border on which to place the button, if no border style is specified). We will change the color of the form to pure white as well:
background = white;hasClose = true;clientSize = { 400, 400 };
When drawing the grid, we will base its dimensions on the window size, to make it easily adjustable by sim-ply modifying the clientSize property of the class.
We will define some constants as well, at the top of the file, using eC’s define mechanism:
define spacing = 20;define lineWidth = 10;
As the first step of drawing our grid, we will com-pute how much space each of the 3 sections of the grid should take, evenly dividing by 3 the available space (af-ter taking out the spacing at both ends), we will name these variables sw and sh for section width and height:
int sw = (clientSize.w - 2*spacing) / 3;int sh = (clientSize.h - 2*spacing) / 3;
Our grid is then rendered with the following 4 calls to Area(): (Listing 1).
Try to put this together to see the grid (you can re-fer to the full listing of the TicTacToe game at the end of this article in case you get confused how things fit together).
Our next step is to keep track of the state of the game. For this purpose, we will use an enumeration type along with a 3x3 array:
enum TTTSquare { _ , X, O };TTTSquare board[3][3];
As a global object, the board will automatically be initialized with ‘0’ values by default, which will match to the ‘_’ (empty) value of our TTSquare enumeration
Listing 1
// Vertical lines
surface.Area(spacing + sw - lineWidth / 2, spacing,
spacing + sw + lineWidth / 2-1, clientSize.h - spacing - 1);
surface.Area(spacing + sw*2 - lineWidth / 2, spacing,
spacing + sw*2 + lineWidth / 2-1, clientSize.h - spacing - 1);
// Horizontal lines
surface.Area(spacing, spacing + sh - lineWidth / 2,
clientSize.w - spacing – 1, spacing + sh + lineWidth / 2-1);
surface.Area(spacing, spacing + sh*2 - lineWidth / 2,
clientSize.w - spacing – 1, spacing + sh*2 + lineWidth / 2-1);

CROSS PLATFORM DEVELOPMENT
18 02/2012 en.sdjournal.org
type. For the purpose of our initial testing however, we will initialize it to some arbitrary state so we can make sure drawing X’s and O’s works:
TTTSquare board[3][3] ={{ _ , X, O }{ O, _ , _ },{ _ , _ , X }};
Now let’s write code to render the X’s and O’s. For the sake of simplicity, we will use text and fonts (we could have chosen to use bitmaps instead and use the Surface::Blit() method to display them). First, we will create a FontResource object to automatically load and unload our font when required. The Ecere graph-ics system supports dynamic display mode change, e.g. switching from Direct3D to OpenGL, or changing color depth while the application is running. This can be handled through Window’s OnLoadGraphics / OnUn-loadGraphics callback virtual methods, but the FontRe-source and BitmapResource classes provide automatic management of Fonts and Bitmaps:
FontResource tttFont { “Comic Sans MS”, 50, bold = true, window = this };
Here we have selected “Comic Sans MS” for the fa-ceName (the first property) of our font, a size of 50 font points and a bold weight.
By setting the window property of the FontResource to our TicTacToe instance, the font will automatically get loaded and unloaded for use within the display system of our window. By default, all windows of an applica-tion share the same display system, but with Ecere it is possible for one window to work with OpenGL while another runs in GDI or X11 mode, in which case mul-tiple display systems are in use (and multiple fonts/bitmaps objects must be loaded). The BitmapResource class works in a very similar way to the FontResource (in fact they both inherit from a common Resource class).
The FontResource is purely a resource management object. The actual Font object to be used for rendering can be accessed through its font property, which can be set on a Surface as such:
surface.font = tttFont.font;
In order to center the X’s and O’s within the squares of the grid, it will be necessary to obtain the dimensions of each letter. To do so we will use the Surface::TextExtent method, after having selected our font:
int Xw, Xh, Ow, Oh;surface.TextExtent(“X”, 1, &Xw, &Xh);surface.TextExtent(“O”, 1, &Ow, &Oh);
The first parameter of TextExtent is the string to dis-play, the second the length (only 1 character), followed by the addresses of 2 integer variables to retrieve both the width and height of the string.
We will then use Surface::WriteText to display the letters at the appropriate location, using the section width and height variables from earlier again (sw and sh) in our computations. The proper entry in our two-dimensional board table is examined to see whether nothing, a X, or a O is to be rendered. X’s are displayed in green, whereas O’s are displayed in red.
int x, y;for(y = 0; y < 3; y++){for(x = 0; x < 3; x++){TTTSquare p = board[y][x];if(p == X){surface.foreground = green;surface.WriteText(spacing + sw * x + sw / 2 – Xw/2,spacing + sh * y + sh / 2 - Xh/2, “X”, 1);}else if(p == O){surface.foreground = red;surface.WriteText(spacing + sw * x + sw / 2 – Ow/2,spacing + sh * y + sh / 2 - Oh/2, “O”, 1);}}}
We have organized the whole task of rendering the X’s and O’s within the DrawPieces method of the TicTacToe class, which will be invoked from the OnRedraw method.
Processing InputThe Ecere GUI provides method callbacks to handle
mouse and keyboard input within a Window. Keyboard events are received by the OnKeyDown, OnKeyUp and On-KeyHit methods. OnKeyHit is normally used for handling characters, which can be repeated while the key is held down. The input methods will relay the character infor-mation provided by input methods (IMEs), which can be composed by multiple key presses releases. OnKeyUp/On-KeyDown is normally used to perform action associated with a specific key. It is also possible to query the state of keys, which is most useful in the context of a video game.
For handling mouse input, nine callback virtual methods of the Window class can be overridden, three buttons times three types of events:
On[Left/Middle/Right][ButtonDown/ButtonUp/DoubleClick].
Mouse wheel support is handled as special key val-ues within the OnKeyUp or OnKeyHit method: wheelUp and wheelDown.
For our small TicTacToe game, we will simply process OnLeftButtonDown:
bool OnLeftButtonDown(int mx, int my, Modifiers mods){return true;}

Cross-Platform Development with the SDK
1902/2012 en.sdjournal.org
Here we have modified the default parameters names from x and y to mx and my, because we wish to reserve x and y for the indices within our board table. The first thing we will check when the mouse button is pressed is whether we are within the TicTacToe grid, which is de-fined by the spacing and clientSize of our class:
if(mx >= spacing && mx < clientSize.w - spacing &&my >= spacing && my < clientSize.h – spacing)
If we know we are within the grid, we will then sub-tract the top-left spacing from mx and my, in preparation to convert the pixel mouse coordinates into coordinates within our grid, with a simple division by sw and sh:
mx -= spacing;my -= spacing;x = mx / sw;y = my / sh;
One last check we’ll add is to make sure we are not clicking on the grid lines themselves, as it would not be clear on which square we wish to position our pieces: (Listing 2).
Then we are ready to place the X piece, if the square clicked by the user is empty, and re-quest an update of our window:
if(!board[y][x]) { board[y][x] = X; Update(null); }
Game LogicA 2-players game is much
more fun when there are 2 play-ers. The eC distributed objects framework makes it extreme-ly easy to write multi-player games without the tediousness of implementing a network pro-tocol. Instead, a server connec-tion class is defined and meth-ods can be called across the network, as if the object was local. Many such samples can be found within the samples/ directory of the SDK. For the purpose of this article however, we will focus instead on imple-menting an AI player. The hu-man player will play X, while the computer plays O.
First, we will define a turn variable which specifies whose turn it is. A value of 0 will mean the game is over. We will initialize it to X: the player will start.
TTTSquare turn; turn = X;
Then to make sure the player can’t continue playing after a TicTacToe, we will check whether it is indeed his turn to play (turn == X) within OnLeftButtonDown.
We will also turn our useless “TicTacToe” button into a “Reset” button that restarts the game, setting turn to X and clearing the board with 0s: (Listing 3).
We will integrate the game logic within a Move-Played() method which will get called right after the user places a piece on the board, in the OnLeftButton-Down method: (Listing 4).
Listing 3Button btnReset{this, font = { “Arial”, 12 }, caption = “Reset”, position = { 8, 8 };
bool NotifyClicked(Button button, int x, int y, Modifiers mods){memset(board, 0, sizeof(board));turn = X;Update(null);return true;}};
Now we need code to detect a Tic Tac Toe!TTTSquare FindTicTacToe(TTTSquare state[3][3]){int i;
// Diagonal ‘\’ if(state[0][0] && state[0][0] == state[1][1] && state[1][1] == state[2][2])return state[0][0];// Diagonal ‘/’if(state[2][0] && state[2][0] == state[1][1] && state[1][1] == state[0][2])return state[2][0];
for(i = 0; i < 3; i++){// Horizontalif(state[i][0] && state[i][0] == state[i][1] && state[i][1] == state[i][2])return state[i][0];// Verticalif(state[0][i] && state[0][i] == state[1][i] && state[1][i] == state[2][i])return state[0][i];}return 0;}
Listing 2if((mx < sw - lineWidth / 2 || mx > sw + lineWidth / 2) && // 1st vertical line(mx < sw*2 - lineWidth / 2 || mx > sw*2 + lineWidth / 2) && // 2nd vertical line(my < sh - lineWidth / 2 || my > sh + lineWidth / 2) && // 1st horizontal line(my < sh*2 - lineWidth / 2 || my > sh*2 + lineWidth / 2)) // 2nd horizontal line

CROSS PLATFORM DEVELOPMENT
20 02/2012 en.sdjournal.org
We check for a tic tac toe, if we found one, the game is over: we dis-play the winner in a message box. If X just played, it is now the computer’s turn to play. We call the BestMove() method where we will implement the computer’s AI. If there was a move available, it gets played and Move-Played() is invoked again to verify whether there is now a Tic Tac Toe. If the computer (O) just played, it is now the player’s turn (X).
The AIImplementing game AIs is always a
fun endeavor! Classic 3x3 Tic Tac Toe is a rather simple game, and there are many approaches one could take to implement an AI, including hard-coding and/or categorizing solutions. However we will chose to implement a basic minimax algorithm, which can scale to more complex variants of the game, and can be used for other games as well (Figure5).
The Ecere Chess application (whose source code is available on our GitHub page) also implements a minimax type algorithm. An overview of the minimax algorithm can be found at http://en.wikipedia.org/wiki/Minimax.
Here we will only provide a quick summary of the AI implementation. The AI included in the full listing at the end of this article includes additional code to add randomness and cause it to make human-like errors, based on a ‘mastery’ level, ranging from 0 (dumb) to 100 (you can only tie). For the sake of understanding minimax, the sim-pler algorithm (which does not make mistakes) follows: (Listing 5).
The code uses recursion to evalu-ate all possible moves, alternating be-tween each player. It uses a floating point rating system, where the rating is negated at every player switch to make it relative to the current player. A TicTacToe at the current level is given a value of 1, while a TicTacToe further away is made less significant by a di-vide by 2. The best move is returned in the bestMove parameter. No available move is given a special value of -100.
Full Tic Tac Toe ListingThe full listing of TicTacToe.ec follows. With the Ecere SDK, it can
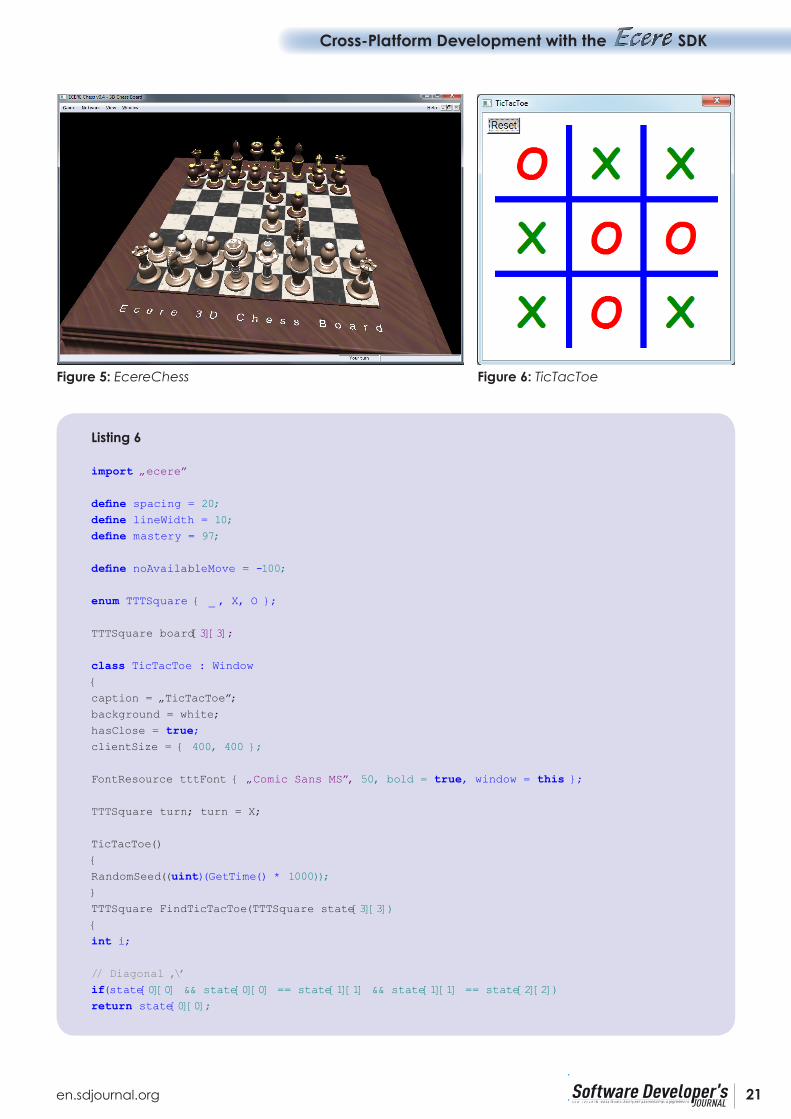
be compiled and executed on any platform. A static binary on Windows (.exe) including the Ecere runtime library (with no external dependen-cies), takes up 657 KB once compressed with UPX (Figure 6) (Listing 6).
Listing 4void MovePlayed(){TTTSquare result = FindTicTacToe(board);if(result){MessageBox { caption = “Tic Tac Toe!”,contents = (result == X ? “You win!” : “Computer wins!”) }.Modal();turn = 0;}else if(turn == X){// Computer playsPoint move { };turn = O;if(BestMove(turn, board, move) != noAvailableMove){board[move.y][move.x] = O;MovePlayed();}elseturn = 0;}elseturn = X;}
Listing 5define noAvailableMove = -100;
float BestMove(TTTSquare t, TTTSquare state[3][3], Point bestMove){int x, y;float bestRating = noAvailableMove;for(y = 0; y < 3; y++){for(x = 0; x < 3; x++){if(!state[y][x]){float newRating;state[y][x] = t;if(FindTicTacToe(state))newRating = 1;else{Point move;newRating = BestMove((t == X) ? O : X, state, move);if(newRating == noAvailableMove)newRating = 0;newRating = -newRating/2;}state[y][x] = 0;if(newRating > bestRating){bestRating = newRating;bestMove = { x, y };} } }}return bestRating; }
Cross-Platform Development with the SDK
2102/2012 en.sdjournal.org
Figure 5: EcereChess Figure 6: TicTacToe
Listing 6
import „ecere”
define spacing = 20;define lineWidth = 10;define mastery = 97;
define noAvailableMove = -100;
enum TTTSquare { _ , X, O };
TTTSquare board[3][3];
class TicTacToe : Window{
caption = „TicTacToe”;
background = white;
hasClose = true;clientSize = { 400, 400 };
FontResource tttFont { „Comic Sans MS”, 50, bold = true, window = this };
TTTSquare turn; turn = X;
TicTacToe()
{
RandomSeed((uint)(GetTime() * 1000));}
TTTSquare FindTicTacToe(TTTSquare state[3][3])
{
int i;
// Diagonal ‚\’
if(state[0][0] && state[0][0] == state[1][1] && state[1][1] == state[2][2])return state[0][0];

CROSS PLATFORM DEVELOPMENT
22 02/2012 en.sdjournal.org
// Diagonal ‚/’
if(state[2][0] && state[2][0] == state[1][1] && state[1][1] == state[0][2])return state[2][0];
for(i = 0; i < 3; i++){
// Horizontal
if(state[i][0] && state[i][0] == state[i][1] && state[i][1] == state[i][2])return state[i][0];// Vertical
if(state[0][i] && state[0][i] == state[1][i] && state[1][i] == state[2][i])return state[0][i];}
return 0;}
float BestMove(TTTSquare t, TTTSquare state[3][3], Point bestMove){
static int level = 0;int x, y;float bestRating = noAvailableMove;int filled = 0;bool couldTicTacToe = false;/* A player is likely to see the opponent’s tic tac toe in his own tic tac toe spot */ Point badMove;
Point moves[9];
int numMoves = 0;
level++;
for(y = 0; y < 3; y++)for(x = 0; x < 3; x++)if(state[y][x]) filled++;
for(y = 0; y < 3; y++){
for(x = 0; x < 3; x++){
if(!state[y][x]){
float newRating;state[y][x] = t;
if(FindTicTacToe(state))newRating = 1;
else{
Point move;
newRating = BestMove((t == X) ? O : X, state, move);
if(newRating == noAvailableMove)newRating = 0;
newRating = -newRating/2;
if(newRating <= -0.25f){
badMove = move;
couldTicTacToe = true;}
}
state[y][x] = 0;

Cross-Platform Development with the SDK
2302/2012 en.sdjournal.org
if(newRating > bestRating){
bestRating = newRating;
bestMove = { x, y };
numMoves = 1;
moves[0] = bestMove;
}
else if(level == 1 && newRating == bestRating)moves[numMoves++] = { x, y };
}
}
}
if(GetRandom(0, 60) > mastery || (filled > 4 && filled < 7 && couldTicTacToe && (bestMove.x != badMove.x || bestMove.y != badMove.y)))
{
if(level == 2 && GetRandom(0, 25) > mastery)bestRating = -0.5f;
if(level == 4 && GetRandom(0, 100) > mastery)bestRating = -0.125f;
}
if(level == 1 && numMoves > 1)bestMove = moves[GetRandom(0, numMoves-1)];
level--;
return bestRating;}
void MovePlayed(){
TTTSquare result = FindTicTacToe(board);
if(result){
MessageBox { caption = „Tic Tac Toe!”,
contents = (result == X ? „You win!” : „Computer wins!”) }.Modal();
turn = 0;
}
else if(turn == X){
// Computer plays
Point move { };
turn = O;
if(BestMove(turn, board, move) != noAvailableMove){
board[move.y][move.x] = O;
MovePlayed();
}
elseturn = 0;
}
elseturn = X;
}
void DrawPieces(Surface surface){
int sw = (clientSize.w - 2*spacing) / 3;int sh = (clientSize.h - 2*spacing) / 3;

CROSS PLATFORM DEVELOPMENT
24 02/2012 en.sdjournal.org
int x, y;int Xw, Xh, Ow, Oh;
surface.font = tttFont.font;
surface.TextExtent(„X”, 1, &Xw, &Xh);
surface.TextExtent(„O”, 1, &Ow, &Oh);
for(y = 0; y < 3; y++){
for(x = 0; x < 3; x++){
TTTSquare p = board[y][x];
if(p == X){
surface.foreground = green;
surface.WriteText(spacing + sw * x + sw / 2 – Xw/2,
spacing + sh * y + sh / 2 - Xh/2, „X”, 1);
}
else if(p == O){
surface.foreground = red;
surface.WriteText(spacing + sw * x + sw / 2 – Ow/2,
spacing + sh * y + sh / 2 - Oh/2, „O”, 1);
}
}
}
}
void OnRedraw(Surface surface){
int sw = (clientSize.w - 2*spacing) / 3;int sh = (clientSize.h - 2*spacing) / 3;
surface.background = blue;
// Vertical lines
surface.Area(spacing + sw - lineWidth / 2, spacing,
spacing + sw + lineWidth / 2-1, clientSize.h - spacing - 1);
surface.Area(spacing + sw*2 - lineWidth / 2, spacing,
spacing + sw*2 + lineWidth / 2-1, clientSize.h - spacing - 1);
// Horizontal lines
surface.Area(spacing, spacing + sh - lineWidth / 2,
clientSize.w - spacing - 1, spacing + sh + lineWidth / 2-1);
surface.Area(spacing, spacing + sh*2 - lineWidth / 2,
clientSize.w - spacing - 1, spacing + sh*2 + lineWidth / 2-1);
DrawPieces(surface);
}
bool OnLeftButtonDown(int mx, int my, Modifiers mods){
if(turn == X && mx >= spacing && mx < clientSize.w - spacing && my >= spacing && my < clientSize.h - spacing)
{
int sw = (clientSize.w - 2*spacing) / 3;int sh = (clientSize.h - 2*spacing) / 3;mx -= spacing;

Cross-Platform Development with the SDK
2502/2012 en.sdjournal.org
my -= spacing;
/* 1st vertical line */
if((mx < sw - lineWidth / 2 || mx > sw + lineWidth / 2) &&/* 2nd vertical line */
(mx < sw*2 - lineWidth / 2 || mx > sw*2 + lineWidth / 2) &&
/* 1st horizontal line */
(my < sh - lineWidth / 2 || my > sh + lineWidth / 2) &&
/* 2nd horizontal line */
(my < sh*2 - lineWidth / 2 || my > sh*2 + lineWidth / 2))
{
int x = mx / sw;int y = my / sh;if(!board[y][x]){
board[y][x] = X;
Update(null);MovePlayed();
}
}
}
return true;}
Button btnReset
{
this, font = { „Arial”, 12 }, caption = „Reset”, position = { 8, 8 };
bool NotifyClicked(Button button, int x, int y, Modifiers mods){
memset(board, 0, sizeof(board));turn = X;
Update(null);return true;}
};
}
TicTacToe mainForm {};
Jeromie St-LouisJerome is the founder and lead visionary behind the Ecere SDK. He is also the author of the “3D Coding BlackHole”, a 3D graphics pro-gramming tutorial series from 1996 which evolved into the SDK’s 3D engine. Jerome started working on a cross-platform game engine as well as a GUI toolkit for use within games in 1997 which became the Ecere SDK. In 2004, Jerome designed eC as a language to present the SDK in an object-oriented manner and support Rapid Application Development in the IDE. Jerome wrote many applications with the Ecere SDK, notably the Acovel Media Player, Ecere Communicator and Paper2PACS. Through his company Ecere Corporation, Jerome offers consulting services to the government, private and health care (radiology in particular: PACS/RIS solutions) sectors. Among his clients is Gallium Software, for whom he is a lead developer on InterMAPhics mapping/GIS products.

CROSS PLATFORM DEVELOPMENT
26 02/2012 en.sdjournal.org
What is PhoneGap?PhoneGap is a collection of tools, and libraries that
allow you to build native mobile applications for mul-tiple devices. PhoneGap supports the development of portable application code that can run on Apple iOS iPhones, iPads, iPods, all Android devices, Windows Phone 7 devices, BlackBerry phones and PlayBooks, HP WebOS phones and TouchPad, as well as Symbian and Samsung Bada devices (Figure 1).
PhoneGap embraces web technology, so web devel-opers can leverage their existing skills and write their applications in HTML, CSS, and JavaScript.
How does it work?Running an Application on a device
At runtime, PhoneGap works by instantiating a browser component on the device. This is a chrome-less browser, meaning that it does not have an address-bar
or forward/back buttons. The end developer’s applica-tion consists of HTML, JavaScript and CSS that are load-ed into the browser component. PhoneGap provides a JavaScript API that allows developer code to access device functionality, that is currently not accessible to web sites loaded in the default browser.
Building for a device.PhoneGap includes tools and libraries for packag-
ing developer code into an application that can run on the device. The exact process of packaging will de-pend on the device as each has its own methods of packaging. The developer code is typically maintained in a www folder indicating the root of the application. All content within this root folder is considered to be portable and will have little if any modification be-tween device targets.
Apache Cordova :: the framework formerly known as PhoneGapThis article uses the names PhoneGap and Cordova synonymously to refer to the open source project currently in incubation within the Apache Software Foundation.
Figure 1: Developers can leverage their existing skills in web technologies such as HTML, CSS and Javascript to create cross-platform apps

Apache Cordova :: the framework formerly known as PhoneGap
2702/2012 en.sdjournal.org
Distributing your applicationPhoneGap applications are distributed through app
stores, just like any other native application. The same rules apply for what your app is allowed to do, and what kind of content is appropriate. Your PhoneGap application will typically need to be reviewed, and upon passing review, it will be distributed via app store downloads.
What need does it fill?The best explanation of how PhoneGap can help your
company is really the story of how it came to be in the first place. When the iPhone SDK came out, the entire team at Nitobi was excited and wanted to build apps for this new cool platform. Nitobi at the time was primarily a web development shop selling JavaScript components, and providing consulting and dev services to companies in need of performant ajaxy websites. Nitobi was not in a position to send the entire team off to learn Objective-C, but some of the team while playing with the SDK discov-ered that they could present pretty compelling markup in the browser component. With a little more work, they were allowing the hosted JavaScript code to call native code and access device functionality.
Next came Android, similarly appealing, so instead of sending everyone to learn Java and the Android SDK, a single developer was tasked with providing the same features via a hosted WebBrowser control and almost instantly Nitobi had created a cross platform framework allowing for applications running in a host-ed WebBrowser on multiple mobile devices.
… and so on, …
Nitobi, as a company, has always embraced open source, so naturally, PhoneGap has always been open source. This is without question why the project is so successful today. Early in the project, most of the con-tributions were coming from Nitobi developers, but a community was also uniting around the openness of the project. Early in 2011 the community caught up to Nitobi in number of commits, most certainly due in part to IBM putting 4 full-time developers on the proj-ect (Figure 2).
Nitobi additionally had to earn revenue, so devel-oper work time was focused on client development projects and consulting. We identified client needs that were filled by PhoneGap, and strove to use it wherever possible. We also identified opportunities to commit code back to the PhoneGap project and made deals with clients at a discount if they were willing.
As new Adobe employees we are now even more committed to contributing to the project as we no lon-ger have to split our time with client projects, and can focus on the framework itself.
StandardsImplementing consistent functionality across different
devices exposed the need to follow standards. While inves-tigating interfaces for addition into PhoneGap, the team has kept a close eye on standards bodies like the W3C. Sev-eral PhoneGap contributors have even joined standards groups to help define the next wave of device APIs.
The Geolocation API was implemented in PhoneGap before it made its way to iOS ( then iPhone OS ). Follow-ing standards meant that in many cases the browser maker actually implements the same API as PhoneGap and PhoneGap can simply defer to the browser imple-mentation when running on these devices.
How PhoneGap can help ease you into the world of mobile development
Software development is not easy, and good mobile software development is downright hard. Factors like lim-ited processor power, screen size, and battery consump-tion all play a role in challenging the developer to deliver a compelling experience. A common consideration when choosing a device to target is the skill-set that is required to develop for the device. Each device manufacturer/pro-vider typically provides it’s own Software Developer Kit (SDK) to enable developers to target the device. An SDK will have restrictions on what languages an application can be written in, as well as what tools you can use to develop for it. The SDK will provide the device level functionality, and define what functionality is available through its APIs.
While many articles focus on the development lan-guage being the only blocker to jumping to a new plat-form, the issue is much deeper.
Developers wishing to target a new device will have to potentially:• Learn or know the language required for the device • Learn or know how to use the tools to build for the
device • Learn the User Interface APIs, and how to construct
their application • Learn the device APIs available, and how to use them
Figure 2: PhoneGap is an open source project with many contributors. Source: ohloh.net

CROSS PLATFORM DEVELOPMENT
28 02/2012 en.sdjournal.org
In the case of PhoneGap applications, this picture is simplified somewhat. The only piece that changes from one device to another is the tooling. The language used to develop is always JavaScript, so users already familiar with JavaScript are ready to go. The User Interface API is again, JavaScript, with HTML + CSS to define layout, and positioning, look and feel. Also, the device APIs are exactly the same, so a developer moving from one PhoneGap device to another can expect it to work in exactly the same way, just like their portable PhoneGap code does (Figure 3).
More than websites on the phoneA common mis-conception that newcomers to
PhoneGap have is that it is just a website. There is an important distinction that must be made when ap-proaching developing a JavaScript based application.
You should not expect to update your application whenever you like, as you would with your website. App store policies generally do not allow you to make changes without going through the review process again. While it is possible to serve web content over http to your app, it is best to avoid having this be the primary function of your app.
PhoneGap is not a web server, so you should not expect to run php, or .net code, or have paths like ‘/’ magically resolve to ‘/index.html’. Some consider-ation should also be made for data access methods. PhoneGap applications can not connect to a remote database servers directly, so you will need a web server to manage translation of your data from your database, and serve it over http.
A typical PhoneGap application consists of one or more standalone web pages hosted on the device con-necting to a RESTy API on the server, typically serving JSON for transport efficiency.
Your application should provide some sort of offline functionality, or it should at least be aware when it is running offline, and inform the user of what to expect. App stores generally will not accept an application that shows an infinite spinner while attempting to connect to an unreachable server. PhoneGap provides the Net-work Connection API so your application can not only detect when it is connected, but tell if the connection is via wifi, or cellular data.
In the world of mobile devices, although remarkable, processor capabilities are limited. The amount of code that needs to load before a user interface is presented is an important consideration.
There are potentially 3 areas where code size can im-pact performance and applications should be optimized:
1. Time for code to be loaded from the file system.
2. Time for code to be interpreted by the script host.
3. How much memory the code occupies at runtime.
Modern best practices for JavaScript suggest that you concatenate files, and use a minification tool to compress the amount of data delivered. While file size will improve the load time for your app, there is no benefit in zipping your content as is currently done by many web servers. This is primarily because the file itself will not be subject to network latency, so minifica-tion should be enough for text based files.
Another area to consider is the actual screen sizes of the devices. Using css3 media queries it is possible to tar-get different resolutions with different runtime assets.
The following example demonstrates targeting small screens, versus tablet size devices.
@media screen and (max-width: 599px) { .class { background:url(MySmallImage.png); } } @media screen and (min-width: 600px) { .class { background:url(MyTabletImage.png); } }
I’ll tell you when I’m readyThe entire PhoneGap API is asynchronous, meaning
calls to get device values do not return an immediate result, but return the result at some later time via a callback method. This approach is similar to an AJAX website, where the page is refreshed without having to reload, and the user interface can remain responsive to the user even while data is pending.
Figure 3: The only piece that changes from one device to another is the tooling and the language used to develop is always JavaScript

Apache Cordova :: the framework formerly known as PhoneGap
2902/2012 en.sdjournal.org
Application logic, sometimes referred to as Business logic, is typically running in the webpage itself in JavaS-cript. This may be in contrast to web developers coming from an environment where the web server is doing all the work, and maintaining state for multiple clients. Applica-tion logic, including state, and view management is typi-cally performed in JavaScript in PhoneGap applications.
HTML has many features that make it suitable for de-fining user interface presentation, as opposed to typi-cal document layout.
Gap StoresThe usual process for distributing PhoneGap apps is
through an App store. For most devices, this is the only way to distribute an app. This means all the usual processes ap-ply, from app review, to code signing. PhoneGap itself does not provide any extra help in this area, and developers are still at the mercy of whichever store they are pursuing.
The liberal license that PhoneGap distributed under does not require any attribution, so there is effectively no way to know how many PhoneGap applications there are in the wild. Developers will typically announce their app on the mailing list, or submit a form on phonegap.com that allows developers to list their applications. There are literally tens of thousands of PhoneGap applications published throughout the various App stores (Figure 4).
Reuse of assetsMany companies come at PhoneGap looking to
establish a presence in an app store. Typically they al-ready have a website, and sometimes even a mobile
friendly website. In these cases much of the css and im-age resources will not change, however the approach is typically different as these items are packaged into the app, and not served by a web server. If the current web site consists of server side logic, they may need to restructure either some or all of code to work in a disconnected state.
[insert PhoneGap-compass.odt example here]
Here is an example of the Compass application that will run on iOS, Android, WP7, etc. You can also view a video of this application at http://www.youtube.com/watch?v=imFN2fqw1t0 (Listing 1).
Figure 4: There are thousands of PhoneGap apps published throughout the various app stores
Listing 1
<!DOCTYPE html><html> <head> <meta name=”viewport” content=”width=device-width, initial-
scale=1.0, maximum-scale=1.0, user-scalable=no;” /> <meta http-equiv=”Content-type” content=”text/html; charset=utf-8”/> <title>Cordova Compass</title> <style> body { background:#111 none repeat scroll 0 0; color:#ccc; font-family:”Segoe WP”, Verdana, Geneva, sans-serif; margin:12px 12px; border-top:1px solid #000; font-size:24px; } div.info { margin-left:20px;

CROSS PLATFORM DEVELOPMENT
30 02/2012 en.sdjournal.org
font-size: 24px; }
span.btn { background: black; color: white; text-decoration: none; line-height:32px; min-height:32px; min-width:80px; font-size: 24px; text-decoration:none; text-align:center; padding:12px 12px; margin:8px 8px; font-family:”Segoe WP Semibold” Helvetica Arial; border:solid #ccc 1px; } </style> <script type=”text/javascript” charset=”utf-8” src=”cordova-1.6.0.js”></script>
<script type=”text/javascript”>
document.addEventListener(“deviceready”,onDeviceReady,false);
var compassWatchId = null;
// once the device ready event fires, you can safely do your thing! -jm function onDeviceReady() { console.log(“onDeviceReady. You should see
this message in the IDE output window.”); }
function onHeadingUpdate(heading) { compassRose.style.msTransform = “rotate(-” + heading.trueHeading + “deg)”; compassRose.style.webkitTransform = “rotate(-” + heading.trueHeading + “deg)”; trueHeadingTxt.innerText = “trueHeading : “ + heading.trueHeading; magHeadingTxt.innerText = “magneticHeading : “ + heading.magneticHeading; accuracyTxt.innerText = “headingAccuracy : “ + heading.headingAccuracy; timestampTxt.innerText = “timestamp : “ + heading.timestamp; }
function onCompassFail(err) { var msg = err == CompassError.COMPASS _ NOT _
SUPPORTED ? “Compass not supported” : “Internal Error”; errMsg.innerText = “Compass Error : “ + err + “ - “ + msg; }
function startCompassWatch(bStart) { errMsg.innerText = “”; if(bStart) { if(!compassWatchId) { compassWatchId = navigator.compass.watchHe
ading(onHeadingUpdate,onCompassFail,{frequency:100}); } } else if(compassWatchId) { navigator.compass.clearWatch(compassWatchId);

Apache Cordova :: the framework formerly known as PhoneGap
3102/2012 en.sdjournal.org
PitfallsThe most common complaint with PhoneGap ( re-
ally about HTML5 user interfaces in general ) is related to the scrolling interaction. Everyone has come to ex-pect iPhone’s beautiful smooth scrolling, although this can be difficult to recreate in HTML5. There are several libraries that do a very good job at mimicking the na-tive interaction, but developers must still be mindful of what they are doing to avoid choppiness or flickering during scrolling. Libraries include iScroll4, which is a standalone solution, and Sencha Touch which requires developers to embrace the Sencha way more deeply.
The browser components running on mobile de-vices are very similar. In fact, most of them are running a variation of WebKit, the exception of course being Windows Phone 7, which is running Internet Explorer 9. All of the browsers support W3 defined DOM Level 2 events which allows calls to addEventListener to be implemented consistently.
PhoneGap’s device APIsPhoneGap allows your application to access every-
thing that a normal native app would.
PhoneGap core device APIs include:
1. Accelerometer • Monitor the motion sensor on the device.
2. Camera • Take pictures with the device camera, and allow the user
to select images from their photo library on the device.
3. Capture • Capture video and still images from the camera, and
audio from the microphone.
4. Compass • Give users of your app some direction.
5. Contacts • Search and Create contacts in the user’s address
book.
6. File • Low level read and write access to the file system.• Upload and download files from a web server.
7. GeoLocation • Make your app location aware.
8. Media • Play and record audio files.
9. Network • Monitor the device connections
10. Notification • Access to vibration, beep and alerts.
11. Storage • Persistent data store in WebStorage.
compassWatchId = null; } }
</script>
</head> <body> <div> <img id=”compassRose” src=”CompassRose.png” style=”margin:20px 80px;”></img> </div>
<div class=”info” id=”trueHeadingTxt” style=”color:Red;”>trueHeading : </div> <div class=”info” id=”magHeadingTxt” style=”color:Blue;”>magneticHeading :</div> <div class=”info” id=”accuracyTxt” style=”color:Yellow;”>headingAccuracy :</div> <div class=”info” id=”timestampTxt” style=”color:Green;”>timestamp :</div> <div style=”margin:40px 40px;”> <span class=”btn” onclick=”startCompassWatch(true);”>Start Watch</span> <span class=”btn” onclick=”startCompassWatch(false);”>Stop Watch</span> </div>
<div id=”errMsg” class=”info” style=”background-color:Red;color:#000;”> </div> </body></html>

CROSS PLATFORM DEVELOPMENT
32 02/2012 en.sdjournal.org
All APIs are implemented consistently across all sup-ported devices, so the same code will run everywhere (Figure 5).
What doesn’t PhoneGap do?Quite purposefully, PhoneGap does not provide any
user interface controls. PhoneGap is solely focused on be-ing the best container, and device api host for your web tech built application. But PhoneGap does not limit your choice either, and it allows you to develop with whatever UI framework you are familiar with. There are many op-tions including jQuery Mobile, and Sencha Touch. Simi-larly, there is a multitude of choices for providing applica-tion structure, via best practice patterns. Frameworks like Backbone, or Knockout fit comfortably into PhoneGap.
PluginsIn architecting PhoneGap, it became obvious that
there would always be some differences in what each device could do. The APIs defined as the core PhoneGap device APIs represent a very broad set of functionality that can be consistently delivered, but there is also a need to extend functionality for a particular device if a feature is compelling enough. PhoneGap provides an easy mechanism to ‘plugin’ new functionality as it is de-veloped. At it’s heart PhoneGap is providing a bridge from the JavaScript world to the native code world, and back again. This bridge can also be used by developers wishing to augment this functionality with their own native additions.
There is currently a huge list of plugins in a separate repository to support everything from PayPal, Face-book, and Twitter integrations, to Scanning BarCodes with the Camera. The beauty of plugins is that they can be developed organically, in that if a developer has a specific expertise on a platform they can develop a plu-gin for it without being concerned with how to imple-ment it elsewhere. Another developer can pick it up and fill in the functionality for another device.
The plugin repo can be found here: https://github.com/phonegap/phonegap-plugins
How much does it cost?PhoneGap is and always has been free. It was li-
censed under the liberal MIT license before being con-tributed to the Apache Software Foundation. Apache Cordova is licensed under the Apache license.
Figure 5: PhoneGap’s core device API’s are show in the above matrix across the various platforms
Jesse MacFadyen is a senior computer scientist at Adobe Systems. Jesse was part of the team at Nitobi that created PhoneGap and joined Adobe when Nitobi was acquired in October of 2011. PhoneGap has been submitted to the Apache Software Foundation and is now called Apache Cordova. Jesse continues to contribute to Apache Cordova and recently worked closely with Microsoft to bring the full functionality of PhoneGap to Windows Phone 7 Mango.

CROSS PLATFORM DEVELOPMENT
34 02/2012 en.sdjournal.org
As the number of mobile platforms grows, many companies realize that it is really expensive to develop natively for each platform, even the ma-
jor ones. To write a native app for iOS, Android and Win-dows Phone 7 three different programming languages and frameworks must be learned and well known - and this three are not the only mobile platforms that ex-ist. In that young market not many experienced native code developers are around, which makes the devel-opment of mobile apps just more expensive. And for future updates every app has to be maintained and tested seperately.
In most companies that want to go mobile with apps and possibly with a mobile site alot of skilled web de-velopers are working inhouse already. They can use HTML5 and cross-platform tools to create their applica-tions. But action games or other performance-criticial applications are currently no target for HTML5 cross-platform-developing. For most other use cases HTML5 can be used with good results.
There exist alot of cross-plattform-development tools and frameworks, I will focus on the Enyo frame-work today, packing it as native app for iOS or Android and deploying it as mobile webapp.
Enyo was developed by Hewlett Packard for the HP Touchpad Tablet and is the Framework that powers the webOS Operating System next to technologies like node.js and WebKit. It was finally released end of Janu-ary 2012 as Open Source (Apache License) to the public. Enyo is able to run on desktops and on mobile and if we wanted to target other markets like mobile appstores, we could produce directly our (mobile-) website from it or even desktop applications (Intel AppUp Encapsula-tor, MacGap).
There are two versions of Enyo. Enyo 1.x, which is not developed further and which was shipped with webOS 3 and the new Enyo 2. While Version 1 had alot of wid-gets for building user interfaces, it depended hardly on systems equipped with WebKit (iOS, Android, webOS).
Enyo 2 was just released together with Enyo 1 which was closed source before. Enyo 2 will get UI-Elements in next releases too, but at least the core framework tries to be a real cross platform solution, even with support for Internet Explorer. It has a more modular-ized approach. Today with Enyo 2, you can use the core system with every other UI-Framework (e.g. bootstrap from Twitter) or write all the UI on your own. But ac-cording to the release schedule, the Enyo UI-Widgets will be released at the end of February.
That was some basic information and some history, let us start exploring Enyo: during this article we will create a basic cross-plattform application, package it with Phonegap and even deploy a mobile site on her-oku services. An Enyo app is usually developed in the browser and after the initial developing in the browser the app is brought to other platforms for device/plat-form specific development, debugging and testing.
For every chapter you will find the whole code in the zipfile linked at the end or also beginning at each chapter.
“Hello World” in EnyoThe smallest Enyo app possible would be a “hello
world”-application. In Enyo just a very small amount of HTML has to be defined before like the doctype, body/html tags and the references to the Enyo framework it-self. Enyo creates almost the entire markup from JavaS-cript and renders it into the DOM, so that will be mostly all the HTML markup we will need: (Listing 1).
The most important part, as everything else is just ba-sic markup and the inclusion of the framework is the cre-ation of a Enyo control with the content “Hello World”:new enyo.Control({content: “Hello World”}).write();
That line renders directly to a div element contain-ing “Hello World”:
<div id=”control”>Hello World</div>
EXAMPLECODE Part 1 - Hello World
EnyoJS, Phonegap and node.js for Cross-Platform-Development: Developing a todo applicationBy Robert Kowalski
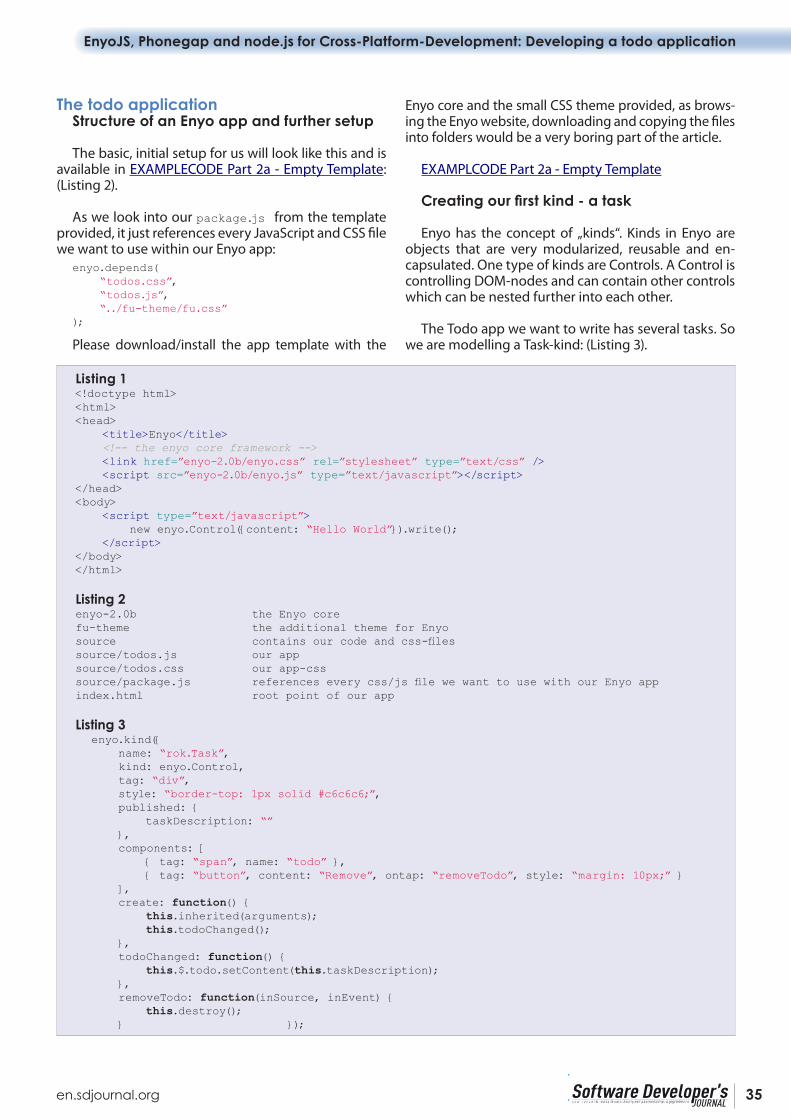
EnyoJS, Phonegap and node.js for Cross-Platform-Development: Developing a todo application
3502/2012 en.sdjournal.org
The todo applicationStructure of an Enyo app and further setup
The basic, initial setup for us will look like this and is available in EXAMPLECODE Part 2a - Empty Template: (Listing 2).
As we look into our package.js from the template provided, it just references every JavaScript and CSS file we want to use within our Enyo app:
enyo.depends( “todos.css”, “todos.js”, “../fu-theme/fu.css”);
Please download/install the app template with the
Enyo core and the small CSS theme provided, as brows-ing the Enyo website, downloading and copying the files into folders would be a very boring part of the article.
EXAMPLCODE Part 2a - Empty Template
Creating our first kind - a task
Enyo has the concept of „kinds“. Kinds in Enyo are objects that are very modularized, reusable and en-capsulated. One type of kinds are Controls. A Control is controlling DOM-nodes and can contain other controls which can be nested further into each other.
The Todo app we want to write has several tasks. So we are modelling a Task-kind: (Listing 3).
Listing 1<!doctype html><html><head> <title>Enyo</title> <!-- the enyo core framework --> <link href=”enyo-2.0b/enyo.css” rel=”stylesheet” type=”text/css” /> <script src=”enyo-2.0b/enyo.js” type=”text/javascript”></script></head><body> <script type=”text/javascript”> new enyo.Control({content: “Hello World”}).write(); </script></body></html>
Listing 2enyo-2.0b the Enyo corefu-theme the additional theme for Enyosource contains our code and css-filessource/todos.js our appsource/todos.css our app-csssource/package.js references every css/js file we want to use with our Enyo appindex.html root point of our app
Listing 3enyo.kind({ name: “rok.Task”, kind: enyo.Control, tag: “div”, style: “border-top: 1px solid #c6c6c6;”, published: { taskDescription: “” }, components: [ { tag: “span”, name: “todo” }, { tag: “button”, content: “Remove”, ontap: “removeTodo”, style: “margin: 10px;” } ], create: function() { this.inherited(arguments); this.todoChanged(); }, todoChanged: function() { this.$.todo.setContent(this.taskDescription); }, removeTodo: function(inSource, inEvent) { this.destroy(); } });

CROSS PLATFORM DEVELOPMENT
36 02/2012 en.sdjournal.org
Our kind is called Task with the namespace rok: name: “rok.Task”
It will render to a div container which was specified explictly by the tag property. At components we see the nesting of controls I talked about before.
Our rendered div will have two nested elements: a span element for the task text and a button to remove the task from the list.
Events and Event binding
The removebutton has an eventbinding with on-tap for tap-events. Tapping is one of the events Enyo knows and can react to (beside many other much more complex ones, e.g. dragging over the screen or self-created events).
{ tag: “button”, content: “Remove”, ontap: “removeTodo”, style: “margin: 10px;” }
Our tap-event handler points to the method re-moveTodo where we call this.destroy(); - it destroys the kind and removes it from the DOM.
removeTodo: function() { this.destroy();}
Published Properties
Our kind has a published property that is exposed and which we can access and set from outside:
published: { taskDescription: “”},
Within our kind the task description property will be accessible with this.taskDescription.
Accessing Controls / Components and automatically called methods (rendered, constructor, created)
When a kind is created the method create is called by the Enyo framework automatically. Every kind that is created inherits from its parent kind with this.inherited(arguments);.
Enyo kinds have a constructor too, but in this article we will not need to override a contructor.
Another method named rendered is called every time when a kind was rendered to the DOM rendered. We will use it later in the application.
As we want to set the text for the task at creation, we override the create method and add this.todoCh-anged();, which is called at creation and sets our pub-lished and exposed properties on the element with the name todo:
create: function() { this.inherited(arguments); this.todoChanged();},todoChanged: function() { this.$.todo.setContent(this.
taskDescription); },
this.$ is used to address and access controls with-in the kind. In this line we access our control with the name todo and set its content to the value of our de-scription which was exposed to the outside of our kind.
Every Control in Enyo has getter and setters for con-tent, CSS-classes and CSS-styles, for example:
.setContent();
.getContent();
.getClasses();
.setClasses();
.getStyle();
.setStyle();
.getAttribute();
.setAttribute();
Now let’s play around with that kind and test if ev-erything works as we intended by creating some tasks in our JavaScript console of the browser. We will use our exposed properties to set task descriptions and then change the textcolor of one kind to get familiar with the getters and setters Enyo provides.
var task1 = new rok.Task({ taskDescription: “Buy Milk”}).write();
var task2 = new rok.Task({ taskDescription: “Wash the car”}).write();
task2.setStyle(‘color: red;’);
Figure 1: Creating tasks in Chromium
Getter and Setter
We have just seen a list of setters and getters from buildin Enyo properties. And we played with the setter for the style of a Control in the console of our browser.
But Enyo does not only provides getter and setter

EnyoJS, Phonegap and node.js for Cross-Platform-Development: Developing a todo application
3702/2012 en.sdjournal.org
for the buildin properties of kinds. It also generates getter and setter methods for our exposed properties that are available from outside (we have defined them under published before):
// get the exposed propertytask1.getTaskDescription(); // “Buy Milk”
//set the exposed propertytask2.setTaskDescription(‘Buy Sugar’);task2.getTaskDescription(); // “Buy Sugar”task2.todoChanged(); // render it into the DOM
Destroying Controls
In order to remove a Control or kind (Controls are one type of kinds) we call a method called destroy() on it, e.g.:
task1.destroy();
EXAMPLECODE Part 2b - Task
Creation of tasks with a user interface
It is nice to have our first kind working, but we need a way to create tasks without the developer console for the user of our app. So we add another kind for the in-put of todo descriptions and the addition of todos to the document model (Listing 4).
This kind will be responsible for the input of new tasks, their creation and rendering. We have some nested components again in this kind. They get a pad-ding of 10px with the style property. It is a textfield for
input and a button to submit the todo. And we have an empty component called todolist in which we will render every todo-kind (the kind we just have created one step before).
Every time we tap our button labeled with Add, our addTask method is called.{ tag: “button”, content: “Add”, ontap: “addTask” }
If the textarea is not empty, we create a new compo-nent based on our task kind we have created and it will be rendered later into our todolist container.
if (this.$.todoTextarea.hasNode().value !== “”) {
this.createComponent({ kind: rok.Task, container: this.$.todolist, taskDescription:
this.$.todoTextarea.hasNode().value }); //re-render todolist this.$.todolist.render();
Our properties are accessed again with the this.$-accessor. After we added a new component to the DOM-node we have to rerender the node to make our changes visible.
At the end of the method the inputfield is reset to an empty state.
this.$.todoTextarea.hasNode().value = “”;
To test our app in the browser we have to modify
Listing 4enyo.kind({ name: “rok.Todos”, kind: enyo.Control, components: [ { style: “padding: 10px”, components: [ { tag: “input”, name: “todoTextarea” }, { tag: “button”, content: “Add”, ontap: “addTask” } ]}, { name: “todolist” } ], create: function() { this.inherited(arguments); }, addTask: function(inSource, inEvent) {
if (this.$.todoTextarea.hasNode().value !== “”) { this.createComponent({ kind: rok.Task, container: this.$.todolist, taskDescription: this.$.todoTextarea.hasNode().value }); //re-render todolist this.$.todolist.render(); //reset input this.$.todoTextarea.hasNode().value = “”; } }});

CROSS PLATFORM DEVELOPMENT
38 02/2012 en.sdjournal.org
the script tag in the index.html file. This will create our kind and render it.
<script type=”text/javascript”> new rok.Todos().write(); </script>
EXAMPLECODE Part 2c - Input
Some styling
From the beginning a basic theme was included in the templates for the app, it is called fu-theme. We can use it to style our todo app and make it look more attractive. By the way: CSS-classnames in Enyo are de-fined with classes.
The class “enyo-fit” ensures that our app is filling every screen with different sizes. We create a smal kind for some basic styling: (Listing 5).
As you see, this last kind provides a container for our app with some basic css classes and styles. The todos-kind is added as a nested component, togeth-er with a headline for our todolist. The todos kind itself is nesting our task-kind which are added by tapping the submit-button.
In addition to that we can add some CSS to the todos.css we have included in our package.js us-ing enyo.depends();
body { background-color: #eee; }
In order to use our new parent kind we open in-dex.html again and modify the JavaScript tag in the body to these lines:
<script type=”text/javascript”> new rok.TodoApp().write();</script>
EXAMPLECODE Part 2d – Styling
Adding a store for our tasks
Every time we are refreshing the page or are restart-ing the app we lose our tasks. A solution for it is to save our tasks with the JavaScript library lawnchair into the Figure 2: The app running in Chromium
Listing 5enyo.kind({ name: “rok.TodoApp”, kind: enyo.Control, classes: “enyo-fit, theme-fu”, style: “background-color: #eee; text-align: center;”, components: [ { tag: “div”, content: “Todos”, style: “padding: 10px; font-size: 18px; \ font-weight: bold;” }, { kind: “rok.Todos” } ]});
Listing 6<!-- load lawnchair --><script src=”lib/lawnchair-0.6.1.min.js” type=”text/javascript”></script>Lawnchair will be initialized before we initialize our application-kind in the index.html:var lawn = new Lawnchair(‘todos’, function(store) {
});
new rok.TodoApp().write();

EnyoJS, Phonegap and node.js for Cross-Platform-Development: Developing a todo application
3902/2012 en.sdjournal.org
DOM. So we download and add lawnchair to our index.html: (Listing 6).
Our kind rok.Todos needs some additions and refac-toring to work properly with lawnchair. You will see that we have moved the creation of the tasks in a seperate method called createTask to remove duplicated code. We use this.createComponent after input was sub-mitted and additionally for the lawnchair entries pulled from the lawnchair instance at the rendered method of the kind: (Listing 7).
The rendered method above is called by convention every time after the kind is rendered in Enyo. We over-ride it, reading our tasks from the lawnchair instance and create tasks based on the results we get.
The method addTask which just read our input be-fore and created task entries for us now also creates new lawnchair entries as JSON and saves them in the lawnchair instance we created at the index.html. Now our tasks should be populated again in the list even af-ter a restart of the app.
A small bug
If we test our application and hit the removebutton we will notice that the removed entries are available again after a refresh / restart of the app.
Our kind rok.Task which detroys itself if the re-movebutton is clicked does not remove the task from the lawnchair store. They are populated again when we read from our lawnchair instance.
Listing 7enyo.kind({ name: “rok.Todos”, kind: enyo.Control, components: [ { style: “padding: 10px”, components: [ { tag: “input”, name: “todoTextarea” }, { tag: “button”, content: “Add”, ontap: “addTask” } ]}, { name: “todolist” } ], create: function() { this.inherited(arguments); }, rendered: function() { this.inherited(arguments); var self = this; if (lawn) { lawn.all(function(r){ for (var index in r){ self.createTask(r[index].task); } }); } }, createTask: function(taskDescription) { this.createComponent({ kind: rok.Task, container: this.$.todolist, taskDescription: taskDescription }); //re-render todolist this.$.todolist.render(); }, addTask: function(inSource, inEvent) { if (this.$.todoTextarea.hasNode().value !== “”) { //get value, create lawnchair entry var taskvalue = this.$.todoTextarea.hasNode().value, entry = {task: taskvalue}; this.createTask(taskvalue); //save entry in the lawnchair lawn.save(entry); //reset input this.$.todoTextarea.hasNode().value = “”; } }});

CROSS PLATFORM DEVELOPMENT
40 02/2012 en.sdjournal.org
In order to achieve a complete removal of the task we want to delete we will add some code to the method which is called by a tap on the removebut-ton: (Listing 8).
We get all tasks from our lawnchair storage and if it is the task we want to remove we delete it with lawn.remove. Having added persistent Todos, we can start with the creation of apps and a mobile webapp now.
EXAMPLECODE Part 2e - lawnchair
Make an app with Phonegap
Phonegap is a native „Shell“ for HTML5 Applications which is basically a webview inside some native code. It is Open Source Software and licensed under Apache License Version 2.0 license. Phonegap has the possibil-ity to add native written plugins (e.g. in Objective-C or Java for iOS / Android).
I would recommend that for elements that are per-formance critical in the application, for new internal Phone-APIs for which no Phonegap plugins exist yet or for UI elements that are hard to realize with HTML5. These plugin APIs are exposed to us as JavaScript-API in the Phonegap webview.
In order to make our app available on iOS we have to install Apple Xcode and then Phonegap. With the Android SDK installed, we can easily make an app from the same codebase for Android.
For the Android application we have to install the Android SDK. I would recommend to install Eclipse and the Android SDK for Eclipse, too.
In Xcode on OSX the setup of our app with Phonegap is really easy and straight forward. After the creation of a Phonegap Project in Xcode, we have to locate the generated www folder and copy our files into it. The www-folder contains a generated index.html which we should not overwrite, but modify to our needs (loading our JavaScript and CSS files, initialization of our app).
The Android Application needs some more steps for the initial setup. We have to create some folder and files on our own and change some configura-tions. There is a detailed guide for it in the Phonegap Docs. Even if the setup for a Android app is slightly more complex, the setup should not take longer than 10 minutes after the Android SDK and Eclipse is installed.
Figure 3: The app running in the Android Emulator
Deploying the todo app as webapp on heroku as node.js app
Node.js is an event-based platform for serverside JavaScript which was invented three years ago by Ryan Dahl.
To use it for our webapp, we install the latest stable node.js and the package manager for node.js: npm. I assume git is already installed as version control system.
After installing the server and package manager we have to create an account at heroku.com and a first app through the webinterface. We follow the instructions on the screen and also may have to install the heroku toolbelt.
Listing 8removeTodo: function() { //remove it from the lawnchair store var taskToRemove = this.$.todo.getContent(); if (lawn) { lawn.all(function(r){ for (var index in r){ if (r[index].task === taskToRemove) { lawn.remove(r[index].key); } } }); } this.destroy();}

EnyoJS, Phonegap and node.js for Cross-Platform-Development: Developing a todo application
4102/2012 en.sdjournal.org
Installing Express and the creation of the webapp
We also need to install the express-framework with npm install -g express and create our basic app:
express app. After that, we have to copy our Enyo app to the freshly created folder public and make some minor changes to the app.js, which also was cre-ated from express. We have to replace
// Routesapp.get(‘/’, routes.index);with
// Respond with Enyo app app.get(‘/’, function(req, res){
res.sendfile(‘index.html’);});and in order to deploy on heroku, replaceapp.listen(3000);with:
var port = process.env.PORT || 3000;
app.listen(port, function() { console.log(“Listening on “ + port);});
EXAMPLECODE Part 3 - Heroku
Deployment
As we created an account at heroku and set every-thing up (git remote) we just need to push to heroku:
git add .
git commit -m ‘initial app commit’
git push heroku master
Congratulations! We have just created an application running on node.js and deployed it with our Enyo app as webapp to heroku.
Conclusion - What we have got and lessons we have learned
At the end of the day we have got a tiny todo app. But it is an easy example that showed us the follow-ing facts: with that small codebase we coded once in one language we are able to package apps for the markets/stores of iOS (Apple), Android (Google), Windows Phone 7 (Microsoft), Blackberry (RIM) and webOS (HP).
Additionally we created a (mobile-) webapp, which can be used by the browser of smartphones. It does not need appstores and the review process of the appstores. Updates to the webapp are published immediatly. It was deployable to production in a few easy steps.
If we would want to create desktop applications, we could even package it in another native shell, maybe one for desktops, using Intel AppUp Encap-sulator or the MacGap project. We are able to create real desktop applications in addition to our native Phonegap shell and mobile website with minimal effort.
Next StepsGetting a better design that attracts alot of people
would be a tough next step for our next iterations with the todo app. We could add some CSS or create some widget-related kinds that helps us with the user in-terface, e.g. a spacer-kind which would consist of CSS mainly. We could place that UI helper between the re-movebutton and the task description.
Another next step could be a couchDB- or mon-goDB-backend on a server to save and deliver our tod-olist / tasks. Equipped with that backend we could run the mobile site (first step deployed in this article), sev-eral apps and even an API for external developers that all share the same data.
We could interact with that webservice (couchDB or mongoDB) in the way we currently use our lawnchair instance for saving and deleting our tasks and would have to set up AJAX requests that send and receive JSON instead of using lawnchair in our Enyo app.
Further Reading
http://enyojs.com
http://phonegap.com
http://appdeveloper.intel.com/en-us/encapsulator-beta
http://westcoastlogic.com/lawnchair/
http://nodejs.org/
Robert Kowalski
Robert Kowalski is working as Javascript Ninja at Jimdo. Before he started working at Jimdo he worked as mobile developer and created mobile websites and applications.

CROSS PLATFORM DEVELOPMENT
42 02/2012 en.sdjournal.org
Writing mobile applications for multiple plat-forms is a real issue in these days of fragmen-tation. Suppose you have been asked to create
a mobile application that customers could discover in an application store such as the Android Market or the Apple iOS Appstore, but also reach through the mobile web. That sounds like several jobs at first. Perhaps you might think that this project will require at least one team for each native application platform, and then another one for the mobile website. Thanks to hybrid mobile applications, that may no longer be the case.
As mobile device technology has improved, HTML5 has become a real option for creating a single user in-terface for both native applications as well as for the Web. Many giants in technology believe that HTML5 will eventually be the only cross-platform programming lan-guage. Chances are good that in the future HTML5 will be the vernacular for everything mobile. Rather than writing an application natively for each and every mo-bile platform, and then once again for the mobile web, consider this instead. Set up web services to handle any server-side data manipulation your application might need to provide and use HTML5 to create and maintain a single user interface. A novel approach to native applica-tions known as hybrid applications could be your answer.
What is a hybrid application?A hybrid application refers to a native application
that uses a single full-page web browser control as its only user interface. The HTML that consists of the appli-cation’s UI is served directly from the application itself so that it does not require an Internet connection in or-der to function. Hybrid applications may still make use
of native functionality of the device such as the camera, geolocation services, and accelerometer by accessing native code through a JavaScript bridge. Essentially, that HTML code is wrapped by a native shell that of-fers a library of functionality to the UI. This bridge code gives the HTML5 user interface the ability to act like a native application without requiring a native user interface.
A hybrid application may be written from scratch us-ing the appropriate development environment for the native application in question. Just make sure that the main web browser control “listens” for HTTP requests for a certain URL. If the browser control sees a request that matches a certain criteria that it is looking for, it should trigger some sort of activity. Alternately, tech-nologies such as appMobi or PhoneGap offer build ser-vices that give you the ability to create such a native application from just the HTML and JavaScript files that would comprise a mobile website.
Hybrid applications act just like any other native appli-cation once they are built thanks to HTML5. They may be created as “ad hoc” builds for testing, or built for produc-tion and submitted to the appropriate application store.
Why HTML5?There are many reasons why developing your next
mobile application using HTML5 is a good idea. While some may say that performance might be an issue, or that JavaScript on a mobile device is harder to debug than native programming languages, there are some real benefits to writing your application user interface only once using HTML5.
Hybrid Applications Help Relieve Cross Platform PainWriting mobile applications for multiple platforms is a real issue in these days of fragmentation. Suppose you have been asked to create a mobile application that customers could discover in an application store such as the Android Market or the Apple iOS Appstore, but also reach through the mobile web. That sounds like several jobs at first. Perhaps you might think that this project will require at least one team for each native application platform, and then another one for the mobile website. Thanks to hybrid mobile applications, that may no longer be the case.

Hybrid Applications Help Relieve Cross Platform Pain
4302/2012 en.sdjournal.org
Your application is “future-proof”
Application interfaces written in HTML5 will still be usable and relevant in the future even as technology advances and changes around it. The Web isn’t going away anytime soon, and the HTML5 standard is being incorporated into more and more web browser soft-ware packages than ever before. Contrast that stability with native programming. Even if a single native cod-ing paradigm were to win out and all the others were banished to the scrap heap and forgotten, HTML5 would still be viable since it can be used to enhance development as well as create applications on its own. As a matter of fact, as technology progresses, HTML5 applications will continue to perform better thanks to software and hardware updates to mobile devices.
Technology leaders have endorsed HTML5
Many technology companies believe that there will come a point in the near future where web applications and native applications will converge. HTML5 will play a significant role in that convergence. Since Steve Jobs effectively killed Flash in a memo written in April of 2010 (link: http://www.apple.com/hotnews/thoughts-on-flash/) HTML5 has been truly crowned the only via-ble cross-platform programming language for mobile. By writing a single interface for mobile using HTML5, you’ll be saving effort that might be wasted creating and maintaining a native user interface. Google’s strat-egy in mobile also relies heavily on adoption of HTML5. The fact that both Android and iOS operating systems include web browsers that are fully HTML5 compliant is a great indicator of that support.
HTML5 development is cost effective
Writing native applications for iOS in objective C re-quires a coder who is familiar with that language. Those programmers are scarce, and their skills are valued at a premium. HTML5 developers on the other hand are everywhere. Although HTML5 is relatively new, HTML has been with us since the dawn of the Internet in the ‘90’s. It is a language that is easy to pick up, but requires some time to master. Web developers are less costly to find, train, and pay than native code developers.
Faster devices give HTML5 more power
With each passing day, mobile device manufactur-ers roll out newer and more powerful devices. Updates to the JavaScript parser browsers and browser controls will keep websites and hybrid applications running at speeds comparable to native applications in the future. The iOS operating system now gives HTML5 and CSS3 a direct path to hardware acceleration that delivers on the promise of an HTML5 user interface that looks and feels native. Similarly the Android V8 JavaScript engine will also accelerate HTML5 user interfaces.
Easy maintenance
One certainty in the programming business is that things change. Oftentimes, things change quickly de-pending on customers’ tastes, new technologies, or new opportunities that come up. By building the user interface of your mobile applications using HTML5, you can be sure that your customers will have the “latest and greatest” at all times rather than trying to play “catch up” getting things up and running. The user interface will only have to be altered once, so it cuts the amount of work to make changes for multiple platforms down considerably. Depending on how your application is created, you may even be able to post the new user interface to the Web and have your application down-load it directly rather than forcing your customers back through the application stores for an upgrade.
Hybrid applications give you access to de-vice-level features
If your application needs to get access to features of the device itself such as the accelerometer or save data to the file system for later retrieval, a hybrid appli-cation built using appMobi or PhoneGap will provide the bridge capability to make those applications ac-tive. If you build your hybrid application from scratch, of course you’ll have to add those device-level features yourself.
What challenges will you face?Although hybrid applications running HTML5-en-
abled user interfaces solve a lot of problems with cross-platform application development, there are still issues that need to be addressed.
Device display resolution and size ratio
Writing a hybrid mobile application for multiple devices can prove to be a challenge. One issue is that devices have different native resolutions. Applications with too small a resolution will cause the application to look “blocky” or “fuzzy” when they are scaled up to run on a device with a larger resolution.
There are two schools of thought to writing an appli-cation that displays appropriately on multiple devices. The first technique is that the developer builds the ap-plication UI once and scales it appropriately to all de-vices. This type of application is built to the width of the largest device supported and uses scaling commands to size the application down to fit on devices with a smaller resolution. The second school of thought as-sumes that the developer detects the platform as the application starts up and makes appropriate modifica-tions to the UI, essentially repositioning the UI for each supported device. There are unique benefits and draw-backs to each of these techniques.

CROSS PLATFORM DEVELOPMENT
44 02/2012 en.sdjournal.org
Build Once
If you decide to build the application once for all de-vice resolutions, be aware of “dead space” issues as well as issues that will crop up if your application is designed to rotate between a portrait and landscape orientation and back again.
Unfortunately, there is a trade-off to building the application at maximum size and sizing appropriately. This technique forces developers to give up valuable screen space on certain devices. Because the screen ra-tio of these devices vary from device to device, creating an application using a “build once” method will result in some “dead space” in the application on some plat-forms. Take a look at the diagram below (Diagram 1).
Because sized applications suffer from two very dif-ferent forms of “dead space” issues between landscape and portrait orientation, building an application using this technique makes it very challenging to also build in the ability to handle orientation changes. Develop-ers may want to consider locking the orientation of the
application to always show in portrait or landscape in order to keep this from being a problem.
To build an application for this case, scale the applica-tion for the biggest screens and then allow the hardware to display at the specified width. Just like the Mike Tee-vee’s chocolate bar in “Willy Wonka” (http://en.wikipedia.org/wiki/Charlie_and_the_Chocolate_Factory#The_Television_Room), build the application for the biggest screens and then use the device’s browser software to shrink the page to fit. While scaling an application up creates “fuzziness” or “pixilation”, scaling an application down to a smaller resolution just sacrifices some of the small detail that would be visible on larger devices.
For example, suppose the customer requires an application that displays properly on both the iPad and the iPhone. The iPad has a native resolution of 1024x768 pixels, but the older iPhone has a resolu-tion of 320x480. In order to build an application that would look appropriate on both devices, the applica-tion should be built with an HTML component that was fixed at 768 pixels wide (assuming the application runs in portrait orientation).
A final consideration to applications that are “built once” is that UI elements must be built with the small-est screens in mind. Although the iPad can easily sup-port a screen with five or six icons wide, an iPhone or Android handset device will require an icon that is at least 120 pixels square to look appropriate after being sized down for smaller devices. Make sure that your ap-plication audience is fine with a particularly large-look-ing user interface on devices with a larger resolution before you settle on the “build once” technique
Sense and modify UI for the platform
As an alternative to “build once”, an application can be built to sense what type of device it is running on and adjust the user interface accordingly. This option is best for applications that don’t scroll and aim to pro-vide an experience closest to a true native application.
This option will make the application faster to load as well since the device’s processor won’t have to work on the task of scaling all the UI elements for the application whenever something must be shown on the screen.
Hybrid application packages such as appMobi and PhoneGap will actually report to your HTML code what type of device it is running on. You can use this infor-mation to detect which platform the application is run-ning on and react accordingly. Furthermore, any web applications can detect the screen dimensions using the JavaScript screen.width and screen.height parameters. Based on that data, a developer could have the appli-cation react by loading alternate CSS3 documents and JavaScript libraries. These alternate files would alter the
When an application runs on a device other than the iPad in portrait orientation, there will be some unused space visible at the bottom of the screen. Developers must fill this space with non-essential elements just to reduce users’ confusion.
In Landscape mode, the opposite of the portrait “dead space” problem is evident. Since handheld devices are longer and skinnier,
when the viewport sizes the application down there will be space on the iPad that is simply not visible on Android or iPhone handheld devices.
Diagram 1

Hybrid Applications Help Relieve Cross Platform Pain
4502/2012 en.sdjournal.org
UI elements size and position accordingly. Use the CSS3 rules below to build application style sheets: (Table 1).
For more information on CSS rules, check out w3Schools’ CSS tutorial online here:
http://www.w3schools.com/css/default.asp
To include external CSS3 documents, add a style ele-ment referencing the filename to the head element of the application’s HTML document.
<link href=”CSSFILENAME.css” rel=”stylesheet” type=”text/css” />
Unfortunately, sizing for each device comes with a cost. The user interface for the application must be de-signed for every device it supports. Once the application is finished, testing on multiple devices must be done to make sure that the application performs as expected.
In summary, consider creating applications using the “build once” approach for applications that don’t re-quire orientation changes and are able to “flow” using customary CSS positioning rules. Developers building an application that is meant to feel more like a native application should eschew some of the conventions of the web and consider sticking with a more specialized approach of sensing each platform and modifying the user interface appropriately.
Limited standardization of native resource access
Not every mobile device is created equal. Building a hybrid application for Blackberry will be subtly different than building an application for iOS or Android because
not all Blackberry devices feature a webkit-enabled browser control in their developer toolbox. Depending on the devices that you have to target, you will have to make exceptions in your hybrid application, or drop sup-port for a device all together.
For example, in the PhoneGap API there is no JavaS-cript API bridge for the Media object for Symbian or Black-Berry. The only platforms that support this particular command are Android, iOS, and Windows Phone 7. Fur-thermore, there are some quirks to some PhoneGap com-mands as well. The Accelerometer command for example works subtly different on an iOS device than on Android, or BlackBerry. The Accelerometer object is not available to the Symbian or Windows Phone 7 platforms. The appMo-bi build system only supports iOS and Android builds.
Despite support for newer versions of platform oper-ating systems, many older devices are simply not able to run hybrid applications. Even if you were to build the ap-plication from scratch yourself on every platform, these older devices are unusable because the web brows-er control either doesn’t support webkit commands (http://en.wikipedia.org/wiki/WebKit), or the operating system makes the JavaScript bridge technique impos-sible. Webkit browser controls are required to create an HTML5 experience that is as close to native as possible, and the JavaScript bridge is required to access the native capabilities of the smartphone device. Luckily, the smart-phone market is continually turning over. Smartphone technology completely turns over every two years, so it is only a matter of time until these older devices are simply no longer used.
A simple solution to this problem is to just not sup-port platforms that pose unique challenges to hybrid
Rule Use Example Rule
positionUse the position rule to place UI elements by pixel coor-dinate in an application. This rule must be set in order to take advantage of the top, left, bottom, and right rules.
position:absolute;
top/bottom
Use one of these rules to position UI elements vertically. The top rule positions the element from the top of the parent element, while bottom positions the element up from the bottom of the parent element.
top:30px; bottom:25px;
left/right
Use one of these rules to position UI elements horizontal-ly. The left rule positions the element in from the left side of the parent element, while the right rule positions the element in from the right side of the parent element.
left:25px; right 100px;
width Use this rule to scale the width of a UI element . width:250px;
height Use this rule to scale the height of a UI element. height:120px;
display Use this rule to turn on and turn off UI elements in the application. display:none;
Table 1: CSS3 rules

CROSS PLATFORM DEVELOPMENT
46 02/2012 en.sdjournal.org
application development. Spending more resources than necessary is a bad idea, and if there is not an overwhelm-ing need for a particular “problem” platform, simply ignor-ing it until the technology catches up to your application is an option.
The alternative solution is to ask your hybrid applica-tion to sense the platform it is running on, and react ac-cordingly. Perhaps the application “downshifts” into a different mode that doesn’t require certain device capa-bilities thus allowing less capable devices to still run the application, just without all the bells and whistles. Alterna-tively, perhaps this less capable application instead stores choices for use later on a more capable platform such as the desktop Web.
Compiling hybrid applications
Although the user interface for the applications run-ning on all the platforms is unified, you will still need to leverage some sort of native application development resources to create a final binary application. In order to build an Android or BlackBerry hybrid application from scratch you would need the appropriate Java develop-ment environment running in Eclipse. Windows Mobile requires Microsoft Visual Studio. You’ll want to install the Carbide IDE to build a Symbian application from scratch. In order to develop a native iOS application, you would need XCode running on a Mac, as well as a subscription to the iOS developer program.
Luckily, companies like appMobi and PhoneGap offer hosted build systems to solve this very problem. The ap-pMobi XDK allows developers to write their hybrid appli-cation using just HTML5, JavaScript, and CSS, preview it in its simulator, and then have the binary built in the cloud and delivered to them. The PhoneGap build system has a similar cloud build capability that will turn web code into a native application.
Application stores
Once you have your hybrid application built, you should put some thought into getting your application into the appropriate application stores for customers to install on their devices. Hybrid applications are completely compli-ant with all application stores’ terms of service, including the Apple iOS Appstore.
Although the Android Market and the Blackberry App World application stores allow developers to submit just about any type of application and get it into the market with few hassles, other application stores require that you wait for the company to review your application before accepting it. Get acquainted with what is required to sub-mit your application to these application stores as soon as possible in order to prevent heartbreak later. The most notable example of an application store that asks devel-opers to jump over both technical and logistical hurdles
before accepting an application into the store is the Apple iOS Application Store.
In order to submit an iOS application to the Apple Ap-pstore, the fully created application must be signed and registered using an active iOS Developer Account. A sin-gle-developer subscription to the iOS Developer program is currently $99 a month. Furthermore, in order to prove that the developer requesting the account is in fact an employee of a particular institution, a rigorous battery of questions is required including the company’s tax id. An Apple computer is also required to complete the final step of uploading the binary to iTunes Connect. Once the ap-plication has been submitted, there is an approval process that takes on average two weeks to complete, and could simply result in the application being rejected rather than submission into the store.
ConclusionIn conclusion, consider writing hybrid applications in
order to address the challenges posed by fragmentation in the smart phone market. With the new CSS3 trans-forms, HTML5 has become a favorite language of technol-ogy leaders for cross-platform mobile development. Even without those endorsements, HTML has been around a long time and is not going away anytime soon. That means that finding developers to build and maintain the new UI is cost-effective. Just be sure to watch out for the challenges that a hybrid application poses. The spectrum of device display size ratios will have to be addressed, and there should also be a plan for how to deal with any vari-ance in the access to native resources that your application might require. Also, finding the native technical resources to build your hybrid application into a native binary and submitting it to the appropriate application stores are other challenges faced by mobile application developers. So for your next project, when you are asked to create ap-plications for mobile that will run on both the Web and in-stall from one or more mobile application stores, consider creating it using a hybrid application.
Andrew Smith has worked as a client-side engineer for the past twelve years. He got his start writing dynamic HTML on the web team for MapQuest and then continued writing Javascript and CSS for several successful startups. At one point, Andrew was tapped specifically to teach a course at The Art Institutes
International in Javascript/DHTML.
With the success of the appMobi development ecosys-tem, Andrew’s role has changed from that of a develop-er to that of an instructor and technologist. He relishes the chance to help web developers like him use their existing skill set to create superior mobile applications.


PROGRAMMING IN PEARL LANGUAGE
48 02/2012 en.sdjournal.org
Continuous integration is innate in some modern frameworks, such as Grails, which by default im-plement testing counterparts around every soft-
ware component, offer powerful mocking mechanism and configurations for development, test and produc-tion environments. It is not so automatic in Perl but we want to show how it can be acquired with a reasonable effort, that it is largely compensated by many advan-tages, from code and team members’ point of view.
The Perl ecosystem is rich, from the perspective of the language, resources and people. For instance, we are working with many bioinformaticians or specialists in natural language processing who came to program-ming through Perl. To successfully integrate their con-tributions into maintainable large scale projects, the team must have the right framework and culture. With-out an environment where they can contribute to real projects, specialists who have not been trained as soft-ware engineers may quickly lose their motivation and their interest in software development. To setup such a framework, both the technical and the behavioral as-pects are to be taken into account. Even if one key Agile motto is to empower all team members and leave to them the freedom and the responsibility to choose and optimize their organization, it will often be the role of core software developers or team leaders to setup the framework and choose the right tools.
With this perspective in mind, we will go through testing techniques and present some tools we have successfully applied for continuous integration and de-ployment in Perl. We will not try to cover all aspects of it but we will focus on some coding and testing good practices, all of which we will try to demonstrate with practical cases.
Getting code organizedWriting about how to organize code, how to setup
project files, may look rather trivial at a first glance. However, the intrinsic freedom offered by Perl, that some would call anarchy, does not force the devel-oper to build a structured hierarchy. To succeed, an-archy comes with self discipline and to quote Lutz Prechelt “writing good Perl programs depends more strongly on the knowledge and discipline of the pro-grammer than in most other languages” [1]. If a large part of the poor reputation of Perl in the community comes from traumatic experiences with cryptic, awfully long and unmaintainable source codes, a few good practices can help reduce chaos, increase maintainability and lets you focus on “get-ting the job done.”
Damian Conway’s “Perl Best Practices” [2] is the reference in the domain, but we will present here a minimal set of directions that have shown to be ef-ficient in keeping multi-developer projects under control.
A module can be seen as the atomic file unit of a Perl project. It is usually stored in a .pm file and contains a package or a class. Without falling in the extremes of the inspiring Jeff Bay’s “Object Calisthen-ics” [3], there are certainly some aspects worth be-ing publicized among the team. Limiting the length of subroutines to ten lines, avoiding else construct or multiple levels of abstraction in one function and promoting the Don’t Repeat Yourself (DRY) rule are common healthy habits. Moreover, these practices will pay off when time comes to maintain the code, refactor some element or test it.
Continuous Deployment in Perl: Code & FolkContinuous Integration is the tactic of decreasing the latency between the implementation of a new piece of code and its integration in the overall project. It is the backbone of Continuous Deployment that is often defined as releasing software very frequently in order to satisfy customer needs and get their feedback as soon as possible. Both have shown their benefits and play an important role in the success of the current Agile software development trend.

Gamification in Software Development and Agile
4902/2012 en.sdjournal.org
Setting up a distribution
A distribution is a set of modules, scripts (CGI or command line), documentation and packaging deco-ration. A typical project will consist of a collection of dependent distributions. Perl already offers almost 25,000 distributions on the CPAN repository. Most of them are very easy to deploy. Therefore we use the de facto standard distribution structure, with a couple of tuning actions.
To create a distribution, the Module::Starter distri-bution provides a convenient script:module-starter --mb --module=My::Module \ --author=”Alexandre Masselot” \ --email=”[email protected]”
A directory My-Module/ is created with a default structure. We add a bin/ sub-directory for the default location of scripts that will later be deployed by default in /usr/local/bin. A cgi/ sub-directory can also be needed, but it must be explicitly specified in the Build.PL file, for example with:
my %cgis;1
$cgis{$_} = $_ foreach <cgi/*>;
Within the Module::Build->new constructor, add the parameter:
cgi _ files => \%cgis,2
And finally, before the $builder->create _ build _script(); add:
$builder->add _ build _ element(‘cgi’);
To ease the deployment and get error messages ear-ly, it is also a good practice to define the third-parties’ module dependencies, eventually with their version constraints in Build.PL.
To prepare the distribution for packaging will re-quire building a MANIFEST index, a MANIFEST.SKIP can be populated with regular expressions matching files to exclude:
.*\.tar\.gz$\.svn\/Build$_ build...
Finally, the project is almost ready to be imported into a source control manager, such as subversion or github. To limit unnecessary conflicts, all auto-generated files shall be excluded: blib/, Build, *.tar.gz etc.
1 my is used for variable declaration and % defines a hash table.2 => is the separator between key/value pairs in a hash and \ is
the reference to the variable.
The new distribution is now ready to be deployed, but at this stage, it is just an empty shell. The next step is to start writing code. And with code comes testing.
Testing“Testing shows the presence, not the absence of bugs”
Edsger W. Dijkstra, 1969
Test Driven Development (TDD) is based on very short 2-step cycles where a test assertion is written before the code that passes the test. It has gained in popularity and increases code stability. For a Perl team made of people with different backgrounds, TDD offers the important benefit of leveraging everyone’s contri-butions. Regarding the Perl language itself, thoroughly testing the code can also help dramatically in building a sustainable project. We will not review here all pros and cons of TDD but we will discuss a couple of behav-ioral and cultural challenges, before presenting several useful testing techniques.
Specific Perl reasons for testing code
Mixing hard core developers and scientists with some basic programming knowledge is common in multi-disciplinary projects. Both have their own strengths but when time comes to commit lines of code, the first ones can have the feeling to get their project endangered by the latter. Getting a field scien-tist to write tests first has several major outcomes:
From the software education point of view, he will have to clearly state “what does my subroutine needs to fulfill?” before actually coding it and this mindset of-ten increases the code structure quality;
It allows asynchronous pair programming: a skilled developer can come afterwards to optimize crucial components, preserving semantic without the need to fully master the domain.
Moreover, the anarchist nature of Perl language does not naturally enforce code readability nor struc-ture and a project can be killed by poor maintainability in the medium term. Enforcing strict coding conven-tions is uncommon to Perl development but unit test-ing offers a framework around this freedom. If a devel-oper unleashes himself and produces a rather cryptic subroutine, he will make it understandable to his peers via explicit (and readable!) tests demonstrating various input and outcomes of his piece of “art”. To this respect, reviewing the tests committed into the code repository are often a better channel of communication between team members than scanning the code itself and can serve as the actual code documentation.
Beside “Perl code is too cryptic”, another very com-mon criticism is “how to decide which third party’s code

PROGRAMMING IN PEARL LANGUAGE
50 02/2012 en.sdjournal.org
to use?”. TIMTOWTDI (“There Is More Than One Way To Do It”) is a Perl mantra and this becomes obvious when the time comes to browse http://search.cpan.org to find the best distribution to solve a problem. Checking that an installed distribution is used correctly, that it fulfills cor-rectly the target tasks is a first step achieved by tests. However, we have often experienced that the chosen distribution does not scale up or does not react correctly to a new situation. A solution is often to head for a new distribution on CPAN or to create an original one. At this point the test suite will guarantee that the new code be-haves correctly, according to the previous cases. It signifi-cantly reduces the risks when constantly refactoring the code, a must-have in continuously deployed projects.
Testing Perl code: practical hintsSince the beginning, testing has been a central part
of Perl development and one can count more than 230,000 tests executed when installing Perl & default distributions. It is not our intention to cover exten-sively Perl testing techniques: the reader can refer to Ian Langworth “Perl Testing: A Developer’s Notebook” [4] or to the CPAN documentation. We will present here some practical constructs, useful modules and tech-niques to guide the developer towards a comfortable testing environment.
Default testing
Following CPAN distribution standard, test suite files lay in the t/ sub-directory with a .t suffix and a number prefix to order the tests. A single test can be launched via:
perl -Ilib t/01-my-test.tand all suites via:./Build test
The text output pinpoints clearly eventual failing as-sertions and an error code is returned unless all of them were correct. It is also possible to execute all or parts of the test suites with the versatile command prove. It can also report Junit-like output to be integrated by third-parties tools:
prove --formatter TAP::Formatter::JUnit t > test.junit.xml
Setting up keyboard shortcuts in your IDE or edi-tor to these commands will enhance the comfort of launching tests at a high pace, as often as the file/save command is hit.
Test::Most
Besides default Perl test mechanisms, the conve-nient Test::Most distribution combines the most com-mon testing modules. It provides a large range of asser-tion statements allowing a rich variety of compact yet readable test cases. As a source of potential inspiration,
we present here a teaser of such assertions:
• a module can be loaded, without compilation errors:
• use_ok ’My::Module’;
• a Perl truth (displays test name and counts one failure if $val is false): ok $val, ’test name’3;
• matches a scalar value: is $val, $expected, ’test name’;
• or can be compared with more complex structure: is _ deeply $hashRef, \%expected, ’test name’;
• matches a regular expression: like myFunc(@args), qr/pattern/, ’test name’;
• a variable is greater than a threshold: cmp _ ok $val, ’>=’, $expected, ’test name’;
• or close enough to an expected one: cmp _ deep $val, num($expected, $tol), ’test name’;
• an exception is thrown and its text matches a regu-lar expression: throws _ ok {myFunc(@args)} qr/ex-ception _ text/, ’test name’;
• warnings output matches a regular expression warning _ like {myFunc(@args)} qr/ex-pected _ warning/, ’test name’;
Some cross distribution testing can also been done, typically to check documentation completeness of all subroutines with POD annotations (Plain Old Documen-tation is Perl’s equivalent of Javadoc). As it might be con-venient not to pollute the documentation with private subroutines, even though privacy does not mean much in Perl, we can declare all subroutines with their name starting with ’p _ ’ to be excluded from this check:
use Test::More;all _ pod _ coverage _ ok( { also _ private => [ qr/^p _ .+/ ] } );done _ testing();
Mocking
Waiting for minutes before a test suite completes soon becomes annoying and one direct consequence is to see developers running it less and less often. It is important that tests can be completed in the fast-est possible way for better comfort and productivity. Therefore, test data should be built to clearly identify
3 Parentheses can be optional in Perl.

Gamification in Software Development and Agile
5102/2012 en.sdjournal.org
the goal of each test assertion. This is particularly true when writing regression tests, as the developer must be encouraged to build the smallest data set produc-ing a bug. With such a mindset, both execution speed and maintainability will increase.
To this respect, we can provide a mocked environ-ment, i.e. a simulated one, not suitable for production but dedicated to tests. A Test::MockObject module is available, but we present here a couple of situations lying outside the object mocking per se.
For example, to test a crawling robot, one could identify a set of web pages suitable for a given situa-tion. But launching tests on the web is time consuming, depends on external resources (tests will fail if the site is down) and not very polite. One solution is to copy the remote pages into a directory t/resources/site-01/, reduce them down to a minimalistic content and set the root URL as:
’file:///path/to/t/resources/site-01’.
If a production project is aimed at working with a large database hosted by MySql, it can be convenient not to launch unit tests against a MySql instance. One solution is to rely on a lighter SQL engine, such as SQLite. If the domain/table relation is done via an ob-ject relational mapper like Rose::DB or DBIx::Class, it is easy to switch from one database engine to another.
File encapsulation and cleaning
Tests often need data stored in files. Such files can naturally be hosted in a t/resources/ sub-directory. However, if data has to be written, or files need to be modified, it is wise to copy them in a temporary direc-tory and automatically remove them when the process ends. To get back to the web site mocking example re-ferred above, we can create a MockSite module:
package MockSite;use strict;
use File::Temp qw/tempdir/;use File::Copy::Recursive qw/dircopy/;use File::Basename;
sub mockLocalSite{ my $localdir = shift;4
my $bn = basename($localdir); my $tmpDir = tempdir(“$bn-XXXXX”, CLEANUP
=> 1); dircopy($localdir, $tmpDir); “file://$tmpDir”;5
}
And therefore call within a test:use MockSite;my $urlRoot = MockSite::mockLocalSite(‘t/
resources/site-01’);
4 shift access and consume the first argument.5 last evaluation is returned.
Finally, if we create persistent entities, they should be deleted at the end of the execution. It is possible to add a double deletion check in an END{...} block, executed at the end of the process even if it fails upon an error.
Integration and functional tests
In the previous section, we have not made any ex-plicit distinctions between unit, regression or other test categories. However, the discussion was centered on one module or at most on one distribution. However, a large project is built as an assembly of basic compo-nents and the continuous deployment quest needs this assembly to be tested.
We will not cover in details the following steps, but we must mention them as they are also important in our overall process.
If Dist2::Module::B depends on Dist1::Module::A, some level of integration testing can be achieved in Dist2/t/*.t files. Nevertheless, for the sake of clarity and efficiency, it is possible to create a dedicated proj-ect aimed only at integration testing. These tests might take longer to execute and be launched less frequently (every hour) before the distribution is released.
Functional testing, i.e. black box test suites based on specifications, can also be built in the same manner.
For a web application, some functional and load tests can be undertaken with Test:::WWW::Mechanics or, for browser emulation, with WWW::Selenium. At this point it is also highly recommended to run a web vul-nerability scanner.
Continuous IntegrationContinuous deployment depends on the shortest
latency between committing code into the repository and deployment. Before deploying the project to pro-duction servers, we must check that no code modifica-tion has any side effect either with other modules or with contributions of fellow developers. To wave such a signal as soon as possible and limit conflicts, it is ad-vised to commit code at the highest pace.
But the continuous deployment quest also aims at letting developers concentrate on creative tasks and not bother with tedious repetitive testing. The integra-tion process must therefore be automated and send reports asynchronously, only if an error occurs.
In a classic approach, a server (or more often, a virtual machine on a test server) checks for code commits every 5 minutes. If a commit occurred, source code is checked out and tests are launched. In case of downwards mod-ule dependency, the inferred tests are also executed. If any error occurs, an email is sent to project owner (or

PROGRAMMING IN PEARL LANGUAGE
52 02/2012 en.sdjournal.org
last committer). If all test suites are valid, the code can be packaged and is ready for the deployment step.
An example of a basic continuous integration au-tomation that can be written at the shell level, and launched via a crontab as a suite of commands, where any failure stops the process and sends an email, is il-lustrated here:1 svn status # check for code changes2 svn update # check out 3 perl Build.PL # build4 ./Build test # launch tests5 ./Build dist # package6 ncftpput -u distuser -p password disthost.domain.org public _ html/dist/perl/ My-Mod-ule-version.tar.gz
The packaged distribution is made available at http://disthost.domain.org/~distuser/dist/perl/My-Module-version.tar.gz.
Hudson/JenkinsThe solution outlined above can work for simple cas-
es but doesn’t handle distribution dependencies, email alerts or reporting.
Fortunately, Java gods can be invoked to the rescue as these aspects are much more evolved in their cul-ture. Different solutions are possible but we have ob-tained the best results with the open source Hudson/Jenkins, the latter being a recent community split of the project.
Jenkins offers the possibility to integrate a project via a suite of shell commands, with the same pipeline as describe above. We will present here, through snap-shots, a variation of this workflow taking into account distribution cross-dependencies. Once a distribution has been tested, it is installed in a local directory ref-erenced by an environment variable $INTEGRATION _INSTALL _ DIR (./Build install --install _ base $INTEGRATION _ INSTALL _ DIR). Thus, it is available for further tests, with $PERL5LIB = $INTEGRATION _ IN-STALL _ DIR/lib. In Jenkins, such environment vari-ables can be defined system wide. For each distribu-tion, a new project is created and the major steps are illustrated in figures 1 to 4.
Figure 2: testing and local deployment in $INTEGRATION_INSTALL_DIR directory.
Figure 1: Subversion status triggers the project build. Other systems SCM are available

Gamification in Software Development and Agile
5302/2012 en.sdjournal.org
Alert on failures
The classic way to alert team members of a fail-ure is via email or rss feeds. However, experience shows that developers can be prone to ignore such alerts. To counter this natural tendency, we propose a physical solution, as it is harder to ignore a visible raised flag by the coffee machine than a folder in a mail client.
Jenkins status can be checked at http://yourserv-er:8080/api/xml and we parse this output for status other than ’blue’. To raise or lower a flag (figure 5), we use the light Yoctopuce servo controller [5] via a cron script (flagit, the servo C++ code is a simple adaptation from the demo code):
#!/usr/bin/env perluse strict;use LWP::Simple qw /get/;use File::Basename qw/dirname/;
my $xml = get(‘http://cih-1830:8080/api/xml’);my $angle=($xml=~/<color>(?!blue)/)?1000:-1000;6
my $cmd=dirname($0).”/flagit 1 $angle”;system $cmd;
6 =~ to match a regular expression
Figure 3: distribution archive is built, with version number and -latest.tar.gz suffix to provide a constant name for the future deployment. These archives are copied to a public web server.
Figure 4: Jenkins overall status: the better the weather icon, the more stable the project.
Figure 5: Yoctopuce servo driven flagging system to display the continuous integration status

PROGRAMMING IN PEARL LANGUAGE
54 02/2012 en.sdjournal.org
If the team is still not responsive to a flag, a similar code can be used to trigger a beacon with the Yocto-puce PowerRelay[6], an extreme and hardly escapable solution.
Deploying the applicationThe final step in Continuous Deployment is... to
deploy, to install the application on a production computer.
In the previous step, we proposed a way to build a set of distributions and copy them in a web directory. Therefore the installation, from the production server side, can be done in 4 steps:1 wget -O - http://disthost.domain.org/~distuser/dist/perl/My-Module-latest.tar.gz | tar -xzvf -
2 cd My-Module3 perl Build.pl && ./Build && ./Build test4 ./Build install
There are two major issues with this solution. The first one is the installation of required third-parties modules. We can either assume that the dependency set evolves slowly and install them manually, or invoke ./Build installdeps to grab them automatically from CPAN repository. The second challenge is that root privileges are required to install a distribution in the default location and it is not a best practice to run cron installations with such privileges.
A solution is to run the install script with the argu-ment --install _ base /dist/dir/ and later set PERL5LIB and PATH environment variables respectively to /dist/dir/lib and /dist/dir/bin.
We provide on CPAN a module HON::Deploy wrap-ping these few steps and adding a few more function-alities, such as deploying cgi scripts, installing multiple distributions at once or overriding shebang lines with an appropriate perl path:
./hon-deploy-perl-distrib.pl \--dist=http://.../Module-A-latest.tar.gz,http://.../Module-B-latest.tar.gz \--dir-base=$HOME/perl \--dir-cgi=$HOME/public _ html/cgi-bin \--perl-interpreter=$(which perl)
There are far more possibilities for installing code, in-cluding remote procedures, but we hope that we have shown in this section how convenient, robust and pow-erful Perl deployment can be.
ConclusionIn our experience, the best practices presented here
cover most of what is needed to reap the benefits of Continuous Integration and Continuous Deployment in Perl projects. With this safety net in place, the risk of
inadvertently injecting defects and breaking product functionalities is minimized and the whole team can confidently move forward. New features can be pushed more rapidly and more smoothly into production, to the benefit of the end users. Not only the whole devel-opment process becomes much more predictable and manageable, but because developers can see the re-sult of their work and receive feedback in a more timely fashion, their motivation and their ability to innovate increase as well. Setting up this framework is not very difficult and doesn’t take much time. Making sure that the team adopts it requires clear communication but is not a huge challenge either given the current momen-tum of test driven design and Agile methodologies. Once the team members realize how the approach in-creases their productivity and the quality of their work, don’t be surprised if they take ownership of the process and start making suggestions to make it even better.
Alexandre Masselot and Pierre-Antoine [email protected],
References
[1] Lutz Prechelt. “Are Scripting Languages Any Good? A Validation of Perl, Python, Rexx, and Tcl against C, C++, and Java”. Advances in Computers, Vol. 57 (2003), pp. 205-270
[2] Damian Conway. “Perl Best Practices: Standards and Styles for Developing Maintainable Code” O’Reilly (2005)
[3] Jef Bay. “Object Calisthenics”. The ThoughtWorks Anthology: Essays on Software Technology and Innovation (2008)
[4] Ian Langworth “Perl Testing: A Developer’s Notebook”. Chromatic, O’Reilly (2005)
[5] http://www.yoctopuce.com/EN/products/yocto-servo
[6] http://www.yoctopuce.com/EN/products/yocto-powerrelay

PROGRAMMING IN PEARL LANGUAGE
56 02/2012 en.sdjournal.org
With this article you will learn how to bootstrap a Dancer website, how to run it locally for de-velopment purposes, and how to develop a
complete Dancer application.
Why Dancer?Dancer is a Perl web framework, heavily influenced
by the Ruby Sinatra framework. After learning and us-ing Sinatra, Dancer developers decided that a similar framework was missing in the Perl community. Dancer began as a rewrite of Sinatra for Perl but soon grew up as a standalone project. Although some Sinatra features are still easy to notice, Dancer is no longer a simple reimplementation but a new tool by itself. The Dancer website is at http://perldancer.org/.
Dancer has a small footprint. This means that it de-pends on a small number of modules, making it easy to install on any operating system, as long Perl is available. A fair amount number of plugins are available that can be installed for extra features.
Our ProjectIn this article we will develop a full Dancer applica-
tion, a photo gallery named Polonaise. It will be a little different from standard web applications. Instead of a form to upload pictures, we will implement photo uploading by POST requests, in a REST approach. This means that the user will be able to upload a photo from anywhere, with or without a browser. To help test the application we will develop a little Perl command line tool to upload pictures.
Following this same idea, to get a file one will be able to use a web browser, checking each gallery pho-tos, or fetching a picture or picture meta-data directly using any other tool. To delete a photo, a web request will also be used.
Therefore, Polonaise will answer accordingly with the HTTP verb that is issued to the web server. POSTs are used to upload pictures, GETs are used to browse the gallery, and DELETEs are used to remove files or full galleries.
Learning the basic Polonaise stepsTo start using Dancer you must make sure it is in-
stalled on your system. Usually it is a matter of running cpan Dancer as superuser, and the Dancer framework gets installed in your system. After that, a dancer com-mand should be available.
Our first step will be the creation of a folder and re-quired files for a dancer application. Although we can do that manually one can use the dancer command to bootstrap a dancer application:
$ dancer -a Polonaise
Code listing 1 shows the directory structure created by this command. We will not discuss all the created files, and only focus on the relevant ones. Dancer follows the MVC (Model, View, Controller) logic and therefore
Dancing Polonaise With PerlIn the last year the size of the Dancer community has quadrupled, and the number of Dancer websites is, every day, larger. Read on to learn why so many people are choosing to Dance
Listing 1: ‘dancer -a Polonaise’ ouput listing the generated files+ Polonaise+ Polonaise/bin+ Polonaise/bin/app.pl+ Polonaise/config.yml+ Polonaise/environments+ Polonaise/environments/development.yml+ Polonaise/environments/production.yml+ Polonaise/views+ Polonaise/views/index.tt+ Polonaise/views/layouts+ Polonaise/views/layouts/main.tt+ Polonaise/MANIFEST.SKIP+ Polonaise/lib Polonaise/lib/+ Polonaise/lib/Polonaise.pm+ Polonaise/public+ Polonaise/public/css+ Polonaise/public/css/style.css+ Polonaise/public/css/error.css+ Polonaise/public/images+ Polonaise/public/500.html+ Polonaise/public/404.html+ Polonaise/public/dispatch.fcgi+ Polonaise/public/dispatch.cgi+ Polonaise/public/javascripts+ Polonaise/public/javascripts/jquery.js+ Polonaise/t+ Polonaise/t/002 _ index _ route.t+ Polonaise/t/001 _ base.t+ Polonaise/Makefile.PL

Dancing Polonaise With Perl
5702/2012 en.sdjournal.org
separates databases from web documents and applica-tion logic. In fact, by default a Dancer application does not have any associated database. The view portion is stored in the views folder, where web templates are stored. The lib folder is where the controller will be writ-ten, more precisely in the lib/Polonaise.pm file.
The public folder stores plain HTML files, images, style sheets and Javascript files. Note that by default Dancer installs a copy of jquery in your application. We will get into the other files and folders when we need them.
Our application is already a complete website. We can test it by running:
$ bin/app.pl
That will start a standalone web server listening on port 3000. Open a browser, enter the address http://loc-alhost:3000/ and you can test your Polonaise first version.
Once the application files are in place we can start add-ing actions and rendering HTML. Dancer follows a simple MVC approach, this means that requests are formulated in URIs, Dancer then chooses which method to execute for a given HTTP request, and typically this method chooses which template to use to generate the HTML which is sent back to the requester. To better explain this work-flow in the following sections some requests are implemented.
Picture uploadingAs we already stated, uploading photos will be done us-
ing the POST method, whether the user is using a browser or command-line tool. But before we can upload a photo we need to have a place to store it. We will create a folder named gallery inside the public folder. Note that if you want to deploy this service anywhere, that folder will need write permissions by the user that is running the web server.
Dancer control code will be written in lib/polonaise.pm module. The control code is written in routes which
answer to specific HTTP verbs. Each route will answer to one or more verbs, for a specific web path.
The first thing required to upload a photo is a meth-od to handle the POST operation. This can be some-thing like: (Listing 2).
The first line defines a route to be matched each time a user requests any URL that starts with /upload. The post in the beginning means that this route will only match HTTP POST requests. In the URL we have two placeholders. One, with two asterisks, means that we expect to match any number of folders. The last aster-isk, means we want to match just a file name (or folder name, in fact). So, this route will be invoked if the user requests the URL for /upload/2011/02/madrid/girl.jpg. The first two asterisks will match 2011/02/madrid and the last will match girl.jpg. The splat command in the beginning of the method retrieves these parameters, and returns them. Note that when we use the two as-terisks (named the megasplat), we get a reference to an array. Therefore, our path will be received as an array.
The upload function, part of Dancer, gets the con-tent of a file upload (when you use an input tag in HTML with type file). Before saving the photo being upload-ed, we need to make sure the path where we want to store it exists. So, we use the catfile from File::Spec to concatenate the path under our public folder (we can get its full path using the setting method). We create the path if it doesn’t exist, and save it, using the copy_to method, available on the upload object.
To make this work you must create a web form to sub-mit pictures, or a standalone application that uploads it. We decided to show you the application approach, just to illustrate the use of a REST service. Imagine you can write your own application to upload photos, from any device, without the need of a web browser.
Our uploader tool looks like: (Listing 3).
Listing 2: post ‘/upload/**/*’ => sub { my ($path, $name) = splat; my $file = upload(‘filename’); my $folder = catfile(setting(‘public’), ‘gallery’, @$path); make _ path($folder) unless -d $folder; $file->copy _ to(catfile($folder, $name)); return “OK”;};
Listing 3: #!/usr/bin/perl use LWP::UserAgent; use HTTP::Request::Common;
my $gallery = shift; my $photo = shift; my $ua = LWP::UserAgent->new; my $res = $ua->request(POST “http://localhost:3000/upload/$gallery/$photo”, Content _ Type => ‘multipart/form-data’, Content => [filename => [ $photo ]]);

PROGRAMMING IN PEARL LANGUAGE
58 02/2012 en.sdjournal.org
With this code saved in a file upload.pl one can call: $ upload 2012/02/madrid girl.jpg
And it will upload the girl.jpg file to the specified gal-lery. It would be possible as well to develop the typical web form to upload photos. With the examples present-ed in this document you should be able to implement it.
Displaying Galleries ListWe now have a method that can display our galleries,
actually let’s make that the root (“/”) of our application. This means that we can define the following method:
get ‘/’ => { redirect ‘/gallery’;};
This means that whenever a user calls your domain name, this route will match, and the Dancer redirect method will be called. This will perform an HTTP redi-rect to another URL (the /gallery one). The method to answer to the gallery URL can look like: (Listing 4).
Note that we are not making any restriction where the user uploads photos. This means we can have galleries to-gether will images. Here we are considering that if the file is a folder, it is a gallery, otherwise, it is a photo. In fact, we want the user to be able to specify as argument the gallery path he wants to visit. Let’s support it as well: (Listing 5).
In this case we decided to use a regular expression in the route definition. This gives us more flexibility. We are matching anything that follows the ‘gallery’
After creating the hash with the information for the galleries we can call the template method to render the gallery template, that can be something like: (Listing 6).
This template uses the syntax of Template::Toolkit templating system. Basically, commands between [% and %] are interpreted and variables interpolated. Please refer to the Template module documentation for details. Dancer uses, by default, a Dancer::Template::Simple templating system. To use Template::Toolkit we need to edit the config.yml file (in the root of our Dancer ap-plication), comment the simple template system, and adding Template::Toolkit, as presented below1.
# template: “simple”template: “template _ toolkit”engines: template _ toolkit: encoding: ‘utf8’ start _ tag: ‘[%’ end _ tag: ‘%]’
Also, note that we are not worrying with the images file sizes. Our gallery index is loading all images at full
1 The configuration file uses YAML syntax that is sensitive to indentation. Take care when editing it.
Listing 4: get ‘/gallery’ => { chdir catfile(setting(‘public’), ‘/gallery’);
my @galleries; my @photos; for my $file (glob(“*”)) { if (-d $file) { push @galleries, $file } else { push @photos, $file } }
template ‘gallery’, { galleries => \@galleries, photos => \@photos};};
Listing 5: get qr{/gallery/(.*)} => sub { my ($path) = splat; my $systempath = catfile(setting(‘public’), ‘gallery’, $path); chdir $systempath; my (@galleries, @photos); for my $file (glob(“*”)) { if (-d $file) { push @galleries, $file } else { push @photos, $file } } template ‘gallery’, { current => $path, galleries => \@galleries, photos => \@photos }; };

Dancing Polonaise With Perl
5902/2012 en.sdjournal.org
resolution, and asking the browser to present them as a thumbnail. This is not efficient, neither for the web server nor regarding traffic. A real solution should cre-ate thumbnails for each uploaded image.
Presenting an image and commentsTo illustrate the use of a database management sys-
tem (so, the M in the MVC terminology), we will use a SQLite database to store picture comments. For simplic-ity we will just store comments and dates. In a real solu-tion you should take care of users and authentication.
To create the database we will use the command line sqlite tool. In the command line write:
$ sqlite3 comments.sqlite ‘CREATE TABLE comments (path, comment,
timestamp datetime DEFAULT current _ timestamp)’
This will create the comments.sqlite database with three fields, and with a timestamp whose value will default to the current time. Again, be sure to set per-missions right if you are deploying this application. The best solution might be to create a db folder in the root
of your application and put the database inside it. This way you can set write permissions to the folder, so that the web server is able to create temporary files.
The second step is to configure the Dancer::Plugin::Database module. It makes access to the database easier from within the Dancer application. In the config.yml file add a plugins section with:
plugins: Database: driver: ‘SQLite’ database: ‘db/comments.sqlite’
This plugin supports any database management system that the DBI module supports, that is, virtually, any system in the globe. To use this plugin we need to import it in lib/polonaise.pm:
use Dancer::Plugin::Database;
The route to handle each picture view and com-ments will answer two HTTP verbs, both GET (when the user just wants to see a picture) and POST (when the user wants to comment). For that we use the any verb, and list the verbs we are supporting: (Listing 7).
Listing 6: <h3>Photo Gallery Index</h3>[% IF galleries.size %]<h2>Galleries</h2><ul>[% FOREACH gal IN galleries %] <li><a href=”/gallery/[% current %]/[% gal %]”>[% gal %]</a></li>[% END %]</ul>[% END %]
[% IF photos.size %]<h2>Photos</h2>[% FOREACH photo IN photos %] <a href=”/view/[% current %]/[% photo %]”> <img width=”150” src=”/gallery/[% current %]/[% photo %]”/> </a>[% END %]</ul>[% END %]
Listing 7: any [‘get’,’post’], ‘/view/**/*’ => sub { my ($path, $pic) = splat; my $fullpath = catfile(‘/gallery’, @$path, $pic);
if (param(‘comment’)) { database->quick _ insert(‘comments’, { path => $fullpath, comment => param(‘comment’)}); }
my @comments = database->quick _ select(‘comments’, { path => $fullpath }, { order _ by => ‘timestamp’});
template ‘image’, { comments => \@comments, name => $pic, fullpath => $fullpath}; };
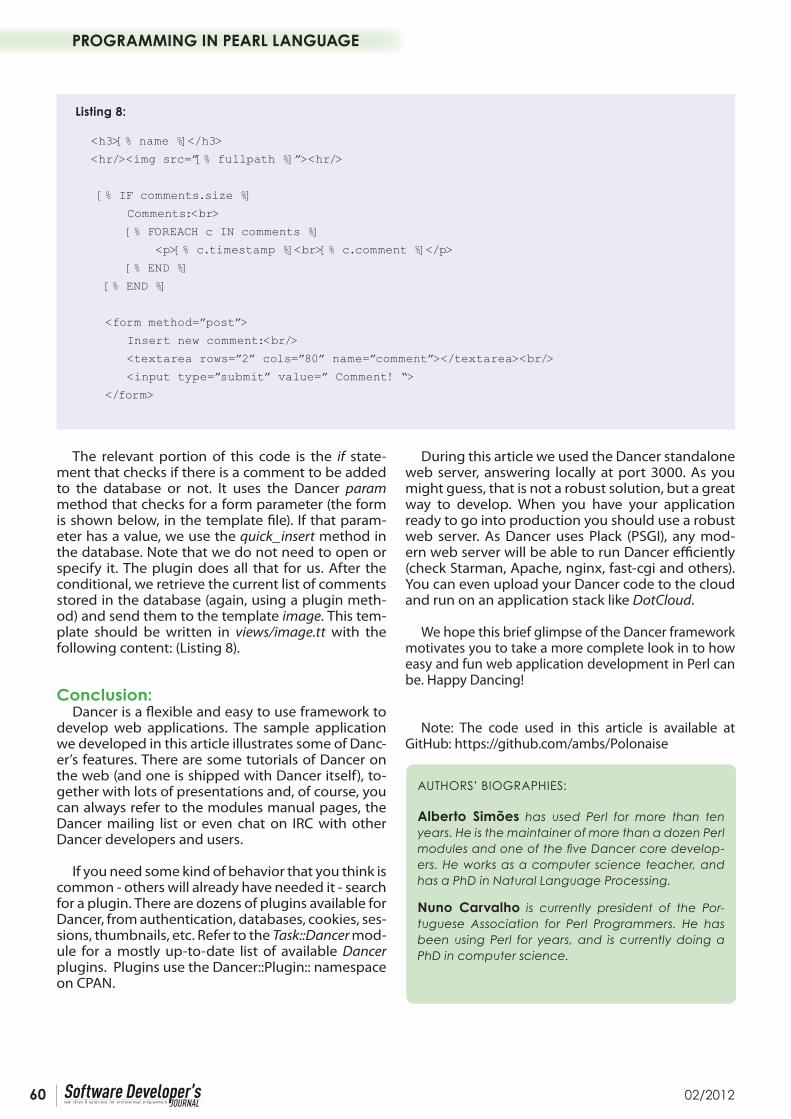
PROGRAMMING IN PEARL LANGUAGE
60 02/2012 en.sdjournal.org
The relevant portion of this code is the if state-ment that checks if there is a comment to be added to the database or not. It uses the Dancer param method that checks for a form parameter (the form is shown below, in the template file). If that param-eter has a value, we use the quick_insert method in the database. Note that we do not need to open or specify it. The plugin does all that for us. After the conditional, we retrieve the current list of comments stored in the database (again, using a plugin meth-od) and send them to the template image. This tem-plate should be written in views/image.tt with the following content: (Listing 8).
Conclusion:Dancer is a flexible and easy to use framework to
develop web applications. The sample application we developed in this article illustrates some of Danc-er’s features. There are some tutorials of Dancer on the web (and one is shipped with Dancer itself), to-gether with lots of presentations and, of course, you can always refer to the modules manual pages, the Dancer mailing list or even chat on IRC with other Dancer developers and users.
If you need some kind of behavior that you think is common - others will already have needed it - search for a plugin. There are dozens of plugins available for Dancer, from authentication, databases, cookies, ses-sions, thumbnails, etc. Refer to the Task::Dancer mod-ule for a mostly up-to-date list of available Dancer plugins. Plugins use the Dancer::Plugin:: namespace on CPAN.
During this article we used the Dancer standalone web server, answering locally at port 3000. As you might guess, that is not a robust solution, but a great way to develop. When you have your application ready to go into production you should use a robust web server. As Dancer uses Plack (PSGI), any mod-ern web server will be able to run Dancer efficiently (check Starman, Apache, nginx, fast-cgi and others). You can even upload your Dancer code to the cloud and run on an application stack like DotCloud.
We hope this brief glimpse of the Dancer framework motivates you to take a more complete look in to how easy and fun web application development in Perl can be. Happy Dancing!
Note: The code used in this article is available at GitHub: https://github.com/ambs/Polonaise
AUTHORS’ BIOGRAPHIES:
Alberto Simões has used Perl for more than ten years. He is the maintainer of more than a dozen Perl modules and one of the five Dancer core develop-ers. He works as a computer science teacher, and has a PhD in Natural Language Processing.
Nuno Carvalho is currently president of the Por-tuguese Association for Perl Programmers. He has been using Perl for years, and is currently doing a PhD in computer science.
Listing 8:
<h3>[% name %]</h3>
<hr/><img src=”[% fullpath %]”><hr/>
[% IF comments.size %]
Comments:<br>
[% FOREACH c IN comments %]
<p>[% c.timestamp %]<br>[% c.comment %]</p>
[% END %]
[% END %]
<form method=”post”>
Insert new comment:<br/>
<textarea rows=”2” cols=”80” name=”comment”></textarea><br/>
<input type=”submit” value=” Comment! “>
</form>

SOFTWARE DEVELOPMENT
62 02/2012 en.sdjournal.org
Mobile devices are everywhereOver a decade ago, while attending a Microsoft
Professional Developers Conference, we were shown a video on the coming mobile future. The video show-cased futuristic-looking, Windows-powered phones being used for tasks such as locating the closest doctor’s office. In an era where the Palm VII (http://en.wikipedia.org/wiki/Palm_VII) was the closest thing to a wireless smartphone, the video showcased an im-pressive future.
Fast forward to 2012:There is no mistake that we are living this future. Smartphones and other mobile devic-es such as tablets are everywhere. They are available at multiple price points and are increasingly affordable. In fact, for many in the developing world, their only com-puter is the powerful smartphone they own.
Mobile application development: growth predictions from Gartner
Gartner predicts that by 2016, at least 50 percent of enterprise e-mail users will rely primarily on a browser, tablet, or mobile client instead of a desktop client. Given the increase in the adoption of mobile devices, it is also expected that software application development targeting these devices will also dramatically increase in the coming years. Again, Gartner predicts that by 2015 mobile application development projects targeting smartphones and tablets will outnumber native PC projects by a ratio of 4 to 1. Gartner further says that
smartphones and tablets will represent more than 90 percent of the new net growth in device adoption in the coming four years.
The Apple app store now boasts over 500,000 apps. Android has close to the same number and the Windows Phone marketplace, a much more recent contender, re-cently crossed 50,000 and is growing at a fast pace.
Line of business mobile applications: the challenge posed by fragmentation
Given this rather exciting backdrop, we can be cer-tain that most line-of-business applications will be made available on mobile platforms in the immediate future. As with any other opportunity, mobile applica-tion development with all its promises comes with its own set of challenges.
One of the primary challenges is the issue of frag-mentation. Estimates from the third quarter of 2011 indicated that the mobile operating system market is very fragmented. The variants of Android accounted for around 50% of devices sold during this quarter. Symbian and iOS accounted for about 17% each. Re-search in Motion (RIM/Blackberry) accounted for about 11% and the Windows Phone platform for around 2%.
Developing a line-of-business application that will function on all these devices involves working with the following vastly different technologies: (Table 1).
Native Mobile Apps with ASP.NET MVC
Table 1
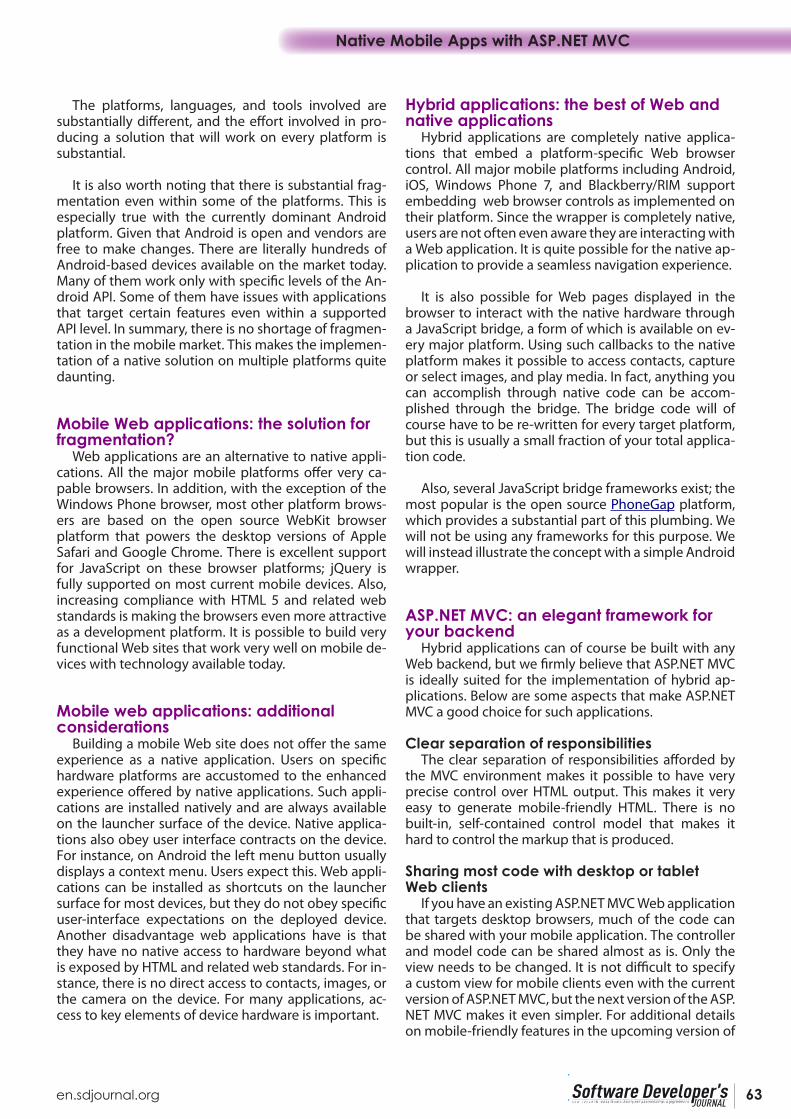
Native Mobile Apps with ASP.NET MVC
6302/2012 en.sdjournal.org
The platforms, languages, and tools involved are substantially different, and the effort involved in pro-ducing a solution that will work on every platform is substantial.
It is also worth noting that there is substantial frag-mentation even within some of the platforms. This is especially true with the currently dominant Android platform. Given that Android is open and vendors are free to make changes. There are literally hundreds of Android-based devices available on the market today. Many of them work only with specific levels of the An-droid API. Some of them have issues with applications that target certain features even within a supported API level. In summary, there is no shortage of fragmen-tation in the mobile market. This makes the implemen-tation of a native solution on multiple platforms quite daunting.
Mobile Web applications: the solution for fragmentation?
Web applications are an alternative to native appli-cations. All the major mobile platforms offer very ca-pable browsers. In addition, with the exception of the Windows Phone browser, most other platform brows-ers are based on the open source WebKit browser platform that powers the desktop versions of Apple Safari and Google Chrome. There is excellent support for JavaScript on these browser platforms; jQuery is fully supported on most current mobile devices. Also, increasing compliance with HTML 5 and related web standards is making the browsers even more attractive as a development platform. It is possible to build very functional Web sites that work very well on mobile de-vices with technology available today.
Mobile web applications: additional considerations
Building a mobile Web site does not offer the same experience as a native application. Users on specific hardware platforms are accustomed to the enhanced experience offered by native applications. Such appli-cations are installed natively and are always available on the launcher surface of the device. Native applica-tions also obey user interface contracts on the device. For instance, on Android the left menu button usually displays a context menu. Users expect this. Web appli-cations can be installed as shortcuts on the launcher surface for most devices, but they do not obey specific user-interface expectations on the deployed device. Another disadvantage web applications have is that they have no native access to hardware beyond what is exposed by HTML and related web standards. For in-stance, there is no direct access to contacts, images, or the camera on the device. For many applications, ac-cess to key elements of device hardware is important.
Hybrid applications: the best of Web and native applications
Hybrid applications are completely native applica-tions that embed a platform-specific Web browser control. All major mobile platforms including Android, iOS, Windows Phone 7, and Blackberry/RIM support embedding web browser controls as implemented on their platform. Since the wrapper is completely native, users are not often even aware they are interacting with a Web application. It is quite possible for the native ap-plication to provide a seamless navigation experience.
It is also possible for Web pages displayed in the browser to interact with the native hardware through a JavaScript bridge, a form of which is available on ev-ery major platform. Using such callbacks to the native platform makes it possible to access contacts, capture or select images, and play media. In fact, anything you can accomplish through native code can be accom-plished through the bridge. The bridge code will of course have to be re-written for every target platform, but this is usually a small fraction of your total applica-tion code.
Also, several JavaScript bridge frameworks exist; the most popular is the open source PhoneGap platform, which provides a substantial part of this plumbing. We will not be using any frameworks for this purpose. We will instead illustrate the concept with a simple Android wrapper.
ASP.NET MVC: an elegant framework for your backend
Hybrid applications can of course be built with any Web backend, but we firmly believe that ASP.NET MVC is ideally suited for the implementation of hybrid ap-plications. Below are some aspects that make ASP.NET MVC a good choice for such applications.
Clear separation of responsibilitiesThe clear separation of responsibilities afforded by
the MVC environment makes it possible to have very precise control over HTML output. This makes it very easy to generate mobile-friendly HTML. There is no built-in, self-contained control model that makes it hard to control the markup that is produced.
Sharing most code with desktop or tablet Web clients
If you have an existing ASP.NET MVC Web application that targets desktop browsers, much of the code can be shared with your mobile application. The controller and model code can be shared almost as is. Only the view needs to be changed. It is not difficult to specify a custom view for mobile clients even with the current version of ASP.NET MVC, but the next version of the ASP.NET MVC makes it even simpler. For additional details on mobile-friendly features in the upcoming version of

SOFTWARE DEVELOPMENT
64 02/2012 en.sdjournal.org
ASP.NET MVC, please refer to http://www.asp.net/mvc/tutorials/mvc-4/aspnet-mvc-4-mobile-features.
Minimal friction with underlying web development model
ASP.NET MVC does not build several layers of ab-straction over stateless Web applications. Instead it of-fers a very simple model that works in alignment with the underlying platform. This makes it very easy to make AJAX calls or use jQuery on the client. There is no complex abstraction such as ASP.NET Web Forms’ ViewState to worry about.
In addition to the above, it is also worth pointing out that the business and database layers that already ex-ist in your current .NET applications can be effectively reused with ASP.NET MVC applications. ASP.NET MVC is completely agnostic about the business and database layers and can work effectively with any system that is currently in place.
Sample hybrid applicationWe will now walk through a very simple sample that
will illustrate the development of a hybrid applica-tion end-to-end using the ASP.NET MVC platform. The sample displays information on students attending a fictional university named Contoso University. There are a couple of general information links as well as access to a student directory where students can be looked up by name. The sample does not implement any security or error handling in order to keep the code clear. There is no complex code since the objective of the sample is not to showcase the power of the ASP.NET MVC platform, but to showcase its suitability as a backend platform for the development of hybrid, native mobile applications.
The complete code for this sample is available at bit.ly/mvc-native-mobile-apps.
Prerequisites to work with the sample code:
• ASP.NET MVC 3 with Visual Studio 2010 (any version including the Express Edition).
• Functional installation of the Android SDK and the Android Development Tools plugin for Eclipse.
Detailed instructions and requirements are available here: http://developer.android.com/sdk/requirements.html
• jQuery and jQuery mobile. Local copy is not required since the sample code will simply reference the jQuery CDN.
The ASP.NET MVC backendIn the sample code, the provided _Layout.cshtml
contains script references to the jQuery and jQuery mobile libraries. They are not required to build an ASP.NET MVC mobile application, but they do han-dle a lot of the grunt work. We use jQuery mobile in our sample since our purpose is not to illustrate the nuances of formatting content on mobile devices (Listing 1).
Most mobile web clients assume that a Web page is sized at about 900 pixels and will automatically scale to display the entire page on the device. With a mo-bile site that is optimized for a smaller device, we can provide a hint to the device that it should not scale but should instead use the width of the device. This is accomplished via the use of the viewport meta tag as shown below (Listing 2).
IThe default index action method on the home controller is mapped to the following view markup (Listing 3).
Listing 3
Listing 2
Listing 1
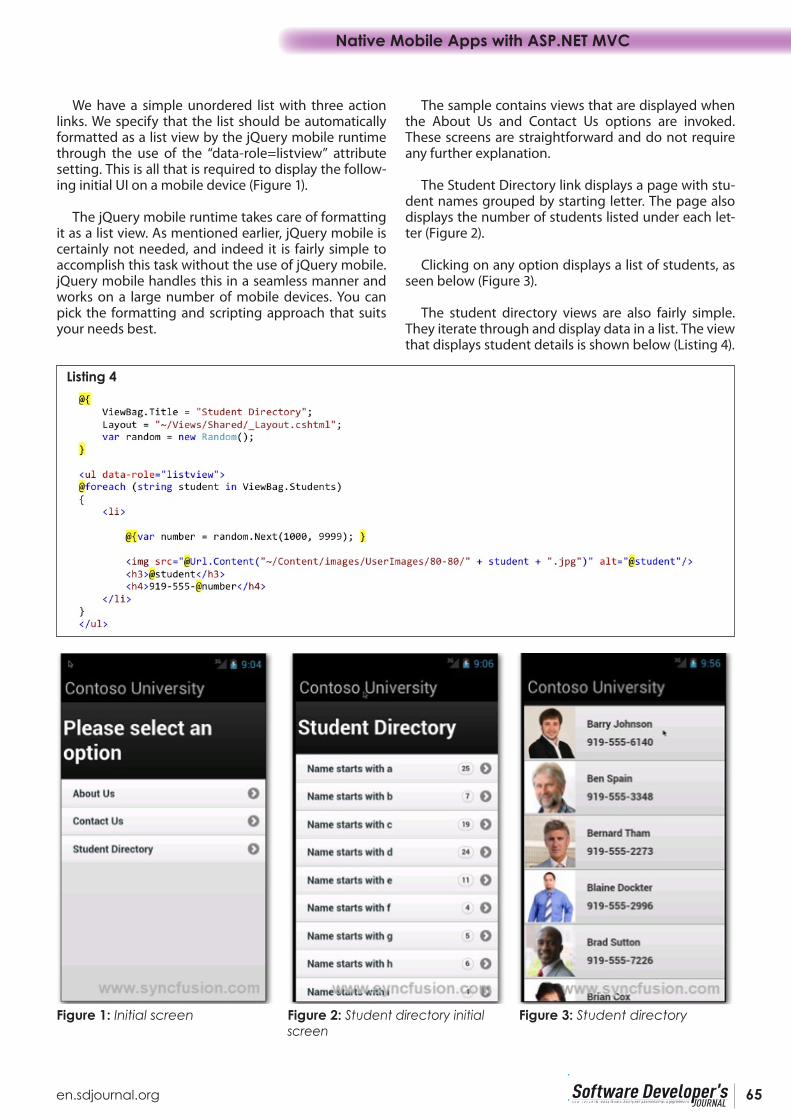
Native Mobile Apps with ASP.NET MVC
6502/2012 en.sdjournal.org
We have a simple unordered list with three action links. We specify that the list should be automatically formatted as a list view by the jQuery mobile runtime through the use of the “data-role=listview” attribute setting. This is all that is required to display the follow-ing initial UI on a mobile device (Figure 1).
The jQuery mobile runtime takes care of formatting it as a list view. As mentioned earlier, jQuery mobile is certainly not needed, and indeed it is fairly simple to accomplish this task without the use of jQuery mobile. jQuery mobile handles this in a seamless manner and works on a large number of mobile devices. You can pick the formatting and scripting approach that suits your needs best.
The sample contains views that are displayed when the About Us and Contact Us options are invoked. These screens are straightforward and do not require any further explanation.
The Student Directory link displays a page with stu-dent names grouped by starting letter. The page also displays the number of students listed under each let-ter (Figure 2).
Clicking on any option displays a list of students, as seen below (Figure 3).
The student directory views are also fairly simple. They iterate through and display data in a list. The view that displays student details is shown below (Listing 4).
Figure 1: Initial screen Figure 2: Student directory initial screen
Figure 3: Student directory
Listing 4

SOFTWARE DEVELOPMENT
66 02/2012 en.sdjournal.org
It is a good idea to run the ASP.NET MVC backend in a desktop browser and test it out before proceeding to review the Android wrapper that we will work with next.
You can also directly test on a mobile browser pro-vided the test site is accessible from your test device. If both the development PC and your test device are on the same network, it is possible to make setting chang-es to the ASP.NET development browser or IIS Express to allow access to the Web application from your test device. Such access is blocked by default.
An easier, alternate approach is to use a proxy, which simply redirects traffic on an external port to the inter-nal server. This is the approach we often use. The proxy that we use is available for download from https://github.com/jocull/SharpProxy. For further details visit http://www.codefromjames.com/wordpress/?p=97.
Android wrapperThe code for the Android wrapper that hosts the
Web application inside a native Android application is reproduced below (Listing 5).
The code is quite simple to follow.
1. WebView is the Android equivalent of the Web-Browser control. It is a wrapper around the default WebKit-based Android browser.
2. We obtain access to an instance of the Android We-bView control (defined in an XML layout file and in-stantiated by the Android runtime at execution).
3. We enable the use of JavaScript on this WebView instance since JavaScript is disabled by default with the WebView control.
4. We then make a few adjustments to the display of the scrollbar–basically turning it off to mimic the look and feel of a native application.
5. We then load the actual Web application using a call to the loadUrl API on the WebView instance. your-web-link should be changed to point to your Web application.
6. The last section of the code handles the invocation of the hardware back button and causes the embedded WebView to navigate to the previous page.
Listing 5

Native Mobile Apps with ASP.NET MVC
6702/2012 en.sdjournal.org
As you can see this code is not tied to the Web ap-plication in any direct manner and will not change sub-stantially from application to application. You will only need to add additional code when you require access to specific hardware functionality on the device. We do not delve deeper into this topic here but if you are interested in investigating this further, please look up information on the addJavascriptInterface method of the WebView.
For simplicity, we have described just the Android wrapper. Similar wrappers and extension mechanisms exist on all other major mobile platforms (Figure 4).
ConclusionHybrid applications are a very promising solution
worth looking into for any line-of-business mobile ap-plication. They are not suited for scenarios where ex-tensive access to native hardware is required (such as with games) but will work very well in most other sce-narios. Any solution implemented with a Web backend is also more likely to be future-proof. The HTML stan-dard has evolved slowly over the years and is unlikely to dramatically change as proprietary solutions often tend to do. It offers a stable base on which applications can be built with the certainty that they will continue to work for the foreseeable future. Mobile platform ven-dors are putting an extraordinary amount of effort into the implementation of HTML 5 and related standards. This will also serve to make Web applications more powerful and able to accomplish a substantial subset of what is possible with native applications.
You can leverage your existing .NET Web develop-ment skills and produce powerful 100% native solu-tions that work on a broad cross-section of devices. At Syncfusion, we are excited by the immense potential offered by hybrid applications. We currently offer a wide set of mobile controls for use under the ASP.NET MVC platform and have many more exciting offerings on the way. We hope you too are excited by the poten-tial offered by hybrid mobile applications.
Figure 4: Contact Us page displayed on Android 4.0 Emulator inside a native application shell
ABOUT SYNCFUSIONSyncfusion, the enterprise technology partner of choice for Windows development, delivers a range of .NET components and controls coupled with a service-oriented approach throughout the entire application lifecycle. Known for its extremely fast grid control, and breaking new ground in ASP.NET MVC and mobile development, Syncfusion has established itself as the trusted partner for mission-critical applications. With releases every quarter, 24-hour support, and flexible licensing, Syncfusion meets the changing needs of enterprises across the globe. Founded in 2001 in Research Triangle Park, North Carolina, Syncfusion has more than 7,000 customers including Fortune 100 and global financial companies.
ABOUT THE AUTHOR
Daniel Jebaraj is Vice President of Product Development at Syncfusion, a leading provider of components
for Windows development. In addition to overseeing product development, he actively engage with enterprise customers, which include large financial institutions, Fortune 100 companies and global IT consultancies. Before joining Syncfusion in 2001, he managed development teams at Rogue Wave Software.

SOFTWARE DEVELOPMENT
68 02/2012 en.sdjournal.org
For programmers doing code maintenance is sim-ply inevitable. Whenever we start with a blank project, or perhaps a new class, things remain
fresh for maybe the first 15 minutes of the job. Then it gets all about fixing bugs, extending existing func-tionality, extracting repetitive parts into methods, etc. Knowing that all programming is maintenance, we can avoid some pitfalls early on, and keep technical debt at bay.
Perhaps the greatest reason of not caring for writ-ing good, readable code is because it’s enough for pro-gram to work when it’s understood only by the com-puter. As long as we assume that our job is done when things just work, then why would we waste our time correcting perfectly fine program, right? Sadly, things never look this way and sooner or later you’ll be forced to come back to your creation and tweak it.
Perhaps users will detect a new bug, or client will request a new functionality. Either way you’ll find your-self knee deep in old code. When it happens you’ll be glad you took care of writing something readable. Oth-erwise… I’ve seen monstrous “if” statements with nest-ed “if” statements, taking care of data validation, error handling, and delivering functionality – all at once. Ex-tending such code is mentally straining and absolutely unrewarding. Come along with me, and I’ll show you some simple tricks, to make introducing new function-ality whole lot easier. It’ll let you be more agile too!
NamesLet’s start with names. It’s the most fundamental
and essential topic, as writing code is pretty much all about giving names to variables, classes, and methods. Developing software though, is usually more about
reading code, than writing it. And while analyzing an algorithm we can keep only a limited amount of infor-mation in our minds. Therefore it is vital to put as little strain on reader’s mind as possible. Let’s consider fol-lowing code: (Listing 1).
Clean codingIf you have ever read code written by another person, you were probably having difficult time figuring out what was the author’s intention and what is the actual workflow of the algorithm. Therefore it is common practice to let the author fix bugs in his own code should problems arise. Nevertheless, even your own code tends to become more difficult to understand as the time passes.
Listing 1: Obfuscated code (C#) public class N { N a, b; public int c; public N(int c) { this.c = c; } public void ins(int d) { if (d < c) { if (a == null) a = new N(d); else a.ins(d); } else { if (b == null) b = new N(d); else b.ins(d); } } }

Clean coding
6902/2012 en.sdjournal.org
It is a rather simple algorithm, part of elementary Data Structures course in Computer Science curricu-lum. Average developer can be expected to figure out what it does, especially after focusing on it for some time. Pen and paper may be used to iterate the code on a piece of paper (Listing 2).
When we keep names of our variables and functions expressive, they convey enough meaning to be read und understood easily. Developing software is already complex enough, so it’s in developers interest, to sim-plify things whenever possible. As a rule of thumb it’s good practice to name variables as nouns and func-tions as verbs to underline the distinction between passive and active components of the class.
Once upon a time, there was an age of linkers that could recognize only several letters long names, screens were narrow and there were no IDEs to provide information about access scope, type of variable and types returned by functions. Anyone who has had op-portunity to work with old C / C++ code and APIs can tell you about horrors of working with cryptic function and argument names. Only through thorough study of manual pages could one achieve state of mind when abbreviations encoded within names prove useful as reminders of underlying data structures.
Nowadays we’ve got everything it takes to give our variables and functions names which are
pronounceable and provide no redundant informa-tion. It is important to be able to actually talk about code, since code reviews and associated discussion is core factor in delivering quality code. Standard abbre-viations like msg instead of message or iter for iterator are fine. Those are standard and widely known. On the other hand though setsockopt() is pronounceable, but is difficult to guess that it is supposed to stand for ‘set options for a socket’. Even worse function like fcntl() leaves us completely helpless, as we are not even able to pronounce it while asking for help.
Another important thing to keep in mind about names is that they should be searchable. A friend of mine – a brilliant developer – has a long history of working solitary on his own projects. During the years he developed a habit of creating his own class for ar-rays, which he calls simply ‘A’. Array of arrays is ‘AA’. ‘AAA’ would be three dimensional array and so on. As a lone wolf developer he has no problem reading and understanding his cryptic code, but any attempts of searching the code base for a single letter representing a class are in vain – unnecessarily raising difficulty of maintaining the system.
Last but not least, while naming parts of the system, developers should stick to established conventions and programmatic common sense. Once during a project I was working on, colleague and I decided we needed to have a system user, who would be assigned some
Listing 2: Unobfuscated code (C#)
public class BinaryTreeNode { BinaryTreeNode lesserNode, greaterNode; public int nodeValue; public BinaryTreeNode(int value) { this.nodeValue = value; } public void insertNode(int newValue) { if (newValue < nodeValue) { if (lesserNode == null) lesserNode = new BinaryTreeNode(newValue); else lesserNode.insertNode(newValue); } else { if (greaterNode == null) greaterNode = new BinaryTreeNode(newValue); else greaterNode.insertNode(newValue); } } }

SOFTWARE DEVELOPMENT
70 02/2012 en.sdjournal.org
resources. Those resources would be identified with a token, representing human user, to whom the re-sources would be given back later. We thought it would be witty to call the system user Charon and the token Obol. In Greek mythology Charon was a ferryman, who helped souls of the deceased reach the afterlife. Obol was a coin ancient Greeks put in the mouth of their dead, so they could pay Charon for his service and thus be granted place in Hades. Introducing this bit of trivia into the system surely made for a great tale, but it re-quired everyone on the team to ask us for explanation. Very quickly had we decided to drop those names in favor of “unassignedResources” and “ownerToken”.
FunctionsFunctions are primarily a way of extracting and reus-
ing repetitive code. This principle becomes very quickly obvious to any programmer. But functions are capable of serving one more purpose. They are perfectly suited to separate layers of abstraction.
Let’s have a look at listing 2 once again. Algorithm should be familiar hence effort required to understand and tweak it is relatively little. Variable names are clear and thus it seems things should be alright. But there is a way to improve things even further (Listing 3).
Just a glimpse at listing 3 and we know what’s going on. There’s even no need to analyze statements within
“if” clause, as function name says all that is necessary. In-ner functions “insertAsGreater()” and “insertAsLesser()” give us idea of what’s going on in the algorithm, with-out forcing us to analyze, understand and keep in mind, what exactly happens there. Thanks to proper use of functions, we get more general view of the logic, and less details. This means what we see is more abstract.
Having short, well named and abstract functions lets us write code which is agnostic of underlying platform. Calls to framework APIs and standard libraries become part of lower lever, more detailed functions, thus ren-dering parts of our code universal. Due to this even de-velopers new to the project and technology stack will have easier time understanding workflow of the busi-ness logic.
Well written code can be similar to an article in a newspaper. As we read it from top to bottom we get to learn more details about covered topic. Early para-graphs introduce only general ideas behind the events. Usually by the end of the article readers learn about some more detailed background info, read quotes from involved parties and so on. Thus reader may abandon the article before making it to the end and still feel like they have learnt something new. That’s right the effect we want to achieve in our code – someone examining our classes shouldn’t have to spend a lot of time to just get the general feeling what is going on. More details should there for him but encapsulated in functions.
Listing 3: Code with descriptive functions used to hide implementation details (C#)
public void insertNode(int newValue) { if (isLesser(newValue)) insertAsLesser(newValue); else insertAsGreater(newValue); } private bool isLesser(int newValue) { return newValue < nodeValue; } private void insertAsLesser(int newValue) { if (lesserNode == null) lesserNode = new BinaryTreeNode(newValue); else lesserNode.insertNode(newValue); } private void insertAsGreater(int newValue) { if (greaterNode == null) greaterNode = new BinaryTreeNode(newValue); else greaterNode.insertNode(newValue); }

Clean coding
7102/2012 en.sdjournal.org
I hope it’s a bit more clear why should we use func-tions to make our code cleaner. Now I’d like talk about achieving this goal.
It’s important to have short functions, because this way they convey information in smaller chunks and it’s easy to focus on them. Ideally they should be as short as possible and no longer than can be fit on a computer screen. Reading and analyzing code should not require constant scrolling up and down.
Functions should focus only on one thing. Clean coding is not about cutting lines of code at random and putting them together in functions. Code should be logically grouped. To achieve this, programmers should give their functions descriptive names, so their readers can safely assume they know what functions do without reading actual code. Sometimes it will make signatures of our methods long, but our goal is to make reading code more like reading a book than mathematical equations – those can be very short, but very difficult. On the other hand though, long name may suggest that a function has several responsibilities and should be divided into several smaller functions.
Function arguments are yet another potential pitfall. In noble desire to reuse most quirky parts of code we may build a complex function, which operates on a lot of data. Such function may require a lot of arguments to work properly. Function like these are difficult to use. Client programmers have to remember type and order of the ar-guments, perhaps constantly looking up the documenta-tion. IDEs can help there showing appropriate signature, but still it may be difficult to grasp what exactly is going on within the code. Understanding of such program re-quires thorough analysis of the said function’s body.
One could say writing one big function with a lot of ar-guments helps suggest that the function carries out atom-ic operation, which requires all the data and should not be interrupted. But perhaps we could take another route. One possible approach is to encapsulate the data in an object. If we were working on a program dealing with geometric points we could have a function signature similar to “foo(x, y)”. We can consider changing it to “foo(point)”, which puts more emphasize on the logic of the program.
Another possible approach is to split said function into several smaller ones which take only one argu-ment. Value returned by first function could be used immediately by another one. Thus, reader can see what is the use of each variable and how the process flows. Since he cannot use the latter function without obtain-ing result from the first one, he won’t be tempted to invoke them in wrong order.
Function’s name and the argument it takes suggest that the function is working only on the passed chunk of data. Method “calculatePay(employee)” can be ex-pected to read data from the passed object and return a value. It may be surprising if it affects actual data within employee object, or even worse – somewhere else in the program. Being able to safely make assump-tions about scope of a function can greatly simplify programmers work as he does not have to be paranoid about consequences of calling a method – he clearly knows what his input is and what should be the out-put. If anything else is affected along the way we say the function has “side effects”. Such behavior should be avoided where possible.
I would like to say one last thing concerning the functions before I move on. It is good practice to stick to query-command separation. Your methods should either “ask” the object about its state, or “change” it. A method should never do both at once. Otherwise we may find ourselves in a strange situation, when ask-ing the same question changes the answer, i.e. calling twice the same “query” function yields different results.
CommentsOne of the more controversial parts of writing main-
tainable and easy to understand code is the art of com-menting. Comments are supposed to make things easier for the reader and provide information neces-sary for understanding the algorithm or other design decisions. I prefer to avoid comments where possible and write code which documents itself. Let’s consider following snippet on listing 4.
Versus that on listing 5:
Listing 4: Poor commenting (C#)
double t1, t2, t3; // minTemperature, avgTemperature, maxTemperature
Listing 5: Code not requiring commenting (C#)
double minTemperature;
double avgTemperature;
double maxTemperature;

SOFTWARE DEVELOPMENT
72 02/2012 en.sdjournal.org
Or perhaps one of the brightest examples of redun-dant comments, not uncommon in code bases around the world would be: (Listing 6).
Comments like these do nothing to contribute to-wards better understanding of the problem, yet they introduce complexity of switching contexts between programming and natural language. Any programmer working with the code will have to balance focus be-tween these two. Human brain can focus only a limited amount of items and once, and once read the com-ments will be mentally blocked by the developer – ig-nored and thus rather obstacle than help.
Wealth of information can be conveyed using well named functions in place of littering the code with comments. Let’s consider code from listing 7. It is real life code from an open source simulation framework (Listing 7).
I believe author’s intention was to give his readers best idea of what happens behind the scenes. It is very
noble pursuit, yet I couldn’t start working with the code, until I did some initial refactoring. Resulting code is shown on Listing 8.
This code is much more concise and clearly con-veys its meaning. It takes just a glimpse to see what’s going on, and additional details are available for curi-ous readers upon request – in bodies of correspond-ing methods. “If” statements always introduce a lot of complexity and several levels of abstraction at once. It’s important to “hide” those abstractions in well named functions. It is perhaps best to hide each part of the statement, namely to encapsulate in sepa-rate functions each of the resulting branches and the evaluated expression as well. The code from listing 10 could be hidden in one function named simply “serveCustomerIfSomeoneIsWaiting()”.
Should we leave if statements in their original form someone will have to later analyze, understand and keep in mind logic behind it all. Comments bloat the code even further forcing us to balance between
Listing 6: Code with redundant comments (C#)
double minTemperature; // the minimal temperature double avgTemperature; // the average temperature double maxTemperature; // the maximum temperature
Listing 7: original code (Java)
//check if there is someone waitingif (myModel.truckQueue.isEmpty()) {// NO, there is no one waiting// insert yourself into the idle VC queuemyModel.idleVCQueue.insert(this);// and wait for things to happenpassivate();}else {// YES, there is a customer (truck) waiting // ...Truck nextTruck = myModel.truckQueue.first();// remove the truck from the queuemyModel.truckQueue.remove(nextTruck); // ...hold(new SimTime(myModel.getServiceTime()));// ...nextTruck.activate(new SimTime(0.0));// ... }
Listing 8: Refactored code (Java)
if (isSomeoneWaiting()) {serveTheCustomer();} else {becomeIdle();}

Clean coding
7302/2012 en.sdjournal.org
additional languages and contexts. Formal language of the source code is always strict, whereas natural lan-guage requires us to perform interpretation and analy-sis on a whole new level of abstraction.
Error handling & exceptionsData validation within the code can be devastating
for its cleanliness as it puts in one place several differ-ent responsibilities. Art of writing clean code is all about learning how to hide unnecessary details from the reader. Inconvenience of using error codes is twofold. Firstly, error codes pose a problem since they force us to handle problems immediately where they arise, thus interweaving high level business logic with low level problems like perhaps malformed strings. Secondly, er-ror codes force us to design functions which return val-ues even though there is no reason to do so. Function called “setDatabaseFields()” is a command and thus not a question, we could assume it returns void. Calling the
method “trySettingDatabaseFields()” doesn’t help ei-ther because we only know that “something is wrong” with the function, but have no details until we examine the actual code, which may be difficult.
In listing 9 we can see example of a program, which uses error codes to validate its data on the spot. I propose a different approach, using exceptions as in Listing 10.
Approach like this enables software developers to produce code which is separated in two distinct areas – within “try” and catch “blocks” respectively. Within “try” we have the positive scenario presented and we can forget about nuances of error handling. This is the way we want the workflow to be, it is our positive scenario. “Catch” block handles the errors and is a perfect place to deal with low level nuances of coding, like difficul-ties with network connection, missing files, malformed date strings, missing required form fields. Those are our negative scenarios.
Listing 9: Validating data using error codes (C#) public string saveOrder(OrderForm form) { ErrorCode result; result = this.trySettingDate(form.RawDate); if (result == ErrorCode.InvalidDate) return “There is no such date.”; else if (result == ErrorCode.InvalidDateFormat) return “Date should be in format YYYY-MM-DD.”; else if (result == ErrorCode.EmptyField) return “Date is required.”; result = this.trySettingPrice(form.RawPrice); if (result == ErrorCode.InvalidPriceFormat) return “Price has to be in format x.xx. It has to be non-zero value.”; else if (result == ErrorCode.EmptyField) return “Price is required.”; result = this.trySettingName(form.Name); if (result == ErrorCode.EmptyField) return “Name is required.”; return null; }
Listing 10: Exceptions separating business logic from error handling (C#) public void saveOrder(OrderForm form) { try { validateAndSetDate(form.RawDate); validateAndSetPrice(form.RawPrice); validateAndSetName(form.Name); } catch (Exception e) { throw e; } }

SOFTWARE DEVELOPMENT
74 02/2012 en.sdjournal.org
ClassesSubject of object oriented analysis and design is a
complex one and way beyond scope of this article. There are numerous principles of laying out classes within the application of which I would like to tackle just two.
Single Responsibility Principle (SRP) says that there should be only one reason to modify each class. It is crite-rion based more on logical distinction than on anything else. If we have employee class which exposes two methods “caluclatePay()” and “printMonthlyReport()” then we have mixed together two different aspects – pay calculating rules and presentation template. Should ever any of those two change, we’ll have to reach back to our original class. Of course it’s difficult to anticipate the change and there is no point producing dozens of single method classes. Nevertheless working on a proj-ect we should have some intuition about requirements which may be most prone to change.
Open/Closed Principle (ORP) states that our classes should be open to extension and closed to change. Let’s assume we need to add another class, which does similar things as one we already have. Perhaps “Report-Printer” class needs now not only to print plain text reports, but also has to support some rich text format-ting. We may extract shared structure and behavior into one abstract class. That abstract class should be designed with goal of being least prone to change – it should keep as little detailed information as possible and may be in no way dependent on derived classes. It is the “closed” part of our object system.
Open part of the principle lies in the derived classes. They provide behavior unique to each part of the prob-lem. Should our system require introducing third way of printing reports we’ll be able to simply extend existing abstract class. If the client code is written to rely on work-ing with abstract classes there will be little work required to adapt it to the new functionality. Sometimes derived classes may be perceived as simple configuration of more general behavior expressed in the base class.
Test driven developmentAs we’re nearing the end of this article I would like to talk
a little bit about Test Driven Development. It is a practice of writing unit tests before writing actual code itself. Good unit tests code coverage gives developers some great ad-vantages of which I would like to focus only on some.
First of all code which is well tested can be easily changed. Whenever we get a request for introducing new functionality to our libraries we start by simply adding appropriate tests to those we have already writ-ten. Then we start thinking on how to actually change the code. Due to ease of running automated tests over and over again we can continuously find and fix bugs on the spot making it easier to maintain the software.
Another interesting aspect of writing tests first tech-nique is that it forces developer to look at the software through the eyes of the client. Before writing any line of code programmer thinks about the input and the output. The focus is not on the nuances of technical so-lutions, but on the observable behavior which adds to the business value of the software.
Writing a lot of tests has some drawbacks of course. Positive effects of extending functionality and main-taining code base become visible only after longer pe-riod of time. Therefore small projects may not benefit from overhead associated with detailed writing of all the test cases. Should the projects grow in size, though, it may be difficult to introduce good TDD, as writing tests for preexisting code can rarely produce expected results. Unit tests written this way will always be taint-ed with being written to work like the underlying pro-gram, instead of enforcing behavior.
ConclusionI feel that ability to write clean code is a vital part
of any programmer’s skillset. Developers with good communication skills are highly sought after in the job market as software development is a team sport. We need to be able to communicate clearly to others what are we working on. One of the most effective media of communication is well written program which can tell its own story in an intelligible way.
In this discipline best documentation is the source code itself – its correctness is constantly checked by the IDEs, compilers (or interpreters) and test runs. Com-ments and other forms of documentation employing natural language are prone to degeneration as the code evolves – they can only grasp general idea of the program, but not the actual algorithm but it is the algo-rithm that we need.
We need to keep in mind that software development often means more time spent reading code than actually writing it. Therefore producing code which is easy to read is an investment which will surely yield profit. To learn more about the techniques of producing well-structured code I recommend reading “Clean Code: A Handbook of Agile Software Craftsmanship” by Robert C. Martin. It has wealth of pragmatic information which I believe can be useful to any developer regardless of experience.
Łukasz KiedaSoftware Developer at S-Arts Poland working on social networks and a hobbyist .Net devel-oper. Student at AGH University of Science and Technology.

SOFTWARE DEVELOPMENT
76 02/2012 en.sdjournal.org
As you can see in figure 1, an octree is created by surrounding the entire data in question with an axis aligned cube and then splitting that cube
into equal sized sub-cubes by using three axis aligned planes which pass through the cubes’ center. This is done recursively on the sub-cubes until an end condi-tion is met: either number of data elements is smaller than a threshold or a depth limit has been reached. The data can be stored either in the leaf nodes or in the in-ner nodes. This can be decided according to the appli-cation requirements.
An octree is used in games to optimize rendering and collision detection. In rendering optimization it is used to cull objects that are out of the current view frustum or that are occluded by other objects. In colli-sion detection, an octree is used to group objects that are close together and only perform the costly collision test on relevant pairs of objects.
ProblemsThe utility of an octree can be seen when we try to
access a point from the data. Rather than going through the list of all the points in the data set the point just has
to be compared against the bounding box of each of the roots children, choosing the node whose bounding box encloses the point and then recursively repeating this process for each chosen node. It’s obvious that with each level we go deeper in the octree we can safely dis-card 7/8 of the remaining data because it’s irrelevant.
This structure offers many advantages, but it also has many disadvantages. Its main disadvantage is that it is difficult to use well with moving objects. It’s pretty hard to keep moving objects in the octree be-cause the cost of updating the objects location in the tree can get pretty high. The update can be done ei-ther by reinserting the object or by trying to find the neighbor it has moved to by traversing backwards to the common root and then back down. Both are time consuming. Although traversal is usually logarithmic in time, the cost of testing against the bounding box of each node encountered ads a lot to the total time. This is why some developers only use the octree to store static data and use separate structures for dy-namic objects.
Also, while this structure works well for point data, it runs into some trouble when we talk about com-plex data like polygons and meshes because these can straddle over multiple cells of the octree. This can be solved in multiple ways but each has its downside.
• Splitting the object in question – the splitting plain doesn’t just cut the bounding box, but also the objects in the box; downside: pretty complex calculations;
• Saving the object in all the nodes it straddles in – pretty simple, but you have to be careful not to perform the processing you want multiple times on same object; downside: redundant data;
OctreesOctrees are structures that help in spatially partitioning large sets of data. They can be viewed as an implementation of hierarchical clustering in which the data is recursively split in smaller, more manageable chunks. Octrees can have many uses but are mostly used in game development to speed up certain tasks that would otherwise take too much time to complete.
Figure 1: Octree creation

Octrees
7702/2012 en.sdjournal.org
• Save the object at the level of the octree where it fits entirely in just one bounding box – also simple, but its main downside is that some objects might end up in the root because they are badly positioned;
My solutionsMost of the time the octree is used as is, with no
modifications to surpass the disadvantages men-tioned, but I have been researching this structure for some time to come up with a solution to these prob-lems. The following paragraphs present the ideas that I have come up with.
For the problem with dynamic objects, I realized that the most time consuming operation is finding the neighbor in which the object has moved. I also realized that the center of that neighbor can be found easily be-cause we know the current center and the size of the current node bounding box. So the only thing that was needed was a way to link that center to a pointer to the node. The idea that I had (and then found out it had been done by Hanan Samet in the 80s and early 90s) was to use a hash table: use a hash function (see code listing below) to encode the coordinates of the center of each node of the octree and store the pointer of that node in a hash table using the encoded coordinates as a key. This makes getting the neighbors’ pointer a con-stant time operation.
The hash function I used is an adaptation of Rob-ert Jenkins’ 96 bit Mix Function found on this website http://www.concentric.net/~ttwang/tech/inthash.htm : (Listing 1).
The first three lines of the functions code are added by me as an adaptation. The rest is the normal Robert Jenkins Mix function. I added the first lines because the Mix function needs integers to work and I have floats as coordinates so a cast was necessary and because I needed the hash key to be different if two points that had the same values but in a different order (p1(1.2, 3.4, 5.6) and p2(3.4, 5.6, 1.2) for example) where fed to the function. That’s what the 0x7ed55d16 &, 0x165667b1 *, 0xd3a2646c ^ are for. The & 0xfffffff0 part is to mask out the last few bits for floating point precision control.
Before we can get a neighbors’ pointer we need to find which neighbor the object has moved too. An ordinary node can have up to 26 neighbors and mak-ing that many intersection tests with bounding boxes is still time consuming. But in the paper “An Algorithm for Hidden Surface Complexity Reduction and Colli-sion Detection Based on Oct Trees” by Brent H. Pease, a technique is described that can help us discard most of the neighbors we should test. Out of the 26 possible neighbors of a certain node we only have to test at most 7 with this technique.
The idea is to see in which direction the object is moving and consider only the nodes that are posi-tioned along that direction. To do this we construct a ray from the last position of the object to the new posi-tion. The center of the current node can also be used as a reference point instead of the old position. By tak-ing the sign of each of the components of the ray we can decide which of the six sides of the current node bounding box the object might have passed. For ex-ample if the x component of the ray is negative then the side of the bounding box that is orthogonal to the X axis of the world coordinate system and its’ corners have a smaller x component then the center might have been passed by the object. Using this on all three components of the ray three of the six sides of the box can be safely discarded leaving us to choose from only 7 neighbors instead of 26.
The only problem with this solution is that the com-plete octree has to be created and hashed. Usually when in a specific area of the scene there are fewer objects the splitting into sub-cubes stops at a higher level in the tree. But for the hash table solution to work it is necessary to further split the nodes until a certain depth has been reached. This is because during the game a moving object might end up in one of those ar-eas and a node that is on the same level as the current node has to exist there for us to be able to move the object in the new position. We could create the new
Llisting 1: Hash function for the coordinates of a node center
int ComputeKey(float fa, float fb, float fc )
{
int a = 0x7ed55d16 & (((int &)fa) & 0xfffffff0);
int b = 0x165667b1 * (((int &)fb) & 0xfffffff0);
int c = 0xd3a2646c ^ (((int &)fc) & 0xfffffff0);
a=a-b; a=a-c; a=a (̂c >> 13);
b=b-c; b=b-a; b=b (̂a << 8);
c=c-a; c=c-b; c=c (̂b >> 13);
a=a-b; a=a-c; a=a (̂c >> 12);
b=b-c; b=b-a; b=b (̂a << 16);
c=c-a; c=c-b; c=c (̂b >> 5);
a=a-b; a=a-c; a=a (̂c >> 3);
b=b-c; b=b-a; b=b (̂a << 10);
c=c-a; c=c-b; c=c (̂b >> 15);
return (c);
}

SOFTWARE DEVELOPMENT
78 01/2012
node on the fly but that implies we use some memory operations which aren’t very cheap time wise (new and delete are very slow operations).
For the straddling problem, there is a variant of oc-trees that offer a great solution. They are called loose octrees – the first mention of this structure is in this conversation http://tulrich.com/geekstuff/partitioning.html (The interesting part is at the bottom). The idea of a loose octree is very simple once you understand the normal octree. Simply loosen the node dimensions of a normal octree. What this means is that you have a pri-mary size for a node which is the normally computed size (1/8 of the parent size) and then you have a sec-ondary size which is a fraction larger than the primary. How much larger depends on the application. I have read that usually the size of one side of the secondary boundary is twice the size of the primary boundary.
How does this solve the straddling problem? Well we establish a restriction that the maximum radius an ob-ject can have to be included in a specific node is half of that nodes primary size. If an object is larger than that it is stored in a higher level in the tree. Now, because of the loose node size and this restriction, we don’t have to store the object in multiple nodes. We know for sure that if an objects center is in a specific node, that object will not exceed the secondary boundary of the node.
So putting all of these ideas together (loose octrees, hash table and neighbor elimination) we get an update procedure that looks something like this: (Listing 2).
As you can see, using the loose octree and the neigh-bor elimination technique, we don’t even have to do 7 bounding box checks as previously stated. We get the exact center we need with just a few calculations.
UsageSo how do we use this structure after creating it and
establishing how to update it. Well it depends on what we want to do. Do we want to use it for optimizing ren-dering or collision detection?
To optimize rendering the first step is to send as little unnecessary data to the GPU as possible. This means that anything that isn’t visible should not be processed. This includes polygons that are not in the current view frustum, polygons that are occluded by other objects, polygons that aren’t facing the camera etc.
Culling the polygons that are not in the current view frustum is easy with an octree. Just create the frustum and try to insert it in the tree: recursively check the bounding box of each node for intersection with the frustum. If an intersection occurs send the data stored in that node to the GPU. If not, ignore it.
Listing 2: Update procedure for octree. This is run once per frame for each object that has moved
Vector3 C; // current node center
Float L; // current node size
Vector3 Nx, Ny, Nz; // normals for test planes
Vector3 ObjPos; // current object position
// compute the direction the object is relative to the node center
// this is so we don’t check the planes that are opposite to the
// object relative to the node center; those planes are irrelevant
Vector3 V = ObjPos – C;
Nx = V.x > 0 ? Vector3(1,0,0): Vector3(-1,0,0);
Ny = V.y > 0 ? Vector3(0,1,0): Vector3(0,-1,0);
Nz = V.z > 0 ? Vector3(0,0,1): Vector3(0,0,-1);
Float halfL = L/2;
// point on all the test planes
Vector3 P = Nx * halfL + Ny * halfL + Nz * halfL;
Vector3 newC = C; // to store the new center
// if the current position of the object is on the outside
// of the nodes bounding plane add to the current center
// the size of the node in the direction of the plane normal
If( Dot(Nx, (ObjPos + P)) > 0 ) newC += Nx * L;
If( Dot(Ny, (ObjPos + P)) > 0 ) newC += Ny * L;
If( Dot(Nz, (ObjPos + P)) > 0 ) newC += Nz * L;
// if it’s a new center move the object there
If( newC != C)
{
OctreeNode* pNode = hashTable.GetNodePointer(newC);
pNode.Add(Object);
CurrentNode.Remove(Object);
}

Octrees
01/2012
Occlusion culling is done fare and more easily with z-buffers and back-facing polygons are quite easily culled by todays’ graphic cards so the octree isn’t the best option for these two scenarios.
Optimization for collision detection implies perform-ing the complex calculations on as few pairs of objects as possible. The idea is to do the calculations only on objects that are close together: there is no use in do-ing collision detection between the sword in the hero’s hand and the box ten meters away. Octrees help here because the objects are grouped according to their po-sition. So we can easily find the objects that are close together and perform the calculations only on those.
The process is similar to frustum culling, described earlier: take each object that moved after the last frame and recursively compare its’ bounding box with the bounding box of each node encountered traversing the tree. If the bounding boxes intersect add the ob-jects in that node to a list of objects to compare too and visit that nodes children. If not discard that node and its’ children.
For loose octrees, both frustum and bounding box intersection tests are done with the bounding box formed by the secondary boundary (the larger box) be-cause we have to make sure that all the relevant objects
are correctly processed, even object from neighboring nodes that might straddle in the current node.
ConclusionsIn this article I explained the basics of using an octree
in games and detailed some of my ideas regarding this structure. There are many details I didn’t cover but this can be a starting point for anyone trying to research this subject further.
I believe this structure is a very powerful tool in game development and once the basic functionality is understood it is quite easy to implement.
Adrian Jurca
Adrian Jurca is an independent game developer, passionate about engine coding. He’s eager to learn and understand anything related to graphics and physics for games. During the last five years he’s been working on his own game engine in his spare time. He currently develops plugins for CAD software in an Autodesk partner company.
- A D V E R T I S E M E N T -

SOFTWARE DEVELOPMENT
80 02/2012 en.sdjournal.org
Windows Azure is a good offer for sites and services that need to scale. Windows Azure is Microsoft cloud services system that offers the following services:
• hosting and scaling of web sites and background services,
• cloud-based storage (blobs, queues and tables),
• SQL Azure database,
• SQL reporting services,
• cloud-based cache,
• enterprise service bus,
• access control services
For beginners or users with not so familiar with cloud Windows Azure has good trial offers. Develop-ers with MSDN library premium subscription get also one small computing instance time for the time when subscription holds. To find out more please visit http://www.windowsazure.com/.
Cloud environment is similar to dedicated hosting but it is still very different – your applications are deployed to Windows Azure environment and host operating sys-tem is in judge for creating virtual server instances for you. Those instances my come and go but your site is always up and running. We cannot control the work of host system and that’s why we cannot count on local resources kept in virtual server (like uploaded files in file system). As we will see later then such dependencies can be considered as bad practices because our solu-tion is not independent from infrastructure.
When moving to cloud some questions are still fa-miliar from multi-server scenarios:
• How to store session and application variables when differents servers respond to requests in a same session?
• Where we have to keep our data so that it is acces-sible by all web front-end servers?
• How to organize caching?
• Where we should keep files?
• Where we should keep logs?
These questions get almost always easy answers when we are hosting our applications in-premises. We can use file shares, databases etc and we don’t really consider these questions as a problem. These questions will raise up as problems to solve when we are moving to cloud. This is because for us many aspects of our sys-tems are so normal – what do you meen I cannot save file to disk on cloud? Yes, you can, but as host operating system has no idea about your files (these files are not part of deployment package) then in the case of new virtual server these files are lost. When moving to cloud we often need to change some aspects of technical de-sign of our applications.
Example: Generalizing file accessIn this article we will generalize file access so our ap-
plication can run on-premises, on shared hosting and on Windows Azure and all we have to do is some con-figuring work. We will start with simple page that offers file upload and we end up with generalized file access.
Suppose we have simple ASP.NET page with file field and upload button. The code for button click event is defined like follows: (Listing 1).
Porting existing web applications to Windows AzureIn this article we will generalize file access so our application can run on-premises, on shared hosting and on Windows Azure and all we have to do is some configuring work. We will start with simple page that offers file upload and we end up with generalized file access.

Porting existing web applications to Windows Azure
8102/2012 en.sdjournal.org
This code works fine but it has some problems:• our web application is bound to storage implemen-
tation details,
• if we want to support also other storages then we have to write new code everywhere where we ac-cept file uploads,
• our forms get smarter and smarter and they are too strongly dependent on underlaying infrastructure.
We need to separate our form and file upload logic in this point and we need solution that allows us to change file storage implementation without touching code behind upload forms.
Analyzing file storeBasing on my experiences I come up with following
solution:
• we will bring in new term: file store that represents some place where we can keep our files,
• as our application must not know details of file store implementation and there can be more than one implementation (for file system, for SharePoint document library, for Windows Azure etc) we need to define interface that works as contract between application and file store implementations,
• we have to bring in some DI(What means DI ?)de-pendency injection(DI) container so we can easily ask correct instance of file store implementation,
• we have to standardize organization of file store so all file store implementations can understand what application wants to do.
Usually we have different types of uploaded files – there can be documents, pictures, videos, user profile images, customized stylesheets and so on. On Share-Point we have document library for files, maybe even more than one. On Windows Azure we will use blob storage that has limited options for directory trees. As this one is most limited we work out our file store im-plementation with Windows Azure in mind.
On Windows Azure blob store account we have con-tainers that contain blobs. Blobs will be the files we are keeping in containers. Now let’s say that we need one container for every type of uploaded file. I’m playing just with one example scenario here and in this point your analysis and considerations may be way different. For our application we get the following containers:• profile images• documents
We need a way how to say to file store implementa-tion what kind of file we are saving. Later we need to ask URL of file when we need to send the file to brows-er. And let’s don’t forget the fact that user can delete and update files.
Defining file store interfaceWe have enough information to define contract be-
tween our application and file store implementations. Here is our interface: (Listing 2).
Listing 1: Click-event of upload buttonprotectedvoid UploadCommand _ Click(object sender, EventArgs e){var path = Path.Combine(Server.MapPath(“~/Files/Profiles/”), FileField.FileName);
if (File.Exists(path))File.Delete(path);
using (var stream = File.OpenWrite(path)) { stream.Write(FileField.FileBytes, 0, FileField.FileBytes.Length); }}
Listing 2: File store interface and store type enumpublicinterfaceIFileStore{void DeleteFile(FileStoreTypeEnum storeType, string fileName);void SaveFile(FileStoreTypeEnum storeType, string fileName, byte[] fileBytes);string GetFileUrl(FileStoreTypeEnum storeType, string fileName);}publicenumFileStoreTypeEnum{ ProfileImage, Document}

SOFTWARE DEVELOPMENT
82 02/2012 en.sdjournal.org
Note. We are using enum because it is error prone compared to strings and has its own type compared to constants with primitive types. If we have a typeo in enum member name in our code then code doesn’t compile.
File store: Disk based implementationAs a first thing let’s start with file store that is keep-
ing files on disk. We already have some code that saves files to disk and this concept is most familiar to us. We will define root path of file store in application setting called DiskFileStore.RootPath. If you want to be more correct then you can define your own configuration section and create all related classes to read configura-tion data (Listing 3).
Before enjoying the full power of our dile store solu-tion let’s write also file store implementation for Win-dows Azure.
File Store: Windows Azure blob storage implementation
As we saw before Windows Azure blob storage has the following structure:• Blob store account
• Container• Blob
By our analysis containers are defined by StoreType enumerator. Files are handled as blobs. Here is our Win-dows Azure blob storage with folders (you can use free
Listing 3: DiskFileStore classpublicclassDiskFileStore : IFileStore{protectedstring RootPath { get; set; }
public DiskFileStore() {var rootPath = ConfigurationManager.AppSettings[“DiskFileStore.RootPath”];
RootPath = HttpContext.Current.Server.MapPath(“~/” + rootPath);if (!RootPath.EndsWith(“/”)) RootPath += “/”; }
publicvoid DeleteFile(FileStoreTypeEnum storeType, string fileName) {... }
publicvoid SaveFile(FileStoreTypeEnum storeType, string fileName, byte[] fileBytes) {var filePath = GetFilePath(storeType, fileName);if (File.Exists(filePath))File.Delete(filePath);
using (var stream = File.OpenWrite(filePath)) { stream.Write(fileBytes, 0, fileBytes.Length); } }
publicstring GetFileUrl(FileStoreTypeEnum storeType, string fileName) {... }
protectedstring GetFilePath(FileStoreTypeEnum storeType, string fileName) {if(storeType == FileStoreTypeEnum.ProfileImage)returnPath.Combine(RootPath + “Profiles/”, fileName);if (storeType == FileStoreTypeEnum.ProfileImage)returnPath.Combine(RootPath + “Documents/”, fileName);
thrownewArgumentException(“Cannot find store folder “ + storeType, “storeType”);
}}

Porting existing web applications to Windows Azure
8302/2012 en.sdjournal.org
version of CloudBerry Explorer for Azure Blob Storage to manage your blobs): (Figure 1).
Now let’s write file store imple-mentation for Windows Azure blob storage (Listing 4).
Now we have file store also for Windows Azure and it’s time to change our web application so it uses the file store implementation we want without affection web ap-plication code.
Listing 4: AzureBlobFileStorepublicclassAzureBlobFileStore : IFileStore{privatereadonlyCloudStorageAccount _ storageAccount;privatereadonlyCloudBlobClient _ blobClient;
public AzureBlobFileStore() {var accountName = ConfigurationManager.AppSettings[“AzureBlobStore.AccountName”];var key = ConfigurationManager.AppSettings[“AzureBlobStore.Key”];
var asas = newStorageCredentialsAccountAndKey(accountName,key);
_ storageAccount = newCloudStorageAccount(asas, true); _ blobClient = _ storageAccount.CreateCloudBlobClient(); }
publicvoid DeleteFile(FileStoreTypeEnum storeType, string fileName) {... }
publicvoid SaveFile(FileStoreTypeEnum storeType, string fileName, byte[] fileBytes) {var container = GetContainer(storeType);var blob = container.GetBlobReference(fileName);
blob.UploadByteArray(fileBytes); }
publicstring GetFileUrl(FileStoreTypeEnum storeType, string fileName) {... }
privateCloudBlobContainer GetContainer(FileStoreTypeEnum storeType) {if (storeType == FileStoreTypeEnum.ProfileImage)return _ blobClient.GetContainerReference(“profiles”);if (storeType == FileStoreTypeEnum.Document)return _ blobClient.GetContainerReference(“documents”);
thrownewArgumentException(“Cannot find store container “ + storeType, “storeType”); }}
Figure 1: CloudBerry Explorer for Azure Blob Storage

SOFTWARE DEVELOPMENT
84 02/2012 en.sdjournal.org
Using Structuremap As stated before we need DI container that finds
correct instance of file store implementation so our application only knows the interface. I am using Structuremap in this example as DI container and in this example we will use mappings from web.config file (Listing 5).
To get mappings loaded we add the following code to global.asax file: (Listing 6).
And here is the code for our upload button click event: (Listing 7).
Now we have are in point where file store is sepa-rated from our application. Depending on our needs we can change Structure map configuration and our application uses automatically the file store imple-mentation we want. We can use disk based file store on share hosting. We can use Windows Azure blob storage in Windows Azure and also in shared host-ing. It really depends on our current needs what file store we want to use.
ConclusionPorting web applications to cloud can be challeng-
ing because we need to work hard to distantiate built-in depencies of infrastructure to separate classes or
libraries. Using dependcy injection frameworks we can easily support different implementations of same interface and use cloud implementations of classes if we need to use cloud services.
One thing to note – having implementations for cloud services doesn’t mean that we have to host our application on Windows Azure. We can run our ap-plication in premises and scale only some parts of it using cloud services.
ABOUT AUTHOR
Gunnar Peipman
Gunnar Peipman is IIS/ASP.NET MVP from Estonia. Currently working at Estonian department of Attido Ltd, Finland as .NET solutions architect and tech lead. Gunnar spends his free time on blogging, playing with new technology, visiting technical conferences and building Estonian Microsoft com-munity portal. If possible, Gunnar is also traveling and visits different metal festivals with friends.
Listing 5: Structuremap mappings in web.config file<StructureMap><AddInstanceKey=”AzureBlobFileStore”PluginType=”ArticleSamples.IFileStore, ArticleSamples”PluggedType=”ArticleSamples.AzureBlobFileStore, ArticleSamples” /><!--AddInstance Key=”DiskFileStore” PluginType=”ArticleSamples.IFileStore, ArticleSamples” PluggedType=”ArticleSamples.DiskFileStore, ArticleSamples” /--></StructureMap>
Listing 6: Application start method in Global.asax filevoid Application _ Start(object sender, EventArgs e){ObjectFactory.Initialize(container => { container.PullConfigurationFromAppConfig = true; });}
Listing 7: Button click event in Upload.aspx code-behindprotectedvoid UploadCommand _ Click(object sender, EventArgs e){var fileStore = ObjectFactory.GetInstance<IFileStore>(); fileStore.SaveFile(FileStoreTypeEnum.ProfileImage, FileField.FileName, FileField.FileBytes);}


SOFTWARE DEVELOPMENT
86 02/2012 en.sdjournal.org
Object/Relational Mapping, or O/RM, is a hot top-ic. Talk is everywhere, it seems that new O/RM libraries pop up every month - everyone is writ-
ing their own, and Microsoft itself is putting a consider-able amount of its weight behind its own solution. So, what exactly is an O/RM for, and why should you care?
If you’re like me, you’re probably accustomed to starting your projects by defining a data model, that is, after you have a set of well-defined requirements to guide you. Whether you start from an Entity-Relational model or go directly to the physical model is probably a matter of either personal preference, company policy or the desire to have something which is not tied to a particular database vendor: the E-R model is pretty good at that. You define your entities, attributes and associations to represent the concepts that you wish to save in the database. If you start from an E-R model, you must generate the actual physical model for each of the RDBMs that you will be targeting, admittedly, in most cases, it may be just one.
Then comes coding. If you’re lucky enough to only have one RDBMS to be concerned about, it’s all a matter of separating the database access code from the rest of it and having it organized, consistent and correct; oh, and, of, course, you have to actually learn how to do what you want to do with your data: let’s face it, Object-Oriented Programming (OOP) developers aren’t usu-ally also SQL developers, although some of the former may have more than a slight idea of how to accomplish things. It also happens that knowing how to get some-thing done (effectiveness) does not mean that it is done the best way (efficiency). Then you have to worry about security – those nasty SQL injection attacks – and per-formance. When you finally manage to get things right,
that’s when you receive the good news that there’s an-other customer interested in your product. But, alas, he wants to use a different RDBMS. And it doesn’t support identity fields, and date fields are dealt with differently, and there’s no Boolean data type...
Enter O/RM. In order to understand what it really is about, you must think about things rather differently, and one way to think about software development is through Domain-Driven Design.
Domain Driven DesignDomain-Driven Design (DDD) is a term coined by
Eric Evans in his seminal work, not surprisingly titled Domain-Driven Design: Tackling Complexity in the Heart of Software. In it, he postulates that complex systems should be based on class models, all concepts should be represented by traditional OOP concepts and persistence itself is merely an aspect of the system (one that must be dealt with explicitly, mind you). Do-main-Driven Design, as O/RM, is not tied to any specific computer language, but it is tied to OOP.
Following the DDD approach, instead of defining a data model, you start by defining a class, or domain, model. I think everyone will agree that this is also RD-BMS-independent; this has also an advantage: class models are much richer than data models, whether they are E-R or physical one. Just think for a second: how do you represent inheritance in table diagrams? How about abstract classes or virtual methods? And interfac-es? All of this comes naturally to OOP developers, but there is no standard way – or there are several standard ways, which is the same - to accomplish it in the rela-tional world. Also, in relational models, you think about
O/RMs Dissected
What You Will Learn• What is Object/Relational
Mapping• What is Domain Driven Design• When to use an O/RM• When not to use an O/RM
What You Should Know• Object-oriented programming• Database concepts

O/RMs Dissected
8702/2012 en.sdjournal.org
structure, not behavior, while in OOP, unless you have an anemic model, you also specify the operations that go along with your classes and can even throw in some additional metadata. This is known as the Impedance Mismatch, the essential difference of nature between a relational model and an object-oriented one, and that is precisely the reason why O/RM exists.
O/RMThe first Object/Relational libraries appeared in mid-
90s for the SmallTalk and, later on, the Java languages. The concept has matured a lot since then, and gained a legion of followers as well as detractors. It exists in all major languages, provided they are object-oriented, in many flavors.
O/RM goes along very well with DDD, as you can imagine: you focus on your classes, which are part of the same universe that you are used to, along with graphi-cal controls and network APIs. What O/RM offers you is an abstraction around database calls and SQL queries, shielding you from the actual RDBMS details, and thus allowing you to move your code seamlessly between different vendors, without changing a line of code – af-ter all, all you are doing is instantiating classes, setting property values and calling methods. Classes (named entities in O/RM terminology) get properly translated to either tables or views, scalar types to database-spe-cific types, properties to columns and object instances to physical records; associated records are converted to collections or complex type properties (other entities).All your code is checked at compile time and you can even analyze it for best practices, style or conventions; you trust your O/RM to translate it to the RDBMS that you are targeting in the best possible way, applying best practices such as parameterized queries, usage of parameters and indexes, and so on. O/RM exists for all languages that support OOP, from JavaScript (true!) to C#, and from PHP to C++. When you run your program, it turns your code into plain old SQL.
I’ve been talking about DDD, which means class-es first, but some O/RMs also allow you to work with tables first, that, the traditional way. In this case, you have to generate the classes that map to your data model, define how this mapping is done and adjust some database-specific settings. The class and map-ping generation can be either done manually or with a helper tool, of which there are several ones available, both commercial as well as free, quite useful if you have lots of tables. With classes first, the O/RM tool can di-rectly generate the data model for you or produce a data definition language (DDL) script for you to run at a later time. Some O/RMs are even smart enough to de-tect changes to the class model that are not present in the database and apply changes to it, for example, new properties added. You typically don’t need to be con-cerned about the generated data model, but you do
have something to say: for example, in order to repre-sent class inheritance, you have three canonical forms, as described in Martin Fowler’s Patterns of Enterprise Application Architecture:
• Single table inheritance: this means all properties for base and descending classes are stored in a single table, on which a discriminator column is used to indi-cate the actual type of each record; many nullable col-umns are likely to exist, for each of the properties of a descending class that do not exist in the other classes;
• Class table inheritance: base properties are stored in a table, and properties specific to each class are stored in their own tables; both tables share the same primary key column;
• Concrete class inheritance: no table for the base class exists, and each concrete class gets its own table with all of its properties converted to columns; you must take care not to use the same primary key for two records on any of the tables, because this would prevent you from loading a concrete instance of a class from a base one and its identifier: the O/RM would be confused because it would find more than one record, on different tables, and would not be able to make the decision of which to choose.
There is no rule as to which one is best; you must make your own decision, and there are arguments for and against each strategy.
Listing 1: Entity classes in C#, which are the same regardless of the chosen class inheritance pattern

SOFTWARE DEVELOPMENT
88 02/2012 en.sdjournal.org
Common O/RM Services
In OOP, you have a multitude of techniques that you can use, from Aspect Oriented Programming to Service Oriented Programming, through Dependency Injection and Inversion of Control, to name just some of the currently most popular. O/RMs also bring along some specif-ic services which can be quite useful, namely:
• Change tracking: the capacity to detect that an object instance loaded from a database has been changed and needs to be saved back; most of the time this is done automatically;
• First level cache: loaded class in-stances are stored on a memory cache, to avoid the performance penalty of instantiating new in-stances whenever the same re-cord is retrieved;
• Unit of work: the O/RM keeps track of the objects that belong to the database and saves (inserts, updates, deletes) them in an or-derly, atomic way, respecting their dependencies: dependent in-stances are stored after indepen-dent ones;
• Lazy loading: properties, associ-ated collections and classes are loaded only when (and if) they
Figure 1: A simple class model
Figure 3: A data model using the class table inheritance pattern
Figure 4: A data model using the concrete class inheritance pattern
Figure 2: A data model using the single table inheritance pattern

O/RMs Dissected
8902/2012 en.sdjournal.org
are accessed, no additional explicit database call is required, and no unnecessary loading occurs if not necessary;
• DB-independent querying: getting data from the database without knowing exactly how it is stored, just supplying the desired entity type (or even de-fining a new one) and some OOP-based conditions; it is even possible to use stored procedures in some O/RMs;
• Event handling: it is possible to be notified when-ever an instance is about to be/has just been saved, deleted or updated;
• Batching: inserts, updates and deletes are sent to the database in a batch, so fewer commands are sent;
• Mappings: this is how you translate your tables and views to classes; even if you change the underlying database names and structures, you may well be able to keep your existing classes with no changes, just by changing the mapping.
Most of these concepts are also described in detail in Patterns of Enterprise Application Architecture, and I strongly advise you to have a serious look at it.
Bear in mind that O/RM is not standard, and al-though you can expect to find most of these services in modern products, they will probably not act exactly the same.
Decision Factors So, with all these bells and whistles, is O/RM the an-
swer for all your problems? It depends. What it is for sure is just another programming abstraction that you may use. For example, an O/RM is not, and should not be used:
• A business logic framework: it typically offers you no more than plain old classes, you have to code the business rules yourself;
• As a general purpose Extraction, Transformation and Loading (ETL) tool: it is generally not suited for deal-ing with thousands (or more) simultaneous instances in memory, having to instantiate, track changes and possibly save or update a large number of instances can result in poor performance;
• If extreme performance matters, you’re better off with stored procedures, views and database-specific techniques; typically O/RMs only support standard or widely adopted operations;
• For reporting, the dynamic SQL generated by the O/RM may be suboptimal, for example, it may bring along more data than you actually need;
• When you must use triggers or other “magical” and specific database concepts, which can confuse the O/RM;
• The developer has more knowledge in SQL that in OOP;
• In scenarios where the SQL is not known before-hand and dynamic SQL generation is required.
Having said that, some typical uses and benefits of O/RMs, in no particular order, are:
• When RDBMS independence is a requirement;
• Focus is on DDD;
• Create, Read, Update, Delete (CRUD)-style operations;
• Developer has not a great knowledge in SQL, but does have in OOP;
• Changes to the database structure are expected, and code should be maintained with as few chang-es as possible;
• If you want no external artifacts other than the code itself;
• You are free to reuse some of your classes from proj-ect to project, even if they use different RDBMSes, which is DRY-friendly;
• IDE refactoring, including of queries, is, of course, fully supported, which normally does not occur with, say, SQL text files;
• Everyone that knows OOP can read and understand code that uses O/RM for persistence.
Common MisconceptionsFor some users, O/RMs have a bad reputation of be-
ing slow, not efficient and of doing things they weren’t supposed to. From my experience, this mostly results from either poor knowledge of what an O/RM exists for, not using the right patterns or having inappropri-ate configuration. Giant companies such as Microsoft, Oracle and others are using them with success, so why can’t we? On the other hand, despite its apparent sim-plicity – converting properties to columns and entities to tables - , a modern O/RM is a complex beast, and deciding to implement your own can often result in pain and sorrow.

SOFTWARE DEVELOPMENT
90 02/2012 en.sdjournal.org
O/RM ChoicesYou have a number of choices if you decide to take
the O/RM path, provided your use case qualifies for it.
First, you have to choose the O/RM solution, and whether you want to go for a commercial or a free and perhaps even open source solution. Some aspects that you should take in consideration when you make this de-cision are:
• Support for your technology of choice (Java, .NET, etc);
• Maturity of code: is this a first version or a mature one? How often do new versions come out? How fast are bugs fixed?
• Choice of mapping types: choices are XML (less intru-sive, not strongly typed, not compiled), code-based (strongly typed, checked at compile time) and attri-butes/annotations (usually more tied to a particular O/RM product);
• Specific functionalities that may exist in one O/RM product and not on another;
• Support for RDBMSes that you wish to target;
• The existence of IDE-based plugins or third-party tools for entity definition and code and mappings generation; this is of utmost importance if you intend to have a great number of entities, since generating all of these (plus their mapping code) is troublesome and error-prone;
• Quality of API documentation and samples;
• Usage of plain old classes instead of having to imple-ment a particular interface or inheriting from an ab-stract base class; this may or may not be of importance to you, most of the time, we can live with both options;
• Existence of communities of users that can help you overpass problems and avoid common pitfalls;
• Possibility of commercial support;
• Support for class first and data first models (if rel-evant to you);
Reliability of supplier: generally speaking, one should expect that a well-known software house will not drop support for an existing version of a product, which may not occur with individually-developed open source projects, but we all know that this is not always the case.
The second choice is if you want to go from class model first or from data model first. Not all O/RMs sup-port both of these models, you must make a decision consistent with the solution you picked first.
Finally, you must choose how to map your domain model to the database. With mapping by XML you are decoupling your classes from the O/RM product, so in theory you can even use them with other products. Mapping by code is an option that has the advantage of being refactor-friendly: if you choose to change a prop-erty’s name, the mapping will also be updated to reflect the change, and it also is product-independent. The at-tributes/annotations solution is generally not portable among O/RMs, which may not be a problem after all, but does introduce a strong dependency between your class project and the O/RM. Also, not all O/RMs support this.
State of the ArtSome of the current trends in O/RMs, implemented
in some of the latest product versions, seem to be:
• Automatic configuration of mappings between the database and the entity classes; this relies on con-ventions, which may be overridden, but generally are a good starting point;
• Validation of entities prior to saving them;
• Generation/updating of the data model based on code changes to entities (on class first model);
• Usage of “naked”, plain old classes for your entities; this means no base class or interface is required.
ConclusionThe O/RM is a welcome addition to a developer’s tool-
box. It is everywhere, and indeed can introduce great benefits, which can dramatically cut your development effort and avoid future pains. Remember, however, that just because you have a hammer, not everything is a nail. Study carefully your problem and see if it really helps, if it doesn’t, good old SQL is also here to stay.
Ricardo Peres
Ricardo Peres has more than 12 years of experience in software development. He works for a multinational, Portugal-based company called Critical Software, where he develops software mostly with Microsoft technologies.
He writes regularly in his blog, Development With A Dot, especially on ASP.NET and NHibernate, and can be reached at [email protected] or followed at https://twitter.com/#!/RJPeres75.

SOFTWARE DEVELOPMENT
92 02/2012 en.sdjournal.org
How we can use Social NetworksI wanted to outline my thoughts on how we as de-
velopers can leverage social media to our advantage whilst we do a variety of things. The reason I want to do this is that whilst design and gaming industries have leveraged social media well, as developers we are may-be falling behind somewhat.
I will be dealing with the three major social media sites at the moment, Twitter, Google+ and Facebook – each of these is different enough to warrant its own section but the majority of the techniques I will be touching on will be transferable to other networking websites.
For each site I will look at the core things we as de-velopers want to do on the web (or at least I want to do as a developer!). These are• Getting help – Asking questions on specific or
general programming topics.• Showing off – Displaying your current work and get
feedback on it.• Finding work – Looking for part-time or full-time
work, or consulting positions.• Socialising – Meeting like-minded developers.
To get the most out of this article you should already have a decent working knowledge of the three social networks, however even if you don’t have an account on them or are a relative novice I would hope you will still get something from this.
Without any further ado, let’s jump in with the first social network.
TwitterTwitter is a hosepipe of information, next to useless
at archiving various snippets of information but excel-lent for dipping into every so often to take a look at your own personal Zeitgeist.
Twitter has the notion of a “one-way follow”, which is excellent as you can follow as many people as you want
both in and out of our industry without the intimacy of a Facebook friend request, for example. Furthermore, the larger your follow base, the greater chance that these tips will work.
With that in mind let me first quickly discus how to get a good following on Twitter – the first thing to know is that numbers are probably not the best met-ric for you on this, the best metric is how people are engaged with you – that is how often people reply to you and how often people retweet (share) your stuff. To ensure people are engaged by you, tweet high qual-ity content, be it in the form of links or 140 character words of wisdom. At the risk of sounding like a “self-help” book, to be engaged with you first have to be engaging.
Assuming you have amassed a following of some sort on Twitter the next thing is how do we utilise it in the four areas outlined above.
Getting help
Getting help on twitter is surprising easy, you just need to ask for it. “If your question can be written in 140 characters or under then do so, but if not be sure to post it somewhere people can easily access via a link in your tweet. Unlike other networks were there feels like there has to be a little more quid-pro-quo Twitter is seen to be more throw away and people are happy to give help when they can.
Twitter has a notion of sharing called retweeting – if you like what someone has said you can share it with your followers using a retweet button, this posts what they have said along with attribution to the original au-thor of the tweet.
If you want people to share your question with their Twitter followers (always a good thing) be mindful that not everyone uses the new retweet functionality and still prefer to put RT @your_handle, with this being the case try and leave maybe 20 characters free to allow them to do this without having to edit your tweet.
How we can use Social NetworksSome of us don’t like to admit it but the social element of the web has really blown up in the past few years and social media looks like it is here to stay.

How we can use Social Networks
9302/2012 en.sdjournal.org
Whilst people are generally willing to help, remem-ber to respond to any replies you get, even if the infor-mation supplied ended up not helping you.
Because Twitter is like a hosepipe there is a temp-tation to repost your question multiple times because the assumption is new people will see it each time, whilst this is kind of true you shouldn’t go overboard with reposting – it will annoy the regulars.
Given the post restraints posting up code isn’t really an option, so I would recommend using something like jsfiddle.net or pastebin.com
Showing off
Showing off your work used to be a lot easier on Twitter than it is today, the coming of the URL shorten-er has meant that now an average Twitter feed is awash with hundreds of bit.ly links that are meaningless.
There are three things I can mention to try and en-sure that your link gets clicked on and shared:
Ensure that your content is good. It may seem like a no brainer, but you want to avoid the temptation of posting every little code tweak and making it sound like a real game changer.
If your content is hidden behind a link give it a good title, it should reflect the content but the more descrip-tive you can make it the better – hash tags (#likethis) are the primary way to categorise content on Twitter, use them appropriately to mark up your tweet for oth-ers to find.
Post when people will see – obviously Twitter is an international thing and you will likely have an interna-tional audience, but what I mean is if you are trying to post something that you want your local peers to no-tice and you have just made your final code commit at 3AM, probably wait until a more sociable hour before you start posting about it.
Finding work
Finding work on Twitter is a bit of a mixed bag. On the negative side there is a tiny signal-to-noise ratio-- the amount of recruitment agents sending spam and unskilled programmers claiming everything under the sun is quite frankly, depressing. But on the more posi-tive side, it has never been easier to market yourself as an expert as the barrier to entry is essentially nil. Simply sign up for a free github account, post some code on-line, and share it-- voila!
As mentioned, spammer recruitment agents are an issue, so be wary of any unsolicited tweets.
Socialising
I have found Twitter to be one of the harder social networks to properly socialise on, one the one hand because of the slew of mobile apps and the massive user base, it should be easy to arrange to do things but I have found that due to the throw away nature of many of the relationships on Twitter doing proper net-working and socialising can be difficult.
One way to try and keep on top of things would be to use the List feature to group similar people togeth-er, I try and do it based on geography and profession (so, for example I have a Northern Irish Web Developer group)
Google PlusAlthough Google Plus is the newest out of the three
social sites covered here, it is already proving its chops and worth for developers.
Like Twitter there is a one-way follow mechanism, which affords many of the same positives and nega-tives. Also like Twitter there is a notion of lists called circles.
Circles allow you to categorise your contacts into easy-to-view groups of your choosing. While the per-son will know if you add them to a circle, they will never know the name of the group that you choose to assign them (which is mega-handy when an annoying family member or co-worker wants you to follow them, just add them to the ‘people-to-ignore’ circle and you are done!’).
All my developer buddies and contacts go into a rather general circle of mine called ‘Nerds’ I use this cir-cle when I want to see only industry related Google Plus posts (or at least posts from industry related people)
You can also chose who gets to see your content, which means you don’t have to bore one circle of friends with content more appropriate for another.
Getting help
I haven’t seen too many people attempting to get help on Google Plus, I think down to the relatively small user base at the moment coupled with the fact that many people are still finding their feet with where Google Plus sits within their social networks.
Certainly having more room to play with is a big plus, but there is no real code friendly formatting, so examples would need to be linked offsite.
One way you can get help is to post it publicly but at the same time also include email addresses of contacts you think might be able to help.

SOFTWARE DEVELOPMENT
94 02/2012 en.sdjournal.org
Showing off
You would think that the issues with getting help would carry across into showing off but I don’t think this is the case.
A lot of people seem to be using Google Plus as a blogging platform, and really when you break it down all the right components are there, the ability to easily share and comment on posts means that your content has the ability to go viral and the extra leg room pro-vided by the content limits (I am not sure what the limit is but I am pretty sure this article could fit into one up-date) is a real plus.
People seem happy enough sharing and plussing ar-ticles, sharing definitely seems to happen far more on Google Plus than it does on Facebook.
Finding work
To be honest I have yet to see Google Plus being used by either recruitment agents in any strong way or by someone specifically looking for work, the fact many people do use it as a personal blog though means they have easily accessible content for potential employers to look at.
Naturally as time goes on there will be a greater link between all the Google products, so having an up-to-date profile on Google Plus will be useful to market your-self. The profile is actually one area that Twitter really lacks, with Google Plus you can give a pretty complete bio including current and previous job roles, this isn’t quite as refined as Facebook’s, but it is still pretty good.
Socialising
Socialising on Google Plus is easier than on Twitter, I think this is down to the length of the posts and the fact there is more information stored on Google Plus about people, sharing links and videos.
There have been some pretty high profile cases were people have badmouthed companies they have worked for in what they thought was a private post but with the wrong selection made it ended up being public, and once something is shared by someone else there doesn’t seem to be a way to revoke permissions – just a word of warning!
FacebookFacebook is the oldest of these three sites and cer-
tainly the one with the greater penetration.
Unlike the previous networks Facebook has a two-way follow mechanism, but like the other two there is a notion of grouping people into lists.
Having the two way follow makes it harder to make new connections on your personal profile as you al-ready know the person from another walk of life, that being said there are still ways developers can leverage the massive user base of Facebook.
Getting help
Most companies and organisations now have some sort of Facebook page, which makes getting help from the source usually fairly easy – unlike Google Plus or Twitter where it isn’t obvious to others if companies have got back to people, Facebook makes it fairly ob-vious if someone has replied to a comment, which in-creases accountability.
There are also several well established groups on Facebook for various programming languages, frame-works and other tech-related topics – the groups are community driven and usually fairly receptive to ques-tions and giving help.
On the down side, the reach your personal profile has is limited to the number of friends you have, as a result getting help from Facebook doesn’t feel like it could go just as viral as if you got help from the other.
Showing off
The easiest way to show off on Facebook is to cre-ate a page for your product or company, using the now ubiquitous like button can get you a selection of followers that have the potential to make your posts somewhat viral (most engagements users have with your page gets logged into their timeline).
Unlike Twitter and Google Plus comments on Facebook have a slightly more permanent feel to them, so you have to be ready to receive negative criticism and remember that your response to it will be fairly public.
Finding work
Finding work on Facebook is a bit of a no go, be-cause the platform has been set up to really cater to friendships there really isn’t a notion of using it to find work. Also because family members and friends are on it, sometimes it is hard to keep your overall profile professional, so advertising your Facebook might not always be to your advantage.
Recently Facebook have brought in a notion of lists, which lets you group friends together into man-ageable subsets, potentially you could share some information with one group and not the other but I have yet to hear of anyone having success doing something like this to find work.

9502/2012 en.sdjournal.org
Of course that isn’t to say there isn’t a group set up in your local area were people post job offers or requests, but that isn’t something baked into the website.
Socialising
Socialising is what Facebook was designed to do, and I think it does this hands down better than any of the other website I have discussed today.
With the ability to tag and add locations to pic-tures, videos and posts and the fact that connections you have made on Facebook are presumably already your friend or at least acquaintance definitely make the site feel more geared up to socialising.
Facebook also has an easy-to-use event tool, which lets you create and invite people to events. I have seen this used successfully for local meetups of different user groups and even for larger developer conferences and talks.
ConclusionThe barrier to entry on the sites I have talked about
is low, but only if you take those first steps and just start producing content and engaging others.
With that said, that pretty much sums up my thoughts on social networks and how we can use them as developers, hopefully it has been some help and I would encourage people to dig into them and explore the possibilities, with a slew of apps and pl-ugins available for these social networks and others there is just no barrier to entry.
I guess the last thing I want to do is ask you to share this journal on your social networks of choice and add me at the following addresses [https://twitter.com/#!/tosbourn/] [https://plus.google.com/108259413842523229630/posts] [https://www.facebook.com/toby.osbourn] I will hopefully get chatting to you soon!
Toby OsbournToby Osbourn is a web developer specializing in fast and secure PHP who loves to dabble in the front end when he gets chance. You can catch up with him on Twitter and his personal blog.


![Procedura reclami - Marzo 2018 - csps.parts.fiat.com · ,qgh[ ,qwurgx]lrqh sdj 5hjroh jhqhudol sdj 1rwh gl ohwwxud sdj &dxvdol uhfodpr &dxvdol 4xdqwlwj ±,q sl sdj &dxvdol 4xdqwlwj](https://img.dokumen.tips/doc/110x75/5e07092cc43050483722173a/procedura-reclami-marzo-2018-cspspartsfiatcom-qgh-qwurgxlrqh-sdj-5hjroh.jpg)
![韓国_仙台表9B024 SDJ'9BC11LEC004 3 4 SDJ'9g01CIST104 3 4 4 3 SDJt9actnsu203 4 SDJ19B01C]Su20d 3 SDJ'9gCiLJDXA03 A 4 3 SDJ19B01C10X803 s 44,800 49,800 47,800 54,800 49,800 59,800](https://img.dokumen.tips/doc/110x75/5edb0c2709ac2c67fa68b916/ee9b02-4-sdj9bc11lec004-3-4-sdj9g01cist104-3-4-4-3-sdjt9actnsu203.jpg)


![Reg ACI Gold 01062020€¦ · sdj sdj sdj sdj sdj $57 ± $66,67(1=$ 6$1,7$5,$ ± ³0(',&2 352172´ sdj $57 ± 5hjroh jhqhudol sdj $57 ± ,qirupd]lrql vdqlwdulh sdj $57 ± &rqvljol](https://img.dokumen.tips/doc/110x75/5f7b8a98e4e66835b402c10c/reg-aci-gold-sdj-sdj-sdj-sdj-sdj-57-66671-6175-02-352172.jpg)