Embed Size (px)
Citation preview
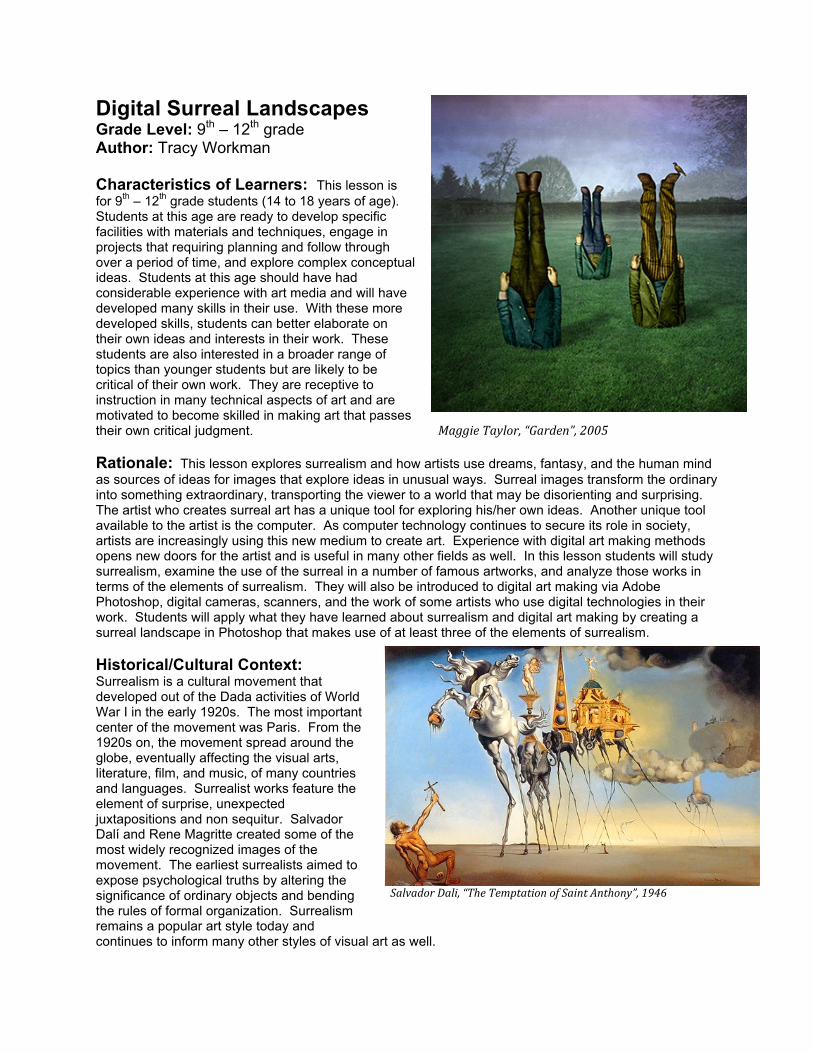
Digital Surreal Landscapes Grade Level: 9th – 12th grade Author: Tracy Workman Characteristics of Learners: This lesson is for 9th – 12th grade students (14 to 18 years of age). Students at this age are ready to develop specific facilities with materials and techniques, engage in projects that requiring planning and follow through over a period of time, and explore complex conceptual ideas. Students at this age should have had considerable experience with art media and will have developed many skills in their use. With these more developed skills, students can better elaborate on their own ideas and interests in their work. These students are also interested in a broader range of topics than younger students but are likely to be critical of their own work. They are receptive to instruction in many technical aspects of art and are motivated to become skilled in making art that passes their own critical judgment. Rationale: This lesson explores surrealism and how artists use dreams, fantasy, and the human mind as sources of ideas for images that explore ideas in unusual ways. Surreal images transform the ordinary into something extraordinary, transporting the viewer to a world that may be disorienting and surprising. The artist who creates surreal art has a unique tool for exploring his/her own ideas. Another unique tool available to the artist is the computer. As computer technology continues to secure its role in society, artists are increasingly using this new medium to create art. Experience with digital art making methods opens new doors for the artist and is useful in many other fields as well. In this lesson students will study surrealism, examine the use of the surreal in a number of famous artworks, and analyze those works in terms of the elements of surrealism. They will also be introduced to digital art making via Adobe Photoshop, digital cameras, scanners, and the work of some artists who use digital technologies in their work. Students will apply what they have learned about surrealism and digital art making by creating a surreal landscape in Photoshop that makes use of at least three of the elements of surrealism. Historical/Cultural Context: Surrealism is a cultural movement that developed out of the Dada activities of World War I in the early 1920s. The most important center of the movement was Paris. From the 1920s on, the movement spread around the globe, eventually affecting the visual arts, literature, film, and music, of many countries and languages. Surrealist works feature the element of surprise, unexpected juxtapositions and non sequitur. Salvador Dalí and Rene Magritte created some of the most widely recognized images of the movement. The earliest surrealists aimed to expose psychological truths by altering the significance of ordinary objects and bending the rules of formal organization. Surrealism remains a popular art style today and continues to inform many other styles of visual art as well.
MaggieTaylor,“Garden”,2005
SalvadorDali,“TheTemptationofSaintAnthony”,1946
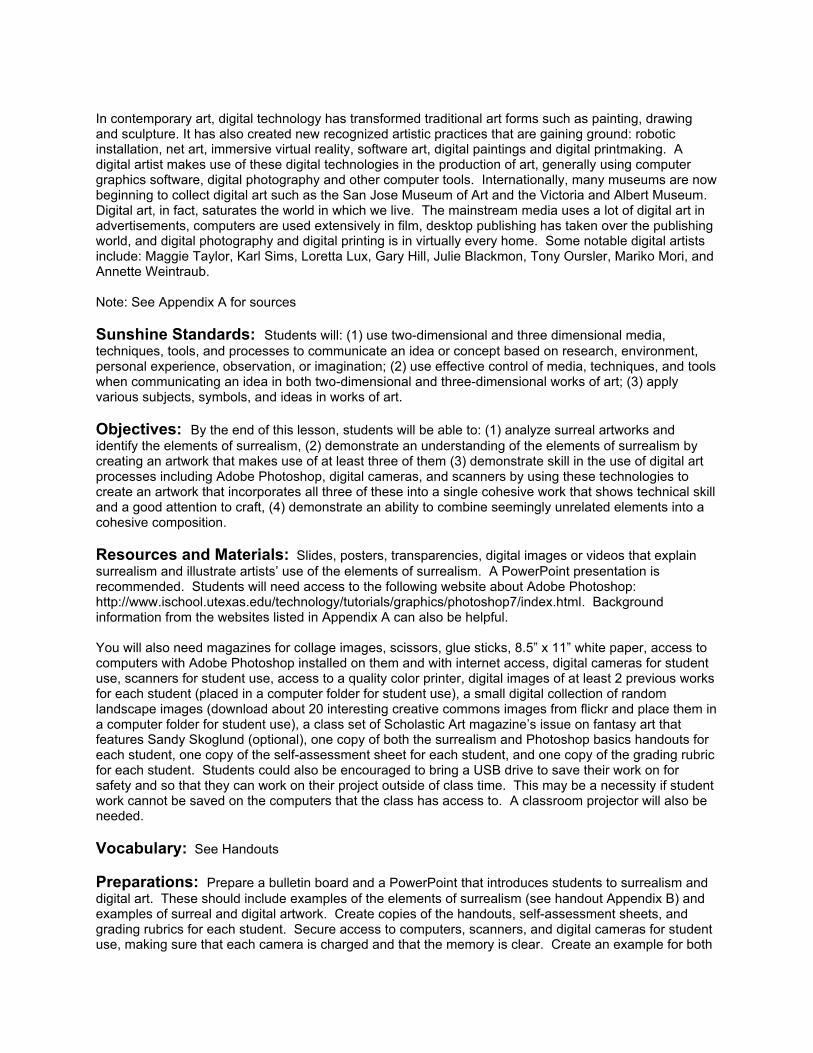
In contemporary art, digital technology has transformed traditional art forms such as painting, drawing and sculpture. It has also created new recognized artistic practices that are gaining ground: robotic installation, net art, immersive virtual reality, software art, digital paintings and digital printmaking. A digital artist makes use of these digital technologies in the production of art, generally using computer graphics software, digital photography and other computer tools. Internationally, many museums are now beginning to collect digital art such as the San Jose Museum of Art and the Victoria and Albert Museum. Digital art, in fact, saturates the world in which we live. The mainstream media uses a lot of digital art in advertisements, computers are used extensively in film, desktop publishing has taken over the publishing world, and digital photography and digital printing is in virtually every home. Some notable digital artists include: Maggie Taylor, Karl Sims, Loretta Lux, Gary Hill, Julie Blackmon, Tony Oursler, Mariko Mori, and Annette Weintraub. Note: See Appendix A for sources Sunshine Standards: Students will: (1) use two-dimensional and three dimensional media, techniques, tools, and processes to communicate an idea or concept based on research, environment, personal experience, observation, or imagination; (2) use effective control of media, techniques, and tools when communicating an idea in both two-dimensional and three-dimensional works of art; (3) apply various subjects, symbols, and ideas in works of art. Objectives: By the end of this lesson, students will be able to: (1) analyze surreal artworks and identify the elements of surrealism, (2) demonstrate an understanding of the elements of surrealism by creating an artwork that makes use of at least three of them (3) demonstrate skill in the use of digital art processes including Adobe Photoshop, digital cameras, and scanners by using these technologies to create an artwork that incorporates all three of these into a single cohesive work that shows technical skill and a good attention to craft, (4) demonstrate an ability to combine seemingly unrelated elements into a cohesive composition. Resources and Materials: Slides, posters, transparencies, digital images or videos that explain surrealism and illustrate artists’ use of the elements of surrealism. A PowerPoint presentation is recommended. Students will need access to the following website about Adobe Photoshop: http://www.ischool.utexas.edu/technology/tutorials/graphics/photoshop7/index.html. Background information from the websites listed in Appendix A can also be helpful. You will also need magazines for collage images, scissors, glue sticks, 8.5” x 11” white paper, access to computers with Adobe Photoshop installed on them and with internet access, digital cameras for student use, scanners for student use, access to a quality color printer, digital images of at least 2 previous works for each student (placed in a computer folder for student use), a small digital collection of random landscape images (download about 20 interesting creative commons images from flickr and place them in a computer folder for student use), a class set of Scholastic Art magazine’s issue on fantasy art that features Sandy Skoglund (optional), one copy of both the surrealism and Photoshop basics handouts for each student, one copy of the self-assessment sheet for each student, and one copy of the grading rubric for each student. Students could also be encouraged to bring a USB drive to save their work on for safety and so that they can work on their project outside of class time. This may be a necessity if student work cannot be saved on the computers that the class has access to. A classroom projector will also be needed. Vocabulary: See Handouts Preparations: Prepare a bulletin board and a PowerPoint that introduces students to surrealism and digital art. These should include examples of the elements of surrealism (see handout Appendix B) and examples of surreal and digital artwork. Create copies of the handouts, self-assessment sheets, and grading rubrics for each student. Secure access to computers, scanners, and digital cameras for student use, making sure that each camera is charged and that the memory is clear. Create an example for both
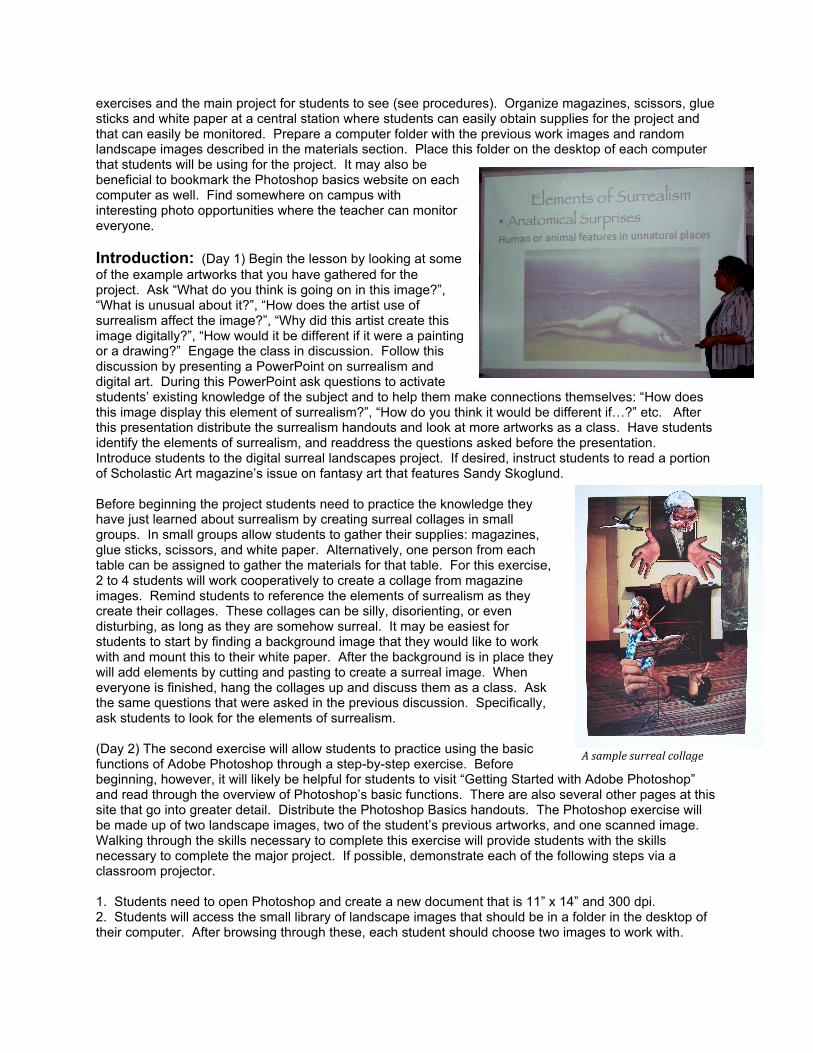
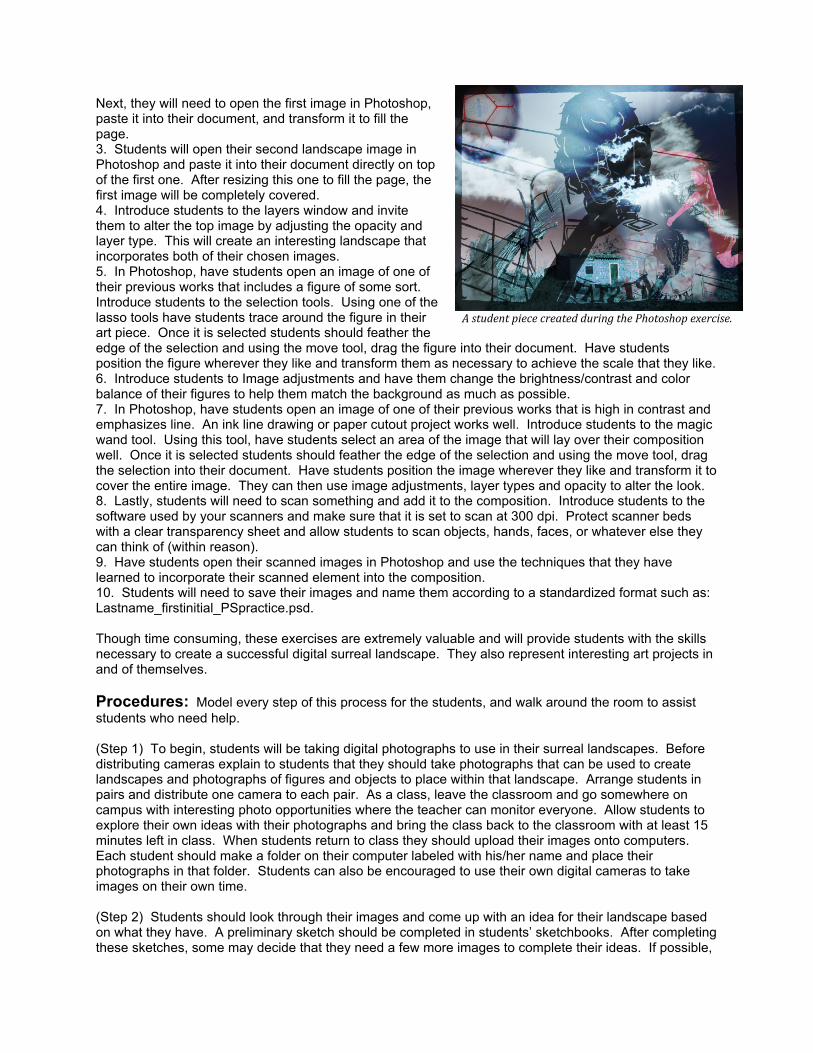
exercises and the main project for students to see (see procedures). Organize magazines, scissors, glue sticks and white paper at a central station where students can easily obtain supplies for the project and that can easily be monitored. Prepare a computer folder with the previous work images and random landscape images described in the materials section. Place this folder on the desktop of each computer that students will be using for the project. It may also be beneficial to bookmark the Photoshop basics website on each computer as well. Find somewhere on campus with interesting photo opportunities where the teacher can monitor everyone. Introduction: (Day 1) Begin the lesson by looking at some of the example artworks that you have gathered for the project. Ask “What do you think is going on in this image?”, “What is unusual about it?”, “How does the artist use of surrealism affect the image?”, “Why did this artist create this image digitally?”, “How would it be different if it were a painting or a drawing?” Engage the class in discussion. Follow this discussion by presenting a PowerPoint on surrealism and digital art. During this PowerPoint ask questions to activate students’ existing knowledge of the subject and to help them make connections themselves: “How does this image display this element of surrealism?”, “How do you think it would be different if…?” etc. After this presentation distribute the surrealism handouts and look at more artworks as a class. Have students identify the elements of surrealism, and readdress the questions asked before the presentation. Introduce students to the digital surreal landscapes project. If desired, instruct students to read a portion of Scholastic Art magazine’s issue on fantasy art that features Sandy Skoglund. Before beginning the project students need to practice the knowledge they have just learned about surrealism by creating surreal collages in small groups. In small groups allow students to gather their supplies: magazines, glue sticks, scissors, and white paper. Alternatively, one person from each table can be assigned to gather the materials for that table. For this exercise, 2 to 4 students will work cooperatively to create a collage from magazine images. Remind students to reference the elements of surrealism as they create their collages. These collages can be silly, disorienting, or even disturbing, as long as they are somehow surreal. It may be easiest for students to start by finding a background image that they would like to work with and mount this to their white paper. After the background is in place they will add elements by cutting and pasting to create a surreal image. When everyone is finished, hang the collages up and discuss them as a class. Ask the same questions that were asked in the previous discussion. Specifically, ask students to look for the elements of surrealism. (Day 2) The second exercise will allow students to practice using the basic functions of Adobe Photoshop through a step-by-step exercise. Before beginning, however, it will likely be helpful for students to visit “Getting Started with Adobe Photoshop” and read through the overview of Photoshop’s basic functions. There are also several other pages at this site that go into greater detail. Distribute the Photoshop Basics handouts. The Photoshop exercise will be made up of two landscape images, two of the student’s previous artworks, and one scanned image. Walking through the skills necessary to complete this exercise will provide students with the skills necessary to complete the major project. If possible, demonstrate each of the following steps via a classroom projector. 1. Students need to open Photoshop and create a new document that is 11” x 14” and 300 dpi. 2. Students will access the small library of landscape images that should be in a folder in the desktop of their computer. After browsing through these, each student should choose two images to work with.
Asamplesurrealcollage
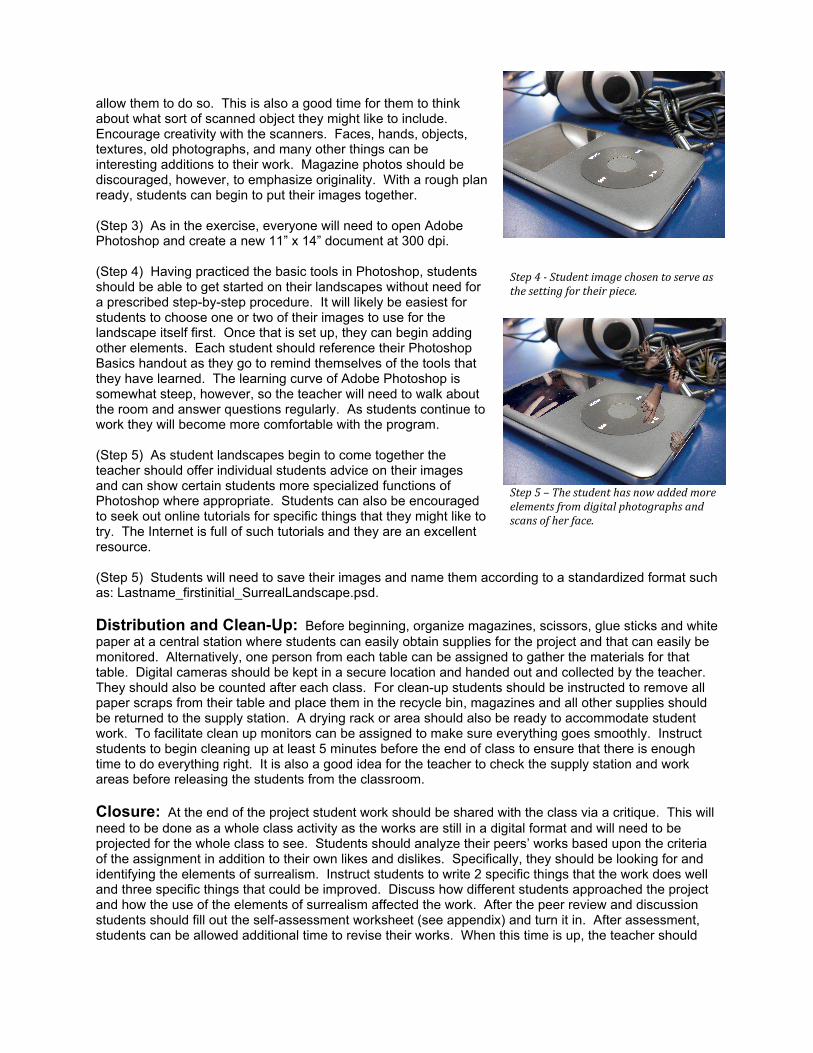
Next, they will need to open the first image in Photoshop, paste it into their document, and transform it to fill the page. 3. Students will open their second landscape image in Photoshop and paste it into their document directly on top of the first one. After resizing this one to fill the page, the first image will be completely covered. 4. Introduce students to the layers window and invite them to alter the top image by adjusting the opacity and layer type. This will create an interesting landscape that incorporates both of their chosen images. 5. In Photoshop, have students open an image of one of their previous works that includes a figure of some sort. Introduce students to the selection tools. Using one of the lasso tools have students trace around the figure in their art piece. Once it is selected students should feather the edge of the selection and using the move tool, drag the figure into their document. Have students position the figure wherever they like and transform them as necessary to achieve the scale that they like. 6. Introduce students to Image adjustments and have them change the brightness/contrast and color balance of their figures to help them match the background as much as possible. 7. In Photoshop, have students open an image of one of their previous works that is high in contrast and emphasizes line. An ink line drawing or paper cutout project works well. Introduce students to the magic wand tool. Using this tool, have students select an area of the image that will lay over their composition well. Once it is selected students should feather the edge of the selection and using the move tool, drag the selection into their document. Have students position the image wherever they like and transform it to cover the entire image. They can then use image adjustments, layer types and opacity to alter the look. 8. Lastly, students will need to scan something and add it to the composition. Introduce students to the software used by your scanners and make sure that it is set to scan at 300 dpi. Protect scanner beds with a clear transparency sheet and allow students to scan objects, hands, faces, or whatever else they can think of (within reason). 9. Have students open their scanned images in Photoshop and use the techniques that they have learned to incorporate their scanned element into the composition. 10. Students will need to save their images and name them according to a standardized format such as: Lastname_firstinitial_PSpractice.psd. Though time consuming, these exercises are extremely valuable and will provide students with the skills necessary to create a successful digital surreal landscape. They also represent interesting art projects in and of themselves. Procedures: Model every step of this process for the students, and walk around the room to assist students who need help. (Step 1) To begin, students will be taking digital photographs to use in their surreal landscapes. Before distributing cameras explain to students that they should take photographs that can be used to create landscapes and photographs of figures and objects to place within that landscape. Arrange students in pairs and distribute one camera to each pair. As a class, leave the classroom and go somewhere on campus with interesting photo opportunities where the teacher can monitor everyone. Allow students to explore their own ideas with their photographs and bring the class back to the classroom with at least 15 minutes left in class. When students return to class they should upload their images onto computers. Each student should make a folder on their computer labeled with his/her name and place their photographs in that folder. Students can also be encouraged to use their own digital cameras to take images on their own time. (Step 2) Students should look through their images and come up with an idea for their landscape based on what they have. A preliminary sketch should be completed in students’ sketchbooks. After completing these sketches, some may decide that they need a few more images to complete their ideas. If possible,
AstudentpiececreatedduringthePhotoshopexercise.
allow them to do so. This is also a good time for them to think about what sort of scanned object they might like to include. Encourage creativity with the scanners. Faces, hands, objects, textures, old photographs, and many other things can be interesting additions to their work. Magazine photos should be discouraged, however, to emphasize originality. With a rough plan ready, students can begin to put their images together. (Step 3) As in the exercise, everyone will need to open Adobe Photoshop and create a new 11” x 14” document at 300 dpi. (Step 4) Having practiced the basic tools in Photoshop, students should be able to get started on their landscapes without need for a prescribed step-by-step procedure. It will likely be easiest for students to choose one or two of their images to use for the landscape itself first. Once that is set up, they can begin adding other elements. Each student should reference their Photoshop Basics handout as they go to remind themselves of the tools that they have learned. The learning curve of Adobe Photoshop is somewhat steep, however, so the teacher will need to walk about the room and answer questions regularly. As students continue to work they will become more comfortable with the program. (Step 5) As student landscapes begin to come together the teacher should offer individual students advice on their images and can show certain students more specialized functions of Photoshop where appropriate. Students can also be encouraged to seek out online tutorials for specific things that they might like to try. The Internet is full of such tutorials and they are an excellent resource. (Step 5) Students will need to save their images and name them according to a standardized format such as: Lastname_firstinitial_SurrealLandscape.psd. Distribution and Clean-Up: Before beginning, organize magazines, scissors, glue sticks and white paper at a central station where students can easily obtain supplies for the project and that can easily be monitored. Alternatively, one person from each table can be assigned to gather the materials for that table. Digital cameras should be kept in a secure location and handed out and collected by the teacher. They should also be counted after each class. For clean-up students should be instructed to remove all paper scraps from their table and place them in the recycle bin, magazines and all other supplies should be returned to the supply station. A drying rack or area should also be ready to accommodate student work. To facilitate clean up monitors can be assigned to make sure everything goes smoothly. Instruct students to begin cleaning up at least 5 minutes before the end of class to ensure that there is enough time to do everything right. It is also a good idea for the teacher to check the supply station and work areas before releasing the students from the classroom. Closure: At the end of the project student work should be shared with the class via a critique. This will need to be done as a whole class activity as the works are still in a digital format and will need to be projected for the whole class to see. Students should analyze their peers’ works based upon the criteria of the assignment in addition to their own likes and dislikes. Specifically, they should be looking for and identifying the elements of surrealism. Instruct students to write 2 specific things that the work does well and three specific things that could be improved. Discuss how different students approached the project and how the use of the elements of surrealism affected the work. After the peer review and discussion students should fill out the self-assessment worksheet (see appendix) and turn it in. After assessment, students can be allowed additional time to revise their works. When this time is up, the teacher should
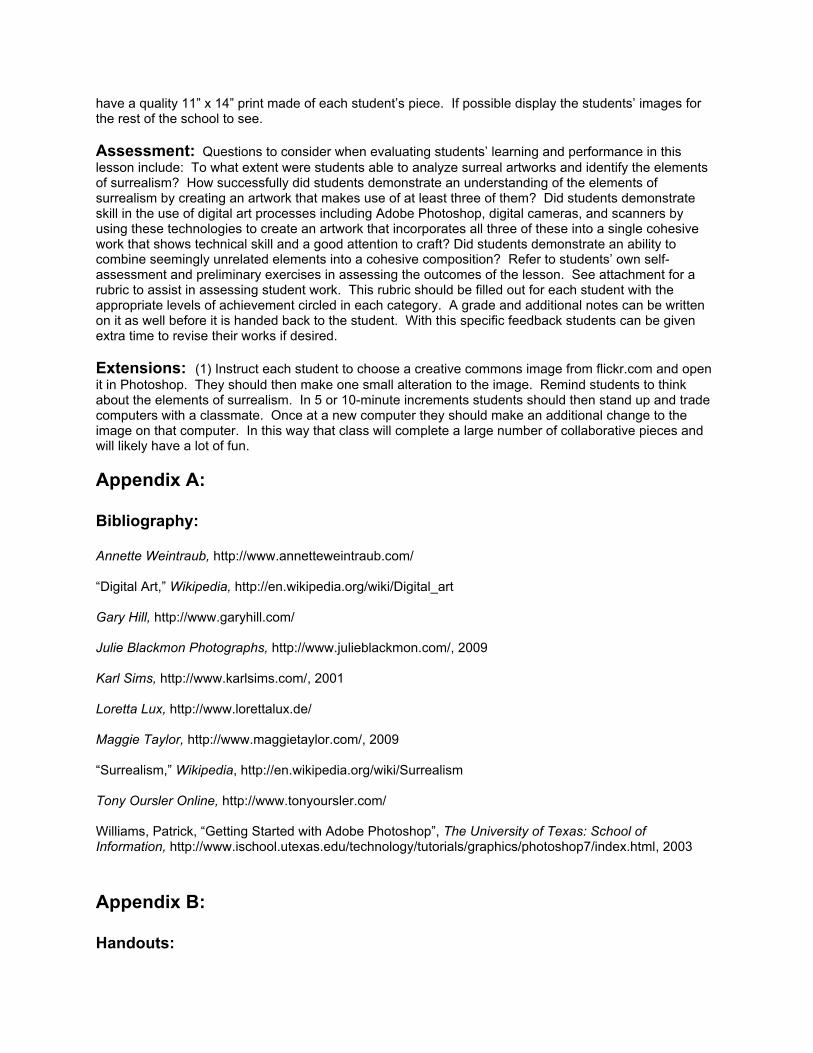
Step4Studentimagechosentoserveasthesettingfortheirpiece.
Step5–Thestudenthasnowaddedmoreelementsfromdigitalphotographsandscansofherface.
have a quality 11” x 14” print made of each student’s piece. If possible display the students’ images for the rest of the school to see. Assessment: Questions to consider when evaluating students’ learning and performance in this lesson include: To what extent were students able to analyze surreal artworks and identify the elements of surrealism? How successfully did students demonstrate an understanding of the elements of surrealism by creating an artwork that makes use of at least three of them? Did students demonstrate skill in the use of digital art processes including Adobe Photoshop, digital cameras, and scanners by using these technologies to create an artwork that incorporates all three of these into a single cohesive work that shows technical skill and a good attention to craft? Did students demonstrate an ability to combine seemingly unrelated elements into a cohesive composition? Refer to students’ own self-assessment and preliminary exercises in assessing the outcomes of the lesson. See attachment for a rubric to assist in assessing student work. This rubric should be filled out for each student with the appropriate levels of achievement circled in each category. A grade and additional notes can be written on it as well before it is handed back to the student. With this specific feedback students can be given extra time to revise their works if desired. Extensions: (1) Instruct each student to choose a creative commons image from flickr.com and open it in Photoshop. They should then make one small alteration to the image. Remind students to think about the elements of surrealism. In 5 or 10-minute increments students should then stand up and trade computers with a classmate. Once at a new computer they should make an additional change to the image on that computer. In this way that class will complete a large number of collaborative pieces and will likely have a lot of fun. Appendix A: Bibliography: Annette Weintraub, http://www.annetteweintraub.com/ “Digital Art,” Wikipedia, http://en.wikipedia.org/wiki/Digital_art Gary Hill, http://www.garyhill.com/ Julie Blackmon Photographs, http://www.julieblackmon.com/, 2009 Karl Sims, http://www.karlsims.com/, 2001 Loretta Lux, http://www.lorettalux.de/ Maggie Taylor, http://www.maggietaylor.com/, 2009 “Surrealism,” Wikipedia, http://en.wikipedia.org/wiki/Surrealism Tony Oursler Online, http://www.tonyoursler.com/ Williams, Patrick, “Getting Started with Adobe Photoshop”, The University of Texas: School of Information, http://www.ischool.utexas.edu/technology/tutorials/graphics/photoshop7/index.html, 2003 Appendix B: Handouts:
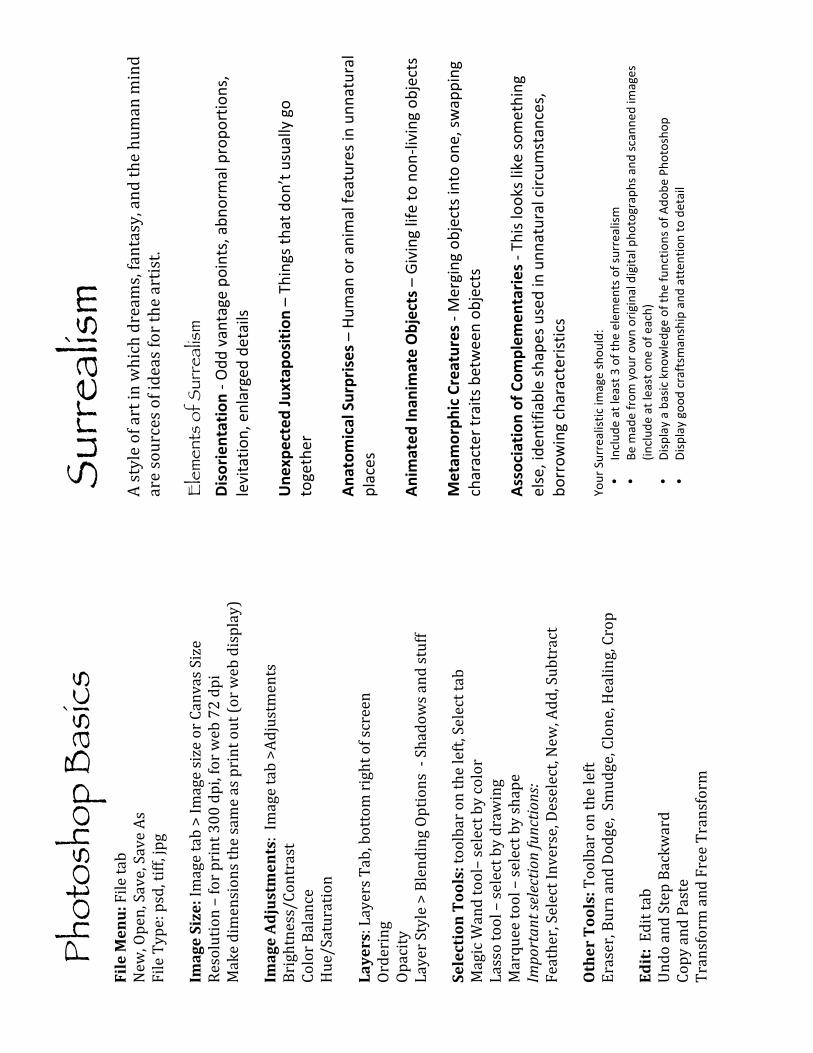
Sur
real
ism
Astyleofartinwhichdream
s,fantasy,andthehumanmind
aresourcesofideasfortheartist.
E
lem
ents
of S
urre
alis
m
Disorientation‐O
ddvantagepoints,abn
ormalpropo
rtions,
levitatio
n,enlargedde
tails
Une
xpectedJuxtap
osition–Th
ingsth
atdon
’tusuallygo
together
Ana
tomicalSurprises–Hum
anoranim
alfe
aturesinunn
atural
places
Animated
Inan
imateObjects–Givinglifetonon
‐livingobjects
Metam
orph
icCreatures‐Mergingobjectsintoone
,swapping
charactertraitsbetweenob
jects
Association
ofC
omplem
entaries‐Th
islookslikesomething
else,ide
ntifiableshape
sused
inunn
aturalcircumstances,
bo
rrow
ingcharacteristics
You
rSurrealisticim
ageshou
ld:
• Includ
eatleast3
ofthe
elemen
tsofsurrealism
• Be
madefrom
you
row
noriginaldigita
lpho
tographsand
scann
edim
ages
(includ
eatleasto
neofe
ach)
• Displayabasickno
wledgeofth
efunctio
nsofA
dobe
Pho
toshop
•
Displaygoo
dcraftsmanshipand
atten
tiontodetail
Ph
otos
hop
Bas
ics
FileMenu:Filetab
New,Open,Save,SaveAs
FileType:psd,tiff,jpg
ImageSize:Imagetab>ImagesizeorCanvasSize
Resolution–forprint300dpi,forweb72dpi
Makedimensionsthesameasprintout(orw
ebdisplay)
ImageAdjustments:Imagetab>Adjustments
Brightness/Contrast
ColorBalance
Hue/Saturation
Layers:LayersTab,bottomrightofscreen
Ordering
Opacity
LayerStyle>BlendingOptions‐Shadowsandstuff
SelectionTools:toolbarontheleft,Selecttab
MagicWandtool–selectbycolor
Lassotool–selectbydrawing
Marqueetool–selectbyshape
Importantselectionfunctions:
Feather,SelectInverse,Deselect,New,Add,Subtract
OtherTools:Toolbarontheleft
Eraser,BurnandDodge,Smudge,Clone,Healing,Crop
Edit:Edittab
UndoandStepBackward
CopyandPaste
TransformandFreeTransform
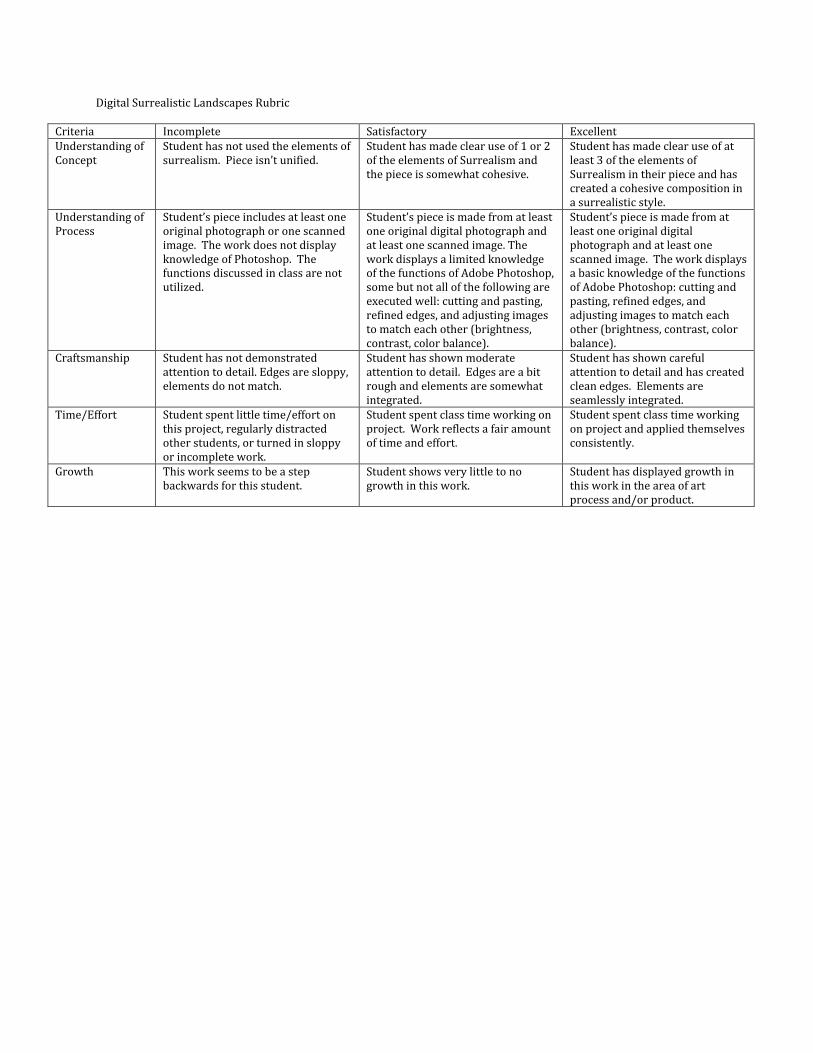
DigitalSurrealisticLandscapesRubric
Criteria Incomplete Satisfactory ExcellentUnderstandingofConcept
Studenthasnotusedtheelementsofsurrealism.Pieceisn’tunified.
Studenthasmadeclearuseof1or2oftheelementsofSurrealismandthepieceissomewhatcohesive.
Studenthasmadeclearuseofatleast3oftheelementsofSurrealismintheirpieceandhascreatedacohesivecompositioninasurrealisticstyle.
UnderstandingofProcess
Student’spieceincludesatleastoneoriginalphotographoronescannedimage.TheworkdoesnotdisplayknowledgeofPhotoshop.Thefunctionsdiscussedinclassarenotutilized.
Student’spieceismadefromatleastoneoriginaldigitalphotographandatleastonescannedimage.TheworkdisplaysalimitedknowledgeofthefunctionsofAdobePhotoshop,somebutnotallofthefollowingareexecutedwell:cuttingandpasting,refinededges,andadjustingimagestomatcheachother(brightness,contrast,colorbalance).
Student’spieceismadefromatleastoneoriginaldigitalphotographandatleastonescannedimage.TheworkdisplaysabasicknowledgeofthefunctionsofAdobePhotoshop:cuttingandpasting,refinededges,andadjustingimagestomatcheachother(brightness,contrast,colorbalance).
Craftsmanship Studenthasnotdemonstratedattentiontodetail.Edgesaresloppy,elementsdonotmatch.
Studenthasshownmoderateattentiontodetail.Edgesareabitroughandelementsaresomewhatintegrated.
Studenthasshowncarefulattentiontodetailandhascreatedcleanedges.Elementsareseamlesslyintegrated.
Time/Effort Studentspentlittletime/effortonthisproject,regularlydistractedotherstudents,orturnedinsloppyorincompletework.
Studentspentclasstimeworkingonproject.Workreflectsafairamountoftimeandeffort.
Studentspentclasstimeworkingonprojectandappliedthemselvesconsistently.
Growth Thisworkseemstobeastepbackwardsforthisstudent.
Studentshowsverylittletonogrowthinthiswork.
Studenthasdisplayedgrowthinthisworkintheareaofartprocessand/orproduct.
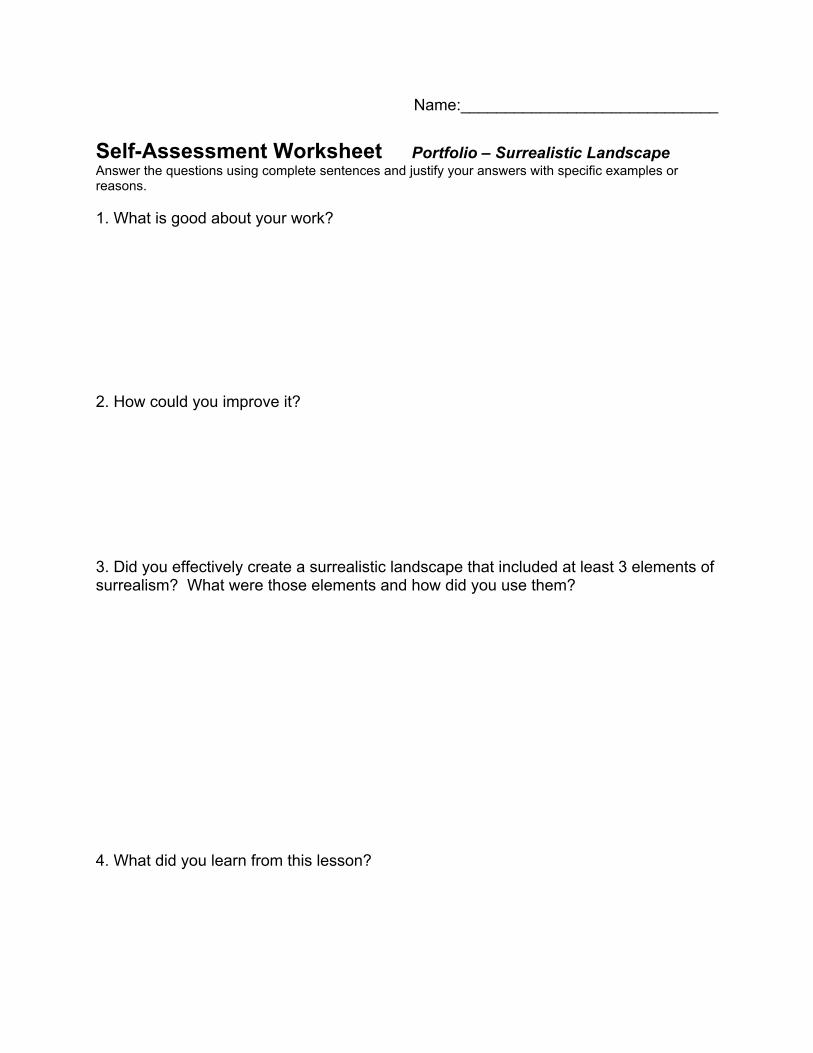
Name:_____________________________ Self-Assessment Worksheet Portfolio – Surrealistic Landscape Answer the questions using complete sentences and justify your answers with specific examples or reasons. 1. What is good about your work? 2. How could you improve it? 3. Did you effectively create a surrealistic landscape that included at least 3 elements of surrealism? What were those elements and how did you use them? 4. What did you learn from this lesson?