Embed Size (px)
Citation preview

Digital Signage Content Manager
Templates, Content, Timing, Emergency Messaging, and Analytics
Prepared by:
Christopher Gardner,
University of Michigan ITS
5/28/2013

Digital Signage Content Manager Basic User Guide Page 2
Table of Contents FWI Content Manager Overview .................................................................................................... 4
Region 1: Timeline, Template Layout, and Preview Section ...................................................... 4
Region 2: Content, Templates, Users, and Groups Section ........................................................ 5
Region 3: Network Overview ..................................................................................................... 5
Region 4: Content Types ............................................................................................................. 6
Setting up Network Overview ......................................................................................................... 6
Setting up a Content Player ........................................................................................................ 7
Setting up a Playlist ..................................................................................................................... 8
Setting up a Channel ................................................................................................................... 8
Additional Windows and Views ...................................................................................................... 9
Dynamic URL Window ................................................................................................................. 9
Layout Properties Window ....................................................................................................... 10
Data Fields ............................................................................................................................. 10
Sort/Filter/Distinct Tabs ........................................................................................................ 11
Freeform/Tabular .................................................................................................................. 12
Layout Dimensions & Field Properties .................................................................................. 13
Designing and Laying Out a Template .......................................................................................... 15
Developing a Design .................................................................................................................. 15
Applying Regions to the Layout ................................................................................................ 16
Making the Template Play on a Player Machine ...................................................................... 18
Creating Content ........................................................................................................................... 19
PowerPoint ................................................................................................................................ 19
Flash .......................................................................................................................................... 19
Video ......................................................................................................................................... 20
Word ......................................................................................................................................... 21
PDF ............................................................................................................................................ 21
Feed ........................................................................................................................................... 21
Text............................................................................................................................................ 21
HTML ......................................................................................................................................... 22

Digital Signage Content Manager Basic User Guide Page 3
Live Data .................................................................................................................................... 23
Wayfinding ................................................................................................................................ 24
Weather .................................................................................................................................... 26
Live TV ....................................................................................................................................... 26
Date/Time ................................................................................................................................. 26
Bing Maps/Progressive Slot Meter ........................................................................................... 26
Control Pad ............................................................................................................................... 26
Timing and Recurrence ................................................................................................................. 26
Recurrence ................................................................................................................................ 27
Timing ........................................................................................................................................ 27
Configuring Digital Signs for DPS Emergency Alerts ..................................................................... 28
Creating a Channel .................................................................................................................... 28
Configuring the Alert ................................................................................................................. 29
Deploying the Channel and Subscribing the Players ................................................................ 30
Configuring a Low-level Alert Ticker ............................................................................................. 31
Create an RSS Ticker ................................................................................................................. 31
Digital Signage Analytics ............................................................................................................... 32
Creating an Advertising Campaign ............................................................................................ 32
Subscribing Content to a Campaign .......................................................................................... 32
Retrieving Data Collected During a Campaign .......................................................................... 33

Digital Signage Content Manager Basic User Guide Page 4
FWI Content Manager Overview The Content Manager is divided in to four sections as shown in the image below:
Region 1: Timeline, Template Layout, and Preview Section
This section serves multiple purposes in sign design. Each is controlled using the buttons at the
top of section 3 (circled in Figure 1 above).
Preview – The play symbol will show a preview of any sign or template selected in the Network
overview region of Content Manager. This preview is useful in verifying a sign’s appearance
before deploying it to the actual sign.
Template Layout – The template symbol will show a layout of the selected template without
any content in the regions. Instead, each region contains a listing of the content included
within. Additionally, the content title listed will be grayed out if the recurrence has expired (the
content is no longer showing).
Use caution when previewing HTML or wayfinding content. HTML will display at regular
resolution despite the preview being shrunk to fit screen. Even viewing content at actual
size does not guarantee the final appearance of the HTML on the sign. Wayfinding maps
also rely on a start location to map routes. Be certain to click on a player to preview
when using a variable “You are here” location.
Figure 1 - Screenshot of Content Manager Window

Digital Signage Content Manager Basic User Guide Page 5
Timeline View – This view is most easily accessible through the preview mode by clicking the
stop button. In this view, the user can see when content or templates are playing on a selected
player. The playing times are represented by a series of bars, and the timeframe can be
adjusted using sliders available at the top of the window.
Player Status – The right-most button on the controls sets section 1 to show captured
screenshots of each player in the network overview. This only works when screen capture is
enabled within the player software on the player machine itself. This can be done by exiting
Content Player (press Q on the player machine) and running Content Player Configuration.
Region 2: Content, Templates, Users, and Groups Section
This section contains the under-lying information for security access and sign building. The
Users and Groups tabs are managed by ITS, but the Content and Templates tabs are key to sign
building (the tabs are circled near the bottom of Figure 1 above).
Templates – This tab holds a listing of all available templates. Security settings do not allow ITS
to lock down templates, and thus all templates are visible to each user. To avoid any possible
confusion or unintentional alteration of signs, each unit is required to append their unit prefix
to any template they create.
Content – This tab holds the folders and content of each unit. Content can be locked down, and
thus each user will only see content within their respective unit’s folder and any content that is
current uncategorized.
Region 3: Network Overview
This section reflects the sign-playing computers (player computers) on the network as well as
the templates and content displaying on each. The overview is displayed in a hierarchical
format: Company > Location > Players, Channels, and Playlists > Templates > Regions > Content
Company – This is the Globe icon near the top. Each unit within U of M is represented by a
company object.
Since uncategorized content is visible to EVERYONE, please remember to place any
created content in to the respective unit folder. In addition, to aid in sorting unclaimed
content, use the same naming conventions as described for templates above.
Content can sometimes be multiple pages long. To make moving content easier, there is
an option to split the window. This is a small bar located just above the scroll bar on the
right.

Digital Signage Content Manager Basic User Guide Page 6
Location – Locations have an icon that resembles a building, and they reflect categorizations of
content players within a company. While it is called a location, it is simply used to organize
players within a company. A company can have any number of locations, and locations can
have any name.
Content Players, Playlists, & Channels – Beneath each location are a collection of players,
playlists, and channels.
Content Players are indicated by an icon that looks similar to a monitor. These reflect
the various signs throughout a unit.
Playlists are used to display one set of information on multiple displays.
Channels are used for broadcasting important emergency messages to the digital signs.
Templates – All three of the objects listed above can hold a template (though not all of them
necessarily do). The template is a layout of regions capable of holding content on a digital
display. Templates located directly on a player will play as designated by recurrence and timing,
while templates in a playlist or channel are played when certain criteria are met.
Regions – Regions are sections of a template designated by the user to hold content of any
type.
Content – Content is any type of information placed in a region for display on a digital sign.
Region 4: Content Types
This section contains a full list of available content that can be displayed on a digital sign. While
this list is useful, there is a much better method to create content that will automatically
categorize it in to the appropriate unit folder (see section on creating content).
Setting up Network Overview The first steps in using Content Manager are to set up the
Locations, Players, and Playlists within the Company.
1. To do so, right click on the Company object at the top
of the Network Overview.
2. In the resulting window, click on create a new Location.
Channel subscriptions are not part of the hierarchy, but do appear in the network
overview. These subscriptions indicate that a Content Player is ready to display
information if the channel criteria are met.

Digital Signage Content Manager Basic User Guide Page 7
Figure 2 - Network Overview Setup
3. Give the location a name that is useful in identifying this group of Content Players.
4. Once the Location(s) is established, right click on it to
create Content Players, Playlists, and Channels.
5. Again, name each object in such a way that it is easily identifiable later.
Setting up a Content Player
Start by right clicking on a location and choosing New
Content Player. In the Content Player creation screen,
fill in the appropriate fields as follows (any field not
mentioned can be left at its default value):
Name: Anything that is wanted, but should make the
player easily identifiable (example: third floor sign near
elevator).
Scaling: This can be set as desired, but it is
recommended that Players be set to: Shrink templates
and content if needed to fit screen, so that the sign will
play no matter the size of the original layout. Using this
option, it is wise to check the box below to center the
layout.
Computer name: Fill in the Content Player machine’s
name in this location. If the Content Player has a static
IP address, that can be used as well. This section can be left to the default if the user does not
wish to publish to a player, and can be changed at any time by right clicking on the player
object and choosing Properties.
A Content Player in Content Manager with no associated Content Player machine is an
excellent way to experiment with layouts before pushing them to an active sign in the
building.
Figure 3 - Content Player Configuration

Digital Signage Content Manager Basic User Guide Page 8
Setting up a Playlist
Playlists are used to publish one sign
layout and content to multiple
displays. Start by right clicking on a
location and choosing New Playlist.
The playlist will be created in the
location. Right clicking on it and
choosing Properties will bring up the
window in Figure 4 to the right.
From here, the playlist can be enable
and disabled. It can also have its
behavior set:
Include only if player is
empty – This means that only
content player objects with
no templates on them will
play this playlist.
Always include before/after
player templates – This
means that the playlist will play on all signs before or after any template that is currently
on the content player object.
Override player templates – This will force the playlist template to play in place of the
existing templates on the player
Setting up a Channel
Channels are triggered templates that will play on a sign when certain criteria are met. At the
University of Michigan, these are used primarily in Emergency Messages, and details on how to
set one up are located in the Emergency Messaging Section.
Figure 4 - Playlist properties window

Digital Signage Content Manager Basic User Guide Page 9
Additional Windows and Views There are several windows that regularly appear during sign construction. Understanding them
will assist in quickly navigating the various features of the software.
Dynamic URL Window
The dynamic URL button appears at any time that a file path is required by Content Manager.
Clicking it will bring up the Dynamic URL window. This window offers the user the following
fields:
Path – This is the path to the file being used. The […] button at the end of this field can
be used to open a typical Windows Explorer browser window.
Method – This field can be set to one of four options if the data is to be pulled via a
specific method. The four methods are:
o Get
o Post
o Exchange
o SQL
Query/Data – This section offers parameters for URLs. When a URL is entered in
entirety to the path, these sections will auto-populate to contain the parameters.
User name/Password/Domain – These sections only need to be filled out if the file
resides in a location that the Content Player does not have access to.
Deployment behavior – This is a key region on all content. This dictates to Content
Manager how the data is to be pushed or pulled to the Content Player. There are four
options:
o Ask me what to do… - This option will result in Content Manager prompting the
user for a deployment method each time it deploys content to a sign.
o Copy resource… – This option will place a duplicate of the file on the Content
Player that will be used to populate the sign.
o Don’t copy resource… - This will force the Content Player to use the file directly
from the network. This only works if the Content Player auto-login account has
access to the share (or if information is entered for the user name, password,
and domain fields).
o Let player download… - This option will ask the Content Player to download a
copy of the file to the player machine. The Content Player software will then
regularly check the network location for updates or changes to the file.
Don’t Cache Data – This tells the Content Player to not cache and versions of the file.
When the file is deployed again, the old version is overwritten each time.

Digital Signage Content Manager Basic User Guide Page 10
Layout Properties Window
There will be multiple occasions to use Layout View. Windows such as Live Data, Region
Properties, Date/Time objects, and Control Pads allow the user to control layouts, fonts, colors,
and other aspects of data appearance. This section is a brief overview on how to use Layout
View.
Figure 5 - Example Layout Properties window for a Live Data object.
Data Fields
Layout View is divided in to several sections. First is the Data Fields section. These are the fields
that are available to be dragged down in to the layout. Each content object layout view has
different data fields available depending on the content type:

Digital Signage Content Manager Basic User Guide Page 11
The Data Fields include:
Static Text - Live Data, Weather, Control Pad, Date/Time content.
o This data field is used to simply add static text to any portion of a layout.
Built-in - Live Data, Date/Time content.
o This type of data field allows the user to input pre-calculated values in to a
layout (such as a date, time, page number, etc.).
Date/Time - Date/Time content.
o Unique to Date/Time content objects, this lets the user create a specific date or
time field as part of a layout.
(Live Data column names) –Live Data content.
o In Live Data, you may see data-specific items in the fields area that were pulled
from the column headers of your Live Data source file.
Markup Text - Live Data, Weather, Date/Time content.
o Markup text can be used to add static content to dynamic data. For example,
“@umich.edu” can be added to a uniqname category in a live data object using
markup text: {uniqname}@umich.edu . The dynamic portion of the markup text
must be included in {}.
Pagination - Live Data content.
o Pagination moves the data forward or backward one page. These fields do not
show if there is not a page to progress to. Pagination direction can be set in the
field properties once it has been added to the layout.
Quick Index - Live Data, Weather, Date/Time content.
o A quick index allows the user to quickly paginate through a large list of data. This
field usually contains a background image of evenly spaces letters to scroll
though. The options for this field include a section to indicate which field is being
paginated through. It should also be noted that the software includes a leading 0
on the scroll list, and thus a background image without space to the left for this
will end up with the scrolling being slightly off.
Spacer – Live Data content.
o This only appears in tabular mode, and is used to create spaces in the layout.
Sort/Filter/Distinct Tabs
Data fields can be dragged to any of the three tabs on the right to restrict and organize the data
shown.
Sort – Dragging a data field to the sort tab will sort the data according to the values in
that column. If a second field is dragged in to the sort tab, it will be used as a secondary

Digital Signage Content Manager Basic User Guide Page 12
sort. For example, the first field may be date and the second field may be time. This
would cause the data to be sorted by date, and then within each day, the data would be
sorted by time.
Filter – This tab can be used to filter out unwanted data based on values, numeric
calculations, or dates and times. This can be useful for keeping events list up to date or
hiding unlisted names and numbers.
Distinct – This tab is useful for data sets that have multiple repeated values. This tab
ensures that only one of each value is shown.
Freeform/Tabular
This section is for the physical laying out of the data fields. It’s within this section that size,
location, font, color, and numerous other things are determined.
The first step to designing the layout is to pull down the data field to the freeform layout area.
There are 3 sections to each layout: title, row, and footer. While the row can contain any type
of data field, the title and footer may not contain Live Data fields.
All fields dragged down in to the layout have multiple options available to them in the field
properties menu. This menu is indicated by a small triangle in the upper right corner of the field
when hovered over. For most fields, the menu contains the following options:
Font – This controls the type, size, and attributes of the font.
Auto-Size – This feature will decrease the font size in any field if the text does not fit in
it. This feature is especially important in emergency messaging.
Pagination – This is another way to manage text that does not fit in a field. For
paragraphs that are too long, this option controls how the display will handle the
overflow. This logically only works if Auto-Size is disabled.
Font Color – This is self-explanatory.
Good practice suggests that live data objects are moved to their respective regions on
the template before being designed in this view. Doing so will provide the user with
region boundaries and background images.
By default, any data field dragged down from the data field section will appear in
white, Arial, 11 point font. Users should be aware of this when preparing layouts on
white backgrounds.

Digital Signage Content Manager Basic User Guide Page 13
Frame – This will give a border around the placed field.
Alignment – This allows the user to control where the text
is located in the field: top, middle, or bottom, and left,
center, or right.
Formatting – This field is used in several ways depending
on the type of field. For dates and time, it allows the user
to choose how the date or time should appear. For other
fields, it can be set to indicate a file path for images.
Background Image – Fields, like regions and templates, can
have a background image. This is useful when creating
static field buttons.
Highlighted Image – This option indicates the image that
appears when a user activates the given field.
Highlight Filter – This indicates the filter that is applied
when a user interacts with the given field (such as date =
today).
Interactivity – This brings up the interactivity dialog
window. For more information, please see the section on
interactivity.
Bring to Front/Send to Back – This brings the field higher or lower than overlapping
fields.
Copy Format – This allows the user to copy the font format of one field to apply to other
fields in the same layout. This will not copy formatting from one layout to another.
Copy – This allows user to duplicate a given field.
Layout Dimensions & Field Properties
The final section of the layout properties window has options for the layout itself as well as
more precise controls for the various fields within the layout.
Figure 7 - Data layout properties.
Figure 6 - Field options list.

Digital Signage Content Manager Basic User Guide Page 14
For layout dimensions, there are options to organize how the data will be presented on the
sign. When designing this layout, a user only needs to develop one data point in the row. The
software will duplicate this layout on all the remaining pieces of data.
Title/Title gap – This is an area at the top of the list of data, and is an excellent location
for column headings. The gap indicates the space between the title and the start of the
data.
Row height/width - These fields indicate the dimensions of one piece of the data. By
carefully planning one data field out, the user can obtain the maximum amount of data
on the screen.
Group by – If the data has characteristics that allow it to be categorized, this section will
become available. The data will then appear in labeled sections based on the data
categorization.
Left/Right margin – The margins apply to the data piece itself. This is useful when
multiple columns of data are presented.
Row gap – The amount of space between two rows of data.
Footer – A footer section in the layout, which is an excellent location to hold pagination
and quick index controls.
In a region… - This field is automatically populated is the object is placed in a region on
the template. Otherwise, it can be filled in with any pixel value desired. When the title,
row, and footer combine to exactly fit the pixels in the region, a message will be
displayed indicating this (see figure 7 above).
The field properties field provides options to enter field dimensions and x, y coordinate
locations for each selected field.

Digital Signage Content Manager Basic User Guide Page 15
Designing and Laying Out a Template Templates are used in controlling the overall layout and design of a sign. They can be large,
small, horizontal, or vertical depending on the need. Some templates have multiple regions for
content while some may only have one or two.
Developing a Design
The first steps in designing a template are done outside Content Manager. Most units prefer to
use Photoshop to create a layout that is appealing. Several examples of these layouts are
available for others to use at the following path:
\\dsw-common.m.storage.umich.edu\dsw-common\SharedContent\Templates
This location includes both Photoshop and jpg files for use on signs.
When using a pre-created template background or when creating a new one, users should
consider the dimensions of the display. Is it horizontal? Is it vertical? What is the resolution?
The answers to these questions will determine what is available for use on the sign. When
designing a template background from scratch, units should decide where data will be placed as
well as how to make the design easy to read and accessible to all. For a complete list of helpful
ideas and best practices, please visit the digital signage webpage:
http://www.itcs.umich.edu/digital-signage/using/content-best-practices.php
Once the background is designed, it can
be placed in the template:
1. Open Content Manager.
2. In the Template menu at the
top, choose New…
3. The Template Editor window
will appear as well as a Region
List window and a Template
Properties window (see Figure 5
above).
4. In the Template Properties
window, there are several fields
to fill in, including one for the
background image:
a. Name – This is the name of
the template. Since the Figure 8 - Template Editor Window

Digital Signage Content Manager Basic User Guide Page 16
templates cannot be locked down by security policies, it is important that each
template follows the naming convention of Prefix - Template Name (example:
LIB-Example Template).
b. Description – This section is used to describe the template briefly to easily
identify it later.
c. Size – This is the resolution of the layout. There are several common sizes
available in the pull down to the right for quick selection.
d. Color – If the user wishes to not use a background image, the background can be
set to a static color using this option.
e. Background – This section contains the path to the background image created
earlier. The dynamic URL button will allow the user to quickly browse to the
background image using Windows Explorer.
f. Suggested Recurrence – Recurrence controls when the template is played on the
player. This field offers a default value whenever the template is used, but it can
be changed.
g. Sequence Region – This section allows the user to select a sequence region
(note: this is greyed out if no regions have been created). A sequence region is
the region that must play all of its content before the next template is played.
Applying Regions to the Layout
Once the properties of the template have been established, the user is ready to add regions.
Regions are sections within a template that contain content. They can be the size of the entire
template or they can be extremely small. They can hold any type of content and can have
background images or colors of their own. Created regions appear in the Region List window.
Region properties can be accessed via right click or by clicking the properties button at the
bottom of the Region List window while a region is selected.
1. To create a region, click on the star symbol at the top of the Template Editor window.
2. A default region will be created at location 8,8 and will have 640x480 dimensions.
3. One the region is created, there are two methods to adjusting the size and location of
the region:
a. Using the frame of the region, click and drag to move. The key points on the
frame (the little white squares) can be clicked and dragged to resize the region.
While moving or resizing a region, pink lines will appear, indicating alignment
Sequence regions should be set to the region that contains the most important
information on the sign. This way, the sign is guaranteed to play everything of value
before switching to another template.

Digital Signage Content Manager Basic User Guide Page 17
with other regions. This method is quite useful when casually aligning regions to
a background.
b. Using the Region Properties window, the location and size can be manually
placed. Location is entered in the format of “X,Y” while size is entered as “XxY”.
This method is extremely useful in getting regions to the exact size and location
desired.
4. The Region Properties window should then be opened (if it is not opened already) and
the following fields entered:
a. Name – Name the region for
easy identification later.
b. Location – X,Y coordinate of
the upper left corner of the
region.
c. Size – XxY dimensions of the
region.
d. Color – This can set a static
background color for a region
(default is transparent).
e. Opacity – Designates if the
region is see-through or not
when a color is chosen
f. Border – Adds a border to the
region. If Border is checked, a
color selector and width field
becomes available.
g. Background – Use this section
to add a background image to
the region itself.
h. Content Types – Use this to
restrict what types of content
can be played in the region.
i. Text Format – Text styling for
regions that only hold text (such as titles and tickers) is controlled by the region
itself. Text objects do not have a formatting button included in them. Use this
section to control the size, font, color, and attributes of the font within the
region. The check box is available if the text within the region scrolls like a ticker.
Figure 9 - Region Properties Window

Digital Signage Content Manager Basic User Guide Page 18
Continue creating regions until the template contains the necessary amount. Once all the
regions are placed, press the save button at the top of the Template Editor window.
Making the Template Play on a Player Machine
The final step in building the layout is to place the template on the screen. There are two ways
to do this:
1. Drag the template from the template list (section 2 in Figure 1) to the Player machine in
the Network Overview (section 3 in Figure 1). This will place the template directly on the
player. From this point, the user should be able to see a preview of the created template
when preview is turned on for the player.
2. Drag the template from the template list to a Playlist for the associated player
machines. For more information on playlists, please see the section on “Setting up a
Playlist”.
For regions that overlap, there is a z-index. Right clicking any region will give the option
to “Bring to Front” or “Send to Back”. Each region can also be easily duplicated via right
click. Use this method to create several regions of equal size.

Digital Signage Content Manager Basic User Guide Page 19
Creating Content Content, like the templates, must be designed with the user in mind. Most viewers are walking
by the sign, and there is only a short period to catch their attention. The sign should be able to
catch attention or relay information in a very brief time. For this reason, content needs to be
large and easily read from far away. Sign owners should also consider users who have
disabilities in content and template design. A full list of accessibility resources is available at:
http://www.itcs.umich.edu/digital-signage/using/content-best-practices.php
Most content is created outside Content Manager and then linked to, but items such as text
and weather are part of the software. Each unit at U of M is assigned a content repository
folder in the content tab (section 2, figure 1). This folder should hold all content created by the
unit.
If a unit requires sub-categories within the unit content folder, they should contact 764-HELP.
PowerPoint
PowerPoint presentations can easily be added to a digital sign, but features such as transitions
do not play. The presentation will simply pass through the slides before progressing to the next
content object.
Flash
Flash can be loaded in to any region of a sign. There are a few commands that are unique to
Flash properties:
Determine Content End By – Allows the user to dictate what the software uses to
determine when the Flash file has finished playing.
Use Alternate Player – Allows the user to force the flash file to be played in an alternate
player such as VLC.
Any content created outside this folder is accessible to all other units and could be
deleted. To avoid this, make sure all content is named with the unit prefix at the
beginning, so it is easily identifiable.
To avoid creating content outside the unit folder, it is easiest to right click the folder and
choose New Content in this Category.

Digital Signage Content Manager Basic User Guide Page 20
Video
Video is very powerful on the digital signs; however, it is important that units consider several
variables before deciding to use video. First, the machine playing the sign must be powerful
enough to play the video without slowing down. Second, the network connection to the player
must be fast enough to handle the video if it is streaming. Third, speakers will need to be
connected to the player if sound is needed as part of the video.
The video properties window has multiple options within it:
Loop Content – This will replay the video repeatedly until the set duration is reached.
Player Navigation – This option provides the viewer with a panel to control the progress
of the video.
Video Player to Use – This allows the sign programmer to decide which media player to
use when playing this particular video. The options are:
o Default – let Windows decide.
o Windows Media Player
o QuickTime
o VLC Player (note: this is not installed by default as part of the ITS player image)
Audio Muted – This mutes the video even with on-board audio devices.
Is Streaming Video – This is checked when the video source is streaming over the
network.
Video is used on UM main campus primarily to display live television feeds to signs. ITS has a
TVoIP (Television over Internet) service that offers multiple channels. The stream paths for the
channels are:
CBS College Sports - rtsp://10.211.43.93:1935/rtplive/UMIPTVenc07
Big Ten Network (HD) - rtsp://10.211.43.93:1935/rtplive/BTN1HD.sdp
ABC (HD) - rtsp://10.211.43.93:1935/rtplive/ABCWXYZ1HD.sdp
CBS (HD) - rtsp://10.211.43.93:1935/rtplive/CBSWWJ1HD.sdp
CW (HD) - rtsp://10.211.43.93:1935/rtplive/CWWKBD1HD.sdp
FOX News - rtsp://10.211.43.93:1935/rtplive/FOXNEWS1SD.sdp
FOX (HD) - rtsp://10.211.43.93:1935/rtplive/FOXWJBK1HD.sdp
MSNBC - rtsp://10.211.43.93:1935/rtplive/MSNBC1SD.sdp
NBC (HD) - rtsp://10.211.43.93:1935/rtplive/NBCWDIV1HD.sdp
PBS (HD) - rtsp://10.211.43.93:1935/rtplive/PBSWTVS1HD.sdp
USA (HD) - rtsp://10.211.43.93:1935/rtplive/USA1HD.sdp
CNN - rtsp://10.211.43.93:1935/rtplive/UMIPTVenc04

Digital Signage Content Manager Basic User Guide Page 21
Word
Word can be used in signs, but it is generally disregarded for other formats such as PDF and
text. When used on a sign, a document in Word actually requires the player machine to load
Microsoft Word in the background before the object can be displayed. For this reason, Word is
discouraged.
PDF’s can be powerful tools for displaying information on a sign. One advantage of PDF
documents is the ability to control page duration for multiple page documents. As noted above,
it is a great alternative for displaying Microsoft Word documents on a display, as the PDF reader
is faster to display.
PDF properties only contain one extra field, which is Page Duration. As previously mentioned,
this option gives the user a method to control how long each page of a multiple page PDF
displays. Pages will display on the screen for the set duration period in the properties, but the
document itself will show as long as the object duration. This allows a user to show the multiple
pages of the document several times before moving to the next content object. Please see the
section on recurrence and duration for more information.
Feed
Feeds can pull from any syndicated feed accessible from the web for display on the sign. While
useful, this type of content is generally only used for tickers. Due to the lack of layout
capabilities, Live Data objects are preferable to feeds when displaying RSS.
Text
Text is the primary content object used for displaying titles and static text content on the signs.
Since the content object has a section for typing in, no external file is needed. Users can still link
a text object to a text file if they desire. As mentioned in the region section above, text
formatting is controlled by the region where it resides. To change text appearance, users must
right click on the containing region and edit the properties there.
The TVoIP service is still very early in testing. If a unit intends to display a live TV feed to
a digital sign, they should check with ITS (764-HELP or [email protected]) for any
restrictions before proceeding.

Digital Signage Content Manager Basic User Guide Page 22
HTML
Digital signs are able to display most web
pages, but users should be cautious when
using HTML objects.
First, the preview in Content Manager does
not show web pages correctly when viewed
at a scaled size. Even when the manager is
told to view ac actual resolution, the layout
still doesn’t always appear correctly.
Next, interactive signs with HTML on them
are essentially navigable web pages. The
visitor using the sign is able to follow all
links and occasionally able to force the
software to minimize behind an actual
Internet Explorer window. Sign managers
with interactive signs are urged to be
cautious when placing HTML on the sign.
Finally, the components of the sign
properties window do not always work
correctly with all pages. An example of this on campus is the Magic Bus website. Features such
as Elements to Remove do not function properly as the page is dynamically created.
The HTML Properties window contains the following fields:
Name – This should be a detailed name easily identifiable in the content list. Users
should remember to include the unit prefix at the beginning of the name of each piece
of content.
Description – This field is not required, but can be useful in identifying content later.
Duration – This field dictates how long the given content object will play.
URL – This is the path to the page that the user wishes to show.
Show scrollbars/Allow popups – These check boxes are usually left blank, but can be
changed for html pages that do not fit the region or for pages that may have pop-ups.
Elements to remove – This field provides a comma separated list of HTML objects on
the page that are to be removed. The objects must have an ID in the code. The comma
separated list does not need to include the # symbol.
Figure 10 - HTML Properties Window
Digital Signage Content Manager Basic User Guide Page 23
Clip rectangle – This selection box enables the user to enter X and Y coordinates to
frame the section of the webpage they wish to display. This field requires 4 numbers to
be complete. The first X,Y coordinate refers to the upper left corner of the rectangle,
while the second X,Y coordinate refers to the lower right corner. Using this feature may
require multiple trial and error attempts to frame the correct section of the page. In
addition, web pages that change may result in content moving and no longer appearing
in the clip rectangle.
Browser size – This field shows the field in preview as it would be rendered in a browser
window of specific size.
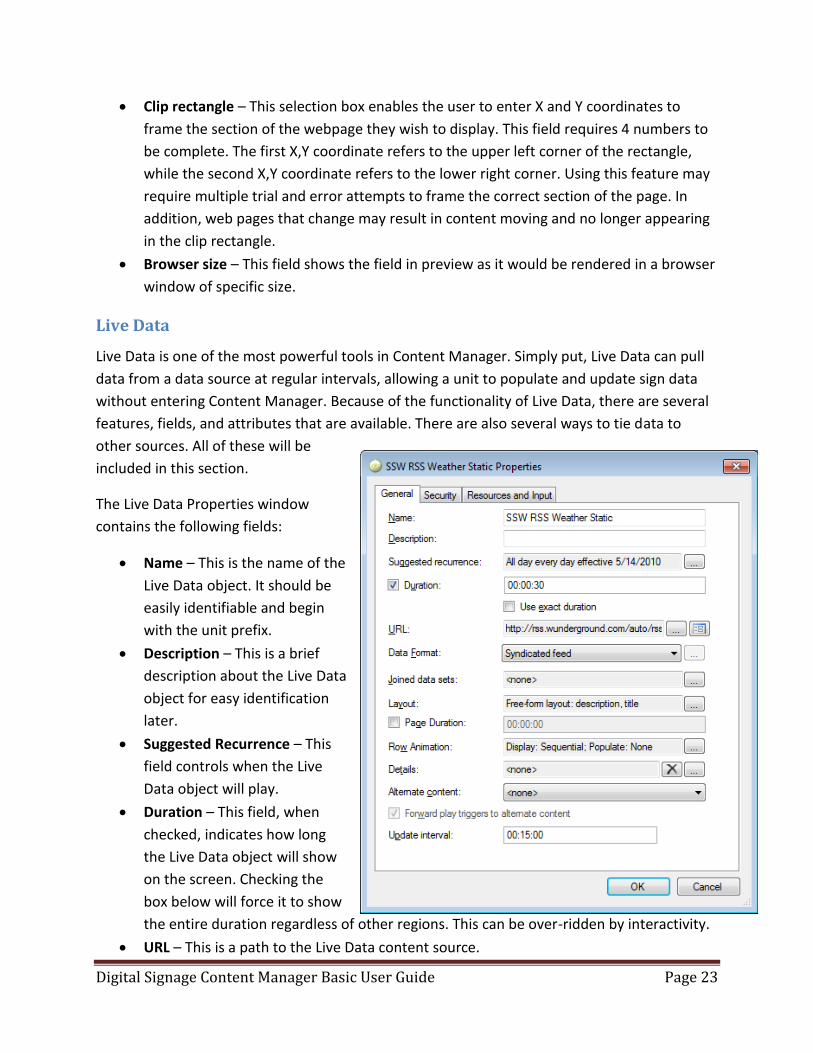
Live Data
Live Data is one of the most powerful tools in Content Manager. Simply put, Live Data can pull
data from a data source at regular intervals, allowing a unit to populate and update sign data
without entering Content Manager. Because of the functionality of Live Data, there are several
features, fields, and attributes that are available. There are also several ways to tie data to
other sources. All of these will be
included in this section.
The Live Data Properties window
contains the following fields:
Name – This is the name of the
Live Data object. It should be
easily identifiable and begin
with the unit prefix.
Description – This is a brief
description about the Live Data
object for easy identification
later.
Suggested Recurrence – This
field controls when the Live
Data object will play.
Duration – This field, when
checked, indicates how long
the Live Data object will show
on the screen. Checking the
box below will force it to show
the entire duration regardless of other regions. This can be over-ridden by interactivity.
URL – This is a path to the Live Data content source.

Digital Signage Content Manager Basic User Guide Page 24
Data Format – This is the format of the data source. When a source is selected, a sub-
menu may appear. This sub menu provides options regarding the format selected, and is
also available by pressing the […] button to the right once a format is selected. Formats
include:
o XMl
o Excel
o Map
o Syndicated Feed
o Separated Text
o SQL
o Daylight
o Delphi
o EMS
o ESP
o Opera
Joined data sets – This feature allows a Live Data object to be linked to another live data
object via a unique identifier.
Layout – Please see the section on the Layout Properties window.
Page duration - For layouts with multiple pages of data, this section indicates how long
each page of data should display.
Row animation – This field indicates how the data should fill the screen.
Details – This provides information about the data when a given row is interacted with.
For more information, see FWI wiki.
Alternate content – This is an option to select a different piece of content to play when
no data is available to show from the data source (data source is empty).
Update interval – This field indicates how often the Content Player should return to the
data source to check for updates to the data.
Wayfinding
Wayfinding content is maps and directions for users. Unlike most other content, wayfinding has
great variety in development, layout, and options. A wayfinding object can be as simple as a
static map to as complex as a fully interactive, multiple map layouts with breadcrumb trails and
QR codes. For this reason, an entire section is available later in this documentation regarding
wayfinding. This section will simply cover the basic options of the content object.
Name – This is the name of the Wayfinding object. It should be easily identifiable and
begin with the unit prefix.
A Live Data content object is an excellent way of developing a sign that requires very
little use of Content Manager for updates. An entire layout can be built around an Excel
file. If the object is set up properly, a user can update the Excel file (and thus the sign)
without any knowledge of the FWI software.

Digital Signage Content Manager Basic User Guide Page 25
Description – This is a brief description about the Wayfinding object for easy
identification later.
Suggested Recurrence – This field controls
when the Wayfinding object will play.
Duration – This field, when checked,
indicates how long the Wayfinding object will
show on the screen. Checking the box below
will force it to show the entire duration
regardless of other regions. This can be over-
ridden by interactivity.
Floor paths – This section contains paths to
the background map image(s) for the
wayfinding object.
You Are Here Location/Variable – These two
fields are available to indicate to the user
their current location on the map. For a
single display, YAH location is easier to use,
where YAH variables should be used when
implementing the wayfinding object on
multiple displays. YAH should always be
indicated in the format: X, Y, Map, Floor.
Wayfinding – This button takes the user to
the wayfinding window, where users can populate locations and paths.
X/Y/Floor Field Name – This field is only used if the X and Y coordinates are located in
the associated data source.
Marker Field Name – This field indicates what to show at the targeted location when a
wayfinding route is mapped. It can be set to any field in the associated data source, and
it very useful. For example, a room number can be displayed at the target location when
a user maps directions to it. An image can also be used here, at which point a path
should be typed in and the following check box selected.
Marker Text Format – This indicates the layout of the marker text.
Animations – This section contains controls of the beacon indicators for You Are Here
and target locations.
Associated Content – This field points to a live data object that contains information
pertinent to the wayfinding object. It can be left blank unless a live data object is being
used to hold coordinate points for the map.
Dimensions – This field is not used (per FWI wiki).

Digital Signage Content Manager Basic User Guide Page 26
Weather
The weather feature provide with the software is useful in its inclusion of images for the
weather forecast, but it is difficult to use for its lack of layout options and control. The fields in a
weather object are similar to other content objects with a few exceptions:
Layout – This controls how the weather data appears. Unfortunately, it always includes
a shade background, and fields cannot be added or removed.
Number of items – This field indicates how many pieces of weather information are to
be displayed. One item would show current weather, two would show weather for
today and tomorrow, three would show today plus two more days, etc.
Start index – Indicates what day to start with for multiple pieces of weather data. The
default value (1) will start with today’s weather, while a 2 would start with tomorrow’s
weather, etc.
Zip code/variable – Indicates to the weather software where the sign is located, in
order to pull appropriate weather data. A machine variable can be used if signs are
located in multiple places with differing zip codes.
Live TV
Live TV is a way of taking a live television signal and broadcasting it to a region of a sign.
Unfortunately, the software is current only capable of reading non-digital signals. Solutions to
this problem are being investigated at ITS.
Date/Time
Date and time content is for populating a region with current date or time. The object itself has
very few options except in the layout, where date/time fields can be formatted in multiple
ways.
Bing Maps/Progressive Slot Meter
These two content types are not used currently on campus. For more information on either,
please review the documentation on the FWI wiki.
Control Pad
Control pads are simple interface options to provide multiple buttons for interactive displays.
Timing and Recurrence When content plays on a sign is nearly as important as what content plays on the sign. For
static signs, timing and recurrence is simply a matter of making sure each content object gets

Digital Signage Content Manager Basic User Guide Page 27
due time on the screen. For interactive displays however, timing and recurrence are key to the
sign functioning properly.
Recurrence
Each template, region, and content object has a
recurrence on it. By default, all of these are slated to
play 24/7, but this may not be what is desired by the
unit. In some cases, a content object may need no
recurrence at all, playing only when triggered.
Recurrence can be accessed for all templates,
regions, and content by right clicking. Users are given
two options regarding recurrence: New Recurrence
and Existing Recurrences. Clicking on either will allow
the user to add or modify the recurrence of the item.
The recurrence window has options to change start
times, end times, range of dates, and pattern. It also contains an option to delete the particular
recurrence, and this is how recurrence is removed completely from content objects.
Timing
Timing controls how long each content object plays. In the properties window of any content
object is a duration field. This field dictates how long the given content object will play when
shown. Typically, static displays show objects for 10-60 seconds, while interactive displays show
content a bit longer. The choice is up to the user, but the viewer of the sign should be
considered in all cases.
Content duration also impacts template durations. Templates have a property called a
sequence region. This is the region that must play all of its content prior to the next template
appearing on the screen. A template can be forced to show for an exact duration by creating a
region with 1 content object in it, and giving that content the desired template duration. That
region should then be set as the sequence region for the template.
Content in a region plays in the order that it appears in Content Manager. To change
the order of content, simply drag existing content to the region again. This will move it
to the top of the list.
Figure 11 - Recurrence window.

Digital Signage Content Manager Basic User Guide Page 28
Configuring Digital Signs for DPS Emergency Alerts Emergency messaging in FWI Content Manager is
controlled by channels. The channel is configured
with a template, a network location, and an RSS
feed. These components allow DPS to take over the
display on any machine based on a variable in an
RSS feed.
Creating a Channel
The channel item in Content Manager holds the
instructions for the player signs. It indicates what
RSS feed to watch, what criteria within the feed to
monitor, and what needs to happen if that criteria
is met. The channel holds a template and content
just like a playlist.
1. Right click on a location and create a channel. It may be easier to create a new location
within the unit to hold all channels.
2. In the channel properties:
a. Name – Give the channel a recognizable name.
b. Description – Fill this in if desired.
c. Display and behavior
i. Shrink the templates and content if needed to fit the screen. Since this is
an emergency message, it is imperative that the signs are able to display
it.
ii. Align templates smaller than screen size to Middle center.
d. Deployment properties
i. Channel ID – This is how the channel will appear in the database. It
should be named following this convention: DPS_UNIT
ii. Polling interval – This is how often the signs check for updates to the
emergency feed. Initially, this will be short (10 seconds), but may be
increased if network burden is too high.
iii. Delete unused content upon receiving a deployment – ensures that the
newest content is displayed.
iv. Wake up player when this channel is activated – in case the sign is asleep.
Figure 12 - Channel Properties

Digital Signage Content Manager Basic User Guide Page 29
v. Contains emergency or other high-priority content – this ensures that the
channel receives to priority on the sign.
e. Dynamic activation
i. Select Turn the channel and choose “on” from the drop down.
ii. When the URL: http://police.umich.edu/rss/alert_rss.php
iii. Select processed with XPath: /rss/channel/item/alertlevel
iv. Choose “text-contains” from the drop down and set the value to 1
3. Click the “Connection properties” link
4. Set the Protocol to: LAN
5. Set the Path to: UNC path accessible to the
player machine
a. Note: This folder must be accessible
by the sign player. You can either
grant read access to the player
system account (DSW-UNIT-###) or
read access to the ‘Everyone’
account to this directory. Alternatively, a user name and password can be
provided.
Configuring the Alert
The channel is like a playlist in that in only defines how the content is played or controlled. It
doesn’t actually specify the content itself. DPS has a set of guidelines for emergency alerts
based on the criteria of readability and accessibility.
1. Create a template to hold your emergency alert
2. The template should have one region and should be the resolution of your content
player display
3. Create a Live Data object to hold the contents of the feed
a. Give it an easily recognizable name
b. For initial layout, use the URL: http://police.umich.edu/rss/alert_rss_test.php
c. The Data Format should be: Syndicated feed
d. The update interval should be: 00:00:15
e. The layout of the RSS feed is built using the test rss feed
Figure 13 - Connection Properties Window

Digital Signage Content Manager Basic User Guide Page 30
i. The background color of the object should be bright yellow and all
regions should have black font
color
ii. Using “Manually Specify
Dimensions” in the Options menu,
make the object have Row height
and Row Width of the exact
dimensions of the region – all other
heights should be 0
iii. Create a title region and make it fill
about one third of the region
1. Font should be: Arial
2. Font-Size should be
approximately: 100pt
3. Auto-size font should be: on
iv. Create a region for publication date
and time making it large enough to
fill the remaining top half of the
region
1. Font should be: Arial
2. Font-Size should be approximately: 48pt
3. Auto-size font should be: on
v. Create a region for the description and give it the remaining bottom half
of the page
1. Font should be: Arial
2. Font-Size should be approximately: 72pt
3. Auto-size font should be: on
f. The final result should resemble the screen in figure 13:
g. Change the URL to the active non-test version of the DPS feed:
http://police.umich.edu/rss/alert_rss.php
Deploying the Channel and Subscribing the Players
Channels are deployed the same way as the player machines (right click – deploy). Player
machines then need to be subscribed to the channel. This can be done by simply dragging the
channel to the players that require it. Doing so will add a “Subscription to Channel” indicator to
the player. The players will then need to be deployed as well to complete the setup.
Figure 14 - Example Emergency Alert

Digital Signage Content Manager Basic User Guide Page 31
Configuring a Low-level Alert Ticker Not all emergencies warrant the complete over-ride of the display. As a result, many units rely
on an emergency ticker scrolling across the bottom of the screen. This is simple to configure
and can be used in conjunction with existing tickers.
Create an RSS Ticker
The DPS crime alerts are a lower level type of alert,
but they are broadcasted to the same RSS feed.
The ticker activates if any content is published to
the RSS feed; however, if the alertlevel is set to 1,
the ticker is irrelevant, as the screen is taken over
(see instructions above). The first step is to create
an RSS item for the feed.
1. Create an RSS content item
2. Give it an easily recognizable name
3. Give it a duration that will be long enough
to display all the content in the feed
a. 30-60 seconds should suffice
depending on the scroll speed
4. The URL should be:
http://police.umich.edu/rss/alert_rss.php
5. The feed should show the title and
description.
Figure 15 - Low Level Alert RSS

Digital Signage Content Manager Basic User Guide Page 32
Digital Signage Analytics Configuring the digital signs for analytics is quick and easy. There are three basics steps:
1. Create an advertising campaign.
2. Subscribe content to the advertising campaign.
3. Collect the data.
Creating an Advertising Campaign
The first step is to create an advertising campaign for
a group of content. Advertising is the true purpose of
this tracking capability, but it will do what is needed
for analytics as well. Advertising can be accessed from
the Tools menu in Content Manager:
In the Manage Advertiser Campaigns window, you
will see a list of all existing campaigns. To create a
campaign, click the New Campaign button in the
lower right. The window in figure 19 will appear.
In this window, you will need to complete four key fields:
(Campaign) Name – What you want your advertising
campaign to be named?
Starts – When would you like to track the usage of
certain content?
End – How long would you like to track usage on the
sign?
(Advertiser) Name – Who is monitoring this
advertisement?
In the figure above, I have created a campaign to track the
usage of content on the SSW Kiosk machines. I will be tracking
usage during the month of October. Other adjustments can be
made below, but are not necessary.
Subscribing Content to a Campaign
Once the campaign has been established, we must indicate which content should be tracked.
This is done on the content objects themselves. On any piece of content you would like to track,
Figure 16 - Campaign Management Window
Figure 17 - Advertising Campaign Window
Digital Signage Content Manager Basic User Guide Page 33
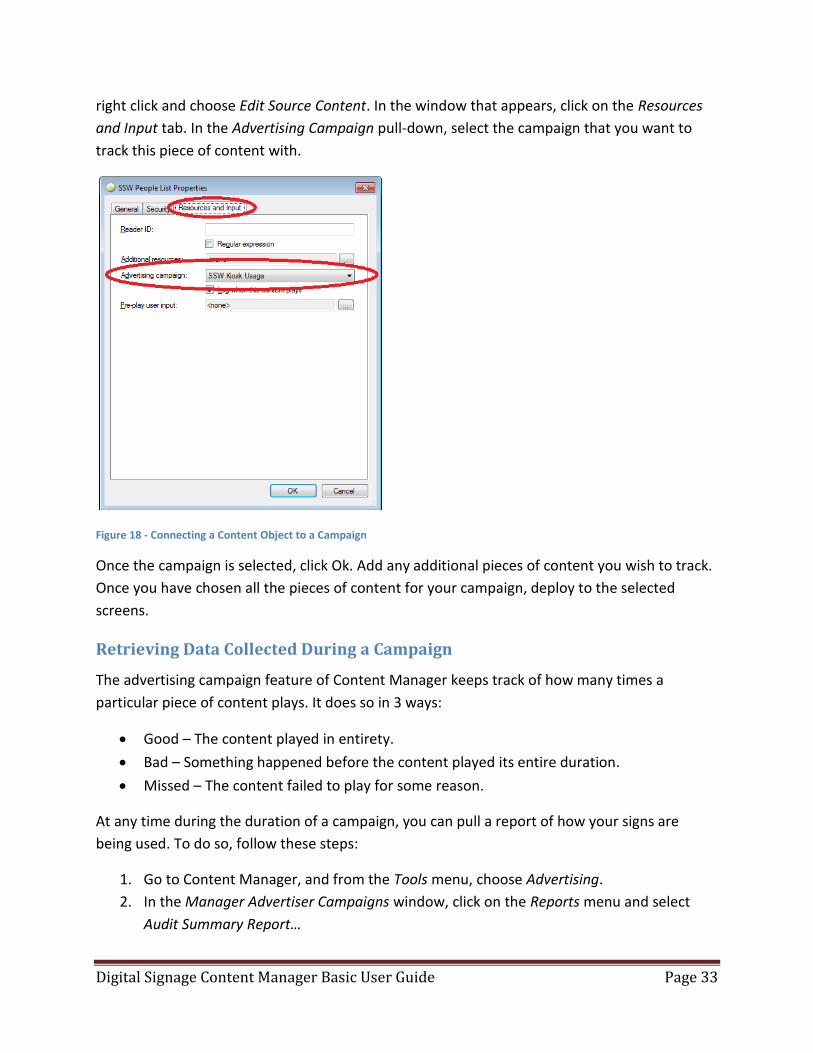
right click and choose Edit Source Content. In the window that appears, click on the Resources
and Input tab. In the Advertising Campaign pull-down, select the campaign that you want to
track this piece of content with.
Figure 18 - Connecting a Content Object to a Campaign
Once the campaign is selected, click Ok. Add any additional pieces of content you wish to track.
Once you have chosen all the pieces of content for your campaign, deploy to the selected
screens.
Retrieving Data Collected During a Campaign
The advertising campaign feature of Content Manager keeps track of how many times a
particular piece of content plays. It does so in 3 ways:
Good – The content played in entirety.
Bad – Something happened before the content played its entire duration.
Missed – The content failed to play for some reason.
At any time during the duration of a campaign, you can pull a report of how your signs are
being used. To do so, follow these steps:
1. Go to Content Manager, and from the Tools menu, choose Advertising.
2. In the Manager Advertiser Campaigns window, click on the Reports menu and select
Audit Summary Report…

Digital Signage Content Manager Basic User Guide Page 34
3. Choose the appropriate date range that you wish to see information from, and then
click Next.
4. Choose the advertiser(s) you created for your campaign and then click Next.
5. Choose the campaign(s) you created to track content plays on the signs and then click
Next.
6. Select the content you wish to show in the report, and then click Next.
7. Choose which locations you wish to track in the report and then click Next.
8. Select which signs specifically you wish to track from the chosen locations and then click
Finish.
The report should be similar to the one below (which represents about an hour of time in the
SSW campaign created above, despite the 10/1 -10/31 time frame). It should be noted that
steps 4 and 5 above allow you to choose multiple campaigns and combine them in to one
report, while steps 6 and 7 allow you to narrow down your report to specific signs and
locations. If you don’t need to restrict or broaden your data, you can click Finish at any time.
Figure 19 - Example Campaign Results Window