Embed Size (px)
Citation preview

2-682-260-11 (2)
2006 Sony Corporation
Operating InstructionsBefore operating this printer, please readthis manual thoroughly and retain it forfuture reference.
Owner’s RecordThe model and serial numbers arelocated on the bottom. Record the serialnumber in the space provided below.Refer to these numbers whenever youcall upon your Sony dealer regarding thisproduct.Model No. DPP-FP35Serial No.
Digital PhotoPrinter
DPP-FP35
Before you begin
Preparations
Printing from a PictBridgecamera (PictBridge mode)
Printing from a PC(PC mode)
Troubleshooting
Additional information
2 GB
WARNING
To reduce fire or shock hazard, do notexpose the unit to rain or moisture.
For the customers in the U.S.A.CAUTIONYou are cautioned that any changes or modificationsnot expressly approved in this manual could voidyour authority to operate this equipment.
If you have any questions about this product, youmay call:Sony Customer Information Services Center1-800-222-SONY (7669)
The number below is for the FCC related mattersonly.
Regulatory Information
Declaration of ConformityTrade Name: SONYModel No.: DPP-FP35Responsible Party:
Sony Electronics Inc.Address: 16530 Via Esprillo,
San Diego, CA 92127 U.S.A.Telephone No.: 858-942-2230This device complies with part 15 of the FCCRules. Operation is subject to the followingtwo conditions:(1) this device may not cause harmfulinterference, and (2) this device must accept anyinterference received, including interferencethat may cause undesired operation.
Note:This equipment has been tested and found to complywith the limits for a Class B digital device, pursuant toPart 15 of the FCC Rules.These limits are designed to provide reasonableprotection against harmful interference in aresidential installation. This equipment generates,uses, and can radiate radio frequency energy and,if not installed and used in accordance with theinstructions, may cause harmful interference toradio communications. However, there is noguarantee that interference will not occur in aparticular installation. If this equipment doescause harmful interference to radio or televisionreception, which can be determined by turningthe equipment off and on, the user is encouragedto try to correct the interference by one or more ofthe following measures:
– Reorient or relocate the receiving antenna.– Increase the separation between the equipment
and receiver.– Connect the equipment into an outlet on a circuit
different from that to which the receiver isconnected.
– Consult the dealer or an experienced radio/TVtechnician for help.
For the Customer in EuropeThis product has been tested and found compliantwith the limits set out in the EMC Directive forusing connection cables shorter than 3 meters (9.8feet).
AttentionThe electromagnetic fields at the specific frequenciesmay influence the picture of this digital photoprinter.
NoticeIf static electricity or electromagnetism causes datatransfer to discontinue midway (fail), restart theapplication or disconnect and connect thecommunication cable (USB, etc) again.
Disposal of Old Electrical & ElectronicEquipment (Applicable in the EuropeanUnion and other European countrieswith separate collection systems)
This symbol on theproduct or on itspackaging indicates thatthis product shall not betreated as householdwaste. Instead it shall behanded over to theapplicable collectionpoint for the recyclingof electrical andelectronic equipment.By ensuring thisproduct is disposed ofcorrectly, you will help
prevent potential negative consequences for theenvironment and human health, which couldotherwise be caused by inappropriate wastehandling of this product. The recycling ofmaterials will help to conserve natural resources.For more detailed information about recycling ofthis product, please contact your local CivicOffice, your household waste disposal service orthe shop where you purchased the product.

3 GB
NOTICE FOR CUSTOMERS IN THEUNITED KINGDOMA moulded plug complying with BS 1363 is fitted to thisequipment for your safety and convenience.Should the fuse in the plug supplied need to be replaced,a fuse of the same rating as the supplied one andapproved by ASTA or BSI to BS 1362, (i.e.marked with
or mark) must be used.If the plug supplied with this equipment has a detachablefuse cover, be sure to attach the fuse cover after youchange the fuse. Never use the plug without the fusecover. If you should lose the fuse cover, please contactyour nearest Sony service station.
Duplication, edition, or printing of a CD, TVprograms, copyrighted materials such as picturesor publications, or any other materials except foryour own recording or creation is limited toprivate or domestic use only. Unless you holdcopyright or have permission of copyrightholders for the materials to be duplicated, use ofthose materials beyond this limit may infringe theprovisions of the copyright law and be subject tothe copyright holder’s claim for damages.When using photo images with this printer, payspecial attention not to infringe the provisions ofthe copyright law. Any unauthorized use ormodification of others’ portrait may also infringetheir rights.For some demonstrations, performances, orexhibits, photography may be forbidden.
Backup recommendationsTo avoid potential risk of data loss caused byaccidental operation or malfunction of theprinter, we recommend that you save abackup copy of your data.
InformationIN NO EVENT SHALL SELLER BE LIABLEFOR ANY DIRECT, INCIDENTAL ORCONSEQUENTIAL DAMAGES OF ANYNATURE, OR LOSSES OR EXPENSESRESULTING FROM ANY DEFECTIVEPRODUCT OR THE USE OF ANYPRODUCT.
On trademarks and copyrights• Cyber-shot is the trademark of Sony
Corporation.• Microsoft, Windows® and DirectX are
registered trademarks of MicrosoftCorporation in the United States and othercountries.
• IBM and PC/AT are registered trademarks ofInternational Business Machines Corporation.
• Intel and Pentium are the registeredtrademarks or trademarks of IntelCorporation.
• All other companies and product namesmentioned herein may be the trademarks orregistered trademarks of their respectivecompanies. Furthermore, “™” and “®” arenot mentioned in each case in this manual.
•This software is based in part on the work ofthe independent JPEG Group.
• LibtiffCopyright © 1988-1997 Sam LefflerCopyright © 1991-1997 Silicon Graphics, Inc.Permission to use, copy, modify, distribute,and sell this software and its documentationfor any purpose is hereby granted without fee.

4 GB
Table of contents
Before you begin
Overview ................................................ 6What you can do with this printer .............. 6
Identifying the parts ............................... 8
Preparations
1 Checking the contents of thepackage .......................................... 10
2 Preparing the print pack ................. 11Size of print paper ................................... 11Optional print packs ................................ 11
3 Loading the print cartridge ............. 12
4 Inserting the print paper ................. 13
5 Connecting the AC power source ... 16
Printing from a PictBridgecamera (PictBridge mode)
Printing images from the digitalcamera ............................................ 17
Notice for users
Program © 2006 Sony CorporationDocumentation ©2006 Sony Corporation
All rights reserved. This manual or the softwaredescribed herein, in whole or in part, may not bereproduced, translated or reduced to any machinereadable form without prior written approval fromSony Corporation.
IN NO EVENT SHALL SONY CORPORATION BELIABLE FOR ANY INCIDENTAL,CONSEQUENTIAL OR SPECIAL DAMAGES,WHETHER BASED ON TORT, CONTACT, OROTHERWISE, ARISING OUT OF OR INCONNECTION WITH THIS MANUAL, THESOFTWARE OR OTHER INFORMATIONCONTAINED HEREIN OR THE USE THEREOF.
By breaking the seal of the envelope of the CD-ROM package, you accept all the terms andconditions of this agreement. If you do not acceptthese terms and conditions, please return this diskenvelope unopened, along with the rest of thepackage, immediately to the dealer where youobtained it.
Sony Corporation reserves the right to make anymodification to this manual or the informationcontained herein at any time without notice.The software described herein may also begoverned by the terms of a separate user licenseagreement.
Any design data such as sample pictures providedin this software cannot be modified or duplicatedexcept for the purpose of personal use. Anyunauthorized duplication of this software isprohibited under copyright law.Please note that unauthorized duplication ormodification of others’ portraits or copyrightedwork could infringe the rights reserved by rightholders.
5 GB
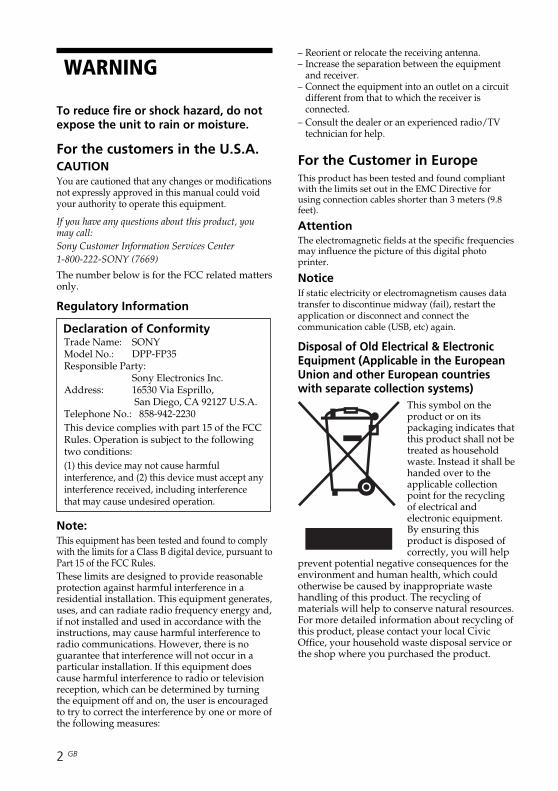
Printing from a PC (PC mode)
Installing the software .......................... 19System requirements ............................... 19Installing the printer driver ...................... 20Installing the Picture Motion Browser ...... 23
Printing photos from the PictureMotion Browser .............................. 25Printing from other application software .. 32
Troubleshooting
If trouble occurs .................................... 34
If paper jams ........................................ 42
Cleaning the inside of the printer ......... 42
Additional information
Precautions ........................................... 44
Specifications ....................................... 45Printing range ......................................... 47
Glossary ................................................ 48
Index .................................................... 49
6 GB
Before you begin
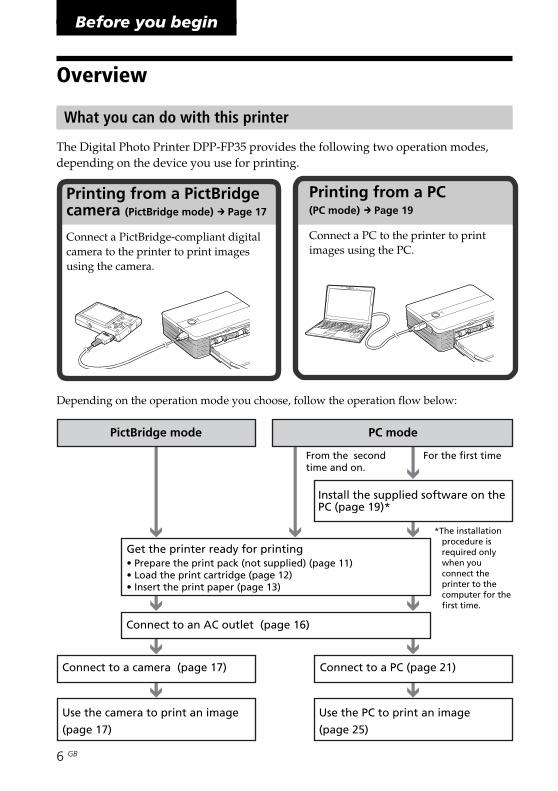
Printing from a PictBridgecamera (PictBridge mode) c Page 17
Connect a PictBridge-compliant digitalcamera to the printer to print imagesusing the camera.
Printing from a PC(PC mode) c Page 19
Connect a PC to the printer to printimages using the PC.
Depending on the operation mode you choose, follow the operation flow below:
Get the printer ready for printing• Prepare the print pack (not supplied) (page 11)• Load the print cartridge (page 12)• Insert the print paper (page 13)
Install the supplied software on thePC (page 19)*
Connect to an AC outlet (page 16)
Connect to a camera (page 17)
Use the camera to print an image
(page 17)
Connect to a PC (page 21)
Use the PC to print an image
(page 25)
From the secondtime and on.
For the first time
*The installationprocedure isrequired onlywhen youconnect theprinter to thecomputer for thefirst time.
Overview
What you can do with this printer
The Digital Photo Printer DPP-FP35 provides the following two operation modes,depending on the device you use for printing.
PictBridge mode PC mode

7 GB
Befo
re you
beg
in
PictBridge-compliant*(page 17)The printer supports the PictBridgestandard, so that you can print an imageeasily from a PictBridge-compliant digitalcamera.
Windows PC support with a convenientUSB connection (page 19)By connecting the printer to your PC via aUSB connector and installing the suppliedprinter driver, you can print images fromyour PC.
Super Coat 2The Super Coat 2 feature enables highdurability and moisture or fingerprintresistance, keeping your prints in goodcondition for an extended period of time.
Auto Fine Print 3The Auto Fine Print 3 analyses the pictureinformation of an image, including theExif data, and corrects the resultingpicture to make an image look morenatural and beautiful.
Exif 2.21** (Exif Print)support (page 29)When you use the supplied PictureMotion Browser software to print animage from your PC, you can choose ExifPrint picture correction in addition to theconventional OS picture correction. InExif Print correction, the supplied printerdriver uses the Exif data of an image andthe printer‘s color processing to adjust andreproduce an image with supreme picturequality.
Red-eye reduction and otheradjustments (PC mode only, page 29)You can adjust an image to reduce the red-eye phenomenon that may occur when thesubject was shot with flash. Adjustmentsof brightness, hue, and other elements ofpicture quality are also possible.
Paper tray allowing bulk printing of 20sheets (page 14)With the supplied paper tray, you canprint up to 20 sheets of print paper at onetime.
* PictBridge is a standard that allows you toconnect a digital camera directly to a printerwithout a PC, enabling direct printing on thespot.
** Exif (Exchangeable image file format fordigital cameras) Print is a global standard fordigital photo printing. A digital camerasupporting Exif Print stores data relevant tothe shooting conditions as each shot is taken.The printer utilises the Exif Print data storedin each image file to ensure the printed resultmatches the original shot as closely aspossible.

8 GB
Identifying the parts
For details, see the pages indicated in theparentheses.
Printer1 Paper tray compartment door
(page 15)
2 1 (on/standby) switch (page 17)• To turn on the printer, press 1 to turn
on the 1 indicator in yellow green.• To turn off the printer, keep pressing 1
for more than one second until the 1indicator turns in red.
1 (on/standby) indicator (page 17)• Lights in red: The printer is in the
standby mode.• Lights in yellow green: The printer is
powered on.• Flashes in yellow green: Printing is in
process.
3 PICTBRIDGE indicator (page 18)• Lights: The printer is being connected
to a PictBridge-compliant digitalcamera.
• Flashes: A device that does not supportthe PictBridge feature is connected. Or,the image to be printed is damaged.
4 ERROR indicator (page 12)• Lights: The paper tray is not inserted.
No print paper is in the paper tray.Paper remains in the printer.
• Flashes slowly: The print cartridgeends. No print cartridge is inserted.
• Flashes rapidly: Paper is jammed.
5 Print cartridge compartment door(pages 12, 13)
6 Print cartridge eject lever(page 12)
7 Print cartridge (pages 12, 13)
9 GB
Befo
re you
beg
in
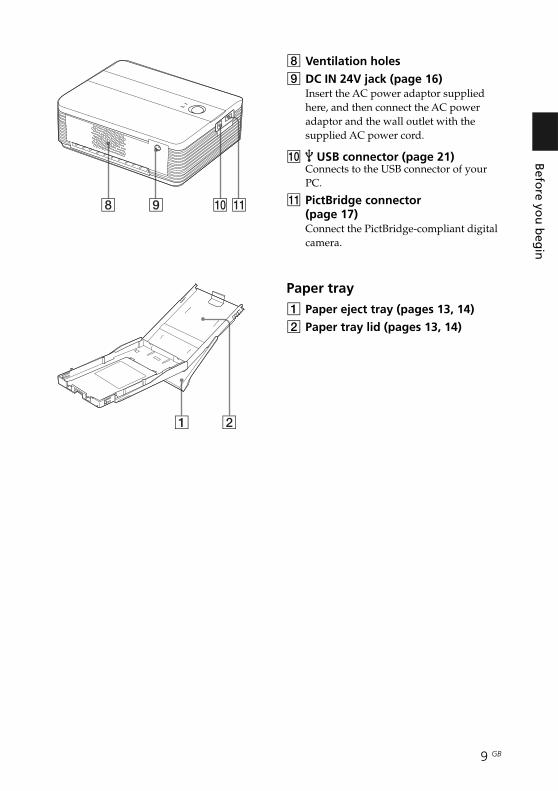
8 Ventilation holes
9 DC IN 24V jack (page 16)Insert the AC power adaptor suppliedhere, and then connect the AC poweradaptor and the wall outlet with thesupplied AC power cord.
0 USB connector (page 21)Connects to the USB connector of yourPC.
qa PictBridge connector(page 17)Connect the PictBridge-compliant digitalcamera.
Paper tray1 Paper eject tray (pages 13, 14)
2 Paper tray lid (pages 13, 14)
10 GB
Preparations
1 Checking thecontents of thepackage
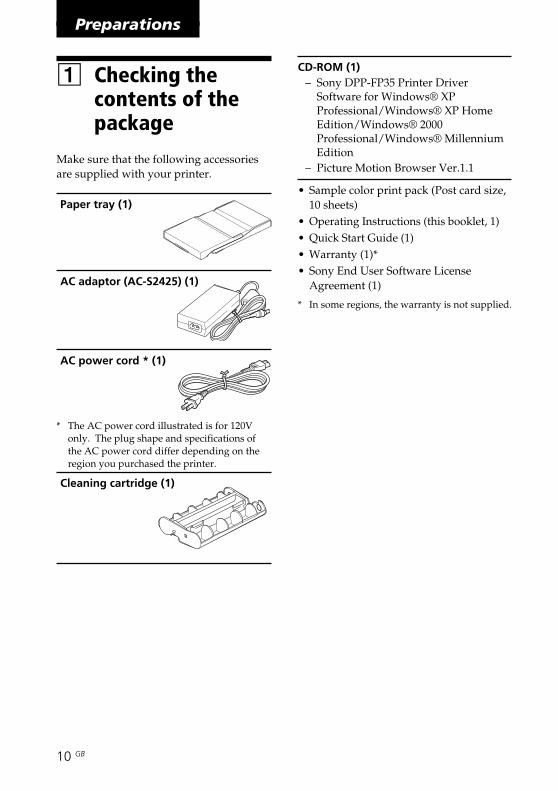
Make sure that the following accessoriesare supplied with your printer.
Paper tray (1)
AC adaptor (AC-S2425) (1)
AC power cord * (1)
* The AC power cord illustrated is for 120Vonly. The plug shape and specifications ofthe AC power cord differ depending on theregion you purchased the printer.
Cleaning cartridge (1)
CD-ROM (1)– Sony DPP-FP35 Printer Driver
Software for Windows® XPProfessional/Windows® XP HomeEdition/Windows® 2000Professional/Windows® MillenniumEdition
– Picture Motion Browser Ver.1.1
• Sample color print pack (Post card size,10 sheets)
• Operating Instructions (this booklet, 1)• Quick Start Guide (1)• Warranty (1)*• Sony End User Software License
Agreement (1)
* In some regions, the warranty is not supplied.
11 GB
Preparatio
ns
2 Preparing the printpack
To print an image, you need aprint pack designed for theprinter. The sample color printpack contains a set of 10 sheetsof post card size print paperand a print cartridge for 10prints.
Size of print paper
The size of the post card size print paperis as follows:
• Post card (4 x 6 inch/10 x 15 cm) size(101.6 x 152.4 mm)(the maximum borderless printing size)
Optional print packs
You can use the following optional printpacks for the printer:
Post card size print packSVM-F40P• 40 sheets of 4 x 6 inch print paper (20-
sheet-pack x 2)• Print cartridge for 40 printsSVM-F80P• 80 sheets of 4 x 6 inch print paper (20-
sheet-pack x 4)• 2 print cartridges each for 40 printsSVM-F120P• 120 sheets of 4 x 6 inch print paper (20-
sheet-pack x 6)• 3 print cartridges each for 40 prints
Note
Not all models are available in all countries.
Notes on using print packs
• Always use the print pack designed for thisprinter only. If you use different types ofprint pack, printing may not be possible ormalfunction may occur.
• The side without the imprinting is theprinting surface. Inferior print quality mayresult if the printing surface is contaminatedwith dust or fingerprints. Be careful to avoidtouching the printing surface.
• Do not bend the paper or tear it off at theperforations before printing.
• Do not print on used sheets of print paperor attempt to rewind the ribbon inside theprint cartridge. Doing so could result indamages to the printer.
• Please do not disassemble the print cartridge.• Do not pull out the ribbon from the print
cartridge.
Notes on storing print packs (for qualityprints)
• When you are going to store a partially-usedpack of the print cartridge and print paper foran extended period of time, store it in itsoriginal bag or in a similar container.
• Avoid placing the print pack in locations thatare subject to high temperature, highhumidity, excessive dust, or direct sunlight.
• Use print pack within two years from the dateof production.
Note on storing printouts
Do not affix cellophane tape or plastic erasers toprintouts. Also avoid leaving printouts underplastic desk mats.

12 GB
Removing the print cartridgeWhen the print cartridge runs out, theERROR indicator will flash slowly.Open the cartridge compartment door,push up the eject lever, and remove theused print cartridge.
Eject lever
Notes
• Use the print cartridge contained in the samebox with the print paper.
• Do not touch the ink ribbon or place the printcartridge in a dusty location. Fingerprints ordust on the ink ribbon may result in imperfectprinting.
Ink ribbon
3 Loading the printcartridge
1 Pull and open the cartridgecompartment door.
2 Insert the print cartridge in thearrow direction until it clicks intoplace.
Arrow
3 Close the cartridge compartmentdoor.
13 GB
Preparatio
ns
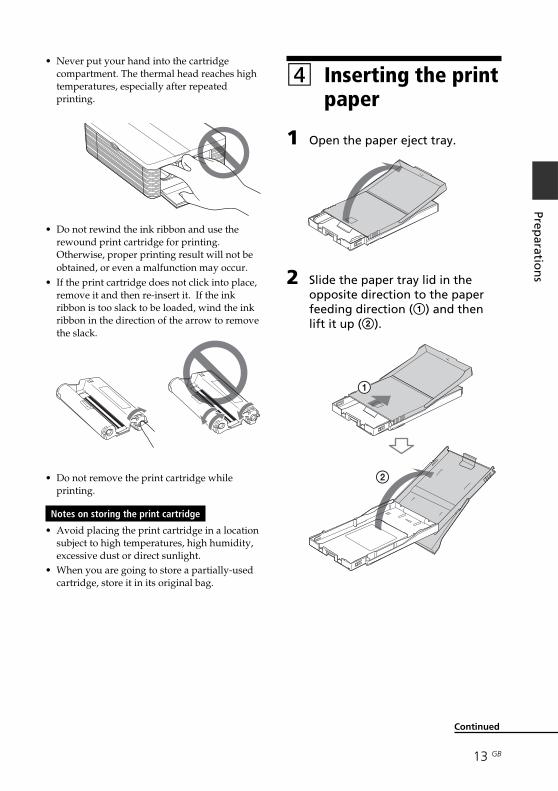
• Never put your hand into the cartridgecompartment. The thermal head reaches hightemperatures, especially after repeatedprinting.
• Do not rewind the ink ribbon and use therewound print cartridge for printing.Otherwise, proper printing result will not beobtained, or even a malfunction may occur.
• If the print cartridge does not click into place,remove it and then re-insert it. If the inkribbon is too slack to be loaded, wind the inkribbon in the direction of the arrow to removethe slack.
• Do not remove the print cartridge whileprinting.
Notes on storing the print cartridge
• Avoid placing the print cartridge in a locationsubject to high temperatures, high humidity,excessive dust or direct sunlight.
• When you are going to store a partially-usedcartridge, store it in its original bag.
4 Inserting the printpaper
1 Open the paper eject tray.
2 Slide the paper tray lid in theopposite direction to the paperfeeding direction (1) and thenlift it up (2).
Continued
14 GB
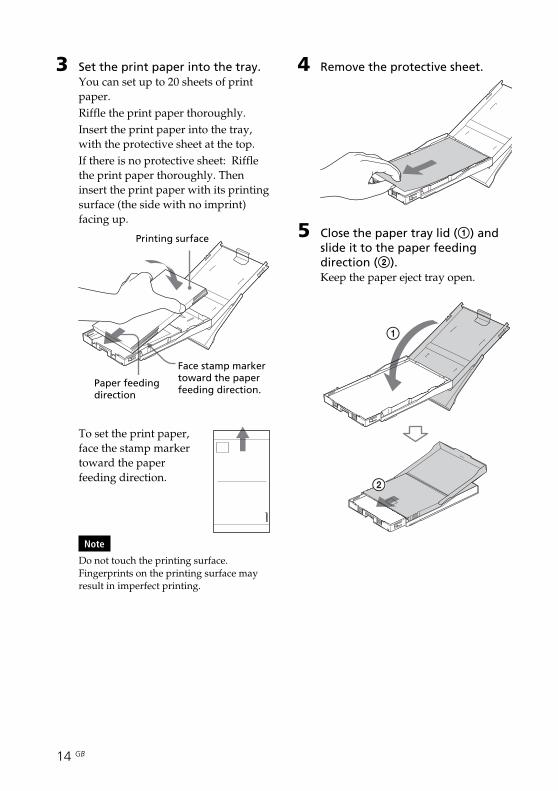
4 Remove the protective sheet.
5 Close the paper tray lid (1) andslide it to the paper feedingdirection (2).Keep the paper eject tray open.
3 Set the print paper into the tray.You can set up to 20 sheets of printpaper.Riffle the print paper thoroughly.Insert the print paper into the tray,with the protective sheet at the top.If there is no protective sheet: Rifflethe print paper thoroughly. Theninsert the print paper with its printingsurface (the side with no imprint)facing up.
To set the print paper,face the stamp markertoward the paperfeeding direction.
Note
Do not touch the printing surface.Fingerprints on the printing surface mayresult in imperfect printing.
Face stamp markertoward the paperfeeding direction.
Printing surface
Paper feedingdirection
15 GB
Preparatio
ns
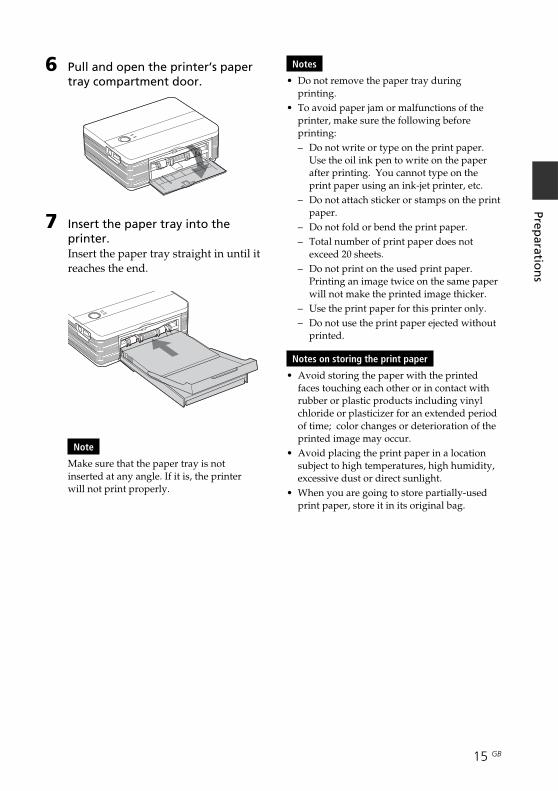
6 Pull and open the printer’s papertray compartment door.
7 Insert the paper tray into theprinter.Insert the paper tray straight in until itreaches the end.
Note
Make sure that the paper tray is notinserted at any angle. If it is, the printerwill not print properly.
Notes
• Do not remove the paper tray duringprinting.
• To avoid paper jam or malfunctions of theprinter, make sure the following beforeprinting:– Do not write or type on the print paper.
Use the oil ink pen to write on the paperafter printing. You cannot type on theprint paper using an ink-jet printer, etc.
– Do not attach sticker or stamps on the printpaper.
– Do not fold or bend the print paper.– Total number of print paper does not
exceed 20 sheets.– Do not print on the used print paper.
Printing an image twice on the same paperwill not make the printed image thicker.
– Use the print paper for this printer only.– Do not use the print paper ejected without
printed.
Notes on storing the print paper
• Avoid storing the paper with the printedfaces touching each other or in contact withrubber or plastic products including vinylchloride or plasticizer for an extended periodof time; color changes or deterioration of theprinted image may occur.
• Avoid placing the print paper in a locationsubject to high temperatures, high humidity,excessive dust or direct sunlight.
• When you are going to store partially-usedprint paper, store it in its original bag.

16 GB
5Connecting the ACpower source
1 Insert one plug of the supplied ACpower cord to the supplied ACadaptor.
2 Insert the other plug of the ACpower cord to the wall outletclose by (wall socket).
3 Insert the plug of the AC adaptorto the DC IN 24V jack of theprinter.The 1 (on/standby) indicator lightsin red.
Precautions• The printer is not disconnected from the AC
power source (mains) as long as it is connectedto the wall outlet , even if the printer itself hasbeen turned off.
• Connect the AC adaptor to an easily accessiblewall outlet close by. If some trouble occurswhile using the adaptor, immediately shut offthe power by disconnecting the plug from thewall outlet.
• When you have finished using the AC adaptor,disconnect it from the DC IN 24V jack of theprinter.
• The print paper emerges from the rear a fewtimes during printing. Do not block the rearwith the AC adaptor or AC power cord.
• Be sure to use the AC adaptor supplied withthe printer. Do not use other AC adaptor, asthis may cause malfunction.
• In case the cord of the AC adaptor is damaged,never use it any longer, as this may causedanger.
• Do not short the DC plug of the AC adaptorwith a metallic object, as this may causemalfunction.
• Do not use the AC adaptor in a narrow space,such as the one between the printer and thewall.
AC power cord(supplied)
To the wall outlet
AC adaptorAC-S2425(supplied)
To DC IN 24V
17 GB
Printin
g fro
m a PictB
ridg
e camera
Printing from a PictBridge camera (PictBridge mode)
Printing images fromthe digital camera
You can connect a PictBridge-compliantdigital camera and print an image directlyfrom your digital camera.
Before you beginYou need preparations 1 through 4(pages 10 to 15), and the following:
1 Set your digital camera ready forprinting with a PictBridge-compliant printer.The settings and operations that arenecessary before connection differdepending on the digital camera. Fordetails, see the operating instructionsof the digital camera you use. (In caseof Sony Cyber-shot digital camera, forexample, select “PictBridge” or“Auto” mode for the “USB Connect”.)
NoteWhen you use a DSC-T1, you need toupdate software version.
2 Connect the printer to the ACpower source (page 16).1 Insert one plug of the supplied AC
power cord to the supplied ACpower adaptor.
2 Insert the other plug of the ACpower cord to the wall outlet.
3 Insert the plug of the AC poweradaptor to the DC IN 24V jack ofthe printer.
The 1 (on/standby) indicator lightsin red.
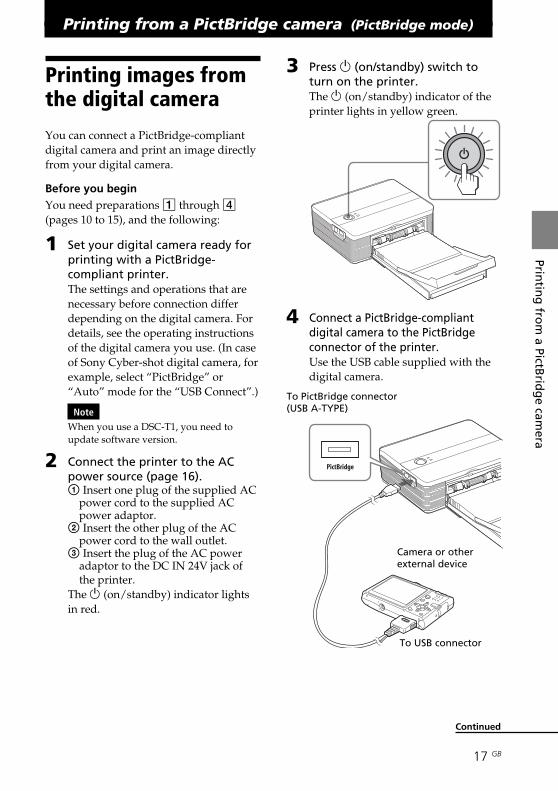
3 Press 1 (on/standby) switch toturn on the printer.The 1 (on/standby) indicator of theprinter lights in yellow green.
4 Connect a PictBridge-compliantdigital camera to the PictBridgeconnector of the printer.Use the USB cable supplied with thedigital camera.
Camera or otherexternal device
To PictBridge connector(USB A-TYPE)
To USB connector
Continued

18 GB
Notes
• You cannot connect a PictBridge-compliant digital camera and a PCsimultaneously to the printer. Whenprinting from a digital camera, removethe PC from the printer.
• The connector is designed for thePictBridge only. Never connect adevice other than a PictBridge-compliant digital camera.
• The type of USB cable you should usemay differ depending on the digitalcamera. Use a USB cable with an A-TYPE connector for the printer and anappropriate type for your digitalcamera.
• If you use a commercially availableUSB cable, please use the one shorterthan 3m in length.
When you connect a PictBridge-compliant digital camera to theprinterThe printer automatically enters thePictBridge mode. The PICTBRIDGEindicator turns to green.
5 Operate the digital camera toprint an image.The printer supports the followingprints:• Single-image print.• All images print• Index print• DPOF print• Border/Borderless print• Date print
PICTBRIDGE indicator
Notes on printing
• If you replace a print cartridge while theprinter is connected to a PictBridge-compliantdigital camera, an image may not be printedproperly. If this occurs, disconnect and thenconnect the digital camera.
• Never move or turn off the printer while it isprinting; the print cartridge or paper maybecome stuck. In case you turn off the power,keep the paper tray inserted and then turn onthe printer. If paper being printed remains inthe printer, remove the paper that emergedautomatically and resume printing from thestep 1.
• The print paper emerges a few times duringprinting. Do not touch nor pull the emergedpaper. Wait for the print paper to be fullyejected after printing ends.
• As the print paper emerges from the rear afew times during printing, make sure to spareenough space behind the printer duringprinting.
• If print paper runs out during continuousprinting or if you print with no print paper inthe paper tray, the printer’s ERROR indicatorlights. Feed the print paper without turningoff the power and resume printing.
On the PICTBRIDGE indicator
The PICTBRIDGE indicator shows theconnection status between the printer and thedigital camera as follows:• When the indication lights: The connection
between the printer and the PictBridge-compliant digital camera is established.
• When the indication blinks: The device thatdoes not support the PictBridge feature isconnected. Or the image to be printed isdamaged.

19 GB
Printin
g fro
m a PC
Printing from a PC (PC mode)
You can print the images from a PC byinstalling the supplied software on yourPC and connecting it to the printer .This section explains how to install thesupplied software on your PC and how touse the supplied Picture Motion Browsersoftware to print an image.Please also refer to the operatinginstructions supplied with your PC.Installation of the software is necessaryonly when you connect the printer to yourPC for the first time.
On the supplied CD-ROMThe supplied CD-ROM contains thefollowing software:• Printer driver for DPP-FP35: The
software describes the printer’srequirements and enables printing fromthe computer.
• Picture Motion Browser: Sony’soriginal software application that allowsyou to handle photographs and movingimages—capturing, managing,processing, and printing.
Installing the software
System requirements
To use the supplied printer driver andPicture Motion Browser, your PC mustmeet the following system requirements:
OS: Microsoft Windows® XPProfessional/Windows® XP HomeEdition/Windows® 2000Professional/Windows® MillenniumEdition, pre-installed (IBM PC/ATcompatible)(Windows 95, Windows 98 GoldEdition, Windows 98 Second Edition,Windows NT, other versions (ex.Server) of Windows 2000 are notsupported.)
CPU: Pentium III 500MHz or faster(Pentium III 800MHz or faster isrecommended.)
RAM: 128 MB or more (256 MB or more isrecommended.)
Hard disk space: 200 MB or more(Depending on the Windows versionyou use, more space will be required.To handle image data, you will needadditional hard disk space.)
Display:Screen area: 800 x 600 pixels or moreColors: High Color (16-bit) or more
Required software: DirectX 9.0 or higher(Required for the Picture MotionBrowser.)
Notes
• If a hub is used to connect the printer andyour PC, or if two or more USB devicesincluding other printers are connected to yourPC, a trouble may occur. If this occurs,simplify the connections between your PCand the printer.
• You cannot operate the printer from anotherUSB device being used simultaneously.
Continued
20 GB
• Do not remove the USB cable from or connectit to the printer during data communicationor printing. The printer may not workproperly.
• Do not allow the PC connected to the printerto switch to standby mode or hibernationmode during printing. If you do so, theprinter may not print properly.
• We cannot guarantee operations with allpersonal computers, even though they maymeet or exceed the system requirements.
• Picture Motion Browser supports the DirectXtechnology and the DirectX installation maybe required.
Installing the printer driver
1 Make sure that the printer isdisconnected from thecomputer.
Note
If you connect the printer to your PC in thisstage, either of the following dialog boxesare displayed:• When using Windows Me: Add New
Hardware Wizard• When using Windows 2000/XP:
Found New Hardware WizardIf this occurs, disconnect the printer fromthe PC and then click “Cancel” in thedialog box.
2 Turn on your computer and startWindows.• When installing or uninstalling the
software in Windows® 2000Professional, log on to Windows as“Administrator” or “Power user”.
• When installing or uninstalling thesoftware with Windows® XPProfessional/Windows® XP HomeEdition, log on using a “Computeradministrator” user account.
Notes
• Be sure to close all running programsbefore installing the software.
• The dialog boxes in this section arethose in Windows XP Professional,unless otherwise specified. Theinstallation procedures and the dialogboxes shown differ depending on theoperating system.
3 Insert the supplied CD-ROM intothe CD-ROM drive of yourcomputer.The setup starts automatically and theinstallation window is displayed.
Note
In case the installation window is notautomatically displayed, double-click the“Setup.exe” of the CD-ROM.
4 Click “Installing Printer Driver”.
The “Sony DPP-FP35 - InstallShieldWizard” dialog box appears.
5 Click “Next”.The license agreement dialog box isdisplayed.

21 GB
Printin
g fro
m a PC
6 Check “I accept the terms of thelicense agreement” and click“Next”.If you check “I do not accept the termsof the license agreement”, you cannotproceed to the next step.
The “Ready to install the program”dialog box is displayed.
7 Click “Install”.The “Printer connection” dialog box isdisplayed.
8 Connect the printer to the ACpower source (page 16).
9 Press 1 (on/standby) switch toturn on the printer (page 17).The 1 (on/standby) indicator of theprinter lights in yellow green.
10 Click “Next”.
11 Connect the USB connectors ofthe printer and your computer.
The printer automatically enters thePC mode and the printer setup willstart automatically.When the printer setup is complete,the “InstallShield Wizard Complete”dialog box is displayed.
Note
In case you use commercially availableUSB cable, use a B-type USB cable shorterthan 3m in length.
12 Click “Finish”.The installation of the printer driver iscomplete. When you are prompted torestart your computer, restart thecomputer.
13 • To finish installation, click“Complete” and remove theCD-ROM from your computerand keep it for future use.
• To continue to install thePicture Motion Browsersoftware, click “Installing thePicture Motion Browser” andfollow the procedures on page23.
To USBconnector(B-TYPE)
Windows PCTo USBconnector
Continued

22 GB
Notes
• If the printer driver CD-ROM is promptedduring the installation, specify the followingdirectory:– When using the Windows Me:
D:\DRIVER\winme– When using the Windows 2000/XP:
D:\DRIVER\win2000.xp“D” stands for the CD-ROM drive of yourPC and may differ depending on thesystem.
• The supplied CD-ROM will be required whenyou uninstall or re-install the printer driver.Keep it in good order for possible future use.
• If the installation fails, remove the printerfrom your computer, restart your computer,and then do the installation procedures fromthe step 3.
• After installation, the “Sony DPP-FP35” is notset as the default printer. Set the printer youuse for each application.
• Before you use the printer, read the Readmefile (the Readme folder of the CD-ROMcEnglish foldercReadme.txt).
Checking the installationOpen the “Printers and Faxes” (in case ofWindows® XP Professional/Windows®
XP Home Edition) or “Printers” from the“Control Panel”. When the “Sony DPP-FP35” is displayed in the “Printers andFaxes” or “Printers” window, the printerdriver has been successfully installed.
Uninstalling the printer driverWhen the printer driver becomesunnecessary, remove it from your PC harddisk as follows:
1 Disconnect the USB cable fromyour printer and the computer.
2 Insert the supplied CD-ROM intothe CD-ROM drive of yourcomputer.The setup starts automatically and theinstallation window is displayed.
3 Click “Installing Printer Driver”.The “Sony DPP-FP35 - InstallShieldWizard” dialog box appears.
4 Click “Next”.The license agreement dialog box isdisplayed.
5 Check “I accept the terms of thelicense agreement” and click“Next”.The dialog box used for confirminguninstallation is displayed.
6 Click “Yes”.
The dialog box used for restarting thecomputer is displayed.
23 GB
Printin
g fro
m a PC
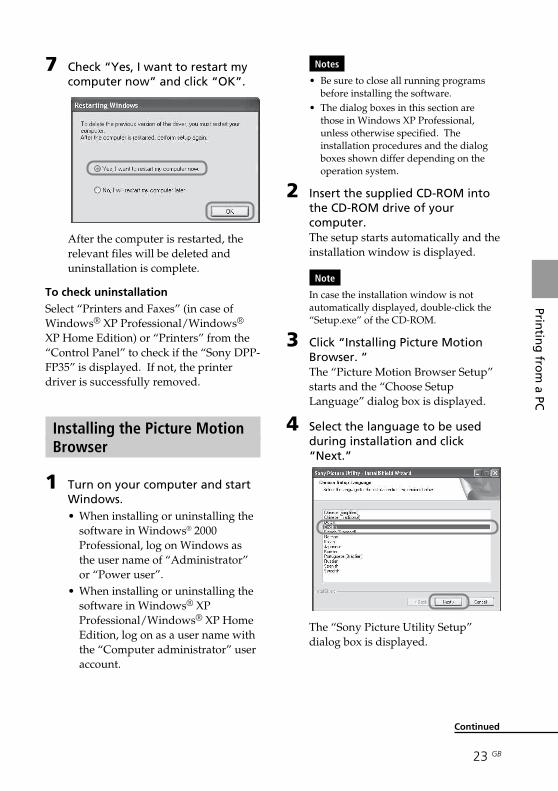
7 Check “Yes, I want to restart mycomputer now” and click “OK”.
After the computer is restarted, therelevant files will be deleted anduninstallation is complete.
To check uninstallationSelect “Printers and Faxes” (in case ofWindows® XP Professional/Windows®
XP Home Edition) or “Printers” from the“Control Panel” to check if the “Sony DPP-FP35” is displayed. If not, the printerdriver is successfully removed.
Installing the Picture MotionBrowser
1 Turn on your computer and startWindows.• When installing or uninstalling the
software in Windows® 2000Professional, log on Windows asthe user name of “Administrator”or “Power user”.
• When installing or uninstalling thesoftware in Windows® XPProfessional/Windows® XP HomeEdition, log on as a user name withthe “Computer administrator” useraccount.
Notes
• Be sure to close all running programsbefore installing the software.
• The dialog boxes in this section arethose in Windows XP Professional,unless otherwise specified. Theinstallation procedures and the dialogboxes shown differ depending on theoperation system.
2 Insert the supplied CD-ROM intothe CD-ROM drive of yourcomputer.The setup starts automatically and theinstallation window is displayed.
Note
In case the installation window is notautomatically displayed, double-click the“Setup.exe” of the CD-ROM.
3 Click “Installing Picture MotionBrowser. ”The “Picture Motion Browser Setup”starts and the “Choose SetupLanguage” dialog box is displayed.
4 Select the language to be usedduring installation and click“Next.”
The “Sony Picture Utility Setup”dialog box is displayed.
Continued
24 GB
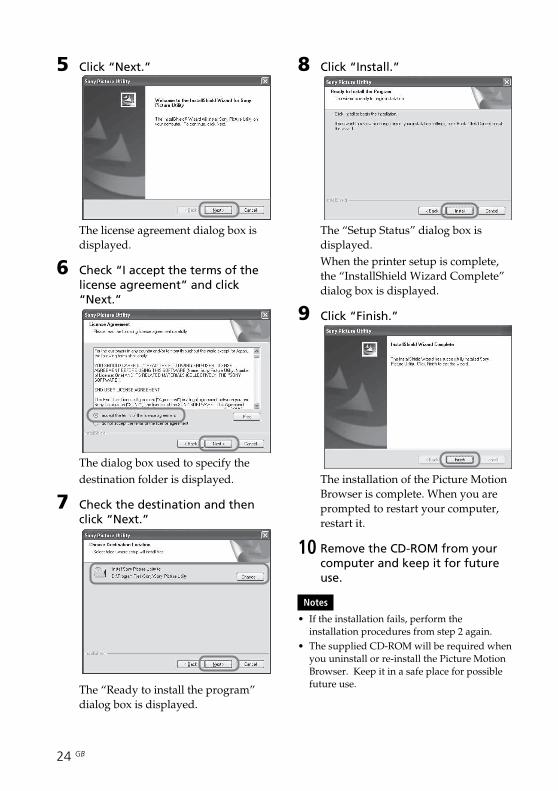
8 Click “Install.”
The “Setup Status” dialog box isdisplayed.When the printer setup is complete,the “InstallShield Wizard Complete”dialog box is displayed.
9 Click “Finish.”
The installation of the Picture MotionBrowser is complete. When you areprompted to restart your computer,restart it.
10 Remove the CD-ROM from yourcomputer and keep it for futureuse.
Notes
• If the installation fails, perform theinstallation procedures from step 2 again.
• The supplied CD-ROM will be required whenyou uninstall or re-install the Picture MotionBrowser. Keep it in a safe place for possiblefuture use.
5 Click “Next.”
The license agreement dialog box isdisplayed.
6 Check “I accept the terms of thelicense agreement” and click“Next.”
The dialog box used to specify thedestination folder is displayed.
7 Check the destination and thenclick “Next.”
The “Ready to install the program”dialog box is displayed.
25 GB
Printin
g fro
m a PC
When the software is installedThe is displayed on the Windowsdesktop, as well as a shortcut to the website for printer customer registration. Ifyou finish registration, you can findsupport information at:http://www.sony.net/registration/di/
Uninstalling the Picture MotionBrowserWhen this software is no longer needed,remove it from your computer as follows:
1 Click “Start” - “Setting” - “ControlPanel” (or “Start” - “ControlPanel” with Windows XP).
2 Double-click “Add/RemovePrograms.”The Control Panel is displayed.
3 Select “Sony Picture Utility” andclick “Change/Remove”(“Remove” with Windows XP).The software is uninstalled.
Printing photos fromthe Picture MotionBrowser
You can use the Picture Motion Browser toprint an image from your PC using post cardsize print paper.
1 Start the Picture Motion Browserwindow using either of thefollowing methods:• Double-click (Picture Motion
Browser) on the Windows desktop.• Click “Start” - “All Programs” (or
“Programs” with Windows 2000) -“Sony Picture Utility” - “PictureMotion Browser.”
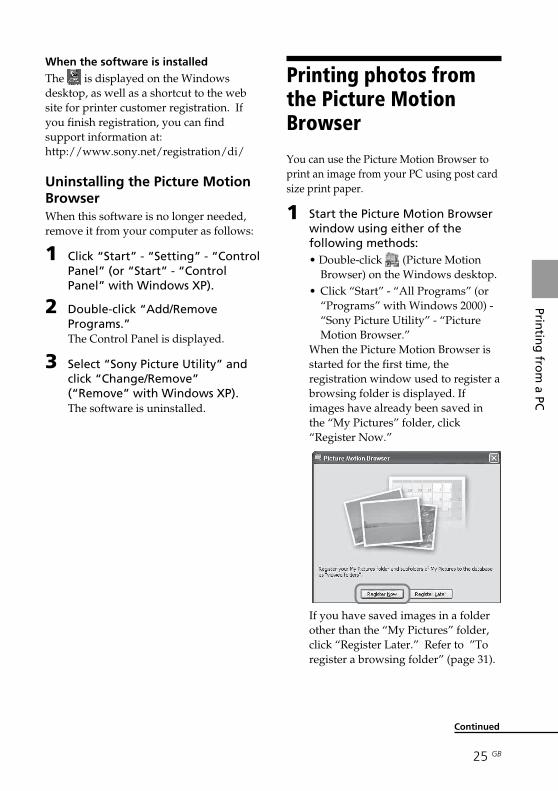
When the Picture Motion Browser isstarted for the first time, theregistration window used to register abrowsing folder is displayed. Ifimages have already been saved inthe “My Pictures” folder, click“Register Now.”
If you have saved images in a folderother than the “My Pictures” folder,click “Register Later.” Refer to ”Toregister a browsing folder” (page 31).
Continued
26 GB
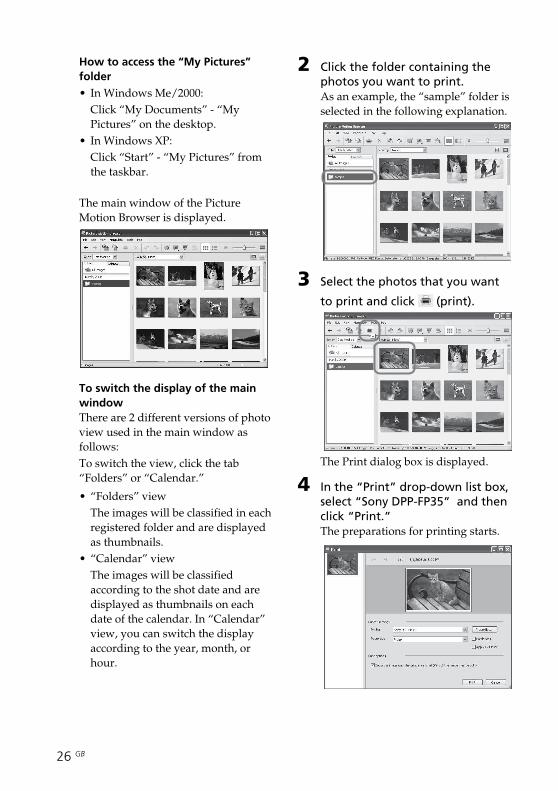
2 Click the folder containing thephotos you want to print.As an example, the “sample” folder isselected in the following explanation.
3 Select the photos that you want
to print and click (print).
The Print dialog box is displayed.
4 In the “Print” drop-down list box,select “Sony DPP-FP35” and thenclick “Print.”The preparations for printing starts.
How to access the “My Pictures”folder• In Windows Me/2000:
Click “My Documents” - “MyPictures” on the desktop.
• In Windows XP:Click “Start” - “My Pictures” fromthe taskbar.
The main window of the PictureMotion Browser is displayed.
To switch the display of the mainwindowThere are 2 different versions of photoview used in the main window asfollows:To switch the view, click the tab“Folders” or “Calendar.”
• “Folders” viewThe images will be classified in eachregistered folder and are displayedas thumbnails.
• “Calendar” viewThe images will be classifiedaccording to the shot date and aredisplayed as thumbnails on eachdate of the calendar. In “Calendar”view, you can switch the displayaccording to the year, month, orhour.
27 GB
Printin
g fro
m a PC
Items Functions
Printer Select “Sony DPP-FP35”.
Paper sizeFrom the drop-down listbox, select the paper sizeyou actually use forprinting:• P size• L size
NoteIn some regions, L size printpaper is not sold.
Print options• When checked, an image
will be printed over theentire printing area of thepaper. An edge of thephoto may not beprinted.
• When unchecked, animage will be printedwithout cutting off anedge.
Tip
To print an image withoutmargins around it(Borderless Print), you mustcheck this option.
Borderless• When checked, an image
will be printed withoutmargins around it.
• When unchecked, animage will be printedwith margins around it.
Tip
When you make aBorderless Print, you mustcheck the “Zoom the imageuntil the print area is full”item for Print options.
Items Functions
Apply Exif Print• When checked, an image
shot with a Exif Print(Exif 2.21)-compliantdigital camera will beadjusted and printedwith its optimum picturequality.
NoteThe image displayed on themonitor will not beadjusted.
• When unchecked, animage will be printedwithout adjustments.
NoteEven if you uncheck theitem, “Color reproduction/Picture quality” is still set to“Auto Fine Print 3”. Tochange the “Colorreproduction/Picturequality” settings, follow theProperties steps.
PropertiesSpecifies orientation,picture quality and otherdetails.
To make detailed settings, click“Properties,” so that the propertiesdialog box for the selected printer isdisplayed.
Continued
28 GB
Items Functions
Copies Specify the number ofcopies to be printed.
Enlarge/ReduceSpecify the percentage toenlarge or reduce the sizeof an image when printed.You can set the referencepoint when an image isenlarged or reduced bychecking “Upper leftreference”.• When unchecked, an
image is enlarged orreduced with the centeras the reference point.Usually, use thisoption.
• When checked, an imageis enlarged or reducedwith the upper leftcorner as the referencepoint.
Print previewCheck this option todisplay a preview of animage before printed.
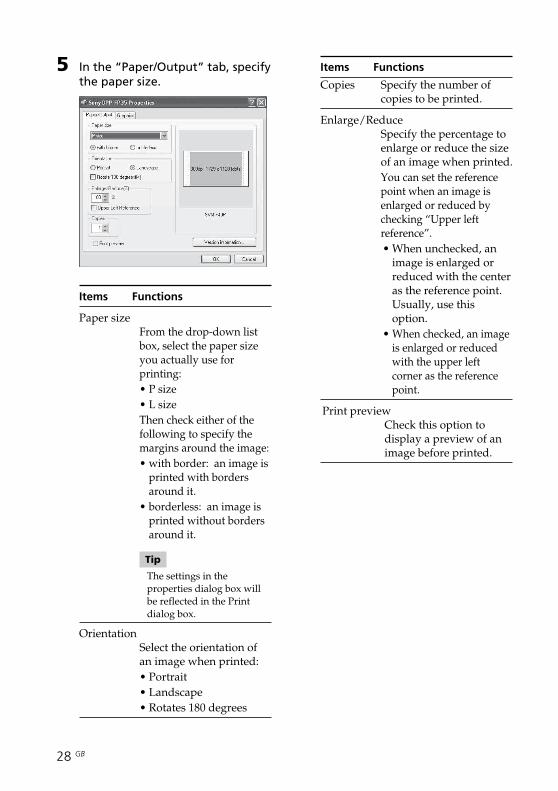
5 In the “Paper/Output” tab, specifythe paper size.
Items Functions
Paper sizeFrom the drop-down listbox, select the paper sizeyou actually use forprinting:• P size• L sizeThen check either of thefollowing to specify themargins around the image:• with border: an image is
printed with bordersaround it.
• borderless: an image isprinted without bordersaround it.
Tip
The settings in theproperties dialog box willbe reflected in the Printdialog box.
OrientationSelect the orientation ofan image when printed:• Portrait• Landscape• Rotates 180 degrees

29 GB
Printin
g fro
m a PC
6 In the “Graphics” tab, set thecolor reproduction and picturequality.
Items Functions
Color reproduction/Picture qualitySelect the setting from thedrop-down list box:•Off: An image will be printed
without adjustment.•Auto Fine Print 3:From the
“Settings” drop-down listbox, select either of thefollowing correction method:– Photographical: An image
will be adjustedautomatically and printedwith natural and beautifulpictures. (Recommendedoption)
–Vivid: An image will beadjusted automatically andprinted with more vividpictures. (In this setting, astronger sharpnesscorrection is given, makingpictures more vivid.)
Items Functions
•ICM (system): From the“Settings” drop-down listbox, select either of thefollowing correction method:– Graphics: when graphics or
vivid colors are used.– Match: when you want to
match colors.– Pictures: when a
photograph or pictures areprinted.
ExifPrintCheck it to adjust and print animage shot with a Exif Print(Exif 2.21)-compliant digitalcamera. The printer driveruses the color conversion andExif shooting data to adjust theimage.This option is effective onlywith Picture Motion Browser.
Tip
The settings in the propertiesdialog box will be reflected inthe Print dialog box.
Red-eye reductionCheck it to automaticallyreduce the red-eyephenomenon of the subjectshot by using a flash light.
Notes• When you check this option,
make sure to select “Preview”to display the preview imagebefore printing and check thatthe red-eye reduction has beencorrectly processed to theimage.
Continued
30 GB
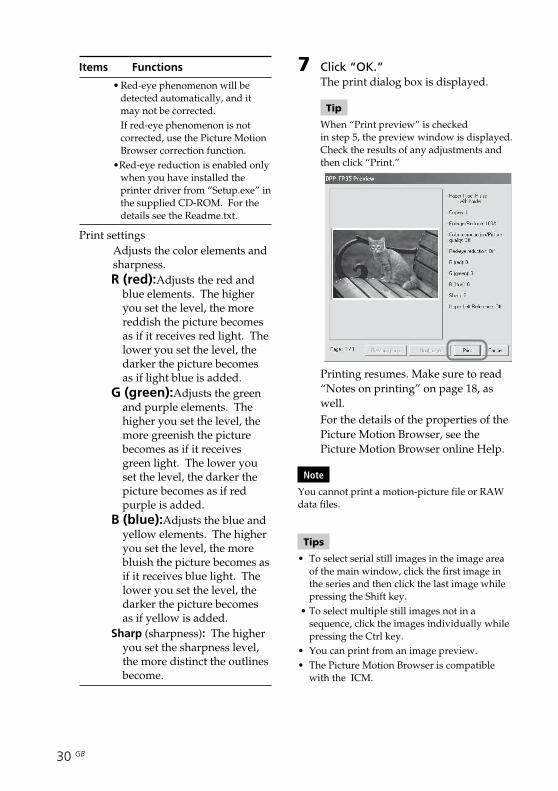
7 Click “OK.”The print dialog box is displayed.
Tip
When “Print preview” is checkedin step 5, the preview window is displayed.Check the results of any adjustments andthen click “Print.”
Printing resumes. Make sure to read“Notes on printing” on page 18, aswell.For the details of the properties of thePicture Motion Browser, see thePicture Motion Browser online Help.
Note
You cannot print a motion-picture file or RAWdata files.
Tips
• To select serial still images in the image areaof the main window, click the first image inthe series and then click the last image whilepressing the Shift key.
• To select multiple still images not in asequence, click the images individually whilepressing the Ctrl key.
• You can print from an image preview.• The Picture Motion Browser is compatible
with the ICM.
Items Functions
• Red-eye phenomenon will bedetected automatically, and itmay not be corrected.If red-eye phenomenon is notcorrected, use the Picture MotionBrowser correction function.
•Red-eye reduction is enabled onlywhen you have installed theprinter driver from “Setup.exe” inthe supplied CD-ROM. For thedetails see the Readme.txt.
Print settingsAdjusts the color elements andsharpness.R (red):Adjusts the red and
blue elements. The higheryou set the level, the morereddish the picture becomesas if it receives red light. Thelower you set the level, thedarker the picture becomesas if light blue is added.
G (green):Adjusts the greenand purple elements. Thehigher you set the level, themore greenish the picturebecomes as if it receivesgreen light. The lower youset the level, the darker thepicture becomes as if redpurple is added.
B (blue):Adjusts the blue andyellow elements. The higheryou set the level, the morebluish the picture becomes asif it receives blue light. Thelower you set the level, thedarker the picture becomesas if yellow is added.
Sharp (sharpness): The higheryou set the sharpness level,the more distinct the outlinesbecome.

31 GB
Printin
g fro
m a PC
To register a browsing folderThe Picture Motion Browser does notallow you to view images saved on the PChard disk directly. You must to register thebrowsing folder as follows:
1 Click “File”-“Register ViewedFolder,” or click (RegisterFolders to View).The browsing folder registrationwindow is displayed.
2 Select the folder you want toregister and then click “Register.”
Note
You cannot register the whole drive.
3 Click “Yes.”Registration of the image informationin the data base starts.
4 Click “Close.”
Notes
• The folder you select as the destinationof the imported images will beregistered automatically.
• You cannot cancel registration of thefolder you register here.
To change the browsing folderClick “Tools” - “Settings” - “Viewedfolders.”
Tips
• If a sub folder is contained in the sourcefolder, the images in the sub folder will alsobe registered.
• When the software is first started, themessage prompting you to register “MyPictures” will be displayed.
• Depending on the number of images, it maytake some tens of minutes to register images.
Continued
32 GB
Printing from otherapplication software
You can use a commercially-availableapplication software to print an imagefrom the DPP-FP35. Select “DPP-FP35” inthe print dialog box and select the printpaper size in the page setup dialog box.For details in print settings, see steps 5 and6 on pages 28 and 29.
On “borderless” setting in the “Papersize” sectionWhen using an application other than thePicture Motion Browser, an image mightbe printed with borders even if you selectborderless print in the “Paper size” sectionof the “Paper/Output” tab in the “SonyDPP-FP35 Properties” dialog box.When you select the borderless printoption, the printing range information forborderless print will be supplied to theapplication. Some applications, however,may arrange and print the image withborders within the specified range.If this occurs, do either of the following toprint an image without borders:
• When you can set print range with anapplication, set an image to be printedfully in the print range. For example,select “Full page photo print” or asimilar option.
• Set a larger value in the “Enlarge/Reduce” text box in the “Paper/Output”tab of the “Sony DPP-FP35 Properties”dialog box.If borders remain on the right andbottom sides of a printed image evenafter you set a larger value, check“Upper left reference”.
In either case, make sure to display andcheck the preview image before printing.
To stop printing
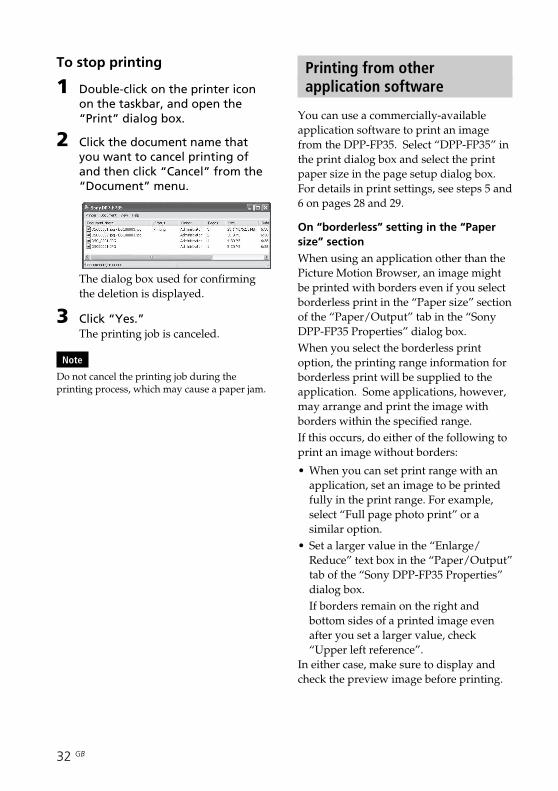
1 Double-click on the printer iconon the taskbar, and open the“Print” dialog box.
2 Click the document name thatyou want to cancel printing ofand then click “Cancel” from the“Document” menu.
The dialog box used for confirmingthe deletion is displayed.
3 Click “Yes.”The printing job is canceled.
Note
Do not cancel the printing job during theprinting process, which may cause a paper jam.
33 GB
Printin
g fro
m a PC
Orientation settingDepending on the application softwareyou use, orientation may not change evenif you change portrait or landscape setting.
With border/borderless setting of theprinter driverWhen the application software you usehas border/borderless setting, we suggestyou select borderless as the printer driversetting.
Print quantity setting in the Propertiesdialog boxDepending on the application softwareyou use, the print quantity setting of theapplication you use may have priorityover the setting specified in the printerdriver dialog box.
Exif Print Settings in the “Graphics” tabThe Exif Print setting in the “Colorreproduction/Picture quality” sectionsupports the Picture Motion Browseronly. If you use other application to printan image with this option checked, theimage may be printed with incorrectcolors. If this occurs, remove the check.

34 GB
Symptom
ThePICTBRIDGEindicator of theprinter does notlight.
Symptom
The 1 (on/standby) switchcannot be turnedon.
Cause/Solutions
c Connect the cable correctly.
c Press the 1 (on/standby) switch to turnon the 1 (on/standby) indicator inyellow green.
c See the homepage for the digital camerayou are using.
c If a USB mouse or other non-PictBridge-compliant device is connected, remove itand connect a PictBridge-compliant device.
c Disconnect the digital camera and theprinter and then connect them again. Orturn off and then on the printer and thedigital camera.
c Connect the cable again after printing iscomplete.
c You cannot connect a PictBridge-compliant digital camera and the PC tothe printer at the same time. Remove theUSB cable of the PC and connect thedigital camera again to the printer.
Check
• Is the digital cameraconnected correctly?
• Is the printer turned on?
• Does the firmware of yourdigital camera support theprinter?
• Is the PICTBRIDGEindicator of the printerflashing?
• Is printing in process?
• Is the printer connected tothe PC?
Cause/Solutions
c Connect the AC power cord to an ACoutlet securely. (.page 16)
Check
• Is the AC power cordproperly connected?
Troubleshooting
If trouble occurs
If you run into any problems using the printer, use the following guidance to solvethe problem. If the problem persists, consult your Sony dealer.
Power
Connecting with a digital camera

35 GB
Trou
blesh
oo
ting
Symptom
An error isdisplayed withthe digitalcamera and youcannot makeprinting.
You cannot makea DPOF printing.
Symptom
You lost thesupplied CD-ROM and wantto obtain a newone.
The printerdriver cannot beinstalled.
Check
• Are you sure that you havefollowed the installationprocedures correctly?
• Is another applicationprogram running?
• Did you specify the CD-ROM as the installation CD-ROM correctly?
• Is the USB driver installed?
Connecting with a computer
Cause/Solutions
c Please download the printer driver fromthe Customer support home page(.page 46). Or contact your Sonydealer.
c Follow the procedures in the operatinginstructions to install the driver(.page 20). If an error occurs, restartyour computer and do the installationprocedures again.
c Exit all applications and then install thedriver again.
c Double-click My Computer, and then theCD-ROM icon in the open window.Follow the procedures in the operatinginstructions to install the driver.
c The USB driver may not be installedproperly. Follow the operatinginstructions to install the USB driveragain.
Check
• Are you using the identicaltype of print paper andprint cartridge?
Cause/Solutions
c Insert the print paper whose type isidentical with the print cartridge loaded.To change the type of the print cartridge,postpone printing, replace printcartridges, and then resume printing.
c Some types of digital cameras do notsupport DPOF printing. Use anothermethod for printing.
36 GB
Symptom
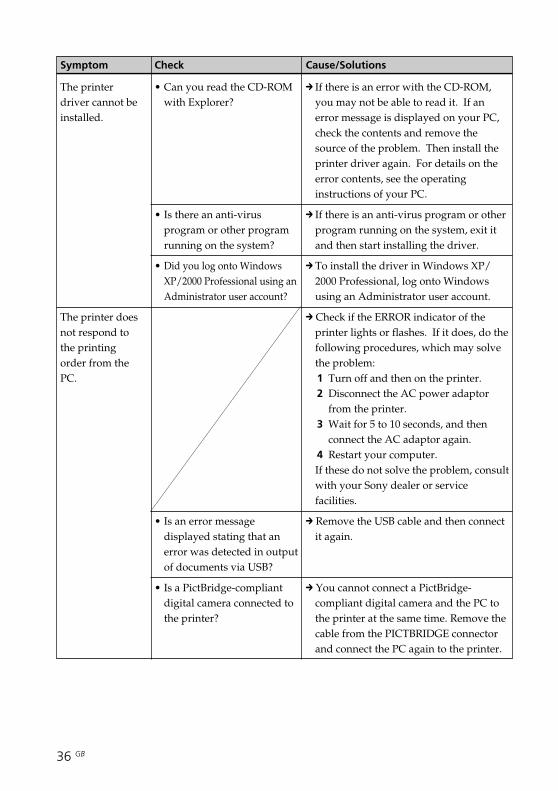
The printerdriver cannot beinstalled.
The printer doesnot respond tothe printingorder from thePC.
Check
• Can you read the CD-ROMwith Explorer?
• Is there an anti-virusprogram or other programrunning on the system?
• Did you log onto WindowsXP/2000 Professional using anAdministrator user account?
• Is an error messagedisplayed stating that anerror was detected in outputof documents via USB?
• Is a PictBridge-compliantdigital camera connected tothe printer?
Cause/Solutions
c If there is an error with the CD-ROM,you may not be able to read it. If anerror message is displayed on your PC,check the contents and remove thesource of the problem. Then install theprinter driver again. For details on theerror contents, see the operatinginstructions of your PC.
c If there is an anti-virus program or otherprogram running on the system, exit itand then start installing the driver.
c To install the driver in Windows XP/2000 Professional, log onto Windowsusing an Administrator user account.
c Check if the ERROR indicator of theprinter lights or flashes. If it does, do thefollowing procedures, which may solvethe problem:1 Turn off and then on the printer.2 Disconnect the AC power adaptor
from the printer.3 Wait for 5 to 10 seconds, and then
connect the AC adaptor again.4 Restart your computer.If these do not solve the problem, consultwith your Sony dealer or servicefacilities.
c Remove the USB cable and then connectit again.
c You cannot connect a PictBridge-compliant digital camera and the PC tothe printer at the same time. Remove thecable from the PICTBRIDGE connectorand connect the PC again to the printer.
37 GB
Trou
blesh
oo
ting
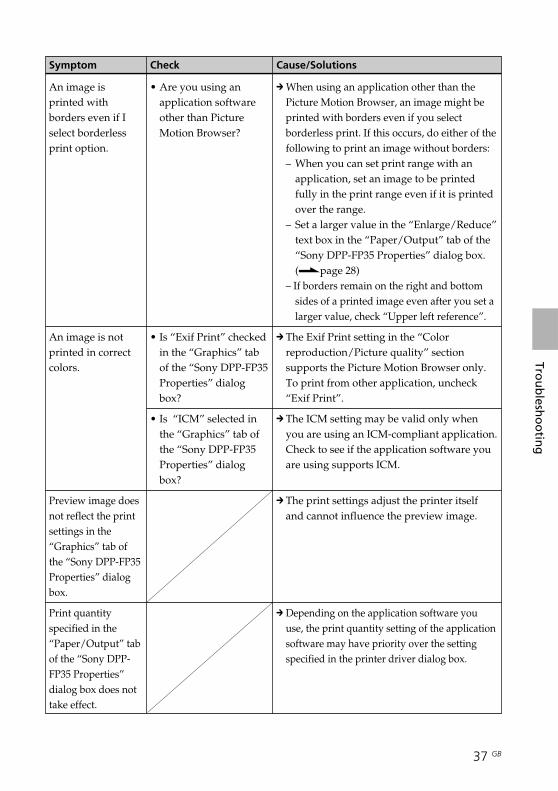
Symptom
An image isprinted withborders even if Iselect borderlessprint option.
An image is notprinted in correctcolors.
Preview image doesnot reflect the printsettings in the“Graphics” tab ofthe “Sony DPP-FP35Properties” dialogbox.
Print quantityspecified in the“Paper/Output” tabof the “Sony DPP-FP35 Properties”dialog box does nottake effect.
Check
• Are you using anapplication softwareother than PictureMotion Browser?
• Is “Exif Print” checkedin the “Graphics” tabof the “Sony DPP-FP35Properties” dialogbox?
• Is “ICM” selected inthe “Graphics” tab ofthe “Sony DPP-FP35Properties” dialogbox?
Cause/Solutions
c When using an application other than thePicture Motion Browser, an image might beprinted with borders even if you selectborderless print. If this occurs, do either of thefollowing to print an image without borders:– When you can set print range with an
application, set an image to be printedfully in the print range even if it is printedover the range.
– Set a larger value in the “Enlarge/Reduce”text box in the “Paper/Output” tab of the“Sony DPP-FP35 Properties” dialog box.(.page 28)
– If borders remain on the right and bottomsides of a printed image even after you set alarger value, check “Upper left reference”.
c The Exif Print setting in the “Colorreproduction/Picture quality” sectionsupports the Picture Motion Browser only.To print from other application, uncheck“Exif Print”.
c The ICM setting may be valid only whenyou are using an ICM-compliant application.Check to see if the application software youare using supports ICM.
c The print settings adjust the printer itselfand cannot influence the preview image.
c Depending on the application software youuse, the print quantity setting of the applicationsoftware may have priority over the settingspecified in the printer driver dialog box.

38 GB
Symptom
Paper does notfeed.
The print paperemerges duringprinting inprocess.
PrintingWhen you place print paper in the paper tray and start printing, paper feedingerror may occur: the printer does not feed paper; the printer may feedoverlapped paper; or the printer may feed paper diagonally. If this occurs, checkthe items listed in the following symptom “Paper does not feed”.
Check
• Is the print paper properlyset in the paper tray?
• Are you using print paperthat was not designed forthe printer?
• Is the print paper jammed?
• Is it in the middle of theprinting process?
Cause/Solutions
c If print paper is not properly loaded, theprinter may develop trouble. Check thefollowing:• Is the correct set of print paper and
print cartridge loaded? (.page 11)• Is the print paper inserted in the
correct direction?• Did you place more than 20 sheets of
print paper in the paper tray?(.page 14)
• Did you riffle the print paperthoroughly?
• Did you bend or fold the print paperbefore printing?
c If print paper runs out duringcontinuous printing or if you print withno print paper in the paper tray, theprinter’s ERROR indicator lights. Feedthe print paper without turning off thepower and resume printing.
c Use print paper designed for the printer.If you use incompatible print paper, theprinter may develop trouble. (.page11)
c When the printer cannot feed the printpaper, the ERROR indicator flashesrapidly. Remove the paper tray andcheck paper jam. (.page 42)
c The print paper may emerge a few timesduring printing. Do not touch nor pullthe emerged paper. Wait for the printpaper to be fully ejected after printingends. As the print paper emerges fromthe rear a few times during printing,make sure to spare enough space behindthe printer during printing.

39 GB
Trou
blesh
oo
ting
Symptom
The printedpictures areinferior inquality.
Printed results
Check
• Did you print previewimage data?
• Did you allow dust to geton the print cartridge?
• Did you allow dust orfinger prints to get on theprinted surface?
• Did you use used printpaper?
• Did you use an AdobeRGB-compliant digital camera,not compatible with theDCF 2.0, to shoot an imagein the AdobeRGB mode?
Cause/Solutions
c When a digital camera saves an image, apreview image may be saved along withthe primary images. The printed qualityof the preview images will not be asgood as the primary images. Note that ifyou delete the preview images, the datafor the primary images may bedamaged.
c Wipe the plastic part of the printcartridge and remove dust.
c Do not touch the printing surface (theshiny-side with no imprint). Fingerprintson the printing surface may result inimperfect printing.
c Do not print on used print paper.Printing an image twice on the samepaper will not make the printed imagethicker. Doing so could result indamages to the printer.
c An AdobeRGB image file that supportsthe DCF 2.0 will undergo colorcorrections, but an AdobeRGB image filethat does not support the DCF 2.0 will beprinted in vague colors without colorcorrections.What is an AdobeRGB?An AdobeRGB is a color space that theAdobe Systems Incorporated employsand uses as the default setting for imageprocessing software including the AdobePhotoshop. The AdobeRGB, an optionalcolor space extended with the DCF 2.0,determines the color ranges widely usedin printing industry.For whether or not a digital camerasupports the AdobeRGB, see theoperating instructions of the digitalcamera.

40 GB
Symptom
The picturequality andcolors of theimage previewedon the screen ofthe digitalcamera differfrom thoseprinted.
The imagecannot be printedfully in the printrange.
The image isstretchedhorizontallywhen printed.
The image isprinted at anangle.
Check
• Is the aspect ratio of theimage correct?
• Did you rotate the imageor add other process?
• Is the paper tray insertedproperly?
Cause/Solutions
c Because of differences in the phosphormethod or profiles of a monitor or LCDscreen, please regard the image beingdisplayed on the screen as just areference.
c Depending on the type of digital cameraused, the aspect ratio of the recordedimage differs, so the image may not beprinted covering the entire printablearea.
c Depending on the type of digital cameraused, the image may be stretchedvertically if it has been rotated orprocessed using your digital camera.This is not because of trouble with theprinter, but because the image wasrewritten with your digital camera.
cRe-insert the paper tray firmly straightin to the end.

41 GB
Trou
blesh
oo
ting
Symptom
I cannot insertthe printcartridgesmoothly.
The printcartridge cannotbe removed.
The print paperis not ejected.
Printing stopsmidway.
Check
• Is the ERROR indicatorflashing rapidly?
• Does the ERROR indicatorlight?
• Is the ERROR indicatorflashing rapidly?
Others
Cause/Solutions
c If the print cartridge does not click intoplace, remove it and then re-insert it.Only when the ink ribbon is too slack tobe loaded, wind the ink ribbon in thedirection of the arrow to remove theslack. (.page 13)
c Keep the paper tray inserted and turn offthe 1 (on/standby) switch and then turnit on. After the initial motion stops, try toremove the cartridge. If this does notsolve the problem, contact Sony servicefacilities or your Sony dealer.
c Paper is jammed. See “If paper jams”(.page 42) and remove jammed paperfrom the printer. If jammed papercannot be removed, contact the Sonyservice facilities.
c Remove the print paper and resumeprinting. If you cannot remove the printpaper, follow the procedures shown in“If paper jams” (.page 42) andremove jammed paper from the printer.
c Paper is jammed. See “If paper jams”(.page 42) and remove jammed paperfrom the printer. If jammed papercannot be removed, contact the Sonyservice facilities.

42 GB
If paper jams
If the print paper jams, the ERRORindicator lights or flashes rapidly andprinting stops.When the ERROR indicator lights,remove the print paper and resumeprinting.When the ERROR indicator flashesrapidly, turn off the power with thepaper tray and print cartridge loaded.Then turn on the printer again. Whenthe printer’s initial loading process ends,remove the paper tray from the printer.Check if there is jammed paper in thepaper outlet or feeding slot of the printerand remove the jammed paper, if any.
Note
If you cannot remove the jammed paper,contact your Sony dealer or service facilities.
To turn off the printerKeep pressing the 1 (on/standby)switch for longer than one second untilthe 1 (on/standby) indicator turns tored.
Pull out thejammed paperslowly.
Cleaning the inside ofthe printer
If white lines or periodical dots areprinted on the pictures, use the cleaningcartridge supplied and the protectivesheet of the supplied printing pack toclean inside the printer.
Tip
You can also use the protective sheetsupplied in the optional printing pack.
Make sure that the digital camera andthe computer are disconnected from theprinter.
1 Open the cartridgecompartment door and ifthere is a print cartridge,remove it (page 12).
2 Insert the supplied cleaningcartridge into the printer andclose the cartridgecompartment door.
3 Remove the paper tray fromthe printer. If there is printpaper in the tray, remove theprint paper from the tray.
Take out thepaper tray toremove thejammed paper.
43 GB
Trou
blesh
oo
ting
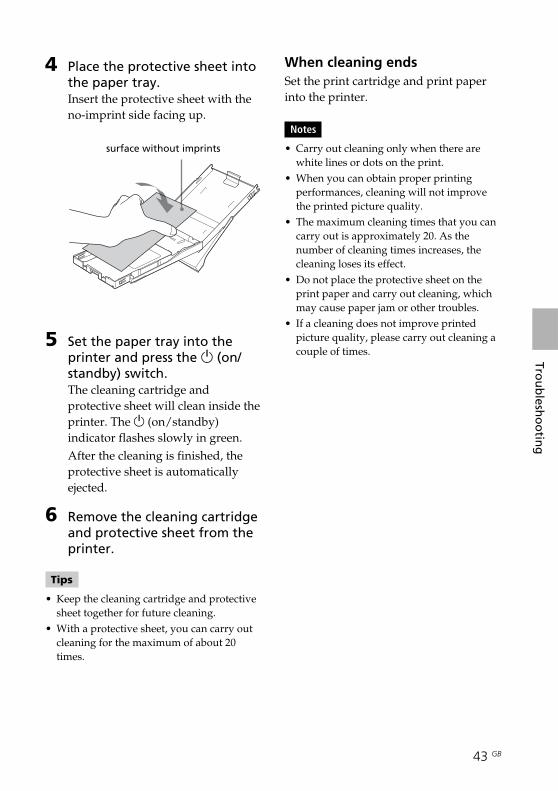
4 Place the protective sheet intothe paper tray.Insert the protective sheet with theno-imprint side facing up.
surface without imprints
5 Set the paper tray into theprinter and press the 1 (on/standby) switch.The cleaning cartridge andprotective sheet will clean inside theprinter. The 1 (on/standby)indicator flashes slowly in green.After the cleaning is finished, theprotective sheet is automaticallyejected.
6 Remove the cleaning cartridgeand protective sheet from theprinter.
Tips
• Keep the cleaning cartridge and protectivesheet together for future cleaning.
• With a protective sheet, you can carry outcleaning for the maximum of about 20times.
When cleaning endsSet the print cartridge and print paperinto the printer.
Notes
• Carry out cleaning only when there arewhite lines or dots on the print.
• When you can obtain proper printingperformances, cleaning will not improvethe printed picture quality.
• The maximum cleaning times that you cancarry out is approximately 20. As thenumber of cleaning times increases, thecleaning loses its effect.
• Do not place the protective sheet on theprint paper and carry out cleaning, whichmay cause paper jam or other troubles.
• If a cleaning does not improve printedpicture quality, please carry out cleaning acouple of times.

44 GB
Precautions
On safety• Be careful not to set or drop any heavy
objects on the power cord, or to damagethe power cord in any way. Neveroperate this printer with a damagedpower cord.
• Should any solid object or liquid fall intothe cabinet, unplug the printer and haveit checked by qualified personnel beforeoperating it any further.
• Never disassemble the printer.• To disconnect the power cord, pull it out
by the plug. Never pull the power corditself.
• When the printer is not going to be usedfor an extended period of time,disconnect the power cord from the walloutlet.
• Do not handle the printer roughly.• To reduce the risk of electrical shock,
always unplug the printer from theelectrical outlet before cleaning andservicing the printer.
On installation• Avoid placing the printer in a location
subject to:– vibration– high humidity– excessive dust– direct sunlight– extremely high or low temperatures
• Do not use electrical equipment near theprinter. The printer will not workproperly in electromagnetic fields.
• Do not place heavy objects on theprinter.
• Leave enough room around the printerso that the ventilation holes are notblocked. Blocking these holes may causeinternal heat build-up.
On the AC adaptor• Be sure to use the AC adaptor supplied
with the printer. Do not use other ACadaptors, as this may cause amalfunction.
• Do not use the supplied AC adaptor toother devices.
• Do not use an electrical transformer(travel converter), as this may causeoverheat or a malfunction.
• In case the cord of the AC adaptor isdamaged, never use it any longer, as thismay cause danger.
On moisture condensationIf the printer is brought directly from acold location to a warm location or placedin an extremely warm or humid room,moisture may condense inside the unit. Insuch cases the printer will probably notwork properly and may even develop afault if you persist in using it. If moisturecondensation occurs, unplug the ACpower cord of the printer and do not usethe printer for at least one hour.
On transportWhen you transport the printer, removethe print cartridge, paper tray or ACadaptor, from the printer and put theprinter and its peripherals in the originalbox with the protective packaging.If you no longer have the original box andpacking parts, use similar packing materialso that the printer will not be damagedwhile being transported.
On cleaningClean the cabinet, panel and controls witha soft dry cloth, or a soft cloth lightlymoistened with a mild detergent solution.Do not use any type of solvent, such asalcohol or benzine, which may damage thefinish.
Additional information
45 GB
Ad
ditio
nal in
form
ation
On restrictions on duplicationIf duplicating documents with the printer,pay special attention to the following:• Duplication of banknotes, coins, or
securities is against the law.• Duplication of blank certificates,
licenses, passports, private securities, orunused postal stamps is also against thelaw.
• TV program, films, video tapes, others’portraits or other materials may becopyrighted. Unauthorized videoprinting of such materials may infringethe provisions of the copyright law.
Specifications
x PrinterPrinting method
Dye sublimation printing (Yellow/Magenta/Cyan 3 pass)
Resolution300 (H) x 300 (V) dpiEquivalent to3 color Ink-Jet 4800 dpi x 4800 dpi *1
6 color Ink-Jet 3810 dpi x 3810 dpi *2
Image processing per dot256 levels (8 bits for each Yellow/Magenta/Cyan), approx. 16 770 000colors
Printing sizePost Card (4 x 6 inch/10 x 15 cm) size:
101.6 x 152.4 mm (maximum,borderless)
Printing time (per sheet)*3
PictBridge mode*4: Approx. 77 secondsPC mode*5: Approx. 60 seconds
Input/Output connectorsUSB for PC connection USB 1.1(Type B)
Highspeed is not supported.PictBridge connector
Compatible image file formatsJPEG: DCF 2.0 compatible, Exif 2.21
compatible, JFIF*6
Some image file formats are notcompatible.
Continued
46 GB
x AC power adaptor AC-S2425Power requirements
AC 100 to 240 V, 50/60 Hz, 1.5 to0.75 A
Rated output voltageDC 24 V, 2.2 A
Operating temperature5 ˚C to 35 ˚C (41 ˚F to 95 ˚F)
DimensionsApprox. 60 x 30.5 x 122 mm(2 3/8 x 1 1/4 x 4 7/8 inches)(w/h/d, excluding protruding parts)
MassApprox. 300 g (11 oz)
Design and specifications are subject tochange without notice.
*1: When the 16 x 16 matrix is used: 300 x 16 =4,800 dpi
*2: When the 12.7 x 12.7 matrix is used: 300 x12.7 = 3,810 dpi
*3: When photo of 3.11MB file size is taken byDSC-T30 (7Mega Cyber-shot)
*4: Time from when the print button on thedisplay window of the camera is pressed towhen printing is finished via DSC-T30connected by USB cable.
*5: The time for data processing andtransferring is excluded.
*6: Baseline JPEG with 4:4:4, 4:2:2, or 4:2:0format
Customer support home page
The latest support information is available atthe following home page address:
http://www.sony.net/
Maximum number of pixels to behandled
10 000(H) x 7 500(V) dotsPrint cartridge/Print Paper
See “Preparing the print pack” onpage 11.
Power requirementsDC IN jack, DC 24 V(On standby mode, less than 1W)
Operating temperature5 ˚C to 35 ˚C (41 ˚F to 95 ˚F)
DimensionsApprox. 175 x 60 x 137 mm(7 x 2 3/8 x 5 1/2 inches)(w/h/d, excluding protruding parts)(306 mm (12 1/8 inches) of depth whenthe paper tray is installed.)
MassApprox. 1 kg (2 lb 3 oz)(excluding the paper tray, printcartridge, AC power adaptor)
Supplied accessoriesSee “Checking the contents of thepackage” on page 10.
47 GB
Ad
ditio
nal in
form
ation
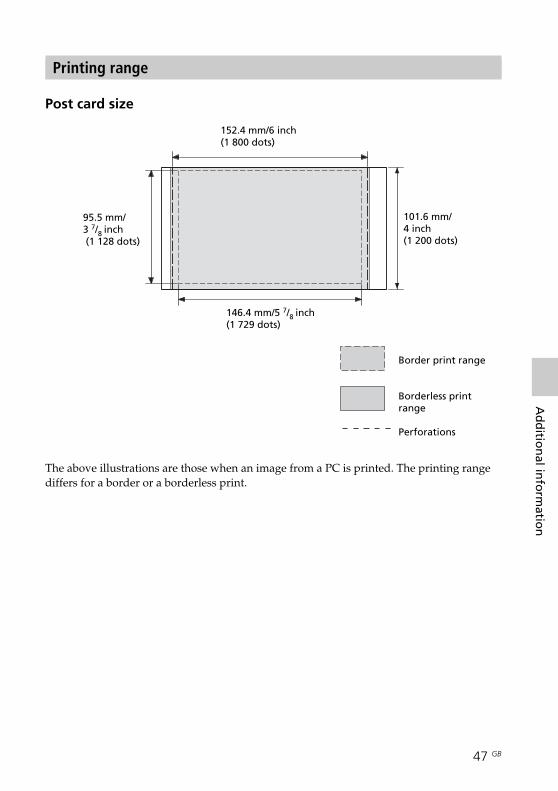
The above illustrations are those when an image from a PC is printed. The printing rangediffers for a border or a borderless print.
Border print range
Borderless printrange
Perforations
Post card size
Printing range
152.4 mm/6 inch(1 800 dots)
101.6 mm/4 inch(1 200 dots)
146.4 mm/5 7/8 inch(1 729 dots)
95.5 mm/3 7/8 inch (1 128 dots)
48 GB
Glossary
Auto Fine Print 3The function automatically corrects thepicture quality so that an image may beprinted in more vivid, clear andbeautiful pictures. It is especiallyeffective for a darker image with lowcontrast. The pictures are corrected toreproduce natural skin colors, vivid treeleaf green, or clear sky blue.
DCF (Design rule for Camera File system)This camera conforms with the DCF(Design rule for Camera File system)standard established by JEITA (JapanElectronics and Information TechnologyIndustries Association) to maintain fileexchangeability and compatibilitybetween digital cameras and relatedproducts. Complete exchangeability andcompatibility, however, are notguaranteed.
DPOF (Digital Print Order Format)The format used to record theinformation necessary for automaticallyprinting images shot by a digital cameraat a printing shop or with a home-useprinter. The printer supports DPOFprinting and can automatically print thepreset number of copies of the DPOFpreset images.
Exif 2.21 (Exif Print)Exif (Exchangeable image file format fordigital cameras) Print is a globalstandard for digital photo printing. Adigital camera supporting Exif Printstores the data relevant to the conditionsof shooting as each shot is taken. Theprinter utilises the Exif Print data storedin each image file to ensure the printedresult matches the original shot asclosely as possible*1. *1 When the “Auto Fine Print 3” is enabled
and an image (JPEG file) is shot by an ExifPrint (Exif 2.21)-compliant digital camera,the image is automatically adjusted to itsoptimum picture quality and printed.
PictBridgeA standard specified by Camera &Imaging Products Association thatallows you to connect PictBridge-complaint digital camera directly to theprinter without a PC, enabling directprinting on the spot.
49 GB
Ad
ditio
nal in
form
ation
IInserting
Print cartridge 12Print paper 13
InstallingPicture MotionBrowser 23Printer driver 20System requirements19
MMoisture condensation44
OOn/standby indicator16, 17, 42On/standby switch17, 42Overview 6
PPaper jams 42Paper tray 13Paper tray lid 13PC mode 6, 19PictBridge camera 6, 17PictBridge connector 17PICTBRIDGE indicator18Picture Motion Browser19Precautions 44Preview 30
Print cartridge 12Print pack 11Print paper 11, 13Printing
From a PC 19From a PictBridgecamera 17
Printing range 47
RRed-eye phenomenon 29Restrictions onduplication 45
SSpecifications 45Stop printing 32Super Coat 2 7Supplied accessories 10System requirements 19
TTransport 44Troubleshooting 34
UUninstalling
Picture MotionBrowser 25Printer driver 22
USB connector 21
Index
AAC adaptor 16AC power cord 16Auto Fine Print 3 7, 48
BBorders/borderless print27
CCartridge compartmentdoor 12Cleaning 42Connecting
Computer 21PictBridge-compliantdigital camera 17To AC outlet 16
DDC IN 24V 16DPOF (Digital PrintOrder Format) 48
EEject lever 12Enlarge/reduce 28ERROR indicator12, 36, 38, 41Exif Print 7, 27, 29, 48

50 GB

51 GB
Ad
ditio
nal in
form
ation

52 GB
Sony Corporation Printed in China


![DIGITAL PHOTO PRINTER DP-DS80D - DNP Imaging · DIGITAL PHOTO PRINTER DP-DS80D Printer Driver Instruction Manual For Windows Vista January 5, 2015 Ver.1.01 ... [DP-DS80D Printer Driver]](https://img.dokumen.tips/doc/110x75/5f0dd4397e708231d43c4aaa/digital-photo-printer-dp-ds80d-dnp-digital-photo-printer-dp-ds80d-printer-driver.jpg)