Embed Size (px)
Citation preview
Developing Node.js apps using IBM Bluemix DevOps ServicesLab 2: Easily create a Node.js application from scratch in the cloud
This lab is part of a workshop to explore IBM® Bluemix DevOps Services through hands-on exercises. The main objective of the workshop is to explore DevOps Services capabilities to develop and deliver Node.js applications in the cloud. For further information on other labs, go to the workshop main page.
Before you beginBefore you start this lab, review the Overview and Prerequisites page. Optionally, you can watch the recorded demo on https://www.youtube.com/watch?v=01DP97OV-W0 (10 minutes. The demo is not exactly similar to this lab but covers the same concepts)
Learning ObjectivesIn this lab, you will learn how to do the following:
• Create Node.js application from scratch on Bluemix• Create a DevOps Service project associated to the Bluemix application• Modify and manage source code using Bluemix DevOps Services (Web IDE, Git Hosting)• Support agile planning and collaborative work with Bluemix DevOps Services (Track &
Plan)• Enable automated builds and deployments on Bluemix (Delivery Pipeline)
Time Required:This lab takes about 10-20 minutes to complete.
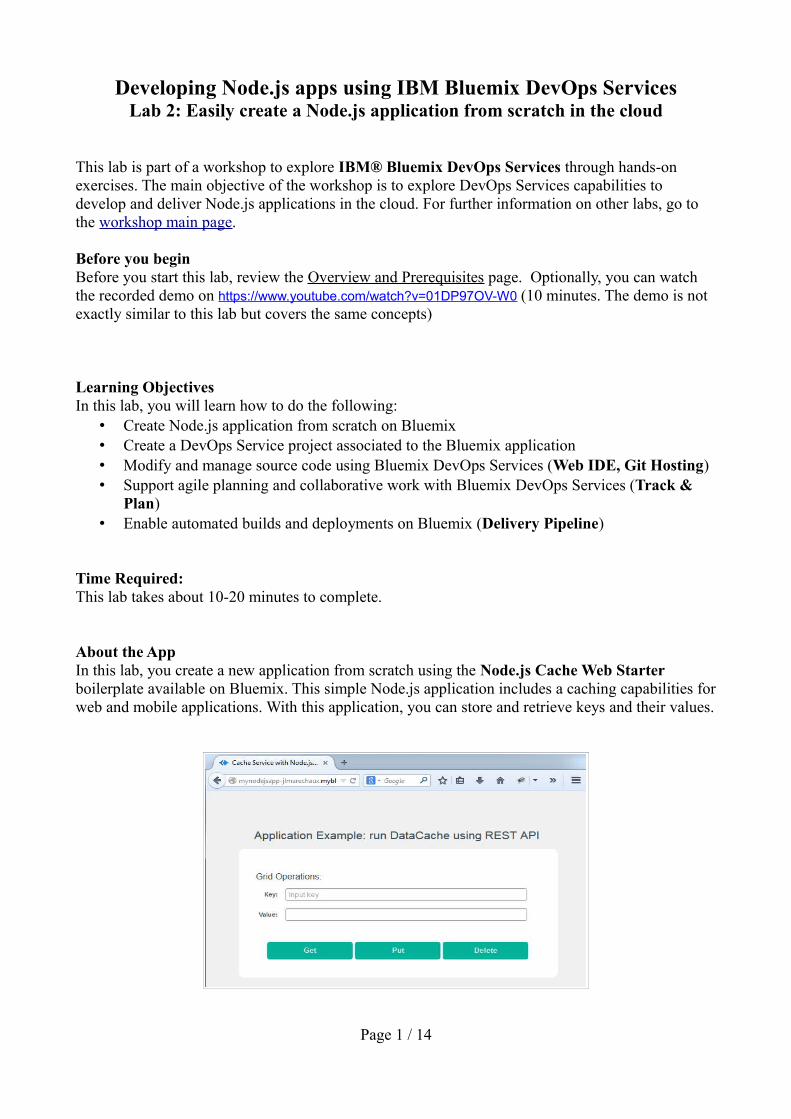
About the AppIn this lab, you create a new application from scratch using the Node.js Cache Web Starter boilerplate available on Bluemix. This simple Node.js application includes a caching capabilities forweb and mobile applications. With this application, you can store and retrieve keys and their values.
Page 1 / 14

1- Create a Node.js application in the cloud
To create a new application on Bluemix, you can choose from several available runtimes and boilerplates. In this section, you use the Node.js Cache Web Starter boilerplate to quickly create and deploy a new Node.js application.
1. Navigate to http://www.bluemix.net/ and log in to access your Bluemix dashboard.
2. On the Bluemix dashboard, click CREATE AN APP.
3. When asked what kind of app you want to create, choose the web option
4. On the next screen, click Browse Sample Apps, then BROWSE BOILERPLATES.
5. From the Boileplates section, select Node.js Cache Web Starter.
Page 2 / 14

6. Enter a name for the new application. The name is a descriptive name to identify the application on the Bluemix dashboard. The host must be a unique URL on Bluemix, so it is agood practice to include your name or a unique identifier, such as in the example below:
◦ Name: NodeJS-<your-unique-id>◦ Host: NodeJS-<your-unique-id>
When you enter an application name, the host name is provided for you, but you can modify it. If you modify the host name, make sure:
• You keep a valid URL format • You use a globally unique host name to avoid conflict with other Bluemix
applications.• The app name is limited to 27 characters
7. Next you are asked how you want to start coding. Elect the GIT option as you will code using Bluemix DevOps Services.
8. Scroll down and click VIEW APP OVERVIEW. The application is created and deployed on Bluemix. Wait until the dashboard indicates that the app is running.
Page 3 / 14

9. In the Routes section, click the link to access your deployed application. The Routes is where you find the URL to your server.
10. Test the new Application Type in in a key and a value, and then click Put. The data is storedin the cache and can be retrieved (using Get) anytime.
• Key: FirstKey• Value: My first value added to the cache
11. Note that this application is deployed on a public cloud (Bluemix). You can send its URL to anyone and test it from any mobile device.
Milestone 1
Bluemix application: In just a few minutes, you have created and deployed aNode.js application in Bluemix. The application is up and running and you can already test it.
2- Modify source code in the cloud
The source code of your Node.js application is stored in a Git repository (a version control system). You could access it using any Git client, but in this section, you use Bluemix DevOps Services and the Web IDE capability to modify the source code directly in the cloud, from a web browser.
1. On the Bluemix dashboard for your app, click ADD GIT (upper-right corner). This will create an Bluemix DevOps Services project and link it to your Bluemix application. Note that there is a validation process with your email address before the GIT repository is created.
Remember that you create applications in Bluemix, but you create projects in DevOps Services. A project is a place to modify source code and collaborate with others in orderto deploy applications on Bluemix.
2. If prompted, enter your credentials to access Bluemix DevOps Services. Then click CONTINUE when asked to confirm the Git repository creation.. A new DevOps Services project is created. It is automatically linked to your Bluemix application.
Page 4 / 14

3. Click EDIT CODE that now appears on the upper-right corner of the Bluemix dashboard. You are redirected to the corresponding DevOps Services project (same name than the Bluemix application).
In DevOps Services, you have access to a set of capabilities to support yourapplication development project: Web IDE, Source code repository (Git hosting),Delivery Pipeline, and Agile Planning & Tracking.Note that this project is for team collaboration, so at this point, you could invite
other members.
4. From the left pane, browse the source code that has been created for your Node.js application.
5. Under the views folder, select index.ejs to display the code.
6. Modify the source code by adding some text within the <h1> tag. In the example below, "*** Amazing ***" is added to the page.
Optionally, you can modify other aspects of the page such as the displayed buttons. Remove “-primary” for two buttons on line 24 and 25.
7. Click File > Save to save your changes.
Page 5 / 14

8. On the Run Bar, click the Deploy button.
You are asked to confirm to stop and redeploy. Click OK, then the application is being deployed to Bluemix.
9. When deployment is complete, the status is updated (running, green dot)
Click the Open URL button to access the running application in the cloud and test your changes.
If the deployment fails (red light instead of green light), you may find valuable hints in this video: http://youtu.be/k6yom7K9YbE Here you have just tested the manual deployment. Later in this lab you will test the automated deployment (Delively Pipeline)
Milestone 2
DevOps Services project: Congratulations! You have created a project on Bluemix DevOps Services to develop your application. Then you have used the Web IDE to modify source code and you have manually deployed your Node.js application in the cloud (Bluemix).
Page 6 / 14

3- Create work items for easy planning and tracking
Bluemix DevOps Services provides capabilities to support Agile planning. In this section, you enable the Track & Plan capability and you create your first work items: a user story and a defect.
1. On the Bluemix DevOps Services page, click the Settings button.
2. From the left menu, click OPTIONS, then check the Enable Track & Plan option.
3. On the same page, verify the information under the “Make this a Bluemix Project” section.It must contain valid information related to your organization (your account) and your regionon Bluemix.
4. Click SAVE.
5. On the upper-right corner, click TRACK & PLAN. The DevOps Services Quick Planner opens. This is the place to do project planning and manage collaborative work with your team.
6. On the left pane, click Backlog. The Product Backlog for this new project is empty but you
Page 7 / 14

can start adding work items (epics, stories, defect...)
7. In the first input field (“Create a work item...”), enter some text to create a new story: “As a user, I want to be notify if I try to save a key that already exists so that I do not override existing data”. Note that you can specify other attributes such as type, description, subscribers, owner, tags, priority, or parent.
8. Click CREATE. The story is created and added to the backlog.
9. Create another work item. Type in the following summary: “Background color for forms must be green *defect #production $high !normal”
We call this approach the “Tweet-like notation”. In the work item description, you add tags to quickly specify attributes for the work item.
10. Click CREATE. Because of the different tags in the summary, the work item (a defect) is created and the following attributes are set:
◦ Type: Defect◦ Tags: production◦ Priority: High◦ Severity: Normal
Using the tweet-like notation, it easy to create work items and to set some attributes.
11. You want to fix this defect about the background color of the form. ◦ Click Unassigned and then select your name◦ Click new and select Start Working◦ Write down and remember the defect number (9331 in the example below). You will
Page 8 / 14

need the number in the next part of this lab.
Milestone 3
Agile planning: With the Track & Plan capability, your team can collaborate efficiently in the cloud. The Quick Planner facilitates Backlog management, Agile planning, and work item tracking for collocated and distributed teams.
4- Fix a defect, and deploy the new version of the application
In a previous section, you deployed your changes manually on Bluemix. This approach is quite useful during development when you want to test some code without delivering it to the source control.In this section, you fix a defect in the code and you use the DevOps Services Delivery Pipeline capability to automatically build and deploy the new version of the application.
1. On the Bluemix DevOps Services page, click BUILD & DEPLOY.
Notice that by default, the system has created a delivery pipeline for you in order to accelerate and facilitate builds and deployments to Bluemix. You will take advantage of this delivery pipeline soon.
Page 9 / 14

2. Click EDIT CODE on the upper-right corner. You will fix a defect in the application and see the automated deployment in action.
3. Open the style sheet file (style.css) under public > stylesheets.
4. Around line 27, look for the code related to the form background color and change it to fix the defect identified earlier◦ Remove the #FFFFF; hexadecimal code (white)◦ Hit Ctrl-Space to activate code assist◦ In the list, choose the rgb – rgb color template
◦ Specify the following RGB values: rgb(160,219,142)
Note that this RGB code is equivalent to the hexadecimal code A0DB8E. So you may specify one orthe other and obtain the same result.
Page 10 / 14

5. Click File > Save (or CTRL-S) to save your changes. (Note that the Web IDE also contains an auto-save feature)
To help you write code more efficiently, the Web IDE provides content assist (Ctrl-Space), color coding and syntax checking for a variety of languages such as CSS or Javascript.
Now that you fixed the defect, it is time to deliver you change to the code repository.
6. On the left-side bar, click the Git Repository button
7. On the Git page, in the Work Directory Changes section, check the Select All box and add a comment that contains your defect number (the one you created earlier in the lab): Multiple changes, including a fix for defect <replace-with-your-defectNumber>
You have modified the files style.css and index.ejs in this lab. The other files were generated by the system when you create an application from Bluemix. Note that link between change set and work item is created when you specify work item keyword (epic, story, defect) followed by a work item number (story 123, defect 345,...)r
8. Click COMMIT to commit your changes (make sure you included your defect number in the comment before you commit)
9. Under the Outgoing section, click PUSH to deliver your changes to the Git repository.
Page 11 / 14

Milestone 4
Source control: The page that you have modified is now delivered to the remote Git repository and is visible to other team members. With Bluemix DevOps Services and the Git Hosting capability, you can work in isolation until you decide to share your code with the entire team.
10. On the upper-right corner, click BUILD & DEPLOY.
Note that build and deployment have been triggered automatically as you pushed changes to the Git repository. When the build completes successfully, the application is automatically deployed to the cloud (Bluemix).
11. From the pipeline, click the link to the deploy application and verify your changes.
Milestone 5
Continuous delivery: A Delivery Pipeline is defined for your projects. Any change delivered to the repository triggers a build and a deployment on Bluemix.
5- Update your work progress in a work item
In this section, you update the defect work item to specify that you fixed the problem. You also verify that a lifecycle traceability link (between the change set and the work item) was created when
Page 12 / 14

you submitted your changes.
1. On the upper-right corner, click TRACK & PLAN. The DevOps Services Quick Planner opens. This is the place to do project planning and manage collaborative work with your team.
2. In the IN PROGRESS section (My Work > In Progress), click the defect to open it
3. Change the work item status from In Progress to Resolve. Add a comment in the discussionsection to explain how you fixed the problem and click SAVE.
4. Click the LINKS tab. Notice the Change Sets (Remote) section, It contains a list of all the Git changes associated to this work item.
5. If you click a change set, a Git Log window opens and displays more information.
6. Click TRACK & PLAN (upper rightcorner), then click Backlog on the left pane. The Product Backlog for this new project opens. This is where you can start adding work items (epics, stories, defect...)
Milestone 6
Lifecycle traceability: Source code changes are associated with work items (story, defect, task...). This improves lifecycle traceability and helps the agile team to identify which parts of the code are modified.
Page 13 / 14

Summary
In this lab, you learned about the main Bluemix DevOps Services capabilities:• Web IDE to develop applications in the Cloud from a Web browser.• Track & Plan to support collaborative work and agile planning during a project• Git Hosting to manage source code and create links to work items• Delivery Pipeline to build and deploy applications• Integration with Bluemix to easily deploy and run applications on the IBM Cloud
Next Steps…Continue on to Lab 3 of this workshop where you’ll learn how to reuse existing code to create and deploy your own application (http://bluelabs.mybluemix.net/workshops/introNodeJS).
Page 14 / 14


![[Presentation] BUILDING SCALABLE APPS WITH DEVOPS on IBM Bluemix](https://img.dokumen.tips/doc/110x75/55a68eeb1a28abb97d8b4890/presentation-building-scalable-apps-with-devops-on-ibm-bluemix.jpg)