Embed Size (px)
Citation preview

DESSMANN - FINGERPRINT LOCK
User Guide - K5
1

Contents
1 Introduction 3
1.1 Packing List . . . . . . . . . . . . . . . . . . . . . . . . . . . . . . . . . . . . . . . . . . . . . 3
1.2 Technical Data . . . . . . . . . . . . . . . . . . . . . . . . . . . . . . . . . . . . . . . . . . . 4
2 Product Description 5
3 Basic Instructions 6
3.1 Batteries Setup . . . . . . . . . . . . . . . . . . . . . . . . . . . . . . . . . . . . . . . . . . . 6
3.2 System Start and Shutdown . . . . . . . . . . . . . . . . . . . . . . . . . . . . . . . . . . . . 6
4 Quick Start 7
4.1 Open the Door . . . . . . . . . . . . . . . . . . . . . . . . . . . . . . . . . . . . . . . . . . . 8
4.2 Close the Door . . . . . . . . . . . . . . . . . . . . . . . . . . . . . . . . . . . . . . . . . . . 8
5 Lock Menu 10
5.1 Enter the System Menu . . . . . . . . . . . . . . . . . . . . . . . . . . . . . . . . . . . . . . 10
5.2 Settings . . . . . . . . . . . . . . . . . . . . . . . . . . . . . . . . . . . . . . . . . . . . . . . 10
5.2.1 Unlock Mode . . . . . . . . . . . . . . . . . . . . . . . . . . . . . . . . . . . . . . . . 10
5.2.2 Lock Password . . . . . . . . . . . . . . . . . . . . . . . . . . . . . . . . . . . . . . . 11
5.2.3 Set Time . . . . . . . . . . . . . . . . . . . . . . . . . . . . . . . . . . . . . . . . . . 11
5.2.4 Unlocked Alarm . . . . . . . . . . . . . . . . . . . . . . . . . . . . . . . . . . . . . . 11
5.3 Users Management . . . . . . . . . . . . . . . . . . . . . . . . . . . . . . . . . . . . . . . . 12
5.3.1 Add User . . . . . . . . . . . . . . . . . . . . . . . . . . . . . . . . . . . . . . . . . . 12
5.3.2 Delete User . . . . . . . . . . . . . . . . . . . . . . . . . . . . . . . . . . . . . . . . . 13
5.4 Information . . . . . . . . . . . . . . . . . . . . . . . . . . . . . . . . . . . . . . . . . . . . . 13
5.4.1 Users Log . . . . . . . . . . . . . . . . . . . . . . . . . . . . . . . . . . . . . . . . . . 13
5.4.2 Users List . . . . . . . . . . . . . . . . . . . . . . . . . . . . . . . . . . . . . . . . . . 14
5.4.3 Storage . . . . . . . . . . . . . . . . . . . . . . . . . . . . . . . . . . . . . . . . . . . 14
6 Lock Functions 15
6.1 Alarm Functions . . . . . . . . . . . . . . . . . . . . . . . . . . . . . . . . . . . . . . . . . . 15
6.1.1 Illegal Intrusion Alarm . . . . . . . . . . . . . . . . . . . . . . . . . . . . . . . . . . . 15
6.1.2 Multi-attempts Alarm . . . . . . . . . . . . . . . . . . . . . . . . . . . . . . . . . . . . 15
6.1.3 Unlocked Door Alarm . . . . . . . . . . . . . . . . . . . . . . . . . . . . . . . . . . . 15
6.2 Batteries Low . . . . . . . . . . . . . . . . . . . . . . . . . . . . . . . . . . . . . . . . . . . . 16
6.2.1 First Warning . . . . . . . . . . . . . . . . . . . . . . . . . . . . . . . . . . . . . . . . 16
6.2.2 Second Warning . . . . . . . . . . . . . . . . . . . . . . . . . . . . . . . . . . . . . . 16
6.3 Emergency Battery . . . . . . . . . . . . . . . . . . . . . . . . . . . . . . . . . . . . . . . . . 16
6.4 Locker Function . . . . . . . . . . . . . . . . . . . . . . . . . . . . . . . . . . . . . . . . . . . 17
6.5 Mechanical Key . . . . . . . . . . . . . . . . . . . . . . . . . . . . . . . . . . . . . . . . . . . 17
6.6 Factory Reset . . . . . . . . . . . . . . . . . . . . . . . . . . . . . . . . . . . . . . . . . . . . 18
7 Product Warranty 19
8 Contact Us 20
2

Chapter 1
Introduction
1.1 Packing List
Thank you for choosing a DESSMANN lock.
The following accessories are provided in order to set up and use your smart lock:
Item Qty Item Qty
01/ Lock Front Panel 1 Pce 06/ Lock Accessories 1 Set
02/ Lock Back Panel 1 Pce 07/ 1.5V Batteries 4 Pces
03/ Lock 1 Pce 08/ Reset Stick 1 Pce
04/ Mechanical Key 3 Pces 09/ Rubber Seal 2 Pces
05/ User Guide 1 Book
Please check all of the above accessories are included in the box before installation.
In case any of these items is damaged or missing, please contact us or your closest dealer.
Make sure that the mechanical keys can operate the lock.
3

1.2. TECHNICAL DATA CHAPTER 1. INTRODUCTION
1.2 Technical Data
Lock
S700Front Panel (HxLxW) 585x72x25mm
Back Panel (HxLxW) 440x72x25mm
Lock
Weather Resistant Body •
Locker Mechanism •
Hidden Mechanical Lock •
Power Supply 2 sets of 4 AA Batteries
Emergency Power Supply 9V Battery
DurabilityLock Tested More Than
100,000 openings
InterfaceScreen Dot-Matrix Screen
Keypad 15 Buttons
Functions
Main Opening Method Fingerprint
Alternative Opening Method Password, Mechanical Key
Fingerprint Capacity 80 Fingerprints
Password Capacity 1 Password
Time Display •
Low Power Notification •
System Reset Button •
Security
Admin Authentication Admin Fingerprint
Admin Numbers 10 Admins
Registered User Identification By Name
Users Log-In Record 1,024 entries
Failed Fingerprint
Authentication
System Freeze for 3 Minutes
after 10 Failed Attempts
Failed Card AuthenticationSystem Freeze for 3 Minutes
after 5 Failed Attempts
Failed Password AuthenticationSystem Freeze for 3 Minutes
after 5 Failed Attempts
Save Data when Batteries are
Down•
Wrapped Password •
Due to continuous improvements, we reserve the right to amend
any aspect of the above specifications without notice.
4

Chapter 2
Product Description
5

Chapter 3
Basic Instructions
3.1 Batteries Setup
One set of 4 AA batteries or two sets of 4 AA batteries are required to power the lock.
3.2 System Start and Shutdown
Start
Make sure the batteries are properly installed, then start the system as follows:
• Scan your fingertip at the authentication lens
OR
• Press ENTER
The screen will lighten up after system start.
Shutdown
System will automatically shutdown when not in use.
6

Chapter 4
Quick Start
Functions Operation
Enter
System Menu
1/ Press START
2/ Press MENU
3/ Enter Admin Fingerprint (Default: none)
New
Admin
1/ Enter System Menu
2/ Select ”2.Manage Users”
3/ Select ”1.Add User”
4/ Select ”1.Add Admin FP”
5/ Scan Fingertip Twice
6/ Enter a Name. ENTER to Save
User
1/ Enter System Menu
2/ Select ”2.Manage Users”
3/ Select ”1.Add User”
4/ Select ”2.Add User FP”
5/ Scan Fingertip Twice
6/ Enter a Name. ENTER to save
7

4.1. OPEN THE DOOR CHAPTER 4. QUICK START
4.1 Open the Door
with Finger
Scan your fingertip on the authentication lens. Push the handle.
Best PracticesTo guarantee an optimal authentication:
• Make sure your finger is clean & dry
• Align your finger parallel to the authentication lens
• Do not move your finger for 2 seconds while scanning
with Password
Enter password & press ENTER to unlock the door. Push the handle.
Smart Password
To confuse people looking at you when you type your password, it can be inputted within a random
string of number. If your password is 888888, the following combinations will still unlock the door:
• 1289888888
• 8888887556
• 87463888888451879
4.2 Close the Door
The 3 locking bolts automatically trigger out when you close the door.
8

4.2. CLOSE THE DOOR CHAPTER 4. QUICK START
Closing the Door
Do not press the handle down when closing the door, just gently push the door.
9

Chapter 5
Lock Menu
DESSMANN lock management software let you easily manage your users. Browse with the arrows keys &
press ENTER to confirm each step.
5.1 Enter the System Menu
System can only be managed with the admin fingerprint.
Start system (3.2.1) and press MENU twice:
Scan admin fingerprint (default: none).
5.2 Settings
5.2.1 Unlock Mode
There are 3 modes offered by DESSMANN lock to open it:
• Fingerprint Only - Identification with fingerprint only
• Fingerprint OR Password - Identification with either fingerprint OR password
• Fingerprint & Password - Identification with both fingerprint AND password
10

5.2. SETTINGS CHAPTER 5. LOCK MENU
5.2.2 Lock Password
Enter the last password in use and press ENTER. (Default: 888888)
Enter the new password (must be 6 digits, no more, no less), press ENTER, confirm it again, press ENTER.
5.2.3 Set Time
We recommend you to properly set the time to fully enjoy all the functions of your lock.
Change the values with the keypad. Press ENTER to confirm.
5.2.4 Unlocked Alarm
Switch ON or OFF the Unlocked door alarm. When turn ON, an alarm sound will buzz when the lock bolts
are not properly triggered.
11

5.3. USERS MANAGEMENT CHAPTER 5. LOCK MENU
5.3 Users Management
5.3.1 Add User
FP stands for FingerPrint.
New Admin FP
Scan the new admin fingertip twice.
Enter a name for this admin using the keypad. The name can only have a maximum of 6 digits or charac-
ters. Press ENTER to confirm.
Attention
Pay special attention to the following:
• The admins can manage the whole system, choose them carefully
• Up to 10 admins can be registered in the system
• Only a factory reset can delete admins from the system
• Use a distinctive finger for admin tasks & for everyday use
12
5.4. INFORMATION CHAPTER 5. LOCK MENU
New User FP
Scan the new user fingertip twice.
Enter a name for this user using the keypad. The name can only have a maximum of 6 digits or characters.
Press ENTER to confirm.
Best PracticesTo ensure optimal results, register the same finger 2 to 3 times.
5.3.2 Delete User
Select the user you want to delete with the arrows keys & press ENTER to confirm.
Note: Admin cannot be deleted.
5.4 Information
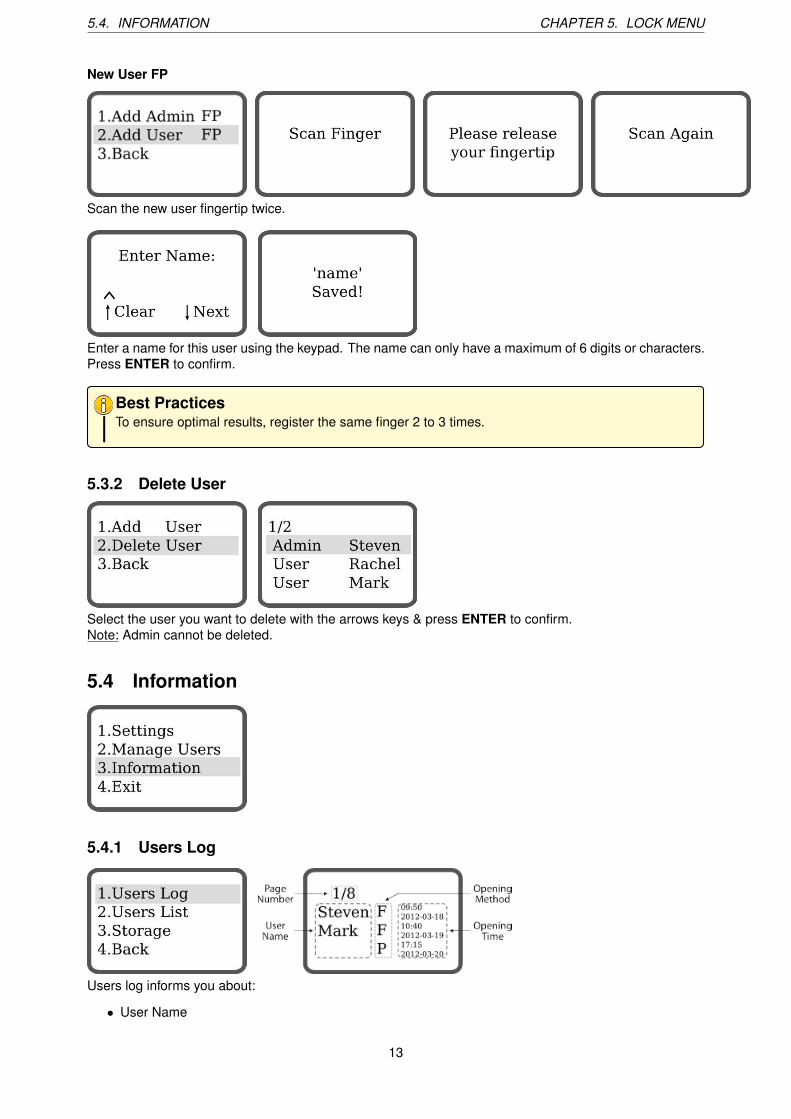
5.4.1 Users Log
Users log informs you about:
• User Name
13

5.4. INFORMATION CHAPTER 5. LOCK MENU
• Opening Method
– F for Fingerprint (Fingerprint Only Selected)
– P for Password (Fingerprint OR Password Selected)
– A for Fingerprint & Password
• Opening Time
Change page with the arrows keys & press ENTER to exit.
5.4.2 Users List
Users list informs you about registered user in the system.
Change page with the arrows keys & press ENTER to exit.
5.4.3 Storage
Storage informs you about how many users are registered in the system and how many new users can be
enrolled. Press ENTER to exit.
• Total - Maximum numbers of fingerprint and card in the lock.
• In Use - Total of fingerprint and/or card already registered to users.
• Available - Total of fingerprint and card available to register new users.
14

Chapter 6
Lock Functions
6.1 Alarm Functions
6.1.1 Illegal Intrusion Alarm
If an illegal intrusion occurs, such a thief trying to pick-lock your door, a buzzer will ring and the following
will be displayed:
6.1.2 Multi-attempts Alarm
After multiple failed authentication with fingerprint, card or password, the system will freeze for 3 minutes.
6.1.3 Unlocked Door Alarm
If the door is not properly close, a buzzer will ring and the door will display the following for 60 seconds.
15

6.2. BATTERIES LOW CHAPTER 6. LOCK FUNCTIONS
6.2 Batteries Low
• When the batteries are low, a buzzer will bip as a warning when you open the door & a message will
be displayed on the screen at the same time.
• Check the system time after batteries replacement, because time information will be stored only 2
minutes without power.
• Recycle the used batteries according to the related laws and regulations of your country.
• 2 different warnings will informed you about the state of your batteries:
6.2.1 First Warning
At first warning, the door can still operate for about 100 times, please replace the batteries as soon as
possible.
6.2.2 Second Warning
At second warning, the lock cannot operate anymore, you should use the emergency battery or the me-
chanical key.
6.3 Emergency Battery
In case the lock runs out of battery. You can power the system with a 9V battery.
Just plug a 9V battery on the 2 9V battery pins located on the right side of the front panel and you can
operate your lock as usual. Don’t forget to change your batteries afterward.
16

6.4. LOCKER FUNCTION CHAPTER 6. LOCK FUNCTIONS
6.4 Locker Function
Close Position
When the 3 locking bolts are out, turn the locker upwards. The lock will always be close. Nobody can open
the door from outside (either with Fingerprint, Password or Mechanical Key).
Open Position
When the 3 locking bolts are inside the lock, turn the locker upwards. The lock will always be open. The
door can always be opened from the outside.
6.5 Mechanical Key
In case of system failure or damage, the lock can still be opened with a key. The keyhole is located at the
front panel behind the logo. Pull the keyhole cover and use the emergency key to open the door.
We advise you to leave the keys outside of your house, so you can get one of them in case of emergency.
17
6.6. FACTORY RESET CHAPTER 6. LOCK FUNCTIONS
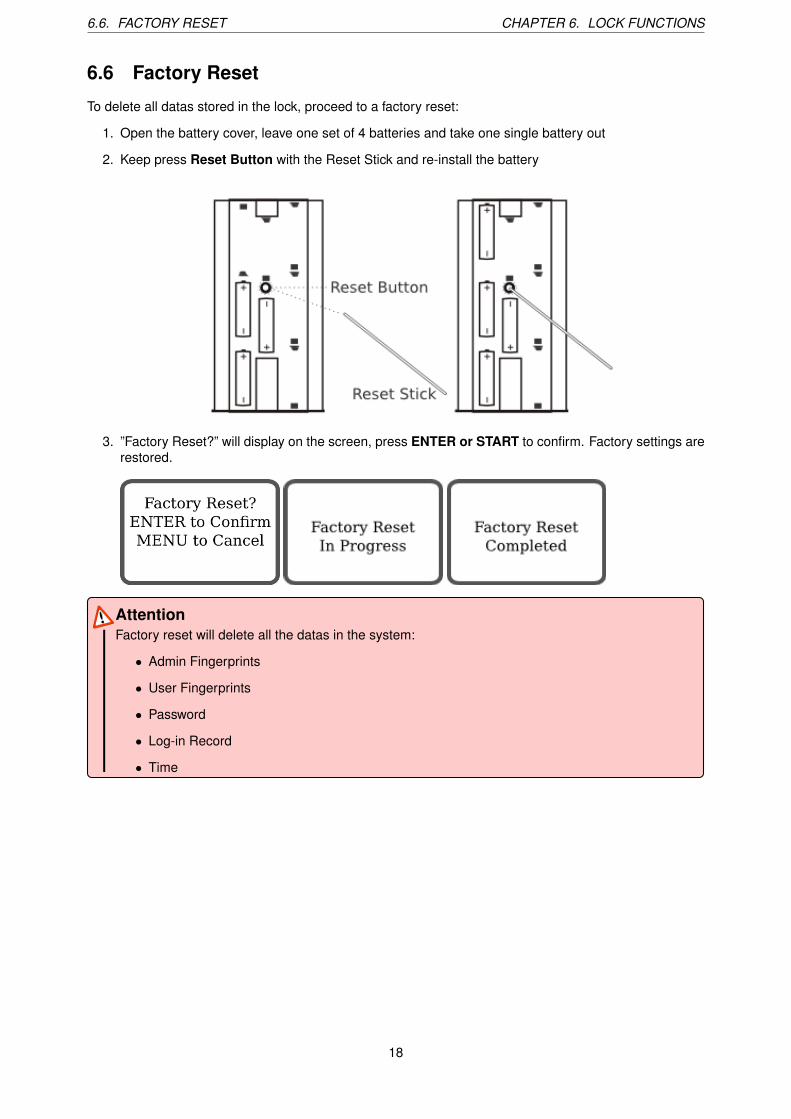
6.6 Factory Reset
To delete all datas stored in the lock, proceed to a factory reset:
1. Open the battery cover, leave one set of 4 batteries and take one single battery out
2. Keep press Reset Button with the Reset Stick and re-install the battery
3. ”Factory Reset?” will display on the screen, press ENTER or START to confirm. Factory settings are
restored.
Attention
Factory reset will delete all the datas in the system:
• Admin Fingerprints
• User Fingerprints
• Password
• Log-in Record
• Time
18

Chapter 7
Product Warranty
DESSMANN warrants to the original purchaser that the hardware product shall be free from defects in
material and workmanship for twelve (12) months from the date of purchase.
If a defect covered by this warranty occurs during this warranty period, DESSMANN or a DESSMANN
AUTHORIZED REPAIR CENTER will repair the defective hardware product or component, free of charge.
The original purchaser is entitled to this warranty only if the date of purchase is registered at point of sale
or the consumer can demonstrate, to DESSMANNs satisfaction, that the product was purchased within the
last 12 months.
SERVICE AFTER EXPIRATION OF WARRANTY
Please try our website at www.dessmannlock.com or call the Consumer Assistance Hotline at 0086-40060-
00028 for troubleshooting information and/or referral to the nearest DESSMANN AUTHORIZED REPAIR
CENTER. In some instances, it may be necessary for you to ship the complete product, FREIGHT PRE-
PAID AND INSURED FOR LOSS OR DAMAGE, to the nearest service location. Please do not send any
products to Dessmann without contacting us first.
WARRANTY LIMITATIONS
THIS WARRANTY SHALL NOT APPLY IF THIS PRODUCT:
1. IS MODIFIED OR TAMPERED WITH
2. IS DAMAGED BY NEGLICENCE, ACCIDENT, UNREASONABLE USE, OR BY OTHER CAUSES
UNRELATED TO DEFECTIVE MATERIALS OR WORKMANSHIP
3. HAS BEEN ASSEMBLED OR DISASSEMBLED, REPAIRED OR INSTALLED WITHOUT PERMIS-
SION
4. HAS BEEN DAMAGED BY THE BATTERIES
5. AS HAD THE SERIAL NUMBER ALTERED, DEFACED OR REMOVED.
ANY APPLICABLE IMPLIED WARRANTIES, INCLUDING WARRANTIES OF MERCHANTABILITY AND
FITNESS FOR A PARTICULAR PURPOSE, ARE HEREBY LIMITED IN DURATION TO THE WARRANTY
PERIODS DESCRIBED ABOVE (12 MONTHS). IN NO EVENT SHALL DESSMANN BE LIABLE FOR
CONSEQUENTIAL OR INCIDENTAL DAMAGES RESULTING FROM THE BREACH OF ANY IMPLIED
OR EXPRESS WARRANTIES.
19

Chapter 8
Contact Us
Maintenance, Repair & Operations
Tel: +86 571 8711 9266
Fax: +86 571 8711 9299
Mail: [email protected]
www.dessmannlock.com
20