Embed Size (px)
Citation preview
© 2016 Infoblox Inc. All rights reserved. Infoblox-DG-0144-00 Cisco ISE Integration w ith Infoblox NIOS February 2016 Page 1 of 22
DEPLOYMENT GUIDE
Cisco ISE Integration with Infoblox NIOS For NIOS 7.3 and above
© 2016 Infoblox Inc. All rights reserved. Infoblox-DG-0144-00 Cisco ISE Integration w ith Infoblox NIOS February 2016 Page 2 of 22
Contents
Introduction ............................................................................................................................ 3
Supported Platforms ............................................................................................................... 3
Prerequisites .......................................................................................................................... 3
The Information Exchange....................................................................................................... 4
Information Provided by Cisco ........................................................................................... 4
Information Published by Infoblox for Action by Cisco ISE ................................................... 4
Information Published by Infoblox to Cisco ISE ................................................................... 5
Configuring Cisco ISE ............................................................................................................. 6
Configuring NIOS to Communicate with the Cisco ISE Server .................................................... 7
Configuring Notification Rules ................................................................................................ 11
Creating Extensible Attributes to Map to Subscribed Data ....................................................... 13
Enabling Network Users .................................................................................................. 15
Assigning Extensible Attributes to the Subscribed Data ..................................................... 16
Assigning Extensible Attributes to a DHCP Network Range ............................................... 17
Viewing Subscribed Information for a User ....................................................................... 17
Creating Certificates ............................................................................................................. 21
Limitations ............................................................................................................................ 21
Use Cases ........................................................................................................................... 22

© 2016 Infoblox Inc. All rights reserved. Infoblox-DG-0144-00 Cisco ISE Integration w ith Infoblox NIOS February 2016 Page 3 of 22
Introduction
Cisco ISE stands for Cisco Identity Services Engine. It is a centralized security policy management platform that
automates and enforces security access to network resources. In other words, it is a network access controller (NAC) that can be automated to allow or restrict network access to devices based on certain rules/policies.
Cisco pxGrid (platform exchange grid) Controller is a layer on top of Cisco ISE. It is the layer that communicates
with other third-party vendors (i.e. Infoblox) to get specific information to allow or restrict the network access in
addition to the static rules/policies configured on ISE and the dynamic rules/policies discovered by Cisco. It is also the grid that we will be connecting to in order to send and get information to and from the ISE server.
Infoblox NIOS acts as a client to the pxGrid Controller and will be subscribing to information from the Cisco ISE
box such as usernames, domain names, SSID, VLANs, etc. NIOS also publishes information that it has acquired via DHCP to Cisco ISE. NIOS also publishes events triggered as a result of ADP/DNS Firewall rules being hit.
Features of integrating with Cisco ISE/pxGrid include:
The ability to get (i.e., subscribe) to session notificat ions from the Cisco ISE server
The ability to publish RPZ, ADP, IPAM, and DHCP data to the Cisco ISE server
Supported Platforms
Cisco ISE integration is supported on the following Infoblox appliances:
IB 810/820 (only as members)
IB 1410
IB 1420
IB 2210
IB 2220 IB 4010
Prerequisites
The following are prerequisites for the Infoblox and Cisco ISE/pxGrid integration:
NIOS 7.3.
Grid Master.
Network Insight member.
VNIOS license if using VNIOS.
DNS license.
DHCP license.
RPZ license.
Threat protection license if using PT appliance.
Client certificate created by the Cisco ISE administrator.
Bulk Download certificate from the Cisco ISE monitoring node.
NOTE: Usually Cisco ISE is deployed in multiple nodes in a production environment with separate nodes for
primary admin node (PPAN), primary monitoring node (PMNT), secondary admin node (SPAN), secondary
monitoring node (SMNT), primary pxGrid node (pxGrid1), and secondary pxGrid node (pxGrid2)—with policy
service nodes (PSN). However, if the ISE server is limited to one server, then bulk download and the CA
certificate is the same certificate, i.e., the default self-signed server certificate located in the administration > certificates > system certificates area.
© 2016 Infoblox Inc. All rights reserved. Infoblox-DG-0144-00 Cisco ISE Integration w ith Infoblox NIOS February 2016 Page 4 of 22
The Information Exchange
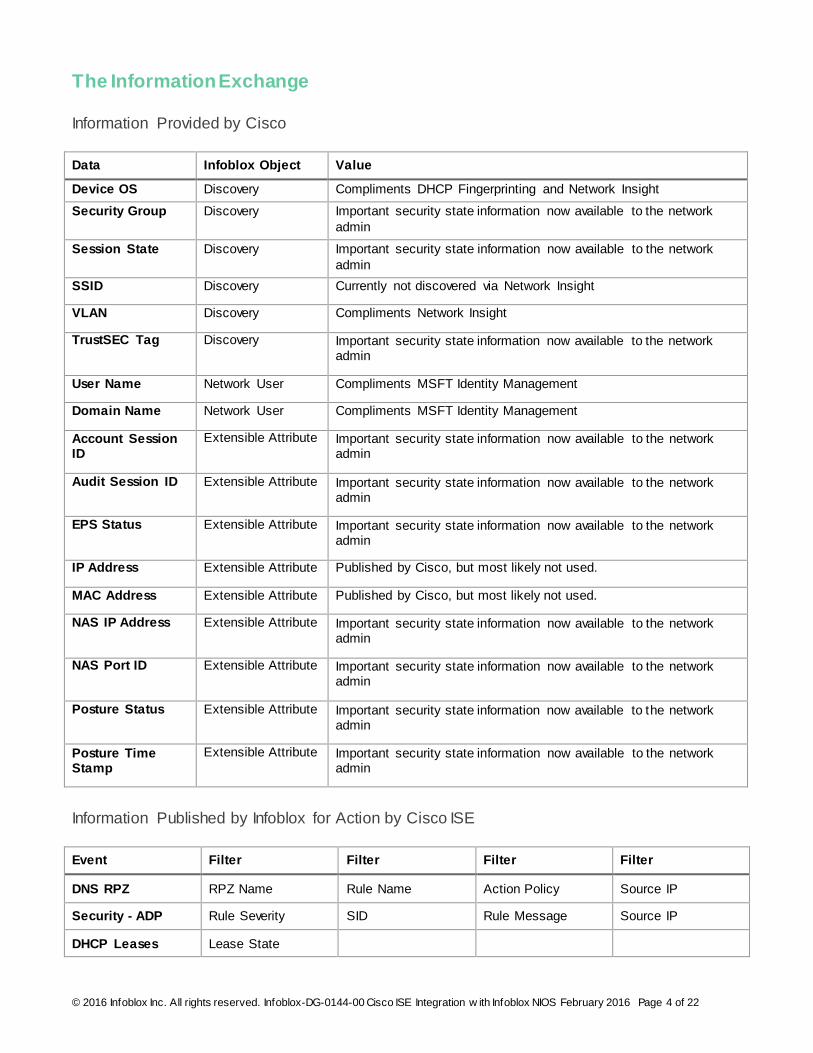
Information Provided by Cisco
Data Infoblox Object Value
Device OS Discovery Compliments DHCP Fingerprinting and Network Insight
Security Group Discovery Important security state information now available to the network
admin
Session State Discovery Important security state information now available to the network
admin
SSID Discovery Currently not discovered via Network Insight
VLAN Discovery Compliments Network Insight
TrustSEC Tag Discovery Important security state information now available to the network admin
User Name Network User Compliments MSFT Identity Management
Domain Name Network User Compliments MSFT Identity Management
Account Session ID
Extensible Attribute Important security state information now available to the network admin
Audit Session ID Extensible Attribute Important security state information now available to the network admin
EPS Status Extensible Attribute Important security state information now available to the network admin
IP Address Extensible Attribute Published by Cisco, but most likely not used.
MAC Address Extensible Attribute Published by Cisco, but most likely not used.
NAS IP Address Extensible Attribute Important security state information now available to the network admin
NAS Port ID Extensible Attribute Important security state information now available to the network admin
Posture Status Extensible Attribute Important security state information now available to the network admin
Posture Time Stamp
Extensible Attribute Important security state information now available to the network admin
Information Published by Infoblox for Action by Cisco ISE
Event Filter Filter Filter Filter
DNS RPZ RPZ Name Rule Name Action Policy Source IP
Security - ADP Rule Severity SID Rule Message Source IP
DHCP Leases Lease State
© 2016 Infoblox Inc. All rights reserved. Infoblox-DG-0144-00 Cisco ISE Integration w ith Infoblox NIOS February 2016 Page 5 of 22
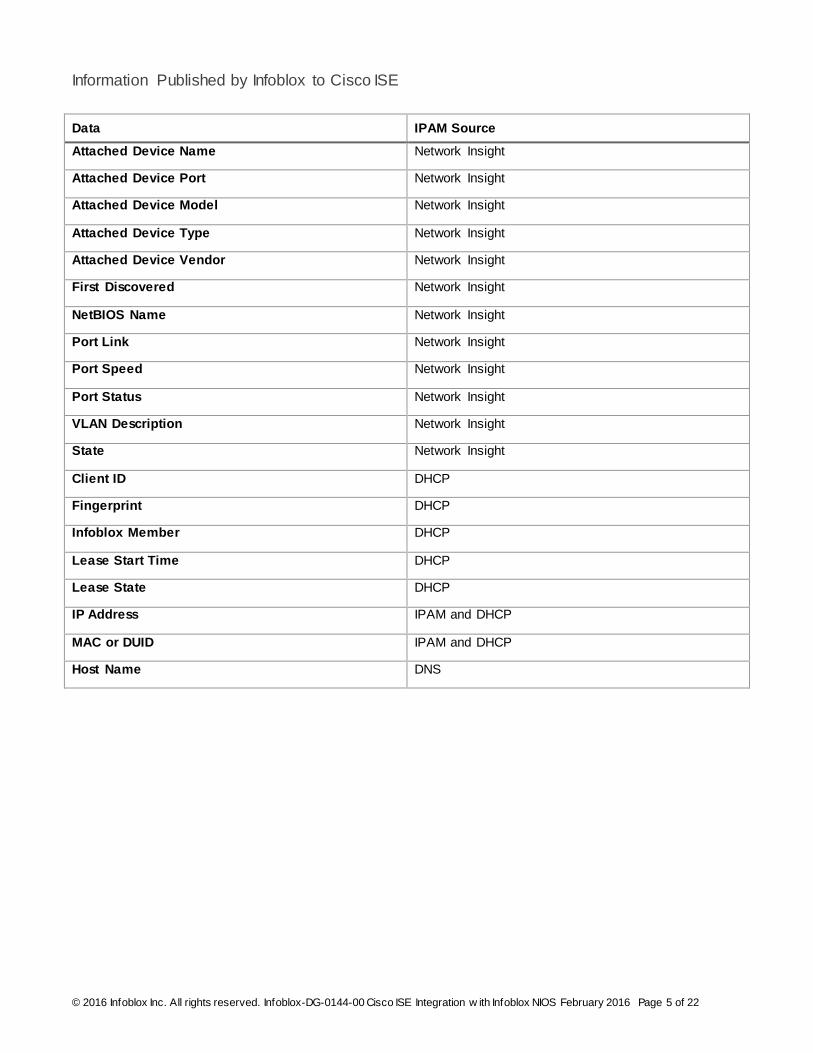
Information Published by Infoblox to Cisco ISE
Data IPAM Source
Attached Device Name Network Insight
Attached Device Port Network Insight
Attached Device Model Network Insight
Attached Device Type Network Insight
Attached Device Vendor Network Insight
First Discovered Network Insight
NetBIOS Name Network Insight
Port Link Network Insight
Port Speed Network Insight
Port Status Network Insight
VLAN Description Network Insight
State Network Insight
Client ID DHCP
Fingerprint DHCP
Infoblox Member DHCP
Lease Start Time DHCP
Lease State DHCP
IP Address IPAM and DHCP
MAC or DUID IPAM and DHCP
Host Name DNS
© 2016 Infoblox Inc. All rights reserved. Infoblox-DG-0144-00 Cisco ISE Integration w ith Infoblox NIOS February 2016 Page 6 of 22
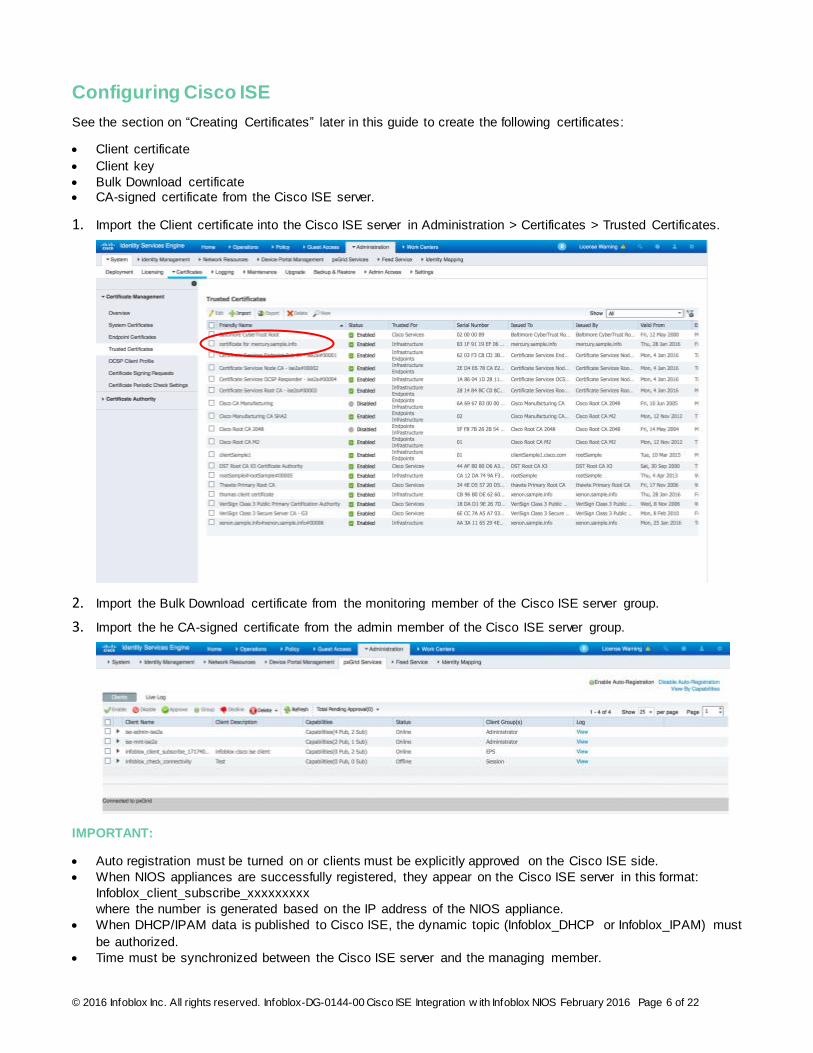
Configuring Cisco ISE
See the section on “Creating Certificates” later in this guide to create the following certificates:
Client certificate
Client key
Bulk Download certificate CA-signed certificate from the Cisco ISE server.
1. Import the Client certificate into the Cisco ISE server in Administration > Certificates > Trusted Certificates.
2. Import the Bulk Download certificate from the monitoring member of the Cisco ISE server group.
3. Import the he CA-signed certificate from the admin member of the Cisco ISE server group.
IMPORTANT:
Auto registration must be turned on or clients must be explicitly approved on the Cisco ISE side.
When NIOS appliances are successfully registered, they appear on the Cisco ISE server in this format:
Infoblox_client_subscribe_xxxxxxxxx
where the number is generated based on the IP address of the NIOS appliance.
When DHCP/IPAM data is published to Cisco ISE, the dynamic topic (Infoblox_DHCP or Infoblox_IPAM) must
be authorized.
Time must be synchronized between the Cisco ISE server and the managing member.
© 2016 Infoblox Inc. All rights reserved. Infoblox-DG-0144-00 Cisco ISE Integration w ith Infoblox NIOS February 2016 Page 7 of 22
If the admin node fails (in the Cisco ISE deployment), the IP and certificates of the admin node must be
configured as the Cisco ISE server on NIOS.
If the monitoring node (which performs bulk download used during startup) fails, the certificates of the backup monitoring node need to be configured as Bulk Download certificates of the Cisco ISE server on NIOS.
Configuring NIOS to Communicate with the Cisco ISE Server
1. Boot up the NIOS physical or virtual appliances; you need to have at least a Grid Master and a network
insight appliance.
2. Install the VNIOS license (if using VNIOS) and the following licenses:
License Event types
Network Insight Most important
RPZ DNS RPZ
Threat Protection Security External/Internal DNS Protection
DNS, DHCP, and MSMGMT IPAM
DNS and DHCP DHCP Lease
3. Create the Grid with the discovery appliance.
Enable discovery on the network insight member.
Enable DNS.
Enable RPZ.
4. Create an RPZ, either local or feed based, and enable NTP on members.
5. Add a network in IPAM and enable DHCP.
6. Create a DHCP scope.
Ensure that RPZ logging is enabled.
Ensure that all of the settings in the grid discovery properties are enabled.
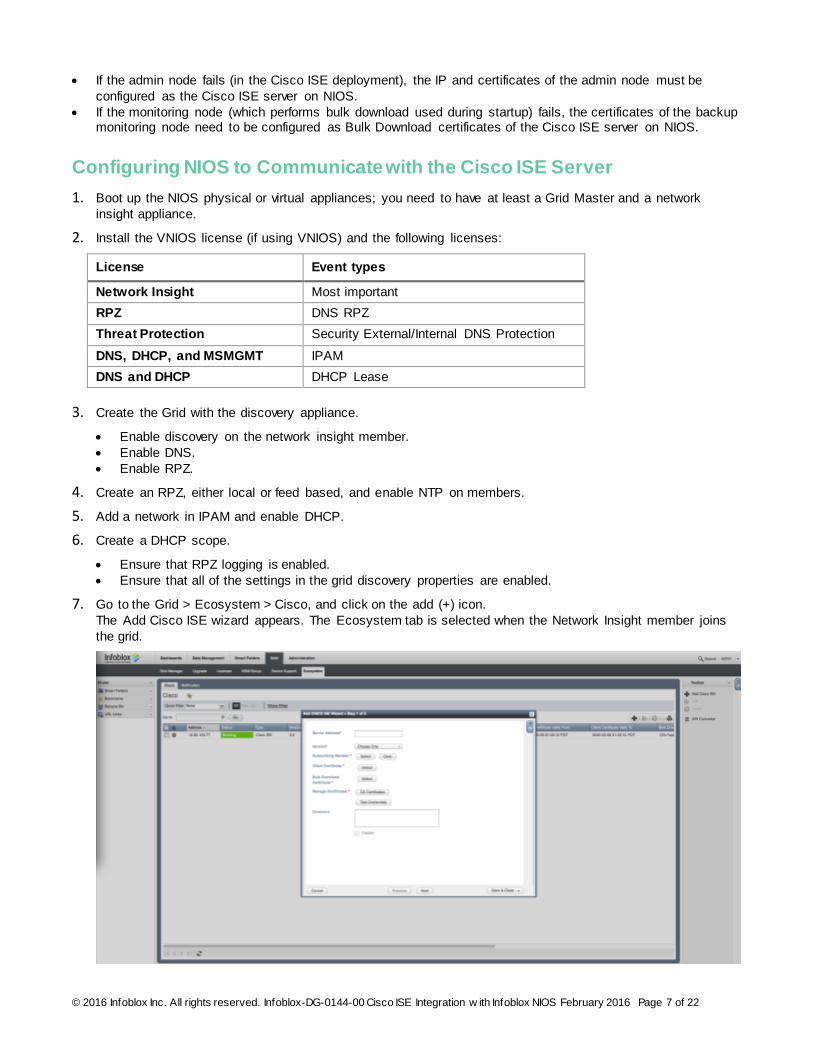
7. Go to the Grid > Ecosystem > Cisco, and click on the add (+) icon.
The Add Cisco ISE wizard appears. The Ecosystem tab is selected when the Network Insight member joins
the grid.
© 2016 Infoblox Inc. All rights reserved. Infoblox-DG-0144-00 Cisco ISE Integration w ith Infoblox NIOS February 2016 Page 8 of 22
8. Enter the IP address of the Cisco ISE server, and choose the version of the Cisco ISE server.
Infoblox supports Cisco ISE versions 1.3, 1.4, and 2.0.
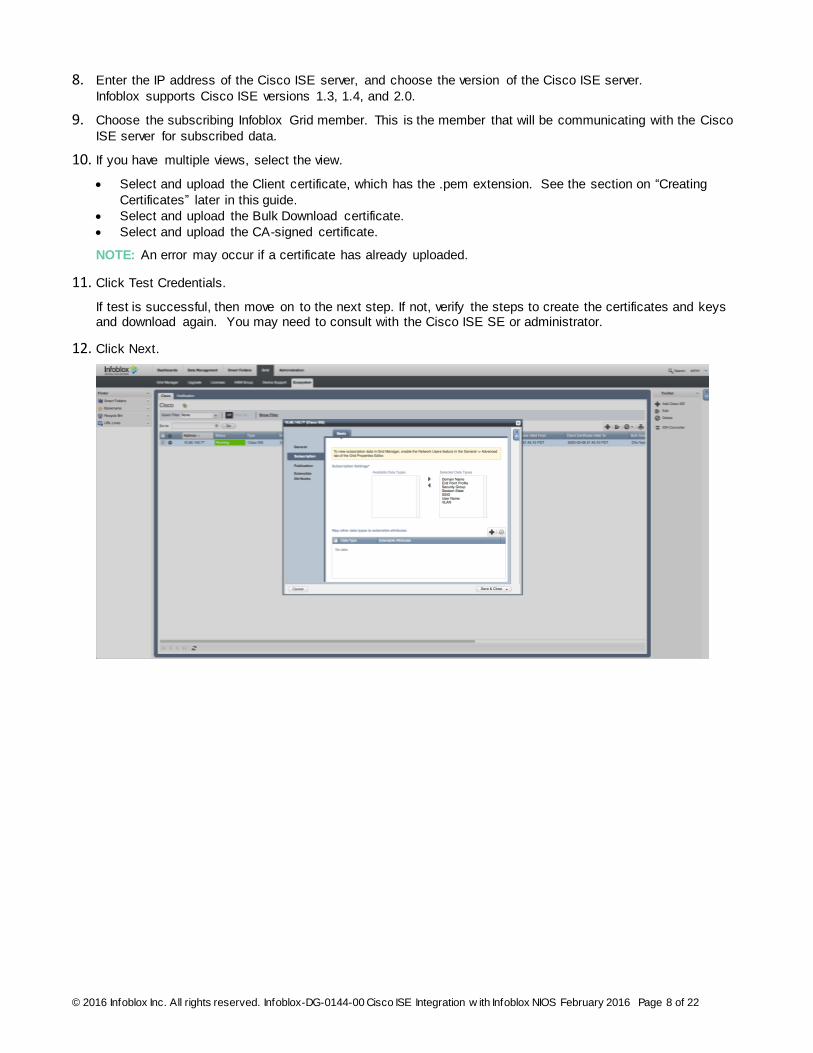
9. Choose the subscribing Infoblox Grid member. This is the member that will be communicating with the Cisco
ISE server for subscribed data.
10. If you have multiple views, select the view.
Select and upload the Client certificate, which has the .pem extension. See the section on “Creating
Certificates” later in this guide.
Select and upload the Bulk Download certificate.
Select and upload the CA-signed certificate.
NOTE: An error may occur if a certificate has already uploaded.
11. Click Test Credentials.
If test is successful, then move on to the next step. If not, verify the steps to create the certificates and keys and download again. You may need to consult with the Cisco ISE SE or administrator.
12. Click Next.
© 2016 Infoblox Inc. All rights reserved. Infoblox-DG-0144-00 Cisco ISE Integration w ith Infoblox NIOS February 2016 Page 9 of 22
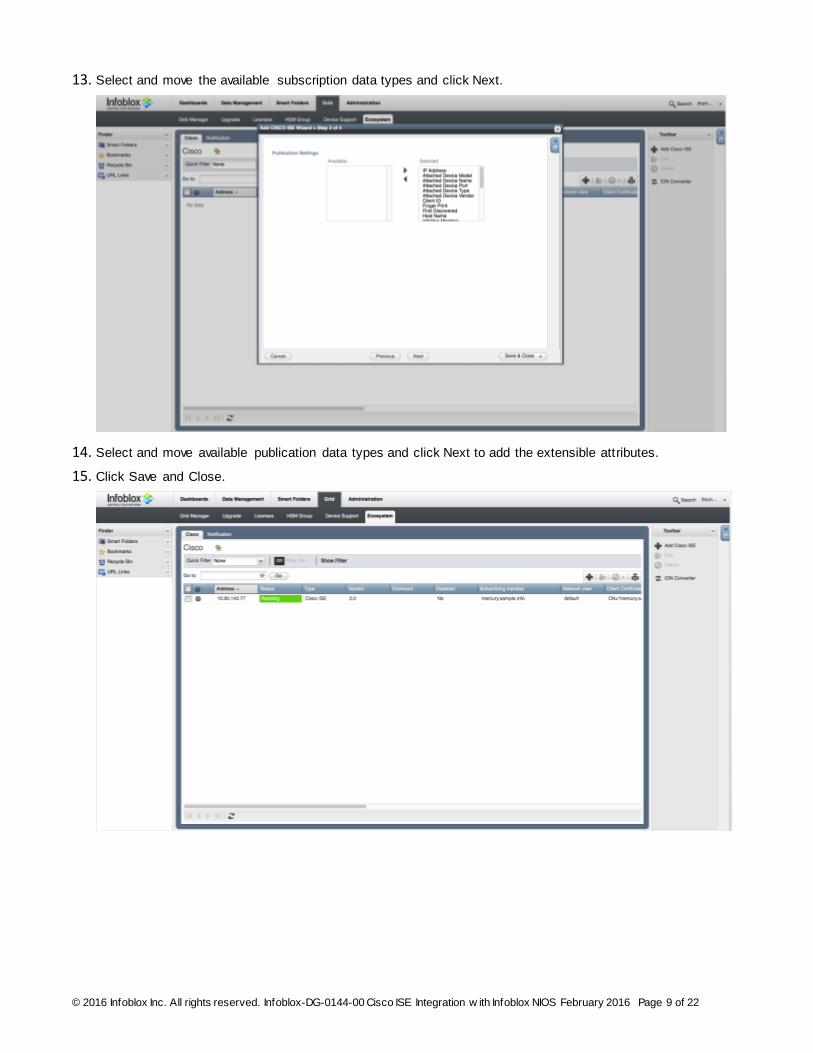
13. Select and move the available subscription data types and click Next.
14. Select and move available publication data types and click Next to add the extensible attributes.
15. Click Save and Close.
© 2016 Infoblox Inc. All rights reserved. Infoblox-DG-0144-00 Cisco ISE Integration w ith Infoblox NIOS February 2016 Page 10 of 22
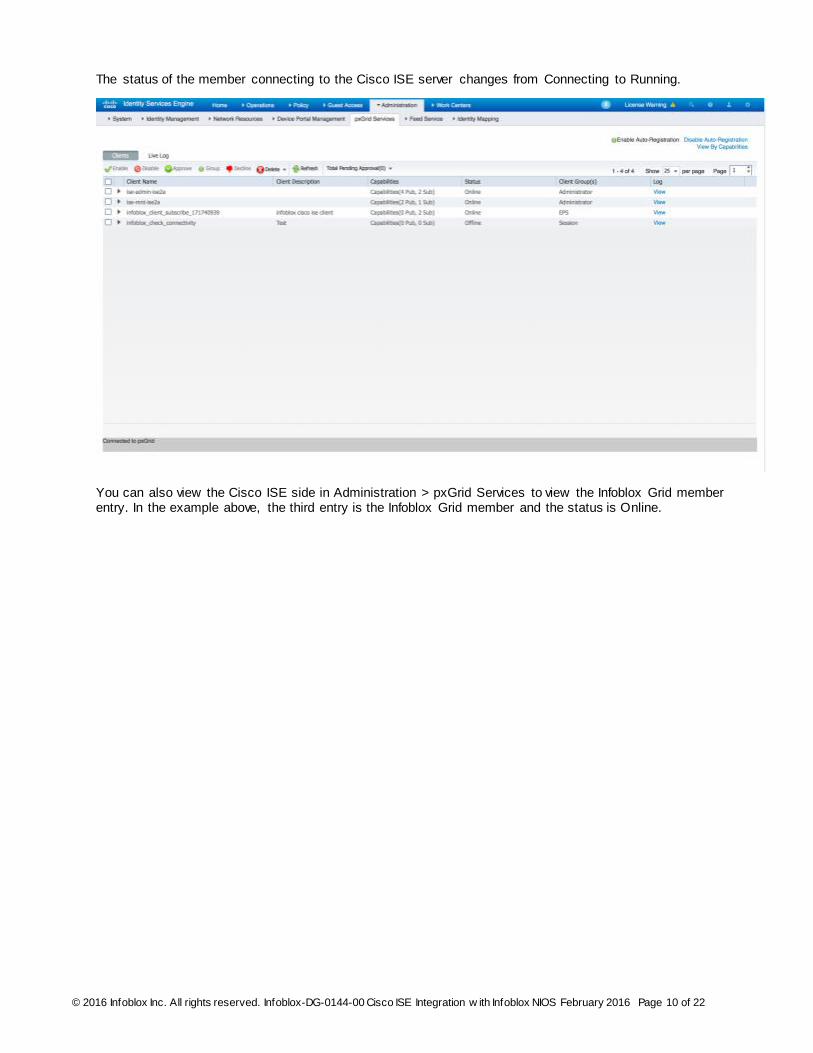
The status of the member connecting to the Cisco ISE server changes from Connecting to Running.
You can also view the Cisco ISE side in Administration > pxGrid Services to view the Infoblox Grid member entry. In the example above, the third entry is the Infoblox Grid member and the status is Online.
© 2016 Infoblox Inc. All rights reserved. Infoblox-DG-0144-00 Cisco ISE Integration w ith Infoblox NIOS February 2016 Page 11 of 22
Configuring Notification Rules
To publish dynamic data from NIOS to Cisco ISE, you must configure notification rules.
1. Disable IF-MAP on the Grid level and member level:
a. Go to Data Management > DHCP > Grid DHCP properties from the toolbar.
b. Select IF-Map and click the Enable IF-MAP check box.
c. Click Save and Close.
d. Navigate to Data Management > DHCP > Members.
e. Click on a member and edit the member.
f. Toggle Advanced Mode
g. Select the IF-MAP tab and click Enable IF-MAP.
h. Click Save and Close.
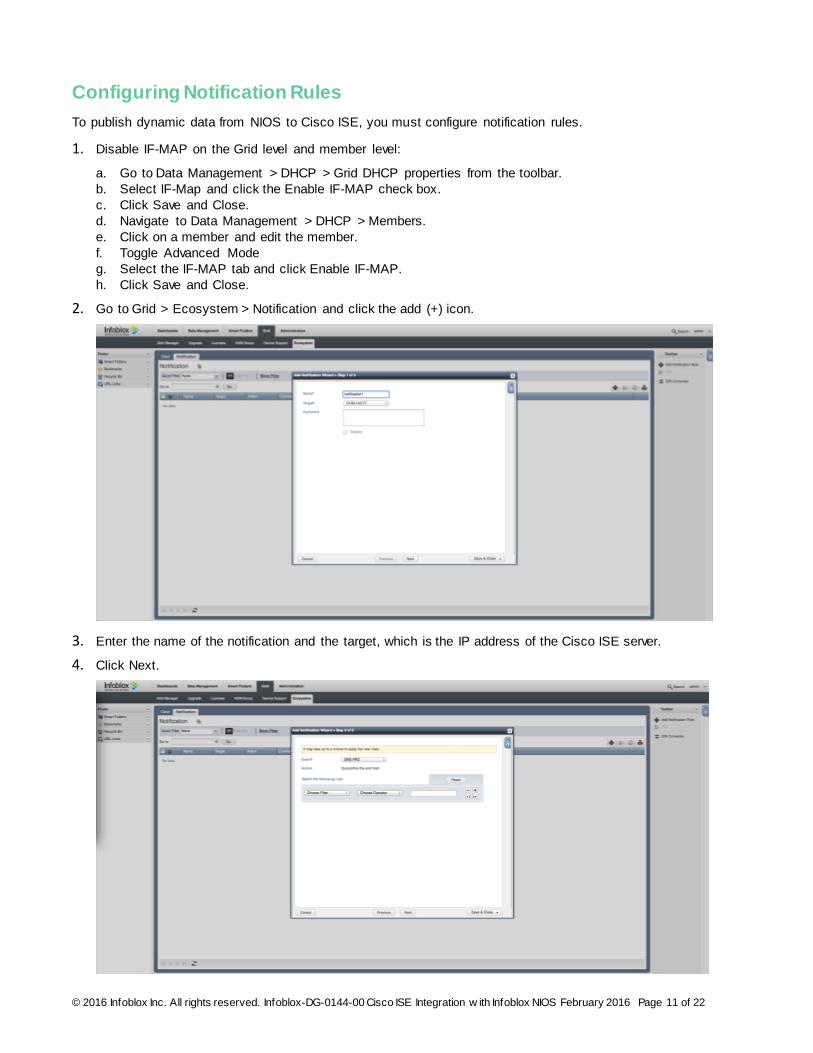
2. Go to Grid > Ecosystem > Notification and click the add (+) icon.
3. Enter the name of the notification and the target, which is the IP address of the Cisco ISE server.
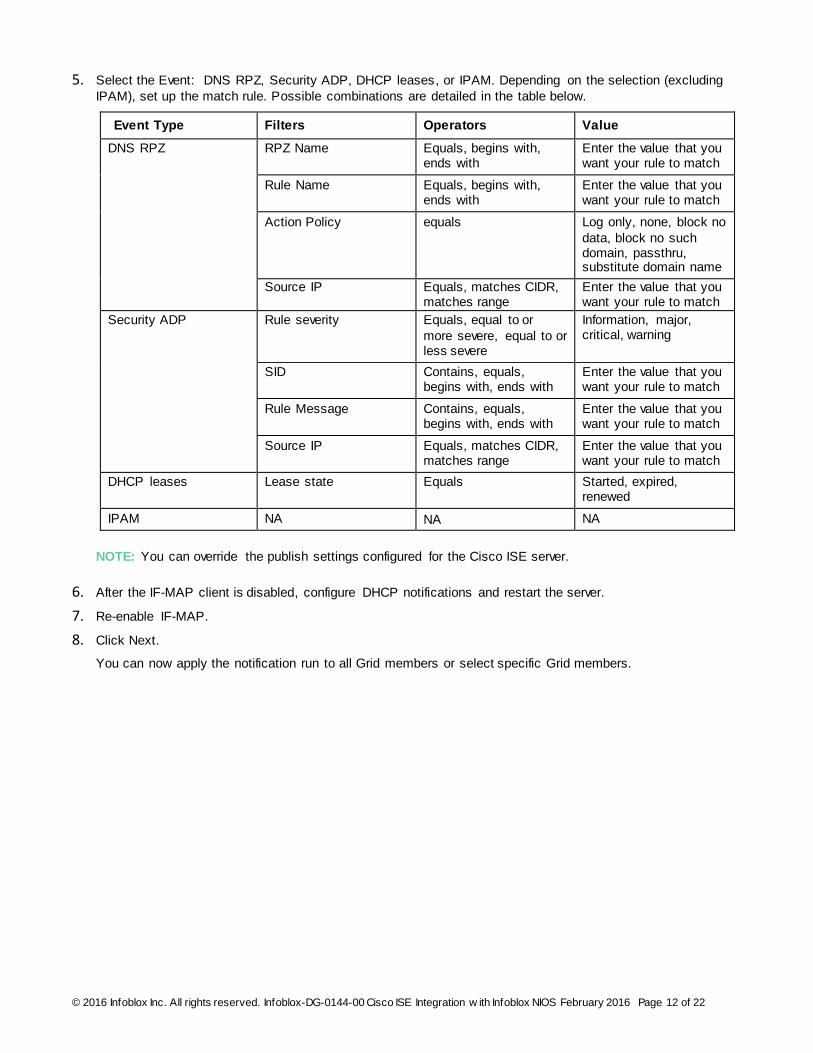
4. Click Next.
© 2016 Infoblox Inc. All rights reserved. Infoblox-DG-0144-00 Cisco ISE Integration w ith Infoblox NIOS February 2016 Page 12 of 22
5. Select the Event: DNS RPZ, Security ADP, DHCP leases, or IPAM. Depending on the selection (excluding
IPAM), set up the match rule. Possible combinations are detailed in the table below.
Event Type Filters Operators Value
DNS RPZ RPZ Name Equals, begins with, ends with
Enter the value that you want your rule to match
Rule Name Equals, begins with, ends with
Enter the value that you want your rule to match
Action Policy equals Log only, none, block no
data, block no such domain, passthru, substitute domain name
Source IP Equals, matches CIDR, matches range
Enter the value that you want your rule to match
Security ADP Rule severity Equals, equal to or
more severe, equal to or less severe
Information, major, critical, warning
SID Contains, equals, begins with, ends with
Enter the value that you want your rule to match
Rule Message Contains, equals, begins with, ends with
Enter the value that you want your rule to match
Source IP Equals, matches CIDR, matches range
Enter the value that you want your rule to match
DHCP leases Lease state Equals Started, expired, renewed
IPAM NA NA NA
NOTE: You can override the publish settings configured for the Cisco ISE server.
6. After the IF-MAP client is disabled, configure DHCP notifications and restart the server.
7. Re-enable IF-MAP.
8. Click Next.
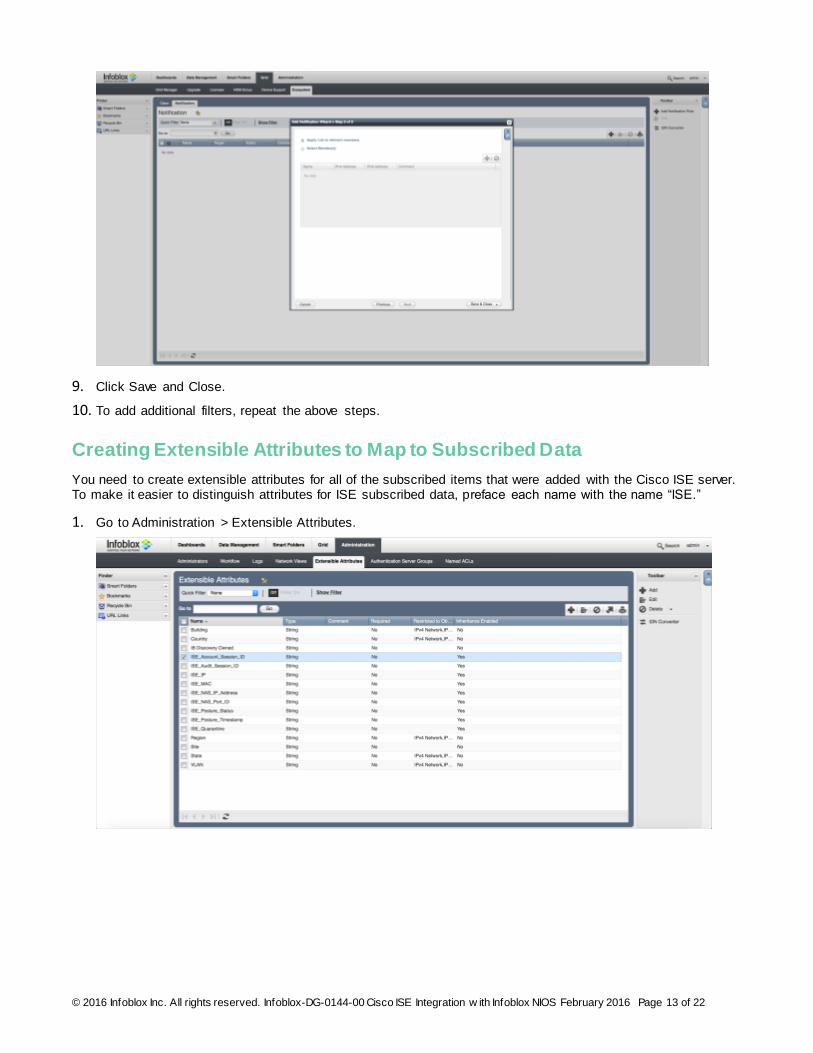
You can now apply the notification run to all Grid members or select specific Grid members.
© 2016 Infoblox Inc. All rights reserved. Infoblox-DG-0144-00 Cisco ISE Integration w ith Infoblox NIOS February 2016 Page 13 of 22
9. Click Save and Close.
10. To add additional filters, repeat the above steps.
Creating Extensible Attributes to Map to Subscribed Data
You need to create extensible attributes for all of the subscribed items that were added with the Cisco ISE server. To make it easier to distinguish attributes for ISE subscribed data, preface each name with the name “ISE.”
1. Go to Administration > Extensible Attributes.
© 2016 Infoblox Inc. All rights reserved. Infoblox-DG-0144-00 Cisco ISE Integration w ith Infoblox NIOS February 2016 Page 14 of 22
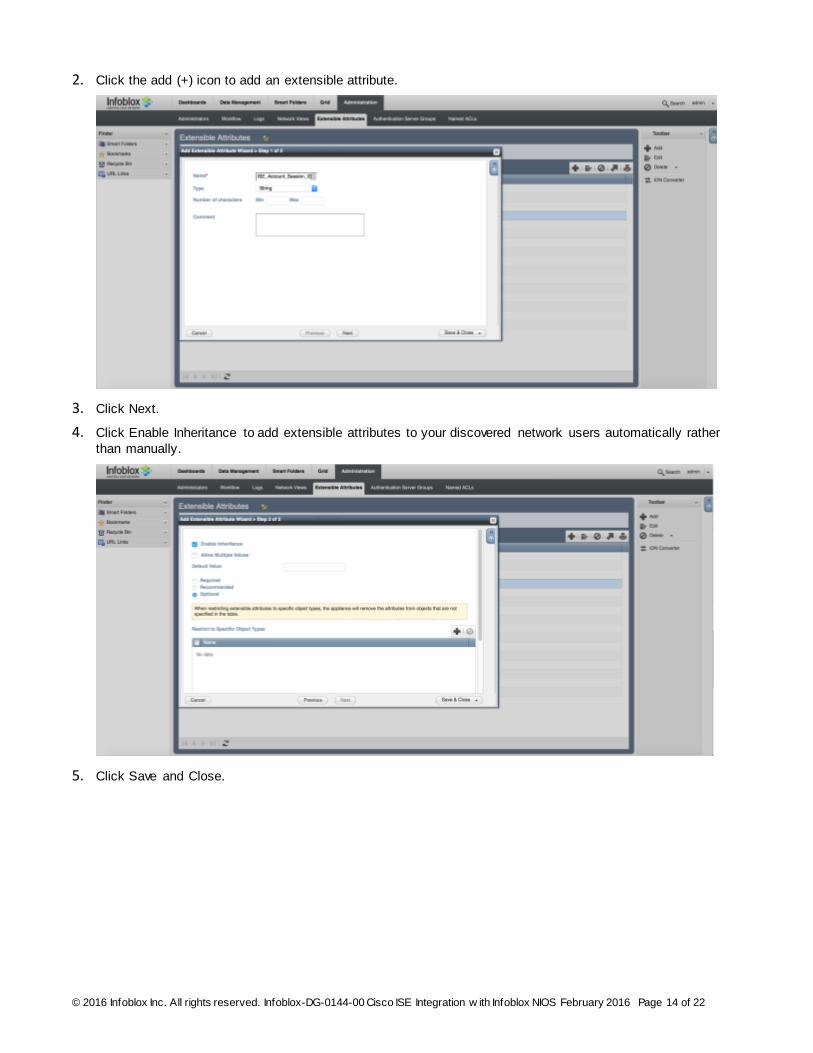
2. Click the add (+) icon to add an extensible attribute.
3. Click Next.
4. Click Enable Inheritance to add extensible attributes to your discovered network users automatically rather
than manually.
5. Click Save and Close.
© 2016 Infoblox Inc. All rights reserved. Infoblox-DG-0144-00 Cisco ISE Integration w ith Infoblox NIOS February 2016 Page 15 of 22
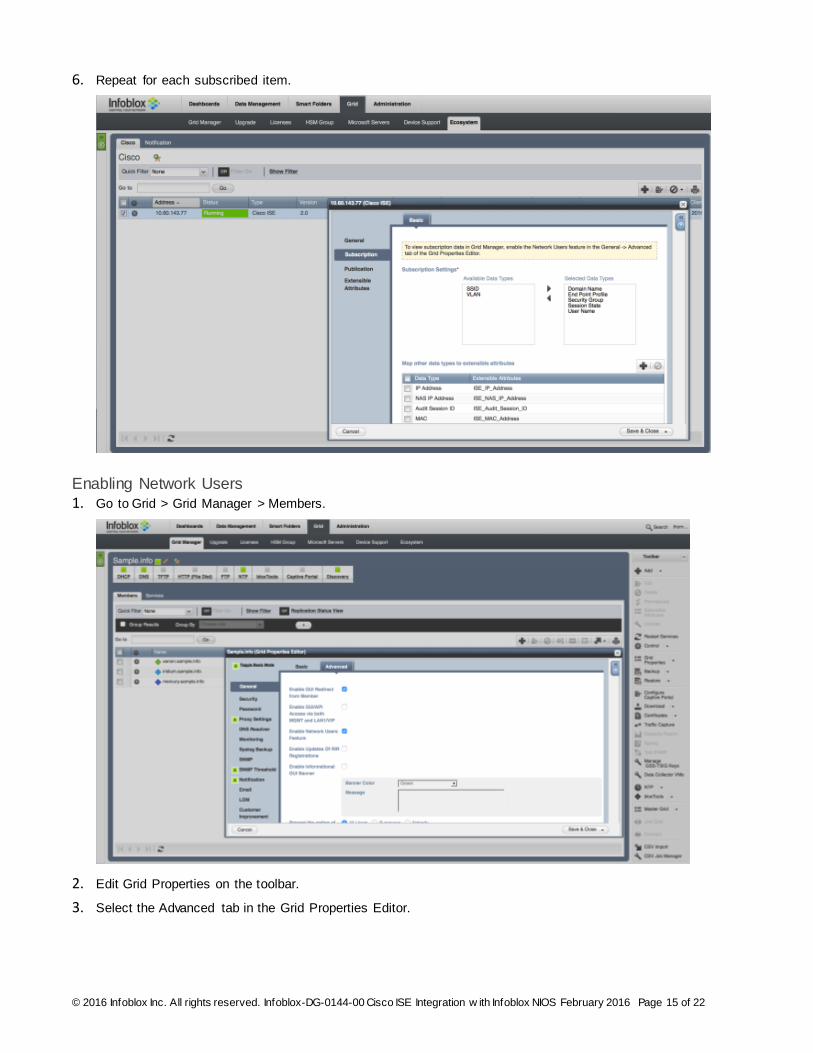
6. Repeat for each subscribed item.
Enabling Network Users
1. Go to Grid > Grid Manager > Members.
2. Edit Grid Properties on the toolbar.
3. Select the Advanced tab in the Grid Properties Editor.

© 2016 Infoblox Inc. All rights reserved. Infoblox-DG-0144-00 Cisco ISE Integration w ith Infoblox NIOS February 2016 Page 16 of 22
4. Click Enable Network Users Feature.
Assigning Extensible Attributes to the Subscribed Data
1. Select the Ecosystem tab, click the entry to select it, and click Edit.
2. Select the Subscription tab.
3. Click the add (+) icon to map other data types to extensible attributes.
© 2016 Infoblox Inc. All rights reserved. Infoblox-DG-0144-00 Cisco ISE Integration w ith Infoblox NIOS February 2016 Page 17 of 22
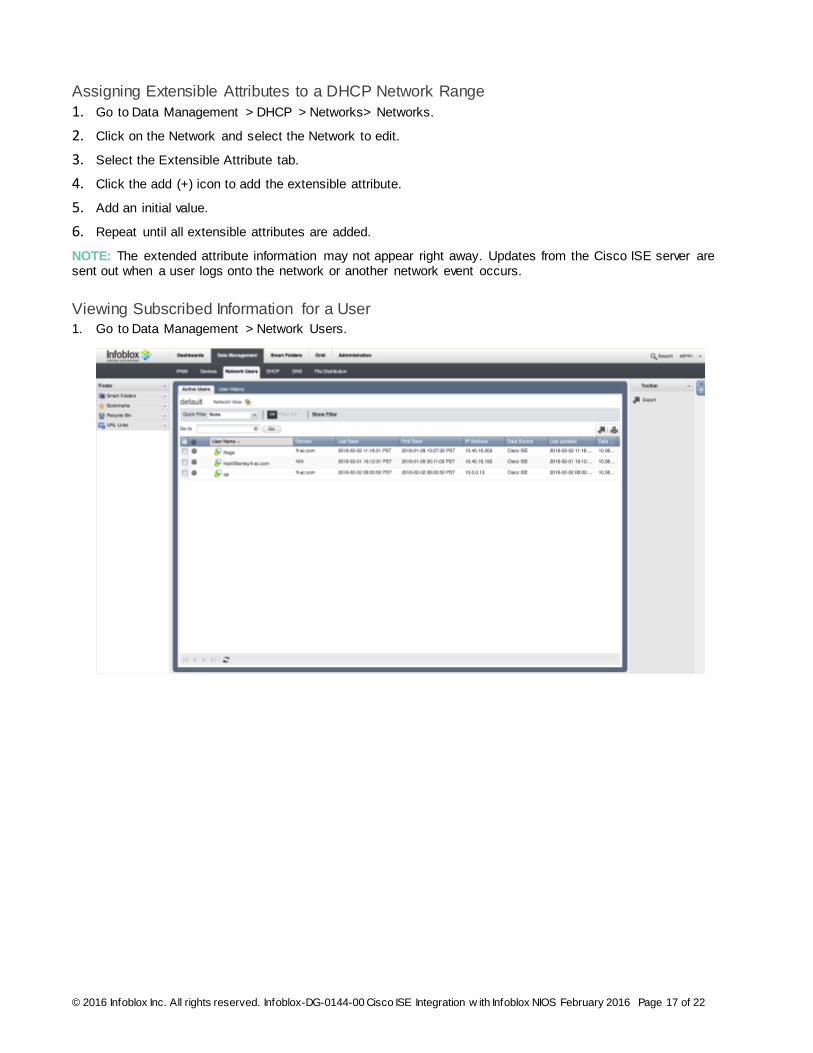
Assigning Extensible Attributes to a DHCP Network Range
1. Go to Data Management > DHCP > Networks> Networks.
2. Click on the Network and select the Network to edit.
3. Select the Extensible Attribute tab.
4. Click the add (+) icon to add the extensible attribute.
5. Add an initial value.
6. Repeat until all extensible attributes are added.
NOTE: The extended attribute information may not appear right away. Updates from the Cisco ISE server are sent out when a user logs onto the network or another network event occurs.
Viewing Subscribed Information for a User
1. Go to Data Management > Network Users.
© 2016 Infoblox Inc. All rights reserved. Infoblox-DG-0144-00 Cisco ISE Integration w ith Infoblox NIOS February 2016 Page 18 of 22
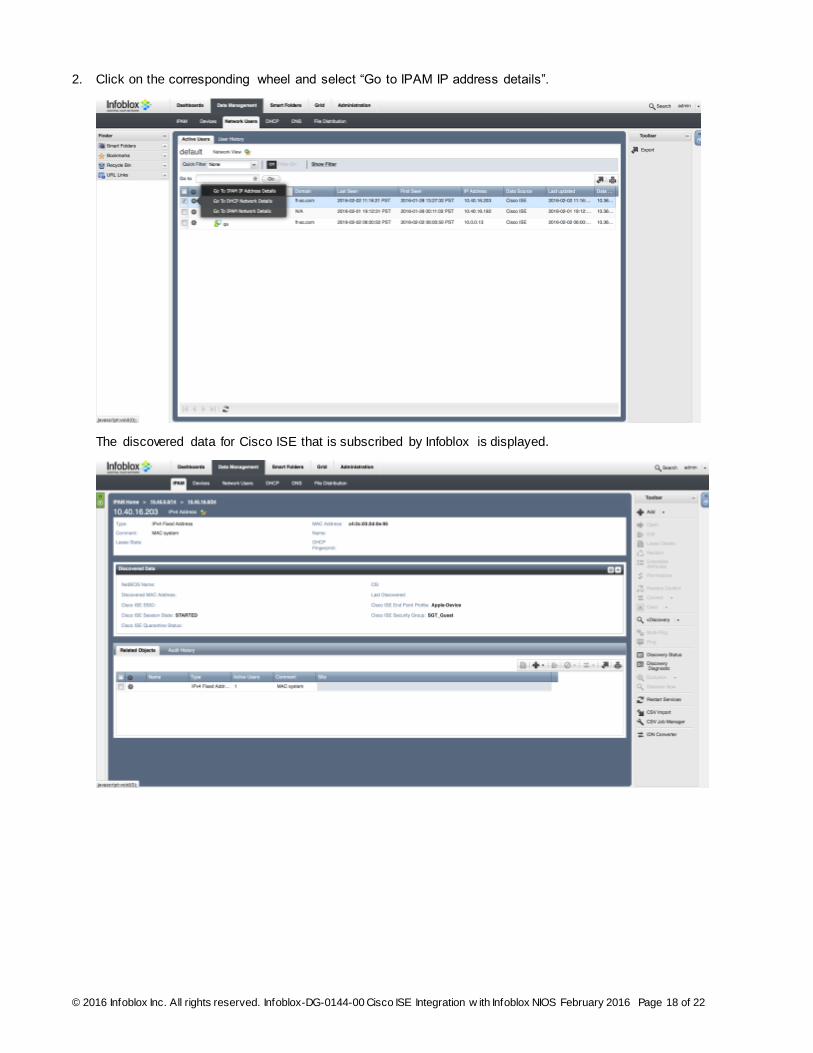
2. Click on the corresponding wheel and select “Go to IPAM IP address details”.
The discovered data for Cisco ISE that is subscribed by Infoblox is displayed.
© 2016 Infoblox Inc. All rights reserved. Infoblox-DG-0144-00 Cisco ISE Integration w ith Infoblox NIOS February 2016 Page 19 of 22
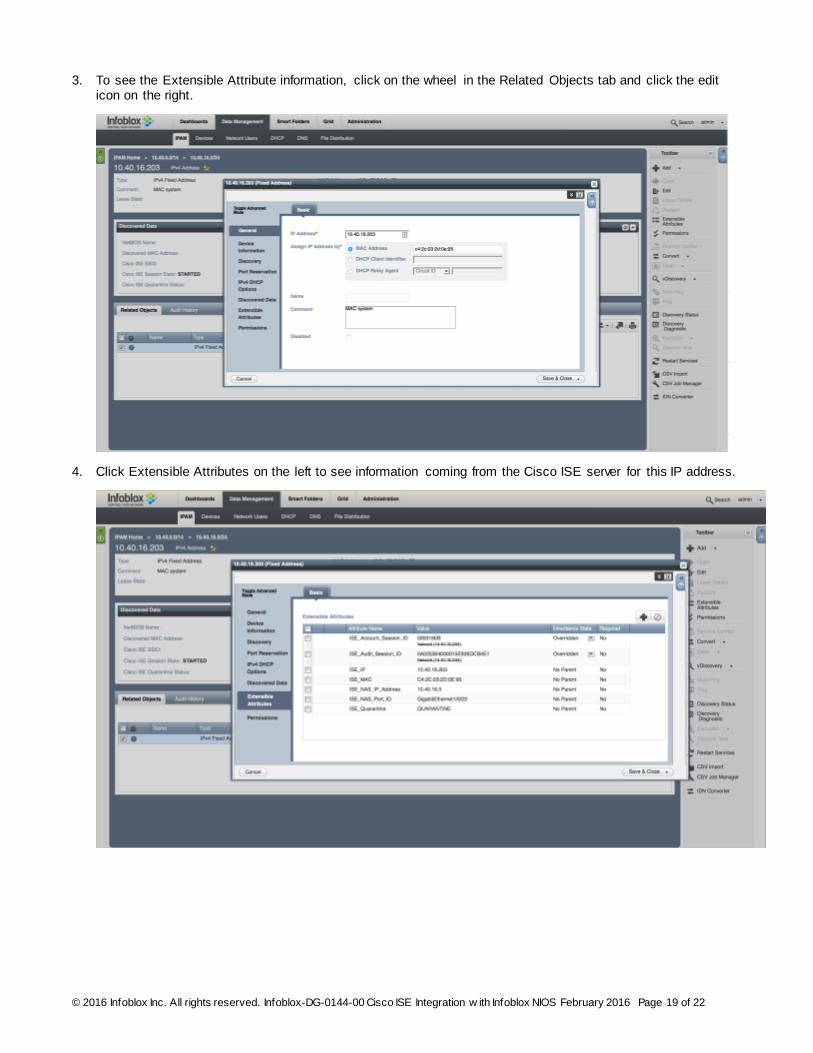
3. To see the Extensible Attribute information, click on the wheel in the Related Objects tab and click the edit icon on the right.
4. Click Extensible Attributes on the left to see information coming from the Cisco ISE server for this IP address.

© 2016 Infoblox Inc. All rights reserved. Infoblox-DG-0144-00 Cisco ISE Integration w ith Infoblox NIOS February 2016 Page 20 of 22
5. To view the corresponding information on the Cisco ISE server, go to Operations > RADIUS Livelog.
6. Click on the details icon and the following screen is displayed.
© 2016 Infoblox Inc. All rights reserved. Infoblox-DG-0144-00 Cisco ISE Integration w ith Infoblox NIOS February 2016 Page 21 of 22
Creating Certificates
To communicate with the Cisco ISE server in a secure manner, a Client certificate must be created. In a command window, enter:
Openssl genrsa –out <key name>.key 4096 Openssl req –new –key <key name>.key -out <csr name>.csr
The output from the command is:
For CSR request:
Country Name (2 letter code) [XX]: Example: US
State or Province Name (full name) []: Example: CA
Locality Name (eg, city) [Default City]: Example: SC
Organization Name (eg, company) [Default Company Ltd]: Example: Infoblox
Organizational Unit Name (eg, section) []:<Organization Name> Example: QA
Common Name (eg, your name or your server's hostname) []:<host name of the subscribing member>
Email Address []: A challenge password []:
NOTE: The common name is the most important item. It has to match the name of the subscribing member.
Openssl req –x509 –days 365 –key <key name>.key –in <csr name> -out <certificate name>.cer
7. Concatenate the .key file and the .cer file to create a .pem file. This is the client certificate.
8. To import the certificate to Cisco ISE's trusted store, click on the import button and select the “Trust for
authentication within ISE” check box. The location for the certificate is Administration > Certificates >Trusted
Certificates.
9. Export the self-signed ISE certificate of the ISE server (in Administration > Certificates System Certificates).
When examining the certificate, make sure that the usage check box for pxGrid is checked. This is also
known as the Bulk Download certificate.
Limitations
In order to deploy the integration successfully, note the following limitations:
Cisco ISE server 2.0 does not support any IPAM and DHCP information that we send to it at this time.
Only one grid member can be a subscribing member. This is a Cisco limitation. However, multiple grid members can publish to Cisco ISE.
Only 1 IPAM rule can be configured per Cisco ISE server
IPAM publishing uses dynamic topics that needs to be authorized on the Cisco ISE server before any data can be published.
Quarantine events resulting from RPZ and ADP hits can be sent to Cisco ISE versions 1.3, 1.4, and 2. 0 DHCP and IPAM data can only be published to Cisco ISE 2.0.
© 2016 Infoblox Inc. All rights reserved. Infoblox-DG-0144-00 Cisco ISE Integration w ith Infoblox NIOS February 2016 Page 22 of 22
Use Cases
The data that is exchanged between Infoblox and Cisco ISE/pxGrid enable significant use cases for protecting networks.
RPZ hits data sent to Cisco ISE can trigger Cisco to quarantine the end station that is trying to resolve to a
known bad site.
ADP hits data sent to Cisco ISE can trigger Cisco to quarantine the end station that has launched a DNS
attack.
Device OS information can be used to determine types of devices on the network and if some of those
devices are prohibited. For example, gaming consoles might be prohibited in some network environments.
And the ratio of devices could be used to plan out network scalability.
Security group information could be used to correlate RPZ events. If a device within a security group is
triggering RPZ hits, then devices in that security group could be quarantined.
Session state information could be used to determine if an unauthorized user is trying to log into the network.
For example, a large number of authentication failures from a workstation could be a clue to a hacking attack.
User name and domain name can be used with the Infoblox Identity Mapping feature.
The EPS (endpoint protection service) status provides quarantine status for a workstation. If the workstation is
quarantined, then this warrants further investigation.
A NAS (network access server) IP address could be used to determine if a NAS is being overrun with
authentication requests.
The posture status is used to determine if a workstation is compliant or not in terms of having proper anti -
malware software.
A TrustSEC tag defines the security policy for the workstation that was dynamically placed into a logical group.
A posture time stamp tells you the time of the posture status. For example, when a workstation falls out of compliance on having up-to-date anti-malware software installed.