Embed Size (px)
Citation preview

DEPARTMENT OF HUMAN RESOURCESSENIOR & DISABLED SERVICES DIVISION500 Summer Street NE
Salem, Oregon 97310-1015
AUTHORIZED BY: ACCESS Transmittal 00-3
Sharon Kidder, Manager Date: Oct. 27, 2000
SDSD Field Services
Facilities and Information Systems Manager
TO: All Management and Staff who use the ACCESS system
SUBJECT: Oregon ACCESS Release 17.03
CONTACT: Mike Bodi, (503) 378-2101 X 267
DISCUSSION: This ACCESS Transmittal releases information on the changes toOregon ACCESS completed for Release 17.03. The following information will be availablein your office on Monday, November 6, 2000. This release contains changes to theACCESS/Mainframe Integration process. Screen prints, a CD, and training materials areincluded. It is highly recommended that local offices educate staff on all changes.
Screen-scraping, the current technology used to do ACCESS/CMS Integration, is beingreplaced with an OpenServer program. With this different technology, the progress meteryou currently see in the integration screens, will no longer be there. It will, however, appearwhen integrating new cases that involve the ENRC screen. This OpenServer technology willSave information to UCMS more quickly.
In addition to greatly improving the speed of the integration process, severalchanges/additions have been made to enhance the functionality of ACCESS/CMSintegration. It will no longer be necessary to enter the Security Code when using integration.
Please be sure to read the attached materials closely.
Due to the possibility of errors when integrating with CMS, ACCESS will no longerautomatically enter the Social Security Number as the Claim Number on the income screen.The worker will need to type in the correct claim number along with the corresponding letterdesignation. An information message will pop up the first time you try to leave the screenwithout a claim number. A number will need to be entered prior to using integration. If younavigate to the integration screen, and have not entered the claim number, you will need toreturn to the ACCESS application and enter the number.
Several additions have been made to the Medical Assistance tab in the Benefit section of theapplication. The top part of the screen includes an Incoming code drop-down box as wellas a field for the Effective Date; a Reason code drop-down box; a check-box for both NoReview Due (NRD) and No Further Medical (NFM), and the applicable dates; and a field toenter the # in Household and # in Medical. These fields must be entered in ACCESSprior to doing integration. If you are on the integration screens, and the above informationhas not been entered, you will need to go back into the application to enter the information.
When the application is complete and ready to send to CMNEW/CMS, click Mainframeon the menu bar. The appropriate label will be enabled. When clicked, if pertinentinformation is missing in ACCESS, a “Validation” pop-up box will appear. This box willidentify all mandatory fields not completed, as well as all optional fields not completed. The“optional” fields will depend upon the type of case being set up. For example, on a Pendingcase many fields are not needed, like review dates, but will be required for New case.
“Non-By passable” (mandatory) errors will be identified by a red X, “By passable”(optional) errors will be identified by a yellow !, and “Informational” messages will beidentified by a blue i. Check the list and return to ACCESS to complete required fields. These fields must be entered in the ACCESS application prior to doing integration.
Data fields not used by SDSD are removed from the ACCESS integration (CMNEW,UCMS, and CMUP/PCMS) screens. These fields include JS, Exmp, Trgt, Grade, and GCon the CMNEW screen; CC Wrk Hrs, Pay Prf: Sch Hrs, Actual/GC Hrs, Act Prov, andTANF Sit End on the UCMS screen; and Jobs Stat, Exmp, Trgt, Grade, and MDRC on theCMUP/PCMS screen. Fields on the integration screens, which are available inACCESS, will be disabled in integration. These fields will need to be completed inACCESS prior to doing integration.
On the CMUP/PCMS screen is a check-box to Include Unborn Child and a button labeledExtra Persons. When the Include Unborn Child box is checked, it will write an UnbornChild record to CMS. This will include it as part of your mainframe case. The ExtraPersons button will bring up a window listing all persons on a mainframe case that are noton the ACCESS application; this may include an Unborn Child or an Unknown Father.
When SAVING to CMS, and mainframe errors occur, ACCESS will return all errormessages at once. (These messages will appear in a pop-up box labeled CMS Errors forCase EX####). Keep in mind, however, that correcting these errors may create additionalerrors. If this happens another error message box will appear. “Non-By Passable”(mandatory) messages will be identified by a red X. Check this list, correct the errors, andclick the SAVE button again. Many of the CMS required fields must be entered in theACCESS application prior to doing integration.
The SCMS screen is now an ACCESS screen. After setting up a new, or updating anexisting case, the ACCESS/SCMS screen will display data from the mainframe. This will bea read only screen. With this new technology ACCESS writes directly to the mainframe. Because of this process, the mainframe screens will not come up. To view information onthe mainframe, click CMS to get to the integration screens. From here, click the CMS radiobutton. This will display the information from the mainframe.
You will be required to go to the ENRC screen just as you do now. From SCMS, click theENRC button to bring up this screen. This screen will continue to use the screen-scrapingprocess, but will be quicker. This means that when navigating to the ENRC screen theprogress meter will appear as before.
When ACCESS information is saved to CMNEW or CMS, it will be checked against theCIS data. Any information that is not “synchronized” (does not match) will cause a screento pop-up. Fields highlighted in Red indicate that the information does not match.
To synchronize the information, check the information indicated in ACCESS against theinformation from CIS, and decide which is correct. Using the “check box” to the right ofthe highlighted field(s), check the box with the CORRECT piece of information. This willautomatically “synchronize” the information and update the appropriate region.
Prior to integrating an ACCESS case, all information MUST be synchronized.
Mainframe DCMS functionality, which enables the deletion of transactions in the CMSsuspend file, is available from ACCESS. This is used when a transaction is discovered tobe in error on the same day it was created. Remember, this deletion can only happen on thesame day the record was created because of the nightly mainframe processing. To delete asuspense record, click the Delete Transaction button on the UCMS screen.
PLEASE REVIEW THE ATTACHED TRAINING MATERIAL:
* Informational screen prints
* CD Screen Cam...be sure ALL ACCESS staff have a chance to view this CD prior to using the new release.
More information/explanation on how to use these changes may be found in Online Helpby clicking on the HELP button (question mark) on the tool bar. For information on howto print a particular form choose the Help button from the Print forms list or selectPrinting Forms from the Table of Contents. Then click on the specific form you need helpto print.
The help displayed will be specific to the screen you are working in or you may “search”for any other feature you need help with. On the Table of Contents for Online Help clickon the Latest Changes and New Features to get an overview of the changes in thisrelease.
OIS has a help desk established for staff to bring ACCESS related issues and questions tothe attention of the ACCESS project. You may reach the Help Desk during normal businesshours at (503) 945-5623 or (888) 457-3375.
To register new employees for basic ACCESS training, please contact the SDSD TrainingUnit at (503) 945-5834. For other ACCESS trainings, please see the training schedule withinOregon ACCESS. This is accessible from the Training button on the Main Menu inACCESS.
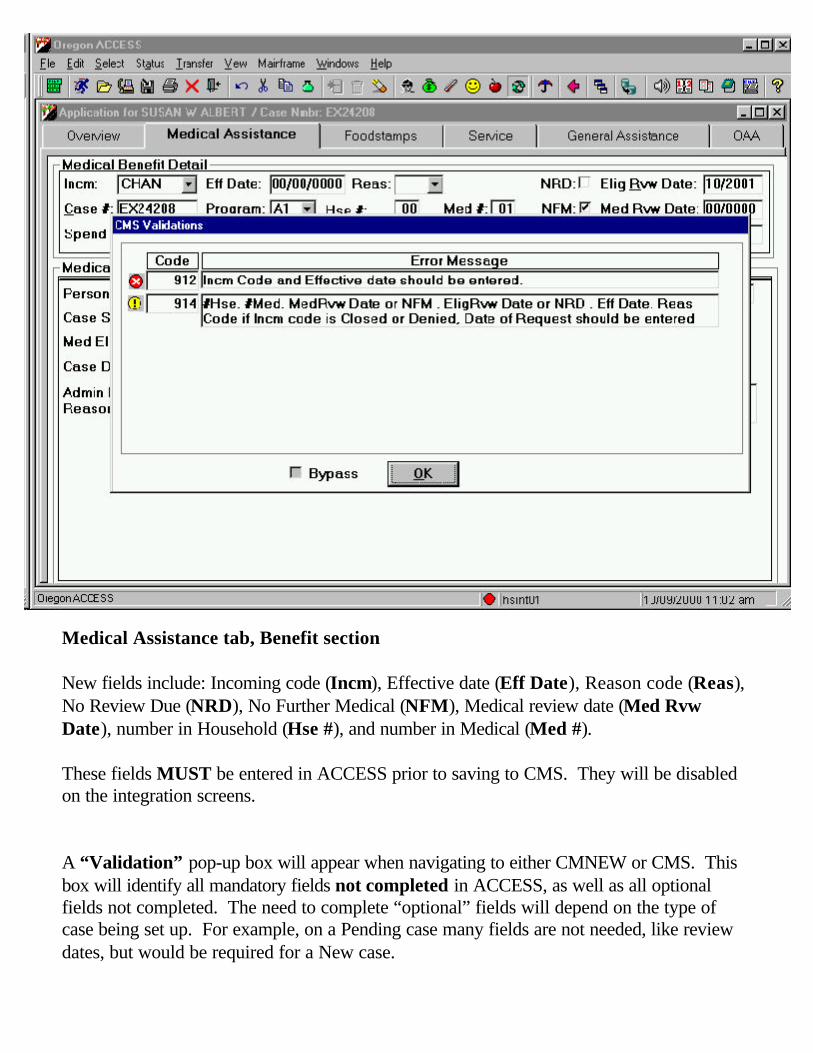
Medical Assistance tab, Benefit section
New fields include: Incoming code (Incm), Effective date (Eff Date), Reason code (Reas),No Review Due (NRD), No Further Medical (NFM), Medical review date (Med RvwDate), number in Household (Hse #), and number in Medical (Med #).
These fields MUST be entered in ACCESS prior to saving to CMS. They will be disabledon the integration screens.
A “Validation” pop-up box will appear when navigating to either CMNEW or CMS. Thisbox will identify all mandatory fields not completed in ACCESS, as well as all optionalfields not completed. The need to complete “optional” fields will depend on the type ofcase being set up. For example, on a Pending case many fields are not needed, like reviewdates, but would be required for a New case.
“Non-By Passable” (mandatory) errors will be identified by a red X and “By Passable”(optional) errors will be identified by a yellow !. Any “Information” messages will beidentified by a blue i. Check the list and return to ACCESS to complete required fields. These fields must be entered in the ACCESS application prior to doing integration.
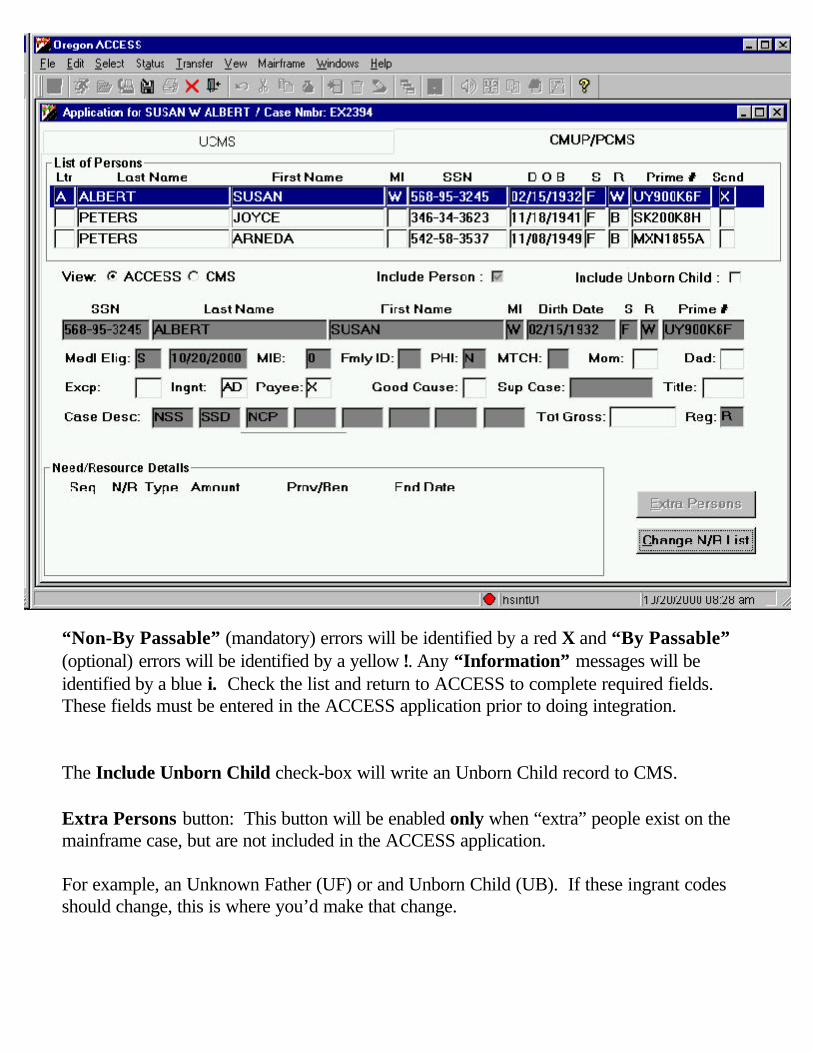
The Include Unborn Child check-box will write an Unborn Child record to CMS.
Extra Persons button: This button will be enabled only when “extra” people exist on themainframe case, but are not included in the ACCESS application.
For example, an Unknown Father (UF) or and Unborn Child (UB). If these ingrant codesshould change, this is where you’d make that change.

The CMS Errors for Case EX#### will be listed on this pop-up box. ACCESS willreturn all error messages at once. Keep in mind, however, that correcting these errors maycreate additional errors.Error messages listed here have come directly from CMS. These are actual errors and willneed to be corrected prior to “saving” information to the mainframe.
The Delete Transaction button is the DCMS function and will delete and record enteredthe day it was created. Please use caution with this function.
After setting up a new, or updating an existing case, the ACCESS view of the SCMS screen will display data from the mainframe.
This is a read only screen.
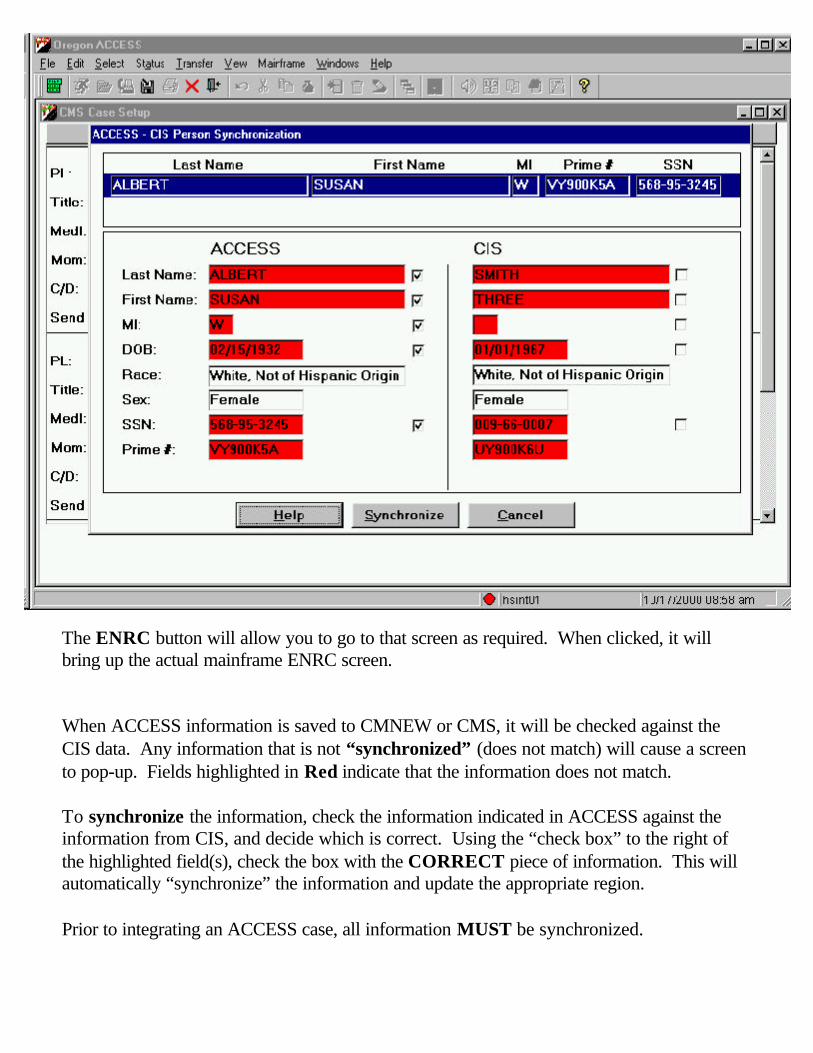
The ENRC button will allow you to go to that screen as required. When clicked, it willbring up the actual mainframe ENRC screen.
When ACCESS information is saved to CMNEW or CMS, it will be checked against theCIS data. Any information that is not “synchronized” (does not match) will cause a screento pop-up. Fields highlighted in Red indicate that the information does not match.
To synchronize the information, check the information indicated in ACCESS against theinformation from CIS, and decide which is correct. Using the “check box” to the right ofthe highlighted field(s), check the box with the CORRECT piece of information. This willautomatically “synchronize” the information and update the appropriate region.
Prior to integrating an ACCESS case, all information MUST be synchronized.


![Scanovatech20031816501€¦ · Homestead Disabled Agricultural Senior Citizen Disabled Veteran Other Is there currently in force for the Property a written Builder's Warranty? C]](https://img.dokumen.tips/doc/110x75/5ffb234eeb36b6646b7914ac/scanovatech20031816501-homestead-disabled-agricultural-senior-citizen-disabled-veteran.jpg)