Embed Size (px)
Citation preview

D-Day at Omaha Beach 1
RULES BOOKLET
2 D-Day at Omaha Beach
Contents
1. IntRoDUCtIon .................................... 4
2. GAMe CoMPonents .............................. 42.1 The Map .............................................................................................. 4
2.2 The Playing Pieces ............................................................................. 5
2.3 The Cards ............................................................................................ 7
2.4 Charts & Tables .................................................................................. 7
3. settInG UP FoR PLAY .......................... 7
4. seQUenCe oF PLAY .............................. 8
5. Us AMPHIBIoUs oPeRAtIons................. 85.1 Landing Checks ................................................................................... 8
5.2 Landing US Units ................................................................................ 9
5.3 Placing Units in Beach Landing Boxes ............................................ 10
6. GeRMAn FIRe .................................... 106.1 Reading the Fire Cards ..................................................................... 10
6.2 German Fields of Fire ....................................................................... 10
6.3 Resolving German Fire ..................................................................... 10
German Fields of Fire (6.2) .......................................................................... 11
6.4 Disrupted German Units................................................................... 12
6.5 German Artillery Fire (beginning Turn 4) ......................................... 12
German Fire (6.3) German Fire Example 1 ..................................................... 13
German Fire Example 2 ............................................................................... 13
7. Us ACtIons ....................................... 147.1 Free Actions ...................................................................................... 14
7.2 Conducting Actions .......................................................................... 14
7.3 Action: Move One Hex .................................................................... 15
7.4 Action: Climb a Bluff (infantry, HQs & Generals only) .................... 15
7.5 Action: Climb a Cliff (infantry only) ................................................. 15
7.6 Stacking Limits ................................................................................. 15
7.7 Disrupted US Units ........................................................................... 16
8. Us CoMBAt ACtIons ........................... 168.1 Units Eligible to Attack ..................................................................... 16
8.2 Attack Weapons ............................................................................... 16
8.3 Resolving an Attack ......................................................................... 17
8.4 Conducting a Barrage Action ........................................................... 17
US Attacks (8.3) ......................................................................................... 18
8.5 Naval Fire Markers ........................................................................... 20
9. GeRMAn UnIts, DePtH & ReInFoRCeMents ................................ 20
9.1 Revealing German Units & Depth Markers ..................................... 20
9.2 Adding Depth to German Units ........................................................ 20
9.3 German Reinforcements Triggered by Events................................. 21
9.4 German Tactical Reinforcements triggered by a WN Depth Marker 21
9.5 Releasing Kampfgruppe Meyer ....................................................... 21
10. Us enGIneeR BeACH oBstACLe DeMoLItIon .........................................21
10.1 Clearing Beach Obstacles .............................................................. 21
11. Us HeRoes, HeADQUARteRs AnD GeneRALs .......................................... 22
11.1 Heroes ............................................................................................. 22
11.2 Headquarters .................................................................................. 22
11.3 Generals .......................................................................................... 23
11.4 German Fire against Leaders ......................................................... 23
12. ContRoL AnD CoMMUnICAtIon ......... 2312.1 US Control ....................................................................................... 23
12.2 German Communication ................................................................. 23
12.3 US Communication ......................................................................... 24
13. WInnInG & LosInG tHe FIRst WAVes . 2413.1 Catastrophic Loss ........................................................................... 24
13.2 Determining Victory ....................................................................... 24
14. IntRoDUCtIon to tHe eXtenDeD GAMe 2514.1 Changes to German Fire ................................................................. 25
14.2 Optional Early Implementation of German Actions ...................... 25
15. eXtenDeD GAMe seQUenCe oF PLAY ... 25
16. GeRMAn ACtIons ............................ 2516.1 Re-Occupy Action ........................................................................... 26
16.2 Re-Supply Action ............................................................................ 26
16.3 Redeploy Action ............................................................................. 26
16.4 Reinforce Action ............................................................................. 27
16.5 Mortar Action ................................................................................. 27
German Actions – Extended Game (16) ........................................................ 27
16.6 Patrol Action ................................................................................... 28
16.7 Artillery Fire Action ........................................................................ 28
16.8 Advance Action .............................................................................. 28
German Advance Action Example (16.8) ....................................................... 28
16.9 Ambush Action ............................................................................... 29

D-Day at Omaha Beach 3
17. ADDItIons to Us ACtIons ................ 2917.1 Infantry & Leader Two-Hex Movement ......................................... 29
17.2 Tank Road Movement ..................................................................... 29
17.3 Artillery Barrage Action ................................................................ 30
18. CoMMAnD Posts (CPs) .................... 3018.1 Establishing a Command Post ........................................................ 30
18.2 Command Range ............................................................................ 30
18.3 Capabilities of Command Posts ..................................................... 30
19. enGIneeR BAses ............................ 3019.1 Establishing an Engineer Base ....................................................... 30
19.2 Engineer Range ............................................................................... 30
19.3 Capabilities of Engineer Bases ...................................................... 31
19.4 Beach Obstacle Demolition ............................................................ 31
20. WInnInG AnD LosInG tHe eXtenDeD GAMe ................................................. 31
20.1 Catastrophic Loss ........................................................................... 31
20.2 First Victory Check ......................................................................... 31
20.3 Second Victory Check .................................................................... 31
21. BeYonD tHe BeACH sCenARIo .......... 3221.1 Scenario Set-Up .............................................................................. 32
21.2 Scenario Victory ............................................................................. 33
22. oPtIonAL HIstoRICAL VARIAnts ...... 3322.1 Effective Allied Bombardment ....................................................... 33
22.2 First Wave Tanks Land Safely ....................................................... 34
22.3 Rangers reinforce Pointe du Hoc ................................................... 34
22.4 Improved German Reaction ........................................................... 34
23. oPtIonAL HIstoRICAL VARIAnt: GeRMAn ARMoR ............................................... 34
23.1 German Armor Set-Up .................................................................... 34
23.2 Armor Reinforcement Appearance ............................................... 34
23.3 German Armor Field of Fire ............................................................ 34
23.4 German Armor Actions .................................................................. 35
German Armor Fields of Fire (23.3) ............................................................... 35
23.5 German Armor Movement ............................................................. 36
EVENT DESCRIPTIONS ................................................................................ 36
23.6 US Actions Against German Armor ............................................... 37
23.7 Victory Point Adjustments ............................................................. 37
teRRAIn eFFeCts CHARt ...................... 38
oPtIonAL VARIAnt: GeRMAn ARMoR MoVeMent MAP (23.5) .......................... 39
GeRMAn ACtIon sUMMARY (tURns 17-32) 40
CReDIts
Game Design & Development: John H. ButterfieldResearch Assistance: Joseph BalkoskiPlaytesters: Charles Budzinksi, Allen Hill, Nathan Hill, Bill Watkins, James Terry, David Spangler, Roger Taylor, Dave Rohde, Paul van Etten, Jim MillerMap Graphics: Joe YoustCounter Graphics: Joe YoustCard design: Joe YoustRules Booklet Layout: Chris Dickson & Lisé PattersonRules Editing: Christopher Schall, Patrick Hildreth, Ricky GrayProduction: Callie CumminsBox design: Chris Dickson & Lisé Patterson
© 2017, Decision Games, Bakersfield, CA. [Third Printing][DDOB_Rules-Color_V5F]
If any parts are missing or damaged, please write to:Decision GamesP.O. Box 21598, Bakersfield, CA 93390-1598
You can also register this game purchase on-line at: www.decisiongames.com
4 D-Day at Omaha Beach
1. IntRoDUCtIon
D-Day at Omaha Beach is a solitaire game simulating the twelve momen-tous hours on 6 June 1944, when US amphibious forces assaulted a stretch of sand held by German forces on the Calvados coast of France—a shore that would ever after be known by its code name: Omaha Beach. Of the fi ve beaches assaulted by the Allies on D-Day, Omaha was the bloodiest and the hardest-won. For several hours on that June day, the fate of the inva-sion hung in the balance. Ultimately, despite the failure of the Allied inva-sion plan, the heroism and initiative of the US soldier prevailed and a viable beachhead was established.
In D-Day at Omaha Beach, you control the US forces assaulting the beach and struggling to gain a foothold on French soil against unexpectedly strong German resistance. The game system controls the German forces that oppose you.
D-Day at Omaha Beach features several unique game mechanics to...•control the German forces in an unpredictable but coherent strategy, •create varying situations every time you play,•portray the differing battle conditions on the beach and inland country-
side.
At the start of play, each turn of the game represents fi fteen minutes of real time. Then, when the focus shifts from the battle for the beach to the US move inland, the time scale expands to 30 minutes per turn and rules are introduced to allow for additional US and German tactics.
DDOB for two players: D-Day at Omaha Beach also provides an engaging cooperative simulation for two players. Each player directs the units of one US division: The 1st Division landing on the eastern half of the beach and the 29th Division assaulting the western half.
2. GAMe CoMPonents
D-Day at Omaha Beach includes the following components:
•One 22” x 34” Mounted Game Board•352 die-cut counters•One deck of 55 event cards•Three player aid cards•One color Rules booklet•Campaign Analysis article
No dice are used in DDOB.
If your game has any missing or damaged items please contact: Decision Games, Customer Service, PO Box 21598 Bakersfi eld CA 93390 or online at www.decisiongames.com. For rules questions send an SASE to Game Questions: Omaha Beach at the above address. We also post errata and rules updates on our website.
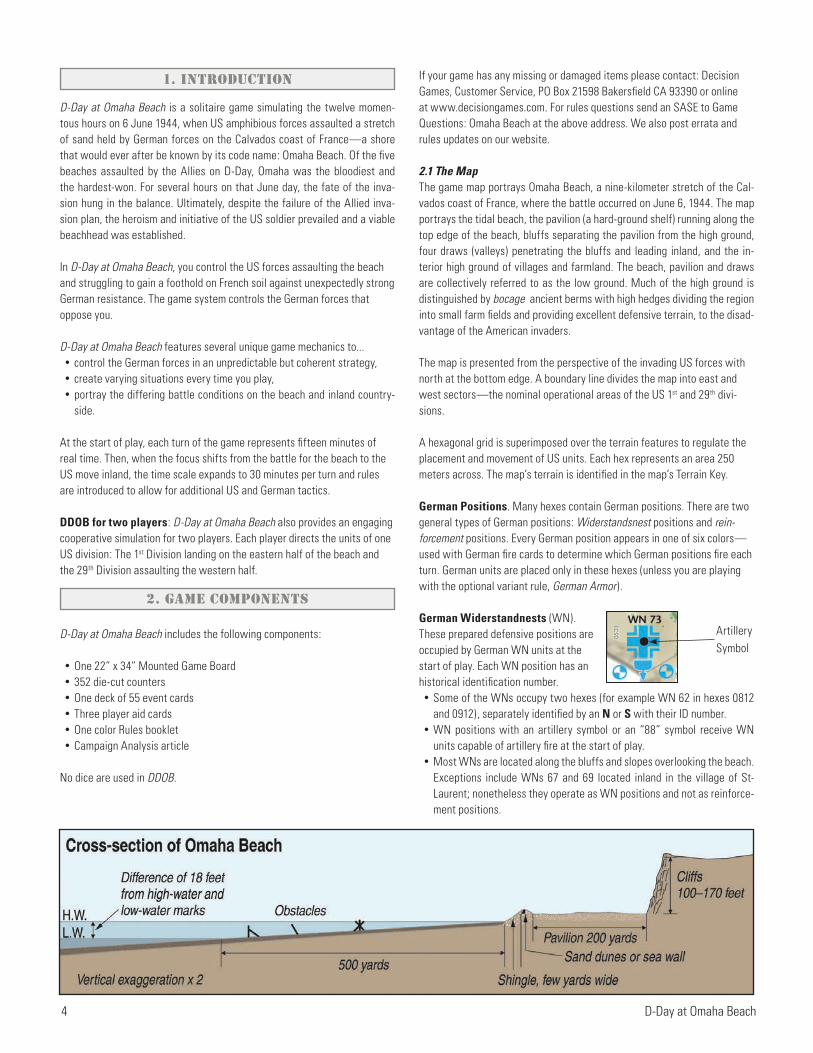
2.1 The MapThe game map portrays Omaha Beach, a nine-kilometer stretch of the Cal-vados coast of France, where the battle occurred on June 6, 1944. The map portrays the tidal beach, the pavilion (a hard-ground shelf) running along the top edge of the beach, bluffs separating the pavilion from the high ground, four draws (valleys) penetrating the bluffs and leading inland, and the in-terior high ground of villages and farmland. The beach, pavilion and draws are collectively referred to as the low ground. Much of the high ground is distinguished by bocage ancient berms with high hedges dividing the region into small farm fi elds and providing excellent defensive terrain, to the disad-vantage of the American invaders.
The map is presented from the perspective of the invading US forces with north at the bottom edge. A boundary line divides the map into east and west sectors—the nominal operational areas of the US 1st and 29th divi-sions.
A hexagonal grid is superimposed over the terrain features to regulate the placement and movement of US units. Each hex represents an area 250 meters across. The map’s terrain is identifi ed in the map’s Terrain Key.
German Positions. Many hexes contain German positions. There are two general types of German positions: Widerstandsnest positions and rein-forcement positions. Every German position appears in one of six colors—used with German fi re cards to determine which German positions fi re each turn. German units are placed only in these hexes (unless you are playing with the optional variant rule, German Armor).
German Widerstandnests (WN). These prepared defensive positions are occupied by German WN units at the start of play. Each WN position has an historical identifi cation number. •Some of the WNs occupy two hexes (for example WN 62 in hexes 0812
and 0912), separately identifi ed by an N or S with their ID number.•WN positions with an artillery symbol or an “88” symbol receive WN
units capable of artillery fi re at the start of play.•Most WNs are located along the bluffs and slopes overlooking the beach.
Exceptions include WNs 67 and 69 located inland in the village of St-Laurent; nonetheless they operate as WN positions and not as reinforce-ment positions.
ArtillerySymbol

D-Day at Omaha Beach 5
German Reinforcement Positions. These posi-tions may be occupied by German reinforcement units entering during play. Most reinforcement positions have an ID letter/number consisting of a Zone Letter (from A to G) and a Reinforcement Priority Number (from 1 to 11), used to determine when and where German reinforcements appear.•Blank reinforcement positions. Some reinforcement positions have no
ID (for example, hex 1014). Such positions may be occupied by a German unit when a tactical reinforcement is triggered (9.4) or, by a German action in the extended game.
•Direction of Advance. Some reinforcement positions have an arrow used for the advance action (only in the extended game).
•Unoccupied German positions possess no inherent strength. However, in the extended game, an unoccupied German reinforcement position may ambush US units.
German Fire Dots and Fields of Fire. The hexes surrounding each German position contain fire dots matching the position’s color. All the fire dots ema-nating from a single German position are collectively referred to as that position’s field of fire. The fire dots represent three levels of fire against US units:
US Beach Landing Boxes. A row of boxes facing the beach hold US units about to land at Omaha Beach. Each box is identified with the initials of its historical beach code name and a unique number (such as DW1, for Dog White 1 ). US units in Beach Landing Boxes are committed to land in the beach hex each box points toward.
Exit Hexes. Map-edge hexes with roads leading off the map are identi-fied with a letter from A to G. German positions trace communication to exit hexes. You may earn victory points by moving your units off the map through exit hexes.
The Turn Track. You record the passage of turns, and of time, by moving the turn marker along the turn track at the end of each turn. The track also indicates game events such as tidal changes and event deck shuffles. You place US units on the space of the track corresponding to their turn of entry, until it is time for them to enter play.•Time Scale: The turn track covers a twelve hour period beginning at
0615 hours on June 6 1944. The first 16 turns each represent 15 minutes of time. Beginning with turn 17, each turn represents 30 minutes.
The Card/Phase Track. As you draw cards during each turn, place each card in the box matching the card’s function, for reference during the turn. At the end of each turn, remove all cards from the track and place them in a discard pile, off-map. The order of the track outlines the sequence of play for both the basic and extended game.
Other Tracks and Boxes•German Artillery boxes hold artillery units in positions off the map but
within range of Omaha Beach. Each box identifies the on-map German positions that observe for each unit.
•German reinforcement boxes hold German reinforcement units of three types—tactical, division and Kampfgruppe Meyer—for selection as called for by game events. A fourth reinforcement box—German Ar-mor—is used only if playing with the optional German Armor rules.
•German depth boxes hold German depth markers of three types—WN, building, and mobile—for selection during play.
•The US Infantry Loss Boxes for the 1st and 29th divisions hold US regu-lar infantry units eliminated during play.
•The US Command Post Track holds markers showing the command range of US regimental command posts (used in the extended game only).
•The US Engineer Track holds markers showing the operational range of US engineer bases (used in the extended game only).
2.2 The Playing PiecesThe 352 playing pieces consist of units, representing specific US and Ger-man military forces, and markers, placed on units, tracks or the map to denote information or status. The features of US and German units differ. For example, only US units have steps and only German units have an unre-vealed side.
2.21 US Units
Intense fire
Steady fire
Sporadic fire
Designation
TargetSymbol
BeachLandingBox
ArrivalTurn
UnitType
Weapons
Attack Strength Reduced AttackStrength
Front (full strength) Back (reduced strength)
SAMPLE US INFANTRY UNIT
Number of Steps
Range
Attack Strength
Front (full strength) Back (reduced strength)SAMPLE US TANK UNIT
Reduced Attack Strength
Division. Every US unit is attached to either the 1st or 29th division. Units with the 29th Division are a lighter green color than those with the 1st.
Designation. The military designation of the unit identifies the unit’s formation and parent formations, included primarily for historical interest.
Steps. Each US unit possesses one to four steps, indicating the unit’s overall manpower. US units lose steps as a result of combat losses. Units representing regular infantry companies start the game with three steps, units representing artillery battalions start with four steps, while all other formations start with just one or two steps. A unit with one or two steps has one counter with one or two printed sides. A unit with three or four steps has two counters, with two printed sides on one counter and one or two printed sides on a replacement counter, distinguished by a dark green band. Only one counter for a given unit is in play at one time.
Attack Strength. A quantification of the unit’s fire power in combat, used when attacking German units. A unit’s strength is reduced as it loses steps.
Weapons. US units possess various weapons and equipment used when attacking German units. •The US Weapons Chart lists all the weapons and equipment possessed
by all full-strength infantry units, and by all other US units regardless of
6 D-Day at Omaha Beach
strength. Weapons for these units are not shown on the unit’s counter.•An infantry unit that has lost steps loses some of its weapons and pos-
sesses only those listed on its counter.
Range. US units capable of attacking German units from non-adjacent hexes have a numerical range, representing the maximum number of hexes from which the unit may fi re at a German unit. A range of U indicates unlimited range—the unit may fi re at German units anywhere on the map (within the restrictions of 8.12).
● ◆ ▲ Target Symbol. A selector used to randomly determine which US units are hit by German fi re or are the subject of an event or other game function. A black target symbol indicates the unit can control adjacent hexes. A unit with a white target symbol controls only the hex it occupies (see 12.1).
Arrival Turn and Location. The turn in which the US unit enters play is shown along with the Beach Landing Box in which to place the unit on its turn of entry. Units without a turn of entry are placed in beach landing boxes during set-up.
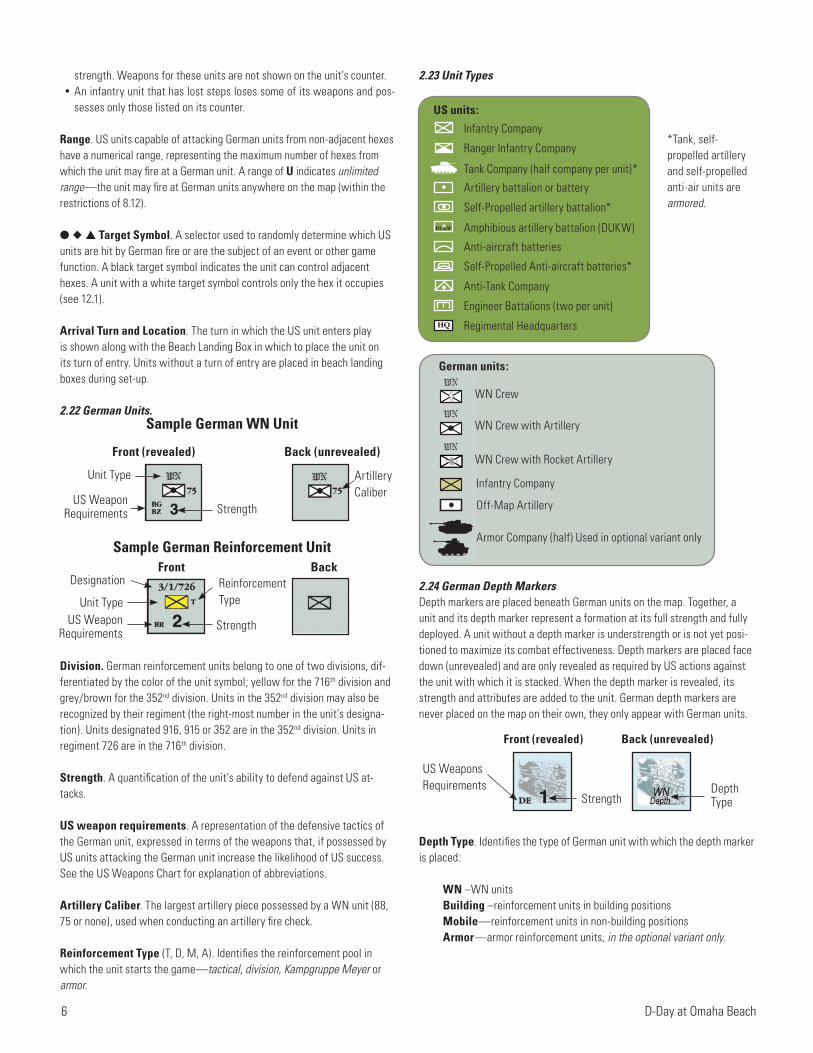
2.22 German Units.
2.23 Unit Types
*Tank, self-propelled artillery and self-propelled anti-air units are armored.
Sample German Reinforcement Unit
Unit Type
Designation
Strength
ReinforcementType
US WeaponRequirements
Front Back
Unit Type ArtilleryCaliber
StrengthUS Weapon
Requirements
Front (revealed) Back (unrevealed)
Sample German WN Unit
US WeaponsRequirements
StrengthDepth Type
Front (revealed) Back (unrevealed)
Division. German reinforcement units belong to one of two divisions, dif-ferentiated by the color of the unit symbol; yellow for the 716th division and grey/brown for the 352nd division. Units in the 352nd division may also be recognized by their regiment (the right-most number in the unit’s designa-tion). Units designated 916, 915 or 352 are in the 352nd division. Units in regiment 726 are in the 716th division.
Strength. A quantifi cation of the unit’s ability to defend against US at-tacks.
US weapon requirements. A representation of the defensive tactics of the German unit, expressed in terms of the weapons that, if possessed by US units attacking the German unit increase the likelihood of US success. See the US Weapons Chart for explanation of abbreviations.
Artillery Caliber. The largest artillery piece possessed by a WN unit (88, 75 or none), used when conducting an artillery fi re check.
Reinforcement Type (T, D, M, A). Identifi es the reinforcement pool in which the unit starts the game—tactical, division, Kampgruppe Meyer or armor.
Infantry Company
Ranger Infantry Company
Tank Company (half company per unit)*
Artillery battalion or battery
Self-Propelled artillery battalion*
Amphibious artillery battalion (DUKW)
Anti-aircraft batteries
Self-Propelled Anti-aircraft batteries*
Anti-Tank Company
Engineer Battalions (two per unit)
Regimental Headquarters
US units:
WN Crew
WN Crew with Artillery
WN Crew with Rocket Artillery
Infantry Company
Off-Map Artillery
Armor Company (half) Used in optional variant only
German units:
2.24 German Depth Markers Depth markers are placed beneath German units on the map. Together, a unit and its depth marker represent a formation at its full strength and fully deployed. A unit without a depth marker is understrength or is not yet posi-tioned to maximize its combat effectiveness. Depth markers are placed face down (unrevealed) and are only revealed as required by US actions against the unit with which it is stacked. When the depth marker is revealed, its strength and attributes are added to the unit. German depth markers are never placed on the map on their own, they only appear with German units.
Depth Type. Identifi es the type of German unit with which the depth marker is placed:
WN –WN unitsBuilding –reinforcement units in building positionsMobile—reinforcement units in non-building positionsArmor—armor reinforcement units, in the optional variant only.

D-Day at Omaha Beach 7
2.25 Other Markers
2.3 The CardsEvery card in the 54-card deck is divided into three sections. A 55th card summarizes US actions and should be removed from the deck for reference during play.
During play, draw cards from the deck and look at the appropriate section:
•The Landing Results section determines how US units are affected by amphibious landings.
•The Event section generates an event based on the current game turn.•The Fire section is used primarily during the German Fire Phase to deter-
mine which German positions fi re at which US units or perform other ac-tions. In addition, the German Fire section is sometimes referred to during US actions, when resolving infi ltration moves and barrages against Ger-man units.
A single card draw is for only one of these three purposes—ignore the other sections of the card. The rules refer to the cards by the purpose for which they are drawn: landing cards, event cards and fi re cards.
2.4 Charts & TablesThe following charts and tables are included on player aid cards:
Amphibious Landing TablesGerman Fire ChartTerrain Effects ChartUS Weapons ChartUS Attack ChartUS Barrage TableSummaries of Key Priorities and ProceduresGerman Action Summary (extended game)Easy Fox Introductory Scenario
3. settInG UP FoR PLAY
Lay out the map so you are sitting along the north side, with the beach land-ing boxes near you. Choose a scenario to play:•Easy Fox is an introductory scenario recommended for new players, us-
ing just the east half of the game map. Refer to the special set-up and rules on the back cover of this rules book.
•The First Waves covers the fi rst four hours of the invasion across all of Omaha Beach (Turns 1-16) and takes three hours to play. Use only rules sections 1-13.
•D-Day at Omaha Beach covers the fi rst 12 hours of the invasion (Turns 1-32). Turns 1-16 are played with the rules in sections 1-13 only. Then, turns 17-32 utilize the additional rules in sections 14-20. Playing time ranges from six to eight hours.
•Beyond the Beach covers the 8 hour period beginning at 1000 hours on D-Day (Turns 17-32), when the US invaders are already ashore and begin-ning their move inland. Use sections 1-20, and the set-up rules in section 21. Playing time is four to fi ve hours.
•After you have played through the game a few times, you may wish to explore the optional rules and set-ups offered in sections 22 and 23.
Naval Fire
Phase
US HQCommand
Post Range
German Disrupted
EngineerBase
Front
Front
Front
Front
Front
FrontBack
Back
Back
Back
Back
Back
Disrupted
Action Taken
Smoke
US Garrison
Turn
US Engineer Operational
Range
US Hero
German off-map Artillery
Climbing Beach Obstacles Cleared
US General
Command Transfer
Sample CardExploding MineLandingOutcomes}
US Target Symbol and Outcome Letter
Turn Range
German Position
Color
Armor HitBonus
German Action Letter
(extended game only)
German Artillery Value and required calibers
Event}US Target Symbol
GermanFire}Card Number
US LeaderTarget Symbol
Double square indicates German position with depth marker

8 D-Day at Omaha Beach
Set up The First Waves or D-Day at Omaha Beach scenario as follows:
Prepare the German Widerstandsnests.Mix together the 18 WN depth markers, face down.
•Place an unrevealed depth marker in the following nine WN posi-tions: 60, 61, 62N, 65N, 66N, 68N, 70, 72N, 73.
•Place the remaining WN depth markers face down in the WN depth box.
Mix together the 18 WN units face down and place them on the map unrevealed, as follows:
•Place the 2 units marked “88” on WN 61 and WN 72S. Stack units on top of depth markers, if present.
•Place the 6 units with artillery symbols on WN positions 60, 62S, 65S, 68S, 70 and 73.
•Place the rocket unit on WN 69.•Place the remaining nine units on the remaining WN positions.
Place the four German artillery units in their spaces in the German artillery boxes.
Separately mix together each of the following types of German units and markers, and place them face down in the matching boxes on the map:
•9 Tactical Reinforcement Units (T)•11 Divisional Reinforcement units (D)•8 Kampgruppe Meyer units (M) and four mobile depth markers in
the Kampgruppe Meyer box•20 mobile depth markers in the mobile depth box.•8 building depth markers
Place 8 US tank units without a listed entry turn in the Beach Landing Boxes listed on their counters. Place all other US units (except replacement units) in the spaces of the Turn Track matching the turn of entry shown on each unit. You may want to organize the units in each space into two stacks—1st divi-sion and 29th division. If you are playing The First Waves Scenario, US units scheduled to enter on or after Turn 16 are not needed.
Place the Turn marker in Turn 1 of the Time Track, and the Phase marker in the first space of the Card/Phase track.
Shuffle the cards and place the deck face down beside the map, with room next to the deck for a discard pile.
Place all remaining markers aside for use later in the game.
4. seQUenCe oF PLAY
DDOB is played in turns. Each turn consists of several phases, conducted in the following sequence. Move the Phase marker along the Card/Phase track to keep track of the current phase. During the course of the turn you will draw several cards, each for a different function. As you draw each card, place it in the appropriate box of the Card/Phase track, for reference.I. US Amphibious Operations Phase
1. Draw a landing card and apply its results to US units in Beach Landing boxes in the East Sector. Then draw a second landing card and apply its results to units in Beach Landing Boxes the West Sector.
2. Land all units remaining in Beach Landing Boxes by moving each to the corresponding waterline/beach hex.
3. Take units in the current turn of the Turn Track and place them in the Beach Landing Boxes listed on the units.
II. Event Phase (skip on Turn 1)Draw an event card and implement the event listed for the current turn.
III. German Fire PhaseDraw a fire card and conduct German fire against US units in the East sector, then draw a second fire card and conduct fire in the West Sector. Conduct fire in each sector as follows:
1. Occupied German positions that match the colors shown on the fire card fire at US units in the position’s field of fire. Check to see which US units are hit by fire and apply disruption, step losses or elimination as called for.
2. Beginning Turn 4: If the fire card includes a German artillery value, check to see if a US unit in the sector is hit by artillery fire.
3. Remove Disruption markers from eligible German positions.
IV. US Engineer Phase (skip on Turn 1)Place Cleared markers in beach hexes with obstacles, to show that the ob-stacles there have been cleared by US engineers (10.1).
V. US Action PhasePerform actions with US units. Actions include movement, attack and bar-rage. In each US division, two units or stacks may perform actions. In addition, the following units may perform actions “for free”: • infantry performing a preservation move action,• ranger infantry,•units with any of the following markers: hero, inspired, climb or disrupted,•An HQ unit or General,•units in command of an HQ unit or General.
VI. End of TurnMove all cards from the card track to the discard pile, and move the Phase marker back to the beginning of the card track. If the turn track indicates that the cards are to be shuffled, shuffle all discards back into the deck. Move the turn marker one turn ahead on the Turn Track.Keep playing turns until either US division suffers catastrophic loss (ending the game) or until the end of the scenario, at which time you calculate vic-tory points to find if you have won or lost.Beginning with Turn 17, when the time scale shifts from 15 to 30 minutes per turn, additional activities are introduced to the sequence of play, as described in section 14.
5. Us AMPHIBIoUs oPeRAtIons
All US units enter play via amphibious landing, during the US Amphibious Op-erations phase. Each turn, conduct landing checks for units already in Beach Landing Boxes, then move units in the boxes to the beach. Finally, place newly arriving units in the Beach Landing Boxes (they will land next turn).
5.1 Landing ChecksConduct a landing check in each sector in which units are in beach land-ing boxes, beginning with the East sector. This check determines if units in Beach Landing Boxes are affected by hazards representing cross currents, rough seas, equipment failure, navigational errors and German mined ob-stacles.
D-Day at Omaha Beach 9
Procedure: Draw a landing card and apply the results of this single draw to all units in Beach Landing Boxes in the sector. The card shows the three US target symbols (◆,▲,●), each with a Landing Result letter (A, B, C or D). For each unit, refer to the Landing Table for the current turn, cross referencing the unit’s type with the Landing Results letter for the unit’s target symbol to determine the landing result for the unit. Units may drift east or west of their intended landing location, be delayed, lose steps or be eliminated by a landing result. Apply the result to the unit immediately.
Example: On Turn 2, four infantry units are in Beach Landing Boxes in the West sector. You draw a card with results of ◆B ●A ▲D. Referring to the Landing Table for Turn 2, you find that the infantry unit with the ◆ selector drifts two boxes east (result B), the two infantry units with the ● selector drift four boxes east (result A), and the unit with the ▲ selector is not affected (result D).
5.11 Drift Results If a unit drifts, move the unit the indicated number of boxes to the left (east) or to the right (west) along the row of Beach Landing Boxes. A unit that drifts will land on the beach from the box it drifts to. •A unit that drifts beyond the easternmost or westernmost Beach Landing
Box on the map is delayed. Place it on the Turn track, two turns after the current turn.
•A unit that drifts to a landing box during a high tide turn that does not point toward a high tide beach hex is delayed.
5.12 HQ units and Generals are not checked for landing results, but an HQ may be affected by a submerged mine explosion (5.14). If an HQ or General is stacked with a unit that drifts, the HQ or General may drift with the unit or may stay in its landing box, at your option.
5.13 Ranger Infantry Landing Options As noted on the Landing Table, a ranger infantry unit that receives a “No Effect” landing result on turn 4 or later may voluntarily drift one to four hexes east, at your option. This does not apply to the ranger infantry unit designated C/R2 scheduled to land on Turn 2.
5.14 ✹ Submerged Mine Explosions (Turn 7-22) If the landing card you draw includes an Exploding Mine symbol, apply all other landing results, then check to see if one of your units in a beach landing box detonates submerged mines as it lands in a beach hex that has not been cleared of obstacles. All beach obstacles are uncleared at the start of play, and be-come cleared as you perform engineer operations (10.1).
•During Low Tide (Turns 1-6 and 28-32), mines are not submerged and are not a hazard; no check is required.
•During Mid Tide (Turns 7-15), if any units in the sector will land in a mid-tide waterline hex with uncleared beach obstacles, you must remove a step from one such unit of your choice. All beach obstacles are consid-ered cleared beginning on Turn 23 of the extended game, and so checks are not required during mid-tide turns 23-27.
•During high tide (Turns 16-22), if any units will pass through hexes with uncleared beach obstacles to reach their high-tide waterline landing hex, you must remove a step from one such unit of your choice.
Leader Exception: If an HQ unit is the only unit available to suf-fer loss due to a mine explosion, it does not lose a step. Instead it is delayed; place the HQ two turns after the current turn on the turn track. A General is not affected by a mine explosion.
5.15 As noted on the Landing Tables, landing results vary with the unit type and the turn. Some units are exempt from landing checks later in the game. For example, do not conduct landing checks for infantry units after turn 14. However, if such units are landing in or through uncleared beach obstacle hexes prior to turn 23, a landing check is still required, to see if the unit hits submerged mines. If no landing checks are required in a given sector, do not draw a landing card for that sector.
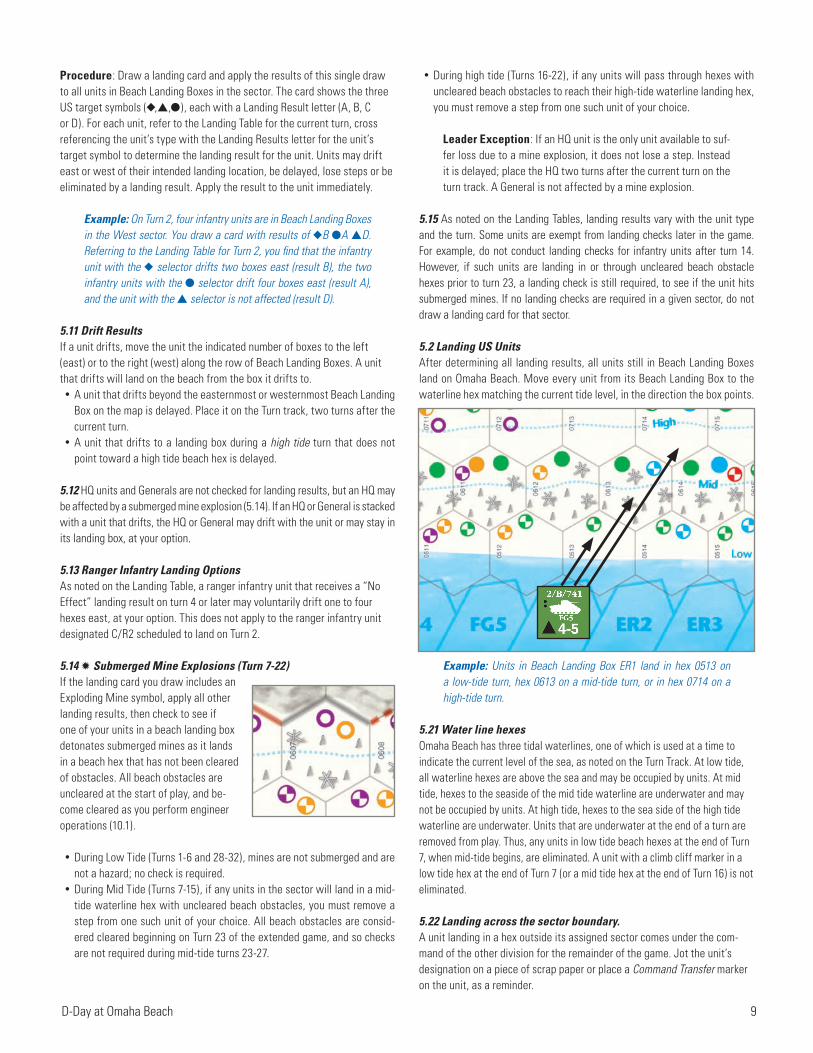
5.2 Landing US UnitsAfter determining all landing results, all units still in Beach Landing Boxes land on Omaha Beach. Move every unit from its Beach Landing Box to the waterline hex matching the current tide level, in the direction the box points.
Example: Units in Beach Landing Box ER1 land in hex 0513 on a low-tide turn, hex 0613 on a mid-tide turn, or in hex 0714 on a high-tide turn.
5.21 Water line hexes Omaha Beach has three tidal waterlines, one of which is used at a time to indicate the current level of the sea, as noted on the Turn Track. At low tide, all waterline hexes are above the sea and may be occupied by units. At mid tide, hexes to the seaside of the mid tide waterline are underwater and may not be occupied by units. At high tide, hexes to the sea side of the high tide waterline are underwater. Units that are underwater at the end of a turn are removed from play. Thus, any units in low tide beach hexes at the end of Turn 7, when mid-tide begins, are eliminated. A unit with a climb cliff marker in a low tide hex at the end of Turn 7 (or a mid tide hex at the end of Turn 16) is not eliminated.
5.22 Landing across the sector boundary. A unit landing in a hex outside its assigned sector comes under the com-mand of the other division for the remainder of the game. Jot the unit’s designation on a piece of scrap paper or place a Command Transfer marker on the unit, as a reminder.
10 D-Day at Omaha Beach
5.3 Placing Units in Beach Landing BoxesAfter landing all units from the Beach Landing Boxes, take all units in the current turn space of the Turn track and place each in the Beach landing Box listed on the unit.• If the unit lists a specific beach box, such as ER3, place the unit in that
box.• If the unit lists a beach but not a specific box (such as ER), you may place
the unit in any Beach Landing Box with those letters.• If the unit lists a division number (1st or 29th) instead of a Beach, you may
place the unit in any lettered Beach Landing Box in the unit’s sector (east for 1st, west for 29th).
5.31 One or two units may be placed in a beach landing box. Generals and HQ units do not count against this limit. A general may not be placed alone in a Beach Landing Box if there are any units scheduled to arrive on the same turn with which he could be placed.
5.32 You may not place a unit in a Beach Landing Box without ID letters; such boxes may only be entered as a result of drift.
5.33 Only ranger infantry units may be placed in the Charlie Beach Landing Boxes (CH), although other units may involuntarily drift there.
5.34 Voluntary Delay Beginning on Turn 7, you are not required to place a unit in a beach landing box on the turn it is scheduled to arrive. If you choose to delay a unit’s ar-rival, place it on the turn track, in the space for any later turn. The unit will arrive on that turn (unless you delay it again). •A unit delayed voluntarily or involuntarily that subsequently enters on or
before turn 10 must be placed in its assigned beach landing box.•A unit delayed voluntarily or involuntarily that subsequently enters after
turn 10 may be placed in any beach landing box, in either sector.•You may not voluntarily delay the arrival of a unit prior to turn 7.
6. GeRMAn FIRe
During the German Fire Phase, draw one fire card for the East sector to de-termine which German positions in that sector fire at US units, then draw a second fire card for the West sector and resolve all fires there. US units in the field of fire of a German unit may be hit by fire and suffer disruption or step loss. Place the two fire cards in the appropriate boxes of the Card/phase track for reference.All undisrupted occupied German positions may potentially fire—whether the units there are revealed or unrevealed. Firing does not cause a German unit to become revealed.
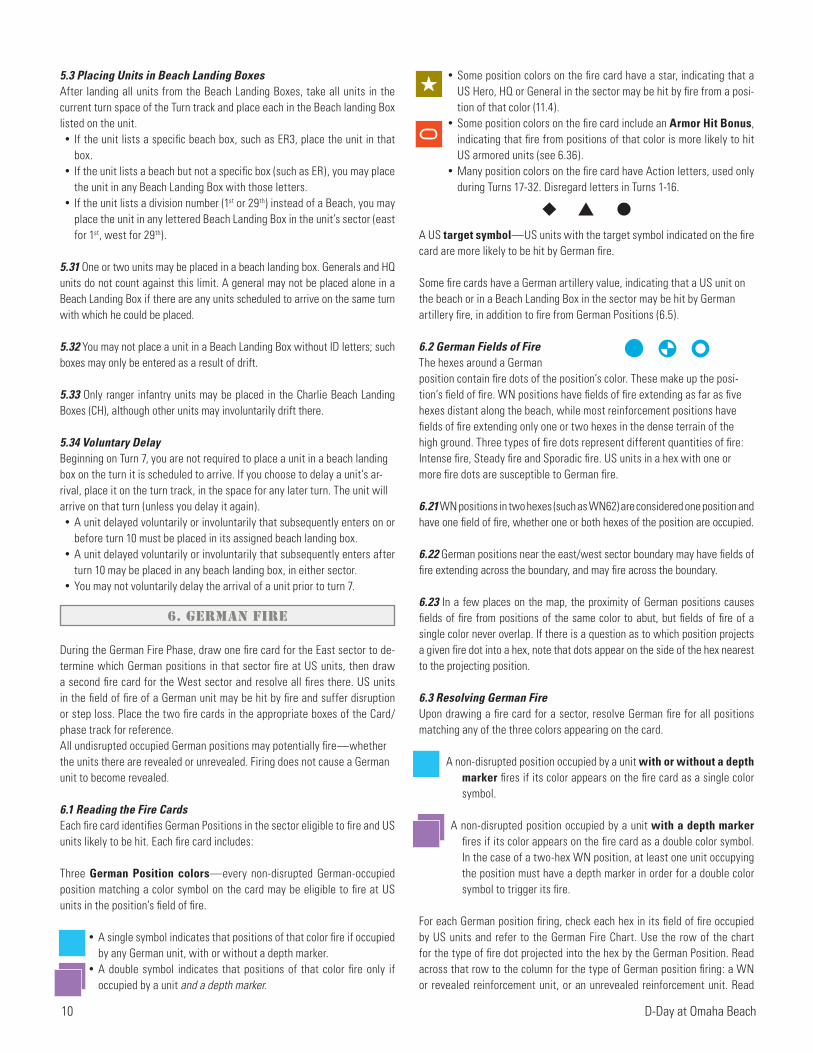
6.1 Reading the Fire CardsEach fire card identifies German Positions in the sector eligible to fire and US units likely to be hit. Each fire card includes:
Three German Position colors—every non-disrupted German-occupied position matching a color symbol on the card may be eligible to fire at US units in the position’s field of fire.
•A single symbol indicates that positions of that color fire if occupied by any German unit, with or without a depth marker.
•A double symbol indicates that positions of that color fire only if occupied by a unit and a depth marker.
•Some position colors on the fire card have a star, indicating that a US Hero, HQ or General in the sector may be hit by fire from a posi-tion of that color (11.4).
•Some position colors on the fire card include an Armor Hit Bonus, indicating that fire from positions of that color is more likely to hit US armored units (see 6.36).
•Many position colors on the fire card have Action letters, used only during Turns 17-32. Disregard letters in Turns 1-16.
A US target symbol—US units with the target symbol indicated on the fire card are more likely to be hit by German fire.
Some fire cards have a German artillery value, indicating that a US unit on the beach or in a Beach Landing Box in the sector may be hit by German artillery fire, in addition to fire from German Positions (6.5).
6.2 German Fields of FireThe hexes around a German position contain fire dots of the position’s color. These make up the posi-tion’s field of fire. WN positions have fields of fire extending as far as five hexes distant along the beach, while most reinforcement positions have fields of fire extending only one or two hexes in the dense terrain of the high ground. Three types of fire dots represent different quantities of fire: Intense fire, Steady fire and Sporadic fire. US units in a hex with one or more fire dots are susceptible to German fire.
6.21 WN positions in two hexes (such as WN62) are considered one position and have one field of fire, whether one or both hexes of the position are occupied.
6.22 German positions near the east/west sector boundary may have fields of fire extending across the boundary, and may fire across the boundary.
6.23 In a few places on the map, the proximity of German positions causes fields of fire from positions of the same color to abut, but fields of fire of a single color never overlap. If there is a question as to which position projects a given fire dot into a hex, note that dots appear on the side of the hex nearest to the projecting position.
6.3 Resolving German FireUpon drawing a fire card for a sector, resolve German fire for all positions matching any of the three colors appearing on the card.
A non-disrupted position occupied by a unit with or without a depth marker fires if its color appears on the fire card as a single color symbol.
A non-disrupted position occupied by a unit with a depth marker fires if its color appears on the fire card as a double color symbol. In the case of a two-hex WN position, at least one unit occupying the position must have a depth marker in order for a double color symbol to trigger its fire.
For each German position firing, check each hex in its field of fire occupied by US units and refer to the German Fire Chart. Use the row of the chart for the type of fire dot projected into the hex by the German Position. Read across that row to the column for the type of German position firing: a WN or revealed reinforcement unit, or an unrevealed reinforcement unit. Read
D-Day at Omaha Beach 11
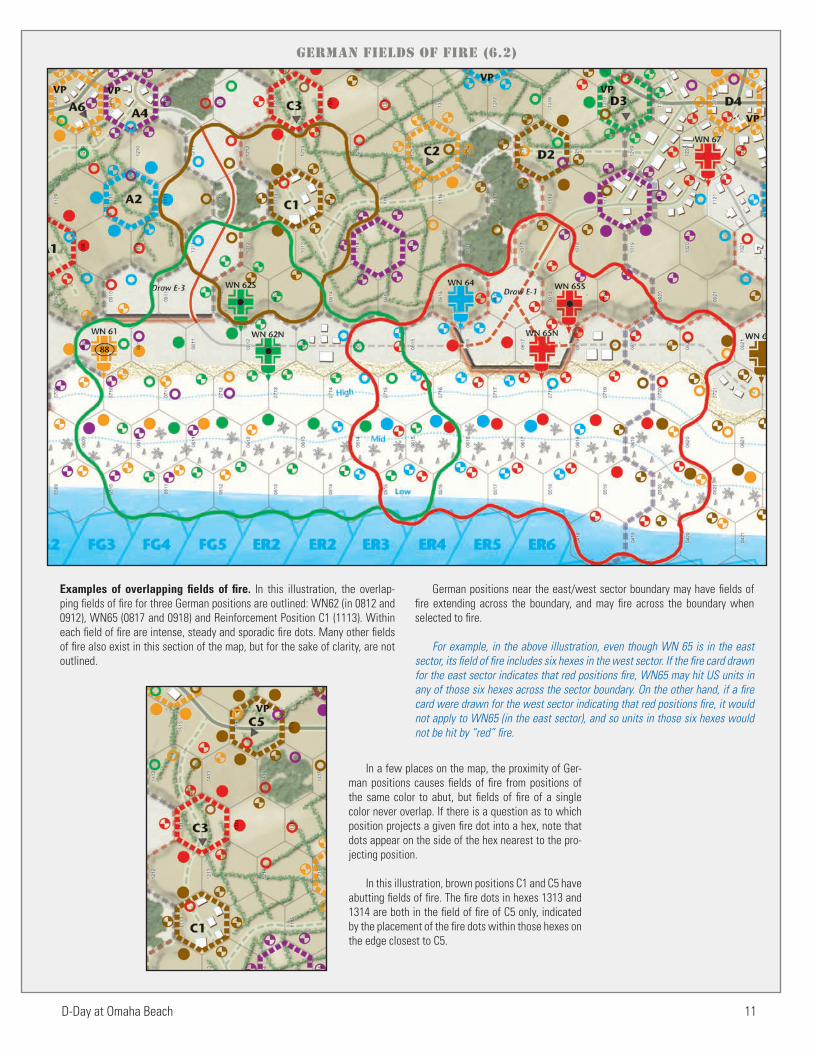
Examples of overlapping fields of fire. In this illustration, the overlap-ping fields of fire for three German positions are outlined: WN62 (in 0812 and 0912), WN65 (0817 and 0918) and Reinforcement Position C1 (1113). Within each field of fire are intense, steady and sporadic fire dots. Many other fields of fire also exist in this section of the map, but for the sake of clarity, are not outlined.
German positions near the east/west sector boundary may have fields of fire extending across the boundary, and may fire across the boundary when selected to fire.
For example, in the above illustration, even though WN 65 is in the east sector, its field of fire includes six hexes in the west sector. If the fire card drawn for the east sector indicates that red positions fire, WN65 may hit US units in any of those six hexes across the sector boundary. On the other hand, if a fire card were drawn for the west sector indicating that red positions fire, it would not apply to WN65 (in the east sector), and so units in those six hexes would not be hit by “red” fire.
In a few places on the map, the proximity of Ger-man positions causes fields of fire from positions of the same color to abut, but fields of fire of a single color never overlap. If there is a question as to which position projects a given fire dot into a hex, note that dots appear on the side of the hex nearest to the pro-jecting position.
In this illustration, brown positions C1 and C5 have abutting fields of fire. The fire dots in hexes 1313 and 1314 are both in the field of fire of C5 only, indicated by the placement of the fire dots within those hexes on the edge closest to C5.
GeRMAn FIeLDs oF FIRe (6.2)

12 D-Day at Omaha Beach
the result in the box to determine if any US units in the hex are hit by fire. Factors determining if a US unit is hit include the type of fire dot in the hex (intense, steady or sporadic), the US unit’s target symbol (●,◆ or ▲), and the US unit’s type (armored or non-armored). Units hit by fire lose steps and/or become disrupted, as noted on the chart.
6.31 Hit Limits of German Positions In a single fire, a German position may hit a number of US units up to the number of German units and depth markers in the position. For example, a lone unit in a position may hit just one US unit in a single turn, while a WN with two unit markers and one depth marker may hit up to three US units. If the number of US units eligible to be hit exceeds this limit, select the units to take hits in the following priority order.
•Priority 1: Units in hexes with Intense fire dots. If after checking all Intense fire hexes, the German position has not reached its hit limit proceed to priority 2.
•Priority 2: Units in hexes with Steady fire dots. If after checking all Steady fire hexes, the German position has not reached its hit limit, proceed to priority 3.
•Priority 3:Units in hexes with Sporadic fire dots.
If you need to select from among units within one of these priorities, select the US unit closer to the firing position, then the unit with the most steps. If a choice still remains, you choose which units receive the hits.
6.32 Step loss as a result of German Fire. A US unit hit by fire may suffer a one-step loss, as noted on the German Fire Chart; flip the unit over to its reduced strength side. The next time the unit is hit, replace it with a reduced strength unit. If the unit has only one step, remove it from play.
6.33 Disruption as a result of German Fire. A US unit hit by fire may become disrupted instead of or in addition to los-ing a step; place a disrupted marker on the unit. An already disrupted unit that incurs another disruption result is not further affected. A unit may be disrupted by fire from one position and lose a step as a result of fire from another position in the same Fire Phase.
6.34 Step Loss Limitation. A given US unit may not lose more than one step in a single German Fire Phase, even if hit by fire from multiple German positions. Apply the excess hits to other targeted US units if available; if not, ignore the excess hits. However, you must attempt to hit the most US units possible when assign-ing hits from multiple positions. For example, if German position A is limited to hitting two units and three units are eligible to be hit, one of which is also hit by position B, assume that position B hits that unit, and Position A hits the other two.
6.35 A hex occupied by US units with a total of five or more steps is a concentrated target, increasing the units’ susceptibility to German fire. The units in a concentrated target are considered to have the target symbol shown on the German Fire card, regardless of the actual symbols on the units’ counters.
6.36 When a position color on the fire card includes an armor symbol, firing positions of that color receive the armor hit bonus. All US armored units the position is firing upon are considered non-armored when determining hits. Note that per the
German Fire Chart, US armored units in a hex with an intense fire dot are hit even if the firing German position does not have the armor bonus.
6.37 Hits are against units, not stacks. One unit in a stack may be hit while the other is not. If both units in a stack are hit, both may lose a step.
6.4 Disrupted German UnitsA German unit with a disrupted marker does not fire and does not project a field of fire. A German unit remains disrupted until its position color appears on a fire Card drawn for its sector. After resolving all fire in the German Fire Phase, remove disruption markers from every disrupted German unit in a position match-ing a color appearing on the fire card. Remove disruption from a German unit if its color appears on the fire card as a single or double symbol, whether or not the unit has a depth marker.
6.41 If a two-hex WN position has units in both hexes and one of those units is disrupted, the unit in the other hex of the position still has a field of fire and may fire. However, the disrupted unit and its depth marker do not contribute in determining if the position is eligible to fire and how many units it can hit.
6.5 German Artillery Fire (beginning Turn 4)If you draw a fire card with an artillery result, first resolve all fire by German positions in the sector, then check to see if German artillery fire hits a US unit in the sector. German artillery fire does not occur on Turns 1-3.
Procedure: The number on the left of the artillery result is the artillery value. Count the number of undisrupted artillery units in the sector, in both WN posi-tions and the Sector Artillery Box. Count only those having the calibers listed on the card. If the number of eligible German artillery units equals or exceeds the value, one US unit in that sector with the target symbol shown on the fire card is hit.
Artillery value examples:
If there are three or more undisrupted German units in the sector with 75, 88 or 105 caliber artillery, a US unit is hit by artillery fire.
If there are two or more undisrupted German units in the sector with 88 or 105 caliber artillery, a US unit is hit by artillery fire. Ger-man units with 75 caliber artillery do not contribute in this case.
Choose a US unit with the target symbol shown on the card to lose a step, in the following priority:
1. An infantry unit of your choice in a beach landing box.2. A non-infantry unit in a beach hex.3. A non-infantry unit in a beach landing box.4. An infantry unit in a beach hex.
If you need to select from among units within one of these priorities, select units with the most steps. If a choice still remains, you choose which unit is hit. If no US units with a target symbol matching the card are in a beach hex or beach landing box in the sector, no unit is hit by artillery fire.

D-Day at Omaha Beach 13
GeRMAn FIRe (6.3)GeRMAn FIRe eXAMPLe 1
You draw a German Fire Card for the west sector showing position colors of red, purple and green. Two positions shown in the illustration will fire: the red WN position in 0728, and the purple WN position in 0531 and 0631. The green position in 0629 does not fire because the double green symbol on the card means that a depth marker is required and 0629 has none. The blue position in 0533 does not fire because blue does not appear on the card.
You refer to the German Fire Chart to resolve the fire from red position 0728. The position has two markers – a unit and a depth marker – so it may hit up to two US units. The first priority is to hit units in hexes with intense fire; units of all types in such hexes lose a step, regardless of their target symbol. The infantry unit in 0427 is the only unit in intense fire; you remove a step by flipping the unit over. The next priority is to hit units in hexes with steady fire; non-armored units with the target symbol shown on the fire card in such hexes lose a step. Two units are eligible, in hexes 0626 and 0527. Since the firing posi-tion can only hit one more unit, you must select the infantry unit in 0527 because it has more steps. The anti air unit in 0626 is spared.
Next you resolve the fire from purple position 0531/0631. The position has three markers in its two hexes – two units and one depth marker – so it may hit up to three US units. The first priority is to hit units in hexes with intense fire; but there are none. The next priority is to hit non-armored units with the target symbol shown on the fire card in hexes with steady fire. Three units are in hexes with steady fire, but none of them have the target symbol matching the fire card, so none of them are hit. The third priority is to hit units in hexes with sporadic fire; non-armored units with the target symbol shown on the fire card in such hexes become disrupted. You place a disrupted marker on the ranger infantry unit in 0333 – the only unit affected by fire from the German position.
Using the same positions in the above illustration, lets say you instead draw the Fire Card shown here, with position colors of orange, red and blue. Two positions shown in the illustration will fire: the red WN position in 0728, and the blue WN position in 0533. The green and purple positions do not fire because they do not appear on the card. Orange appears on the card but there are no occupied orange positions in the illustration to fire
You resolve the fire from red position 0728. The po-sition has two markers so it may hit up to two US units. The first priority is to hit units in hexes with intense fire. The infantry unit in 0427 is the only unit in intense fire; you remove a step from the unit. The next priority is to hit units in hexes with steady fire; units with the target symbol shown on the fire card in such hexes lose a step,
including armor units because the color symbol on the fire card includes the armor bonus. Three US units are in hexes with steady fire but only the tank unit in 0328 has the target symbol shown on the fire card; you remove a step from the tank unit. The red position has now hit two targets and can hit no more, so even though the infantry unit in 0429 is in a hex with sporadic fire and has the same target symbol as the fire card, it is not hit.
The blue position in 0533 has only unit US unit in its field of fire: the ranger infantry unit is in hex 0333 with steady fire but its target symbol does not match that on the fire card, so it is spared.
GeRMAn FIRe eXAMPLe 2:

14 D-Day at Omaha Beach
6.51 Knocking Out German artillery units. When you eliminate a WN unit with artillery, it no longer contributes to German artillery fire. Artillery units in the German Artillery boxes cannot be eliminated directly, but they are made inactive by gaining control of the German positions serving as observers for each artillery unit. The German Artillery boxes list several German Positions for each artillery unit in the box—these are the artillery unit’s potential observers. If all the observer positions listed for a given artillery unit are in your control, flip the artillery unit to its inactive side—it no longer contributes to German artillery fire. However, if any of those positions subsequently becomes occupied by a German unit or in German communication, the artillery unit for which the position is spotting becomes active again.
6.52 WN positions with artillery symbols have fields of fire like all other positions. They may conduct fire and may contribute their artillery capability to artillery fire checks in the same German Fire Phase, if called for by a German Fire card draw.
6.53 The rocket artillery battery in WN69 does not contribute to German artillery fire checks. This unit fires its rockets when specifically called for by an event.
7. Us ACtIons
During the US Action Phase you may conduct actions with US units. Each turn, you may select two US units or stacks in each division, each of which may conduct one action. In addition, US units meeting certain requirements may conduct actions for free.US units may conduct any of the following actions, if eligible:•Move one hex (all units)•Climb a Bluff (infantry, generals and HQs only)•Climb a Cliff (infantry only)•Remove disruption (any unit with a disrupted marker)•Attack (all units)•Barrage (tank units only)•Naval artillery barrage (naval fire marker only)
7.1 Free ActionsUnits may conduct free actions which do not count toward your limit of two actions per division per turn. However, a unit may only perform one action per turn, even if that action is free. Units may conduct free actions in the following situations:
•Ranger infantry units. Ranger infantry units always perform actions for free. This ability does not extend to non-ranger units stacked with a ranger unit.
•A unit with a Hero or Inspired marker.•A unit with a climb, climb cliff or disrupted marker.•Headquarters units and Generals.•A unit in command of an HQ unit or General. A unit that is stacked
with or adjacent to an HQ unit or General at the start of the Action Phase is in command, and may conduct a free action. Units that are conducting free actions because they are in command of an HQ unit or General may conduct different actions. The leaders are ordering and encouraging each unit separately.
•An infantry unit conducting a self-preservation move. An infantry unit in a beach hex may conduct a self-preservation move as a free ac-tion, consisting of moving the unit from the beach hex it occupies to an adjacent beach hex that is closer to a protective hexside. If the destina-tion hex is not a beach hex, or is equidistant or further from a protective hexside, the move does not qualify as a self-preservation move. Shingle, seawall, slope, bluff and scaleable cliff hexsides are protective hexsides. Sheer cliffs are not.
7.2 Conducting ActionsYou may have your units perform actions in any order, sequencing your two allowed actions and your free actions as you choose. A given unit may per-form no more than one action per turn whether that action is free or not. You must complete all actions for one division before performing actions with the other.
You may place Action Taken markers on units that perform ac-tions using the divisional allotment of two actions, to help you keep track of the expenditure. Remove the markers at the end of the Action Phase.
7.21 Two units in a stack may perform an action together at the cost of one action, as long as they perform the same exact action; for example, moving into the same hex or attacking the same German position. If you want the units in a stack to move in different directions or perform different actions, you must use two actions.
7.22 A unit that you move across the east/west sector boundary (as opposed to landing across the boundary) may be considered part of either division when
In this example, arrows indicate allowed free pres-ervation moves. Moves into other beach hexes require the expenditure of one of the division’s ac-tions.
D-Day at Omaha Beach 15
performing actions. You may spend an action from either division’s allotment to have the unit perform an action, if an expenditure is required. •When playing with two players, a unit that moves just one hex across
the boundary remains in its original division’s control. A unit that moves more than one hex beyond the boundary comes under the control of the other division.
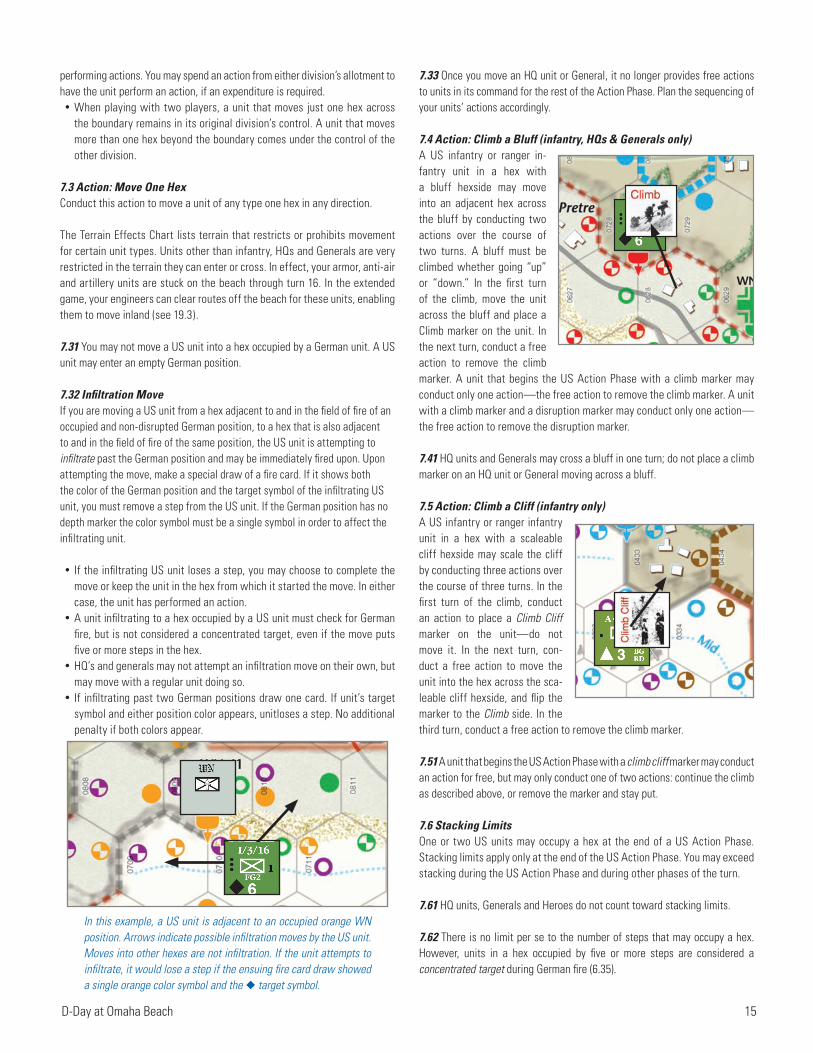
7.3 Action: Move One Hex Conduct this action to move a unit of any type one hex in any direction.
The Terrain Effects Chart lists terrain that restricts or prohibits movement for certain unit types. Units other than infantry, HQs and Generals are very restricted in the terrain they can enter or cross. In effect, your armor, anti-air and artillery units are stuck on the beach through turn 16. In the extended game, your engineers can clear routes off the beach for these units, enabling them to move inland (see 19.3).
7.31 You may not move a US unit into a hex occupied by a German unit. A US unit may enter an empty German position.
7.32 Infiltration Move If you are moving a US unit from a hex adjacent to and in the field of fire of an occupied and non-disrupted German position, to a hex that is also adjacent to and in the field of fire of the same position, the US unit is attempting to infiltrate past the German position and may be immediately fired upon. Upon attempting the move, make a special draw of a fire card. If it shows both the color of the German position and the target symbol of the infiltrating US unit, you must remove a step from the US unit. If the German position has no depth marker the color symbol must be a single symbol in order to affect the infiltrating unit.
• If the infiltrating US unit loses a step, you may choose to complete the move or keep the unit in the hex from which it started the move. In either case, the unit has performed an action.
•A unit infiltrating to a hex occupied by a US unit must check for German fire, but is not considered a concentrated target, even if the move puts five or more steps in the hex.
•HQ’s and generals may not attempt an infiltration move on their own, but may move with a regular unit doing so.
• If infiltrating past two German positions draw one card. If unit’s target symbol and either position color appears, unitloses a step. No additional penalty if both colors appear.
In this example, a US unit is adjacent to an occupied orange WN position. Arrows indicate possible infiltration moves by the US unit. Moves into other hexes are not infiltration. If the unit attempts to infiltrate, it would lose a step if the ensuing fire card draw showed a single orange color symbol and the ◆ target symbol.
7.33 Once you move an HQ unit or General, it no longer provides free actions to units in its command for the rest of the Action Phase. Plan the sequencing of your units’ actions accordingly.
7.4 Action: Climb a Bluff (infantry, HQs & Generals only)A US infantry or ranger in-fantry unit in a hex with a bluff hexside may move into an adjacent hex across the bluff by conducting two actions over the course of two turns. A bluff must be climbed whether going “up” or “down.” In the first turn of the climb, move the unit across the bluff and place a Climb marker on the unit. In the next turn, conduct a free action to remove the climb marker. A unit that begins the US Action Phase with a climb marker may conduct only one action—the free action to remove the climb marker. A unit with a climb marker and a disruption marker may conduct only one action—the free action to remove the disruption marker.
7.41 HQ units and Generals may cross a bluff in one turn; do not place a climb marker on an HQ unit or General moving across a bluff.
7.5 Action: Climb a Cliff (infantry only)A US infantry or ranger infantry unit in a hex with a scaleable cliff hexside may scale the cliff by conducting three actions over the course of three turns. In the first turn of the climb, conduct an action to place a Climb Cliff marker on the unit—do not move it. In the next turn, con-duct a free action to move the unit into the hex across the sca-leable cliff hexside, and flip the marker to the Climb side. In the third turn, conduct a free action to remove the climb marker.
7.51 A unit that begins the US Action Phase with a climb cliff marker may conduct an action for free, but may only conduct one of two actions: continue the climb as described above, or remove the marker and stay put.
7.6 Stacking LimitsOne or two US units may occupy a hex at the end of a US Action Phase. Stacking limits apply only at the end of the US Action Phase. You may exceed stacking during the US Action Phase and during other phases of the turn.
7.61 HQ units, Generals and Heroes do not count toward stacking limits.
7.62 There is no limit per se to the number of steps that may occupy a hex. However, units in a hex occupied by five or more steps are considered a concentrated target during German fire (6.35).
16 D-Day at Omaha Beach
7.63 If US units are in violation of the stacking limits at the end of the US Action Phase, you must eliminate units until the limits are met.
7.7 Disrupted US UnitsA US unit with a disrupted marker may not perform any action, except the “free” action of removing the disruption marker. You may want to wait until all other units have performed their actions before removing disruption markers from US units, so that you do not inadvertently perform other ac-tions with those units.
It is possible for a US unit to become disrupted during the US Action Phase, as a result of an unsuccessful US attack. Such a disruption may not be removed from the unit in the Action Phase in which it was incurred, since it has already performed an action. To aid you in differentiating units disrupted in the Action Phase from units disrupted prior to the phase, US disruption markers are provided in two shades.
8. Us CoMBAt ACtIons
During the US Action Phase, your units may attempt to disrupt and destroy German units via two types of actions: •Attack a German-occupied hex. An attack must include at least one in-
fantry unit adjacent to the German-occupied hex. Other units may par-ticipate from adjacent hexes and, if capable of ranged fire, from non-adjacent hexes.
•Barrage a German-occupied hex exclusively from non-adjacent hexes. Tank units may barrage a German-occupied hex in range of but not adja-cent to the tank itself.
8.1 Units Eligible to AttackAn attack must include at least one infantry or ranger infantry unit attacking a German-occupied hex from an adjacent hex. As long as this requirement is met, any units may join in the attack against the same German-occupied hex within the following conditions:
Infantry units must be in a hex adjacent to the German-occupied hex.Heavy infantry units (those with a printed range of 2) must be adja-cent or one hex away from the German-occupied hex.Tank, anti-tank and anti-air units must be within range and one or more of the following must be true:
• the unit is adjacent to the target hex, or• the unit is adjacent to an attacking infantry unit, or• the unit is in command of any HQ or General, or•at least one attacking infantry unit is in command of any HQ or
General.Artillery units (including SP artillery) must be …
• in range but not adjacent to the target; and• in command of an HQ (not a General) that is also commanding at
least one infantry unit attacking the position (You will find this condition difficult to meet until late in the game); and
• if the artillery unit is not armored, it may not be in the field of fire of an undisrupted German unit.
Naval fire may be included in the attack if you have a naval fire marker to expend, and at least one attacking infantry unit has a radio or is in command of an HQ.
8.11 Determining Range A hex is in range of a US unit if the distance in hexes between them (count-ing the target hex but not the firing unit’s hex) is equal to or less than the firing unit’s range.
8.12 High Ground Ranged Fire Restriction A US unit in a beach or pavilion/draw hex may not conduct ranged fire against a German-occupied position on the high ground, unless that posi-tion projects a field of fire into at least one beach hex (meaning the position is on the bluff overlooking the beach). This restriction applies to attack actions and barrage actions.
•The high ground ranged fire restriction does not apply to naval fire.
8.13 Each unit participating in an attack against a single German-occupied hex must conduct an action in order to participate in the attack. A unit unable to conduct an action may not attack.
8.14 HQ units and Generals do not directly participate in an attack, and are not affected by the results of an attack.
8.15 As noted on the Terrain Effects Chart, a unit on the low ground (beach or pavilion) may not attack across a bluff or cliff hexside, unless capable of conducting ranged fire. A unit on the high ground may attack across a bluff hexside, but not across a cliff hexside.
• A heavy infantry unit (range of 2) may attack across a bluff or cliff hexside, but only if another infantry unit is attacking the German position from an adjacent hex through an allowed hexside.
8.16 A German position may only be attacked once in a give US Action Phase.
8.2 Attack WeaponsDesign Note: In most wargames, a successful attack requires greater numeri-
cal strength than the enemy. This is an important factor in US attacks in DDOB, but equally important is employing the right weapons and tactics.
Every US unit possesses one or more weapons, as shown on the US Weapons Chart. Every German unit and depth marker lists weapon require-ments. US units with the required weapons attack the German unit more effectively than US units without.
8.21 Reduced-Strength US Infantry Weapons The weapons possessed by reduced-strength infantry units are printed on their counter instead of on the Weapons Chart. The weapons possessed by reduced-strength infantry vary from unit to unit; to reflect differences in equipment lost and abandoned as casualties mount.
8.22 Flanking Some German reinforcement units and depth markers list flanking (FL) as a weapon requirement. This weapon (actually a tactic) is not possessed by any one US unit. In order to meet the flanking requirement in an attack, US units must be attacking the German-occupied hex from at least two hexes that are adjacent to the target but not to each other.
• If both the German unit and its depth marker list the flanking requirement, the US units must be attacking from at least three hexes adjacent to the German hex to satisfy the requirement. The three hexes may be adjacent to each other.
8.23 Heroes & Weapons When a unit with a hero attacks from an adjacent hex, the hero provides a weapon “wild card.” The hero may stand in for any one weapon require-ment of your choice, after all German weapon requirements are revealed.
D-Day at Omaha Beach 17
•A hero cannot stand in for the flanking requirement. •A hero can increase your attack strength by one, instead of providing a
weapon wild card, at your option.•This benefit is not cumulative. If more than one hero is involved in an at-
tack, you may only name one wild card weapon.
8.24 HQ Radios US HQ units possess radios, a weapon requirement for defeating certain German units. A US unit attacking a German position from an adjacent hex when in command of an HQ may include the radio among its weapon capabilities.
8.25 The naval fire weapon requirement can be met by expending a naval fire marker as a part of the US attack (see 8.5). In addition, a hero’s wild card can satisfy the naval fire requirement.
8.26 Heavy Infantry Weapons. Certain infantry units have a printed range of 2. When such a unit is attack-ing from an adjacent hex, it has all the weapon capabilities listed for heavy infantry on the US Weapons Chart. When participating in an attack from a non-adjacent hex, or across a bluff or cliff hexside, a full strength heavy infantry unit can bring fewer of its weapons to bear, as noted on the chart. Once a heavy infantry company loses a step, it loses its ranged fire capabil-ity and is like any other regular US infantry unit.
8.27 Tank Weapons. As noted on the US Weapon Chart, the weapon capabilities of a US tank unit depends on its range from the target hex. At a range of 1-5 hexes, the tank fulfills the requirement for artillery (AR) and a bazooka (BZ); and at a range of 1-3 hexes, the tank also fulfills the requirement for a browning automatic rifle (BR) and a machine gun (MG).
8.3 Resolving an AttackAn attack is resolved by comparing the strength and weapons of the attacking US units to the strength and weapon requirements of the units and markers in the German-occupied hex under attack. The German defenders may become disrupted, lose their depth marker, gain a depth marker, become unrevealed, or be defeated as a result of the attack. A defeated German unit is removed from play, temporarily or permanently. US units may become disrupted as a result of attacking, and sometimes lose a step.
Once you have declared an attack action against a German-occupied hex and selected all the US units performing actions to participate in the attack (including expenditure of a naval fire marker if you have one), resolve the attack as follows:
1. Reveal the German unit, if not revealed. If the hex has an unrevealed depth marker, do not reveal it yet.
2. Add up the total strength of your attacking units and compare it to the strength total of the revealed German units and markers in the hex. The German strength may be increased by the terrain in the German position’s hex, as noted on the Terrain Effects Chart.
3. Check to see if your attacking units possess all the weapons required to defeat the revealed German units and markers in the hex. If a hero is participating, he may stand in for one required weapon.
4. Refer to the US Attack Table. Use the upper section of the table if you do not possess the required weapons; use the lower section if you do. Lo-cate the line corresponding to the numerical comparison of your attack strength to the German defense strength. Locate the column corre-sponding to the disposition of the German units in the target hex—unit alone, unit with unrevealed depth marker, or unit with revealed depth marker. Cross-index row with column to find the attack result. Attack results are explained on the Attack Table.
5. Apply the attack result to the German unit and marker in the target hex, and to US units if called for. If the target hex includes an unrevealed depth marker, the attack result may direct you to immediately reveal the marker, recalculate the weapon and strength comparison, and consult the Attack Table again.
8.31 An attack by more than one unit against a German-occupied hex is resolved as a single attack. Add the strengths of all your participating units together to acquire a single strength total, and utilize all the weapons of your participating units. If attacking through multiple hexsides, consider the attack happening through the hexside terrain that is least advantageous to the German defenders.
For example, if attacking across a slope and shingle, use shingle to determine the German defensive advantage.
8.32 When attacking a WN position occupying two adjacent hexes, you attack only one hex at a time. The German units in the other hex do not aid the defense in any way and are not affected by the outcome of the attack.
8.33 German Withdrawal. When a US attack defeats a German reinforcement unit of the 352nd Divi-sion the unit withdraws instead of being eliminated, if it can trace German communication at the moment of attack (see 12.2 and 12.23). Place the withdrawn unit face down in the Division Reinforcement Box (regardless of reinforcement type). Defeated units not eligible to withdraw are removed from play. The following units are not eligible to withdraw:•a WN unit,•a reinforcement unit in the 716th division,•a unit not in German communication.
8.34 There is no “advance after combat” when a German unit is defeated—do not move your attacking units into the vacated hex.
8.4 Conducting a Barrage ActionA tank unit may conduct an action to barrage a German-occupied hex, if the tank unit is in range of but not adjacent to the target hex, and either of the following are true:•The tank unit occupies a hex in the field of fire of the target hex. •An undisrupted infantry unit occupies a hex in the field of fire of the target
hex. The infantry unit is considered to be observing for the tank unit. Observ-ing is not considered an action. If an infantry unit is observing for the tank unit, either the tank unit or the observing unit must be in command of an HQ or General.
If these conditions are met, draw a fire card and refer to the US Barrage table to determine how the German position is affected by the barrage. If the fire card does not show the German position’s color or the barraging unit’s target symbol, the barrage has no effect.

18 D-Day at Omaha Beach
US Attack Example 1
US Attack Example 2
An infantry unit with a hero has made its way onto the high ground and is attacking WN64, containing a lone WN unit with no depth marker. The hero enables the unit to conduct the attack as a free action. The infan-try unit has taken a step loss; it has a strength of 4 and possesses only the weapons listed on its counter—bazookas (BZ), bangalore torpedoes (BG) and a radio (RD). You begin attack resolution by revealing the WN unit—it has a strength of 2. The BZ and BR on the WN unit mean that a bazooka and a browning automatic rifle are required to defeat it. You have the ba-zooka but not the BAR. Your hero acts as a “wild card”, standing in for the BAR. You are twice the strength of the WN unit (4 to 2) and thanks to your hero, you possess the required weapons. You locate the line on the Attack Chart for Weapons “Yes” and Attack strength at least double. You read across to the column for the German situation—German unit alone. The result reads German defeated. The WN unit is removed from play.
An infantry unit and tank unit are attacking WN 61, containing an unrevealed WN unit and depth marker. The two US units are not in com-mand of an HQ or General, and neither has a hero, so you expend the divi-sion’s allotment of two actions to conduct the attack. The tank is eligible to participate because it is adjacent to the attacking infantry. You are attacking with a strength of 8, and both units have all the infantry and tank weapons listed on the US Weapons Chart. You reveal the WN unit (but not its depth marker)—it has a strength of 2 which is doubled to 4 because you are at-tacking across a shingle hexside. The BG and MO listed on the WN unit mean that US bangalore torpedoes and mortars are required to defeat it. Your infantry unit possesses both weapons (per the US Weapons Chart).
So far, you are twice the strength of the WN unit (8 to 4) and possess the required weapons. You locate the line on the Attack Chart for Weapons “Yes” and Attack strength at least double. You read across to the column for the German situation at the moment—German unit & unrevealed depth marker. The result reads Reveal the depth marker; compare again and con-sult the column to the right. You flip over the depth marker revealing an additional strength of 1 (not doubled), giving the position a total strength of 5, and two additional weapon requirements—AR (artillery) and RD (radio).
Your infantry has a radio and thanks to the tank, you also meet the artillery requirement. Referring to the Attack Chart again, this time you use the row for Weapons Yes and Attack strength greater but not double. You read across to the new German situation—German unit & revealed depth marker. This result reads Depth marker eliminated and unit disrupted. You remove the depth marker and place a disruption marker on the surviving WN unit—another successful attack.
Us AttACks (8.3)

D-Day at Omaha Beach 19
US Attack Example 3
Three infantry units are attacking a position on the high ground con-taining an unrevealed reinforcement unit and depth marker. The three US units are in command of a General so they all attack as free actions. A tank unit on the beach is also in command but cannot participate because it is not on the high ground. Your infantry units have a total strength of 12, and because one of them is full strength (I/3/16), all the infantry weapons listed on the US weapons chart are present.
You reveal the WN unit (but not its depth marker)—it has a strength of 2 which is doubled to 4 because it occupies a bocage hex. The BR on the German unit mean that a BAR is required to defeat it. So far, you have more strength than the German (12 to 4) and possess the required weapon. You locate the line on the Attack Chart for Weapons “Yes” and Attack strength at least double. You read across to the column for the German situation at the moment—German unit & unrevealed depth marker.
The result reads Reveal the depth marker; compare again and consult the column to the right. You flip over the depth marker revealing an addition-al strength of 1 (also doubled), giving the position a total strength of 6, and two additional weapon requirements—FL (flanking) and RD (radio). Your full strength infantry unit has a radio, but you are not conducting a flank attack. To fulfill the flanking requirement you must be attacking from at least two hexes that are adjacent to the enemy but not to each other. You are attacking from two hexes adjacent to each other.
Referring to the Attack Chart again, this time you use the row for Weapons No and Attack strength at least double. You read across to the new German situation—German unit & revealed depth marker. This result reads German disrupted and optional attrition. You face a tough decision—attrition allows you to remove the German depth marker in exchange for a US step loss. You decide to eliminate your single step infantry unit (G/2/16). You remove the German depth marker and place a disrupted marker on the surviving German reinforcement unit.
Unit Type Weapons and EquipmentFull Strength Infantry Full Strength Ranger Infantry
BZ – BazookaBG – Bangalore TorpedoBR – Browning Automatic RifleDE – DemolitionsMO – MortarRD – Radio
20 D-Day at Omaha Beach
8.41 A barrage may be conducted by only one unit. You may not combine the strengths of units into one barrage. Draw a separate fire card for every barrage you conduct. Do not refer to the fire cards drawn during the German Fire Phase. A German-occupied hex may be the target of more than one barrage in a single US action phase, but may not be attacked and barraged in the same phase. A barrage against a hex in a two-hex WN position affects only the units in the target hex.
8.42 Barrage actions against German occupied hexes on the high ground are subject to the restrictions of rule 8.12. An unrevealed reinforcement unit may not be barraged.
8.5 Naval Fire MarkersYou receive naval fire markers as a result of event card draws. You may ex-pend a naval fire marker to conduct naval fire as part of a US attack, or to conduct a separate Naval Artillery Barrage.
8.51 Naval Fire in US attacks. You may expend a naval fire marker to include naval fire in any US attack if an infantry unit participating in the attack has a radio or is in command of an HQ (thus having access to the HQ’s radio). If this requirement is met, naval fire contributes to your attack in two ways;• the strength of the naval fire marker (9) is added to your attack strength,• the weapon requirements for naval fire, artillery and demolitions are met.
8.52 Naval Fire Barrage. You may expend a naval fire marker to conduct a naval artillery barrage against any German WN position (revealed or unrevealed) or any revealed reinforcement position on the map, as long as at least one undisrupted US infantry unit with a radio or in command of an HQ is in the target’s field of fire. If these requirements are met, the German-occupied hex is barraged: place a disrupted marker on the unit in the hex. If a depth marker is in the hex, remove it from play. German units are not eliminated by naval barrage. A reinforcement position with an unrevealed German unit may not be the target of a naval barrage.
8.53 A naval artillery barrage is considered a free action and may be performed at any time during the US Action Phase. However, a single German-occupied hex may not be subject to a barrage and an attack in the same US action phase.
8.54 You may use a naval fire marker in the turn you receive it, or you may save it to use in a subsequent turn. Once you use the marker to conduct naval fire, discard the marker.
9. GeRMAn UnIts, DePtH & ReInFoRCeMents
German units occupy German position hexes. A unit may occupy a German position hex alone, or with a depth marker stacked beneath it. A unit and its depth marker represent a single German force at the position.
At the start of play the only German units on the map are WN units, occupy-ing WN positions; some WN units start with depth markers beneath them, some without. During play additional German units and depth markers enter play in several ways:•WN units without depth markers may gain them as called for by an event
card draw or as the result of an unsuccessful US attack.•Reinforcement units may appear in reinforcement positions, usually as a
result of an event card draw. Initially, reinforcements are taken from the Tactical Reinforcement Pool and placed without a depth marker. When the Tactical Reinforcement pool is empty, reinforcements are taken from the Division Reinforcement pool and are placed with a depth marker.
•Reinforcement units on the map without depth markers may gain them as called for by an event card draw, or as the result of an unsuccessful US attack.
9.1 Revealing German Units & Depth MarkersGerman units and depth markers are initially placed on the map face down (unrevealed). The general type of unit or marker is identified on the back of the counter. An unrevealed unit exerts a field of fire and may fire. A German unit is revealed as the result of US actions—usually an attack (see Section 8). When a German unit is revealed, its depth marker remains unrevealed until such time as the unit is subject to a sufficiently strong US attack. At that time the unit’s depth marker is revealed to add to the unit’s defense. Once a German unit or depth marker is revealed, it remains revealed until removed from the map, or until a combat result directs the unit to become unrevealed.
9.2 Adding Depth to German UnitsDepth markers are added to German units during play as a result of event card draws, and sometimes as a result of an unsuccessful US attack (see the US Attack Results Chart). An event may call for one depth marker to be added to a unit anywhere on the map, or for a depth marker to be added to a unit in one sector, or for depth markers to be added to units in both sectors.
Upon drawing a depth marker event, choose one German unit without a depth marker and place a depth marker beneath it. If there is more than one German unit without a depth marker (on the map or in the sector indicated in the event), choose a unit based on the following priorities:
1. Choose the German unit closest in hexes to a US unit. 2. If two or more units are equidistant choose the unit:
a. In a single-hex WN position;b. Then in a two-hex WN position;c. Then in a reinforcement position.
3. If there is more than one eligible unit of a given position type, place the depth marker in the position with the lowest ID number. A German reinforcement position without an ID number is considered to have a number of “0” for this purpose. If two or more positions have the same number, place the marker in the position with the lowest letter.
A German unit must be in communication in order to receive a depth marker (see 12.2). Disrupted units may receive a depth marker. If a sector named in the event has no German unit eligible to receive a depth marker, place the depth marker with a unit in the other sector. If neither sector has an eligible unit, no depth marker is placed. A depth marker may only be placed in a Ger-man position occupied by a German unit. Depth markers never occupy a hex on their own.
9.21 Placing depth markers Upon selecting a German unit to receive a depth marker, randomly draw a depth marker from the appropriate depth marker pool and place it beneath the unit, unrevealed.•For a WN unit, draw from the WN depth pool;•For a reinforcement unit in a building hex, draw from the building depth
pool;

D-Day at Omaha Beach 21
•For a reinforcement unit in any other type of hex, draw from the mobile depth pool.
9.22 A depth marker may be placed with a German unit that previously lost its depth marker due to US attack or barrage. There is no limit to the number of times a German unit may lose a depth marker and receive another, as long as it is in German communication.
9.23 Some events call for the placement of a US Hero and a German depth marker. Place the depth marker in the same sector as the hero, if possible.
9.24 Depth marker depletion Later in the game, one or more depth marker pools may become empty. • If the WN depth pool is empty when a WN depth marker is called for,
choose a unit in a reinforcement position instead.• If the Building depth pool is empty when a building depth marker is called
for, take a mobile depth marker instead.• If the mobile depth pool is empty when a mobile depth marker is called
for, take no depth marker, the Germans have run out of depth.
If only one depth marker is available when two are called for, apply the place-ment priorities to the entire map, not just one sector, to place the marker.
9.3 German Reinforcements Triggered by EventsGerman reinforcement units enter play when an event card draw directs you to place German reinforcements in specific German zones. For each rein-forcement called for by an event, draw a German reinforcement unit at ran-dom from the Tactical Reinforcement pool. Place the unit face down without a depth marker in an empty German reinforcement position in communicationin the zone listed in the event. Select the specific position within the zone using the following priorities:
1. a position adjacent to a US unit. Place in the lowest numbered position if two or more are adjacent.
2. a position within two hexes of a US unit. Place in the lowest numbered position if two or more qualify.
3. The lowest numbered position.
9.31 If the Tactical Reinforcement pool is empty, draw a unit from the Division Reinforcement pool instead. Division reinforcement units enter play with a depth marker. Once you have determined the reinforcement unit’s position draw a depth marker from the appropriate depth pool (building or mobile) and place it beneath the reinforcement unit.
9.32 Reinforcement units entering play via an event draw may not be placed on German reinforcement positions without an ID number. WN positions do not receive reinforcement units. A reinforcement unit may not be placed in a position already occupied by a German unit.
9.33 A German position must be in communication in order to receive a reinforcement unit (see 12.2). Note that an unoccupied German position may be adjacent to US units and still be in communication, and thus eligible to receive a reinforcement. If no positions in a given zone can trace communication, the reinforcement unit for that zone does not appear.
9.34 If the Tactical Reinforcement pool and Division reinforcement pool are empty when a reinforcement unit is called for, the reinforcement does not enter play. If you run out of reinforcements during a multiple-reinforcement event,
apply the priorities of 9.3 to the entire map to determine which zones receive the available reinforcement units.
9.4 German Tactical Reinforcements triggered by a WN Depth MarkerA German reinforcement unit enters play when you reveal a WN depth mark-er reading Tactical Reinforcement. At the moment this happens, immediately conduct the following:
1. Remove the depth marker from play.2. Draw a reinforcement unit from the Tactical Reinforcement pool and
place it in the unoccupied German reinforcement position nearest to the WN position from which you removed the depth marker, even if that reinforcement position has no ID number.
3. If two or more positions are equidistant, place the reinforcement in the position closest to a US unit. If still equidistant, place the reinforce-ment in the lower numbered position.
9.41 For purposes of placing a reinforcement triggered by a WN, a reinforcement position without an ID number (for example, in hex 0828) is considered to have an ID number of 0. The restrictions of 9.33 apply to reinforcements triggered by a WN.
9.42 A reinforcement triggered by a WN may only be taken from the Tactical reinforcement pool and is placed without a depth marker. If the pool is empty, the reinforcement does not enter play.
9.5 Releasing Kampfgruppe MeyerThe Kampfgruppe Meyer box holds German units that were historically available for commitment to Omaha Beach but were diverted elsewhere by 352nd Infantry Division command. These units are available to be taken as reinforcements only if you draw the Kampfgruppe Meyer event. Each time you draw the event, ran-domly select four units and two depth markers from KG Meyer. Place the units in the Division Reinforcement pool and the depth markers in the Mobile Depth box. Those units are subsequently eligible to enter play as called for by events and actions. If all eight KG Meyer units are released, subsequent KG Meyer events are ignored.
10. Us enGIneeR BeACH oBstACLe DeMoLItIon
Engineer Demolition teams land with the first waves to destroy beach ob-stacles and mines that might threaten US forces landing later in the morning during mid and high tide. These teams are not represented by counters in the game, but their vital mission to clear the beach is. Most mid-tide waterline beach hexes contain beach obstacle symbols. Until engineers clear the ob-stacles, units landing in these hexes may suffer loss due to mine explosions (5.14).
10.1 Clearing Beach ObstaclesDuring the Engineer Phase of each turn beginning with Turn 2, you may clear obstacles in one or two beach obstacle hexes in each sector, but only in hexes that are not in the field of fire of any non-disrupted German positions whose color appears on the fire card you drew for the sector for the current turn.

22 D-Day at Omaha Beach
Example: The colors on the fire card drawn for the East sector this turn are red, purple and blue, and no WN positions are eliminated or disrupted during the Engineer Phase. You may clear obstacles from hex 0612—the only beach obstacle hex in the East sector without fire dots of those colors. If the same card were drawn when WN 60 (purple) has been eliminated or is disrupted, you would be able to clear any two hexes from hex 0606 to 0612 of beach obstacles
10.11 Cleared Markers Place a cleared marker to indicate that the obstacles in a beach hex have been cleared. As the game progresses and you clear several hexes in a row, you may avoid “counter clutter” by using just two markers to indicate an uninterrupted row of cleared hexes: place the two markers in the hexes at either end of the row and orient them so their arrows point toward each other, as shown in the diagram. This indicates that those two hexes and all the hexes between them have been cleared.
10.12 Tidal Limits During low-tide turns (2-6) engineers may clear up to two hexes per sector per turn. During mid-tide turns (7-15) engineers may clear just one hex per sector per turn. During high tide turns (16-22), no hexes may be cleared.
11. Us HeRoes, HeADQUARteRsAnD GeneRALs
Key US individuals and command formations are represented by hero mark-ers, HQ units and General counters. Heroes, HQs and Generals are collec-tively referred to as leaders. Leaders do not count against stacking limits and do not possess steps. Any number may occupy a given hex.
11.1 HeroesHeroes are individual soldiers and low level officers who performed above and beyond the call of duty, inspiring their fellow soldiers with initiative and courage in the face of overwhelming danger. The story of Omaha Beach in-cludes numerous instances where an individual or small group of soldiers turned the tide. By the actions of such soldiers, the US forces prevailed. DDOB includes counters naming some of these men in each division. The names on the Hero counters are included for historical interest only. All hero markers are identical in capability.
11.11 Hero Entry A hero enters play each time you draw the Hero event. Place a hero marker on a US unit of your choice in the division listed in the event. A hero is consid-ered part of the unit to which you assign him and may not be transferred to another unit and may not be alone in a hex. Keep a hero’s marker directly on top of his assigned unit. When a unit with a hero is eliminated, the hero (or inspired marker) is also removed from play.
11.12 Hero Free Action A unit with a hero may perform an action for free in the US action phase. The free action is conferred only on the individual unit, not all units in the hex.
11.13 Hero Attack Wild Card A hero with a unit attacking a German unit from an adjacent hex provides the attack with one of the following benefits: •When checking to see if you have the weapons required to defeat the
German position the hero counts as one required weapon of your choice, other than flanking ; or
•When calculating and comparing your Attack strength to the German defense strength, you may use the hero to increase your strength by 1.
11.14 Hero Sacrifice A hero may be killed by German fire (see 11.4). You may also voluntarily sacrifice a hero in the following circumstances to save a unit: If a hero is with a one-step unit that must take a step loss as a result of German fire, you may choose to sacrifice the hero instead of eliminating the unit.
11.15 Inspired Units When a hero is killed by German Fire or voluntary sacrifice, his marker is flipped over to the inspired side and remains with his unit as long as the unit is in play. A unit with an inspired marker may perform an action for free in each US action phase. An inspired unit does not receive the hero’s attack wild card bonus.
11.2 HeadquartersThe headquarters for each of four infantry regiments are represented by HQ units, each comprising the regiment’s commander, his staff and equipment.Each HQ unit has the following capabilities:
•An HQ may move one hex during the US action phase as a free action, within the restrictions of the terrain effects chart (see 7.5).
•An HQ commands all US units in the HQ unit’s hex and all adjacent hexes at the start of the US action phase, regardless of the units’ designations.
•A unit in command of an HQ may perform an action for free.•A unit that attacks a German position from an adjacent hex while in com-
mand of an HQ is considered to possess a radio.•An HQ may enable tank, anti-tank, anti-air or artillery units in its com-
mand to conduct ranged fire (see 8.1).•Starting with Turn 17, an HQ may establish a command post to increase
the range of its command.
Rule 10.11In this example, hexes 0613 and 0615 through 0618 have been cleared of beach obstacles. Hex 0614 is not cleared.

D-Day at Omaha Beach 23
12.1 US ControlA US unit of any of the following types controls the hex it occupies.
• Infantry with one step•Artillery, anti-tank, and anti-air units•Headquarters•Command posts and engineer bases (in the extended game)
A US unit of either of the following types controls the hex it occupies and the adjacent hexes around it, even if disrupted:• Infantry with two or three steps•Armor (of any step level).
Generals and Heroes do not control hexes.
12.11 A US unit in a beach, pavilion or draw hex does not control adjacent hexes on the high ground. The reverse is not true; a US unit on the high ground capable of controlling adjacent hexes controls adjacent beach, pavilion and draw hexes.
12.2 German CommunicationA German position must be in communication in order to:
• receive a reinforcement unit;• receive a depth marker;•withdraw after being defeated by a US attack;•perform certain actions in the extended game.
A German position is in communication if you can trace a path of hexes of any length from the position to any exit hex (A through G). The path may not pass through any hexes occupied or controlled by US units. Furthermore, a German communication path may not pass through a rough hex, beach hex, or a pavilion hex adjacent to a beach hex. The path may pass through draw or pavilion hexes not adjacent to the beach.
12.21 A German unit in a hex adjacent to a US unit negates US control of that hex for purposes of tracing German communication through the hex, including tracing communication for the German unit itself.
12.22 When tracing communication to an unoccupied German position (for example, to determine if a German reinforcement may be placed there), the position’s hex itself can be in US control and still be in German communication, if a communication path can be traced.
12.23 German Bocage Communication. A German reinforcement position occupied by a German unit may trace communication through one bocage hex adjacent to the position, even if that hex is controlled (but not occupied by) a US unit. This special ability applies only to one bocage hex adjacent to the tracing position; thereafter, communication for the position must be traced normally. This ability is es-pecially helpful to units of the 352nd division attempting to withdraw after being defeated by US attack. This ability does not apply to WN positions or to unoccupied reinforcement positions.
11.3 GeneralsTwo US Generals landed at Omaha Beach on the morning of D-Day, leading, motivating and inspiring units to move and attack their way off the beach. Brig. Gen. Norman “Dutch” Cota, assistant commander of the 29th division landed at 0730 hours followed an hour later by his 1st division counterpart, Brig. Gen. Willard Wyman.Each of these leaders and their aides are represented by a counter with the following capabilities:
•A general may move one hex during the US action phase as a free action, within the restrictions of the terrain effects chart.
•A general commands all US units in his hex and all adjacent hexes at the start of the US action phase, regardless of the unit’s designation.
•A unit in command of a general may perform an action for free.•A general may enable a tank, anti-tank or anti-air unit in his command to
conduct ranged fire (but not an artillery unit, see 8.1).
11.31 A general may be in a hex by himself, or may stack with any US units. The presence of a General alone in a hex does not inhibit German fire or communication in any way. If a General is the sole occupant of a German position when a German unit is called to be placed there, place the unit and remove the General from play—he has been captured.
11.4 German Fire against LeadersA hero, general or HQ may be hit by German fire during the German Fire phase. If a fire card includes a German position color with a star, a position of that color in the sector may hit a leader in its intense or steady field of fire.
• If a hero is hit, he is killed; flip his marker to the inspired side.• If an HQ is hit, it is disorganized and will take some time to re-establish
command. Remove the HQ from the map and place it two turns later on the turn track. The unit will re-enter play via beach landing.
• If a General is hit, he is lightly wounded ; flip his counter over. Being lightly wounded does not affect a General’s capabilities.
• If a lightly wounded General is hit, he is killed; Remove his counter from play.
11.41 Select a leader to take a hit only after assigning hits to other eligible US units, regardless of the type of fire in the leader’s hex. If the number of other units eligible to be hit equals or exceeds the German position’s hit limit, the leader is not hit.
11.42 Leaders do not become disrupted by German fire, although the units they are stacked with may.
12. ContRoL AnD CoMMUnICAtIon
Each US unit controls the hex it occupies and some US units control adjacent hexes. German units do not control hexes per se; they affect nearby hexes through their fields of fire. US control affects whether German communica-tion can be traced to a German position or hex. German fields of fire affect whether US communication can be traced to a US unit or hex.

24 D-Day at Omaha Beach
13.1 Catastrophic LossCatastrophic loss represents a level of casualties so great that the division’s fighting capability has been effectively destroyed. Historically, as D-Day un-folded on Omaha Beach, the US high command struggled to gather reliable information on US losses (lots of news) and US successes (little news), and came close to closing the beach to further landings. In DDOB, catastrophic loss is the threshold at which such a decision might have been made.
If either US Division suffers Catastrophic loss, you lose the game. Catastrophic loss is defined as eight regular infantry units of the division reduced to one-step or eliminated.
During play, each time one of your regular infantry units loses its second step and is replaced with a one-step unit, place the counter for the full-strength unit in the Infantry Loss box for the unit’s original division. If the number of infantry units in a division’s loss box reaches eight units, the division suffers catastrophic loss.
13.11 Eliminated ranger infantry units and non-infantry units are not placed in the loss box and do not count toward catastrophic loss.
13.12 Later in the game, certain event card draws allow you to add steps to reduced infantry units in play by taking a counter from an Infantry Loss box. This event reduces your losses toward suffering catastrophic loss.
13.2 Determining VictoryIf neither US division has suffered catastrophic loss by the end of Turn 16, determine if you have won The First Waves by adding up Victory Points.
You earn Victory Points for the following:•1 VP for each WN position you control. A WN position occupying two
hexes is worth 2 VP (but is worth no points until you control both hexes).•1 VP for each German reinforcement position you control (including posi-
tions not marked “VP”).•5 VPs for each draw under your control.
You win the game if you have 19 or more Victory Points.
13.21 Controlling Draws There are four draws—or small valleys—leading inland from Omaha Beach. Control of these draws was vital to the US ability to move vehicles and heavy equipment off the beach. You control a draw if all its draw hexes south (inland) of the anti-tank barrier at the mouth of the draw are in US control.
13.22 A hex is considered in US control for victory point purposes if the hex is occupied or controlled by a US unit, and is in US communication, and is not in the field of fire of a German unit, including disrupted German units (see 12.1 and 12.3). Occupation or control of the hex by a US unit is not enough for victory point purposes—the hex must also be safe from German fire.
•A hex is also considered in US control for victory purposes if US commu-nication can be traced to it and German communication cannot, and the hex is not in a German field of fire—basically, the hex is behind secure US lines.
Example: Although the German reinforcement unit with a strength of 4 is surrounded by hexes in US control, it is still in communica-tion because it can trace bocage communication through 1316 (out through 1416). The 3-strength German unit cannot trace communi-cation—the two bocage hexes adjacent to it are themselves sur-rounded by US control, preventing tracing of communication beyond the first bocage hex.
12.24 Communication status of German positions is established at the beginning of the German Fire Phase and does not change throughout the phase. A position out of communication at the start of the phase remains out of communication throughout the phase, even if German fire reduces or eliminates US units that were blocking communication. During a US attack, German communication status is determined at the moment of attack.
12.3 US CommunicationUS units are not affected by being in or out of communication during the game. At the end of a scenario, US communication is required in order to control hexes for victory purposes.
A hex is in US communication if you can trace a path of hexes of any length from the hex to any beach hex. •The path may not pass through any hexes occupied by or in the field of
fire of a German unit. •The path may not be traced through a rough hex or a bluff or cliff hexside.
12.31 US communication may not be traced into or through a hex in the field of fire of a German unit even if that hex is occupied by a US unit. A German position’s field of fire extends into all hexes with fire dots emanating from that position, even if the German unit occupying the position is disrupted. An empty German position has no field of fire for purposes of tracing US communication.
13. WInnInG & LosInG tHe FIRst WAVes
Play of the First Waves Scenario continues until one of your US divisions suffers catastrophic loss—ending the game immediately—or until Turn 16, at which point you consult these victory conditions to determine if you win or lose.
D-Day at Omaha Beach 25
14. IntRoDUCtIon to tHe eXtenDeD GAMe
If you are playing the scenario D-Day at Omaha Beach or Beyond the Beach, use the rules for the extended game (sections 14-20) beginning on Turn 17. The rules in sections 1-13 remain in force, unless specifically superceded by the extended game rules.
In the extended game the time scale shifts from 15 minutes to 30 minutes per turn, affecting several game functions:
•You draw two event cards per turn.•German units may hit more targets when they fire.•You may perform three actions per division per turn, instead of two.•US infantry and armor units may sometimes move more than one hex in
a single action.•You may eliminate a German unit and its depth marker in a single US
attack.
German and US forces gain additional capabilities beginning on Turn 17, to reflect the shift in battle from the beach and bluffs to the villages and bocage of the high ground:
•German positions may perform actions other than firing at US units.•Unoccupied WN positions may be re-occupied by German units.•US artillery units may conduct the barrage action.•US headquarters units may establish command posts to increase the
range of their command.•You may place engineer bases on the beach to clear obstacles to non-
infantry movement and to direct traffic off the beach.
14.1 Changes to German Fire14.11 German hit limit doubled when firing The limits of 6.31 are doubled in the extended game. For example, the hit limit of a German position occupied by a single unit without a depth marker is two US units, and the hit limit of a position with a unit and a depth marker is four.
14.12 No US step loss limit A US unit may lose more than one step in a single German Fire Phase when hit by fire from more than one German position. The limits of 6.34 do not apply in the extended game. However, a US unit may lose no more than one step by fire from a single position in a single phase.
14.2 Optional Early Implementation of German ActionsExperienced players may wish to implement the following rule adjustment to increase the realism and challenge of the game. This adjustment is recom-mended only for players who have won the extended game.
Implement the rules for German Actions (all of Section 16) beginning on Turn 12. All other extended game rules commence on Turn 17.
15. eXtenDeD GAMe seQUenCe oF PLAY
The sequence of play in the extended game follows the basic structure of the sequence of play in rules section 3, with the modifications and additions noted below.
I. US Amphibious Operations PhaseAs in the basic sequence of play.
II. First Event PhaseDraw an event card and implement the event listed for the current turn. Skip on Turn 32.
III. German Fire PhaseAs in the basic sequence of play, with the addition that German positions may perform actions other than firing, as indicated by German action letters on the fire cards.
IV. Second Event PhaseDraw another event card and implement the event listed for the current turn. Skip on Turn 32.
V. US Engineer & HQ PhasePlace engineer bases in eligible beach hexes and increase the operational range of previously placed engineer bases (see 19.1). Place garrison markers (19.3).Convert HQ units to command posts and increase the command range of previously established command posts (see 18.1).
VI. US Action PhaseAs in the basic sequence of play, except each division is allowed three ac-tions per turn. In addition, the situations in which US units may perform ac-tions for free is expanded to include the following:
•units within the command range of an HQ Command Post,•units performing a movement action in beach, pavilion or draw hexes
within the operational range of a US engineer base.
VII. End of TurnAs in the basic sequence of play.
16. GeRMAn ACtIons
In the extended game, German positions may conduct actions other than firing, as called for by action letters appearing with the position colors on the German Fire cards. Actions may be performed by German-occupied posi-tions with and without US units in their fields of fire. In some cases, even unoccupied German positions may perform actions. Action letters stand for a variety of actions, depending on the situation of the German position.
Procedure: When you draw a fire card, check all the following types of Ger-man positions in the sector matching the colors on the fire card to determine if each fires or conducts some other action: •every occupied WN and reinforcement position, •every unoccupied WN position in German communication, •every unoccupied reinforcement position within two hexes of a US unit
and in German communication.
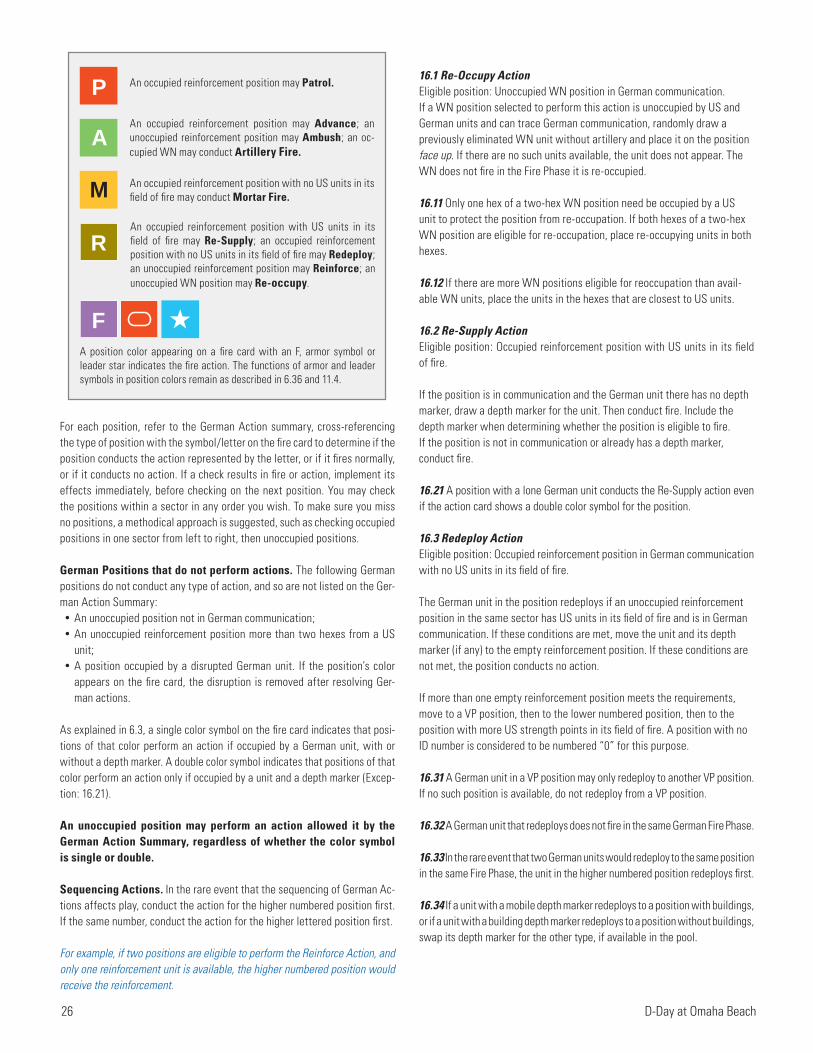
26 D-Day at Omaha Beach
For each position, refer to the German Action summary, cross-referencing the type of position with the symbol/letter on the fire card to determine if the position conducts the action represented by the letter, or if it fires normally, or if it conducts no action. If a check results in fire or action, implement its effects immediately, before checking on the next position. You may check the positions within a sector in any order you wish. To make sure you miss no positions, a methodical approach is suggested, such as checking occupied positions in one sector from left to right, then unoccupied positions.
German Positions that do not perform actions. The following German positions do not conduct any type of action, and so are not listed on the Ger-man Action Summary:•An unoccupied position not in German communication;•An unoccupied reinforcement position more than two hexes from a US
unit;•A position occupied by a disrupted German unit. If the position’s color
appears on the fire card, the disruption is removed after resolving Ger-man actions.
As explained in 6.3, a single color symbol on the fire card indicates that posi-tions of that color perform an action if occupied by a German unit, with or without a depth marker. A double color symbol indicates that positions of that color perform an action only if occupied by a unit and a depth marker (Excep-tion: 16.21).
An unoccupied position may perform an action allowed it by the German Action Summary, regardless of whether the color symbol is single or double.
Sequencing Actions. In the rare event that the sequencing of German Ac-tions affects play, conduct the action for the higher numbered position first. If the same number, conduct the action for the higher lettered position first.
For example, if two positions are eligible to perform the Reinforce Action, and only one reinforcement unit is available, the higher numbered position would receive the reinforcement.
16.1 Re-Occupy ActionEligible position: Unoccupied WN position in German communication.If a WN position selected to perform this action is unoccupied by US and German units and can trace German communication, randomly draw a previously eliminated WN unit without artillery and place it on the position face up. If there are no such units available, the unit does not appear. The WN does not fire in the Fire Phase it is re-occupied.
16.11 Only one hex of a two-hex WN position need be occupied by a US unit to protect the position from re-occupation. If both hexes of a two-hex WN position are eligible for re-occupation, place re-occupying units in both hexes.
16.12 If there are more WN positions eligible for reoccupation than avail-able WN units, place the units in the hexes that are closest to US units.
16.2 Re-Supply ActionEligible position: Occupied reinforcement position with US units in its field of fire.
If the position is in communication and the German unit there has no depth marker, draw a depth marker for the unit. Then conduct fire. Include the depth marker when determining whether the position is eligible to fire.If the position is not in communication or already has a depth marker, conduct fire.
16.21 A position with a lone German unit conducts the Re-Supply action even if the action card shows a double color symbol for the position.
16.3 Redeploy ActionEligible position: Occupied reinforcement position in German communication with no US units in its field of fire.
The German unit in the position redeploys if an unoccupied reinforcement position in the same sector has US units in its field of fire and is in German communication. If these conditions are met, move the unit and its depth marker (if any) to the empty reinforcement position. If these conditions are not met, the position conducts no action.
If more than one empty reinforcement position meets the requirements, move to a VP position, then to the lower numbered position, then to the position with more US strength points in its field of fire. A position with no ID number is considered to be numbered “0” for this purpose.
16.31 A German unit in a VP position may only redeploy to another VP position. If no such position is available, do not redeploy from a VP position.
16.32 A German unit that redeploys does not fire in the same German Fire Phase.
16.33 In the rare event that two German units would redeploy to the same position in the same Fire Phase, the unit in the higher numbered position redeploys first.
16.34 If a unit with a mobile depth marker redeploys to a position with buildings, or if a unit with a building depth marker redeploys to a position without buildings, swap its depth marker for the other type, if available in the pool.
An occupied reinforcement position with US units in its field of fire may Re-Supply; an occupied reinforcement position with no US units in its field of fire may Redeploy; an unoccupied reinforcement position may Reinforce; an unoccupied WN position may Re-occupy.
A position color appearing on a fire card with an F, armor symbol or leader star indicates the fire action. The functions of armor and leader symbols in position colors remain as described in 6.36 and 11.4.
An occupied reinforcement position may Patrol.
An occupied reinforcement position may Advance; an unoccupied reinforcement position may Ambush; an oc-cupied WN may conduct Artillery Fire.
An occupied reinforcement position with no US units in its field of fire may conduct Mortar Fire.
R
A
P
M
F

D-Day at Omaha Beach 27
16.5 Mortar ActionEligible position: Occupied position with no US units in its field of fire.
The German unit fires mortar shells at US units beyond its field of fire but within the position’s mortar range.
Reinforcement Position Mortar Range: all hexes within three hexes of the position may be hit by mortar fire.
WN Position Mortar Range: all beach hexes and pavilion hexes adjacent to beach hexes within five hexes of the WN position; all draw and high ground hexes within two hexes of the WN position.
GeRMAn ACtIons – eXtenDeD GAMe (16)
German Action Determination Example 2
Using the same illustration, assume that you have instead drawn the German Fire Card on the right: Purple M, Blue armor and Brown P.
• Brown Reinforcement Position in 0907. The position is occupied by a unit with no depth marker and the brown symbol on the fire card shows two markers, so the position does not conduct an action.
• Purple WN position – Action M. The WN position is occupied with US units in its field of fire, so it conducts normal fire. If no US units were in its field of fire, it would conduct the mortar action.
• Purple Reinforcement Position A4 – Action M. The position is unoc-cupied so it conducts no action.
• Blue Reinforcement Position – Fire action with armor bonus. The position is occupied with US units in its field of fire, so it conducts normal fire. There is no US armor to be hit.
• Brown Reinforcement Position in 1113 – Action P. The position is occupied with US units in its field of fire. It conducts the patrol ac-tion.
German Action Determination Example 1
In this illustration showing part of the east sector, assume that you have drawn the German Fire Card on the left: Red A, Purple R and Blue M. You check German positions, both occupied and unoccupied, with the colors red, purple and blue, referring to the German Action Sum-mary to determine what action each performs. Going from left to right on the map:
• Purple WN position – Action R. You cross-reference the “R” action shown for purple with the status of the WN position (occupied with US units in its field of fire) to find that the WN fires normally. If the WN position were unoccupied, it would conduct the Re-occupy ac-tion.
• Purple Reinforcement Position A4 – Action R. The position is unoc-cupied, in German communication and within 2 hexes of a US unit. It conducts the Reinforce action.
• Blue Reinforcement Position – Action M. The position is occupied with US units in its field of fire, so it conducts normal fire. If no US units were in its field of fire, it would conduct the Mortar action.
• Red Reinforcement Position C3 – Action A. The position is unoccu-pied with a US unit in its field of fire. It conducts the Ambush action.
16.4 Reinforce ActionEligible position: Unoccupied reinforcement position in German communica-tion and within two hexes of a US unit.
If the position is a VP position, place a reinforcement unit with a depth marker in the position.
If the position is not a VP position, and has US units in its intense or steady field of fire, place a reinforcement unit with a depth marker. If a non-VP position only has US units in its sporadic field of fire or has no units in its field of fire at all, conduct no action.
The unit does not fire in the German Fire Phase in which it is placed.

28 D-Day at Omaha Beach
Treat all hexes within the position’s mortar range as if in the position’s steady field of fire. US units (including armor) with the target symbol indi-cated on the fire card are hit and lose a step, but are not disrupted.
•Mortar fire from a German position with a depth marker may hit up to two US units.
•Mortar fire from a position without a depth marker hits just one unit. • If the number of eligible US target units exceeds the mortar fire limit,
choose units with the most steps. If steps are equal, you choose the tar-get.
16.51 If no US units with the target symbol shown on the German fire card are within mortar range of the position, the position conducts no action.
16.6 Patrol ActionEligible position: Occupied reinforcement position.
The position does not fire. Instead it conducts probes and quick attacks to scout and harass the enemy. Place disrupted markers on every US unit, regardless of target symbol, in hexes in the position’s intense and steady field of fire (not in hexes with sporadic fire dots). • If there are no US units in the position’s intense or steady field of fire,
place a disrupted marker on just one US unit within three hexes of the position. If more than one US unit is within this range, disrupt the closest
unit, then the unit with the target symbol shown on the fire card, then with the greater attack strength. Your choice if strengths are equal.
• If no US units are within three hexes of the German position, the position conducts no action.
16.61 HQ units and generals are not disrupted by patrol actions.
16.7 Artillery Fire ActionEligible Position: Occupied WN position with no US units in its field of fire.
If the WN position has artillery (88 or 75 caliber), one US unit is hit. Choose a US unit in either sector with the target symbol shown on the fire card to lose a step, in the following priority:
1. An infantry unit of your choice in a beach landing box.2. A non-infantry unit in a beach hex.3. A non-infantry unit in a beach landing box.4. An infantry unit in a beach hex.
If you need to select from among units within one of these priorities, select a unit in the WN position’s sector, then select the unit with the most steps. If a choice still remains, you choose which unit is hit. If there are no US units eligible to be hit, the position conducts no action.
A WN position need not be in communication to conduct this action, but must possess 88 or 75 caliber artillery. The rocket artillery unit in WN 69 is not eligible.
16.8 Advance ActionEligible position: Occupied reinforcement position.
Under certain circumstances a German unit may attempt to move from the position it occupies to the position pointed to by the directional arrow in the unit’s position, even if the destination is occupied by US units.
• If an occupied German position has an advance arrow pointing toward a position that is not occupied by a German unit, check to see if the unit attempts to advance.
• If an occupied German Position does not have an advance arrow, or if it has an arrow pointing to a position already occupied by a German unit, the position fires normally (if US units are in its field of fire) or conducts no action (if no US units are in its field of fire).
16.81 Advance Attempt CheckThe unit attempts to advance if any of the following apply:•No US units are in the unit’s field of fire; or•The unit is revealed, and is from the 352nd division, and has a depth
marker; or•The unit is unrevealed and has a depth marker.
The unit fires if US units are in its field of fire and either of the following apply:•The unit is from the 716th division, or;•The unit has no depth marker.
16.82 Advance Procedure If the conditions for attempting to advance are met, determine if the German unit is able to advance from its current position to its destination position.
The German Fire card indicates an “A” action for red positions; in the case of an occupied reinforcement position, this means Advance. The red reinforcement position in 1313 has an advance arrow point-ing to position C1 (1113), and is occupied by a unit from the 352nd division with a depth marker – the unit is eligible to conduct the advance action. Consulting the route of advance diagram (16.82), you determine that the two 4-strength US units are in the route of advance, and the 6-strength unit is not. Next, you disrupt units in the route of advance with the target symbol indicated on the fire card – in this case L/3/16 is disrupted. The remaining undisrupted US unit in the route of advance (F/2/16) has an effective defense strength of 4 (it is in clear terrain so it is not doubled). Four is less than 7, so the German advance is successful. You move the German unit and its depth marker to C1 and remove a step from the defending US unit.
GeRMAn ADVAnCe ACtIon eXAMPLe (16.8)

D-Day at Omaha Beach 29
1. Determine the route of advance. Choose the diagram from among these three that corresponds to the relative location of the unit’s position and the destination position of its advance. All the hexes in the selected diagram make up the German unit’s route of advance.
2. If no US units are in the route of advance (i.e., in any of the hexes in the selected diagram), the German unit advances; move it (and its depth marker) to the destination position. Otherwise, if there are any US units in the route of advance, proceed to step 3.
3. Disrupt US defenders. Place disrupted markers on the following US units in the route of advance:
•All units other than infantry and tank units;•All infantry and tank units with a target symbol matching the current fire
card. 4. Determine the effective US defense. Add up the strength ratings of all
non-disrupted US units in the route of advance. Double the strength of US units in building and bocage hexes when doing this calculation.
• If the US strength is seven or more, the German advance is repulsed. The German unit stays in its current position and does not fire.
• If the US strength is less than seven, the German advance is successful. Remove one step from a US unit of your choice in the route of advance and move the German unit and its depth marker to the destination posi-tion. If the destination position is occupied by US units, move the US units to an adjacent hex of your choice that is not in the route of advance. Any other US units in the route of advance are not moved.
16.83 If a unit with a mobile depth marker advances to a position with buildings, or if a unit with a building depth marker advances to a position without buildings, swap its depth marker for the other type, if available in the pool.
16.84 If a US unit defending against a German advance has a hero marker, increase the strength of the unit by one, after any adjustments for terrain.
16.85 Advance actions are considered to occur after all other German actions in the Action Phase. The advancing unit gains the benefit of any disruption or step loss inflicted on US units in its route of advance by other German units in the phase.
16.86 Position B1 has two advance arrows, pointing to A7 and A6. If the Advance action occurs for a German unit in B1, and either A7 or A6 is German-occupied (but not both), the unit in B1 attempts to advance to the other position. If neither are occupied by German units, the unit in B1 attempts to advance to A7.
16.9 Ambush ActionEligible position type: Unoccupied reinforcement position in German com-munication and with US unit in its field of fire.
The ambush action is conducted by an unoccupied German position and represents fire from a reconnoitering force or small resistance nest. An ambush is resolved using the Ambush column of the German Fire Chart. An ambush hits one US unit with the indicated target symbol in a hex in the position’s intense field of fire; the US unit loses a step. If there are no such
units, the ambush disrupts one US unit with the indicated target symbol in a hex in the position’s steady or sporadic field of fire.
16.91 No more than one US unit may be affected by an Ambush from a single position. If more than one unit with the indicated target symbol is eligible to be hit, select the unit closest to the German position, then the unit with more steps. If steps are equal, you choose.
17. ADDItIons to Us ACtIons
The extended game introduces several enhancements to US capabilities:•Each division may perform three actions per US Action Phase, instead
of two.•US infantry, leaders and tank units may be able to move more than one
hex when conducting a movement action.•US artillery units may barrage German positions.
17.1 Infantry & Leader Two-Hex MovementUS infantry and ranger infantry units, HQs and Generals performing a move-ment action may move two hexes. An infantry/ranger unit may move two hexes as long as it does not enter: •a bocage hex, unless the hex is entered by a road or trail; or •a hex in the intense or steady field of fire of an occupied and undisrupted
German position.
In other words, an infantry/ranger unit entering a bocage hex (not by road/trail), or a hex in intense or steady fire may only move one hex. An HQ or general may move two hexes without restriction, but may not enter or cross prohibited terrain.
17.11 An infantry/ranger unit conducting the climb action to cross a bluff hexside does not receive a climb marker. However the unit may only move that one hex. A leader crossing a bluff may move two hexes.
17.12 When an infantry/ranger unit conducts the climb action to climb a cliff, initiate the action by moving the unit across the cliff hexside and placing a climb marker on the unit (instead of a climb cliff marker). In the next turn, conduct a free action to remove the climb marker.
17.2 Tank Road MovementTank units may move more than one hex if moving along roads. •A tank unit beginning its move on a secondary road may move up to two
hexes along secondary and major roads. •A tank unit beginning its move on a major road may move up to four hexes
along major roads. •A tank unit must stop its move upon entering a hex in the intense field of
fire of an occupied German position. A tank unit need not stop in a hex in a steady or sporadic field of fire.
17.21 In order to move more than one hex along a road, a tank unit must begin its move in a road hex and enter hexes via a connecting road throughout its move.
17.22 Mined roads and trails may not be entered at all by tanks until they have been cleared by engineer bases (see 19.3).
17.23 Artillery, armored artillery, anti-tank, anti-air and armored anti-air may move only one hex per turn.
30 D-Day at Omaha Beach
17.3 Artillery Barrage Action An artillery or SP artillery unit may conduct an action to barrage a German-occupied hex, if all the following conditions are met:•The artillery unit is in range of but not adjacent to the target hex.•The target hex contains a WN unit (revealed or unrevealed) or a revealed
reinforcement unit. An unrevealed reinforcement unit may not be bar-raged.
•The artillery unit is in command of an HQ or CP (not a general).•The artillery unit or an undisrupted US infantry unit occupies a hex in the
field of fire of the target hex. This unit is considered to be observing for the artillery unit.
•The observing infantry unit (if any) is in command of the same HQ or CP as the artillery unit.
• If the artillery unit is not armored, it may not be in a hex in a German field of fire—meaning that the unit must use an infantry unit to observe.
•The high ground ranged fire restriction applies to artillery barrage (8.12); that is, an artillery unit in a beach, pavilion or draw hex may only barrage a German position that projects a field of fire into at least one beach hex.
If these conditions are met, draw a German Fire card and refer to the US Bar-rage table to determine how the German position is affected by the artillery barrage. The limitations of 8.41 apply.
18. CoMMAnD Posts (CPs)
You may convert your HQ units into command posts during the US Engineer and HQ Phase on Turn 17 or after. A CP may not move but it gains a command range that increases over time, enabling it to command US units up to four hexes away.
18.1 Establishing a Command PostAn HQ unit may convert to a CP in any hex that is not in the potential field of fire of any German position. If a German-occupied position or an unoccupied position in German communication projects any fire dots into the HQ’s hex, the HQ may not convert into a CP there. To establish a Command Post, flip an HQ unit to its CP side during the US Engineer and HQ Phase and place the matching command range marker in the first space of the Command Range track. Doing this is not considered an action.
18.11 Abandoning a Command Post. You may revert a CP to a regular HQ unit during the US Action Phase by flipping it over and performing an HQ movement action. If you do so, remove the corresponding command range marker from the command range track.
18.2 Command RangeWhen you first establish a CP it commands US units in its hex and any adja-cent hexes, like an HQ unit. The initial placement of the CP’s command mark-er on the command track shows this capability—a command range of one hex. In subsequent turns you may increase the CP’s command range. During the US Engineer and HQ Phase you may advance the marker for an already established CP one space along the command range track, as long as the CP’s hex is not currently in the field of fire of any occupied German position.
18.21 As many as four command range markers may occupy the command range track (one for each US HQ in the game), and every marker may be advanced along the track during the US Operations Phase, if eligible.
18.22 Some command range values are repeated on the command track. For example, command range 3 appears in three boxes in a row, meaning that it takes at least three turns to increase a CP’s range from 3 to 4.
18.3 Capabilities of Command PostsA CP commands all the US units within its current command range. For ex-ample, a CP with a range of three commands all US units within three hexes of its hex. This range is counted by including the hex occupied by the unit to be commanded but not the CP’s hex.
Units within a CP’s command range receive all the benefits of being in com-mand of an HQ including:•Free actions•Radios•Tank and artillery ranged fire coordination.
18.31 Command range may be counted through hexes in German fields of fire but not through German units.
18.32 A CP in the field of fire of an occupied German position may not command US units. In such a situation, the CP’s range marker retains its current position on the command track, but its range may not be increased.
18.33 A CP is considered a leader and may be hit by German fire. If a CP is hit, it immediately reverts to an HQ unit; flip the unit to its HQ side and remove its command range marker from the command track. A command post is not eliminated by German fire.
19. enGIneeR BAses
Beginning with Turn 17, four engineer bases (two per division) are available to you. Engineer bases represent combat engineers and Engineer Special Bri-gades—support troops that facilitate the movement of units off the beach and up the draws, by directing traffic, garrisoning rear areas, and clearing obstacles such as the shingle, anti-tank ditches and walls, and mined roads.
You may place Engineer bases in beach hexes during the US Engineer and HQ Phase. Once placed, an engineer base does not move but projects an engineer range that increases over time, facilitating the safe movement of US units off the beach and through the draws, and guarding previously taken German positions.
19.1 Establishing an Engineer BaseAn engineer base may be placed in any beach hex in its division’s sector that is not in the potential field of fire of any German position. If a German-occu-pied position or an unoccupied position in German communication projects any fire dots into a beach hex, the Engineer base may not be placed there.
It is suggested that you place each engineer base in a beach hex near a different draw, so that each base projects its engineer range up a different draw as its range increases. Upon placing an engineer base on the map, place the matching engineer range marker in the “0” space of the Engineer Range track. Once placed, the base may not be moved.
19.2 Engineer RangeWhen you first place an engineer base it has an engineer range of “0”, as shown by the initial position of the base’s engineer range marker on the engineer track, meaning that the base’s capabilities operate only in the hex

D-Day at Omaha Beach 31
it occupies. In subsequent turns, you may advance the marker along the track to increase the operational range of the engineer base.
During the US Engineer and HQ Phase you may advance the engineer range marker for one already established engineer base per US division one space along the engineer range track, as long as the engineer base’s hex is not currently in the potential field of fire of any German position.
19.21 Divisional Engineer Operation Limit You may only place one engineer base or increase one base’s range per division per turn. You may not advance an engineer range marker in the same turn you place a new engineer base for that division.
19.3 Capabilities of Engineer BasesAn engineer base’s range represents the area in which support troops are operating and work has been completed to facilitate the safe movement of US troops and vehicles. All the following benefits are in force within an en-gineer base’s range of operations:
•Garrisons. You may place a US garrison marker in every unoccupied German position that is in an engineer’s range and not in the field of fire of a German unit. Garrisons prevent the appearance of German units in unoccupied WN and reinforcement positions, and such positions are in US control for victory purposes at the end of play. Garrisons may not be the target of mortar fire or artillery fire. They do not impede the German advance action and are removed from the map if the hex they occupy is the destination of a successful advance action.
•Shingle lanes. Shingle hexsides do not impede movement of any units. •Road Clearing. German-built obstructions on the pavilion and in draws,
including anti-tank walls, anti-tank ditches and mined roads are consid-ered cleared. All US units may move through and over the hazards as if they do not exist. Cleared roads in mined road hexes provide the move-ment benefits of normal roads.
•Traffic Management. US units that begin their move in a beach, pavil-ion or draw hex in an engineer unit’s range of operations may perform a movement action for free. A unit you are moving via traffic management may be moved onto the high ground. The traffic management benefit does not extend to units beginning their move on the high ground and does not allow combat actions.
19.31 An engineer base’s range includes all the hexes within its range and the hexsides bordering those hexes.
For example, an engineer base in hex 0711 with a range of 1 has cleared shingle lanes in the hexsides bordering hexes 0710, 0711 and 0712, and has cleared the antitank ditch hexsides bordering hexes 0810 and 0811.
19.32 An engineer’s range of operations does not extend into hexes in the field of fire of a German-occupied position, even if the engineer’s range is sufficient to reach that hex. Engineer bases are never the target of German fire and may not be eliminated.
19.33 German artillery fire inhibits engineer operations An engineer base may not increase its range or provide traffic management during a turn in which German artillery fire occurs in its sector. This includes artillery fire as a result of an event or a fire card.
19.34 Engineer bases do not affect seawall hexsides. The movement restrictions listed on the Terrain Effects Chart for seawall hexsides apply even if in range of an engineer base.
19.4 Beach Obstacle DemolitionAll beach obstacles in mid-tide waterline hexes are considered cleared be-ginning on Turn 24 and remain cleared for the rest of the game, whether or not engineer bases are present.
20. WInnInG AnD LosInG tHe eXtenDeD GAMe
Play of the D-Day at Omaha Beach scenario continues until one of your US divisions suffers catastrophic loss—ending the game immediately—or until either of two Victory check points, one at the end of Turn 16 and one at the end of Turn 32.
20.1 Catastrophic LossYou lose the game immediately if one of your divisions suffers catastrophic loss.
Catastrophic loss limitsTurns 1-16: eight infantry units in either division’s loss box.Turns 17-32: fourteen infantry units in either division’s loss box.
20.2 First Victory CheckAt the end of Turn 16, total up your Victory Points as described in 13.2. Compare your total to the following victory point levels:
25 or more victory points: The game ends in a decisive US victory. Your forces have overcome the German defenses and quickly established a secure presence on the high ground.
11 to 24 Victory Points: Continue play. The battle for the beach and the high ground still hangs in the balance.
10 or fewer Victory Points. The game ends in a decisive US defeat. Your forces are holding just a few isolated spots of high ground while still under fire on the beach. German forces are building up a strong line of defense just beyond the beach.
20.3 Second Victory CheckAt the end of Turn 32, total up your victory points to determine if you win or lose. You earn victory points for the following (use these awards instead of those in 13.2):
1 VP for each German reinforcement position you control in a hex on or adjacent to a major road, or a minor road leading off the south edge of the map. There are a total of 42 such hexes and all are marked with a VP symbol.
4 VPs for each draw you open to US traffic. A draw is open to traffic if you control every hex of the draw and your engineers have completely cleared the draw of German obstacles.
1 VP for every non-infantry, non-HQ unit on the high ground at the end of play.
1 VP for each armor or regular infantry step that moves off the map from a lettered exit hex, but only if you can trace US communication to the exit hex at the end of play. You can earn VP’s for having an armored unit on the high ground and for exiting its steps.
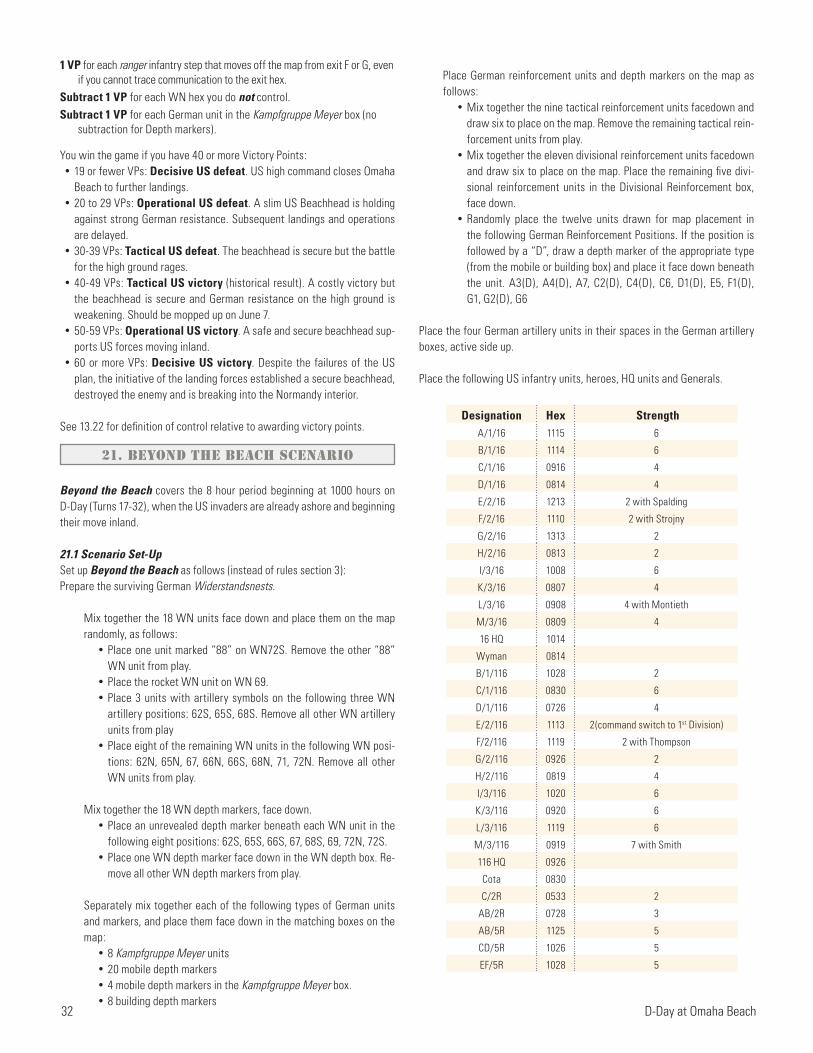
32 D-Day at Omaha Beach
1 VP for each ranger infantry step that moves off the map from exit F or G, even if you cannot trace communication to the exit hex.
Subtract 1 VP for each WN hex you do not control.Subtract 1 VP for each German unit in the Kampfgruppe Meyer box (no
subtraction for Depth markers).
You win the game if you have 40 or more Victory Points:•19 or fewer VPs: Decisive US defeat. US high command closes Omaha
Beach to further landings.•20 to 29 VPs: Operational US defeat. A slim US Beachhead is holding
against strong German resistance. Subsequent landings and operations are delayed.
•30-39 VPs: Tactical US defeat. The beachhead is secure but the battle for the high ground rages.
•40-49 VPs: Tactical US victory (historical result). A costly victory but the beachhead is secure and German resistance on the high ground is weakening. Should be mopped up on June 7.
•50-59 VPs: Operational US victory. A safe and secure beachhead sup-ports US forces moving inland.
•60 or more VPs: Decisive US victory. Despite the failures of the US plan, the initiative of the landing forces established a secure beachhead, destroyed the enemy and is breaking into the Normandy interior.
See 13.22 for definition of control relative to awarding victory points.
21. BeYonD tHe BeACH sCenARIo
Beyond the Beach covers the 8 hour period beginning at 1000 hours on D-Day (Turns 17-32), when the US invaders are already ashore and beginning their move inland.
21.1 Scenario Set-UpSet up Beyond the Beach as follows (instead of rules section 3):Prepare the surviving German Widerstandsnests.
Mix together the 18 WN units face down and place them on the map randomly, as follows:
•Place one unit marked “88” on WN72S. Remove the other “88” WN unit from play.
•Place the rocket WN unit on WN 69.•Place 3 units with artillery symbols on the following three WN
artillery positions: 62S, 65S, 68S. Remove all other WN artillery units from play
•Place eight of the remaining WN units in the following WN posi-tions: 62N, 65N, 67, 66N, 66S, 68N, 71, 72N. Remove all other WN units from play.
Mix together the 18 WN depth markers, face down.•Place an unrevealed depth marker beneath each WN unit in the
following eight positions: 62S, 65S, 66S, 67, 68S, 69, 72N, 72S.•Place one WN depth marker face down in the WN depth box. Re-
move all other WN depth markers from play.
Separately mix together each of the following types of German units and markers, and place them face down in the matching boxes on the map:
•8 Kampfgruppe Meyer units•20 mobile depth markers•4 mobile depth markers in the Kampfgruppe Meyer box.•8 building depth markers
Place German reinforcement units and depth markers on the map as follows:
•Mix together the nine tactical reinforcement units facedown and draw six to place on the map. Remove the remaining tactical rein-forcement units from play.
•Mix together the eleven divisional reinforcement units facedown and draw six to place on the map. Place the remaining five divi-sional reinforcement units in the Divisional Reinforcement box, face down.
•Randomly place the twelve units drawn for map placement in the following German Reinforcement Positions. If the position is followed by a “D”, draw a depth marker of the appropriate type (from the mobile or building box) and place it face down beneath the unit. A3(D), A4(D), A7, C2(D), C4(D), C6, D1(D), E5, F1(D), G1, G2(D), G6
Place the four German artillery units in their spaces in the German artillery boxes, active side up.
Place the following US infantry units, heroes, HQ units and Generals.
Designation Hex StrengthA/1/16 1115 6
B/1/16 1114 6
C/1/16 0916 4
D/1/16 0814 4
E/2/16 1213 2 with Spalding
F/2/16 1110 2 with Strojny
G/2/16 1313 2
H/2/16 0813 2
I/3/16 1008 6
K/3/16 0807 4
L/3/16 0908 4 with Montieth
M/3/16 0809 4
16 HQ 1014
Wyman 0814
B/1/116 1028 2
C/1/116 0830 6
D/1/116 0726 4
E/2/116 1113 2(command switch to 1st Division)
F/2/116 1119 2 with Thompson
G/2/116 0926 2
H/2/116 0819 4
I/3/116 1020 6
K/3/116 0920 6
L/3/116 1119 6
M/3/116 0919 7 with Smith
116 HQ 0926
Cota 0830
C/2R 0533 2
AB/2R 0728 3
AB/5R 1125 5
CD/5R 1026 5
EF/5R 1028 5

D-Day at Omaha Beach 33
For each one-step regular infantry unit placed on the map, place the match-ing full strength unit in the infantry loss box—a total of four units in the 1st
Division Loss Box and five in the 29th Division Loss Box (including A/1/116, which has been completely eliminated).Place the following US units in any high tide line beach hex in their as-signed sector, within stacking limits.
East SectorTank 1/B/741 2Tank 2/A/741 2Tank 1/A/741 2Anti-Air 1•2/397 2Artillery 7FA 4Armored Anti-Air A•B/197 1
West SectorTank 1/A/743 2Tank 1/B/743 4Tank 2/B/743 2Tank 2/C/743 4Anti-Air 5•6/397 2Artillery 58FA 6Armored Anti-Air C•D/467 1
Place the 62nd FA battalion on turn 26 of the turn track (it is delayed).Remove from play all US units scheduled to enter prior to turn 16 not listed above.
Place all US units scheduled to enter play on Turn 16 in any beach landing boxes of your choice in their assigned sector, within the restrictions of 5.3.Place all US units schedule to enter on Turn 17 or later on the spaces of the Turn Track matching the turn of entry shown on each unit.
Place cleared markers to indicate that nine beach hexes have been cleared of obstacles: 0612-0616, 0523-0525, 0426.
Place the Turn marker in Turn 17 of the Time Track.
Shuffle the cards and place the deck face down beside the map, with room next to the deck for a discard pile. Consider the event calling for WN 69 to fire its rocket artillery (Screaming Meemies! ) to have occurred once.
21.2 Scenario VictoryPlay of the Beyond the Beach scenario continues until one of your US divi-sions suffers catastrophic loss—ending the game immediately—or until the end of Turn 32, at which point victory is assessed in accordance with Rules Section 20. However, all victory levels are adjusted as follows:
•24 or fewer VPs: Decisive US defeat.•25 to 34 VPs: Operational US defeat. •35-44 VPs: Tactical US defeat. •45-54 VPs: Tactical US victory.•55-64 VPs: Operational US victory.•65 or more VPs: Decisive US victory.
22. oPtIonAL HIstoRICAL VARIAnts
After playing the game several times, you may wish to explore the optional historical variants in this section, each positing a plausible “what-if” situa-tion on D-Day at Omaha Beach. You can use these individually or in combina-tion. Each has a victory point adjustment to be added to or subtracted from your Victory Point total at the end of the game. Variants 22.1, 22.2 and 22.3 can be used with any scenario; variant 22.4 only with the D-Day at Omaha Beach or Beyond the Beach scenarios. A variant introducing German armor is presented in rules section 23.
22.1 Effective Allied BombardmentPrior to the US landings, the German positions at Omaha Beach were subject-ed to aerial and naval bombardment, intended to neutralize the defense. As it turned out the bombardments were largely ineffective. The B24 bombers of the 8th Airforce dropped their bombs far inland of the defenses, for fear of hit-ting Allied landing craft approaching the beach. And the naval bombardment, though of spectacular intensity, was too brief to wear away and penetrate the defensive structures overlooking Omaha Beach. The Navy wanted more daylight time for their bombardment, but the army’s landing timetable would not allow it. What if the air bombardment had hit the beach defenses? What if the naval bombardment had more time to build up?
To play this variant, make all the following adjustments:
Delay the start of play. The game starts on Turn 4 (0700 hours). Delay all US units entering prior to turn 16 by three turns—place each three turns ahead on the turn track (e.g., place Turn 1 units in the Turn 4 space of the Turn Track). Place US tank units with no turn number in the landing boxes. Delay all units entering on Turn 16 or later by just one turn. Place the Game turn marker in the Turn 4 space.
Pre-Invasion Bombardment. Draw two fire cards. Place a disrupted mark-er on every WN of a color indicated on either card, and remove its depth marker from play, if it has one. If a WNs color appears on both cards, it is knocked out, remove the unit and its depth marker from play. Place the two cards in the discard pile.
Start the game on Turn 4, and draw an event card for that turn. •On turns 4 and 5, use the landing table for Turns 2 and 3. Starting Turn 6,
use the landing table for the current turn. •German units may not become undisrupted on Turn 4, even if selected
to fire. •Engineer obstacle clearing begins on Turn 5.•German artillery becomes activated to fire on Turn 5 (instead of Turn 4).•The game still ends on Turn 16, if playing The First Waves, or Turn 32 if
playing other scenarios.
The definition of the free infantry preservation move is expanded to also include a one-hex move into any beach, pavilion or draw hex that is not in the field of fire of any German unit. Disrupted units exert a field of fire for this purpose. The basic definition also applies. Victory Point adjustment: -10.

34 D-Day at Omaha Beach
22.2 First Wave Tanks Land SafelyThe Tanks of the 741st and 743rd tank battalions scheduled to land on Turn 1 were outfitted with duplex drives and were intended to be launched from LCT’s (Landing Craft Tank) offshore and make their way to the beach on their own power. The rough seas doomed this plan. Historically most lead tanks of the 741st battalion sank. The 743rd battalion to the west was more fortunate as their officers recognized the difficulty and drove the LCTs to shore. What if an across-the-board decision was made to bring all DD tanks to shore via LCT?
To play this variant, use the Turn 2 Landing Hazard Table for tank units landing on turn 1.
Victory Point adjustment: -5
22.3 Rangers reinforce Pointe du HocThe rangers of the 2nd and 5th battalions played a pivotal role in the success of the western assault on Omaha Beach, but, except for C company/2nd Rangers, they were actually scheduled to reinforce the assault on Pointe du Hoc several miles to the west. As it turned out, the rangers did not receive the signal to reinforce and so executed their back-up plan: landing on Dog sector of Omaha Beach. What if the Rangers did not land at Omaha Beach?
To play this variant, remove all rangers from the game except for the C/2R unit scheduled to enter on Turn 1.
Victory Point adjustment: +5
22.4 Improved German ReactionThe slow and confused German response to the Allied landings on D-Day contributed to the operation’s success. South of Omaha Beach, the 352nd Di-vision’s key reserve—Kampfgruppe Meyer—wasted hours on a wild goose chase before being ordered to Omaha and Gold beaches piecemeal. What if the German divisional and corps commanders received and acted on accurate reports of the initial landings?
To play this variant, make the following adjustments:•Place all KG Meyer units in the Division Reinforcement Pool, and all mo-
bile depth markers in the Mobile Depth box. Disregard events calling for the moving of KG Meyer units to the Division Reinforcement Pool.
•When a reinforcement is taken from the Tactical Reinforcement Pool, place it with a depth marker (change to 9.3)
•When Mobile depth markers are exhausted for the first time, draw five at random from among those eliminated and return them to the Mobile Depth Pool. Do this only once.
Victory Point adjustment: +5
23. oPtIonAL HIstoRICAL VARIAnt: GeRMAn ARMoR
The 352nd division included two armor companies stationed south of Omaha Beach. One composed of Marder III’s was ordered to Omaha Beach, but due to Allied air attacks, it did not arrive until the morning of the 7th. The other, composed of StuG III assault guns, was diverted to Gold Beach. What if ele-ments of these companies had made their way through Allied air interdiction to reach Omaha Beach on D-Day?
This variant allows German armored reinforcement units to enter play, beginning on Turn 17. Unlike other German units, German armor need not occupy specific positions on the map. An armor unit is its own German position with its own position color. When selected to perform an action, a German armor unit may move, fire or a combination of both. German armor moves by primary and secondary road only and may occupy any hexes along such roads. If an undisrupted German armor unit reaches certain pavilion hexes adjacent to the beach, you immediately lose the game.
23.1 German Armor Set-UpIf playing the D-Day at Omaha Beach or Beyond the Beach scenarios, place the four armor units and four armor depth markers in the Optional Armor Box at the start of play, unrevealed side up. German Armor is not available in the First Waves scenario.
23.2 Armor Reinforcement AppearanceBeginning on Turn 17, a German armor unit enters play as a reinforcement if all the following apply:•There are no units in the Tactical Reinforcement Pool. German armor may
not enter until the Tactical reinforcement pool is empty.•A reinforcement event is drawn as the second event draw of the turn.
German armor may not enter on the first event draw of the turn.•The reinforcement position indicated by the event card is in a hex with a
primary or secondary road (based on the reinforcement placement priori-ties of 9.3), and a path of connected road hexes can be traced from the position to entry/exit hex B, C, D or E. This path may not pass through a hex occupied by or in control of a US unit. Hexes that can only trace to entry/exit hexes A, F or G do not qualify.
If the above situation applies, draw an armor unit and depth marker from the armor reinforcement pool, instead of drawing from the Division Rein-forcement Pool. Place the armor unit in the selected reinforcement position revealed side up with the depth marker unrevealed beneath.
Example: You draw event card #19 as the second event card on Turn 23, indicating that reinforcements enter in Zones C and G. In Zone G, the priorities of 9.3 result in the selection of position G5—not a road hex, so a normal reinforcement is placed there. In Zone C, position C6 is selected. This is a road hex from which German communication can be traced to Entry hex C, so an armor reinforce-ment is placed there instead of a regular reinforcement.
23.21 No more than one armor reinforcement may appear in a single turn. If more than one is called for (or if only one is available), place the armor unit in the lower numbered reinforcement position.
23.3 German Armor Field of FireA German armor unit projects a field of fire into all adjacent hexes and most hexes within two hexes of the unit, depending on the terrain. The field of fire moves with the unit and affects US movement, US communication and the armor unit’s fire, like the field of fire of a normal German unit. Fire dots printed on the map do not apply to German armor, even if in a hex with a printed German position.
Armor position color

D-Day at Omaha Beach 35
To determine a German armor unit’s field of fire, first establish the intensity of fire in the hexes adjacent to the unit:
Terrain in adjacent hex Intensity of fire in hexClear or Woods Intense FireBocage or Building Steady Fire
A clear hex is any hex on the high ground, beach or pavilion with no terrain features other than a road or a trail.
Then establish the intensity of fire in every hex two hexes away from the armor unit and adjacent to a hex with intense fire from the armor unit:
Clear or Woods, not across a hedge hexside Intense FireBocage, Building, or across a hedge hexside Steady Fire
Hedge hexsides affect fire into hexes two away from the armor unit, but not into hexes adjacent to the unit. German obstacles have no effect on field of fire. German Armor does not project sporadic fire.
23.4 German Armor ActionsA German armor unit performs an action when its color appears on the Ger-man Fire card drawn for its sector. The action letter (if any) appearing with the color symbol determines the type of action conducted by the armor unit, as listed below and on the German Action Summary. As with other units, an armor unit with a depth marker conducts an action on a single or double color symbol, while an armor unit without a depth marker conducts an action only on a single color symbol.
Action: Fire or Move• Fire, if any US units are in the unit’s field of fire.• If no US units in field of fire, move up to four hexes (see 23.5)
Action: Move or Fire•Move up to 4 hexes (see 23.5). • If no movement at all is possible and US units are in the unit’s
field of fire, fire.
Action: Overrun•Move up to 4 hexes. If the first, second or third hex of the move
is occupied solely by non-armored US units, move through that hex. All the units in the hex moved through become disrupted. Stop if a hex occupied by US armor is encountered, or if a second US occupied hex is encountered, or if the fourth hex of the move is occupied by any type of US unit. The German unit may not end its move in a US-occupied hex.
• If no movement at all is possible and US units are in the unit’s field of fire, fire.
Action: Aimed Fire
•Fire if any US units are in adjacent hexes. If fire is conducted, all targets in the unit’s field of fire are eligible to be hit (not just adjacent units).
• If no US units are in adjacent hexes, move up to four hexes.Action: Position & Fire
•Move up to three hexes. After completing movement, fire if any US units are in adjacent hexes. If fire is conducted, all targets in the unit’s field of fire are eligible to be hit (not just adjacent units).
• If no movement at all is possible and US units are in the unit’s field of fire, fire.
GeRMAn ARMoR FIeLDs oF FIRe (23.3)
R
M
A
P

36 D-Day at Omaha Beach
• If there are no 1-step infantry units in the division, you may choose a 1-step unit in the other division. If there are no 1-step infantry units at all, disregard this event.
Screaming Meemies! If WN 69 is occupied by the German rocket artillery unit, a US unit is hit by a nebelwerfer barrage. Choose one US unit to lose a step within the following restrictions:• The unit must be in a beach or pavilion/draw hex.• The unit must be at least three hexes away from WN 69 and not more than
seven hexes away.• If more than one unit is eligible, choose the unit with the most steps. Among
units with the most steps, you choose.If the rocket artillery unit is eliminated or disrupted, disregard this event.
Smoke obscures beach. The WN positions listed in the event do not fire this turn, even if their color appears on the fire card. Place smoke markers on the positions as a reminder. Remove the smoke markers at the end of the turn. • If a US unit attempts an infiltration move against a WN position affected by
smoke, a fire card is still drawn to see if the infiltrating unit suffers a step loss.
Snipers target runners. The command radius for the indicated Command Post is limited to one hex this turn.
Unexpected US naval fire hits position. Draw a fire card to randomly determine which of three positions is hit by a barrage of US naval artillery fire. The position listed on the event card with the target selector shown on the fire card is hit. • If a German unit is in the position it is disrupted and its depth marker (if any)
is eliminated. • If US units are in the position, draw a second fire card. One US unit in the
position with the target symbol on the second card must lose a step. If no units in the position have the target symbol on the second fire card, the fire has no effect.
• If no units are in the position, the fire has no effect.Leaders are not affected. This fire does not cost you a naval fire marker.
US Patrol Report. Reveal the unrevealed German unit and depth marker clos-est to a US unit in the indicated sector, even if the position is across the sector boundary. If two or more unrevealed units are the same distance from US units, you choose one.
23.41 Once in play, a German armor unit is always revealed—use the column of the German Fire Chart for a revealed reinforcement position when resolving German armor fire. All fire by German armor may hit US armor; the appearance of the armor bonus on a fire card has no additional effect.
23.42 German armor on the high ground may fire at targets on the low ground only if the armor unit is adjacent to a low ground hex (not necessarily the target hex). Armor on the low ground may not fire at targets on the high ground at all.
23.43 When a German position is occupied by a German armor unit, only the armor unit is eligible to perform an action.
23.5 German Armor MovementWhen an action directs a German armor unit to move, move the unit the indicated number of hexes along connecting primary and secondary roads if possible, within the following priorities:
eVent DesCRIPtIons
Events that are not fully explained on the event cards or elsewhere in the rules are listed here, with necessary rule details.
German Artillery Limits Engineer Operations. Engineer operations are inhibited for the turn as follows:•You may not place new engineer bases, • you may not increase the operational range of engineer units in play,• you may not move units for free using the engineer’s traffic management
ability.This event does not occur if there are no WN artillery units in play and all four German off-map artillery markers are inactive.
German Plunging Fire. All sporadic fire dots in beach hexes bordering a pro-tective hexside (shingle, seawall, slope, bluff or scaleable cliff) are considered steady fire dots in the upcoming German Fire Phase. • In the extended game, if this event is drawn after the German Fire Phase (in
the Second Event Phase), no event occurs.
German Prisoner Talks. Reveal an unrevealed German unit and depth marker of your choice in the sector listed in the event card. If there are none in that sector, you may choose one in the other sector.• If a WN is revealed in this manner, and its depth marker calls for a Tactical
Reinforcement, place the reinforcement per 9.4, but face up.
German Rocket Artillery destroyed. If the Screaming Meemies event has occurred at least once, the German rocket artillery unit in WN 69 is destroyed by US Naval fire. Remove the unit and its depth marker (if any) from play. If Screaming Meemies has not occurred, or if the rocket artillery unit is already eliminated, no event occurs.
Germans Concealed. Disrupt all US units with either of the indicated target symbols adjacent to any unrevealed German reinforcement unit. This event does not affect US units adjacent to WN units or revealed reinforcement units.
Hero. Place a hero marker on any US unit in the named Division. Some hero events also call for adding a depth marker to one German unit. Place the depth marker in the same sector as the hero, in accordance with 9.2.Lost boat teams catch up and Soldiers from support unit join infantry. Add a step to a 1-step regular infantry unit of your choice in the division named in the event. Do so by replacing the one-step unit with the two-step unit with the same designation, taken from the infantry loss box.
• If a US unit is in a road hex within three connecting road hexes of the armor unit, the armor unit moves toward that US unit. If US units meet the above condition in more than one direction from the armor unit, move the armor unit in the direction indicated by its movement orders.
• If no US units are within three connecting road hexes of the armor unit, move the armor unit in the direction indicated by its movement orders.
Movement Orders. The German Armor Movement Map shows the move-ment orders for all German armored movement. When directed to move an armor unit according to its movement orders, locate the unit’s hex on the German Armor Movement Map and move the unit in the direction indicated.
Road Junctions. Each road junction on the German Armor Movement Map is labeled with the hex a German armor unit moves to from that junction. A unit in a hex with a road junction may have a choice of directions to move, as indicated on the map. If a choice is offered, the unit moves in the direction indicated for the target selector shown on the current fire card.
For example, a German armor unit in hex 1321 (D4) moves to 1322 if the ● target selector shows on the fire card, to 1320 if ◆ is on the card, and to 1220 if ▲ is on the card.

D-Day at Omaha Beach 37
German positions vary, requiring US forces to employ various weapons to do the job. Will C company have the demo charges needed to take out that tobruk or were they left on the beach?
German Fire. The first wave landings suffered constant fire from WN po-sitions. Even so, there were moments when fire abated and opportunities presented themselves for maneuver, regrouping and advance. To represent this in the time scale of the game, German positions fire on an unpredict-able basis instead of every turn; but when fire occurs, it can take a high toll—modeling historical loss rates.
German Depth Markers. This design evolution combines the concept of a strength chit and an unknown unit. Each German unit is built of two markers, each adding a strength element and a tactical element (the weapon require-ments) to provide a highly variable mix of German opposition. A German unit without its depth marker is either still forming up into defensive positions, or has suffered losses. The depth marker system also simulates the German habit of assembling ad hoc formations, and reinforcing critical positions with elements from other formations. The US player will sometimes eliminate a unit’s depth marker only to have another take its place before the whole unit can be taken out. The Germans lose their overall depth as the day progress-es—while defeated German units may return to play, eliminated depth does not.
German forces on the high ground. An unrevealed German reinforce-ment unit represents a mobile force whose location has not yet been pin-pointed by US forces, even though the position may be firing on US units. Unrevealed reinforcement units are a tough enemy: A US unit suffering a step loss due to fire from the position becomes disrupted; the unit may not be the target of an artillery or naval barrage; and certain events disrupt US units adjacent to unrevealed German reinforcement units. Unrevealed German WN positions do not share these advantages. WNs gain much of their firepower from fixed fortifications and emplacements, easy for US forces to spot.
Diceless Combat. The combat system combines weapon requirements and strength comparisons with a procedure for revealing the attributes of a German position gradually, depending on the effectiveness of the US at-tack (simply put, if you conduct an attack that fails, you don’t even find out how strong the enemy position is). There are so many variables built into US attacks and German defenses that the dice variable is not needed.
— John H. Butterfield
• If a WN is revealed in this manner, and its depth marker calls for a Tactical Reinforcement, place the reinforcement per 9.4, but face up.
Designer’s NotesD-Day at Omaha Beach did not start out as a solitaire game. In 2005, Joe
Balkoski’s masterful book on the battle, Omaha Beach: D-Day, June 6, 1944, in-spired me to think about a game on the topic. After reading his work and some other histories of the battle, themes for the design emerged. I envisioned a game that evoked the great sacrifice and heroism expended by “the greatest generation” on the beach that day. The game would show how the initiative of the US soldier and field commanders overcame disaster to achieve victory. The movement and combat systems of the game should not just be about num-bers—the mechanics should incorporate intangibles such as leadership, tactics and improvisation. I also wanted the tactical experience to transform as the day progressed through phases –the bloodbath of the first wave landings, closing with the enemy on the bluffs, and taking the battle into the unfamiliar terrain of the bocage on the high ground.
In thinking about the themes and systems of the game it became clear that there would be no upside to playing the Germans. A German player would spend the first several turns using his static WN units to shoot at everything the system would allow him to. If the US forces managed to survive and penetrate the static crust, the German Player would then attempt to stem the tide with a handful of reserve units, restricted by “fog of war” rules imposed to prevent him from deploying those units with historical hindsight.
It was obvious to me that the game system should control the German response, but I still envisioned a game for two players—a cooperative effort with one player controlling the 16th regiment and attached forces, and the other the 116th regiment. I designed the game to support this two-player solitaire concept with a system that splits the action down the middle. Early versions of the design had detailed rules for adjudicating action at the “seam” and it even had each player making some decisions for German deployment and actions in the other player’s sector. However, I dropped these rules as it became clear that they subverted the overall themes and spirit of the game. Playtesters found the sense of cooperation and camaraderie inherent in the gravity of the situation. Detailed rules were not required.
Some notes on specific mechanics:
Weapons and weapon requirements. US infantry companies land with a full complement of weapons and equipment useful in taking German positions. However as the early landing waves lose steps, they lose some of these weap-ons, retaining only the equipment shown on their counters. The defenses of the
Movement Termination. The German Armor Movement Map calls out movement end points in three pavilion hexes adjacent to the beach. A Ger-man armor unit that enters any of these hexes stops moving for the remain-der of the game. It may continue to fire as called for by action results. If an undisrupted German armor unit occupies a movement end point at the end of a turn, you lose the game decisively.
23.51 When a German armor unit moves, its depth marker moves with it. A German armor unit may move through other German units but may not end its move in a hex with another German unit. If directed to do so, move the armor unit one hex further if possible. If this is not possible, move the armor unit one hex less.
23.52 German armor units may only move along primary and secondary roads. Under no circumstances may an armor unit enter a hex not connected to the unit’s current hex by primary or secondary road. German armor may not move along trails.
23.53 A German armor unit may not enter a hex occupied by a US unit, unless conducting the Overrun Action (see 23.4). If directed to enter a US occupied hex when not conducting an overrun, the unit stops moving adjacent to the
US unit. US engineer bases and garrison markers have no effect on German armor movement. German armor may move on mined roads.
23.6 US Actions Against German ArmorGerman armor may be attacked like any other German position, and may suffer disruption and defeat. A defeated German armor unit does not with-draw—remove it from play.
No terrain defense benefit. German armor units receive no benefit from terrain—do not double an armor unit’s strength when attacked in a woods, bocage or building hex.Infantry vs Armor Self Preservation Move. A US infantry unit adjacent to and in the intense field of fire of a German armor unit at the start of the US Action Phase may conduct a self preservation move as a free action. The move must be a one-hex move into a hex not adjacent to the armor unit and not in its intense field of fire.
23.7 Victory Point AdjustmentsFor each German Armor unit that enters the map, you gain 1 victory point, even if subsequently eliminated. If all four enter, add 4 VP’s total.

38 D-Day at Omaha Beach
1) Terrain effects on German Defense are not cumulative. For example, the strength of a German unit in a bocage hex attacked through slope hexsides is only doubled.
2) A water line hex below the current tide level is submerged—entry is prohibited. A unit in a submerged hex at the end of the US Action Phase is eliminated.
3) German defensive benefits for being attacked across a hexside apply only if all adjacent attacking US units are attacking through such hexsides.
4) An HQ unit or general does not receive a climb marker when crossing a bluff. In the extended game, a leader crossing a bluff may move two hexes, if otherwise allowed.
5) A US unit on the high ground may attack across a bluff hexside. Treat the German defender as if being attacked across a slope hexside.
6) A unit may enter a hex or cross a hexside with terrain otherwise prohib-ited to the unit if moving along a road.
Terrain Effect Notes
teRRAIn eFFeCts CHARt
Terrain US Infantry Movement
US Leader Movement
All Other US Units Movement German Defense (1) Extended Game Adjustment
(Turn 17 on)
Yes Yes Yes
Woods / Orchard Yes Yes No, unless entered via road.
Unit strength doubled; depth not.
Buildings Yes Yes Yes Unit and depth strength doubled.
Bocage Yes Yes No, unless entered via road.
Unit and depth strength doubled.
Infantry may move only one hex if entering a bocage hex not via
a road.
Rough No No No
Yes Yes No, unless crossed by a road.
Yes Yes No Unit strength doubled, depth not (3).
These hexsides do not inhibit US movement if in range of an
engineer base.
Slope hexside Yes Yes No, unless crossed by a road.
Unit and depth strength doubled (3).
Bluff hexside Yes, conduct climb action. Yes (4) No, unless crossed
by a road. Attack prohibited (5)Infantry crossing a bluff does not receive a climb marker, but may
only move 1 hex.
Scaleable Cliff hexside Yes, conduct climb cliff action. No No Attack prohibited. Infantry can climb a cliff in two
turns instead of three.
Sheer Cliff hexside No No No Attack prohibited.
Yes Yes Yes (6)Tank units can move more than
one hex through road hexes (17.2).
Mined Road Hex Yes Yes No Treat as a normal road if in range of an engineer base.
Shingle Hexside
Primary Road
Anti-Tank Ditch
Secondary Road
Anti-Tank Wall
Trail
Water Line (2) Beach Beach Obstacle
HighGround
Pavilion/Draw
HedgeHexside
SeawallHexside
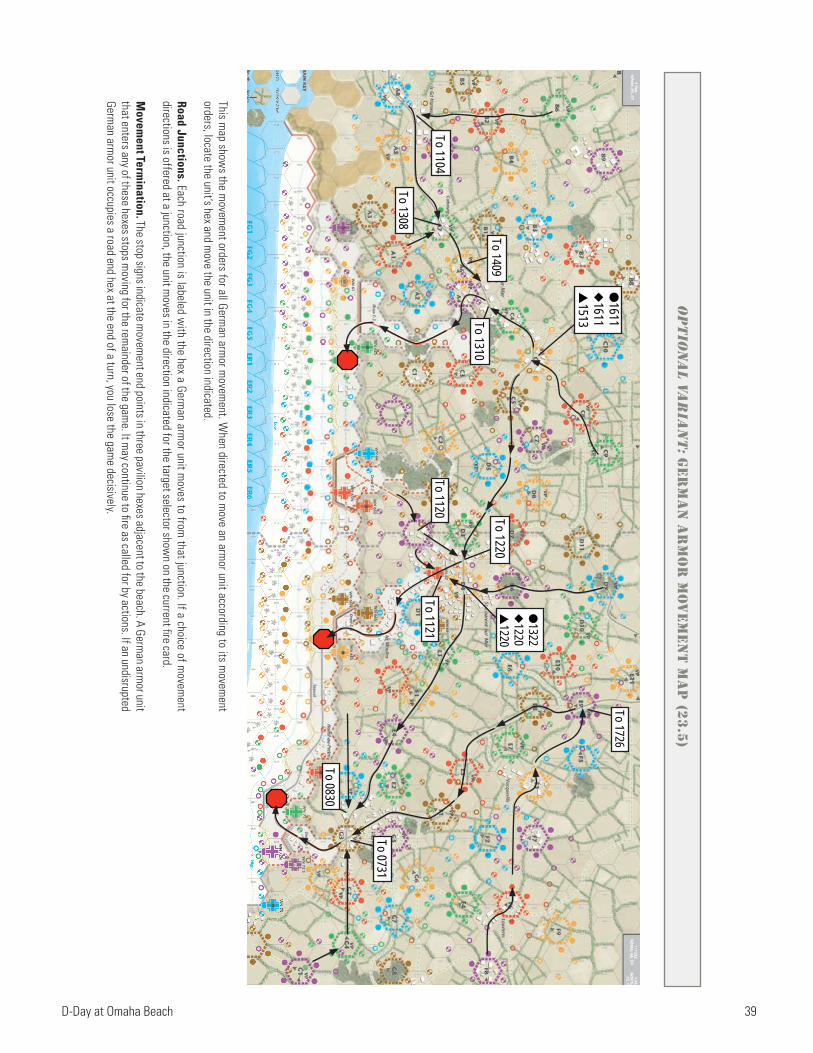
D-Day at Omaha Beach 39
oP
tIo
nA
L VAR
IAn
t: G
eR
MA
n A
RM
oR
Mo
Ve
Me
nt
MA
P (2
3.5)
This map show
s the movem
ent orders for all German arm
or movem
ent. When directed to m
ove an armor unit according to its m
ovement
orders, locate the unit’s hex and move the unit in the direction indicated.
Road Junctions. Each road junction is labeled with the hex a Germ
an armor unit m
oves to from that junction. If a choice of m
ovement
directions is offered at a junction, the unit moves in the direction indicated for the target selector show
n on the current fi re card.
Movem
ent Termination. The stop signs indicate m
ovement end points in three pavilion hexes adjacent to the beach. A Germ
an armor unit
that enters any of these hexes stops moving for the rem
ainder of the game. It m
ay continue to fi re as called for by actions. If an undisrupted Germ
an armor unit occupies a road end hex at the end of a turn, you lose the gam
e decisively.
●
13
22
◆1
22
0
▲1
22
0
To
12
20
To
11
21
To 1
120
To 0
73
1
To 0
830
To 1
310
To 1
409
To 1
308
To 1
104
●
16
11
◆1
61
1
▲1
51
3
To 1
726

40 D-Day at Omaha Beach
Ge
RM
An
AC
tIo
n sU
MM
AR
Y (t
UR
ns
17-32)
Germ
an Fire Card
Action
WN
POSITIO
NREIN
FORCEM
ENT PO
SITION
Optional Variant: G
erman
Arm
or Unit /(see 23.4)
Occupied;/U
S units in field of fire
Occupied;/N
o US
units in field of fireU
noccupied;/in Ger-
man com
munication
Occupied;/U
S units in field of
fire
Occupied;/N
o US units
in field of fire
Unoccupied; in G
erman
comm
unication and within
2 hexes of US unit.
FIREN
o ActionN
o ActionFIRE
No Action
No Action
FIRE OR M
OVE
Fire if US units in field of fire. M
ay hit armor. M
ay hit leader if ★
. Otherwise m
ove up to 4 hexes.
FIREM
ay hit armor (6.36)
No Action
No Action
FIREM
ay hit armor (6.36)
No Action
No Action
FIREM
ay hit leader (11.4)N
o ActionN
o ActionFIREM
ay hit leader (11.4)N
o ActionN
o Action
FIREN
o Action
RE-OCCU
PYPlace elim
inated WN
unit in the position (16.1). N
o fire.
RE-SUPPLY A
ND
FIREPlace Depth m
arker (if none) before firing.
REDEPLO
YCheck 16.3 to see if unit m
oves to new position.
REINFO
RCEVP position: place reinforce-m
ent unit and depth marker
(16.4)/Non-VP position: place
reinforcement unit and depth
marker only if US unit in
intense or steady field of fire.
OVERRU
NM
ove up to 4 hexes; may
move through 1 non-arm
or US-occupied hex. If no m
ove possible and US units in field of fire, fire.
FIRE
MO
RTAR FIRE
Hit US units with
indicated target symbol
within 5 hexes, 2 hexes
on high ground (16.5). Otherw
ise, no action
No Action
FIRE
MO
RTAR FIRE
Hit US units with indicat-
ed target symbol w
ithin 3 hexes (16.5). Otherw
ise, no action.
No Action
MO
VE OR FIRE
Move up to 4 hexes. If no m
ove possible and US units in field of fire, fire.
FIREN
o ActionN
o Action
PATROL
Disrupt all US units in the position’s intense and steady field of fire (16.6). N
o fire.
PATROL
Disrupt one US unit within
3 hexes of position (16.6).N
o Action
POSITIO
N A
ND
FIREM
ove up to 3 hexes, then fire if adjacent to US unit. If no m
ove possible and US units in field of fire, fire.
FIRE
ARTILLERY FIRE
If WN
has artillery, hit one US unit (16.7). Otherw
ise, no action.
No Action
AD
VAN
CE OR
FIREAttem
pt advance if position has advance arrow
and requirem
ents of 16.8 are m
et. Otherw
ise, fire.
AD
VAN
CEAttem
pt advance if posi-tion has advance arrow
and requirem
ents of 16.8 are m
et. Otherwise, no
action.
AM
BU
SHOne US unit w
ith indicated tar-get sym
bol in position’s field of fire is hit, see the Germ
an Fire Chart and 16.9. Otherw
ise, no action
AIM
ED FIRE
Fire if adjacent to US unit. Otherw
ise move up to 4 hexes
RA P M I II