Embed Size (px)
Citation preview

Database Administration Guide

013008
©2008 Blackbaud, Inc. This publication, or any part thereof, may not be reproduced or transmitted in any form or by any means, electronic, or mechanical, including photocopying, recording, storage in an information retrieval system, or otherwise, without the prior written permission of Blackbaud, Inc.
The information in this manual has been carefully checked and is believed to be accurate. Blackbaud, Inc., assumes no responsibility for any inaccuracies, errors, or omissions in this manual. In no event will Blackbaud, Inc., be liable for direct, indirect, special, incidental, or consequential damages resulting from any defect or omission in this manual, even if advised of the possibility of damages.
In the interest of continuing product development, Blackbaud, Inc., reserves the right to make improvements in this manual and the products it describes at any time, without notice or obligation.
All Blackbaud product names appearing herein are trademarks or registered trademarks of Blackbaud, Inc.
All other products and company names mentioned herein are trademarks of their respective holder.
EE/FE/RE/SIS-DatabaseAdministrationGuide-013008
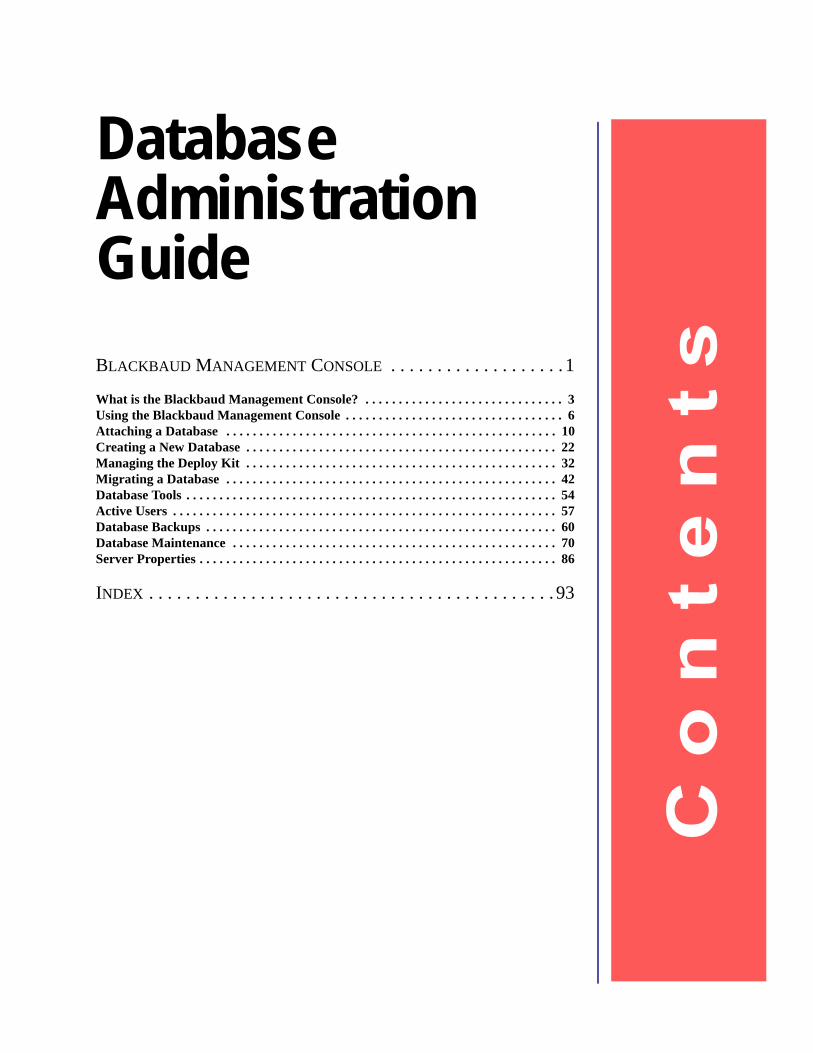
Database Administration GuideBLACKBAUD MANAGEMENT CONSOLE . . . . . . . . . . . . . . . . . . . 1
What is the Blackbaud Management Console? . . . . . . . . . . . . . . . . . . . . . . . . . . . . . . 3Using the Blackbaud Management Console . . . . . . . . . . . . . . . . . . . . . . . . . . . . . . . . . 6Attaching a Database . . . . . . . . . . . . . . . . . . . . . . . . . . . . . . . . . . . . . . . . . . . . . . . . . . 10Creating a New Database . . . . . . . . . . . . . . . . . . . . . . . . . . . . . . . . . . . . . . . . . . . . . . . 22Managing the Deploy Kit . . . . . . . . . . . . . . . . . . . . . . . . . . . . . . . . . . . . . . . . . . . . . . . 32Migrating a Database . . . . . . . . . . . . . . . . . . . . . . . . . . . . . . . . . . . . . . . . . . . . . . . . . . 42Database Tools . . . . . . . . . . . . . . . . . . . . . . . . . . . . . . . . . . . . . . . . . . . . . . . . . . . . . . . . 54Active Users . . . . . . . . . . . . . . . . . . . . . . . . . . . . . . . . . . . . . . . . . . . . . . . . . . . . . . . . . . 57Database Backups . . . . . . . . . . . . . . . . . . . . . . . . . . . . . . . . . . . . . . . . . . . . . . . . . . . . . 60Database Maintenance . . . . . . . . . . . . . . . . . . . . . . . . . . . . . . . . . . . . . . . . . . . . . . . . . 70Server Properties . . . . . . . . . . . . . . . . . . . . . . . . . . . . . . . . . . . . . . . . . . . . . . . . . . . . . . 86
INDEX . . . . . . . . . . . . . . . . . . . . . . . . . . . . . . . . . . . . . . . . . . . . 93


Blackbaud Management Console
Contents
What is the Blackbaud Management Console . . . . . . . . . . . . . . . . . . . . . . . . . .3Using the Blackbaud Management Console . . . . . . . . . . . . . . . . . . . . . . . . . . .6SQL Server 2005 Requirements . . . . . . . . . . . . . . . . . . . . . . . . . . . . . . . . . . . . . . .7Blackbaud Management Console Wizards . . . . . . . . . . . . . . . . . . . . . . . . . . . . . . .8Database Utilities . . . . . . . . . . . . . . . . . . . . . . . . . . . . . . . . . . . . . . . . . . . . . . . . . .9Server Utilities . . . . . . . . . . . . . . . . . . . . . . . . . . . . . . . . . . . . . . . . . . . . . . . . . . .10Menu Commands . . . . . . . . . . . . . . . . . . . . . . . . . . . . . . . . . . . . . . . . . . . . . . . . .10Attaching a Database . . . . . . . . . . . . . . . . . . . . . . . . . . . . . . . . . . . . . . . . . . . . .10Creating a New Database . . . . . . . . . . . . . . . . . . . . . . . . . . . . . . . . . . . . . . . . .22Managing the Deploy Kit . . . . . . . . . . . . . . . . . . . . . . . . . . . . . . . . . . . . . . . . .32Migrating a Database . . . . . . . . . . . . . . . . . . . . . . . . . . . . . . . . . . . . . . . . . . . .42Database Tools . . . . . . . . . . . . . . . . . . . . . . . . . . . . . . . . . . . . . . . . . . . . . . . . . .54 Viewing Database Properties . . . . . . . . . . . . . . . . . . . . . . . . . . . . . . . . . . . . . . . .26Taking a Database Offline . . . . . . . . . . . . . . . . . . . . . . . . . . . . . . . . . . . . . . . . . .55Detaching a Database . . . . . . . . . . . . . . . . . . . . . . . . . . . . . . . . . . . . . . . . . . . . .56Active Users . . . . . . . . . . . . . . . . . . . . . . . . . . . . . . . . . . . . . . . . . . . . . . . . . . . .57Sending Messages to Users . . . . . . . . . . . . . . . . . . . . . . . . . . . . . . . . . . . . . . . . .57Disconnecting a User . . . . . . . . . . . . . . . . . . . . . . . . . . . . . . . . . . . . . . . . . . . . . .59Database Backups . . . . . . . . . . . . . . . . . . . . . . . . . . . . . . . . . . . . . . . . . . . . . . .60Scheduling a Backup . . . . . . . . . . . . . . . . . . . . . . . . . . . . . . . . . . . . . . . . . . . . . .60Running a Database Backup . . . . . . . . . . . . . . . . . . . . . . . . . . . . . . . . . . . . . . . .64Restoring from a Backup . . . . . . . . . . . . . . . . . . . . . . . . . . . . . . . . . . . . . . . . . . .66Viewing Backup History . . . . . . . . . . . . . . . . . . . . . . . . . . . . . . . . . . . . . . . . . . .68Database Maintenance . . . . . . . . . . . . . . . . . . . . . . . . . . . . . . . . . . . . . . . . . . .70Scheduling Database Maintenance . . . . . . . . . . . . . . . . . . . . . . . . . . . . . . . . . . .70Rebuilding Indexes . . . . . . . . . . . . . . . . . . . . . . . . . . . . . . . . . . . . . . . . . . . . . . .75Updating Statistics . . . . . . . . . . . . . . . . . . . . . . . . . . . . . . . . . . . . . . . . . . . . . . . .76Shrinking the Database . . . . . . . . . . . . . . . . . . . . . . . . . . . . . . . . . . . . . . . . . . . .78Checking Database Integrity . . . . . . . . . . . . . . . . . . . . . . . . . . . . . . . . . . . . . . . .79Moving Database Files . . . . . . . . . . . . . . . . . . . . . . . . . . . . . . . . . . . . . . . . . . . .81Viewing Maintenance History . . . . . . . . . . . . . . . . . . . . . . . . . . . . . . . . . . . . . . .83Server Properties . . . . . . . . . . . . . . . . . . . . . . . . . . . . . . . . . . . . . . . . . . . . . . . .86
CH A PT E R 12
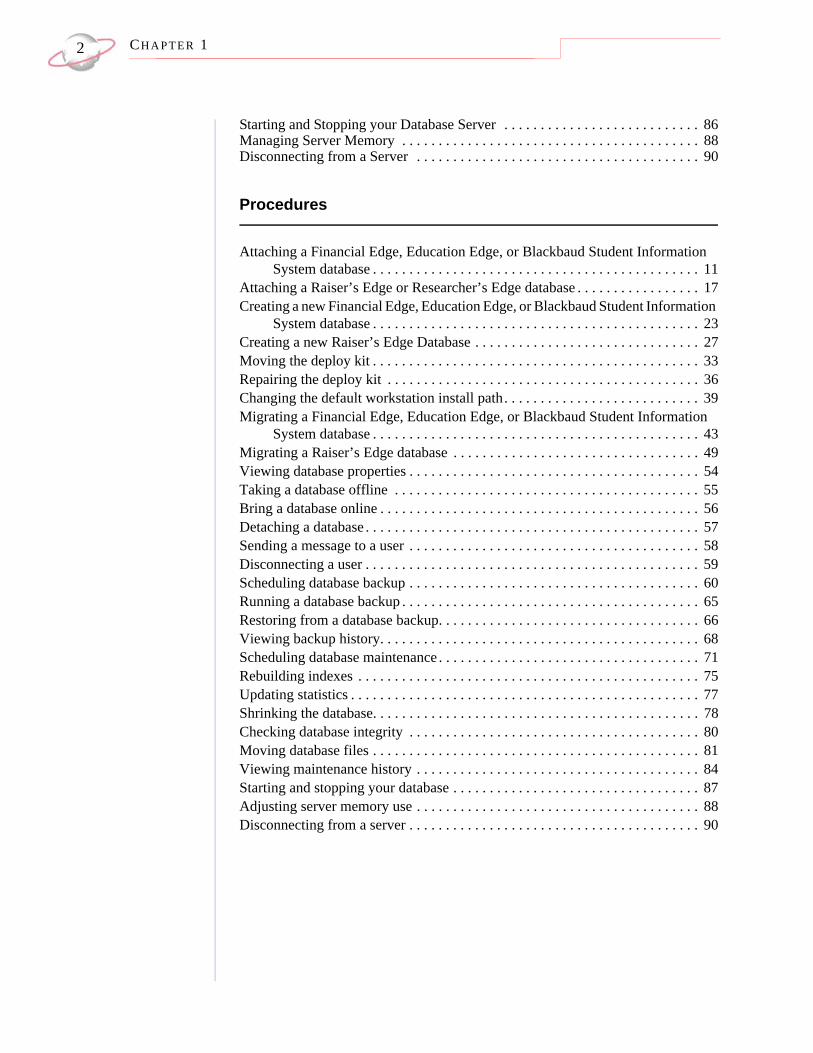
Starting and Stopping your Database Server . . . . . . . . . . . . . . . . . . . . . . . . . . . 86Managing Server Memory . . . . . . . . . . . . . . . . . . . . . . . . . . . . . . . . . . . . . . . . . 88Disconnecting from a Server . . . . . . . . . . . . . . . . . . . . . . . . . . . . . . . . . . . . . . . 90
Procedures
Attaching a Financial Edge, Education Edge, or Blackbaud Student Information System database . . . . . . . . . . . . . . . . . . . . . . . . . . . . . . . . . . . . . . . . . . . . . 11
Attaching a Raiser’s Edge or Researcher’s Edge database . . . . . . . . . . . . . . . . . 17Creating a new Financial Edge, Education Edge, or Blackbaud Student Information
System database . . . . . . . . . . . . . . . . . . . . . . . . . . . . . . . . . . . . . . . . . . . . . 23Creating a new Raiser’s Edge Database . . . . . . . . . . . . . . . . . . . . . . . . . . . . . . . 27Moving the deploy kit . . . . . . . . . . . . . . . . . . . . . . . . . . . . . . . . . . . . . . . . . . . . . 33Repairing the deploy kit . . . . . . . . . . . . . . . . . . . . . . . . . . . . . . . . . . . . . . . . . . . 36Changing the default workstation install path. . . . . . . . . . . . . . . . . . . . . . . . . . . 39Migrating a Financial Edge, Education Edge, or Blackbaud Student Information
System database . . . . . . . . . . . . . . . . . . . . . . . . . . . . . . . . . . . . . . . . . . . . . 43Migrating a Raiser’s Edge database . . . . . . . . . . . . . . . . . . . . . . . . . . . . . . . . . . 49Viewing database properties . . . . . . . . . . . . . . . . . . . . . . . . . . . . . . . . . . . . . . . . 54Taking a database offline . . . . . . . . . . . . . . . . . . . . . . . . . . . . . . . . . . . . . . . . . . 55Bring a database online . . . . . . . . . . . . . . . . . . . . . . . . . . . . . . . . . . . . . . . . . . . . 56Detaching a database . . . . . . . . . . . . . . . . . . . . . . . . . . . . . . . . . . . . . . . . . . . . . . 57Sending a message to a user . . . . . . . . . . . . . . . . . . . . . . . . . . . . . . . . . . . . . . . . 58Disconnecting a user . . . . . . . . . . . . . . . . . . . . . . . . . . . . . . . . . . . . . . . . . . . . . . 59Scheduling database backup . . . . . . . . . . . . . . . . . . . . . . . . . . . . . . . . . . . . . . . . 60Running a database backup . . . . . . . . . . . . . . . . . . . . . . . . . . . . . . . . . . . . . . . . . 65Restoring from a database backup. . . . . . . . . . . . . . . . . . . . . . . . . . . . . . . . . . . . 66Viewing backup history. . . . . . . . . . . . . . . . . . . . . . . . . . . . . . . . . . . . . . . . . . . . 68Scheduling database maintenance . . . . . . . . . . . . . . . . . . . . . . . . . . . . . . . . . . . . 71Rebuilding indexes . . . . . . . . . . . . . . . . . . . . . . . . . . . . . . . . . . . . . . . . . . . . . . . 75Updating statistics . . . . . . . . . . . . . . . . . . . . . . . . . . . . . . . . . . . . . . . . . . . . . . . . 77Shrinking the database. . . . . . . . . . . . . . . . . . . . . . . . . . . . . . . . . . . . . . . . . . . . . 78Checking database integrity . . . . . . . . . . . . . . . . . . . . . . . . . . . . . . . . . . . . . . . . 80Moving database files . . . . . . . . . . . . . . . . . . . . . . . . . . . . . . . . . . . . . . . . . . . . . 81Viewing maintenance history . . . . . . . . . . . . . . . . . . . . . . . . . . . . . . . . . . . . . . . 84Starting and stopping your database . . . . . . . . . . . . . . . . . . . . . . . . . . . . . . . . . . 87Adjusting server memory use . . . . . . . . . . . . . . . . . . . . . . . . . . . . . . . . . . . . . . . 88Disconnecting from a server . . . . . . . . . . . . . . . . . . . . . . . . . . . . . . . . . . . . . . . . 90

BL A C K B A U D MA N A G E M E N T CO N S O L E 3
Welcome to the Database Administration Guide. This guide was written to help you successfully use the Blackbaud Management Console. The Blackbaud Management Console houses database maintenance utilities that help you better manage your database. From the Blackbaud Management Console, you can also start and stop your server and view important server information.
Information in this guide is subject to
change. Please visit our website at www.blackbaud.com to view the most current information. To access our system recommendations, select System Recommendations from the Support menu on our website.
For example, using the Blackbaud Management Console, you can run backups, create new databases, disconnect users, and change deploy kit settings. All the functionality of the Blackbaud Management Console is discussed in this guide.
What is the Blackbaud Management Console?The Blackbaud Management Console helps you manage your database. The management console includes links to several database-maintenance wizards and utilities. The following section offers a brief overview of all the wizards and utilities available.
For Read-Only Database Assistance
(formerly RE:Open) users, Microsoft SQL Server Standard/Enterprise provides read and write access to the database. If a user writes a Microsoft Access database connected to The Raiser’s Edge or The Financial Edge connected through the SQL Server database and deletes a record in the Access database, that record is deleted in The Raiser’s Edge or The Financial Edge. We recommend you use read-only access. If you write to the database, you will corrupt the data and invalidate your support and maintenance agreement.
Active Users. The Active users category, available in the Installed products pane tree view of the Blackbaud Management Console screen, includes several utilities. You can view active users in your database, send messages to active users, and disconnect active users.• Viewing active users: In the Active Users pane, a list of all workstation
users currently working in your database(s) appears. For detailed instructions about how to view users active in your database(s), see “Active Users” on page 57.
• Send a message to active users: In the Active Users pane, click Message to send messages to all or selected database users. For detailed instructions about how to send a message to active users, see “Sending Messages to Users” on page 57.
• Disconnect active users: In the Active Users pane, click Disconnect to disconnect all or selected database users. For detailed instructions about how to disconnect an active user, see “Disconnecting a User” on page 59.
Attach Database. If you have an existing Microsoft SQL Server database you use with your Blackbaud products, you can attach the database to your server.Even if you run a full version of SQL Server 2000 Standard or Enterprise, you must use the Blackbaud Management Console to attach databases. If you do not use the Blackbaud Management Console, you cannot access the databases from The Raiser’s Edge, The Education Edge, The Financial Edge, Blackbaud Student Information System, or The Researcher’s Edge.For detailed instructions about how to attach a database, see “Attaching a Database” on page 10.
Backup. The Backup category, available in the Installed products pane tree view of the Blackbaud Management Console screen, includes several utilities. You can schedule a backup of your database to run regularly at a specific time, run a backup of your database(s), or restore your database from a backup file.

CH A PT E R 14
• Perform Backup: When you click Backup in the Perform Backup frame, you can run a full or compressed backup of your database while users continue working in the program. The full backup saves a complete copy of your database in a directory you specify. The compressed backup compresses your database files into a single Zip file and deletes the copies. For detailed instructions about how to back up a database, see “Running a Database Backup” on page 64.
• Restore from Backup: The Blackbaud Management Console makes restoring your database from a backup simple. If you use the Blackbaud Management Console to generate your backup file, click Restore in the Restore from Backup frame and complete a few easy steps. This process works with full and compressed backups. For detailed instructions about how to restore a database from a backup, see “Restoring from a Backup” on page 66.
• Schedule Backup: When you click Schedule in the Schedule Backup frame, you can establish when your database is automatically backed up. You select the days of the week and time you want the backup to run. For detailed instructions about how to schedule a backup, see “Scheduling a Backup” on page 60.
Bring <database name> online. After you take a database offline, you may need to bring it back online at a later date. With the Blackbaud Management Console, you can do this easily. For detailed instructions about how to bring a database online, see “Bring a Database Online” on page 55
Create New Database. Users of The Raiser’s Edge, The Financial Edge, The Education Edge, and Blackbaud Student Information System who are new to Blackbaud software or purchase additional databases must use the Create New Database Wizard to create a database to use with the program. For detailed instructions about how to create a new database, see “Creating a New Database” on page 22.
Detach <database name>. The Detach <database name> utility, accessed from the right-click and Tools menu, enables you to disconnect the database currently connected to the program. You can use the Attach Database Wizard, also available in the Blackbaud Management Console, to attach any other database in which you want to work. For detailed instructions about how to detach a database, see “Detaching a Database” on page 56.
If you are an existing Raiser’s Edge or
Financial Edge user and update to a newer version of the software, we recommend you refer to the Raiser’s Edge Update Guide or the Financial Edge Update Guide included with the software package when you update the program. The information included in the Database Administration Guide is geared toward database maintenance, not the updating process.
Maintenance. The Maintenance category, available in the tree view of the Installed products pane in the Blackbaud Management Console screen, includes several utilities.• Schedule Maintenance: Using the Blackbaud Management Console, you
can schedule various database maintenance options to run at specific intervals. For example, you can select to automatically rebuild your database indexes at 12 a.m. every Saturday. For detailed instructions about how to schedule database maintenance, see “Scheduling Database Maintenance” on page 70.
• Rebuild Indexes: Using the Blackbaud Management Console, you can rebuild database indexes to reorganize the storage of the index data and remove fragmentation. For detailed instructions about how to rebuild database indexes, see “Rebuilding Indexes” on page 75.
BL A C K B A U D MA N A G E M E N T CO N S O L E 5
• Update Statistics: Using the Blackbaud Management Console, you can update optimizer statistics. This process optimizes database performance by recalculating information about the organization of key values in indexes used by the database engine. For detailed instructions about how to update optimizer statistics, see “Updating Statistics” on page 76.
• Shrink Database: Using the Blackbaud Management Console, you can shrink your database to reclaim vacated space. For detailed instructions about how to shrink the database, see “Shrinking the Database” on page 78.
• Check Integrity: Using the Blackbaud Management Console, you can run a validation to check database integrity. We recommend you run this utility before you make changes to your system, such as upgrading hardware or software. For detailed instructions about how to check the database integrity, see “Checking Database Integrity” on page 79.
Manage Deploy Kit. Users of The Raiser’s Edge, The Financial Edge, The Education Edge, and Blackbaud Student Information System can use the Deploy Kit Wizard, available from the Manage Deploy Kit frame on the Blackbaud Management Console screen, to create, update, and move the deployment kit used by your workstations to access the program. For detailed instructions about how to manage the deploy kit, see “Managing the Deploy Kit” on page 32.
Migrate Database. Users of The Raiser’s Edge, The Financial Edge, The Education Edge, and Blackbaud Student Information System can use the Blackbaud Management Console to migrate existing Blackbaud ASA databases into Microsoft SQL Server. For detailed instructions about how to migrate a database, see “Migrating a Database” on page 42.
To use Crystal Reports to run reports directly
off a SQL Server database running SQL Server Standard, SQL Server Enterprise, or MSDE with Read-Only Database Assistance, a Crystal Reports Professional license is required. For information about purchasing Crystal Reports Professional licenses, contact your account representative or send an email request to [email protected].
Servers. Using the Blackbaud Management Console, you can stop, start, and pause your server; disconnect from your server; and manage server memory use.• Stop/Start/Pause Database: Using the Blackbaud Management Console,
you can start and stop your database server. When you stop a database, users cannot log in. For detailed instructions about how to start, stop, and pause your server, see “Starting, Stopping, and Pausing your Database Server” on page 86.
• Disconnect from <server name>: To access a Microsoft SQL Server, the Blackbaud Management Console must first establish a connection to the server. This connection is established automatically when you run the installation or update. Afterward, you can disconnect the Blackbaud Management Console from a server without affecting user access to the data. For detailed instructions about how to disconnect from a server, see “Disconnecting from a Server” on page 90.
• Manage Server Memory Use: Using the Blackbaud Management Console, you can configure server memory use. We recommend only experienced system administrator’s or certified SQL Server technicians adjust the server memory settings. For detailed instructions about how to manage server memory, see “Managing Server Memory” on page 88.
CH A PT E R 16
Take <database name> offline. Using the Blackbaud Management Console, you can take a database offline. This means the database is closed, marked offline, and cannot be modified. When you bring the database back online, the database is open and available for use. Online is the default setting. For detailed instructions about how to take a database offline, see “Taking a Database Offline” on page 55.
Using the Blackbaud Management Console
If you have version 7.5 or earlier of
The Raiser’s Edge installed, you will have two Blackbaud Management Consoles on the server after you install The Financial Edge.
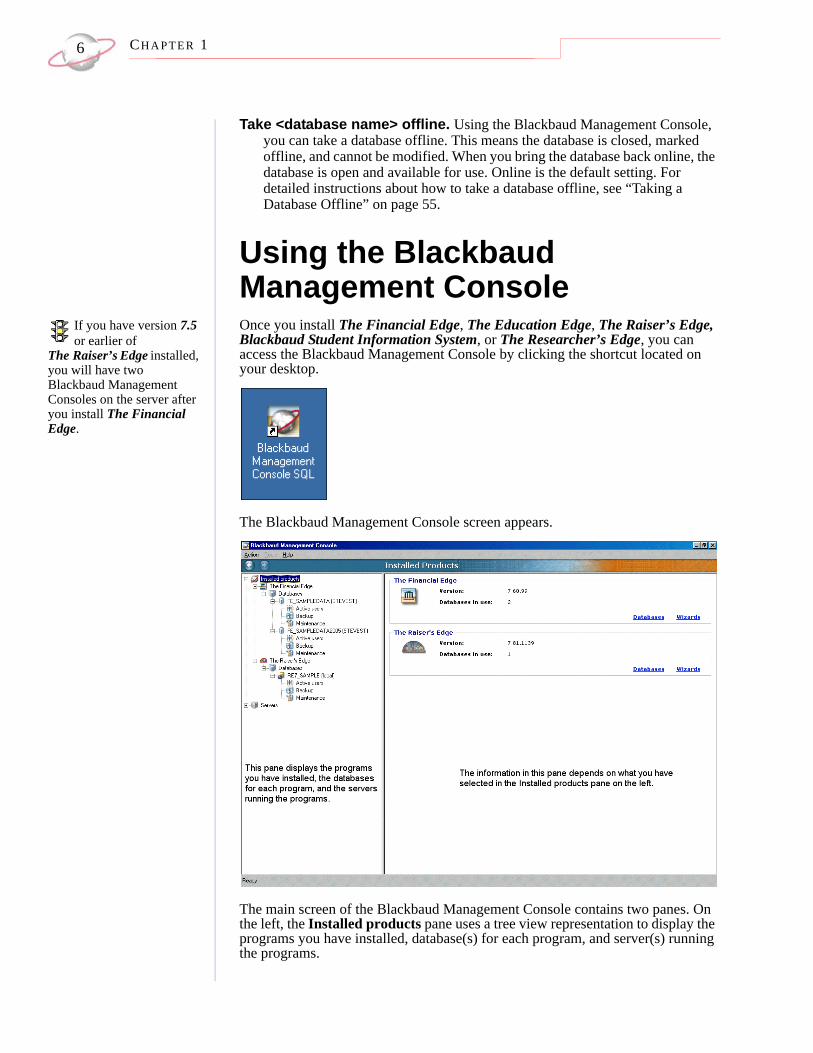
Once you install The Financial Edge, The Education Edge, The Raiser’s Edge, Blackbaud Student Information System, or The Researcher’s Edge, you can access the Blackbaud Management Console by clicking the shortcut located on your desktop.
The Blackbaud Management Console screen appears.
The main screen of the Blackbaud Management Console contains two panes. On the left, the Installed products pane uses a tree view representation to display the programs you have installed, database(s) for each program, and server(s) running the programs.
BL A C K B A U D MA N A G E M E N T CO N S O L E 7
You can access the Blackbaud
Management Console help file from the Help menu.
The information in the pane on the right depends on your selection in the Installed products pane. For example, if you select The Financial Edge, The Education Edge, Blackbaud Student Information System, The Raiser’s Edge, or The Researcher’s Edge in the Installed products pane, the database wizards appear. If you select Servers in the Installed products pane, server information appears.To expand and display all the database and server information in the tree view, click the plus signs (+) in the Installed products pane. To hide the database and server information in the tree view, click the minus signs (-) in the Installed products pane. There are multiple ways to access the functionality housed in the Blackbaud Management Console. To access the database wizards, select The Financial Edge, The Education Edge, Blackbaud Student Information System, The Raiser’s Edge, or The Researcher’s Edge in the Installed products pane, or click the Wizards link in the right pane. You can also use the Tools menu to access the database wizards.To navigate through the Blackbaud Management Console, use the Back and Forward buttons located on the toolbar
SQL Server 2005 RequirementsIf you use SQL Server 2005 with the Blackbaud Management Console, you must do as follows:• To each Microsoft Windows user or user group that accesses
The Raiser's Edge, a SQL Server 2005 administrator using Windows Only Authentication must apply the “View Server State” permission.
• On the machine running the Blackbaud Management Console, install SQL Server 2005 client tools.
CH A PT E R 18
Blackbaud Management Console WizardsThe programs you have installed appear in the
Installed products pane.
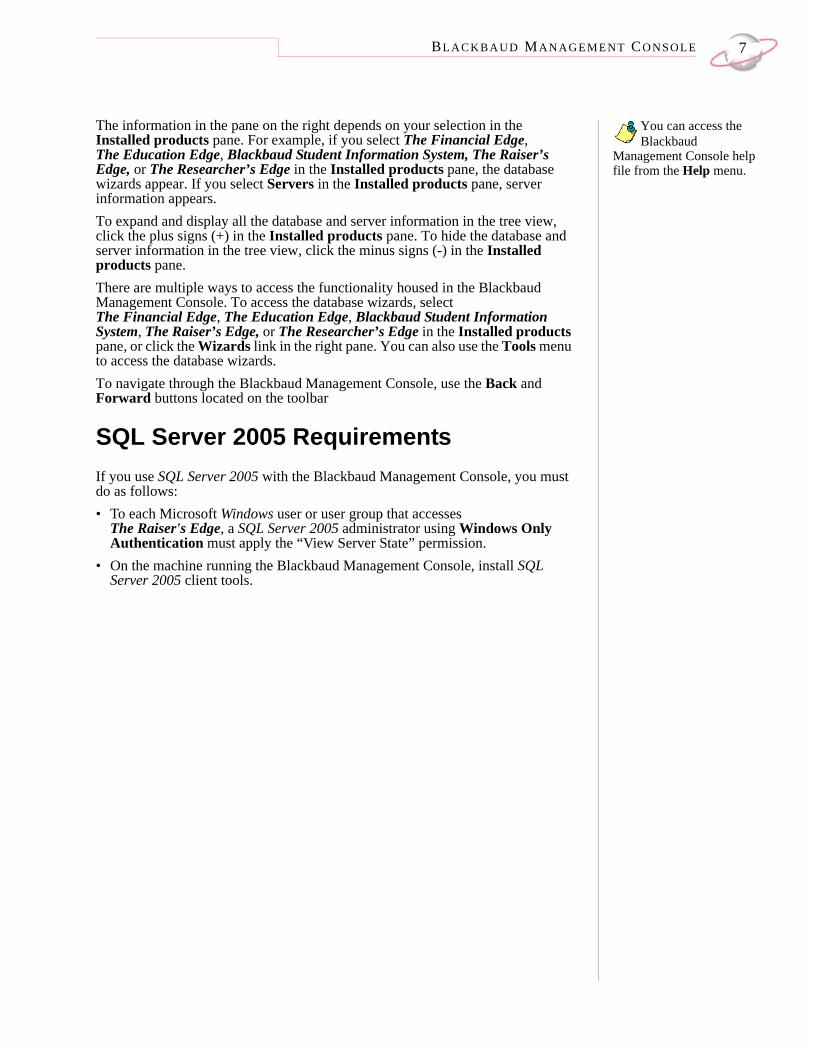
To access the various Blackbaud Management Console wizards available, select a product in Installed products pane, locate the wizard to run in the right pane, and click Run Now. This guide includes detailed instructions on how to work in all wizards available in the Blackbaud Management Console.
If you have the standalone version of
The Raiser’s Edge installed, only the Attach Database, Create New Database, and Migrate Database wizards appear on the Blackbaud Management screen.
For a definition of each wizard, see “What is the Blackbaud Management Console?” on page 3.
BL A C K B A U D MA N A G E M E N T CO N S O L E 9
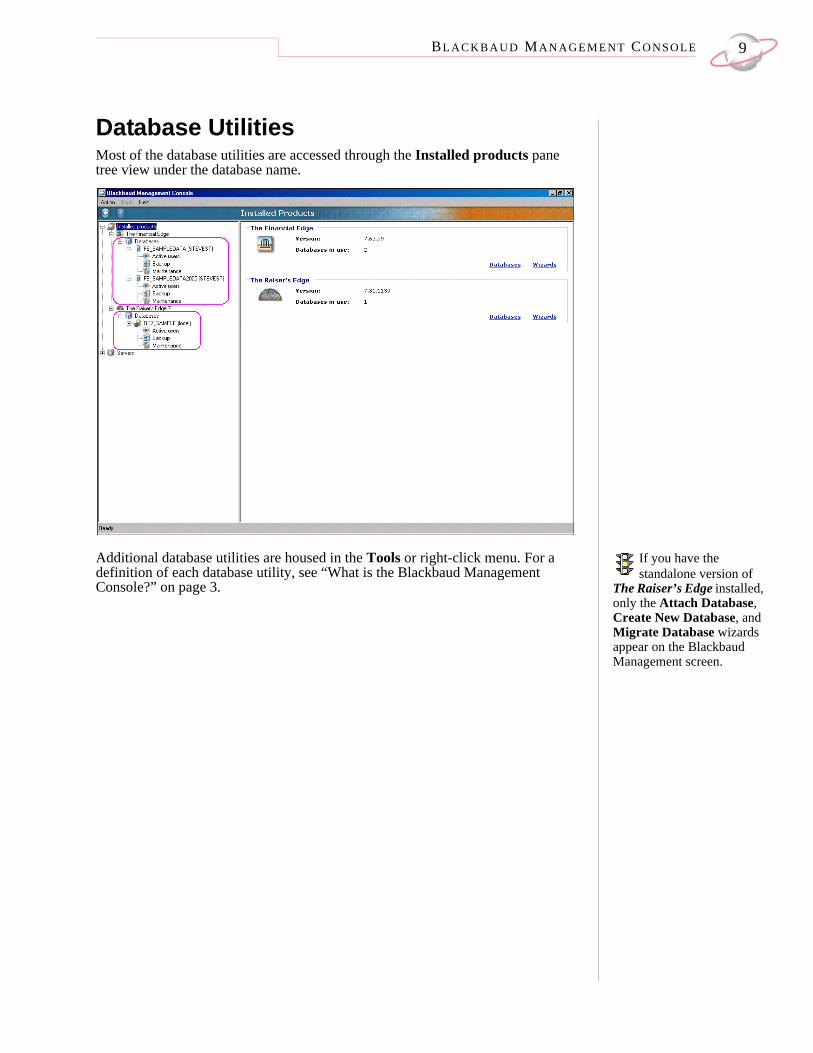
Database UtilitiesMost of the database utilities are accessed through the Installed products pane tree view under the database name.
If you have the standalone version of
The Raiser’s Edge installed, only the Attach Database, Create New Database, and Migrate Database wizards appear on the Blackbaud Management screen.
Additional database utilities are housed in the Tools or right-click menu. For a definition of each database utility, see “What is the Blackbaud Management Console?” on page 3.

CH A PT E R 110
Server UtilitiesTo access the server utilities, click the Servers category in the Installed products pane tree view. The utilities appear in the right pane.
Additional server utilities are housed in the Tools menu or right-click menu. For a definition of each server utility, see “What is the Blackbaud Management Console?” on page 3.
Menu CommandsThe Blackbaud Management Console contains three menus. You use these menu commands on the toolbar to access Blackbaud Management Console functionality. The Tools menu is active only for certain functionality.Action. From the Action menu, you exit the Blackbaud Management Console at
any time.Tools. From the Tools menu, you access a number of database tools and
maintenance functionality, as well as database user information. The options on the Tools menu vary depending on your selection in the Installed products pane.
Help. From the Help menu, you access the Blackbaud Management Console help file and Blackbaud Management Console program information.
Attaching a DatabaseIf you have an existing Blackbaud Microsoft SQL Server database, you use the Attach Database Wizard to attach it to the Blackbaud Management Console. This feature is useful if you move or detach a database.
BL A C K B A U D MA N A G E M E N T CO N S O L E 11
The Attach Database Wizard is only for
attaching a database that has already migrated to SQL Server.
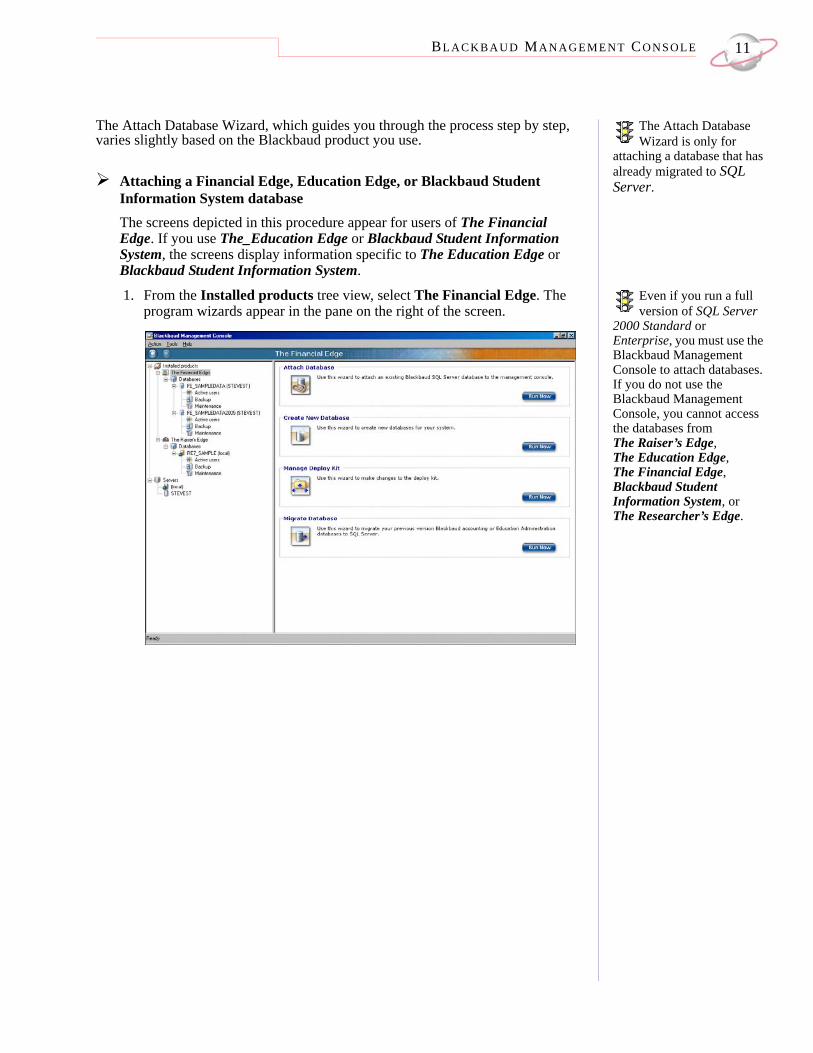
The Attach Database Wizard, which guides you through the process step by step, varies slightly based on the Blackbaud product you use.
Attaching a Financial Edge, Education Edge, or Blackbaud Student Information System databaseThe screens depicted in this procedure appear for users of The Financial Edge. If you use The_Education Edge or Blackbaud Student Information System, the screens display information specific to The Education Edge or Blackbaud Student Information System.
Even if you run a full version of SQL Server
2000 Standard or Enterprise, you must use the Blackbaud Management Console to attach databases. If you do not use the Blackbaud Management Console, you cannot access the databases from The Raiser’s Edge, The Education Edge, The Financial Edge, Blackbaud Student Information System, or The Researcher’s Edge.
1. From the Installed products tree view, select The Financial Edge. The program wizards appear in the pane on the right of the screen.
CH A PT E R 112
To run the wizard, you can also click the icons
that appear in the wizard frames or use the Tools menu.
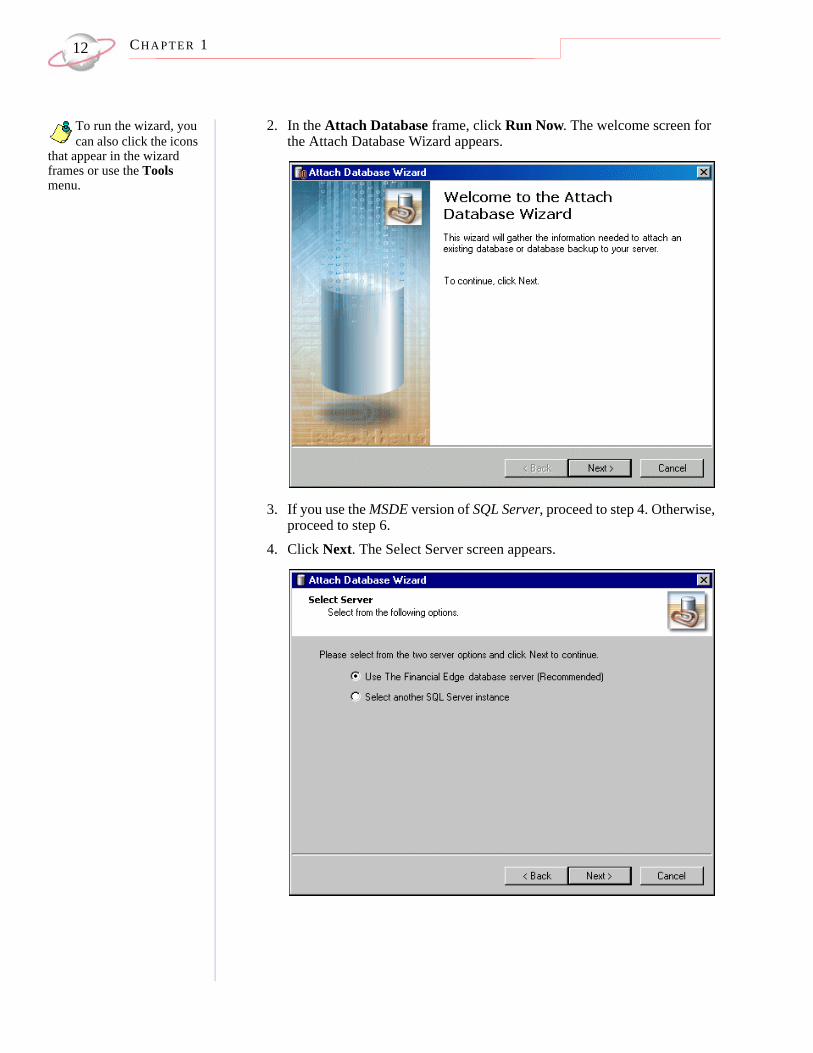
2. In the Attach Database frame, click Run Now. The welcome screen for the Attach Database Wizard appears.
3. If you use the MSDE version of SQL Server, proceed to step 4. Otherwise, proceed to step 6.
4. Click Next. The Select Server screen appears.
BL A C K B A U D MA N A G E M E N T CO N S O L E 13
Due to MSDE size restrictions, if your
database is larger than 1.8 gigs, mark Select another SQL Server instance.
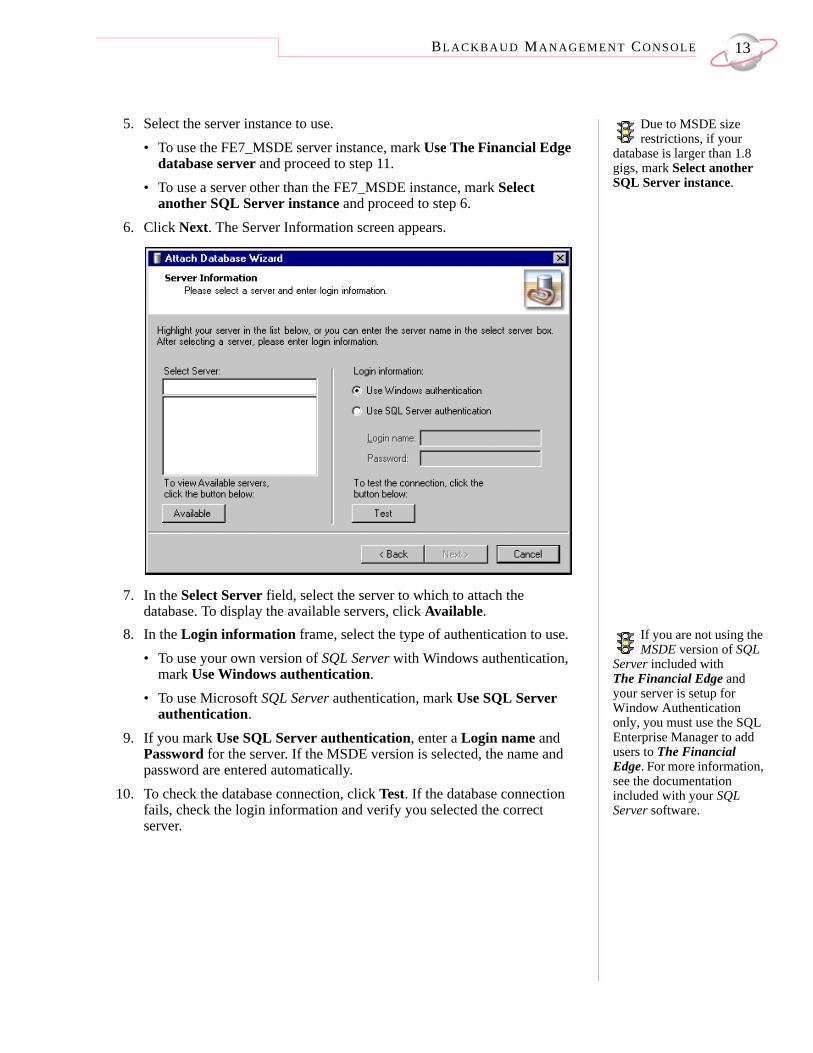
5. Select the server instance to use.• To use the FE7_MSDE server instance, mark Use The Financial Edge
database server and proceed to step 11.• To use a server other than the FE7_MSDE instance, mark Select
another SQL Server instance and proceed to step 6.6. Click Next. The Server Information screen appears.
7. In the Select Server field, select the server to which to attach the database. To display the available servers, click Available.
If you are not using the MSDE version of SQL
Server included with The Financial Edge and your server is setup for Window Authentication only, you must use the SQL Enterprise Manager to add users to The Financial Edge. For more information, see the documentation included with your SQL Server software.
8. In the Login information frame, select the type of authentication to use. • To use your own version of SQL Server with Windows authentication,
mark Use Windows authentication. • To use Microsoft SQL Server authentication, mark Use SQL Server
authentication. 9. If you mark Use SQL Server authentication, enter a Login name and
Password for the server. If the MSDE version is selected, the name and password are entered automatically.
10. To check the database connection, click Test. If the database connection fails, check the login information and verify you selected the correct server.
CH A PT E R 114
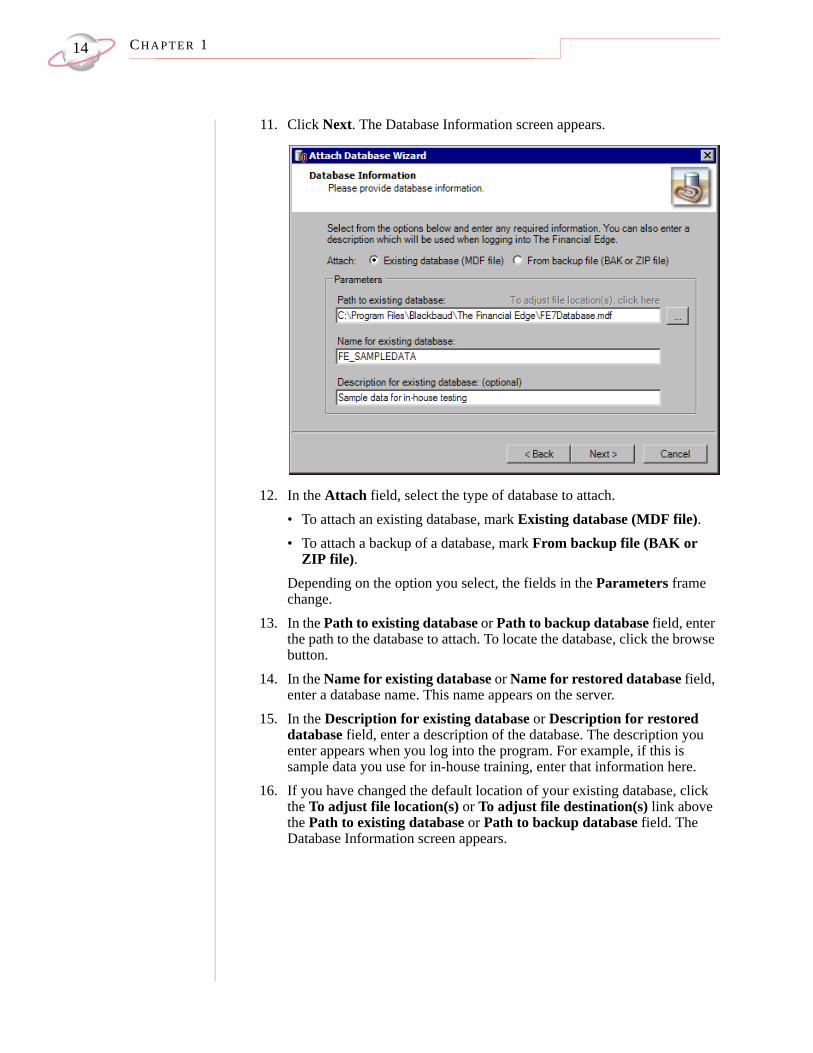
11. Click Next. The Database Information screen appears.
12. In the Attach field, select the type of database to attach.• To attach an existing database, mark Existing database (MDF file). • To attach a backup of a database, mark From backup file (BAK or
ZIP file).Depending on the option you select, the fields in the Parameters frame change.
13. In the Path to existing database or Path to backup database field, enter the path to the database to attach. To locate the database, click the browse button.
14. In the Name for existing database or Name for restored database field, enter a database name. This name appears on the server.
15. In the Description for existing database or Description for restored database field, enter a description of the database. The description you enter appears when you log into the program. For example, if this is sample data you use for in-house training, enter that information here.
16. If you have changed the default location of your existing database, click the To adjust file location(s) or To adjust file destination(s) link above the Path to existing database or Path to backup database field. The Database Information screen appears.
BL A C K B A U D MA N A G E M E N T CO N S O L E 15
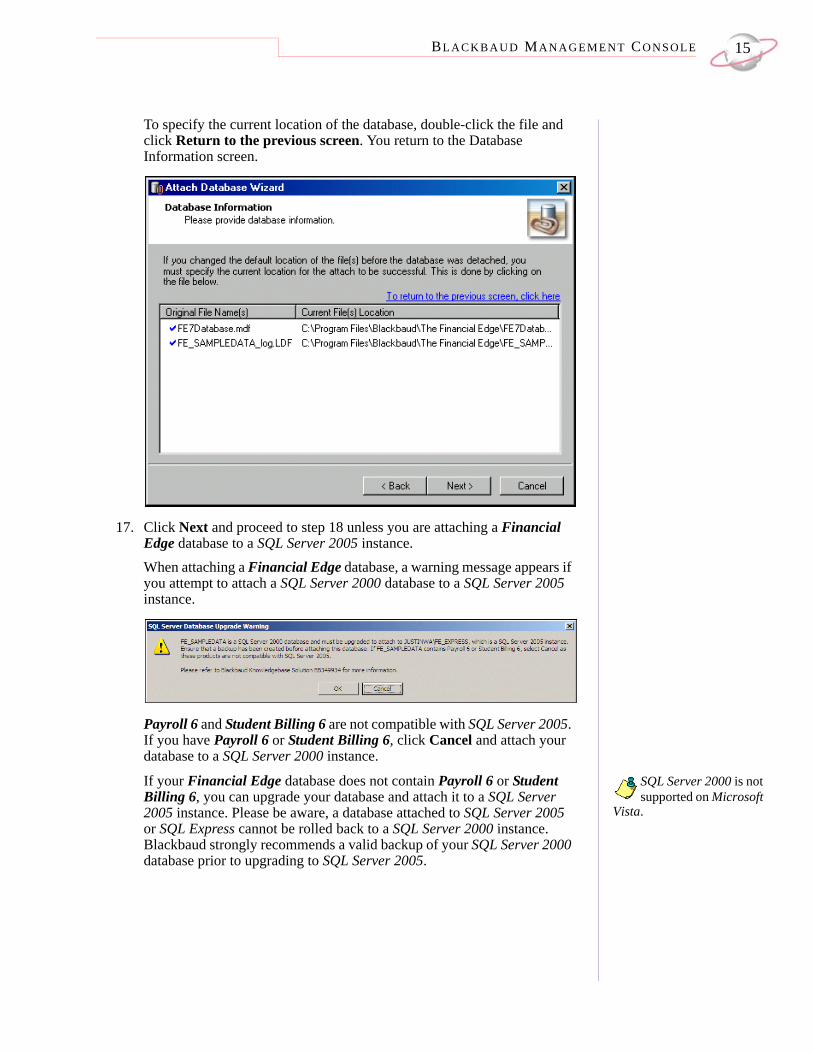
To specify the current location of the database, double-click the file and click Return to the previous screen. You return to the Database Information screen.
17. Click Next and proceed to step 18 unless you are attaching a Financial Edge database to a SQL Server 2005 instance. When attaching a Financial Edge database, a warning message appears if you attempt to attach a SQL Server 2000 database to a SQL Server 2005 instance.
Payroll 6 and Student Billing 6 are not compatible with SQL Server 2005. If you have Payroll 6 or Student Billing 6, click Cancel and attach your database to a SQL Server 2000 instance.
SQL Server 2000 is not supported on Microsoft
Vista.
If your Financial Edge database does not contain Payroll 6 or Student Billing 6, you can upgrade your database and attach it to a SQL Server 2005 instance. Please be aware, a database attached to SQL Server 2005 or SQL Express cannot be rolled back to a SQL Server 2000 instance. Blackbaud strongly recommends a valid backup of your SQL Server 2000 database prior to upgrading to SQL Server 2005.
CH A PT E R 116
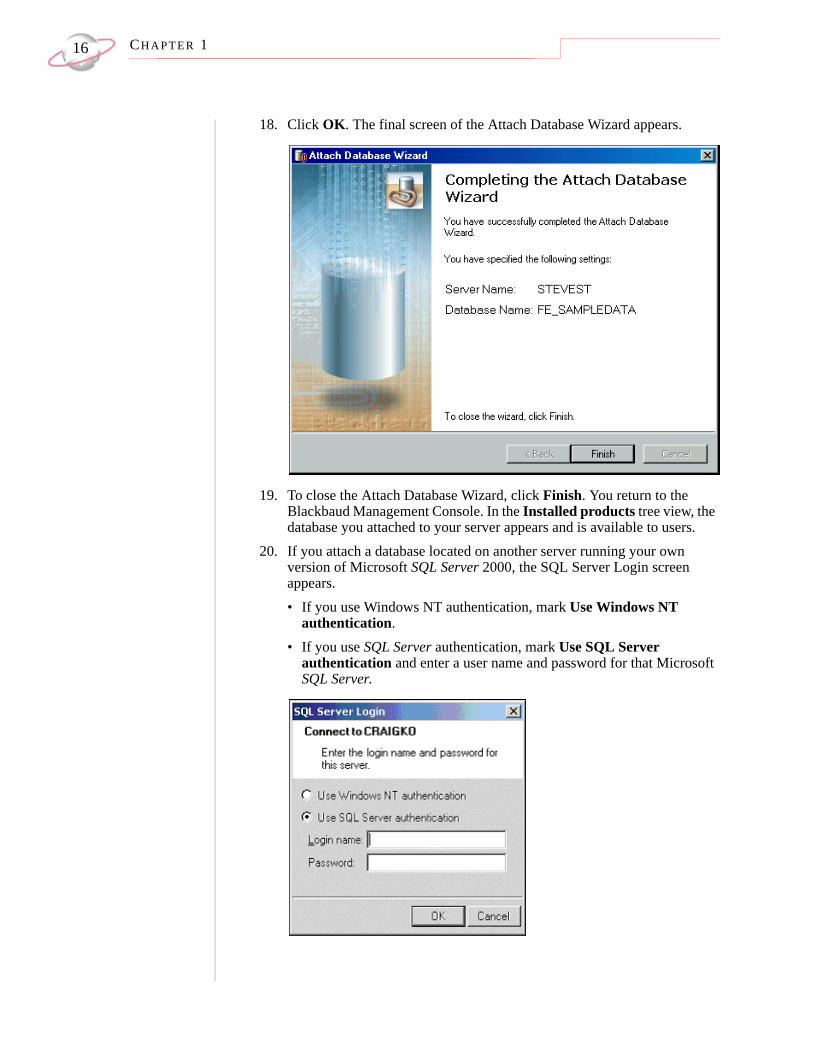
18. Click OK. The final screen of the Attach Database Wizard appears.
19. To close the Attach Database Wizard, click Finish. You return to the Blackbaud Management Console. In the Installed products tree view, the database you attached to your server appears and is available to users.
20. If you attach a database located on another server running your own version of Microsoft SQL Server 2000, the SQL Server Login screen appears.• If you use Windows NT authentication, mark Use Windows NT
authentication. • If you use SQL Server authentication, mark Use SQL Server
authentication and enter a user name and password for that Microsoft SQL Server.
BL A C K B A U D MA N A G E M E N T CO N S O L E 17
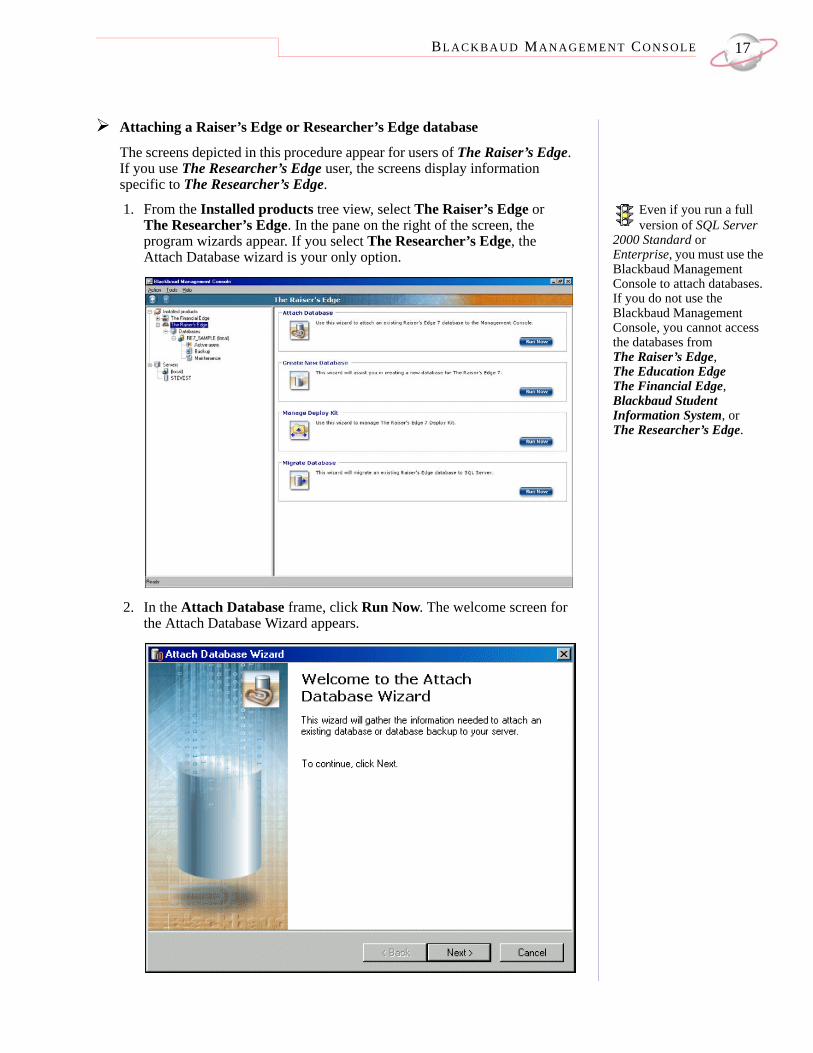
Attaching a Raiser’s Edge or Researcher’s Edge database
The screens depicted in this procedure appear for users of The Raiser’s Edge. If you use The Researcher’s Edge user, the screens display information specific to The Researcher’s Edge.
Even if you run a full version of SQL Server
2000 Standard or Enterprise, you must use the Blackbaud Management Console to attach databases. If you do not use the Blackbaud Management Console, you cannot access the databases from The Raiser’s Edge, The Education Edge The Financial Edge, Blackbaud Student Information System, or The Researcher’s Edge.
1. From the Installed products tree view, select The Raiser’s Edge or The Researcher’s Edge. In the pane on the right of the screen, the program wizards appear. If you select The Researcher’s Edge, the Attach Database wizard is your only option.
2. In the Attach Database frame, click Run Now. The welcome screen for the Attach Database Wizard appears.
CH A PT E R 118
3. If you use the MSDE version of SQL Server, proceed to step 4. Otherwise, proceed to step 6.
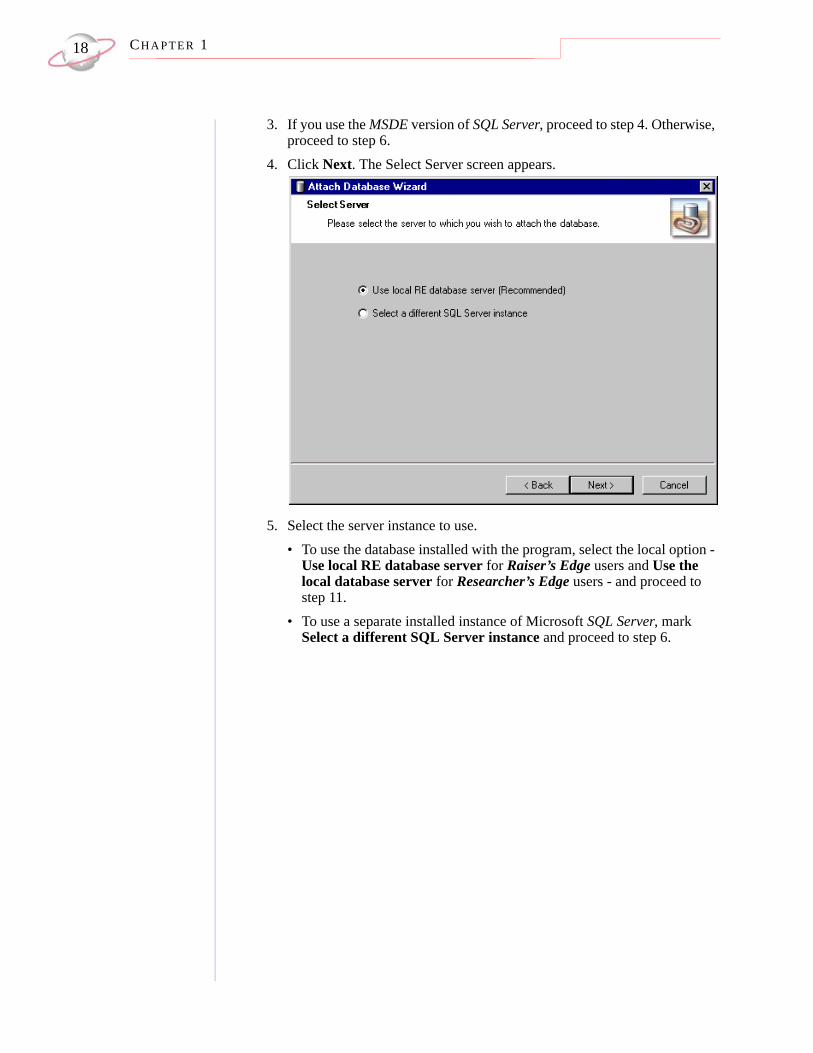
4. Click Next. The Select Server screen appears.
5. Select the server instance to use.• To use the database installed with the program, select the local option -
Use local RE database server for Raiser’s Edge users and Use the local database server for Researcher’s Edge users - and proceed to step 11.
• To use a separate installed instance of Microsoft SQL Server, mark Select a different SQL Server instance and proceed to step 6.
BL A C K B A U D MA N A G E M E N T CO N S O L E 19
A registered server is any server on your
system controlled by SQL Server Management tools.
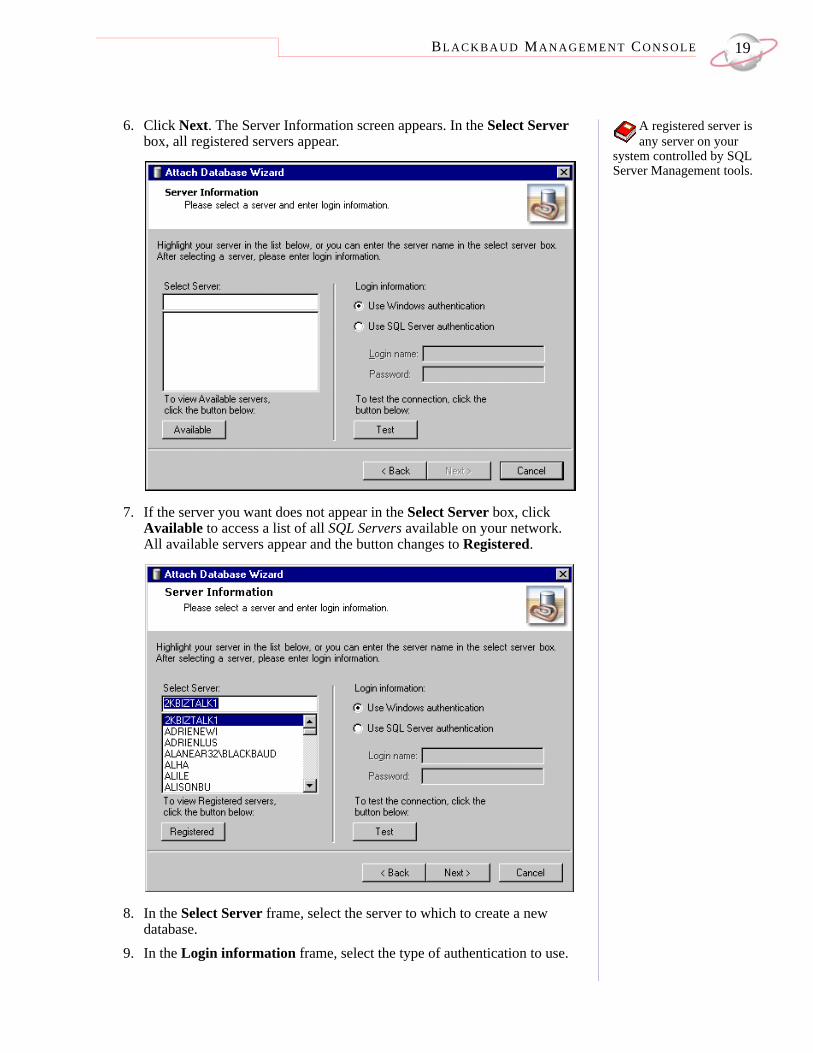
6. Click Next. The Server Information screen appears. In the Select Server box, all registered servers appear.
7. If the server you want does not appear in the Select Server box, click Available to access a list of all SQL Servers available on your network. All available servers appear and the button changes to Registered.
8. In the Select Server frame, select the server to which to create a new database.
9. In the Login information frame, select the type of authentication to use.
CH A PT E R 120
• If you have SQL Server Standard/Enterprise Edition configured to work with Windows authentication, mark Use Windows authentication. You can log into the server using the same Login name and Password you use to log into your system.
• If you used SQL Server authentication to establish a Login name and Password in SQL Server Standard/Enterprise Edition and you want to use that login information to access your server, mark Use SQL Server authentication and enter a Login name and Password for the server.
If you are not using the MSDE version of SQL
Server included with The Raiser’s Edge and your server is setup for Window Authentication only, you must use the SQL Enterprise Manager to add users to The Raiser’s Edge. For more information, see the documentation included with your SQL Server software.
10. To check the server connection, click Test. If the connection fails, check the login information and verify you selected the correct server.
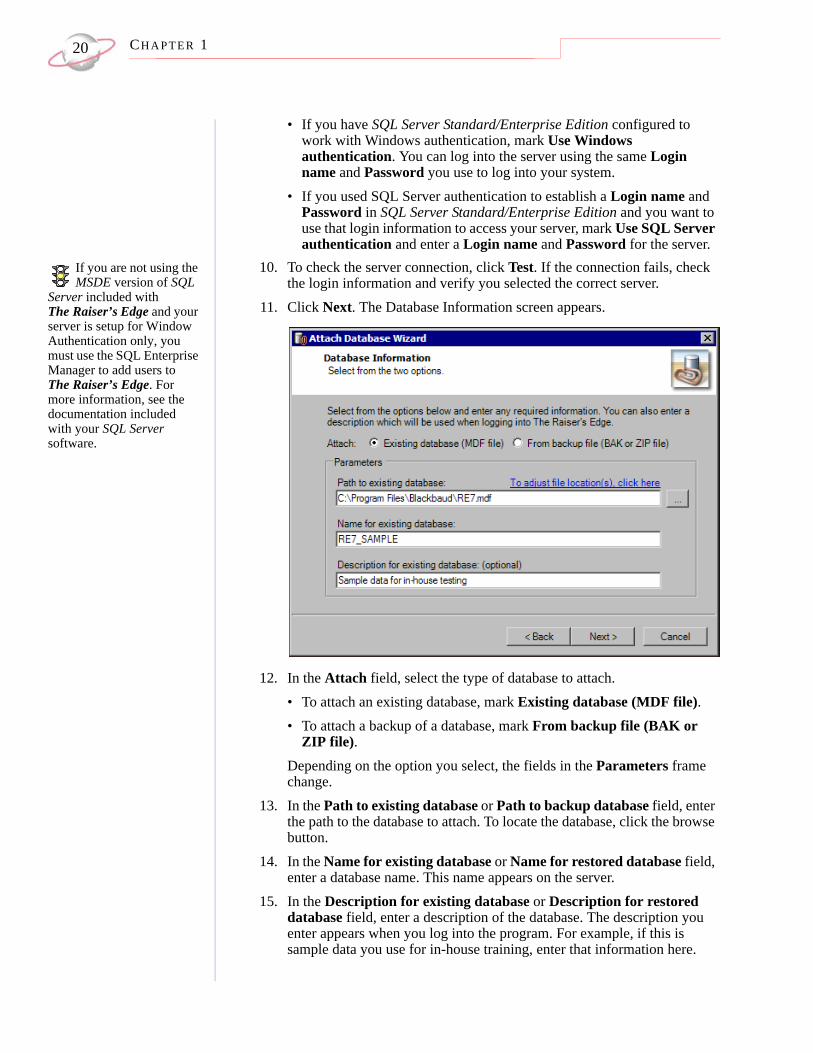
11. Click Next. The Database Information screen appears.
12. In the Attach field, select the type of database to attach.• To attach an existing database, mark Existing database (MDF file). • To attach a backup of a database, mark From backup file (BAK or
ZIP file).Depending on the option you select, the fields in the Parameters frame change.
13. In the Path to existing database or Path to backup database field, enter the path to the database to attach. To locate the database, click the browse button.
14. In the Name for existing database or Name for restored database field, enter a database name. This name appears on the server.
15. In the Description for existing database or Description for restored database field, enter a description of the database. The description you enter appears when you log into the program. For example, if this is sample data you use for in-house training, enter that information here.

BL A C K B A U D MA N A G E M E N T CO N S O L E 21
16. If you have changed the default location of your existing database, click the To adjust file location(s) or To adjust file destination(s) link above the Path to existing database or Path to backup database field. The Database Information screen appears.To specify the current location of the database, double-click the file and click the Return to the previous screen link. You return to the Database Information screen.
17. Click Next. The final screen of the Attach Database Wizard appears.
CH A PT E R 122
18. Click Finish. You return to the Blackbaud Management Console. In the Installed products tree view, the database you attached to your server appears and is available to users.
Creating a New DatabaseYou can access the Blackbaud
Management Console help file from the Help menu.
If you use The Raiser’s Edge, The Financial Edge, The Education Edge, or Blackbaud Student Information System and do not have an existing Blackbaud Microsoft SQL Server database or ASA database to migrate to Microsoft SQL Server, you can use the Create New Database Wizard to create a new database.You use this feature when you purchase additional databases or are a new Blackbaud user. You can use the Create New Database Wizard only if you have a license to create a new database.The Create Database Wizard, which guides you through the process step by step, differs slightly based on the Blackbaud product you use. • For instructions about how to create a Financial Edge, Education Edge, or
Blackbaud Student Information System database, see “Creating a new Financial Edge, Education Edge, or Blackbaud Student Information System database” on page 23.
• For instructions about how to create a Raiser’s Edge database, see “Creating a new Raiser’s Edge Database” on page 27.
BL A C K B A U D MA N A G E M E N T CO N S O L E 23
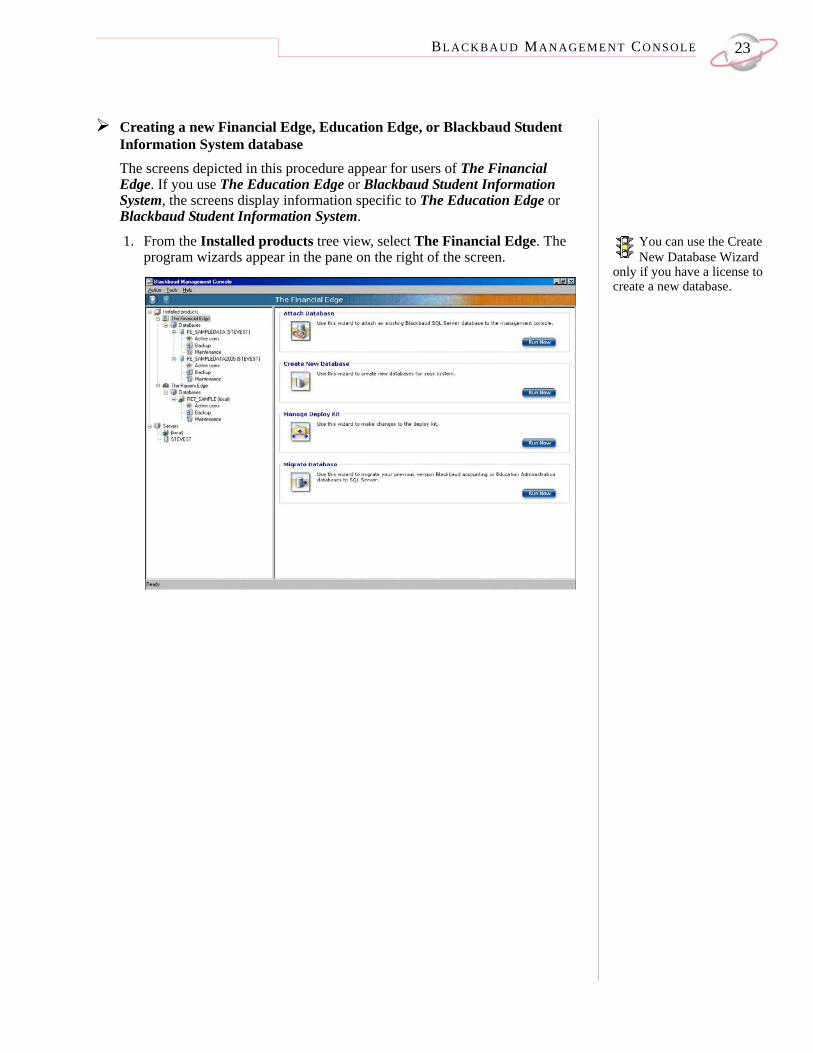
Creating a new Financial Edge, Education Edge, or Blackbaud Student Information System databaseThe screens depicted in this procedure appear for users of The Financial Edge. If you use The Education Edge or Blackbaud Student Information System, the screens display information specific to The Education Edge or Blackbaud Student Information System.
You can use the Create New Database Wizard
only if you have a license to create a new database.
1. From the Installed products tree view, select The Financial Edge. The program wizards appear in the pane on the right of the screen.
CH A PT E R 124
To run the wizards, you can also click the icons
that appear in the wizard frames or use the Tools menu.
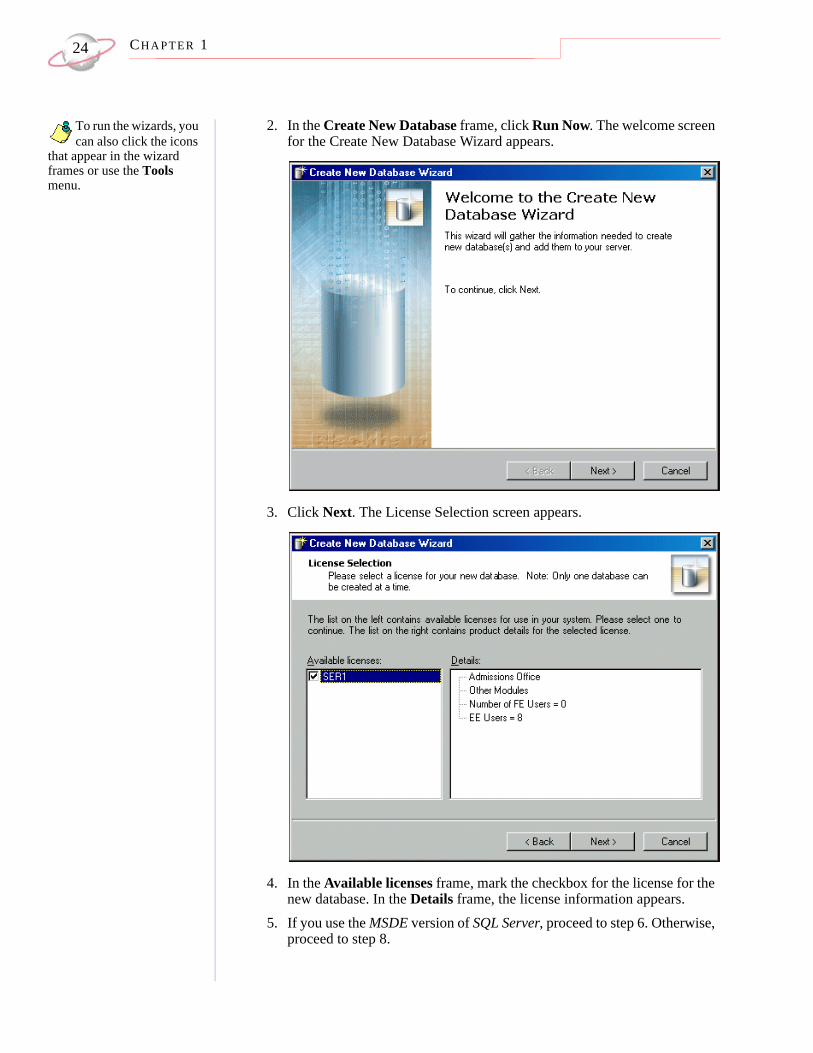
2. In the Create New Database frame, click Run Now. The welcome screen for the Create New Database Wizard appears.
3. Click Next. The License Selection screen appears.
4. In the Available licenses frame, mark the checkbox for the license for the new database. In the Details frame, the license information appears.
5. If you use the MSDE version of SQL Server, proceed to step 6. Otherwise, proceed to step 8.
BL A C K B A U D MA N A G E M E N T CO N S O L E 25
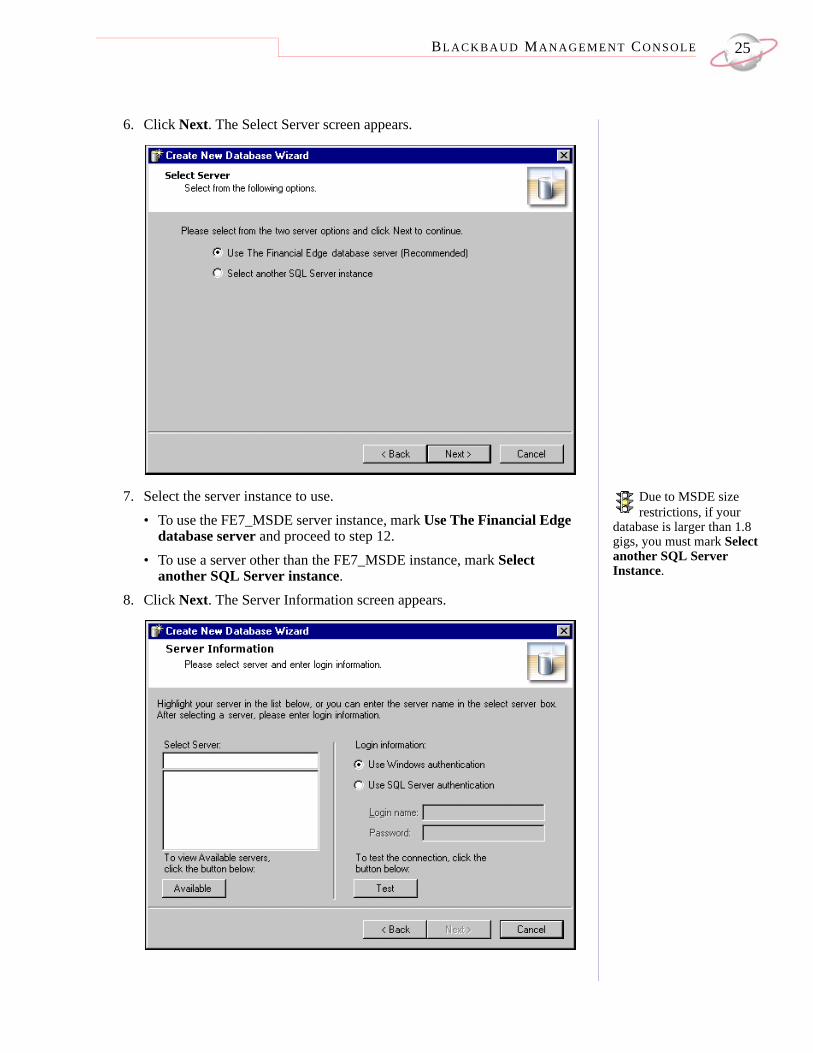
6. Click Next. The Select Server screen appears.
Due to MSDE size restrictions, if your
database is larger than 1.8 gigs, you must mark Select another SQL Server Instance.
7. Select the server instance to use.• To use the FE7_MSDE server instance, mark Use The Financial Edge
database server and proceed to step 12.• To use a server other than the FE7_MSDE instance, mark Select
another SQL Server instance. 8. Click Next. The Server Information screen appears.
CH A PT E R 126
9. In the Select Server field, select the server for which to create a new database. To display the available servers, click Available.
10. In the Login information frame, select the type of authentication to use. • To use your own version of SQL Server with Windows authentication,
mark Use Windows authentication. • To use a SQL Server authentication only, mark Use SQL Server
authentication and enter a Login name and Password for the server.11. Click Test. If the database connection fails, check the login information
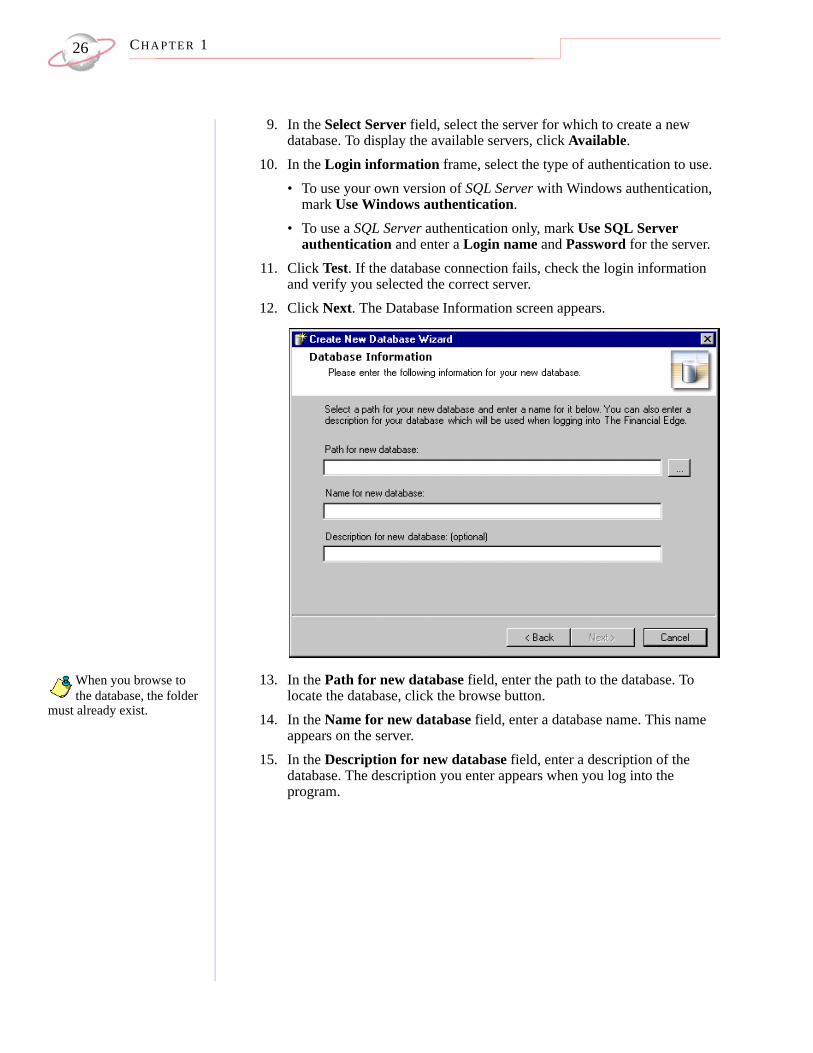
and verify you selected the correct server.12. Click Next. The Database Information screen appears.
When you browse to the database, the folder
must already exist.
13. In the Path for new database field, enter the path to the database. To locate the database, click the browse button.
14. In the Name for new database field, enter a database name. This name appears on the server.
15. In the Description for new database field, enter a description of the database. The description you enter appears when you log into the program.

BL A C K B A U D MA N A G E M E N T CO N S O L E 27
16. Click Next. The final screen of the Create New Database Wizard appears.
17. Click Finish. You return to the Blackbaud Management Console.
Creating a new Raiser’s Edge Database
1. In the Installed products tree view, select The Raiser’s Edge. In the pane on the right of the screen, the program wizards appear.
CH A PT E R 128
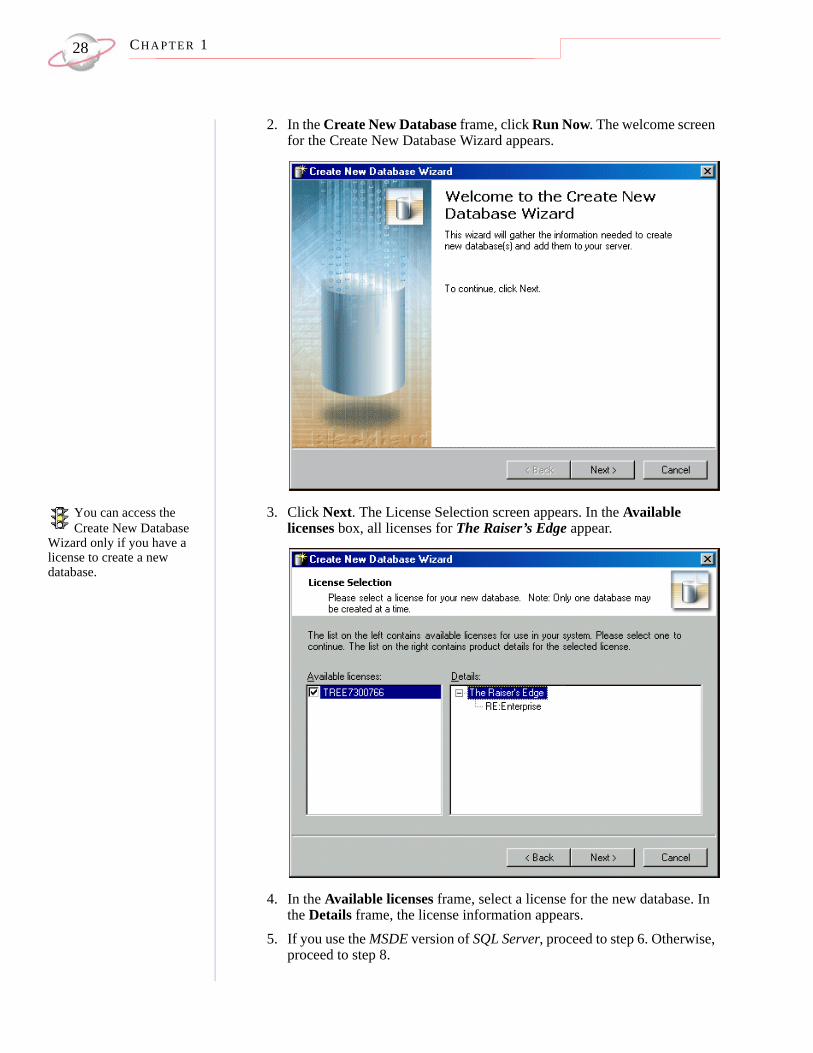
2. In the Create New Database frame, click Run Now. The welcome screen for the Create New Database Wizard appears.
You can access the Create New Database
Wizard only if you have a license to create a new database.
3. Click Next. The License Selection screen appears. In the Available licenses box, all licenses for The Raiser’s Edge appear.
4. In the Available licenses frame, select a license for the new database. In the Details frame, the license information appears.
5. If you use the MSDE version of SQL Server, proceed to step 6. Otherwise, proceed to step 8.

BL A C K B A U D MA N A G E M E N T CO N S O L E 29
6. Click Next. The Server Destination Database screen appears.
7. Select the server instance to use.• To use the Raiser’s Edge database installed with the program, mark
Use local RE7 database server and proceed to step 13.• To use a separate installed instance of Microsoft SQL Server, mark
Select another SQL Server instance.
A registered server is any server on your
system controlled by SQL Management tools.
8. Click Next. The Server Information screen appears. In the Select Server box, all registered servers appear.
CH A PT E R 130
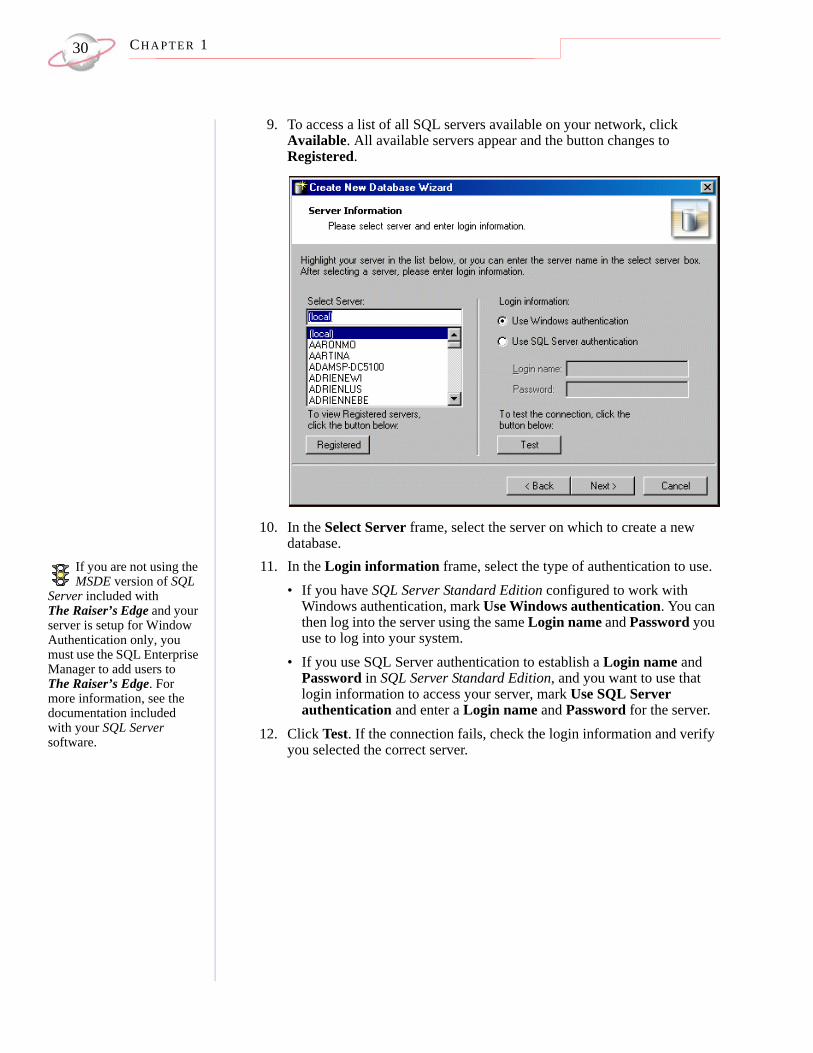
9. To access a list of all SQL servers available on your network, click Available. All available servers appear and the button changes to Registered.
10. In the Select Server frame, select the server on which to create a new database.
If you are not using the MSDE version of SQL
Server included with The Raiser’s Edge and your server is setup for Window Authentication only, you must use the SQL Enterprise Manager to add users to The Raiser’s Edge. For more information, see the documentation included with your SQL Server software.
11. In the Login information frame, select the type of authentication to use. • If you have SQL Server Standard Edition configured to work with
Windows authentication, mark Use Windows authentication. You can then log into the server using the same Login name and Password you use to log into your system.
• If you use SQL Server authentication to establish a Login name and Password in SQL Server Standard Edition, and you want to use that login information to access your server, mark Use SQL Server authentication and enter a Login name and Password for the server.
12. Click Test. If the connection fails, check the login information and verify you selected the correct server.
BL A C K B A U D MA N A G E M E N T CO N S O L E 31
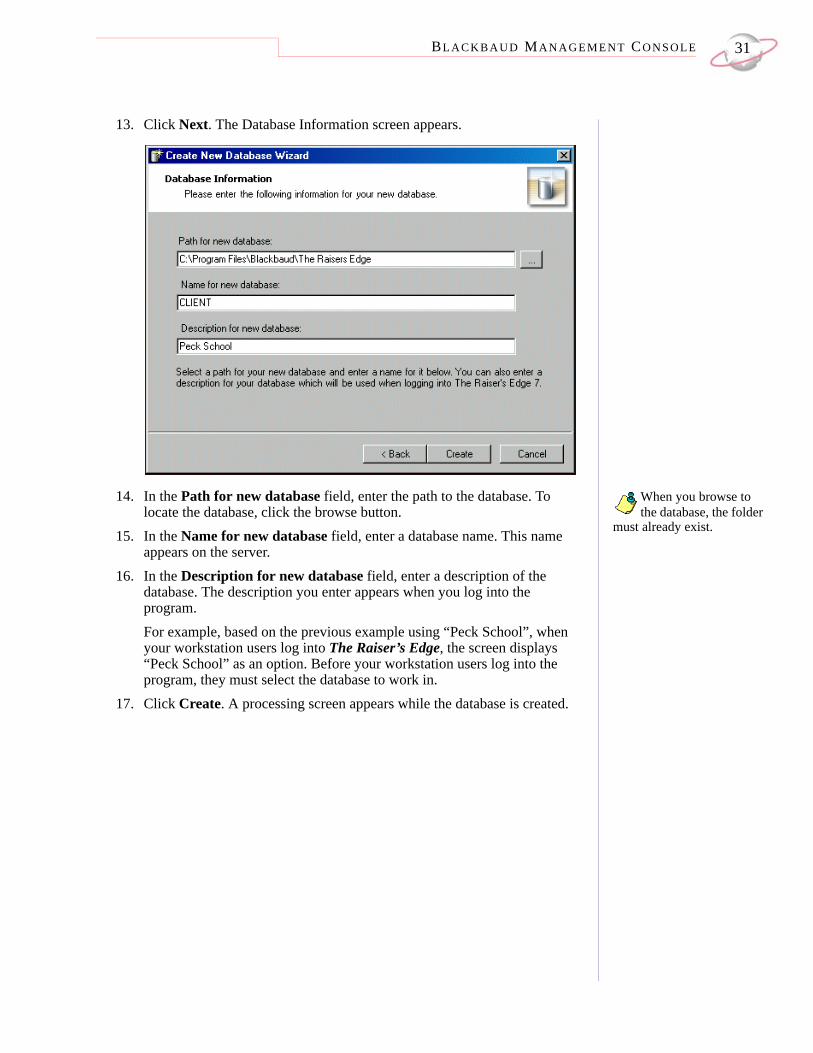
13. Click Next. The Database Information screen appears.
When you browse to the database, the folder
must already exist.
14. In the Path for new database field, enter the path to the database. To locate the database, click the browse button.
15. In the Name for new database field, enter a database name. This name appears on the server.
16. In the Description for new database field, enter a description of the database. The description you enter appears when you log into the program. For example, based on the previous example using “Peck School”, when your workstation users log into The Raiser’s Edge, the screen displays “Peck School” as an option. Before your workstation users log into the program, they must select the database to work in.
17. Click Create. A processing screen appears while the database is created.
CH A PT E R 132
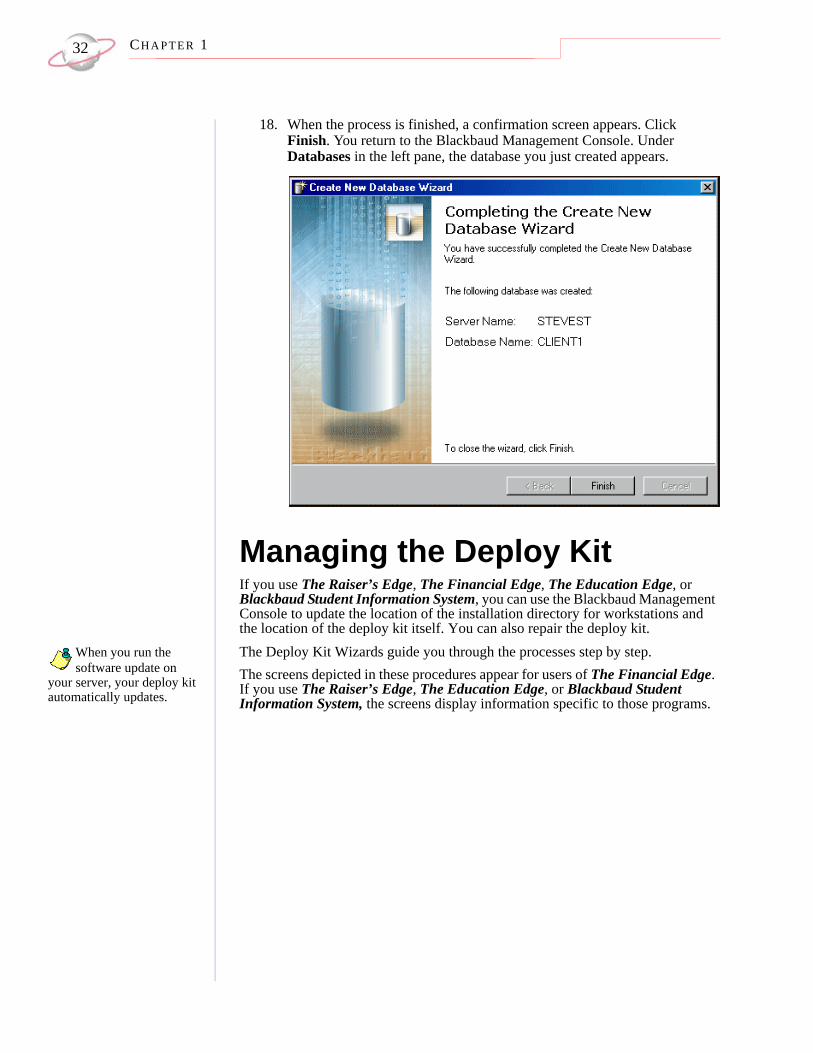
18. When the process is finished, a confirmation screen appears. Click Finish. You return to the Blackbaud Management Console. Under Databases in the left pane, the database you just created appears.
Managing the Deploy KitIf you use The Raiser’s Edge, The Financial Edge, The Education Edge, or Blackbaud Student Information System, you can use the Blackbaud Management Console to update the location of the installation directory for workstations and the location of the deploy kit itself. You can also repair the deploy kit.
When you run the software update on
your server, your deploy kit automatically updates.
The Deploy Kit Wizards guide you through the processes step by step.The screens depicted in these procedures appear for users of The Financial Edge. If you use The Raiser’s Edge, The Education Edge, or Blackbaud Student Information System, the screens display information specific to those programs.
BL A C K B A U D MA N A G E M E N T CO N S O L E 33
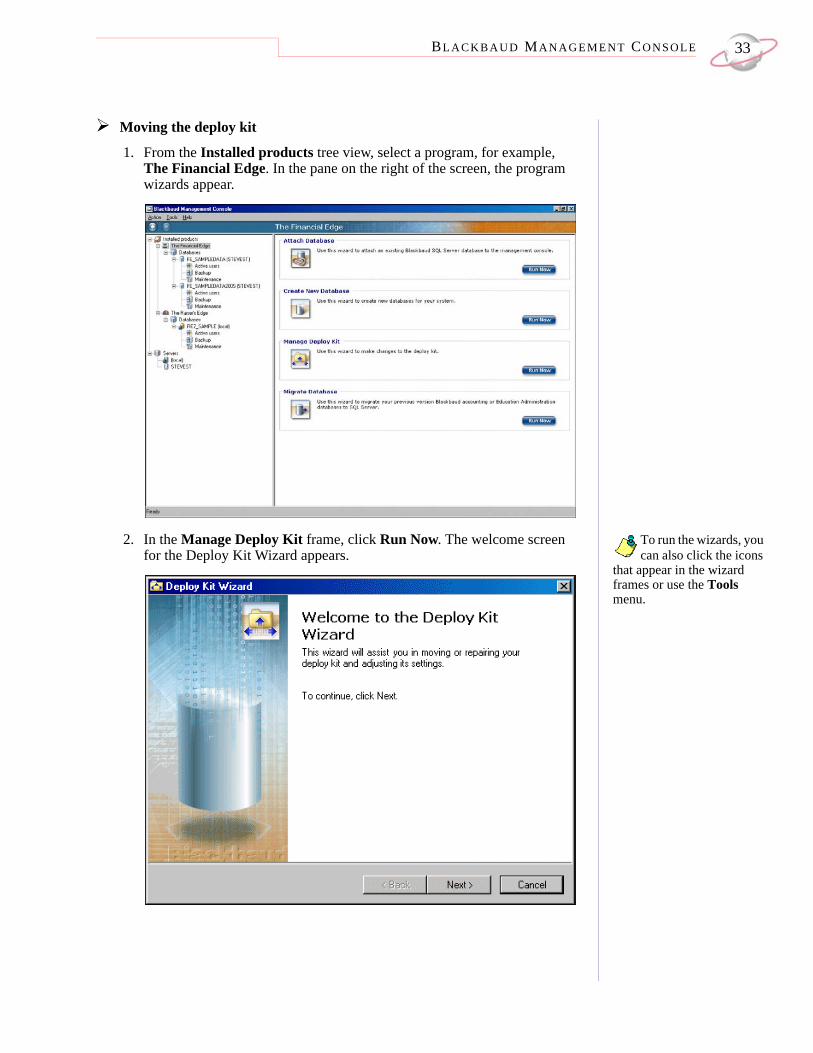
Moving the deploy kit
1. From the Installed products tree view, select a program, for example, The Financial Edge. In the pane on the right of the screen, the program wizards appear.
To run the wizards, you can also click the icons
that appear in the wizard frames or use the Tools menu.
2. In the Manage Deploy Kit frame, click Run Now. The welcome screen for the Deploy Kit Wizard appears.
CH A PT E R 134
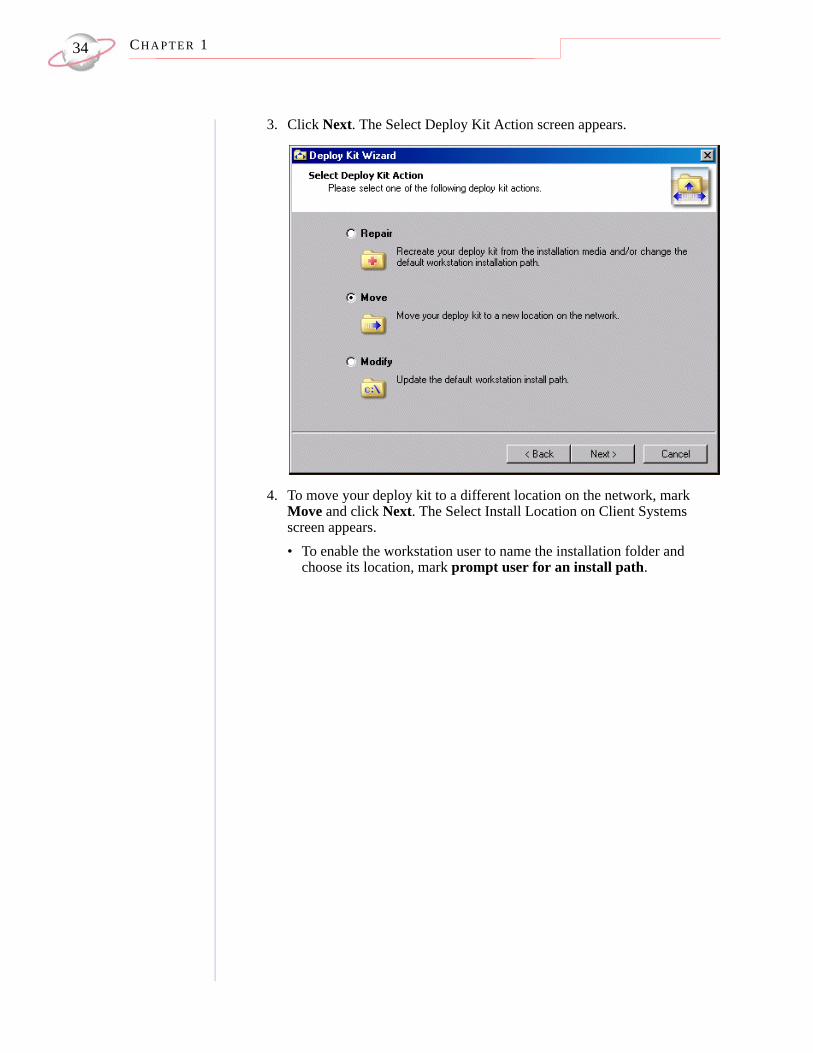
3. Click Next. The Select Deploy Kit Action screen appears.
4. To move your deploy kit to a different location on the network, mark Move and click Next. The Select Install Location on Client Systems screen appears.• To enable the workstation user to name the installation folder and
choose its location, mark prompt user for an install path.
BL A C K B A U D MA N A G E M E N T CO N S O L E 35
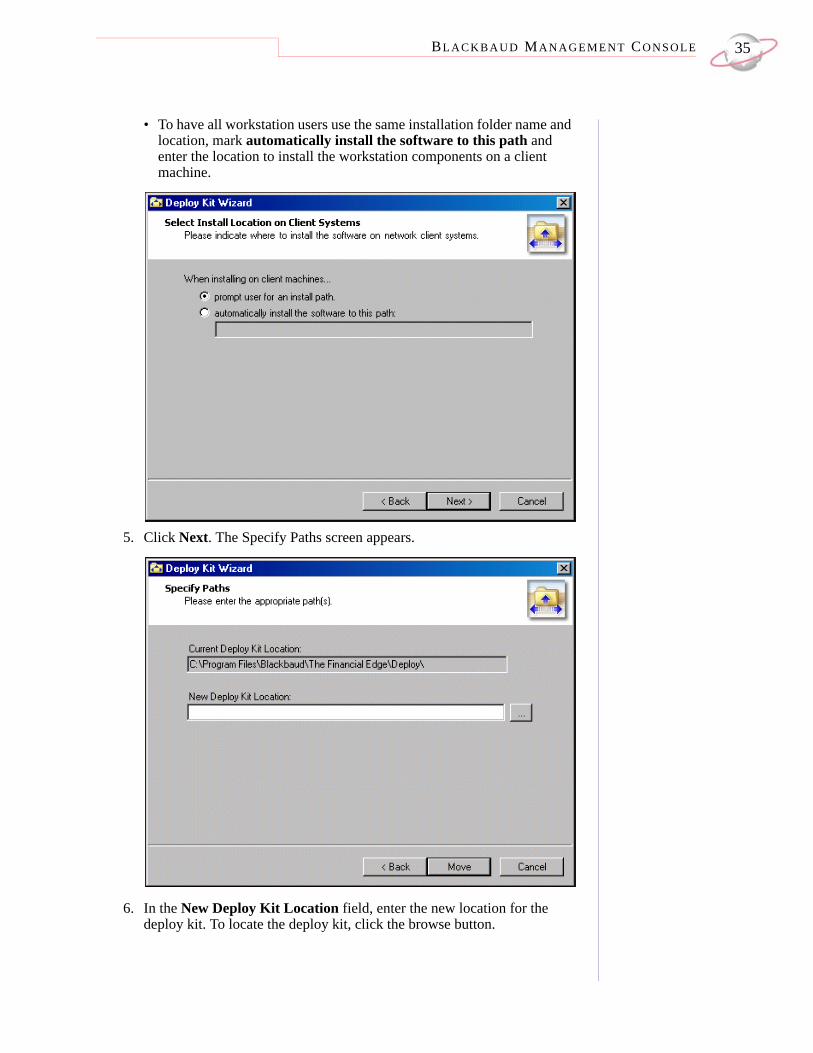
• To have all workstation users use the same installation folder name and location, mark automatically install the software to this path and enter the location to install the workstation components on a client machine.
5. Click Next. The Specify Paths screen appears.
6. In the New Deploy Kit Location field, enter the new location for the deploy kit. To locate the deploy kit, click the browse button.
CH A PT E R 136
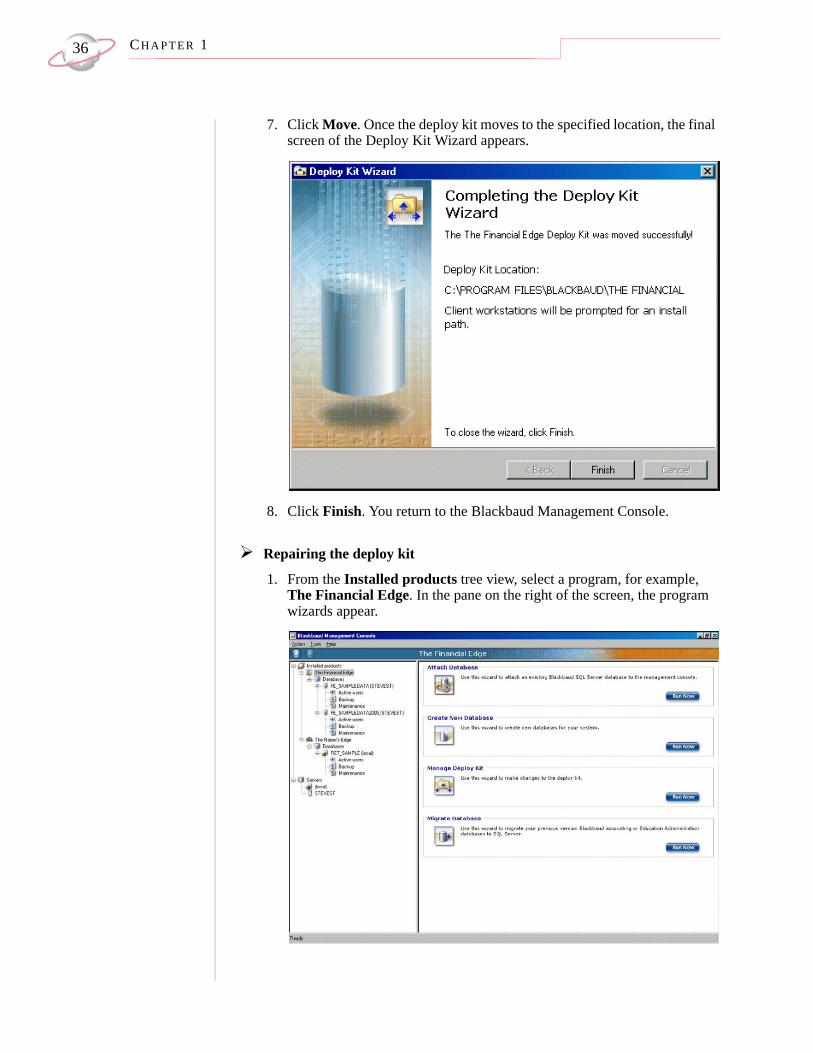
7. Click Move. Once the deploy kit moves to the specified location, the final screen of the Deploy Kit Wizard appears.
8. Click Finish. You return to the Blackbaud Management Console.
Repairing the deploy kit
1. From the Installed products tree view, select a program, for example, The Financial Edge. In the pane on the right of the screen, the program wizards appear.

BL A C K B A U D MA N A G E M E N T CO N S O L E 37
To run the wizards, you can also click the icons
that appear in the wizard frames or use the Tools menu.
2. In the Manage Deploy Kit frame, click Run Now. The welcome screen for the Deploy Kit Wizard appears.
3. Click Next. The Select Deploy Kit Action screen appears.
4. To repair your deploy kit using files from the installation CD, mark Repair and click Next. The Select Install Location on Client Systems screen appears.• To enable the workstation user to name the installation folder and
choose its location, mark prompt user for an install path.
CH A PT E R 138
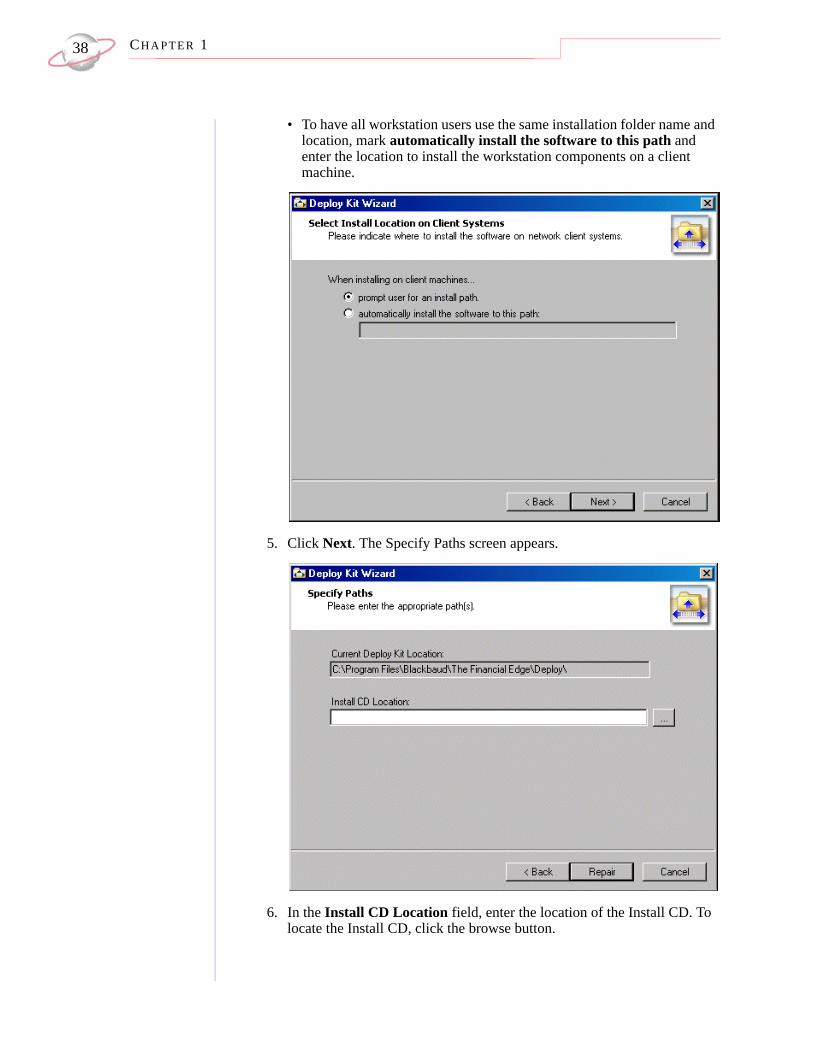
• To have all workstation users use the same installation folder name and location, mark automatically install the software to this path and enter the location to install the workstation components on a client machine.
5. Click Next. The Specify Paths screen appears.
6. In the Install CD Location field, enter the location of the Install CD. To locate the Install CD, click the browse button.

BL A C K B A U D MA N A G E M E N T CO N S O L E 39
7. Click Repair. The final screen of the Deploy Kit Wizard appears.
8. Click Finish. You return to the Blackbaud Management Console.
Changing the default workstation install path
1. From the Installed products tree view, select a program, for example, The Financial Edge. In the pane on the right of the screen, the program wizards appear.

CH A PT E R 140
2. In the Manage Deploy Kit frame, click Run Now. The welcome screen for the Deploy Kit Wizard appears.
3. Click Next. The Select Deploy Kit Action screen appears.
4. To change the default workstation installation path, mark Modify and click Next. The Select Install Location on Client Systems screen appears.• To enable the workstation user to name the installation folder and
choose its location, mark prompt user for an install path.
BL A C K B A U D MA N A G E M E N T CO N S O L E 41
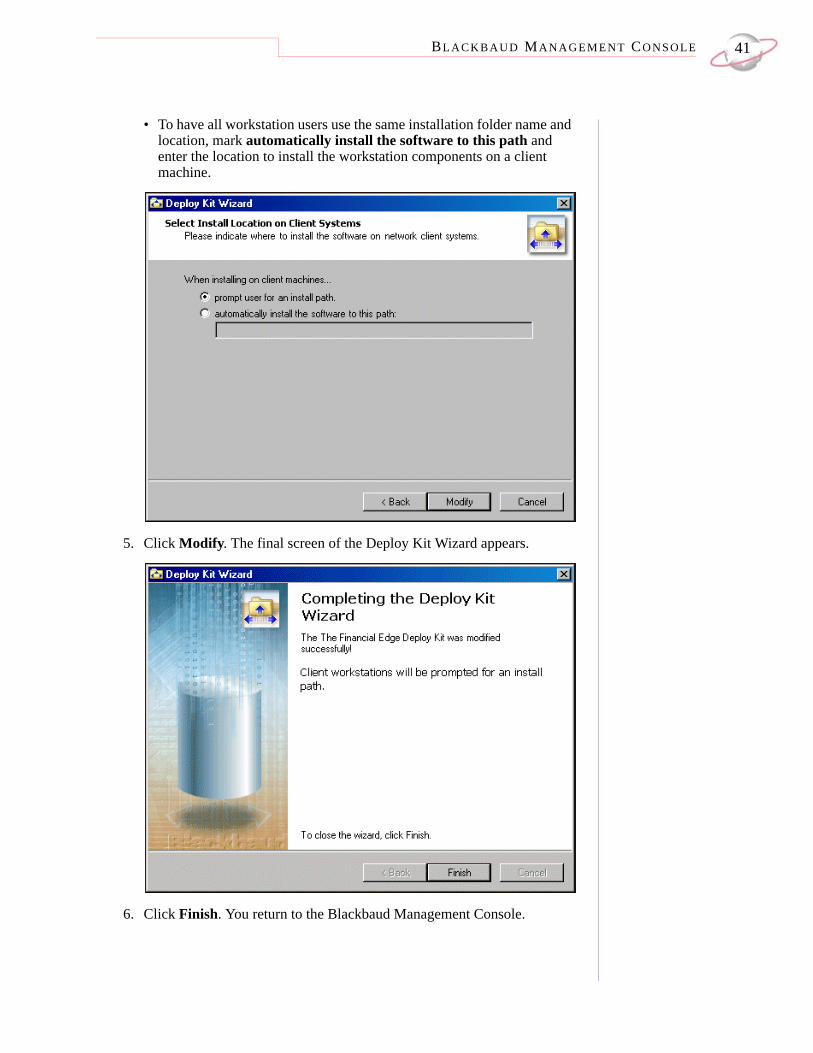
• To have all workstation users use the same installation folder name and location, mark automatically install the software to this path and enter the location to install the workstation components on a client machine.
5. Click Modify. The final screen of the Deploy Kit Wizard appears.
6. Click Finish. You return to the Blackbaud Management Console.

CH A PT E R 142
Migrating a DatabaseIf you migrate an Accounting for
Nonprofits 6.4 database, you must lock the database using the pre-convert utility before migrating.
Users of The Raiser’s Edge, The Financial Edge, The Education Edge and Blackbaud Student Information System can use the Blackbaud Management Console to migrate existing Blackbaud ASA databases to Microsoft SQL Server. If you migrate an Accounting for Nonprofits 6.4 database, you must lock the database using the pre-convert utility before migrating. The pre-convert utility “GLPreconvert.exe” is located in the folder with your 6.4 program files. To ensure you have the most recent pre-conversion utility, make sure you are running the latest version of Accounting for Nonprofits 6.4.If you migrate your Adaptive Server Anywhere (ASA) database(s) to a new server, you may need to install the ASA database engine. If this is necessary, you are prompted during the migration process to install the engine and restart the Blackbaud Management Console. You must also call Blackbaud Support and obtain a password, which you must enter during the engine installation to verify your ASA license.The Migrate Database Wizard, which guides you through the process step by step, differs slightly based on the Blackbaud product you use. • For instructions about how to migrate a Financial Edge, Education Edge, and
Blackbaud Student Information System database, see “Migrating a Financial Edge, Education Edge, or Blackbaud Student Information System database” on page 43.
• For instructions about how to migrate a Raiser’s Edge database, see “Migrating a Raiser’s Edge database” on page 49.

BL A C K B A U D MA N A G E M E N T CO N S O L E 43
Migrating a Financial Edge, Education Edge, or Blackbaud Student Information System databaseThe screens depicted in this procedure appear for users of The Financial Edge. If you use The Education Edge or Blackbaud Student Information System, the screens display information specific to The Education Edge or Blackbaud Student Information System.1. From the Installed products tree view, select The Financial Edge. In the
pane on the right of the screen, the program wizards appear.
CH A PT E R 144
To run the wizards, you can also click the icons
that appear in the wizard frames or use the Tools menu.
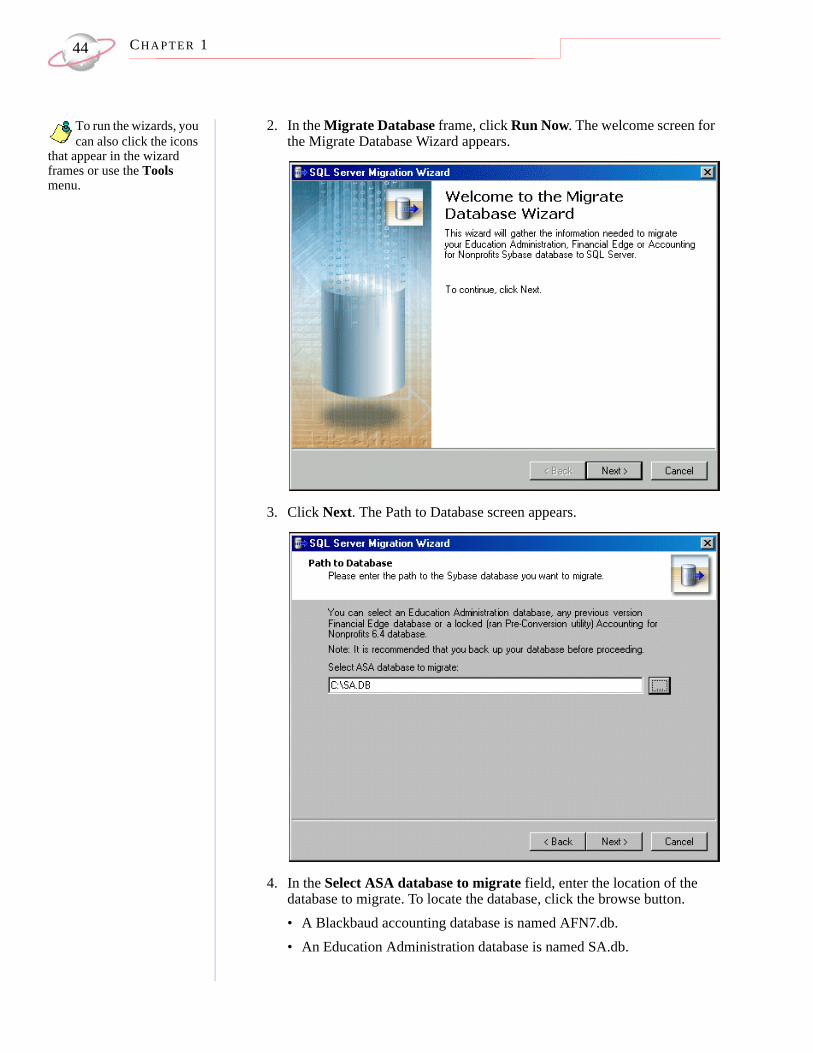
2. In the Migrate Database frame, click Run Now. The welcome screen for the Migrate Database Wizard appears.
3. Click Next. The Path to Database screen appears.
4. In the Select ASA database to migrate field, enter the location of the database to migrate. To locate the database, click the browse button. • A Blackbaud accounting database is named AFN7.db. • An Education Administration database is named SA.db.
BL A C K B A U D MA N A G E M E N T CO N S O L E 45
If you migrate your Adaptive Server
Anywhere (ASA) database(s) to a new server, you may need to install the ASA database engine. If this is necessary, a message appears during the migration process to prompt you to install the engine and restart the Blackbaud Management Console. You must also call Blackbaud Support and obtain a password.
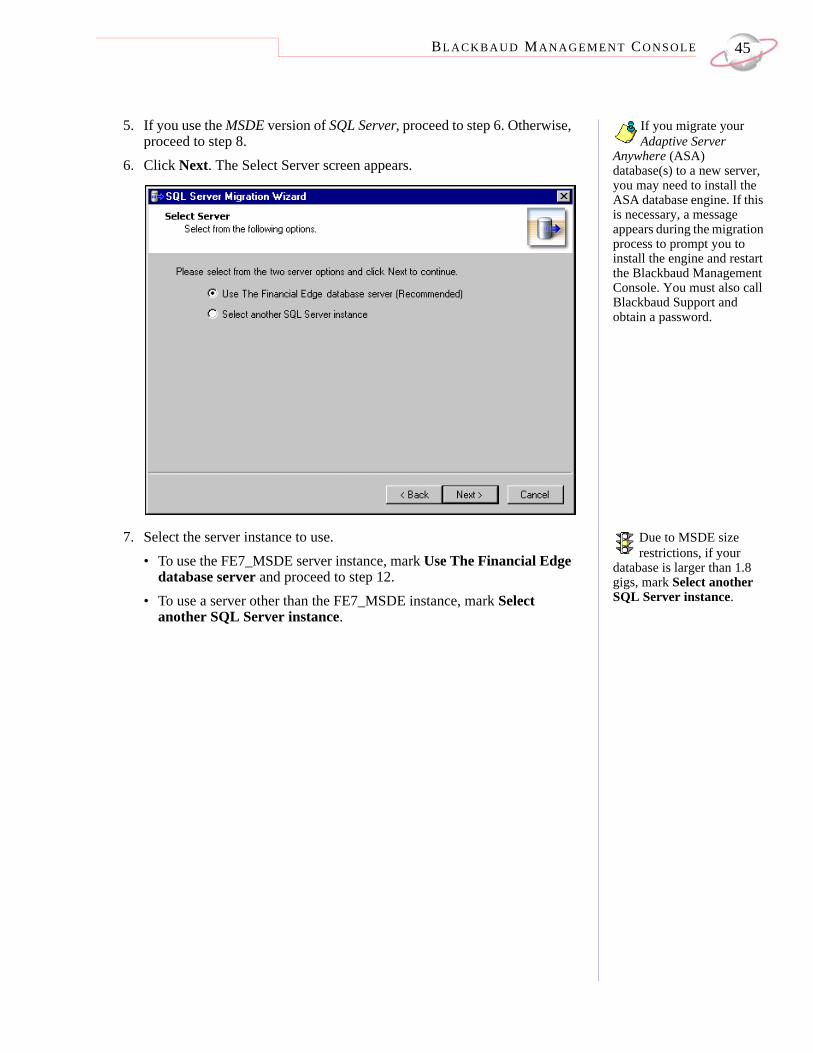
5. If you use the MSDE version of SQL Server, proceed to step 6. Otherwise, proceed to step 8.
6. Click Next. The Select Server screen appears.
Due to MSDE size restrictions, if your
database is larger than 1.8 gigs, mark Select another SQL Server instance.
7. Select the server instance to use.• To use the FE7_MSDE server instance, mark Use The Financial Edge
database server and proceed to step 12.• To use a server other than the FE7_MSDE instance, mark Select
another SQL Server instance.
CH A PT E R 146
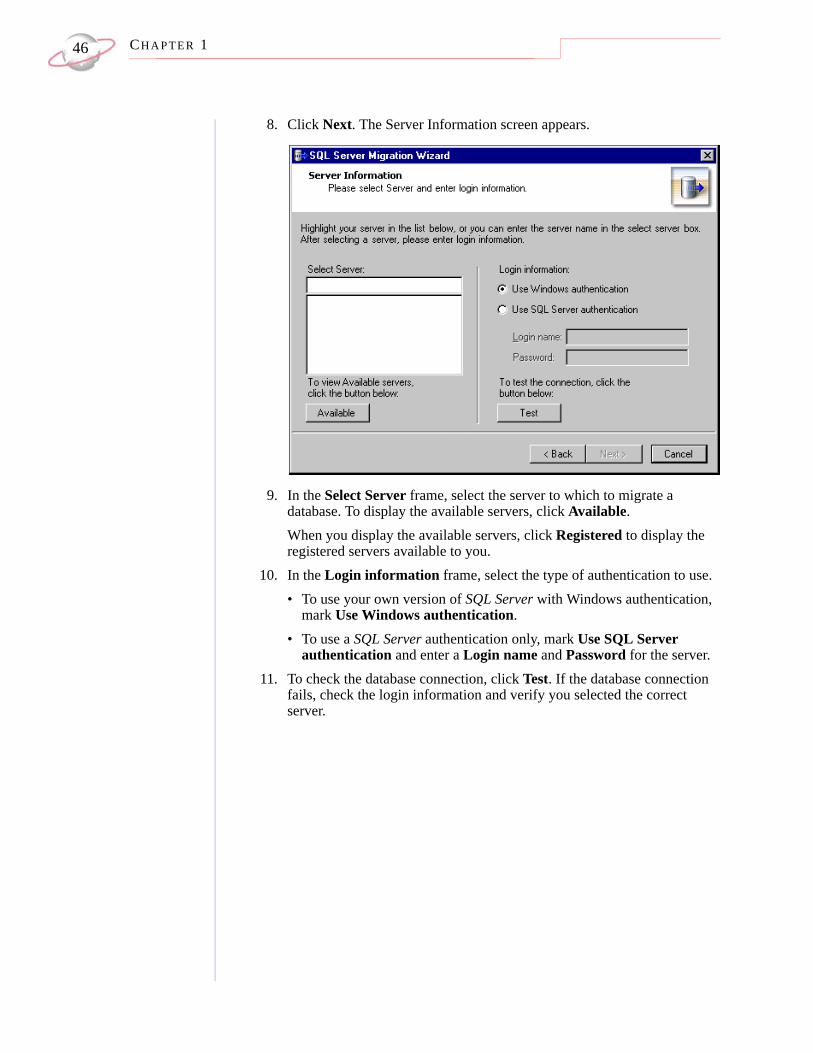
8. Click Next. The Server Information screen appears.
9. In the Select Server frame, select the server to which to migrate a database. To display the available servers, click Available. When you display the available servers, click Registered to display the registered servers available to you.
10. In the Login information frame, select the type of authentication to use. • To use your own version of SQL Server with Windows authentication,
mark Use Windows authentication. • To use a SQL Server authentication only, mark Use SQL Server
authentication and enter a Login name and Password for the server.11. To check the database connection, click Test. If the database connection
fails, check the login information and verify you selected the correct server.
BL A C K B A U D MA N A G E M E N T CO N S O L E 47
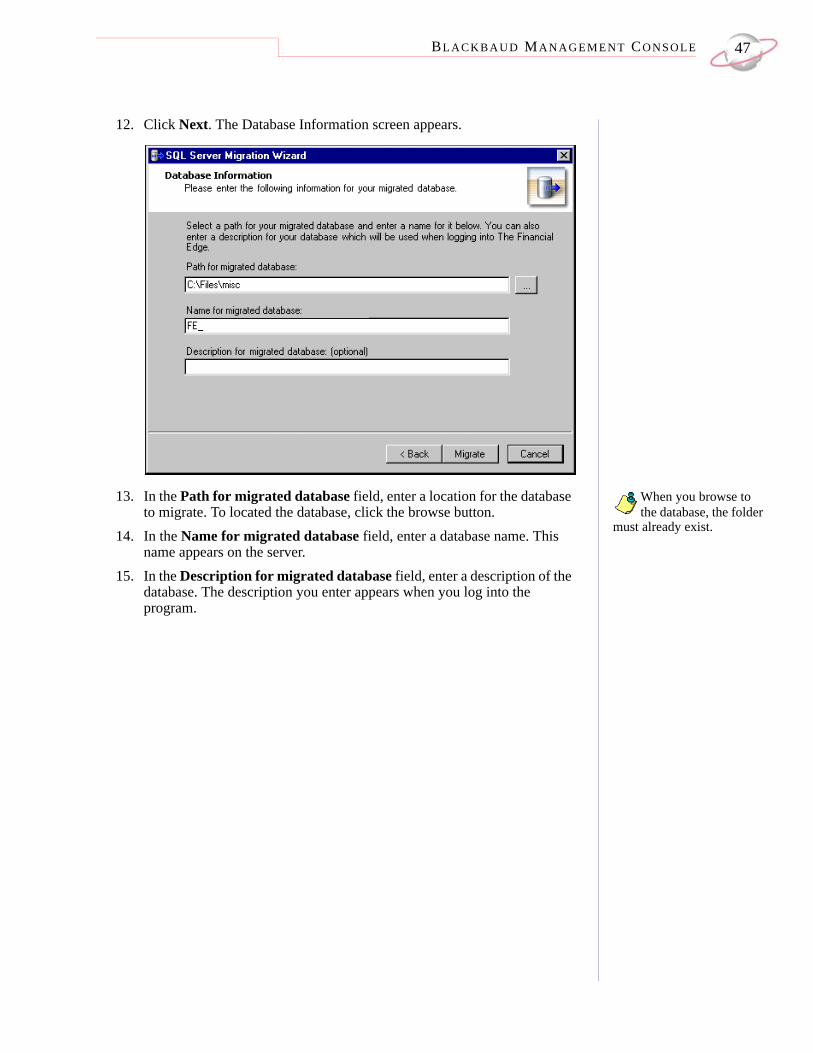
12. Click Next. The Database Information screen appears.
When you browse to the database, the folder
must already exist.
13. In the Path for migrated database field, enter a location for the database to migrate. To located the database, click the browse button.
14. In the Name for migrated database field, enter a database name. This name appears on the server.
15. In the Description for migrated database field, enter a description of the database. The description you enter appears when you log into the program.
CH A PT E R 148
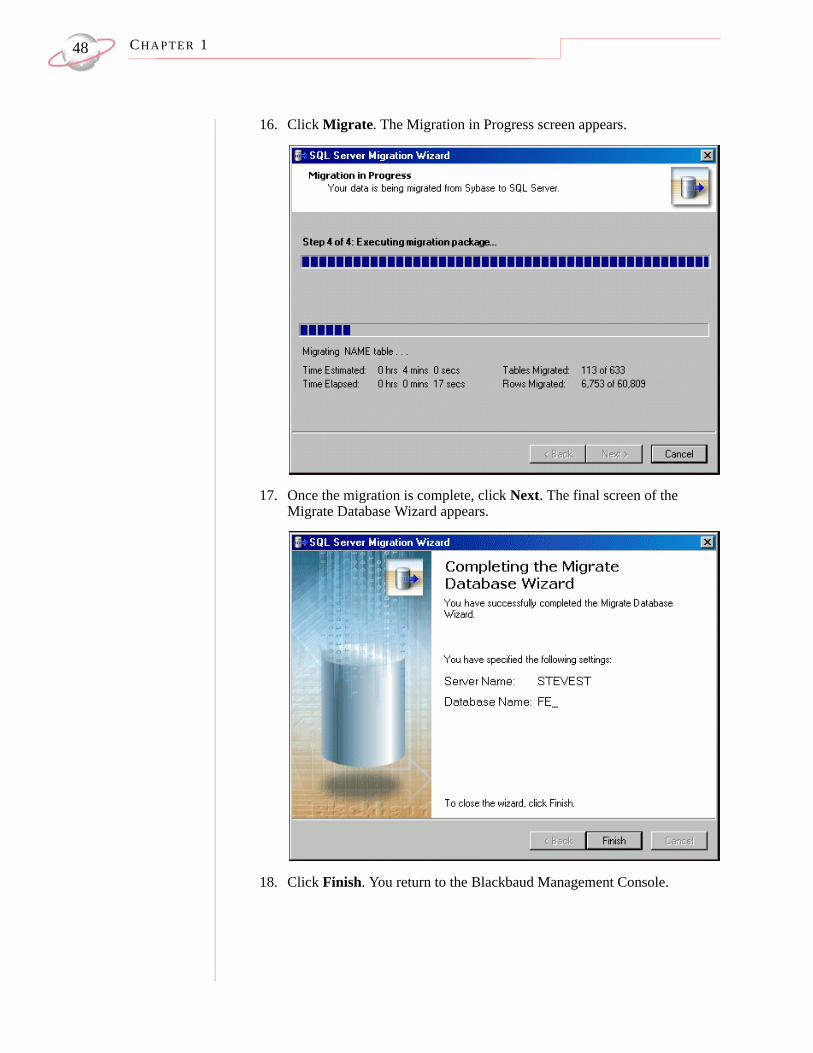
16. Click Migrate. The Migration in Progress screen appears.
17. Once the migration is complete, click Next. The final screen of the Migrate Database Wizard appears.
18. Click Finish. You return to the Blackbaud Management Console.
BL A C K B A U D MA N A G E M E N T CO N S O L E 49
Migrating a Raiser’s Edge database
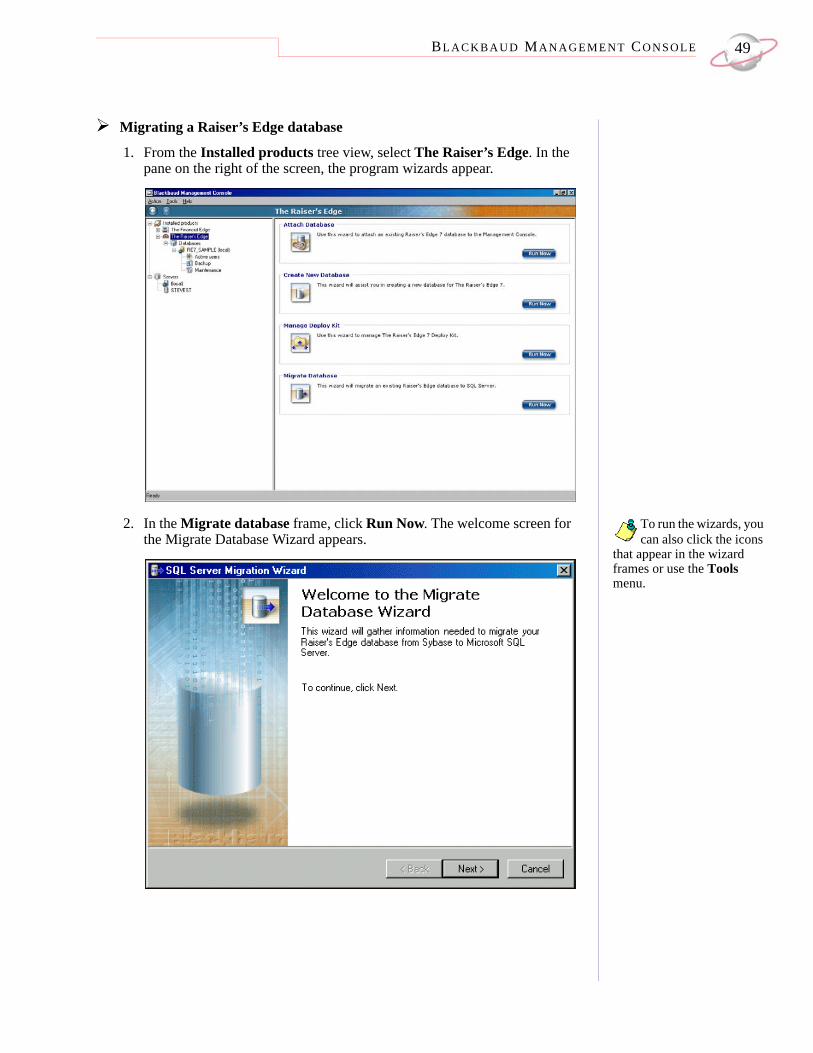
1. From the Installed products tree view, select The Raiser’s Edge. In the pane on the right of the screen, the program wizards appear.
To run the wizards, you can also click the icons
that appear in the wizard frames or use the Tools menu.
2. In the Migrate database frame, click Run Now. The welcome screen for the Migrate Database Wizard appears.
CH A PT E R 150
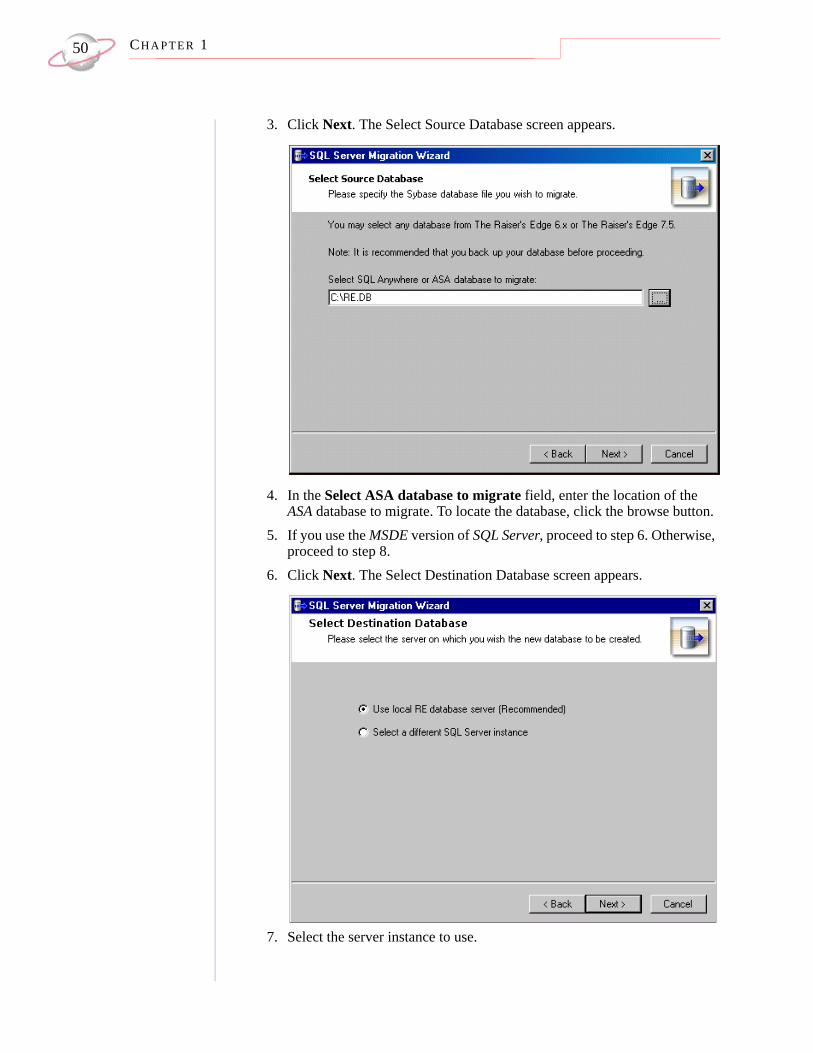
3. Click Next. The Select Source Database screen appears.
4. In the Select ASA database to migrate field, enter the location of the ASA database to migrate. To locate the database, click the browse button.
5. If you use the MSDE version of SQL Server, proceed to step 6. Otherwise, proceed to step 8.
6. Click Next. The Select Destination Database screen appears.
7. Select the server instance to use.
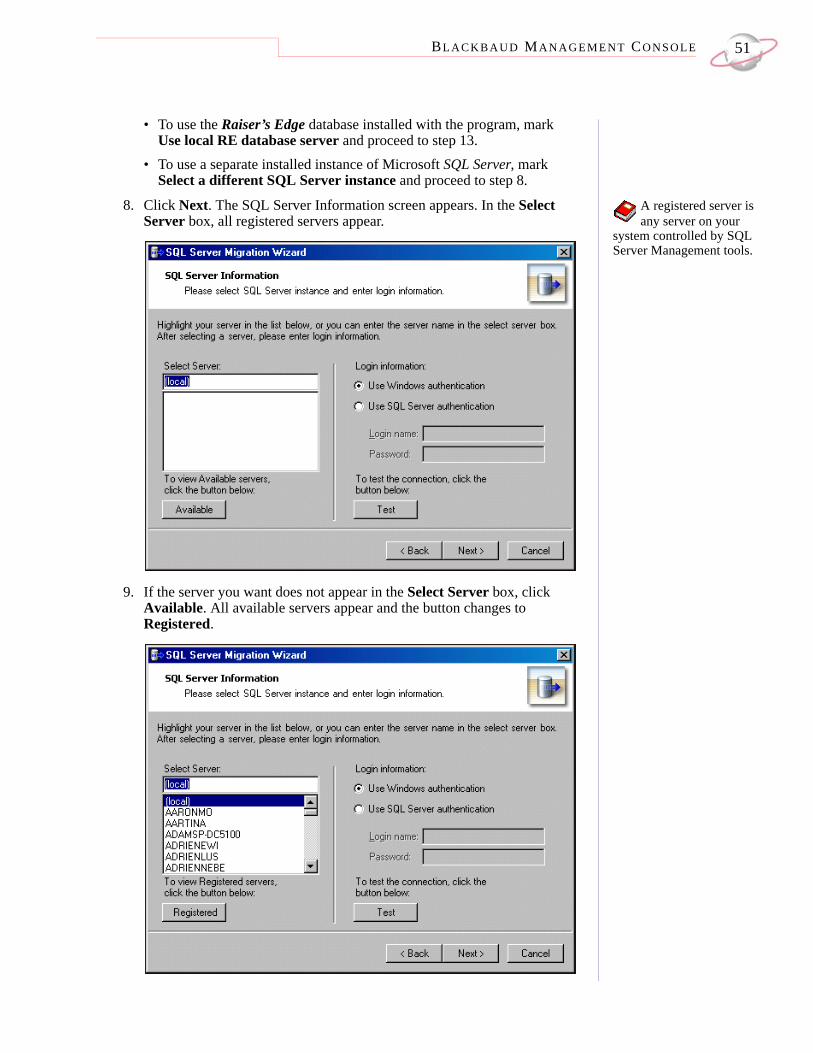
BL A C K B A U D MA N A G E M E N T CO N S O L E 51
• To use the Raiser’s Edge database installed with the program, mark Use local RE database server and proceed to step 13.
• To use a separate installed instance of Microsoft SQL Server, mark Select a different SQL Server instance and proceed to step 8.
A registered server is any server on your
system controlled by SQL Server Management tools.
8. Click Next. The SQL Server Information screen appears. In the Select Server box, all registered servers appear.
9. If the server you want does not appear in the Select Server box, click Available. All available servers appear and the button changes to Registered.
CH A PT E R 152
10. In the Select Server frame, select the server to which to migrate your database.
If you are not using the MSDE version of SQL
Server included with The Raiser’s Edge and your server is setup for Window Authentication only, you must use the SQL Enterprise Manager to add users to The Raiser’s Edge. For more information, see the documentation included with your SQL Server software.
11. In the Login information frame, select the type of authentication to use. • If you have SQL Server Standard/Enterprise Edition configured to
work with Windows authentication, mark Use Windows authentication. You can then log into the server using the same Login name and Password you use to log into your system.
• If you used SQL Server authentication to establish a Login name and Password in SQL Server Standard/Enterprise Edition and want to use that login information to access your server, mark Use SQL Server authentication and enter a Login name and Password for the server.
12. Click Test. If the connection fails, check the login information and verify you selected the correct server.
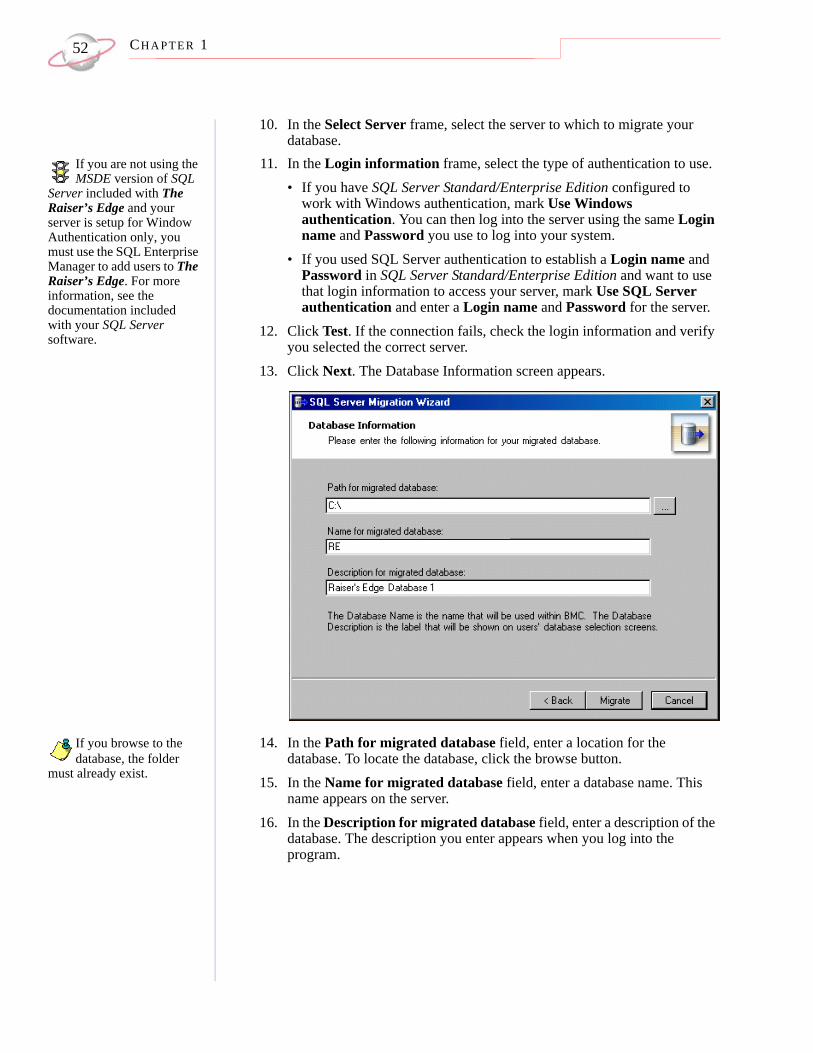
13. Click Next. The Database Information screen appears.
If you browse to the database, the folder
must already exist.
14. In the Path for migrated database field, enter a location for the database. To locate the database, click the browse button.
15. In the Name for migrated database field, enter a database name. This name appears on the server.
16. In the Description for migrated database field, enter a description of the database. The description you enter appears when you log into the program.
BL A C K B A U D MA N A G E M E N T CO N S O L E 53
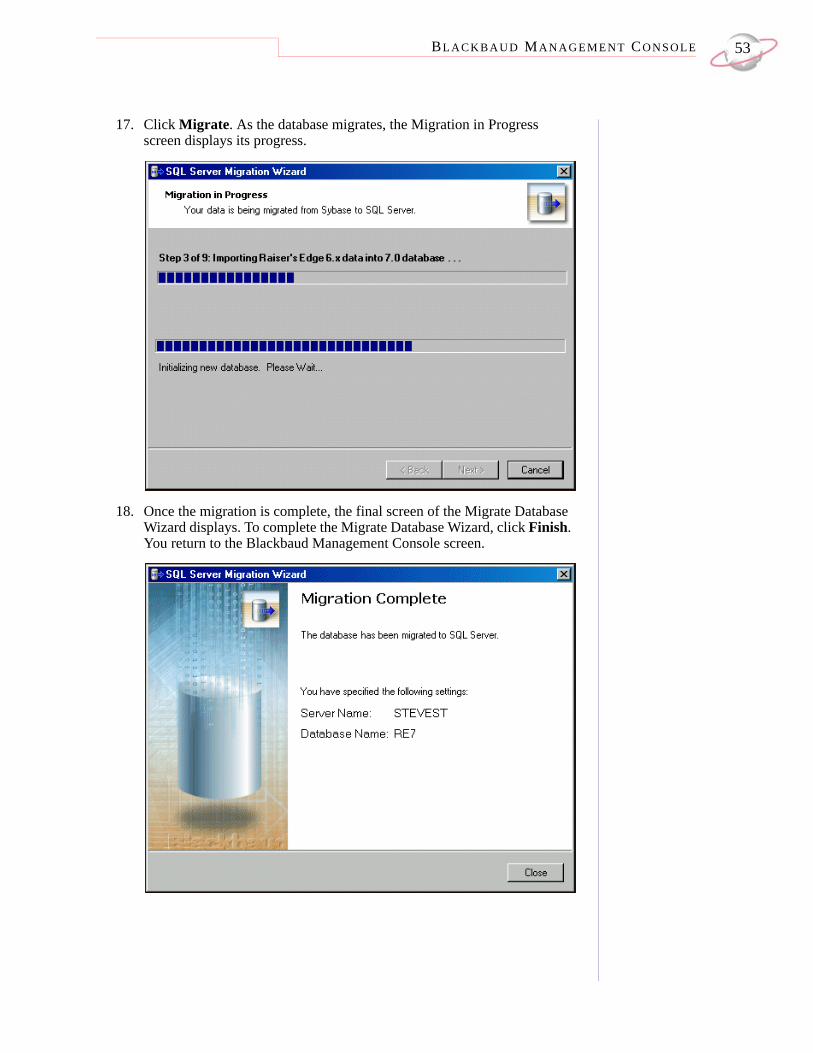
17. Click Migrate. As the database migrates, the Migration in Progress screen displays its progress.
18. Once the migration is complete, the final screen of the Migrate Database Wizard displays. To complete the Migrate Database Wizard, click Finish. You return to the Blackbaud Management Console screen.
CH A PT E R 154
Database ToolsYou can access the Blackbaud
Management Console help file from the Help menu.
Using database tools, you can take a database offline or detach the database. When you select a database in the Installed products tree view, you can select these database utilities from the Tools menu and view database properties.
Viewing Database PropertiesTo view which users are connected to the
database, you can also use the Database Connection Viewer located on the Plug-Ins page of the program.
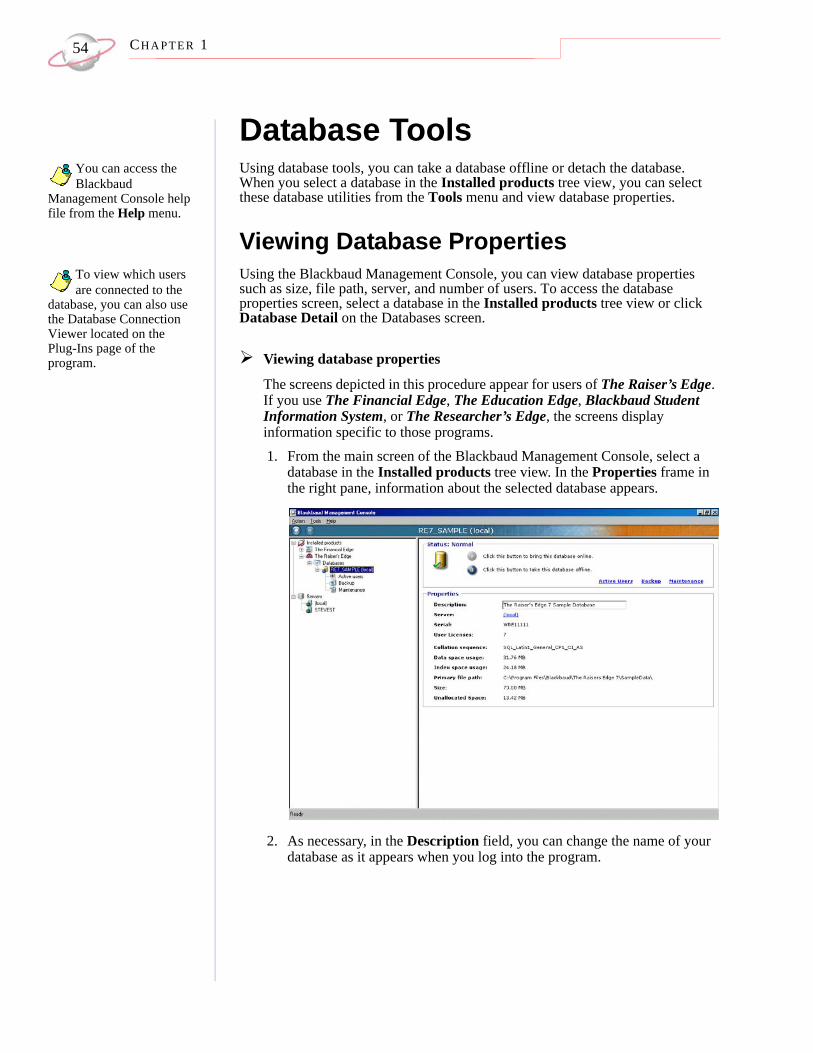
Using the Blackbaud Management Console, you can view database properties such as size, file path, server, and number of users. To access the database properties screen, select a database in the Installed products tree view or click Database Detail on the Databases screen.
Viewing database properties
The screens depicted in this procedure appear for users of The Raiser’s Edge. If you use The Financial Edge, The Education Edge, Blackbaud Student Information System, or The Researcher’s Edge, the screens display information specific to those programs.1. From the main screen of the Blackbaud Management Console, select a
database in the Installed products tree view. In the Properties frame in the right pane, information about the selected database appears.
2. As necessary, in the Description field, you can change the name of your database as it appears when you log into the program.
BL A C K B A U D MA N A G E M E N T CO N S O L E 55
Taking a Database OfflineUsing the Blackbaud Management Console, you can take a database offline. When you take a database offline, the database is closed and marked offline. While the database is offline, you cannot modify it. You may take a database offline to make a copy of the data or to keep users out of a database without shutting down the entire server.Before you take the database offline, all users must be out of the system.When you bring the database back online, the database is open and available for use. The default setting is Online.
Taking a database offline
The screens depicted in this procedure appear for users of The Raiser’s Edge. If you use The Financial Edge, The Education Edge, Blackbaud Student Information System, or The Researcher’s Edge, the screens display information specific to those programs.1. From the main screen of the Blackbaud Management Console, select the
database to take offline. In the pane on the right of the screen, information about the selected database appears.
Before you take the database offline, all
users must be out of the system.
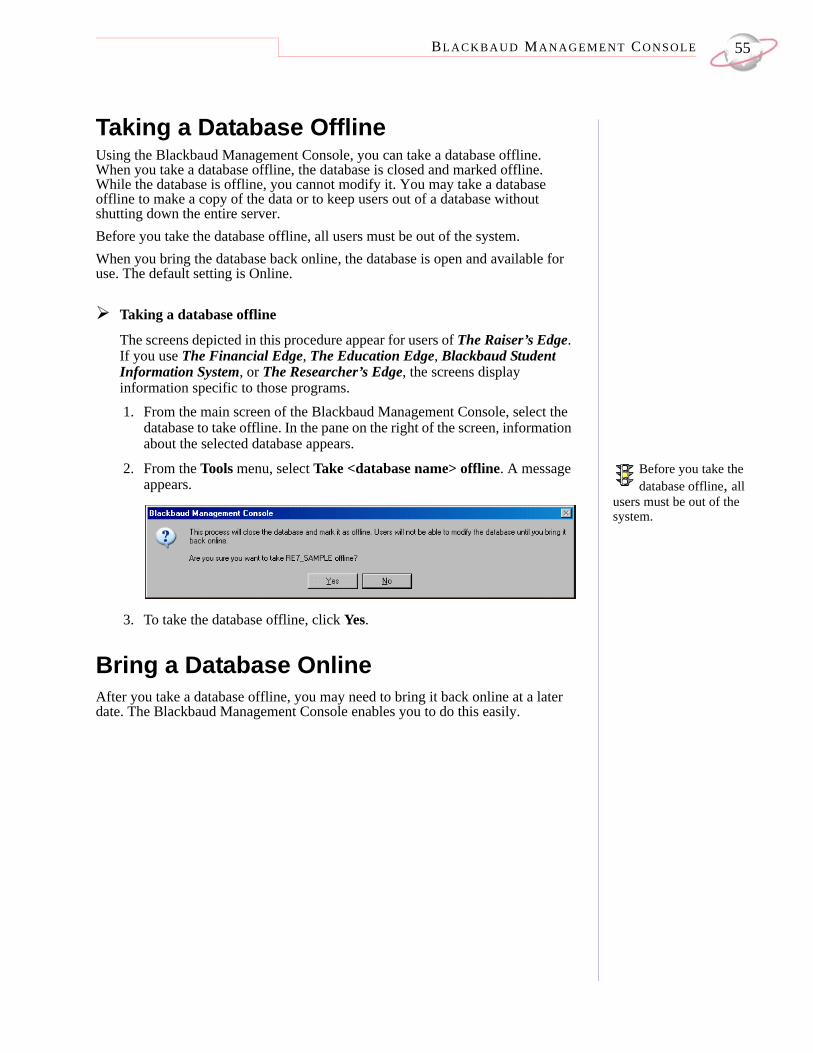
2. From the Tools menu, select Take <database name> offline. A message appears.
3. To take the database offline, click Yes.
Bring a Database OnlineAfter you take a database offline, you may need to bring it back online at a later date. The Blackbaud Management Console enables you to do this easily.
CH A PT E R 156
Bring a database online
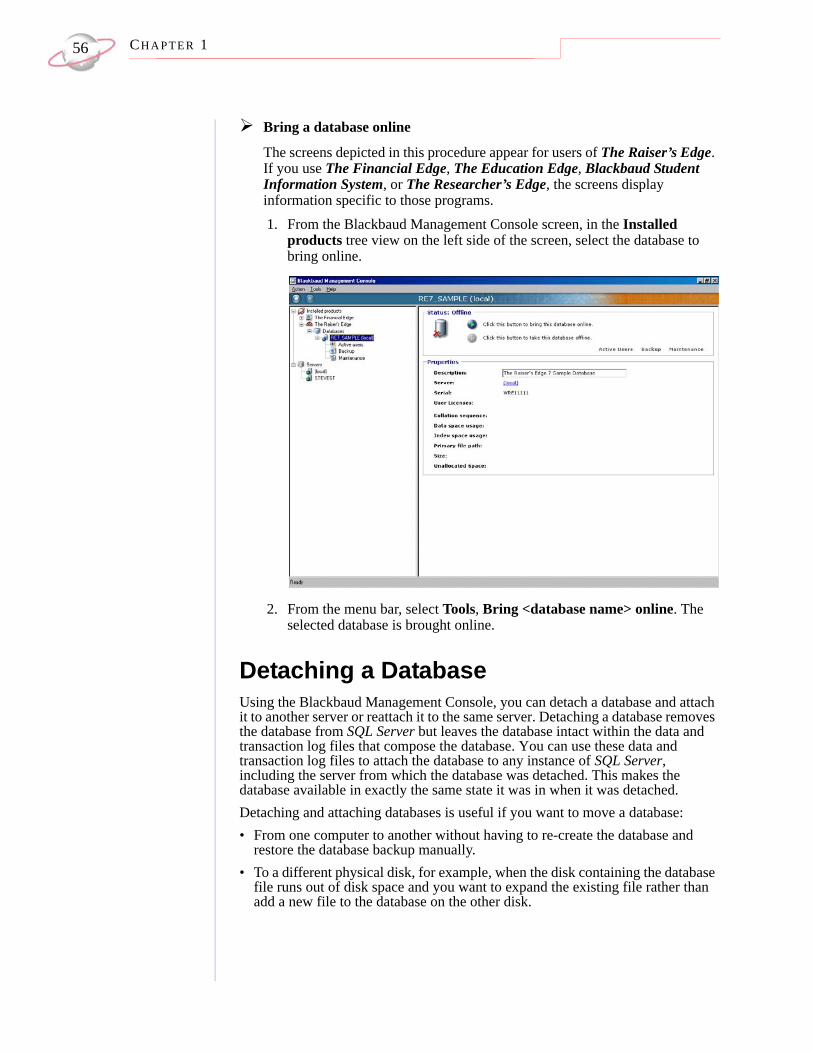
The screens depicted in this procedure appear for users of The Raiser’s Edge. If you use The Financial Edge, The Education Edge, Blackbaud Student Information System, or The Researcher’s Edge, the screens display information specific to those programs.1. From the Blackbaud Management Console screen, in the Installed
products tree view on the left side of the screen, select the database to bring online.
2. From the menu bar, select Tools, Bring <database name> online. The selected database is brought online.
Detaching a DatabaseUsing the Blackbaud Management Console, you can detach a database and attach it to another server or reattach it to the same server. Detaching a database removes the database from SQL Server but leaves the database intact within the data and transaction log files that compose the database. You can use these data and transaction log files to attach the database to any instance of SQL Server, including the server from which the database was detached. This makes the database available in exactly the same state it was in when it was detached.Detaching and attaching databases is useful if you want to move a database: • From one computer to another without having to re-create the database and
restore the database backup manually.• To a different physical disk, for example, when the disk containing the database
file runs out of disk space and you want to expand the existing file rather than add a new file to the database on the other disk.
BL A C K B A U D MA N A G E M E N T CO N S O L E 57
Detaching a database
The screens depicted in this procedure appear for users of The Raiser’s Edge. If you use The Financial Edge, The Education Edge, Blackbaud Student Information System, or The Researcher’s Edge, the screens display information specific to those programs.1. From the main screen of the Blackbaud Management Console, select the
database to detach. In the pane on the right of the screen, information about the selected database appears.
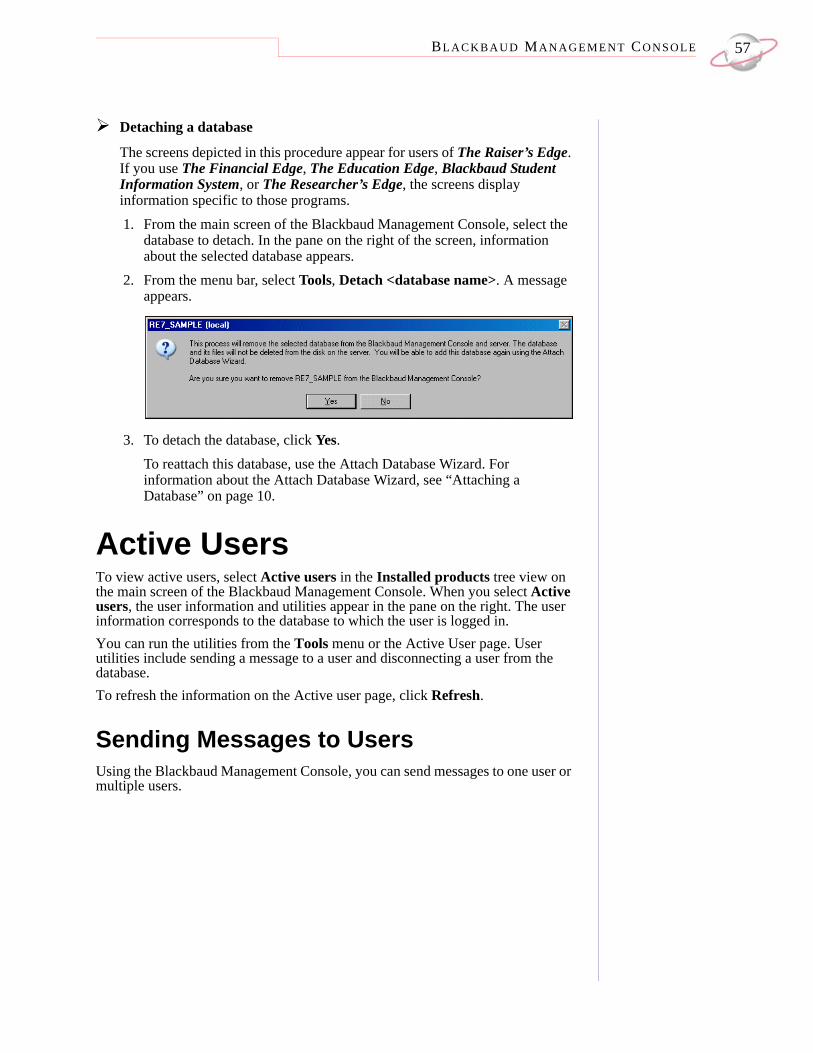
2. From the menu bar, select Tools, Detach <database name>. A message appears.
3. To detach the database, click Yes. To reattach this database, use the Attach Database Wizard. For information about the Attach Database Wizard, see “Attaching a Database” on page 10.
Active UsersTo view active users, select Active users in the Installed products tree view on the main screen of the Blackbaud Management Console. When you select Active users, the user information and utilities appear in the pane on the right. The user information corresponds to the database to which the user is logged in. You can run the utilities from the Tools menu or the Active User page. User utilities include sending a message to a user and disconnecting a user from the database.To refresh the information on the Active user page, click Refresh.
Sending Messages to UsersUsing the Blackbaud Management Console, you can send messages to one user or multiple users.
CH A PT E R 158
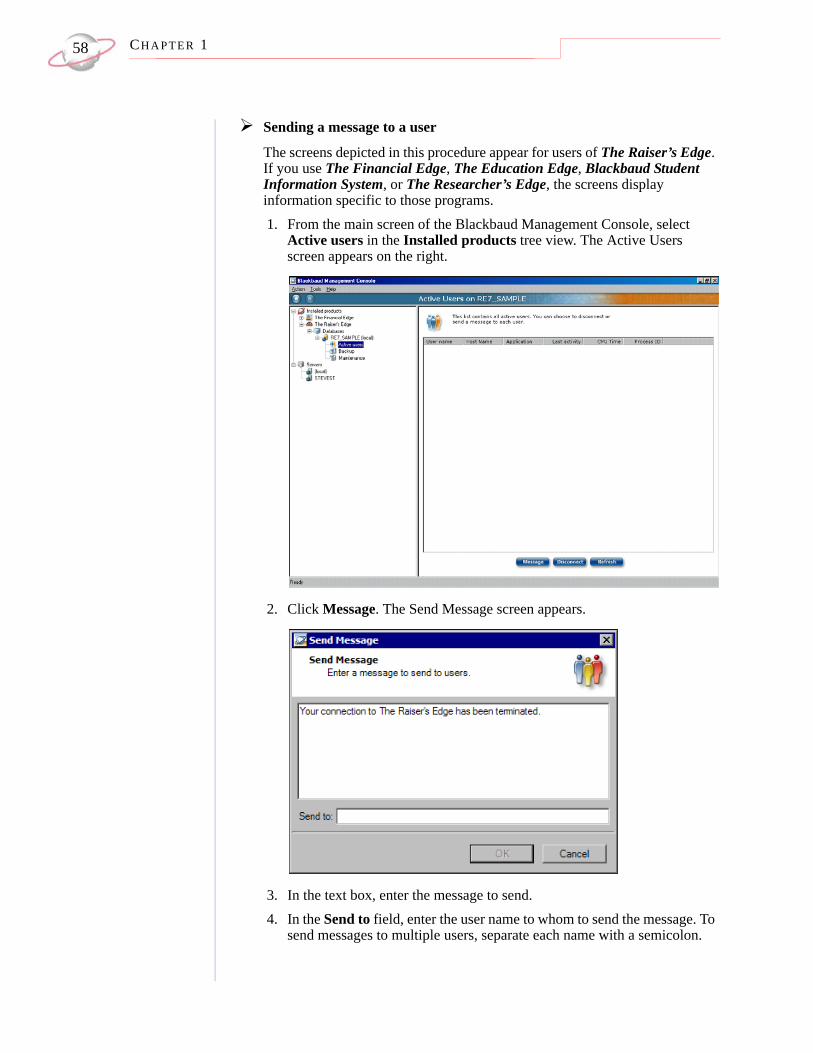
Sending a message to a user
The screens depicted in this procedure appear for users of The Raiser’s Edge. If you use The Financial Edge, The Education Edge, Blackbaud Student Information System, or The Researcher’s Edge, the screens display information specific to those programs.1. From the main screen of the Blackbaud Management Console, select
Active users in the Installed products tree view. The Active Users screen appears on the right.
2. Click Message. The Send Message screen appears.
3. In the text box, enter the message to send.4. In the Send to field, enter the user name to whom to send the message. To
send messages to multiple users, separate each name with a semicolon.
BL A C K B A U D MA N A G E M E N T CO N S O L E 59
5. To send the message, click OK. You return to the Blackbaud Management Console.
Disconnecting a UserUsing the Blackbaud Management Console, you can disconnect a user from a database. This feature is useful if the program ends abnormally, leaving the user connected to the database but unable to log in. You should also disconnect a user before you take a database offline.
To refresh the information on the
Active Users screen, click Refresh.
On the Active Users screen of the Blackbaud Management Console, you can view active users of a particular database. The user information corresponds to the database to which the user is logged in.
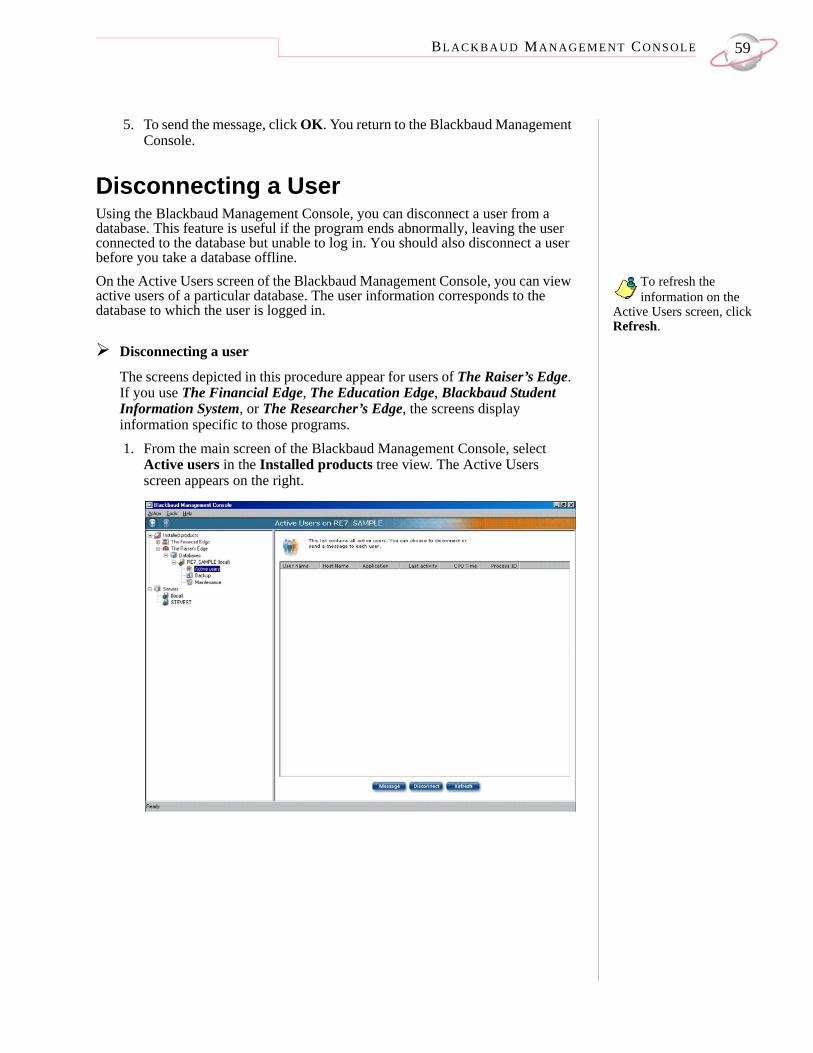
Disconnecting a user
The screens depicted in this procedure appear for users of The Raiser’s Edge. If you use The Financial Edge, The Education Edge, Blackbaud Student Information System, or The Researcher’s Edge, the screens display information specific to those programs.1. From the main screen of the Blackbaud Management Console, select
Active users in the Installed products tree view. The Active Users screen appears on the right.
CH A PT E R 160
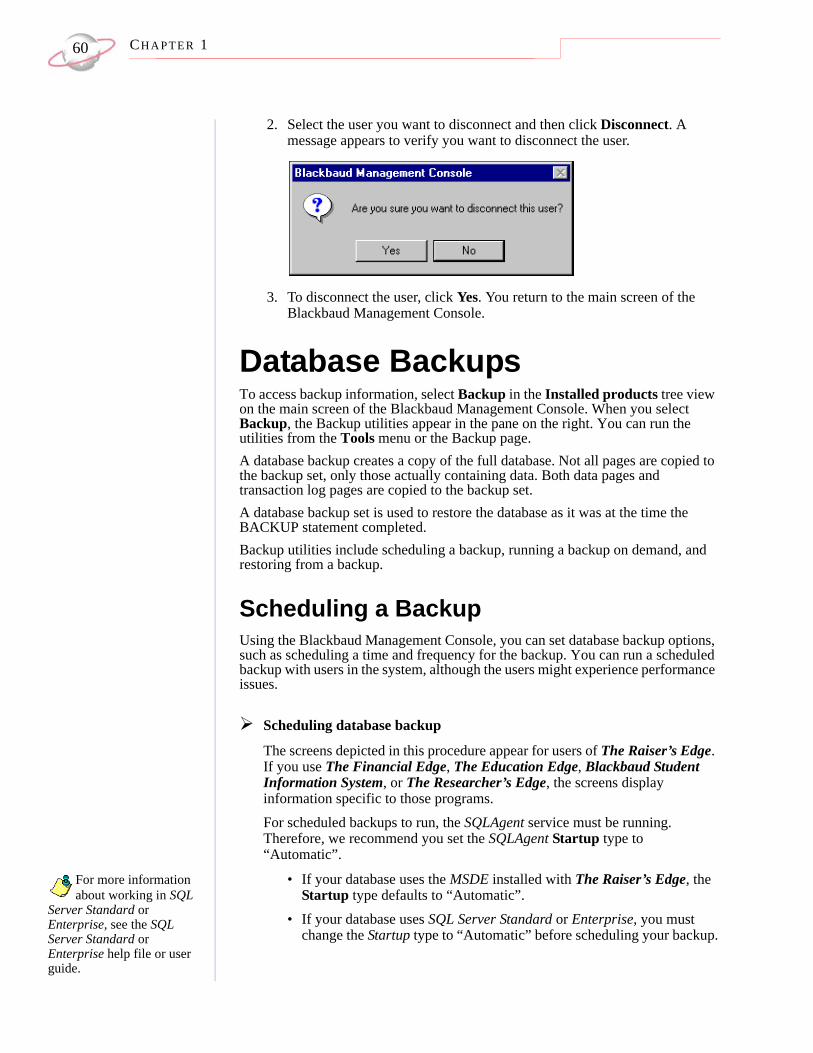
2. Select the user you want to disconnect and then click Disconnect. A message appears to verify you want to disconnect the user.
3. To disconnect the user, click Yes. You return to the main screen of the Blackbaud Management Console.
Database BackupsTo access backup information, select Backup in the Installed products tree view on the main screen of the Blackbaud Management Console. When you select Backup, the Backup utilities appear in the pane on the right. You can run the utilities from the Tools menu or the Backup page. A database backup creates a copy of the full database. Not all pages are copied to the backup set, only those actually containing data. Both data pages and transaction log pages are copied to the backup set.A database backup set is used to restore the database as it was at the time the BACKUP statement completed.Backup utilities include scheduling a backup, running a backup on demand, and restoring from a backup.
Scheduling a Backup Using the Blackbaud Management Console, you can set database backup options, such as scheduling a time and frequency for the backup. You can run a scheduled backup with users in the system, although the users might experience performance issues.
Scheduling database backup
The screens depicted in this procedure appear for users of The Raiser’s Edge. If you use The Financial Edge, The Education Edge, Blackbaud Student Information System, or The Researcher’s Edge, the screens display information specific to those programs.For scheduled backups to run, the SQLAgent service must be running. Therefore, we recommend you set the SQLAgent Startup type to “Automatic”.
For more information about working in SQL
Server Standard or Enterprise, see the SQL Server Standard or Enterprise help file or user guide.
• If your database uses the MSDE installed with The Raiser’s Edge, the Startup type defaults to “Automatic”.
• If your database uses SQL Server Standard or Enterprise, you must change the Startup type to “Automatic” before scheduling your backup.
BL A C K B A U D MA N A G E M E N T CO N S O L E 61
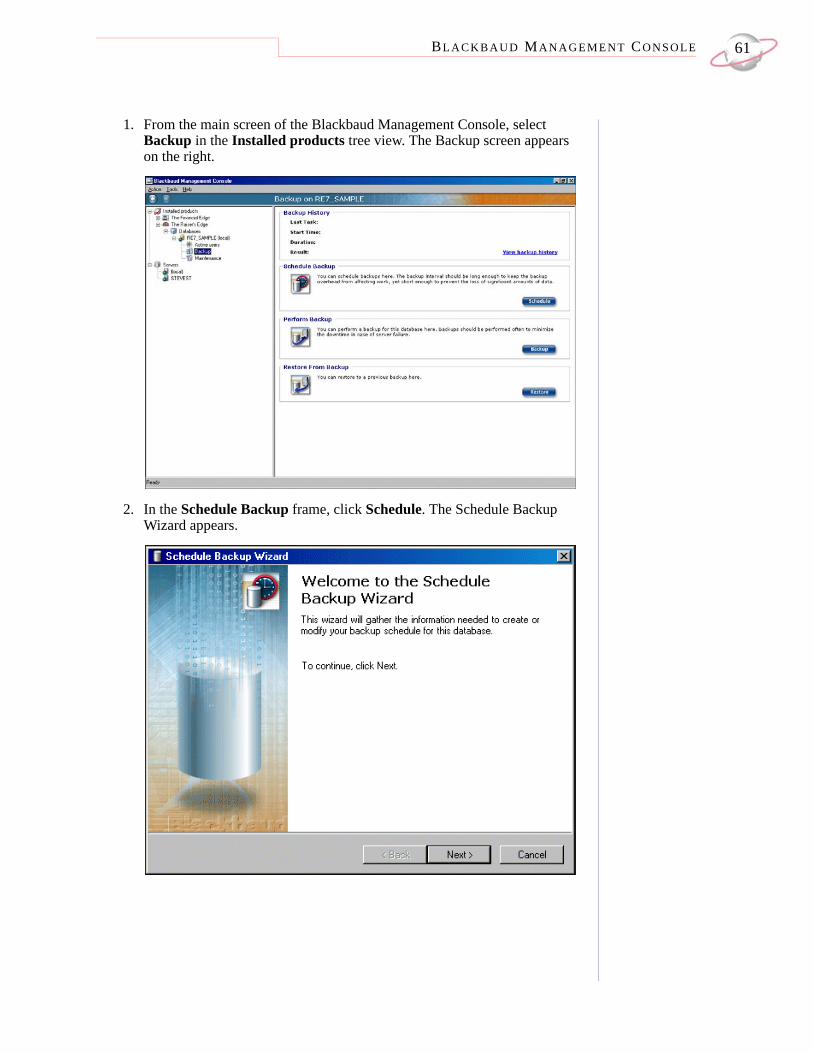
1. From the main screen of the Blackbaud Management Console, select Backup in the Installed products tree view. The Backup screen appears on the right.
2. In the Schedule Backup frame, click Schedule. The Schedule Backup Wizard appears.

CH A PT E R 162
3. Click Next. The Adjust Backup Schedule screen appears.
4. To schedule the time and frequency for creating a backup, mark Enabled and specify the Frequency and time of the backups.
5. Click Next. The Set Backup Path screen appears.
6. In the Select a path for the backup files field, enter a location to store your backup files. To map to the location, click the browse button.
BL A C K B A U D MA N A G E M E N T CO N S O L E 63
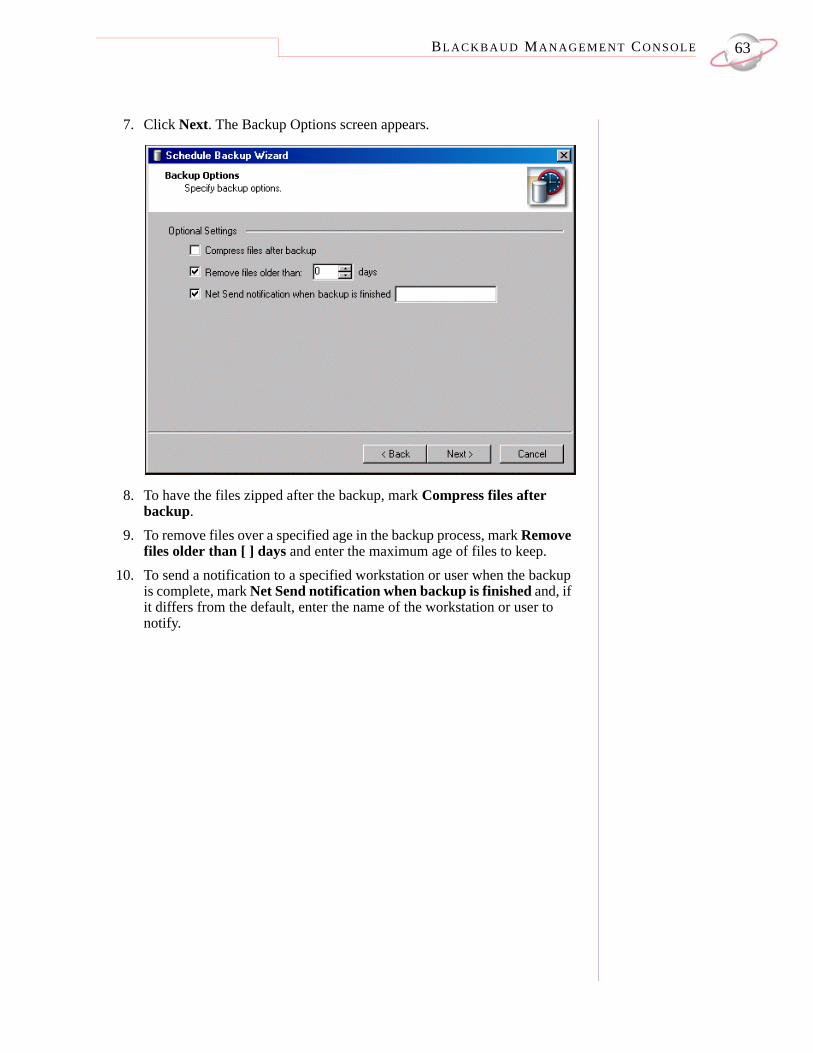
7. Click Next. The Backup Options screen appears.
8. To have the files zipped after the backup, mark Compress files after backup.
9. To remove files over a specified age in the backup process, mark Remove files older than [ ] days and enter the maximum age of files to keep.
10. To send a notification to a specified workstation or user when the backup is complete, mark Net Send notification when backup is finished and, if it differs from the default, enter the name of the workstation or user to notify.
CH A PT E R 164
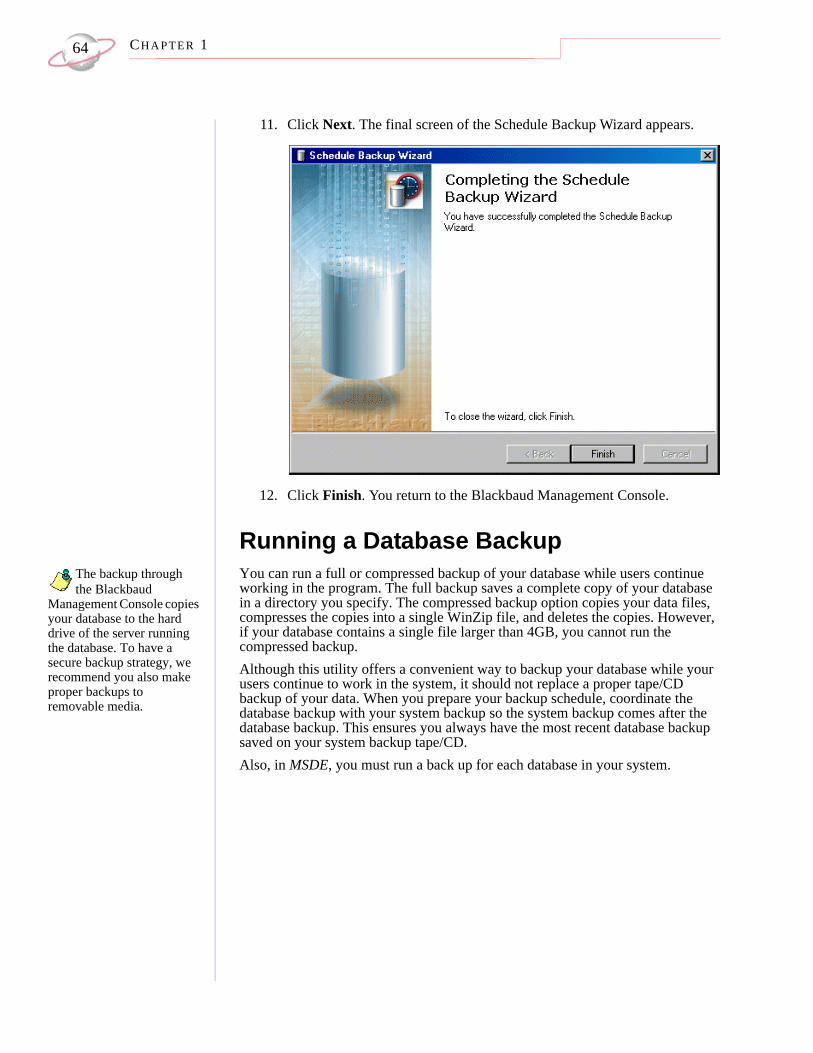
11. Click Next. The final screen of the Schedule Backup Wizard appears.
12. Click Finish. You return to the Blackbaud Management Console.
Running a Database BackupThe backup through the Blackbaud
Management Console copies your database to the hard drive of the server running the database. To have a secure backup strategy, we recommend you also make proper backups to removable media.
You can run a full or compressed backup of your database while users continue working in the program. The full backup saves a complete copy of your database in a directory you specify. The compressed backup option copies your data files, compresses the copies into a single WinZip file, and deletes the copies. However, if your database contains a single file larger than 4GB, you cannot run the compressed backup. Although this utility offers a convenient way to backup your database while your users continue to work in the system, it should not replace a proper tape/CD backup of your data. When you prepare your backup schedule, coordinate the database backup with your system backup so the system backup comes after the database backup. This ensures you always have the most recent database backup saved on your system backup tape/CD.Also, in MSDE, you must run a back up for each database in your system.
BL A C K B A U D MA N A G E M E N T CO N S O L E 65
Using the Blackbaud Management Console,
you can schedule the time and frequency for creating a backup.
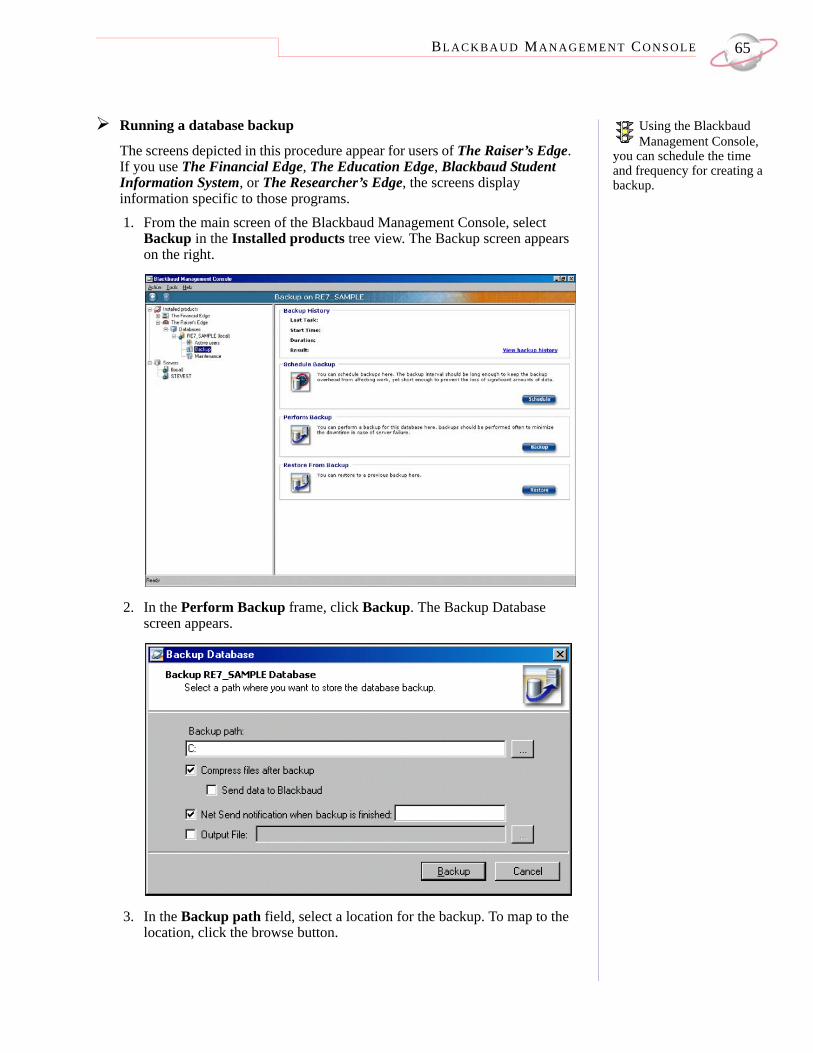
Running a database backup
The screens depicted in this procedure appear for users of The Raiser’s Edge. If you use The Financial Edge, The Education Edge, Blackbaud Student Information System, or The Researcher’s Edge, the screens display information specific to those programs.1. From the main screen of the Blackbaud Management Console, select
Backup in the Installed products tree view. The Backup screen appears on the right.
2. In the Perform Backup frame, click Backup. The Backup Database screen appears.
3. In the Backup path field, select a location for the backup. To map to the location, click the browse button.
CH A PT E R 166
4. To have the files zipped after the backup, mark Compress files after backup.
Unless you have been directed to by
Blackbaud Technical Support, do not mark Send data to Blackbaud.
If you select this option, the Send data to Blackbaud checkbox is enabled. Unless you have been directed to by Blackbaud Technical Support, do not mark this checkbox.
5. To send a notification to a specified workstation or user, mark Net Send notification when backup is finished and, if it differs from the default, enter the name of the workstation or user to notify.
6. To generate a text file that details the backup process, mark Output File and click the browse button to map to the location to generate the output file.
7. To start the backup, click Backup. You return to the Blackbaud Management Console.
Restoring from a BackupUsing the Blackbaud Management Console, you can restore your database from a backup. This process works with full and compressed backup files.
Once the database is restored, all data
entered since creating the backup will be lost.
To make sure you fully understand the process, we recommend you test the restoring-from-backup procedure. Familiarizing yourself with the process before you actually need to use it may avoid delays and extended down time when you actually need to restore your database from a backup.To restore from a backup, users must be out of the database.
Restoring from a database backup
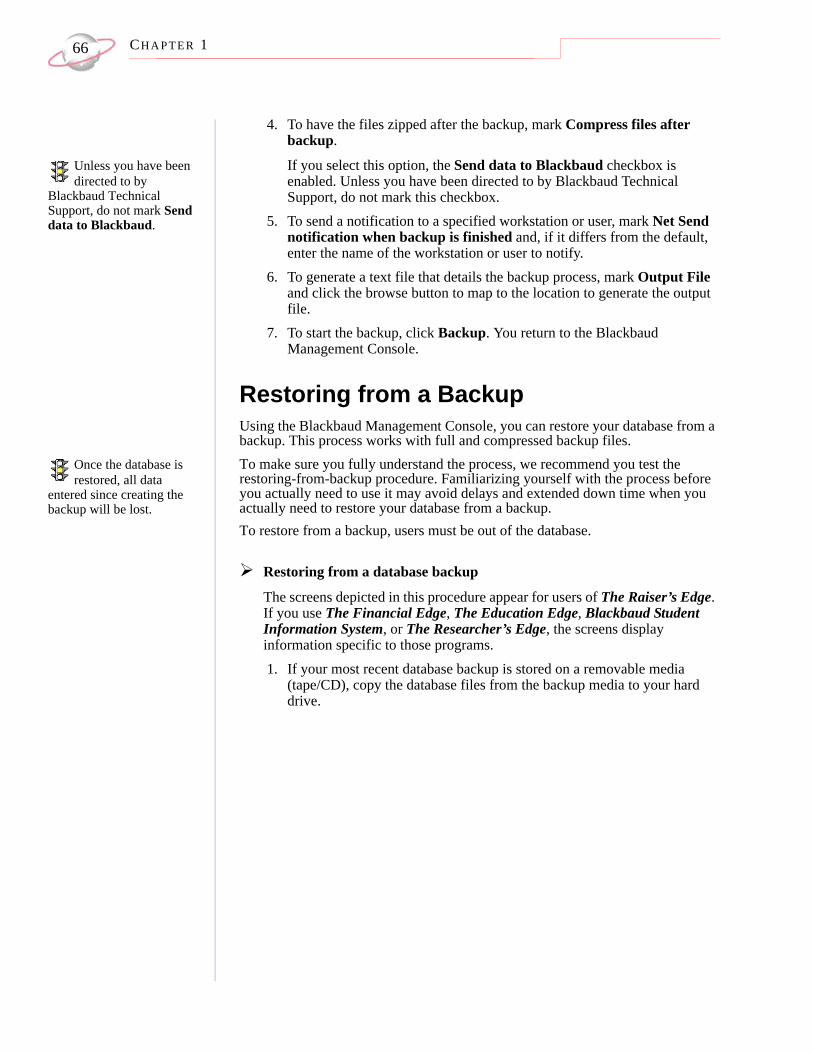
The screens depicted in this procedure appear for users of The Raiser’s Edge. If you use The Financial Edge, The Education Edge, Blackbaud Student Information System, or The Researcher’s Edge, the screens display information specific to those programs.
1. If your most recent database backup is stored on a removable media (tape/CD), copy the database files from the backup media to your hard drive.
BL A C K B A U D MA N A G E M E N T CO N S O L E 67
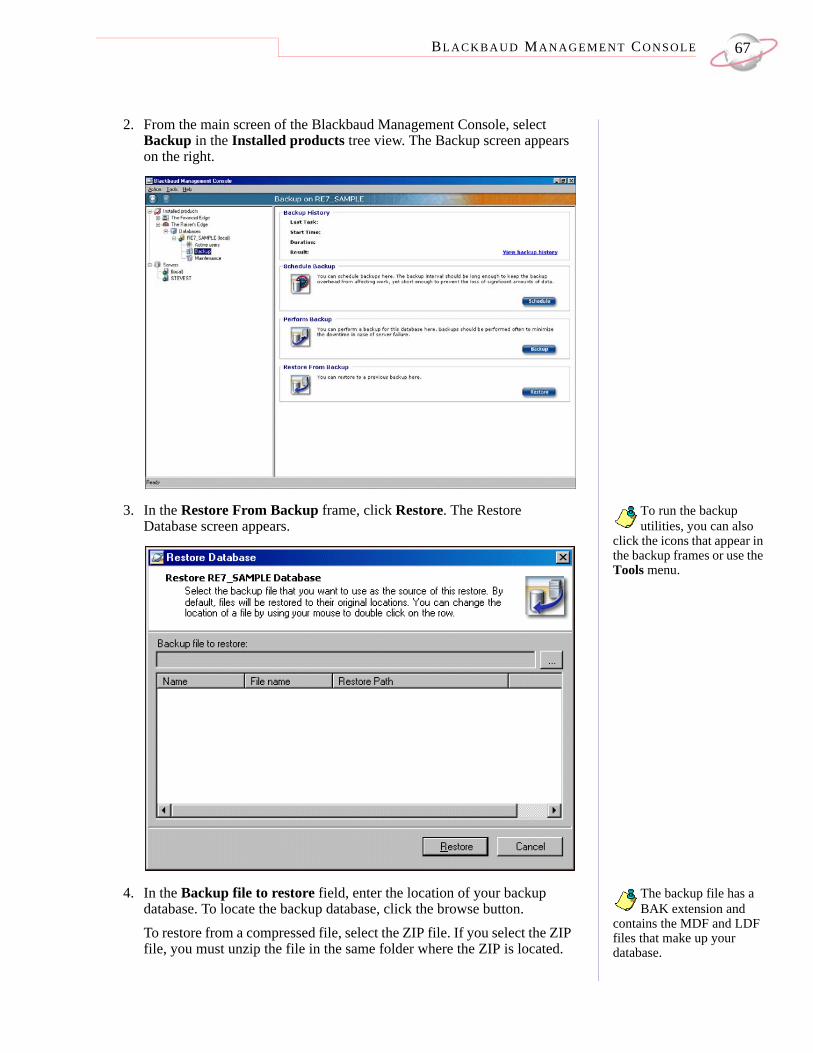
2. From the main screen of the Blackbaud Management Console, select Backup in the Installed products tree view. The Backup screen appears on the right.
To run the backup utilities, you can also
click the icons that appear in the backup frames or use the Tools menu.
3. In the Restore From Backup frame, click Restore. The Restore Database screen appears.
The backup file has a BAK extension and
contains the MDF and LDF files that make up your database.
4. In the Backup file to restore field, enter the location of your backup database. To locate the backup database, click the browse button.To restore from a compressed file, select the ZIP file. If you select the ZIP file, you must unzip the file in the same folder where the ZIP is located.
CH A PT E R 168
After the database is restored, all data
entered since you created the backup is lost.
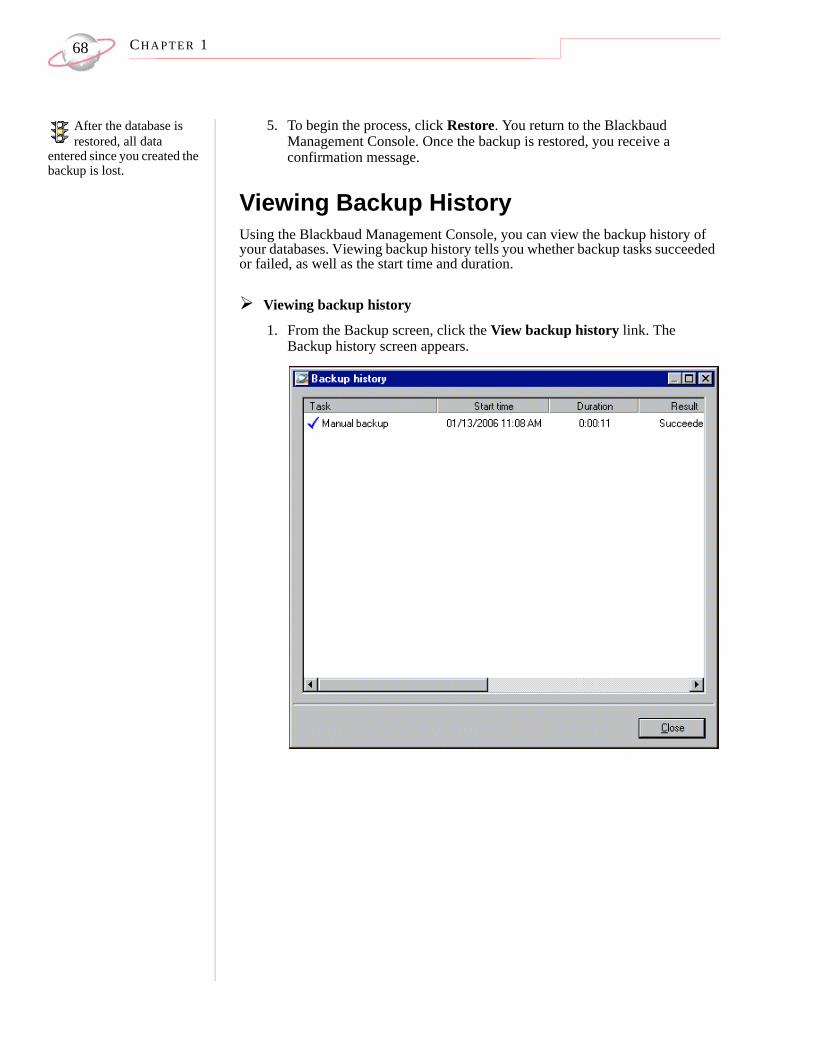
5. To begin the process, click Restore. You return to the Blackbaud Management Console. Once the backup is restored, you receive a confirmation message.
Viewing Backup HistoryUsing the Blackbaud Management Console, you can view the backup history of your databases. Viewing backup history tells you whether backup tasks succeeded or failed, as well as the start time and duration.
Viewing backup history
1. From the Backup screen, click the View backup history link. The Backup history screen appears.
BL A C K B A U D MA N A G E M E N T CO N S O L E 69
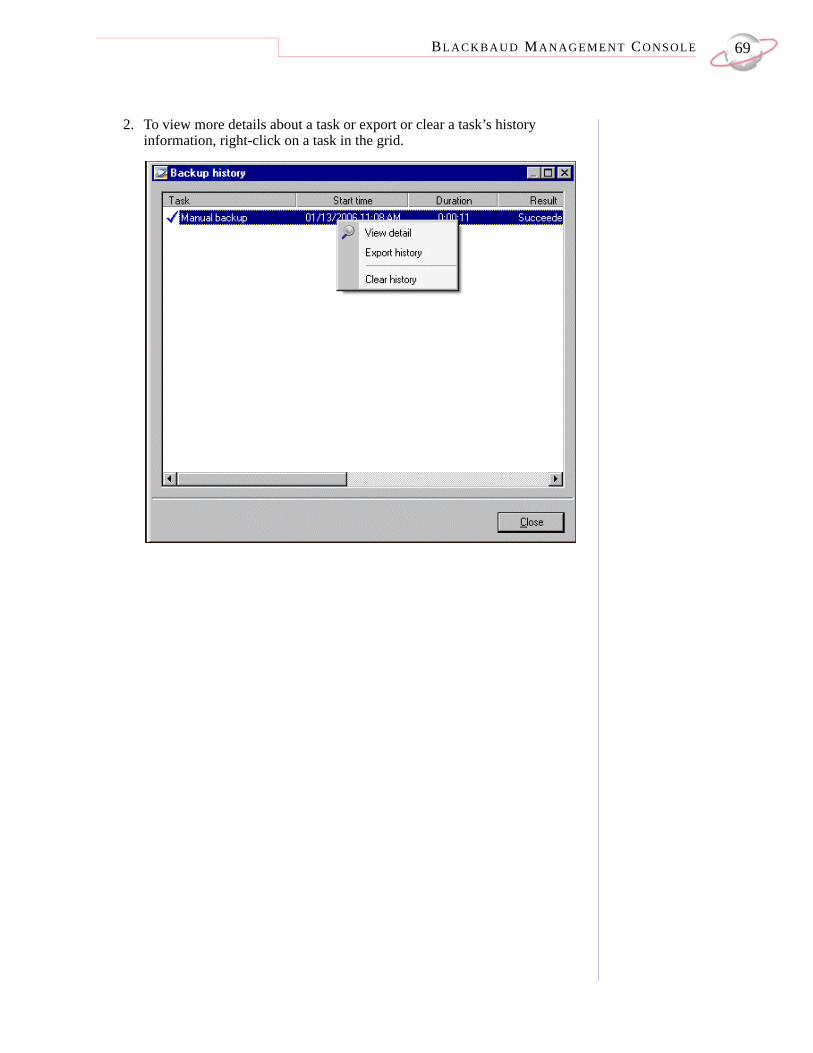
2. To view more details about a task or export or clear a task’s history information, right-click on a task in the grid.
CH A PT E R 170
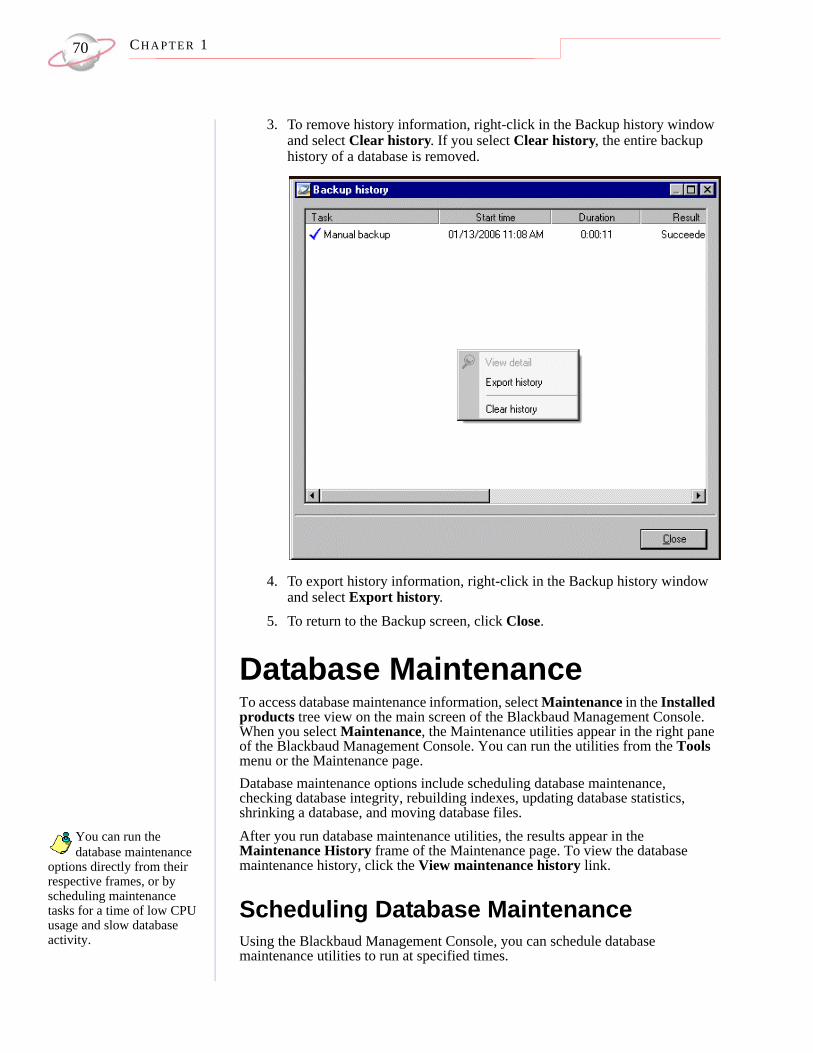
3. To remove history information, right-click in the Backup history window and select Clear history. If you select Clear history, the entire backup history of a database is removed.
4. To export history information, right-click in the Backup history window and select Export history.
5. To return to the Backup screen, click Close.
Database MaintenanceTo access database maintenance information, select Maintenance in the Installed products tree view on the main screen of the Blackbaud Management Console. When you select Maintenance, the Maintenance utilities appear in the right pane of the Blackbaud Management Console. You can run the utilities from the Tools menu or the Maintenance page. Database maintenance options include scheduling database maintenance, checking database integrity, rebuilding indexes, updating database statistics, shrinking a database, and moving database files.
You can run the database maintenance
options directly from their respective frames, or by scheduling maintenance tasks for a time of low CPU usage and slow database activity.
After you run database maintenance utilities, the results appear in the Maintenance History frame of the Maintenance page. To view the database maintenance history, click the View maintenance history link.
Scheduling Database MaintenanceUsing the Blackbaud Management Console, you can schedule database maintenance utilities to run at specified times.
BL A C K B A U D MA N A G E M E N T CO N S O L E 71
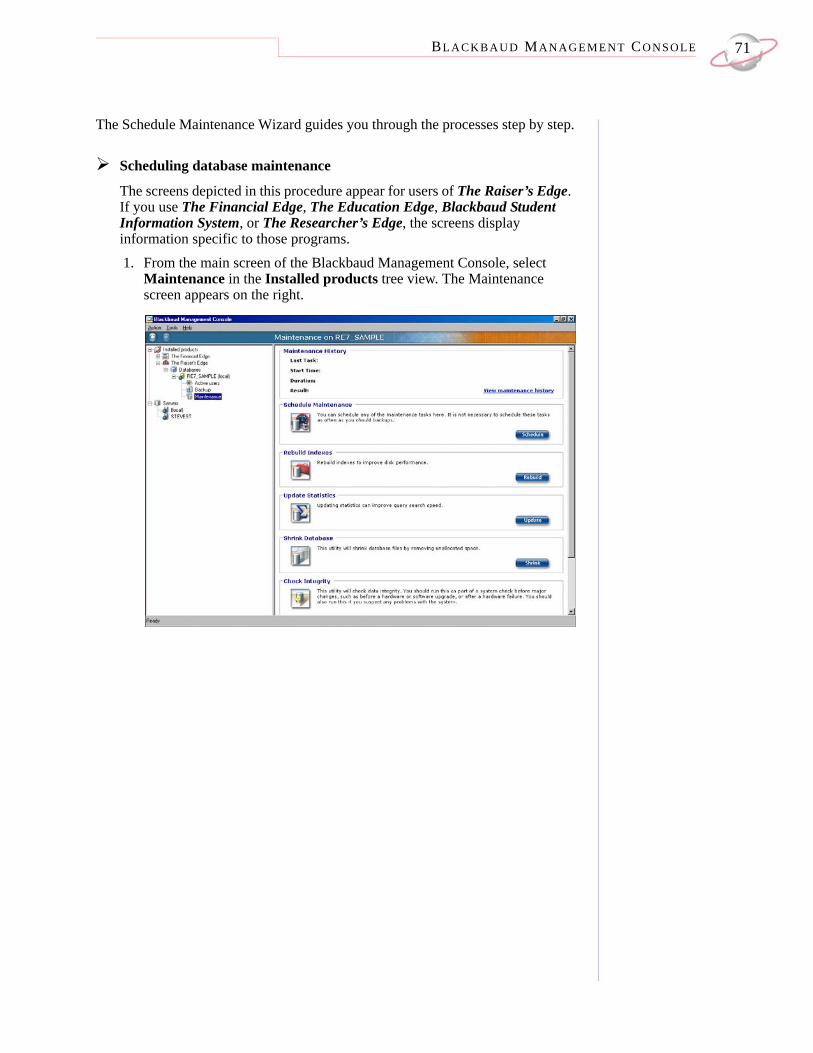
The Schedule Maintenance Wizard guides you through the processes step by step.
Scheduling database maintenance
The screens depicted in this procedure appear for users of The Raiser’s Edge. If you use The Financial Edge, The Education Edge, Blackbaud Student Information System, or The Researcher’s Edge, the screens display information specific to those programs.1. From the main screen of the Blackbaud Management Console, select
Maintenance in the Installed products tree view. The Maintenance screen appears on the right.

CH A PT E R 172
2. In the Schedule Maintenance frame, click Schedule. The Schedule Maintenance Wizard appears.
3. Click Next. The Adjust Maintenance Schedule screen appears.
4. To schedule the time and frequency for the database maintenance options, mark Enabled and specify the Frequency and time of the maintenance.

BL A C K B A U D MA N A G E M E N T CO N S O L E 73
5. Click Next. The Select Maintenance Tasks screen appears.
6. To rebuild the indexes during the scheduled maintenance, mark Rebuild indexes and select how to handle free space during the rebuild. You can select to Reorganize pages with the original amount of free space or to Change free space percentage to a specified percentage.
7. To update the statistics during the scheduled maintenance, mark Update statistics. You can change the percentage of the database the statistics are based on.
8. To shrink the database during the scheduled maintenance, mark Shrink database and enter the amount of free space that remains after shrinking your database.
If you mark Include indexes, the validation
automatically attempts to repair any minor problems encountered in the indexes.
9. To check the integrity during the scheduled maintenance, mark Check integrity. To include indexes in the integrity check, mark Include indexes.
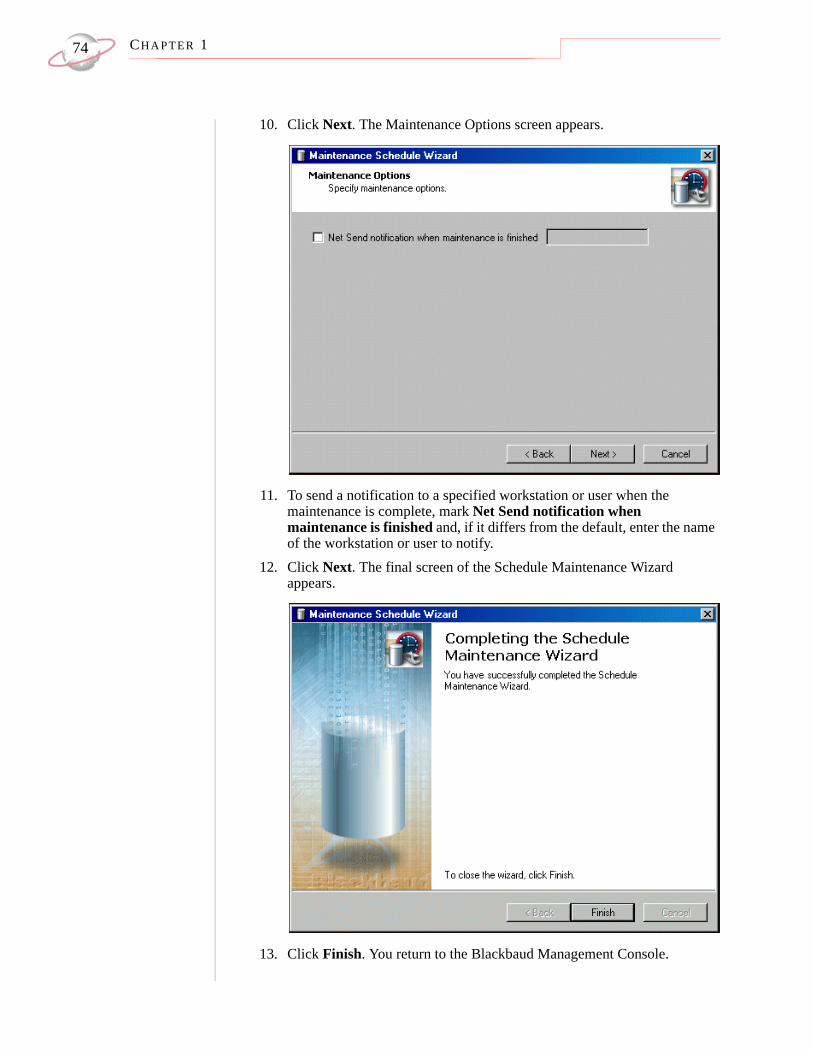
CH A PT E R 174
10. Click Next. The Maintenance Options screen appears.
11. To send a notification to a specified workstation or user when the maintenance is complete, mark Net Send notification when maintenance is finished and, if it differs from the default, enter the name of the workstation or user to notify.
12. Click Next. The final screen of the Schedule Maintenance Wizard appears.
13. Click Finish. You return to the Blackbaud Management Console.
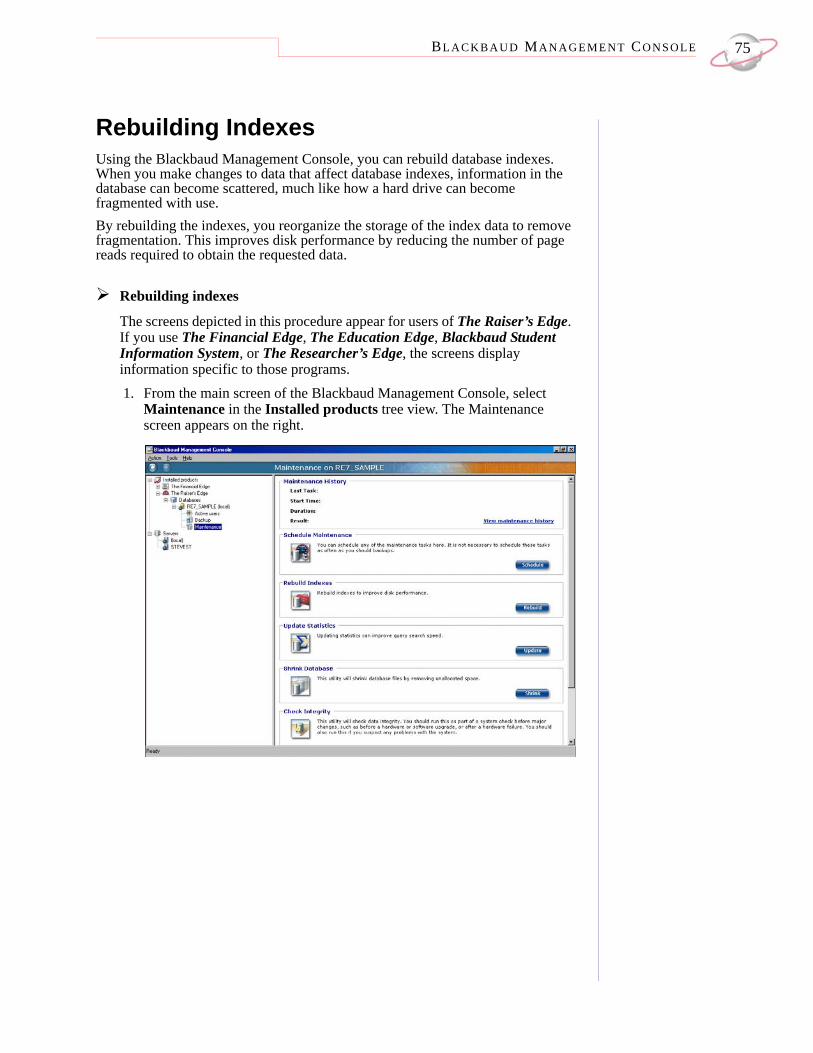
BL A C K B A U D MA N A G E M E N T CO N S O L E 75
Rebuilding IndexesUsing the Blackbaud Management Console, you can rebuild database indexes. When you make changes to data that affect database indexes, information in the database can become scattered, much like how a hard drive can become fragmented with use.By rebuilding the indexes, you reorganize the storage of the index data to remove fragmentation. This improves disk performance by reducing the number of page reads required to obtain the requested data.
Rebuilding indexes
The screens depicted in this procedure appear for users of The Raiser’s Edge. If you use The Financial Edge, The Education Edge, Blackbaud Student Information System, or The Researcher’s Edge, the screens display information specific to those programs.1. From the main screen of the Blackbaud Management Console, select
Maintenance in the Installed products tree view. The Maintenance screen appears on the right.
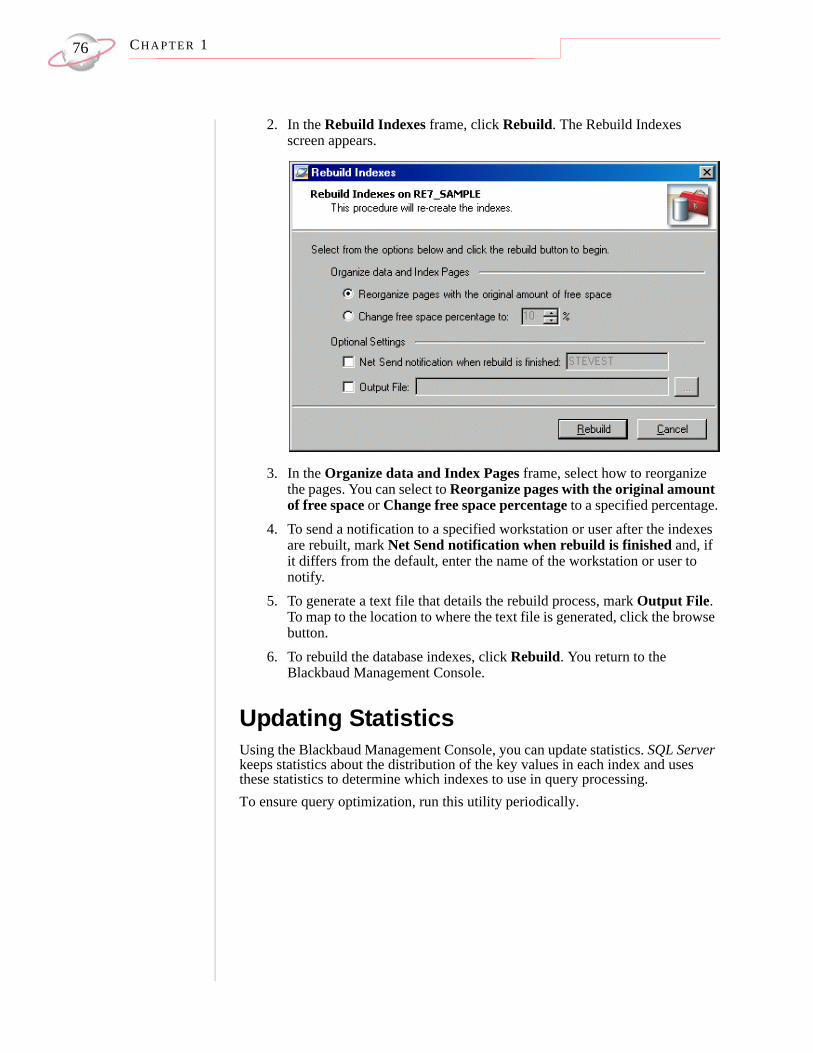
CH A PT E R 176
2. In the Rebuild Indexes frame, click Rebuild. The Rebuild Indexes screen appears.
3. In the Organize data and Index Pages frame, select how to reorganize the pages. You can select to Reorganize pages with the original amount of free space or Change free space percentage to a specified percentage.
4. To send a notification to a specified workstation or user after the indexes are rebuilt, mark Net Send notification when rebuild is finished and, if it differs from the default, enter the name of the workstation or user to notify.
5. To generate a text file that details the rebuild process, mark Output File. To map to the location to where the text file is generated, click the browse button.
6. To rebuild the database indexes, click Rebuild. You return to the Blackbaud Management Console.
Updating StatisticsUsing the Blackbaud Management Console, you can update statistics. SQL Server keeps statistics about the distribution of the key values in each index and uses these statistics to determine which indexes to use in query processing. To ensure query optimization, run this utility periodically.
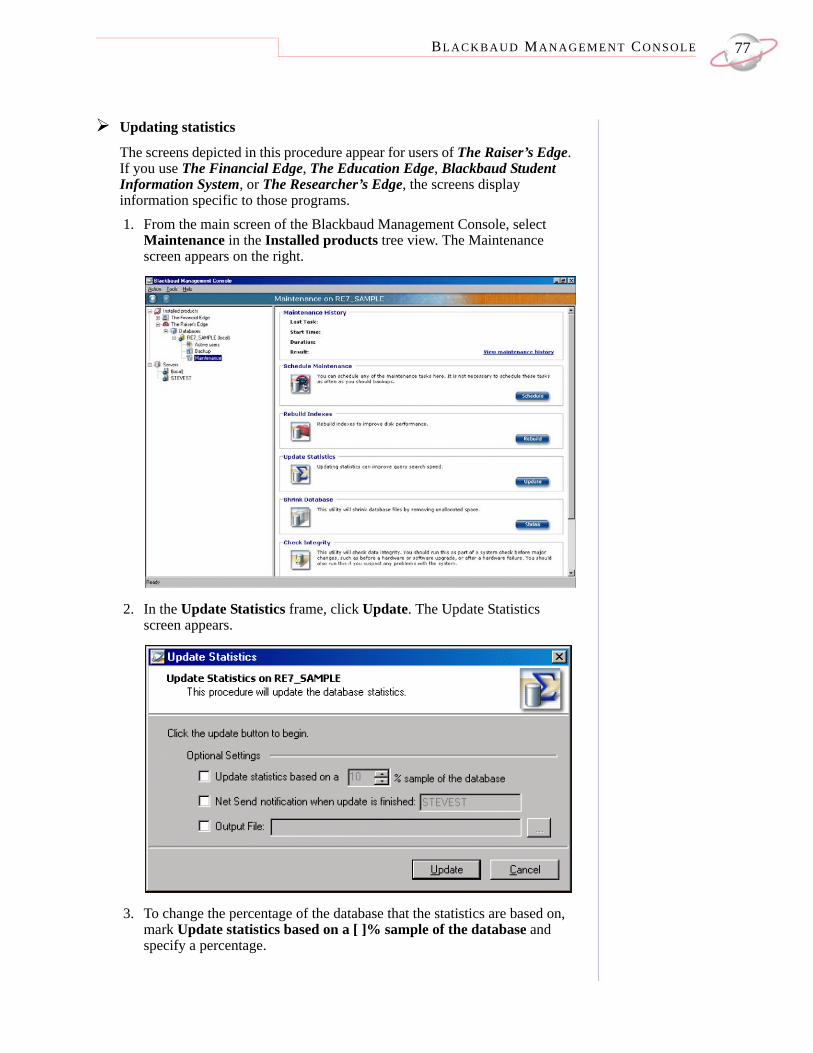
BL A C K B A U D MA N A G E M E N T CO N S O L E 77
Updating statistics
The screens depicted in this procedure appear for users of The Raiser’s Edge. If you use The Financial Edge, The Education Edge, Blackbaud Student Information System, or The Researcher’s Edge, the screens display information specific to those programs.1. From the main screen of the Blackbaud Management Console, select
Maintenance in the Installed products tree view. The Maintenance screen appears on the right.
2. In the Update Statistics frame, click Update. The Update Statistics screen appears.
3. To change the percentage of the database that the statistics are based on, mark Update statistics based on a [ ]% sample of the database and specify a percentage.
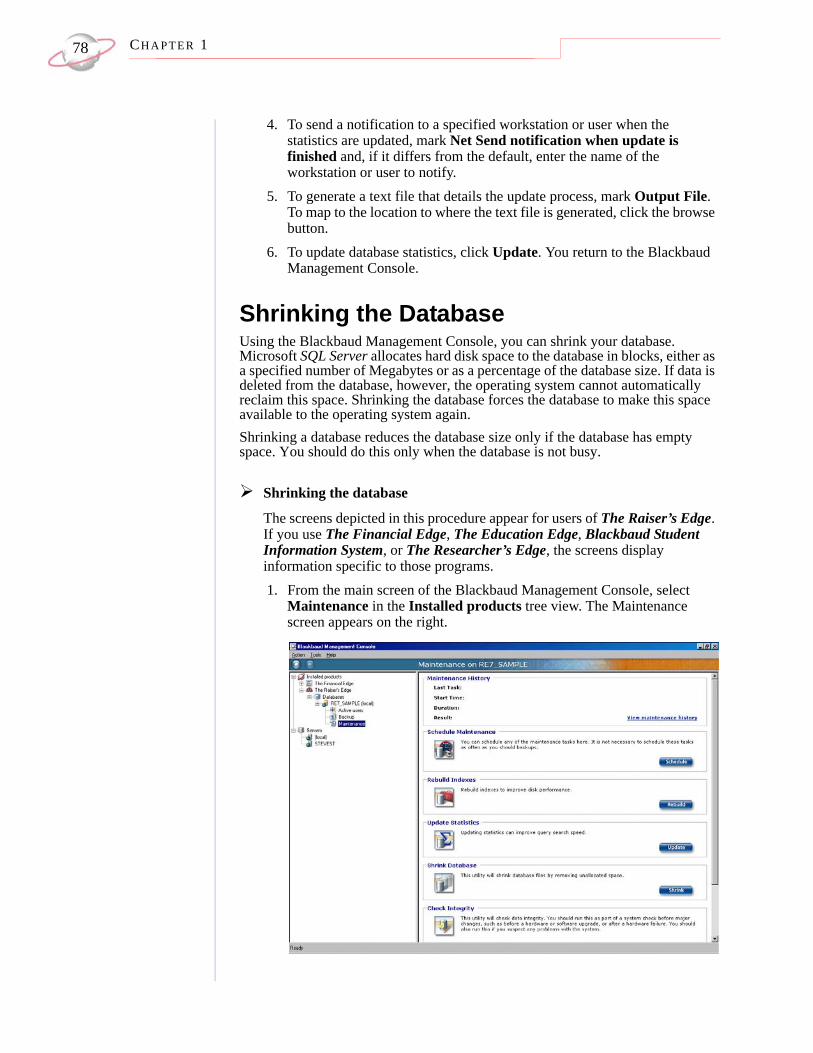
CH A PT E R 178
4. To send a notification to a specified workstation or user when the statistics are updated, mark Net Send notification when update is finished and, if it differs from the default, enter the name of the workstation or user to notify.
5. To generate a text file that details the update process, mark Output File. To map to the location to where the text file is generated, click the browse button.
6. To update database statistics, click Update. You return to the Blackbaud Management Console.
Shrinking the DatabaseUsing the Blackbaud Management Console, you can shrink your database. Microsoft SQL Server allocates hard disk space to the database in blocks, either as a specified number of Megabytes or as a percentage of the database size. If data is deleted from the database, however, the operating system cannot automatically reclaim this space. Shrinking the database forces the database to make this space available to the operating system again. Shrinking a database reduces the database size only if the database has empty space. You should do this only when the database is not busy.
Shrinking the database
The screens depicted in this procedure appear for users of The Raiser’s Edge. If you use The Financial Edge, The Education Edge, Blackbaud Student Information System, or The Researcher’s Edge, the screens display information specific to those programs.1. From the main screen of the Blackbaud Management Console, select
Maintenance in the Installed products tree view. The Maintenance screen appears on the right.
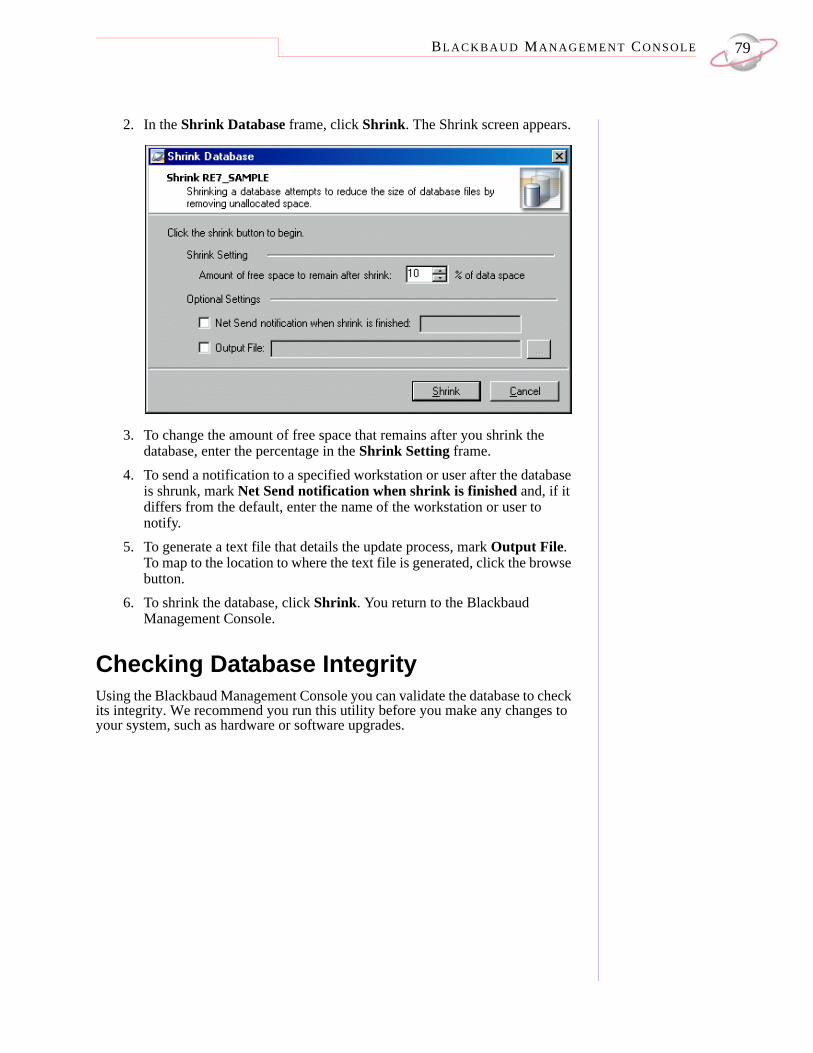
BL A C K B A U D MA N A G E M E N T CO N S O L E 79
2. In the Shrink Database frame, click Shrink. The Shrink screen appears.
3. To change the amount of free space that remains after you shrink the database, enter the percentage in the Shrink Setting frame.
4. To send a notification to a specified workstation or user after the database is shrunk, mark Net Send notification when shrink is finished and, if it differs from the default, enter the name of the workstation or user to notify.
5. To generate a text file that details the update process, mark Output File. To map to the location to where the text file is generated, click the browse button.
6. To shrink the database, click Shrink. You return to the Blackbaud Management Console.
Checking Database IntegrityUsing the Blackbaud Management Console you can validate the database to check its integrity. We recommend you run this utility before you make any changes to your system, such as hardware or software upgrades.
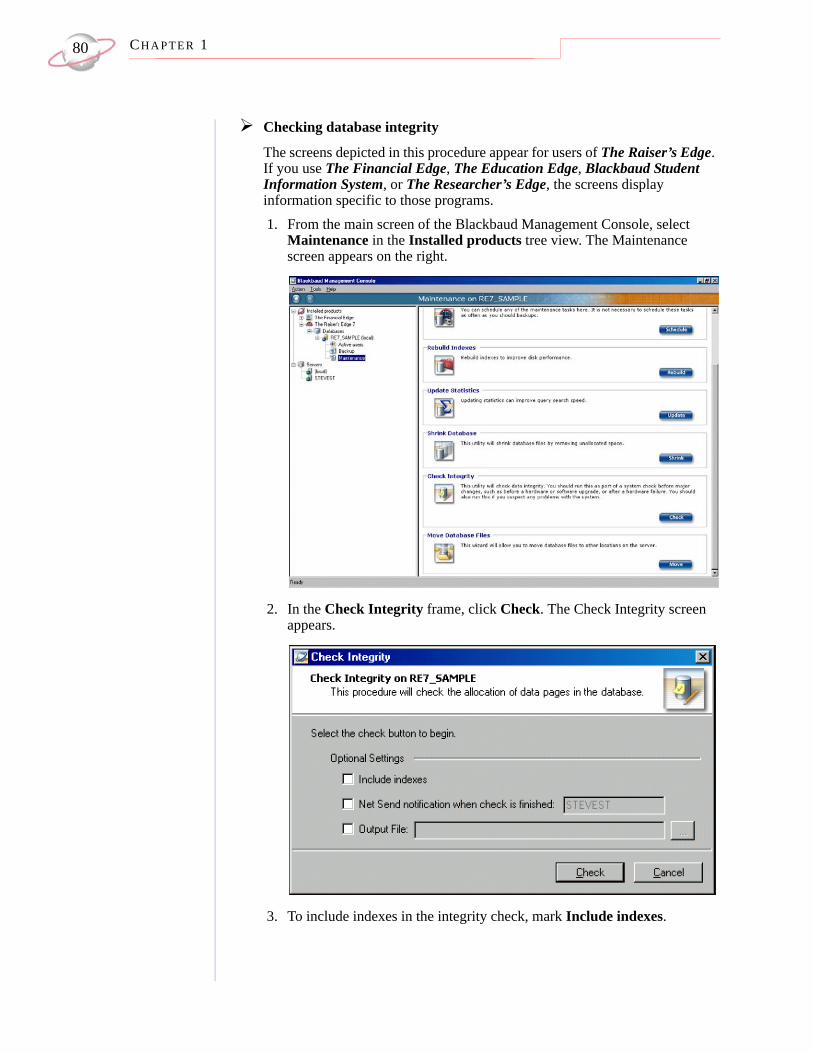
CH A PT E R 180
Checking database integrity
The screens depicted in this procedure appear for users of The Raiser’s Edge. If you use The Financial Edge, The Education Edge, Blackbaud Student Information System, or The Researcher’s Edge, the screens display information specific to those programs.1. From the main screen of the Blackbaud Management Console, select
Maintenance in the Installed products tree view. The Maintenance screen appears on the right.
2. In the Check Integrity frame, click Check. The Check Integrity screen appears.
3. To include indexes in the integrity check, mark Include indexes.
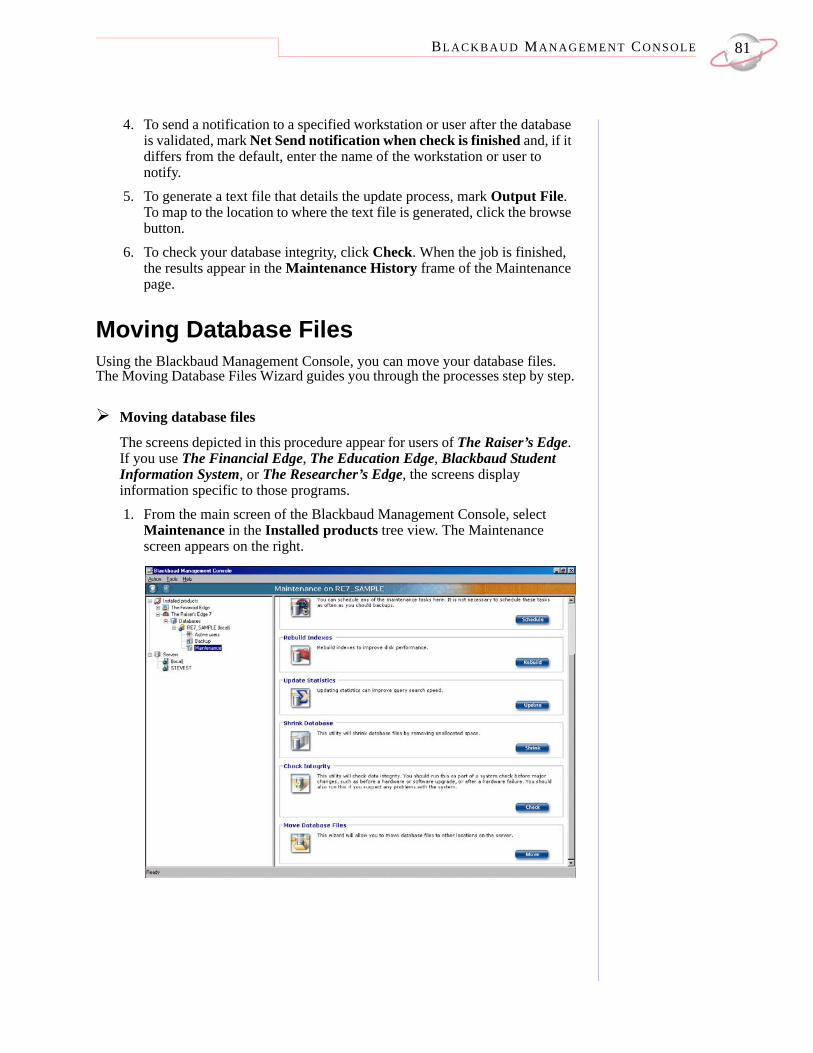
BL A C K B A U D MA N A G E M E N T CO N S O L E 81
4. To send a notification to a specified workstation or user after the database is validated, mark Net Send notification when check is finished and, if it differs from the default, enter the name of the workstation or user to notify.
5. To generate a text file that details the update process, mark Output File. To map to the location to where the text file is generated, click the browse button.
6. To check your database integrity, click Check. When the job is finished, the results appear in the Maintenance History frame of the Maintenance page.
Moving Database FilesUsing the Blackbaud Management Console, you can move your database files. The Moving Database Files Wizard guides you through the processes step by step.
Moving database files
The screens depicted in this procedure appear for users of The Raiser’s Edge. If you use The Financial Edge, The Education Edge, Blackbaud Student Information System, or The Researcher’s Edge, the screens display information specific to those programs.1. From the main screen of the Blackbaud Management Console, select
Maintenance in the Installed products tree view. The Maintenance screen appears on the right.
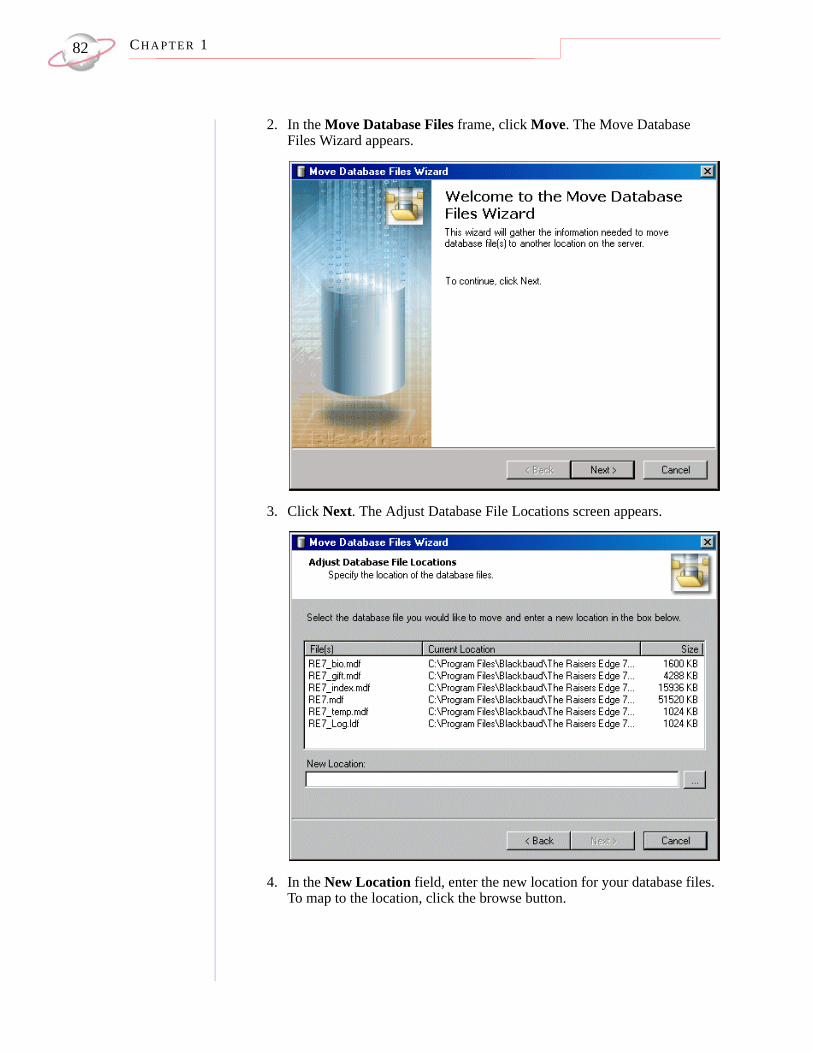
CH A PT E R 182
2. In the Move Database Files frame, click Move. The Move Database Files Wizard appears.
3. Click Next. The Adjust Database File Locations screen appears.
4. In the New Location field, enter the new location for your database files. To map to the location, click the browse button.
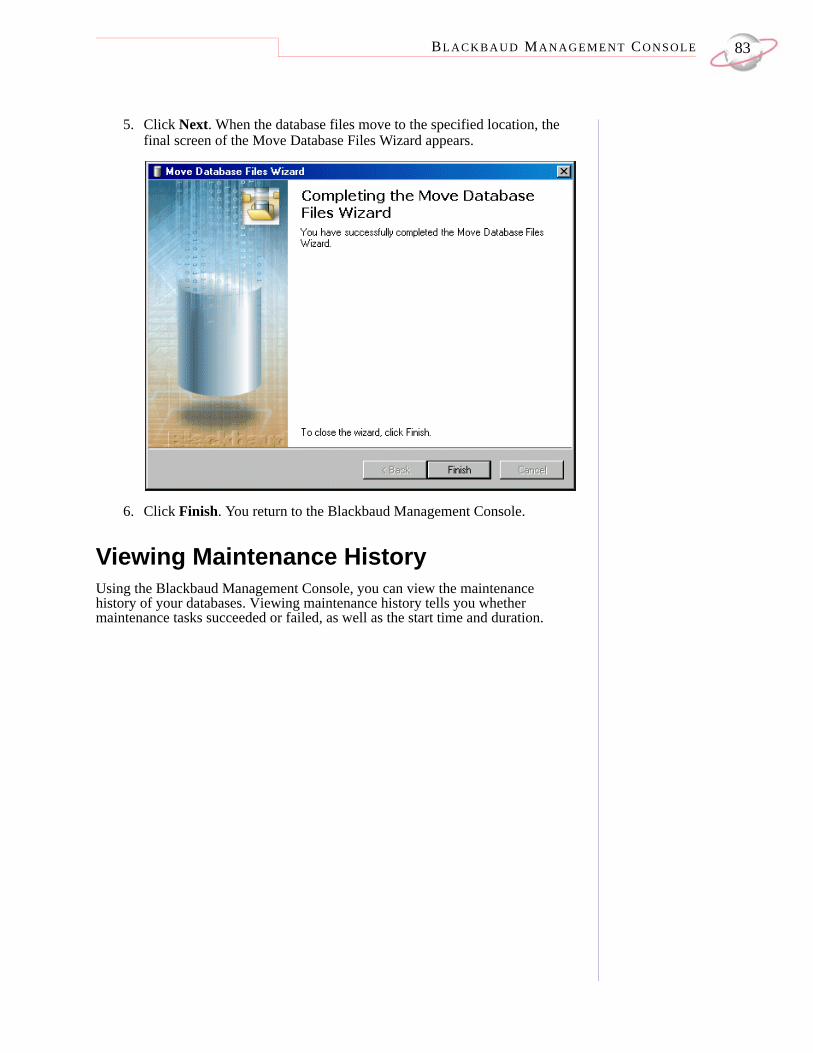
BL A C K B A U D MA N A G E M E N T CO N S O L E 83
5. Click Next. When the database files move to the specified location, the final screen of the Move Database Files Wizard appears.
6. Click Finish. You return to the Blackbaud Management Console.
Viewing Maintenance HistoryUsing the Blackbaud Management Console, you can view the maintenance history of your databases. Viewing maintenance history tells you whether maintenance tasks succeeded or failed, as well as the start time and duration.

CH A PT E R 184
Viewing maintenance history
The screens depicted in this procedure appear for users of The Raiser’s Edge. If you use The Financial Edge, The Education Edge, Blackbaud Student Information System, or The Researcher’s Edge, the screens display information specific to those programs.1. From the Maintenance screen, click the View maintenance history link.
The Maintenance history screen appears.
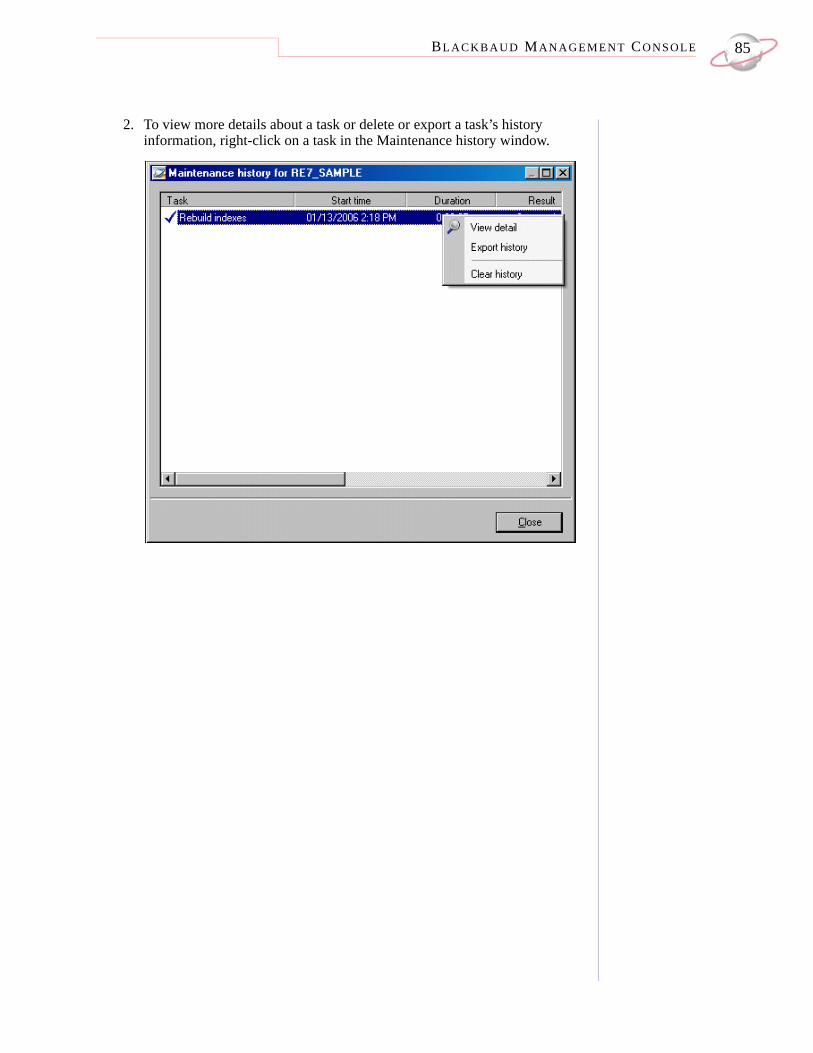
BL A C K B A U D MA N A G E M E N T CO N S O L E 85
2. To view more details about a task or delete or export a task’s history information, right-click on a task in the Maintenance history window.

CH A PT E R 186
3. To remove history information, right-click in the Maintenance history window and select Clear history. Clearing history information removes the entire maintenance history of a database.
4. To export history information, right-click in the Maintenance history window and select Export history.
5. To return to the Blackbaud Management Console, click Close.
Server PropertiesUsing the Blackbaud Management Console, you can view server properties, such as the number of attached databases and server name. You can also start, stop, and pause your database from the individual server pages and configure memory use on the server.
Starting, Stopping, and Pausing your Database ServerUsing the Blackbaud Management Console, you can start, stop, and pause your database server. When you stop a database, users cannot log in and all current users are disconnected.

BL A C K B A U D MA N A G E M E N T CO N S O L E 87
Starting and stopping your database
The screens depicted in this procedure appear for users of The Raiser’s Edge. If you use The Financial Edge, The Education Edge, Blackbaud Student Information System, or The Researcher’s Edge, the screens display information specific to those programs.1. From the main screen of the Blackbaud Management Console, select
Servers in the Installed products tree view. The Servers screen appears on the right.
2. Click Server Details. In the pane on the right, information about the server appears. Server details appears in the Properties frame.
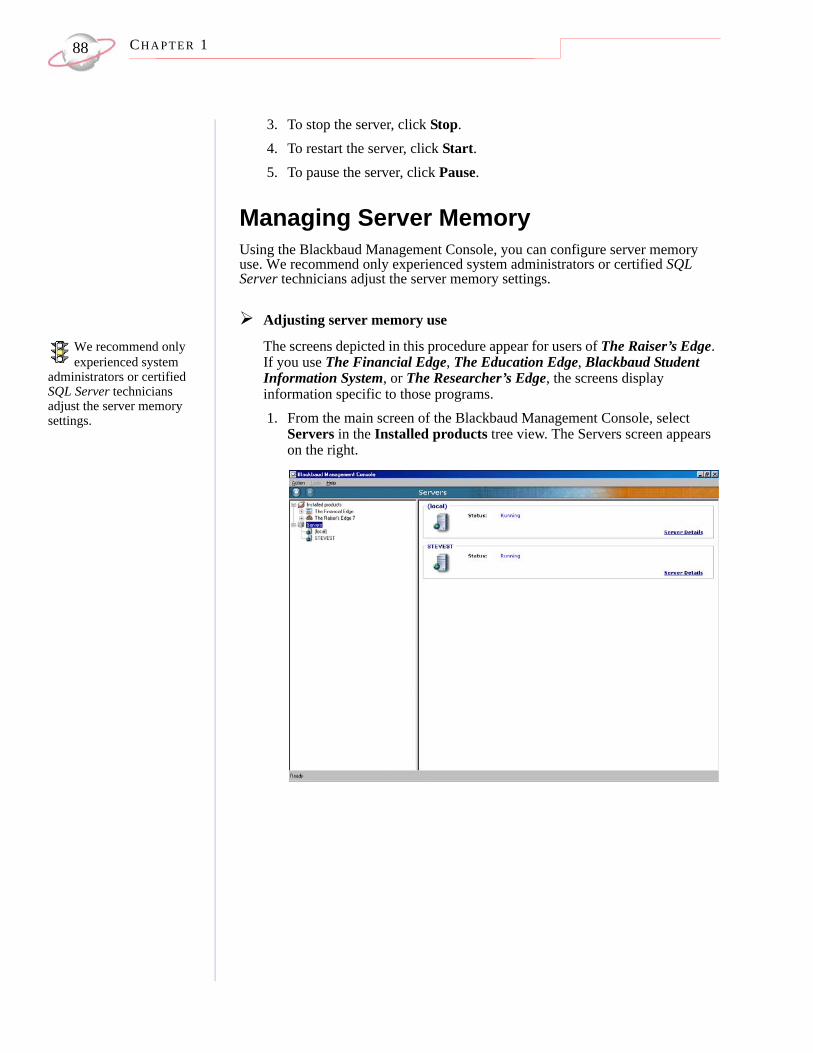
CH A PT E R 188
3. To stop the server, click Stop. 4. To restart the server, click Start.5. To pause the server, click Pause.
Managing Server MemoryUsing the Blackbaud Management Console, you can configure server memory use. We recommend only experienced system administrators or certified SQL Server technicians adjust the server memory settings.
Adjusting server memory use
We recommend only experienced system
administrators or certified SQL Server technicians adjust the server memory settings.
The screens depicted in this procedure appear for users of The Raiser’s Edge. If you use The Financial Edge, The Education Edge, Blackbaud Student Information System, or The Researcher’s Edge, the screens display information specific to those programs.1. From the main screen of the Blackbaud Management Console, select
Servers in the Installed products tree view. The Servers screen appears on the right.
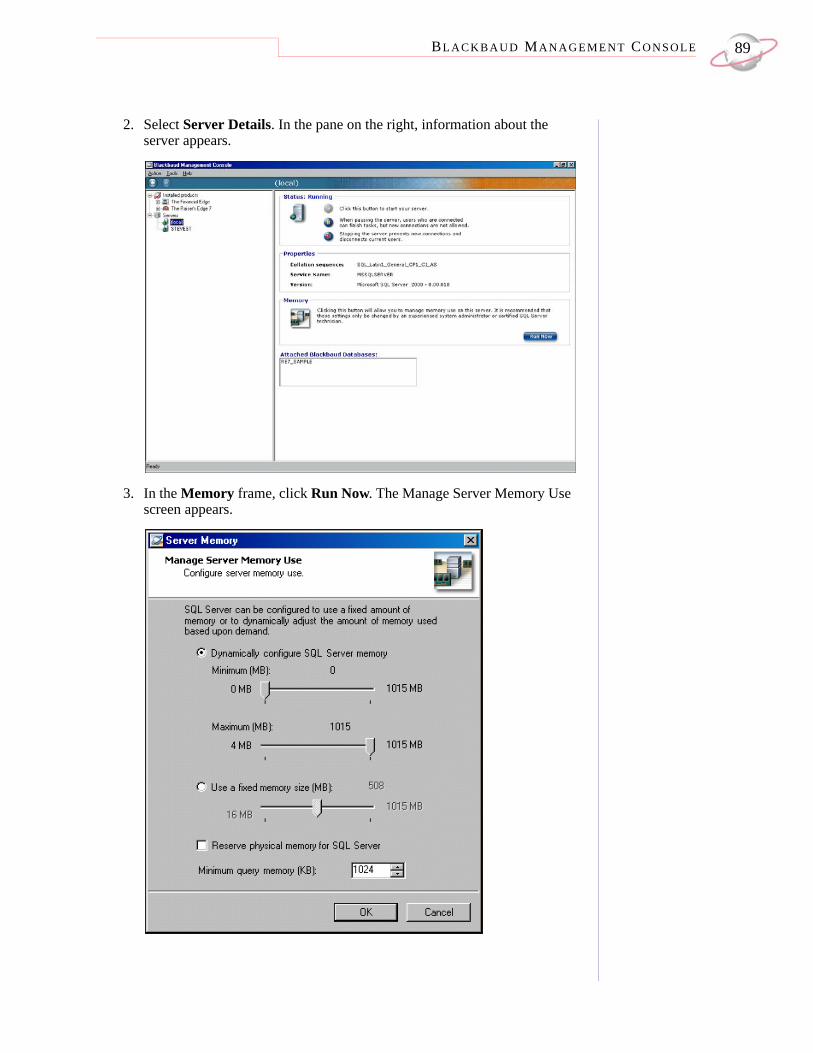
BL A C K B A U D MA N A G E M E N T CO N S O L E 89
2. Select Server Details. In the pane on the right, information about the server appears.
3. In the Memory frame, click Run Now. The Manage Server Memory Use screen appears.
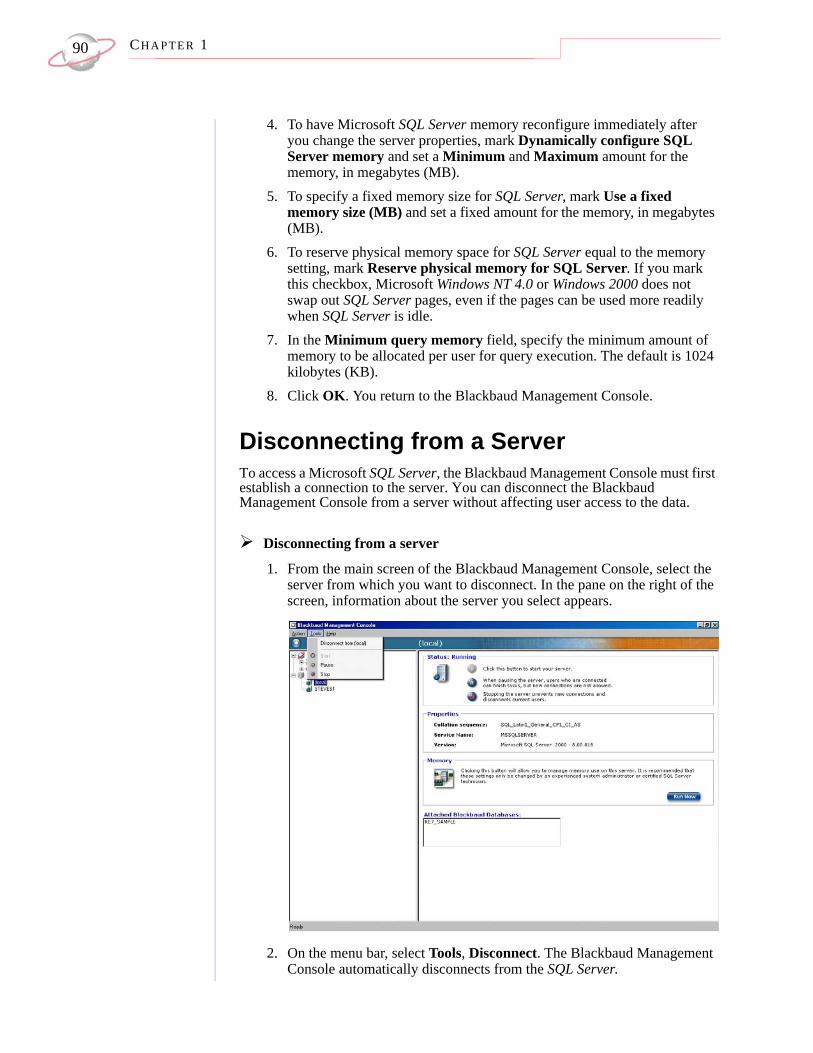
CH A PT E R 190
4. To have Microsoft SQL Server memory reconfigure immediately after you change the server properties, mark Dynamically configure SQL Server memory and set a Minimum and Maximum amount for the memory, in megabytes (MB).
5. To specify a fixed memory size for SQL Server, mark Use a fixed memory size (MB) and set a fixed amount for the memory, in megabytes (MB).
6. To reserve physical memory space for SQL Server equal to the memory setting, mark Reserve physical memory for SQL Server. If you mark this checkbox, Microsoft Windows NT 4.0 or Windows 2000 does not swap out SQL Server pages, even if the pages can be used more readily when SQL Server is idle.
7. In the Minimum query memory field, specify the minimum amount of memory to be allocated per user for query execution. The default is 1024 kilobytes (KB).
8. Click OK. You return to the Blackbaud Management Console.
Disconnecting from a ServerTo access a Microsoft SQL Server, the Blackbaud Management Console must first establish a connection to the server. You can disconnect the Blackbaud Management Console from a server without affecting user access to the data.
Disconnecting from a server
1. From the main screen of the Blackbaud Management Console, select the server from which you want to disconnect. In the pane on the right of the screen, information about the server you select appears.
2. On the menu bar, select Tools, Disconnect. The Blackbaud Management Console automatically disconnects from the SQL Server.

BL A C K B A U D MA N A G E M E N T CO N S O L E 91
3. To reconnect the database to the server, select Tools, Connect on the menu bar.

CH A PT E R 192
93IN D E X
IndexAaccessing
Blackbaud Management Console 6action menu 10active user
defined 3disconnecting 59overview 57sending messages 57
addingexisting databases 10
adjusting server memory use 88ASA database, migrating to Microsoft SQL Server 42attach database
defined 3Raiser’s Edge, The 17
attaching databasesEducation Edge, The 11Financial Edge, The 11
authentication 30
Bbackup
defined 3restoring from 66running 64scheduling 60view history 68
Blackbaud Management Consoleexplained 3opening 6screen explained 6wizards available 8
bringing databases onlineoverview 4procedure 55
Cchanging
workstation default install paths 39check integrity
defined 5checking
database integrity 79command, menu 10configuring
server memory 88
create new databasedefined 4
create new database wizardauthentication 30database information 31license selection 28select destination database 29server information 29
creating databasesEducation Edge, The 23Financial Edge, The 23Raiser’s Edge, The 27
Ddatabase
attachEducation Edge, The 11Financial Edge, The 11Raiser’s Edge, The 17
backuprestore from 66scheduling 60view history 68
bring online 55create
Education Edge, The 23Financial Edge, The 23Raiser’s Edge, The 27
detaching 56disconnect users 59indexes, rebuilding 75integrity 79maintenance overview 70migrate
Education Edge, The 43Financial Edge, The 43Raiser’s Edge, The 49
move files 81running backup 64scheduling maintenance 70server, starting and stopping 86shrinking 78taking offline 55tools 54updating statistics 76users, send message 57utilities 9validating 79view properties 54
deploy kitchange workstation default install path 39defined 5move 33repair 36
description for new database 31detach database

IN D E X94
defined 4detaching databases 56disconnect
server 90users 59
disconnect from server, explained 5
EEducation Edge, The
add existing database 11create database 23migrate database 43
FFinancial Edge, The
add existing database 11create database 23migrate database 43
Hhelp menu 10history of maintenance, view 83history, backup, view 68
Iindex, rebuilding 75install path, workstation, change 39integrity of database, checking 79
Llicense selection 28
Mmaintenance
explained 4overview 70scheduling for database 70
maintenance history, view 83memory
configure 5server, managing 88use 5
menu command 10migrate database
defined 5Education Edge, The 43
Financial Edge, The 43Raiser’s Edge, The 49
movedatabase files 81deploy kit 33
Nname for new database 31new database, creating 22
Ooffline, take database
explained 6procedure 55
opening, see accessing 6
Ppath for new database 31pause server 5properties
database, view 54server 86
RRaiser’s Edge, The
add existing database 17create database 27migrate database 49
rebuild indexesdefined 4procedure 75
reconnecting server 91repair deploy kit 36restoring from backups 66right-click menu 9running database backups 64
Sschedule maintenance
backups 60database maintenance 70defined 4
select another SQL Server instance 29select destination database 29send message to active users 57server
disconnecting 90memory 5

95IN D E X
memory, managing 88pause 5properties, viewing 87reconnecting 91start 5stop 5utilities 5, 10
shrink databasedefined 5procedure 78
start serverdefined 5procedure 86
statistics, updating 76stop server
defined 5procedure 86
Ttake database offline
defined 6procedure 55
tools menu 9, 10tools, database 54transfer, see migrating
Uupdate statistics
defined 5procedure 76
use local RE7 database server 29use windows authentication 30user
active 57disconnecting 59SQL server authentication 30
userssend message 57
utilitiesdatabase 9see also database toolsserver 10
Vvalidate database
defined 5procedure 79
viewbackup history 68database properties 54maintenance history 83server properties 87
Wworkstation
change install path 39deploy kit
move 33repair 36
installation 32

IN D E X96
about BlackbaudBlackbaud is the leading global provider
of software and related services designed
specifically for nonprofit organizations.
Approximately 16,000 organizations use one
or more of Blackbaud products and consulting
services for fundraising, financial management,
Web site management, school administration,
and ticketing. Blackbaud’s solutions include
The Raiser’s Edge®, Team Approach®, The
Financial Edge™, The Education Edge™, The
Patron Edge®, Blackbaud®NetCommunity™,
The Information Edge™, WealthPoint™,
ProspectPoint™, and donorCentrics™, as
well as a wide range of consulting, analytical,
and educational services. Founded in 1981,
Blackbaud is headquartered in Charleston,
South Carolina and has operations in
Cambridge, Massachusetts; Toronto, Ontario;
Glasgow, Scotland; London, England; and
Sydney, Australia.
© 2007, Blackbaud Inc.This manual is for informational purposes only. Blackbaud makes no warranties, expressed or implied, in this summary. The
information contained in this document represents the current view of Blackbaud, Inc., on the items discussed as of
the date of this publication.
All Blackbaud product names appearing herein are trademarks or registered trademarks of Blackbaud, Inc. The names of actual
companies and products appearing herein may be the trademarks of their respective owners.
corporate headquartersBlackbaud, Inc.
2000 Daniel Island DriveCharleston, SC 29492USA
Web www.blackbaud.comPhone 843.216.6200Fax 843.216.6100
supportReview the Customer Support Guide for information about our online resources and support procedures. Download the Customer Support Guide from our Web site’s Support Overview.http://support.blackbaud.com
documentationWe welcome your comments and suggestions about our user guides and help files. In the subject line of your email, please include the product name and version [email protected]
salesContact us for more information about our products and services.
Email [email protected] 800.443.9441Fax 843.216.6111
formsContact Blackbaud Forms to learn about preprinted material designed specifically for Blackbaud software. Learn more about our checks, Business and Development Office forms, membership cards, Patron Edge tickets, and more.
Web http://forms.blackbaud.comPhone 866.422.3676
international contactsBlackbaud Europe Ltd
11 York RoadLondonSE1 7NX
Phone +44 (0) 20 7921 9600Fax +44 (0) 20 7921 9601
38 Queen StreetGlasgowG1 3DXScotland
Phone +44 (0) 141 575 0000Fax +44 (0) 141 575 0999
Web www.blackbaud.co.ukEmail [email protected]
[email protected] [email protected]
Support (UK Local Rate) 0845 658 8500
Support (From Outside UK) +44 (0) 141 575 0801
The Patron Edge Support (UK Local Rate) 0845 658 8580
The Patron Edge Support (From Outside UK) +44 (0) 20 7921 9600
Blackbaud Gift AidPhone 01580 892235 (UK Local Rate)
+44 (0) 1580 892235 (From Outside UK)
Blackbaud Pacific Pty Ltd.ABN 73 095 925 170Suite 4, 561-577 Harris StreetUltimo NSW 2007Australia
Mailing AddressPO Box K736Haymarket NSW 1240Australia
Web www.blackbaud.com.auEmail [email protected]
[email protected] [email protected]
Freecall 1800 688 910 Australia 0800 444 712 New Zealand 800 6162 205 Singapore
Phone +61 2 9211 7366Fax +61 2 9211 7607
REV - 031507


![SQL Server TSQL [Read-Only] - csuohio.educis.csuohio.edu/~sschung/IST331/SQL_Server_TSQL.pdf · Microsoft SQL Server. SQL Server 2005 Microsoft-SQL Server 2005 is a relational database](https://img.dokumen.tips/doc/110x75/5e202cff7110143c3f45a3d1/sql-server-tsql-read-only-sschungist331sqlservertsqlpdf-microsoft-sql.jpg)