Embed Size (px)
Citation preview

CultureCulturethe first few days after moving outside to prevent any leaf burn and excessive wilting. Garden mums require a high light intensity for good quality, ideally in full sun. Maintain at least 6000 foot candles in growing area. Shading will increase plant stretch and the need for plant growth regulators.
When transplanting multiple plants per pot, keep the cuttings closer to the center of the pot to help reduce individual plant separation at finish. In general, plant cuttings no more than four to five inches apart near the center of the pot. This allows the cuttings to grow together early in the crop and create a stronger plant base.
Growing MediaFor mum production, the growing medium should retain adequate water after irrigation but also drain sufficiently to provide aeration during rainy weather. Many growers use peat based mixes commonly used for bedding plants and baskets. Some growers prefer heavier bark-based mixes. Of the two types of growing medium, bark based mixes are more porous and might require 20%
more nitrogen with the feed program. In either case, be sure that the growing mix is well drained with 12-18% air-filled pore space. The pH range should be 5.8-6.2. If a very lightweight mix is used, large plants can be top heavy and prone to tipping over in windy conditions. If this is a problem, use a growing mix that contains a heavier component (like bark) to provide weight and stability to the pots.
FertilizationFeed after transplanting with 250-300 ppm fertilizer containing a high percentage of ammonium nitrogen such as constant 20-10-20 or 20-20-20, adding 100 ppmN ammonium nitrate to the 20-10-20. Start alternating with calcium based fertilizer such as 15-0-15 after about 3 weeks, repeating it every 3rd-4th feeding. You should maintain a soil solution pH at 5.7-6.0. After flower buds reach pea size, reduce feed to 200 ppmN once a week, using calcium and potassium based fertilizers only. You may have to reapply 20-10-20 during extended periods of rain.
For garden mums grown with slow-re-lease fertilizer choose one of the newer types on the market that is less likely to release solely on soil temperature. You can use a 3-4 month release type at manufacturer’s recommended rates for southern locations. Northern growers often get better results using a five to six months or eight to nine month longevity product. Slow release fertilizer at half rate could be used in combination with
liquid feed. Use weekly soil test results to monitor pH and EC of your crop and adjust the feed program accordingly.
SpacingSpacing will vary from grower to grower, depending on finished pot size and your target sales market. For the best results we recommend that the foliage not touch. Proper spacing will prevent tall ‘stovepipe’ growth, yellow foliage, disease and unsaleable plants.
WateringDrip tubes or drip tape is recommended instead of hand watering or overhead irrigation. Drip irrigation helps to keep foliage dry and prevents the spread of bacterial leaf spot. During the first few weeks of growth, keep the plants evenly moist but not soaked. It is best to irrigate at sunrise or just before. Mums can tolerate some later afternoon wilt, but they should be watered thoroughly early the next morning. Avoid fluctuations between too wet or too dry. Try to water the plants on a regular basis in order to prevent excessive drying. On the other hand over-watering will only cause root disease and a poor finished plant. Avoid feeding wilted plants. Instead, use clear water until plants regain turgidity.
PinchingMany garden mum varieties can be treated as no-pinch varieties if grown in a 6” or larger container. Smaller pots do not have sufficient time to develop and
Mums C U L T U R A L T I P S
Information courtesy of Bernard Chodyla, technical advisor at Gediflora, with additions from Ron Adams and staff members of Jolly Farmer growing team.
TransplantingTransplant rooted cuttings as soon as possible after arrival. Any delay in planting or excessive drying will restrict vegetative growth after transplanting and may cause premature budding. Before you are ready to start planting, have your finished pots completely filled with media. Partially filled pots will wilt sooner and contribute to uneven plants. Make sure media is evenly moist throughout the entire pot, not just the top few inches. Never plant dry cuttings.
Do not bury the crowns of rooted cuttings. Keep soil moist for the first several weeks after transplanting to promote the vegetative growth. You may need to sprinkle your plants hourly for
26

web: www.jollyfarmer.com | email: [email protected] 27
branch without a pinch. If a grower is more comfortable with doing a pinch, this is fine and can be done when plant-ing the rooted cutting to save time and labor. When pinching, always do a “soft pinch” removing only ½” or less from the cutting tip. Pinching hard or pinching after July 15 may delay flowering.
Premature BuddingEarly budding can be caused by extreme conditions such as too dry or too cool. In the North, cool night temperatures in June could be a common cause of premature budding. Avoid moving plants outside too early. If premature budding occurs, feed plants 2-3 times with an ammonium-based fertilizer at 300 ppm N to bypass the buds with new vegetative growth.
Hot Weather IssuesIf your geographical area is receiving prolonged hot weather, beware of high growing media temperatures especially in plants on black landscape cloth. Very hot weather over an extended period of time can cause the slow release fertilizer to release early, burn roots and weaken the plants. Once this happens, the soil remains saturated for longer periods of time when wet, and root diseases can set in. To avoid this, use lower rates of slow release products, and do more liquid feeding. Any root stress from high temperatures or pots sitting wet for prolonged periods can result in pythium, fusarium or phytopthora.
Growth RegulatorsIn most cases, if proper varieties are be-ing used along with the correct schedule, no growth regulators are needed. Smaller finished products, such as market packs or 4”, may benefit from the use of growth regulators. B-9 sprayed at 2500 to 5000 ppm will slow the growth and a Bonzi drench at 2-3 ppm will virtually stop all growth. The last PGR application should be no later than 4 weeks before first color. Excessive or late applications of growth regulators will delay flowering. Florel will significantly delay natural day flowering if applied after June 20th.
InsectsPotential insect problems include aphids, caterpillars, mites, thrips, leaf miners, and whiteflies. Always take the extra precaution of weekly scouting and prevention. The sooner the infestation is found, the fewer plants will be affected. Rotate insecticides and miticides to avoid resistance and control a wide range of pests and their development stages. The following spray program can be used for mite and thrips control, using chemicals available in the US. Other chemical names would be used in Canada.
Avid + Pylon tank mix Conserve + DuraGuard tank mix Citation + Mesurol tank mix Pedestal
The above combinations should be applied twice in a row and then should not be reapplied until at least two other insecticides with different modes of
from the lab is performed and correct fungicides or bactericides are selected.
When applying pesticides:
• Always experiment with any new chemical on a few plants before treating your entire crop.
• Always use label rates.
Make sure these products are available for use and labeled for mums in your state or province.
For issues concerning chrysanthemum white rust control and prevention go to: www.aphis.usda.gov/plant_health/plant_pest_info.
Further information on premature budding and hot weather growing problems are available online.
action are applied to avoid resistance build up.
Other recommended pesticides include:
• For spider mite control: Floramite, Hexygon, Judo, Ovation, Sammite
• For thrips control: Flagship, Orthene, Safari, Preclude
• For leaf miners control: Azatin, Decathlon, Flagship, Safari
• For whitefly control: Distance, Endeavor, Flagship, Marathon II, Preclude, Safari, Tristar
When applying pesticides:
• Always experiment with any new chemical on a few plants before treating your entire crop.
• Always use label rates.
Make sure these products are available for use and labeled for mums in your state or province.
DiseasesThe most common disease problems on garden mums include: botrytis, pythium, rhizoctonia, fusarium and bacterial leaf spot. Thorough monitoring of your crop, implementing an IPM program and prevention are the best defense options against disease problems. It is very important to use drip irrigation, sterilize production areas, remove weeds and use healthy plant material. This will reduce the need for chemical control of disease problems. Inspect roots periodically to determine plant health. Chemical control could be very effective if quick diagnosis
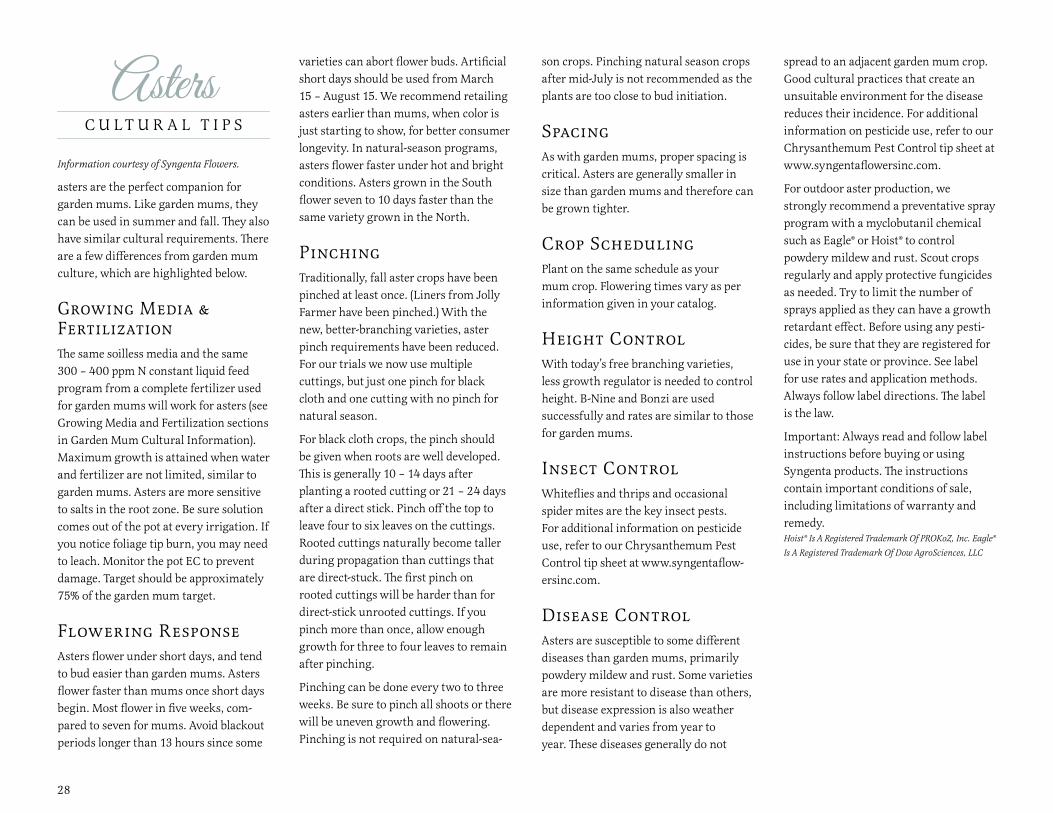
Asters C U L T U R A L T I P S
Information courtesy of Syngenta Flowers.
asters are the perfect companion for garden mums. Like garden mums, they can be used in summer and fall. They also have similar cultural requirements. There are a few differences from garden mum culture, which are highlighted below.
Growing Media & FertilizationThe same soilless media and the same 300 – 400 ppm N constant liquid feed program from a complete fertilizer used for garden mums will work for asters (see Growing Media and Fertilization sections in Garden Mum Cultural Information). Maximum growth is attained when water and fertilizer are not limited, similar to garden mums. Asters are more sensitive to salts in the root zone. Be sure solution comes out of the pot at every irrigation. If you notice foliage tip burn, you may need to leach. Monitor the pot EC to prevent damage. Target should be approximately 75% of the garden mum target.
Flowering ResponseAsters flower under short days, and tend to bud easier than garden mums. Asters flower faster than mums once short days begin. Most flower in five weeks, com-pared to seven for mums. Avoid blackout periods longer than 13 hours since some
varieties can abort flower buds. Artificial short days should be used from March 15 – August 15. We recommend retailing asters earlier than mums, when color is just starting to show, for better consumer longevity. In natural-season programs, asters flower faster under hot and bright conditions. Asters grown in the South flower seven to 10 days faster than the same variety grown in the North.
PinchingTraditionally, fall aster crops have been pinched at least once. (Liners from Jolly Farmer have been pinched.) With the new, better-branching varieties, aster pinch requirements have been reduced. For our trials we now use multiple cuttings, but just one pinch for black cloth and one cutting with no pinch for natural season.
For black cloth crops, the pinch should be given when roots are well developed. This is generally 10 – 14 days after planting a rooted cutting or 21 – 24 days after a direct stick. Pinch off the top to leave four to six leaves on the cuttings. Rooted cuttings naturally become taller during propagation than cuttings that are direct-stuck. The first pinch on rooted cuttings will be harder than for direct-stick unrooted cuttings. If you pinch more than once, allow enough growth for three to four leaves to remain after pinching.
Pinching can be done every two to three weeks. Be sure to pinch all shoots or there will be uneven growth and flowering. Pinching is not required on natural-sea-
son crops. Pinching natural season crops after mid-July is not recommended as the plants are too close to bud initiation.
SpacingAs with garden mums, proper spacing is critical. Asters are generally smaller in size than garden mums and therefore can be grown tighter.
Crop SchedulingPlant on the same schedule as your mum crop. Flowering times vary as per information given in your catalog.
Height ControlWith today’s free branching varieties, less growth regulator is needed to control height. B-Nine and Bonzi are used successfully and rates are similar to those for garden mums.
Insect ControlWhiteflies and thrips and occasional spider mites are the key insect pests. For additional information on pesticide use, refer to our Chrysanthemum Pest Control tip sheet at www.syngentaflow-ersinc.com.
Disease ControlAsters are susceptible to some different diseases than garden mums, primarily powdery mildew and rust. Some varieties are more resistant to disease than others, but disease expression is also weather dependent and varies from year to year. These diseases generally do not
spread to an adjacent garden mum crop. Good cultural practices that create an unsuitable environment for the disease reduces their incidence. For additional information on pesticide use, refer to our Chrysanthemum Pest Control tip sheet at www.syngentaflowersinc.com.
For outdoor aster production, we strongly recommend a preventative spray program with a myclobutanil chemical such as Eagle® or Hoist® to control powdery mildew and rust. Scout crops regularly and apply protective fungicides as needed. Try to limit the number of sprays applied as they can have a growth retardant effect. Before using any pesti-cides, be sure that they are registered for use in your state or province. See label for use rates and application methods. Always follow label directions. The label is the law.
Important: Always read and follow label instructions before buying or using Syngenta products. The instructions contain important conditions of sale, including limitations of warranty and remedy. Hoist® Is A Registered Trademark Of PROKoZ, Inc. Eagle® Is A Registered Trademark Of Dow AgroSciences, LLC
28
29
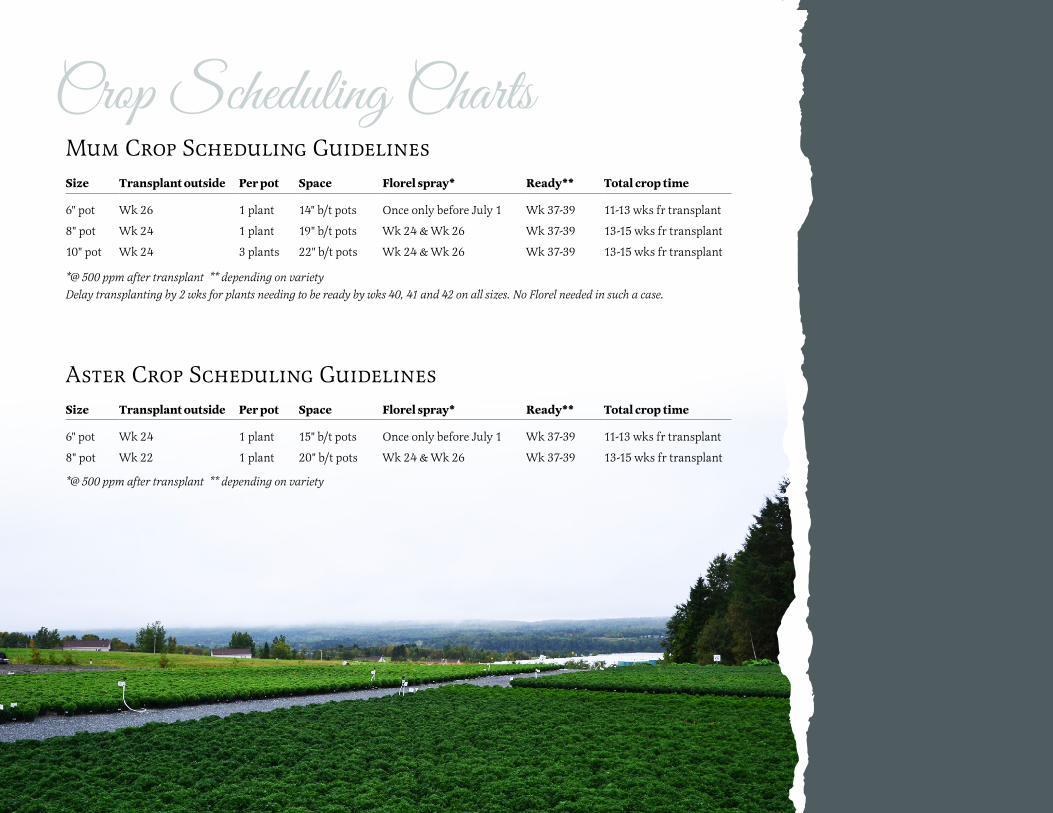
Crop Scheduling Charts
Aster Crop Scheduling Guidelines Size Transplant outside Per pot Space Florel spray* Ready** Total crop time
6" pot Wk 24 1 plant 15" b/t pots Once only before July 1 Wk 37-39 11-13 wks fr transplant
8" pot Wk 22 1 plant 20" b/t pots Wk 24 & Wk 26 Wk 37-39 13-15 wks fr transplant
*@ 500 ppm after transplant ** depending on variety
Mum Crop Scheduling Guidelines Size Transplant outside Per pot Space Florel spray* Ready** Total crop time
6" pot Wk 26 1 plant 14" b/t pots Once only before July 1 Wk 37-39 11-13 wks fr transplant
8" pot Wk 24 1 plant 19" b/t pots Wk 24 & Wk 26 Wk 37-39 13-15 wks fr transplant
10" pot Wk 24 3 plants 22" b/t pots Wk 24 & Wk 26 Wk 37-39 13-15 wks fr transplant
*@ 500 ppm after transplant ** depending on varietyDelay transplanting by 2 wks for plants needing to be ready by wks 40, 41 and 42 on all sizes. No Florel needed in such a case.