Embed Size (px)
Citation preview

Creating an A0 sized poster in portrait orientation, in Microsoft PowerPoint Open Microsoft PowerPoint. From the >File menu, choose >Page Setup… In the dialogue box, check ‘Portrait’ under ‘Orientation’, and under ‘Slides sized for:’ choose ‘Custom’ and set width to 84.1cm and height to 118.9cm; click ‘OK’.

The screen should now look like this: If you are familiar with Powerpoint, you can now simply insert text boxes and images to fill up the page, and arrange them as you wish. If you are not familiar with Powerpoint, you have two options at this stage. The simpler option is to choose a prearranged layout and to insert text and images in the layout provided. The alternative is to drag and drop text boxes and images onto a blank page and arrange them yourself. To use a prearranged layout: Choose the >Format menu, and select >Slide Layout:

The screen will look like this: Click on the layout in the window on the right which best suits the poster you want to create, for example: Now simply click on the section to which you wish to add text or image, following the prompts. You can adjust the size of the text using the tool bar at the top of the screen, and adjust the size of any images which you insert by clicking on it and then dragging the corners or the sides. You can move any text box or image also by clicking on it and dragging it. Filling in the boxes in the example above can produce a result like the one below in seconds. You are then free to keep adjusting it until you have it looking as you wish.

To get an impression of what the poster looks like at actual size, change the screen display to 100%. Creating your own layout: First you need to select the blank slide layout at the top of the slide layout menu.
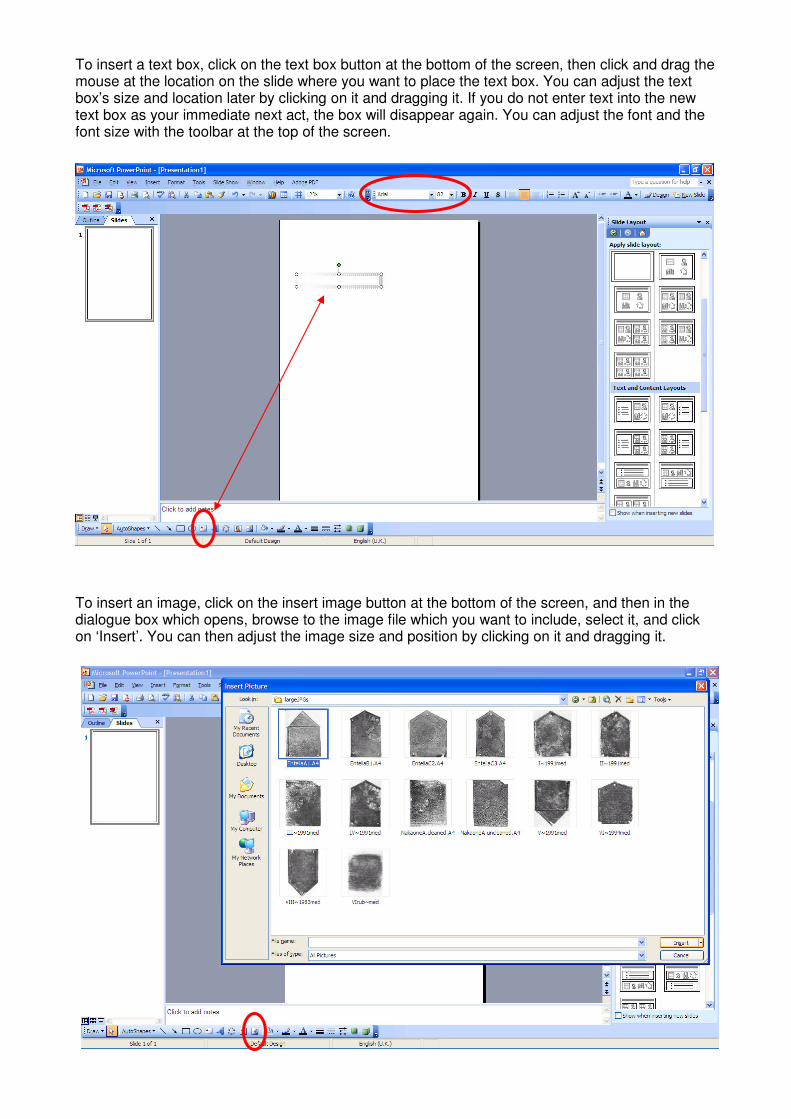
To insert a text box, click on the text box button at the bottom of the screen, then click and drag the mouse at the location on the slide where you want to place the text box. You can adjust the text box’s size and location later by clicking on it and dragging it. If you do not enter text into the new text box as your immediate next act, the box will disappear again. You can adjust the font and the font size with the toolbar at the top of the screen. To insert an image, click on the insert image button at the bottom of the screen, and then in the dialogue box which opens, browse to the image file which you want to include, select it, and click on ‘Insert’. You can then adjust the image size and position by clicking on it and dragging it.


![Study of interaction of Positronium with light atoms: H, He and Li - … · 2011. 9. 26. · H 2.126 a0 [1] 2.8 a0 He 1.566 a0 [1] 2.4 a0 Li 3.8-4.1 a0 [2] 5.8 a0* [1] Zhang et al.,](https://img.dokumen.tips/doc/110x75/60d6fc9e5d0bd91fec0eca5c/study-of-interaction-of-positronium-with-light-atoms-h-he-and-li-2011-9-26.jpg)