Embed Size (px)
Citation preview

Creating Accessible Presentations
Training Guide

Recommended Approach
• Accessible features & functions are consistent across Microsoft platforms (Word, Excel, PowerPoint)
• Start with MS Word > then branch out to PowerPoint and Excel
• Good Resources– Creating Accessible Documents: An Interactive
Training Guide– Learning and Development Centre Website

Make Content Easier to See
• Font style – Choose Sans Serif Styles
• Font Size – The larger the better (30 pt. min)• Use adequate contrast (test print in greyscale) • Avoid ‘patterned’ backgrounds• Avoid Transitions• Avoid using

Make Content Easier to Understand
• Keep slides simple• Avoid using lots of different colours, fonts,
images
• Provide context for hyperlinks• Use lots of ‘white space’• Limit number of points per page to six

Use Built-in Style Layouts
• Style layouts include text and graphical placeholders which are understood by adaptive technology
• Exercise 1: Changing Slide Layouts– Right click > Layout– Look at options available

Create or Customize Master Slides
• Slide Masters allow you to add/change existing layouts and create a personal template
• Exercise 2: Customizing Master Slides– View > Slide Master– Add page numbers to the slides– Insert > Slide Number– View > Normal
• Efficiency Tip: Create a template for future use:– File > Save as type > PowerPoint template

Have you ever created images,
text, or objects that were not inserted
into a ‘placeholder’?
• When place holders are not used, the logical tab order for slide elements must be set manually.
• Exercise 3: Create ‘Logical Tab Order’
• Home > Arrange > Selection Pane…– Organize the elements of
this slide in reverse order (bottom - top)
Special Note: Floating Text and Images are not
reformatted when changing design templates!
Floating Objects

Use “Real Lists”
Ordered ListsRead RecipeGather IngredientsBakeIceEat• Exercise 4 – Make the list
above a numbered list
Unordered ListsSleeping BagTentFoodClothingToiletries• Exercise 5 – Make the list
above a bulleted list

Use Slide Notes
• Slide notes can be read by assistive technologies, and can also be included in exports to PDF format
• Use notes to explain and expand on slide contents
• Add notes while you create your material• Exercise 6– Add some notes to this slide – Click to add notes

Alt Text for All Images & Objects• Alternative text should:– present the content and
function of the image– be succinct
• Alternative text should not:– be redundant (the same as
adjacent or body text)– use the phrases "image of…" or
"graphic of…".
• Exercise 7 – Add Alt Text – Add alternative text to the image – Right Click > Format > Alt text

Creating Charts - 1
1. Choose a Slide Layout with image placeholder2. Select ‘Insert Chart’ option3. Select ‘Chart Style’ (Bar, Pie, Line, etc.)4. Enter data in the Excel window that pops up5. Close Excel Window (Click on x top right)6. Use Chart Tools to format chart7. Add Alternative Text– Right Click > Format > Chart Area > Alt Text

Creating Charts - 2
• Exercise 9 – Creating Charts
• Use the placeholder to the right to create a chart.
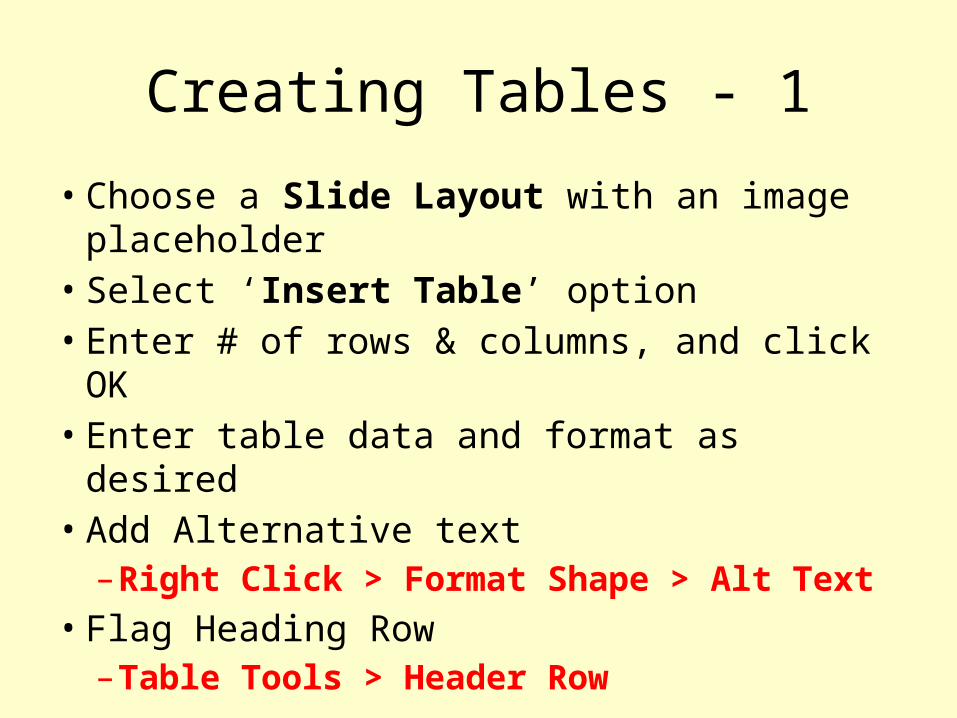
Creating Tables - 1
• Choose a Slide Layout with an image placeholder
• Select ‘Insert Table’ option• Enter # of rows & columns, and click OK• Enter table data and format as desired• Add Alternative text– Right Click > Format Shape > Alt Text
• Flag Heading Row– Table Tools > Header Row

Creating Tables - 2
• Exercise 10 – Creating Tables
• Use the placeholder to the right to create a table.

Accessibility Checker
• The built in accessibility checker will identify any potential issues with your presentation and will provide guidance on how to correct.
• Exercise 12 – Run Accessibility Checker• File > Check for Issues > Check Accessibility• Correct identified errors• Save file

Export to PDF
• Files exported as PDF can include the ‘Accessibility Features’ if the appropriate flags are set.
• Exercise 11 – Save as PDF• File > Save As PDF > Options• Check the options as shown
on the sample• Press OK

Questions?
Thank you for your time