Embed Size (px)
Citation preview

Coveo Platform 7.0
OpenText Content Server Connector Guide

Coveo Platform 7.0 | OpenText Content Server Connector Guide
Notice
The content in this document represents the current view of Coveo as of the date of publication. Because Coveocontinually responds to changing market conditions, information in this document is subject to change withoutnotice. For the latest documentation, visit our website at www.coveo.com.
© Coveo Solutions Inc., 2013
Coveo is a trademark of Coveo Solutions Inc. This document is protected by intellectual property laws and issubject to all restrictions specified in the Coveo Customer Agreement.
Document part number: PM-130320-EN
Publication date: 1/3/2019
4www.coveo.com ii

Coveo Platform 7.0 | OpenText Content Server Connector Guide
Table of Contents
1. OpenText Content Server Connector 1
2. OpenText Content Server Connector Deployment Overview 4
3. OpenText Content Server Connector Requirements 6
4. Enabling the OpenText Content Server Web Services 7
4.1 Connecting the OTCS Web Services 7
4.2 Setting IIS Permissions 8
4.3 Enabling WCF Services 9
5. Setting Up an OpenText Content Server Crawling Account 10
6. Configuring an OpenText Content Server Security Provider 13
7. Configuring and Indexing an OpenText Content Server Source 16
7.1 Creating an OpenText Content Server Connector Mapping File 22
7.2 Standard Mapping File Schema 23
7.3 Modifying Hidden OpenText Content Server Source Parameters 29
7.4 Adding an Explicit Connector Parameter 32
8. Managing Built-in Facets and Related Results Appearing in a .NET Search Interface 36
9. Adding Security Providers to a .NET Search Interface 39
4www.coveo.com iii

4www.coveo.com iv
Coveo Platform 7.0 | OpenText Content Server Connector Guide

Coveo Platform 7.0 | OpenText Content Server Connector Guide
1. OpenText Content Server ConnectorCES 7.0.5388+ (April 2013)
The Coveo connector for OpenText Content Server (OTCS) allows you to crawl and bring OTCS content into theunified index, making it easily searchable by end-users.
Note: OpenText Content Server is a technology component that was formerly known as Livelink ECM - EnterpriseServer (see the OpenText document Livelink is Now Part of the OpenText ECM Suite).
Connector Features
Content indexing
The connector can retrieve and index exclusively the following default OTCS entity types:
l Appearance Workspace Folder
l Appearance
l Category
l Channel
l Collection (without the children documents)
l Compound Document
l Discussion
l Document
l Enterprise Workspace
l Folder
l Live Report
l News
l Poll
l Project
l Prospector
l Reply
l Shortcut
l Task List
l Task
l Topic
4www.coveo.com 1

Coveo Platform 7.0 | OpenText Content Server Connector Guide
l URL
l Virtual Folder
l Workflow Status
l XML DTD
Fully supported security model
The connector fully supports the OTCS security model using a security provider to get permissions for eachindexed OTCS item. This means that, in Coveo search interfaces, a user searching for OTCS content only seesthe content to which he has access in OTCS.
Incremental refresh CES 7.0.5425+ (May 2013)
The incremental refresh feature continuously and automatically refreshes indexed OTCS items as they aremodified.
Notes:
l CES 7.0.8541+ (September 2016) The incremental refresh can take account of deleted items (exceptnews items) that are stored in the Recycle Bin module.
A source full refresh or rebuild is required to update deleted news items since news are not in the RecycleBin once deleted.
l Incremental refresh limitations:
o A source full refresh or rebuild is required to update added and modified items in projects, channels,discussions, and task lists (child items).
o A source full refresh or rebuild is required to update child items permissions when the parent item ismodified.
o Takes into account deleted items only if the OpenText Content Server Recycle Bin module is enabledin OTCS, but with CES 7.0.8047– (Dec 2015), a source full refresh or rebuild is required to removedeleted items.
o CES 7.0.8388+ (June 2016) Incremental refreshes are supported even if the Document Undeletemodule is not installed. However, when the module is not installed, deleted items (except documents)are not taken into account.
o Not available for Livelink 9.7.1 sources.
Connector FeatureHistory
Coveo Platform version Monthly release Features
7.0.8225 March 2016 Add support for OTCS 10.5
4www.coveo.com 2

Coveo Platform 7.0 | OpenText Content Server Connector Guide
Coveo Platform version Monthly release Features
7.0.5425 May 2013 l Add incremental refresh for OTCS
l Add support for Livelink 9.7.1
7.0.5388 April 2013 Introduction of the connector
What'sNext?
Review the deployment process (see "OpenText Content Server Connector Deployment Overview" on page 4).
4www.coveo.com 3

Coveo Platform 7.0 | OpenText Content Server Connector Guide
2. OpenText Content Server Connector DeploymentOverviewThe following procedure outlines the steps needed to deploy the OpenText Content Server (OTCS) connector. Thesteps indicate the order in which you must perform configuration tasks on both the OTCS and Coveo servers.
To deploy theOpenText Content Server connector
1. Validate that your environment meets the requirements (see "OpenText Content Server ConnectorRequirements" on page 6).
2. In OpenText Content Server:
a. Enable the Web Services.
The Coveo connector requires OTCS Web services to operate. You must ensure that these Web servicesare available (see "Enabling the OpenText Content Server Web Services" on page 7).
b. Select or create the crawling account.
The Coveo connector needs an OTCS account with which it can fully crawl the OTCS content (see "SettingUp an OpenText Content Server Crawling Account" on page 10).
3. In the Coveo Administration Tool:
a. Configure a user identity.
The Coveo connector needs to know the OTCS account that you previously selected or created. You mustcreate a CES user identity to use this account. Use either the Screen Name or the Email Address of thededicated OTCS account. You will later assign this user identity to the security provider and the sourceused by the connector to crawl the OTCS content.
b. Configure a security provider.
The Coveo connector needs a security provider to be able to get the permissions for each indexedOTCS item, and therefore fully support the OTCS security model (see "Configuring an OpenText ContentServer Security Provider" on page 13).
c. Configure and index the OpenText Content Server source.
The Coveo connector needs to know details about OTCS to be able to index its content (see "Configuringand Indexing an OpenText Content Server Source" on page 16).
4. Enrich your OTCS indexed content
a. Optionally, create and use a mapping file to fine-tune indexed content
Consider customizing the connector mapping file to fine-tune the indexed content or to index other entitiesin your OTCS (see "Creating an OpenText Content Server Connector Mapping File" on page 22).
b. Optionally, modify hidden source parameters.
4www.coveo.com 4

Coveo Platform 7.0 | OpenText Content Server Connector Guide
Once your OTCS source is up and running, if you encounter issues, consider modifying some hiddensource parameters to try resolving the issues (see "Modifying Hidden OpenText Content Server SourceParameters" on page 29).
5. Customize your search interfaces with OTCS content
a. Add OTCS facets to your search interfaces
You can create facets using fields such as the OTCSFileType metadata to allow users to easily filterOTCS documents (see "Managing Built-in Facets and Related Results Appearing in a .NET SearchInterface" on page 36).
b. Allow OTCS users to be authenticated in a Coveo search interface
When your OTCS is not integrated with Active Directory, your end-users need to sign in to OTCS in aCoveo search interface to be able to see search results from OTCS. In this case, you need to add theOTCS security provider to your search interface to allow end-user to sign in to OTCS (see "Adding SecurityProviders to a .NET Search Interface" on page 39).
4www.coveo.com 5

Coveo Platform 7.0 | OpenText Content Server Connector Guide
3. OpenText Content Server Connector RequirementsYour environment must meet the following requirements to be able to use the Coveo connector for OpenTextContent Server:
l CES 7.0.5388+ (April 2013)
l Coveo license for the OpenText Content Server connector
Your Coveo license must include support for the OpenText Content Server connector to be able to use thisconnector.
l OpenText product support:
o OpenText Content Server (OTCS) 10.5
Note: CES 7.0.8225+ (March 2016) Support for OTCS 10.5.
o Deprecated support versions: Livelink 9.7.1 CES 7.0.5425+ (May 2013) and OTCS 10
What'sNext?
The Coveo connector for OpenText Content Server (OTCS) needs OpenText Web services to be able to indexOTCS content (see "Enabling the OpenText Content Server Web Services" on page 7).
4www.coveo.com 6

Coveo Platform 7.0 | OpenText Content Server Connector Guide
4. Enabling the OpenText Content Server Web ServicesThe Coveo connector for OpenText Content Server (OTCS) needs OpenText Web services to be able to indexOTCS content. The files for the required web services are installed with the OTCS installation.
Use the following procedures to correctly connect, configure, and set permissions for OTCS Web services:
l "Connecting the OTCS Web Services" on page 7
l "Setting IIS Permissions" on page 8
l "Enabling WCF Services " on page 9
4.1 Connecting the OTCSWeb Services1. Using an administrator account, connect to your OTCS server.
2. Start Internet Information Services (IIS) Manager.
3. On the Internet Information Services (IIS) Manager left pane, expand your server > Sites.
4. If not already done when you installed OTCS, right-click Default Web Site, and then select Add Application inthe menu, and in the Add Application dialog box:
4www.coveo.com 7

Coveo Platform 7.0 | OpenText Content Server Connector Guide
a. In the Alias box, enter les-services or cws (OTCS 10.5+).
b. In the Physical path box, enter C:\OPENTEXT\webservices\dotnet\les-services orC:\OPENTEXT\webservices\dotnet\cws (OTCS 10.5+).
c. Click OK.
Note: The Coveo connector needs the following OTCS web services that are installed by default in theC:\OPENTEXT\webservices\dotnet\les-services (C:\OPENTEXT\webservices\dotnet\cws forOTCS 10.5+) folder:
l Authentication
l DocumentManagement
l IndexService
l MemberService
l ContentService
5. Back on the Internet Information Services (IIS) Manager left pane, click your new les-services or cws (OTCS10.5+) application.
6. On the right pane, click Advanced Settings and in the Advanced Settings dialog box:
a. In Application Pool, select ASP.NET 2.0.
b. Click OK.
7. Still with new les-services or cws(OTCS 10.5+)application selected, in the central pane, double-click HandlerMappings.
8. On the right pane, click Edit Feature Permissions and in the Edit Feature Permissions dialog box:
a. Select the Read and Script check boxes.
b. Click OK.
4.2 Setting IIS Permissions1. On the OTCS server, using Windows Explorer, navigate to the [OT_HOME]\webservices\dotnet folder.
2. Right-click the les-services or cws (OTCS 10.5+)folder, and then choose Properties.
3. In the les-services Properties or cws Properties (OTCS 10.5+) dialog box:
a. Select the Security tab.
b. Under Group or user names, click Edit.
c. In the Permissions for les-services or Permissions for cws (OTCS 10.5+) dialog box:
4www.coveo.com 8

Coveo Platform 7.0 | OpenText Content Server Connector Guide
i. Add the local IUSR user with the Read permissions.
ii. Add the IIS Application Pool Identity (e.g. ApplicationPoolIdentity or NetworkService) with Read& execute permission.
iii. Click OK.
d. Click OK.
4. In the Windows Explorer, open the [OT_HOME]\webservices\dotnet\les-services or [OT_HOME]\webservices\dotnet\cws (OTCS 10.5+) folder.
5. Right-click the logs folder, and then choose Properties.
6. In the logs Properties dialog box:
a. Select the Security tab.
b. Under Group or user names, click Edit.
c. In the Permissions for logs dialog box:
i. For the IIS Application Pool Identity (e.g. ApplicationPoolIdentity or NetworkService) select theModify permission.
ii. Click OK.
d. Click OK.
4.3 Enabling WCF Services1. On the OTCS server, open a Command Prompt window (cmd.exe).
2. Execute the following command to enable the WCF Services:"%SystemRoot%\Microsoft.NET\Framework\v3.0\Windows Communication
Foundation\ServiceModelReg.exe" -i
3. When the command completes, close the Command Prompt window.
What'sNext?
Select or create an OTCS crawling account to be used by the Coveo connector to fully crawl the OTCS content (see"Setting Up an OpenText Content Server Crawling Account" on page 10).
4www.coveo.com 9

Coveo Platform 7.0 | OpenText Content Server Connector Guide
5. Setting Up anOpenText Content Server CrawlingAccountThe Coveo connector needs to connect to the OpenText Content Server (OTCS) using an account that has readaccess to all the OTCS content that you want to index. The Coveo connector only reads and does not modify theOTCS content.
The best practice is to create an OTCS crawling account with a non-expiring password to be used exclusively bythe Coveo connector and grant this account complete read access to all OTCS content. When you want to alsoindex permissions, the crawling account requires System administration rights.
To grant the crawling account read permissions to all items
1. Using an administrator account, sign in to OpenText ECM Suite.
2. On the OpenText Content Server menu, select Enterprise >Workspace.
3. Next to Enterprise, click the Functions arrow, and in the menu, select Permissions.
4. In the Permissions page:
4www.coveo.com 10

Coveo Platform 7.0 | OpenText Content Server Connector Guide
a. In the Assigned Access section, add the crawling account to which you want to grant the rights.
b. Click the newly created crawling account, and in the Edit User Permissions pane:
i. Select the See Contents check box.
ii. In the Apply To drop-down list, select This item & sub-items.
iii. In the Sub-Items Options, select the check boxes for item types that you want to index.
iv. Click Update.
To grant the crawling account SystemAdministrationRights
1. Using an administrator account, sign in to OpenText ECM Suite.
2. On the OpenText Content Server menu, select Enterprise > Users & Groups.
3. In the Users and Groups page, find the user to which you want to grant Administration rights, and then click the
4www.coveo.com 11

Coveo Platform 7.0 | OpenText Content Server Connector Guide
Edit link for that user.
4. In the General Info for: [username] page:
a. Select the General tab.
b. In the Privileges section at the bottom, select the System administration rights check box.
c. Click Update.
What'sNext?
On the Coveo server, configure a CES user identity for your OTCS crawling account and then create a securityprovider (see "Configuring an OpenText Content Server Security Provider" on page 13).
4www.coveo.com 12

Coveo Platform 7.0 | OpenText Content Server Connector Guide
6. Configuring anOpenText Content Server SecurityProviderThe Coveo connector needs a security provider to be able to get the permissions for each indexed OpenTextContent Server (OTCS) item, and therefore fully support the OTCS security model. This means that, in a Coveosearch interface, a user searching for OTCS content only sees the content to which he has access in OTCS.
Note: You can get familiar with how Coveo components deal with permissions on documents both at indexingand query time.
To configure aOpenText Content Server security provider
1. On the Coveo server, access the Administration Tool.
2. Select Configuration > Security.
3. In the Security page, in the navigation panel on the left, click Security Providers.
4. In the Security Providers page, click Add to create a new security provider.
5. In the Modify Security Provider page:
4www.coveo.com 13

Coveo Platform 7.0 | OpenText Content Server Connector Guide
a. In the Name box, enter a name to identify this security provider.
Example: OpenText Content Server Security Provider
Note: You can also use the OTCS connector to crawl a Livelink version 9.7.1 source. You need to add ahidden parameter to do so (see below).
b. In the Security Provider Type drop-down list, selectOpenText Content Server (x64).
c. In the User Identity section:
i. In the drop-down list, select the user identity that you selected or created previously.
ii. When needed, click Add, Edit, or Manage user identities respectively to create, modify, or manageuser identities.
d. CES 7.0.5556+ (June 2013) In the Security Provider for User Mappings drop-down list, select thesecurity provider that will receive the login names of the users and perform the mapping to OTCS users.
Example:When Microsoft Windows users perform a search, select an Active Directory security providerto map AD users to OTCS users.
e. In theWeb Service Url box, enter the address of the OpenText Content Server Web Service. By default,this value is:
http://OTCS_Server/les-services/
where you replace OTCS_Server by the fully qualified domain name of your server.
Example: http://OTCS.corp.MyCompany.com/les-services/
Important: CES 7.0.8225+ (March 2016) (For OTCS 10.5+ only) Replace les-services by cws.
Example: http://OTCS.corp.MyCompany.com/cws/
Note: You will also need to specify this URL in theWeb Service URL parameter when you configureyour source (see "Configuring and Indexing an OpenText Content Server Source" on page 16).
f. In theWeb Service Configuration File box, in rare cases where the security provider encounterscommunication issues with Windows Communication Foundation (WCF), you can modify the way in whichthe security provider communicates with OTCS by entering the path and file name of a customconfiguration file (see the Microsoft document Configuring Services Using Configuration Files).
g. Next to Parameters, click Add Parameter when you want to show and use advanced source parameters(see "Modifying Hidden OpenText Content Server Source Parameters" on page 29).
Important: CES 7.0.5425+ (May 2013) When you are indexing a Livelink v9.7.1, you must add theOTCSVersion parameter and enter the 9.7.1 value.
h. Leave the Allow Complex Identities option cleared as it does not apply to this type of security provider.
i. Click Apply Changes.
4www.coveo.com 14

Coveo Platform 7.0 | OpenText Content Server Connector Guide
What'sNext?
Configure and index an OTCS source (see "Configuring and Indexing an OpenText Content Server Source" onpage 16).
4www.coveo.com 15

Coveo Platform 7.0 | OpenText Content Server Connector Guide
7. Configuring and Indexing anOpenText Content ServerSourceA source defines a set of configuration parameters for a specific OpenText Content Server (OTCS).
Note: In an environment with more than one OTCS, you need to define one source for each OTCS that you wantto index.
To configure and index anOpenText Content Server source
1. On the Coveo server, access the Administration Tool.
2. Select Index > Sources and Collections.
3. In the Collections section:
a. Select an existing collection in which you want to add the new source.
OR
b. Click Add to create a new collection.
4. In the Sources section, click Add.
The Add Source page that appears is organized in three sections.
5. In the General Settings section of the Add Source page:
4www.coveo.com 16

Coveo Platform 7.0 | OpenText Content Server Connector Guide
a. Enter the appropriate value for the following required parameters:
Name
Enter a descriptive name of your choice for the connector source.
Example: OpenText Content Server
Source Type
Select the connector used by this source. In this case, selectOpenText Content Server.
Notes: If you do not see OpenText Content Server, your environment does not meet therequirements (see "OpenText Content Server Connector Requirements" on page 6).
You can also use the OTCS connector to crawl a Livelink version 9.7.1 source. You need to add ahidden parameter to do so (see below).
Addresses
Enter the document or folder IDs that you want to index. One ID per line or * to index the whole OTCScontent from the Enterprise Workspace root.
Note: CES 7.0.6830– (July 2014) This parameter is not used for the OpenText Content Serverconnector, but must not be left empty. Enter NA.
You can find the ID for a node in OTCS by clicking the Functions icon of an item, selectingProperties > General on the menu, clicking Change next to Nickname, and then read the Item IDvalue.
Example:When you want to create an OTCS source only for one project, in the projectGeneralproperty tab, read the Item ID value, like 4094 in the following example.
4www.coveo.com 17

Coveo Platform 7.0 | OpenText Content Server Connector Guide
Note: Using certain item types as the root node will result in an error when retrieving theirpermissions. All item types receiving their permissions from their parents (such as Task, News, alltypes under Discussion, and possibly other types) are not supported as the root node.
Refresh Schedule
Time interval at which the source is automatically refreshed to keep the index content up-to-date. Therecommended Every day option instructs CES to refresh the source everyday at 12 AM.
Note: You can create new or modify existing source refresh schedules.
b. Review the value for the following parameters that often do not need to be modified:
Rating
Change this value only when you want to globally change the rating associated with all items in thissource relative to the rating to other sources.
Example:When a source replaces a legacy system, you may want to set this parameter to High, sothat in the search interface, results from this source appear earlier in the list compared to those fromlegacy system sources.
Document Types
If you defined a custom document type set for this source, select it.
Active Languages
If you defined custom active language sets, ensure to select the most appropriate for this source.
Fields
By default, when an OTCS metadata name matches the name of a CES standard or custom field, themetadata value is automatically mapped to the CES field and the field can be used to make the searchinterface results more relevant. It is a good practice to create a custom field set that and fields withnames matching those of your signification OTCS metadata.
If you defined custom field sets, ensure to select the most appropriate for this source.
6. In the Specific Connector Parameters & Options section of the Add Source page:
4www.coveo.com 18

Coveo Platform 7.0 | OpenText Content Server Connector Guide
a. Configure the following required parameters:
Web Service URL
Enter the URL of the OpenText Content Server Web Service used to communicate with the server. Bydefault, this value is:
http://OTCS_Server/les-services/
where you replace OTCS_Server by the fully qualified domain name of your server.
Example: http://OTCS.corp.MyCompany.com/les-services/
Important: CES 7.0.8225+ (March 2016) (For OTCS 10.5+ only) Replace les-services by cws.
Example: http://OTCS.corp.MyCompany.com/cws/
Note: This is the same value that you entered for theWeb Service Url parameter when youconfigured the security provider (see "Configuring an OpenText Content Server Security Provider" onpage 13).
Content Server URL
Enter the URL pointing to the OpenText Content Server necessary to have valid clickable URIs.
Example:When you access the OTCS, the Content Server URL is the part of the URL beforeLivelink.exe:
In the above example: http://OTCS.corp.MyCompany.com/OTCS/
4www.coveo.com 19

Coveo Platform 7.0 | OpenText Content Server Connector Guide
b. Review the value for the following parameters that often do not need to be modified:
Mapping File
By default, when an OTCS metadata name matches the name of a CES standard or custom field, themetadata value is automatically mapped to the CES field. When this default behavior is sufficient toleverage OTCS metadata, leave this field empty.
When you want to control more precisely how to map OTCS metadata to CES fields, create a custommapping file and enter the absolute full path pointing to your file (see "Creating an OpenText ContentServer Connector Mapping File" on page 22).
Example: C:\CES7\Config\MyOTCSMappingFile.xml
Number of Refresh Threads
Enter the number of threads that will be used to retrieve OpenText Content Server content. The defaultvalue is 2.
Parameters
Click Add Parameter when you want to show and use advanced source parameters (see "ModifyingHidden OpenText Content Server Source Parameters" on page 29).
Important: CES 7.0.5425+ (May 2013) When you are indexing a Livelink v9.7.1, you must add theOTCSVersion parameter and enter the 9.7.1 value.
c. In the Option section:
Index Subfolders
Keep this check box selected (recommended). By doing so, all subfolders from the specified portaladdress are indexed.
Index the document's metadata
When selected, CES indexes all the document metadata, even metadata that are not associated with afield. The orphan metadata are added to the body of the document so that they can be searched usingfree text queries.
When cleared (default), only the values of system and custom fields that have the Free Text Queriesattribute selected will be searchable without using a field query.
4www.coveo.com 20

Coveo Platform 7.0 | OpenText Content Server Connector Guide
Example: A document has two metadata:
l LastEditedBy containing the value Hector Smith
l Department containing the value RH
In CES, the custom field CorpDepartment is bound to the metadata Department and its Free TextQueries attribute is selected.
When the Index the document's metadata option is cleared, searching for RH returns the documentbecause a field is indexing this value. Searching for hector does not return the document becauseno field is indexing this value.
When the Index the document's metadata option is selected, searching for hector also returns thedocument because CES indexed orphan metadata.
Document's addresses are case-sensitive
Leave the check box cleared. This parameter needs to be checked only in rare cases for systems inwhich distinct documents may have the same name but different casing.
Generate a cached HTML version of indexed documents
When you select this check box (recommended), at indexing time, CES creates HTML versions ofindexed documents. In the search interfaces, users can then more rapidly review the content byclicking the Quick View link rather than opening the original document with the original application.Consider clearing this check box only when you do not want to use Quick View links or to saveresources when building the source.
Open results with cached version
Leave this check box cleared (recommended) so that in the search interfaces, the main search resultlink opens the original document with the original application. Consider selecting this check box onlywhen you do not want users to be able to open the original document but only see the HTML version ofthe document as a Quick View. In this case, you must also selectGenerate a cached HTML version ofindexed documents.
7. In the Security section of the Add Source page:
4www.coveo.com 21

Coveo Platform 7.0 | OpenText Content Server Connector Guide
a. In the OpenText Content Server Security Provider drop-down list, select the security provider that youcreated for this source (see "Configuring an OpenText Content Server Security Provider" on page 13).
b. In the Authentication drop-down list, select the user identity that you created for the OpenText ContentServer.
c. Click Save and Start to save the source configuration and start indexing this source.
8. Validate that the source building process is executed without errors:
l In the navigation panel on the left, click Status, and then validate that the indexing proceeds withouterrors.
OR
l Open the CES Console to monitor the source building activities.
What'sNext?
Set an incremental refresh schedule for your source.
If you experience issues or want to fine tune how your OTCS source is indexed, consider using hidden OTCSsource parameters (see "Modifying Hidden OpenText Content Server Source Parameters" on page 29).
7.1 Creating an OpenText Content Server Connector Mapping FileThe Coveo connector for OpenText Content Server (OTCS) has no mapping file by default. When the name ofmetadata found on OTCS documents matches the name of CES system or custom fields, the metadata areautomatically mapped.
When you need to more accurately control where and how metadata is mapped on your items, you must create anduse a mapping file that respects the schema of the standard mapping file (see "Standard Mapping File Schema" onpage 23).
Examples: You need a mapping when you want to:
l Customize the HTML body for items of a specific type.
l Concatenate two or more OTCS metadata in a CES field.
l Map an OTCS metadata value to a CES field for which names do not match.
To create and use anOTCS connector mapping file
1. Using an administrator account, connect to the Coveo Master server.
2. Using a text editor:
a. Create the mapping file.
You can start with the following commented sample mapping file.
<?xml version="1.0" encoding="utf-8" ?><Mappings><!-- Review the ValidationSchemaVersion1.xsd to view the available fields andattributes -->
4www.coveo.com 22

Coveo Platform 7.0 | OpenText Content Server Connector Guide
<Version>1</Version><!-- Mandatory node to identify the mapping file version. Do notmodify. -->
<CommonMapping><!-- Optional. Any Mapping defined within this section will be applied toall documents. -->
<Title>%[title]</Title></CommonMapping><Mapping type="Document"><!-- Optional. This is a specific mapping. The fields and
elements described will only be applied to items of type "Document".Values for OpenText Content Server are the type of nodes. --
><Body>This is a body</Body><PrintableUri>http://www.coveo.com</PrintableUri><Fields>
<Field name="field1">%[metadata1]</Field></Fields>
</Mapping><DefaultMapping> <!-- Optional. This is the default mapping. It will be applied to any
item that was not mapped to a specified mapping --><ClickableUri>www.clickableuri.com</ClickableUri>
</DefaultMapping></Mappings>
b. Respecting the mapping file format, customize the file using the following tips:
l Use OTCS node types to create specific <Mapping type="..."> tags in the mapping file.
You can easily find the values to enter in this tag from the Type of items in OpenText Content Server.
Example:When you want to manage OTCS Discussion fields, in the OTCS Workspace, simply hovera discussion item. The tooltip indicates the value to enter in the Mapping type tag.
In the mapping file, you would create the <Mapping type="Discussion"> node.
l The connector populates the special OTCSFileType metadata with the type of OTCS documents. Thismetadata is useful to create a facet based on the types of items found in OTCS.
c. Save the file using a name of your choice in the [Index_Path]\Config\ folder.
d. Save your changes.
What'sNext?
Assign your customized mapping file in your OpenText Content Server source (see "Configuring and Indexing anOpenText Content Server Source" on page 16).
7.2 Standard Mapping File SchemaA Coveo connector may need a mapping file to correctly copy the repository metadata values to appropriate indexfields. This topic describes the format of the standard mapping file by providing its XML schema definition. Refer tothis schema to review the possible content of the file and ensure that your mapping file is valid.
4www.coveo.com 23

Coveo Platform 7.0 | OpenText Content Server Connector Guide
Notes:
l CES 7.0.7914+ (October 2015) Using a mapping file, in a field or body element, you can retrieve the contentof an external file by setting the isUrl attribute to true in the start tag and entering the external file URL asthe value.
Example: <Field name="contact" isUrl="true">%[UrlMetadata]</field>
The normal mapping resolution is performed and when the download attempt of the resolved value issuccessful, the downloaded content is converted to a string and put in the body or field element. One usecase is when you have a database with a column containing a URI that points to a document that you want touse as a body.
When using this feature, have in mind that:
o isUrl is case-sensitive.
o Direct mapping (ex: <Field name="[value]" isUrl="true">[value]</Field>) and mappingresolution (ex: <Body isUrl="true">%[File_Path_or_URL]</Body>) are both supported schemes.
o Old mappings are compatible, meaning that when isUrl is not specified, the attribute is considered setto false (no download is performed).
o The specified external file can be a .PDF, .DOCS, .ETC, .TXT, . RTF or .HTML file and its URL can startwith http://, https:// or file://.
o The content of the external file must be public since no authentication is supported when performing thedownload attempt.
o When an invalid URL is specified, an error message stating that a mapping fails is logged, but thedocument is still indexed.
l By default, when the name of a field in the field set selected for the source matches the name of a metadatafrom the indexed repository, the metadata value is automatically copied to the field, even when they are notformally associated in a mapping file.
l The standard mapping file schema is supported by all connectors written in C# (all connectors except WebLegacy). However, it is recommenced for the connectors that use their own mappings (such as Oracle UCM)to NOT mix these specific mappings with standard ones.
l Some connectors come with a default mapping file that is available in the [CES_Path]\bin folder, Themapping file name is in the form:
Coveo.CES.CustomCrawlers.[ConnectorName].MappingFile.xml
When a default mapping file is available, it is recommended to start with its content by using and customizinga copy of the file.
This mapping file format is used by more recently developed or updated connectors. This standard mapping fileonly contains metadata to field mappings, not other connector configuration parameters. When needed, aconnector rather uses a separate configuration file for non-mapping parameters.
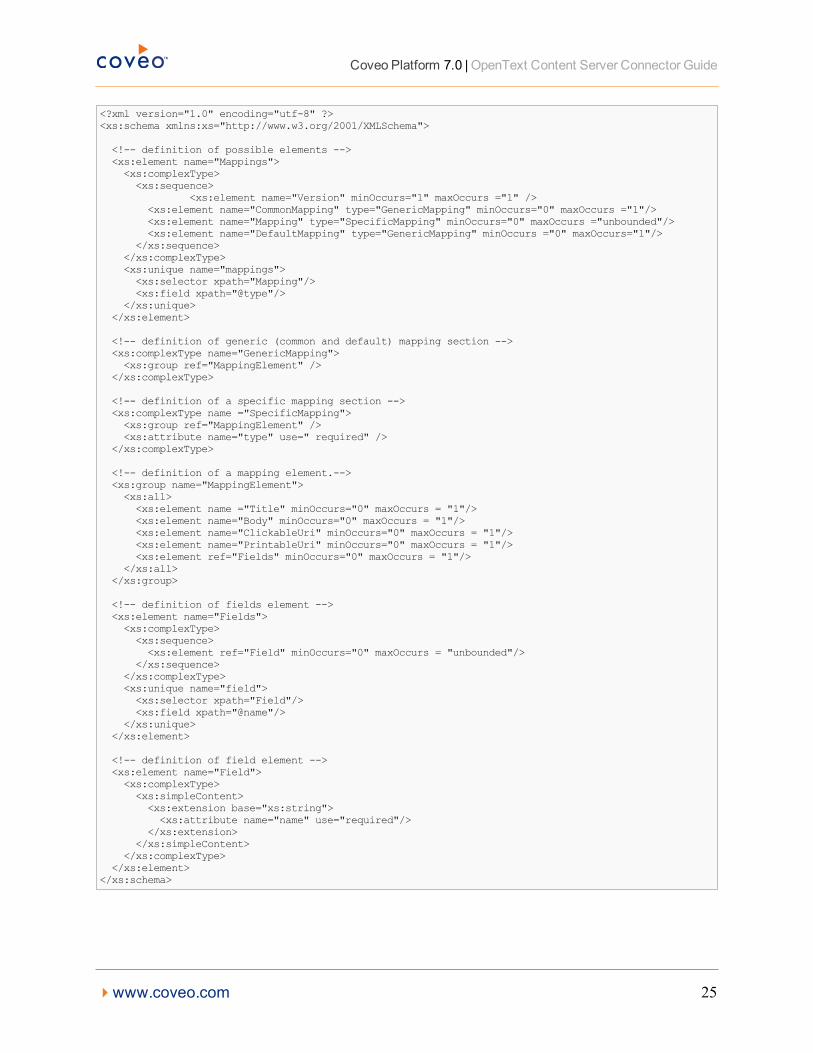
The format of the mapping file version 1 is specified in the following XML schema definition (XSD).
4www.coveo.com 24
Coveo Platform 7.0 | OpenText Content Server Connector Guide
<?xml version="1.0" encoding="utf-8" ?><xs:schema xmlns:xs="http://www.w3.org/2001/XMLSchema">
<!-- definition of possible elements --><xs:element name="Mappings"><xs:complexType><xs:sequence>
<xs:element name="Version" minOccurs="1" maxOccurs ="1" /><xs:element name="CommonMapping" type="GenericMapping" minOccurs="0" maxOccurs ="1"/><xs:element name="Mapping" type="SpecificMapping" minOccurs="0" maxOccurs ="unbounded"/><xs:element name="DefaultMapping" type="GenericMapping" minOccurs ="0" maxOccurs="1"/>
</xs:sequence></xs:complexType><xs:unique name="mappings"><xs:selector xpath="Mapping"/><xs:field xpath="@type"/>
</xs:unique></xs:element>
<!-- definition of generic (common and default) mapping section --><xs:complexType name="GenericMapping"><xs:group ref="MappingElement" />
</xs:complexType>
<!-- definition of a specific mapping section --><xs:complexType name ="SpecificMapping"><xs:group ref="MappingElement" /><xs:attribute name="type" use=" required" />
</xs:complexType>
<!-- definition of a mapping element.--><xs:group name="MappingElement"><xs:all><xs:element name ="Title" minOccurs="0" maxOccurs = "1"/><xs:element name="Body" minOccurs="0" maxOccurs = "1"/><xs:element name="ClickableUri" minOccurs="0" maxOccurs = "1"/><xs:element name="PrintableUri" minOccurs="0" maxOccurs = "1"/><xs:element ref="Fields" minOccurs="0" maxOccurs = "1"/>
</xs:all></xs:group>
<!-- definition of fields element --><xs:element name="Fields"><xs:complexType><xs:sequence><xs:element ref="Field" minOccurs="0" maxOccurs = "unbounded"/>
</xs:sequence></xs:complexType><xs:unique name="field"><xs:selector xpath="Field"/><xs:field xpath="@name"/>
</xs:unique></xs:element>
<!-- definition of field element --><xs:element name="Field"><xs:complexType><xs:simpleContent><xs:extension base="xs:string"><xs:attribute name="name" use="required"/>
</xs:extension></xs:simpleContent>
</xs:complexType></xs:element>
</xs:schema>
4www.coveo.com 25

Coveo Platform 7.0 | OpenText Content Server Connector Guide
Example: The JIVE connector uses the standard mapping file schema:
<?xml version="1.0" encoding="utf-8" ?><Mappings><Version>1</Version><CommonMapping><Fields><Field name="sysauthor">%[author.displayName]</Field><!-- Jive system fields --><Field name="syscstag">%[tags]</Field><Field name="syscstaggroup">%[categories]</Field><Field name="syscsplace">%[coveo.places.titles]</Field><Field name="syscsplacetype">%[coveo.places.types]</Field>
</Fields></CommonMapping><Mapping type="announcement"><Title>%[subject]</Title><Body><![CDATA[ <html> %[content.text] </html> ]]></Body><Fields><Field name="sysfiletype">csannouncement</Field><!-- Jive system fields --><Field name="syscsitemtype">Announcement</Field>
</Fields></Mapping><Mapping type="attachment"><Title>%[name]</Title><Fields><Field name="sysfilename">%[name]</Field>
</Fields></Mapping><Mapping type="checkpoint"><Title>%[name]</Title><Body>%[description]</Body><Fields><Field name="sysdtdue">dueDate</Field><Field name="sysfiletype">cscheckpoint</Field><!-- Jive system fields --><Field name="syscsitemtype">Checkpoint</Field>
</Fields></Mapping><Mapping type="comment"><Title>%[subject]</Title><Body><![CDATA[ <html> %[content.text] </html> ]]></Body><Fields><Field name="sysfiletype">cscomment</Field><!-- Jive system fields --><Field name="syscsitemtype">Comment</Field>
</Fields></Mapping><Mapping type="discussion"><Title>%[subject]</Title><Body><![CDATA[ <html> %[content.text] </html> ]]></Body><Fields><Field name="sysfiletype">csdiscussion</Field><!-- Jive system fields --><Field name="syscsitemtype">Discussion</Field>
</Fields></Mapping><Mapping type="dm"><Title>%[subject]</Title><Body><![CDATA[ <html> %[content.text] </html> ]]></Body><Fields><Field name="sysfiletype">csdm</Field><!-- Jive system fields --><Field name="syscsitemtype">dm</Field>
</Fields></Mapping><Mapping type="document">
4www.coveo.com 26

Coveo Platform 7.0 | OpenText Content Server Connector Guide
<Title>%[subject]</Title><Body><![CDATA[ <html> %[content.text] </html> ]]></Body><Fields><Field name="sysfilename">%[subject]</Field><Field name="sysfiletype">csdocument</Field><!-- Jive system fields --><Field name="syscsitemtype">Document</Field>
</Fields></Mapping><Mapping type="file"><Title>%[subject]</Title><Fields><Field name="sysfilename">%[subject]</Field>
</Fields></Mapping><Mapping type="group"><Title>%[name]</Title><Body>%[description]</Body><Fields><Field name="sysauthor">%[creator.displayName]</Field><Field name="sysfiletype">cssocialgroup</Field><!-- Jive system fields --><Field name="syscsitemtype">Social Group</Field>
</Fields></Mapping><Mapping type="idea"><Title>%[subject]</Title><Body><![CDATA[ <html> %[content.text] </html> ]]></Body><Fields><Field name="sysfiletype">csidea</Field><!-- Jive system fields --><Field name="syscsitemtype">Idea</Field>
</Fields></Mapping><Mapping type="message"><Title>%[subject]</Title><Body><![CDATA[ <html> %[content.text] </html> ]]></Body><Fields><Field name="sysfiletype">csmessage</Field><!-- Jive system fields --><Field name="syscsitemtype">Message</Field>
</Fields></Mapping><Mapping type="person"><Title>%[displayName]</Title><Body> %[displayName] %[emails(work).value] %[jive.profile(Title).value]</Body><Fields><Field name="UserProfile_FirstName">%[name.givenName]</Field><Field name="UserProfile_LastName">%[name.familyName]</Field><Field name="UserProfile_AccountName">%[jive.username]</Field><Field name="UserProfile_Title">%[jive.profile(Title).value]</Field><Field name="UserProfile_AboutMe">%[jive.profile(Biography).value]</Field><Field name="UserProfile_PictureURL">%[thumbnailUrl]</Field><Field name="UserProfile_WorkEmail">%[emails(work).value]</Field><Field name="UserProfile_WorkPhone">%[phoneNumbers(work).value]</Field><Field name="mobile">%[phoneNumbers(mobile).value]</Field><Field name="syslocation">%[location]</Field><Field name="sysfiletype">csuser</Field><!-- Jive system fields --><Field name="syscsitemtype">User</Field>
</Fields></Mapping><Mapping type="poll"><Title>%[subject]</Title><Body><![CDATA[ <html> %[content.text] </html> ]]></Body><Fields><Field name="sysfiletype">cspoll</Field><!-- Jive system fields -->
4www.coveo.com 27

Coveo Platform 7.0 | OpenText Content Server Connector Guide
<Field name="syscsitemtype">Poll</Field></Fields>
</Mapping><Mapping type="post"><Title>%[subject]</Title><Body><![CDATA[ <html> %[content.text] </html> ]]></Body><Fields><Field name="sysfiletype">csblogpost</Field><!-- Jive system fields --><Field name="syscsitemtype">Blog Post</Field>
</Fields></Mapping><Mapping type="project"><Title>%[name]</Title><Body>%[description]</Body><Fields><Field name="sysdtdue">dueDate</Field><Field name="sysauthor">%[creator.displayName]</Field><Field name="sysfiletype">csproject</Field><!-- Jive system fields --><Field name="syscsitemtype">Project</Field>
</Fields></Mapping><Mapping type="space"><Title>%[name]</Title><Body>%[description]</Body><Fields><Field name="sysfiletype">cscommunity</Field><!-- Jive system fields --><Field name="syscsitemtype">Community</Field>
</Fields></Mapping><Mapping type="systemblog"><Title>%[name]</Title><Body>%[description]</Body><Fields><Field name="sysfiletype">cssystemblog</Field><!-- Jive system fields --><Field name="syscsitemtype">System Blog</Field>
</Fields></Mapping><Mapping type="task"><Title>%[subject]</Title><Body><![CDATA[ <html> %[content.text] </html> ]]></Body><Fields><Field name="sysdtdue">dueDate</Field><Field name="sysfiletype">cstask</Field><!-- Jive system fields --><Field name="syscsitemtype">Task</Field><Field name="syscstaskassignedto">%[owner.extra.displayName]</Field>
</Fields></Mapping><Mapping type="update"><Title>%[subject]</Title><Body><![CDATA[ <html> %[content.text] </html> ]]></Body><Fields><Field name="sysfiletype">csupdate</Field><!-- Jive system fields --><Field name="syscsitemtype">Update</Field>
</Fields></Mapping><Mapping type="video"><Title>%[subject]</Title><Body><![CDATA[ <html> %[content.text] </html> ]]></Body><Fields><Field name="sysfiletype">csvideo</Field><!-- Jive system fields --><Field name="syscsitemtype">Video</Field>
4www.coveo.com 28

Coveo Platform 7.0 | OpenText Content Server Connector Guide
</Fields></Mapping>
</Mappings>
7.3 Modifying Hidden OpenText Content Server Source ParametersThe Add Source and Source: ... General pages of the Administration Tool present the parameters with which youcan configure the connector for most OpenText Content Server (OTCS) setups. More advanced and more rarelyused parameters are hidden. You can choose to make one or more of these parameters appear in the Add Sourceand Source: ... General pages of the Administration Tool so that you can change their default value. Considerchanging values of hidden parameters when you encounter issues.
The following list describes the advanced hidden parameters available with OTCS sources. The parameter type(integer, string…) appears between parentheses following the parameter name.
SpecificContentDeletionNode (String) CES 7.0.8541+ (September 2016)
This ID of the node enabled on the OTCS server used for the content deletion process. The parameter valuecan either be an UndeleteWS or a Recycle Bin node ID. The default value is -1, which tells the connector toignore the parameter.
Notes:
l When available, you find the Recycle Bin node ID after objID= in the Content Server URL.
Example: In the following OpenText Content Server URL, the Recycle Bin node ID is 126020:http:/<OTCSServer>/OTCS/livelink.exe?func=ll&objId=126020=&objAction=browse
l The parameter is necessary when the connector cannot automatically detect the UndeleteWS node orRecycle Bin ID, which is necessary to take account of deleted items during incremental refreshes.
oolean) CES 7.0.8541+ (September 2016)
Whether to add anonymous access if "public access" is specified on the content object. The default value isFalse.
UseOtcsContentTypes (Boolean) CES 7.0.8388+ (June 2016)
Whether to use the content types returned by OTCS instead of "binary file". The default value is False.
Note:When you set the parameter value to True, update the document type set used by your OTCS source toensure all content types returned by OTCS are indexed.
Example:When you want to index all Microsoft Office 2007+ documents (Word, Excel, and PowerPoint),ensure the following document types are contained in the document set used by the source: .doc, .dot,
.docx, .dotx, .docm, .dotm, .xls, .xlt, .xla, .xlsx, .xltx, .xlsm, .xltm, .xlam,
.xlsb, .ppt, .pot, .pps, .ppa, .pptx, .potx, .ppsx, .potx, .ppsx, .ppam, .pptm,
.potm, .ppsm
BatchSize (Integer)
Number of items to fetch per request made to the OTCS. The default value is 256. The minimum value is 1. A
4www.coveo.com 29

Coveo Platform 7.0 | OpenText Content Server Connector Guide
small value forces the connector to make small but frequent queries to OTCS. A larger value leads to larger andless frequent queries.
WebServiceConfigFile (String)
The path and file name of a custom configuration file. In rare cases where the connector encounterscommunication issues with Windows Communication Foundation (WCF), you can modify the way in which theconnector communicates with OTCS by creating and specifying a custom configuration file (see the Microsoftdocument Configuring Services Using Configuration Files).
ItemTypesToIndex (String)
By default, this parameter is empty so that all supported OTCS item types are indexed. You can use thisparameter to restrict the types of OTCS items to indexed by entering only the OTCS item types that you want toindex, separated by a semi-colon ;. You can easily find the values to enter in this parameter from the Type ofitems in OpenText Content Server. In the OTCS Workspace, simply hover a discussion item. The tooltipindicates the value to enter in the parameter.
SpecificRootNode (Integer) (deprecated) CES 7.0.6830– (July 2014)
Note: CES 7.0.6942+ (August 2014) The Addresses parameter replaces it (see Configuring and Indexing anOpenText Content Server Source).
By default, the connector crawls the whole OTCS content from the Enterprise Workspace root. You can use thisparameter to specify to start crawling from another root node or from a subnode by entering the node ID.
You can find this ID for a node in OTCS by clicking the Functions icon of an item, selectingProperties > General on the menu, clicking Change next to Nickname, and then read the Item ID value.
4www.coveo.com 30

Coveo Platform 7.0 | OpenText Content Server Connector Guide
Example:When you want to create an OTCS source only for one project, in the projectGeneral property tab,read the Item ID value, like 4094 in the following example.
Note: Using certain item types as the root node will result in an error when retrieving their permissions. Allitem types receiving their permissions from their parents (such as Task, News, all types under Discussion,and possibly other types) are not supported as the root node.
NumberOfRefreshThreads (Integer)
This parameter determines the number of threads used to simultaneously crawl OTCS. The default value is 1.
RetrieveFullNodeData (Boolean)
By default this parameter is set to True to instruct the connector to perform additional OTCS requests to extractall node metadata and allow to get the OTCS Category data. When you do not want to index OTCS Categorydata, set this parameter to False to roughly double the crawling speed.
OTCSVersion (String) CES 7.0.5425+ (May 2013)
This parameter allows to specify the version of the OTCS/Livelink source to crawl. You need to add thisparameter only when you want to crawl a Livelink version 9.7.1 source. The two possible values are:
l 10sp2 - The default to crawl an OpenText Content Server source.
l 9.7.1 - To crawl a Livelink source.
RetrieveUsers (Boolean) CES 7.0.5785+ (August 2013)
When set to True, this parameter instructs the connector to retrieve the OTCS users. The default value is False.
Example:When the authors of OTCS documents are user IDs, not the user names, set the RetrieveUsersparameter to True to retrieve the users. You can then map the user IDs to the user names so that in the searchresults, you can display user names rather than user IDs.
4www.coveo.com 31

Coveo Platform 7.0 | OpenText Content Server Connector Guide
Tomodify hiddenOpenText Content Server source parameters
1. Refer to "Adding an Explicit Connector Parameter" on page 32 to add one or more OpenText Content Serverhidden source parameters.
2. For a new OpenText Content Server source, access the Add Source page of the Administration Tool to modifythe value of the newly added advanced parameter:
a. Select Index > Sources and Collections.
b. Under Collections, select the collection in which you want to add the source.
c. Under Sources, click Add.
d. In the Add Source page, edit the newly added advanced parameter value.
3. For an existing OpenText Content Server source, access the Source: ... General page of the AdministrationTool to modify the value of the newly added advanced parameter:
a. Select Index > Sources and Collections.
b. Under Collections, select the collection containing the source you want to modify.
c. Under Sources, click the existing OpenText Content Server source in which you want to modify the newlyadded advanced parameter.
d. In the Source: ... General page, edit the newly added advanced parameter value.
4. Rebuild your OpenText Content Server source to apply the changes to the parameters.
7.4 Adding an Explicit Connector ParameterConnector parameters applying to all sources indexed using this connector are called explicit parameters.
When you create or configure a source, the Coveo Enterprise Search (CES) 7.0 Administration Tool presentsparameters with which you can configure the connector for most setups. For many connectors, more advanced andmore rarely used parameters also exist but are hidden by default. CES then uses the default value associated witheach of these hidden parameters.
You can however choose to make one or more of these parameters appear in the Add Source and Source: ...General pages of the Administration Tool so that you can change their default value.
To add an explicit connector parameter
1. On the Coveo server, access the Administration Tool.
2. Select Configuration > Connectors.
3. In the list on the Connectors page, select the connector for which you want to show advanced hiddenparameters.
4. In the Parameters section of the selected connector page, click Add Parameter for each hidden parameterthat you want to modify.
4www.coveo.com 32

Coveo Platform 7.0 | OpenText Content Server Connector Guide
Note: The Add Parameter button is present only when hidden parameters are available for the selectedconnector.
5. In the Modify the parameters of the connector page:
a. In the Type list, select the parameter type as specified in the parameter description.
b. In the Name box, type the parameter name exactly as it appears in the parameter description. Parameternames are case sensitive.
c. In the Default Value box, enter the default value specified in the parameter description.
Important: Do not set the value that you want to use for a specific source. The value that you enter herewill be used for all sources defined using this connector so it must be set to the recommended defaultvalue. You will be able to change the value for each source later, in the Add Source and Source: ...General pages of the Administration Tool.
d. In the Label box, enter the label that you want to see for this parameter.
Example: To easily link the label to the hidden parameter, you can simply use the parameter name, andif applicable, insert spaces between concatenated words. For the BatchSize hidden parameter, enterBatch Size for the label.
4www.coveo.com 33

Coveo Platform 7.0 | OpenText Content Server Connector Guide
Note: To create multilingual labels and quick help messages, use the following syntax:<@ln>text</@>, where ln is replaced by the language initials—the languages of the AdministrationTool are English (en) and French (fr).
Example: <@fr>Chemin d'accès du fichier de configuration</@><@en>Configuration
File Path</@> is a label which is displayed differently in the French and English versions of theAdministration Tool.
Tip: The language of the Administration Tool can be modified by pressing the following key combination:Ctrl+Alt+Page Up.
e. Optionally, in Quick Help, enter the help text that you want to see for this parameter when clicking thequestion mark button that will appear beside the parameter value.
Tip: Copy and paste key elements of the parameter description.
f. When Predefined values is selected in the Type parameter, in the Value box that appears, enter theparameter values that you want to see available in the drop-down parameter that will appear in theAdministration Tool interface. Enter one value per line. The entered values must exactly match the valueslisted in the hidden parameter description.
g. Select the Optional parameter check box when you want to identify this parameter as an optionalparameter. When cleared, CES does not allow you to save changes when the parameter is empty. Thisparameter does not appear for Boolean and Predefined values parameter types.
h. Select the Sensitive information check box for password or other sensitive parameter so that, in theAdministration Tool pages where the parameter appears, the typed characters appear as dots to maskthem. This parameter appears only for the String type.
Example:When you select the Sensitive information check box for a parameter, the characters typedappear as follows in the text box:
i. Select the Validate as an email address check box when you want CES to validate that the text string thata user enters in this parameter respects the format of a valid email address. This parameter appears onlyfor the String type.
j. In the Maximum length box, enter the maximum number of characters for the string. This parameterappears only for the String type. When you enter 0, the length of the string is not limited.
k. Click Save.
6. Back in the Connector page, click Apply Changes.
The hidden parameter now appears in the Add Source and Source: ... General pages of the AdministrationTool for the selected source. You can change the parameter value from these pages. Refer to thedocumentation for each connector for details.
4www.coveo.com 34

Coveo Platform 7.0 | OpenText Content Server Connector Guide
Note:When you want to modify a hidden source parameter, you must first delete it, and then redefine it with themodified values.
4www.coveo.com 35

Coveo Platform 7.0 | OpenText Content Server Connector Guide
8. Managing Built-in Facets and Related Results Appearingin a .NET Search InterfaceThe Coveo .NET Front-End comes with a number of built-in facets and Related Results defined for various .NETsearch interfaces. You can modify which built-in facets and Related Results appear in each .NET search interface.
Important: The Related Results information is passed through the .NET search interface URL. When you add afew Related Results panels to a .NET search interface, the search interface URL can easily exceed the InternetExplorer URL length limit. Use the URL shortener feature to eliminate this issue.
Tomanage the built-in facets andRelatedResults appearing in a .NET search interface
1. Access the Coveo .NET Front-End Interface Editor.
2. Select the Search Interfaces tab.
3. On the menu bar:
a. In the Current Interface drop-down list, select the search interface that you want to modify.
b. Click the Features menu.
4. In the navigation panel on the left, click Facets and Related Results.
In the panel on the right:
l The facets and Related Results panels currently appearing in the selected search interface are listedunder Facets and Related Results in the order that they appear in each of the facet and Related Resultszones (Hub default position, Right, Top or Left).
l The available built-in facets are listed under Built-in Facets. Several built-in facets based on system fieldsare applicable to content from any repository. Other facets are exclusive to the content of a specific type ofrepository.
Examples: The Author facet is applicable to the content of any repository for which the sysauthorsystem field was populated. The Liferay Type facet is only applicable to Liferay content.
l The available built-in Related Results are listed under Built-in Related Results.
4www.coveo.com 36

Coveo Platform 7.0 | OpenText Content Server Connector Guide
5. You can perform one the following operations:
4www.coveo.com 37

Coveo Platform 7.0 | OpenText Content Server Connector Guide
l Add a built-in facet to the search interface:
In the Built-in Facets list, click the Add "[FacetName]" link corresponding to the facet that you want toadd.
Note: For the Type facet, the default list of Allowed Values (facet items) is the following:audio,doc,html,image,mapimail,mime,mpp,msg,one,pdf,ppt,rtf,txt,video,wp,xls,zip.
If you want the Type facet to show other file types as facet items, simply add the needed file types to thedefault list in the Allowed Values parameter box.
Example:audio,doc,html,image,mapimail,mime,mpp,msg,one,pdf,ppt,rtf,txt,video,wp,xls,zip
,vsd
The corresponding facet appears at the end of the Facets and Related Results list.
l Add a built-in Related Results panel to the search interface:
In the Built-in Related Results list, click the Add "[RelatedResultsName]" link corresponding to theRelated Results panel that you want to add.
The corresponding Related Results appears at the end of the Facets and Related Results list.
l Remove a facet or Related Results from the search interface:
o In the Facets and Related Results list, select the check box of one or more facets or Related Resultsthat you want to remove.
o Click Delete (above the Built-in Facets list).
o Click Yes when prompted to confirm the delete operation.
l Change the order in which facets and Related Results appear in the search interface:
In the Custom Facets list:
a. On the line corresponding to the facet or Related Results that you want to reorder, click Up or Down asmany times as needed to relocate the facet or Related Results in relation with the others in the samezone.
b. Repeat for each facet or Related Results that you want to reorder.
Note:When the position of a facet or a Related Results panel is Default, the position is inherited from thesearch interface or search hub default position.
6. Access and refresh the search interface, and then validate that the built-in facet and Related Results changesare as desired.
4www.coveo.com 38
Coveo Platform 7.0 | OpenText Content Server Connector Guide
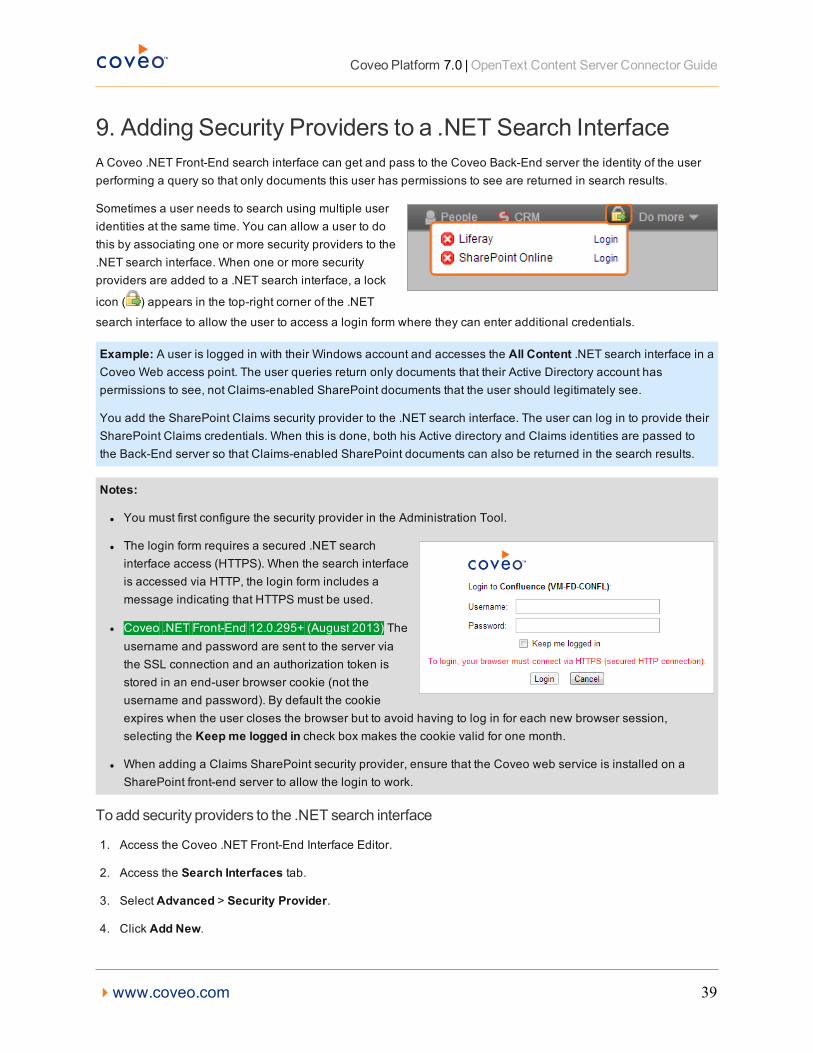
9. Adding Security Providers to a .NET Search InterfaceA Coveo .NET Front-End search interface can get and pass to the Coveo Back-End server the identity of the userperforming a query so that only documents this user has permissions to see are returned in search results.
Sometimes a user needs to search using multiple useridentities at the same time. You can allow a user to dothis by associating one or more security providers to the.NET search interface. When one or more securityproviders are added to a .NET search interface, a lock
icon ( ) appears in the top-right corner of the .NETsearch interface to allow the user to access a login form where they can enter additional credentials.
Example: A user is logged in with their Windows account and accesses the All Content .NET search interface in aCoveo Web access point. The user queries return only documents that their Active Directory account haspermissions to see, not Claims-enabled SharePoint documents that the user should legitimately see.
You add the SharePoint Claims security provider to the .NET search interface. The user can log in to provide theirSharePoint Claims credentials. When this is done, both his Active directory and Claims identities are passed tothe Back-End server so that Claims-enabled SharePoint documents can also be returned in the search results.
Notes:
l You must first configure the security provider in the Administration Tool.
l The login form requires a secured .NET searchinterface access (HTTPS). When the search interfaceis accessed via HTTP, the login form includes amessage indicating that HTTPS must be used.
l Coveo .NET Front-End 12.0.295+ (August 2013) Theusername and password are sent to the server viathe SSL connection and an authorization token isstored in an end-user browser cookie (not theusername and password). By default the cookieexpires when the user closes the browser but to avoid having to log in for each new browser session,selecting the Keepme logged in check box makes the cookie valid for one month.
l When adding a Claims SharePoint security provider, ensure that the Coveo web service is installed on aSharePoint front-end server to allow the login to work.
To add security providers to the .NET search interface
1. Access the Coveo .NET Front-End Interface Editor.
2. Access the Search Interfaces tab.
3. Select Advanced > Security Provider.
4. Click Add New.
4www.coveo.com 39
Coveo Platform 7.0 | OpenText Content Server Connector Guide
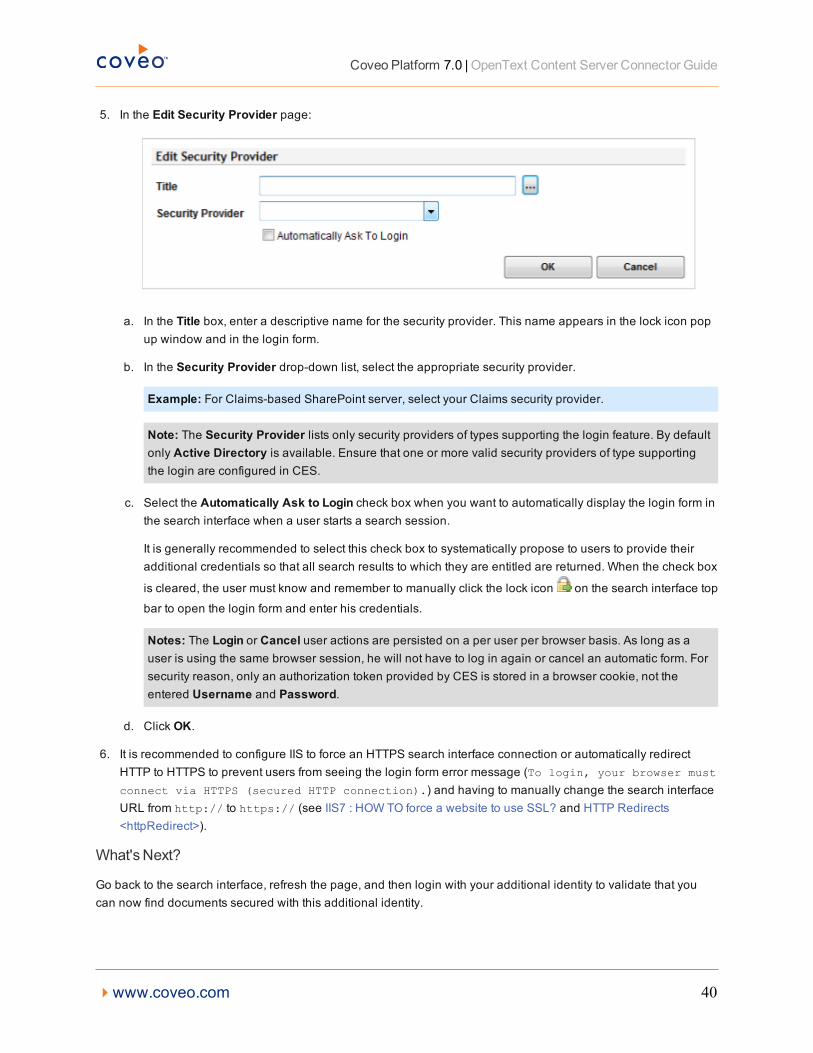
5. In the Edit Security Provider page:
a. In the Title box, enter a descriptive name for the security provider. This name appears in the lock icon popup window and in the login form.
b. In the Security Provider drop-down list, select the appropriate security provider.
Example: For Claims-based SharePoint server, select your Claims security provider.
Note: The Security Provider lists only security providers of types supporting the login feature. By defaultonly Active Directory is available. Ensure that one or more valid security providers of type supportingthe login are configured in CES.
c. Select the Automatically Ask to Login check box when you want to automatically display the login form inthe search interface when a user starts a search session.
It is generally recommended to select this check box to systematically propose to users to provide theiradditional credentials so that all search results to which they are entitled are returned. When the check box
is cleared, the user must know and remember to manually click the lock icon on the search interface topbar to open the login form and enter his credentials.
Notes: The Login or Cancel user actions are persisted on a per user per browser basis. As long as auser is using the same browser session, he will not have to log in again or cancel an automatic form. Forsecurity reason, only an authorization token provided by CES is stored in a browser cookie, not theentered Username and Password.
d. Click OK.
6. It is recommended to configure IIS to force an HTTPS search interface connection or automatically redirectHTTP to HTTPS to prevent users from seeing the login form error message (To login, your browser must
connect via HTTPS (secured HTTP connection).) and having to manually change the search interfaceURL from http:// to https:// (see IIS7 : HOW TO force a website to use SSL? and HTTP Redirects<httpRedirect>).
What'sNext?
Go back to the search interface, refresh the page, and then login with your additional identity to validate that youcan now find documents secured with this additional identity.
4www.coveo.com 40


![Coveo Platform 7.0 - PTC Windchill Connector Guidedownload.coveo.com/onlinehelppdfs/CES70-PTCWindchillConnector… · Path]\Bin\Coveo.CES.CustomCrawlers.Windchill.FieldSet.xmldefaultXMLPTC](https://img.dokumen.tips/doc/110x75/5a7ece627f8b9a2e358ea5a0/coveo-platform-70-ptc-windchill-connector-pathbincoveocescustomcrawlerswindchillfieldsetxmldefaultxmlptc.jpg)