Embed Size (px)
Citation preview

Countermeasure Tracking Systems (CTS)
Inventory Management and Tracking System (IMATS)
User Guide
Version 1.8
January 2016

CTS IMATS User Guide Table of Contents
Page 2 of 59
TABLE OF CONTENTS
Table of Contents ........................................................................................................................................ 2
1 Introduction ......................................................................................................................................... 4
2 Useful Tips .......................................................................................................................................... 5
3 Public Health Administrator (PHA) .................................................................................................... 6
3.1 Menu Options ............................................................................................................................... 6
3.2 Facilities ....................................................................................................................................... 7
3.2.1 Add Facilities ........................................................................................................................ 7
3.3 Configure Users for PHA Role .................................................................................................. 10
3.3.1 Custom Roles ...................................................................................................................... 10
3.3.2 Add Users............................................................................................................................ 12
3.4 Data Exchange............................................................................................................................ 14
4 Facility Administrator........................................................................................................................ 16
4.1 Menu Options ............................................................................................................................. 16
4.2 Configure Users for Facility Administrator Role ....................................................................... 17
4.2.1 Custom Roles ...................................................................................................................... 17
4.2.2 Add Users............................................................................................................................ 17
4.3 Import Local Data ...................................................................................................................... 17
4.4 Manually Input Local Data ........................................................................................................ 20
4.4.1 Add Storage Locations ........................................................................................................ 20
4.4.2 Add Suppliers...................................................................................................................... 23
4.4.3 Add Product Information .................................................................................................... 25
4.4.4 Add Inventory ..................................................................................................................... 27
4.5 Add Request ............................................................................................................................... 28
4.6 Create a Pick List for Product Requests ..................................................................................... 31
5 Dashboard .......................................................................................................................................... 32
5.1 Create Receipts ........................................................................................................................... 32
5.2 Put Away .................................................................................................................................... 32
5.3 Pick ............................................................................................................................................. 33
5.4 Ship............................................................................................................................................. 34
6 APPENDIX A: SAMS Access ......................................................................................................... 35
7 APPENDIX B: Setup Options .......................................................................................................... 36
7.1 Configure All.............................................................................................................................. 36
7.2 As Needed .................................................................................................................................. 37

CTS IMATS User Guide Table of Contents
Page 3 of 59
8 APPENDIX C: Tasks ....................................................................................................................... 38
8.1 Task 1: Search for a facility ...................................................................................................... 38
8.2 Task 2: Add a facility ................................................................................................................ 39
8.3 Task 3: Create a custom role ..................................................................................................... 40
8.4 Task 4: Add a new user ............................................................................................................. 41
8.5 Task 5: Assign the facility to new user ..................................................................................... 42
8.6 Task 6: Add a new supplier ....................................................................................................... 43
8.7 Task 7: Set up your warehouse ................................................................................................. 44
8.8 Task 8: Set up your warehouse – add range .............................................................................. 45
8.9 Task 9: Assign a unit of measure to a product .......................................................................... 46
8.10 Task 10: Add a purchase order .................................................................................................. 47
8.11 Task 11: Receive your purchase order ...................................................................................... 48
8.12 Task 12: Put away the items ...................................................................................................... 49
8.13 Task 13: Confirm that your items have been put away ............................................................. 50
8.14 Task 14: Create a pick list ......................................................................................................... 51
8.15 Task 15: Pick and verify the pick list ........................................................................................ 52
8.16 Task 16: Find your shipment and edit details .......................................................................... 53
8.17 Task 17: Receive items without purchase order........................................................................ 54
9 APPENDIX D: Glossary .................................................................................................................. 55
10 APPENDIX E: RSS Site Priority Valid Values ............................................................................ 58
11 APPENDIX F: Facility Type Valid Values .................................................................................. 59

CTS IMATS User Guide Introduction
Page 4 of 59
1 INTRODUCTION
The Centers for Disease Control and Prevention (CDC) Countermeasure Tracking Systems (CTS)
Inventory Management and Tracking System (IMATS) allows state and local public health to track
medical and non-medical countermeasure inventory and supplies during daily operations or an
event. The system includes functions such as receipts, put away, and shipping. These functions
allow users to enter detailed information about assets, such as total number received, lot number,
expiration date and storage location.
IMATS is deployed on the CDC network. CDC requires a level of security to ensure the protection
of private and/or sensitive information from unauthorized disclosure, loss, or damage. The CDC
Secure Access Management Services (SAMS) is an access management system that is designed to
authenticate users and allow access to applications for which access rights have been granted.
SAMS is the next generation replacement for CDC’s legacy Secure Data Network (SDN) portal and
does not require the use of digital certificates. SAMS will function as the access gateway to
IMATS, as well as the other CTS programs.
This document is intended to help administrators configure IMATS for use in their planning
jurisdictions. There are two standard roles in IMATS—the Public Health Administrator (PHA) and
the Facility Administrator. The PHA role will be granted to users with high-level management or
oversight responsibilities for a project area (one of CDC’s 62 Public Health Emergency
Preparedness Cooperative Agreement grantees, which include 50 states, four directly funded
localities, three U.S. territories, and five freely associated states). The Facility Administrator is an
individual who manages one or more facilities. This role is granted to administrators who do not fit
in the PHA role and may be used for local or regional managers.
This document provides separate sections for the PHA role and the Facility Administrator role with
the steps necessary to set up IMATS for use. Options for setting up IMATS are included in
Appendix B. Additionally, Appendix C includes a series of tasks that can be provided to new users
as a training tool.
Training material is available on the IMATS webpage at http://www.cdc.gov/cts/imats/supporting-
info.html. Additional materials are currently being developed and will be added to the IMATS
webpage as they become available. All IMATS questions should be submitted to

CTS IMATS User Guide Useful Tips
Page 5 of 59
2 USEFUL TIPS
For online help, select the “?” icon at the top right corner of each page to access
documentation information.
Use the application’s Back button, when available, to return to the previous page.
Use the application’s Next button, when available, to continue to the next page.
Use the Add button to save a new item.
Use the Done button to exit the Add function.
Information must be entered into those data fields marked with a red asterisk (*). Those
fields cannot be left blank. You will not be able to proceed until these fields are populated.
Based on information previously entered, you might be required to populate certain
additional “conditional” data fields even though they are not marked with a red asterisk (*).
IMATS contains two standard roles—PHA and Facility Administrator. Additional roles may
be added using the Custom Roles process located under the Setup menu.
The Products sub-menu found under Setup is used to configure product information, such as
name, manufacturer, and National Drug Code (NDC)/stock number. Information regarding
actual inventory is added using the Inventory Management menu.
To view the current inventory in a facility, use the Inventory Management>Inventory>Search
Inventory function. This is where a user will have the opportunity to make manual
adjustments if permission has been granted. Steps for these processes can be found in the
online help documentation.
There may be minor differences between the version of IMATS you evaluate and the
production version. These differences should not affect your evaluation.
Appendix B: Setup Options provides several alternatives for configuring IMATS.
If you need assistance or have any questions, please contact the IMATS support staff at

CTS IMATS User Guide Public Health Administrator
Page 6 of 59
3 PUBLIC HEALTH ADMINISTRATOR (PHA)
Prior to using IMATS, a PHA may add facilities within the PHA’s project area. Once this is
complete, custom roles and users can be added at the project area level or the facility level. PHAs
have access to all facilities and inventory data within their project area; however, it is unlikely that
they will do any processing at the facility level. The PHA role is meant for a high-level state
administrator who has management or oversight responsibilities.
3.1 MENU OPTIONS
Bold items are described in the following sections.
Inventory Management Reports Data Exchange Setup
Requests – Search, Add Count Inventory Report
Search Requests Facility – Search Facilities, Add Facility, Search Storage Locations, Add Storage Location, Add Range of Locations
Purchase Order – Search, Add
Audit Trail Report Search Reports Import
Receive – Search, Add View Logs Export
Put Away Product – Search, Add, Assign Unit of Measure
Pick – Search, Add, Search Requests (create pick list)
Supplier – Search, Add
Back Order – Search, Add Unit of Measure – Search, Add
Shipment Users – Search, Add
Push Package Custom Roles – Search, Add
Inventory - Search Inventory, Add Inventory Item, Move Inventory, Transfer Inventory
Funding Source – Search, Add

CTS IMATS User Guide Public Health Administrator
Page 7 of 59
3.2 FACILITIES
A facility in IMATS is any place you store inventory (e.g., warehouse, store room).
3.2.1 Add Facilities
Create facilities in your project area.
To add a facility:
On the Setup menu, click Facility, and then Add Facility.
Under New Facility, enter the following information:
Field Required? Description
Project Area
Yes Project area where the facility belongs
Region No Region within the project area where the facility is located
Facility Name
Yes Name of the facility
Status Yes Status of the facility
Active: Supplies can be shipped to this facility
Inactive: Supplies cannot be shipped to this facility
Type of Distribution Site
Yes Designates the type of distribution site.
RSS Site Priority
Conditional Required only if Type of Distribution Site is State RSS.
Facility Type
Yes Type of facility (for example, a hospital or local health department)
Facility Type, Other
Conditional Required only if Facility Type is Other
POD, Closed Type
Conditional Required only if Facility Type is POD, Closed
POD, Closed Type Other
Conditional Required only if POD, Closed Type is Other.

CTS IMATS User Guide Public Health Administrator
Page 8 of 59
Field Required? Description
Notes No Any text that you feel would be helpful to include
Under Ship to Address, enter the following information:
Field Required? Description
Address Line 1 Conditional* Facility’s street address
Address Line 2 No Continuation of the street address, if needed
Longitude Conditional* Facility’s longitude
Latitude Conditional* Facility’s latitude
City Yes City where the facility is located
State Yes State where the facility is located
Zip Code Yes Facility’s zip code
County No County where the facility is located
*Either the street address or longitude/latitude must be entered.

CTS IMATS User Guide Public Health Administrator
Page 9 of 59
Under Receiving Capabilities, enter the following information:
Field Required? Description
Loading Dock(s) Available
No Select if the facility has one or more loading docks
Number of Loading Docks
Yes:
If you selected the
Loading Dock(s)
Available check box
Number of loading docks in the facility
Accommodate 53-foot Trailer
No Select if the facility can accommodate a 53-foot trailer
Maximum Truck Size
No Maximum truck size the facility can accommodate
Fork Lift Available
No Select if the facility has a fork lift that can be used
Lift Gate Available
No Select if the facility has a lift gate that can be used
Under Primary Contact, enter the following information:
Field Required? Description
Primary Contact
Yes Facility’s primary point of contact
Telephone Yes Phone number of the primary contact
Ext No Extension of the primary contact’s phone number
Cell Phone No Cell phone number of the primary contact
Fax No Fax number of the primary contact
Email Address Yes Email address of primary contact
CTS IMATS User Guide Public Health Administrator
Page 10 of 59
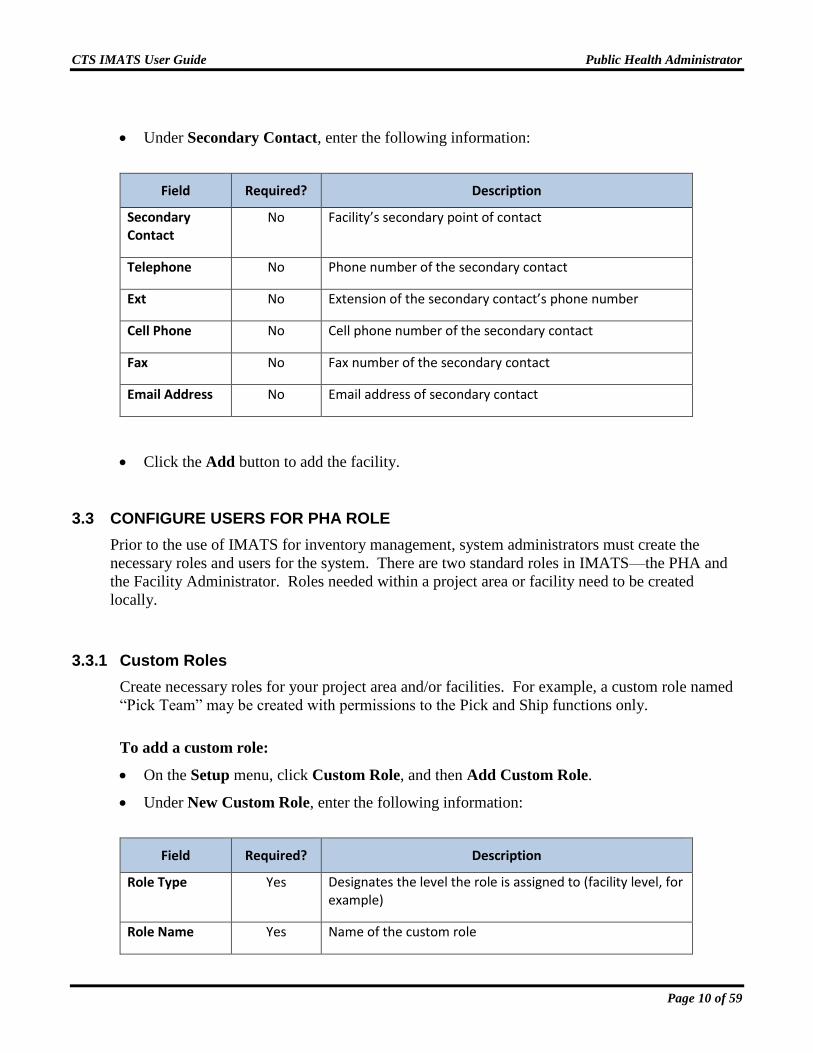
Under Secondary Contact, enter the following information:
Field Required? Description
Secondary Contact
No Facility’s secondary point of contact
Telephone No Phone number of the secondary contact
Ext No Extension of the secondary contact’s phone number
Cell Phone No Cell phone number of the secondary contact
Fax No Fax number of the secondary contact
Email Address No Email address of secondary contact
Click the Add button to add the facility.
3.3 CONFIGURE USERS FOR PHA ROLE
Prior to the use of IMATS for inventory management, system administrators must create the
necessary roles and users for the system. There are two standard roles in IMATS—the PHA and
the Facility Administrator. Roles needed within a project area or facility need to be created
locally.
3.3.1 Custom Roles
Create necessary roles for your project area and/or facilities. For example, a custom role named
“Pick Team” may be created with permissions to the Pick and Ship functions only.
To add a custom role:
On the Setup menu, click Custom Role, and then Add Custom Role.
Under New Custom Role, enter the following information:
Field Required? Description
Role Type Yes Designates the level the role is assigned to (facility level, for example)
Role Name Yes Name of the custom role

CTS IMATS User Guide Public Health Administrator
Page 11 of 59
Field Required? Description
Description No Any text that you feel would be helpful in describing the role
Click the Next button to add the permissions.
To assign permissions to the role:
Under New Custom Role Permissions, enter the following information:
Field Required? Description
Project Area Yes Project area the role is assigned to
Facility Yes Facility or facilities within the project area the role is assigned to

CTS IMATS User Guide Public Health Administrator
Page 12 of 59
Under Permissions, select the check box next to each permission you want to assign. To
select/deselect all permissions, select the Select/Deselect all check box.
NOTE: You must select at least one permission.
When you are done, click the Add button. The system saves the information you entered,
displays the previous page, and displays the role on the right side of the page.
3.3.2 Add Users
Add users to your project area and/or facilities.
To enter the basic information:
On the Setup menu, click User, and then Add User.
Under New User, enter the following information:
Field Required? Description
Title No User’s title (for example, Mr. ,Ms., Mrs., Dr.)
First Name Yes User’s first name
Middle Name No User’s middle name
Last Name Yes User’s last name
Suffix No User’s name suffix (for example, Jr., Sr., MD, RN)
Under User Role, enter the following information:
Field Required? Description
Role Yes User’s role when using IMATS
Project Area Yes Project area the user roles and the user are assigned to

CTS IMATS User Guide Public Health Administrator
Page 13 of 59
Under Address, enter the following information about the user’s home or work location:
Field Required? Description
Address Line 1 No Street address
Address Line 2 No Continuation line for street address, if needed
City No City
State No State
County No County
Zip Code No Zip code
Under Contact, enter the following information:
Field Required? Description
Telephone Yes User’s phone number
Ext No Extension of the user’s phone number
Secondary Telephone
No User’s second phone number, if available
Ext No Extension of the user’s second phone number
Email Address Yes User’s email address, used as Username
Password Yes User’s password for IMATS
Click the Next button.
To assign a facility to the user:
In the Facility list, select the check box next to each facility you want to assign. To
select/deselect all facilities, select the Select/Deselect all check box.
Click the Next button.

CTS IMATS User Guide Public Health Administrator
Page 14 of 59
To assign permissions to the user:
In the Available Permissions list, all permissions are selected. Deselect the check box next
to each permission you do not want to assign to the user. To select/deselect all permissions,
select the Select/Deselect all check box.
NOTE: You must select at least one permission.
Click the Done button. The system saves the information you entered, displays the previous
page, and displays the user on the right side of the page.
3.4 DATA EXCHANGE
IMATS includes the Data Exchange feature. This feature enables state level users to respond to an
Inventory Data Exchange (IDE) request from the CDC. The CDC will send an IDE request only
during a public health event.
The following steps illustrate how the Data Exchange feature collects inventory count information
and then integrates it into IMATS. The Data Exchange feature is available only to those with the
Public Health administrator role.
1. From the IDE application, CDC DSNS creates and sends a request for inventory count
information to participating project area IMATS users.
2. IMATS automatically creates an IDE report using the current project area data found in IMATS.
3. For IMATS users that collect data from local-level health departments, a data exchange export
function is available and provides the ability to convert the IDE request into either an Excel
spreadsheet or an XML file. This file can then be sent to the local-level health departments via
e-mail, fax or other mode of transmission.
4. The local-level health departments enter the necessary data into the file and return it to the sender
via e-mail, fax or other mode of transmission.
5. IMATS Data Exchange provides an import function for the local data. This function imports
data contained in the Excel spreadsheets and XML files received from the local-level health
departments and adds it to the IDE Report.
6. The project area user reviews and approves the IDE report and then sends the report to CDC
DSNS via IMATS Data Exchange.

CTS IMATS User Guide Public Health Administrator
Page 15 of 59
To search inventory count requests:
On the Data Exchange menu, click Search Requests.
Enter search criteria, and then click the Search button.
To view details of a request, click the link in the Request Name column to display the
request.
Field Description
Request # ID assigned to the request
Request Name Name assigned to the request
Request Status Status of the request
Active: The current request in the system for which reports are created and sent
Closed: A request that is no longer current; it has been replaced by a more recent request
To search and/or send inventory count reports to CDC:
On the Data Exchange menu, click Search Reports.
Enter search criteria, and then click the Search button.
To view details of a report, click the link in the Report Name column to display the report.
To send the report to the CDC, click the Send button.
Field Description
Project Area ID assigned to the request
Report Status Status of the report
Pending: IMATS has generated the report, but it has not yet been sent to the CDC
Sent: The report has been sent to the CDC

CTS IMATS User Guide Facility Administrator
Page 16 of 59
4 FACILITY ADMINISTRATOR
Prior to the use of IMATS for inventory management, facilities, custom roles and users must be
added to the system. Once this is complete, local data can be imported for a facility.
4.1 MENU OPTIONS
Bold items are described in the following sections.
Inventory Management Reports Setup
Requests – Search, Add Count Inventory Report
Facility – Search Facilities, Add Facility, Search Storage Locations, Add Storage Location, Add Range of Locations
Purchase Order – Search, Add Audit Trail Report Import
Receive – Search, Add Export
Put Away Product – Search, Add, Assign Unit of Measure
Pick – Search, Add, Search Requests (create pick list)
Supplier – Search, Add
Back Order – Search, Add Unit of Measure – Search, Add
Shipment Users – Search, Add
Push Package Custom Roles – Search, Add
Inventory - Search Inventory, Add Inventory Item, Move Inventory, Transfer Inventory
Funding Source – Search, Add

CTS IMATS User Guide Facility Administrator
Page 17 of 59
4.2 CONFIGURE USERS FOR FACILITY ADMINISTRATOR ROLE
Prior to the use of IMATS for inventory management, system administrators must create the
necessary roles and users for the system. There are two standard roles in IMATS—the PHA and
the Facility Administrator. Roles needed within a project area or facility need to be created
locally. If an administrator chooses not to use the Import function, local data may be added using
the process described in Section 4.4.
4.2.1 Custom Roles
See Section 3.3.1 for details.
4.2.2 Add Users
See Section 3.3.2 for details.
4.3 IMPORT LOCAL DATA
The Import feature provided in IMATS allows users to upload data from their existing inventory
management system(s). The local data will have to be translated into the proper format(s), as
described below. Users may choose to use the Import feature or manually input their data as
described in Section 4.4.
The Import function appends new records into the database and is not intended to be used to
update current inventory data.
For a successful data import into IMATS, be sure to import in the following order:
1. Facilities
2. Storage Locations
3. Users
4. Suppliers
5. Products
6. Units of Measure
7. Inventory
NOTE: Import templates are provided on the IMATS webpage at
http://www.cdc.gov/cts/imats/documents/imats_importtemplates_v1_8.zip.

CTS IMATS User Guide Facility Administrator
Page 18 of 59
At the top of the page, click Setup, and then Import.
Under Import Data, enter the following information:
Field Required? Description
File Yes Name of the file containing the data you want to import
Do one of the following:
Enter a filename
Click the Browse button to select the file
Import Data File Type
Yes File type you want to import
File formats are listed in the following sections
Project Area Conditional
(Depends upon your user role)
Project area the users belong to
Facility Conditional
(Depends upon your user role)
Facility within the project area where material/user is located
Click the Preview button. The file displays so that you can make sure it is the one you want
to import.
o The import files should not contain a column heading row. If using the import templates
provided above, export the data to a tab-delimited text file, open the text file, delete the
first row, and then save the file.
Is the correct file displayed?
o If Yes, continue to the next step.
To import users
Click the Next button, and continue to assign permissions.

CTS IMATS User Guide Facility Administrator
Page 19 of 59
In the Available Permissions list, all permissions are selected. De-select the
check box next to each permission you do not want to assign to the users. To
select/deselect all permissions, select the Select/Deselect all check box.
NOTE: You must select at least one permission.
Click the Import button. A confirmation message displays stating that the file
will be loaded into IMATS.
Click the OK button. The system imports the file from your computer and
processes it so that the users can log in and use IMATS.
o If No, click the Back button, and repeat the previous two steps.
Click the Import button. A confirmation message will display stating that the file will be
loaded into IMATS for the selected facility.
Click the OK button. The system imports the file from your computer and processes it so
that you can view the items.
o If the file is not formatted properly, the issues will be flagged with the icon. Fix any
data issues and import the file.

CTS IMATS User Guide Facility Administrator
Page 20 of 59
4.4 MANUALLY INPUT LOCAL DATA
4.4.1 Add Storage Locations
A storage location is a physical space within a facility (e.g. “Receiving Dock A”)
To add one storage location at a time:
On the Setup menu, click Facility, and then Add Storage Location.
Under New Storage Location, enter the following information:
Field Required? Description
Project Area Yes Project area to which the storage location is assigned
Facility Yes Facility within the project area to which that storage location is assigned
Under Location, enter the following information:
Field Required? Description
Name Yes Name of the storage location
Receiving Area
Check box
No Select this check box if the location is used only to receive items, not to store them on a more permanent basis
Type Yes Defines the type of items stored in the location
Type text box
Enabled only if the Type field is Other
Yes:
If it is enabled
Enter the type of items stored in the location
Status Yes Status of the storage location
Available: Inventory can be stored in the location
Blocked: Inventory cannot be assigned to the location by the system; it must be stored manually
Inactive: Inventory cannot be stored in the location, because it is not being used

CTS IMATS User Guide Facility Administrator
Page 21 of 59
Field Required? Description
Full: Inventory cannot be stored in the location, because it is full
Square Footage No Square footage of the storage location; numbers and decimal points are allowed
Notes No Any text you feel it would be helpful to include
Click the Add button. The system saves the storage location and displays it on the right side
of the page.
To add a range of storage locations:
On the Setup menu, click Facility, and then Add Range of Storage Locations.
Under Add Range of Storage Locations, enter the following information, if the fields
display on your screen:
Field Required? Description
Project Area Yes Project area to which the storage location is assigned
Facility Yes Facility within the project area to which that storage location is assigned
Under Location, enter the following information:
Field Required? Description
Name Yes Designates the main area where the range of storage locations is
For example you might enter Room 100 or Receiving
Receiving Area
Check box
No Select this check box if the location is used only to receive items, not to store them on a more permanent basis
Type Yes Defines the type of items stored in the location

CTS IMATS User Guide Facility Administrator
Page 22 of 59
Field Required? Description
Type text box
Enabled only if the Type field is Other
Yes:
If it is enabled
Enter the type of items stored in the location
Status Yes Status of the location
Available: Inventory can be stored in the location
Blocked: Inventory cannot be assigned to the location by the system; it must be stored manually
Inactive: Inventory cannot be stored in the location because it is not being used
Full: Inventory cannot be stored in the location because it is full
Square Footage No Square footage of the storage location; numbers and decimal points are allowed
Under Location Ranges, enter the following information for each level you want to add:
Field Required? Description
Start Range Yes First number (or letter) in the level
End Range Yes Ending number (or letter) in the level you are adding
If you would like to include a separator between the levels, select one in the Range
Separator field.
What is a separator?
A separator (a space, dash, comma, etc.) is placed between the levels in a location. Using a
separator can make reading the location a little easier.
For example, if you have a location named Floor 5Section 3Shelf 2, you could add a comma
between the levels so that the location would read Floor 5, Section 3, Shelf 2.
If desired, do one of the following:
o Click the Preview Locations link to view the storage locations you have created so far.

CTS IMATS User Guide Facility Administrator
Page 23 of 59
o Click the Clear Location Ranges link to delete the information you have entered.
Click the Add button. The system saves the range of locations and displays it on the right
side of the page.
4.4.2 Add Suppliers
To add a supplier:
On the Setup menu, click Supplier, and then Add Supplier.
Under New Supplier, enter the following information:
Field Required? Description
Project Area No Project area that is to receive supplies from the supplier
If a project area is not selected, the supplier will be assigned to all project areas
Facility No Facility within the project area that is to receive supplies from the supplier
If a facility is not selected, the supplier will be assigned to all facilities in the project area
Supplier Name Yes Name of the supplier
Status Yes Status of the supplier
Active: Supplier is a viable source of supplies
Inactive: Supplier is not a viable source of supplies
NOTE: An inactive supplier is not deleted from the system, which means you can still search for it and view its information
Supplier Type Yes Type of supplier (manufacturer, retailer, distributor, etc.)
Notes No Any text that you feel would be helpful to include

CTS IMATS User Guide Facility Administrator
Page 24 of 59
Under Address, enter the following information:
Field Required? Description
Address Line 1 No Supplier's street address
Address Line 2 No Continuation line for supplier's street address, if needed
City No City where the supplier is located
State No State where the supplier is located
Zip Code No Supplier's zip code
County No County where the supplier is located
Under Contact, enter the following information:
Field Required? Description
Name Yes Name of the supplier contact
Title No Title of the supplier contact (Mr., Ms., etc.)
Telephone Yes Contact's phone number
Ext No Extension of the contact's phone number
Fax No Contact's fax number
Email No Contact's e-mail address
Click the Add button. The system saves the supplier and displays it as a hyperlink on the
right side of the page.

CTS IMATS User Guide Facility Administrator
Page 25 of 59
4.4.3 Add Product Information
To add a product:
On the Setup menu, click Product, and then Add Product.
Under New Product, enter the following information:
Field Required? Description
Project Area Conditional
(Depends upon your user role)
Project area to which the product is assigned
If a project area is not selected, the product will be assigned to all project areas
Facility Conditional
(Depends upon your user role)
Facility or facilities within the project area to which that product is assigned
If a facility is not selected, the product will be assigned to all facilities in the project area
Product Item Number
Yes Product identifier
Enter the number, and then select either National Drug Code (NDC) or Stock Number or Model Number
Product Name Yes Name of the product
Package Description
Yes The lowest unit that represents how the product is packaged
If an antibiotic is packaged as capsules in a bottle, the package description could be listed as Bottle of 25
Strength No Strength of the product when administered or dispensed (75 mg, for example)
Size
Enabled only if Product Item Number field is Stock Number or Model Number
No Size of the product (medium or large, for example)
Product Description
No Any text helpful in describing the product

CTS IMATS User Guide Facility Administrator
Page 26 of 59
Field Required? Description
Manufacturer No Company that manufactured the product
A manufacturer is a type of supplier If you don't see the manufacturer you are interested in, see Add Suppliers for instructions on adding it to the system
Notes No Any helpful text to include
Click the Add button. The system saves the product and displays it on the right side of the
page.

CTS IMATS User Guide Facility Administrator
Page 27 of 59
4.4.4 Add Inventory
To add an inventory item:
On the Inventory Management menu, click Inventory, and then Add Inventory Item.
Under Add Inventory Item, enter the following information:
Field Required? Description
Project Area Yes Project area where the item is located
Facility Yes Facility within the project area where the item is located
Product Name Yes Name of the item you want to add
Begin typing the name. After the first three characters, the system will list all products that match your entry
Storage Location Type
Yes Allows user to filter the list of storage locations displayed in the Storage Location drop down list
Storage Location
Yes Storage location where the item is stored
Serial Number No Item's serial number
Lot Number Conditional
(required for products with NDC)
Item's lot number
Product Expiration Date
Conditional
(required for products with NDC)
Date the item expires
Enter a date in mm/dd/yyyy format, or click the Calendar button to select a date
Funding Source Type
Yes
Type of funding source (state or local, for example)
Funding Source No Name of the funding source
Quantity Yes Total number of units located in inventory

CTS IMATS User Guide Facility Administrator
Page 28 of 59
Field Required? Description
If the Quantity field is set to 10 and the Unit of Measure field is Box, this means 10 boxes are located in inventory
Unit of Measure
Yes How the item is packaged (for example, bottle, box, etc.)
Units per UOM Yes Number of items contained in the unit of measure you entered in the Unit of Measure field
If the Unit of Measure field is set to Box and the Units per UOM field is 20, this means each box contains 20 units
Click the Add button. The system saves the item and displays it on the right side of the page.
4.5 ADD REQUEST
The following instructions explain how to add a request to the system. A request is used to order
items from another IMATS facility. A similar process, Add Purchase Order, is used when
ordering items from a supplier outside of the IMATS system.
To add a request:
On the Inventory Management menu, click Requests, and then Add Request.
Under New Request, enter the following information:
Field Required? Description
Request Number
--- The system populates this field with a number that identifies the purchase order
Project Area Yes Project area that is requesting products
Facility Yes Facility within the project area that is requesting products
Funding Source Type
Yes
Type of funding source for the requested items (state or local, for example)
Funding Source
No Source of funding for the requested items; the funding sources can be configured by an administrator using the setup menu

CTS IMATS User Guide Facility Administrator
Page 29 of 59
Field Required? Description
Requested From
Yes Facility you are requesting the items from
Status N/A The system populates this field with the status of the request
Date Requested
Yes Date the items were requested
The system populates this field with the current date
To change the date, enter it in mm/dd/yyyy format, or click the Calendar button to select a date
Notes No Any text that you feel would be helpful to include
Under Shipment Information, enter the following information:
Field Required? Description
Request From POC
No Point of contact at the facility you are requesting the products from
The system populates this field with the name that was entered when the facility was added to IMATS
If desired, you can change the point of contact; note that doing so will change the point of contact only for this request, not for the entire system
Request From Phone Number
No Phone number for the point of contact at the facility you are requesting products from
The system populates this field with the number that was entered when the facility was added to IMATS
If desired, you can change the phone number; note that doing so will change the phone number only for this request, not for the entire system
Shipment Date No Date the items were shipped
Enter a date in mm/dd/yyyy format, or click the Calendar button to select a date

CTS IMATS User Guide Facility Administrator
Page 30 of 59
Field Required? Description
Estimated Arrival Date
No Date the items are estimated to arrive in your facility
Enter a date in mm/dd/yyyy format, or click the Calendar button to select a date
Shipped Via No Transportation company used for shipping
Shipped From No Location of the facility that shipped the items
Tracking Number
No Shipment tracking number provided by the transportation company
Click the Next button to add items to the request.
To add items to request:
Under Add Item, enter the following information:
Field Required? Description
Product Name Yes Name of the product (item) to be added to the request
Begin typing the name
After the first three characters, the system will list all products found in the facility you are requesting items from
Product Item Number
N/A The system populates this field with the item's NDC or stock #/model # that was entered when the item was created
Quantity Yes Total number of UOMs being requested
If the Quantity field is set to 10 and the Unit of Measure field is Box, this means you want to order 10 boxes
Unit of Measure
Yes UOM of the item being ordered (box, case, etc.)
Notes No Any text that would be helpful to include
Click the Add button. The system adds the item to the request and lists it on the right side of
the page.

CTS IMATS User Guide Facility Administrator
Page 31 of 59
Continue adding items, or click the Done button. The system saves the request and displays
the previous page, where you can enter a new request, if desired.
4.6 CREATE A PICK LIST FOR PRODUCT REQUESTS
The following instructions explain how to create a pick list for items requested from another
IMATS facility. For items to be sent to an outside entity, use the Add Pick List process.
To create a pick list:
1. On the Inventory Management menu, click Pick, and then Search Requests.
2. To display all product requests click the Search button.
3. To filter the requests, under Search Requests, enter information in one or more of the
following fields:
Field Description
Project Area Project area where the items will be picked
Facility Facility within the project area where the items will be picked
Requested By Facility that is requesting the products
Request Number Product request number
Enter a partial or complete number
Request Date Range From/To
Date the items were requested
Enter a date in mm/dd/yyyy format, or click the Calendar button to select a date
4. Click the Search button. The results display in the lower portion of the page.
5. Click the link in the Request Number column to display the request.
6. Review the list of requested items and select the check box next to each item you want to
include on the pick list.
7. Click the Create Pick List button to generate a pick list. The pick list number will be
displayed at the top of the page.

CTS IMATS User Guide Dashboard
Page 32 of 59
5 DASHBOARD
Users have a dashboard showing all items in Open status for their facility or facilities. The
dashboard contains the following four tabs:
Create Receipts
Put Away
Pick
Ship
5.1 CREATE RECEIPTS
This tab lists purchase orders (POs) in the Open status and requests in the Open or Pending status
The PO/Request Number is a hyperlink to the Edit Purchase Order or Edit Request page
The Action column contains a button labeled Receive. When clicked, the user will navigate to
the Add Receipt (PO) or Add Receipt (Request) page.
5.2 PUT AWAY
This tab lists all put away lists in the Open or Put Away, Not Verified status
The PO Number includes a hyperlink to the Edit Put Away page

CTS IMATS User Guide Dashboard
Page 33 of 59
The Action column contains the following:
o Button labeled Verify for lists in the Put Away, Not Verified status. When clicked, an
overlay displays items that have been put away. The user has two options: Verified (to
verify and close the put away) and Cancel.
o Button labeled Put Away for lists in the Open status. When clicked, the user navigates to
the Edit Put Away List page
5.3 PICK
This tab displays pick lists in the Open or Picked, Not Verified status and requests (pick
requests) in the Open status
The Order/Request Number includes a hyperlink to the Edit Pick List page for orders only. For
requests, the hyperlink navigates to the Request Detail page
The Action column contains the following:
o Requests: Button labeled Create Pick List that navigates to the Request Detail page
o Pick lists in Open status: Button labeled Pick that navigates to the Edit Pick List page
o Pick lists in the Picked, Not Verified status: Button labeled Verify that displays the
verify overlay
CTS IMATS User Guide Dashboard
Page 34 of 59
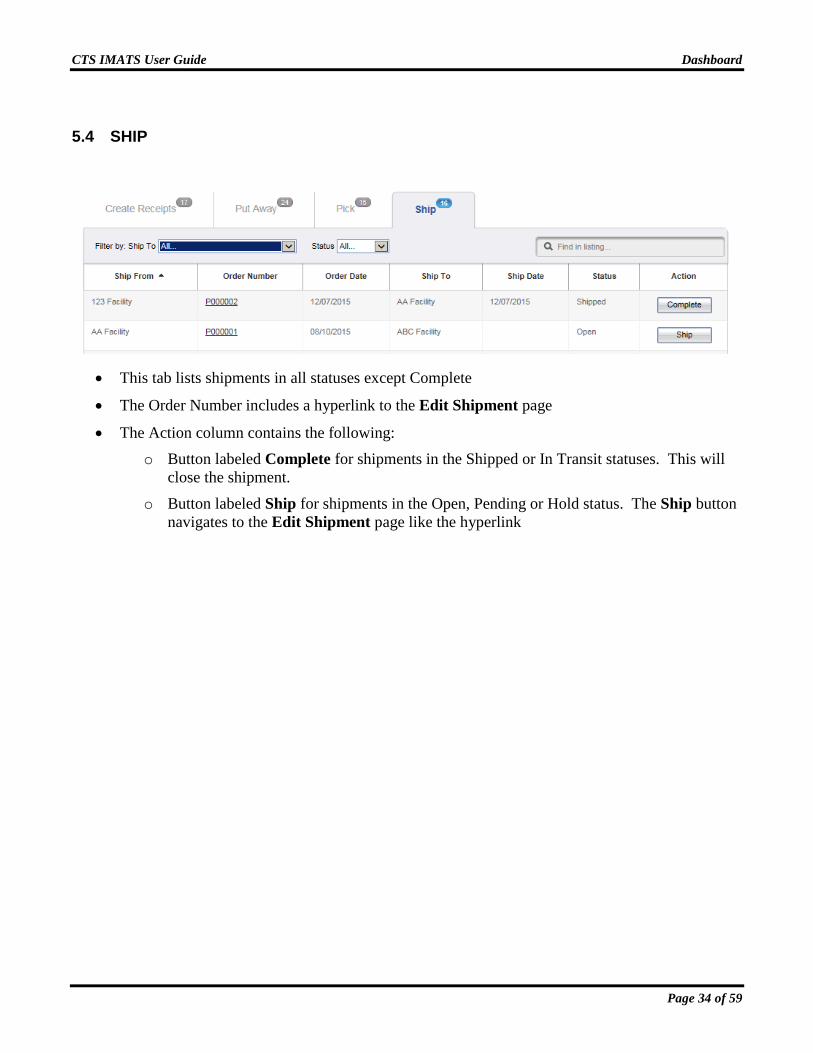
5.4 SHIP
This tab lists shipments in all statuses except Complete
The Order Number includes a hyperlink to the Edit Shipment page
The Action column contains the following:
o Button labeled Complete for shipments in the Shipped or In Transit statuses. This will
close the shipment.
o Button labeled Ship for shipments in the Open, Pending or Hold status. The Ship button
navigates to the Edit Shipment page like the hyperlink

CTS IMATS User Guide Appendix A: SAMS Access
Page 35 of 59
6 APPENDIX A: SAMS ACCESS
All IMATS users must go through the CDC Secure Access Management Services (SAMS) proofing
process prior to accessing the system. Please follow the steps below.
1. Send an email to [email protected] stating that you would like to implement IMATS.
2. Provide the first name, last name, email address, phone number, role, and facility (if applicable)
of individuals in your organization who will need access to the system. There are two main roles
available in IMATS as well as custom roles, so please choose from the following:
a. Public Health Administrator (PHA) – User with high-level management or oversight
responsibilities for a project area*. The PHA role should only be given to individuals at the
project-area level who require access to ALL facilities in the project area. By default, a PHA
in a project area can view and edit ALL items associated with ALL facilities in the project
area.
*Project areas: CDC’s 62 Public Health Emergency Preparedness grantees, which include
50 states, District of Columbia, three major metropolitan cities, three U.S. territories, and
five freely associated states.
b. Facility Administrator – User who manages one or more facilities. The facility administrator
role should be used for administrators that do not fit in the PHA role. This role may be used
for local or regional managers. Facility administrators are able to access and edit ALL items
in each facility to which they have access and can create new facility administrator accounts
with the same or fewer permissions. Each facility administrator can have multiple facilities
assigned to him.
c. Custom Role – User assigned to a single facility that will be given a custom role. The
Countermeasure Tracking Systems (CTS) team will create user accounts for all PHAs and
Facility Administrators. The PHA or Facility Administrator will be responsible for creating
custom roles for specific users.
3. Complete the SAMS identity proofing process. Each individual will receive an email from
[email protected] once he or she has been added to SAMS with instructions on how to
complete the process (click SAMS training presentation for a presentation that details this
process).

CTS IMATS User Guide Appendix B: Setup Options
Page 36 of 59
7 APPENDIX B: SETUP OPTIONS
A PHA in a project area who has chosen to use IMATS as the sole inventory management system
has many options when setting up IMATS. The three approaches below provide an idea of what is
possible; however, PHAs may choose to implement the system in their own ways.
7.1 CONFIGURE ALL
In this approach, the PHA would configure ALL facilities and users in the project area. The PHA
may also set up all of the custom roles to be used by each facility.
This approach would have the PHA set up the top-level storage facilities in the project area and
the administrator for each facility. For example, if Project Area A had two state facilities (RSS 1
and RSS 2), the PHA would configure a facility for each of these sites and would add a Facility
Administrator for each. It would then be the responsibility of the two RSS Administrators to
configure IMATS for their facility, as well as to add the facilities at the next level down, as shown
in Figure 1.
Project Area A
RSS 1
LocalLocal
RSS 2
LocalLocal
Figure 1 – Project Area Facilities

CTS IMATS User Guide Appendix B: Setup Options
Page 37 of 59
7.2 AS NEEDED
In this approach, each administrator is responsible for his or her facility or facilities. The
administrator would only configure the suppliers, custom roles, users, etc. needed by the subject
facility.

CTS IMATS User Guide Appendix C: Tasks
Page 38 of 59
8 APPENDIX C: TASKS
The following tasks provide users with general steps to perform to become familiar with IMATS
functionality. These tasks should be performed in the IMATS Training environment. A scenario is
provided to give context to the tasks.
Scenario
A public health event has occurred in your project area and local areas need supplies to dispense to
affected citizens. The Division of Strategic National Stockpile has notified you that 700 cases of
doxycycline are being sent to one of your receipt, stage, and store (RSS) sites.
8.1 TASK 1: SEARCH FOR A FACILITY
Timber Ridge Elementary School has been selected to act as a new point of dispensing (POD)
for the current health event. You will begin distributing supplies to Timber Ridge.
Search to see if the school exists in your system as a facility.
1. Use the system to attempt to locate Timber Ridge Elementary School.
Proceed to next task.

CTS IMATS User Guide Appendix C: Tasks
Page 39 of 59
8.2 TASK 2: ADD A FACILITY
Currently, new facilities have no users assigned by default.
Add Timber Ridge Elementary School to your system. They have one loading dock and fork
lift. Assign Timber Ridge Elementary School to your task lead.
1. Add a new facility using the following information:
Facility: Timber Ridge Elementary School
Phone: 404-555-1212
Contact: John Smith
Email: [email protected]
2. Create a secondary contact.
3. Complete adding a facility.
Proceed to next task.
CTS IMATS User Guide Appendix C: Tasks
Page 40 of 59
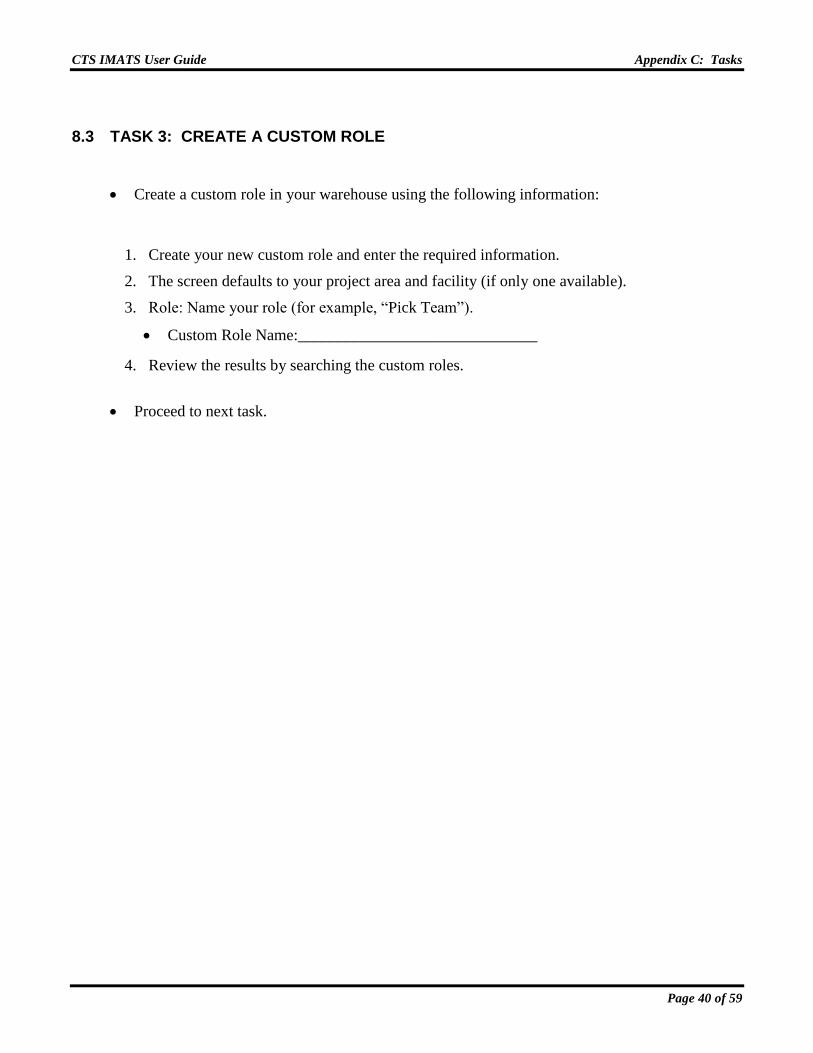
8.3 TASK 3: CREATE A CUSTOM ROLE
Create a custom role in your warehouse using the following information:
1. Create your new custom role and enter the required information.
2. The screen defaults to your project area and facility (if only one available).
3. Role: Name your role (for example, “Pick Team”).
Custom Role Name:______________________________
4. Review the results by searching the custom roles.
Proceed to next task.

CTS IMATS User Guide Appendix C: Tasks
Page 41 of 59
8.4 TASK 4: ADD A NEW USER
So that another person in your staff may manage the receipt of the items, create a user, and
assign that user a role.
1. Create your new user and enter their required information.
2. Assign your new user the role you created in the last task.
3. Assign that user to the facility you created.
4. Grant your new user all permissions.
5. Complete adding a new user.
6. Note the new user to use in further tasks.
First Name:_________________________________________
Last Name:_____________________________________
7. Review the results by searching the user.
Proceed to next task.

CTS IMATS User Guide Appendix C: Tasks
Page 42 of 59
8.5 TASK 5: ASSIGN THE FACILITY TO NEW USER
This task cannot be performed until Timber Ridge Elementary School is assigned to the user
performing the steps.
Assign Timber Ridge Elementary School to your new user.
1. Select User from the Setup menu.
2. Assign Timber Ridge Elementary School to your new user.
Proceed to next task.

CTS IMATS User Guide Appendix C: Tasks
Page 43 of 59
8.6 TASK 6: ADD A NEW SUPPLIER
A local retailer has donated medical supplies to your warehouse. This retailer does not
currently exist in your system.
1. Locate the Supplier screen.
2. The screen defaults to your project area and facility.
3. Define the vendor’s name and abbreviation (for example, “local vendor” or “LV”).
4. Define status and type.
5. Enter in placeholder data for their phone number and email.
Proceed to next task.

CTS IMATS User Guide Appendix C: Tasks
Page 44 of 59
8.7 TASK 7: SET UP YOUR WAREHOUSE
Create a location in your warehouse using the following information:
1. The screen defaults to your project area and facility (if only one available).
2. Location: Name your location (for example, “REC-1A”).
Location:______________________________
3. Location status: available.
4. Review the results by searching the locations.
5. Repeat the step above to add a receiving area location.
Proceed to next task.

CTS IMATS User Guide Appendix C: Tasks
Page 45 of 59
8.8 TASK 8: SET UP YOUR WAREHOUSE – ADD RANGE
Create a range of locations in your warehouse using the following information:
1. The screen defaults to your project area and facility.
Location: 1st floor
Storage level: Start range (a to z)
Storage level: End range (1 to 10)
Proceed to next task.

CTS IMATS User Guide Appendix C: Tasks
Page 46 of 59
8.9 TASK 9: ASSIGN A UNIT OF MEASURE TO A PRODUCT
1. Assign a unit of measure (cases with 50 units per case) to a product.
Doxycycline 100mg oral tablet, #20 tab unit of use
NDC – 24658-220-20
NOTE: This unit of measure is just for testing and may not be a true unit of measure for
this product. This NDC pertains to a bottle containing 20 tablets. The unit of measure
reflects how many units (in this case bottle) are in a case or pallet.
Proceed to next task.

CTS IMATS User Guide Appendix C: Tasks
Page 47 of 59
8.10 TASK 10: ADD A PURCHASE ORDER
The truck carrying the 700 cases of doxycycline from DSNS is expected to arrive at RSS site
in six hours. Place your expected material into IMATS by creating an order to DSNS.
1. Create a new purchase order. The screen defaults to your project area and facility.
2. Add the item (begin typing to populate the items available).
Doxycycline 100mg oral tablet, #20 tab unit of use, NDC – 24658-220-20
3. Add 700 cases with 50 units per case. This is the unit of measure you added in task 10.
4. Complete adding the order (which will generate purchase order [PO] #).
5. Write down the PO # for later use.
PO #:__________________________________________
6. Review the results by searching order.
Proceed to next task.

CTS IMATS User Guide Appendix C: Tasks
Page 48 of 59
8.11 TASK 11: RECEIVE YOUR PURCHASE ORDER
The truck carrying the supplies has arrived at your RSS site. The supplies have been unloaded
and stored in a temporary holding area. Add these additional items into your inventory using
IMATS.
1. Select Receipt from the menu.
2. Locate the purchase order.
3. Select the purchase order and follow the link to receive against each item in that purchase
order.
4. Enter date received, receipt location, quantity, and other required information.
5. Select a receiving location:
Location:________________________________
6. Complete adding the receipt.
7. Note the temporary holding location.
8. Verify inventory levels in the location.
Hint: There are two ways to find this information: navigate to the Storage Location screen
or search the inventory.
Proceed to next task.

CTS IMATS User Guide Appendix C: Tasks
Page 49 of 59
8.12 TASK 12: PUT AWAY THE ITEMS
You have requested that your floor staff move the doxycycline shipment to a different holding
area. They have done this.
1. Select Put Away from the menu.
2. Locate the purchase order.
3. Select the purchase order and follow the link to assign put away location.
4. Select a put-away location.
Location: __________________.
Hint: Select Load All Locations to show all available locations from the drop-down.
5. Select and put away the item.
6. Print the put-away list by selecting Print List.
Proceed to next task.

CTS IMATS User Guide Appendix C: Tasks
Page 50 of 59
8.13 TASK 13: CONFIRM THAT YOUR ITEMS HAVE BEEN PUT AWAY
Due to the presence of untrained volunteers assisting in the movement of your doxycycline
shipment, you ask your regular staff to confirm that all 700 cases of doxycycline were put
away together.
1. Locate the purchase order.
2. Confirm the put away by verifying the item.
3. Verify inventory levels in the location.
Hint: There are two ways to find this information: navigate to the Storage Location screen
or search the inventory.
Proceed to next task.

CTS IMATS User Guide Appendix C: Tasks
Page 51 of 59
8.14 TASK 14: CREATE A PICK LIST
You have received an order from Timber Ridge Elementary School. Create a pick list of the
items that your warehouse staff will take off your shelves.
1. Create a new pick list.
2. Enter in PO # 12345.
3. Select Project Area and Facility.
4. Select Timber Ridge Elementary School as the ship-to facility to receive the items.
5. Add 400 cases of Doxycycline 100mg oral tablet, #20 tab unit of use, 20 bot to your pick
list.
6. To select the product, begin typing the item’s name in the product name.
7. Fulfill the pick from the locations provided.
8. After entering the item, save the pick list.
9. Note the order number to use in further steps.
Order Number: ___________________________________________
Proceed to next task.

CTS IMATS User Guide Appendix C: Tasks
Page 52 of 59
8.15 TASK 15: PICK AND VERIFY THE PICK LIST
You and several volunteers have picked the items off the shelves and stored them at the
loading dock. Mark your pick list as Picked.
1. Locate the pick list created in the previous task.
2. Print the pick list by selecting Print List.
3. Select and pick the items.
4. Select and verify the items.
5. Verify remaining inventory levels in the location.
Hint: There are two ways to find this information: navigate to the Storage Location screen
or search the inventory.
Proceed to next task.

CTS IMATS User Guide Appendix C: Tasks
Page 53 of 59
8.16 TASK 16: FIND YOUR SHIPMENT AND EDIT DETAILS
Locate your shipment and enter shipment details. Timber Ridge Elementary School is stocked
to capacity and would like you to move your shipping date one week. Edit your shipment
details by setting its status to Hold. The shipment will be sent by truck. Print your invoice.
1. Locate your shipment.
2. Edit your shipment details and enter shipment information.
3. Print pallet labels and shipping document.
Proceed to next task.

CTS IMATS User Guide Appendix C: Tasks
Page 54 of 59
8.17 TASK 17: RECEIVE ITEMS WITHOUT PURCHASE ORDER
A local supplier has donated 100 bottles of 45 mg strength Tamiflu to your warehouse. Each
bottle contains 40 tablets. In addition, the supplier has promised to provide regular shipments
of Tamiflu for as long as the health event continues. The items that were donated have
reached your warehouse.
1. Select Receive from the menu.
2. Add a new receipt.
3. The screen defaults to your project area and facility.
4. Enter supplier, funding source, product, location, quantity, and other required information.
5. Select a receipt location. Location: _________________________________
6. Verify updated inventory levels in the location.
Hint: There are two ways to find this information: navigate to the Storage Location screen
or search the inventory.
7. Do “put away” as explained in previous tasks.

CTS IMATS User Guide Appendix D: Glossary
Page 55 of 59
9 APPENDIX D: GLOSSARY
The following table lists common terms used throughout IMATS.
Term Definition
Back Order A process for handling requested items that are not available in inventory.
Custom Role A role assigned to a user that has been customized with specific permissions required for the user to perform his/her job tasks.
Data Exchange The process used for exchanging requests for inventory counts from CDC to project areas and reports of inventory counts from project areas to CDC.
Data Exchange Report A collection of inventory counts for a specific project area and reporting date usually generated by the project area and transmitted to CDC.
Data Exchange Request A request made by CDC to the project areas for a report of inventory counts of specific products.
Facility Any place where inventory is stored. This could be a distribution center, warehouse or a store room within a hospital.
Funding Source The entity that supplies monies for products.
Inventory Management and Tracking System (IMATS)
The IMATS solution provides state and local public health providers with a tool to track medical and non-medical countermeasure inventory and supplies during daily operations or an event. The solution tracks quantity of inventory and facilitates warehouse operations, including receiving, staging, and storing inventory.
Item Number The National Drug Code (NDC) or stock number for a product.
Jurisdiction Locality, as defined by the project area not the CDC, within the project area where a facility is located.
Move Inventory Process used to move items from one storage location to another within a facility.
National Drug Code (NDC) The unique numeric identifier for a packaged pharmaceutical as recognized by the Food and Drug Administration (FDA).
Non-pharmaceutical A product that is not a prescription drug. Examples include personal protective equipment and medical/surgical supplies or equipment.

CTS IMATS User Guide Appendix D: Glossary
Page 56 of 59
Term Definition
Package Size For pharmaceuticals, this is the amount of product in a package. For example, 50 tablets in a bottle. For non-pharmaceuticals, an example would be “1” when “Each” is selected for the package type.
Package Type For pharmaceuticals, this is the packaging noted in the third segment of the NDC. Possible types include vial, bottle, box, and blister pack. For non-pharmaceuticals, the package type chosen should properly identify the smallest unit used for the product. For example, “Box”, “Carton” or “Each”.
See Appendix_D for valid values
Pharmaceutical A drug or medicine used in medical treatment.
Pick The process of selecting or pulling items from storage in order to fill a request for products.
Product A pharmaceutical or non-pharmaceutical inventory item.
Project Area A recipient of funds from CDC’s Public Health Emergency Preparedness (PHEP) cooperative agreement. The 62 recipients include 50 states, Washington, D. C., Chicago, Los Angeles, New York City, and eight territories and freely associated states.
Purchase Order A list of products that a facility requests from a supplier.
Push Package File A push package file contains information about containers (and their contents) received from the Division of Strategic National Stockpile (DSNS) during a national event.
Put Away The process used to move items from a receiving area to storage location.
Receipt Process used to identify incoming items. There are three processes: Receipt (PO) for receiving goods order with a purchase order, Receipt (Request) for receiving items ordered using the request process and Receipt (without PO) for receiving items that were not ordered.
Region Locality, as defined by the project area not the CDC, within the project area where a facility is located.
Request A list of products that a facility requests from another IMATS facility.
Ship From The facility that is shipping items.
Ship To The facility that is receiving items.

CTS IMATS User Guide Appendix D: Glossary
Page 57 of 59
Term Definition
Standard Unit of Measure A unit of measure that has a constant number of units. For example “Dozen” will always have twelve units.
Storage Location A physical location within a facility. For example, “Receiving Dock 1A” or “Shelf 1A3C”.
Strength The amount of active ingredient present in each dosage (for example, 500 mg).
Supplier Any entity that provides products. This could be a vendor, manufacturer (maker of the product), or a facility.
Transfer Inventory Process used to transfer items from one facility to another facility.
Type of Distribution Site Designates the type of distribution site a facility is. For example, treatment center, point of dispensing, etc.
Unit of Measure (UOM) The unit used for counting items, such as case, box, pallet or each.

CTS IMATS User Guide Appendix E: RSS Site Priority Valid Values
Page 58 of 59
10 APPENDIX E: RSS SITE PRIORITY VALID VALUES
The following table lists the valid values for RSS site priority. Use the abbreviation for import files.
RSS Site Priority Abbreviation
Primary P
Secondary S
Tertiary T

CTS IMATS User Guide Appendix F: Facility Type Valid Values
Page 59 of 59
11 APPENDIX F: FACILITY TYPE VALID VALUES
The following table lists the valid values for Facility Type. Use the abbreviation for import files.
Facility Type Abbreviation
Alt. Care Facility ALTCARE
Commercial Pharm COMMPHARM
Community Clinic, Othr COMMCLNC
Correctional Facilities CORRECTIONS
Fed Facilities FEDFAC
Fed Qualified Comm Hlth Clinic FEDHLTHCLNC
Hospital HOSP
Indian Health Svc HIS
Local Health Dept LHD
Nursing Home/Assisted Living NURSHOME
Other OTHR
POD, Closed POD-C
POD, Open POD-O
Private Physician PRIVPHYS
Storage Facility STRGFAC
Tribal Govt TRIBAL
Visiting Nurse/Home Hlth VISITNURS
