Embed Size (px)
Citation preview

CoSign Web App Version 7.1
--------------------------------
User Guide

Notice
This manual contains information that is proprietary to ARX (Algorithmic Research) Ltd. No
part of this manual may be reproduced in any form whatsoever without prior written approval
by ARX (Algorithmic Research) Ltd.
ARX (Algorithmic Research) Ltd. reserves the right to revise this publication and make any
changes without obligation to notify any person of such revisions and changes.
For further information, contact ARX (Algorithmic Research) Ltd.
Trademarks
CoSign Central Enterprise, CoSign Central FIPS, CoSign Web App, MiniKey, and CryptoKit
are trademarks of ARX (Algorithmic Research) Ltd. Other names are trademarks or registered
trademarks of respective owners and are used solely for identification purposes.
ARX (Algorithmic Research) Ltd, Tel. 1-866-EASY-PKI (327-9754) Site: www.arx.com
© Copyright 2014 ARX (Algorithmic Research) Ltd.
All rights reserved.
CoSign Web App – User Guide
Pub. Date 07.14
Pub. No. CSN.WBAPP.INS.USR V7.1.07.14

i
Table of Contents
Chapter 1: Overview ...................................................................................................................................... 1
Requirements for Data Authentication Systems ........................................................................................................ 1 Introduction to CoSign .............................................................................................................................................. 2
Environments Supported by CoSign .................................................................................................................. 2 Applications that Work with CoSign.................................................................................................................. 3 CoSign Components ........................................................................................................................................... 3
CoSign Guides........................................................................................................................................................... 4 Intended Audience ..................................................................................................................................................... 5 Organization of this Guide ........................................................................................................................................ 5
Chapter 2: Introduction to CoSign Web App .............................................................................................. 7
About CoSign Web App............................................................................................................................................ 7 Advantages of CoSign Web App ....................................................................................................................... 7
Chapter 3: Installing and Deploying the CoSign Web App ........................................................................ 9
CoSign Web App Installation .................................................................................................................................... 9 Installing and Configuring the CoSign Client .................................................................................................... 9 Installing the CoSign Web App Component .................................................................................................... 13 Configuring the Mail Server ............................................................................................................................. 17
Uninstalling the CoSign Web App .......................................................................................................................... 18
Chapter 4: Using CoSign Web App for Signing and Validating Documents ......................................... 19
Logging in to the CoSign Web App ........................................................................................................................ 19 Selecting a Document .............................................................................................................................................. 21
Selecting a File from a Cloud-Based File storage Service ............................................................................... 22 Viewing and Signing Documents ............................................................................................................................ 24
Viewing Pages .................................................................................................................................................. 26 Signing a PDF Document ................................................................................................................................. 26 Signing Office 2007/2010/2013 Documents .................................................................................................... 29 Viewing Signature Details ................................................................................................................................ 32
Validating Signatures .............................................................................................................................................. 33 Post-Signing Actions ............................................................................................................................................... 34 Signing in a Point of Sale Mode of Operation ......................................................................................................... 36
Chapter 5: Adding Graphical Signatures and Modifying User Settings ................................................. 40
Adding Graphical Signatures .................................................................................................................................. 40 Modifying User Settings .......................................................................................................................................... 42
Chapter 6: Signing Documents from Cloud-based File Storage Services ............................................. 44
Signing Documents from Dropbox .......................................................................................................................... 45 Signing Documents from SkyDrive ......................................................................................................................... 46 Signing Documents from Google Drive .................................................................................................................. 47
Invoking the Signature Operation from Within Google Drive ......................................................................... 48 Signing Documents from Box ................................................................................................................................. 50
Invoking the Signature Operation from Within Box ........................................................................................ 51

ii
Chapter 7: Configuring the CoSign Web App ........................................................................................... 53
Modifying CoSign Web App Parameters ................................................................................................................ 53 Modifying Image Setting Parameters ............................................................................................................... 53 Defining SMTP Settings .................................................................................................................................. 54 Defining Extended Authentication Settings ..................................................................................................... 54 Defining API Integration Settings .................................................................................................................... 57 Defining General Settings ................................................................................................................................ 57
Configuring CoSign Web App in Passive ADFS mode .......................................................................................... 59 Configuring Web.Config for ADFS ................................................................................................................. 60 Running the Federation Utility ......................................................................................................................... 60
Integrating with Cloud-Based File Storage Services ............................................................................................... 65 Defining Cloud Storage Settings ...................................................................................................................... 66 Creating an Application for Enabling Access to User Accounts in the Cloud ................................................. 67
Index .............................................................................................................................................................. 77

1
Chapter 1: Overview
Over the last four decades, the biggest challenge of IT departments in many organizations was
moving to a paperless work environment. Seemingly, there was tremendous success in this
regard. Today, most transactions in the business world are performed electronically:
Documents are written using word processing programs.
Messages are sent via email.
Inventories and purchases are tracked using Enterprise Resource Planning (ERP) systems.
Medical information is stored in Electronic Medical Record (EMR) systems.
Although these transactions are performed in a paperless environment, organizations have still
not managed to find an easy way to get rid of the paper used for data authentication (signing
the authenticity of the data). Today, although organizations have invested large amounts of
funds and other resources in creating paperless environments, their workers are still printing
every transaction, signing it, and saving the printed copy. These organizations require a digital
method for data authentication.
By moving to a viable electronic data authentication system, organizations can reduce their
printing, archiving, shipping, and handling costs. In addition, better and more competitive
customer service can often be provided.
Requirements for Data Authentication Systems
A viable data authentication system must meet the following specifications:
Security – The system must ensure that no one other than the data creator can tamper with
or change the data in any way.
Third-party validation – The system must enable any third party to validate the
authenticity of the data. If a dispute arises between the parties (the data creator and
recipient), any third party must be able to validate the data authenticity in order to settle
the dispute.
System independence – Data authentication must be independent of the system that
created the data. Users must be able to validate the authenticity of the data using a known
standard that is independent of any specific system.
Validation over time – Users must be able to validate data authenticity at any point in
time. Authenticity cannot expire at any point.
Currently, the only data authentication method known to support all of these requirements is
the Public Key Infrastructure (PKI) method of authenticating data, simply called “digital
signatures”.

1 CoSign Web App User Guide
2
Introduction to CoSign
CoSign is a PKI-based, off-the-shelf digital-signature solution that can be integrated with a
wide range of applications. In this way, CoSign enables organizations to embed digital
signatures in various documents, forms, and transactions. CoSign is a turnkey, hardware-based
solution that is easily and quickly deployed in the network and provides cost-effective digital-
signature capabilities for the organization.
CoSign includes all the components needed for PKI-based digital-signature deployment. You
do not need to install any other device or integrate any other component for the system to
work.
Environments Supported by CoSign
CoSign integrates with leading user management systems, including Microsoft Active
Directory and a variety of LDAP (Lightweight Directory Access Protocol) based directories,
such as IBM Tivoli. This integration ensures no overhead in managing the digital-signature
system and signature credentials (i.e., the private keys that are needed in a PKI environment),
solving one of the main problems of legacy digital-signature systems. System managers,
network managers, and end-users can continue to use the IT infrastructure in the same manner
as before CoSign was installed.
CoSign stores the signature credentials in a secure server, ensuring that the signer has
exclusive access to his or her signature credentials, while still maintaining a centrally managed
solution. This is necessary in order to fulfill the security requirement of the data authentication
system.
Another option is to use the CoSign Cloud service. An organization can register its users to
the service and thus enable them to digitally sign content without having to deploy the CoSign
appliance on the organizational premises.

Overview 1
3
Applications that Work with CoSign
An increasing number of applications can work with CoSign as their digital-signature layer
without needing any further integration, including:
Microsoft Office 2007/2010/2013 (Word and Excel)
Microsoft InfoPath 2007/2010/2013
Adobe Acrobat
Microsoft SharePoint 2007/2010/2013
XML
TIFF files
Word Perfect
Microsoft Outlook and Outlook Express
Adobe Server forms (for signing web forms)
AutoCAD
Lotus Notes
Microsoft BizTalk
FileNet eForms
Verity Liquid Office
ERP systems (e.g., SAP)
OpenText
Oracle
Crystal Reports
Web applications
Any application that has a print option can use CoSign to generate a PDF file and sign it.
For information on using CoSign with other applications, contact ARX technical support.
CoSign Components
CoSign includes the following components:
CoSign appliance – The CoSign appliance hardware and software, connected to the
organization’s network.
Client – The CoSign Client software, installed on the users’ computers.
Administrator – The CoSign Administrative software that includes the CoSign Microsoft
Management Console (MMC) snap-in, installed on the administrative computer.

1 CoSign Web App User Guide
4
CoSign Connector for SharePoint – This connector enables adding digital signature
functionality to documents managed by Microsoft SharePoint, or using digital signatures
within any workflow procedure that is based on Microsoft SharePoint.
CoSign Web App – This application is deployed in the Microsoft Web Server of the
organization and enables users to sign documents without installing any client component.
CoSign Web App can use either the local CoSign appliance or the CoSign Cloud
environment for performing digital signature operations.
Applications can interact with the CoSign Web App and add a digital signature to
documents using a web based interface.
CoSign Cloud – A CoSign Cloud-based application that provides digital signature
services to users who register for the services. The CoSign Cloud supports single users as
well as groups of users.
Software Development Kit - SAPI – This component enables developers to integrate
digital signatures into their system. The developer can use SAPI (Signature API) to
integrate with CoSign.
CoSign Guides
CoSign documentation includes the following guides:
CoSign Administrator Guide – Provides all the information necessary for an administrator
to install and manage the CoSign appliance in the various environments in which CoSign
can operate.
CoSign User Guide – Provides all the information necessary for an end user to use
CoSign. Includes information about special add-ins for various applications such as
Microsoft Office.
CoSign Connector for SharePoint User Guide – Provides all the information necessary for
implementing and using the CoSign Connector for SharePoint.
CoSign Web App User Guide – Provides all the information necessary for deploying
CoSign Web App in the organization’s environment.
CoSign Programmer Guide (SAPI) – Provides all the information necessary for a
developer to interact with CoSign. Four application interfaces (API) are available:
An interface for C/C++ applications.
An interface for COM based applications.
An interface based on Web Services to be used by Application Servers.
An interface to CoSign Web App, enabling application servers to use CoSign Web
App for web based signature operations.

Overview 1
5
Intended Audience
This guide is intended for users wishing to implement the CoSign Web App. It is assumed that
readers have prior knowledge of CoSign.
Organization of this Guide
This guide is organized as follows:
Chapter 1: Overview – Provides an overview and introduction to CoSign.
Chapter 2: Introduction to CoSign Web App – Provides an introduction to CoSign Web
App.
Chapter 3: Installing and Deploying the CoSign Web App – Describes how to install and
deploy CoSign Web App.
Chapter 4: Using CoSign Web App for Signing and Validating Documents – Describes
how to use CoSign Web App.
Chapter 5: Adding Graphical Signatures and Modifying User Settings – Describes how
each end-user can add graphical signatures and modify various user settings such his/her
signature appearance.
Chapter 6: Signing Documents from Cloud-based File Storage Services – Describes the
end user experience for the following Cloud-based file storage services: Dropbox,
SkyDrive, Google Drive, and Box.
Chapter 7: Configuring the CoSign Web App – Describes how to customize the CoSign
Web App.


7
Chapter 2: Introduction to CoSign Web App
About CoSign Web App
Using CoSign Web App, users can digitally sign and validate documents without having to
install any client software. Instead, the signature operation uses the CoSign appliance or
appliances that were configured as part of the CoSign Client installation within the CoSign
Web App platform. You can optionally configure CoSign Web App to use the CoSign
appliances deployed in the Cloud.
CoSign Web App can be used from a wide variety of devices including iPads, iPhones,
Samsung Galaxy smart phones, etc. CoSign Web App serves many users in parallel.
CoSign Web App supports the following document types:
PDF files.
Note that the PDF file must be no larger than 30 MB.
In addition, password protected PDF files are not supported yet.
Microsoft Word (.docx and .doc) and Microsoft Excel (.xlsx and .xls) documents.
MS documents that contain no signature fields are converted to PDF format when they
are loaded to the CoSign Web App.
You can globally configure whether MS documents that contain at least one signature
fields are converted to PDF when loaded, or remain in their original format.
Note that the maximum supported file size is 30 MB, or 200 pages. Even files that are
close to the maximum limit may not load properly.
Advantages of CoSign Web App
No database – The CoSign Web App does not include nor does it depend on a database
deployed in the web server. This means that it can be easily deployed and upgraded to a new
version.
High availability – It is very easy to create a high availability farm containing several web
servers, each hosting a CoSign Web App, for signing documents through a web interface.
No memory footprints – The CoSign Web App manages all files and other elements such as
graphical images in memory, and does not leave any footprints of files or other sensitive data
in the local hard disk of the CoSign Web App’s platform.
Integration with other applications – CoSign Web App can be integrated with applications
such as a document management application. In these types of scenarios, the application uses a
special plug-in that performs a Sign with CoSign operation. When an end user wishes to view
a file and sign it, the end-user is redirected to the CoSign Web. After signing is complete, the

2 CoSign Web App User Guide
8
document management application retrieves the signed file from the CoSign Web App.
The exact interface between the application and the CoSign Web App is described in the
CoSign Web App API section of the CoSign Programmer Guide.

9
Chapter 3: Installing and Deploying the CoSign Web
App
This chapter describes how to:
Install CoSign Web App.
Deploy CoSign Web App.
CoSign Web App Installation
CoSign Web App can be installed as a web component using the following Web Server
product:
Microsoft IIS version 7 and above on a computer running Windows 2008 R2 and above.
Both administrative operations and user operations are based on web-based applications, thus
the end user does not have to install any software on the end PC. However, a CoSign Client
must be installed on the server on which the CoSign Web App component is installed. The
recommended order of installation is:
1. Installing and Configuring the CoSign Client.
2. Installing the CoSign Web App Component.
Installing and Configuring the CoSign Client
CoSign Web App accesses CoSign through the CoSign client installation. Therefore, before
installing the CoSign Web App component, you must:
1. Install a CoSign Client version 7.1 or above on the server that will host the CoSign Web
App component.
The CoSign Web App can only work with a CoSign Appliance version 6.2 or
above.
In addition, it is mandatory to have .NET Framework 4 installed on the hosting
platform.
2. Configure the CoSign client for optimal usage by the CoSign Web App. Refer to
Configuring the CoSign Client for CoSign Web App.

3 CoSign Web App User Guide
10
Configuring the CoSign Client for CoSign Web App
To configure the CoSign Client to work with CoSign Web App:
1. Access the CoSign control panel by selecting Start Programs ARX CoSign
CoSign Control Panel. The CoSign Control panel appears.
2. Select Client Configuration. The CoSign configuration utility’s main window appears.
3. Click to the left of the Client node.
4. Click the Appliances node.
Figure 1 CoSign Configuration Utility – Client Configuration – Appliances Parameters
5. In the Appliances screen:
a. Add the CoSign appliance IP or DNS name to the Appliance list.
b. If the list contains more than one appliance to provide high availability, you must
specify the first one as the Preferred appliance.

Using CoSign Web App for Signing and Validating Documents 3
11
c. If you would like to use the CoSign appliances that are deployed in the Cloud, enter
the following addresses:
cosignred.arx.com
cosignblue.arx.com
In addition, mark “cosignred.arx.com” as the Preferred appliance.
d. Check the Client Optimization checkbox.
e. If CoSign is deployed in an Active Directory environment, in the Prompt for logon
method drop-down select either of the following:
User Pwd Server Side (AD/LDAP)
SSPI Used Pwd Client Side (AD)
f. If CoSign is deployed in an LDAP environment, in the Prompt for logon method
drop-down select User Pwd Server Side (AD/LDAP).
6. Select File Apply (save to registry) to apply the changes.
7. Click the Login dialog node.
Figure 2 CoSign Configuration Utility – Client Configuration – Login Dialog Parameters

3 CoSign Web App User Guide
12
8. In the Login dialog screen:
a. Uncheck the Permit known applications only checkbox.
b. Select Disable login dialog.
9. Select File Apply (save to registry) to apply the changes.
10. Click the Timeouts node.
Figure 3 CoSign Configuration Utility – Client Configuration – Timeout Parameters
11. In the Timeouts screen:
Set the Configuration reload interval to 0.
It is recommended to reduce the Connect failure block time to 30.
12. Select File Apply (save to registry) to apply the changes.
13. Select File Exit to exit the CoSign configuration utility.
Note: Following any update to the CoSign Client configuration it is recommended to
perform a reset by running an iisreset command so the new parameters will take effect.

Using CoSign Web App for Signing and Validating Documents 3
13
Installing the CoSign Web App Component
To install the CoSign Web App component:
1. Deploy the CoSign Web App package to a directory in the Web Server.
2. Launch the Internet Information Services (IIS) Manager program that manages the
Microsoft Web Server.
3. Right click Sites in the Connections pane and select Add Web Site.
Figure 4 Internet Information Services (IIS) Manager
The Add Web Site window appears.

3 CoSign Web App User Guide
14
Figure 5 Add Web Site Window
4. Perform the following:
a. In the Site name field, enter a name for this web site. The recommended name is
CoSignWeb.
b. In the Application pool field:
If you are using a Windows 2012 system, select ASP .NET v4.5.
Otherwise, select ASP .NET v4.0.
If you are unable to select the application pool ASP.NET v4.0, configure
ASP .NET v4.0 as part of the Microsoft IIS deployment (refer to Microsoft
documentation for instructions).
c. In the Physical path field, select the location in the server's hard disk where the
CoSign Web App will be deployed. For example: c:\inetpub\CoSignWeb.
d. In the Host name field, define a host name (such as sign.xxx.com), or leave the field
empty.
e. In the Type field that is in the Binding section, select HTTP or HTTPS.
For testing purposes you can use the HTTP protocol, but on a production system
HTTPS should be used in order to secure the communication between the user's
browser and the web server, which handles the uploaded documents and the user's
credentials.
f. In the Port field, specify a port number. For testing purposes you can use port 80.

Using CoSign Web App for Signing and Validating Documents 3
15
g. If you selected HTTPS as the Binding type, the screen refreshes and an SSL
Certificate field appears. In the SSL Certificate field select an already uploaded SSL
certificate and a server key that will be used to identify this web site. For more
information on how to enroll for an SSL key and certificate and upload them to the
Microsoft IIS web server, please refer to Microsoft documentation.
Figure 6 Add Web Site Window – Specifying an SSL Certificate for the HTTPS Protocol
5. Click OK. The Web site is deployed.

3 CoSign Web App User Guide
16
6. If you selected HTTPS as the Binding type:
a. Select the new site under Sites in the Connections pane.
Figure 7 Sites Node in Internet Information Services (IIS) Manager
b. Click SSL Settings in the right pane (Figure 7). The SSL Settings window appears.
c. Check the Require SSL checkbox.
Note: Whether you choose to use HTTPS or HTTP communication, make sure there is
connectivity between users and the CoSign Web App as well as communication
between the CoSign Web App and the CoSign appliance. If there are any networking
related issues such as a firewall, users will not be able to communicate with CoSign
Web App, and CoSign Web App will not be able to interface with the CoSign
appliance.
Using CoSign Web App for Signing and Validating Documents 3
17
Redirecting HTTP to HTTPS
If you specified HTTPS connection to the CoSign Web App, you can redirect all HTTP
connections as follows:
1. Select the new site under Sites in the Connections pane (Figure 7).
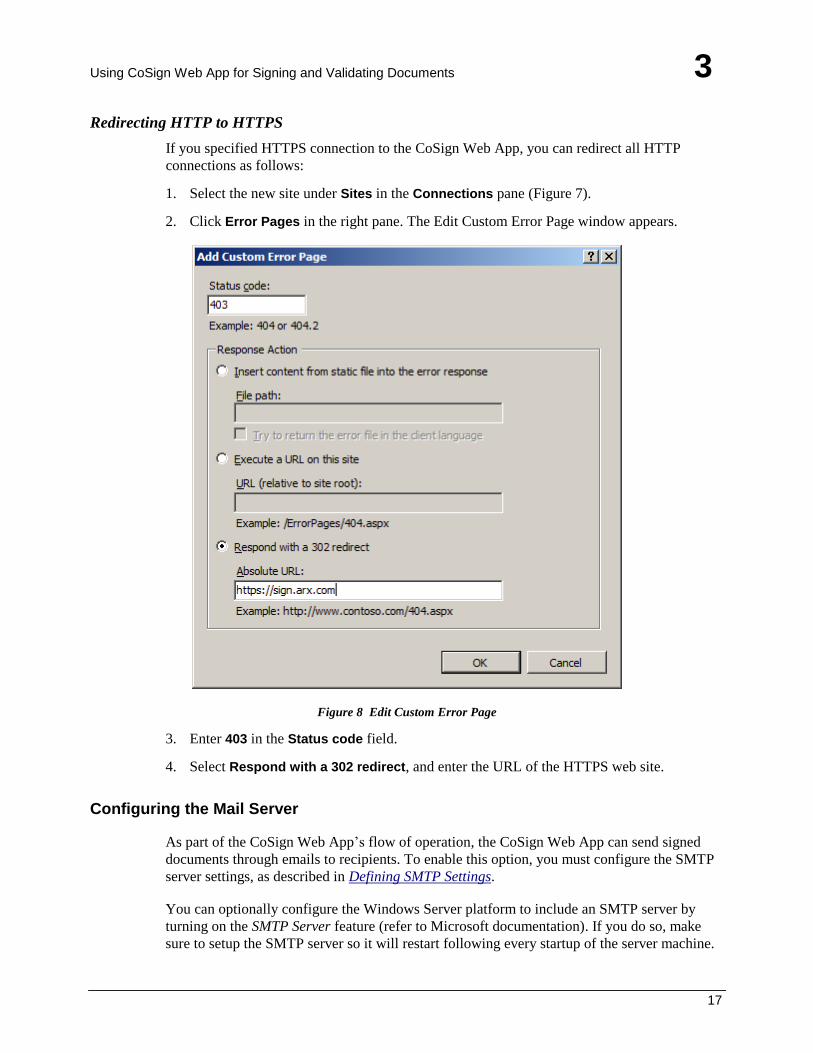
2. Click Error Pages in the right pane. The Edit Custom Error Page window appears.
Figure 8 Edit Custom Error Page
3. Enter 403 in the Status code field.
4. Select Respond with a 302 redirect, and enter the URL of the HTTPS web site.
Configuring the Mail Server
As part of the CoSign Web App’s flow of operation, the CoSign Web App can send signed
documents through emails to recipients. To enable this option, you must configure the SMTP
server settings, as described in Defining SMTP Settings.
You can optionally configure the Windows Server platform to include an SMTP server by
turning on the SMTP Server feature (refer to Microsoft documentation). If you do so, make
sure to setup the SMTP server so it will restart following every startup of the server machine.

3 CoSign Web App User Guide
18
Uninstalling the CoSign Web App
To uninstall the CoSign Web App:
1. Open the Internet Information Services (IIS) Manager program that manages the
Microsoft Web Server.
2. In the connection pane, right-click the web site under Sites and click Remove.
3. Go to the location where the CoSign Web App files are located and delete that directory.
4. Uninstall the CoSign Client.
Note that because the CoSign Web App leaves no footprints of files or other elements such as
graphical images, you do not need to delete any temporary files as part of the uninstall
procedure.

19
Chapter 4: Using CoSign Web App for Signing and
Validating Documents
Using CoSign Web App, you can digitally sign and validate documents without having to
install any client software. The workflow is as follows:
1. Log into CoSign Web App.
2. Select a document.
3. View the document contents.
4. Sign empty signature fields and/or create signatures.
5. Validate existing signatures, if desired.
6. Save or send the signed copy.
Logging in to the CoSign Web App
In order to view documents, sign them and validate them, you must first login to the CoSign
Web App. Login is performed based on your CoSign user ID and password.
To login to CoSign Web App:
1. Access CoSign Web App by entering its URL, such as : https://cosignweb.org.com.
The CoSign Web App login page appears:

4 CoSign Web App User Guide
20
Figure 9 Login Page
2. In the User name / email field:
Enter your User name if CoSign Web App is using a local CoSign appliance or
appliances.
Enter your email address if CoSign Web App is using CoSign appliances deployed in
the Cloud.
3. Enter your password in the Password field.
4. Click Sign in.
The Select Document window appears (Figure 10).
Note that if you do not perform any action in CoSign Web App for a few minutes, you will be
automatically logged off.

Using CoSign Web App for Signing and Validating Documents 4
21
Selecting a Document
The window that appears immediately after logging in is the Select Document window.
Figure 10 Select Document Window
You can select a document in either of two ways:
From your PC or device – Click Browse to select a local document. This option is not
available when using an iPad or iPhone.
From the Cloud –Click to access one of the Cloud-based file storage services and select
your file. This method is especially useful for mobile devices (tablets and smartphones)
that do not have a local Browse functionality. For details, refer to Selecting a File from a
Cloud-Based File storage Service.

4 CoSign Web App User Guide
22
Selecting a File from a Cloud-Based File storage Service
1. In the Select Document window (Figure 10), select one of the following:
Dropbox
Google Drive
Box
Microsoft SkyDrive
You are redirected to the Login window of the selected service.
2. Log into the service.
3. Optionally select the Remember me option if you want the browser to remember your
credentials.
4. The first time you access the Cloud-based file storage service from CoSign, right after
logging in to Dropbox you may be asked to confirm that you grant CoSign access to the
service.
Figure 11 Confirm CoSign Access to Dropbox
5. Allow access.
CoSign will save your login information so that you can automatically log into the service
without having to enter credentials each time
Also, depending on the Cloud-based file storage service, you will be notified by email that
the CoSign application would like to connect with your Dropbox account.

Using CoSign Web App for Signing and Validating Documents 4
23
Refer to Chapter 6 for a description of the end user experience when signing using a
Cloud-based file storage service.
Refer to Integrating with Cloud-Based File Storage Services for instructions on how to
register an organizational account for the various Cloud-based file storage providers.

4 CoSign Web App User Guide
24
Viewing and Signing Documents
After uploading a document to CoSign Web App, you can view all its pages, locate existing
signature fields (both signed and empty ones) and sign empty signature fields, as well as
create & sign new signature fields.
Starting from CoSign Web App version 7.1, you can also upload Word and Excel
2007/2010/2013 documents, and produce Office 2007/2010/2013 signatures.
However, you cannot add new signatures to these documents, but only sign empty existing
signature fields or view the details of signed field.
The file you loaded appears in the CoSign Web App window.
If the document does not contain any empty signature fields, by default it will appear with
a signature-creation frame hovering in the middle of the window. When you browse
through the pages, that frame will appear on every page. The frame enables you to create a
signature field on any page, position and resize it, and then sign inside it.
Figure 12 Example of a Loaded Document Without Empty Signature Fields

Using CoSign Web App for Signing and Validating Documents 4
25
If the document has pre-existing empty signature fields, by default it will appear without a
signature-creation frame. You will be able to sign the empty fields but will not able to
move or resize them.
Figure 13 Example of a Loaded Document With Empty Signature Fields
Note: Within CoSign Web App you cannot create an empty signature field. If you do
not sign inside a signature-creation frame, no field is created.
However, documents loaded into CoSign Web App can contain empty signature fields,
and you can sign those fields within CoSign Web App.

4 CoSign Web App User Guide
26
Viewing Pages
Use the select-page carousel to browse through the document
The five page icons correspond to page numbers. Click the left arrow for the previous five
pages, or the right arrow for the next five pages. Blue arrows above and below a page icon
indicate the currently-displayed page.
If a PDF document has pre-existing empty signature fields, the select-page carousel indicates a
page containing empty signature fields using a sign icon instead of the page number.
.
Use the zoom icons to zoom in and out.
Note that for an Office 2007/2010/2013 document there is no indication which pages are
signed. Instead, general information about the document signatures is provided.
Signing a PDF Document
You can either sign a pre-existing empty signature field, or create a new field and sign it.
1. If you wish to sign a pre-existing field, skip to step 2. If you are creating a new signature
field, perform the following:
a. Locate the hovering signature-creation frame (see Figure 12). If the signature-creation
frame is not displayed, click .
b. Optionally, move the frame to the desired location on the page, as follows:
In a PC, click inside the frame and drag.
In a mobile device, touch inside the frame and drag.
c. Optionally, resize the frame, as follows:
In a PC, click a side or a corner and drag.
In a mobile device, touch a side or a corner and drag.
2. Click/tap in the signature frame. The Signature Appearance window appears.

Using CoSign Web App for Signing and Validating Documents 4
27
Figure 14 Signature Appearance Window
3. Select a graphical signature from the carousel. Alternatively, click the radio button to Sign
without a graphical signature.
Note that a user’s graphical images and default settings are kept in the user's account in
the CoSign appliance.
4. Optionally, add a reason and title to the signature, and define your signature appearance.
To do so, click/tap Add reason and change signature appearance. The window
refreshes to display the following:

4 CoSign Web App User Guide
28
Figure 15 Adding Reason and Defining Appearance
5. In you created a new field, edit the appearance as desired by selecting whether to show the
date and time, the signer’s title, etc.
If you are signing a pre-existing field, you can only enter the reason and title if those are
required.
6. Click/tap .
The document will display a digital signature, similar to the following:
Figure 16 Sample Signature
7. You can optionally click the signature to view its details. Refer to Viewing Signature
Details.

Using CoSign Web App for Signing and Validating Documents 4
29
Signing Office 2007/2010/2013 Documents
Using CoSign Web App, you can sign existing signature fields in Office documents. Note that
you cannot create new signature fields.
By default, if an Office document contains at least one signature or signature field, it is not
converted to PDF when you upload it into CoSign Web App and you can sign it in CoSign
Web App.
CoSign Web App supports the signing of signature fields that were created by the Microsoft
Signature Line provider or ARX Signature Line Provider. However, it is recommended to
create signature fields using the Microsoft Signature Line provider to avoid rendering
problems. If a signature field was created using the ARX Signature Line Provider, the text
“Software is required” appears in the location of the empty signature field.
To define whether an Office document containing signature fields is converted to PDF when it
is uploaded to CoSign Web App, refer to OfficeBackwardCompatibility.
Note: As described in the CoSign client guide, a user may sign a Word/Excel document
only if the certificate chain is trusted. That is, the CoSign ROOT certificate must be
trusted in the Web App platform. You can use the Install CoSign CA Certificate option of
the CoSign Configuration utility to instruct Web App to trust the CoSign ROOT
certificate.
To sign an Office document:
1. Optionally view the signature information appearing in the top right corner. In the
example shown below, the information is that the document contains three unsigned
signature fields.

4 CoSign Web App User Guide
30
2. Click/tap Sign Document.
If the document has more than one empty field, a list of the signature field identifiers
(taken from the Suggested Signer attribute of the signature fields) is displayed. Select a
signature field and click/tap Close.
The Signature Appearance window appears.

Using CoSign Web App for Signing and Validating Documents 4
31
3. Click/tap Add Reason and change signature appearance if you wish to add more
information to the signature, such as a reason.
4. Click/tap Apply. The document is signed.
The information in the upper right corner is updated.

4 CoSign Web App User Guide
32
Viewing Signature Details
You can view the signature details of each signature.
In a PDF document, click any signature, whether pre-existing or created by you, to view
its details.
A Details window similar to the following is displayed.
Figure 17 Signature Details for a PDF Document
For an Office 2007/2010/2013 document, a signature summary report appears in the top
right corner of the screen.
Click valid to view information about each signed field.
Figure 18 Signature Summary Report for an MS Office Document
A Signature Details window similar to the following is displayed.

Using CoSign Web App for Signing and Validating Documents 4
33
Figure 19 Signature Details for an MS Office Document
Validating Signatures
You can view the validity status of each signed signature field.
In a PDF document:
Each signature displays in its top left corner an indication of the validity of the signature
(see Figure 16). A green checkmark indicates the signature is valid, and a red X indicates
it is invalid.
In addition, clicking/tapping a signature field displays the Signature Details window
(Figure 17), which lists the status of the signature and provides information about the user
certificate.
In an Office 2007/2010/2013 document:
A signature summary report appears in the top right corner of the screen.
Click valid in the summary report to view information about each signed field, including
its validity status (see Figure 19).

4 CoSign Web App User Guide
34
Post-Signing Actions
When you finish viewing and signing the entire document, click/tap Done. The following
window appears.
Figure 20 What Would You Like to Do Next Window
You can select any of the following options:
Save in <file storage service> – Save a signed copy of the file back in the Cloud-based
file storage service. The copy is a new file, and must be given a new name (you cannot
overwrite the original file). This option appears only if you retrieved the file from a
Cloud-based file storage service. The name of the option indicates the specific file storage
service from which you retrieved the file.
Download copy – Download a signed copy to your computer’s Downloads folder. The
copy is a new file but its name is the name of the original file.
This option may not appear when using a mobile device (for example, on iPads).
Send via email – Send the file as an attachment using your default mail application.
When you select this option, an email message frame appears within the window. You can
enter multiple recipients, separated by semicolons, in the To field. Enter any text in the
Subject field and main body of the email. Clicking/tapping Send will send the message
with the signed document added as an attachment.
Starting from CoSign Web App version 7.1, an auto-complete mechanism can be used to
assist in filling in previously-used email addresses.

Using CoSign Web App for Signing and Validating Documents 4
35
Figure 21 Sending the Signed File Via Email
Close document – Closes the document and returns to the CoSign Web App home page.
This is equivalent to canceling the sign operation.

4 CoSign Web App User Guide
36
Signing in a Point of Sale Mode of Operation
You can set your account to work in a Point of Sale (POS) mode of operation. In this mode of
operation, each empty signature field can be signed electronically (intended for external
customers), or digitally (intended for the agent, a CoSign user). POS mode supports only PDF
files.
Once the document is digitally signed, it is not possible to add new electronic signatures
(customer signatures). Therefore make sure the document is first signed electronically
wherever needed before signing it digitally.
For instructions on how to set your account to work in a Point of Sale mode of operation, refer
to EnablePOSMode.
To sign in POS mode:
1. If you wish to sign a pre-existing field, skip to step 2. If you are creating a new signature
field, perform the following:
Locate the hovering signature-creation frame (see Figure 12). If the signature-creation
frame is not displayed, click .
2. Click/tap in the signature frame. The POS Signing window appears.
Figure 22 POS Signing Window

Using CoSign Web App for Signing and Validating Documents 4
37
The page displays two tabs: Customer tab and Agent tab. Customers should use the
Customer tab, which creates an electronic signature, and the CoSign user should use the
Agent tab, which creates a digital signature.
By default the Customer tab is selected.
3. To create a Customer signature:
a. Instruct the customer to electronically sign in the signature area (typically using the
agent’s tablet or iPad).
b. Click/tap the Customer tab if you wish to add additional information to the electronic
signature.
Figure 23 POS Customer Signature Additional Fields
c. Optionally add a reason and title to the signature, and define the signature appearance.
d. Click/tap .
4. To create an Agent signature:
a. Click the Agent tab. A Signature Appearance window appears.

4 CoSign Web App User Guide
38
Figure 24 POS Agent Signature Appearance Window
b. Select a graphical signature from the carousel. Alternatively, click the radio button to
Sign without a graphical signature.
Note that a user’s graphical images and default settings are kept in the user's account
in the CoSign appliance.
c. Optionally, add a reason and title to the signature, and define your signature
appearance. To do so, click/tap Add reason and change signature appearance. The
window refreshes to display the following:

Using CoSign Web App for Signing and Validating Documents 4
39
Figure 25 POS Agent - Adding Reason and Defining Appearance
d. In you created a new field, edit the appearance as desired by selecting whether to
show the date and time, the signer’s title, etc.
If you are signing a pre-existing field, you can only enter the reason and title if those
are required.
e. Click/tap .
The document will display a digital signature, similar to the following:
Figure 26 Sample Signature
5. You can optionally click the signature to view its details. Refer to Viewing Signature
Details.

40
Chapter 5: Adding Graphical Signatures and Modifying
User Settings
Using CoSign Web App, you can add graphical signatures and modify various user settings
such as your signature appearance.
Adding Graphical Signatures
You can add personal graphical signatures using any of the following methods:
Sketching
Typing
Uploading a graphic file
The graphical signatures you add are kept in your user account inside the CoSign appliance.
To add graphical signatures:
1. Open the drop-down list adjacent to your user name, in the top right corner of the CoSign
Web App window (Figure 27).
Figure 27 User Settings Drop-Down List
2. Select My Signatures.

Adding Graphical Signatures and Modifying User Settings 5
41
Figure 28 My Signatures – Adding New Graphical Signatures
3. Add a signature using any of the following methods:
Sketch – Use the mouse in a desktop computer, or sketch with your finger upon a
mobile device. You can then save or cancel the sketch.
Type – Select a font from among nine fonts and type in the desired text. You can then
save or cancel the signature.
Upload – Upload a jpeg or bmp file.

5 CoSign Web App User Guide
42
Modifying User Settings
You can modify and update your user settings that affect the CoSign Web App session. All
these parameters are kept in your user account inside the CoSign appliance.
To modify user settings:
1. Open the drop-down menu adjacent to your user name, in the top right corner of the
CoSign Web App window (Figure 27).
2. Select Settings.
Figure 29 My Signatures
3. Optionally, set any of the following:
Title – Enter a default title.
Change Password – Change your password, if relevant (for example, if CoSign is
installed in a Directory Independent environment).

Adding Graphical Signatures and Modifying User Settings 5
43
Default Signature Appearance – Specify the appearance of signature fields you will
be creating. Set the appearance by selecting or deselecting the following:
Show graphical signature
Show date and time
Show my name
Show my title
Show signature reason
Reasons for Signing – You can maintain a list of reasons that are displayed
whenever a reason needs to be added to a digital signature. You can add reasons to the
list and remove reasons from the list, edit existing reason and select a reason to be the
default reason.
Advanced Settings – Define the following advanced settings, applying to all signature
fields you will be creating:
Signature type – Defines whether the signature type will be Digital, Electronic, or
Invisible Digital.
Date format – Defines the date format of the signatures.
Time format – Defines the time format of the signatures.
Display format – Defines whether only a date is displayed as part of the digital
signature, or both date and time are displayed.
Operational Mode – Define whether CoSign Web App works in standard operation mode
or in Point of Sale mode:
Standard – The regular mode of operation described in this guide.
Point of Sale – A mode of operation where external users supply an electronic
signature while being overseen by an organizational representative, such as a Sales
representative, who digitally signs the overall transaction. For more information, refer
Signing in a Point of Sale Mode of Operation.

44
Chapter 6: Signing Documents from Cloud-based File
Storage Services
As mentioned above, the document that needs to be signed can be extracted from a Cloud-
based file storage service, signed using the CoSign Web App, and then loaded back to the
Cloud-based file storage system or sent via email.
This chapter describes the end user experience for the following Cloud-based file storage
services: Dropbox, SkyDrive, Google Drive, and Box.
In Box and Google Drive, you can sign with CoSign from within Box or Google Drive. That
is, after you select a certain document, you are redirected to CoSign Web App to digitally sign
the document, and after the document is signed, a signed copy is saved to either Box or
Google Drive.
Note that your organization needs to perform some integration tasks to register the CoSign
Web App as an application in the relevant Cloud-based file storage service. These integration
tasks are described in Integrating with Cloud-Based File Storage Services.

Signing Documents from Cloud-based File Storage Services 6
45
Signing Documents from Dropbox
When you first attempt in CoSign Web App to sign documents that are stored in Dropbox, you
are asked to confirm that you grant CoSign access to your data:
Figure 30 Confirm CoSign Access to Dropbox
After you click Allow, you will receive an email notifying you that the CoSign application will
interface your Dropbox account.
You can now proceed to view, sign and save the file in CoSign Web App.

6 CoSign Web App User Guide
46
Signing Documents from SkyDrive
When you first attempt in CoSign Web App to sign documents that are stored in SkyDrive,
you are asked to confirm that you grant CoSign access to your data:
Figure 31 Confirm CoSign Access to SkyDrive
After you click Yes you can proceed to view, sign and save the file in CoSign Web App.

Signing Documents from Cloud-based File Storage Services 6
47
Signing Documents from Google Drive
When you first attempt in CoSign Web App to sign documents that are stored in Google
Drive, you are asked to confirm that you grant CoSign access to your data:
Figure 32 Confirm CoSign Access to Google Drive
After you click Allow Access you can proceed to view, sign and save the file in CoSign Web
App.

6 CoSign Web App User Guide
48
Invoking the Signature Operation from Within Google Drive
Every end-user can configure Google Drive so that he/she can invoke a digital signature
operation upon a selected document from within Google Drive.
In order to have CoSign appear in your Google Drive menus, you need to connect the CoSign
Digital Signatures application to Google Drive, as described in this section.
Note: As a prerequisite, a CoSign administrator must first configure the Google Drive
CoSign application, as described in Enabling Users to Sign from Within Google Drive.
To add CoSign to Google Drive Menus:
1. Click a file, select Open with and select Connect more apps.
2. Search for the CoSign Digital Signatures application.
The search results window appears:
Figure 33 Connecting the CoSign Application in Google Drive
3. Click + Connect. The following window appears:
Figure 34 CoSign Connected to Google Drive

Signing Documents from Cloud-based File Storage Services 6
49
4. Select whether to make CoSign Digital Signatures application the default application for
files it can open.
5. Click OK.
6. Restart your browser.
The CoSign Digital Signatures application now appears in the Open with menu of every PDF,
Word or Excel file you select in Google Drive, as shown in Figure 35:
Figure 35 Opening CoSign from Within Google Drive
Selecting CoSign Digital Signature redirects you to CoSign Web App with the selected file
appearing in the window. After finishing the signature ceremony, the updated signed
document is written back to the Google Drive storage. You can select whether the updated
signed file overwrites the original file or is saved as a new file.

6 CoSign Web App User Guide
50
Signing Documents from Box
When you first attempt in CoSign Web App to sign documents that are stored in Box, right
after logging in to Box you are asked to confirm that you grant CoSign access to your data:
Figure 36 Confirm CoSign Access to Box
After you authorize access you can proceed to view, sign and save the file in CoSign Web
App.

Signing Documents from Cloud-based File Storage Services 6
51
Invoking the Signature Operation from Within Box
Every end-user can configure Box so that he/she can invoke a digital signature operation upon
a selected document from within Box.
In order to have CoSign appear in your Box menus, you need to add the CoSign Digital
Signatures application to your apps, as described in this section.
Note: As a prerequisite, a CoSign administrator must first configure the Box CoSign
application, as described in Enabling Users to Sign from Within Box.
To add CoSign to Box Menus:
1. Go to your Apps section.
Figure 37 Box Apps Section
2. Search for the CoSign Digital Signatures application.
The search results window appears:
Figure 38 Searching for the CoSign App in Box
3. Click the CoSign icon. The following window appears.
6 CoSign Web App User Guide
52
Figure 39 Adding the CoSign App to Box
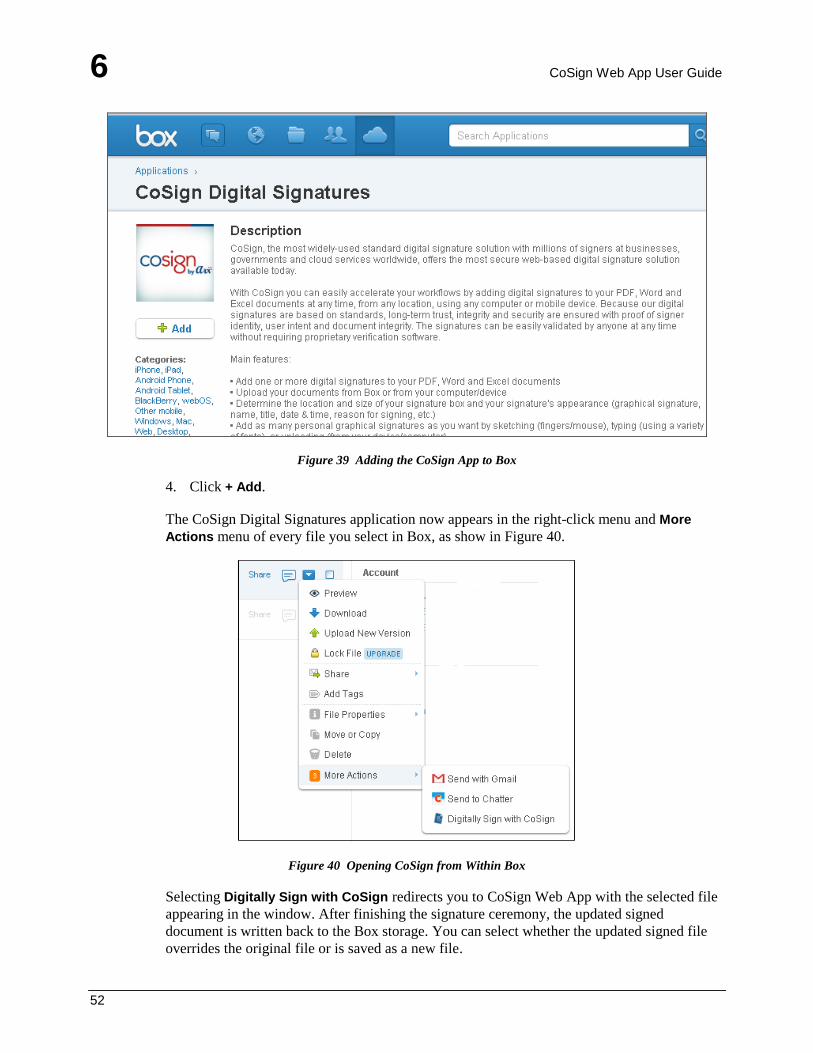
4. Click + Add.
The CoSign Digital Signatures application now appears in the right-click menu and More
Actions menu of every file you select in Box, as show in Figure 40.
Figure 40 Opening CoSign from Within Box
Selecting Digitally Sign with CoSign redirects you to CoSign Web App with the selected file
appearing in the window. After finishing the signature ceremony, the updated signed
document is written back to the Box storage. You can select whether the updated signed file
overrides the original file or is saved as a new file.
53
Chapter 7: Configuring the CoSign Web App
This chapter describes the CoSign Web App customizations that a CoSign admin can perform.
These include:
Modifying various CoSign Web App parameters. All CoSign Web App related
configuration is performed in the web.config file, located in the home directory of the
CoSign Web App application.
Configuring CoSign Web App in passive ADFS mode. This is a prerequisite for service
providers who wish to offer digital signature services to organizations that deploy Active
Directory with ADFS.
Registering the CoSign Web App as an application in the various Cloud-based file storage
services. This is a prerequisite if you wish to use CoSign Web App to sign files stored in a
Cloud-based file storage system.
Modifying CoSign Web App Parameters
You can modify various CoSign Web App parameters by editing the web.config file, located
in the home directory of the CoSign Web App application.
Important: Because the web.config file contains all the CoSign Web App definitions,
it is recommended to back up the file before making any changes to it.
Modifying Image Setting Parameters
The default Image Settings configuration is as follows:
<ImageSettings>
<!-- add here Image settings-->
<add key="ReducePercent" value="100"/>
<add key="ReduceIterations" value="1"/>
</ImageSettings>
The ReducePercent and ReduceIteration parameters provide the instructions for shrinking
an uploaded graphical signature image if its size is larger than 30K. ReducePercent specifies
by how much to shrink the image at each iteration. ReduceIteration specifies the maximum
number of iterations.

7 CoSign Web App User Guide
54
Defining SMTP Settings
The SMTP Settings section is by default empty.
<SMTPSettings>
<!-- add here SMTP settings-->
</SMTPSettings >
You can enter the following parameters into the section. If the parameters already appear in
your web.config file, you can changes their values as needed.
To set the SMTP host IP/Name:
<add key="SMTPHost" value="THE_VALUE" />
To set the SMTP Port:
<add key="SMTPPort" value="THE_VALUE" />
To set the sender address:
<add key="SMTPMailFrom" value="THE_VALUE" />
To set the mail message body:
<add key="SMTPMessageBody" value="THE_VALUE" />
To set the mail Subject:
<add key="SMTPMailSubject" value="THE_VALUE" />
Defining Extended Authentication Settings
The Extended Authentication Settings section is empty by default.
< ExtAuthSettings>
<!-- add here extended authentication settings-->
</ ExtAuthSettings>
If CoSign is configured to use extended authentication, configure extended authentication
parameters in the ExtAuthSettings section.

Configuring the CoSign Web App 7
55
To force Prompt for sign:
<add key="PromptForSign" value="Never/Always" />
Never – The user will not be requested to provide a password for every digital
signature operation. This is the default behavior.
Always – The user will be required to enter his/her password for every signature
operation (as illustrated in Figure 41).
Figure 41 Example of Password Requested Upon Every Signature Operation
To force extended password usage:
<add key="ExtPwdRequired" value="Yes/No" />
No – No extended authentication mechanism is used. This is the default value.
Yes – An extended authentication mechanism is used, such an OTP (One Time
Password) device. Figure 42 provides an example of this scenario.
In this case, you must make sure that the CoSign appliance is configured to use
extended authentication.

7 CoSign Web App User Guide
56
Figure 42 Extended Authentication Required

Configuring the CoSign Web App 7
57
Defining API Integration Settings
By default, the API Settings section is empty. This section enables applications to redirect
users to the CoSign Web App for the purpose of signing documents during their session with
the application.
< APISettings>
<!-- add here API integration settings-->
</ APISettings>
The following configuration parameters can be defined (for more information, refer to section
VI of the CoSign Programmer Guide).
To enable API request handling:
<add key="EnableAPIRequests" value="true/false" />
false means that no application can interact with the CoSign Web App. This is the
default setting.
true means that an application can redirect their users to communicate with the
CoSign Web App for the purpose of signing documents.
To enable Google Drive integration (default=true)
<add key="EnableGoogleDriveIntegration" value="true/false" />
For more information, refer to Enabling Users to Sign from Within Google Drive.
To enable Box integration (default=true)
<add key="EnableBoxIntegration" value="true/false" />
For more information, refer to Enabling Users to Sign from Within Box.
To define an API request session timeout (default=30 min.)
<add key="APIRequestTimeOut" value="30" />
If the application does not collect back the signed document after this timeout, the
document will be erased from the memory of the CoSign Web App.
Defining General Settings
The following general settings can be set in the General Settings section.
The following parameters specify whether a link exists for the Forgot My Password
functionality, as well as its name and URL:
To activate a "Forgot my password" link:
<add key="ForgetPwdVisible" value="true/false" />
To set the "Forget my password" link text:
<add key="ForgetPwdText" value="THE_VALUE" />

7 CoSign Web App User Guide
58
To set the "Forget my password" link URL:
<add key="ForgetPwdUrl" value="THE_VALUE" />
The following parameters specify whether a link exists for the Sign Up functionality, as
well as its name and URL:
To activate a "Sign up" link:
<add key="SignUpVisible" value="true/false" />
To set the "Sign up" link text:
<add key="SignUpText" value="THE_VALUE" />
To set the " Sign up " link URL:
<add key="SignUpUrl" value="THE_VALUE" />
The following additional parameters can be setup:
To enable or disable the change password functionality:
<add key="EnableChangePwd" value="true/false" />
Note: In Directory Independent installations, the change password option is enabled by
default.
To set the default domain name (default value = "")
<add key="DefaultDomain" value="arx" />
This parameter is relevant in cases where CoSign is installed in an Active Directory
environment. If the default domain name is specified using DefaultDomain, the user
will not be required to supply the CoSign Domain Name.
To enable working with AD (default value = "false")
<add key="ADMode" value="true/false" />
This parameter is relevant in cases where CoSign is installed in an Active Directory
environment. If the CoSign Client is configured to use CoSign in an Active Directory
environment, the CoSign Web App will work even without setting ADMode to true.
However, if the ADMode parameter is set to true, the GUI of the CoSign Web App
will be slightly changed, for example, the user settings will not include the change
password option.
The following additional parameters are relevant for CoSign Web App V7.1 and above:
To enable or disable the Point of Sale (POS) functionality globally for all users:
<add key="EnablePOSMode" value="true/false" />
The default value is false, meaning POS mode is not globally enabled. To enable
POS mode for an individual user, refer to Operational Mode in the Modifying User
Settings section.
When the value is true, all users have the capability to execute a POS signature
process.

Configuring the CoSign Web App 7
59
To enable or disable the new Office capability, in which Office 2007/2010/2013
documents are not converted to PDF if they contain one or more signature fields:
<add key="OfficeBackwardCompatibility" value="true/false" />
The default value is false which instructs the system not to convert Word and Excel
2007/2010/2013 documents to PDF if they contain one or more signature fields.
Configuring CoSign Web App in Passive ADFS mode
CoSign Web App can be deployed by a service provider to offer individuals and organizations
digital signature services. Any end user who wishes to use the service must be added to the
service either manually or automatically through CoSign APIs. The end user is authenticated
to the service using a User ID and password mechanism.
Starting from CoSign v7.1, the service provider can offer digital signature services to
organizations that deploy Active Directory with ADFS. By configuring a trust between the
service provider and the organization that wishes to use the services, any user that belongs to
the organization can communicate automatically using the ADFS ticketing mechanisms (based
on the SAML standard).
Using the ADFS ticketing mechanism, the end user first uses the local Active Directory
services to authenticate and receive an ADFS ticket. The ADFS ticket is then used as a
mechanism to connect to CoSign Web App, with the initial communication creating a new
account for the user (including a digital signature key and a certificate). The end user can then
continue using the account to sign documents.
This section describes how a digital signature service provider should configure CoSign Web
App to enable users of an organization that deployed ADFS to use the CoSign Signature
service. This configuration is required for every organization that wishes to use the service. It
consists of two tasks:
Configuring Web.Config for ADFS
Running the Federation Utility
For more information about the ADFS functionality provided by the CoSign appliance, refer
to the ADFS sections in the CoSign Administrator Guide.

7 CoSign Web App User Guide
60
Configuring Web.Config for ADFS
1. Rename web.config.adfs to be web.config, thus overwriting the original
web.config file.
2. In the web.config file, add a line in the ADFSSettings section for every organization
you wish to trust, as follows:
<ADFSSettings>
<add key="org1-ID" value="https://adfs.org1.com/adfs/ls/" />
<add key="org2-ID" value="https://adfs.org2.com/adfs/ls/" />
</ADFSSettings>
Where:
key is the identification of an organization.
value is the local Identity Provider URI for the ADFS service of this originating
organization.
The URL for users wishing to connect to the Web App Service must be of the
following type:
https://<web app DNS>/org/<identification of the originating organization>.
For example:
https://webapp.service.com/org/Company-Z.
Running the Federation Utility
The administrator deploying CoSign Web App must run the Fedutil utility for every new
organization wishing to use the digital signature service through ADFS.
1. Enable the Fedutil mechanism as follows:
If the PC hosting CoSign Web App is running Windows 2008, install the package
from http://www.microsoft.com/en-us/download/details.aspx?id=17331.
If the PC hosting the CoSign Web App is running Windows 2012, you need only
select the Windows Identity Foundation option in the Control Panel’s Turn
Windows features on or off section.
2. In the Microsoft IIS server on which CoSign Web App is installed, go to C:\Program
Files (x86)\Windows Identity Foundation SDK\v4.0 and execute fedutil.exe.
The Federation Utility Wizard welcome page appears.

Configuring the CoSign Web App 7
61
Figure 43 Federation Utility – Welcome Page
3. In the Welcome page do the following:
a. In Application configuration location, specify the path to the web.config file for
your CoSign Web App website. For example:
C:\inetpub\CoSignWebApp\web.config.
b. In Application URI, specify the URI for your website. For example:
https://webapp.service.com/.
c. Click Next. The Security Token Service page appears.

7 CoSign Web App User Guide
62
Figure 44 Federation Utility – Security Token Service Page
4. In the Security Token Service page:
a. Select Use an existing STS.
b. Specify the FederationMetadata.xml file that was provided to you by the originating
organization that deployed the local ADFS deployment.
c. Click Next. The Security Token Encryption page appears.

Configuring the CoSign Web App 7
63
Figure 45 Federation Utility – Security Token Encryption Page
5. In the Security Token Encryption Page:
a. Select No encryption.
b. Click Next. The Offered Claims page appears.

7 CoSign Web App User Guide
64
Figure 46 Federation Utility – Offered Claims Page
6. The Offered Claims page displays information related to Claims that are defined in the
local ADFS of the originating organization. Review the claims and click Next.
The Summary page appears.

Configuring the CoSign Web App 7
65
Figure 47 Federation Utility – Summary Page
7. In the Summary page click Finish.
The Web App web.config file is updated, and information is created under the
FederationMetaData directory.
8. Backup both the web.config file and the FederationMetaData directory.
Integrating with Cloud-Based File Storage Services
The setup described in this section must be performed to enable users of your organization to
access documents stored in Cloud-based storage services such as Google Drive or Dropbox.
The following setup tasks must be performed:
The CloudStorageSettings section of the web.config file must be updated to include
information regarding the Cloud-based storage services. For information, refer to Defining
Cloud Storage Settings.
A dedicated application must be defined for the selected Cloud-based storage service. This
application will enable the CoSign Web App to access the user account in the Cloud-
based storage services.
In the case of Google Drive or Box, you can configure these applications to enable
invoking Cosign from Google Drive or Box menus.
For information, refer to Creating an Application for Enabling Access to User Accounts in
the Cloud.

7 CoSign Web App User Guide
66
Defining Cloud Storage Settings
The Cloud Storage Settings section is by default empty.
< CloudStorageSettings >
<!-- add here Cloud Storage settings-->
</CloudStorageSettings>
The following configuration parameter must be set if you wish to integrate with any
Cloud-based storage systems:
Enable using Dropbox as a Cloud-Based File Storage
<add key="EnableDropbox" value="true/false" />
The default is enabled.
Enable using Box as a Cloud-Based File Storage
<add key="EnableBox" value=" true/false " />
The default is enabled.
Enable using Sky Drive as a Cloud-Based File Storage
<add key="EnableSkyDrive" value=" true/false " />
The default is enabled.
Enable using Google as a Cloud-Based File Storage
<add key="EnableGoogle" value=" true/false " />
The default is enabled.
Note that if a single cloud-based file storage is enabled, then only the icon for this cloud
storage will appear immediately after the user logs on. If no cloud-based file storage is
enabled, no indication of a cloud based file storage system appears.
Set the Cloud storage callback URL (redirect URL):
<add key="CloudStorageCallbackURL" value="THE_VALUE" />
When the user is redirected to the Cloud-based storage service for a login operation, the
Cloud-based storage system is redirected back to CloudStorageCallbackURL to continue
the user session in the CoSign Web App.
Specify the following value in the case of Box:
https://sign.xxx.com/cloudstorage/loggedtocloudstorage/box
where sign.xxx.com is the location where the CoSign Web App is deployed.
Specify the following value in the case of Google:
https://sign.xxx.com/cloudstorage/loggedtocloudstorage/GoogleDrive
where sign.xxx.com is the location where the CoSign Web App is deployed.

Configuring the CoSign Web App 7
67
Creating an Application for Enabling Access to User Accounts in the Cloud
This section describes, for each type of Cloud-based storage service, how to create an
application enabling the CoSign Web App to access the user account in the Cloud-based
storage service.
Creating a CoSign Application in Dropbox
1. Connect to the Dropbox development portal at https://www.dropbox.com/developers and
login with a user account.
2. Select Apps Console.
3. Click Create app to create a new application.
Figure 48 Creating a Dropbox API Application
4. Select the Dropbox API app option.
5. Select the following options:
a. What types of data does your app need to store on DropBox? – Select Files and
Datastores.
b. ”Can your app be limited to its own folder? – Select No.
c. What type of files does your app need access to? – Select All File Types.

7 CoSign Web App User Guide
68
d. Provide an app name, and you’re on your way – The recommended app name is
<your organization name > - CoSign.
6. Click Create app. The following form appears:
Figure 49 Dropbox API Application Forms
7. In the Application forms, supply additional information such as a description and icons.
After applying for production – there is no limit on the number of users who
can use the CoSign application.
8. Record the App key and App secret values for entering in the web.config file.
9. Click Update.
10. Enter the App key and App secret values in the DropBoxSettings section of the
web.config file. The DropBoxSettings section is by default empty.
<DropBoxSettings>
<!-- add here DropBox settings-->
</DropBoxSettings>
a. Enter the DropBox App key value:
<add key="AppKey" value="THE_VALUE" />
b. Enter the DropBox App Secret value:
<add key="AppSecret" value="THE_VALUE" />

Configuring the CoSign Web App 7
69
11. Click Apply for production.
It takes about a day for Dropbox to approve your CoSign app.
Creating a CoSign Application in SkyDrive
1. Connect to the SkyDrive development portal at https://skydrive.live.com/ and login in
with a user account.
2. Click the Developers link at the bottom of the page:
3. Click My apps.
Figure 50 Creating a SkyDrive Application
4. Create a new application. The recommended name is CoSign - <your organization
name>.

7 CoSign Web App User Guide
70
Figure 51 Entering Information in the SkyDrive Application
5. Record the Client ID and Client Secret values for entering in the web.config file.
6. In the Redirect domain field, enter only the domain part of the
CloudStorageCallbackURL parameter in the web.config file (refer to
CloudStorageCallbackURL.).
For example:
In the case of Box https://arsign.arx.com/CloudStorage/LoggedToCloudStorage/box
In the case of Google: https://arsign.arx.com/CloudStorage/LoggedToCloudStorage/GoogleDrive
7. Set Mobile Client App to no.
8. Supply additional information such as Terms of Service URL and Application Logo.
9. Click Save.
10. Enter the Client ID and Client Secret values in the SkyDriveSettings section of the
web.config file. The SkyDriveSettings section is by default empty.
< SkyDriveSettings>
<!-- add here SkyDrive settings-->
</ SkyDriveSettings>

Configuring the CoSign Web App 7
71
Enter the SkyDrive Client ID value:
<add key="ClientID" value="THE_VALUE" />
Enter the SkyDrive Client Secret value:
<add key="ClientSecret" value="THE_VALUE" />
Creating a CoSign Application in Google Drive
For information on how to integrate with Google Drive, refer to the following Google
documentation: https://developers.google.com/drive/quickstart-cs and
https://developers.google.com/drive/enable-sdk. For assistance, contact ARX support.
Enabling Users to Sign from Within Google Drive
You can configure Google Drive to enable users to access CoSign Web App from the Google
Drive menu of a document that is stored inside the Google Drive web application. To do so:
1. Make sure the parameter EnableGoogleDriveIntegration in the API Settings
section of web.config is set to true.
2. Configure the Google Drive CoSign application to enable users to invoke CoSign from
within Google Drive. For assistance, contact ARX support.
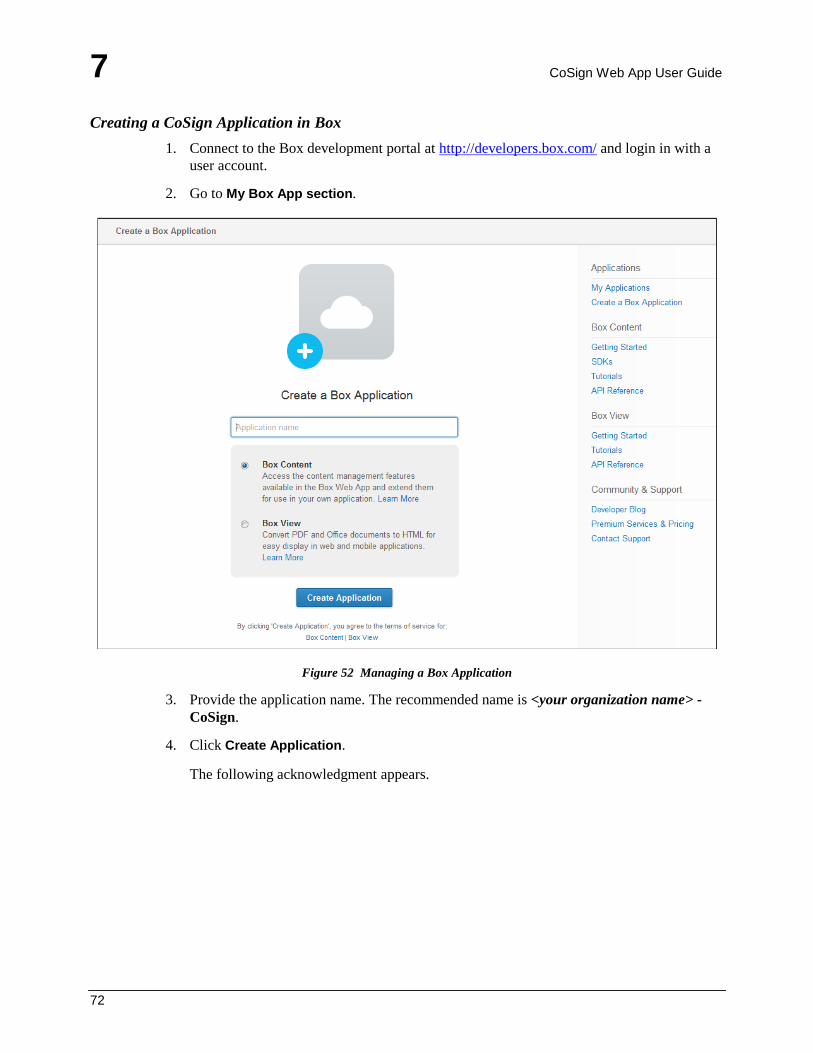
7 CoSign Web App User Guide
72
Creating a CoSign Application in Box
1. Connect to the Box development portal at http://developers.box.com/ and login in with a
user account.
2. Go to My Box App section.
Figure 52 Managing a Box Application
3. Provide the application name. The recommended name is <your organization name> -
CoSign.
4. Click Create Application.
The following acknowledgment appears.

Configuring the CoSign Web App 7
73
Figure 53 Acknowledgment of Box Application Creation
5. Continue to configure your Box application:
Figure 54 Setting Box OAuth2 Parameters
6. Configure the OAuth2 parameters as follows:
a. Record the Client ID and Client Secret values for entering in the web.config file.
b. Select both Scopes items: Read and Write all files and folders and Manage an
Enterprise.
c. Enter a redirect_uri that points to the CoSign Web App URL, such as
https://sign.arx.com/.
7. Click Save Application.

7 CoSign Web App User Guide
74
8. Enter the Client Id and Client Secret value in the BoxSettings section of the web.config
file. The BoxSettings section is by default empty:
< BoxSettings>
<!-- add here Box settings-->
</ BoxSettings>
Enter the ClientID value:
<add key="ClientID" value="THE_VALUE" />
Enter the ClientSecret value:
<add key="ClientSecret" value="THE_VALUE" />
Enabling Users to Sign from Within Box
You can configure Box to enable users to access CoSign Web App from the Box menu of a
document that is stored inside the Box web application. To do so:
1. Make sure the parameter EnableBoxIntegration in the API Settings section of
web.config is set to true.
2. Configure the Box CoSign application to enable users to invoke CoSign from within Box,
as follows:
a. In the Edit a Box Application form (Figure 53), click Create a New Web App
Integration.
Figure 55 Creating a New Web App Integration
The following General Information form appears.

Configuring the CoSign Web App 7
75
Figure 56 Creating a Box File Action
b. Edit the following parameters as follows. You may want to change other information
as well (refer to the Box developer guides).
Supported Extensions – doc, docx, pdf, xls, xlsx
Scoped To: select The parent folder of the file/folder from which this
integration is invoked.
Category – Web (recommended)
Filetype Category – Documents (recommended)
Integration Status – Online
New window settings – Check the Popup window will open in a tab checkbox
(recommended)
Client Callback URL – A mandatory field. Enter the following:
https://sign.arx.com/CloudStorage/BoxFileAction/Box, where sign.arx.com is
the organizational CoSign Web App deployment location.

7 CoSign Web App User Guide
76
c. Supply the following Callback parameters:
Method Parameter Name Parameter value
Get RedirectUrl #redirect_to_box_url#
Get FileID #file_id#
Get AuthCode #auth_code#
d. Specify the following Prompt Message text: The Secure Way to Sign on the Go –
easily add digital signatures to PDF, Word and Excel documents
e. Click Save Web App Integration.
f. When you finish configuring the application, publish your application to Box by
selecting Submit for approval (Figure 55).
Figure 57 Submitting a Box App for Approval

77
Index
—A— Active Directory settings
enable working with AD, 58
set domain name, 58
ADFS mode
configuring web.config, 60
introduction, 59
running the federation utility, 60
Advantages of CoSign Web App, 7
API Integration settings, 57
Applications that work with CoSign, 3
Authenticating, data requirements, 1
Authentication, extended authentication, 54
—B— Box
creating a CoSign app in Box, 72
enabling invoking CoSign from Box, 57, 74
invoking CoSign from Box, 51
signing documents retrieved from Box, 50
—C— Configuring CoSign Web App, 53
CoSign
applications that work with CoSign, 3
components, 3
documentation, 4
environments supported by CoSign, 2
CoSign client
installing, 9
optimizing for CoSign Web App, 10
Customizing CoSign Web App, 53
API Integration Settings, 57
cloud storage settings, 66
Extended Authentication Settings, 54
General Settings, 57
Image Settings, 53
SMTP Settings, 54
web.config file, 53
—D— Data authentication systems, 1
Date and Time display in of signature, 43
Date format of signature, 43
Document appearance, 24
Dropbox
creating a CoSign app in Dropbox, 67
signing documents retrieved from Dropbox, 45
—E— Environments supported by CoSign, 2
Extended Authentication settings, 54
—F— Federation utility, running, 60
Forgot My Password settings, 57
—G— General settings, 57
Google Drive
creating a CoSign app in Google Drive, 71
enabling invoking CoSign from Google Drive, 57,
71
invoking CoSign from Google Drive, 48
signing documents retrieved from Google Drive,
47
Graphical signatures
adding, 40
sketching, 41
typing in, 41
uploading a file, 41
—H— HTTPS
redirecting HTTP to HTTPS, 17
specifying HTTPS settings, 14
—I— Image reduction settings, 53
Installing CoSign Web App
configuring a mail server, 17
installation overview, 9
installing the CoSign Client, 9
installing the Web App component, 13
using HTTPS, 14
Integrating with Cloud-based file storage services, 65
Intended audience, 5
Introduction
to CoSign, 2
to CoSign Web App, 7
to digital signatures, 1
—L— Logging in to CoSign Web App, 19
CoSign Web App User Guide
78
—O— Operation mode
Point of Sale, 43
standard, 43
Operational mode
setting, 43
Overview of CoSign, 1
Overview of CoSign Web App, 7
—P— Password, changing, 42
POS mode
enabling for a specific user, 43
enabling globally, 58
Post-signing actions, 34
Prior knowledge, 5
—R— Reasons for signing, 43
—S— Selecting a document, 21
from a cloud-based file management service, 22
from a local device, 21
Signature
adding graphical signatures, 40
defining date and time display, 43
defining date format, 43
defining reasons for signing, 43
defining signature appearance, 43
defining signature type, 43
defining time format, 43
Signature appearance, defining, 43
Signature type, setting, 43
Signing a PDF document
creating a new signature, 26
post-signing actions, 34
signing a pre-existing signature field, 26
Signing an MS Office document
post-signing actions, 34
signing a pre-existing signature field, 29
Signing work flow, 19
SkyDrive
creating a CoSign app in SkyDrive, 69
signing documents retrieved from SkyDrive, 46
SMTP settings, 54
—T— Time format of signature, 43
—U— Uninstalling CoSign Web App, 18
User settings, modifying, 42
—V— Validating document signatures, 33
Viewing a document, 26
Viewing signature details, 32
—W— web.config file
backing up, 53
location, 53
modifying, 53


![COSIGN - European Commission : CORDIS · 619572 - ICT COSIGN [PUBLIC] D2.6 Combining Optics and SDN In next Generation data centre](https://img.dokumen.tips/doc/110x75/5b9a6e7e09d3f20b318b953f/cosign-european-commission-cordis-619572-ict-cosign-public-d26-combining.jpg)

![COSIGN - CORDIS€¦ · [2] COSIGN – Deliverable D1.3 – Comparative analysis of control plane alternatives 1.1.2 Acronyms and Abbreviations Most frequently usedacronyms in the](https://img.dokumen.tips/doc/110x75/5f050bed7e708231d410fe05/cosign-cordis-2-cosign-a-deliverable-d13-a-comparative-analysis-of-control.jpg)


