Embed Size (px)
Citation preview

Reviewer’s Guide

Contents
1 | Introducing Corel PaintShop Pro X6............................... 1
2 | Customer profiles............................................................ 3
3 | What’s included?............................................................. 5
4 | Key features .................................................................... 7Create your best images faster ........................................................................... 7The easiest way to extraordinary photos .......................................................... 11A complete toolset for all skill levels ................................................................. 14Exceptional value with new Membership perks ................................................ 16
5 | Benchmarking PaintShop Pro X6 .................................. 17

Reviewer’s Guide [ 1 ]
Introducing Corel® PaintShop® Pro X6
Corel® PaintShop® Pro X6 is powerful, easy-to-use image-editing software that helps anyone produce stunning photos and creative designs. And with new 64-bit architecture, PaintShop Pro X6 is more powerful and responsive than ever before.
You can now create your best images faster, thanks to the performance gains enabled by 64-bit processing. With PaintShop Pro X6, you’ll make more rapid adjustments, process more effects, work with larger files, and work with more photos simultaneously. The 64-bit version makes resource-intensive tasks, such as working with images greater than 400 megapixels smooth and reliable.
Developed in concert with our users, PaintShop Pro X6 offers polished and refined workspaces, new ultra quick and easy selection tools, and all the creative design tools and effects that have made PaintShop Pro a favorite of so many for so long. Many of our users’ beloved features have benefited from the new 64-bit code, offering better response times and more robust effects processing.
PaintShop Pro X6 also provides a built-in script recorder that lets you automate just about anything that you can do with the application. Plus, an updated PaintShop Pro Scripting Guide is freely available to help school anyone interested in automation. It’s also easy to add IPTC data, which helps photographers increase the searchability of their images. In addition, the inclusion of a 32-bit version ensures that you can work with legacy third party plug-ins, and the 64-bit version offers enhanced support for Adobe® Photoshop® plug-ins.
Editions of Corel® PaintShop® Pro X6The following editions are available to meet the needs of both professionals and value-minded customers.
Corel® PaintShop® Pro X6 Ultimate: The ultimate photo editor combines the pro-quality tools of PaintShop Pro X6 with powerful image correction technology Perfectly Clear by Athentech Imaging, portrait beautifying tools Reallusion® FaceFilter3 Standard, and a collection of creative extras.
Corel® Photo Video Suite X6: This all-in-one video production and photo-editing suite combines the creative power of PaintShop Pro X6 and VideoStudio Pro X6 to make editing your photos and videos fast and fun.
License Edition: For corporate and education customers, the License Edition offers a highly affordable photo-editing and design solution, ideal for producing imagery for presentations, marketing materials, documentation, and other projects. Fully network deployable and available at compelling volume license pricing, PaintShop Pro is a great choice for commercial and educational organizations.


Reviewer’s Guide [ 3 ]
Customer profiles
Corel PaintShop Pro X6 is the photo editor of choice for a diverse range of users, from photographers and photo enthusiasts to designers, self marketers, and creative consumers.
Photo enthusiastsFirst and foremost, PaintShop Pro is designed from the ground up for the photo enthusiast. Whether they’re just starting out as hobbyists with their first DSLR, or are already passionate, seasoned photographers, photo enthusiasts want a photo editor that helps them quickly and easily organize and manage their photos.
After identifying promising images, they want easy-to-use editing tools that help them refine those images to their maximum potential. As enthusiasts develop both their photographic eye and photo-editing skills, they want access to additional tools, features, and effects that can help them express their creativity — with fast results and minimal effort.
DesignersDesigners produce graphical content for many disparate projects and want tools that help them express their creativity. Whether they’re working photographers, graphic design professionals, video producers, or web professionals, they want a photo editor that lets them work with vector and raster layers, supports industry-standard file formats, and gives them powerful creative options.
Self marketersThese small business owners, independent or professional marketers, and social media specialists want a photo editor that fits their budget and lets them quickly produce high-quality graphics in-house.
Creative consumersWhether they’re scrapbookers or recreational graphics producers, creative consumers produce content to share with friends and family. They want a photo editor that’s easy to use, stays out of their way, and gives them access to a wide range of features and effects.
EducationFor students, teachers, and administrators or decision-makers, PaintShop Pro offers an unbeatable value. It gives educators all the tools they need to teach the fundamentals of photography and graphic design at a fantastic price.


Reviewer’s Guide [ 5 ]
What’s included?
Application• Corel® PaintShop® Pro X6: This powerful, easy-
to-use image-editing software helps anyone with a passion for photography produce stunning photos and creative designs. It offers a wealth of features that help you organize, edit, and share your photos and artistic creations with ease.
• 32- and 64-bit versions: PaintShop Pro X6 is available in 32- and 64-bit versions, and you can install both. While the 64-bit version offers better performance and memory management, the 32-bit version ensures compatibility with 32-bit hardware and plug-ins.
Documentation• Online Help, Learning Center palette
• PDF User Guide
• Discovery Center, with both video and text tutorials
• Getting Started windows provide an overview of new tools and features, making it easy to get up to speed quickly
• PDF Scripting Guide, available to download for all free PaintShop Pro X6 Standard Memberships
Minimum system requirements• Microsoft® Windows® 8, Windows® 7, Windows
Vista®, and Windows® XP with latest service pack (32-bit or 64-bit editions)
• Intel® or AMD 1.5 GHz or faster processor with SSE2 support (multi-core processor recommended)
• 2 GB of RAM (4 GB recommended)
• 1 GB free hard-disk space (2 GB recommended)
• 1024 × 768 resolution, 16-bit color display (1366 × 768 resolution, 24-bit or higher color display recommended)
• DirectX® 9 or higher compatible audio card with latest driver
• Windows-compatible CD- or DVD-ROM drive for installation
• Internet connection required for online features and tutorial videos
File format support• Input: AI, BMP, CAL, CALS, CGM, CLP, CMX1, CT,
CUR, CUT, DCX, DIB, DRW*, EMF, EPS, GIF, HDP, HGL*, HPG*, IFF, IMG, J2C, J2K, JIF, JP2, JPC, JPE, JPEG, JPG, JPS, JPX, MAC, MPO, MRW, MSP, PBM, PCD*, PCT, PCX, PDF, PGL*, PGM, PIC, PICT, PNG, PNS, PPM, PS, PSD, PSP (PSP image files), RAS, RAW, RIF, RLE, SCT, SVG, SVGZ, TGA, TIF, UFO, WBM, WBMP, WDP, WEBP, WMF, WPG*
RAW file support from more than 300 camera models including 3FR, ARW, CR2, CRW, DCR, DNG, ERF, K25, KDC, MEF, MOS, NEF, NRW, ORF, PEF, RAF, RW2, SR2, SRF, X3F
• Brush: PaintShop Pro Brush (.pspbrush), Adobe Photoshop Brush (.abr), Jasc Brush (.jbr)
• Output: BMP, CAL, CALS, CLP, CUT, DCX, DIB, EMF, EPS, AI, PS, GIF, HDP, WDP, IFF, IMG, JP2, J2C, J2K, JPC, JPX, JPG, JIF, JPE, JPEG, MAC, MSP, PBM, PCX, PGM, PIC, PPM, PNG, PSD, PSP (PSP image files), RAS, RAW, RIF, RIFF, RLE, SCT, CT, JPS, PNS, TGA, TIF, TIFF, WBMP, WBM, WEBP, WMF
1 CMX, DRW, HGL, HPG, PGL, and WPG formats supported only with 32-bit installation


Reviewer’s Guide [ 7 ]
Key features
Corel® PaintShop® Pro X6 is powerful, easy-to-use image-editing software that helps anyone produce stunning photos and creative designs.
Create your best images fasterWith new 64-bit power, PaintShop Pro X6 is better and more powerful than ever before. You can now load, edit, and output your photos much more quickly. The increased stability and memory management enabled by 64-bit architecture means that you can make more rapid adjustments, process more effects, and work with more photos simultaneously.
New! 64-bit PaintShop® Pro: The 64-bit edition of PaintShop Pro X6 was built to be more efficient where it
counts. The primary benefit offered by the 64-bit edition is that it accesses RAM beyond 4 GB. This equates to faster processing, especially for resource-intensive tasks, and greater stability when working with large file sizes.
New! Faster launch: The first thing you’re bound to notice about the new 64-bit edition of PaintShop Pro X6 is how quickly it launches. Depending on your hardware configuration, you can expect at least a 10% boost in launch speed.
New! 64-bit object removal: The 64-bit edition of PaintShop Pro provides greater stability when using the Object Remover to edit photos of large file sizes.
You can now remove objects from images larger than 22 megapixels.

[ 8 ] Reviewer’s Guide
New! 64-bit Smart Carver: With the 64-bit edition of PaintShop Pro X6, the Smart Carver now supports 16-bit image editing. This greatly reduces the potential for ‘banding’ or ‘image noise’ in your adjusted photos.
New! Support for 400+ megapixels: The 64-bit edition of PaintShop Pro X6 provides support for a whopping 400+ megapixels. While megapixel count is not the be-all and end-all for image quality, this level of support lets you keep pace with the soaring megapixel count offered by today’s DLSRs.
New! Memory management: With its new, 64-bit architecture, PaintShop Pro X6 is able to address more memory when working with large file sizes.
New! Open more images at once: With the 64-bit edition of PaintShop Pro X6, you can smoothly open upwards of 50 photos. This is especially notable for batch processing; for example, converting a batch of 50 RAW images to PNG is now 57% faster than PaintShop Pro X5.
New! Faster HDR processing: With the 64-bit edition of PaintShop Pro X6, you’ll enjoy a quickened pace when working with the HDR tools. Exposure Merge provides faster loading of photos, swifter and more responsive tools for making adjustments, as well as quicker HDR processing time.
Exposure Merge is a three-step process:
• Merge – choose merge settings, apply custom editing to photos
• HDR Adjustments – make adjustments to merged HDR image
• Fine-Tune – refine the HDR image, reduce noise, sharpen, etc.
Give it a tryUsing the Object Remover
1 In PaintShop Pro X6 (64-bit), click the Edit tab at the top of the application window.
2 Click File Open, and browse for an image, or drag an image into the workspace.
3 Click the Object Remover tool and drag around the part of the image you want to remove.
4 On the Tool Options palette, click the Source mode button.
A rectangle is displayed in the image window.
5 Position the rectangle over the area that will replace the section to be removed.You can drag the rectangle’s handles to resize it, and drag the rotation handle to rotate it.
6 On the Tool Options palette, click the Apply button.
Give it a tryRemoving an image area with the Smart Carver
1 In PaintShop Pro X6 (64-bit), click the Edit tab at the top of the application window.
2 Click File Open and browse for a RAW image, or drag a RAW image into the workspace.
3 In the Camera RAW Lab, click Edit.
4 Click Image Smart Carver.
The Smart Carver dialog box opens.
5 In the Object Removal area, click the Remove button, and then brush over the area that you
want to remove from the image.
You can use the Brush Size slider to decrease or increase the size of the brush.
6 In the Smart Carving area, click the Auto-contract horizontally button.
7 When you are satisfied with the result, click OK.
Give it a tryOpening many images at once
1 In the Manage workspace of PaintShop Pro X6 (64-bit), hold down Ctrl and then click to select 30 or more images.
2 Click the Edit tab.
This opens the selected images for editing.
For comparison, try the same procedure with the 32-bit edition.

Reviewer’s Guide [ 9 ]
You choose merge settings, make custom edits, and preview the merged alignment during the
first step of Exposure Merge.
You can manually adjust the resultant HDR image or apply a preset during the second step of Exposure Merge.
Give it a tryStep 1: Merging multiple HDR exposures
1 In the Manage workspace, press Ctrl and then click to select the thumbnails of the photos you want to merge.
2 Click File HDR Exposure Merge.
3 In the Step 1: Merge window, choose a profile from the Camera response curve profile drop-list.If you are unsure, select Auto Select.
4 In the Alignment area, choose an alignment type from the Method drop-list.To crop edges that don’t overlap, enable the Auto crop check box.
5 Click Align.To see the result, enable the Preview Alignment check box near the bottom of the panel.
6 If necessary, you can keep or remove specific areas from individual photos by using the controls in the Custom editing area.
7 Click Process.
Give it a tryStep 2: Adjusting the HDR image
1 In the Step 2: HDR Adjustments window, perform any of the following actions to achieve the look you want:• in the Presets area, click a preset thumbnail• enable the White Balance check box, click the
Dropper tool, and then click the image to set the white point
• drag the Temperature slider to warm or cool the image, and drag the Tint slider to fine-tune the color
• drag the Contrast, Highlights, Midtones, and Shadows slider to adjust the tone and contrast
• drag the Vibrancy slider to saturate or desaturate the colors
• choose Creative detail or Natural detail from the Detail drop-list, and then drag the respective sliders to adjust the amount of local detail
To focus on black-and-white processing, click the B&W tab.
To re-enable color processing, click the Color tab.

[ 10 ] Reviewer’s Guide
You can apply photo fixes, color and contrast corrections, remove noise, and more during
the final step of Exposure Merge.
2 To save your HDR image for further editing, click Create HDR file, type a file name, and then click Save.
3 Click Process.
The settings are applied to the 16-bit image file in preparation for final output.
Give it a try Give it a tryStep 3: Fine-tuning the HDR image
1 In the Step 3: Fine-Tune window, apply any of the following tools or adjustment options:• Smart Photo Fix• White Balance• Brightness/Contrast• Fill Light/Clarity• Local Tone Mapping• High Pass Sharpen• Digital Noise Removal
2 When you are satisfied, click Save and close.
3 In the Save As dialog box, type a file name, and then click Save.

Reviewer’s Guide [ 11 ]
The easiest way to extraordinary photosBefore developing PaintShop Pro X6, we consulted our users to learn what they wanted from the next edition of their favorite photo editor. Among the top requests were a 64-bit version and UI refinement. After years of building an exceptional feature set, it was time to hone the fit and finish of PaintShop Pro. The fine-tuned workspaces present less clutter, and two new selection tools will help you isolate an image area quicker than ever. And of course, you’ll still find
the same easy-to-use creative design tools and effects that help you dramatically transform your photos with minimal time and effort.
Enhanced! Workspaces: With PaintShop Pro X6, you’ll find dedicated Manage, Adjust, and Edit workspaces that present tools and options for each intended task. The refined workspaces reduce clutter and duplication, which makes PaintShop Pro more welcoming and easier than ever to use.
The refined PaintShop Pro X6 (top) provides dedicated, clutter-free workspaces that let you focus on the task at hand.

[ 12 ] Reviewer’s Guide
New! Open an image as single layer: For speed and convenience, you can now drag an image to the Layers palette, and it will be instantly added to the currently opened image as a single layer.
Import custom workspace: Many PaintShop Pro customers are veteran users who have built their own toolbars and workspace customizations for specific tasks. To save you time and effort, PaintShop Pro X6 makes it easy to import a custom workspace so you can instantly access your favorite personal workspaces.
New! Smart Selection Brush: This new brush uses a photo segmentation engine that lets you select objects based on brushstokes. Photo segmentation collects pixels into regions that correspond to separate surfaces, objects, or natural edges of an object. This means that you can simply paint over an object to select it, and you can build or reduce the selection with additional brushstrokes. It’s a fast, easy, and accurate way to isolate part of an image.
Give it a tryTaking a workspace tour
1 In the Manage workspace, click the Preview Mode button.
This switches the workspace from Thumbnail Mode to Preview Mode. To switch back, click the Thumbnail Mode button.
The Manage workspace has four main components:• Navigation palette – for finding and
organizing your photos• Preview area – for viewing a single image or
thumbnails of all images in the active folder • Info palette – for viewing and entering EXIF or
IPTC data• Organizer palette – for selecting photos
2 At the top of the workspace, click the Adjust tab.
The Adjust workspace has four main components:• Adjust palette – tools and controls for
adjusting photos• Preview area – displays the photo selected in
the Organizer palette• Instant Effects palette – preset effects• Organizer palette – for selecting photos
3 At the top of the workspace, click the Edit tab.
The Edit workspace has five main components:• Tools toolbar – tools for painting, drawing,
cropping, typing text, and performing other image editing tasks
• Tool Options palette – settings and controls for the active tool
• Layers palette – view, organize, and adjust image layers
• Materials palette – colors and materials for painting, drawing, filling, and retouching
• Image window – displays open files
Give it a tryOpening an image as single layer
1 Open an image in the Edit workspace.
2 From the Organizer palette, drag a different image to the Layers palette.
A new Raster layer is added.
You can also drag an image from Windows Explorer.
Give it a tryImporting a workspace
1 In the Edit workspace, choose File Workspace Load.
2 In the Load Workspace dialog box, choose one of the following:• Yes – saves the current workspace• No – does not save the current workspace
If you have custom toolbars or other workspace augmentations, you may want to save the current workspace before loading another one.
3 Select the workspace file you want to import, and then click Load.

Reviewer’s Guide [ 13 ]
You simply drag the new Smart Selection Brush over an image area to create and refine a selection.
New! Auto Selection tool: This new tool lets you enclose an image area in a bounding rectangle that automatically detects and snaps to edge. It’s quick and simple, and does most of the work for you, which lets you focus on being creative.
The new Auto Selection tool automatically detects and snaps to the edges of an object area that you select.
New! Video tutorials: PaintShop Pro X6 provides instant access to a plethora of proficiency building video tutorials. You simply click Help Video Tutorials.
Give it a tryUsing the Smart Selection Brush
1 In the Edit workspace, open a photo that contains an object or person that you want to isolate.
2 On the Tools toolbar, click the Smart Selection Brush .
3 On the Tool Options palette, adjust the Size setting.
You can also adjust any of the following settings:• Mode – specifies whether to replace, add, or
remove an existing selection• Feather – softens the edges of a selection by
specifying a fade width• Anti-alias – smoothens the edges of a
selection by using transparency
4 Drag the brush across the image area that you want to select, and release to review the selection.
You don’t need to be precise; the selection expands automatically to toward edges.
You can press Shift and drag to add to the selection, or press Ctrl and drag to remove the selection.
Give it a tryUsing the Auto Selection tool
1 In the Edit workspace, open a photo that contains an object or person that you want to select.
2 On the Tools toolbar, click the Auto Selection tool.
3 Drag across the image to enclose the area that you want to select, and release to view the auto-selection.
To redo the selection, press Ctrl + D and then reselect an area.

[ 14 ] Reviewer’s Guide
A complete toolset for all skill levels
PaintShop Pro X6 provides professional-quality tools and guidance to help you take your photo editing to the next level. PaintShop Pro X6 offers a built-in script recorder that lets you automate practically any action that the application performs. In addition, we’ve updated the PaintShop Pro Scripting Guide to help you get up to speed quickly.
Enhanced! Script update: In combination with batch editing and custom presets, scripting can help you accelerate common or repetitive tasks. PaintShop Pro X6 provides an updated script framework to help you take advantage the application’s automation capabilities. You can record a series of commands as a script that you can playback at any time. This can save you significant time with tedious tasks, which is especially useful if you apply the same effect(s) to many photos.
You can use scripting to automate applying a Dragan effect to a photo or series of photos.
Give it a tryScripting to automate a Dragan effect
1 In the Edit workspace, open an image.
2 Click File Script Start Recording.
3 On the Layers palette, click the New Layer button and choose New Adjustment Layer Levels.
4 In the Levels area of the Levels dialog box, drag the black diamond slider to approximately 15 and the gray diamond slider to approximately 170, and then click OK.
5 Click the New Layer button and choose New Adjustment Layer Hue/Saturation/Lightness.
In the Hue/Saturation/Lightness dialog box, drag the Saturation slider to approximately -30, and click OK.
6 Click the New Layer button and choose New Adjustment Layer Curves.
In the Curves dialog box, add three points along the Histogram with the following approximate values, and then click OK:• Output = 24, Input = 52• Output = 109, Input = 129• Output = 221, Input = 193
7 On the Layers palette, right-click the original image and choose Duplicate.
Click Effects Edge Effects High Pass, and in the High Pass dialog box, enter a Radius setting of approximately 18.
Right-click the duplicate layer, choose Properties, then choose Overlay from the Blend mode list box and click OK.
8 Right-click in the Layers palette and choose Merge Merge All (Flatten).
9 Click File Script Save Recording, and then type a name for your script in the Save As dialog box.

Reviewer’s Guide [ 15 ]
Enhanced! Scripting Guide: The updated PaintShop Pro Scripting Guide offers a helping hand for anyone interested in scripting. PaintShop Pro X6
scripts are written in the Python programming language, and this guide can help users who are intimated by code.
You can use the powerful PaintShop Pro scripting engine to create custom toolbars. For example, you can build your own toolbar for applying an image effect, such as the Dragan effect.
Give it a tryCreating a custom toolbar
1 In the Edit workspace, open an image, and then click View Customize.
2 In the Customize dialog box, click the Toolbars tab, and then click New.
3 In the Toolbar Name dialog box, type a name for the toolbar, and then click OK.
A small, empty toolbar appears.
4 In the Customize dialog box, click the Commands tab.
5 In the Categories area, choose Layers.
6 In the Commands area, scroll through the list and drag the following icons to the toolbar:
• Levels
• Hue/Saturation/Lightness
• Curves
• Duplicate
7 In the Commands area, choose Effects and then drag the High Pass icon to the toolbar.
8 In the Commands area, choose Layers and drag the following icons to the toolbar:
• Properties
• Merge All (Flatten)
9 Click Close.You can double-click the toolbar to dock it, or leave it floating in the workspace.
Give it a try

[ 16 ] Reviewer’s Guide
Enhanced! IPTC data for RAW files: With PaintShop Pro X6, you can add IPTC data to your RAW files by using the Info palette in the Manage workspace. IPTC data is used by photographers and agencies to save keywords, comments, and copyright
information, which makes their images searchable. When you output a RAW file in JPEG or TIFF formats, PaintShop Pro X6 will embed any IPTC data so that it stays with your files.
You can use the Info palette to easily add IPTC data to your images.
Enhanced! Support for Adobe® Photoshop® plug-ins: PaintShop Pro X6 provides support for Adobe Photoshop plug-ins to ensure that you can seamlessly work with your favorite 64-bit extensions and creative effects. In addition, you can also use the 32-bit edition of PaintShop Pro to run any older plug-ins that aren’t supported by 64-bit architecture.
Enhanced! 64-bit plug-in interface: With the new 64-bit edition of PaintShop Pro, the plug-in interface has been updated to ensure that you can use 3rd-party plug-ins with ease.
Exceptional value with new Membership perks
The all-new PaintShop® Pro Membership program makes this all-in-one solution the most affordable photo-editing and design package on the market. Membership is free and by signing up you’ll receive important product service packs, exclusive PaintShop Pro X6 content, as well as access to webinars and special offers.
Members will be notified when the latest content and service packs are available for download, ensuring you’re always getting the most out of PaintShop Pro X6.

Reviewer’s Guide [ 17 ]
Benchmarking PaintShop® Pro X6 (64-bit)
To make PaintShop Pro X6 the most powerful version ever, we completely rebuilt its architecture to migrate from 32 to 64 bit.
Why 64 bit? And why now?
For application developers, the chief advantage offered by 64-bit architecture is the ability to access RAM beyond 4 GB. Migrating a 32-bit application to 64-bit architecture, however, is a large undertaking that requires significant development time.
The code has to be rebuilt from the ground up, starting with the foundation of 64-bit support libraries, and optimizing algorithms to take advantage of the 64-bit OS kernel, which improves many aspects of application performance. And it’s not simply about speed — decisions have to be made about how best to utilize the additional processing power.
For customers, the appeal of a 64-bit application is that it promises to take advantage of newer hardware configurations. While 64-bit processors and operating systems have been available for years, software has been slow to make the switch due to the considerable effort involved.
Prior to developing PaintShop Pro X6, we surveyed our users and the number one request was for a 64-bit version. And so, we focused our development on bringing 64-bit power to PaintShop Pro and boosting the performance, speed, and stability of our users favorite features.
The result is a faster, smoother, and more responsive image-editing experience. Launched side-by-side with the previous version, PaintShop Pro X6 will start 10% faster. The HDR tools are quicker than ever. The Smart Carver now performs 16-bit image editing, reducing ‘noise’ and improving the quality of your adjusted image. Plus, you can work with more images at once, and with larger images (greater than 400 megapixels).
Benchmark use cases
The following use cases describe common tasks that our users perform regularly, illustrating the performance gains enabled by 64-bit architecture. All benchmark tests were performed on the following system:
• CPU: Intel® Core™ i5-2520M CPU @ 2.50GHz (4CPUs), ~ 2.5GHz
• OS: Windows® 7 Enterprise SP1- 64bit
• RAM: 4 GB
Cataloging JPEGs: When you point PaintShop Pro to a folder or external drive, the application catalogs, or indexes, all images at the specified destination. Whether you are cataloging a few new images direct from your camera, or connecting to a hard drive to access thousands of images, the process can consume both time and application resources.
This is one of several key areas where the 64-bit version of PaintShop Pro X6 performs better and faster than ever. For example, RAW files — notoriously cumbersome for image editors — now load 9% faster than the 32-bit PaintShop Pro X5. And JPEGs, which

[ 18 ] Reviewer’s Guide
are the most popular format of our users, can now be cataloged a dramatic 78% quicker.
The new 64-bit PaintShop Pro X6 catalogs JPEGs a whopping 78% faster than the previous version.
Opening a JPEG in the Edit workspace: Here’s an area where a small boost can make a big difference to the feel of an application. Once you’ve chosen an image to edit and your creative juices start flowing, the last thing you want is a delay. You’re already thinking about how best to improve your image, and your image editor should respond fluidly.
Every editing task starts with opening the image, and PaintShop Pro X6 now does this significantly faster.
When you choose a JPEG for editing, PaintShop Pro X6 will open the image in the Edit workspace
18% quicker than PaintShop Pro X5.
Converting a batch of RAW files to PNG: Batch processing lets users automate routine image-editing tasks and is especially useful when working with multiple photos. For example, a web designer may need to convert several RAW files to PNG. For a typical
hobbyist user, automating the resizing of a batch of photos can save significant time and tedium.
With PaintShop Pro X6 (64-bit), you can now convert a batch of RAW files to PNG 57% quicker, and JPEG to PNG 70% faster. Plus, batch resizing clocks in 16% more swiftly.
The new 64-bit PaintShop Pro X6 is 57% faster at converting batches of RAW files to PNG.
Applying the Skin Smoothing effect: Retouching, or portrait editing, has long been one of most popular image-editing tasks. Due to the frequent adjusting and re-adjusting steps inherent in the process, retouching also tends to hog system resources and stall the performance of an image editor.
This is another area where the migration to 64-bit architecture resulted in an effect performing more rapidly.
With PaintShop Pro X6, you can now apply the Skin Smoothing instant effect up to 28% faster
than the previous version.
Reviewer’s Guide [ 19 ]
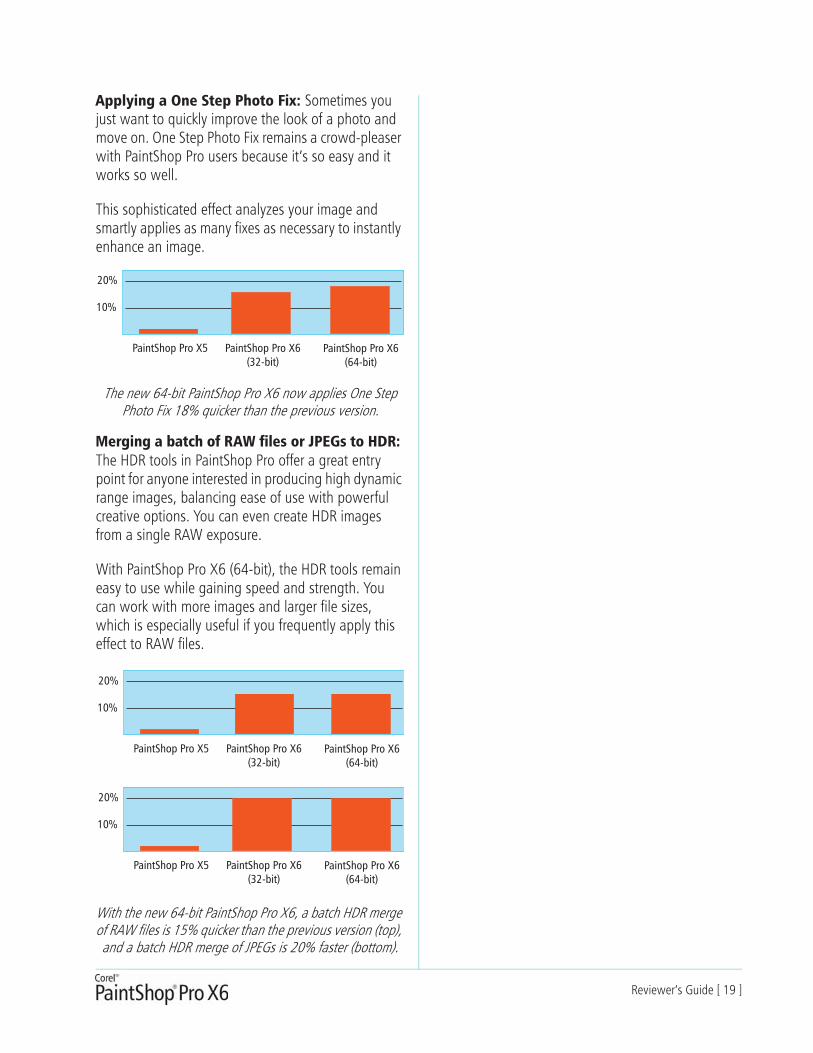
Applying a One Step Photo Fix: Sometimes you just want to quickly improve the look of a photo and move on. One Step Photo Fix remains a crowd-pleaser with PaintShop Pro users because it’s so easy and it works so well.
This sophisticated effect analyzes your image and smartly applies as many fixes as necessary to instantly enhance an image.
The new 64-bit PaintShop Pro X6 now applies One Step Photo Fix 18% quicker than the previous version.
Merging a batch of RAW files or JPEGs to HDR: The HDR tools in PaintShop Pro offer a great entry point for anyone interested in producing high dynamic range images, balancing ease of use with powerful creative options. You can even create HDR images from a single RAW exposure.
With PaintShop Pro X6 (64-bit), the HDR tools remain easy to use while gaining speed and strength. You can work with more images and larger file sizes, which is especially useful if you frequently apply this effect to RAW files.
With the new 64-bit PaintShop Pro X6, a batch HDR merge of RAW files is 15% quicker than the previous version (top), and a batch HDR merge of JPEGs is 20% faster (bottom).

About Corel
Corel is one of the world’s top software companies providing some of the industry’s best-known graphics, productivity and digital media products. Boasting the most comprehensive portfolio of innovative software, we’ve built a reputation for delivering solutions that are easy to learn and use, helping people achieve new levels of creativity and productivity. The industry has responded with hundreds of awards for innovation, design, and value.
Used by millions of people around the world, our product lines include CorelDRAW® Graphics Suite, Corel DESIGNER®, CorelCAD™, Corel® Painter®, Corel® PaintShop® Pro, Corel® VideoStudio®, and Corel® WordPerfect® Office. For more information on Corel, please visit www.corel.com.
Copyright © 2013 Corel Corporation. All rights reserved.
Corel® PaintShop® Pro X6 Reviewer’s Guide
Protected by U.S. Patents 5652880; 5347620; 5767860; 6195100; 6385336; 6552725; 6657739; 6731309; 6825859; 6633305; Patents Pending.
Product specifications, pricing, packaging, technical support and information (“specifications”) refer to the retail English version only. The specifications for all other versions (including other language versions) may vary.
INFORMATION IS PROVIDED BY COREL ON AN “AS IS” BASIS, WITHOUT ANY OTHER WARRANTIES OR CONDITIONS, EXPRESS OR IMPLIED, INCLUDING, BUT NOT LIMITED TO, WARRANTIES OF MERCHANTABLE QUALITY, SATISFACTORY QUALITY, MERCHANTABILITY OR FITNESS FOR A PARTICULAR PURPOSE, OR THOSE ARISING BY LAW, STATUTE, USAGE OF TRADE, COURSE OF DEALING OR OTHERWISE. THE ENTIRE RISK AS TO THE RESULTS OF THE INFORMATION PROVIDED OR ITS USE IS ASSUMED BY YOU. COREL SHALL HAVE NO LIABILITY TO YOU OR ANY OTHER PERSON OR ENTITY FOR ANY INDIRECT, INCIDENTAL, SPECIAL, OR CONSEQUENTIAL DAMAGES WHATSOEVER, INCLUDING, BUT NOT LIMITED TO, LOSS OF REVENUE OR PROFIT, LOST OR DAMAGED DATA OR OTHER COMMERCIAL OR ECONOMIC LOSS, EVEN IF COREL HAS BEEN ADVISED OF THE POSSIBILITY OF SUCH DAMAGES, OR THEY ARE FORESEEABLE. COREL IS ALSO NOT LIABLE FOR ANY CLAIMS MADE BY ANY THIRD PARTY. COREL’S MAXIMUM AGGREGATE LIABILITY TO YOU SHALL NOT EXCEED THE COSTS PAID BY YOU TO PURCHASE THE MATERIALS. SOME STATES/COUNTRIES DO NOT ALLOW EXCLUSIONS OR LIMITATIONS OF LIABILITY FOR CONSEQUENTIAL OR INCIDENTAL DAMAGES, SO THE ABOVE LIMITATIONS MAY NOT APPLY TO YOU.
Corel, the Corel logo, CorelCAD, CorelDRAW, Corel DESIGNER, PaintShop Pro, Painter, VideoStudio, and WordPerfect are trademarks or registered trademarks of Corel Corporation and/or its subsidiaries in Canada, the U.S., and/or other countries.
Other product, font, and company names and logos may be trademarks or registered trademarks of their respective companies.

Corel Corporation1600 Carling Ave.Ottawa, ONCanada K1Z 8R7
Corel UK LimitedSapphire CourtBell StreetMaidenheadBerkshire SL6 1BUUnited Kingdom
Media Contact North America
Sara Chesiuk Public Relations ManagerCorel Corporation613-728-0826 ext. [email protected]


![Corel PaintShop Photo Pro X3 Reviewer's Guide (NL) · PDF fileHandleiding voor de recensent [ 1 ] 1 Inleiding tot Corel® PaintShop Photo™ Pro X3 Digitale fotografie ontwikkelt zich](https://img.dokumen.tips/doc/110x75/5aa002ab7f8b9a71178d77d5/corel-paintshop-photo-pro-x3-reviewers-guide-nl-voor-de-recensent-1-1-inleiding.jpg)


![Guida di valutazione di Corel PaintShop Pro X4 · Guida di valutazione [ 1 ] Introduzione a Corel® PaintShop™ Pro X4 Corel® PaintShop™ Pro X4 è una soluzione ideale per gestire,](https://img.dokumen.tips/doc/110x75/5b7b810d7f8b9aa74b8cad6e/guida-di-valutazione-di-corel-paintshop-pro-x4-guida-di-valutazione-1-introduzione.jpg)
![Corel PaintShop Pro X9 Reviewer's Guide - … · Corel PaintShop Pro X9 Reviewer’s Guide [ 1 ] Introducing Corel® PaintShop® Pro X91 Photos matter. Truer today than ever before](https://img.dokumen.tips/doc/110x75/5bb4d2ea09d3f24d6c8be0d0/corel-paintshop-pro-x9-reviewers-guide-corel-paintshop-pro-x9-reviewers.jpg)