Embed Size (px)
Citation preview

Pick Tool is one of the most important tools used in Corel DRAW for selection and for editing of the graphic. 1. Open Corel DRAW. Select Rectangle Tool from the toolbox (marked with red circle).
2. Draw rectangle. Once you draw it, it is selected by default.
3. Now select Pick Tool (marked with green circle).
4. Click anywhere outside the rectangle. It will get deselected.
5. Click on the like of the rectangle. It will get selected.
6. Keep the pick tool within rectangle it will change the cursor into move icon (marked with green circle).
7. Press and drag the mouse button to move the rectangle. 1. Open Corel DRAW. Draw rectangle. Keep it selected. If deselected by mistake, select it using pick tool

2. Click it once again on the rectangle. Observe the difference carefully. Basic selection points are turned into arrows (marked with green circle).
3. Let us work on the corner points. Place the cursor on any corner point. The cursor is changed from pointer into circular arrow that represents rotation movement (drawn separately and marked with green circle).
4. Press on any corner point and rotate. Rectangle rotates around its center.
5. Drag the center outside the circle using pick tool (marked with green circle).
6. Press on any corner point again and rotate. Rectangle rotates around its newly positioned center.
1. Open Corel DRAW. Draw rectangle. Keep it selected. If deselected by mistake, select it using pick tool.
2. Click it once again on the rectangle. Observe the difference carefully. Basic selection points are turned into arrows. This time, we will work with the middle points. You will find straight arrow points in

the middle of the four lines of the rectangle (marked with green circle).
3. Place the cursor on the middle point of the top horizontal line. The cursor is changed from pointer into double straight line arrows with opposite left right direction. That represents Skew movement (separately drawn and marked with red circle).
4. Press and drag to the left or right. Rectangle gets skewed in a horizontal direction.
5. Go back to normal rectangle using Edit > Undo
6. Place the cursor on the middle point of the left or the right vertical line. Press and drag to the up or down. Rectangle gets skewed in a vertical direction.
. Open Corel DRAW. Draw rectangle. Keep it selected. Select Pick Tool. The rectangle will have total eight points, four points at the four corners and four in the middle of the four sides.
2. Place the cursor on any corner point. Pointer changes into the cursor showing the direction at which the rectangle will be resized.

3. Drag the cursor outside, it will increase the size of the rectangle proportionally (blue rectangle). Drag the cursor inside, it will decrease the size of the rectangle proportionally (red rectangle).
4. Similarly you can drag the middle points on the horizontal lines.
5. Also drag the middle points on the vertical lines.
1. Open Corel DRAW. Draw rectangle. Keep it selected
2. Click "Fountain Fill Dialog" from Fill Tool. AT Linear fill type select Red color for "From" and Yellow for "To" under color blend.Make a note that midpoint value is 50 by default. Click OK.
3. At 50, it's a smooth gradation of the two colors.
4. If you slide the midpoint slider towards left extreme i.e. to 1, Yellow color will be dominant in the result.

5. If you slide the midpoint slider towards right extreme i.e. to 99, Red color will be dominant in the result.
6. Bring back to 50, it's a smooth gradation of the two colors. Try rest of the fill types with different midpoint values. Please do not change any other settings. Let us learn the details about the basic editing of outline which includes changing of color, thickness and removing outline.
1. Open Corel DRAW. Draw rectangle. Keep it selected.
2. Right click on any color in the color palette situated at the right side. The outline color will change to that color.
3. If you right click on white color the out line may seems to be disappeared. But its still there because you won't be able to see white line on white background. 4. Right click on any color other than white. Try to experiment with different colors. 5. Press the cursor on Outline Tool (marked with red circle).
6. It will display the options available. Click on 24 Point Outline (Thick). The outline of the rectangle becomes thick.

7. You can right click on any color in the color palette to change the color of this thick outline. Tryout different thickness available in the outline tool. 8. Observe the color palette carefully. There is a cross with no fill on the top.
9. Right click on the cross mark. The outline of the rectangle will get disappeared.
10. Again color it by right clicking on some color. Go to Outline Tool and click "No outline" option (marked with green circle).
11. Again the outline is disappeared. Let us learn the details about the basics of fill in Corel DRAW.
1. Open Corel DRAW. Draw rectangle. Keep it selected.
2. Click on any color from the color palette at right hand side. The object is filled with color. We have increased the thickness of the outline to see the difference in the colors prominently.
3. If you right click on the some color, outline will be colored with same fill color. Now you will see the object with no border as the border is merged with the fill since we have used same color for both.
4. Try different colors for fill and outline.
5. Click on the cross mark at the top of the color palette. The color is removed and you again get the object with outline.

6. Please remember that cross filled icon on the top of the color palette is used to remove fill when clicked normally and it removes outline when clicked with right button. 7. Click on Fill Tool from toolbox (marked with red circle).
8. The first option is "Fill Color Dialog". Click it and you will get "Uniform Fill" dialog box. Click on any color or the shade. Please do not change any settings. Click ok.
9. The object is filled with the color you have selected.
Let us learn the details about the basics of fountain fill in Corel DRAW.
1. Open Corel DRAW. Draw rectangle. Keep it selected.
2. Click on Fill Tool from toolbox. The second option is "Fountain Fill Dialog". Click it and you will get "Fountain Fill" dialog box. 3. Let us observe the default values in the dialogue box. Black and white colors are selected for fill. "Two Color" is selected in the color blend. And the fill type is "Linear" Please do not change any settings.
4. Click ok. The object is filled with black and white linear gradient fill.

5. Open Fountain Fill again and change Linear Fill type to Radial. Click ok. Observer the result. Try Square and Conical fill types. In the following image we have (from top left, clockwise direction), Linear, Radial, Square and Conical fill.
6. Select Linear fill type and Two Color is selected by default. Select two different colors from "From and To" drop down menu under color blend
7. Click ok and observer the result.
8. Try rest of the fill types and use different color combinations

Working with text in Corel DRAW is really interesting experience because you can edit the text in so many ways.
1. Open Corel DRAW. Select Text Tool (marked with green circle). The icon is A (Capital A).
2. Click the cursor on the page and type the text. It may be very small so stretch it by pulling its corner point using Pick Tool.
3. Move it anywhere using Pick Tool again. 4. Pull other points using pick Tool, to stretch the text horizontally and vertically.
5. Filling text with color is just a click away. Keep the text selected. Click on any color from the color palette at right hand side. The text is filled with the selected color.
6. If you click on the cross icon in the color palette, there will be no color in the text. 7. You can apply outline to the text in Corel DRAW. Different types of effects can be created using outline. Click the cursor on the page and type the text. Stretch it to bigger size by pulling corner point. Keep it selected. We have removed the color from the text.
8. Now right click on any color in the color palette.

9. This will apply the outline to the text of the same color you have right clicked. 10. If you Right click on the cross icon in the color palette, there will be no outline to the text. 11. Let us try to change outline thickness of the text. It creates astonishing effects. Keep the text selected. 12. Press Outline Tool. In the fly out menu click on 2 point outline (Thin). The outline is thicker than the default. Try different types of available thickness.
We are covering fill in the text. It's not different than filling any other object but filling the text using fountain fill makes great difference with respect to the effects.
1. Open Corel DRAW. Type the text. Use thick font to get better effect.
2. Select Fountain Fill from Fill Tool. You have four options i.e. Linear, Radial, Conical and Square. Select one by one. Change the color and apply the fill tothe text.
3. Remove the outline and check the difference in the result.
4. We have three options in the pattern fill i.e. Two color, Full color and bitmap. Select Pattern Fill from Fill Tool. Try using all the three options.
5. Try to use different colors in two color pattern fill.

6. Remove the outline and check the difference in the result.
7. Realistic fill using texture applies different dimensions to the text. Apply different types of textures. Try to use different colors for outline. Select Texture Fill from Fill Tool. 8. Try using different type of textures. Go for different types from Texture Library.
9. Remove the outline or give different colors to outlines and check the difference in the result.
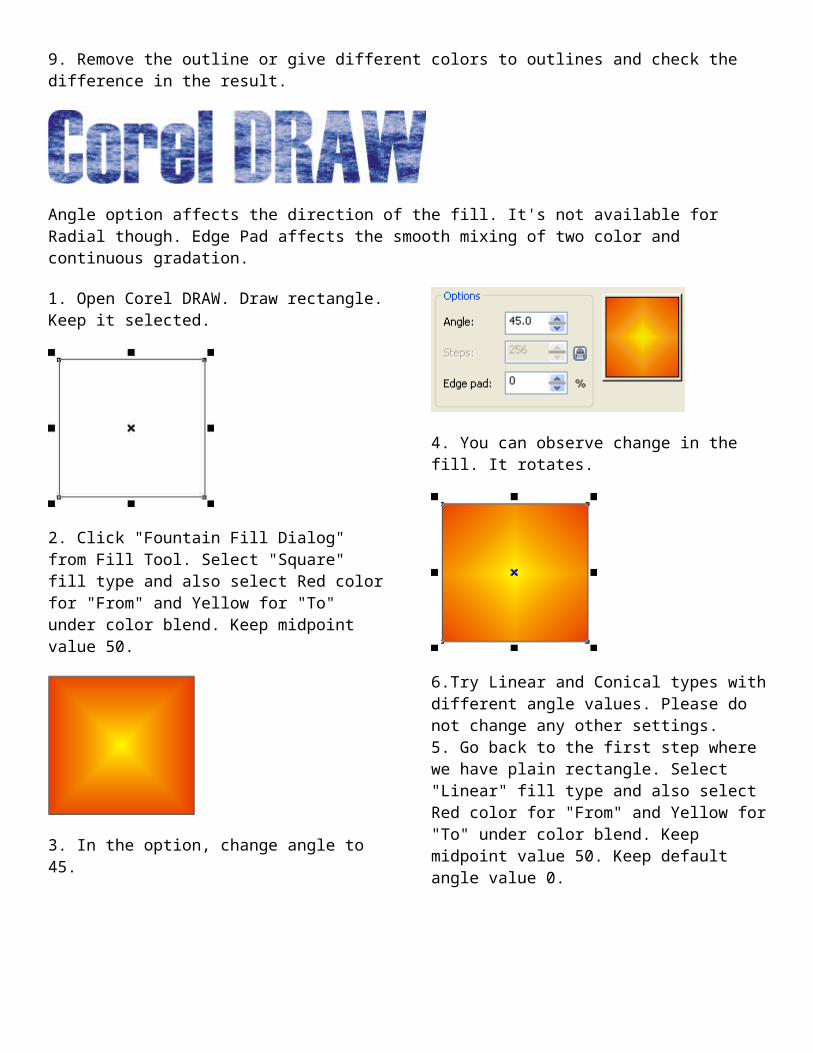
Angle option affects the direction of the fill. It's not available for Radial though. Edge Pad affects the smooth mixing of two color and continuous gradation.
1. Open Corel DRAW. Draw rectangle. Keep it selected.
2. Click "Fountain Fill Dialog" from Fill Tool. Select "Square" fill type and also select Red color for "From" and Yellow for "To" under color blend. Keep midpoint value 50.
3. In the option, change angle to 45.
4. You can observe change in the fill. It rotates.

6.Try Linear and Conical types with different angle values. Please do not change any other settings. 5. Go back to the first step where we have plain rectangle. Select "Linear" fill type and also select Red color for "From" and Yellow for "To" under color blend. Keep midpoint value 50. Keep default angle value 0.
6. In the option, change Edge Pad to 49 (It's a max value).
7. You get two distinct colors, Red and Yellow in the fill.
8. As you go on decreasing the value, you get smooth gradation. At 0, you get the uniform fill of
the two properly blend colors. Please do not change any other settings.
We can create our own patterns in Corel draw. Let us first learn to fill the objects using patterns.
1. Open Corel DRAW. Draw rectangle. Keep it selected.
2. Click "Pattern Fill Dialog" from Fill Tool. "2-color" pattern type is selected by default.
3. You can select any pattern from drop down and select different colors for Front and Back. Click ok. Please do not change any other settings.
4. We can create full color pattern in Corel DRAW. Let us learn to fill it in the object. Go back to first step. Draw rectangle and keep it selected. Click "Pattern Fill Dialog" from Fill Tool. Select "Full Color" option.
5. You can select any pattern from drop down. This time you won't get any color option to change. Click ok. Please do not change any other settings.
6. Bitmap fill is more smooth looking real design than other two. Go back to first step. Draw rectangle and keep it selected. Click "Pattern Fill Dialog" from Fill Tool. Select "Bitmap" option.
7. You can select any pattern from drop down. This time also you won't get any color option to change. Click ok. Please do not change any other settings.
8. Corel DRAW comes up with the wide range of texture fills useful forbackgrounds and may other purposes. Go back to first step. Draw rectangle and keep it selected. Click "Texture Fill Dialog" from Fill Tool.
9. Select any texture from the texture list. Click ok. The rectangle will be filled with texture. Please do not change any other settings.
We will try to import bitmap using Import command in Corel DRAW. Youcan try to import any bitmap i.e. JPG or tif image of your choice.
1. Open Corel DRAW. 2. Go to File > Import

3. Locate any jpg or tif image on your pc and import any jpg or tif image. 4. You will get the cursor with the information
about the image and how to place the image on the page.
5. First the name and the size of the image. Read the next instruction carefully. It says "Click and drag to resize".
6. Click and drag the cursor in the window and resize the image according to your requirement.
7. Delete the image and import it again to follow the next instruction that says" Press Enter to center on page". 8. Press Enter key of the keyboard. The image will be placed in the center of the page.

We will discuss about the different modes of working in Corel DRAW. The drawings in Corel Draw can become heavy and takes time to open. Sometime it takes longer duration to refresh the drawings where the blend effect is exclusively used. We can use different modes to watch different levels in the drawing. Simple wire frame is used to see the basic elements in the drawingquickly.
1. Open Corel DRAW. 2. Import any jpg or tif file. Just take care that it should be colored and not black and white file.
3. Go to View and select Simple Wireframe. The image turns to grayscale.
4. Go to View and select Normal. The image turns to original color. Delete the image. 5. Now draw two rectangles filled with different colors while you are in the normal Wireframe mode. Apply blend effect using those two rectangles.
6. Go to View and select Simple Wireframe again. You will find that the intermediate steps of the blend are disappeared along with the colors inside. And you get to see the basic elements of the blend which are just two unfilled rectangles in this case.

7. Go back to view and select Normal mode again and you will see the blend with steps and colors. 8. Please make a note that you don't need to select any object to apply Wireframe mode. It is applied globally on all the objects present in the windows Wireframe mode used to display the intermediate steps in the blend though it will not display the colors in it.
1. Open Corel DRAW. 2. Draw two rectangles filled with different colors while you are in the normal Wireframe mode.
3. Apply blend effect using those two rectangles.
4. Go to View and select Wireframe. You will find that the intermediate steps of the blend remained as it is while the color is disappeared.
5. Go back to view and select Normal mode again and you will get back the blend colors We will make duplicate of the object using Duplicate command. We are using text as an object. You can draw some shape and follow the instructions. There are three simple ways of duplicating the object.
1. Open Corel DRAW. Type the text and fill it with any color. Keep it selected.

2. Go to Edit > Duplicate
3. The text is duplicated giving another copy.
4. You can even press CTRL + D to duplicate any object. Remember to select the object with pick tool which you are going to make a duplicate of. 5. There is another way of duplicating the object using mouse. Follow the procedure carefully. 6. Select the object and drag it using mouse to the location where you want to place the duplicate. 7. DO NOT RELEASE the left mouse button. 8. While the left mouse button is still pressed, click Right Mouse button. 9. This will create the duplicate of the object.
Draft mode displays bitmaps and drawing fills on low resolution. It is one step behind the normal mode as far as the display is concerned but since it uses low resolution, it is faster than Normal mode.
1. Open Corel DRAW. 2. Import any colored bitmap picture.
3. Zoom the pictures and toggle between Normal and drat mode. The previous picture was in Normal mode. The following picture is in draft mode.
4. You will find that the picture is bit pixilated in the draft mode as it uses low resolution.
5. There is another way of finding the working of the draft mode.
6. Draw two rectangles while you are in the Normal mode. Fill the first with green color.
7. Select Interactive fill tool and fill the second rectangle with fountain fill using the combination of red and white colors with Linear fill.

8. Apply blend effect using those two rectangles. Observe the blend carefully. The green color is blended with the combination of red and white gradient smoothly.
9. Go to View and change the view to Draft mode. You will find that the rectangle which is filled with red and white linear fill has changed the fill color to the shade of pink that is intermediate of red and white and blended to the green color.
10. This way the draft mode refreshes the drawing with the low resolution. 11. If you switch back to the Normal mode, you will get back the original red and white fountain fill in the second rectangle
Let us start with the order command where we will send the object back and front of other object. There are some more interesting options in this menu that we will study in the related lessons.
1. Open Corel DRAW. 2. Draw rectangle using rectangle tool and fill it will red color.3. Draw another rectangle, which will overlap the part of the first rectangle and fill this rectangle with green color. 4. Draw third rectangle in such a way that will occupy some space of the both red and green rectangle. Fill this rectangle with blue color. 5. Keep the Blue color rectangle selected. If it is deselected by mistake, select it using pick tool.

6. Go to Arrange > Order > Back One 7. The blue rectangle goes back one step. It means it goes behind green rectangle. Now it lies between red and green.
8. Go to Arrange > Order > Back One 9. Blue rectangle goes one more step back. Now it is behind red rectangle.
10. Keep the blue rectangle selected. 11. Go to Arrange > Order > Forward One 12. Blue rectangle comes one step forward and comes in front of the red rectangle.
13. Go to Arrange > Order > Forward One 14. Again blue rectangle come one step forward and comes in front of the green rectangle.

15. Select all three rectangles using pick tool. Just drag it around all the rectangles to select them all. 16. Remember the present order of the object. Its red at the back then green in the middle and blue in the front.
17. Go to Arrange > Order > Reverse Order 18. The order of the object reverses.
19. It means now its blue at the back, green in the middle and red in the front if you want to shift the selected object behind particular object, Corel draw provides the command called "Behind" in the order menu. Similarly, if you want to shift the selected object in front of particular object, Corel draw provides the command called "In Front Of" in the order menu.
1. Open Corel DRAW. 2. Draw rectangle using rectangle tool and fill it will red color. Draw another rectangle, which will overlap the part of the first rectangle and fill this rectangle with green color. 3. Draw third rectangle in such a way that will occupy some space of the both red and green rectangle. Fill this rectangle with blue color. 4. Draw fourth rectangle that will occupy some space of the last three rectangles and fill it with yellow color. Keep yellow rectangle selected.

5. Go to Arrange > Order > Behind 6. The cursor changes to thick black arrow.
7. Suppose you want to place the yellow rectangle behind green. You will click the arrow on the green rectangle.
8. The yellow rectangle is shifted behind the green rectangle.
9. You can draw few more shapes and try this command. 10. Now select the red rectangle, which is at the back of all the rectangles.

11. Go to Arrange > Order > In Front Of 12. The cursor changes to thick black arrow. 13. Suppose you want to place the red rectangle in front of Blue. You will click the arrow on blue rectangle. 14. The red rectangle is shifted in front of the blue rectangle.
15. You can draw few more shapes and try this command. while working with Corel draw, you may need to see the full screen preview to judge the object how will it appear on the full screen without surrounded by tools or selection points or even the software environment. This will help you to get the idea of a whole picture without any visual limitations and disturbance.
1. Open Corel Draw. 2. Select Ellipse tool and draw the circle within the page area and fill it with any color.
3. Go to view > Full Screen Preview 4. You will see the full screen preview of the circle along with the page.

5. Press any key to come back to the desktop. 6. Select the object with pick tool if it is not selected.
7. Now try shortcut key with F9 for full screen preview. 8. You will notice that even the object is selected; full screen preview won't show the selection.
9. Come back to the desktop by pressing any keyYou may draw lot of objects on the page but like to preview just the object you have selected. It's a great command because you get to see the preview
of the object separately without being clustered with others even it is surrounded by many.
1. Open Corel Draw.2. Select Ellipse tool and draw the circle within the page area and fill it with any color. Select Rectangle Tool and draw rectangle, fill it with some other color.3. You can draw few more objects and fill the color.lace them near each other on the page.
4. Select circle.
5. Go to view > Preview Selected Only. 6. You will see the full screen preview of the circle which you have selected.

7. If you select two object pressing Shift key and using Pick tool, you will get the preview of the two objects what ever you have selected.
8. We selected two stars shown in the above image. We get only those object in the preview when we go for Preview Selected Only option.
This is not the preview but while working you may want to concentrate on particular object. You can zoom it using zoom tool but there is a shortcut.
1. Open Corel Draw. 2. Select Ellipse tool and draw the circle within the page area and fill it with any color. Select Rectangle Tool and draw rectangle, fill it with some other color. You can draw few more objects and fill the color. Place them near each other on the page. 3. Select circle.
4. Press Shift + F25. Only circle which is selected is zoom in the window to its maximum extend and you can work on it without the disturbance of any other object.

While working with Corel draw you go for zoom, preview, you may scroll the page and do lot of things. There is a time comes when you want to go back to fit in window view. We have a shortcut for that also.
1. Open Corel Draw. 2. Select Ellipse tool and draw the circle within the page area and fill it with any color.
3. Scroll the page using scroll bar to shift the page away from its original position or You can even zoom the object using zoom tool just to change the default page view.
4. Now you want to go back to fit in windows view.
5. This is the view where the page comes to its default place. It means the place when you created the new page. Try the shortcut key. 6. Press Shift + F4 7. The page comes back to its default position.
This command is useful to get the view of all the objects scattered on the page or outside the page at once.
1. Open Corel Draw. 2. Select Rectangle tool and draw 3 – 4 rectangles. Fill it with any colors and scatter them on the page and even away from the page. 3. Select Ellipse tool and draw the circle within the page area and fill it with any color.

4. Press F4 key. 5. All the objects will appear in the window at once.
6. This can be useful occasionally to check out where you have placed your objects. 7. While working with Corel draw we can use the area around the page and place our objects there. These objects can be brought into the window with the total picture using this command Grouping in Corel draw is used for easy selection of the different object in single click. If you have lot of separate object in the design, you can group them for easy selection. Please make a note that even if you group the objects together they still remain as independent entities.
1. Open Corel Draw. 2. Select Rectangle tool and draw rectangle. Fill it with any color.
3. Draw ellipse using ellipse tool near the rectangle and fill it with different color than rectangle.

4. Select both, the rectangle and ellipse using pick tool.
5. Go to Arrange > Group 6. Both the objects are grouped together. 7. Please observe carefully that they still have different colors within themselves as we filled in the beginning. 8. Select pick tool and click on any one of the object, both the objects will get selected. There may be some case where you need to group not only different objects but different groups itself. 9 . Draw another rectangle and ellipse, fill them with different colors and group them using same command. 10. Now we have a pair of group each having rectangle and ellipse.

11. You can select these two groups separately using Pick tool. 12. Now select both the groups using Pick tool.
13. Go to Arrange > Group 14. Select pick tool and click on any one of the object, both the groups will get selected because they are the part of one single group now.
Let us learn to ungroup the group.

1. Open Corel Draw. 2. Using Rectangle and Ellipse tool, draw rectangle and ellipse. Fill it with different colors.
3. Select both, the rectangle and ellipse using pick tool. 4. Go to Arrange > Group 5. If you select any object using pick tool, the group will get selected. Keep the group selected.
6. Let us Ungroup this Group. 7. Go to Arrange > Ungroup 8. Deselect by clicking the pick tool outside the objects. 9. Try to select any one object using pick tool.
10. You will observe that now you can select single object as they are ungrouped. We need to create two groups and group them again into one. With Ungroup All command you ungroup everything that is grouped. 11. Group the previous rectangle and ellipse again. 12. Follow the same procedure and create another group. Just fill the objects with different colors.

13. Select both the groups using Pick tool. 14. Go to Arrange > Group 15. Now we have a group which is made up of two different groups.
16. Keep this group selected. 17. Go to Arrange > Ungroup 18. With this, the two groups are ungrouped. You still have two different groups that have two objects grouped within.

19. Go to Edit > Undo to group the both groups again. 20. We are back to the final group step. We again have the group that has two groups within.21. Go to Arrange > Ungroup All 22. Deselect by clicking the pick tool outside the objects.23. All four objects are separate. There is no group remained. Try to select any one object using pick tool. You will observe that now you can select each single object as they are ungrouped.
We have learned that once we form the group of two or more objects, they are selected together. In fact that's the basic purpose of forming of the group. It is for the ease of selection. But if you with to fill
the color separately to particular object in the group,there is a way to do this.

1. Open Corel Draw. 2. Using Rectangle and Ellipse tool, draw rectangle and ellipse. Fill it with same colors.
3. Select both, the rectangle and ellipse using pick tool.
4. Go to Arrange > Group 5. Select the group using Pick tool.6. Fill some other color.
7. As a group both the objects selected together and they are fill with the same color. 8. Now we want to fill the rectangle with different color than ellipse. At the same time we do not with to break the group. 9. Press CTRL and select rectangle with the pick tool.
10. The rectangle is selected. 11. Fill it with any color other than the color in ellipse.
12. You can even stretch, scale and rotate the object in this mode separately without breaking the group.
Combine command is used to make the objects treated as one single entity. It cannot be selected separately.
1. Open Corel Draw. 2. Using Rectangle and Ellipse tool, draw rectangle and ellipse. Fill them with different colors. Select both, the rectangle and ellipse using pick tool.

3. Go to Arrange > Combine 4. You will observe that both the objects are filled with one color as they are treated as a single object.
When the base objects are overlapped, the overlapped part becomes hollow after applying combine command.
5. Using Rectangle and Ellipse tool, draw rectangle and ellipse. Overlap the objects. Fill them with different colors. Select both, the rectangle and ellipse using pick tool.
6. Go to Arrange > Combine
7. You can observe that the object becomes the single entity and filled with one color. The overlapped part becomes hollow. As we used ungroup to separate the objects that are grouped, we use Break Curve Apart to separate the objects that are combined. 8. Using Rectangle and Ellipse tool, draw rectangle and ellipse. Fill them with different colors. Select both, the rectangle and ellipse using pick tool.
9. Go to Arrange > Combine 10. The objects are combined and filled with single color.

11. Now we need to separate the objects. 12. Go to Arrange > Break Curve Apart 13. Click anywhere to deselect the object. Select any object using Pick Tool.
14. You will observe that now you can select any object separately and fill the color of your choice.
Lets us understand the concept of group and combine in depth and compare both of them using certain commands.
1. Open Corel Draw. 2. Draw rectangle using Rectangle and fill it with red color. Keep it selected.
3. Go to Edit > Duplicate 4. You will get another rectangle filled with red color. Fill the second rectangle with green color. Keep them side by side, on the same level with a very less space in between. Select both of them.
5. Go to Arrange > Group 6. Both the rectangles are grouped and still filled with the different colors. 7. Go to Arrange > Ungroup 8. Now the rectangles are ungrouped. 9. Go to Arrange > Combine 10. The objects are combined and filled with single color.
11. You need to do this smoothly as we are going to use the same rectangles further to explain the difference between group and combine. 12. Go to Arrange > Break Curve Apart 13. Click anywhere to deselect the object. Select any object using Pick Tool. You will observe that

now you can select any object separately and fill the color of your choice.
14. Delete any one rectangle. Select the rectangle left on the page. Click on the fill tool and select Fountain Fill Dialogue. Select Radial in Type and Two Color in Color Blend. Choose any colors for From and To boxes. Click OK to fill the radial fill in the rectangle. Keep the rectangle selected.
15. Go to Edit > Duplicate 16. You get another identical rectangle with redial fill. Please try to observe the nature of the radial fill in those two rectangles. They have two centers.This means both the rectangles have their own identical separate radial fills. Keep them side by side, on the same level with a very less space in between. Select both of them.
17. Go to Arrange > Group 18. Both the rectangles are grouped and still filled with the separate radial fills.19. Go to Arrange > Ungroup
20. Now the rectangles are ungrouped. Select both of them. 21. Go to Arrange > Combine 22. Both the rectangles are combined. Now please carefully observe the fountain fill. When grouped, the fill are separate with two centers in each rectangle. After combine command is applied, both the rectangles are treated as one single object and hence the two fills are turned into one single fountain fill. This fill has one center and both the rectangles are treated as big one single rectangle.
23. Go to Arrange > Break Curve Apart 24. The object is separated again and we have two different rectangles with two separate radial fills.
Let us start with the basics of guidelines that will help you white drawing in Corel draw.
1. Open Corel DRAW. 2. Go to View and check Guidelines.

3. Select pick Tool place it over the horizontal ruler. Drag the pointer down. It will bring the dotted line on the page called Guideline. 4. Follow the same procedure using vertical ruler and bring vertical guideline.
5. You can use these guidelines for reference and draw the object when require. You can remove these guidelines temporarily. 6. Go to View and uncheck Guidelines. This is off the guidelines. You can check it to bring them back.
7. If you want to remove them permanently, select the guideline you want to remove using pick tool. Once you select it, it will turn into red color.
8. Press Delete key to delete the guideline. Truly amazing facility provided by Corel draw where you can rotate the guideline for the reference of drawing something angular. 9. Drag the horizontal guideline using pick tool. When it is dragged it is red colored that means it is selected. 10. Click the guideline again with pick tool. This will display the rotating handles with center points as we get in any object when clicked twice with pick tool.
11. Place the cursor on any one of the two handle and start rotating the guideline. You can observe that you can rotate the guideline.

12. Press CTRL + Z to UNDO. 13. Once the guideline is selected by pick tool, the property bar displays the properties of the guidelines. Put 60 in the "Angle of Rotation" box and press enter.
14. The guideline is rotated by 60 degrees. This way you can be precise with the rotation of the guideline.
15. Drag the few horizontal and vertical guidelines using pick tool.
16. Go to Edit > Select All > Guidelines
17. They all turn to red as they are all selected. You can rotate them all by adding the angle in the property bar. 18. Add 60 in the angle of rotation. All the guidelines are rotated by 60 degrees.

19. Click anywhere other than guidelines to deselect them.
20. Press Shift key this time and select 1-2 horizontal and vertical guidelines.
21. This proves that now guidelines can be selected like any other object.
As we have seen that now Corel draw treats the guideline like a normal object that can be selected, deleted even can be rotated. While working in Corel draw sometimes its advisable to lock the guideline so that it will not move while working with the objects. You can select and lock or unlock the guidelines.
1. Open Corel DRAW. 2. Drag the few horizontal and vertical guidelines using pick tool. 3. Using Pick Tool, select any guideline. 4. Go to Arrange > Lock Object
5. Try to move the guideline using pick tool, it will not move. It won't even get deleted. 6. Select the locked guideline with pick tool. 7. Go to Arrange > Unlock Object
8. Now it can be moved or deleted. Let us go into the deep of guidelines using Guidelines Setup. 9 . View > Guidelines Setup

10. By default, show guidelines will be checked, if not, check it. 11. Change the default guideline color to Green and click OK. 12. Drag the guideline on the page. 13. It will have green color and when selected will turn into red.
14. Go to View > Guidelines Setup 15. Uncheck Show Guidelines 16. The guidelines will disappear. 17. Bring them back by either checking the same box or View > Guidelines There is another way to access Guidelines Setup and clear the guidelines on the page. 18. Drag the horizontal and vertical guidelines on the page. 19. Double click on the horizontal guideline using pick tool. 20. This will open guidelines setup box with Horizontal option opened. 21. If you click on vertical guideline, it will open the guidelines setup box with Vertical option opened.
22. The number in the box indicates the position of the selected guideline. 23. Press clear, the number will vanish and the guideline will disappear. 24. You can press delete to delete the guideline. Let us see how to move and add the guideline at the precise distance using guidelines setup. 25. Open Corel DRAW. 26. Drag the horizontal and vertical guidelines on the page. 27. Double click on the horizontal guideline using pick tool. 28. This will open guidelines setup box with Horizontal option opened. 29. Add some figure in the box other than what is present by default, if suppose it is 6, then add 10.
30. Click Move. 31. The selected guideline will be moved at 10. 32. Now add 2 in the box and click Add. 33. You will get new guideline at 2. We will start with the shaping where we can weld, trim, intersect and do lot more things with the selected objects. Let us understand the basic principle of weld, trim and intersect. 1. You always need two objects for weld, trim and intersect.

2. Better to overlap them first before you work with weld, trim and intersect.
3. When you overlap two objects and go for weld command, the overlapped part of the objects is melted and the two objects are turned into one single object.
4. If you overlap two objects and try trim command, the overlapped part of the first object will cut or trim the part of the second object.
5. If you overlap two objects and try intersect command, the overlapped or the intersected part will be available separately.
6. There are different ways to work with shaping commands. Shaping can be useful to create irregular shapes Welding is, melting of the overlapped parts and converting the two objects into one. 1. Open Corel Draw. 2. Select Rectangle tool and draw a rectangle. Draw another rectangle so as to overlap the part of the first one. Double click on the pick tool to select both the rectangle simultaneously.

3. Go to Arrange > Shaping > Weld 4. Both the rectangles are joined and formed one single shape, melting the overlapped part.
5. Create three rectangles overlapping each other. Select all of them simultaneously using pick tool.
6. Use weld command to weld them together.
7. Try different shapes to weld and create different types of irregular shapes.
We can weld the object using different methods and thus we have more control on the procedure. Here we will select the object to which we want to weld the initially selected object.
1. Open Corel Draw. 2. Select Rectangle tool and draw a rectangle. Draw another rectangle so as to overlap the part of the first one. Keep the second rectangle selected.
3. Go to Arrange > Shaping > Shaping 4. This will open the docker i.e. the dialogue box fixed to the right of the desktop.

5. Uncheck source and target object initially (if they are checked). 6. Click Weld To. 7. You will get "Weld To" cursor to select the object you want to weld to the already selected object. 8. Click the cursor on the first rectangle. 9. The selected rectangle is welded to the clicked rectangle to form one single object.
1. Open Corel DRAW. Select Ellipse Tool. Press Ctrl and draw the circle.Type the text using Text Tool.
2. Select the text with pick Tool. Text > Fit Text To Path Select the circle as a path with the pointer.
3. Select the Effect properly again to get the options of Fit Text To Path on Property Bar.
3. There is an option of "Distance from Path" on the property bar (Green marked). Increase the value to increase the distance between text & path.
4. Arrange > Break Text Apart 5. This will detach the path from the text keeping the text in circular manner and the path is again ready for another text. 6. Type the text and apply Fit Text to Path.7. This time take the text at the bottom of the circle using Text Placement (Red Marked) and invert it by pressing Place on Other Side (Orange Marked.)
7. Iincrease the distance using Distance from Path.

The same command if you are using with advance version of Corel Draw, say Corel Draw X3, you will find the text is getting fit around the circle instantly as you bring the cursor to the edge of the circle. Let us see the options available for the effect.
1. Open Corel DRAW. 2. Carry out the effect as described in the basic lesson. 3. Keep the effect selected.
4. The extreme left drop down box shows the option of "Text Orientation".
5. Text orientation is the manner text fits on the path. 6. Start selecting the options one by one and check out the effect.
7. When all the options for text orientation are over, select the first option to come back to original effect. Once you fit the text on the path you can adjust the distance of the text from the path. 8. Go back to 2nd step. Keep the effect selected.
9. Second option from the left is used for adjusting the distance.
10. Increase the distance. 11. You will find that text is moving away from the circle.
12. Decrease the distance.

13. You will find the text is coming near to the circle. 14. Go on decreasing the distance so that you start getting negative value.15. You will find that the text crosses the border of the circle and enter in the circle.
Horizontal offset decides the horizontal position of the text along the path. 16. Go back to 2nd step. Keep the effect selected.17. Third option from the left is used for Horizontal offset.
18. Increase the distance. 19. You will find that text is moving right side along the path of the circle. It's a clockwise movement. 20. Decrease the distance and go further. 21. You will find the text is moving left side. Its anticlockwise movement.
Mirroring the text either horizontally and vertically can be achieved with Mirror Text option. This is a simple option but need to study carefully to understand exact use of it. Let us first try the basic things.
1. Open Corel DRAW. 2. Carry out the effect as described in the basic lesson. Keep the effect selected.
3. There is an option called Mirror Text on the property bar.
4. To the right of Mirror text there is an icon of Mirror Horizontally. 5. Click this icon. 6. You will get the horizontal mirror image.
7. Come back to original position by clicking the same icon again. 8. There is another icon besides, called Mirror Vertically.9. Click this to get vertical mirror image.

10. You will get the vertical mirror image inside the circle as the original image is outside the circle just on the edge. 11. Come back to original position by clicking the same icon again. Tick spacing is some thing provided for the ease of work while you adjust the distance between the path and the text. Once you mention the tick spacing, the text will move with that increment. 12. Go back to 2nd step. Keep the effect selected.
13. Add 1.5 inches for tick spacing. 14. Select the text using pick tool. 15. Move the text away from the circle.16. You will notice that you get the snapping at the increment of 1.5 inches when you move the text.
17. Off the Tick Snapping 18. Start moving the text again. 19. You will notice that the text is moving smoothly without any snapping. Once you apply the text and you wish to change the font and/or the size, its possible within the effect itself. You don't need to start from the beginning. 20. Go back to 2nd step. Keep the effect selected.
21. You will get the drop down menus to change the font and font size on the property bar. 22. Change the font and see the effect first. 23. Then change the size and observe the effect.
24. Try to apply Bold and Italic options also. Once you apply the effect you may want to get rid of the circle and keep the curved text on the page. There are two ways of doing this. Let us try the first one.
1. Open Corel DRAW. 2. Carry out the effect as described in the basic lesson. 3. Select the circle using pick tool.

4. You will notice that the whole effect is getting selected, means the circle is getting selected along with the text also. 5. Delete, to remove the circle, press Delete key. 6. Circle is disappeared along with the text. 7. It means you can not delete the circle separately at this stage. 8. Undo delete. 9. Keep the effect selected. 10. Right click on the cross mark in the color palette (situated at the top) to remove the outline. 11. This will remove the outline of the circle. 12. This gives the necessary required effect where you won't see the circle but it is still there.
13. The problem with this procedure is, it will remove all the outlines, means if you apply the outline for the text, it will remove that outline also. The second procedure is the clean one where you can actually delete the circle and keep the text intact. 14. Go back to 2nd step. Keep the effect selected. It should select circle also.
15. Go to Arrange > Break Text Apart 16. Deselect the effect by clicking somewhere else. 17. Select the circle using pick tool. 18. You will notice that circle can be selected separately now. 19. Delete the circle using Delete Key. 20. You will get the curved text.
Let us try different path other than circle and check out what we get. We will be using freehand too for this lesson. Its fifth from top in the toolbox.
1. Open Corel DRAW. 2. Select Freehand Tool. 3. Draw wavy line using Freehand Tool.
4. Type the text. Keep it selected.
5. Go to Text > Fit Text to Path 6. Click on the path. 7. The text will fit with the shape of the wavy path we have drawn using Freehand Tool.

Add perspective is one of the most simple and effective commands that we can start with. Observe it carefully and you will have lot of fun.
1. Open Corel DRAW. 2. Type " Inside" using text tool. Stretch it to bigger size using pick tool. Keep it selected.
3. Go to Effects > Add Perspective
4. Observe carefully. You will get four points at the four corners of the text.
5. Drag top left point, which is on the top of "I" towards topside.
6. You will find that text is changed into the design that has perspective. 7. Drag bottom left point that is at the base of "I" towards downside. This will add spice to the perspective effect.
You can remove perspective effect and bring back the text into original form.
8. Go to Arrange > Clear Transformations 9. The text is back to its original form.
Let us try Add Perspective command on shapes.
1. Open Corel DRAW. 2. Draw circle and fill it with some color. Keep it selected.

3. Effects > Add perspective
4. Try to drag all four points to different directions.
5. Try out different shapes.
6. Use polygon tool to draw another type of shape.
7. Use Clear Transformation to bring the shape back to its original form.