Embed Size (px)
Citation preview
Control Users with Captive Portal
• The Captive Portal Identity Source, on page 1• Captive Portal Guidelines and Limitations, on page 1• How to Configure the Captive Portal for User Control, on page 3• Troubleshoot the Captive Portal Identity Source, on page 12• History for Captive Portal, on page 13
The Captive Portal Identity SourceCaptive portal is one of the authoritative identity sources supported by the Firepower System. It is an activeauthentication method where users authenticate onto the network using a managed device.
You typically use captive portal to require authentication to access the internet or to access restricted internalresources; you can optionally configure guest access to resources. After the system authenticates captive portalusers, it handles their user traffic according to access control rules. Captive portal performs authentication onHTTP and HTTPS traffic only.
HTTPS traffic must be decrypted before captive portal can perform authentication.Note
Captive portal also records failed authentication attempts. A failed attempt does not add a new user to the listof users in the database. The user activity type for failed authentication activity reported by captive portal isFailed Auth User.
The authentication data gained from captive portal can be used for user awareness and user control.
Related TopicsHow to Configure the Captive Portal for User Control, on page 3
Captive Portal Guidelines and LimitationsWhen you configure and deploy captive portal in an identity policy, users from specified realms authenticatethrough the following device to access your network:
• Virtual routers on 7000 and 8000 Series devices
• ASA FirePOWER devices in routed mode running Version 9.5(2) or later
Control Users with Captive Portal1
• Firepower Threat Defense devices in routed mode
When a remote access VPN user has already actively authenticated through a managed device acting as asecure gateway, captive portal active authentication will not occur, even if configured in an identity policy.
Note
Routed Interface Required
Captive portal active authentication can be performed only by a device with a routed interface configured. Ifyou are configuring the rule for captive portal and your captive portal device contains inline and routedinterfaces, you must configure an interface condition to target only the routed interfaces on the device.
If the identity policy referenced by your access control policy contains one or more captive portal identityrules and you deploy the policy on a Firepower Management Center that manages:
• One or more devices with routed interfaces configured, the policy deployment succeeds and the routedinterfaces perform active authentication.
The system does not validate the type of interface in ASA with FirePOWER devices. If you apply acaptive portal policy to an inline (tap mode) interface on an ASA with FirePOWER device, the policydeployment succeeds but users in traffic matching those rules are identified as Unknown.
• One or more NGIPSv devices, the policy deployment fails.
Captive Portal and Policies
You configure captive portal in your identity policy and invoke active authentication in your identity rules.Identity policies are associated with access control policies.
You configure some captive portal identity policy settings on the access control policy'sActive Authenticationtab page and configure the rest in an identity rule associated with the access control policy.
Adding the first or removing the last active authentication rule when SSL decryption is disabled (that is, whenthe access control policy does not include an SSL policy) restarts the Snort process when you deployconfiguration changes, temporarily interrupting traffic inspection.Whether traffic drops during this interruptionor passes without further inspection depends on how the target device handles traffic. See Snort® RestartTraffic Behavior for more information.
Caution
Captive Portal Requirements and Limitations
Note the following requirements and limitations:
• The system supports up to 20 captive portal logins per second.
• There is a maximum five minute limit between failed login attempts for a failed login attempt to becounted toward the count of maximum login attempts. The five minute limit is not configurable.
(Maximum login attempts are displayed in connection events: Analysis > Connections > Events.)
If more than five minutes elapse between failed logins, the user will continue to be redirected to captiveportal for authentication, will not be designated a failed login user or a guest user, and will not be reportedto the Firepower Management Center.
Control Users with Captive Portal2
Control Users with Captive PortalCaptive Portal Guidelines and Limitations

• The only way to be sure a user logs out is to close and reopen the browser. Unless that happens, in somecases, the user can log out of captive portal and be able to access the network without authenticatingagain using the same browser.
• If a realm is created for a parent domain and the managed device detects a login to a child of that parentdomain, the user's subsequent logout is not detected by the managed device.
• To use an ASA FirePOWER device (in routed mode and running ASA version 9.5(2) or later) for captiveportal, use the captive-portal ASA CLI command to enable captive portal for active authentication anddefine the port as described in the ASA Firewall Configuration Guide (Version 9.5(2) or later):https://www.cisco.com/c/en/us/support/security/adaptive-security-appliance-asa-software/products-installation-and-configuration-guides-list.html.
• You must allow traffic destined for the IP address and port of the device you plan to use for captiveportal.
• To perform captive portal active authentication on HTTPS traffic, you must use an SSL policy to decryptthe traffic from the users you want to authenticate. You cannot decrypt the traffic in the connectionbetween a captive portal user's web browser and the captive portal daemon on the managed device; thisconnection is used to authenticate the captive portal user.
• To limit the amount of non-HTTP or HTTPS traffic that is allowed through the managed device, youshould enter typical HTTP and HTTPS ports in the identity policy's Ports tab page.
The managed device changes a previously unseen user from Pending to Unknownwhen it determinesthat the incoming request does not use the HTTP or HTTPS protocol. As soon as the managed devicechanges a user from Pending to another state, access control, Quality of Service, and SSL policies canbe applied to that traffic. If your other policies don't permit non-HTTP or HTTPS traffic, configuringports on the captive portal identity policy can prevent undesired traffic from being allowed through themanaged device.
How to Configure the Captive Portal for User ControlAccessSupported DomainsSupported DevicesClassic LicenseSmart License
Administrator/AccessAdmin/NetworkAdmin
AnyAny, exceptNGIPSv
ControlAny
High-level overview of how to control user activity with captive portal:
Before you begin
To use the captive portal for active authentication, you must set up an access control policy, an identity policy,an SSL policy, and associate the identity and SSL policies with the access control policy. Finally, you mustdeploy the policies to managed devices. This topic provides a high-level summary of those tasks.
An example of the entire procedure begins in Configure the Captive Portal Part 1: Create an Identity Policy,on page 5.
Perform the following tasks first:
Control Users with Captive Portal3
Control Users with Captive PortalHow to Configure the Captive Portal for User Control
• Confirm that your Firepower Management Center manages one or more devices with a routed interfaceconfigured.
In particular, if your FirepowerManagement Center manages ASAwith FirePOWER devices, see CaptivePortal Guidelines and Limitations, on page 1.
• To use encrypted authentication with the captive portal, either create a PKI object or have your certificatedata and key available on the machine from which you're accessing the Firepower Management Center.To create a PKI object, see PKI Objects.
Procedure
Step 1 Create and enable a realm as discussed in the following topics:
• Create a Realm• Configure a Realm Directory• Download Users and Groups
Step 2 Create an active authentication identity policy for captive portal.The identity policy enables selected users in your realm access resources after authenticating with the captiveportal.
For more information, see Configure the Captive Portal Part 1: Create an Identity Policy, on page 5.
Step 3 Configure an access control rule for the captive portal that allows traffic on the captive portal port (by default,TCP 885).You can choose any available TCP port for the captive portal to use. Whatever your choice, you must createa rule that allows traffic on that port.
For more information, see Configure the Captive Portal Part 2: Create a TCP Port Access Control Rule, onpage 6.
Step 4 Add another access control rule to allow users in the selected realms to access resources using the captiveportal.This enables users to authenticate with captive portal. For more information, see Configure the Captive PortalPart 3: Create a User Access Control Rule, on page 7.
Step 5 Configure an SSL decrypt - resign policy for the Unknown user so captive portal users can access web pagesusing the HTTPS protocol.The captive portal can authenticate users only if the HTTPS traffic is decrypted before the traffic is sent tothe captive portal. Captive portal is seen by the system as the Unknown user.
For more information, see Configure Captive Portal Part 4: Create an SSL Decrypt-Resign Policy, on page8.
Step 6 Asscociate the identity and SSL policies with the access control policy from step 2.This final step enables the system to authenticate users with the captive portal.
For more information, see Configure Captive Portal Part 5: Associate Identity and SSL Policies with theAccess Control Policy, on page 9.
Control Users with Captive Portal4
Control Users with Captive PortalHow to Configure the Captive Portal for User Control

What to do next
See Configure the Captive Portal Part 1: Create an Identity Policy, on page 5.
Related TopicsExclude Applications from Captive Portal, on page 11PKI ObjectsTroubleshoot the Captive Portal Identity Source, on page 12Snort® Restart Scenarios
Configure the Captive Portal Part 1: Create an Identity Policy
Before you begin
This five-part procedure shows how to set up the captive portal using the default TCP port 885 and using aFirepower Management Center server certificate for both the captive portal and for SSL decryption. Each partof this example explains one task required to enable the captive portal to perform active authentication.
If you follow all the steps in this procedure, you can configure captive portal to work for users in your domains.You can optionally perform additional tasks, which are discussed in each part of the procedure.
For an overview of the entire procedure, see How to Configure the Captive Portal for User Control, on page3.
Procedure
Step 1 Log in to the Firepower Management Center if you have not already done so.Step 2 Click Policies > Access Control > Identity and create or edit an identity policy.Step 3 (Optional.) Click Add Category to add a category for the captive portal identity rules and enter a Name for
the category.Step 4 Click the Active Authentication tab.
Step 5 Choose the appropriate Server Certificate from the list or click the add icon ( ) to add a certificate.
Captive portal does not support the use of Digital Signature Algorithm (DSA) or Elliptic CurveDigital Signature Algorithm (ECDSA) certificates.
Note
Step 6 Enter 885 in the Port field and specify theMaximum login attempts.Step 7 (Optional.) Choose an Active Authentication Response Page as described in Captive Portal Fields, on page
10.
Control Users with Captive Portal5
Control Users with Captive PortalConfigure the Captive Portal Part 1: Create an Identity Policy

The following figure shows an example.
Step 8 Click Save.Step 9 Click the Rules tab.
Step 10 Click Add Rule to add a new captive portal identity policy rule, or click the edit icon ( ) to edit an existingrule.
Step 11 Enter a Name for the rule.Step 12 From the Action list, choose Active Authentication.
The system can enforce captive portal active authentication on HTTP and HTTPS traffic only. If an identityruleAction isActive Authentication (you are using captive portal) or if you are using passive authenticationand you check the option on theRealms& Settings tab page toUse active authentication if passive or VPNidentity cannot be established, use TCP ports constraints only.
Step 13 Click the Realm & Settings tab.Step 14 From the Realms list, choose a realm to use for user authentication.Step 15 (Optional.) Check Identify as Guest if authentication cannot identify user. For more information, see
Captive Portal Fields, on page 10.Step 16 Choose an Authentication Protocol from the list.Step 17 (Optional.) To exempt specific application traffic from captive portal, see Exclude Applications from Captive
Portal, on page 11.Step 18 Add conditions to the rule (port, network, and so on) as discussed in Rule Condition Types.Step 19 Click Add.Step 20 At the top of the page, click Save.
What to do next
Continue with Configure the Captive Portal Part 2: Create a TCP Port Access Control Rule, on page 6.
Configure the Captive Portal Part 2: Create a TCP Port Access Control RuleThis part of the procedure shows how to create an access control rule that allows the captive portal tocommunicate with clients using TCP port 885, which is the captive portal's default port. You can choose
Control Users with Captive Portal6
Control Users with Captive PortalConfigure the Captive Portal Part 2: Create a TCP Port Access Control Rule

another port if you wish, but the port must match the one you chose in Configure the Captive Portal Part 1:Create an Identity Policy, on page 5.
Before you begin
For an overview of the entire captive portal configuration, see How to Configure the Captive Portal for UserControl, on page 3.
Procedure
Step 1 In the access control policy editor, click Add Rule.Step 2 Enter a Name for the rule.Step 3 Choose Allow from the Action list.Step 4 Click the Ports tab.Step 5 From the Protocol list under the Selected Destination Ports field, choose TCP.Step 6 In the Port field, enter 885.Step 7 Click Add next to the Port field.
The following figure shows an example.
Step 8 Click Add at the bottom of the page.
What to do next
Continue with Configure the Captive Portal Part 3: Create a User Access Control Rule, on page 7.
Configure the Captive Portal Part 3: Create a User Access Control RuleThis part of the procedure discusses how to add an access control rule that enables users in a realm toauthenticate using captive portal.
Control Users with Captive Portal7
Control Users with Captive PortalConfigure the Captive Portal Part 3: Create a User Access Control Rule

Before you begin
For an overview of the entire captive portal configuration, see How to Configure the Captive Portal for UserControl, on page 3.
Procedure
Step 1 In the rule editor, click Add Rule.Step 2 Enter a Name for the rule.Step 3 Choose Allow from the Action list.Step 4 Click the Users tab.Step 5 In the Available Realms list, click the realms to allow.Step 6 If no realms display, click (refresh).Step 7 In the Available Users list, choose the users to add to the rule and click Add to Rule.Step 8 (Optional.) Add conditions to the access control policy as discussed in Rule Condition Types.Step 9 Click Add.Step 10 On the access control rule page, click Save.Step 11 In the policy editor, set the rule position. Click and drag or use the right-click menu to cut and paste. Rules
are numbered starting at 1. The system matches traffic to rules in top-down order by ascending rule number.The first rule that traffic matches is the rule that handles that traffic. Proper rule order reduces the resourcesrequired to process network traffic and prevents rule preemption.
What to do next
Continue with Configure Captive Portal Part 4: Create an SSL Decrypt-Resign Policy, on page 8.
Configure Captive Portal Part 4: Create an SSL Decrypt-Resign PolicyThis part of the procedure discusses how to create an SSL access policy to decrypt and resign traffic beforethe traffic reaches the captive portal. The captive portal can authenticate traffic only after it has been decrypted.
Before you begin
For an overview of the entire captive portal configuration, see How to Configure the Captive Portal for UserControl, on page 3.
Procedure
Step 1 If you haven't done so already, create a certificate object to decrypt SSL traffic as discussed in PKI Objects.Step 2 Click Policies > Access Control > SSL.Step 3 Click New Policy.Step 4 Enter aName and choose aDefault Action for the policy. Default actions are discussed in SSL Policy Default
Actions.Step 5 Click Save.
Control Users with Captive Portal8
Control Users with Captive PortalConfigure Captive Portal Part 4: Create an SSL Decrypt-Resign Policy
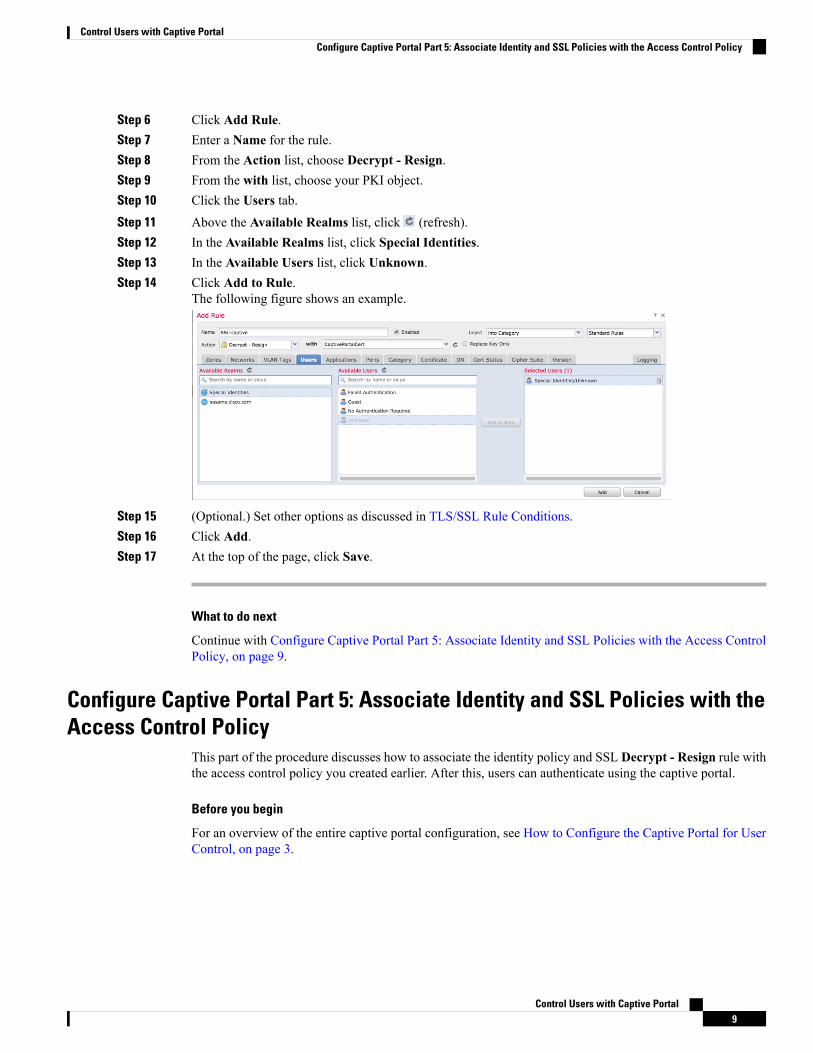
Step 6 Click Add Rule.Step 7 Enter a Name for the rule.Step 8 From the Action list, choose Decrypt - Resign.Step 9 From the with list, choose your PKI object.Step 10 Click the Users tab.Step 11 Above the Available Realms list, click (refresh).Step 12 In the Available Realms list, click Special Identities.Step 13 In the Available Users list, click Unknown.Step 14 Click Add to Rule.
The following figure shows an example.
Step 15 (Optional.) Set other options as discussed in TLS/SSL Rule Conditions.Step 16 Click Add.Step 17 At the top of the page, click Save.
What to do next
Continue with Configure Captive Portal Part 5: Associate Identity and SSL Policies with the Access ControlPolicy, on page 9.
Configure Captive Portal Part 5: Associate Identity and SSL Policies with theAccess Control Policy
This part of the procedure discusses how to associate the identity policy and SSL Decrypt - Resign rule withthe access control policy you created earlier. After this, users can authenticate using the captive portal.
Before you begin
For an overview of the entire captive portal configuration, see How to Configure the Captive Portal for UserControl, on page 3.
Control Users with Captive Portal9
Control Users with Captive PortalConfigure Captive Portal Part 5: Associate Identity and SSL Policies with the Access Control Policy
Procedure
Step 1 ClickPolicies >Access Control > Access Control and edit the access control policy you created as discussedin Configure the Captive Portal Part 2: Create a TCP Port Access Control Rule, on page 6. If a view icon
( ) appears instead, the configuration belongs to an ancestor domain, or you do not have permission tomodify the configuration.
Step 2 Either create a new access control policy or edit an existing policy.Step 3 At the top of the page, click the link next to Identity Policy.Step 4 From the list, choose the name of your identity policy and, at the top of the page, click Save.Step 5 Repeat the preceding steps to associate your captive portal SSL policy with the access control policy.Step 6 If you haven't done so already, target the policy at managed devices as discussed in Setting Target Devices
for an Access Control Policy.
What to do next
• Deploy your identity and access control policies to managed devices as discussed in Deploy ConfigurationChanges.
• Monitor user activity as discussed in Using Workflows.
Captive Portal FieldsUse the following fields to configure captive portal on the Active Authentication tab of your identity policy.See also Identity Rule Fields.
Server Certificate
The server certificate presented by the captive portal daemon.
Captive portal does not support the use of Digital Signature Algorithm (DSA) or Elliptic Curve DigitalSignature Algorithm (ECDSA) certificates.
Note
Port
The port number to use for the captive portal connection. If you plan to use an ASA FirePOWER devicefor captive portal, the port number in this field must match the port number you configured on the ASAFirePOWER device using the captive-portal CLI command.
Maximum login attempts
The maximum allowed number of failed login attempts before the system denies a user's login request.
Active Authentication Response Page
The system-provided HTTP response page includes Username and Password fields, as well as a Loginas guest button to allow users to access the network as guests. To display a single login method, configurea custom HTTP response page.
Choose the following options:
Control Users with Captive Portal10
Control Users with Captive PortalCaptive Portal Fields

• To use a generic response, click System-provided. You can click the view icon ( ) to view theHTML code for this page.
• To create a custom response, clickCustom. A window with system-provided code is displayed thatyou can replace or modify. When you are done, save your changes. You can edit a custom page by
clicking the edit icon ( ).
Related TopicsInternal Certificate Objects
Exclude Applications from Captive PortalAccessSupported DomainsSupported DevicesClassic LicenseSmart License
Administrator,Access Admin,Network Admin
AnyAny, exceptNGIPSv
ControlAny
You can select applications (identified by their HTTP User-Agent strings) and exempt them from captiveportal active authentication. This allows traffic from the selected applications to pass through the identitypolicy without authenticating.
Only applications with the User-Agent Exclusion Tag are displayed in this list.Note
Procedure
Step 1 On the Realm & Settings tab of the identity rule editor page, use Cisco-provided filters in the ApplicationFilters list to narrow the list of applications you want to add to the filter.
• Click the arrow next to each filter type to expand and collapse the list.
• Right-click a filter type and clickCheck All orUncheck All. Note that the list indicates howmany filtersyou have selected of each type.
• To narrow the filters that appear, type a search string in the Search by name field; this is especially
useful for categories and tags. To clear the search, click the clear icon ( ).
• To refresh the filters list and clear any selected filters, click the reload icon ( ).
• To clear all filters and search fields, click Clear All Filters.
The list displays 100 applications at a time.Note
Step 2 Choose the applications that you want to add to the filter from the Available Applications list:
• To narrow the individual applications that appear, enter a search string in the Search by name field. To
clear the search, click the clear icon ( ).
Control Users with Captive Portal11
Control Users with Captive PortalExclude Applications from Captive Portal

• Use the paging icons at the bottom of the list to browse the list of individual available applications.
• To refresh the applications list and clear any selected applications, click the reload icon ( ).
Step 3 Add the selected applications to exclude from external authentication. You can click and drag, or you canclick Add to Rule. The result is the combination of the application filters you selected.
What to do next
• Continue configuring the identity rule as described in Create an Identity Rule.
Troubleshoot the Captive Portal Identity SourceFor other related troubleshooting information, see Troubleshoot Realms and User Downloads and TroubleshootUser Control.
If you experience issues with captive portal, check the following:
• The time on your captive portal server must be synchronized with the time on the FirepowerManagementCenter.
• If you have DNS resolution configured and you create an identity rule to perform Kerberos (or HTTPNegotiate, if you want Kerberos as an option) captive portal, you must configure your DNS serverto resolve the fully qualified domain name (FQDN) of the captive portal device. The FQDN must matchthe hostname you provided when configuring DNS.
For ASA with FirePOWER Services and Firepower Threat Defense devices, the FQDN must resolve tothe IP address of the routed interface used for captive portal.
• If you select Kerberos (or HTTP Negotiate, if you want Kerberos as an option) as theAuthentication Type in an identity rule, the Realm you select must be configured with an AD JoinUsername and AD Join Password in order to perform Kerberos captive portal active authentication.
• If you select HTTP Basic as the Authentication Type in an identity rule, users on your network maynot notice their sessions time out. Most web browsers cache the credentials from HTTP Basic loginsand use the credentials to seamlessly begin a new session after an old session times out.
• If the connection between your Firepower Management Center and a managed device fails, no captiveportal logins reported by the device can be identified during the downtime, unless the users were previouslyseen and downloaded to the FirepowerManagement Center. The unidentified users are logged as Unknownusers on the Firepower Management Center. After the downtime, the Unknown users are reidentifiedand processed according to the rules in your identity policy.
• If the device you want to use for captive portal contains both inline and routed interfaces, you mustconfigure a zone condition in your captive portal identity rules to target only the routed interfaces on thecaptive portal device.
• The system does not validate the type of interface in ASA with FirePOWER devices. If you apply acaptive portal policy to an inline (tap mode) interface on an ASA with FirePOWER device, the policydeployment succeeds but users in traffic matching those rules are identified as Unknown.
Control Users with Captive Portal12
Control Users with Captive PortalTroubleshoot the Captive Portal Identity Source

• The only way to be sure a user logs out is to close and reopen the browser. Unless that happens, in somecases, the user can log out of captive portal and be able to access the network without authenticatingagain using the same browser.
• Active FTP sessions are displayed as the Unknown user in events. This is normal because, in activeFTP, the server (not the client) initiates the connection and the FTP server should not have an associateduser name. For more information about active FTP, see RFC 959.
History for Captive PortalDetailsVersionFeature
Users can log in as guest using captiveportal.
6.1.0Guest login.
Feature introduced. You can use the captiveportal to require users to enter theircredentials when prompted in a browserwindow. The mapping also allows policiesto be based on a user or group of users.
6.0Captive portal.
Control Users with Captive Portal13
Control Users with Captive PortalHistory for Captive Portal

Control Users with Captive Portal14
Control Users with Captive PortalHistory for Captive Portal