Embed Size (px)
Citation preview
Table of contents Dentsply SironaOperator's Manual Connect SW
266 97 549 D3534
D3534.208.18.02.02 08.2019
Table of contents
1 Introduction ............................................................................................................. 61.1 Dear Customer,............................................................................................ 6
1.1.1 Contact data................................................................................... 61.2 Copyright and trademark ............................................................................. 7
2 General data ........................................................................................................... 82.1 Certification .................................................................................................. 82.2 General safety information........................................................................... 8
2.2.1 Intended use .................................................................................. 82.3 Accessories.................................................................................................. 8
2.3.1 Accessories for implant measurement........................................... 92.3.2 Hub ................................................................................................ 10
2.4 Structure of the manual................................................................................ 102.4.1 Identification of the danger levels .................................................. 102.4.2 Formats and symbols used............................................................ 112.4.3 Operating conventions ................................................................... 112.4.4 Manual formats (assistance).......................................................... 132.4.5 Odontogram used .......................................................................... 132.4.6 Data format .................................................................................... 13
2.5 User interface............................................................................................... 142.5.1 New features from the new acquisition unit and Connect SW
software ......................................................................................... 142.5.1.1 New screen format ....................................................... 142.5.1.2 New control options ...................................................... 152.5.1.3 Touchpad...................................................................... 152.5.1.4 Trackball ....................................................................... 15
2.5.2 Phase bar....................................................................................... 162.5.2.1 ADMINISTRATION....................................................... 162.5.2.2 ACQUISITION .............................................................. 162.5.2.3 MODEL......................................................................... 162.5.2.4 CONNECT.................................................................... 162.5.2.5 Current program version............................................... 172.5.2.6 Open chat ..................................................................... 17
2.5.3 Object bar ...................................................................................... 172.5.4 Step menu...................................................................................... 182.5.5 Context bar .................................................................................... 192.5.6 System menu................................................................................. 19
Dentsply SironaOperator's Manual Connect SW
Table of contents
66 97 549 D3534D3534.208.18.02.02 08.2019 3
2.5.7 Start view ....................................................................................... 192.5.8 Workflow path ................................................................................ 19
3 Getting started ........................................................................................................ 203.1 Installing the software .................................................................................. 203.2 Uninstalling the software.............................................................................. 203.3 Restore factory default settings ................................................................... 203.4 Copy protection............................................................................................ 213.5 Downloading software.................................................................................. 213.6 Starting the software .................................................................................... 223.7 License manager ......................................................................................... 23
3.7.1 Installation of the License Manager (Individual)............................. 233.7.2 License update without Internet access......................................... 23
4 Configuration .......................................................................................................... 244.1 Parameters .................................................................................................. 244.2 Devices ........................................................................................................ 24
4.2.1 Scanner.......................................................................................... 254.2.1.1 Configuring the scanner ............................................... 254.2.1.2 Resetting scanner settings ........................................... 254.2.1.3 Calibrating the scanner................................................. 264.2.1.4 Color calibration............................................................ 294.2.1.5 Scanner heating settings (Omnicam) ........................... 324.2.1.6 Updating the firmware .................................................. 32
4.3 Settings ........................................................................................................ 324.3.1 ADA/FDI odontogram..................................................................... 324.3.2 Notifications ................................................................................... 334.3.3 Hub settings ................................................................................... 334.3.4 Patient database............................................................................ 334.3.5 Language....................................................................................... 334.3.6 Quality improvement agreement.................................................... 33
4.4 App Center (applications) ............................................................................ 34
5 System menu.......................................................................................................... 355.1 Saving the impression.................................................................................. 355.2 Saving the impression under a different name ............................................ 365.3 Importing an impression............................................................................... 365.4 Exporting an impression .............................................................................. 365.5 Exporting scan data ..................................................................................... 375.6 Open a case in the CEREC software........................................................... 37
Table of contents Dentsply SironaOperator's Manual Connect SW
466 97 549 D3534
D3534.208.18.02.02 08.2019
5.7 License manager ......................................................................................... 375.8 Configuration................................................................................................ 375.9 Window mode .............................................................................................. 385.10 Open help information.................................................................................. 385.11 Exit program ................................................................................................ 38
6 Start view ................................................................................................................ 396.1 Create a new patient.................................................................................... 406.2 Patient database .......................................................................................... 40
6.2.1 Buttons........................................................................................... 416.2.2 Searching for individual patients .................................................... 416.2.3 Edit a patient .................................................................................. 416.2.4 Deleting patients ............................................................................ 426.2.5 Delete a case ................................................................................. 426.2.6 Opening an impression .................................................................. 426.2.7 Add a new case ............................................................................. 426.2.8 2D optical impressions with the scanner........................................ 42
7 Page palette............................................................................................................ 437.1 View options................................................................................................. 437.2 Tools ............................................................................................................ 45
7.2.1 Buccal registration ......................................................................... 457.2.2 Cut out model areas....................................................................... 467.2.3 Resetting the model ....................................................................... 467.2.4 Trimming ........................................................................................ 477.2.5 Entering the preparation margin .................................................... 47
7.3 Display objects............................................................................................. 497.4 Activating analysis ....................................................................................... 51
8 ADMINISTRATION phase ...................................................................................... 53
9 ACQUISITION phase.............................................................................................. 569.1 Image catalogs............................................................................................. 56
9.1.1 Adding image catalogs................................................................... 579.2 3D Preview................................................................................................... 579.3 Take a scan ................................................................................................. 57
9.3.1 Mode.............................................................................................. 579.3.2 CEREC Omnicam, Omnicam......................................................... 58
9.3.2.1 Scanner warm-up time ................................................. 589.3.2.2 Scanner guide .............................................................. 599.3.2.3 Taking optical impressions with the scanner ................ 65

Dentsply SironaOperator's Manual Connect SW
Table of contents
66 97 549 D3534D3534.208.18.02.02 08.2019 5
9.3.3 CEREC Primescan, Primescan ..................................................... 679.3.3.1 Optical impressions with the scanner ........................... 679.3.3.2 Scanner guide .............................................................. 69
9.3.4 Cut out model areas....................................................................... 759.3.5 Additional acquisitions ................................................................... 769.3.6 Full jaw scan mode ........................................................................ 77
9.3.6.1 Start the scan process.................................................. 799.3.6.2 Lower jaw scan............................................................. 809.3.6.3 Upper jaw scan............................................................. 839.3.6.4 Buccal registration ........................................................ 86
9.4 Finishing the phase...................................................................................... 86
10 MODEL phase ........................................................................................................ 8710.1 Editing the model ......................................................................................... 8710.2 Buccal registration (optional) ....................................................................... 8710.3 Manual correlation for image fields .............................................................. 9010.4 Select Scanbody .......................................................................................... 9010.5 Trimming the preparation............................................................................. 9110.6 Entering the preparation margin .................................................................. 9210.7 Preparation analysis .................................................................................... 9210.8 Finishing the phase...................................................................................... 92
11 CONNECT phase ................................................................................................... 9411.1 Registration and functions of the Connect portal ......................................... 9411.2 Log in to the portal from the Connect software ............................................ 9411.3 Check restoration information ...................................................................... 9511.4 Entering order data ...................................................................................... 9511.5 Anonymizing patient data............................................................................. 9511.6 Add additional information ........................................................................... 9511.7 Shopping cart............................................................................................... 9611.8 Order list ...................................................................................................... 96
Index ....................................................................................................................... 97

1 Introduction1.1 Dear Customer,
Dentsply SironaOperator's Manual Connect SW
666 97 549 D3534
D3534.208.18.02.02 08.2019
1 Introduction
1.1 Dear Customer,Thank you for purchasing Connect SW from Dentsply Sirona.
You can use Connect SW in combination with a Dentsply Sironaacquisition unit to create digital impressions and send them to yourpartner laboratory or a central production point via the Connect portal.Various dental applications can be produced there.
It is not possible to design and mill restorations with this software.
Improper use and handling can create hazards and cause damage.Therefore, please read and follow this document carefully. You shouldalways keep it within reach.
Also pay attention to the safety instructions to prevent personal injuryand material damage.
YourConnect SW team,
1.1.1 Contact dataCustomer Service Center In the event of technical queries, please use our online contact form at
the following address: http://srvcontact.sirona.com
Manufacturer's address Sirona Dental Systems GmbHFabrikstrasse 3164625 BensheimGermany
Tel.: +49 (0) 6251/16-0Fax: +49 (0) 6251/16-2591e-Mail: [email protected]
Dentsply SironaOperator's Manual Connect SW
1 Introduction1.2 Copyright and trademark
66 97 549 D3534D3534.208.18.02.02 08.2019 7
1.2 Copyright and trademarkCopyright © Sirona Dental Systems GmbH. All rights reserved.
The information contained in this manual may be changed withoutnotice.
The software and all related documentation are protected by copyright.You must therefore handle it in the same way as any other protectedmaterial.
Anyone who copies this software to any medium for any purpose otherthan his own personal use without the written permission of SironaDental Systems will be liable to prosecution.
Trademarks Microsoft®, Windows 7®, and Windows 10® are registered trademarks.
WindowsTM is a trademark of Microsoft Corporation.
All other trademarks are the property of their respective holders.
Notes on 3rd party code libraries must be stored in license.pdf in theinstallation directory.
2 General data2.1 Certification
Dentsply SironaOperator's Manual Connect SW
866 97 549 D3534
D3534.208.18.02.02 08.2019
2 General dataPlease read this document completely and follow the instructionsexactly. You should always keep it within reach.
Original language of the present document: German
2.1 CertificationCE markThis product bears the CE mark in accordance with the provisions of theCouncil Directive 93/42/EEC of June 14, 1993 concerning medicaldevices (MDD).
2.2 General safety informationOnly use original softwareOnly use original software or software which has been released byDentsply Sirona. To produce restorations and equipment, manipulatedor non-released software components must not be used.
Software and software components must not be installed using incorrectdata.
Please check that each installed component has been granted approvalin its country. Contact your dealer for more information.
Models to be checked by trained personnelEach model which is created with this software must be checked forsuitability by a trained person (e.g. dental technician or dentist).
For the USA onlyCAUTION: According to US Federal Law, this product may be sold onlyto or by instruction of physicians, dentists, or licensed professionals.
2.2.1 Intended useThe Connect SW Software is intended to be used for creating opticalimpression of dental situations (intraoral or from stone models) andsending these optical impressions digitally to dental laboratories orcentral production services that create dental products. This process iscomparable to creating and mailing traditional stone models.
2.3 AccessoriesIn order to ensure product safety, this device may be operated only withoriginal Dentsply Sirona accessories or third-party accessoriesexpressly approved by Dentsply Sirona. The user is responsible for anydamage resulting from the use of non-approved accessories.

Dentsply SironaOperator's Manual Connect SW
2 General data2.3 Accessories
66 97 549 D3534D3534.208.18.02.02 08.2019 9
2.3.1 Accessories for implant measurement
2 General data2.4 Structure of the manual
Dentsply SironaOperator's Manual Connect SW
1066 97 549 D3534
D3534.208.18.02.02 08.2019
2.3.2 HubHub is a network-based data center for CAD/CAM data in the practice.Hub stores data from the acquisition unit and enables data exchangesbetween devices.
If a Hub is connected to the network, it is detected automatically.
The Hub logo appears in the context bar in the Connect SW.
The Connect SW must be set so that it can save data on the Hub. Formore information refer to the Hub Operator's Manual.1. In the system menu in the "Configuration" area, under "Settings" the
menu "Patient Database".Ä The "Database Settings" menu appears.
2. Activate the "Hub Patient Database" option.
Setup and commissioning of the Hub is described for users in theOperator's Manual. For more information, refer to the Hub ServiceManual.
2.4 Structure of the manual
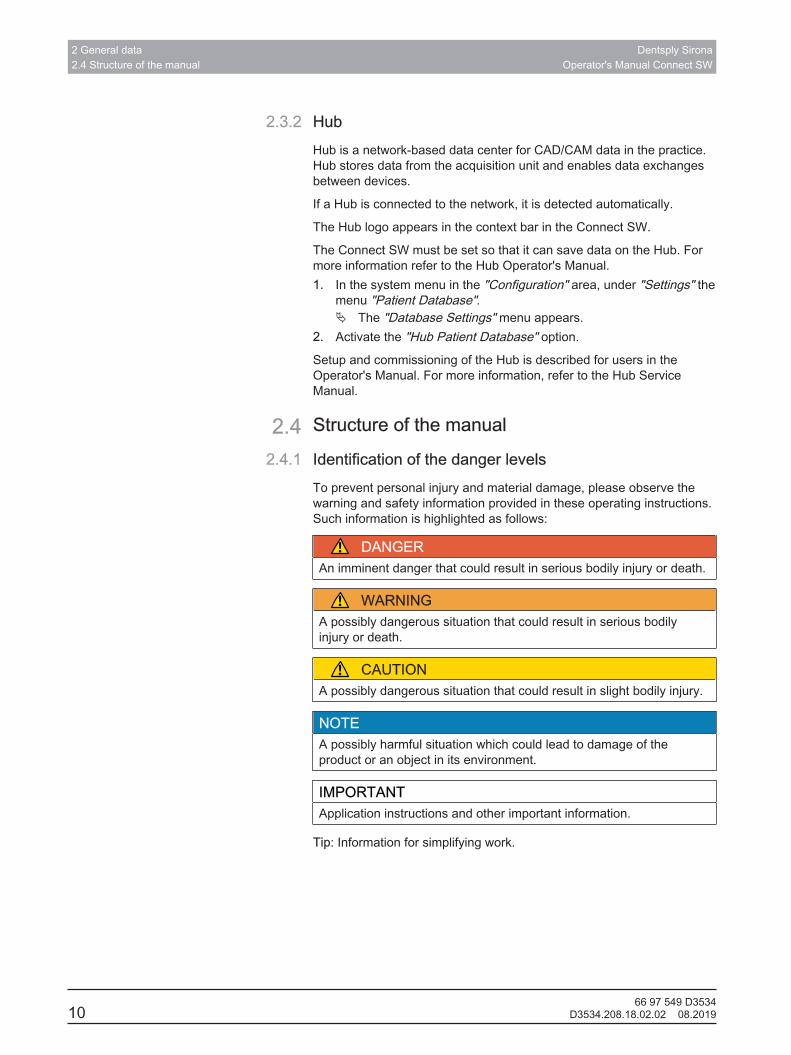
2.4.1 Identification of the danger levelsTo prevent personal injury and material damage, please observe thewarning and safety information provided in these operating instructions.Such information is highlighted as follows:
DANGERAn imminent danger that could result in serious bodily injury or death.
WARNINGA possibly dangerous situation that could result in serious bodilyinjury or death.
CAUTIONA possibly dangerous situation that could result in slight bodily injury.
NOTEA possibly harmful situation which could lead to damage of theproduct or an object in its environment.
IMPORTANTApplication instructions and other important information.
Tip: Information for simplifying work.

Dentsply SironaOperator's Manual Connect SW
2 General data2.4 Structure of the manual
66 97 549 D3534D3534.208.18.02.02 08.2019 11
2.4.2 Formats and symbols usedThe formats and symbols used in this document have the followingmeaning:
Prerequisite1. First action step2. Second action stepor➢ Alternative action
Result➢ Individual action step
Requests you to do something.
See "Formats and symbols used [→ 11]"
Identifies a reference to anothertext passage and specifies itspage number.
● List Designates a list."Command / menu item" Indicates commands / menu
items or quotations.
2.4.3 Operating conventions
Example MeaningTapping Pressing once and releasing the finger or the left
trackball/touchpad key on the acquisition unit.Double-tapping Pressing twice quickly in succession and releas-
ing the finger or the left trackball/touchpad key onthe acquisition unit.
Moving themouse in one di-rection
On the acquisition unit: Moving the trackball/fin-ger in the corresponding direction.
Seizing a point Pressing and holding the left mouse button (lefttrackball/touchpad button on the acquisition unit).
"Ctrl+N" On the keyboard: Press the Ctrl and N keys si-multaneously.
Drag & drop .Select an element (e.g. a pictograph) and drop /release it onto a potential destination.
2 General data2.4 Structure of the manual
Dentsply SironaOperator's Manual Connect SW
1266 97 549 D3534
D3534.208.18.02.02 08.2019
Multi-touch technology (only for systems with touch monitor)The screen is equipped with multi-touch technology. You can navigateand enter content using your finger. Icons open if you tap them withyour finger.
Navigating in the software
Example MeaningTap Single tap on the screen using your finger.
To execute functions in the software you must taponce on the corresponding button.
Double-tapping Two taps on the screen in rapid succession usingyour finger.Tip: To open programs in Windows you must tapthe corresponding button twice (double-click).
Call up shortcutmenus
Tap the corresponding point and hold the fingeron the screen for a longer period. A shortcutmenu opens at this point.
Drag & drop .Tap an element (e.g. pictograph), drag and droponto new potential destination.
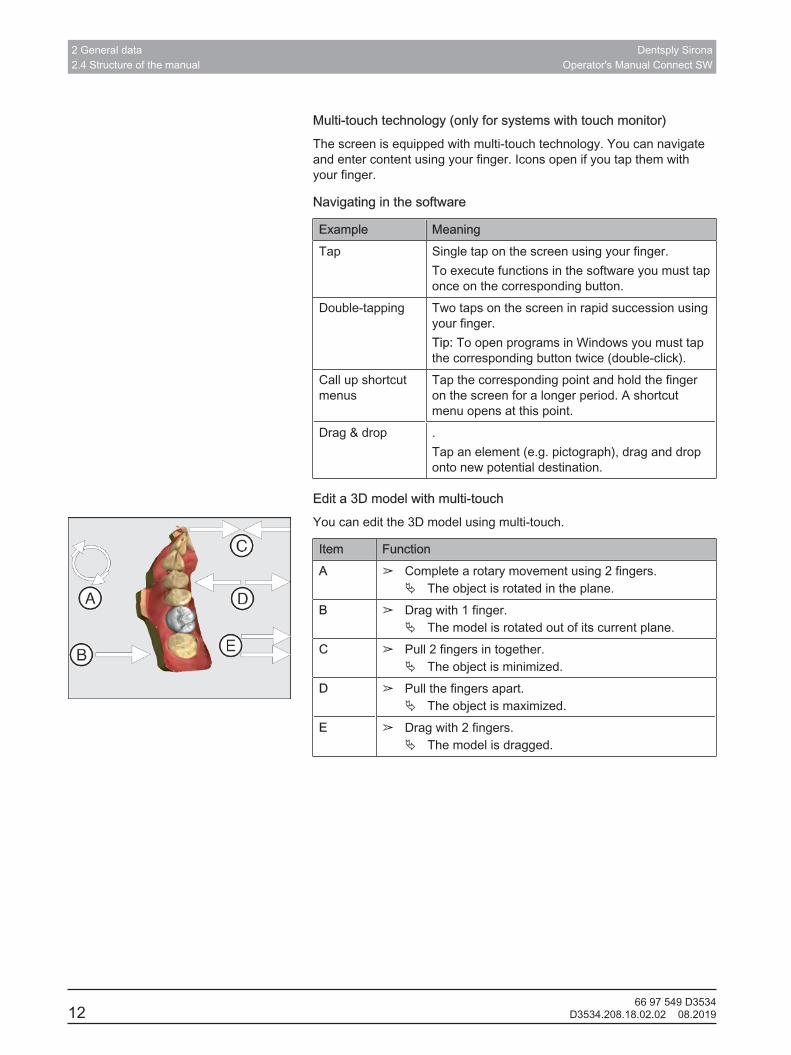
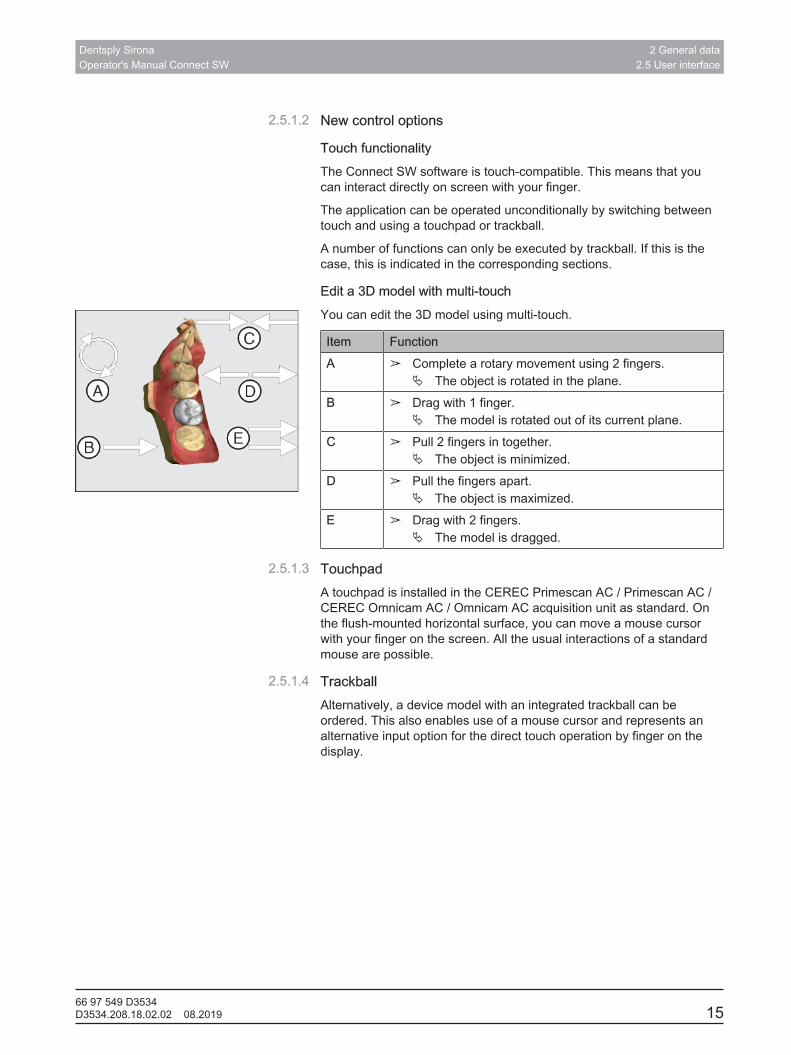
Edit a 3D model with multi-touchYou can edit the 3D model using multi-touch.
Item FunctionA ➢ Complete a rotary movement using 2 fingers.
Ä The object is rotated in the plane.B ➢ Drag with 1 finger.
Ä The model is rotated out of its current plane.C ➢ Pull 2 fingers in together.
Ä The object is minimized.D ➢ Pull the fingers apart.
Ä The object is maximized.E ➢ Drag with 2 fingers.
Ä The model is dragged.
Dentsply SironaOperator's Manual Connect SW
2 General data2.4 Structure of the manual
66 97 549 D3534D3534.208.18.02.02 08.2019 13
2.4.4 Manual formats (assistance)You can access the manual via the Help button or by pressing "F1".
The PDF format user manual can be found on the supplied softwareDVD or on the Internet (http://www.dentsplysirona.com/manuals).
This format is page-oriented and is well suited for printing out thedesired pages.
2.4.5 Odontogram usedThe software can be adjusted to the international odontogram (FDI) orthe USA odontogram (ADA) (Odontogram).
In this documentation teeth are named as follows:
Principle: FDI (#ADA)Example: 13 (#6)
2.4.6 Data formatYou can assign one or more cases to any patient in the software.Depending on the processing status, a case comprises multiple opticalimpressions, the virtual models reconstructed from them and thepreparation margin which has been drawn in.
In this manual, patient data is generally referred to as "cases".
The software uses its own file format (*.con) to export a case. Thisformat contains all of the case data including patient information. Adifferent file format is used (*.dxd) to send data via the Connect portal orif data is opened in the CEREC SW.
Furthermore, a Support.zip exists which can be sent to customerservice in the event of a fault, and can be exported to theADMINISTRATION phase. This file contains additional case informationand does not save any patient information.
Under certain circumstances, older software versions cannot open dataexports from a more recent version.
2 General data2.5 User interface
Dentsply SironaOperator's Manual Connect SW
1466 97 549 D3534
D3534.208.18.02.02 08.2019
2.5 User interface
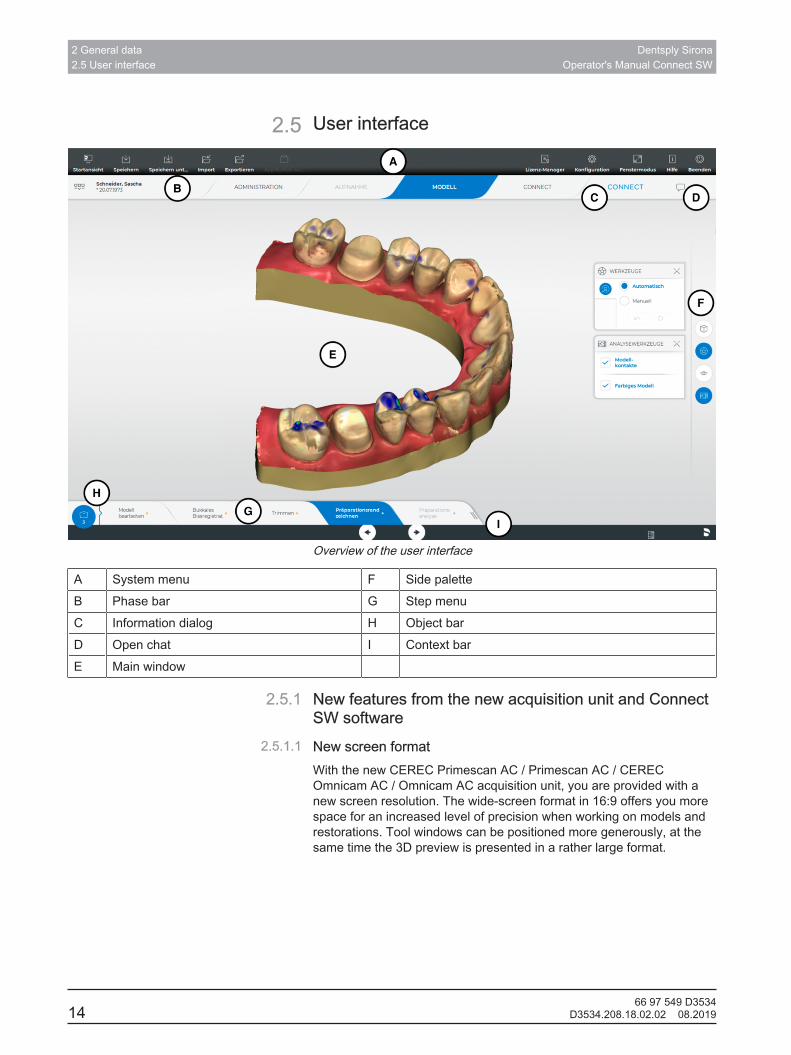
Overview of the user interface
A System menu F Side paletteB Phase bar G Step menuC Information dialog H Object barD Open chat I Context barE Main window
2.5.1 New features from the new acquisition unit and ConnectSW software
2.5.1.1 New screen formatWith the new CEREC Primescan AC / Primescan AC / CERECOmnicam AC / Omnicam AC acquisition unit, you are provided with anew screen resolution. The wide-screen format in 16:9 offers you morespace for an increased level of precision when working on models andrestorations. Tool windows can be positioned more generously, at thesame time the 3D preview is presented in a rather large format.
Dentsply SironaOperator's Manual Connect SW
2 General data2.5 User interface
66 97 549 D3534D3534.208.18.02.02 08.2019 15
2.5.1.2 New control options
Touch functionalityThe Connect SW software is touch-compatible. This means that youcan interact directly on screen with your finger.
The application can be operated unconditionally by switching betweentouch and using a touchpad or trackball.
A number of functions can only be executed by trackball. If this is thecase, this is indicated in the corresponding sections.
Edit a 3D model with multi-touchYou can edit the 3D model using multi-touch.
Item FunctionA ➢ Complete a rotary movement using 2 fingers.
Ä The object is rotated in the plane.B ➢ Drag with 1 finger.
Ä The model is rotated out of its current plane.C ➢ Pull 2 fingers in together.
Ä The object is minimized.D ➢ Pull the fingers apart.
Ä The object is maximized.E ➢ Drag with 2 fingers.
Ä The model is dragged.
2.5.1.3 TouchpadA touchpad is installed in the CEREC Primescan AC / Primescan AC /CEREC Omnicam AC / Omnicam AC acquisition unit as standard. Onthe flush-mounted horizontal surface, you can move a mouse cursorwith your finger on the screen. All the usual interactions of a standardmouse are possible.
2.5.1.4 TrackballAlternatively, a device model with an integrated trackball can beordered. This also enables use of a mouse cursor and represents analternative input option for the direct touch operation by finger on thedisplay.

2 General data2.5 User interface
Dentsply SironaOperator's Manual Connect SW
1666 97 549 D3534
D3534.208.18.02.02 08.2019
2.5.2 Phase barThe workflow is illustrated in the software in four phases.
Phase bar
● ADMINISTRATION● ACQUISITION● MODEL● CONNECT
2.5.2.1 ADMINISTRATION
ADMINISTRATION
In this phase, you can perform the following:● Manage patients● Create cases and determine their type,● Define the tooth numbers and materials.
2.5.2.2 ACQUISITIONIn this phase, you can perform the following:
ACQUISITION
● Create acquisitions - lower jaw, - upper jaw, - buccal bite registration
● View a 3D preview of the acquisitions
2.5.2.3 MODEL
MODEL
In this phase, you can perform the following:● The buccal registration of the bite situation● Adjust the virtual models● Draw and edit preparation margins
2.5.2.4 CONNECTIn this phase, you can log in to the Connect portal (see “Log in to theportal from the Connect software [→ 94]”). You must register as adentist on the Connect homepage for this.
You can open this phase by clicking the phase in the phase bar"CONNECT" or the Next arrow in context bar.
Dentsply SironaOperator's Manual Connect SW
2 General data2.5 User interface
66 97 549 D3534D3534.208.18.02.02 08.2019 17
2.5.2.5 Current program versionIf you click on the lettering "CONNECT" in the phase tab, you obtaininformation on the current program version.
2.5.2.6 Open chatYou can chat with your laboratory via the speech bubble. When youselect the top right corner of the speech bubble, the software asks youto log onto the Connect portal.
In the chat window under "All Chats" you can have your job-relatedchats displayed. You can archive or display your chats in the chatwindow.
Under "Notifications" you can call up the notifications from the Connectportal.
Under "History" you can see your most recent chats.
Under "Settings" you can change your online status ("available" and"Busy").
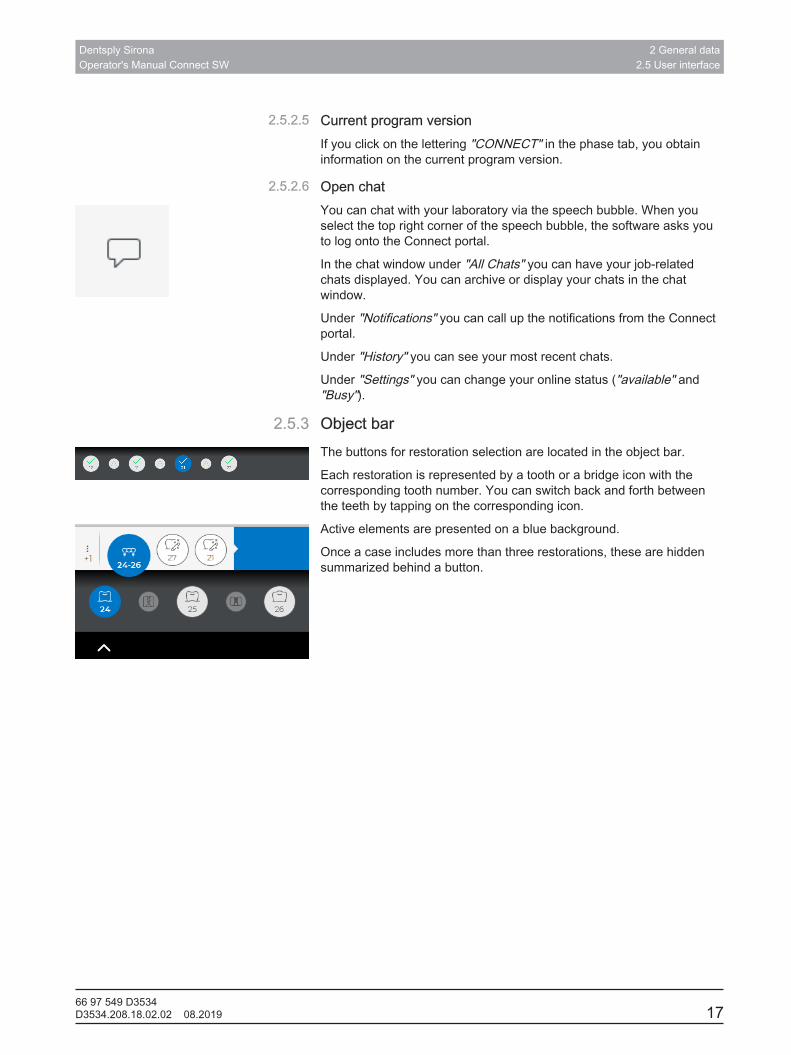
2.5.3 Object barThe buttons for restoration selection are located in the object bar.
Each restoration is represented by a tooth or a bridge icon with thecorresponding tooth number. You can switch back and forth betweenthe teeth by tapping on the corresponding icon.
Active elements are presented on a blue background.
Once a case includes more than three restorations, these are hiddensummarized behind a button.

2 General data2.5 User interface
Dentsply SironaOperator's Manual Connect SW
1866 97 549 D3534
D3534.208.18.02.02 08.2019
2.5.4 Step menuEach phase is divided into steps. They are shown in the step menu atthe bottom edge of the screen. The step menu changes depending onwhich phase the current case is in.
This menu guides you through the process step-by-step. All obligatorysteps of a phase are performed automatically or manually. Changes inthe individual steps are accepted by clicking on the next step.
The arrow keys in the context bar can be used to switch betweenphases.
Certain steps must be confirmed with a "Ok" or can be interrupted.
Status symbolsAll steps have a status symbol. Asterisks indicate obligatory steps.
Orange asterisk /no check mark:
The step is mandatory and has not been started yet.
White asterisk /no check mark:
The step has not yet been completed.
No asterisk /check mark:
The step has been completed successfully.
Mandatory and optional stepsOptional steps can be shown or hidden using the button on the right ofthe step menu. To do so, tap in the right area near to the edge of thelast step.
Optional steps are executed automatically and have a green checkmark with immediate effect. However, the standards used can bemodified. Obligatory steps are also automatically executed by thesoftware as far as possible. The automatic process stops at the nextmandatory step, when self-execution is necessary. There is only oneobligatory step per phase.
Dentsply SironaOperator's Manual Connect SW
2 General data2.5 User interface
66 97 549 D3534D3534.208.18.02.02 08.2019 19
2.5.5 Context barIn the lower area of the screen, you will find a black bar.
In this area, you will find context-dependent function buttons, such asthe arrow keys for switching to the next phase.
Certain steps must be confirmed with a "OK" or can be interrupted.
Furthermore, the context bar contains the status information andfunctions on the right side:● Screen lock● Connect Chat● Hub connectivity● Battery status
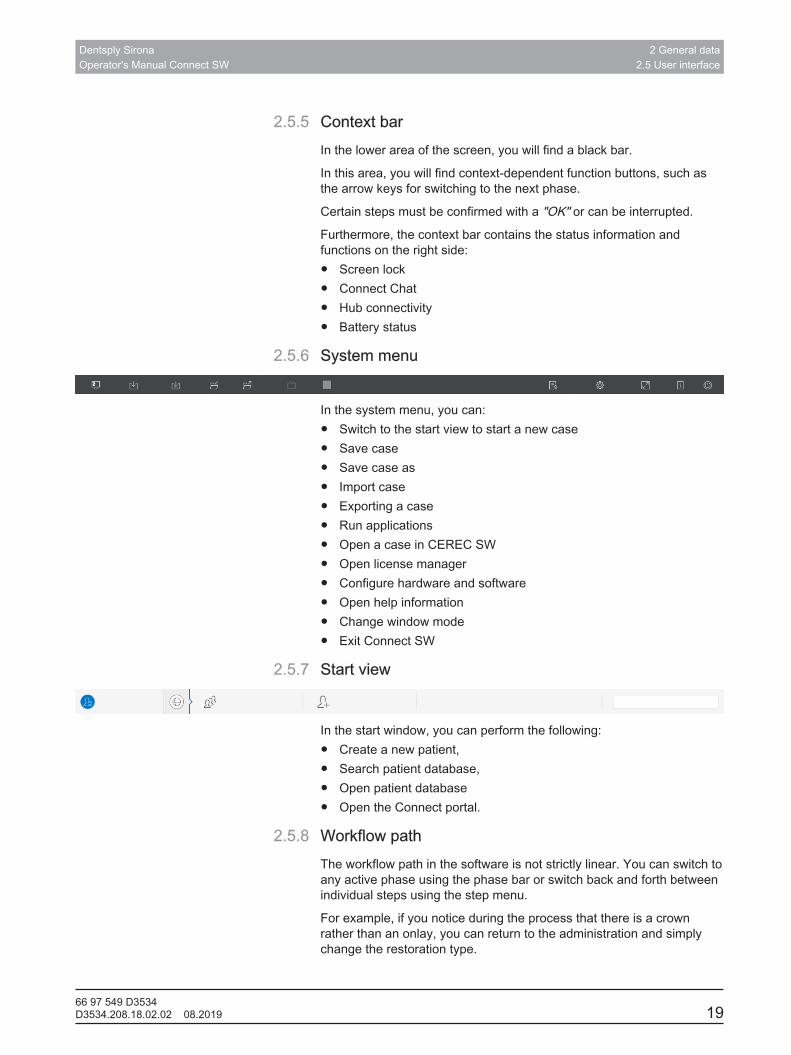
2.5.6 System menu
In the system menu, you can:● Switch to the start view to start a new case● Save case● Save case as● Import case● Exporting a case● Run applications● Open a case in CEREC SW● Open license manager● Configure hardware and software● Open help information● Change window mode● Exit Connect SW
2.5.7 Start view
In the start window, you can perform the following:● Create a new patient,● Search patient database,● Open patient database● Open the Connect portal.
2.5.8 Workflow pathThe workflow path in the software is not strictly linear. You can switch toany active phase using the phase bar or switch back and forth betweenindividual steps using the step menu.
For example, if you notice during the process that there is a crownrather than an onlay, you can return to the administration and simplychange the restoration type.
3 Getting started3.1 Installing the software
Dentsply SironaOperator's Manual Connect SW
2066 97 549 D3534
D3534.208.18.02.02 08.2019
3 Getting started
3.1 Installing the softwareü The PC is powered up and all programs are terminated.ü You have downloaded the installation file from the Internet and
saved it to the device.1. Navigate to the location of the installation file.2. Run the "setup. exe" file.3. Select the language of the installation and press the button marked
"OK".Ä The installation wizard opens.
4. Press the "Next" button.Ä The license agreement is shown.
5. Confirm the license agreement with the "Yes" button.Ä The program continues the installation routine.
6. Select "Full Installation".
NOTEInstalling DirectXIf DirectX is not yet installed on your computer, it will be installed now.Accept the license agreement and decide whether the computer is tobe restarted now or later.
7. After installation, you can display the "ReadMe" file by checking orunchecking the appropriate check box.
8. Click on the "Finish" button.
3.2 Uninstalling the softwareü The program is closed.1. Press “Start / All Programs / Sirona Dental Systems /Connect SW /
Tools / Deinstallation” to uninstall the software.Ä During the uninstall procedure, you will be asked whether you
want to delete the patient data or the entries in the registrationdatabase (e.g. the calibration data).
2. Depending on your decision, confirm with the "Yes" button ordecline with the "No" button.Ä The software is uninstalled.
3.3 Restore factory default settingsü The program is closed.1. Uninstall the software (see "Uninstalling the software [→ 20]").2. Install the software (see "Installing the software [→ 20]").
Ä The original factory default settings are restored.
Dentsply SironaOperator's Manual Connect SW
3 Getting started3.4 Copy protection
66 97 549 D3534D3534.208.18.02.02 08.2019 21
3.4 Copy protectionThe software can be started only when the USB license stick is pluggedin. The USB license stick is included in the scope of supply of theacquisition unit. If you require additional licenses, please contact yourdealer.
Always keep the USB license stick near the acquisition unit/PC.
All authorizations (interface and software licenses) can be installed aselectronic licenses on the USB license stick. You must enter a 25-digitlicense key for this purpose.You will receive the license key along with the acquisition unit.Alternatively, you can order it separately from your dealer.
Following an update, you may require a new license that is not availableon your USB license stick. For more information, refer to the “Licensemanager” section.
IMPORTANTSoftware license for Connect SW is pre-installed.No separate license needs to be installed for the Connect SWsoftware. This is pre-installed on every USB license stick.
3.5 Downloading softwareService packsTo keep your software updated, regularly check whether new servicepacks are available.
To do this, visit the website at “www.dentsplysirona.com” and go to“Digital impression” in the “Connect Software” area.
Automatic software updatesOnce the Connect SW software is opened and the acquisition unit isconnected to the Internet, the Connect SW software from version 5.0searches for updates automatically.
If a new version is found you will be asked whether you want todownload this now or later.
If you decide not to download the software now the, the Connect SWsoftware will prompt you again when you next start.
Once you have downloaded the Connect SW software, you will beasked whether you want to install the software now.
3 Getting started3.6 Starting the software
Dentsply SironaOperator's Manual Connect SW
2266 97 549 D3534
D3534.208.18.02.02 08.2019
3.6 Starting the softwareü The Connect SW software is installed. You will find the start icon on
the desktop.ü The USB license stick is connected with a valid, current license.1. Double-click the Connect SW start icon.or➢ Press “Start / All Programs / Sirona Dental Systems/ Connect SW /
Connect SW”.Ä The software is started.

Dentsply SironaOperator's Manual Connect SW
3 Getting started3.7 License manager
66 97 549 D3534D3534.208.18.02.02 08.2019 23
3.7 License managerFor more information on the license manager, refer to the section on“License manager.”
3.7.1 Installation of the License Manager (Individual)ü The PC is powered up and all programs are terminated.1. Insert the DVD in the DVD drive.
Ä The setup program starts automatically.2. If this is not the case, run the "Setup.exe" file in the root directory of
the DVD.Ä The installation wizard opens.
3. Press the "OK" button.4. In the next dialog, click the "Next" button.
Ä The license agreement is shown.5. Read through the license agreement carefully.6. If you accept the license agreement, then check the "I accept the
terms in the license agreement" option button and then click the"Next" button.
7. In the next dialog, select the "Custom" button.8. Uncheck all options apart from the license manager.9. In the next dialog, click the "Next" button.10. In the next dialog, click the "Install" button.
Ä The program continues the installation routine. This may takeseveral minutes.
11. Click the "Finish" button once installation is complete.Ä The license manager is installed.
3.7.2 License update without Internet accessIf the acquisition unit does not have Internet access itself, you can runthe license manager on another PC with Internet access.
You need to remove the license stick from the Sirona acquisition unitand plug it into the PC with Internet access. The license stick is behindthe lower cover at the rear side of the acquisition unit.
Install the license manager on the PC with Internet access and run thelicense update.
4 Configuration4.1 Parameters
Dentsply SironaOperator's Manual Connect SW
2466 97 549 D3534
D3534.208.18.02.02 08.2019
4 ConfigurationThe "Configuration" menu contains the following submenus:● "Parameters"● "Devices"● "Settings"● "Apps"
4.1 ParametersGeneral informationThe "Parameters" menu is arranged according to adjustment options.
The parameters in the configuration are used the standard value whencalculating tools.
Preparation AnalysisUnder "Preparation Analysis" you can define the ideal distance of thepreparation to the antagonist. A tolerance value can also be specifiedhere.
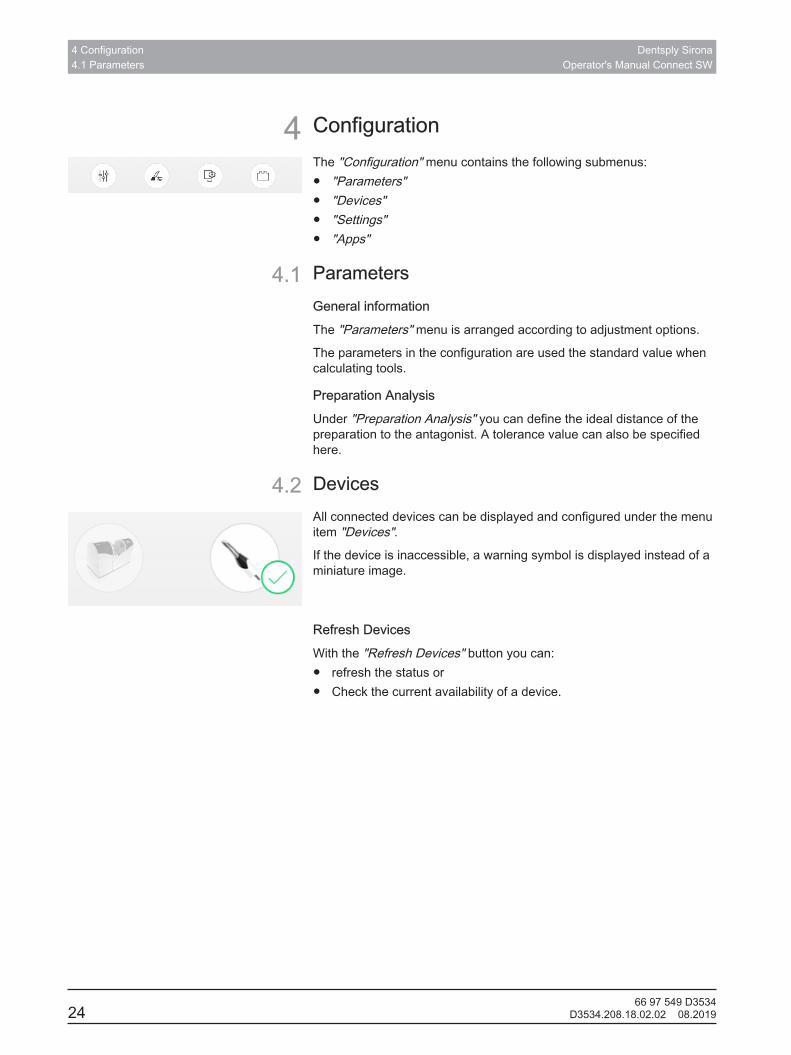
4.2 DevicesAll connected devices can be displayed and configured under the menuitem "Devices".If the device is inaccessible, a warning symbol is displayed instead of aminiature image.
Refresh DevicesWith the "Refresh Devices" button you can:● refresh the status or● Check the current availability of a device.
Dentsply SironaOperator's Manual Connect SW
4 Configuration4.2 Devices
66 97 549 D3534D3534.208.18.02.02 08.2019 25
4.2.1 Scanner4.2.1.1 Configuring the scanner
Audio feedbackUsing the "Sound:" selection box, you can switch the audio feedback foracquisitions on or off. You can set the volume using the slide bar. Youare able to choose from five different sounds.
Switch on the color analysis1. In the software, navigate to the system menu and click on the
"Configuration" button.2. Press the "Devices" button.3. Press the "Omnicam" / "Primescan" button.4. Select the "Shade Detection" option.
- You can choose between various color systems ("Shade GuideSelection").- You can decide whether you would like to be notified in 14 dayswhen the color calibration is needed again.- If color analysis is not possible with your scanner, a correspondingnotice will appear. A color calibration is also not available in thiscase.
5. Confirm the changes below with "Ok".6. Click the "Color Calibration" button and carry out the color
calibration.
4.2.1.2 Resetting scanner settings➢ Press the "Reset Scanner Settings" button.
Ä The settings are reset to factory settings.
4 Configuration4.2 Devices
Dentsply SironaOperator's Manual Connect SW
2666 97 549 D3534
D3534.208.18.02.02 08.2019
4.2.1.3 Calibrating the scanner
Using a calibrated scannerThe measurement procedure used by the system requires the use of acalibrated scanner. The scanner is calibrated ex works. Calibrate thescanner after every reinstallation and after each time that it istransported. The calibration set supplied is available for the calibrationprocess.
CEREC Omnicam / Omnicam: In order to achieve optimum results, thescanner must be allowed to warm up for 15-20 minutes beforecalibration.
CEREC Primescan / Primescan: In order to achieve optimum results,the scanner must be allowed to warm up for 2 minutes beforecalibration.
Recalibrate the scanner in the following cases:● following transport (shaking stress) or during first commissioning,● after storage in unheated or un-air-conditioned rooms (temperature
differences exceeding 30°C / 85°F),● with temperature differences of over 15°C / 60°F between the last
calibration and operation.● In general, carrying out a calibration is the correct process in the
event of errors in the acquisition process (such as poor imagequality or the lack of a 3D preview). In many cases, the errors canbe corrected in doing so.
● As the system may be exposed to vibration loads without knowledgeof this, it should be calibrated once a month.
Starting calibration1. In the software, navigate to the system menu and click on the
"Configuration" button.2. Press the "Devices" button.3. Press the "Omnicam" / "Primescan" button.4. Press the "Calibrate" button.
Ä The camera view is displayed in one window.5. Enter the 8-digit Sirona ID. You can find this ID on the sticker on the
calibration set (not required for CEREC Primescan / Primescan).
Dentsply SironaOperator's Manual Connect SW
4 Configuration4.2 Devices
66 97 549 D3534D3534.208.18.02.02 08.2019 27
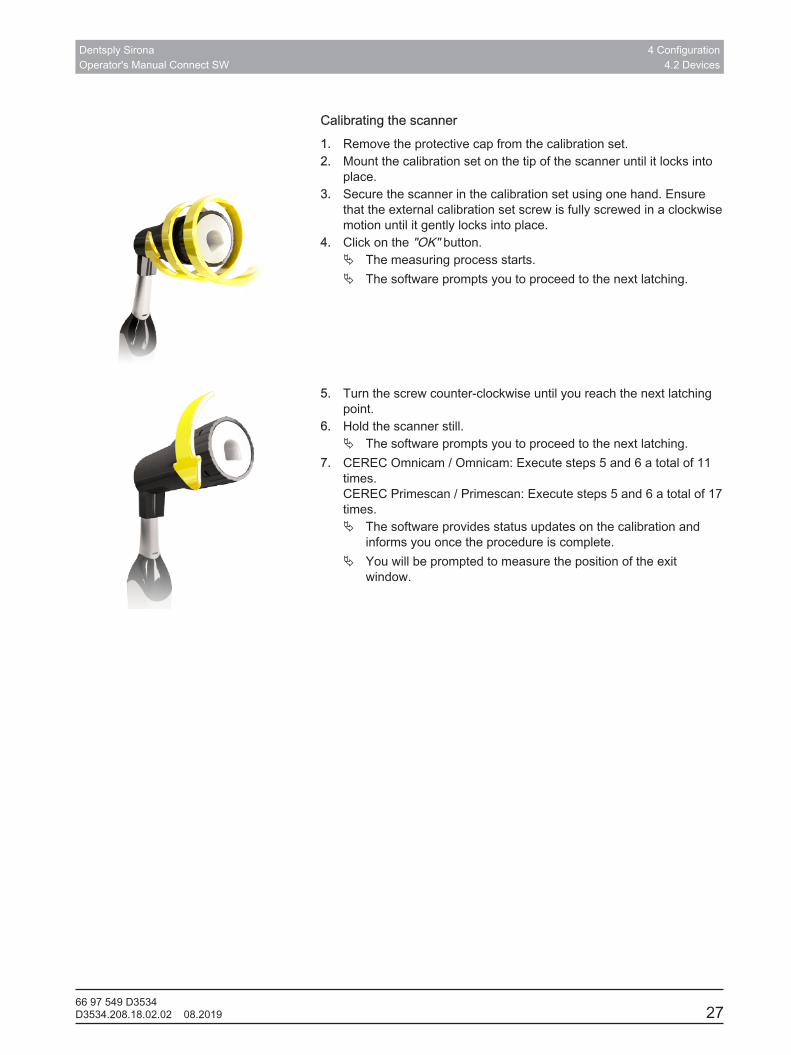
Calibrating the scanner1. Remove the protective cap from the calibration set.2. Mount the calibration set on the tip of the scanner until it locks into
place.3. Secure the scanner in the calibration set using one hand. Ensure
that the external calibration set screw is fully screwed in a clockwisemotion until it gently locks into place.
4. Click on the "OK" button.Ä The measuring process starts.Ä The software prompts you to proceed to the next latching.
5. Turn the screw counter-clockwise until you reach the next latchingpoint.
6. Hold the scanner still.Ä The software prompts you to proceed to the next latching.
7. CEREC Omnicam / Omnicam: Execute steps 5 and 6 a total of 11times. CEREC Primescan / Primescan: Execute steps 5 and 6 a total of 17times.Ä The software provides status updates on the calibration and
informs you once the procedure is complete.Ä You will be prompted to measure the position of the exit
window.
4 Configuration4.2 Devices
Dentsply SironaOperator's Manual Connect SW
2866 97 549 D3534
D3534.208.18.02.02 08.2019
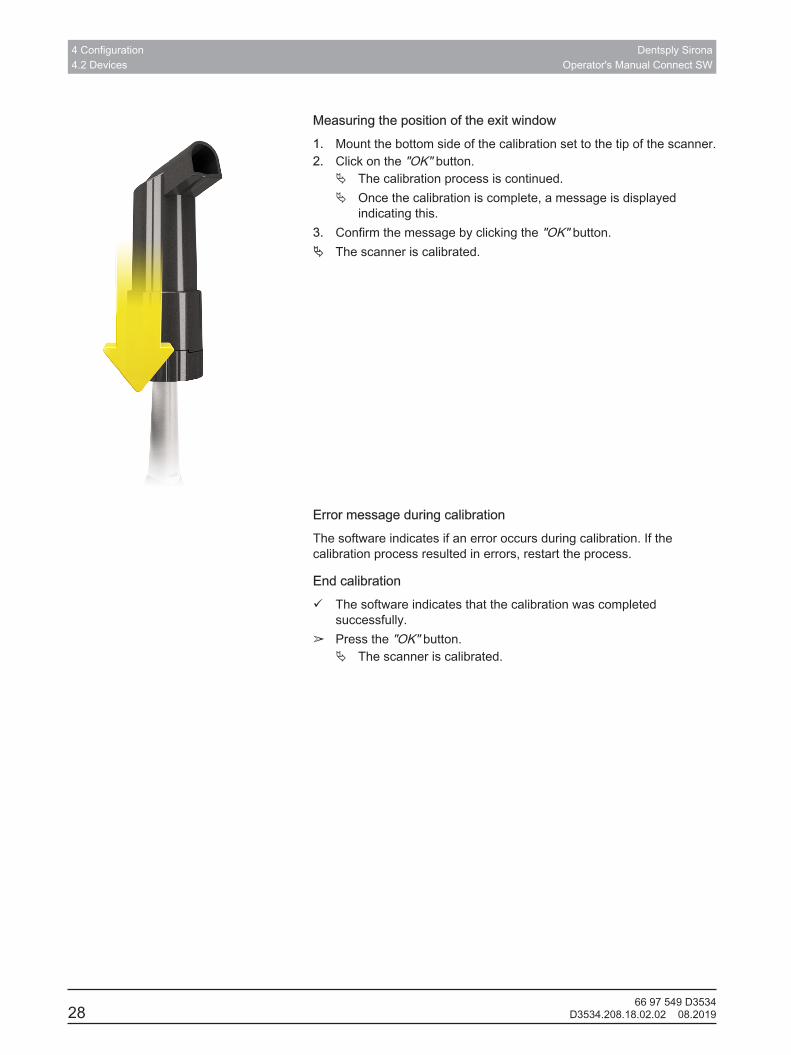
Measuring the position of the exit window1. Mount the bottom side of the calibration set to the tip of the scanner.2. Click on the "OK" button.
Ä The calibration process is continued.Ä Once the calibration is complete, a message is displayed
indicating this.3. Confirm the message by clicking the "OK" button.Ä The scanner is calibrated.
Error message during calibrationThe software indicates if an error occurs during calibration. If thecalibration process resulted in errors, restart the process.
End calibrationü The software indicates that the calibration was completed
successfully.➢ Press the "OK" button.
Ä The scanner is calibrated.
Dentsply SironaOperator's Manual Connect SW
4 Configuration4.2 Devices
66 97 549 D3534D3534.208.18.02.02 08.2019 29
4.2.1.4 Color calibration
General information
NOTEFaulty color analysisThe color analysis can be negatively impacted due to strong lightincidence and it can lead to varying results.➢ Set the scanner up so that it is not located directly in the beam
path of an extreme light source (e.g., the treatment light) and notexposed to direct sunlight.
A color-calibrated scanner must be used for the color analysis.
NOTEObserve color calibrationA color calibration may only be performed at least 20 minutes afterthe system start/cleaning.The color calibration must be performed regularly.
The scanner must be color calibrated every two weeks in order to carryout a reliable color analysis. You will achieve the best results if thescanner is color calibrated immediately before scanning a new case.
Carry out a color calibration also after changing a sleeve/mirror sleeve.
Heavily scratched sleeve window may not be used for a color analysis.
Storing a color-calibration setThe color-calibration set must be stored in its packaging in a dry placewhich is protected from light. It must be used with a disinfected scanneras the color-calibration set must itself not be disinfected. If dustaccumulates on the inside of the color-calibration set, it must becarefully removed using compressed air.
Switch on the color analysis1. In the software, navigate to the system menu and click on the
"Configuration" button.2. Click on the "Devices" button.3. Click on the "Omnicam" / "Primescan" button.4. Select the "Shade Detection" option.
- You can choose between various color systems ("Shade GuideSelection").- You can decide whether you would like to be notified in 14 dayswhen the color calibration is needed again.
5. Confirm the changes below with "Ok".6. Click the "Color Calibration" button and carry out the color
calibration.
4 Configuration4.2 Devices
Dentsply SironaOperator's Manual Connect SW
3066 97 549 D3534
D3534.208.18.02.02 08.2019
Color-calibrating the scanner
NOTEOnly use color calibration set with clean, dry CEREC Primescan /Primescan / CEREC Omnicam / Omnicam scannerIn order to achieve optimum results, the CEREC Primescan /Primescan / CEREC Omnicam / Omnicam scanner must be clean,disinfected and dry before color calibration.➢ Make sure that the CEREC Primescan / Primescan / CEREC
Omnicam / Omnicam scanner is clean, disinfected and dry.
1. Remove the color-calibration set from the packaging.2. Use the CEREC Primescan / Primescan / CEREC Omnicam /
Omnicam scanner to scan the QR code on the underside of yourcolor-calibration set. In order to do this, you must hold the CERECPrimescan / Primescan / CEREC Omnicam / Omnicam scanner stillin front of the QR code so that it is completely visible in the picture.If the QR code appears to be shiny, hold the scanner at more of anoblique angle in order to avoid any glaring light and to make iteasier to scan the codes. If the QR code is recognized, the next"Please mount color calibration set" step appears.This step of the QR code scan is skipped during the subsequentcolor calibration and the serial number of the color-calibration set isthus displayed. If this does not match the serial number printed onyour color-calibration set, click on the "Rescan QR Code" buttonand scan the new QR code.
3. Mount the color-calibration set on the tip of the scanner until it locksinto place.
4. Click on the "Ok" button.Ä The measuring process starts. Do not move the CEREC
Primescan / Primescan / CEREC Omnicam / Omnicam scanneror the color-calibration set during this time.
Ä The software provides status updates on the calibration andinforms you once the procedure is complete.
Ending the color calibrationü The software indicates that the color calibration was completed
successfully.1. Click on the "Ok" button.
Ä The CEREC Primescan / Primescan / CEREC Omnicam /Omnicam scanner is now color-calibrated.
2. Remove the color-calibration set from the scanner and place it backin the packaging.
Error message during color calibrationThe software indicates if an error occurs during color calibration. If thecolor calibration contained an error, ensure the following:● The color-calibration set is free of dust● The color-calibration set was mounted correctly● The CEREC Primescan / Primescan / CEREC Omnicam / Omnicam
scanner exit window is clean➢ Then restart the color calibration.
Dentsply SironaOperator's Manual Connect SW
4 Configuration4.2 Devices
66 97 549 D3534D3534.208.18.02.02 08.2019 31
Do not continue using a damaged color-calibration set; instead, contactyour distributor to purchase a new one.
Replacing the color calibration set
NOTERegularly replacing the color calibration setIn order to achieve optimum results, the color calibration set must bereplaced regularly.➢ Observe the following:
Please note that the color calibration set● can only be used with CEREC 5 software ≥ 5.x or Connect SW ≥ 5.● can only be kept for use for a maximum of 2 years. You can find the
expiry date at the bottom of the color calibration set container.Previous storage may mean that the period for use has beenreduced to less than 2 years.
● can only be used for one year after the container has been opened.Write the date that the container was opened on the container after"Opened on ___________" using a waterproof pen and do not useafter one year.
The color calibration set may no longer be used once either of the twoperiods has expired.
The software notifies you that the color calibration set needs to bereplaced with a new set before the color calibration expires.
Once the color calibration set has expired the software notifies you thata color analysis can only be carried out based on old calibration data.
Please contact your dealer for replacements for the color calibration set.
4 Configuration4.3 Settings
Dentsply SironaOperator's Manual Connect SW
3266 97 549 D3534
D3534.208.18.02.02 08.2019
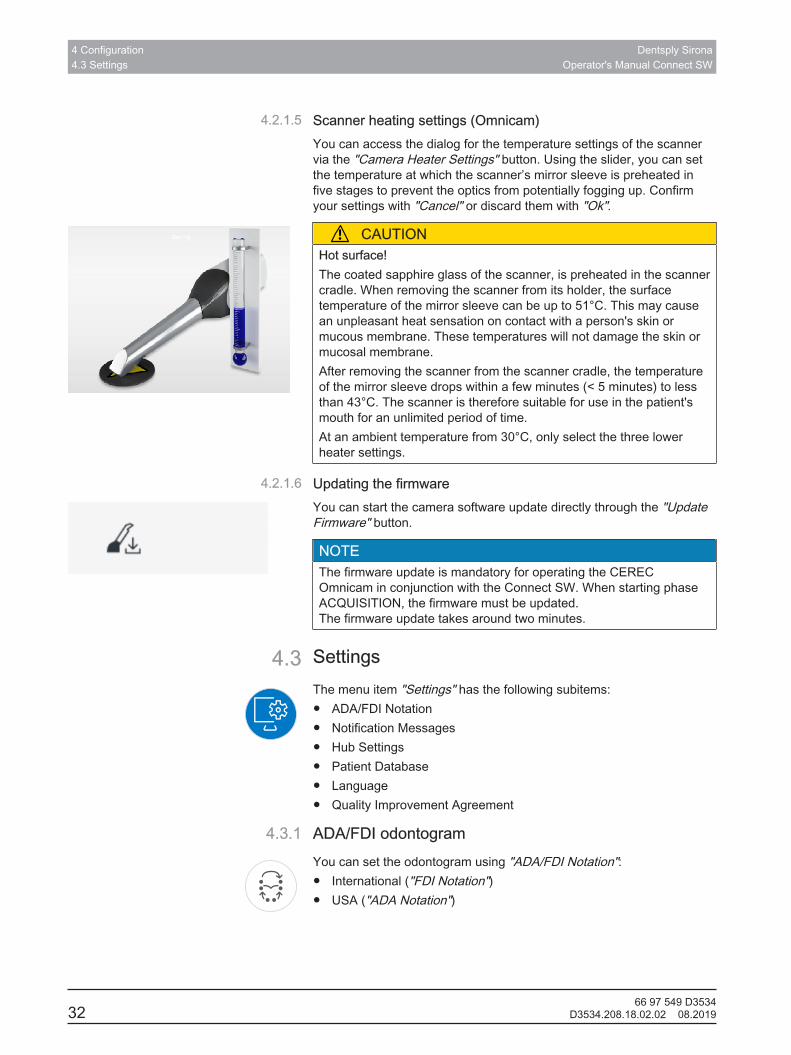
4.2.1.5 Scanner heating settings (Omnicam)You can access the dialog for the temperature settings of the scannervia the "Camera Heater Settings" button. Using the slider, you can setthe temperature at which the scanner’s mirror sleeve is preheated infive stages to prevent the optics from potentially fogging up. Confirmyour settings with "Cancel" or discard them with "Ok".
CAUTIONHot surface!The coated sapphire glass of the scanner, is preheated in the scannercradle. When removing the scanner from its holder, the surfacetemperature of the mirror sleeve can be up to 51°C. This may causean unpleasant heat sensation on contact with a person's skin ormucous membrane. These temperatures will not damage the skin ormucosal membrane.After removing the scanner from the scanner cradle, the temperatureof the mirror sleeve drops within a few minutes (< 5 minutes) to lessthan 43°C. The scanner is therefore suitable for use in the patient'smouth for an unlimited period of time.At an ambient temperature from 30°C, only select the three lowerheater settings.
4.2.1.6 Updating the firmwareYou can start the camera software update directly through the "UpdateFirmware" button.
NOTEThe firmware update is mandatory for operating the CERECOmnicam in conjunction with the Connect SW. When starting phaseACQUISITION, the firmware must be updated. The firmware update takes around two minutes.
4.3 SettingsThe menu item "Settings" has the following subitems:● ADA/FDI Notation● Notification Messages● Hub Settings● Patient Database● Language● Quality Improvement Agreement
4.3.1 ADA/FDI odontogramYou can set the odontogram using "ADA/FDI Notation":● International ("FDI Notation")● USA ("ADA Notation")

Dentsply SironaOperator's Manual Connect SW
4 Configuration4.3 Settings
66 97 549 D3534D3534.208.18.02.02 08.2019 33
4.3.2 NotificationsNotes may appear in pop-up windows when using the software. Many ofthese messages can be deactivated by clicking on the "Don't show thismessage again" check box. If this check box is already selected or if anew user uses the software, all notifications can be reset here. Bypressing the "Reset" button, all notes are displayed again.
4.3.3 Hub settingsYou can implement the settings for connecting to the server in the "HubSettings" menu item. The IP settings may be automatic or may beentered manually with the corresponding IP address and port.
Information on the connection status is provided on the right half of thescreen.
If the check mark "Scan network for Hub" is set, it is automaticallyconnected to the Connect SW software.
4.3.4 Patient databaseIn the menu item "Patient Database", you can determine where patientdata and cases are saved.
You have the option to rename patients and cases in the patientoverview table (accessible via the start view).
You can specify a folder for this data. This allows you, for example, tosave all data on a secure server on the practice network.
Alternatively, you can manage patient data with Sirona SIDEXISsoftware and save cases in a database created in SIDEXIS.
You can export a support container (*.zip) in the tabular patientoverview (accessible via the start view) that contains all the data foranalyzing problems: rst file, image data, log files, etc.
4.3.5 LanguageHere, you can set the language of the software.
4.3.6 Quality improvement agreementHere you can select whether or not you wish to participate in the qualityimprovement program.
By participating in the program for quality improvement, you agree toanonymous usage data being sent to Dentsply Sirona. The datatransmitted are used to improve the quality of the software.
To participate in the program for quality improvement, set a checkmarknext to "Yes, I would like to participate in the quality improvementprogram."
4 Configuration4.4 App Center (applications)
Dentsply SironaOperator's Manual Connect SW
3466 97 549 D3534
D3534.208.18.02.02 08.2019
4.4 App Center (applications)Via the App Center (Apps), you have access to various apps(applications) for our CAD/CAM products.
Dentsply SironaOperator's Manual Connect SW
5 System menu5.1 Saving the impression
66 97 549 D3534D3534.208.18.02.02 08.2019 35
5 System menu
In the system menu, you can:● Switch to the start view to start a new case● Save case● Save case as● Import case● Exporting a case● Run applications● Open a case in CEREC SW● Open license manager● Configure hardware and software● Open help information● Change window mode● Exit Connect SW
Open system menu➢ Press the button in the top left corner of the screen.
Ä The system menu is displayed.
Close system menu1. Press the button in the top left corner of the screen.or➢ Tap or click in the main window.
Ä The system menu is closed.
5.1 Saving the impressionIn this window, you can save the current optical impression.➢ Select "Save" in the system menu.
Ä The impression is saved.
5 System menu5.2 Saving the impression under a different name
Dentsply SironaOperator's Manual Connect SW
3666 97 549 D3534
D3534.208.18.02.02 08.2019
5.2 Saving the impression under a different nameThis dialog allows you to save the current optical impression under anew name or assign it to a different patient.1. Select "Save As" in the system menu.
Ä The "Save as…" dialog box opens.2. Enter a name for the optical impression.3. Select the appropriate patient.4. Press the "OK" button.
5.3 Importing an impressionü An existing optical impression is located on your acquisition unit (or
data storage medium).1. Click the "Import" button in the system menu.
Ä A standard Windows dialog box opens.2. Select the folder where the optical impression is located.3. Select the relevant file.
NOTEFile typesIf the selected file is an optical impression with CEREC Connect SWor Connect SW this is opened. If not, it will not open, and an errormessage will be displayed.
4. Press the "Open" button.5. Assign a name to the optical impression.6. Press the "OK" button.Ä The optical impression is imported and opened.
5.4 Exporting an impressionYou can save an optical impression in a compressed format in anylocation.
ü You have opened an optical impression.1. Select "Export".
Ä A standard Windows file dialog box opens.2. Select the target folder to which you want to export the optical
impression.3. Assign a name to the optical impression.4. Press the "Save" button.Ä The optical impression is exported.
If you want to transfer the optical impression from your acquisition unitto another PC (e.g. in order to upload it to the Internet portal), you canuse a USB stick for this purpose.
Dentsply SironaOperator's Manual Connect SW
5 System menu5.5 Exporting scan data
66 97 549 D3534D3534.208.18.02.02 08.2019 37
5.5 Exporting scan dataYou can export scan data as STL or DXD in order to process● in inLab SW, CEREC SW or Connect SW (DXD)
or● in another compatible (STL)
system.
IMPORTANTDentsply Sirona will not be held liable for the further processing of*.stl data in other/external software.
5.6 Open a case in the CEREC softwareIf the CEREC SW and Connect SW are operated in parallel, a CERECbutton appears in the Connect SW system menu. If you press thisbutton, the current case will open in the CEREC software - e.g. in orderto create the temporary solution.
5.7 License managerThe license manager is used for the installation of new softwarelicenses on the USB license stick. To do this, start the license managervia the system menu and follow the instructions on the screen. Keep thelicense certificate with 25-digit license key ready, which you eitherobtained with the unit or ordered separately from your dealer.
Tip: You can also start the license manager via “Start / All Programs /Sirona Dental Systems / Connect SW / Tools / License Manager”.
To activate the license you must have an Internet connection and theUSB license stick must be connected.
IMPORTANTSoftware license for Connect SW is pre-installed.No separate license needs to be installed for the Connect SWsoftware. This is pre-installed on every USB license stick.
Licenses and code librariesFor information on licenses and code libraries from other providers, seelicenses.pdf. The file is in the installation directory under "C:/Programs/Sirona Dental Systems/CADCAM".
5.8 ConfigurationThe configuration is described in the "Configuration [→ 24]" section.
5 System menu5.9 Window mode
Dentsply SironaOperator's Manual Connect SW
3866 97 549 D3534
D3534.208.18.02.02 08.2019
5.9 Window modeThe "Window Mode" function can be used to exit full-screen mode orenter it again. You can also activate or deactivate the window mode bypressing F11.
5.10 Open help informationYou can access the manual via the Help button or by pressing "F1".
5.11 Exit programThe "Exit" function can be used to close the software.
Dentsply SironaOperator's Manual Connect SW
6 Start view
66 97 549 D3534D3534.208.18.02.02 08.2019 39
6 Start view
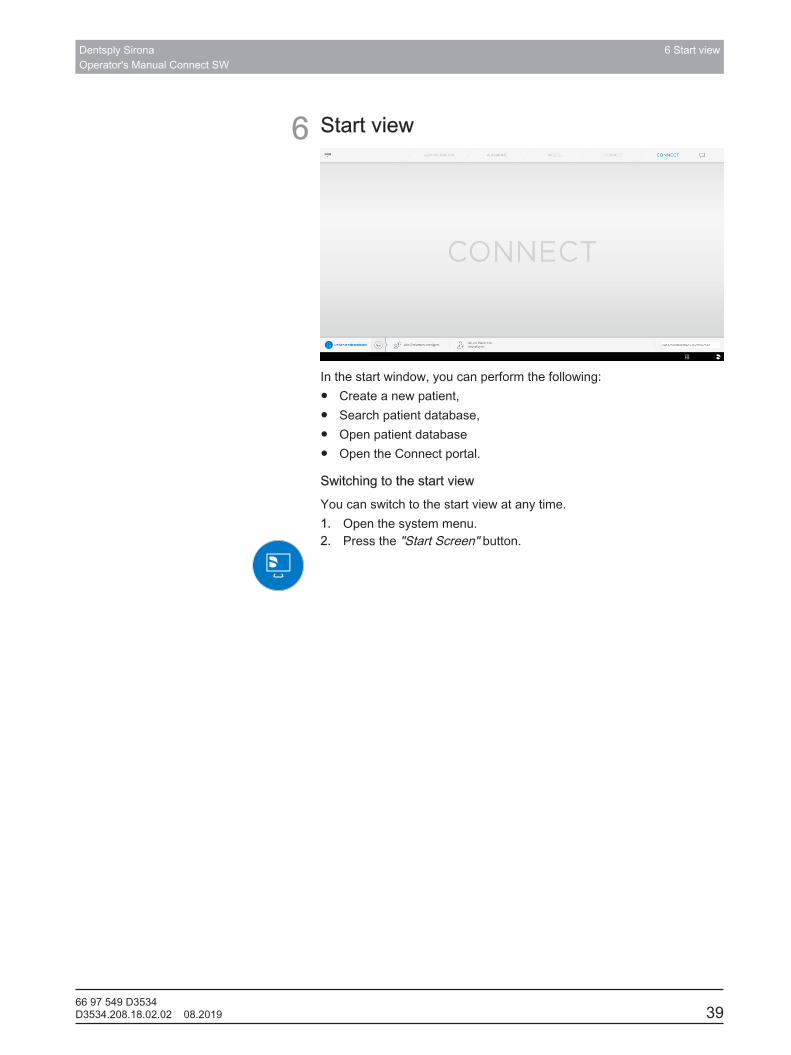
In the start window, you can perform the following:● Create a new patient,● Search patient database,● Open patient database● Open the Connect portal.
Switching to the start viewYou can switch to the start view at any time.1. Open the system menu.2. Press the "Start Screen" button.
6 Start view6.1 Create a new patient
Dentsply SironaOperator's Manual Connect SW
4066 97 549 D3534
D3534.208.18.02.02 08.2019
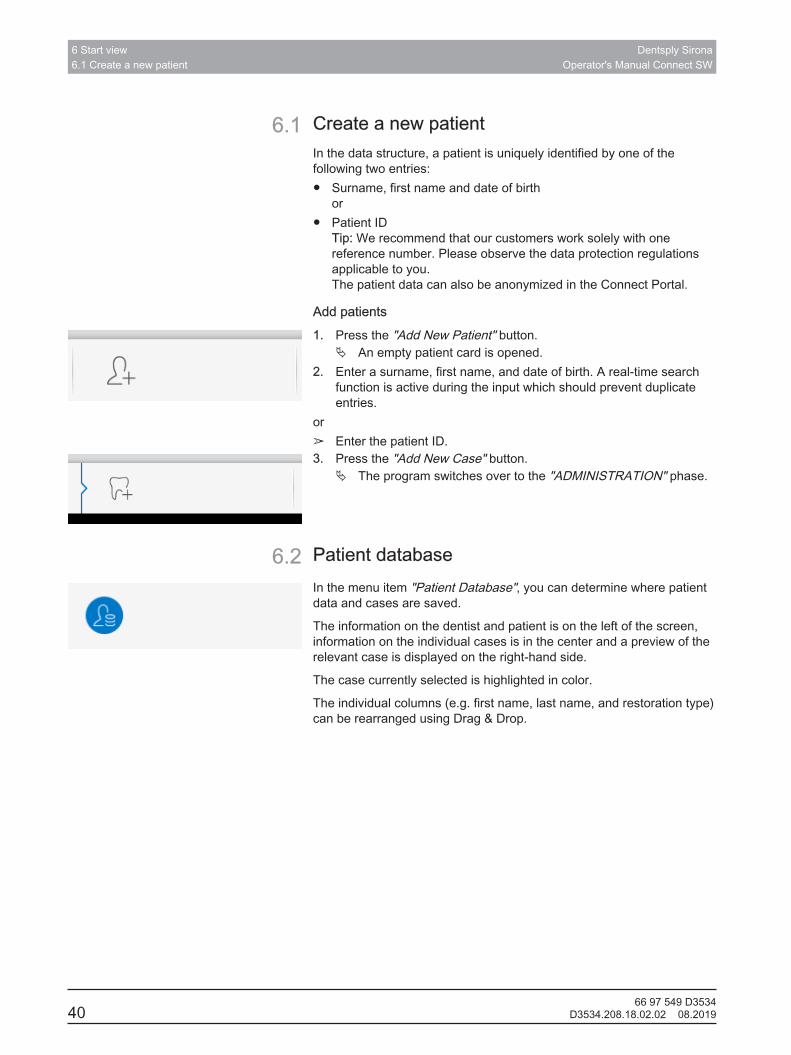
6.1 Create a new patientIn the data structure, a patient is uniquely identified by one of thefollowing two entries:● Surname, first name and date of birth
or● Patient ID
Tip: We recommend that our customers work solely with onereference number. Please observe the data protection regulationsapplicable to you. The patient data can also be anonymized in the Connect Portal.
Add patients1. Press the "Add New Patient" button.
Ä An empty patient card is opened.2. Enter a surname, first name, and date of birth. A real-time search
function is active during the input which should prevent duplicateentries.
or➢ Enter the patient ID.3. Press the "Add New Case" button.
Ä The program switches over to the "ADMINISTRATION" phase.
6.2 Patient databaseIn the menu item "Patient Database", you can determine where patientdata and cases are saved.
The information on the dentist and patient is on the left of the screen,information on the individual cases is in the center and a preview of therelevant case is displayed on the right-hand side.
The case currently selected is highlighted in color.
The individual columns (e.g. first name, last name, and restoration type)can be rearranged using Drag & Drop.
Dentsply SironaOperator's Manual Connect SW
6 Start view6.2 Patient database
66 97 549 D3534D3534.208.18.02.02 08.2019 41
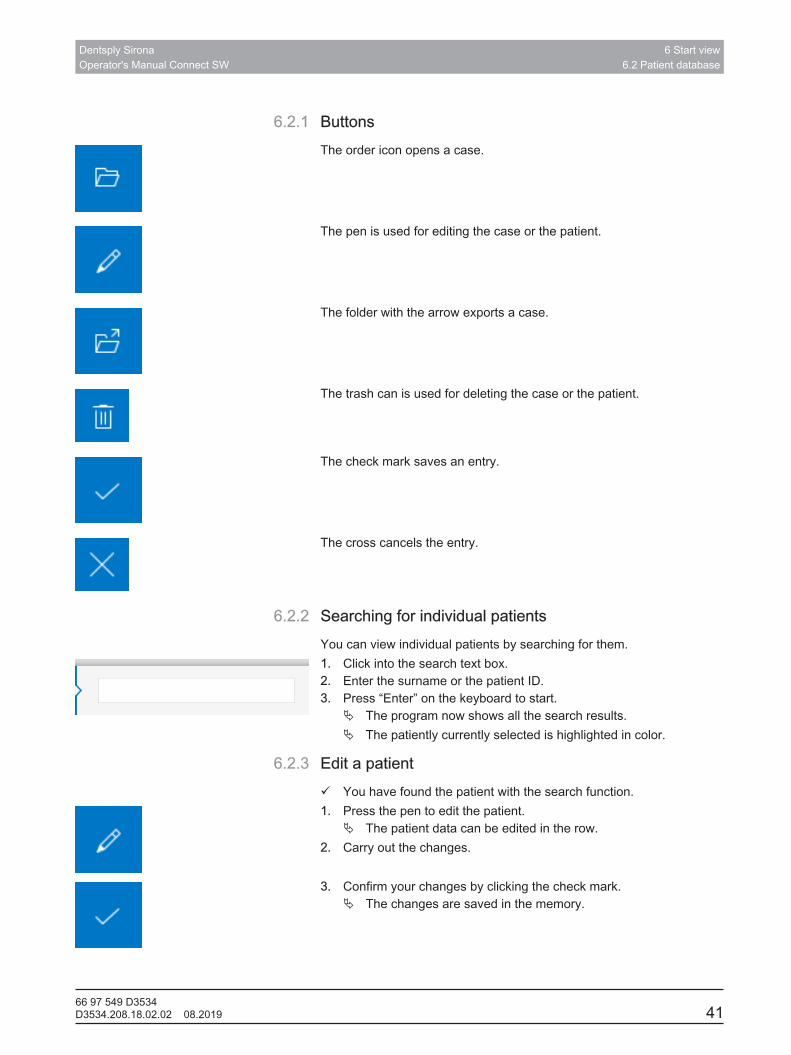
6.2.1 ButtonsThe order icon opens a case.
The pen is used for editing the case or the patient.
The folder with the arrow exports a case.
The trash can is used for deleting the case or the patient.
The check mark saves an entry.
The cross cancels the entry.
6.2.2 Searching for individual patientsYou can view individual patients by searching for them.1. Click into the search text box.2. Enter the surname or the patient ID.3. Press “Enter” on the keyboard to start.
Ä The program now shows all the search results.Ä The patiently currently selected is highlighted in color.
6.2.3 Edit a patientü You have found the patient with the search function.1. Press the pen to edit the patient.
Ä The patient data can be edited in the row.2. Carry out the changes.
3. Confirm your changes by clicking the check mark.Ä The changes are saved in the memory.
6 Start view6.2 Patient database
Dentsply SironaOperator's Manual Connect SW
4266 97 549 D3534
D3534.208.18.02.02 08.2019
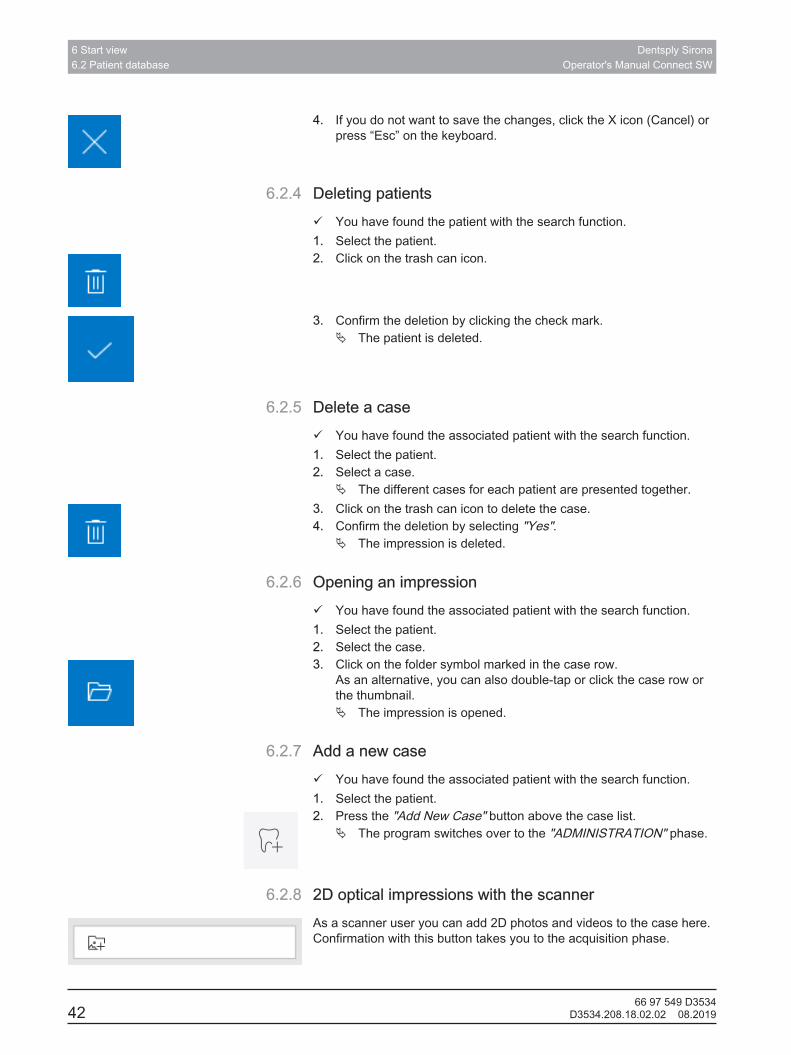
4. If you do not want to save the changes, click the X icon (Cancel) orpress “Esc” on the keyboard.
6.2.4 Deleting patientsü You have found the patient with the search function.1. Select the patient.2. Click on the trash can icon.
3. Confirm the deletion by clicking the check mark.Ä The patient is deleted.
6.2.5 Delete a caseü You have found the associated patient with the search function.1. Select the patient.2. Select a case.
Ä The different cases for each patient are presented together.3. Click on the trash can icon to delete the case.4. Confirm the deletion by selecting "Yes".
Ä The impression is deleted.
6.2.6 Opening an impressionü You have found the associated patient with the search function.1. Select the patient.2. Select the case.3. Click on the folder symbol marked in the case row.
As an alternative, you can also double-tap or click the case row orthe thumbnail.Ä The impression is opened.
6.2.7 Add a new caseü You have found the associated patient with the search function.1. Select the patient.2. Press the "Add New Case" button above the case list.
Ä The program switches over to the "ADMINISTRATION" phase.
6.2.8 2D optical impressions with the scannerAs a scanner user you can add 2D photos and videos to the case here.Confirmation with this button takes you to the acquisition phase.
Dentsply SironaOperator's Manual Connect SW
7 Page palette7.1 View options
66 97 549 D3534D3534.208.18.02.02 08.2019 43
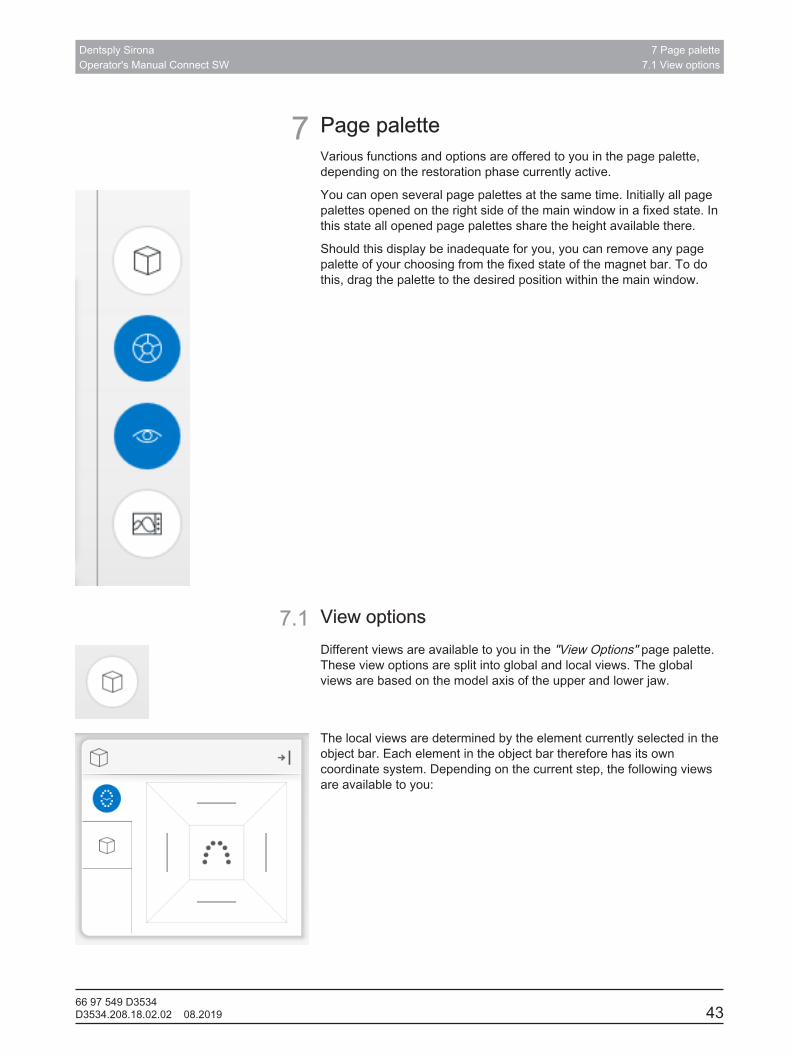
7 Page paletteVarious functions and options are offered to you in the page palette,depending on the restoration phase currently active.
You can open several page palettes at the same time. Initially all pagepalettes opened on the right side of the main window in a fixed state. Inthis state all opened page palettes share the height available there.
Should this display be inadequate for you, you can remove any pagepalette of your choosing from the fixed state of the magnet bar. To dothis, drag the palette to the desired position within the main window.
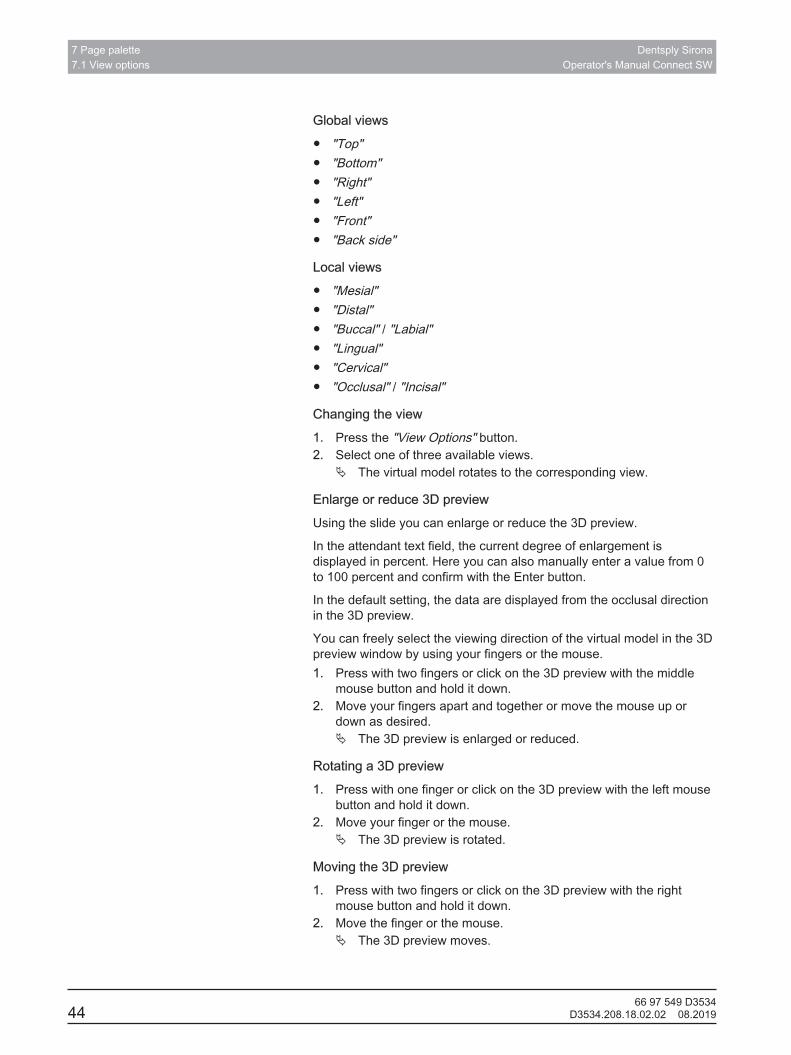
7.1 View optionsDifferent views are available to you in the "View Options" page palette.These view options are split into global and local views. The globalviews are based on the model axis of the upper and lower jaw.
The local views are determined by the element currently selected in theobject bar. Each element in the object bar therefore has its owncoordinate system. Depending on the current step, the following viewsare available to you:
7 Page palette7.1 View options
Dentsply SironaOperator's Manual Connect SW
4466 97 549 D3534
D3534.208.18.02.02 08.2019
Global views● "Top"● "Bottom"● "Right"● "Left"● "Front"● "Back side"
Local views● "Mesial"● "Distal"● "Buccal" / "Labial"● "Lingual"● "Cervical"● "Occlusal" / "Incisal"
Changing the view1. Press the "View Options" button.2. Select one of three available views.
Ä The virtual model rotates to the corresponding view.
Enlarge or reduce 3D previewUsing the slide you can enlarge or reduce the 3D preview.
In the attendant text field, the current degree of enlargement isdisplayed in percent. Here you can also manually enter a value from 0to 100 percent and confirm with the Enter button.
In the default setting, the data are displayed from the occlusal directionin the 3D preview.
You can freely select the viewing direction of the virtual model in the 3Dpreview window by using your fingers or the mouse.1. Press with two fingers or click on the 3D preview with the middle
mouse button and hold it down.2. Move your fingers apart and together or move the mouse up or
down as desired.Ä The 3D preview is enlarged or reduced.
Rotating a 3D preview1. Press with one finger or click on the 3D preview with the left mouse
button and hold it down.2. Move your finger or the mouse.
Ä The 3D preview is rotated.
Moving the 3D preview1. Press with two fingers or click on the 3D preview with the right
mouse button and hold it down.2. Move the finger or the mouse.
Ä The 3D preview moves.
Dentsply SironaOperator's Manual Connect SW
7 Page palette7.2 Tools
66 97 549 D3534D3534.208.18.02.02 08.2019 45
7.2 ToolsYou will find all tools in the page palette under "Tools". The availabletools are displayed for each step.
To change a tool, press the button of another tool in the window of theof the page palette.
To close a tool, press the button of the active tool once more.
"Undo" and "Reset"With the "Undo" button in the tools you can undo all changes made onthe selected restorations since the tool was started.
With the "Reset" button in the tools you can undo all changes made onall restorations since the tool was started.
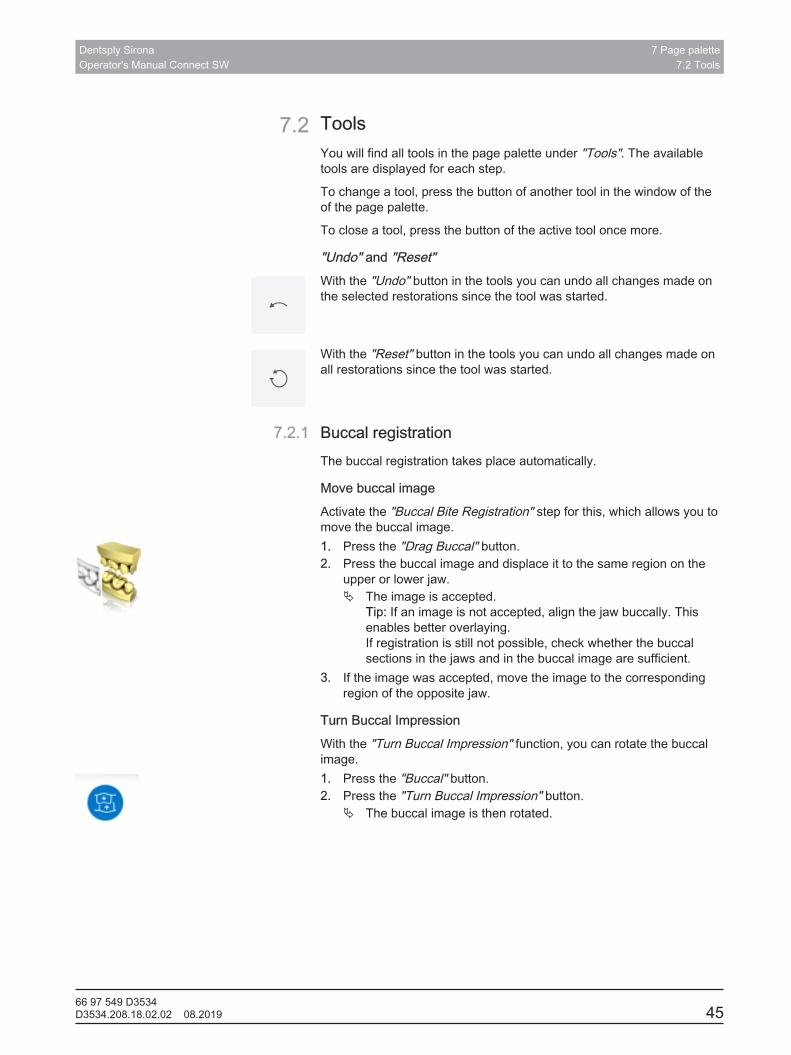
7.2.1 Buccal registrationThe buccal registration takes place automatically.
Move buccal imageActivate the "Buccal Bite Registration" step for this, which allows you tomove the buccal image.1. Press the "Drag Buccal" button.2. Press the buccal image and displace it to the same region on the
upper or lower jaw.Ä The image is accepted.
Tip: If an image is not accepted, align the jaw buccally. Thisenables better overlaying.If registration is still not possible, check whether the buccalsections in the jaws and in the buccal image are sufficient.
3. If the image was accepted, move the image to the correspondingregion of the opposite jaw.
Turn Buccal Impression With the "Turn Buccal Impression" function, you can rotate the buccalimage.1. Press the "Buccal" button.2. Press the "Turn Buccal Impression" button.
Ä The buccal image is then rotated.

7 Page palette7.2 Tools
Dentsply SironaOperator's Manual Connect SW
4666 97 549 D3534
D3534.208.18.02.02 08.2019
7.2.2 Cut out model areas("MODEL" phase, "Edit Model" step)
IMPORTANTFor precision reasons, this function can only be operated by trackballor touchpad.
With the "Cut" function, you can cut out model areas. The cut-out modelareas are then discarded once you exit the "Edit Model" step. Youcannot display discarded areas later on.
Removing the model areaWhen performing this activity, be careful not to accidentally cut out anyareas that e.g. are located behind the model or are otherwise cut awayfrom the line.1. Press the "Cut" button.2. Begin the cut line with a double-click.3. Press to set additional points.4. Finish the cut by double clicking.
Ä The model area is cut off.
Inverting the model areaWith the "Invert Selected" function, the model area that is cut out can beinverted.
ü The "Cut" tool is selected.ü You have created a cut.➢ Press the "Invert Selected" button.
Ä The model area which was cut out is displayed.The rest of the model area is hidden.
Tip: You can invert the model area that is cut out by double-clicking onthe semitransparent cut-out area.
7.2.3 Resetting the model("MODEL" phase, "Edit Model" step)
With the "Reset Model" function, all changes will be reset.1. Press the "Reset Model" button.2. Confirm with "Apply".
Dentsply SironaOperator's Manual Connect SW
7 Page palette7.2 Tools
66 97 549 D3534D3534.208.18.02.02 08.2019 47
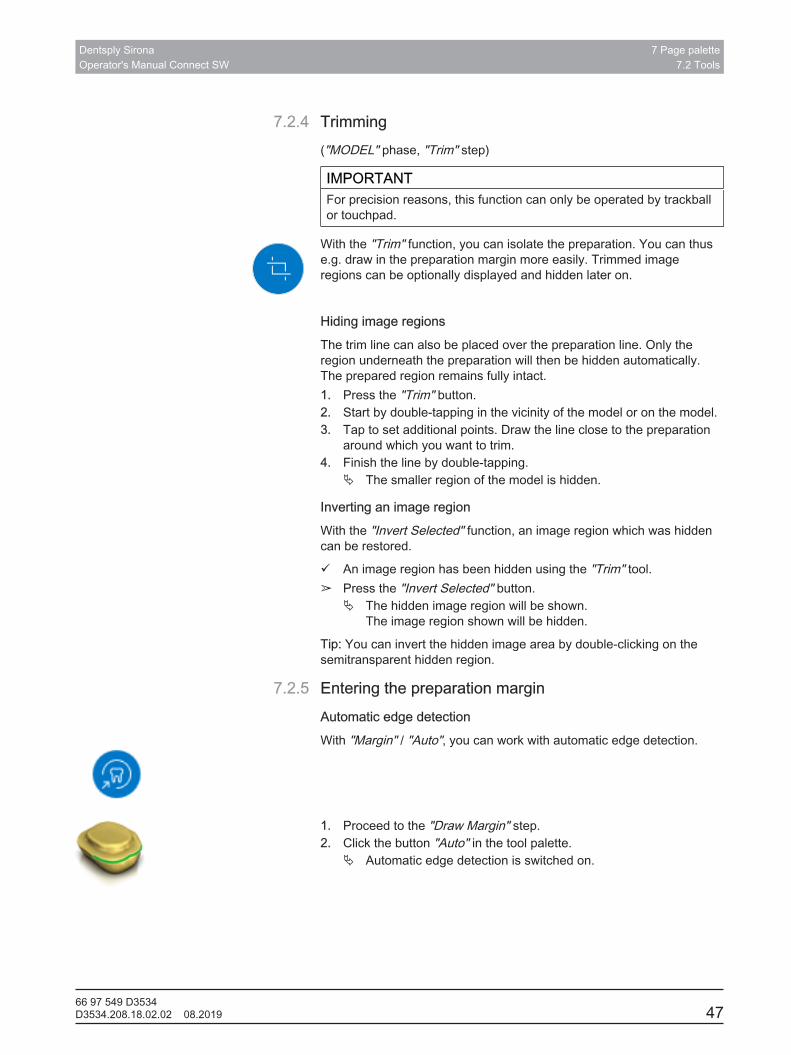
7.2.4 Trimming("MODEL" phase, "Trim" step)
IMPORTANTFor precision reasons, this function can only be operated by trackballor touchpad.
With the "Trim" function, you can isolate the preparation. You can thuse.g. draw in the preparation margin more easily. Trimmed imageregions can be optionally displayed and hidden later on.
Hiding image regionsThe trim line can also be placed over the preparation line. Only theregion underneath the preparation will then be hidden automatically.The prepared region remains fully intact.1. Press the "Trim" button.2. Start by double-tapping in the vicinity of the model or on the model.3. Tap to set additional points. Draw the line close to the preparation
around which you want to trim.4. Finish the line by double-tapping.
Ä The smaller region of the model is hidden.
Inverting an image regionWith the "Invert Selected" function, an image region which was hiddencan be restored.
ü An image region has been hidden using the "Trim" tool.➢ Press the "Invert Selected" button.
Ä The hidden image region will be shown.The image region shown will be hidden.
Tip: You can invert the hidden image area by double-clicking on thesemitransparent hidden region.
7.2.5 Entering the preparation marginAutomatic edge detectionWith "Margin" / "Auto", you can work with automatic edge detection.
1. Proceed to the "Draw Margin" step.2. Click the button "Auto" in the tool palette.
Ä Automatic edge detection is switched on.
7 Page palette7.2 Tools
Dentsply SironaOperator's Manual Connect SW
4866 97 549 D3534
D3534.208.18.02.02 08.2019
Manual drawingWith "Manual" you can draw in the preparation margin manually. Withthis technique, you must place the individual points close together inorder to clearly define the contour of the preparation margin even indifficult situations.
ü The "Margin" tool is open.➢ Press the "Manual" button.
Ä The manual technique is switched on.
Tip: You start the drawing by double-clicking and end it by double-clicking. The tooth number appears if the preparation margin is drawn. Ifamendments are required you can make corrections by clicking on theline in manual mode. To end the correction, click on the blue line again.
Dentsply SironaOperator's Manual Connect SW
7 Page palette7.3 Display objects
66 97 549 D3534D3534.208.18.02.02 08.2019 49
7.3 Display objectsOpening view optionsOpen the "View Options" page palette. Here you will find all currentlyavailable options for setting visibilities in the 3D preview. The optionsavailable depend on the current step.
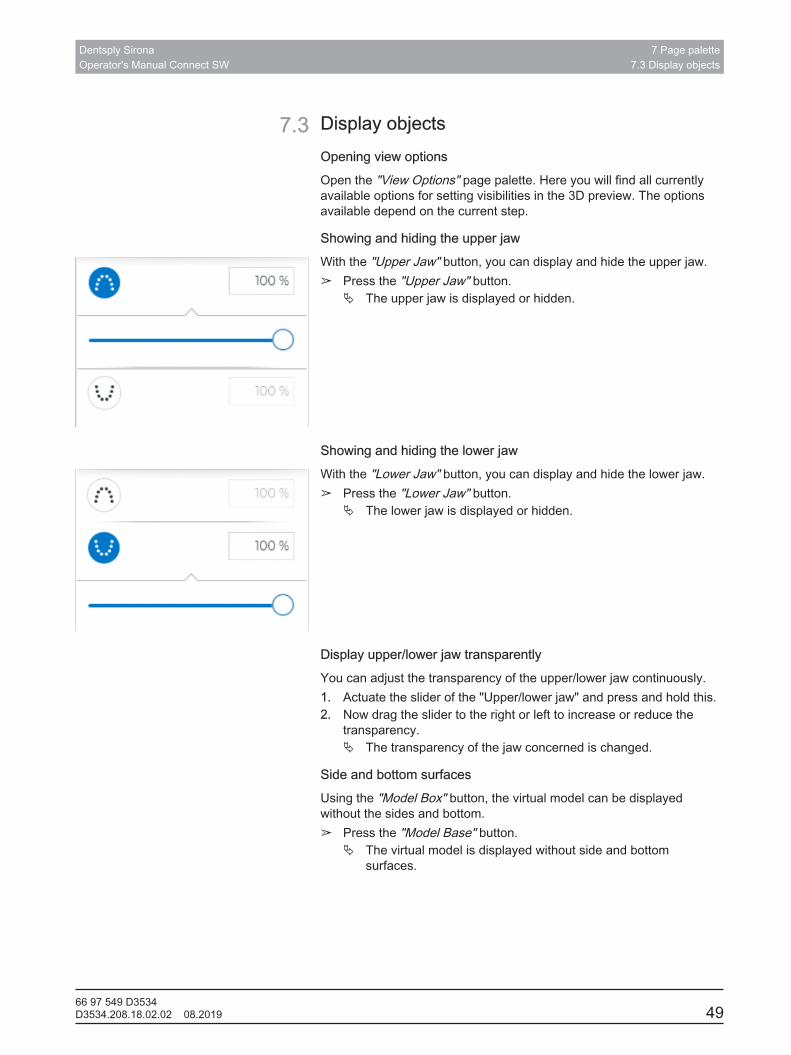
Showing and hiding the upper jawWith the "Upper Jaw" button, you can display and hide the upper jaw.➢ Press the "Upper Jaw" button.
Ä The upper jaw is displayed or hidden.
Showing and hiding the lower jawWith the "Lower Jaw" button, you can display and hide the lower jaw.➢ Press the "Lower Jaw" button.
Ä The lower jaw is displayed or hidden.
Display upper/lower jaw transparentlyYou can adjust the transparency of the upper/lower jaw continuously.1. Actuate the slider of the "Upper/lower jaw" and press and hold this.2. Now drag the slider to the right or left to increase or reduce the
transparency.Ä The transparency of the jaw concerned is changed.
Side and bottom surfacesUsing the "Model Box" button, the virtual model can be displayedwithout the sides and bottom.➢ Press the "Model Base" button.
Ä The virtual model is displayed without side and bottomsurfaces.
7 Page palette7.3 Display objects
Dentsply SironaOperator's Manual Connect SW
5066 97 549 D3534
D3534.208.18.02.02 08.2019
Displaying and hiding the trimmed regionWith the "Trimmed Model" button, you can display and hide the trimmedregion.
ü You have trimmed a region in the MODEL phase.➢ Press the "Trimmed Model" button.
Ä The trimmed region of the virtual model is displayed or hidden.
Additional image catalogs acquiredAdditional image catalogs acquired such as BioCopy can also bedisplayed and hidden here.
Dentsply SironaOperator's Manual Connect SW
7 Page palette7.4 Activating analysis
66 97 549 D3534D3534.208.18.02.02 08.2019 51
7.4 Activating analysisActivating Analyzing Tools➢ Open the page palette "Analyzing Tools"to activate the analysis
tools.
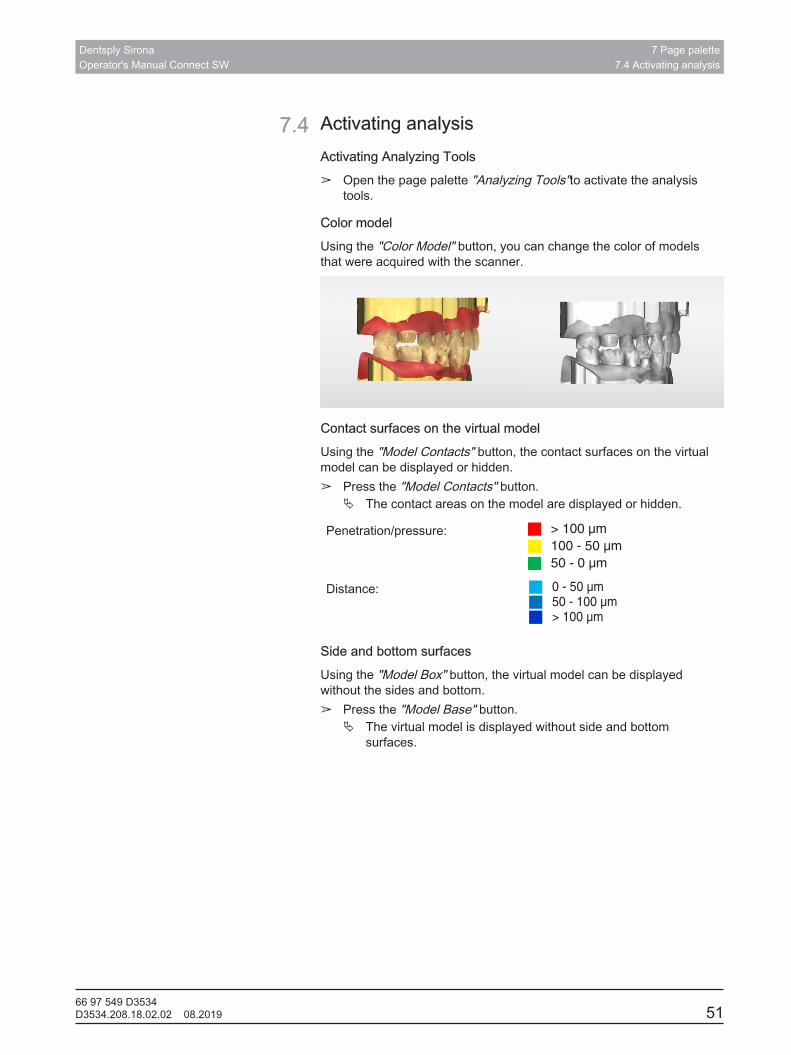
Color modelUsing the "Color Model" button, you can change the color of modelsthat were acquired with the scanner.
Contact surfaces on the virtual modelUsing the "Model Contacts" button, the contact surfaces on the virtualmodel can be displayed or hidden.➢ Press the "Model Contacts" button.
Ä The contact areas on the model are displayed or hidden.
Penetration/pressure: > 100 µm
100 - 50 µm
50 - 0 µm
Distance: 0 - 50 µm50 - 100 µm> 100 µm
Side and bottom surfacesUsing the "Model Box" button, the virtual model can be displayedwithout the sides and bottom.➢ Press the "Model Base" button.
Ä The virtual model is displayed without side and bottomsurfaces.
7 Page palette7.4 Activating analysis
Dentsply SironaOperator's Manual Connect SW
5266 97 549 D3534
D3534.208.18.02.02 08.2019
Distance to the antagonistIf the preparation margin has been drawn in then the distance to theantagonist can be displayed in the step "Preparation Analysis". Theparameters can be set under "Configuration" / "Parameters" /"Preparation Analysis".Tip: Set the distance to the desired value, e.g. 1500 µm and 0 µmtolerance. Distances that are less than 1500 µm are then displayed inthe software.
Under Tolerance you can add a tolerance range to the ideal distance.This is displayed in blue. The blue marking is displayed between idealvalue minus tolerance value and ideal value plus tolerance value.
Example: You set the distance (ideal value) to 1500 µm and a tolerancevalue of 500 µm.● Distances less than 1000 µm are displayed in red by the software.● Distances between 1000 µm and 2000 µm are displayed in blue.● Distances greater than 2000 µm are displayed in green.
UndercutsIf the preparation margin has been drawn in then the undercuts can bedisplayed in the step "Preparation Analysis". The thickness of theundercut can be read from the scale.
Dentsply SironaOperator's Manual Connect SW
8 ADMINISTRATION phase
66 97 549 D3534D3534.208.18.02.02 08.2019 53
8 ADMINISTRATION phaseSelecting a restoration typeTip: Restorations can be selected both in the upper and lower jaw.➢ Select the restoration type in the page palette: "Single Restoration",
"Bridge Restoration" or "Full arch scan mode".
Single tooth restorationü You have selected the restoration type "Single Restoration".1. Select the restoration type.
Ä The types of restoration available match the selected toothnumber.
2. Select a fully anatomic or veneered restoration.3. Select the tooth for which the restoration is to be created.
Ä The selected tooth is marked.4. Go to the "Select Material" step in the step menu in order to select
the material class. Selection of the material class is optional.For the "Abutment" restoration type, select the manufacturer andimplant type suitable for the implant. Select TiBase, ScanPost or anintraoral scanbody from another provider.
5. Confirm your settings with "Ok".Tip: If you click "Cancel", the restoration will not be created and theprogram will return to the odontogram.
6. If necessary, create further restorations.
Bridge restorationü You have selected the restoration type "Bridge Restoration".1. Determine the restoration type and the design mode for the
abutment teeth. With a bridge on implants you can only select"Implant".
2. Select the positions of the abutment teeth of the bridge.Ä The selected teeth are marked.
3. Determine the restoration type and the design mode for theintermediate teeth.Ä The selected teeth are marked.
4. In the step menu, go to the "Select Material" step to select thematerial. The selection of the material class is optional.
5. Confirm your settings with "Ok".Tip: If you click on "Cancel", the restoration will not be created andthe program will return to the odontogram.
6. If necessary, create further restorations.
8 ADMINISTRATION phase Dentsply SironaOperator's Manual Connect SW
5466 97 549 D3534
D3534.208.18.02.02 08.2019
Full arch scan modeIf no bridge or individual restoration is selected, you are automatically in"Full arch scan mode". You can send this scan to the laboratoryautomatically without making any further selections.
You can also choose between aligners, splints, and individualimpression trays here.
Select materialYou can select the desired material in this optional step.1. Select the desired material class.2. Select "See Additional Notes" if you wish to order a certain material
and define it in the text field in the Connect portal.
Color selection➢ Click "Select Final Shade" or "Select Stump Shade" to proceed to
the step of choosing colors. Stating the color is optional.
Tip: It is also possible to state the color later in the additionalinformation in the portal.
You can select the stump/restoration color in this step.1. First select the shade guide.2. Then select the appropriate color using the coloring group.3. Press "Ok" to confirm the selection.
Selecting the scanbody type (only for abutments)You can select the desired scanbody type in this step. In addition toTiBase and ScanPost, you can also select IO FLO and "Other" to usean intraoral scanbody from another provider.
CAUTIONThe user is responsible for the correct use of scanbodies, which areoffered by other providers. Dentsply Sirona can neither guarantee theclinical safety and biocompatibility nor the scan quality for all availablescanbodies. Ask your provider whether such use with Omnicam orPrimescan is permitted in your country.
➢ Tap or click on the desired scanbody type.
Selecting material for the veneering structureYou can select the desired material for the veneering structure in thisstep.➢ Select the desired material.
Selecting material for the frameworkYou can select the desired material for the framework in this step.➢ Select the desired material.
Dentsply SironaOperator's Manual Connect SW
8 ADMINISTRATION phase
66 97 549 D3534D3534.208.18.02.02 08.2019 55
Closing the ADMINISTRATION phaseAfter at least one restoration has been added to the odontogram, youcan jump to the "ACQUISITION" phase.
ü At least one restoration is added to the odontogram.ü The "ACQUISITION" phase can be selected.1. Press the "ACQUISITION" button in the phase bar.
or➢ Press the Next arrow in the context bar.
Ä The program switches over to the "ACQUISITION" phase.
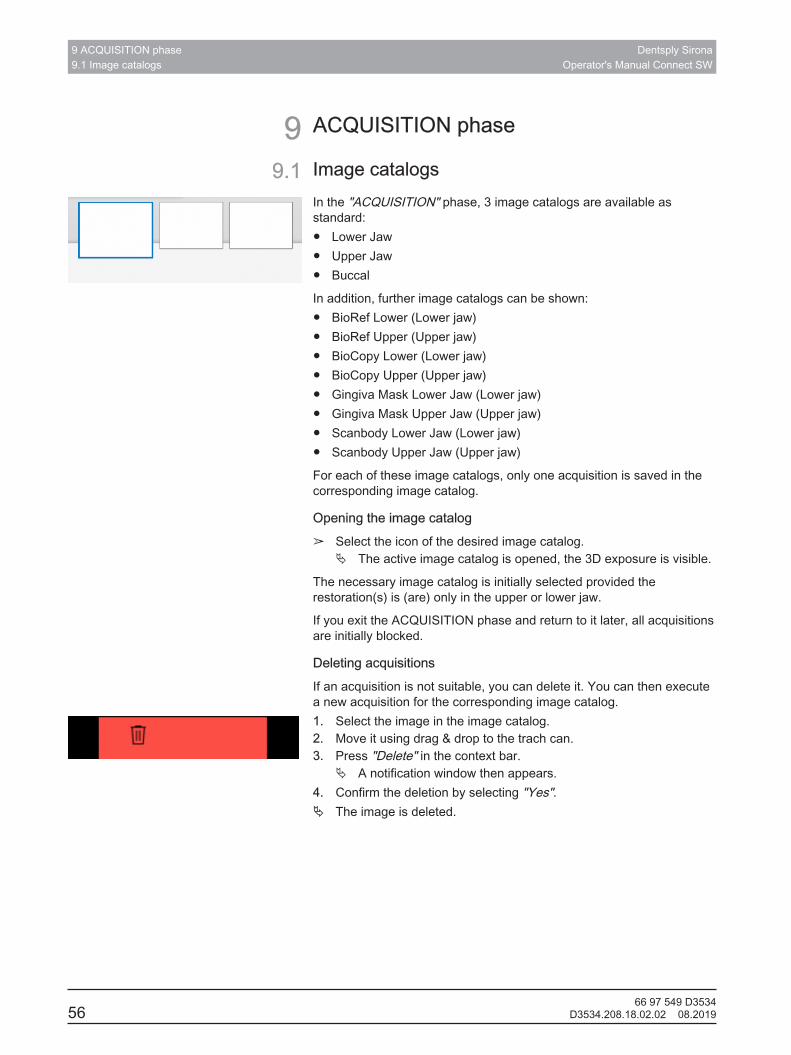
9 ACQUISITION phase9.1 Image catalogs
Dentsply SironaOperator's Manual Connect SW
5666 97 549 D3534
D3534.208.18.02.02 08.2019
9 ACQUISITION phase
9.1 Image catalogsIn the "ACQUISITION" phase, 3 image catalogs are available asstandard:● Lower Jaw● Upper Jaw● Buccal
In addition, further image catalogs can be shown:● BioRef Lower (Lower jaw)● BioRef Upper (Upper jaw)● BioCopy Lower (Lower jaw)● BioCopy Upper (Upper jaw)● Gingiva Mask Lower Jaw (Lower jaw)● Gingiva Mask Upper Jaw (Upper jaw)● Scanbody Lower Jaw (Lower jaw)● Scanbody Upper Jaw (Upper jaw)
For each of these image catalogs, only one acquisition is saved in thecorresponding image catalog.
Opening the image catalog➢ Select the icon of the desired image catalog.
Ä The active image catalog is opened, the 3D exposure is visible.
The necessary image catalog is initially selected provided therestoration(s) is (are) only in the upper or lower jaw.
If you exit the ACQUISITION phase and return to it later, all acquisitionsare initially blocked.
Deleting acquisitionsIf an acquisition is not suitable, you can delete it. You can then executea new acquisition for the corresponding image catalog.1. Select the image in the image catalog.2. Move it using drag & drop to the trach can.3. Press "Delete" in the context bar.
Ä A notification window then appears.4. Confirm the deletion by selecting "Yes".Ä The image is deleted.
Dentsply SironaOperator's Manual Connect SW
9 ACQUISITION phase9.2 3D Preview
66 97 549 D3534D3534.208.18.02.02 08.2019 57
9.1.1 Adding image catalogsUsing the "Add Catalog" button, you can create additional imagecatalogs in the page palette.1. Click the button "Add Catalog" in the page palette.
Ä The possible image catalogs are offered.2. Select the required image catalog.Ä The image catalog is displayed next to the standard image catalogs.
9.2 3D PreviewIn the default setting, the data are displayed from the occlusal directionin the 3D preview.
You can freely select the viewing direction of the virtual model in the 3Dpreview window by using the mouse.
Rotating a 3D preview1. Press with one finger or click on the 3D preview with the left mouse
button and hold it down.2. Move your finger or the mouse.Ä The 3D preview is rotated.
Moving the 3D preview1. Press with two fingers or click on the 3D preview with the right
mouse button and hold it down.2. Move the finger or the mouse.Ä The 3D preview moves.
Zooming into/out of the 3D preview1. Press with two fingers or click on the 3D preview with the middle
mouse button and hold it down.2. Move your fingers apart and together or move the mouse up or
down as desired.Ä The 3D preview is enlarged or reduced.
9.3 Take a scan
9.3.1 ModeStep Video / PhotoIn the "Video" / "Photo" step, you can make intraoral videos andindividual intraoral images with the scanner.
Taking photos1. In the step menu, go to "Video / Picture".2. Select the "Photo" option.3. Press the button or use the foot switch to trigger the scanner.
9 ACQUISITION phase9.3 Take a scan
Dentsply SironaOperator's Manual Connect SW
5866 97 549 D3534
D3534.208.18.02.02 08.2019
Recording videos1. In the step menu, go to "Video / Picture".2. Select the "Video" option.3. Press the button to start video recording or use the foot control.4. Repeatedly press the button or actuate the foot control once more
to stop the recording.
View photos and videos1. Select the button with the "View" folder symbol.2. Use the left or right arrows to see all exposures taken. Videos can
be started by pressing the play icon.Tip: In the acquisition modes activate the right button with the foldersymbol in order to switch directly from the acquisition mode to themedia view.
9.3.2 CEREC Omnicam, Omnicam9.3.2.1 Scanner warm-up time
When switching on the system, the scanner needs to warm up for 15 -20 minutes. If the coated sapphire glass of the scanner is not sufficientlywarm, it may steam up during the acquisition. This complicates the scanacquisition.
Following use, always position the scanner on the heater plate or in thescanner cradle.
You can set the end temperature to which the scanner heater warmsthe mirror sleeve of the scanner.1. In the software, navigate to the system menu and click on the
"Configuration" button.2. Click on the "Devices" button.3. Click on the "Omnicam" button.4. Click on the "Camera Heater Settings" button.5. Use the slider to adjust the temperature.
Dentsply SironaOperator's Manual Connect SW
9 ACQUISITION phase9.3 Take a scan
66 97 549 D3534D3534.208.18.02.02 08.2019 59
9.3.2.2 Scanner guideThe scanner acquires images which are used during the ongoingmeasurement in spatial relation to each other (image registration).
During the acquisition and then during the ongoing registration process,a distinctive sound can be heard. If the registration cannot be implemented, the acquisition flow issuspended. You are informed of this by means of a sound. This isdifferent to the sound emitted during successful acquisition. You canadjust the volume under configuration and select another type of sound(melody).
IMPORTANTRegistration errorShould a registration error occur, you must return to another acquiredpoint.To start with, practice this procedure on the model and then onintraoral areas.➢ Move the scanner to a position where a successful acquisition
was taken. A point that has already been acquired in the occlusalarea is best.
ð You will be able to hear the sound for registered acquisitions.➢ Continue the acquisition.
Divide the acquisition into four consecutive sequences:1. Occlusal2. Buccal3. Lingual4. Proximal
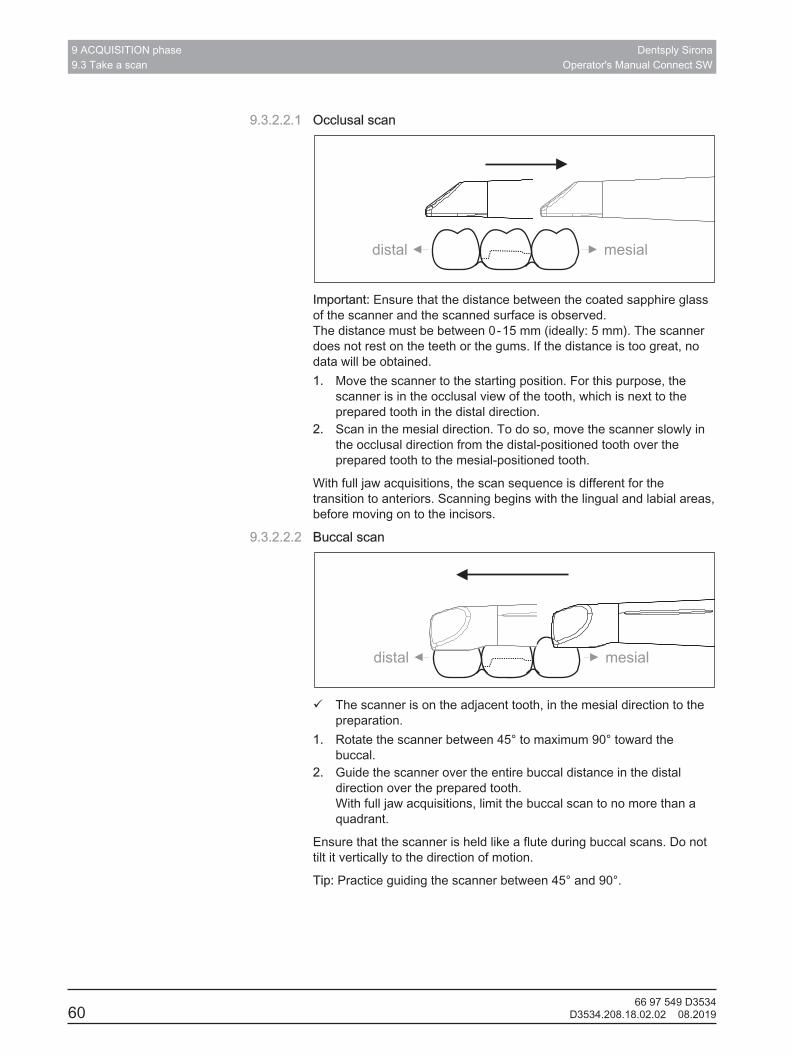
9 ACQUISITION phase9.3 Take a scan
Dentsply SironaOperator's Manual Connect SW
6066 97 549 D3534
D3534.208.18.02.02 08.2019
9.3.2.2.1 Occlusal scan
Important: Ensure that the distance between the coated sapphire glassof the scanner and the scanned surface is observed. The distance must be between 0 - 15 mm (ideally: 5 mm). The scannerdoes not rest on the teeth or the gums. If the distance is too great, nodata will be obtained.1. Move the scanner to the starting position. For this purpose, the
scanner is in the occlusal view of the tooth, which is next to theprepared tooth in the distal direction.
2. Scan in the mesial direction. To do so, move the scanner slowly inthe occlusal direction from the distal-positioned tooth over theprepared tooth to the mesial-positioned tooth.
With full jaw acquisitions, the scan sequence is different for thetransition to anteriors. Scanning begins with the lingual and labial areas,before moving on to the incisors.
9.3.2.2.2 Buccal scan
ü The scanner is on the adjacent tooth, in the mesial direction to thepreparation.
1. Rotate the scanner between 45° to maximum 90° toward thebuccal.
2. Guide the scanner over the entire buccal distance in the distaldirection over the prepared tooth. With full jaw acquisitions, limit the buccal scan to no more than aquadrant.
Ensure that the scanner is held like a flute during buccal scans. Do nottilt it vertically to the direction of motion.
Tip: Practice guiding the scanner between 45° and 90°.
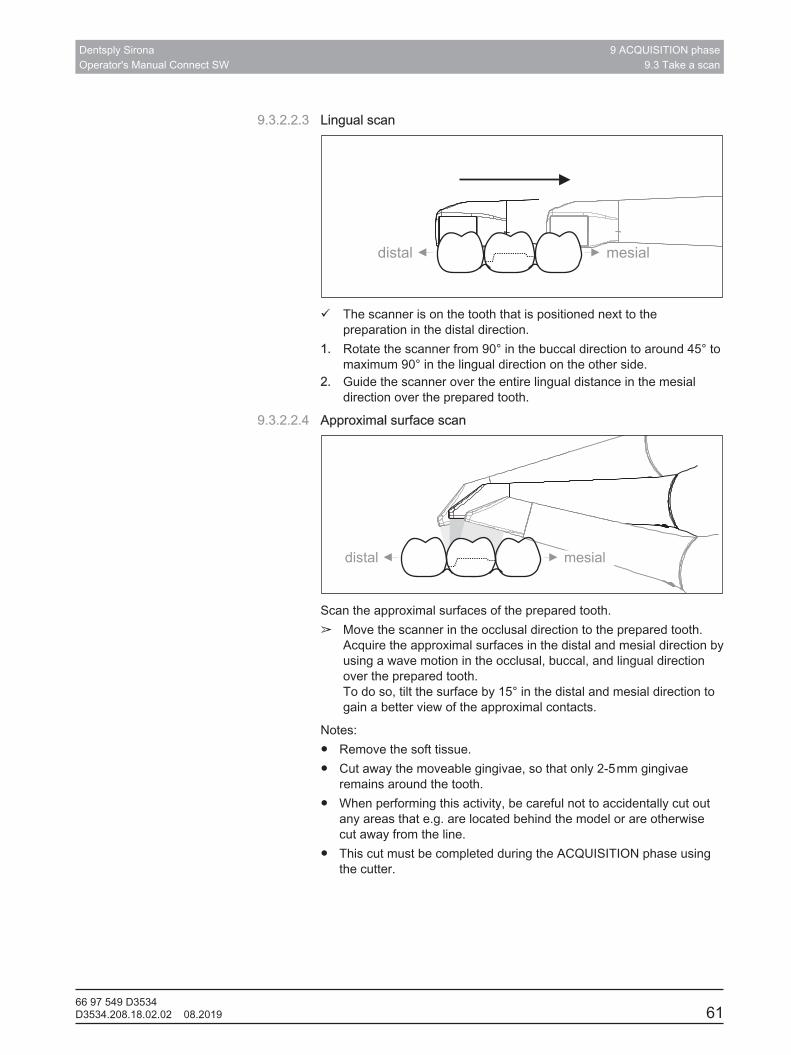
Dentsply SironaOperator's Manual Connect SW
9 ACQUISITION phase9.3 Take a scan
66 97 549 D3534D3534.208.18.02.02 08.2019 61
9.3.2.2.3 Lingual scan
ü The scanner is on the tooth that is positioned next to thepreparation in the distal direction.
1. Rotate the scanner from 90° in the buccal direction to around 45° tomaximum 90° in the lingual direction on the other side.
2. Guide the scanner over the entire lingual distance in the mesialdirection over the prepared tooth.
9.3.2.2.4 Approximal surface scan
Scan the approximal surfaces of the prepared tooth.➢ Move the scanner in the occlusal direction to the prepared tooth.
Acquire the approximal surfaces in the distal and mesial direction byusing a wave motion in the occlusal, buccal, and lingual directionover the prepared tooth.To do so, tilt the surface by 15° in the distal and mesial direction togain a better view of the approximal contacts.
Notes:● Remove the soft tissue.● Cut away the moveable gingivae, so that only 2-5 mm gingivae
remains around the tooth.● When performing this activity, be careful not to accidentally cut out
any areas that e.g. are located behind the model or are otherwisecut away from the line.
● This cut must be completed during the ACQUISITION phase usingthe cutter.
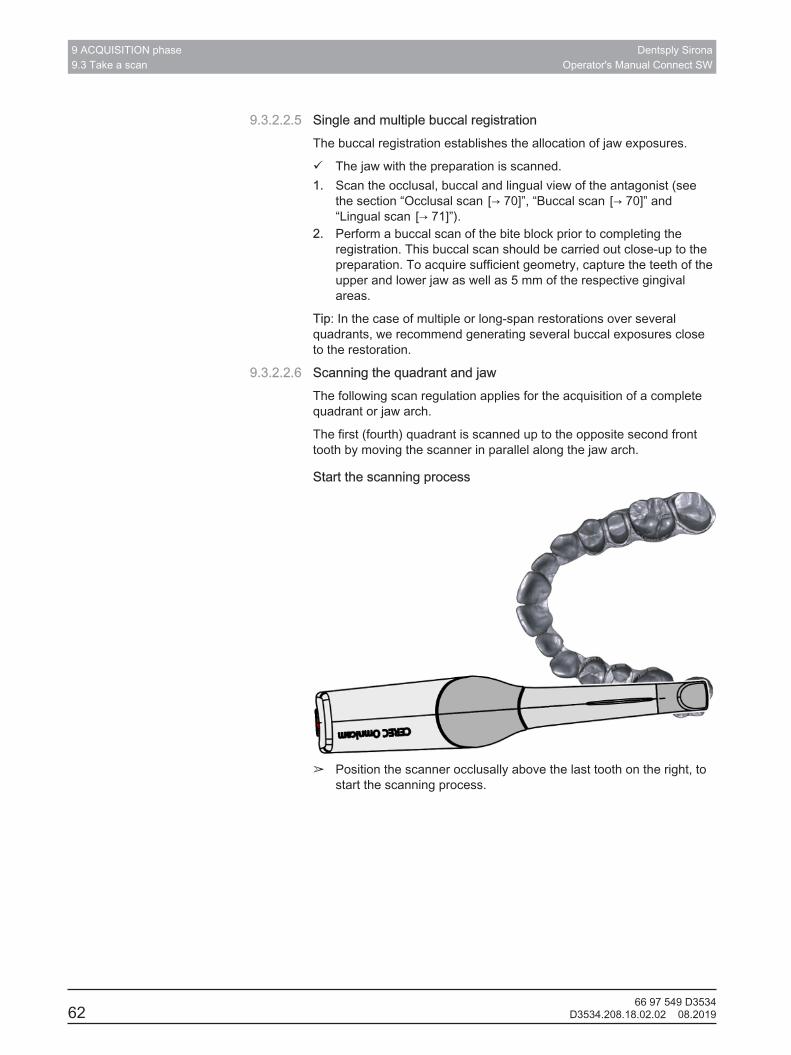
9 ACQUISITION phase9.3 Take a scan
Dentsply SironaOperator's Manual Connect SW
6266 97 549 D3534
D3534.208.18.02.02 08.2019
9.3.2.2.5 Single and multiple buccal registrationThe buccal registration establishes the allocation of jaw exposures.
ü The jaw with the preparation is scanned.1. Scan the occlusal, buccal and lingual view of the antagonist (see
the section “Occlusal scan [→ 70]”, “Buccal scan [→ 70]” and“Lingual scan [→ 71]”).
2. Perform a buccal scan of the bite block prior to completing theregistration. This buccal scan should be carried out close-up to thepreparation. To acquire sufficient geometry, capture the teeth of theupper and lower jaw as well as 5 mm of the respective gingivalareas.
Tip: In the case of multiple or long-span restorations over severalquadrants, we recommend generating several buccal exposures closeto the restoration.
9.3.2.2.6 Scanning the quadrant and jawThe following scan regulation applies for the acquisition of a completequadrant or jaw arch.
The first (fourth) quadrant is scanned up to the opposite second fronttooth by moving the scanner in parallel along the jaw arch.
Start the scanning process
➢ Position the scanner occlusally above the last tooth on the right, tostart the scanning process.
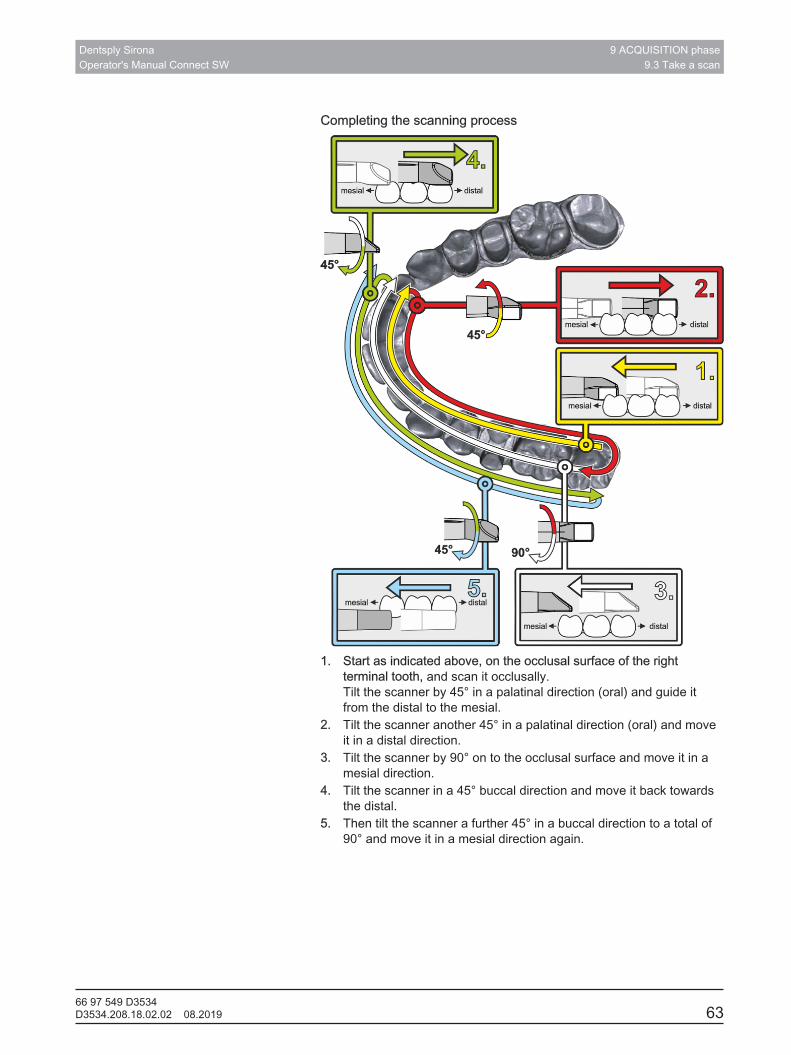
Dentsply SironaOperator's Manual Connect SW
9 ACQUISITION phase9.3 Take a scan
66 97 549 D3534D3534.208.18.02.02 08.2019 63
Completing the scanning process
1. Start as indicated above, on the occlusal surface of the rightterminal tooth, and scan it occlusally. Tilt the scanner by 45° in a palatinal direction (oral) and guide itfrom the distal to the mesial.
2. Tilt the scanner another 45° in a palatinal direction (oral) and moveit in a distal direction.
3. Tilt the scanner by 90° on to the occlusal surface and move it in amesial direction.
4. Tilt the scanner in a 45° buccal direction and move it back towardsthe distal.
5. Then tilt the scanner a further 45° in a buccal direction to a total of90° and move it in a mesial direction again.
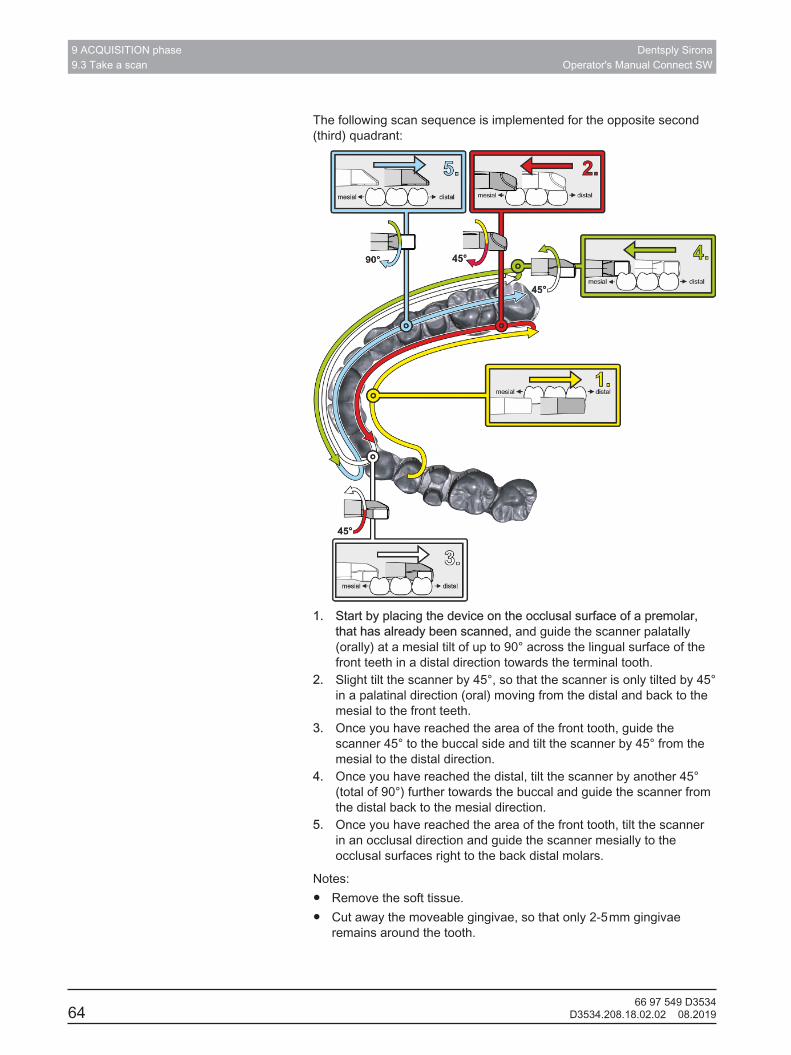
9 ACQUISITION phase9.3 Take a scan
Dentsply SironaOperator's Manual Connect SW
6466 97 549 D3534
D3534.208.18.02.02 08.2019
The following scan sequence is implemented for the opposite second(third) quadrant:
1. Start by placing the device on the occlusal surface of a premolar,that has already been scanned, and guide the scanner palatally(orally) at a mesial tilt of up to 90° across the lingual surface of thefront teeth in a distal direction towards the terminal tooth.
2. Slight tilt the scanner by 45°, so that the scanner is only tilted by 45°in a palatinal direction (oral) moving from the distal and back to themesial to the front teeth.
3. Once you have reached the area of the front tooth, guide thescanner 45° to the buccal side and tilt the scanner by 45° from themesial to the distal direction.
4. Once you have reached the distal, tilt the scanner by another 45°(total of 90°) further towards the buccal and guide the scanner fromthe distal back to the mesial direction.
5. Once you have reached the area of the front tooth, tilt the scannerin an occlusal direction and guide the scanner mesially to theocclusal surfaces right to the back distal molars.
Notes:● Remove the soft tissue.● Cut away the moveable gingivae, so that only 2-5 mm gingivae
remains around the tooth.
Dentsply SironaOperator's Manual Connect SW
9 ACQUISITION phase9.3 Take a scan
66 97 549 D3534D3534.208.18.02.02 08.2019 65
● When performing this activity, be careful not to accidentally cut outany areas that e.g. are located behind the model or are otherwisecut away from the line.
● This cut must be completed during the ACQUISITION phase usingthe cutter.
9.3.2.2.7 Completing measurementsü The exposures are complete.1. Press the "Next" button.
Ä The virtual model is calculated and displayed in color.2. If missing data emerges in the preparation area, carry out further
exposures.
9.3.2.3 Taking optical impressions with the scanner
NOTEImage brightnessThe image brightness during the acquisition is controlledautomatically, so that there is always optimum image brightness,largely independent of the distance between the scanner and thetooth.The surroundings of the tooth to be scanned should be as weaklyilluminated as possible. Avoid any type of external light. Switch off theoperating light.
IMPORTANTDo not use cotton rolls in the scan areaDo not use any cotton rolls in the vicinity of the scan area, as they canreduce the precision of the scan and create image interference.
CAUTIONPrevent cross-contaminationGerms can be transmitted to uncontaminated persons via the hands,materials or objects.➢ For hygiene reasons, wear a new set of disposable gloves for
each patient while using the scanner.
CAUTIONIn the case of patients with allergies to nickelShould the scanner mirror sleeve make contact with the skin ofpatients allergic to nickel, allergic reactions may occur.➢ Ensure that in the case of patients with nickel allergies, the parts
of the mirror sleeve which may make contact are protected fromareas of skin.
9 ACQUISITION phase9.3 Take a scan
Dentsply SironaOperator's Manual Connect SW
6666 97 549 D3534
D3534.208.18.02.02 08.2019
WARNINGRisk of injury for those diagnosed with epilepsyFor persons who have been diagnosed with epilepsy, there is a risk ofepileptic shock through the flashing light of the scanner.➢ Patients who have been diagnosed with epilepsy cannot be
treated with the scanner.➢ Dentists and dental assistants who have been diagnosed with
epilepsy cannot work with the scanner.
Proceeding with scanning procedure1. Activate the foot control or click on the switch with the cursor.
Ä The scanning procedure begins.2. Proceed with the scanning procedure as described above.
Dentsply SironaOperator's Manual Connect SW
9 ACQUISITION phase9.3 Take a scan
66 97 549 D3534D3534.208.18.02.02 08.2019 67
9.3.3 CEREC Primescan, Primescan9.3.3.1 Optical impressions with the scanner
NOTEImage brightnessThe image brightness during the acquisition is controlledautomatically, so that there is always optimum image brightness,largely independent of the distance between the scanner and thetooth.The surroundings of the tooth to be scanned should be as weaklyilluminated as possible. Avoid any type of external light. Switch off theoperating light.
IMPORTANTDo not use cotton rolls in the scan areaDo not use any cotton rolls in the vicinity of the scan area, as they canreduce the precision of the scan and create image interference.
CAUTIONPrevent cross-contaminationGerms can be transmitted to uncontaminated persons via the hands,materials or objects.➢ For hygiene reasons, wear a new set of disposable gloves for
each patient while using the scanner.
WARNINGRisk of injury for those diagnosed with epilepsyFor persons who have been diagnosed with epilepsy, there is a risk ofepileptic shock through the flashing light of the scanner.➢ Patients who have been diagnosed with epilepsy cannot be
treated with the scanner.➢ Dentists and dental assistants who have been diagnosed with
epilepsy cannot work with the scanner.
CAUTIONPotentially hazardous optical radiationThe scanner transmits potentially hazardous optical radiation whichmay cause harm to the eyes.➢ During operation, do not look directly at the scanner for long
periods.
IMPORTANTPotential switch-off procedureIn the case of several repeated scans of the image fields withoutmodel calculation, the scanner can deviate from the calibratedtemperature range. In this case, a warning message appears and youneed to take a scanning break prior to completing the exposures.Please wait roughly long enough for the remaining exposures to beperformed. The potential switch-off procedure is innocuous for yourscanner and is not a malfunction.

9 ACQUISITION phase9.3 Take a scan
Dentsply SironaOperator's Manual Connect SW
6866 97 549 D3534
D3534.208.18.02.02 08.2019
IMPORTANTHeating up the scannerThe internal scanner heating ensures that condensation does notform during scanning. The heating starts immediately after starting upthe exposure unit, and after around five minutes the scanner is free ofcondensation. This is usually the case through to navigation into theexposure phase.
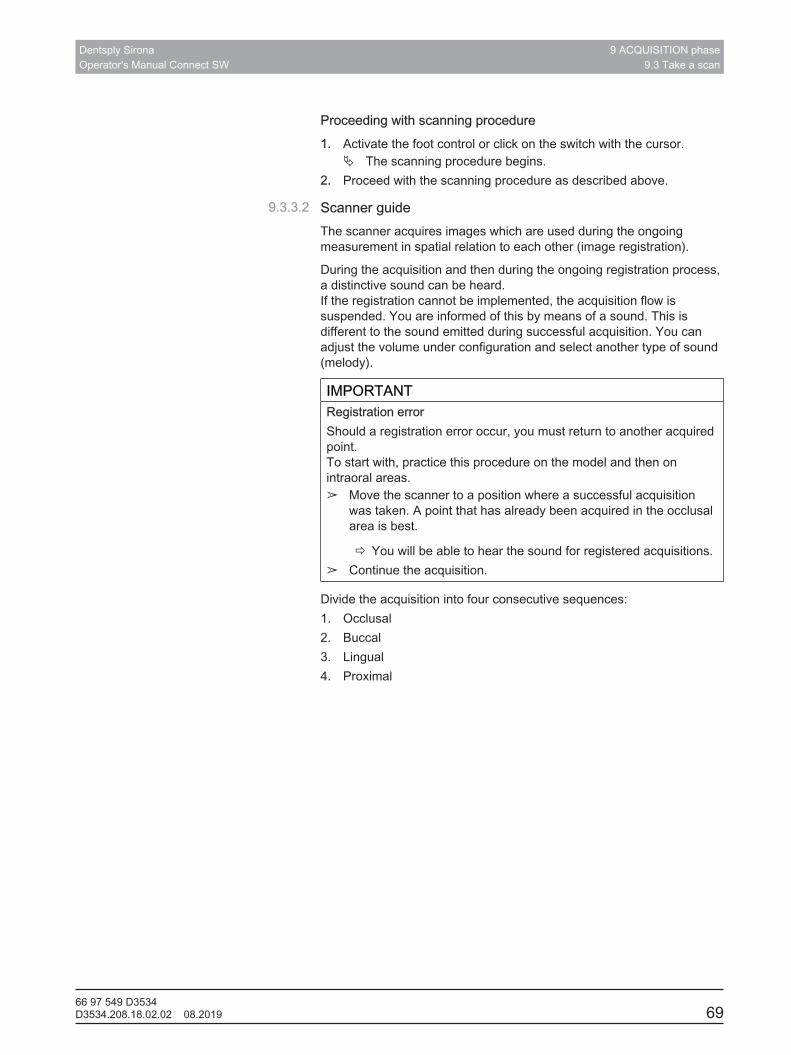
Dentsply SironaOperator's Manual Connect SW
9 ACQUISITION phase9.3 Take a scan
66 97 549 D3534D3534.208.18.02.02 08.2019 69
Proceeding with scanning procedure1. Activate the foot control or click on the switch with the cursor.
Ä The scanning procedure begins.2. Proceed with the scanning procedure as described above.
9.3.3.2 Scanner guideThe scanner acquires images which are used during the ongoingmeasurement in spatial relation to each other (image registration).
During the acquisition and then during the ongoing registration process,a distinctive sound can be heard. If the registration cannot be implemented, the acquisition flow issuspended. You are informed of this by means of a sound. This isdifferent to the sound emitted during successful acquisition. You canadjust the volume under configuration and select another type of sound(melody).
IMPORTANTRegistration errorShould a registration error occur, you must return to another acquiredpoint.To start with, practice this procedure on the model and then onintraoral areas.➢ Move the scanner to a position where a successful acquisition
was taken. A point that has already been acquired in the occlusalarea is best.
ð You will be able to hear the sound for registered acquisitions.➢ Continue the acquisition.
Divide the acquisition into four consecutive sequences:1. Occlusal2. Buccal3. Lingual4. Proximal
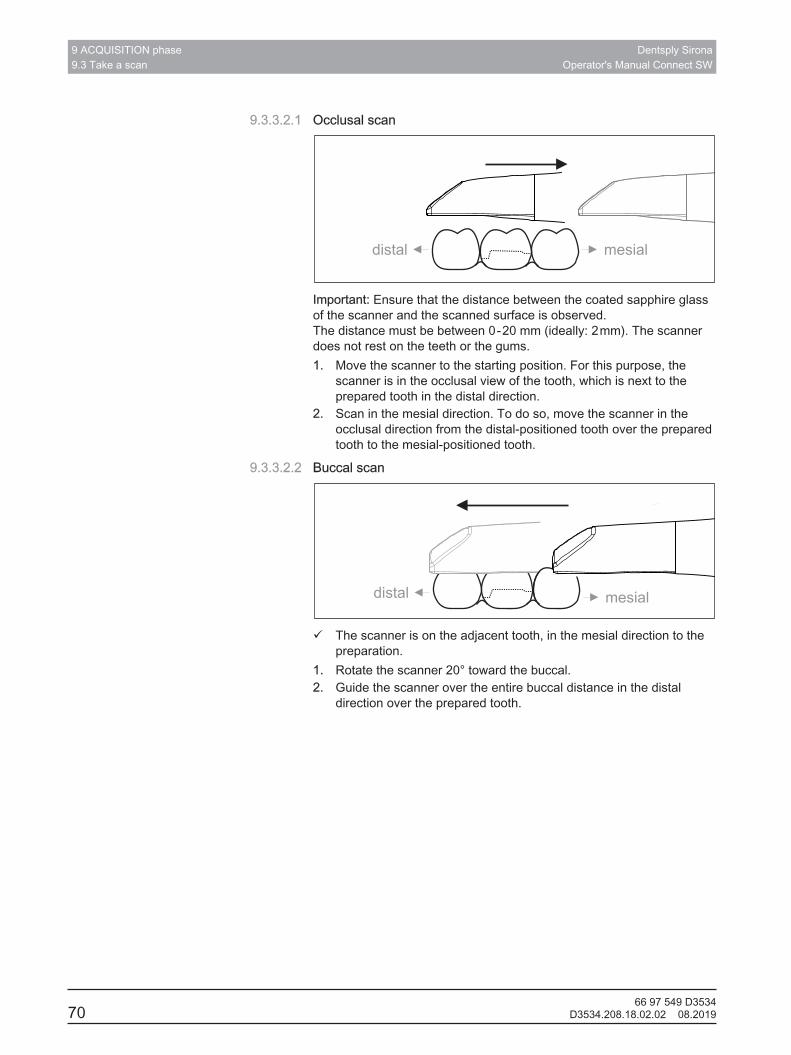
9 ACQUISITION phase9.3 Take a scan
Dentsply SironaOperator's Manual Connect SW
7066 97 549 D3534
D3534.208.18.02.02 08.2019
9.3.3.2.1 Occlusal scan
Important: Ensure that the distance between the coated sapphire glassof the scanner and the scanned surface is observed. The distance must be between 0 - 20 mm (ideally: 2 mm). The scannerdoes not rest on the teeth or the gums.1. Move the scanner to the starting position. For this purpose, the
scanner is in the occlusal view of the tooth, which is next to theprepared tooth in the distal direction.
2. Scan in the mesial direction. To do so, move the scanner in theocclusal direction from the distal-positioned tooth over the preparedtooth to the mesial-positioned tooth.
9.3.3.2.2 Buccal scan
ü The scanner is on the adjacent tooth, in the mesial direction to thepreparation.
1. Rotate the scanner 20° toward the buccal.2. Guide the scanner over the entire buccal distance in the distal
direction over the prepared tooth.
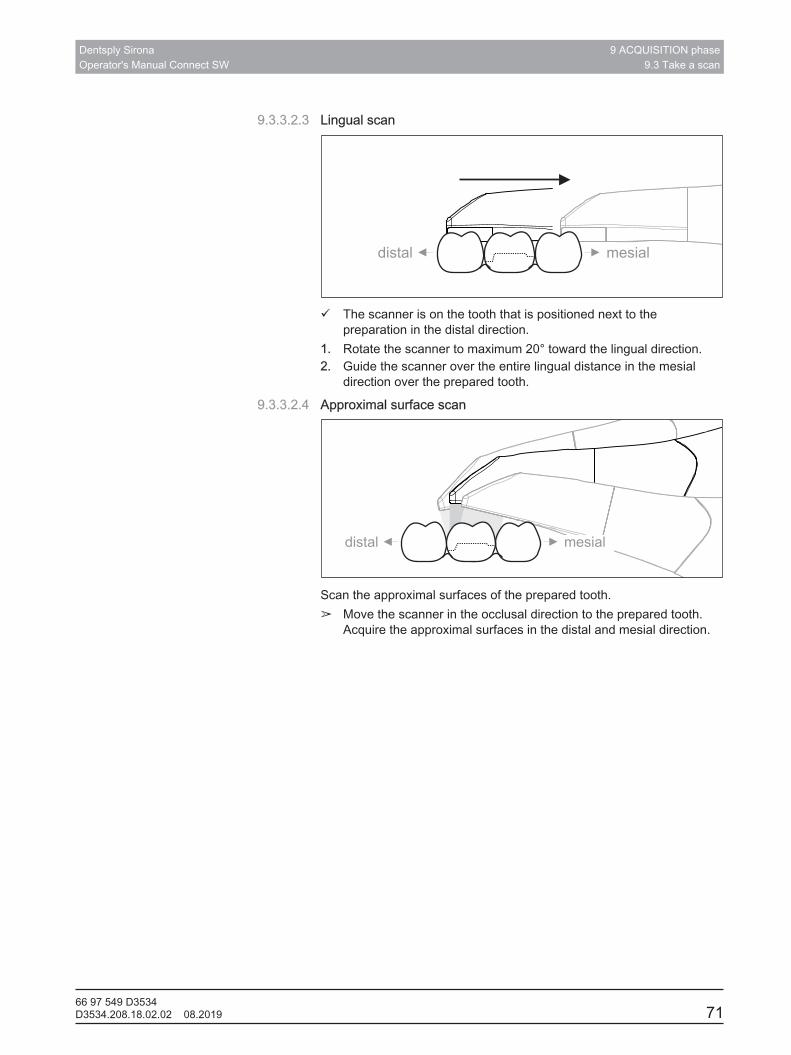
Dentsply SironaOperator's Manual Connect SW
9 ACQUISITION phase9.3 Take a scan
66 97 549 D3534D3534.208.18.02.02 08.2019 71
9.3.3.2.3 Lingual scan
ü The scanner is on the tooth that is positioned next to thepreparation in the distal direction.
1. Rotate the scanner to maximum 20° toward the lingual direction.2. Guide the scanner over the entire lingual distance in the mesial
direction over the prepared tooth.
9.3.3.2.4 Approximal surface scan
Scan the approximal surfaces of the prepared tooth.➢ Move the scanner in the occlusal direction to the prepared tooth.
Acquire the approximal surfaces in the distal and mesial direction.
9 ACQUISITION phase9.3 Take a scan
Dentsply SironaOperator's Manual Connect SW
7266 97 549 D3534
D3534.208.18.02.02 08.2019
9.3.3.2.5 Single and multiple buccal registrationThe buccal registration establishes the allocation of jaw exposures.
ü The jaw with the preparation is scanned.1. Scan the occlusal, buccal and lingual view of the antagonist (see
the section “Occlusal scan [→ 70]”, “Buccal scan [→ 70]” and“Lingual scan [→ 71]”).
2. Perform a buccal scan of the bite block prior to completing theregistration. This buccal scan should be carried out close-up to thepreparation. To acquire sufficient geometry, capture the teeth of theupper and lower jaw as well as 5 mm of the respective gingivalareas.
Tip: In the case of multiple or long-span restorations over severalquadrants, we recommend generating several buccal exposures closeto the restoration.
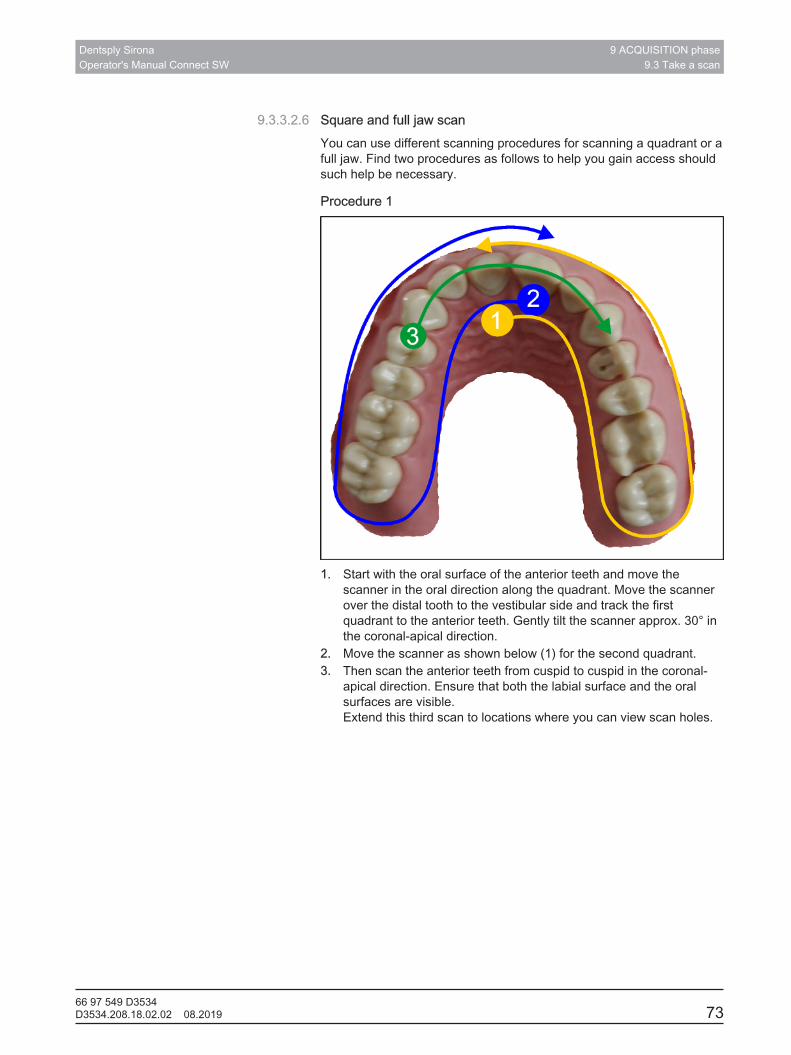
Dentsply SironaOperator's Manual Connect SW
9 ACQUISITION phase9.3 Take a scan
66 97 549 D3534D3534.208.18.02.02 08.2019 73
9.3.3.2.6 Square and full jaw scanYou can use different scanning procedures for scanning a quadrant or afull jaw. Find two procedures as follows to help you gain access shouldsuch help be necessary.
Procedure 1
1. Start with the oral surface of the anterior teeth and move thescanner in the oral direction along the quadrant. Move the scannerover the distal tooth to the vestibular side and track the firstquadrant to the anterior teeth. Gently tilt the scanner approx. 30° inthe coronal-apical direction.
2. Move the scanner as shown below (1) for the second quadrant.3. Then scan the anterior teeth from cuspid to cuspid in the coronal-
apical direction. Ensure that both the labial surface and the oralsurfaces are visible.Extend this third scan to locations where you can view scan holes.
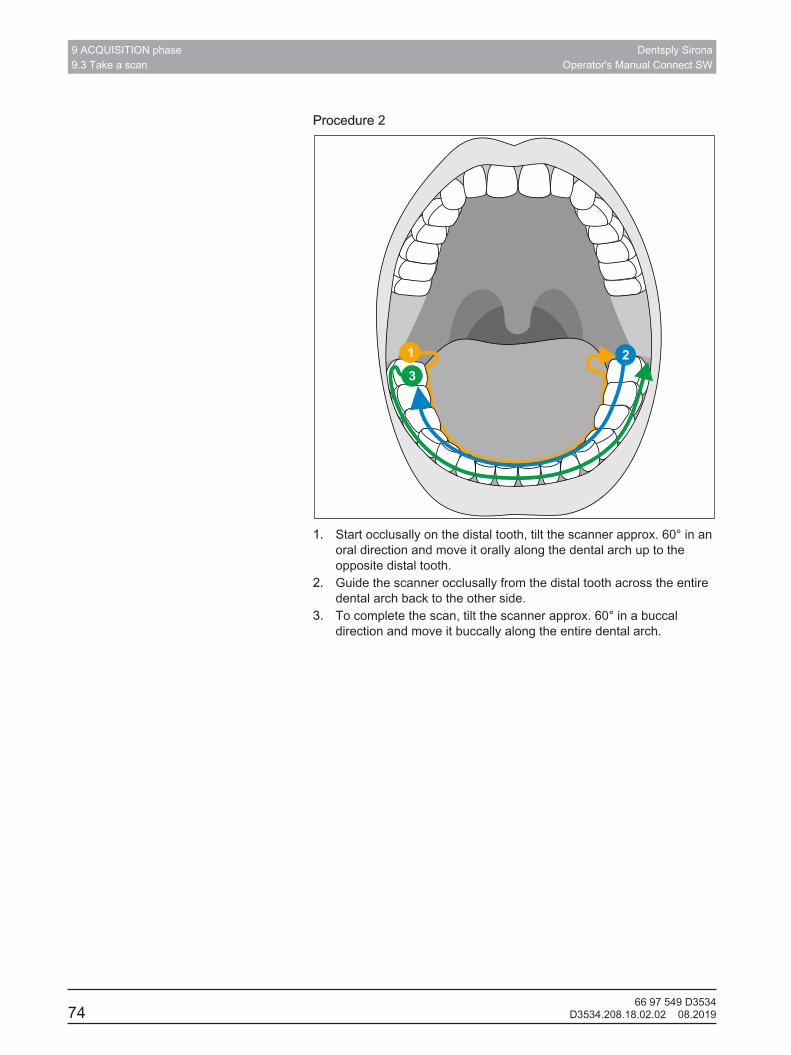
9 ACQUISITION phase9.3 Take a scan
Dentsply SironaOperator's Manual Connect SW
7466 97 549 D3534
D3534.208.18.02.02 08.2019
Procedure 2
1. Start occlusally on the distal tooth, tilt the scanner approx. 60° in anoral direction and move it orally along the dental arch up to theopposite distal tooth.
2. Guide the scanner occlusally from the distal tooth across the entiredental arch back to the other side.
3. To complete the scan, tilt the scanner approx. 60° in a buccaldirection and move it buccally along the entire dental arch.

Dentsply SironaOperator's Manual Connect SW
9 ACQUISITION phase9.3 Take a scan
66 97 549 D3534D3534.208.18.02.02 08.2019 75
9.3.3.2.7 Concluding the optical impressionsü The exposures are complete.1. Click on the "Next" button.
Ä The virtual model is calculated and displayed in color.2. If missing data emerges in the preparation area, carry out further
scans.
9.3.4 Cut out model areasWith the "Cut" function, you can should be able to cut out model areas.These can be areas in which parts of cotton rolls or cheeks wereunintentionally acquired.
When performing this activity, be careful not to accidentally cut out anyareas that e.g. are located behind the model or are otherwise cut awayfrom the line.
IMPORTANTFor precision reasons, this function can only be operated by trackballor touchpad.
ü You are now in the ACQUISITION or MODEL phase.1. Actuate the tool wheel.2. Press the "Cut" button.
Ä The cursor changes to a cross.3. Begin the cut line with a double-tap/double-click.4. Tap/click to set additional points.5. Finish the cut by double-tapping/double-clicking.
Ä The model area is cut out.6. Press the "Apply" button to implement the change.
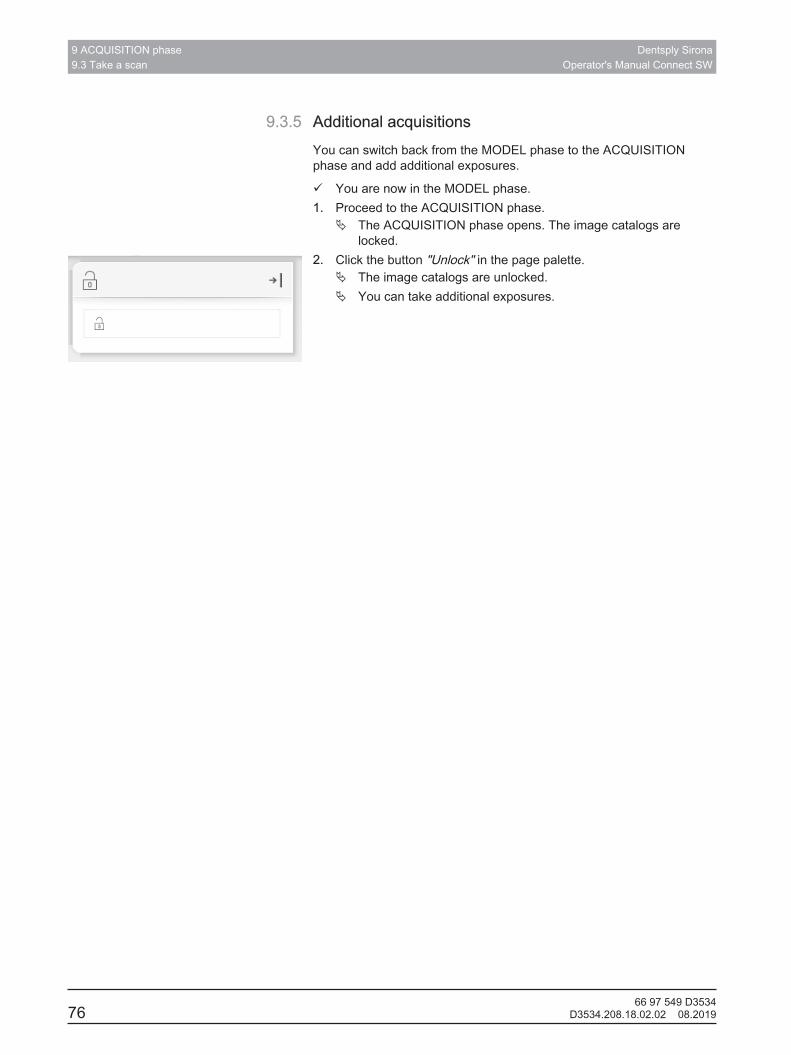
9 ACQUISITION phase9.3 Take a scan
Dentsply SironaOperator's Manual Connect SW
7666 97 549 D3534
D3534.208.18.02.02 08.2019
9.3.5 Additional acquisitionsYou can switch back from the MODEL phase to the ACQUISITIONphase and add additional exposures.
ü You are now in the MODEL phase.1. Proceed to the ACQUISITION phase.
Ä The ACQUISITION phase opens. The image catalogs arelocked.
2. Click the button "Unlock" in the page palette.Ä The image catalogs are unlocked.Ä You can take additional exposures.
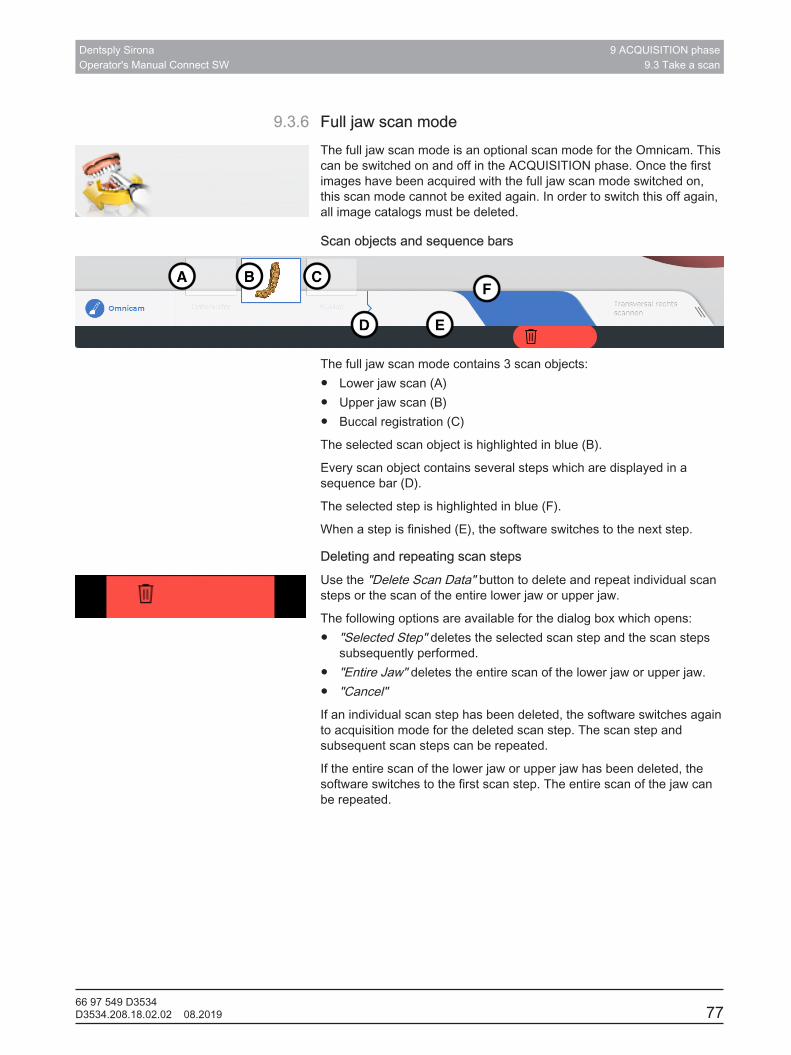
Dentsply SironaOperator's Manual Connect SW
9 ACQUISITION phase9.3 Take a scan
66 97 549 D3534D3534.208.18.02.02 08.2019 77
9.3.6 Full jaw scan modeThe full jaw scan mode is an optional scan mode for the Omnicam. Thiscan be switched on and off in the ACQUISITION phase. Once the firstimages have been acquired with the full jaw scan mode switched on,this scan mode cannot be exited again. In order to switch this off again,all image catalogs must be deleted.
Scan objects and sequence bars
The full jaw scan mode contains 3 scan objects:● Lower jaw scan (A)● Upper jaw scan (B)● Buccal registration (C)
The selected scan object is highlighted in blue (B).
Every scan object contains several steps which are displayed in asequence bar (D).
The selected step is highlighted in blue (F).
When a step is finished (E), the software switches to the next step.
Deleting and repeating scan stepsUse the "Delete Scan Data" button to delete and repeat individual scansteps or the scan of the entire lower jaw or upper jaw.
The following options are available for the dialog box which opens:● "Selected Step" deletes the selected scan step and the scan steps
subsequently performed.● "Entire Jaw" deletes the entire scan of the lower jaw or upper jaw.● "Cancel"If an individual scan step has been deleted, the software switches againto acquisition mode for the deleted scan step. The scan step andsubsequent scan steps can be repeated.
If the entire scan of the lower jaw or upper jaw has been deleted, thesoftware switches to the first scan step. The entire scan of the jaw canbe repeated.
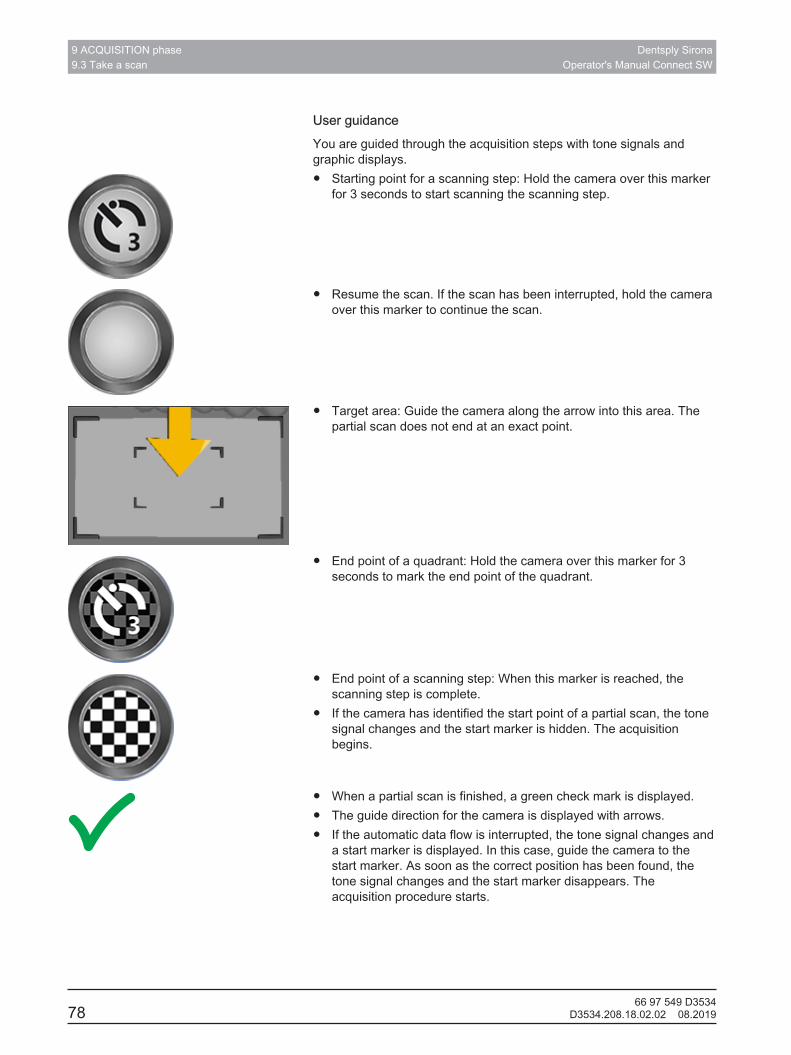
9 ACQUISITION phase9.3 Take a scan
Dentsply SironaOperator's Manual Connect SW
7866 97 549 D3534
D3534.208.18.02.02 08.2019
User guidanceYou are guided through the acquisition steps with tone signals andgraphic displays.● Starting point for a scanning step: Hold the camera over this marker
for 3 seconds to start scanning the scanning step.
● Resume the scan. If the scan has been interrupted, hold the cameraover this marker to continue the scan.
● Target area: Guide the camera along the arrow into this area. Thepartial scan does not end at an exact point.
● End point of a quadrant: Hold the camera over this marker for 3seconds to mark the end point of the quadrant.
● End point of a scanning step: When this marker is reached, thescanning step is complete.
● If the camera has identified the start point of a partial scan, the tonesignal changes and the start marker is hidden. The acquisitionbegins.
● When a partial scan is finished, a green check mark is displayed.● The guide direction for the camera is displayed with arrows.● If the automatic data flow is interrupted, the tone signal changes and
a start marker is displayed. In this case, guide the camera to thestart marker. As soon as the correct position has been found, thetone signal changes and the start marker disappears. Theacquisition procedure starts.
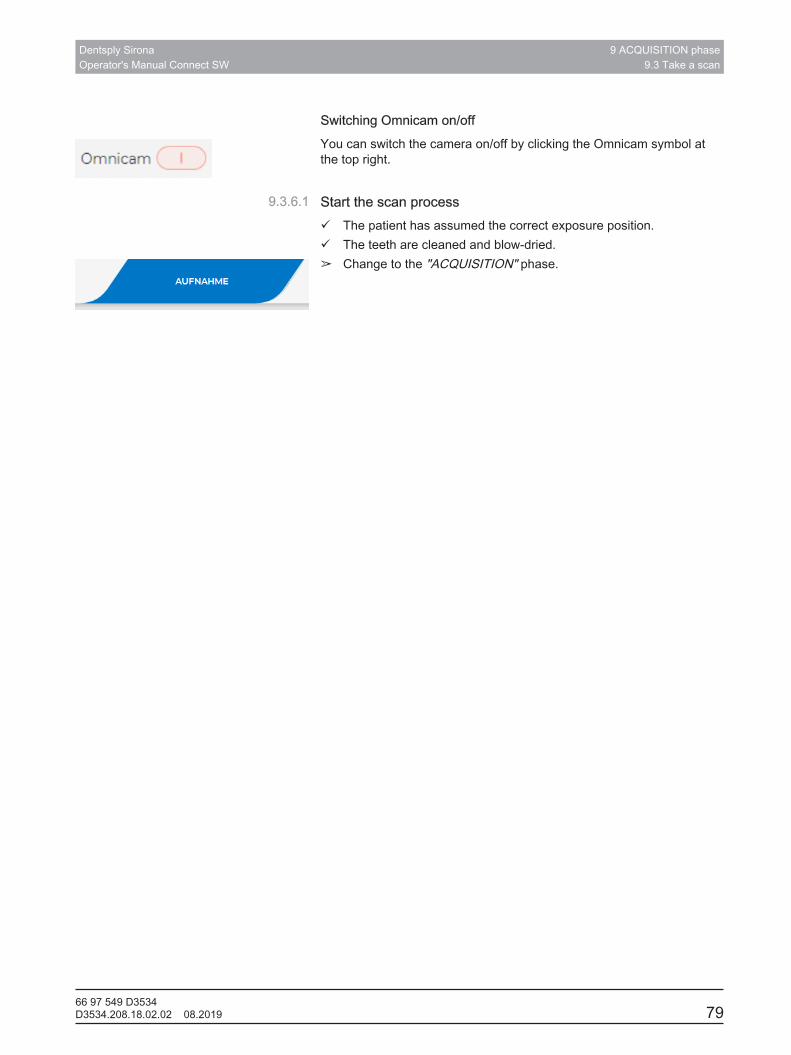
Dentsply SironaOperator's Manual Connect SW
9 ACQUISITION phase9.3 Take a scan
66 97 549 D3534D3534.208.18.02.02 08.2019 79
Switching Omnicam on/offYou can switch the camera on/off by clicking the Omnicam symbol atthe top right.
9.3.6.1 Start the scan processü The patient has assumed the correct exposure position.ü The teeth are cleaned and blow-dried.➢ Change to the "ACQUISITION" phase.
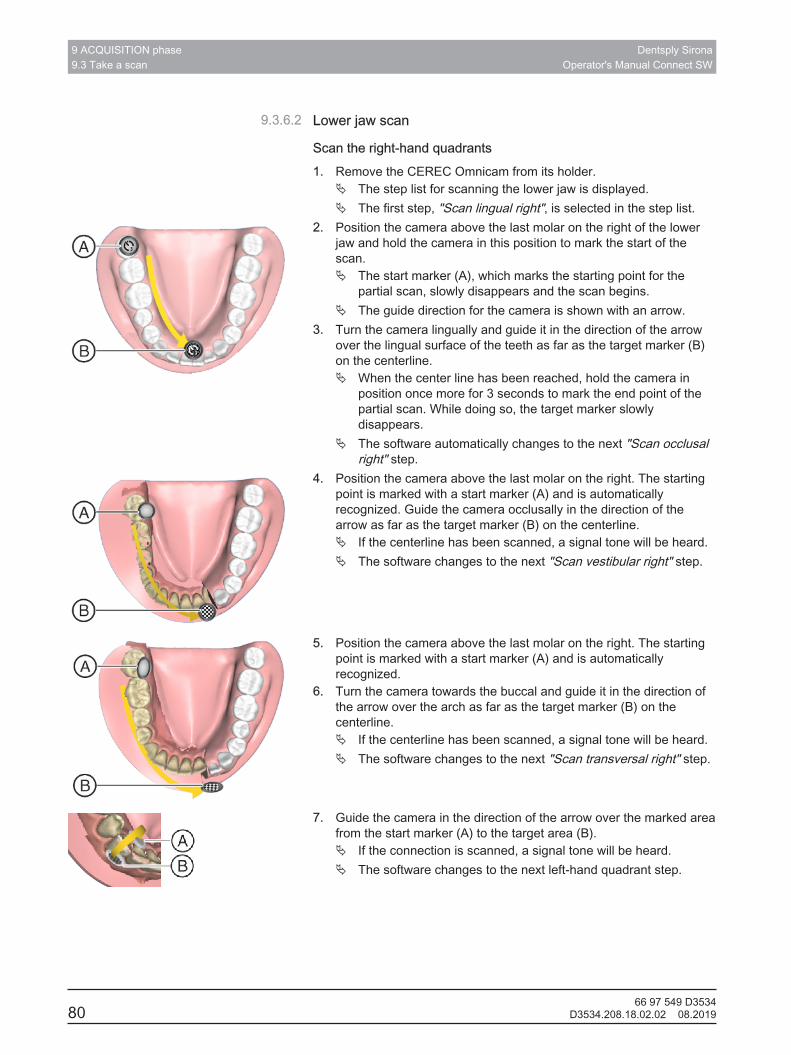
9 ACQUISITION phase9.3 Take a scan
Dentsply SironaOperator's Manual Connect SW
8066 97 549 D3534
D3534.208.18.02.02 08.2019
9.3.6.2 Lower jaw scan
Scan the right-hand quadrants1. Remove the CEREC Omnicam from its holder.
Ä The step list for scanning the lower jaw is displayed.Ä The first step, "Scan lingual right", is selected in the step list.
2. Position the camera above the last molar on the right of the lowerjaw and hold the camera in this position to mark the start of thescan.Ä The start marker (A), which marks the starting point for the
partial scan, slowly disappears and the scan begins.Ä The guide direction for the camera is shown with an arrow.
3. Turn the camera lingually and guide it in the direction of the arrowover the lingual surface of the teeth as far as the target marker (B)on the centerline.Ä When the center line has been reached, hold the camera in
position once more for 3 seconds to mark the end point of thepartial scan. While doing so, the target marker slowlydisappears.
Ä The software automatically changes to the next "Scan occlusalright" step.
4. Position the camera above the last molar on the right. The startingpoint is marked with a start marker (A) and is automaticallyrecognized. Guide the camera occlusally in the direction of thearrow as far as the target marker (B) on the centerline.Ä If the centerline has been scanned, a signal tone will be heard.Ä The software changes to the next "Scan vestibular right" step.
5. Position the camera above the last molar on the right. The startingpoint is marked with a start marker (A) and is automaticallyrecognized.
6. Turn the camera towards the buccal and guide it in the direction ofthe arrow over the arch as far as the target marker (B) on thecenterline.Ä If the centerline has been scanned, a signal tone will be heard.Ä The software changes to the next "Scan transversal right" step.
7. Guide the camera in the direction of the arrow over the marked areafrom the start marker (A) to the target area (B).Ä If the connection is scanned, a signal tone will be heard.Ä The software changes to the next left-hand quadrant step.
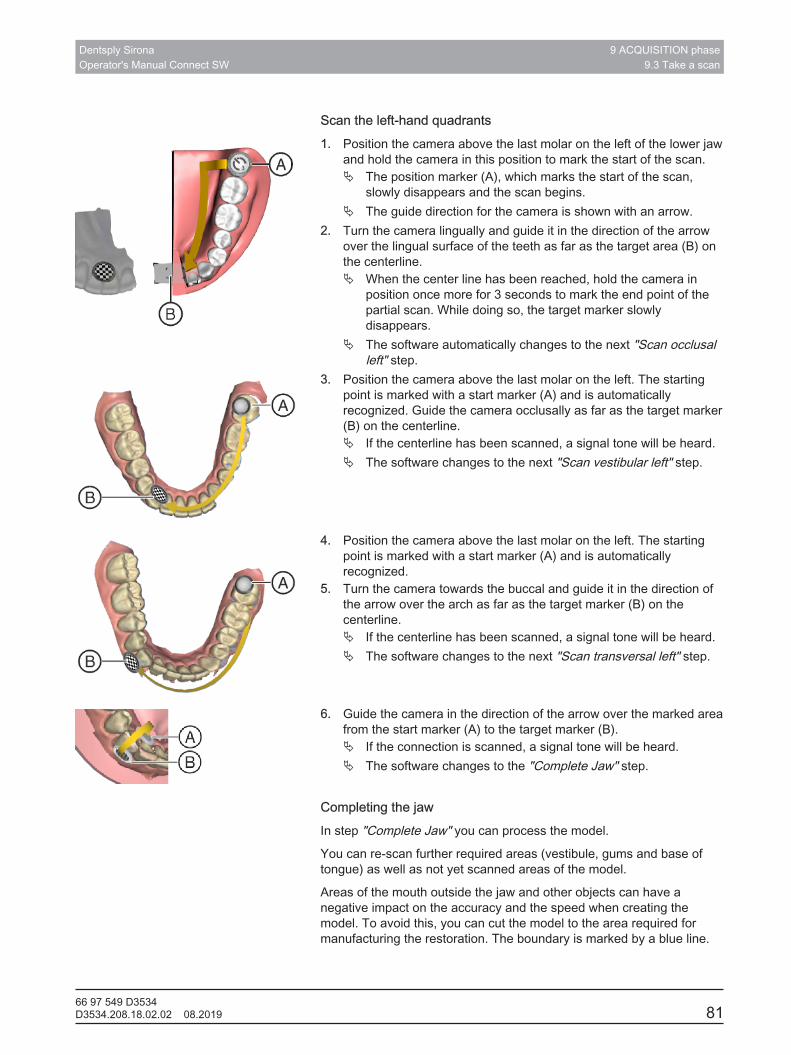
Dentsply SironaOperator's Manual Connect SW
9 ACQUISITION phase9.3 Take a scan
66 97 549 D3534D3534.208.18.02.02 08.2019 81
Scan the left-hand quadrants1. Position the camera above the last molar on the left of the lower jaw
and hold the camera in this position to mark the start of the scan.Ä The position marker (A), which marks the start of the scan,
slowly disappears and the scan begins.Ä The guide direction for the camera is shown with an arrow.
2. Turn the camera lingually and guide it in the direction of the arrowover the lingual surface of the teeth as far as the target area (B) onthe centerline.Ä When the center line has been reached, hold the camera in
position once more for 3 seconds to mark the end point of thepartial scan. While doing so, the target marker slowlydisappears.
Ä The software automatically changes to the next "Scan occlusalleft" step.
3. Position the camera above the last molar on the left. The startingpoint is marked with a start marker (A) and is automaticallyrecognized. Guide the camera occlusally as far as the target marker(B) on the centerline.Ä If the centerline has been scanned, a signal tone will be heard.Ä The software changes to the next "Scan vestibular left" step.
4. Position the camera above the last molar on the left. The startingpoint is marked with a start marker (A) and is automaticallyrecognized.
5. Turn the camera towards the buccal and guide it in the direction ofthe arrow over the arch as far as the target marker (B) on thecenterline.Ä If the centerline has been scanned, a signal tone will be heard.Ä The software changes to the next "Scan transversal left" step.
6. Guide the camera in the direction of the arrow over the marked areafrom the start marker (A) to the target marker (B).Ä If the connection is scanned, a signal tone will be heard.Ä The software changes to the "Complete Jaw" step.
Completing the jawIn step "Complete Jaw" you can process the model.
You can re-scan further required areas (vestibule, gums and base oftongue) as well as not yet scanned areas of the model.
Areas of the mouth outside the jaw and other objects can have anegative impact on the accuracy and the speed when creating themodel. To avoid this, you can cut the model to the area required formanufacturing the restoration. The boundary is marked by a blue line.
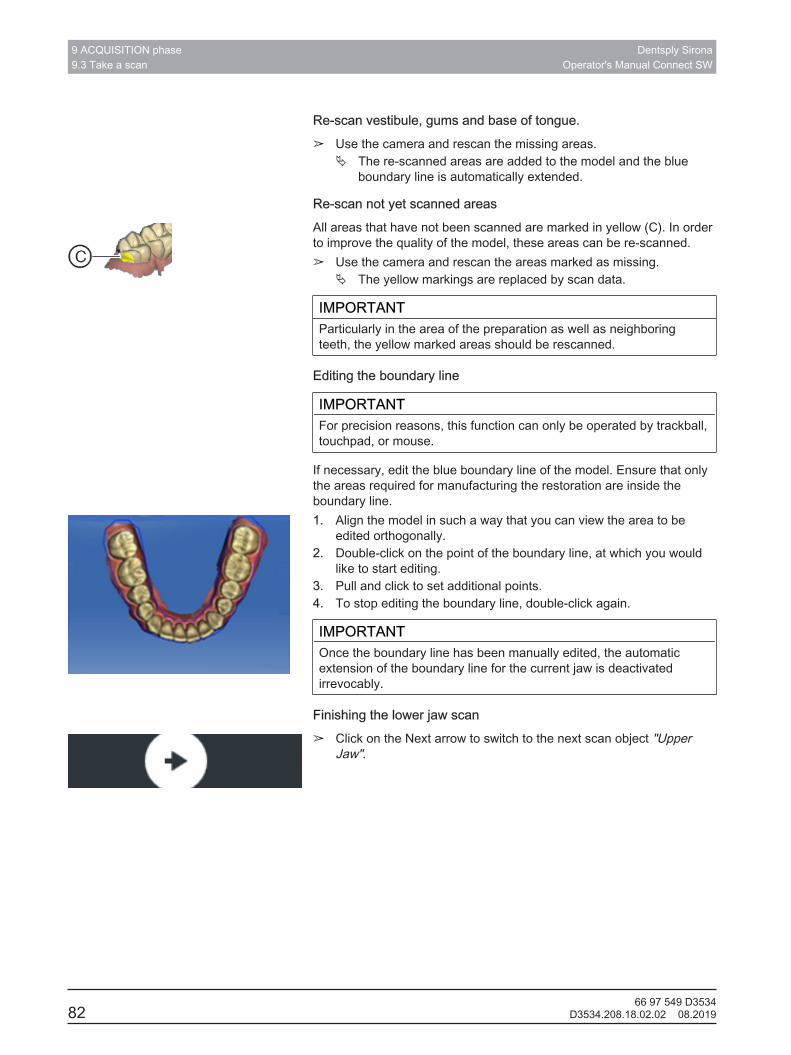
9 ACQUISITION phase9.3 Take a scan
Dentsply SironaOperator's Manual Connect SW
8266 97 549 D3534
D3534.208.18.02.02 08.2019
Re-scan vestibule, gums and base of tongue.➢ Use the camera and rescan the missing areas.
Ä The re-scanned areas are added to the model and the blueboundary line is automatically extended.
Re-scan not yet scanned areasAll areas that have not been scanned are marked in yellow (C). In orderto improve the quality of the model, these areas can be re-scanned.➢ Use the camera and rescan the areas marked as missing.
Ä The yellow markings are replaced by scan data.
IMPORTANTParticularly in the area of the preparation as well as neighboringteeth, the yellow marked areas should be rescanned.
Editing the boundary line
IMPORTANTFor precision reasons, this function can only be operated by trackball,touchpad, or mouse.
If necessary, edit the blue boundary line of the model. Ensure that onlythe areas required for manufacturing the restoration are inside theboundary line.1. Align the model in such a way that you can view the area to be
edited orthogonally.2. Double-click on the point of the boundary line, at which you would
like to start editing.3. Pull and click to set additional points.4. To stop editing the boundary line, double-click again.
IMPORTANTOnce the boundary line has been manually edited, the automaticextension of the boundary line for the current jaw is deactivatedirrevocably.
Finishing the lower jaw scan➢ Click on the Next arrow to switch to the next scan object "Upper
Jaw".
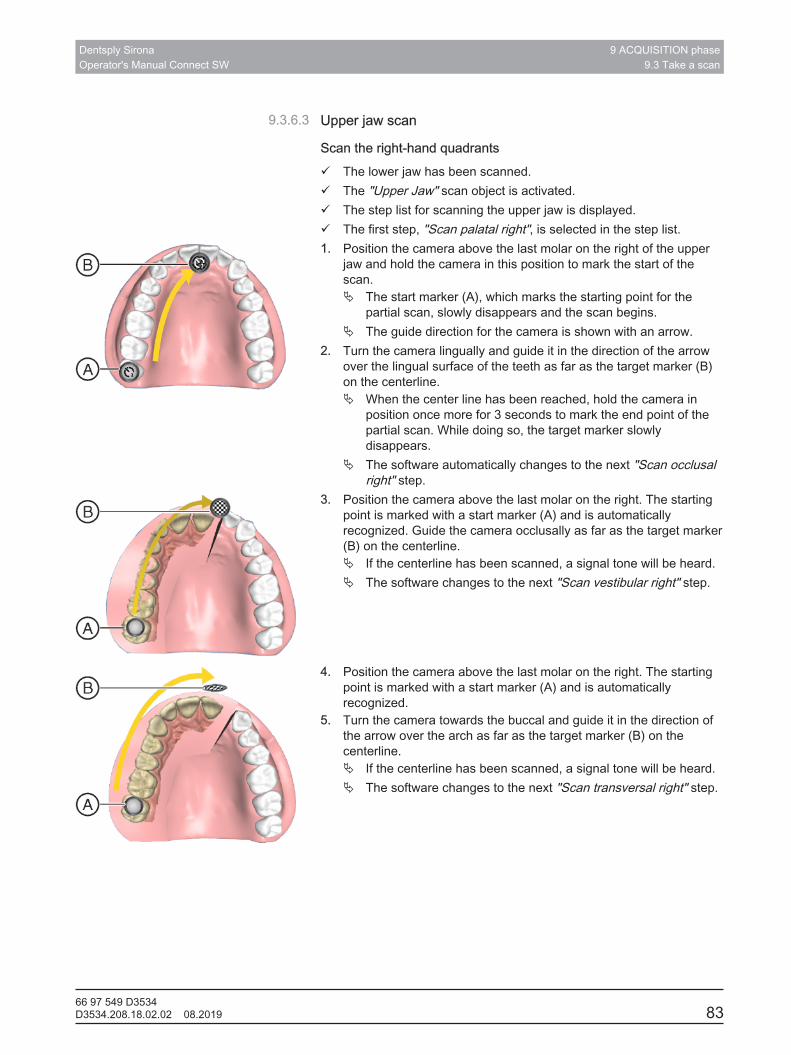
Dentsply SironaOperator's Manual Connect SW
9 ACQUISITION phase9.3 Take a scan
66 97 549 D3534D3534.208.18.02.02 08.2019 83
9.3.6.3 Upper jaw scan
Scan the right-hand quadrantsü The lower jaw has been scanned.ü The "Upper Jaw" scan object is activated.ü The step list for scanning the upper jaw is displayed.ü The first step, "Scan palatal right", is selected in the step list.1. Position the camera above the last molar on the right of the upper
jaw and hold the camera in this position to mark the start of thescan.Ä The start marker (A), which marks the starting point for the
partial scan, slowly disappears and the scan begins.Ä The guide direction for the camera is shown with an arrow.
2. Turn the camera lingually and guide it in the direction of the arrowover the lingual surface of the teeth as far as the target marker (B)on the centerline.Ä When the center line has been reached, hold the camera in
position once more for 3 seconds to mark the end point of thepartial scan. While doing so, the target marker slowlydisappears.
Ä The software automatically changes to the next "Scan occlusalright" step.
3. Position the camera above the last molar on the right. The startingpoint is marked with a start marker (A) and is automaticallyrecognized. Guide the camera occlusally as far as the target marker(B) on the centerline.Ä If the centerline has been scanned, a signal tone will be heard.Ä The software changes to the next "Scan vestibular right" step.
4. Position the camera above the last molar on the right. The startingpoint is marked with a start marker (A) and is automaticallyrecognized.
5. Turn the camera towards the buccal and guide it in the direction ofthe arrow over the arch as far as the target marker (B) on thecenterline.Ä If the centerline has been scanned, a signal tone will be heard.Ä The software changes to the next "Scan transversal right" step.
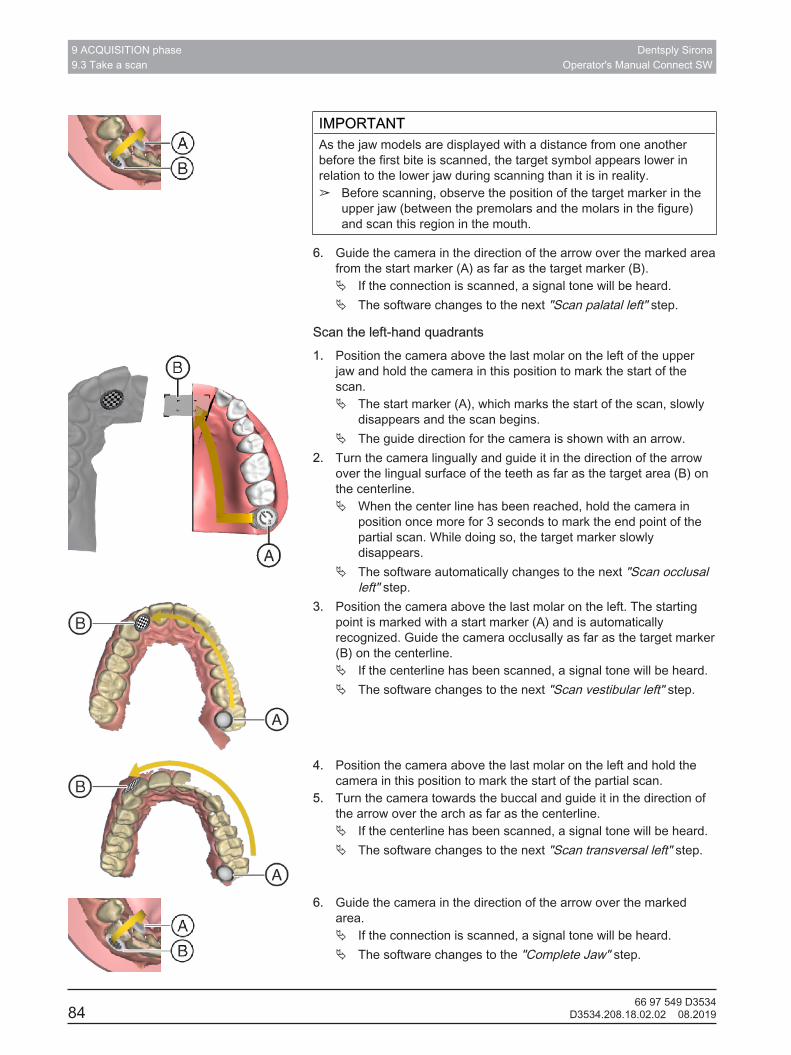
9 ACQUISITION phase9.3 Take a scan
Dentsply SironaOperator's Manual Connect SW
8466 97 549 D3534
D3534.208.18.02.02 08.2019
IMPORTANTAs the jaw models are displayed with a distance from one anotherbefore the first bite is scanned, the target symbol appears lower inrelation to the lower jaw during scanning than it is in reality.➢ Before scanning, observe the position of the target marker in the
upper jaw (between the premolars and the molars in the figure)and scan this region in the mouth.
6. Guide the camera in the direction of the arrow over the marked areafrom the start marker (A) as far as the target marker (B).Ä If the connection is scanned, a signal tone will be heard.Ä The software changes to the next "Scan palatal left" step.
Scan the left-hand quadrants1. Position the camera above the last molar on the left of the upper
jaw and hold the camera in this position to mark the start of thescan.Ä The start marker (A), which marks the start of the scan, slowly
disappears and the scan begins.Ä The guide direction for the camera is shown with an arrow.
2. Turn the camera lingually and guide it in the direction of the arrowover the lingual surface of the teeth as far as the target area (B) onthe centerline.Ä When the center line has been reached, hold the camera in
position once more for 3 seconds to mark the end point of thepartial scan. While doing so, the target marker slowlydisappears.
Ä The software automatically changes to the next "Scan occlusalleft" step.
3. Position the camera above the last molar on the left. The startingpoint is marked with a start marker (A) and is automaticallyrecognized. Guide the camera occlusally as far as the target marker(B) on the centerline.Ä If the centerline has been scanned, a signal tone will be heard.Ä The software changes to the next "Scan vestibular left" step.
4. Position the camera above the last molar on the left and hold thecamera in this position to mark the start of the partial scan.
5. Turn the camera towards the buccal and guide it in the direction ofthe arrow over the arch as far as the centerline.Ä If the centerline has been scanned, a signal tone will be heard.Ä The software changes to the next "Scan transversal left" step.
6. Guide the camera in the direction of the arrow over the markedarea.Ä If the connection is scanned, a signal tone will be heard.Ä The software changes to the "Complete Jaw" step.
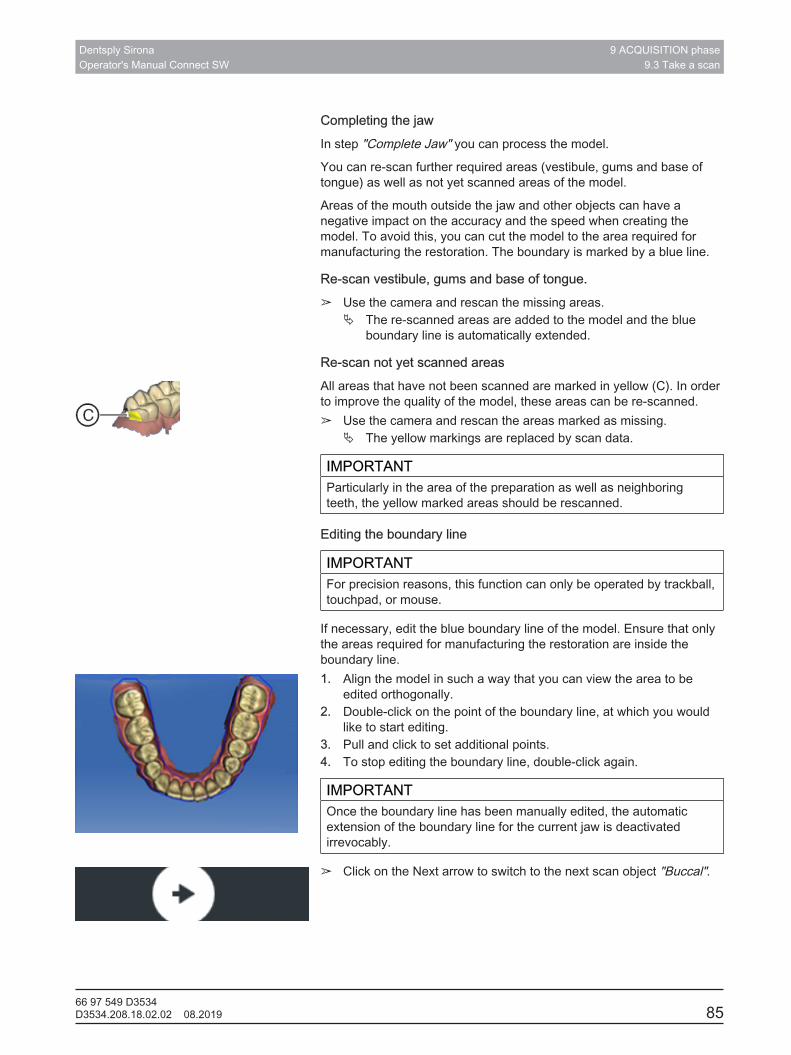
Dentsply SironaOperator's Manual Connect SW
9 ACQUISITION phase9.3 Take a scan
66 97 549 D3534D3534.208.18.02.02 08.2019 85
Completing the jawIn step "Complete Jaw" you can process the model.
You can re-scan further required areas (vestibule, gums and base oftongue) as well as not yet scanned areas of the model.
Areas of the mouth outside the jaw and other objects can have anegative impact on the accuracy and the speed when creating themodel. To avoid this, you can cut the model to the area required formanufacturing the restoration. The boundary is marked by a blue line.
Re-scan vestibule, gums and base of tongue.➢ Use the camera and rescan the missing areas.
Ä The re-scanned areas are added to the model and the blueboundary line is automatically extended.
Re-scan not yet scanned areasAll areas that have not been scanned are marked in yellow (C). In orderto improve the quality of the model, these areas can be re-scanned.➢ Use the camera and rescan the areas marked as missing.
Ä The yellow markings are replaced by scan data.
IMPORTANTParticularly in the area of the preparation as well as neighboringteeth, the yellow marked areas should be rescanned.
Editing the boundary line
IMPORTANTFor precision reasons, this function can only be operated by trackball,touchpad, or mouse.
If necessary, edit the blue boundary line of the model. Ensure that onlythe areas required for manufacturing the restoration are inside theboundary line.1. Align the model in such a way that you can view the area to be
edited orthogonally.2. Double-click on the point of the boundary line, at which you would
like to start editing.3. Pull and click to set additional points.4. To stop editing the boundary line, double-click again.
IMPORTANTOnce the boundary line has been manually edited, the automaticextension of the boundary line for the current jaw is deactivatedirrevocably.
➢ Click on the Next arrow to switch to the next scan object "Buccal".
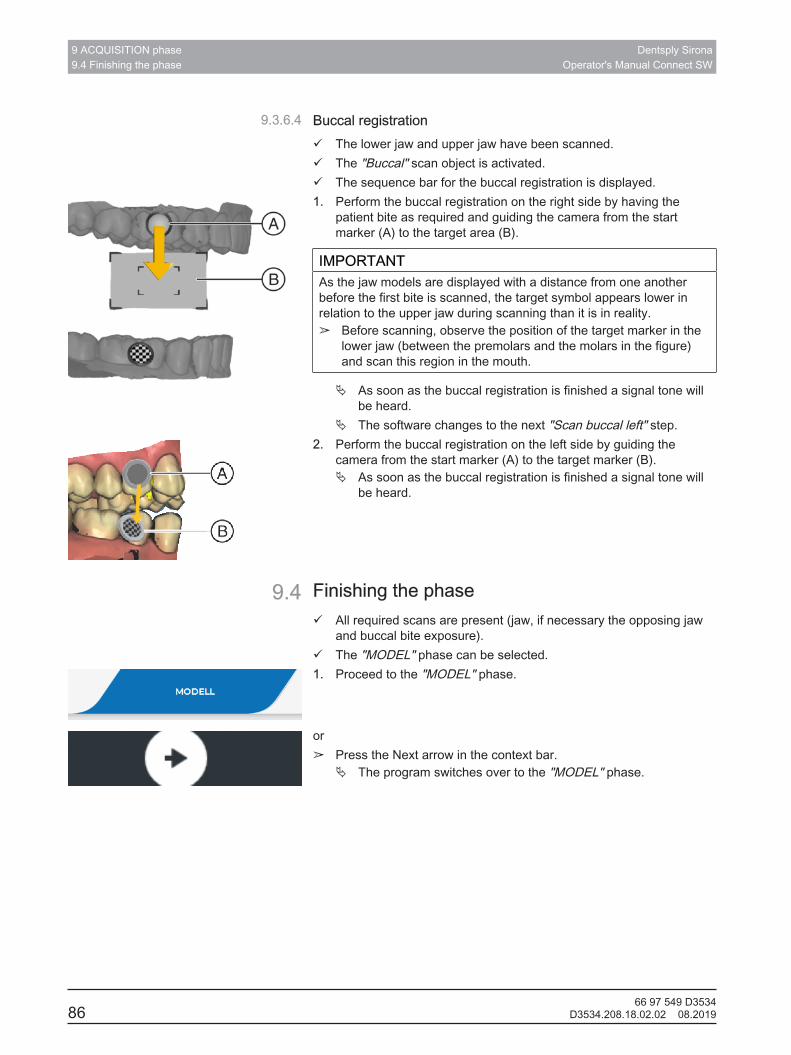
9 ACQUISITION phase9.4 Finishing the phase
Dentsply SironaOperator's Manual Connect SW
8666 97 549 D3534
D3534.208.18.02.02 08.2019
9.3.6.4 Buccal registrationü The lower jaw and upper jaw have been scanned.ü The "Buccal" scan object is activated.ü The sequence bar for the buccal registration is displayed.1. Perform the buccal registration on the right side by having the
patient bite as required and guiding the camera from the startmarker (A) to the target area (B).
IMPORTANTAs the jaw models are displayed with a distance from one anotherbefore the first bite is scanned, the target symbol appears lower inrelation to the upper jaw during scanning than it is in reality.➢ Before scanning, observe the position of the target marker in the
lower jaw (between the premolars and the molars in the figure)and scan this region in the mouth.
Ä As soon as the buccal registration is finished a signal tone willbe heard.
Ä The software changes to the next "Scan buccal left" step.2. Perform the buccal registration on the left side by guiding the
camera from the start marker (A) to the target marker (B).Ä As soon as the buccal registration is finished a signal tone will
be heard.
9.4 Finishing the phaseü All required scans are present (jaw, if necessary the opposing jaw
and buccal bite exposure).ü The "MODEL" phase can be selected.1. Proceed to the "MODEL" phase.
or➢ Press the Next arrow in the context bar.
Ä The program switches over to the "MODEL" phase.
Dentsply SironaOperator's Manual Connect SW
10 MODEL phase10.1 Editing the model
66 97 549 D3534D3534.208.18.02.02 08.2019 87
10 MODEL phaseIn the "MODEL" phase, the virtual models are reconstructed based onthe acquired image catalogs.
If you would like to edit the model, change to the "Edit Model" step.
The "Edit Model", "Bite Registration" and "Set Model Axis" steps relateto the entire model (upper and lower jaw).
All other steps in the "MODEL" phase refer to the restoration currentlyselected. These steps must be carried out as relevant for allrestorations.
10.1 Editing the modelThis step is optional. You must select this step in order to access it.
In the "Edit Model" step, you can work with the following tool:● "Cut"● "Reset Model"Use of the individual tools is described in the section "Page palette [→ 43]".
10.2 Buccal registration (optional)The software joins the models together automatically und shows thiswith a green check mark at the buccal window. If this is not possible, thesoftware will attempt to correlate the jaws in the following process. If thisis not possible, you can also correlate the models together manually.
Manual correlationIn this step, the virtual models of the upper and lower jaw should bealigned with one another with the help of the buccal image in its correctposition.
In the "Buccal Bite Registration" step, you can work with the followingtools in the page palette:● Drag Buccal● Turn Buccal Impression
Rotating the lower and upper jaw➢ Press with one finger or click in the gray area with the left mouse
button and keep held down.Ä The lower jaw and upper jaw can be rotated about the vertical
axis simultaneously.➢ Press with one finger or click on the lower jaw or upper jaw with the
left mouse button and keep held down.Ä The arches can be rotated freely, individually.
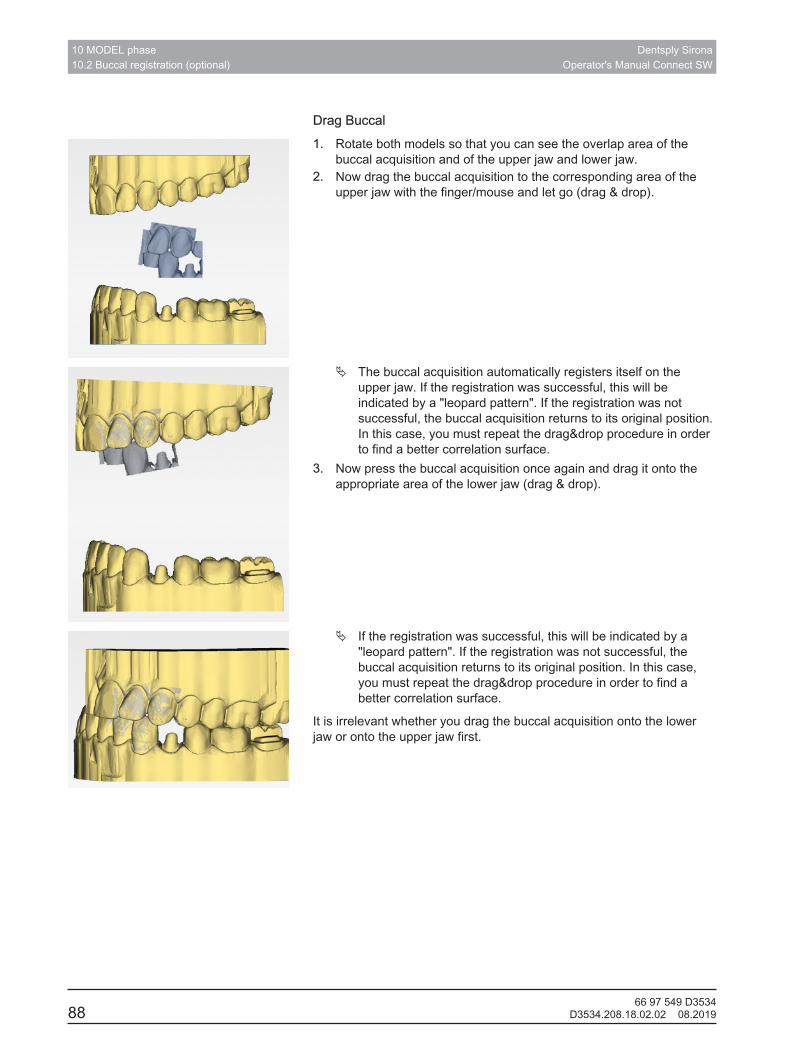
10 MODEL phase10.2 Buccal registration (optional)
Dentsply SironaOperator's Manual Connect SW
8866 97 549 D3534
D3534.208.18.02.02 08.2019
Drag Buccal1. Rotate both models so that you can see the overlap area of the
buccal acquisition and of the upper jaw and lower jaw.2. Now drag the buccal acquisition to the corresponding area of the
upper jaw with the finger/mouse and let go (drag & drop).
Ä The buccal acquisition automatically registers itself on theupper jaw. If the registration was successful, this will beindicated by a "leopard pattern". If the registration was notsuccessful, the buccal acquisition returns to its original position.In this case, you must repeat the drag&drop procedure in orderto find a better correlation surface.
3. Now press the buccal acquisition once again and drag it onto theappropriate area of the lower jaw (drag & drop).
Ä If the registration was successful, this will be indicated by a"leopard pattern". If the registration was not successful, thebuccal acquisition returns to its original position. In this case,you must repeat the drag&drop procedure in order to find abetter correlation surface.
It is irrelevant whether you drag the buccal acquisition onto the lowerjaw or onto the upper jaw first.
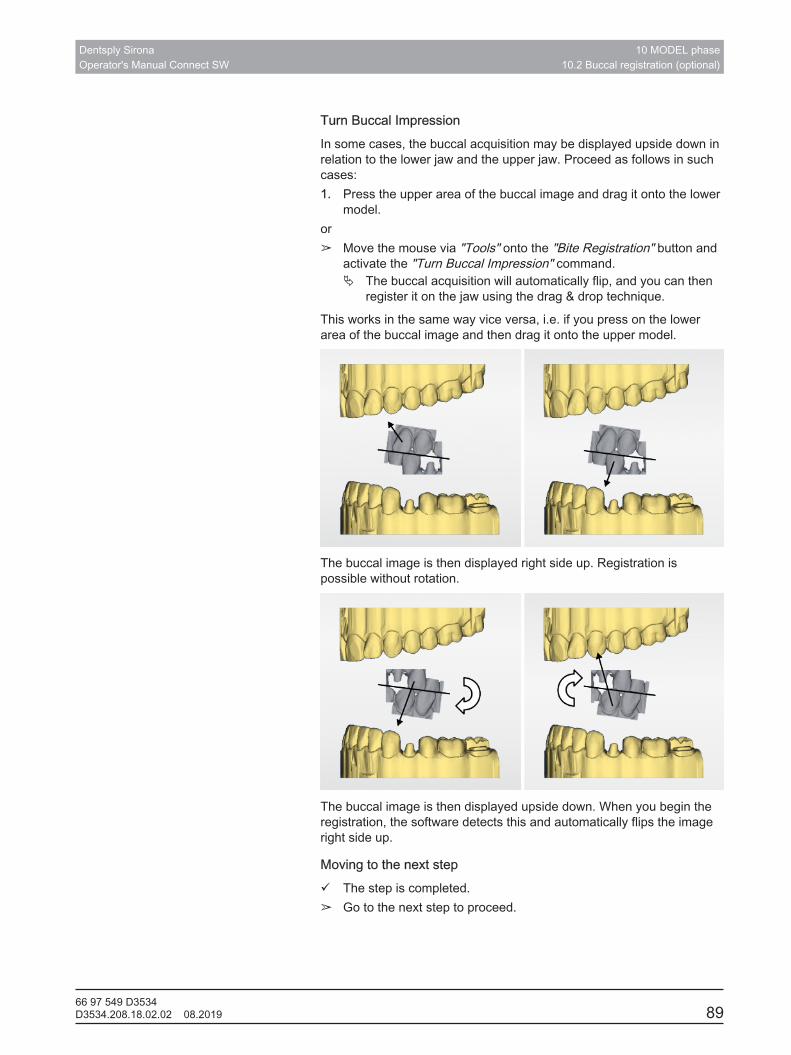
Dentsply SironaOperator's Manual Connect SW
10 MODEL phase10.2 Buccal registration (optional)
66 97 549 D3534D3534.208.18.02.02 08.2019 89
Turn Buccal ImpressionIn some cases, the buccal acquisition may be displayed upside down inrelation to the lower jaw and the upper jaw. Proceed as follows in suchcases:1. Press the upper area of the buccal image and drag it onto the lower
model.or➢ Move the mouse via "Tools" onto the "Bite Registration" button and
activate the "Turn Buccal Impression" command.Ä The buccal acquisition will automatically flip, and you can then
register it on the jaw using the drag & drop technique.
This works in the same way vice versa, i.e. if you press on the lowerarea of the buccal image and then drag it onto the upper model.
The buccal image is then displayed right side up. Registration ispossible without rotation.
The buccal image is then displayed upside down. When you begin theregistration, the software detects this and automatically flips the imageright side up.
Moving to the next stepü The step is completed.➢ Go to the next step to proceed.
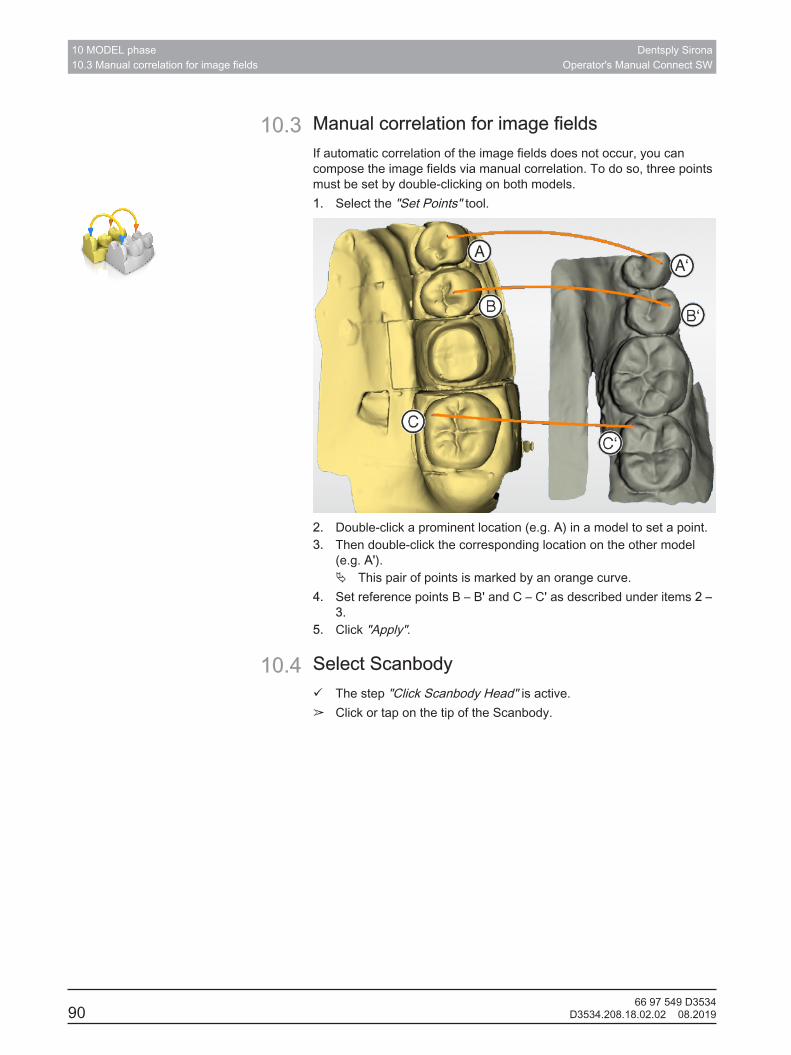
10 MODEL phase10.3 Manual correlation for image fields
Dentsply SironaOperator's Manual Connect SW
9066 97 549 D3534
D3534.208.18.02.02 08.2019
10.3 Manual correlation for image fieldsIf automatic correlation of the image fields does not occur, you cancompose the image fields via manual correlation. To do so, three pointsmust be set by double-clicking on both models.1. Select the "Set Points" tool.
2. Double-click a prominent location (e.g. A) in a model to set a point.3. Then double-click the corresponding location on the other model
(e.g. A').Ä This pair of points is marked by an orange curve.
4. Set reference points B – B' and C – C' as described under items 2 –3.
5. Click "Apply".
10.4 Select Scanbodyü The step "Click Scanbody Head" is active.➢ Click or tap on the tip of the Scanbody.
Dentsply SironaOperator's Manual Connect SW
10 MODEL phase10.5 Trimming the preparation
66 97 549 D3534D3534.208.18.02.02 08.2019 91
10.5 Trimming the preparationThis step is optional. You must click on this step in order to access it.
In the "Trim Area" step, you can hide image regions outside of thepreparation; e.g. mesial and distal neighbors.
If the virtual model is trimmed in this design step, both the sides and thebottom are subsequently displayed as closed.
In the step "Trim Area", you can work with the following tool:● "Trim"The use of the tool is described in the “Page palette [→ 43]” section.
Trimming image regions
IMPORTANTFor precision reasons, this function can only be operated by trackball,touchpad, or mouse.
You can trim several image regions.1. Rotate the model to a perspective in which you can see all areas
that you want to trim. The model cannot be rotated while you aredrawing the line.
2. Double click in any location to set the starting point of the trim line.3. Click to set further points of the line, e.g. in the interdental space.4. Double click in any position to end the line. Ensure that the closing
end of the line does not cut any areas of the model that you want tokeep.Ä The smaller image region to the side of the line is hidden.
Tip: If the wrong image region is hidden, you can switch to theother image region by double-clicking the hidden region.
10 MODEL phase10.6 Entering the preparation margin
Dentsply SironaOperator's Manual Connect SW
9266 97 549 D3534
D3534.208.18.02.02 08.2019
10.6 Entering the preparation marginIn the step "Draw Margin", you can work with the following tool:● Margin
The use of the tool is described in the Page palette [→ 43] section.
General information
IMPORTANTFor precision reasons, this function can only be operated by trackball,touchpad, or mouse.
IMPORTANTYou can enlarge or reduce the 3D view during the input or editing ofthe preparation margin (see “3D Preview”) in order to ensure thecorrect positioning of the preparation margin. Be sure to hold downthe left mouse button for a long time. A short click adds a point to thepreparation margin.
The preparation margin must always form a closed line.
You can edit the finished preparation margin after entering the last line.
Once the preparation margin is complete and has a tooth number, onlythe "Manual" tool will be available. This can be used for editing.
To enter the preparation margin, a technique can be selected in thepage palette:
Entering the preparation margin in the case of clear preparationedgesTip: You can rotate the model during input in order to obtain a betterview of the preparation limit. Click and hold the left mouse button and move the model with themouse.
Enter the preparation margin for the next restoration➢ Continue with the preparation margin for the next restoration by
clicking on the desired restoration in the object bar.
10.7 Preparation analysisThis step can optionally be selected after defining the insertion axis.
Here the following analyses are possible:● Undercuts● Distance to antagonists
10.8 Finishing the phaseü The next phase can be selected.1. Proceed to the next phase.

Dentsply SironaOperator's Manual Connect SW
10 MODEL phase10.8 Finishing the phase
66 97 549 D3534D3534.208.18.02.02 08.2019 93
or➢ Press the Next arrow in the context bar.
Ä The program switches over to the next phase.
11 CONNECT phase11.1 Registration and functions of the Connect portal
Dentsply SironaOperator's Manual Connect SW
9466 97 549 D3534
D3534.208.18.02.02 08.2019
11 CONNECT phaseIn this phase, you can log in to the Connect portal (see “Log in to theportal from the Connect software [→ 94]”). You must register as adentist on the Connect homepage for this.
You can open this phase by clicking the phase in the phase bar"CONNECT" or the Next arrow in context bar.
Model data in the Connect PortalThe user contact data is saved within Connect and is used by DentsplySirona to make contact if necessary. The users should send patientdata via Connect SW software in anonymized form only whereverpossible. Connect SW deletes this data at regular intervals.
11.1 Registration and functions of the Connect portal1. Go to the Connect homepage and select "Dentist registration".
Ä The application software now guides you through the log-inprocess.
2. Enter all required information there.Ä On completing registration successfully, you will receive an e-
mail from Connect SW with an activation link.3. Activate your account by clicking the link in the e-mail.
Under "My account" you have the option of amending your user dataand saving additional information such as your Skype™ ID.
Under "My favorite Laboratories" you can add up to 5 laboratories withwhich you are able to work via Connect SW. For this, click on "Searchlabs" and enter at least your zip code and an area for the search. Viathe "add" and "remove" buttons you can adapt your favoritelaboratories.
Under the "External portals" link you have the option of linking theConnect portal with other portals. If you do connect with other portals,the data-protection regulations apply for the other portal that isconnected. Depending on the external portal you may need its accessdata to log on.
You can also change your password in this area and display yourConnect order list.
Under the "User Administration" link you can create new users, e.g. ifthere are multiple users working in a practice, and manage their accessrights.
11.2 Log in to the portal from the Connect software1. Enter user name and password.2. Activate the relevant option if you want to save the user name and
password.3. Press "Apply" in the window.
Dentsply SironaOperator's Manual Connect SW
11 CONNECT phase11.3 Check restoration information
66 97 549 D3534D3534.208.18.02.02 08.2019 95
Ä The data are uploaded in parallel to the information beingentered in the portal.
11.3 Check restoration informationYou can check the restoration information in the first step.
To the left of the overview the restoration information is shown for eachrestoration that was created in the "ADMINISTRATION" phase.
If the data are not correct you have to change them in the"ADMINISTRATION" phase. You can leave the portal by clicking the“back” double arrow button.
If the data are correct, you can select "Enter Order Data" to move to thenext step.
11.4 Entering order dataIn this step you can select the lab to which the case is to be sent andenter the desired delivery date.
IMPORTANTMaximum 5 labsYou can save a maximum of 5 labs in the list of your favorite labs.
You can add labs to or delete labs from the list via "Add Lab".Under "Return Date" you can select the delivery date by clicking on thedesired day in the calendar. Under "Time" you can also state a deliverytime.
You can then click "Additional instructions of purchaser" to enterindividual order information, which must be entered in addition to thereturn date.
11.5 Anonymizing patient dataWhen sending the order, if you wish to hide your first name, surnameand date of birth, you can tick "Anonymize". The recipient only receivesthe "Patient ID" and no identifying patient data.
11.6 Add additional informationIn this step you must add the patient's gender and insurance type(Germany only).
Under "Additional Instructions", either a wide text field is provided orindividual fields for further information are shown, which were createdby their laboratory.
Using the "Additional Files" function you can send additional files(photos).
You can then go to the "Add To Cart" step to move to the shopping cartor click on "Submit Cart" to send the order immediately.
11 CONNECT phase11.7 Shopping cart
Dentsply SironaOperator's Manual Connect SW
9666 97 549 D3534
D3534.208.18.02.02 08.2019
11.7 Shopping cartIn the shopping cart you can check the order details, modify them ordelete the order from the shopping cart.
As soon as the file has been fully uploaded and all the information iscorrect, you can send the order to your lab via "Submit Cart". To do sounder "Verification" you must enter your password and confirm it with"Ok". The order list is then inserted automatically.
11.8 Order listAll sent orders are displayed in the order list. The most recently sentorder is always at the top.
You can filter the orders by the various statuses via the filter next to thelist.
In order to view the order details you must select the relevant order inthe list so that it is highlighted in a color. Then you can view the detailsby clicking on "View Order" in the step menu.
Via the step menu you can call up individual items of information on thehighlighted order.
Dentsply SironaOperator's Manual Connect SW
Index
66 97 549 D3534D3534.208.18.02.02 08.2019 97
Index
AArrow keys, 18
BBuccal registration
Moving acquisitions, 45Rotating exposures, 45
CCE mark, 8Close
MODEL, 87Code library, 37Contact surfaces
Virtual model, 51Customer Service Center, 6Cut
Inverting the model area, 46
DDeclaration of conformity, 8Display objects
Transparency, 49Trimmed model, 50
Displaying side surfaces, 49, 51Displaying the bottom, 49, 51
EEntering the preparation margin
Automatic, 47Manual, 48
IImage regions
Hide, 91impression
Exporting, 36Import, 36Save as, 36Saving, 35
LLicenses, 37
MManual
HTML format, 13, 38PDF format, 13
Manufacturer's address, 6Model
Trimming the preparation, 91Multi-Touch, 12
Edit a 3D model, 12, 15Enlarge a 3D model, 12, 15Navigation, 12Reduce a 3D model, 12, 15Rotate a 3D model, 12, 15
OOdontogram
ADA, 13FDI, 13
PProduct safety, 8
RRotating
Buccal image, 89Lower and upper jaw, 87
SSafety instructions, 10Scan objects, 77Scanner
Warm-up time, 58Screen, 12Software
Uninstallation, 20Step menu, 18
Index Dentsply SironaOperator's Manual Connect SW
9866 97 549 D3534
D3534.208.18.02.02 08.2019
TTool
Buccal registration, 45Cut, 46Entering the preparation margin, 47Resetting the model, 46Trimming, 47
TrimmingInverting the selection, 47
VView options, 43Views
Global, 44Local, 44


We reserve the right to make any alterations which may be required due to technical improvements.
© Sirona Dental Systems GmbH Sprache: englisch Printed in GermanyD3534.208.18.02.02 08.2019 Ä.-Nr.: 128 048
Sirona Dental Systems GmbH
Fabrikstr. 3164625 BensheimGermanywww.dentsplysirona.com
Order No 66 97 549 D3534