Embed Size (px)
Citation preview
7
Configuring Secure Socket Layer (SSL)
Contents
Overview . . . . . . . . . . . . . . . . . . . . . . . . . . . . . . . . . . . . . . . . . . . . . . . . . . . . . . 7-2
Terminology . . . . . . . . . . . . . . . . . . . . . . . . . . . . . . . . . . . . . . . . . . . . . . . . . . . 7-3
Prerequisite for Using SSL . . . . . . . . . . . . . . . . . . . . . . . . . . . . . . . . . . . . . . . . 7-5
Steps for Configuring and Using SSL for Switch and Client Authentication . . . . . . . . . . . . . . . . . . . . . . . . . . . . . . . . . . . . . . . . 7-5
General Operating Rules and Notes . . . . . . . . . . . . . . . . . . . . . . . . . . . . . . . . 7-6
Configuring the Switch for SSL Operation . . . . . . . . . . . . . . . . . . . . . . . . . . 7-7
1. Assign Local Login (Operator) and Enable (Manager) Password . 7-7
2. Generate the Switch’s Server Host Certificate . . . . . . . . . . . . . . . . . 7-9
3. Enable SSL on the Switch and Anticipate SSL Browser Contact Behavior . . . . . . . . . . . . . . . . . . . . . . . . . . . . . . . . . . . . . . . . . . . . . . . . . . 7-17
Common Errors in SSL Setup . . . . . . . . . . . . . . . . . . . . . . . . . . . . . . . . . . . . 7-21
7-1
Configuring Secure Socket Layer (SSL)Overview
Overview
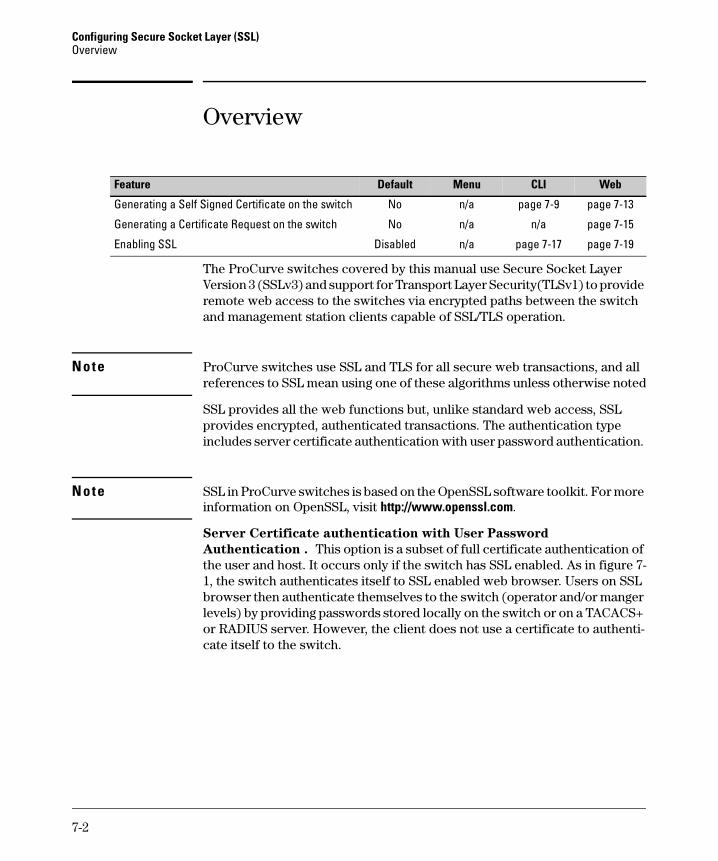
The ProCurve switches covered by this manual use Secure Socket Layer Version 3 (SSLv3) and support for Transport Layer Security(TLSv1) to provide remote web access to the switches via encrypted paths between the switch and management station clients capable of SSL/TLS operation.
Note ProCurve switches use SSL and TLS for all secure web transactions, and all references to SSL mean using one of these algorithms unless otherwise noted
SSL provides all the web functions but, unlike standard web access, SSL provides encrypted, authenticated transactions. The authentication type includes server certificate authentication with user password authentication.
Note SSL in ProCurve switches is based on the OpenSSL software toolkit. For more information on OpenSSL, visit http://www.openssl.com.
Server Certificate authentication with User Password
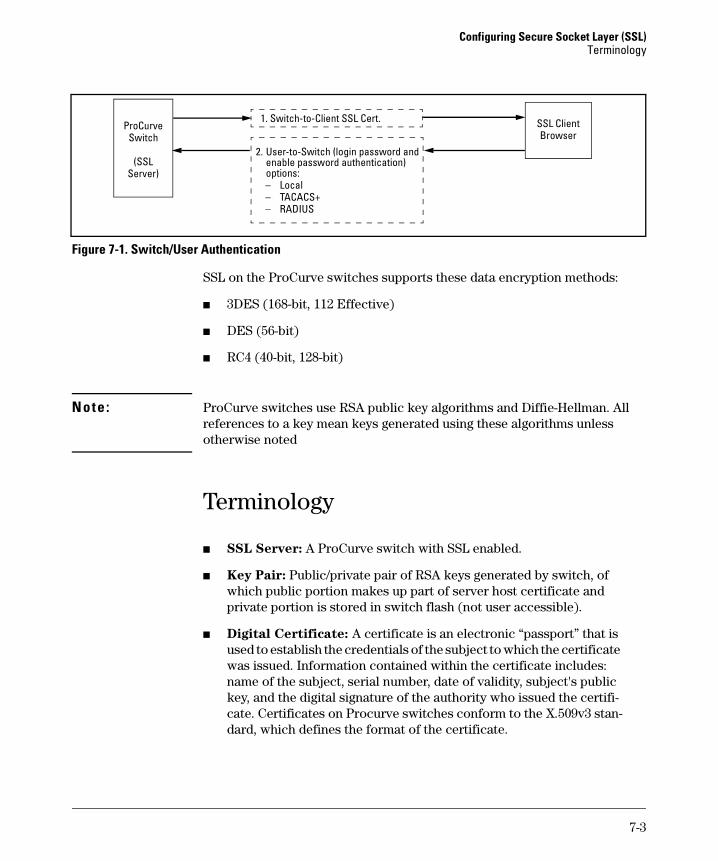
Authentication . This option is a subset of full certificate authentication of the user and host. It occurs only if the switch has SSL enabled. As in figure 7-1, the switch authenticates itself to SSL enabled web browser. Users on SSL browser then authenticate themselves to the switch (operator and/or manger levels) by providing passwords stored locally on the switch or on a TACACS+ or RADIUS server. However, the client does not use a certificate to authenti-cate itself to the switch.
Feature Default Menu CLI Web
Generating a Self Signed Certificate on the switch No n/a page 7-9 page 7-13
Generating a Certificate Request on the switch No n/a n/a page 7-15
Enabling SSL Disabled n/a page 7-17 page 7-19
7-2
Configuring Secure Socket Layer (SSL)Terminology
Figure 7-1. Switch/User Authentication
SSL on the ProCurve switches supports these data encryption methods:
■ 3DES (168-bit, 112 Effective)
■ DES (56-bit)
■ RC4 (40-bit, 128-bit)
Note : ProCurve switches use RSA public key algorithms and Diffie-Hellman. All references to a key mean keys generated using these algorithms unless otherwise noted
Terminology
■ SSL Server: A ProCurve switch with SSL enabled.
■ Key Pair: Public/private pair of RSA keys generated by switch, of which public portion makes up part of server host certificate and private portion is stored in switch flash (not user accessible).
■ Digital Certificate: A certificate is an electronic “passport” that is used to establish the credentials of the subject to which the certificate was issued. Information contained within the certificate includes: name of the subject, serial number, date of validity, subject's public key, and the digital signature of the authority who issued the certifi-cate. Certificates on Procurve switches conform to the X.509v3 stan-dard, which defines the format of the certificate.
ProCurve Switch
(SSL Server)
SSL Client Browser
1. Switch-to-Client SSL Cert.
2. User-to-Switch (login password and enable password authentication) options:– Local– TACACS+– RADIUS
7-3
Configuring Secure Socket Layer (SSL)Terminology
■ Self-Signed Certificate: A certificate not verified by a third-party certificate authority (CA). Self-signed certificates provide a reduced level of security compared to a CA-signed certificate.
■ CA-Signed Certificate: A certificate verified by a third party certif-icate authority (CA). Authenticity of CA-Signed certificates can be verified by an audit trail leading to a trusted root certificate.
■ Root Certificate: A trusted certificate used by certificate authorities to sign certificates (CA-Signed Certificates) and used later on to verify that authenticity of those signed certificates. Trusted certificates are distributed as an integral part of most popular web clients. (see browser documentation for which root certificates are pre-installed).
■ Manager Level: Manager privileges on the switch.
■ Operator Level: Operator privileges on the switch.
■ Local password or username: A Manager-level or Operator-level password configured in the switch.
■ SSL Enabled: (1) A certificate key pair has been generated on the switch (web interface or CLI command: crypto key generate cert
[key size] (2) A certificate been generated on the switch (web interface or CLI command: crypto host-cert generate self-signed
[arg-list]) and (3) SSL is enabled (web interface or CLI command: web-management ssl). (You can generate a certificate without enabling SSL, but you cannot enable SSL without first generating a Certificate.
7-4

Configuring Secure Socket Layer (SSL)Prerequisite for Using SSL
Prerequisite for Using SSL
Before using the switch as an SSL server, you must install a publicly or commercially available SSL enabled web browser application on the com-puter(s) you use for management access to the switch.
Steps for Configuring and Using SSL for Switch and Client Authentication
The general steps for configuring SSL include:
A. Client Preparation
1. Install an SSL capable browser application on a management station you want to use for access to the switch. (Refer to the documentation provided with your browser.)
Note : The latest versions of Microsoft Internet Explorer and Netscape web browser support SSL and TLS functionality. See the browser documentation for addi-tional details
B. Switch Preparation
1. Assign a login (Operator) and enable (Manager) password on the switch (page 7-7).
2. Generate a host certificate on the switch (page 7-9).i. Generate certificate key pairii. Generate host certificate
You need to do this only once. The switch's own public/private certificate key pair and certificate are stored in the switch's flash memory and are not affected by reboots or the erase startup-config command. (You can remove or replace this certificate, if necessary.) The certificate key pair and the SSH key pair are independent of each other, which means a switch can have two keys pairs stored in flash.
3. Enable SSL on the switch (page 7-17).
4. Use your SSL enabled browser to access the switch using the switch’s IP address or DNS name (if allowed by your browser). Refer to the documentation provided with the browser application.
7-5
Configuring Secure Socket Layer (SSL)General Operating Rules and Notes
General Operating Rules and Notes
■ Once you generate a certificate on the switch you should avoid re-generating the certificate without a compelling reason. Otherwise, you will have to re-introduce the switch’s certificate on all manage-ment stations (clients) you previously set up for SSL access to the switch. In some situations this can temporarily allow security breaches.
■ The switch's own public/private certificate key pair and certificate are stored in the switch's flash memory and are not affected by reboots or the erase startup-config command
■ The public/private certificate key pair is not be confused with the SSH public/private key pair. The certificate key pair and the SSH key pair are independent of each other, which means a switch can have two keys pairs stored in flash
■ On ProCurve switches that support stacking, when stacking is enabled, SSL provides security only between an SSL client and the stack manager. Communications between the stack commander and stack members is not secure.
7-6
Configuring Secure Socket Layer (SSL)Configuring the Switch for SSL Operation
Configuring the Switch for SSL Operation
1. Assign Local Login (Operator) and Enable (Manager) Password
At a minimum, ProCurve recommends that you always assign at least a Manager password to the switch. Otherwise, under some circumstances, anyone with Telnet, web, or serial port access could modify the switch’s configuration.
SSL-Related CLI Commands in This Section Page
web-management ssl page 7-19
show config page 7-19
show crypto host-cert page 7-12
crypto key
generate cert [rsa] <512 | 768 |1024> page 7-10
zeroize cert page 7-10
crypto host-cert
generate self-signed [arg-list] page 7-10
zeroize page 7-10
7-7

Configuring Secure Socket Layer (SSL)Configuring the Switch for SSL Operation
Using the web browser interface To Configure Local Passwords. You can configure both the Operator and Manager password on one screen. To access the web browser interface refer to the chapter titled “Using the Web Browser Interface” in the Management and Configuration Guide for your switch.
Figure 7-2. Example of Configuring Local Passwords
1. Proceed to the security tab and select device passwords button.
2. Click in the appropriate box in the Device Passwords window and enter user names and passwords. You will be required to repeat the password strings in the confirmation boxes.
Both the user names and passwords can be up to 16 printable ASCII characters.
3. Click on Apply Changes button to activate the user names and pass-words.
Password Button
Security Tab
7-8
Configuring Secure Socket Layer (SSL)Configuring the Switch for SSL Operation
2. Generate the Switch’s Server Host Certificate
You must generate a server certificate on the switch before enabling SSL. The switch uses this server certificate, along with a dynamically generated session key pair to negotiate an encryption method and session with a browser trying to connect via SSL to the switch. (The session key pair mentioned above is not visible on the switch. It is a temporary, internally generated pair used for a particular switch/client session, and then discarded.)
The server certificate is stored in the switch’s flash memory. The server certificate should be added to your certificate folder on the SSL clients who you want to have access to the switch. Most browser applications automati-cally add the switch’s host certificate to there certificate folder on the first use. This method does allow for a security breach on the first access to the switch. (Refer to the documentation for your browser application.)
There are two types of certificated that can be used for the switch’s host certificate. The first type is a self-signed certificate, which is generated and digitally signed by the switch. Since self-signed certificates are not signed by a third-party certificate authority, there is no audit trail to a root CA certificate and no fool-proof means of verifying authenticity of certificate. The second type is a certificate authority-signed certificate, which is digitally signed by a certificate authority, has an audit trail to a root CA certificate, and can be verified unequivocally
Note : There is usually a fee associated with receiving a verified certificate and the valid dates are limited by the root certificate authority issuing the certificate.
When you generate a certificate key pair and/or certificate on the switch, the switch places the key pair and/or certificate in flash memory (and not in running config). Also, the switch maintains the certificate across reboots, including power cycles. You should consider this certificate to be “perma-nent”; that is, avoid re-generating the certificate without a compelling reason. Otherwise, you will have to re-introduce the switch’s host certificate on all management stations you have set up for SSL access to the switch using the earlier certificate.
Removing (zeroizing) the switch's certificate key pair or certificate render the switch unable to engage in SSL operation and automatically disables SSL on the switch. (To verify whether SSL is enabled, execute show config.)
7-9
Configuring Secure Socket Layer (SSL)Configuring the Switch for SSL Operation
To Generate or Erase the Switch’s Server Certificate with the CLI
Because the host certificate is stored in flash instead of the running-config file, it is not necessary to use write memory to save the certificate. Erasing the host certificate automatically disables SSL.
CLI commands used to generate a Server Host Certificate.
To generate a host certificate from the CLI: i. Generate a certificate key pair. This is done with the crypto key
generate cert command. The default key size is 512.
Note : If a certificate key pair is already present in the switch, it is not necessary to generate a new key pair when generating a new certificate. The existing key pair may be re-used and the crypto key generate cert command does not have to be executed
ii. Generate a new self-signed host certificate. This is done with the crypto host-cert generate self-signed [ Arg-List ] command.
Note : When generating a self-signed host certificate on the CLI if there is not certificate key generated this command will fail.
Syntax: crypto key generate cert [rsa] < 512 | 768 |1024 >
Generates a key pair for use in the certificate.
crypto key zeroize cert
Erases the switch’s certificate key and disables SSL opera-
tion.
crypto host-cert generate self-signed [arg-list]
Generates a self signed host certificate for the switch. If a
switch certificate already exists, replaces it with a new
certificate. (See the Note on page 7-9.)
crypto host-cert zeroize
Erases the switch’s host certificate and disables SSL opera-
tion.
7-10
Configuring Secure Socket Layer (SSL)Configuring the Switch for SSL Operation
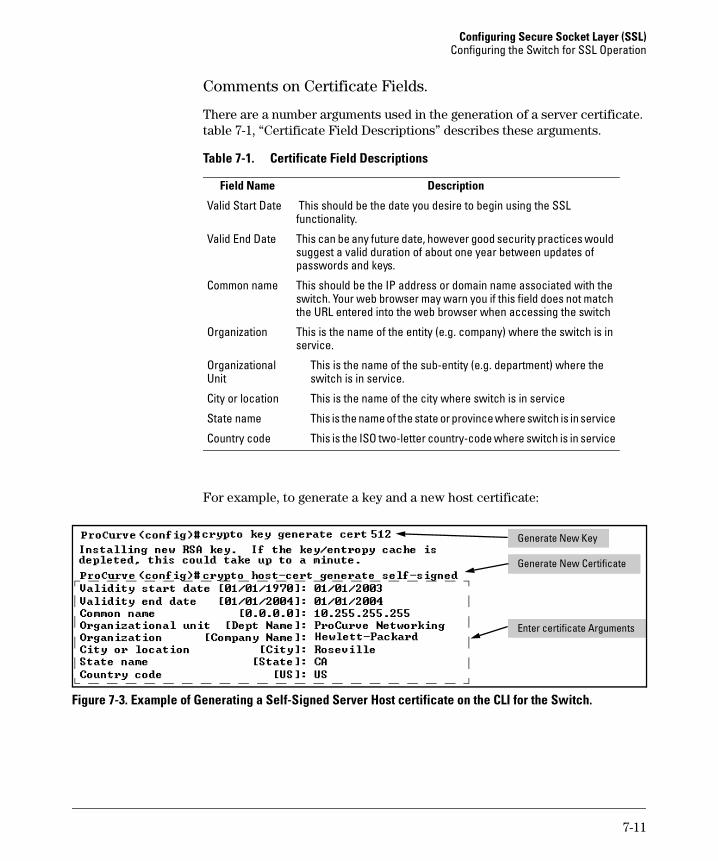
Comments on Certificate Fields.
There are a number arguments used in the generation of a server certificate. table 7-1, “Certificate Field Descriptions” describes these arguments.
Table 7-1. Certificate Field Descriptions
For example, to generate a key and a new host certificate:
Figure 7-3. Example of Generating a Self-Signed Server Host certificate on the CLI for the Switch.
Field Name Description
Valid Start Date This should be the date you desire to begin using the SSL functionality.
Valid End Date This can be any future date, however good security practices would suggest a valid duration of about one year between updates of passwords and keys.
Common name This should be the IP address or domain name associated with the switch. Your web browser may warn you if this field does not match the URL entered into the web browser when accessing the switch
Organization This is the name of the entity (e.g. company) where the switch is in service.
Organizational Unit
This is the name of the sub-entity (e.g. department) where the switch is in service.
City or location This is the name of the city where switch is in service
State name This is the name of the state or province where switch is in service
Country code This is the ISO two-letter country-code where switch is in service
Generate New Key
Enter certificate Arguments
Generate New Certificate
7-11

Configuring Secure Socket Layer (SSL)Configuring the Switch for SSL Operation
Notes “Zeroizing” the switch’s server host certificate or key automatically disables SSL (sets web-management ssl to No). Thus, if you zeroize the server host certificate or key and then generate a new key and server certificate, you must also re-enable SSL with the web-management ssl command before the switch can resume SSL operation.
CLI Command to view host certificates.
To view the current host certificate from the CLI you use the show crypto
host-cert command.
For example, to display the new server host certificate:
Figure 7-4. Example of show crypto host-cert command
Syntax: show crypto host-cert
Displays switch’s host certificate
Show host certificate command
7-12
Configuring Secure Socket Layer (SSL)Configuring the Switch for SSL Operation
Generate a Self-Signed Host Certificate with the Web browser interface
You can configure SSL from the web browser interface. For more information on how to access the web browser interface, refer to the chapter titled “Using the Web Browser Interface” in the Management and Configuration Guide for your switch.
To generate a self signed host certificate from the web browser interface:i. Select the Security tab then the [SSL] button. The SSL configuration
screen is divided into two halves. The left half is used for creating a new certificate key pair and (self-signed / CA-signed) certificate. The right half displays information on the currently installed certificate.
ii. Select the Create Certificate/Certificate Request radio button. iii. Select Self-Signed in the Certificate Type drop-down list.iv. Select the RSA Key Size desired. If you want to re-use the current
certificate key, select Current from this list.v. Fill in the remaining certificate arguments. (Refer to “Comments
on Certificate Fields.” on page 7-11.)vi. Click on the [Apply Changes] button to generate new certificate and
key, if selected.
Note : When generating a self-signed host certificate, if no key is present and the current option is selected in the RSA key size box and error will be generated. New key generation can take up to two minutes if the key queue is empty.
7-13

Configuring Secure Socket Layer (SSL)Configuring the Switch for SSL Operation
For example, to generate a new host certificate via the web browsers inter-face:
Figure 7-5. Self-Signed Certificate generation via SSL Web Browser Interface Screen
To view the current host certificate in the web browser interface:
1. Proceed to the Security tab
2. Then the [SSL] button
Security Tab
SSL button
Certificate Type Box
Key Size Selection
Certificate Arguments
Create Certificate Button
7-14
Configuring Secure Socket Layer (SSL)Configuring the Switch for SSL Operation
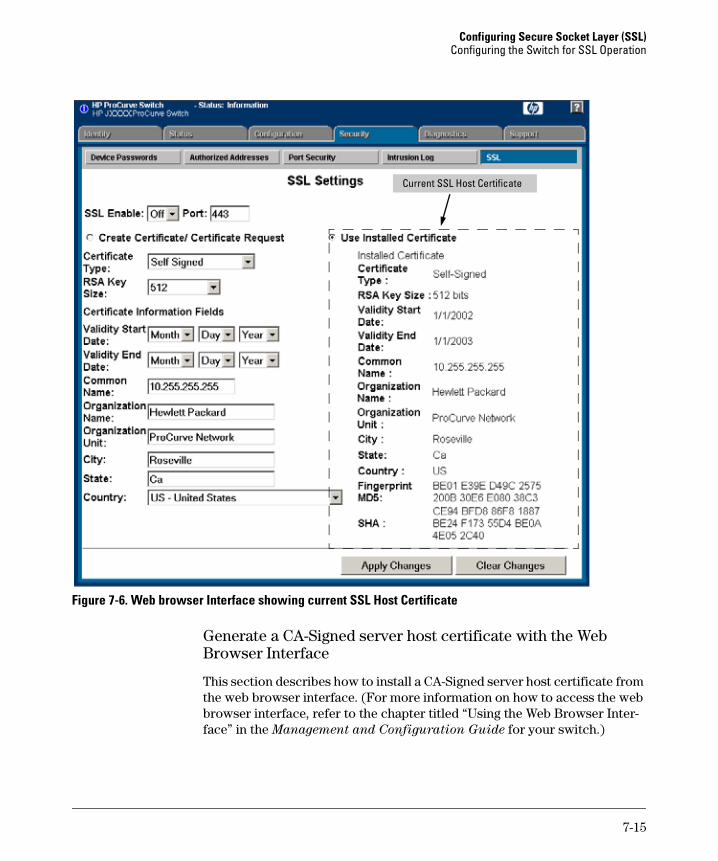
Figure 7-6. Web browser Interface showing current SSL Host Certificate
Generate a CA-Signed server host certificate with the Web Browser Interface
This section describes how to install a CA-Signed server host certificate from the web browser interface. (For more information on how to access the web browser interface, refer to the chapter titled “Using the Web Browser Inter-face” in the Management and Configuration Guide for your switch.)
Current SSL Host Certificate
7-15
Configuring Secure Socket Layer (SSL)Configuring the Switch for SSL Operation
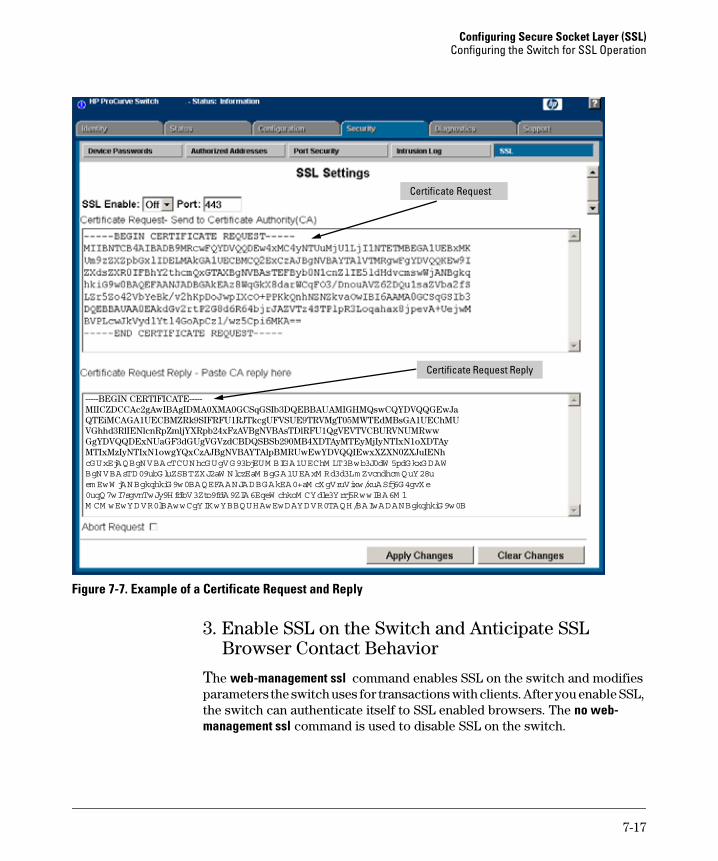
The installation of a CA-signed certificate involves interaction with other entities and consists of three phases. The first phase is the creation of the CA certificate request, which is then copied off from the switch for submission to the certificate authority. The second phase is the actual submission process that involves having the certificate authority verify the certificate request and then digitally signing the request to generate a certificate response (the usable server host certificate). The third phase is the download phase consisting of pasting to the switch web server the certificate response, which is then validated by the switch and put into use by enabling SSL.
To generate a certificate request from the web browser interface:i. Select the Security tab, then the [SSL] button.ii. Select the Create Certificate/Certificate Request radio button. iii. Select Create CA Request from the Certificate Type drop-down list.iv. Select the key size from the RSA Key Size drop-down list. If you
want to re-use the current certificate key, select Current from this list.
v. Fill in the remaining certificate arguments. (Refer to “Comments on Certificate Fields.” on page 7-11.)
vi. Click on [Apply Changes] to create the certificate request. A new web browser page appears, consisting of two text boxes. The switch uses the upper text box for the certificate request text. The lower text box appears empty. You will use it for pasting in the certificate reply after you receive it from the certificate authority. (This authority must return a none-PEM encoded certificate request reply.)
vii. After the certificate authority processes your request and sends you a certificate reply (that is, an installable certificate), copy and paste the certificate into the lower text box.
viii. Click on the [Apply Changes] button to install the certificate.
7-16
Configuring Secure Socket Layer (SSL)Configuring the Switch for SSL Operation
Figure 7-7. Example of a Certificate Request and Reply
3. Enable SSL on the Switch and Anticipate SSL Browser Contact Behavior
The web-management ssl command enables SSL on the switch and modifies parameters the switch uses for transactions with clients. After you enable SSL, the switch can authenticate itself to SSL enabled browsers. The no web-management ssl command is used to disable SSL on the switch.
Certificate Request
Certificate Request Reply
-----BEGIN CERTIFICATE-----MIICZDCCAc2gAwIBAgIDMA0XMA0GCSqGSIb3DQEBBAUAMIGHMQswCQYDVQQGEwJaQTEiMCAGA1UECBMZRk9SIFRFU1RJTkcgUFVSUE9TRVMgT05MWTEdMBsGA1UEChMUVGhhd3RlIENlcnRpZmljYXRpb24xFzAVBgNVBAsTDlRFU1QgVEVTVCBURVNUMRwwGgYDVQQDExNUaGF3dGUgVGVzdCBDQSBSb290MB4XDTAyMTEyMjIyNTIxN1oXDTAyMTIxMzIyNTIxN1owgYQxCzAJBgNVBAYTAlpBMRUwEwYDVQQIEwxXZXN0ZXJuIENhcGUxEjAQBgNVBAcTCUNhcGUgVG93bjEUM BIGA1UEChM LT3Bwb3J0dW 5pdGkxGDAWBgNVBAsTD09ubGluZSBTZXJ2aW NlczEaM BgGA1UEAxM Rd3d3LmZvcndhcmQuY28uem EwW jANBgkqhkiG9w0BAQEFAANJADBGAkEA0+aM cXgVruVixw/xuASfj6G4gvXe0uqQ7wI7sgvnTwJy9HfdbV3Zto9fdA9ZIA6EqeW chkoM CYdle3Yrrj5RwwIBA6M lM CM wEwYDVR0lBAwwCgYIKwYBBQUHAwEwDAYDVR0TAQH/BAIwADANBgkqhkiG9w0B
7-17
Configuring Secure Socket Layer (SSL)Configuring the Switch for SSL Operation
Note Before enabling SSL on the switch you must generate the switch’s host certificate and key. If you have not already done so, refer to “2. Generate the Switch’s Server Host Certificate” on page 7-9.
When configured for SSL, the switch uses its host certificate to authenticate itself to SSL clients, however unless you disable the standard web browser interface with the no web-management command it will be still available for unsecured transactions.
SSL Client Contact Behavior. At the first contact between the switch and an SSL client, if you have not copied the switch’s host certificate into the browser’s certificate folder, your browser’s first connection to the switch will question the connection and, for security reasons, give you the option of accepting or refusing. If a CA-signed certificate is used on the switch, for which a root certificate exists on the client browser side, then the browser will NOT prompt the user to ensure the validity of the certificate. The browser will be able to verify the certificate chain of the switch server certificate up to the root certificate installed in the browser, thus authenticating the switch unequivocally. As long as you are confident that an unauthorized device is not using the switch’s IP address in an attempt to gain access to your data or network, you can accept the connection.
Note When an SSL client connects to the switch for the first time, it is possible for a “man-in-the-middle” attack; that is, for an unauthorized device to pose undetected as the switch, and learn the usernames and passwords controlling access to the switch. When using self-signed certificates with the switch, there is a possibility for a “man-in-the-middle” attack when connecting for the first time; that is, an unauthorized device could pose undetected as a switch, and learn the usernames and passwords controlling access to the switch. Use caution when connecting for the first time to a switch using self-signed certificates. Before accepting the certificate, closely verify the contents of the certificate (see browser documentation for additional information on viewing contents of certificate).
The security concern described above does not exist when using CA-signed certificates that have been generated by certificate authorities that the web browser already trusts
7-18
Configuring Secure Socket Layer (SSL)Configuring the Switch for SSL Operation
Using the CLI interface to enable SSL
To enable SSL on the switch
1. Generate a Host certificate if you have not already done so. (Refer to “2. Generate the Switch’s Server Host Certificate” on page 7-9.)
2. Execute the web-management ssl command.
To disable SSL on the switch, do either of the following:
■ Execute no web-management ssl.
■ Zeroize the switch’s host certificate or certificate key. (page 7-10).
Using the web browser interface to enable SSL
To enable SSL on the switchi. Proceed to the Security tab then the SSL buttonii. Select SSL Enable to on and enter the TCP port you desire to
connect on.iii. Click on the [Apply Changes] button to enable SSL on the port.
To disable SSL on the switch, do either of the following:i. Proceed to the Security tab then the SSL buttonii. Select SSL Enable to off .iii. Click on the [Apply Changes] button to enable SSL on the port.
Syntax: [no] web-management ssl
Enables or disables SSL on the switch.
[port < 1-65535 | default:443 >]
The TCP port number for SSL connections (default:
443). Important: See “Note on Port Number” on page
7-20.
show config
Shows status of the SSL server. When enabled, web-management ssl appears in the config list.
7-19

Configuring Secure Socket Layer (SSL)Configuring the Switch for SSL Operation
Figure 7-8. Using the web browser interface to enable SSL and select TCP port number
Note on Por t Number
ProCurve recommends using the default IP port number (443). However, you can use web-management ssl tcp-port to specify any TCP port for SSL connec-tions except those reserved for other purposes. Examples of reserved IP ports are 23 (Telnet) and 80 (http). Some other reserved TCP ports on the switch are 49, 80, 1506, and 1513.
Caution SSL does not protect the switch from unauthorized access via the Telnet, SNMP, or the serial port. While Telnet access can be restricted by the use of passwords local to the switch, if you are unsure of the security this provides, you may want to disable Telnet access (no telnet). If you need to increase SNMP security, use SNMP version 3 only for SNMP access. Another security measure is to use the Authorized IP Managers feature described in the switch’s Security
Guide. To protect against unauthorized access to the serial port (and the Clear button, which removes local password protection), keep physical access to the switch restricted to authorized personnel.
Enable SLLand port number Selection
7-20
Configuring Secure Socket Layer (SSL)Common Errors in SSL Setup
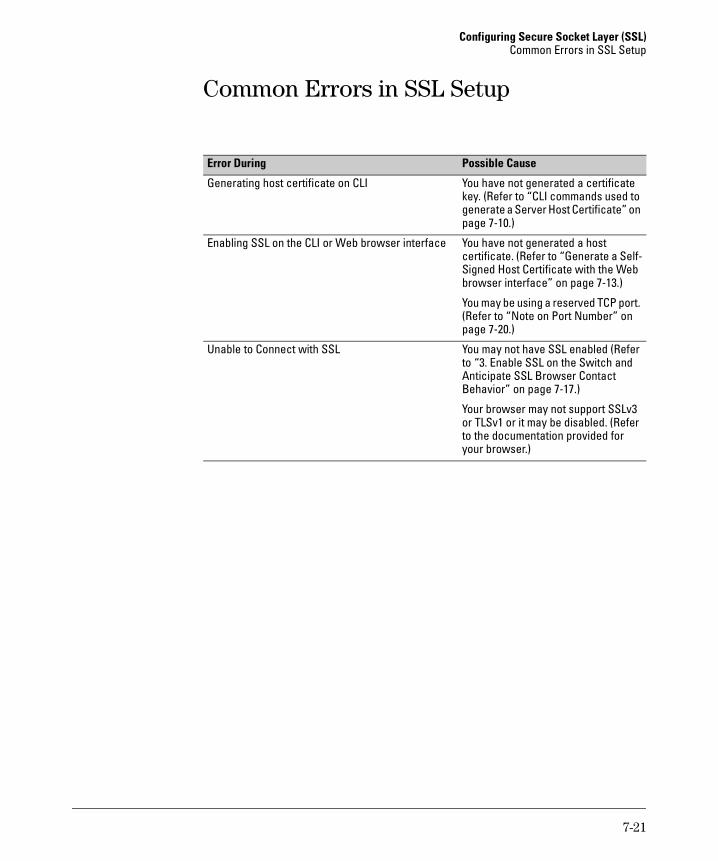
Common Errors in SSL Setup
Error During Possible Cause
Generating host certificate on CLI You have not generated a certificate key. (Refer to “CLI commands used to generate a Server Host Certificate” on page 7-10.)
Enabling SSL on the CLI or Web browser interface You have not generated a host certificate. (Refer to “Generate a Self-Signed Host Certificate with the Web browser interface” on page 7-13.)
You may be using a reserved TCP port. (Refer to “Note on Port Number” on page 7-20.)
Unable to Connect with SSL You may not have SSL enabled (Refer to “3. Enable SSL on the Switch and Anticipate SSL Browser Contact Behavior” on page 7-17.)
Your browser may not support SSLv3 or TLSv1 or it may be disabled. (Refer to the documentation provided for your browser.)
7-21
Configuring Secure Socket Layer (SSL)Common Errors in SSL Setup
— This page is intentionally unused. —
7-22


![Configuring SSL With Self-signed Certificates[1]](https://img.dokumen.tips/doc/110x75/5571ff7049795991699d3e1c/configuring-ssl-with-self-signed-certificates1.jpg)